Embed Size (px)
Citation preview

VERIZON VOICE MAIL USER GUIDECA/FL/TX/PA/VA REGION — BUSINESS
1
ABOUT YOUR VERIZON BUSINESS VOICE MAIL SERVICEWelcome to Business Voice Mail—the smart voice mail solution for businesses!
Business Voice Mail gives you the advantages of a complete, feature-rich voice mail system. However, you only invest in the mailboxes you need—and Verizon maintains all the system equipment at no additional charge. You are assured of professional, private call answering and message service 24 hours a day.
Business Voice Mail answers all your incoming calls when:
• Your line is busy
• You are unable to answer your telephone
Business Voice Mail answers up to three incoming calls simultaneously. No more busy signals to frustrate your callers!
An interrupted dial tone on your line alerts you to new messages in your mailbox. Visual Waiting Indication and Wireless Notification are also available.
Business Voice Mail is easy to use; user-friendly prompts guide you through all feature settings. Digital-recording quality and flexible options all work together to enhance your business image.
2
TABLE OF CONTENTS
About Your Verizon Business Voice Mail Service ............................................1
Additional Dialing Rates That May Apply ...........................................................4
Customizing Your Business Voice Mail Service ................................................4
Getting Started .............................................................................................................6
Entering Your Mailbox the First Time
From your own telephone ...................................................................................7 From a remote telephone ...................................................................................8
Whenever You Want To Use Your Service ............................................................9
Special Keys That Are Always Available ........................................................... 10
Listening to Your Messages .................................................................................. 10
Scanning Messages................................................................................................... 13
Personal Options
Greetings ............................................................................................................... 14 Passcode (Password) ........................................................................................ 17 Passcode Suppression (Automatic Passcode) ........................................ 18 Personal Receptionist (Attendant Transfer) ............................................ 18 Selecting a Language Option ......................................................................... 19
Scheduling Reminders ............................................................................................. 20
Sending Messages
Broadcast Group Lists ...................................................................................... 23 Delivery Options ................................................................................................. 26
3
Time and Date Stamp ............................................................................................... 27
Optional Features
Ring Count Change1 ........................................................................................... 28 Visual Message Waiting Indicator/FSK...................................................... 29 Wireless Notification ........................................................................................ 30 Multiple Number Service ................................................................................. 30
Optional Mailbox Arrangement
Group Mailboxes ................................................................................................. 32 Getting Started—Group Mailboxes ............................................................ 32 Gateway Greeting .............................................................................................. 33 To Set Up Your Gateway Greeting ................................................................ 33 Entering Your Group Mailbox the First Time ............................................ 35 Whenever You Want to Use Your Group Mailbox .................................... 36
Prompts Available to Callers When They Forward to Your Mailbox ...... 37
1This service may have a small additional monthly fee..
Important Notice: Your Verizon Voicemail service is governed by the Terms of Service for Verizon Voicemail for Business available to you at verizon.com/terms. Please review the Terms carefully. By using the service, you are agreeing to those Terms, including arbitration of any disputes. If you are unable to view them online please call 1.800.VERIZON (1.800.837.4966).
4
ADDITIONAL DIALING RATES THAT MAY APPLYLong distance If you dial the system telephone number from a location outside your local calling area, long distance rates will apply.Measured Service If your service is located in a Measured Service area, local usage or message unit charges will apply for each caller forwarded to your mailbox and for each time you dial your system telephone number.
CUSTOMIZING YOUR BUSINESS VOICE MAIL SERVICE
Select your own Passcode The first time you dial your mailbox, you’ll be required to change your temporary Passcode to a Passcode of your own choice. Your chosen Passcode will then be permanent until you wish to change it again. This will keep your mailbox private and secure.A Passcode is:• 4-10 digits in length• Easy for you to remember• Difficult for other people to guess
5
Prepare your recorded greetings (see pages 14-16) There are three kinds of user-recorded greetings your callers will hear: a Personal Greeting for when you cannot answer your telephone, a Busy Greeting1 for when you’re already on your telephone and an Extended Absence Greeting for when you are out of the office for an extended time.You can record the greetings in your own voice or use our automated1,2 system recordings. Before setting up your mailbox, plan what you want your callers to hear. You can record a 30-second greeting on single mailboxes and a 45-second greeting on Multiple Answer Call service. Sample Personal Greeting: “This is the ABC Company. No one is available to take your call right now; but your call is important to us. Please leave your name, telephone number and message after the beep and we will promptly return your call.”Or select our automated system greeting: “You have reached (your recorded name). At the beep, please leave a message.”Sample Busy Greeting: “This is the ABC Company. Our telephone lines are busy now; but your call is important to us. Please leave your name, telephone number and message after the beep and we will promptly return your call.”Suggestion for your recorded greetings: Instruct your callers to press after they complete their message if they want to review or change their message.Suggestion for your most frequent callers: Inform them they can fast-forward through your greetings by pressing
after your greeting has started to leave a message immediately.Name Announcement You’ll be asked to record your name as a label for your mailbox. Record either your business name or your first and last name.
1If you ignore recording a Busy Greeting or erase it, callers will hear your Personal Greeting.2Automated greetings are not available with Multiple Answer Call.
6
GETTING STARTEDThe first time you use your mailbox, you must “personalize” it using the following steps: Using a Touch-Tone® telephone:1. Dial your Access Number.
When calling from a remote telephone you will need to press and dial your mail-box number.
2. Dial your starter Password (4 or 7 digits).
3. Create a new Password. When prompted, enter an easy-to-remember number consisting of 4-10 digits and press the key. Since you MUST remember this Password, the service will recite it back. • Press to keep. • Press to cancel and change.
To ensure security, we recommend NOT using: • Your telephone (or mailbox) number. • A series of same numbers (e.g., 33333). • Sequential numbers (e.g., 23456).4. Record your greeting.
When prompted, record the greetings your callers will hear when you are unavailable for calls and press the key. The service will recite it back. • Press to keep. • Press to cancel re-record.
5. Record your name. When prompted, record your name and press the key. The service will recite it back. • Press to keep. • Press to cancel and change.
7
ENTERING YOUR MAILBOX THE FIRST TIMEListen to the voice prompts.From your own telephone: 1. Dial the Business Voice Mail access telephone number.2. Dial your temporary passcode (4 to 7 digits).3. Create your new passcode. If using Multiple Answer Call:
• Create up to 8 submailboxes. Press to create submailboxes - OR -
press to skip this step. • If you press : Press the quantity (between 1 and 8) of submailboxes you want
to create. The system will create your submailboxes and the voice prompt will tell you the temporary Passcode for each submailbox. Please tell each submailbox user to individually set up their submailbox with their own choice of a personalized greeting and Passcode.
• Remember, if you create submailboxes, to include identification of each submailbox and its user when you record your Personal Greeting for the main mailbox. Example: ( is submailbox 1, is submailbox 2, etc.) “... press to leave a message for Joe Smith, press to leave a message for Sally Jones,” etc.
4. Record your Personal Greetings. Remember to press when you finish recording.
5. Record your name.
8
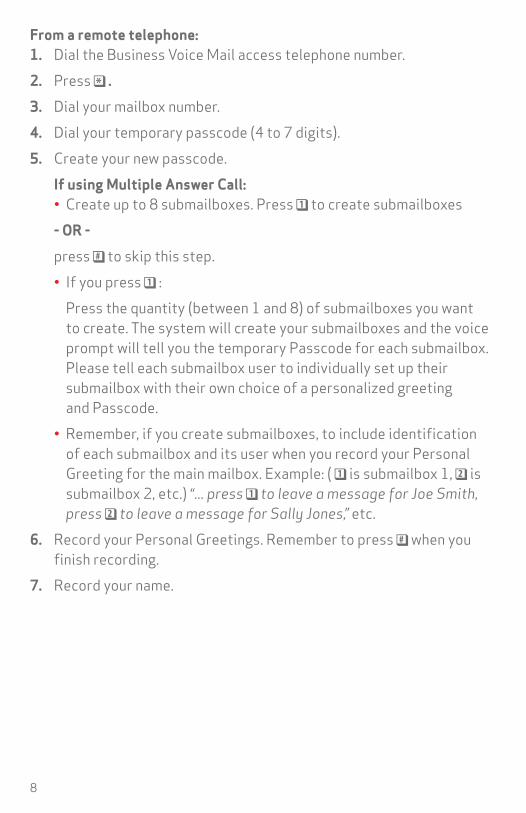
From a remote telephone: 1. Dial the Business Voice Mail access telephone number.2. Press .3. Dial your mailbox number.4. Dial your temporary passcode (4 to 7 digits).5. Create your new passcode. If using Multiple Answer Call:
• Create up to 8 submailboxes. Press to create submailboxes - OR -
press to skip this step. • If you press : Press the quantity (between 1 and 8) of submailboxes you want
to create. The system will create your submailboxes and the voice prompt will tell you the temporary Passcode for each submailbox. Please tell each submailbox user to individually set up their submailbox with their own choice of a personalized greeting and Passcode.
• Remember, if you create submailboxes, to include identification of each submailbox and its user when you record your Personal Greeting for the main mailbox. Example: ( is submailbox 1, is submailbox 2, etc.) “... press to leave a message for Joe Smith, press to leave a message for Sally Jones,” etc.
6. Record your Personal Greetings. Remember to press when you finish recording.
7. Record your name.
9
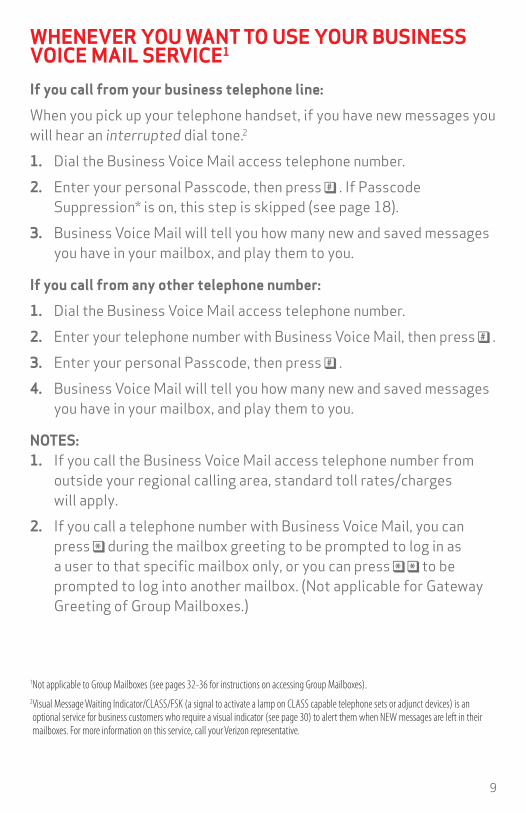
WHENEVER YOU WANT TO USE YOUR BUSINESS VOICE MAIL SERVICE1
If you call from your business telephone line:
When you pick up your telephone handset, if you have new messages you will hear an interrupted dial tone.2
1. Dial the Business Voice Mail access telephone number.2. Enter your personal Passcode, then press . If Passcode
Suppression* is on, this step is skipped (see page 18).3. Business Voice Mail will tell you how many new and saved messages
you have in your mailbox, and play them to you.
If you call from any other telephone number:
1. Dial the Business Voice Mail access telephone number.2. Enter your telephone number with Business Voice Mail, then press .3. Enter your personal Passcode, then press .4. Business Voice Mail will tell you how many new and saved messages
you have in your mailbox, and play them to you.
NOTES: 1. If you call the Business Voice Mail access telephone number from
outside your regional calling area, standard toll rates/charges will apply.
2. If you call a telephone number with Business Voice Mail, you can press during the mailbox greeting to be prompted to log in as a user to that specific mailbox only, or you can press to be prompted to log into another mailbox. (Not applicable for Gateway Greeting of Group Mailboxes.)
1Not applicable to Group Mailboxes (see pages 32-36 for instructions on accessing Group Mailboxes).2 Visual Message Waiting Indicator/CLASS/FSK (a signal to activate a lamp on CLASS capable telephone sets or adjunct devices) is an optional service for business customers who require a visual indicator (see page 30) to alert them when NEW messages are left in their mailboxes. For more information on this service, call your Verizon representative.
10
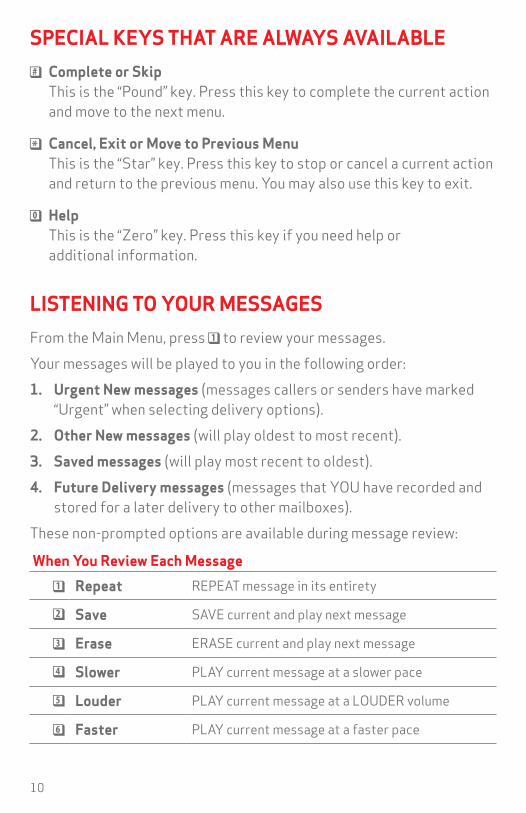
SPECIAL KEYS THAT ARE ALWAYS AVAILABLE Complete or Skip
This is the “Pound” key. Press this key to complete the current action and move to the next menu.
Cancel, Exit or Move to Previous Menu This is the “Star” key. Press this key to stop or cancel a current action and return to the previous menu. You may also use this key to exit.
Help This is the “Zero” key. Press this key if you need help or additional information.
LISTENING TO YOUR MESSAGESFrom the Main Menu, press to review your messages.Your messages will be played to you in the following order:1. Urgent New messages (messages callers or senders have marked
“Urgent” when selecting delivery options).2. Other New messages (will play oldest to most recent).3. Saved messages (will play most recent to oldest).4. Future Delivery messages (messages that YOU have recorded and
stored for a later delivery to other mailboxes).These non-prompted options are available during message review:
When You Review Each Message
Repeat REPEAT message in its entirety
Save SAVE current and play next message
Erase ERASE current and play next message
Slower PLAY current message at a slower pace
Louder PLAY current message at a LOUDER volume
Faster PLAY current message at a faster pace
11
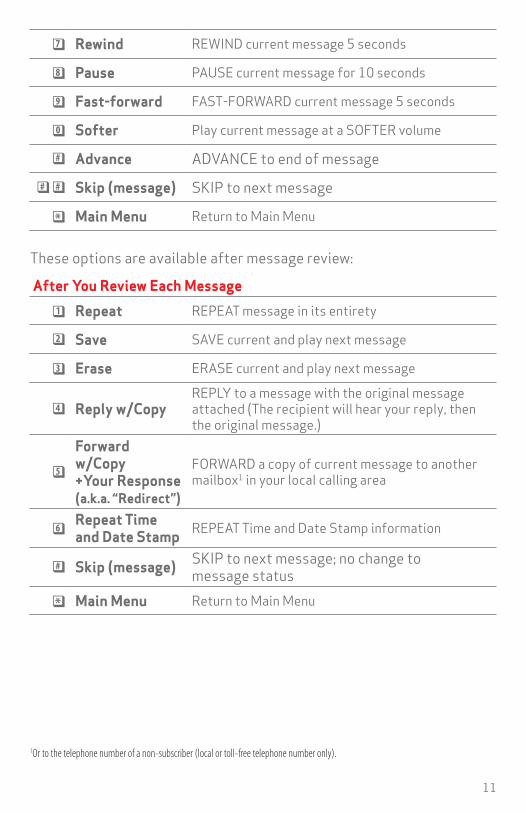
Rewind REWIND current message 5 seconds
Pause PAUSE current message for 10 seconds
Fast-forward FAST-FORWARD current message 5 seconds
Softer Play current message at a SOFTER volume
Advance ADVANCE to end of message
Skip (message) SKIP to next message
Main Menu Return to Main Menu
These options are available after message review:
After You Review Each Message
Repeat REPEAT message in its entirety
Save SAVE current and play next message
Erase ERASE current and play next message
Reply w/CopyREPLY to a message with the original message attached (The recipient will hear your reply, then the original message.)
Forward w/Copy +Your Response (a.k.a. “Redirect”)
FORWARD a copy of current message to another mailbox1 in your local calling area
Repeat Time and Date Stamp REPEAT Time and Date Stamp information
Skip (message) SKIP to next message; no change to message status
Main Menu Return to Main Menu
1 Or to the telephone number of a non-subscriber (local or toll-free telephone number only).
12
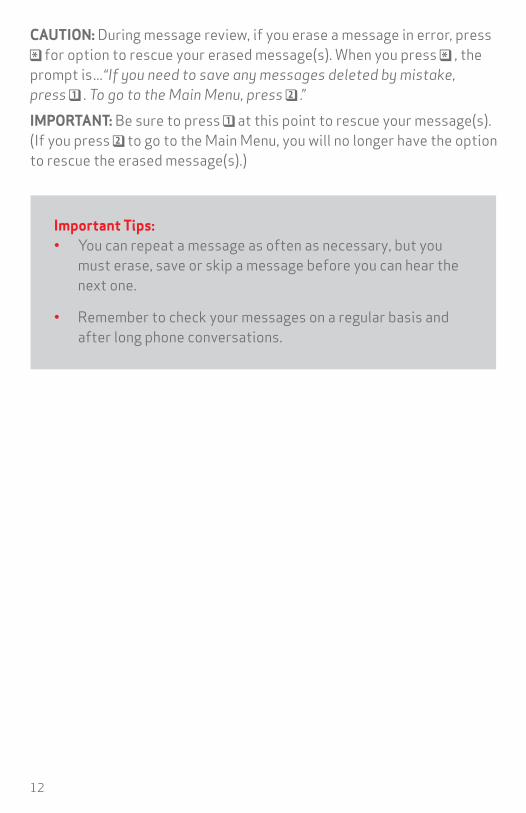
Important Tips: • You can repeat a message as often as necessary, but you
must erase, save or skip a message before you can hear the next one.
• Remember to check your messages on a regular basis and after long phone conversations.
CAUTION: During message review, if you erase a message in error, press for option to rescue your erased message(s). When you press , the
prompt is...“If you need to save any messages deleted by mistake, press . To go to the Main Menu, press .” IMPORTANT: Be sure to press at this point to rescue your message(s). (If you press to go to the Main Menu, you will no longer have the option to rescue the erased message(s).)
13
SCANNING MESSAGESThis feature allows you to quickly scan your messages by listening to the Time and Date Stamp (message “envelope” information) for each message in your mailbox.
To scan your messages: 1. At the Main Menu, press to scan messages. (To reach the Main
Menu during message review, press.
2. Business Voice Mail will play the Time and Date Stamp information for the new and saved messages in your mailbox.
3. Press if you wish to listen to a specific message. Press to cancel and return to the Main Menu.
NOTES: 1. New messages scan chronologically oldest to most recent; saved
messages scan chronologically most recent to oldest.2. If the caller is a Business Voice Mail subscriber (or if a non-
subscriber is programmed into one of your Broadcast Group Lists), you will also hear the recording for Recorded Name. (See page 23 for more information about Broadcast Group Lists.)
3. After the message plays, Business Voice Mail will automatically resume scan to the next message. After Time and Date Stamp for last message plays, you will be returned to the Main Menu.
14
PERSONAL OPTIONSGreetings Business Voice Mail offers you the flexibility of three different types of greetings for your callers:• Personal Greeting: record when you set up your mailbox• Alternate Greeting: record at any time as an option• Automatic Greeting: your system default greetingThe first time you dial into your mailbox, the system will prompt you to record the Personal Greeting. After you set up your mailbox, if you prefer to use the Automatic Greeting (system default), you can toggle the Automatic Greeting on or off. When you toggle the Automatic Greeting off, the Personal Greeting will play to your callers.TIP: Research indicates callers are more likely to leave a message when you use personalized Voice Mail greetings.
Personal Greeting When you set up your mailbox, you will be prompted to record your Personal Greeting. You can re-record your Personal Greeting at any time. For example, “This is (your name and/or title) at [your company name]. My office hours are 8 a.m. to 5 p.m., Monday to Friday. I’m not available to take your call right now, but you are important to me. Please leave your name, telephone number and message after the tone, and I’ll return your call promptly.”To activate and record/change your Personal Greeting (see diagram on page 19): 1. At the Main Menu, press to select Personal Options.
(To reach the Main Menu during message review, press .)2. Press for Greetings.3. Press to record/change your Personal Greeting.
The service will play your current Personal Greeting. • Press to keep this Personal Greeting. • Press to re-record. Begin recording after the tone. The system
will replay your new Personal Greeting. Press to accept. • Press to erase this Personal Greeting.
Press to continue without recording a new Personal Greeting. Press to record a new Personal Greeting.
15
Alternate Greeting The Alternate Greeting allows you to leave special information for your callers for a specific period. For example, “Hello, you have reached [your business name]. Our hours are 8 AM to 5 PM, Monday through Friday. We are now closed. Please leave your name, telephone number and a brief message at the tone. We will return your call before Noon of the next working day. Thank you; we appreciate your business!” When the special information is no longer needed, you can easily toggle to your Personal Greeting To activate and record/change your Alternate Greeting: 1. At the Main Menu, press to select Personal Options.
(To reach the Main Menu during message review, press .)2. Press for Greetings.3a. Press to record/change your Alternate Greeting.
The service will play your current Alternate Greeting. • Press to keep this Alternate Greeting. • Press to re-record. Review. Press to accept. • Press to erase. Press to continue without recording.
Press to record.3b. Or press for Alternate Greeting “toggle.” Voice Mail will tell you if
your Alternate Greeting is on or off. • If on, press to toggle off; if off, press to toggle on.
16
Automatic Greeting (System Default Greeting) When you set up your mailbox, you will be prompted to record a Personal Greeting. However, at any time after you set up your mailbox, you can revert back to the Automatic Greeting, which is: “You have reached [your RECORDED NAME1], please leave a message at the tone.”How to turn ON the Automatic Greeting (applicable after you record an Alternate Greeting): 1. At the Main Menu, press to select Personal Options.
(To reach the Main Menu during message review, press .)2. Press for Greetings.3. Press for Automatic Greeting.4. Press to turn the Automatic Greeting on.
How to turn off the Automatic Greeting: 1. Repeat the process to toggle the Automatic Greeting off. When the
Automatic Greeting is off, your Personal Greeting will play.Recorded Name When you set up your mailbox, you will be prompted to create a Recorded Name. Recorded Name is the preface for your Automatic Greeting, (see above). If you activate and use your Automatic Greeting, your callers will hear... “You have reached [your Recorded Name], please leave a message at the tone.”Notes: 1. Suggestions for Recorded Name are personal name and/or title,
name of your business or “other,” as applicable.2. Business Voice Mail plays your telephone number for the Recorded
Name before your mailbox is set up; however, when you set up your mailbox, you will be prompted to create a personal recording for Recorded Name. (Your personal recording replaces the system default recording of your telephone number.1)
1 Voice Mail plays your telephone number for Recorded Name before your mailbox is set up; however, when you set up your mailbox, you will be prompted to create a personal recording for Recorded Name. Your recording replaces the recording of your telephone number..
17
To change your Recorded Name: 1. At the Main Menu, press to select Personal Options.
(To reach the Main Menu during message review, press .)2. Press for Greetings.3. Press for Recorded Name.4. Follow the voice prompts to create your Recorded Name. • Press to accept. Press to re-record.
Passcode (Password) To change your Passcode: 1. At the Main Menu, press to select Personal Options.
(To reach the Main Menu during message review, press .)2. Press for Personal Profile.3. Press for Passcode Options.4. Press to change Passcode.5. Enter your new 4 to 8-digit Passcode (using numbers 1 through 9).
The service will play your new Passcode. • Press to accept Passcode. Press to try again. CAUTION: To ensure privacy and security, Business Voice Mail prompts you to change your Passcode when you set up your mailbox. We suggest that you change your Passcode periodically and use a number other than your telephone number.
18
Passcode Suppression1 (Automatic Passcode) When you activate Passcode Suppression, you can access your Voice Mail service —from your own telephone line only—without having to enter your Passcode every time. Convenient time saver!To turn Passcode Suppression ON/OFF: 1. At the Main Menu, press to select Personal Options.
(To reach the Main Menu during message review, press .)2. Press for Personal Profile.3. Press for Passcode Options.4. Press for Passcode Suppression. • If Passcode Suppression is on, press to turn off. • If Passcode Suppression is off, press to turn on.CAUTION: When you activate Passcode Suppression, anyone with access to your telephone line can enter your mailbox and review your messages.
Personal Receptionist2 If you activate Personal Receptionist, your callers can transfer out of Voice Mail to a telephone number selected by you (instead of leaving a message in your mailbox). Personal Receptionist transfers your callers from your mailbox greeting to a single destination telephone number (local or toll-free number only). You can easily set up and activate or deactivate this feature at any time.
1Passcode Suppression not available for Group Mailboxes (see pages 32-36).2Callers must press “0”before the tone to transfer to the destination telephone number.
Important Tips: • Use your Personal Greeting to instruct callers to press
to transfer to the telephone number you have selected. Example: “This is [your name] at [your company name]. I’m not available to take your call now. To leave a message, wait for the tone—or to reach me at my cell phone number, press now, ... before the tone...”
• After telling callers to “press now,” continue greeting comments to allow callers time to press before the tone.

19
To set/change your Personal Receptionist number: 1. At the Main Menu, press to select Personal Options.
(To reach the Main Menu during message review, press .)2. Press for Personal Receptionist feature.3. Press to select/change your Personal Receptionist telephone
number. The service will play your current Personal Receptionist destination telephone number (if previously set).
• Press to keep. • Press to change. • Enter your new 10-digit Personal Receptionist
telephone number. • Press to keep it and return to the Personal Receptionist Menu. • Press to delete. • Press to delete. • Press to keep it and return to the Personal Receptionist
Telephone Number Menu.
Selecting a Language Option When you use Business Voice Mail, you will hear voice prompts to guide you through your options. You can choose to listen to these instructions in English, “Expert English1” or Spanish.To set/change your Language Options: 1. At the Main Menu, press to select Personal Options.
(To reach the Main Menu during message review, press .)2. Press for Personal Profile.3. Press for Language Options. • Press for English. • Press for “Expert English.” • Press for Spanish.Repeat steps above to change Language Option.
1 “Expert English” is a set of abbreviated prompts for more rapid navigation—applicable to users who are very familiar with their Business Voice Mail service.
20
SCHEDULING REMINDERS
Use Reminder service to help you remember appointments or other important events. Simply set up a future delivery date and time (maximum 365 days). Reminder service will call your telephone number on the date and time you selected to play your message to you. If you do not answer the Reminder call, your Reminder message will be delivered to your Business Voice Mailbox as a new message.To schedule a Reminder: 1. At the Main Menu, press for Reminders.
(To reach the Main Menu during message review, press .)2. You will be prompted to classify your Reminder. • Press for a one-time Reminder. The Reminder will be sent once
at the date and time specified. • Press for a daily Reminder. Your Reminder will be sent every day
at the time specified. • Press for a daily Reminder on weekdays only. Your Reminder will
be sent Monday – Friday at the time specified. • Press for a Reminder on weekends only. Your Reminder will be
sent on Saturday and Sunday at the time specified. • Press to specify days of the week for the Reminder. • Specify the days you would like to receive a Reminder. Monday = Tuesday = Wednesday = Thursday = Friday = Saturday = Sunday = For example, if you wish to receive the Reminder on Monday
and Friday, press , then . Voice Mail will repeat your entries. • Press to keep this schedule. Press to re-try.3. Record your Reminder message after the tone. Press any key
when finished. • Press to keep this Reminder. • Press to try again.

21
4. Enter the date you wish to receive the Reminder using one or two digits for the month, followed by two digits for the day.
For example: = January 25 = December 5 OR press if Reminder is to be delivered the same day it
is created. 5. Enter the time you wish to receive your Reminder. Using standard
time, use one or two digits for the hour, followed by two digits for the minute.
For example: = 8:45 = 10:006. Press for AM delivery, press for PM delivery.7. The system will repeat the date and time you entered. • Press to keep it. • Press to try again.NOTE: Mailbox subscribers can schedule a Reminder message to be sent up to 365 days from when the Reminder was created.
22
SENDING MESSAGES1
You can record and send a message to any other Verizon Voice Mailbox in your local calling area.2 To send messages using the Voice Mail system, you must “address” your message, record your message and then send it. You can also create Broadcast Group Lists which allow you to send a message to several mailboxes at the same time (see page 23).
To send a message to other Voice Mail users or Broadcast Group Lists: 1. At the Main Menu, press to send a message.
(To reach the Main Menu during message review, press .)2. Enter the destination’s 10-digit number or the 1- or 2-digit
Broadcast Group List number for address. Press after each entry. To send to a party with a Group Mailbox3, enter the 10-digit
telephone number with Business Voice Mail followed immediately by the appropriate Group Mailbox number (Area Code + XXX-XXXX + Group Mailbox number (1, 2, or 3, etc.)).
• Repeat to add additional addresses for the message. • If you enter an incorrect address, press to start over.3. Press to complete addressing.4. Begin recording your message after the tone.5. Press any key when you are finished.6. Press to send your message. If you hang up without pressing ,
your message will be sent. (See page 26 for descriptions of other Delivery Options.)
1 Additional charges may apply as Verizon expands the geographic boundaries for mailbox-to-mailbox system messaging features.2 You can also send and forward to the telephone number of a non-subscriber (local or toll-free telephone number only). However, the message plays as soon as the destination telephone number picks up, which could potentially be an answering device or system greeting (a portion of the message may not be recorded).
3See pages 32-36 for information about Group Mailboxes.
23
Broadcast Group Lists Broadcast Group Lists are lists of telephone numbers (“addresses”) you create and maintain. When you establish a Broadcast Group List, you can send a single message to every number in the group at one time. Standard Mailbox users can create up to 5 Group Lists. Enhanced Mailbox users can create up to 10 Group Lists with up to 24 destinations per list.To add a Broadcast Group List: 1. At the Main Menu, press for Personal Options.
(To reach the Main Menu during message review, press .)2. Press for Broadcast Group Lists.3. Press to add a Broadcast Group List.4. Select and enter your new 1- or 2-digit Group List number. (If you
already have the maximum number of Broadcast Group Lists, a prompt will suggest you delete a Group List to free up a slot for a new Group List.)
5. Record a title for your Group List. Press any key when finished. Voice Mail will repeat title.
• Press to keep title. Press to re-record title.6. Press to begin adding telephone numbers to this Group List. To
include a subscriber who has a Group Mailbox1—enter the 10-digit telephone number with Voice Mail followed immediately by the appropriate Group Mailbox number (Area Code + XXX-XXXX + Group Mailbox number (1, 2, or 3, etc.)).
1See pages 32-36 for information about Group Mailboxes.
24
To delete an entire Broadcast Group List: 1. At the Broadcast Group List Menu, press to delete an existing
Group List.2. Enter the 1- or 2-digit Group List number. If you do not know the
number of the Group List you wish to delete, press to hear Group List titles, then press when you hear the title of the Group List you wish to delete.
3. Business Voice Mail will repeat the title of the Group List selected. • Press to delete. • Press to keep it and return to the Broadcast Group List Menu.
To record/change Broadcast Group List titles: 1. At the Broadcast Group List Menu, press to edit an existing
Group List.2. Enter the 1- or 2-digit Group List number. If you do not know the
number of the Group List you wish to change, press to hear Group List titles, then press when you hear the title of the Group List you wish to change.
3. Press to record/change Group List title.4. The system will repeat the current Group List title. • Press to keep Group List title. Press to try again.5. Record new Group List title. Press any key when finished. • Press to keep Group List title. Press to re-record.
25
To add/delete telephone numbers for an existing Broadcast Group List: 1. At the Broadcast Group List Menu, press for existing Group List.2. Enter the 1- or 2-digit Group List number. If you do not know the
number of the Broadcast Group List you wish to delete, press to hear Group List titles, then press¡when you hear title of appropriate Broadcast Group List.
To add telephone numbers: • Press to add a telephone number to the Group List. Dial the
10-digit number you wish to add. (Voice Mail prompt will confirm if telephone number belongs to another Voice Mail subscriber.)
• Press to accept. Press to try again. Next, you’ll be prompted to either keep, create or re-record a Recorded Name for this number.1
Repeat for each telephone number you wish to add to the Group List.
To delete telephone numbers: • Press to hear Recorded Name for Group List members. • Press when you hear the number you wish to delete.Repeat for each additional number you wish to delete.
1 If you do not create a new Recorded Name, the recipient’s own Recorded Name will remain in your list (or telephone number if a non-subscriber).
26
Delivery Options After you record and address your message, you can send it as a regular message by pressing , simply hanging up, or selecting one or more of the following Delivery Options:• Press to select private status for a message. Marks your message
as private and announces message as “Private” to your recipient before the message is played.
• Press to select future delivery status for a message. You choose the date and time of message delivery. Future Delivery messages are stored in your own mailbox until they are delivered.
To review your future delivery messages, access your mailbox and listen to your messages. When you review your messages, Future Delivery messages will play to you after your new and saved messages (see page 10.)
NOTE: Future Delivery is applicable to messages you record and send (see page 22) and messages you forward (see page 11.)
• Press to select Return Receipt Notification for a message. When your message is played by the recipient, the system automatically sends a confirmation message back to you to verify receipt.
• Press to select Urgent Priority status for a message. Your message will be played before other new messages in the recipient’s mailbox.
27
To select Future Delivery option (after setting up message):1 1. Enter the date you want your message delivered using two digits for
the month, followed by two digits for the day. • Example: = June 1
= November 30 • Press for today’s date. 5. Using standard2 time, enter the time you want your message
delivered using two digits for the hour, followed by two digits for the minute.
• Example: = 9:30 = 11:00
6. Press for AM delivery, press for PM delivery.7. Voice Mail will replay the time and date you selected for future
delivery of your message. • Press to keep this time and/or date. • Press to change this time and/or date. • Press to cancel future delivery.NOTE: Mailbox subscribers can schedule a Future Delivery message and send it up to 365 days in the future.
TIME AND DATE STAMP(Message “Envelope” Information)When you listen to your new and saved messages, Voice Mail will play the Time and Date Stamp information for the current message first (i.e., calendar date and time of day the message was received in your mailbox).To repeat the Time and Date Stamp at the end of the message, press .
1 Future Delivery is applicable for messages you record and send (see page 22) and messages you forward (see page 11).2Use standard time, not “military”time.
28
1These services may have a small additional monthly fee 2Additional dialing rates may apply.
OPTIONAL FEATURES1,2
Ring Count Change1 Ring Count Change lets you set the number of times your telephone rings before your callers forward to your mailbox (minimum 2 rings; maximum 9 rings). You can change the setting at any time and as often as you like.To set up Ring Count Change: 1. Lift handset, and press . (In some areas, you must
press .) • If you hear three short bursts of dial tone, the system is prompting
you to enter the number of rings you want to hear before the call is forwarded to your mailbox. Set the number of rings from 2-9.
For example: If you want your phone to ring twice before the call is forwarded to your mailbox, press ; if you want your phone to ring 5 times, press .
• If you hear a normal dial tone after you enter , the system is prompting you to enter the number of seconds you want your phone to ring before the call is forwarded to your mailbox. (Refer below to the rings-to-seconds conversion chart to set the number of rings.)
NOTE: The setting for Ring Count Change only affects your telephone line when your telephone line is not in use and a ringing call is not answered. When your telephone line is in use, your incoming calls will always forward immediately to Business Voice Mail.Use the chart below if the system prompts you to enter the number of seconds your telephone rings before forwarding calls to your mailbox.
Number of Rings Number of Seconds Number of Rings Number of Seconds
2 10 6 34
3 16 7 40
4 20 8 46
5 28 9 52
29
1 Visual Message Waiting Indicator/CLASS/FSK can be added at no additional fee, except in California where a monthly fee applies. If added after installation, additional installation fees apply. Contact your Verizon Business Office for more information.
For example: If you want your phone to ring twice before the call is forwarded to your mailbox, press ; if you want your phone to ring 5 times, press .2. You will hear another interrupted dial tone or a confirmation signal,
either of which validates your selection.3. Hang up to complete the process.TIP: A setting of 9 rings is like turning off Voice Mail, as most callers will hang up before the 9th ring.
Visual Message Waiting Indicator/CLASS/FSK1 Visual Message Waiting Indicator/CLASS/FSK is a signal that activates a flashing lamp on CLASS/FSK-capable telephone sets or adjunct display devices to indicate you have a new message in your mailbox.When using Visual Message Waiting Indicator/CLASS/FSK on a CLASS-capable telephone set or adjunct device, you will get both a flashing lamp and an interrupted dial tone for new messages in your mailbox.Not all telephone sets or display devices are CLASS/FSK-compatible, even if they use a flashing lamp to indicate a new message. (Example: Some telephone sets can activate the message-waiting lamp via interrupted dial tone, while other telephone sets work with a signal internal to the phone system.)It is important that you know the specific technology associated with your telephone set, system or display device to determine compatibility with Visual Message Waiting Indicator/CLASS/FSK. The user manual for your telephone set or the equipment manufacturer’s help desk are the best sources for this information.If you want a flashing lamp to alert you when you get a new message in your mailbox, your Verizon Business Office can provide information regarding a CLASS capable telephone set, and Visual Message Waiting Indicator/CLASS/FSK.NOTE: Visual Message Waiting Indicator/CLASS/FSK feature is not available in all areas.
30
Wireless Notification1 You can be notified on your Verizon Wireless digital cell phone when messages are left in your mailbox. You will receive a text message, “Your have a voice mail message at XXX-XXX-XXXX (your mailbox access number).” You will not be charged for this feature or text message; however it does require activation. To order, please call your local business office.
Multiple Number Service
(OnePoint Voice Mail Only)
Multiple Number Service allows you to point up to four numbers in addition to your business telephone number to your OnePoint Voice Mail. For example you could have calls to your Verizon Wireless number and lines from other work locations all reach your OnePoint Voice Mail. No more checking multiple mailboxes.The alternate numbers can be any combination of wireline or wireless telephone numbers. Each alternate number requires Fixed Call Forwarding No Answer/Busy Transfer to your voicemail system access number to allow calls to forward into the mailbox.If your Verizon Wireless number will be answered by your OnePoint Voice Mail, you will need to utilize the No Answer/Busy Transfer feature included with your Verizon Wireless service to forward your calls to your OnePoint Voice Mail. You can activate this feature this feature on your Verizon Wireless phone by press followed by your OnePoint Voice Mail system access number and then press send. After you hear the confirmation tone, press end. (To deactivate press and press send. After you hear the confirmation tone, press end.) Service is subject to customer agreement and calling plan. Regular airtime charges and long distance (if applicable) apply to any calls that are forwarded to OnePoint Voice Mail. If you have any questions on charges or activation, you can visit verizonwireless.com, dial from your wireless phone, or call 1.800.922.0204.
1 Only available with Verizon Wireless phones. Not available in all areas. No charge for the feature but it requires activation. Contact you local business office.
31
Important Notes:
• Charges for call forwarding on alternative numbers may vary by state and carrier. Long distance charges may apply.
• Verizon Wireless service is subject to customer agreement and calling plan. Regular airtime charges and long distance (if applicable) apply to any calls that are forwarded to OnePoint Voice Mail.
• If your alternate number(s) is provided by a carrier other than Verizon or is located outside the regional calling area, it may not be compatible with Multiple Number Service or may require callers to re-enter the telephone number they dialed in order to leave you a message.
32
OPTIONAL MAILBOX ARRANGEMENTGroup Mailboxes (Extension Mailboxes)1
(OnePoint Voice Mail Only)
Group Mailboxes is an optional arrangement of regular mailboxes fronted by a Gateway Greeting.Callers will first hear the Gateway Greeting. While listening to the Gateway Greeting, callers select transfer to an associated Group Mailbox (based on instructions in the Gateway Greeting).After callers make their choice—by pressing the appropriate key on their telephone keypad—they will hear the greeting for the selected Group Mailbox. At the tone, they can leave a message (if selected mailbox is a mailbox type that accepts messages).Or callers can listen to the Gateway Greeting and wait for automatic system transfer to Group Mailbox #1 and leave a message at the tone.2
Standard Numeric ID for Group Mailboxes is: Group Mailbox “1”, Group Mailbox “2” or Group Mailbox “3”, etc.NOTE: Numeric ID for the Gateway Greeting is always “0”.
Getting Started—Group Mailboxes The first time you dial into Business Voice Mail, you will be asked to set up your mailbox.3 You will need the following information.This is the specific Numeric ID for your Group Mailbox. Example: Group Mailbox “1”, Group Mailbox “2” or Group Mailbox “3”, etc. Numeric ID for the Gateway Greeting is always “0”.Your Business Office Sales Consultant provides the information above when your Group Mailboxes are ordered. If you do not have this information, please contact the person within your company who ordered the Group Mailboxes.4
1 Group Mailboxes (except the Gateway Greeting) are mailbox “types”of your choice (i.e., Standard, OnePoint Voicemail or Announce-ment-Only Mailboxes). For instructions on how to manage the feature settings for your mailbox, refer to the appropriate section of this user guide (see pages 2 and 3 for the Table of Contents). 2IMPORTANT: Announcement-Only Mailbox not recommended for Mailbox 1; the OnePoint Voicemail is only applicable to Mailbox 1. 3 Your business can select the quantity of mailboxes in the group (maximum 99), and select the mailbox package— with any applicable optional features—for each mailbox in the group.
4 If your company does not have this information, an authorized representative can call our Help Desk at 1.800.VERIZON (1.800.837.4966).

33
Gateway Greeting When you set up the Gateway Greeting, the tutorial prompts you to create a personalized Gateway Greeting. Personalized Gateway Greeting example: “You have reached Voice Mail for [company name]. If you know the ID number for the mailbox you wish to reach, please press that number on your keypad now, followed by . For Staff Assistance, press ; for Billing, press ...”, etc.The Gateway Greeting functions the same for all Group Mailboxes. The Gateway Greeting features are Automatic Greeting, Personal Greeting and Personal Receptionist.As an alternative to a personalized Gateway Greeting, you can select the Automatic Greeting (system default greeting) for your Gateway Greeting, which includes all Recorded Names for the Group Mailboxes (see page 35).After you set up your Gateway Greeting, you can override the personalized greeting by turning the Automatic Greeting ON for the group. The Automatic Gateway Greeting for a Group Mailbox is... “You have reached Voice Mail for (the 10-digit telephone number). If you know the number of the mailbox, please key it in now, followed by . Or you can press the Group Mailbox number from the following options: (callers hear Recorded Names for all mailboxes in the group in numeric order).”1
To Set Up Your Gateway Greeting2
If you call from your business telephone line:
1. Dial the Voice Mail access telephone number.2. Enter the default Passcode (last four digits of the main
telephone number) for the Gateway Greeting, then press .3. Enter Numeric ID ( for Gateway Greeting), then press .4. Follow the voice prompts to set up your Gateway Greeting.NOTE: You will be prompted to create a new Passcode and a personalized Gateway Greeting.
1 If Automatic Greeting is used, all Group Mailbox users must include their mailbox Numeric ID in their Recorded Name... “Mailbox number 1, Mary Smith.” or... “Mailbox number 2, Accounting Department.”
2Passcode Suppression not applicable to Gateway Greeting.
34
If you call from any other telephone number:
1. Dial the Business Voice Mail access telephone number.2. Enter the 10-digit telephone number with Business Voice Mail (main
telephone number), then press .3. Enter the default Passcode (last four digits of the main telephone
number) for the Gateway Greeting, then press .4. Enter the Numeric ID ( for Gateway Greeting), then press .5. Follow the voice prompts to set up your Gateway Greeting.NOTE: You will be prompted to create a new Passcode and a personalized Gateway Greeting.To change the personalized Gateway Greeting: Access the Gateway Greeting following steps above, then see page 14 for steps to change the personalized Gateway Greeting.To use the Automatic Greeting (system default) for the Gateway Greeting: Access the Gateway Greeting following steps above, then see page 16 for steps to toggle on the Automatic Greeting. Repeat steps to toggle off the Automatic Greeting.To activate or change Personal Receptionist feature setting for the Gateway Greeting: Access the Gateway Greeting following steps above, then see page 18 for steps to manage feature settings for Personal Receptionist feature.Personal Receptionist provides a “zero-out” option for your callers who prefer (or must have) “live answer.” Destination telephone number for Personal Receptionist transfer must be local or toll-free telephone number only. Caller must press for Personal Receptionist transfer before the Gateway Greeting performs a default transfer to Group Mailbox 1.
35
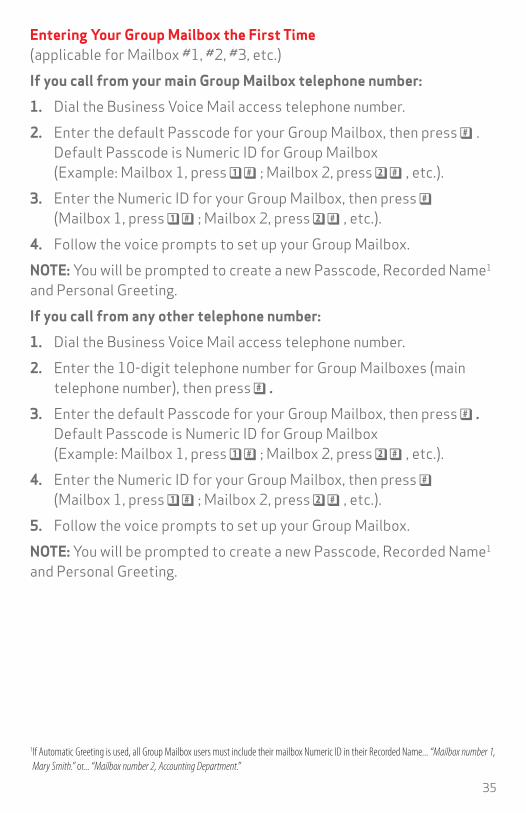
Entering Your Group Mailbox the First Time (applicable for Mailbox #1, #2, #3, etc.)If you call from your main Group Mailbox telephone number:
1. Dial the Business Voice Mail access telephone number.2. Enter the default Passcode for your Group Mailbox, then press .
Default Passcode is Numeric ID for Group Mailbox (Example: Mailbox 1, press ; Mailbox 2, press , etc.).
3. Enter the Numeric ID for your Group Mailbox, then press (Mailbox 1, press ; Mailbox 2, press , etc.).
4. Follow the voice prompts to set up your Group Mailbox.NOTE: You will be prompted to create a new Passcode, Recorded Name1
and Personal Greeting.If you call from any other telephone number:
1. Dial the Business Voice Mail access telephone number.2. Enter the 10-digit telephone number for Group Mailboxes (main
telephone number), then press .3. Enter the default Passcode for your Group Mailbox, then press .
Default Passcode is Numeric ID for Group Mailbox (Example: Mailbox 1, press ; Mailbox 2, press , etc.).
4. Enter the Numeric ID for your Group Mailbox, then press (Mailbox 1, press ; Mailbox 2, press , etc.).
5. Follow the voice prompts to set up your Group Mailbox.NOTE: You will be prompted to create a new Passcode, Recorded Name1
and Personal Greeting.
1 If Automatic Greeting is used, all Group Mailbox users must include their mailbox Numeric ID in their Recorded Name... “Mailbox number 1, Mary Smith.” or... “Mailbox number 2, Accounting Department.”
36
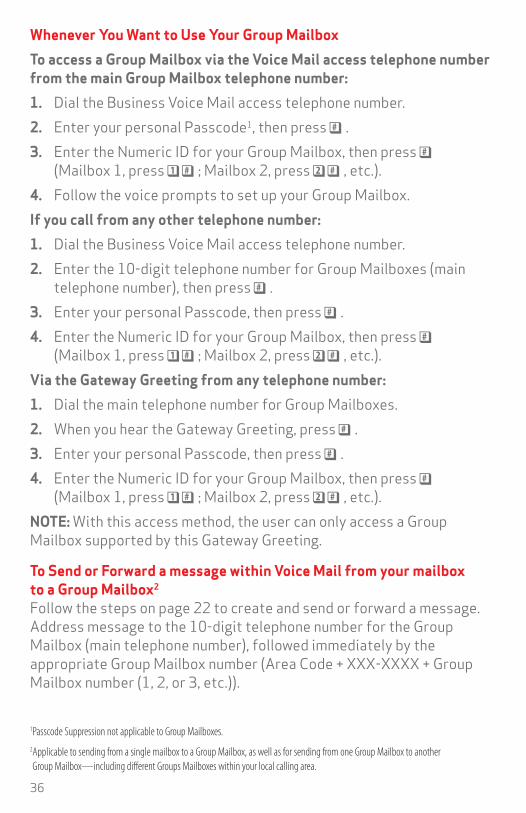
Whenever You Want to Use Your Group Mailbox
To access a Group Mailbox via the Voice Mail access telephone number from the main Group Mailbox telephone number:
1. Dial the Business Voice Mail access telephone number.2. Enter your personal Passcode1, then press .3. Enter the Numeric ID for your Group Mailbox, then press
(Mailbox 1, press ; Mailbox 2, press , etc.).4. Follow the voice prompts to set up your Group Mailbox.If you call from any other telephone number:
1. Dial the Business Voice Mail access telephone number.2. Enter the 10-digit telephone number for Group Mailboxes (main
telephone number), then press .3. Enter your personal Passcode, then press .4. Enter the Numeric ID for your Group Mailbox, then press
(Mailbox 1, press ; Mailbox 2, press , etc.).Via the Gateway Greeting from any telephone number:
1. Dial the main telephone number for Group Mailboxes.2. When you hear the Gateway Greeting, press .3. Enter your personal Passcode, then press .4. Enter the Numeric ID for your Group Mailbox, then press
(Mailbox 1, press ; Mailbox 2, press , etc.).NOTE: With this access method, the user can only access a Group Mailbox supported by this Gateway Greeting.
To Send or Forward a message within Voice Mail from your mailbox to a Group Mailbox2
Follow the steps on page 22 to create and send or forward a message. Address message to the 10-digit telephone number for the Group Mailbox (main telephone number), followed immediately by the appropriate Group Mailbox number (Area Code + XXX-XXXX + Group Mailbox number (1, 2, or 3, etc.)).
1Passcode Suppression not applicable to Group Mailboxes.2 Applicable to sending from a single mailbox to a Group Mailbox, as well as for sending from one Group Mailbox to another Group Mailbox—including different Groups Mailboxes within your local calling area.
37
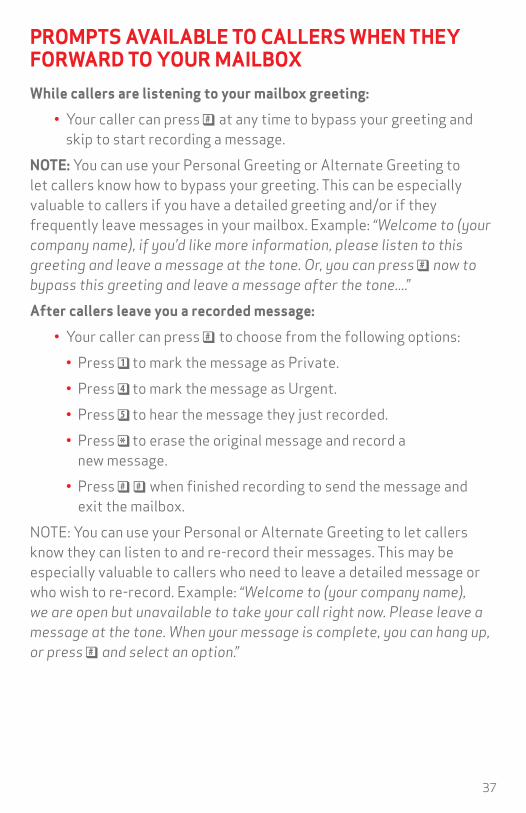
PROMPTS AVAILABLE TO CALLERS WHEN THEY FORWARD TO YOUR MAILBOXWhile callers are listening to your mailbox greeting:
• Your caller can press at any time to bypass your greeting and skip to start recording a message.
NOTE: You can use your Personal Greeting or Alternate Greeting to let callers know how to bypass your greeting. This can be especially valuable to callers if you have a detailed greeting and/or if they frequently leave messages in your mailbox. Example: “Welcome to (your company name), if you’d like more information, please listen to this greeting and leave a message at the tone. Or, you can press now to bypass this greeting and leave a message after the tone....”After callers leave you a recorded message:
• Your caller can press to choose from the following options: • Press to mark the message as Private. • Press to mark the message as Urgent. • Press to hear the message they just recorded. • Press to erase the original message and record a
new message. • Press when finished recording to send the message and
exit the mailbox.NOTE: You can use your Personal or Alternate Greeting to let callers know they can listen to and re-record their messages. This may be especially valuable to callers who need to leave a detailed message or who wish to re-record. Example: “Welcome to (your company name), we are open but unavailable to take your call right now. Please leave a message at the tone. When your message is complete, you can hang up, or press and select an option.”
38
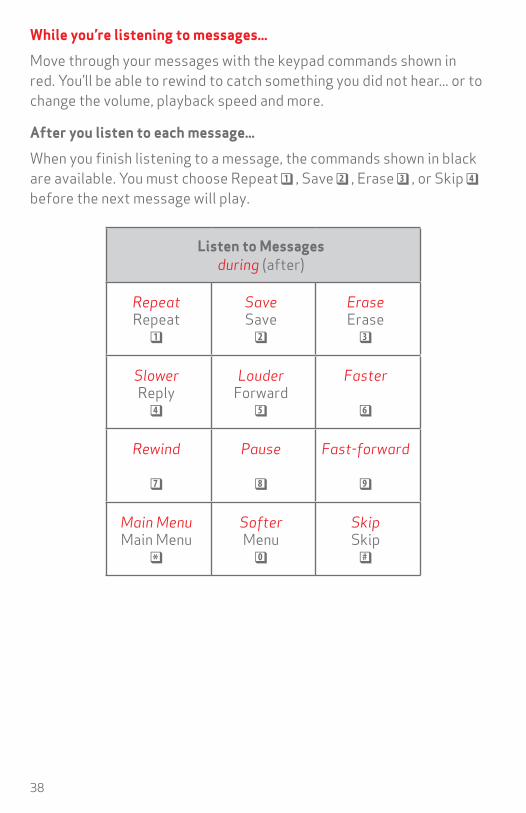
While you’re listening to messages...
Move through your messages with the keypad commands shown in red. You’ll be able to rewind to catch something you did not hear... or to change the volume, playback speed and more.
After you listen to each message...
When you finish listening to a message, the commands shown in black are available. You must choose Repeat , Save , Erase , or Skip before the next message will play.
Listen to Messages during (after)
Repeat Repeat
Save Save
Erase Erase
Slower Reply
Louder Forward
Faster
Rewind
Pause
Fast-forward
Main Menu Main Menu
Softer Menu
Skip Skip

SMBCTXVMUGNAT1214©2015 Verizon. All Rights Reserved.
If you need help using Verizon Voice Mail or have questions about the service, please call
1.800.VERIZON (1.800.837.4966).