Embed Size (px)
Citation preview

ART. C904S+5848ART. C904S+5948
Istruzioni / Instructions / Instructions De Montage / Bedienungsanleitung / Instrucciones
VENEZIA
ART. C909S+5848ART. C909S+5948
ART. 5911A+C911SB+5848ART. 5911A+C911SB+5948
ART. 5913A+C913SB+5848ART. 5913A+C913SB+5948
Installazione / Installation.
02
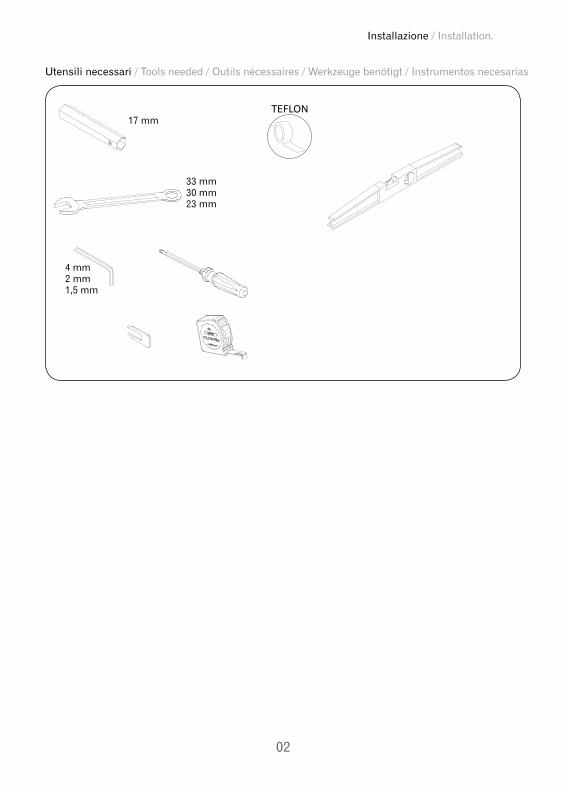
17 mm
Utensili necessari / Tools needed / Outils nécessaires / Werkzeuge benötigt / Instrumentos necesarias
4 mm2 mm1,5 mm
TEFLON
33 mm30 mm23 mm
VENEZIA
03
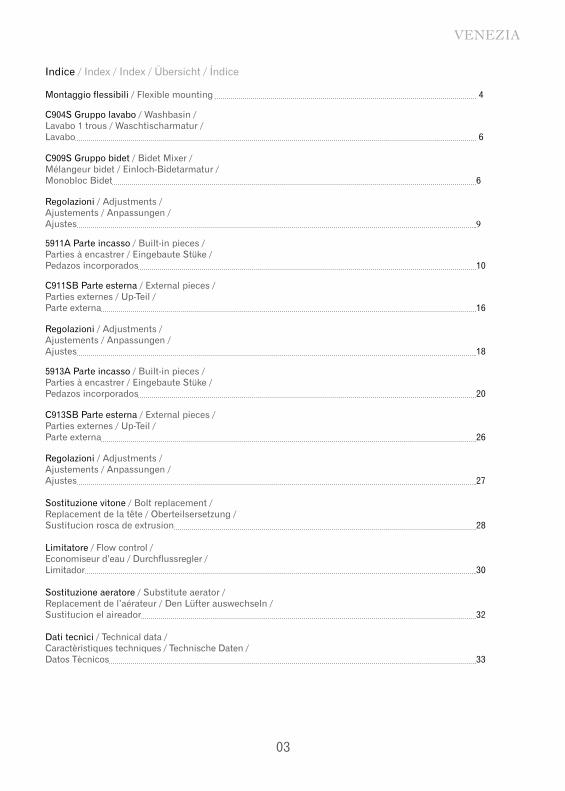
Indice / Index / Index / Übersicht / Índice
Montaggio flessibili / Flexible mounting 4
C904S Gruppo lavabo / Washbasin / Lavabo 1 trous / Waschtischarmatur / Lavabo 6
C909S Gruppo bidet / Bidet Mixer / Mélangeur bidet / Einloch-Bidetarmatur / Monobloc Bidet 6
Regolazioni / Adjustments / Ajustements / Anpassungen / Ajustes 9
5911A Parte incasso / Built-in pieces / Parties à encastrer / Eingebaute Stüke / Pedazos incorporados 10
C911SB Parte esterna / External pieces / Parties externes / Up-Teil / Parte externa 16
Regolazioni / Adjustments / Ajustements / Anpassungen / Ajustes 18
5913A Parte incasso / Built-in pieces / Parties à encastrer / Eingebaute Stüke / Pedazos incorporados 20
C913SB Parte esterna / External pieces / Parties externes / Up-Teil / Parte externa 26
Regolazioni / Adjustments / Ajustements / Anpassungen / Ajustes 27
Sostituzione vitone / Bolt replacement / Replacement de la tête / Oberteilsersetzung / Sustitucion rosca de extrusion 28
Limitatore / Flow control / Economiseur d’eau / Durchflussregler / Limitador 30
Sostituzione aeratore / Substitute aerator / Replacement de l’aérateur / Den Lüfter auswechseln / Sustitucion el aireador 32
Dati tecnici / Technical data / Caractèristiques techniques / Technische Daten / Datos Tècnicos 33
1.
3. 4.
5.
2.
6.
Installazione / Installation.
04
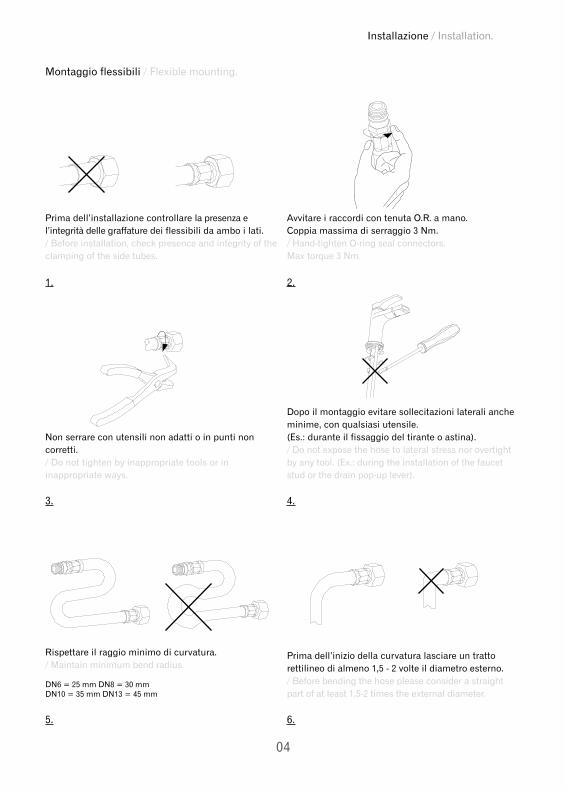
Montaggio flessibili / Flexible mounting.
Prima dell’installazione controllare la presenza e l’integrità delle graffature dei flessibili da ambo i lati. / Before installation, check presence and integrity of the clamping of the side tubes.
Non serrare con utensili non adatti o in punti non corretti./ Do not tighten by inappropriate tools or in inappropriate ways.
Rispettare il raggio minimo di curvatura./ Maintain minimum bend radius.
DN6 = 25 mm DN8 = 30 mmDN10 = 35 mm DN13 = 45 mm
Avvitare i raccordi con tenuta O.R. a mano. Coppia massima di serraggio 3 Nm./ Hand-tighten O-ring seal connectors.Max torque 3 Nm.
Dopo il montaggio evitare sollecitazioni laterali anche minime, con qualsiasi utensile. (Es.: durante il fissaggio del tirante o astina)./ Do not expose the hose to lateral stress nor overtight by any tool. (Ex.: during the installation of the faucet stud or the drain pop-up lever).
Prima dell’inizio della curvatura lasciare un tratto rettilineo di almeno 1,5 - 2 volte il diametro esterno./ Before bending the hose please consider a straight part of at least 1,5-2 times the external diameter.

7.
9. 10.
11.
8.
05
VENEZIA
9. 10.
Non incassare il condotto nel muro. / Do not set the hose in the wall.
Avvitare i raccordi con tenuta a guarnizione (dadi) a mano più 1/4 di giro con chiave appropriata./ Hand-tighten connectors with gasket seal (nuts) then apply 1/4 turn using an appropriate wrench.
Non collegare la messa a terra dell’impianto elettrico al flessibile o ad altra conduttura idraulica.Chiudere l’impianto idraulico in caso di prolungata assenza. Sostituire il flessibile in caso di piccole perdite./ Do not connect the electric grounding to the flexible hose nor to any other water piping.Turn off the plumbing in case of long absence. Replace the hose in case of leakage and anyway.
Non installare il flessibile in torsione o in tensione./ Tighten the hose without any twist or tension.
Il contatto prolungato con sostanze, pur blandamente aggressive, può determinare il danneggiamento della treccia ed il conseguente scoppio del flessibile./ Prolonged contact with any substance, even scarcely aggressive, can cause external braid damage and subsequent flexible burst.

Installazione / Installation.
06
ART. C904S+5848ART. C904S+5948
Gruppo lavabo / Washbasin / Lavabo 1 trous / Waschtischarmatur / Lavabo
ART. C909S+5848ART. C909S+5948
Gruppo Bidet / Bidet mixer / Mélangeur bidet / Einloch-Bidetarmatur / Monobloc bidet

VENEZIA
07
1. 2. 3.
33 mm
A
A
B
C
B
C
DE
4. 5. 6.
AD
29 mm30 mm
A
B
C
D
E B
C
7.
Installazione / Installation.
08
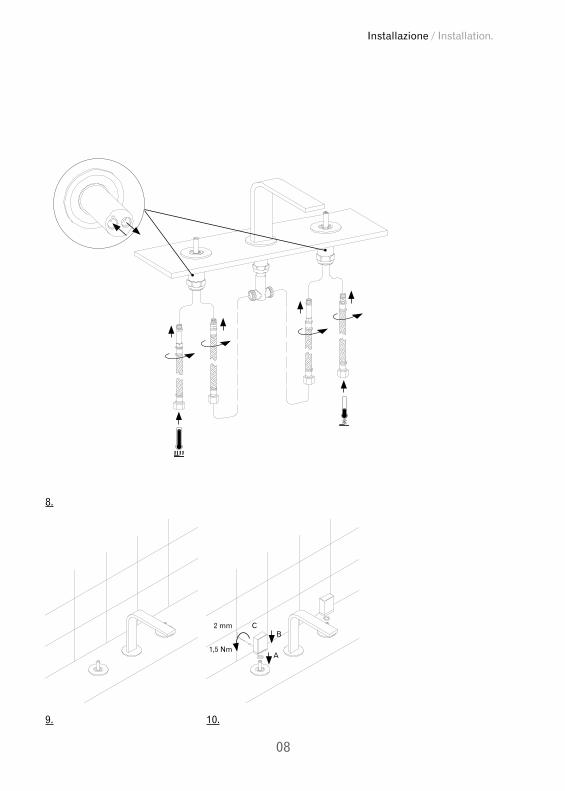
8.
9. 10.
A
2 mm
1,5 Nm
CB

9
VENEZIA
Regolazioni / Adjustments / Ajustements / Anpassungen / Ajustes
1.

Installazione / Installation.
10
ART. 5911A Parte incasso / Built-in pieces / Partier à encastrer / Eingebaute Stüke / Pedazos incorporados

11
VENEZIA
1.
AB
B
2.
INGRESSOINPUT - 1/2”
TEFLON
INGRESSOINPUT - 1/2”
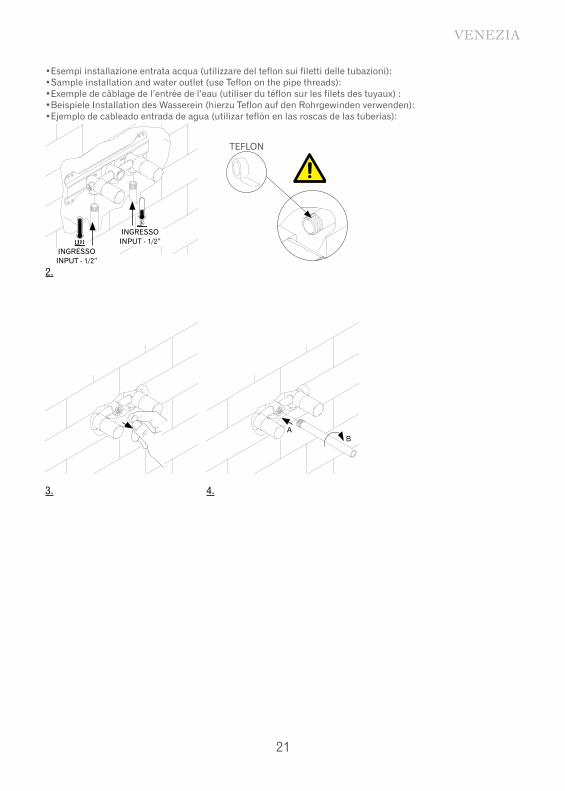
•Esempi installazione entrata acqua (utilizzare del teflon sui filetti delle tubazioni):•Sample installation and water outlet (use Teflon on the pipe threads):•Exemple de câblage de l’entrée de l’eau (utiliser du téflon sur les filets des tuyaux) :•Beispiele Installation des Wasserein (hierzu Teflon auf den Rohrgewinden verwenden):•Ejemplo de cableado entrada de agua (utilizar teflón en las roscas de las tuberías):
•MONTAGGIO PIASTRA Qualora necessitasse fissare al muro il miscelatore incasso, é possibile montare l’apposita piastra come indicato in fig.•ASSEMBLING PLATE In the case that the built-in mixer should be installed to the wall, it is possible to fix the special plate as shown by fig. •MONTAGE DE LA PLAQUE Dans le cas où il serait nécessarie de fixer au mur le mitigeur encastré, monter la plaque correspondante comme la montre la fig. •PLATTENMONTAGE Falls die Einbaumischbatterie an der Wand zu befestigen ist, kann die dazu erforderliche Platte wie in der Abb. montiert werden•MONTAJE PLACA En el caso de que se necesitara fijar en la pared el mezclador empotrado, resulta posible montar la especifica placa, cómo indicado en la fig.
Installazione / Installation.
12
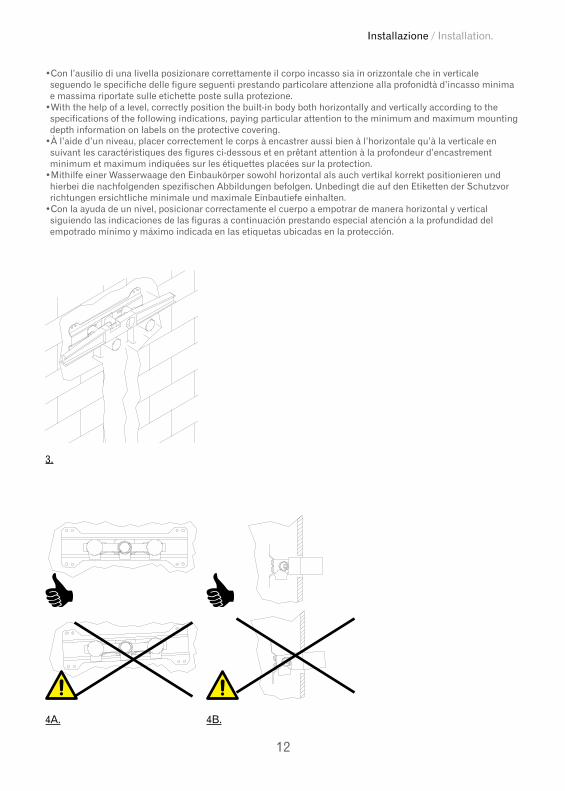
4A. 4B.
•Con l’ausilio di una livella posizionare correttamente il corpo incasso sia in orizzontale che in verticale seguendo le specifiche delle figure seguenti prestando particolare attenzione alla profonidtà d’incasso minima e massima riportate sulle etichette poste sulla protezione.•With the help of a level, correctly position the built-in body both horizontally and vertically according to the specifications of the following indications, paying particular attention to the minimum and maximum mounting depth information on labels on the protective covering.•À l’aide d’un niveau, placer correctement le corps à encastrer aussi bien à l’horizontale qu’à la verticale en suivant les caractéristiques des figures ci-dessous et en prêtant attention à la profondeur d’encastrement minimum et maximum indiquées sur les étiquettes placées sur la protection.•Mithilfe einer Wasserwaage den Einbaukörper sowohl horizontal als auch vertikal korrekt positionieren und hierbei die nachfolgenden spezifischen Abbildungen befolgen. Unbedingt die auf den Etiketten der Schutzvor richtungen ersichtliche minimale und maximale Einbautiefe einhalten.•Con la ayuda de un nivel, posicionar correctamente el cuerpo a empotrar de manera horizontal y vertical siguiendo las indicaciones de las figuras a continuación prestando especial atención a la profundidad del empotrado mínimo y máximo indicada en las etiquetas ubicadas en la protección.
3.

13
VENEZIA
profondità minima / minimum depth /profondeur minimale / minimale tiefe /profundidad mínima
profondità massima / maximum depth / profondeur maximale / maximale tiefe / profundidad máxima
•Localizzazione dell’etichetta:•Position of the label:•Localisation de l’étiquette:•Etikettenlokalisierung:•Localización de la etiqueta:
•Mettere in pressione l’impianto per verificarne la tenuta e la corretta installazione•Put the system under pressure in order to verify the hold and correct installation•L’installation sous pression pour en vérifier l’ètanchéité et le bon fonctionnement•Installation unter Druck stellen um das Fassungsvermögen und den korrekten Einbau zu überprüfen•Presurizar la planta para comprobar su retenciò instalaciòn correcta
Filo rivestimento Line of the facing
Fil revetementVerkleidungskante
Borde revestimiento
Filo rivestimento Line of the facing
Fil revetementVerkleidungskante
Borde revestimiento
Installazione / Installation.
14
5. 6. 7.
9.8.
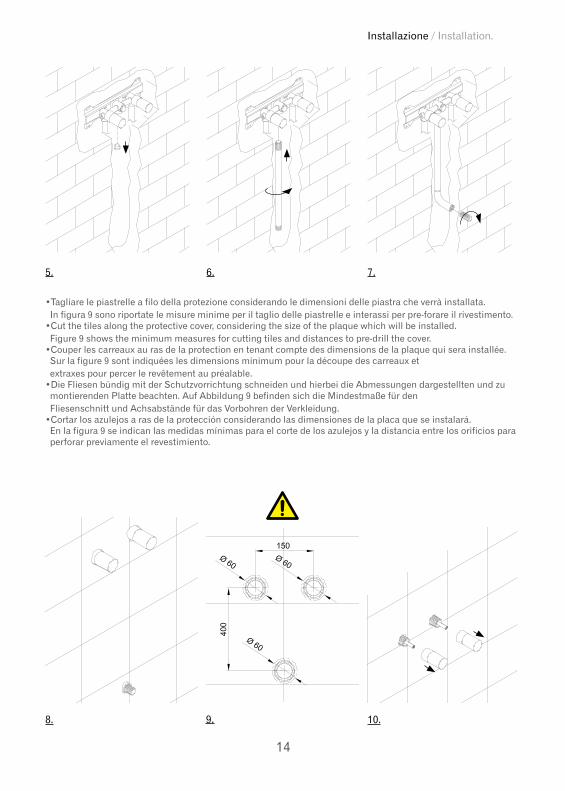
•Tagliare le piastrelle a filo della protezione considerando le dimensioni delle piastra che verrà installata. In figura 9 sono riportate le misure minime per il taglio delle piastrelle e interassi per pre-forare il rivestimento.•Cut the tiles along the protective cover, considering the size of the plaque which will be installed. Figure 9 shows the minimum measures for cutting tiles and distances to pre-drill the cover.•Couper les carreaux au ras de la protection en tenant compte des dimensions de la plaque qui sera installée. Sur la figure 9 sont indiquées les dimensions minimum pour la découpe des carreaux et extraxes pour percer le revêtement au préalable.•Die Fliesen bündig mit der Schutzvorrichtung schneiden und hierbei die Abmessungen dargestellten und zu montierenden Platte beachten. Auf Abbildung 9 befinden sich die Mindestmaße für den Fliesenschnitt und Achsabstände für das Vorbohren der Verkleidung.•Cortar los azulejos a ras de la protección considerando las dimensiones de la placa que se instalará. En la figura 9 se indican las medidas mínimas para el corte de los azulejos y la distancia entre los orificios para perforar previamente el revestimiento.
10.

15
VENEZIA
Installazione / Installation.
16
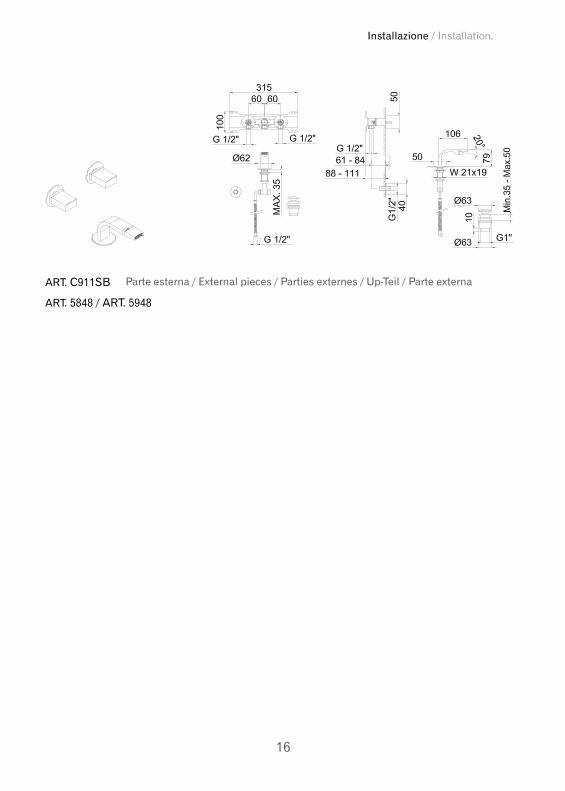
ART. C911SB Parte esterna / External pieces / Parties externes / Up-Teil / Parte externa
ART. 5848 / ART. 5948
17
VENEZIA
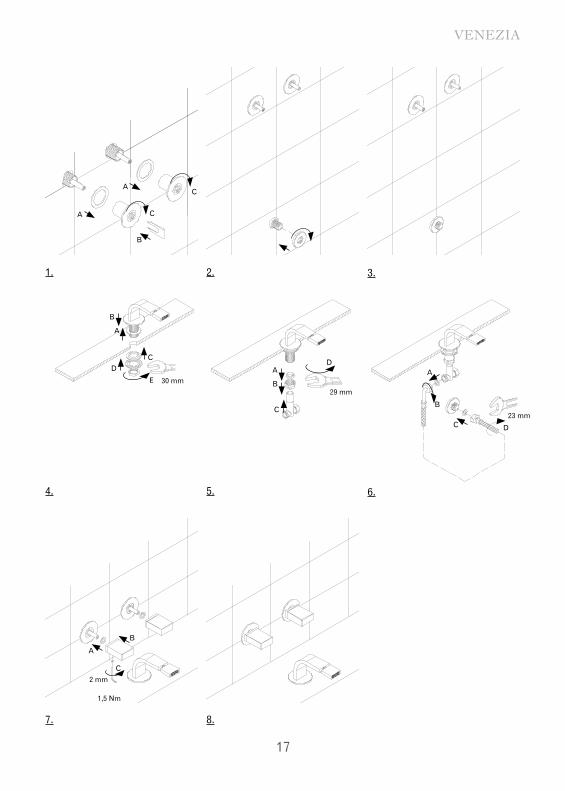
1. 2. 3.
4.
A
B
A
C
C
5. 6.
AD
29 mm
30 mm
A
B
CD
E B
C23 mm
C
A
B
D
7.
A
B
2 mm
1,5 Nm
C
8.
Installazione / Installation.
18
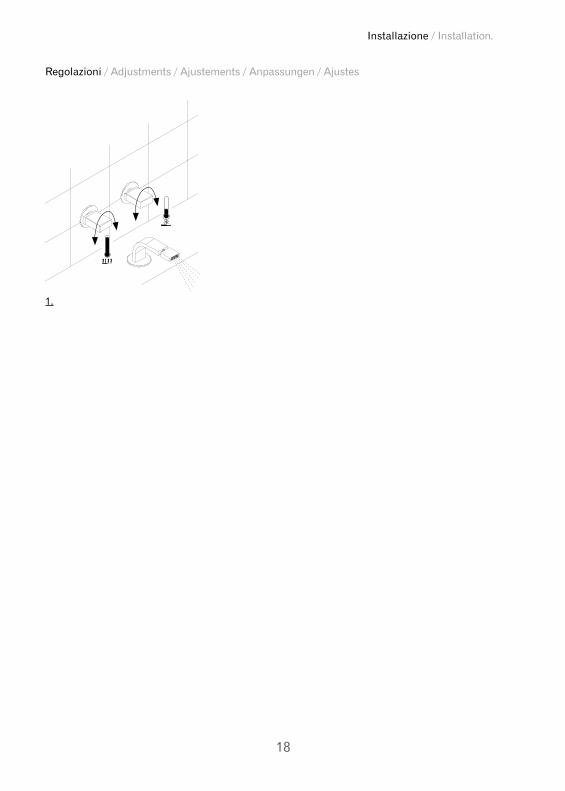
Regolazioni / Adjustments / Ajustements / Anpassungen / Ajustes
1.

19
VENEZIA
Installazione / Installation.
20
1.
AB
B
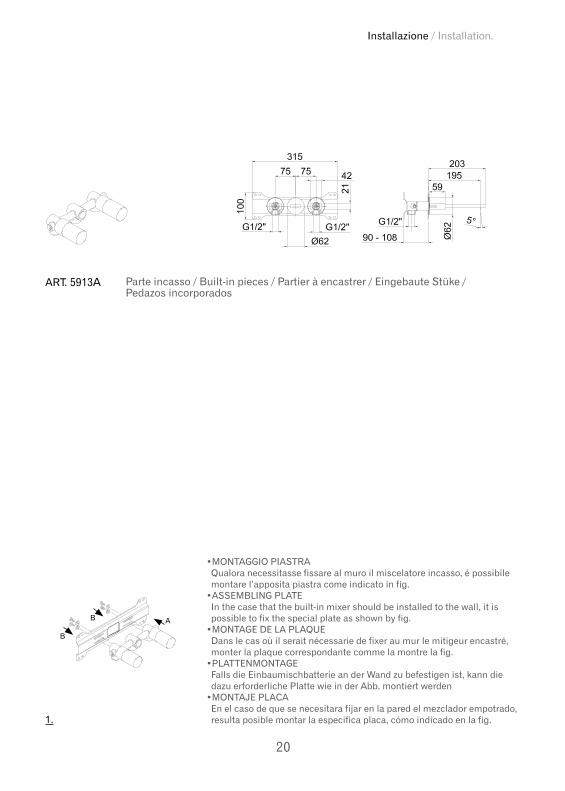
ART. 5913A Parte incasso / Built-in pieces / Partier à encastrer / Eingebaute Stüke / Pedazos incorporados
•MONTAGGIO PIASTRA Qualora necessitasse fissare al muro il miscelatore incasso, é possibile montare l’apposita piastra come indicato in fig.•ASSEMBLING PLATE In the case that the built-in mixer should be installed to the wall, it is possible to fix the special plate as shown by fig. •MONTAGE DE LA PLAQUE Dans le cas où il serait nécessarie de fixer au mur le mitigeur encastré, monter la plaque correspondante comme la montre la fig. •PLATTENMONTAGE Falls die Einbaumischbatterie an der Wand zu befestigen ist, kann die dazu erforderliche Platte wie in der Abb. montiert werden•MONTAJE PLACA En el caso de que se necesitara fijar en la pared el mezclador empotrado, resulta posible montar la especifica placa, cómo indicado en la fig.
21
VENEZIA
2.
INGRESSOINPUT - 1/2”
TEFLON
INGRESSOINPUT - 1/2”
•Esempi installazione entrata acqua (utilizzare del teflon sui filetti delle tubazioni):•Sample installation and water outlet (use Teflon on the pipe threads):•Exemple de câblage de l’entrée de l’eau (utiliser du téflon sur les filets des tuyaux) :•Beispiele Installation des Wasserein (hierzu Teflon auf den Rohrgewinden verwenden):•Ejemplo de cableado entrada de agua (utilizar teflón en las roscas de las tuberías):
3. 4.
AB

Installazione / Installation.
22
6A. 6B.
•Con l’ausilio di una livella posizionare correttamente il corpo incasso sia in orizzontale che in verticale seguendo le specifiche delle figure seguenti prestando particolare attenzione alla profonidtà d’incasso minima e massima riportate sulle etichette poste sulla protezione.•With the help of a level, correctly position the built-in body both horizontally and vertically according to the specifications of the following indications, paying particular attention to the minimum and maximum mounting depth information on labels on the protective covering.•À l’aide d’un niveau, placer correctement le corps à encastrer aussi bien à l’horizontale qu’à la verticale en suivant les caractéristiques des figures ci-dessous et en prêtant attention à la profondeur d’encastrement minimum et maximum indiquées sur les étiquettes placées sur la protection.•Mithilfe einer Wasserwaage den Einbaukörper sowohl horizontal als auch vertikal korrekt positionieren und hierbei die nachfolgenden spezifischen Abbildungen befolgen. Unbedingt die auf den Etiketten der Schutzvor richtungen ersichtliche minimale und maximale Einbautiefe einhalten.•Con la ayuda de un nivel, posicionar correctamente el cuerpo a empotrar de manera horizontal y vertical siguiendo las indicaciones de las figuras a continuación prestando especial atención a la profundidad del empotrado mínimo y máximo indicada en las etiquetas ubicadas en la protección.
5A. 5A.
23
VENEZIA
Filo rivestimento Line of the facing
Fil revetementVerkleidungskante
Borde revestimiento
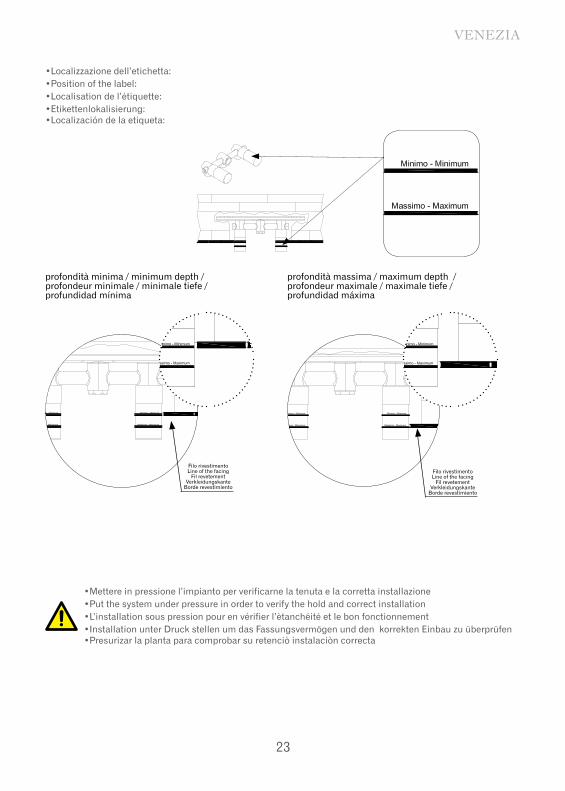
profondità minima / minimum depth /profondeur minimale / minimale tiefe /profundidad mínima
profondità massima / maximum depth / profondeur maximale / maximale tiefe / profundidad máxima
Filo rivestimento Line of the facing
Fil revetementVerkleidungskante
Borde revestimiento
•Localizzazione dell’etichetta:•Position of the label:•Localisation de l’étiquette:•Etikettenlokalisierung:•Localización de la etiqueta:
•Mettere in pressione l’impianto per verificarne la tenuta e la corretta installazione•Put the system under pressure in order to verify the hold and correct installation•L’installation sous pression pour en vérifier l’ètanchéité et le bon fonctionnement•Installation unter Druck stellen um das Fassungsvermögen und den korrekten Einbau zu überprüfen•Presurizar la planta para comprobar su retenciò instalaciòn correcta
Installazione / Installation.
24
7. 8. 9.
11.10.
B
A
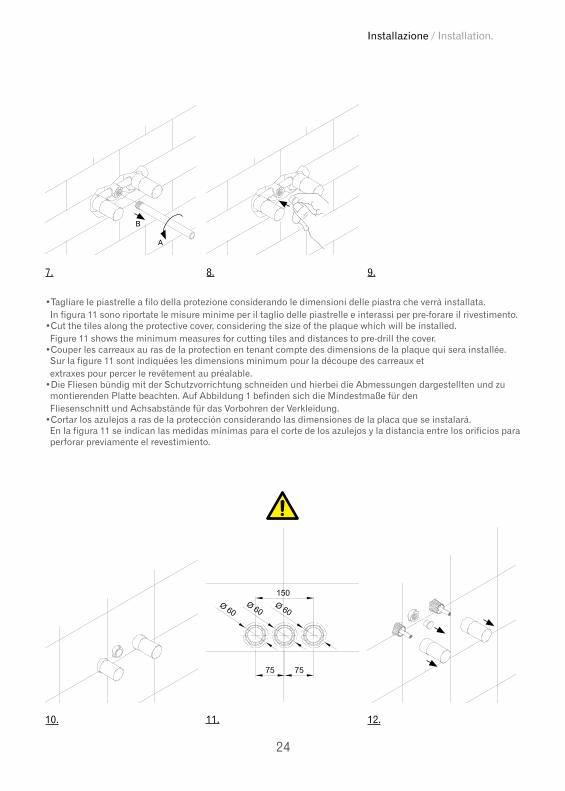
•Tagliare le piastrelle a filo della protezione considerando le dimensioni delle piastra che verrà installata. In figura 11 sono riportate le misure minime per il taglio delle piastrelle e interassi per pre-forare il rivestimento.•Cut the tiles along the protective cover, considering the size of the plaque which will be installed. Figure 11 shows the minimum measures for cutting tiles and distances to pre-drill the cover.•Couper les carreaux au ras de la protection en tenant compte des dimensions de la plaque qui sera installée. Sur la figure 11 sont indiquées les dimensions minimum pour la découpe des carreaux et extraxes pour percer le revêtement au préalable.•Die Fliesen bündig mit der Schutzvorrichtung schneiden und hierbei die Abmessungen dargestellten und zu montierenden Platte beachten. Auf Abbildung 1 befinden sich die Mindestmaße für den Fliesenschnitt und Achsabstände für das Vorbohren der Verkleidung.•Cortar los azulejos a ras de la protección considerando las dimensiones de la placa que se instalará. En la figura 11 se indican las medidas mínimas para el corte de los azulejos y la distancia entre los orificios para perforar previamente el revestimiento.
12.

25
VENEZIA
Installazione / Installation.
26
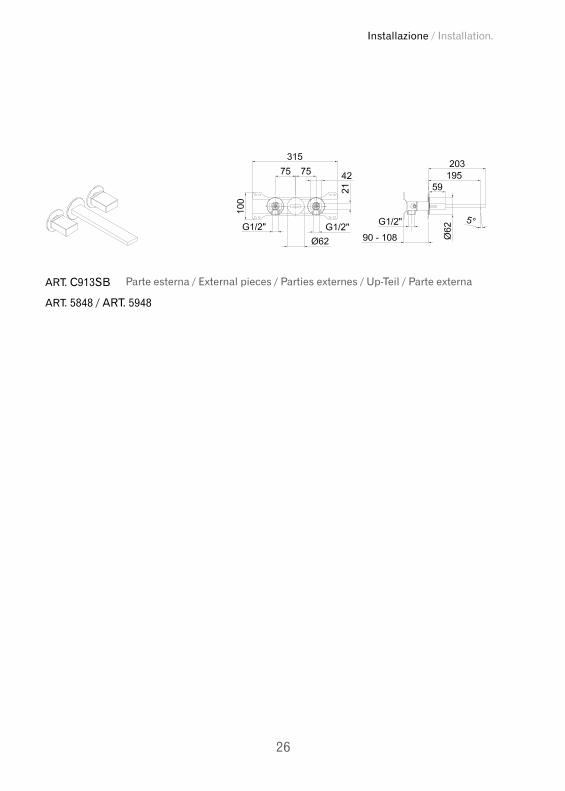
ART. C913SB Parte esterna / External pieces / Parties externes / Up-Teil / Parte externa
ART. 5848 / ART. 5948
27
VENEZIA
1. 2. 3.
A
B
C
AB
2 mm1,5 Nm
CD
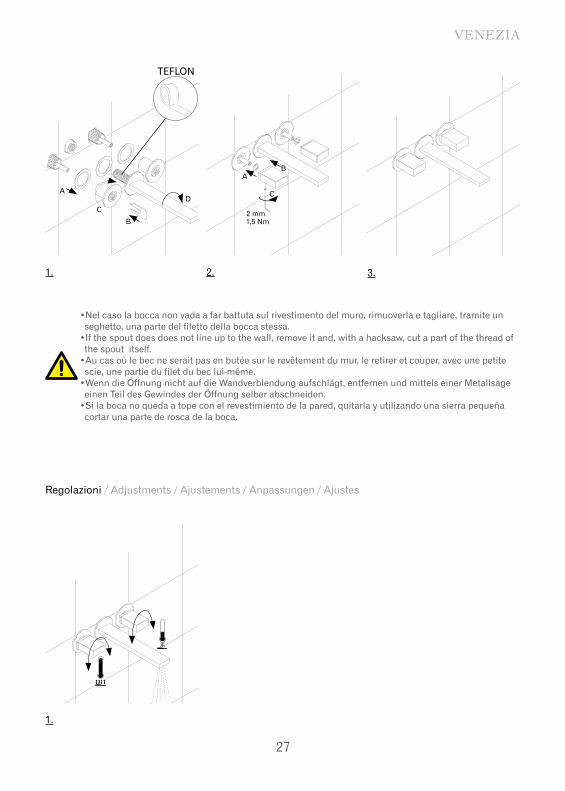
•Nel caso la bocca non vada a far battuta sul rivestimento del muro, rimuoverla e tagliare, tramite un seghetto, una parte del filetto della bocca stessa. •If the spout does does not line up to the wall, remove it and, with a hacksaw, cut a part of the thread of the spout itself.•Au cas où le bec ne serait pas en butée sur le revêtement du mur, le retirer et couper, avec une petite scie, une partie du filet du bec lui-même.•Wenn die Öffnung nicht auf die Wandverblendung aufschlägt, entfernen und mittels einer Metallsäge einen Teil des Gewindes der Öffnung selber abschneiden.•Si la boca no queda a tope con el revestimiento de la pared, quitarla y utilizando una sierra pequeña cortar una parte de rosca de la boca.
Regolazioni / Adjustments / Ajustements / Anpassungen / Ajustes
1.
TEFLON
Installazione / Installation.
28
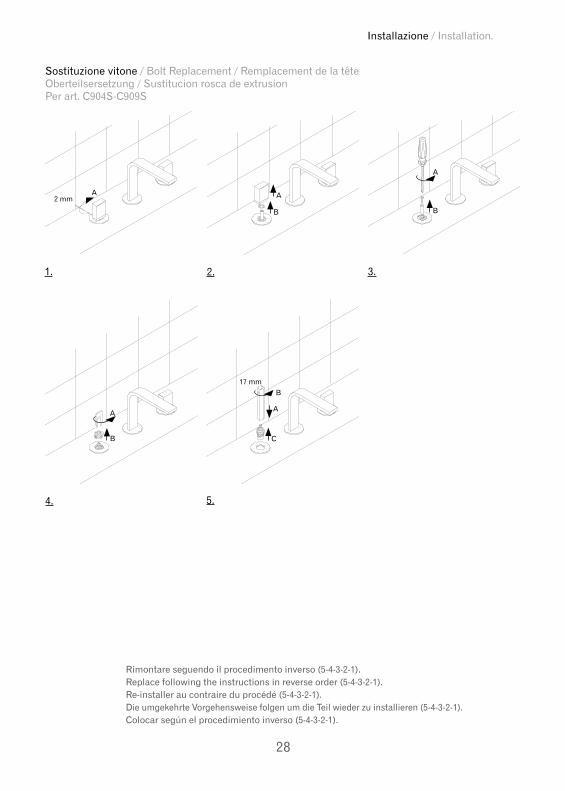
Sostituzione vitone / Bolt Replacement / Remplacement de la tête Oberteilsersetzung / Sustitucion rosca de extrusionPer art. C904S-C909S
2.1.
2 mm
B
A
3.
Rimontare seguendo il procedimento inverso (5-4-3-2-1). Replace following the instructions in reverse order (5-4-3-2-1). Re-installer au contraire du procédé (5-4-3-2-1). Die umgekehrte Vorgehensweise folgen um die Teil wieder zu installieren (5-4-3-2-1). Colocar según el procedimiento inverso (5-4-3-2-1).
5.4.
A
A
B
B
A
C
A
17 mmB
29
VENEZIA
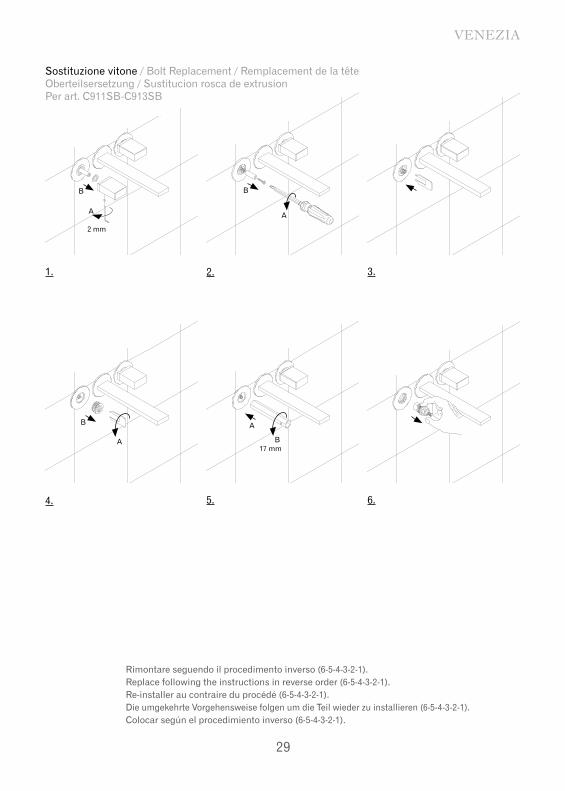
Sostituzione vitone / Bolt Replacement / Remplacement de la tête Oberteilsersetzung / Sustitucion rosca de extrusionPer art. C911SB-C913SB
2.1.
2 mm
A
3.
Rimontare seguendo il procedimento inverso (6-5-4-3-2-1). Replace following the instructions in reverse order (6-5-4-3-2-1). Re-installer au contraire du procédé (6-5-4-3-2-1). Die umgekehrte Vorgehensweise folgen um die Teil wieder zu installieren (6-5-4-3-2-1). Colocar según el procedimiento inverso (6-5-4-3-2-1).
5.4. 6.
B B
A
B
A
A
B17 mm
Installazione / Installation.
30
2.1. 3.
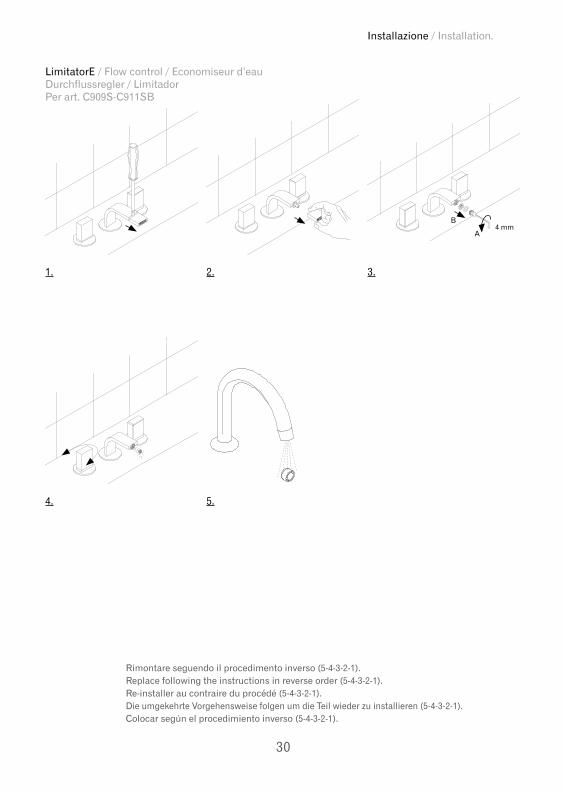
Rimontare seguendo il procedimento inverso (5-4-3-2-1). Replace following the instructions in reverse order (5-4-3-2-1). Re-installer au contraire du procédé (5-4-3-2-1). Die umgekehrte Vorgehensweise folgen um die Teil wieder zu installieren (5-4-3-2-1). Colocar según el procedimiento inverso (5-4-3-2-1).
LimitatorE / Flow control / Economiseur d’eauDurchflussregler / LimitadorPer art. C909S-C911SB
5.4.
B
A4 mm

31
VENEZIA
Sostituzione aeratore / Substitute aerator / Remplacement de l’aèrateur / Den Lüfter auswescseln / Sustituir el aireadorPer art. C904S-C913SB
Rimontare seguendo il procedimento inverso (2-1)Replace following the instructions in reverse order (2-1)Re-installer au contraire du procédé (2-1)Die umgekehrte Vorgehensweise folgen um die Teil wie der zu installieren (2-1)Colocar según el procedimiento inverso (2-1)
2.1.
Installazione / Installation.
32
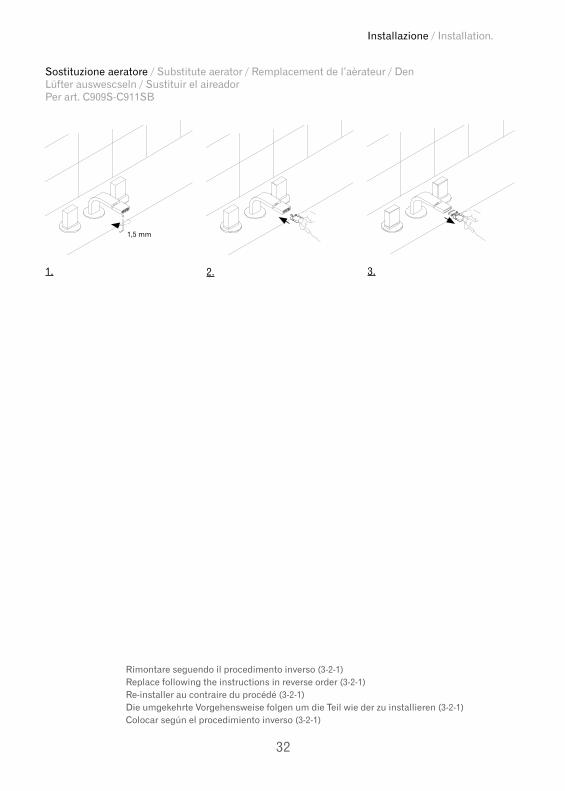
Sostituzione aeratore / Substitute aerator / Remplacement de l’aèrateur / Den Lüfter auswescseln / Sustituir el aireadorPer art. C909S-C911SB
Rimontare seguendo il procedimento inverso (3-2-1)Replace following the instructions in reverse order (3-2-1)Re-installer au contraire du procédé (3-2-1)Die umgekehrte Vorgehensweise folgen um die Teil wie der zu installieren (3-2-1)Colocar según el procedimiento inverso (3-2-1)
2.1. 3.
1,5 mm
33
VENEZIA
FRANCE.
SPAIN.ENGLAND.
GERMANY.ITALY.
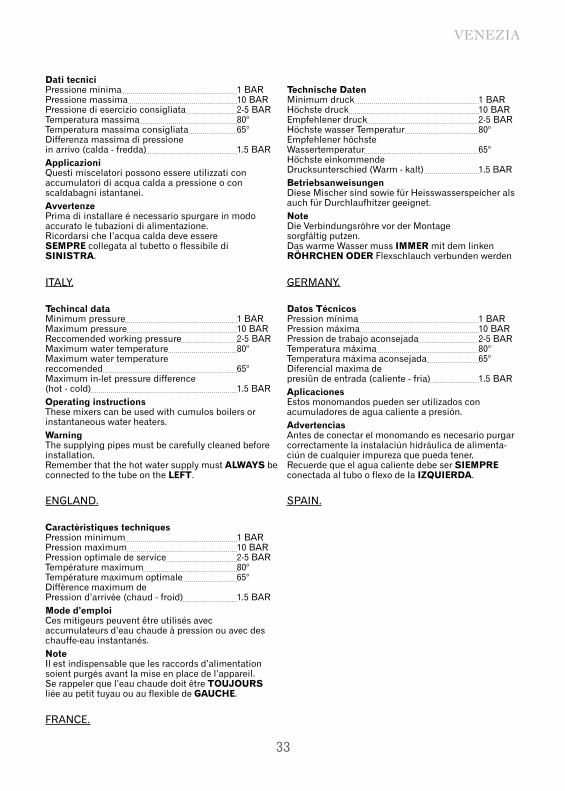
Dati tecnici Pressione minima 1 BARPressione massima 10 BARPressione di esercizio consigliata 2-5 BARTemperatura massima 80°Temperatura massima consigliata 65°Differenza massima di pressione in arrivo (calda - fredda) 1.5 BARApplicazioniQuesti miscelatori possono essere utilizzati con accumulatori di acqua calda a pressione o con scaldabagni istantanei. AvvertenzePrima di installare é necessario spurgare in modo accurato le tubazioni di alimentazione.Ricordarsi che I’acqua calda deve essere SEMPRE collegata al tubetto o flessibile di SINISTRA.
Techincal dataMinimum pressure 1 BARMaximum pressure 10 BARReccomended working pressure 2-5 BARMaximum water temperature 80°Maximum water temperature reccomended 65°Maximum in-let pressure difference (hot - cold) 1.5 BAROperating instructionsThese mixers can be used with cumulos boilers or instantaneous water heaters. WarningThe supplying pipes must be carefully cleaned before installation.Remember that the hot water supply must ALWAYS be connected to the tube on the LEFT.
Caractèristiques techniques Pression minimum 1 BARPression maximum 10 BARPression optimale de service 2-5 BARTempérature maximum 80°Température maximum optimale 65°Diffèrence maximum dePression d’arrivèe (chaud - froid) 1.5 BARMode d’emploiCes mitigeurs peuvent être utilisés avec accumulateurs d’eau chaude à pression ou avec des chauffe-eau instantanés. NoteIl est indispensable que les raccords d’alimentation soient purgés avant la mise en place de l’appareil.Se rappeler que l’eau chaude doit être TOUJOURS liée au petit tuyau ou au flexible de GAUCHE.
Technische Daten Minimum druck 1 BARHöchste druck 10 BAREmpfehlener druck 2-5 BARHöchste wasser Temperatur 80°Empfehlener höchste Wassertemperatur 65°Höchste einkommendeDrucksunterschied (Warm - kalt) 1.5 BARBetriebsanweisungenDiese Mischer sind sowie für Heisswasserspeicher als auch für Durchlaufhitzer geeignet. NoteDie Verbindungsröhre vor der Montage sorgfältig putzen. Das warme Wasser muss IMMER mit dem linken RÖHRCHEN ODER Flexschlauch verbunden werden
Datos Técnicos Pression mínima 1 BARPression máxima 10 BARPression de trabajo aconsejada 2-5 BARTemperatura máxima 80°Temperatura máxima aconsejada 65°Diferencial maxìma depresiûn de entrada (caliente - fria) 1.5 BARAplicacìonesEstos monomandos pueden ser utilizados con acumuladores de agua caliente a presión. AdvertenciasAntes de conectar el monomando es necesario purgar correctamente la instalaciún hidráulica de alimenta-ciún de cualquier impureza que pueda tener.Recuerde que el agua caliente debe ser SIEMPRE conectada al tubo o flexo de Ia IZQUIERDA.

Installazione / Installation.
34
ENGLAND.
FRANCE.
SPAIN.
GERMANY.ITALY.
Cura del prodotto La pulizia delle superfici va fatta utilizzando un sapone liquido diluito in acqua.Non usare mai in nessun caso detersivi liquidi contenenti sostanze abrasive o a base di acido muriatico, spugne abrasive, aceto, ammoniaca,acetone, candeggina, acidi di uso domestico, disinfettanti vari.ATTENZIONE! L’impiego di prodotti non consigliatipuò deteriorare irrimediabilmente le superfici, nel qual casoil produttore non risponderà del danno.L’azienda si riserva in qualunque momento di apportare senza preavviso modifiche a prodotti e accessori. I dati riprodotti in questo documento hanno carattere informativo e non sono vincolanti.
Advice on product careTo clean the surface use a soap and water solution.Never use for any reason cleaning solutions containing abrasive substances, chloric acids, ammonia, vinegar, bleach, domestic acids, disinfectants, or anytype of abrasive pad.WARNING! Incorrect cleaning may permanently ruin the surface of the products and in such case the manufacturer may not be held liable for damage.The Manufacturer reserves the right to modify product and accessories at any time without prior notice. Datas, products and sketches included in this document are just for information and do not bind the producer.
Conseils pour l’entretien du produitLa poussìere en surface devra être faite en utilisant un savon liquide dilué dans l’eau.Ne jamais utiliser en aucun cas des détergents liquides contenant des substances abrasives ou à base d’acide, nid’éponges abrasives, vinaigre, ammoniaque, acétone, eau de Javel, acides à usage domestique, désinfectants divers.ATTENTION! L’empli de produits non conseillés peut détériorer irrémediablement la surface des articles pour lequels le fabricant ne sera pas responsable.La société se réserve le droit de modifier ses produits et ses accessoires à tout moment et sans préavis. Informations, produits et croquis reproduits dans ce documents sont de nature informative et ne sont pas contractuels.
Pflege hinweise unserer artikelZur Reinigung empfehlen wir Wasser und flüssige Seife.Verwenden Sie bitte nie flüssige Reinigungsmittel, die Schmirgel, Salzsäure, Essig, Ammoniak, Aceton, Bleichlange, Desinfektionsmittel u.s.w. enthalten.WARNUNG! Der Gebrauch solcher Mittel kann unsere Artikel beschädigen und in diesem Fall gewährt Hersteller keine Garantie.Der Hersteller behalt sich das Recht vor jederzeit Änderungen an seinen Produkten und Zubehörteilen ohne Vorbescheid vorzunhehmen. Katalogangaben sowie Abbindungen, Maß-und Leistungsangaben sind unverbindlich.
Consejos para el cuidado del productoLa limpieza de las superficies se hace utilizando un jabón liquido diluido en agua.No usar en ningún caso detergentes liquidos que contengan sustancias abrasivas ó a base de ácido clorhídrico, estropajossabrasivos, amoniaco, acetona, lejía, ácidos de uso doméstico, desinfectantes varios.ATENCÍON! El uso de productos desaconsejados puede danãr irremediablemente las superficies de los elementos, de lo cual el fabricante no se hará responsable en ningún caso.La sociedad se reserva el derecho de modificar sus productos y accessorios en cualquier momento y sin previo aviso.

35
VENEZIA
Note / Notes / Notes / Notizen / Notas

Australian StandardInstallationProducts shall be installed in accordance with AS/NZS 3500 series of standards. Installer shall ensure that the flow controlled aerator is tightened to prevent removal by hand.
Dis
egni
e g
rafic
a: w
ww
.dip
i-des
igns
.com
1
1290
0007
0000
000
Rev
. 0