Embed Size (px)
Citation preview

Venepuncture and Cannulation
Louise Smith
Clinical Nurse Specialist

Outcomes
By the end of this session you will be aware of: – Basic anatomy
– Preparation procedures including patient identification
– Equipment required
– Preferred venous access sites (and alternatives!!)
– Patient care
– Safety and infection control
– Top tips!!

After this session
This is only the beginning!
– All personnel who carry out venepuncture and cannulation must have received training, supervision and be deemed competent by a named mentor having been observed performing venepuncture and cannulation on several (?5) occasions

Arteries and Veins

Palpation of Veins
Suitable
– Round
– Firm
– Elastic
– Refill when depressed
NB Go by touch and not sight!
Unsuitable
– Pulse
– Hard
– Small
– Knotty
– Fibrosed
– Bumby
– Valves

Equipment (Venepuncture)
• Disposable gloves (check for latex allergy) • Tourniquet • Alcohol wipes/Gauze swabs • Plaster • Venepuncture needle and set/Syringe • Appropriate blood bottles • Specimen forms and transport bags • Sharps bin

Patient Preparation • Check identity and compare with request form
– Full name, DoB
• Explanation of procedure allowing time for questions and withdrawal of consent
• Check environment and patient position – Do they need to lay down – Privacy
• Assemble equipment prior to commencing procedure

Blood bottles

Procedure • Wash hands • Seat patient in a chair/bed/couch with the arm supported in an
area where there is privacy and enough room to move freely around the patient
• Apply tourniquet • Select the most appropriate vein (palpate well to distinguish
difference between nerves, arteries and tendons) • Put on gloves • It is not necessary to swab clean skin (RCN and RCGP 2005) If
using alcohol swab for dirty areas allow to dry for 30 seconds

Procedure (Venepuncture)
• Stretch skin over vein using thumb of one hand • Insert the needle, bevel side up, at a 30-45 degree angle approximately
1mm into vein • (Watch for flashback) • Stabilise needle and blood bottle with one hand using the other to change
bottles • Once all samples collected release tourniquet • Cover needle with gauze, DO NOT apply pressure until needle withdrawn.
Invert bottles • Apply firm pressure for approx 30 seconds • Apply plaster and dispose of sharps safely

Order

Inversions

Cannulation
• Administer IVs (medication, fluids blood etc)
• Just in case (collapse etc)
• Monitoring of a patients condition
• Nutritional support

Sites for Cannulation

4 Common sites
• Basilic vein
• Median basilic vein
• Median cephalic vein
• Cephalic vein
All are large with thick walls and wide lumens

Sites to avoid
• Fibrosed areas
• Bruised areas
• Sites close to infection
• Lymphoedema
• Affected side post mastectomy or CVA
• Sites where cytotoxic chemotherapy is being administered

Equipment (Cannulation)
• Disposable gloves (check for latex allergy)
• Tourniquet
• Alcohol wipes/Gauze swabs
• Dressing
• Appropriate size cannula
• Flush/IV fluids/stopper
• Sharps bin

Does size matter? • Age and medical history of patient • Length of use • Need for insertion
• 14g Brown (Emergency e.g cardiac arrest) • 16g Grey (Trauma) • 18g Green (Rapid infusions e.g. fluid/blood) • 20g Pink (Routine infusions/blood, post op) • 22g Blue (small veins, short term infusions) • 24g Yellow (small veins, children, older people)

Procedure (Cannulation)
• Stretch skin over vein using thumb of one hand • Insert the needle, bevel side up, at a 30-45 degree angle approximately 1mm into
vein • Watch for flashback • Lower angle of cannula to almost skin level • Advance the cannula slightly • Pull back the introducer (2-5mm) and continue to advance the cannula (should be
no resistance) in one movement • Release tourniquet • Apply pressure to distal tip of cannula whilst fully removing introducer • Close system using stopper or IV and flush with normal saline • Secure with appropriate dressing

Safety and Infection Control (Venepuncture and Cannulation)
• Skin - cuts and abrasions should be covered with a waterproof dressing
• Gloves – disposable gloves seamless latex or vinyl should be worn
• Hand washing • Aprons should be worn if possibility of splashing • Eyes protected if there is a danger of flying debris
(not only from the procedure)

Sharps
Appropriate sharps box
– Never over fill
– Never re sheath a needle
– Needle stick injury

Spillages
• Gloves
• Soak up excess with disposable towels
• Clean area with hypochlorite solution as per local policy

Troubleshooting • Blood stops flowing
– ? Vein collapsed – try reapplying the tourniquet – Change position of the needle. Move it forward or back – Adjust angle of the needle (bevel may be against the vein wall) – Loosen tourniquet as may be obstructing blood flow – Vacuum may have gone on blood tube
• Haematoma forms during collection – Release tourniquet, apply gauze swab and remove needle, apply pressure for
> 30 seconds
• Arterial hit – Bright red blood, remove needle and apply pressure for > 5 mins

Points to remember • If taking hormone or fasting bloods note time last food
drink or hormonal medication taken etc • If tourniquet has been applied for > 2 mins before
venepuncture, release and re apply (abnormal results) • If patient experiences sudden acute pain discontinue
immediately • Don’t keep going!! Refer on • Observe for signs of dizziness or fainting. Fainting
sitting up will result in a fit

Top tips
• Keep veins warm
• Soak in water/heat pads
• Gentle stroking, rubbing with swab
• Anxiety
• 2 attempts and move on

Play time!!!!!

Central Venous Access Devices
Paula Wilkins
Nursing Director

Aims
• Identify the different types of lines and why they would be used
• Understand the principles behind insertion
• Understand the care of the different line types
• Troubleshooting

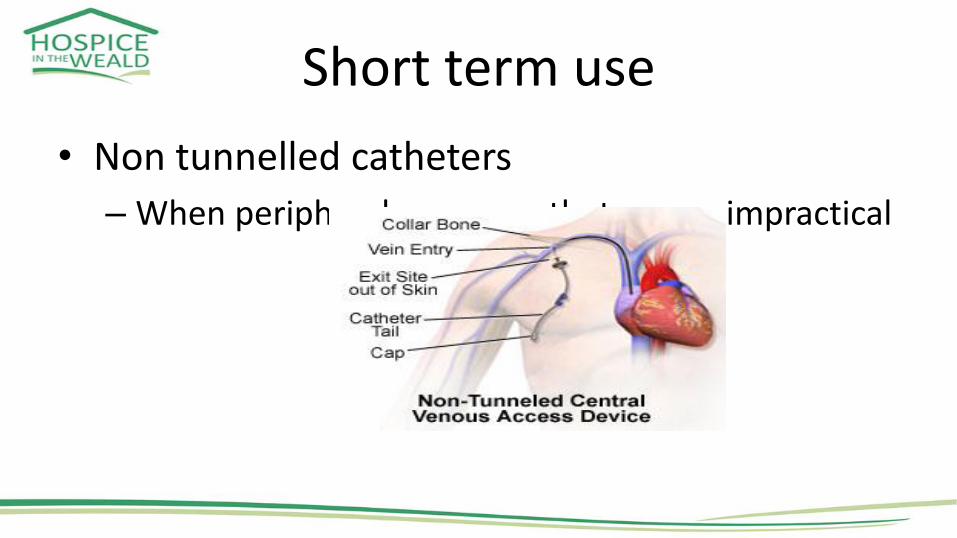
Short term use
• Non tunnelled catheters
– When peripheral venous catheters use impractical

Mid term use
• PICC
– Peripherally Inserted Central Catheter
• Should be avoided in in patient use because of limited longevity and increased incidence of thrombosis

Long term use
• Skin Tunnelled Central Lines
– Repeated administration
• Implantable ports
– More suitable for children

Single, double, triple
• Kept to a minimum to reduce risk of complications
– Thrombosis
– Infection

Groshong Lines

Ports
• Intravenous
• Epidural

Care of the line • Post insertion
– Signs of infection or bleeding – Dressing left in place for 24 hrs – Immediate use ? Not in intravenous port a cath
• Dressing – Opsite iv3000/Mepore if oozing/skin fix/neck bag – Nothing ??
• Flushing – Heplok/Hepsal / Normal saline – Possitive pressure (never smaller than 10ml syringe) – Weekly or more frequently depending on clinical situation
How to access the line
• Sterile or non sterile gloves
– Open or closed access
– Cleaning solution
• Alcohol degrades the line
• IV sets changed 24-48hrly if transfusing blood products 72-96 hrs otherwise

Taking blood
• Prepare patient and equipment
• Clean “bung” using appropriate solution
• Attach syringe (not smaller than 10ml)
• Remove dead space blood and discard unless taking for blood cultures
• Take blood samples
• Flush (all lumen)

Living with the line
• Bathing
– Shower rather than bath
– No swimming
• Contact HCP
– Leaking
– Infection
– Swollen arm/Prominent veins on chest wall
– SoB