Embed Size (px)
Citation preview
Designed and manufactured by Limbs & Things Limited,Sussex Street, St. Philips, Bristol, BS2 0RA, UK.Telephone: +44 (0)117 311 0500 Fax: +44 (0)117 311 [email protected] www.limbsandthings.com
Part No: 065-025
Issue 2, June 2011© 2011 Limbs & Things
Standard Venepuncture Arm
User Guide
Standard Venepuncture Arm - Light Part No: 00330Standard Venepuncture Arm - Brown Part No: 00331Standard Venepuncture Arm - Black Part No: 00332
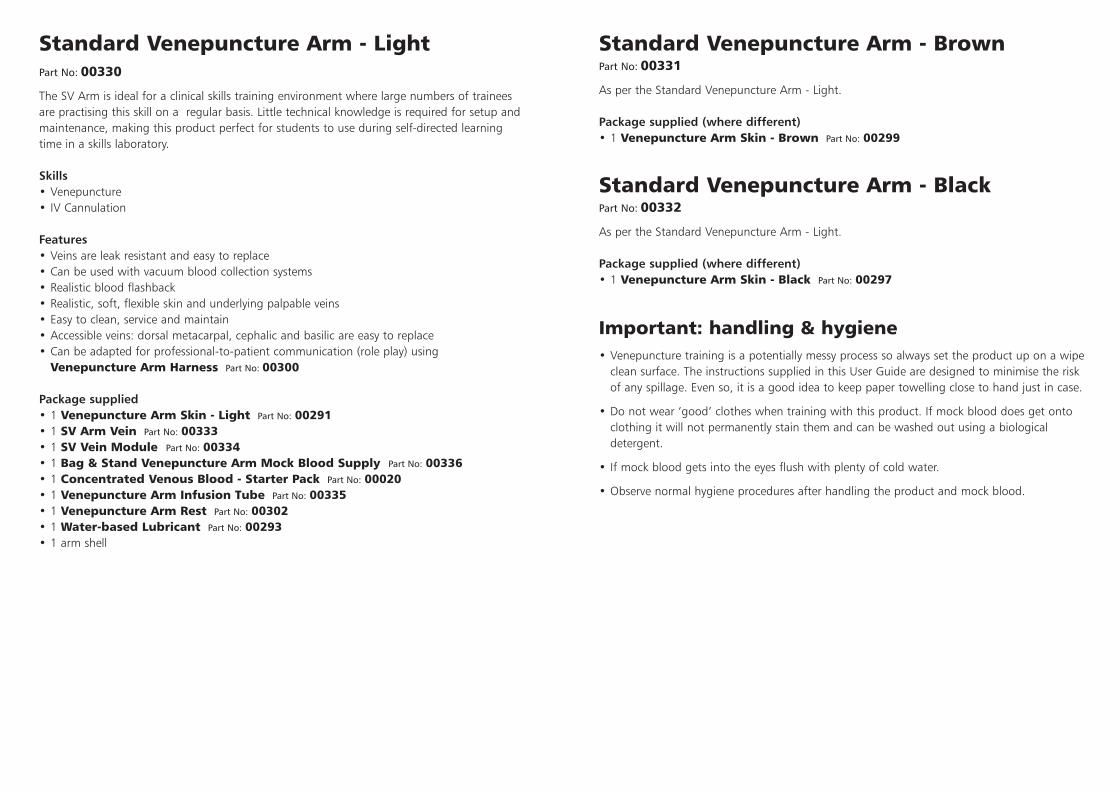
Standard Venepuncture Arm - LightPart No: 00330
The SV Arm is ideal for a clinical skills training environment where large numbers of traineesare practising this skill on a regular basis. Little technical knowledge is required for setup andmaintenance, making this product perfect for students to use during self-directed learningtime in a skills laboratory.
Skills• Venepuncture • IV Cannulation
Features• Veins are leak resistant and easy to replace• Can be used with vacuum blood collection systems • Realistic blood flashback• Realistic, soft, flexible skin and underlying palpable veins • Easy to clean, service and maintain• Accessible veins: dorsal metacarpal, cephalic and basilic are easy to replace• Can be adapted for professional-to-patient communication (role play) using
Venepuncture Arm Harness Part No: 00300
Package supplied • 1 Venepuncture Arm Skin - Light Part No: 00291• 1 SV Arm Vein Part No: 00333• 1 SV Vein Module Part No: 00334• 1 Bag & Stand Venepuncture Arm Mock Blood Supply Part No: 00336• 1 Concentrated Venous Blood - Starter Pack Part No: 00020• 1 Venepuncture Arm Infusion Tube Part No: 00335• 1 Venepuncture Arm Rest Part No: 00302• 1 Water-based Lubricant Part No: 00293• 1 arm shell
0
Standard Venepuncture Arm - BrownPart No: 00331
As per the Standard Venepuncture Arm - Light.
Package supplied (where different)• 1 Venepuncture Arm Skin - Brown Part No: 00299
Standard Venepuncture Arm - BlackPart No: 00332
As per the Standard Venepuncture Arm - Light.
Package supplied (where different)• 1 Venepuncture Arm Skin - Black Part No: 00297
Important: handling & hygiene• Venepuncture training is a potentially messy process so always set the product up on a wipe
clean surface. The instructions supplied in this User Guide are designed to minimise the riskof any spillage. Even so, it is a good idea to keep paper towelling close to hand just in case.
• Do not wear ‘good’ clothes when training with this product. If mock blood does get ontoclothing it will not permanently stain them and can be washed out using a biologicaldetergent.
• If mock blood gets into the eyes flush with plenty of cold water.
• Observe normal hygiene procedures after handling the product and mock blood.
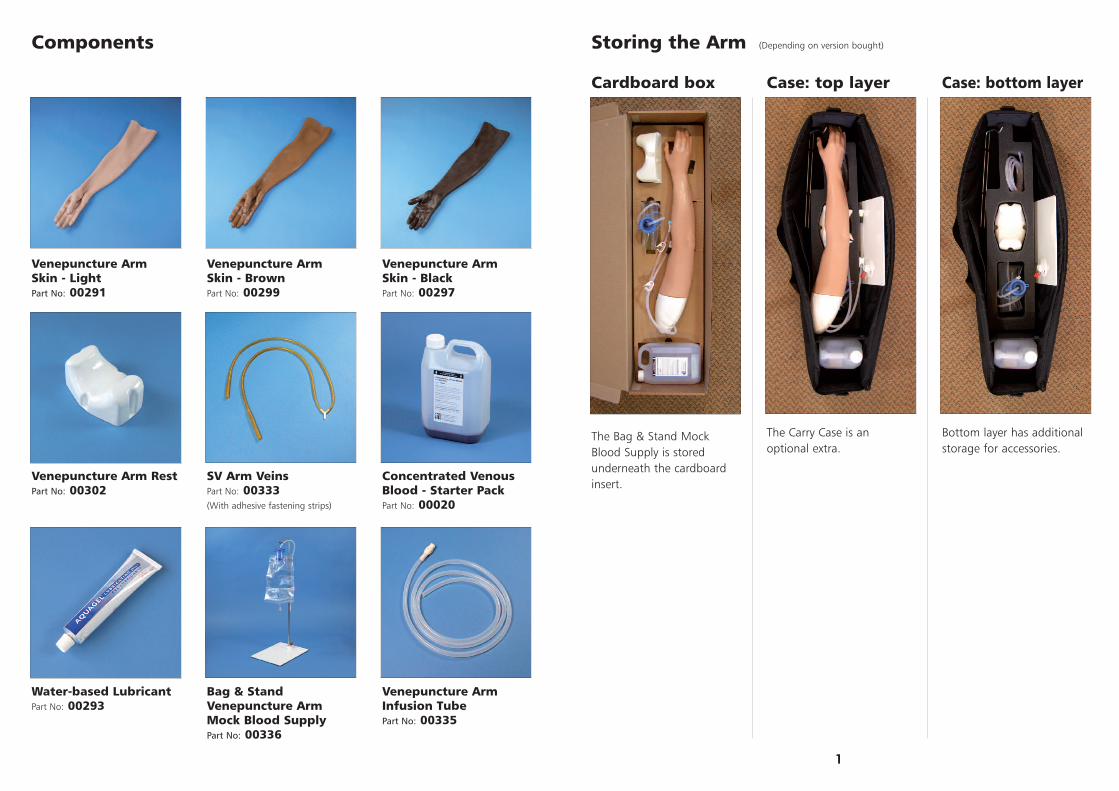
Case: top layer
The Carry Case is anoptional extra.
Venepuncture Arm Skin - BlackPart No: 00297
Concentrated VenousBlood - Starter PackPart No: 00020
Venepuncture ArmInfusion TubePart No: 00335
Components
Venepuncture Arm Skin - BrownPart No: 00299
SV Arm VeinsPart No: 00333(With adhesive fastening strips)
Bag & StandVenepuncture ArmMock Blood SupplyPart No: 00336
Venepuncture Arm Skin - LightPart No: 00291
Venepuncture Arm RestPart No: 00302 0295
Water-based LubricantPart No: 00293
0
Case: bottom layer
Bottom layer has additionalstorage for accessories.
Cardboard box
The Bag & Stand MockBlood Supply is storedunderneath the cardboardinsert.
Storing the Arm (Depending on version bought)
1
2
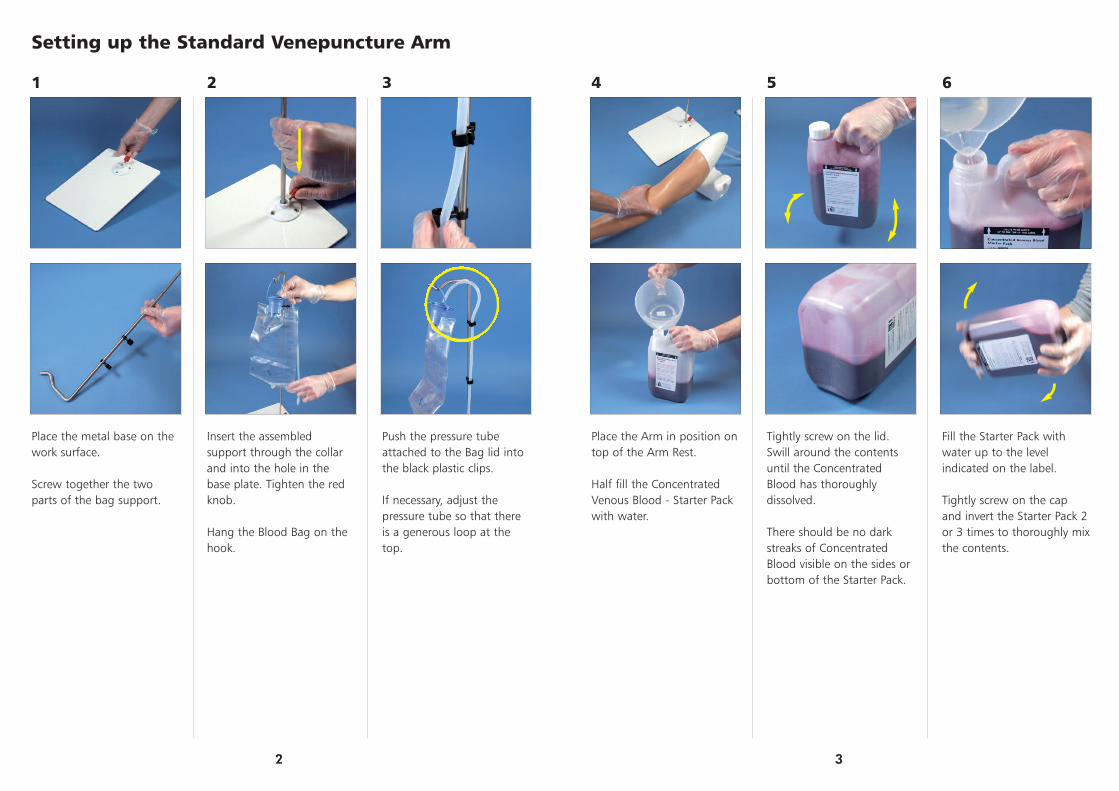
Insert the assembledsupport through the collarand into the hole in thebase plate. Tighten the redknob.
Hang the Blood Bag on thehook.
1
Place the metal base on thework surface.
Screw together the twoparts of the bag support.
3
Push the pressure tubeattached to the Bag lid intothe black plastic clips.
If necessary, adjust thepressure tube so that thereis a generous loop at thetop.
Setting up the Standard Venepuncture Arm
2
5
Tightly screw on the lid.Swill around the contentsuntil the ConcentratedBlood has thoroughlydissolved.
There should be no darkstreaks of ConcentratedBlood visible on the sides orbottom of the Starter Pack.
4
Place the Arm in position ontop of the Arm Rest.
Half fill the ConcentratedVenous Blood - Starter Packwith water.
6
Fill the Starter Pack withwater up to the levelindicated on the label.
Tightly screw on the capand invert the Starter Pack 2or 3 times to thoroughly mixthe contents.
3
8
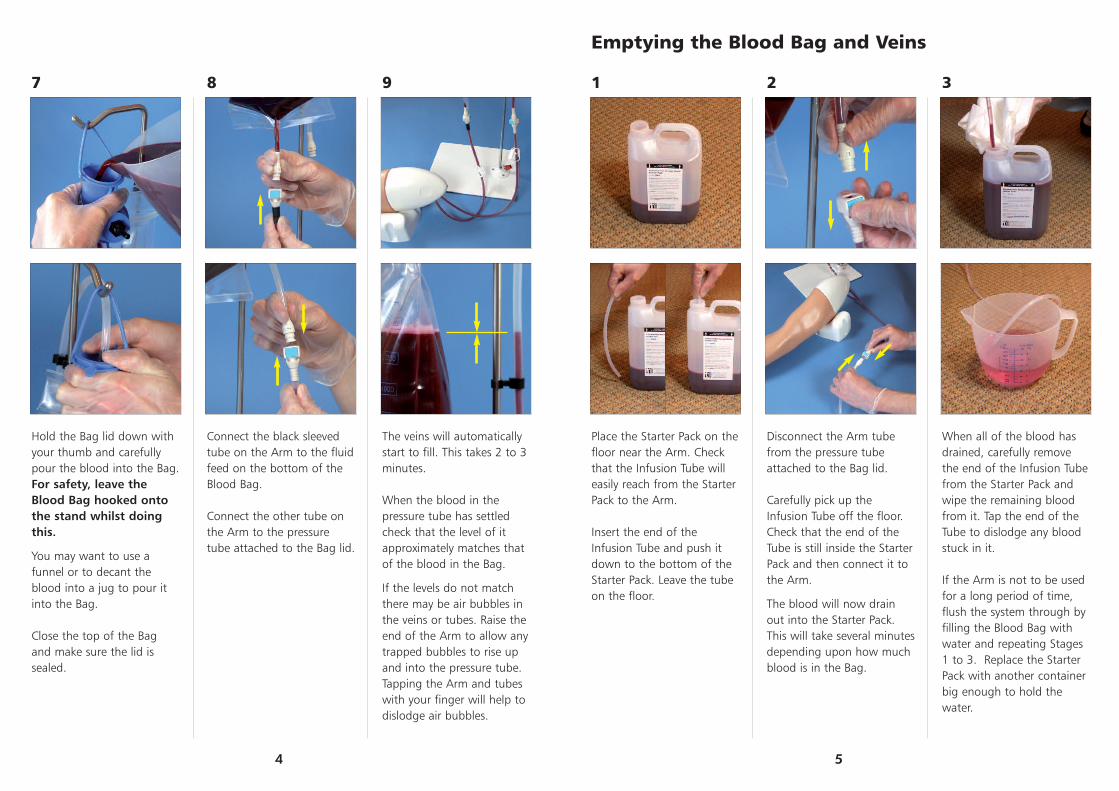
Connect the black sleevedtube on the Arm to the fluidfeed on the bottom of theBlood Bag.
Connect the other tube onthe Arm to the pressuretube attached to the Bag lid.
7
Hold the Bag lid down withyour thumb and carefullypour the blood into the Bag.For safety, leave theBlood Bag hooked ontothe stand whilst doingthis.
You may want to use afunnel or to decant theblood into a jug to pour itinto the Bag.
Close the top of the Bagand make sure the lid issealed.
9
The veins will automaticallystart to fill. This takes 2 to 3minutes.
When the blood in thepressure tube has settledcheck that the level of itapproximately matches thatof the blood in the Bag.
If the levels do not matchthere may be air bubbles inthe veins or tubes. Raise theend of the Arm to allow anytrapped bubbles to rise upand into the pressure tube.Tapping the Arm and tubeswith your finger will help todislodge air bubbles.
4
2
Disconnect the Arm tubefrom the pressure tubeattached to the Bag lid.
Carefully pick up theInfusion Tube off the floor.Check that the end of theTube is still inside the StarterPack and then connect it tothe Arm.
The blood will now drainout into the Starter Pack.This will take several minutesdepending upon how muchblood is in the Bag.
1
Place the Starter Pack on thefloor near the Arm. Checkthat the Infusion Tube willeasily reach from the StarterPack to the Arm.
Insert the end of theInfusion Tube and push itdown to the bottom of theStarter Pack. Leave the tubeon the floor.
3
When all of the blood hasdrained, carefully removethe end of the Infusion Tubefrom the Starter Pack andwipe the remaining bloodfrom it. Tap the end of theTube to dislodge any bloodstuck in it.
If the Arm is not to be usedfor a long period of time,flush the system through byfilling the Blood Bag withwater and repeating Stages1 to 3. Replace the StarterPack with another containerbig enough to hold thewater.
Emptying the Blood Bag and Veins
5
2
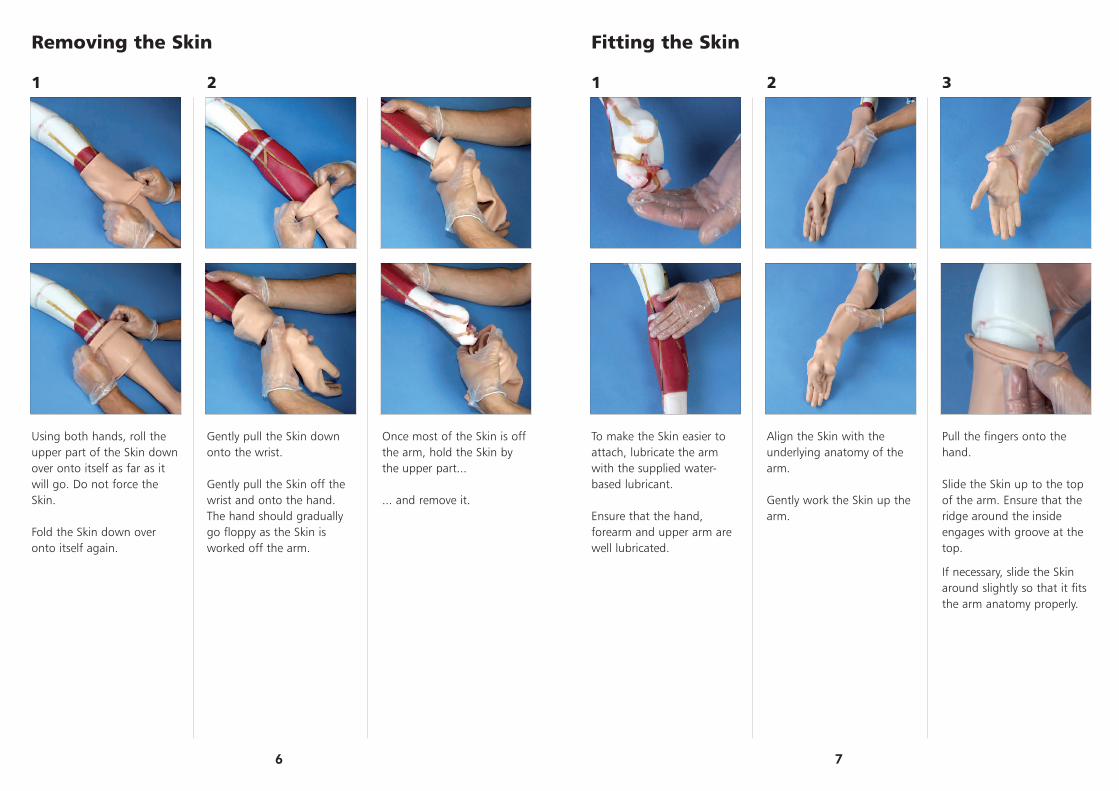
Gently pull the Skin downonto the wrist.
Gently pull the Skin off thewrist and onto the hand.The hand should graduallygo floppy as the Skin isworked off the arm.
1
Using both hands, roll theupper part of the Skin downover onto itself as far as itwill go. Do not force theSkin.
Fold the Skin down overonto itself again.
3
Once most of the Skin is offthe arm, hold the Skin bythe upper part...
... and remove it.
Removing the Skin
6
2
Align the Skin with theunderlying anatomy of thearm.
Gently work the Skin up thearm.
1
To make the Skin easier toattach, lubricate the armwith the supplied water-based lubricant.
Ensure that the hand,forearm and upper arm arewell lubricated.
3
Pull the fingers onto thehand.
Slide the Skin up to the topof the arm. Ensure that theridge around the insideengages with groove at thetop.
If necessary, slide the Skinaround slightly so that it fitsthe arm anatomy properly.
Fitting the Skin
7
2
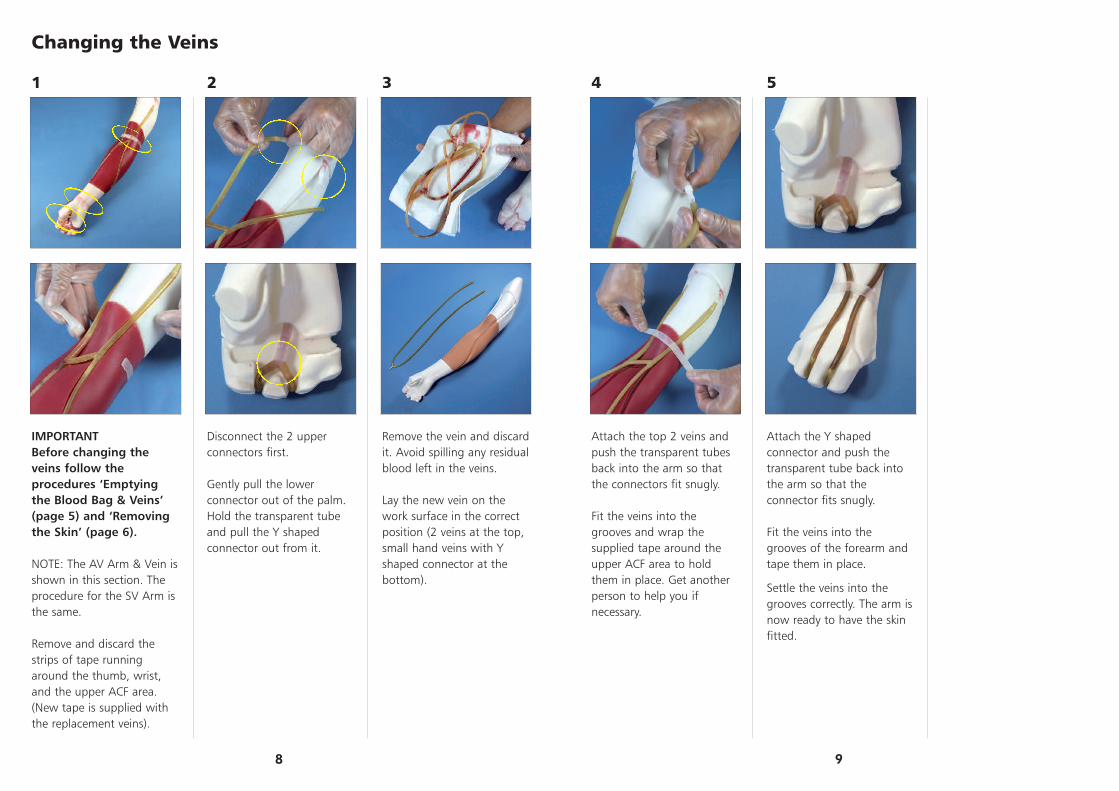
Disconnect the 2 upperconnectors first.
Gently pull the lowerconnector out of the palm.Hold the transparent tubeand pull the Y shapedconnector out from it.
1
IMPORTANTBefore changing theveins follow theprocedures ‘Emptyingthe Blood Bag & Veins’(page 5) and ‘Removingthe Skin’ (page 6).
NOTE: The AV Arm & Vein isshown in this section. Theprocedure for the SV Arm isthe same.
Remove and discard thestrips of tape runningaround the thumb, wrist,and the upper ACF area.(New tape is supplied withthe replacement veins).
3
Remove the vein and discardit. Avoid spilling any residualblood left in the veins.
Lay the new vein on thework surface in the correctposition (2 veins at the top,small hand veins with Yshaped connector at thebottom).
Changing the Veins
8
5
Attach the Y shapedconnector and push thetransparent tube back intothe arm so that theconnector fits snugly.
Fit the veins into thegrooves of the forearm andtape them in place.
Settle the veins into thegrooves correctly. The arm isnow ready to have the skinfitted.
4
Attach the top 2 veins andpush the transparent tubesback into the arm so thatthe connectors fit snugly.
Fit the veins into thegrooves and wrap thesupplied tape around theupper ACF area to holdthem in place. Get anotherperson to help you ifnecessary.
6
Ensure that the veins aroundthe hand fit in the groovescorrectly.
9
1
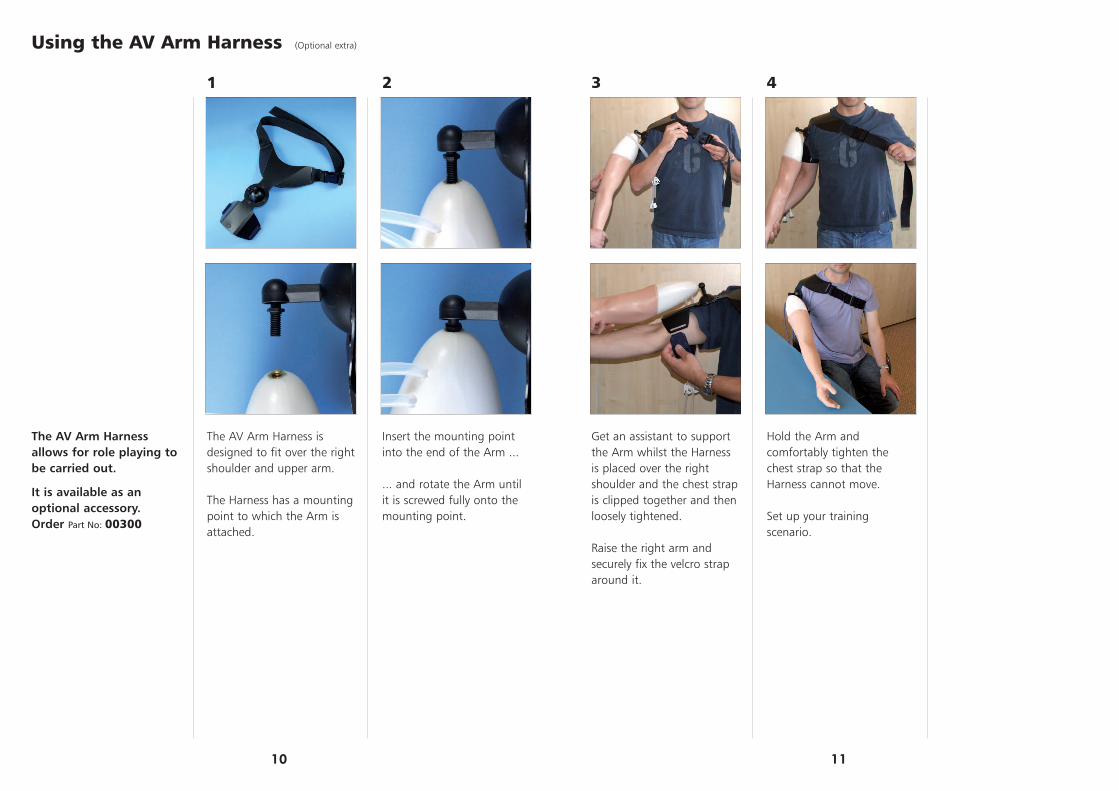
The AV Arm Harness isdesigned to fit over the rightshoulder and upper arm.
The Harness has a mountingpoint to which the Arm isattached.
1
The AV Arm Harnessallows for role playing tobe carried out.
It is available as anoptional accessory. Order Part No: 00300
2
Insert the mounting pointinto the end of the Arm ...
... and rotate the Arm untilit is screwed fully onto themounting point.
Using the AV Arm Harness (Optional extra)
10
4
Hold the Arm andcomfortably tighten thechest strap so that theHarness cannot move.
Set up your trainingscenario.
3
Get an assistant to supportthe Arm whilst the Harnessis placed over the rightshoulder and the chest strapis clipped together and thenloosely tightened.
Raise the right arm andsecurely fix the velcro straparound it.
11