Embed Size (px)
Citation preview

1
Vegetable Grafting: Watermelon
W A S H I N G T O N S T A T E U N I V E R S I T Y E X T E N S I O N F A C T S H E E T • F S 1 0 0 E
Introduction
Vegetable grafting is a centuries-old technique first used in Asia to improve plant production, reduce disease susceptibil-ity, and increase plant vigor. Commercial production of and demand for grafted vegetable plants continues to increase across Asia and Europe, although it is relatively new in the U.S. Beginning in the 1990s, commercial growers and home gardeners in the U.S. have gradually become more aware of the advantages of using grafted vegetable plants.
This Extension fact sheet provides a summary of how to prepare watermelon seedlings for grafting, how to graft, how to heal grafted plants, and how to transplant and maintain grafted plants in the field. For grafting techniques that require high humidity, construct a healing chamber following the instructions provided in the Washington State University Extension Publication FS051E titled Vegetable Grafting: The Healing Chamber.
Grafting Preparation
Watermelon plants are grafted when they are 14–21 days old. In order for a successful graft union to form, the scion and rootstock plants must have similar stem diameters at the time of grafting so their vascular bundles can be aligned and in complete contact with one another. (See Figure 1 for an illustration of plant parts, including the vascular bundles in a watermelon stem.) The scion and rootstock seedlings may not germinate or grow at the same rates, so it is impor-tant to conduct a preliminary test to determine their growth rates in your growing environment. Seed more plants than necessary so you have a greater selection when matching stem diameters. Also, it is rare to get 100% graft survival, so graft at least 20% more plants than needed.
Water both rootstock and scion plants 12–24 hours before grafting. Do not water plants immediately before grafting, unless they are wilted. If reusing grafting clips, wash them in warm, soapy water, sterilize them by soaking for 1 minute in a 10% bleach solution, and rinse them under tap water. Allow the clips to air-dry before reuse. Use only clean, sharp razor blades for grafting, and wash your hands with anti-bacterial soap or hand gel, or use latex-type surgical gloves. While there are many tools that can be used for cutting
vegetable grafts (Figure 2), the double-edged razor blade snapped in half is most commonly used. Fill a spray bottle with tap water in order to mist plants frequently during grafting. If you are using a healing chamber, spray the inner surfaces of the chamber with water a few hours before graft-ing to raise the relative humidity within the chamber.
Grafting Techniques Commonly Used for Watermelon
There are four methods commonly used to graft watermel-on: 1) approach (tongue), 2) hole insertion, 3) one cotyle-don (splice), and 4) side grafting.
1. Approach (Tongue) Grafting
Both rootstock and scion should have one or two true leaves. Cut a 45° downward slit halfway through the
Figure 1. Botanical parts of a watermelon seedling.
Cotyledon
Vascular Bundle
Xylem Phloem
Apical meristem
Axillary meristems (buds)
{
2
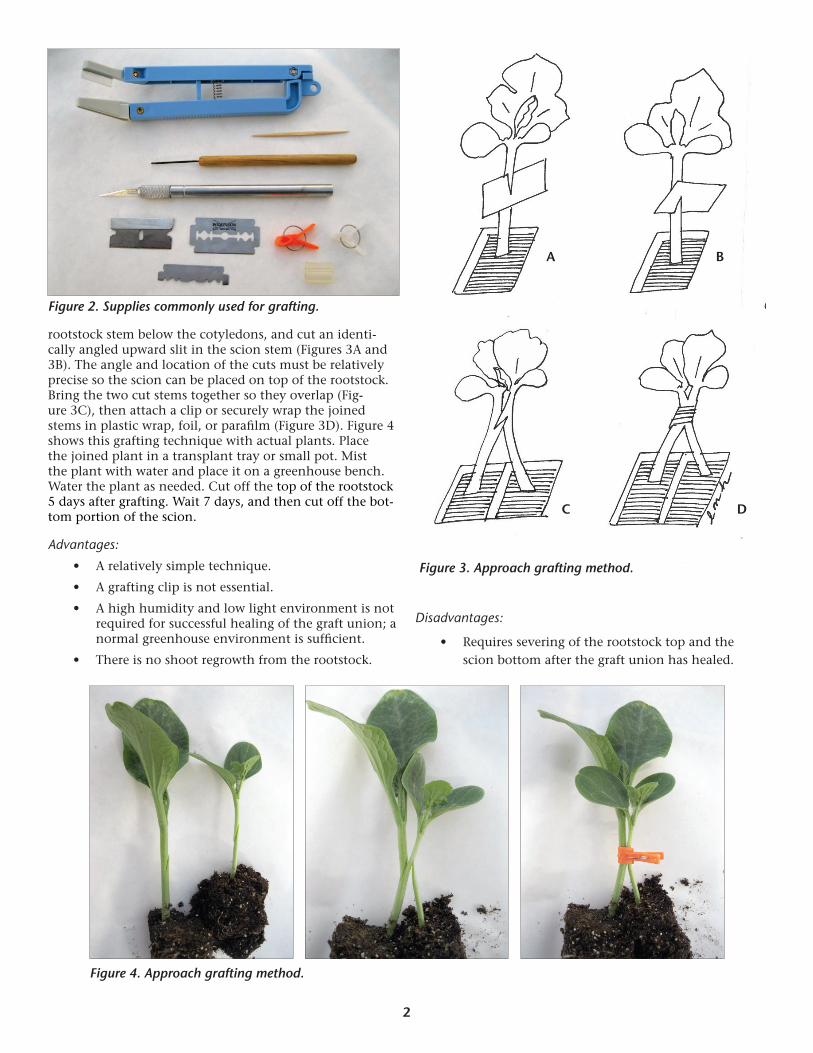
rootstock stem below the cotyledons, and cut an identi-cally angled upward slit in the scion stem (Figures 3A and 3B). The angle and location of the cuts must be relatively precise so the scion can be placed on top of the rootstock. Bring the two cut stems together so they overlap (Fig-ure 3C), then attach a clip or securely wrap the joined stems in plastic wrap, foil, or parafilm (Figure 3D). Figure 4 shows this grafting technique with actual plants. Place the joined plant in a transplant tray or small pot. Mist the plant with water and place it on a greenhouse bench. Water the plant as needed. Cut off the top of the rootstock 5 days after grafting. Wait 7 days, and then cut off the bot-tom portion of the scion.
Advantages:
• Arelativelysimpletechnique.
• Agraftingclipisnotessential.
• Ahighhumidityandlowlightenvironmentisnotrequired for successful healing of the graft union; a normal greenhouse environment is sufficient.
• Thereisnoshootregrowthfromtherootstock.
Disadvantages:
• Requiresseveringoftherootstocktopandthescion bottom after the graft union has healed.
Figure 2. Supplies commonly used for grafting.
Figure 3. Approach grafting method.
A B
C D
Figure 4. Approach grafting method.
3
2. Hole Insertion Grafting
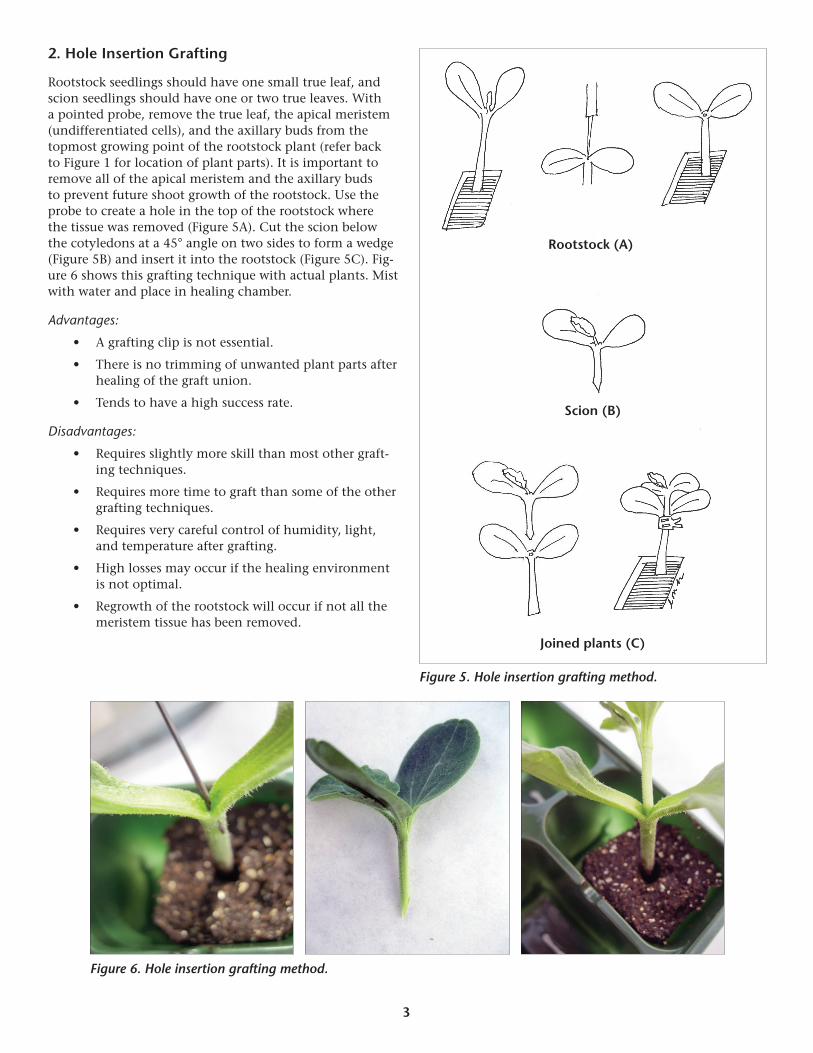
Rootstockseedlingsshouldhaveonesmalltrueleaf,andscion seedlings should have one or two true leaves. With a pointed probe, remove the true leaf, the apical meristem (undifferentiated cells), and the axillary buds from the topmost growing point of the rootstock plant (refer back to Figure 1 for location of plant parts). It is important to remove all of the apical meristem and the axillary buds to prevent future shoot growth of the rootstock. Use the probe to create a hole in the top of the rootstock where the tissue was removed (Figure 5A). Cut the scion below the cotyledons at a 45° angle on two sides to form a wedge (Figure 5B) and insert it into the rootstock (Figure 5C). Fig-ure 6 shows this grafting technique with actual plants. Mist with water and place in healing chamber.
Advantages:
• Agraftingclipisnotessential.
• Thereisnotrimmingofunwantedplantpartsafterhealing of the graft union.
• Tendstohaveahighsuccessrate.
Disadvantages:
• Requiresslightlymoreskillthanmostothergraft-ing techniques.
• Requiresmoretimetograftthansomeoftheothergrafting techniques.
• Requiresverycarefulcontrolofhumidity,light,and temperature after grafting.
• Highlossesmayoccurifthehealingenvironmentis not optimal.
• Regrowthoftherootstockwilloccurifnotallthemeristem tissue has been removed.
Rootstock (A)
Scion (B)
Joined plants (C)
Figure 5. Hole insertion grafting method.
Figure 6. Hole insertion grafting method.
4
3. One Cotyledon Grafting
This method (also known as the splice graft) was originally developed by Japanese engineers for use with automated grafting. Due to the procedure’s simplicity, it has become the most commonly used manual grafting method.
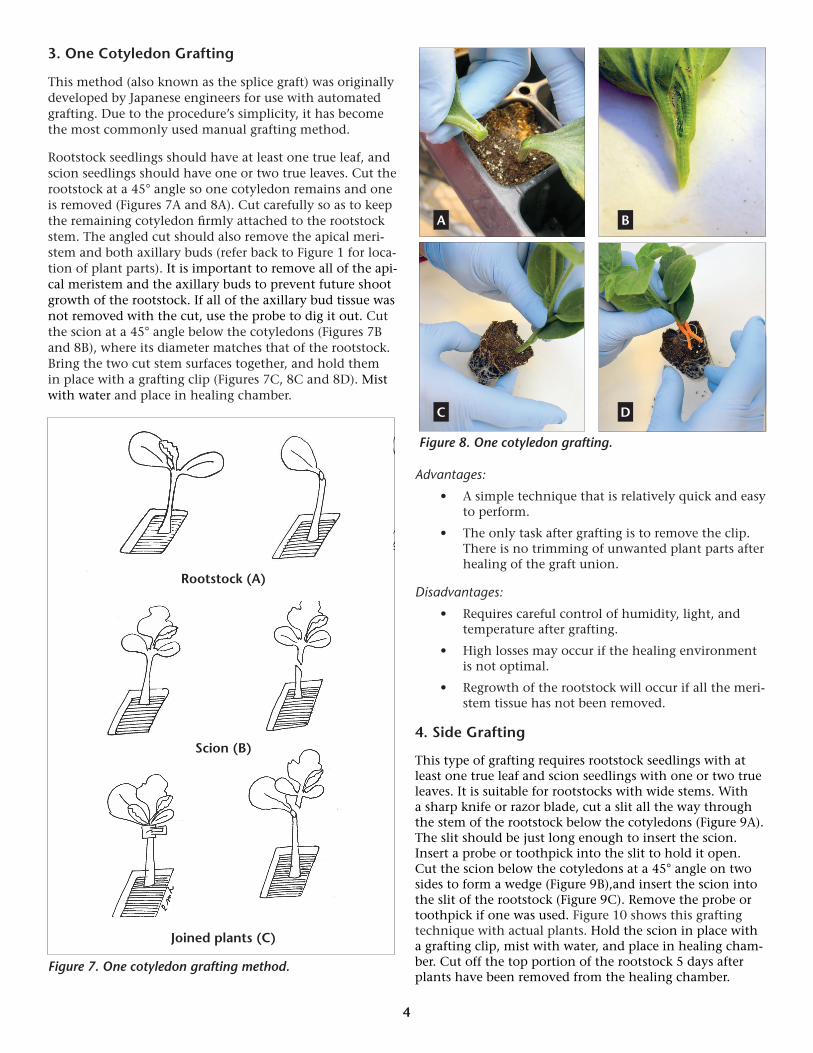
Rootstockseedlingsshouldhaveatleastonetrueleaf,andscion seedlings should have one or two true leaves. Cut the rootstock at a 45° angle so one cotyledon remains and one is removed (Figures 7A and 8A). Cut carefully so as to keep the remaining cotyledon firmly attached to the rootstock stem. The angled cut should also remove the apical meri-stem and both axillary buds (refer back to Figure 1 for loca-tion of plant parts). It is important to remove all of the api-cal meristem and the axillary buds to prevent future shoot growth of the rootstock. If all of the axillary bud tissue was not removed with the cut, use the probe to dig it out. Cut the scion at a 45° angle below the cotyledons (Figures 7B and 8B), where its diameter matches that of the rootstock. Bring the two cut stem surfaces together, and hold them in place with a grafting clip (Figures 7C, 8C and 8D). Mist with water and place in healing chamber.
Advantages:
• Asimpletechniquethatisrelativelyquickandeasyto perform.
• Theonlytaskaftergraftingistoremovetheclip.There is no trimming of unwanted plant parts after healing of the graft union.
Disadvantages:
• Requirescarefulcontrolofhumidity,light,andtemperature after grafting.
• Highlossesmayoccurifthehealingenvironmentis not optimal.
• Regrowthoftherootstockwilloccurifallthemeri-stem tissue has not been removed.
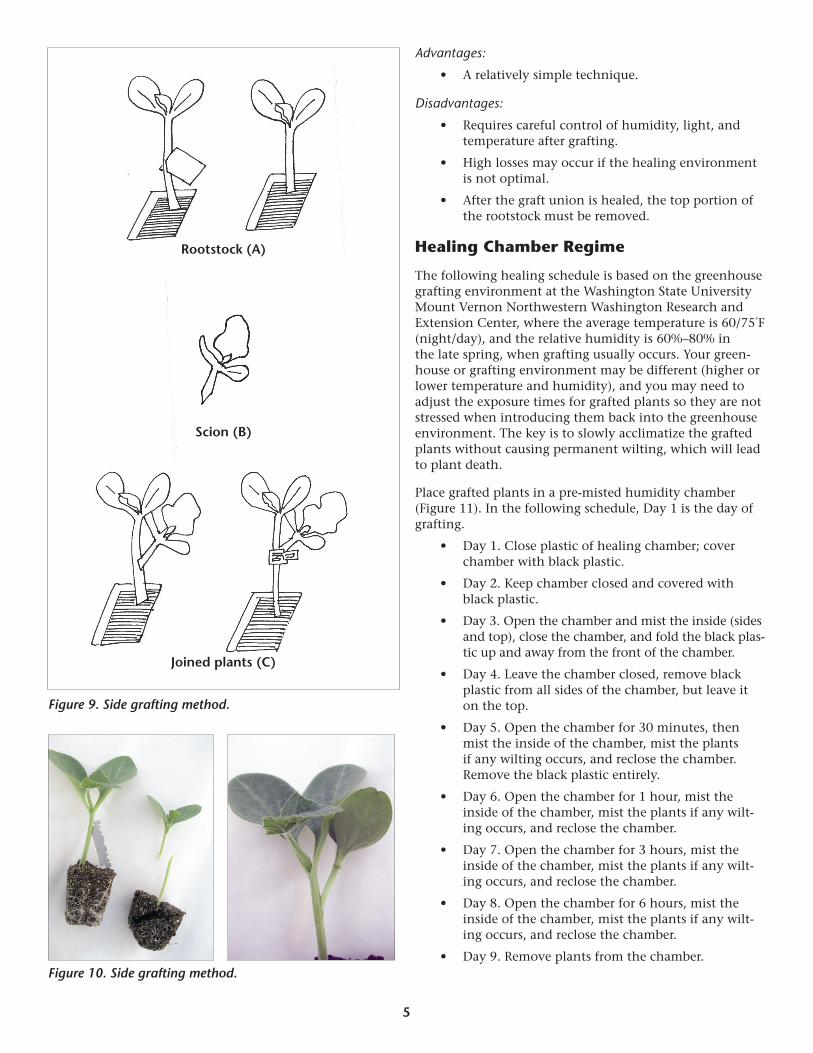
4. Side Grafting
This type of grafting requires rootstock seedlings with at least one true leaf and scion seedlings with one or two true leaves. It is suitable for rootstocks with wide stems. With a sharp knife or razor blade, cut a slit all the way through the stem of the rootstock below the cotyledons (Figure 9A). The slit should be just long enough to insert the scion. Insert a probe or toothpick into the slit to hold it open. Cut the scion below the cotyledons at a 45° angle on two sides to form a wedge (Figure 9B),and insert the scion into theslitoftherootstock(Figure9C).Removetheprobeortoothpick if one was used. Figure 10 shows this grafting technique with actual plants. Hold the scion in place with a grafting clip, mist with water, and place in healing cham-ber. Cut off the top portion of the rootstock 5 days after plants have been removed from the healing chamber.
Rootstock (A)
Joined plants (C)
Scion (B)
Figure 7. One cotyledon grafting method.
Figure 8. One cotyledon grafting.
A B
C D
5
Advantages:
• Arelativelysimpletechnique.
Disadvantages:
• Requirescarefulcontrolofhumidity,light,andtemperature after grafting.
• Highlossesmayoccurifthehealingenvironmentis not optimal.
• Afterthegraftunionishealed,thetopportionofthe rootstock must be removed.
Healing Chamber Regime
The following healing schedule is based on the greenhouse grafting environment at the Washington State University MountVernonNorthwesternWashingtonResearchandExtension Center, where the average temperature is 60/75°F (night/day), and the relative humidity is 60%–80% in the late spring, when grafting usually occurs. Your green-house or grafting environment may be different (higher or lower temperature and humidity), and you may need to adjust the exposure times for grafted plants so they are not stressed when introducing them back into the greenhouse environment. The key is to slowly acclimatize the grafted plants without causing permanent wilting, which will lead to plant death.
Place grafted plants in a pre-misted humidity chamber (Figure 11). In the following schedule, Day 1 is the day of grafting.
• Day1.Closeplasticofhealingchamber;coverchamber with black plastic.
• Day2.Keepchamberclosedandcoveredwithblack plastic.
• Day3.Openthechamberandmisttheinside(sidesand top), close the chamber, and fold the black plas-tic up and away from the front of the chamber.
• Day4.Leavethechamberclosed,removeblackplastic from all sides of the chamber, but leave it on the top.
• Day5.Openthechamberfor30minutes,thenmist the inside of the chamber, mist the plants if any wilting occurs, and reclose the chamber. Removetheblackplasticentirely.
• Day6.Openthechamberfor1hour,misttheinside of the chamber, mist the plants if any wilt-ing occurs, and reclose the chamber.
• Day7.Openthechamberfor3hours,misttheinside of the chamber, mist the plants if any wilt-ing occurs, and reclose the chamber.
• Day8.Openthechamberfor6hours,misttheinside of the chamber, mist the plants if any wilt-ing occurs, and reclose the chamber.
• Day9.Removeplantsfromthechamber.
Rootstock (A)
Joined plants (C)
Scion (B)
Figure 9. Side grafting method.
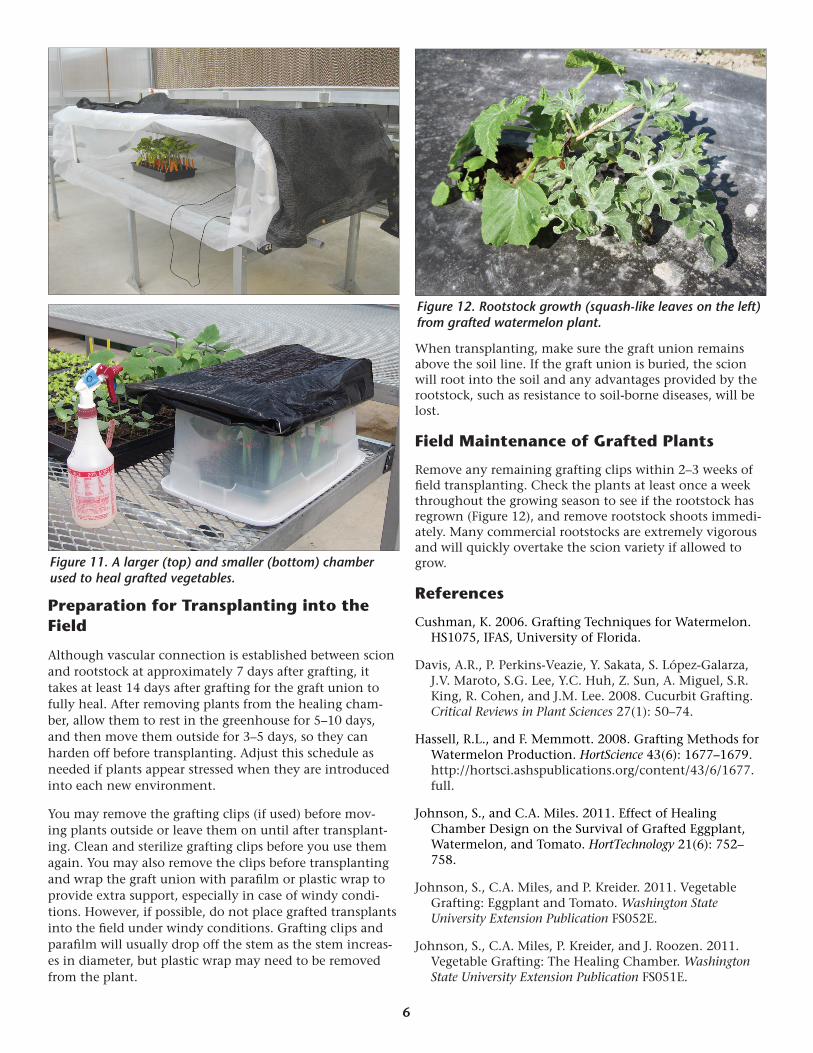
Figure 10. Side grafting method.
6
Preparation for Transplanting into the Field
Although vascular connection is established between scion and rootstock at approximately 7 days after grafting, it takes at least 14 days after grafting for the graft union to fully heal. After removing plants from the healing cham-ber, allow them to rest in the greenhouse for 5–10 days, and then move them outside for 3–5 days, so they can harden off before transplanting. Adjust this schedule as needed if plants appear stressed when they are introduced into each new environment.
You may remove the grafting clips (if used) before mov-ing plants outside or leave them on until after transplant-ing. Clean and sterilize grafting clips before you use them again. You may also remove the clips before transplanting and wrap the graft union with parafilm or plastic wrap to provide extra support, especially in case of windy condi-tions. However, if possible, do not place grafted transplants into the field under windy conditions. Grafting clips and parafilm will usually drop off the stem as the stem increas-es in diameter, but plastic wrap may need to be removed from the plant.
When transplanting, make sure the graft union remains above the soil line. If the graft union is buried, the scion will root into the soil and any advantages provided by the rootstock, such as resistance to soil-borne diseases, will be lost.
Field Maintenance of Grafted Plants
Removeanyremaininggraftingclipswithin2–3weeksoffield transplanting. Check the plants at least once a week throughout the growing season to see if the rootstock has regrown (Figure 12), and remove rootstock shoots immedi-ately. Many commercial rootstocks are extremely vigorous and will quickly overtake the scion variety if allowed to grow.
References
Cushman,K.2006.GraftingTechniquesforWatermelon.HS1075, IFAS, University of Florida.
Davis,A.R.,P.Perkins-Veazie,Y.Sakata,S.López-Galarza, J.V.Maroto,S.G.Lee,Y.C.Huh,Z.Sun,A.Miguel,S.R.King,R.Cohen,andJ.M.Lee.2008.CucurbitGrafting.Critical Reviews in Plant Sciences 27(1): 50–74.
Hassell,R.L.,andF.Memmott.2008.GraftingMethodsforWatermelon Production. HortScience 43(6): 1677–1679. http://hortsci.ashspublications.org/content/43/6/1677.full.
Johnson, S., and C.A. Miles. 2011. Effect of Healing Chamber Design on the Survival of Grafted Eggplant, Watermelon, and Tomato. HortTechnology 21(6): 752–758.
Johnson,S.,C.A.Miles,andP.Kreider.2011.Vegetable Grafting: Eggplant and Tomato. Washington State University Extension Publication FS052E.
Johnson,S.,C.A.Miles,P.Kreider,andJ.Roozen.2011.Vegetable Grafting: The Healing Chamber. Washington State University Extension Publication FS051E.
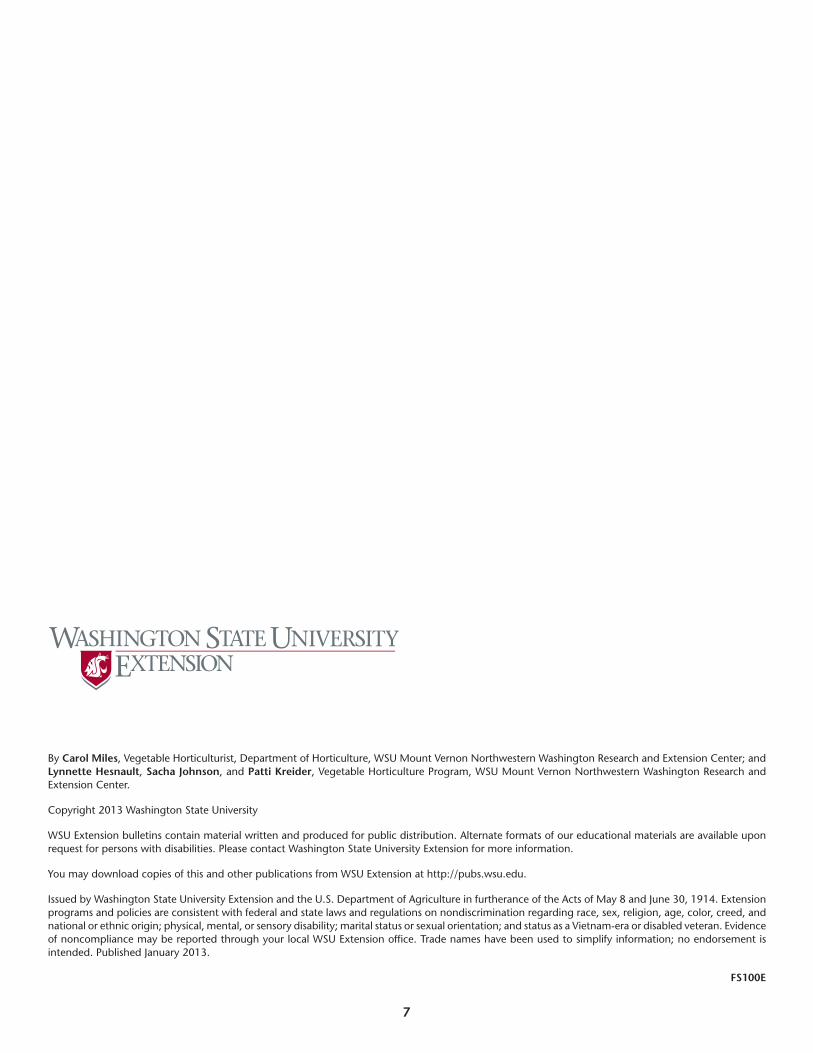
Figure 11. A larger (top) and smaller (bottom) chamber used to heal grafted vegetables.
Figure 12. Rootstock growth (squash-like leaves on the left) from grafted watermelon plant.
7
By Carol Miles, Vegetable Horticulturist, Department of Horticulture, WSU Mount Vernon Northwestern Washington Research and Extension Center; and Lynnette Hesnault, Sacha Johnson, and Patti Kreider, Vegetable Horticulture Program, WSU Mount Vernon Northwestern Washington Research and Extension Center.
Copyright 2013 Washington State University
WSU Extension bulletins contain material written and produced for public distribution. Alternate formats of our educational materials are available upon request for persons with disabilities. Please contact Washington State University Extension for more information.
You may download copies of this and other publications from WSU Extension at http://pubs.wsu.edu.
Issued by Washington State University Extension and the U.S. Department of Agriculture in furtherance of the Acts of May 8 and June 30, 1914. Extension programs and policies are consistent with federal and state laws and regulations on nondiscrimination regarding race, sex, religion, age, color, creed, and national or ethnic origin; physical, mental, or sensory disability; marital status or sexual orientation; and status as a Vietnam-era or disabled veteran. Evidence of noncompliance may be reported through your local WSU Extension office. Trade names have been used to simplify information; no endorsement is intended. Published January 2013.
FS100E


![Valencia Advanced Production System [APS] Rootstock Trial](https://img.pdfslide.us/doc/110x75/62b438cf90c85f32066cb17f/valencia-advanced-production-system-aps-rootstock-trial-.jpg)