Embed Size (px)
Citation preview
Autodesk Vault Professional
Vault Administrator / Manager Manual
Contents Key Terms ......................................................................................................................................... 4
Overview: -Understanding Autodesk Vault ....................................................................................... 5
Vault Architecture ......................................................................................................................... 5
Web Server ................................................................................................................................ 5
Proxy Server .............................................................................................................................. 5
Database Server ........................................................................................................................ 6
File Store ................................................................................................................................... 6
Autodesk Vault Explorer ............................................................................................................ 6
Autodesk Vault Application Integration (Autodesk Vault Add-in) .............................................. 6
Autodesk Vault communication workflow ..................................................................................... 7
Autodesk Vault System Requirement and Deployment Planning: .................................................. 7
System Requirement ................................................................................................................. 7
Factors to consider to plan Autodesk Vault deployment ........................................................... 7
Information Check List .............................................................................................................. 7
Use the Information .................................................................................................................. 8
Autodesk Vault Administration Tasks: .............................................................................................. 9
Manage Vaults and Databases ...................................................................................................... 9
Create a Vault .......................................................................................................................... 10
Attach and Detach Vaults and Databases ................................................................................. 11
Move a Vault ............................................................................................................................ 13
Delete a Vault ........................................................................................................................... 13
Autodesk Vault configuration tasks: ................................................................................................ 14
Users, Groups, and Roles .............................................................................................................. 14
Managing Users ...................................................................................................................... 14
Managing Groups .....................................................................................................................15
Roles and Permissions ..............................................................................................................15
Import and Export Vault Configurations .......................................................................................16
Advanced Vault Server Settings ................................................................................................... 17
Maintenance of Autodesk Vault ...................................................................................................... 20
Server Maintenance: Backing Up Vault ....................................................................................... 20
Back Up Your Vault ................................................................................................................. 20
Develop a Backup Schedule .................................................................................................... 20
Automate Backup Using Microsoft Windows Task Scheduler .................................................. 20
Create Tape Backups ............................................................................................................... 21
Server Maintenance: Restore Vault Data...................................................................................... 21
Restore Vault data from a backup. .......................................................................................... 21
Server Maintenance: Re-index the Server ................................................................................... 22
Server Maintenance: Full Content Indexing ................................................................................. 22
Server Maintenance: Create SQL Maintenance Plan ................................................................... 22
Create a SQL Maintenance Plan for Full SQL ............................................................................... 23
Job Server Administration................................................................................................................ 31
The way It Works .......................................................................................................................... 31
Multi-Site Support for the Job Server ........................................................................................... 31
Enable the Job Server ................................................................................................................... 32
Manage Jobs in the Job Server Queue .......................................................................................... 32
Submit Jobs with Autoloader ....................................................................................................... 33
Submit Jobs Automatically Based on Lifecycle State Change ...................................................... 33
Job Processor Administration ..........................................................................................................34
Configure the Job Processor to Start Automatically ................................................................ 34
Schedule the Job Processor ..................................................................................................... 35
Configure the Job Check Period .............................................................................................. 35
Customize the Job Types List .................................................................................................. 35
Configure the Time Limit for Restarting Jobs .......................................................................... 36
View Job Processor Logs ......................................................................................................... 36
Troubleshooting with Autodesk Vault and related log files ............................................................. 36
Autodesk Vault log files and location .......................................................................................... 36
Vault Server Log Files ............................................................................................................... 37
MSSQL and IIS log files and location ....................................................................................... 38
Performance Tuning ....................................................................................................................... 42
Key Terms: Before fine tuning Autodesk Vault’s performance, Autodesk recommends to know the
following key terms. .................................................................................................................... 42
Fine Tune Autodesk Vault Server Performance ........................................................................... 42
Operating system .................................................................................................................... 42
Server memory........................................................................................................................ 42
Disk performance .................................................................................................................... 45
Aggressive anti-virus programs ............................................................................................... 47
CPU ......................................................................................................................................... 47
Fine Tune Autodesk Vault Client Performance ............................................................................. 47
Customize the View Command ............................................................................................... 47
Memory ................................................................................................................................... 47
Disk Performance .................................................................................................................... 47
References and Additional Resources .............................................................................................. 47
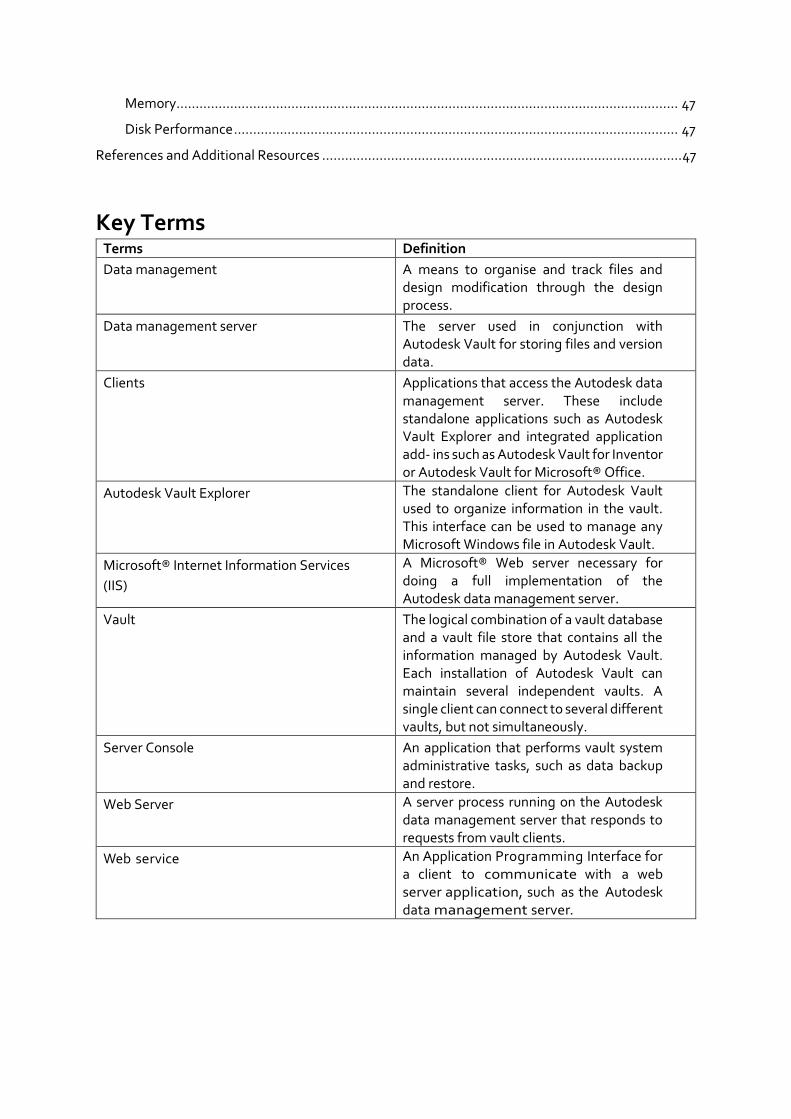
Key Terms Terms Definition
Data management
A means to organise and track files and design modification through the design process.
Data management server The server used in conjunction with Autodesk Vault for storing files and version data.
Clients
Applications that access the Autodesk data management server. These include standalone applications such as Autodesk Vault Explorer and integrated application add- ins such as Autodesk Vault for Inventor or Autodesk Vault for Microsoft® Office.
Autodesk Vault Explorer
The standalone client for Autodesk Vault used to organize information in the vault. This interface can be used to manage any Microsoft Windows file in Autodesk Vault.
Microsoft® Internet Information Services
(IIS)
A Microsoft® Web server necessary for doing a full implementation of the Autodesk data management server.
Vault
The logical combination of a vault database and a vault file store that contains all the information managed by Autodesk Vault. Each installation of Autodesk Vault can maintain several independent vaults. A single client can connect to several different vaults, but not simultaneously.
Server Console
An application that performs vault system administrative tasks, such as data backup and restore.
Web Server
A server process running on the Autodesk data management server that responds to requests from vault clients.
Web service
An Application Programming Interface for a client to communicate with a web server application, such as the Autodesk data management server.

Overview: -Understanding Autodesk Vault
Vault Architecture Three primary components make up the Vault server; a web server, a database, and a file store.
The following figure illustrates the basic configuration of the components.
For Multisite and Replication Scenario, please see the below link for detailed understanding as
required. Multisite: Link Connected Workgroup: Link
Web Server Autodesk Data Management server requires Windows Internet Information Server (IIS) to be installed.
The Autodesk Vault server is actually a Web application that uses services to manage the
communication between the clients and the server with Web services. The interaction between
the clients and the server resembles the way a web browser communicates with a site on the
Internet. The Web services use standard HTTP methods, communicating over the Web server
port 80 by default.
NOTE: the original Microsoft® Windows® installation media might be necessary to complete
the IIS installation.
Proxy Server
A proxy server forwards requests of client computers to other servers. Some networks force all client computers to use a proxy server for all web service requests.

If your network uses a proxy server, you can configure it to use a host name or bypass the proxy server of your host clients.
Note: For more information about configuring a proxy server, see Configure Vault to Use a Proxy
Server.
Database Server
The database server tracks all the relationships between data. It acts like a library card catalogue,
containing indexes and pointers of where to find related information. By default, the Autodesk
data management server installs Microsoft® SQL Server Version (xxxx) Express. Microsoft SQL
Server Express can be upgraded any time after the Autodesk data management server
components are installed. The SQL server can be upgraded to Standard, Enterprise based on
requirement.
File Store
The file store and the database server work with each other. The database provides the index
information for the location of files. The file store is the secure location on the server where the
files are located.
Autodesk Vault Explorer
Vault Explorer is a standalone client application that allows you to browse the vault structure, perform searches, access stored files, and manipulate the data in the vault; it is your ‘window into the vault’. Vault Explorer is organized like Windows Explorer or Microsoft Outlook; it has a folder tree on the left and a list of associated files on the right. User name and password for accessibility, your data is safe from unauthorized access – thereby preventing unwanted change.
Autodesk Vault Application Integration (Autodesk Vault Add-in)
Most other integrations fall into this category. These are specialized integrations within a parent
application, such as Autodesk Vault for Autodesk Inventor® software, Autodesk Vault for
AutoCAD® software, Autodesk Vault for Microsoft® Office, and Autodesk Vault for Plant3D®
and so on. These clients provide two things:
• Direct access to the vault via the application
• More data knowledge to the vault when interacting with the vault server
A vault add-in is a piece of client software that plugs into your existing applications in order to extend its capabilities to support vault operations and workflows. These are tight integrations that allow you to interact with the vault while continuing to work in the context of the applications that you use every day.
Autodesk Vault communication workflow As the previous diagrams have shown, each component can be configured to run on its own
server. When configuring a server for each component, refer to the following workflow.
1. Client checks out a file.
2. Client sends a request for the file to the Vault server.
3. Vault server sends a query to the database.
4. Vault server copies the files from the file store to the client.
Note: It is important to notice the client computer does not directly communicate with another
client computer at any time.
Autodesk Vault System Requirement and Deployment Planning:
System Requirement
The information in this below link addresses the installation, system, hardware, and server
requirements for installing Autodesk Vault Basic, Workgroup, and Professional 2017. Based on
the version to be installed or upgraded, the latest link from Autodesk needs to be followed.
https://knowledge.autodesk.com/support/vault-products/getting-
started/caas/CloudHelp/cloudhelp/2017/ENU/Vault-Install/files/GUID-B64117E4-FA07-4145-
8B5F-86973B13EB11-htm.html?v=2017
Factors to consider to plan Autodesk Vault deployment
A Vault implementation can be as simple as installing all components on a single computer, or as
complex as installing components on several computers in different locations. The more complex
the Implementation, the more information there is to consider. This section provides an outline
of information to consider to make the best decisions for Autodesk Vault Implementation.
Information Check List
When Implementing Vault, please consider:
1. Number of users.
2. The number of servers
3. The hardware specifications for all the servers.
4. The Operating Systems for all servers.
5. All firewalls installed on servers.
6. List of other applications running on all servers.
7. The version of Microsoft® SQL is going to be used.
8. Frequency of users’ access information in Autodesk Vault?
9. The latency between all servers.
Use the Information
Every Vault implementation is unique; the following sections provides guidance to determine the
best configuration as per need.
Number of Users
Knowing the figure of users prevents access problems and slow response times. For example, if
you have more than ten concurrent users, use Windows® Server 2012 or latest version. For more
than 25 users, please consider upgrading to the full standard edition or enterprise edition of SQL.
Microsoft SQL express allows only 25 concurrent connections. When implementing Vault for a
single user, you can load all the components on a single computer.
Number of Servers
When determining the number of servers keep in mind Autodesk Vault communication workflow-from the client computer to the Vault server to the SQL server and back.
Server Hardware Specifications
Please see the system requirement link.
Server Operating Systems
Please see the system requirement link.
Microsoft SQL Version
Please see the system requirement link.
Firewalls
Firewalls can block incoming requests. During the Vault Server installation, the server is checked
for known firewalls. Firewalls can require that you configure them to allow the Vault Server to
communicate correctly. Some system protection software can include firewalls. Check these
tools for the existence of firewalls.
Applications on Servers
Autodesk Vault can be processor intensive. Loading the Vault Server on a server with other
processor intensive applications can cause Autodesk Vault to run slower than expected.
Access Frequency
Frequency that Autodesk Vault Server is accessed affects the server performance. For example,
a Vault implementation with 50 users and one or two users checking out one or two files a day
does not tax the server a lot. Using the same configuration with 35 of users accessing Autodesk
vault every 10 minutes, Server performance shall differ, running at the non-recommended
requirements.
Network Speed
All though network speed is commonly equated to latency, you also need to consider bandwidth
and throughput. Network speed is an important factor to consider, when trying to get the best
performance for your Vault implementation. Without running tests to measure your latency,
bandwidth, and throughput between all the servers, you can’t gain an idea of the connections.
Copy a few large files from one server to another. When performing this test, copy from Server
A to Server B and then copy from server B to Server A. Data traveling from one server to another
does not always take the same route when traveling back.

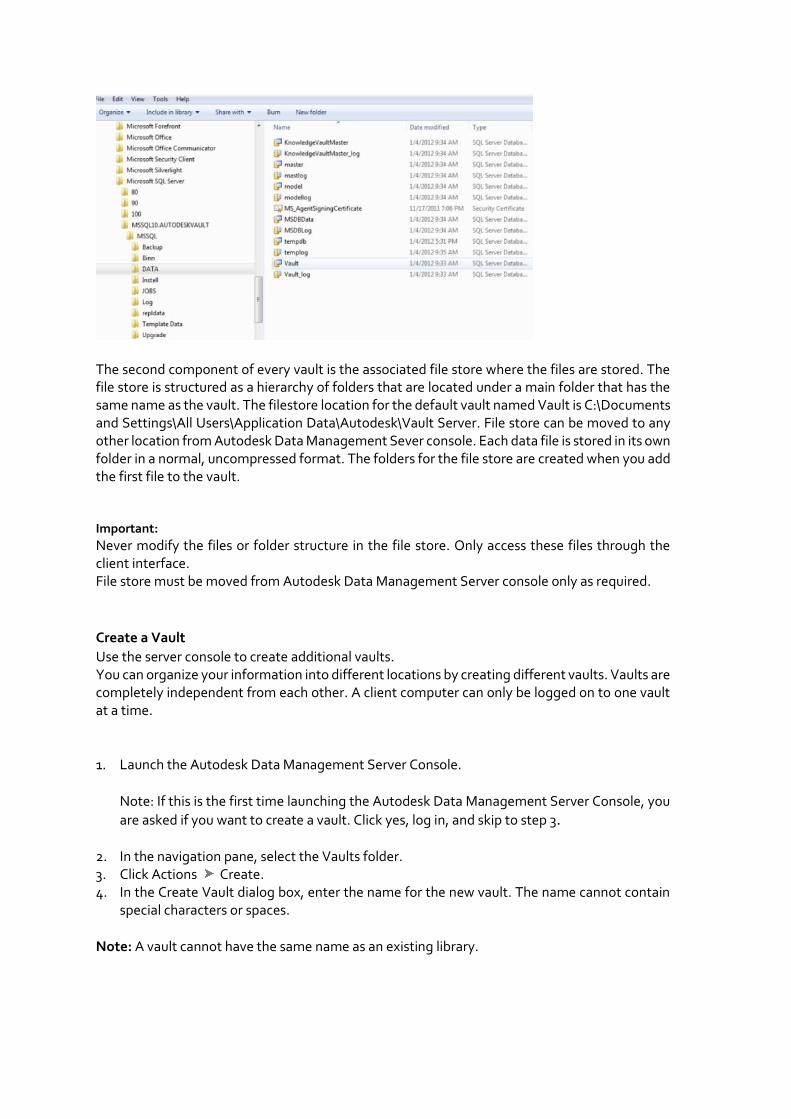
Autodesk Vault Administration Tasks: Manage Vaults and Databases This sections provides the information the way vaults and databases work. When you install the Autodesk Vault server, a single vault named Vault is created. The database files for the vault are created in the MSSQL$AUTODESKVAULT\Data folder under the Microsoft SQL Server installation folder.
Several of the databases located in the Data folder are used by Microsoft SQL Server while others
are specific to the vault. Each database file (MDF) has an associated log file (LDF) that contains
important transaction data and must be moved, backed up, and restored along with the database
file.
• KnowledgeVaultMaster.mdf is the master vault database and it maintains the list of users, user permissions, and a list of vaults and their corresponding file store location.
• Vault.mdf is the database for the vault named Vault. Each vault also has a SQL Server log file associated with it called VaultName.ldf.
Note: Important: Never modify information in the SQL database.
Below is the picture of database files under MSSQL$AUTODESKVAULT\ Data folder
The second component of every vault is the associated file store where the files are stored. The file store is structured as a hierarchy of folders that are located under a main folder that has the same name as the vault. The filestore location for the default vault named Vault is C:\Documents and Settings\All Users\Application Data\Autodesk\Vault Server. File store can be moved to any other location from Autodesk Data Management Sever console. Each data file is stored in its own folder in a normal, uncompressed format. The folders for the file store are created when you add the first file to the vault.
Important:
Never modify the files or folder structure in the file store. Only access these files through the client interface. File store must be moved from Autodesk Data Management Server console only as required.
Create a Vault
Use the server console to create additional vaults. You can organize your information into different locations by creating different vaults. Vaults are completely independent from each other. A client computer can only be logged on to one vault at a time.
1. Launch the Autodesk Data Management Server Console.
Note: If this is the first time launching the Autodesk Data Management Server Console, you
are asked if you want to create a vault. Click yes, log in, and skip to step 3.
2. In the navigation pane, select the Vaults folder. 3. Click Actions Create. 4. In the Create Vault dialog box, enter the name for the new vault. The name cannot contain
special characters or spaces.
Note: A vault cannot have the same name as an existing library.
5. The file store can be located in a default location, or a new location can be specified. Click OK to create the new vault with the default file store location, or click Select File Store Location to specify a new location, and then click OK.
Note: The file store is where the vault database stores the actual files that are in the vault server. The location can be local or remote. If you want to specify a location on another computer, use UNC path naming conventions. For example: \\SERVER\SHARE\Vault.
6. If you want to accept the Default Vault configuration, click OK to create the Vault.
Otherwise, select Use Configuration and choose one of the following configuration templates for your vault:
o Building–Creates a vault with inherent properties for Architectural, Engineering, and
Construction (AEC) design workflows.
o Infrastructure–Creates a vault with inherent properties for Engineering, Natural Resources, and Infrastructure (ENI) design workflows.
o Manufacturing–Creates a vault with inherent properties for Manufacturing (MFG) design workflows.
Note:
To use Autodesk Vault with Plant3D, Infrastructure configuration template is recommended.
The Civil 3D template is included with all three industry templates.
7. Click OK to finish creating the vault.
Attach and Detach Vaults and Databases
Attaching reconnects a vault that was from a different server or from the same server but moved to another physical location on the disk.
When attaching a vault in a multi-site environment, the vault is disabled for all other sites by default. All other sites must enable the attached vault.
Note: When the master vault is attached, you must add the users to the vault so they can access it.
Basic Vault Attachment
If the vault data file (.mdf) and the associated log file are both located in the SQL data folder, use these steps to attach the vault:
1. Launch the Autodesk Data Management Server Console. 2. In the navigation pane, select the Vaults folder. 3. Select Actions Attach. 4. In the Attach Vault dialog, select the Basic tab.
5. Specify the data file to attach from the list of Available Data Files. The Available Data Files list is compiled from the .mdf files in the SQL data folder. If the desired data file is not listed, go to the advanced tab and specify the directory.
6. Enter the name of the file store or click the browse button to browse to the location of the file store.
7. Enter the name of the vault. 8. Click OK.
Advanced Vault Attachment
If the vault data file and the log file are not in the SQL data folder, use these steps to attach the vault:
1. Launch the Autodesk Data Management Server Console. 2. In the navigation pane, select the Vaults folder. 3. Select Actions Attach. 4. In the Attach Vault dialog, select the advanced tab. 5. Enter the name of the data file to attach in the Data File field or click the browse button to
browse the server for the data file (.mdf). 6. Enter the name of the transaction log file associated with the data file in the Log File field or
click the browse button to browse the server for the transaction log file (.ldf). 7. Enter the name of the file store in the File Store field or click the browse button to browse to
the location of the file store. 8. Enter the name of the vault in the Vault Name field. 9. Click OK.
Detaching a vault disconnects it from the server so it can be moved to another location.
Before detaching the master vault database, you must detach all other databases. The vault and its log file are detached. The names of the files for a vault named "Vault" are:
• Vault.mdf • Vault_log.ldf
These files must exist as a pair and cannot be renamed. The default location for these files is:
C:\Program Files\Microsoft SQL Server\MSSQL.1\MSSQL\Data
Detaching a vault removes all permissions to the vault. Once the vault is re-attached, permissions for each user and group must be reassigned. In a multi-site environment, the file store path is deleted for all other sites. If the vault is re-attached, the file store path must be reassigned at each site.
1. In the navigation pane, open the Vaults folder and then select a vault to detach. 2. Select Actions Detach. 3. You are prompted to confirm your actions. Click OK.
The vault and its log file are detached.
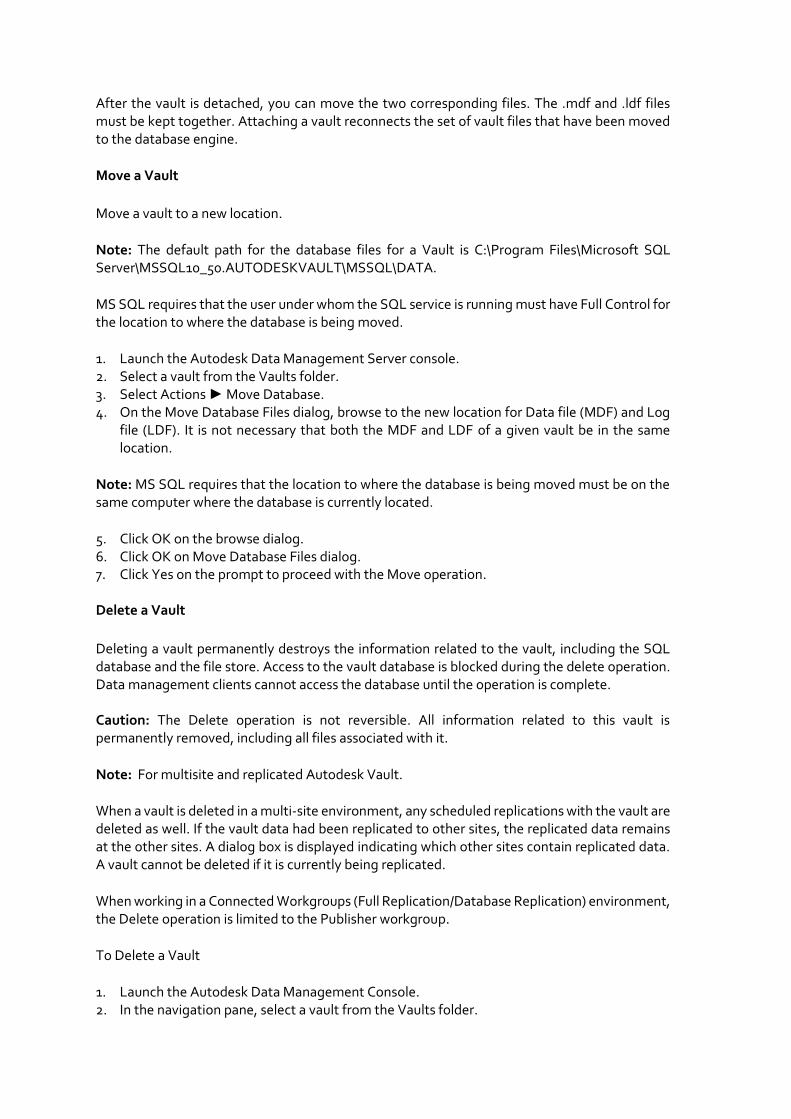
After the vault is detached, you can move the two corresponding files. The .mdf and .ldf files must be kept together. Attaching a vault reconnects the set of vault files that have been moved to the database engine.
Move a Vault
Move a vault to a new location.
Note: The default path for the database files for a Vault is C:\Program Files\Microsoft SQL Server\MSSQL10_50.AUTODESKVAULT\MSSQL\DATA.
MS SQL requires that the user under whom the SQL service is running must have Full Control for the location to where the database is being moved.
1. Launch the Autodesk Data Management Server console. 2. Select a vault from the Vaults folder. 3. Select Actions ► Move Database. 4. On the Move Database Files dialog, browse to the new location for Data file (MDF) and Log
file (LDF). It is not necessary that both the MDF and LDF of a given vault be in the same location.
Note: MS SQL requires that the location to where the database is being moved must be on the same computer where the database is currently located.
5. Click OK on the browse dialog. 6. Click OK on Move Database Files dialog. 7. Click Yes on the prompt to proceed with the Move operation. Delete a Vault
Deleting a vault permanently destroys the information related to the vault, including the SQL database and the file store. Access to the vault database is blocked during the delete operation. Data management clients cannot access the database until the operation is complete. Caution: The Delete operation is not reversible. All information related to this vault is permanently removed, including all files associated with it.
Note: For multisite and replicated Autodesk Vault.
When a vault is deleted in a multi-site environment, any scheduled replications with the vault are deleted as well. If the vault data had been replicated to other sites, the replicated data remains at the other sites. A dialog box is displayed indicating which other sites contain replicated data. A vault cannot be deleted if it is currently being replicated.
When working in a Connected Workgroups (Full Replication/Database Replication) environment, the Delete operation is limited to the Publisher workgroup.
To Delete a Vault
1. Launch the Autodesk Data Management Console. 2. In the navigation pane, select a vault from the Vaults folder.
3. Select Actions Delete. 4. Click Yes to confirm your actions.
The vault is deleted and all information related to the vault is permanently removed.
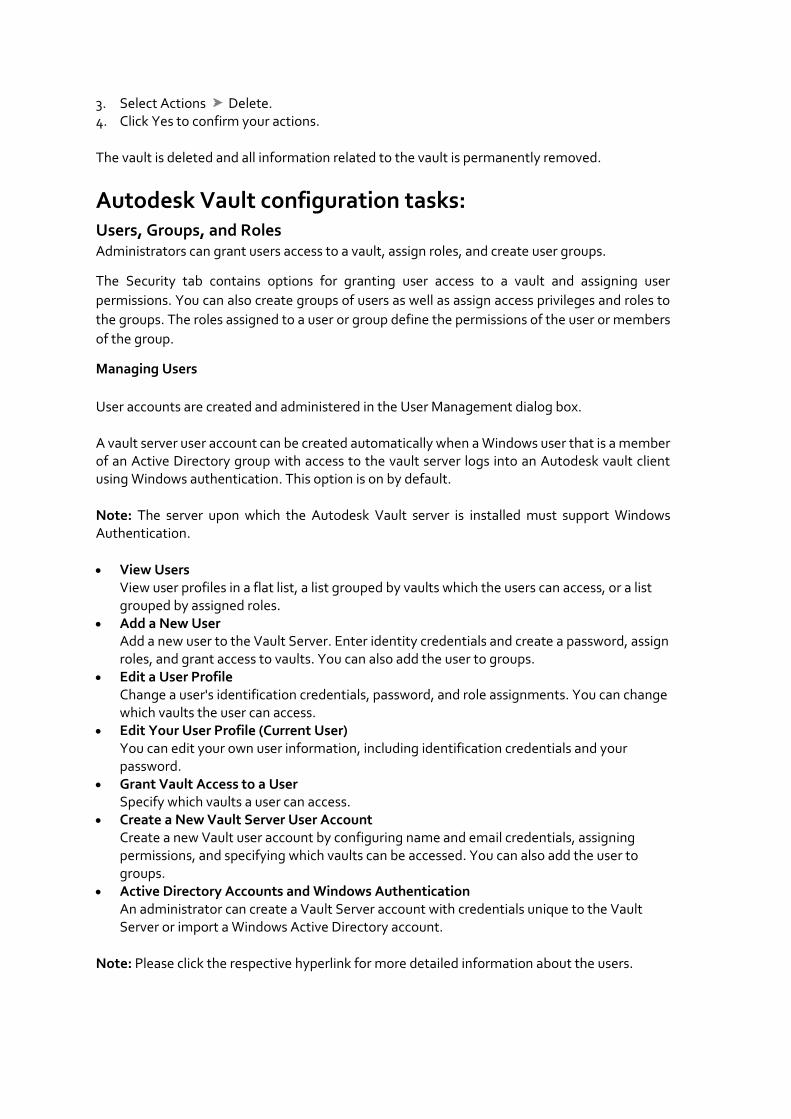
Autodesk Vault configuration tasks: Users, Groups, and Roles
Administrators can grant users access to a vault, assign roles, and create user groups.
The Security tab contains options for granting user access to a vault and assigning user
permissions. You can also create groups of users as well as assign access privileges and roles to
the groups. The roles assigned to a user or group define the permissions of the user or members
of the group.
Managing Users
User accounts are created and administered in the User Management dialog box.
A vault server user account can be created automatically when a Windows user that is a member of an Active Directory group with access to the vault server logs into an Autodesk vault client using Windows authentication. This option is on by default.
Note: The server upon which the Autodesk Vault server is installed must support Windows Authentication.
• View Users View user profiles in a flat list, a list grouped by vaults which the users can access, or a list grouped by assigned roles.
• Add a New User Add a new user to the Vault Server. Enter identity credentials and create a password, assign roles, and grant access to vaults. You can also add the user to groups.
• Edit a User Profile Change a user's identification credentials, password, and role assignments. You can change which vaults the user can access.
• Edit Your User Profile (Current User) You can edit your own user information, including identification credentials and your password.
• Grant Vault Access to a User Specify which vaults a user can access.
• Create a New Vault Server User Account Create a new Vault user account by configuring name and email credentials, assigning permissions, and specifying which vaults can be accessed. You can also add the user to groups.
• Active Directory Accounts and Windows Authentication An administrator can create a Vault Server account with credentials unique to the Vault Server or import a Windows Active Directory account.
Note: Please click the respective hyperlink for more detailed information about the users.
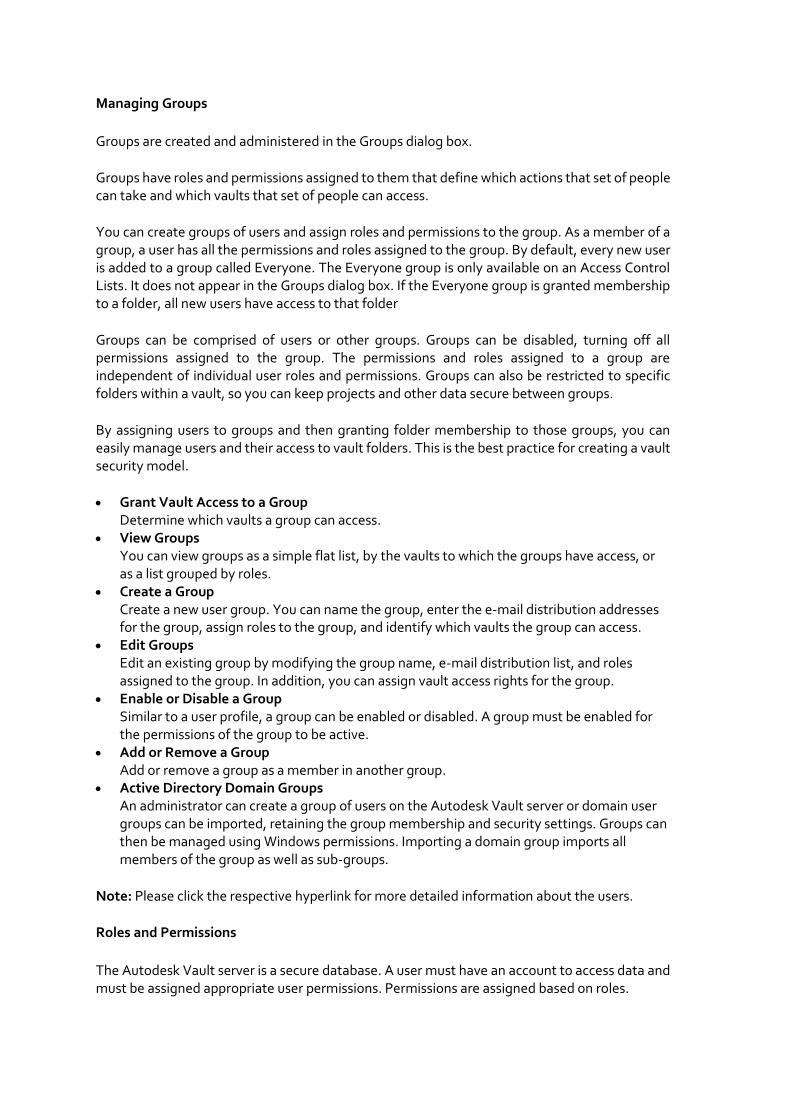
Managing Groups
Groups are created and administered in the Groups dialog box.
Groups have roles and permissions assigned to them that define which actions that set of people can take and which vaults that set of people can access.
You can create groups of users and assign roles and permissions to the group. As a member of a group, a user has all the permissions and roles assigned to the group. By default, every new user is added to a group called Everyone. The Everyone group is only available on an Access Control Lists. It does not appear in the Groups dialog box. If the Everyone group is granted membership to a folder, all new users have access to that folder
Groups can be comprised of users or other groups. Groups can be disabled, turning off all permissions assigned to the group. The permissions and roles assigned to a group are independent of individual user roles and permissions. Groups can also be restricted to specific folders within a vault, so you can keep projects and other data secure between groups.
By assigning users to groups and then granting folder membership to those groups, you can easily manage users and their access to vault folders. This is the best practice for creating a vault security model.
• Grant Vault Access to a Group Determine which vaults a group can access.
• View Groups You can view groups as a simple flat list, by the vaults to which the groups have access, or as a list grouped by roles.
• Create a Group Create a new user group. You can name the group, enter the e-mail distribution addresses for the group, assign roles to the group, and identify which vaults the group can access.
• Edit Groups Edit an existing group by modifying the group name, e-mail distribution list, and roles assigned to the group. In addition, you can assign vault access rights for the group.
• Enable or Disable a Group Similar to a user profile, a group can be enabled or disabled. A group must be enabled for the permissions of the group to be active.
• Add or Remove a Group Add or remove a group as a member in another group.
• Active Directory Domain Groups An administrator can create a group of users on the Autodesk Vault server or domain user groups can be imported, retaining the group membership and security settings. Groups can then be managed using Windows permissions. Importing a domain group imports all members of the group as well as sub-groups.
Note: Please click the respective hyperlink for more detailed information about the users.
Roles and Permissions
The Autodesk Vault server is a secure database. A user must have an account to access data and must be assigned appropriate user permissions. Permissions are assigned based on roles.
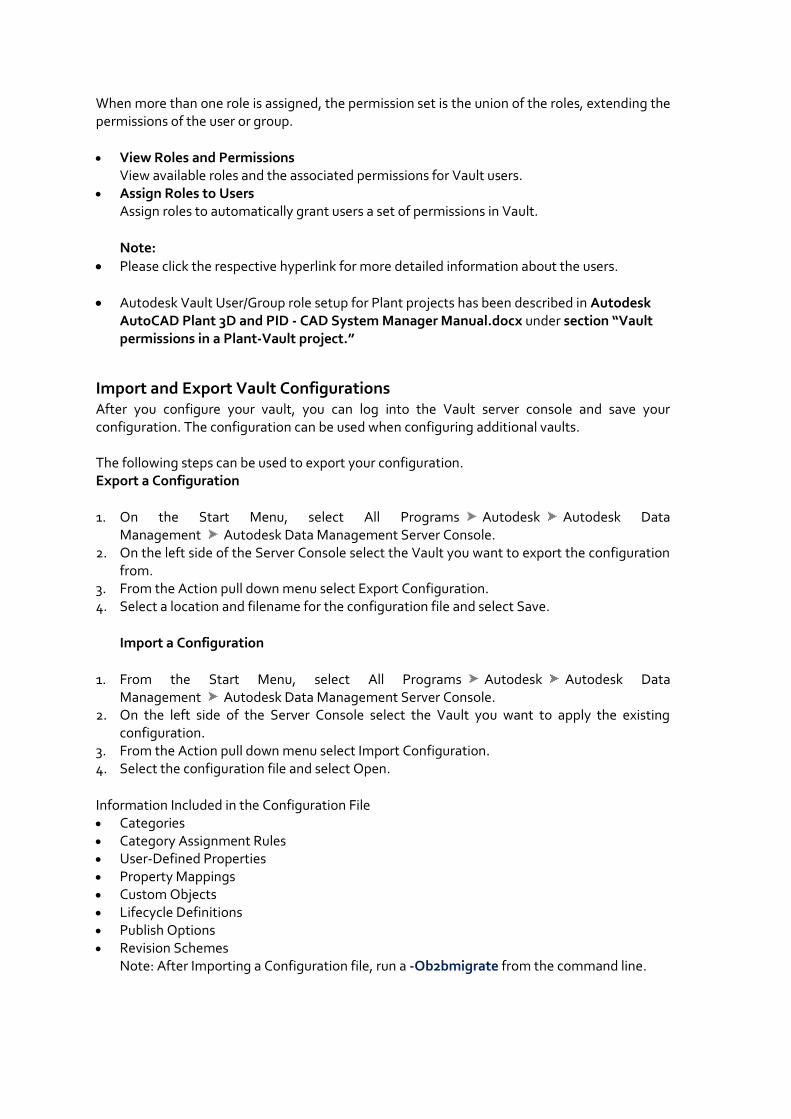
When more than one role is assigned, the permission set is the union of the roles, extending the permissions of the user or group.
• View Roles and Permissions View available roles and the associated permissions for Vault users.
• Assign Roles to Users Assign roles to automatically grant users a set of permissions in Vault.
Note:
• Please click the respective hyperlink for more detailed information about the users.
• Autodesk Vault User/Group role setup for Plant projects has been described in Autodesk AutoCAD Plant 3D and PID - CAD System Manager Manual.docx under section “Vault permissions in a Plant-Vault project.”
Import and Export Vault Configurations After you configure your vault, you can log into the Vault server console and save your configuration. The configuration can be used when configuring additional vaults. The following steps can be used to export your configuration. Export a Configuration
1. On the Start Menu, select All Programs Autodesk Autodesk Data Management Autodesk Data Management Server Console.
2. On the left side of the Server Console select the Vault you want to export the configuration from.
3. From the Action pull down menu select Export Configuration. 4. Select a location and filename for the configuration file and select Save.
Import a Configuration
1. From the Start Menu, select All Programs Autodesk Autodesk Data Management Autodesk Data Management Server Console.
2. On the left side of the Server Console select the Vault you want to apply the existing configuration.
3. From the Action pull down menu select Import Configuration. 4. Select the configuration file and select Open.
Information Included in the Configuration File • Categories • Category Assignment Rules • User-Defined Properties • Property Mappings • Custom Objects • Lifecycle Definitions • Publish Options • Revision Schemes
Note: After Importing a Configuration file, run a -Ob2bmigrate from the command line.

Example: Connectivity.ADMSConsole.exe -Ob2bmigrate -VUadministrator -
VP(adminPassword) -DBUsa -DBP(saPassword)
Note: Folder Category: “PlantProject” and File Category: “PlantProjectFile” is created on first Plant Project creation. It is recommended not to setup category manually as it is hardcoded and overrides any assignment rule.
But in a case you have done additional configurations in a particular Vault and want the same configuration for the new Vault-Export and Import configuration file may be useful and quick.
Advanced Vault Server Settings You can fine tune your Vault Server performance and configure additional server settings, such
as number of rows displayed on a page, Connection timeout threshold, on the Administration
tab of the Global Settings dialog in the Autodesk Data Management Server Console.
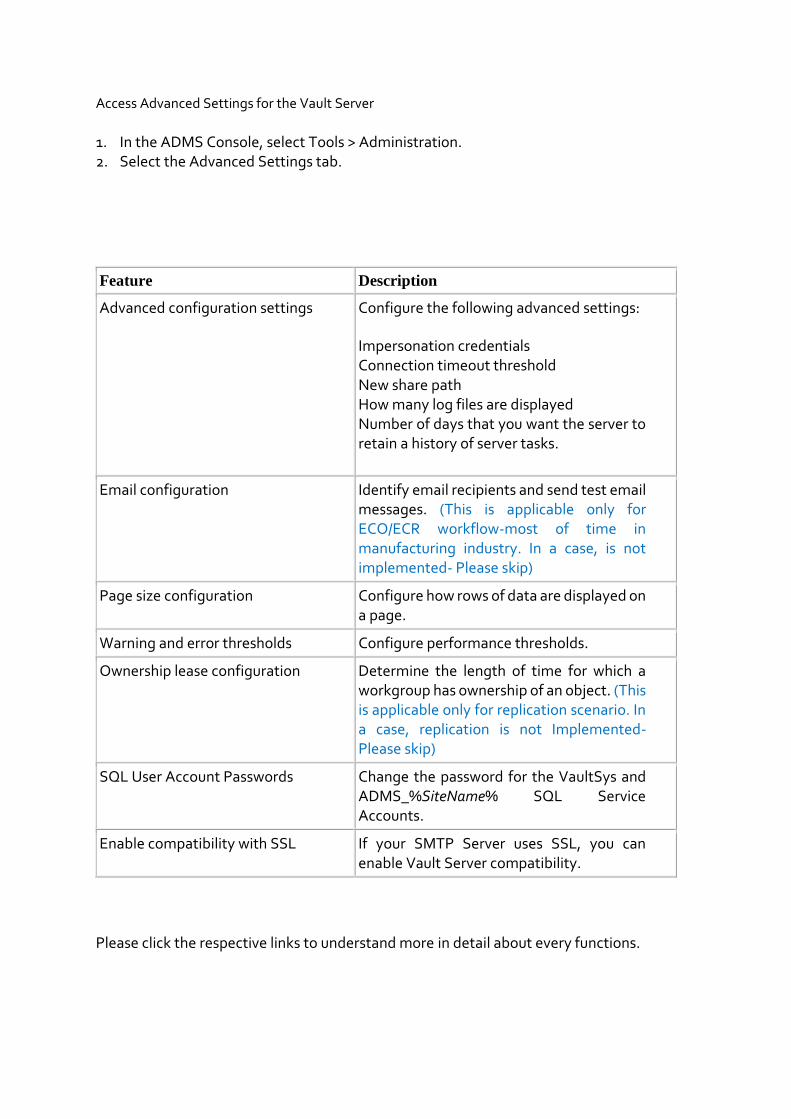
Access Advanced Settings for the Vault Server
1. In the ADMS Console, select Tools > Administration. 2. Select the Advanced Settings tab.
Feature Description
Advanced configuration settings Configure the following advanced settings:
• Impersonation credentials • Connection timeout threshold • New share path • How many log files are displayed • Number of days that you want the server to
retain a history of server tasks.
Email configuration Identify email recipients and send test email messages. (This is applicable only for ECO/ECR workflow-most of time in manufacturing industry. In a case, is not implemented- Please skip)
Page size configuration Configure how rows of data are displayed on a page.
Warning and error thresholds Configure performance thresholds.
Ownership lease configuration Determine the length of time for which a workgroup has ownership of an object. (This is applicable only for replication scenario. In a case, replication is not Implemented-Please skip)
SQL User Account Passwords Change the password for the VaultSys and ADMS_%SiteName% SQL Service Accounts.
Enable compatibility with SSL If your SMTP Server uses SSL, you can enable Vault Server compatibility.
Please click the respective links to understand more in detail about every functions.
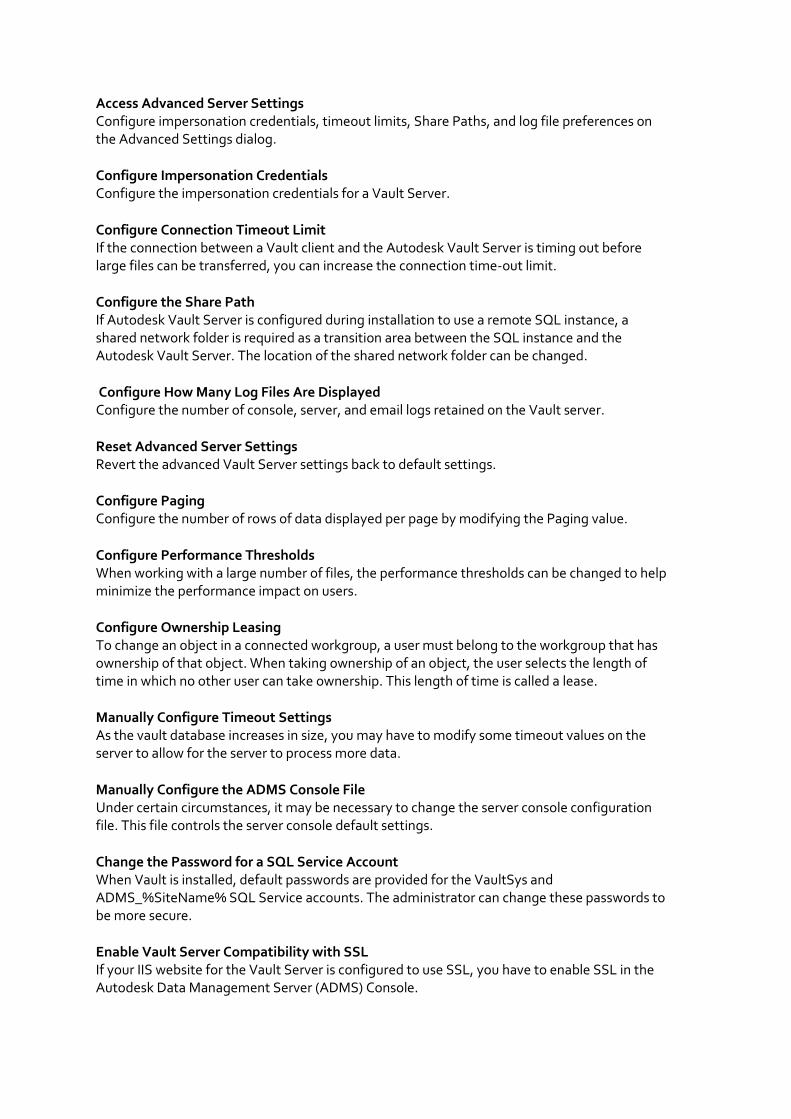
Access Advanced Server Settings Configure impersonation credentials, timeout limits, Share Paths, and log file preferences on the Advanced Settings dialog.
Configure Impersonation Credentials Configure the impersonation credentials for a Vault Server.
Configure Connection Timeout Limit If the connection between a Vault client and the Autodesk Vault Server is timing out before large files can be transferred, you can increase the connection time-out limit.
Configure the Share Path If Autodesk Vault Server is configured during installation to use a remote SQL instance, a shared network folder is required as a transition area between the SQL instance and the Autodesk Vault Server. The location of the shared network folder can be changed.
Configure How Many Log Files Are Displayed Configure the number of console, server, and email logs retained on the Vault server.
Reset Advanced Server Settings Revert the advanced Vault Server settings back to default settings.
Configure Paging Configure the number of rows of data displayed per page by modifying the Paging value.
Configure Performance Thresholds When working with a large number of files, the performance thresholds can be changed to help minimize the performance impact on users.
Configure Ownership Leasing To change an object in a connected workgroup, a user must belong to the workgroup that has ownership of that object. When taking ownership of an object, the user selects the length of time in which no other user can take ownership. This length of time is called a lease.
Manually Configure Timeout Settings As the vault database increases in size, you may have to modify some timeout values on the server to allow for the server to process more data.
Manually Configure the ADMS Console File Under certain circumstances, it may be necessary to change the server console configuration file. This file controls the server console default settings.
Change the Password for a SQL Service Account When Vault is installed, default passwords are provided for the VaultSys and ADMS_%SiteName% SQL Service accounts. The administrator can change these passwords to be more secure.
Enable Vault Server Compatibility with SSL If your IIS website for the Vault Server is configured to use SSL, you have to enable SSL in the Autodesk Data Management Server (ADMS) Console.
Maintenance of Autodesk Vault
Server Maintenance: Backing Up Vault
Backing up vault data is essential. Autodesk recommends that you back up your Vault using the following methods.
Back Up Your Vault
Use the supplied backup-restore utility to back up your Vault data.
Use the server console to back up all data necessary to restore a server if a failure occurs. When you back up the server, all users are blocked from accessing the system. In addition, server console backs up or restores all vaults on the server. There is no way to select individual vaults to back up or restore.
Develop a Backup Schedule
The next step is to automate the process. Two common methods are:
• Use the Windows Task Scheduler. This process uses the backup tools included with the server console as part of a standard Windows batch file.
• Include the backup as part of a tape backup set. This process uses a tape backup system to back up the vault directly or to use a method like the Windows Task Scheduler.
With the server console command line options, you can create a script to automate the backup process. The following script is intended for a default Autodesk Vault server installation. Edit the backup paths and installation paths as needed.
The preferred and most reliable method for backing up a vault is to integrate the server console backup tools into your tape backup plan.
Note: The following script is for performing full backups ONLY. For more command line options or to create a script for performing incremental backups, see the data management server console Help.
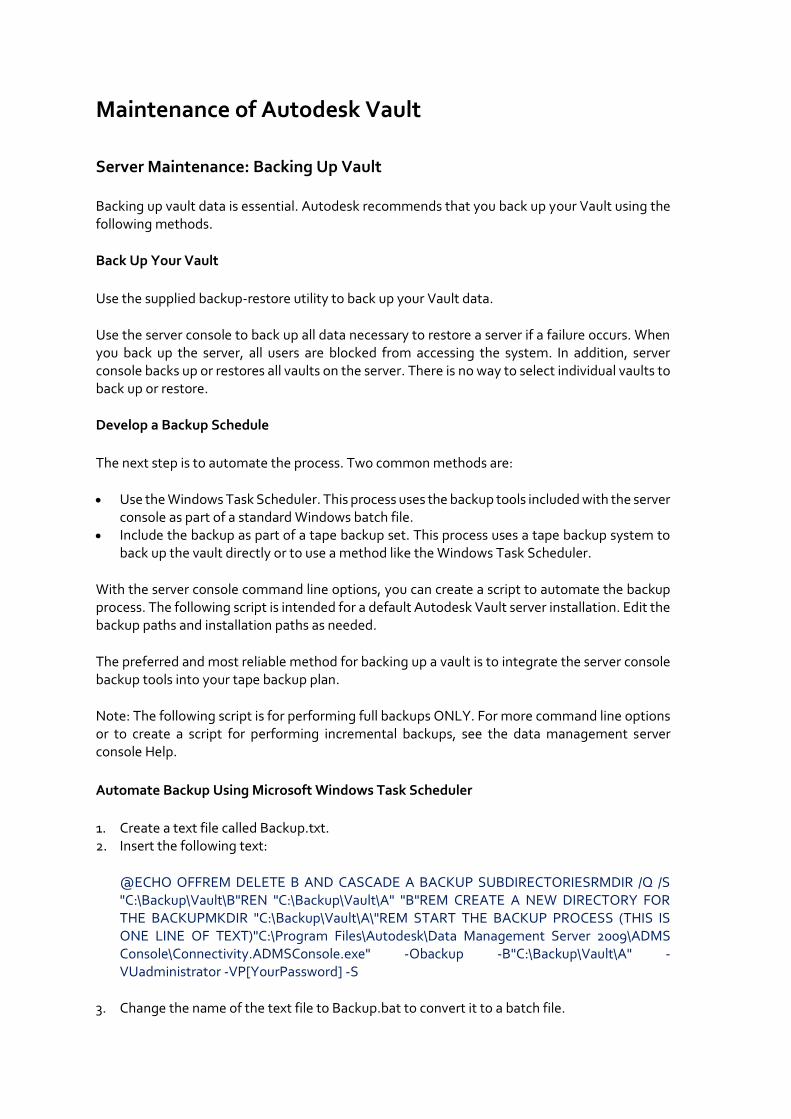
Automate Backup Using Microsoft Windows Task Scheduler
1. Create a text file called Backup.txt. 2. Insert the following text:
@ECHO OFFREM DELETE B AND CASCADE A BACKUP SUBDIRECTORIESRMDIR /Q /S "C:\Backup\Vault\B"REN "C:\Backup\Vault\A" "B"REM CREATE A NEW DIRECTORY FOR THE BACKUPMKDIR "C:\Backup\Vault\A\"REM START THE BACKUP PROCESS (THIS IS ONE LINE OF TEXT)"C:\Program Files\Autodesk\Data Management Server 2009\ADMS Console\Connectivity.ADMSConsole.exe" -Obackup -B"C:\Backup\Vault\A" -VUadministrator -VP[YourPassword] -S
3. Change the name of the text file to Backup.bat to convert it to a batch file.
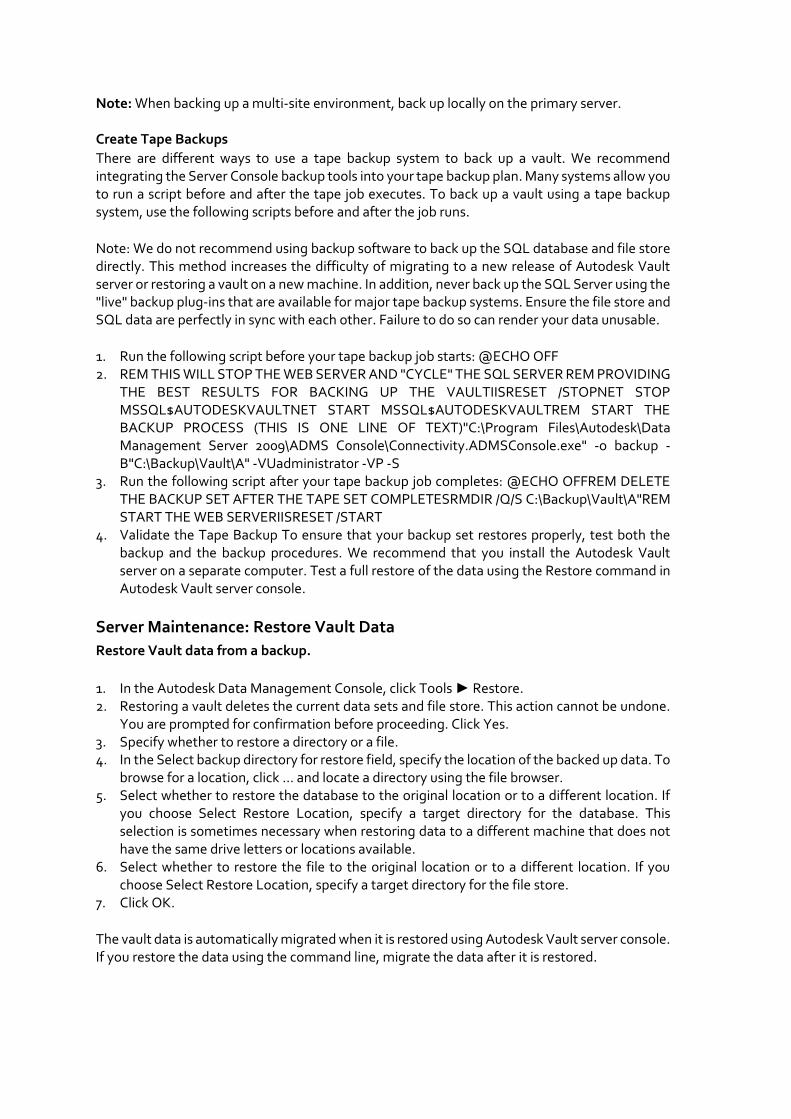
Note: When backing up a multi-site environment, back up locally on the primary server. Create Tape Backups
There are different ways to use a tape backup system to back up a vault. We recommend integrating the Server Console backup tools into your tape backup plan. Many systems allow you to run a script before and after the tape job executes. To back up a vault using a tape backup system, use the following scripts before and after the job runs.
Note: We do not recommend using backup software to back up the SQL database and file store directly. This method increases the difficulty of migrating to a new release of Autodesk Vault server or restoring a vault on a new machine. In addition, never back up the SQL Server using the "live" backup plug-ins that are available for major tape backup systems. Ensure the file store and SQL data are perfectly in sync with each other. Failure to do so can render your data unusable.
1. Run the following script before your tape backup job starts: @ECHO OFF 2. REM THIS WILL STOP THE WEB SERVER AND "CYCLE" THE SQL SERVER REM PROVIDING
THE BEST RESULTS FOR BACKING UP THE VAULTIISRESET /STOPNET STOP MSSQL$AUTODESKVAULTNET START MSSQL$AUTODESKVAULTREM START THE BACKUP PROCESS (THIS IS ONE LINE OF TEXT)"C:\Program Files\Autodesk\Data Management Server 2009\ADMS Console\Connectivity.ADMSConsole.exe" -o backup -B"C:\Backup\Vault\A" -VUadministrator -VP -S
3. Run the following script after your tape backup job completes: @ECHO OFFREM DELETE THE BACKUP SET AFTER THE TAPE SET COMPLETESRMDIR /Q/S C:\Backup\Vault\A"REM START THE WEB SERVERIISRESET /START
4. Validate the Tape Backup To ensure that your backup set restores properly, test both the backup and the backup procedures. We recommend that you install the Autodesk Vault server on a separate computer. Test a full restore of the data using the Restore command in Autodesk Vault server console.
Server Maintenance: Restore Vault Data
Restore Vault data from a backup.
1. In the Autodesk Data Management Console, click Tools ► Restore. 2. Restoring a vault deletes the current data sets and file store. This action cannot be undone.
You are prompted for confirmation before proceeding. Click Yes. 3. Specify whether to restore a directory or a file. 4. In the Select backup directory for restore field, specify the location of the backed up data. To
browse for a location, click ... and locate a directory using the file browser. 5. Select whether to restore the database to the original location or to a different location. If
you choose Select Restore Location, specify a target directory for the database. This selection is sometimes necessary when restoring data to a different machine that does not have the same drive letters or locations available.
6. Select whether to restore the file to the original location or to a different location. If you choose Select Restore Location, specify a target directory for the file store.
7. Click OK.
The vault data is automatically migrated when it is restored using Autodesk Vault server console. If you restore the data using the command line, migrate the data after it is restored.
Server Maintenance: Re-index the Server
Re-indexing the server extracts the properties from all the files in the vault. Typically, this indexing process occurs when a file is first added to the vault or when an updated version is checked in.
From time to time, re index the entire vault to:
• Add new properties to the vault that were previously unknown to the system. • Remove unwanted properties from the vault that are no longer needed, in turn saving space
in the SQL Server database.
The Autodesk Vault server utilizes a technology created by Microsoft called iFilters. iFilters are small applications that exist on the server containing a set of instructions on how to open and extract property data from files. A few iFilters are installed with Autodesk Vault server by default and other exist with the operating system. There are also many third-party iFilters available for other file formats. An Internet search for iFilter returns some of the filters that other software developers have published.
The iFilters that are included by default index the following file types:
• AutoCAD® .dwg • Autodesk Inventor® • Autodesk® 3D Studio Max® • Microsoft® Office
Server Maintenance: Full Content Indexing Full content indexing provides the means to index the actual file contents of many different document types. For example, reading simple text on a .dwg file or finding all occurrences of a word in Microsoft Word documents. By default, full content indexing is not enabled. Full content indexing can be enabled for each vault on the Autodesk Vault server.
Server Maintenance: Create SQL Maintenance Plan
Maintenance plans can be used to schedule tasks required to make sure that the database performs well, such as keeping database and transaction log file sizes small and checking the database for inconsistencies. Autodesk recommends that the plan be run at least once per week, during out of office hours. In a Connected Workgroup Environment, this should be configured on each SQL Server. Part of the Administrators tasks should be to regularly check that the plan ran successfully. If the plan was configured for an earlier release of Vault Server, ensure that you check and update the plan in accordance with this article.
The following steps are universal across all versions of SQL in use with Vault Server (Express and Full SQL). The complete list of supported database engines is located in the product readme file.
Note: Please note that if you are running SQL Express and do not have the SQL Management
Studio installed, the following steps can be completed through the command prompt through
scripts under the section “Creating a Maintenance Script for Microsoft SQL Express,” or you can
install the SQL Management Studio for Express, available from Microsoft‟s web site.
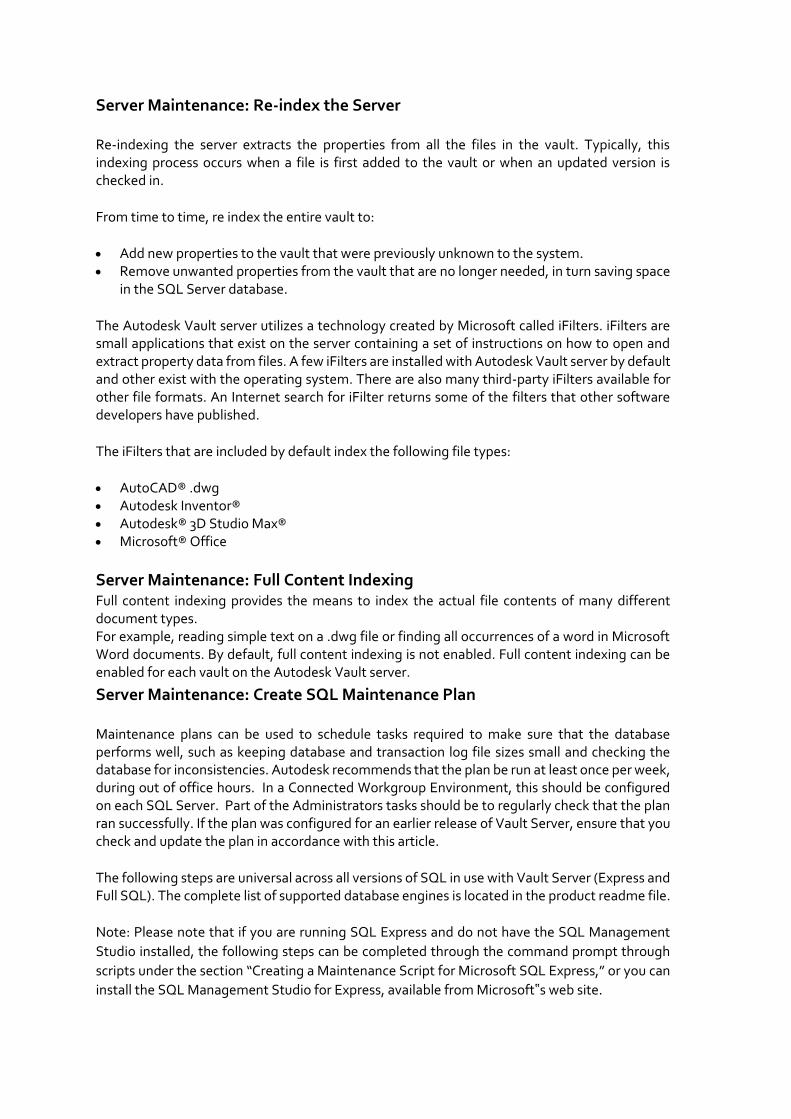
1. Login to the SQL Management Studio. 2. Expand Databases, expand System Databases. 3. Right Click on tempdb and select properties. 4. Select the Files page. 5. If using a multi-core system, additional data files should be configured, using the guidelines
below. If using a single-core system, skip to step d below. a. Data file totals should equal half of the available physical processing cores - up to a
maximum of 8 data files. (example; 8 physical cores would equal 4 total data files, tempdev, tempdev_2, tempdev_3, tempdev_4)
b. Click the Add button to add additional data files. c. Name the new file(s) tempdev_2, tempdev_3, … as needed. d. Set initial size of each data file to 1,024 MB. If using a total of 8 datafiles, an initial size of
512 MB can be used. e. Set Autogrowth to 100 MB, unrestricted growth for each data file. f. Set the LDF log file to combined data file total. (example; if there are 2 data files total, the
resulting LDF should be set to an initial size of 2048 MB) g. The results will appear similar the image below.
6. Under the Options page, set the Recovery model to Simple and the Compatibility level to SQL Server 2012 (100).
7. Select OK.
Create a SQL Maintenance Plan for Full SQL
Maintenance plans can be used to schedule tasks required to make sure that the database performs well, such as keeping database and transaction log file size small and checking the database for inconsistencies.
Note: These settings are recommended by Autodesk and should be configured automatically for
new installations. If migrated from an earlier release of Vault Server, these settings are not
enforced as they may have been changed intentionally by the Administrator.
SQL Standard/Enterprise 2012
1. Verify that the vaults have been backed up with the Autodesk Vault Server Console before proceeding.
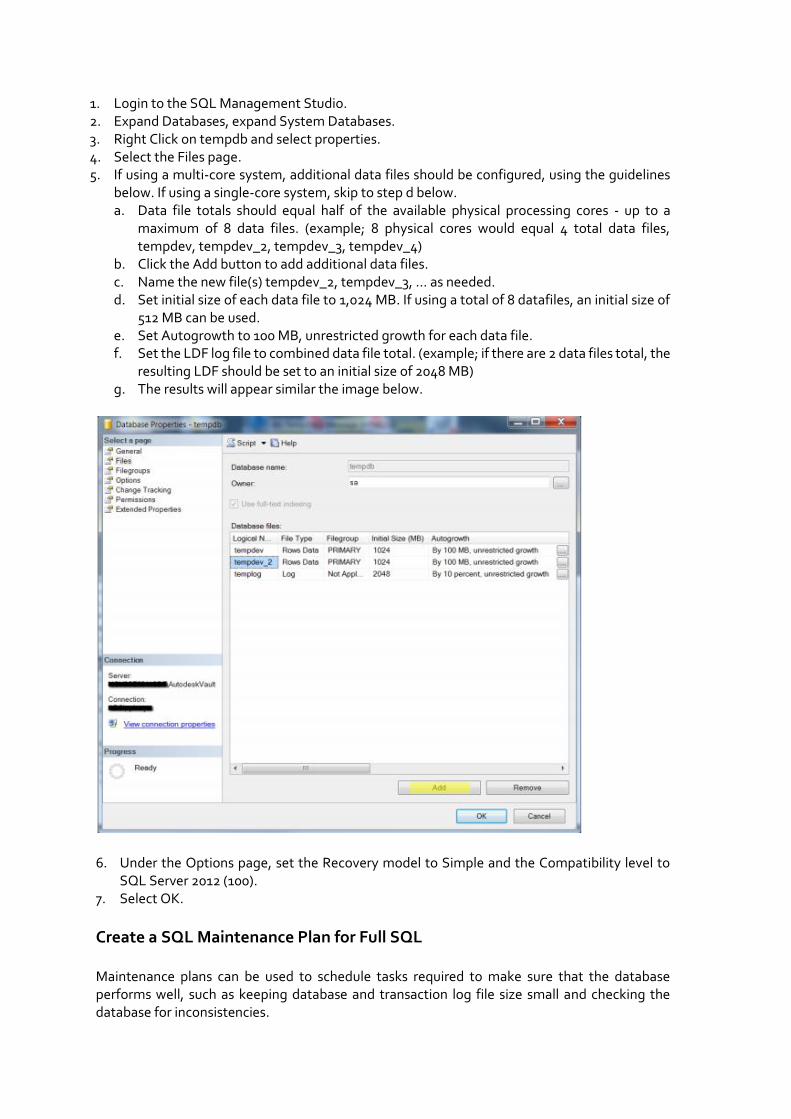
2. Make sure that all users are logged out of the vault server. 3. From the Control Panel, double-click Administrative Tools and then double-click the Services
icon. 4. Locate the SQL Server Agent (AUTODESKVAULT) service 5. Right-click on the SQL Server Agent (AUTODESKVAULT) and select Properties. Change the
Startup Type to Automatic and start the service.
6. Open the Microsoft SQL Management Studio and connect to the AutodeskVault instance. Use <ComputerName>\AUTODESKVAULT as the server name and press Connect.
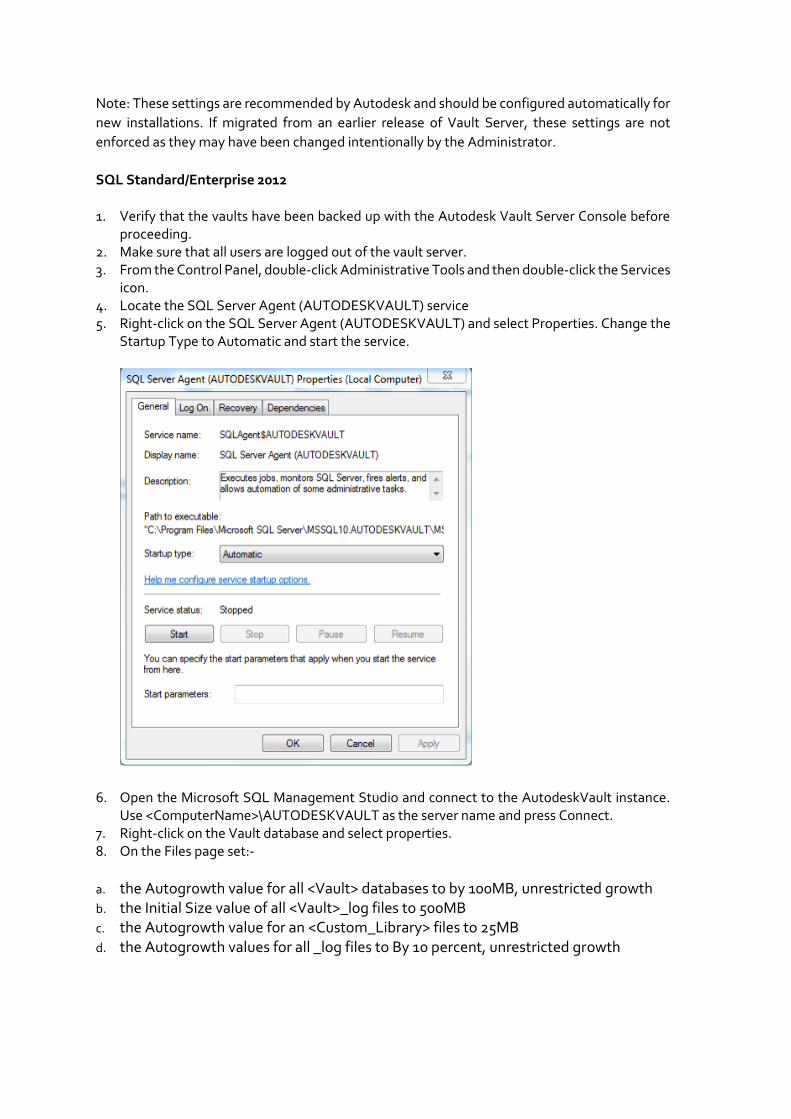
7. Right-click on the Vault database and select properties. 8. On the Files page set:-
a. the Autogrowth value for all <Vault> databases to by 100MB, unrestricted growth b. the Initial Size value of all <Vault>_log files to 500MB c. the Autogrowth value for an <Custom_Library> files to 25MB d. the Autogrowth values for all _log files to By 10 percent, unrestricted growth
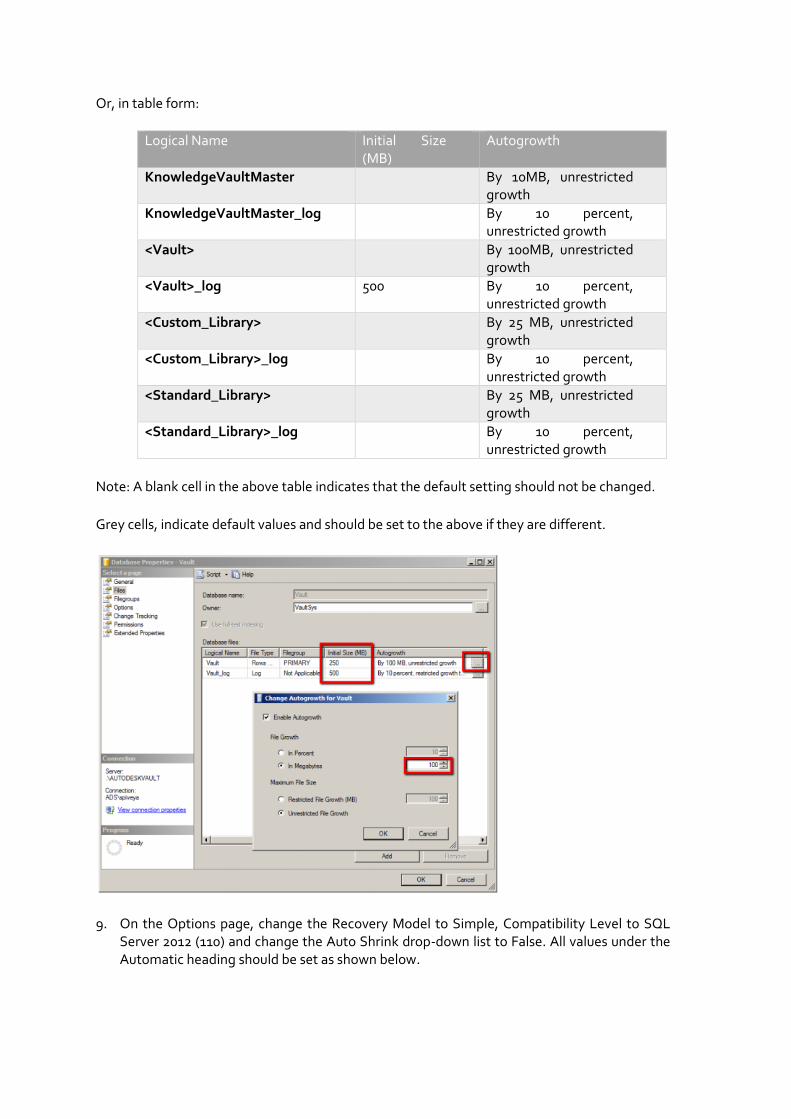
Or, in table form:
Logical Name Initial Size (MB)
Autogrowth
KnowledgeVaultMaster
By 10MB, unrestricted growth
KnowledgeVaultMaster_log
By 10 percent, unrestricted growth
<Vault>
By 100MB, unrestricted growth
<Vault>_log 500 By 10 percent, unrestricted growth
<Custom_Library>
By 25 MB, unrestricted growth
<Custom_Library>_log
By 10 percent, unrestricted growth
<Standard_Library>
By 25 MB, unrestricted growth
<Standard_Library>_log
By 10 percent, unrestricted growth
Note: A blank cell in the above table indicates that the default setting should not be changed.
Grey cells, indicate default values and should be set to the above if they are different.
9. On the Options page, change the Recovery Model to Simple, Compatibility Level to SQL Server 2012 (110) and change the Auto Shrink drop-down list to False. All values under the Automatic heading should be set as shown below.
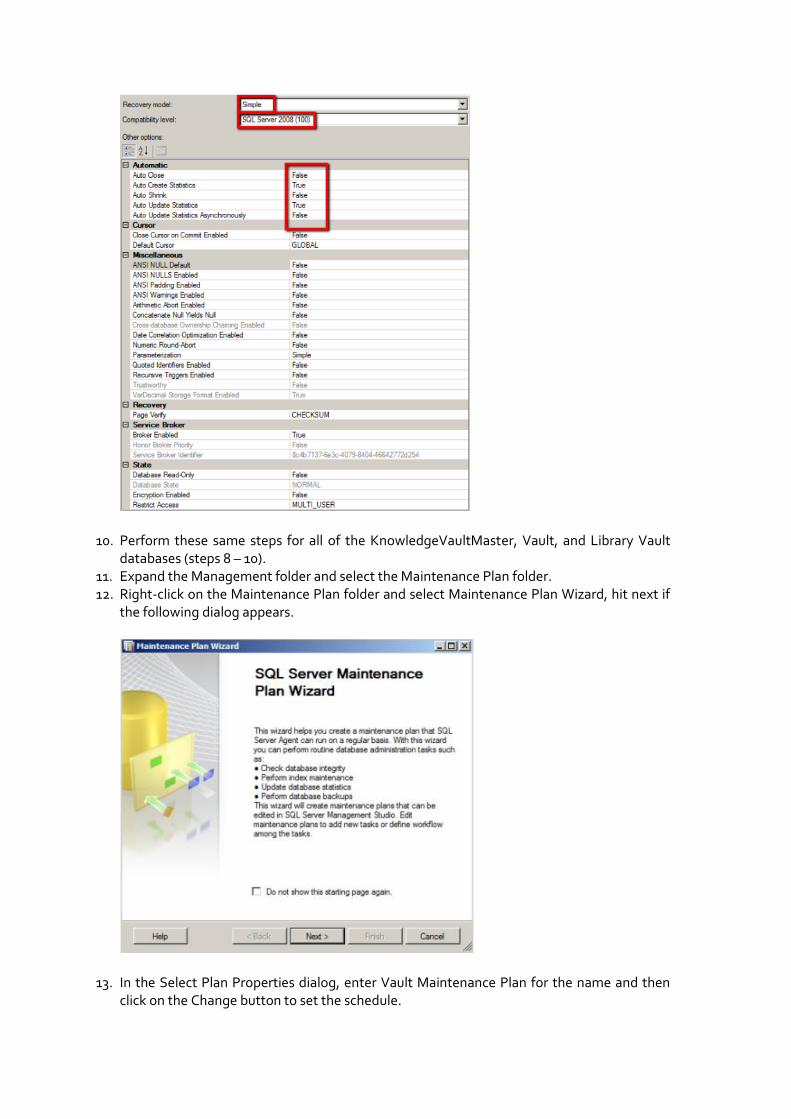
10. Perform these same steps for all of the KnowledgeVaultMaster, Vault, and Library Vault databases (steps 8 – 10).
11. Expand the Management folder and select the Maintenance Plan folder. 12. Right-click on the Maintenance Plan folder and select Maintenance Plan Wizard, hit next if
the following dialog appears.
13. In the Select Plan Properties dialog, enter Vault Maintenance Plan for the name and then click on the Change button to set the schedule.
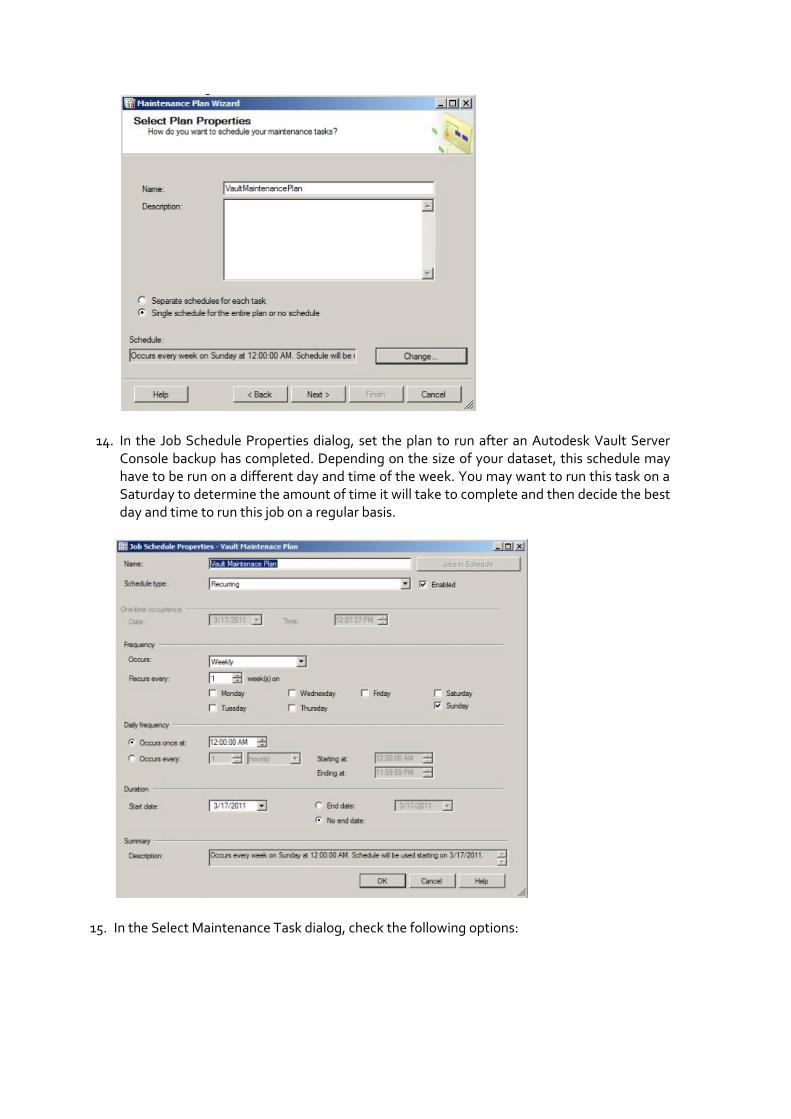
14. In the Job Schedule Properties dialog, set the plan to run after an Autodesk Vault Server Console backup has completed. Depending on the size of your dataset, this schedule may have to be run on a different day and time of the week. You may want to run this task on a Saturday to determine the amount of time it will take to complete and then decide the best day and time to run this job on a regular basis.
15. In the Select Maintenance Task dialog, check the following options:

16. In the Select Maintenance Task Order dialog, set the order to the following:
17. In the Define Database Check Integrity Task dialog, select All user databases from the databases drop-down list and check the box next to Include Indexes.
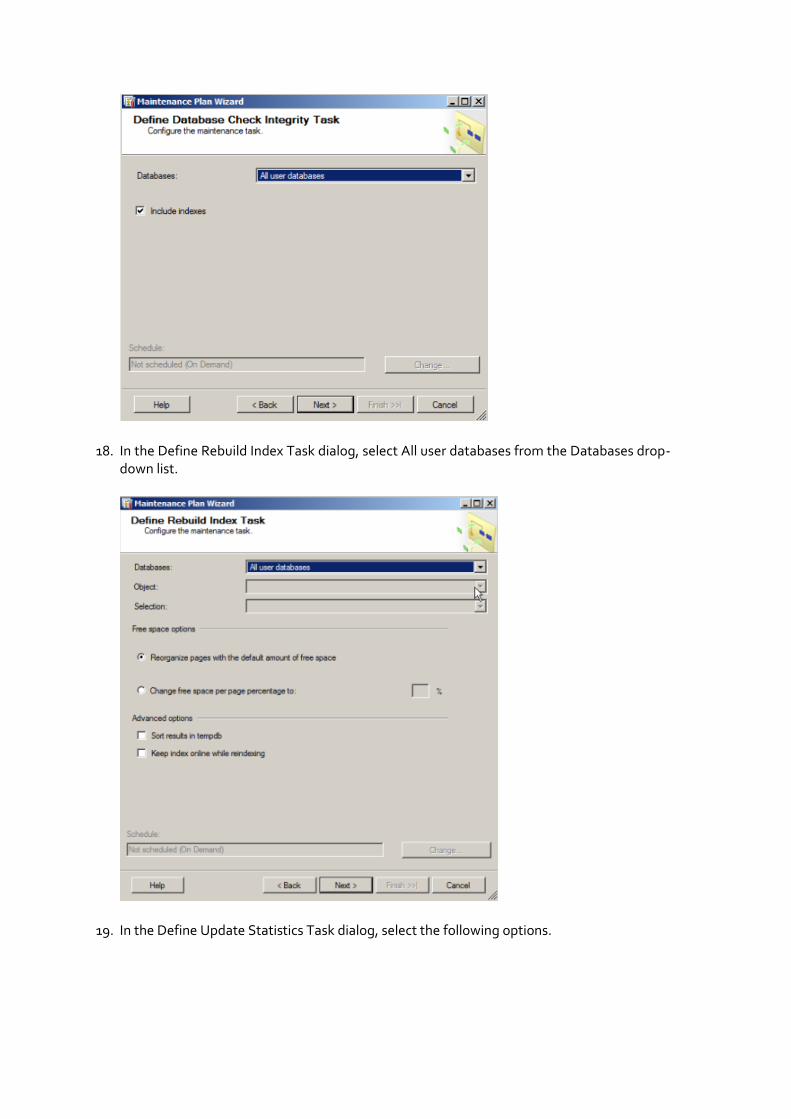
18. In the Define Rebuild Index Task dialog, select All user databases from the Databases drop-down list.
19. In the Define Update Statistics Task dialog, select the following options.
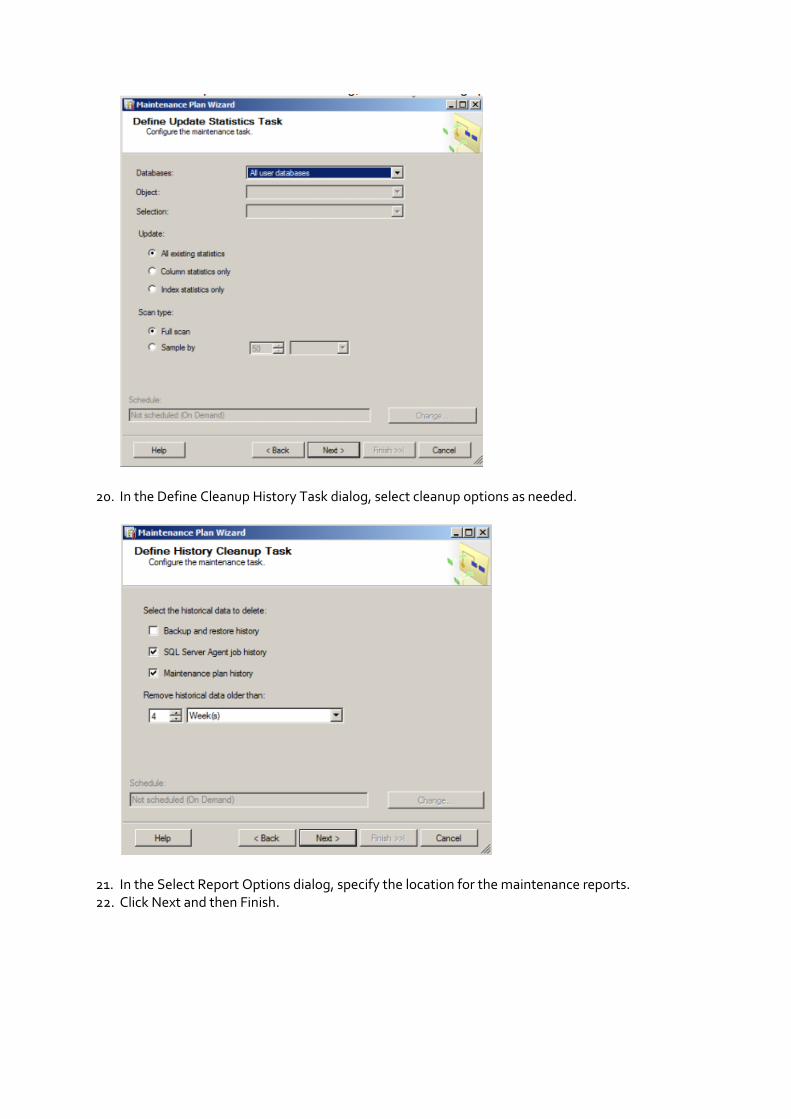
20. In the Define Cleanup History Task dialog, select cleanup options as needed.
21. In the Select Report Options dialog, specify the location for the maintenance reports. 22. Click Next and then Finish.
Job Server Administration
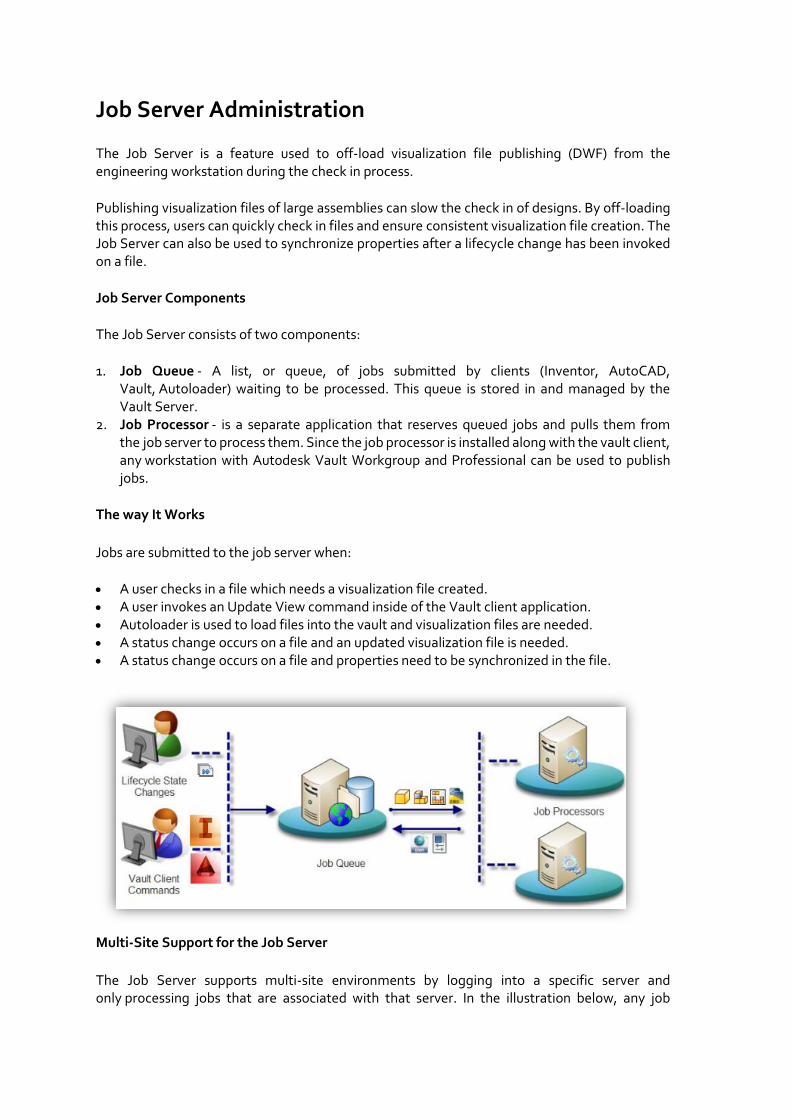
The Job Server is a feature used to off-load visualization file publishing (DWF) from the engineering workstation during the check in process.
Publishing visualization files of large assemblies can slow the check in of designs. By off-loading this process, users can quickly check in files and ensure consistent visualization file creation. The Job Server can also be used to synchronize properties after a lifecycle change has been invoked on a file.
Job Server Components
The Job Server consists of two components:
1. Job Queue - A list, or queue, of jobs submitted by clients (Inventor, AutoCAD, Vault, Autoloader) waiting to be processed. This queue is stored in and managed by the Vault Server.
2. Job Processor - is a separate application that reserves queued jobs and pulls them from the job server to process them. Since the job processor is installed along with the vault client, any workstation with Autodesk Vault Workgroup and Professional can be used to publish jobs.
The way It Works
Jobs are submitted to the job server when:
• A user checks in a file which needs a visualization file created. • A user invokes an Update View command inside of the Vault client application. • Autoloader is used to load files into the vault and visualization files are needed. • A status change occurs on a file and an updated visualization file is needed. • A status change occurs on a file and properties need to be synchronized in the file.
Multi-Site Support for the Job Server
The Job Server supports multi-site environments by logging into a specific server and only processing jobs that are associated with that server. In the illustration below, any job
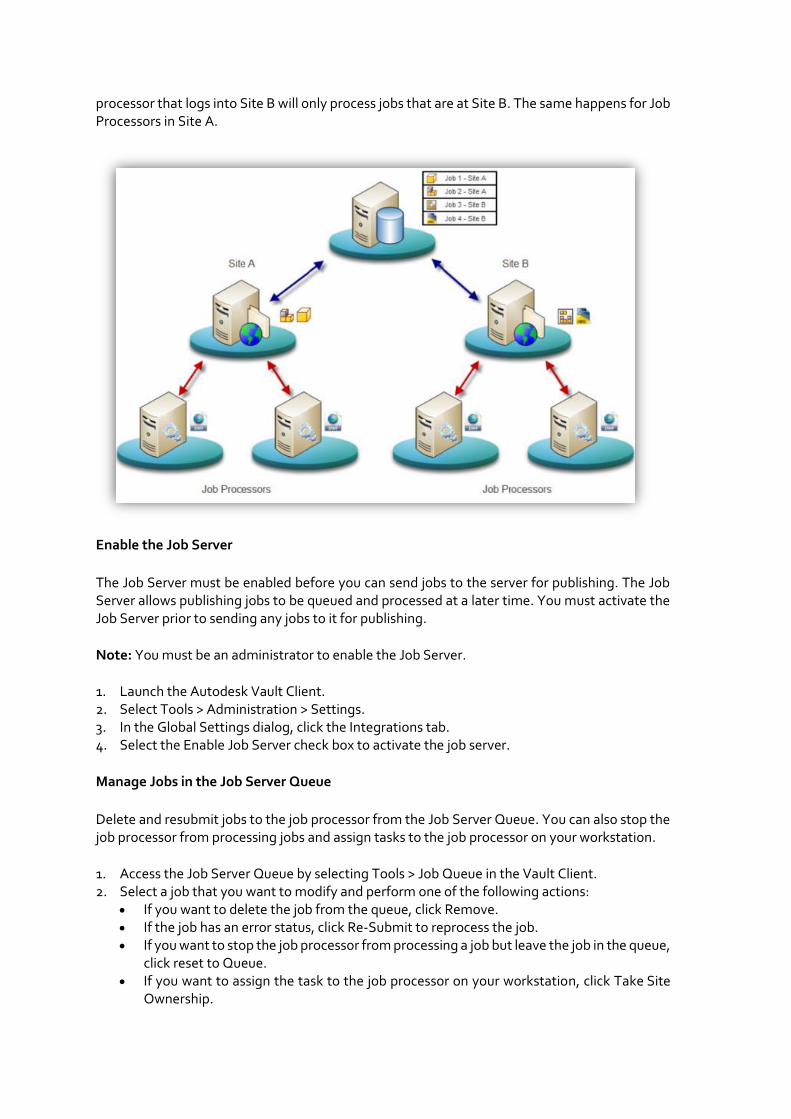
processor that logs into Site B will only process jobs that are at Site B. The same happens for Job Processors in Site A.
Enable the Job Server
The Job Server must be enabled before you can send jobs to the server for publishing. The Job Server allows publishing jobs to be queued and processed at a later time. You must activate the Job Server prior to sending any jobs to it for publishing.
Note: You must be an administrator to enable the Job Server.
1. Launch the Autodesk Vault Client. 2. Select Tools > Administration > Settings. 3. In the Global Settings dialog, click the Integrations tab. 4. Select the Enable Job Server check box to activate the job server.
Manage Jobs in the Job Server Queue
Delete and resubmit jobs to the job processor from the Job Server Queue. You can also stop the job processor from processing jobs and assign tasks to the job processor on your workstation.
1. Access the Job Server Queue by selecting Tools > Job Queue in the Vault Client. 2. Select a job that you want to modify and perform one of the following actions:
• If you want to delete the job from the queue, click Remove. • If the job has an error status, click Re-Submit to reprocess the job. • If you want to stop the job processor from processing a job but leave the job in the queue,
click reset to Queue. • If you want to assign the task to the job processor on your workstation, click Take Site
Ownership.
3. Click Print to send the grid to the default printer. 4. Click Refresh at any time to update the queue.
Jobs can be submitted to the Job Server for processing during the check in process, during the change of lifecycle state, when loading files with Autoloader, or while performing an Update View in the client application. You can configure a lifecycle to automatically synchronize properties and submit files to the job server for processing whenever a certain lifecycle state changes.
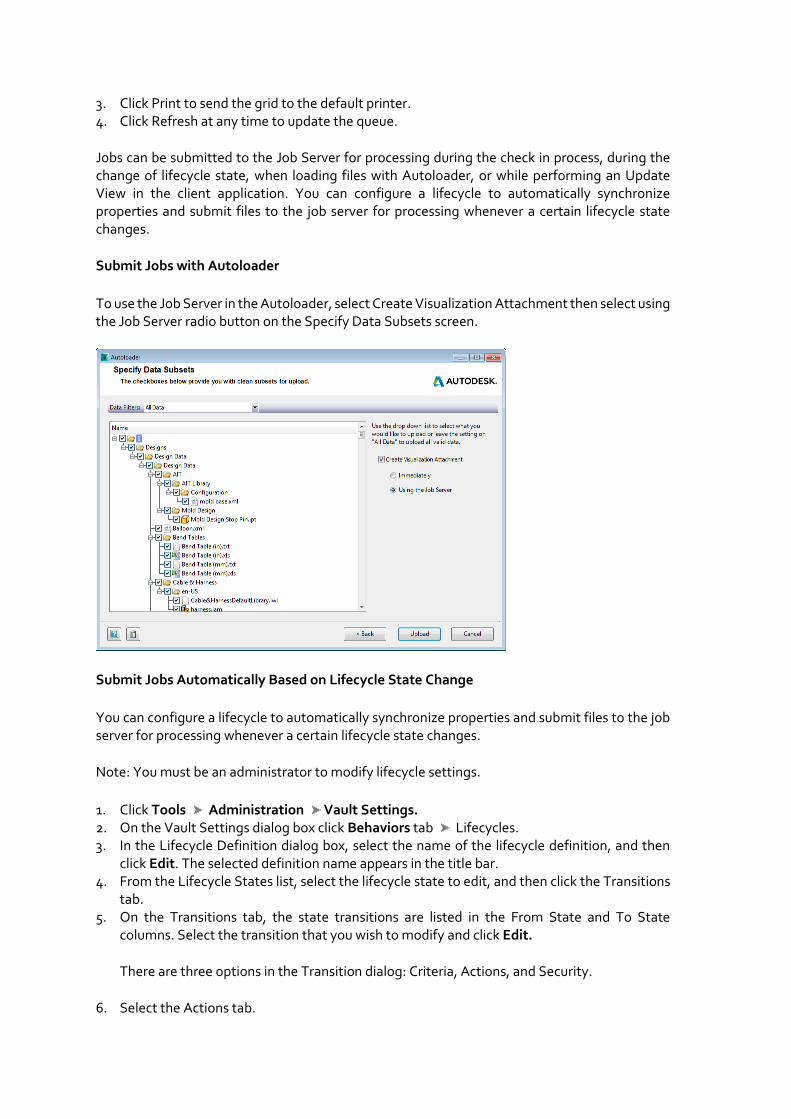
Submit Jobs with Autoloader
To use the Job Server in the Autoloader, select Create Visualization Attachment then select using the Job Server radio button on the Specify Data Subsets screen.
Submit Jobs Automatically Based on Lifecycle State Change
You can configure a lifecycle to automatically synchronize properties and submit files to the job server for processing whenever a certain lifecycle state changes.
Note: You must be an administrator to modify lifecycle settings.
1. Click Tools Administration Vault Settings. 2. On the Vault Settings dialog box click Behaviors tab Lifecycles. 3. In the Lifecycle Definition dialog box, select the name of the lifecycle definition, and then
click Edit. The selected definition name appears in the title bar. 4. From the Lifecycle States list, select the lifecycle state to edit, and then click the Transitions
tab. 5. On the Transitions tab, the state transitions are listed in the From State and To State
columns. Select the transition that you wish to modify and click Edit.
There are three options in the Transition dialog: Criteria, Actions, and Security.
6. Select the Actions tab.
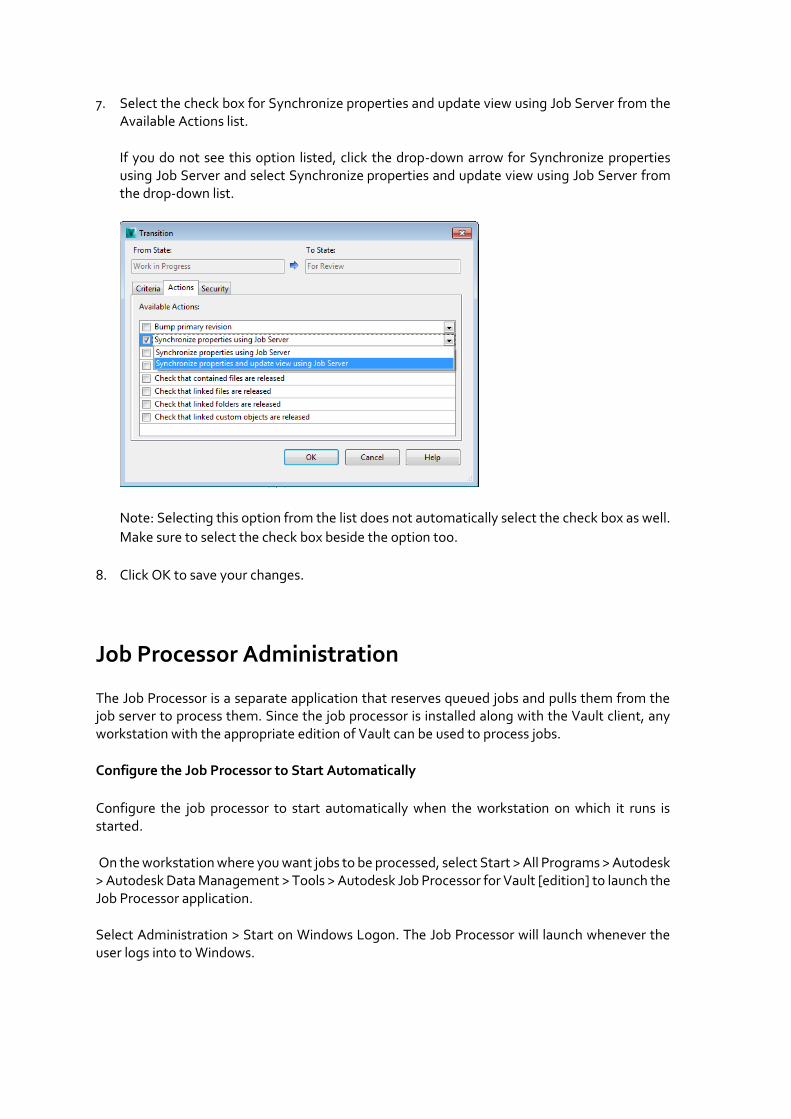
7. Select the check box for Synchronize properties and update view using Job Server from the Available Actions list.
If you do not see this option listed, click the drop-down arrow for Synchronize properties using Job Server and select Synchronize properties and update view using Job Server from the drop-down list.
Note: Selecting this option from the list does not automatically select the check box as well.
Make sure to select the check box beside the option too.
8. Click OK to save your changes.
Job Processor Administration
The Job Processor is a separate application that reserves queued jobs and pulls them from the job server to process them. Since the job processor is installed along with the Vault client, any workstation with the appropriate edition of Vault can be used to process jobs.
Configure the Job Processor to Start Automatically
Configure the job processor to start automatically when the workstation on which it runs is started.
On the workstation where you want jobs to be processed, select Start > All Programs > Autodesk > Autodesk Data Management > Tools > Autodesk Job Processor for Vault [edition] to launch the Job Processor application.
Select Administration > Start on Windows Logon. The Job Processor will launch whenever the user logs into to Windows.
Schedule the Job Processor
Use the Windows Task Scheduler to configure when and how often the Job Processor starts. You must be logged in with a Windows user account to schedule this task.
1. Open the Windows Task Scheduler. 2. Browse to the JobProcessor.exe file in the <install dir>\Autodesk\Vault
[edition]\Explorer\ directory. 3. Configure the frequency and time to start the Job Processor. 4. Save the task.
Note: Be sure to configure the account setting prior to the scheduled task starting for the first
time.
This scheduling change only needs to be set once. The Job Processor will use this account each time it runs. The Job Processor can also be started when a user logs into Windows. This is done by selecting Start on Windows Log in in the Administration menu of the Job Processor dialog.
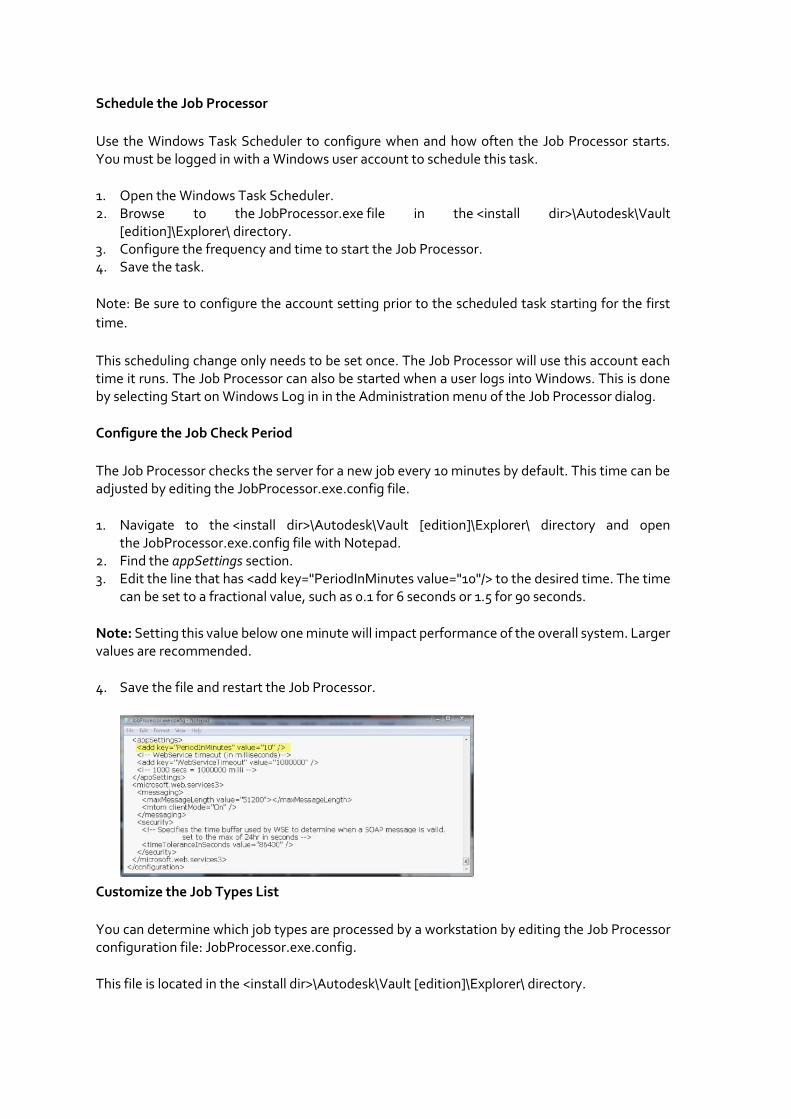
Configure the Job Check Period
The Job Processor checks the server for a new job every 10 minutes by default. This time can be adjusted by editing the JobProcessor.exe.config file.
1. Navigate to the <install dir>\Autodesk\Vault [edition]\Explorer\ directory and open the JobProcessor.exe.config file with Notepad.
2. Find the appSettings section. 3. Edit the line that has <add key="PeriodInMinutes value="10"/> to the desired time. The time
can be set to a fractional value, such as 0.1 for 6 seconds or 1.5 for 90 seconds.
Note: Setting this value below one minute will impact performance of the overall system. Larger values are recommended.
4. Save the file and restart the Job Processor.
Customize the Job Types List
You can determine which job types are processed by a workstation by editing the Job Processor configuration file: JobProcessor.exe.config.
This file is located in the <install dir>\Autodesk\Vault [edition]\Explorer\ directory.

1. Navigate to the <install dir>\Autodesk\Vault [edition]\Explorer\ directory and open the JobProcessor.exe.config file with Notepad.
2. Find the jobHandlers section. 3. Comment out the line that contains the handler you do not want the workstation to process.
Use <!--handler--> to comment out the line. 4. Save the file and restart the Job Processor. Check the Job Types dialog to verify that the job
type no longer appears in the list.
Configure the Time Limit for Restarting Jobs
JobProcessor.exe monitors and controls the Connectivity.JobProcessor.Delegate.Host.exe application, restarting it if it does not complete a single job within a configured amount of time. Time limits can be configured for certain parameters in the JobProcessor.exe.config file.
View Job Processor Logs
The Job Processor logs all jobs in the Event viewer Application log on the workstation. This log can be useful when troubleshooting failed or incomplete jobs.
Troubleshooting with Autodesk Vault and related log
files Autodesk Vault log files and location
You can access Console, Server, File Store, and Email log files from Autodesk Data Management server console. Every sub-tree lists the six most recent log files for that log group. You can show
up to fifteen logs under each log node. To display additional logs:
1. In the ADMS Console, right-click on a Console Logs, Server Logs, File Store Logs, or Email Logs node.
2. Select Show More from the pop-up menu. Five more logs display under each node in the tree view in the left pane you can display up to fifteen logs under each log node.
Please see the below picture.
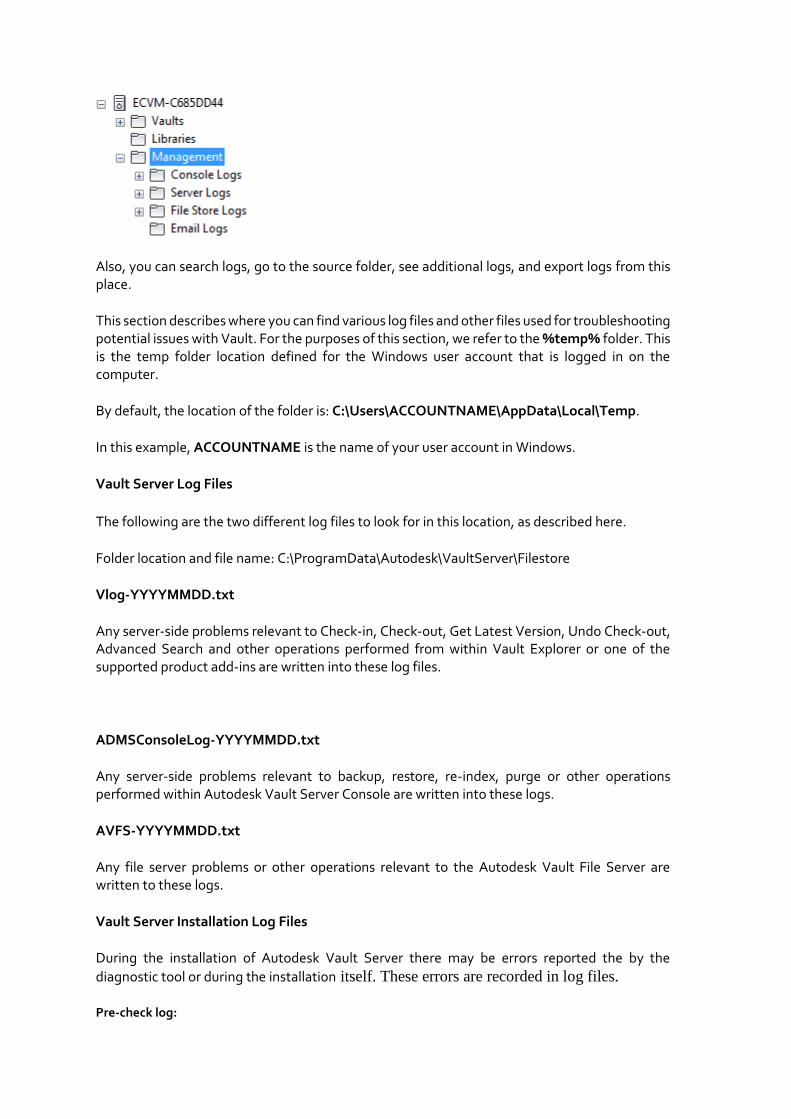
Also, you can search logs, go to the source folder, see additional logs, and export logs from this place.
This section describes where you can find various log files and other files used for troubleshooting potential issues with Vault. For the purposes of this section, we refer to the %temp% folder. This is the temp folder location defined for the Windows user account that is logged in on the computer.
By default, the location of the folder is: C:\Users\ACCOUNTNAME\AppData\Local\Temp.
In this example, ACCOUNTNAME is the name of your user account in Windows.
Vault Server Log Files
The following are the two different log files to look for in this location, as described here.
Folder location and file name: C:\ProgramData\Autodesk\VaultServer\Filestore
Vlog-YYYYMMDD.txt
Any server-side problems relevant to Check-in, Check-out, Get Latest Version, Undo Check-out, Advanced Search and other operations performed from within Vault Explorer or one of the supported product add-ins are written into these log files.
ADMSConsoleLog-YYYYMMDD.txt
Any server-side problems relevant to backup, restore, re-index, purge or other operations performed within Autodesk Vault Server Console are written into these logs.
AVFS-YYYYMMDD.txt
Any file server problems or other operations relevant to the Autodesk Vault File Server are written to these logs.
Vault Server Installation Log Files
During the installation of Autodesk Vault Server there may be errors reported the by the
diagnostic tool or during the installation itself. These errors are recorded in log files.
Pre-check log:
%temp%\EDMlogPrechecks.xml Prechecks.xsl
Autodesk Vault <Version> <year> client installation logs:
%temp%Autodesk Vault <Version> <year> Install.log Autodesk Vault <Version> <year> Setup.log
Autodesk Vault <Version> <year> server installation logs:
%temp%Autodesk Vault <Version> <year> (Server) Install.log Autodesk Vault <Version> <year> (Server) Setup.log
Autodesk Server Diagnostic Tool Log files
If you run the Autodesk Server Diagnostic Tool, the log files are located in the %temp%\EDMLog directory.
Autodesk Server Diagnostic Tool: %temp%\EDMLogDiagTool.xml DiagToolLog.xsl
DWG iFilter Log files
There are log files maintained by the various iFilters used when performing some Vault operations like re-index. These log files can be helpful when troubleshooting problems with block attributes or properties not indexing as expected in Vault Explorer.
Folder location and file name:
Depending on your server setup, your iFilter log files may be contained in a different location. C:\Windows\Temp\ OR %TEMP%
DWGFILT.*.log
MSSQL and IIS log files and location
MS SQL Folder location and file names:
C:\Program Files\Microsoft SQL Server\%SQL_INSTANCE%\LOG
Errorlog
Errorlog.1
Errorlog.2
Errorlog.3
The SQL logs are named sequentially with the most recent (current) file being named error log followed by errorlog.1 then errorlog.2 and so on.
IIS log Folder location and file names
IIS logs are located in the following directories:
• C:\WINDOWS\system32\LogFiles\W3SVC1 - for the Default Web site communication. • C:\WINDOWS\system32\LogFiles\HTTPERR - for IIS errors logs.
The W3C Extended log file format is the default log file format for IIS. It is a customizable ASCII text-based format. You can use IIS Manager to select which fields to include in the log file.
Change logging properties
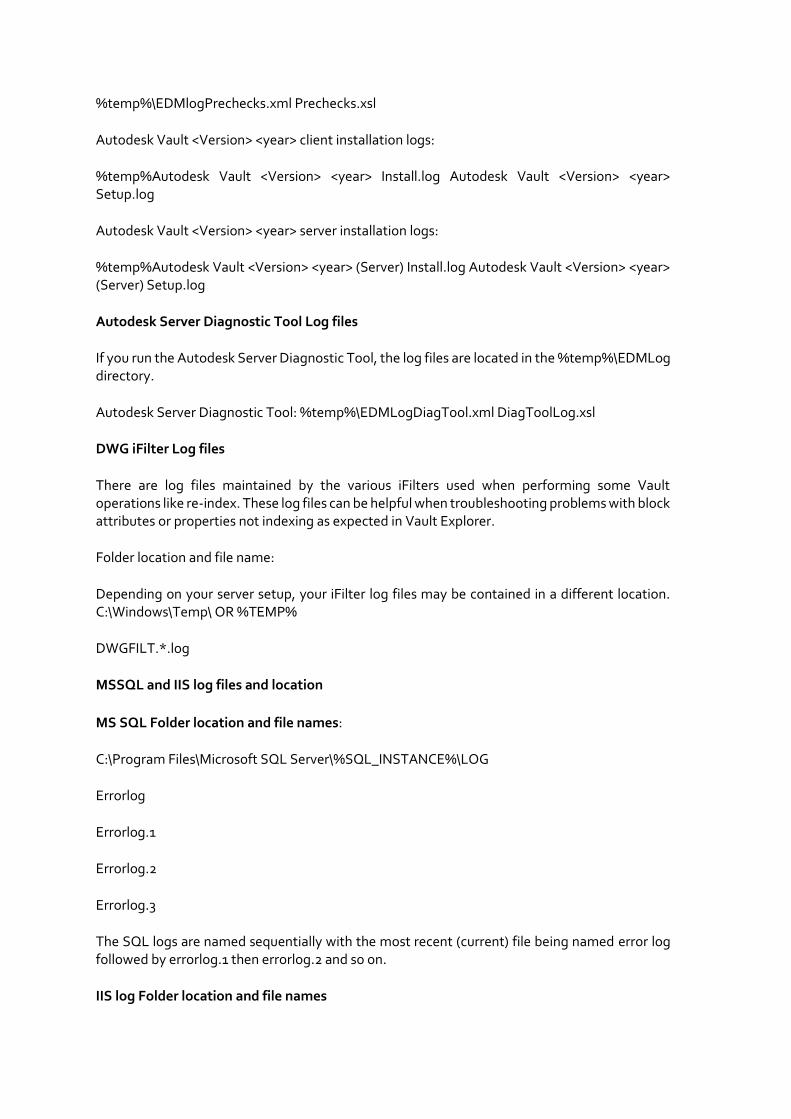
1. On the Windows Start menu, click Control Panel Administrative Tools Internet Information Services
2. In IIS Manager, expand the local computer, expand the Web Sites folder, right-click the Default Web site, and click Properties.
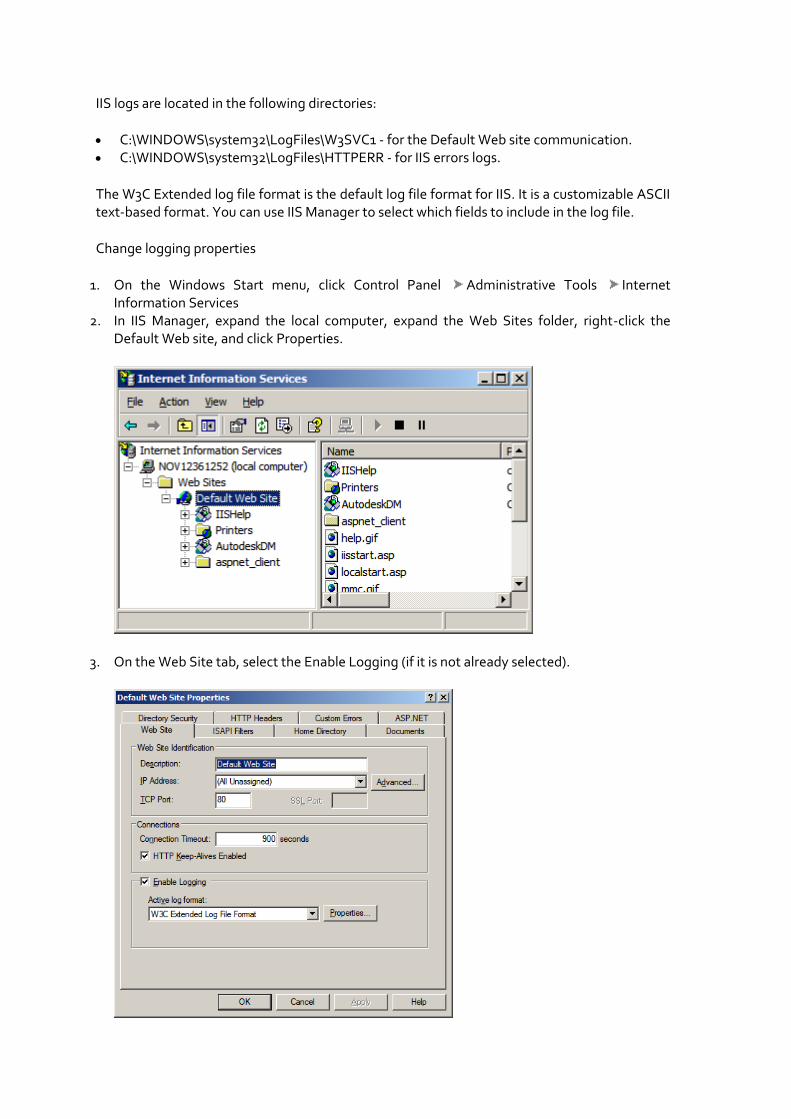
3. On the Web Site tab, select the Enable Logging (if it is not already selected).
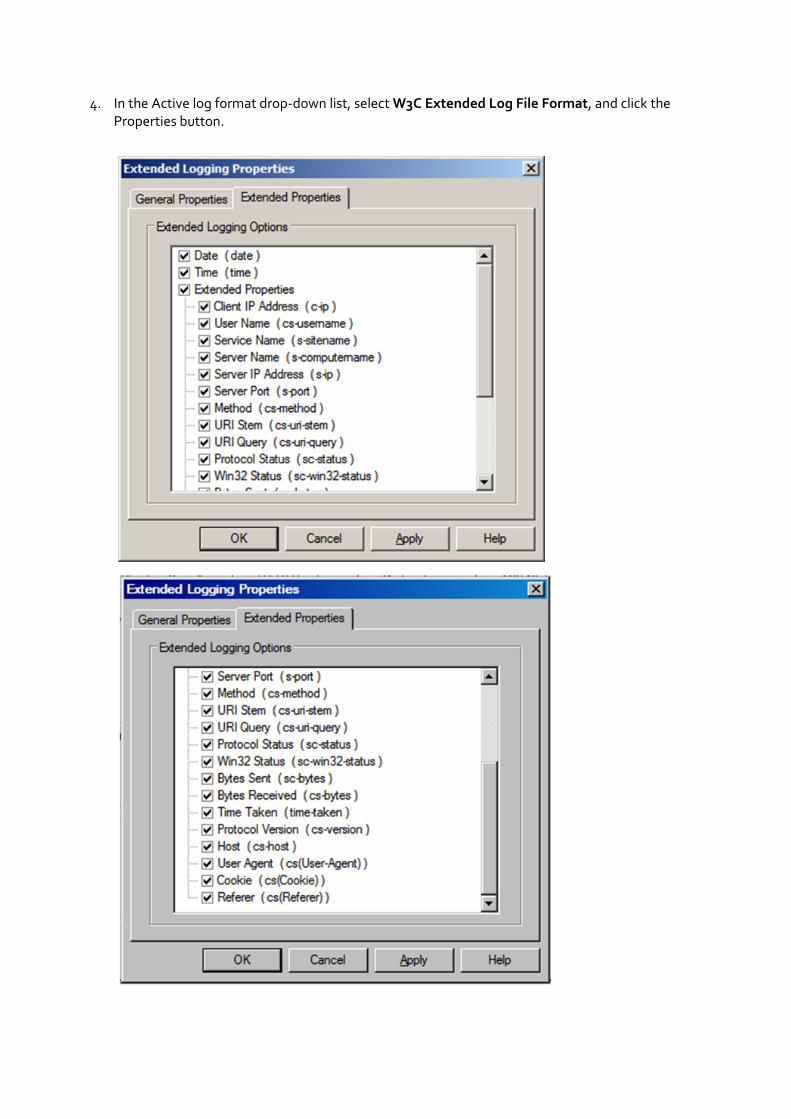
4. In the Active log format drop-down list, select W3C Extended Log File Format, and click the Properties button.
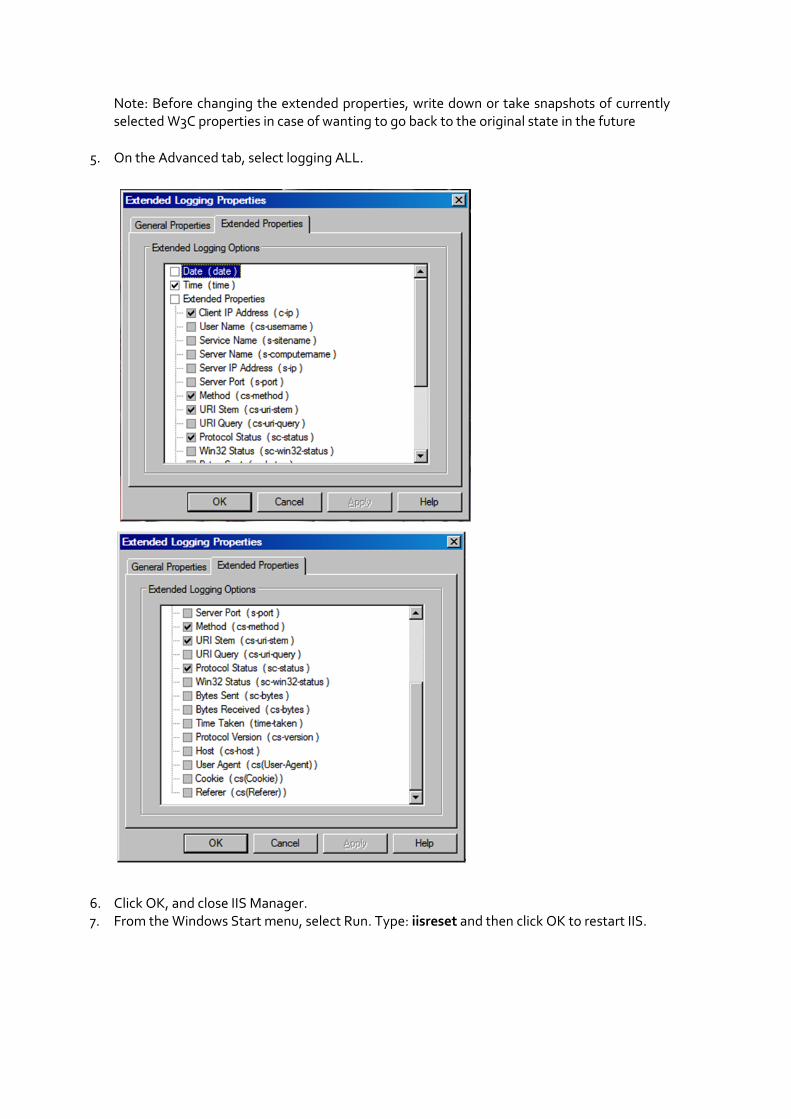
Note: Before changing the extended properties, write down or take snapshots of currently selected W3C properties in case of wanting to go back to the original state in the future
5. On the Advanced tab, select logging ALL.
6. Click OK, and close IIS Manager. 7. From the Windows Start menu, select Run. Type: iisreset and then click OK to restart IIS.
Performance Tuning Key Terms: Before fine tuning Autodesk Vault’s performance, Autodesk recommends to know
the following key terms.
Key Terms Definition
Performance Tuning Monitoring and analysing the performance of a system and adjusting its configuration to obtain optimum performance.
Operating System The software that the rest of the software depends on to make the computer functional. On most PCs this is Microsoft Windows.
Memory It is a set of storage locations on the main circuit board of a PC.
Disk Defragmentation A utility included with the Windows operating system that coalesces files on the hard drive, freeing up disk space.
Anti-virus Program A program that searches for viruses and removes any virus that it finds.
Proxy Server Existing between a client Web browser and a real server, a computer that caches common and often requested Web pages and holds them for easier access by users.
Customize View A command in Autodesk Vault to customize the information shown in the display grid.
Fine Tune Autodesk Vault Server Performance Fine-tune a number of factors to get optimal performance from the Autodesk Vault server.
Operating system
A dedicated server operating system such as Windows server 2008 or Windows Server 2012 is preferable to workstation operating systems.
Server memory
In order to determine whether the server has enough available memory, some key factors must
be considered: the size of your data and the number of users concurrently accessing the Vault
server.
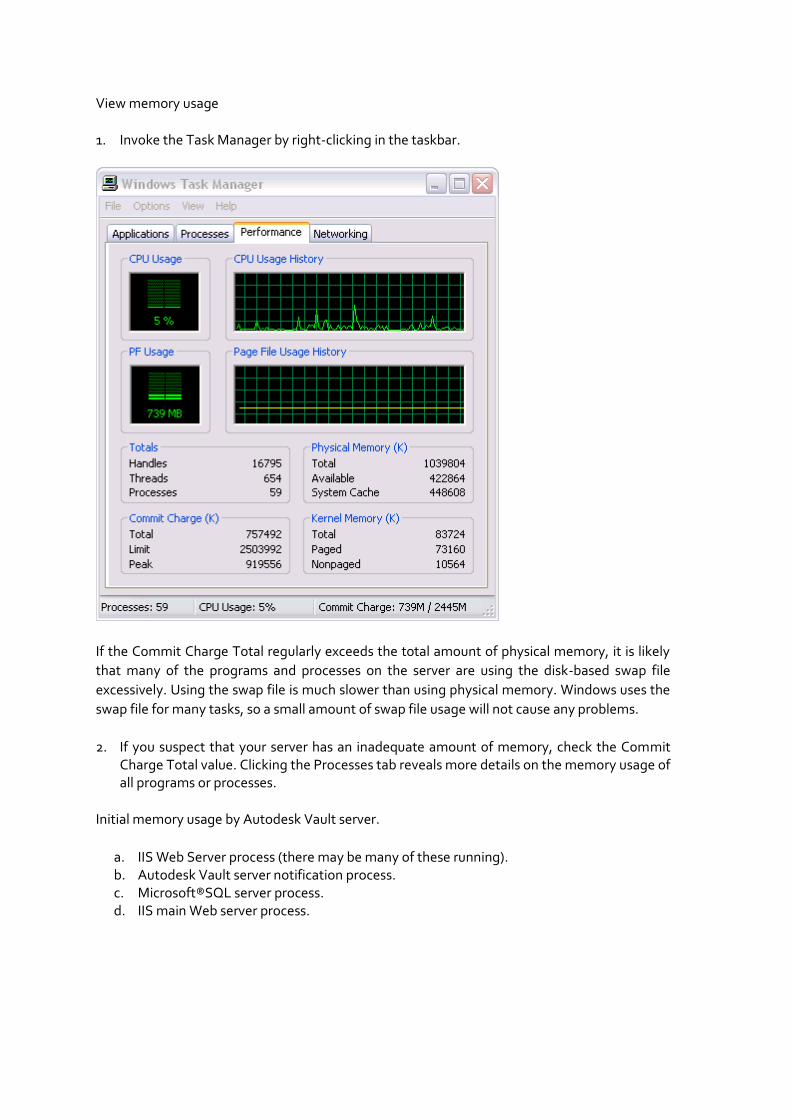
View memory usage
1. Invoke the Task Manager by right-clicking in the taskbar.
If the Commit Charge Total regularly exceeds the total amount of physical memory, it is likely
that many of the programs and processes on the server are using the disk-based swap file
excessively. Using the swap file is much slower than using physical memory. Windows uses the
swap file for many tasks, so a small amount of swap file usage will not cause any problems.
2. If you suspect that your server has an inadequate amount of memory, check the Commit Charge Total value. Clicking the Processes tab reveals more details on the memory usage of all programs or processes.
Initial memory usage by Autodesk Vault server.
a. IIS Web Server process (there may be many of these running). b. Autodesk Vault server notification process. c. Microsoft®SQL server process. d. IIS main Web server process.
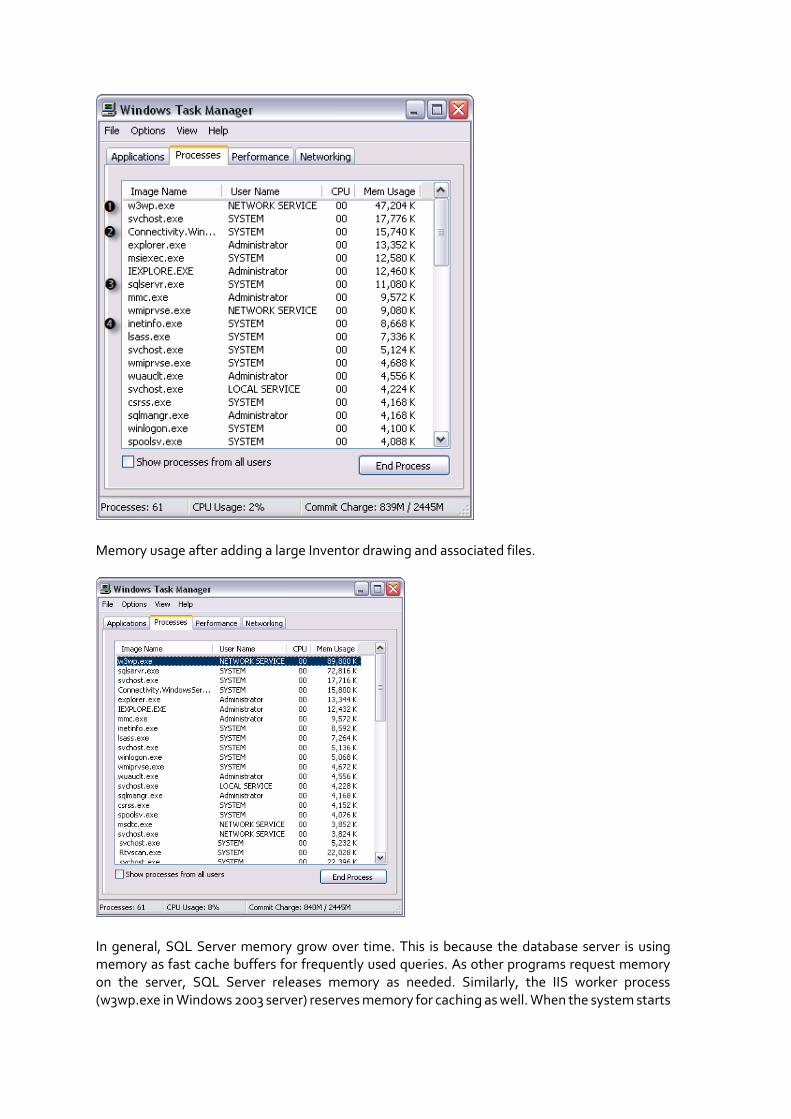
Memory usage after adding a large Inventor drawing and associated files.
In general, SQL Server memory grow over time. This is because the database server is using memory as fast cache buffers for frequently used queries. As other programs request memory on the server, SQL Server releases memory as needed. Similarly, the IIS worker process (w3wp.exe in Windows 2003 server) reserves memory for caching as well. When the system starts
running low on physical memory, the operating system reclaims some of this memory. In general, unless you have a large site with many users or large models, this will not need to be changed.
Disk performance
Using multiple disks generally enhances system performance. There are many types of disk technologies available, such as the Redundant Array of Inexpensive Disks (RAID). Choosing which type of disk technologies depends on the number of users, vault size, frequency of updates, and so on.
Disk fragmentation can also greatly affect Autodesk Vault server performance. Most Windows editions provide a disk tool that measures how the files on your computer are stored on disk.
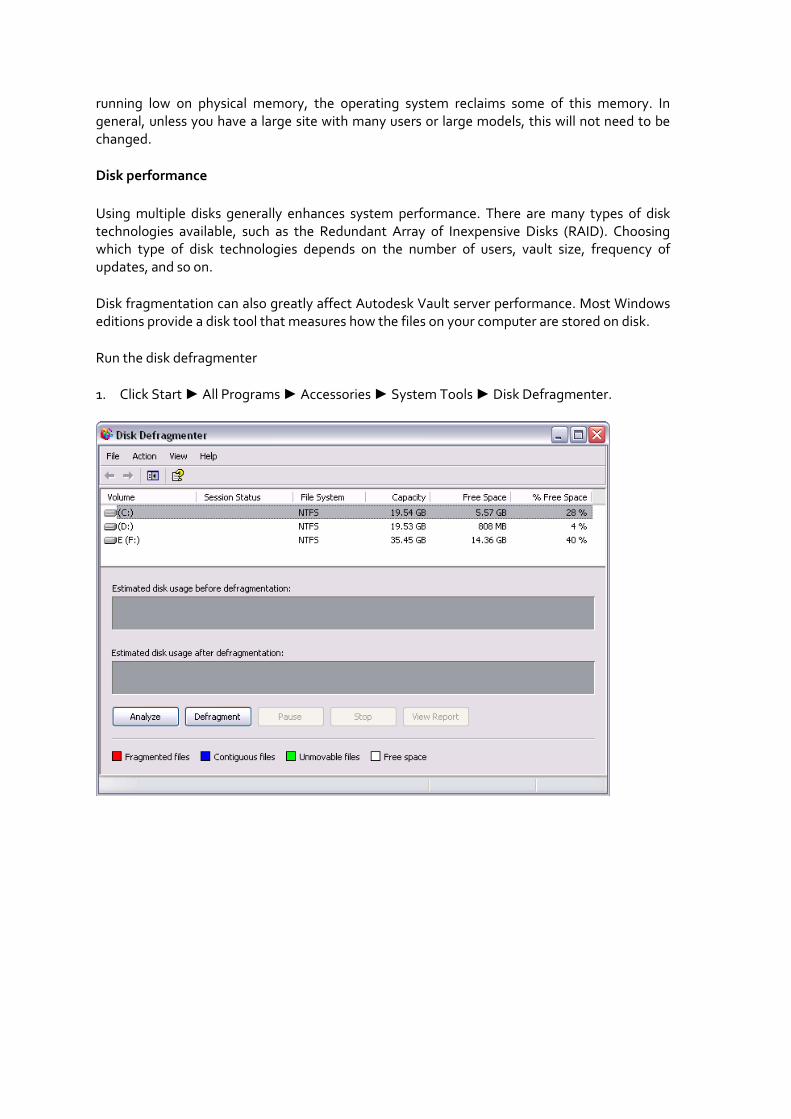
Run the disk defragmenter
1. Click Start ► All Programs ► Accessories ► System Tools ► Disk Defragmenter.
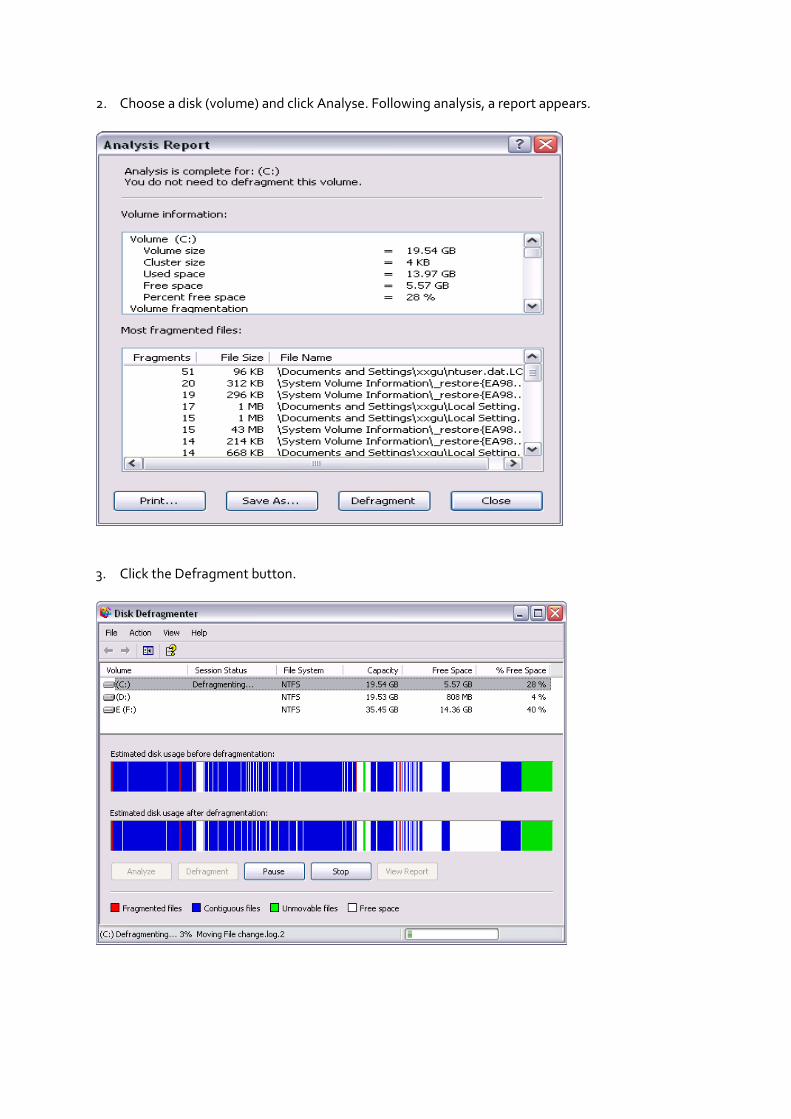
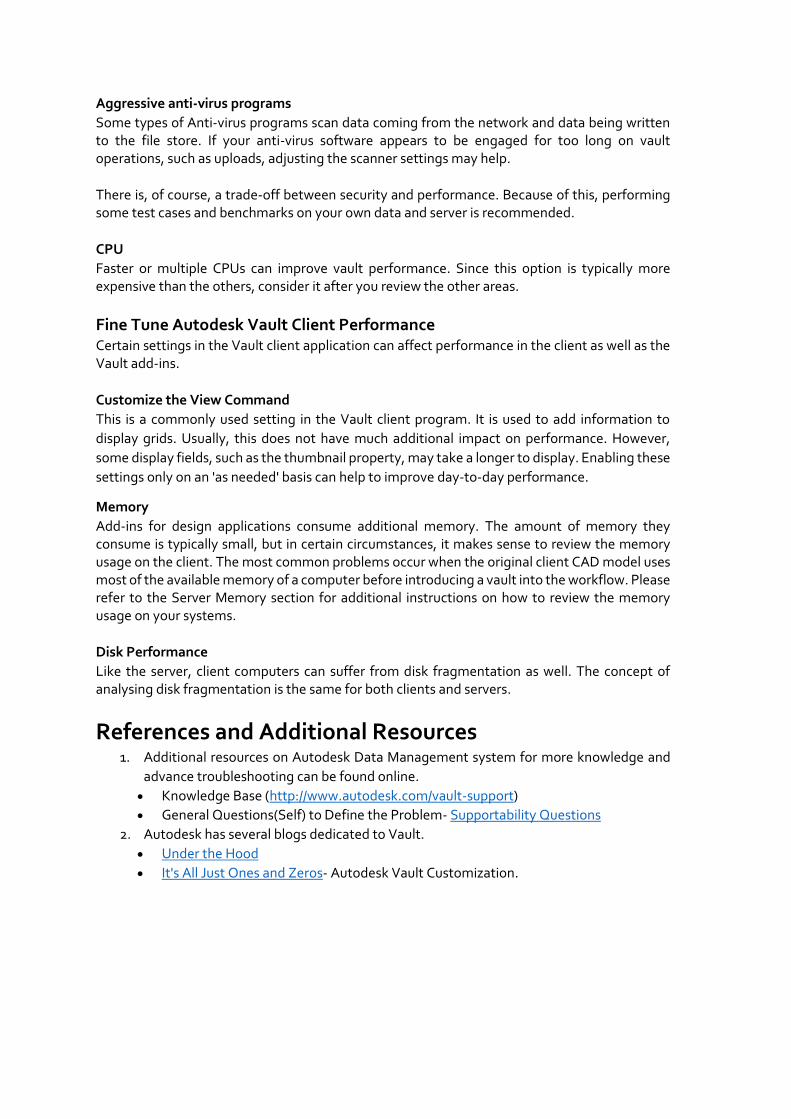
2. Choose a disk (volume) and click Analyse. Following analysis, a report appears.
3. Click the Defragment button.
Aggressive anti-virus programs
Some types of Anti-virus programs scan data coming from the network and data being written to the file store. If your anti-virus software appears to be engaged for too long on vault operations, such as uploads, adjusting the scanner settings may help.
There is, of course, a trade-off between security and performance. Because of this, performing some test cases and benchmarks on your own data and server is recommended.
CPU
Faster or multiple CPUs can improve vault performance. Since this option is typically more expensive than the others, consider it after you review the other areas.
Fine Tune Autodesk Vault Client Performance Certain settings in the Vault client application can affect performance in the client as well as the Vault add-ins.
Customize the View Command
This is a commonly used setting in the Vault client program. It is used to add information to
display grids. Usually, this does not have much additional impact on performance. However,
some display fields, such as the thumbnail property, may take a longer to display. Enabling these
settings only on an 'as needed' basis can help to improve day-to-day performance.
Memory
Add-ins for design applications consume additional memory. The amount of memory they consume is typically small, but in certain circumstances, it makes sense to review the memory usage on the client. The most common problems occur when the original client CAD model uses most of the available memory of a computer before introducing a vault into the workflow. Please refer to the Server Memory section for additional instructions on how to review the memory usage on your systems.
Disk Performance
Like the server, client computers can suffer from disk fragmentation as well. The concept of analysing disk fragmentation is the same for both clients and servers.
References and Additional Resources 1. Additional resources on Autodesk Data Management system for more knowledge and
advance troubleshooting can be found online.
• Knowledge Base (http://www.autodesk.com/vault-support)
• General Questions(Self) to Define the Problem- Supportability Questions
2. Autodesk has several blogs dedicated to Vault.
• Under the Hood
• It's All Just Ones and Zeros- Autodesk Vault Customization.