Embed Size (px)
Citation preview

M I S S O U R I R E S E A R C H & E D U C A T I O N N E T W O R K
1
Using the SMART Board™to Enhance Teaching and
Learning
eMINTS
enhancing Missouri’s Instructional Networked Teaching Strategies
Participant P C v e r s i o n
M I S S O U R I R E S E A R C H & E D U C A T I O N N E T W O R K
2
E N H A N C I N G M I S S O U R I ’ S I N S T R U C T I O N A L N E T W O R K E D T E A C H I N G S T R A T E G I E S
Using the SMART Board™ to Enhance Teaching and Learning
MOREnet Missouri Research & Education Network 3212 LeMone Industrial Boulevard Columbia, Missouri 65201 Voice: (573) 884-7200 Fax: (573) 884-6673 http://emints.more.net Cover Photos: Brian Kratzer Contributors: Janice Friesen Written: September 2000 Revised: March 2003
©2000 Missouri Department of Elementary and Secondary Education (DESE) and Missouri Research and Education Network (MOREnet) The Curators of the University of Missouri. Materials may be duplicated/reproduced in hard copy format for use by educators and educational institutions. The copies may be used for noncommercial purposes only. Titles or names of specific software discussed or described in this document are registered trademarks, trademarks or copyrighted as property of the companies that produce the software. Please note that the World Wide Web is volatile and constantly changing. The URLs provided in the following references were accurate as of the date of this report, but we can make no guarantees for their permanence.

M I S S O U R I R E S E A R C H & E D U C A T I O N N E T W O R K
3
Table Of Contents
Purpose of the Module ............................................................................4
Module Objectives..................................................................................4
Step-by-Step
Starting Out.................................................................................5
Projector Tips ...............................................................................7
Remote Control ............................................................................8
SMART Notebook Menus ................................................................11
Toolbars .....................................................................................15
TNT Ideas for Using the SMART Board ......................................................16
Cautions – Use These Techniques with Care...............................................19
General Tips..........................................................................................20
Advanced Tips and Tricks
Print Capture................................................................................20
Scan Directly into the Program .......................................................20
Use the Floating Tool Bar with Other Applications ..............................20
Import Pictures.............................................................................21
Save as .html and Post on a Webpage .............................................21
Save as .jpg.................................................................................21
How to Fix an Inverted Projector Image ...........................................21
Create an Image for the A/V Mute Display........................................21
Hints about File Management..........................................................22
Connect to a VCR .........................................................................22
Work with Sound .........................................................................22
Practice ................................................................................................22
Resources.............................................................................................23

M I S S O U R I R E S E A R C H & E D U C A T I O N N E T W O R K
4
Purpose of the Module SMART Boards are relatively new pieces of equipment, so many teachers have not had an opportunity to see or use one. This module provides teachers with information they need to use the projector, SMART Board™ and remote control. In the eMINTS program, we realize the addition of equipment is not the most important part of the change that occurs in classrooms. Knowing how to use a SMART Board will help teachers apply more effective teaching strategies. This module goes beyond how to use the equipment to suggest ways a SMART Board can be used for effective student-centered, inquiry-based learning.
Module Objectives
Learners will be exposed to the SMART Board and Notebook software.
Learners will have hands-on opportunities to use the SMART Board.
Learners will gain knowledge about how the SMART Board can be used to support student-centered, inquiry-based learning in the classroom.
Learners will brainstorm ways they will use the SMART Board in the future and
create a plan.

M I S S O U R I R E S E A R C H & E D U C A T I O N N E T W O R K
5
SMART Board Tutorial
Starting Out Explore the computer software that runs the SMART Board. Every time you use the SMART Board, turn the projector on first; then turn on the computer. Your computer is set up to launch the SMART Board software automatically. Your laptop also has SMART Board software, but it does not start up automatically. To use your laptop with the SMART Board, plug in the laptop to the SMART Board, then go to Start > Programs > SMART Board software. The Tool System Tray shortcut on the computer’s desktop allows easy access to the main SMART Board options. Tool System Tray
Floating Tool Bar The floating tool bar lets you use a highlighter, eraser, pen or other tools on any document you have on your screen. It also lets you capture what is on the whole screen or part of it so you can paste it into another document or print it.
Notebook – Opens the SMART Notebook Program.
Keyboard - Opens a keyboard on the SMART Board so you can type information directly on the board.
Floating Tools - Opens a small window of tools for easy access.
Control Panel - Opens the Control Panel, explained in more detail later.
Orient - Opens the window that lets you orient the board so it works correctly.

M I S S O U R I R E S E A R C H & E D U C A T I O N N E T W O R K
6
Floating Tools – In the Control Panel window under the Floating Tools tab, you can choose the tools you want to appear on the Floating Toolbar.
When you open the SMART Board software the first time you may need to use the Control Panel to set it up:
• In the Control Panel Window on the Boards tab, under Serial Ports click on Select….
Follow the on-screen directions. The software will search to find out if a SMART Board is attached to your computer.
Before using the SMART Board the first time (and about once a week after that) you need to orient the board. This process defines sensitive points so the board will be accurate when you write on it and use your hand as a mouse. (The section below comes from the SMART Board manual.) Quick orientation requires only nine clicks to complete and is well-suited for fast orientations. If your Board is accidentally moved or jostled during a presentation, use the Quick orientation to re-orient quickly and with minimal interruption.
M I S S O U R I R E S E A R C H & E D U C A T I O N N E T W O R K
7
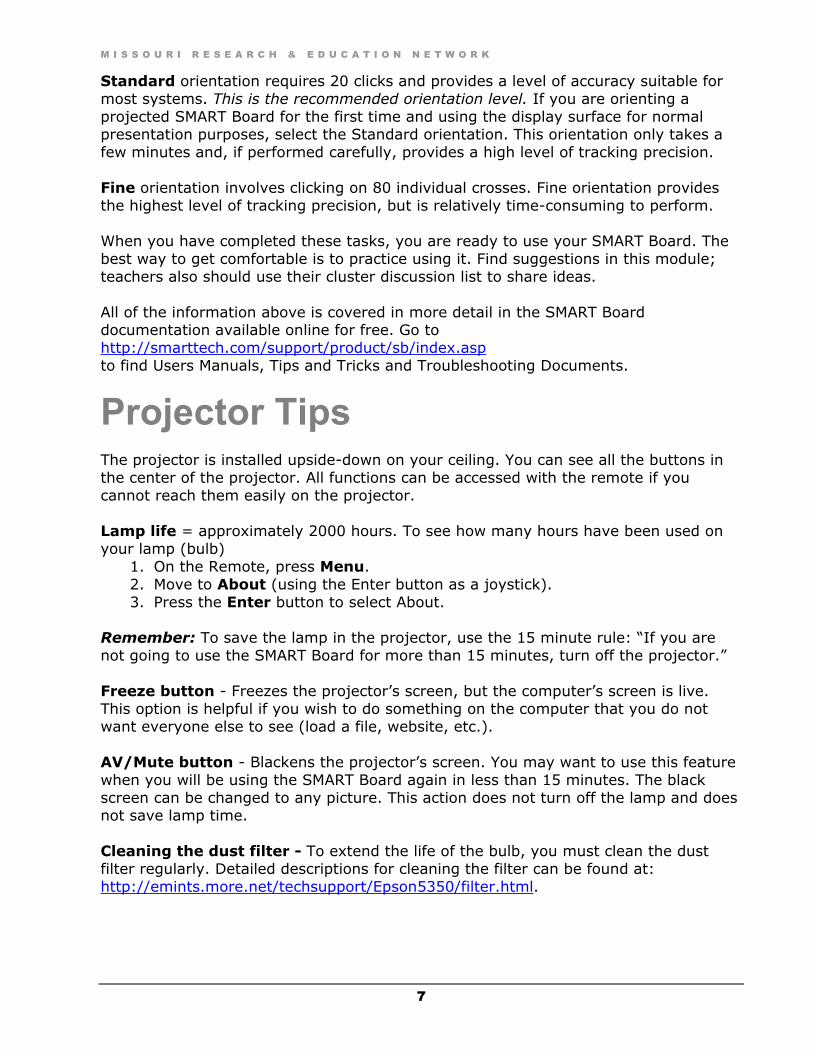
Standard orientation requires 20 clicks and provides a level of accuracy suitable for most systems. This is the recommended orientation level. If you are orienting a projected SMART Board for the first time and using the display surface for normal presentation purposes, select the Standard orientation. This orientation only takes a few minutes and, if performed carefully, provides a high level of tracking precision. Fine orientation involves clicking on 80 individual crosses. Fine orientation provides the highest level of tracking precision, but is relatively time-consuming to perform. When you have completed these tasks, you are ready to use your SMART Board. The best way to get comfortable is to practice using it. Find suggestions in this module; teachers also should use their cluster discussion list to share ideas. All of the information above is covered in more detail in the SMART Board documentation available online for free. Go to http://smarttech.com/support/product/sb/index.asp to find Users Manuals, Tips and Tricks and Troubleshooting Documents.
Projector Tips The projector is installed upside-down on your ceiling. You can see all the buttons in the center of the projector. All functions can be accessed with the remote if you cannot reach them easily on the projector. Lamp life = approximately 2000 hours. To see how many hours have been used on your lamp (bulb)
1. On the Remote, press Menu. 2. Move to About (using the Enter button as a joystick). 3. Press the Enter button to select About.
Remember: To save the lamp in the projector, use the 15 minute rule: “If you are not going to use the SMART Board for more than 15 minutes, turn off the projector.” Freeze button - Freezes the projector’s screen, but the computer’s screen is live. This option is helpful if you wish to do something on the computer that you do not want everyone else to see (load a file, website, etc.). AV/Mute button - Blackens the projector’s screen. You may want to use this feature when you will be using the SMART Board again in less than 15 minutes. The black screen can be changed to any picture. This action does not turn off the lamp and does not save lamp time. Cleaning the dust filter - To extend the life of the bulb, you must clean the dust filter regularly. Detailed descriptions for cleaning the filter can be found at: http://emints.more.net/techsupport/Epson5350/filter.html.
M I S S O U R I R E S E A R C H & E D U C A T I O N N E T W O R K
8
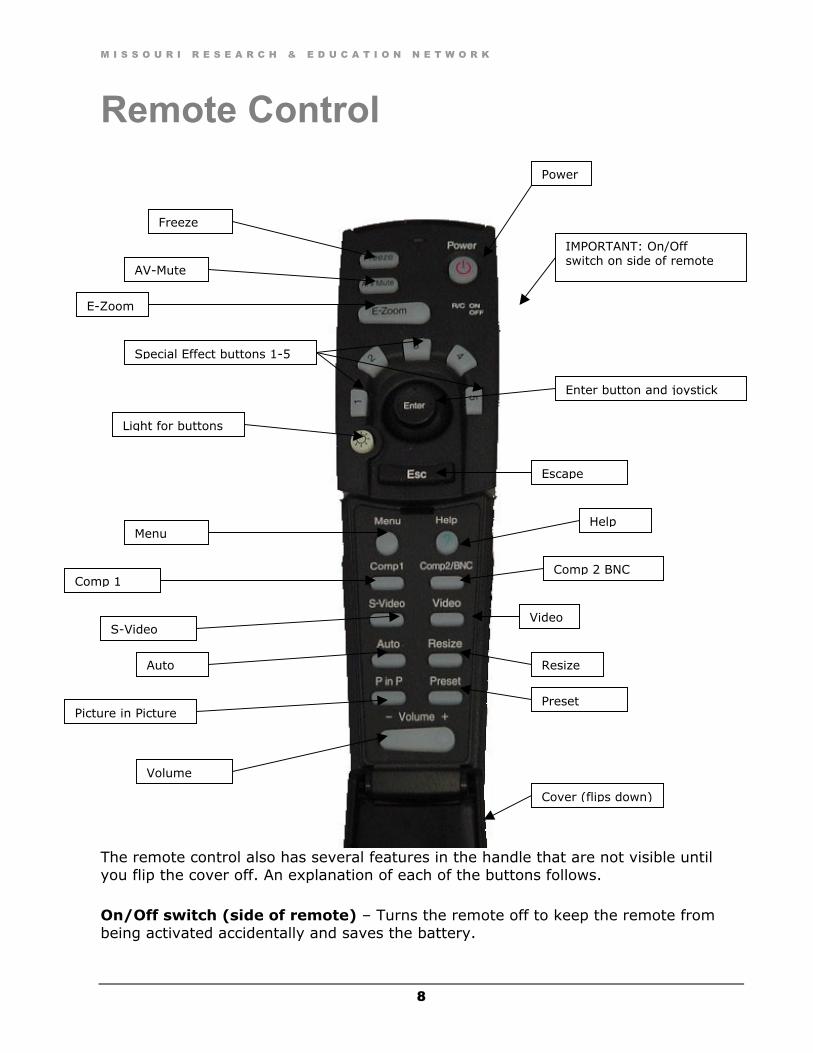
Remote Control
The remote control also has several features in the handle that are not visible until you flip the cover off. An explanation of each of the buttons follows.
On/Off switch (side of remote) – Turns the remote off to keep the remote from being activated accidentally and saves the battery.
Freeze
AV-Mute
E-Zoom
Special Effect buttons 1-5
Light for buttons
Enter button and joystick
Escape
IMPORTANT: On/Off switch on side of remote
Menu Help
Comp 1
S-Video
Comp 2 BNC
Video
Auto Resize
Picture in Picture Preset
Volume
Power
Cover (flips down)

M I S S O U R I R E S E A R C H & E D U C A T I O N N E T W O R K
9
Power – Turns the projector on or off. To turn the projector off, you must press this button twice. Reminder: The projector takes about a minute to cool and cannot be turned back on until cooled. If you are not going to use the projector for more than 15 minutes, turn it off.
Freeze – Pressing this button freezes the screen. The image remains on the SMART Board while you switch to what you want on the computer. This function is very helpful when you need to do something on the teacher workstation, but the students need to see what has been projected on the screen.
A/V mute – Pressing this button blackens the screen. Be careful, the projector is still running even though the screen is black. You can project a picture of your choice instead of the black screen. Note: Using A/V mute does not save lamp life.
E-Zoom – This button lets you enlarge or reduce the image size. If the area you want to zoom in on is not pictured, press the Enter button and scroll image to desired location. For example, this button can be helpful when zooming in on a URL.
Comp 1 – This button tells the projector to view what is on the computer screen. There is a small delay when the projector switches inputs. VCR - This button lets the projector view what is in the VCR. There is a small delay when the projector switches inputs.
P in P – Picture-in-picture lets you view a video and the image on the computer screen at the same time. The video plays on top of the computer screen; it cannot show a computer screen on top of video. The image can be resized with the E-Zoom button and can be moved by using the arrow keys. Press Esc to exit P in P.
Volume – Controls the volume on the projector.
Light – Illuminates the buttons on the remote control for ten seconds.
Esc – The escape button ends something you have chosen with the remote (menu, zoom, etc.). It also acts as a right mouse click when viewing a computer image. When running in menu mode, this button returns to the previous screen.
Enter (pointer buttons) – This button acts as a left mouse click when running a computer image. This button also acts as a joystick to navigate the menu screens.
Effects 1-5 – Preprogrammed special effects that let the remote act as a mouse. 1) Changes the mouse cursor to a stamp 2) Box drawing tool 3) Marker 4) Draws a freehand line 5) Clears the screen

M I S S O U R I R E S E A R C H & E D U C A T I O N N E T W O R K
10
Menu – When you press the menu button, a menu appears on the screen. Follow the on-screen directions to navigate and enter information. This document covers the most frequently used menu items. For other menu options, refer to the Epson PowerLite Projector User’s Guide.
Video Position – Lets you use the arrows around the Enter button to move the entire picture on the screen right, left, up or down. Brightness – Lightens or darkens entire screen image. Contrast – Adjusts the difference between light and dark. Sharpness – Adjusts the sharpness of entire image. Resolution – Leave at AUTO setting.
Audio - This menu permits changes to the volume and quality of sound. Effect - This menu changes the effects assigned to buttons 1-5. Setting
Keystone – Adjusts trapezoid distorted images. P in P – Selects the image source. Message – Specifies what is shown on blackened screen. Prompt – Identifies image source. A/V mute – What is displayed when A/V is turned off. Lets you change the image displayed when in A/V mute mode.
User’s logo - See Creating an Image for A/V Mute Display in the Advanced Tips and Tricks section. Advanced
Language – Select language for menus. Rear projection – Mirrors the image displayed on screen. Ceiling – Lets you flip the image upside down.
About - Lamp usage – Lets you see how many hours the lamp has been used. Lamps generally last about 2000 hours.

M I S S O U R I R E S E A R C H & E D U C A T I O N N E T W O R K
11
SMART Notebook Menus File New - Creates a new Notebook file, not a new page. Open - Opens a saved Notebook file. Save - Saves the Notebook file currently open. Save As - Asks you to change the name or location of the Notebook file you are about to save. Save As JPG - Saves the Notebook as a graphic file that can be put on the Web. Save As HTML - Saves the Notebook file so it can be opened with Netscape Navigator or Internet Explorer. Send Mail – You can send your saved Notebook file to someone else as an e-mail attachment. Print - Prints all the pages of your Notebook file. Print Page - Prints only the Notebook page you are on. Page Setup - Gives choices about how a printed Notebook will look. Print Preview - Shows what the Notebook will look like when printed. List of the Last Files Opened – A shortcut that lists the last few files you have worked on. Exit - Shuts down the SMART Notebook program.
Edit Undo - Cancels the last action. Redo - Reinstates the original action. Cut - Cuts the highlighted text or object so you can place it in a different location or page. Copy - Copies the highlighted text or object so you can put it in another place. Paste – Places the text or object you just cut or copied in a new location. Delete - Removes or erases the text or object you selected (highlighted or clicked on). Select All - Highlights everything on the page so you can copy or cut it. Clear Page - Removes or erases everything from the page. Delete Page - Removes the selected page from the Notebook.
M I S S O U R I R E S E A R C H & E D U C A T I O N N E T W O R K
12
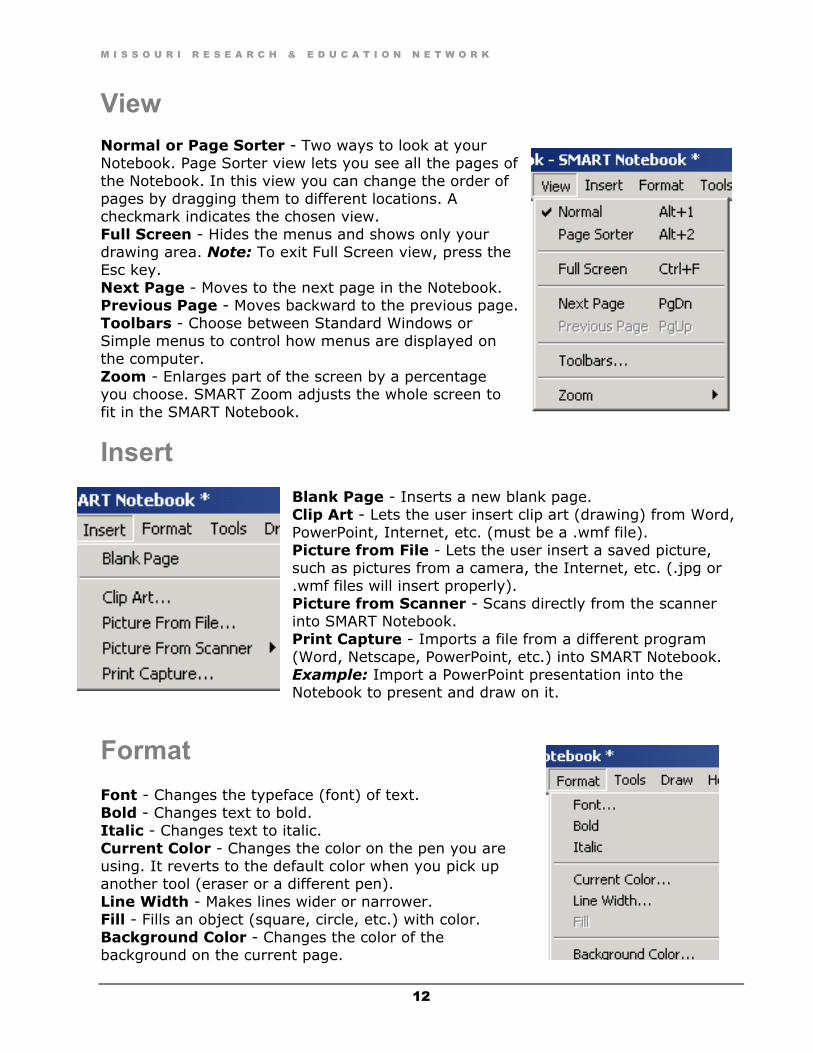
View Normal or Page Sorter - Two ways to look at your Notebook. Page Sorter view lets you see all the pages of the Notebook. In this view you can change the order of pages by dragging them to different locations. A checkmark indicates the chosen view. Full Screen - Hides the menus and shows only your drawing area. Note: To exit Full Screen view, press the Esc key. Next Page - Moves to the next page in the Notebook. Previous Page - Moves backward to the previous page. Toolbars - Choose between Standard Windows or Simple menus to control how menus are displayed on the computer. Zoom - Enlarges part of the screen by a percentage you choose. SMART Zoom adjusts the whole screen to fit in the SMART Notebook.
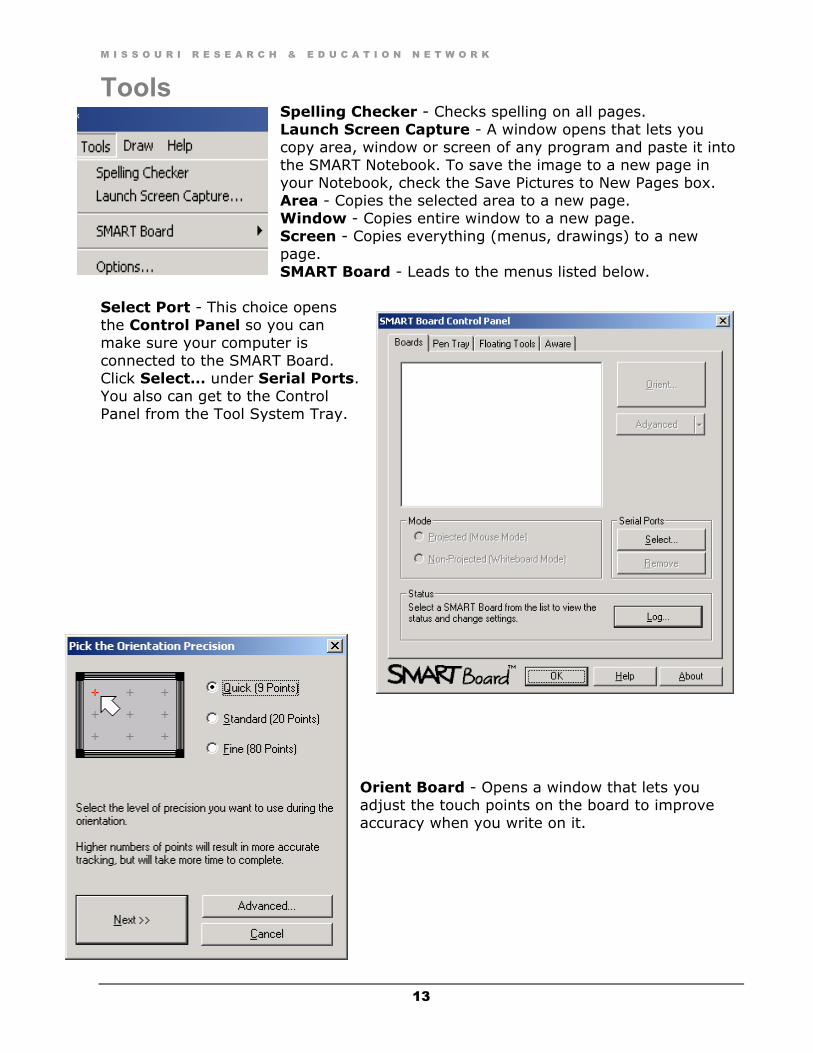
Insert Blank Page - Inserts a new blank page. Clip Art - Lets the user insert clip art (drawing) from Word, PowerPoint, Internet, etc. (must be a .wmf file). Picture from File - Lets the user insert a saved picture, such as pictures from a camera, the Internet, etc. (.jpg or .wmf files will insert properly). Picture from Scanner - Scans directly from the scanner into SMART Notebook. Print Capture - Imports a file from a different program (Word, Netscape, PowerPoint, etc.) into SMART Notebook. Example: Import a PowerPoint presentation into the Notebook to present and draw on it.
Format Font - Changes the typeface (font) of text. Bold - Changes text to bold. Italic - Changes text to italic. Current Color - Changes the color on the pen you are using. It reverts to the default color when you pick up another tool (eraser or a different pen). Line Width - Makes lines wider or narrower. Fill - Fills an object (square, circle, etc.) with color. Background Color - Changes the color of the background on the current page.
M I S S O U R I R E S E A R C H & E D U C A T I O N N E T W O R K
13
Tools Spelling Checker - Checks spelling on all pages. Launch Screen Capture - A window opens that lets you copy area, window or screen of any program and paste it into the SMART Notebook. To save the image to a new page in your Notebook, check the Save Pictures to New Pages box. Area - Copies the selected area to a new page. Window - Copies entire window to a new page. Screen - Copies everything (menus, drawings) to a new page. SMART Board - Leads to the menus listed below.
Select Port - This choice opens the Control Panel so you can make sure your computer is connected to the SMART Board. Click Select… under Serial Ports. You also can get to the Control Panel from the Tool System Tray.
Orient Board - Opens a window that lets you adjust the touch points on the board to improve accuracy when you write on it.

M I S S O U R I R E S E A R C H & E D U C A T I O N N E T W O R K
14
Pen Tray Settings - In the Pen Tray Settings window you can change pen colors and line types.
Draw Group - Combines two or more selected objects into a group. Ungroup – Disconnects the members of a group of objects so you can work with each individually. Order - Arranges objects that overlap (move forward or backward). Select - Makes the Arrow active so you can select or lasso objects or text. Pen - Chooses the pen so you can write on the board. Highlighter - Chooses the highlighter so you can highlight objects or text. Rectangle - Lets you draw squares and rectangles. Ellipse - Lets you draw circles and ellipses. Line - Lets you draw lines. Text - Lets you type text.

M I S S O U R I R E S E A R C H & E D U C A T I O N N E T W O R K
15
Help
Tip of the Day… - Displays the Tip of the Day that appears when you begin the program. Contents… - Takes you to detailed, searchable Help. Tutorial - Takes you to tutorials that walk you through using the SMART Board step-by-step. About SMART Notebook - Displays software version number, license, copyright and technical support information.
Toolbars The mouse changes into a different tool when you choose one from the toolbar. You may not recognize a few tools on the SMART Board Toolbar. In the View menu, if you choose the Standard Windows Toolbar, you will see: The Simple Toolbar has only a few of these buttons and appears on the side of the Notebook screen.
Adds a new document Adds a page to the current document
Pointer-chooses/highlights/clicks
Pen-writes and draws
Highlighter-overwrites with color
Draws shapes, lines or types
Changes color or line width
Draw shapes filled in or empty
Changes font, size and type

M I S S O U R I R E S E A R C H & E D U C A T I O N N E T W O R K
16
TNT (Tried-N-True) Ideas for Using the SMART Board Effective use of the SMART Board begins with a clear idea of the curriculum items addressed and the related Show-Me Standards. Many activities can be enhanced by using the SMART Board. Some are excellent inquiry-based ideas and others are just plain good activities. As you discover effective teaching strategies using your SMART Board, send them to your cluster List and share what you are learning.
Presentation Tool Missouri History and Regions - Ask others in the eMINTS program to take pictures characteristic of their region or showing things of historical significance in their areas. These pictures can be e-mailed to you as attachments. Assign a picture to each group or pair of students in your class. Have them create a presentation for the class that tells more about the picture. Students make presentations on the SMART Board. They will have to research what the picture is and where it came from. Students Presenting the Results of Work - Have students use the SMART Board to display and present their projects. Allowing students to learn from each other through presenting their work on the SMART Board can enhance student learning. Students are more aware of mistakes and the quality of work when it is shown on the big board. Teach the students to give “two stars and a wish” to help evaluate their classmates’ work. Two stars are two things that are really great and the wish is something that can be improved. Do this before giving the final grade and allow the students time to make changes to enhance their projects. Picture Slide Show for an Event - Go to the website Shockwave.com and download the program PhotoJam. Have students take pictures or collect pictures from a folder on your hard drive. Use PhotoJam to make a slide show of these pictures that you can view on the SMART Board. This project can be a meaningful way to use the SMART Board for parent visits, Grandparent’s Day or reviewing a field trip with the students.
Collaboration Group Editing - Errors in spelling and grammar are much easier for kids to see on the SMART Board. Choose a student who takes suggestions well. Have the student present his or her PowerPoint presentation to the class. On each screen, stop to have the students read carefully and make suggestions for improvement. Emphasize that this exercise is to make the presentation better, not to make the author feel bad. Guide the discussion of each screen in a positive way. Have students make comments about what they like as well as what could be better.
M I S S O U R I R E S E A R C H & E D U C A T I O N N E T W O R K
17
Nutrition - Display pictures or words that represent different foods on the board. Have students work together to plan nutritious meals with these items. Then, have each group drag items in its meal to form one nutritious meal on the SMART Board.
Patterns - Type random numbers on the SMART Board. Draw a square for students to drag numbers into. Students take turns dragging numbers into the box based on a mystery pattern they observe. No talk about the Mystery Pattern is allowed and the teacher MUST sit on her hands and not give any guidance. Each student must first figure out what the pattern is (for example, even numbers) and then drag in the next number in the pattern. If anyone from the audience thinks it does not fit into the pattern, he or she can challenge the student. The one who put the number in the box must give a solid reason why his or her choice fits the pattern. If the individual does, the game goes on. If not, his or her number is dragged out and someone else must try. This game can continue as students make up different patterns. Sorting - Put up several columns labeled with characteristics that kids are working on (for example, different ways to make a word plural). Type individual words at the bottom of the screen and have kids drag the words into the correct column. This task can be done with many tools. Inspiration - Use Inspiration software on the SMART Board to build things that will help students learn.
Have students participate in webbing the content of a unit you will study or need to review. Move pieces of the web around as students discuss the subject. The final web can be printed and copied so all students have a representation of what you worked on together.
Create a Venn diagram on the board. Begin with a series of words or pictures that can be dragged around into the correct spaces.
Brainstorming - The SMART Board is a great tool for brainstorming activities. Rules for brainstorming are available from the WebQuest site: http://projects.edtech.sandi.net/staffdev/tpss99/processguides/brainstorming.html Brainstorming Procedure
In a small or large group select a leader and a recorder. Neither role has to be filled by the teacher. The recorder records ideas on the SMART Board.
Define the problem or idea to be brainstormed. Make sure everyone is clear on the topic being explored.
Set up the rules for the session. They should include: o let the leader have control o allow everyone to contribute o ensure that no one will insult, demean or evaluate another participant or
his/her response o state that no answer is wrong o record each answer unless it is a repetition o set a time limit and stop when time is up
M I S S O U R I R E S E A R C H & E D U C A T I O N N E T W O R K
18
Start brainstorming. Have the leader select members of the group to share their answers. The recorder should write down all responses, so everyone can see them. Make sure not to evaluate or criticize any answers until the brainstorming session is complete.
After you finish brainstorming, review the results, then: o look for any ideas that are repeated or similar o group like concepts together o eliminate responses that definitely do not fit o finally, discuss the remaining responses as a group
Variation: Give students five minutes to brainstorm silently, then do round robin reporting where each student gives one suggestion at a time until all participants have given all their ideas.
Consensus Building Making Inferences and Deductions - Give small groups of students a chance to find a picture and put it into a PowerPoint slide show they will present on the SMART Board. (Use the scanner or digital camera or save a picture from the Internet.) It is a good idea to allow students to use the digital camera themselves. Make a rule that they must have the neck strap on at all times and send them in pairs. After they find a picture, the students should look at the picture carefully to find out things they can infer from it and make up questions that will lead the class to find these things. Then have the students take turns presenting their picture to the class and having the other students make inferences and deduce information from it. To help them understand what to do, begin with an example: show a picture of a large vessel (for example, barge, ocean cargo ship). What can you deduce or conclude? Look at the water. Are there objects in it? Can you tell which way the river flows? Look at the wake. Can you tell which way the vessel is moving? Look at the shoreline. Can you tell which city or country it is in? Can you tell if it is loaded? What do you think it is loaded with? Why?
Digital Benefits Art Gallery - The SMART Board lets you show the whole class examples of various kinds of art or art from a particular gallery. Give students examples of a certain type of art and then work to create a piece of art in that style. Groups can scan their pictures then drag them straight into the SMART Board software. Each group can demonstrate what it has created and the class can decide into which style of art their work fits. Saving the Display for Future Use - The SMART Board can be used to display a KWL chart the whole class fills out at the beginning of a unit. The L portion can be filled out after the learning has occurred. The KWL chart also can be printed so students have a copy for reference. SMART Notebook files can be saved as .html documents, which means that they can be added as is to your website. They can be an online record for an absent student or for parents who want to know what you are doing during the school day.

M I S S O U R I R E S E A R C H & E D U C A T I O N N E T W O R K
19
Demonstration Graphing - Students gather information from each other by asking questions such as What kind of pet do you have? What is your favorite food? They then work in groups to display the results using assorted graphs and charts. Show the results on the SMART Board. Students can scan paper graphs and charts into the computer or create them in Excel. Compare. Do they all show the same information? Which format is easier to understand and why?
Tessellation - Students take pictures with the camera of a tessellation they see and display them on the SMART Board, allowing others to find the tessellation. Isolate the tessellation and make it bigger. Try to do what M.C. Escher does to make a picture. Handwriting - Many teachers use the SMART Board to demonstrate handwriting. If what is written on the board is legible, the handwriting recognition software will convert it into typing. It is possible to scan a piece of handwriting paper so there are lines to guide the writing. In the newest versions of SMART Notebook, templates for handwriting paper and graph paper are available.
Caution – Use These Techniques with Care SMART Boards, like most computer equipment, can detract from or enhance the classroom learning environment. The following activities can be overused; most put students into passive roles. Worksheets - Scanning a worksheet so it can be displayed on the SMART Board can be a poor use of the SMART Board. Students passively fill out the blanks as you show them on the SMART Board. There may be reasons for this use, like filling in a standardized form, but generally it is not an effective way to use the SMART Board. Taking Turns - Watch out for activities that do not involve everyone, but involve each person taking one turn and everyone else remaining passive listeners. Taking turns makes sense at times, but it may mean that only one student at a time is actively involved in the lesson. Doing For Rather than Doing With - Demonstration can be good, but if at all possible let the students explore and learn. For example, have students discover how to make a graph by giving them some basic instructions rather than showing them everything on the SMART Board first.

M I S S O U R I R E S E A R C H & E D U C A T I O N N E T W O R K
20
General Tips
Use Group (in Draw menu) to group letters together (to move or select).
Use Ungroup (in Draw menu) to ungroup letters in words to move the individual letters.
You cannot ungroup typed letters, only handwritten letters. You can Drag text (or objects) from the larger Notebook area onto a page in the
sorter view on the right side of the screen. You can Copy and Paste data from other programs. For example, in Word,
highlight text, go to Edit > Copy. Open SMART Notebook, go to Edit > Paste. Clean the board with Windex or whiteboard cleaner and a soft cotton cloth. Erase all writing before spraying cleaner. To remove permanent marker from the board, write over the permanent
marker marks with a dry erase (whiteboard) marker many times to soften and remove the permanent marker.
Advanced Tips and Tricks
Print capture - In SMART Notebook you can capture part or all of another document and put it on the Notebook Screen:
1. Choose Insert > Print Capture…. 2. In the window that appears choose the file you want to capture. 3. The program takes a picture of the document and opens it in SMART Notebook.
Scan directly into the program - If a scanner is attached to your computer, you can scan directly into the SMART Notebook:
1. Choose the Insert > Picture from Scanner. 2. In the side window choose Acquire. When you choose Select Source you
should see your scanner listed. If it is not listed, you will not be able to scan. 3. When a window opens saying that it is connecting to the scanner, please wait.
You should hear your scanner wake up. 4. A scanner window will open. 5. Select Preview to see what is on your scanner. 6. Choose the part of the scanner bed that you want to put into the SMART
Notebook by drawing a square around it and pressing Scan. 7. The scanned picture will appear in the Notebook. You can move or resize it. Use the Floating Tool Bar with other applications - The Floating Toolbar can appear on the screen when you are using other applications such as Netscape or Microsoft Word.
1. If you are in a Word document and want the Floating Toolbar to appear, click on the SMART Board icon on the toolbar at the bottom of your screen where you find the Start Menu.
2. The Tool System Tray will appear. 3. Click on the Floating Toolbar Buttons.
M I S S O U R I R E S E A R C H & E D U C A T I O N N E T W O R K
21
4. When you click back on your document, it will come forward and the Tool System Tray will disappear, but the floating tools will remain available.
5. You can use the tools in the tray to highlight or mark on any page visible on the screen. The marks will not be saved with the document and will disappear when you scroll in the document.
6. You can use the cameras on the bottom of the screen to take a screen shot of all or part of the screen. SMART Notebook will open and place the image on a blank slide. You also can paste the screen image into documents in other programs such as Word and PowerPoint.
Import pictures – You can import a picture from a file or a piece of clip art into your Notebook. To import:
1. Choose Insert menu. 2. Choose either Clip Art… or Picture from File… 3. Navigate to a selected picture. 4. Double click on the picture to import it into your Notebook page.
Note: Windows machines: Notebook supports Clip Art with a .wmf file extension only. Macintosh machines: Notebook supports Clip Art with a .pict file extension only. Save as .html and post on a webpage – Any Notebook you create can be saved as an .html file and put on the Web:
1. Choose File > Save as HTML. 2. Give the file a name and choose the location to save it. If you plan to add it to
your website, put it into the folder with the rest of your website files. 3. The file is saved as a webpage including one .html file and a folder of images.
The file will open in Page Sorter View, but you can click on any of the pages to enlarge and see the whole thing.
Save as .jpg – To use one of your Notebook pages as a graphic on a webpage or in a PowerPoint presentation, you can save it as a .jpeg (picture format). Go to File > Save as JPG. Note: You also can save in .pict format, but that format works only in some Macintosh applications. How to fix an inverted projector image (if it appears upside down) – Your projector is hanging from your ceiling, so it has been adjusted to project upside down (which is right side up on the SMART Board). Occasionally the picture flips back. If this happens follow these steps:
1. Lift the flap to the bottom part of the remote. 2. Press the Menu key. 3. Use the directional button (Enter) to go to Advanced. 4. Use the directional button to go to Ceiling. 5. Move the highlight to ON and press Enter. 6. The SMART Board image returns right side up.
Create an image for the A/V Mute display
1. Find a picture you want on the screen when you press the A/V Mute button. 2. Press the Menu button on the remote control. 3. Go to User’s Logo options. Press Enter for the User’s Logo Setting Window. 4. When asked, “Do you use the present image as a user logo?” press Yes, then
Enter.

M I S S O U R I R E S E A R C H & E D U C A T I O N N E T W O R K
22
5. Select the area you want displayed on the screen. Press Enter. 6. When asked, “Do you use this image?” press Yes, then Enter. 7. Select a zoom rate, press Enter. 8. When asked, “Do you save this user logo?” press Yes, then Enter. 9. When “Saving the user logo is completed” appears, press Menu or Enter to
exit the set up.
Hints about file management – It is a good idea to create a folder on your desktop where you can put all the files you use on the SMART Board. You might want to name this shortcut folder SMART Board. Connect to a VCR When you use your SMART Board to show anything from your VCR you are using it the same way you would use a conventional pull down white screen. The important difference is that you need to hook up your VCR to the projector through the plugs in the wall plate. The wall plate is well marked; just be sure to plug the VCR cable into three slots—Video, Audio Left and Audio Right—on both the VCR and the wall plate. Use the cable in the box of cables provided by Schiller’s. Work with sound The projector has good speakers and volume control, so the whole class can hear. Instead of television or computer speakers, the sound comes from the projector.
Two times you may want sound to come out of the projector:
When you show a video from a VCR. Cables run from the VCR (Audio Left and Audio Right) to bring audio from the VCR through the projector.
When you want sound from the computer to come through the projector. A cable should go from the Audio Out connection on the back of the computer to the Audio connection on the wall plate. Match the cable to the ports so all sounds that usually come through the computer workstation speakers come through the projector. (Note: A small piece of hardware called a splitter, which can be found at electronics stores, can let you have sound come through both the computer and the projector at the same time.)
Practice
Before your next group session, try using your SMART Board in many different ways. Then send e-mail to your Cluster discussion list describing one of the ways you liked best and how it worked for you. Ideas to get you started:
Use the SMART Board for Daily Oral Language. Lead a brainstorming session using the SMART Board. Use the SMART Board to demonstrate something for your students. Have a student or group of students present a project using the SMART Board. Try using the Handwriting recognition feature. Try using the Floating Toolbar to highlight important things on a website. Use the SMART Board for a sorting activity

M I S S O U R I R E S E A R C H & E D U C A T I O N N E T W O R K
23
Resources SMART Tech website http://smarttech.com/support/product/sb/index.asp Interactive Whiteboard Evaluation http://www.mirandanet.ac.uk/pubs/smartboard.htm SMART Board Math (an eThemes Resource) http://emints.more.net/ethemes/resources/S00000187.html