Embed Size (px)
Citation preview
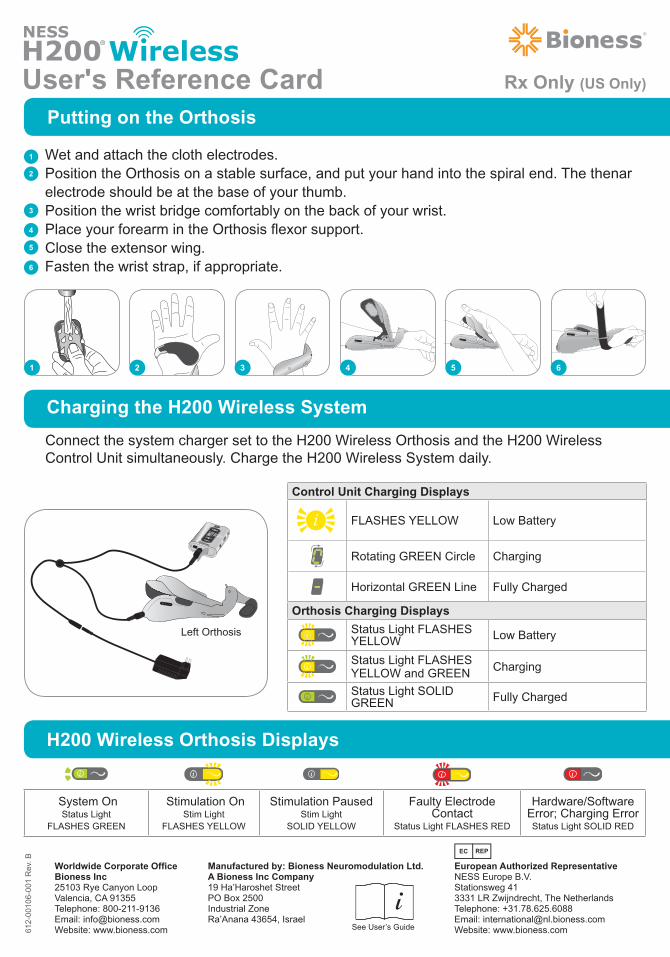
Putting on the Orthosis
Manufactured by: Bioness Neuromodulation Ltd. A Bioness Inc Company19 Ha’Haroshet StreetPO Box 2500Industrial ZoneRa’Anana 43654, Israel
Worldwide Corporate Office Bioness Inc25103 Rye Canyon Loop Valencia, CA 91355 Telephone: 800-211-9136Email: [email protected]: www.bioness.com
User's Reference Card
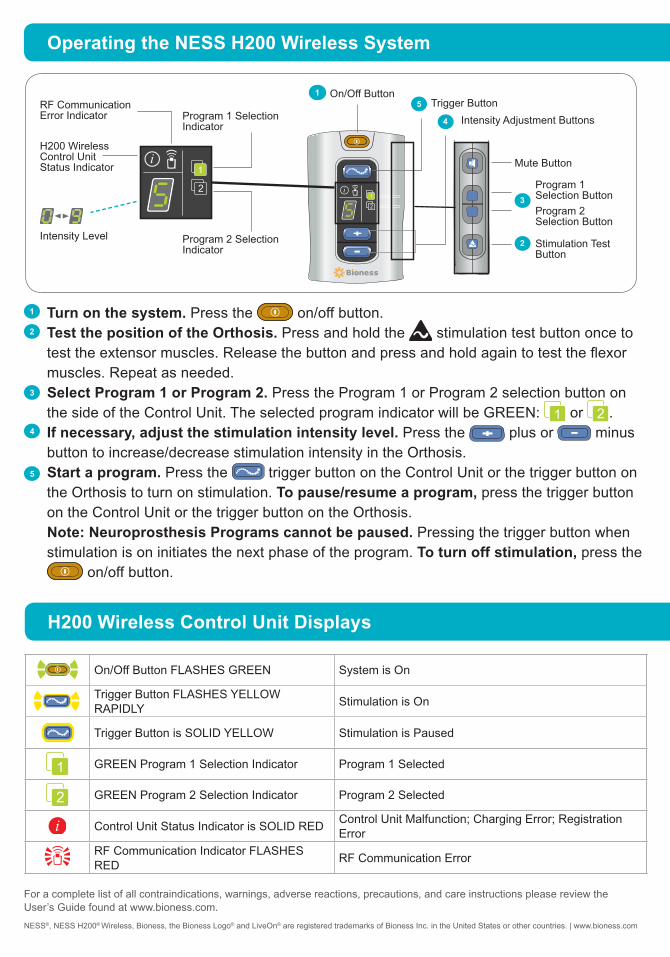
Connect the system charger set to the H200 Wireless Orthosis and the H200 Wireless Control Unit simultaneously. Charge the H200 Wireless System daily.
Charging the H200 Wireless System
Control Unit Charging Displays
FLASHES YELLOW Low Battery
Rotating GREEN Circle Charging
Horizontal GREEN Line Fully Charged
Orthosis Charging Displays
Status Light FLASHES YELLOW Low Battery
Status Light FLASHES YELLOW and GREEN Charging
Status Light SOLID GREEN Fully Charged
H200 Wireless Orthosis Displays
System OnStatus Light
FLASHES GREEN
Stimulation OnStim Light
FLASHES YELLOW
Stimulation PausedStim Light
SOLID YELLOW
Faulty ElectrodeContact
Status Light FLASHES RED
Hardware/SoftwareError; Charging ErrorStatus Light SOLID RED
612-
0010
6-00
1 R
ev. B
See User’s Guide
Rx Only (US Only)
European Authorized RepresentativeNESS Europe B.V. Stationsweg 413331 LR Zwijndrecht, The NetherlandsTelephone: +31.78.625.6088 Email: [email protected]: www.bioness.com
3 4 5 621
4
5
6
3
Wet and attach the cloth electrodes.Position the Orthosis on a stable surface, and put your hand into the spiral end. The thenar electrode should be at the base of your thumb.Position the wrist bridge comfortably on the back of your wrist.Place your forearm in the Orthosis flexor support.Close the extensor wing.Fasten the wrist strap, if appropriate.
2
1
Left Orthosis
H200 Wireless Control Unit Displays
On/Off Button FLASHES GREEN System is On
Trigger Button FLASHES YELLOW RAPIDLY
Stimulation is On
Trigger Button is SOLID YELLOW Stimulation is Paused
GREEN Program 1 Selection Indicator Program 1 Selected
GREEN Program 2 Selection Indicator Program 2 Selected
Control Unit Status Indicator is SOLID REDControl Unit Malfunction; Charging Error; Registration Error
RF Communication Indicator FLASHES RED
RF Communication Error
Operating the NESS H200 Wireless System
1 Turn on the system. Press the on/off button. Test the position of the Orthosis. Press and hold the stimulation test button once to test the extensor muscles. Release the button and press and hold again to test the flexor muscles. Repeat as needed. Select Program 1 or Program 2. Press the Program 1 or Program 2 selection button on the side of the Control Unit. The selected program indicator will be GREEN: or .If necessary, adjust the stimulation intensity level. Press the plus or minus button to increase/decrease stimulation intensity in the Orthosis.Start a program. Press the trigger button on the Control Unit or the trigger button on the Orthosis to turn on stimulation. To pause/resume a program, press the trigger button on the Control Unit or the trigger button on the Orthosis. Note: Neuroprosthesis Programs cannot be paused. Pressing the trigger button when stimulation is on initiates the next phase of the program. To turn off stimulation, press the
on/off button.
2
3
4
5
NESS®, NESS H200® Wireless, Bioness, the Bioness Logo® and LiveOn® are registered trademarks of Bioness Inc. in the United States or other countries. | www.bioness.com
15
4
On/Off ButtonTrigger Button
Intensity Adjustment Buttons
Program 2 Selection Indicator
Program 1 Selection Indicator
RF Communication Error Indicator
H200 Wireless Control Unit Status Indicator
Program 1 Selection Button
Program 2 Selection Button
Mute Button
Stimulation Test Button
3
2Intensity Level
For a complete list of all contraindications, warnings, adverse reactions, precautions, and care instructions please review the User’s Guide found at www.bioness.com.

![Lupron (leuprolide acetate) Injection, Solution Rx only ... · Lupron (leuprolide acetate) Injection, Solution [Abbott Laboratories] Rx only . DESCRIPTION . Leuprolide acetate is](https://img.pdfslide.us/doc/110x75/5bd5671d09d3f2733e8b8a35/lupron-leuprolide-acetate-injection-solution-rx-only-lupron-leuprolide.jpg)