Embed Size (px)
Citation preview
CYBER RECRUITER 7.0: USER GUIDEDECEMBER 2010
TABLE OF CONTENTSCyber Recruiter Overview 4
Legend..........................................................................................................................................................4Terms...........................................................................................................................................................4
Roles...................................................................................................................................................................................4Icons...................................................................................................................................................................................5Navigation..........................................................................................................................................................................5
Shortcut Links...............................................................................................................................................6Main Menu Bar.............................................................................................................................................7Requistion Management...............................................................................................................................7Applicant Management................................................................................................................................8
Shortcut Links 9
Home Page...................................................................................................................................................9Left-Hand Menu Bar.........................................................................................................................................................10Action Items.....................................................................................................................................................................16
Inbox..........................................................................................................................................................17Inbox Actions....................................................................................................................................................................18
Req List.......................................................................................................................................................23
Main Menu Bar 24Requisitions......................................................................................................................................................................24Applicants.........................................................................................................................................................................25
Help............................................................................................................................................................46Feedback..........................................................................................................................................................................46Tech Support....................................................................................................................................................................46User Manuals...................................................................................................................................................................47On-Demand Training........................................................................................................................................................48Current News...................................................................................................................................................................48About............................................................................................................................................................................... 49
Requisitions 50
Creating a New Requisition.........................................................................................................................50From Scratch....................................................................................................................................................................51From Existing Requisition AND From Template................................................................................................................53
Managing Requisitions................................................................................................................................54Requisition List.................................................................................................................................................................54
Navigating within a Requisition File............................................................................................................55Main Page........................................................................................................................................................................ 56Job Description Page........................................................................................................................................................58
Visibility Software Cyber Recruiter v 7.0 User Guide P a g e | 2
Req Questions Page.........................................................................................................................................................59Applicants Page................................................................................................................................................................60Approvals Page.................................................................................................................................................................71History Page.....................................................................................................................................................................72Notes Page.......................................................................................................................................................................73Requirements Page..........................................................................................................................................................74Costs Page........................................................................................................................................................................75Attachments Page............................................................................................................................................................76Agency Portal Page...........................................................................................................................................................78Print Req.......................................................................................................................................................................... 79Job Boards........................................................................................................................................................................79
Applicants 80
Adding a New Applicant..............................................................................................................................80Online Application – Website...........................................................................................................................................80From Clipboard.................................................................................................................................................................80From File/Advanced Import.............................................................................................................................................82
Managing Applicants...................................................................................................................................85Cyber Recruiter Inbox.......................................................................................................................................................85
Navigating within an Applicant File.............................................................................................................90Activity Page.....................................................................................................................................................................91Experience Page.............................................................................................................................................................109Application Page.............................................................................................................................................................114Status/History Page........................................................................................................................................................115Correspondence Page....................................................................................................................................................116Notes Page.....................................................................................................................................................................119Demographics Page........................................................................................................................................................120Miscellaneous (App Details) Page..................................................................................................................................121References Page.............................................................................................................................................................122Attachments Page..........................................................................................................................................................123Resume Page..................................................................................................................................................................124Print Application.............................................................................................................................................................126
Appendix A – quick find 127Within a Requisition:......................................................................................................................................................127Within an Applicant File:................................................................................................................................................127
Appendix B – Creating Advanced Criteria 128
Visibility Software Cyber Recruiter v 7.0 User Guide P a g e | 3

CYBER RECRUITER OVERVIEW
Thank you for purchasing the Cyber Recruiter Applicant Tracking System from Visibility Software, LLC. This User’s Guide provides process-oriented instructions to all users and is organized along the same timeline and workflow of a typical recruiting process, from creating a new requisition to hiring the right candidate.
‘How to Read’ this User Guide: The Guide is broken down by sections. Each section describes the functionality available using screen prints and information. The screen prints, when appropriate will have RED boxes/YELLOW highlights to emphasis a piece of the system. Some areas will have the below look and feel to give Users information about the section along with tid-bits of helpful suggestions, dependencies, hints or tricks.
LEGEND
The following icons throughout the guide provide Users with more information.
Tip – Hint or Shortcut on how to do something
Dependency – Area of the system relates to another area. Changes should be considered in all areas.
Process – Suggestion and/or example on how to utilize this area.
Based on security permissions in the Cyber Recruiter system, Users will be able to:
Utilize options off of the Main Menu Bar (Requisitions, Applicants, Reports, etc…) Create new requisitions (manually, from a template, and or copying from an
existing requisition) Manage requisitions using all tools and features (Requirements, Approvals, Notes,
etc…) Add Applicants (manually, from email, from a file, from the online application) Manage Applicants using all tools and features (Assigned Requisitions,
Routing/Invites, Offer Letters, References, etc…) Perform Applicant searches (resumes, database, using advanced criteria etc…) Create & Run reports (Applicant & Requisition specific) Manage the “My Preferences” (Change Password, Defaults etc…) Ask for Help (Feedback, Technical Support, User Manuals, etc…) Operate and navigate through the recruiting process from start to finish
TERMS
ROLES
- Admin: A person who has access to the Administrator menu of Cyber Recruiter. - User: A person who has access to the general views of Cyber Recruiter. (Recruiter, Supervisor, Approver, Admin, etc…)- Applicant: A person who will view and review information on the corporate careers site and in the Self Service module.- Employee: A subset of Applicants who have been classified with the status of HIRED in Cyber Recruiter. These people
will view and review information the Self Service module.
Visibility Software Cyber Recruiter v 7.0 User Guide P a g e | 4
ICONS
Here is a list of common icons used in Cyber Recruiter:
Action Icon Location
Save In the header, the right-most icon on the page to save
Cancel In the header, the icon immediately left of the save icon. Note: this icon will not display if the page can only be saved – for example the Inbox setup page.
Print In the header, the left-most icon on the page to print. Note: this icon will not display if the page does not have a report available.
Spell Check Right –hand corner below the field to spell checked
Add Row Top of the Table to add a new record
Delete Row Right of the recordEdit Row Left of the recordEdit Record Right of the record to edit
NAVIGATION
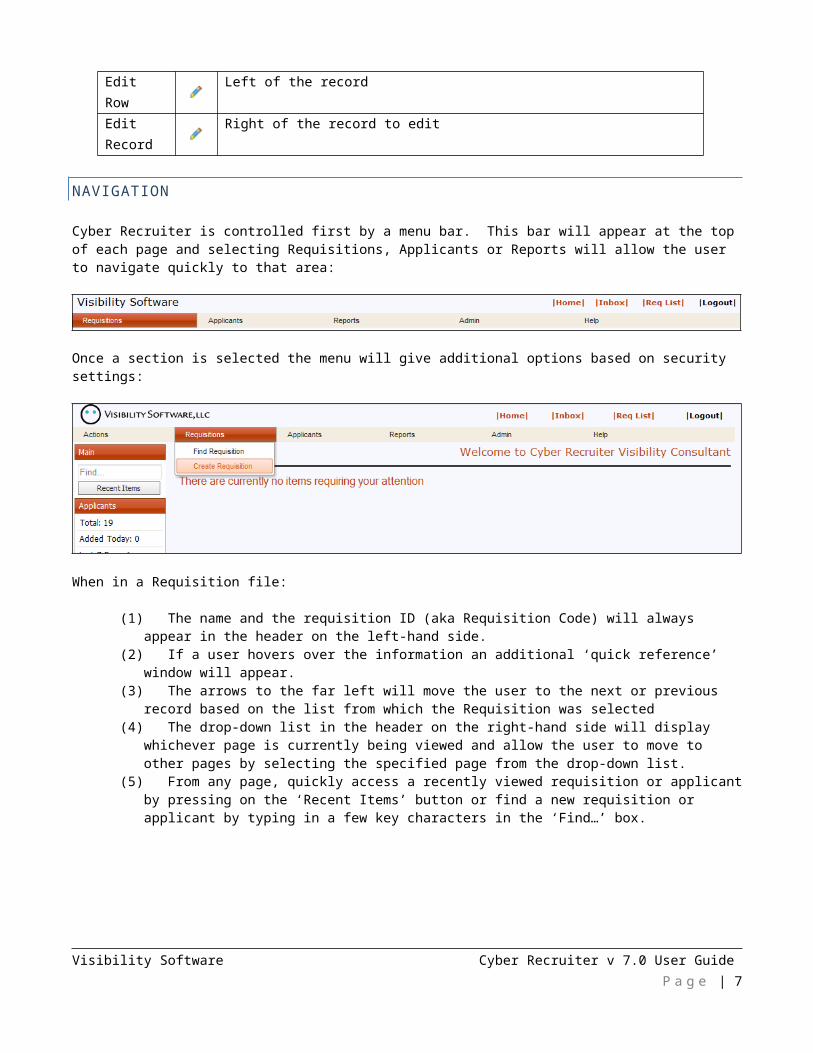
Cyber Recruiter is controlled first by a menu bar. This bar will appear at the top of each page and selecting Requisitions, Applicants or Reports will allow the user to navigate quickly to that area:
Once a section is selected the menu will give additional options based on security settings:
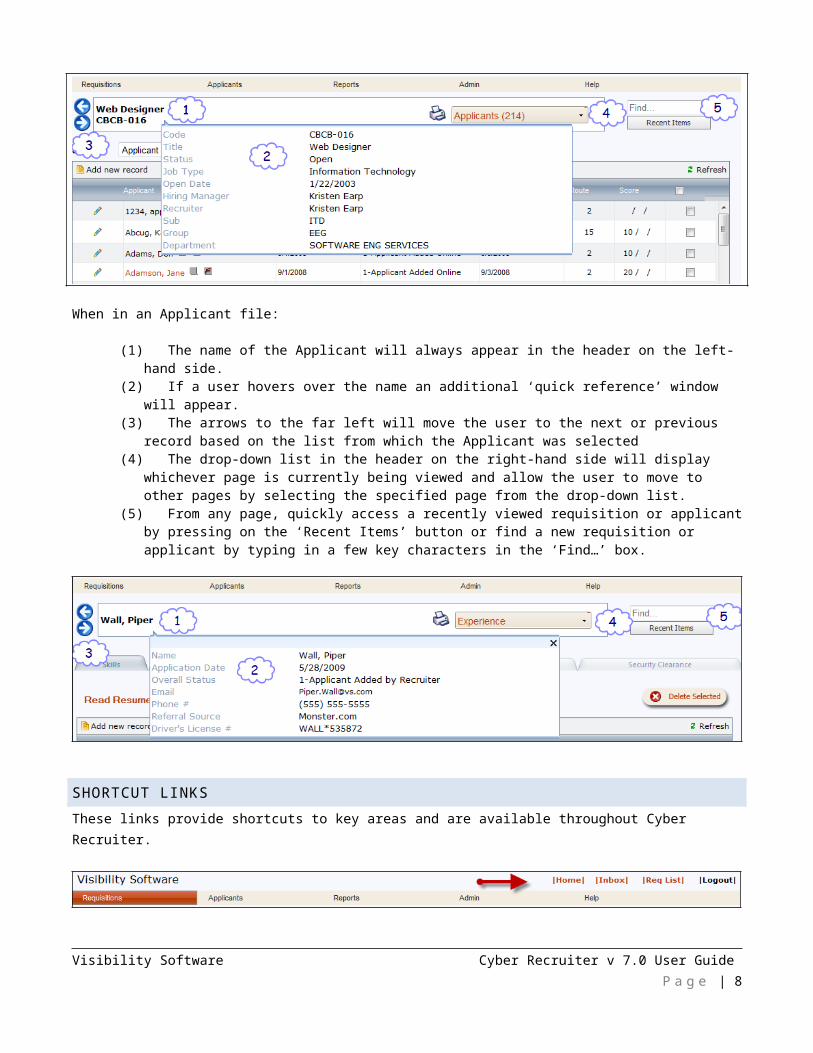
When in a Requisition file:
(1) The name and the requisition ID (aka Requisition Code) will always appear in the header on the left-hand side. (2) If a user hovers over the information an additional ‘quick reference’ window will appear. (3) The arrows to the far left will move the user to the next or previous record based on the list from which the
Requisition was selected(4) The drop-down list in the header on the right-hand side will display whichever page is currently being viewed
and allow the user to move to other pages by selecting the specified page from the drop-down list.
Visibility Software Cyber Recruiter v 7.0 User Guide P a g e | 5
(5) From any page, quickly access a recently viewed requisition or applicant by pressing on the ‘Recent Items’ button or find a new requisition or applicant by typing in a few key characters in the ‘Find…’ box.
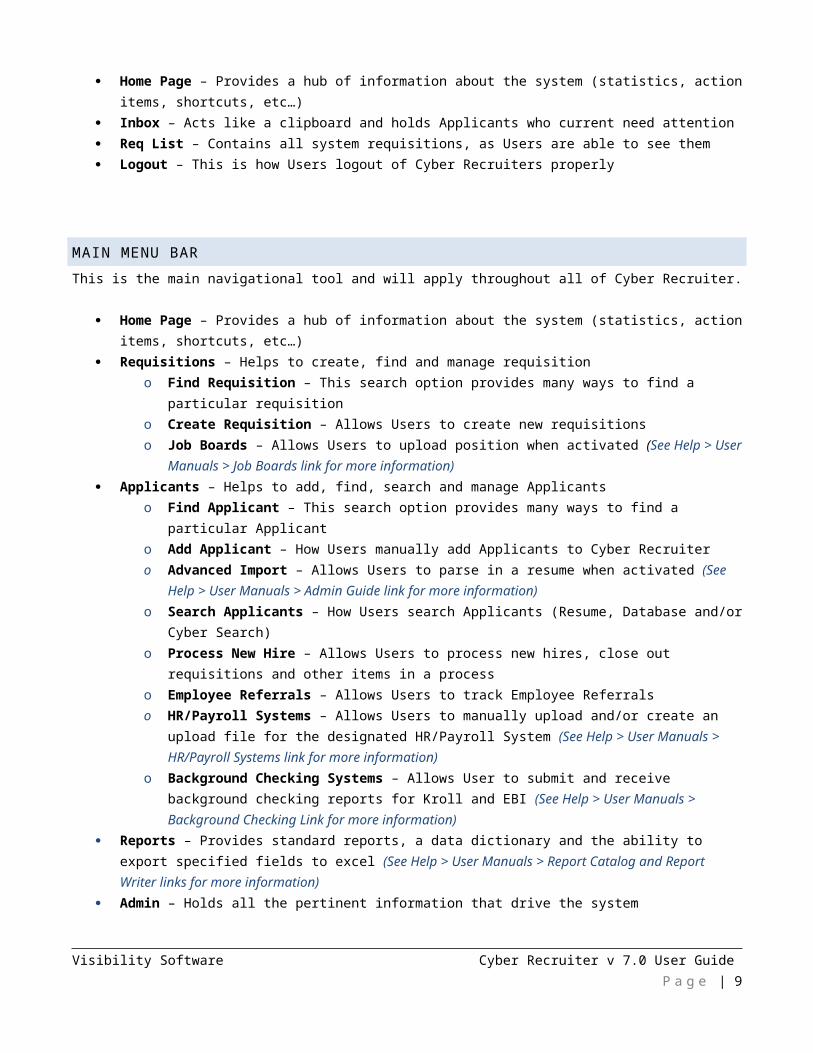
When in an Applicant file:
(1) The name of the Applicant will always appear in the header on the left-hand side. (2) If a user hovers over the name an additional ‘quick reference’ window will appear. (3) The arrows to the far left will move the user to the next or previous record based on the list from which the
Applicant was selected(4) The drop-down list in the header on the right-hand side will display whichever page is currently being viewed
and allow the user to move to other pages by selecting the specified page from the drop-down list.(5) From any page, quickly access a recently viewed requisition or applicant by pressing on the ‘Recent Items’
button or find a new requisition or applicant by typing in a few key characters in the ‘Find…’ box.
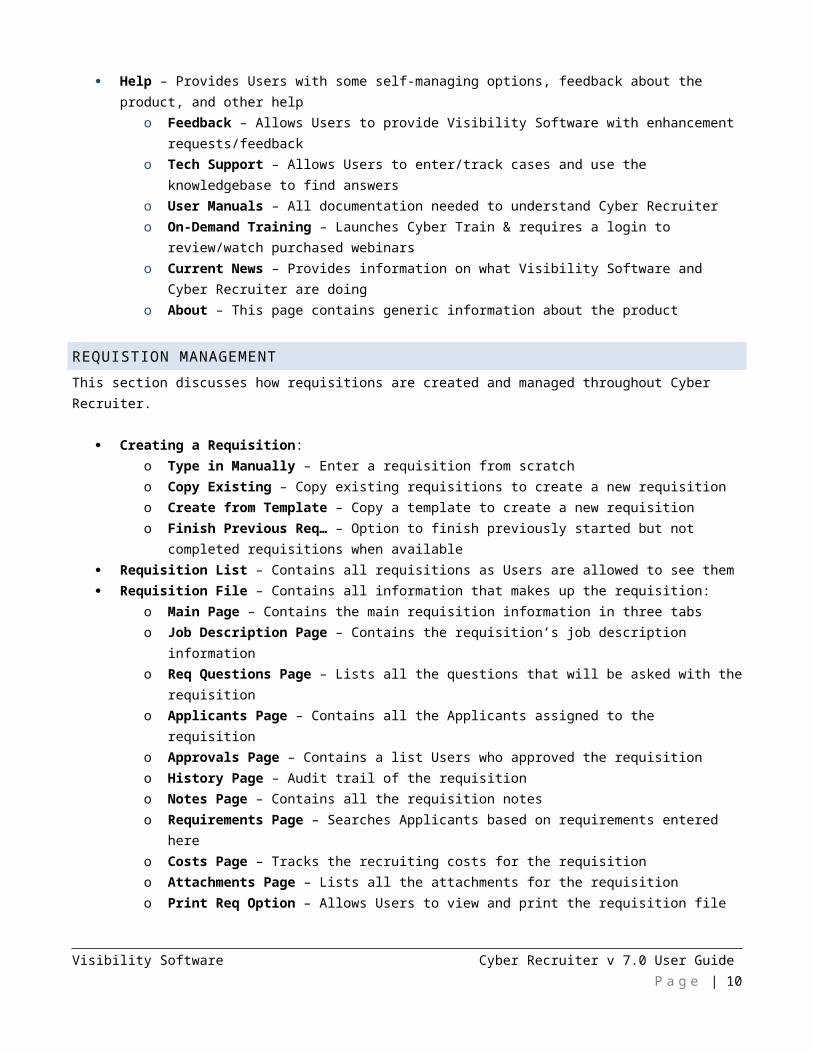
SHORTCUT LINKSThese links provide shortcuts to key areas and are available throughout Cyber Recruiter.
Home Page – Provides a hub of information about the system (statistics, action items, shortcuts, etc…) Inbox – Acts like a clipboard and holds Applicants who current need attention Req List – Contains all system requisitions, as Users are able to see them Logout – This is how Users logout of Cyber Recruiters properly
Visibility Software Cyber Recruiter v 7.0 User Guide P a g e | 6
MAIN MENU BAR
This is the main navigational tool and will apply throughout all of Cyber Recruiter.
Home Page – Provides a hub of information about the system (statistics, action items, shortcuts, etc…) Requisitions – Helps to create, find and manage requisition
o Find Requisition – This search option provides many ways to find a particular requisitiono Create Requisition – Allows Users to create new requisitionso Job Boards – Allows Users to upload position when activated (See Help > User Manuals > Job Boards link
for more information) Applicants – Helps to add, find, search and manage Applicants
o Find Applicant – This search option provides many ways to find a particular Applicanto Add Applicant – How Users manually add Applicants to Cyber Recruitero Advanced Import – Allows Users to parse in a resume when activated (See Help > User Manuals > Admin
Guide link for more information)o Search Applicants – How Users search Applicants (Resume, Database and/or Cyber Search) o Process New Hire – Allows Users to process new hires, close out requisitions and other items in a processo Employee Referrals – Allows Users to track Employee Referrals o HR/Payroll Systems – Allows Users to manually upload and/or create an upload file for the designated
HR/Payroll System (See Help > User Manuals > HR/Payroll Systems link for more information)o Background Checking Systems – Allows User to submit and receive background checking reports for Kroll
and EBI (See Help > User Manuals > Background Checking Link for more information) Reports – Provides standard reports, a data dictionary and the ability to export specified fields to excel (See Help >
User Manuals > Report Catalog and Report Writer links for more information) Admin – Holds all the pertinent information that drive the system Help – Provides Users with some self-managing options, feedback about the product, and other help
o Feedback – Allows Users to provide Visibility Software with enhancement requests/feedbacko Tech Support – Allows Users to enter/track cases and use the knowledgebase to find answers o User Manuals – All documentation needed to understand Cyber Recruitero On-Demand Training – Launches Cyber Train & requires a login to review/watch purchased webinarso Current News – Provides information on what Visibility Software and Cyber Recruiter are doingo About – This page contains generic information about the product
REQUISTION MANAGEMENTThis section discusses how requisitions are created and managed throughout Cyber Recruiter.
Creating a Requisition:o Type in Manually – Enter a requisition from scratcho Copy Existing – Copy existing requisitions to create a new requisitiono Create from Template – Copy a template to create a new requisition o Finish Previous Req… – Option to finish previously started but not completed requisitions when available
Requisition List – Contains all requisitions as Users are allowed to see them Requisition File – Contains all information that makes up the requisition:
Visibility Software Cyber Recruiter v 7.0 User Guide P a g e | 7
o Main Page – Contains the main requisition information in three tabso Job Description Page – Contains the requisition’s job description informationo Req Questions Page – Lists all the questions that will be asked with the requisitiono Applicants Page – Contains all the Applicants assigned to the requisitiono Approvals Page – Contains a list Users who approved the requisitiono History Page – Audit trail of the requisitiono Notes Page – Contains all the requisition noteso Requirements Page – Searches Applicants based on requirements entered hereo Costs Page – Tracks the recruiting costs for the requisitiono Attachments Page – Lists all the attachments for the requisitiono Print Req Option – Allows Users to view and print the requisition file
APPLICANT MANAGEMENT
This section discusses how Applicants are added and managed throughout Cyber Recruiter.
Adding Applicants:o From Clipboard – Allows Users to create an Applicant Fileo From File – Allows Users to create an Applicant File from a resume saved on the system
Applicant File – Contains all information that makes up the Applicant Fileo Activity Page – Internal correspondences and management of Applicants
Assigned Reqs – Lists all the requisitions attached to Applicants Routings – Lists all the routings for Applicants Interviews – Lists all the interviews for Applicants Offers – Lists all Users involved in the Offer Approval Process
o Experience Page – Contains Applicant’s skills/education/employment/military/security information o Application Page – Contains main application information o Status/History Page – Audit trail of the Applicant Fileo Correspondence Page – Lists all interactions with Applicants (emails/letters)o Notes Page – Contains all the Applicant noteso Demographics Page – Contains the Applicant’s Contact and EEO information.o Misc Info Page – Lists additional fields of Applicant informationo References Page – Contains the Applicant’s referenceso Attachments Page – Lists all the attachments for Applicantso Resume Page – Holds the Applicant’s text/formatted resumes and cover letter o Employee Referred Page – Lists referral information for tracking and reporting purposes o Add/Remove to Inbox Option – Adds/removes the Applicant to the User’s Inbox o Print Application – Allows Users to view and print the application
Visibility Software Cyber Recruiter v 7.0 User Guide P a g e | 8
SHORTCUT LINKS
The Shortcut Links are in an easy to locate spot at the top of the page in Cyber Recruiter. Read more about each one to see what they can do.
HOME PAGE
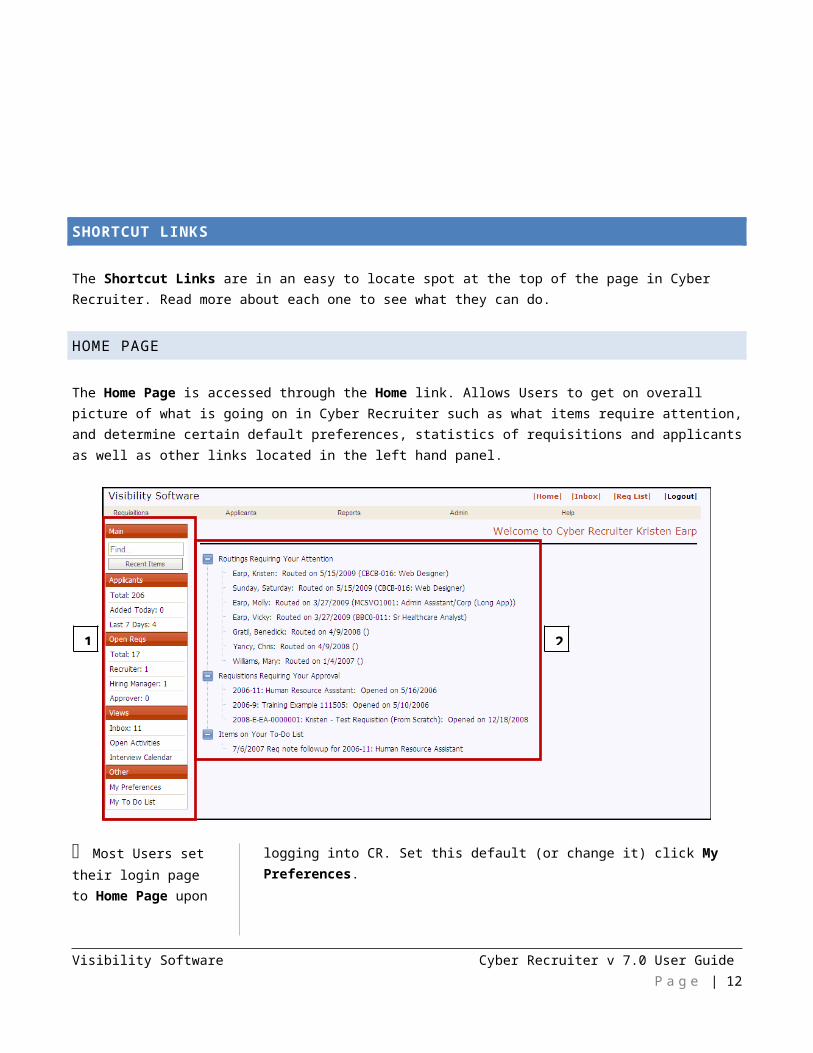
The Home Page is accessed through the Home link. Allows Users to get on overall picture of what is going on in Cyber Recruiter such as what items require attention, and determine certain default preferences, statistics of requisitions and applicants as well as other links located in the left hand panel.
Most Users set their login page to Home Page upon logging into CR. Set this default (or change it) click My Preferences.
Info on the Home Page info depends on each User’s level of security.
The User’s name defaults across the top in the Welcome Banner once he/she is logs into Cyber Recruiter (CR). This helps to identify each particular User who logs into the system.
There are two (2) big features of the Home Page. One feature is the Left-Hand Menu Bar which provides Users a preview of what is statistics and important links. Each item in the list is a hyperlink that either act as a shortcut for Users to find more information about that particular situation or takes Users to see more detailed workflow view.
Visibility Software Cyber Recruiter v 7.0 User Guide P a g e | 9
1 2
The other feature is the middle section that
contains the Action Items. When something is triggering here, it is alerting Users to an open activity that requires attention.
LEFT-HAND MENU BAR
Users can gain an overall view of the system as well as quick access the Open Activities, Interview Calendar, & My Preferences, as well as any other custom links that might be set up for Users by the Administrator.
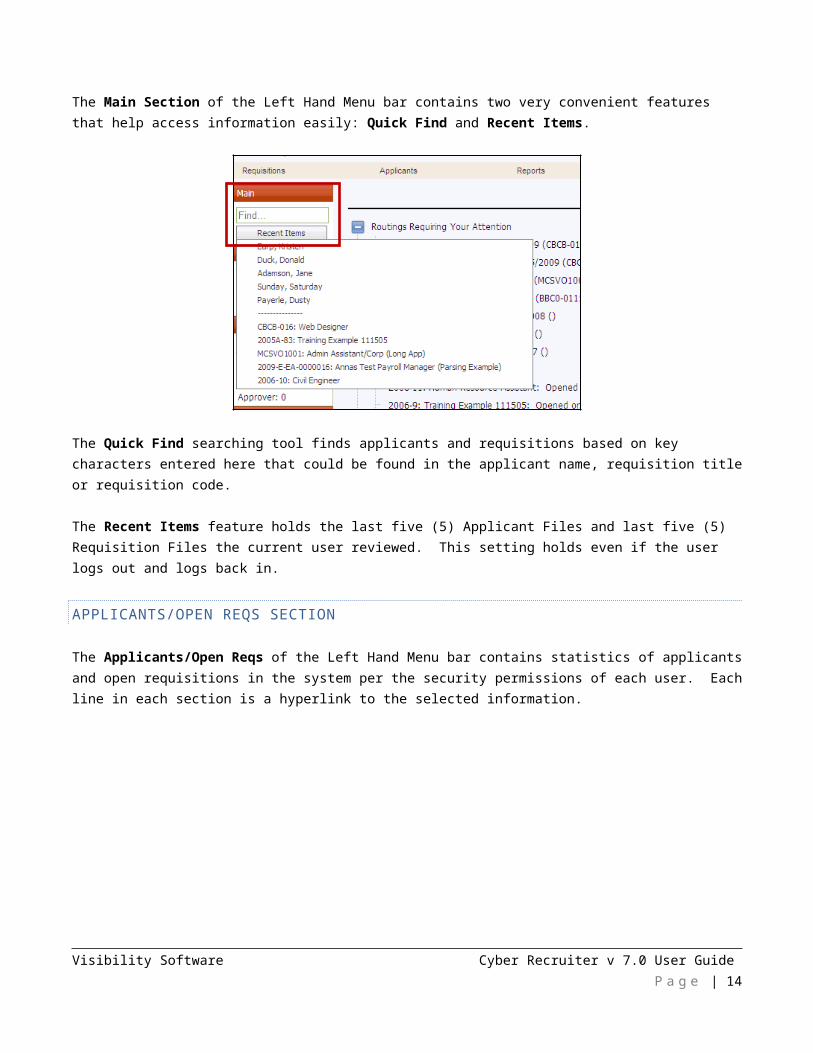
MAIN SECTION
The Main Section of the Left Hand Menu bar contains two very convenient features that help access information easily: Quick Find and Recent Items.
Visibility Software Cyber Recruiter v 7.0 User Guide P a g e | 10
The Quick Find searching tool finds applicants and requisitions based on key characters entered here that could be found in the applicant name, requisition title or requisition code.
The Recent Items feature holds the last five (5) Applicant Files and last five (5) Requisition Files the current user reviewed. This setting holds even if the user logs out and logs back in.
APPLICANTS/OPEN REQS SECTION
The Applicants/Open Reqs of the Left Hand Menu bar contains statistics of applicants and open requisitions in the system per the security permissions of each user. Each line in each section is a hyperlink to the selected information.
VIEWS
Visibility Software Cyber Recruiter v 7.0 User Guide P a g e | 11
The Views option of the Left Hand Menu bar contains hyperlinks to the current user’s Inbox (which is also at the top of the page), Open Activities (Recruiter only link) and Interview Calendar (Interview activities set up through Cyber Recruiter).
OPEN ACTIVITIESOpen Activities allow ‘Recruiter’ users to see what kinds of activities are outstanding in the system.
Check the Show Mine Only checkbox to only see activities initiated by the current user. For example, if the recruiter sent out an interview evaluation form to be completed, the recruiter can check here to see if initiated activity is still outstanding. If the item is listed here then it is outstanding and if it is necessary send a reminder email by checking the boxes next to the names listed and clicking the Email Reminder Button.
INTERVIEW CALENDARInterview Calendar allows Users to see all the interviews setup by month.
Visibility Software Cyber Recruiter v 7.0 User Guide P a g e | 12

Users can filter the view by looking at All Users/Single User views as well as Interviews by Applicant/Interviewer depending on security permissions. The interviews are color coded for convenience. GREEN means the interviewer has ACCEPTED the invite request; RED means the interviewer has DENIED the invite request; whereas BLACK means the interviewer has not yet confirmed their intentions.
If there is interviews setup, the date becomes a hyperlink allowing users to see more information about the interview. Users can send out Email Reminders to those who confirmed their attendance as well as see more information about the Applicant, Requisition or Print the list of interviewers who will be in attendance. This is especially helpful for organizations who like want to give their front desk a list of persons who will be coming daily/monthly.
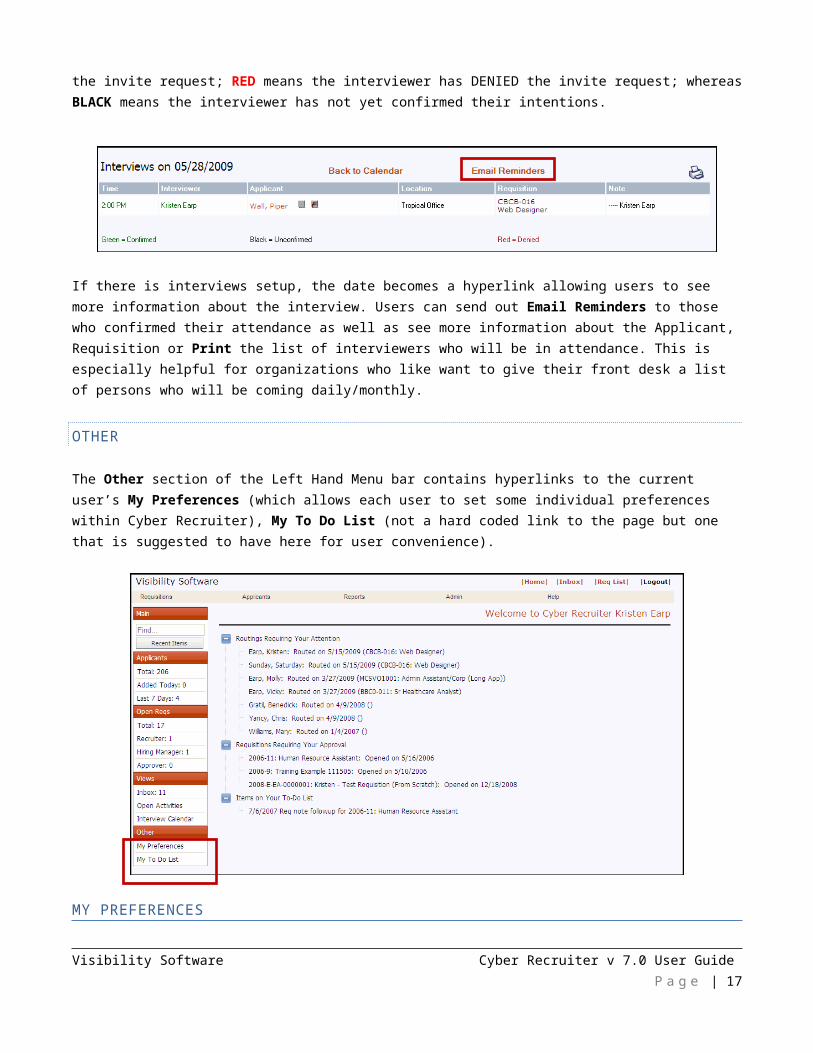
OTHER
The Other section of the Left Hand Menu bar contains hyperlinks to the current user’s My Preferences (which allows each user to set some individual preferences within Cyber Recruiter), My To Do List (not a hard coded link to the page but one that is suggested to have here for user convenience).
Visibility Software Cyber Recruiter v 7.0 User Guide P a g e | 13
MY PREFERENCESMy Preferences > General Tab allows users to set up their own general viewing preferences.
Additionally, passwords are modified through the Click here to change your password link. Passwords can contain letters, numbers, or special characters up to 15 characters in length, but it CANNOT be blank (Note: Passwords also depend on certain security settings determined by the Administrator).
Open Resumes in New Window? best set to YES. It opens a new Internet Browser. If NO, resumes replace the current CR session & Users have to click Back to return to CR.
Login Page field determines what page should first show when the user logs into the system. The Delegate Approver field allows each user to select someone else to conduct approvals and evaluations of Applicants in his/her absence. The specified user receives emails and Home Page tasks for the user. Set this field to BLANK when no delegation is needed. Users can also decide whether to Open Resumes in New Window or not. Lastly, there is the option to Add Headers when Printing Resumes, which will add the applicant’s contact information to the top of each resume page printed out.
Visibility Software Cyber Recruiter v 7.0 User Guide P a g e | 14

My Preferences > Applicant Search Tab allows users to set defaults for the applicant statuses they want to see when doing a Find Applicant search as well as if want to determine a sorting method and application date range.
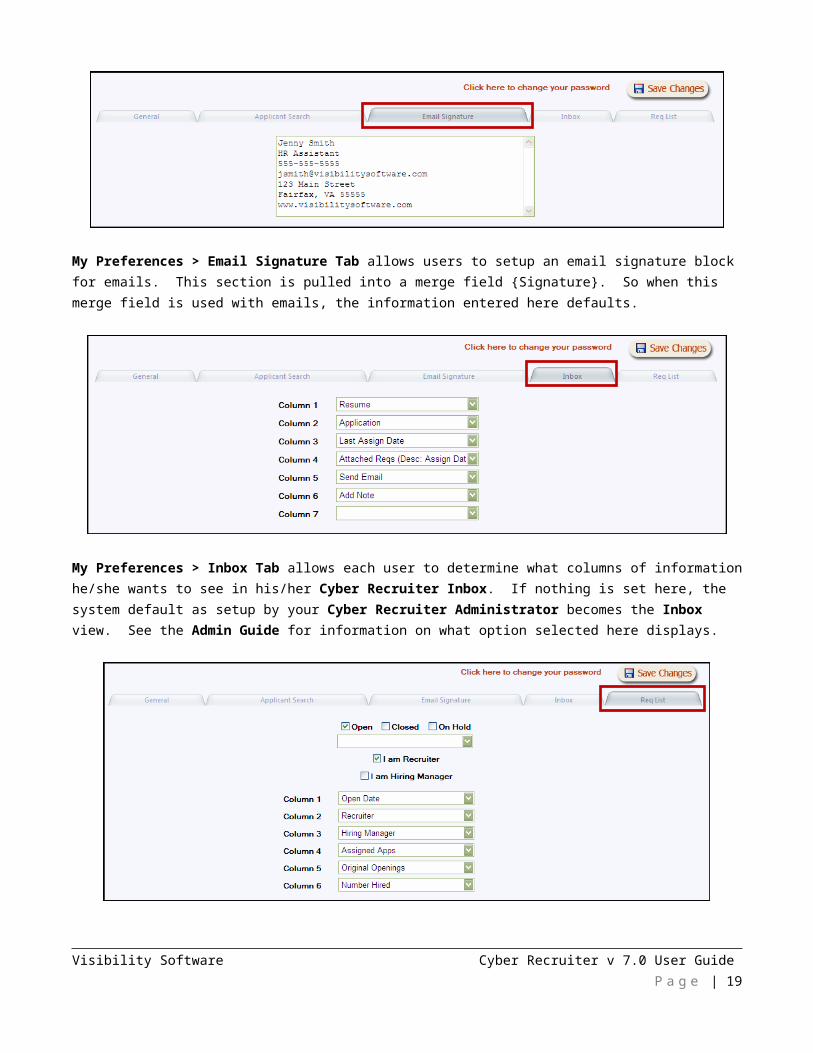
My Preferences > Email Signature Tab allows users to setup an email signature block for emails. This section is pulled into a merge field {Signature}. So when this merge field is used with emails, the information entered here defaults.
My Preferences > Inbox Tab allows each user to determine what columns of information he/she wants to see in his/her Cyber Recruiter Inbox. If nothing is set here, the system default as setup by your Cyber Recruiter Administrator becomes the Inbox view. See the Admin Guide for information on what option selected here displays.
Visibility Software Cyber Recruiter v 7.0 User Guide P a g e | 15

My Preferences > Req List Tab allows users to set defaults for the kind of requisitions to show in the Req List based on requisition statuses and/or role one plays in the system. These defaults work upon entering the Req List for the first time in the current session. As users change the Req List view in the current session, the new changes are held. However, every new session applies the established defaults here.
This section also allows each user to determine what columns of information he/she wants to see in his/her Req List. If nothing is set here, the system default as setup by your Cyber Recruiter Administrator becomes the Req List view. See the Admin Guide for information on what option selected here displays.
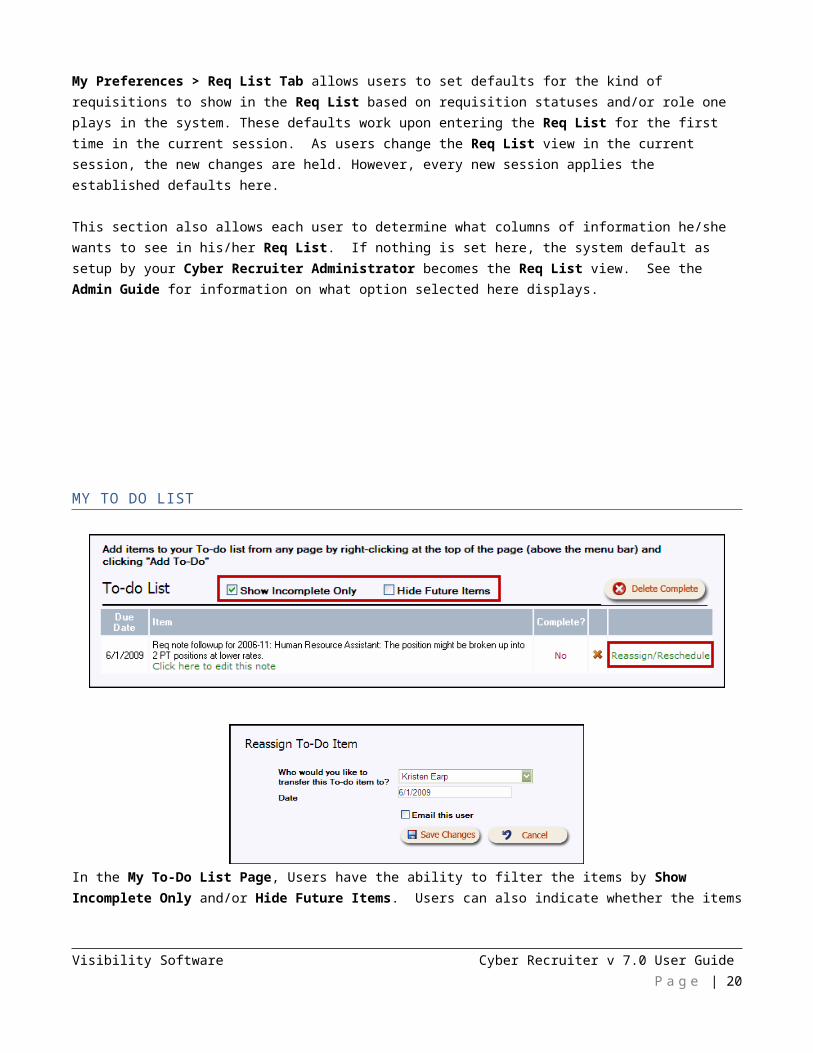
MY TO DO LIST
Visibility Software Cyber Recruiter v 7.0 User Guide P a g e | 16
In the My To-Do List Page, Users have the ability to filter the items by Show Incomplete Only and/or Hide Future Items. Users can also indicate whether the items are completed by toggling the No/Yes option or change the details by clicking the Reassign/Reschedule link.
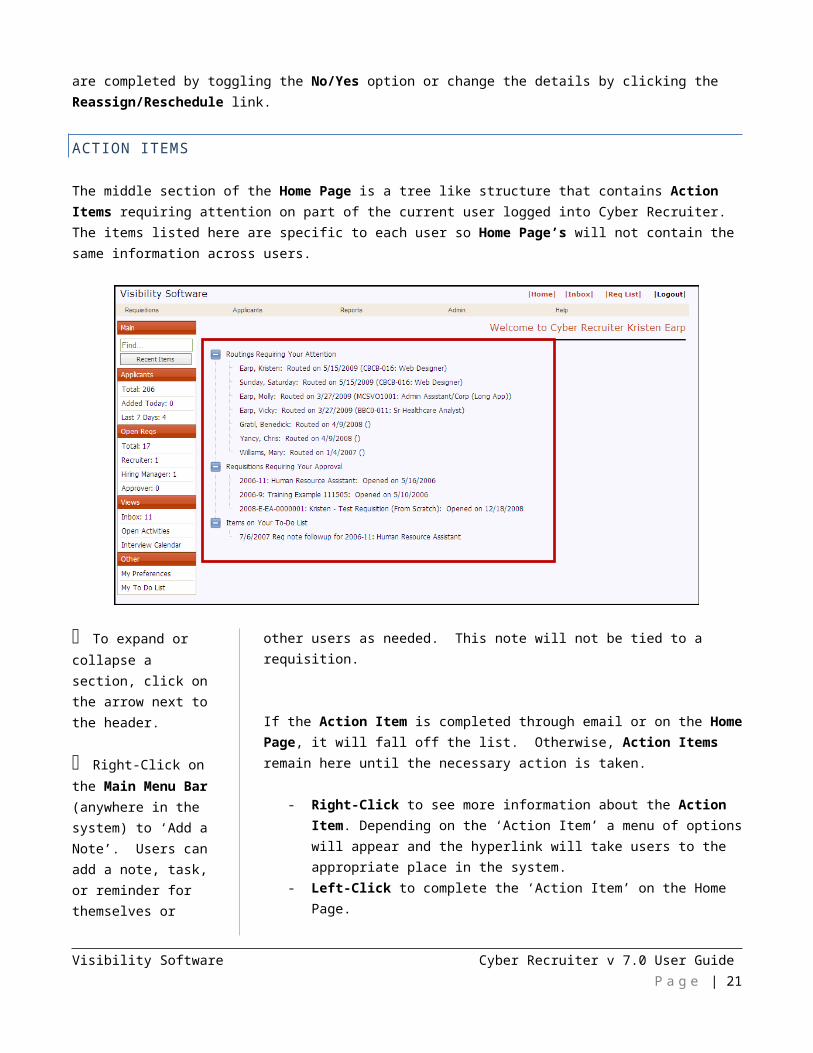
ACTION ITEMS
The middle section of the Home Page is a tree like structure that contains Action Items requiring attention on part of the current user logged into Cyber Recruiter. The items listed here are specific to each user so Home Page’s will not contain the same information across users.
To expand or collapse a section, click on the arrow next to the header.
Right-Click on the Main Menu Bar (anywhere in the system) to ‘Add a Note’. Users can add a
note, task, or reminder for themselves or other users as needed. This note will not be tied to a requisition.
If the Action Item is completed through email or on the Home Page, it will fall off the list. Otherwise, Action Items remain here until the necessary action is taken.
- Right-Click to see more information about the Action Item. Depending on the ‘Action Item’ a menu of options will appear and the hyperlink will take users to the appropriate place in the system.
Visibility Software Cyber Recruiter v 7.0 User Guide P a g e | 17

- Left-Click to complete the ‘Action Item’ on the Home Page.
Items on Your To-Do List is the last section on this page. These items are tasks/reminders that are set up by users. They default here when the due date entered for the task/note equals the current day or past. To see a complete list of all tasks, regardless of date, click on the Your To Do List link in the ‘Preview Box’. NOTE: If the organization is using Active Directory (Single Sign On), then the requisition approvals and offer approvals on the Home Page will not force a password.
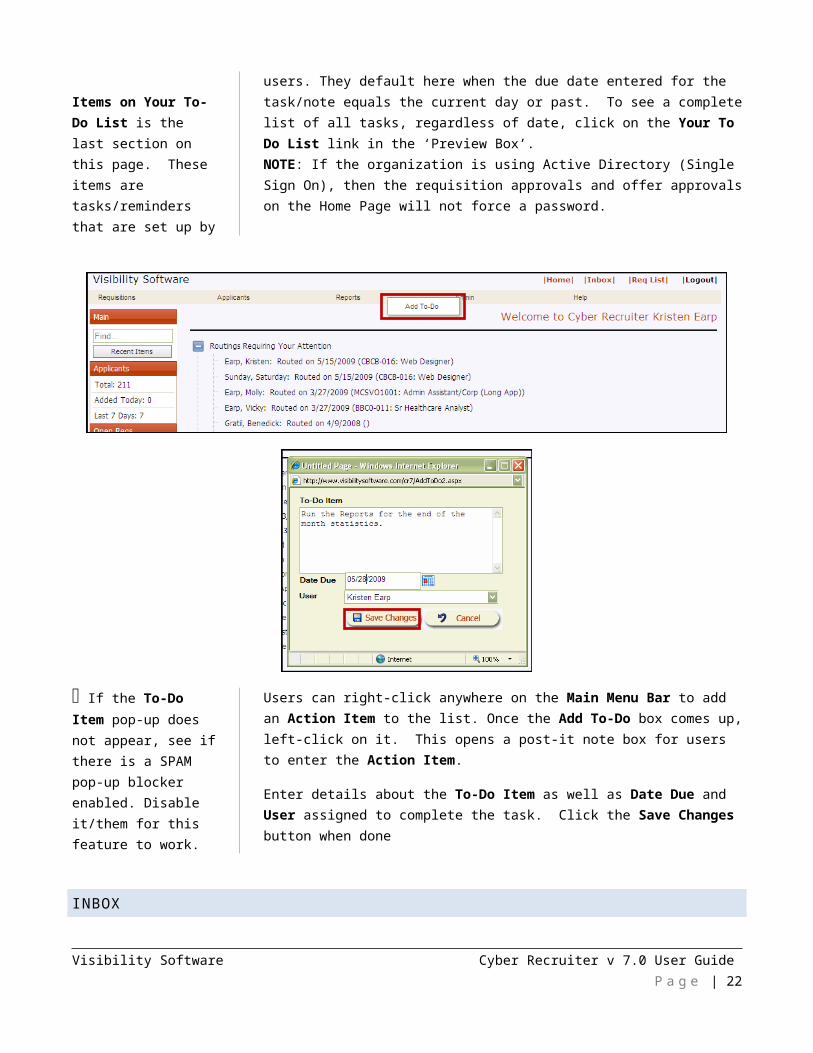
If the To-Do Item pop-up does not appear, see if there is a SPAM pop-up blocker enabled. Disable it/them for this feature to work.
Users can right-click anywhere on the Main Menu Bar to add an Action Item to the list. Once the Add To-Do box comes up, left-click on it. This opens a post-it note box for users to enter the Action Item.
Enter details about the To-Do Item as well as Date Due and User assigned to complete the task. Click the Save Changes button when done
INBOX
The Inbox allows each user to track applicants he/she is responsible. Applicants can be added here manually or as an automatic action when the applicant applies to a position. This feature acts like a virtual clipboard or file which holds the current desired applications. If the file is no longer considered current, users can delete the file from the Inbox which essentially files it back into the database until needed.
Visibility Software Cyber Recruiter v 7.0 User Guide P a g e | 18
The term Inbox refers to the CR Inbox. Not the user’s Inbox in Outlook or other emailing system.
The Inbox hyperlink takes users to his/her specific Inbox. Any applicant highlighted PINK indicates that he/she is an Employee Referral. (Note: See the Applicant section of this guide to learn more about the Inbox). With certain security permissions, users can see other user’s inboxes and/or take actions like emailing, routing, and printing.
INBOX ACTIONS
There are several actions users can perform from the inbox given the right security permissions including: emailing, routing, printing and deleting.
This is a quick way to notify a group of applicants as needed from your inbox.
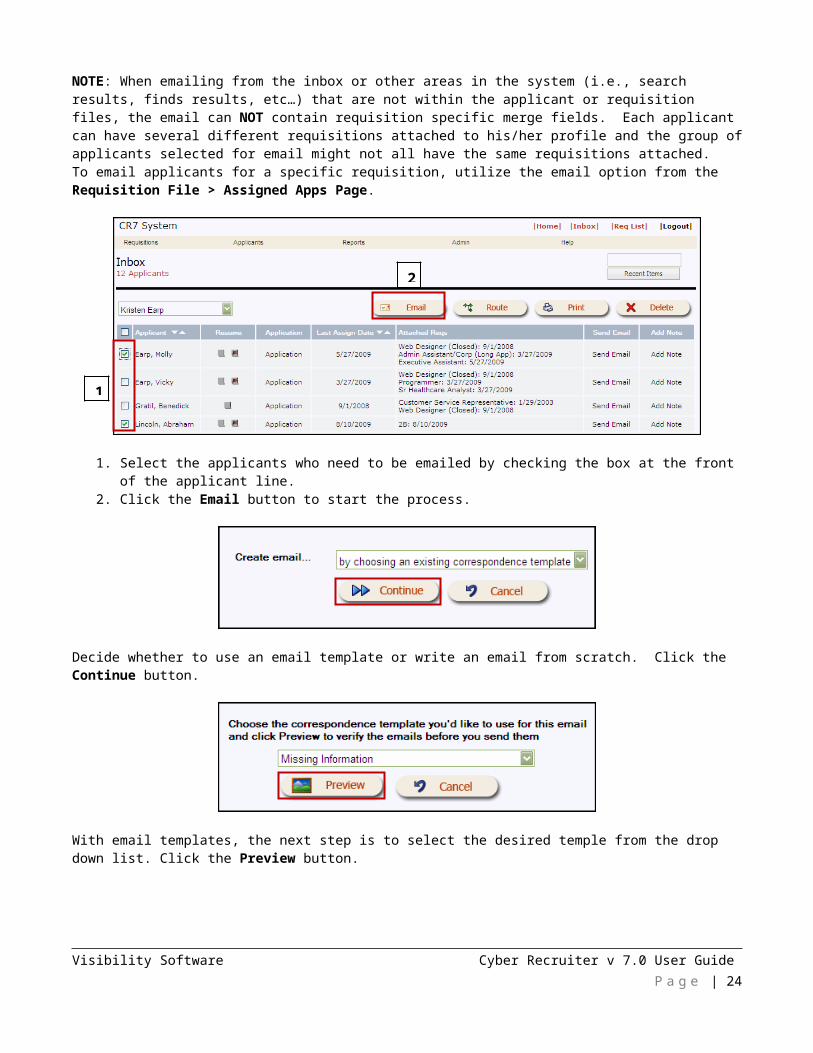
NOTE: When emailing from the inbox or other areas in the system (i.e., search results, finds results, etc…) that are not within the applicant or requisition files, the email can NOT contain requisition specific merge fields. Each applicant can have several different requisitions attached to his/her profile and the group of applicants selected for email might not all have the same requisitions attached. To email applicants for a specific requisition, utilize the email option from the Requisition File > Assigned Apps Page.
Visibility Software Cyber Recruiter v 7.0 User Guide P a g e | 19
1. Select the applicants who need to be emailed by checking the box at the front of the applicant line. 2. Click the Email button to start the process.
Decide whether to use an email template or write an email from scratch. Click the Continue button.
With email templates, the next step is to select the desired temple from the drop down list. Click the Preview button.
Visibility Software Cyber Recruiter v 7.0 User Guide P a g e | 20
1
2
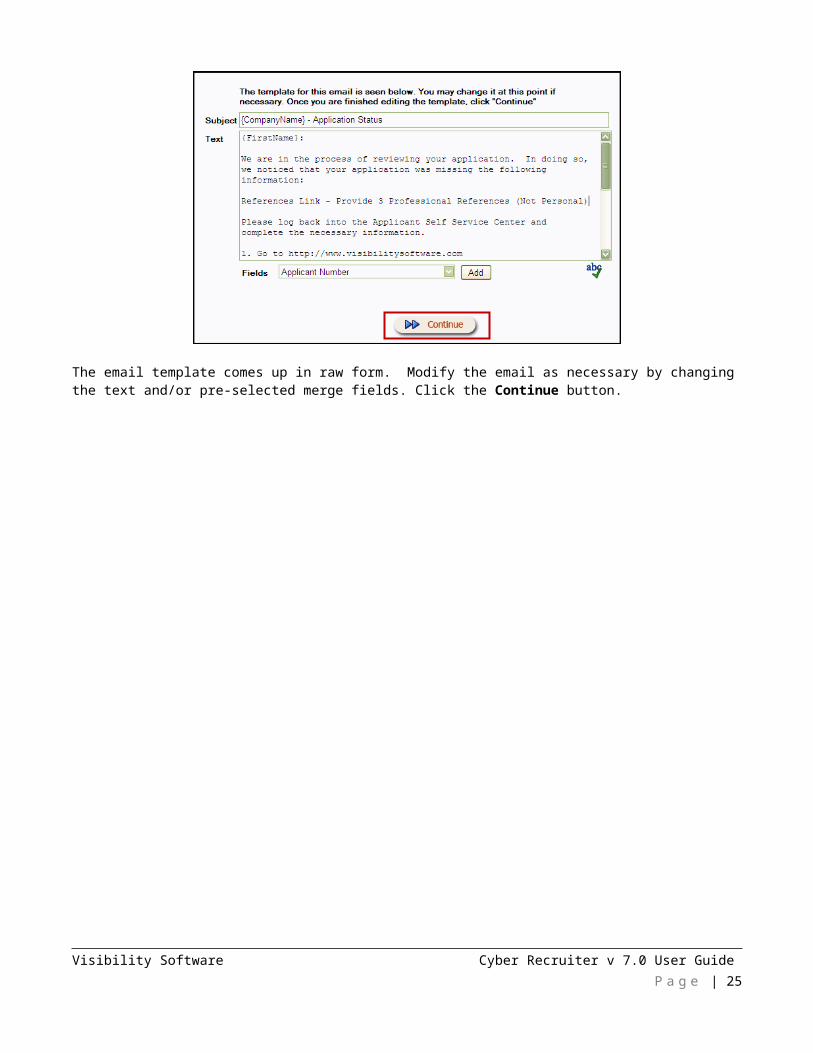
The email template comes up in raw form. Modify the email as necessary by changing the text and/or pre-selected merge fields. Click the Continue button.
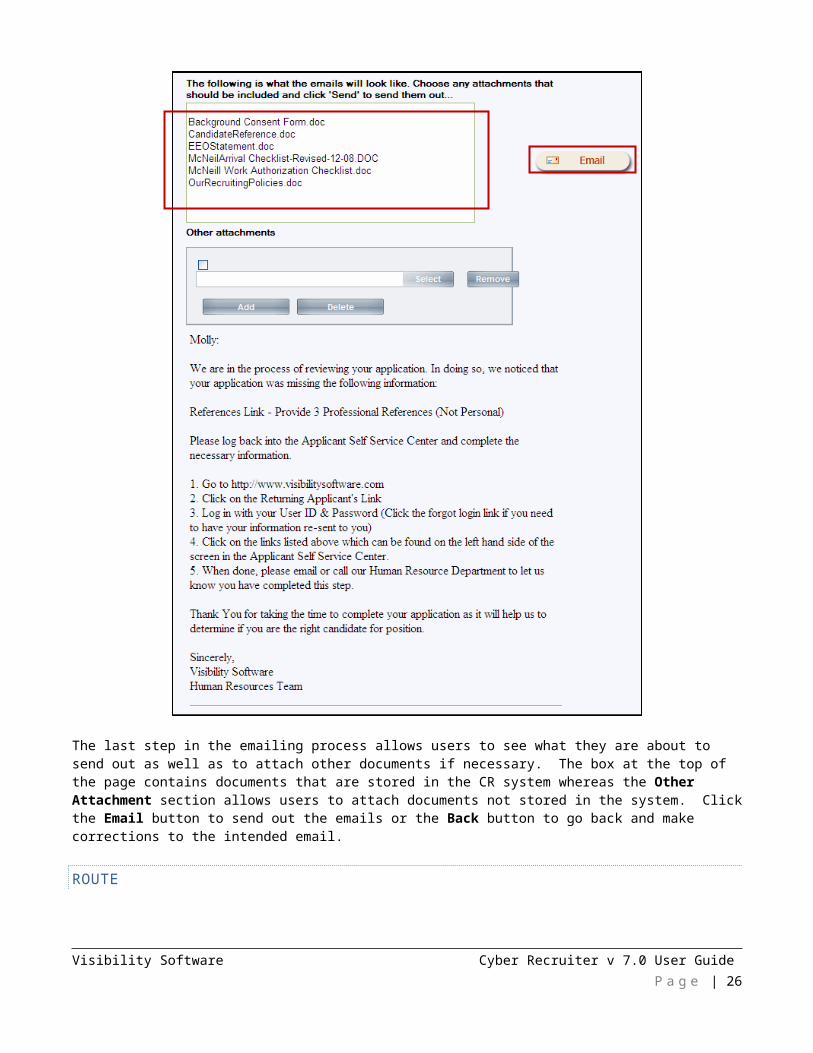
The last step in the emailing process allows users to see what they are about to send out as well as to attach other documents if necessary. The box at the top of the page contains documents that are stored in the CR system whereas the Other Attachment section allows users to attach documents not stored in the system. Click the Email button to send out the emails or the Back button to go back and make corrections to the intended email.
ROUTE
Visibility Software Cyber Recruiter v 7.0 User Guide P a g e | 21
Another action item from the inbox is the ability to route. The routing option here functions the same way as the routing option found in the Requisition File > Assigned Apps Page. See this section of the manual for more information on routing.
1. Select the applicants to be routed to hiring managers by checking the box at the front of the applicant line. 2. Click the Route button to start the process.
1. Route To – Select the hiring manager(s) who will receive the routing email. 2. Check the Add to Inbox option to add the applicant to the hiring manager’s Cyber Recruiter’s inbox for quick
access. If the hiring managers in your organization do not use this feature, do not check the option as the applicants will start to cue up in there with no one to remove them.
Visibility Software Cyber Recruiter v 7.0 User Guide P a g e | 22
2
1

3. Req – Select the requisition from the drop-down list 4. Route to Hiring Manager – the field updates upon selection of the requisition to include the name of the named
hiring manager. Check this box if the routing needs to be sent to the hiring manager. Check the box automatically selects the appropriate person from the Route To drop-down list without having to find the person in the list.
5. Email – Select the email option (See the Requisition File > Assigned Applicants Page > Routing Section to learn more about the different emailing options available).
6. Email Text – Add any additional text to the routing as needed in the Email Text section. 7. Click the Save Changes button to send the email routing.
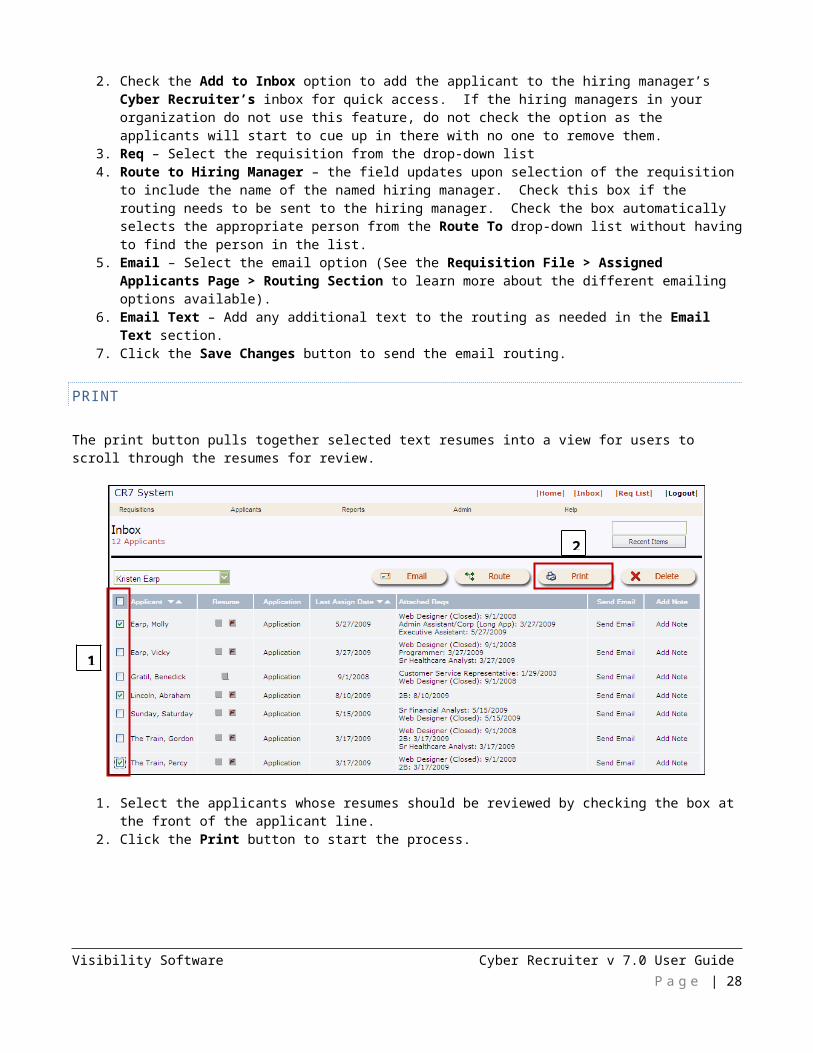
The print button pulls together selected text resumes into a view for users to scroll through the resumes for review.
1. Select the applicants whose resumes should be reviewed by checking the box at the front of the applicant line.2. Click the Print button to start the process.
After the Print button is clicked a pdf/report like feature is launched. Use the arrows at the top to float through the resumes selected. Click the Print icon to actually print out a hard copy of the resume if needed.
Visibility Software Cyber Recruiter v 7.0 User Guide P a g e | 23
2
1
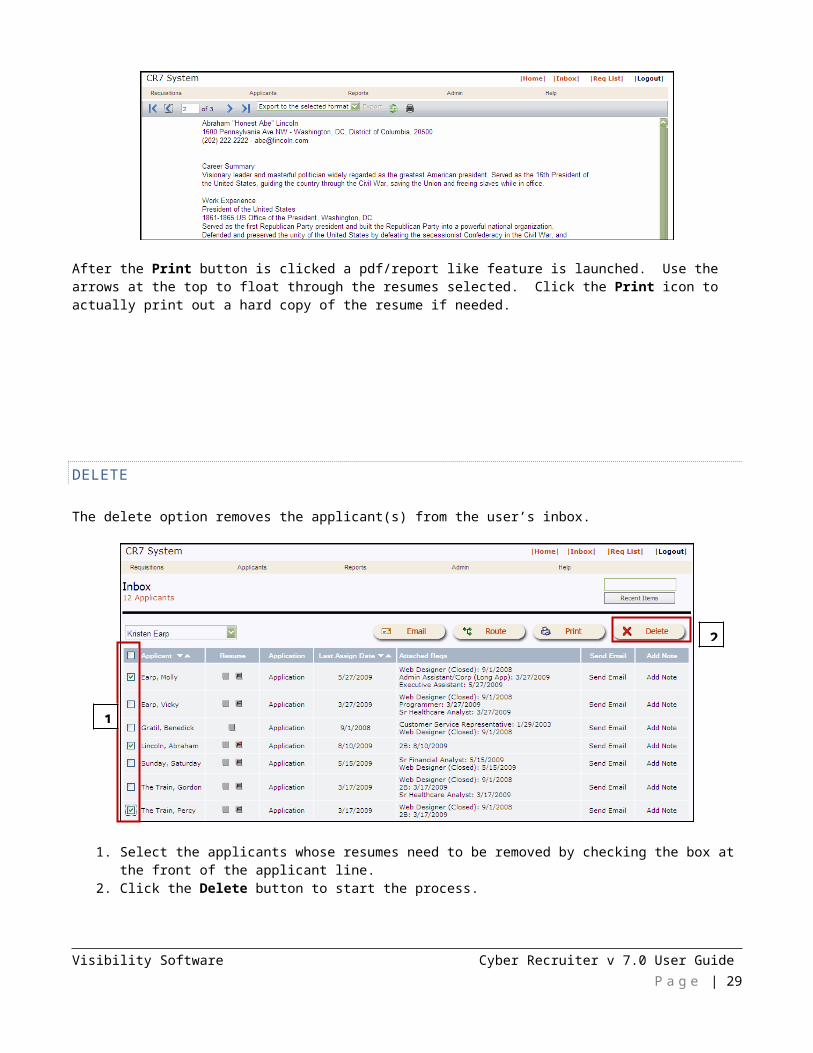
DELETE
The delete option removes the applicant(s) from the user’s inbox.
1. Select the applicants whose resumes need to be removed by checking the box at the front of the applicant line. 2. Click the Delete button to start the process.
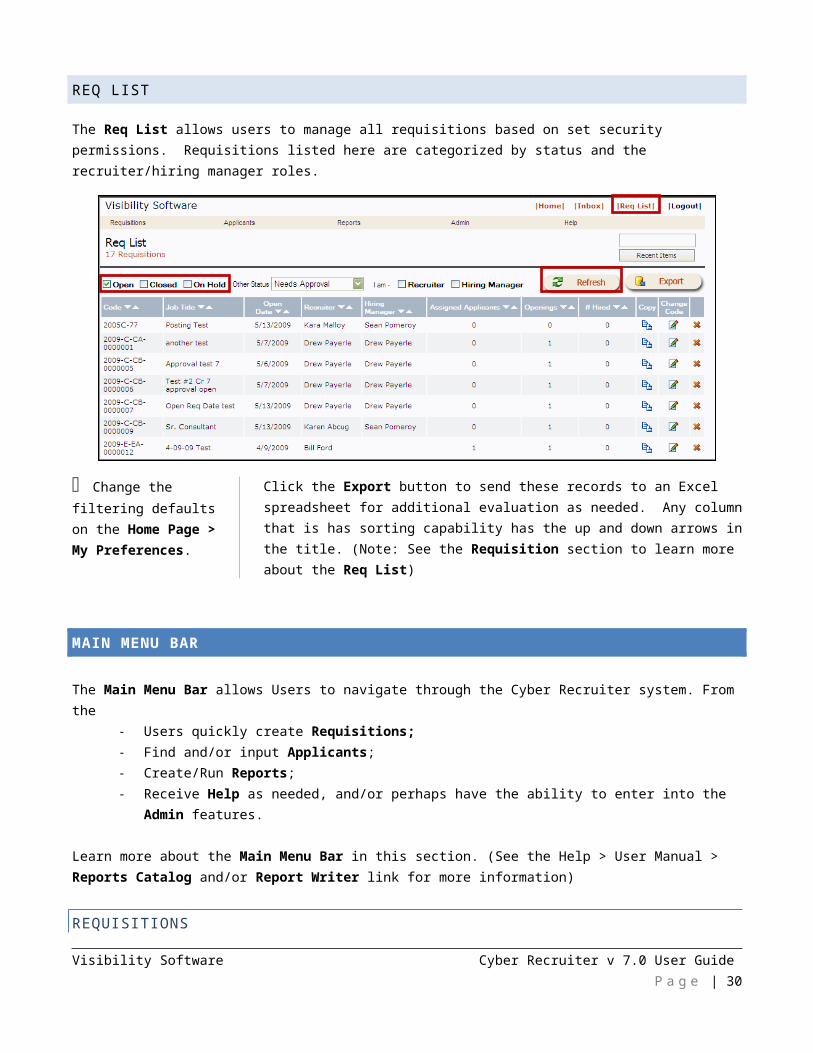
REQ LIST
The Req List allows users to manage all requisitions based on set security permissions. Requisitions listed here are categorized by status and the recruiter/hiring manager roles.
Visibility Software Cyber Recruiter v 7.0 User Guide P a g e | 24
1
2
Change the filtering defaults on the Home Page > My Preferences.
Click the Export button to send these records to an Excel spreadsheet for additional evaluation as needed. Any column that is has sorting capability has the up and down arrows in the title. (Note: See the Requisition section to learn more about the Req List)
MAIN MENU BAR
The Main Menu Bar allows Users to navigate through the Cyber Recruiter system. From the - Users quickly create Requisitions;- Find and/or input Applicants;- Create/Run Reports;- Receive Help as needed, and/or perhaps have the ability to enter into the Admin features.
Learn more about the Main Menu Bar in this section. (See the Help > User Manual > Reports Catalog and/or Report Writer link for more information)
REQUISITIONS
The Requisition section contains the following options: Find Requisition, Create Requisition and Job Boards (if available).
FIND REQUISITION
The Find Requisition option helps users to find requisitions based on specified criteria.
Visibility Software Cyber Recruiter v 7.0 User Guide P a g e | 25
The maximum results returned are setup by the CR Administrator. If the max is achieved, CR will force the User to redefine the search.
Users select the desired criteria to be as specific or general as needed. Leaving all options blank will show ALL requisitions in the Cyber Recruiter database as allowed per security permissions. Find Requisition also allows for partial searching which means one can enter part of the known information (Example – part of the job title or requisition number).
CREATE REQUISITION
Create Requisition allows users to create requisition opportunities via several methods and is configured by the Cyber Recruiter Administrator. (Note: The Create Requisition option is discussed in greater detail in the Requisition section of this User Guide).
JOB BOARDS
Job Boards allows users to send requisition postings to specific job boards interfaced with Cyber Recruiter. These interfaces are determined and setup by the Cyber Recruiter Administrator. (Note: The Job Boards option is discussed in greater detail in the Help > User Manuals > Job Boards link).
APPLICANTS
Visibility Software Cyber Recruiter v 7.0 User Guide P a g e | 26

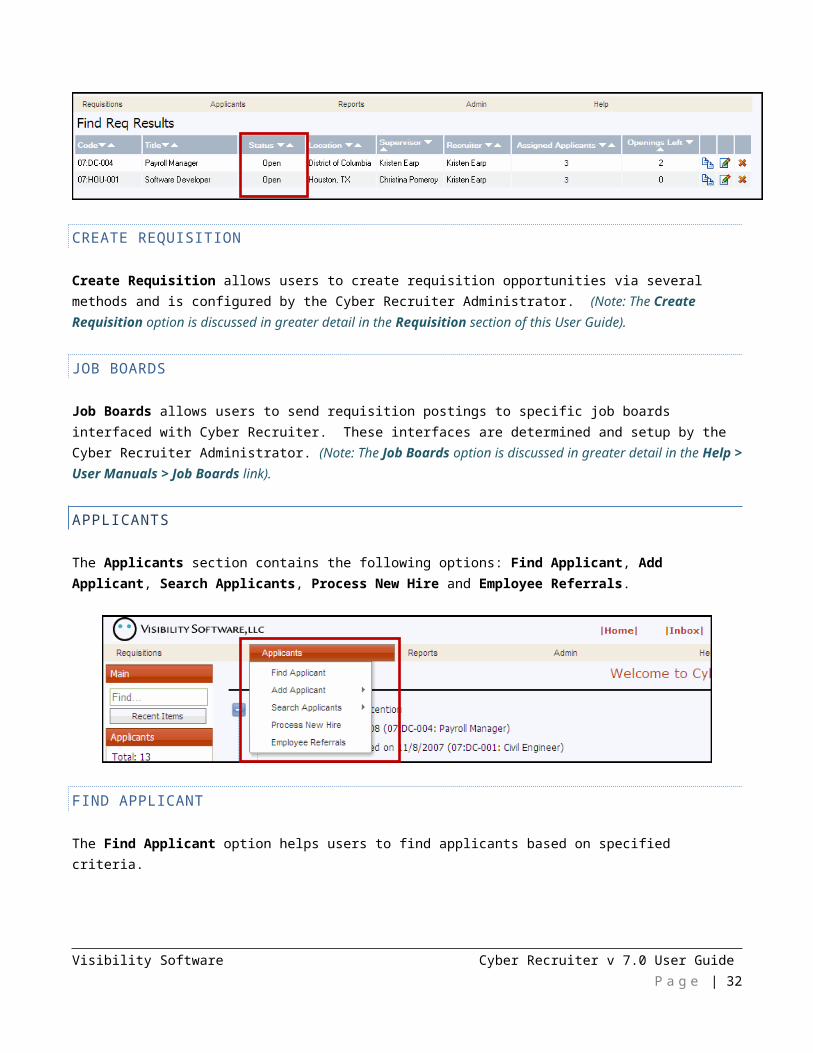
The Applicants section contains the following options: Find Applicant, Add Applicant, Search Applicants, Process New Hire and Employee Referrals.
FIND APPLICANT
The Find Applicant option helps users to find applicants based on specified criteria.
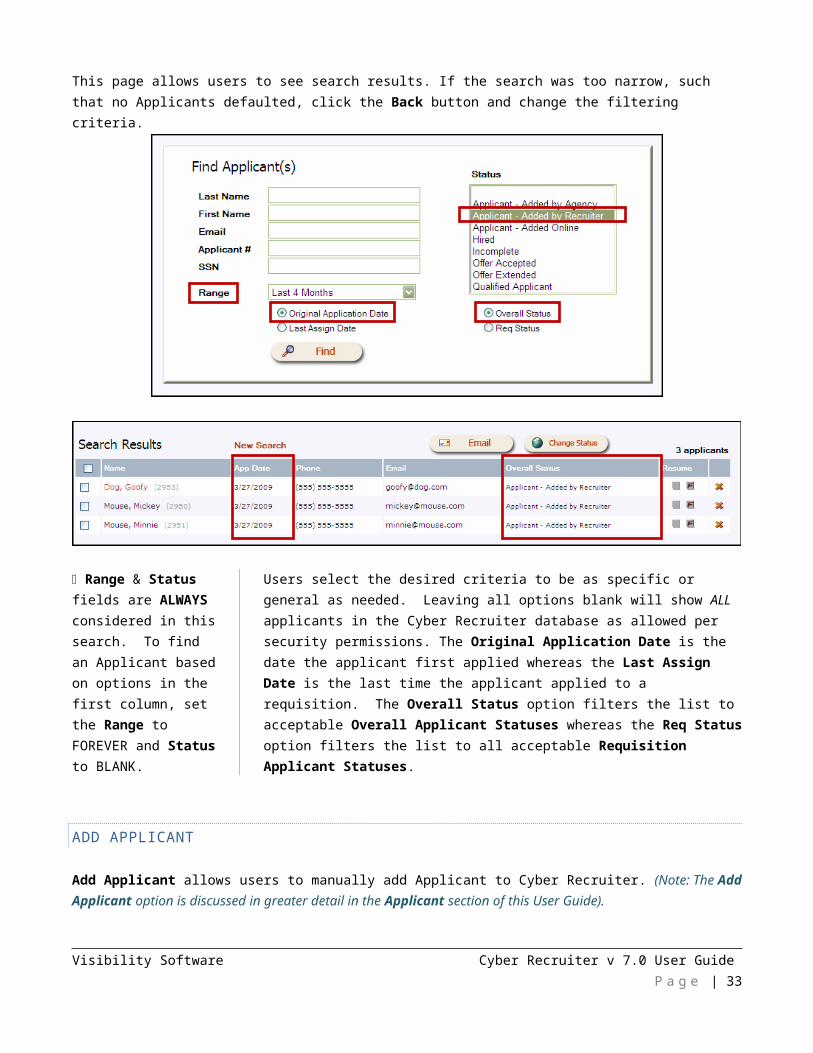
This page allows users to see search results. If the search was too narrow, such that no Applicants defaulted, click the Back button and change the filtering criteria.
Range & Status fields are ALWAYS considered in this search. To find an
Applicant based on options in the first column, set the Range to FOREVER and Status to BLANK. Users select the desired criteria to be as specific or general as needed. Leaving all options blank will show ALL applicants in the Cyber Recruiter database as allowed per security permissions. The Original Application Date is the date the applicant first
Visibility Software Cyber Recruiter v 7.0 User Guide P a g e | 27
applied whereas the Last Assign Date is the last time the applicant applied
to a requisition. The Overall Status option filters the list to acceptable Overall Applicant Statuses whereas the Req Status option filters the list to all acceptable Requisition Applicant Statuses.
ADD APPLICANT
Add Applicant allows users to manually add Applicant to Cyber Recruiter. (Note: The Add Applicant option is discussed in greater detail in the Applicant section of this User Guide).
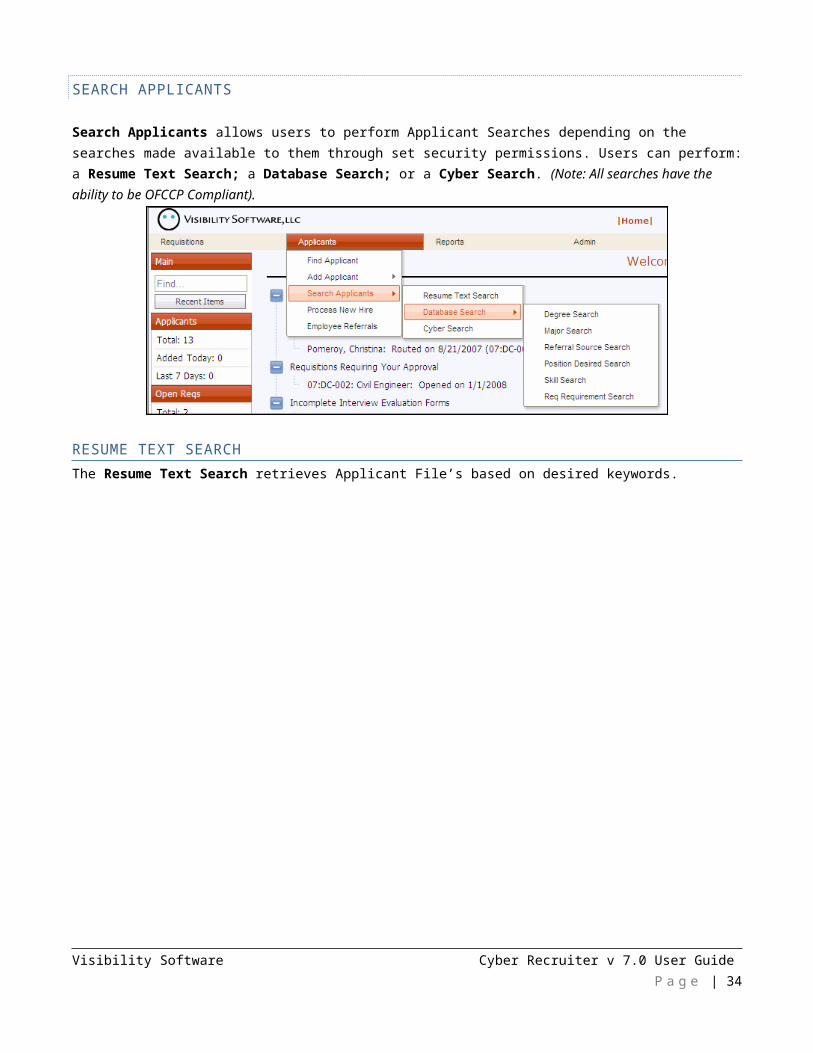
SEARCH APPLICANTS
Search Applicants allows users to perform Applicant Searches depending on the searches made available to them through set security permissions. Users can perform: a Resume Text Search; a Database Search; or a Cyber Search. (Note: All searches have the ability to be OFCCP Compliant).
RESUME TEXT SEARCHThe Resume Text Search retrieves Applicant File’s based on desired keywords.
Visibility Software Cyber Recruiter v 7.0 User Guide P a g e | 28
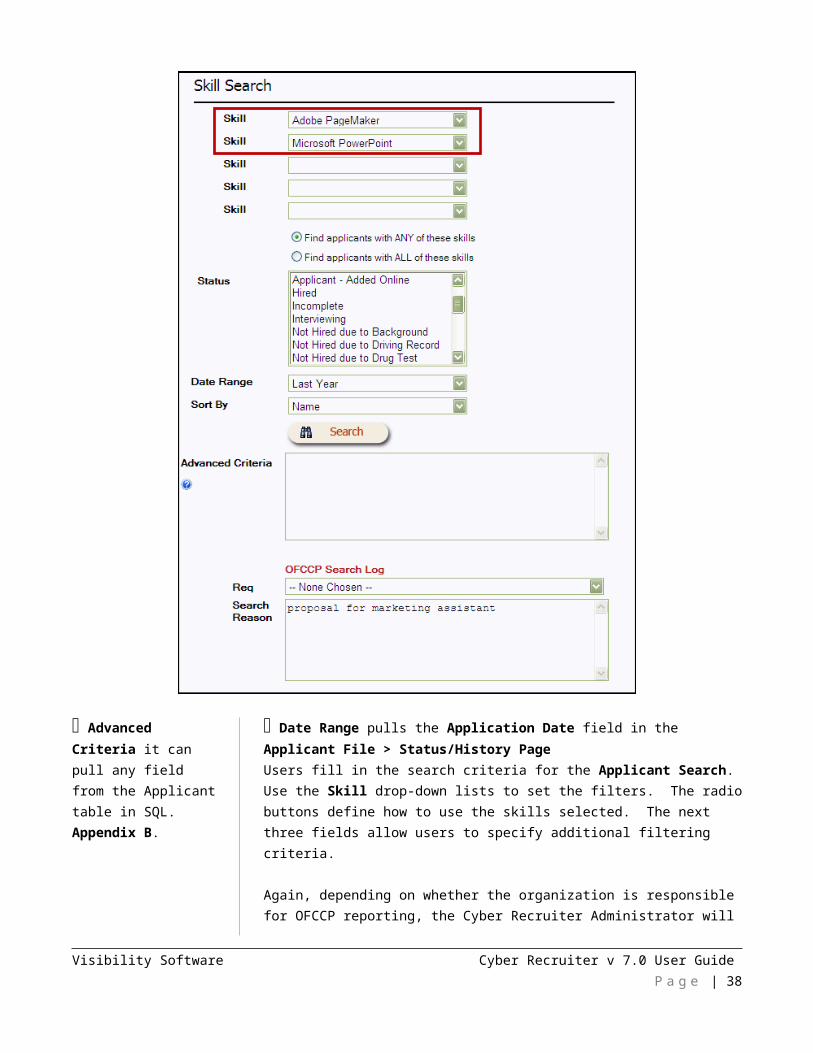
Advanced Criteria it can pull any field from the Applicant table in SQL. Use Appendix A for helpful tips/rules.
OFCCP Search Log is option that can be turn on/off. If a requisition is required with searches, this is the view users will see. If at least a comment
is required, an open text box will be available. If nothing is required, the OFCCP section will not appear. Required Text vs. Optional TextThe Required Text column must be found in the text resume in order for the Applicant to display in the search results. Additionally if more than one field is used for the Required Text column, this will act like an ‘AND’ feature. Each field used in the Optional Text column will return Applicants with resumes that match what is entered. If more than one item entered in the Optional Text column, it will act like an ‘OR’ feature.
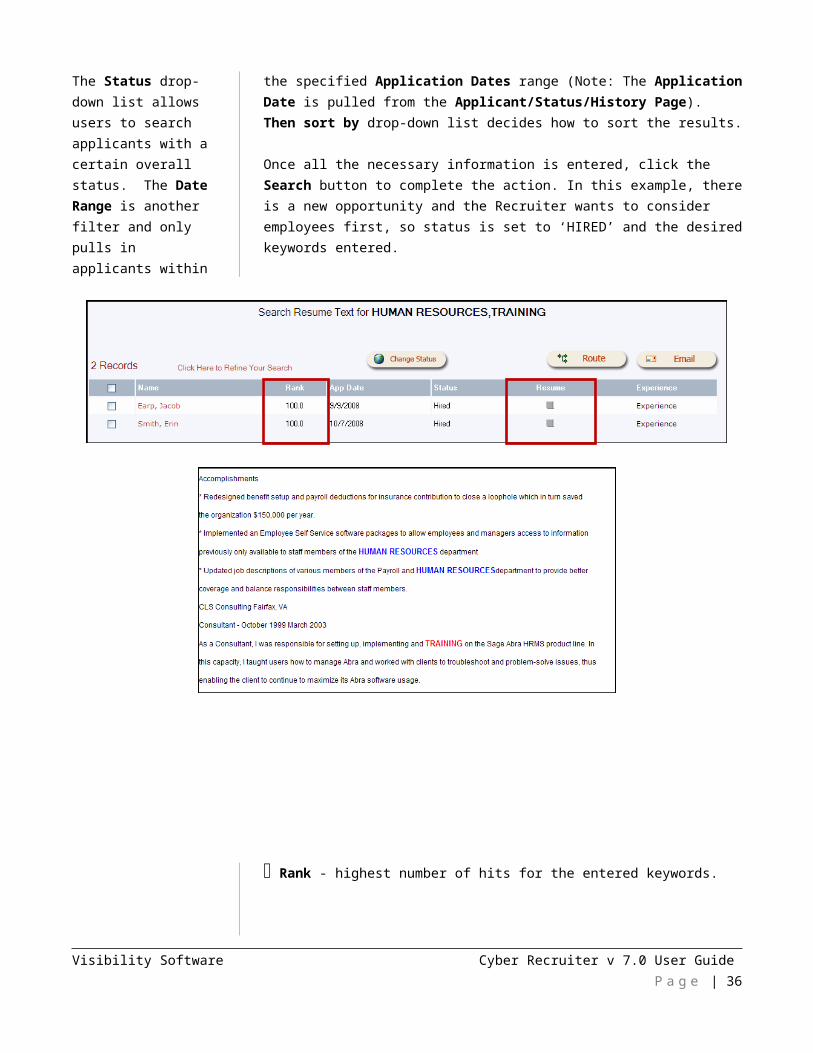
Other Filtering OptionsThe Status drop-down list allows users to search applicants with a certain overall status. The Date Range is another filter and only pulls in applicants within the specified Application Dates range (Note: The Application Date is pulled from the Applicant/Status/History Page). Then sort by drop-down list decides how to sort the results.
Visibility Software Cyber Recruiter v 7.0 User Guide P a g e | 29
Once all the necessary information is entered, click the Search button to
complete the action. In this example, there is a new opportunity and the Recruiter wants to consider employees first, so status is set to ‘HIRED’ and the desired keywords entered.
Rank - highest number of hits for the entered keywords.
Remember to click the gray icon, NOT the one with the F, to see how the keywords are color coded resume.
When the results are returned on the Resume Text Search results there are several options:
- Route the Applicants/Employees to the appropriate Hiring Manager for consideration; (See Shortcut Links > Inbox > Inbox Actions in this manual for more information on routings)
- Email to see if they are still interested (good when it is an Applicant who applied a long time ago); (See Shortcut Links > Inbox > Inbox Actions in this manual for more information on emailing)
- Refine the Search if necessary; and - Review the Applicant File/Resume - Click on the Applicant Name, Experience or
Resume icons to see more information
Visibility Software Cyber Recruiter v 7.0 User Guide P a g e | 30

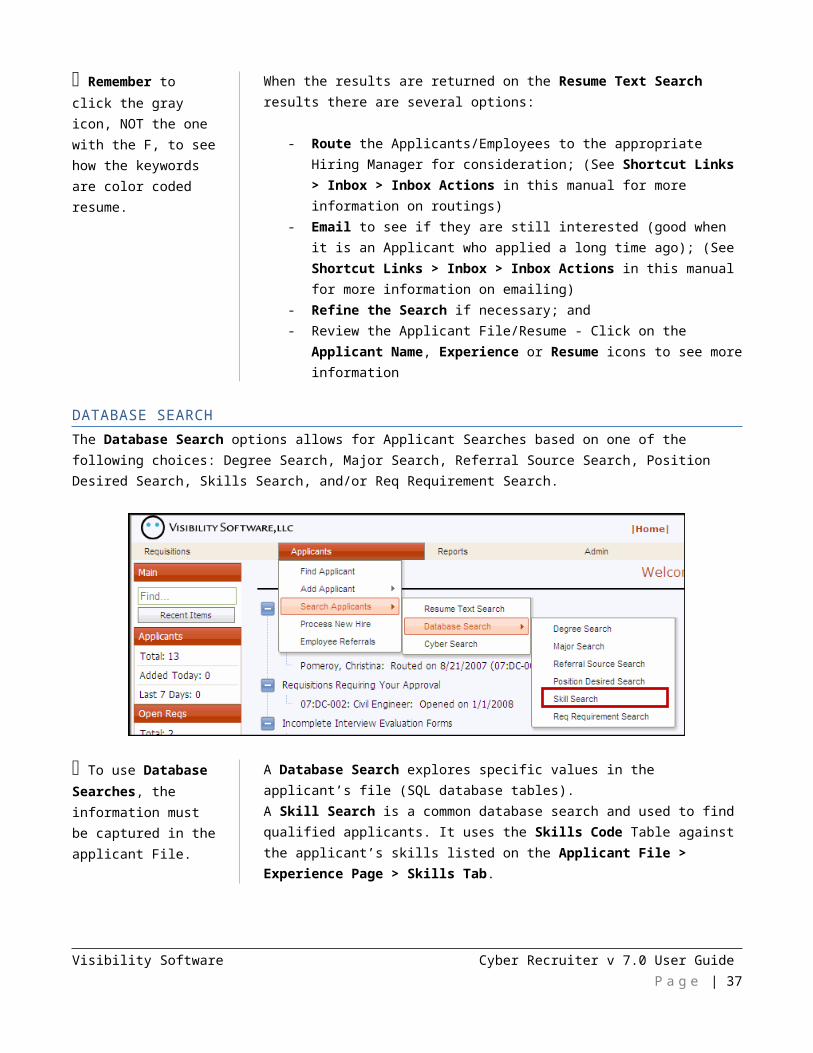
DATABASE SEARCHThe Database Search options allows for Applicant Searches based on one of the following choices: Degree Search, Major Search, Referral Source Search, Position Desired Search, Skills Search, and/or Req Requirement Search.
To use Database Searches, the information must be captured in the applicant File.
A Database Search explores specific values in the applicant’s file (SQL database tables). A Skill Search is a common database search and used to find qualified applicants. It uses the Skills Code Table against the applicant’s skills listed on the Applicant File > Experience Page > Skills Tab.
Visibility Software Cyber Recruiter v 7.0 User Guide P a g e | 31
Advanced Criteria it can pull any field from the Applicant table in SQL. Appendix B.
Date Range pulls the Application Date field in the Applicant File > Status/History Page
Users fill in the search criteria for the Applicant Search. Use the Skill drop-down lists to set the filters. The radio buttons define how to use the skills selected. The next three fields allow users to specify additional filtering criteria.
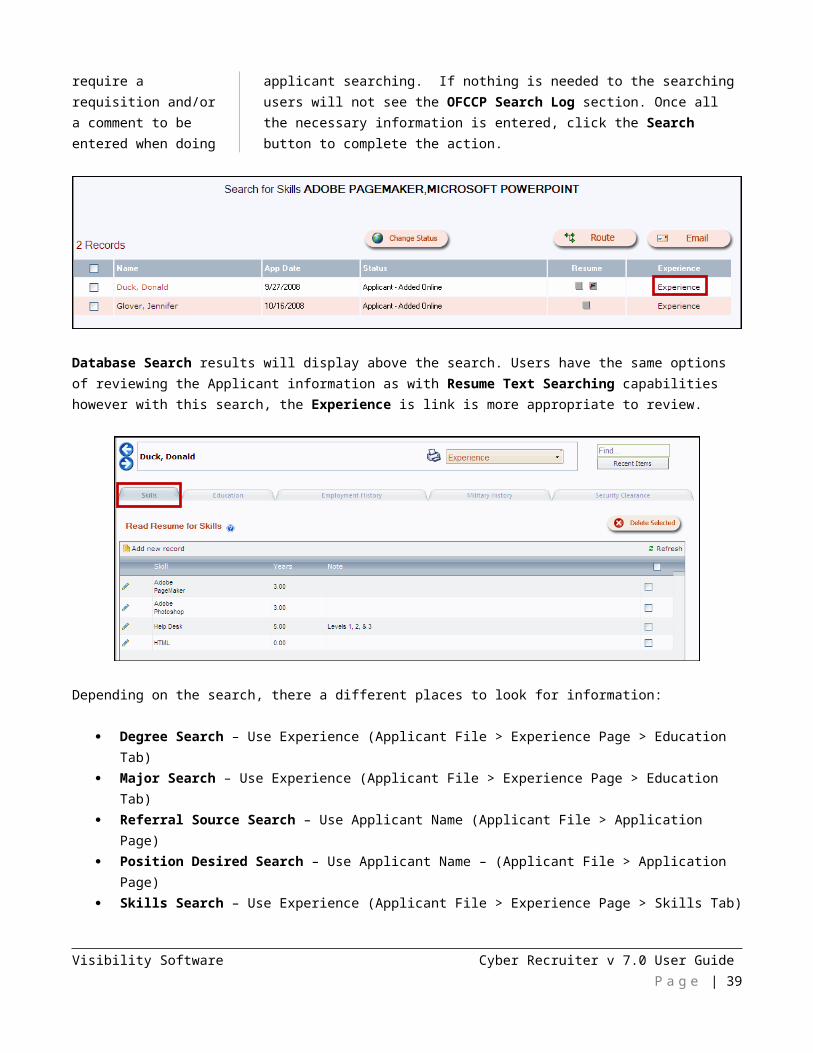
Again, depending on whether the organization is responsible for OFCCP reporting, the Cyber Recruiter Administrator will require a requisition and/or a comment to be entered when doing applicant searching. If nothing is needed to the searching users will not see the OFCCP Search Log section. Once all the necessary information is entered, click the Search button to complete the action.
Visibility Software Cyber Recruiter v 7.0 User Guide P a g e | 32
Database Search results will display above the search. Users have the same options of reviewing the Applicant information as with Resume Text Searching capabilities however with this search, the Experience is link is more appropriate to review.
Depending on the search, there a different places to look for information:
Degree Search – Use Experience (Applicant File > Experience Page > Education Tab) Major Search – Use Experience (Applicant File > Experience Page > Education Tab) Referral Source Search – Use Applicant Name (Applicant File > Application Page) Position Desired Search – Use Applicant Name – (Applicant File > Application Page) Skills Search – Use Experience (Applicant File > Experience Page > Skills Tab) Req Requirement Search – Use Experience (Requisition File > Requirements Page & Applicant File > Experience
Page > Skill Tab)
Visibility Software Cyber Recruiter v 7.0 User Guide P a g e | 33
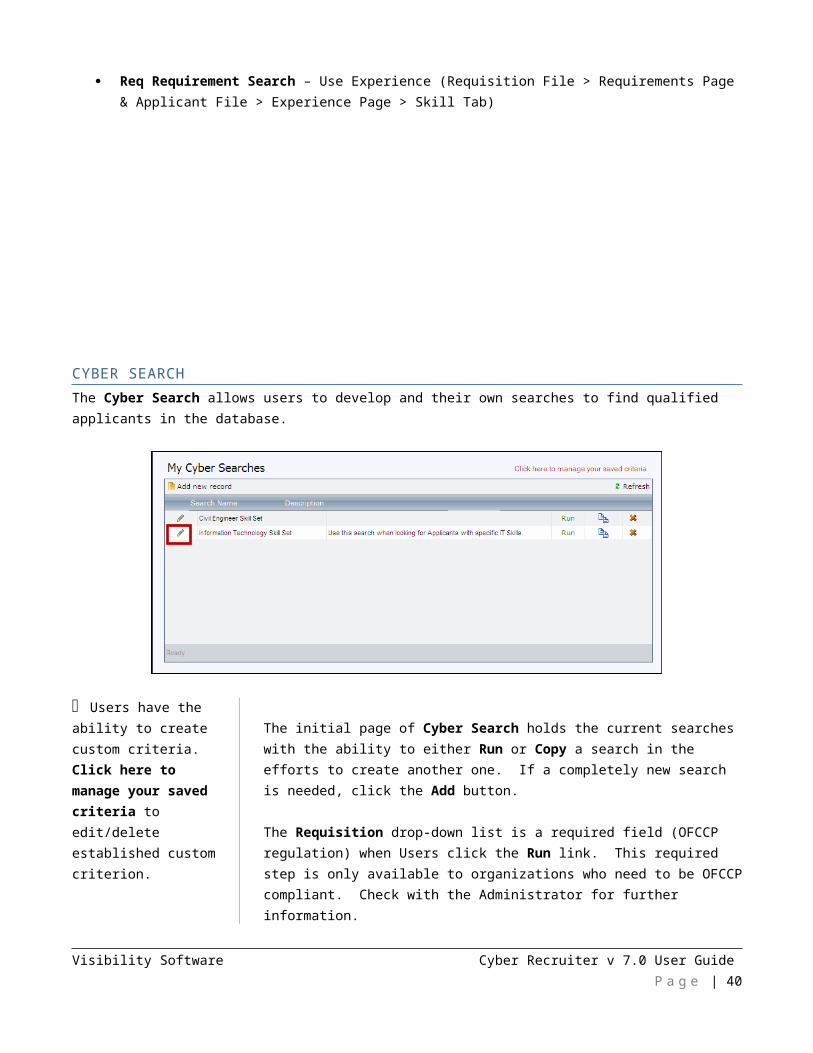
CYBER SEARCHThe Cyber Search allows users to develop and their own searches to find qualified applicants in the database.
Users have the ability to create custom criteria. Click here to manage your saved criteria to edit/delete established custom criterion.
The initial page of Cyber Search holds the current searches with the ability to either Run or Copy a search in the efforts to create another one. If a completely new search is needed, click the Add button.
The Requisition drop-down list is a required field (OFCCP regulation) when Users click the Run link. This required step is only available to organizations who need to be OFCCP compliant. Check with the Administrator for further information.
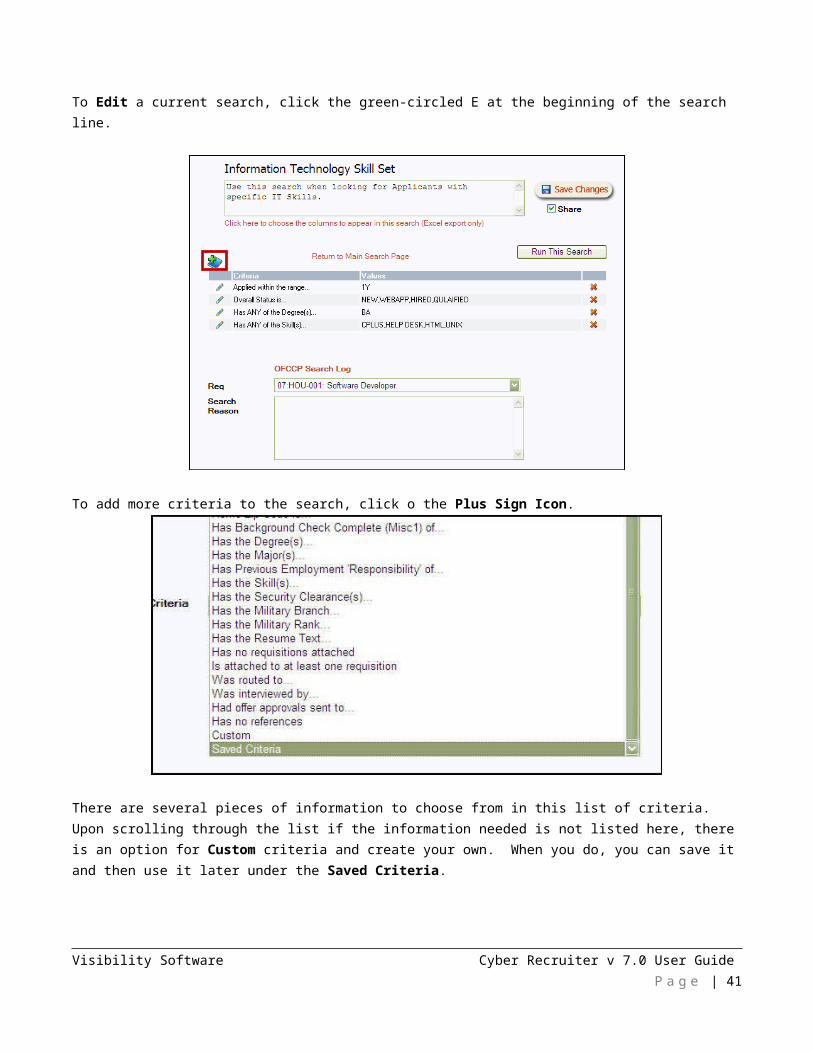
To Edit a current search, click the green-circled E at the beginning of the search line.
To add more criteria to the search, click o the Plus Sign Icon.
Visibility Software Cyber Recruiter v 7.0 User Guide P a g e | 34

There are several pieces of information to choose from in this list of criteria. Upon scrolling through the list if the information needed is not listed here, there is an option for Custom criteria and create your own. When you do, you can save it and then use it later under the Saved Criteria.
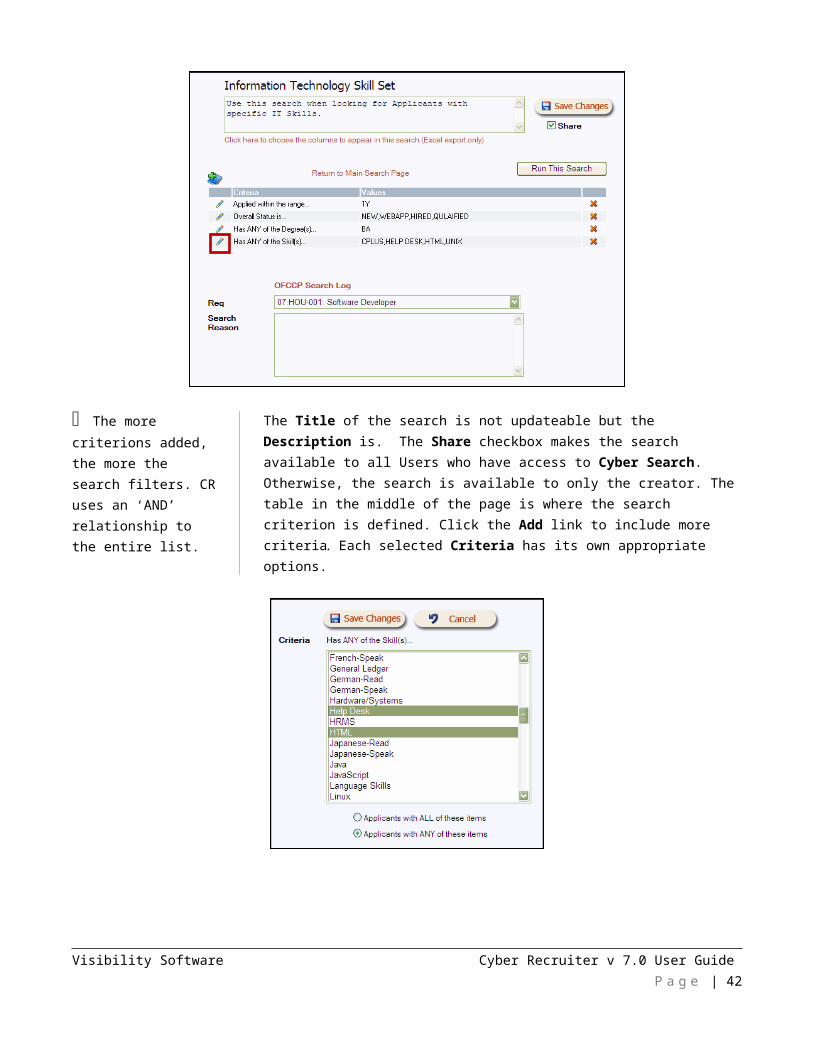
The more criterions added, the more the search filters. CR uses an ‘AND’ relationship to the entire list.
The Title of the search is not updateable but the Description is. The Share checkbox makes the search available to all Users who have access to Cyber Search. Otherwise, the search is available to only the creator. The table in the middle of the page is where the search criterion is defined. Click the Add link to include more criteria. Each selected Criteria has its own appropriate options.
Visibility Software Cyber Recruiter v 7.0 User Guide P a g e | 35
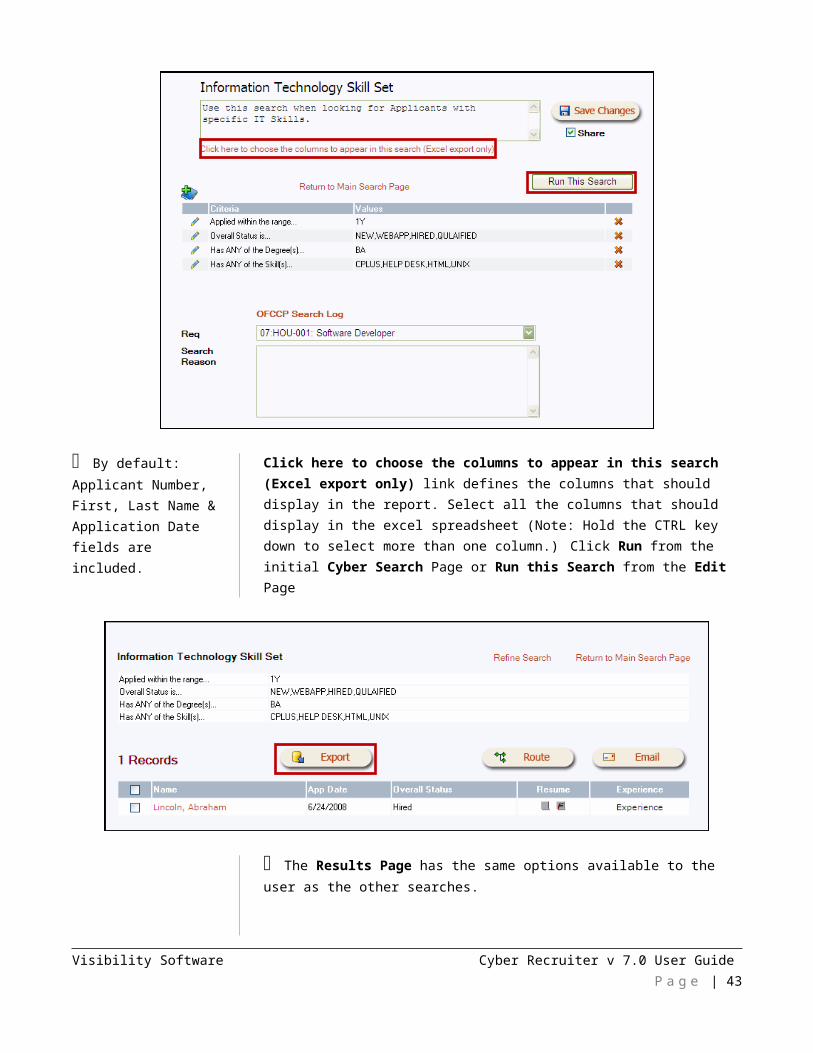
By default: Applicant Number, First, Last Name & Application Date fields are included.
Click here to choose the columns to appear in this search (Excel export only) link defines the columns that should display in the report. Select all the columns that should display in the excel spreadsheet (Note: Hold the CTRL key down to select more than one column.) Click Run from the initial Cyber Search Page or Run this Search from the Edit Page
Visibility Software Cyber Recruiter v 7.0 User Guide P a g e | 36
The Results Page has the same options available to the user as the other searches.
Depending on the criterion included in the search, users might have to look at the Resume (gray square box) and/or the Applicant File > Experience page. Select all the desired applicants for the spreadsheet by checking the box at the beginning of the applicant line and then click Export to Excel. (Note: Use the Select All and Deselect All links to highlight/unselect all applicants as needed).
PROCESS NEW HIREProcess New Hire is located off the Main Menu Bar > Applicant section and allows users to go through an automated process to hire applicants into Cyber Recruiter. There are up to eight (8) steps that could be included:
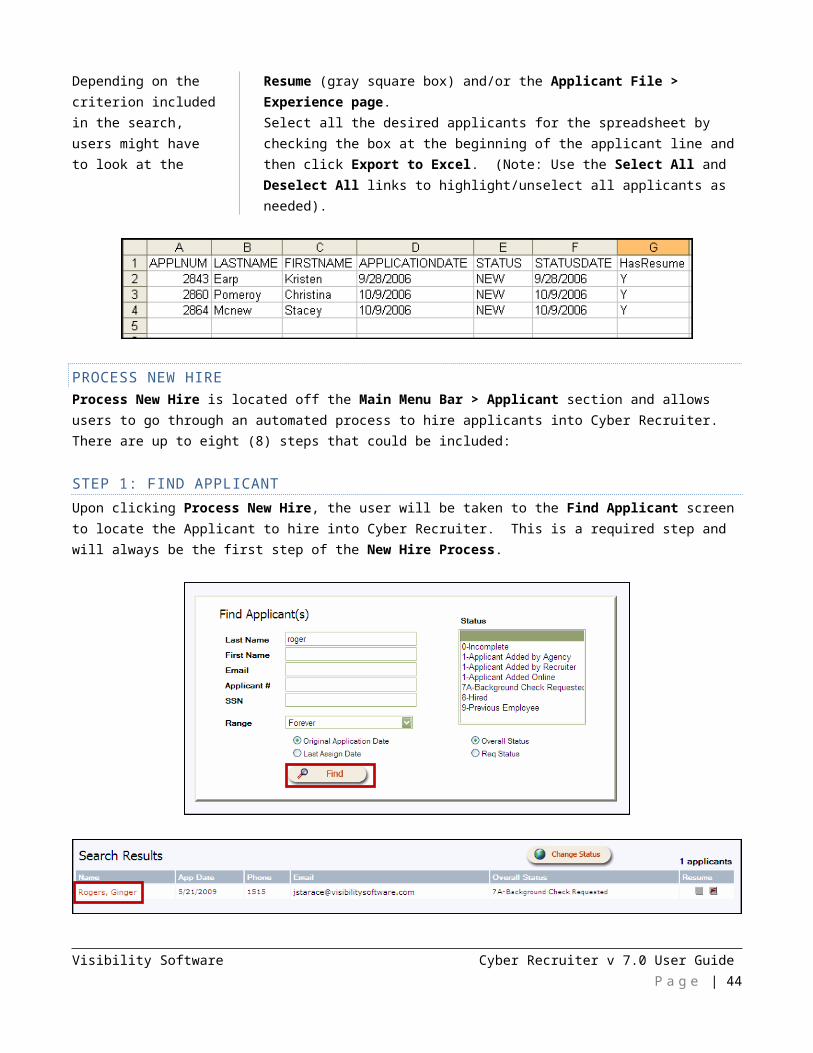
STEP 1: FIND APPLICANTUpon clicking Process New Hire, the user will be taken to the Find Applicant screen to locate the Applicant to hire into Cyber Recruiter. This is a required step and will always be the first step of the New Hire Process.
Visibility Software Cyber Recruiter v 7.0 User Guide P a g e | 37
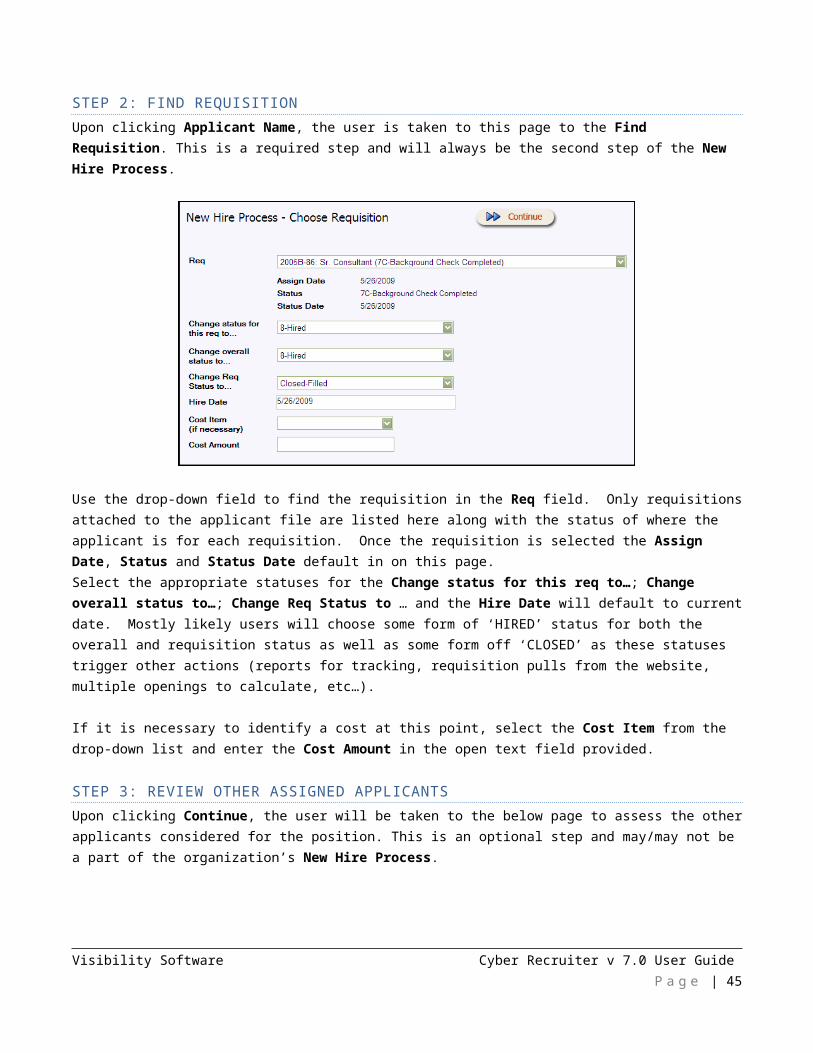
STEP 2: FIND REQUISITIONUpon clicking Applicant Name, the user is taken to this page to the Find Requisition. This is a required step and will always be the second step of the New Hire Process.
Use the drop-down field to find the requisition in the Req field. Only requisitions attached to the applicant file are listed here along with the status of where the applicant is for each requisition. Once the requisition is selected the Assign Date, Status and Status Date default in on this page. Select the appropriate statuses for the Change status for this req to…; Change overall status to…; Change Req Status to … and the Hire Date will default to current date. Mostly likely users will choose some form of ‘HIRED’ status for both the overall and requisition status as well as some form off ‘CLOSED’ as these statuses trigger other actions (reports for tracking, requisition pulls from the website, multiple openings to calculate, etc…).
If it is necessary to identify a cost at this point, select the Cost Item from the drop-down list and enter the Cost Amount in the open text field provided.
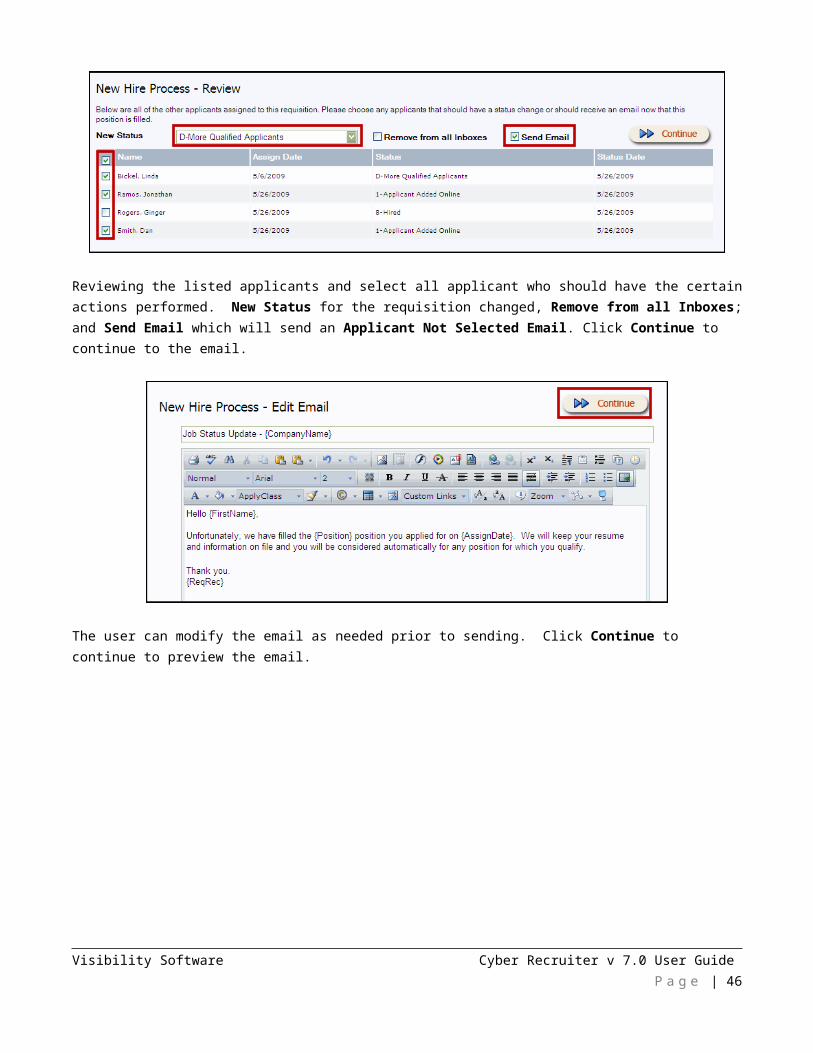
STEP 3: REVIEW OTHER ASSIGNED APPLICANTS Upon clicking Continue, the user will be taken to the below page to assess the other applicants considered for the position. This is an optional step and may/may not be a part of the organization’s New Hire Process.
Visibility Software Cyber Recruiter v 7.0 User Guide P a g e | 38
Reviewing the listed applicants and select all applicant who should have the certain actions performed. New Status for the requisition changed, Remove from all Inboxes; and Send Email which will send an Applicant Not Selected Email. Click Continue to continue to the email.
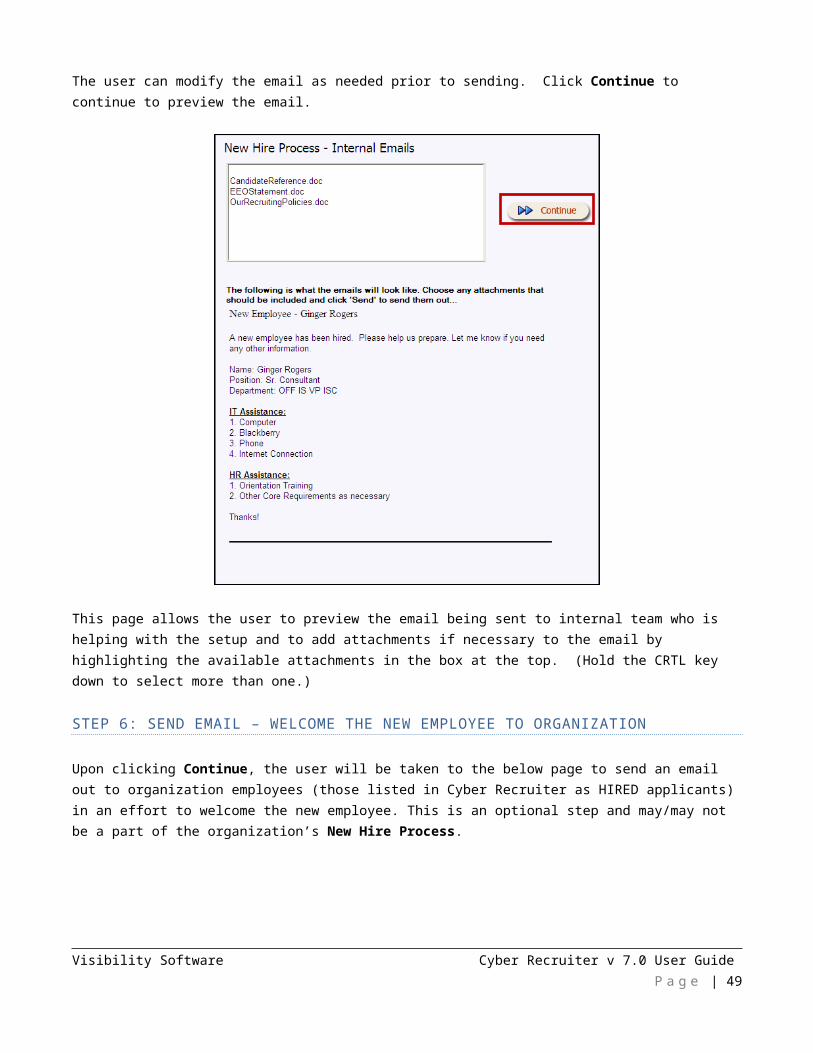
The user can modify the email as needed prior to sending. Click Continue to continue to preview the email.
Visibility Software Cyber Recruiter v 7.0 User Guide P a g e | 39
This page allows the user to preview the email being sent to the remaining applicants and to add an attachment if necessary to the email by highlighting the available attachments in the box at the top. (Hold the CRTL key down to select more than one.)
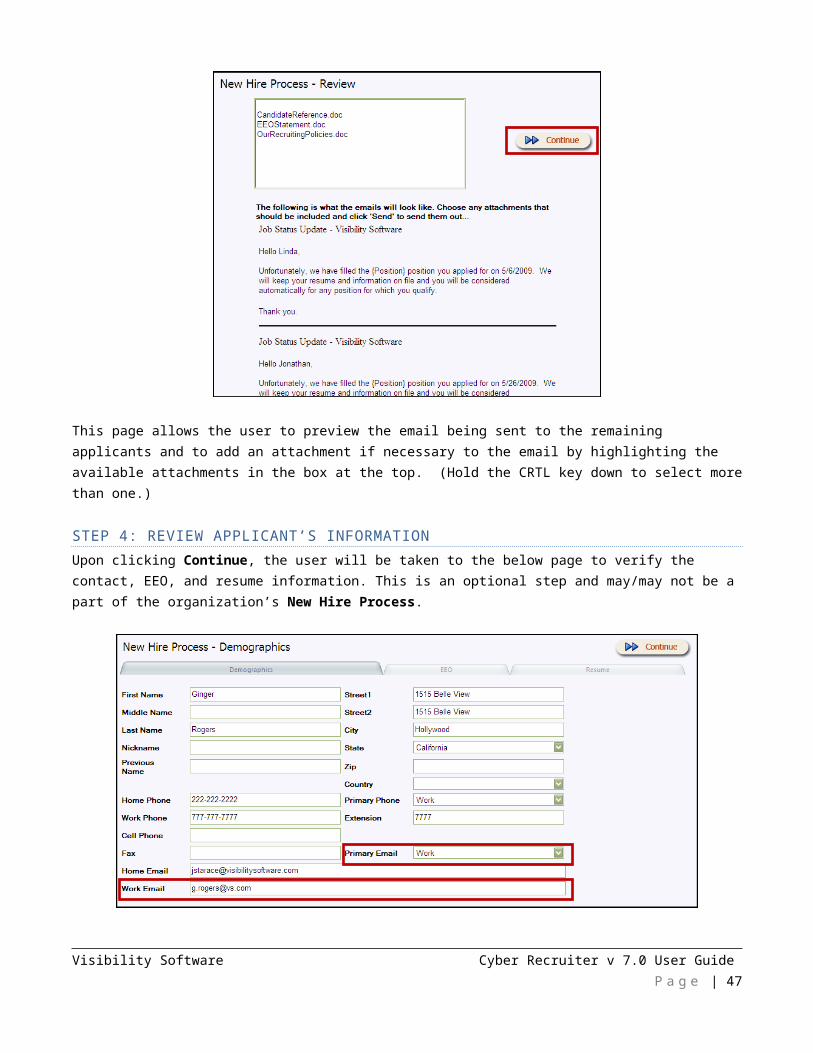
STEP 4: REVIEW APPLICANT’S INFORMATION Upon clicking Continue, the user will be taken to the below page to verify the contact, EEO, and resume information. This is an optional step and may/may not be a part of the organization’s New Hire Process.
The Demographics Tab allows the user to review the information for accuracy and to enter the new Work Email Address and/or Work Number if available. If this information is entered make sure to change the Primary Email and Primary Phone defaults as needed.
Visibility Software Cyber Recruiter v 7.0 User Guide P a g e | 40
The EEO Tab allows the user to review the EEO information for AAP reporting purposes and transfer of information into an HRIS system.
The Resume Tab allows the user to make any final tweaks and/or adjustments as necessary. For example, if this Applicant is getting prepped to send out to client, here is where the Recruiter/Human Resources can make sure all that is needed in the resume is there.
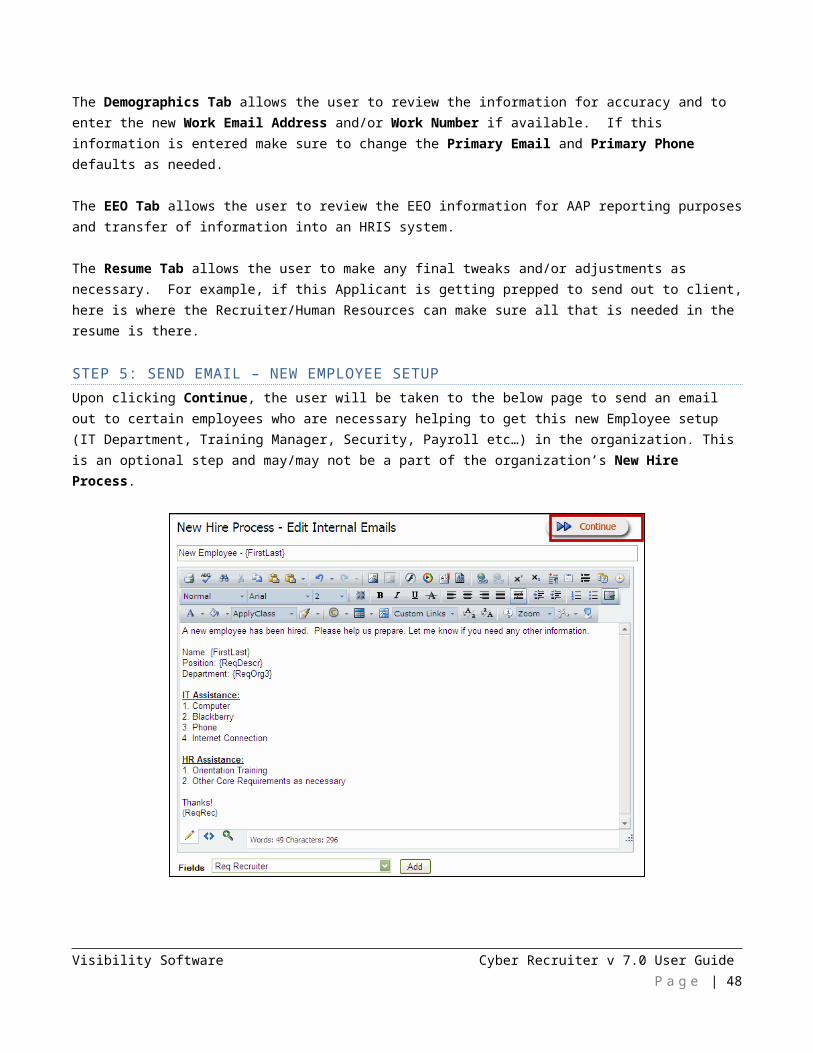
STEP 5: SEND EMAIL – NEW EMPLOYEE SETUP Upon clicking Continue, the user will be taken to the below page to send an email out to certain employees who are necessary helping to get this new Employee setup (IT Department, Training Manager, Security, Payroll etc…) in the organization. This is an optional step and may/may not be a part of the organization’s New Hire Process.
The user can modify the email as needed prior to sending. Click Continue to continue to preview the email.
Visibility Software Cyber Recruiter v 7.0 User Guide P a g e | 41
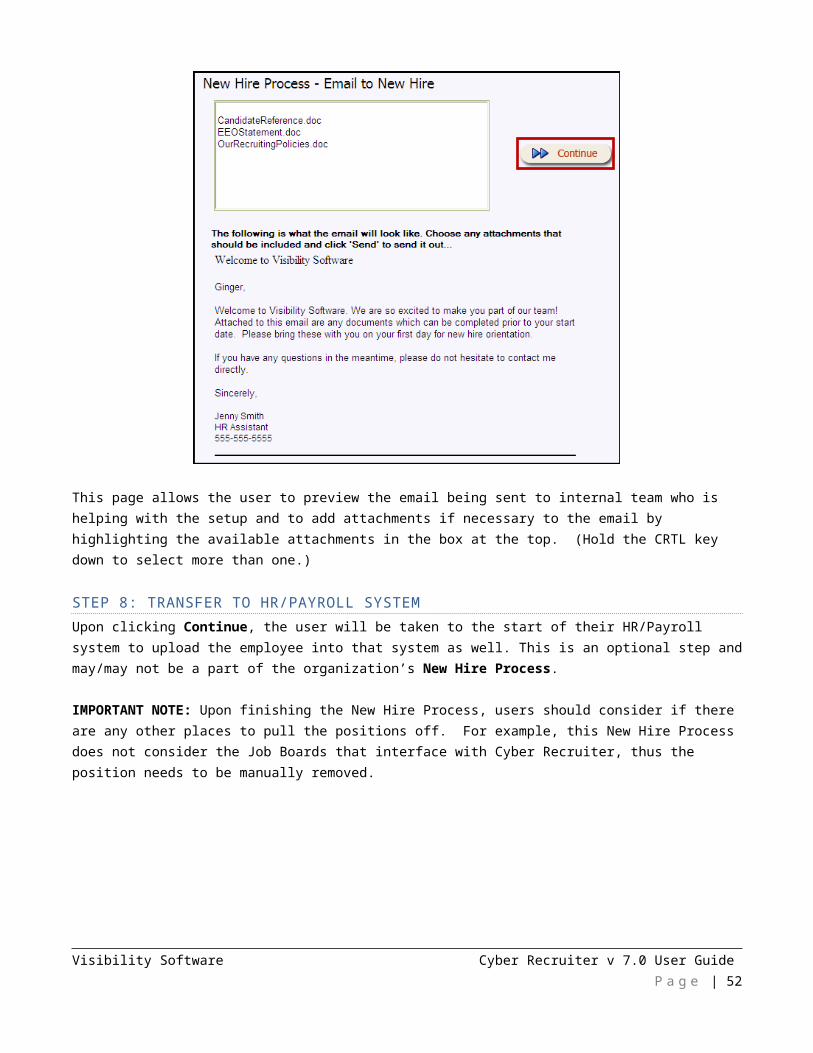
This page allows the user to preview the email being sent to internal team who is helping with the setup and to add attachments if necessary to the email by highlighting the available attachments in the box at the top. (Hold the CRTL key down to select more than one.)
STEP 6: SEND EMAIL – WELCOME THE NEW EMPLOYEE TO ORGANIZATION
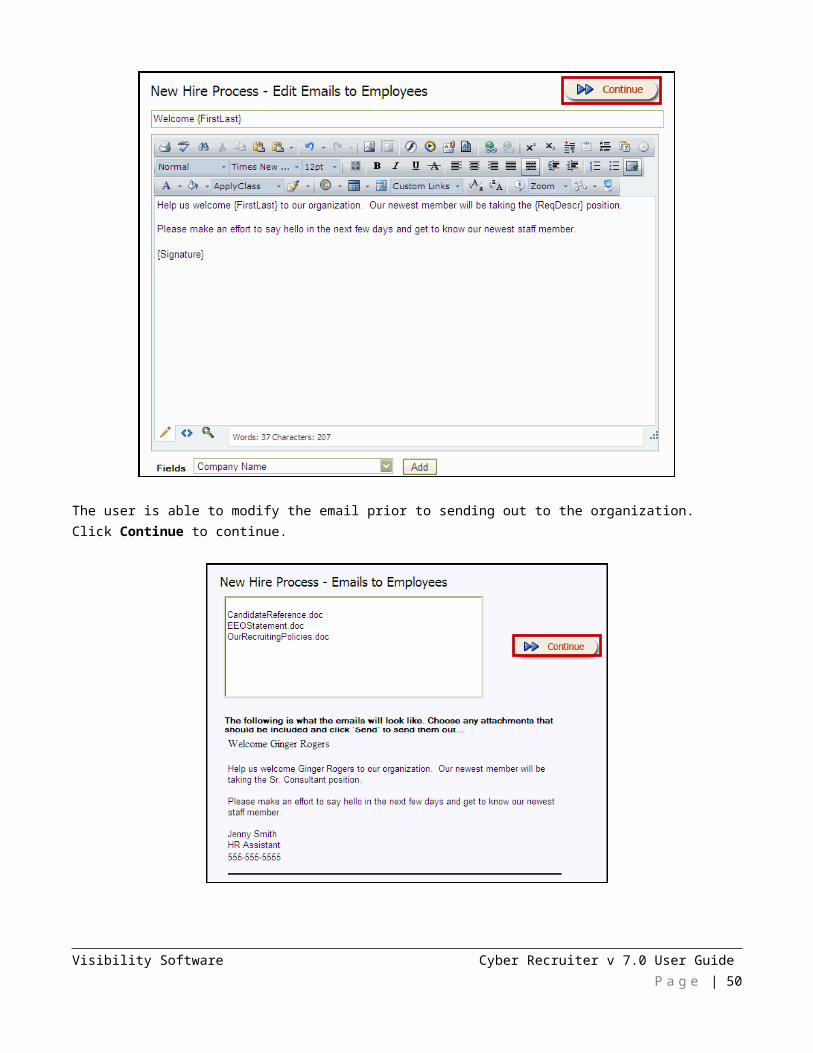
Upon clicking Continue, the user will be taken to the below page to send an email out to organization employees (those listed in Cyber Recruiter as HIRED applicants) in an effort to welcome the new employee. This is an optional step and may/may not be a part of the organization’s New Hire Process.
Visibility Software Cyber Recruiter v 7.0 User Guide P a g e | 42
The user is able to modify the email prior to sending out to the organization. Click Continue to continue.
This page allows the user to add attachments if necessary to the email by highlighting the available attachments in the box at the top. (Hold the CRTL key down to select more than one.)
Visibility Software Cyber Recruiter v 7.0 User Guide P a g e | 43
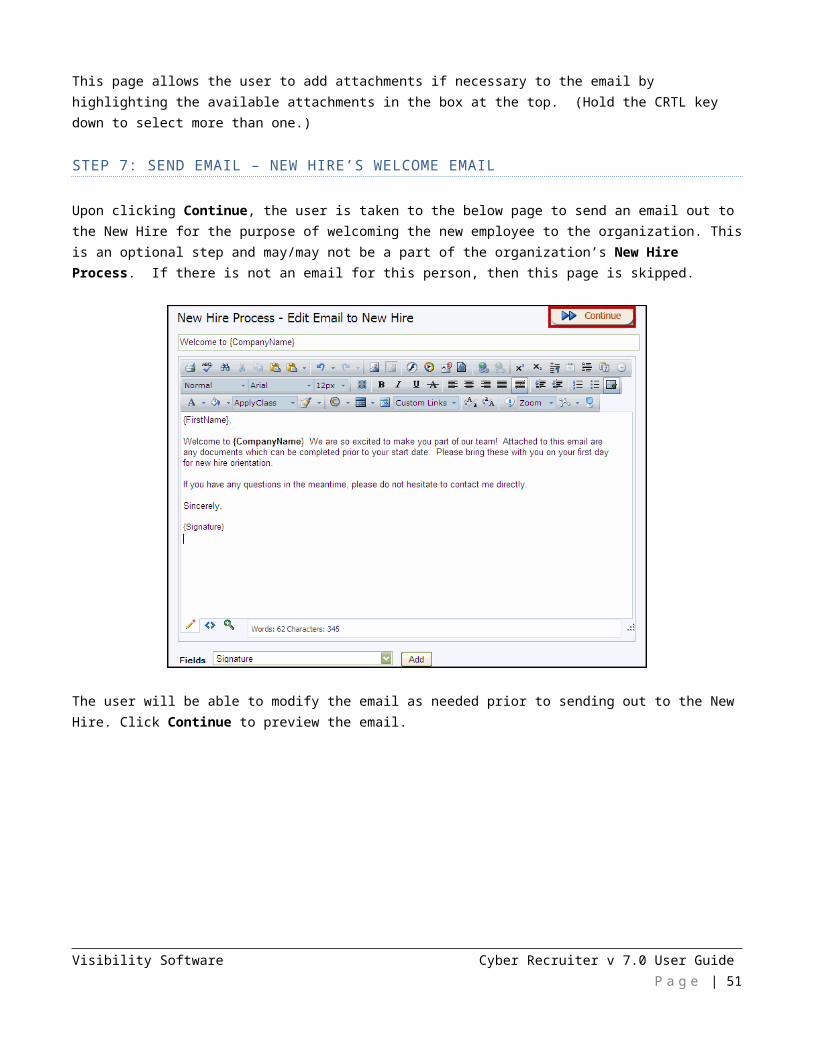
STEP 7: SEND EMAIL – NEW HIRE’S WELCOME EMAIL
Upon clicking Continue, the user is taken to the below page to send an email out to the New Hire for the purpose of welcoming the new employee to the organization. This is an optional step and may/may not be a part of the organization’s New Hire Process. If there is not an email for this person, then this page is skipped.
The user will be able to modify the email as needed prior to sending out to the New Hire. Click Continue to preview the email.
Visibility Software Cyber Recruiter v 7.0 User Guide P a g e | 44
This page allows the user to preview the email being sent to internal team who is helping with the setup and to add attachments if necessary to the email by highlighting the available attachments in the box at the top. (Hold the CRTL key down to select more than one.)
STEP 8: TRANSFER TO HR/PAYROLL SYSTEMUpon clicking Continue, the user will be taken to the start of their HR/Payroll system to upload the employee into that system as well. This is an optional step and may/may not be a part of the organization’s New Hire Process.
IMPORTANT NOTE: Upon finishing the New Hire Process, users should consider if there are any other places to pull the positions off. For example, this New Hire Process does not consider the Job Boards that interface with Cyber Recruiter, thus the position needs to be manually removed.
Visibility Software Cyber Recruiter v 7.0 User Guide P a g e | 45
EMPLOYEE REFERRALS
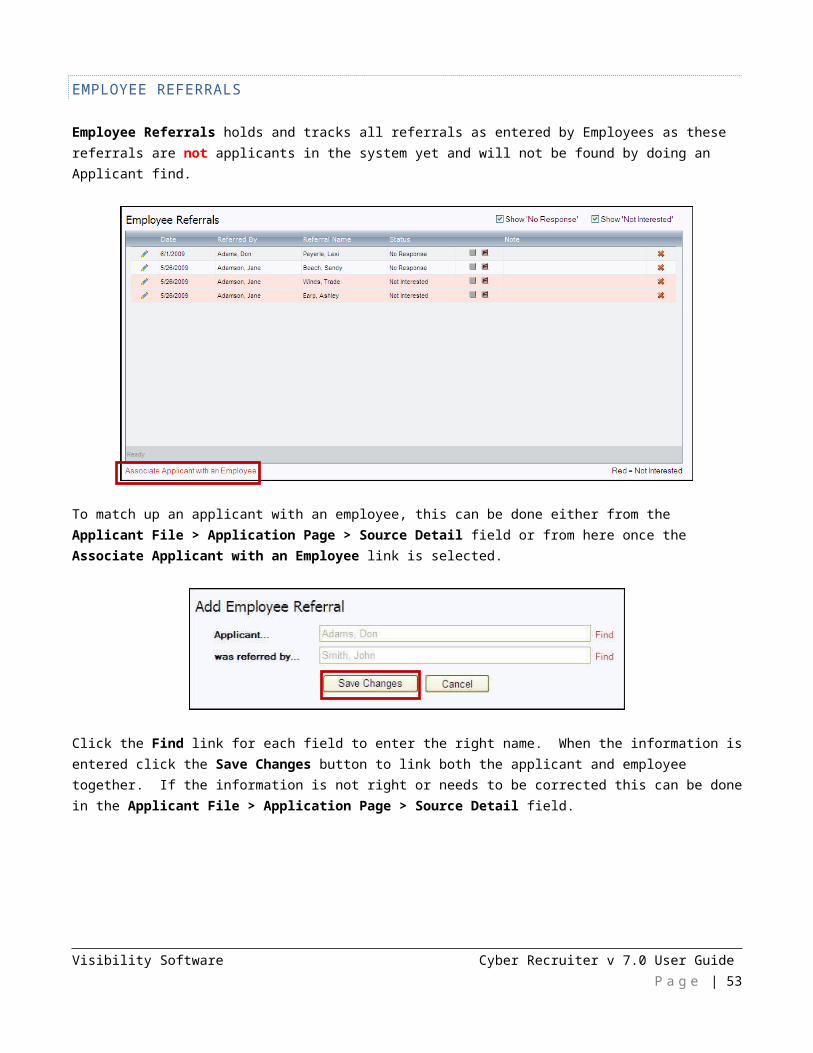
Employee Referrals holds and tracks all referrals as entered by Employees as these referrals are not applicants in the system yet and will not be found by doing an Applicant find.
To match up an applicant with an employee, this can be done either from the Applicant File > Application Page > Source Detail field or from here once the Associate Applicant with an Employee link is selected.
Click the Find link for each field to enter the right name. When the information is entered click the Save Changes button to link both the applicant and employee together. If the information is not right or needs to be corrected this can be done in the Applicant File > Application Page > Source Detail field.
Visibility Software Cyber Recruiter v 7.0 User Guide P a g e | 46
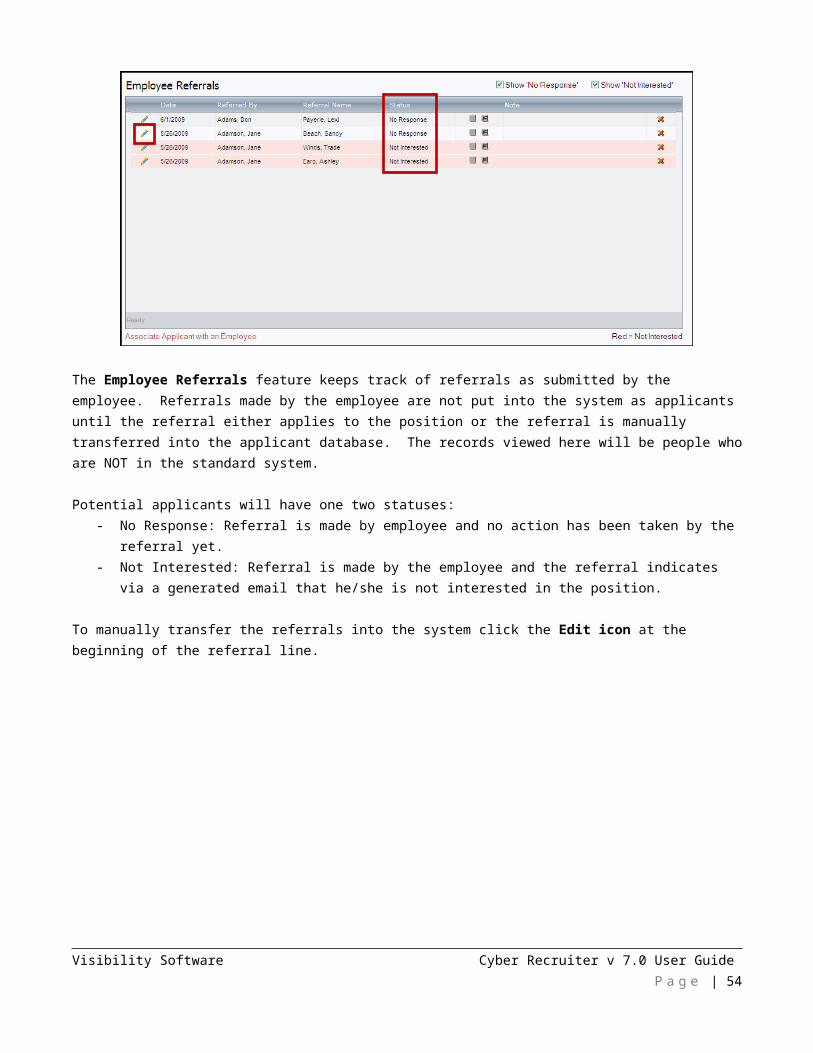
The Employee Referrals feature keeps track of referrals as submitted by the employee. Referrals made by the employee are not put into the system as applicants until the referral either applies to the position or the referral is manually transferred into the applicant database. The records viewed here will be people who are NOT in the standard system.
Potential applicants will have one two statuses: - No Response: Referral is made by employee and no action has been taken by the referral yet.- Not Interested: Referral is made by the employee and the referral indicates via a generated email that he/she is
not interested in the position.
To manually transfer the referrals into the system click the Edit icon at the beginning of the referral line.
Visibility Software Cyber Recruiter v 7.0 User Guide P a g e | 47
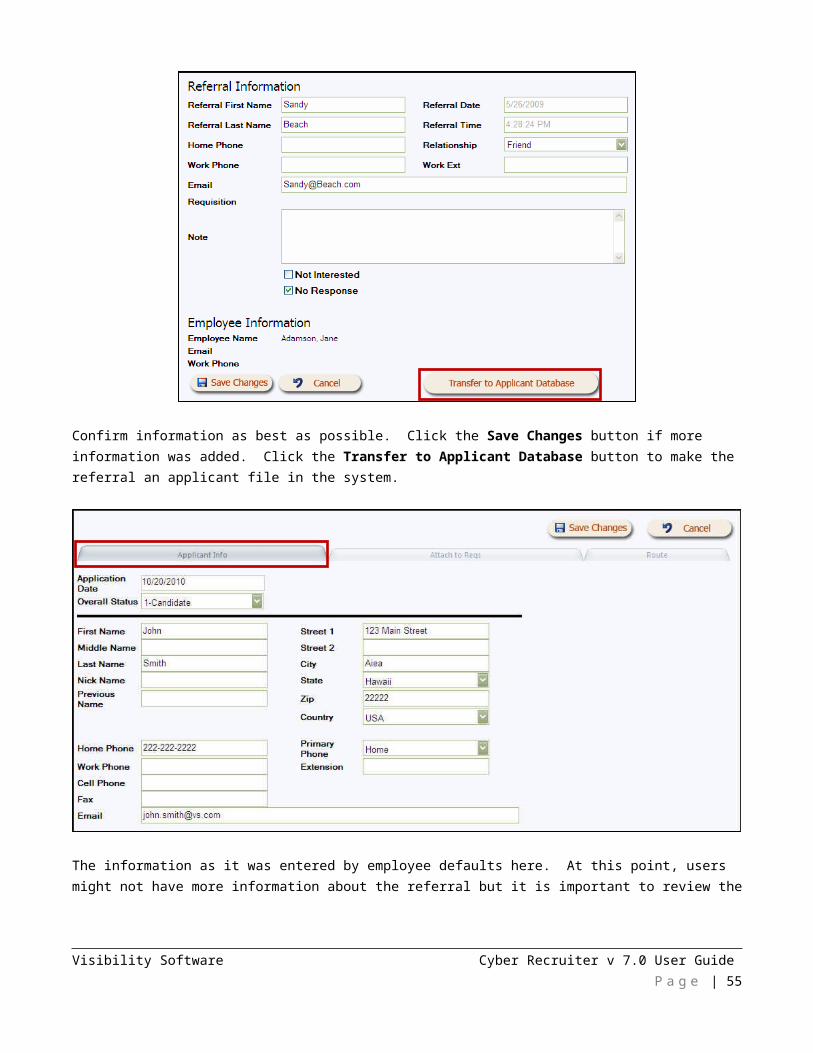
Confirm information as best as possible. Click the Save Changes button if more information was added. Click the Transfer to Applicant Database button to make the referral an applicant file in the system.
The information as it was entered by employee defaults here. At this point, users might not have more information about the referral but it is important to review the Application Date and Overall Status to make sure the information is accurate for tracking purposes. Click Save Changes when done.
Visibility Software Cyber Recruiter v 7.0 User Guide P a g e | 48
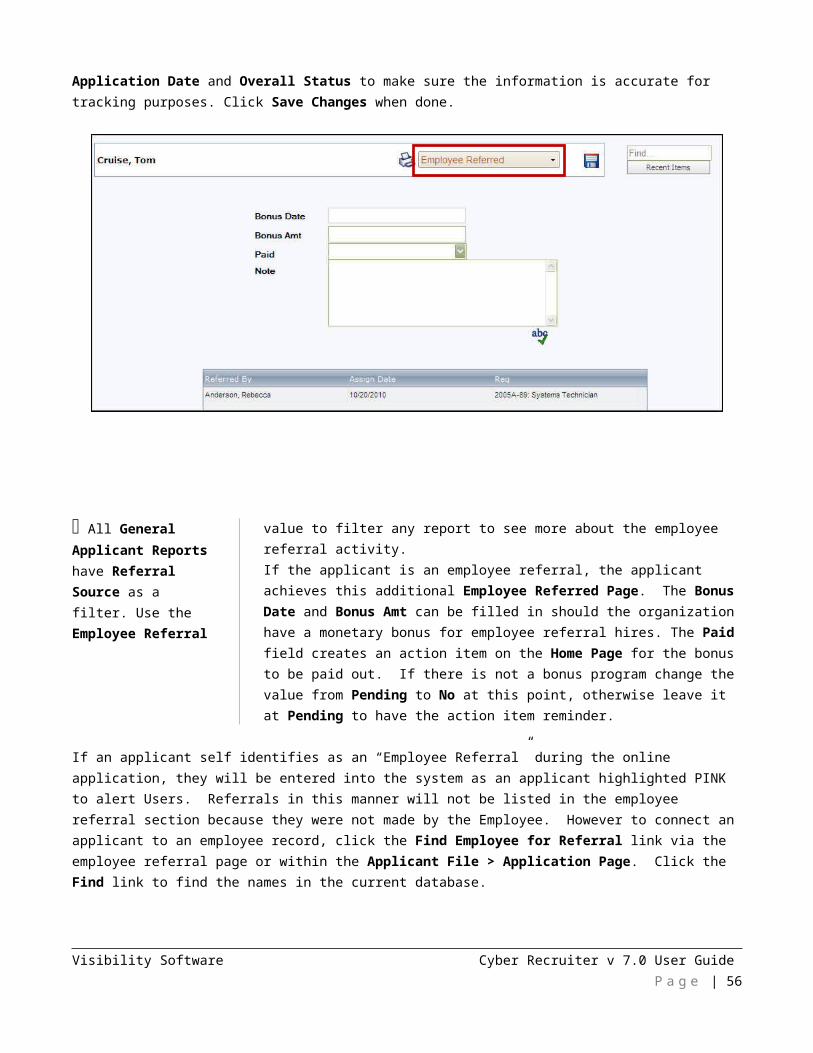
All General Applicant Reports have Referral Source as a filter. Use the Employee Referral value to filter any report to see more about the employee referral activity.
If the applicant is an employee referral, the applicant achieves this additional Employee Referred Page. The Bonus Date and Bonus Amt can be filled in should the organization have a monetary bonus for employee referral hires. The Paid field creates an action item on the Home Page for the bonus to be paid out. If there is not a bonus program change the value from Pending to No at this point, otherwise leave it at Pending to have the action item reminder.
If an applicant self identifies as an “Employee Referral” during the online application, they will be entered into the system as an applicant highlighted PINK to alert Users. Referrals in this manner will not be listed in the employee referral section because they were not made by the Employee. However to connect an applicant to an employee record, click the Find Employee for Referral link via the employee referral page or within the Applicant File > Application Page. Click the Find link to find the names in the current database.
Once the employee is selected, the Associate Applicant with Referral page comes up. The Referral Name and Referred By are ‘Read Only’ fields and the Date field defaults today’s date. Select the appropriate Requisition from the drop-down list and click Save Changes Button when done.
Visibility Software Cyber Recruiter v 7.0 User Guide P a g e | 49
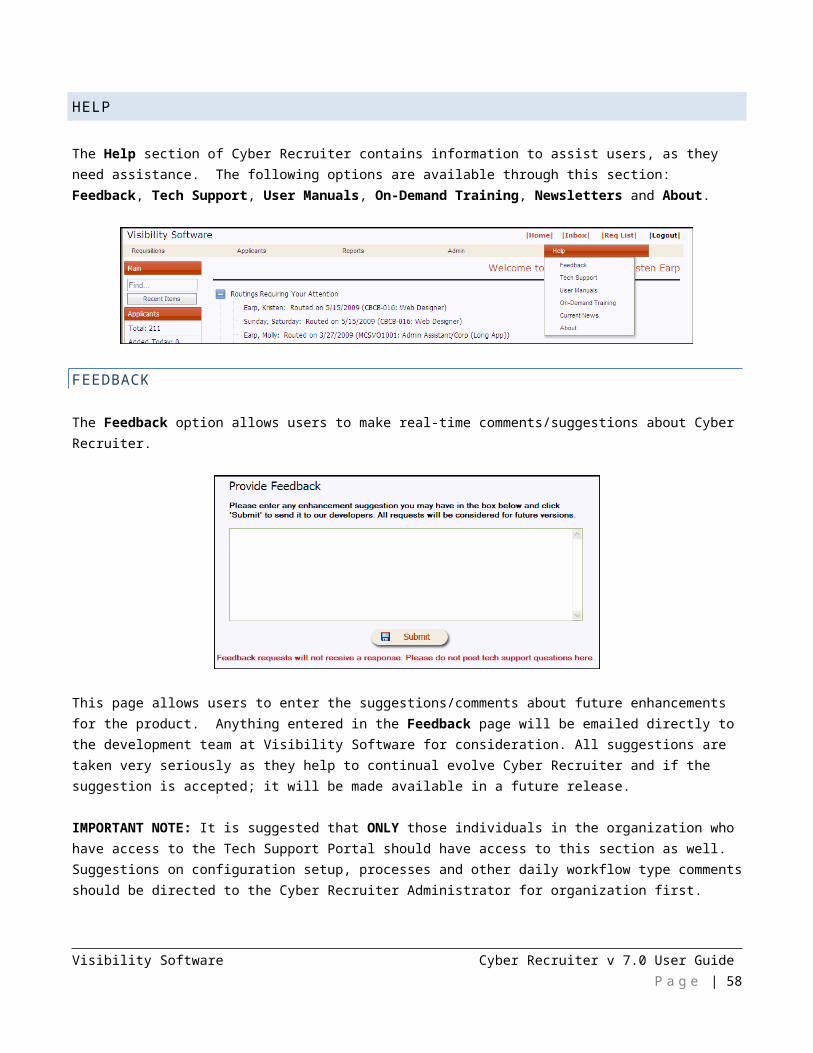
HELP
The Help section of Cyber Recruiter contains information to assist users, as they need assistance. The following options are available through this section: Feedback, Tech Support, User Manuals, On-Demand Training, Newsletters and About.
FEEDBACK
The Feedback option allows users to make real-time comments/suggestions about Cyber Recruiter.
This page allows users to enter the suggestions/comments about future enhancements for the product. Anything entered in the Feedback page will be emailed directly to the development team at Visibility Software for consideration. All suggestions are taken very seriously as they help to continual evolve Cyber Recruiter and if the suggestion is accepted; it will be made available in a future release.
IMPORTANT NOTE: It is suggested that ONLY those individuals in the organization who have access to the Tech Support Portal should have access to this section as well. Suggestions on configuration setup, processes and other daily workflow type comments should be directed to the Cyber Recruiter Administrator for organization first.
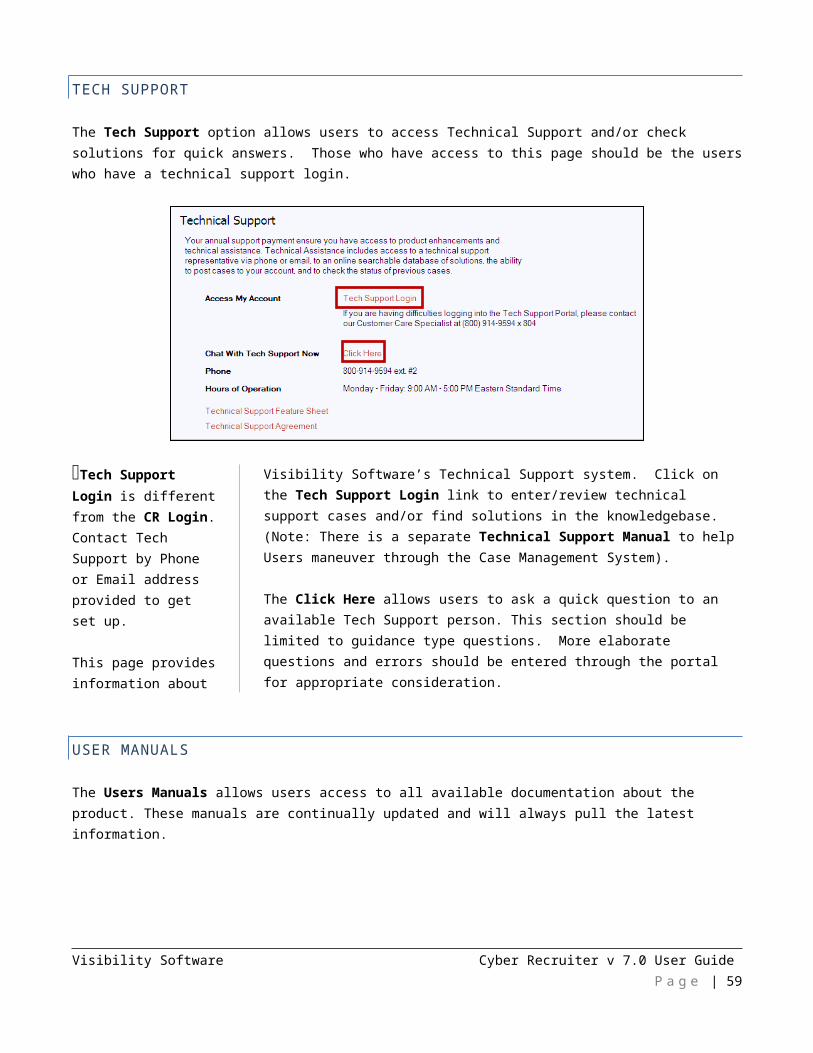
TECH SUPPORT
The Tech Support option allows users to access Technical Support and/or check solutions for quick answers. Those who have access to this page should be the users who have a technical support login.
Visibility Software Cyber Recruiter v 7.0 User Guide P a g e | 50
Tech Support Login is different from the CR Login. Contact Tech Support by Phone or Email address provided to get set up.
This page provides information about Visibility Software’s Technical Support system. Click on the Tech Support Login link to enter/review technical support cases and/or find solutions in the knowledgebase. (Note: There is a separate Technical Support Manual to help Users maneuver through the Case Management System).
The Click Here allows users to ask a quick question to an available Tech Support person. This section should be limited to guidance type questions. More elaborate questions and errors should be entered through the portal for appropriate consideration.
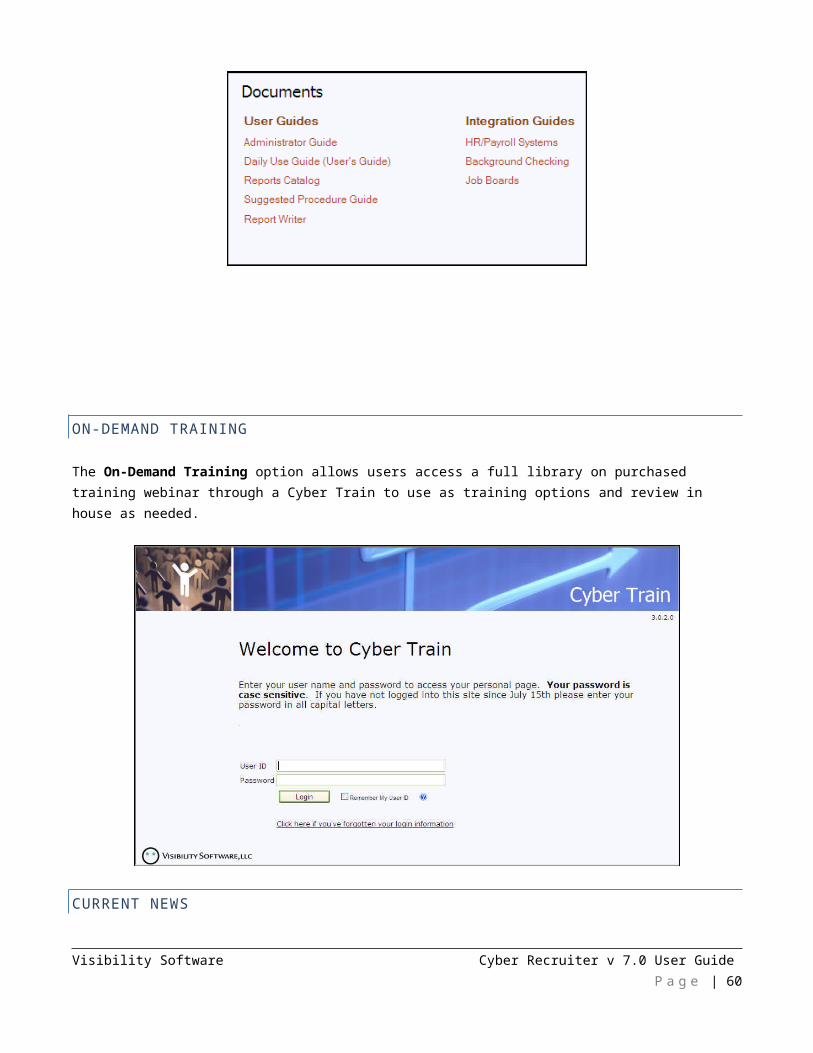
USER MANUALS
The Users Manuals allows users access to all available documentation about the product. These manuals are continually updated and will always pull the latest information.
Visibility Software Cyber Recruiter v 7.0 User Guide P a g e | 51
ON-DEMAND TRAINING
The On-Demand Training option allows users access a full library on purchased training webinar through a Cyber Train to use as training options and review in house as needed.
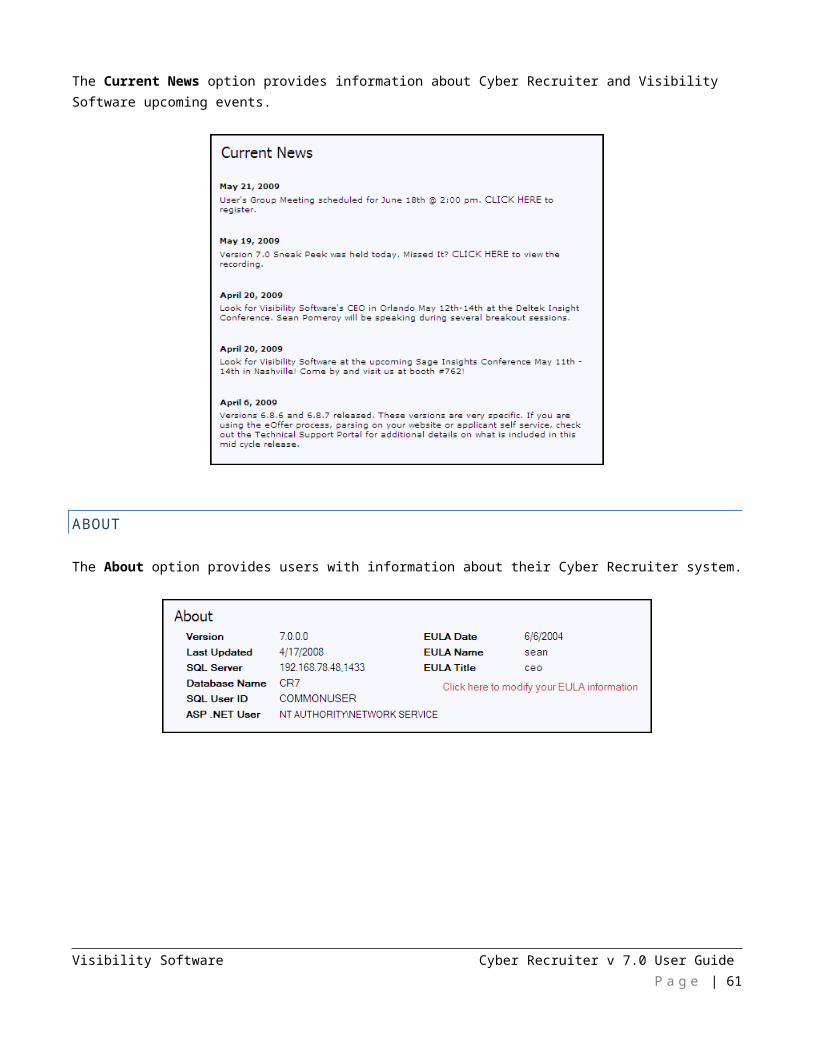
CURRENT NEWSThe Current News option provides information about Cyber Recruiter and Visibility Software upcoming events.
Visibility Software Cyber Recruiter v 7.0 User Guide P a g e | 52
ABOUT
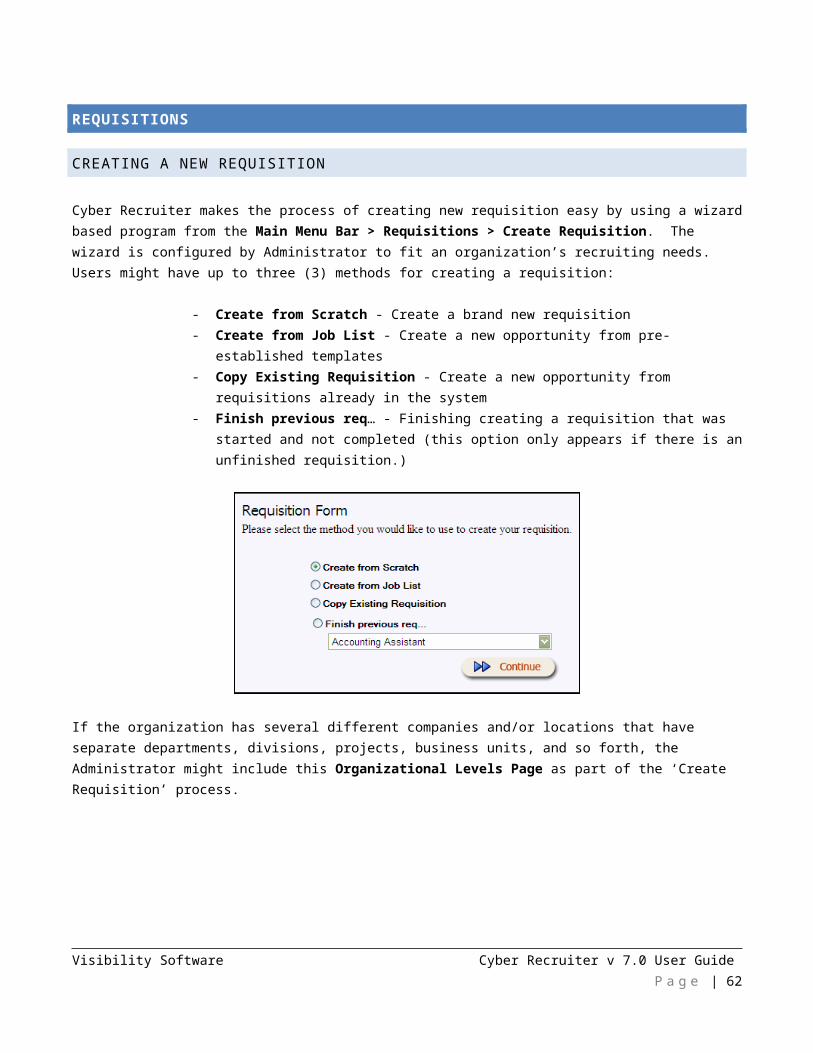
The About option provides users with information about their Cyber Recruiter system.
Visibility Software Cyber Recruiter v 7.0 User Guide P a g e | 53
REQUISITIONS
CREATING A NEW REQUISITION
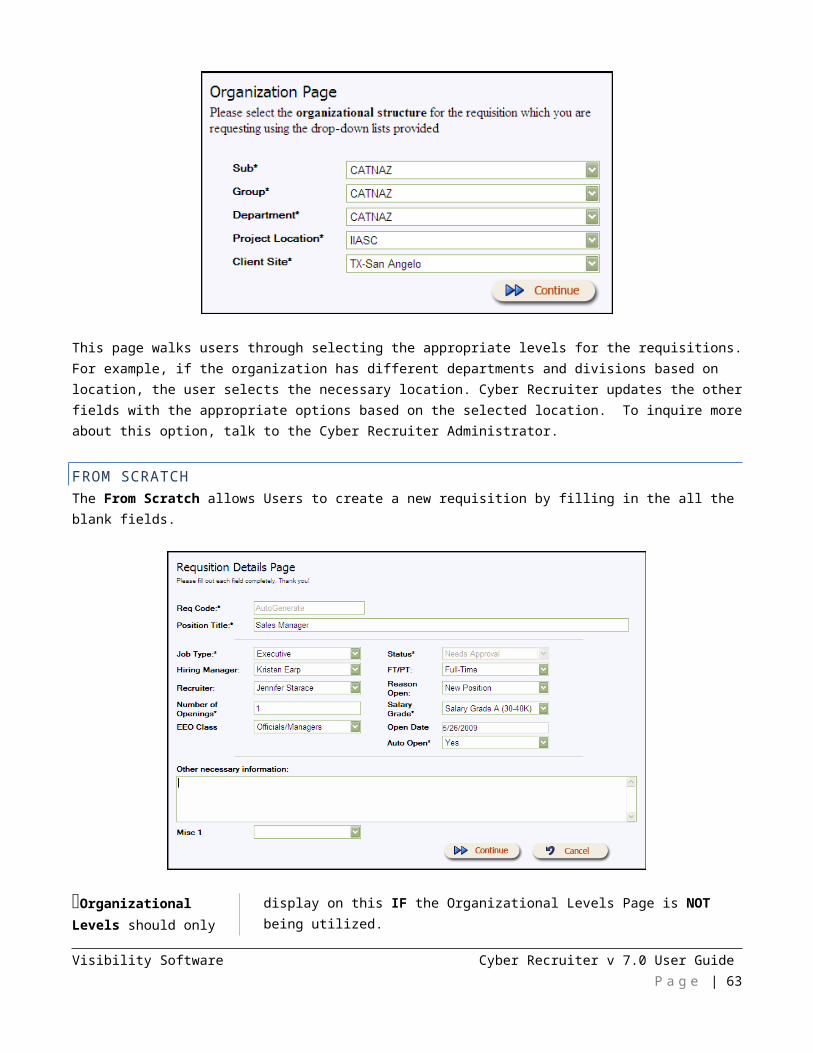
Cyber Recruiter makes the process of creating new requisition easy by using a wizard based program from the Main Menu Bar > Requisitions > Create Requisition. The wizard is configured by Administrator to fit an organization’s recruiting needs. Users might have up to three (3) methods for creating a requisition:
- Create from Scratch - Create a brand new requisition- Create from Job List - Create a new opportunity from pre-established templates- Copy Existing Requisition - Create a new opportunity from requisitions already in the system- Finish previous req… - Finishing creating a requisition that was started and not completed (this
option only appears if there is an unfinished requisition.)
If the organization has several different companies and/or locations that have separate departments, divisions, projects, business units, and so forth, the Administrator might include this Organizational Levels Page as part of the ‘Create Requisition’ process.
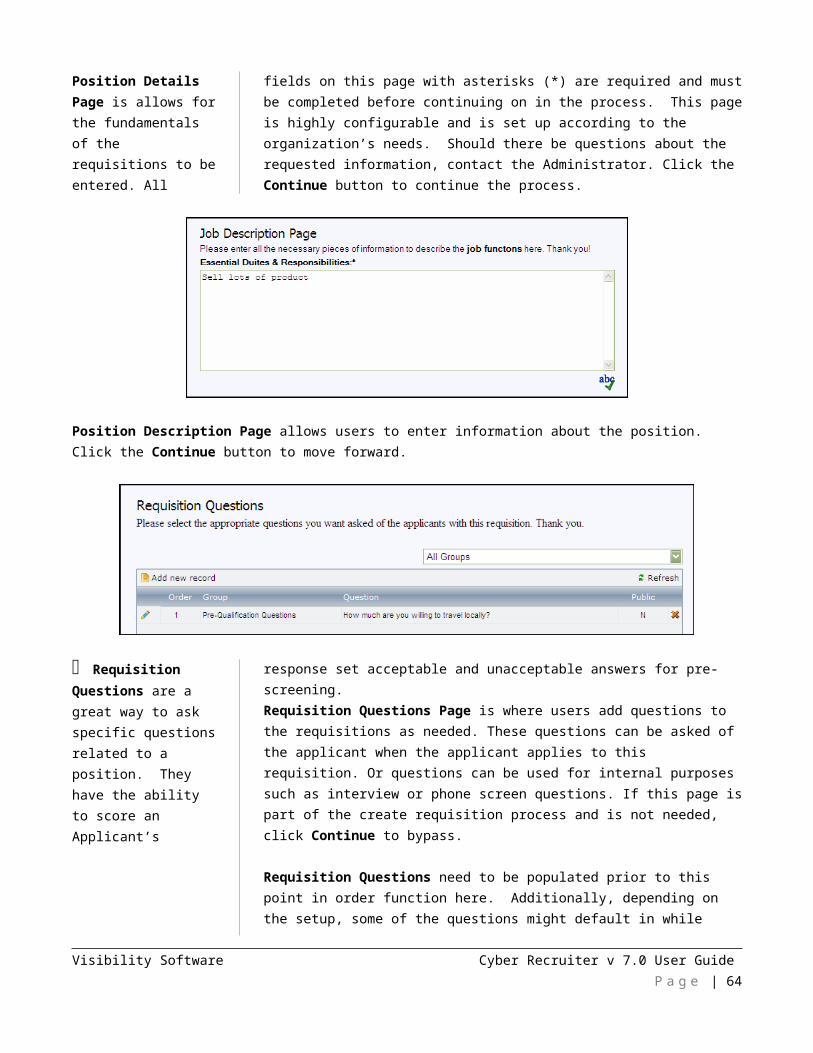
Visibility Software Cyber Recruiter v 7.0 User Guide P a g e | 54
This page walks users through selecting the appropriate levels for the requisitions. For example, if the organization has different departments and divisions based on location, the user selects the necessary location. Cyber Recruiter updates the other fields with the appropriate options based on the selected location. To inquire more about this option, talk to the Cyber Recruiter Administrator.
FROM SCRATCHThe From Scratch allows Users to create a new requisition by filling in the all the blank fields.
Organizational Levels should only display on this IF the Organizational Levels Page is NOT being utilized.
Position Details Page is allows for the fundamentals of the requisitions to be entered. All fields on this page with asterisks (*) are required and must be completed before continuing on in the process. This page is highly configurable and is set up according to the organization’s needs. Should there be questions about the requested information, contact the Administrator. Click the Continue button to continue the process.
Position Description Page allows users to enter information about the position. Click the Continue button to move forward.
Visibility Software Cyber Recruiter v 7.0 User Guide P a g e | 55
Requisition Questions are a great way to ask specific questions related to a position. They have the ability to score an Applicant’s response set acceptable and unacceptable answers for pre-screening.
Requisition Questions Page is where users add questions to the requisitions as needed. These questions can be asked of the applicant when the applicant applies to this requisition. Or questions can be used for internal purposes such as interview or phone screen questions. If this page is part of the create requisition process and is not needed, click Continue to bypass.
Requisition Questions need to be populated prior to this point in order function here. Additionally, depending on the setup, some of the questions might default in while others will need to be added.
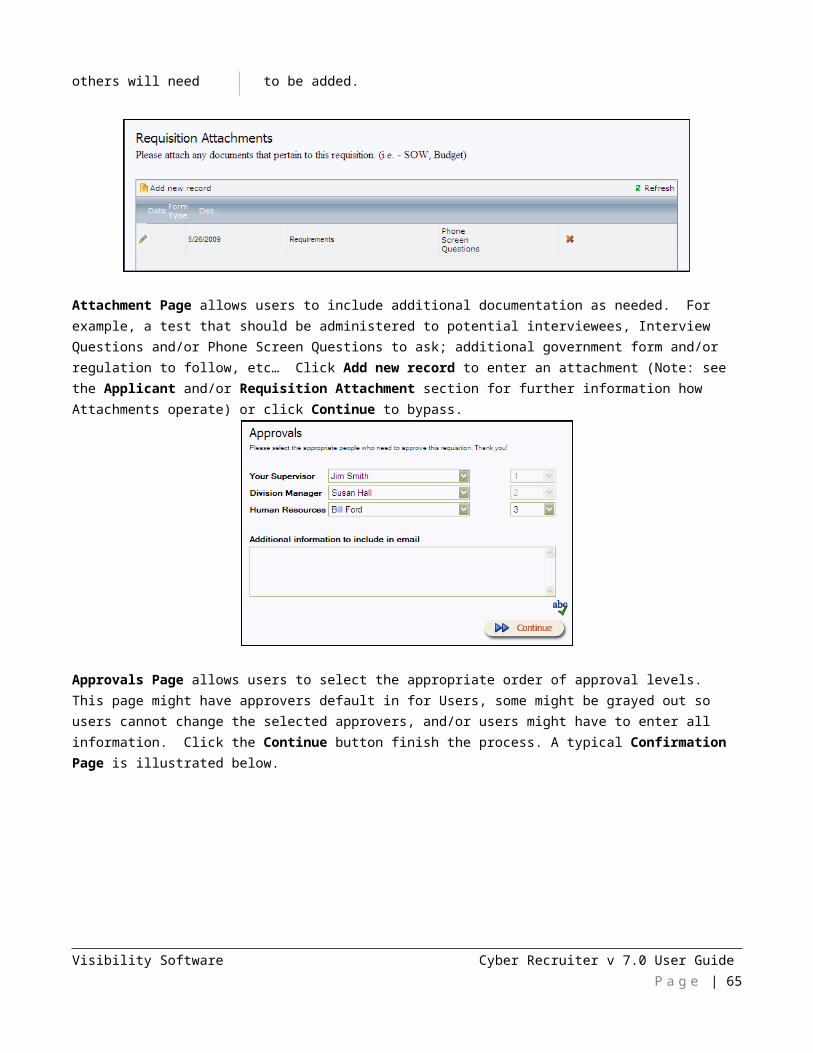
Attachment Page allows users to include additional documentation as needed. For example, a test that should be administered to potential interviewees, Interview Questions and/or Phone Screen Questions to ask; additional government form and/or regulation to follow, etc… Click Add new record to enter an attachment (Note: see the Applicant and/or Requisition Attachment section for further information how Attachments operate) or click Continue to bypass.
Visibility Software Cyber Recruiter v 7.0 User Guide P a g e | 56

Approvals Page allows users to select the appropriate order of approval levels. This page might have approvers default in for Users, some might be grayed out so users cannot change the selected approvers, and/or users might have to enter all information. Click the Continue button finish the process. A typical Confirmation Page is illustrated below.
FROM EXISTING REQUISITION AND FROM TEMPLATEBoth options produce the same flow of pages the Create From Scratch option does.
- From Existing Requisition utilizes established requisitions in the system to start the new requisition opportunity. - From Approved Template utilizes established templates to start a new requisition opportunity. Templates are
requisitions where the Status equals TEMPLATE.
Visibility Software Cyber Recruiter v 7.0 User Guide P a g e | 57
MANAGING REQUISITIONS
Cyber Recruiter makes managing requisitions easy to do.
- Req List is like a filing cabinet and holds all Requisition Files created in Cyber Recruiter as users have security permissions to view them.
- Home Page > My Preference allows users to set defaults to show particular kinds of requisition files upon entering the Req List.
- Requisition Files each have a drop-down list that organizes and stores the information in a logical order.
REQUISITION LIST
The Cyber Recruiter Requisition List is a central location in which all requisition files are located.
Users can set their own defaults and columns of information for this page in Home Page > My Preferences > Req List.
Templates are not included in the ‘ALL’ option. To preview Templates, the option
needs to be selected.
Requisition Files are sorted by the Code column initially but users can sort (ascending/descending) by any column that has the up and down arrows in the header. To open a Requisition File, click on the Code hyperlink field. The Req List can also filter Requisition Files as needed using Requisition Statuses (Checkboxes and Other Status drop-down list) and/or the User’s Role. Click the Refresh button to apply changes to the filters.
Visibility Software Cyber Recruiter v 7.0 User Guide P a g e | 58
Requisition statuses are comprised of the three (3) checkboxes and the Other Status drop-down list
which contains statuses developed by the organization. The checkboxes are typical requisition statuses and listed for convenience. These filters work together using an ‘OR’ feature. For Example: When all three (3) are selected it is telling Cyber Recruiter to show Requisition Files with the status of Open ‘OR’ Closed ‘OR’ On Hold. Click the Refresh button to update filtering criteria.
Delete option when available; permanently remove the Requisition File from the system.
Role filters are tied to the Requisition File > Main Page Recruiter/Hiring Manager fields. So that when users select a role, it displays only the Requisitions Files based on their role. The following options: Copy, Change Code, and Delete are restricted security permissions that all users may not have. Copy takes starts a new requisition, Change Code link allows the requisition code to be altered.
NAVIGATING WITHIN A REQUISITION FILE
Cyber Recruiter makes navigating in requisition files very simple. Once users are within the Requisition File:
- Banner contains the requisition Code/Job Title and a Drop-Down List to navigate through the pages of the Requisition File. This section discusses these pages in more detail.
- Hover over the Job Title anywhere in the Requisition File to get a pop-up of quick requisition statistics.- Scrolling Feature < > works with the Requisition List and Find Requisition areas. Results returned from either of
these searches, allow users to scroll through the requisition files one at a time here.
IMPORTANT NOTE: Maintaining an accurate Requisition File is very important as this is where the information is pulled to the website, job boards, agency portal, reports and other tracking measures. The Requisition Form (Input Tool) is only a way to get the Requisition File started and the Print Req (Output Tool) is a report of where the Requisition File is currently.
Visibility Software Cyber Recruiter v 7.0 User Guide P a g e | 59
The below table below is common flow of pages utilized in Requisition Form to start the Requisition File.
Requisition Form Requisition FileMain Page Main PageJob Description Job Description
ApplicantsReq Questions (Depends) Requisition QuestionsApprovals Approvals
Requirements
CostsNotes (Depends) Notes Attachments (Depends) Attachments
Job BoardsAgency Portal
Print Req (At the End) Print Req
MAIN PAGEThe Requisition Main Page contains the primary information that makes up a Requisition File.
Visibility Software Cyber Recruiter v 7.0 User Guide P a g e | 60
(Items in YELLOW are controlled by the Administrator & Items in GREEN are hard coded to the page)
Status & the Posting Date fields determine when & where the requisition posts.
Hot Jobs field posts the requisition in the ‘Featured Job’ link on the website.
Application field determines the application templates used for this requisition when there is multiple application established.
Openings field is # of positions are available & Remaining Opening field does the calculation.
Main Page allows users to review/update the Requisition File details as necessary. This page is highly configurable to meet the organization’s needs and is split up into three (3) tabs: General Tab, Job Info Tab, and Misc Tab (User-defined title).
General Tab holds basic information about the position such as: Recruiter, Supervisor, Status, Date fields, etc… Auto Open field is ties directly to the Status field:
YES: automatically changes the Status field to Open after the approval process is complete.
NO: retains original status (Ex: Needs Approval) is a manual change to Open The Date Posted Internally and Date Posted Externally fields contain the dates that the user wants to pull the requisition from the self service center for employees (internally) and from the career pages/self service center for applicants (externally). If a hard removal of the posting is needed regardless of whether it is on the career pages or self service, use the Remove Posting field. (Note: Posting rules can be setup in admin to default values in these fields as the Cyber Recruiter Administrator sees fit.)
Visibility Software Cyber Recruiter v 7.0 User Guide P a g e | 61
Filled By field is automatically filled in when the applicant is HIRED for the position and
the Fill Date field will default the date the requisition the applicant is HIRED if the option to ‘Close’ the requisition is selected. This field can be updated as needed.
(Items in YELLOW are controlled by the Administrator & Items in PURPLE are configurable based on organizational levels)
Job Info Tab contains the salary related information and other Human Resource related fields that are not always on the Requisition Form (EEO Class, Exempt, Salary information, etc…).
Misc Tab captures organization specific requisition information and is highly configurable including the Tab Header. This tab can hold up to twenty (20) fields. Contact the Administrator if additional fields are needed here
JOB DESCRIPTION PAGE
The Job Description Page contains the official Job Description, Requirements, Public Job Description, and/or other necessary text information about the Requisition.
Visibility Software Cyber Recruiter v 7.0 User Guide P a g e | 62
The Tabs here are setup during the initial process to pull certain info to the Website, Self Service, Job Boards, Employee Referrals, etc… Discuss all needed changes to current setup with the Administrator.
Job Description Page breaks up the job description information into four (4) tabs. Depending on the Requisition Form, some or all of these tabs will contain information when a new position is created and it will post out as configured by the Administrator. Some organizations even use the Notes Page to help pull & post information as needed.
The tab titles offer suggested ways to break up the job description information but it not necessary to do. The more the information is broken down, the more sections it can breakdown on the website and/or job boards that Cyber Recruiter interfaces. However the organization decides how they will capture the information, it should be consistently followed so that information is populated where it needs to be. Changes to the process need to be discussed and reviewed.
Visibility Software Cyber Recruiter v 7.0 User Guide P a g e | 63
REQ QUESTIONS PAGE
The Req Questions Page stores any requisition specific questions for internal and external use as needed.
Groups drop-down list not only filters the view to a particular group, if a group is selected prior to the clicking Add new record, it filters available questions to that group. The All Groups option displays everything.
Questions default the Order, Public & Required statuses are they were originally entered into the system but can be modified here as needed.
Req Questions Page displays the specific questions about a requisition. Questions can only be added to a Requisition File, they cannot be developed. Contact the Administrator if there are additional questions that should be available. Typical groups of questions are as listed below:
- Pre-Qualifications Questions are usually Public and Required because they are questions the applicant answers when applying for a position. These kinds of questions aim at getting more information about a specific skill set/experience level. Users might have a general group called ‘Pre-Qualification Questions’ to choose from or set up several more smaller and specific groups by category.
- Interview Questions/Phone Screen Questions are usually not Public and Required because they are questions to be asked later in the process. By adding them here, the questions become available within the Applicant File > Application Page for answers to be captured per requisition attached to the applicant. Example, the applicant applies to a position, and the interview is done. Six months later, the applicant applies to another position and the interview is done for that one as well. The questions/answers can be kept separate from one another.
Visibility Software Cyber Recruiter v 7.0 User Guide P a g e | 64
APPLICANTS PAGE
The Applicants Page contains all applicants/employees considered for the position.
Print icon works with the Applicants listed here. If the view is filtered, Print displays the filtered view.
Applicants(#) indicates the total # of applicants attached to the requisition and is found in the drop-down list when looking at the applicant option.
Group button will display the applicants by the status currently assigned. Click again to show the names.
Applicants Page lists all the applicants assigned to the requisition by either applying to the position online and/or users manually addition. Applicants are automatically sorted by Applicant Name (first column) but can be changed with the Sort by drop-down list. If the list starts to get long, it can be filtered by the Set Filter button. Clicking this button allows users to select a status or group of statuses that should only display on the page.
Basic summary information about each Applicant is displayed here. The Applicant Name and Route links are shortcuts to the Applicant File should users want to see more information. The Status indicates where the Applicant is in the recruiting process for this particular requisition. The Assign Date is the date the Applicant was attached to the requisition whereas the Status Date indicates the last time the Status field was updated. Score tracks accumulated points associated with application questions, requisition questions and interview evaluation questions if scoring techniques are used. Each one is link to a report that provides the total accumulated score as well as scoring per question and if the answer was acceptable or unacceptable.
In addition to evaluating applicants, users can also manage each of them individually (or as a group) by utilizing the buttons at the bottom. These buttons work in conjunction
Visibility Software Cyber Recruiter v 7.0 User Guide P a g e | 65
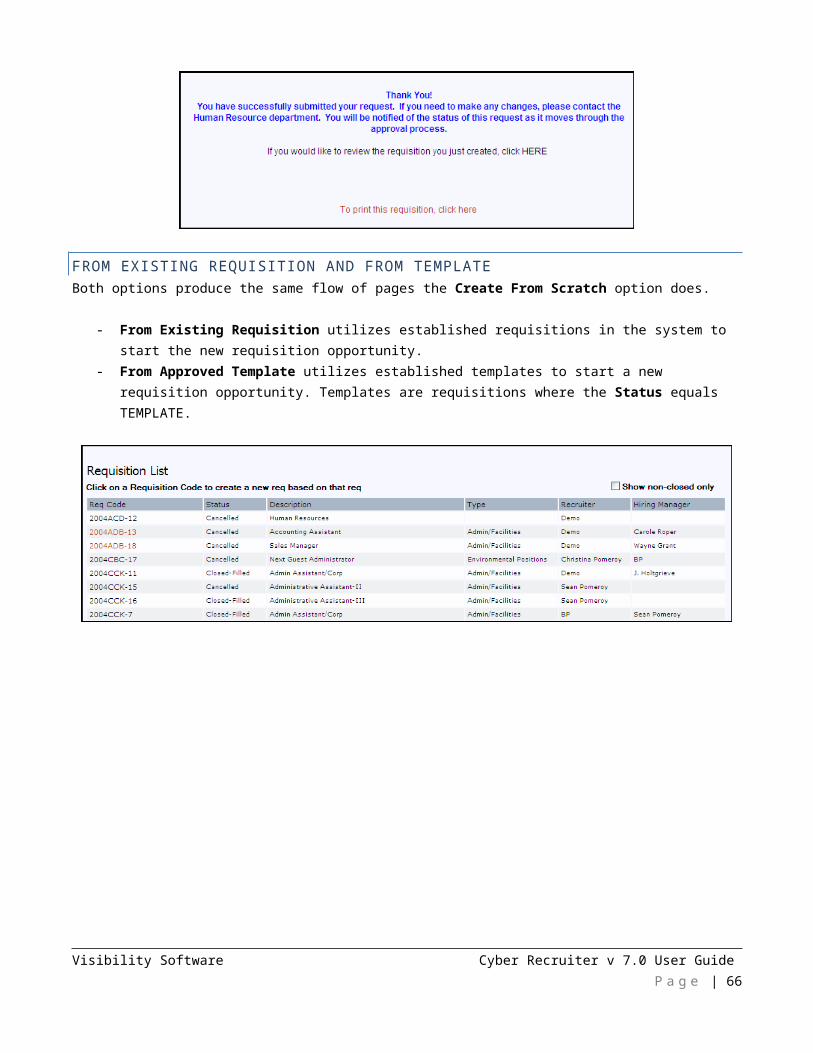
with the checkboxes at the end of the applicant line. Use the Select All or Deselect All links as needed.
DELETE BUTTONDelete eliminates the association between selected applicant(s) and Requisition File. A system security check will prompt users to verify this is the action they really want to take. (Note: This button only deletes the association between the Applicant File and the Requisition File; it does NOT delete the applicant from the system.)
EMAIL BUTTON
Email allows users to send an email to all the selected applicant(s). For example, ten (10) Applicants were considered for this position. After hiring the one that was most qualified, the other nine (9) are sent an ‘Applicant Not Selected’ email. One email can be created for the entire group considered.
If users believe the email did not send, contact the Administrator to check the Email Log.
Users select the Applicants by clicking the box at the end of each Applicant line and then click the Email button. A quick way to select the majority of Applicants is to use Select All link and then deselect any Applicant not needed manually.
Visibility Software Cyber Recruiter v 7.0 User Guide P a g e | 66
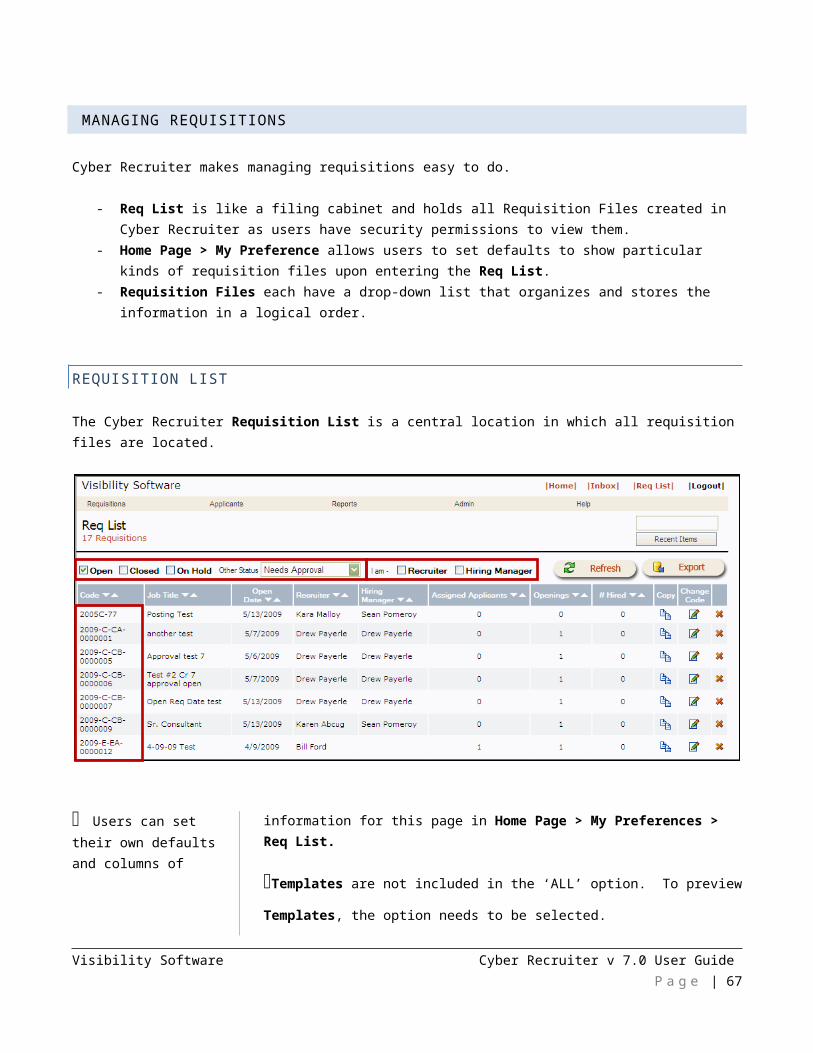
Visibility Software Cyber Recruiter v 7.0 User Guide P a g e | 67
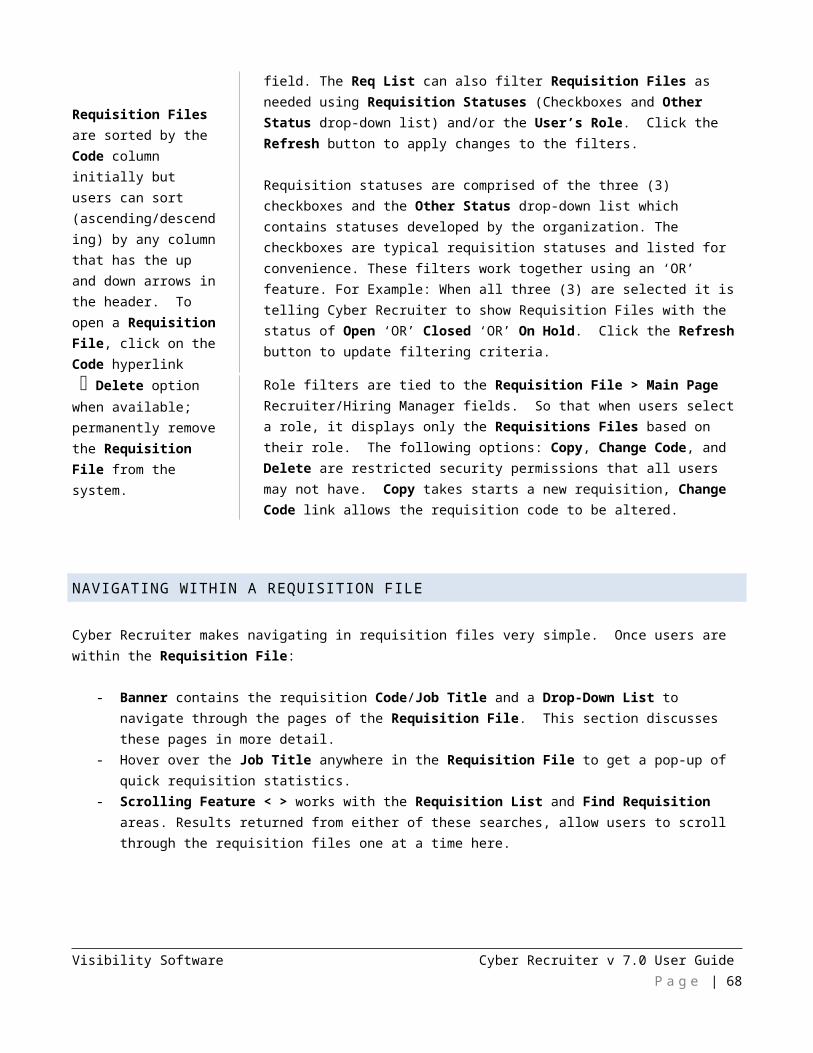
Errors/Missing Info such as an email address will default on this screen above the email preview.
A series of prompts take the User through sending out the email:
1. Decide whether to use a template or to create an email from scratch2. If the template option is selected, pick the desired one3. Third, modify the email template or create it if from scratch as needed 4. Preview how the email looks to each applicant before clicking the Send button.5. Select any necessary attachments by highlighting them in the box next to the
Send button.
ROUTE BUTTON
Route allows users to route the applicant(s) as group to other users who need to evaluate them.
Users select the applicants by clicking the box at the end of each applicant line and then click the Route button.
Visibility Software Cyber Recruiter v 7.0 User Guide P a g e | 68
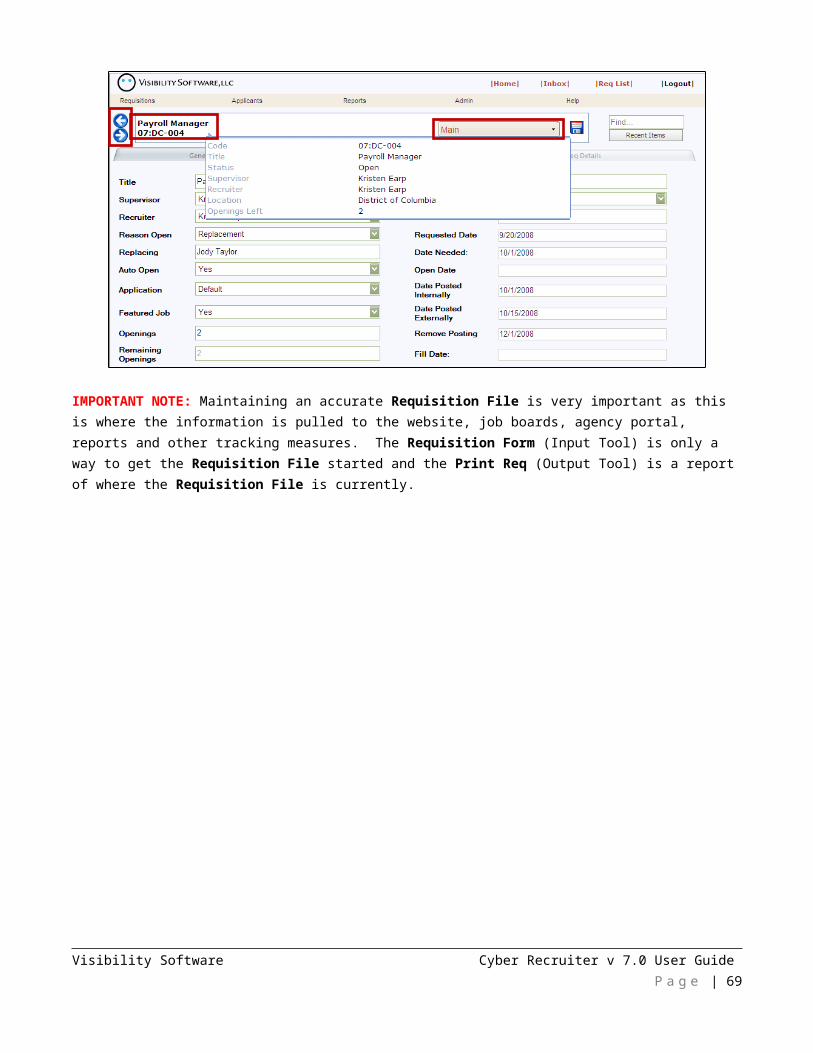
Route Hiring Manager field updates based on selected requisition with the hiring manager’s name.
Route Resume Page allows users to set up the routing details. The Requisition will default the Req field. More than one user can be selected by holding down the CRTL key and highlighting all names necessary. Add to Inbox(es) checkbox automatically adds the applicants being routed to the user(s) selected here. Type additional instructions/messages in the Email Text section as needed. Click the Save Changes button to complete the process.
Visibility Software Cyber Recruiter v 7.0 User Guide P a g e | 69
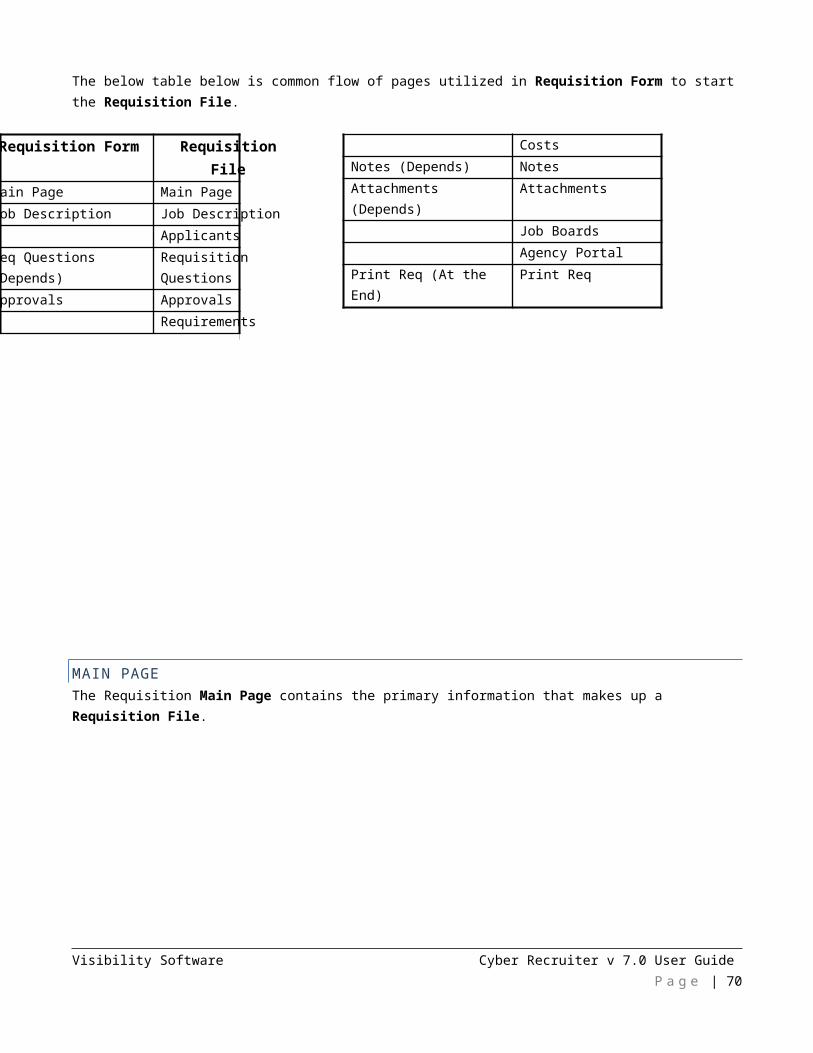
COMMUNICATION OPTIONS:The Email drop-down list provides the following options:
- Send one email with all Applicants listed – sends a short email with just the names of the applicants listed. With this email, users need to log into Cyber Recruiter to review candidates.
- Do NOT Email – Relies on the user(s) to check his/her Home Page for new routing activities to complete.- Send a separate email for each Applicant – utilizes an email template which is setup by the Administrator
to give detailed information about each applicant - The Checkbox Options work with all email options:
o Allow response from email option allows these selected user(s) to make a decision about these Applicant(s) from within the email sent. If this option is not selected, the selected user(s) can log into Cyber Recruiter make their decisions about applicant(s).
o Email response back to sender option sends an email notification to the user who sent the routing. If this option is not checked, the user who sent the routing can log into Cyber Recruiter to see where the applicant(s) are in the recruiting process for this requisition.
o Update applicant’s req status option is available only when the routing is being sent to one user and is otherwise grayed out. When available, it allows the user’s response to update the applicant’s Status for the requisition. If more than one user is selected, the recruiter (or user who routed the applicants) needs to evaluate all the responses and decide what the applicant’s Status for the requisition should be. To see all the responses for the applicant, check the Applicant File > Activity Page > Routings Tab > Response Column.
CHANGING STATUS BUTTON
Change Status allows users to change the applicant(s) status for the requisition.
Visibility Software Cyber Recruiter v 7.0 User Guide P a g e | 70
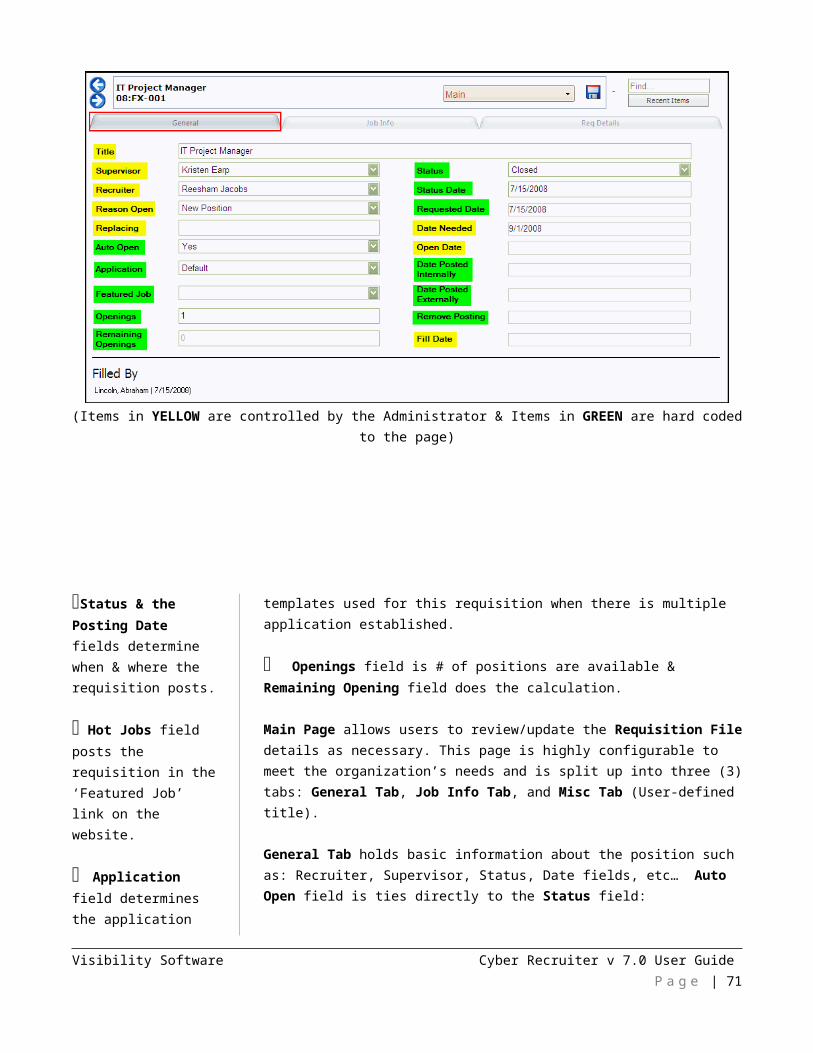
This status indicates where the applicant is in the recruiting process for this requisition. At minimum to HIRE an applicant into Cyber Recruiter, three (3) must happen and can all be done from here. Typically, users go through the Main Menu Bar > Applicants > Process New Hire as there are usually several other on-boarding items to consider.
These things can be completed from several locations in the system. However, all three (3) of them can be handled at simultaneously here as well as in the Applicant File > Assigned Reqs Page:
1. Change the Applicant Status for the requisition to HIRED – Recognizes this Applicant as hired for the position and is listed on the Requisition File > Main Page > General Tab – Filled By field
2. Check the box: Update overall status also – Recognizes the Applicant as an Employee3. Check the box: Change this req to Closed status – Pulls the requisition from the website and fills in the closed date.
Visibility Software Cyber Recruiter v 7.0 User Guide P a g e | 71
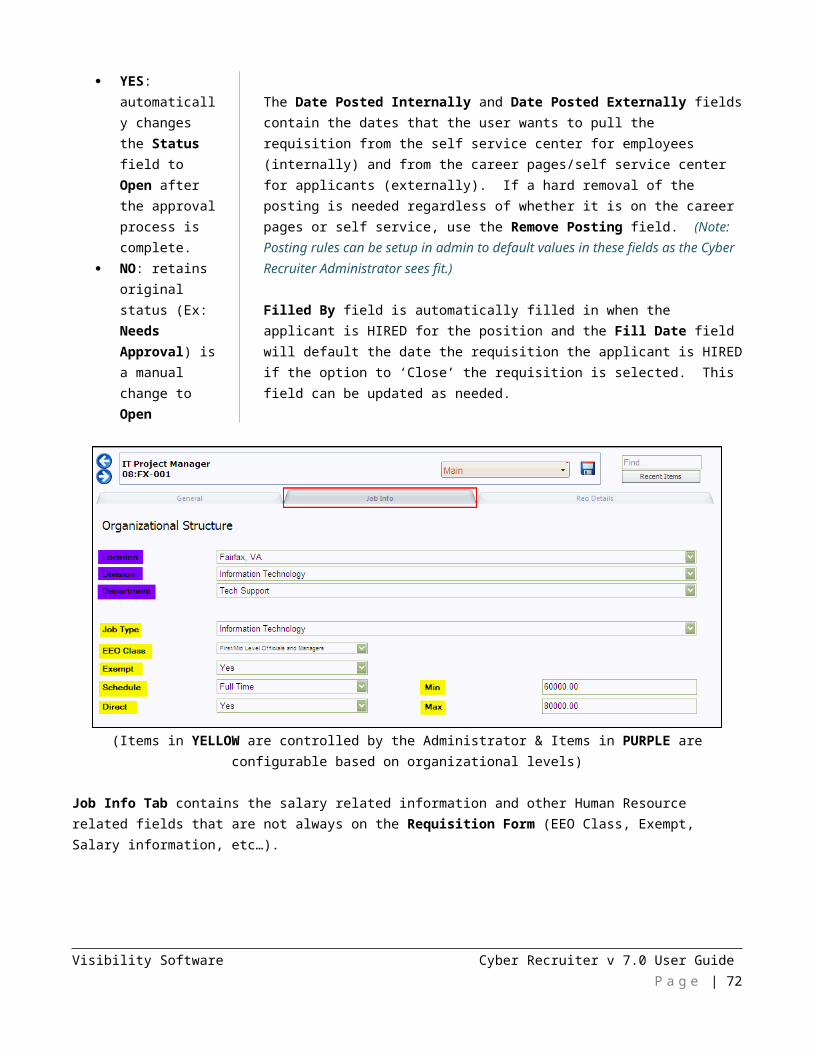
Users can also change selected applicant(s) statuses as a group by clicking the box at the end of each applicant line and then clicking the Change Status button.
Change Applicant Statuses Page allows users to change a group of applicant statuses for the requisition. If a notification to the recruiter/hiring manager needs to be sent as well, check the appropriate boxes before clicking the Save Changes button. Example, once an Applicant is hired the other Applicants need to have their statuses changed to Position Filled.
COPY TO NEW REQ BUTTON
The Copy to New Req button allows users to add applicant(s) to another requisition as needed.
Visibility Software Cyber Recruiter v 7.0 User Guide P a g e | 72
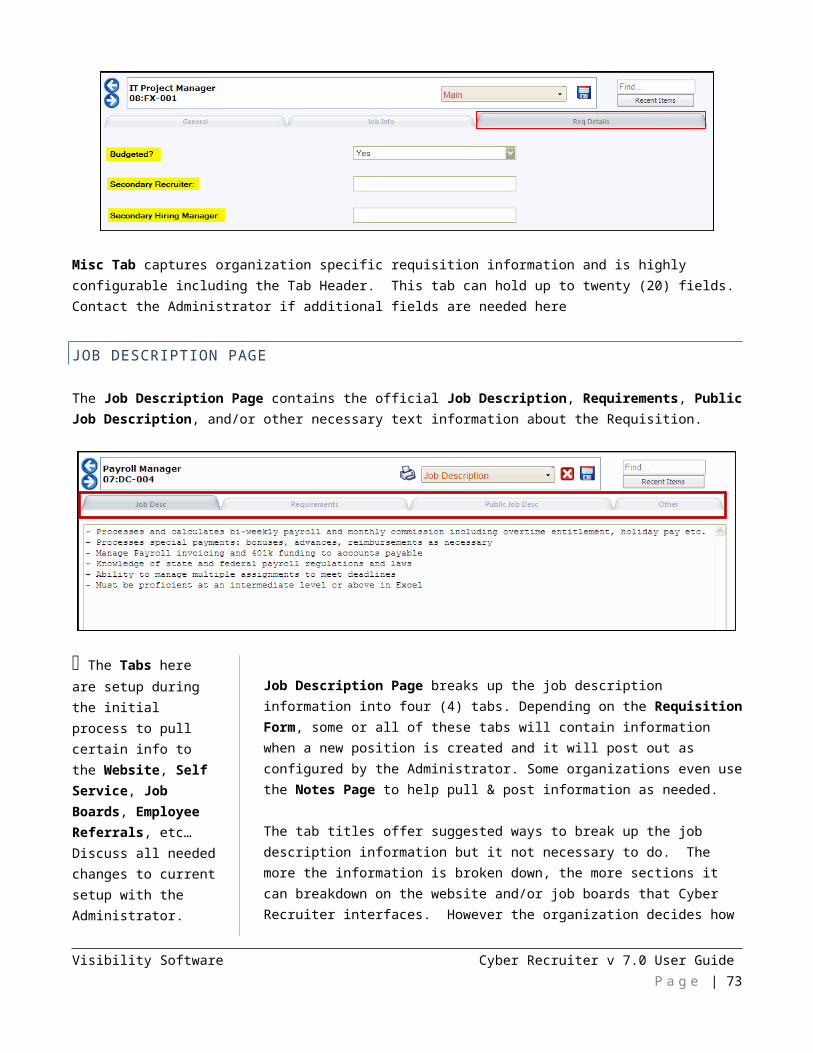
Users select the applicant(s) clicking the box at the end of each line and then clicking the Copy to New Req button.
Copying does not remove the Applicant from the current requisition.
Copy Applicants to a New Requisition Page allows users to select the Req and Applicant Status for the requisition. Example, there is another position that better suits the Applicant’s skill; this allows users to move them over. Click the Save Changes Icon when done or the Cancel Icon to abort the process.
PRINT RESUMES BUTTON
The Print Resumes button allows Users to print the selected Applicant(s) resumes.
Visibility Software Cyber Recruiter v 7.0 User Guide P a g e | 73
Users select the Applicant(s) clicking the box at the end of each Applicant line and then click the Print Resumes button.
APPLICANTS ASSIGNED PROPERTIES
Users with the appropriate security permissions can edit Applicant Files connected to the Requisition File.
Visibility Software Cyber Recruiter v 7.0 User Guide P a g e | 74
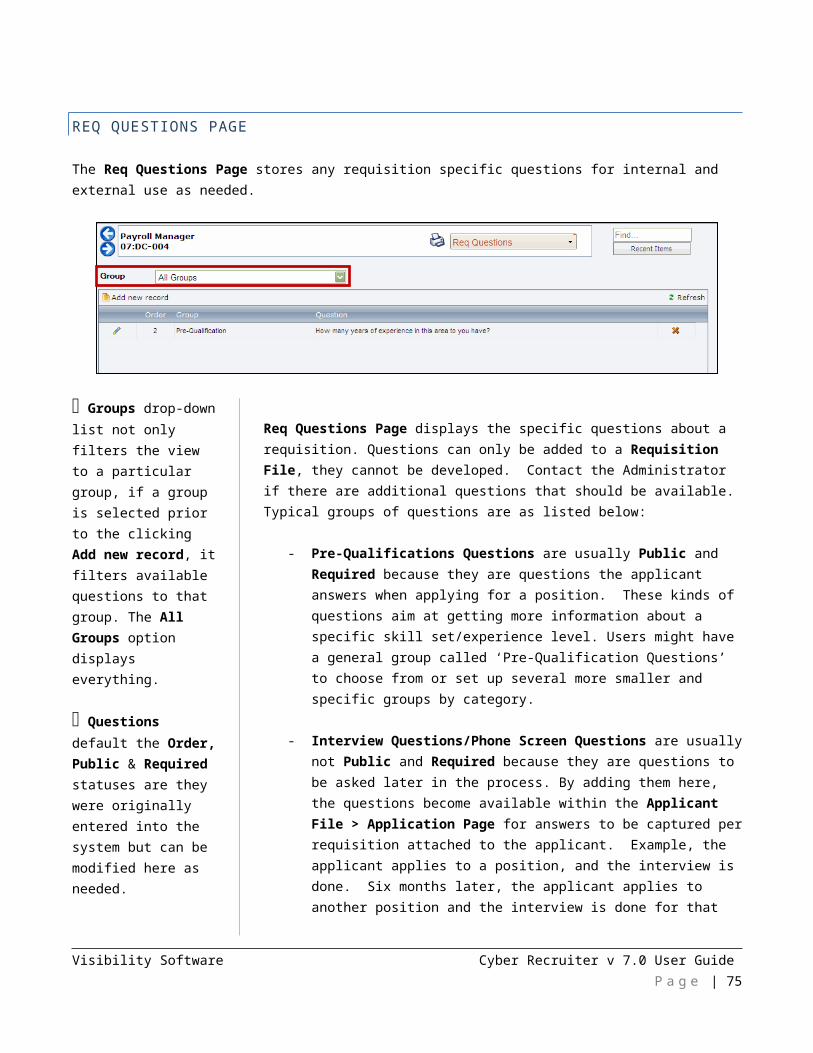
Click on the edit icon at the beginning of the applicant line if the Assign Date or Status Date needs to be altered. Current Status hyperlink will do the same thing as the clicking on the Status in the applicant line does. Please review the Change Status section of this area for more information.
SCORE COLUMNThe Score column allows Users to preview Applicants scores based on how they have answered questions.
Visibility Software Cyber Recruiter v 7.0 User Guide P a g e | 75
Scoring is only possible on questions with drop-down answer types.
The Applicant Score Report tracks scoring on three (3) different types of questions: Application, Requisition, and Interview Evaluations. The Application Questions and Requisition Questions are based on questions answered by the applicant. The Interview Evaluation Questions will be based on users (Interviewers) who give feedback about the applicant.
Visibility Software Cyber Recruiter v 7.0 User Guide P a g e | 76
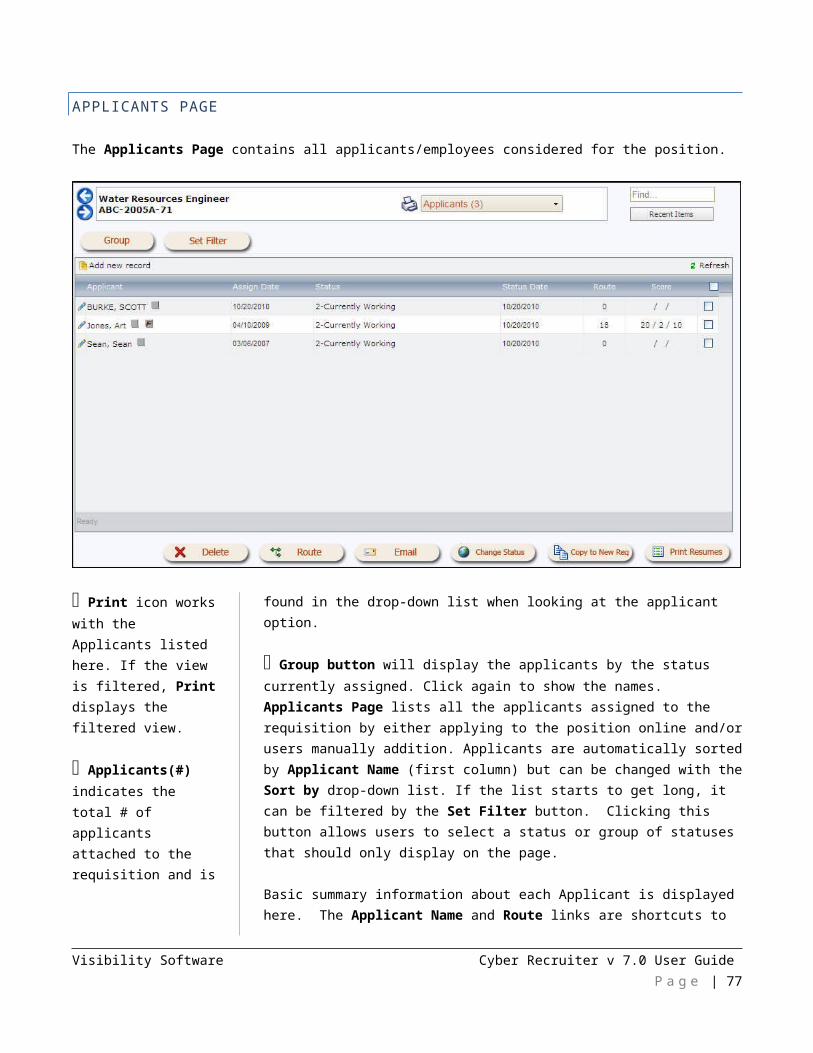
APPROVALS PAGE
The Approvals Page displays all of the Approval levels for the requisition.
Approvals # reflects the # of Approval levels for the requisition.
Reminders can also be sent from the Home Page > Open Activities.
Approvals Page contains all the approvers for the requisition. If approvers are not considered in the Create Requisition process or need to be added, click the Add link. Click Email Reminder hyperlink if one approver needs to be notified again to approve the requisition. A completed ‘Approval Process’ will have an Approval Date and Approved fields filled in as shown. Click the Restart Approval Process link as needed. This will clear the Approval Date and Approved columns for the process to restart. The original approvals are stored in the Requisition File > History Page.
To manually override an approval, click on edit the beginning of the approver line.
Visibility Software Cyber Recruiter v 7.0 User Guide P a g e | 77
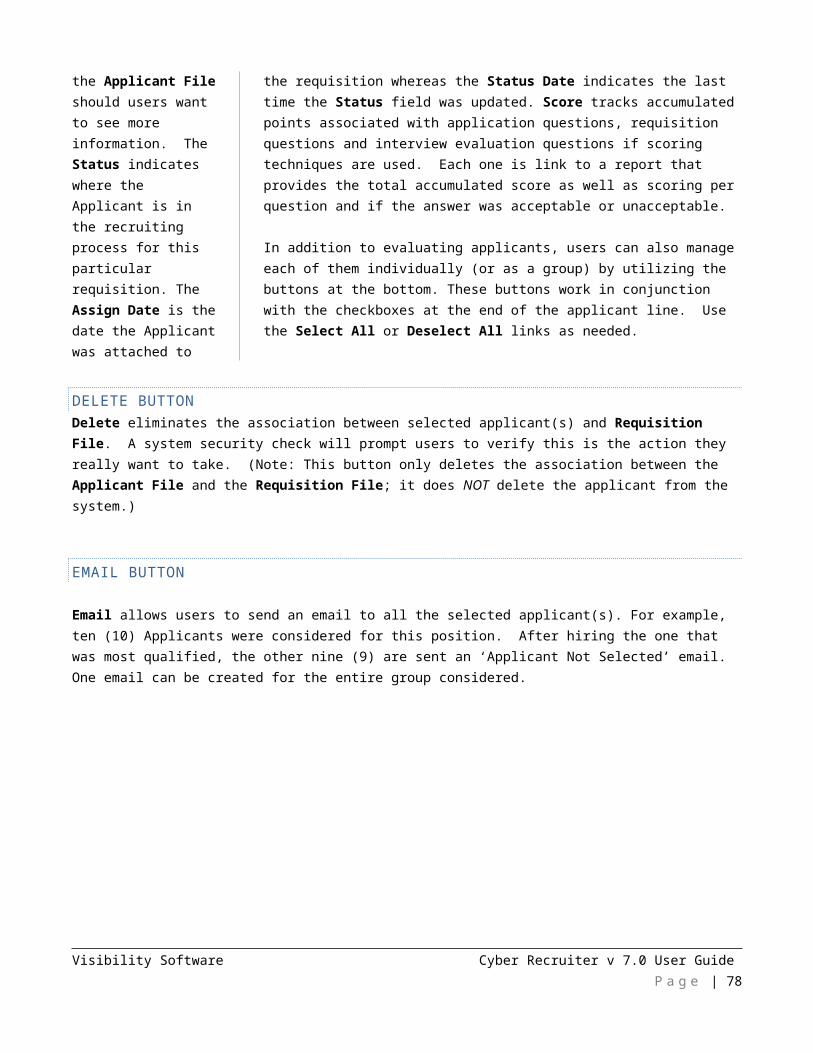
In order to do a manual override, users must enter their password as well as have Administrator rights. Additional Information can be entered as well as Update Additional Information for all approvers which sends out the new information entered for the rest of the ‘Approval Process’. Click the Email next approver when it is the appropriate situation to do so.
HISTORY PAGE
The History Page displays and records all core actions as related to the requisition.
The History Page cannot be updated or changed. However, users can click Print to obtain a hardcopy or delete a record by clicking on the red X at the end of each record, given the appropriate security permissions. Additionally, users can see more information by clicking on any hyperlinks (when available) on this page.
Visibility Software Cyber Recruiter v 7.0 User Guide P a g e | 78
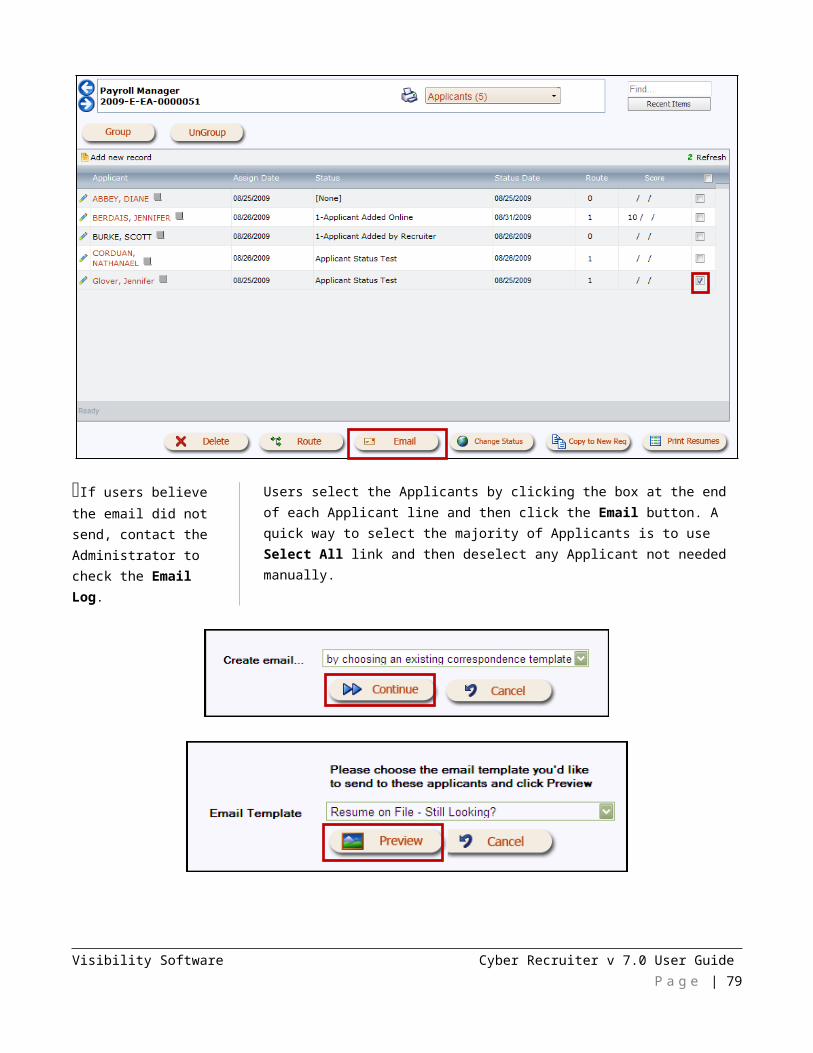
The following events/actions create history records in Cyber Recruiter:- Creating a new requisition- Changing the status of a requisition- Attaching an Applicant to a requisition- Changing the Applicant status attached to a
requisition- Adding a note- Adding an attachment
- Adding a requisition cost- Changing a requisition cost- Adding a requisition note- Adding a new hire- The approval or disapproval of a requisition- Deleting an Applicant association
NOTES PAGE
The Notes Page tracks in-depth notes and tasks for a requisition.
Notes Page holds notes as they pertain to the Requisition File. Click Print to see all notes in a list. Users add new notes by clicking the Add new record link and/or edit existing ones by clicking Edit icon at the beginning of the note record.
Visibility Software Cyber Recruiter v 7.0 User Guide P a g e | 79

Notes Types are important to consider as every note requires a category.
Note Templates - Right-click in the Notes text box for list of Templates & Left-click to populate the text box with a Template. Contact Administrator to add Templates.
Add/Edit Requisition Note Page allows user to supply details about the note. Select the appropriate Note Type from the drop-down list and enter the Note Date. The Follow-up Date field indicates whether this note is passive (FYI) or active (task to follow up). Leaving the field blank makes the note passive, whereas entering a date acts like the due date for the task. The day the task is due, is the day it will show up on the Home Page as an item requiring attention. (Note: To learn more about how To Do Items show up on the Home Page as tasks and how to manage them, refer to the Main Page section).
The Note text box is where the note is entered. All users in the system default in the Email this note to… drop-down list (when adding a note) or in the Email to somebody else link (when editing a note). Select Users by holding the CRTL key down and highlight the names as needed.
REQUIREMENTS PAGE
The Requirements Page sets required skills and/or education needed for the requisition.
Visibility Software Cyber Recruiter v 7.0 User Guide P a g e | 80
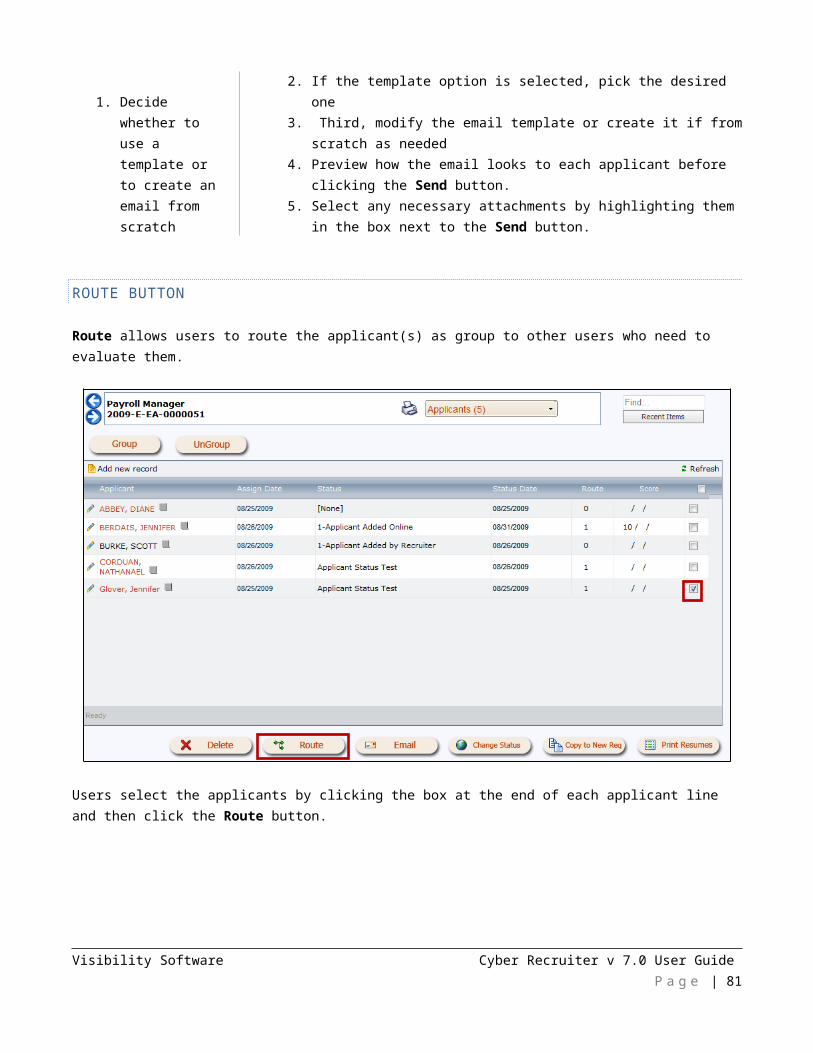
This search works only if the organization utilizes Skills & Educational fields (Degree and/or Major) in the Applicant File.
Requirements Page allows users to find Applicants in the database based on requirements entered here and/or guidelines for the position. Users can Copy Requirements from another requisition or Perform Req Requirement Search to perform the actual search. The more requirements added, the narrower the search (works like an ‘AND’ feature.) The search reviews the Applicant File > Experience Page.
The search will only look for the Skill, Degree and/or Major. The desired Years or Comment is additional information when reviewing results.
To further investigate results, there are several options: Applicant Name – Applicant’s file; the Experience hyperlink – Applicant File > Experience Page; and the gray little squares – Applicant’s resume. If some of these applicants should be considered for the position, users can Email to check interest or Route to the hiring manager using the buttons and checkboxes located at the beginning of the applicant line.
COSTS PAGE
The Costs Page tracks any items, which incur costs while recruiting for the requisition.
Visibility Software Cyber Recruiter v 7.0 User Guide P a g e | 81
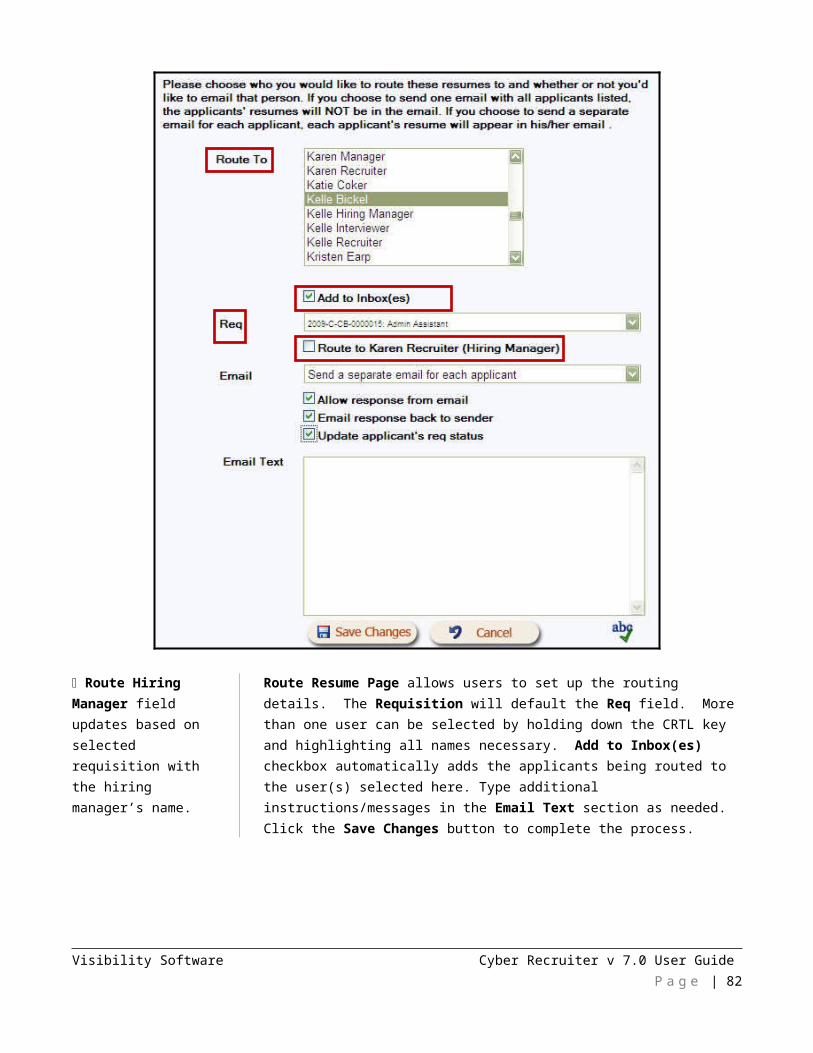
Costs Page keeps an audit trail items that cost the organization money to fill the position. Users can Print the list, Add new record as needed, and edit details by clicking the Edit icon the beginning of the Cost Item line.
Cost Items are important to consider as every entry requires a category.
Add/Edit Requisition Cost Page allows users to enter the Cost Item details. Select the Cost Item through the drop-down list. Users then enter the necessary information such as Cost Date, Amount, and Note. When adding a Cost Item first time around, users can check the Recruiter/Hiring Manager checkboxes to send an email those associated costs. Click the Save Changes button to complete the action.
ATTACHMENTS PAGE
The Attachment Page holds external files and documents to a requisition (Word docs, Spreadsheets, pdfs, etc.)
Visibility Software Cyber Recruiter v 7.0 User Guide P a g e | 82
Attachments are saved in CR, so if the file is deleted from where it originally was located, it is still accessible through CR.
Attachments Page holds any other information necessary to keep with the Requisition File. Users can click Add new record to create a new attachment or edit an existing attachment click the Edit icon at the front of each attachment line. To view the attachment, click on the Description link. The file opens in a new internet browser in the proper application format (Word, Excel, Adobe Viewer, etc). It is not possible to modify a document from here; however, the document can be saved as another filename in order to make changes.
Types are important to consider as every attachment requires a category.
File Type is a validation for acceptable files to upload.
Add/Edit Requisition Attachment Page allows users to enter the attachment details. Select the Type of attachment by using the drop-down list. Enter the Date, Description, and Note. (Note: Description will be the actual hyperlink to the attachment.) Click the Browse button to find the Attachment and match it up to the File Type. When editing an Attachment, users can modify the details but not the actually attachment itself. When in the edit mode, you can add another attachment using the Browse button. Click the Save Changes button when done.
Visibility Software Cyber Recruiter v 7.0 User Guide P a g e | 83
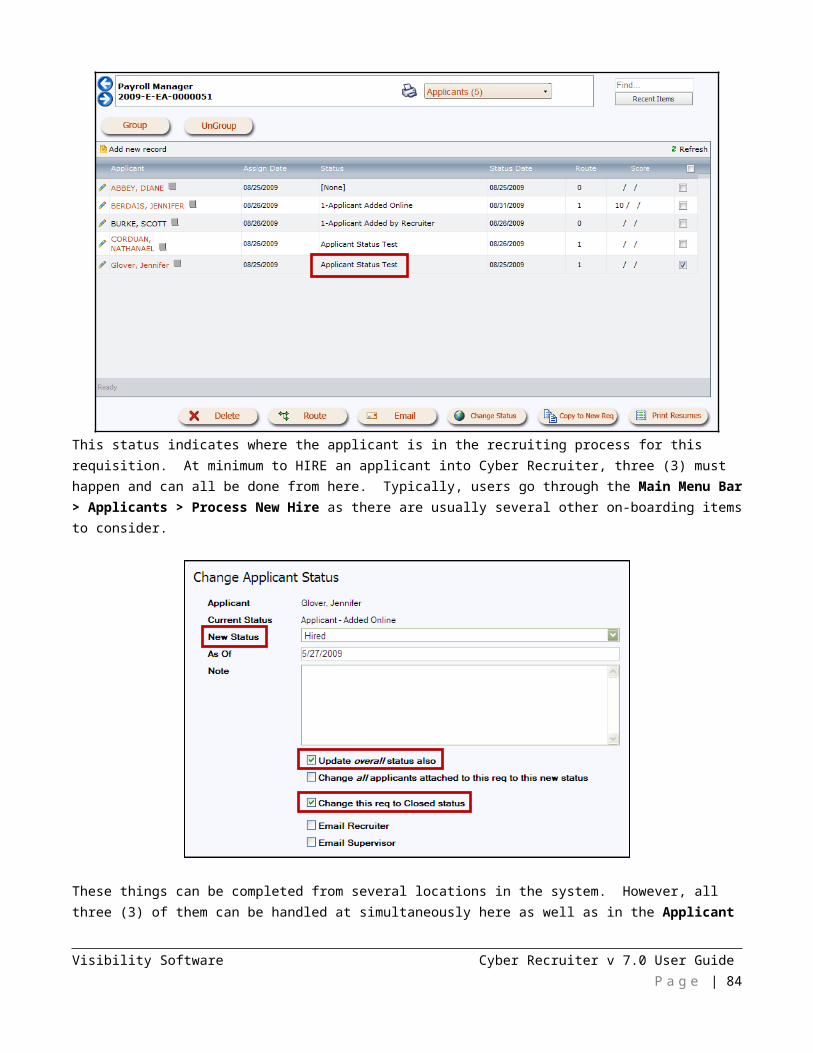
AGENCY PORTAL PAGE
The Agency Portal Page is where users can submit positions to agencies (staffing firms, headhunter assistance and other organizations) to assist in the recruiting process.
Consider the Notes Page when receiving
applicants from Agencies because it could contain additional information about the applicant.
Visibility Software Cyber Recruiter v 7.0 User Guide P a g e | 84
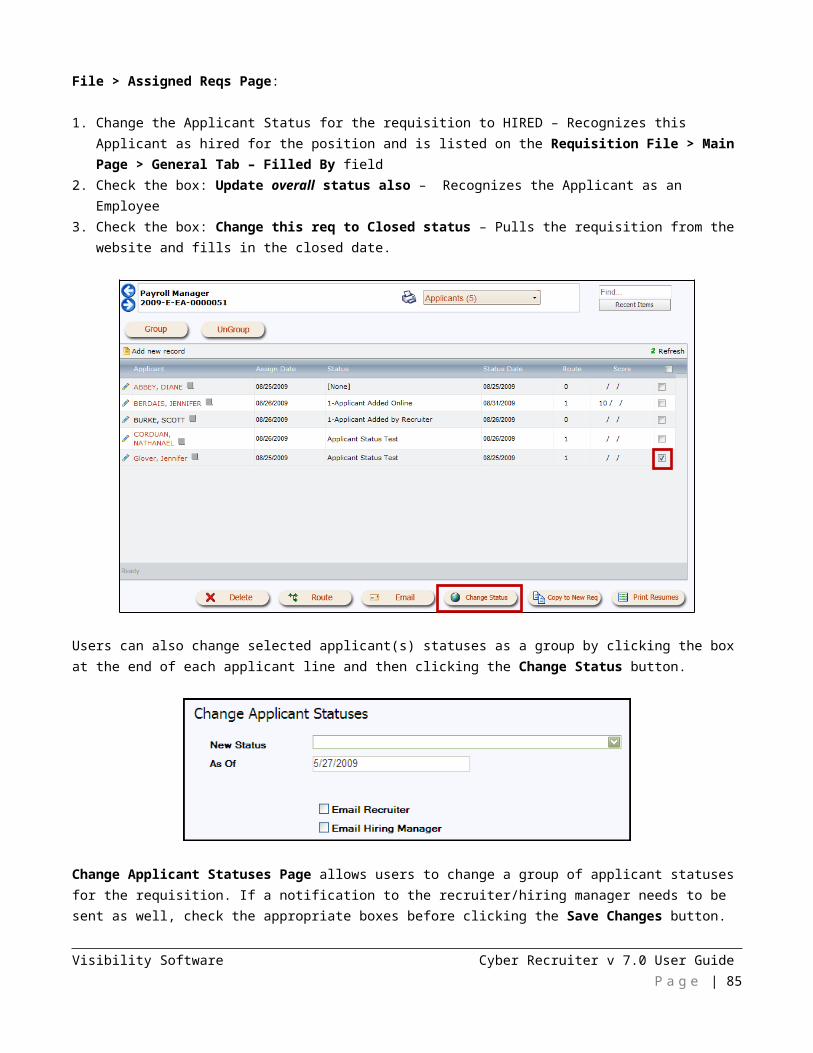
Agency Portal Page lists any existing relationships with agencies to help assist in the recruiting process. Highlight which agencies to notify of a
new position. Hold the CRTL key down and select as many as necessary. Click Save Changes when done.
Click the link Click here to send an email to each of the Agencies chosen above to send an email alerting agencies of a new position. The email is set up by the Administrator. NOTE: Only positions with O or OPEN statuses are visible in the Agency Portal.
Visibility Software Cyber Recruiter v 7.0 User Guide P a g e | 85

PRINT REQ The Print Req link prints the current requisition.
The Print Req link displays the requisition information as determined by the Administrator. The report is viewed in the default report viewer selected in the Home Page > My Preference. The information in this link changes as the information changes with the requisition.
JOB BOARDS
The Dice, HotJobs, Monster, & CareerBuilder pages are made available in the Requisition File when an organization chooses to integrate with any of these Job Boards through Cyber Recruiter. When the relationship exists, this link will be turned on. Posting requisitions to Job Boards is NOT an automated process; in fact it is a 2-step process. Let’s use this example:
1. Requisition File > Dice Page: Determine the fields necessary for the specific Job Board to post the requisition2. Main Menu Bar > Requisition > Job Boards > Dice: Post all the necessary requisitions to the Job Board
For more information on posting to Job Boards review the Main Menu Bar > Help > User Manuals > Job Boards Link.
Visibility Software Cyber Recruiter v 7.0 User Guide P a g e | 86
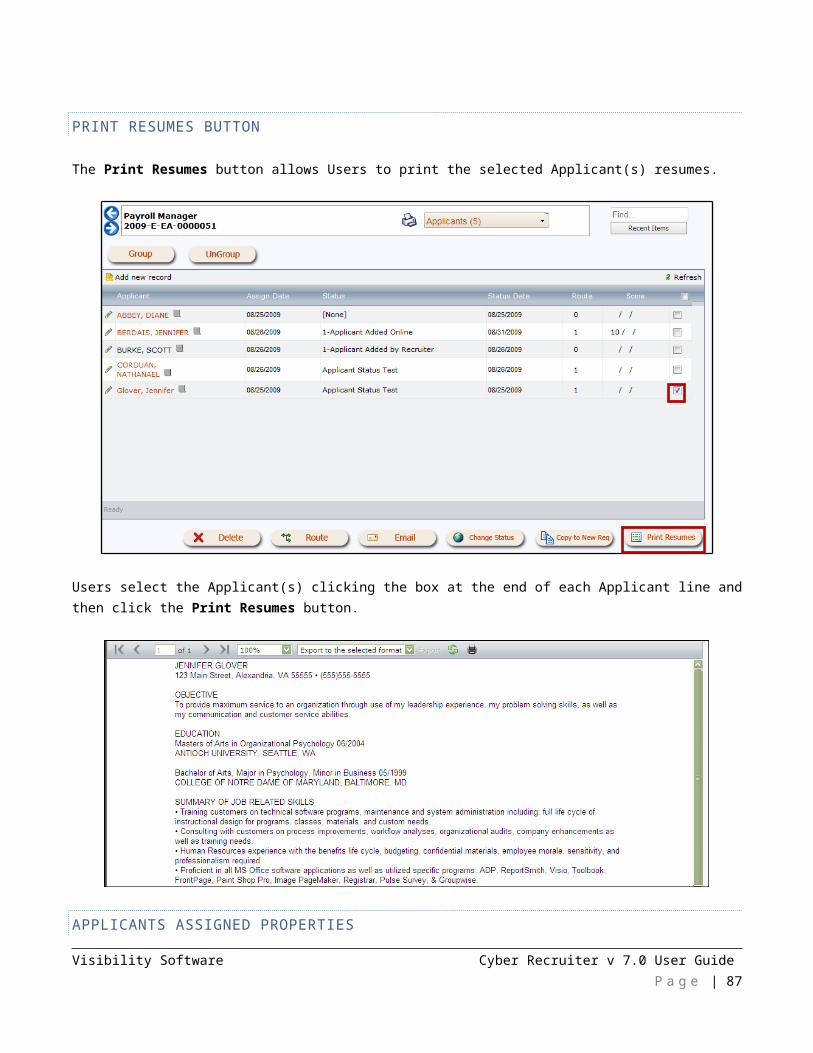
APPLICANTS
ADDING A NEW APPLICANT
Applicants can be added to the system through various avenues to obtain an applicant pool:- Applicants can add themselves through the corporate website’s online application- Job Boards can re-direct Applicants to the corporate website. - Users can add applicants they find from Job Boards, newspapers, faxes, etc… through Main Menu Bar > Applicants
> Add Applicant > From File, From Clipboard or Advanced Import. - Applicants can be submitted via the Employee Referral Portal- Applicants can be submitted via the Agency Portal
ONLINE APPLICATION – WEBSITE
Incomplete Applicants are typically ones who have not completed the online application process.
The online application is created and maintained by the organization’s Administrator. Depending on the setup as applicants apply to positions the recruiter/hiring manager can be notified by email and the applicant placed in the recruiter/hiring manager’s inbox for quick access. If there needs to be a change to the online application or actions that happen as applicants apply, consult the Administrator.
FROM CLIPBOARD
From Clipboard allows users to enter applicants by cutting/copying and pasting the resume into this textbox provided.
Visibility Software Cyber Recruiter v 7.0 User Guide P a g e | 87
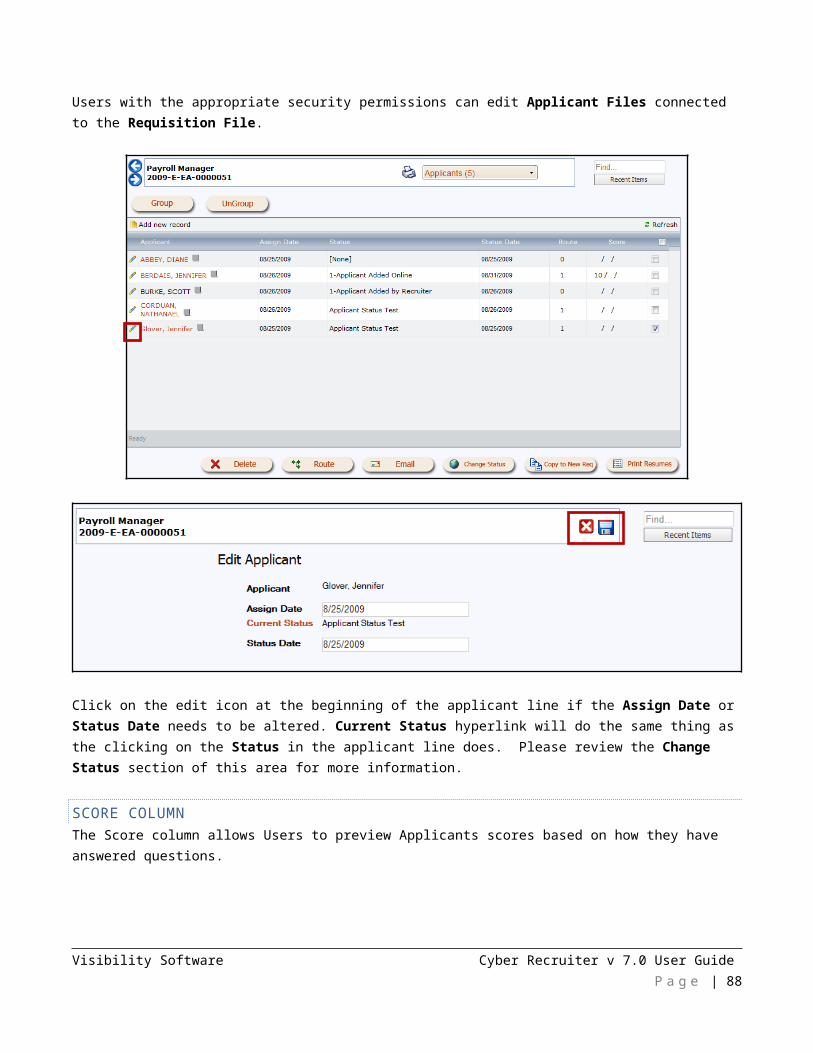
Here is where users will cut and paste in the resume into the text box and/or just click >> Continue button to start a new applicant file.
Visibility Software Cyber Recruiter v 7.0 User Guide P a g e | 88
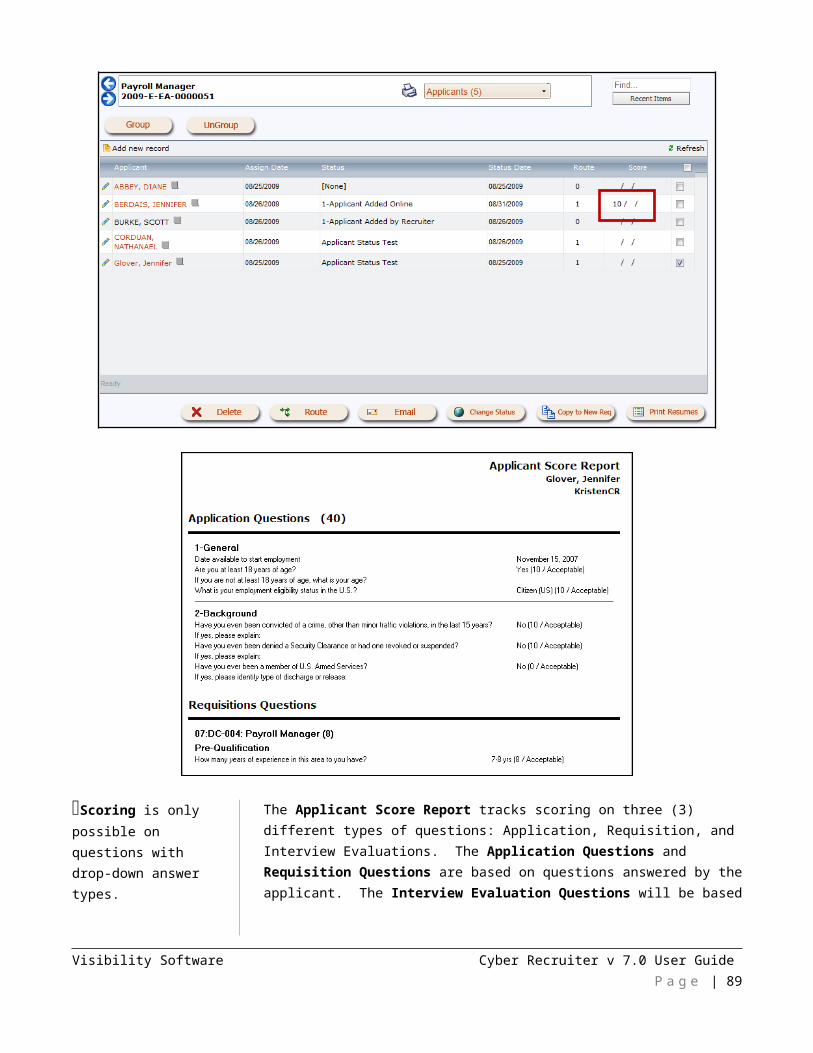
Self Service field if set to Wizard forces applicants to fill out an application upon entering the self service. Normal displays a regular view of self service where applicants can maintain information and apply to additional positions.
Before the Applicant is added to the system, this page attempts to parse out the Contact Information and Skills into the Applicant File. Users verify the parsed contact information is correct before clicking the Save Change button. There are a few required fields on this page: Application Date; Current Status; First Name and Last Name.
The Application Date field tracks the date Applicants are entered into the system and is recommended to capture this information for reporting purposes. The Current Status field typically defaults 1-Applicant Added by Recruiter. The First Name and Last Name fields identify each Applicant’s record. Click the Saves Changes button continue the process.
Email Address – if the applicant does not have one the Send Email to New Applicant Page is automatically skipped.
Users can then preview a suggested email. The email could have detailed instructions on how to fill out an online application if interested in the position or a notification that their qualifications look good and would like to bring them in for an interview for example. Click Cancel button if the email is not needed or click the Send button to send it to Applicants.
FROM FILE/ADVANCED IMPORT
These two (2) options produce the same flow of pages. The only difference is that the From File option is for word documents (.doc or .docx) and text files (.txt) and is made available with purchase of the product. The Advanced Import
Visibility Software Cyber Recruiter v 7.0 User Guide P a g e | 89
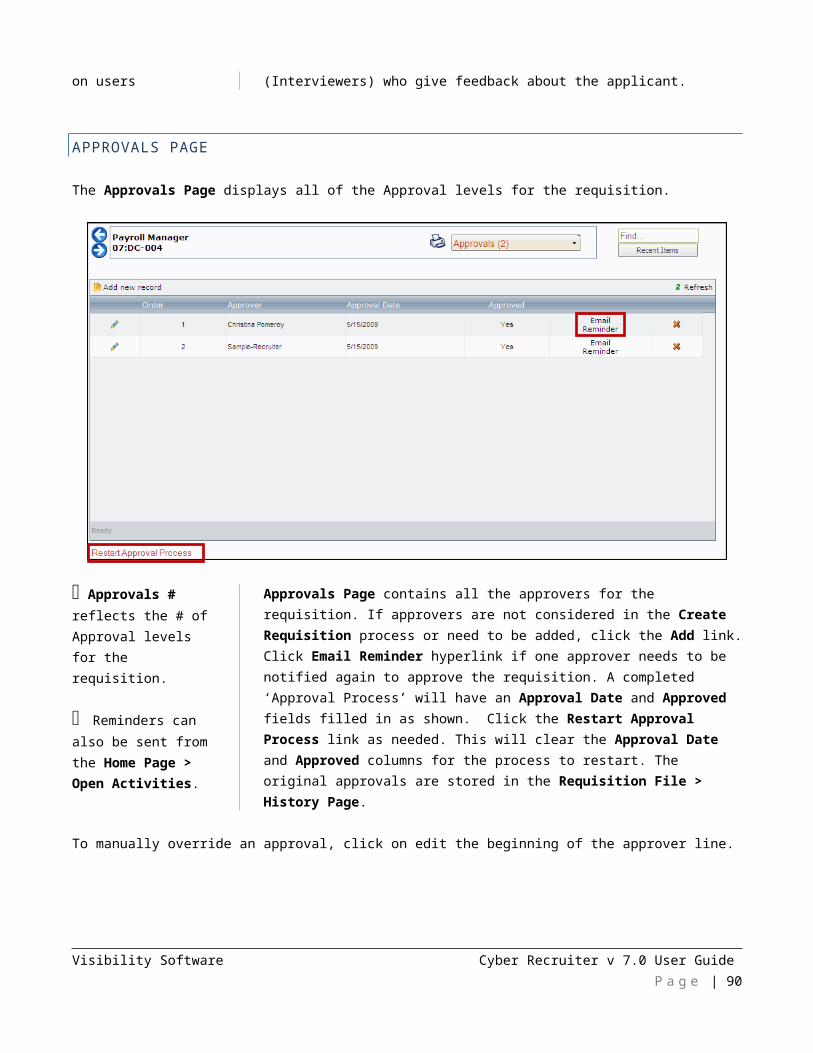
option is made available through an optional service allowing for more complex parsing and/or data conversion. Contact Visibility Software to turn the Advanced Import option on for the organization.
From the Main Menu Bar > Applicants > Add Applicant > From File:
Users click the Browse button to find and enter the resume file on the computer and/or network system and then click the Process button to parse the resume.
Visibility Software Cyber Recruiter v 7.0 User Guide P a g e | 90
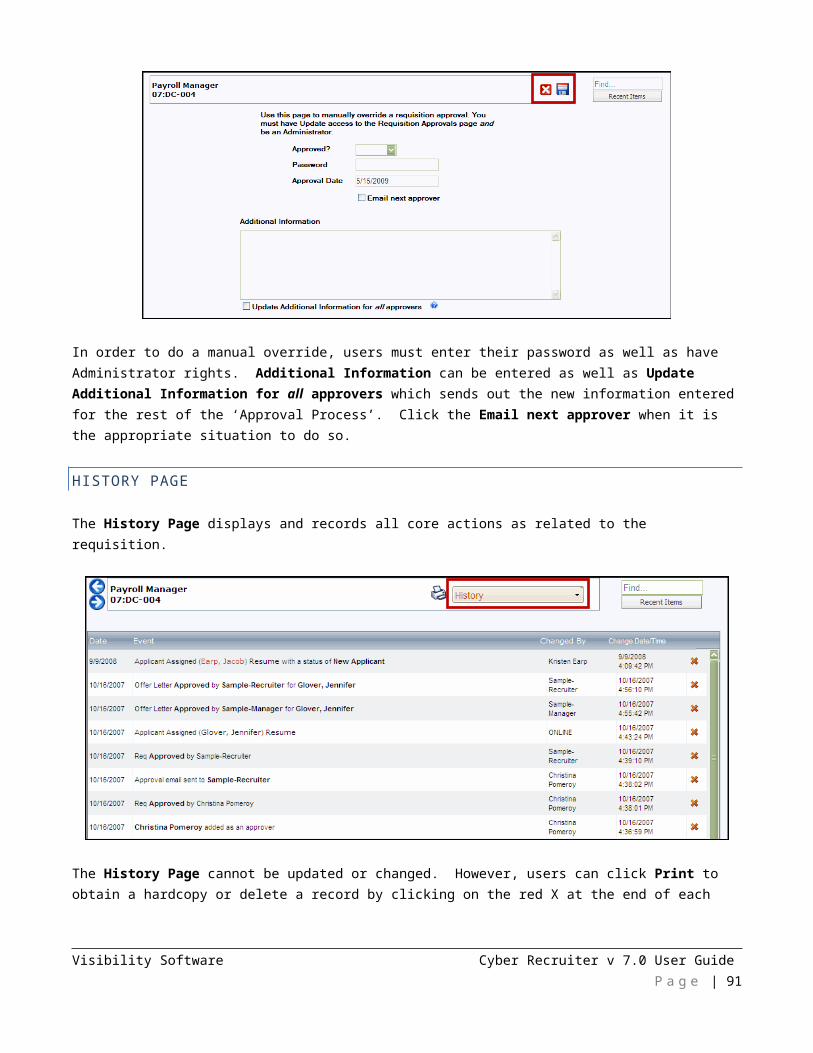
Duplicate Check occurs as soon as Users click the Save Changes button. It searches for duplicates based on the Administrator’s setup for the check.
Users should fill in the Referral Source & Position Desired fields on this page if searches/tracking or reporting are necessary.
Before the Applicant is added to the system, this page attempts to parse out the Contact Information and Skills. If using the Advanced Import feature, in addition, the system will parse Education, Previous Employment, Security Clearance and Military History. Users should verify that the information is correct before clicking the Save Change button. There are a few required fields on this page: Application Date; Current Status; First Name and Last Name.
The Application Date field tracks the date Applicants are entered into the system and is recommended to capture this information for reporting purposes. The Current Status field typically defaults New Applicant to indicate a new Applicant in the system whereas Web Applicant status is usually reserved for Applicants who come through the website). The First Name and Last Name fields identify each Applicant’s record.Click the Saves Changes button continue the process
Duplicate Check only alerts users when there is a match. The applicant in PINK is the one you just added. Anyone else listed currently exists in the system. If the information looks the same like it does this in case, choose the Delete this new Applicant radio button and then click the Submit button. If this applicant is indeed a new applicant, select the Keep this new applicant radio button and then click the Submit button.
Visibility Software Cyber Recruiter v 7.0 User Guide P a g e | 91
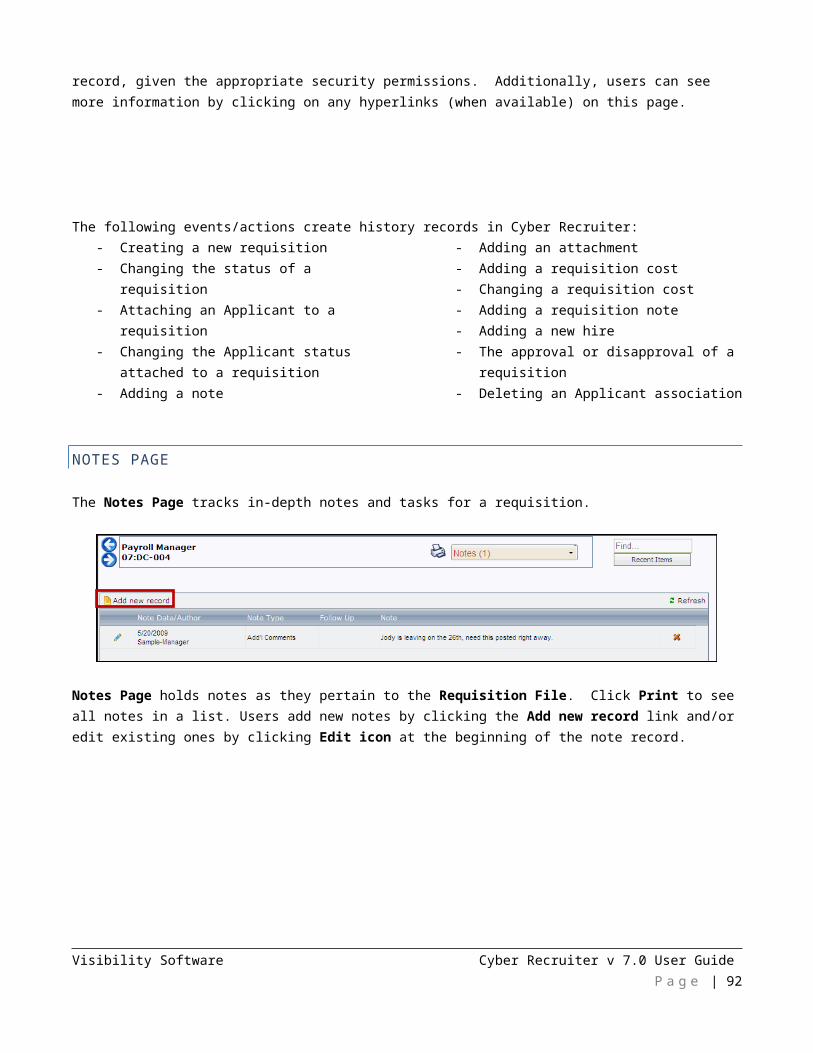
MANAGING APPLICANTS
Cyber Recruiter facilitates the process of managing Applicants.
- Inbox is like a clipboard or a physical ‘Inbox’ on the desk holding current Applicant Files that need quick access- Home Page > My Preference allows users to set defaults to show particular pieces of information from the
applicant file upon entering the Inbox. - Applicant Files each have a drop-down list that organizes and stores the information in a logical order.
CYBER RECRUITER INBOX
The Cyber Recruiter Inbox is a temporary location for users to manage his/her applicant flow they as needed.
Inbox is highly configurable. Defaults can be changed per user from Home Page > My Preferences
Delete Button does not delete the applicant from the system, rather just the Inbox.
The Inbox defaults to the currently logged in user. Use the drop-down list under the Inbox title to see another user’s Inbox given the appropriate security permissions.
Applicant Files are sorted by the Applicant column initially but users can sort (ascending/descending) by any column that has the up and down arrows in the header. To open an Applicant File, click on the Name hyperlink field. The Inbox can also filter Applicant Files as needed using the User drop-down list. There are several actions users can take advantage of in the Inbox such as the ability to: Email, Route, Print and Delete applicant files as needed. Print will pull the resumes of those selected to print as needed.
Visibility Software Cyber Recruiter v 7.0 User Guide P a g e | 92
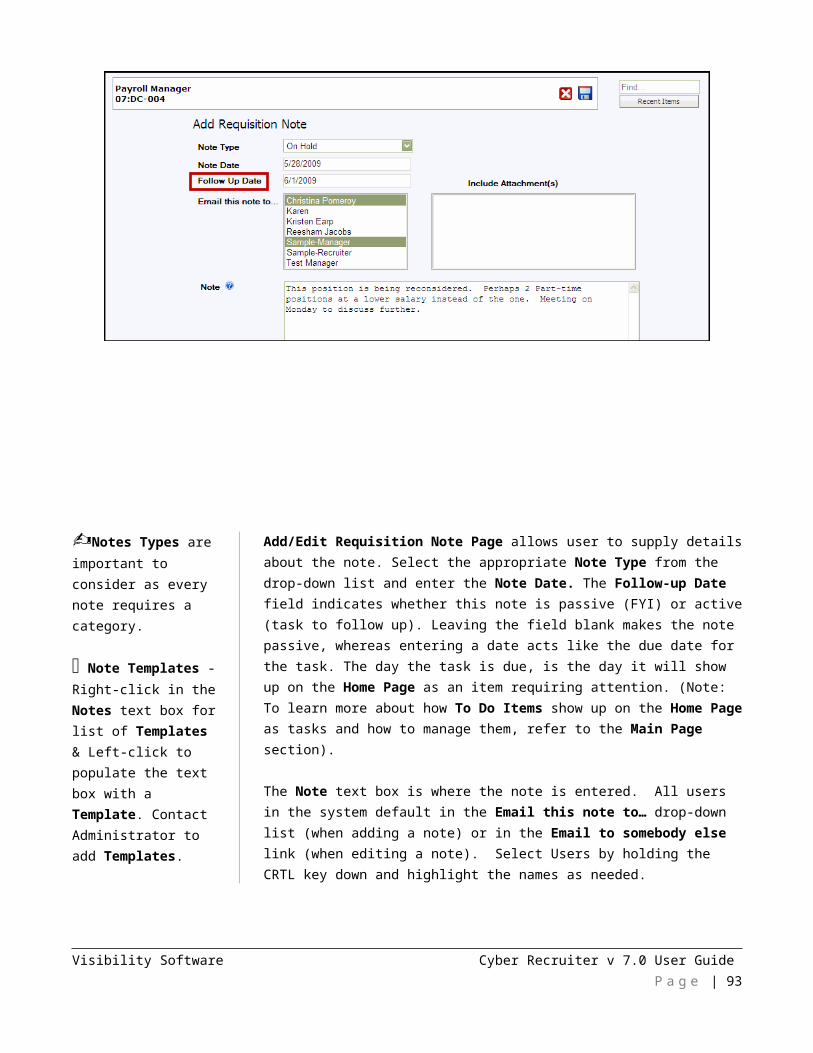
EMAIL BUTTON
Email allows users to send an email to all the selected applicant(s). For example, three (3) applicants are coming in for a group interview. They need to know who they will be seeing, driving directions to the office and any other contact information necessary. Users can create one email for the entire group considered.
If users believe the email did not send out, contact Administrator to check the Email Log.
Users select the applicants by clicking the box at the beginning of each Applicant line and then click the Email button. A quick way to select the majority of applicants is to use Select All link and then deselect any applicant not needed manually.
Visibility Software Cyber Recruiter v 7.0 User Guide P a g e | 93
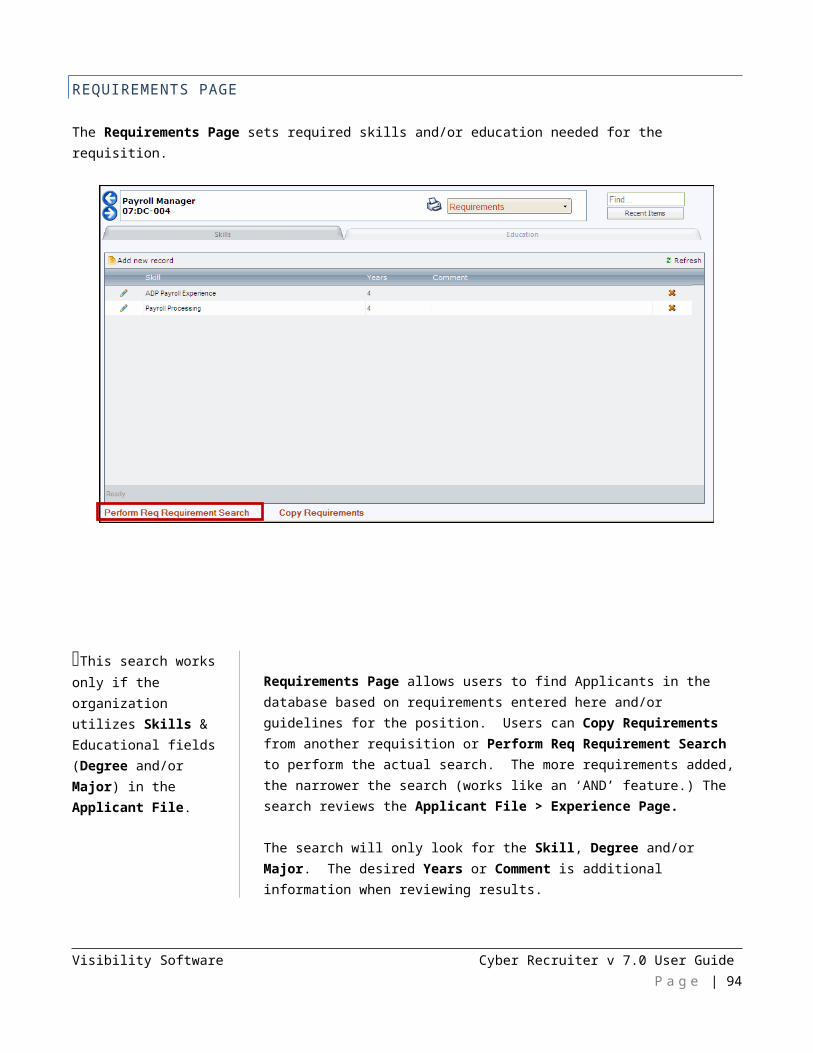
Visibility Software Cyber Recruiter v 7.0 User Guide P a g e | 94
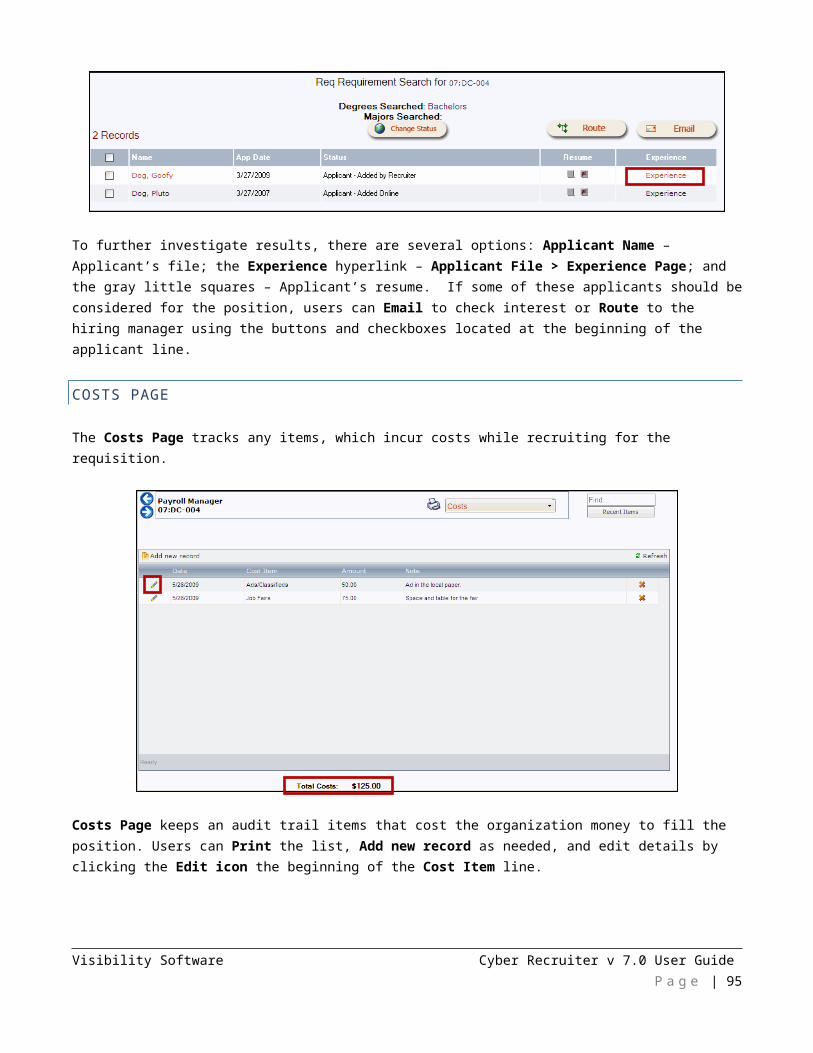
Errors/Missing Info such as an email address will default on this screen above the email preview.
A series of prompts take the User through sending out the email: 1. Decide whether to use a template or to create an email from scratch2. If the template option is selected, pick the desired one3. Third, modify the email template or create it if from scratch as needed 4. Preview how the email looks to each applicant before clicking the Send button.5. Select any necessary attachments by highlighting them in the box next to the
Send button.
ROUTE BUTTON
Route allows users to route the applicant(s) as group to other users who need to evaluate them.
Users select the Applicants by clicking the box at the beginning of each Applicant line and then click the Route button.
Visibility Software Cyber Recruiter v 7.0 User Guide P a g e | 95
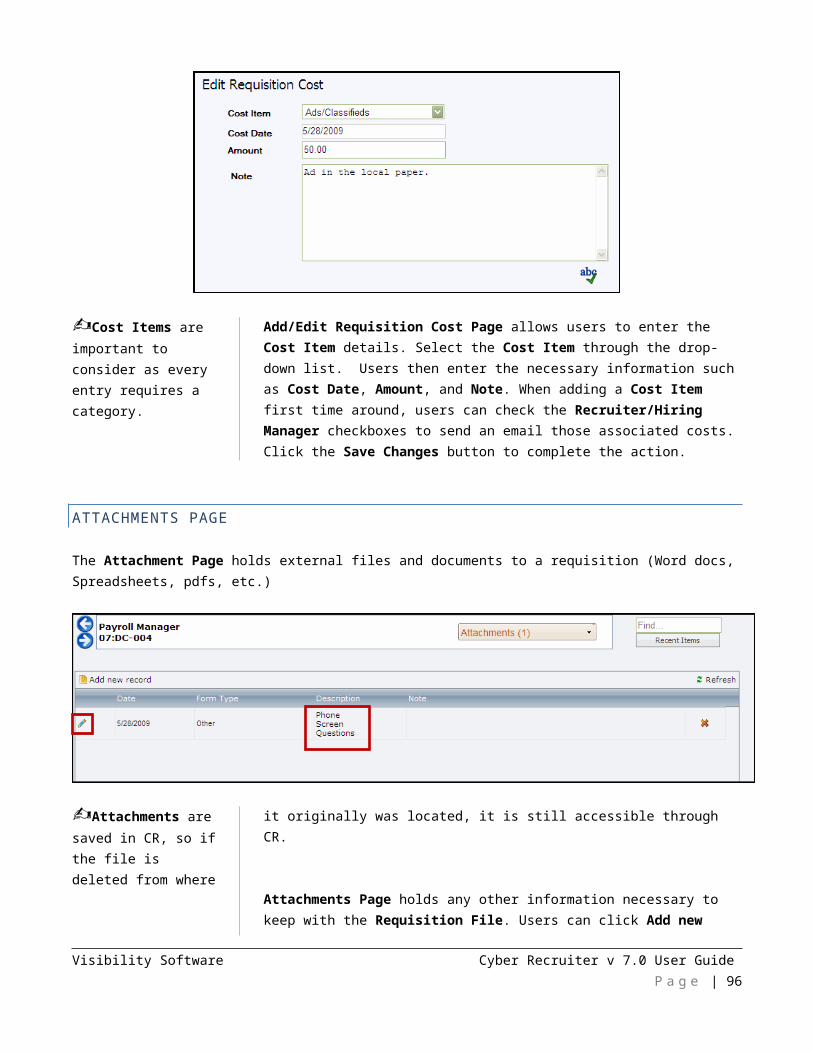
1. Route To – Select the hiring manager(s) who will receive the routing email. 2. Check the Add to Inbox option to add the applicant to the hiring manager’s Cyber Recruiter’s inbox for quick
access. If the hiring managers in your organization do not use this feature, do not check the option as the applicants will start to cue up in there with no one to remove them.
3. Req – Select the requisition from the drop-down list 4. Route to Hiring Manager – the field updates upon selection of the requisition to include the name of the named
hiring manager. Check this box if the routing needs to be sent to the hiring manager. Check the box automatically selects the appropriate person from the Route To drop-down list without having to find the person in the list.
5. Email – Select the email option (See the Requisition File > Assigned Applicants Page > Routing Section to learn more about the different emailing options available).
6. Email Text – Add any additional text to the routing as needed in the Email Text section. 7. Click the Save Changes button to send the email routing.
Visibility Software Cyber Recruiter v 7.0 User Guide P a g e | 96
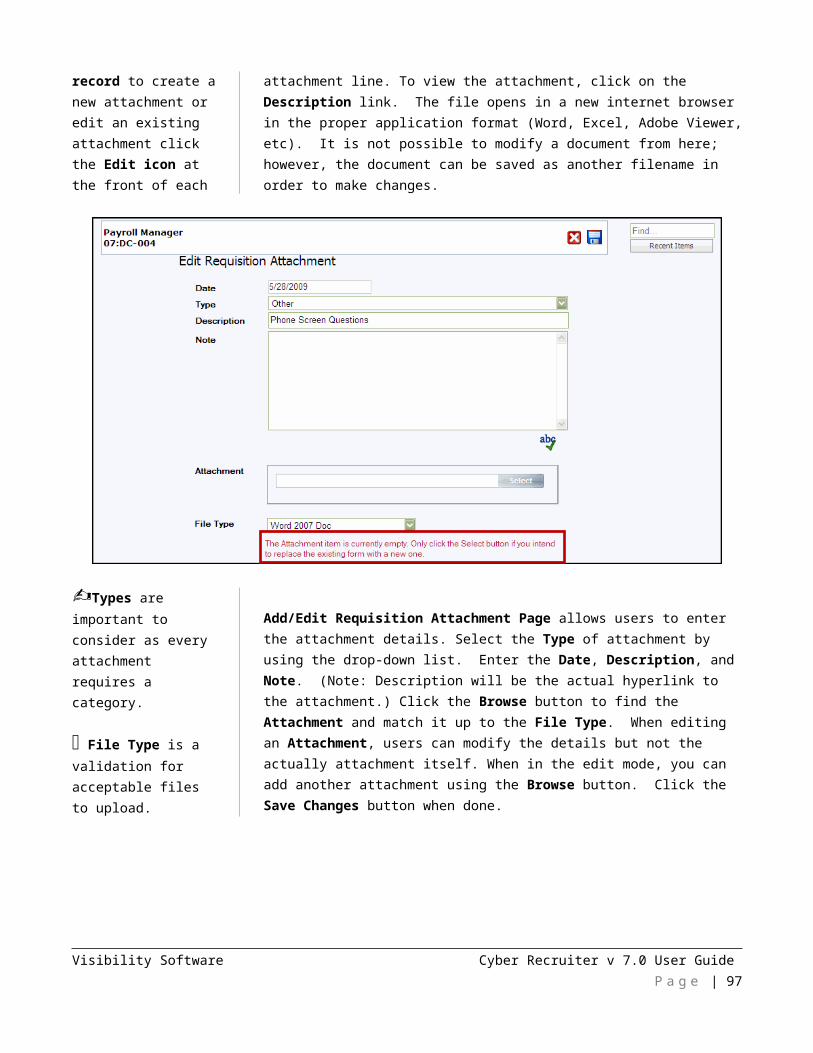
COMMUNICATION OPTIONS:The Email drop-down list provides the following options:
- Send one email with all Applicants listed – sends a short email with just the names of the applicants listed. With this email, users need to log into Cyber Recruiter to review candidates.
- Do NOT Email – Relies on the user(s) to check his/her Home Page for new routing activities to complete.- Send a separate email for each Applicant – utilizes an email template which is setup by the Administrator
to give detailed information about each applicant and works with the checkbox options:o Allow response from email option allows these selected user(s) to make a decision about these
Applicant(s) from within the email sent. If this option is not selected, the selected user(s) can log into Cyber Recruiter make their decisions about applicant(s).
o Email response back to sender option sends an email notification to the user who sent the routing. If this option is not checked, the user who sent the routing can log into Cyber Recruiter to see where the applicant(s) are in the recruiting process for this requisition.
o Update applicant req status option is available only when the routing is being sent to one user and is otherwise grayed out. When available, it allows the user’s response to update the applicant’s Status for the requisition. If more than one user is selected, the recruiter (or user who routed the applicants) needs to evaluate all the responses and decide what the applicant’s Status for the requisition should be. To see all the responses for the applicant, check the Applicant File > Activity Page > Routings Tab > Response Column.
NAVIGATING WITHIN AN APPLICANT FILE
Cyber Recruiter makes navigating in applicant files very straightforward. Once users are within the Applicant File:
- Banner contains the applicant Last Name, First Name and a Drop-Down List to navigate through the pages of the Applicant File. This section discusses these pages in more detail.
- Hover over the Name anywhere in the Applicant File to get a pop-up of quick applicant information.- Scrolling Feature < > works with the Inbox and Find Applicant areas. Results returned from either of these
searches, allow users to scroll through the applicant files one at a time here.
IMPORTANT NOTE: Maintaining an accurate Applicant File is very important as this is the information is pulled to reports and other tracking measures used to preserve the exact records. The Online Application Form (Input Tool) is only a way to get the Applicant File started and the Print Application (Output Tool) is a report of where the Applicant File is currently.
Visibility Software Cyber Recruiter v 7.0 User Guide P a g e | 97
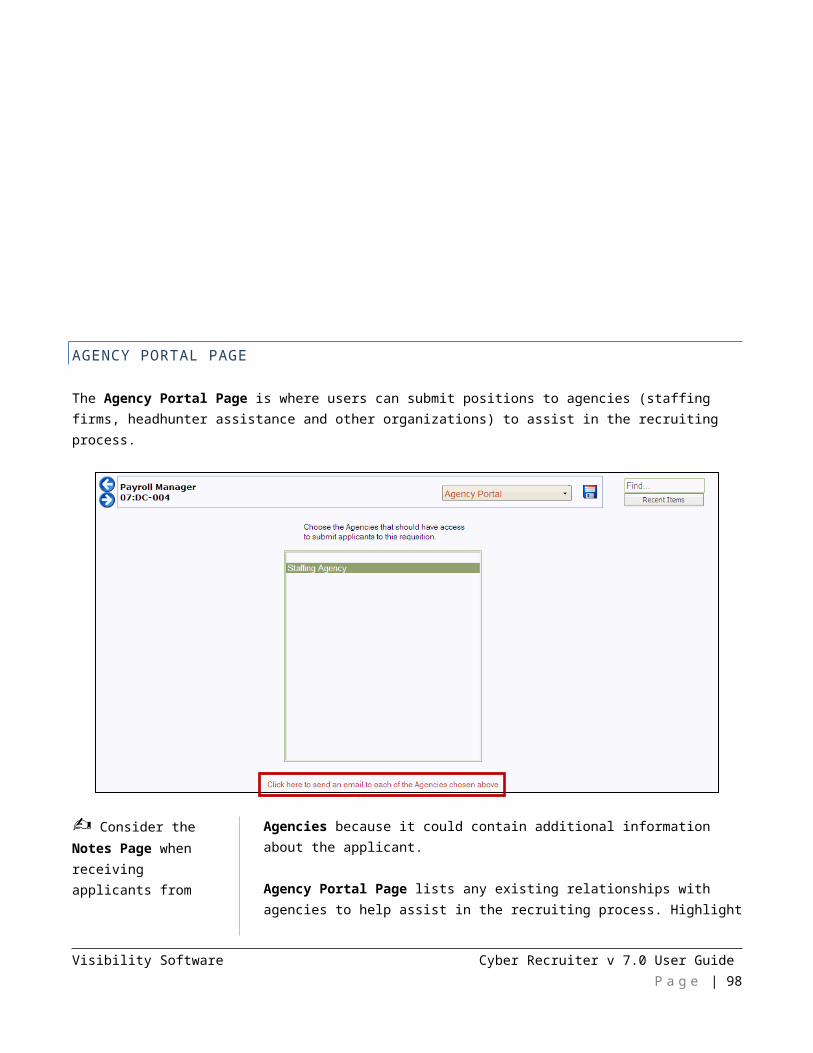
The below table below is common flow of pages utilized in Requisition Form to start the Requisition File.
Online Application Form Applicant FileActivity Page > Assigned Req Activity PageExperience Page Experience PageApplication Page (some) Application Page
Status/History PageCorrespondence Page (depends) Correspondence PageNotes Page (depends) Notes PageDemographics Page Demographics Page
Misc Page (as needed)References Page References PageAttachments Page (depends) Attachments pageResume Page Resume Page
Add/Remove Inbox (as needed)Print Application (Self Service) Print Application
ACTIVITY PAGE
Activity Page tracks the user’s activity with the Applicant File as security permissions allow. Internal activity is considered:
Activities done thru the Activity Page is ‘Internal’ to the organization, nothing goes to the Applicant.
- Add Requisitions – positions the applicant applied to- Route Applicants – sending applicants to users for review of qualifications- Set up Interviews – gathering the user(s) who will be interviewing the applicant- Approve Offer Terms – approving offers prior to sending out the offer letter
ASSIGNED REQS TAB
The Assigned Reqs Tab is where users can see all the assigned requisitions to the applicant.
Visibility Software Cyber Recruiter v 7.0 User Guide P a g e | 98
Status per Req differs from the Overall Status. Overall status indicates whether the person is an Applicant or Employee.
Assigned Reqs Tab displays all considered requisitions for the Applicant. The Status (Date) field indicates where the applicant is in the recruiting process is per each requisition. The first number next to the Activity Page on the drop-down list correspondences to the Assigned Reqs Tab. This number indicates how many requisitions are attached. If the number equals three (3) but users see two (2) on this page, be sure to review the Show non-closed only checkbox. The setting hides closed requisition from the user’s view.
Another available action on this page is the Change Status button. The ability to change the status can be done per requisition by clicking on the hyperlink in the Status column for each requisition or use the button to change the status of multiple requisitions at once. Additionally, the Delete button removes requisition from applicant file NOT the system.
To attach a new requisition to an Applicant File, click the Add button.
Visibility Software Cyber Recruiter v 7.0 User Guide P a g e | 99
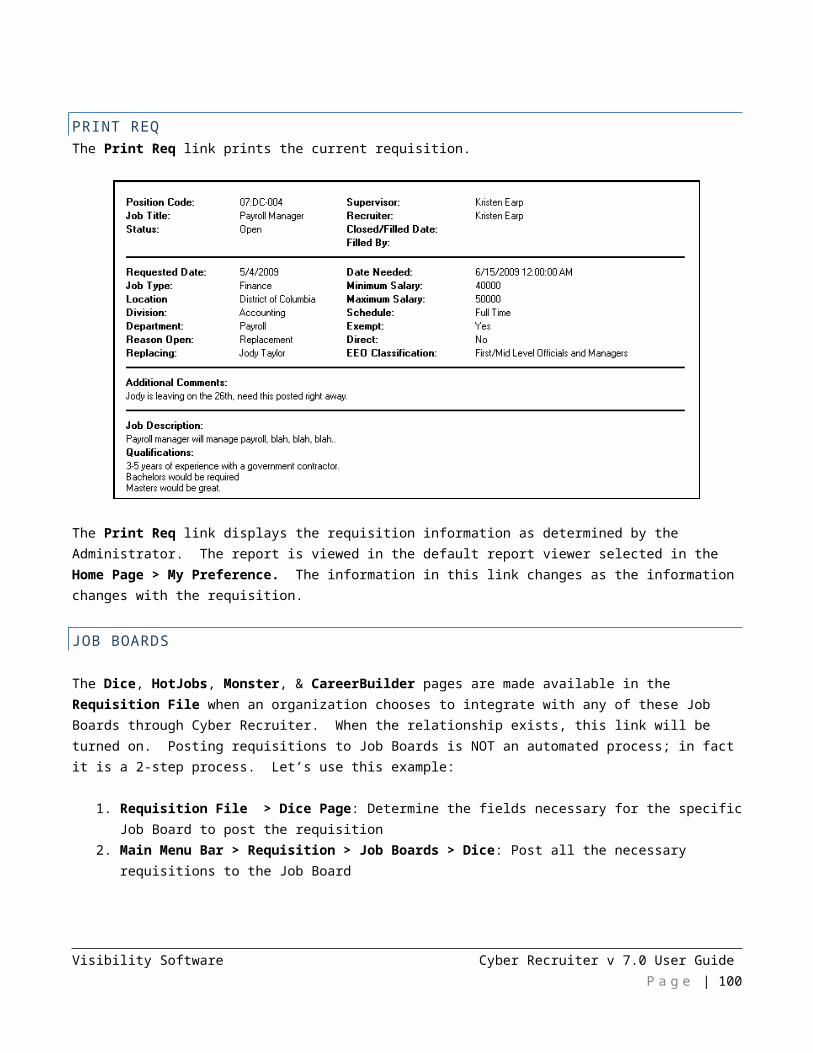
Update overall status also checkbox is available when the selected status is setup as both an overall status and status to use per requisition.
Add Requisition to Applicant Page allows users to add the requisition to the application file and set up the routing details. Once the requisition is selected, pick the Status the applicant should start at for this requisition.
More than one user can be selected by holding down the CRTL key and highlighting all names necessary or check the box for the Route to Hiring Manager to select the manager. Add to Inbox(es) checkbox automatically adds the applicants being routed to the user(s) selected here. Type additional instructions/messages in the Email Text section as needed. Click the Save Changes button to complete the process.
COMMUNICATION OPTIONS:
The checkbox options:
- Allow response from email option allows these selected user(s) to make a decision about these Applicant(s) from within the email sent. If this option is not selected, the selected user(s) can log into Cyber Recruiter make their decisions about applicant(s).
- Email response back to sender option sends an email notification to the user who sent the routing. If this option is not checked, the user who sent the routing can log into Cyber Recruiter to see where the applicant(s) are in the recruiting process for this requisition.
Visibility Software Cyber Recruiter v 7.0 User Guide P a g e | 100
- Update applicant’s req status option is available only when the routing is being sent to one user and is otherwise grayed out. When available, it allows the user’s response to update the applicant’s Status for the requisition. If more than one user is selected, the recruiter (or user who routed the applicants) needs to evaluate all the responses and decide what the applicant’s Status for the requisition should be. To see all the responses for the applicant, check the Applicant File > Activity Page > Routings Tab > Response Column.
ACTIONS DONE FIELD
The Action Done field is very important to the flow of the actions that happens upon applying to requisitions AND it is tied to the Application Page > Self Service Field too. When an applicant applies for the first time and completes the application process, the following happens:
1. Self Service field changes to ‘Normal’; 2. Actions Done field changes to ‘Yes’;3. Triggers the routing and emails as configured as well as changes the status of the applicant for the requisition
WHEN IT ‘ACTIONS DONE’ FIELD AUTOMATICALLY UPDATES
When a returning applicant or employee applies to a job via the self service module, the following rules apply for the Actions Done field:
Position has NO requisition questions:
Visibility Software Cyber Recruiter v 7.0 User Guide P a g e | 101
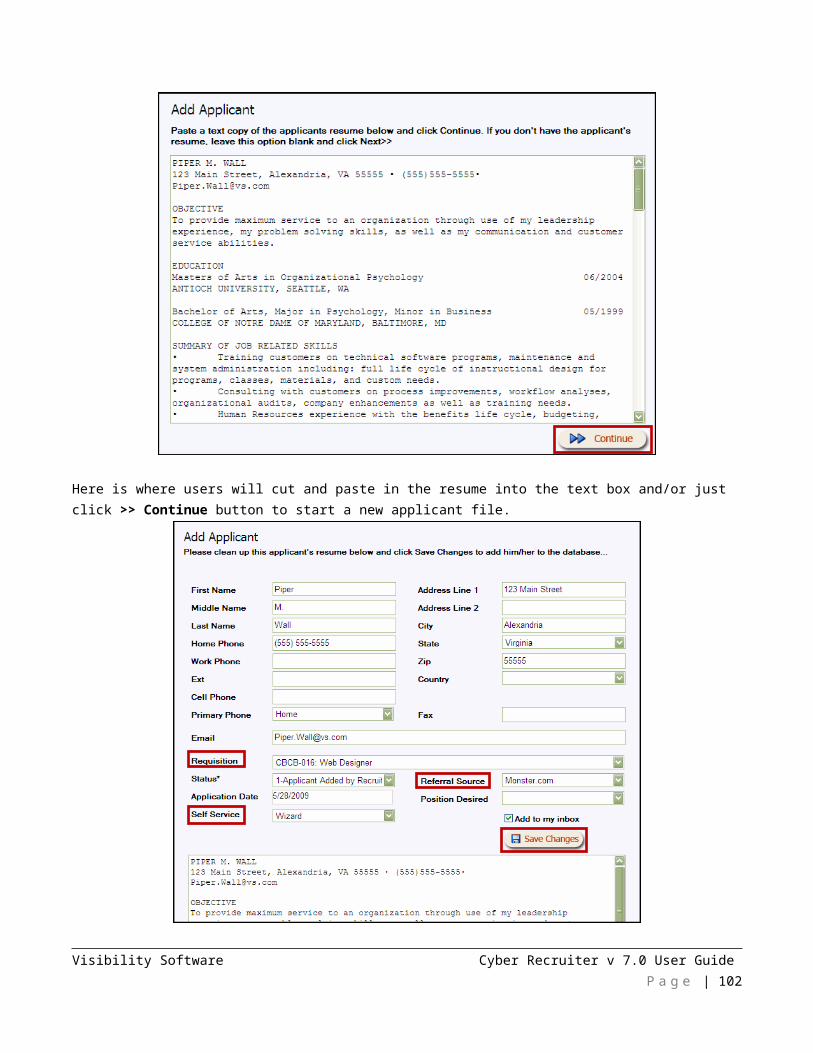
The record is written to the Student File > Activity Page > Assigned Requisitions Tab AND Actions Done field (Click on the Edit Icon on this Tab for the position) is set to ‘YES’. This triggers the routings and emails as setup AND the applicant status assigned is the ‘acceptable’ status.
Position DOES have requisition questions:
The record is written to the Student File > Activity Page > Assigned Requisitions Tab AND Actions Done field is set to NO. The status assigned is the ‘starting’ status. When the person completes all required requisition questions, THEN the ‘Actions’ field changes to YES. This triggers the routings and emails as setup AND the applicant status is changed to the ‘acceptable’ status based on how the questions were answered.
NOTE: If the person tries to come back after the process is completed and change the answers to the requisition questions, this DOES NOT change the status or resend routings and other emails because the ‘Actions’ field is already set to YES telling the system all the actions are done.
Job closes PRIOR to the Applicant answering the Requisition Questions:
Nothing changes or updates in the ‘Actions’ field. Thus, the actions of routings, emails and changing status are ignored. All is held constant to where the applicant was when the job closed.
WHEN THE ‘ACTIONS DONE’ FIELD IS MANUALLY UPDATED
Does the Applicant need to fill out the application more than once? If so, first click on the Edit icon for the desired position here. Set the Actions Done field to NO. This will allow for the appropriate actions in the Admin > Website > Career Portal > Self Service > Main Page > Edit > Browse Open Jobs Tab. to take place when the application is completed. Then, from the drop-down list, select the Application Page. Set the Self Service Field from ‘Normal’ to ‘Wizard’. These two changes will prompt the applicant to fill out the application template attached to the requisition upon logging into the Self Service. The last step would be to notify the applicant that they need to take this step.
Visibility Software Cyber Recruiter v 7.0 User Guide P a g e | 102

Status on the Activity Page > Assigned Reqs Tab is a common place to change the applicant’s per requisition. Users will want to update statuses to reflect different stages.
To HIRE an applicant, three (3) must happen: 1. Change the Applicant Status for the requisition to HIRED – indicates what
position the Applicant is hired2. Change the Applicant Overall Status to HIRED – indicates the Applicant is an
Employee3. Change the Requisition Stats to CLOSED – Pulls the requisition from the website and
fills in the closed date
The Change the applicants overall status checkbox only becomes available on this page when the Status field equals a status that is used for both Applicant Status for requisitions and Overall Applicant Status. For example New Applicant, Offer Accepted, No Match, and Hired are typical statuses that are used for both purposes.
Users can also change the applicant’s status for the selected requisition(s) as a group by clicking the box at the end of each requisition line and then clicking the Change Status button.
Visibility Software Cyber Recruiter v 7.0 User Guide P a g e | 103
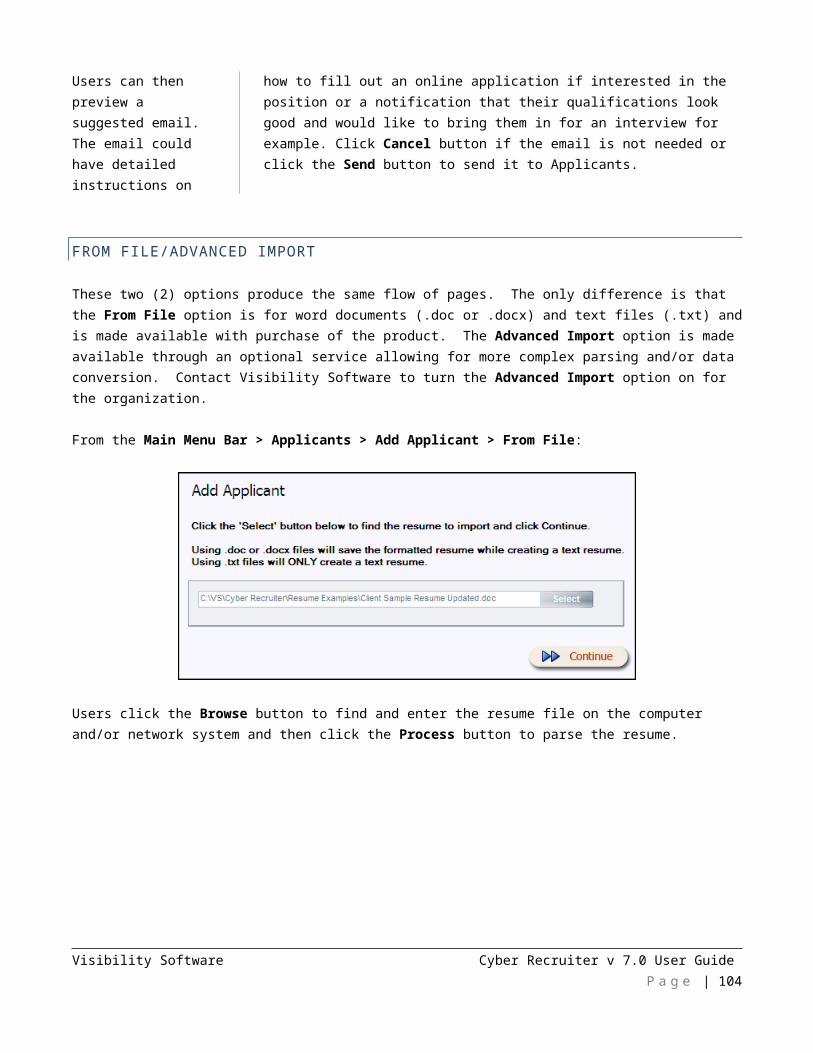
Change Applicant Statuses Page allows users to change the applicant’s status for a group of requisitions. If a notification email needs to be sent check the appropriate boxes before clicking the Save Changes button.
ROUTING TAB
This Routing Tab is where users can see all the routing activity for the applicant.
Routing Tab lists all users who received a routing to review this applicant’s information. When the activity is created a record is inputted here. When the activity is completed, a Response Date and Response default in. If it has been awhile and nothing is recorded here to show the activity is completed, click the Email Reminder link to resend the routing (OR from the Home Page > Open Activities.) If the requisition details need to be reviewed, users can click on the requisition hyperlink under the Req column.
To see more information about that routing activity, click the Edit Icon at the beginning of the routing line. To add a routing activity, click the Add new record link.
Visibility Software Cyber Recruiter v 7.0 User Guide P a g e | 104
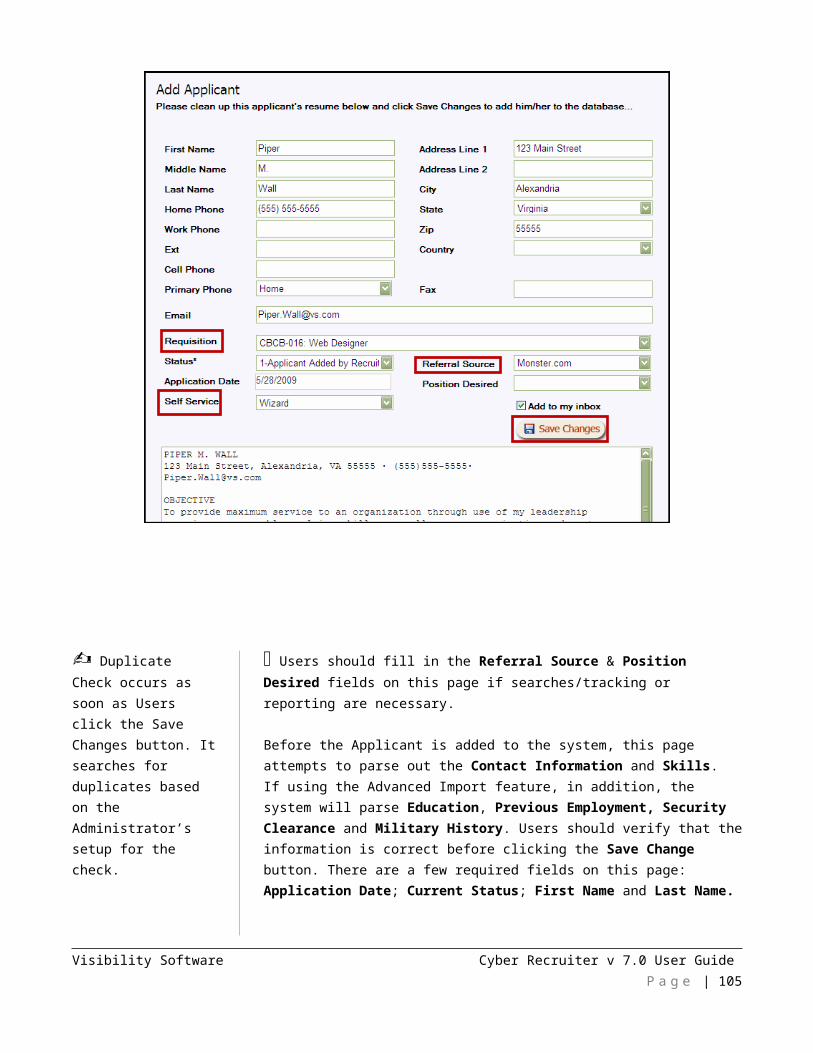
Route to Hiring Manager is updated based on selected requisition. Check this box to pre-select the Hiring Manager.
Add Applicant Routing Page allows users to set up the routing details. Select the requisition in the Req field. More than one user can be selected by holding down the CRTL key and highlighting all names necessary. Add to Inbox(es) checkbox automatically adds the applicants being routed to the user(s) selected here. Type additional instructions/messages in the Email Text section as needed. Click the Save Changes button to complete the process.
COMMUNICATION OPTIONS:The checkbox options:
- Allow response from email option allows these selected user(s) to make a decision about these Applicant(s) from within the email sent. If this option is not selected, the selected user(s) can log into Cyber Recruiter make their decisions about applicant(s).
Visibility Software Cyber Recruiter v 7.0 User Guide P a g e | 105
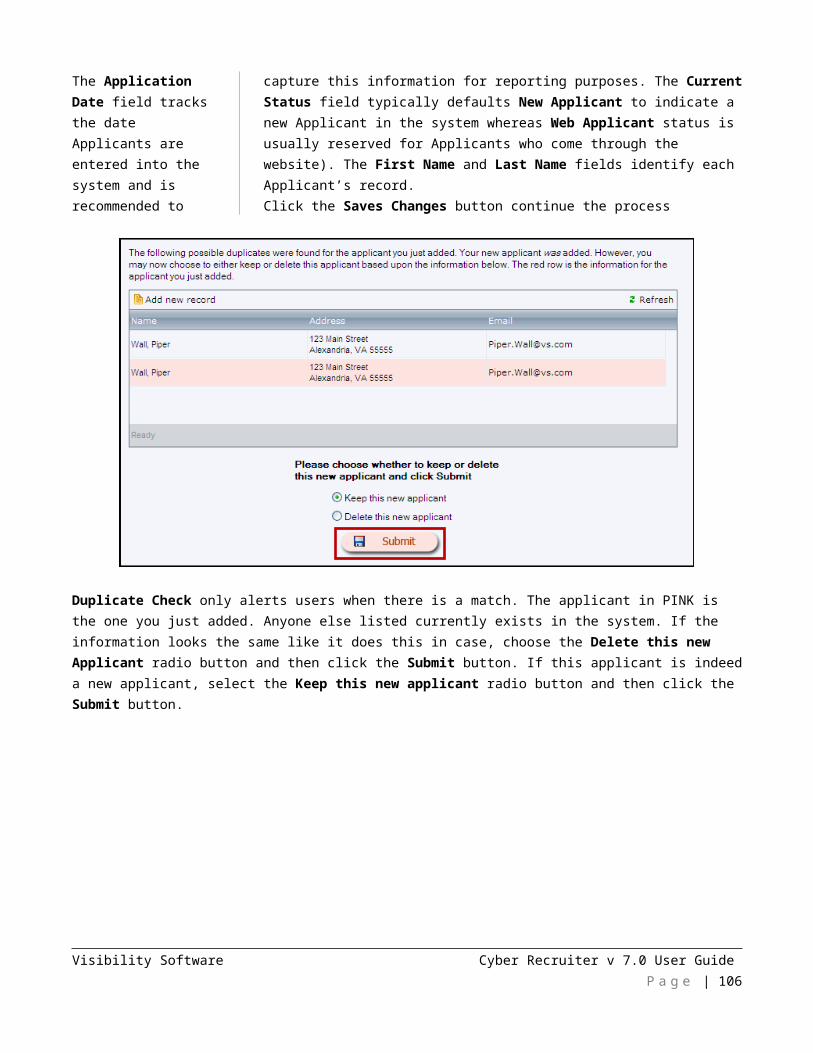
- Email response back to sender option sends an email notification to the user who sent the routing. If this option is not checked, the user who sent the routing can log into Cyber Recruiter to see where the applicant(s) are in the recruiting process for this requisition.
- Update applicant’s req status option is available only when the routing is being sent to one user and is otherwise grayed out. When available, it allows the user’s response to update the applicant’s Status for the requisition. If more than one user is selected, the recruiter (or user who routed the applicants) needs to evaluate all the responses and decide what the applicant’s Status for the requisition should be. To see all the responses for the applicant, check the Applicant File > Activity Page > Routings Tab > Response Column.
INTERVIEW TAB
The Interview Tab holds all the interview activity as it relates to the users for the applicant.
Interview Tab is strictly internal activity & is not made available to applicants. However, the option to start an email to the applicant is available.
If an email template should be used to confirm the interview details, discuss options with the CR Administrator. Most templates contain merge fields (Date, Time, and Location).
Visibility Software Cyber Recruiter v 7.0 User Guide P a g e | 106
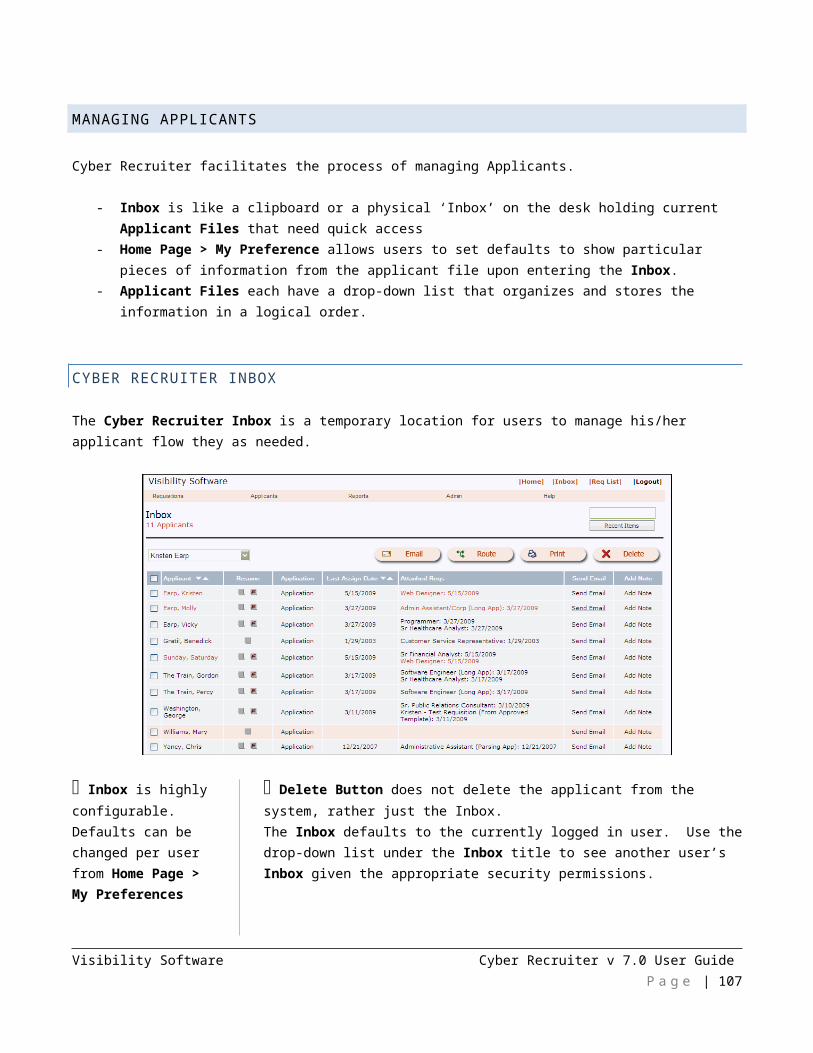
Buttons across the top of the tab work with the checkboxes at the end of the activity line.
Interview Tab is used to set up interviews details for users. If organizations have the recruiter, for example, set up the Interviews for the hiring manager, human resources, etc… Setting up interviews in here, puts the interview details on
the Home Page > Interview Calendar, creates Home Page > Actions Items and can send an email.
When the activity is created a record is entered here. When the activity is completed, the To See column and Score Column (only if using scoring is used with these questions – See Scoring in requisition section for more information). In the To See column, under each recipient’s name, users could see:
- Accepted/Denied - acknowledgment of the interview with a response. - Eval Complete – signifies the interview evaluation form was completed (only if
the organization chooses to use this form)- Canceled – if/when necessary to reschedule/cancel the interview
Use the Email Reminder and Email Eval Form buttons as needed if activities remain outstanding or from the Home Page > Open Activities. If the requisition details need to be reviewed, users can click on the requisition hyperlink under the Req column. To add an invite activity, click the Add new record button.
Sending out Interviews produces a vCalendar
attachment to the email. Users can click on it to update their calendars in the email system used.
Attachments only uses the Duration and Time fields as entered in the Interview details for the time and duration in the calendar attachment. Use the Notes section to
Visibility Software Cyber Recruiter v 7.0 User Guide P a g e | 107
indicate time slots if for Interviewers to update their own calendars OR send Interviews separately with the correct time for each.Add Applicant Interview Page allows users to fill out the interview details. Select the user(s) who the applicant is interviewing within the To See drop-down list, (Hold CRTL key down to select more than one). Determine the logistics such as Interview Date, Time, Duration, and Location. Select the appropriate Requisition
and enter the next status the Applicant in the Change status to… field if there is another status that should be changed at this point.
Select the Email Recruiter or Email Hiring Manager checkboxes to notify those users IF the status for the applicant changes during this process meaning something is selected in the Change status to… field. Select the Email Interviewer checkbox to send an email notification to the selected User(s). Selecting the Request Confirmation checkbox in conjunction allows the User(s) responses to be emailed back to the User who set up the interview.
Users decide when to send the questions to the interviewer with the invite or later in the process after the interview as needed. To send with the Invite, check the Include Link to the Evaluation Form checkbox.
Additionally, the option to Email Applicant checkbox can be used to launch the Correspondence Page > Emailing Process should the user decide to send an interview confirmation email.
Click the Save Changes button when this page is completed.
Cancel Interview pulls the Invite off the Interview Calendar on the Home Page. It DOES NOT cancel the interview in Outlook/Groupwise or other email calendar.
Cancel Interview allows users to send out an email to all those who need to know. The email here is a template that can be set up by the CR Administrator. Whether the template is set up or not, users can modify/create as needed. Click the Append this email text to the note for this invite if this should update in the Status/History Page. Use the Also copy these people… drop-down list as necessary. Click the Save Changes button when done.
Visibility Software Cyber Recruiter v 7.0 User Guide P a g e | 108
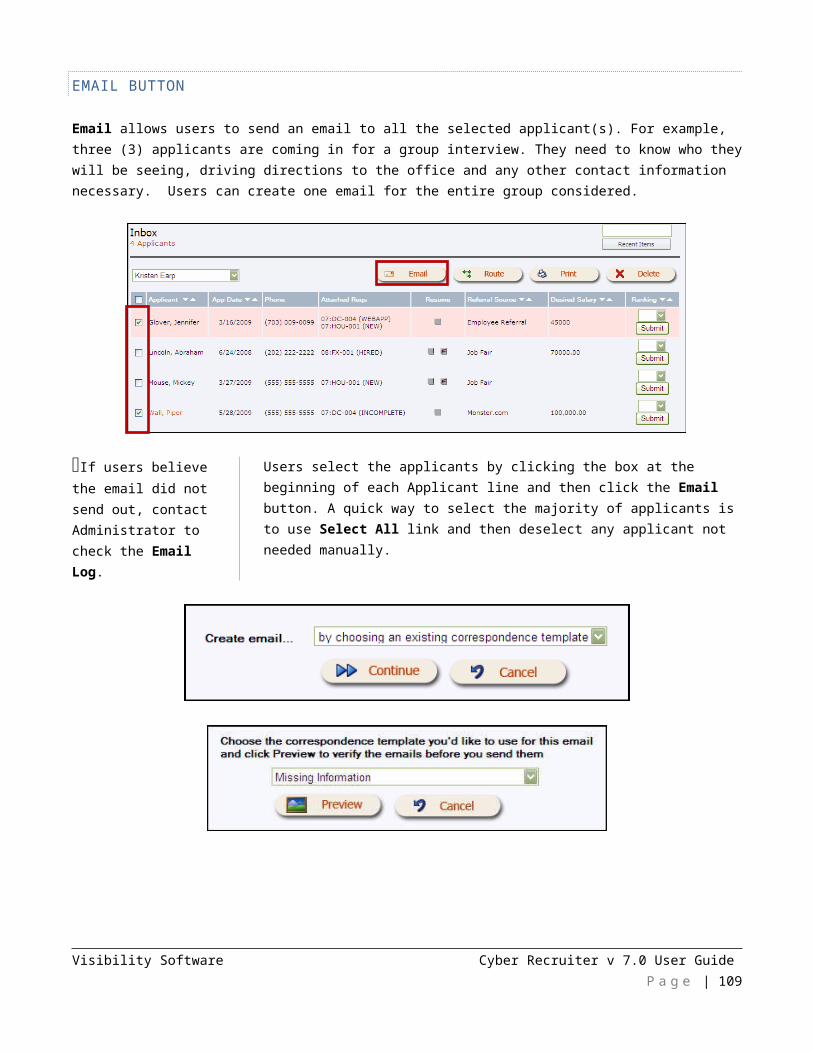
To see more information about the interview details, how evaluation questions are answered and/or to modify particulars, click the Edit Icon.
Visibility Software Cyber Recruiter v 7.0 User Guide P a g e | 109
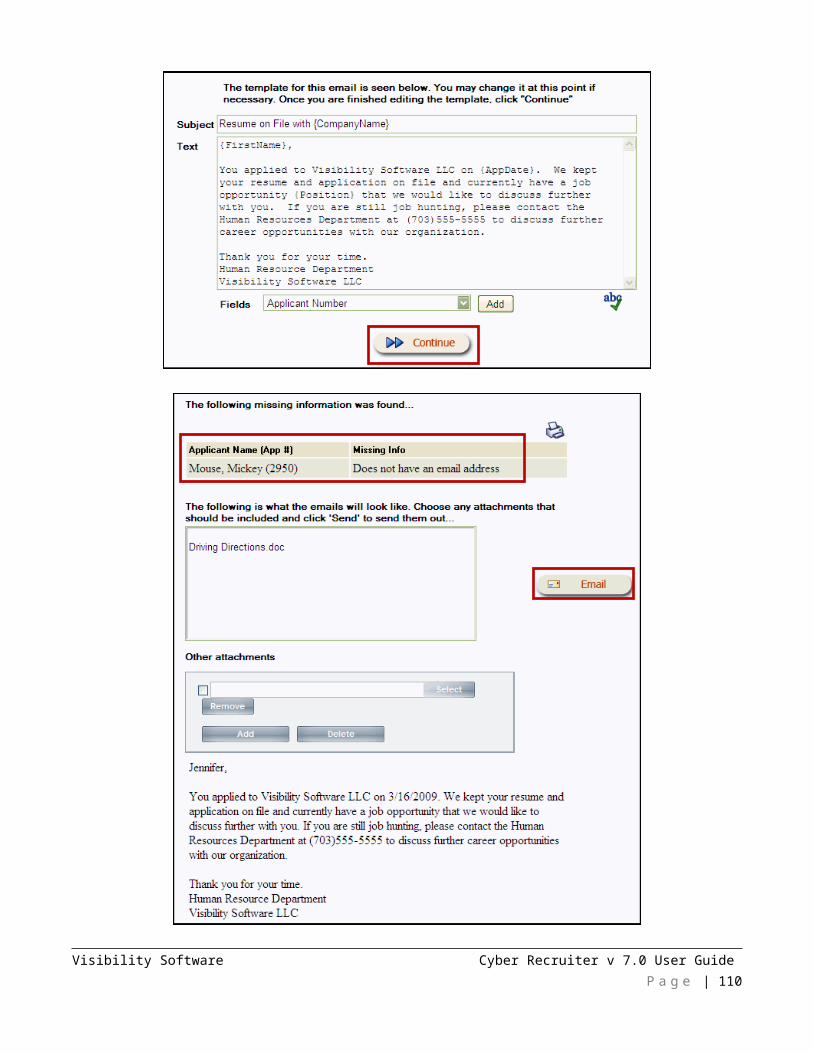
The Interview Details Tab is where certain the details can be updated and/or reviewed as needed. Any notes that were established between the sending of the interview request and the confirmation of it are listed in the Notes Section.
The Evaluation Tab is where the answers to the interview evaluation questions is maintained. This information can be seen in the Requisition File > Applicants Page > Score Report Links as well.
OFFERS TAB
This Offers Tab is where users create the offer approval terms and send out offer letters to applicant.
Visibility Software Cyber Recruiter v 7.0 User Guide P a g e | 110
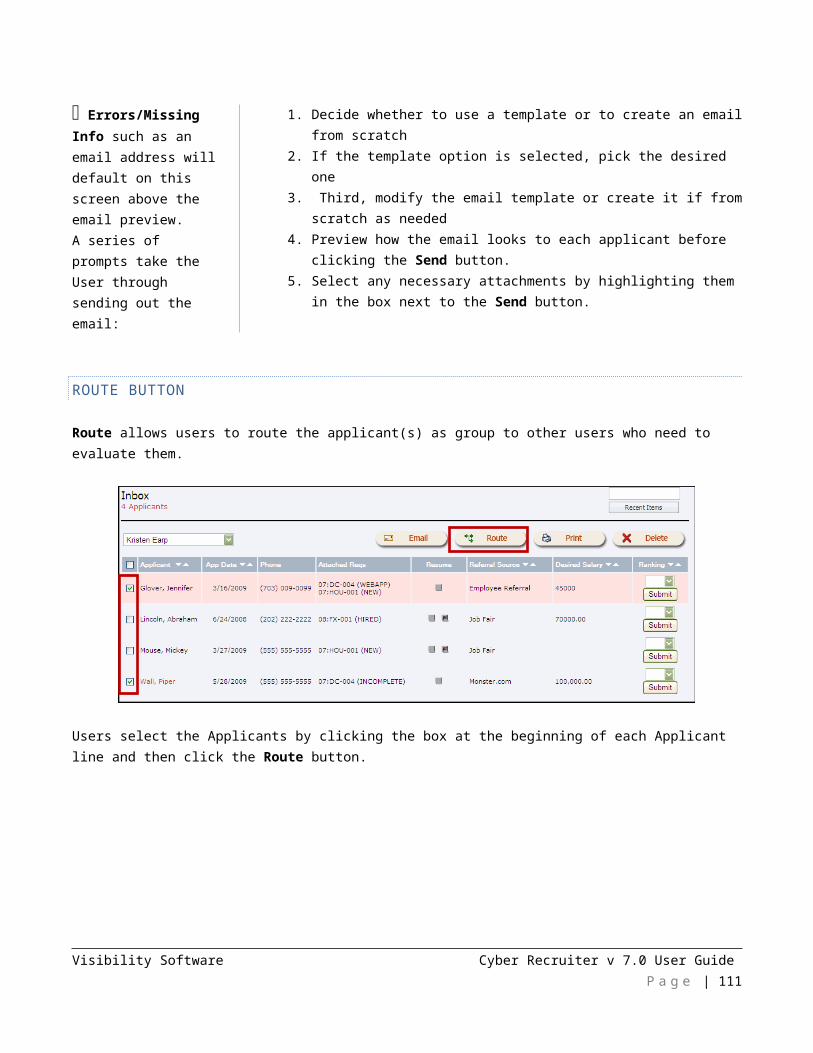
Offers Tab can incorporate the process of sending offer letters via email with electronic signatures.
Offers Tab is where users will create offer term approvals and offer letters as needed. When the activity is completed, the Status will change from Pending to Approved. If the requisition details need to be reviewed, users can click on the requisition hyperlink under the Requisition column.
To add an offer approval activity, click the Add new record link.
Additional Information section is completed at this point. It provides additional information to the approvers about the terms if utilized.
Add Applicant Offer Page > Request Details Tab allows users to fill out the offer approval details. The Requisition, when the terms Expire, as well as the expected Start Date and Starting Salary are important to fill in as organizations usually have offer letters that pull these fields. The Change Status To field allows users to update the applicant status for the requisition so as to eliminate an extra step of having to do it manually. Additional Information as being tracked defaults at the bottom of the page. Click the Save Changes button to complete this action.
Visibility Software Cyber Recruiter v 7.0 User Guide P a g e | 111
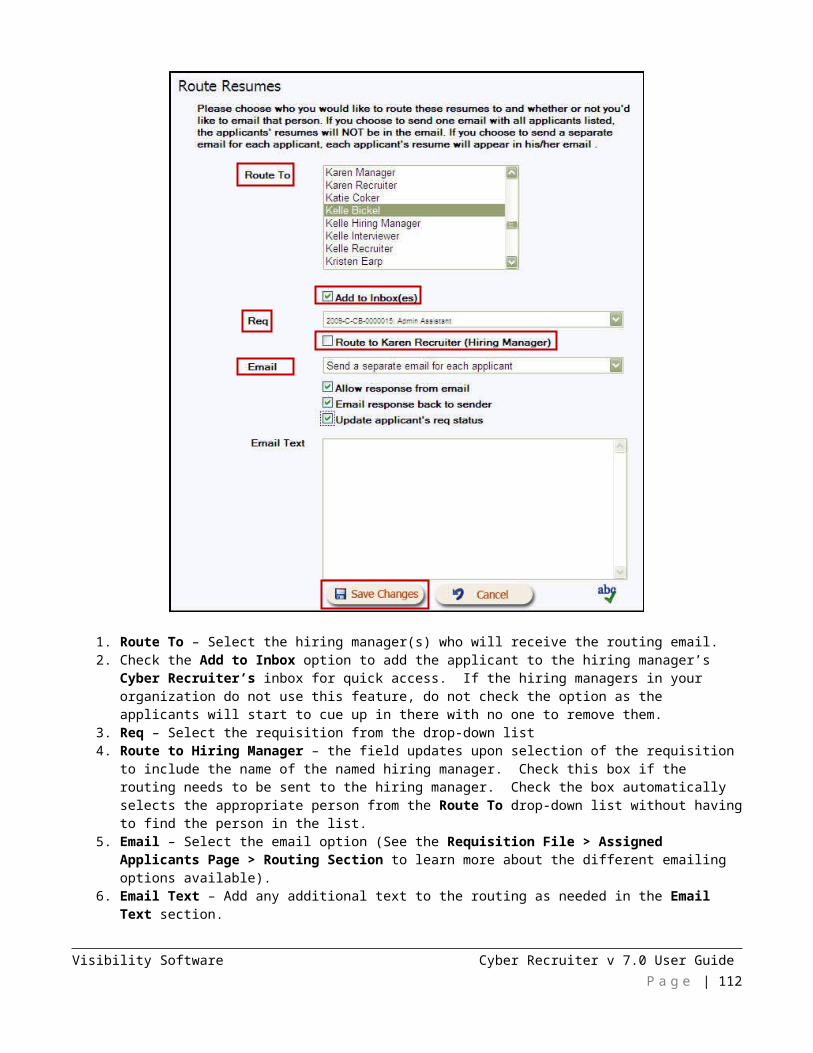
Add Applicant Offer Page > Approvers Tab allows users to select the levels of approvals and other notification emails as needed. User can potentially select up to five (5) levels of approval. To automate the approval process, select the Email First Approver checkbox. Selecting Email Recruiter/Hiring Manger of the Req checkboxes sends an email notification to keep them in the loop.
Once the offer terms are created, to review/edit the information, click the Edit icon the beginning of the offer process line.
Visibility Software Cyber Recruiter v 7.0 User Guide P a g e | 112
In the Edit Applicant Offer Page > Requisition Detail Tab, users can see the following fields: Signed, Signature, and Sign Date. If the organization is utilizing the e-offer letter/process then these fields are filled in when the applicant/new hire accepts the offer terms via the e-offer website page. Otherwise, these fields are blank and can be ignored in the offer acceptance process.
Use Email Reminder link if the activity has been outstanding for a
long time. The link resends the offer approval request. (Or can be done from the Home Page > Open Activities too.)
Visibility Software Cyber Recruiter v 7.0 User Guide P a g e | 113

For the activity to be completed, the Approvers section needs to have the Approval Date and Response listed. Once all
the Approvers responded and the Status equals Approved/Declined the next step of the process can be started.
If the terms were denied, depending on the offer approval process, the terms can be edited on the Request Details Tab and then on the Approvers Tab the Restart Approval Process link is clicked. This will wipe the current approval statuses clean (held in the Applicant File > Status/History Page) allowing for the new statuses and responses to be captured here.
Once the offer terms are approved, users click the Change link to add/change the letter associated with the offer activity.
IMPORTANT NOTE: If users want to modify the existing letter attached, this is not the place to do it. The Change link allows users to swap out the letter completely, not make changes to the existing letter. Example: a full-time offer letter was used when a part-time offer letter was intended. To modify an existing letter attached, go to the Applicant File > Correspondence Page. Find the existing letter and click the Edit icon to make the necessary changes.
Users select the right letter template and click the >> Continue button to review and modify the letter as needed.
Visibility Software Cyber Recruiter v 7.0 User Guide P a g e | 114

Click the Print icon to print the letter out and send it to the applicant/new hire. To save the letter in the Applicant File > Correspondences Page, click the Save Changes button.
Offer Letters & Emails NEED to be done thru the Offer Tab to use the e-offer process.
Once the letter is created, users can review the letter in the Applicant File > Correspondence Page. If organizations would like to email the new hire a copy of the offer letter and/or use the E-Offer process collecting an electronic signature, click the Email link.
Visibility Software Cyber Recruiter v 7.0 User Guide P a g e | 115
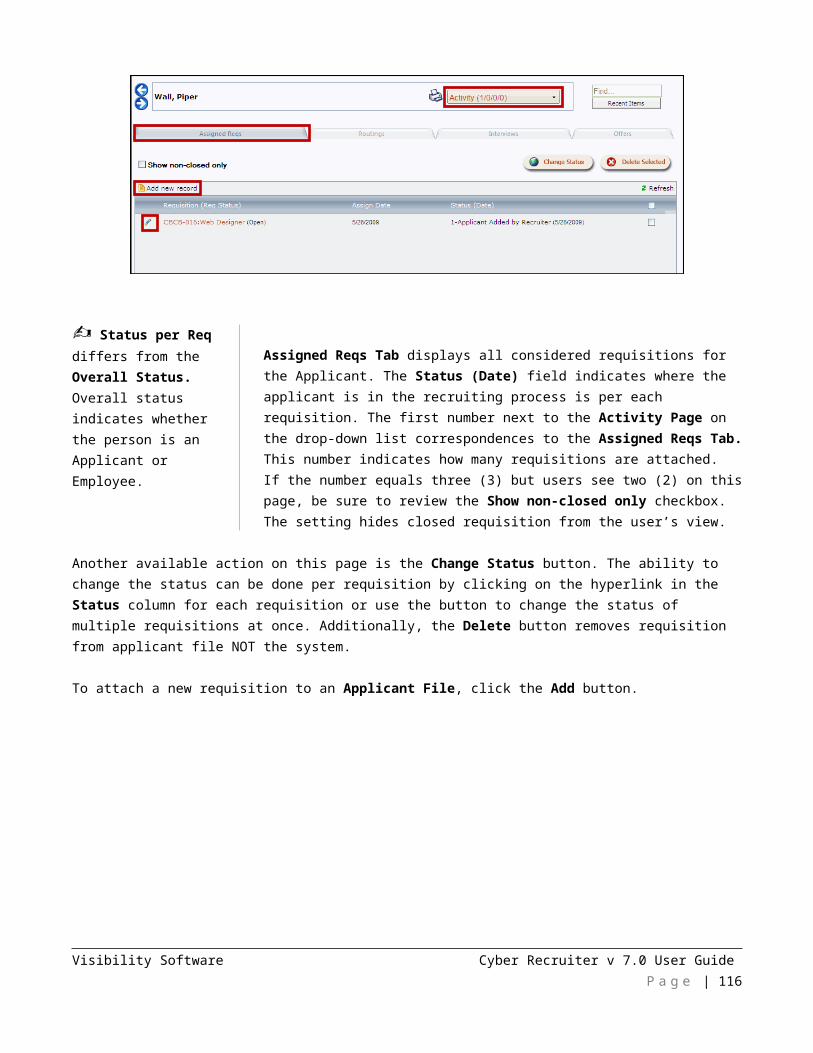
It is recommended to have more than one email template to provide the flexibility of sending an email with the offer letter attached verse sending an email with the offer letter and link to sign the offer letter electronically. Click the Preview Button when done.
This page allows users to modify the email as needed. If the section of the email that contains a long HTML statement that is encrypted to help protect the applicant’s information when he/she clicks on the link (in this example – click here) as that is all he/she will see. Other options on this page allow users to Preview Letter and send a copy of the email to the user by checking the Copy Me checkbox. The ability to adjust the letter Margins is possible here if not setup with the original letter template as well as the ability to attach other document either by highlighting the documents in the Attachment list or using the Other Attachments that searches the user’s computer/network. Click the Send button to complete the process.
From the email, applicants can click on the link to open the e-offer process.
Visibility Software Cyber Recruiter v 7.0 User Guide P a g e | 116
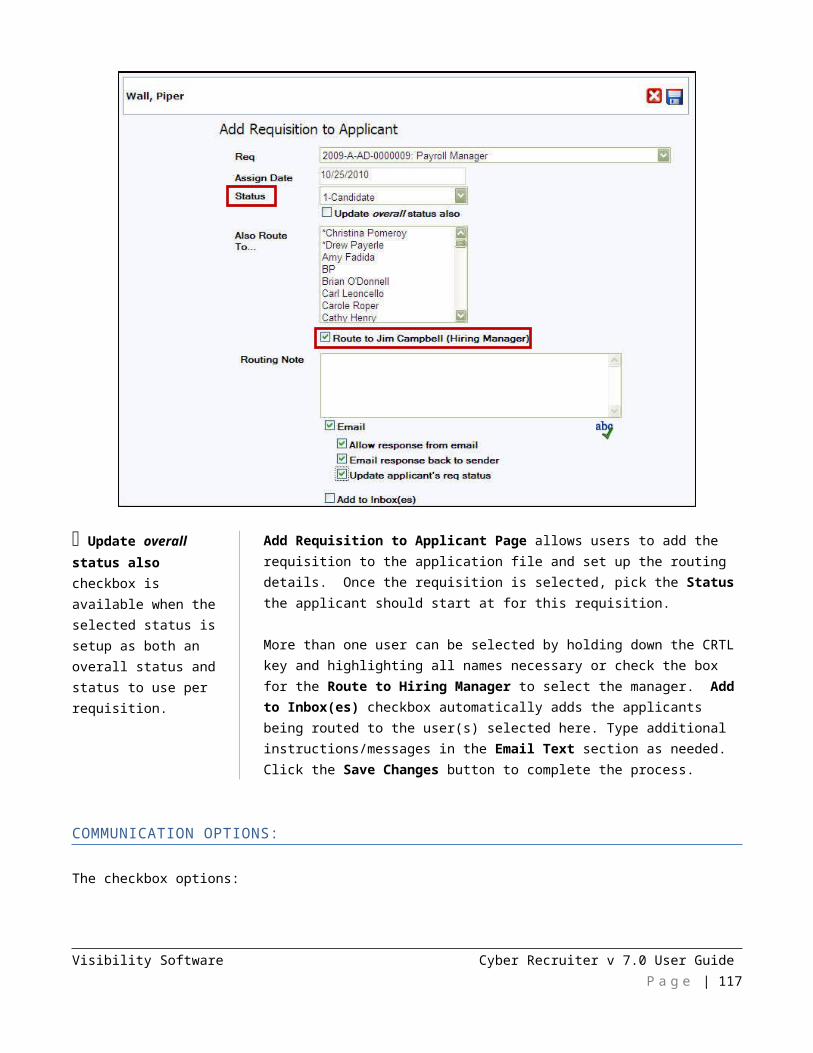
Clicking I Agree, will default the Signed, Signature, and Sign Date in the Offers details.
Visibility Software Cyber Recruiter v 7.0 User Guide P a g e | 117
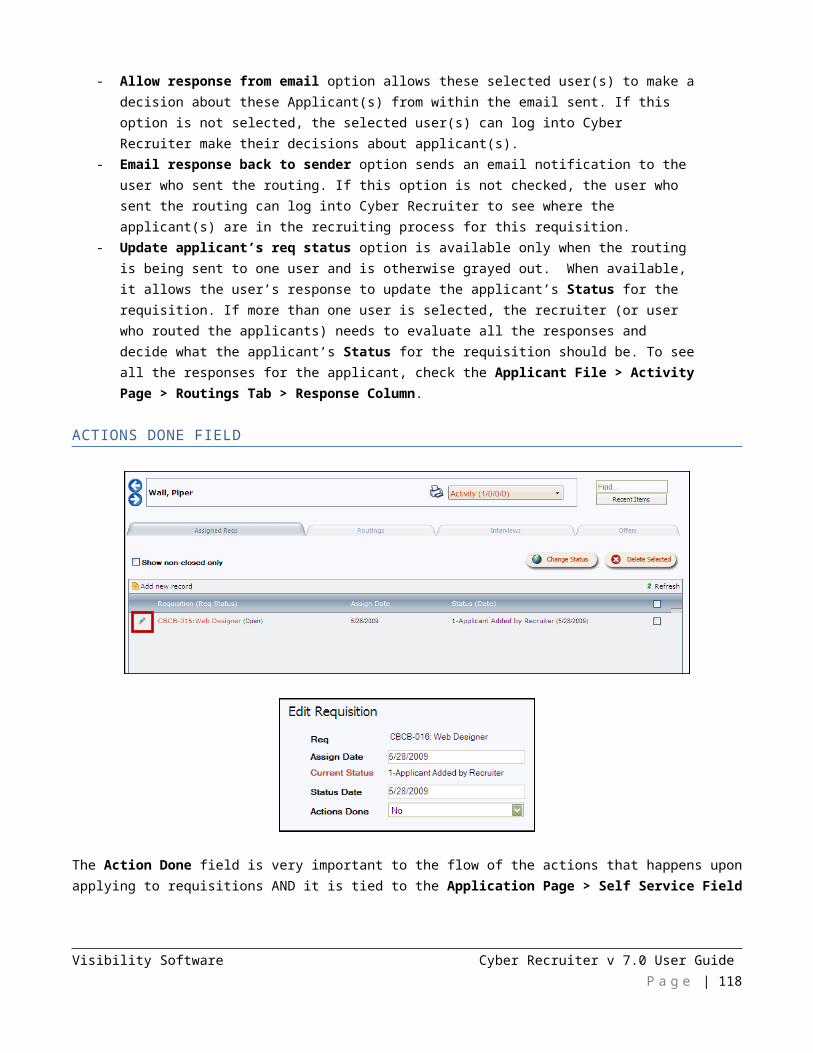
EXPERIENCE PAGE
The Experience Page lists all the Skills, Education, Employment History, Military History and Security Clearance information for the applicant.
SKILLS TAB
The Skills Tab lists all the Cyber Recruiter database skills entered for the applicant.
Read Resume for Skills compares the resume to the Skills in the database and places any matches here.
Skills Tab holds the applicant’s skill set. If the online application asks for this information, the page can be populated upon completion of the online application. Users can add/modify each skill as needed. For example, let’s say the applicant provided these skills. After a phone interview, the recruiter wants to add more information to this page. Delete the skills that the applicant did not appear to have, Add ones they did not list and Edit existing ones to provide more information.
Visibility Software Cyber Recruiter v 7.0 User Guide P a g e | 118
EDUCATION TAB
The Education Tab lists all educational information entered for the applicant.
Applicants can maintain their own info thru the Self Service Module. However, there might be occasions where users can make the update too.Education Tab holds the applicant’s educational
background. If the online application asks for this information, the page can be populated upon completion of the online application. Users can add/modify each experience as needed.
For example, let’s say the applicant provided an experience but they are still in school. During the recruiting process, the applicant completes his/her education and earns a degree. Click the Edit icon to update the information or direct the applicant to the self service to do it himself/herself.
If the organization utilizes Main Menu Bar > Applicant > Applicant Searching > Degrees or Majors, here is where the system looks for the information in the search.
Visibility Software Cyber Recruiter v 7.0 User Guide P a g e | 119
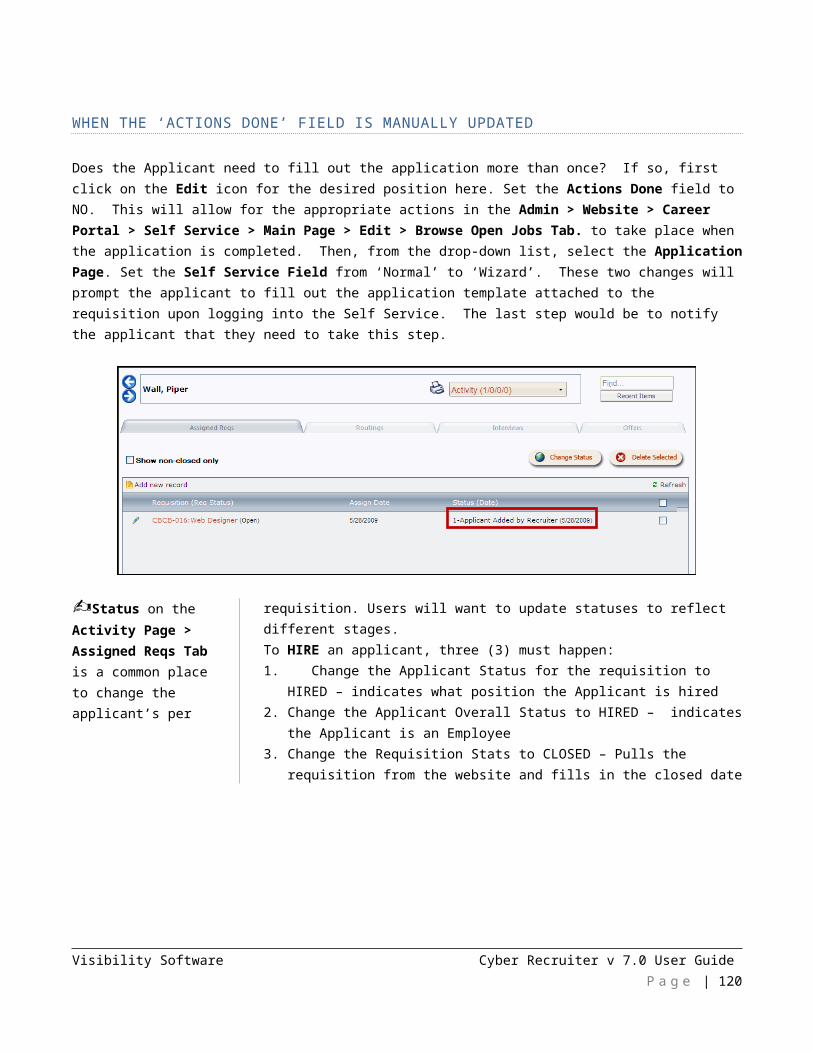
EMPLOYMENT HISTORY TAB
The Employment History lists all previous/current employment experiences entered for the applicant.
When contacting Employers, enter information gathered in the Notes sections of each experience as needed.
Employment History Tab holds the Applicant’s employment background. If the online application asks for this information, the page can be populated upon completion of the online application. Users can add/modify each experience as needed.
For example, users want to check the employment. Click the Edit icon at the beginning of the line to look up the Supervisor Name & Number.
Visibility Software Cyber Recruiter v 7.0 User Guide P a g e | 120
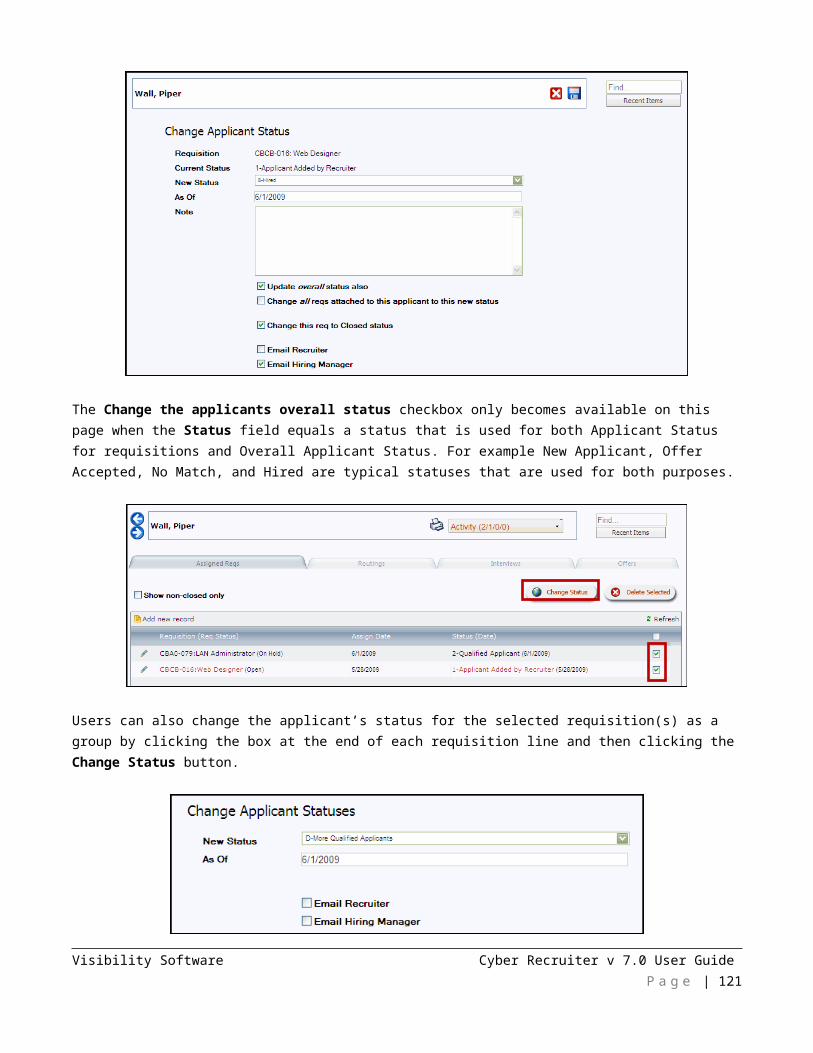
MILITARY HISTORY TAB
The Military History Tab lists all military experiences entered for the applicant.
Military History Tab holds the Applicant’s military background (if they have one). If the online application asks for this information, the page can be populated upon completion of the online application. Users can add/modify each experience as needed.
To see more information like Specialty, Service #, & other Notes click the Edit icon at the beginning of the line.
Visibility Software Cyber Recruiter v 7.0 User Guide P a g e | 121
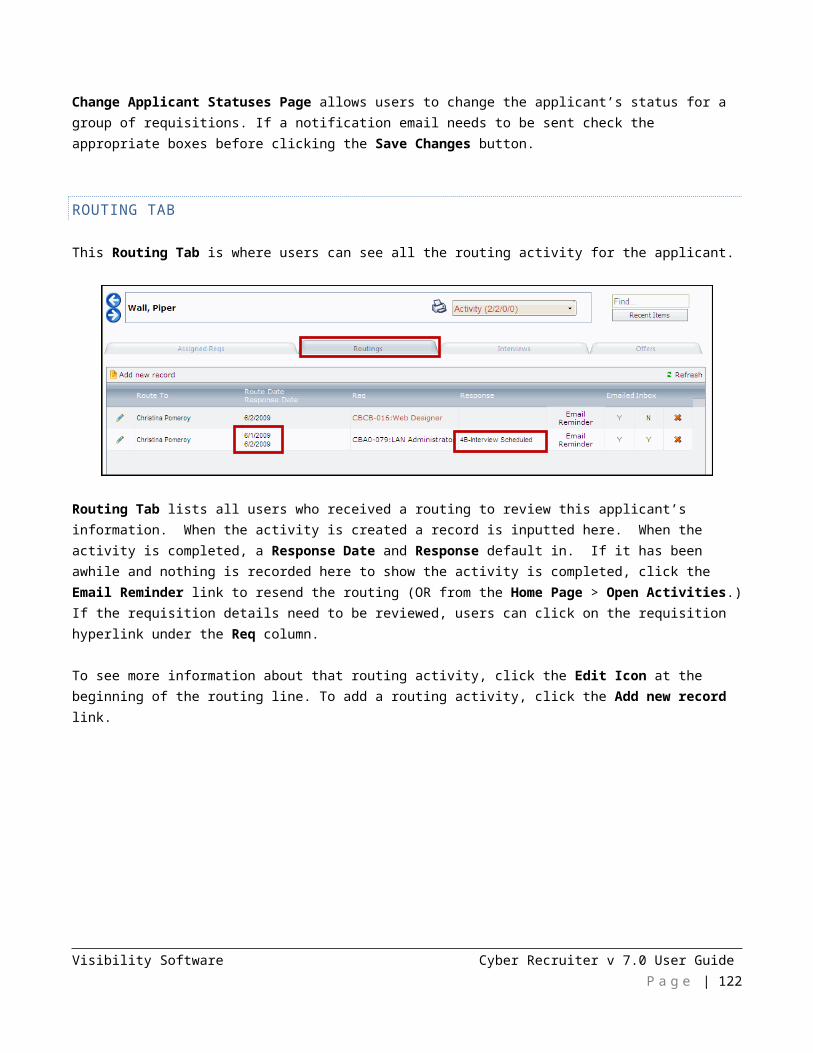
SECURITY CLEARANCE TAB
The Security Clearance Tab lists all security clearances entered for the applicant.
Security Clearance Tab holds information about the Applicant’s security clearance information (if they have one). If the online application asks for this information, the page can be populated upon completion of the online application. Users can add/modify each experience as needed.
To see more information about the Investigation, Expiration Date & Notes click the Edit icon at the beginning of the line.
Visibility Software Cyber Recruiter v 7.0 User Guide P a g e | 122

APPLICATION PAGE
The Application Page contains all the main application information for the applicant.
Application Page is highly configurable, talk to CR Administrator.
SS Login is filled in when organizations allow Applicants to pick their own Login ID.
When applicants are manually added, the Self Service field typically set to Wizard. This prompts applicants to fill out an online application upon entering the Self Service. Normal does not prompt the online application.
Application Page > Application Questions Tab contains basic information through fields and questions asked of the applicant. The Referral Source and Source Details are used to capture the information on how this applicant found the position. Salary Expectations has security permissions around it so some users may or may not see this information. Area of Interest is used when the organization collects unsolicited applications so that users know what kind of position the applicant is looking for and can perform searches off this field if/when a position in this area becomes available. When applicants finish the application and sign the Applicant Agreement Page, the Signed Application Agreement, Signature, and Sign Date are filled.
The SS Password (aka PIN), is automatically generated when an Applicant File is created. Click the Reset link to email the Applicant the password as needed.
If an applicant starts the online application process, the Self Service field defaults to Wizard but when the applicant finishes the application process the field changes the field to Normal.
Application Questions and answers are listed on this page at the bottom. If scoring is tied to the drop-down answer questions, the overall application score is generated.
Visibility Software Cyber Recruiter v 7.0 User Guide P a g e | 123
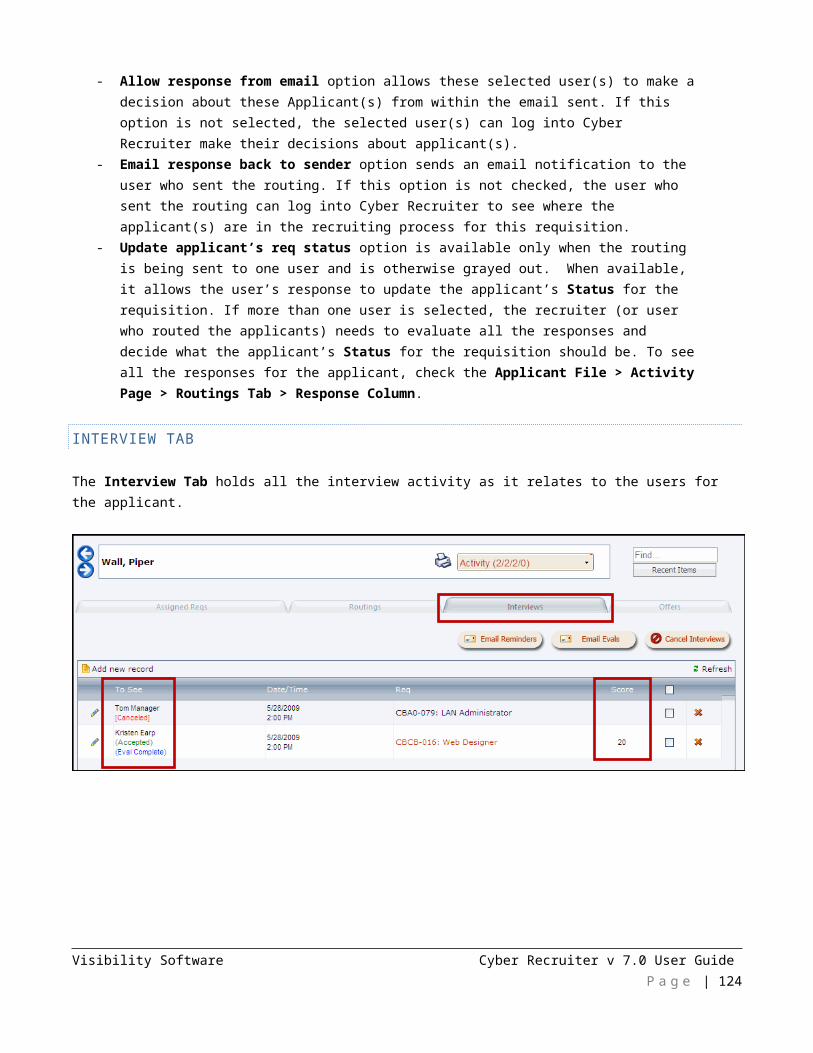
Requisition Questions are specific to the position and come from the Requisition File > Req Questions Page.
Application Page > Requisition Questions Tab contains all the requisition specific questions and answers. To see the questions and answers, click on the hyperlink number at the end of the line. To access the requisition, click on the Code: Description Link in the Requisition (Req Status) column.
STATUS/HISTORY PAGE
The Status/History Page contains the Applicant Overall Status as well as all history created for the applicant.
Visibility Software Cyber Recruiter v 7.0 User Guide P a g e | 124
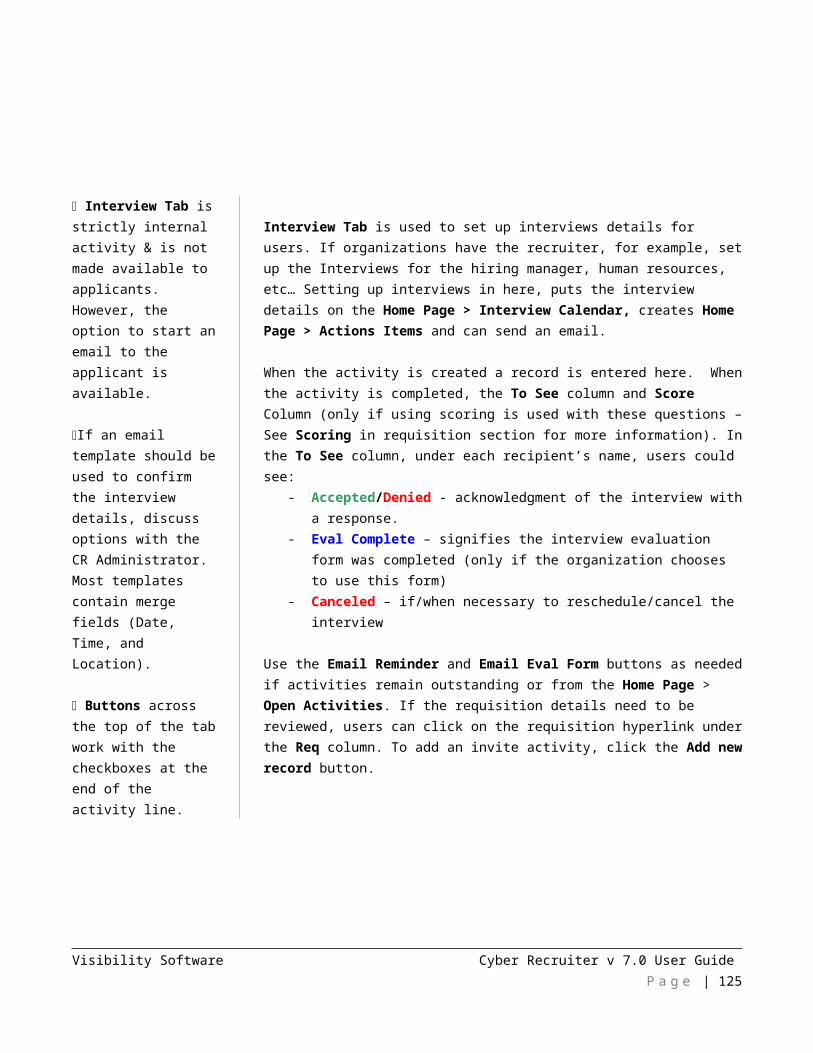
Applicant Number automatically generates the unique ID. The code is AppNum.
Standard Tab tracks changes made in CR; Self Service tracks changes from the Applicant.
The Status indicates high level whether this file is an applicant or an employee one. Given the right permissions to this page, the Status and/or History can be updated/deleted. The Original Application Date is the date the Applicant entered the system and the As of Date reflects the last time the Overall Status changed.
Users can click Print to obtain a hardcopy or delete a record by clicking on the red-circled X at the end of each record, given the appropriate security permissions. Users can see more information by clicking on any hyperlinks (when available) on this page.
The following events/actions create history records in Cyber Recruiter:
- Accepting an interview request (via email or home page)
- Answer a routing (via email or home page)
- Sending correspondence email- Adding correspondence letter- Emailing correspondence letter
(creates 2, one for letter, one for email)- Adding attachment- Adding invite record- Keying in or importing an Applicant- Adding note- Adding offer approval- Attaching new requisition to
Applicant- Changing overall status- Changing requisition status for
Applicant
- Adding a routing- Adding a New Hire- Deleting a requisition from an
Applicant- Deleting a routing- Deleting an invite- Deleting an offer approval- Changing the signature on the
Application Page- Changing bonus paid to Yes for
Employee Referred Page- Canceling an Interview- Emailing an offer approval reminder- Emailing references to somebody- Transferring Employee Referral
Manually to an Applicant- Completion of interview evaluation
form
CORRESPONDENCE PAGE
The Correspondence Page is where communication with the applicant is created and tracked.
Visibility Software Cyber Recruiter v 7.0 User Guide P a g e | 125

Email & Letter checkboxes filters the view
Correspondence Page allows users to create emails and letters to send to the applicant throughout various stages of the recruiting process. (Note: Email and Letter Templates are set up prior to use, if additional ones are needed for ease of workflow, contact the CR Administrator.) To add a correspondence for to the applicant, click the Add new record button.
Visibility Software Cyber Recruiter v 7.0 User Guide P a g e | 126
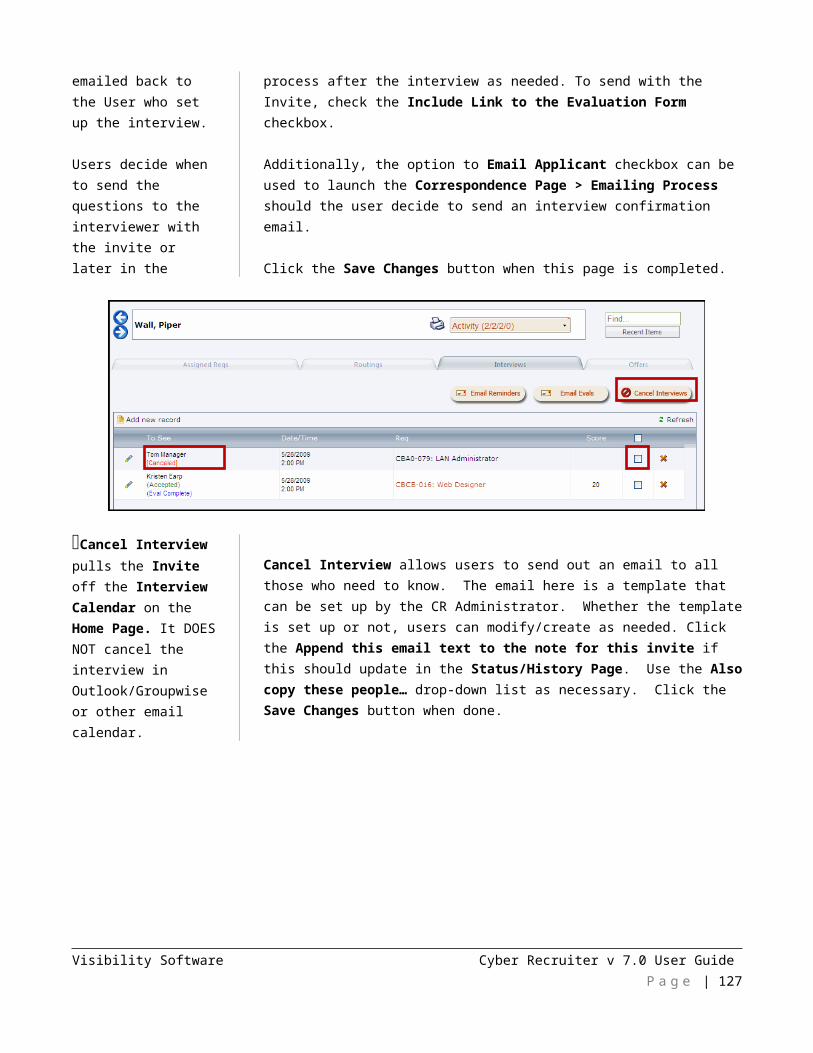
Select the appropriate email template. If a variable in the email template (or letter template) cannot be determined because there is more than one possibility, a box to clarify defaults next. Example, the Applicant is being considered for two (2) positions, and if the {Position} variable is used in the email template, the system prompts clarification.
Users do NOT have the option of creating an email from scratch when choosing to email letters. Those emails need to be pre-established templates.
First Users decide what they are creating an email or letter. If it is an email, then Users select whether to use a template or to create one from scratch. All three (3) of the options exist here. This page allows Users to create Click the Next button to continue.Preview the letter being sent to the Applicant, making changes as necessary. After the Save Changes button is clicked, Users have the option to print (from within the HTML editor) or to Email the letter to the Applicant.
Users can NOT edit sent email but can see more info about it by clicking the Edit icon.
Preview the email and Letter as needed. Make sure the Email Address is entered and all the available attachments that need to be included in this email are selected (Hold the CRTL key down to select more than one and/or use the Browse button at the bottom of the page) Select the Copy Me option if a copy should be sent to the User as well. Once all the important information is captured, click the Send button to complete this action.
Visibility Software Cyber Recruiter v 7.0 User Guide P a g e | 127
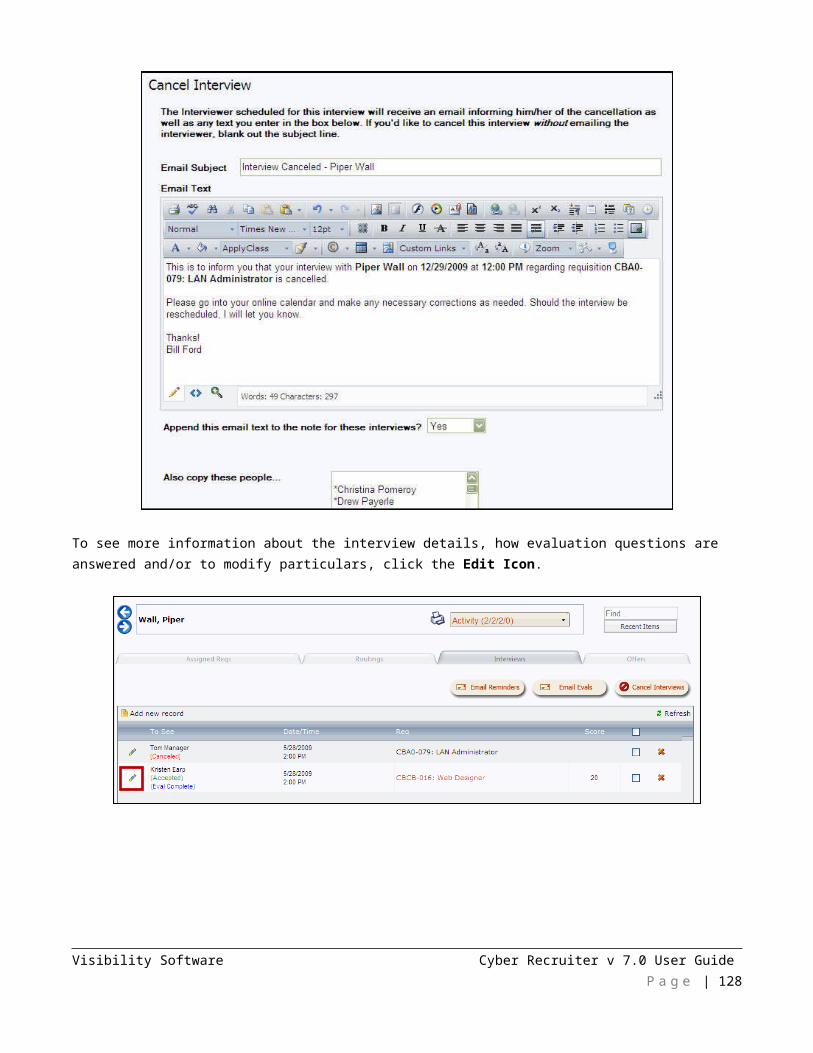
NOTES PAGE
The Notes Page is a general page for tracking in-depth notes and tasks for applicants.
Notes Page holds users entered notes as they pertain to the applicant. Click Print to see all notes in a list. Users can click Add new records link to add new notes or edit existing ones by clicking the Edit icon at the beginning of the note record.
Visibility Software Cyber Recruiter v 7.0 User Guide P a g e | 128
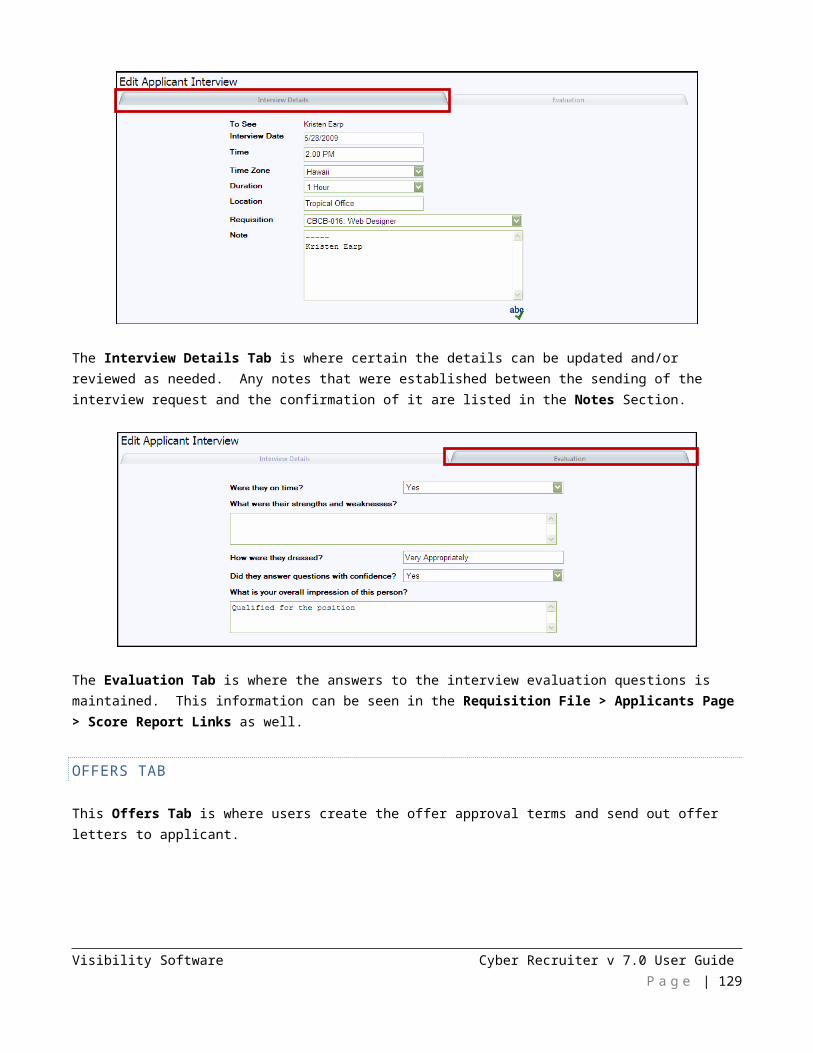
Notes Types are important to consider as every note requires one.
Note Templates - Right-click in the Notes text box for list of Templates & Left-click to populate the text box with a Template. Contact Administrator to add Templates.
Add/Edit Applicant Note Page allows users to enter note details. Select the appropriate Note Type from the drop-down list and enter the Note Date.
The Follow-up Date field indicates whether this note is passive (FYI – just a note in the system) or active (task to follow up creating an action item on the Home Page when the date entered is reached). Leaving the field blank makes the note passive, whereas entering a date makes it passive. (Note: Learn more about To Do Items on the Home Page and how to manage them, in the Main Page section of the manual).
The Note text box is where the note is entered. Add more information to the Note as needed by clicking the Edit icon at the beginning of the line. All users default in the Email this note to… drop-down list (when adding a note) or in the Email to somebody else link (when editing a note). Select users by holding the CRTL key down and highlight the names as needed.
DEMOGRAPHICS PAGE
The Demographics Page contains applicant contact and EEO information.
Visibility Software Cyber Recruiter v 7.0 User Guide P a g e | 129
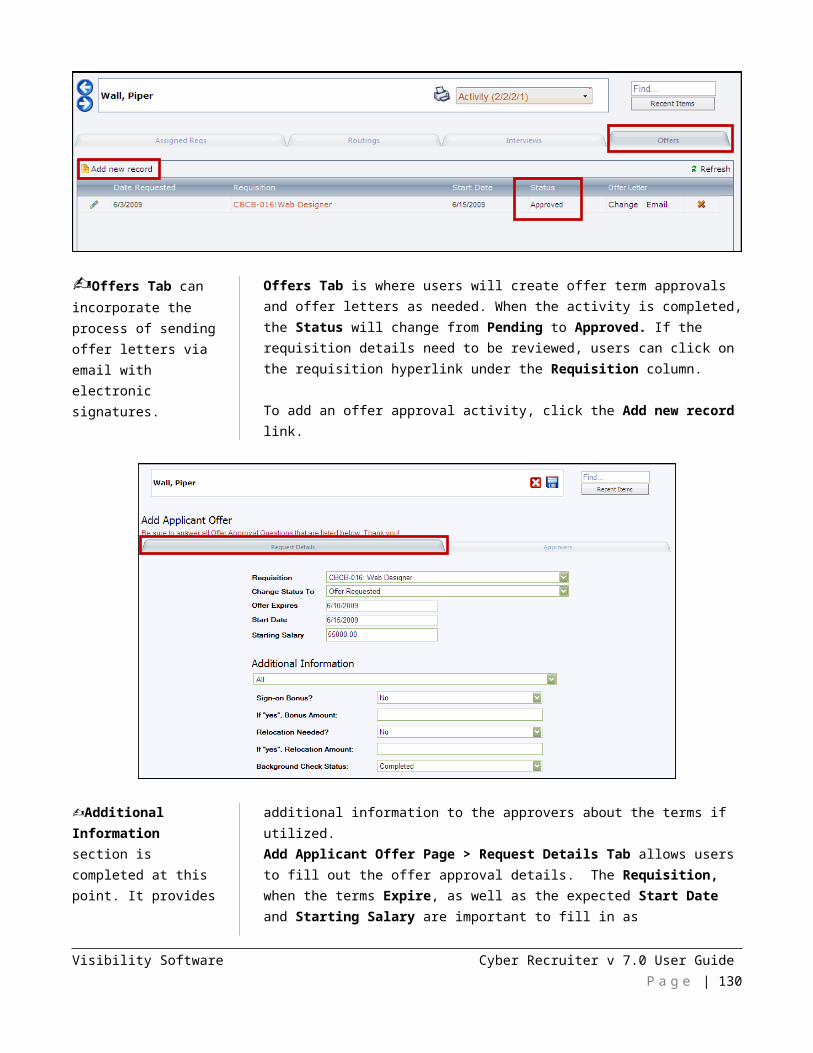
EEO options - Info Withheld allows the EEO info to be required with online application process but allowing the applicant the right to not answer.
Demographics Page holds sensitive information about the applicant and usually has tight security surrounding it. A copy of the text resume is held here for a quick review as needed. Users might need to come back to this page before hiring an applicant into a HR System because the SSN, Birth Date, or other information might be required for the transfer.
NOTE: All EEO fields will show on this tab even if the information is not being collected with the online application. Cyber Recruiter is compliant with EEO regulations – to learn more about the regulations please visit - http://www.eeoc.gov
MISCELLANEOUS (APP DETAILS) PAGE
The Miscellaneous Page (User-defined Title) holds specific applicant information that cannot be captured anywhere else in the system.
Miscellaneous Page is highly configurable to organization’s needs.
Visibility Software Cyber Recruiter v 7.0 User Guide P a g e | 130
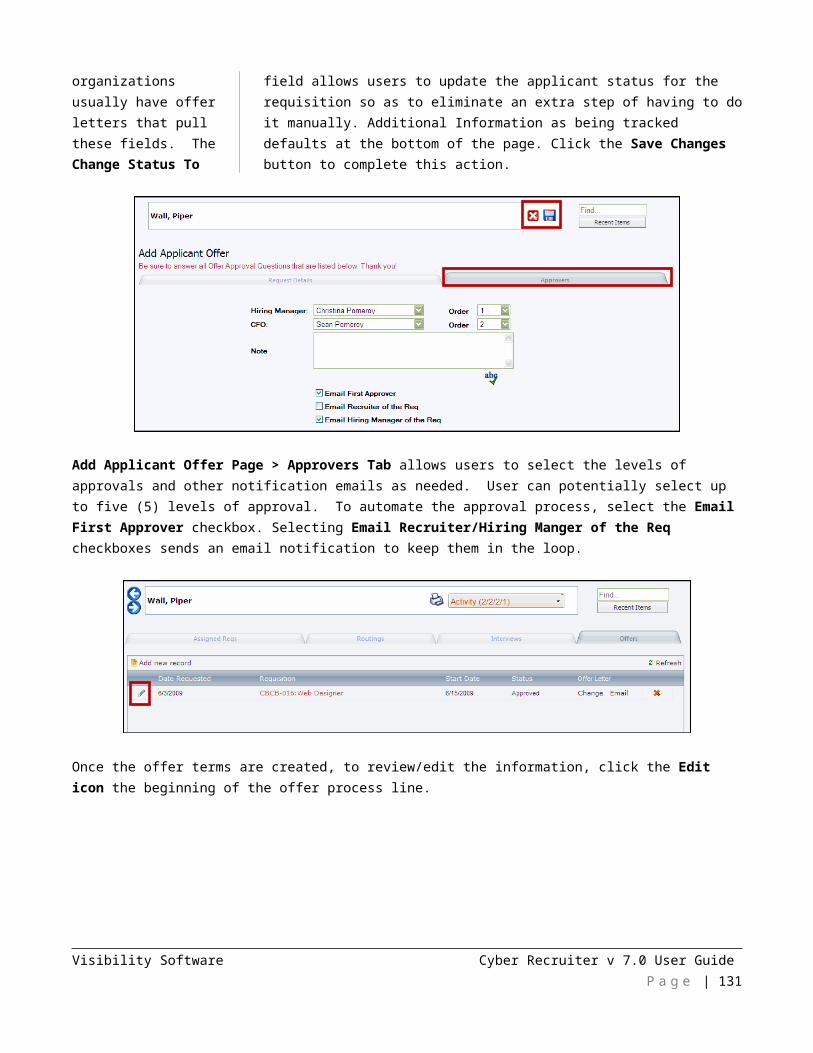
REFERENCES PAGE
The Reference Page contains all references types provided by the applicant.
Email references to somebody sends an email to specified users.
References Page is used to hold information about the applicant’s references. If the online application asks for this information, the page can be populated upon completion of the online application. Users can add/modify each experience as needed.
Visibility Software Cyber Recruiter v 7.0 User Guide P a g e | 131
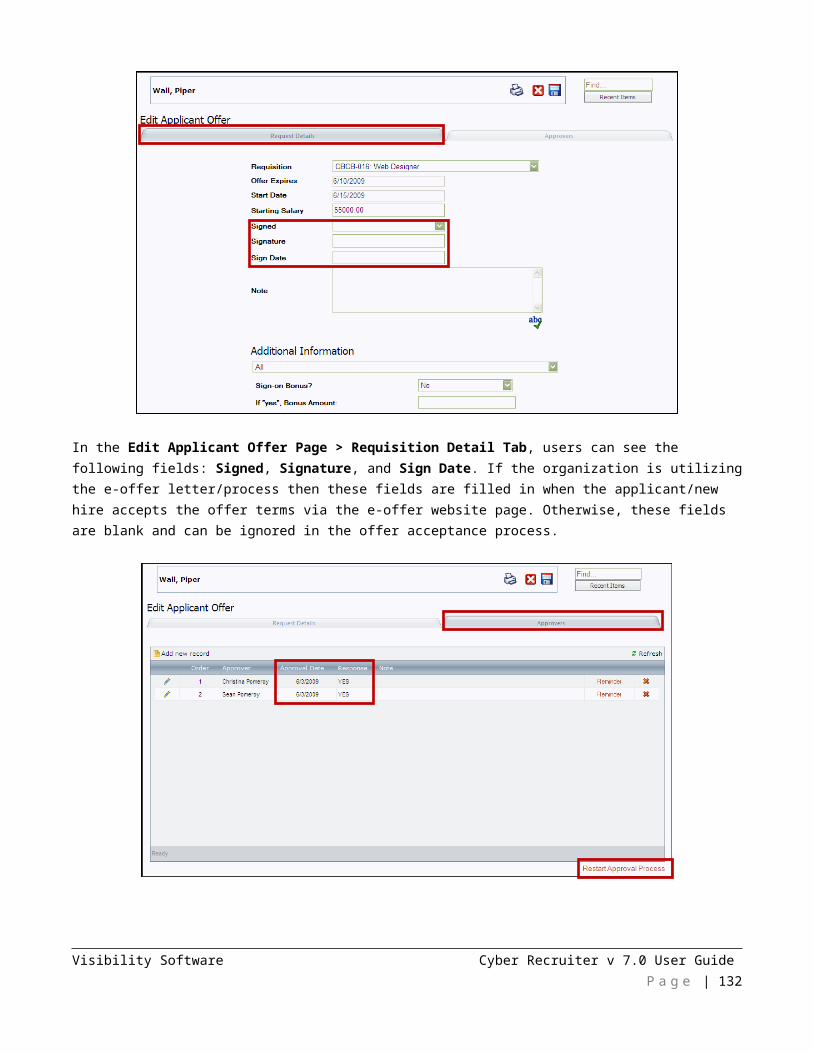
Add/Edit Applicant Reference Page allows users to complete a reference check as needed. If the organization has standard questions to ask the reference, they default at the bottom of the page and can be used as a guide. Users check the Verified radio button and fill in the Date Contacted and Verified By after the reference check is complete.
ATTACHMENTS PAGE
The Attachments Page is used to attach external files and documents to the applicant.
Attachments Page holds additional information with the Applicant File. For example, a test the applicant took, portfolio example, any signed documentation, returned background check results, etc… To add an attachment, click the Add button.
Visibility Software Cyber Recruiter v 7.0 User Guide P a g e | 132
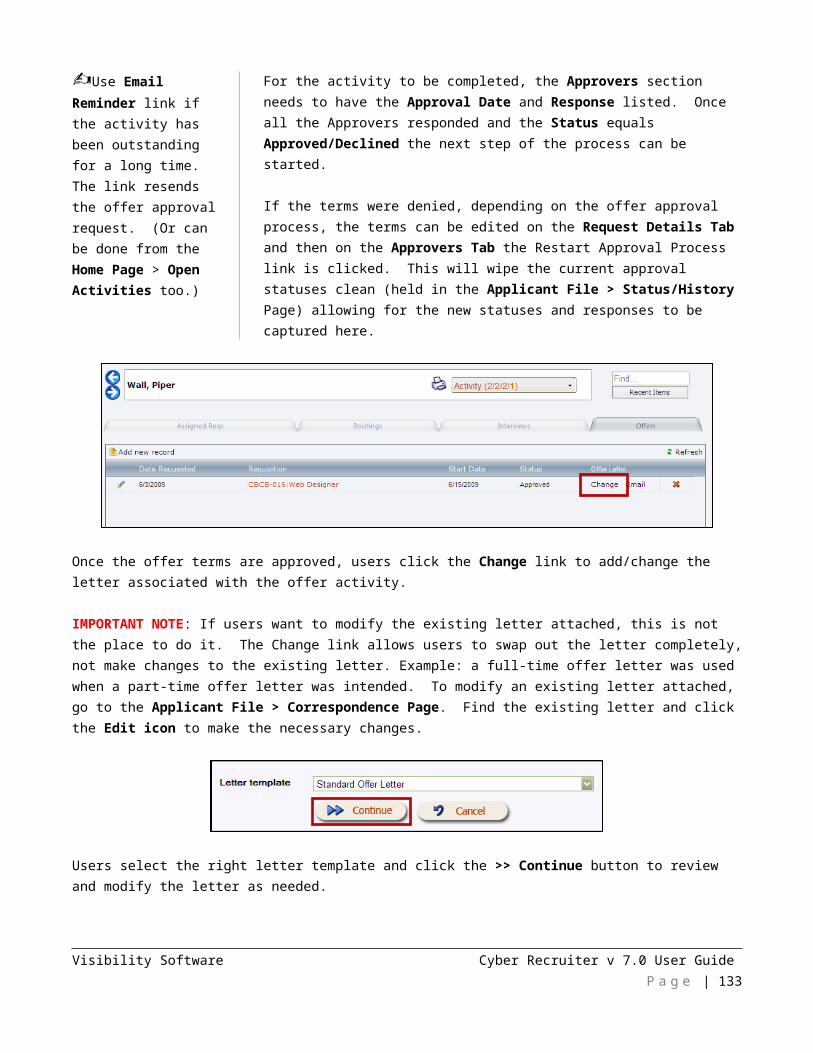
Types are important to consider as every attachment requires a category.
File Type is a validation for acceptable files to upload.
Add/Edit Applicant Attachment Page allows users to enter the attachment details. Select the Type of attachment by using the drop-down list. Enter the Date, Description, and Note. (Note: Description will be the actual hyperlink to the attachment.) Click the Browse button to find the Attachment and match it up to the File Type. When editing an Attachment, users can modify the details but not the actually attachment itself. When in the edit mode, you can add another attachment using the Browse button. Click the Save Changes button when done.
RESUME PAGE
The Resume Page houses the Applicant’s resume and cover letter.
Visibility Software Cyber Recruiter v 7.0 User Guide P a g e | 133
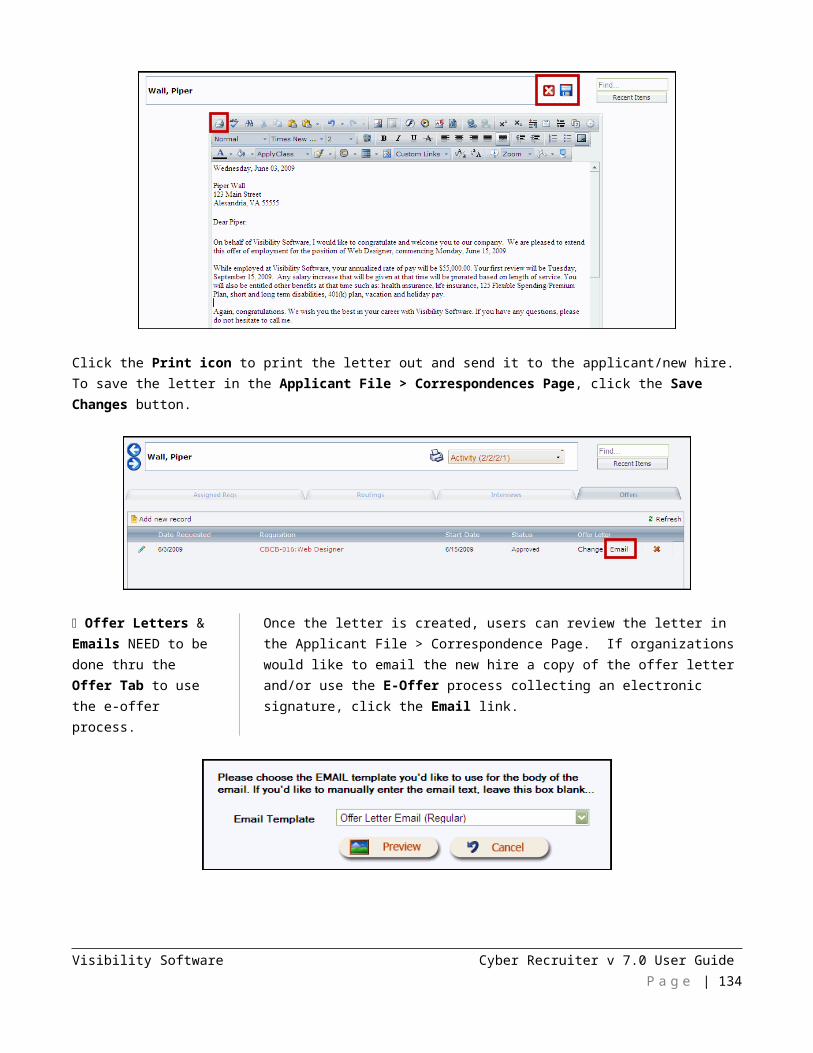
Acceptable file types to upload are: doc, .rtf, html and .pdf files
Resume Page allows users to review the applicant’s resume and cover letter. The resume in the text box displayed is the current text resume used in the Main Menu Bar > Applicants > Applicant Searching > Resume Text Search.
All files in the Resume History section are resumes previous to the one listed here and/or the formatted uploaded one. Even when the applicant is the one who updates his/her resume from the Self Service Center, the original will be stored. To see more information, click the View Text or View File hyperlinks as necessary.
Visibility Software Cyber Recruiter v 7.0 User Guide P a g e | 134
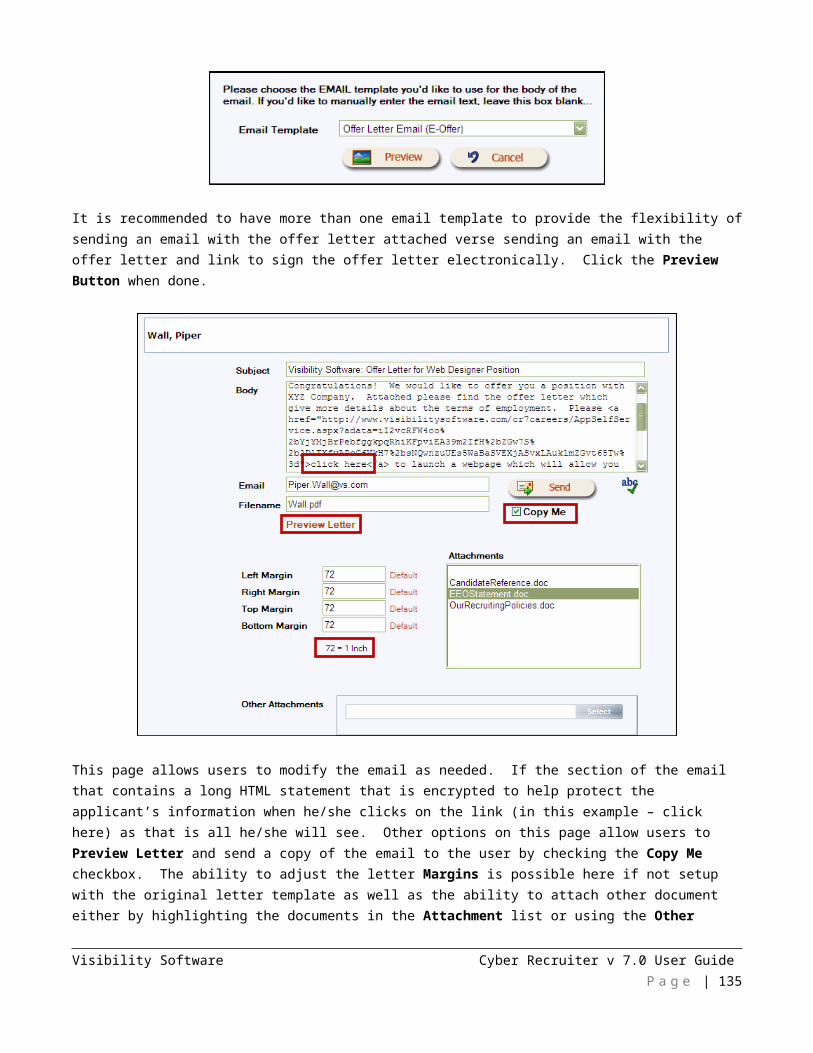
The Click here to view the formatted resume link opens the Applicant’s uploaded formatted resume and Cover Letter Tab opens the Applicant’s cover letter (if supplied).
To replace the current formatted resume, click the Click here to upload a new document link. This feature allows Users to Browse the computer and/or network drive to find and upload the document as needed. Select the Keep old resume document in history is a record of the original should be kept and type in a Description so that Users know what the file is.
For example, the organization is a staffing firm and needs to have several formatted resumes that emphasis a different skill set ready for new opportunities. The ability to keep all those resumes is here however, the text resume should be something that is inclusive for all so that the Resume Text Search will find all scenarios.
PRINT APPLICATION
Visibility Software Cyber Recruiter v 7.0 User Guide P a g e | 135
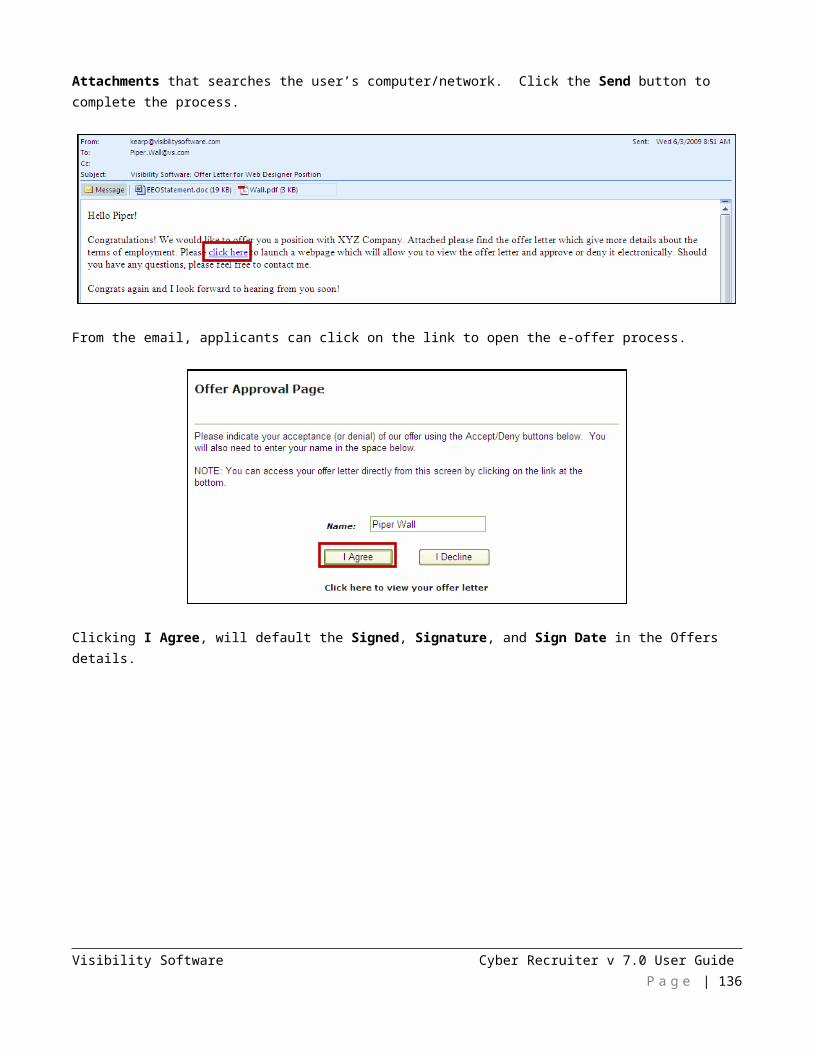
The Print Application Page pulls the applicant information into a printable report.
Print Application does not include EEO Info
Users click the Print Application link to open a new internet browser with the Applicant’s information. It displays all possible information collected about an Applicant.
Visibility Software Cyber Recruiter v 7.0 User Guide P a g e | 136
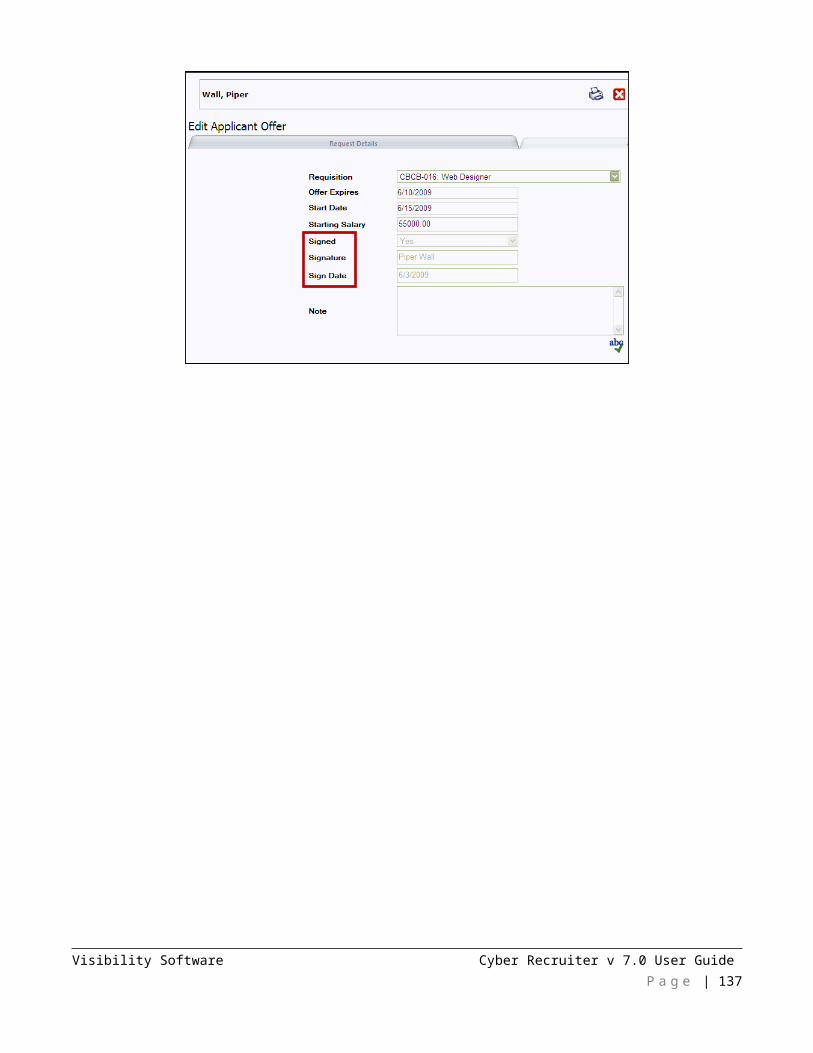
APPENDIX A – QUICK FINDMain Menu Bar/Home Page Main Menu Bar/Requisition/Find RequisitionMain Menu Bar/Requisition/Create RequisitionMain Menu Bar/Applicants/Find ApplicantMain Menu Bar/Applicants/Add ApplicantMain Menu Bar/Applicants/Search ApplicantsMain Menu Bar/Reports/Applicant ReportsMain Menu Bar/Reports/Applicant Reports/GeneralMain Menu Bar/Reports/Applicant Reports/Affirmative ActionMain Menu Bar/Reports/Requisition ReportsMain Menu Bar/Reports/Data DictionaryMain Menu Bar/Reports/Report WriterMain Menu Bar/Reports/Export Data to ExcelMain Menu Bar/Help/FeedbackMain Menu Bar/Help/User ManualsMain Menu Bar/Help/Tech Support Main Menu Bar/Help/On-Demand TrainingMain Menu Bar/Help/Current NewsMain Menu Bar/Help/AboutMain Menu Bar/Admin
WITHIN A REQUISITION:Requisition/Main PageRequisition/Job Description PageRequisition/Req Questions PageRequisition/Applicants PageRequisition/Approvals PageRequisition/History PageRequisition/Notes PageRequisition/Requirements PageRequisition/Costs PageRequisition/Attachments PageRequisition/Print Req Option
WITHIN AN APPLICANT FILE:Applicant/Activity PageApplicant/Experience PageApplicant/Application PageApplicant/Status/History PageApplicant/Correspondence PageApplicant/Notes PageApplicant/Demographics PageApplicant/Misc Info PageApplicant/Reference PageApplicant/Attachments PageApplicant/Resume PageApplicant/Add/Remove to Inbox Option
Visibility Software Cyber Recruiter v 7.0 User Guide P a g e | 137
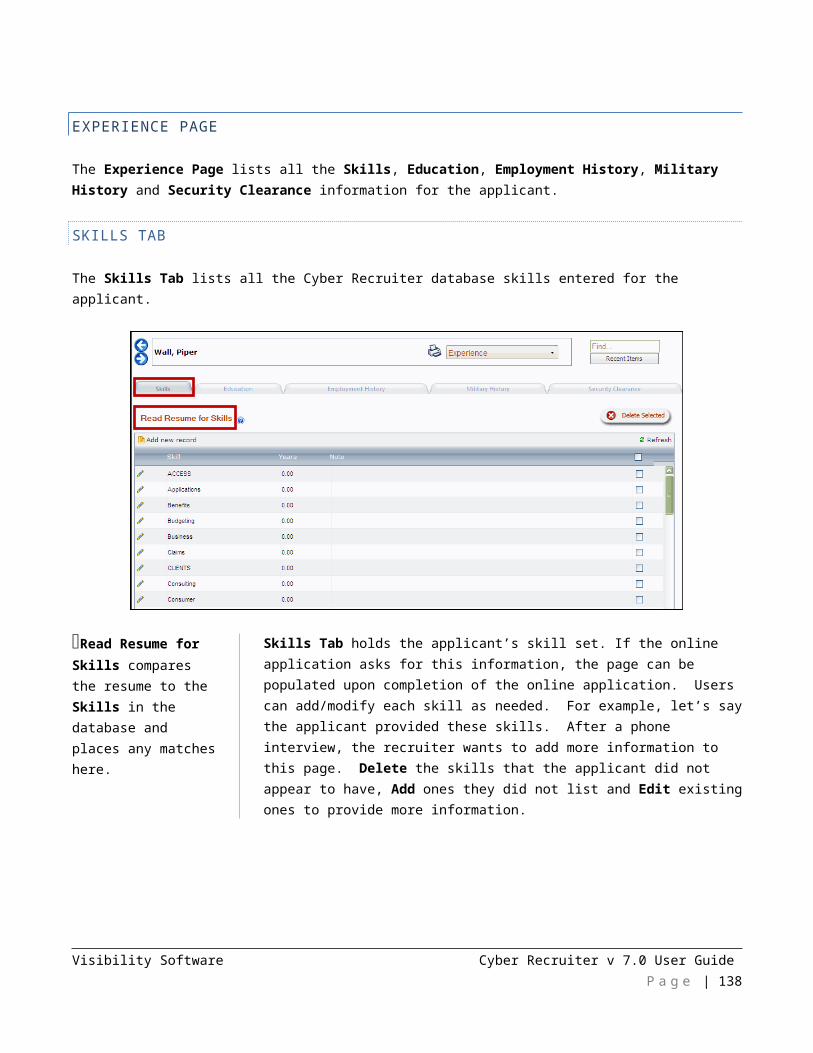
APPENDIX B – CREATING ADVANCED CRITERIA When creating advanced criteria while performing a search in Cyber Recruiter, use the following rules as a guide…
1. NEVER use double quotes (ex. ") in the criteria, always single quotes (ex. ') when necessary. In T-SQL, text values and date values go in single quotes.
2. Cyber Recruiter uses standard Microsoft T-SQL language. If the User is already familiar with this language, the User can probably proceed without help.
3. The syntax of any advanced criteria must be of the following format...<FieldName> <Operator> <Value>
To refine a search to Applicants who live in Virginia, type...
homestate='VA'
To refine a search to Applicants who applied in March, 2003, type...
applicationdate>='3/1/2003' and applicationdate<='3/31/2003'
To refine a search to Applicants with a desired salary less than $30,000, type...
desiredsalary<30000
4. If using the OR keyword in the advanced criteria, enclosed the entire criteria in parentheses. For example, to refine a search to Applicants who live in Virginia, Maryland, or Washington, DC, type...
(homestate='VA' or homestate='MD' or homestate='DC')
5. Alternately, the User can use the IN keyword (instead of an equal sign) without enclosing the entire criteria in parentheses...
homestate in ('VA','MD','DC')
Visibility Software Cyber Recruiter v 7.0 User Guide P a g e | 138


![regular expressions · file-201[23]0101\.txt file-20120101.txt file-20130101.txt file-20110101.txt Character Sets](https://img.pdfslide.us/doc/110x75/5fd6b8f258e3c00b8d231dde/regular-file-201230101txt-file-20120101txt-file-20130101txt-file-20110101txt.jpg)