Embed Size (px)
Citation preview
- 1 -
Full Managed Server Service “FMS01” With web-based tracking software LiveGTS built-in
User Manual for Business Version
(Thank you for using our service) All the catalogs have hyperlink that can skip to destination directly
- 2 -
Catalog 1. Overview--------------------------------------------------------------------------------------------------------------3
2. Customize to be your own platform(logo,company name and etc)----------------------------------3
3. Connect your device to your platform by GPRS-----------------------------------------------------------8
4. System Functions
4.1 Map-----------------------------------------------------------------------------------------------------------------8
4.2 Real-time
4.2.1 Geo-fence--------------------------------------------------------------------------------------------------10
4.2.2 Speed alarm-----------------------------------------------------------------------------------------------11
4.2.3 Update position-------------------------------------------------------------------------------------------12
4.2.4 Report Interval---------------------------------------------------------------------------------------------12
4.2.5 Stop engine------------------------------------------------------------------------------------------------13
4.2.6 Cleared Stored Data-------------------------------------------------------------------------------------13
4.2.7 Send SMS--------------------------------------------------------------------------------------------------13
4.2.8 Take photo-------------------------------------------------------------------------------------------------13
4.2.9 Manual Alarm---------------------------------------------------------------------------------------------14
4.3 History------------------------------------------------------------------------------------------------------------14
4.4 Report
4.4.1 GPS Report------------------------------------------------------------------------------------------------15
4.4.2 Distance Report-------------------------------------------------------------------------------------------15
4.4.3 Trip Report--------------------------------------------------------------------------------------------------16
4.4.4 Stop Report-------------------------------------------------------------------------------------------------16
4.4.5 Area Report-------------------------------------------------------------------------------------------------16
4.4.6 Photo Report-----------------------------------------------------------------------------------------------16
4.4.7 AD Report---------------------------------------------------------------------------------------------------17
4.4.8 AD chart-----------------------------------------------------------------------------------------------------17
4.4.9 I/O Report---------------------------------------------------------------------------------------------------17
4.4.10 Speed Report---------------------------------------------------------------------------------------------17
4.4.11 Invalid Tracker Report----------------------------------------------------------------------------------18
4.4.12 Handle Alarm Report-----------------------------------------------------------------------------------18
4.5 Manage
4.5.1 Tracker Config --------------------------------------------------------------------------------------------19
4.5.2 Driver Config-----------------------------------------------------------------------------------------------19
4.5.3 Modify Password------------------------------------------------------------------------------------------19
4.5.4 My Account-------------------------------------------------------------------------------------------------20
4.5.5 Email Setting-----------------------------------------------------------------------------------------------20
5. Admin Functions
5.1 User Management----------------------------------------------------------------------------------------------21
5.2 I/Out Port-----------------------------------------------------------------------------------------------------------22
5.3 User Roles---------------------------------------------------------------------------------------------------------22
5.4 System Config----------------------------------------------------------------------------------------------------23
5.5 Field Customize--------------------------------------------------------------------------------------------------23
5.6 Model Management---------------------------------------------------------------------------------------------24
5.7 Data Management-----------------------------------------------------------------------------------------------25
5.8 System Status------------------------------------------------------------------------------------------------------25
6. Extra functions( POI, Rich Info)------------------------------------------------------------------------------------25
- 3 -
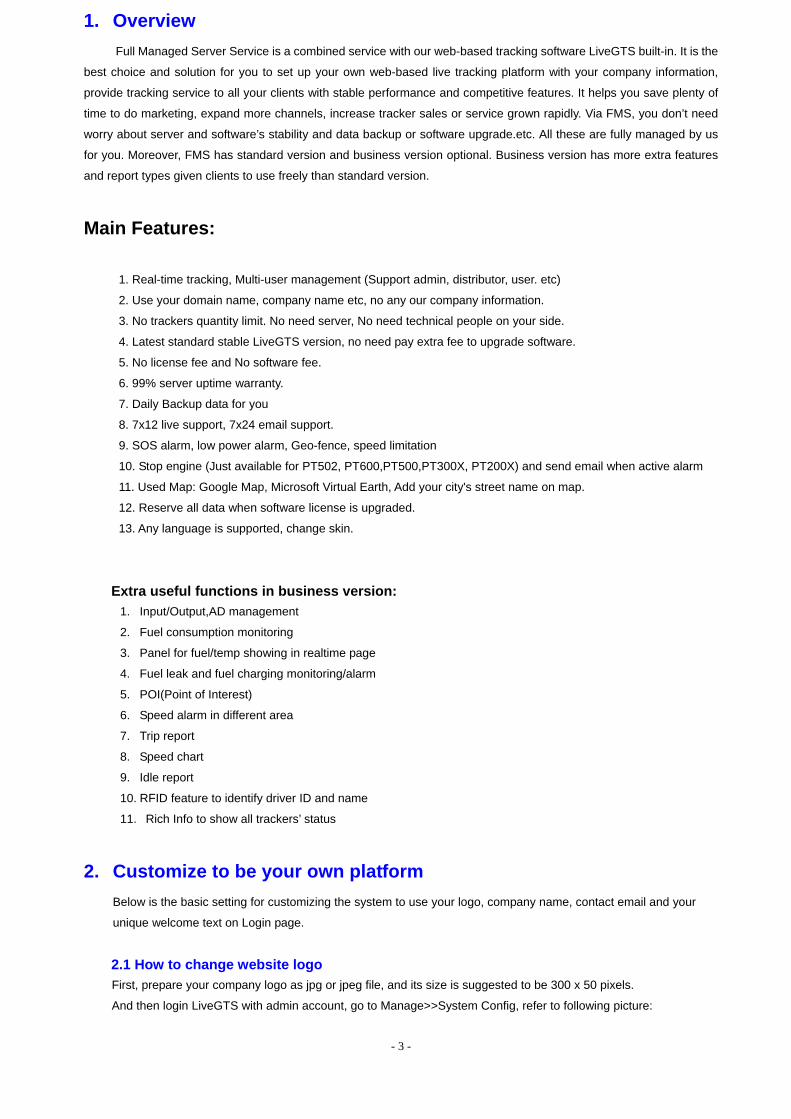
1. Overview Full Managed Server Service is a combined service with our web-based tracking software LiveGTS built-in. It is the
best choice and solution for you to set up your own web-based live tracking platform with your company information,
provide tracking service to all your clients with stable performance and competitive features. It helps you save plenty of
time to do marketing, expand more channels, increase tracker sales or service grown rapidly. Via FMS, you don’t need
worry about server and software’s stability and data backup or software upgrade.etc. All these are fully managed by us
for you. Moreover, FMS has standard version and business version optional. Business version has more extra features
and report types given clients to use freely than standard version.
Main Features: 1. Real-time tracking, Multi-user management (Support admin, distributor, user. etc)
2. Use your domain name, company name etc, no any our company information.
3. No trackers quantity limit. No need server, No need technical people on your side.
4. Latest standard stable LiveGTS version, no need pay extra fee to upgrade software.
5. No license fee and No software fee.
6. 99% server uptime warranty.
7. Daily Backup data for you
8. 7x12 live support, 7x24 email support.
9. SOS alarm, low power alarm, Geo-fence, speed limitation
10. Stop engine (Just available for PT502, PT600,PT500,PT300X, PT200X) and send email when active alarm
11. Used Map: Google Map, Microsoft Virtual Earth, Add your city's street name on map.
12. Reserve all data when software license is upgraded.
13. Any language is supported, change skin.
Extra useful functions in business version:
1. Input/Output,AD management
2. Fuel consumption monitoring
3. Panel for fuel/temp showing in realtime page
4. Fuel leak and fuel charging monitoring/alarm
5. POI(Point of Interest)
6. Speed alarm in different area
7. Trip report
8. Speed chart
9. Idle report
10. RFID feature to identify driver ID and name
11. Rich Info to show all trackers’ status
2. Customize to be your own platform Below is the basic setting for customizing the system to use your logo, company name, contact email and your
unique welcome text on Login page.
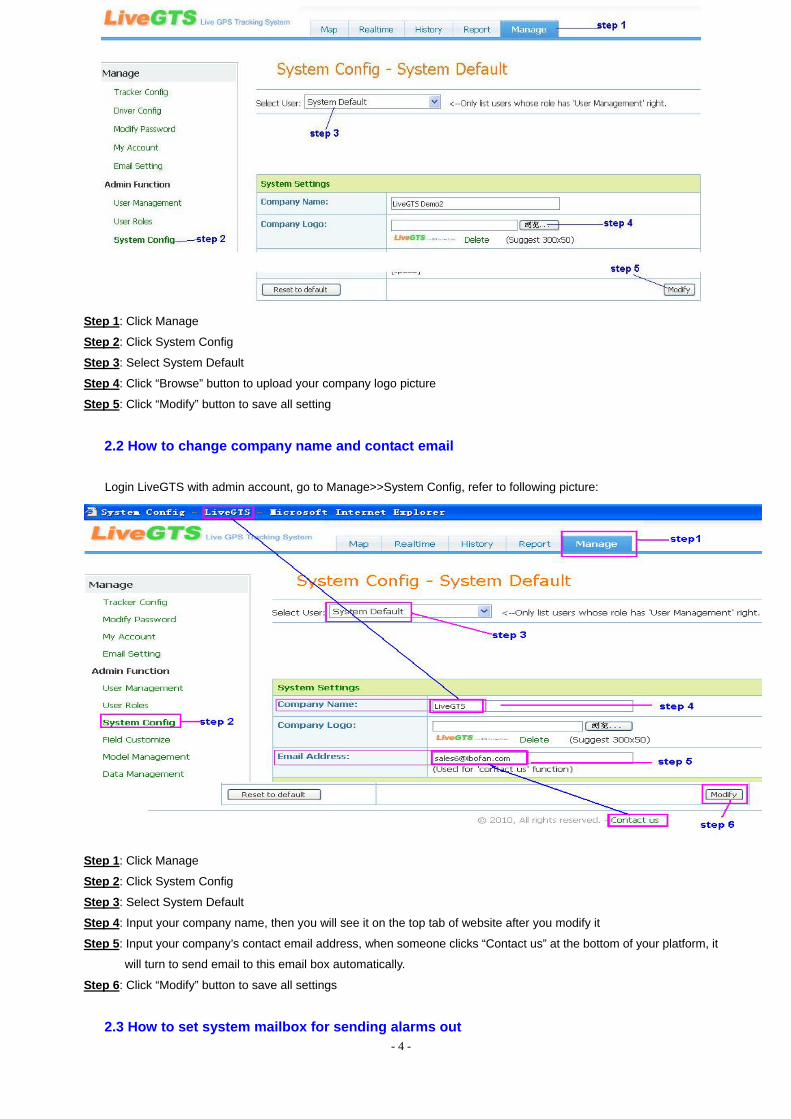
2.1 How to change website logo First, prepare your company logo as jpg or jpeg file, and its size is suggested to be 300 x 50 pixels.
And then login LiveGTS with admin account, go to Manage>>System Config, refer to following picture:
- 4 -
Step 1: Click Manage
Step 2: Click System Config
Step 3: Select System Default
Step 4: Click “Browse” button to upload your company logo picture
Step 5: Click “Modify” button to save all setting
2.2 How to change company name and contact email
Login LiveGTS with admin account, go to Manage>>System Config, refer to following picture:
Step 1: Click Manage
Step 2: Click System Config
Step 3: Select System Default
Step 4: Input your company name, then you will see it on the top tab of website after you modify it
Step 5: Input your company’s contact email address, when someone clicks “Contact us” at the bottom of your platform, it
will turn to send email to this email box automatically.
Step 6: Click “Modify” button to save all settings
2.3 How to set system mailbox for sending alarms out
- 5 -
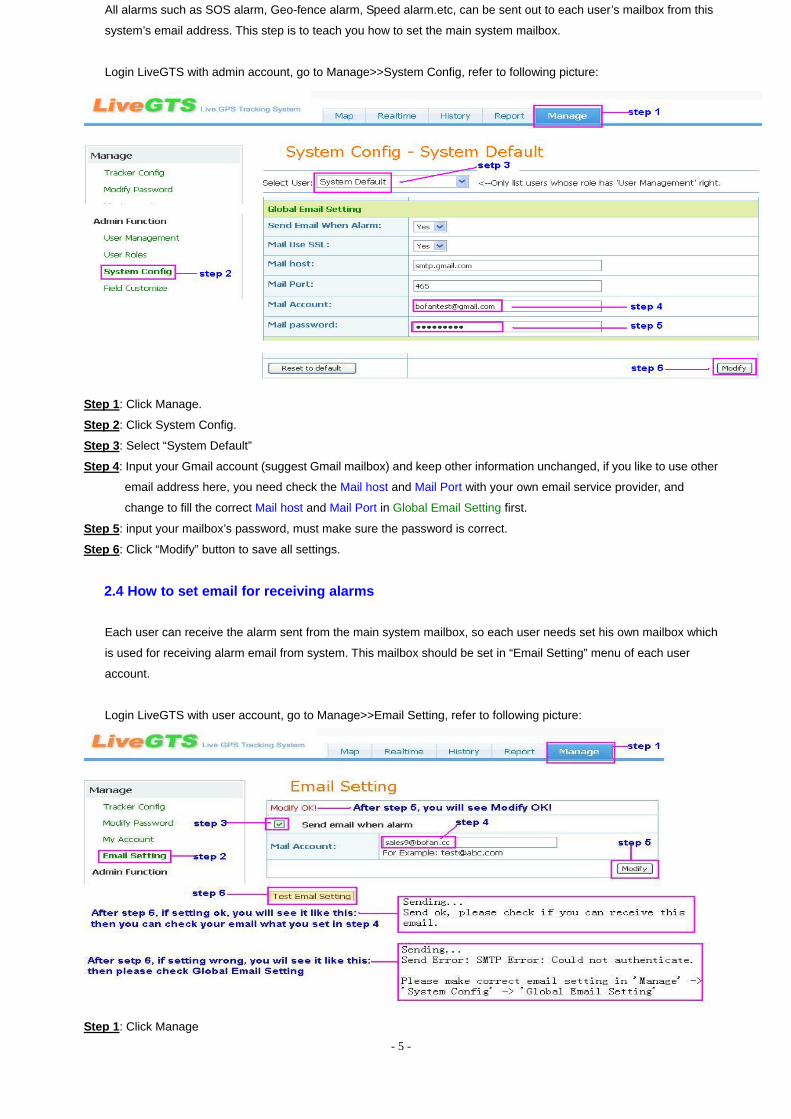
All alarms such as SOS alarm, Geo-fence alarm, Speed alarm.etc, can be sent out to each user’s mailbox from this
system’s email address. This step is to teach you how to set the main system mailbox.
Login LiveGTS with admin account, go to Manage>>System Config, refer to following picture:
Step 1: Click Manage.
Step 2: Click System Config.
Step 3: Select “System Default”
Step 4: Input your Gmail account (suggest Gmail mailbox) and keep other information unchanged, if you like to use other
email address here, you need check the Mail host and Mail Port with your own email service provider, and
change to fill the correct Mail host and Mail Port in Global Email Setting first.
Step 5: input your mailbox’s password, must make sure the password is correct.
Step 6: Click “Modify” button to save all settings.
2.4 How to set email for receiving alarms Each user can receive the alarm sent from the main system mailbox, so each user needs set his own mailbox which
is used for receiving alarm email from system. This mailbox should be set in “Email Setting” menu of each user
account.
Login LiveGTS with user account, go to Manage>>Email Setting, refer to following picture:
Step 1: Click Manage
- 6 -
Step 2: Click Email Setting
Step 3: Tick in the box of “Send email when alarm”
Step 4: Input the email address which is used for receiving alarm emails
Step 5: Click “Modify” button to save all settings
Step 6: Click “Test Email Setting”.
If you see “Send ok”, it means the setting is ok.
If you see “Send Error”, it means the “Global Email Setting” in System Config of Admin account is wrong, you
need check the Mail host and Mail Port, and mailbox password again.
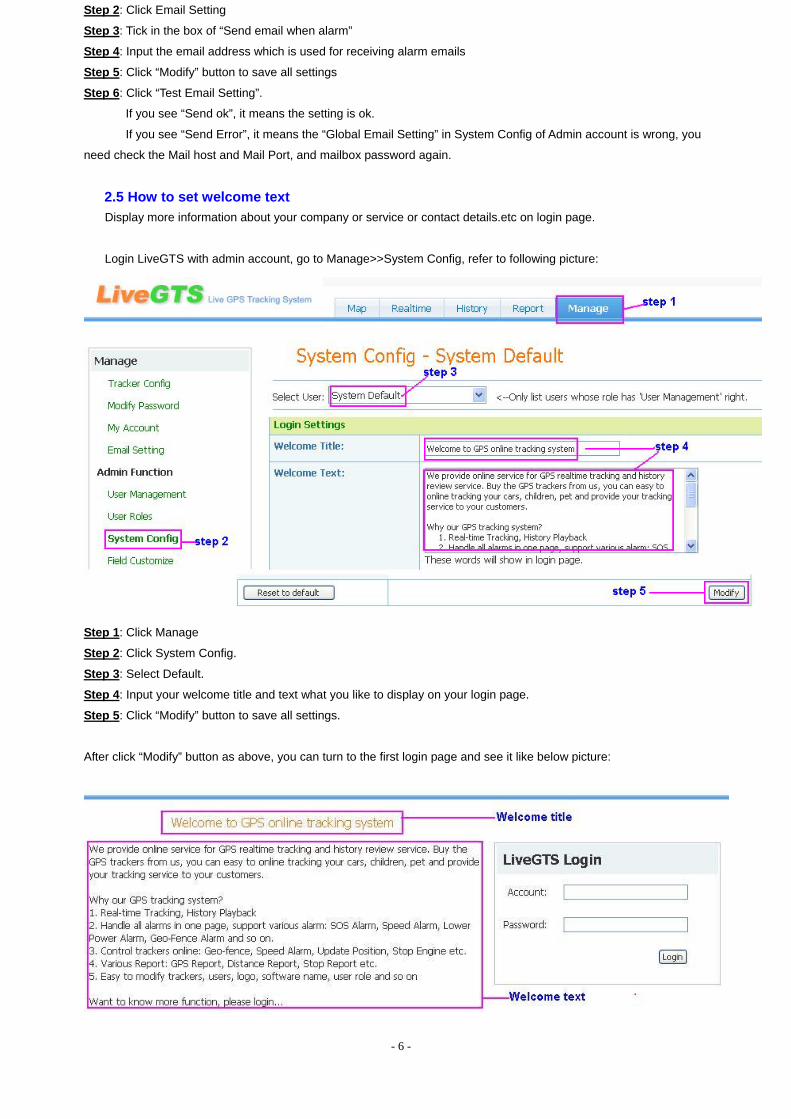
2.5 How to set welcome text Display more information about your company or service or contact details.etc on login page.
Login LiveGTS with admin account, go to Manage>>System Config, refer to following picture:
Step 1: Click Manage
Step 2: Click System Config.
Step 3: Select Default.
Step 4: Input your welcome title and text what you like to display on your login page.
Step 5: Click “Modify” button to save all settings.
After click “Modify” button as above, you can turn to the first login page and see it like below picture:
- 7 -
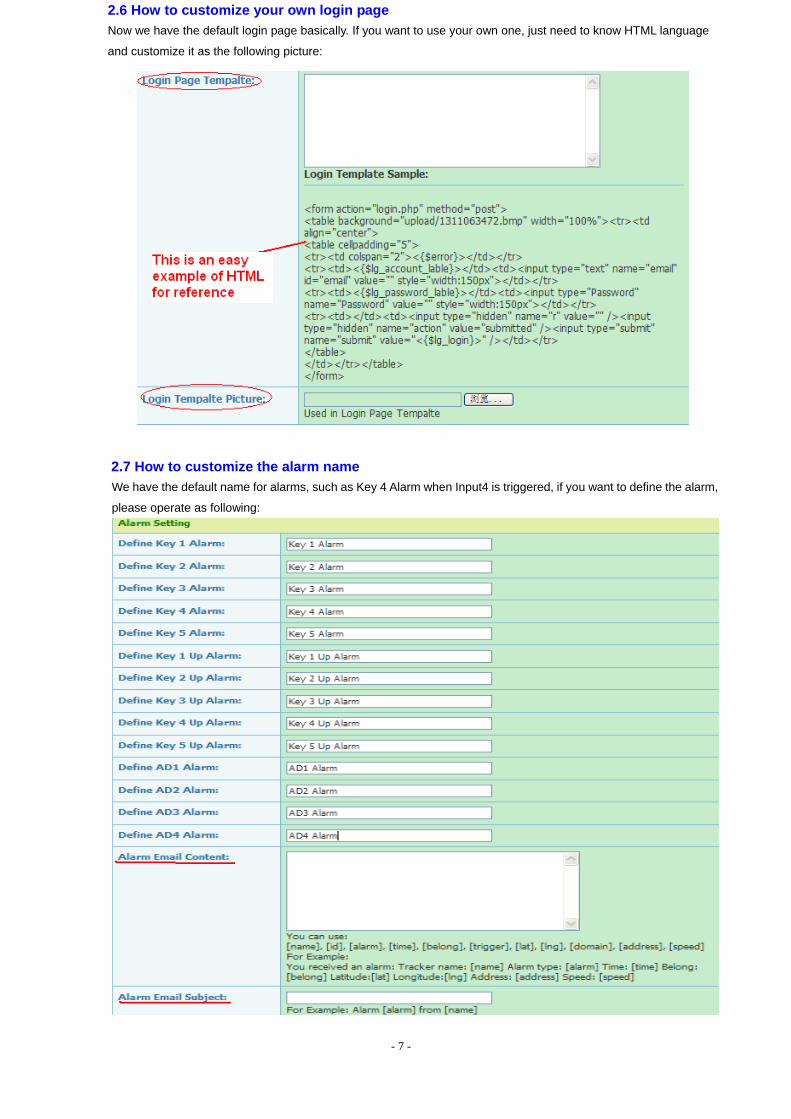
2.6 How to customize your own login page Now we have the default login page basically. If you want to use your own one, just need to know HTML language
and customize it as the following picture:
2.7 How to customize the alarm name We have the default name for alarms, such as Key 4 Alarm when Input4 is triggered, if you want to define the alarm,
please operate as following:
- 8 -
Note: It is the default alarm names in above example, if you want to define it as special name, please input your
desired name to replace and do not forget Modify finally.
For example, if you already connect Input4 wire with ACC(Ignition), and want to get alarm of Engine Start Alarm
instead of “Key 4 alarm”, then input Engine Start Alarm in the blank of “Define Key 4 Alarm”.
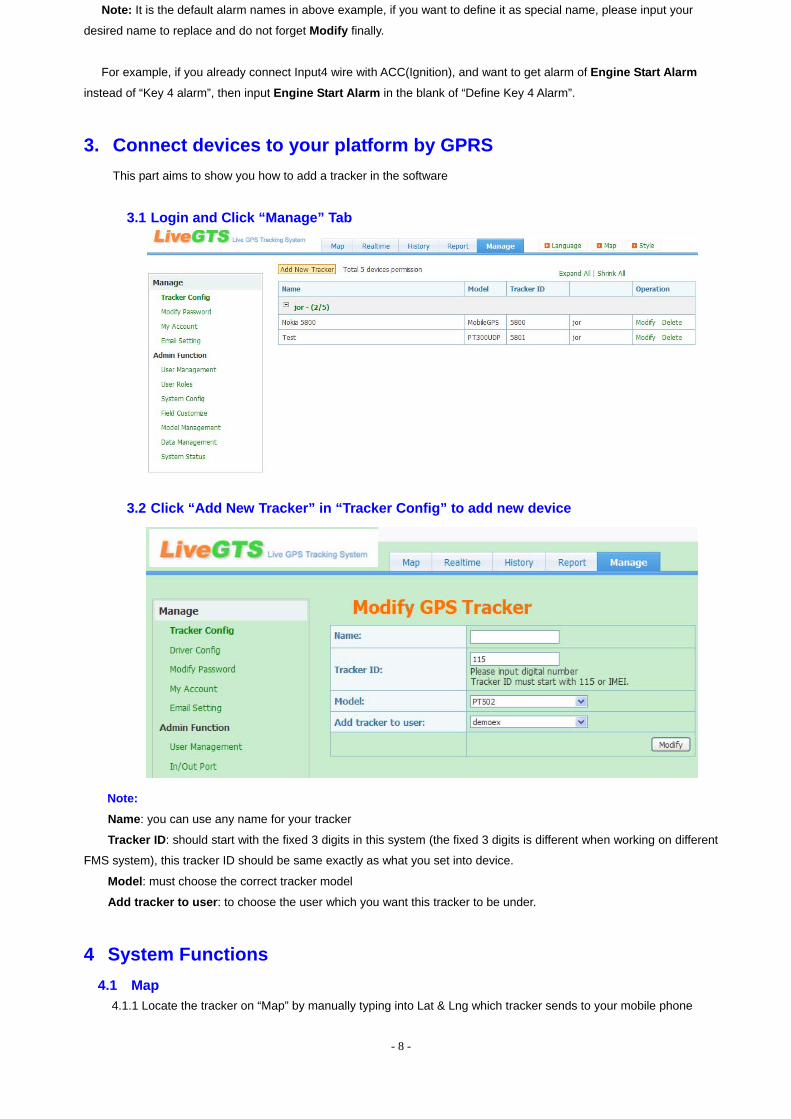
3. Connect devices to your platform by GPRS This part aims to show you how to add a tracker in the software
3.1 Login and Click “Manage” Tab
3.2 Click “Add New Tracker” in “Tracker Config” to add new device
Note:
Name: you can use any name for your tracker
Tracker ID: should start with the fixed 3 digits in this system (the fixed 3 digits is different when working on different
FMS system), this tracker ID should be same exactly as what you set into device.
Model: must choose the correct tracker model
Add tracker to user: to choose the user which you want this tracker to be under.
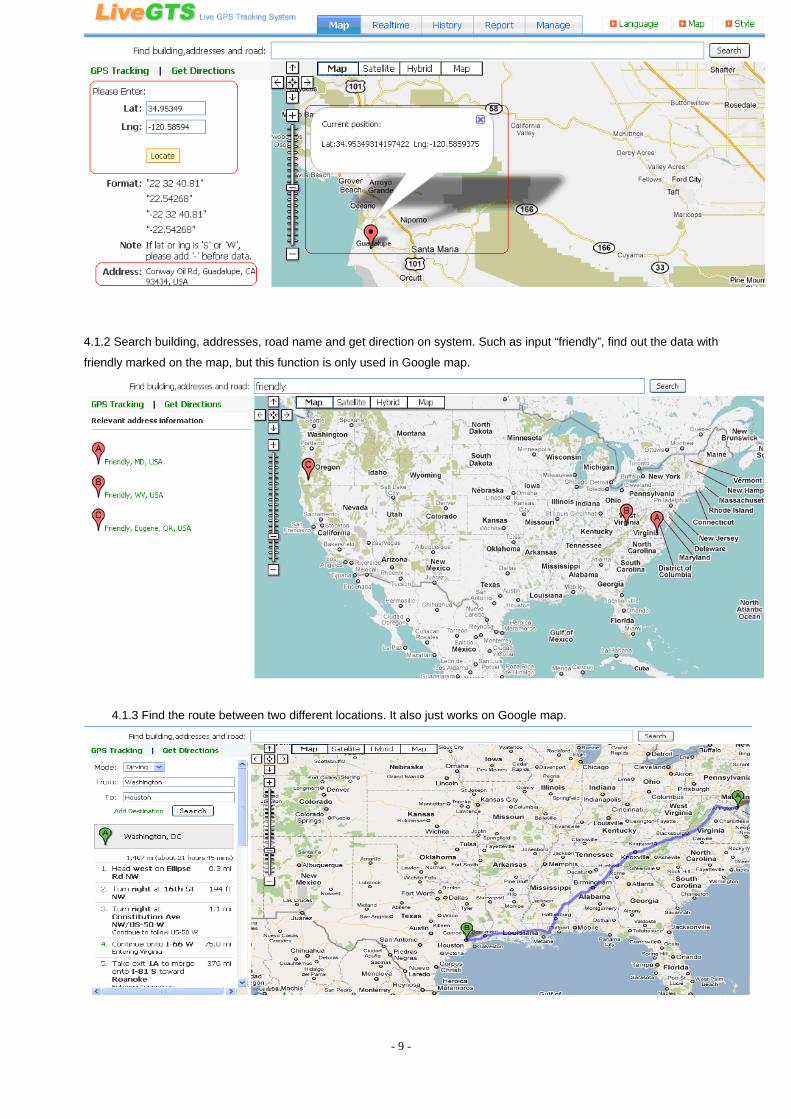
4 System Functions 4.1 Map
4.1.1 Locate the tracker on “Map” by manually typing into Lat & Lng which tracker sends to your mobile phone
- 9 -
4.1.2 Search building, addresses, road name and get direction on system. Such as input “friendly”, find out the data with
friendly marked on the map, but this function is only used in Google map.
4.1.3 Find the route between two different locations. It also just works on Google map.
- 10 -
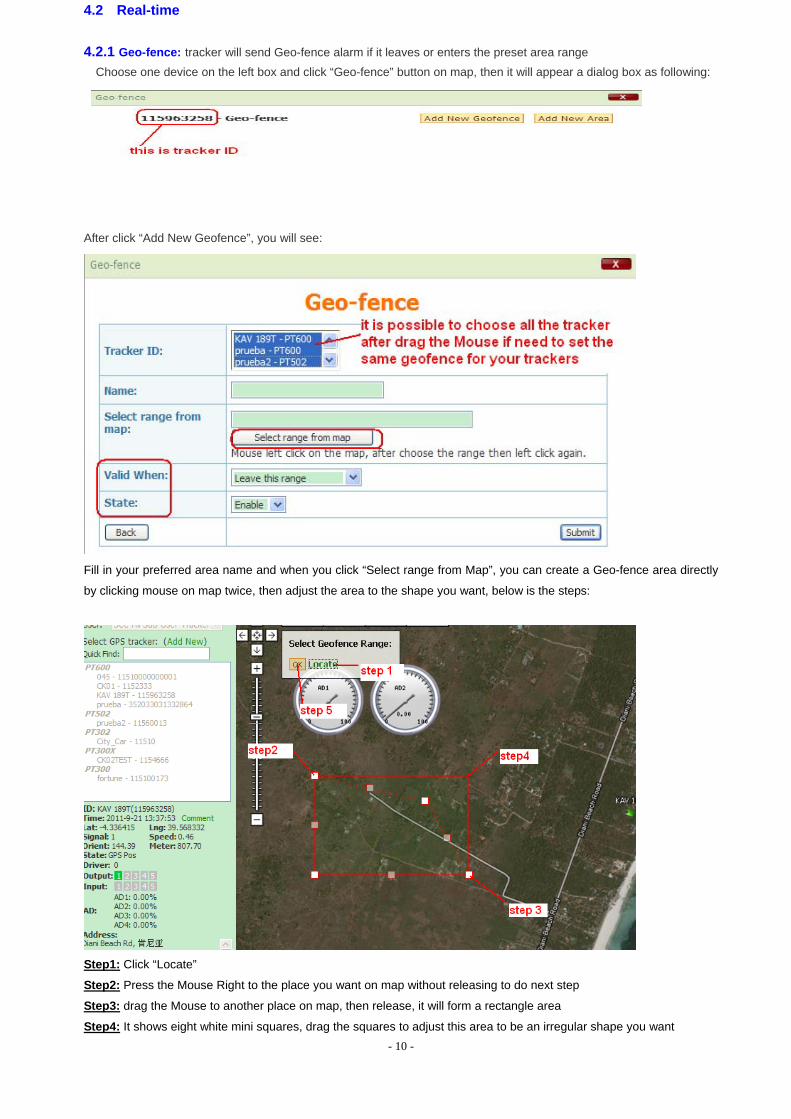
4.2 Real-time 4.2.1 Geo-fence: tracker will send Geo-fence alarm if it leaves or enters the preset area range Choose one device on the left box and click “Geo-fence” button on map, then it will appear a dialog box as following:
After click “Add New Geofence”, you will see:
Fill in your preferred area name and when you click “Select range from Map”, you can create a Geo-fence area directly
by clicking mouse on map twice, then adjust the area to the shape you want, below is the steps:
Step1: Click “Locate”
Step2: Press the Mouse Right to the place you want on map without releasing to do next step
Step3: drag the Mouse to another place on map, then release, it will form a rectangle area
Step4: It shows eight white mini squares, drag the squares to adjust this area to be an irregular shape you want

- 11 -
Step5: Click OK after the Geo-fence area is fixed
After creating Geo-fence area, it will have alarm when tracker leaves or enters the area as you select.
4.2.2 Speed Alarm Choose a device on the left side and click “Speed Alarm” on the map, and it will appear a dialog box:
Extended Function: Different Speed Alarm in different area.
Step1: Set up different area under “Geo-fence” button.
Click ”Geo-fence” button ”Add New Area” button, you will get below dialog box:
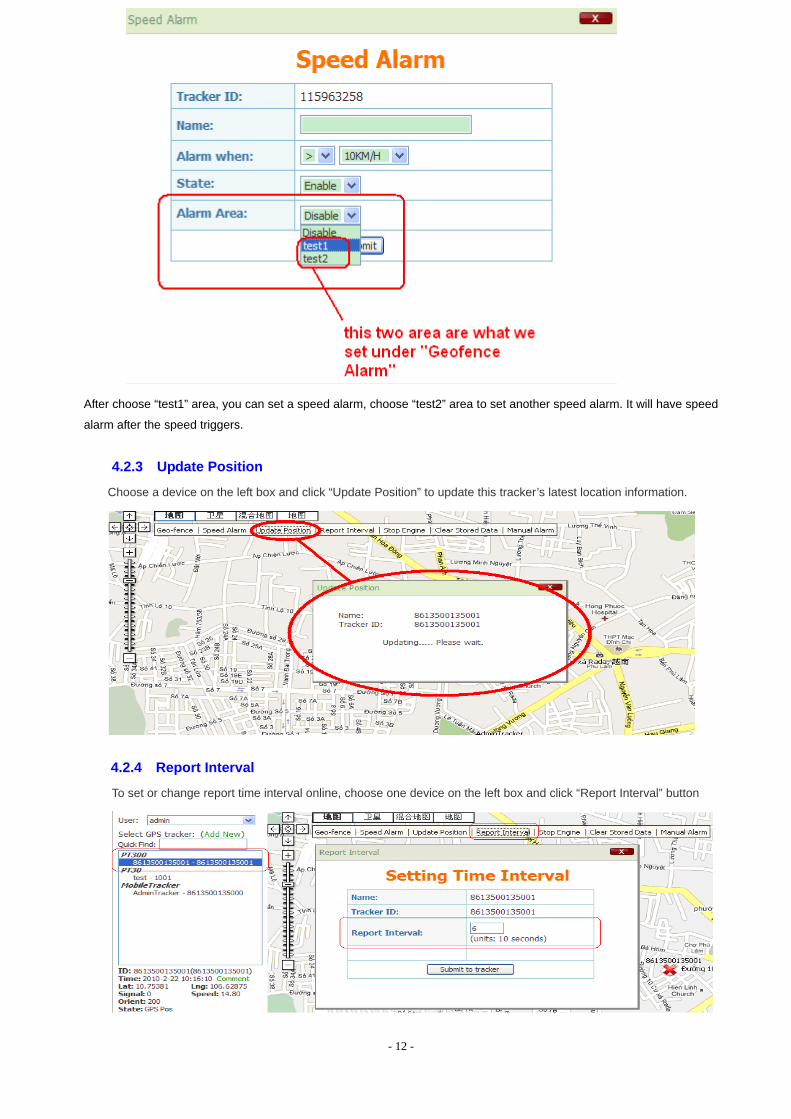
In below example, we added two different areas, test1 and test2 for tracker ID 115963258.
Step2: Click “Speed Alarm” button after choosing the device you need to set
- 12 -
After choose “test1” area, you can set a speed alarm, choose “test2” area to set another speed alarm. It will have speed
alarm after the speed triggers.
4.2.3 Update Position
Choose a device on the left box and click “Update Position” to update this tracker’s latest location information.
4.2.4 Report Interval
To set or change report time interval online, choose one device on the left box and click “Report Interval” button
- 13 -
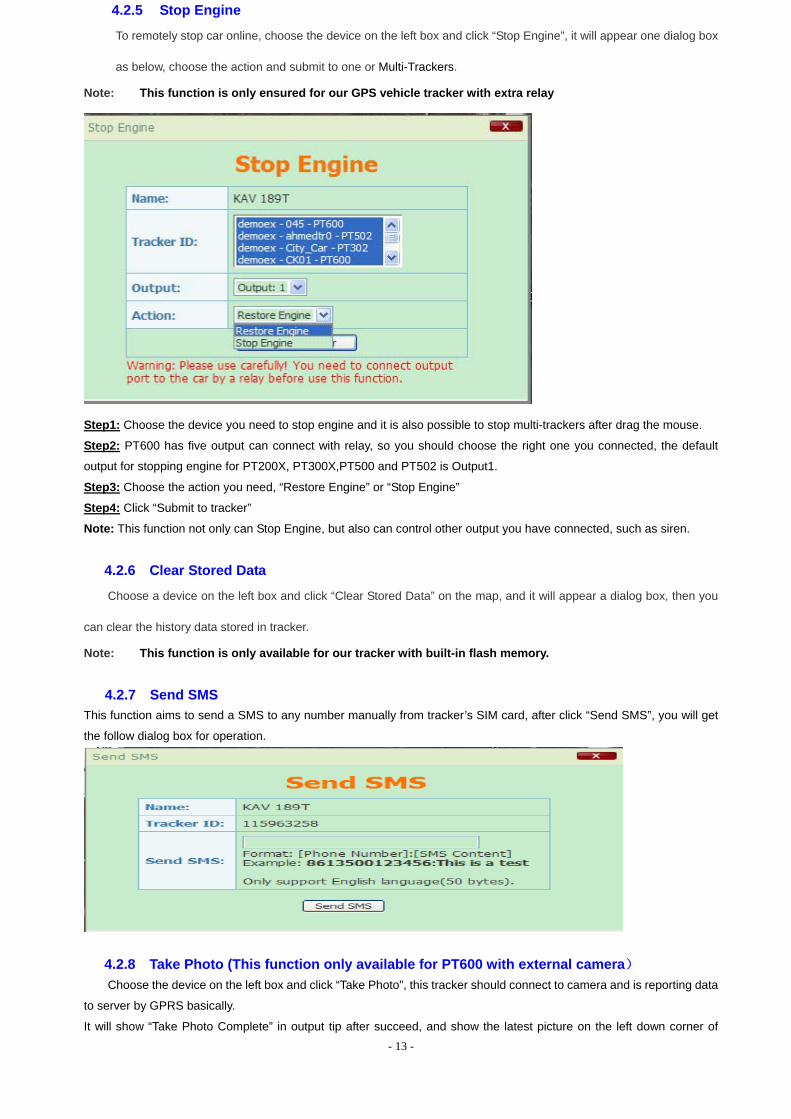
4.2.5 Stop Engine
To remotely stop car online, choose the device on the left box and click “Stop Engine”, it will appear one dialog box
as below, choose the action and submit to one or Multi-Trackers.
Note: This function is only ensured for our GPS vehicle tracker with extra relay
Step1: Choose the device you need to stop engine and it is also possible to stop multi-trackers after drag the mouse.
Step2: PT600 has five output can connect with relay, so you should choose the right one you connected, the default
output for stopping engine for PT200X, PT300X,PT500 and PT502 is Output1.
Step3: Choose the action you need, “Restore Engine” or “Stop Engine”
Step4: Click “Submit to tracker”
Note: This function not only can Stop Engine, but also can control other output you have connected, such as siren.
4.2.6 Clear Stored Data
Choose a device on the left box and click “Clear Stored Data” on the map, and it will appear a dialog box, then you
can clear the history data stored in tracker.
Note: This function is only available for our tracker with built-in flash memory.
4.2.7 Send SMS This function aims to send a SMS to any number manually from tracker’s SIM card, after click “Send SMS”, you will get
the follow dialog box for operation.
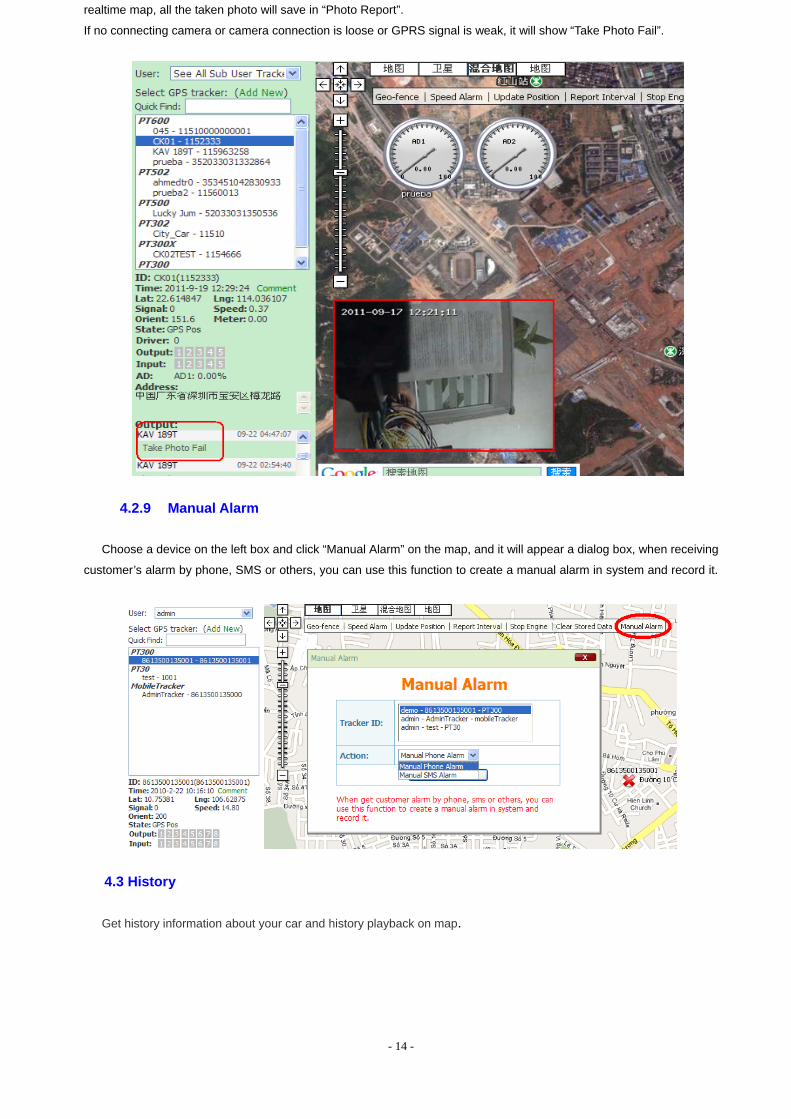
4.2.8 Take Photo (This function only available for PT600 with external camera) Choose the device on the left box and click “Take Photo”, this tracker should connect to camera and is reporting data
to server by GPRS basically.
It will show “Take Photo Complete” in output tip after succeed, and show the latest picture on the left down corner of
- 14 -
realtime map, all the taken photo will save in “Photo Report”.
If no connecting camera or camera connection is loose or GPRS signal is weak, it will show “Take Photo Fail”.
4.2.9 Manual Alarm
Choose a device on the left box and click “Manual Alarm” on the map, and it will appear a dialog box, when receiving
customer’s alarm by phone, SMS or others, you can use this function to create a manual alarm in system and record it.
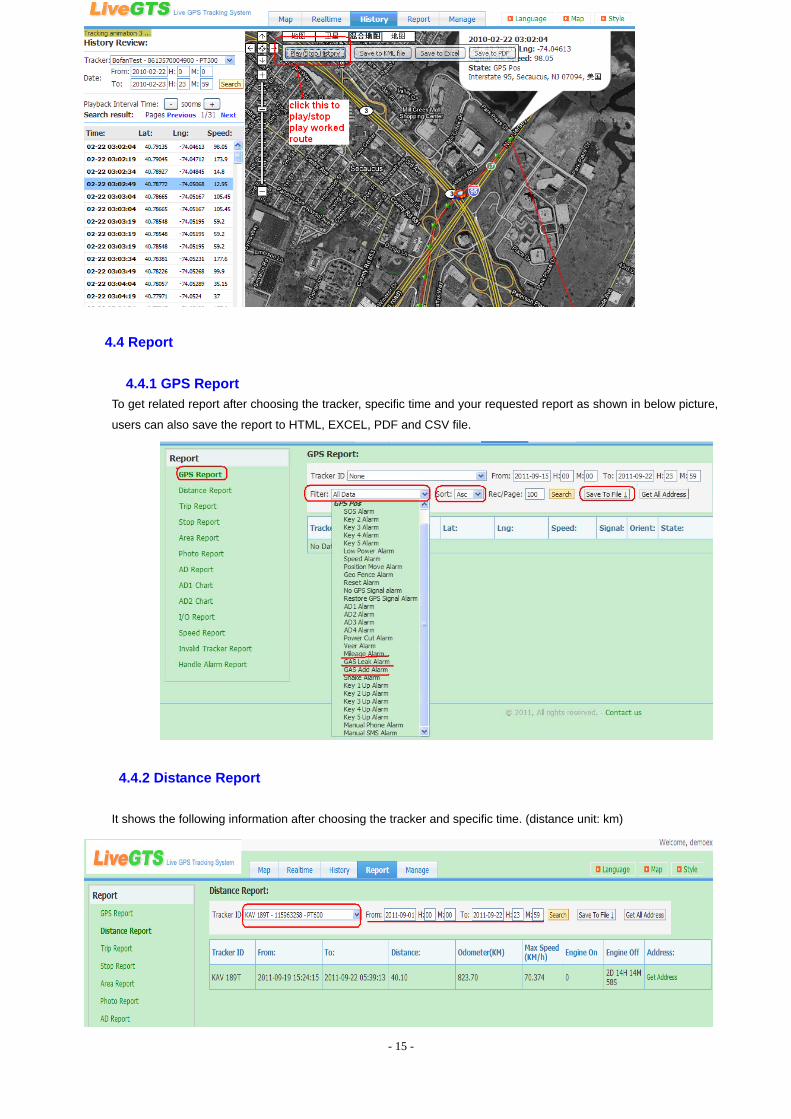
4.3 History
Get history information about your car and history playback on map.
- 15 -
4.4 Report
4.4.1 GPS Report To get related report after choosing the tracker, specific time and your requested report as shown in below picture,
users can also save the report to HTML, EXCEL, PDF and CSV file.
4.4.2 Distance Report It shows the following information after choosing the tracker and specific time. (distance unit: km)
- 16 -
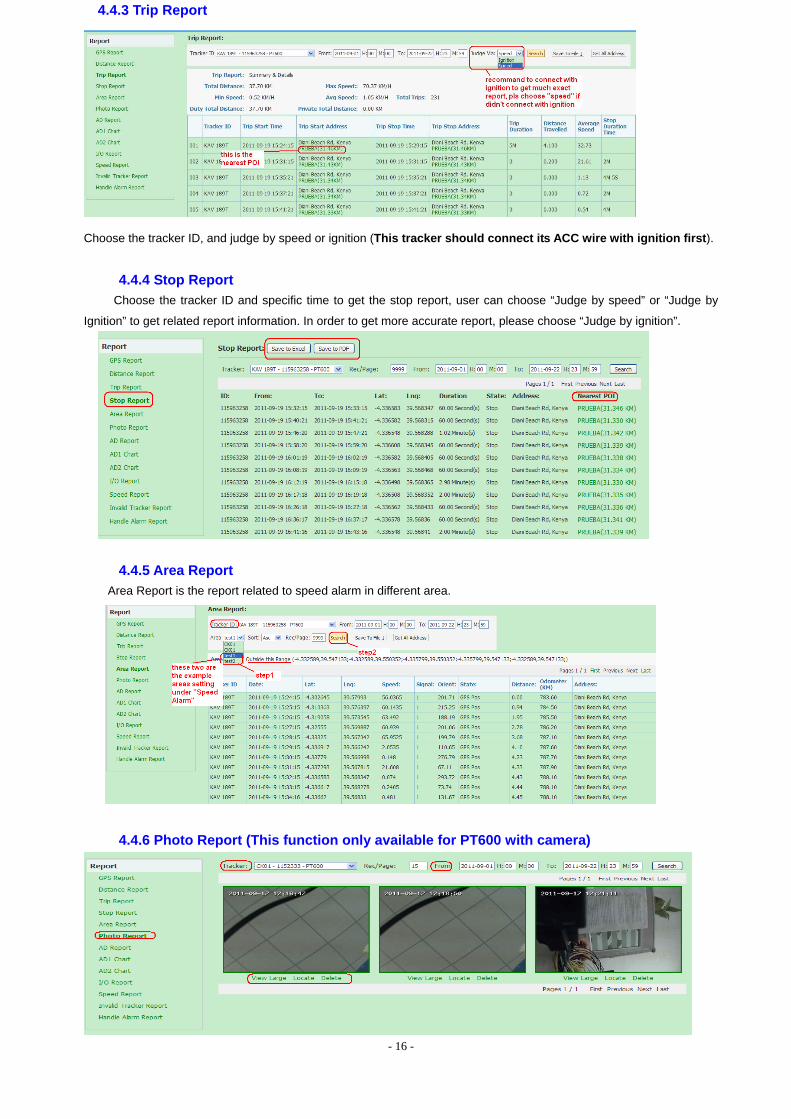
4.4.3 Trip Report
Choose the tracker ID, and judge by speed or ignition (This tracker should connect its ACC wire with ignition first).
4.4.4 Stop Report
Choose the tracker ID and specific time to get the stop report, user can choose “Judge by speed” or “Judge by
Ignition” to get related report information. In order to get more accurate report, please choose “Judge by ignition”.
4.4.5 Area Report Area Report is the report related to speed alarm in different area.
4.4.6 Photo Report (This function only available for PT600 with camera)
- 17 -
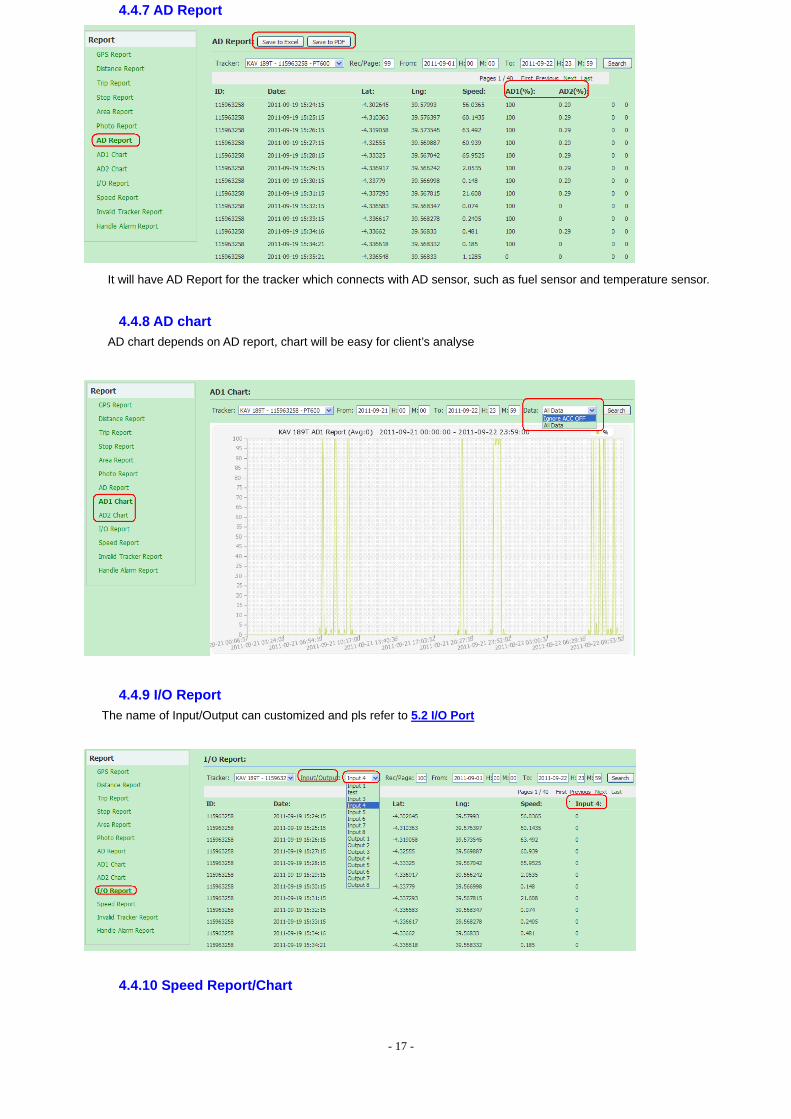
4.4.7 AD Report
It will have AD Report for the tracker which connects with AD sensor, such as fuel sensor and temperature sensor.
4.4.8 AD chart
AD chart depends on AD report, chart will be easy for client’s analyse
4.4.9 I/O Report The name of Input/Output can customized and pls refer to 5.2 I/O Port
4.4.10 Speed Report/Chart
- 18 -
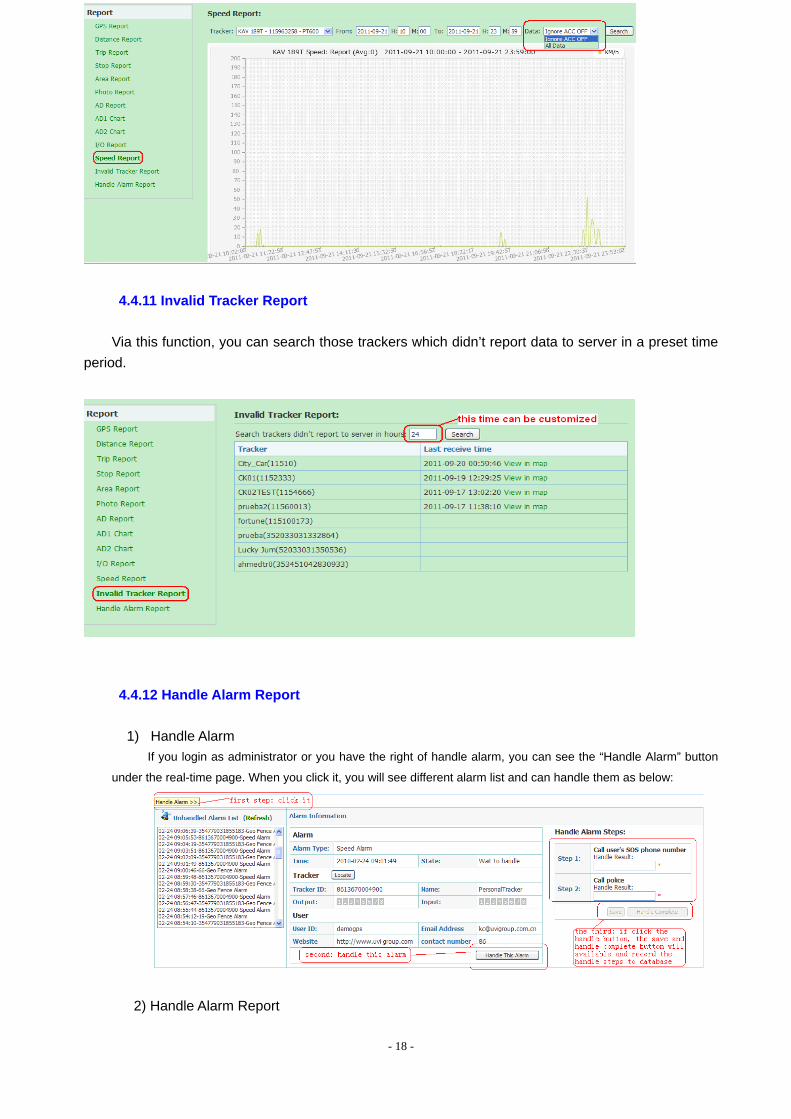
4.4.11 Invalid Tracker Report
Via this function, you can search those trackers which didn’t report data to server in a preset time period.
4.4.12 Handle Alarm Report
1) Handle Alarm If you login as administrator or you have the right of handle alarm, you can see the “Handle Alarm” button
under the real-time page. When you click it, you will see different alarm list and can handle them as below:
2) Handle Alarm Report
- 19 -
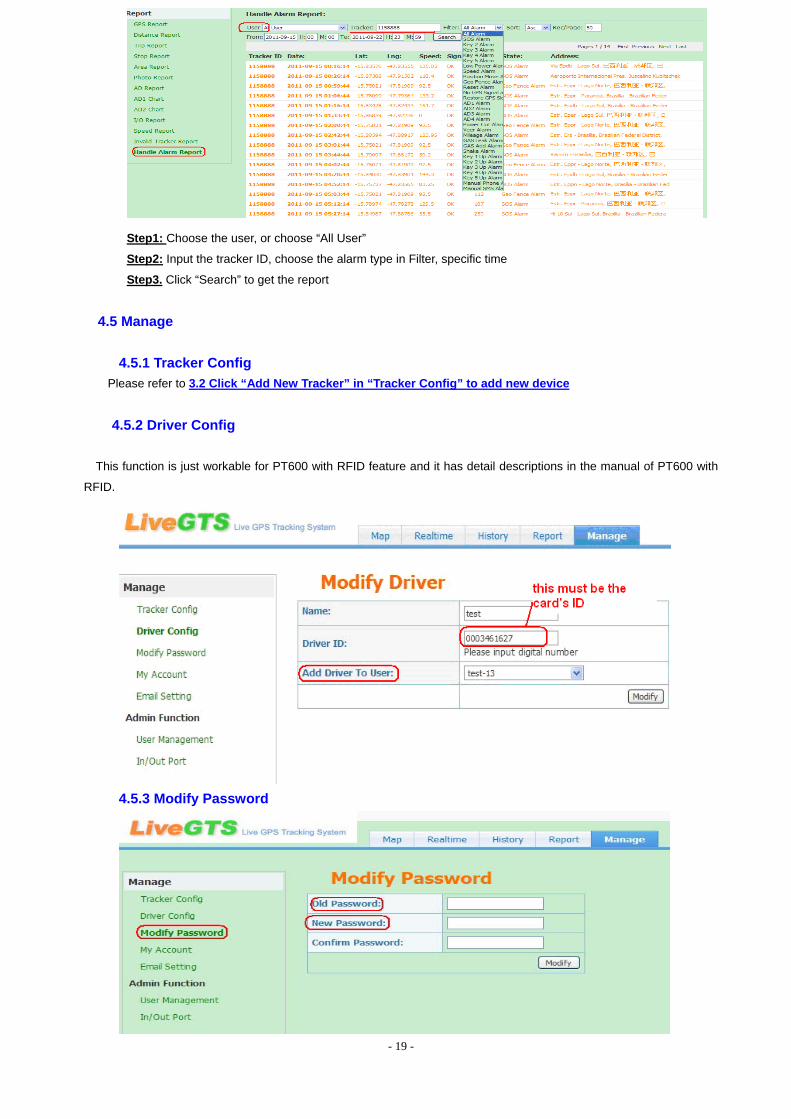
Step1: Choose the user, or choose “All User”
Step2: Input the tracker ID, choose the alarm type in Filter, specific time
Step3. Click “Search” to get the report
4.5 Manage
4.5.1 Tracker Config Please refer to 3.2 Click “Add New Tracker” in “Tracker Config” to add new device
4.5.2 Driver Config
This function is just workable for PT600 with RFID feature and it has detail descriptions in the manual of PT600 with
RFID.
4.5.3 Modify Password
- 20 -
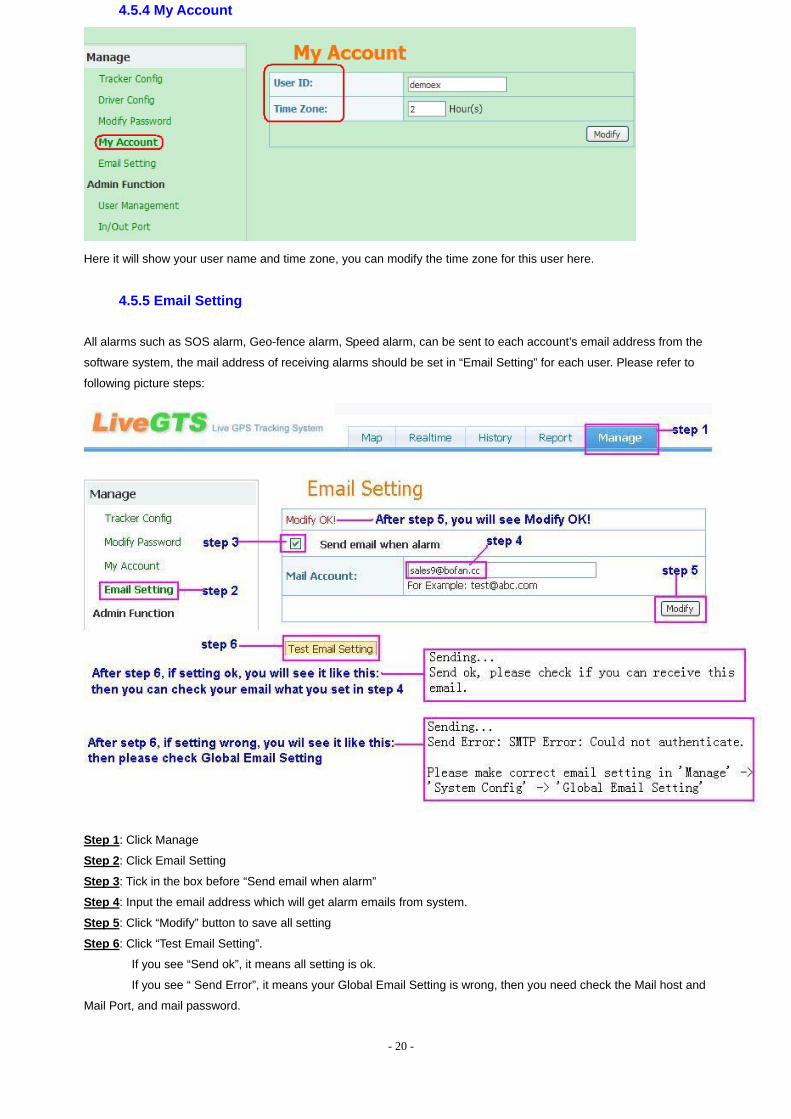
4.5.4 My Account
Here it will show your user name and time zone, you can modify the time zone for this user here.
4.5.5 Email Setting
All alarms such as SOS alarm, Geo-fence alarm, Speed alarm, can be sent to each account’s email address from the
software system, the mail address of receiving alarms should be set in “Email Setting” for each user. Please refer to
following picture steps:
Step 1: Click Manage
Step 2: Click Email Setting
Step 3: Tick in the box before “Send email when alarm”
Step 4: Input the email address which will get alarm emails from system.
Step 5: Click “Modify” button to save all setting
Step 6: Click “Test Email Setting”.
If you see “Send ok”, it means all setting is ok.
If you see “ Send Error”, it means your Global Email Setting is wrong, then you need check the Mail host and
Mail Port, and mail password.
- 21 -
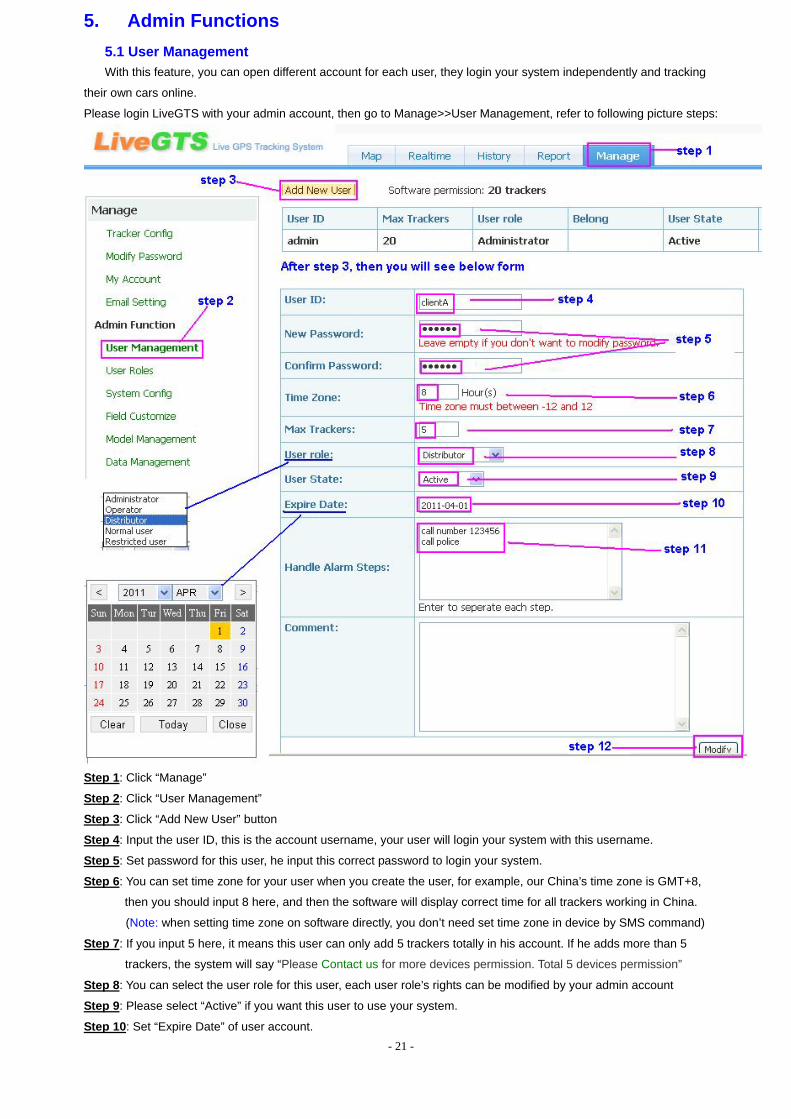
5. Admin Functions 5.1 User Management
With this feature, you can open different account for each user, they login your system independently and tracking
their own cars online.
Please login LiveGTS with your admin account, then go to Manage>>User Management, refer to following picture steps:
Step 1: Click “Manage”
Step 2: Click “User Management”
Step 3: Click “Add New User” button
Step 4: Input the user ID, this is the account username, your user will login your system with this username.
Step 5: Set password for this user, he input this correct password to login your system.
Step 6: You can set time zone for your user when you create the user, for example, our China’s time zone is GMT+8,
then you should input 8 here, and then the software will display correct time for all trackers working in China.
(Note: when setting time zone on software directly, you don’t need set time zone in device by SMS command)
Step 7: If you input 5 here, it means this user can only add 5 trackers totally in his account. If he adds more than 5
trackers, the system will say “Please Contact us for more devices permission. Total 5 devices permission”
Step 8: You can select the user role for this user, each user role’s rights can be modified by your admin account
Step 9: Please select “Active” if you want this user to use your system.
Step 10: Set “Expire Date” of user account.

- 22 -
Step 11: If your user requests you do something for him once there is alarm, you can ask him about the handle steps at
first, then you make a record in this step. When there is alarm, you can see those handle steps in “Handle
Alarm” for this user’s tracker.
Step 12: Click “Modify” to save all settings.
5.2 I/Out Port
Step1: Choose one tracker in the box and then click “View”
Step2. Define the name of input, output and AD, and it will show the defined name instead of default one in realtime page,
I/O Report and so on.
Step3: Click “Save” to save all your settings.
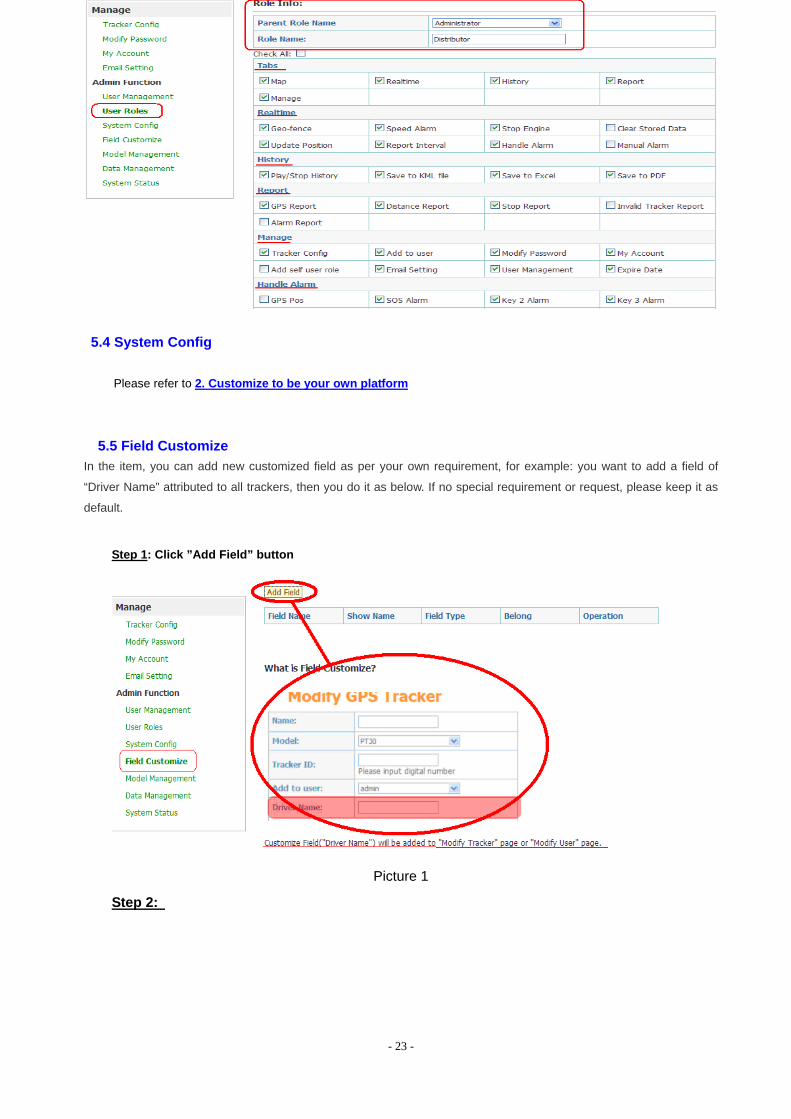
5.3 User Roles Administrator can assign different rights for different user role.
Note: Please modify user role carefully, or else, it will affect all users. It is better to keep it as default first.
Below is the function options, if click yes for a function option, it means the selected User Role will have this function, If
not click yes, this user role will not have this function. For example: For your sub-user role ”Distributor”, you don’t click
yes for “Report” option, then “Report” tab will not display out in all distributor accounts when they are using your system.
So you can decide what functions you want assign for each user role. In “User Roles” menu, admin can also add other
customized user roles in system and assign rights for each of them.
- 23 -
5.4 System Config Please refer to 2. Customize to be your own platform
5.5 Field Customize In the item, you can add new customized field as per your own requirement, for example: you want to add a field of
“Driver Name” attributed to all trackers, then you do it as below. If no special requirement or request, please keep it as
default.
Step 1: Click ”Add Field” button
Picture 1
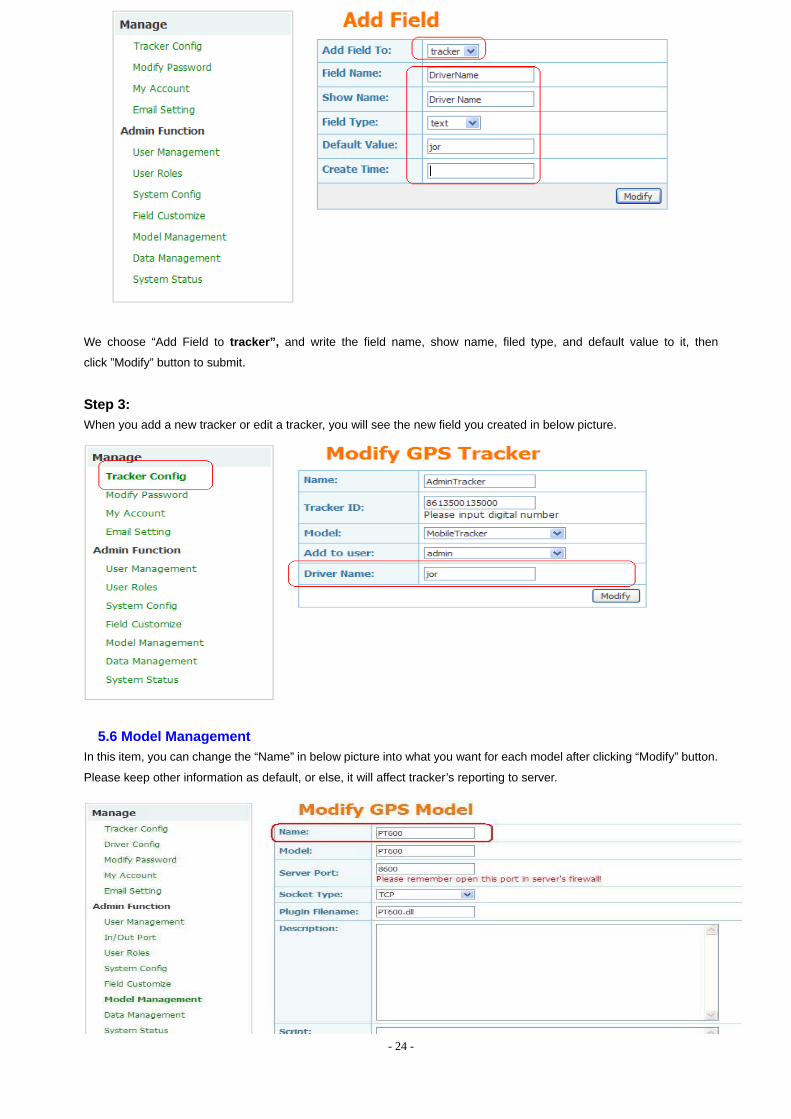
Step 2:
- 24 -
We choose “Add Field to tracker”, and write the field name, show name, filed type, and default value to it, then
click ”Modify” button to submit.
Step 3: When you add a new tracker or edit a tracker, you will see the new field you created in below picture.
5.6 Model Management In this item, you can change the “Name” in below picture into what you want for each model after clicking “Modify” button.
Please keep other information as default, or else, it will affect tracker’s reporting to server.
- 25 -
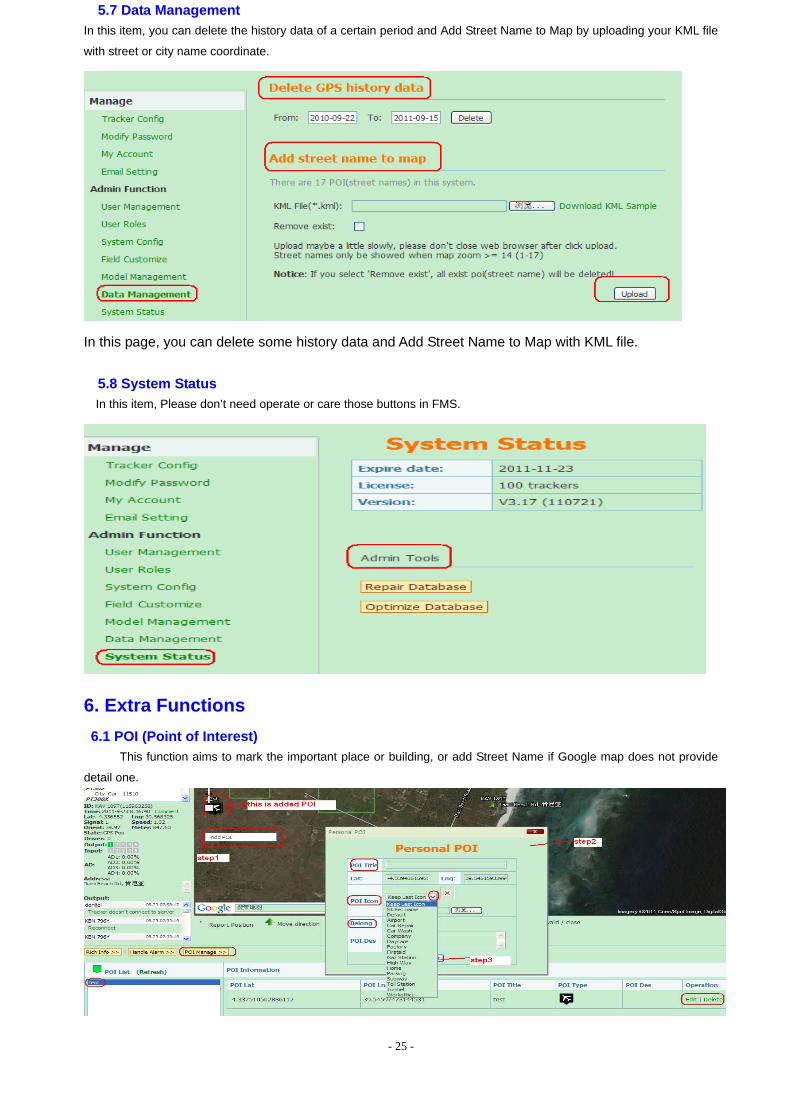
5.7 Data Management In this item, you can delete the history data of a certain period and Add Street Name to Map by uploading your KML file
with street or city name coordinate.
In this page, you can delete some history data and Add Street Name to Map with KML file. 5.8 System Status In this item, Please don’t need operate or care those buttons in FMS.
6. Extra Functions 6.1 POI (Point of Interest)
This function aims to mark the important place or building, or add Street Name if Google map does not provide
detail one.
- 26 -
Step1: Click right Mouse button on the point you need to add POI, then click “Add POI” button
Step2: The above dialog box “Personal POI” come out, fill in your needed information. If you don’t want to show this
POI to all your clients, please choose your clients’ User Name in “Belong” option, otherwise, please choose Public only.
Step3: Click “Submit” to finish setting, then the added POI will show on the map
At the bottom of map in Real-time Page, there is a “POI Manage” button, here you can manage your added POI,
“Edit” Or “Delete”.
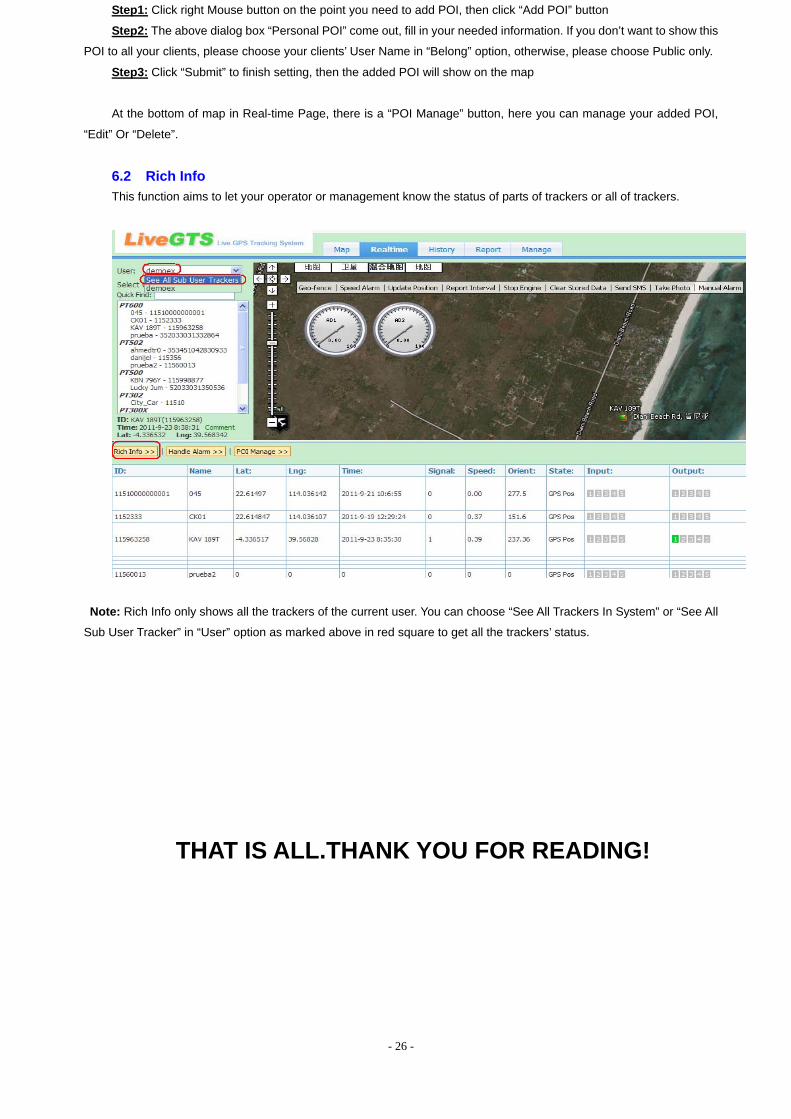
6.2 Rich Info This function aims to let your operator or management know the status of parts of trackers or all of trackers.
Note: Rich Info only shows all the trackers of the current user. You can choose “See All Trackers In System” or “See All
Sub User Tracker” in “User” option as marked above in red square to get all the trackers’ status.
THAT IS ALL.THANK YOU FOR READING!


![VKontakte: for business [English version]](https://img.pdfslide.us/doc/110x75/55c9c286bb61eb55528b4633/vkontakte-for-business-english-version.jpg)