Embed Size (px)
Citation preview
Reform To Captaris Alchemy
10/30/2009
Reform To Captaris Alchemy 2
Table of Contents
About the Alchemy Plug-in..............................................................................................3
System Requirements .....................................................................................................3
Hardware Requirements .................................................................................................3
Other Requirements........................................................................................................4
Installation ......................................................................................................................4
Plugin Registration and Licensing ....................................................................................5
Sending Your First Document to Alchemy........................................................................5
Maintenance................................................................................................................. 17
Troubleshooting ............................................................................................................ 17
Reform To Captaris Alchemy 3
About the Alchemy Plug-in
The Alchemy plug-in acts as a bridge between Reform and Alchemy. It allows you to
archive documents processed by Reform into an Alchemy account for later retrieval.
The plug-in is very flexible, as it allows you to set up the Alchemy account with static
and/or dynamic values, which allow you to better organize your documents.
FabSoft’s Reform maximizes the integration with Captaris' Alchemy by enabling
automatic delivery of document information from any operating system, application or
device. Whether a document is being printed from a host system, scanned in using an
MFP or copier, or generated by a user from an application, Reform will capture the
process, extract the data and intelligently archive it to Alchemy. With Reform’s
alternative input options, more of your valuable information can be effortlessly
accessed and easily shared company-wide through Alchemy. Reform can control
directory locations as well as custom index information to simplify document retrieval.
Fast and easy access to important information is an extremely vital resource, and
Reform’s integration capabilities to Alchemy let you obtain the most comprehensive
document information archive to improve the workflow of your business operations.
System Requirements
• Reform 12 Enterprise or Reform 12
• Alchemy Plugin
• For Evaluation and Demonstration: Windows XP, Windows 2003 Server,
Windows Vista, Windows 7 or Windows 2008 Server (64 Bit Operating Systems are
Supported)
• For Production Systems: Windows 2003 Server or Windows 2008 Server (64 Bit
Operating Systems are Supported)
All required Reform software downloads can be found at www.fabsoft.com >>
Downloads section.
Hardware Requirements
• Production System Recommendation (These suggestions are only estimations.
High load environments may require multiple servers, or additional hardware.)
1. Pentium 4 Processor
2. 4 GB RAM
3. HDD Space 100 GB (Redundancy recommended)
4. Battery Backup (UPS)
5. Dedicated server, no other software products except for virus and
security programs.
Reform To Captaris Alchemy 4
• Minimum System Requirements for demonstration purposes only
1. Pentium 4 Processor
2. 2 GB RAM
3. HDD Space 30 GB
Hardware specifications depend greatly on the workload and throughput that is
required. Higher end processors and greater amounts of memory will increase the
amount of information and data that Reform can process thus improving overall system
throughput. For load balancing or failover, multiple servers can also be used. (Note: A
license for Reform and each plug-in is required for each server running the software.)
Before obtaining the server that you plan on utilizing for Reform, please check the plug-
ins’ user manuals for System Requirements as well as they may require additional
hardware. For production systems, we also recommend redundant hard drives utilizing
the mirroring features of RAID (Redundant Array of Independent Disks) to minimize data
loss and expedite system recovery in the event of a hardware failure. Battery backups
are also suggested to maintain system uptime and reliability in case of power failures.
Other Requirements
• The Alchemy plug-in for Reform v12 requires the Alchemy web services, also
known as the “Alchemy Web Interface”
• The Alchemy server should be configured and on the same domain as the
server running Reform 12.
• The user logged into the Reform server and the Reform 12 Spooler Service
should have administrative permissions on the Alchemy server. For more information
about configuring the logon account for the Reform 12 Spooler service, please see the
Reform manual.
Installation To install the Alchemy Plug-in components, download and run the installer.
Step through the prompts and accept the User License Agreement. The installation will
begin. Allow the installation to complete and then read on to the next section to learn
how to set up Alchemy integration. The tutorial assumes that your Alchemy server is
currently configured and ready to accept incoming documents. To configure the
Alchemy workflow, we will be using the Reform Designer to create a form from a
template and then use the Workflow Designer to configure the form’s destination.
Reform To Captaris Alchemy 5
Plugin Registration and Licensing
When evaluating Reform 12, the plugins will also be in an evaluation mode for that
period of time. Once Reform has been purchased and licensed, the required plugins
must also be licensed in order to continue functioning correctly.
Please see the “Reform 12 Licensing and Registration” section of the Reform 12 User
Manual for more information on how to license Reform 12 Plug-ins. After the license is
entered, the Reform Spooler will need to be restarted to refresh the licenses. More
information regarding the Reform Spooler Service can be found in the Reform 12 User
Manual.
Sending Your First Document to Alchemy 1. First we need to create a form from a template using the Reform Designer. Open the
Reform Designer by going to Start>Programs>Reform…>Designer.
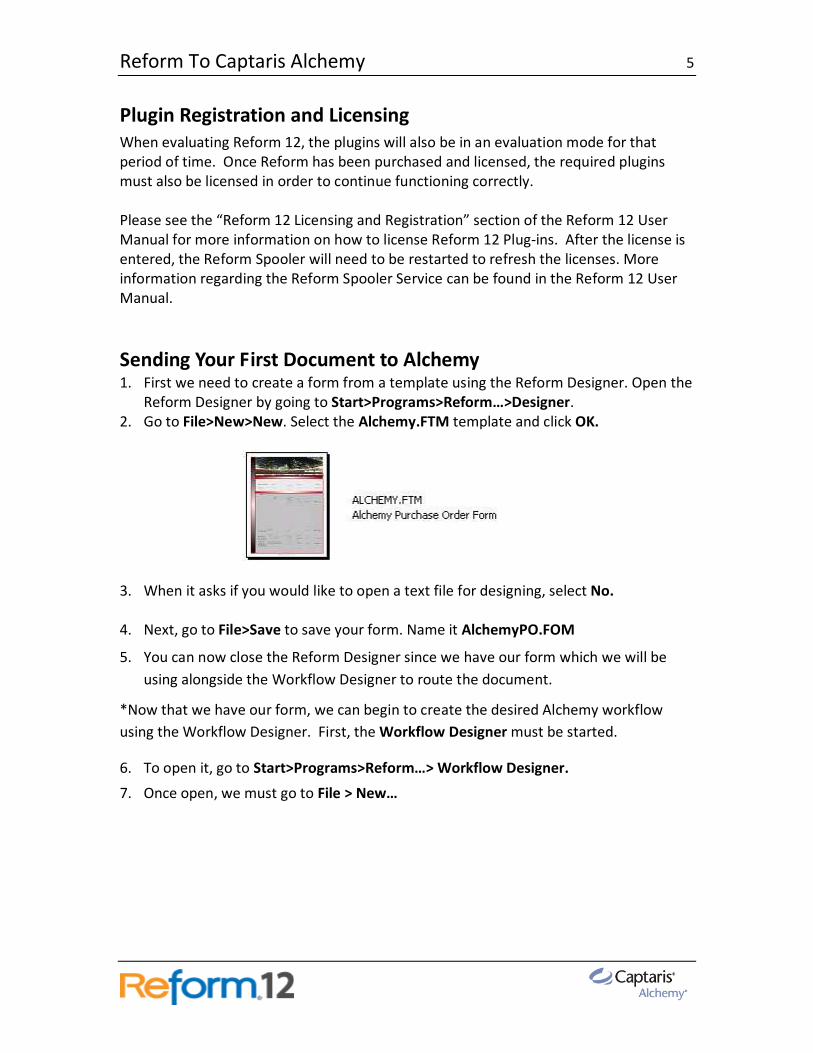
2. Go to File>New>New. Select the Alchemy.FTM template and click OK.
3. When it asks if you would like to open a text file for designing, select No.
4. Next, go to File>Save to save your form. Name it AlchemyPO.FOM
5. You can now close the Reform Designer since we have our form which we will be
using alongside the Workflow Designer to route the document.
*Now that we have our form, we can begin to create the desired Alchemy workflow
using the Workflow Designer. First, the Workflow Designer must be started.
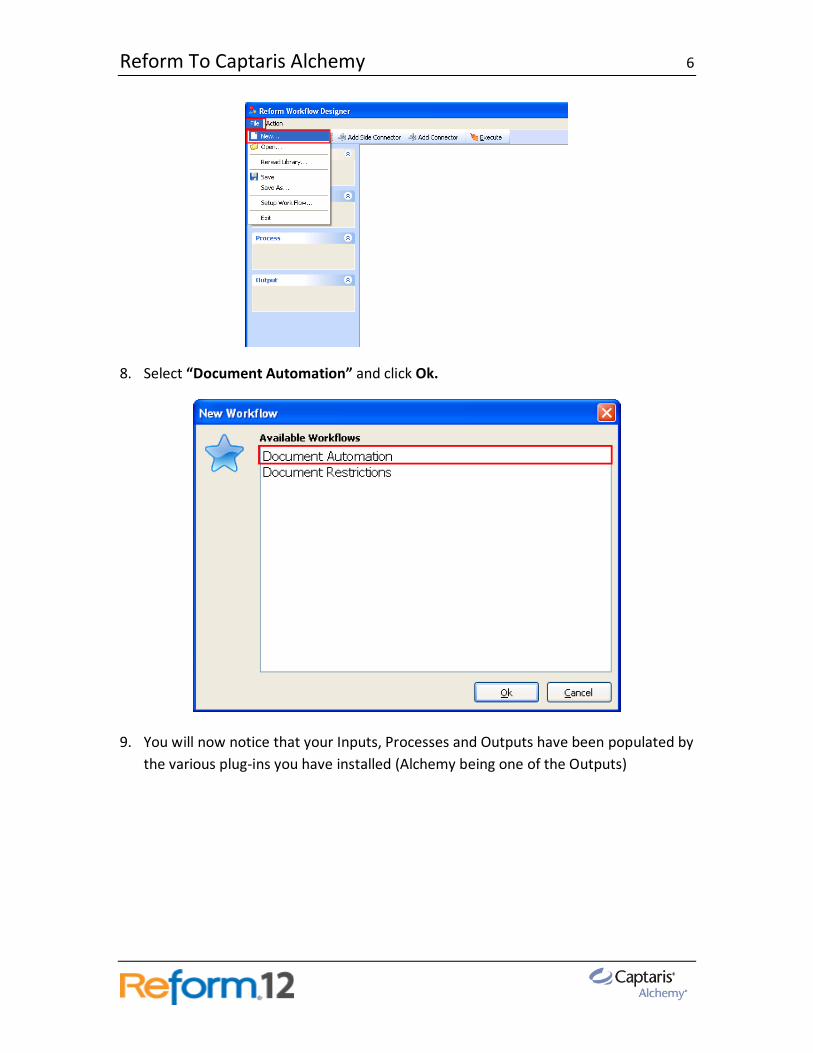
6. To open it, go to Start>Programs>Reform…> Workflow Designer.
7. Once open, we must go to File > New…
Reform To Captaris Alchemy 6
8. Select “Document Automation” and click Ok.
9. You will now notice that your Inputs, Processes and Outputs have been populated by
the various plug-ins you have installed (Alchemy being one of the Outputs)
Reform To Captaris Alchemy 7
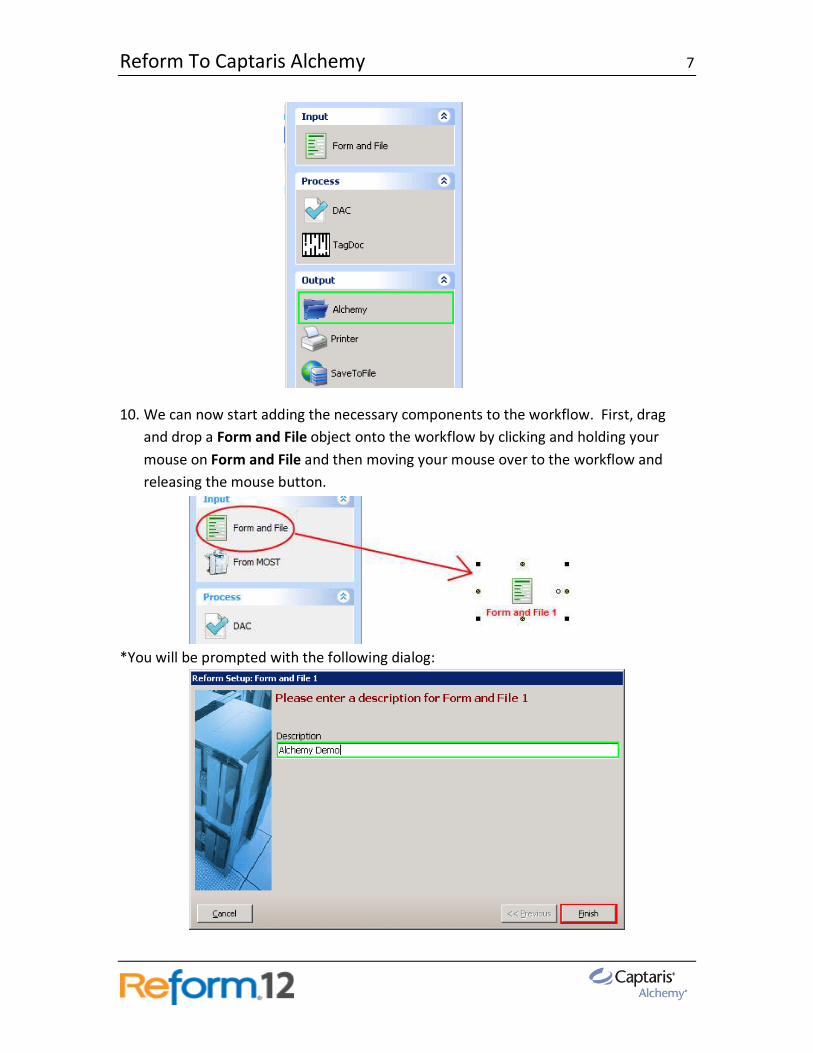
10. We can now start adding the necessary components to the workflow. First, drag
and drop a Form and File object onto the workflow by clicking and holding your
mouse on Form and File and then moving your mouse over to the workflow and
releasing the mouse button.
*You will be prompted with the following dialog:
Reform To Captaris Alchemy 8
11. Enter a description for the object you just added. This is done by typing in the
provided box. Type “Alchemy Demo” and click Finish. This will take you back to
your workflow.
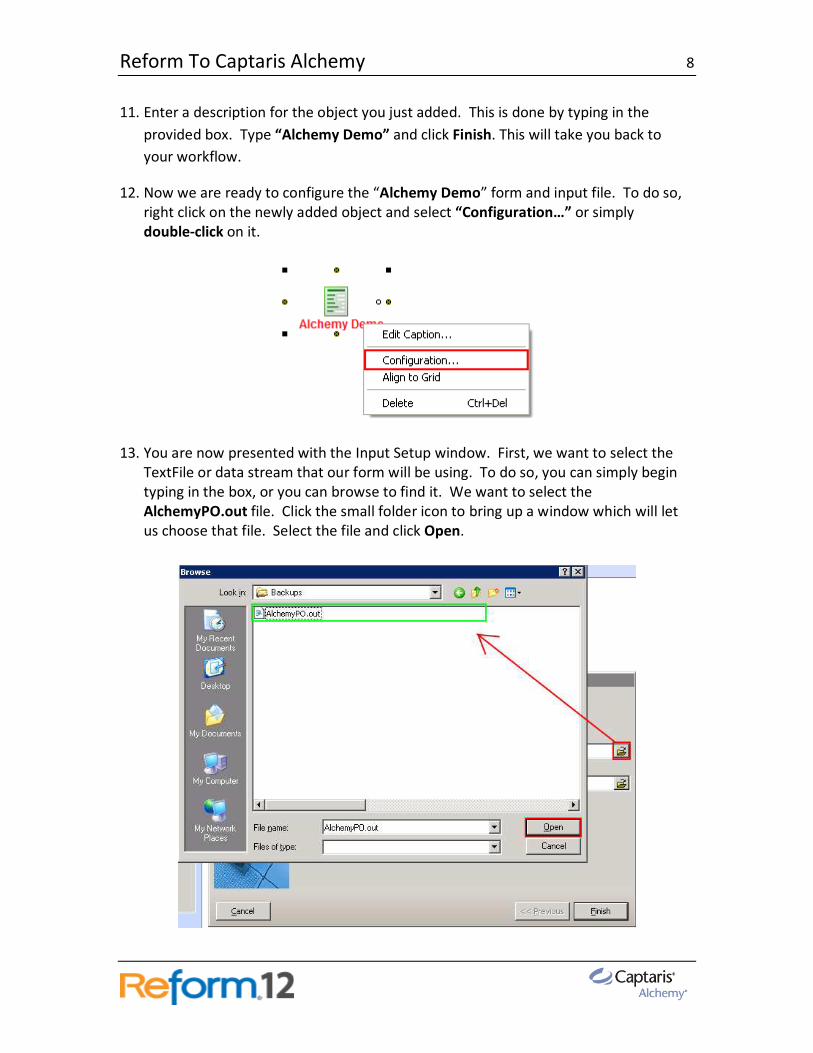
12. Now we are ready to configure the “Alchemy Demo” form and input file. To do so,
right click on the newly added object and select “Configuration…” or simply
double-click on it.
13. You are now presented with the Input Setup window. First, we want to select the
TextFile or data stream that our form will be using. To do so, you can simply begin
typing in the box, or you can browse to find it. We want to select the
AlchemyPO.out file. Click the small folder icon to bring up a window which will let
us choose that file. Select the file and click Open.
Reform To Captaris Alchemy 9
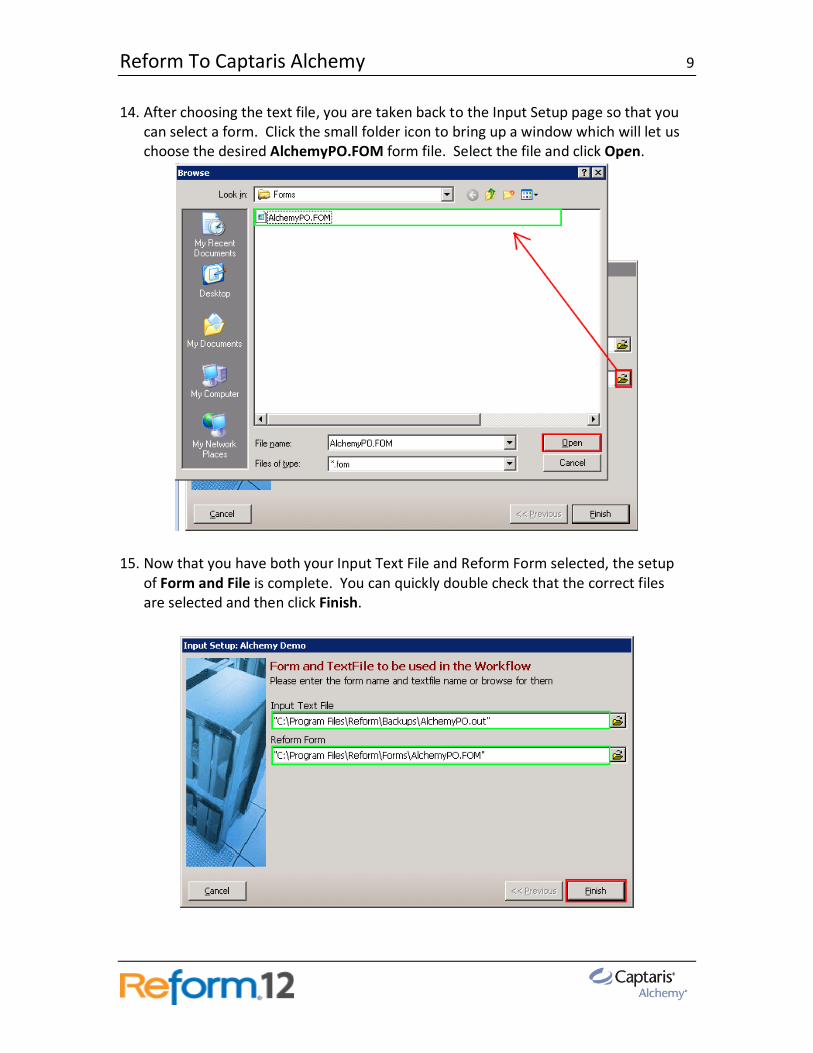
14. After choosing the text file, you are taken back to the Input Setup page so that you
can select a form. Click the small folder icon to bring up a window which will let us
choose the desired AlchemyPO.FOM form file. Select the file and click Open.
15. Now that you have both your Input Text File and Reform Form selected, the setup
of Form and File is complete. You can quickly double check that the correct files
are selected and then click Finish.
Reform To Captaris Alchemy 10
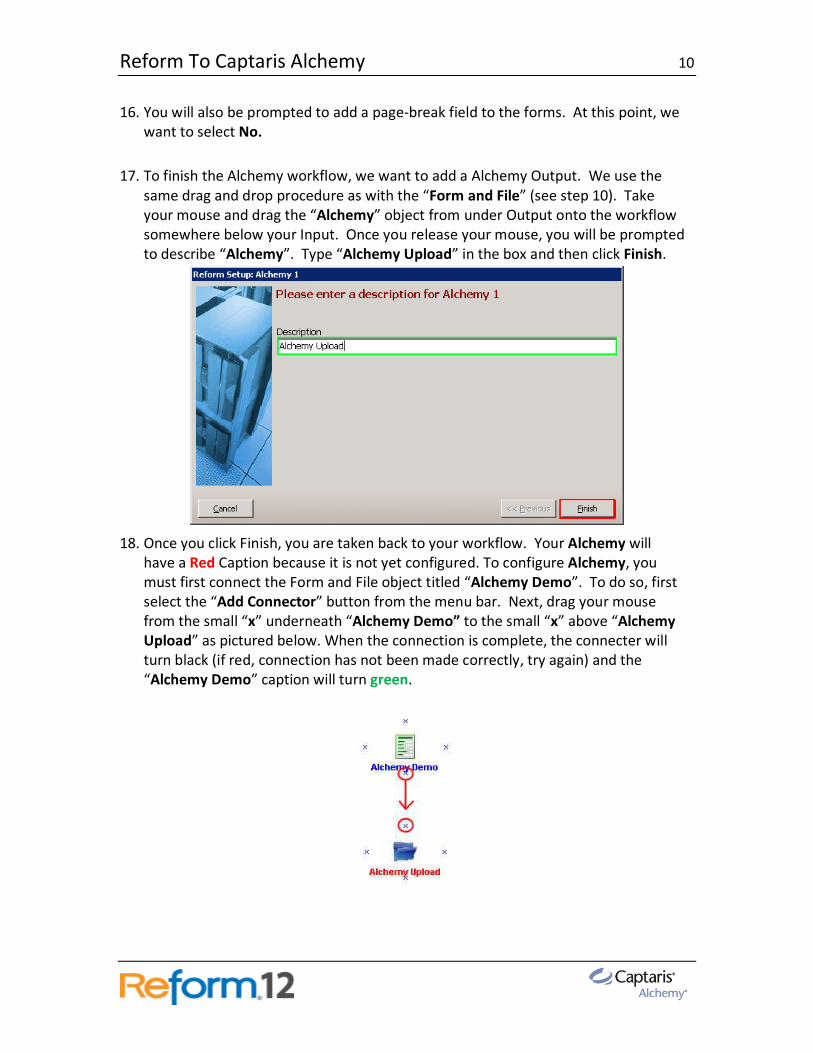
16. You will also be prompted to add a page-break field to the forms. At this point, we
want to select No.
17. To finish the Alchemy workflow, we want to add a Alchemy Output. We use the
same drag and drop procedure as with the “Form and File” (see step 10). Take
your mouse and drag the “Alchemy” object from under Output onto the workflow
somewhere below your Input. Once you release your mouse, you will be prompted
to describe “Alchemy”. Type “Alchemy Upload” in the box and then click Finish.
18. Once you click Finish, you are taken back to your workflow. Your Alchemy will
have a Red Caption because it is not yet configured. To configure Alchemy, you
must first connect the Form and File object titled “Alchemy Demo”. To do so, first
select the “Add Connector” button from the menu bar. Next, drag your mouse
from the small “x” underneath “Alchemy Demo” to the small “x” above “Alchemy
Upload” as pictured below. When the connection is complete, the connecter will
turn black (if red, connection has not been made correctly, try again) and the
“Alchemy Demo” caption will turn green.
Reform To Captaris Alchemy 11
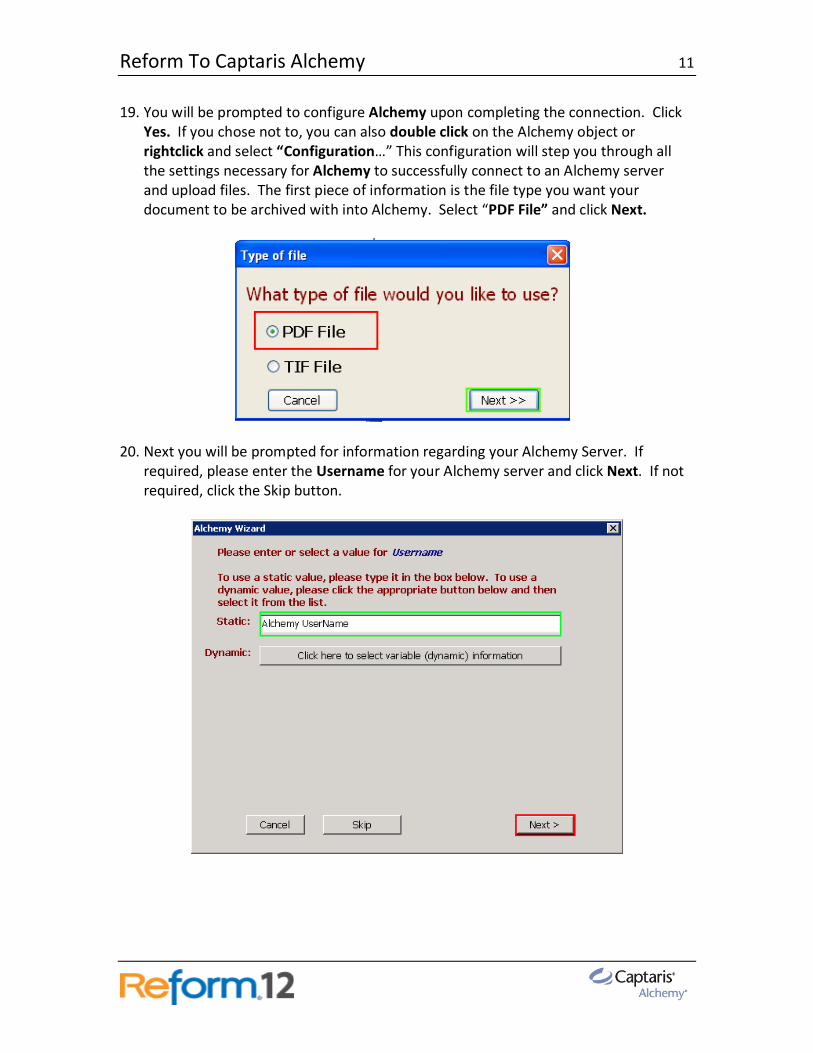
19. You will be prompted to configure Alchemy upon completing the connection. Click
Yes. If you chose not to, you can also double click on the Alchemy object or
rightclick and select “Configuration…” This configuration will step you through all
the settings necessary for Alchemy to successfully connect to an Alchemy server
and upload files. The first piece of information is the file type you want your
document to be archived with into Alchemy. Select “PDF File” and click Next.
20. Next you will be prompted for information regarding your Alchemy Server. If
required, please enter the Username for your Alchemy server and click Next. If not
required, click the Skip button.
Reform To Captaris Alchemy 12
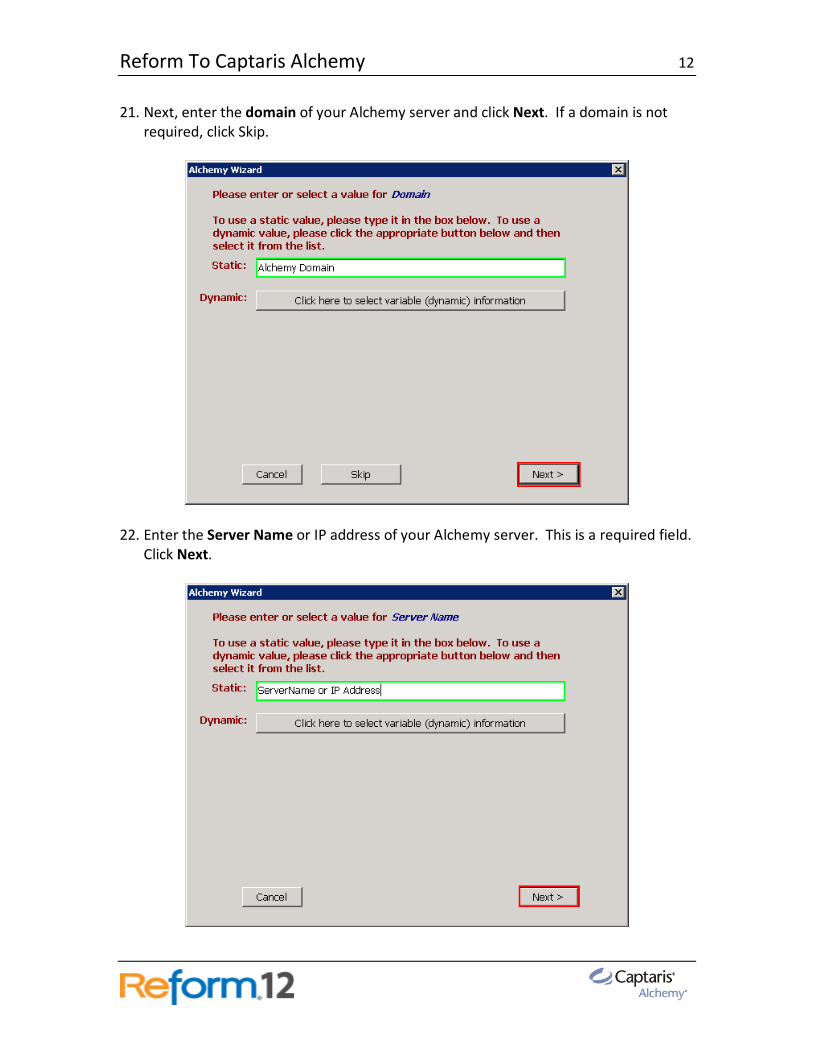
21. Next, enter the domain of your Alchemy server and click Next. If a domain is not
required, click Skip.
22. Enter the Server Name or IP address of your Alchemy server. This is a required field.
Click Next.
Reform To Captaris Alchemy 13
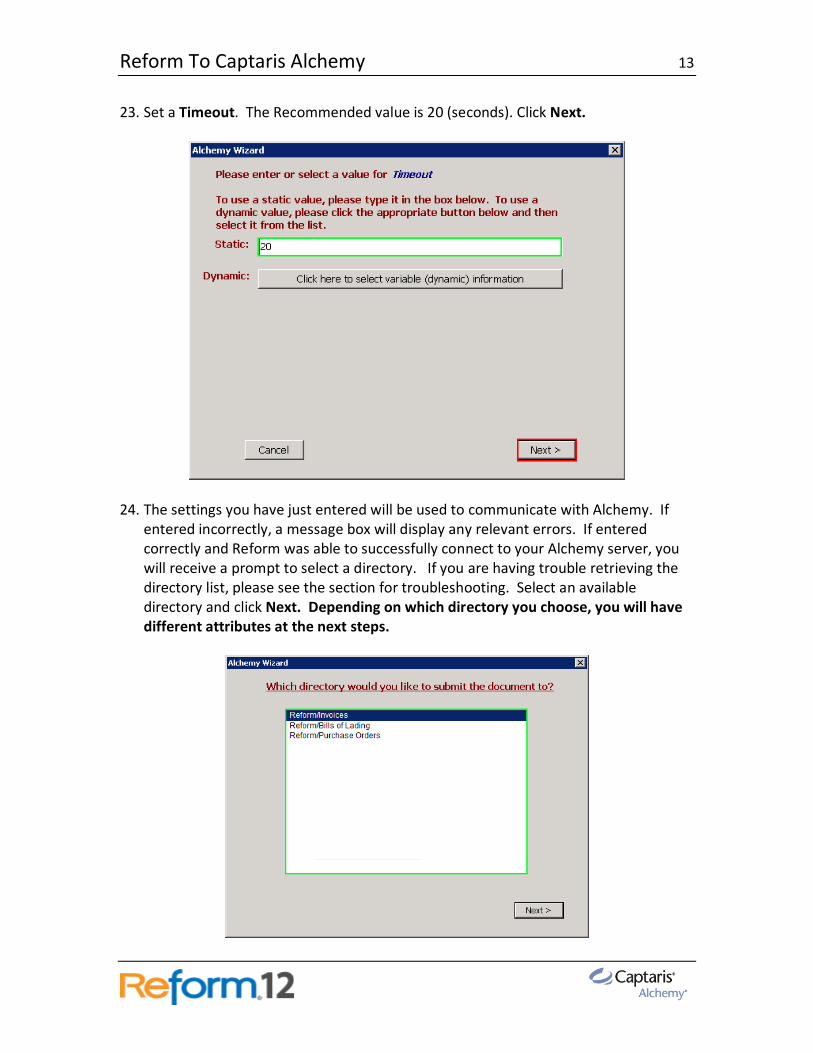
23. Set a Timeout. The Recommended value is 20 (seconds). Click Next.
24. The settings you have just entered will be used to communicate with Alchemy. If
entered incorrectly, a message box will display any relevant errors. If entered
correctly and Reform was able to successfully connect to your Alchemy server, you
will receive a prompt to select a directory. If you are having trouble retrieving the
directory list, please see the section for troubleshooting. Select an available
directory and click Next. Depending on which directory you choose, you will have
different attributes at the next steps.

Reform To Captaris Alchemy 14
25. Type in a static value for Document Title or use the “Click here to select variable
information” button to select fields populated from your form.
26. Select the field titled “IssueDate” from the list that appears. The Document Title
will be gathered dynamically from this field. Click Next.
Reform To Captaris Alchemy 15
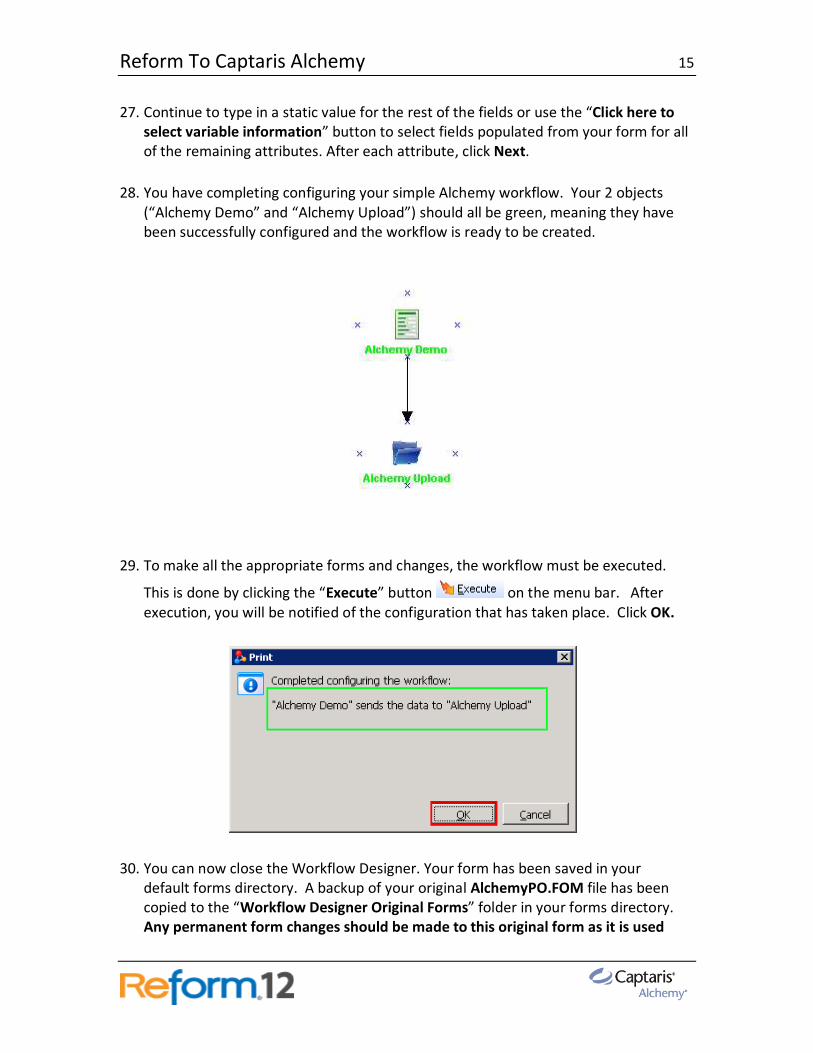
27. Continue to type in a static value for the rest of the fields or use the “Click here to
select variable information” button to select fields populated from your form for all
of the remaining attributes. After each attribute, click Next.
28. You have completing configuring your simple Alchemy workflow. Your 2 objects
(“Alchemy Demo” and “Alchemy Upload”) should all be green, meaning they have
been successfully configured and the workflow is ready to be created.
29. To make all the appropriate forms and changes, the workflow must be executed.
This is done by clicking the “Execute” button on the menu bar. After
execution, you will be notified of the configuration that has taken place. Click OK.
30. You can now close the Workflow Designer. Your form has been saved in your
default forms directory. A backup of your original AlchemyPO.FOM file has been
copied to the “Workflow Designer Original Forms” folder in your forms directory.
Any permanent form changes should be made to this original form as it is used
Reform To Captaris Alchemy 16
throughout the form configuration process as a template. If changes are made to
the template, the workflow will need to be executed again to make those
changes to the generated forms.
31. To test your settings and make sure that files can be uploaded, first we should open
the form with the Reform Designer. Navigate to your Forms directory and double
click on AlchemyPO.FOM. When asked to open the associated TextFile, click Yes.
Verify that the special fields exist on the right hand side of your form.
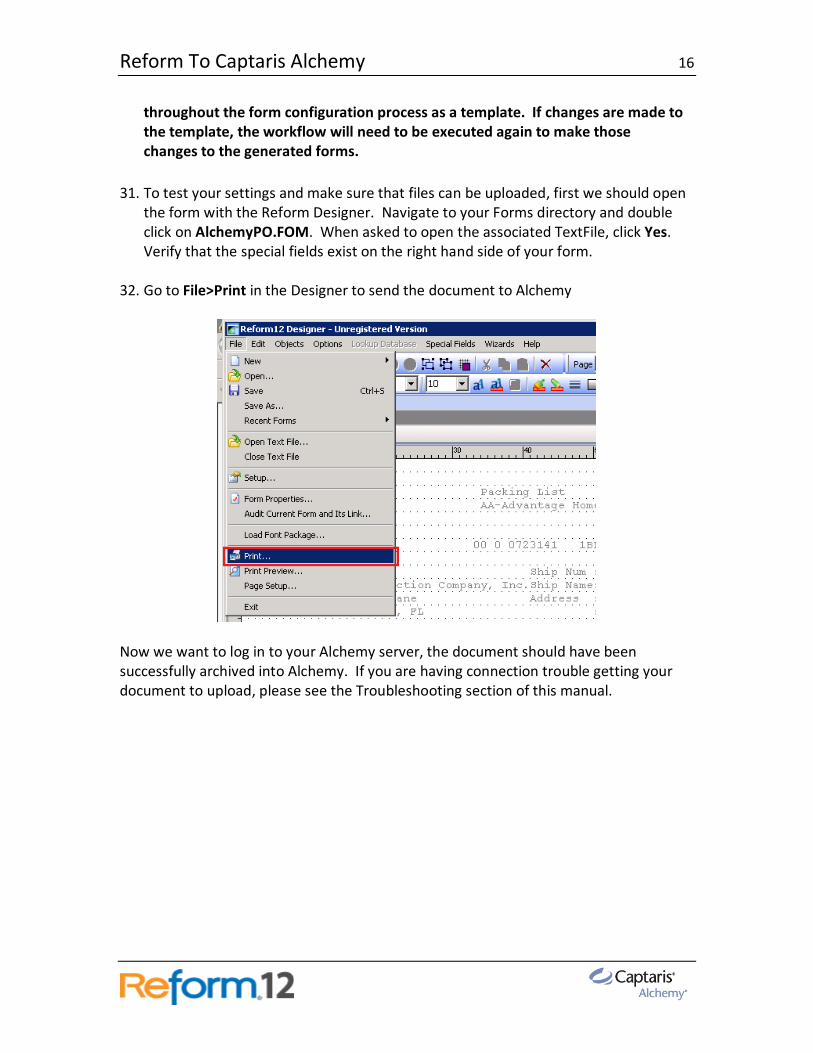
32. Go to File>Print in the Designer to send the document to Alchemy
Now we want to log in to your Alchemy server, the document should have been
successfully archived into Alchemy. If you are having connection trouble getting your
document to upload, please see the Troubleshooting section of this manual.
Reform To Captaris Alchemy 17
Maintenance There are certain directories that need to be monitored for growth along with the
Alchemy plugin for Reform 12. As a system processes more and more jobs, the size of
these directories can grow very quickly. Overall system performance can be affected by
the large amounts of space that the files may take up. Obsolete files should be deleted
according to your needs and file retention specifications. It is recommended to monitor
the following directories for growth:
Directories:
C:\Program Files\Reform…\Backups
C:\Program Files\Reform…\Spooler\ImageQueue
Troubleshooting
If you are having problems connecting to your Alchemy server using the Workflow
Designer, it is important that the server allows connections from your computer and
service account. The Reform 12 Spooler service’s logon account must have access to the
Alchemy server. For instructions on how to configure the service account, please see
the Reform manual.
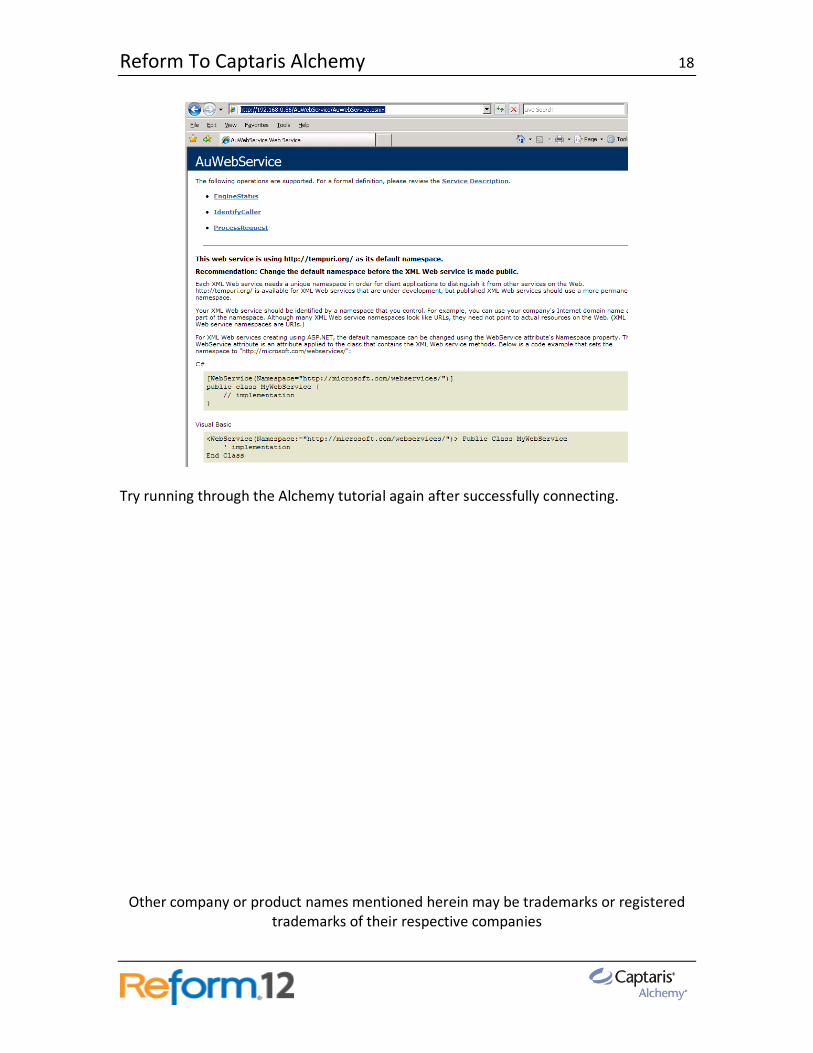
Open Internet Explorer and attempt to browse to the URL for your Captaris Alchemy
Server: http://<ALCHEMYSERVERNAME> /AuWebService/AuWebService.asmx
Please verify sure you have access to this page. If you are prompted with a login, please
login with the correct credentials. These credentials may be required to be used with
the Reform Service or entered into the Alchemy configuration, depending on your
environment.
When you connect successfully, you should see the following:
Reform To Captaris Alchemy 18
Try running through the Alchemy tutorial again after successfully connecting.
Other company or product names mentioned herein may be trademarks or registered
trademarks of their respective companies