Embed Size (px)
Citation preview

USER MANUAL

2
Conduct an orchestra of lights.
Precautions
The Luxli Orchestra series can produce a dazzling symphony of light. Synchronize LED light units of all sizes, choose from millions of possible colors, apply lighting effects from four selectable modes, and control them instantly with the powerful Conductor mobile app.
The Timpani 1 × 1 multicolor LED light features a highly accurate and versatile RGBAW LED panel. It offers CCT, Filter, RGB, and Special Effects operating modes that provide remarkable control over each variable with an easy-to-use interface. The light is equipped with Bluetooth 4.2 LE that pairs with your tablet or smartphone the moment you open Luxli’s Conductor mobile app. Whether controlled via the app or the intuitive interface on the unit itself, the Timpani will illuminate your creative vision with endless possibilities.
For the latest version of the Conductor mobile app, firmware updates, as well as videos and ideas for creative uses for the Timpani, visit luxlilight.com.
• Keep this product away from water and flammable gases or liquids.
• Use only the correct, recommended voltage.
• Do not attempt to disassemble or repair this product.
• Clean this product with only a soft, dry cloth.
• To avoid damage to this product, be careful not to overtighten or improperly thread any of the threaded fittings.
• All images are for illustrative purposes only.

3
Troubleshooting
• If you encounter any problems, first try turning the device off and then on.
• If the problem persists, remove the battery for 15 seconds, and then restart.
• Go to luxlilight.com to make sure you have the most recent firmware update. If a new firmware version is available, follow the instructions on how to download it to your light.
4
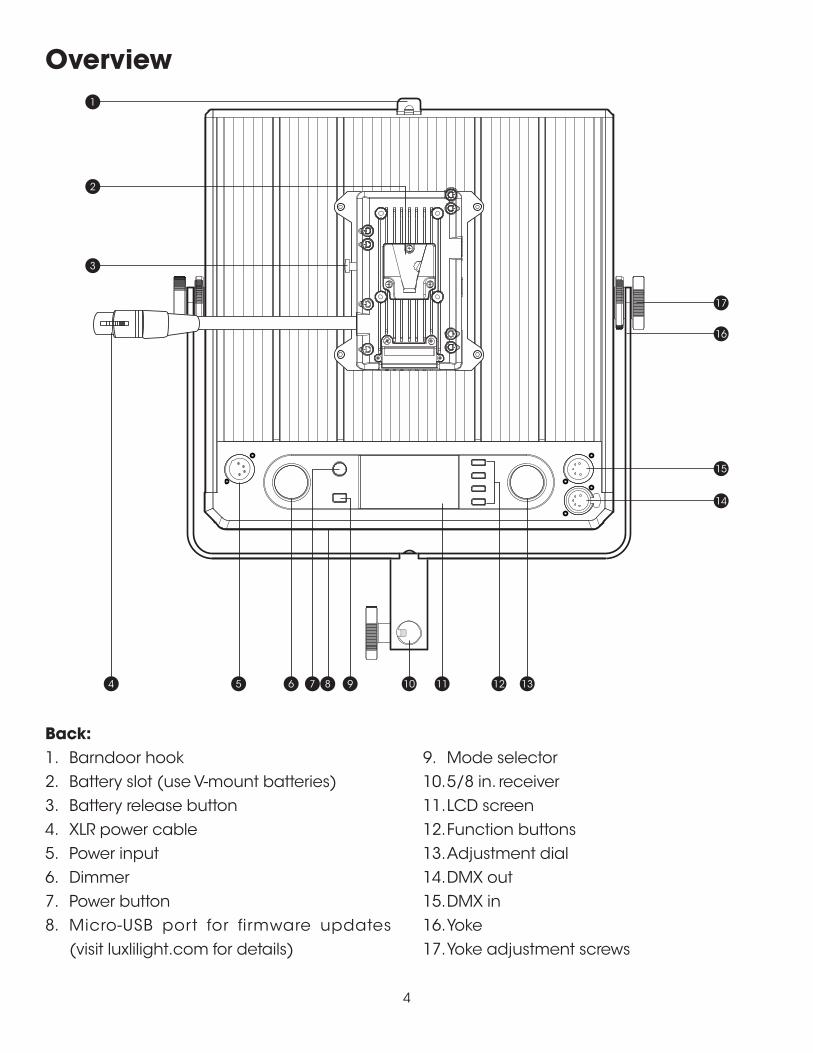
Overview
Back:1. Barndoor hook2. Battery slot (use V-mount batteries)3. Battery release button4. XLR power cable5. Power input6. Dimmer7. Power button8. Micro-USB port for firmware updates
(visit luxlilight.com for details)
9. Mode selector10. 5/8 in. receiver11. LCD screen12. Function buttons13. Adjustment dial14. DMX out15. DMX in16. Yoke17. Yoke adjustment screws
4 5 6 97 10 11 13128
2
3
17
16
15
14
1

5
Top:1. Diffuser slot 2. Barndoor slot
1 2
6
User Interface
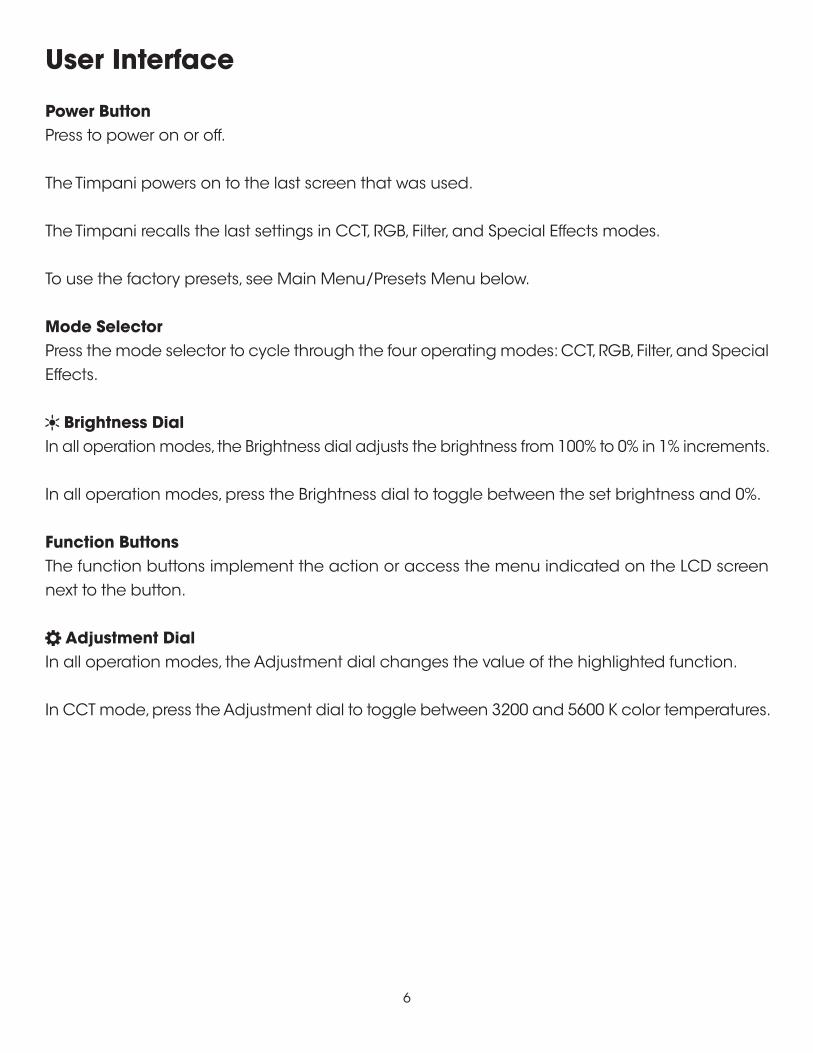
Power ButtonPress to power on or off.
The Timpani powers on to the last screen that was used.
The Timpani recalls the last settings in CCT, RGB, Filter, and Special Effects modes.
To use the factory presets, see Main Menu/Presets Menu below.
Mode SelectorPress the mode selector to cycle through the four operating modes: CCT, RGB, Filter, and Special Effects.
Brightness DialIn all operation modes, the Brightness dial adjusts the brightness from 100% to 0% in 1% increments.
In all operation modes, press the Brightness dial to toggle between the set brightness and 0%.
Function ButtonsThe function buttons implement the action or access the menu indicated on the LCD screen next to the button.
Adjustment DialIn all operation modes, the Adjustment dial changes the value of the highlighted function.
In CCT mode, press the Adjustment dial to toggle between 3200 and 5600 K color temperatures.
7
CCT Mode
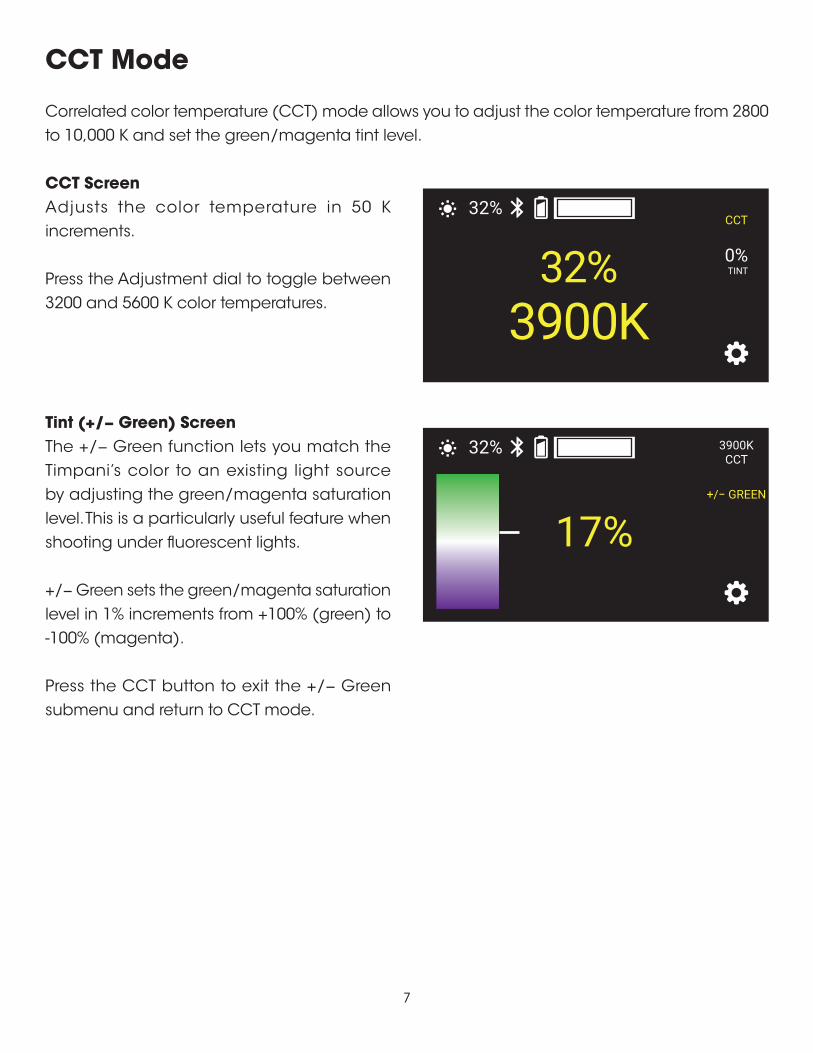
Correlated color temperature (CCT) mode allows you to adjust the color temperature from 2800 to 10,000 K and set the green/magenta tint level.
CCT ScreenAdjusts the color temperature in 50 K increments.
Press the Adjustment dial to toggle between 3200 and 5600 K color temperatures.
Tint (+/− Green) ScreenThe +/− Green function lets you match the Timpani’s color to an existing light source by adjusting the green/magenta saturation level. This is a particularly useful feature when shooting under fluorescent lights.
+/− Green sets the green/magenta saturation level in 1% increments from +100% (green) to -100% (magenta).
Press the CCT button to exit the +/− Green submenu and return to CCT mode.
32%3900K
TINT0%
CCT32%
17%
CCT
+/− GREEN
3900K32%
8
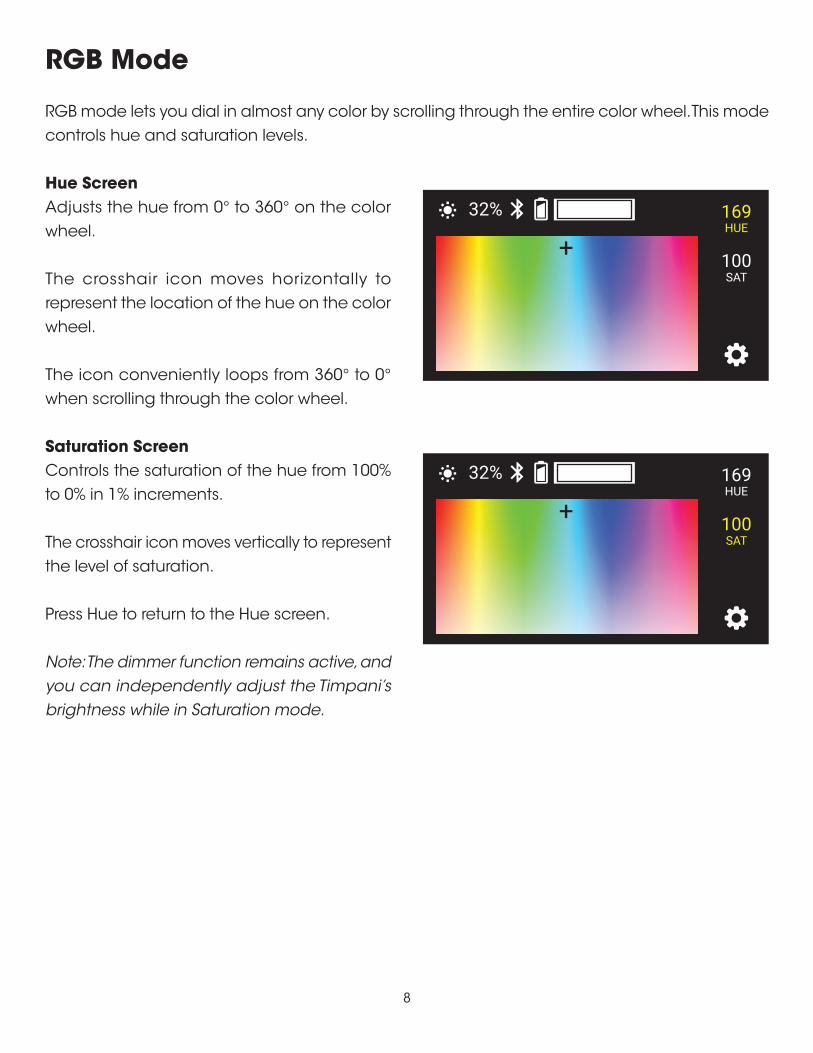
RGB Mode
RGB mode lets you dial in almost any color by scrolling through the entire color wheel. This mode controls hue and saturation levels.
Hue ScreenAdjusts the hue from 0° to 360° on the color wheel.
The crosshair icon moves horizontally to represent the location of the hue on the color wheel.
The icon conveniently loops from 360° to 0° when scrolling through the color wheel.
Saturation ScreenControls the saturation of the hue from 100% to 0% in 1% increments.
The crosshair icon moves vertically to represent the level of saturation.
Press Hue to return to the Hue screen.
Note: The dimmer function remains active, and you can independently adjust the Timpani’s brightness while in Saturation mode.
HUE
100SAT
16932%
HUE
100SAT
16932%

9
Filter Mode
The Timpani is preset with 150 digital gel filters. Filter mode allows you to apply colored gels to any CCT setting.
Gel ScreenScrolls through the 150 digital gel filters.
The LCD displays the filter number and name along with the color.
When Filter mode is selected, the Timpani defaults to the gel selection screen.
CCT ScreenAdjusts the white-balance color temperature without leaving Filter mode. The LCD continues to display the current filter number.
Press Gel to exit the CCT screen.
Important! When the white-balance temperature is changed in this mode, the temperature in CCT mode is also changed to this temperature setting. If the temperature setting is changed in CCT mode, the Timpani will set the same white-balance temperature here.
Medium PurpleMauveBright PinkFollies PinkRose PinkSmokey PinkScarletS. Rose PinkBright Rose
54
CCT
54GEL
3900K32%
54
CCT
54GEL
3900K32%Medium PurpleMauveBright PinkFollies PinkRose PinkSmokey PinkScarletS. Rose PinkBright Rose

10
Special Effect Mode
The Timpani is preset with 10 animated special effects. Each effect has an edit mode that allows you to control the variable settings of the selected effect.
Special Effect ScreenUse the Adjustment dial to scroll down the list and select one of the ten preprogrammed effects. Press Play to run the effect. Press Stop to discontinue.
Edit MenuEach effect has several programmable settings. Pressing the Edit button opens the Edit menu, where elements of color temperature, hue, saturation, timing, and duration can be modified.
1. Scroll to the setting you want to edit, and press Select.
2. A new screen will open where you can modify that setting.
3. To implement the change, press Confirm. The setting’s screen will close, and the Edit screen will reappear.
To return to the Edit screen and the previous settings without saving the changes, press Back.
Press Back again to return to the Special Effects menu.
The Timpani displays the changes in real time as you modify them, so you can experiment with the settings while running the effect.
32%CCT chase
Color chase
Explosion
Fire
Fireworks
Lightning
SELECT
BACK
Fire typeCandle
Campfire
Bonfire

11
Description of the Special EffectsCCT ChaseA continuous loop that changes between two preset color temperatures. Good for simulating a sunrise, sunset, or a change from cloudy to sunny weather in real time. Since the sequence loops, you can shoot multiple takes without reprogramming the light.
CCT Start: Selects the color temperature at the beginning of the sequence (2400 to 10,000 K).
CCT Stop: Selects the final color temperature of the sequence (2400 to 10,000 K).
+/- Green: Sets the green/magenta (tint) saturation level in 1% increments from +100% (green) to -100% (magenta).
Time Unit: Select between seconds and minutes for the time loop.
Time/Loop: Select how many seconds or minutes the loop will last (1 to 160).
Color ChaseA continuous loop that moves through the color wheel between two selected colors. Since the sequence loops, you can shoot multiple takes without reprogramming the light.
Hue Start: Selects the color at the beginning of the sequence (0° to 360°).
Hue Stop: Selects the final color of the sequence (0° to 360°).
Saturation: Determines the color intensity from 100% (full color) to 0% (white light).
Time Unit: Select between seconds and minutes for the time loop.
Time/Loop: Select the duration in seconds or minutes for each loop (1 to 160).
12
ExplosionSimulates the light from explosions. The Timpani generates random-length pulses and strobes within a range of the red to amber section of the color wheel.
Explosions/Minute: Sets how many separate explosions occur each minute (1 to 360).
Duration (%): Set the percentage of time the light is illuminated for each pulse or strobe (5% to 95%).
FireSimulates the light of a candle, campfire, or bonfire in various wind conditions.
Fire Type: Select candle, campfire, or bonfire.
Wind Type: Select between no wind, breeze, windy, or storm.
FireworksSimulates the light from fireworks. Colors and timing of each flash are random.
Explosions/Minute: Sets how many flashes will occur per minute (1 to 50).
Duration (%): Determines the percentage of time the light is illuminated in each cycle. Select from a range of 5% (shortest duration) to 95% (longest duration).
LightningSimulates lightning by creating random short and long bursts.
CCT: Selects the color temperature of the lightning flashes (3000 to 10,000 K) in 50 K increments.
Interval(s): Sets the interval of seconds between lightning flashes (1 to 60).

13
PaparazziSimulates the random firing of multiple camera flashes.
Intensity: Higher intensity increases the number of random flashes per second (0 to 100).
Bulb Type: Determines the length of each flash. Slow is the longest duration. Modern is the shortest duration. Choose from Slow, Medium, Fast, and Modern.
CCT: Sets the color temperature of the flashes from 2800 to 10,000 K
+/- Green: Sets the green/magenta (tint) saturation level in 1% increments from +100% (green) to -100% (magenta).
PulseOffers a steady pulse at a programmable rate. Similar to the Strobe special effect (below), but the light fades on and off.
Hue: Selects the light color (0 to 360).
Saturation: Determines the color intensity from 100% (full color) to 0% (white light).
Pulses/Minute: Sets how many times the light will pulse each minute (1 to 200).
14
SirenSimulates the flashing lights of an emergency vehicle, like a police car or ambulance.
Colors: Select the color combination of flashing lights. Choose red, blue, and white; red and blue; red and white; blue and white; blue; red; or SAE Amber.
Flash/Cycle: Set the number of times each individual color will flash within the cycle. Choose from 1 to 4 times per cycle.
Cycles/Minute: Determines how many repetitions of the cycle will occur each minute. Choose from 10 to 360.
Duration (%): Determines the percentage of time the light is illuminated in each cycle. Select from a range of 10% (shortest duration) to 90% (longest duration).
StrobeOffers a steady flashing light at a programmable rate.
Hue: Selects the light color (0 to 360).
Saturation: Determines the color intensity from 100% (full color) to 0% (white light).
Frequency: Changes the number of flashes per second (1 to 25).
Duration (%): Determines the percentage of time the light is illuminated in each cycle. Select from range of 10% (shortest duration) to 90% (longest duration).
15
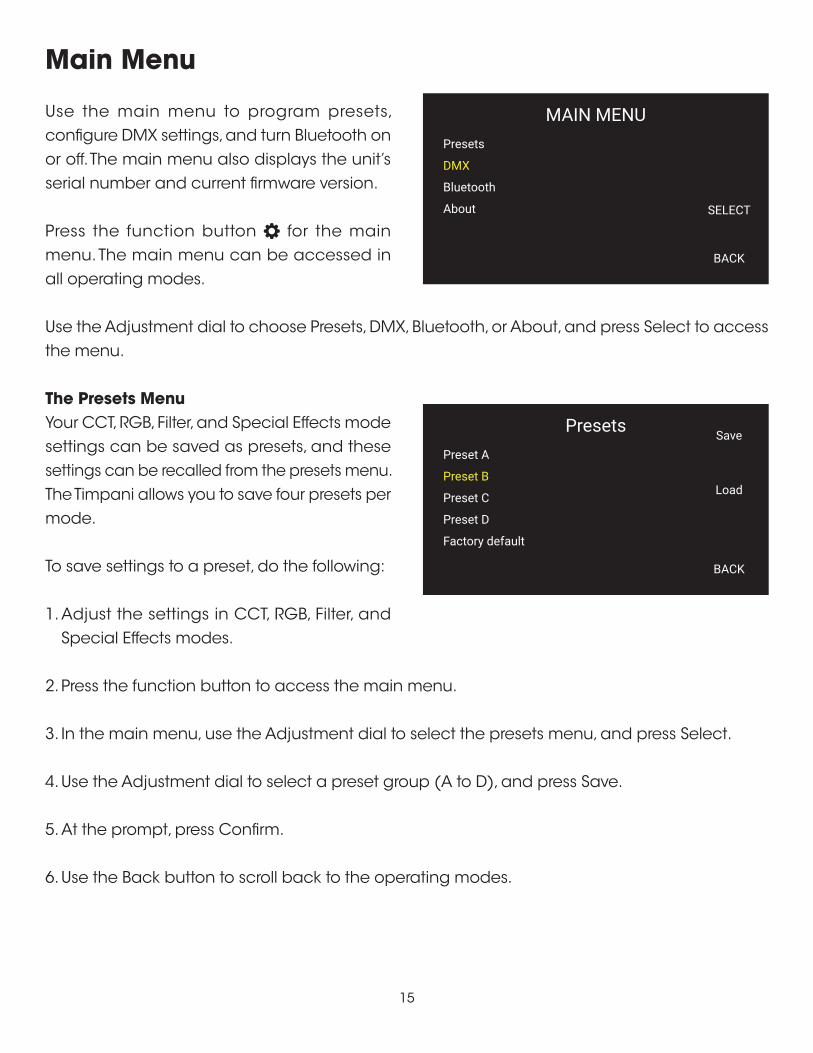
Main Menu
Use the main menu to program presets, configure DMX settings, and turn Bluetooth on or off. The main menu also displays the unit’s serial number and current firmware version.
Press the function button for the main menu. The main menu can be accessed in all operating modes.
Use the Adjustment dial to choose Presets, DMX, Bluetooth, or About, and press Select to access the menu.
The Presets MenuYour CCT, RGB, Filter, and Special Effects mode settings can be saved as presets, and these settings can be recalled from the presets menu. The Timpani allows you to save four presets per mode.
To save settings to a preset, do the following:
1. Adjust the settings in CCT, RGB, Filter, and Special Effects modes.
2. Press the function button to access the main menu.
3. In the main menu, use the Adjustment dial to select the presets menu, and press Select.
4. Use the Adjustment dial to select a preset group (A to D), and press Save.
5. At the prompt, press Confirm.
6. Use the Back button to scroll back to the operating modes.
Presets
DMX
Bluetooth
About SELECT
BACK
MAIN MENU
SavePreset A
Preset B
Preset C
Preset D
Factory default
Load
BACK
Presets

16
To recall a preset:
1. Select the preset group with the Adjustment dial, and press Load.
2. At the prompt, press Confirm. The Timpani will load the saved settings.
3. Press Back to scroll back to the operation mode that was loaded to the preset. The Timpani will not display the preset settings until you scroll back to the appropriate operation mode.
To restore the original factory presets:
Use the Adjustment dial to select Factory Default. Press Load and then Confirm. Pressing Back before you press Confirm cancels this operation, and the Timpani retains all of your programming.
Bluetooth MenuTo control the Timpani via the Conductor mobile app, Bluetooth must be turned on.
To turn Bluetooth on and off:
1. Scroll to the Bluetooth menu, and press Select. The Bluetooth settings menu will open and indicate the Bluetooth status.
2. Press Select and use the Adjustment dial to select Off or On, and then press Confirm.
3. Press Back to return to the main menu.
4. Press Back again to return to the most recent operation mode.
Bluetooth
SELECT
BACK
Bluetooth SettingsOn
Off
On
CONFIRM
BACK
Bluetooth state
17
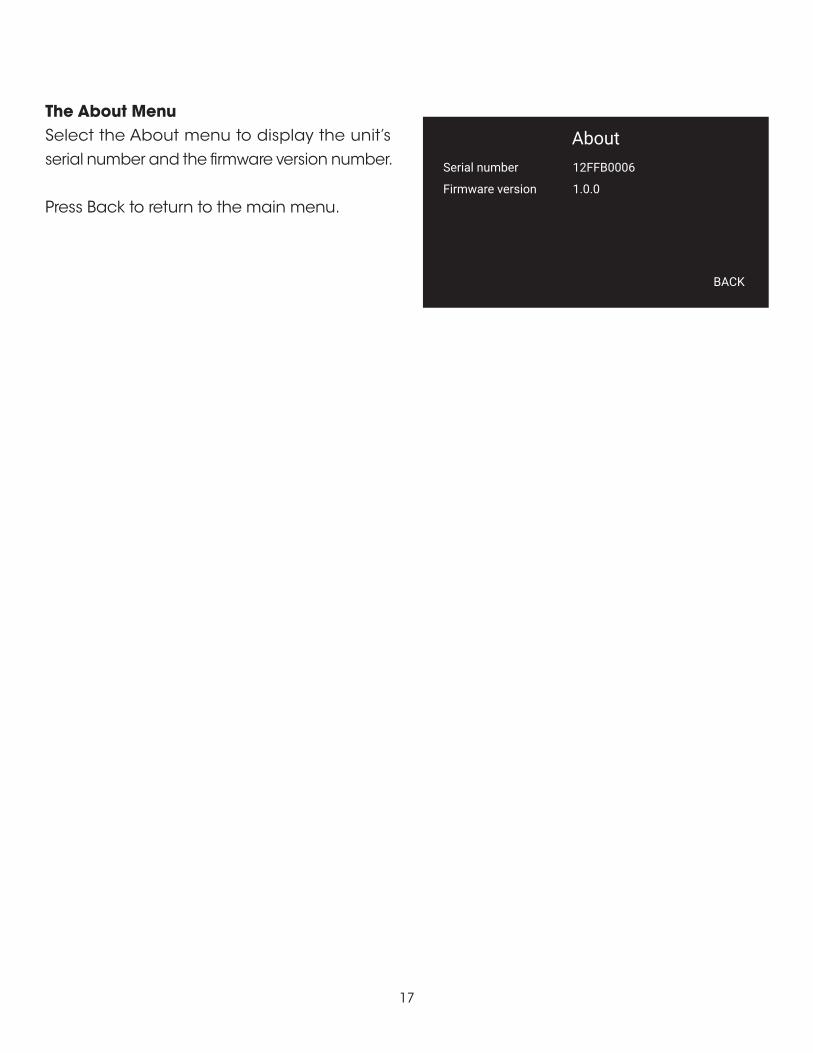
The About MenuSelect the About menu to display the unit’s serial number and the firmware version number.
Press Back to return to the main menu.
Serial number
Firmware version
BACK
About12FFB0006
1.0.0

18
DMX Operation
Connecting the Timpani to a DMX ControllerImportant! To connect the Timpani to a DMX controller, use a 5-pin DMX data cable. Do not use an XLR microphone cable. It will not transfer data to the Timpani.
To avoid interference that can be introduced into the data over long cable runs, use a cable rated at 24 AWG or lower. Copper shielding, PVC jacket, and a twisted-pair cable will also reduce interference that can affect data transmission reliability.
1. Connect the DMX output from the controller to the Timpani’s DMX input.
2. If there are no additional lights connected to the Timpani, connect a 5-pin DMX terminator to the Timpani’s DMX output.
3. If additional lights are daisy-chained to the Timpani, use a DMX cable to attach the next light in the chain to the Timpani’s DMX output. Be sure to attach a DMX terminator to the last light in the daisy chain.

19
The DMX Menu
The DMX menu lets you select the DMX address, operating mode, and the DMX Endian setting.
Setting the DMX AddressThe Timpani supports DMX 512 and has 512 channels available to receive DMX data from a controller. The DMX address is the first channel that will receive DMX data. For example:
• If you want the Timpani to receive data on channels 1 through 8, set the DMX address to 1.
• If you want the Timpani to receive data on channels 9 through 16, set the DMX address to 9.
To determine how many channels will be used by a particular mode, see the channel assignment tables below.
To set the DMX address:
1. Scroll to the DMX Address menu with the Adjustment dial, and press Select.
2. Use the Adjustment dial to select a channel from 1 to 512, and press Save.
3. At the prompt, press Confirm.
DMX Address
DMX Mode
DMX Endian
1
CCT 16 bit
Little endian
SELECT
BACK
DMX Settings
CONFIRM
BACK
DMX Address
76

20
Selecting DMX ModesThe Timpani offers 8-bit and 16-bit modes.
The 8-bit modes should be used with basic DMX controllers such as dimming consoles.
16-bit modes are best for use with virtual DMX control from a computer or advanced 16-bit DMX controllers.
DMX Modes for the Timpani include:
CCT mode: ( 8 bit and 16 bit) Corresponds to the CCT mode described above. The DMX controller can adjust the color temperature from 2800 to 10,000 K and set the green/magenta saturation level.
HSL mode: ( 8 bit and 16 bit) Corresponds to the RGB mode described above. This mode controls hue and saturation levels. The DMX controller can scroll through the entire color wheel in 1% increments.
GEL mode: ( 8 bit and 16 bit) Corresponds to the Filter mode described above. GEL mode allows the DMX controller to apply any of the 150 preset colored gels to any CCT setting.
Note: Details for each DMX mode can be viewed using RDM (Remote Device Management).
To set the DMX mode, follow these steps:
1. Scroll to the DMX Mode menu with the Adjustment dial, and press Select.
2. Use the Adjustment dial to select a DMX mode, and press Confirm.
CCT 8 bit
CCT 16 bit
HSL 8 bit
HSL 16 bit
GEL 8 bit
GEL 16 bit
CONFIRM
BACK
DMX Mode

21
DMX Mode Channel AssignmentsCCT 8 bit
HSL 8 bit
CCT 16 bit
Channel Value Function1 0 to 255 Master Intensity (0% to 100%)2 0 to 255 CCT (2800 to 10,000 K)3 0 to 54
55 to 154 155 to 155 156 to 255
Green Tint 0% -100% to -1% 0% 1% to 100%
Channel Value Function1 0 to 255 Master Intensity (0% to 100%)2 0 to 255 Hue (0° to 360°)3 0 to 255 Saturation (0% to 100%)4 0 to 255 Lightness (50% to 100%)
Channel MSB (Coarse) Channel LSB (Fine) Value Function2 1 0 to 65,536 Master Intensity (0% to 100%)4 3 0 to 65,535 CCT (2800 to 10,000 K)5 5 0 to 54
55 to 154 155 to 155 156 to 255
Green Tint 0% -100% to -1% 0% 1% to 100%

22
HSL 16 bit
GEL 16 bit
Channel MSB (Coarse) Channel LSB (Fine) Value Function2 1 0 to 65,535 Master Intensity (0% to 100%)4 3 0 to 65,535 Hue (0° to 360°)6 5 0 to 65,535 Saturation (0% to 100%)8 7 0 to 65,535 Lightness (50% to 100%)
Channel MSB (Coarse) Channel LSB (Fine) Value Function2 1 0 to 65,535 Master Intensity (0% to 100%)4 3 0 to 65,535 CCT Gel 1 (2800 to 10,000 K)5 5 0 to 255 Gel Selection 1 (same order as on
display)6 6 0 to 255 Fade from Gel 1 to Gel 2 (0% to
100%)8 7 0 to 65,535 CCT Gel 2 (2800 to 10,000 K)9 9 0 to 255 Gel Selection 2 (same order as on
display)
GEL 8 bit
Channel Value Function1 0 to 255 Master Intensity (0% to 100%)2 0 to 255 CCT Gel 1 (2800 to 10,000 K)3 0 to 255 Gel 1 Selection (same order as on display)4 0 to 255 Fade from Gel 1 to Gel 2 (0% to 100%)5 0 to 255 CCT Gel 2 (2800 to 10,000 K)6 0 to 255 Gel 2 Selection (same order as on display)

23
DMX EndianThe Timpani is preset to DMX Little Endian.
Refer to your DMX controller guide for more information about DMX Endian settings.
To change the DMX Endian setting:
1. From the DMX Settings menu, select DMX Endian.
2. Use the Adjustment dial to select the desired Endian mode, and press Confirm. After confirming your selection, you are returned to the DMX Settings menu.
3. Press Back to return to the main menu. Press Back again to return to the most recent operating mode.
Littile endian
Big endian
CONFIRM
BACK
DMX Endian
24
Upgrade Firmware
Information about firmware updates and version history is available at luxlilight.com.
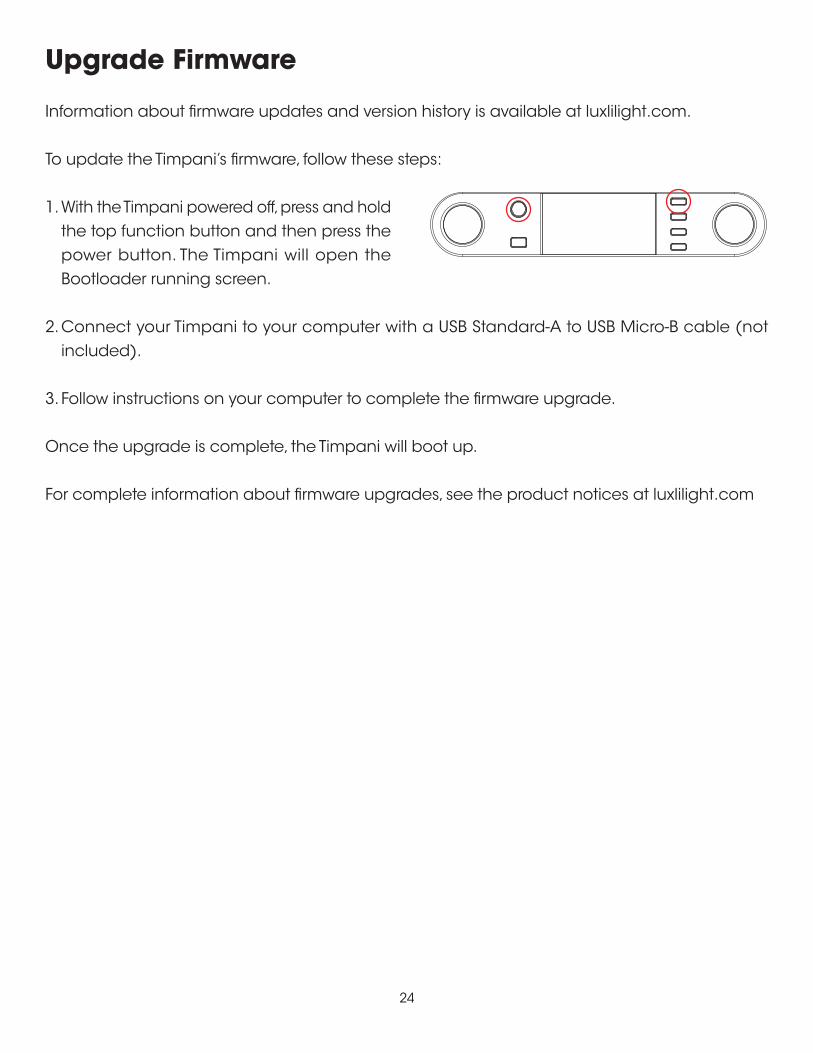
To update the Timpani’s firmware, follow these steps:
1. With the Timpani powered off, press and hold the top function button and then press the power button. The Timpani will open the Bootloader running screen.
2. Connect your Timpani to your computer with a USB Standard-A to USB Micro-B cable (not included).
3. Follow instructions on your computer to complete the firmware upgrade.
Once the upgrade is complete, the Timpani will boot up.
For complete information about firmware upgrades, see the product notices at luxlilight.com

25
Light Fixture
Connectors
Specifications
Beam Angle 78°
Color Temperature 2800 to 10,000 K ±100 K
Color Accuracy Standard CRI 95 TLCI 97
Cooling System Passive
Dimming Yes, 0 to 100% (Continuous)
Display LCD
Light Panel RGBW LED
Housing Material Aluminum
Lumens 4650
Photometrics 380.9 fc / 4100 lux at 2.99' / 0.91 m
Number of LEDs 672
Expected Lamp Life 50,000 Hours
Rectangular Panel Size 1 × 1 ft. (30.5 × 30.5 cm)
Fixture Dimensions (W × H × D) 12.25 × 12.25 × 1.4 in. (31.1 × 31.1 × 3.5 cm) Including Yoke
Fixture Weight 6.95 lb. (3.15 kg) Without Yoke
Battery Plate V-mount
Power Connector 4-pin XLR
DMX Connector 5-Pin XLR
Service Connector Micro-USB
Mounting
Fixture Mount 5/8 in. Receiver
26
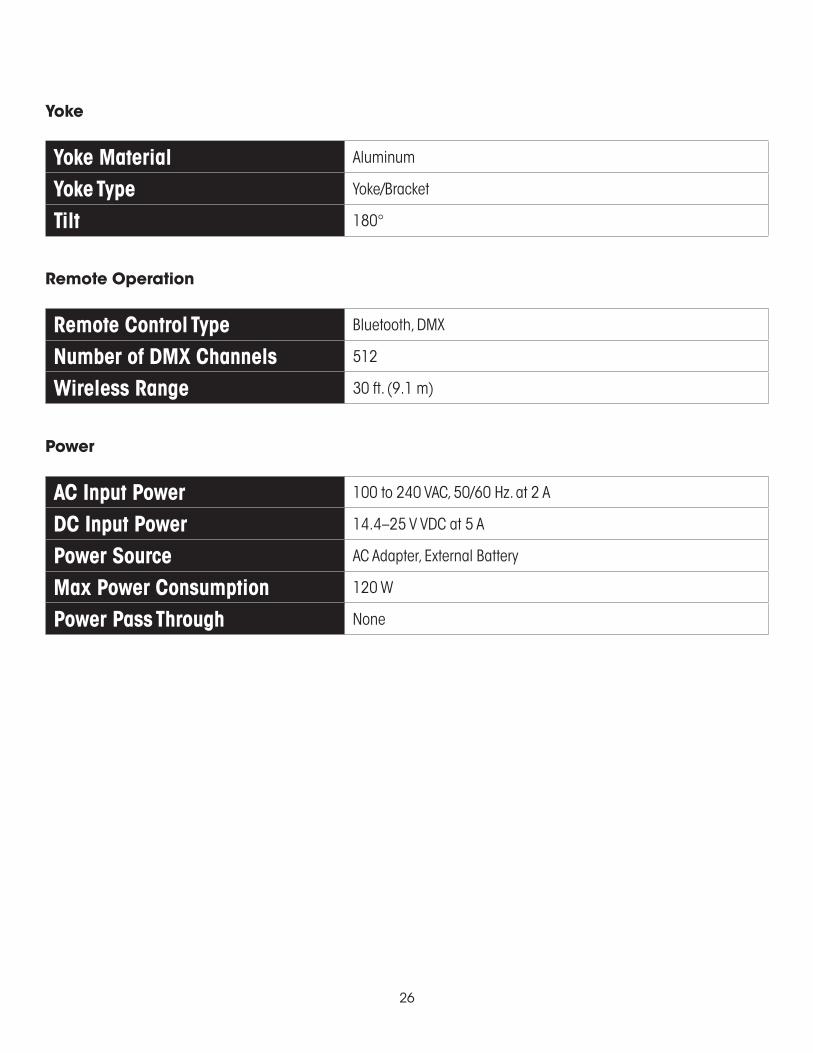
Yoke
Remote Operation
Power
Yoke Material Aluminum
Yoke Type Yoke/Bracket
Tilt 180°
Remote Control Type Bluetooth, DMX
Number of DMX Channels 512
Wireless Range 30 ft. (9.1 m)
AC Input Power 100 to 240 VAC, 50/60 Hz. at 2 A
DC Input Power 14.4–25 V VDC at 5 A
Power Source AC Adapter, External Battery
Max Power Consumption 120 W
Power Pass Through None

27
FCC Compliance Statement
This device complies with part 15 of the FCC rules. Operation is subject to the following two conditions:
1. This device may not cause harmful interference
2. This device must accept any interference received, including interference that may cause undesired operation.
Note: This equipment has been tested and found to comply with the limits for a Class B digital device, pursuant to part 15 of the FCC Rules. These limits are designed to provide reasonable protection against harmful interference in a residential installation. This equipment generates, uses, and can radiate radio frequency energy and, if not installed and used in accordance with the instructions, may cause harmful interference to radio communications. However, there is no guarantee that interference will not occur in a particular installation. If this equipment does cause harmful interference to radio or television reception, which can be determined by turning the equipment off and on, the user is encouraged to try to correct the interference by one or more of the following measures:
• Reorient or relocate the receiving antenna.
• Increase the separation between the equipment and receiver.
• Connect the equipment to an outlet on a circuit different from that to which the receiver is connected.
• Consult the dealer or an experienced radio/TV technician for help.
Important: Changes or modifications to this product not authorized by Gradus Group could void the electromagnetic compatibility (EMC) and wireless compliance and negate your authority to operate the product. This product has demonstrated EMC compliance under conditions that included the use of compliant peripheral devices and shielded cables between system components. It is important that you use compliant peripheral devices and shielded cables between system components to reduce the possibility of causing interference to radios, televisions, and other electronic devices.

28
One-Year Limited Warranty
This Luxli product is warranted to the original purchaser to be free from defects in materials and workmanship under normal consumer use for a period of one (1) year from the original purchase date or thirty (30) days after replacement, whichever occurs later. The warranty provider’s responsibility with respect to this limited warranty shall be limited solely to repair or replacement, at the provider’s discretion, of any product that fails during normal use of this product in its intended manner and in its intended environment. Inoperability of the product or part(s) shall be determined by the warranty provider. If the product has been discontinued, the warranty provider reserves the right to replace it with a model of equivalent quality and function.
This warranty does not cover damage or defect caused by misuse, neglect, accident, alteration, abuse, improper installation or maintenance. EXCEPT AS PROVIDED HEREIN, THE WARRANTY PROVIDER MAKES NEITHER ANY EXPRESS WARRANTIES NOR ANY IMPLIED WARRANTIES, INCLUDING BUT NOT LIMITED TO ANY IMPLIED WARRANTY OF MERCHANTABILITY OR FITNESS FOR A PARTICULAR PURPOSE. This warranty provides you with specific legal rights, and you may also have additional rights that vary from state to state.
To obtain warranty coverage, contact the Luxli Customer Service Department to obtain a return merchandise authorization (“RMA”) number, and return the defective product to Luxli along with the RMA number and proof of purchase. Shipment of the defective product is at the purchaser’s own risk and expense.
For more information or to arrange service, visit www.luxlilight.com or call Customer Service at 212-594-2353.
Product warranty provided by the Gradus Group.
www.gradusgroup.com
LUXLI is a registered trademark of the Gradus Group.
© 2018 Gradus Group LLC. All Rights Reserved.

luxlilight.com GG1