Embed Size (px)
Citation preview

Top Producer Systems Phone number: 1.800.830.8300
E-mail: [email protected] www.topproducer.com
Fax number: 604.270.6365
Top Producer® SellPhone™
User Guide

Top Producer® SellPhone™User Guide
Information in this document is subject to change without notice. Companies, names and data used in examples herein are fictitious unless otherwise noted, and are used for illustration purposes only. No part of this document may be reproduced or transmitted in any form or by any means, electronic or mechanical, recording or otherwise for any purpose, without the express written permission of Top Producer Systems, a Move™ company, 4708 Caldwell Road East, Edgewood, WA 98372-9221 USA.
Trademarks
Top Producer®, Top Producer® 7i, Top Producer® 7i Remote, Top Producer® Assistant, Top Producer® SellPhone™, Top Producer for Palm™ handhelds, Top Producer™ 7i, Broker Tools, Franchise Tools, Top Marketer™ and Top Producer® Websites are trademarks of Top Producer Systems, a Move™ company, 4708 Caldwell Road East, Edgewood, WA 98372-9221 USA.
Microsoft, Windows, Windows 95, Windows 98, Windows ME, Windows NT, Windows 2000, and Win-dows XP are trademarks of Microsoft Corporation.
Openwave, Openwave SDK, Openwave SDK Universal Edition, Openwave SDK WAP Edition are trade-marks of Openwave Systems Inc. All rights reserved.
The RIM and BlackBerry families of related marks, images and symbols are the exclusive properties of and trademarks of Research In Motion Limited. All rights reserved.
Palm, Hotsync, Palm OS, and Palm Computing are trademarks of Palm Computing Inc., a 3Com Com-pany.
Adobe Acrobat and Adobe Acrobat Reader are trademarks of Adobe Systems Incorporated.
The Sentry Spelling-Checker Engine ©2000 Wintertree Software Inc.
All other product names, company names, trademarks or service marks are the property of their respective owners.
©2003-2006 Top Producer Systems Company. All rights reserved.

Table Of Contents
Getting Started . . . . . . . . . . . . . . . . . . . . . . 5What is Top Producer SellPhone? ........................... 6About Wireless Internet Services ........................... 7Setting Up Top Producer SellPhone ......................... 8Assigning A License To An Assistant ....................... 9How To Use This Guide ....................................... 10Contacting Technical Support .............................. 12How To Use An Internet-Enabled Mobile Phone ............................ 13How To Use A BlackBerry Handheld Device ............ 14Logging On And Off Top Producer SellPhone .......... 15
The Basics . . . . . . . . . . . . . . . . . . . . . . . . . 18Top Producer SellPhone Basics ............................. 19
Working With The Main Menu . . . . . . . . . . . . . . . . . . . . . 23
The Main Menu Options ...................................... 24
Contact Management . . . . . . . . . . . . . . . . 26Finding And Adding Contact Information ............... 27The Contact Management Screens ....................... 32
Today’s Business . . . . . . . . . . . . . . . . . . . . 41Working With Activities ....................................... 42Today’s Business Screens ................................... 49
Leads . . . . . . . . . . . . . . . . . . . . . . . . . . . . . 55Viewing A Lead .................................................. 56The Leads Screens ............................................. 57Lead Alerts ....................................................... 60
Listings . . . . . . . . . . . . . . . . . . . . . . . . . . . 62Viewing A Listing ............................................... 63The Listings Screens .......................................... 65
Closings . . . . . . . . . . . . . . . . . . . . . . . . . . . 68Viewing A Closing .............................................. 69
Top Producer SellPhone User Guide 3

Table Of Contents
The Closings Screens ......................................... 71
Email . . . . . . . . . . . . . . . . . . . . . . . . . . . . . 74Checking And Sending Email ............................... 75The Email Menu ................................................. 78Working With Incoming Messages ........................ 79Sending An Email Message .................................. 82Working With Folders ......................................... 87Email Options .................................................... 90
SellPhone Preferences . . . . . . . . . . . . . . . . 94Customizing Top Producer SellPhone Preferences ... 95
Troubleshooting . . . . . . . . . . . . . . . . . . . . 107Troubleshooting ...............................................108
Top Producer SellPhone User Guide 4

Getting Started
In this chapter:
• “What is Top Producer SellPhone?” on page 6
• “About Wireless Internet Services” on page 7
• “Setting Up Top Producer SellPhone” on page 8
• “Assigning A License To An Assistant” on page 9
• “How To Use This Guide” on page 10
• “Contacting Technical Support” on page 12
• “How To Use An Internet-Enabled Mobile Phone” on page 13
• “How To Use A BlackBerry Handheld Device” on page 14
• “Logging On And Off Top Producer SellPhone” on page 15
Top Producer SellPhone User Guide

Getting Started
What is Top Producer SellPhone?
Welcome to Top Producer SellPhone. Top Producer SellPhone allows you to access your Top Producer 7i email, contacts, activities, listings, closings and leads from wherever wireless Internet service is available.
This section tells you:
• about wireless Internet services (see page 7).
• about setting up Top Producer SellPhone (see page 8).
• how to use this guide (see page 10).
• how to contact technical support (see page 12).
Top Producer SellPhone User Guide 6

Getting Started
About Wireless Internet Services
To start using Top Producer SellPhone:• you will need an Internet-enabled mobile phone; or a
BlackBerry® Handheld device.
• your cellular provider must support the wireless Internet.
• you may need to sign up for an Internet cellular account.
Your cellular provider may charge you whenever you are logged into the Internet with your phone’s micro browser. After logging out of Top Producer SellPhone, make sure you also log out of the micro browser to avoid unnecessary cellular charges. Your cellular provider may also have specific charges for wireless Internet usage; please contact your provider’s customer service for information on billing.
Top Producer SellPhone User Guide 7

Getting Started
Setting Up Top Producer SellPhone
You do not have to install or set up anything to start using Top Producer SellPhone on your mobile phone. However, you may want to change some of the default application settings to customize Top Producer SellPhone to suit your working preferences.
Top Producer SellPhone can be set up:
• to display a specified screen whenever you log in
• to accept a specified login authentification rule of your choice
• to alert you when a lead is received (if your phone supports this function), etc.
These, and many other useful Top Producer SellPhone settings, are set up from the SellPhone preferences page in Top Producer 7i.
Changing SellPhone Default Settings in Top Producer 7i
If you choose to change the default settings for Top Producer SellPhone, you are required to log in to Top Producer 7i, point to Setup, Applications setup, and then click Top Producer SellPhone.
For more detailed information on using the SellPhone preferences page, please see “Customizing Top Producer SellPhone Preferences” on page 95 in this User Guide.
Top Producer SellPhone User Guide 8

Getting Started
Assigning A License To An Assistant
If you have an assistant, you can assign a Top Producer SellPhone license to them so that they can access your Top Producer 7i database using Top Producer SellPhone.
The instructions below assume you have already set up an assistant. If you have NOT and you would like more information, please see Top Producer 7i’s online Help or User Guide.
To assign a Top Producer SellPhone license to an assistant:
1. Log on to Top Producer 7i.
2. Point to Setup, then click Agent setup.
3. Click Assistants from the action menu.
4. Highlight an assistant and click View or edit from the action menu.
5. Select the Give this assistant access to Top Producer SellPhone check box.
Note: The assistant will require a Top Producer Sell-Phone license. To remove the license from the assistant, clear the check box.
6. Click OK.
Top Producer SellPhone User Guide 9

Getting Started
Main menuQuick searchSearch resultsSelct contactSelct DetailsContact record
How To Use This Guide
Each chapter describing Top Producer SellPhone’s features starts with the steps required to accomplish common functions. The remainder of each chapter discusses the various phone screens in more detail.
Adjacent to each example of a Top Producer SellPhone screen is a table showing how to access the screen. In the example to the left, to access the contact Details screen (where you can dial a contact), start from the Main menu and proceed through the Quick search, Search results, Contact selection, Contact details and Contact record screens.
About Portable Document FormatThe Top Producer SellPhone User Guide is presented in Portable Document Format (PDF), and is viewed by using Adobe® Acrobat® Reader®.
For more information about Adobe Acrobat, please refer to Adobe Acrobat’s online Help. (To access the online Help from the main Adobe Acrobat window, click the Help menu, then Reader Help.)
The guide is best used online on your computer screen, but you can also print the guide.
Saving the User Guide
If you have not already done so, please save the guide to any directory on your hard drive. To view the guide in the future, double-click the saved file to open it in Adobe Acrobat.
You can access the User Guide any time from Top Producer 7i:
1. From the Top Producer 7i main menu, click Help and then click Download user guides.
The Download User Guides page opens.
2. Click the hyperlink corresponding to the User Guide you want to download.
The selected User Guide opens in Adobe Acrobat.
3. To save a copy of the User Guide, click the Save ( )
icon from the Adobe Acrobat toolbar.
Top Producer SellPhone User Guide 10

Getting Started
The Save a Copy... pop-up window opens.
4. Click the Save in drop-down list and specify a location on your computer (usually the Desktop is the easiest location).
5. Click Save.
How to print the User Guide
To print the Top Producer SellPhone User Guide:
1. From the Adobe Acrobat menu, click File, then click Print; or click the Print ( ) icon.
The Print pop-up window opens.
2. Set your printer options, then click OK.
Navigating within the User Guide
If you are reading the Top Producer SellPhone User Guide online as a PDF file, click any text that appears in blue to jump directly to that section, (for example, click on [feature] on page [XX]” to jump directly to that section).
Searching the User Guide
You can search for and locate specific information in this guide by looking for key words, such as “technical support”, “email”, or “listings”.
To search the User Guide for specific text:
1. From the Adobe Acrobat toolbar, click the Find ( )
icon; or from the main menu click Edit, then Find.
The Find pop-up window opens.
2. In the Find What field, type a key word. For example, if you’re looking for information about vendors, type “vendor”.
3. Depending on your search preferences, select one or all of the Match Whole Word Only, Match Case, and Find Backwards check box(es).
4. Click Find.
Top Producer SellPhone User Guide 11

Getting Started
Contacting Technical Support
Top Producer Technical Support is available Monday - Friday, 6:00 AM - 5:00 PM (Pacific Time):
• Email: [email protected].
• Fax: 604.270.6365.
• Telephone: 1.800.830.8300.
For support information and FAQs, go to www.topproducer.com.
Top Producer SellPhone User Guide 12

Getting Started
How To Use An Internet-Enabled Mobile Phone
There are many different Internet-enabled phone models available. Top Producer SellPhone runs on your phone’s micro browser, a phone function that allows you to access the Internet. Please see your phone’s user guide for information on the micro browser and your specific phone’s features.
Use the scroll keys to navigate the screens. Some phones have 4 scroll keys, some have only 2. In Top Pro-ducer SellPhone, you only use the Up and Down scroll keys to navigate the screens.
Use the right Soft key to select the right menu choice; in the example shown, this key would move Back a screen. In this example of a mobile phone, the Soft key is labeled HOME; in other phones it may not be labeled at all.
Use the alphanumeric keys to make numerical selections and to enter text.
When Top Producer SellPhone requires text input, repeat-edly pressing one of these keys will generate the corre-sponding letter. For example, press the 5 key once to enter j, twice for k and three times for l.See “How to enter text” on page 20 for more information.
Use the CLR button to delete characters. Some phones may not have a CLR button; refer to your phone guide for more information.
The Soft keys are two buttons on the phone that are used to select the corresponding options listed at the bottom of the screen. They are called Soft keys because their function depends on the corresponding command at the bottom of the screen.
Use the left Soft key to select the left menu choice; in the example shown, this key would Select the highlighted option (Go to today).
Most phones have a hard Back key, which may be labelled BACK, END, or
something else depending on the par-ticular model of phone (refer to your phone manual). You can use this key to move to previous screens. See “Back”, on page 20.
Press and hold the hard Back key to end the micro browser session at any time.
Top Producer SellPhone User Guide 13

Getting Started
How To Use A BlackBerry Handheld Device
Top Producer SellPhone is designed to run on the BlackBerry® Handheld device. For information about the micro-browser, please see the product’s user guide for information or talk to your service provider.
Note: The functions outlined below may vary slightly from device to device. The descriptions herein are simply suggested as a general guideline.
Use the Trackwheel to scroll through menus and click on functions. Roll the wheel up/down to scroll; press it to select (much like the mouse on your computer).
Use the Escape key to return to a previous screen, or to hide and close a menu. Pressing it repeatedly will return you to the Home screen.
Wait for your wireless network to connect, (i.e. GSM or GPRS) and check the coverage strength indicator icon before selecting the browser icon.
The Alt key lets you access the numbers and symbols printed above the letters on the key-board, (i.e. [Alt + W] = 1).
The Power key is the device’s on/off switch. When turning the device on/off, hold the key down.
Press the Enter key to initiate an action (i.e. after entering your username and password, press Enter).
Top Producer SellPhone User Guide 14

Getting Started
Logging On And Off Top Producer SellPhone
Please contact your cellular provider for assistance with the following information required to log on to Top Producer SellPhone:
• how to start your phone’s micro browser and enter the Top Producer SellPhone URL (tpsellphone.com).
• how to bookmark the Top Producer SellPhone URL.
• how to access the Top Producer SellPhone bookmark.
While you are talking with your cellular provider, you may also want to ask for assistance with setting up short message service (SMS) on your phone. For more information, see “Enabling Lead Alerts” on page 98.
Logging on To log on to Top Producer SellPhone for the first time:
1. Connect to the wireless Internet using your phone’s micro browser.
2. Go to tpsellphone.com using your phone’s micro browser (or go to the Top Producer SellPhone bookmark if you have already set this up).
The Enter username screen appears.
Note: An “http://” prefix may be automatically added to the tpsellphone.com address. This means that the address in your phone’s microbrowser may appear like this: http://tpsellphone.com. This is Top Producer SellPhone’s way of direct-ing you to a secure site, if necessary. You do NOT have to modify the address.
3. If you have not already done so, bookmark the Enter username screen so you do not have to enter the Top Producer SellPhone web address every time you
Top Producer SellPhone User Guide 15

Getting Started
log on. The next time you want to log on, go directly to the Top Producer SellPhone bookmark.
4. Enter your Top Producer username and select Next.
5. Enter your password and select Log on.
The main menu appears. For more information, see “The Main Menu Options” on page 24.
Note: When you log on to Top Producer SellPhone for the first time, you must enter both your user-name and password. On subsequent log-ons, depending on your cellular provider, you may only need to enter your password. You can also set up Top Producer SellPhone so that when you log in you must enter both your username and password, just your password or just your PIN code. You can also set up Top Producer SellPhone so that you can log in with-out having to enter a username, password or PIN code. For more information, see “Authen-tication rule” on page 97.
Logging off If you want another agent or assistant to use your phone to log onto Top Producer SellPhone, make sure the Authentication rule drop-down list is set to Require username and password, then log off. (You can set the Authentication rule drop-down list in Top Producer 7i.)
For more information, see “Authentication rule” on page 97. When another agent or assistant logs in, the Enter username screen appears, letting the agent or assistant specify their own username, then their password, to access Top Producer SellPhone.
To log off Top Producer SellPhone or change users:
1. From the main menu, select Log off. For more information, see “The Main Menu Options” on page 24.
The Thank you for using Top Producer SellPhone screen opens.
2. To let another user log on, click Logon.
Top Producer SellPhone User Guide 16

Getting Started
The Enter username screen opens.
3. From here, the user should specify their username and select Next.
4. The user should specify their password, and then click Logon.
5. To return to the phone’s default browser screen, select Home.
Top Producer SellPhone User Guide 17

The Basics
In this chapter:
• “Top Producer SellPhone Basics” on page 19
• “How to select options” on page 19
• “How to navigate screens and lists” on page 20
• “How to enter text” on page 20
• “How to enter dates and times” on page 21
• “Dialing contacts” on page 21
• “About sessions” on page 21
Top Producer SellPhone User Guide

The Basics
Top Producer SellPhoneBasics
This section explains the basics of using Top Producer SellPhone, including:
• scrolling around the screen.
• selecting options.
• navigating lists.
• entering text and dates.
• dialing a contact from a Top Producer SellPhone screen.
Screen sizeIn this user guide, for clarity all screen options are displayed at once. However, most wireless Internet phones can only display a few lines of text at a time. Use the Up and Down scroll keys to access options that are hidden by the edges of the screen.
How to select optionsA typical Top Producer SellPhone screen will have a number of options, with a menu bar at the bottom.
You can select an option in two ways:• Press the corresponding number on the keypad, (for exam-
ple, press 4 for Go to today in this example). Some menu options (for example those above 9) may not have a quick-access key.
TIP! If you don’t see an option that you need, remember to scroll down the list to see if it is hidden at the bottom of the screen.
Use the Down scroll key to scroll down the menu to display the remaining options.
Top Producer SellPhone User Guide 19

The Basics
• Use the scroll keys to move the cursor to the appropriate selection, then press the left Soft key (Selct) to select it.
Note: When using Top Producer SellPhone on a BlackBerry handheld device, there may be only one Soft key available in many instances. You can select an option by using the Trackwheel and the pop-up menu. For more information, see “How To Use A BlackBerry Handheld Device” on page 14.
How to navigate screens and listsNavigation through the screens and lists in Top Producer SellPhone is accomplished by using Soft keys and menu items, as well as the phone’s own keys such as CLR.
BackUse the Back Soft key or menu item, when available, to go to a previous screen. Most phones also have a key which can be used to go back to previous screens. This key may be labelled something like “BACK”, “END”, or “CLR”. Press this phone key repeatedly to go back to previously viewed screens. If you are having difficulty leaving a feature or option, try selecting Back or pressing this phone key until you have the option of selecting Menu to return to the main menu. Please refer to your phone’s User Guide for more information on which key to use.
Note: When using Top Producer SellPhone on the BlackBerry handheld device, as seen in the screen to the left, there is only one Soft key available. To select an item from the list, press the Trackwheel and use the pop-up menu.
-Next- and -Previous-If a list (for example the results of a search) contains more than one page, use the -Previous- and -Next- options to navigate through the list.
Note: Pressing Back will not move back in the list, but will return you to the previous screen.
How to enter textYour micro browser supports a number of different text-entry modes. How you select these modes depends on the model of
Top Producer SellPhone User Guide 20

The Basics
phone you have. Please refer to your phone’s user guide for more information.
• ALPHA or ABC — Text entry mode.
• NUM — Only numbers will be entered.
When in ALPHA (ABC) mode, pressing one of the alphanumeric keys will enter the first of its corresponding letters. Quickly press the key repeatedly to select the other corresponding letters.
For example, press the 2abc key once for a, twice for b, and three times for c.
To enter special symbols, keep pressing the *, 0 or 1 key until the symbol you need appears (see your phone guide for more information).
How to enter dates and timesAll dates are entered in the mm/dd/yy format. All times are entered in the hh:mm AM/PM format. You do not have to enter the slashes (/); Top Producer SellPhone will automatically enter them for you.
If you enter an invalid date or time, you will see the Invalid date/Invalid time screen. Select Back and re-enter the date or time.
Dialing contactsIn a number of screens, (for example, “Contact operations” on page 34), you can select Dial to call the contact immediately. Your cell phone will call the contact’s default phone number, and when you end the call you will be returned to the same Top Producer SellPhone screen you were in before the call, without having to log back into Top Producer SellPhone.
When a contact is called in this way, the default phone number is dialed according to the settings in Top Producer SellPhone preferences. For more information see “Phone type priority for auto-dialing” on page 97 and “Phone numbers” on page 99.
Whenever you call a contact this way, after the call is completed you will be asked whether you want to create a marked done call activity for the contact. Select Yes to create a marked done call activity, No to cancel. For more information on activities, see “Marking activities “done”” on page 45.
About sessionsWhenever you log on to Top Producer SellPhone, a new session is created. As you use Top Producer SellPhone it will remember where you are and what you are doing. If you need to make or receive a phone call you can disconnect from your micro browser,
Top Producer SellPhone User Guide 21

The Basics
or if you are inactive for a period of time you may be automati-cally disconnected. When you reconnect to Top Producer SellPhone you will be returned to the same screen where you disconnected from.
If you are inactive for a long period of time, your session will be deleted and the next time you reconnect to the Internet you will see the Expired session screen. Select Logon to start afresh in Top Producer SellPhone.
Top Producer SellPhone User Guide 22

Working With The Main Menu
In this chapter:
• “The Main Menu Options” on page 24
Top Producer SellPhone User Guide

Working With The Main Menu
The Main Menu Options
The main menu allows quick access to the following nine options. Select Menu to return to the main menu from other areas of Top Producer SellPhone.
• Today’s Biz (Today’s Business) — Display your activities for today, or schedule an activity. For more information, see “Today’s Business” on page 41.
Note: If your phone cannot display 18 or more char-acters per line, Today’s business will be referred to as Today’s Biz throughout Top Producer SellPhone.
• Quick search — Quickly look up a contact by name. For more information, see “To search for and call/email a con-tact using Quick search:” on page 27.
• New Contact — Add a new contact. For more information, see “New Contact” on page 32.
The main menu is the default start-up screen after logging on to Top Producer SellPhone. You can set up Top Producer SellPhone so that Quick search, Contact search, Today’s business, Email, Closings summary, Listings summary or Leads summary are the first screens displayed. For more information, see “Startup screen” on page 96.
• Leads — Search for, view or call your leads. For more infor-mation, see “Leads” on page 55.
• Listings — Search for and view your listings and property information. For more information, see “Listings” on page 62.
• Closings — Search for and view your closings and property information. For more information, see “Closings” on page 68.
• Email — Send and receive email. For more information, see “Email” on page 74.
Note: If you have not set up your email preferences in Top Producer 7i, you will not be able to send or receive email. Log into Top Producer 7i and click My Email to set up email. For more information about setting up email, see the online Help. You can also down-load the user guide from the online Help for more detailed information.
Top Producer SellPhone User Guide 24

Working With The Main Menu
• Search — Search for contacts using a number of criteria or list all your contacts. For more information, see “To search for a contact using Contact search:” on page 28.
• Log off — Log out of Top Producer SellPhone. Remember to quit your micro browser to avoid unnecessary cellular service charges. For more information, see “To log off Top Producer SellPhone or change users:” on page 16.
Top Producer SellPhone User Guide 25

Contact Management
In this chapter:
• “Finding And Adding Contact Information” on page 27
• “The Contact Management Screens” on page 32
Top Producer SellPhone User Guide

Contact Management
Finding And Adding Contact Information
Top Producer SellPhone provides a complete range of contact management features. You can:
• search for a contact by name, phone number, price range or contact type.
• call or email a contact.
• view or modify contact information.
• add, edit or delete contacts.
• link activities to the contact or view linked activities.
Using Quick search
The Quick search feature allows you to quickly find a contact by searching for their first or last name, or company name. Enter the full name or enter partial text.
To search for and call/email a contact using Quick search:
1. Select Quick search from the main menu.
2. Enter a contact name, part of a contact name or a company name in the Contact name screen, then select Find.
Note: You can search by first name, last name, or both. Use a search format of first name[space]last name, or last name[comma]first name. You can search on name fragments (i.e. you can search for “Smith” using “Smi” or “Sm” or “ith”).
3. Select a contact from the list that appears.
4. You can Dial or Email the contact, select Details to view the contact’s information, Delete the contact or return to the Menu.
Top Producer SellPhone User Guide 27

Contact Management
The Contact details screen displays the contact’s information.
5. Select More for more options.
6. You can call the contact’s default number. To call the contact using one of their other numbers, select phones. Select the relevant option to view or edit the contact’s associated email address, notes, activities associated with the contact, contact types, primary and secondary names, address or company name, or delete the contact.
Using Contact search
The Search feature lets you search for more criteria than the Quick search feature. Use the Search feature to find a contact by entering their name, phone number, present home minimum or maximum price, future home minimum or maximum price, and contact type.
To search for a contact using Contact search:
1. Select Search from the main menu.
2. Select Search from the Contacts screen.
3. You can search by contact Name, Phone number, price range of present and future home, Contact Type, or a combination of all of these. Select a search term to enter your search under the specified category. Select Clear search to clear your search and start again.
If you are performing a search based on a Min/Max value range, the results will include any contacts within the specified price range. For example, for a Pres Home Min value of $120,000 and a Pres Home Max value of
Top Producer SellPhone User Guide 28
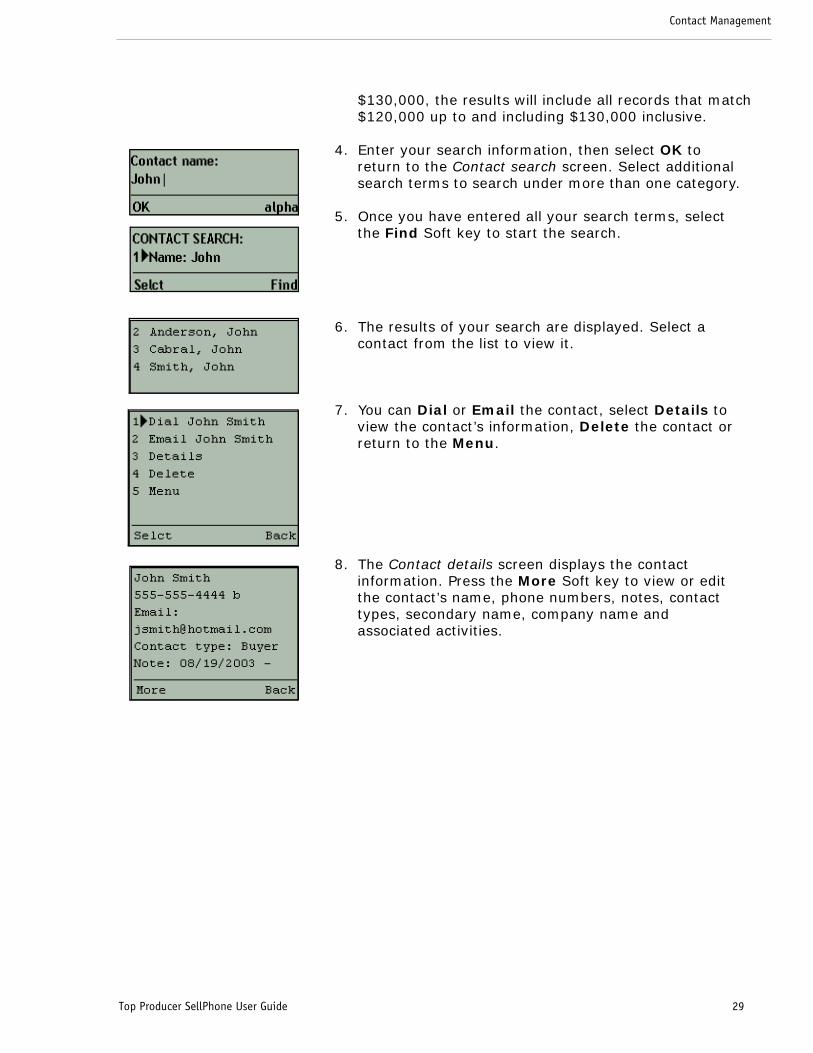
Contact Management
$130,000, the results will include all records that match $120,000 up to and including $130,000 inclusive.
4. Enter your search information, then select OK to return to the Contact search screen. Select additional search terms to search under more than one category.
5. Once you have entered all your search terms, select the Find Soft key to start the search.
6. The results of your search are displayed. Select a contact from the list to view it.
7. You can Dial or Email the contact, select Details to view the contact’s information, Delete the contact or return to the Menu.
8. The Contact details screen displays the contact information. Press the More Soft key to view or edit the contact’s name, phone numbers, notes, contact types, secondary name, company name and associated activities.
Top Producer SellPhone User Guide 29

Contact Management
Entering a new contact
You can use the New Contact feature to enter a new contact record.
To enter a new contact:
1. Select New Contact from the main menu.
2. Enter the contact’s first name and select Next.
3. Enter the contact’s last name and select Next.
4. Optionally, enter a secondary first and last name (for example, the contact’s spouse. You can enter nothing and select Next to leave the fields empty.
5. Enter the home phone number and select Next.
6. Enter the business number and select Next.
7. Enter the mobile number and select Next.
8. Enter the email address and select Next.
Top Producer SellPhone User Guide 30

Contact Management
9. Enter the first few letters of the contact type and select Save. If you do not want to enter a contact type, leave the field blank.
10. Select the contact type you want to use from the list of matching contact types. If no types match your entry, the entire list will be displayed.
11. Enter more contact information by selecting Phones, Notes, Address or Company. You can link an activity to the contact by selecting Activities.
Top Producer SellPhone User Guide 31

Contact Management
Main menuQuick search
Main menuNew Contact
The Contact Management Screens
Quick searchUse Quick search to quickly search for a contact. All contacts containing the search term in their first or last names, or in their company name will be displayed.
To perform a quick search:
1. Select Quick search from the main menu.
2. Enter a name, part of a name, or a company name. If you leave this empty, all your contacts will be displayed.
3. Select Find.
A list of all contacts matching your search is displayed. For more information, see “Contact list” on page 34.
Note: You can search by first name, last name, or both. Use a search format of first name[space]last name, or last name[comma]first name. You can search on name fragments (i.e. you can search for “Smith” using “Smi”, “Sm” or “ith”.) For example, to search for Michael Smith, you could enter “michael smith”, “mic smi”, “smith,michael”, “sm,mic”, or just “smi”. Entering just “smi” would also display any con-tacts with first name Jasmine, last name Word-smith, etc.
New ContactSelect New Contact from the Main menu to add a new contact. You will be prompted to enter the contact’s primary and secondary (i.e. spouse) names, phone numbers, email address and contact type. For more information, see “To enter a new contact:” on page 30.
Top Producer SellPhone User Guide 32

Contact Management
Main menuSearchContacts
Main menu
ContactsSearch
Contact search
ContactsSelect Search from the Main menu to display the Contacts screen. From here you can select:
• Search: search for a contact using a range of criteria. For more information, see “Contact Search” on page 33.
• List all: display a list of all your contacts. For more infor-mation, see “Contact list” on page 34.
Contact SearchUse Contact search to search for contacts matching one of a number of search criteria.
1. Select one of the search criteria. You can fill out as many of the search criteria as you want. If you want to display all your contacts, do not enter any search criteria and skip to Step 2.
• Name: enter a name, part of a name, or a company name.
• Phone: enter a phone number or part of a phone number.
• Pres Home Min: enter the lower amount of the con-tact’s present home price.
• Pres Home Max: enter the upper amount of the contact’s present home price.
• Fut Home Min: enter the lower amount of the con-tact’s desired future home price.
• Fut Home Max: enter the upper amount of the con-tact’s desired future home price.
When entering minimum and maximum values for a search, Top Producer SellPhone searches for and returns all records containing the values within the specified range, including the minimum and maximum values.
• Cont. type: enter a contact type. You can use frag-ments of contact types; if you want to search on more than one contact type, separate them with a semi-colon. Example: enter Buy;Sell to locate all contacts with type Buyer, Buy Once, Seller, Sell Consortium, etc.
• Clear search: clear all your search terms.• Menu: return to the main menu.
2. When you are ready to perform the search, select Find to display a list of contacts matching your search criteria. For more information, see “Contact list” on page 34.
Top Producer SellPhone User Guide 33

Contact Management
Main menuSearchContactsList allContact list
Main menuSearchContactsContact listContact operatio
Contact listThe Contact list screen displays the results of a contact search or your entire contact list if you selected List all.
• navigate through the contact list by selecting the - Previ-ous - and - Next - options.
• to create a new contact, select New to display the Primary first name screen. For more information, see “Enter contact name” on page 40.
Note: The New option is only available if you selected List all and NOT when you perform a search.
• to view, edit or delete a contact, select the contact to dis-play the Contact operations screen.
Contact operationsFrom the Contact operations screen you can do the following:
• Dial: dial the contact’s default number. For more informa-tion, see “Dialing contacts” on page 21.
• Email: send an email to the contact. For more information, see “Composing a message” on page 82.
Note: The Email option is only available if you have set up your email address on the Agent setup page of Top Producer 7i; AND if the selected contact has an email address specified. If the selected contact does NOT have an email address entered, use the Add email screen via the Details option to enter this information.
• If the contact has multiple email addresses, you will be able to select the address you want from the list.
Note: If the contact has multiple email addresses and you have the “Always use primary email address...” setting selected, the primary email address will be used. For more information, see page 105.
• Details: view or edit the contact. For more information, see “Contact details” on page 35.
ns
Top Producer SellPhone User Guide 34

Contact Management
Main menuQuick searchContact listContact operatioContact details
Main menuQuick searchContact listContact operatioContact detailsContact menu
• Delete: delete the contact. You can set up Top Producer SellPhone so you do not have to confirm the deletion of contacts, notes, phone numbers, activities, leads, listings or closings. For more information, see “Show ‘Delete’ con-firmation” on page 98.
• Menu: return to the main menu.
Contact detailsThe Contact details screen displays the following contact information:
• contact name and secondary name (if applicable)
• phone number
• address
• company name
• email address
• contact types
• present property price range
• future property price range
• most recently entered note
The two examples on the left show a contact with name and phone number only, and another contact with all the above fields present.
For more contact details, to edit the contact, or to link activities to the contact, select More to display the Contact menu screen. For more information, see “Contact menu” on page 35.
Contact menuSelect More from the Contact details screen to display the Contact menu screen, where you can select the following:
• Call: call the contact (if a phone number is available). If your phone allows, you will be returned to the Contact menu screen once the call is completed.
• Phones: view, add or delete phone numbers. For more information, see “Phone list” on page 36.
• Email address: view a list of the contact’s email addresses, add a new email address, or email the contact. For more information, see “Email address list” on page 37.
• Notes: view, edit or delete notes. For more information, see “Notes” on page 38.
• Activities: view all appointments, calls, to-dos and email associated with the contact, or link an activity. For more information, see “The Activity list” on page 50.
ns
ns
Top Producer SellPhone User Guide 35

Contact Management
Main menuQuick searchContact listContact operatioContact detailsContact menuPhone list
Main menuQuick searchContact listContact operatioContact detailsContact menuPhone listAdd phone numb
• Contact types: add or remove contact types associated with the contact. For more information, see “Contact types” on page 39.
• Names: change the contact’s name or enter/change a sec-ondary contact name. For more information, see “Enter contact name” on page 40.
• Address: View, enter or edit the contact’s address infor-mation. For more information, see “Address” on page 40.
• Company: Enter or edit company information. Once you have entered the company information, select OK to save the company name and return to the Contact menu screen.
• Delete: Delete the contact.
Phone listThe Phone list screen displays all phone numbers associated with the contact. Extensions are preceded by the + sign. The type of phone number is indicated after the number (the first letter of the phone type is displayed), for example:
h: Home number
b: Business number
f: Fax number
m: Mobile number
o: Other number
• Select New to enter a new phone number and display the Add phone screen. See “Add phone” below.
• Place the cursor next to a number and select Edit to change the number or type. For more information, see “Edit a phone number” on page 37.
• Place the cursor next to a phone number and select Dial, or press the corresponding numeric key to dial the number.
Add phoneEnter a new phone number of the default type. For more information, see “Phone type priority for auto-dialing” on page 97. Enter numbers only when inputting phone numbers - do not enter spaces, brackets or dashes.
• Enter a phone number in the Add phone screen and select Save to display the Phone menu screen. For more informa-tion, see “Edit a phone number” on page 37.
Note: When entering area codes, be aware of your local phone company’s rules for dialing local
ns
ns
er
Top Producer SellPhone User Guide 36

Contact Management
Main menuQuick searchContact listContact operatioContact detailsContact menuPhone listEdit phone numb
Main menuQuick searchContact listContact operatioContact detailsContact menuEmail address
Main menuQuick searchContact listContact operatioContact detailsContact menuEmail addressSelect address
area codes. For more information, see “Phone numbers” on page 99.
Edit a phone numberHighlight a phone number from the Phone list screen and select Edit using the Soft keys to edit a phone number. You can:
• Edit number: change the phone number.
• Edit extension: enter or edit the phone extension.
• Dial: call the number.
• Change type: change the type of number. The phone types you can choose from depend on the types you have in Top Producer 7i.
• Delete: delete the number
Email address listThe Email address list screen lists all email addresses associated with a contact. The option to email a selected address is only available if you have set up an email address on the Agent setup page of Top Producer 7i.
• If the selected contact does NOT have an email address entered, the Add email screen is displayed so you can enter this information.
• Highlight an email address and press the Email Soft key to send an email to the address. For more information, see “Composing a message” on page 82.
• Highlight an email address and press the Edit Soft key to edit or delete the email address.
• New: add a new email address. Select Save when you have entered the new address.
Edit email addressFrom the Edit Email address options screen you can select:
• Email: send an email to the address. For more information, see “Composing a message” on page 82.
• Edit address: edit the address. Select Save when done.
• Delete: delete the address.
Note: The Email menu item is only available if you have set up your email address on the Agent information page in Top Producer 7i.
ns
er
ns
ns
Top Producer SellPhone User Guide 37

Contact Management
Main menuQuick searchContact listContact operatioContact detailsContact menuNotes
Main menuQuick searchContact listContact operatioContact detailsContact menuNotesNote details
NotesThe Notes screen lists all notes associated with a contact. Notes are sorted by date of entry and displayed in descending order. If there are no notes associated with the contact, the Enter note screen will be displayed.
• New — enter a new note. For more information, see “Enter note” on page 38.
• To view, edit or delete a note, select it to display the Note details screen. For more information, see “Note details” on page 38.
Note detailsThe Note details screen displays the full text of the note.
• More — edit the note. For more information, see “Note options” below.
Note optionsFrom the Note options screen you can select:
• Edit — edit or view the full text of the note. For more infor-mation, see “Enter note” below.
Note: If you enter a note that exceeds 256 charac-ters, you will NOT be able to edit it in Top Pro-ducer SellPhone. Instead, you will see the “Unable to edit long value” message.
• Delete — delete the note.
Enter note• Save — save the note and return to the Notes screen.
Note: If you want the date to be displayed automat-ically in notes, select the Include date stamp in notes check box in Top Producer 7i’s Pref-erences window. Point to Setup, Prefer-ences, and then General. The Preferences window opens. Select the Include date, time, and created by stamp in notes check box.
ns
ns
Top Producer SellPhone User Guide 38

Contact Management
Main menuQuick searchContact listContact operatioContact detailsContact menuContact types
Main menuQuick searchContact listContact operatioContact detailsContact menuContact typesAdd contact typ
Main menuQuick searchContact listContact operatioContact detailsContact menuEdit names
Contact typesThe Contact types screen displays a list of contact types associated with the contact, in alphabetical order.
• Add: associate a contact type with the contact. For more information, see “Add contact type” below.
Note: You cannot create new contact types in Top Producer SellPhone. New contact types can only be created in Top Producer 7i. For more information about creating new contact types, please see Top Producer 7i’s online Help or user guide.
• Del: remove a contact type. This Soft key option is only available when the cursor is next to a contact type.
Add contact typeFrom the Add contact type screen you can do the following:
• Select a contact type to associate with the current contact.
Note: A contact may have more than one contact type associated with it.
• Scroll down the list and select Next to see more contact types.
• Back — return to the Contact types screen without adding a contact type.
Edit namesSelect Names from the Contact menu to edit or enter contact names.
From the Edit names screen you can change a contact (primary) name, or enter or change a secondary name.
• Prm: change a contact (primary) name. For more informa-tion, see “Enter contact name” on page 40.
• Sec: enter or change a secondary (spouse or partner) name. For more information, see “Enter contact name” on page 40.
ns
ns
e
ns
Top Producer SellPhone User Guide 39

Contact Management
Main menuQuick searchContact listContact operatioContact detailsContact menuEdit namesEnter contact na
Main menuQuick searchContact listContact operatioContact detailsContact menuAddress menu
Contact details
Main menuQuick searchContact listContact operatioContact detailsContact menuAddress menuStreet address
Enter contact nameIn the Enter contact name screens you can enter a new contact’s name, or edit a primary or secondary name.
• In the First name screen, enter the first name, then select Next.
• In the Last name screen, enter the last name, then select Save.
AddressFrom the Address screen you can view, add or edit contact address information.
• Street address — view or edit the street address. See “Street address” below.
• City — view or edit the city. Select Save when done.
• Zip code — view or edit the Zip code. Select Save when done.
• P.O. box — view or edit the P.O. box. Select Save when done.
• State — view or edit the state. Select Save when done.
• Country — view or edit the country. Select Save when done.
Street addressSelect Street Address from the Address screen to enter or edit a street address.
To enter or edit a street address:
1. Enter a house number and select Next. You can leave the house number blank.
2. Enter a street name and select Next.
3. Enter a suite number and select Save to return to the Address screen. If there is no suite number for the contact, leave it blank.
ns
me
ns
ns
Top Producer SellPhone User Guide 40

Today’s Business
In this chapter:
• “Working With Activities” on page 42
• “Today’s Business Screens” on page 49
Top Producer SellPhone User Guide

Today’s Business
Working With Activities
This section tells you:
• about activities (see below).
• how to view your daily appointments, calls, to-dos, email and leads (see page 43).
• how to schedule new appointments, calls, or to-dos (see page 44).
• how to mark activities done as you complete them (see page 45).
• how to link activities to contacts, listings or closings (see page 45).
About activities There are three different types of activities in Top Producer SellPhone.
• Independent activities — These activities are not created from a contact, listing or closing. You can link this type of activity to a contact, a listing or a closing.
• Contact-dependent activities — These activities are cre-ated from a Top Producer 7i contact page or the Top Pro-ducer SellPhone Contact menu screen. For more information, see “Contact menu” on page 35. If the “owner” contact is deleted, the activity is also deleted.
• Listing- or closing-dependent activities — These activ-ities are created from a Top Producer 7i listing or a closing page, or a Top Producer SellPhone Listing or Closing menu screen. For more information, see “Listing menu” on page 66 or “Closing menu” on page 72. If the listing or clos-ing is deleted, the associated activity will also be deleted. You cannot link one of these activities to another listing or closing.
About repeating activitiesRepeating activities can be created in Top Producer 7i but not in Top Producer SellPhone. When you make a change to a repeating activity, (except for the date):
• you can choose whether to change just the one instance of the activity, or all instances of the activity.
Top Producer SellPhone User Guide 42

Today’s Business
• if you apply a change to a single repeating activity, such as the description, the activity will become unlinked from the group, becoming an independent activity.
When you make a date change to a selected activity in a repeating series of activities, only the selected activity’s date will change. The activity will remain a part of the repeating series.
For more information, see “Activities” on page 102.
Note: You cannot link a repeating activity to a listing or closing.
About activities that are part of an action planWhen a marketing, listing or closing action plan is applied to a contact in Top Producer 7i, the activities that make up the plan are scheduled in sequence. If the listing or closing dates change, then the activity dates will change correspondingly.
If you delete a plan activity with a dependent subsequent activity, the subsequent activity will be rescheduled to occur on the date of the deleted activity.
Viewing an activity You can look at your appointments, calls, to-dos, email and leads from Today’s Business.
To view an activity:
1. Select Today’s Biz from the main menu.
2. Select All activities to view all your activities.
A list of all your activities is displayed. If there are no activities for a particular category, that category will not be displayed.
3. Select an activity from the list.
The activity details are displayed.
Top Producer SellPhone User Guide 43

Today’s Business
4. Select More.
5. You can edit the activity, mark it done, delete it, call a linked contact (if the linked contact has a phone number) or return to Today’s business.
Adding a new activity To add an activity:
1. Select Today’s Biz from the main menu.
2. Select More if there are no activities for today, or, select Options if there are activities for today.
3. Select New activity.
Top Producer SellPhone User Guide 44

Today’s Business
Main menuToday’s BizAll activitiesSelect an activitMoreEditLinks
or
Main menuToday’s BizAll activitiesNewDescriptionLinks
4. Enter a description and select Save.
5. You can enter or change the activity’s type, description, date, start and finish time, links or notes as necessary.
Marking activities “done”
You should mark activities done as you complete them. Once activities are marked done they will no longer appear in Today’s business. Activities are marked done from the Activity menu. For more information, see “Activity menu” on page 51.
Linking the activity to a contact, listing or closing
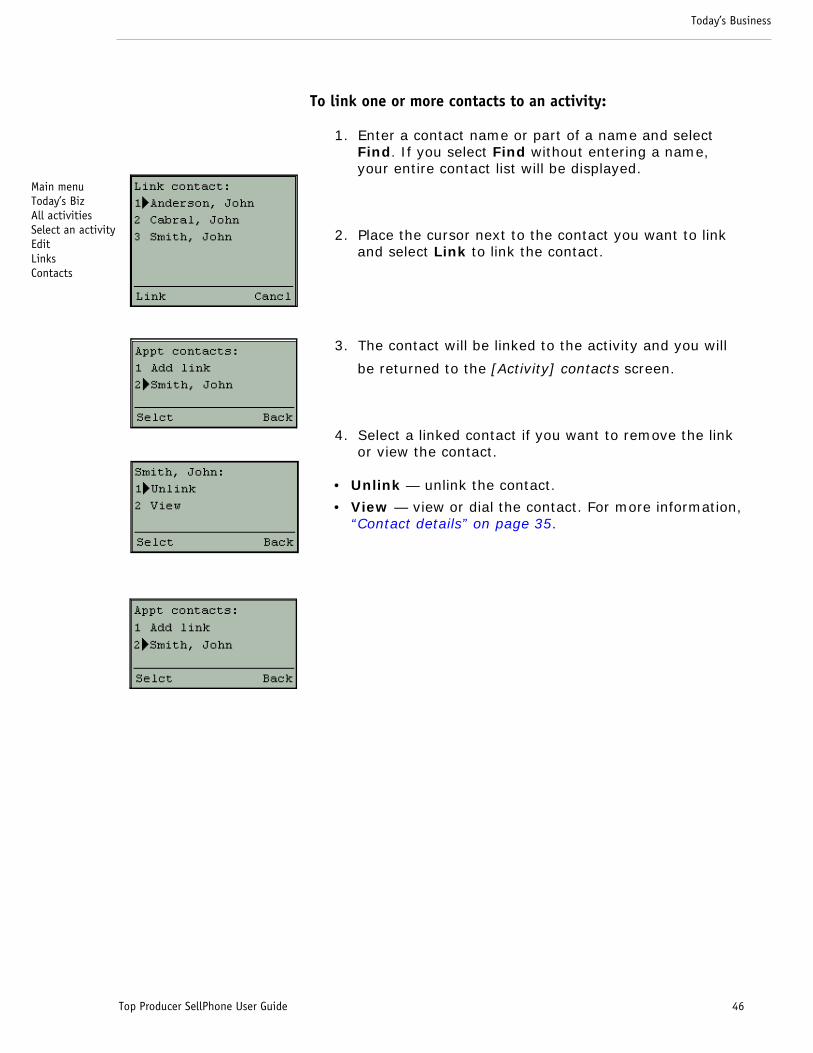
Select Links from the Create or edit an activity screen to access the Links screen. From the Links screen you can link the activity to a contact, a listing or a closing, or view pre-existing links. You can link an activity to as many contacts as you want, and to either one listing or closing.
• Contacts: — view or link contacts. For more information, see “Linking a contact” on page 45.
• Listings: — view a linked listing or link the activity to a list-ing (see “Linking a listing” on page 47). This option will not be available for repeating activities or for activities created from a listing or a closing.
• Closings: — view a linked closing or link the activity to a closing (see “Linking a closing” on page 47). This option will not be available for repeating activities or for activities cre-ated from a listing or a closing.
Linking a contactThe [Activity] contacts screen displays contacts linked to the activity.
• Add link — link a contact to the activity.
y
Top Producer SellPhone User Guide 45
Today’s Business
Main menuToday’s BizAll activitiesSelect an activitEditLinksContacts
To link one or more contacts to an activity:
1. Enter a contact name or part of a name and select Find. If you select Find without entering a name, your entire contact list will be displayed.
2. Place the cursor next to the contact you want to link and select Link to link the contact.
3. The contact will be linked to the activity and you will
be returned to the [Activity] contacts screen.
4. Select a linked contact if you want to remove the link or view the contact.
• Unlink — unlink the contact.
• View — view or dial the contact. For more information, “Contact details” on page 35.
y
Top Producer SellPhone User Guide 46

Today’s Business
Main menuToday’s BizAll activitiesSelect an activitMoreEditLinksListings
Main menuToday’s BizAll activitiesSelect an activitEditLinksClosings
Linking a listingThe [Activity] listing screen displays listings linked to the activity. If there is no listing linked to the activity, this screen will be bypassed and you will see the Link listing screen.
You can link only one listing to an activity; when you link a listing to an activity any listings or closings already linked to the activity will be un-linked.
• Change link — link a different listing to the activity using the Link listing screen.
• Unlink — unlink the listing.
• View — view the listing.
Then do the following:
Link listing
1. Scroll through the list and select the appropriate listing or select Search to search for a listing. For more information, see “Search for listings” on page 65.
2. The listing will be linked to the activity and you will be returned to the [Activity] listing screen. If a listing was previously linked to the activity, the original link will be replaced with the new listing.
Linking a closingThe [Activity] closing screen displays closings linked to the activity. If there is no closing linked to the activity, this screen will be bypassed and you will see the Link closing screen, below.
You can link only one closing to an activity; when you link a closing to an activity any listings or closings already linked to the activity will be un-linked.
• View: view the closing.
• Unlink: unlink the closing.
• To link a different closing to the activity, select Change link to display the Link closing screen. Then, follow the instructions on page 48.
y
y
Top Producer SellPhone User Guide 47

Today’s Business
Link closing
To link a closing to an activity:
1. Scroll through the list and select the appropriate closing; or select Search to search for a closing, (see “Search for closings” on page 71).
2. The closing will be linked to the activity and you will be returned to the [Activity] closing screen.
Note: If a closing was previously linked to the activ-ity, the original link will be replaced with the new closing.
Top Producer SellPhone User Guide 48

Today’s Business
Main menuToday’s Biz
Today’s Business Screens
Today’s business screenToday’s business displays the appointments, calls, to-dos and email you have scheduled for today. It also displays how many new leads have been downloaded.
If there are no activities for a particular category, that category will not be displayed. If you have no activities for today, “No activities for this date” is displayed. Select Options to display the Today’s business options screen.
You can select the following:
• Appts, Calls, To-do: display your scheduled activities for the selected type. For more information, see “The Activity list” on page 50.
• Email: display your scheduled email. For more information, see “The Email list” on page 51.
• Leads: Display new leads. For more information, see “Lead list” on page 57.
• All activities: display all your scheduled activities. For more information, see “The Activity list” on page 50.
• Options: Display Today’s business options, allowing you to view activities for a different day or week. For more infor-mation, see “Today’s business options” on page 50.
To create an activity, select the activity type you want to create, and then select New from the Activity list.
Note: If a Call has a time assigned to it, it will appear as an Appointment under Today’s business. For more information, see the Set time/No time options; “Create or edit an activity” on page 52.
Top Producer SellPhone User Guide 49

Today’s Business
Main menuToday’s BizOptions
Main menuToday’s BizAll activities
Main menuToday’s BizAll activitiesSelect an activit
Today’s business options• New activity — add a new activity. For more information,
see “Create or edit an activity” on page 52.
• Change day — view your activities for a different day.
• Week view — view a list of the days of the week. For more information, see “The Week view” on page 53.
• Go to today — view today’s activities. For more informa-tion, see “The Activity list” on page 50.
• Menu — return to the Main menu.
The Activity listThe Activity list screen displays a list of activities. If selected from Today’s Business, activities will be listed for a particular day. If selected from a listing, closing or contact, all linked activities will be displayed. How activities are displayed depends on the settings in the “Activities” section of Top Producer SellPhone setup, see “Activities” on page 102.
When All activities is selected, the activities are labeled [A] for Appointment, [C] for Call, [T] for To-do, and [E] for email, as shown in the example on the left.
• New — create a new activity, of the same type as the list, or of the default type if you selected All or called the list from a contact, listing or closing. For more information, see “Appointment (this is the default setting)” on page 102.
• Select an activity to view it.
When you select an activity, the activity date and description are displayed.
• More — view activity details, edit or delete the activity, or mark it done. For more information, see “Activity menu” on page 51.
Note: An activity’s “Remind me” and “Drop-off” peri-ods in Top Producer 7i will affect how long the activity is displayed in Top Producer Sell-Phone’s Today’s business. For more informa-tion, see Top Producer 7i’s online Help or user guide.
y
Top Producer SellPhone User Guide 50

Today’s Business
Main menuToday’s BizEmailsSelect an email
Main menuToday’s BizEmails
Main menuToday’s BizAll activitiesSelect an activitActivity detailsMoreActivity menu
Main menuToday’s BizEmailsSelect an emailMore
The Email listThe Email list displays your scheduled email. If selected from Today’s Business, activities will be listed for a particular day. If selected from a listing, closing or contact, all linked email will be displayed.
• Select an email to view it.
Note: You cannot schedule an email in Top Producer SellPhone, so there is no “New” option in the Email list.
When you select an email, the email date, description, and number of links is displayed. If the email has been marked done, this is also displayed.
• More — send, edit or delete the email, or mark it done. For more information, see “Email menu” on page 51.
Activity menu• Call — call the contact who is linked to the selected activity
(call, to-do, or appointment). For more information on link-ing contacts, see “Linking a contact” on page 45.
• Edit — edit the selected activity. For more information, see “Create or edit an activity” on page 52.
• Mark done/unmark — mark the activity done, or unmark the activity if it is marked done.
Note: Email activities marked done will not appear in the Today’s business activity list. If you have selected Display in lists - marked done activities (see “Under Display in lists..., select:” on page 103), marked done activities will be displayed when viewing activities linked to a contact, listing or closing.
• Delete — delete the activity.
• Today’s Biz — return to the Today’s business screen.
Email menu• Send — send the email. This also marks the email activity
done.
• Edit — edit the email activity. For more information, see “Edit email activity” below.
• Mark done — mark the email activity done. If you have marked an email as “done”, it does not result in the email
y
Top Producer SellPhone User Guide 51

Today’s Business
Main menuToday’s BizEmailsSelect an emailMoreEdit
Main menuToday’s BizAll activitiesSelect an activitMoreEdit
or
Main menuToday’s BizAll activitiesNewDescription
being sent. Email activities cannot be unmarked done in Top Producer SellPhone; only in Top Producer 7i.
• Delete — delete the email activity.
• Today’s Biz — return to the Today’s business screen.
Edit email activity• Description: — edit the email activity description.
• Date: — edit the email activity date.
• Auto send: — toggle between auto-sending email (Y) and not auto-sending email (N). When set to (Y), email will be sent automatically on the email activity date.
• Links: — select this option to view contacts, listings or clos-ings linked to the email activity, or to link a contact, listing or closing. For more information, see “Leads” on page 55.
• Notes: — displays the number of notes associated with the email activity. Select this option to enter notes for the email activity.
Create or edit an activityThe Create/edit activity screen lets you create or edit an activity. Depending on the type of activity being created or edited, not all options shown may be available.
If the activity is a recurring activity, you can choose to apply changes to the current activity only, or to all repetitions of the activity. For more information, see “Activities” on page 102.
• Type: — choose the activity’s type. You can choose Appointment, Call or To-do.
• Links: — link the activity to a contact, listing or closing. For more information, see “Leads” on page 55.
• Date: — change the date for the activity.
• Desc: — enter or edit a description of the activity.
• Start or Finish: — define the time period for the activity. These options will not be available if the activity is a To-do. For more information, see “Set start or finish time” on page 53.
• No time/Set time: — (only available for call activities).
• No time: — Select this option if the call does not require a time. The Start and Finish options will become unavailable.
• Set time: — Select this option if the call requires a time. The Start and Finish options will become available.
Note: When you assign a time to a call using the Set time option in Top Producer SellPhone, or enter a time when creating the call in
y
Top Producer SellPhone User Guide 52

Today’s Business
Main menuToday’s BizAll activitiesSelect an activitMoreEditStart/Finish
Main menuToday’s BizAll activitiesNewDescription
or
Start/Finish
Main menuToday’s BizOptionsWeek view
Top Producer 7i, the call will be displayed under Appointments in Today’s business, not under Calls.
• Priority: — enter a priority for the activity. 1 is highest, 99 is lowest.
Note: This option is only available for untimed activities.
• Notes: — enter notes for the activity.
• Delete: — delete the activity.
Note: If you delete or mark done an activity that is part of an action plan and that has dependent activities, the subsequent activity in the plan will have its date adjusted to the date of the deleted or marked done activity.
Set start or finish timeTo set the start or finish time for the activity, do the following.
• Select AM or PM.
• Enter the time you want the activity to start or finish, then select Save to return to the Create/edit activity screen. In this example, to enter a time of 4:20, you would press 0420 on your phone’s keypad.
The Week viewThe Week view screen displays the numbers of activities for every day of the selected week. Simply select a day of the week to view all activities for that day.
Note: If you set your SellPhone preferences to dis-play Days without activities in Top Producer 7i, then the days with zero [0] activities will be visible, (for example item 7 in the screenshot). If, however, you have NOT selected the Days without activities check box in Top Producer 7i, then only those days with activities will be visible (item 7 will NOT be displayed). For more information on setting how activities will
y
Top Producer SellPhone User Guide 53

Today’s Business
Main menuToday’s BizOptionsWeek viewMoreChange week
Main menuToday’s BizOptionsWeek viewMore
appear on the Week view screen, see “Display in lists & Week view”, on page 103.
To change the view to a different week, do the following:
1. Select - Next - or - Previous - to move forward or back a week, or select More.
2. Select Change week.
3. Enter the date you want the new week view to start from, in the form month, day, year (MM/DD/YY), then select OK to return to the Week view screen and display the new week.
Note: You can choose whether you want the week view to start on Monday or Sunday. For more information, see “Display in lists & Week view” on page 103.
Top Producer SellPhone User Guide 54

Leads
Leads
In this chapter:
• “Viewing A Lead” on page 56
• “The Leads Screens” on page 57
• “Lead Alerts” on page 60
Top Producer SellPhone User Guide 55

Viewing A Lead
You can use the Leads feature to:
• search for and view leads.
• call a lead.
• follow up on a lead.
• view a lead’s contact details.
You cannot create leads inside Top Producer SellPhone. Leads are created or received inside Top Producer 7i. For information about Lead Alerts, see “Lead Alerts” on page 60.
To view a lead:
1. Select Leads from the Main menu. The Leads summary screen displays how many leads you have. Select New Leads [x] to view your new leads.
2. A list of your new leads is displayed. Select a lead from the list to view it.
3. The lead details are displayed. Select More for further options.
4. You can Dial the lead (if it has a contact number), Email the lead (if it has an email address), select Follow up to mark the lead as followed up after you have followed up the lead, view the lead’s Notes, contact Details, Delete the lead, or return to the Leads screen.
Top Producer SellPhone User Guide

Leads
Main menuLeads
Main menuLeadsSearch
Main menuLeadsList all
The Leads Screens
LeadsSelect Leads from the Main menu to display the Leads screen.
The total number of leads in each category is displayed.
• New leads — display all leads that have not yet been fol-lowed up. For more information, see “Lead list” below.
• Followed up — display all followed up leads. For more information, see “Lead list” below. For information on fol-lowing up on leads, see “Follow up” on page 59.
• List all — display all leads. For more information, see “Lead list” below.
• Search — search for a lead. For more information, See “Lead search” below.
• Menu — return to the main menu.
Lead searchSearch your lead list by name or status, or a combination of both.
• Name: — enter a name or part of a name. You can only search on the first part of a name (i.e. to find “Stephen”, search using “Step”, but not “phen”). You can also search for a lead by using the first part of the company name spec-ified for the lead.
• Status: — select New leads or Followed up.
• Clear search: — clear the current search terms
• Find — start the search and display the results. See “Lead list” below.
Lead list• Select a lead to view it. The Lead details screen is displayed.
For more information, see “Lead details” on page 58.
Top Producer SellPhone User Guide 57

Leads
Main menuLeadsList allSelect a lead
Main menuLeadsList allSelect a leadMore
Lead detailsThe Lead details screen displays the following information:
• Lead contact name
• Date the lead was received
• Lead phone number
• Lead email address (if available)
• Lead source
• Lead status
• Lead note
Select More to display the Lead menu screen. For more information, see “Lead menu” below.
Lead menuFrom the Lead menu screen you can do the following:
• Dial — call the contact. This option is not available for leads that do not have a phone number.
• Email: send an email to the contact. For more information, see “Composing a message” on page 82.
Note: The Email option is only available if you have set up your email address on the Agent setup page of Top Producer 7i; AND if the selected contact has an email address specified. If the selected contact does NOT have an email address entered, use the Add email screen via the Details option to enter this information.
• If the contact has multiple email addresses, you will be able to select the address you want from the list.
Note: If the contact has multiple email addresses and you have the “Always use primary email address...” setting selected, the primary email address will be used. For more information, see page 105.
• Follow up — when you have completed a follow-up call for the new lead, select Follow up to mark the lead as “Fol-lowed up”. This will remove the lead from the New Leads category and place a marked done activity in the lead’s con-
Top Producer SellPhone User Guide 58

Leads
Main menuLeadsLead listLead detailsLead menuFollow up
tact history. This option is only available for new leads. For more information, see “Follow up” on page 59.
• Notes: — view or edit the lead’s notes.
• Details — view the lead’s contact details, or link an activity to the lead. For more information, see “Contact details” on page 35.
• Delete — delete the lead.
• Leads — return to the Leads screen. For more information, see “Leads” on page 57.
Follow upWhen you have followed up on a lead, select Yes to mark the lead “Followed up”. Depending on your preference setting in Top Producer SellPhone preferences (for more information, see “Display in lists & Week view” on page 103), a Call, Appointment or To-do that is marked done will be entered in the contact history.
Note: The created activity will be marked done, so it will not appear in Today’s Business as an activ-ity requiring action. You should use this feature AFTER you have followed up the lead. This dif-fers from Top Producer 7i, where following up a lead creates an activity that is NOT marked done.
The lead will be marked as Followed up. Followed up leads no longer appear in the Lead list as a New Lead, but can be viewed by selecting Followed up from the Leads summary page.
Note: A lead will also be marked “Followed up” if you mark done an activity that has been linked to it. For more information, see “Activity menu” on page 51.
Top Producer SellPhone User Guide 59

Leads
Lead Alerts
About Short Message Service (SMS)
Short Message Service (SMS) is the ability to send and receive short text messages from a mobile phone. If you have an SMS-capable cell phone, Top Producer SellPhone can alert you when a lead is received in Top Producer 7i. The type of alert depends on your specific mobile phone, and may be a beep, vibration, light, or message.
Note: Lead Alerts will inform you of customer-entered leads (for example, someone inter-ested in one of your Realtor.com® Marketing System properties or an inquiry form). The alerts do not include leads entered by agents or assistants in Top Producer 7i.
Activating Lead Alerts
To use Lead Alerts you must enable it in Top Producer SellPhone preferences and enter your SMS user information. For instructions on enabling Lead Alerts, see “Enabling Lead Alerts” on page 98.
Your cellular provider and mobile phone must support SMS, and in most cases you must ask your cellular provider to activate the service. Please contact your cellular provider for information on activating SMS and supported mobile phones.
Receiving a lead When a lead is received, your mobile phone will alert you (how this is done will depend on the type of phone you have). You may have to access the alert from a particular folder or menu on your mini browser. Please refer to your phone documentation for more information.
For each lead received from Realtor.com or a lead inquiry form, the alert will display: first name, last name and phone number.
When you receive a lead alert, log into Top Producer SellPhone, select Leads from the Main menu, then select New Leads to view the lead (which will have New status). See “Leads” on page 57 for more information.
Top Producer SellPhone User Guide 60

Leads
About Realtor.com Marketing System
Leads are generated from your Realtor.com Marketing System web site. For more information about Realtor.com Marketing System, please refer to http://www.realtor.com (in Canada, refer to http://www.homestore.ca).
Lead Alerts for Assistants
If you are an assistant and you have been given access to receive lead alerts (enabled from the SellPhone preferences page in Top Producer 7i), you will receive lead alerts for leads.
For leads received from Realtor.com or a lead inquiry form, the alert will display: first name, last name and phone number, appearing similar to the text message sent to your agent, (see “Receiving a lead” on page 60).
Note: How the alert is presented depends on the type of phone you have.
Top Producer SellPhone User Guide 61

Listings
Listings
In this chapter:
• “Viewing A Listing” on page 63
• “The Listings Screens” on page 65
Top Producer SellPhone User Guide 62

Listings
Viewing A Listing
You can use the Listings feature to:
• view your listings.
• view sellers.
• view property information.
• view associated activities and linked closings.
Listings can only be created or deleted using Top Producer 7i. You can NOT create or delete a listing from Top Producer SellPhone.
To view a listing:
1. Select Listings from the Main menu.
The Listings summary screen displays how many listings you have. Select Search. You can also select List all to view all your listings.
2. Select your search criteria. You can search by date range (From and To), by present/future home price range (Min price and Max price) or by Status. In this example, From is selected to search by date range.
3. Enter a start date (MM/DD/YY) and select Next.
4. Enter an end date (MM/DD/YY) and select Apply.
Top Producer SellPhone User Guide 63

5. When you have entered all your search criteria, select Find.
6. Listings matching your search criteria are displayed. Select a listing to view it.
7. The listing details are displayed. Select More for further options.
8. You can view listing notes, the property seller, an associated closing (if relevant), property information, or associated activities. Select Stop reminders to prevent activities associated with this listing from being displayed in Today’s business.
Top Producer SellPhone User Guide

Listings
Main menuListings
Main menuListingsSearch listings
Main menuListingsListings list
The Listings Screens
Listings summaryTo display the Listings summary screen, select Listings from the Main menu.
The first line of the Listings summary screen displays the total number of listings available. From this screen you can do the following:
• List all — view all your listings. For more information, see “The Listings list” on page 65.
• Search — search by date or price. For more information, see “Search for listings” on page 65.
• Menu — select to return to the main menu.
Search for listingsYou can search for listings after a start date, before an end date, up to and including a price limit, or a combination of all three.
• From: — enter a start date (MM/DD/YY).
• To: — enter an end date (MM/DD/YY).
• Min price: — enter a lower price limit.
• Max price: — enter an upper price limit.
• Status: — select a listing status. Choose from All, Active, Expired, Pending (showing), Pending (not showing), Pending/Firm, Closed/Paid, Withdrawn, Cancelled, Closed/Paid Transferred and Pending/Backup.
• Clear search: — erase all the search terms.
• Back: — return to the Listings summary screen.
• Select the Find Soft key to display the results of your search.
The Listings listThe Listings list displays all your listings or the results of your listings search.
• Select a listing to view it. For more information, see “Listing details” on page 66.
Top Producer SellPhone User Guide 65

Listings
Main menuListingsListings listListing details
Main menuListingsListings listListing detailsListing menu
Note: Listings can be displayed by address or seller name. For more information, see “Listings & Closings” on page 106. If listings are being dis-played by address and a listing has no address, the listing will be displayed as No address.
Listing detailsSelect a listing from the Listings screen using Listing search or List all.
The Listing details screen displays the following view-only information, if available:
• Listing address
• Listing status
• List price
• MLS number
• Seller name or number of sellers if there are more than 1
• Date of listing
• Date of expiry
• Commission
• Source of the listing
• Reminder date for the listing
• Number of associated activities (if any)
• Number of associated notes (if any)
You can select:
• More — display the Listing menu.
Listing menuYou can select the following from the Listing menu screen:
• Notes: — view, add, or delete listing notes for the selected property listing. For more information, see “Listing notes” on page 67.
• Sellers: — display the contact details for the property seller or sellers. If there are multiple sellers, you can select which seller to view. For more information, see “Contact details” on page 35.
• View closing: — display the corresponding closing details, if applicable.
• Property: — display the listed property's details. For more in-formation, see “Property information” on page 67.
Top Producer SellPhone User Guide 66

Listings
Main menuListingsListings listListing detailsListing menuListing notes
Main menuListingsListings listListing detailsListing menuProperty details
• Activities: — View and modify existing activities associated with the listing, or create a new activity for this listing. For more information, see “The Activity list” on page 50.
• Show/stop reminders: — Select this to toggle between Show reminders and Stop reminders for the listing. If set to Show reminders, activities for this listing are displayed in Today’s business. If set to Stop reminders, activities for this listing are not displayed.
Listing notesThe Listing notes screen lists all notes associated with the listing. You can do the following:
• Select New to enter a new listing note. When you have entered the note, select Save.
• To view a note, select it.
• To edit a note, select it, then select More. Select Edit. When you have finished editing the note, select Save.
Note: If you enter a note that exceeds 256 charac-ters, you will NOT be able to edit it in Top Pro-ducer SellPhone. Instead, you will see the “Unable to edit long value” message.
• To delete a note, select it, then select More. Select Delete.
Property informationThe Property screen displays the following view-only details of the listed property, if available:
• Address
• Number of bedrooms
• Number of bathrooms
• Square footage
• Location of property (area)
• Relative location to schools
• Year built
Select Back to return to the Listing screen.
Top Producer SellPhone User Guide 67

Closings
Closings
In this chapter:
• “Viewing A Closing” on page 69
• “The Closings Screens” on page 71
Top Producer SellPhone User Guide 68

Closings
Viewing A Closing
Use the Closings feature to:
• view your closings
• view closing parties
• view property information
• view associated activities and linked listings
Closings can only be created or deleted inside Top Producer 7i. You cannot create or delete a closing from Top Producer SellPhone.
To view a closing:
1. Select Closings from the Main menu.
The Closings screen displays how many closings you have.
2. Select Search. You can also select List all to view all your closings.
3. Select your search criteria. You can search by date range (From and To), present/future home price range (Min price and Max price) or Status. In this example, From is selected to search by date range.
4. Enter a start date (MM/DD/YY) and select Next.
5. Enter an end date and select Apply.
Top Producer SellPhone User Guide 69

6. When you have entered all your search criteria, select Find.
7. Closings matching your search are displayed. Select a closing to view it.
8. The closing details are displayed. Select More for further options.
9. You can view closing Notes, the closing Parties, an associated Listing, the closing Property, associated Activities. Select Stop reminders to prevent activities associated with this closing from being displayed in Today’s business. Select Back to return to the Closing list screen.
Top Producer SellPhone User Guide

Closings
Main menuClosings
Main menuClosingsSearch closings
Main menuClosingsClosings list
The Closings Screens
Closings summarySelect Closings from the Main menu to display the Closings summary screen.
The first line of the Closings summary screen displays the total number of closings available. From this screen you can do the following:
• List all — view all your closings. For more information, see “The Closings list” on page 71.
• Search — search by date or price. For more information, “Search for closings” on page 71.
• Menu — return to the main menu.
Search for closingsYou can search for closings occurring over a date range, up to and including a price limit, or a combination of both.
• From: — enter a start date in the format MM/DD/YY.
• To: — enter an end date in the format MM/DD/YY.
• Min price: — enter a minimum price.
• Max price: — enter a maximum price.
• Status: — select a closing status. Choose from All, Pend-ing(showing), Pending (not showing), Pending/Firm, Closed/Paid, Fell Thru, Pending/Backup, and Closed/Paid Transferred.
• Clear search: — erase all the search terms.
• Back: — return to the Closings screen.
• Select the Find Soft key to display the results of your search.
The Closings listThe Closings list displays all your closings or the results of your closings search.
Select a closing to view it. For more information, see “Closing details” on page 72.
Top Producer SellPhone User Guide 71

Closings
Main menuClosingsClosings listClosing details
Main menuClosingsClosings listClosing detailsClosing menu
Note: If a closing has no address, it will be displayed as No address in the Closings list.
Closing detailsSelect a closing from the Closings screen, using Closing search or List all.
The Closing details screen displays the following view-only information:
• Closing address
• Closing price and MLS number
• Seller name or number of sellers if there are more than 1
• Buyer name or number of buyers if there are more than 1
• Closing status
• File number
• Source
• Acceptance date
• Closing date
• Possession date
• Commission amount
You can select:
• More — display the Closing menu.
Closing menuYou can select the following from the Closing menu screen:
• Notes: — view, add, or delete closing notes for the selected property. For more information, see “Closing notes” on page 73.
• Parties: — view the parties associated with the closing. For more information, see “Closing parties” on page 73.
• View listing: — view the associated listing, if applicable.
• Property: — display the property's details. For more infor-mation, see “Property information” on page 67.
• Activities: — view and modify existing activities associated with the closing, or create a new activity for this closing. For more information, see “The Activity list” on page 50.
• Show/stop reminders: — select this to toggle between Show reminders and Stop reminders for the listing. If set to Show reminders, activities for this listing are dis-played in Today’s business, if set to Stop reminders, activities for this listing are not displayed.
Top Producer SellPhone User Guide 72

Closings
Main menuClosingsClosings listClosing detailsClosing menuClosing notes
Main menuClosingsClosings listClosing detailsClosing menuClosing parties
Closing notesThe Closing Notes screen lists all notes associated with the closing. You can do the following:
• Select New to enter a new closing note. When you have entered the note, select Save.
• To view a note, select it.
• To edit a note, select it, then select More, then select Edit. When you have finished editing the note, select Save.
Note: If you enter a note that exceeds 256 charac-ters, you will NOT be able to edit it in Top Pro-ducer SellPhone. Instead, you will see the “Unable to edit long value” message.
• To delete a note, select it, then select More, then select Delete.
Closing partiesThe Closing Parties screen lists all parties involved in the closing, and their role.
• Select a party to view its contact details.
Top Producer SellPhone User Guide 73

In this chapter:
• “Checking And Sending Email” on page 75
• “The Email Menu” on page 78
• “Working With Incoming Messages” on page 79
• “Sending An Email Message” on page 82
• “Working With Folders” on page 87
• “Email Options” on page 90
Top Producer SellPhone User Guide 74

Checking And Sending Email
You can use Email to:
• send and receive email on your phone.
• manage email folders.
To check your email:
1. Select Email from the Main menu to display the Email menu, then select Inbox.
2. Select a message to view it.
3. The message is displayed. Select More for further options.
4. You can reply to the message, forward or delete it, move it to another folder, or link contacts to it.
Top Producer SellPhone User Guide 75

To send an email:
1. Select Email from the main menu to display the Email menu, then select Compose message.
2. Select To:.
3. Select Enter Addr. Alternatively, you can select Ins. Contact and search for a contact in your database.
4. Enter an email address, then select OK.
5. Select Subject.
6. Select Enter Subj. Alternatively, you can select one of the pre-written “quick subjects”.
7. Enter a subject and select OK.
8. Select Message:.
Top Producer SellPhone User Guide
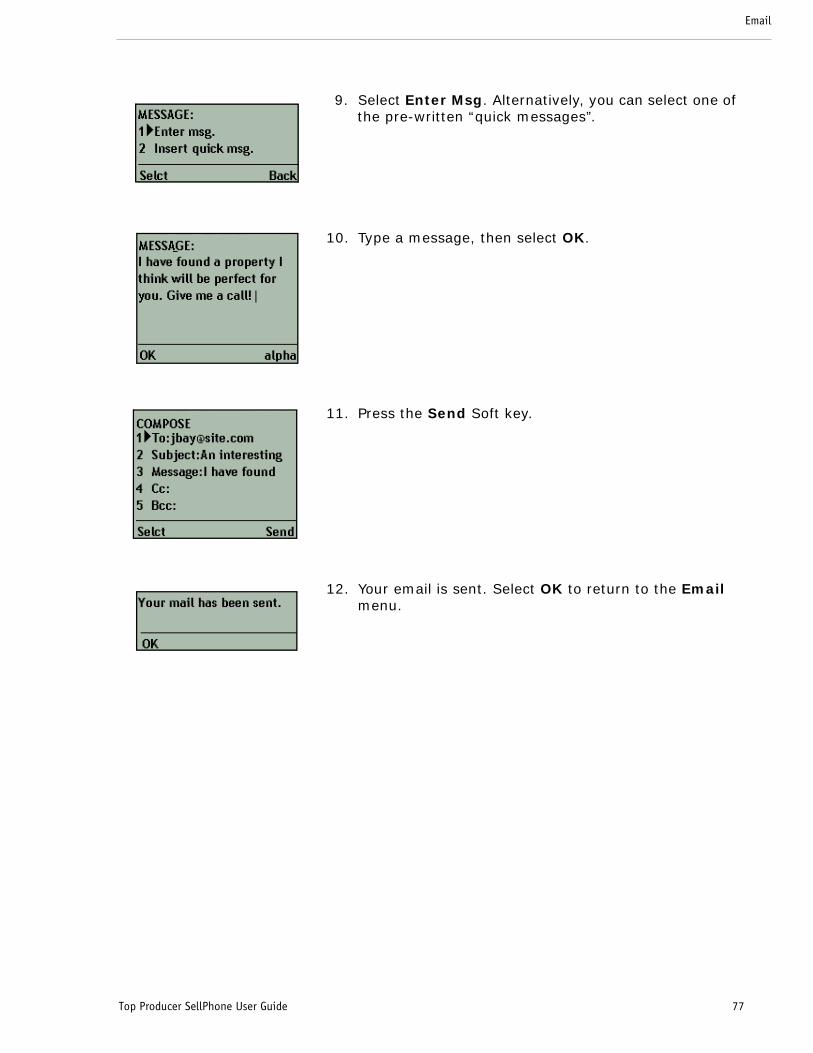
9. Select Enter Msg. Alternatively, you can select one of the pre-written “quick messages”.
10. Type a message, then select OK.
11. Press the Send Soft key.
12. Your email is sent. Select OK to return to the Email menu.
Top Producer SellPhone User Guide 77

Main menuEmail
The Email Menu
Select Email from the main menu to access the Email menu.
Note: If you have not set up your email preferences in Top Producer 7i, you will not be able to send or receive email. Log into Top Producer 7i, point to Email, and then click My Email. For more information about setting up email, see Top Producer 7i’s User Guide or online Help.
You can select the following:
• Inbox — view your email messages. The number of unopened (u) and total number (t) of messages is dis-played. For more information, see “Inbox” on page 79.
• Folders — create email folders and view their contents. For more information, see “Folders” on page 87.
• Compose Msg. — write an email message. For more infor-mation, see “Composing a message” on page 82.
• Trash — view the trash folder. For more information, see “Trash” on page 88.
• Drafts — view the drafts folder. For more information, see “Drafts” on page 88.
• Options — configure email options, including quick mes-sages and subjects, how messages are sorted, and auto-responder options. For more information, see “Options” on page 90.
Email Size LimitTop Producer SellPhone is limited to editing email message sizes of up to 256 characters. If you try to edit a message that is longer than 256 characters, a warning message will alert you that the length of the message is too large to edit.
If you take an action that will result in a message size of greater than 256 characters (such as inserting a quick message or signature, or saving a large reply or forward message to the drafts folder), a warning message will alert you that you will not be able to edit the message body on the phone. Select YES to continue with the action, NO to return to the previous screen.
Top Producer SellPhone User Guide 78

Main menuEmailInbox
Main menuEmailInboxView message
Working With Incoming Messages
InboxUse the Inbox to view your new email messages. The number of unread (u) messages and total number (t) of messages are indicated.
• Check Email — retrieve new email.
Note: When you first go to the Inbox, your mail is automatically retrieved. Use Check Email if you leave the Inbox open for a long time and want to check for new mail.
• Compose Msg. — write an email message. For more infor-mation, see “Composing a message” on page 82.
• Select a Message to read it. For more information, see “View message” on page 79.
• Email Main Menu — return to the Email menu.
Note: Email is sorted according to the Sort options feature when setting up your email options in Top Producer SellPhone. For more information, see “Sort options” on page 91.
View messageYou can view messages from the Inbox or from other email folders. The following view-only information is displayed:
• Subj: — the email subject.
• From: — the email sender.
• Date: — the date the email was received. A paperclip or (A) next to this field indicates that the email contains an attach-ment.
Top Producer SellPhone User Guide 79

Main menuEmailInboxView messageMessage menu
Main menuEmailInboxView messageMessage menuMove to
You can select:
• To: — the email recipients. Move the cursor over this item and select it to view a list of all primary recipients.
• Cc: — the email carbon-copy recipients. Move the cursor over this item and select it to view a list of all Cc: recipients. (The Cc: field will only appear if the sender has specified one or more carbon-copy recipients.)
Note: You cannot view attachments in Top Producer SellPhone.
The email message is displayed below the date. Use the scroll keys to scroll down and read the entire message.
• More — reply to the message, forward it, delete it, move it to a folder, or view linked contacts. For more information, see “Message menu” on page 80.
Message menuFrom the Message menu you can select:
• Reply — reply to the message. For more information, “Composing a message” on page 82.
• Reply to all — reply to all message recipients. For more information, see “Composing a message” on page 82.
• Forward — forward the message. For more information, see “Composing a message” on page 82.
• Delete — delete the message. Depending on how you have set Top Producer SellPhone’s delete confirmation prefer-ence (for more information, see “Show ‘Delete’ confirma-tion” on page 98), you may be asked to confirm message deletion. Deleted messages are moved to the Trash folder. For more information, see “Trash” on page 88.
• Move to — move the message to another folder. For more information, see “Move to” on page 80.
• Mark unread — mark the message unread. When you mark an email unread, the email list screen you were pre-viously viewing will appear, displaying the email message as unread.
• Linked contact(s) — view contacts linked to the message. For more information, see “Linked contacts” on page 81.
Move toSelect a folder to move the message to it.
Top Producer SellPhone User Guide 80

Main menuEmailInboxView messageMessage menuLinked contacts
Main menuEmailInboxView messageMessage menuLinked contactsLinking options
Main menuEmailInboxView messageMessage menuLinked contactsCreate link
Note: You cannot move messages in or out of the Drafts folder. However, you can delete mes-sages from the Drafts folder.
Linked contactsYou can manually link a contact to an email using Create Link. When you do this, the email will show up in the contacts history and you will have a record of correspondence with the contact.
Use the Linked contacts screen to view contacts that have been linked to an email. You can link an email to one or multiple contacts.
• Create Link — link the email to a contact. For more infor-mation, see “Link To contact” on page 81.
• Select a contact from the list of linked contacts to unlink or view the contact. For more information, see “Linking options” on page 81.
Linking options• Unlink — remove the link to a contact.
• View Contact — view the linked contact. For more infor-mation, see “Contact details” on page 35.
Link To contact• Search — search for a contact. Select the contact from the
search results screen to link it to the email. For more infor-mation, see “Quick search” on page 32.
• List All — list all your contacts. Select a contact from the list to link it to the email.
Top Producer SellPhone User Guide 81

Main menuEmailCompose messag
Sending An Email Message
Composing a message
To send an email, you must enter information in the To: field. The other fields are optional.
• To: — enter/edit recipients for the email. If there is more than one recipient, the number of recipients is displayed. For more information, see “To, Cc and Bcc” on page 83.
• Subject: — enter or edit a subject for the email. For more information, see “Subject” on page 85. If a subject already exists, you can edit it or add it to the quick subject list. For more information, see “Edit subject:” on page 85.
• Message: — enter/edit the body of the email. For more information, see “Message” on page 86.
• Cc: — select or add a carbon-copy recipient. For more infor-mation, see “To, Cc and Bcc” on page 83.
• Bcc: — select or add a blind carbon-copy recipient. For more information, see “To, Cc and Bcc” on page 83.
• Save in drafts: — save the email in the Drafts folder. You can save an incomplete email, then finish and send the email at a later time.
• Original msg: — view the original message. This option is only available if you are replying to or forwarding a mes-sage.
• Add sig. — select Add. sig to append a signature to your message. This option will not appear if you have not cre-ated a signature in Top Producer 7i.
Note: You can specify email signature settings in the Signature section of Top Producer 7i’s Agent information window. In Top Producer 7i, point to Setup, then click Agent setup. Because Top Producer SellPhone sends all email in plain text, any formatting applied to your signature in Top Producer 7i will be removed when the email is sent. If you are using a large signature, inserting it into the message may result in a message that is too large to edit on the phone. For more information, see “Email Size Limit” on page 78.
e
Top Producer SellPhone User Guide 82

Main menuEmailCompose messagTo
Main menuEmailCompose messagToInsert contact
• Back — return to the Email menu. For more information, see “The Email Menu” on page 78. If you have unsaved changes to the email, you will be prompted to save the message in the Drafts folder. For more information, see “Drafts” on page 88.
• Send — send the email. You will receive a confirmation that your message has been sent. Top Producer SellPhone sends email in plain text, so any formatting in your Top Producer 7i signature will be removed.
Note: You can elect to NOT receive confirmations. For more information, see “Show ‘Success’ screens” on page 98.
To, Cc and BccYou can enter the email address manually, or select a contact which contains an email address.
• Enter addr. — enter one or more email addresses manu-ally. If you want to send the email to more than one person, separate the addresses with a semi-colon or space. For more information about using special symbols, see “How to enter text” on page 20.
• Ins. contact — select a contact to send the email to. For more information, see “Insert contact” on page 83.
If you have already entered one or more recipients for the email, you will have some other options:
• Add — add another recipient.
• View or edit — view or edit the recipients’ email addresses. For more information, see “Editing or removing recipients” on page 84.
• Remove — remove a recipient’s email address from the email. This option is only displayed if you have one recipient listed in the To, Cc, or Bcc fields.
Insert contactYou can search for a contact or select from a list.
• Search — search for a contact by name or contact type. Only contacts with at least one email address will be dis-played. For more information, see “Insert contact search” on page 84.
• List all — list all contacts with at least one email address.
e
e
Top Producer SellPhone User Guide 83

Main menuEmailCompose messagToInsert contactSearch
Main menuEmailCompose messagToEdit
Insert contact searchYou can search by name or contact type.
• Name: — enter a first or last name, then select the Find Soft key to search for the name. Select a contact from the resulting list to enter their email address into the recipient list. For more information, see “Alternate address” below.
• Cont. type: — enter a contact type to search for, then select the Find Soft key to search for contacts with that type. Select a contact from the resulting list to enter their email address into the recipient list. For more information, see “Alternate address” below.
Note: Apply Select all to the results of the search to send an email to all contacts with a particular type.
Alternate addressBy default, the contact’s primary email address is used when inserting an email address (see page 105). If you de-select this Top Producer SellPhone preferences option, when a contact has more than one email address you will be prompted to pick which address to use. Select the appropriate address to be placed into the recipient field.
Editing or removing recipientsTo edit or remove a recipient, select them from the recipient list (this step is bypassed if there is only one recipient), then select:
• Edit — edit the recipient’s email address.
• Remove — remove the contact from the recipient list.
e
e
Top Producer SellPhone User Guide 84

Main menuEmailCompose messagSubject
Main menuEmailCompose messaSubjectEdit subject
SubjectYou have the option of entering your own subject or you can pick a quick subject from the list.
• Enter subj. — enter a subject manually. When you have entered the subject, select OK.
• Insert quick subj. — select a pre-written subject from the list to use a “quick subject”.
Note: You can add the subject to the quick subject list (see “To add a subject to the quick subject list:” on page 85). For more information about quick subjects, see “Quick Subjects” on page 91.
Edit subject:If you have already entered a subject, you will have three additional options:
• Edit — edit the subject.
• Insert quick subj. — insert a new quick subject. Select a subject from the quick subject list, such as Call me, Appointment, etc.
Note: When you insert a new quick subject, any existing subject text will be overwritten.
• Add to quick subj. — add the current subject to the quick subject list.
To add a subject to the quick subject list:
1. From the Subject screen, select Enter subject and enter a subject.
2. Select the new Subject again from the Compose message screen.
The Edit subject screen opens.
3. Select Add to quick subj. to add the subject to the quick subject list.
e
ge
Top Producer SellPhone User Guide 85

Main menuEmailCompose messagMessage
Main menuEmailCompose messagMessageEdit message
MessageYou have the option of entering your own message or you can pick a quick message from the list.
• Enter msg. — enter a message manually. When you have entered the message, select OK.
• Insert quick msg. — select a pre-written message from the list to use a “quick message”.
Note: You can add your message to the quick mes-sage list (see “To add a message to the quick message list:” on page 86). For more informa-tion about quick messages, see “Quick Mes-sages” on page 90.
Edit messageIf you have already entered a message, you will have three additional options:
• Edit — edit the message.
• Insert quick msg. — insert a new quick message. Select a message from the quick message list to insert it.
• Add to quick msg. — add the current message to the quick message list.
To add a message to the quick message list:
1. From the Message screen, select Enter message and enter a message.
2. Select the new Message again from the Compose message screen.
The Edit message screen appears.
3. Select Add to quick msg. to add the message to the quick message list.
e
e
Top Producer SellPhone User Guide 86

Main menuEmailFolders
Working With Folders
There are four default folders: Inbox, Drafts, Sent items and Trash.
• Inbox: this folder contains new email.
• Drafts: this folder contains email messages that you have selected to save in the drafts folder.
• Sent items: this folder contains email that has been sent, but only if you have selected the Save sent emails in the sent items folder check box on the Email preferences page of Top Producer 7i. For more information, see the Top Producer 7i User Guide.
Note: Email sent using Top Producer 7i’s mass email feature does not appear in the Sent items folder.
• Trash: this folder contains deleted messages.
It is a good idea to create your own custom folders and move relevant email messages into them when you receive them. For example, you may wish to create an Action folder and move email that requires immediate attention into it.
FoldersEach folder name displays the number of unread (u) messages and the total (t) number of messages.
• New — create a new folder. Enter the new folder name and select OK. The new folder will appear in the Folders list.
Note: If you try to create a folder with the same name as a system folder (such as Trash, Out-box, Inbox, etc.), Top Producer SellPhone will ignore the request.
• Inbox — view the Inbox folder. For more information, see “Inbox” on page 79.
• Sent items — view the Sent Items folder.
• Drafts — view the Drafts folder. For more information, see “Drafts” on page 88.
Top Producer SellPhone User Guide 87

Main menuEmailFoldersSelect custom foMenu
Main menuEmailFoldersTrash
Main menuEmailFoldersDrafts
Main menuEmailFoldersDraftsSelect message
• Trash — view the Trash folder. For more information, see “Trash” on page 88.
• You can also select any folders you have created. The example to the left displays the user-created folders Immediate, Wait and Personal.
Folder menuSelect a custom folder, then select the More Soft key to display the Folder menu. This screen allows you to rename or delete custom folders.
Note: You cannot rename or delete the four default folders, so there is no More option in these folders.
• Rename — rename the folder. Enter the new folder name and select OK.
• Delete — delete the folder and all contents. You will be asked to confirm folder deletion.
TrashThe Trash folder contains deleted email.
• Empty trash — permanently delete all messages in the Trash folder.
To read a message or move it to another folder, select it.
DraftsThe Drafts folder contains email that has been written and saved using the Save in drafts function (see “Composing a message” on page 82.)
• Select a message to send, edit, or delete it. For more infor-mation, see “Draft options” below.
Draft options• Send — send the message. It will disappear from the
Drafts folder and a copy will be placed in the Sent items folder.
• Edit — edit the message. For more information, see “Com-posing a message” on page 82.
lder
Top Producer SellPhone User Guide 88

Note: If the email draft was originally created using Top Producer 7i, you will not be able to edit the message from your phone. You must use Top Producer 7i to make modifications. The same is true for email drafts created using Top Pro-ducer SellPhone and edited using Top Producer 7i. If, however, you originally created the email draft using Top Producer SellPhone, and no edits have been made in Top Producer 7i, you may edit the message as usual.
• Delete — delete the message. The message will be moved to the Trash folder. For more information, see “Trash” on page 88.
Top Producer SellPhone User Guide 89

Main menuEmailOptions
Main menuEmailOptionsQuick Msgs.
Email Options
Use Email options to configure your email preferences. These include Quick Messages and Quick Subjects, how email is sorted in lists, auto-responses to email when you are away, and whether message deletion requires confirmation.
Options• Quick msgs. — edit or add quick messages. For more
information, see “Quick Messages” on page 90.
• Quick subjs. — edit or add quick subjects. For more infor-mation, see “Quick Subjects” on page 91.
• Sort options — define how email lists are sorted. For more information, see “Sort options” on page 91.
• Auto res. — set auto-responder options. For more infor-mation, see “Auto-responder” on page 92.
• Save options — set message save options. For more infor-mation, see “Save options” on page 93.
• Assistant access — allow or disallow assistants to access your email. For more information, see “Assistant access” on page 93.
Note: You can add, edit or delete quick subjects and quick messages in Top Producer 7i’s SellPhone preferences window. Point to Setup, then Applications setup, and then click Top Producer SellPhone. For more information, see “Click the Quick Subjects and Quick Mes-sages drop-down list and select:” on page 105.
Quick MessagesQuick Messages are short (up to 256 characters) messages that you can quickly insert into the body of an email, eliminating the need to type the whole message.
• New — enter a new quick message. After entering the message select Save.
• Select a quick message to edit or delete it. For more infor-mation, see “Quick Message options” below.
Top Producer SellPhone User Guide 90

Main menuEmailOptionsQuick Msgs.Select Quick Msg
Main menuEmailOptionsQuick Subjs.
Main menuEmailOptionsQuick Subjs.Select Quick Sub
Main menuEmailOptionsSort Options
Quick Message options• Edit — edit the quick message. After editing the message,
select Save.
• Delete — delete the quick message.
Quick SubjectsQuick subjects are short (up to 256 characters) subjects that you can quickly insert into the subject line of an email, eliminating the need to type the entire subject.
• New — enter a new quick subject. After entering the sub-ject select Save.
• Select a quick subject to edit or delete it. For more informa-tion, see “Quick Subject options” below.
Quick Subject options• Edit — edit the quick subject. After editing the subject, select
Save.
• Delete — delete the quick subject.
Sort optionsYou can choose how your email messages are sorted, and whether they are sorted in ascending or descending order. A tilde sign (~) indicates under which criteria email are sorted, while an <A> or <D> indicates the sort direction (ascending or descending).
• Sender — sort email by sender.
• Subject — sort email by subject.
• Date — sort email by date.
• Unread first (default) — display unread email first, sorting by date.
• Read first — display read email first, sorting by date.
Ascending/descending orderWhen sorting by sender, subject or date, you must choose whether to sort in ascending or descending order.
• Ascending order — sort the selected criterion in ascend-ing order.
• Descending order — sort the selected criterion in descending order.
.
j.
Top Producer SellPhone User Guide 91

Main menuEmailOptionsAuto Res.
Main menuEmailOptionsAuto Res.Edit Msg.
Auto-responder
Note: This option is NOT available if you have set up a POP3 email account in Top Producer 7i. You must have an @topproducer.com email address to use the auto-responder.
The auto-responder will reply to messages when you are away. You can use this feature in two different ways:
1. When you will be away for an extended period, set up a message such as “I am currently away from the office. In the meantime you can reach me at (phone number)”, or “I am currently away from the office. I will contact you when I return on (date)”.
2. If you want to reply to all messages so that the contact knows you have received their message, set up a message such as “I have received your message and will be contacting you shortly”.
• On — turn on the auto responder.• Off — turn off the auto responder.• Edit message — edit the auto-responder message.• Signature on — include signature in auto-responder
message.• Signature off — leave signature out of auto-
responder message.
Note: The auto-responder will not send more than one out-of-office response to the same email address in any 24-hour period. This is to pre-vent an endless loop between two auto-responders from occurring.
Edit auto-responder message• Enter or edit the auto-responder message. When finished, se-
lect Save.
Top Producer SellPhone User Guide 92

Main menuEmailOptionsAuto Res.Save Options
Main menuEmailOptionsAssistant Access
Save optionsYou can have sent messages automatically saved in the Sent folder. The current setting is marked with a tilde sign (~).
• On (default) — save sent messages in the Sent folder.
• Off — do not save sent messages in the Sent folder.
Assistant accessYou can allow your assistants to access your email through the My email function in Top Producer 7i. The current setting is marked with a tilde sign (~).
• On — assistants can access your email via Top Producer 7i.
• Off (default) — assistants cannot access your email.
Note: When the assistant access is turned “On”, your assistant can only access your email through the My email function in Top Producer 7i, NOT via the Email function in Top Producer Sell-Phone.
Top Producer SellPhone User Guide 93

SellPhone Preferences
SellPhone Preferences
In this chapter:
• “Customizing Top Producer SellPhone Preferences” on page 95
• “Application settings” on page 96
• “Using the SellPhone Preference page tabs” on page 98
• “Enabling Lead Alerts” on page 98
• “Phone numbers” on page 99
• “Contacts” on page 100
• “Activities” on page 102
• “Display in lists & Week view” on page 103
• “Email” on page 104
• “Listings & Closings” on page 106
Top Producer SellPhone User Guide 94

SellPhone Preferences
Customizing Top Producer SellPhone Preferences
You can customize the way you log into Top Producer SellPhone, which screen is displayed when you log in, and how contacts, activities, listings and closings are displayed on your phone. To do this you must first log into Top Producer 7i.
Note: You must have a Top Producer SellPhone license to access the SellPhone preferences page in Top Producer 7i.
To access Top Producer SellPhone preference settings:
1. Using a web browser, (i.e. Internet Explorer) go to https://www.topproduceronline.com and log in to Top Producer 7i using your username and password.
2. From the main menu, point to Setup, Applications setup, and then click Top Producer SellPhone.
The SellPhone preferences page opens.
Top Producer SellPhone User Guide 95

The page is divided into two parts, the Application settings section at the top (see “Application settings” on page 96); and a series of tabs in the bottom of the page (see “Using the SellPhone Preference page tabs” on page 98).
3. Customize your settings using this page as described later in this section.
4. If you want to revert the preference settings back to their initial default values, click Restore all defaults from the action menu.
5. Once you have finished changing your settings, select OK to save.
Application settings
The Application settings section of the SellPhone preferences page lets you customize Top Producer SellPhone on your mobile phone. You can specify which screen opens first, how you log in, and which most frequently used phone number you want displayed for your contacts. In addition, you can decide if you want confirmation messages displayed when you successfully perform a function.
Startup screen
You can choose which screen will display immediately after logging into Top Producer SellPhone.
Click the drop down-list and choose from:
• Main menu — This is the default screen. For more infor-mation, see “The Main Menu Options” on page 24.
• Quick search — For more information, see “The Contact Management Screens” on page 32.
• Today’s business — For more information, see “Today’s Business Screens” on page 49.
• Listings — For more information, see “The Listings Screens” on page 65.
• Closings — For more information, see “The Closings Screens” on page 71.
• Leads — For more information, see “The Leads Screens” on page 57.
• Email (if email has been setup). For more information, see “The Email Menu” on page 78.
Top Producer SellPhone User Guide
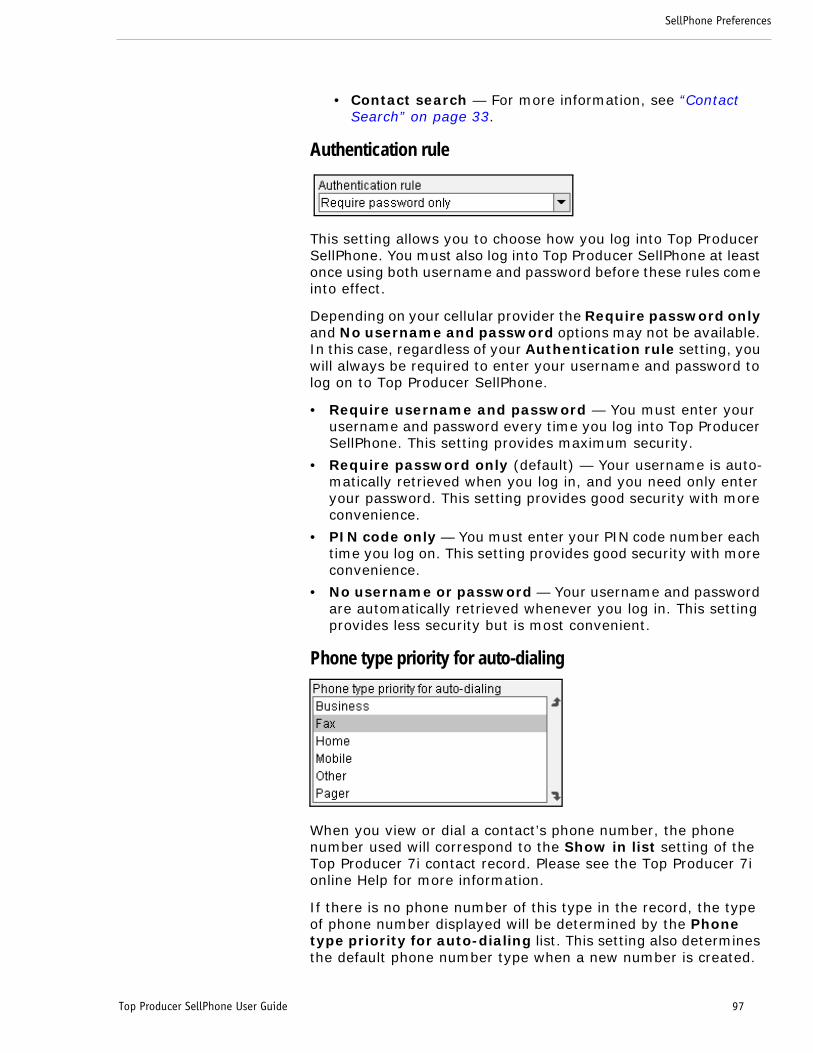
SellPhone Preferences
• Contact search — For more information, see “Contact Search” on page 33.
Authentication rule
This setting allows you to choose how you log into Top Producer SellPhone. You must also log into Top Producer SellPhone at least once using both username and password before these rules come into effect.
Depending on your cellular provider the Require password only and No username and password options may not be available. In this case, regardless of your Authentication rule setting, you will always be required to enter your username and password to log on to Top Producer SellPhone.
• Require username and password — You must enter your username and password every time you log into Top Producer SellPhone. This setting provides maximum security.
• Require password only (default) — Your username is auto-matically retrieved when you log in, and you need only enter your password. This setting provides good security with more convenience.
• PIN code only — You must enter your PIN code number each time you log on. This setting provides good security with more convenience.
• No username or password — Your username and password are automatically retrieved whenever you log in. This setting provides less security but is most convenient.
Phone type priority for auto-dialing
When you view or dial a contact’s phone number, the phone number used will correspond to the Show in list setting of the Top Producer 7i contact record. Please see the Top Producer 7i online Help for more information.
If there is no phone number of this type in the record, the type of phone number displayed will be determined by the Phone type priority for auto-dialing list. This setting also determines the default phone number type when a new number is created.
Top Producer SellPhone User Guide 97

SellPhone Preferences
Re-arrange the priority order by selecting a phone number type and clicking the Up or Down arrows.
Show ‘Delete’ confirmation
By default, you must confirm deletion of contacts, email addresses, notes, phone numbers, activities, leads, listings or closings. De-select this option if you do not want to have to confirm deletion of these items.
Show ‘Success’ screens
By default the completion of certain email operations (for example sending an email) are marked by a ‘success’ screen. De-select this option if you do not want to have these operations confirmed.
Using the SellPhone Preference page tabs
The SellPhone preferences page in Top Producer 7i has a series of seven tabs you can use to customize different areas of Top Producer SellPhone. The tabs are:
• Lead Alerts — see page 98.
• Phone numbers — see page 99.
• Contacts — see page 100.
• Activities — see page 102.
• Display in lists & Week view — see page 103.
• Email — see page 104.
• Listings & Closings — see page 106.
Enabling Lead AlertsShort Message Service (SMS) lets you receive short text messages from a mobile phone. If you have an SMS-capable mobile phone, Top Producer SellPhone can alert you when a lead is received in Top Producer 7i.
Please contact your cellular service provider to:
• ensure that your phone can support SMS.
• activate SMS on your service, if necessary.
• obtain the email address used to send messages to your phone.
• ask for instructions on how to receive SMS messages on your phone.
Top Producer SellPhone User Guide 98
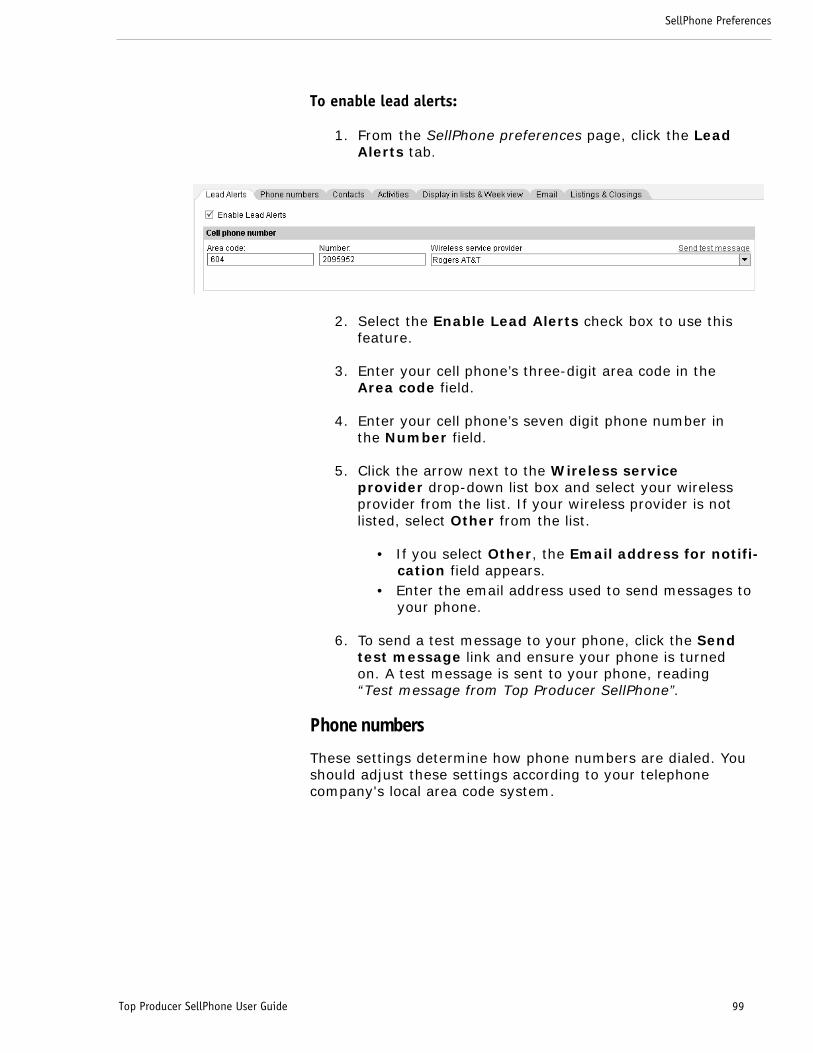
SellPhone Preferences
To enable lead alerts:
1. From the SellPhone preferences page, click the Lead Alerts tab.
2. Select the Enable Lead Alerts check box to use this feature.
3. Enter your cell phone’s three-digit area code in the Area code field.
4. Enter your cell phone’s seven digit phone number in the Number field.
5. Click the arrow next to the Wireless service provider drop-down list box and select your wireless provider from the list. If your wireless provider is not listed, select Other from the list.
• If you select Other, the Email address for notifi-cation field appears.
• Enter the email address used to send messages to your phone.
6. To send a test message to your phone, click the Send test message link and ensure your phone is turned on. A test message is sent to your phone, reading “Test message from Top Producer SellPhone”.
Phone numbersThese settings determine how phone numbers are dialed. You should adjust these settings according to your telephone company's local area code system.
Top Producer SellPhone User Guide 99
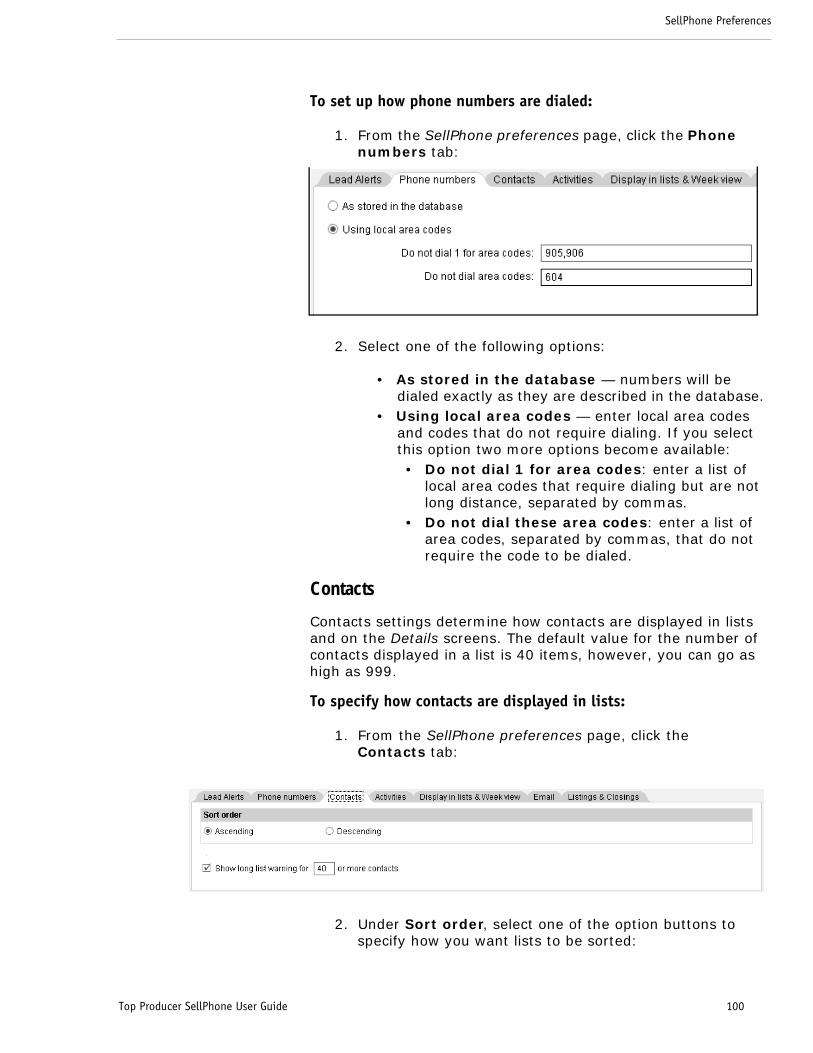
SellPhone Preferences
To set up how phone numbers are dialed:
1. From the SellPhone preferences page, click the Phone numbers tab:
2. Select one of the following options:
• As stored in the database — numbers will be dialed exactly as they are described in the database.
• Using local area codes — enter local area codes and codes that do not require dialing. If you select this option two more options become available:• Do not dial 1 for area codes: enter a list of
local area codes that require dialing but are not long distance, separated by commas.
• Do not dial these area codes: enter a list of area codes, separated by commas, that do not require the code to be dialed.
ContactsContacts settings determine how contacts are displayed in lists and on the Details screens. The default value for the number of contacts displayed in a list is 40 items, however, you can go as high as 999.
To specify how contacts are displayed in lists:
1. From the SellPhone preferences page, click the Contacts tab:
2. Under Sort order, select one of the option buttons to specify how you want lists to be sorted:
Top Producer SellPhone User Guide 100

SellPhone Preferences
• Ascending — select this option button to sort lists from top to bottom. This is the default setting.
• Descending — select this option button to sort lists from bottom to top.
3. Select the Show long list warning for [x] or more contacts check box and enter a value in the adjacent text box to enable Top Producer SellPhone to display a warning whenever a contact search returns a list of contacts greater than or equal to the set number. By default, this option is NOT selected.
Top Producer SellPhone User Guide 101

SellPhone Preferences
ActivitiesThe Activities settings determine the way your phone displays Today’s business items.
To specify how activities are displayed in Today’s business:
1. From the SellPhone preferences page, click the Activities tab:
2. Click the Default type drop-down list to specify which activity type you want assigned to a new activity automatically:
• Appointment (this is the default setting)• Call• To-do
3. Enter a value from 1 to 99 in the Default priority text box to specify the default priority assigned to activities.
4. Click the Change to repeating activity drop-down list and specify how you want your edits applied to a selected repeating activity. You can have the changes apply only to the edited activity, to all occurrences of the repeating activity, or you can choose at the time you edit the activity.
• Require confirmation — changes will be applied only to the edited activity or to all occurrences of the activity.
• Applied to all activities — changes will be auto-matically applied to all occurrences of the repeating activity.
• Applied to modified activities — changes will be applied only to the edited activity (this is the default setting).
Note: If you apply a change to a single repeating activity, such as the description, the activity will become unlinked from the group, becom-ing an independent activity. This does NOT
Top Producer SellPhone User Guide 102
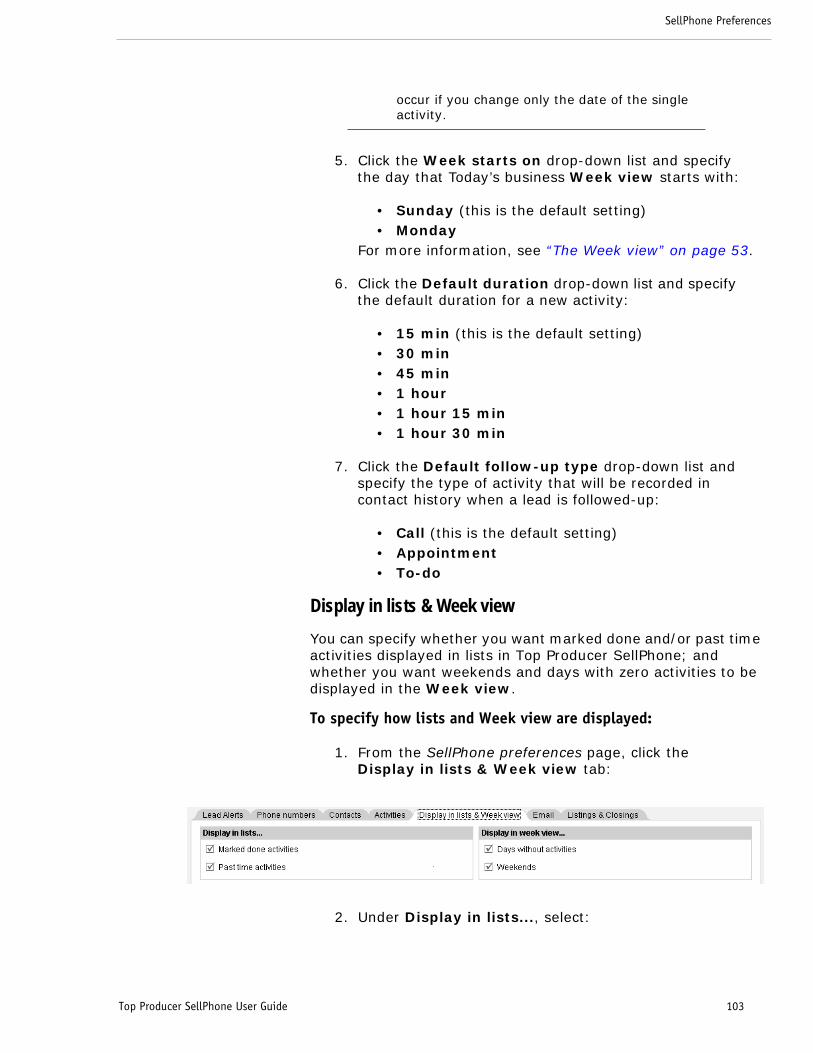
SellPhone Preferences
occur if you change only the date of the single activity.
5. Click the Week starts on drop-down list and specify the day that Today’s business Week view starts with:
• Sunday (this is the default setting)• Monday
For more information, see “The Week view” on page 53.
6. Click the Default duration drop-down list and specify the default duration for a new activity:
• 15 min (this is the default setting)• 30 min • 45 min • 1 hour • 1 hour 15 min • 1 hour 30 min
7. Click the Default follow-up type drop-down list and specify the type of activity that will be recorded in contact history when a lead is followed-up:
• Call (this is the default setting)• Appointment • To-do
Display in lists & Week viewYou can specify whether you want marked done and/or past time activities displayed in lists in Top Producer SellPhone; and whether you want weekends and days with zero activities to be displayed in the Week view.
To specify how lists and Week view are displayed:
1. From the SellPhone preferences page, click the Display in lists & Week view tab:
2. Under Display in lists..., select:
Top Producer SellPhone User Guide 103

SellPhone Preferences
• Marked done activities — select this check box ( ) to display activities which are marked ‘done’ in the linked activity lists. If the box is cleared, or NOT selected, activities which are marked done are NOT displayed (this is the default setting).
Note: Linked activity lists are those activity lists that can be viewed from within a contact, listing or closing record by selecting the Activities menu option. The Today’s business activity list is NOT a linked activity list, so the Display in lists set-tings will NOT affect the display of information in that list.
• Past time activities — select this check box ( ) to display activities that are past their date in the linked activity lists (this is the default setting). If the box is cleared, these activities are NOT displayed.
3. Under Display in week view..., select:
• Days without activities — select this check box ( ) to display days without activities in the Week view screen (this is the default setting). The item appears with [0] appended to the day, indicating zero activities. If the box is cleared, the days without activities are NOT displayed.
• Weekends — select this check box ( ) to display Saturday and Sunday in the Week view screen (this is the default setting). If the box is cleared, Saturday and Sunday are NOT displayed.
EmailUse the Email tab to specify which contact email address you want to use for new contacts, modify email preferences, and to manage your list of preset Quick messages and Quick subjects. Quick Subjects and Quick Messages enable you to send and reply to email with a brief pre-written message or subject.
Top Producer SellPhone User Guide 104

SellPhone Preferences
To specify your email settings:
1. From the SellPhone preferences page, click the Email tab:
2. Select the Always use contact’s primary email address when inserting contacts check box ( ) to specify that the contact’s primary email address is always used when inserting a contact into the To:, Cc: or Bcc: fields of an email.
• If you want to send email to a contact’s secondary email addresses, clear the check box.
3. Click the Email preferences link to change your current email preferences. For more information about these email options, please see the Top Producer 7i User Guide or online Help.
4. Click the Quick Subjects and Quick Messages drop-down list and select:
• Quick Subjects — to view the current list of pre-written quick subjects used to send/reply to email.
• Quick Messages — to view the current list of pre-written short messages used to send/reply to email. • click the Add link to add new Quick Subject or
Quick Message entries. • to change existing Quick Subject or Quick Mes-
sage entries, highlight an item in the list and click the Edit link.
• to remove an existing Quick Subject or Quick Message entry, highlight an item in the list and click the Delete link.
Top Producer SellPhone User Guide 105

SellPhone Preferences
Listings & ClosingsThe Listings & Closings tab lets you specify the display format of listings; and sort order of listings and closings.
To specify the display format of listings and closings:
1. From the SellPhone preferences page, click the Listings & Closings tab:
Note: The display format for closings is NOT editable, therefore, this setting remains unavailable.
2. Click the Display format drop-down list and select:
• Street address — select this item to make refer-ence to listings by their address (this is the default setting).
• Seller name — select this item to make reference to listings by the seller name.
3. Under Sort order, select an option button(s) for Listings AND Closings:
• Ascending — select this option button to sort list-ings/closings in ascending order (this is the default setting).
• Descending — select this option button to sort list-ings/closings in descending order.
Top Producer SellPhone User Guide 106

Troubleshooting
Troubleshooting
In this chapter:
• “Troubleshooting” on page 108
• “Contacting Technical Support” on page 12
Top Producer SellPhone User Guide 107

Troubleshooting
Troubleshooting
Please read the following before contacting Top Producer Technical Support.
I cannot get to the Top Producer SellPhone login screen or Top Producer SellPhone stops working
(a) Make sure you are receiving digital cellular serviceThe wireless Internet requires digital cellular service to function. It is not uncommon for digital service to become unavailable in certain geographic locations, or if the cellular network is exceptionally busy. If you cannot log on to Top Producer SellPhone, first make sure that your cell phone is receiving digital service. Usually this is indicated by a “D” symbol in the phone’s display. If you are receiving analog service (indicated by an “A” symbol), you will not be able to access the wireless Internet. Please try again later, or contact your cellular provider for assistance.
(b) Try to access a different Web siteTry to navigate to a Web site other than the Top Producer SellPhone login site. If you cannot get to any other web sites, please contact your cellular provider for assistance.
I cannot get back to the Main menu or log out of Top Producer SellPhone
Press the END keyKeep pressing the END key to go back to the Main menu or your micro browser’s GO TO screen.
Top Producer SellPhone User Guide 108

Top Producer SellPhone User Guide


![INSTALLATION RUNBOOK FOR Openwave Mobility + vUDR... · INSTALLATION RUNBOOK FOR Openwave Mobility + vUDR Application Type: [Infrastructure (User data repository)] ... subscriber](https://img.pdfslide.us/doc/110x75/5ec54b746ba8811821791552/installation-runbook-for-openwave-mobility-vudr-installation-runbook-for.jpg)