Embed Size (px)
Citation preview

Page 1 of 33
CPD in RCPCH ePortfolio
USER GUIDE Updated July 2019 v4
Page 2 of 33
Contents Item Page CPD Dashboard … 3 Offline use … 4 Creating a new activity … 5 Creating CPD Diary Activity Entries and Reflective Note forms … 6 IMPORTANT: Clarification of Shared and Private CPD Activities … 7 Creating a PDP … 11 Linking your PDP goals to CPD activity entries … 13 Viewing your documents … 15 Viewing your CPD records … 17 Viewing your CPD Timeline … 18 Filtering your CPD Timeline … 19 Editing CPD records … 21 Completing draft CPD records … 23 Producing reports of CPD records … 24 Producing a combined CPD credits and activity report … 25 Producing a CPD credit report for two date ranges … 28 Updating your contact details via the RCPCH website … 32 Contact us … 33
Note:
CPD Diary in ePortfolio should be used within the Chrome web browser to ensure functionality in the system works as expected

Page 3 of 33
DASHBOARD
Click the arrow to switch the dashboard view for each of your roles, if you have multiple roles.
If you only use the CPD Diary in the RCPCH portfolio, you will only have a CPD Diary dashboard and will not need to switch
View your profile details. If you notice anything is incorrect, you can update it by visiting the “My account” section of the RCPCH website https://www.rcpch.ac.uk/
Quick links to create new CPD activities or add supporting resources
Quick links to produce reports of your recorded CPD activity records
Links to FAQs and user guide
View your recorded CPD activities via the Timeline on the “CPD Diary” filter
TIP: You can also click the + button on any screen to create a new activity or report

Page 4 of 33
If you are using your own PC/laptop/mobile device, you can store ePortfolio data on your device for use in offline mode. DO NOT use this option if you are using a public device, for instance at work.

Page 5 of 33
CREATING A NEW ACTIVITY
Choose the type of activity you would like to create
TIP: You can also click the + button on any screen to add a new activity or create a new report

Page 6 of 33
CREATING A NEW CPD ACTIVITY ENTRY OR REFLECTIVE NOTE
The CPD Diary Activity Entry and Reflective Note forms are similar in structure and the following basic instruction applies to both forms.
The reflection field prompts differ on each form to help you to capture the required detail for each type.

Page 7 of 33
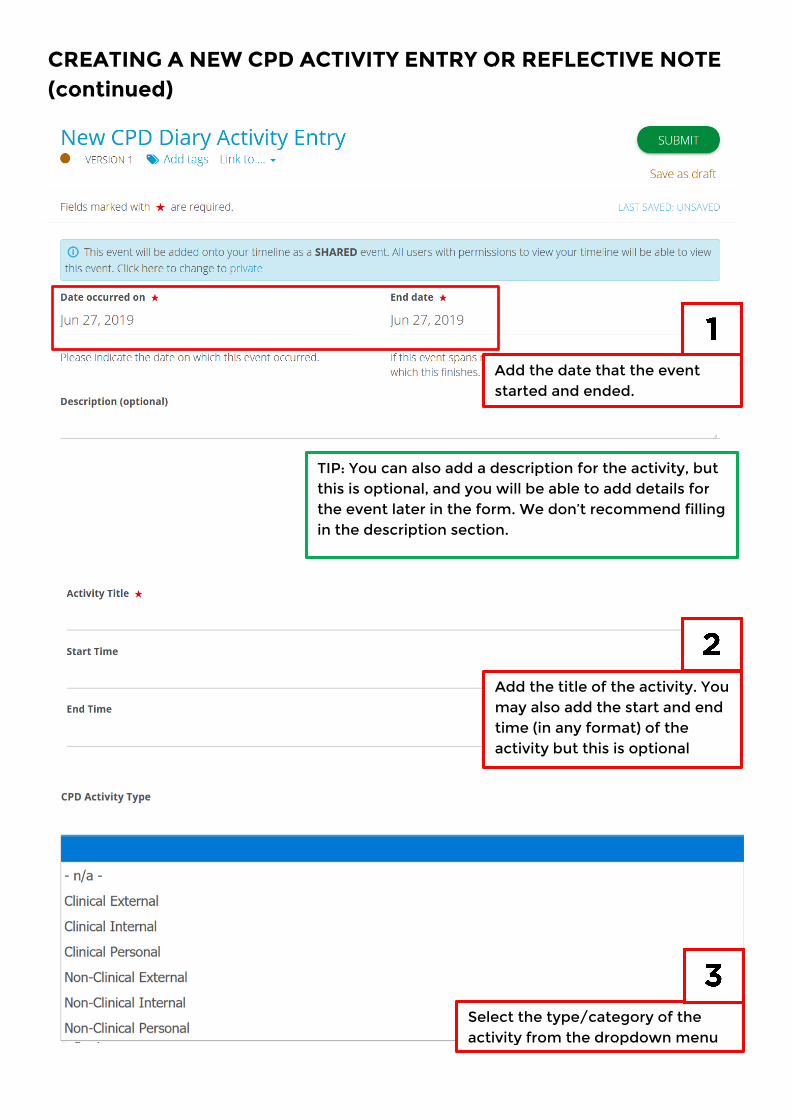
CREATING A NEW CPD ACTIVITY ENTRY OR REFLECTIVE NOTE (continued)
IMPORTANT:
All CPD entries (CPD Activity Entries, Reflective Notes, PDP CPDs, CPD Special Circumstances, CPD Resources, Subscribed CPD Diary activities and CPD reports) are “shared” items on your timeline. However, they cannot be seen by any other user, even if you have allowed permission for someone else (e.g. educational supervisor if you have a dual Trainee and CPD Diary role) to view other data in your RCPCH ePortfolio.
Therefore, you do not need to make the CPD activities “private” in order to protect them from being viewed by another user.
Also, only “shared” activities can be included in reports which you run.
However documents are automatically uploaded as “shared” and viewable if you have allowed permission for e.g. an educational supervisor to see your account. Therefore CPD-related documents should be marked as “private” if you have a dual Trainee/CPD Diary active role.
NOTE: most CPD Diary users will not have a dual role, this only applies to e.g. some
SAS doctors, clinical fellows etc who wish to record progress against the RCPCH curriculum and record CPD via the College CPD scheme.
Page 8 of 33
CREATING A NEW CPD ACTIVITY ENTRY OR REFLECTIVE NOTE (continued)
Add the date that the event started and ended.
TIP: You can also add a description for the activity, but this is optional, and you will be able to add details for the event later in the form. We don’t recommend filling in the description section.
Add the title of the activity. You may also add the start and end time (in any format) of the activity but this is optional
Select the type/category of the activity from the dropdown menu

Page 9 of 33
CREATING A NEW CPD ACTIVITY ENTRY OR REFLECTIVE NOTE (continued)
Add the detail of the activity
Type in the number of credits you wish to allocate to the activity (optional)
You can then link the activity to GMC revalidation domains by ticking the desired domains
Add your reflection for the event. There are useful prompts to help you to structure your reflection. The prompts differ depending on whether you are adding a CPD Activity or a Reflective Note.

Page 10 of 33
CREATING A NEW CPD ACTIVITY ENTRY OR REFLECTIVE NOTE (continued)
You are also able to link a document (e.g. PDF, Word, PPT) to the activity. Click the “Attach Files” button and add the file from your computer or device. IMPORTANT: Documents that are uploaded in relation to CPD must be switched to “private” if you have a dual role of Trainee and CPD Diary, unless you are happy for your e.g. educational supervisor to see them.
Once you have finished entering the activity, press the green submit button to save as a completed activity.
You can also “Save as draft” if you want to complete it later.
NOTE: Drafts will not show up in any reports you run.

Page 11 of 33
CREATING A PDP (PDP CPD)
Add the period (start date and end date) which your PDP will cover.
Add a PDP CPD Description to help you remember its overall focus
“Goals” are the objectives you wish to add to your PDP.
Add a title and description for the objective (e.g. Improving my Clinical Leadership skills)
PLEASE NOTE THAT YOU DO NOT NEED TO ADD A GOAL TARGET

Page 12 of 33
CREATING A PDP (PDP CPD)
You can add more goals (objectives) by clicking the “Add Another Goal“ button
You can save your PDP by scrolling to the top of the screen and clicking the “Start Goals” button
You then need to enter the due date for your goals/objectives at the end of the form.
You can also attach documents to the PDP at the bottom of the form

Page 13 of 33
LINKING YOUR PDP GOALS (OBJECTIVES) TO CPD ENTRIES
You can view your PDP goals by clicking the “Goals” drop-down option at the top of the screen and clicking “Goals”
Click on the objective you wish to link to an event
Click “Link Event to this Target”
You then have the option to create a new event to link to the goal or select an existing event from your Timeline.

Page 14 of 33
You are then presented with your Timeline view. Click items to link to the goal, then click “I’m done linking” when you are finished.
.

Page 15 of 33
VIEWING YOUR DOCUMENTS
Click on the “Documents” option at the top of the screen to access your existing documents or upload a new document.
To upload a document, click the “Upload Document” button
You can also organise documents into folders and select files to go into them should you wish

Page 16 of 33
VIEWING YOUR DOCUMENTS (continued)
You can view which activities are linked to a document from the document section, by clicking the title to expand the detail and following the link under the “Linked to events” section.
To open documents, select the download symbol.

Page 17 of 33
ViEWING YOUR CPD RECORDS
From any screen view, click the Timeline dropdown and select “CPD Diary” to view your list of CPD related records, except for CPD-related documents.
Depending on your role, you may only see Whole timeline and CPD Diary.

Page 18 of 33
ViEWING YOUR CPD RECORDS – VIEWING YOUR CPD TIMELINE
Your CPD Diary Timeline view will display your CPD Diary Activities, Subscribed CPD Activities, Reflective Notes, PDP CPDs and CPD Resources (URLs or references).
You are able to filter or refine this list, using the tools onscreen.
Note: the timeline will default to ordering by date created. We recommend you switch to date occurred for CPD purposes.
TIP: Events listed in brown indicate that they are ‘drafts’ (have not been reflected upon/allocated credits/submitted).
TIP: You can view detail of an item on your timeline by clicking “Preview”
Once viewing an item in preview mode, if you wish to make any edits, click on the “Fill in” or Edit button

Page 19 of 33
ViEWING YOUR CPD RECORDS – FILTERING YOUR TIMELINE (continued)
Once you are in the CPD Diary timeline, you are able to filter/search for events from the search bar at the top of the screen.
You can search by text (i.e. a title of an event or word in the detail or reflection
OR
You can search by event type (i.e. “CPD Diary Activity entry”, “Reflective Note” etc)

Page 20 of 33
ViEWING YOUR CPD RECORDS - FILTERING YOUR TIMELINE (continued)
You can also refine your search by event state (i.e. “Complete” or “Draft”
You also have options to reorder the items.
The timeline defaults to “date created”
We recommend you change it to “date occurred” for CPD purposes.
You also have advanced options to filter by date range

Page 21 of 33
EDITING CPD RECORDS
From your timeline, double-click on the “event” name of the item you wish to edit to open it, or select “Fill in” if the event is a draft.

Page 22 of 33
EDITING CPD RECORDS
Once you have finished editing the activity, press the green submit button to save as a completed activity.
You can also “Save as draft” if you want to complete it later.
Click either the “Edit” button at the bottom of the screen, or “Fill in“ if the event is a draft
Page 23 of 33
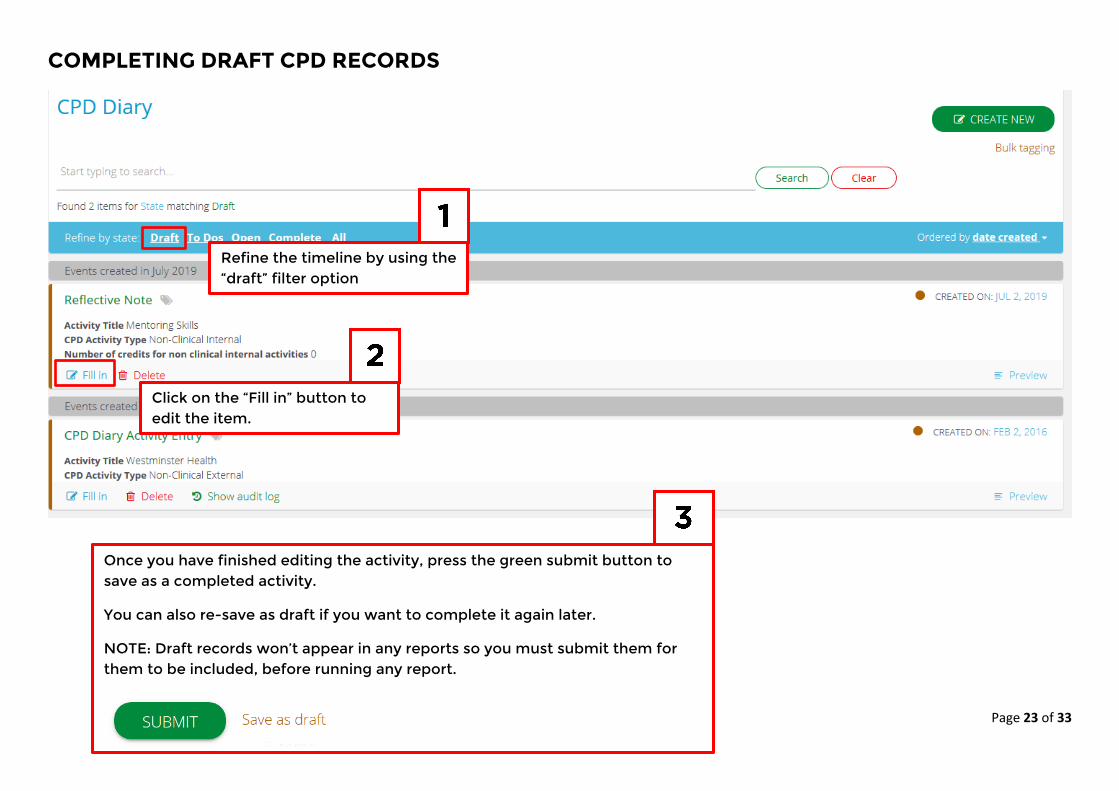
COMPLETING DRAFT CPD RECORDS
Refine the timeline by using the “draft” filter option
Click on the “Fill in” button to edit the item.
Once you have finished editing the activity, press the green submit button to save as a completed activity.
You can also re-save as draft if you want to complete it again later.
NOTE: Draft records won’t appear in any reports so you must submit them for them to be included, before running any report.

Page 24 of 33
PRODUCING REPORTS OF CPD ACTIVITIES
Select the report you wish to produce from the quick links section on the dashboard
TIP: You can create reports by clicking the + button and selecting the report you require
TIP: Only shared and complete CPD diary activities, reflective notes and subscribed CPD activities will appear in reports. If you don’t want an activity to appear in a report, then “mark as private” if complete, or leave as “draft” before you run your report.

Page 25 of 33
PRODUCING A COMBINED CREDITS AND CPD ACTIVITY DETAIL REPORT
This autofills with the date you have produced the report. You can adjust this If you wish.
Type in your date range, as a label for the CPD credit timeframe you are reporting on (e.g. 1 Jan 2018 to 31 Dec 2018), as the system won’t show what you have selected once the report has been generated.
NOTE- Filling this in won’t select the date range, it is simply a label for the report itself.
Select the exact start date and end date for the CPD Credit report section and click the “generate report” button

Page 26 of 33
PRODUCING A COMBINED CREDITS AND CPD ACTIVITY DETAIL REPORT (continued)
The credit data will now be displayed for the period you have entered
Select the exact start date and end date for the CPD detailed report section and click the generate report button
The full detail for all CPD Activities, and reflective notes will be displayed on screen.
Type in your date range, as a label for the CPD detailed report timeframe you are reporting on (e.g. 1 Jan 2018 to 31 Dec 2018), as the system won’t show what you have selected once the report has been generated. NOTE- Filling this in won’t select the date range, it is simply a label for the report itself.

Page 27 of 33
PRODUCING A COMBINED CREDITS AND CPD ACTIVITY DETAIL REPORT (continued)
To print the report (or convert to a PDF document), open the saved report on your timeline, press CTRL and P (PC) or Command and P (Mac) keys on your keybaord and select the option to print, or save as PDF (or whatever version of PDF format your PC/Mac has on it). See our FAQ in ePortfolio on producing reports for more detailed help on this.
+
You can save the generated report on your CPD Diary timeline, as a record or to access later.
To save, scroll to the top of the screen, press the green “Submit” button.
Alternatively, you can save the generated report as a draft, to complete at a later time.
P

Page 28 of 33
PRODUCING A CREDITS REPORT FOR TWO DATE RANGES
This autofills with the date you have produced the report. You can adjust this If you wish.
Type in your date range, as a label for the first CPD credits report timeframe you are reporting on (e.g. 1 Jan 2018 to 31 Dec 2018), as the system won’t show what you have selected once the report has been generated. NOTE- Filling this in won’t select the date range, it is simply a label for the report itself.
Select the start date and end date for the first CPD Credit report and click the “generate report” button

Page 29 of 33
The credits will now be displayed for the first period you have chosen
Select the start date and end date for the second credit report and click the generate report button
Type in your date range as a label for the second CPD credits timeframe you are reporting on (e.g. 1 Jan 2013 to 31 Dec 2018), as the system won’t show what you have selected once the report has been generated. NOTE- Filling this in won’t select the date range, it is simply a label for the report itself.

Page 30 of 33
The credits will now be displayed for the two periods you have specified
You can save the generated report on your CPD Diary timeline, as a record or to access later.
To save, scroll to the top of the screen, press the green “Submit” button.
Alternatively, you can save the generated report as a draft, to complete at a later time.

Page 31 of 33
To print the report (or convert to a PDF document), open the saved report on your timeline, press CTRL and P (PC) or Command and P (Mac) keys on your keybaord and select the option to print, or save as PDF (or whatever version of PDF format your PC/Mac has on it). See our FAQ in ePortfolio on producing reports for more detailed help on this
NOTE: There are other CPD reports available in the RCPCH ePortfolio and those which we may make available in the future, based on your feedback. The process for producing all reports is the same as that highlighted above.
+ P

Page 32 of 33
UPDATING YOUR CONTACT DETAILS
You can update your details (name, email address, GMC number) in the ePortfolio via the RCPCH website
www.rcpch.ac.uk
Once on the homepage, click “log in”
Once you have logged into the your RCPCH account on the website, click on “My account”
You can then click “edit your personal details” and follow the instructions onscreen.

Page 33 of 33
Feedback
Tell us what you think and what guidance, reports and tools you would like in your CPD Diary: [email protected]
More Information www.rcpch.ac.uk/cpd
Contact Us Email us: [email protected]