Embed Size (px)
Citation preview
Corporate
Manager ET V14.7
USER GUIDE
Corporate Manager ET User Guide
1
Table of Contents
Introduction to Corporate Manager ET ................................................................................................. 5 CHAPTER 1: THE CONTACT CARD ............................................................................................. 6 Contact Data ...................................................................................................................................... 7
Opening Contacts ............................................................................................................................ 7 Entering New Contacts ..................................................................................................................... 8 Salutation Field .............................................................................................................................. 10 File As ........................................................................................................................................... 10 Contact Type ................................................................................................................................. 11 Shareholder Variations ................................................................................................................... 11 Signing Lines ................................................................................................................................. 12 Contact Address ............................................................................................................................ 13 Find Address ................................................................................................................................. 14 Entering Additional Addresses ........................................................................................................ 14 Default Address ............................................................................................................................. 15 Firm as a Corporation’s Registered Office Address ........................................................................... 15 Changing Registered Office Address ................................................................................................ 15 Changing an Address ..................................................................................................................... 15 Unlinking an Address ..................................................................................................................... 18 Name Changes .............................................................................................................................. 19
Corporate Name Change ............................................................................................................. 19 Corporate Name Change when Corporation is a Shareholder in Another Matter .............................. 20 Individual Name Change ............................................................................................................. 21
Contact Links................................................................................................................................. 22 Change Contact Links .................................................................................................................... 23 Deleting Contacts or Duplicate Contacts .......................................................................................... 23 Retrieving a Deleted Contact or Matter ........................................................................................... 25 Copy a Contact .............................................................................................................................. 25 Copy a Contact’s Information ......................................................................................................... 26 Digital signatures ........................................................................................................................... 26 Social Networking .......................................................................................................................... 26 Correspondence to Contacts ........................................................................................................... 26
CHAPTER 2: INCORPORATE AND ORGANIZE .......................................................................... 27 Corporation Assistant ........................................................................................................................ 28 Creating a New Corporate Matter ....................................................................................................... 28 Incorporation Wizard ......................................................................................................................... 28
Step 1 – Entering a New Company.................................................................................................. 29 Step 2 – Entering Client Information ............................................................................................... 30 Step 3 – Create Share Classes ........................................................................................................ 31 Step 4: - Enter Provisions ............................................................................................................... 33 Draft Process ................................................................................................................................. 34 Generate Articles ........................................................................................................................... 34 File Online (Ontario and Federal Filings Only) .................................................................................. 34
Organization Wizard .......................................................................................................................... 36 Step 1 – Address and Corporate Information ................................................................................... 36 Step 2 – Appoint Officers and Directors ........................................................................................... 37 Step 3 – Create Share Classes ........................................................................................................ 38
Corporate Manager ET User Guide
2
Step 4 – Issue Shares .................................................................................................................... 39 Generate Organization Package ...................................................................................................... 40
Copy Matter ...................................................................................................................................... 40 Template Matter ............................................................................................................................... 41 CHAPTER 3: COMMON TASKS.................................................................................................. 43 General Corporate Structure .............................................................................................................. 44
Incorporation/Amendment (Federal and Ontario Only) ..................................................................... 44 Organize this Company .................................................................................................................. 45 File Initial Return/Notice of Change Online (Ontario Only) ................................................................ 45 Clean Up the Minute Book (Ontario only) ........................................................................................ 47 Update Minute Book ...................................................................................................................... 47 Change Organization Date .............................................................................................................. 48 Corporate Name Change ................................................................................................................ 48 Amalgamation Wizard .................................................................................................................... 49 Partnerships Wizard ....................................................................................................................... 49
Share Transactions ........................................................................................................................... 49 Issue Shares ................................................................................................................................. 49 Balance Forward ............................................................................................................................ 49 Recreating Historic Share Numbering .............................................................................................. 50 Transferring Shares ....................................................................................................................... 50 Transfer to Treasury ...................................................................................................................... 51 Share Conversion (Class Rename/class Redesignation) .................................................................... 51 Share Exchange (S.86) .................................................................................................................. 52 Share Split .................................................................................................................................... 52 Share Consolidation ....................................................................................................................... 53 NEW Beneficial Shareholders .......................................................................................................... 54 Edit Share Transaction ................................................................................................................... 54 Cancel Share Transactions ............................................................................................................. 55 Delete Share Transactions .............................................................................................................. 56
Directors and Officers ........................................................................................................................ 56 Elect a Director .............................................................................................................................. 56 Resign a Director ........................................................................................................................... 57 Global Resign a Director ................................................................................................................. 58 Appoint an Officer.......................................................................................................................... 58 Resign an Officer ........................................................................................................................... 58
CHAPTER 4: TABS .................................................................................................................... 60 Overview Tab ................................................................................................................................... 61 Capital Tab ....................................................................................................................................... 62
Principals ...................................................................................................................................... 62 Ledgers & Registers ....................................................................................................................... 63
Significant Control ...................................................................................................................... 63 Beneficial Shareholders ............................................................................................................... 63
Share Structure ............................................................................................................................. 64 Stated Capital ................................................................................................................................ 64 Creating a New Share Class ............................................................................................................ 65
Automatic Certificate Numbering ................................................................................................. 65 Template Share Classes .............................................................................................................. 65
Dividends ...................................................................................................................................... 66 Bonuses ........................................................................................................................................ 66 Assets, Liabilities ........................................................................................................................... 67
Corporate Manager ET User Guide
3
Interests in Land in Ontario ............................................................................................................ 67 By-Laws/Jurisdiction Tab ................................................................................................................... 68
Jurisdictions .................................................................................................................................. 68 By-Law/Quorum ............................................................................................................................ 69 Registrations - Business Name, PPSA, Extra Provincial and Trademark .............................................. 69 Renewing Registrations .................................................................................................................. 71 Professionals ................................................................................................................................. 71
Administration/Annuals Tab ............................................................................................................... 72 Administration ............................................................................................................................... 72 Closing Matters/ Viewing Closed Matters ......................................................................................... 73 Saving Documents to Client Sub-Directory Location ......................................................................... 74 Update Saved Document Folder Locations ....................................................................................... 74 Internal Staff/Timekeepers ............................................................................................................. 75 Client Contact, Accountant/Auditor, Banks and Records Keeper ........................................................ 76 Annuals/Activities .......................................................................................................................... 76 Activities ....................................................................................................................................... 77
Add an Activity ........................................................................................................................... 77 Creating and Using Groups ............................................................................................................. 78
Workflow Tab ................................................................................................................................... 78 Documents Out for Signing ............................................................................................................ 78 Location of Corporate Records ........................................................................................................ 80 Phone Log ..................................................................................................................................... 81 Email ............................................................................................................................................ 81 Tasks ............................................................................................................................................ 81 Notes ............................................................................................................................................ 82
Documents Tab ................................................................................................................................ 83 Add a Document Link ..................................................................................................................... 84 Deleting a Document Link .............................................................................................................. 84
CHAPTER 5: AMALGAMATION, PARTNERSHIP, SECTION 85 ROLLOVER ............................... 86 Amalgamation Wizard ....................................................................................................................... 87
Amalgamated Corporation as Shareholder in Another Matter ............................................................ 93 Partnerships Wizard .......................................................................................................................... 93 Section 85 Rollover ........................................................................................................................... 95
Entering Assets and Liabilities ......................................................................................................... 96 Transferring Assets and Liabilities ................................................................................................... 96 Assets for Shares ........................................................................................................................... 96 Shares for Shares .......................................................................................................................... 97 Assets for Promissory Note ............................................................................................................. 98
CHAPTER 6: DOCUMENTS AND REPORTS .............................................................................. 99 Generating Documents/Reports ....................................................................................................... 100
Documents .................................................................................................................................. 100 Update Annuals and/or Registrations ............................................................................................ 101 Creating Blank Forms ................................................................................................................... 102 Saving a Document ...................................................................................................................... 102 Options ....................................................................................................................................... 102 Reports ....................................................................................................................................... 102 Packages..................................................................................................................................... 103
CHAPTER 7: LISTS ................................................................................................................. 105 Using Lists ...................................................................................................................................... 106
Opening Matters .......................................................................................................................... 106

Corporate Manager ET User Guide
4
Searching for Files using Lists ....................................................................................................... 106 Finding Matters using Search ........................................................................................................ 107 Finding Contacts or Matters in Lists .............................................................................................. 107 Matters List ................................................................................................................................. 108 Sorting Lists by Columns .............................................................................................................. 108 Activities Button .......................................................................................................................... 108 Add/Remove/Reorder List Columns ............................................................................................... 109 Resetting a List ............................................................................................................................ 109 Saving List Reports ...................................................................................................................... 109 Deleted Matters ........................................................................................................................... 110 Advanced Searches – Creating a Customized Search ...................................................................... 110
CHAPTER 8: TASKS AND REPORTS ........................................................................................ 113 Workflow ........................................................................................................................................ 114
Reminder Report ......................................................................................................................... 114 Open Matters and Tasks .............................................................................................................. 114 View Tasks .................................................................................................................................. 114 Only Show the next 2 month(s) .................................................................................................... 114 Hide Completed Tasks ................................................................................................................. 114 Rearranging Columns in Reminder Report ..................................................................................... 114 Sorting tasks ............................................................................................................................... 115 Find a Company in the Task List ................................................................................................... 115 Printing Task Reports ................................................................................................................... 115 Create or Add a Task ................................................................................................................... 115 Completing a Task ....................................................................................................................... 116 Editing a Task ............................................................................................................................. 116 Removing a Task ......................................................................................................................... 116 Default Task Values ..................................................................................................................... 116 Task Priority ................................................................................................................................ 117
CHAPTER 9: ADVANCED OPTIONS ........................................................................................ 118 Program Options ......................................................................................................................... 119 Closing Matters/ Viewing Closed Matters ....................................................................................... 119 Deleted Matters ........................................................................................................................... 120 Research ..................................................................................................................................... 120 Search Online .............................................................................................................................. 121 Creating a Mail Merge from Lists ................................................................................................... 121
Corporate Manager ET User Guide
5
Introduction to Corporate Manager ET
Emergent Corporate Manager ET is designed to handle the data storage, reporting and document assembly requirements of law firms and corporate legal departments.
Corporate Manager ET stores the particular profiles of both Contacts and Matters and the relationships between each.
Contacts are individuals, companies, government offices, courts, municipalities, joint shareholders, estate shareholders, family trust shareholders and trustee shareholders. Essentially, the system considers any entity that holds an address or requires a specially formatted signature line to be a Contact.
Matters, on the other hand, represent the Corporations under administration by the department. Some examples of what can be done in Matters include:
• The incorporation of a newly formed company • Resolutions of directors and shareholders for various purposes • The tracking of an extra-provincial registration for an existing corporation
Relationships are created between Contacts and Matters and once a Contact has been entered into the system; it can be used repeatedly for any Matter.
Wizards contained in Corporate Manager ET will dramatically cut down on drafting and editing time, as well as keep your corporate information current and easy to consult.
Technical Support If you have questions about Corporate Manager ET do not hesitate to call the Emergent Help Desk at:
Vancouver: 778-372-0301 Edmonton: 780-229-0237 Calgary: 403-351-0299 Winnipeg: 204-201-1533 Toronto: 416-408-2833 Ottawa: 613-691-0153 Halifax: 902-334-1533 Toll-free: 866-408-2833
For Customer Service or Technical Support, dial Ext. 1
For Training Support, dial Ext. 4
Corporate Manager ET User Guide
6
Chapter 1: The Contact Card
Corporate Manager ET User Guide
7
Contact Data
Information entered on the Contact Card drives every feature, function and task performed by Corporate Manager ET. It is important that you complete the Contact Card with as much available information as possible to minimize revisions of your documents.
This section will cover how to open existing Contacts, enter new Contacts, delete unwanted Contacts, and how to fill in the information required for different types of Contacts, i.e. individuals, companies, joint shareholders, estate shareholders, family trust shareholders and trustee shareholders.
Opening Contacts
Opening Contacts to view information can be done in three ways. Depending on where you are within Corporate Manager ET, you may use whichever is most convenient:
1. Double-click on the Contact’s Name. Double-click on any Contact name wherever it appears within a Matter to open the Contact Card.
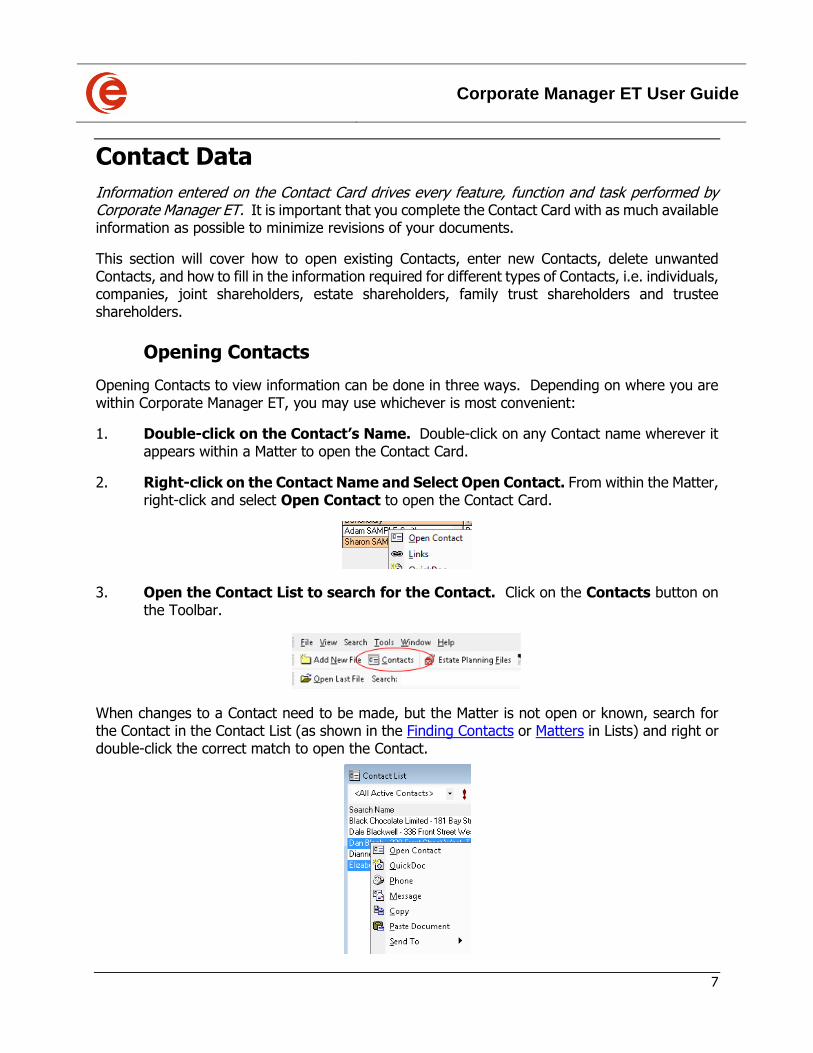
2. Right-click on the Contact Name and Select Open Contact. From within the Matter, right-click and select Open Contact to open the Contact Card.
3. Open the Contact List to search for the Contact. Click on the Contacts button on the Toolbar.
When changes to a Contact need to be made, but the Matter is not open or known, search for the Contact in the Contact List (as shown in the Finding Contacts or Matters in Lists) and right or double-click the correct match to open the Contact.

Corporate Manager ET User Guide
8
Entering New Contacts
The details collected for Contacts vary depending on the Type of Contact. For example, you may want to collect information such as Date of Birth and Social Insurance Number for an individual, whereas this data would not apply to a Company Contact. For this reason, it is very important to select the correct value for the Type field in each Contact Card.
There are two ways to enter Contacts in Corporate Manager ET.
1. Choose File > New > New Contact
This will display a new Contact Card to enter information.
Click the Full Name button and the Name Details window will appear. Enter as much as of the Contact’s Name information as possible.
When all Name fields are complete, click OK to return to the Contact Card. Please refer to the Salutation Section for further discussion on completing the Salutation field.
If this Contact is a Type other than Individual, such as a corporation, change it now by selecting the dropdown menu at Contact Type and selecting the appropriate Type.
Corporate Manager ET User Guide
9
Select the File As dropdown menu and set the File As name, which is covered in more detail later in the File As section.
2. Quick Add a Contact from Within a Matter
Corporate Manager ET allows you to enter Contacts from within a Matter itself. Throughout the Matter screens, you will see areas that require Contacts. These fields define Contacts such as shareholders, directors, officers, bankers, accountants, etc.
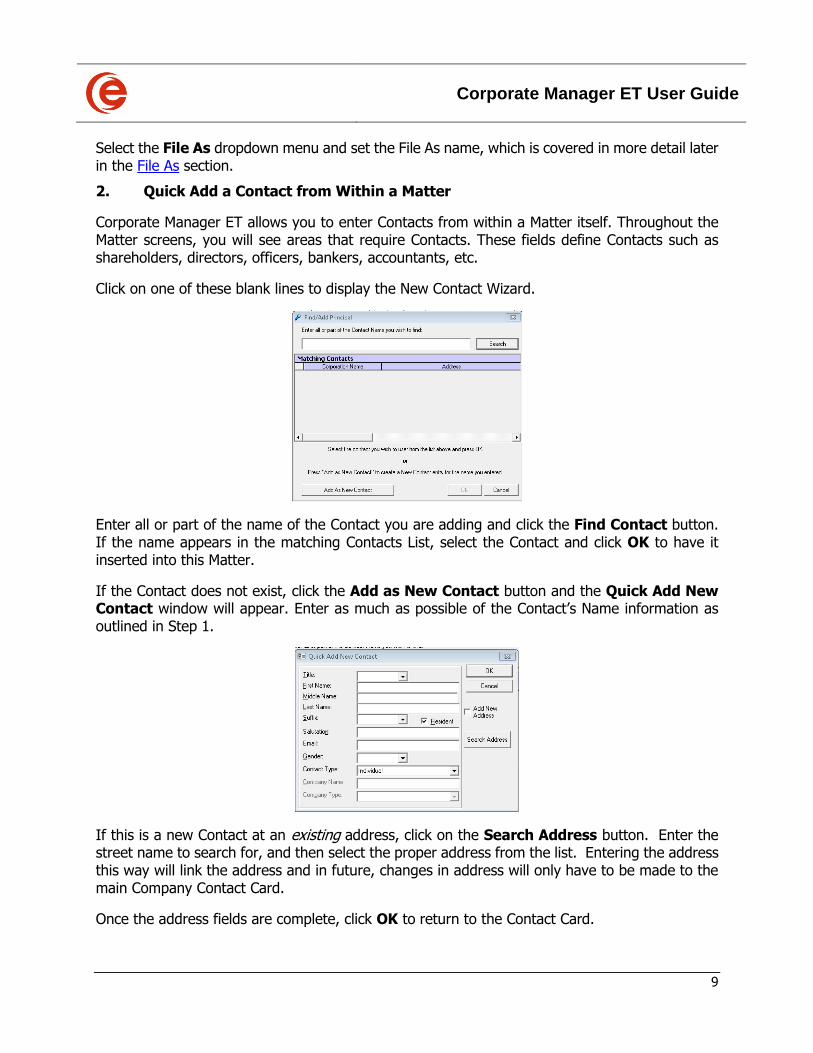
Click on one of these blank lines to display the New Contact Wizard.
Enter all or part of the name of the Contact you are adding and click the Find Contact button. If the name appears in the matching Contacts List, select the Contact and click OK to have it inserted into this Matter.
If the Contact does not exist, click the Add as New Contact button and the Quick Add New Contact window will appear. Enter as much as possible of the Contact’s Name information as outlined in Step 1.
If this is a new Contact at an existing address, click on the Search Address button. Enter the street name to search for, and then select the proper address from the list. Entering the address this way will link the address and in future, changes in address will only have to be made to the main Company Contact Card.
Once the address fields are complete, click OK to return to the Contact Card.

Corporate Manager ET User Guide
10
Salutation Field
Certain individuals may be known by a name that is not their legal name. For example, a person whose legal name is Henry Jonathon Smith may be known as Jack Smith. Mail will be addressed to Jack Smith, but signature lines for legal documents will contain the formal legal name.
In this example, the Salutation field has been manually changed to Jack. Documents generated will contain the full legal name, but correspondence will be addressed to “Dear Jack”.
The Contact Card will look like this:
You will note that the Salutation does not appear on the Contact Card itself and is only visible when you click the Full Name button. However, the Salutation column can easily be added in the Contacts List where all your Contacts are displayed.
File As
On every Contact Card you will notice a File As field that contains all the combinations of the name entered in the Full Name screen for an Individual, or the entered in the Company field for any other type of contact.
Corporate Manager ET User Guide
11
Users can manually enter or select a different File As name if the Contact generally uses a name other than their Full Name. Bear in mind that the File As name will be the name that appears on all signature lines and documents.
Contact Type
When Quick Adding a Contact from the Matter screen, it is important to pay attention to the Contact Type. Most often, the default Type will be Individual and if necessary, should be changed to ensure documents are populated correctly.
The Available Contact Types are:
There are also Types for Government, Municipal or Court Contacts. These should not be used when setting up a Contact Card for an Individual, Company or Estate, but may be necessary elsewhere in the Matter.
Shareholder Variations
All names are entered in the Company name field. See Signing Lines for further information on creating these types of compound Contacts.
Company Any Company involved in a Matter (e.g. the corporation, shareholder). Companies cannot normally be directors or officers. This type has a signing line tab for inclusion in documents.
Employee Employees are Timekeepers, or people at the firm working on a Matter. The Timekeeper checked as Primary will sign correspondence, etc.
Estate The Estate involved in a Matter or when an Estate holds shares. This type has a signing line tab for inclusion in documents.
Family Trust When a Family Trust holds shares. This type has a signing line tab for inclusion in documents.
Individuals Any person playing a role in a Matter (e.g. shareholder, officer, client).
Joint Shareholders
Used when two or more individuals jointly hold shares. This type has a signing line tab for inclusion in documents.
Our Law Firm There should only be one “Our Firm” Contact. All Employees should link their address to this contact card to avoid duplication.
Trustee Shareholder
When a trustee holds shares. This type has a signing line tab for inclusion in documents.
Corporate Manager ET User Guide
12
Corporate Shareholder
Enter the Corporation Name and set the Contact Type to Corporation.
Estate Shareholder
Enter the Estate Shareholder and set the Contact Type to Estate.
Family Trust Shareholder
Enter the Family Trust Shareholder and set the Contact Type to Family Trust.
Joint Shareholders
Enter the Joint Shareholders and set the Contact Type to Joint Shareholders.
Trustee Shareholder
Enter the Trustee Shareholder and set the Contact Type to Trustee.
Once the Shareholder names, Types and addresses are complete, Save and Close the Contact Card. Re-open the Contact Card, click on the Signing Lines Tab, and enter the signatories in the order that you wish them to appear on documents.
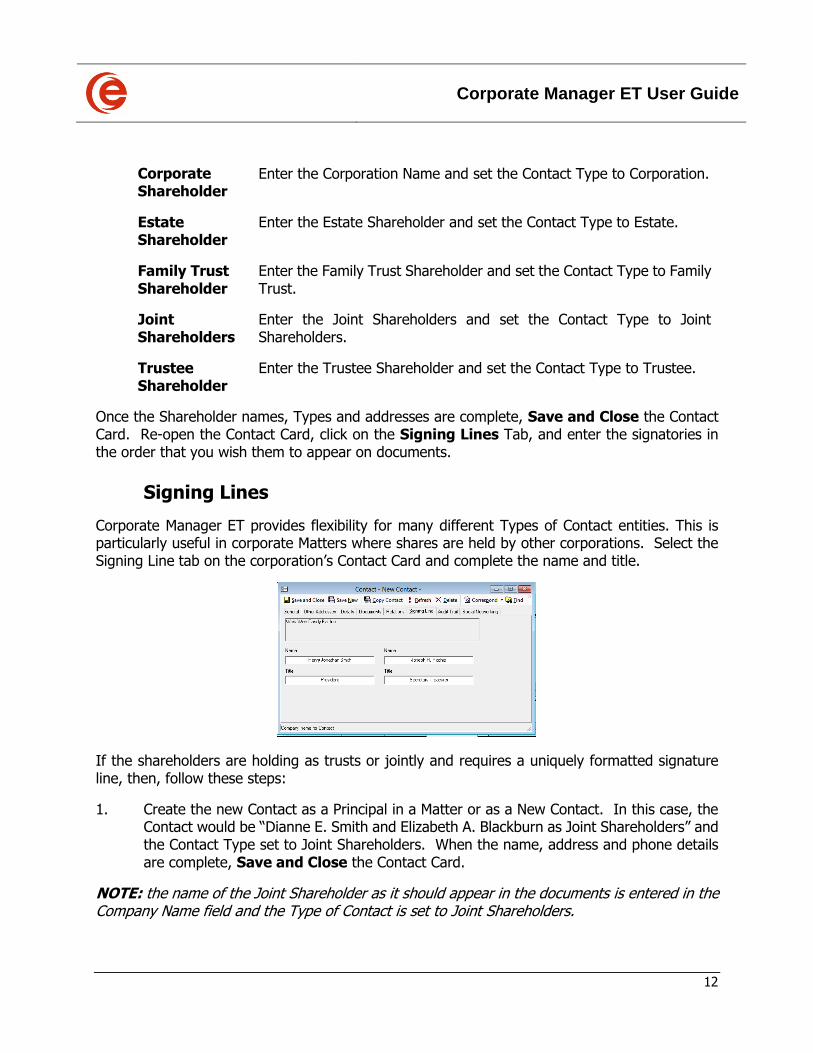
Signing Lines
Corporate Manager ET provides flexibility for many different Types of Contact entities. This is particularly useful in corporate Matters where shares are held by other corporations. Select the Signing Line tab on the corporation’s Contact Card and complete the name and title.
If the shareholders are holding as trusts or jointly and requires a uniquely formatted signature line, then, follow these steps:
1. Create the new Contact as a Principal in a Matter or as a New Contact. In this case, the Contact would be “Dianne E. Smith and Elizabeth A. Blackburn as Joint Shareholders” and the Contact Type set to Joint Shareholders. When the name, address and phone details are complete, Save and Close the Contact Card.
NOTE: the name of the Joint Shareholder as it should appear in the documents is entered in the Company Name field and the Type of Contact is set to Joint Shareholders.
Corporate Manager ET User Guide
13
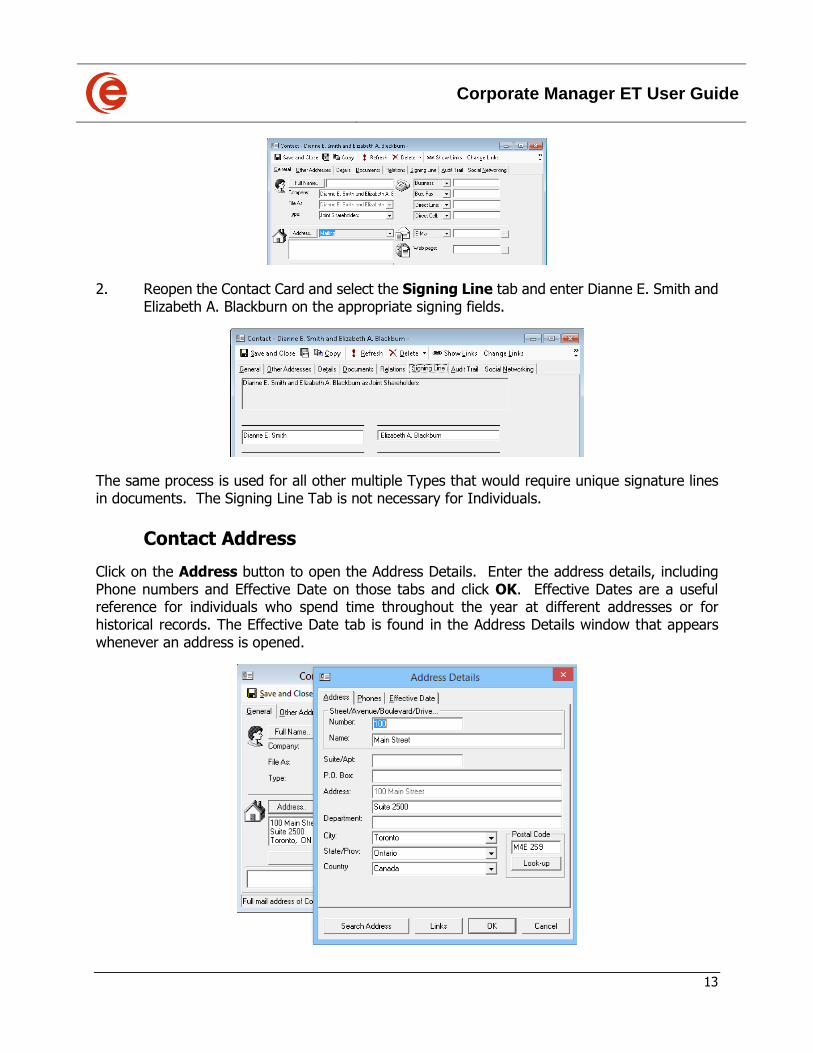
2. Reopen the Contact Card and select the Signing Line tab and enter Dianne E. Smith and Elizabeth A. Blackburn on the appropriate signing fields.
The same process is used for all other multiple Types that would require unique signature lines in documents. The Signing Line Tab is not necessary for Individuals.
Contact Address
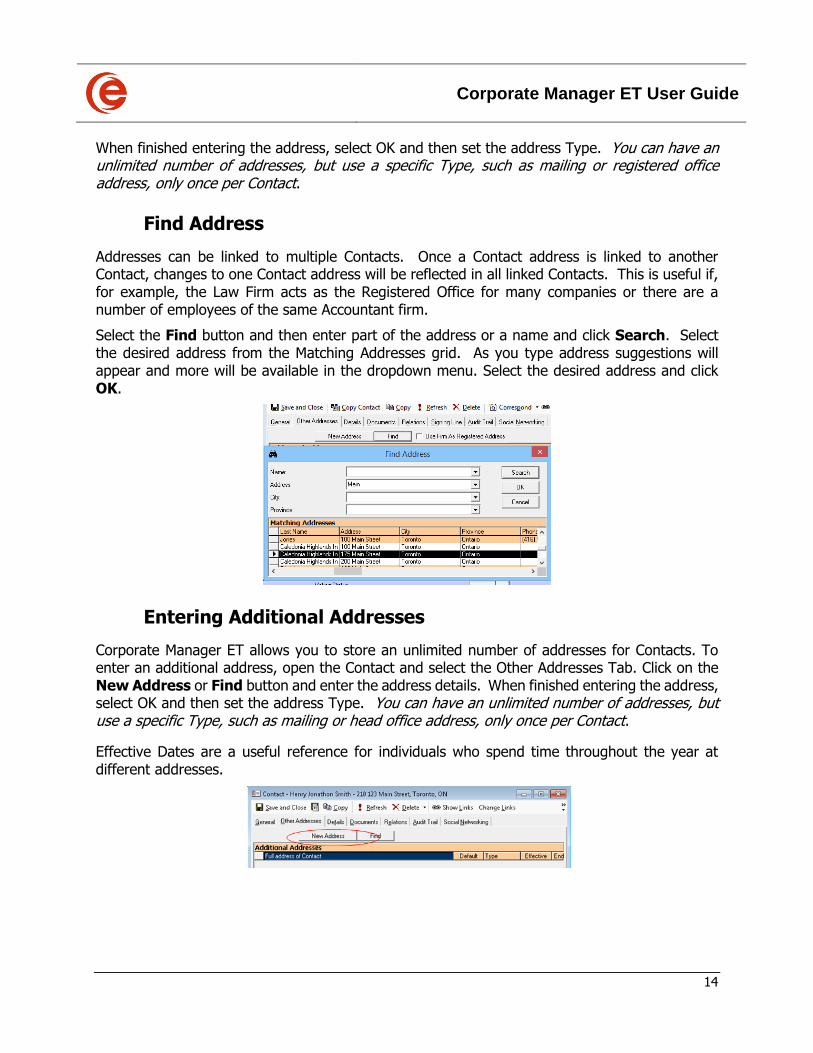
Click on the Address button to open the Address Details. Enter the address details, including Phone numbers and Effective Date on those tabs and click OK. Effective Dates are a useful reference for individuals who spend time throughout the year at different addresses or for historical records. The Effective Date tab is found in the Address Details window that appears whenever an address is opened.
Corporate Manager ET User Guide
14
When finished entering the address, select OK and then set the address Type. You can have an unlimited number of addresses, but use a specific Type, such as mailing or registered office address, only once per Contact.
Find Address
Addresses can be linked to multiple Contacts. Once a Contact address is linked to another Contact, changes to one Contact address will be reflected in all linked Contacts. This is useful if, for example, the Law Firm acts as the Registered Office for many companies or there are a number of employees of the same Accountant firm.
Select the Find button and then enter part of the address or a name and click Search. Select the desired address from the Matching Addresses grid. As you type address suggestions will appear and more will be available in the dropdown menu. Select the desired address and click OK.
Entering Additional Addresses
Corporate Manager ET allows you to store an unlimited number of addresses for Contacts. To enter an additional address, open the Contact and select the Other Addresses Tab. Click on the New Address or Find button and enter the address details. When finished entering the address, select OK and then set the address Type. You can have an unlimited number of addresses, but use a specific Type, such as mailing or head office address, only once per Contact.
Effective Dates are a useful reference for individuals who spend time throughout the year at different addresses.
Corporate Manager ET User Guide
15
Default Address
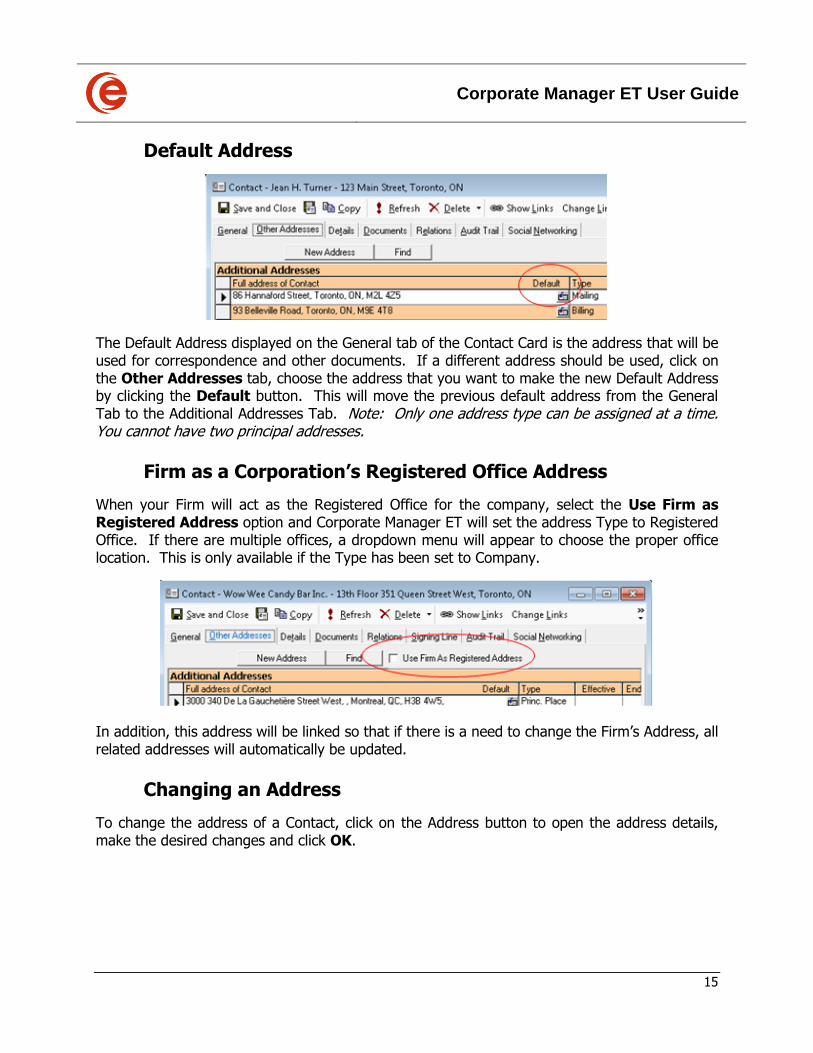
The Default Address displayed on the General tab of the Contact Card is the address that will be used for correspondence and other documents. If a different address should be used, click on the Other Addresses tab, choose the address that you want to make the new Default Address by clicking the Default button. This will move the previous default address from the General Tab to the Additional Addresses Tab. Note: Only one address type can be assigned at a time. You cannot have two principal addresses.
Firm as a Corporation’s Registered Office Address
When your Firm will act as the Registered Office for the company, select the Use Firm as Registered Address option and Corporate Manager ET will set the address Type to Registered Office. If there are multiple offices, a dropdown menu will appear to choose the proper office location. This is only available if the Type has been set to Company.
In addition, this address will be linked so that if there is a need to change the Firm’s Address, all related addresses will automatically be updated.
Changing an Address
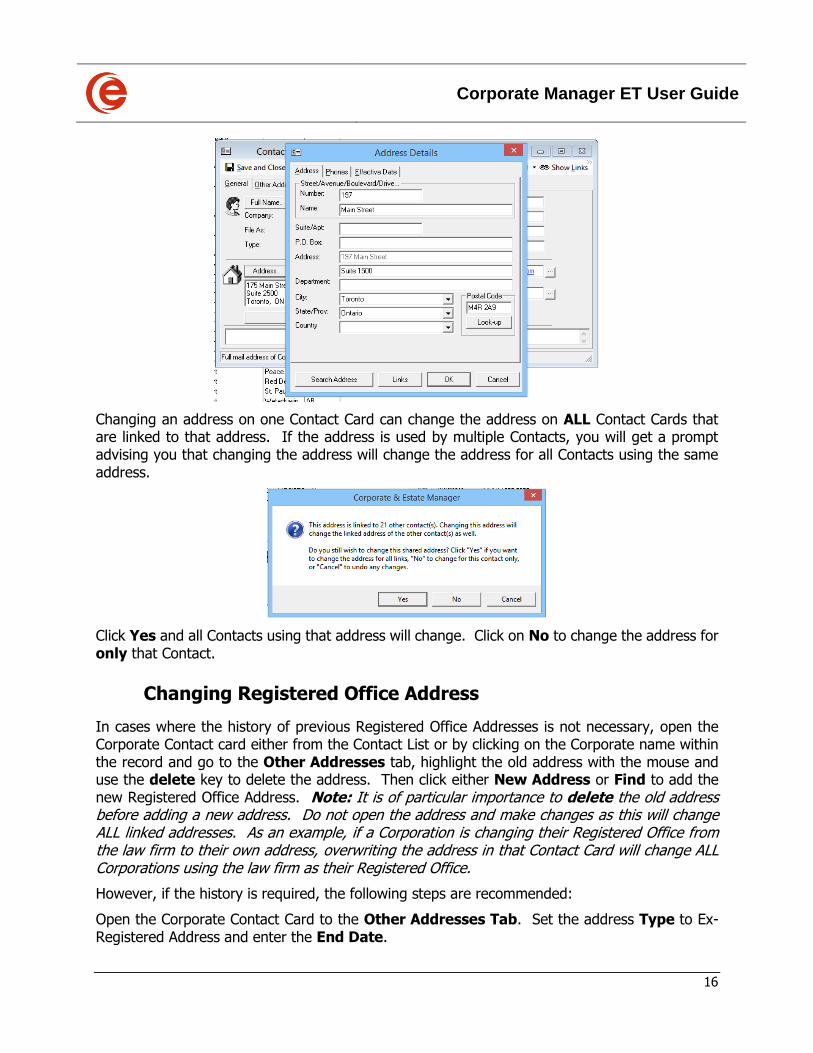
To change the address of a Contact, click on the Address button to open the address details, make the desired changes and click OK.
Corporate Manager ET User Guide
16
Changing an address on one Contact Card can change the address on ALL Contact Cards that are linked to that address. If the address is used by multiple Contacts, you will get a prompt advising you that changing the address will change the address for all Contacts using the same address.
Click Yes and all Contacts using that address will change. Click on No to change the address for only that Contact.
Changing Registered Office Address
In cases where the history of previous Registered Office Addresses is not necessary, open the Corporate Contact card either from the Contact List or by clicking on the Corporate name within the record and go to the Other Addresses tab, highlight the old address with the mouse and use the delete key to delete the address. Then click either New Address or Find to add the new Registered Office Address. Note: It is of particular importance to delete the old address before adding a new address. Do not open the address and make changes as this will change ALL linked addresses. As an example, if a Corporation is changing their Registered Office from the law firm to their own address, overwriting the address in that Contact Card will change ALL Corporations using the law firm as their Registered Office.
However, if the history is required, the following steps are recommended:
Open the Corporate Contact Card to the Other Addresses Tab. Set the address Type to Ex-Registered Address and enter the End Date.
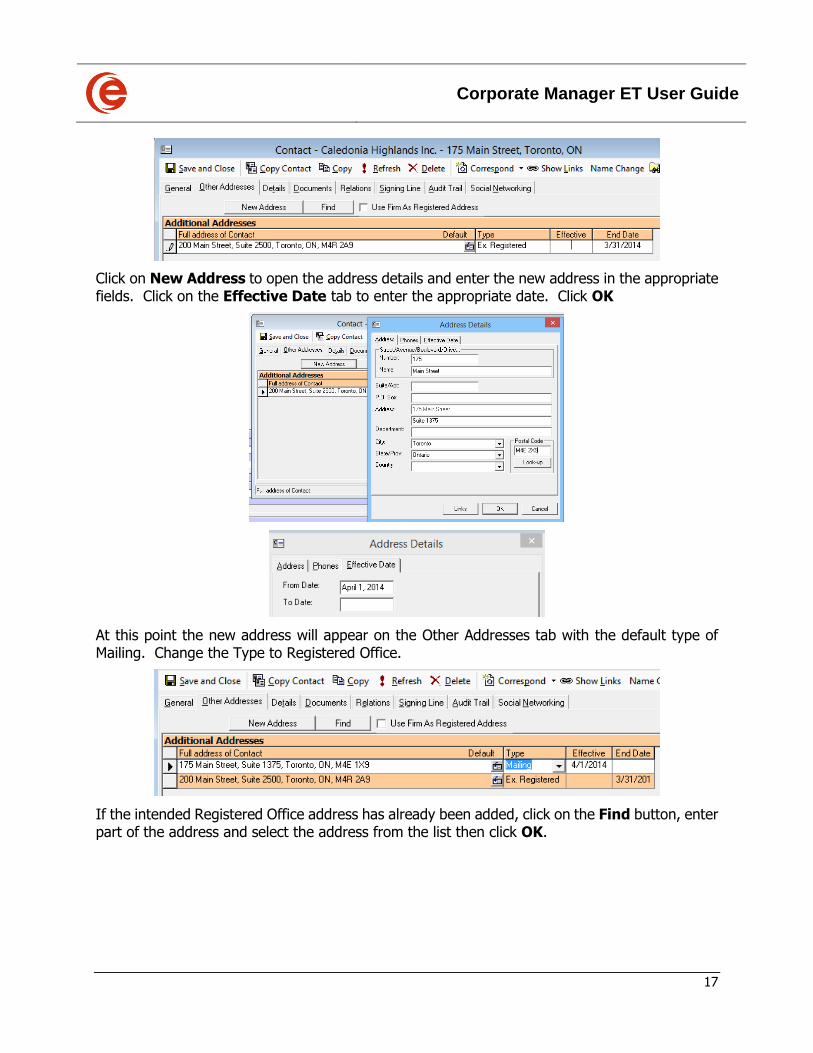
Corporate Manager ET User Guide
17
Click on New Address to open the address details and enter the new address in the appropriate fields. Click on the Effective Date tab to enter the appropriate date. Click OK
At this point the new address will appear on the Other Addresses tab with the default type of Mailing. Change the Type to Registered Office.
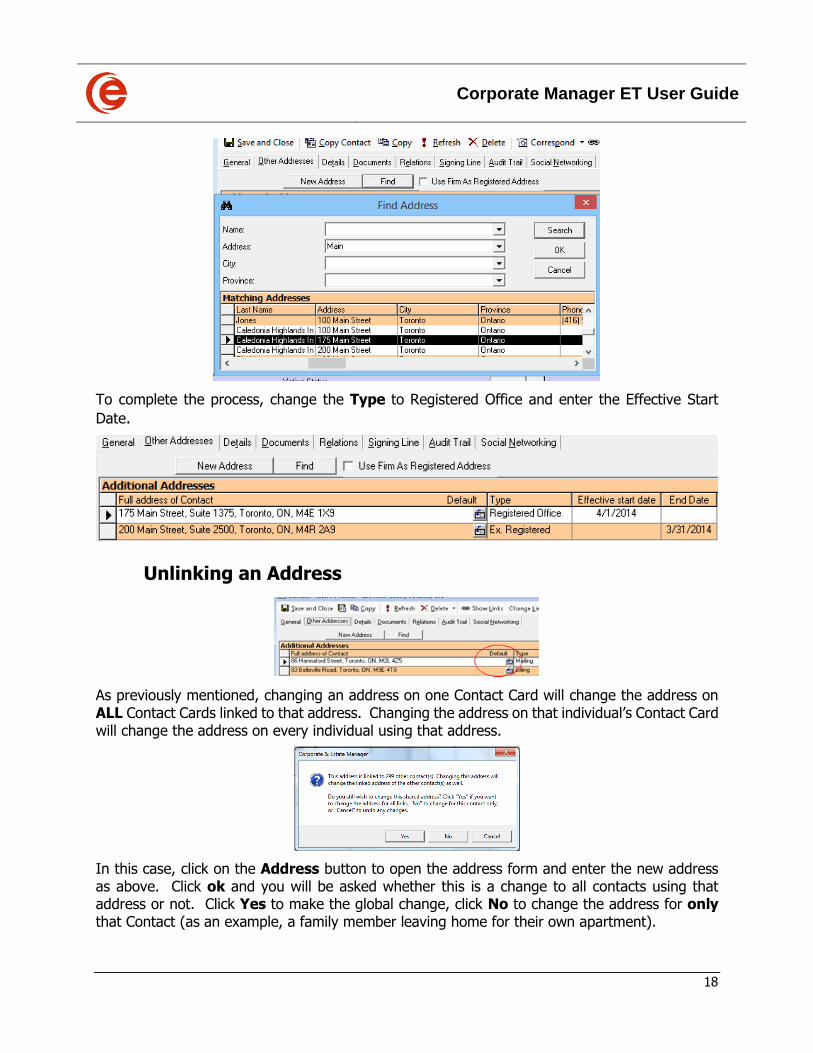
If the intended Registered Office address has already been added, click on the Find button, enter part of the address and select the address from the list then click OK.
Corporate Manager ET User Guide
18
To complete the process, change the Type to Registered Office and enter the Effective Start
Date.
Unlinking an Address
As previously mentioned, changing an address on one Contact Card will change the address on ALL Contact Cards linked to that address. Changing the address on that individual’s Contact Card will change the address on every individual using that address.
In this case, click on the Address button to open the address form and enter the new address as above. Click ok and you will be asked whether this is a change to all contacts using that address or not. Click Yes to make the global change, click No to change the address for only that Contact (as an example, a family member leaving home for their own apartment).
Corporate Manager ET User Guide
19
Name Changes
For corporate records management in particular, it is critical to track the historical names of corporations and the dates of name changes.
NOTE: Do not use this procedure to fix typos! To change a typo, simply change the name in the Contact Card name field and Save/Close.
Corporate Name Change
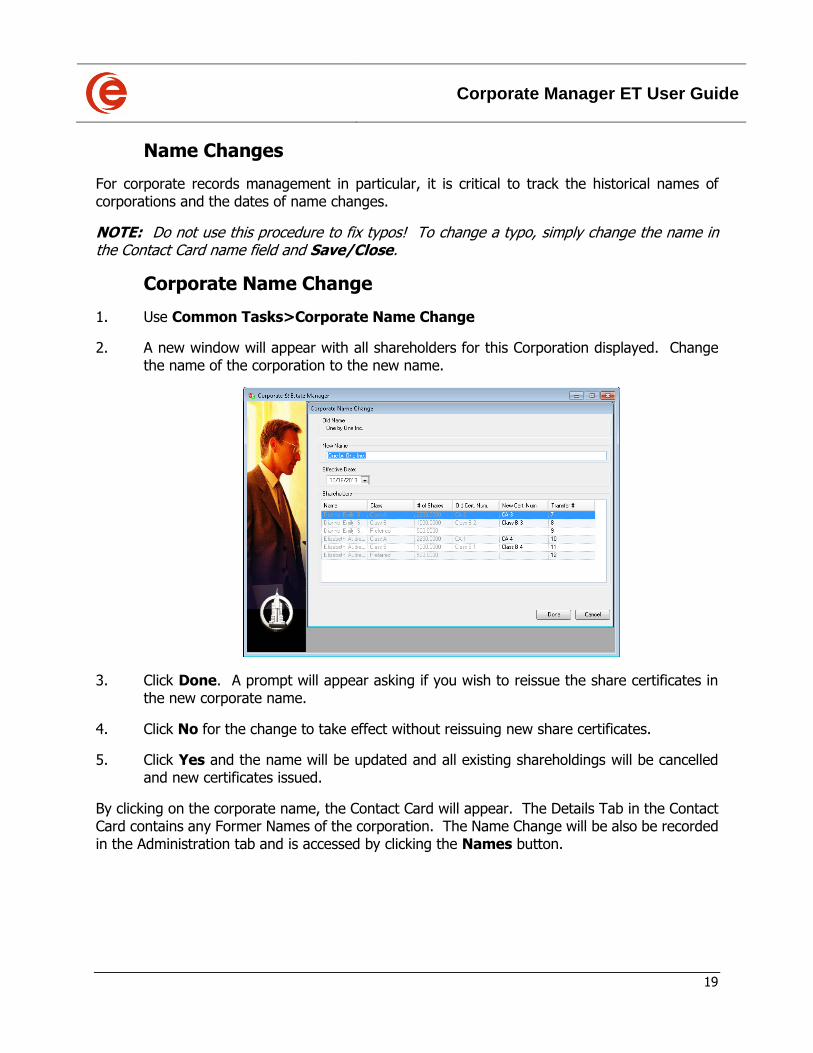
1. Use Common Tasks>Corporate Name Change
2. A new window will appear with all shareholders for this Corporation displayed. Change the name of the corporation to the new name.
3. Click Done. A prompt will appear asking if you wish to reissue the share certificates in the new corporate name.
4. Click No for the change to take effect without reissuing new share certificates.
5. Click Yes and the name will be updated and all existing shareholdings will be cancelled and new certificates issued.
By clicking on the corporate name, the Contact Card will appear. The Details Tab in the Contact Card contains any Former Names of the corporation. The Name Change will be also be recorded in the Administration tab and is accessed by clicking the Names button.
Corporate Manager ET User Guide
20
The new name is automatically entered on the General Tab of the Contact Card. Be sure to confirm the File As section is correct for future documents.
Corporate Name Change when Corporation is a Shareholder in Another Matter
This is a two-step process, with the first step changing the name and shares held by the Corporation in other matters and the second step changing the name and certificates held by shareholders of the Corporation.
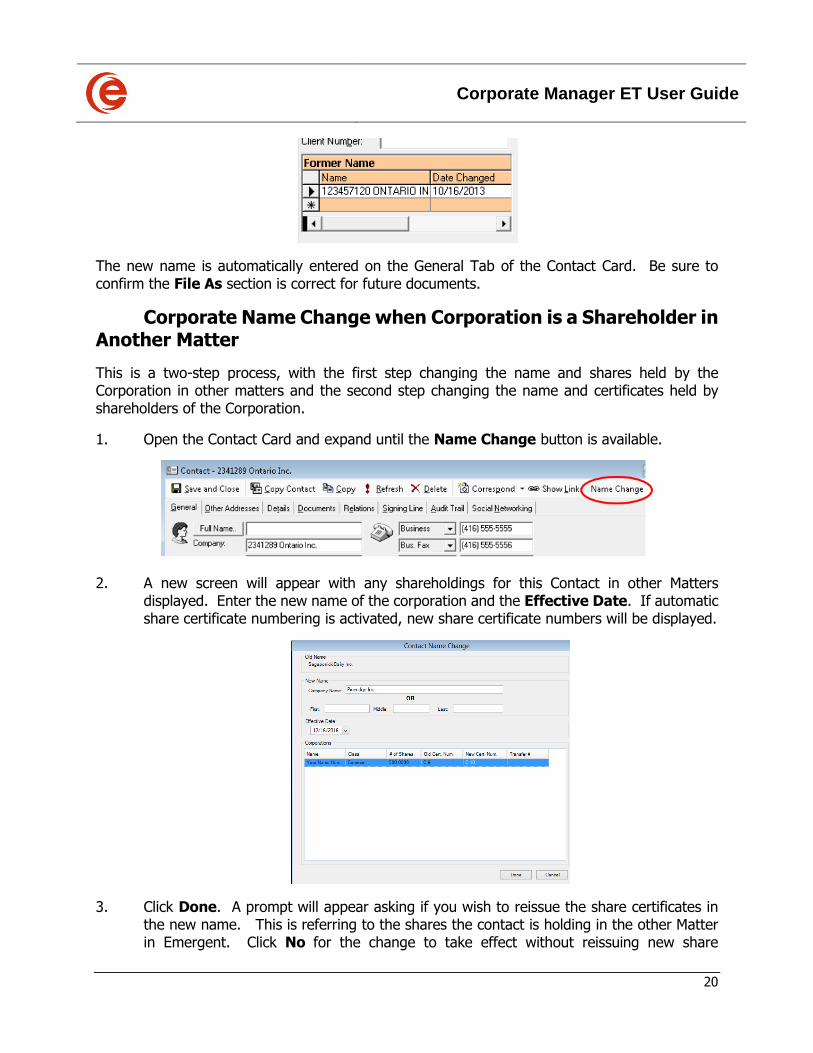
1. Open the Contact Card and expand until the Name Change button is available.
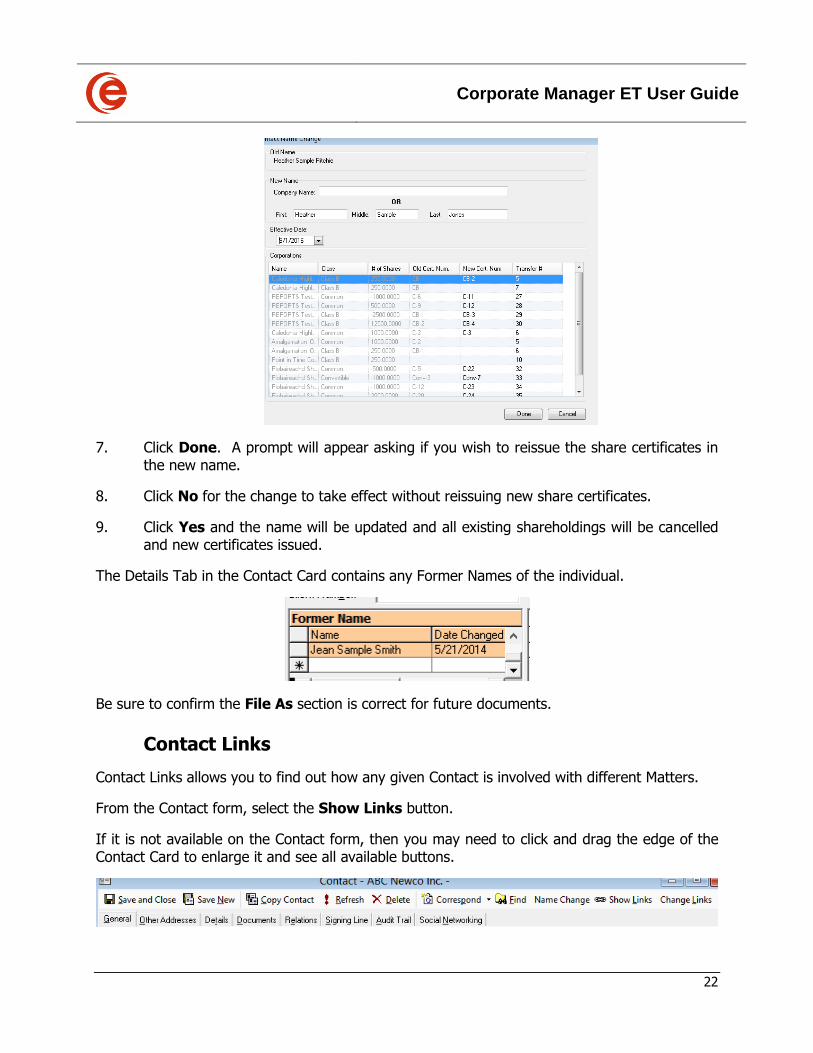
2. A new screen will appear with any shareholdings for this Contact in other Matters displayed. Enter the new name of the corporation and the Effective Date. If automatic share certificate numbering is activated, new share certificate numbers will be displayed.
3. Click Done. A prompt will appear asking if you wish to reissue the share certificates in the new name. This is referring to the shares the contact is holding in the other Matter in Emergent. Click No for the change to take effect without reissuing new share
Corporate Manager ET User Guide
21
certificates. Click Yes and the name will be updated and all existing shareholdings will be cancelled and new certificates issued.
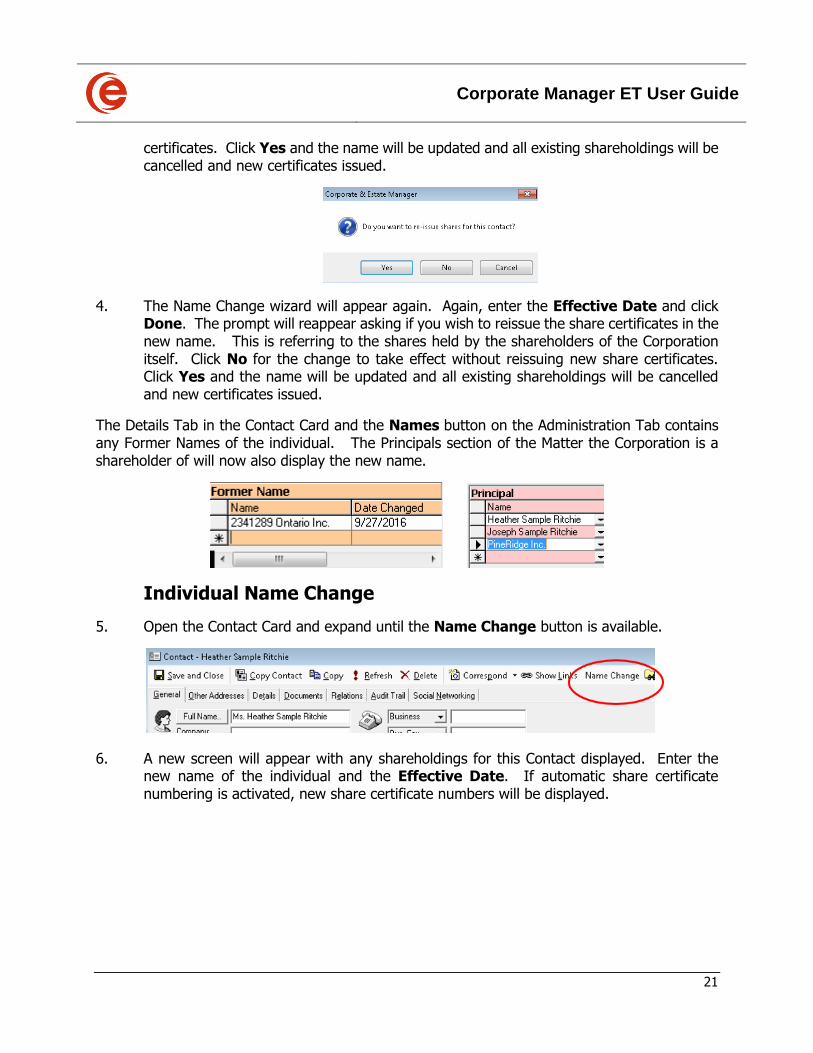
4. The Name Change wizard will appear again. Again, enter the Effective Date and click Done. The prompt will reappear asking if you wish to reissue the share certificates in the new name. This is referring to the shares held by the shareholders of the Corporation itself. Click No for the change to take effect without reissuing new share certificates. Click Yes and the name will be updated and all existing shareholdings will be cancelled and new certificates issued.
The Details Tab in the Contact Card and the Names button on the Administration Tab contains any Former Names of the individual. The Principals section of the Matter the Corporation is a shareholder of will now also display the new name.
Individual Name Change
5. Open the Contact Card and expand until the Name Change button is available.
6. A new screen will appear with any shareholdings for this Contact displayed. Enter the new name of the individual and the Effective Date. If automatic share certificate numbering is activated, new share certificate numbers will be displayed.
Corporate Manager ET User Guide
22
7. Click Done. A prompt will appear asking if you wish to reissue the share certificates in the new name.
8. Click No for the change to take effect without reissuing new share certificates.
9. Click Yes and the name will be updated and all existing shareholdings will be cancelled and new certificates issued.
The Details Tab in the Contact Card contains any Former Names of the individual.
Be sure to confirm the File As section is correct for future documents.
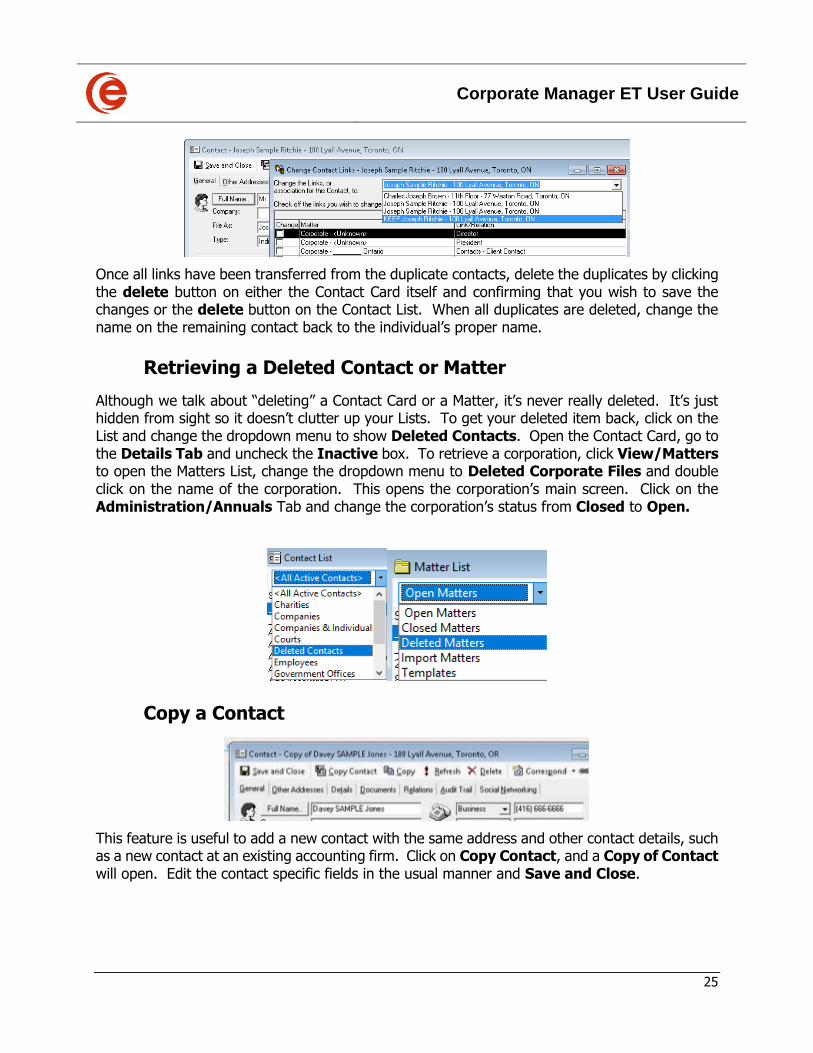
Contact Links
Contact Links allows you to find out how any given Contact is involved with different Matters.
From the Contact form, select the Show Links button.
If it is not available on the Contact form, then you may need to click and drag the edge of the Contact Card to enlarge it and see all available buttons.
Corporate Manager ET User Guide
23
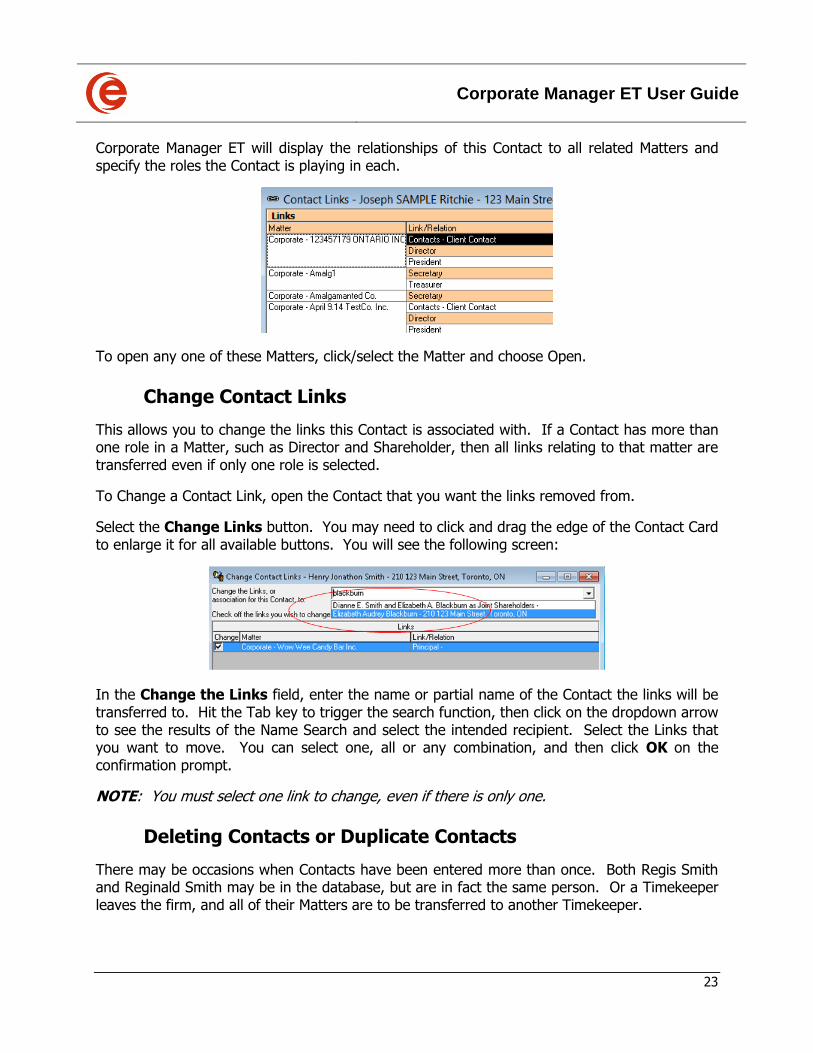
Corporate Manager ET will display the relationships of this Contact to all related Matters and specify the roles the Contact is playing in each.
To open any one of these Matters, click/select the Matter and choose Open.
Change Contact Links
This allows you to change the links this Contact is associated with. If a Contact has more than one role in a Matter, such as Director and Shareholder, then all links relating to that matter are transferred even if only one role is selected.
To Change a Contact Link, open the Contact that you want the links removed from.
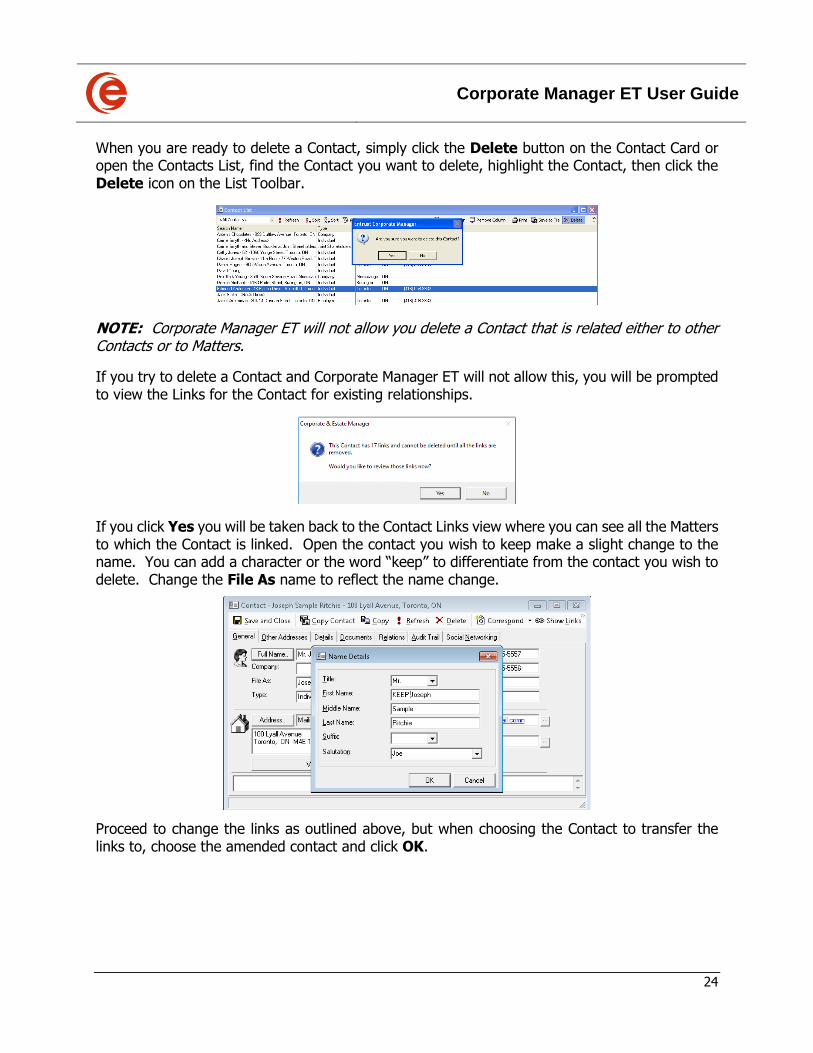
Select the Change Links button. You may need to click and drag the edge of the Contact Card to enlarge it for all available buttons. You will see the following screen:
In the Change the Links field, enter the name or partial name of the Contact the links will be transferred to. Hit the Tab key to trigger the search function, then click on the dropdown arrow to see the results of the Name Search and select the intended recipient. Select the Links that you want to move. You can select one, all or any combination, and then click OK on the confirmation prompt.
NOTE: You must select one link to change, even if there is only one.
Deleting Contacts or Duplicate Contacts
There may be occasions when Contacts have been entered more than once. Both Regis Smith and Reginald Smith may be in the database, but are in fact the same person. Or a Timekeeper leaves the firm, and all of their Matters are to be transferred to another Timekeeper.
Corporate Manager ET User Guide
24
When you are ready to delete a Contact, simply click the Delete button on the Contact Card or open the Contacts List, find the Contact you want to delete, highlight the Contact, then click the Delete icon on the List Toolbar.
NOTE: Corporate Manager ET will not allow you delete a Contact that is related either to other Contacts or to Matters.
If you try to delete a Contact and Corporate Manager ET will not allow this, you will be prompted to view the Links for the Contact for existing relationships.
If you click Yes you will be taken back to the Contact Links view where you can see all the Matters to which the Contact is linked. Open the contact you wish to keep make a slight change to the name. You can add a character or the word “keep” to differentiate from the contact you wish to delete. Change the File As name to reflect the name change.
Proceed to change the links as outlined above, but when choosing the Contact to transfer the links to, choose the amended contact and click OK.
Corporate Manager ET User Guide
25
Once all links have been transferred from the duplicate contacts, delete the duplicates by clicking the delete button on either the Contact Card itself and confirming that you wish to save the changes or the delete button on the Contact List. When all duplicates are deleted, change the name on the remaining contact back to the individual’s proper name.
Retrieving a Deleted Contact or Matter
Although we talk about “deleting” a Contact Card or a Matter, it’s never really deleted. It’s just hidden from sight so it doesn’t clutter up your Lists. To get your deleted item back, click on the List and change the dropdown menu to show Deleted Contacts. Open the Contact Card, go to the Details Tab and uncheck the Inactive box. To retrieve a corporation, click View/Matters to open the Matters List, change the dropdown menu to Deleted Corporate Files and double click on the name of the corporation. This opens the corporation’s main screen. Click on the Administration/Annuals Tab and change the corporation’s status from Closed to Open.
Copy a Contact
This feature is useful to add a new contact with the same address and other contact details, such as a new contact at an existing accounting firm. Click on Copy Contact, and a Copy of Contact will open. Edit the contact specific fields in the usual manner and Save and Close.
Corporate Manager ET User Guide
26
Copy a Contact’s Information
Clicking the Copy button will copy the contact information to your clipboard to be pasted into a word document or email.
Digital signatures
Digital Signatures are administered in the Details tab. Use the Link button to find the digital signature file on your network and link it to the Contact Card.
NOTE: You may need to adjust the image file size to have it fit properly on the document signing line.
Social Networking
Social networking links for Facebook, Linked In and Twitter can be entered in the Social Networking tab of the Contact Card.
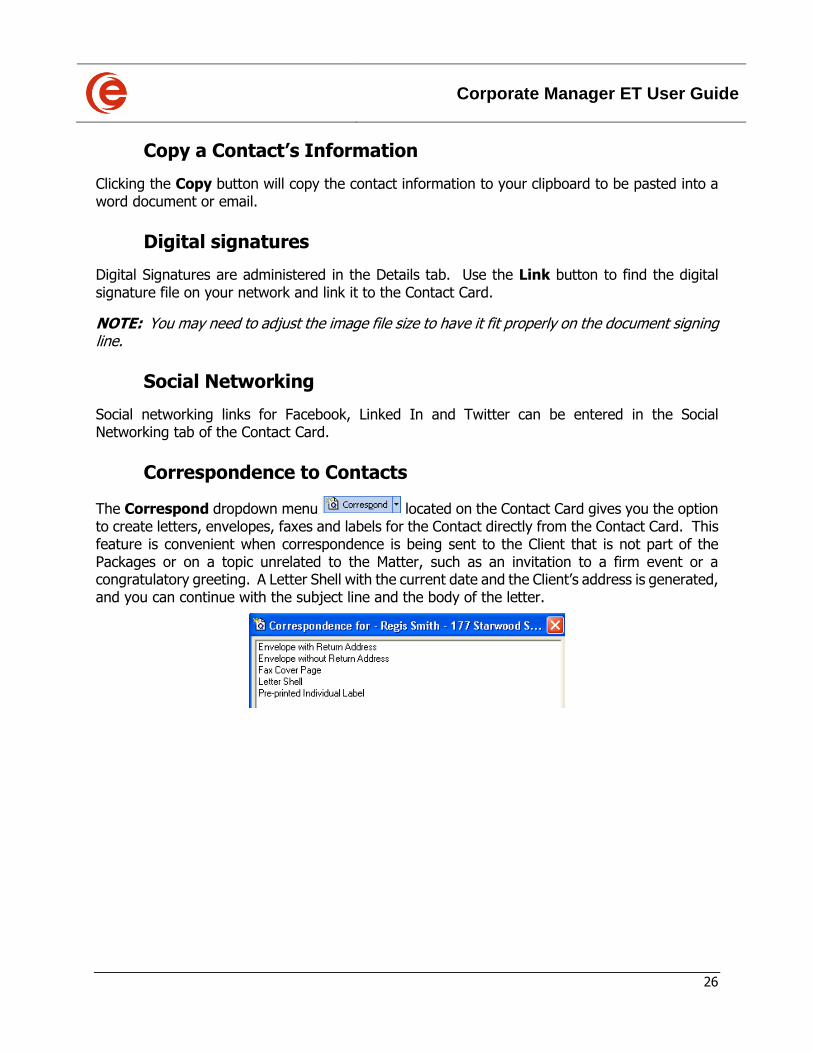
Correspondence to Contacts
The Correspond dropdown menu located on the Contact Card gives you the option to create letters, envelopes, faxes and labels for the Contact directly from the Contact Card. This feature is convenient when correspondence is being sent to the Client that is not part of the Packages or on a topic unrelated to the Matter, such as an invitation to a firm event or a congratulatory greeting. A Letter Shell with the current date and the Client’s address is generated, and you can continue with the subject line and the body of the letter.
Corporate Manager ET User Guide
27
Chapter 2: Incorporate and Organize
Corporate Manager ET User Guide
28
Corporation Assistant The Corporation Assistant is a streamlined process that allows you to incorporate and organize a company quickly and efficiently. You can complete an online incorporation (in available jurisdictions) and create an organization package for a new company in minutes.
Creating a New Corporate Matter
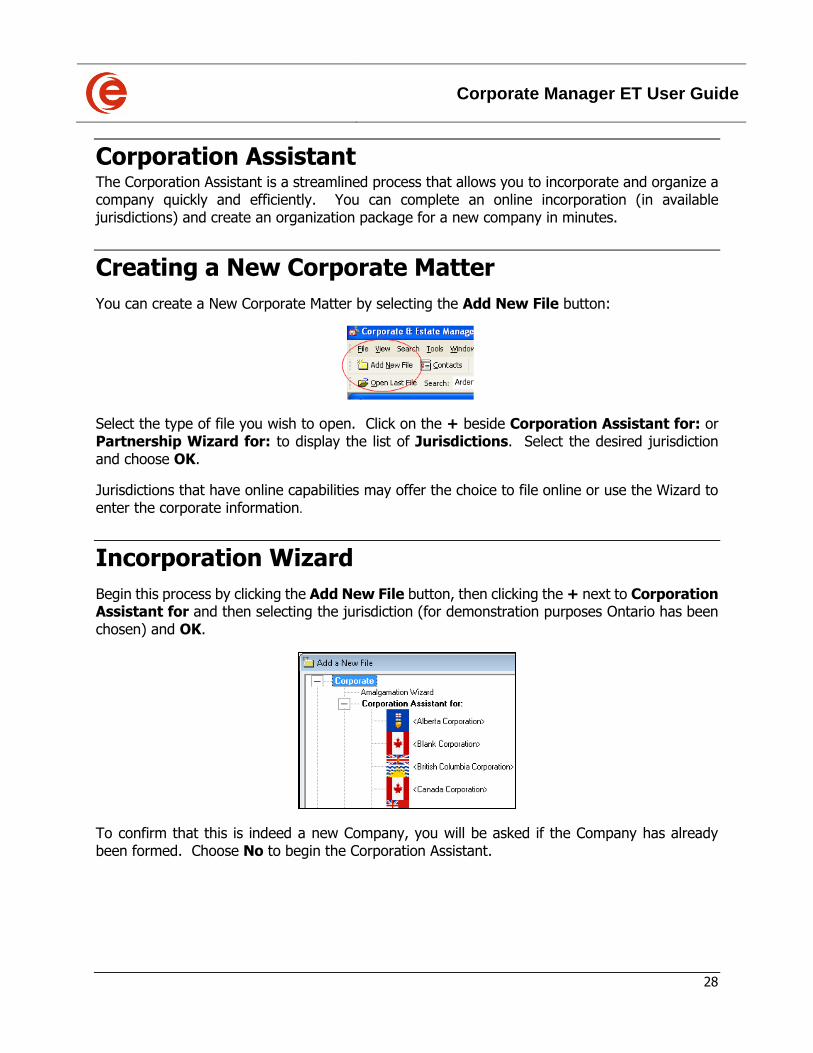
You can create a New Corporate Matter by selecting the Add New File button:
Select the type of file you wish to open. Click on the + beside Corporation Assistant for: or Partnership Wizard for: to display the list of Jurisdictions. Select the desired jurisdiction and choose OK.
Jurisdictions that have online capabilities may offer the choice to file online or use the Wizard to enter the corporate information.
Incorporation Wizard
Begin this process by clicking the Add New File button, then clicking the + next to Corporation Assistant for and then selecting the jurisdiction (for demonstration purposes Ontario has been chosen) and OK.
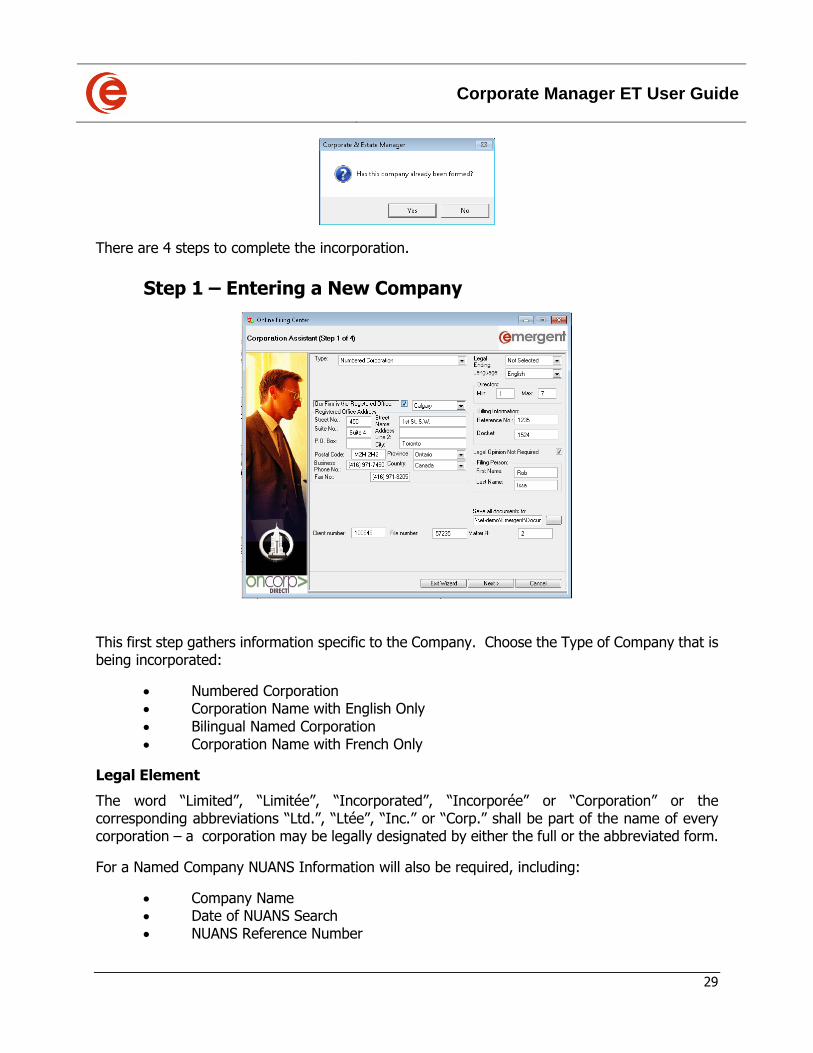
To confirm that this is indeed a new Company, you will be asked if the Company has already been formed. Choose No to begin the Corporation Assistant.
Corporate Manager ET User Guide
29
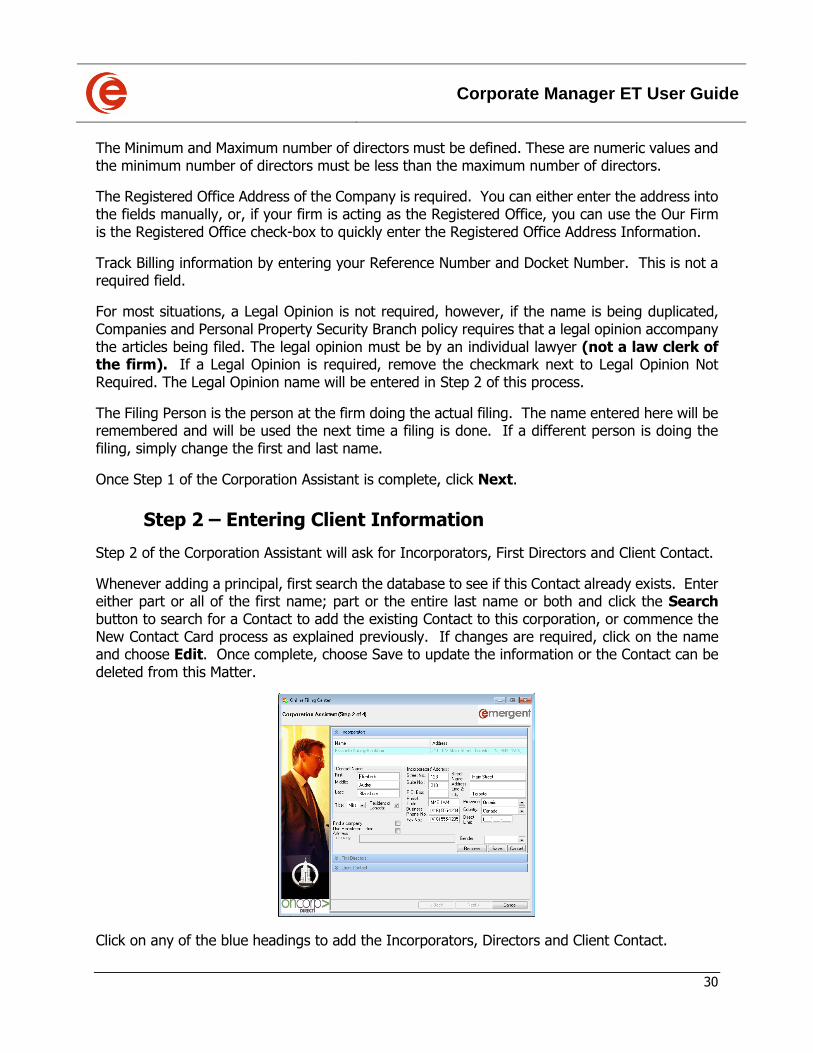
There are 4 steps to complete the incorporation.
Step 1 – Entering a New Company
This first step gathers information specific to the Company. Choose the Type of Company that is being incorporated:
• Numbered Corporation • Corporation Name with English Only
• Bilingual Named Corporation • Corporation Name with French Only
Legal Element
The word “Limited”, “Limitée”, “Incorporated”, “Incorporée” or “Corporation” or the corresponding abbreviations “Ltd.”, “Ltée”, “Inc.” or “Corp.” shall be part of the name of every corporation – a corporation may be legally designated by either the full or the abbreviated form.
For a Named Company NUANS Information will also be required, including:
• Company Name • Date of NUANS Search • NUANS Reference Number
Corporate Manager ET User Guide
30
The Minimum and Maximum number of directors must be defined. These are numeric values and the minimum number of directors must be less than the maximum number of directors.
The Registered Office Address of the Company is required. You can either enter the address into the fields manually, or, if your firm is acting as the Registered Office, you can use the Our Firm is the Registered Office check-box to quickly enter the Registered Office Address Information.
Track Billing information by entering your Reference Number and Docket Number. This is not a required field.
For most situations, a Legal Opinion is not required, however, if the name is being duplicated, Companies and Personal Property Security Branch policy requires that a legal opinion accompany the articles being filed. The legal opinion must be by an individual lawyer (not a law clerk of the firm). If a Legal Opinion is required, remove the checkmark next to Legal Opinion Not Required. The Legal Opinion name will be entered in Step 2 of this process.
The Filing Person is the person at the firm doing the actual filing. The name entered here will be remembered and will be used the next time a filing is done. If a different person is doing the filing, simply change the first and last name.
Once Step 1 of the Corporation Assistant is complete, click Next.
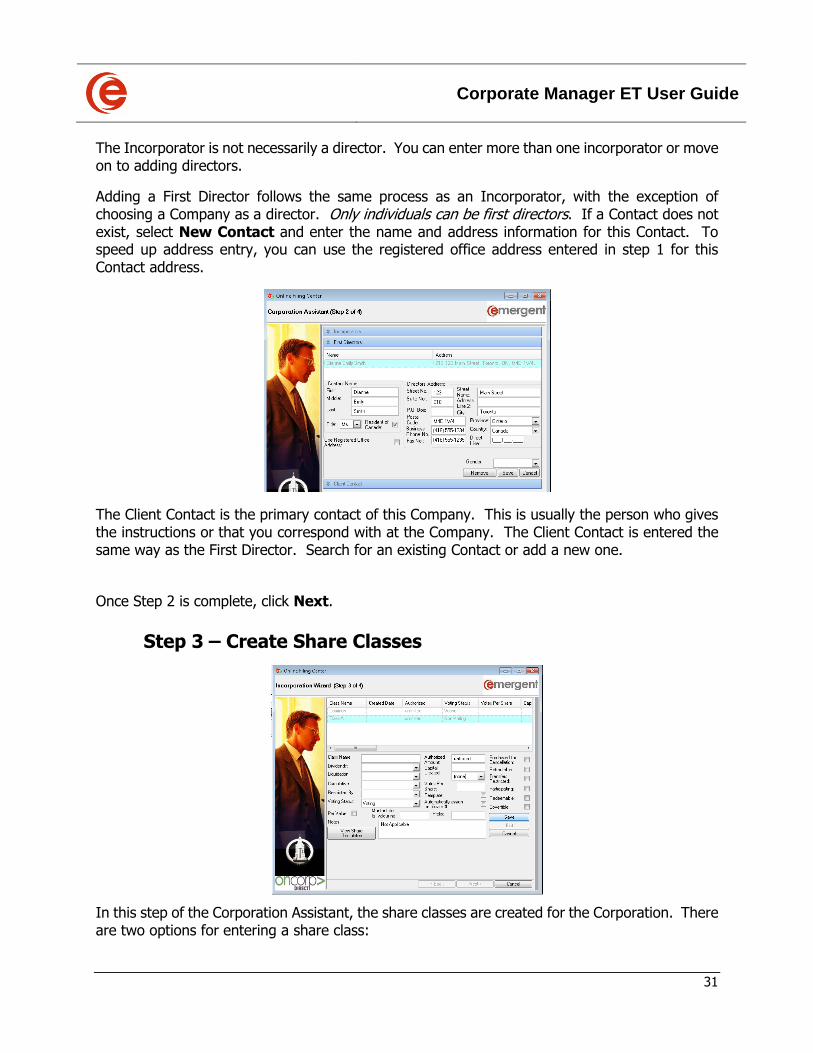
Step 2 – Entering Client Information
Step 2 of the Corporation Assistant will ask for Incorporators, First Directors and Client Contact.
Whenever adding a principal, first search the database to see if this Contact already exists. Enter either part or all of the first name; part or the entire last name or both and click the Search button to search for a Contact to add the existing Contact to this corporation, or commence the New Contact Card process as explained previously. If changes are required, click on the name and choose Edit. Once complete, choose Save to update the information or the Contact can be deleted from this Matter.
Click on any of the blue headings to add the Incorporators, Directors and Client Contact.
Corporate Manager ET User Guide
31
The Incorporator is not necessarily a director. You can enter more than one incorporator or move on to adding directors.
Adding a First Director follows the same process as an Incorporator, with the exception of choosing a Company as a director. Only individuals can be first directors. If a Contact does not exist, select New Contact and enter the name and address information for this Contact. To speed up address entry, you can use the registered office address entered in step 1 for this Contact address.
The Client Contact is the primary contact of this Company. This is usually the person who gives the instructions or that you correspond with at the Company. The Client Contact is entered the same way as the First Director. Search for an existing Contact or add a new one.
Once Step 2 is complete, click Next.
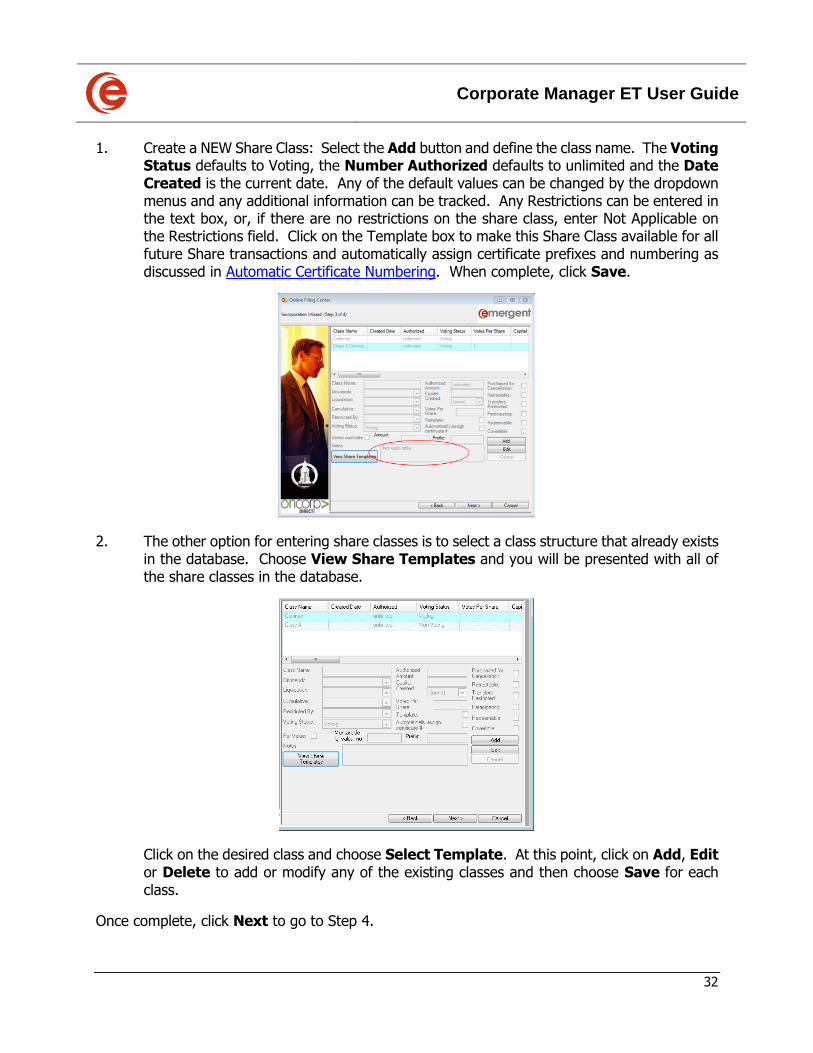
Step 3 – Create Share Classes
In this step of the Corporation Assistant, the share classes are created for the Corporation. There are two options for entering a share class:
Corporate Manager ET User Guide
32
1. Create a NEW Share Class: Select the Add button and define the class name. The Voting Status defaults to Voting, the Number Authorized defaults to unlimited and the Date Created is the current date. Any of the default values can be changed by the dropdown menus and any additional information can be tracked. Any Restrictions can be entered in the text box, or, if there are no restrictions on the share class, enter Not Applicable on the Restrictions field. Click on the Template box to make this Share Class available for all future Share transactions and automatically assign certificate prefixes and numbering as discussed in Automatic Certificate Numbering. When complete, click Save.
2. The other option for entering share classes is to select a class structure that already exists in the database. Choose View Share Templates and you will be presented with all of the share classes in the database.
Click on the desired class and choose Select Template. At this point, click on Add, Edit or Delete to add or modify any of the existing classes and then choose Save for each class.
Once complete, click Next to go to Step 4.

Corporate Manager ET User Guide
33
Step 4: - Enter Provisions
The final step of the Corporation Assistant is to enter the Restrictions on Transfers and Other Provisions for the company.
There are two ways to enter text into these fields.
1. Type, or copy and paste the text into this field. Once new text has been entered, the option to save this text as a template for other Matters in the future appears. If you choose to save this text, give the template a name and choose Save as Template.
This will establish the restrictions for this company, and make it available as a text template for future use in other corporations.
2. The second option is to select the item from an existing saved template. Choose Load Template and select the item from a saved list of templates.
Corporate Manager ET User Guide
34
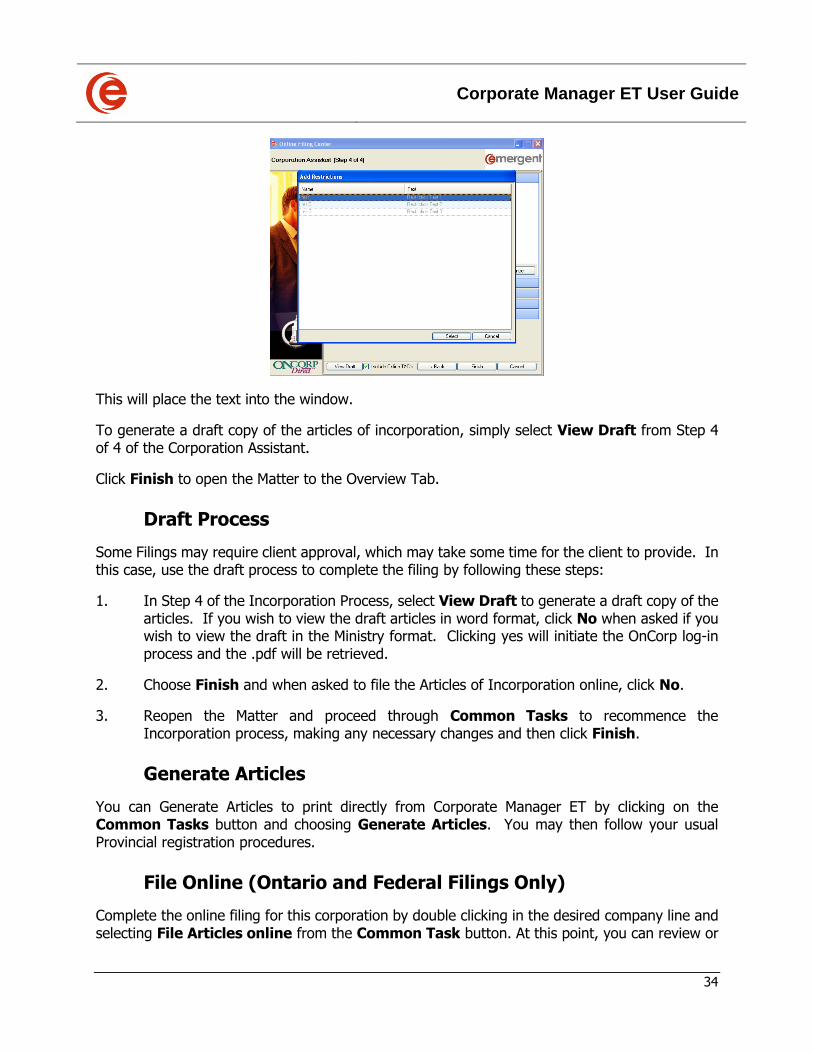
This will place the text into the window.
To generate a draft copy of the articles of incorporation, simply select View Draft from Step 4 of 4 of the Corporation Assistant.
Click Finish to open the Matter to the Overview Tab.
Draft Process
Some Filings may require client approval, which may take some time for the client to provide. In this case, use the draft process to complete the filing by following these steps:
1. In Step 4 of the Incorporation Process, select View Draft to generate a draft copy of the articles. If you wish to view the draft articles in word format, click No when asked if you wish to view the draft in the Ministry format. Clicking yes will initiate the OnCorp log-in process and the .pdf will be retrieved.
2. Choose Finish and when asked to file the Articles of Incorporation online, click No.
3. Reopen the Matter and proceed through Common Tasks to recommence the Incorporation process, making any necessary changes and then click Finish.
Generate Articles
You can Generate Articles to print directly from Corporate Manager ET by clicking on the Common Tasks button and choosing Generate Articles. You may then follow your usual Provincial registration procedures.
File Online (Ontario and Federal Filings Only)
Complete the online filing for this corporation by double clicking in the desired company line and selecting File Articles online from the Common Task button. At this point, you can review or
Corporate Manager ET User Guide
35
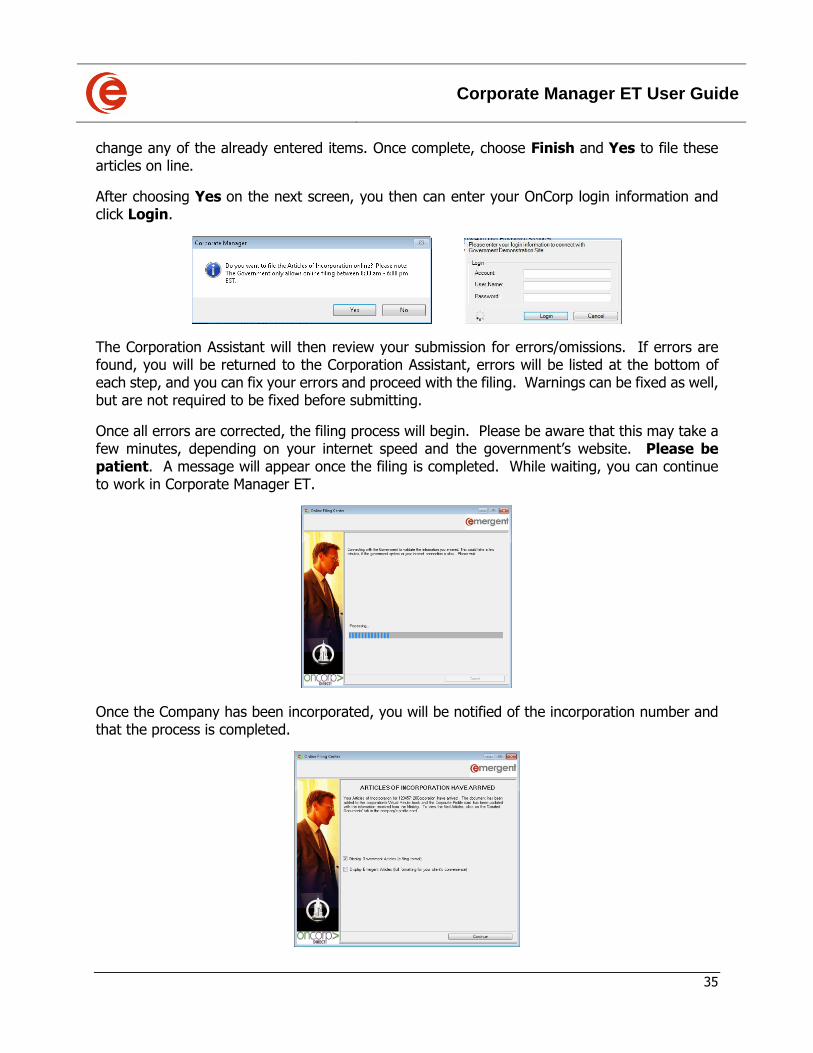
change any of the already entered items. Once complete, choose Finish and Yes to file these articles on line.
After choosing Yes on the next screen, you then can enter your OnCorp login information and click Login.
The Corporation Assistant will then review your submission for errors/omissions. If errors are found, you will be returned to the Corporation Assistant, errors will be listed at the bottom of each step, and you can fix your errors and proceed with the filing. Warnings can be fixed as well, but are not required to be fixed before submitting.
Once all errors are corrected, the filing process will begin. Please be aware that this may take a few minutes, depending on your internet speed and the government’s website. Please be patient. A message will appear once the filing is completed. While waiting, you can continue to work in Corporate Manager ET.
Once the Company has been incorporated, you will be notified of the incorporation number and that the process is completed.

Corporate Manager ET User Guide
36
Click Continue to open the Articles of Incorporation in either Emergent or Government format. Corporation or select the Documents Tab and click on the Articles of Incorporation underlined in blue to view the filed documents.
Organization Wizard
Once a Company has been incorporated, the Corporation Assistant offers additional steps to complete the organization of the Company.
While in the existing Corporate Matter, select Common Tasks > Organize this Company.
Step 1 – Address and Corporate Information
Click on the Mailing Address button and enter this company’s mailing details and phone numbers. Click on the Registered Office Address to enter the details, or check Use Firm Address.
Enter the Number of directors, select if the Company is Private or Public and whether they are Profit or Non-Profit, set the Fiscal Year End and whether it is Exempt from Audit.
At this point, you can also enter internal firm details, such as Client, Matter or File Number and choose the Responsible Lawyer. The list of responsible lawyers is made up of all Contacts in the database that are already entered as employees. If the Lawyer you want is not in this list, either choose someone else or leave the field blank and add the responsible lawyer to the Administration tab after finishing the other steps in the Corporation Assistant.
You can also elect to have all documentation saved to a specified location, such as the client’s sub-directory in the Corporate Services Directory.
Once Step 1 is complete, click Next.
Corporate Manager ET User Guide
37
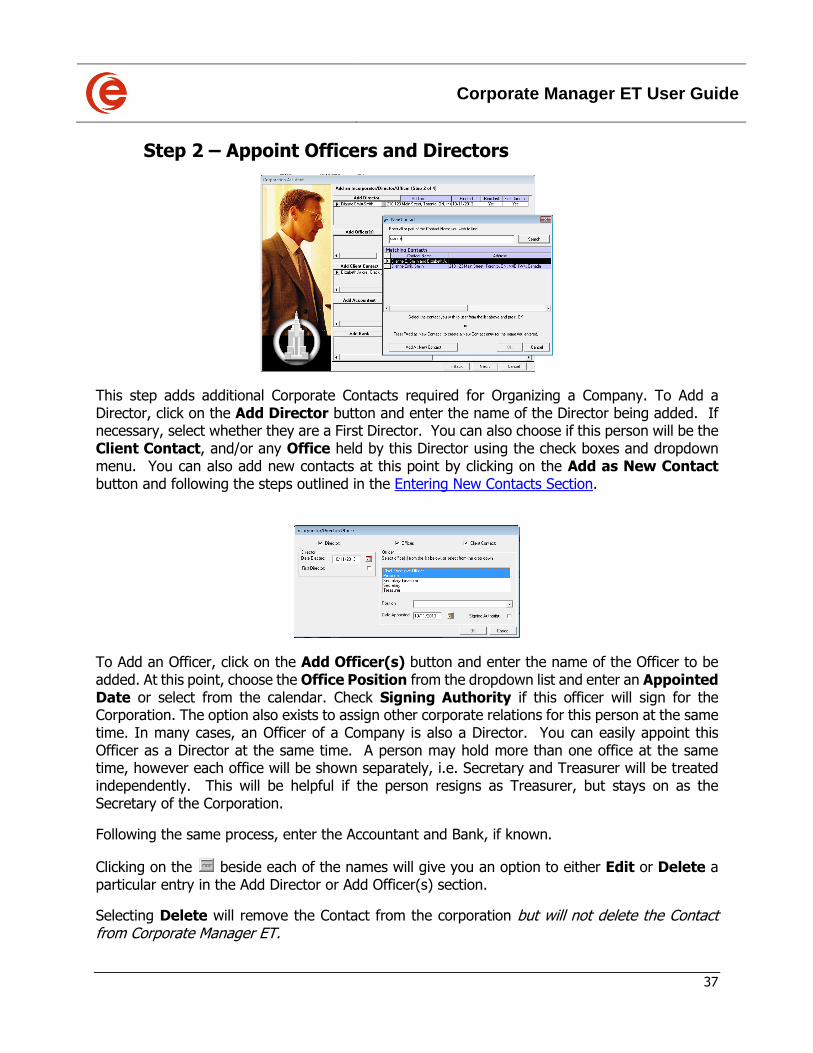
Step 2 – Appoint Officers and Directors
This step adds additional Corporate Contacts required for Organizing a Company. To Add a Director, click on the Add Director button and enter the name of the Director being added. If necessary, select whether they are a First Director. You can also choose if this person will be the Client Contact, and/or any Office held by this Director using the check boxes and dropdown menu. You can also add new contacts at this point by clicking on the Add as New Contact button and following the steps outlined in the Entering New Contacts Section.
To Add an Officer, click on the Add Officer(s) button and enter the name of the Officer to be added. At this point, choose the Office Position from the dropdown list and enter an Appointed Date or select from the calendar. Check Signing Authority if this officer will sign for the Corporation. The option also exists to assign other corporate relations for this person at the same time. In many cases, an Officer of a Company is also a Director. You can easily appoint this Officer as a Director at the same time. A person may hold more than one office at the same time, however each office will be shown separately, i.e. Secretary and Treasurer will be treated independently. This will be helpful if the person resigns as Treasurer, but stays on as the Secretary of the Corporation.
Following the same process, enter the Accountant and Bank, if known.
Clicking on the beside each of the names will give you an option to either Edit or Delete a particular entry in the Add Director or Add Officer(s) section.
Selecting Delete will remove the Contact from the corporation but will not delete the Contact from Corporate Manager ET.
Corporate Manager ET User Guide
38
Appoint an Office by selecting a common office position from the Officer selection box, or by choosing from the extensive list of positions from the Positions dropdown list.
Once Step 2 is complete, click Next.
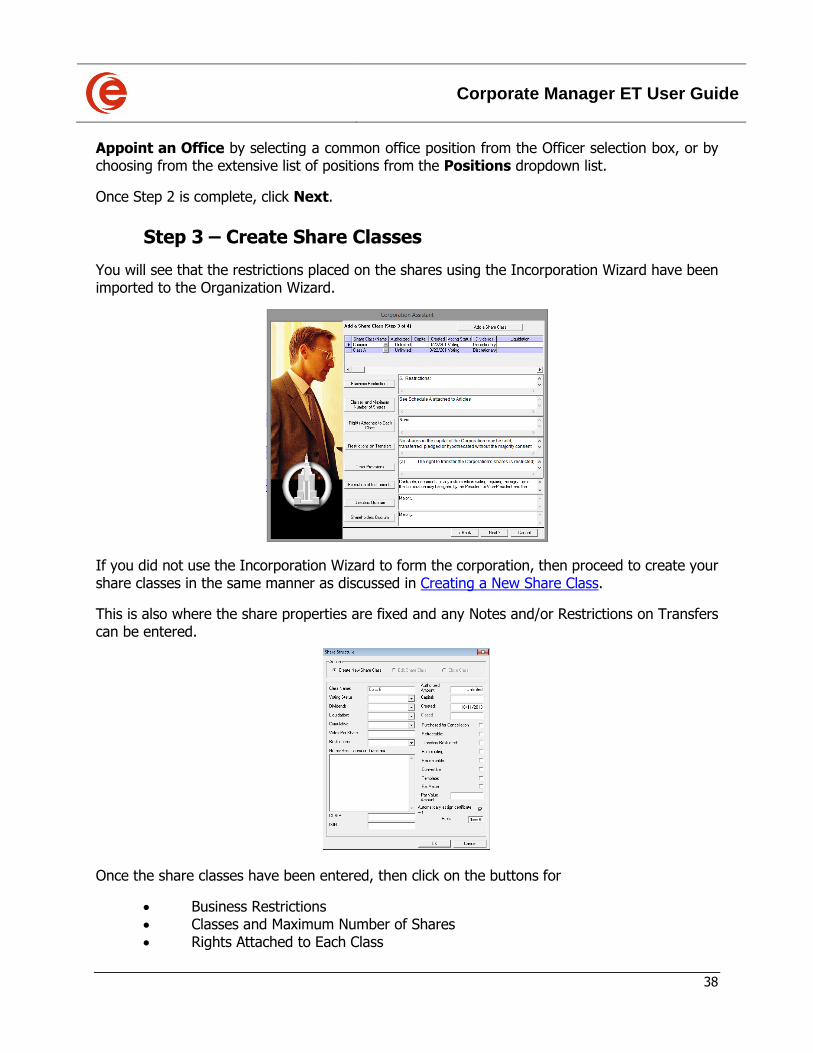
Step 3 – Create Share Classes
You will see that the restrictions placed on the shares using the Incorporation Wizard have been imported to the Organization Wizard.
If you did not use the Incorporation Wizard to form the corporation, then proceed to create your share classes in the same manner as discussed in Creating a New Share Class.
This is also where the share properties are fixed and any Notes and/or Restrictions on Transfers can be entered.
Once the share classes have been entered, then click on the buttons for
• Business Restrictions • Classes and Maximum Number of Shares • Rights Attached to Each Class
Corporate Manager ET User Guide
39
• Restrictions on Transfers • Other Provisions
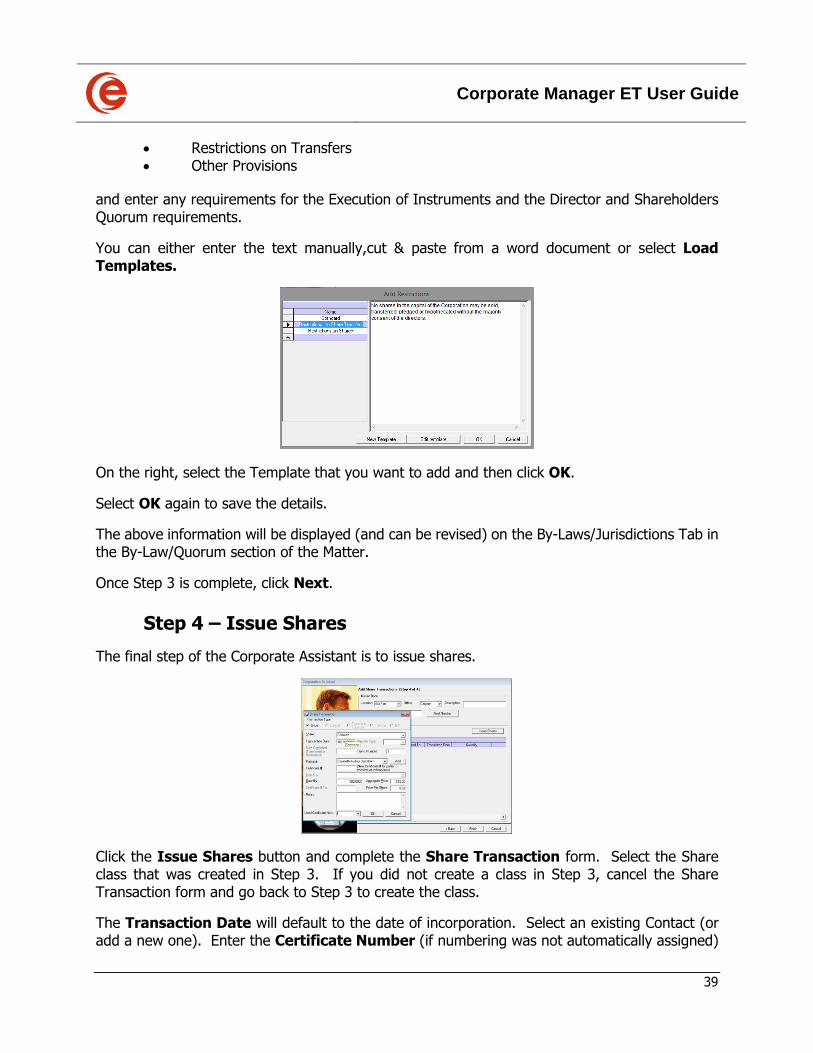
and enter any requirements for the Execution of Instruments and the Director and Shareholders Quorum requirements.
You can either enter the text manually,cut & paste from a word document or select Load Templates.
On the right, select the Template that you want to add and then click OK.
Select OK again to save the details.
The above information will be displayed (and can be revised) on the By-Laws/Jurisdictions Tab in the By-Law/Quorum section of the Matter.
Once Step 3 is complete, click Next.
Step 4 – Issue Shares
The final step of the Corporate Assistant is to issue shares.
Click the Issue Shares button and complete the Share Transaction form. Select the Share class that was created in Step 3. If you did not create a class in Step 3, cancel the Share Transaction form and go back to Step 3 to create the class.
The Transaction Date will default to the date of incorporation. Select an existing Contact (or add a new one). Enter the Certificate Number (if numbering was not automatically assigned)
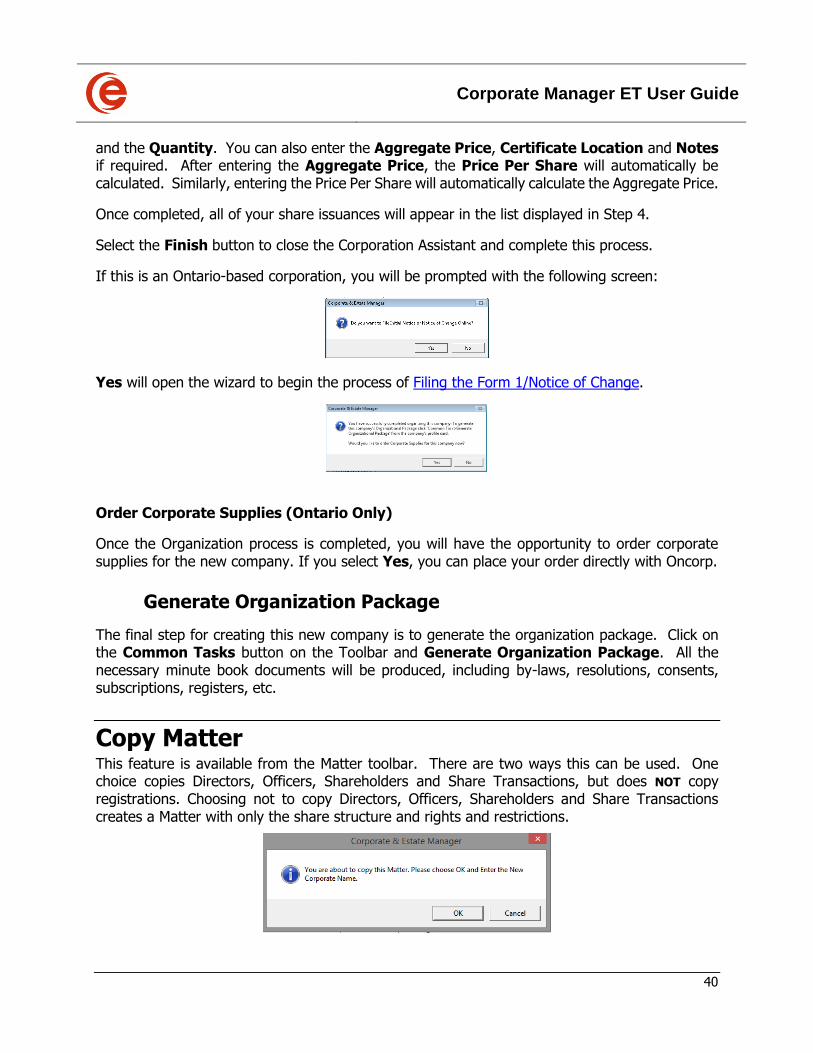
Corporate Manager ET User Guide
40
and the Quantity. You can also enter the Aggregate Price, Certificate Location and Notes if required. After entering the Aggregate Price, the Price Per Share will automatically be calculated. Similarly, entering the Price Per Share will automatically calculate the Aggregate Price.
Once completed, all of your share issuances will appear in the list displayed in Step 4.
Select the Finish button to close the Corporation Assistant and complete this process.
If this is an Ontario-based corporation, you will be prompted with the following screen:
Yes will open the wizard to begin the process of Filing the Form 1/Notice of Change.
Order Corporate Supplies (Ontario Only)
Once the Organization process is completed, you will have the opportunity to order corporate supplies for the new company. If you select Yes, you can place your order directly with Oncorp.
Generate Organization Package
The final step for creating this new company is to generate the organization package. Click on the Common Tasks button on the Toolbar and Generate Organization Package. All the necessary minute book documents will be produced, including by-laws, resolutions, consents, subscriptions, registers, etc.
Copy Matter This feature is available from the Matter toolbar. There are two ways this can be used. One choice copies Directors, Officers, Shareholders and Share Transactions, but does NOT copy registrations. Choosing not to copy Directors, Officers, Shareholders and Share Transactions creates a Matter with only the share structure and rights and restrictions.
Corporate Manager ET User Guide
41
Choose the new date. This will change the election and share transaction dates from the original Matter to the new Matter. After the Matter is copied, enter the new incorporation date on the By-Laws/Jurisdiction Tab, and amend the information on the Administration Tab to reflect new file numbers, Minute Book Box Number, etc.
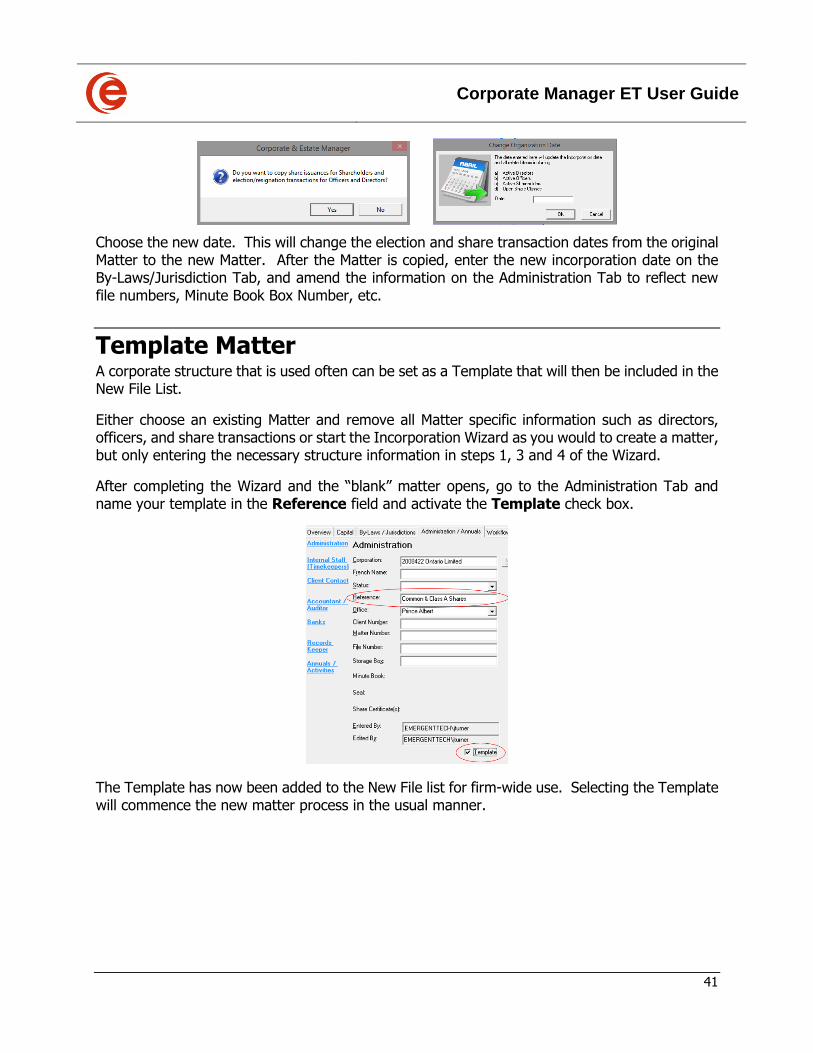
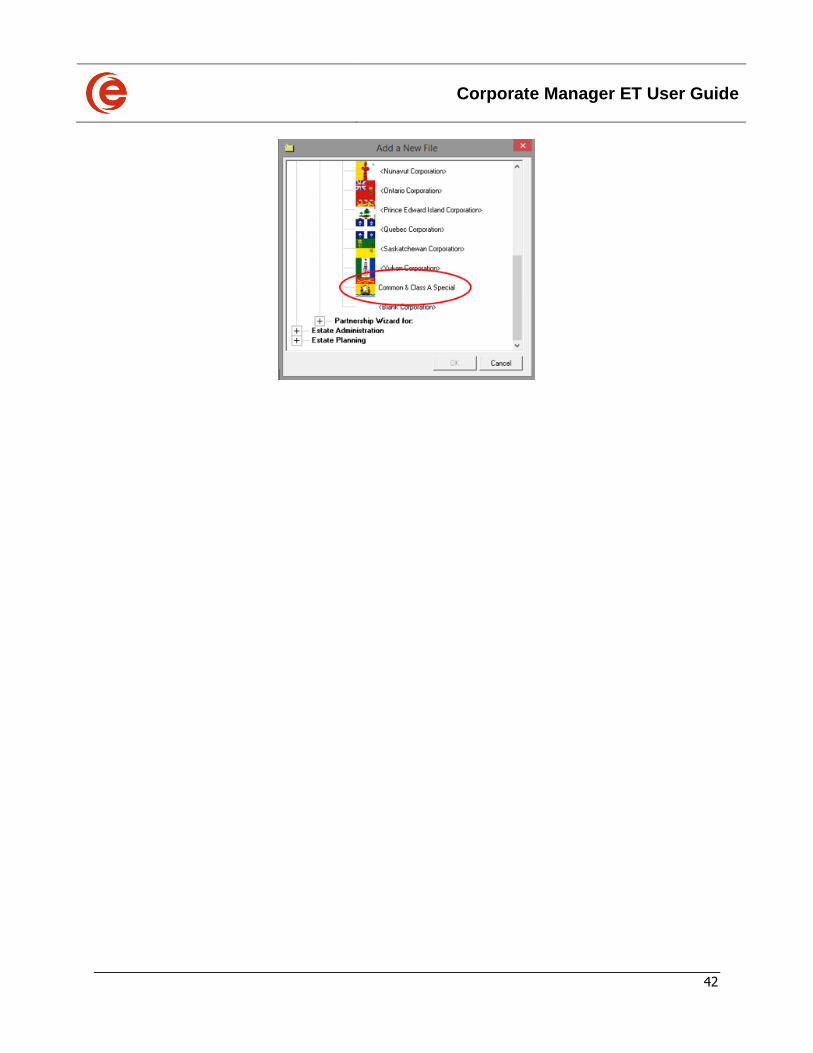
Template Matter A corporate structure that is used often can be set as a Template that will then be included in the New File List.
Either choose an existing Matter and remove all Matter specific information such as directors, officers, and share transactions or start the Incorporation Wizard as you would to create a matter, but only entering the necessary structure information in steps 1, 3 and 4 of the Wizard.
After completing the Wizard and the “blank” matter opens, go to the Administration Tab and name your template in the Reference field and activate the Template check box.
The Template has now been added to the New File list for firm-wide use. Selecting the Template will commence the new matter process in the usual manner.
Corporate Manager ET User Guide
42
Corporate Manager ET User Guide
43
Chapter 3: Common Tasks
Corporate Manager ET User Guide
44
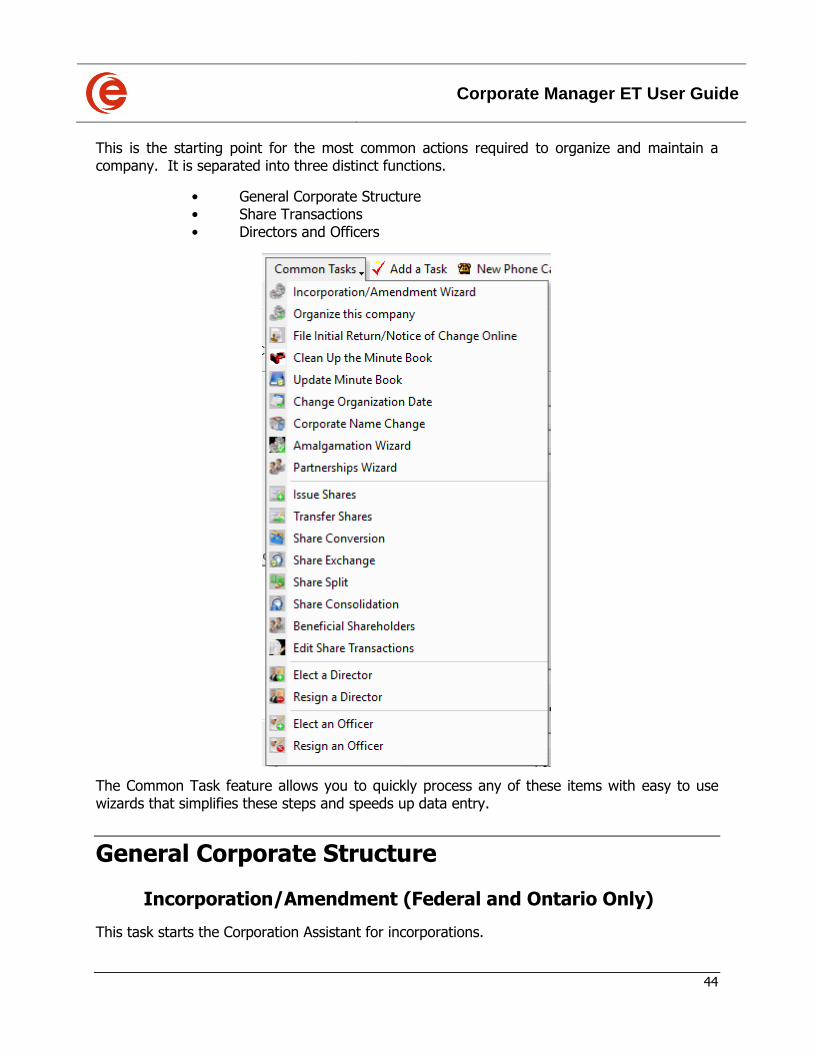
This is the starting point for the most common actions required to organize and maintain a company. It is separated into three distinct functions.
• General Corporate Structure • Share Transactions • Directors and Officers
The Common Task feature allows you to quickly process any of these items with easy to use wizards that simplifies these steps and speeds up data entry.
General Corporate Structure
Incorporation/Amendment (Federal and Ontario Only)
This task starts the Corporation Assistant for incorporations.
Corporate Manager ET User Guide
45
Corporate Manager ET speeds up the process of completing the filing by using information already entered into the database. For this reason, it is important the “Our Firm” Contact be set up correctly with mailing address and phone number. For supported Jurisdictions, on-line filing directly with the Government Ministry is available. Companies can be incorporated during regular government business hours using Corporate Manager ET. Once filing is completed, the Incorporation date and Corporation Number will automatically be added to the Corporate Matter as well as the Articles of Incorporation directly from the Government Ministry.
Organize this Company
Continuing from the incorporation process, the Organization Wizard quickly gathers all of the information necessary to complete an Organization of a Company.
File Initial Return/Notice of Change Online (Ontario Only)
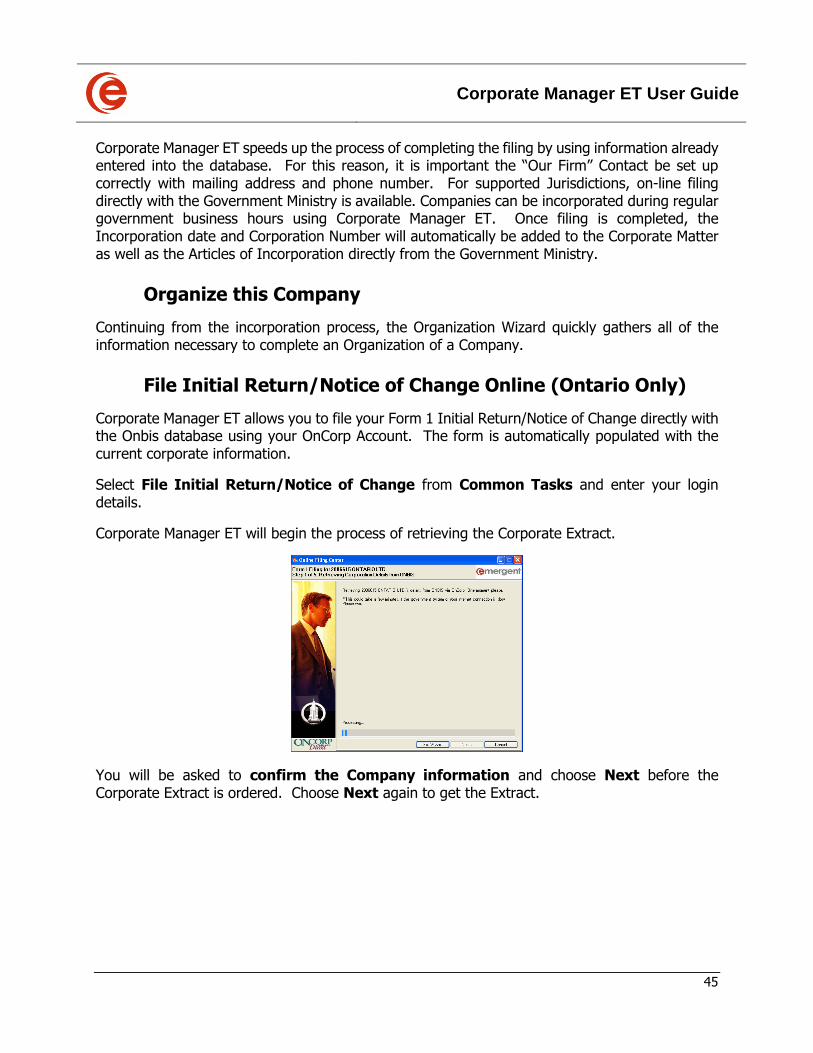
Corporate Manager ET allows you to file your Form 1 Initial Return/Notice of Change directly with the Onbis database using your OnCorp Account. The form is automatically populated with the current corporate information.
Select File Initial Return/Notice of Change from Common Tasks and enter your login details.
Corporate Manager ET will begin the process of retrieving the Corporate Extract.
You will be asked to confirm the Company information and choose Next before the Corporate Extract is ordered. Choose Next again to get the Extract.
Corporate Manager ET User Guide
46
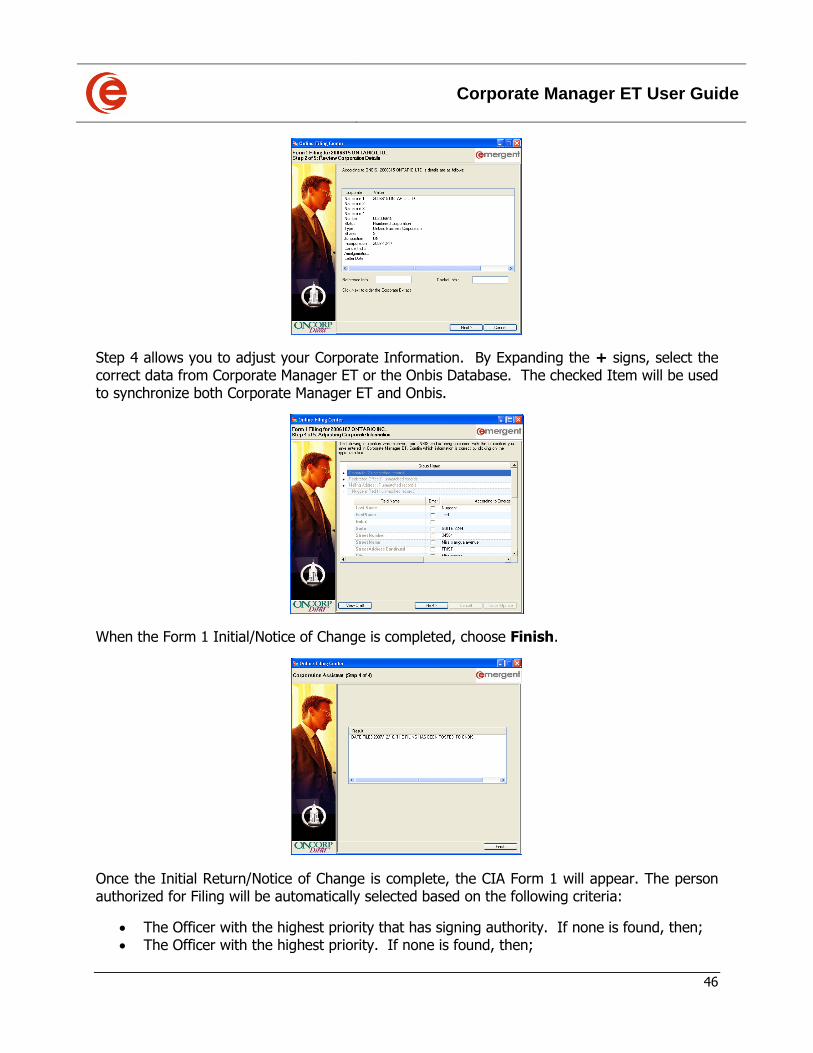
Step 4 allows you to adjust your Corporate Information. By Expanding the + signs, select the correct data from Corporate Manager ET or the Onbis Database. The checked Item will be used to synchronize both Corporate Manager ET and Onbis.
When the Form 1 Initial/Notice of Change is completed, choose Finish.
Once the Initial Return/Notice of Change is complete, the CIA Form 1 will appear. The person authorized for Filing will be automatically selected based on the following criteria:
• The Officer with the highest priority that has signing authority. If none is found, then; • The Officer with the highest priority. If none is found, then;
Corporate Manager ET User Guide
47
• The President. If none is found, then; • A Director.
Clean Up the Minute Book (Ontario only)
Corporate Manager ET cleans up a minute book in a few easy steps.
1. Activate the Organization Wizard on the Common Tasks button and enter the corporation name, incorporation date and corporate number.
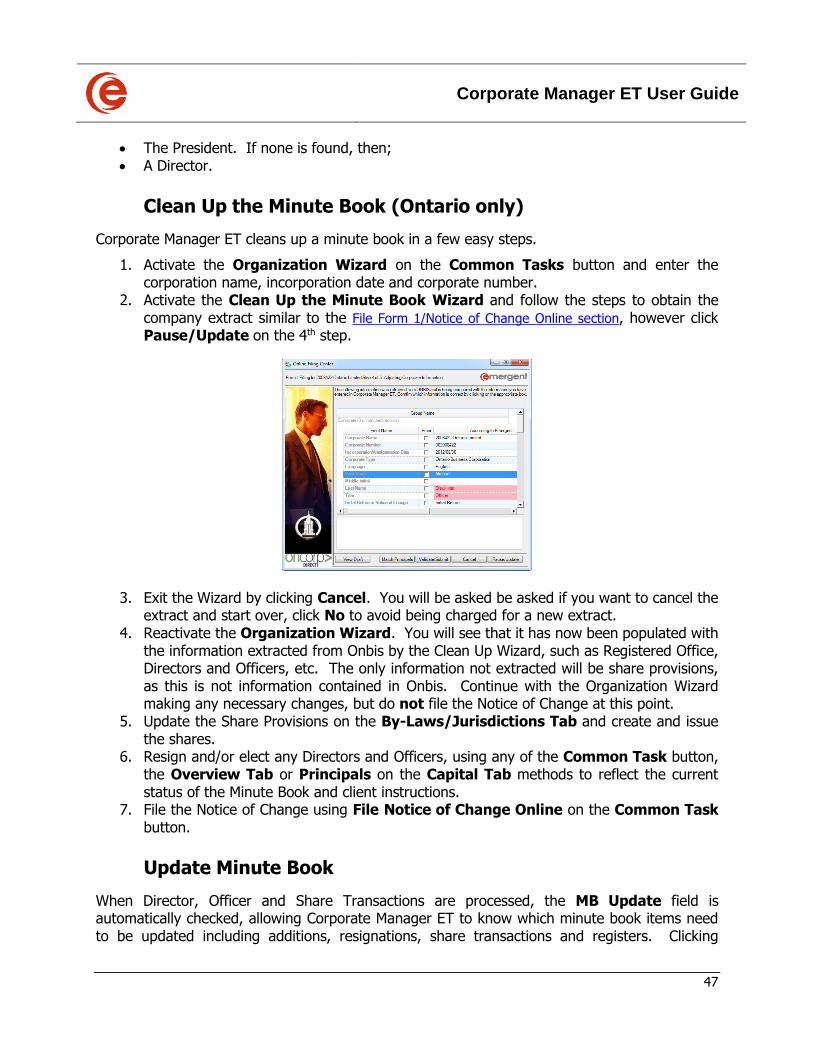
2. Activate the Clean Up the Minute Book Wizard and follow the steps to obtain the company extract similar to the File Form 1/Notice of Change Online section, however click Pause/Update on the 4th step.
3. Exit the Wizard by clicking Cancel. You will be asked be asked if you want to cancel the extract and start over, click No to avoid being charged for a new extract.
4. Reactivate the Organization Wizard. You will see that it has now been populated with the information extracted from Onbis by the Clean Up Wizard, such as Registered Office, Directors and Officers, etc. The only information not extracted will be share provisions, as this is not information contained in Onbis. Continue with the Organization Wizard making any necessary changes, but do not file the Notice of Change at this point.
5. Update the Share Provisions on the By-Laws/Jurisdictions Tab and create and issue the shares.
6. Resign and/or elect any Directors and Officers, using any of the Common Task button, the Overview Tab or Principals on the Capital Tab methods to reflect the current status of the Minute Book and client instructions.
7. File the Notice of Change using File Notice of Change Online on the Common Task button.
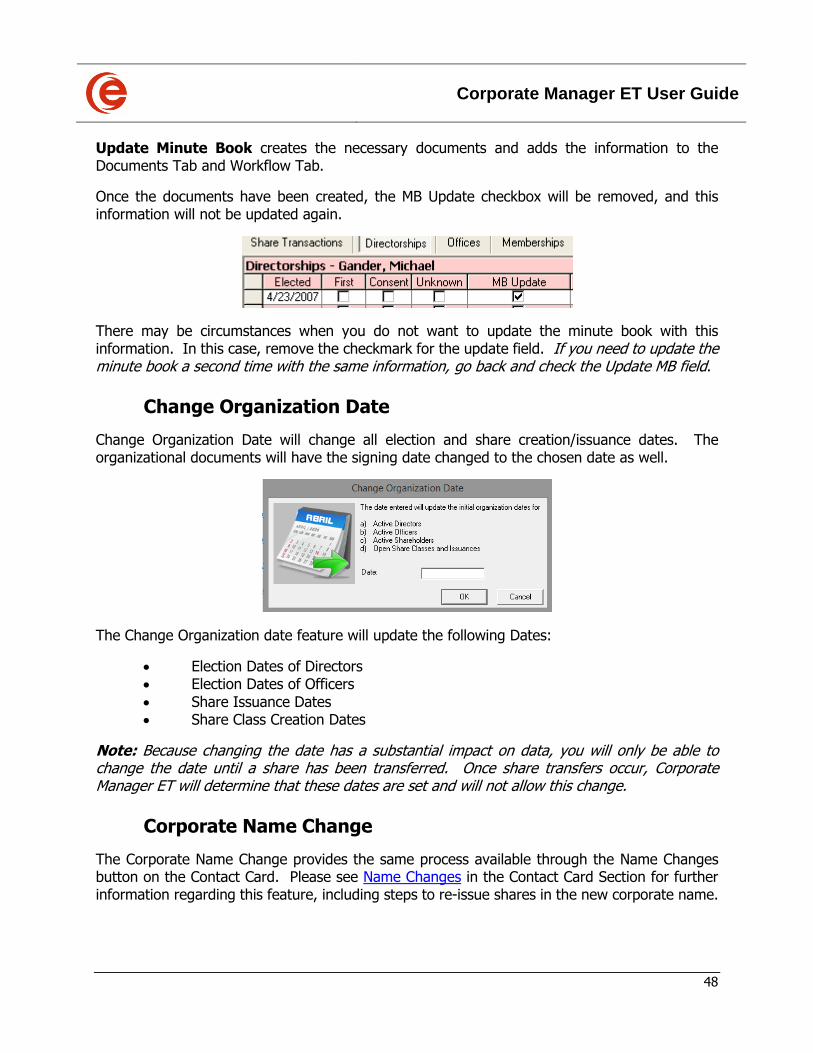
Update Minute Book
When Director, Officer and Share Transactions are processed, the MB Update field is automatically checked, allowing Corporate Manager ET to know which minute book items need to be updated including additions, resignations, share transactions and registers. Clicking
Corporate Manager ET User Guide
48
Update Minute Book creates the necessary documents and adds the information to the Documents Tab and Workflow Tab.
Once the documents have been created, the MB Update checkbox will be removed, and this information will not be updated again.
There may be circumstances when you do not want to update the minute book with this information. In this case, remove the checkmark for the update field. If you need to update the minute book a second time with the same information, go back and check the Update MB field.
Change Organization Date
Change Organization Date will change all election and share creation/issuance dates. The organizational documents will have the signing date changed to the chosen date as well.
The Change Organization date feature will update the following Dates:
• Election Dates of Directors • Election Dates of Officers
• Share Issuance Dates • Share Class Creation Dates
Note: Because changing the date has a substantial impact on data, you will only be able to change the date until a share has been transferred. Once share transfers occur, Corporate Manager ET will determine that these dates are set and will not allow this change.
Corporate Name Change
The Corporate Name Change provides the same process available through the Name Changes button on the Contact Card. Please see Name Changes in the Contact Card Section for further information regarding this feature, including steps to re-issue shares in the new corporate name.
Corporate Manager ET User Guide
49
Amalgamation Wizard
The Common Tasks Amalgamation Wizard should only be used to restart an in-progress amalgamation Please refer to the Amalgamation Wizard Section for in-depth information.
Partnerships Wizard
Please refer to the Partnerships Wizard Section for in-depth information.
Share Transactions
Issue Shares
This can be done from the Common Tasks dropdown menu
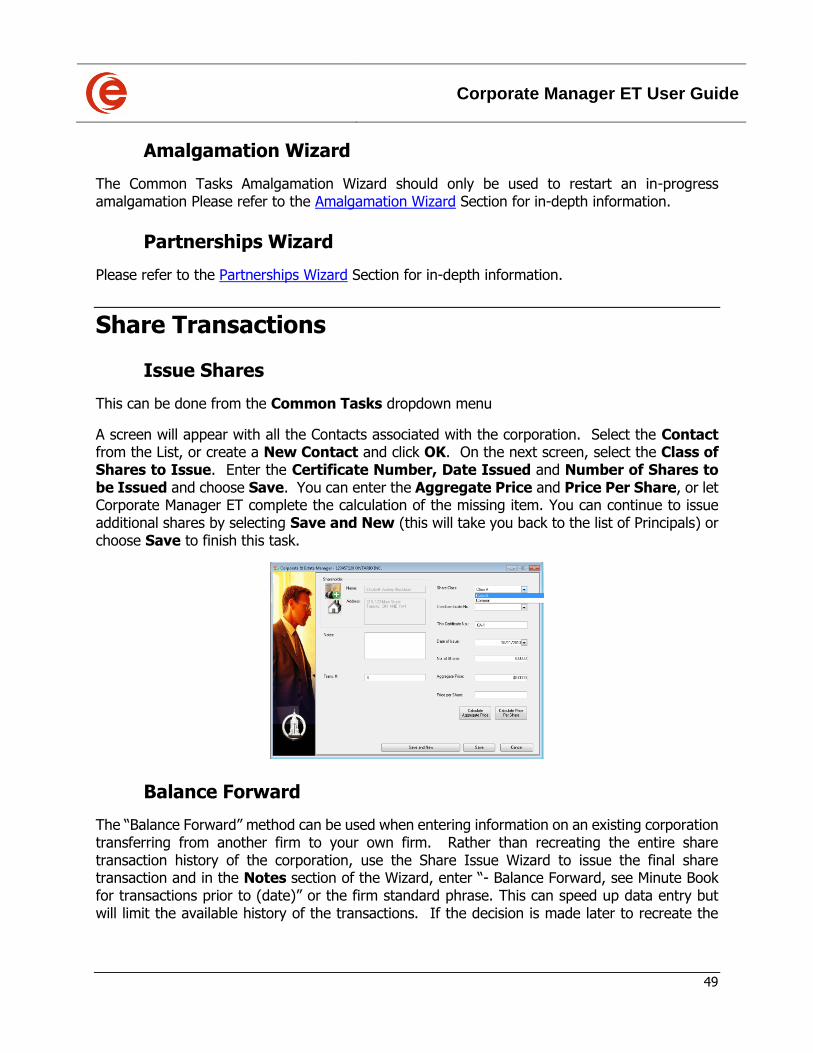
A screen will appear with all the Contacts associated with the corporation. Select the Contact from the List, or create a New Contact and click OK. On the next screen, select the Class of Shares to Issue. Enter the Certificate Number, Date Issued and Number of Shares to be Issued and choose Save. You can enter the Aggregate Price and Price Per Share, or let Corporate Manager ET complete the calculation of the missing item. You can continue to issue additional shares by selecting Save and New (this will take you back to the list of Principals) or choose Save to finish this task.
Balance Forward
The “Balance Forward” method can be used when entering information on an existing corporation transferring from another firm to your own firm. Rather than recreating the entire share transaction history of the corporation, use the Share Issue Wizard to issue the final share transaction and in the Notes section of the Wizard, enter “- Balance Forward, see Minute Book for transactions prior to (date)” or the firm standard phrase. This can speed up data entry but will limit the available history of the transactions. If the decision is made later to recreate the
Corporate Manager ET User Guide
50
share transaction history, the Balance Forward and any subsequent transactions must be deleted first.
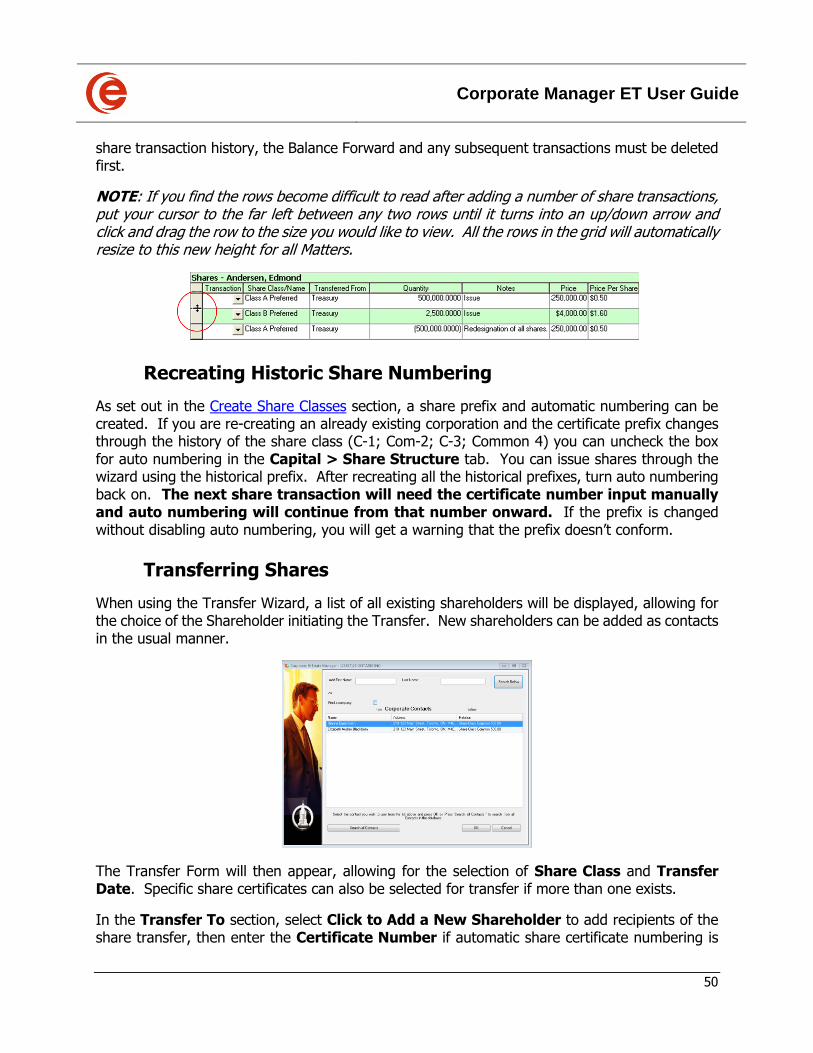
NOTE: If you find the rows become difficult to read after adding a number of share transactions, put your cursor to the far left between any two rows until it turns into an up/down arrow and click and drag the row to the size you would like to view. All the rows in the grid will automatically resize to this new height for all Matters.
Recreating Historic Share Numbering
As set out in the Create Share Classes section, a share prefix and automatic numbering can be created. If you are re-creating an already existing corporation and the certificate prefix changes through the history of the share class (C-1; Com-2; C-3; Common 4) you can uncheck the box for auto numbering in the Capital > Share Structure tab. You can issue shares through the wizard using the historical prefix. After recreating all the historical prefixes, turn auto numbering back on. The next share transaction will need the certificate number input manually and auto numbering will continue from that number onward. If the prefix is changed without disabling auto numbering, you will get a warning that the prefix doesn’t conform.
Transferring Shares
When using the Transfer Wizard, a list of all existing shareholders will be displayed, allowing for the choice of the Shareholder initiating the Transfer. New shareholders can be added as contacts in the usual manner.
The Transfer Form will then appear, allowing for the selection of Share Class and Transfer Date. Specific share certificates can also be selected for transfer if more than one exists.
In the Transfer To section, select Click to Add a New Shareholder to add recipients of the share transfer, then enter the Certificate Number if automatic share certificate numbering is
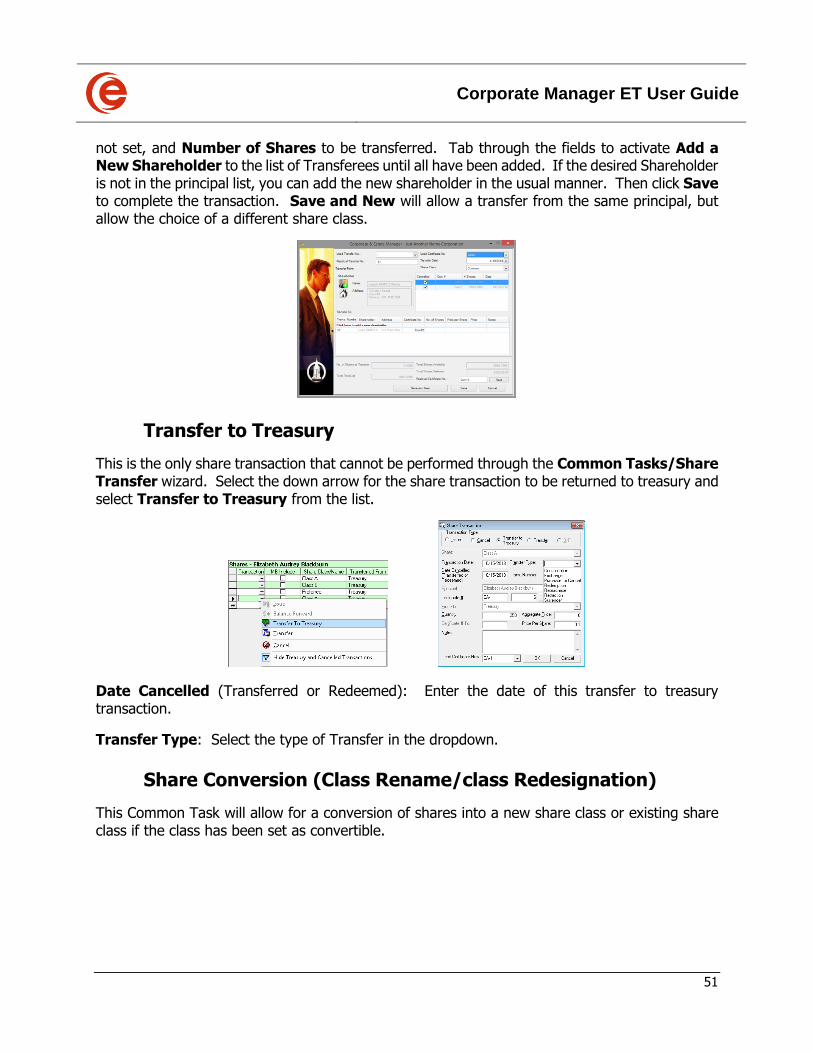
Corporate Manager ET User Guide
51
not set, and Number of Shares to be transferred. Tab through the fields to activate Add a New Shareholder to the list of Transferees until all have been added. If the desired Shareholder is not in the principal list, you can add the new shareholder in the usual manner. Then click Save to complete the transaction. Save and New will allow a transfer from the same principal, but allow the choice of a different share class.
Transfer to Treasury
This is the only share transaction that cannot be performed through the Common Tasks/Share Transfer wizard. Select the down arrow for the share transaction to be returned to treasury and select Transfer to Treasury from the list.
Date Cancelled (Transferred or Redeemed): Enter the date of this transfer to treasury transaction.
Transfer Type: Select the type of Transfer in the dropdown.
Share Conversion (Class Rename/class Redesignation)
This Common Task will allow for a conversion of shares into a new share class or existing share class if the class has been set as convertible.
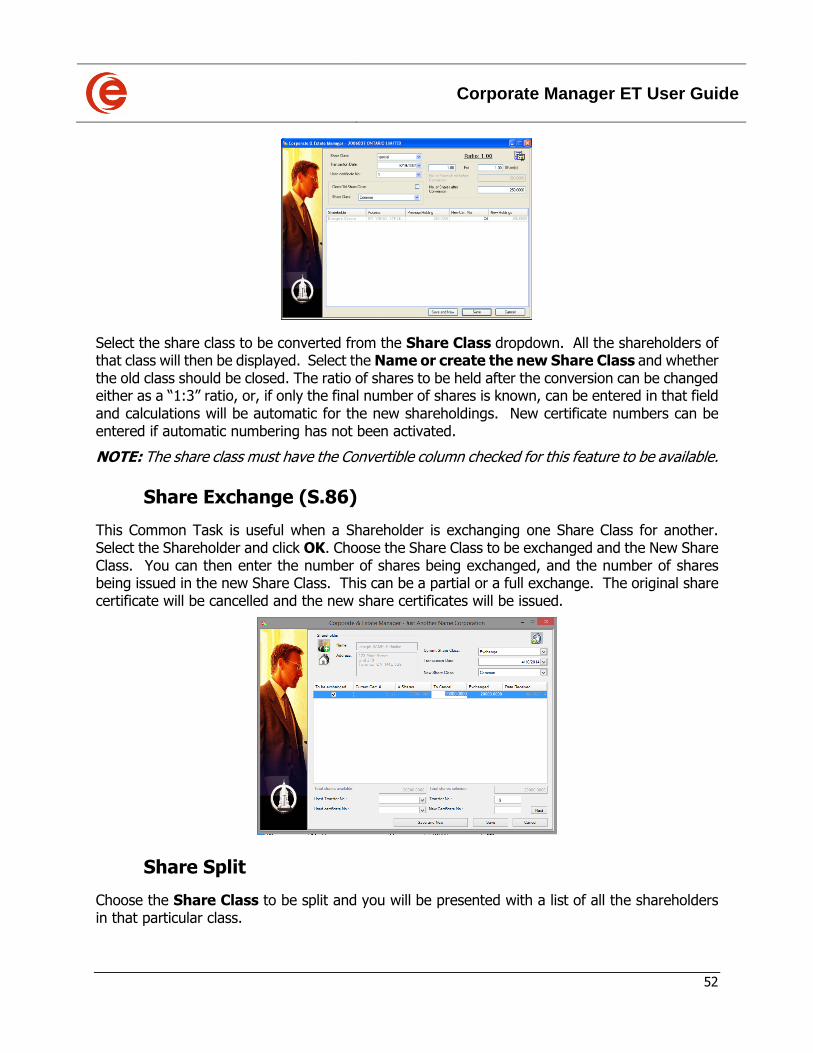
Corporate Manager ET User Guide
52
Select the share class to be converted from the Share Class dropdown. All the shareholders of that class will then be displayed. Select the Name or create the new Share Class and whether the old class should be closed. The ratio of shares to be held after the conversion can be changed either as a “1:3” ratio, or, if only the final number of shares is known, can be entered in that field and calculations will be automatic for the new shareholdings. New certificate numbers can be entered if automatic numbering has not been activated.
NOTE: The share class must have the Convertible column checked for this feature to be available.
Share Exchange (S.86)
This Common Task is useful when a Shareholder is exchanging one Share Class for another. Select the Shareholder and click OK. Choose the Share Class to be exchanged and the New Share Class. You can then enter the number of shares being exchanged, and the number of shares being issued in the new Share Class. This can be a partial or a full exchange. The original share certificate will be cancelled and the new share certificates will be issued.
Share Split
Choose the Share Class to be split and you will be presented with a list of all the shareholders in that particular class.
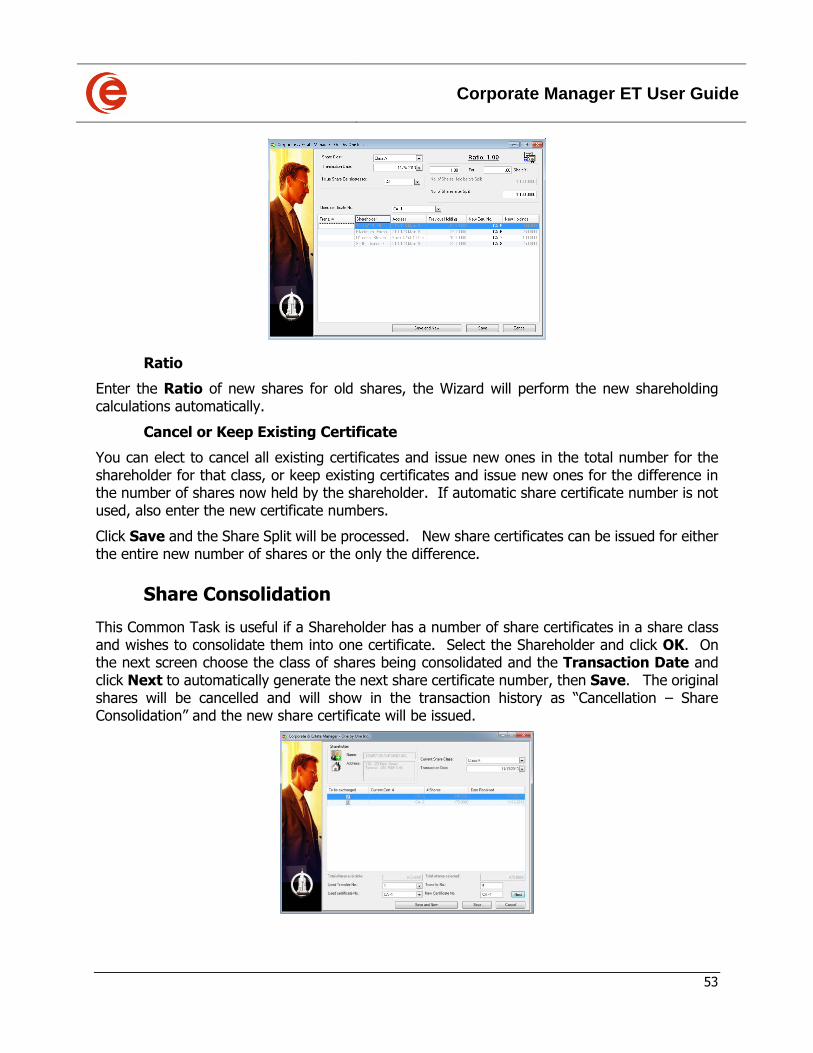
Corporate Manager ET User Guide
53
Ratio
Enter the Ratio of new shares for old shares, the Wizard will perform the new shareholding calculations automatically.
Cancel or Keep Existing Certificate
You can elect to cancel all existing certificates and issue new ones in the total number for the shareholder for that class, or keep existing certificates and issue new ones for the difference in the number of shares now held by the shareholder. If automatic share certificate number is not used, also enter the new certificate numbers.
Click Save and the Share Split will be processed. New share certificates can be issued for either the entire new number of shares or the only the difference.
Share Consolidation
This Common Task is useful if a Shareholder has a number of share certificates in a share class and wishes to consolidate them into one certificate. Select the Shareholder and click OK. On the next screen choose the class of shares being consolidated and the Transaction Date and click Next to automatically generate the next share certificate number, then Save. The original shares will be cancelled and will show in the transaction history as “Cancellation – Share Consolidation” and the new share certificate will be issued.
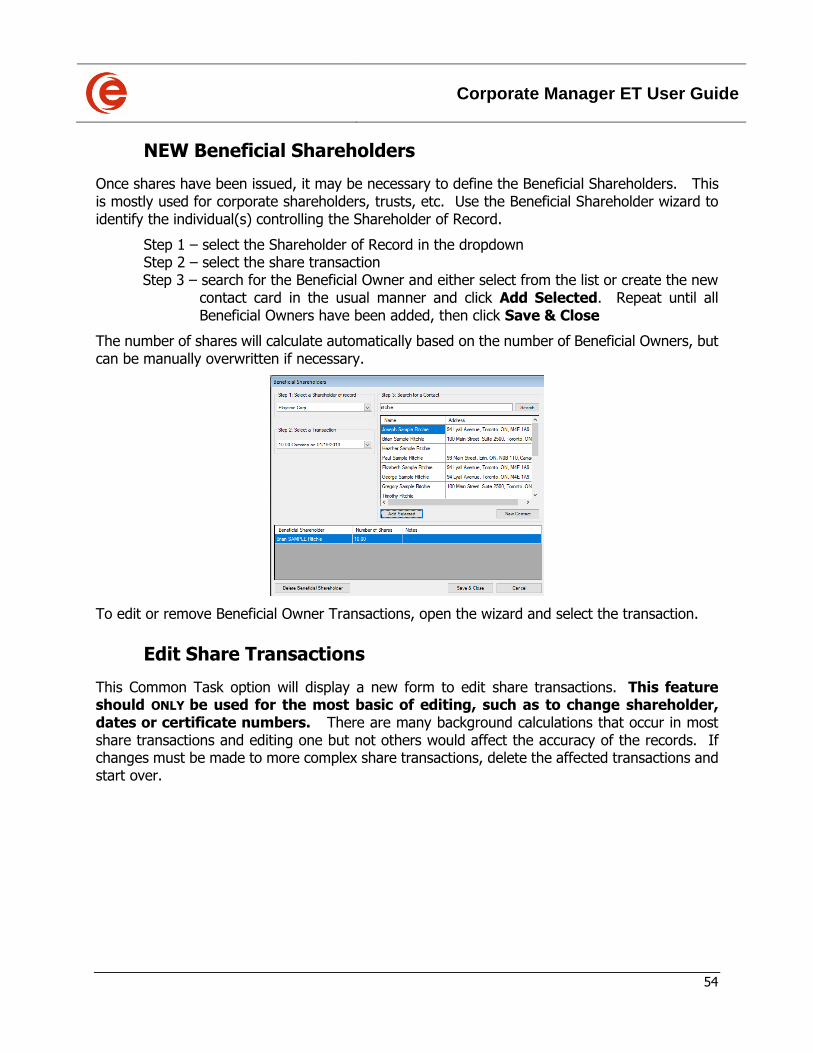
Corporate Manager ET User Guide
54
NEW Beneficial Shareholders
Once shares have been issued, it may be necessary to define the Beneficial Shareholders. This is mostly used for corporate shareholders, trusts, etc. Use the Beneficial Shareholder wizard to identify the individual(s) controlling the Shareholder of Record.
Step 1 – select the Shareholder of Record in the dropdown Step 2 – select the share transaction Step 3 – search for the Beneficial Owner and either select from the list or create the new
contact card in the usual manner and click Add Selected. Repeat until all Beneficial Owners have been added, then click Save & Close
The number of shares will calculate automatically based on the number of Beneficial Owners, but can be manually overwritten if necessary.
To edit or remove Beneficial Owner Transactions, open the wizard and select the transaction.
Edit Share Transactions
This Common Task option will display a new form to edit share transactions. This feature should ONLY be used for the most basic of editing, such as to change shareholder, dates or certificate numbers. There are many background calculations that occur in most share transactions and editing one but not others would affect the accuracy of the records. If changes must be made to more complex share transactions, delete the affected transactions and start over.
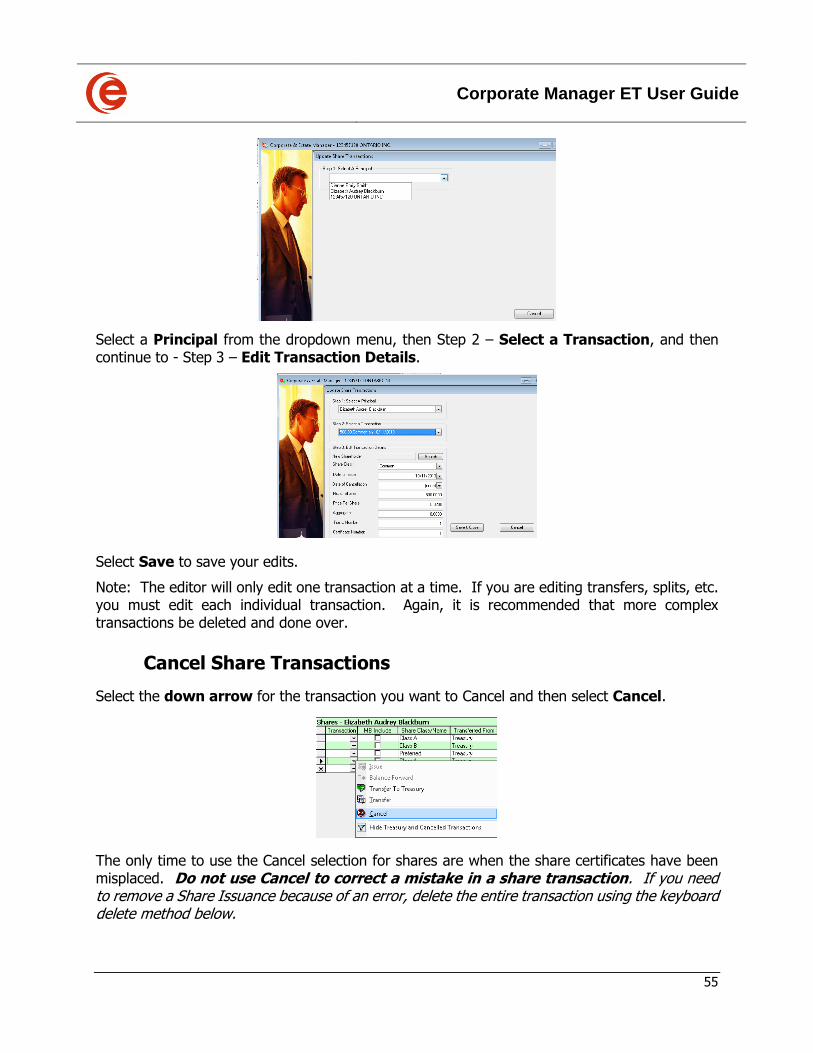
Corporate Manager ET User Guide
55
Select a Principal from the dropdown menu, then Step 2 – Select a Transaction, and then continue to - Step 3 – Edit Transaction Details.
Select Save to save your edits.
Note: The editor will only edit one transaction at a time. If you are editing transfers, splits, etc. you must edit each individual transaction. Again, it is recommended that more complex transactions be deleted and done over.
Cancel Share Transactions
Select the down arrow for the transaction you want to Cancel and then select Cancel.
The only time to use the Cancel selection for shares are when the share certificates have been misplaced. Do not use Cancel to correct a mistake in a share transaction. If you need to remove a Share Issuance because of an error, delete the entire transaction using the keyboard delete method below.
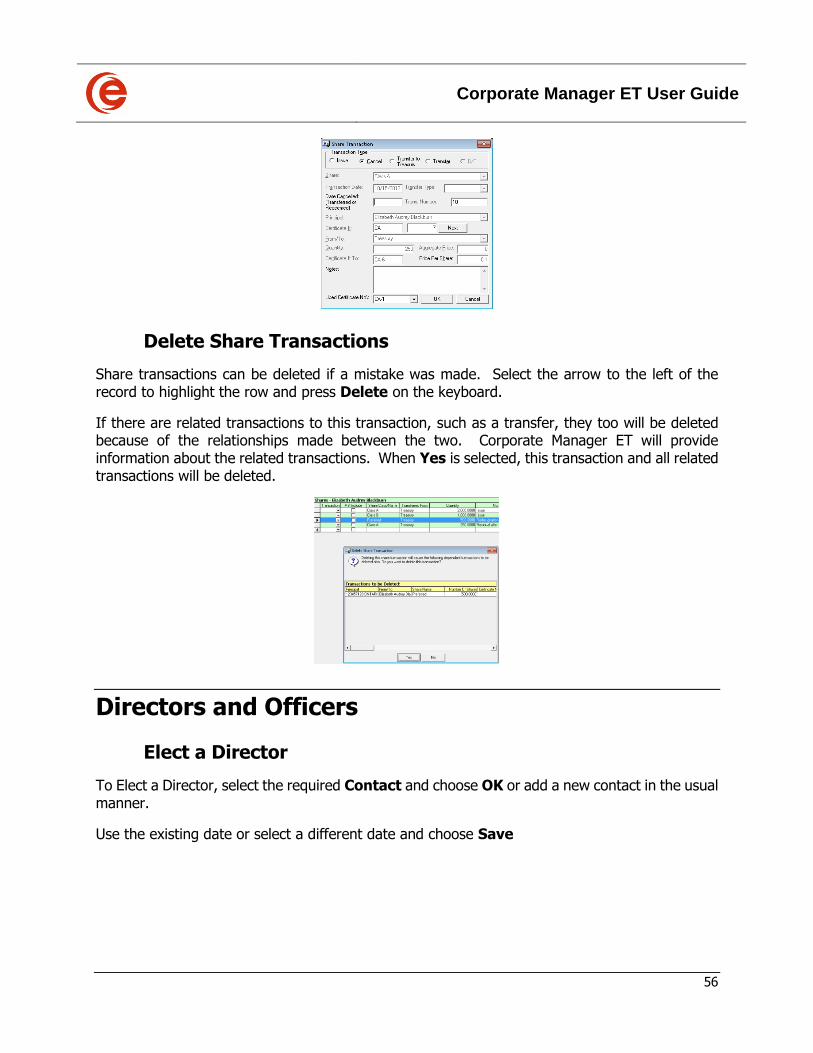
Corporate Manager ET User Guide
56
Delete Share Transactions
Share transactions can be deleted if a mistake was made. Select the arrow to the left of the record to highlight the row and press Delete on the keyboard.
If there are related transactions to this transaction, such as a transfer, they too will be deleted because of the relationships made between the two. Corporate Manager ET will provide information about the related transactions. When Yes is selected, this transaction and all related transactions will be deleted.
Directors and Officers
Elect a Director
To Elect a Director, select the required Contact and choose OK or add a new contact in the usual manner.
Use the existing date or select a different date and choose Save
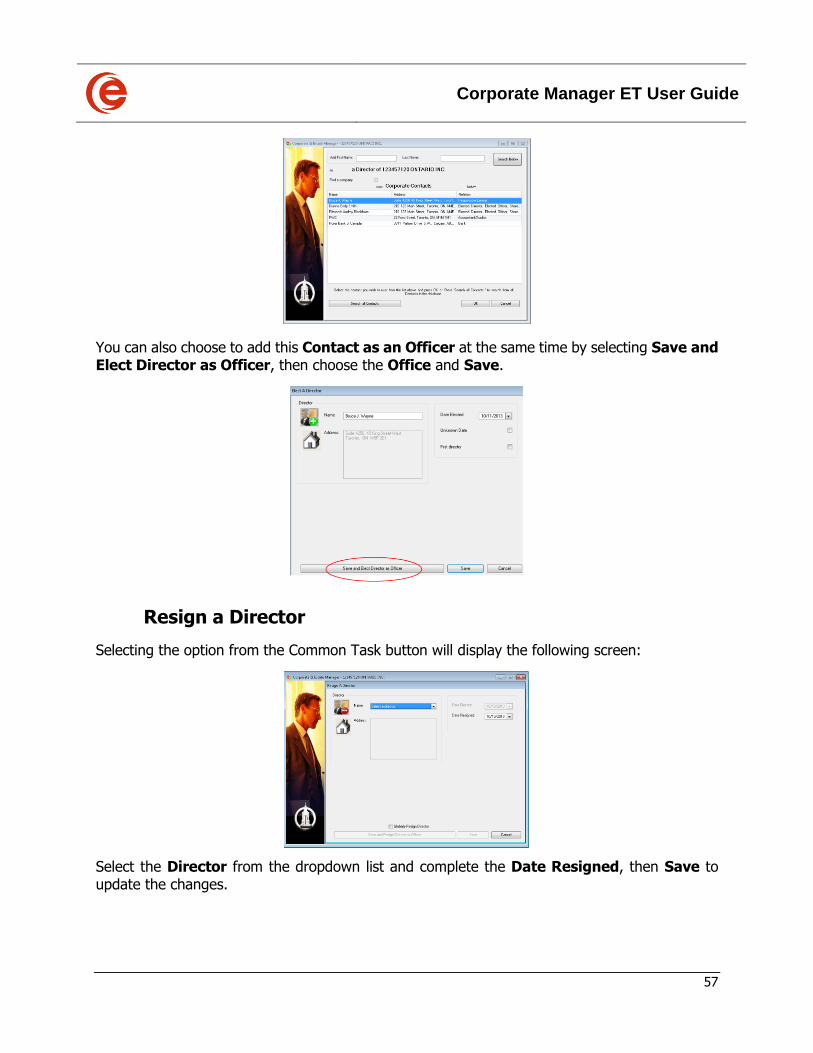
Corporate Manager ET User Guide
57
You can also choose to add this Contact as an Officer at the same time by selecting Save and Elect Director as Officer, then choose the Office and Save.
Resign a Director
Selecting the option from the Common Task button will display the following screen:
Select the Director from the dropdown list and complete the Date Resigned, then Save to update the changes.
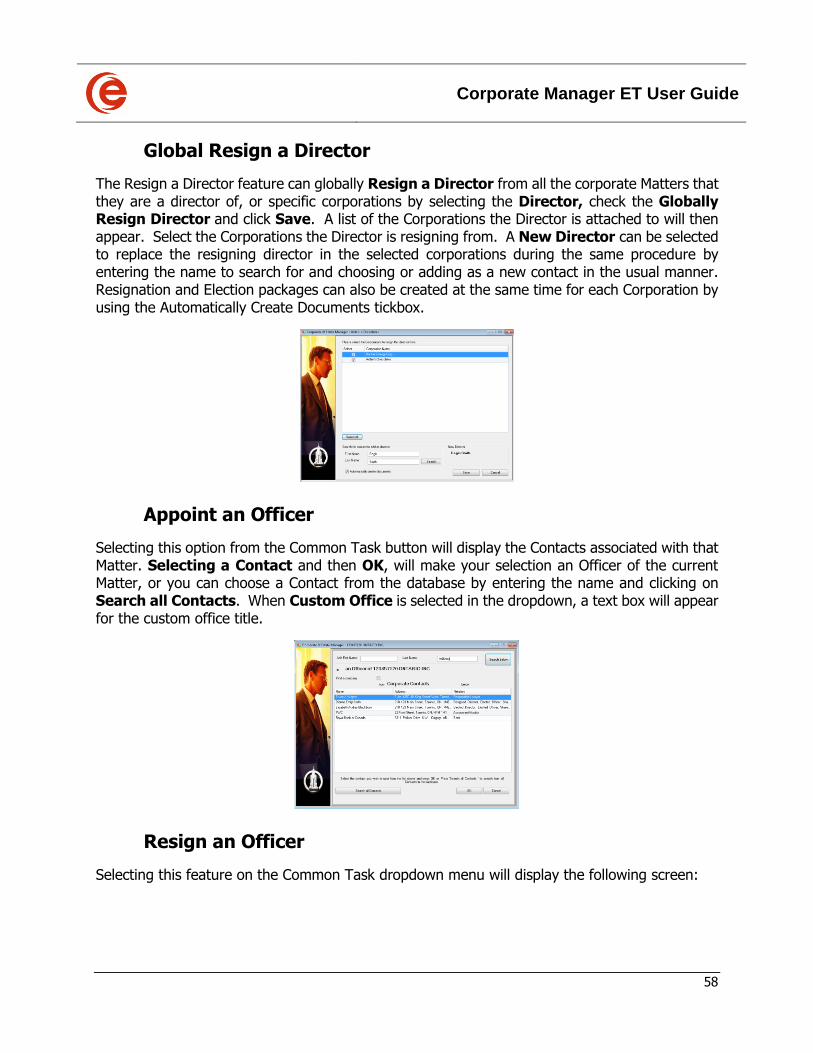
Corporate Manager ET User Guide
58
Global Resign a Director
The Resign a Director feature can globally Resign a Director from all the corporate Matters that they are a director of, or specific corporations by selecting the Director, check the Globally Resign Director and click Save. A list of the Corporations the Director is attached to will then appear. Select the Corporations the Director is resigning from. A New Director can be selected to replace the resigning director in the selected corporations during the same procedure by entering the name to search for and choosing or adding as a new contact in the usual manner. Resignation and Election packages can also be created at the same time for each Corporation by using the Automatically Create Documents tickbox.
Appoint an Officer
Selecting this option from the Common Task button will display the Contacts associated with that Matter. Selecting a Contact and then OK, will make your selection an Officer of the current Matter, or you can choose a Contact from the database by entering the name and clicking on Search all Contacts. When Custom Office is selected in the dropdown, a text box will appear for the custom office title.
Resign an Officer
Selecting this feature on the Common Task dropdown menu will display the following screen:

Corporate Manager ET User Guide
59
Select an Officer to resign and enter the Resignation Date.
If this Officer is also a director, you can choose Save and Resign as Officer and Director.
Corporate Manager ET User Guide
60
Chapter 4: Tabs
Corporate Manager ET User Guide
61
Corporate Matters This section focuses on the data entry requirements for the Corporate Manager ET Matters. The information required to define a corporate Matter is sorted into various tabs, as shown in the screenshots.
Following each screenshot, you will find a summary of the type of information required for each of the data entry tabs along with tips for data entry.
NOTE: Corporate Manager ET does not require that all, or even any, of the data entry fields be completed. However, it is beneficial to enter as much information as possible and keep it updated so that documents and reports reflect accurate corporate records.
Overview Tab
The primary purpose of the Overview Tab is to provide a summary of the corporate structure and provides navigation links using the blue Headings on the various sections to the tab containing that information.
Contact Information is accessed from this Tab by clicking on the appropriate link. Corporate Contact Information can be accessed by clicking on the Company’s name, which opens the company’s Contact Card while clicking on the Client Contact’s name will open their Contact Card.
Quick links are available for Shares and Shareholders, Directors and Officers. In addition, Registrations and the Locations of Corporate Records are also quick linked. If there is more information than can be seen in the table, scroll bars appear.
Corporate Manager ET User Guide
62
Capital Tab
The Capital Tab is where the transactional based details of the entity such as Shares and Share Structure, Officers, Directors, Members and Incorporators are available for reference. Section 85 Rollovers, Dividends and Bonuses are also recorded here.
Principals
Principals, as defined by Corporate Manager ET, are any persons, companies or other entities that hold shares, offices, directorships (or memberships for non-profits) within a corporate Matter.
Any number of Principals can be entered for a corporate Matter. All Principals are viewed on the left side and the details for that Principal’s share transactions, as well as offices or directorships, etc. is displayed on the right side of the screen.
Although it is possible to add a Principal and enter Director and Officer and Shareholder transactions using the tables, it is recommended to use the Wizards as a much more efficient process.
Note: You may find it useful to click on the Notes column heading and drag it to a position closer to the left of the table for easy viewing. You will only have to change the column order once, as it will then appear in this location for all Matters as your default view, even after closing and reopening Corporate Manager ET.
Corporate Manager ET User Guide
63
Ledgers & Registers
In the screenshot above, the Directors button is highlighted and the grid shows a list of all the current Directors for this corporation. Clicking through the various buttons will display that information. For the complete list of current and resigned principals, the appropriate Ledger can be generated through Create Documents.
NEW for June 2019: We now have two new areas.
Significant Control displays the Voting Shareholders, along with the percentage of control and whether they are a registered or beneficial shareholder. Calculations are automatic based on the total number of voting shares held by that shareholder.
Beneficial Shareholders displays the Shareholder of Record, along with the Beneficial Shareholder, as well as details of affected share transactions.
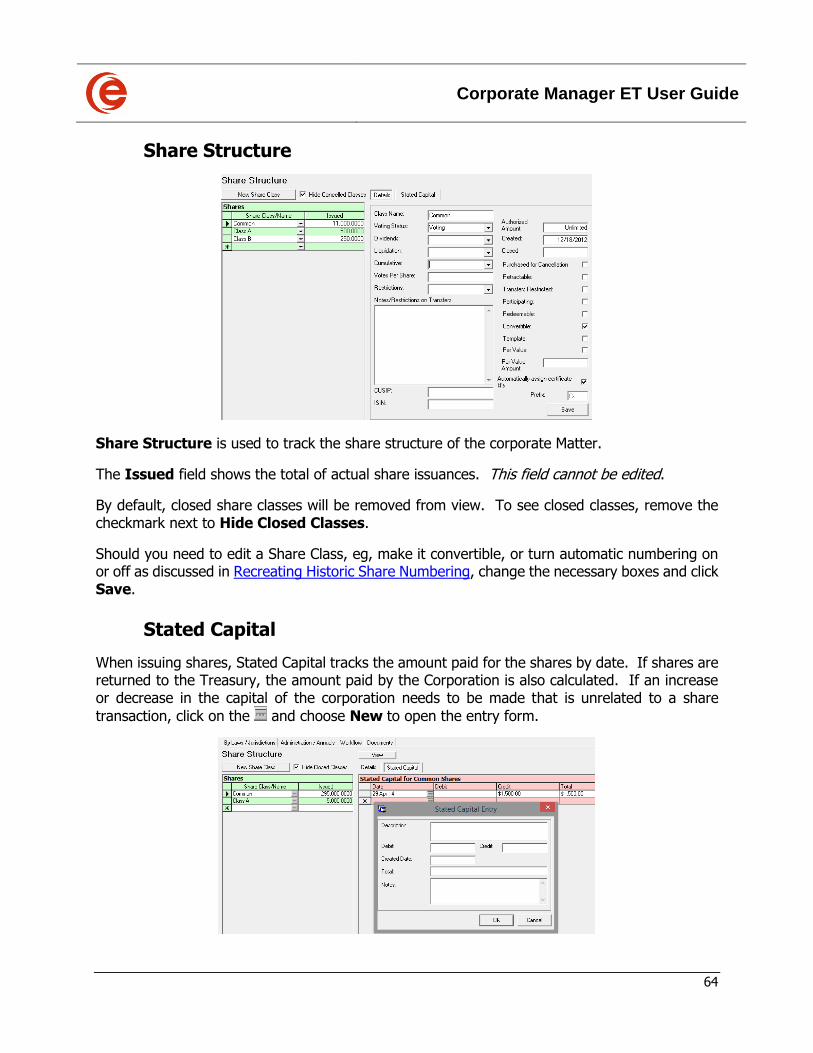
Corporate Manager ET User Guide
64
Share Structure
Share Structure is used to track the share structure of the corporate Matter.
The Issued field shows the total of actual share issuances. This field cannot be edited.
By default, closed share classes will be removed from view. To see closed classes, remove the checkmark next to Hide Closed Classes.
Should you need to edit a Share Class, eg, make it convertible, or turn automatic numbering on or off as discussed in Recreating Historic Share Numbering, change the necessary boxes and click Save.
Stated Capital
When issuing shares, Stated Capital tracks the amount paid for the shares by date. If shares are returned to the Treasury, the amount paid by the Corporation is also calculated. If an increase or decrease in the capital of the corporation needs to be made that is unrelated to a share
transaction, click on the and choose New to open the entry form.
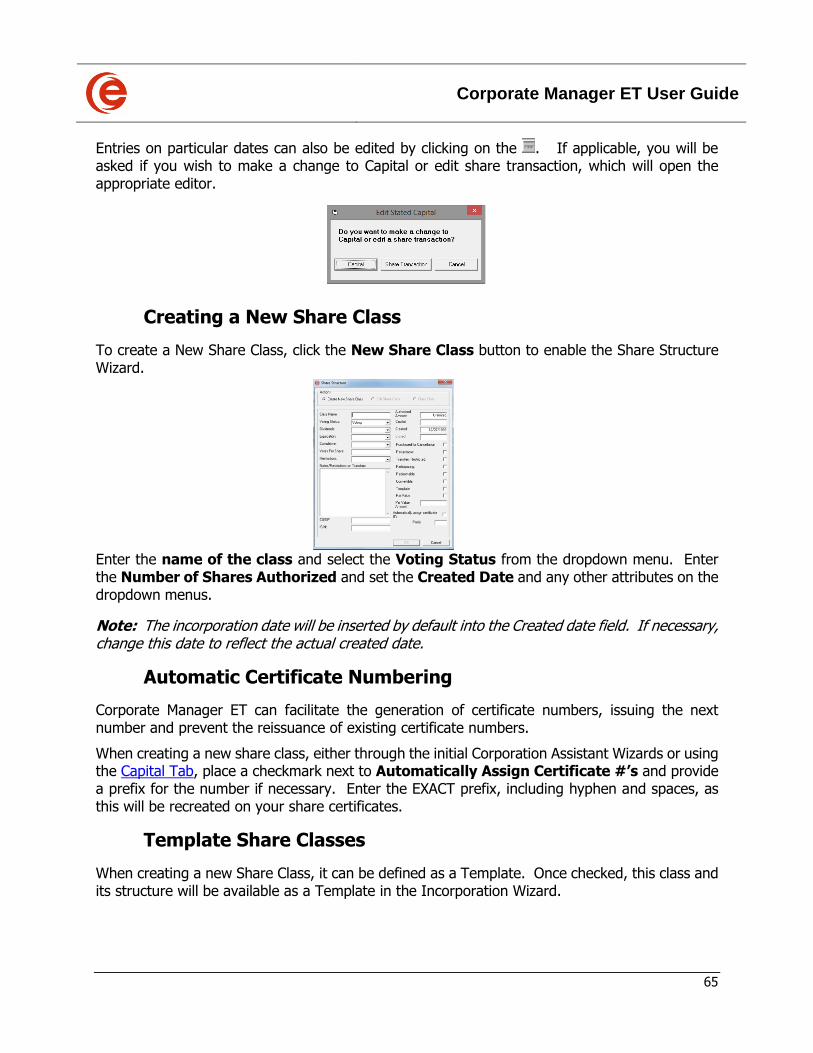
Corporate Manager ET User Guide
65
Entries on particular dates can also be edited by clicking on the . If applicable, you will be asked if you wish to make a change to Capital or edit share transaction, which will open the appropriate editor.
Creating a New Share Class
To create a New Share Class, click the New Share Class button to enable the Share Structure Wizard.
Enter the name of the class and select the Voting Status from the dropdown menu. Enter the Number of Shares Authorized and set the Created Date and any other attributes on the dropdown menus.
Note: The incorporation date will be inserted by default into the Created date field. If necessary, change this date to reflect the actual created date.
Automatic Certificate Numbering
Corporate Manager ET can facilitate the generation of certificate numbers, issuing the next number and prevent the reissuance of existing certificate numbers.
When creating a new share class, either through the initial Corporation Assistant Wizards or using the Capital Tab, place a checkmark next to Automatically Assign Certificate #’s and provide a prefix for the number if necessary. Enter the EXACT prefix, including hyphen and spaces, as this will be recreated on your share certificates.
Template Share Classes
When creating a new Share Class, it can be defined as a Template. Once checked, this class and its structure will be available as a Template in the Incorporation Wizard.
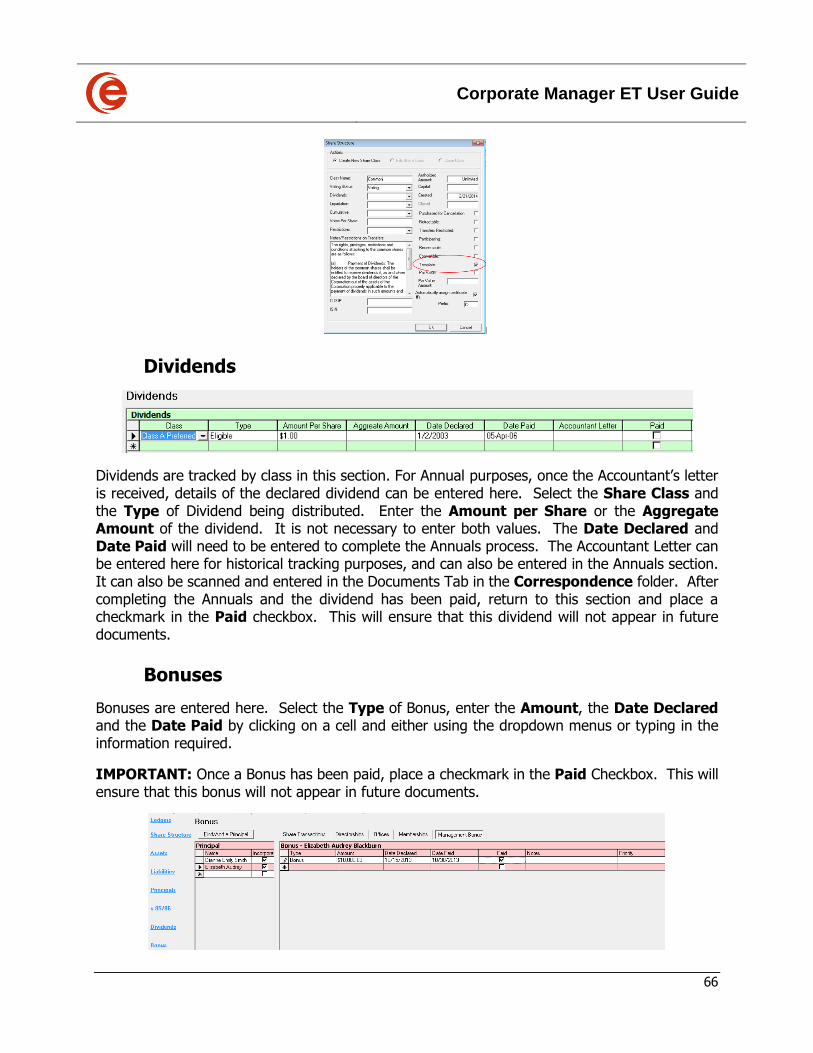
Corporate Manager ET User Guide
66
Dividends
Dividends are tracked by class in this section. For Annual purposes, once the Accountant’s letter is received, details of the declared dividend can be entered here. Select the Share Class and the Type of Dividend being distributed. Enter the Amount per Share or the Aggregate Amount of the dividend. It is not necessary to enter both values. The Date Declared and Date Paid will need to be entered to complete the Annuals process. The Accountant Letter can be entered here for historical tracking purposes, and can also be entered in the Annuals section. It can also be scanned and entered in the Documents Tab in the Correspondence folder. After completing the Annuals and the dividend has been paid, return to this section and place a checkmark in the Paid checkbox. This will ensure that this dividend will not appear in future documents.
Bonuses
Bonuses are entered here. Select the Type of Bonus, enter the Amount, the Date Declared and the Date Paid by clicking on a cell and either using the dropdown menus or typing in the information required.
IMPORTANT: Once a Bonus has been paid, place a checkmark in the Paid Checkbox. This will ensure that this bonus will not appear in future documents.
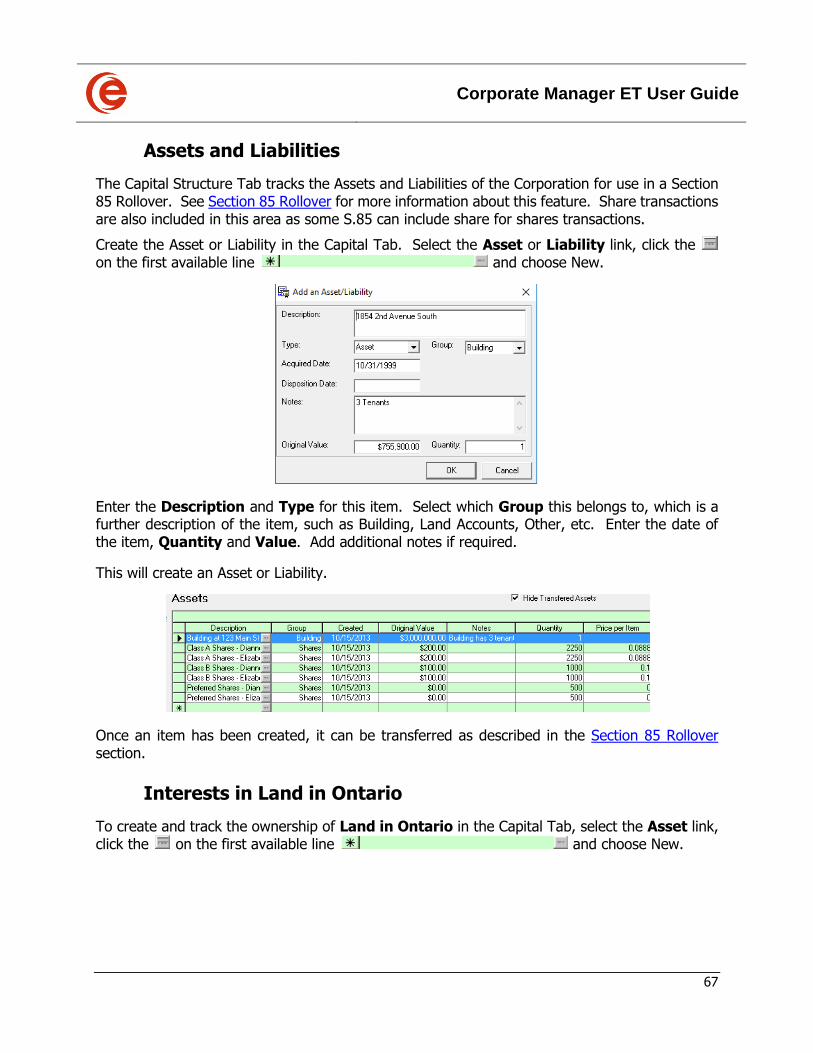
Corporate Manager ET User Guide
67
Assets and Liabilities
The Capital Structure Tab tracks the Assets and Liabilities of the Corporation for use in a Section 85 Rollover. See Section 85 Rollover for more information about this feature. Share transactions are also included in this area as some S.85 can include share for shares transactions.
Create the Asset or Liability in the Capital Tab. Select the Asset or Liability link, click the on the first available line and choose New.
Enter the Description and Type for this item. Select which Group this belongs to, which is a further description of the item, such as Building, Land Accounts, Other, etc. Enter the date of the item, Quantity and Value. Add additional notes if required.
This will create an Asset or Liability.
Once an item has been created, it can be transferred as described in the Section 85 Rollover section.
Interests in Land in Ontario
To create and track the ownership of Land in Ontario in the Capital Tab, select the Asset link, click the on the first available line and choose New.
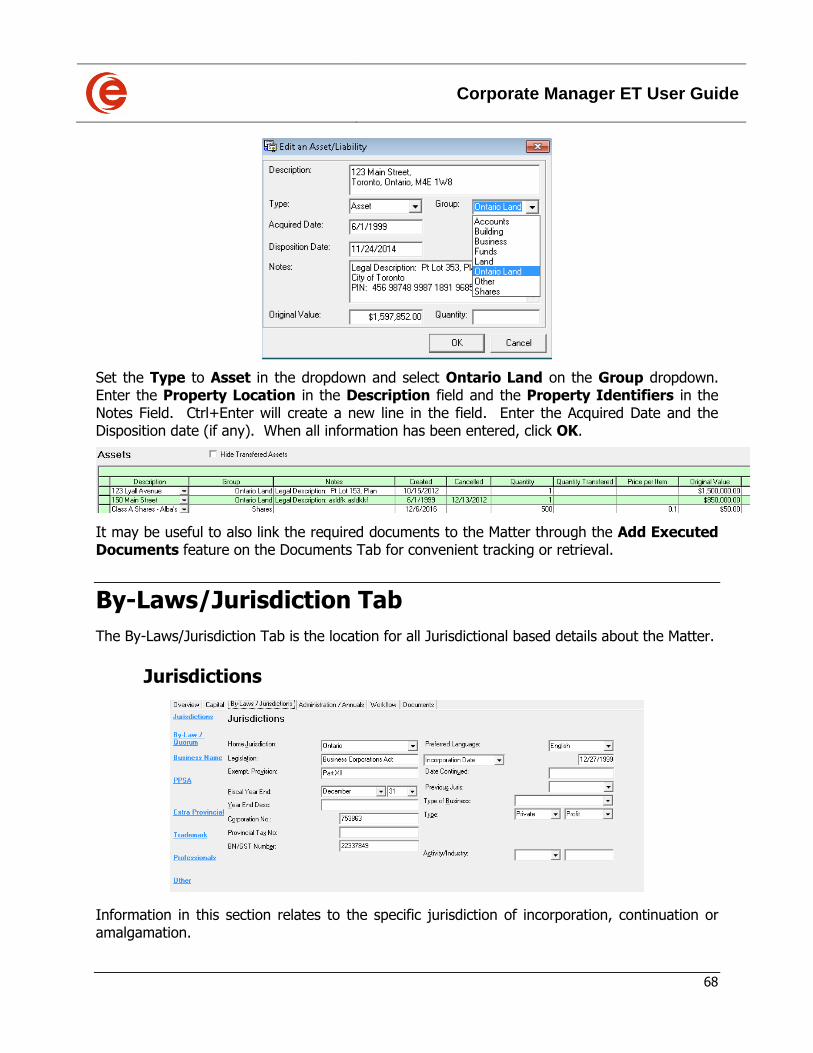
Corporate Manager ET User Guide
68
Set the Type to Asset in the dropdown and select Ontario Land on the Group dropdown. Enter the Property Location in the Description field and the Property Identifiers in the Notes Field. Ctrl+Enter will create a new line in the field. Enter the Acquired Date and the Disposition date (if any). When all information has been entered, click OK.
It may be useful to also link the required documents to the Matter through the Add Executed Documents feature on the Documents Tab for convenient tracking or retrieval.
By-Laws/Jurisdiction Tab
The By-Laws/Jurisdiction Tab is the location for all Jurisdictional based details about the Matter.
Jurisdictions
Information in this section relates to the specific jurisdiction of incorporation, continuation or amalgamation.
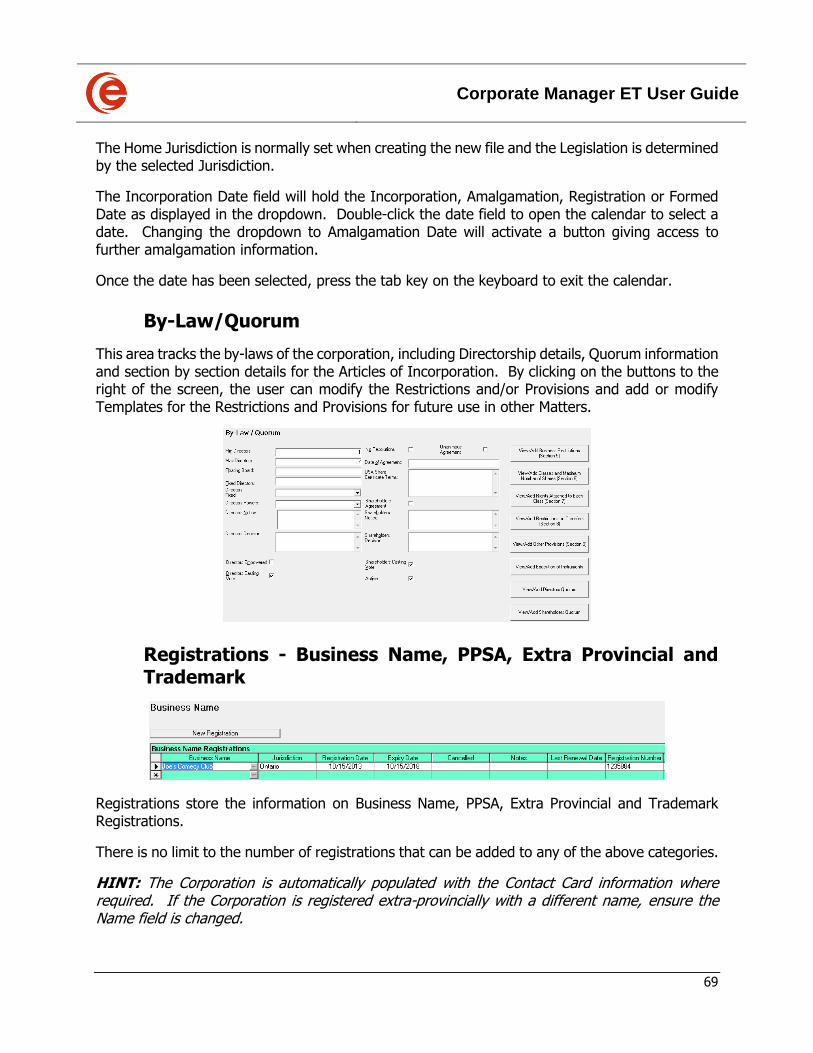
Corporate Manager ET User Guide
69
The Home Jurisdiction is normally set when creating the new file and the Legislation is determined by the selected Jurisdiction.
The Incorporation Date field will hold the Incorporation, Amalgamation, Registration or Formed Date as displayed in the dropdown. Double-click the date field to open the calendar to select a date. Changing the dropdown to Amalgamation Date will activate a button giving access to further amalgamation information.
Once the date has been selected, press the tab key on the keyboard to exit the calendar.
By-Law/Quorum
This area tracks the by-laws of the corporation, including Directorship details, Quorum information and section by section details for the Articles of Incorporation. By clicking on the buttons to the right of the screen, the user can modify the Restrictions and/or Provisions and add or modify Templates for the Restrictions and Provisions for future use in other Matters.
Registrations - Business Name, PPSA, Extra Provincial and Trademark
Registrations store the information on Business Name, PPSA, Extra Provincial and Trademark Registrations.
There is no limit to the number of registrations that can be added to any of the above categories.
HINT: The Corporation is automatically populated with the Contact Card information where required. If the Corporation is registered extra-provincially with a different name, ensure the Name field is changed.
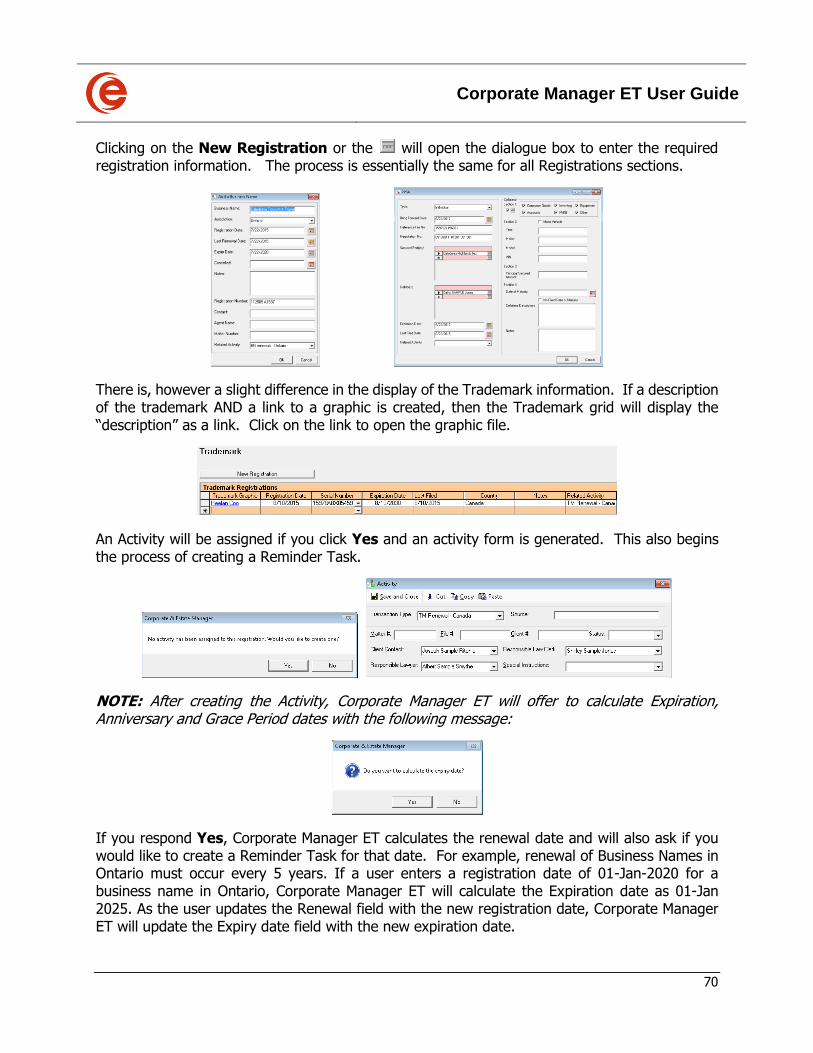
Corporate Manager ET User Guide
70
Clicking on the New Registration or the will open the dialogue box to enter the required registration information. The process is essentially the same for all Registrations sections.
There is, however a slight difference in the display of the Trademark information. If a description of the trademark AND a link to a graphic is created, then the Trademark grid will display the “description” as a link. Click on the link to open the graphic file.
An Activity will be assigned if you click Yes and an activity form is generated. This also begins the process of creating a Reminder Task.
NOTE: After creating the Activity, Corporate Manager ET will offer to calculate Expiration, Anniversary and Grace Period dates with the following message:
If you respond Yes, Corporate Manager ET calculates the renewal date and will also ask if you would like to create a Reminder Task for that date. For example, renewal of Business Names in Ontario must occur every 5 years. If a user enters a registration date of 01-Jan-2020 for a business name in Ontario, Corporate Manager ET will calculate the Expiration date as 01-Jan 2025. As the user updates the Renewal field with the new registration date, Corporate Manager ET will update the Expiry date field with the new expiration date.

Corporate Manager ET User Guide
71
See the Workflow Section for further information on Tasks.
Renewing Registrations
When the time comes to renew a registration, do not click on New Registration, but rather, click on the edit button. This will reopen the registration information form. For the purpose of explanation, we will show the Business Names Registration form.
Do not change the original Registration Date. The Last Registration Date will now become the new Registration Date, most likely the original Expiry Date – in this case 7/22/2020. Clear the original Expiry Date and the program will again offer to calculate the new expiry date and set reminders when ok is clicked.
Professionals
This section tracks the registrations required to maintain a Professional Corporation.
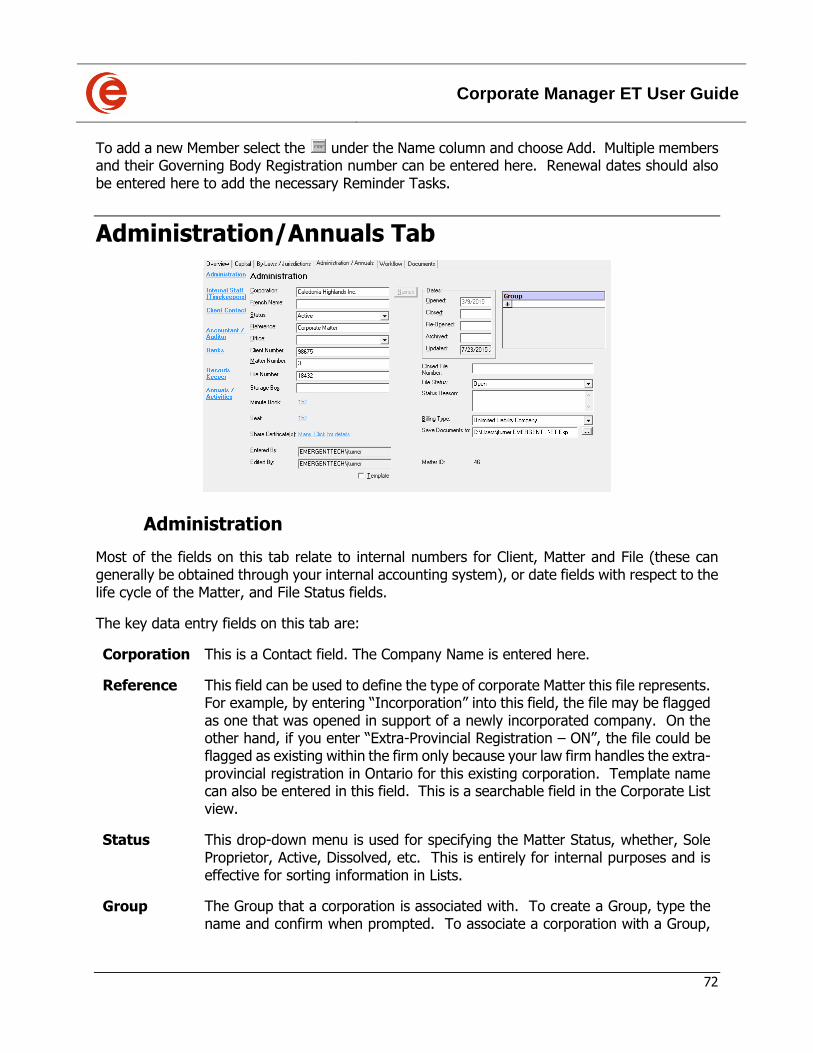
Corporate Manager ET User Guide
72
To add a new Member select the under the Name column and choose Add. Multiple members and their Governing Body Registration number can be entered here. Renewal dates should also be entered here to add the necessary Reminder Tasks.
Administration/Annuals Tab
Administration
Most of the fields on this tab relate to internal numbers for Client, Matter and File (these can generally be obtained through your internal accounting system), or date fields with respect to the life cycle of the Matter, and File Status fields.
The key data entry fields on this tab are:
Corporation This is a Contact field. The Company Name is entered here.
Reference This field can be used to define the type of corporate Matter this file represents. For example, by entering “Incorporation” into this field, the file may be flagged as one that was opened in support of a newly incorporated company. On the other hand, if you enter “Extra-Provincial Registration – ON”, the file could be flagged as existing within the firm only because your law firm handles the extra-provincial registration in Ontario for this existing corporation. Template name can also be entered in this field. This is a searchable field in the Corporate List view.
Status This drop-down menu is used for specifying the Matter Status, whether, Sole Proprietor, Active, Dissolved, etc. This is entirely for internal purposes and is effective for sorting information in Lists.
Group The Group that a corporation is associated with. To create a Group, type the name and confirm when prompted. To associate a corporation with a Group,
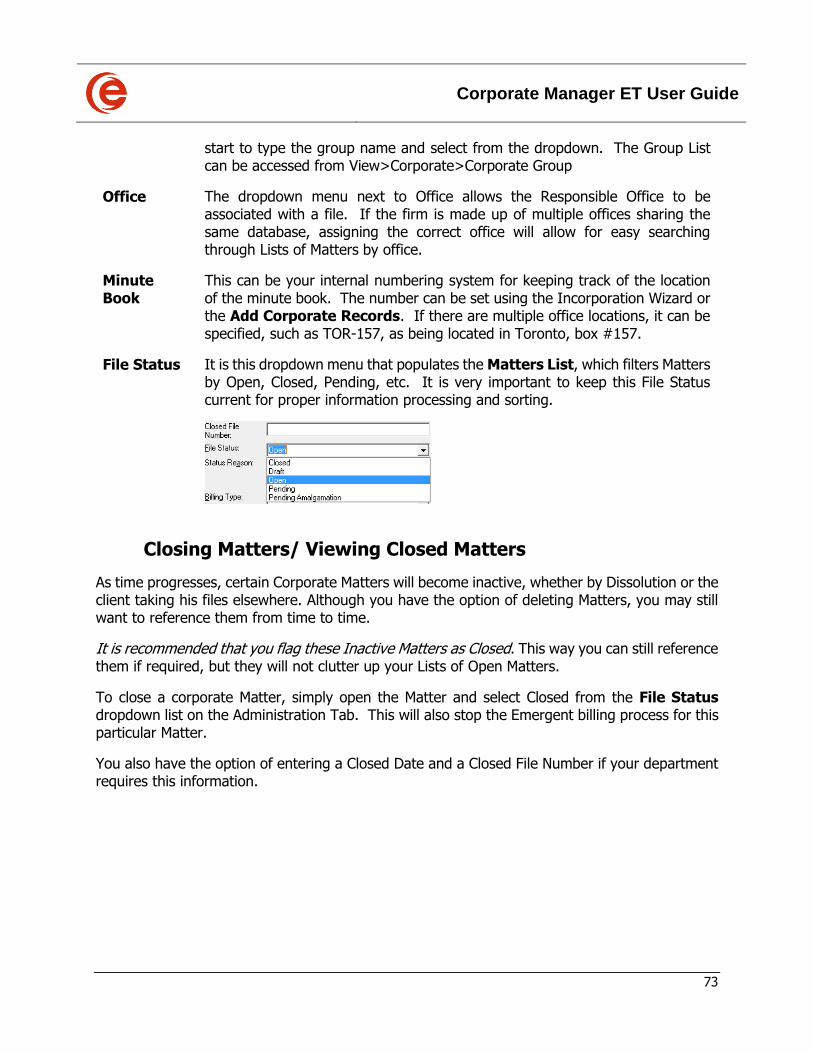
Corporate Manager ET User Guide
73
start to type the group name and select from the dropdown. The Group List can be accessed from View>Corporate>Corporate Group
Office The dropdown menu next to Office allows the Responsible Office to be associated with a file. If the firm is made up of multiple offices sharing the same database, assigning the correct office will allow for easy searching through Lists of Matters by office.
Minute Book
This can be your internal numbering system for keeping track of the location of the minute book. The number can be set using the Incorporation Wizard or the Add Corporate Records. If there are multiple office locations, it can be specified, such as TOR-157, as being located in Toronto, box #157.
File Status It is this dropdown menu that populates the Matters List, which filters Matters by Open, Closed, Pending, etc. It is very important to keep this File Status current for proper information processing and sorting.
Closing Matters/ Viewing Closed Matters
As time progresses, certain Corporate Matters will become inactive, whether by Dissolution or the client taking his files elsewhere. Although you have the option of deleting Matters, you may still want to reference them from time to time.
It is recommended that you flag these Inactive Matters as Closed. This way you can still reference them if required, but they will not clutter up your Lists of Open Matters.
To close a corporate Matter, simply open the Matter and select Closed from the File Status dropdown list on the Administration Tab. This will also stop the Emergent billing process for this particular Matter.
You also have the option of entering a Closed Date and a Closed File Number if your department requires this information.
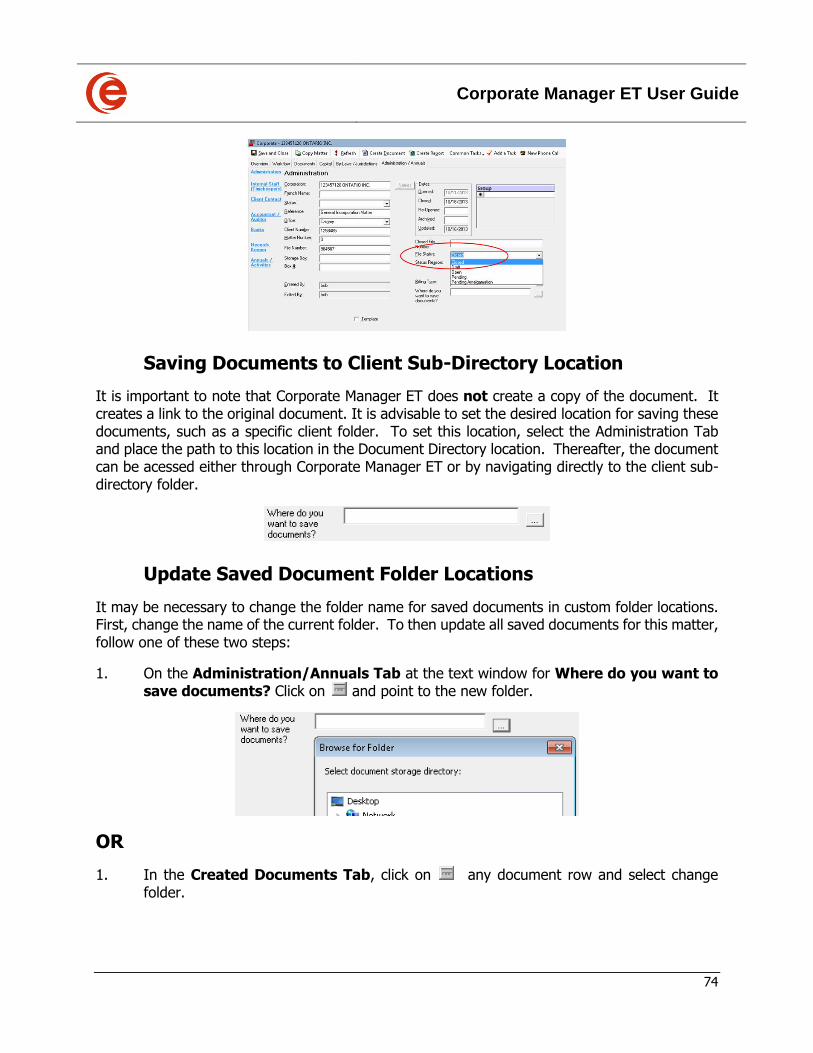
Corporate Manager ET User Guide
74
Saving Documents to Client Sub-Directory Location
It is important to note that Corporate Manager ET does not create a copy of the document. It creates a link to the original document. It is advisable to set the desired location for saving these documents, such as a specific client folder. To set this location, select the Administration Tab and place the path to this location in the Document Directory location. Thereafter, the document can be acessed either through Corporate Manager ET or by navigating directly to the client sub-directory folder.
Update Saved Document Folder Locations
It may be necessary to change the folder name for saved documents in custom folder locations. First, change the name of the current folder. To then update all saved documents for this matter, follow one of these two steps:
1. On the Administration/Annuals Tab at the text window for Where do you want to save documents? Click on and point to the new folder.
OR
1. In the Created Documents Tab, click on any document row and select change folder.
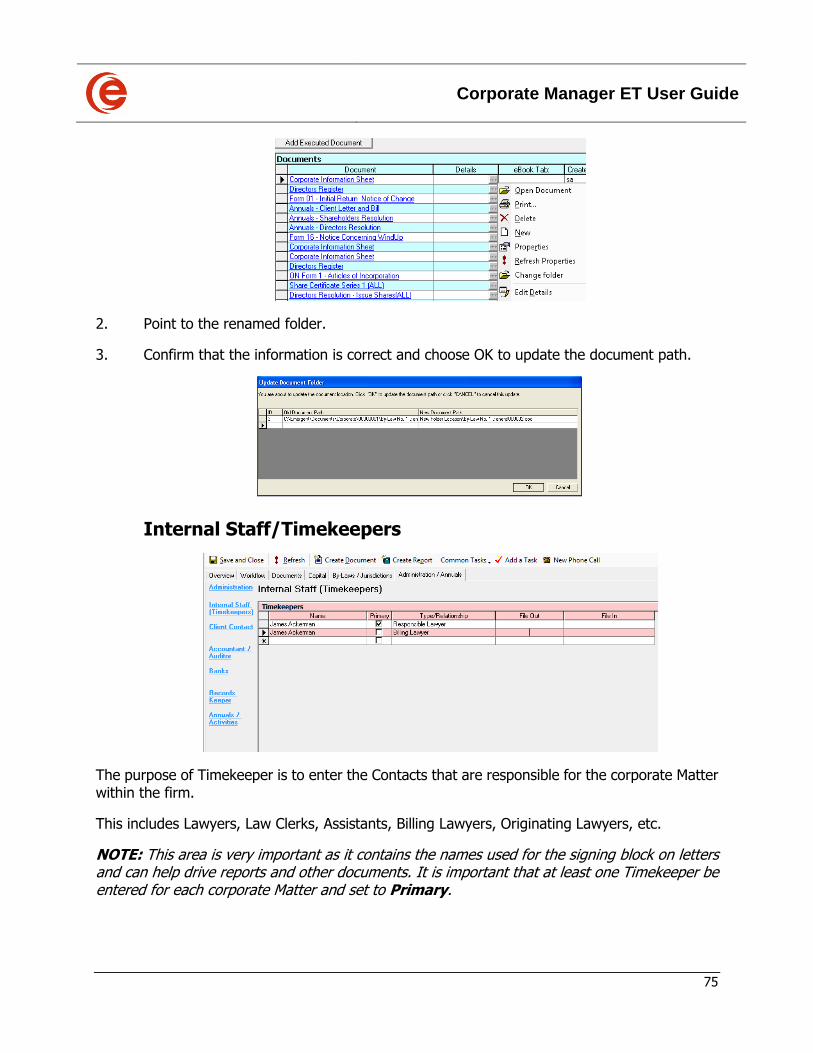
Corporate Manager ET User Guide
75
2. Point to the renamed folder.
3. Confirm that the information is correct and choose OK to update the document path.
Internal Staff/Timekeepers
The purpose of Timekeeper is to enter the Contacts that are responsible for the corporate Matter within the firm.
This includes Lawyers, Law Clerks, Assistants, Billing Lawyers, Originating Lawyers, etc.
NOTE: This area is very important as it contains the names used for the signing block on letters and can help drive reports and other documents. It is important that at least one Timekeeper be entered for each corporate Matter and set to Primary.
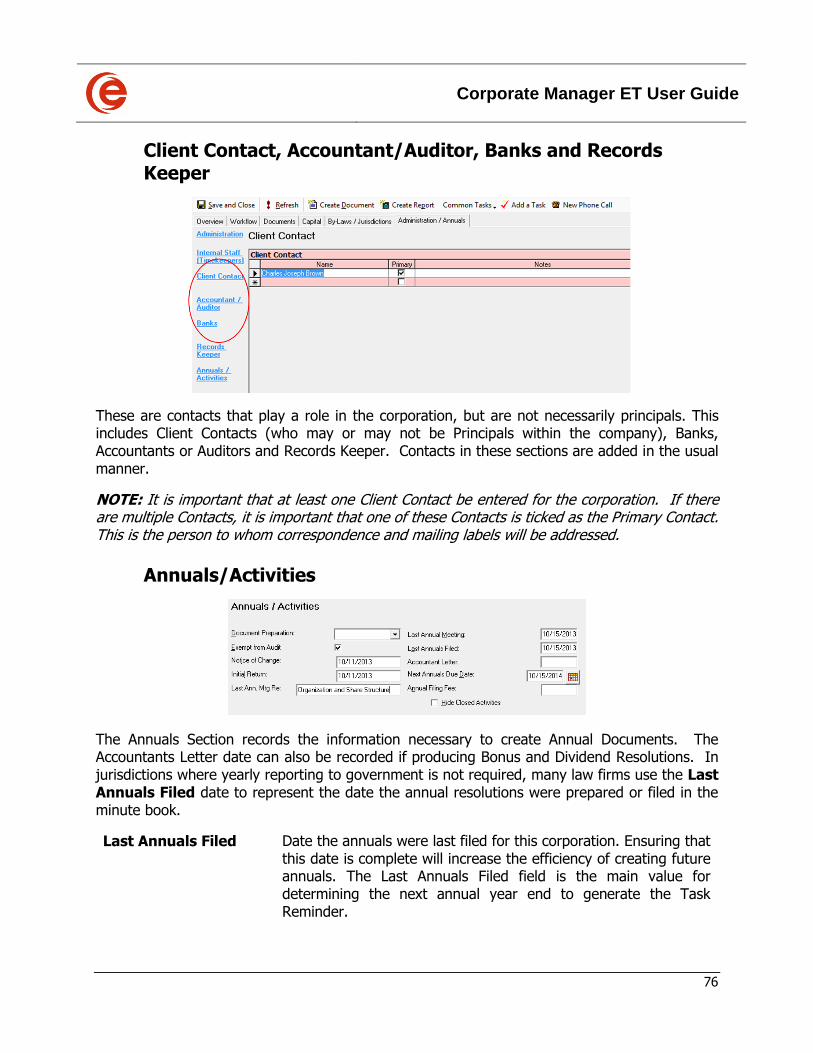
Corporate Manager ET User Guide
76
Client Contact, Accountant/Auditor, Banks and Records Keeper
These are contacts that play a role in the corporation, but are not necessarily principals. This includes Client Contacts (who may or may not be Principals within the company), Banks, Accountants or Auditors and Records Keeper. Contacts in these sections are added in the usual manner.
NOTE: It is important that at least one Client Contact be entered for the corporation. If there are multiple Contacts, it is important that one of these Contacts is ticked as the Primary Contact. This is the person to whom correspondence and mailing labels will be addressed.
Annuals/Activities
The Annuals Section records the information necessary to create Annual Documents. The Accountants Letter date can also be recorded if producing Bonus and Dividend Resolutions. In jurisdictions where yearly reporting to government is not required, many law firms use the Last Annuals Filed date to represent the date the annual resolutions were prepared or filed in the minute book.
Last Annuals Filed Date the annuals were last filed for this corporation. Ensuring that this date is complete will increase the efficiency of creating future annuals. The Last Annuals Filed field is the main value for determining the next annual year end to generate the Task Reminder.
Corporate Manager ET User Guide
77
Next Annuals Due Date
Date the next annuals must be filed. When this is completed, you can easily search the Activities List to find all companies that need their annuals prepared by a certain date. When the date is altered, Corporate Manager ET offers to create a Reminder Task.
Notice of Change and Initial Return
Date Notice of Change and Initial Return records were sent to the respective Ministry or done by online filing (if available) are recorded here. The dates in these fields control the director and officer changes for the next Notice of Change to be filed.
Exempt from Audit When the Exempt from Audit checkbox is checked, then the corporation is exempt from audit and the corporation has Accountants, or if the Exempt from Audit checkbox is not checked, then the corporation has Auditors. The appropriate resolutions are generated for the organizational documents and subsequent Annuals. The appropriate Exempt from Audit provisions under the Act the company was incorporated under are also automatically recorded.
Last Annual Meeting Re
Enter the subject of the last annual meeting.
Last Annual Meeting Enter the date of the last annual meeting;
Annual Filing Fee Can be recorded as reference.
Document Preparation
Dropdown can be used to indicate whether to contact lawyer prior to commencing work, or other information.
Activities
Events in the management of a corporation can be processed through Activities. From file creation to annuals production or business name registrations, each activity can be tracked by activity type, clerk or any other item in the Activities Button List. Renewals of business name registrations, PPSAs, trademarks, etc., are processed in the same manner described in Update Annuals and/or Registrations.
Add an Activity
Activities are added by selecting the dropdown menu under the Transaction Type column. Activities can be edited or removed from this list depending on the selection from the dropdown menu.
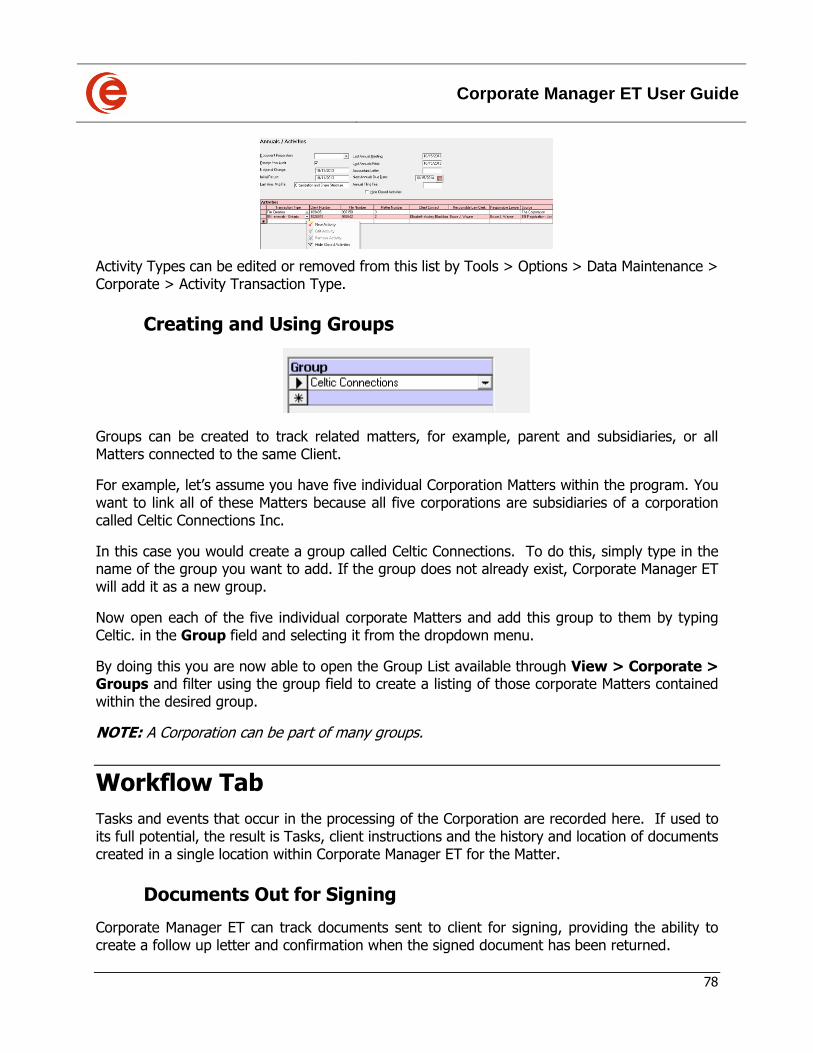
Corporate Manager ET User Guide
78
Activity Types can be edited or removed from this list by Tools > Options > Data Maintenance > Corporate > Activity Transaction Type.
Creating and Using Groups
Groups can be created to track related matters, for example, parent and subsidiaries, or all Matters connected to the same Client.
For example, let’s assume you have five individual Corporation Matters within the program. You want to link all of these Matters because all five corporations are subsidiaries of a corporation called Celtic Connections Inc.
In this case you would create a group called Celtic Connections. To do this, simply type in the name of the group you want to add. If the group does not already exist, Corporate Manager ET will add it as a new group.
Now open each of the five individual corporate Matters and add this group to them by typing Celtic. in the Group field and selecting it from the dropdown menu.
By doing this you are now able to open the Group List available through View > Corporate > Groups and filter using the group field to create a listing of those corporate Matters contained within the desired group.
NOTE: A Corporation can be part of many groups.
Workflow Tab
Tasks and events that occur in the processing of the Corporation are recorded here. If used to its full potential, the result is Tasks, client instructions and the history and location of documents created in a single location within Corporate Manager ET for the Matter.
Documents Out for Signing
Corporate Manager ET can track documents sent to client for signing, providing the ability to create a follow up letter and confirmation when the signed document has been returned.
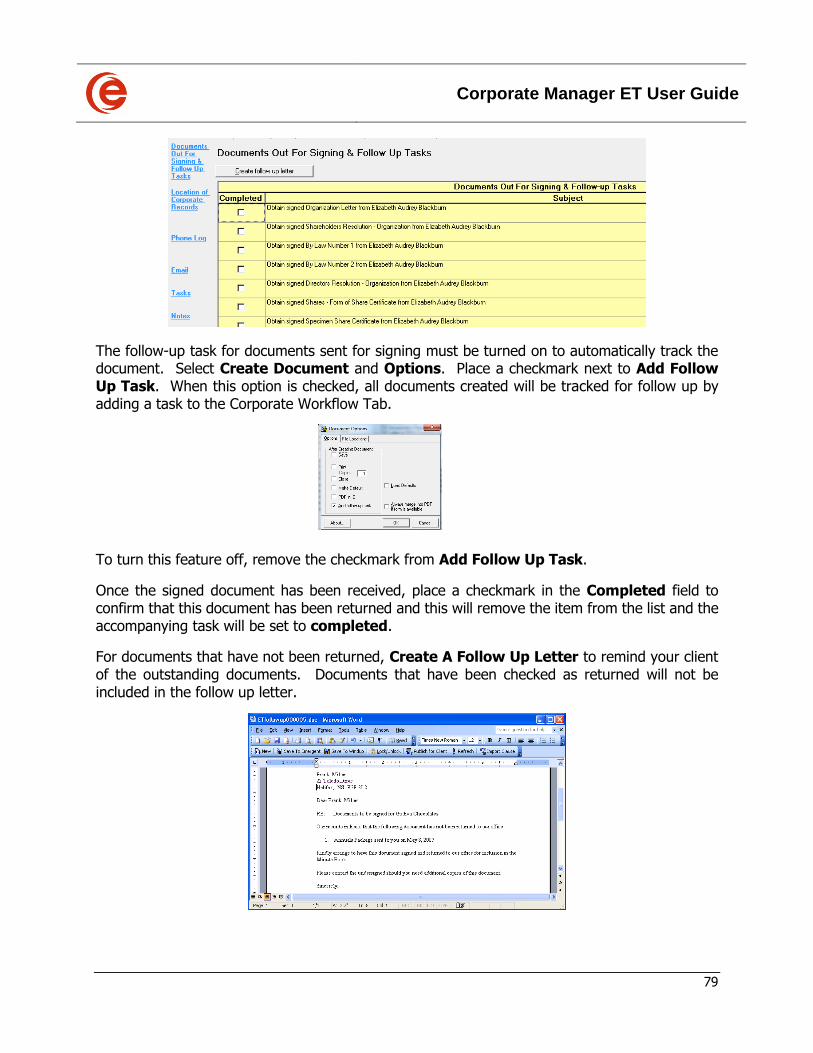
Corporate Manager ET User Guide
79
The follow-up task for documents sent for signing must be turned on to automatically track the document. Select Create Document and Options. Place a checkmark next to Add Follow Up Task. When this option is checked, all documents created will be tracked for follow up by adding a task to the Corporate Workflow Tab.
To turn this feature off, remove the checkmark from Add Follow Up Task.
Once the signed document has been received, place a checkmark in the Completed field to confirm that this document has been returned and this will remove the item from the list and the accompanying task will be set to completed.
For documents that have not been returned, Create A Follow Up Letter to remind your client of the outstanding documents. Documents that have been checked as returned will not be included in the follow up letter.

Corporate Manager ET User Guide
80
When a document is generated by the Wizard, it also creates a Task. The due date of the Task is two months after the document has been sent to your client. To change the due date, edit the Task and insert the new due date.
This Task will also appear on the Reminder Report and the Task List that this document must be returned by the client.
Location of Corporate Records
Corporate Records are tracked by Item, Location and, for firms with multiple offices, the Office where the record is kept. To Add a Corporate Record, select the Add Corporate Records button.
Note: This option of adding a Corporate Record will also be available when issuing a share certificate.
New Values for Item and Location can be added through Tools > Data Maintenance > Corporate. For Multiple offices, Offices can be added in Office/Municipality/Region under Matter.
Items can be added to the Corporate Records by selecting the Add Corporate Records button. They can be edited or deleted by selecting the option from the in the Item Column.
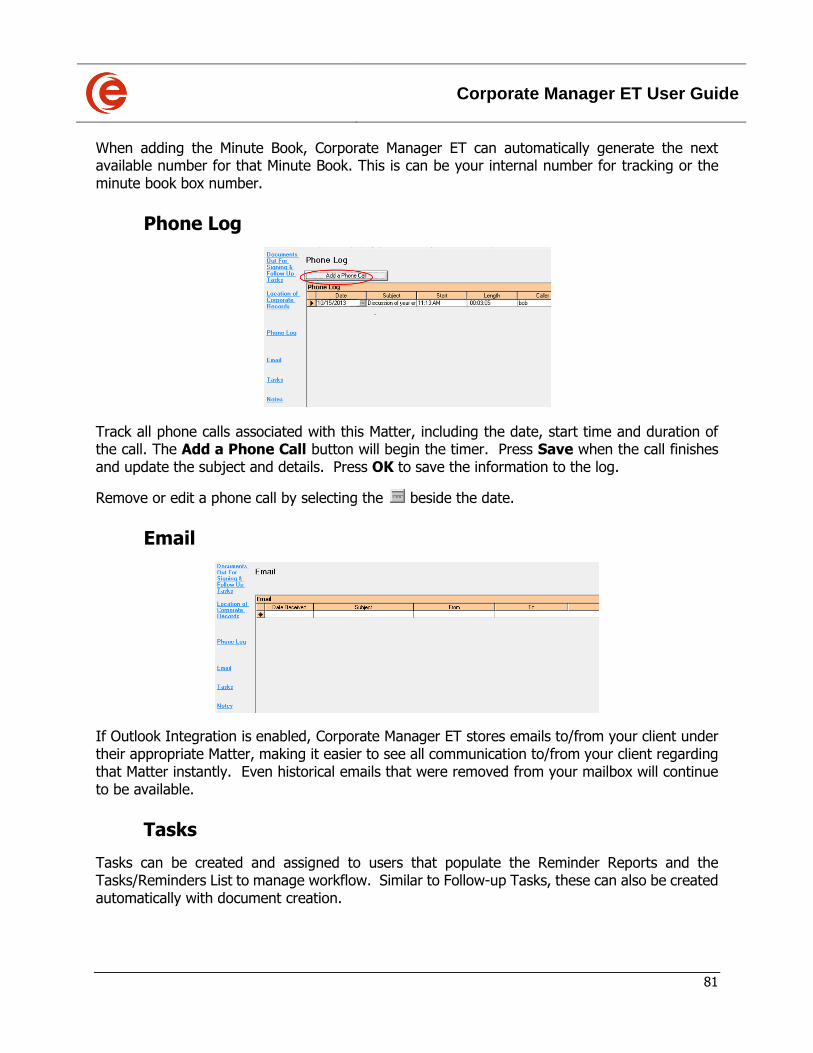
Corporate Manager ET User Guide
81
When adding the Minute Book, Corporate Manager ET can automatically generate the next available number for that Minute Book. This is can be your internal number for tracking or the minute book box number.
Phone Log
Track all phone calls associated with this Matter, including the date, start time and duration of the call. The Add a Phone Call button will begin the timer. Press Save when the call finishes and update the subject and details. Press OK to save the information to the log.
Remove or edit a phone call by selecting the beside the date.
If Outlook Integration is enabled, Corporate Manager ET stores emails to/from your client under their appropriate Matter, making it easier to see all communication to/from your client regarding that Matter instantly. Even historical emails that were removed from your mailbox will continue to be available.
Tasks
Tasks can be created and assigned to users that populate the Reminder Reports and the Tasks/Reminders List to manage workflow. Similar to Follow-up Tasks, these can also be created automatically with document creation.
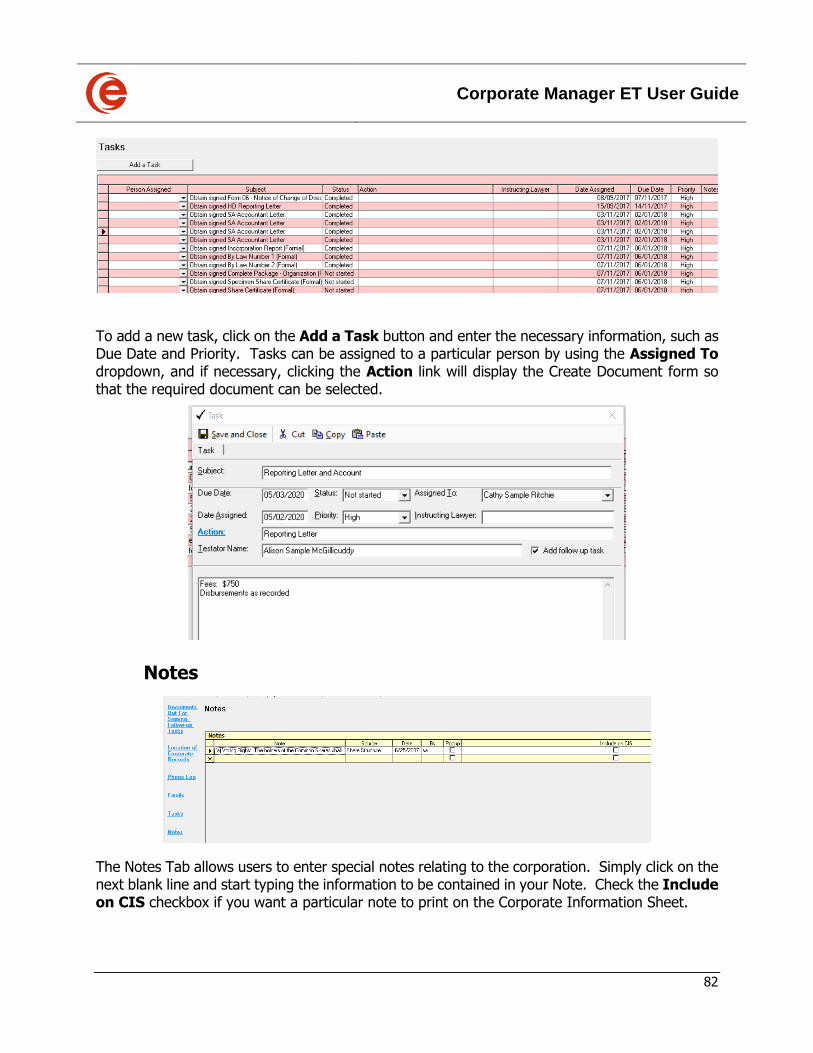
Corporate Manager ET User Guide
82
To add a new task, click on the Add a Task button and enter the necessary information, such as Due Date and Priority. Tasks can be assigned to a particular person by using the Assigned To dropdown, and if necessary, clicking the Action link will display the Create Document form so that the required document can be selected.
Notes
The Notes Tab allows users to enter special notes relating to the corporation. Simply click on the next blank line and start typing the information to be contained in your Note. Check the Include on CIS checkbox if you want a particular note to print on the Corporate Information Sheet.
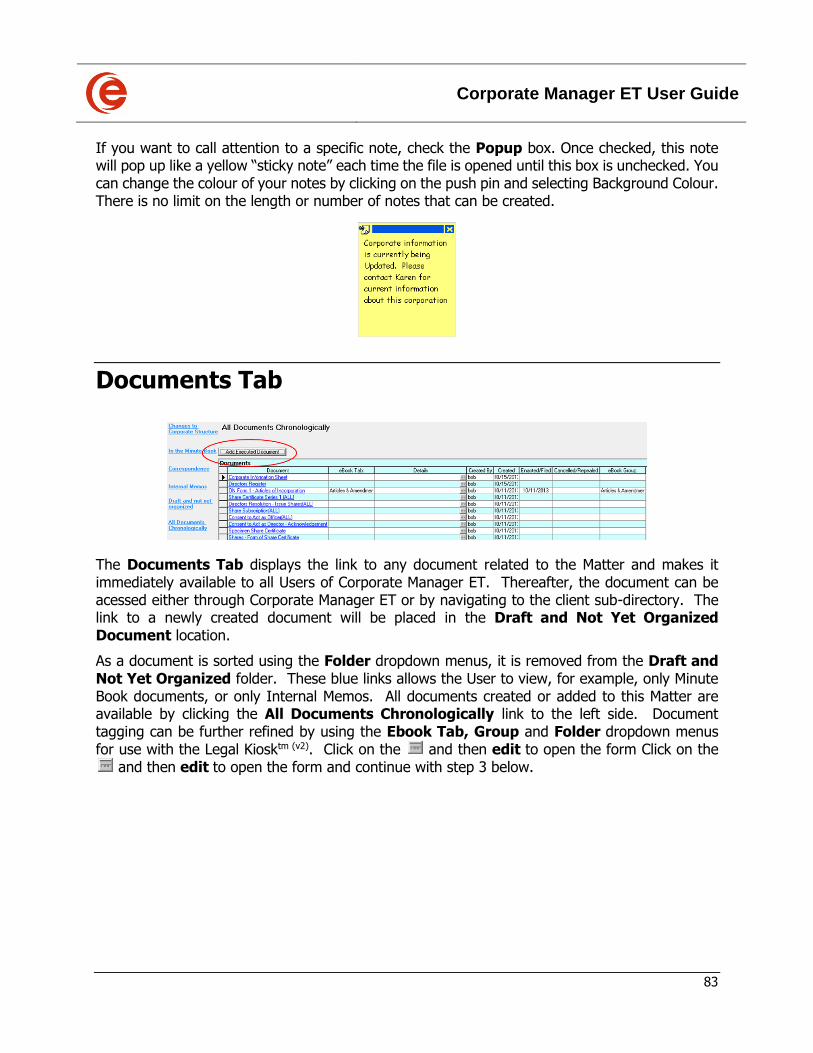
Corporate Manager ET User Guide
83
If you want to call attention to a specific note, check the Popup box. Once checked, this note will pop up like a yellow “sticky note” each time the file is opened until this box is unchecked. You can change the colour of your notes by clicking on the push pin and selecting Background Colour. There is no limit on the length or number of notes that can be created.
Documents Tab
The Documents Tab displays the link to any document related to the Matter and makes it immediately available to all Users of Corporate Manager ET. Thereafter, the document can be acessed either through Corporate Manager ET or by navigating to the client sub-directory. The link to a newly created document will be placed in the Draft and Not Yet Organized Document location.
As a document is sorted using the Folder dropdown menus, it is removed from the Draft and Not Yet Organized folder. These blue links allows the User to view, for example, only Minute Book documents, or only Internal Memos. All documents created or added to this Matter are available by clicking the All Documents Chronologically link to the left side. Document tagging can be further refined by using the Ebook Tab, Group and Folder dropdown menus for use with the Legal Kiosktm (v2). Click on the and then edit to open the form Click on the
and then edit to open the form and continue with step 3 below.
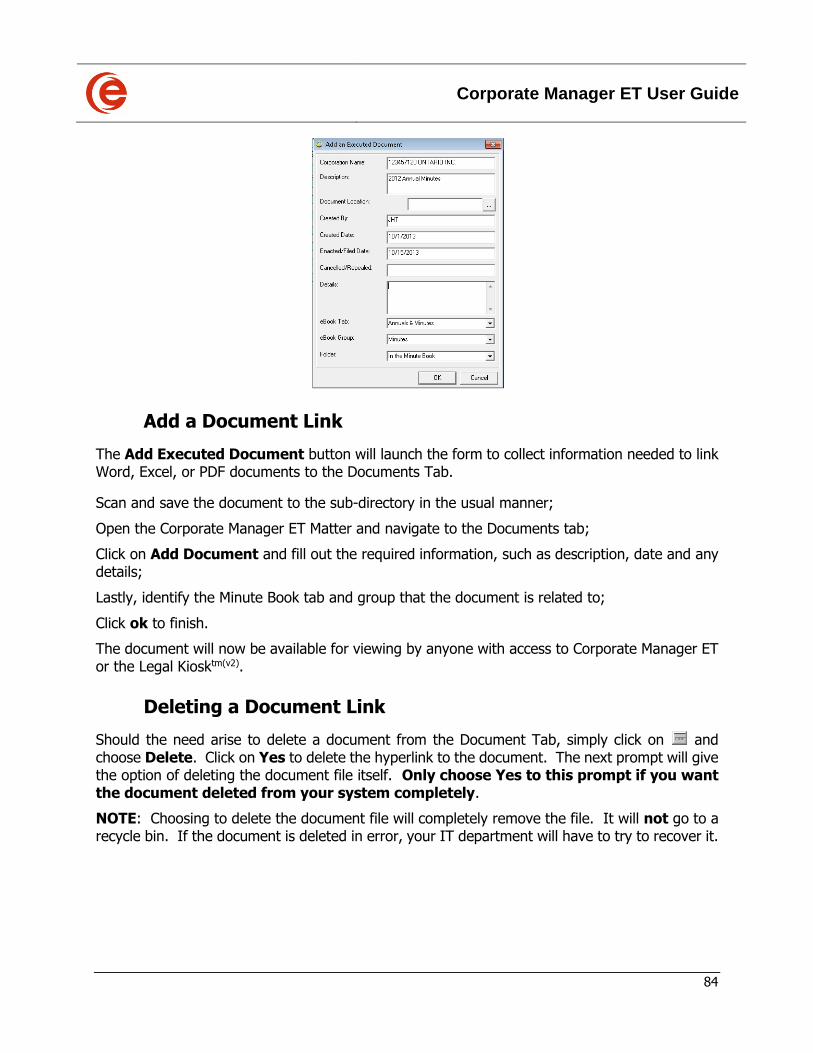
Corporate Manager ET User Guide
84
Add a Document Link
The Add Executed Document button will launch the form to collect information needed to link Word, Excel, or PDF documents to the Documents Tab.
Scan and save the document to the sub-directory in the usual manner;
Open the Corporate Manager ET Matter and navigate to the Documents tab;
Click on Add Document and fill out the required information, such as description, date and any details;
Lastly, identify the Minute Book tab and group that the document is related to;
Click ok to finish.
The document will now be available for viewing by anyone with access to Corporate Manager ET or the Legal Kiosktm(v2).
Deleting a Document Link
Should the need arise to delete a document from the Document Tab, simply click on and choose Delete. Click on Yes to delete the hyperlink to the document. The next prompt will give the option of deleting the document file itself. Only choose Yes to this prompt if you want the document deleted from your system completely.
NOTE: Choosing to delete the document file will completely remove the file. It will not go to a recycle bin. If the document is deleted in error, your IT department will have to try to recover it.
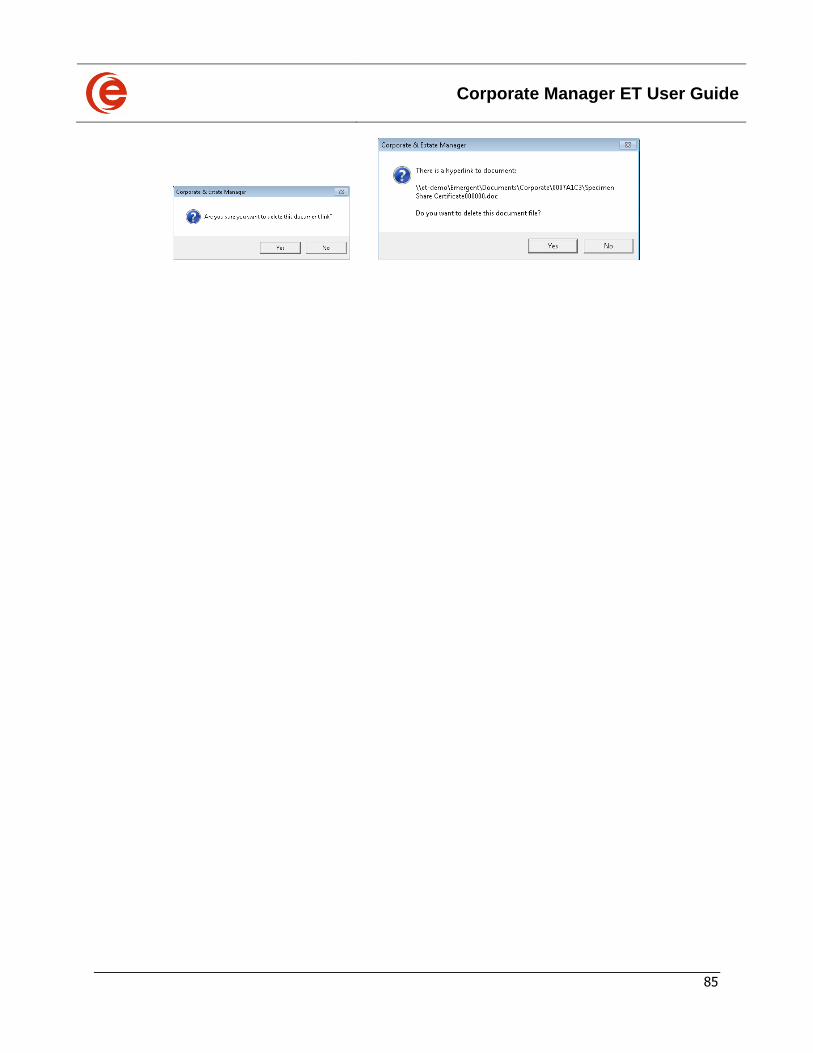
Corporate Manager ET User Guide
85
Corporate Manager ET User Guide
86
Chapter 5: Amalgamation, Partnership, Section 85 Rollover
Corporate Manager ET User Guide
87
Amalgamation Wizard
The Amalgamation process by which two or more companies merge into a single entity is completed using the Amalgamation Wizard. This 7 step process gathers the necessary information for the formation of the new Entity. If the Amalgamation Wizard was started accidentally, cancel at this point and a new file will not be created. The newly formed company will be available in the Corporate File list while the pre-amalgamation corporations will be available in the Matter List under Pending Amalgamations. During the Amalgamation Process, information entered into the wizard can be saved before exiting. Return to the Amalgamation Wizard any time by selecting Amalgamation Wizard from the Common Tasks of any of the PreAmalCos.
Always start the process by selecting Add New File > Corporate > Amalgamation Wizard and ok. This protects the integrity of the history of the amalcos, including previously amalgamated corporate information.
Step 1 of the Wizard, search for the preamalcos and select until all are added to the list.
Once all the preamalcos have been selected, further entries, such as: 1. Date of Amalgamation; 2. Name, Address, Capital Structure and By-laws to be used. If the registered office address
is to be changed, the new address is entered in Step 2; 3. If a new name is being used, the name and NUANS information; 4. Type of amalgamation – Short or Long, Horizontal or Vertical
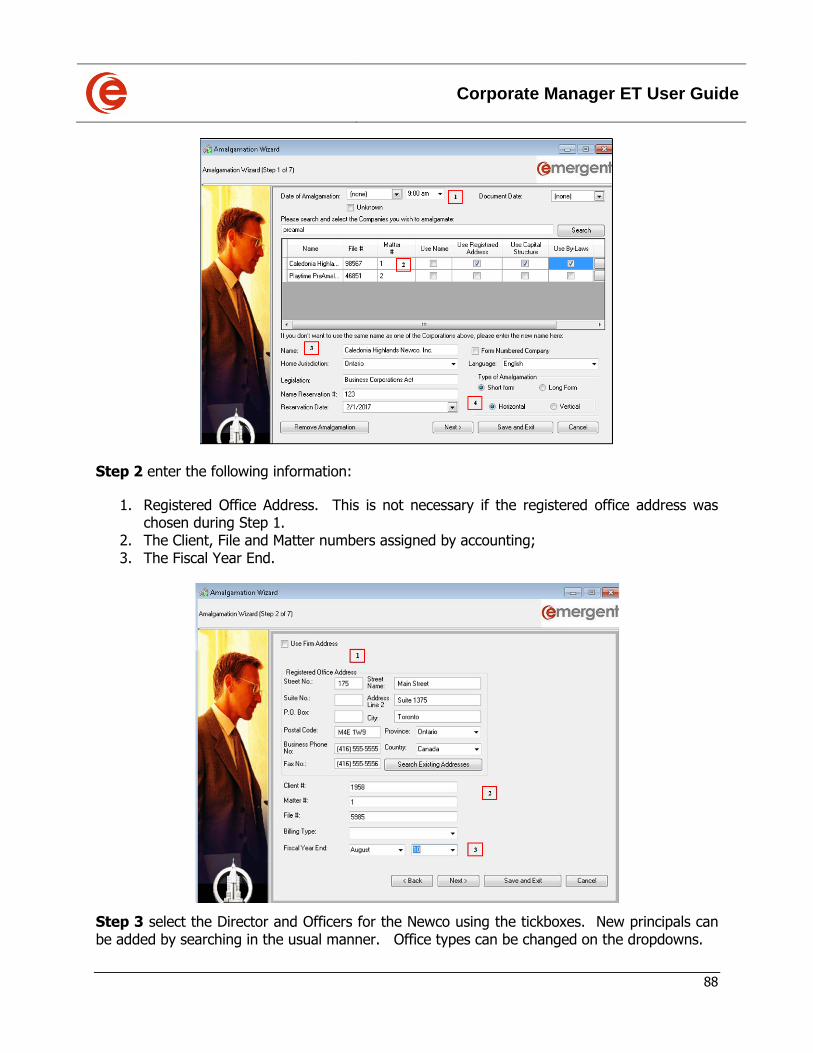
Corporate Manager ET User Guide
88
Step 2 enter the following information:
1. Registered Office Address. This is not necessary if the registered office address was chosen during Step 1.
2. The Client, File and Matter numbers assigned by accounting; 3. The Fiscal Year End.
Step 3 select the Director and Officers for the Newco using the tickboxes. New principals can be added by searching in the usual manner. Office types can be changed on the dropdowns.
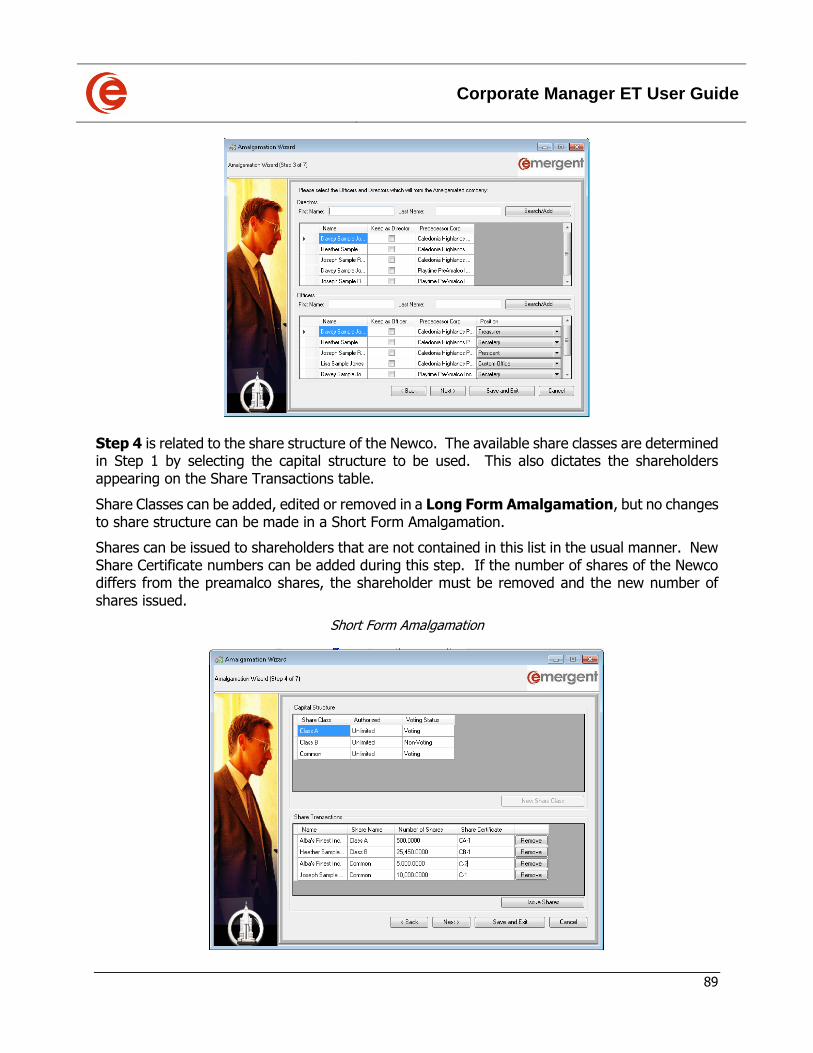
Corporate Manager ET User Guide
89
Step 4 is related to the share structure of the Newco. The available share classes are determined in Step 1 by selecting the capital structure to be used. This also dictates the shareholders appearing on the Share Transactions table.
Share Classes can be added, edited or removed in a Long Form Amalgamation, but no changes to share structure can be made in a Short Form Amalgamation.
Shares can be issued to shareholders that are not contained in this list in the usual manner. New Share Certificate numbers can be added during this step. If the number of shares of the Newco differs from the preamalco shares, the shareholder must be removed and the new number of shares issued.
Short Form Amalgamation
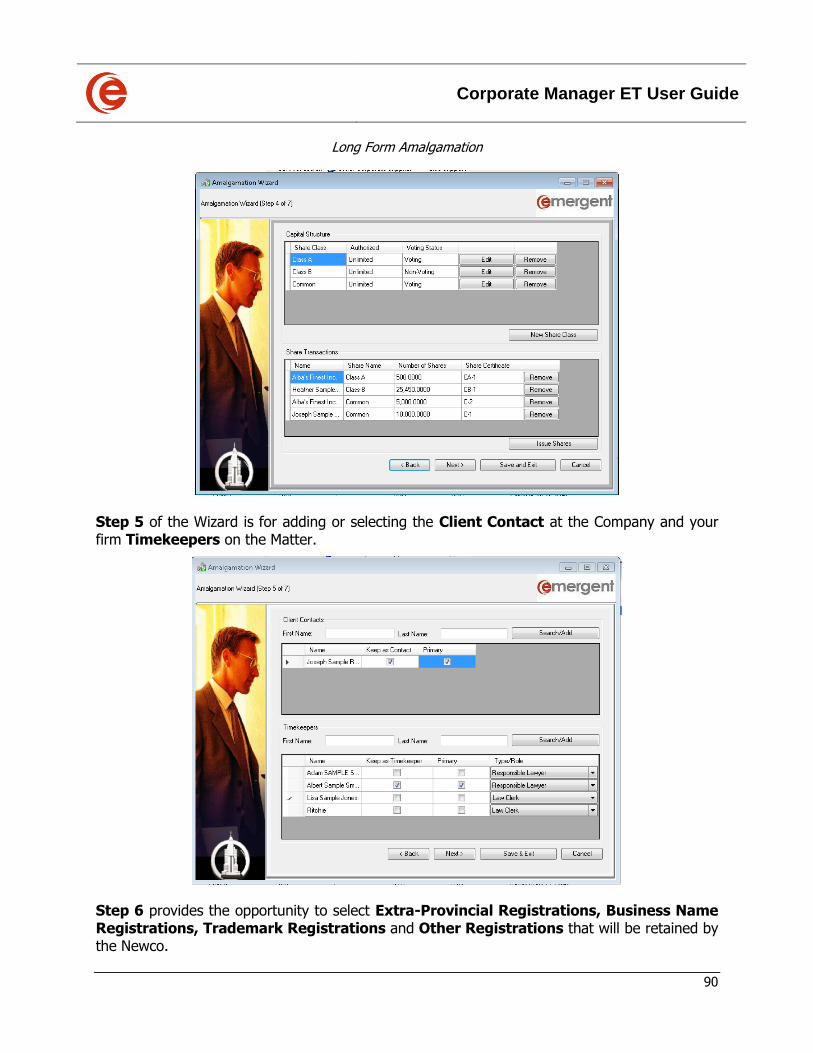
Corporate Manager ET User Guide
90
Long Form Amalgamation
Step 5 of the Wizard is for adding or selecting the Client Contact at the Company and your firm Timekeepers on the Matter.
Step 6 provides the opportunity to select Extra-Provincial Registrations, Business Name Registrations, Trademark Registrations and Other Registrations that will be retained by the Newco.
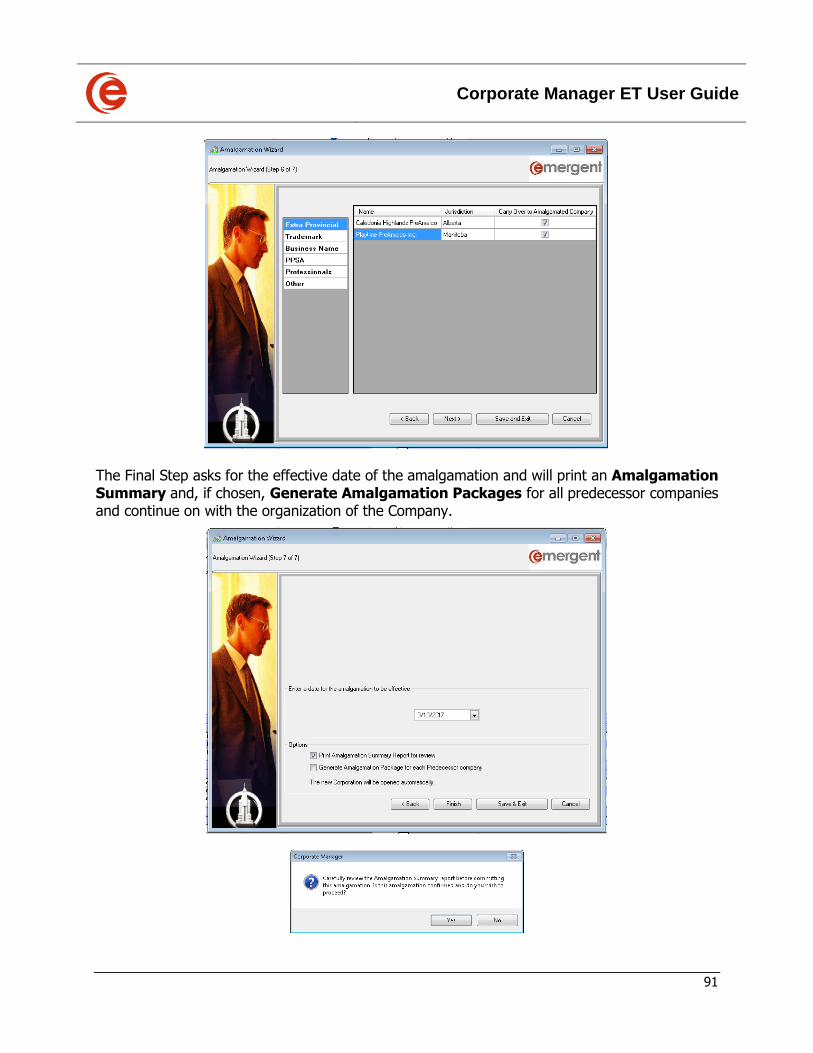
Corporate Manager ET User Guide
91
The Final Step asks for the effective date of the amalgamation and will print an Amalgamation Summary and, if chosen, Generate Amalgamation Packages for all predecessor companies and continue on with the organization of the Company.
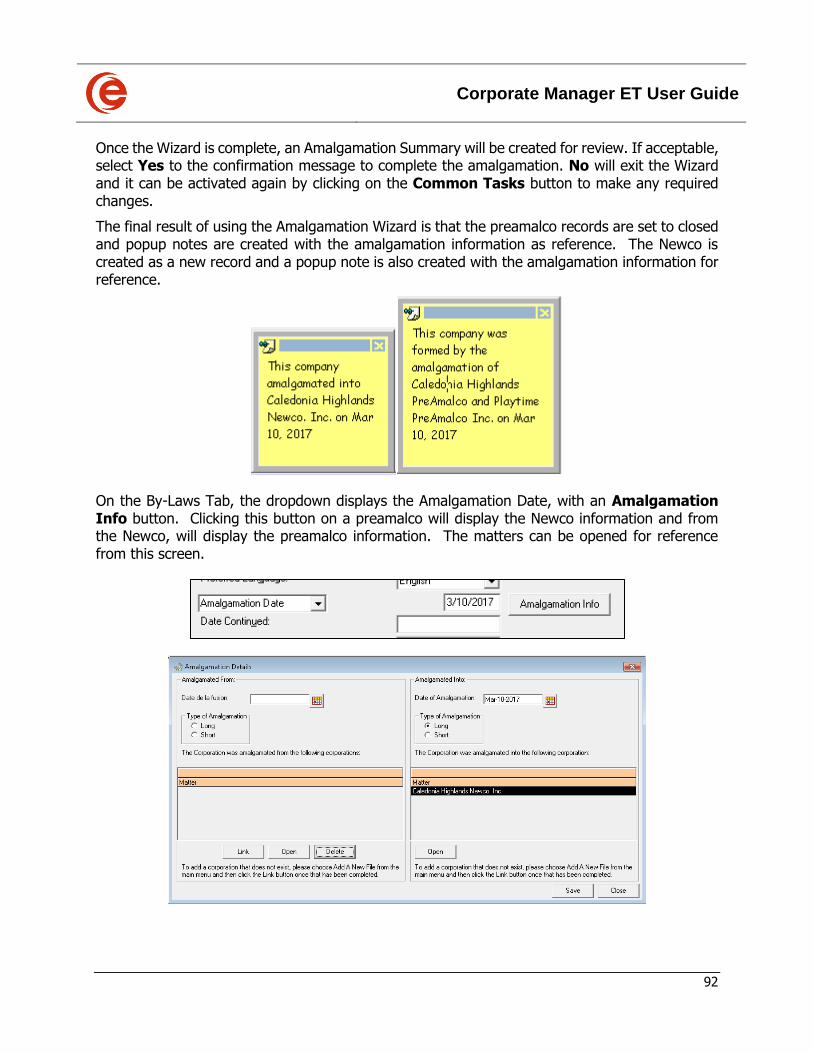
Corporate Manager ET User Guide
92
Once the Wizard is complete, an Amalgamation Summary will be created for review. If acceptable, select Yes to the confirmation message to complete the amalgamation. No will exit the Wizard and it can be activated again by clicking on the Common Tasks button to make any required changes.
The final result of using the Amalgamation Wizard is that the preamalco records are set to closed and popup notes are created with the amalgamation information as reference. The Newco is created as a new record and a popup note is also created with the amalgamation information for reference.
On the By-Laws Tab, the dropdown displays the Amalgamation Date, with an Amalgamation Info button. Clicking this button on a preamalco will display the Newco information and from the Newco, will display the preamalco information. The matters can be opened for reference from this screen.
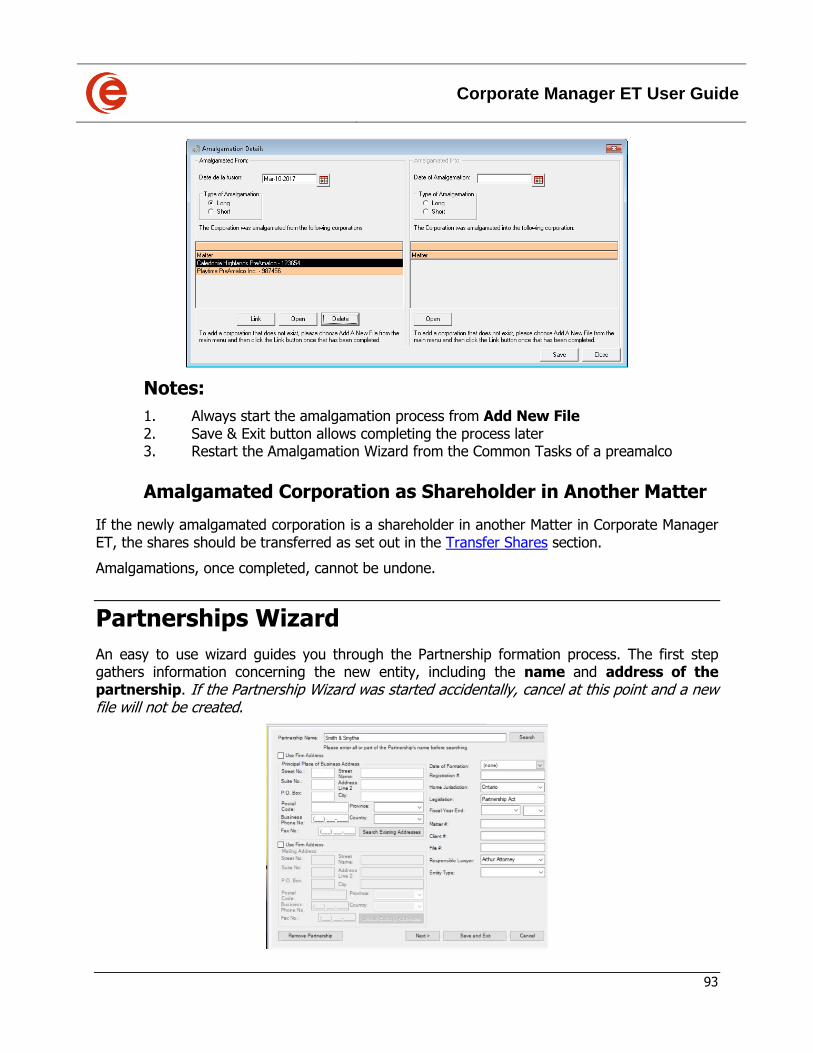
Corporate Manager ET User Guide
93
Notes:
1. Always start the amalgamation process from Add New File 2. Save & Exit button allows completing the process later 3. Restart the Amalgamation Wizard from the Common Tasks of a preamalco
Amalgamated Corporation as Shareholder in Another Matter
If the newly amalgamated corporation is a shareholder in another Matter in Corporate Manager ET, the shares should be transferred as set out in the Transfer Shares section.
Amalgamations, once completed, cannot be undone.
Partnerships Wizard
An easy to use wizard guides you through the Partnership formation process. The first step gathers information concerning the new entity, including the name and address of the partnership. If the Partnership Wizard was started accidentally, cancel at this point and a new file will not be created.
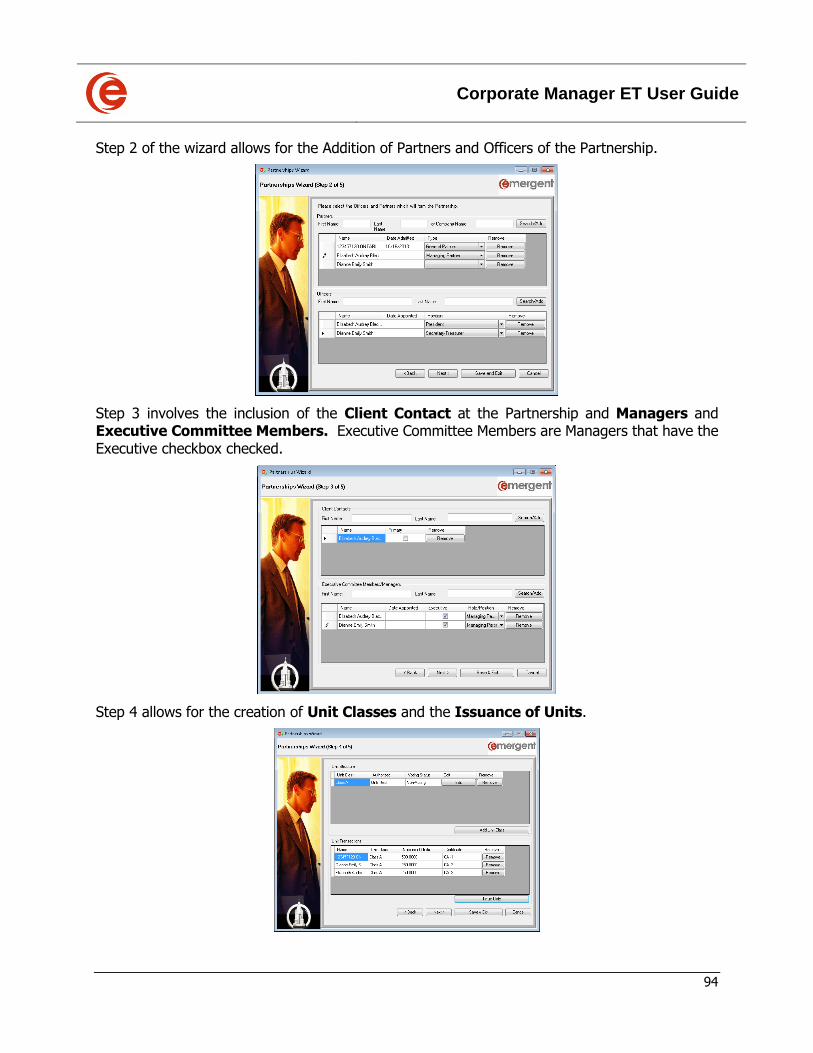
Corporate Manager ET User Guide
94
Step 2 of the wizard allows for the Addition of Partners and Officers of the Partnership.
Step 3 involves the inclusion of the Client Contact at the Partnership and Managers and Executive Committee Members. Executive Committee Members are Managers that have the Executive checkbox checked.
Step 4 allows for the creation of Unit Classes and the Issuance of Units.
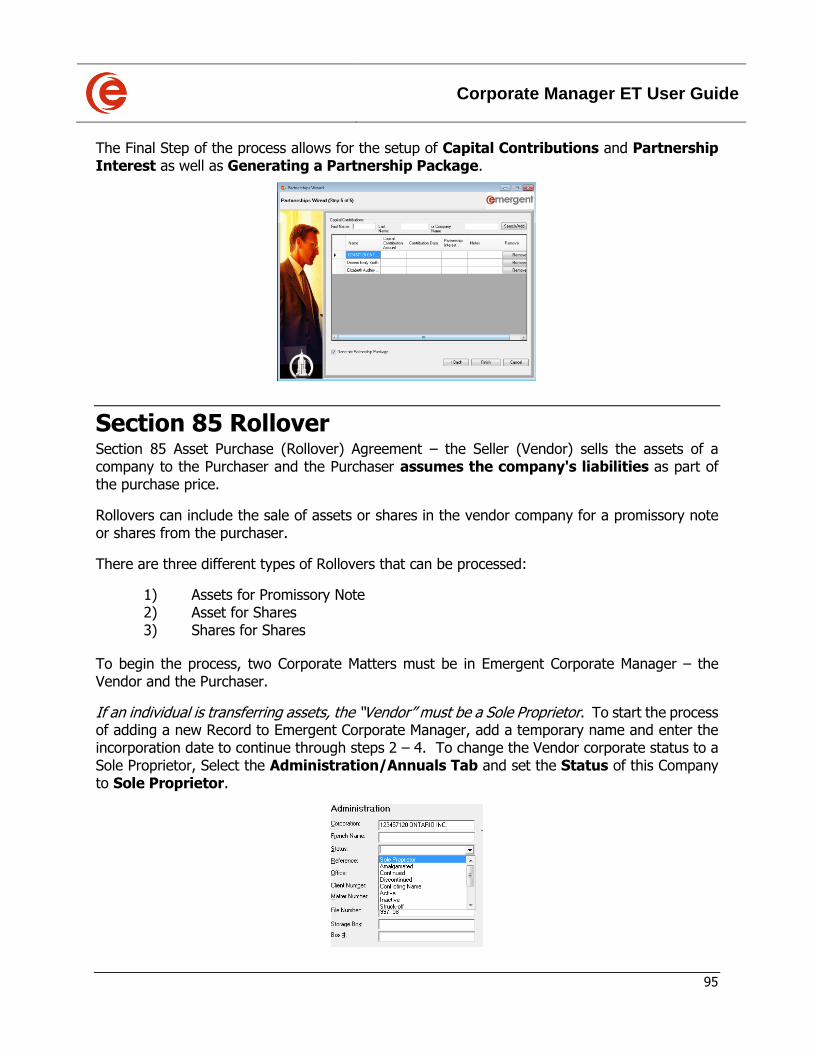
Corporate Manager ET User Guide
95
The Final Step of the process allows for the setup of Capital Contributions and Partnership Interest as well as Generating a Partnership Package.
Section 85 Rollover Section 85 Asset Purchase (Rollover) Agreement – the Seller (Vendor) sells the assets of a company to the Purchaser and the Purchaser assumes the company's liabilities as part of the purchase price.
Rollovers can include the sale of assets or shares in the vendor company for a promissory note or shares from the purchaser.
There are three different types of Rollovers that can be processed:
1) Assets for Promissory Note 2) Asset for Shares 3) Shares for Shares
To begin the process, two Corporate Matters must be in Emergent Corporate Manager – the Vendor and the Purchaser.
If an individual is transferring assets, the “Vendor” must be a Sole Proprietor. To start the process of adding a new Record to Emergent Corporate Manager, add a temporary name and enter the incorporation date to continue through steps 2 – 4. To change the Vendor corporate status to a Sole Proprietor, Select the Administration/Annuals Tab and set the Status of this Company to Sole Proprietor.
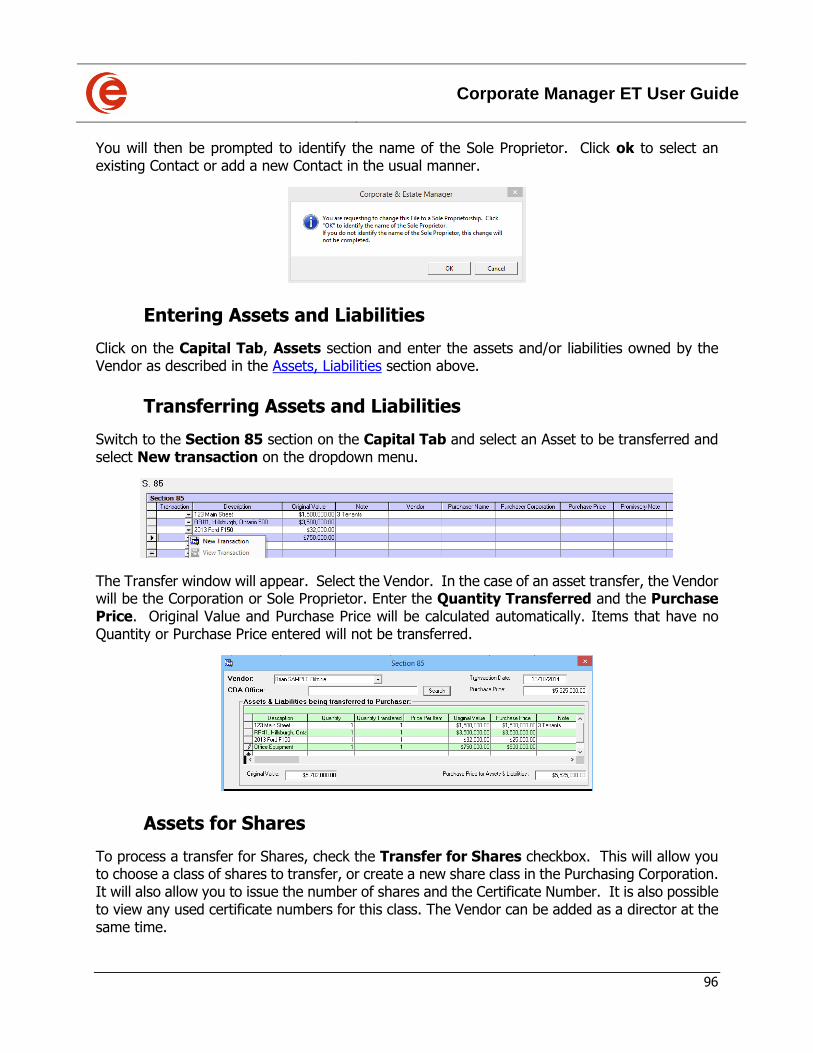
Corporate Manager ET User Guide
96
You will then be prompted to identify the name of the Sole Proprietor. Click ok to select an existing Contact or add a new Contact in the usual manner.
Entering Assets and Liabilities
Click on the Capital Tab, Assets section and enter the assets and/or liabilities owned by the Vendor as described in the Assets, Liabilities section above.
Transferring Assets and Liabilities
Switch to the Section 85 section on the Capital Tab and select an Asset to be transferred and select New transaction on the dropdown menu.
The Transfer window will appear. Select the Vendor. In the case of an asset transfer, the Vendor will be the Corporation or Sole Proprietor. Enter the Quantity Transferred and the Purchase Price. Original Value and Purchase Price will be calculated automatically. Items that have no Quantity or Purchase Price entered will not be transferred.
Assets for Shares
To process a transfer for Shares, check the Transfer for Shares checkbox. This will allow you to choose a class of shares to transfer, or create a new share class in the Purchasing Corporation. It will also allow you to issue the number of shares and the Certificate Number. It is also possible to view any used certificate numbers for this class. The Vendor can be added as a director at the same time.
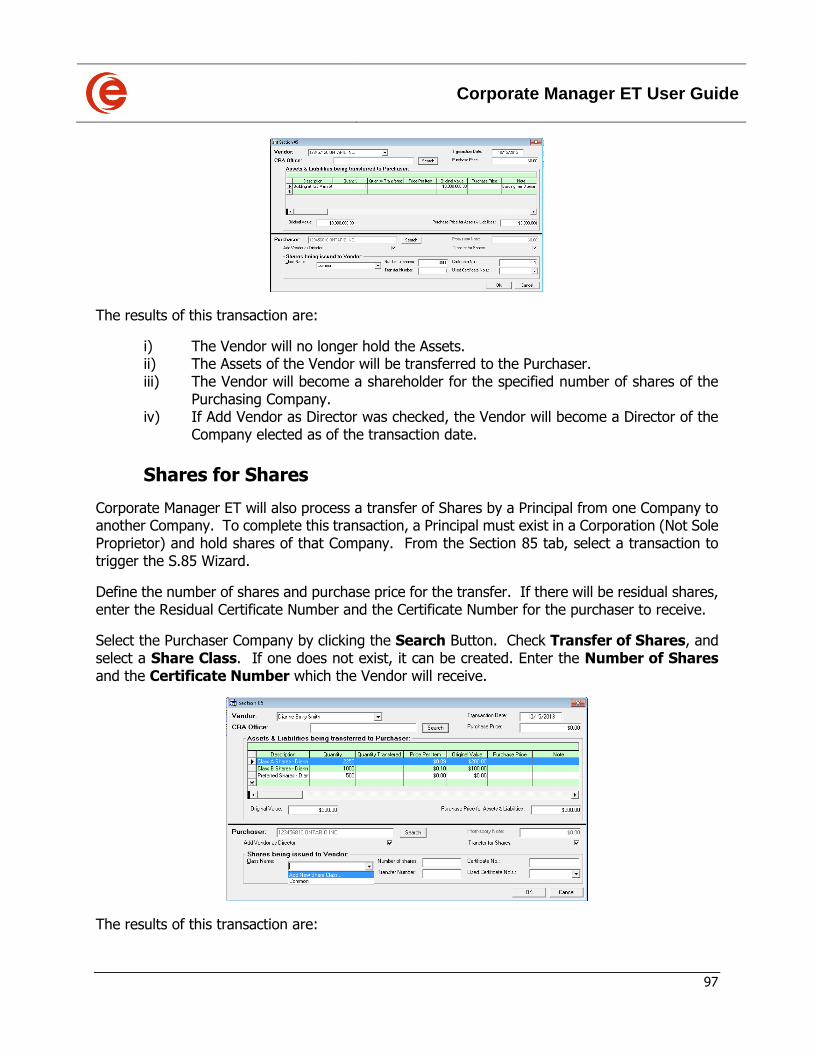
Corporate Manager ET User Guide
97
The results of this transaction are:
i) The Vendor will no longer hold the Assets. ii) The Assets of the Vendor will be transferred to the Purchaser. iii) The Vendor will become a shareholder for the specified number of shares of the
Purchasing Company. iv) If Add Vendor as Director was checked, the Vendor will become a Director of the
Company elected as of the transaction date.
Shares for Shares
Corporate Manager ET will also process a transfer of Shares by a Principal from one Company to another Company. To complete this transaction, a Principal must exist in a Corporation (Not Sole Proprietor) and hold shares of that Company. From the Section 85 tab, select a transaction to trigger the S.85 Wizard.
Define the number of shares and purchase price for the transfer. If there will be residual shares, enter the Residual Certificate Number and the Certificate Number for the purchaser to receive.
Select the Purchaser Company by clicking the Search Button. Check Transfer of Shares, and select a Share Class. If one does not exist, it can be created. Enter the Number of Shares and the Certificate Number which the Vendor will receive.
The results of this transaction are:
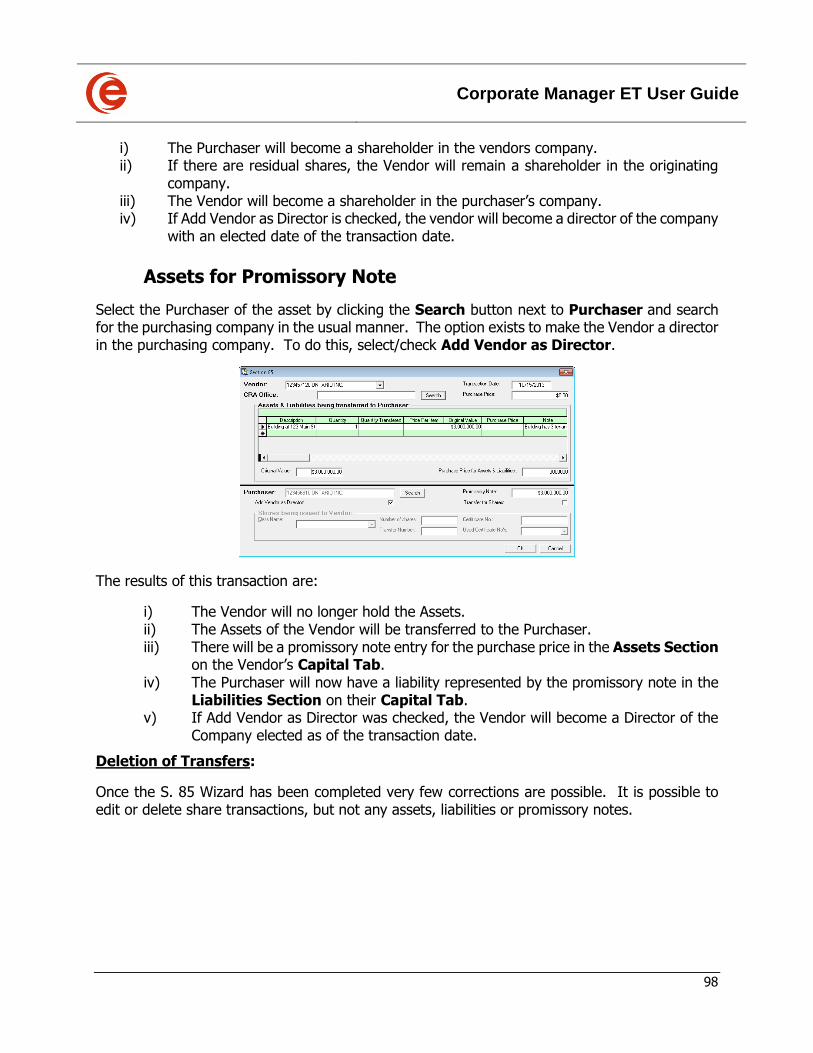
Corporate Manager ET User Guide
98
i) The Purchaser will become a shareholder in the vendors company. ii) If there are residual shares, the Vendor will remain a shareholder in the originating
company. iii) The Vendor will become a shareholder in the purchaser’s company. iv) If Add Vendor as Director is checked, the vendor will become a director of the company
with an elected date of the transaction date.
Assets for Promissory Note
Select the Purchaser of the asset by clicking the Search button next to Purchaser and search for the purchasing company in the usual manner. The option exists to make the Vendor a director in the purchasing company. To do this, select/check Add Vendor as Director.
The results of this transaction are:
i) The Vendor will no longer hold the Assets. ii) The Assets of the Vendor will be transferred to the Purchaser. iii) There will be a promissory note entry for the purchase price in the Assets Section
on the Vendor’s Capital Tab. iv) The Purchaser will now have a liability represented by the promissory note in the
Liabilities Section on their Capital Tab. v) If Add Vendor as Director was checked, the Vendor will become a Director of the
Company elected as of the transaction date.
Deletion of Transfers:
Once the S. 85 Wizard has been completed very few corrections are possible. It is possible to edit or delete share transactions, but not any assets, liabilities or promissory notes.
Corporate Manager ET User Guide
99
Chapter 6: Documents and Reports
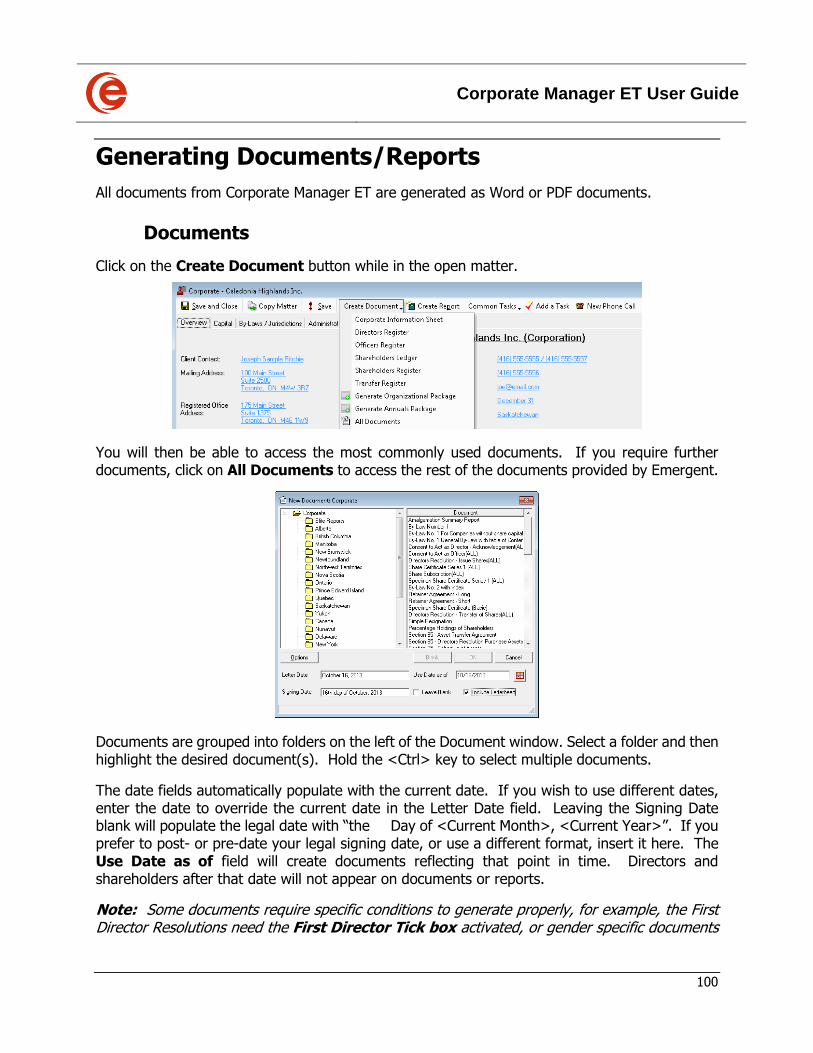
Corporate Manager ET User Guide
100
Generating Documents/Reports
All documents from Corporate Manager ET are generated as Word or PDF documents.
Documents
Click on the Create Document button while in the open matter.
You will then be able to access the most commonly used documents. If you require further documents, click on All Documents to access the rest of the documents provided by Emergent.
Documents are grouped into folders on the left of the Document window. Select a folder and then highlight the desired document(s). Hold the <Ctrl> key to select multiple documents.
The date fields automatically populate with the current date. If you wish to use different dates, enter the date to override the current date in the Letter Date field. Leaving the Signing Date blank will populate the legal date with “the Day of <Current Month>, <Current Year>”. If you prefer to post- or pre-date your legal signing date, or use a different format, insert it here. The Use Date as of field will create documents reflecting that point in time. Directors and shareholders after that date will not appear on documents or reports.
Note: Some documents require specific conditions to generate properly, for example, the First Director Resolutions need the First Director Tick box activated, or gender specific documents
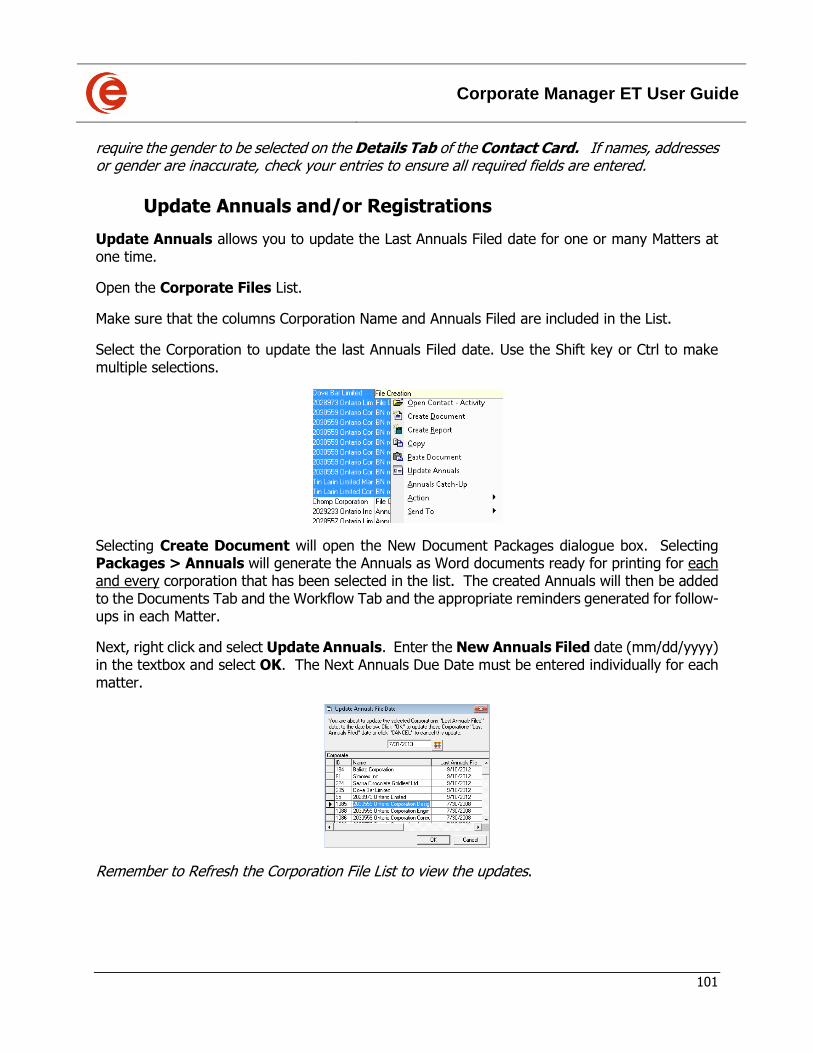
Corporate Manager ET User Guide
101
require the gender to be selected on the Details Tab of the Contact Card. If names, addresses or gender are inaccurate, check your entries to ensure all required fields are entered.
Update Annuals and/or Registrations
Update Annuals allows you to update the Last Annuals Filed date for one or many Matters at one time.
Open the Corporate Files List.
Make sure that the columns Corporation Name and Annuals Filed are included in the List.
Select the Corporation to update the last Annuals Filed date. Use the Shift key or Ctrl to make multiple selections.
Selecting Create Document will open the New Document Packages dialogue box. Selecting Packages > Annuals will generate the Annuals as Word documents ready for printing for each and every corporation that has been selected in the list. The created Annuals will then be added to the Documents Tab and the Workflow Tab and the appropriate reminders generated for follow-ups in each Matter.
Next, right click and select Update Annuals. Enter the New Annuals Filed date (mm/dd/yyyy) in the textbox and select OK. The Next Annuals Due Date must be entered individually for each matter.
Remember to Refresh the Corporation File List to view the updates.
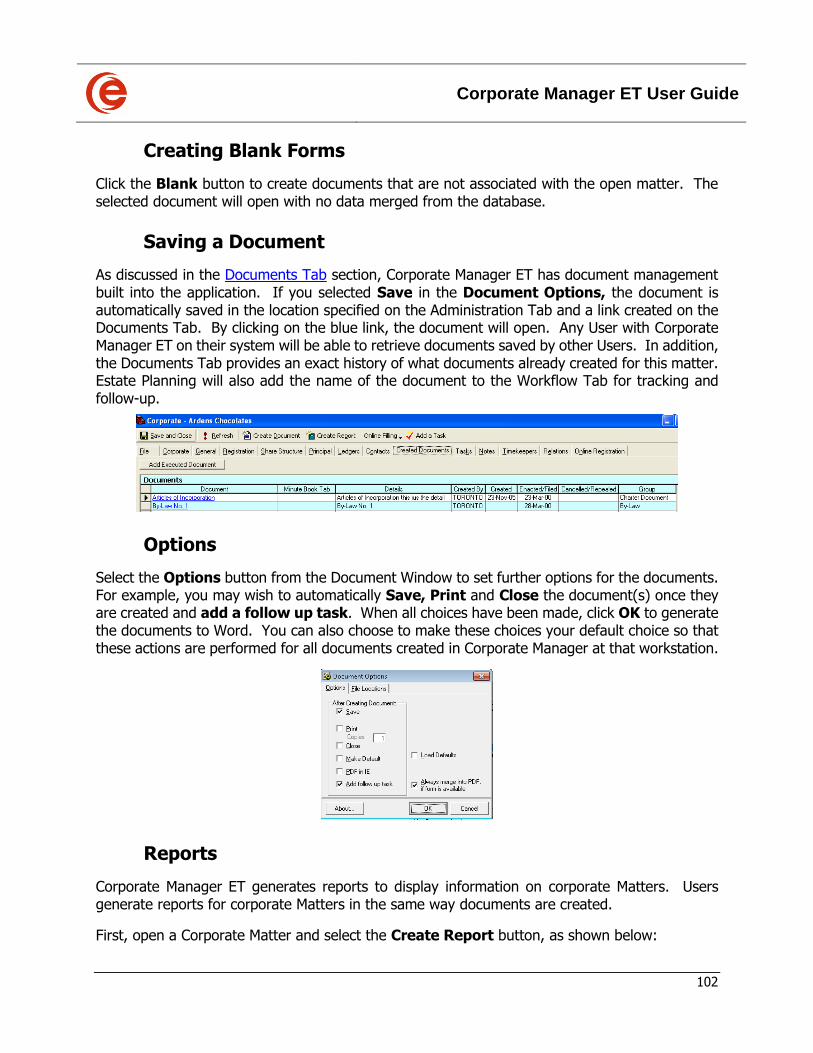
Corporate Manager ET User Guide
102
Creating Blank Forms
Click the Blank button to create documents that are not associated with the open matter. The selected document will open with no data merged from the database.
Saving a Document
As discussed in the Documents Tab section, Corporate Manager ET has document management built into the application. If you selected Save in the Document Options, the document is automatically saved in the location specified on the Administration Tab and a link created on the Documents Tab. By clicking on the blue link, the document will open. Any User with Corporate Manager ET on their system will be able to retrieve documents saved by other Users. In addition, the Documents Tab provides an exact history of what documents already created for this matter. Estate Planning will also add the name of the document to the Workflow Tab for tracking and follow-up.
Options
Select the Options button from the Document Window to set further options for the documents. For example, you may wish to automatically Save, Print and Close the document(s) once they are created and add a follow up task. When all choices have been made, click OK to generate the documents to Word. You can also choose to make these choices your default choice so that these actions are performed for all documents created in Corporate Manager at that workstation.
Reports
Corporate Manager ET generates reports to display information on corporate Matters. Users generate reports for corporate Matters in the same way documents are created.
First, open a Corporate Matter and select the Create Report button, as shown below:
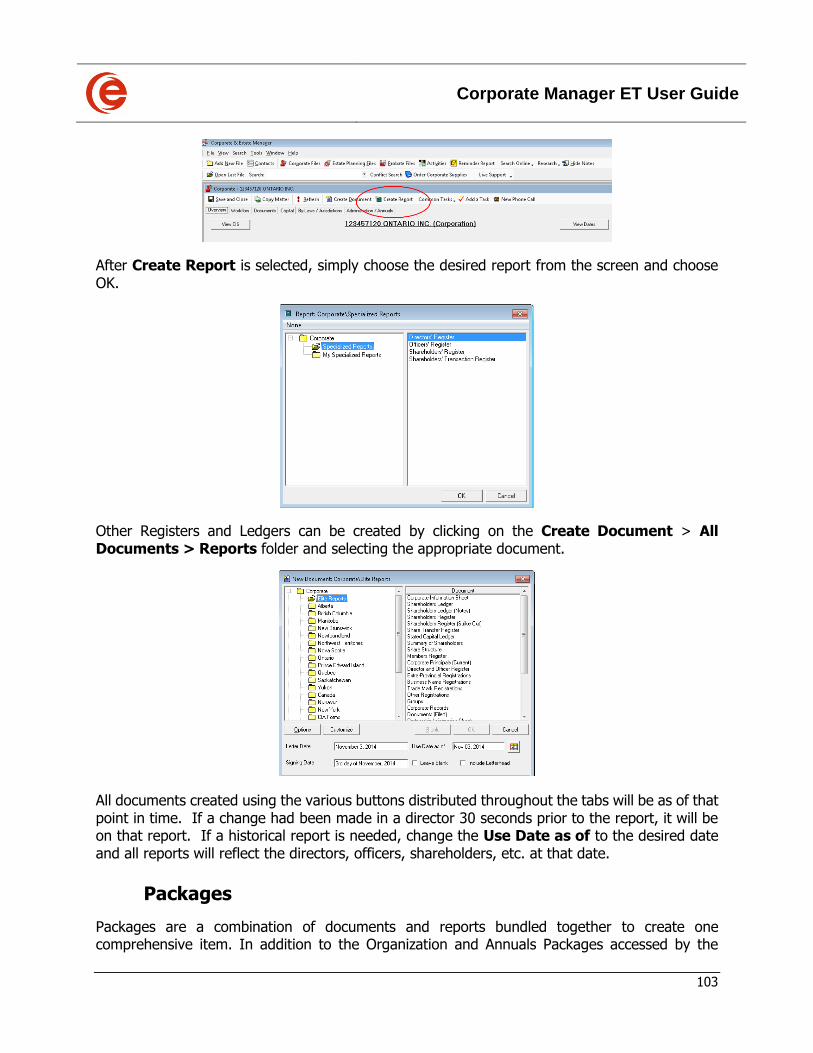
Corporate Manager ET User Guide
103
After Create Report is selected, simply choose the desired report from the screen and choose OK.
Other Registers and Ledgers can be created by clicking on the Create Document > All Documents > Reports folder and selecting the appropriate document.
All documents created using the various buttons distributed throughout the tabs will be as of that point in time. If a change had been made in a director 30 seconds prior to the report, it will be on that report. If a historical report is needed, change the Use Date as of to the desired date and all reports will reflect the directors, officers, shareholders, etc. at that date.
Packages
Packages are a combination of documents and reports bundled together to create one comprehensive item. In addition to the Organization and Annuals Packages accessed by the
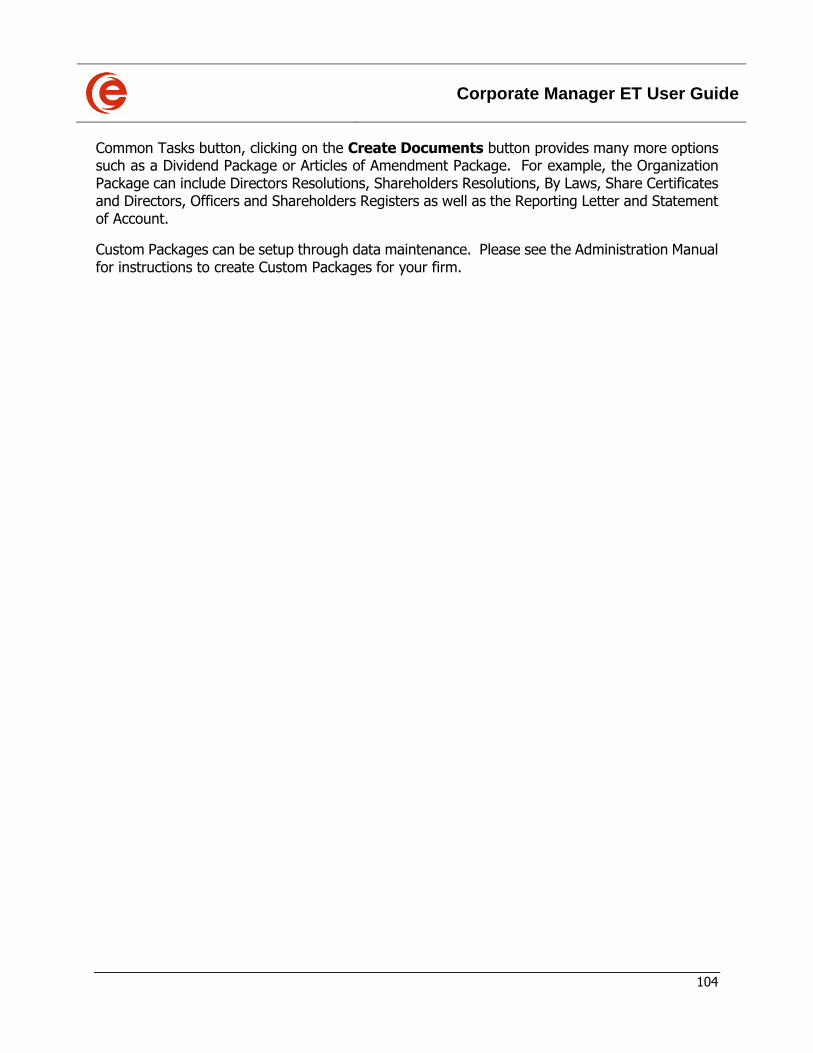
Corporate Manager ET User Guide
104
Common Tasks button, clicking on the Create Documents button provides many more options such as a Dividend Package or Articles of Amendment Package. For example, the Organization Package can include Directors Resolutions, Shareholders Resolutions, By Laws, Share Certificates and Directors, Officers and Shareholders Registers as well as the Reporting Letter and Statement of Account.
Custom Packages can be setup through data maintenance. Please see the Administration Manual for instructions to create Custom Packages for your firm.
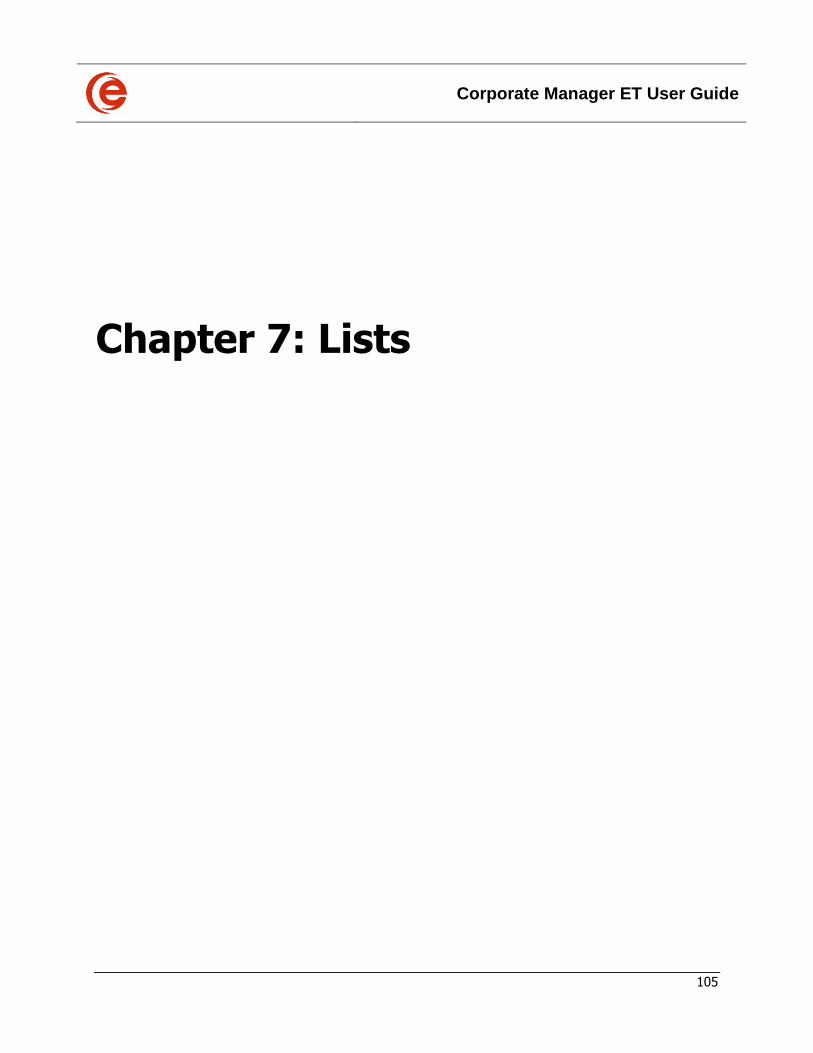
Corporate Manager ET User Guide
105
Chapter 7: Lists
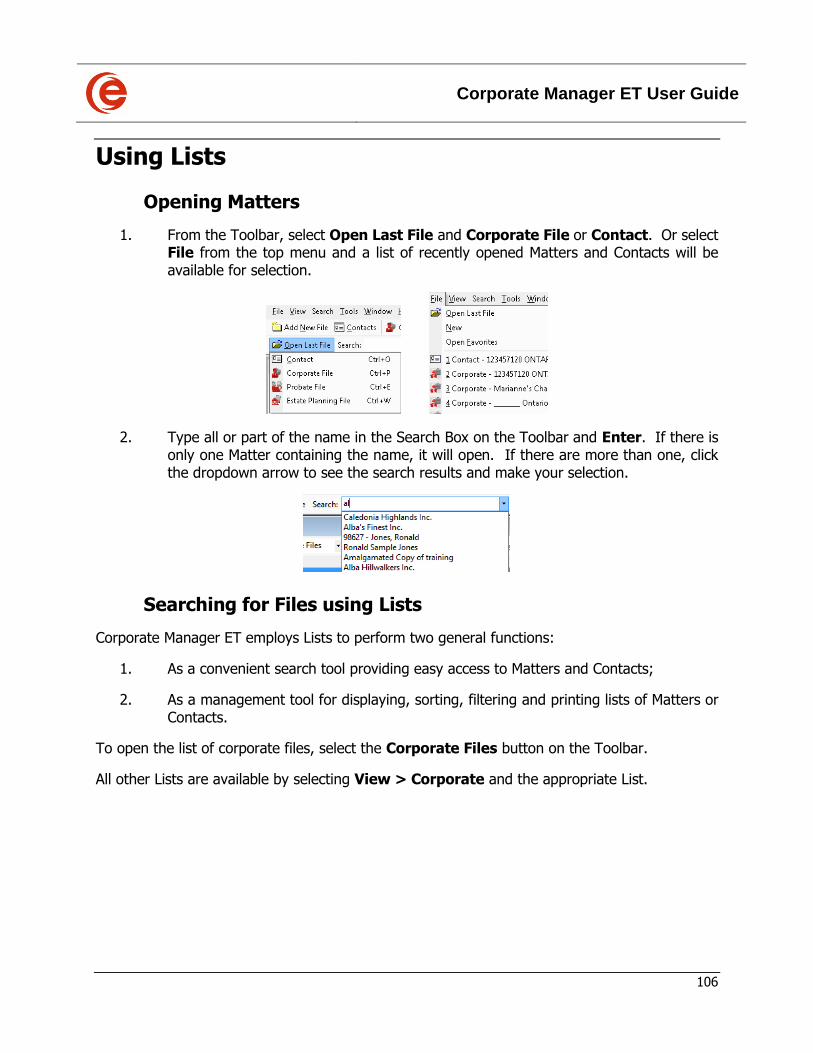
Corporate Manager ET User Guide
106
Using Lists
Opening Matters
1. From the Toolbar, select Open Last File and Corporate File or Contact. Or select File from the top menu and a list of recently opened Matters and Contacts will be available for selection.
2. Type all or part of the name in the Search Box on the Toolbar and Enter. If there is only one Matter containing the name, it will open. If there are more than one, click the dropdown arrow to see the search results and make your selection.
Searching for Files using Lists
Corporate Manager ET employs Lists to perform two general functions:
1. As a convenient search tool providing easy access to Matters and Contacts;
2. As a management tool for displaying, sorting, filtering and printing lists of Matters or Contacts.
To open the list of corporate files, select the Corporate Files button on the Toolbar.
All other Lists are available by selecting View > Corporate and the appropriate List.
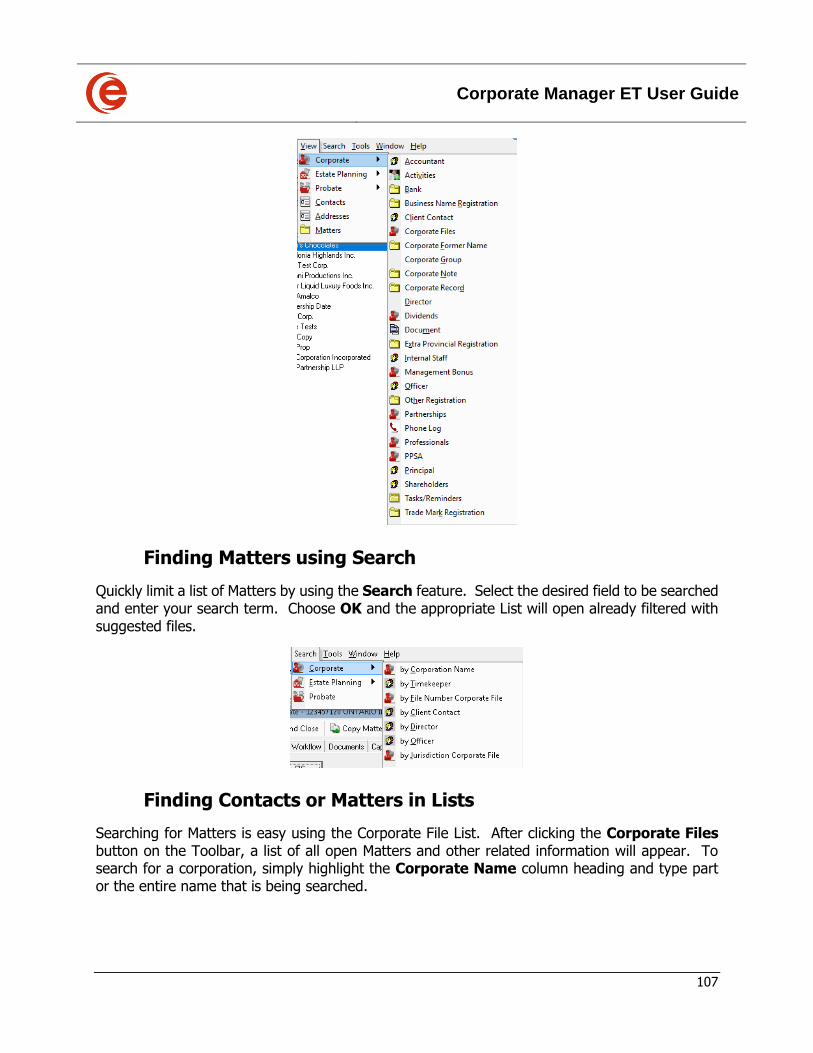
Corporate Manager ET User Guide
107
Finding Matters using Search
Quickly limit a list of Matters by using the Search feature. Select the desired field to be searched and enter your search term. Choose OK and the appropriate List will open already filtered with suggested files.
Finding Contacts or Matters in Lists
Searching for Matters is easy using the Corporate File List. After clicking the Corporate Files button on the Toolbar, a list of all open Matters and other related information will appear. To search for a corporation, simply highlight the Corporate Name column heading and type part or the entire name that is being searched.
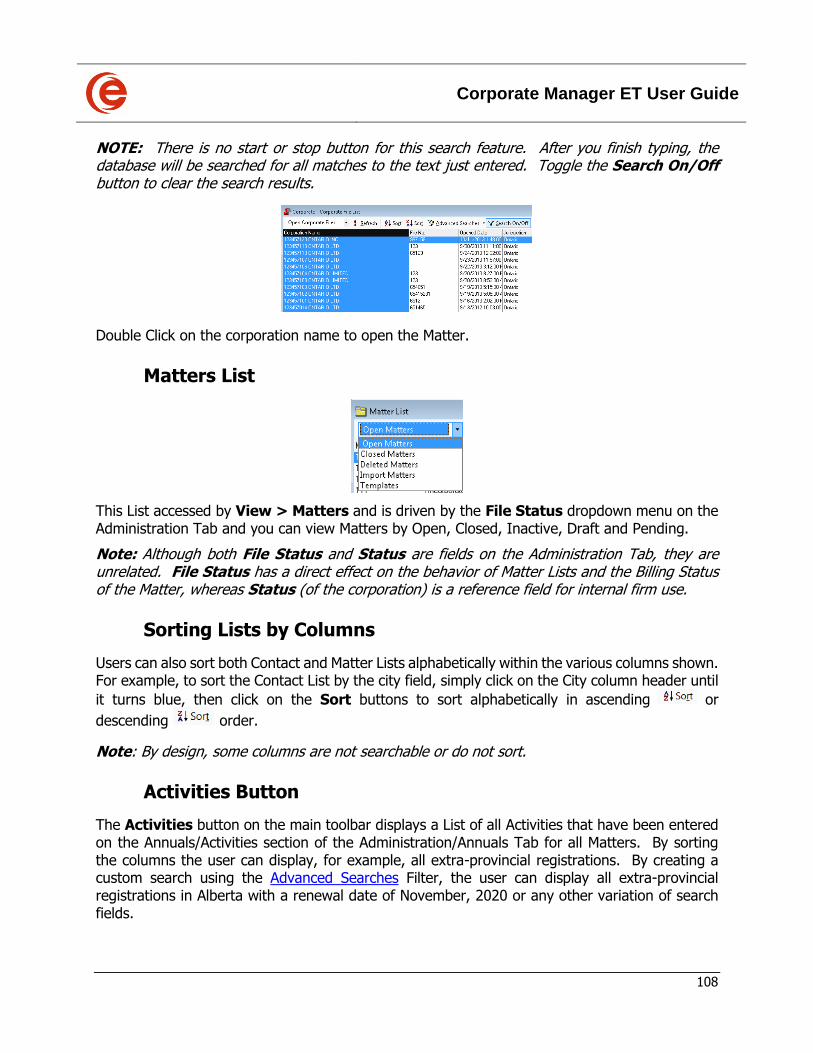
Corporate Manager ET User Guide
108
NOTE: There is no start or stop button for this search feature. After you finish typing, the database will be searched for all matches to the text just entered. Toggle the Search On/Off button to clear the search results.
Double Click on the corporation name to open the Matter.
Matters List
This List accessed by View > Matters and is driven by the File Status dropdown menu on the Administration Tab and you can view Matters by Open, Closed, Inactive, Draft and Pending.
Note: Although both File Status and Status are fields on the Administration Tab, they are unrelated. File Status has a direct effect on the behavior of Matter Lists and the Billing Status of the Matter, whereas Status (of the corporation) is a reference field for internal firm use.
Sorting Lists by Columns
Users can also sort both Contact and Matter Lists alphabetically within the various columns shown. For example, to sort the Contact List by the city field, simply click on the City column header until
it turns blue, then click on the Sort buttons to sort alphabetically in ascending or
descending order.
Note: By design, some columns are not searchable or do not sort.
Activities Button
The Activities button on the main toolbar displays a List of all Activities that have been entered on the Annuals/Activities section of the Administration/Annuals Tab for all Matters. By sorting the columns the user can display, for example, all extra-provincial registrations. By creating a custom search using the Advanced Searches Filter, the user can display all extra-provincial registrations in Alberta with a renewal date of November, 2020 or any other variation of search fields.
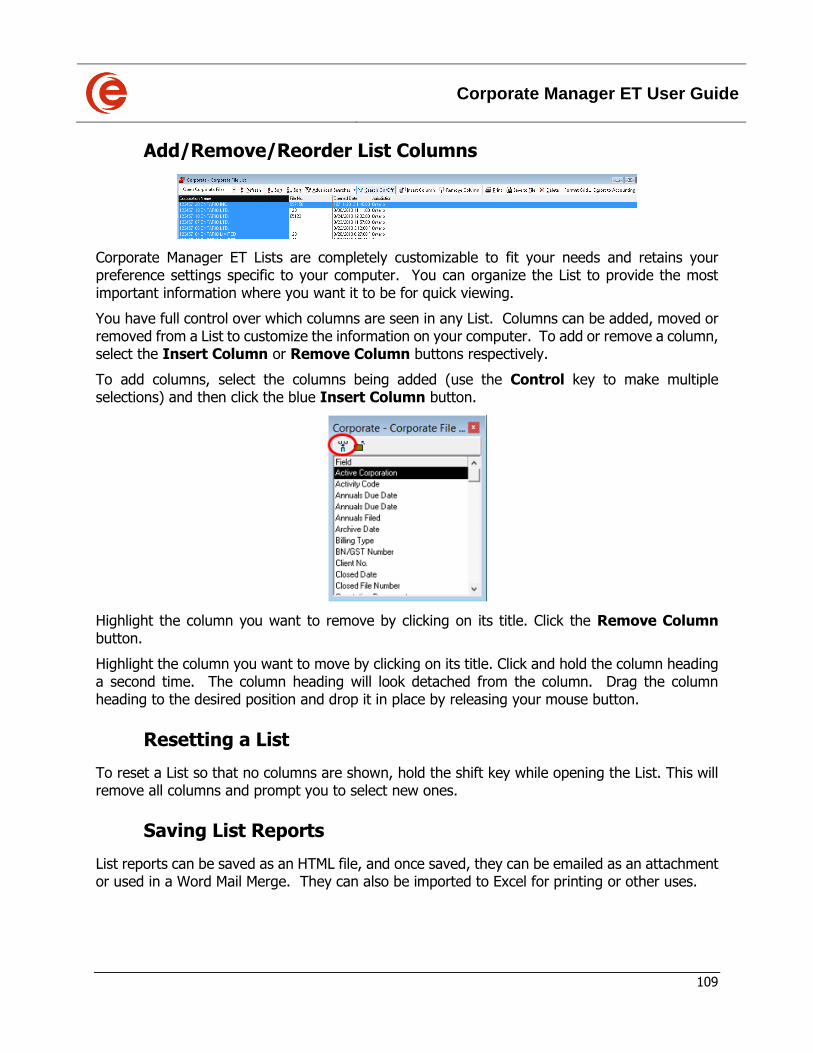
Corporate Manager ET User Guide
109
Add/Remove/Reorder List Columns
Corporate Manager ET Lists are completely customizable to fit your needs and retains your preference settings specific to your computer. You can organize the List to provide the most important information where you want it to be for quick viewing.
You have full control over which columns are seen in any List. Columns can be added, moved or removed from a List to customize the information on your computer. To add or remove a column, select the Insert Column or Remove Column buttons respectively.
To add columns, select the columns being added (use the Control key to make multiple selections) and then click the blue Insert Column button.
Highlight the column you want to remove by clicking on its title. Click the Remove Column button.
Highlight the column you want to move by clicking on its title. Click and hold the column heading a second time. The column heading will look detached from the column. Drag the column heading to the desired position and drop it in place by releasing your mouse button.
Resetting a List
To reset a List so that no columns are shown, hold the shift key while opening the List. This will remove all columns and prompt you to select new ones.
Saving List Reports
List reports can be saved as an HTML file, and once saved, they can be emailed as an attachment or used in a Word Mail Merge. They can also be imported to Excel for printing or other uses.
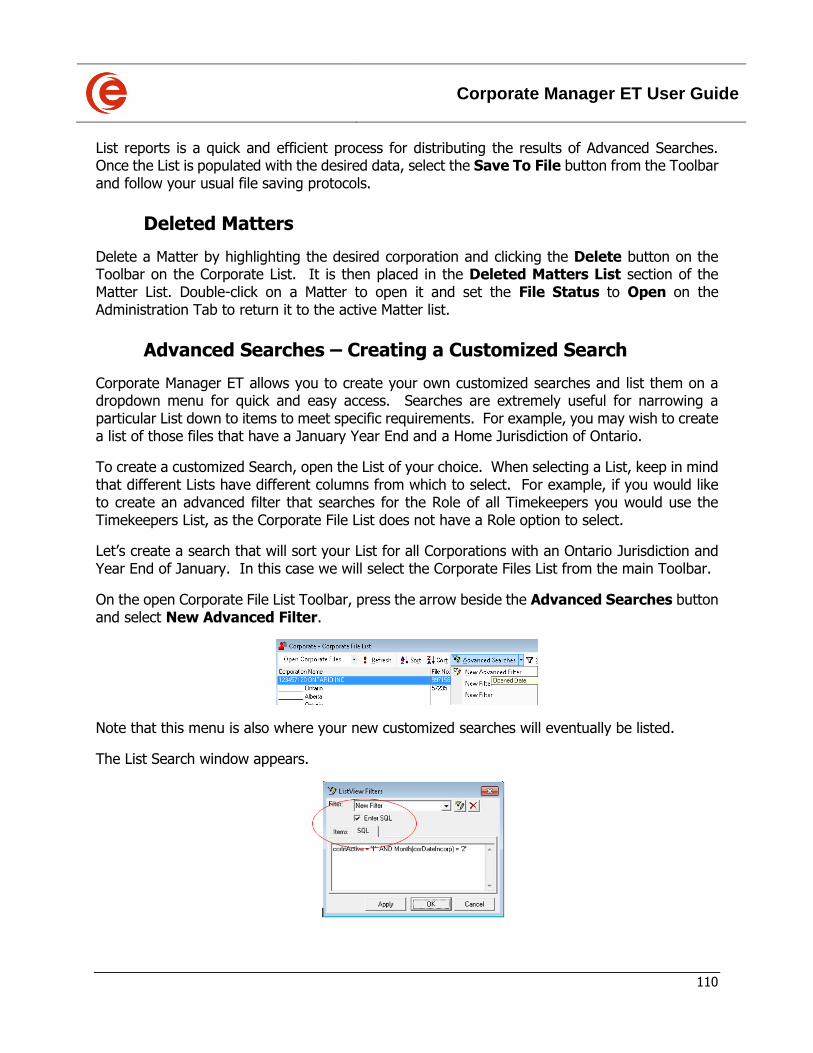
Corporate Manager ET User Guide
110
List reports is a quick and efficient process for distributing the results of Advanced Searches. Once the List is populated with the desired data, select the Save To File button from the Toolbar and follow your usual file saving protocols.
Deleted Matters
Delete a Matter by highlighting the desired corporation and clicking the Delete button on the Toolbar on the Corporate List. It is then placed in the Deleted Matters List section of the Matter List. Double-click on a Matter to open it and set the File Status to Open on the Administration Tab to return it to the active Matter list.
Advanced Searches – Creating a Customized Search
Corporate Manager ET allows you to create your own customized searches and list them on a dropdown menu for quick and easy access. Searches are extremely useful for narrowing a particular List down to items to meet specific requirements. For example, you may wish to create a list of those files that have a January Year End and a Home Jurisdiction of Ontario.
To create a customized Search, open the List of your choice. When selecting a List, keep in mind that different Lists have different columns from which to select. For example, if you would like to create an advanced filter that searches for the Role of all Timekeepers you would use the Timekeepers List, as the Corporate File List does not have a Role option to select.
Let’s create a search that will sort your List for all Corporations with an Ontario Jurisdiction and Year End of January. In this case we will select the Corporate Files List from the main Toolbar.
On the open Corporate File List Toolbar, press the arrow beside the Advanced Searches button and select New Advanced Filter.
Note that this menu is also where your new customized searches will eventually be listed.
The List Search window appears.
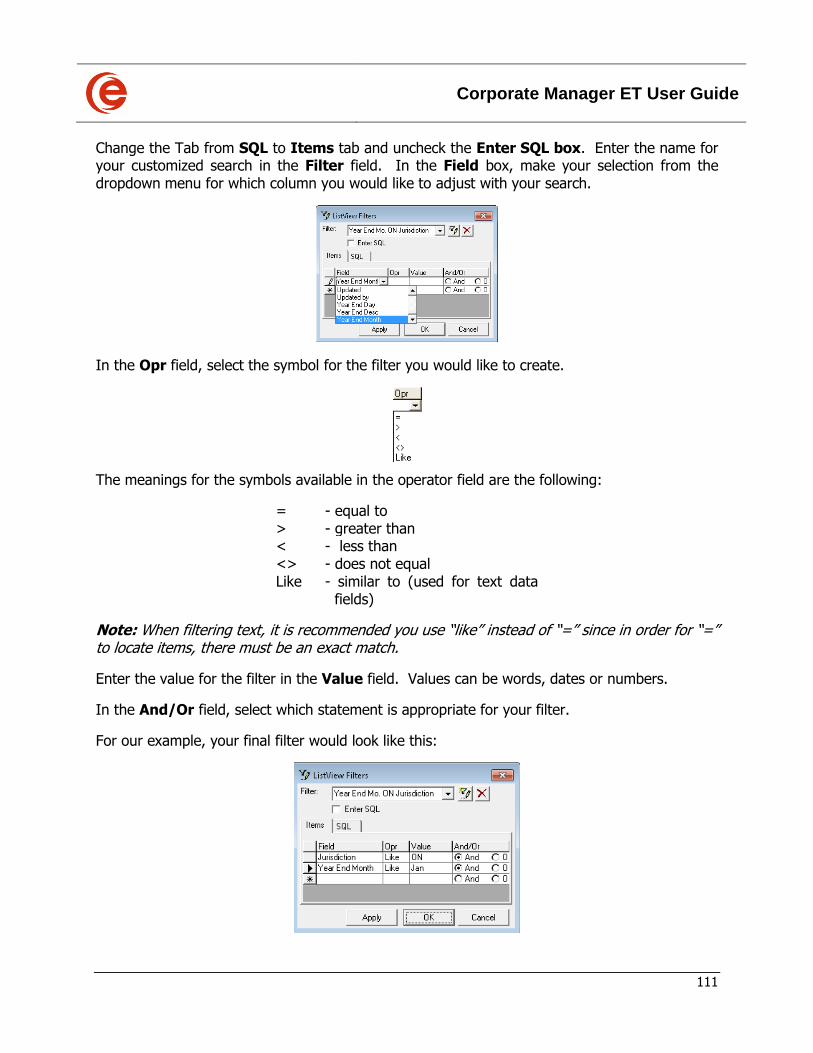
Corporate Manager ET User Guide
111
Change the Tab from SQL to Items tab and uncheck the Enter SQL box. Enter the name for your customized search in the Filter field. In the Field box, make your selection from the dropdown menu for which column you would like to adjust with your search.
In the Opr field, select the symbol for the filter you would like to create.
The meanings for the symbols available in the operator field are the following:
= - equal to > - greater than < - less than <> - does not equal Like - similar to (used for text data
fields)
Note: When filtering text, it is recommended you use “like” instead of “=” since in order for “=” to locate items, there must be an exact match.
Enter the value for the filter in the Value field. Values can be words, dates or numbers.
In the And/Or field, select which statement is appropriate for your filter.
For our example, your final filter would look like this:
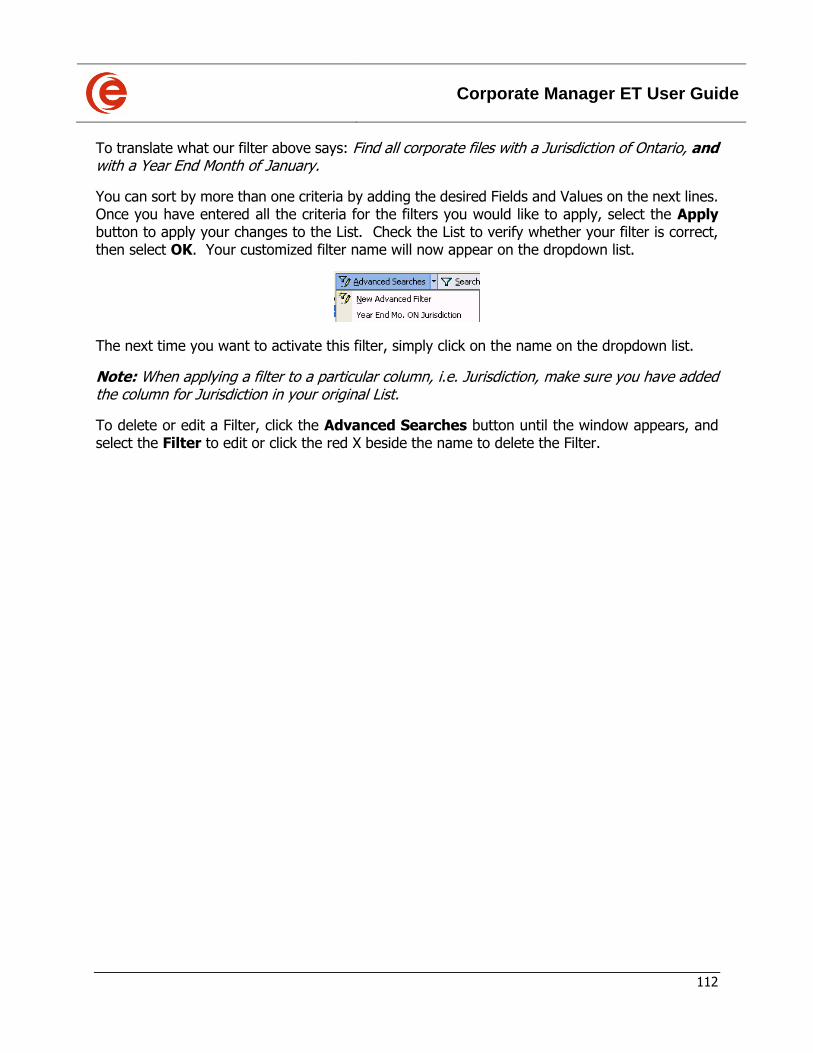
Corporate Manager ET User Guide
112
To translate what our filter above says: Find all corporate files with a Jurisdiction of Ontario, and with a Year End Month of January.
You can sort by more than one criteria by adding the desired Fields and Values on the next lines. Once you have entered all the criteria for the filters you would like to apply, select the Apply button to apply your changes to the List. Check the List to verify whether your filter is correct, then select OK. Your customized filter name will now appear on the dropdown list.
The next time you want to activate this filter, simply click on the name on the dropdown list.
Note: When applying a filter to a particular column, i.e. Jurisdiction, make sure you have added the column for Jurisdiction in your original List.
To delete or edit a Filter, click the Advanced Searches button until the window appears, and select the Filter to edit or click the red X beside the name to delete the Filter.
Corporate Manager ET User Guide
113
Chapter 8: Tasks and Reports
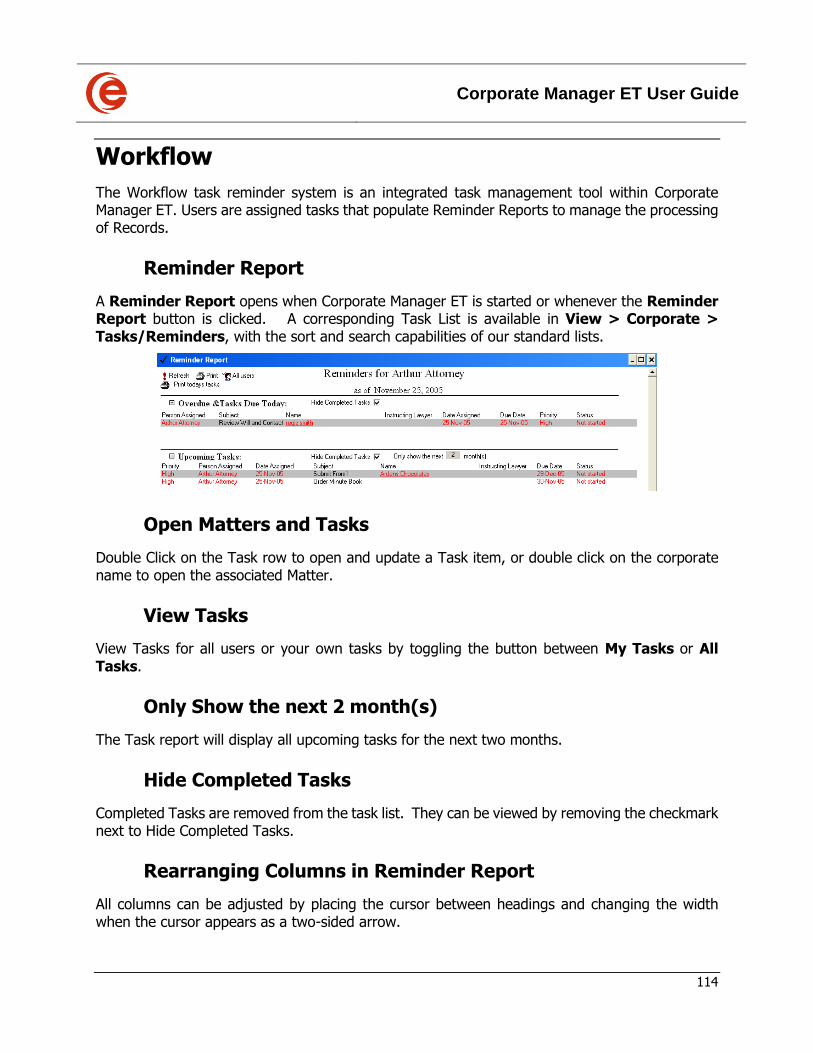
Corporate Manager ET User Guide
114
Workflow
The Workflow task reminder system is an integrated task management tool within Corporate Manager ET. Users are assigned tasks that populate Reminder Reports to manage the processing of Records.
Reminder Report
A Reminder Report opens when Corporate Manager ET is started or whenever the Reminder Report button is clicked. A corresponding Task List is available in View > Corporate > Tasks/Reminders, with the sort and search capabilities of our standard lists.
Open Matters and Tasks
Double Click on the Task row to open and update a Task item, or double click on the corporate name to open the associated Matter.
View Tasks
View Tasks for all users or your own tasks by toggling the button between My Tasks or All Tasks.
Only Show the next 2 month(s)
The Task report will display all upcoming tasks for the next two months.
Hide Completed Tasks
Completed Tasks are removed from the task list. They can be viewed by removing the checkmark next to Hide Completed Tasks.
Rearranging Columns in Reminder Report
All columns can be adjusted by placing the cursor between headings and changing the width when the cursor appears as a two-sided arrow.
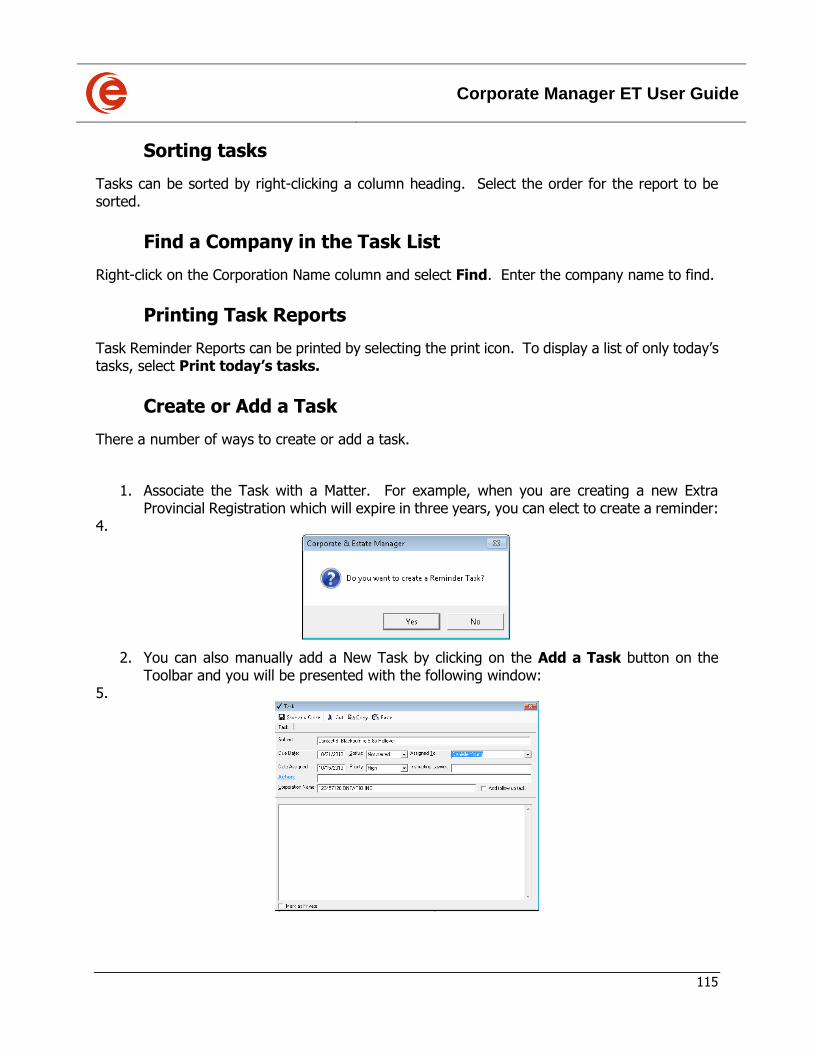
Corporate Manager ET User Guide
115
Sorting tasks
Tasks can be sorted by right-clicking a column heading. Select the order for the report to be sorted.
Find a Company in the Task List
Right-click on the Corporation Name column and select Find. Enter the company name to find.
Printing Task Reports
Task Reminder Reports can be printed by selecting the print icon. To display a list of only today’s tasks, select Print today’s tasks.
Create or Add a Task
There a number of ways to create or add a task.
1. Associate the Task with a Matter. For example, when you are creating a new Extra Provincial Registration which will expire in three years, you can elect to create a reminder:
4.
2. You can also manually add a New Task by clicking on the Add a Task button on the Toolbar and you will be presented with the following window:
5.
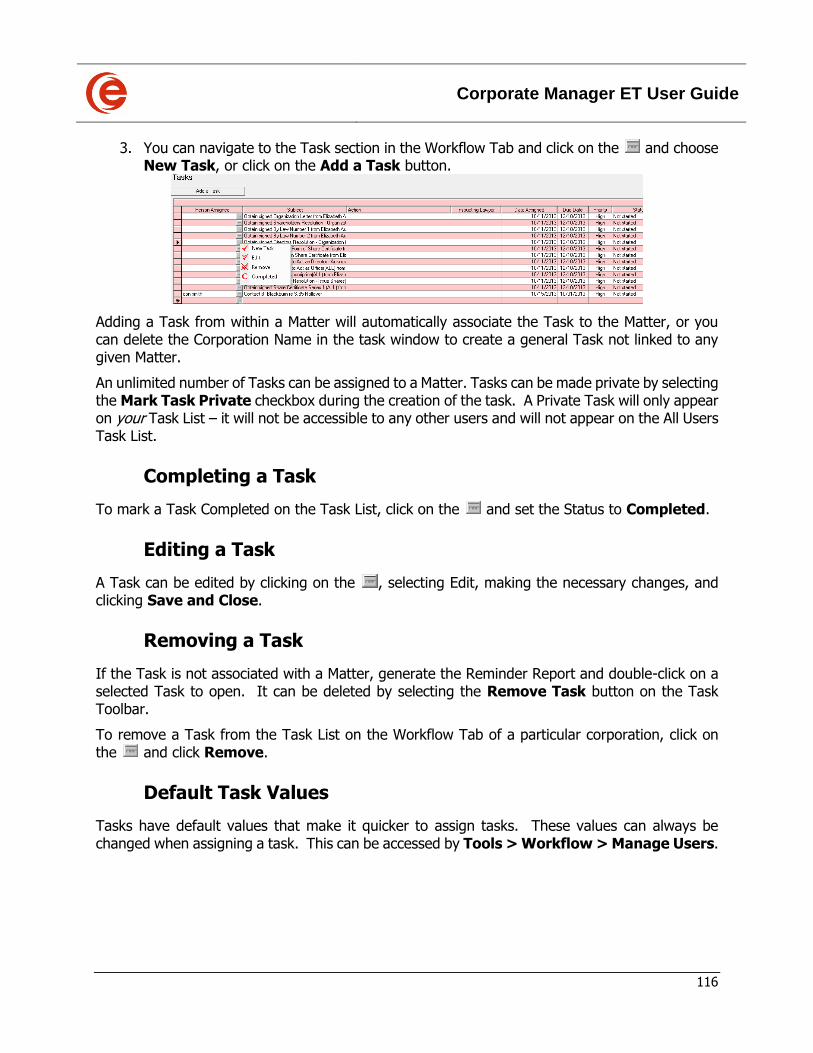
Corporate Manager ET User Guide
116
3. You can navigate to the Task section in the Workflow Tab and click on the and choose New Task, or click on the Add a Task button.
Adding a Task from within a Matter will automatically associate the Task to the Matter, or you can delete the Corporation Name in the task window to create a general Task not linked to any given Matter.
An unlimited number of Tasks can be assigned to a Matter. Tasks can be made private by selecting the Mark Task Private checkbox during the creation of the task. A Private Task will only appear on your Task List – it will not be accessible to any other users and will not appear on the All Users Task List.
Completing a Task
To mark a Task Completed on the Task List, click on the and set the Status to Completed.
Editing a Task
A Task can be edited by clicking on the , selecting Edit, making the necessary changes, and clicking Save and Close.
Removing a Task
If the Task is not associated with a Matter, generate the Reminder Report and double-click on a selected Task to open. It can be deleted by selecting the Remove Task button on the Task Toolbar.
To remove a Task from the Task List on the Workflow Tab of a particular corporation, click on the and click Remove.
Default Task Values
Tasks have default values that make it quicker to assign tasks. These values can always be changed when assigning a task. This can be accessed by Tools > Workflow > Manage Users.
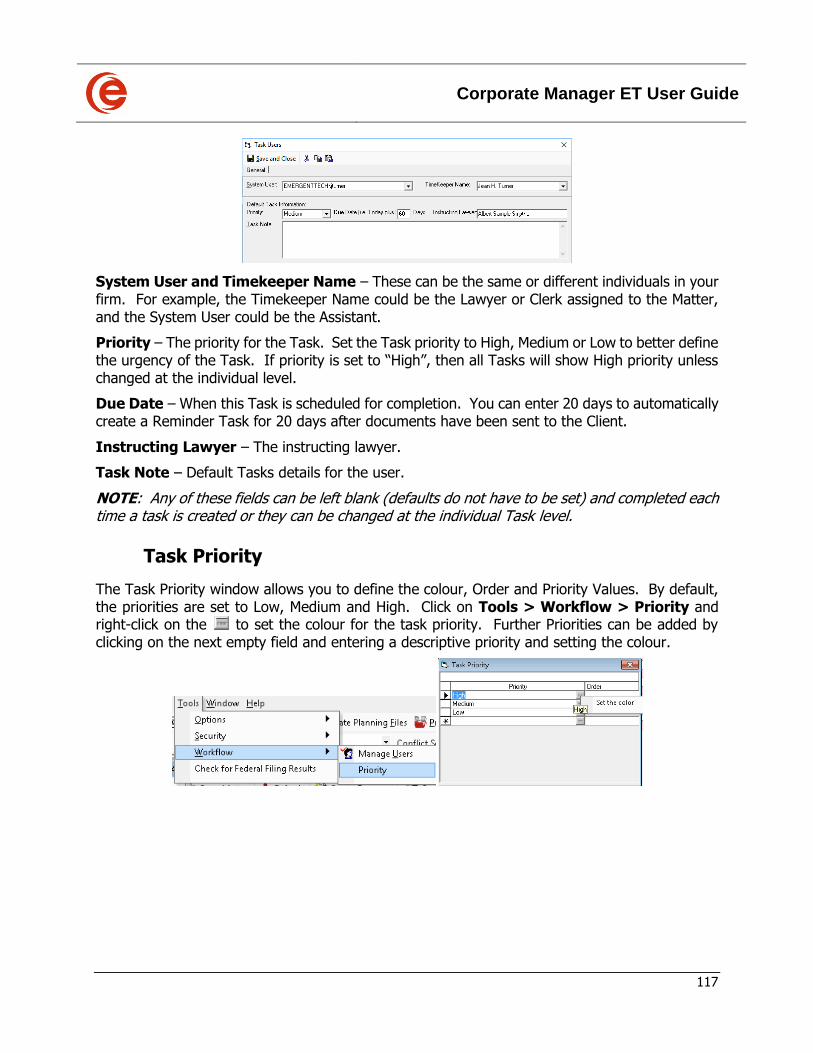
Corporate Manager ET User Guide
117
System User and Timekeeper Name – These can be the same or different individuals in your firm. For example, the Timekeeper Name could be the Lawyer or Clerk assigned to the Matter, and the System User could be the Assistant.
Priority – The priority for the Task. Set the Task priority to High, Medium or Low to better define the urgency of the Task. If priority is set to “High”, then all Tasks will show High priority unless changed at the individual level.
Due Date – When this Task is scheduled for completion. You can enter 20 days to automatically create a Reminder Task for 20 days after documents have been sent to the Client.
Instructing Lawyer – The instructing lawyer.
Task Note – Default Tasks details for the user.
NOTE: Any of these fields can be left blank (defaults do not have to be set) and completed each time a task is created or they can be changed at the individual Task level.
Task Priority
The Task Priority window allows you to define the colour, Order and Priority Values. By default, the priorities are set to Low, Medium and High. Click on Tools > Workflow > Priority and right-click on the to set the colour for the task priority. Further Priorities can be added by clicking on the next empty field and entering a descriptive priority and setting the colour.
Corporate Manager ET User Guide
118
Chapter 9: Advanced Options
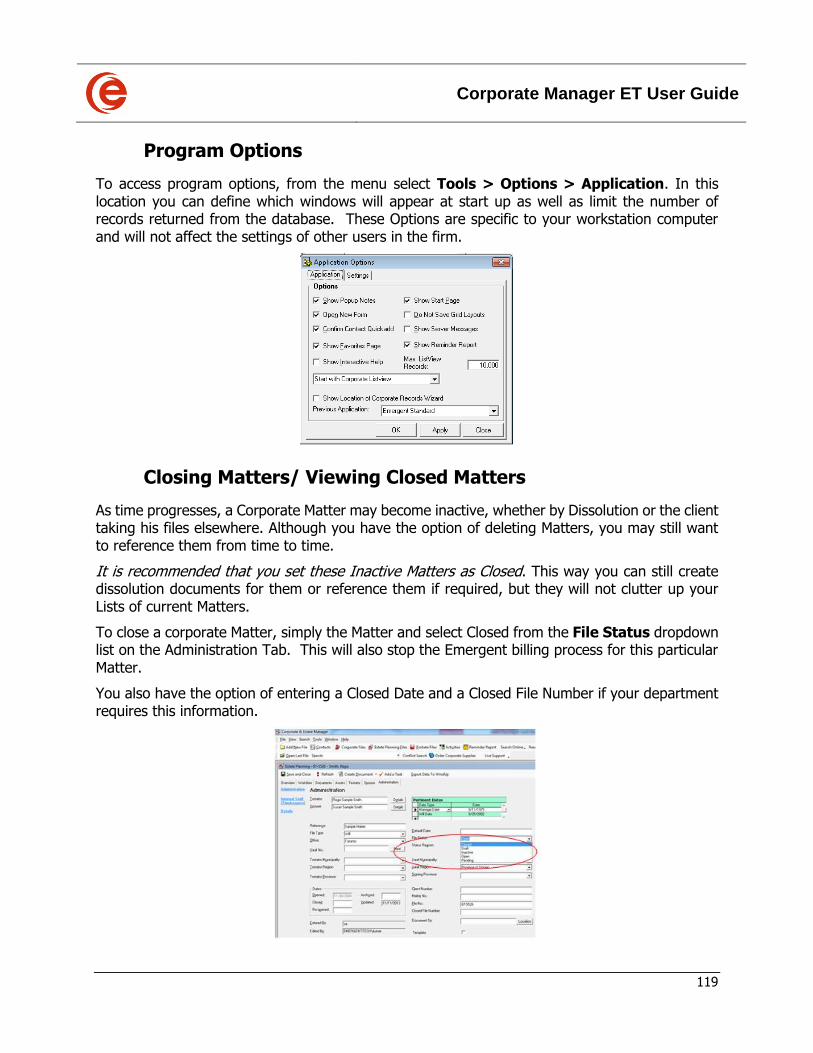
Corporate Manager ET User Guide
119
Program Options
To access program options, from the menu select Tools > Options > Application. In this location you can define which windows will appear at start up as well as limit the number of records returned from the database. These Options are specific to your workstation computer and will not affect the settings of other users in the firm.
Closing Matters/ Viewing Closed Matters
As time progresses, a Corporate Matter may become inactive, whether by Dissolution or the client taking his files elsewhere. Although you have the option of deleting Matters, you may still want to reference them from time to time.
It is recommended that you set these Inactive Matters as Closed. This way you can still create dissolution documents for them or reference them if required, but they will not clutter up your Lists of current Matters.
To close a corporate Matter, simply the Matter and select Closed from the File Status dropdown list on the Administration Tab. This will also stop the Emergent billing process for this particular Matter.
You also have the option of entering a Closed Date and a Closed File Number if your department requires this information.
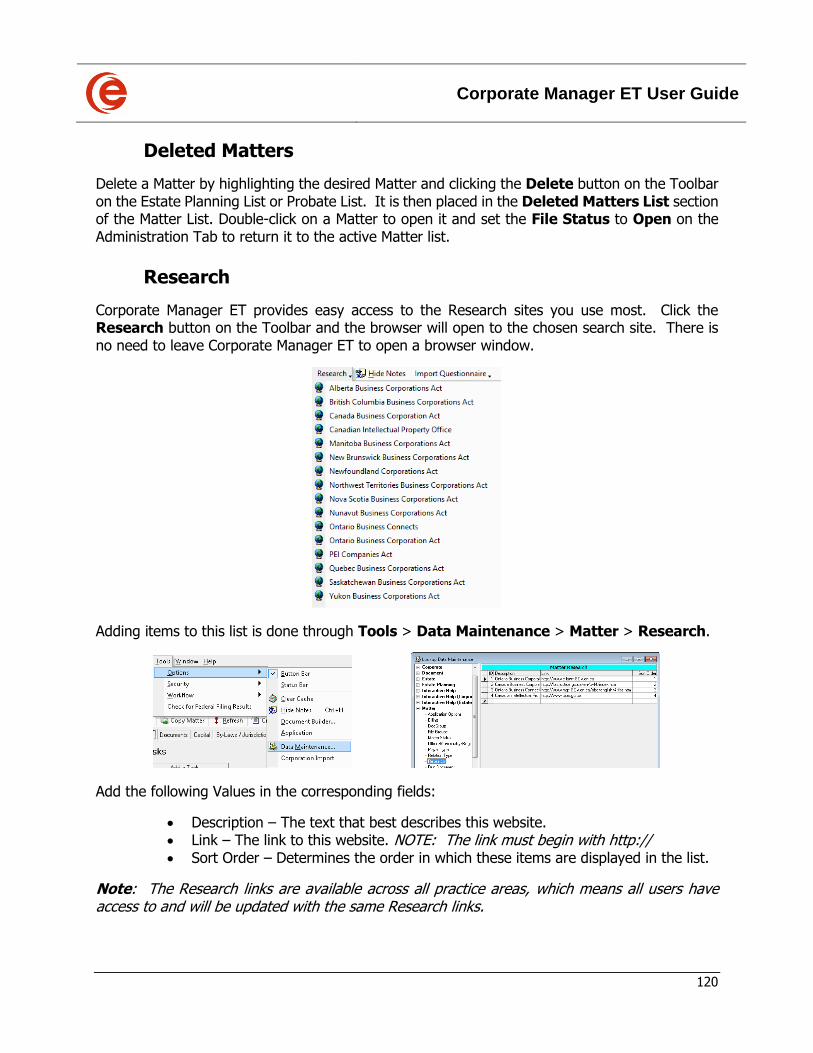
Corporate Manager ET User Guide
120
Deleted Matters
Delete a Matter by highlighting the desired Matter and clicking the Delete button on the Toolbar on the Estate Planning List or Probate List. It is then placed in the Deleted Matters List section of the Matter List. Double-click on a Matter to open it and set the File Status to Open on the Administration Tab to return it to the active Matter list.
Research
Corporate Manager ET provides easy access to the Research sites you use most. Click the Research button on the Toolbar and the browser will open to the chosen search site. There is no need to leave Corporate Manager ET to open a browser window.
Adding items to this list is done through Tools > Data Maintenance > Matter > Research.
Add the following Values in the corresponding fields:
• Description – The text that best describes this website. • Link – The link to this website. NOTE: The link must begin with http:// • Sort Order – Determines the order in which these items are displayed in the list.
Note: The Research links are available across all practice areas, which means all users have access to and will be updated with the same Research links.
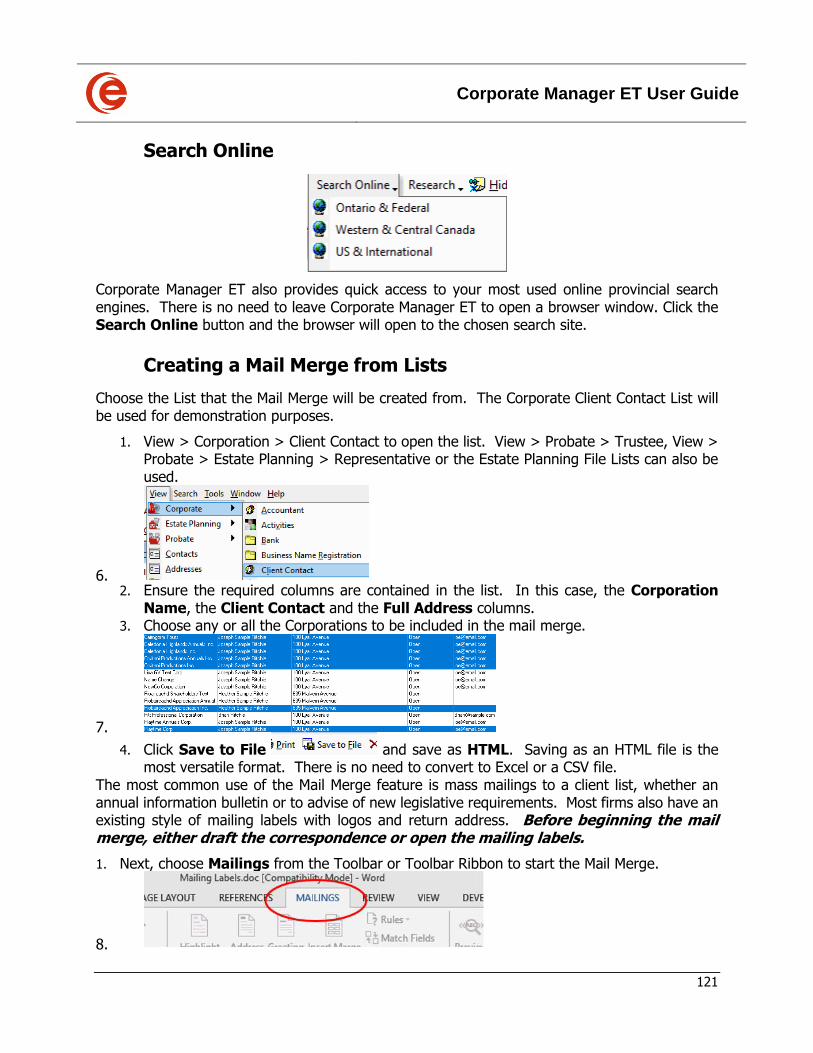
Corporate Manager ET User Guide
121
Search Online
Corporate Manager ET also provides quick access to your most used online provincial search engines. There is no need to leave Corporate Manager ET to open a browser window. Click the Search Online button and the browser will open to the chosen search site.
Creating a Mail Merge from Lists
Choose the List that the Mail Merge will be created from. The Corporate Client Contact List will be used for demonstration purposes.
1. View > Corporation > Client Contact to open the list. View > Probate > Trustee, View > Probate > Estate Planning > Representative or the Estate Planning File Lists can also be used.
6. 2. Ensure the required columns are contained in the list. In this case, the Corporation
Name, the Client Contact and the Full Address columns. 3. Choose any or all the Corporations to be included in the mail merge.
7.
4. Click Save to File and save as HTML. Saving as an HTML file is the most versatile format. There is no need to convert to Excel or a CSV file.
The most common use of the Mail Merge feature is mass mailings to a client list, whether an annual information bulletin or to advise of new legislative requirements. Most firms also have an existing style of mailing labels with logos and return address. Before beginning the mail merge, either draft the correspondence or open the mailing labels.
1. Next, choose Mailings from the Toolbar or Toolbar Ribbon to start the Mail Merge.
8.
Corporate Manager ET User Guide
122
9. On the Start Mail Merge dropdown, select the starting document. If Labels is the starting document, there will be a further step to choose the type of labels. Click OK and then Cancel. This triggers the proper actions for the next steps in creating the labels.
2. Click on Select Recipients and choose Use an Existing List and then Browse to the saved HTML file and select for use.
10. 3. Click Edit Recipient List to edit any duplicates, etc.
11. 4. Next, add the fields that will be used for the Mail Merge. Click Insert Merge Field to display
the columns included from the Client Contact List.
12.
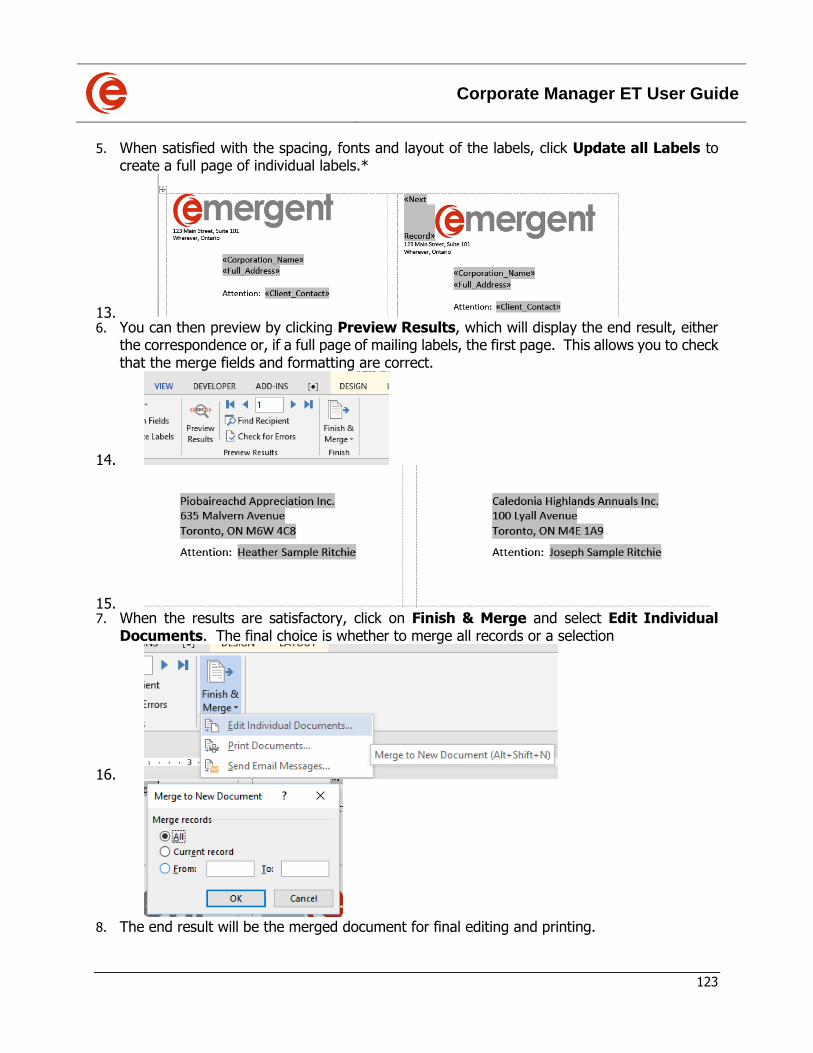
Corporate Manager ET User Guide
123
5. When satisfied with the spacing, fonts and layout of the labels, click Update all Labels to create a full page of individual labels.*
13. 6. You can then preview by clicking Preview Results, which will display the end result, either
the correspondence or, if a full page of mailing labels, the first page. This allows you to check that the merge fields and formatting are correct.
14.
15. 7. When the results are satisfactory, click on Finish & Merge and select Edit Individual
Documents. The final choice is whether to merge all records or a selection
16.
8. The end result will be the merged document for final editing and printing.
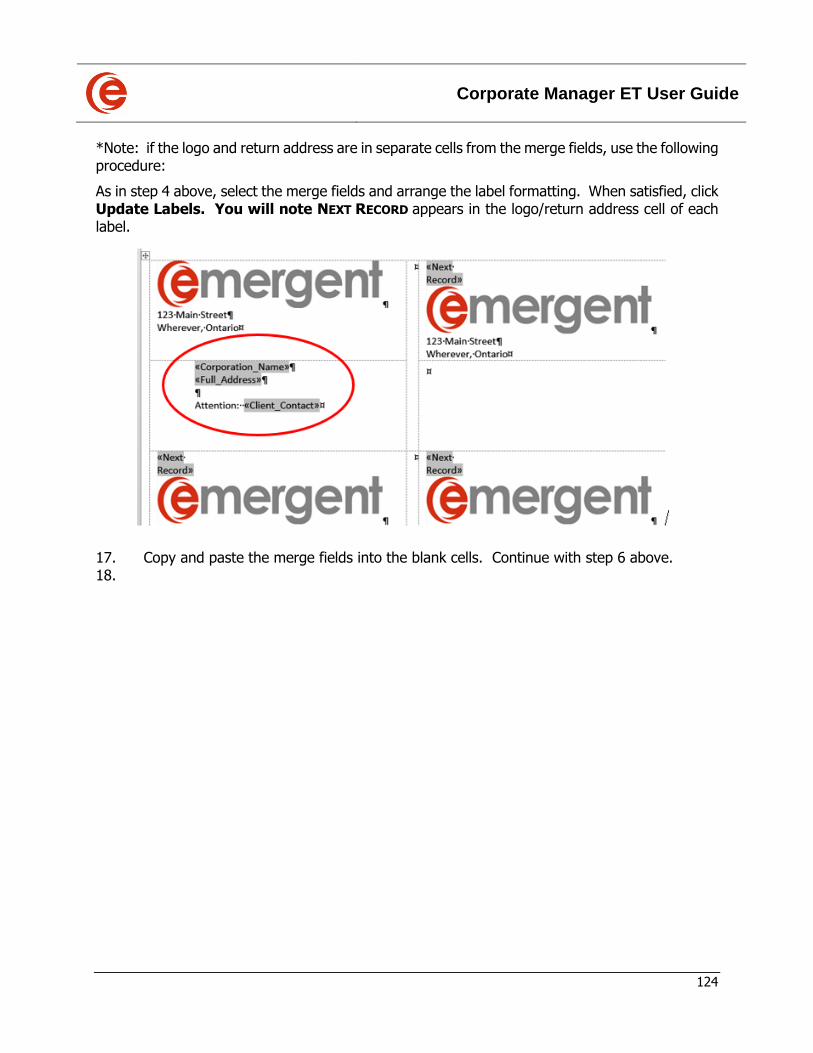
Corporate Manager ET User Guide
124
*Note: if the logo and return address are in separate cells from the merge fields, use the following procedure:
As in step 4 above, select the merge fields and arrange the label formatting. When satisfied, click Update Labels. You will note NEXT RECORD appears in the logo/return address cell of each label.
17. Copy and paste the merge fields into the blank cells. Continue with step 6 above. 18.