Embed Size (px)
Citation preview
1
Copyright ©2019 LG
xxxxxxxxxx (1.0)
Copyright ©2019 LG Electronics Inc. All rights reserved
MBM67258301 (1.0) www.lg.com
LM-X440IM
USER GUIDE
En
glis
h
2
1. General Information ............................................................................................................. 3
1.1 Profile and Safety Precaution .......................................................................................................................... 3
1.2 Safety Warning and Attentions ........................................................................................................................ 4
1.3 Battery Information and Care ......................................................................................................................... 5
2. Your Phone ............................................................................................................................ 6
2.1 Phone Overview .............................................................................................................................................. 6
2.2 Functions of Keys ........................................................................................................................................... 6
2.3 Functions of icons ........................................................................................................................................... 6
2.4 Status Icon ....................................................................................................................................................... 6
2.5 Product Components and Accessories ............................................................................................................ 7
3. Getting started ...................................................................................................................... 7
3.1 Installing the SIM Card & Memory Card ....................................................................................................... 7
3.2 Charging the Battery ....................................................................................................................................... 8
3.3 Linking to the Networks and devices .............................................................................................................. 8
3.4 Using the Touch Screen .................................................................................................................................. 9
3.5 Using the onscreen keypad ........................................................................................................................... 10
3.6 Dialing Calls ................................................................................................................................................. 10
4. Using the Menus ................................................................................................................. 11
4.1 Calculator ....................................................................................................................................................... 11
4.2 Calendar ......................................................................................................................................................... 11
4.3 Camera ........................................................................................................................................................... 11
4.4 Chrome.......................................................................................................................................................... 18
4.5 Clock ............................................................................................................................................................. 18
4.6 Contacts ........................................................................................................................................................ 18
4.7 Google Docs ................................................................................................................................................. 18
4.8 Google Drive ................................................................................................................................................. 19
4.9 Google Duo ................................................................................................................................................... 19
4.10 Files ............................................................................................................................................................... 19
4.11 FM Radio ...................................................................................................................................................... 19
4.12 Gmail ............................................................................................................................................................ 19
4.13 Google ........................................................................................................................................................... 19
4.14 Keep Notes .................................................................................................................................................... 19
4.15 Google Maps ................................................................................................................................................. 19
4.16 Messages ....................................................................................................................................................... 19
4.17 News ............................................................................................................................................................. 20
4.18 Phone ............................................................................................................................................................ 20
4.19 Google Photos ............................................................................................................................................... 20
4.20 Google Play Movies & TV ........................................................................................................................... 20
4.21 Google Play Music ........................................................................................................................................ 20
4.22 Google Play Store ......................................................................................................................................... 20
4.23 Settings.......................................................................................................................................................... 21
4.24 Sheets ............................................................................................................................................................ 28
4.25 SIM Toolkit ................................................................................................................................................... 28
4.26 Slides ............................................................................................................................................................. 29
4.27 Sound Recorder ............................................................................................................................................. 29
3
4.28 YouTube ........................................................................................................................................................ 29
4.29 Google Assistant ........................................................................................................................................... 29
5. Appendix .............................................................................................................................. 29
5.1 FAQ ............................................................................................................................................................... 29
5.2 Phone software update .................................................................................................................................. 31
5.3 Disposal of Your Old Appliance (As per e-waste rule) ................................................................................. 32
5.4 Open Source Software Notice Information ................................................................................................... 32
5.5 Regulatory information (Regulation ID number, BIS Mark, E-Labeling etc.) ............................................. 32
5.6 LG Bridge ..................................................................................................................................................... 32
5.7 Customer Information Center ....................................................................................................................... 33
5.8 Trademarks ................................................................................................................................................... 33
1. General Information 1.1 Profile and Safety Precaution
Please read this pamphlet carefully in order to make your phone in perfect condition. Our company may change this mobile phone without prior written notice and reserves the final right to interpret the performance of this mobile phone. Due to different software and network operators, display on your phone may be different, refer to your phone for details. Please read the following guidelines regarding the use of your phone. Not following them maybe dangerous or illegal. Certification information (SAR) Our phone is designed not to exceed the limits of emission of radio waves recommended by international guidelines. SAR (Specific absorption rate) is the unit of measurement of body-absorbed RF quantity when phone is in use. SAR value is ascertained according to the highest RF level generated during laboratory tests. The true SAR level during phone usage will be far lower than this level. The SAR value of phone may change depending on factors such as how close you are to a network base station, use of accessories and other enhancement. The SAR value may differ depending on national reporting, testing requirements and the network band. The highest SAR value of the device at the head and body are 0.820 W/Kg and 0.316 W/Kg respectively averaged over 1 gm of human issue. Permitted SAR Values for a mobile phone is 1.6W/Kg (1g) SAR Recommendations 1. Use a wireless hands-free system (headphone, headset) with a low power
Bluetooth emitter. 2. Please keep your calls short and use SMS whenever more convenient. This
advice applies especially to children, adolescents and pregnant women. 3. Prefer to use your cell phone when the signal quality is good. 4. People having active medical implants should preferably keep the cell phone at
least 15 cm away from the implant. 5. Maintain a preferable distance of 15 mm from the device. 6. Maximum operating temperature is 35⁰ degree Celsius
4
1.2 Safety Warning and Attentions
Safety Warning Road Safety Comes First Do not use a hand-held phone while driving. Use hands-free fittings when calls are unavoidable while driving. In some countries, dialing or receiving calls while driving is illegal! Switch Off in Aircraft Wireless devices can cause interference in aircraft. Using a mobile phone in flight is illegal and risky. Please make sure that your mobile phone is powered off in flight. Switch Off Before Entering Risky Areas Strictly observe the relevant laws, codes, and regulations on the use of mobile phones in risky areas. Turn off your mobile phone before entering a place susceptible to explosion, such as an oil station, oil tank, chemical plant or a place where a blasting process is under way. Observe All Special Regulations Follow any special regulations in force in any area such as hospitals and always switch off your phone whenever it is forbidden to use it or, when it may cause interference or danger. Properly use your mobile phone near medical apparatuses, such as pacemakers, hearing aids and some other electronic medical devices, as it may cause interference to such apparatuses. Interference The conversation quality of any mobile phone may be affected by radio interference. An antenna is built inside the mobile phone and located below the microphone. Do not touch the antenna area during a conversation, lest that the conversation quality deteriorate. Qualified Service Only qualified personnel may install or repair phone equipment. Installing or repairing the mobile phone on your own may bring great danger and violates the warranty rules. Accessories And Batteries Use only approved accessories and batteries. Use Sensibly Use only in a normal and proper manner. Emergency Calls Ensure the phone is switched on and in service, enter the emergency number, e.g. 112, then press the Dial key. Give your location and state your situation briefly. Do not end the call until told to do so. Note: Just like all other mobile phones, this mobile phone does not necessarily support all the features described in this manual due to network or radio transmission problems. Some networks even do not support the emergency call service. Therefore, do not rely solely on the mobile phone for critical communications such as first aid. Please consult the local network operator. Attentions This mobile phone is well designed with fine art. Please exercise special care when using it. The following suggestions will help your mobile phone survive the warranty period and extend its service life: 1. Keep the mobile phone and all its fittings beyond children's reach. 2. Keep the mobile phone dry. Keep away from rain, moisture, liquid or other
5
substances that may corrode electronic circuits. 3. Do not use or store the mobile phone in dusty places, lest that active parts of
the mobile phone be damaged. 4. Do not store the mobile phone in a high-temperature place. High temperature
will shorten the life of electronic circuits and damage the battery and some plastic parts.
5. Do not store the mobile phone in a chilly place. Otherwise, moistures will be formed inside the mobile phone to damage electronic circuits when the mobile phone is moved to a constant temperature place.
6. Do not throw, knock or shock the mobile phone, as that will destroy the internal circuits and high-precision components of the mobile phone.
7. Use your device in temperature between 0 ⁰C to 35 ⁰C, if possible. Exposing your device to extremely low or high temperatures may result in damage, malfunction or even explosion.
1.3 Battery Information and Care
1. You do not need to completely discharge the battery before recharging. Unlike other battery systems, there is no memory effect that could compromise the battery’s performance.
2. Use only LG batteries and chargers. LG chargers are designed to maximize the battery life.
3. Do not disassemble or short-circuit the battery. 4. Keep the metal contacts of the battery clean. 5. Replace the battery when it no longer provides acceptable performance. The
battery pack may be recharged hundreds of times before it needs replacing. 6. Recharge the battery if it has not been used for a long time to maximize
usability. 7. Do not expose the battery charger to direct sunlight or use it in high humidity,
such as in the bathroom. 8. Do not leave the battery in hot or cold places, as this may deteriorate battery
performance. 9. Risk of explosion if battery is replaced by an incorrect type. Dispose of used
batteries according to the instructions. 10. If you need to replace the battery, take it to the nearest authorized LG
Electronics service point or dealer for assistance. 11. Always unplug the charger from the wall socket after the device is fully
charged to save unnecessary power consumption of the charger. 12. Actual battery life will depend on network configuration, product settings,
usage patterns, battery and environmental conditions. 13. Make sure that no sharp-edged items such as animal’s teeth or claws, come
into contact with the battery. This could cause a fire. WARNING! Notice for Battery Replacement 1. Do not remove the back cover. 2. Your device has an internal battery. For your safety, do not remove the battery
incorporated in the product. If you need to replace the battery, take it to the nearest authorized LG Electronics service point or dealer for assistance.
3. The Li-Ion Battery is a hazardous component which can cause injury. 4. Battery replacement by non-qualified professional can cause damage to your
device.
6
2. Your Phone
2.1 Phone Overview
2.2 Functions of Keys
The mobile phone provides the following keys:
➢ Power Key
Power key situates at the right side of the phone. While using the phone, you can
press this key to lock screen; if you press and hold this key, a phone-options dialog
would pop out. Here, you can select to Power off or Restart or Screenshot or
Emergency.
➢ Volume key Volume key situates at the right side of the phone. You can press it to adjust ringer volume.
2.3 Functions of icons
➢ Home key
Touch it to open home screen.
➢ Back key Touch this icon to return to the previous screen; Note: - To check recent app, swipe up on Home key.
2.4 Status Icon
When there is a notification for an unread message, calendar event or alarm, the status bar displays the corresponding notification icon. Check your device's status
7
by viewing notification icons displayed on the status bar.
No signal
Data is being transmitted over the network
Alarm is set
Vibrate mode is on
Bluetooth is on
Connected to a computer via USB
Battery level
Airplane mode is on
Missed calls
Wi-Fi is connected
Mute mode is on
GPS is on
Hotspot is on
No SIM card
Note: - Some of these icons may appear differently or may not appear at all, depending on the device’s status. Refer to the icons according to the actual environment and area in which you are using the device and your service provider.
2.5 Product Components and Accessories
The Following items are included with your device.
1. Device 2. Charger 3. USB Cable 4. Quick Start Guide 5. Warranty Card 6. Ejection Pin
3. Getting started
3.1 Installing the SIM Card & Memory Card
Installation of SIM Card You must insert the SIM card before using the phone. -> Steps: 1. Switch off the mobile phone. 2. Insert the SIM card correctly in the card slot. (see figure below)
8
Insert Micro SD card The phone supports Micro SD card, which is a multimedia memory card used to multiply the memory of the device. Please follow the instructions as above mentioned.
Note: The SD card is a miniature object. Keep it out of the reach of children for avoid children swallow it.
3.2 Charging the Battery
Your phone is powered by a rechargeable battery. If your phone comes up a message which notifies you that the battery power is too low, at that moment, please recharge the battery. Connect the charger to a power outlet and the micro USB connector to the phone’s USB port. The LED flashlight on the top of the phone is red. Once the phone has finished charging, the light turns green and you should unplug the charger.
3.3 Linking to the Networks and devices
Your phone can connect to a variety of networks and devices, including mobile networks for voice and data transmission, Wi-Fi data networks, and Bluetooth devices, such as headsets. You can also connect your phone to a computer, to transfer files from your phone’s SD card and share your phone’s mobile data
9
connection via USB. Connecting to Mobile Network When you assemble your phone with a SIM card, your phone is configured to use your provider’s mobile networks for voice calls and for transmitting data. Connecting to Wi-Fi networks
Wi-Fi is a wireless networking technology that can provide Internet access at
distances of up to 100 meters, depending on the Wi-Fi router and your
surroundings.
Touch Settings>Network & Internet>Wi-Fi
Check Wi-Fi to turn it on. The phone scans for available Wi-Fi networks and
displays the names of those it finds. Secured networks are indicated with a Lock
icon.
Note: If the phone finds a network that you connected to previously, it connects to
it automatically.
Touch a network to connect to it. If the network is open, you are prompted to
confirm that you want to connect to that network by touching Connect. If the
network is secured, you’re prompted to enter a password or other credentials.
Connecting to Bluetooth devices
Bluetooth is a short-range wireless communications technology that devices can
use to transfer information over a distance of about 8-10 meters. The most
common Bluetooth devices are headphones for making calls or listening to music,
hands-free kits for cars, and other portable devices, including laptops and cell
phones.
Touch Settings>Connected Devices> Bluetooth.
Check Bluetooth to turn it on.
You must pair your phone with a device before you can connect to it. Once you
pair your phone with a device, they stay paired unless you unpair them.
Your phone scans for and displays the IDs of all available Bluetooth devices in
range. If the device you want to pair with isn’t in the list, make it discoverable.
Connecting to a computer via USB
Once the mobile phone is connected to a PC with USB, the PC will charge the
mobile phone automatically. In such case, USB computer connection will appear
on your screen.
1. Drag the notification panel down and tap Charging this device via USB.
2. Select Use USB for File Transfer.
3. The device is recognized as a Removable Disk by the computer. Open the
folder and transfer or copy files from your phone to PC and vice-versa.
3.4 Using the Touch Screen
Touch-screen tips ➢ Touch To act on items on the screen, such as application and settings icons, to type letters and symbols using the onscreen keyboard, or to press onscreen buttons,
10
you simply touch them with your finger. ➢ Touch & hold Touch & hold an item on the screen by touching it and not lifting your finger until an action occurs. For example, to open a menu for customizing the Home screen, you touch an empty area on the Home screen until the menu opens. ➢ Drag Touch & hold an item for a moment and then, without lifting your finger, move your finger on the screen until you reach the target position.. ➢ Swipe or slide To swipe or slide, you quickly move your finger across the surface of the screen, without pausing when you first touch it (so you don’t drag an item instead). For example, you slide the screen up or down to scroll a list. Lock screen When Screen lock in Security setting is enabled, press Power key to lock the
handset. This helps to prevent accidental touching of keys and as well as power
saving. When Sleep function in Display setting is enabled, after the handset
device has been idle for preset period, the screen will be locked automatically to
save power.
Unlock screen Press Power key to switch on the handset device. The lock screen appears. Touch
and slide to up to unlock screen if there is no security lock.
3.5 Using the onscreen keypad
You enter text using the onscreen keyboard. Some applications open the keyboard automatically. In others, you touch a text field where you want to enter text to open the keyboard. To enter text Touch a text field, and the onscreen keyboard opens. Some applications open the keyboard automatically. In others, you touch a text field where you want to enter text to open the keyboard. Touch the keys on the keyboard to type. The characters you’ve entered appear in the text field, with suggestions for the word you are typing below. Use Delete Icon to erase characters to the left of the cursor. After finishing typing, touch Back icon to close the keyboard.
3.6 Dialing Calls
Dialing a call to a number in the contacts
Touch the Phone icon or the phone application icon on the Home screen, then select the Contacts tab. Swipe or slide upward/downward to pick out the target contact. Then you can touch the dial icon to originate a call. Dialing a call to a number in call log Touch the Phone icon or the phone application icon on the Home screen, then select the Recent call log tab. Swipe or slide upward/downward to pick out and touch the target contact. Then you can originate a call. Answering incoming calls Swipe up the Call icon to answer an incoming call.
11
Touch the Call End icon to end the current conversation. To reject an incoming call, swipe down the Call icon. Managing multiple calls If you accept a new call when you’re already on a call, you can swipe the Call icon
up to answer the current call.
4. Using the Menus
4.1 Calculator
You can use this Calculator to solve simple arithmetic problems or use its advanced option to solve more complex equations. Touch Clear to delete the last number or operator you entered. Touch & hold clear to delete everything in the display. In the calculator screen, you can touch upper right corner menu icon to clear history or choose theme etc.
4.2 Calendar
You can open Calendar to view events you’ve created Events from each account you’ve added to your phone and configured to synchronize calendars are displayed in Calendar.
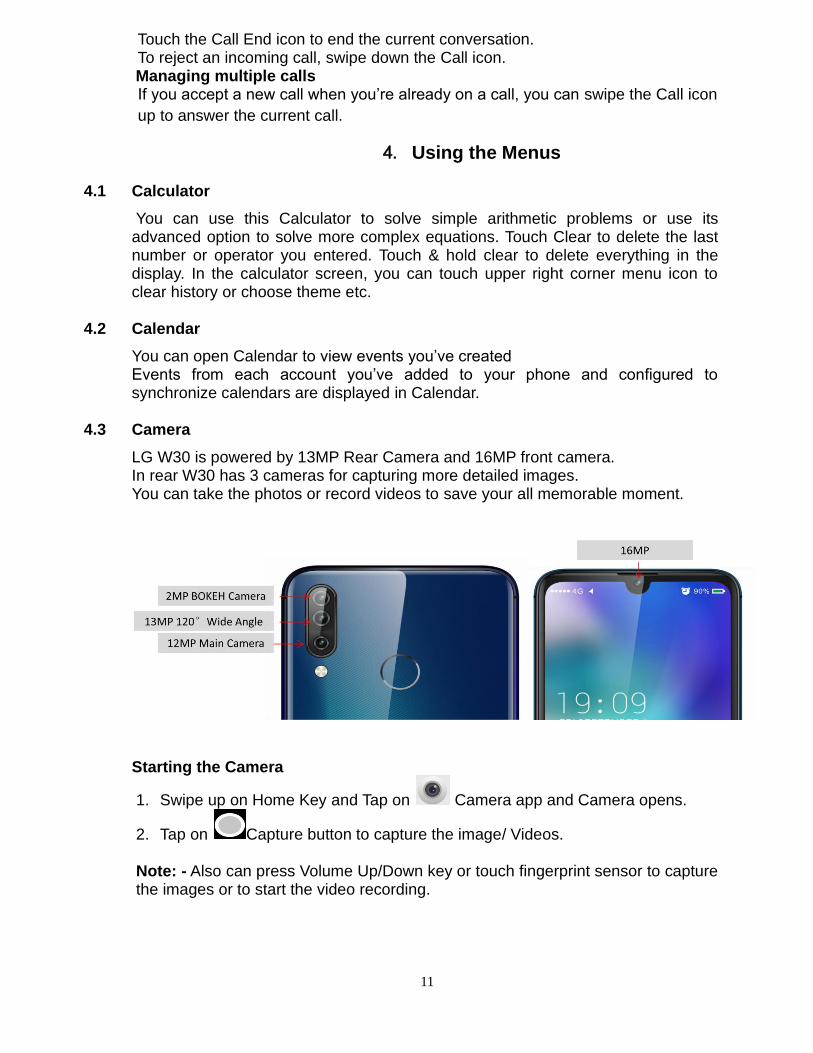
4.3 Camera
LG W30 is powered by 13MP Rear Camera and 16MP front camera. In rear W30 has 3 cameras for capturing more detailed images. You can take the photos or record videos to save your all memorable moment.
Starting the Camera
1. Swipe up on Home Key and Tap on Camera app and Camera opens.
2. Tap on Capture button to capture the image/ Videos. Note: - Also can press Volume Up/Down key or touch fingerprint sensor to capture the images or to start the video recording.
12
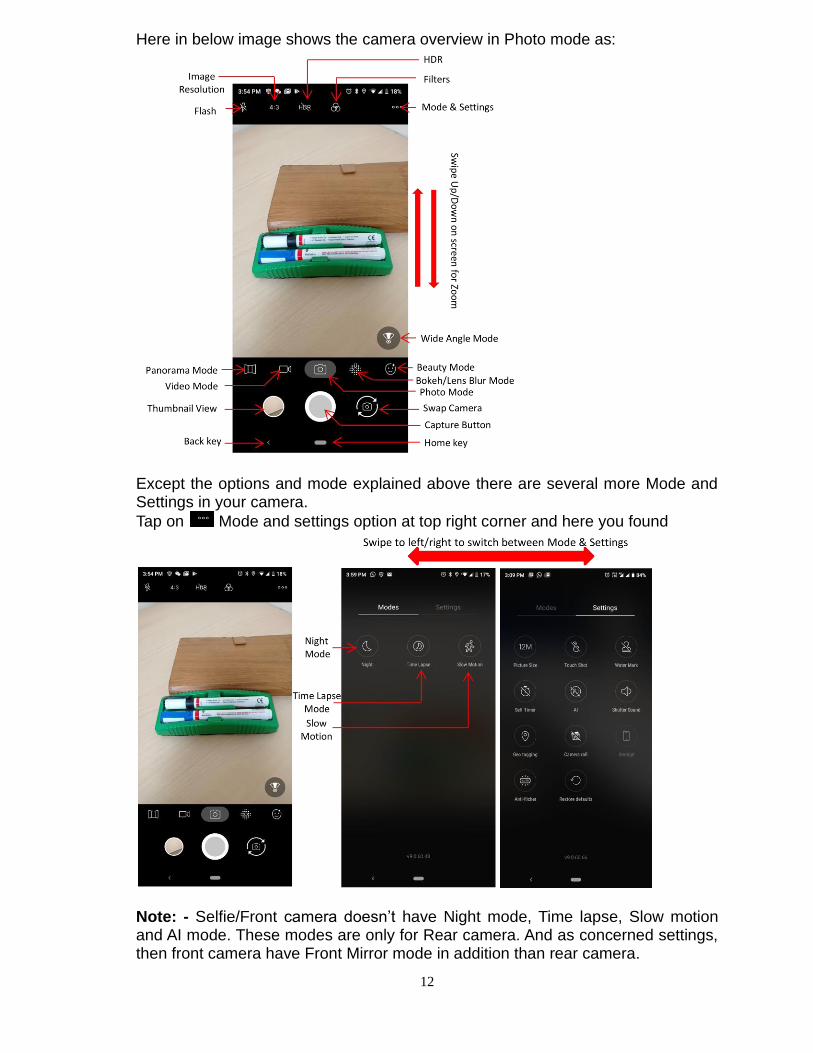
Here in below image shows the camera overview in Photo mode as:
Except the options and mode explained above there are several more Mode and Settings in your camera.
Tap on Mode and settings option at top right corner and here you found
Note: - Selfie/Front camera doesn’t have Night mode, Time lapse, Slow motion and AI mode. These modes are only for Rear camera. And as concerned settings, then front camera have Front Mirror mode in addition than rear camera.
13
Camera Modes & Settings
Mode/ Settings
Description Overview
Photo mode
Photo mode is for capturing images. It is same for both Front and Rear Camera.
Video Mode
Video mode is for recording videos. It is same for both Front and Rear Camera.
Bokeh Mode
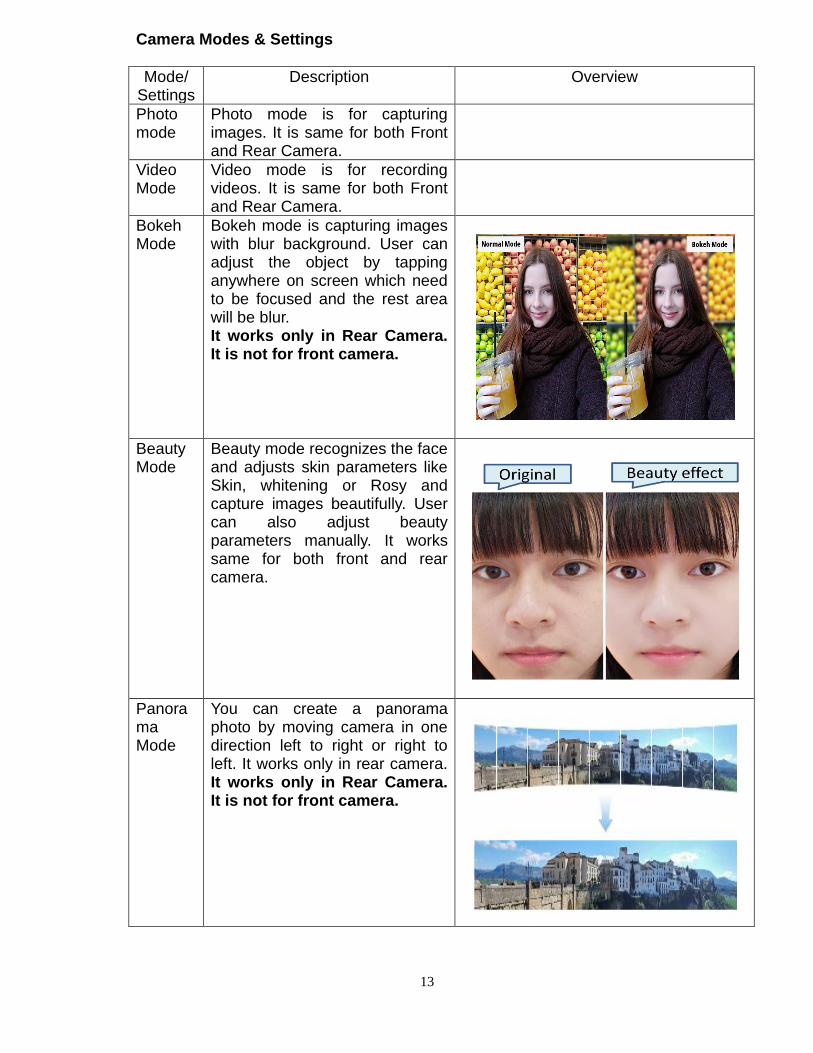
Bokeh mode is capturing images with blur background. User can adjust the object by tapping anywhere on screen which need to be focused and the rest area will be blur. It works only in Rear Camera. It is not for front camera.
Beauty Mode
Beauty mode recognizes the face and adjusts skin parameters like Skin, whitening or Rosy and capture images beautifully. User can also adjust beauty parameters manually. It works same for both front and rear camera.
Panorama Mode
You can create a panorama photo by moving camera in one direction left to right or right to left. It works only in rear camera. It works only in Rear Camera. It is not for front camera.
14
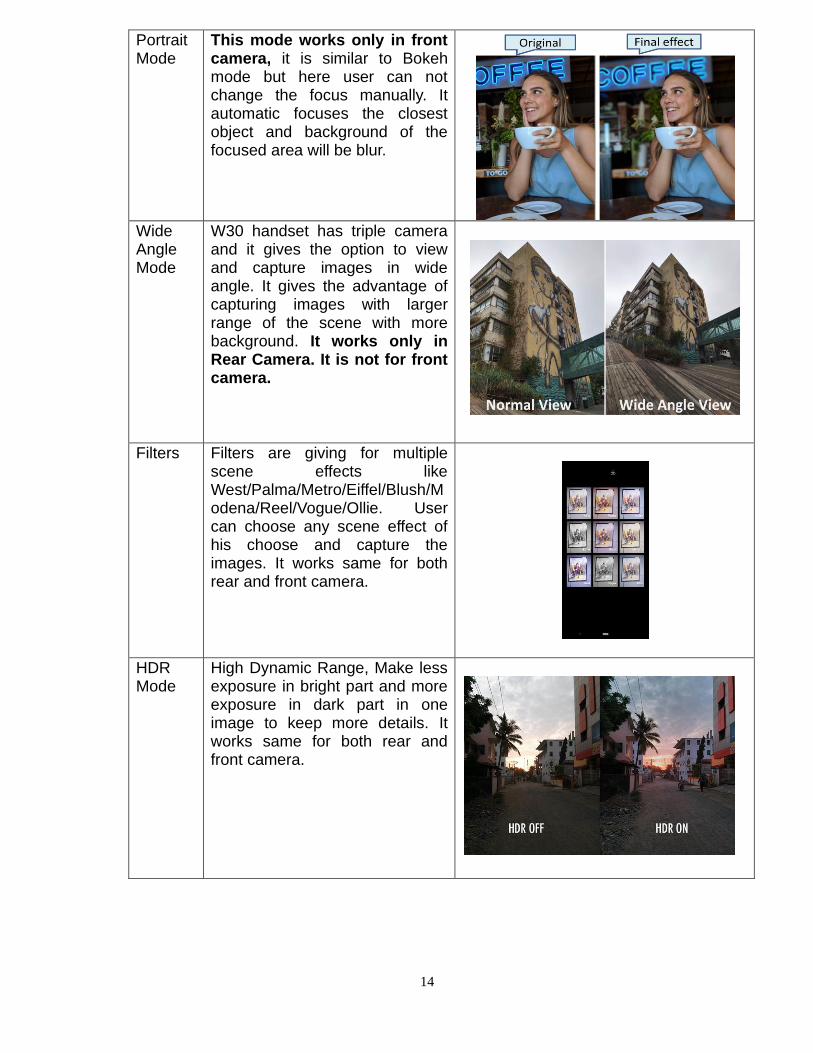
Portrait Mode
This mode works only in front camera, it is similar to Bokeh mode but here user can not change the focus manually. It automatic focuses the closest object and background of the focused area will be blur.
Wide Angle Mode
W30 handset has triple camera and it gives the option to view and capture images in wide angle. It gives the advantage of capturing images with larger range of the scene with more background. It works only in Rear Camera. It is not for front camera.
Filters Filters are giving for multiple scene effects like West/Palma/Metro/Eiffel/Blush/Modena/Reel/Vogue/Ollie. User can choose any scene effect of his choose and capture the images. It works same for both rear and front camera.
HDR Mode
High Dynamic Range, Make less exposure in bright part and more exposure in dark part in one image to keep more details. It works same for both rear and front camera.
15
Image Resolution
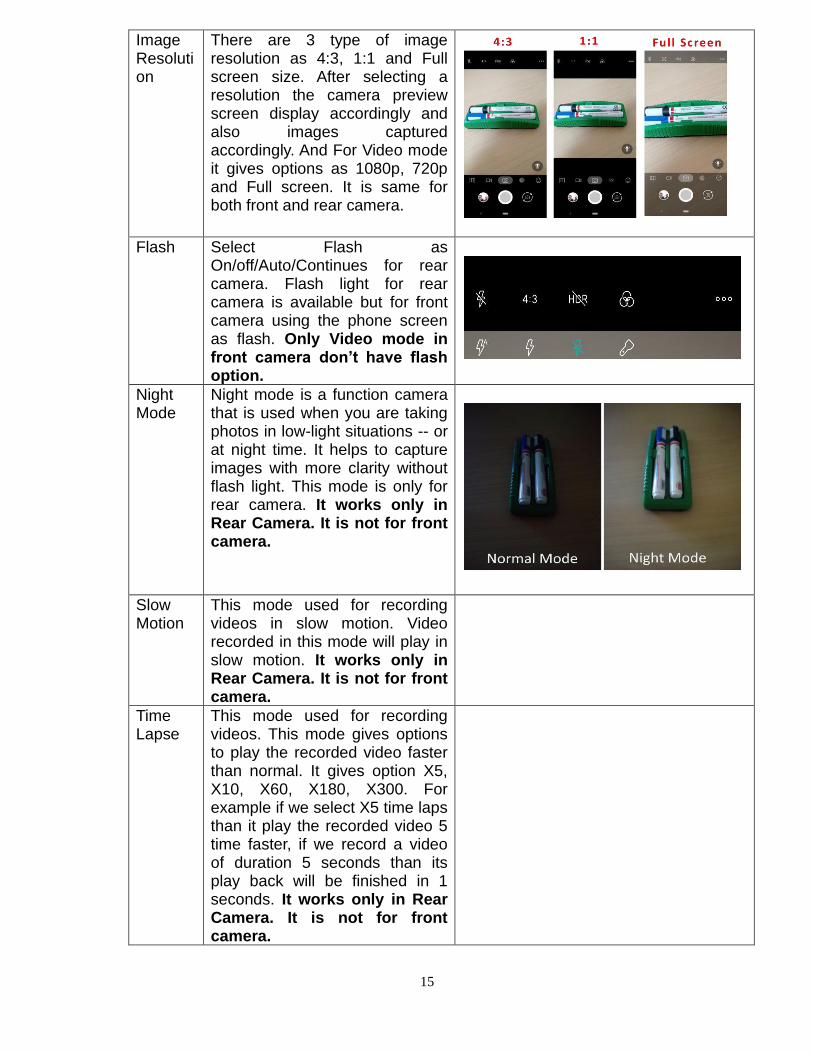
There are 3 type of image resolution as 4:3, 1:1 and Full screen size. After selecting a resolution the camera preview screen display accordingly and also images captured accordingly. And For Video mode it gives options as 1080p, 720p and Full screen. It is same for both front and rear camera.
Flash Select Flash as On/off/Auto/Continues for rear camera. Flash light for rear camera is available but for front camera using the phone screen as flash. Only Video mode in front camera don’t have flash option.
Night Mode
Night mode is a function camera that is used when you are taking photos in low-light situations -- or at night time. It helps to capture images with more clarity without flash light. This mode is only for rear camera. It works only in Rear Camera. It is not for front camera.
Slow Motion
This mode used for recording videos in slow motion. Video recorded in this mode will play in slow motion. It works only in Rear Camera. It is not for front camera.
Time Lapse
This mode used for recording videos. This mode gives options to play the recorded video faster than normal. It gives option X5, X10, X60, X180, X300. For example if we select X5 time laps than it play the recorded video 5 time faster, if we record a video of duration 5 seconds than its play back will be finished in 1 seconds. It works only in Rear Camera. It is not for front camera.
16
Touch Shot
To enable Touch shot can capture the image with touch anywhere on camera screen. It is same for both rear and front camera.
Water mark
To enable water mark can capture images with LG logo at right bottom side. It is same for both front and rear camera.
Self Timer
Self timer is option to capture images automatically after selected time interval. Here options are as 2s, 5s,10s and Off. It functions same for both front and rear camera.
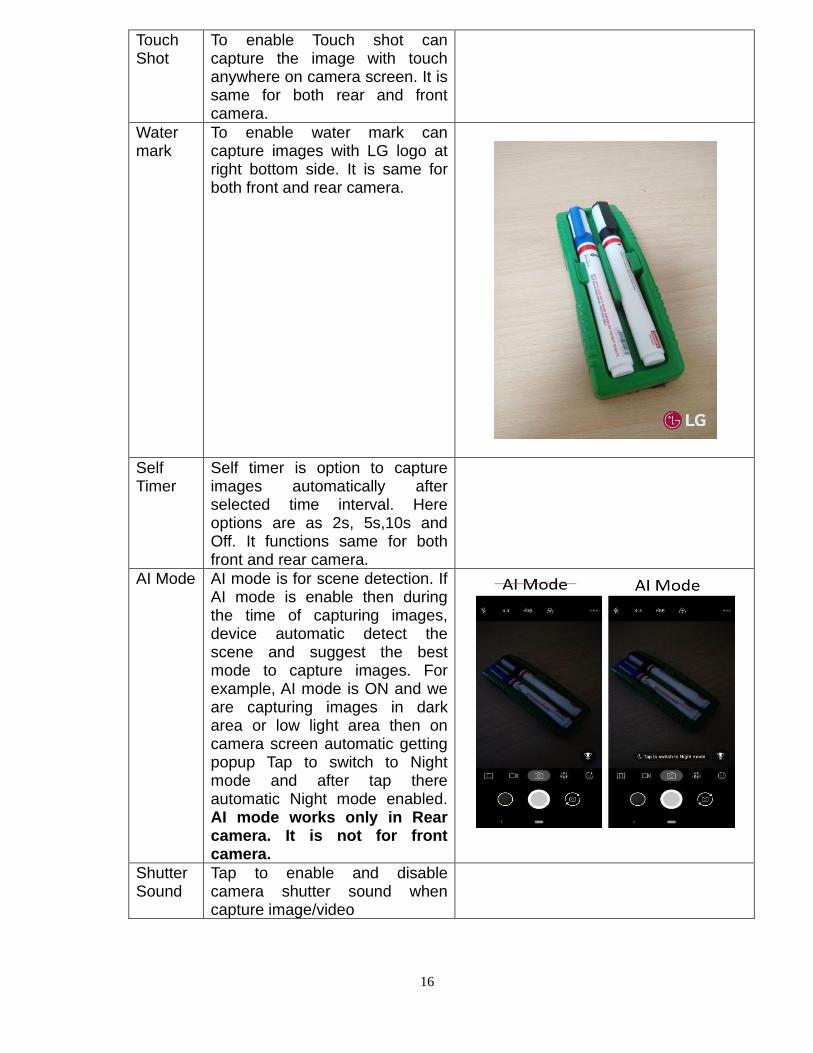
AI Mode AI mode is for scene detection. If AI mode is enable then during the time of capturing images, device automatic detect the scene and suggest the best mode to capture images. For example, AI mode is ON and we are capturing images in dark area or low light area then on camera screen automatic getting popup Tap to switch to Night mode and after tap there automatic Night mode enabled. AI mode works only in Rear camera. It is not for front camera.
Shutter Sound
Tap to enable and disable camera shutter sound when capture image/video
17
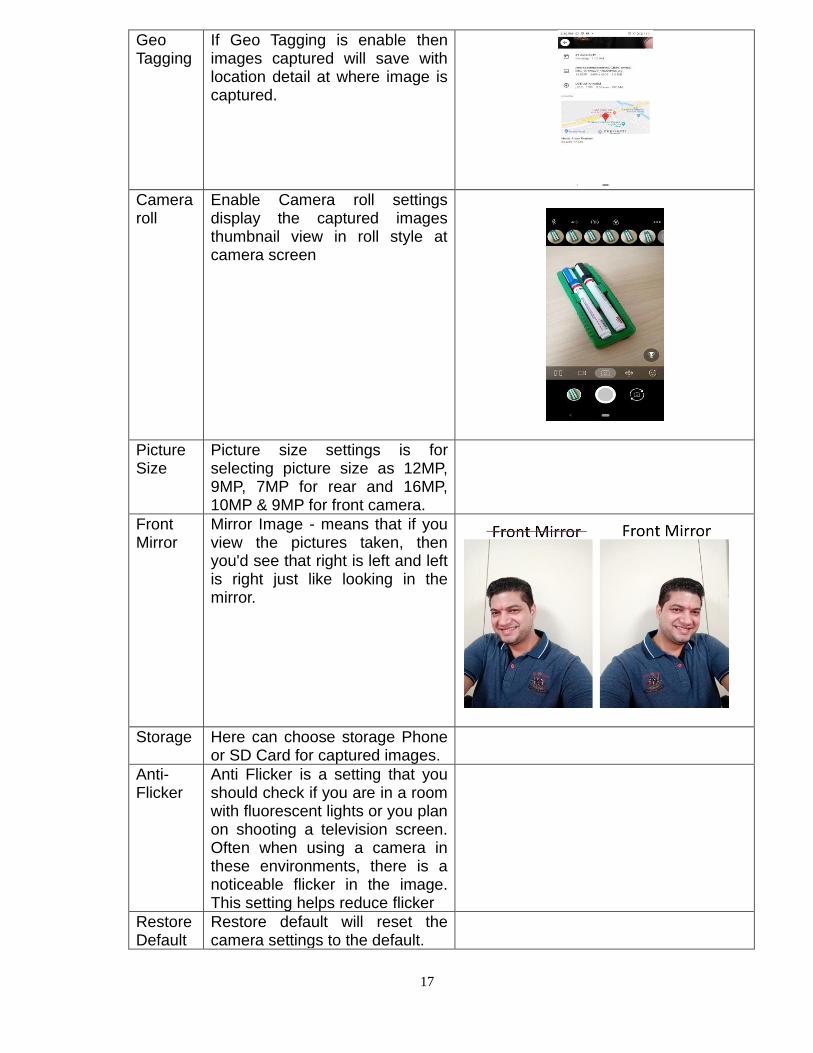
Geo Tagging
If Geo Tagging is enable then images captured will save with location detail at where image is captured.
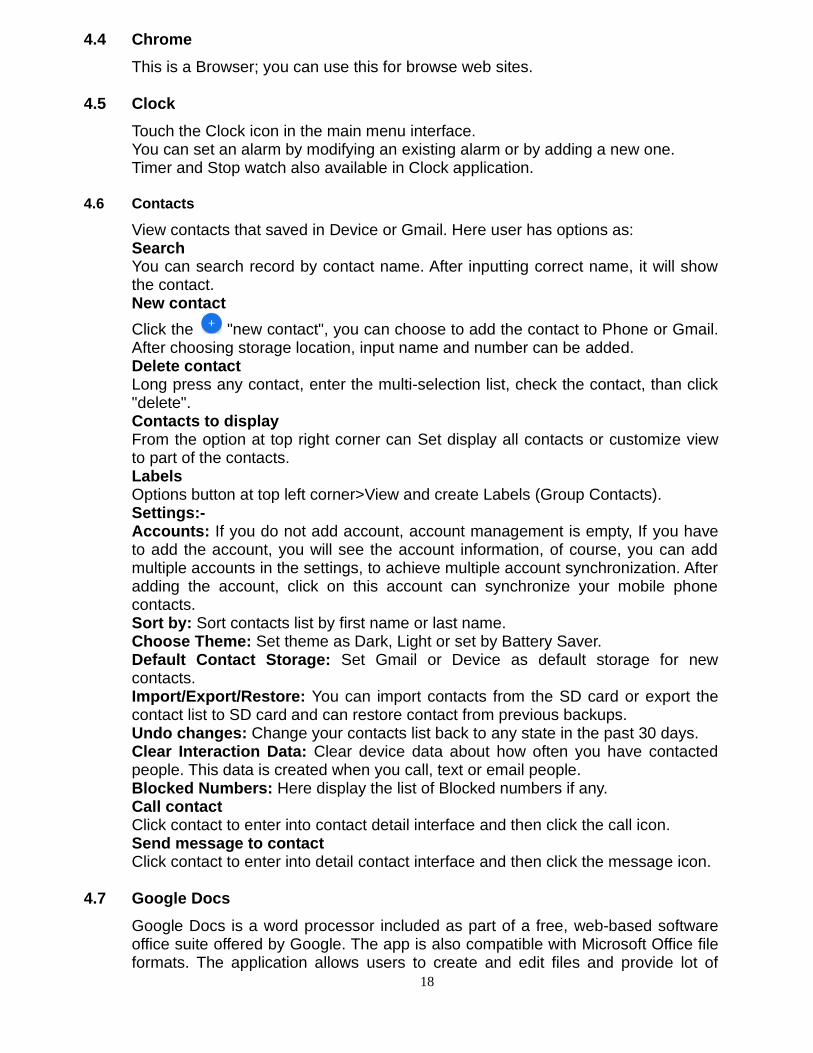
Camera roll
Enable Camera roll settings display the captured images thumbnail view in roll style at camera screen
Picture Size
Picture size settings is for selecting picture size as 12MP, 9MP, 7MP for rear and 16MP, 10MP & 9MP for front camera.
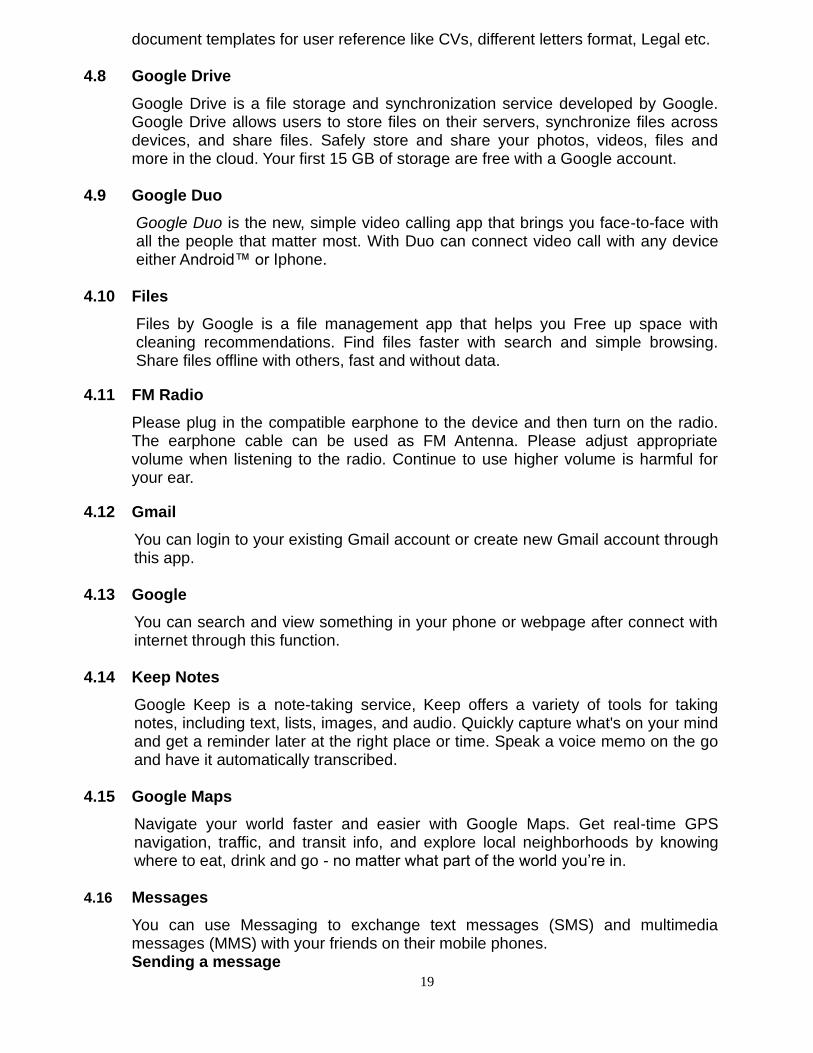
Front Mirror
Mirror Image - means that if you view the pictures taken, then you'd see that right is left and left is right just like looking in the mirror.
Storage Here can choose storage Phone or SD Card for captured images.
Anti-Flicker
Anti Flicker is a setting that you should check if you are in a room with fluorescent lights or you plan on shooting a television screen. Often when using a camera in these environments, there is a noticeable flicker in the image. This setting helps reduce flicker
Restore Default
Restore default will reset the camera settings to the default.
18
4.4 Chrome
This is a Browser; you can use this for browse web sites.
4.5 Clock
Touch the Clock icon in the main menu interface. You can set an alarm by modifying an existing alarm or by adding a new one. Timer and Stop watch also available in Clock application.
4.6 Contacts
View contacts that saved in Device or Gmail. Here user has options as: Search You can search record by contact name. After inputting correct name, it will show the contact. New contact
Click the "new contact", you can choose to add the contact to Phone or Gmail. After choosing storage location, input name and number can be added. Delete contact Long press any contact, enter the multi-selection list, check the contact, than click "delete". Contacts to display From the option at top right corner can Set display all contacts or customize view to part of the contacts. Labels Options button at top left corner>View and create Labels (Group Contacts). Settings:- Accounts: If you do not add account, account management is empty, If you have to add the account, you will see the account information, of course, you can add multiple accounts in the settings, to achieve multiple account synchronization. After adding the account, click on this account can synchronize your mobile phone contacts. Sort by: Sort contacts list by first name or last name. Choose Theme: Set theme as Dark, Light or set by Battery Saver. Default Contact Storage: Set Gmail or Device as default storage for new contacts. Import/Export/Restore: You can import contacts from the SD card or export the contact list to SD card and can restore contact from previous backups. Undo changes: Change your contacts list back to any state in the past 30 days. Clear Interaction Data: Clear device data about how often you have contacted people. This data is created when you call, text or email people. Blocked Numbers: Here display the list of Blocked numbers if any. Call contact Click contact to enter into contact detail interface and then click the call icon. Send message to contact Click contact to enter into detail contact interface and then click the message icon.
4.7 Google Docs
Google Docs is a word processor included as part of a free, web-based software office suite offered by Google. The app is also compatible with Microsoft Office file formats. The application allows users to create and edit files and provide lot of
19
document templates for user reference like CVs, different letters format, Legal etc.
4.8 Google Drive
Google Drive is a file storage and synchronization service developed by Google. Google Drive allows users to store files on their servers, synchronize files across devices, and share files. Safely store and share your photos, videos, files and more in the cloud. Your first 15 GB of storage are free with a Google account.
4.9 Google Duo
Google Duo is the new, simple video calling app that brings you face-to-face with all the people that matter most. With Duo can connect video call with any device either Android™ or Iphone.
4.10 Files
Files by Google is a file management app that helps you Free up space with cleaning recommendations. Find files faster with search and simple browsing. Share files offline with others, fast and without data.
4.11 FM Radio
Please plug in the compatible earphone to the device and then turn on the radio. The earphone cable can be used as FM Antenna. Please adjust appropriate volume when listening to the radio. Continue to use higher volume is harmful for your ear.
4.12 Gmail
You can login to your existing Gmail account or create new Gmail account through this app.
4.13 Google
You can search and view something in your phone or webpage after connect with internet through this function.
4.14 Keep Notes
Google Keep is a note-taking service, Keep offers a variety of tools for taking notes, including text, lists, images, and audio. Quickly capture what's on your mind and get a reminder later at the right place or time. Speak a voice memo on the go and have it automatically transcribed.
4.15 Google Maps
Navigate your world faster and easier with Google Maps. Get real-time GPS navigation, traffic, and transit info, and explore local neighborhoods by knowing where to eat, drink and go - no matter what part of the world you’re in.
4.16 Messages
You can use Messaging to exchange text messages (SMS) and multimedia messages (MMS) with your friends on their mobile phones. Sending a message
20
1. Touch message icon on the home screen and touch add new message icon to edit a new message. 2. Enter a contact’s name or number in the recipient field. As the information is
entered, all matching contacts appear. Touch a suggested contact or multiple contacts as message recipient(s).
3. Touch Enter message to compose your message. 4. After completing the message, touch Send icon to send your message. Note: - This handset supports multi regional languages. User can read and write messages in following languages: English, Hindi, Marathi, Punjabi, Tamil, Telugu, Malayalam, Bengali, Gujarati, Kannada, Assamese, kashmiri, Konkani, Manipuri, Nepali, Oriya, Sanskrit, Sindhi, Urdu, Bodo, Santali, Maithili and Dogri.
4.17 News
Google News is a smart news app that organizes what's happening in the world to help you learn more about the stories that matter to you. Stay up to date with Google News.
4.18 Phone
Dial a call to a number saved in your contacts or to the new number. Also can
check the recent call logs records. Three dots ( ) menu at the top right corner of
the screen for more options and settings like Call history, Calling accounts,
Contact Blacklist etc. Touch the dial pad icon, where you can input phone number
to originate a call.
4.19 Google Photos
Google Photos is the home for all your photos and videos, automatically organized
and easy to share. Also this app have Backup feature and gives users free,
unlimited storage for photos up to 16 megapixels and videos up to
1080p resolution.
4.20 Google Play Movies & TV
The app offers movies and television shows for purchase or rental, depending on
availability.
4.21 Google Play Music
Here you can subscribe music radio channels and enjoy music in online or offline
mode. Also can play music stored in your Phone or SD card storage.
4.22 Google Play Store
Enjoy millions of the latest Android apps, games, music, movies, TV, books,
magazines & more. Here you can search and download paid and free applications
and games of your interest and enjoy.
21
4.23 Settings
The Settings application contains most of the tools for customizing and configuring your phone as: Panic Button Swipe up on Home key>Settings>Panic button This feature is with On/Off facility, by default it is ON for user safety concerns. You can use this function to call Emergency number, 112 in Emergency situation. You can use this function by pressing Power key three times in quick succession; your phone will initiate the call to single emergency number 112. It will work in locked/unlocked mode without needing to enter your phone pass code. Network & Internet You can use Network & Internet settings to manage your SIM card settings, configure and manage connections to networks and devices by using Wi-Fi. Set up hotspot & tethering, Aeroplane mode, VPN and mobile networks in this interface. Swipe up on Home key>Settings>Network & Internet Wi-Fi
➢ On the settings screen, tap Network & Internet> Wi-Fi.
➢ Tap to activate it.
➢ Available Wi-Fi networks appear automatically.
➢ Select a network. • You may need to enter the network's Wi-Fi password.
• The device skips this process for previously accessed Wi-Fi networks. If you do not want to automatically connect to a certain Wi-Fi network, tap the network and then tap Forget network.
Wi-Fi preferences
Under Wi-Fi feature Wi-Fi preference feature is available, It gives options as
➢ Turn On Wi-Fi automatically – On/Off
Wi-Fi will turn back on near high quality saved networks, like your home network.
➢ Open Network notification – On/Off
Notify when a high quality public network is available. ➢ Switch to mobile data automatically – On/Off
Use mobile data when Wi-Fi has no Internet access. Data usage charges may apply.
➢ Install certificates Install certificates if required.
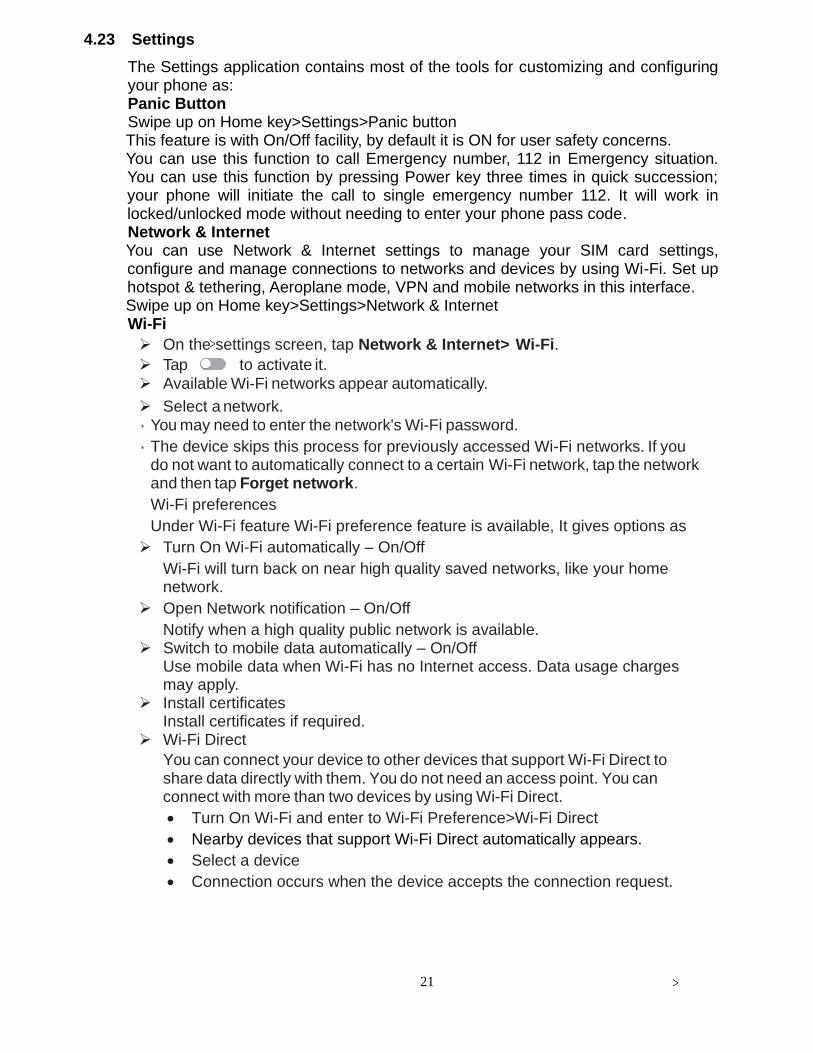
➢ Wi-Fi Direct
You can connect your device to other devices that support Wi-Fi Direct to share data directly with them. You do not need an access point. You can connect with more than two devices by using Wi-Fi Direct.
• Turn On Wi-Fi and enter to Wi-Fi Preference>Wi-Fi Direct
• Nearby devices that support Wi-Fi Direct automatically appears.
• Select a device
• Connection occurs when the device accepts the connection request.
22
Note: - The battery may drain fast using Wi-Fi Direct.
➢ MAC address Here MAC address information available.
➢ Saved Networks Here saved the previously connected Wi-Fi networks.
Mobile Network Here found options as: ➢ Mobile data – On/Off
Access data using mobile network ➢ Roaming – On/Off
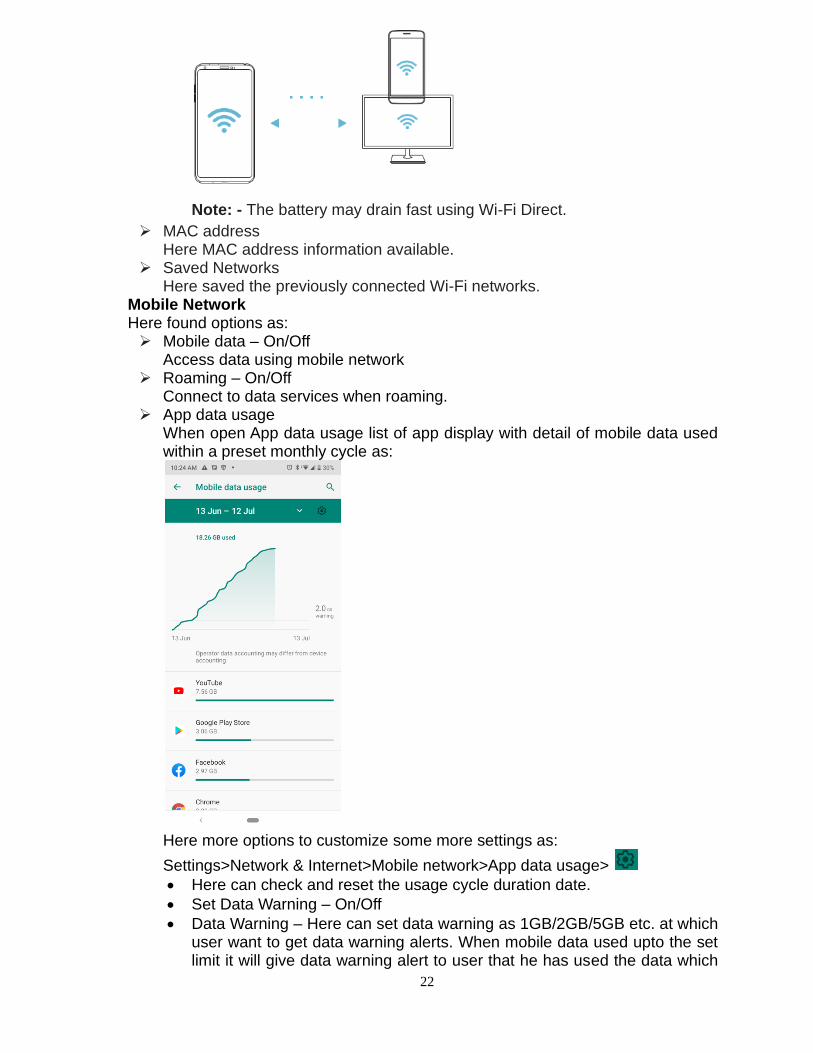
Connect to data services when roaming. ➢ App data usage
When open App data usage list of app display with detail of mobile data used within a preset monthly cycle as:
Here more options to customize some more settings as:
Settings>Network & Internet>Mobile network>App data usage>
• Here can check and reset the usage cycle duration date.
• Set Data Warning – On/Off
• Data Warning – Here can set data warning as 1GB/2GB/5GB etc. at which user want to get data warning alerts. When mobile data used upto the set limit it will give data warning alert to user that he has used the data which
23
he set in Data warning option.
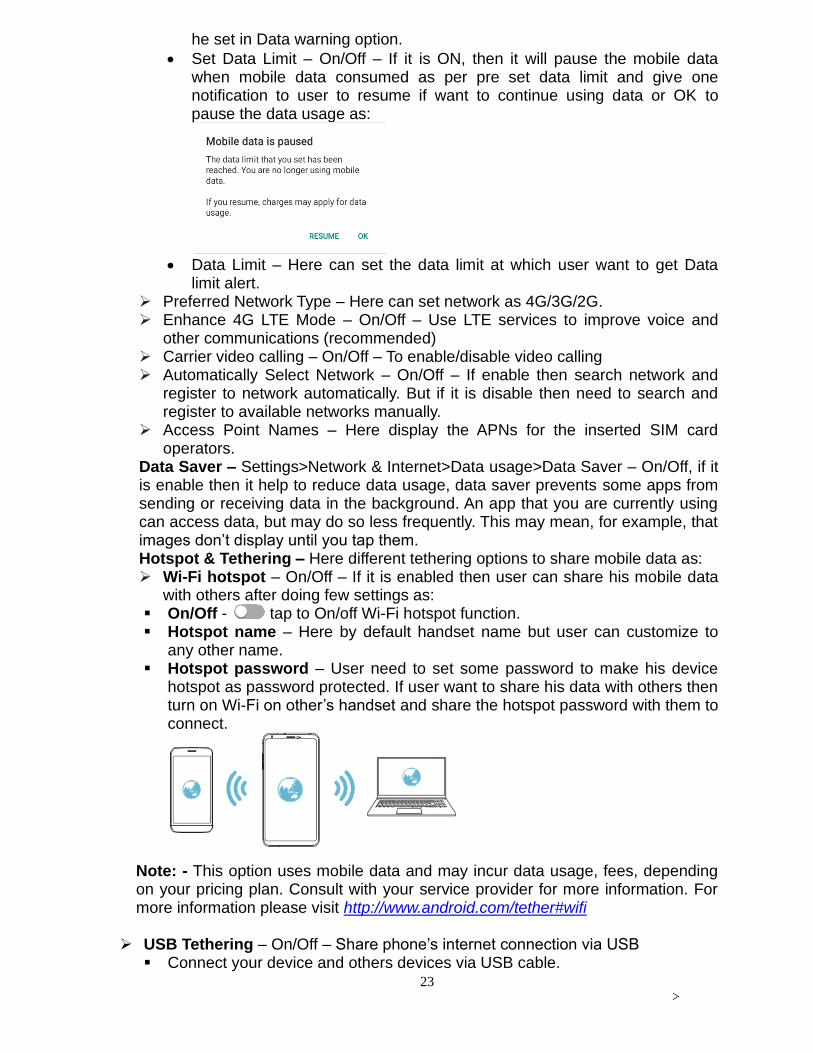
• Set Data Limit – On/Off – If it is ON, then it will pause the mobile data when mobile data consumed as per pre set data limit and give one notification to user to resume if want to continue using data or OK to pause the data usage as:
• Data Limit – Here can set the data limit at which user want to get Data
limit alert. ➢ Preferred Network Type – Here can set network as 4G/3G/2G. ➢ Enhance 4G LTE Mode – On/Off – Use LTE services to improve voice and
other communications (recommended) ➢ Carrier video calling – On/Off – To enable/disable video calling ➢ Automatically Select Network – On/Off – If enable then search network and
register to network automatically. But if it is disable then need to search and register to available networks manually.
➢ Access Point Names – Here display the APNs for the inserted SIM card operators.
Data Saver – Settings>Network & Internet>Data usage>Data Saver – On/Off, if it is enable then it help to reduce data usage, data saver prevents some apps from sending or receiving data in the background. An app that you are currently using can access data, but may do so less frequently. This may mean, for example, that images don’t display until you tap them. Hotspot & Tethering – Here different tethering options to share mobile data as: ➢ Wi-Fi hotspot – On/Off – If it is enabled then user can share his mobile data
with others after doing few settings as: ▪ On/Off - tap to On/off Wi-Fi hotspot function. ▪ Hotspot name – Here by default handset name but user can customize to
any other name. ▪ Hotspot password – User need to set some password to make his device
hotspot as password protected. If user want to share his data with others then turn on Wi-Fi on other’s handset and share the hotspot password with them to connect.
Note: - This option uses mobile data and may incur data usage, fees, depending on your pricing plan. Consult with your service provider for more information. For more information please visit http://www.android.com/tether#wifi
➢ USB Tethering – On/Off – Share phone’s internet connection via USB ▪ Connect your device and others devices via USB cable.

24
▪ On the settings screen Network & Internet>Hotspot & tethering>USB tethering
▪ Tap to activate it
Note: - 1. This option uses mobile data and may incur data usage, fees, depending on your pricing plan. Consult with your service provider for more information. 2. When connecting to a computer, download the USB driver from www.lg.com and install it on the computer. 3. You cannot send or receive files between your device and a computer while USB tethering is turned on. Turn Off USB tethering to send or receive files. 4. Operating system that support tethering are Window Xp or higher or Linux.
➢ Bluetooth Tethering – Share phone’s Internet connection via Bluetooth. A
Bluetooth-connected device can connect to the Internet by using your device’s mobile data with few settings as: ▪ On the settings screen, tap Network & Internet>Hotspot & tethering>Bluetooth
Tethering ▪ Tap to activate it. ▪ Turn on Bluetooth on both devices and pair them.
Note: - This option uses mobile data and may incur data usage fees, depending on your pricing plan. Consult with your service provider for more information. For more information is available http://www.android.com/tether#Bluetooth_tethering SIM Cards Here save the SIM settings as: ▪ SIM 1/SIM2 – Enable/Disable, change SIM name and theme color. ▪ Mobile Data – Save here preferred SIM1 or SIM2 for mobile data ▪ Calls – Save here preferred SIM as SIM1 or SIM2 for outgoing calls. ▪ SMS messages – Save here preferred SIM as SIM1/SIM2 for sending
messages. Aeroplane mode – On/Off – To enable/disable aeroplane mode. VPN - You can connect to a safe virtual network, such as intranet. You can also manage connected virtual private networks. Add VPN as:
1. On the settings screen tap Network & Internet>VPN
2. Tap on + option at top right corner and Add VPN
3. Enter VPN details and save it. Configuring VPN settings as:
1. Tap a VPN from the VPSs list.
25
2. Enter the VPN user account details and tap CONNECT Note: - This feature is available only when the screen lock is activated. If the screen lock is deactivated, a notification screen appears. Tap CHANGE from the notification screen to activate the screen lock. See Setting a screen lock for details.
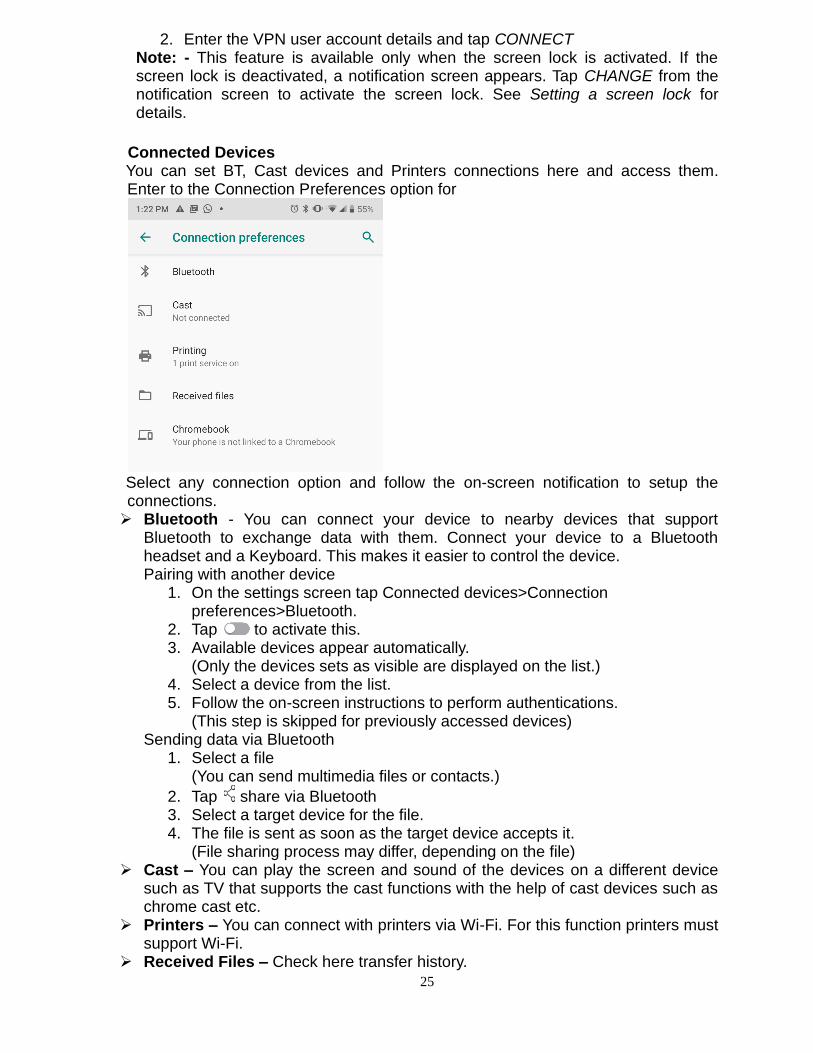
Connected Devices You can set BT, Cast devices and Printers connections here and access them. Enter to the Connection Preferences option for
Select any connection option and follow the on-screen notification to setup the connections. ➢ Bluetooth - You can connect your device to nearby devices that support
Bluetooth to exchange data with them. Connect your device to a Bluetooth headset and a Keyboard. This makes it easier to control the device. Pairing with another device
1. On the settings screen tap Connected devices>Connection preferences>Bluetooth.
2. Tap to activate this. 3. Available devices appear automatically.
(Only the devices sets as visible are displayed on the list.) 4. Select a device from the list. 5. Follow the on-screen instructions to perform authentications.
(This step is skipped for previously accessed devices) Sending data via Bluetooth
1. Select a file (You can send multimedia files or contacts.)
2. Tap share via Bluetooth 3. Select a target device for the file. 4. The file is sent as soon as the target device accepts it.
(File sharing process may differ, depending on the file) ➢ Cast – You can play the screen and sound of the devices on a different device
such as TV that supports the cast functions with the help of cast devices such as chrome cast etc.
➢ Printers – You can connect with printers via Wi-Fi. For this function printers must support Wi-Fi.
➢ Received Files – Check here transfer history.
26
➢ Chromebook – Link devices so that yo can text from your computer, share your phone’s internet connection and simplify unlocking. Use your Chromebook to setup. For more information visit http://support.google.com/chromebook
Apps & Notifications Here you can check all the applications as recent, default and system apps of device and can check screen time for the recent apps, On/Off/Change notification sound, check apps permissions and special access for the apps. Battery You can view your battery status, battery percentage, battery level and battery use in this interface. And you can set up various setting like ➢ Battery Saver – On/Off – If enable then to extend battery life, Battery saver turns
off some device features and restricts apps. ➢ Adaptive Battery – On/Off – If enabled, it will limit battery for apps that you don’t
use often. To extend battery life, Adaptive Battery limits battery for infrequently used apps. Your phone will learn how you use apps over time. Notifications may be delayed for these apps.
➢ Battery Percentage – On/Off – Show battery percentage in status bar. Display Here you can customize various display settings as ➢ Notch style – Here can choose notch style as Default/Water Drop/Hide the notch. ➢ Brightness level – Here can set display brightness from 0-100% ➢ Screen Color Mood – Adjust your screen color mode with available option. ➢ Night Light – On/Off – If enabled, Night Light tints your screen amber. This makes
it easier to look at your screen or read in dim light, and may help you fall asleep more easily.
➢ Adaptive brightness – On/Off – If enabled, your screen brightness will automatically adjust to your environment and activities. You can move the slider manually to help adaptive brightness learn your preferences.
➢ Wallpaper – Choose wallpapers from Live wallpapers/Photos/system wallpapers. ➢ Sleep time – Set sleep time from the available options. ➢ Notification light – On/Off notification light for Missed events/App
notifications/Charging/Charging full/Battery low. ➢ One-handed mode – Here user found instruction as how to activate One-handed
mode and how to use this mode. ➢ Auto rotate screen – On/Off auto rotate screen. ➢ Swap button – It gives option to swap functions of Back and recent key. ➢ Font size – Here user can change font size of text. ➢ Display size – With display size user can make the items on screen smaller or
larger. Some apps may change position. ➢ Screen saver – Set screen saver as clock/colours/Photos and condition for the
screen saver as while charging/while docked/while charging or docked/Never. ➢ Lift to wake – On/Off – If enabled then when you pick the device from sleep
mode then it automatically wake up as you lift the device. ➢ Device theme - Here options to choose device theme as Dark/Light/Automatic
(based on wallpaper) Sound Here you can customize ➢ Volume level for Media/Call volume/Ringtone volume of Incoming
calls/Notification ringtone volume/Alarm volume. ➢ Also Vibrate for calls – On/Off – If enabled then phone will vibrate also for
27
Incoming calls. ➢ Do not disturb – On/Off – If enabled it will mute the sound & notifications but
allow alarm and media, No visual or sound from notifications, Calls from starred contacts and repeat callers and no messages, events & reminders. User can customize its duration and also its behavior.
➢ Phone Ringtone – Here user can customize the SIM1 and SIM 2 incoming calls ringtone. User can customized ringtone from the available system tone options and also from the music/audio files available in phone storage or SD card.
➢ Default Notification Sound - Here user can customize the notification sound from the available system tone options and also from the music/audio files available in phone storage or SD card.
➢ Default Alarm Sound - Here user can customize the Alarm sound from the available system tone options and also from the music/audio files available in phone storage or SD card.
➢ Other sounds and Vibrations – On/Off Dial pad tones, Screen locking sounds, Charging sounds, Touch sounds and Touch vibrations.
Storage Use the Storage settings to monitor the used and available space on your phone and on your SD card and to manage your space. Security & Location You can set the parameters about security through this function as: ➢ Device security – Here options are as:
▪ Screen lock – Here user can set screen lock as None/Swipe/Pattern/PIN/Password.
▪ Face unlock – Here in face unlock settings add your face and use your face to unlock your device.
▪ Fingerprint - Here in fingerprint settings save and setup your fingerprint as your screen lock.
▪ Smart Lock – Here more smart options to keep your device safe with options available as Smart lock with On-body detection, Trusted places, Trusted devices, trusted face and voice match.
Note: - Please understood the instructions carefully of Smart lock before use. ➢ Privacy – Here options are as:
▪ Location – On/Off you device location. ▪ Show passwords – Display character briefly as you type password to unlock
screen. ▪ Device admin apps – Here only one device admin app as Find My Device. It
is useful to lock or erase data in case device is lost. ▪ SIM Card Lock – Set up SIM lock password with the help of SIM PIN. If you
don’t know your SIM PIN, please contact with your operator services and get your PIN.
▪ Except above options few more options as Encryption & credentials, Trusted agents and screen pinning are available in Security settings.
Accounts Here you can check your configured accounts on device for and also add and delete any configured account. Accessibility You use the Accessibility settings to configure any accessibility plug-ins you have installed on your phone and other options like Magnification mode, Color inversion, Power button end calls, Three fingers screenshot etc. Memory

28
You can view total memory; average used (%) and free memory. Digital Wellbeing Digital Wellbeing features is a feature which helps telling which apps you're spending too much time and you can limit your usage to a particular application by set a timer on the application. Google Here you will found google account security settings and other services settings as location, search assistant & voice, setup nearby device etc. Dura Speed Helps boost foreground app speed by restricting background apps. Works only when there is a foreground app. Allow apps here for which you want instant messages alert. System ➢ Language & input - Use the Language & Input settings to select the language
for the text on your phone and for configuring the input method. Open the Language & Input option>Language>Add a language>Select a language from the list. Now selected language will display in the Language preference list. Here select the preferred language and drag it to the top position to use selected language as phone’s default language.
➢ Gestures – Enable Swipe up on Home button to switch apps and if disable will switch to three button interfaces as Back, Home and Recent key.
➢ Date & time - You can use Date & Time settings to set your preferences for how dates are displayed. You can also use these settings to set your own time and time zone, rather than obtaining the current time from the network, etc.
➢ Smart Action – Here gives few smart actions as wake up screen with double tap, Flip to mute the ringtone of incoming calls or lock screen by double tap on home button.
➢ Smart Gestures - This menu about Gesture settings. There are different Gesture as c, o, m etc. You can set up any gesture for the listed application there and then write gesture letter on the screen when device is in sleep mode to wake up your device and to quickly open the application.
➢ Backup – Here can enable or disable backup your data to Google drive, if enable, the google drive will backup of your gmail, apps, contacts, SMS etc.
➢ Reset - Reset your phone in this interface as Erase all data or Reset wifi, mobile & network settings or reset app preference.
➢ Multiple Users - User can create multiple guest/user using this option. ➢ System Update – Check here for any new update if any software update
available here and then update. ➢ About phone - This function enables you to view some phone related
information like software info, IMEI info, serial number, SAR info etc.
4.24 Sheets
Create, edit, and collaborate with others on spreadsheets from your device with the Google Sheets app. With Google Sheets Open, edit, and save Excel files.
4.25 SIM Toolkit
Here you will find SIM Services.
29
4.26 Slides
Create, edit, and collaborate with others on presentations from your device with the Google Slides app. With Google Slides you can Open, edit, and save PowerPoint files.
4.27 Sound Recorder
Use this function to record audio files and can check recorded audio files.
4.28 YouTube
Here you can watch videos of your choice after data is connected.
4.29 Google Assistant
Your device has the Google Assistant built in. Ask it questions. Tell it to do things. It’s your own personal Google. Touch and hold Home key and then you will see "Hi, how can I help?" after which you can say your voice command. Note: - The Google assistant is not available in all languages.
5. Appendix 5.1 FAQ
If you find exceptions when operating the mobile phone, restore the factory settings and then refer to the following table to solve the problem. If the problem persists, contact the distributor or service provider.
Fault Cause Solution
SIM card error
The SIM card is damaged.
Contact your network service provider
The SIM card is not in position.
Check the SIM card
The metal face of the SIM card is polluted.
Clean the SIM card with a clean cloth
Poor received signal quality
Signals are obstructed. For instance, radio waves cannot be effectively transmitted nearby a high building or in a basement.
Move to a place where signals can be effectively transmitted
Line congestions occur when you use the mobile phone in high-traffic hours
Avoid using the mobile phone in high-traffic hours
30
Device Over heat
Gaming for long
periods of time
Streaming content
for hours like
YouTube or Netflix
etc.
Your settings aren’t
optimal like Screen
brightness on full
blast? Animated
wallpaper? Widgets,
widgets
everywhere?
Use less power like Low Power Mode or Battery Saver Mode or Battery optimization to reduces the amount of power your phone is using and can also help preserve your phone’s battery life.
Dim your screen brightness — Keeping the screen at a reasonable brightness (not full blast) will take some strain off your phone’s battery (and your eyes).
Turn off Wi-Fi, GPS, and Bluetooth — Disabling battery-draining features such as these gives your phone a break, allowing it to cool down.
Environmental factors etc.
Used wrong charger
for charging battery.
Avoid direct sunlight Charge your phone correctly with appropriate charger.
Restart your phone — Occasionally restarting your phone can help prevent overheating due to minor software problems.
The mobile phone cannot be powered on
The battery energy is exhausted.
Charge the battery
31
Calls cannot be dialed
Call barring is activated
Cancel call barring
The mobile phone cannot connect the network
The SIM card is invalid
Contact your network service provider
The mobile phone is not in a service area of the GSM network
Move to the network operator's service area
The signal is weak Move to a place where the signal quality is high
The battery cannot be charged
The charging voltage does not match the voltage range indicated on the charger
Ensure the charging voltage matches the voltage range indicated on the charger
An improper charger is used
Use the charger specially designed for the mobile phone
Poor contact Ensure the charger plug is in good contact with the mobile phone
5.2 Phone software update
LG Mobile phone software update from the Internet LG Mobile phone software update from the Internet. For more information about using this function, please visit http://www.lg.com/common/index.jsp, select your country and language. This feature allows you to conveniently update the firmware on your phone to a newer version from the Internet without needing to visit a service center. This feature will only be available if and when LG makes a newer firmware version available for your device. Because the mobile phone firmware update requires the user’s full attention for the duration of the update process, please make sure you check all instructions and notes that appear at each step before proceeding. Please note that removing the USB cable during the upgrade may seriously damage your mobile phone. Note: - LG reserves the right to make firmware updates available only for selected models at its own discretion and does not guarantee the availability of the newer version of the firmware for all handset models. LG Mobile Phone software update via Over-the-Air (OTA) This feature allows you to conveniently update your phone’s software to a newer version via OTA, without connecting a USB cable. This feature will only be available when LG makes a newer firmware version available for your device. To perform the phone software update
32
Settings>System>Advanced>System Update>Check for update.
Note: - Your personal data from internal phone storage including information about your Google account and any other accounts, your system/application data and settings, any downloaded applications and your DRM license might be lost in the process of updating your phone’s software. Therefore, LG recommends that you backup your personal data before updating your phone’s software. LG does not take responsibility for any loss of personal data. This feature depends on the area or service provider.
5.3 Disposal of Your Old Appliance (As per e-waste rule)
The WEEE logo (shown at the left) appears on the product (handset, and charger) to indicate that this product must not be disposed of or dumped with your other
household wastes. You are liable to dispose of all your electronic or electrical waste equipment by relocating over to the specified collection point for recycling of such hazardous waste. Collection and proper recovery of your electronic waste equipment at the time of disposal will allow us to help preserve the environment. Recycling of the electronic waste equipment will ensure safety of human health and environment. For more information on best practices for disposal of electronic and electrical waste, please visit to our web site: http://www.lge.com/in Note: - LGE will not bear any responsibility for any incompliance with the above-mentioned guidelines or improper usage of the mobile phone.
5.4 Open Source Software Notice Information
To obtain the source code under GPL, LGPL, MPL, and other open source licenses, that is contained in this product, please visit http://opensource.lge.com. In addition to the source code, all referred license terms, warranty disclaimers and copyright notices are available for download. LG Electronics will also provide open source code to you on CD-ROM for a charge covering the cost of performing such distribution (such as the cost of media, shipping, and handling) upon email request to [email protected]. This offer is valid for a period of three years after our last shipment of this product. This offer is valid to anyone in receipt of this information.
5.5 Regulatory information (Regulation ID number, BIS Mark, E-Labeling etc.)
For regulatory details, go to Settings>System>About Phone>Regulatory Labels
5.6 LG Bridge
LG Bridge overview LG Bridge is an app that helps you manage the photos, music, videos and documents saved on your LG Smartphone from your computer conveniently. You can back up contacts, photos and more to the computer or update the device software. Note: - See LG Bridge help for details. The supported features may vary depending on the device. LG USB driver is a necessary program to connect your LG smartphone with the computer and is installed when you install LG Bridge.
33
LG Bridge functions 1. Manage the files on the device from a computer via Wi-Fi connection or mobile
data connection. 2. Back up data from the device to a computer or restore data from a computer to
the device via USB cable connection. 3. Update the device software from a computer via USB cable connection.
Installing LG Bridge on a computer 1. Go to www.lg.com from your computer. 2. Select your region and click . 3. In the search bar, enter the name of your device. 4. Click Support Manuals & Downloads. 5. In the Software & Firmware, Click PC Sync and download the setup file. 6. Click Details to view the minimum requirements for installing LG Bridge.
5.7 Customer Information Center
For any query related to after sales service, you may please contact us on the numbers listed below.
5.8 Trademarks
➢ Copyright ©2019 LG Electronics, Inc. All rights reserved. LG and the LG logo are registered trademarks of LG Group and its related entities.
➢ GoogleTM, Google MapsTM, GmailTM, YouTubeTM, Google DuoTM, Google PlayTM, AndroidTM, ChromeTM, Google PhotosTM, Google Play ProtectTM, Google CalendarTM, Google DocsTM, Google DriveTM, Google SheetsTM and other related marks and logos are trademarks of Google LLC.
➢ Bluetooth® is a registered trademark of Bluetooth® SIG, Inc. worldwide.
➢ Wi-Fi® and the Wi-Fi logo are registered trademarks of the Wi-Fi Alliance.
➢ All other trademarks and copyrights are the property of their respective owners.


![LM Pro 2.0 User Guide [English 20050518]](https://img.pdfslide.us/doc/110x75/589442081a28ab9a628b7eba/lm-pro-20-user-guide-english-20050518.jpg)


