Embed Size (px)
Citation preview

User Guide Revision 9.11
ii
TABLE OF CONTENTS
CHAPTER 1: INTRODUCTION ..............................................................................1-1
ABOUT THIS GUIDE ...................................................................................................1-1 CUSTOMER SUPPORT .................................................................................................1-1
HOW DOES LENDER‟S OFFICE WORK? .......................................................................1-2 TRAINING ..................................................................................................................1-2
SYSTEM REQUIREMENTS ............................................................................................1-3
CHAPTER 2: GETTING STARTED ........................................................................2-1
LOGGING IN TO LENDER‟S OFFICE ..............................................................................2-1 PIPELINE ...................................................................................................................2-2
Navigation Bar .....................................................................................................2-3 Assigned Loans .....................................................................................................2-3
Folder Tabs ..........................................................................................................2-4 Search Tools .........................................................................................................2-4
All Branch Statistics .............................................................................................2-5 Published Reports .................................................................................................2-6
SETTING UP YOUR COMPANY ....................................................................................2-7 General Settings ...................................................................................................2-7
System Options .....................................................................................................2-8 Credit Reports .................................................................................................... 2-10
Loan Naming Scheme ......................................................................................... 2-10 Password Options ............................................................................................... 2-11
ECOA Address .................................................................................................... 2-12 Fair Lending ....................................................................................................... 2-12
SETTING UP BRANCH LOCATIONS ............................................................................ 2-13 SETTING UP EMPLOYEES ......................................................................................... 2-14
Creating Employee Accounts .............................................................................. 2-14 System Access ..................................................................................................... 2-16
Roles .................................................................................................................. 2-18 Relationships ...................................................................................................... 2-20
Permissions ........................................................................................................ 2-21 Access Level................................................................................................... 2-22
Access Permissions ......................................................................................... 2-22 Loan Event Notification .................................................................................. 2-24
Editing an Employee Account ............................................................................. 2-25
Editing Multiple Employee Accounts................................................................... 2-26 Exporting the Employee List ............................................................................... 2-29
Edit the Default Role Permissions ....................................................................... 2-30 SYSTEM TEMPLATES................................................................................................ 2-31
Loan Templates .................................................................................................. 2-31 Creating Loan Templates ................................................................................ 2-31
Using Loan Templates .................................................................................... 2-31 Editing & Deleting Loan Templates ................................................................ 2-32

iii
Closing Cost Templates ...................................................................................... 2-33 Creating Closing Cost Templates .................................................................... 2-33
Using Closing Cost Templates ........................................................................ 2-34 Print Group Templates ....................................................................................... 2-35
Creating Print Groups ..................................................................................... 2-35 Using Print Groups ......................................................................................... 2-36
CHAPTER 3: WORKING WITH LOAN FILES .....................................................3-1
CREATING NEW LOANS .............................................................................................3-1
Navigating the Loan File ......................................................................................3-2 Quick Navigation Bar Layout ...............................................................................3-4
This Loan Info ......................................................................................................3-7 FILLING OUT THE LOAN APPLICATION .......................................................................3-8
Adding Multiple Borrowers ..................................................................................3-9 Creating Linked Loans........................................................................................ 3-10
ORDERING CREDIT REPORTS .................................................................................... 3-12 LIABILITIES ............................................................................................................. 3-15
NON-REAL ESTATE ASSETS ..................................................................................... 3-16 REAL ESTATE OWNED (REO) .................................................................................. 3-17
Creating New REO Records................................................................................ 3-17 Linking REO to Mortgage Liabilities .................................................................. 3-18
GENERAL TRACKING ............................................................................................... 3-19 Changing the Loan Status ................................................................................... 3-19
Tracking Documents ........................................................................................... 3-20 Keeping a Conversation Log ............................................................................... 3-20
AGENTS .................................................................................................................. 3-21 Assigning Internal Employees ............................................................................. 3-21
Adding Official Contacts..................................................................................... 3-22 PRINTING DOCUMENTS ............................................................................................ 3-25
Installing ePrint .................................................................................................. 3-26 Printing with ePrint ............................................................................................ 3-28
Saving and Printing Documents as PDF Files .................................................... 3-29 MANAGING MULTIPLE LOAN FILES .......................................................................... 3-30
Managing Loans from the Pipeline ..................................................................... 3-30 Managing Loans from Advanced Search ............................................................. 3-32
WORKING WITH LEAD FILES .................................................................................... 3-34 Creating Lead Files ............................................................................................ 3-34
Changing the Lead Status ................................................................................... 3-35 Assigning a Lead File ......................................................................................... 3-36
Converting a Lead File to a Loan File ................................................................ 3-36
CHAPTER 4: IMPORTING AND EXPORTING LOAN FILES ............................4-1
DOWNLOADING BROWSERXT ....................................................................................4-1 IMPORTING LOAN FILES .............................................................................................4-3
Importing files from Calyx Point ...........................................................................4-3 Importing Files from Fannie Mae .........................................................................4-5
Importing MISMO 2.3 Files ..................................................................................4-6
iv
EXPORTING TO FANNIE MAE ......................................................................................4-7 EXPORTING TO CALYX POINT ....................................................................................4-9
BATCH EXPORTING TO CALYX POINT ....................................................................... 4-10
CHAPTER 5: TASKS ................................................................................................5-1
THE TASKS FOLDERS .................................................................................................5-1 Your Tasks ............................................................................................................5-2
Tracked Tasks .......................................................................................................5-3 Tasks in Your Loans .............................................................................................5-4
CREATING A TASK .....................................................................................................5-5 Creating Tasks from Pipeline ................................................................................5-5
Creating Tasks within a Loan File ........................................................................5-7 TRACKING LOAN FILE ACTIVITIES USING TASKS ........................................................5-8
Create a Conversation Log in a Loan Template ....................................................5-8 Recording Activities in the Conversation Log ..................................................... 5-10
Viewing Activities in the Conversation Log ......................................................... 5-10 PRINTING THE TASK LIST ......................................................................................... 5-11
Saving the Task List to a PDF file ....................................................................... 5-11 Printing the Task List using ePrint ...................................................................... 5-12
CHAPTER 6: CUSTOM REPORTS .........................................................................6-1
VIEWING CUSTOM REPORTS ......................................................................................6-1
SAMPLE REPORTS ......................................................................................................6-3 CREATING AND EDITING CUSTOM REPORTS ...............................................................6-4
Selecting Custom Report Fields ............................................................................6-5 Field Functions.....................................................................................................6-7
Sorting Order .......................................................................................................6-8 Grouping Order ....................................................................................................6-8
Simple Groups ..................................................................................................6-8 Crossed Groups .............................................................................................. 6-10
Creating Conditions ........................................................................................... 6-12 Simple Conditions .......................................................................................... 6-13
Complex Conditions ....................................................................................... 6-15 Setting Date Range ............................................................................................. 6-18
Viewing, Printing, and Exporting Reports ........................................................... 6-19

Chapter 1: Introduction
Welcome and congratulations on choosing Lender‟s Office, the industry‟s most advanced
web-based loan management system. Our goal is to help you become more efficient,
more effective, and more successful using the powerful features of Lender‟s Office.
Lender‟s Office allows you to expand your opportunities and keep you constantly
connected to the information you need to run your business.
As a web-based system, Lender‟s Office is completely free of traditional software,
allowing you to access your information from any Internet-connected computer. Whether
you‟re a loan officer that‟s constantly on the move, or a manager that needs to know
what‟s going on, Lender‟s Office gives you real-time access to loan file information from
virtually anywhere in the world.
About This Guide
This guide is an overall reference manual that covers many features of the Lender‟s
Office system. Depending on an individual‟s employee account setup, certain features
may or may not be accessible or available. Please contact your system administrator for
additional information.
Customer Support
We‟re here to help! We offer several ways for you to contact us for customer or
technical support at no cost to you.
1. Instant Support: If your issue is urgent, click the Instant Support link to chat
directly with our Support Team.
2. E-mail us: If you have a non-urgent question, suggestion, or comment regarding
Lender‟s Office, please click on the Feedback/Question link. A Technical
Support Team Member will contact you shortly.
3. Call us directly: If you‟d rather speak directly with our staff, feel free to call our
toll free number, (888) 285-3912, from 8AM to 5PM (Pacific Standard Time).
Figure 1: Instant Support and Feedback Email links

1-2
Figure 2: Web-based networking model
How Does Lender’s Office Work?
Lender‟s Office is a Web-based system that doesn‟t require any software or local servers
to operate. Using only Microsoft‟s Internet Explorer Web-browser, Lender‟s Office
allows you to access all your critical business information from any Internet-connected
computer, whether you‟re in your office, at home, or anywhere else in the world (see
Figure 2).
Information is stored centrally at the Insight Lending Solutions data processing center,
providing a single point of access to business and loan file information that can be shared
in real-time with any other member of your organization.
Training
Contact Insight Lending Solutions to schedule training for you or your staff by sending
an email to [email protected] or calling us at (888) 285-3912. Best of
all, training and technical support is provided at no cost to you!

1-3
System Requirements
Lender‟s Office is a Web-based system. That means you do not have to install any
software onto your computer. Any machine capable of browsing the Internet can use
Lender‟s Office. The following are some of our recommendations for an optimal
experience while using Lender‟s Office.
Recommended Computer System Specifications:
Operating System: Windows 98, 2000, XP, and Vista
Monitor Resolution: 800 x 600 or greater
RAM: 256 MB or greater
Hard drive space: No hard drive space is required
Internet connection: Broadband connection strongly recommended for best
performance (DSL, cable modem, T1)
Third Party Applications:
Microsoft Internet Explorer 5.5 and higher
Microsoft Word
Adobe Reader 6.0 and higher
Microsoft Excel (optional)
Internet Explorer 5.5 – Internet Explorer 6.x Browser Settings:
The security settings within Internet Explorer may be set up in a way that conflicts with
the operation of Lender‟s Office. If you are having technical problems using Lender‟s
Office, we suggest you do the following before contacting our Technical Support team.
Pop-up Blockers: Lender‟s Office is affected by pop-up blocker features found
in many commonly used add-on tools such as those offered by Yahoo! and
Google. We strongly suggest you set your preferences to allow your browser to
display pop-ups from the www.lendersoffice.com website.
Figure 3: Yahoo toolbar Pop-up Blocker

1-4
Temporary Internet Files: Certain settings in Lender‟s Office may not be
functioning properly because of the way Internet Explorer is instructed to handle
Temporary Internet Files. Follow these steps to correct this issue.
1. On the Internet Explorer menu bar, go to the Tools option and select
Internet Options…
2. Click Settings… inside the Temporary Internet files area (see Figure 4)
Figure 4: Temporary Internet files settings
3. Select the Automatically option under the Check for newer versions of
stored pages: list. Then, click OK to save the setting.
Figure 5: Automatically check for new versions of stored pages
Internet Explorer Trusted Sites: There are some instances where your web
browser‟s security setting will restrict some functionality with Lender‟s Office.
We recommend that you add the Lender‟s Office website to Internet Explorer‟s
Trusted sites so you won‟t experience any unnecessary difficulties. Follow these
steps to add Lender‟s Office to your trusted sites.
1. On the Internet Explorer menu bar, go to the Tools option and select
Internet Options…
2. Click on the Security tab located on the top of the window.
3. Click on the Trusted sites icon (green circle with white check mark).
4. Click on the Sites button.
5. Type https://secure.lendersoffice.com into the Add this Web site... box.
6. Click Add, and then OK.

1-5
Internet Explorer 7 Browser Settings:
For those of you who have upgraded to the Internet Explorer 7 Web browser and have
come across some technical issues with operating Lender‟s Office, here are some
suggestions to deal with those IE7 quirks and get Lender‟s Office up and running again.
Add Lender’s Office to the Trusted Sites Zone: Just like in previous versions of
Internet Explorer, some Web browser security settings may be preventing you
from using Lender‟s Office. Many times, adding us to your Trusted Sites Zone
will be enough to get you back to business.
1. From Internet Explorer 7, pull down the Tools menu, located on the upper
right side of the window, and click on Internet Options… (see Figure 6). This
will open the Internet Options area.
Figure 6: Opening the Internet Options area in Internet Explorer 7
2. Click on the Security tab located on the top of the window.
3. Click on the green check mark Trusted sites icon (see Figure 7).
Figure 7: Internet Explorer Security Tab

1-6
4. Click on the Sites button located on the right side of the window (see Figure 7).
5. Type https://secure.lendersoffice.com into the Add this Web site to the zone
box (see Figure 8). Be sure that the address begins with “https”, not “http”.
Figure 8: Enter Lender's Office URL into the Trusted Sites Zone
6. Click Add. The Lender‟s Office address you entered in Step 5 should now be
seen inside the Websites box (see Figure 9).
Figure 9: Confirm that the address is added to the Websites box
7. Click Close to close the Trusted sites list.
8. Click OK to close the Internet Options area.
9. Close all your Internet Explorer 7 windows and then open a new Internet
Explorer 7 window to access Lender‟s Office. Confirm the successful
addition of Lender‟s Office by the Trusted sites icon and text near the lower-
right corner of the browser window.

Chapter 2: Getting Started
The goal of this chapter is to get familiar with some of the basic screen views and
functions of Lender‟s Office. Sometimes, jumping in is the best way to learn. So fire up
your web browser and let‟s get you set up.
Logging in to Lender’s Office
To begin using Lender‟s Office, type www.lendersoffice.com into the Internet Explorer
address bar. On the upper right corner of the screen, click Login to go to the Lender‟s
Office login screen (see Figure 10).
Figure 10: Lender's Office home page
On the login screen, type in your login name and password, then click Login.
Figure 11: Lender's Office login page

2-2
Pipeline
After logging into Lender‟s Office, the first screen presented to you is the Pipeline (see
Figure 12). The Pipeline is the main hub of all Lender‟s Office functions. Creating new
loans, managing employee accounts, running reports, and everything in between can be
done from the Pipeline screen.
Figure 12: The Pipeline screen
The Pipeline screen can be broken up into four major areas:
Navigation Bar
Assigned Loans
Folder Tabs
Search Tools
There are also two minor areas located below Search Tools:
All Branch Statistics
Published Reports
2-3
Navigation Bar
The left side of the Pipeline contains the Navigation Bar, where different functions of the
system are accessed. They are organized into seven sections:
Loans: Functions related to creating and managing loan files, including importing
loan files from other Loan Originating Systems (LOS).
Leads: Create lead files.
Corporate Admin: Set up company and employee information, system
preferences, and Lender‟s Office billing information.
Price My Loan: Applicable only to PriceMyLoan customers.
Your Settings: Manage your individual settings and preferences.
Reporting: Create, view, and edit custom management reports.
Loan Programs: Setup and manage internal loan programs, closing cost
templates, and price groups.
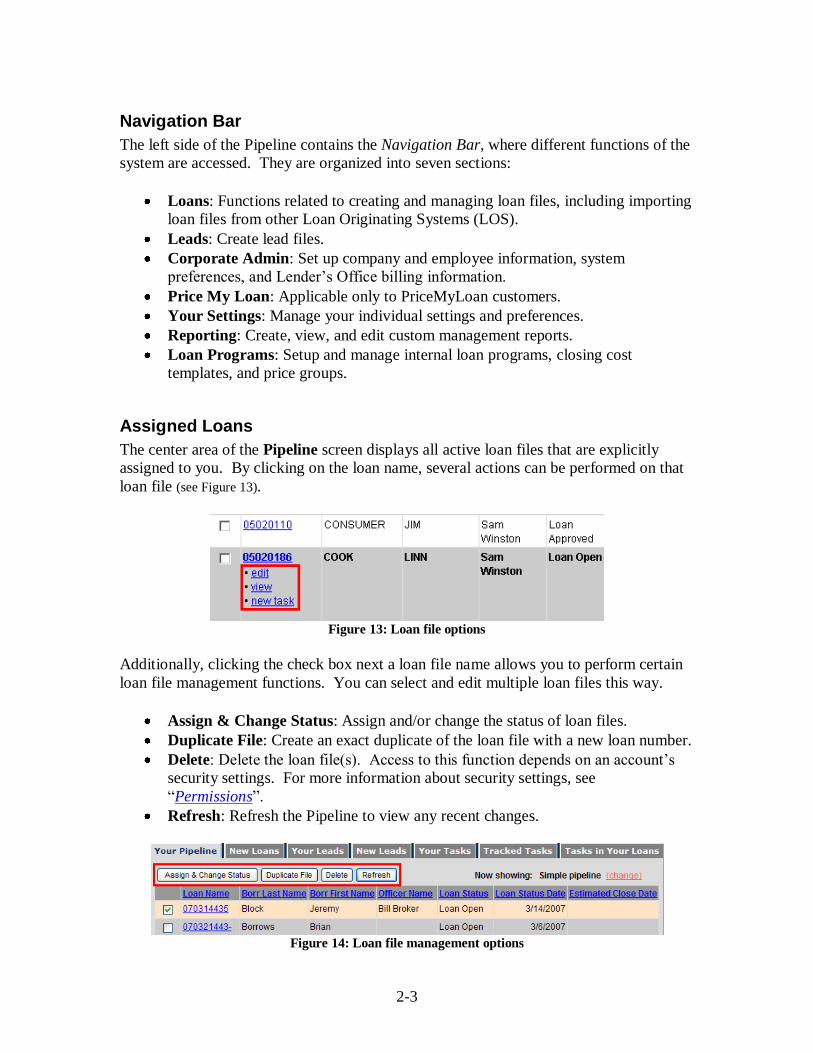
Assigned Loans
The center area of the Pipeline screen displays all active loan files that are explicitly
assigned to you. By clicking on the loan name, several actions can be performed on that
loan file (see Figure 13).
Figure 13: Loan file options
Additionally, clicking the check box next a loan file name allows you to perform certain
loan file management functions. You can select and edit multiple loan files this way.
Assign & Change Status: Assign and/or change the status of loan files.
Duplicate File: Create an exact duplicate of the loan file with a new loan number.
Delete: Delete the loan file(s). Access to this function depends on an account‟s
security settings. For more information about security settings, see
“Permissions”.
Refresh: Refresh the Pipeline to view any recent changes.
Figure 14: Loan file management options

2-4
Folder Tabs
The center of the Pipeline screen is organized into different folder tabs, providing quick
and direct access to the following screens:
Your Pipeline: This default folder tab displays all active loans currently assigned
to you.
Your Leads (Call Center Agent role only): Displays all active leads currently
assigned to you.
New Loans (Manager role only): Displays all Open status loans that are not
assigned to any loan officer.
New Leads (Manager role only): Displays all New status leads that are not
assigned to any Call Center Agent.
Your Tasks*: Displays all tasks that have been created by you, or are currently
assigned to you.
Tracked Tasks*: Displays all tasks that you have selected to track.
Tasks in Your Loans*: Displays all tasks associated with all of your assigned
loans, including tasks that were created by others and were not assigned to you.
* For more information about tasks, see Chapter 5: Tasks.
Search Tools
The upper right side of the Pipeline screen contains the Search Tools area. The Search
Tools allow you to find loans that are not assigned to you or are in an inactive status.
There are two types of searches that can be run: Search and Advanced Search.
Figure 15: Search Tools area
Search: This feature allows you to type in certain details about a loan for quick
access to loans that match that search criteria (see Figure 15). The drop down box
allows you to search for loans by:
o Loan Number
o Borrower First Name
o Borrower Last Name
o Social Security Number
o Property Address
You can type in partial searches for even easier access. For example, instead of
typing „SMITH‟ to search by borrower last name, you can just type „SM‟.
Lender‟s Office will retrieve all loan files with the borrower last name that starts
with „SM‟, such as „SMITH‟, „SMILEY‟, „SMART‟, etc.

2-5
Figure 16: Advanced Search screen
Advanced Search: The Advanced Search feature (see Figure 16) lets you search for
a loan or group of loans using a specific set of criteria. In Figure 16, a search is
being run on all loans that are currently in a “Loan Submitted” status that belong
to the Main Branch.
All Branch Statistics
The All Branch Statistics section gives you a brief look at how active all of your
employees have been within the selected time period. This section will display statistics
such as the number of open loans, submitted loans, new leads, and many others.
1. From the Pipeline screen, locate the All Branch Statistics section on the right
side (see Figure 17).
Figure 17: All Branch Statistics section
2. Select one of the following time periods from the list (see Figure 17):
Last 7 days
This month
Previous month
Previous 2 months
Previous 3 months
Year to date
Previous year

2-6
3. Each statistic entry is also a clickable link. In Figure 17, if you would like to see
a listing of the seven new lead files, you would click on the 7 Lead New link.
4. If the statistics are not as current as you would like, click Update Statistics to
display the most current statistics (see Figure 17). The time stamp should reflect the
new current statistics time.
The All Branch Statistics section is only accessible for Lender‟s Office users who have
both the Manager role and the Corporate access level. For more information to enable
those two settings, see the “Roles” and “Access Level” sections.
Published Reports
The Published Reports section is made up of custom reports that have been designated
to be published. All users are able to see these published reports but only those
employees with the proper permission enabled on their account are allowed to create
published reports. To learn more about account permissions, see “Permissions”. For
more information about custom reports, see Chapter 6: Custom Reports.
If you already have the publishing reports permission enabled on your account, follow
these steps to publish a report.
1. From the Pipeline screen, click on the Published Reports link under the
Reporting section of the Navigation Bar.
Figure 18: Published Reports link
2. The Manage Your Published Reports screen should appear (see Figure 19).
Figure 19: Manage Your Published Reports screen
2-7
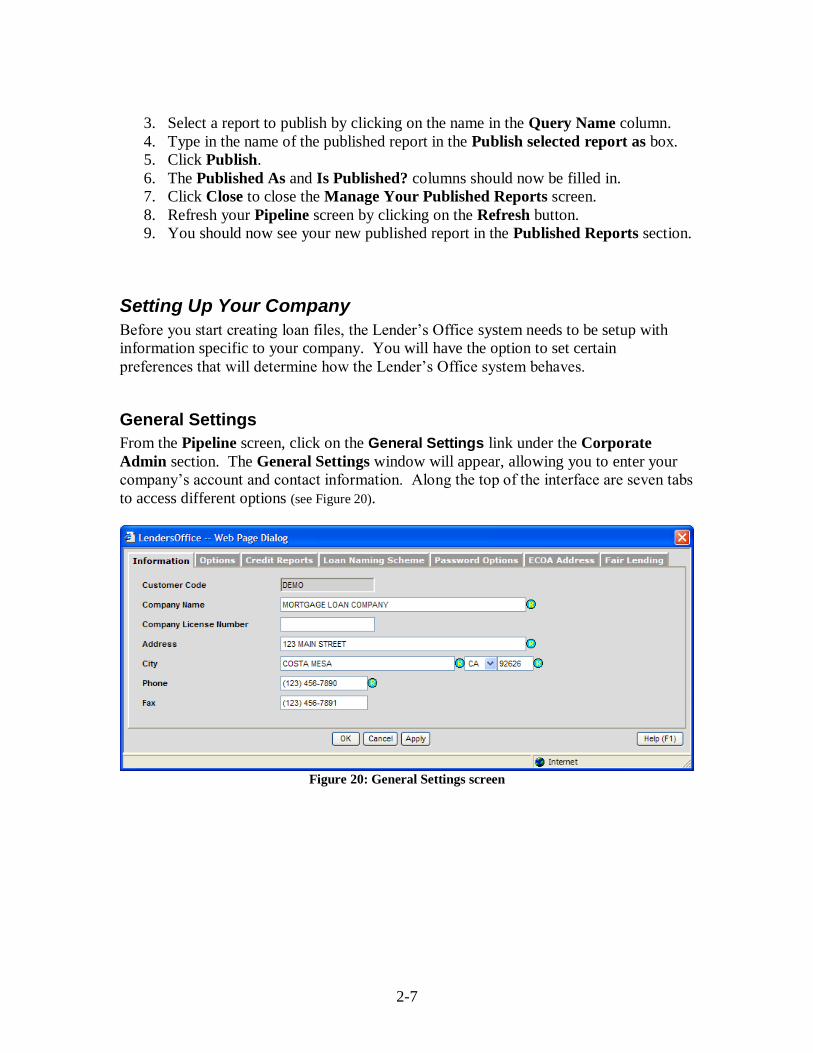
3. Select a report to publish by clicking on the name in the Query Name column.
4. Type in the name of the published report in the Publish selected report as box.
5. Click Publish.
6. The Published As and Is Published? columns should now be filled in.
7. Click Close to close the Manage Your Published Reports screen.
8. Refresh your Pipeline screen by clicking on the Refresh button.
9. You should now see your new published report in the Published Reports section.
Setting Up Your Company
Before you start creating loan files, the Lender‟s Office system needs to be setup with
information specific to your company. You will have the option to set certain
preferences that will determine how the Lender‟s Office system behaves.
General Settings
From the Pipeline screen, click on the General Settings link under the Corporate
Admin section. The General Settings window will appear, allowing you to enter your
company‟s account and contact information. Along the top of the interface are seven tabs
to access different options (see Figure 20).
Figure 20: General Settings screen

2-8
System Options
The Options tab contains general preferences for how Lender‟s Office will behave.
Figure 21: Options screen
Default Price Group: A loan file will belong to this price group if the assigned
Loan Officer and Branch do not specify a price group in their account settings.
LPE Fee (Point) Rounding: The rounding rule the pricing engine will follow
when pricing a loan.
Merit Matrix Login Information: Enter login information to allow Merit Matrix
integration to manage private guidelines for your pricing engine users.
Loan Submission Agreement: The agreement notice (or disclaimer) that users
must agree to when submitting loans through PriceMyLoan. Any agreement
message that you specify is displayed on the Confirmation screen when users go
to submit a loan. Users will be required to click a check box stating that they
accept your disclaimer before they can confirm the loan submission.
FTHB and Housing History Help Text: Specify a custom help message for first
time home buyers in your pricing engine. Users who click the “?” help link next
to the First Time Home Buyer check box in Step 3 “Property & Loan” of the
pricing engine will see this customized message.
Ask AU Response in PML: Certain loan programs require the user to input a
special response from an external AU system, like Fannie Mae's DU or Freddie
Mac's LP, for the most accurate decisioning. Enable the Ask AU Response In
PML option to display the AU Response menu in the third step of the pricing
engine. Not sure if your loan product requires it? Email our PriceMyLoan (PML)
Support Team at [email protected] for any assistance.

2-9
Configuration Options: The configuration options provide you with more
powerful control over user access and feature availability in the system. The
option settings here are company-wide, as opposed to the individual user
permissions that you control inside each user account (see Table 1).
Default Loan Template: Automatically uses the selected loan template on any
PriceMyLoan generated loan files.
Allow call center agents to assign leads to:
Anyone. Leads can be assigned to anyone in your organization.
Manager only. Leads can only be assigned to a Manager role.
Allow call center agents to run prequal on leads?
Yes. Leads can use the Loan Pricing Engine to qualify prospects for loan products.
No. The Loan Pricing Engine is not available on Lead files.
Allow front users to edit loans assigned to processors?
Yes. Loan Officer and AE roles can edit loan files while a Processor is assigned to the file.
No. Loan Officer and AE roles are prevented from editing loan files when a Processor is assigned to the file.
Allow creating loans from our blank template?
Yes. Users are allowed to create new loans using a blank loan template.
No. Users must use an existing loan template when creating new loan files.
Allow non-accountant users to modify trust account info?
Yes. Any user can edit trust account information.
No. Only Accountant roles are allowed to edit trust accounts.
Use AE as official loan officer for new loans?
Yes. AE is assigned as the official loan officer in the loan’s “Official Contact List” when a loan is created by an AE or PML user with an associated AE.
No. AE is not automatically assigned as official loan officer.
Allow ‘Create new file’ option in PML?
Yes. PML users have access to the “Create new file” option.
No. PML users are restricted to uploading Fannie Mae and Point files only.
Display price group name to internal users?
Yes. Lender’s Office users can see the name of the price group on
Step 3 “Property & Loan” of the pricing engine.
No. Hides the name of the price
group during Step 3
“Property & Loan” of the pricing engine.
Allow manual loan submission?
Yes. Allow user to submit for manual underwriting when no qualified programs are found.
No. User cannot submit for manual underwriting when no qualified programs are found.
Allow PML users to upload Calyx Point files?
Yes. PML users are allowed to upload Calyx Point files.
No. PML users cannot upload Calyx Point files.
Comply with State Prepay Laws?
Yes. Pricing engine must comply with State Prepay Laws.
No. Pricing engine will ignore State Prepay Laws (for use by federally chartered lenders).
Allow users to manually enter Loan Program names?
Yes. User can manually edit the Loan Program name field inside a loan/lead file.
No. A loan/lead file’s Loan Program name can only be determined by the Price Group or Loan Program template.
Table 1: Configuration Options

2-10
Credit Reports
Lender‟s Office is seamlessly integrated with over 200 different Credit Reporting
Agencies (CRA), allowing you to order, view, and print credit reports with simultaneous
importing of liabilities and score information. The Credit Reports tab allows you to
designate up to ten preferred CRAs to order credit reports from.
The Hide Credit Agencies in Price My Loan button allows you to hide an unlimited
amount of CRAs from your users, giving you another level of control and customization.
For more information about credit reports, contact your Insight Lending Solutions
representative.
Loan Naming Scheme
Lender‟s Office automatically generates a loan file number based on the auto-naming
scheme you select. Please note that automatically generated loan file names can still be
manually changed when editing a loan file.
Figure 22: Loan Naming Scheme

2-11
There are two available loan naming schemes: Sequential and MERS.
Sequential Naming
o Prefix: Automatically adds a custom prefix to all loan files.
o Use year: Inserts a 2 or 4 digit year in loan names.
o Use month: Inserts a 1 or 2 digit month to loan names.
o Use day: Inserts a 2 digit day to loan names.
o Counter: Inserts a 3 to 9 digit number to loan names. As each loan file is
created, the counter number is incremented by one.
MERS
o Organization ID: Adds your 7-digit Organization ID to loan names.
o Starting Counter: Inserts a 10 digit number to loan names. As each loan
file is created, the counter number is incremented by one.
o The final MERS numbers will be 18 digits long
7-digit Organization ID + 10-digit Counter + 1 Check digit
The Loan Naming Scheme is only automatically applied to loans created from templates.
For duplicated loans and second (subfinancing) loans, you are given the choice to use the
indicated Current scheme or the Lender’s Office default scheme.
Basically, the Lender‟s Office default scheme appends randomly generated letters to the
end of the original loan number.
Duplicate loans would use the original loan number and add four random letters.
o Original loan number: NEW070510
o Duplicate loan number: NEW070510-MBDL
Second (subfinancing) loans would use the original loan number, add “-2nd
-”, and
then add two random letters.
o Original loan number: NEW071208
o Duplicate loan number: NEW071208-2nd-NB
Password Options
The Password Options tab allows you to enforce password security policies. These
policies can be applied to a single branch or to the entire corporation. Password security
policies can also be applied on an individual basis. For more information about
individual password policies, see “Setting Up Employees”.

2-12
Figure 23: Password Options
Branch: Choose the branch you want to apply the new password policy to.
Must change password at next logon: Users must change their password when
they first log on.
Password never expires: Users‟ password is maintained indefinitely until
password policy is changed.
Password expires on: Users must change their password on a pre-set date.
... and continue to expire passwords: Users must change their password after a
pre-determined time period of your choice (15, 30, 45, or 60 days).
Click Apply option to branch to set the new password security policy.
Note: Insight Lending Solutions strongly suggests that all users change their
passwords at least every 90 days. Information contained within your Lender’s Office
account is private and sensitive. Please do not store passwords in an insecure
location. Also, please disable Web-browser features that save login and password
information automatically.
ECOA Address
Enter the default address of the Federal Agency that administers compliance with the
Equal Credit Opportunity Act concerning your company. This address will be used by
default on the appropriate disclosure form(s) in the system.
Fair Lending
Enter the address of the agency that handles questions and complaints regarding your
business here. This address will be used by default on the appropriate disclosure form(s)
in the system.

2-13
Setting Up Branch Locations
Because Lender‟s Office is a Web-based system, setting up branch locations is extremely
easy. You can create as many branches as you want, knowing that users in each of these
branches will be able to access your Lender‟s Office account from wherever they may be.
Figure 24: Adding branch locations
1. From the Pipeline screen, click on the Branches link under the Corporate
Admin section of the Navigation Bar.
2. Click Add new branch to create a new branch record (see Figure 24).
3. Enter the branch name and contact information.
4. Click OK.
Branch locations are applied to user accounts in the Employees section. Please note that
“branch locations” do not need to be taken literally. A “branch” can refer to a
department, team, or other organizational structure that requires loan data to be separated
into identifiable groupings.
2-14
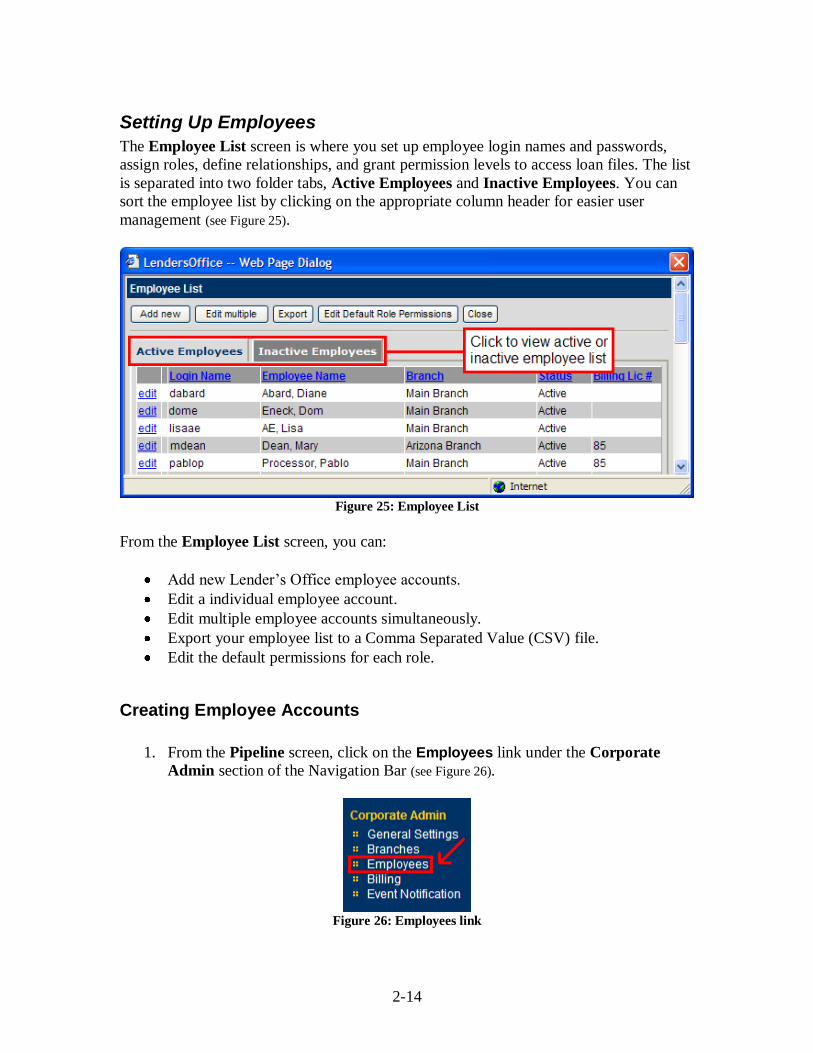
Setting Up Employees
The Employee List screen is where you set up employee login names and passwords,
assign roles, define relationships, and grant permission levels to access loan files. The list
is separated into two folder tabs, Active Employees and Inactive Employees. You can
sort the employee list by clicking on the appropriate column header for easier user
management (see Figure 25).
Figure 25: Employee List
From the Employee List screen, you can:
Add new Lender‟s Office employee accounts.
Edit a individual employee account.
Edit multiple employee accounts simultaneously.
Export your employee list to a Comma Separated Value (CSV) file.
Edit the default permissions for each role.
Creating Employee Accounts
1. From the Pipeline screen, click on the Employees link under the Corporate
Admin section of the Navigation Bar (see Figure 26).
Figure 26: Employees link

2-15
2. Click Add New to create a new employee account (see Figure 27).
Figure 27: Click the "Add new" button to create a new account
3. Enter the employee‟s account information in the Employee Information tab (see
Figure 28). If you have already created branch offices, select the proper branch
from the Branch list. Required fields are indicated by the icon.
Figure 28: Edit Employee screen

2-16
4. Enter any commission details and administrator‟s notes you may have for this
employee account.
5. Enter the appropriate information and settings in the System Access, Roles,
Relationships, and Permissions tabs. These tabs will be discussed in the
following sections.
System Access
Define the employee status and login information in the System Access tab (see Figure 29).
Figure 29: Employee System Access tab
1. Select Current Employee check box if the account is considered active and is
selectable for loan assignments. This would place the employee inside the Active
Employee tab. If the Current Employee check box is not selected, the account
will not be considered a part of your organization, will not be available for loan
assignments, and will be placed inside the Inactive Employee tab.
2-17
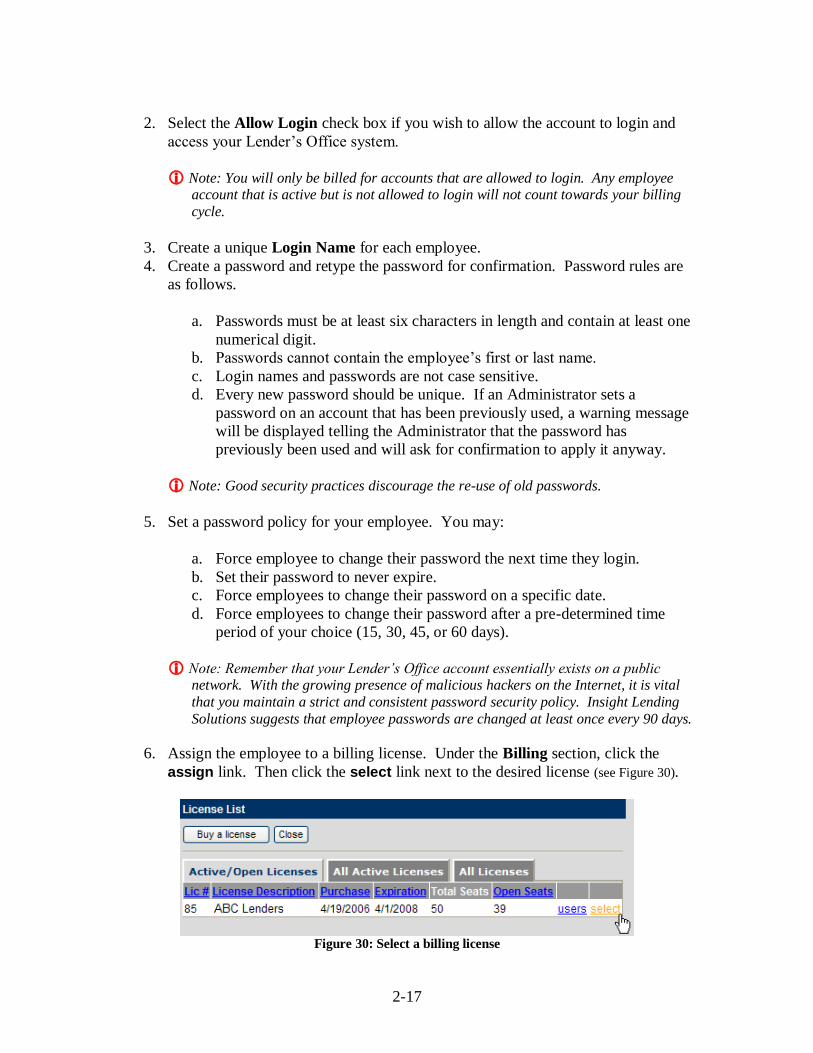
2. Select the Allow Login check box if you wish to allow the account to login and
access your Lender‟s Office system.
Note: You will only be billed for accounts that are allowed to login. Any employee
account that is active but is not allowed to login will not count towards your billing
cycle.
3. Create a unique Login Name for each employee.
4. Create a password and retype the password for confirmation. Password rules are
as follows.
a. Passwords must be at least six characters in length and contain at least one
numerical digit.
b. Passwords cannot contain the employee‟s first or last name.
c. Login names and passwords are not case sensitive.
d. Every new password should be unique. If an Administrator sets a
password on an account that has been previously used, a warning message
will be displayed telling the Administrator that the password has
previously been used and will ask for confirmation to apply it anyway.
Note: Good security practices discourage the re-use of old passwords.
5. Set a password policy for your employee. You may:
a. Force employee to change their password the next time they login.
b. Set their password to never expire.
c. Force employees to change their password on a specific date.
d. Force employees to change their password after a pre-determined time
period of your choice (15, 30, 45, or 60 days).
Note: Remember that your Lender’s Office account essentially exists on a public
network. With the growing presence of malicious hackers on the Internet, it is vital
that you maintain a strict and consistent password security policy. Insight Lending
Solutions suggests that employee passwords are changed at least once every 90 days.
6. Assign the employee to a billing license. Under the Billing section, click the
assign link. Then click the select link next to the desired license (see Figure 30).
Figure 30: Select a billing license

2-18
Roles
Lender‟s Office lets you select among 11 different roles to assign to your employees,
each with their own specific set of features, allowing you to organize your users in a
logical mortgage workflow and restrict access to certain system tools according to their
area of responsibility (see Table 2). Employees may have more than one role assigned to
them, allowing them to have multiple realms of functionality and responsibility.
Admin
Settings Loan Programs
Create Loans
Edit Loans
Assign Loans
Create Leads
Tasks Branch Stats
Trust Account
Administrator
Manager
Accountant 1
Underwriter 2
Lock Desk 2
Processor
Loan Opener
Loan Officer
Lender Account Executive 2
Real Estate Agent
Call Center Agent
Table 2: Roles and their area of responsibility
1 Depending on a Lender’s Office Configuration Option, only employees assigned with the
Accountant role may access loan file Trust Accounts. For more information about this configuration option, see “System Options”.
2 The Underwriter, Lock Desk, and Lender Account Executive are roles specific to PriceMyLoan.
For more information about these roles, please view the Lender AE, Lock Desk, and
Underwriter Guides inside the Lender’s Office Help Center.

2-19
There are certain instances when a user with loan editing privileges would be denied
access to edit a loan file because of the loan status (see Table 3). Any roles not mentioned
in Table 3 do not have access to loan files.
Full: User can view and edit the file.
VO (View Only): User can only view the file.
Loan Open Loan Submitted Loan Approved Loan Closed 3
Manager Full Full Full Full
Underwriter Full Full Full VO
Lock Desk Full Full Full VO
Processor Full 2 Full 2 VO VO
Loan Opener Full 2 VO VO VO
Loan Officer Full 1,2 VO VO VO
Lender Account Executive Full 1,2 VO VO VO
Real Estate Agent VO VO VO VO
Table 3: Loan file editing capabilities according to Role and Loan Status
1 There is a Lender’s Office Configuration Option that will prevent Loan Officer and Lender
Account Executive (AE) roles from editing a loan file if a Processor is assigned to it. For more information about this configuration option, see “System Options”.
2 There is an internal company-wide permission setting that can prevent users from editing a loan
while an Underwriter is assigned. By default, this setting is turned OFF, meaning that these users will be able to edit a loan while an Underwriter is assigned. If you would like to turn this
option ON, contact the Lender’s Office Support Team. 3 Closed loans are only accessible if the user’s account has the “Allow accessing closed loans”
permission enabled. For more information about the closed loan access permission, see “Access Permissions”.

2-20
Relationships
Relationships are a fast and simple way to auto-assign employees to loan files by
associating or linking employees to each other. The Relationships tab allows you to
specify which employees will be linked by providing a list of qualified employees for
each role to choose from (see Figure 31).
Figure 31: Employee Relationships tab
You can associate an employee with Managers, Lender Account Executives, and Lock
Desk agents such that they would automatically be assigned to any loan file created by
that employee account. Underwriters and Processors may also be automatically assigned
to all loans submitted by that employee.

2-21
Permissions
Lender‟s Office lets you specify how much access your employees have to Lender‟s
Office. The Permissions tab allows you to determine which loan files are available for
access, as well as turn on or off specific system features such as Custom Reports and
Price My Loan User Administration. It is broken up into three sections: Access Levels,
Access Permission, and Loan Event Notification (see Figure 32).
Figure 32: Employee Permissions tab
2-22
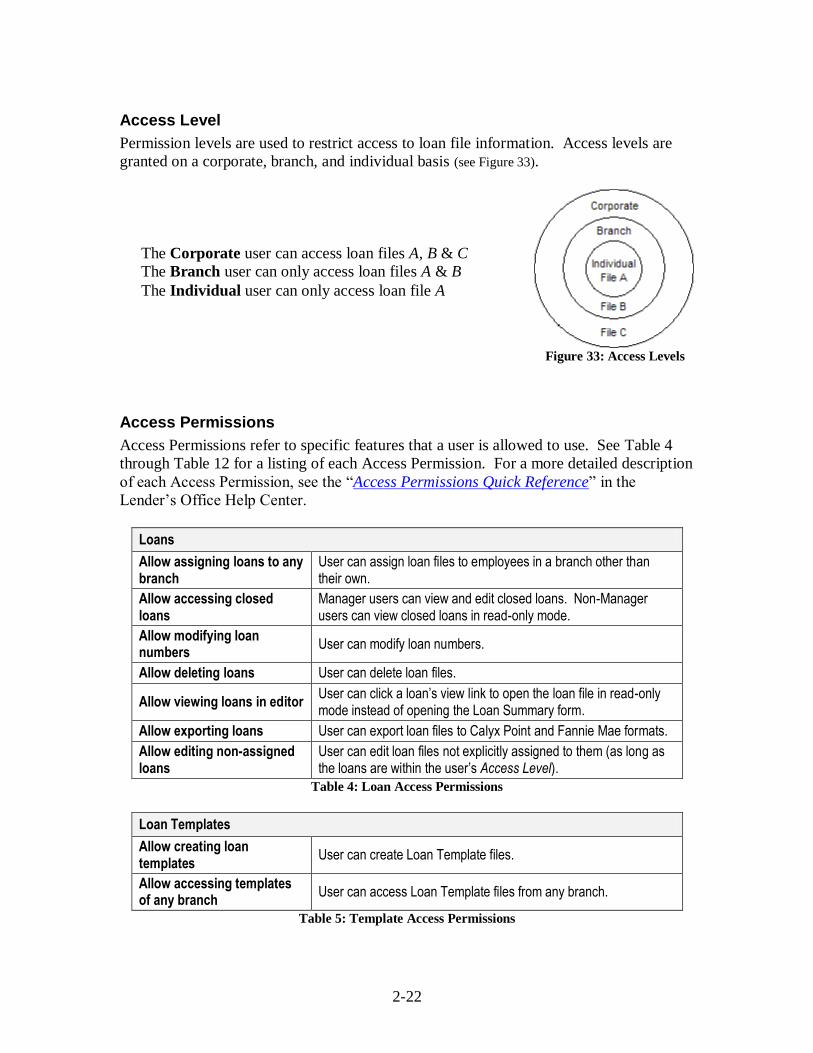
Access Level
Permission levels are used to restrict access to loan file information. Access levels are
granted on a corporate, branch, and individual basis (see Figure 33).
Figure 33: Access Levels .
.
Access Permissions
Access Permissions refer to specific features that a user is allowed to use. See Table 4
through Table 12 for a listing of each Access Permission. For a more detailed description
of each Access Permission, see the “Access Permissions Quick Reference” in the
Lender‟s Office Help Center.
Loans
Allow assigning loans to any branch
User can assign loan files to employees in a branch other than their own.
Allow accessing closed loans
Manager users can view and edit closed loans. Non-Manager users can view closed loans in read-only mode.
Allow modifying loan numbers
User can modify loan numbers.
Allow deleting loans User can delete loan files.
Allow viewing loans in editor User can click a loan’s view link to open the loan file in read-only mode instead of opening the Loan Summary form.
Allow exporting loans User can export loan files to Calyx Point and Fannie Mae formats.
Allow editing non-assigned loans
User can edit loan files not explicitly assigned to them (as long as the loans are within the user’s Access Level).
Table 4: Loan Access Permissions
Loan Templates
Allow creating loan templates
User can create Loan Template files.
Allow accessing templates of any branch
User can access Loan Template files from any branch.
Table 5: Template Access Permissions
The Corporate user can access loan files A, B & C
The Branch user can only access loan files A & B
The Individual user can only access loan file A
2-23
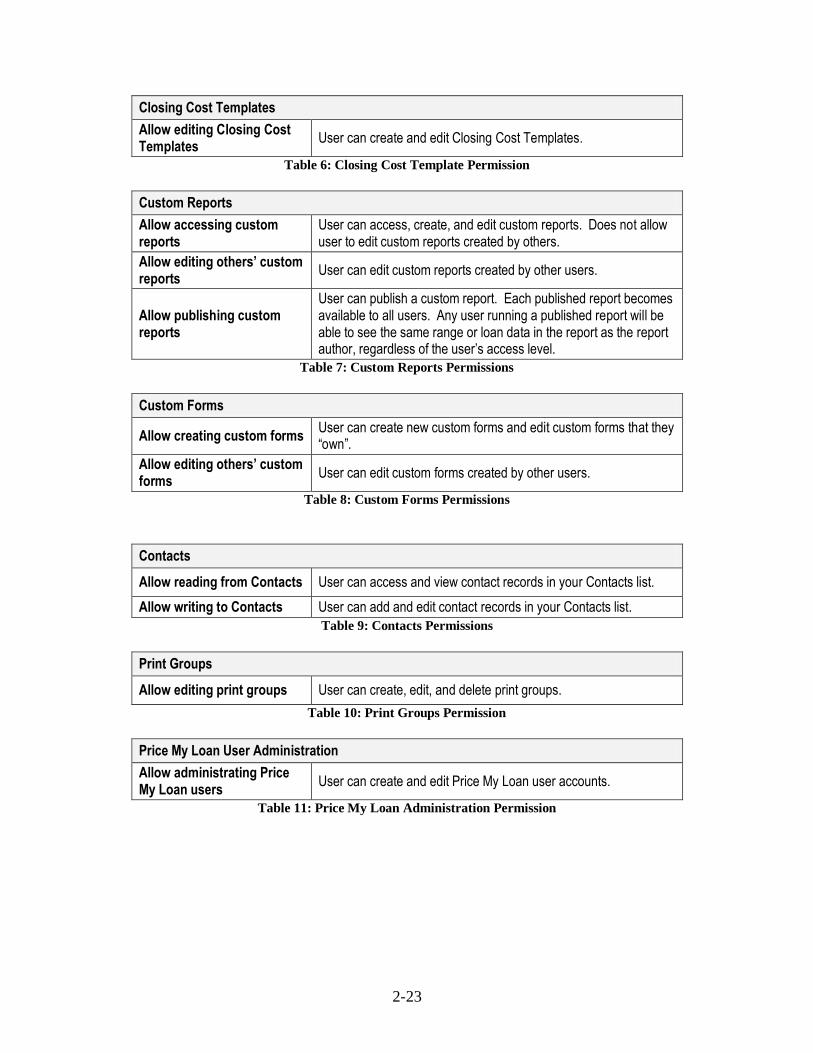
Closing Cost Templates
Allow editing Closing Cost Templates
User can create and edit Closing Cost Templates.
Table 6: Closing Cost Template Permission
Custom Reports
Allow accessing custom reports
User can access, create, and edit custom reports. Does not allow user to edit custom reports created by others.
Allow editing others’ custom reports
User can edit custom reports created by other users.
Allow publishing custom reports
User can publish a custom report. Each published report becomes available to all users. Any user running a published report will be able to see the same range or loan data in the report as the report author, regardless of the user’s access level.
Table 7: Custom Reports Permissions
Custom Forms
Allow creating custom forms User can create new custom forms and edit custom forms that they “own”.
Allow editing others’ custom forms
User can edit custom forms created by other users.
Table 8: Custom Forms Permissions
Contacts
Allow reading from Contacts User can access and view contact records in your Contacts list.
Allow writing to Contacts User can add and edit contact records in your Contacts list.
Table 9: Contacts Permissions
Print Groups
Allow editing print groups User can create, edit, and delete print groups.
Table 10: Print Groups Permission
Price My Loan User Administration
Allow administrating Price My Loan users
User can create and edit Price My Loan user accounts.
Table 11: Price My Loan Administration Permission

2-24
Pricing Engine
Allow applying for ineligible loan programs
User can submit a loan scenario for a loan program the borrower does not qualify for.
Allow running pricing engine w/o credit report
User can manually enter credit information in the pricing engine in order to run pricing on a loan scenario.
Allow submitting loans w/o credit report
User can submit a loan scenario through your pricing engine without uploading a credit report.
Table 12: Pricing Engine Permissions
Loan Event Notification
Lender‟s Office keeps you informed of the latest loan events through automatic email
notifications. When the Send email when loan events occur option is selected, users
who are assigned to a loan will receive a notification email. The loan events that will
trigger automatic email notifications are listed in Table 13.
Loan Event Example
Change in loan status 1 Loan Open changes to Loan Submitted
Change in loan assignment Assigned Loan Officer changes from John Smith to Jane Smith
Conditions are updated 2 Whenever a condition is marked as “Done”
Change in rate lock 3 Whenever an approved rate is locked or when rate lock is broken
Submission of loan 4 Whenever a user submits a loan through the pricing engine
Table 13: Loan Events that send automatic email notifications
1 Changes in loan status notifications can also be sent to those on the Official Contact List if the
“Send email when loan status changes” option is enabled inside their Official Contact record.
2 If applicable/available on your account. This email notification is only sent to the Loan Officer
and Lender Account Executive assigned to the loan. 3 If applicable/available on your account.
4 Only for PriceMyLoan users.
We understand that you and your users may not want to receive an email for every loan
event, so we‟ve given you the choice to opt-out of these notifications. Simply select the
Do not send option in the Loan Event Notification section.
Your users also have access to modify their personal configuration to opt-in or opt-out of
email notifications. From the Pipeline screen, click the Your Profile link under the Your
Settings section of the Navigation Bar. Then select your desired loan event notification
setting (see Figure 34).

2-25
Figure 34: Your Profile email notification setting
Editing an Employee Account
You may eventually need to edit an existing account to enable or disable permissions,
features, or other account settings.
1. From the Pipeline screen, click on the Employees link under the Corporate
Admin section of the Navigation Bar.
2. The Employee List will appear. Click on the edit link next to the employee
account you want to modify (see Figure 35).
Figure 35: Click the "edit" link to modify an account
3. The Edit Employee screen will appear. Make any necessary changes to the
account. You may refer to the previous sections for more details about the System
Access, Roles, Relationships, and Permissions tabs.
2-26
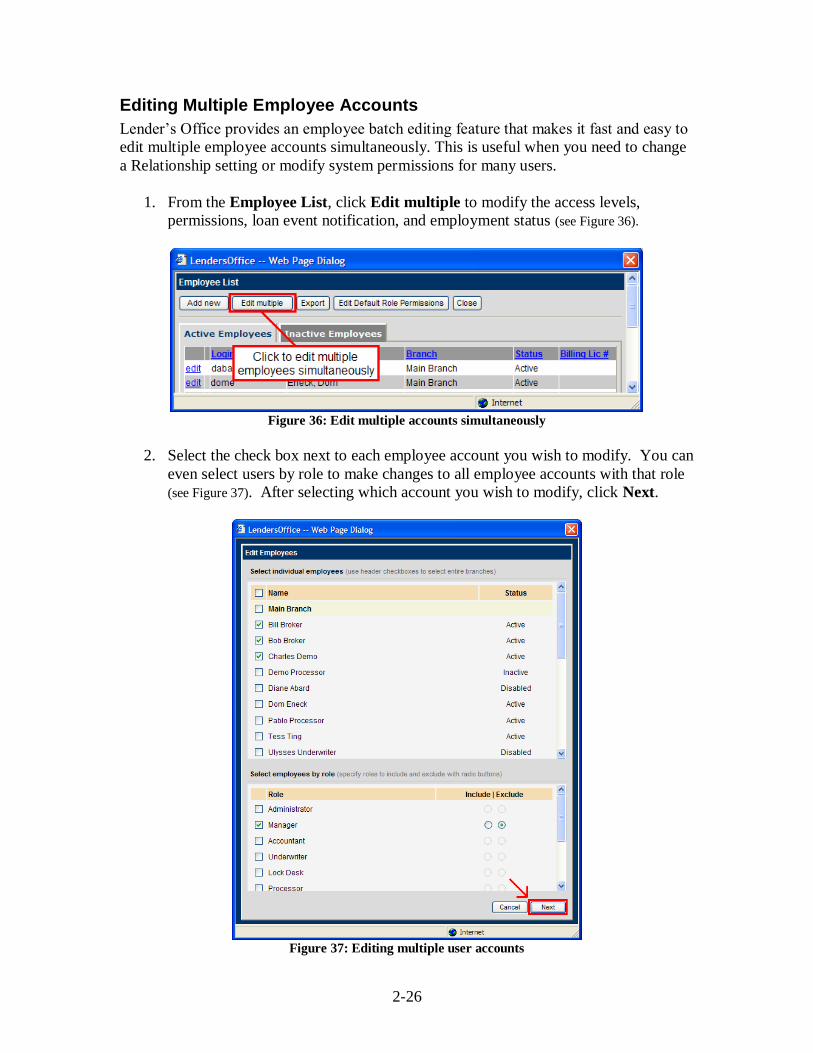
Editing Multiple Employee Accounts
Lender‟s Office provides an employee batch editing feature that makes it fast and easy to
edit multiple employee accounts simultaneously. This is useful when you need to change
a Relationship setting or modify system permissions for many users.
1. From the Employee List, click Edit multiple to modify the access levels,
permissions, loan event notification, and employment status (see Figure 36).
Figure 36: Edit multiple accounts simultaneously
2. Select the check box next to each employee account you wish to modify. You can
even select users by role to make changes to all employee accounts with that role
(see Figure 37). After selecting which account you wish to modify, click Next.
Figure 37: Editing multiple user accounts

2-27
3. Make any necessary changes to the Access level, Employee permissions, Loan
event notification, and Employment status settings. In Figure 38, we are allowing
the selected employees to delete loans, create loan templates, and receive email
notifications. All other settings will remain the same.
Figure 38: Edit multiple employee settings
4. Click Next.

2-28
5. Click Preview to verify if the changes will affect any of the current settings for
each account (see Figure 39). A message will appear in the Notes column indicating
if the account will be affected or not.
Figure 39: Apply changes to these employees
6. Confirm and apply the changes to your selected employees by clicking Apply (see
Figure 39).
7. A window should appear with a confirmation of how many employees were
successfully updated (see Figure 40).
Figure 40: Update confirmation message

2-29
Exporting the Employee List
You may want to save your employee account list as a CSV file for viewing in a table or
spreadsheet format to assist with administrative and account management.
1. From the Pipeline screen, click on the Employees link under the Corporate
Admin section of the Navigation Bar.
2. Click Export (see Figure 41).
Figure 41: Save your Employee List as a CSV file
3. A download confirmation window will appear (see Figure 42).
a. Click Open to immediately view the CSV file in Microsoft Excel.
b. Click Save to save the file to your computer for viewing at a later time or
for attaching to an email.
Figure 42: Confirm CSV file download

2-30
Edit the Default Role Permissions
Lender‟s Office gives you control to customize which permissions are enabled for each
employee role. By changing the default role permissions, you can customize the way
each role works to cater to your company workflow. For more information about roles
and permissions, see “Roles” and “Permissions”.
1. From the Pipeline screen, click on the Employees link under the Corporate
Admin section of the Navigation Bar.
2. Click Edit Default Role Permissions (see Figure 43).
Figure 43: Customize the default role permissions
3. The Edit Default Role Permissions screen will appear. Select the desired role
you would like to change the permissions of from the role list (see Figure 44).
Figure 44: Edit Default Role Permissions screen
4. Select the check box next to each of the permissions you would like to enable.
Clear the check box for the permissions you would like to disable.
5. Click OK.

2-31
System Templates
There are a number of system templates that can be used to make your experience with
Lender‟s Office more efficient and easier to manage. These include Loan File, Closing
Cost, and Print Group templates.
Loan Templates
Loan Templates are used to eliminate repetitive and tedious data entry chores by pre-
populating certain fields and forms with commonly used information.
Creating Loan Templates
1. From the Pipeline screen, click the Create Loan Template link under the Loans
section of the Navigation Bar.
2. The Loan Template looks identical to a loan file. On the This Loan Info screen,
type in the Loan Template name you would like to use in the Loan Number box.
3. The entire file is available for editing, including all forms and Agent settings.
Any changes you make and save to this Loan Template will be pre-populated
when it is used to create a new loan.
Note: Loan Templates are typically created according to a particular loan product
type, branch location, subject property state, or specific to an employee.
Using Loan Templates
When creating a new loan file, Lender‟s Office will ask users which Loan Template they
would like to use when creating the new loan (see Figure 45). Just click on the name of the
template you would like to use. For more information about creating loan files, see
Chapter 3: Working with Loan Files.
Figure 45: Selecting a Loan Template

2-32
Editing & Deleting Loan Templates
To search, edit, and delete Loan Templates, you must use the Advanced Search feature.
It is located in the Search Tools section, on the right side of the Pipeline screen (see
Figure 46). Please note that Loan Officer and Lender Account Executive roles are not
permitted to edit templates that they are not assigned to. Additionally, all users are not
permitted to edit templates outside of their access level.
Figure 46: Advanced Search link
From the Advanced Search screen, select the Templates option in the Search for list and
then click Find using search parameters (see Figure 47).
Figure 47: Searching for Loan Templates
Click on the edit link next to any of the templates found in the search results to make
changes (e.g. renaming the template on the This Loan Info page). To delete a template
or change its assignment (e.g. branch assignment), click on the check box next to each
template you want to delete or change assignments and then click Delete selected files or
Assign & change status (see Figure 48).
Figure 48: Deleting and re-assigning templates

2-33
Closing Cost Templates
Closing Cost Templates can be created to ensure consistency on your Good Faith
Estimates and other forms related to closing costs. Users with the Administrator role or
users with the “Allow accessing Closing Cost Templates” permission enabled have the
ability to create and edit Closing Cost Templates. For more information about the
closing cost template permission, see “Access Permissions”.
Creating Closing Cost Templates
1. On the Pipeline screen, click on the Closing Cost Templates link under the
Loan Programs section of the Navigation Bar.
2. Click Add new closing cost template.
3. The Closing Cost Template appears as in Figure 49. Type in the name of your
closing cost template in the Template Name box.
Figure 49: Creating a Closing Cost Template
4. Add all your fees and click OK to save your changes.
5. Closing Cost Templates may be applied to a loan from the This Loan Info or
GFE screen.

2-34
Using Closing Cost Templates
Closing Cost Templates can easily be applied to your Good Faith Estimate in two areas.
The first way is through the This Loan Info screen inside of a loan file. Click Find
Closing Cost Template… as shown in Figure 50. You will be presented with a list of
Closing Cost Templates that you can choose from by clicking on the apply link.
Figure 50: Applying Closing Cost Templates from the "This Loan Info" page
The second way to apply a Closing Cost Template is through the GFE form inside of the
loan file. Click on the GFE link inside the Forms folder of the Quick Navigation Bar.
From the Good Faith Estimate screen, click Find Closing Cost Template… to select
the Closing Cost Template you wish to use (see Figure 51).
Figure 51: Applying Closing Cost Templates from the Good Faith Estimate screen

2-35
Print Group Templates
To simplify form printing, you can set up customized Print Groups that filter the list of
available documents for printing into more manageable groups.
Figure 52: Creating Print Groups
Creating Print Groups
1. On the Pipeline screen, click on the Print Groups link located under the
Corporate Admin section of the Navigation Bar.
2. This opens the Print Groups Editor screen. Click Add new group to create a
new Print Group (see Figure 52).
3. Type the name of your new Print Group in the Group Name box.
4. On the Print Groups editor screen, you should see two large lists: Available
Forms and Forms in Group. Inside the Available Forms list, select the files
you want to include in your Print Group. Click Add to move it to the Forms in
Group list. You may select multiple forms by holding down the CTRL key
while clicking on the forms.
5. Change the order of your selected forms inside the Forms in Group list by
selecting the form and clicking the Up and Down buttons.
6. Click Save to save your Print Group.

2-36
Using Print Groups
Figure 53: Using Print Groups
1. While inside of a loan file, click on the Print link in the File folder inside the
Quick Navigation Bar (see Figure 53).
2. Select the Print Group you wish you use from the Print Group list.
3. Click on the check boxes next to each document you wish to print or click Select
All to select all the documents in the Print Group.
4. Print the selected forms
a. Click Preview Selected Forms to Print or Email to open or save the
form(s) as a PDF file.
b. Click Print Selected Forms... to send the forms directly to your printer
for printing with our ePrint module. For more information about ePrint,
see “Installing ePrint” in Chapter 3: Working with Loan Files.

Chapter 3: Working With Loan Files
Loan origination and processing on Lender‟s Office is designed to be intuitive and easy
to learn. This chapter will discuss how to create loan files and how Lender‟s Office
handles some common loan scenarios.
Figure 54: This Loan Info screen inside of a loan file
Creating New Loans
1. From the Pipeline screen, click on the Create Loan link under the Loans section
of the Navigation Bar (see Figure 55).
Figure 55: Create Loan link
3-2
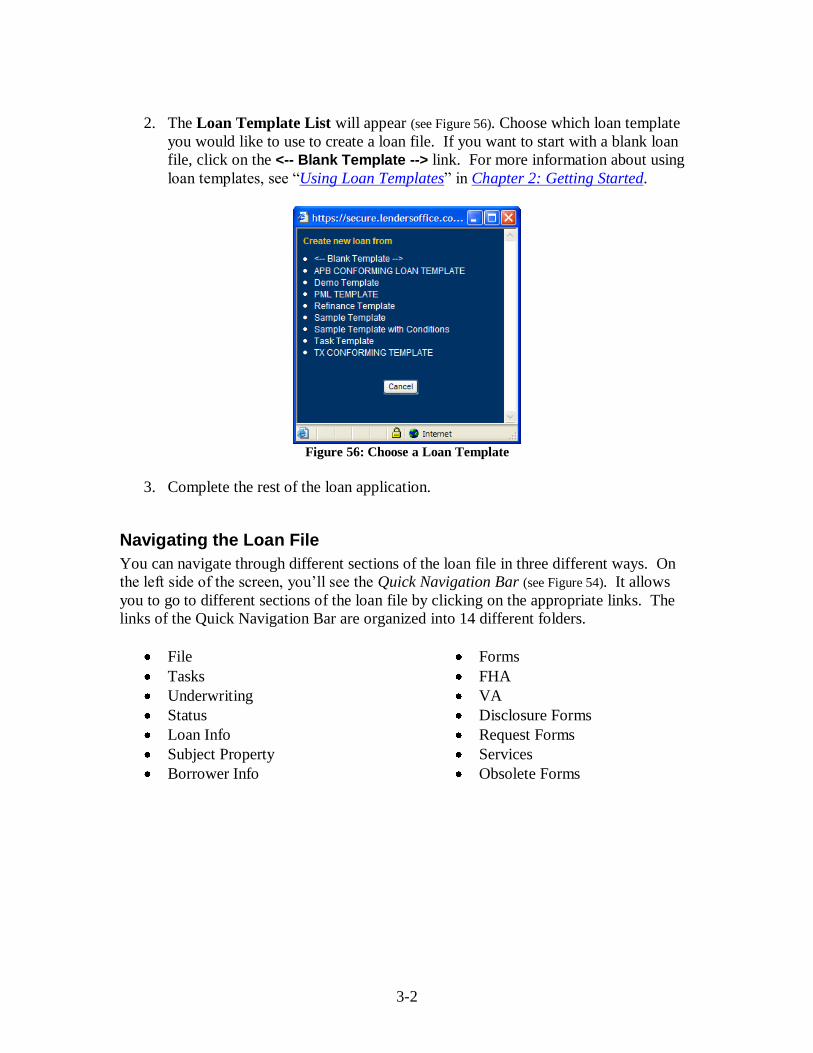
2. The Loan Template List will appear (see Figure 56). Choose which loan template
you would like to use to create a loan file. If you want to start with a blank loan
file, click on the <-- Blank Template --> link. For more information about using
loan templates, see “Using Loan Templates” in Chapter 2: Getting Started.
Figure 56: Choose a Loan Template
3. Complete the rest of the loan application.
Navigating the Loan File
You can navigate through different sections of the loan file in three different ways. On
the left side of the screen, you‟ll see the Quick Navigation Bar (see Figure 54). It allows
you to go to different sections of the loan file by clicking on the appropriate links. The
links of the Quick Navigation Bar are organized into 14 different folders.
File
Tasks
Underwriting
Status
Loan Info
Subject Property
Borrower Info
Forms
FHA
VA
Disclosure Forms
Request Forms
Services
Obsolete Forms

3-3
Clicking on these folders will collapse or expand the folder to display the links and any
subfolders inside of it (see Figure 57 ).
Figure 57: Folder structure
The second way to navigate through the loan file is by clicking on the folder tabs near the
top of the screen. On the This Loan Information screen, there are three folder tabs: This
Loan Information, Up-Front MIP / FF, and Other Financing (see Figure 58). Clicking on
these folder tabs is the same as clicking on the corresponding link inside the Quick
Navigation Bar.
Figure 58: Folder Tabs are found near the top of the screen
The third way to navigate through a loan file is by using the Navigation Buttons located
in the upper left corner of the loan file screen (see Figure 59).
Figure 59: Navigation Buttons
Similar to the back and forward arrow buttons on your Web browser, clicking the Back
and Forward buttons will take you to the screens you were previously viewing. Once
you make any modification to the loan file, the Save button will be made available. If
you do not save your work and try to go to another section of the loan file, Lender‟s
Office will automatically ask if you want to save your changes before proceeding.

3-4
Clicking on the Print… button will take you to the Print screen where you can print your
documents or save them as PDF files. For more information about printing your
documents, see “Printing Documents”.
Quick Navigation Bar Layout
The Quick Navigation Bar has 14 different main folders and over 100 links. In this
section, we‟ll layout the structure of the Quick Navigation Bar and provide brief
descriptions to some of the more commonly used links.
File
Duplicate this file Create a duplicate copy of the loan file with a new loan number.
Borr/Coborr Management Settings to swap the position of the borrower and co-borrower, add additional applications to the file (used for non-married co-borrowers), and swap the position of the primary borrower.
Print Access the print screen as well as Print Groups.
Export
To Calyx Point… Export current loan file to Calyx Point (*.brw) format
To Fannie Mae… Export current loan file to Fannie Mae (*.fnm) format.
Create sub-financing loan Create a linked second loan to the loan file.
Create template from file Create a Loan Template based on the current loan file.
Close file Close the current loan file.
Table 14: Contents of the File folder
Tasks
Create new task Create a new task for current loan file.
Task List View all tasks for the current loan file.
Table 15: Contents of the Tasks folder
Underwriting
Certificate Submitted View and print loan certificate submitted by broker.
PML Summary Tools to view and email a summary of the submitted loan to the assigned Account Executive, Official Loan Officer, and others.
View Broker Notes to Underwriter
View all notes created by submitting broker for underwriter.
Rate Lock Rate lock tools including Rate Lock History, Rate Lock Notes, etc.
Conditions View, edit, or add underwriting conditions.
DocMagic Export loan file to DocMagic.
Table 16: Contents of Underwriting folder

3-5
Status
General Tracking page used to update loan status and manage internal notes.
Agents Assign loan file to internal employees; attach external agents (escrow, title, appraisers, etc.) as Official Contacts to loan file.
Trust Accounts Record and track funds submitted by borrower into trust accounts.
HMDA Input information required for HMDA reporting.
Funding Tools for assigning funding source.
Commissions Calculate loan officer commissions and fees.
Audit History Available to Administrator and Management roles only. Records time and date of loan events (loan creation, submission, deletion, etc.)
Table 17: Contents of Status folder
Subject Property
Description Enter details about the subject property.
Rental Income Enter rental income details about subject property.
Table 18: Contents of Subject Property folder
Borrower Info
Borr. Info Basic contact information about borrower and co-borrower
Borr. Employ. Employment information for borrower.
Coborr. Employ. Employment information for co-borrower
Monthly Income Information on borrower and co-borrower income.
Liabilities Liabilities for borrower and co-borrower. Includes links to ordering and viewing credit reports.
Assets Record non-real estate assets for borrower and co-borrower.
REO Record real estate assets held by borrower and co-borrower.
Pres House Expense Enter details on borrower current housing expenses.
Table 19: Contents of Borrower Info folder

3-6
Forms
Loan 1003 (Pages 1-4) 1003 Uniform Residential Loan Application (URLA)
GFE Good Faith Estimate form for entering closing cost fees. Closing cost templates are accessed from this screen.
Truth In Lending Reg-Z/TIL screen for entering loan payment details, ARM and Option ARM details, amortization schedule, pre-payment, mortgage insurance, interest only period, etc.
Section 32 Disclosure Additional details regarding balloon loans.
ARM Program Disclosure Additional details regarding ARM loans.
CA MLDS (Pages 1-2) California Mortgage Loan Disclosure Statement
1008 Single Summary of loan file for underwriting purposes on a single 1003 application.
1008 Combined Summary of loan file for underwriting purposes on multiple 1003 applications (multiple borrowers).
Lock-In Confirmation Details on rate lock confirmation.
Loan Submission Create a generic loan submission sheet.
Loan Commitment Details on Mortgage Loan Commitment.
Credit Denial Details on Credit Denial Statement.
Mortgage Loan Origination Agreement
Details on Mortgage Loan Origination Agreement.
Aggregate Escrow Account
Details on Aggregate Escrow Account.
Servicing Disclosure Details on Servicing Disclosure Statement.
Flood Hazard Notice Notice of flood hazard form.
TX Mortgage Broker Disclosure
Disclosure statement for Texas mortgage brokers and loan officers.
Verifications Verification forms (all verification forms automatically generated).
VOD Verification of Deposit forms.
VOE Verification of Employment forms.
VOM/R Verification of Mortgage/Rent forms.
VOL Verification of Loan forms.
Verif Land Contract Verification of Land Contract forms.
More… Displays the Print screen.
Table 20: Contents of the Forms folder

3-7
FHA All FHA loan-related forms.
VA All VA loan-related forms.
Disclosure Forms Contains various disclosure forms.
Credit Score Disclosure Disclosure regarding borrower/co-borrower credit score information.
Request Forms Generic request forms for various mortgage services.
Request for Appraisal Generic appraisal request form.
Request for Insurance Generic insurance request form.
Request for Title Generic title request form.
Survey Request Generic survey request form
Services Access linked services.
Order Credit Order / reissue credit reports.
View Credit View previously ordered credit reports
Credit Scores View credit score and other details.
DocMagic Export loan file to DocMagic.
Obsolete Forms Access outdated GFE, 1003, and HMDA forms.
Save Menu Layout Allows you to customize and save the default arrangement of the Quick Navigation Bar.
Table 21: Other forms and services folders
This Loan Info
The very first thing that you see when a loan file is created is the This Loan Info screen
(see Figure 54). Lender‟s Office automatically generates a loan number based on the Loan
Naming Scheme you specify. For more details about the loan naming scheme, see “Loan
Naming Scheme” in Chapter 2: Getting Started.
In Figure 60, you can see several links that will take you directly to the related sections.
These kinds of links are found throughout the loan file.
Figure 60: Links will take you to different sections

3-8
Filling Out the Loan Application
Most of the information you enter into the loan file is linked and cross-referenced to
different sections of the loan file. This means that filling out the loan amount on the This
Loan Info screen will automatically fill out the loan amount on the 1003, Good Faith
Estimate, and Truth In Lending forms and vice versa (see Figure 61).
Figure 61: Loan Amt is automatically filled out in all related sections of the loan file
This leaves you with a couple of ways to complete a loan application. You can fill out
different sections and let it populate to the loan application or go with the more
traditional route of filling out the electronic format of the 1003 form. In fact, you can
mix both methods and find whatever way is most comfortable for you.
Note: Lender’s Office will frequently ask “Do you want to save changes?” when you
move from one screen to another. This occurs because Lender’s Office is constantly
updating your loan file at the server level, allowing others to view those changes.
Click “Yes” if you wish to save your changes and proceed to the next screen. Click
“No” to proceed without saving changes. Click “Cancel” to stay on the current
screen without saving your changes.
3-9
Adding Multiple Borrowers
The Borr/Coborr Management tool allows you to add multiple borrowers to your loan
file and manage the position of each of borrower.
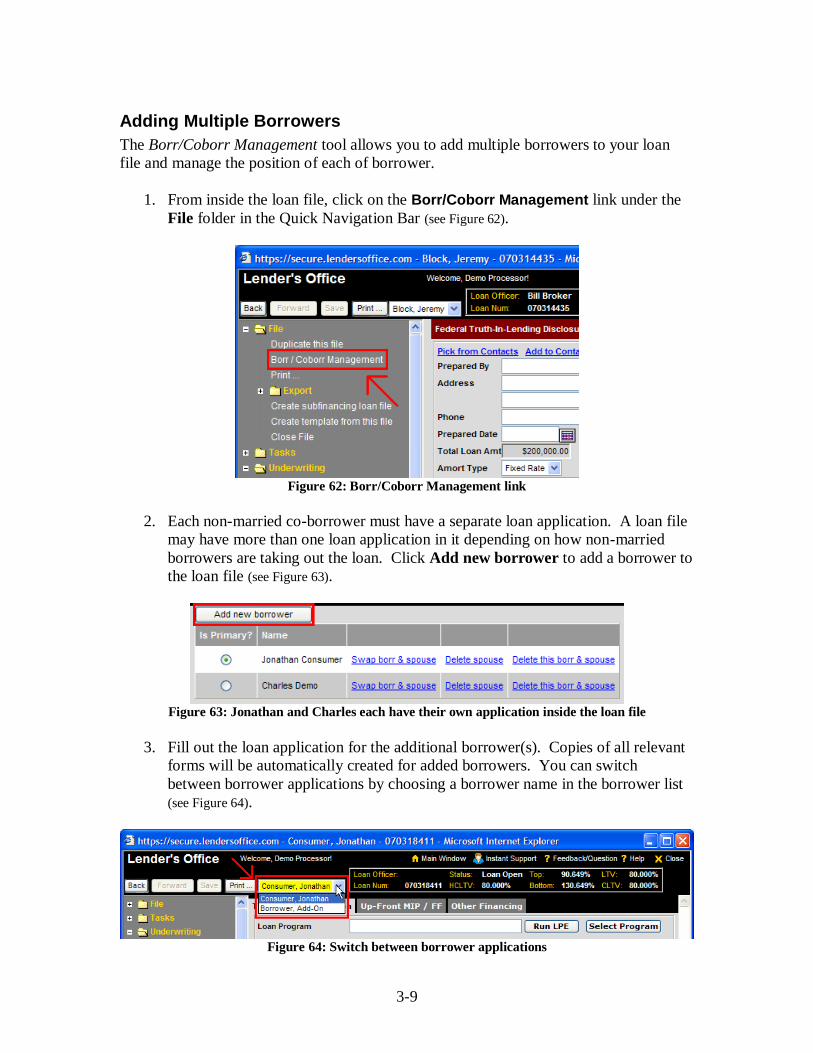
1. From inside the loan file, click on the Borr/Coborr Management link under the
File folder in the Quick Navigation Bar (see Figure 62).
Figure 62: Borr/Coborr Management link
2. Each non-married co-borrower must have a separate loan application. A loan file
may have more than one loan application in it depending on how non-married
borrowers are taking out the loan. Click Add new borrower to add a borrower to
the loan file (see Figure 63).
Figure 63: Jonathan and Charles each have their own application inside the loan file
3. Fill out the loan application for the additional borrower(s). Copies of all relevant
forms will be automatically created for added borrowers. You can switch
between borrower applications by choosing a borrower name in the borrower list
(see Figure 64).
Figure 64: Switch between borrower applications

3-10
4. The Borr/Coborr Management tool allows you to change the positions of all the
borrowers on the loan file (see Figure 63).
a. Is Primary?: Change the position of the Primary borrower by selecting
this option button next to the borrower‟s name
b. Swap borr & spouse: Click this link to switch the positions of the
borrower and co-borrower.
c. Delete spouse: Click this link to remove the co-borrower information
from the loan application.
d. Delete this borr & spouse: Click this link to remove the co-signer(s) loan
application from the loan file.
Creating Linked Loans
You can easily create a 2nd
lien on a loan file using the Create Subfinancing Loan File
feature. Using this feature allows you to copy most of the information from the 1st lien
loan file to the new 2nd
lien loan file and link them together so that changes made to the
1st lien loan file can be easily updated to the 2
nd lien loan file.
1. Click on the Other Financing Info link under the Loan Info folder of the Quick
Navigation Bar (see Figure 65).
Figure 65: Other Financing Info screen
2. Fill out the Additional 2nd lien section with the mortgage details of the 2nd
lien
(see Figure 65). This step will ensure that both the 1st and 2
nd loan files will have
the correct values when the 2nd
lien file is created.

3-11
Figure 66: Create subfinancing loan file link
1. Click on the Create subfinancing loan file link inside the File folder of the
Quick Navigation Bar (see Figure 66).
2. A confirmation window will appear asking if you want to create a subfinancing
loan file (see Figure 67). Click OK to proceed.
Figure 67: Click OK to create the 2nd lien file
3. Review the mortgage information for the 2nd
lien on the This Loan Info screen.
Notice that the 2nd mortgage option is automatically selected in the Lien
Position list (see Figure 68). The loan details are carried over from the Other
Financing Info page of the 1st lien file.
Figure 68: The newly created linked 2nd lien file

3-12
4. From the 2nd
lien file, go to the Other Financing Info screen to confirm the 1st
lien information (see Figure 69).
Figure 69: The 2nd lien file's Other Financing Info screen
5. Any changes made inside of the 1st lien file can be automatically transferred to the
2nd
lien file by clicking the Update button inside the Other Financing Info
screen of the 1st lien file (see Figure 69).
6. To view the linked loan file, click on the Go to button (see Figure 69).
7. To separate the two loan files, click on the Unlink button (see Figure 69).
Ordering Credit Reports
Lender‟s Office is integrated with over 200 different credit reporting agencies (CRA),
allowing you to order, view, and print credit reports directly from within Lender‟s Office.
All credit report information, including credit scores, scoring factors, and liability
information are automatically imported into your loan file. To order credit reports:
1. From inside the loan file, click on the Order Credit link inside the Services folder
of the Quick Navigation Bar (see Figure 70).
Figure 70: Order Credit link

3-13
2. The Credit Report Request screen will appear. Select your desired credit
agency from the Credit Agency list (see Figure 71).
Figure 71: Credit Report Request screen
3. There are two different ways to order credit (see Figure 72):
a. Order new report: Select this option to order a brand new credit report.
You must select the bureaus you wish to order from: Equifax, Experian,
TransUnion, or Fannie.
Figure 72: Order a new report or re-issue an existing report
b. Re-issue existing report: Select this option if you have previously
ordered a credit report for the borrower and do not wish to order a new
file. You must enter the credit report ID/file number and, in some cases,
the Instant View ID number. Re-issuing a credit report is merely asking
for a copy of an existing report from the credit agency and should not have
negative effects on the borrower‟s credit score. Depending on your CRA,
there may be an additional charge for re-issuing credit.

3-14
4. Enter the credit login and password information given to you by the credit agency
(see Figure 73).
Figure 73: Enter the credit login information issued by your credit agency
5. Some of the credit agencies that Lender‟s Office is integrated with use Fannie
Mae‟s credit interface to authenticate the credit request. These agencies are
indicated by a three digit number following the agency name (see Figure 74).
Figure 74: Three-digit number indicates CRA uses the Fannie Mae credit interface
If the CRA uses the Fannie Mae credit interface, a DU UserID and DU Password
will also need to be entered (see Figure 75).
Figure 75: Enter your DU UserID and DU Password
Note: For Administrators, if you do not want to distribute your company’s DU User
ID and password to each of your employees, the Lender’s Office Support Team can
save the DU information to your company’s account. Once the DU information is
saved, your users will no longer be asked to enter when requesting credit. Your users
will not be able to view your DU information. View this page for more information: https://secure.lendersoffice.com/help/faq/HowdoIgetaDUAccounttoacce.asp
6. Enter the rest of the borrower‟s information and then click Submit. The credit
report will automatically display and all credit data will automatically populate
your loan file.

3-15
Liabilities
Section VI of the 1003 Application contains the Liabilities imported from the credit
report. The Liabilities screen can be accessed from the Liabilities link under the
Borrower Info folder of the Quick Navigation Bar or through the Liabilities link located
towards the bottom of Page 2 of the 1003 loan application.
Figure 76: Liabilities screen
Liabilities are automatically imported from credit report and displayed in your list
of liabilities in the middle part of the screen (see Figure 76). If there are any
duplicate records, Lender‟s Office will ask whether or not you want to use the
newer or older liabilities record.
Liabilities will display on the 1003 in the order listed on the screen. To change
the order of a liability, select on the liability item you wish to move and click on
the Move Up or Move Down button.
You may also save the creditor contact information to your contacts by clicking
on the Add to Contacts link. If you have previously saved the contact
information for a creditor, you can populate that information by clicking on the
Pick from Contacts link.

3-16
Non-Real Estate Assets
Section VI of the 1003 Application contains a link to the non-real estate assets section.
You can also select the Assets link inside the Borrower Info folder from the Quick
Navigation Bar.
Figure 77: Non-real estate assets
1. Click Add to create a new asset item (see Figure 77).
2. Select the borrower and the asset type from the drop down menus. Enter the
details of the asset and click on Save.
3. A list of assets will display on the middle portion of the screen. Click on the
appropriate asset to edit.
4. The assets will display on the 1003 in the order that is shown. To change the
order of assets, click on the asset you wish to move, and click the Move Up or
Move Down button.
5. You may also save the asset account information to your Contacts by clicking
on the Add to Contacts link. If you have previously saved the contact
information for a creditor, you can populate that information by clicking on
the Pick from Contacts link.

3-17
Real Estate Owned (REO)
There are two places where you can find REO information: Section VI of the 1003
Application and the REO screen. By clicking the REO link inside the 1003 Application,
you will be re-directed to the REO screen. The REO screen can be accessed directly by
clicking the REO link inside the Borrower Info folder of the Quick Navigation Bar.
Figure 78: REO screen
Creating New REO Records
1. From the REO screen, click Add.
2. Fill out the relevant information for the borrower‟s property.
3. Click Save to save the REO record.

3-18
Linking REO to Mortgage Liabilities
Lender‟s Office provides a feature to link mortgage liabilities to REO records in order to
save you the trouble of entering the property address and payment information twice.
1. Create a REO record. See “Create New REO Record” section for details.
2. Click on the Liabilities link inside the Borrower Info folder of the Quick
Navigation Bar.
3. Create a new liability entry by clicking Add or select an existing liability to
modify (see Figure 79).
4. Select the Mortgage option in the Debt Type list. This will make the Property
Address list available for you to choose a REO record to link to (see Figure 79).
Figure 79: Linking a mortgage liability to a matched REO property
5. Choose an REO property in the Property Address list.
6. If you would like to add the balance and payment information found on the
mortgage liability to the REO record, click Add Bal/Pmt Info to REO.
Note: By clicking on Add Bal/Pmt Info to REO, the balance and payment
information will be added on to any existing values in the REO record. If the balance
and payment information was already entered in the REO record before clicking on
Add Bal/Pmt Info to REO, the REO information will be doubled.

3-19
General Tracking
Real-time tracking of loan statuses is a key benefit of Lender‟s Office. The General
Tracking feature allows everyone in your organization to effectively manage loan status
updates as well as record the completion of certain documents and record conversation
log notes.
Figure 80: General Tracking screen
Changing the Loan Status
1. Click on the General link inside the Status folder of the Quick Navigation Bar.
2. The General Tracking interface is displayed in Figure 80 above. To change the
status of a loan, enter a date in the appropriate field. Typing the letter “t” in any
date field will automatically enter today‟s date.
3. The current status of the loan is automatically determined according to the most
recently entered date. In Figure 80, the File Status shows Loan Approved
because the Approved date (04/22/07) is more recent than the Submitted
(04/20/07) and Open (04/16/07) dates.
4. You can manually force a loan to a certain status by selecting the Lock check box
next to File Status. When the Lock check box is selected, the Change Status
button is made available, allowing you to select a new loan status. After selecting
the new status, the new locked status date will automatically be generated.
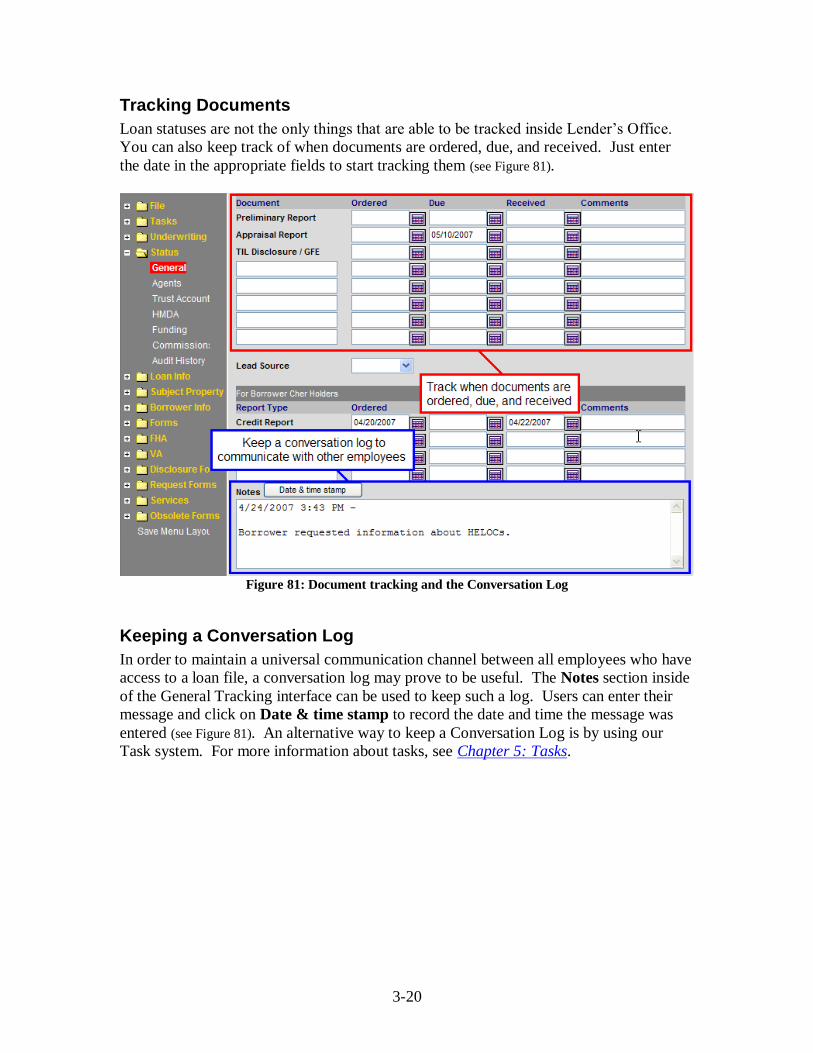
3-20
Tracking Documents
Loan statuses are not the only things that are able to be tracked inside Lender‟s Office.
You can also keep track of when documents are ordered, due, and received. Just enter
the date in the appropriate fields to start tracking them (see Figure 81).
Figure 81: Document tracking and the Conversation Log
Keeping a Conversation Log
In order to maintain a universal communication channel between all employees who have
access to a loan file, a conversation log may prove to be useful. The Notes section inside
of the General Tracking interface can be used to keep such a log. Users can enter their
message and click on Date & time stamp to record the date and time the message was
entered (see Figure 81). An alternative way to keep a Conversation Log is by using our
Task system. For more information about tasks, see Chapter 5: Tasks.

3-21
Agents
The Agents screen lists all the individuals and companies associated with your loan file.
You can access the Agents screen by clicking on the Agents link inside the Status folder
of the Quick Navigation Bar. The Agents screen is divided into two major areas:
INTERNAL ASSIGNMENT and OFFICIAL CONTACT LIST FOR THIS LOAN
(see Figure 82).
Figure 82: Agents screen
Assigning Internal Employees
The Internal Assignments section shows which employees are currently assigned to the
loan file. When an employee‟s name is selected for a loan file, the loan will be displayed
in their Your Pipeline folder tab on the Pipeline screen.
Note: Only one employee for each role can be selected in a loan file. An employee
may also have more than one role in their account. Thus, it is possible that an
employee may be assigned to a loan file under multiple roles.
When you are done originating a loan file, you can instantly transfer that loan to a
different employee pipeline by clicking on the assign link next to the role and selecting
the individual you would like to assign the loan file to. The following is an example of
how to assign a Lock Desk to a loan file.
1. Click on the Agents link inside the Status folder of the Quick Navigation Bar.
2. Click on the assign link next to the Lock Desk role (see Figure 82).
3. A window should appear with a list of eligible Lock Desk agents. Select a Lock
Desk agent by clicking on their name.
4. The Lock Desk agent‟s name should now be displayed on the Agents screen.

3-22
An alternative would be to use the Relationships setting to automatically assign loan files
to different employees when they are created. For more information about relationships,
see the “Relationships” section in Chapter 2: Getting Started.
Adding Official Contacts
The Official Contact List is used to associate different individuals and companies that are
associated with the loan file. These include lenders, appraisers, title agents, listing
agents, and other parties that are involved with the loan (see Figure 83).
Figure 83: Official Contact List screen
1. Click on the Agents link inside the Status folder of the Quick Navigation Bar.
2. Click on Add People… to access the Official Contacts List screen (see Figure 82).
3. Choose a contact type from the Contact Type list (see Figure 83).
4. Fill out the appropriate information.
a. If the individual or company is part of your Contacts, click Pick from
Contacts to populate their information and select your desired contact.
b. If the individual or company is not part of your Contacts, enter all of the
contact information. Click Add to Contacts to add this new contact to
your Contacts.
5. Certain contact types can be included in different forms in Lender‟s Office.
Select the Copy to Prepared-By Fields for Appropriate Forms Upon Save
check box to include the contact name on those fields. For a listing of the forms
affected by the different contact types, see Table 22.

3-23
Note: The creator of the loan file will be added to the Official Contact List based on
their Role Assignment setup. If the creator had the Loan Officer, Loan Processor,
and Manager roles, they would be listed under the Official Contact List with those
contact types. You may remove or edit these listings as necessary.
Contact Type Forms Affected
Appraiser FHA Request For Insurance Endorsement (HUD-54111) FHA Analysis Appraisal Report
ECOA Equal Opportunity Act
Homeowner Insurance
Request for Insurance
Escrow Request For Appraisal Uniform Loan Submission Sheet
Lender California Mortgage Loan Disclosure Statement (CA MLDS) Certification of Loan Disbursement (VA 26-1820) FHA Addendum (Sponsor section - Line 16) FHA HUD Appraised Value Disclosure VA Addendum (Sponsor section - Line 16) VA Verification of Benefit (VA 26-8937) Uniform Loan Submission Sheet
Listing Agent Request For Appraisal
Loan Officer 1 Only applicable when using the Populate from Official Contact option.
Borrower Authorization Form Borrower Certification & Authorization Form CA Impound Statement California Real Estate Agency Disclosure Statement of Credit Denial, Termination, or Change Equal Credit Opportunity Act Federal Truth-In-Lending Disclosure Statement (TIL) FHA Addendum (Lender section - Line 15) Flood Hazard Notice Georgia Disclosure Good Faith Estimate (GFE) Lock-in Confirmation Mortgage Brokerage Business Contract (Florida Only) Mortgage Loan Commitment Mortgage Loan Origination Agreement Privacy Policy Disclosure Right to Receive Copy of Appraisal Report Servicing Disclosure Statement Statement of Appraised Value (HUD-92800.5B) Texas Mortgage Broker/Loan Officer Disclosure Texas Disclosure of Multiple Roles Uniform Loan Submission Sheet 1003 (Interviewer section)1 VA Addendum (Lender section - Line 15)
Mortgagee Request For Insurance Request For Title Commitment
Processor Request For Appraisal Request For Insurance Request For Title Commitment

3-24
Verification of Deposit (VOD) Verification of Employment (VOE) Verification of Loan (VOL) Verification of Land Contract Verification of Mortgage (VOM) Verification of Rent (VOR)
Seller Request For Title Commitment Survey Request
Selling Agent Request for Appraisal
Title Request For Title Commitment Survey Request Uniform Loan Submission
Underwriter FHA DE Analysis of Appraisal (HUD-54114) Statement of Appraised Value (HUD-92800.5B)
Table 22: Forms affected by Official Contacts
6. Save the new contact to the Official Contact List (see Figure 83).
a. Click Save.
b. Click Save and Add other to create a new official contact.
7. Click Back to agents list to return to the Agents screen.
8. The new contact should now appear in the Official Contacts List section on the
bottom of the Agents screen.

3-25
Printing Documents
When you are ready to print your documents, click on the Print link inside the File folder
of the Quick Navigation Bar. This will bring you to the Print screen. Lender‟s Office
has over 60 documents that can be printed for your loan (see Figure 84).
Figure 84: Print screen
There are two ways to print forms and documents in Lender‟s Office.
1. Using the ePrint module to print directly to your printer.
2. Saving the document as a PDF file and then printing from your PDF reader.

3-26
Installing ePrint
The ePrint module allows you to select multiple documents and send them directly to a
local printer. In order to use ePrint, it must be installed onto your computer.
To install the ePrint module onto your computer:
1. From the Pipeline screen, click on the Download link under the Your Settings
section (see Figure 85).
Figure 85: Download link
2. The Software Download Page will appear. On the ePrint Control section, click
on the Click here to install ePrint link.
Figure 86: Software Download Page
3. Click Run to begin the ePrint installation. (see Figure 87).
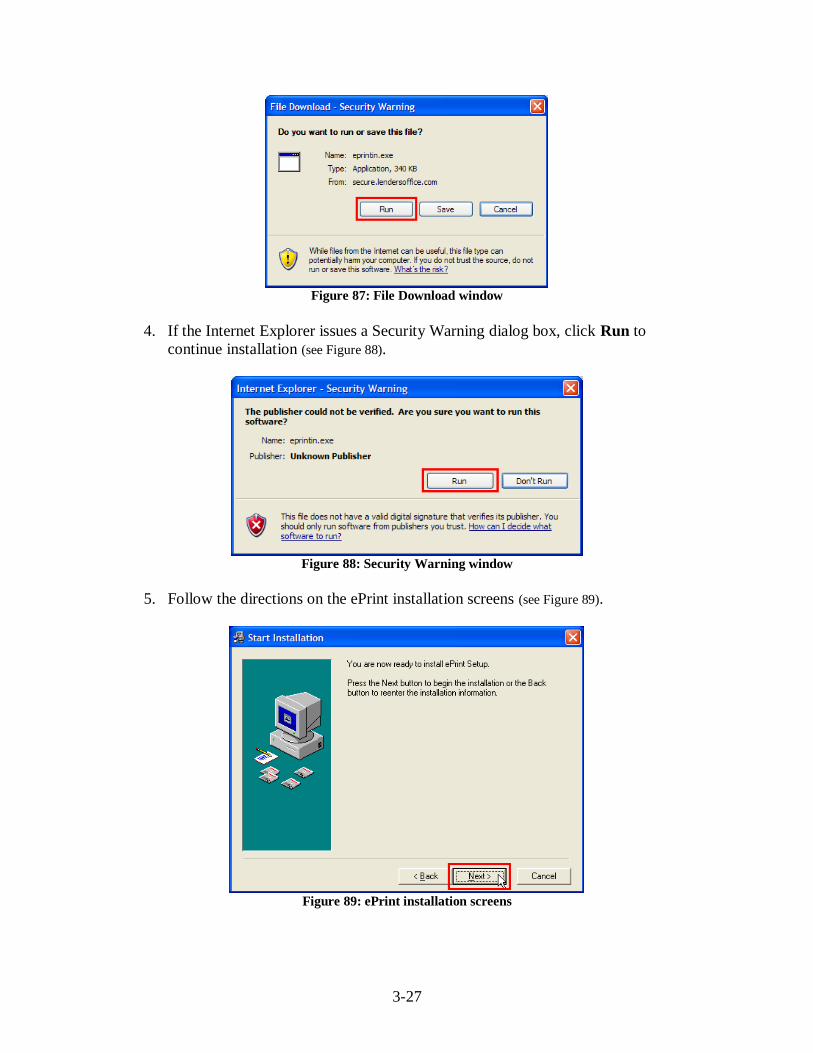
3-27
Figure 87: File Download window
4. If the Internet Explorer issues a Security Warning dialog box, click Run to
continue installation (see Figure 88).
Figure 88: Security Warning window
5. Follow the directions on the ePrint installation screens (see Figure 89).
Figure 89: ePrint installation screens

3-28
Printing with ePrint
1. From the Print screen, select the check box next to each document you want to
print (see Figure 90).
Figure 90: Select documents to print
2. Click Print Selected Forms… to print the documents (see Figure 90).
3. Select your printer from the Printer list (see Figure 91).
4. Select the paper size from the Paper Size list. You can choose from
AUTOMATIC, LEGAL, and LETTER. Choose AUTOMATIC to have Lender‟s
Office automatically select the correct paper size for each document (see Figure 91).
5. Enter the number of copies you want to print in the Number of Copies box.
6. Click Print to send the documents to the printer (see Figure 91).
Figure 91: Select printer, paper size, and number of copies

3-29
Saving and Printing Documents as PDF Files
An alternative to immediately printing documents is to save them as PDF files for review
and printing at a later time. Here are some other benefits to saving your documents as
PDF files:
Review PDF files for correctness before printing.
Email the PDF files to other employees who do not have access to Lender‟s
Office. It is highly recommended that you do not email sensitive documents.
Protect your PDF files with a password. Requiring a password to access the file is
a good way to add another layer of security for your sensitive information.
Here is the procedure to save your documents as a PDF file:
1. On the Print screen, select the check box next to each document you want to print.
2. If you would like to password protect your PDF files, select the check box next to
the lock icon and enter your desired password (see Figure 92).
Figure 92: Save documents as PDF files
3. Click Preview Selected Forms to Print or Email (see Figure 92).
4. The File Download window will appear (see Figure 93). Click Open to open the
PDF for review. Click Save to save the file to your computer.
Figure 93: Open or save the PDF file
5. The PDF file can be printed through the print menu on your PDF reader program.

3-30
Managing Multiple Loan Files
Once loans have been created, it is important for you to be able to share information and
properly manage your employees‟ pipelines. You have already learned how to change a
loan‟s status and how to assign loans to different employees in the “General Tracking”
and “Agents” sections. Those methods allow you to modify a single loan file. In this
section, we will learn how to change the loan status and assign individuals to multiple
loan files quickly and easily from the Pipeline and Advanced Searched screens.
Managing Loans from the Pipeline
1. From the Pipeline screen, select the check box next to each of the files you want
to manage (see Figure 94).
Figure 94: Select loan files in your Pipeline
2. Click Assign & Change Status (see Figure 95).
Figure 95: Click on the Assign & Change Status button

3-31
3. A new window will appear where you can modify the loan status, branch, and
employees assigned to the file. If you do not want to modify certain settings on
the loan file, select the Unchanged option for the setting. In Figure 96, we have
modified the following:
a. Transferred the loan files to the Orange County Branch.
b. Assigned Bill Broker as the Loan Officer of the loan files.
c. Assigned Pablo Processor as the Loan Processor of the loan files.
d. All other settings were unchanged.
Figure 96: Change the loan status, branch, and employee assignments
4. Click OK.
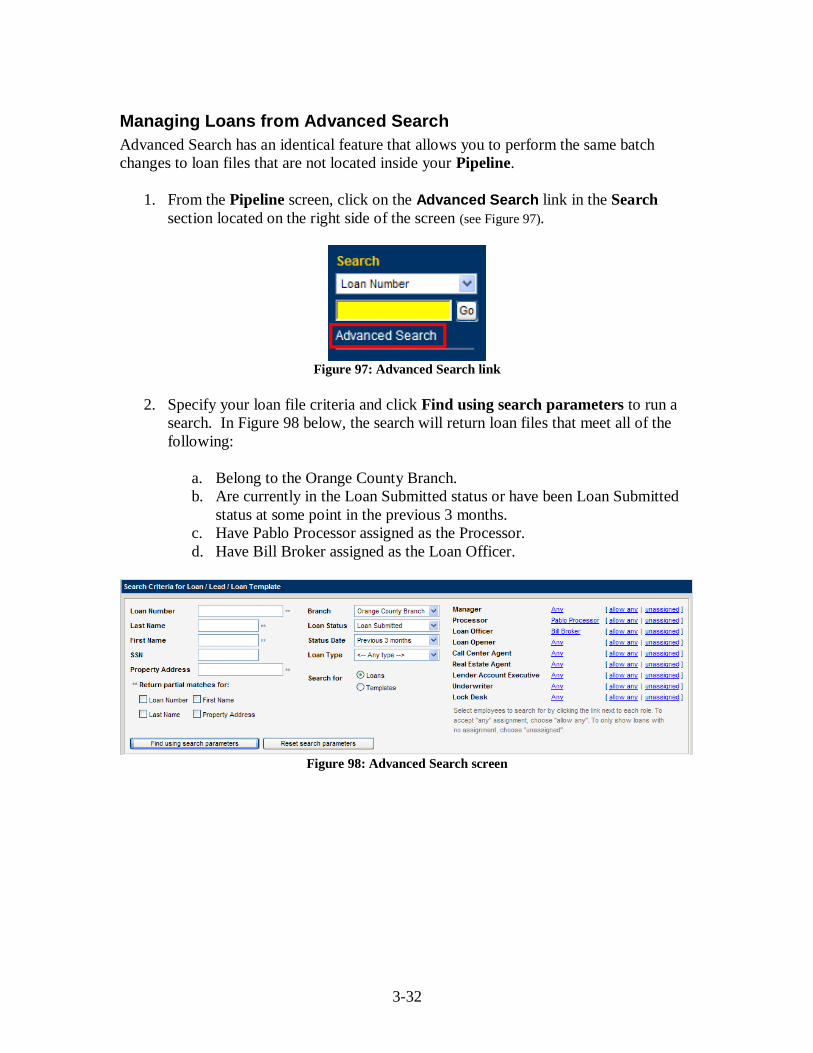
3-32
Managing Loans from Advanced Search
Advanced Search has an identical feature that allows you to perform the same batch
changes to loan files that are not located inside your Pipeline.
1. From the Pipeline screen, click on the Advanced Search link in the Search
section located on the right side of the screen (see Figure 97).
Figure 97: Advanced Search link
2. Specify your loan file criteria and click Find using search parameters to run a
search. In Figure 98 below, the search will return loan files that meet all of the
following:
a. Belong to the Orange County Branch.
b. Are currently in the Loan Submitted status or have been Loan Submitted
status at some point in the previous 3 months.
c. Have Pablo Processor assigned as the Processor.
d. Have Bill Broker assigned as the Loan Officer.
Figure 98: Advanced Search screen

3-33
3. After the search results are displayed, select the check box next to each file you
wish to manage (see Figure 99).
Figure 99: Advanced Search results section
4. Click on Assign & change status.
5. A new window will appear where you can modify the loan status, branch, and
employees assigned to the file. If you do not want to modify certain settings on
the loan file, select the Unchanged option for the setting (see Figure 96).
6. Click OK.

3-34
Working with Lead Files
Lender‟s Office contains features that are specific for lead generators, whether they are
call center agents (telemarketers), junior loan officers, or loan officers that prefer to
separate prospects from borrowers. All leads are stored in the Your Leads folder on the
Pipeline screen.
Creating Lead Files
Only two roles have access to create lead files, the Manager and Call Center Agent roles.
1. From the Pipeline screen, click on the Create Lead link under the Leads section.
Figure 100: Create Lead Link
2. The Lead Generation interface will appear (see Figure 101). Also known as a “short
form” application, the lead interface requires minimal information on a borrower.
Fill out whatever information you need.
Figure 101: New Lead File

3-35
3. The Quick Navigation Bar for the Lead Generation interface contains links to the
following functions:
a. Close File: Save and close lead file.
b. Create New Task: Create a task for the lead. For more information about
tasks, see Chapter 5: Tasks.
c. Task List: Display list of currently active tasks.
d. Lead Info: Display lead information screen (see Figure 101).
e. Run LPE: Process lead through Loan Pricing Engine. This option can be
disabled in your company settings. For more information, see “General
Settings” in Chapter 2: Getting Started.
f. Liabilities: Display credit liabilities. For more information about
liabilities, see “Liabilities”.
g. Order Credit: Order a credit report and automatically imports liabilities.
For more information about ordering credit reports, see “Ordering Credit
Reports”.
h. View Credit: View and print credit reports.
i. Assignment & Status: Transfer lead to another employee and change the
status of the lead. For more information about lead status and
assignments, see the following sections.
Changing the Lead Status
Just like loan files, you can change the status of a lead file very easily.
1. Click on the Assignment & Status link inside the Lead Management folder of
the Quick Navigation Bar (see Figure 102).
Figure 102: Lead Assignment & Status screen

3-36
2. Click on Change Status (see Figure 102).
3. A new window will appear. Choose one of the four lead statuses (see Figure 103).
Figure 103: Choose a lead status
Assigning a Lead File
Just like loan files, you can assign different employees to your lead files. These
assignments would carry over whenever the lead is converted to a loan file. Some
assignments are automatically created according to the relationships setting in the lead
creator‟s account. To assign a lead file:
1. Click on the Assignment & Status link inside the Lead Management folder of
the Quick Navigation Bar (see Figure 102).
2. Click on the assign link next to the role you want to assign.
3. A selection window will appear. Choose the desired employee account by
clicking on their name. If you want to remove an assignment, click on Clear
Assignment in the selection window.
4. The name of the newly assigned employee should now appear in the Lead
Assignment screen.
Converting a Lead File to a Loan File
After a lead has been generated, you can convert it to a loan file. During this process,
you may apply a loan template as well as auto-create a new loan number.
1. Click on the Assignment & Status link inside the Lead Management folder of
the Quick Navigation Bar (see Figure 102).
2. Click on Convert to loan file >>> (see Figure 102).

3-37
3. There are two ways to convert the lead to a loan (see Figure 104).
a. Convert to loan: Select this option if you do not want to use an existing
loan template.
b. Convert to loan using template: Select this option if you want to use a
template. Then choose a template from the list.
Figure 104: Convert a lead to a loan
4. Select a loan numbering option (see Figure 104).
a. Remove “Lead” prefix from loan number: Select this option to keep the
current loan number without the “Lead” prefix.
b. Auto-create new loan number: Select this option to create a new loan
number using the company‟s Loan Naming Scheme. For more
information about the loan naming scheme, see “Loan Naming Scheme” in
Chapter 2: Getting Started.
5. Click Convert. The new loan file should now appear in the Pipeline of the
employees assigned to the file.

Chapter 4: Importing And Exporting Loan Files
Lender‟s Office has an extensive import/export feature that allows you to easily transfer
your loan files from your old LOS directly into Lender‟s Office. Similarly, if you need to
transfer loans created in Lender‟s Office into a different file format, the export feature
provides the ability to save loans as Calyx Point and Fannie Mae files. Exporting loan
files is typically used when uploading a loan file to a lender‟s website for automated
underwriting.
Downloading BrowserXT
Before importing or exporting loan files, you must download and install BrowserXT, our
proprietary import/export interface.
1. From the Pipeline screen, click the Download link under the Your Settings
section of the Navigation Bar.
2. Click on the Download and install BrowserXT link (see Figure 105).
Figure 105: BrowserXT download page
3. Click Run to begin the BrowserXT installation (see Figure 106).
Figure 106: File Download dialog box

4-2
4. If Internet Explorer issues a Security Warning dialog box, click Run to continue
installation (see Figure 107).
Figure 107: Security Warning dialog box
5. Click Next four times to complete the installation process (see Figure 108).
Figure 108: BrowserXT installation screens

4-3
Importing Loan Files
Lender‟s Office makes it easy to import Calyx Point, Fannie Mae, and MISMO files with
the Import Loans tool. You can import multiple lead and loan files and even select the
branch and individuals to be auto-assigned to the files, as they enter the system.
Importing files from Calyx Point
1. From the Pipeline screen, click the Import Loans link under the Loans section of
the Navigation Bar.
2. On the Import Format list, select the Calyx Point option (see Figure 109).
Figure 109: Import Calyx Point option
3. Click Browse… to locate the folder on the computer where your Point files are
saved (see Figure 110).
Figure 110: Calyx Point batch import window
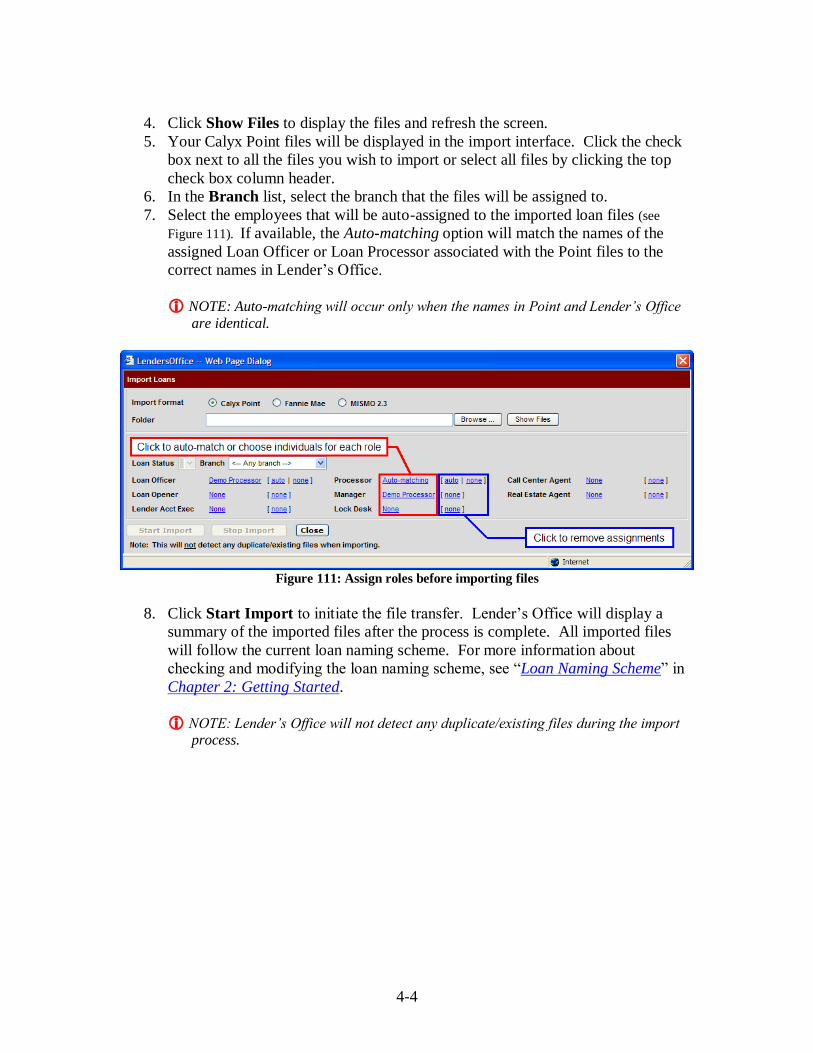
4-4
4. Click Show Files to display the files and refresh the screen.
5. Your Calyx Point files will be displayed in the import interface. Click the check
box next to all the files you wish to import or select all files by clicking the top
check box column header.
6. In the Branch list, select the branch that the files will be assigned to.
7. Select the employees that will be auto-assigned to the imported loan files (see
Figure 111). If available, the Auto-matching option will match the names of the
assigned Loan Officer or Loan Processor associated with the Point files to the
correct names in Lender‟s Office.
NOTE: Auto-matching will occur only when the names in Point and Lender’s Office
are identical.
Figure 111: Assign roles before importing files
8. Click Start Import to initiate the file transfer. Lender‟s Office will display a
summary of the imported files after the process is complete. All imported files
will follow the current loan naming scheme. For more information about
checking and modifying the loan naming scheme, see “Loan Naming Scheme” in
Chapter 2: Getting Started.
NOTE: Lender’s Office will not detect any duplicate/existing files during the import
process.

4-5
Importing Files from Fannie Mae
The process of importing Fannie Mae files is similar to the process of importing Calyx
Point files. For descriptive screenshots of the importing process, see “Importing Files
from Calyx Point”.
1. From the Pipeline screen, click the Import Loans link under the Loans section of
the Navigation Bar.
2. On the Import Format list, select the Fannie Mae option (see Figure 112).
Figure 112: Fannie Mae batch import screen
3. Click Browse… to locate the folder on your computer where your Fannie Mae
files are saved.
4. Click Show Files to display the files and refresh the screen.
5. Your Fannie Mae files will be displayed in the import interface. Click the check
box next to all the files you wish to import or select all files by clicking the top
check box column header.
6. In the Loan Status list, select the status that the files should be in.
7. In the Branch list, select the branch that the files will be assigned to.
8. Select the employees that will be auto-assigned to the imported loan files.
9. Click Start Import to initiate the file transfer. Lender‟s Office will display a
summary of the imported files after the process is complete. All imported files
will follow the current loan naming scheme. For more information about
checking and modifying the loan naming scheme, see “Loan Naming Scheme” in
Chapter 2: Getting Started.
NOTE: Lender’s Office will not detect any duplicate/existing files during the import
process.

4-6
Importing MISMO 2.3 Files
The process of importing MISMO 2.3 files is very similar to the process of importing
Calyx Point files. For descriptive screenshots of the importing process, see “Importing
Files from Calyx Point”.
1. From the Pipeline screen, click the Import Loans link under the Loans section of
the Navigation Bar.
2. On the Import Format list, select the MISMO 2.3 option (see Figure 113).
Figure 113: MISMO 2.3 batch import interface
3. Click Browse… to locate the folder on your computer where your MISMO files
are saved.
4. Click Show Files to display the files and refresh the screen.
5. Your MISMO 2.3 files will be displayed in the import interface. Click the check
box next to all the files you wish to import or select all files by clicking the top
check box column header.
6. In the Loan Status list, select the status that the files should be in.
7. In the Branch list, select the branch that the files will be assigned to.
8. Select the individuals that will be auto-assigned to the imported loan files.
9. Click Start Import to initiate the file transfer. Lender‟s Office will display a
summary of the imported files after the process is complete. All imported files
will follow the current loan naming scheme. For more information about
checking and modifying the loan naming scheme, see “Loan Naming Scheme” in
Chapter 2: Getting Started.
NOTE: Lender’s Office will not detect any duplicate/existing files during the import
process.

4-7
Exporting to Fannie Mae
1. Open the loan file to be exported.
2. Inside the Quick Navigation Bar, open the File folder and click on the Export
sub-folder (see Figure 114).
Figure 114: Exporting Fannie Mae files
3. Click the To Fannie Mae… link.
4. Fill out any additional information on the Fannie Mae Export screen
(see Figure 115) and click Next.
Figure 115: Fannie Mae Export screen
5. Lender‟s Office will provide any warnings if there are conflicts.

4-8
6. On the Fannie Mae Verification screen, click Export (see Figure 116).
Figure 116: Fannie Mae Verification screen
7. Click Save (see Figure 117).
Figure 117: Save the Fannie Mae file
8. Select a location to save the file (see Figure 118).
Figure 118: Choose desired location and file name
9. By default, Lender‟s Office will name the file as “[First Name]_[Last
Name].fnm”. Rename the file as desired, choose the destination, and then click
Save (see Figure 118).

4-9
Exporting to Calyx Point
1. Open the loan file to be exported.
2. Inside the Quick Navigation Bar, open the File folder and click on the Export
sub-folder (see Figure 119).
Figure 119: Exporting Calyx Point files
3. Click the To Calyx Point… link.
4. Select a folder location from the Data Path list or click Select another folder…
to save to a different location (see Figure 120).
Figure 120: Calyx Point export screen
5. In the File Name box, type in the desired name.
6. In the File Type list, select the Borrower File or Prospect File option.
7. Click Export.
NOTE: When opening the exported file in Calyx Point, remember to rebuild your
borrower list.

4-10
Batch Exporting to Calyx Point
If you wish to backup all Lender‟s Office files to Calyx Point, or export multiple loan
files, use the following method:
1. From the Pipeline screen, click on Advanced Search on the right side of the
screen.
2. Search for the loan files you wish to import. To display all files inside the
Lender‟s Office system, leave all fields blank and click Find.
3. Click on every check box in front of the files you want to be exported. You can
select all files by clicking on the top check box column header (see Figure 121).
Figure 121: Batch exporting to Calyx Point
4. Click Export selected files to POINT.
5. Select the location you would like to export the selected files to in the
DATAPATH row. Click on the Browse… button to specify a datapath not on
the list.
Figure 122: Calyx Point export settings

4-11
6. In FILE NAME, choose whether you would like the exported file names to:
a. Use loan number
b. Use borrower‟s name and loan number (e.g. First_Last_LoanNumber)
7. In IF DUPLICATE, choose the appropriate action if a duplicate file name is
found (see Figure 122):
a. Keep existing file: Always keep the existing file in Point intact and skip
export of this file.
b. Replace existing file: Always replace the existing Point file with the
Lender‟s Office file.
c. Ask when duplicate is found: Pauses export process each time a
duplicate file is found and asks whether to keep or replace the existing file.

Chapter 5: Tasks
The Lender‟s Office Task System is a versatile tool that can be used to track
conversations and activities, create personal reminders, send notifications to specific
individuals in your organization, and serve as an audit log. In the simplest terms, it is a
combination of email and a bulletin board system that can be attached to your loan files.
Tasks can be used by Loan Officers to communicate with other employees assigned to
the loan file, eliminating unnecessary phone calls, and can provide proof of
documentation via conversation notes. Tasks can also be used by Loan Processors to
create reminders for themselves to follow up on verifications and other documents.
Managers can review tasks to track the progress of a loan or troubleshoot loan issues.
Overall, the Lender‟s Office Task System provides a streamline approach to organizing
loose ends and improving the productivity of your organization.
The benefits of using Tasks are:
Activities are automatically date and time stamped.
User names are automatically saved.
Once an activity has been recorded, it cannot be edited or deleted.
Activities are tracked in chronological order.
The Tasks Folders
From the Pipeline screen, you will see there are three folder tabs related to Tasks: Your
Tasks, Tracked Tasks, and Tasks in Your Loans (see Figure 123).
Figure 123: Tasks folder tabs in Pipeline screen
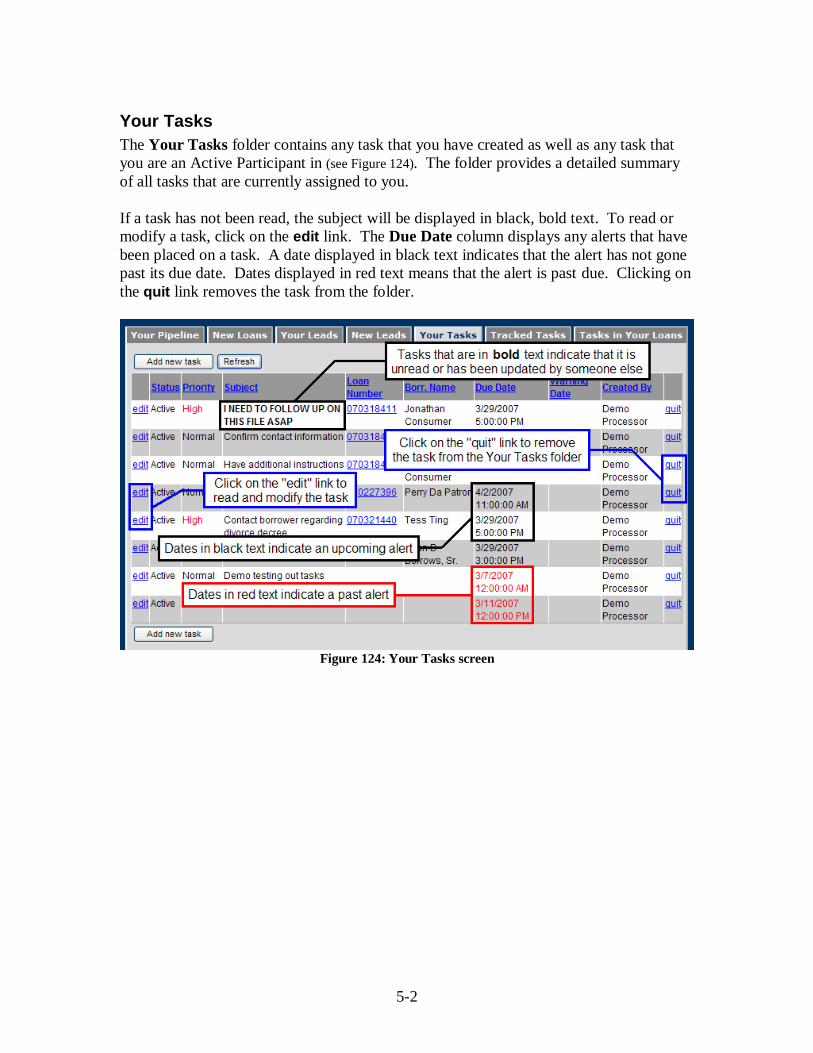
5-2
Your Tasks
The Your Tasks folder contains any task that you have created as well as any task that
you are an Active Participant in (see Figure 124). The folder provides a detailed summary
of all tasks that are currently assigned to you.
If a task has not been read, the subject will be displayed in black, bold text. To read or
modify a task, click on the edit link. The Due Date column displays any alerts that have
been placed on a task. A date displayed in black text indicates that the alert has not gone
past its due date. Dates displayed in red text means that the alert is past due. Clicking on
the quit link removes the task from the folder.
Figure 124: Your Tasks screen

5-3
Tracked Tasks
The Tracked Tasks folder (see Figure 125) contains tasks that you have sent to someone
else and have requested to be notified when the recipient has read your task. A Tracked
Task is similar to an email “read receipt”. For more information about creating tasks, see
“Creating a Task”.
Figure 125: Tracked Tasks screen
Tasks that have not been read by the recipient will appear in bold text under the Subject
column along with an indicator that says “No” in the Read? column. The opposite is true
for tasks that have already been read by recipients; the Subject line will display in plain
text and the Read? column will display “Yes”.
Figure 126: Task filter
The Tracked Tasks folder can also be filtered to view tasks according to certain settings
(see Figure 126). Select the appropriate check boxes to filter the folder. Clicking Preview
will display your new filter settings, but will not save them. You can save your filter
settings by clicking Save. To hide your filter settings, click Hide.

5-4
Tasks in Your Loans
The Tasks in Your Loans folder (see Figure 127) contains any tasks that are related to
loans you are currently assigned to.
This includes:
Tasks that you have created.
Tasks that were created by others and sent to you.
Tasks that others have created but have not included you.
Essentially, the Tasks in Your Loans folder allows you to view all conversations
involving any loan in your pipeline.
Figure 127: Tasks in Your Loans screen
As seen in Figure 127 above, tasks have an edit, rejoin, or join link. Edit indicates you
are already involved with this task. Rejoin means that you were previously assigned to a
task but had subsequently quit the task. Join indicates that the task was created without
including you. Clicking on any of these links allows you to view the task and a history of
notes entered on the task.
Similar to the Tracked Tasks folder, you can employ a filter to help you make sense of
all the tasks in the folder. Click on Show Filter Settings and configure the check boxes
to specify the types of tasks you wish to view.

5-5
Creating a Task
There are two ways to create a task in Lender‟s Office. You can either create a task from
the Pipeline or from the inside of a loan file.
Creating Tasks from Pipeline
1. From the Pipeline screen, click on the loan file you wish to create a task for. The
loan file listing will expand to reveal several links. Click on new task to create a
task for the selected loan file (see Figure 128).
Figure 128: Creating a new task
2. The Task Interface is shown in Figure 129 below. Similar to an email, tasks
have a Subject line, where the title of the task is entered, and a New Notes box,
where the message of the task is entered.
Figure 129: Task Interface

5-6
3. Tasks can be set with “High”, “Normal”, and “Low” priorities. Inside of the task
folders, tasks with “High” priority are displayed in red text under the Priority
column while tasks with “Normal” or “Low” priority are displayed in black text.
4. A task‟s status is defaulted to “Active”. The status of a task can also be changed
to “Done”, “Suspended”, and “Canceled”.
5. Create a Due Date Alert for a task by selecting the Due Date check box and
entering the date and time in the corresponding fields. When a task goes beyond
the due date and time, the date will be displayed in red text under the Due Date
column inside of the Your Tasks, Tracked Tasks, and Tasks in Your Loans
folders.
6. To assign a task to other users, click the edit list link next to Active Participants.
By default, your name will always appear in the Active Participants window.
7. The Task Participants interface (see Figure 130) allows you to select multiple
individuals to receive a task. You can filter the list of names displayed in the Add
window by selecting the appropriate group option in the Group list.
Figure 130: Tracking Active Participants
8. Click the add link to include an individual on your task. Their name will appear
in the Active window on the lower half of the screen.
9. If you wish to track a participant to determine whether that individual has read
your task, place a check mark in the Track? check box next to their name. For
more information about tracking tasks, see “Tracked Tasks”.

5-7
10. Click on the return to history link, see Figure 130, to go back to the main task
window and edit your message.
11. You may quit the task by selecting the Quit this task? check box.
12. Click OK to send your task.
Creating Tasks within a Loan File
The Lender‟s Office Task System is also available while working on a loan, so that tasks
can be created on the fly.
Figure 131: Tasks within a loan
1. While editing a loan file, click on the Tasks folder inside the Quick Navigation
Bar on the left side of the screen. Then click on Create new task (see Figure 131).
2. The Task Interface will appear (see Figure 129). Follow Steps 2 through 12 of
“Creating Tasks from Pipeline” to finish creating a task.

5-8
Tracking Loan File Activities Using Tasks
The task system can be used as a Conversation/Activity log or Audit log to record
activities performed by all users. Messages recorded in a task are automatically time-
stamped and cannot be deleted.
Create a Conversation Log in a Loan Template
To have the Conversation Log automatically available on every loan file, you can pre-
populate all loans with a Conversation Log by creating a task inside a Loan Template file.
You can either create a new Loan Template or edit an existing Loan Template.
1. From the Pipeline screen, click Create Loan Template (see Figure 132).
Figure 132: Create Loan Template
2. Inside the Quick Navigation Bar, click on the Create new task link inside the
Tasks folder (see Figure 133).
Figure 133: Create task inside a Loan Template

5-9
3. Inside the Subject box, type in your desired subject title (see Figure 134). For a
descriptive screenshot of the Task Interface, see Figure 129.
Figure 134: Creating a Conversation Log
4. Click OK.
5. Save and close the Loan Template.
You can now instruct your originators to use the specified Loan Template on all new
loans they create in Lender‟s Office. Additionally, you can use the new Loan Template
as your Default Loan Template in PriceMyLoan. As the default template, all new loans
created in PML will automatically have the Conversation Log available for use.
For more information about setting up a default loan template, see the “System Options”
section in Chapter 2: Getting Started.
For more information about editing an existing Loan Template, see the “Editing &
Deleting Loan Templates” section in Chapter 2: Getting Started.

5-10
Recording Activities in the Conversation Log
When users want to record an activity in the Conversation Log, follow these steps:
1. From the Pipeline screen, click on the Tasks in Your Loans folder tab.
2. Click the edit link next to the task you want to modify. If the edit link is not
available, click on the join or rejoin link to associate yourself with the task.
3. Record the activity in the New Notes section of the Conversation Log. For a
screenshot of the New Notes section inside of the Task Interface, see Figure 129.
4. Click OK to save changes to the Conversation Log.
Viewing Activities in the Conversation Log
1. From the Pipeline screen, click on the Your Tasks or Tasks in Your Loans
folder tab (see Figure 13).
2. Click the edit link next to the task you want to view. If the edit link is not
available, click on the join or rejoin link to associate yourself with the task.
3. All activities will be recorded and time stamped in the History area. All times are
recorded in Pacific Standard Time.
Figure 135: Task History section
4. All users currently assigned to the Conversation Log will be identified in the
Active Participants area (see Figure 136).
Figure 136: Task Active Participants

5-11
Printing the Task List
Lender‟s Office allows you to either save all the tasks in a loan file onto your computer
as a PDF file for viewing and printing or send the tasks directly to your printer using our
ePrint module. For more information about printing documents and ePrint, see “Printing
Documents” in Chapter 3: Working with Loan Files.
Saving the Task List to a PDF file
1. Open the loan file that contains the task/conversation log you wish to print.
2. On the Quick Navigation Bar, click the Task List link under the Tasks folder.
3. Click Print task list on the upper right side of the screen (see Figure 137).
Figure 137: Print task list button
4. Click Save.
5. Choose the location you would like to save the PDF file, rename the file to your
desired file name in the File name: box, and click Save. You can use this file to
view and print the Task List from inside your PDF reader program (e.g. Adobe
Reader 7.0).

5-12
Printing the Task List using ePrint
1. Open the loan file that contains the task/conversation log you wish to print.
2. On the Quick Navigation Bar, click the Task List link under the Tasks folder.
3. Click Print located on the top of the Quick Navigation Bar. This will bring you
to the Print screen.
4. The “Loan Tracking Report – Tasks List” check box should be automatically
selected and highlighted in blue.
5. Click Print Selected Forms… to print using the ePrint module. All tasks in the
Task List will be listed in ascending chronological order.
Figure 138: Task List printout

Chapter 6: Custom Reports
Effective management of your business relies on the availability of sound data. Since
Lender‟s Office is a real-time system, you can be assured that the data collected for your
management reports is up to date and accurate, allowing you to perform business
analyses more frequently.
Viewing Custom Reports
To view custom reports, click on the Custom Reports link under the Reporting section
on the Pipeline screen. The interface is divided into three tabs (see Figure 139).
Your queries: Listing of custom reports you have created.
Others’ queries: Listing of custom reports created by others.
Sample queries: Listing of sample reports provided by Lender‟s Office.
Figure 139: Loan Report Queries screen

6-2
Each query (custom report) has five option links, providing different functionality:
Click the show properties link to view a summary and description of the custom
report, including the report author and last modified date.
Figure 140: Report properties are displayed
Click the edit link to modify the properties of the report. For more information
about editing custom reports, see “Creating and Editing Custom Reports”.
Click the run link to generate the report (see Figure 141).
Figure 141: Report generated from "run" link
Click the copy link to create an editable copy of a report. The copy will be
placed in the Your queries folder.
Click on the delete link to delete a custom report. You are only allowed to delete
custom reports that you have created.

6-3
Sample Reports
The Sample report queries folder contains several different sample reports that come
included with the Lender‟s Office system. To view a description of each sample report,
click the show properties link. Click the run link to generate the sample report.
Figure 142: Sample queries screen
The reports can be edited by clicking the view link; however, any modifications made to
a sample report will not be saved. Instead, Lender‟s Office allows you to copy sample
reports in two easy steps:
1. Select each report you wish to copy by clicking on the check box next to the
report‟s name.
2. Click Copy selected samples. The copied sample reports will appear in the Your
queries folder.

6-4
Creating and Editing Custom Reports
1. From the Pipeline screen, click the Custom Reports link under the Reporting
section of the Navigation Bar to bring up the Loan Report Queries screen.
2. From the Your queries folder tab, click Add new to create a new custom report.
Click on the edit link to modify an existing custom report. The Report Editor
Main Interface is shown in Figure 143.
Figure 143: Report Editor Main Interface – New blank report without fields
3. Create a name for the report by typing the name of the report in the Name box.

6-5
Selecting Custom Report Fields
Figure 144: Report Editor Main Interface – Existing Report with fields
1. Every report derives its data from the Report Fields. Click Add/Remove Fields
to select the report fields that will be used for your report (see Figure 144). The
Report Field Editor will display as in Figure 145.
Figure 145: Report Field Editor Interface

6-6
2. Custom Reports are so flexible that the list of reportable fields can be quite
lengthy. To help you locate related fields more quickly, click on the Show group
list arrow to see the fields organized into loan file information groups (see Figure
146).
Figure 146: Locate a field with a list or by search
3. Another way to locate a specific field is by typing the field name you are looking
for in the Search for box, and then clicking Next (see Figure 146).
4. To add a field to your report, click on the include link next to the field name (see
Figure 146).
5. Continue adding fields to your custom report. Included fields will be displayed in
the Report fields box on the right side of the screen (see Figure 146).
6. Each field will appear as a column header inside of the report. The first field in
the Report fields list will be the left-most column header. The last field in the
Report fields list will be the right-most column header. Modify the order that the
fields appear in the report by clicking on the ▲ and ▼ arrows. Fields can be
deleted by clicking the remove link next to the field name.
7. Click Save to save your field selections.
8. Click Back to go to the previous screen.

6-7
Field Functions
After selecting the fields to use in the report, you can perform different functions on those
fields to help organize the data.
From the Report Editor Main Interface (see Figure 147), click on the Field names and
functions boxes to perform field calculations.
Figure 147: Select field calculation functions
Avg: Calculate the average value of a field
Min: Display the minimum value of a field.
Max: Display the maximum value of a field.
Sum: Calculate the sum of all values of a field.
Sort: Sort all values in the selected field numerically or alphabetically.
Groups: Groups values by the selected field.

6-8
Sorting Order
Since more than one field can be used for sorting, you can specify the sorting order by
moving the field position in the Sorting order area using the ▲ or ▼ arrow buttons (see
Figure 148).
Figure 148: Sorting order area
When you mark a field to be sorted, you can also specify whether you want the sort order
to be in descending order by selecting the Descending? box. By default, the sorting
order is ascending.
Grouping Order
Grouping your data is an extremely valuable way of interpreting information and
detecting trends. In particular, Grouping allows you to generate reports that can help
monitor loan production across your entire organization. The following examples will
address the different ways Grouping can be used to organize your reports.
Simple Groups
Instead of dealing with a report that will list all of the loans in your database, you can
organize loan files into groups. In the example below, we have put loans into groups by
Loan Officer Name.
Figure 149: Grouping Order

6-9
The resulting report lists each file belonging to individual loan officers (see Figure 150).
Figure 150: Report with Officer Name grouping
Now we will apply another grouping level, the Loan Status.
Figure 151: Grouping Order with Officer Name and Loan Status
The resulting report lists each loan file belonging to individual loan officers, and
separates them further by loan status (see Figure 152). Adding more groupings merely
breaks the data into smaller clusters.
Figure 152: Report grouped by Officer Name and Loan Status

6-10
Crossed Groups
In the Grouping order area, there are check boxes under the Crossed? column. This
setting essentially collapses the group and provides a total for the selected field. In
Figure 153, we have grouped and crossed the Loan Officer name.
Figure 153: Officer Name field is grouped and crossed
The resulting report lists all the loan officer names and provides a total for all their loans
(see Figure 154).
Figure 154: Crossed Officer Name report
Adding another non-crossed grouping allows you to split all the loan officer loan totals
into separate groups. In Figure 155 we have added Loan Status as a non-crossed group.
Figure 155: The non-crossed Loan Status is added to the Grouping Order

6-11
The following report provides loan totals for each loan officer, but now they are grouped
by loan status.
Figure 156: Crossed Officer Name and Non-Crossed Loan Status report
Adding more crossed groups is useful when you want to view your data in a condensed
grid like format. In Figure 157 , we have crossed both the Loan Officer and Loan Status.
Figure 157: Crossed Loan Officer and Crossed Loan Status report
Notice how the loan totals are summed by each loan officer and how the loan status
groupings run across the report as columns instead of separate sections.
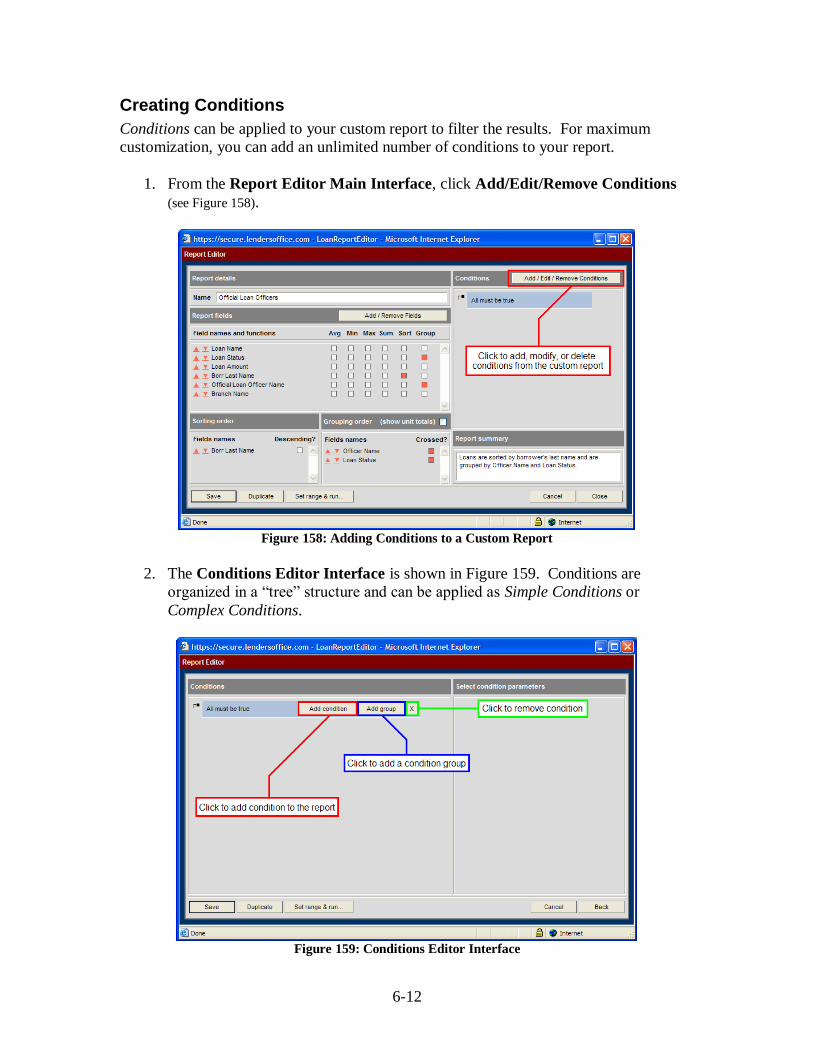
6-12
Creating Conditions
Conditions can be applied to your custom report to filter the results. For maximum
customization, you can add an unlimited number of conditions to your report.
1. From the Report Editor Main Interface, click Add/Edit/Remove Conditions
(see Figure 158).
Figure 158: Adding Conditions to a Custom Report
2. The Conditions Editor Interface is shown in Figure 159. Conditions are
organized in a “tree” structure and can be applied as Simple Conditions or
Complex Conditions.
Figure 159: Conditions Editor Interface

6-13
Simple Conditions
Simple conditions are single layer conditions that filter a report for a specific variable or
field. As an example, let‟s create a report to display only FHA loans.
1. From the Conditions Editor Interface, click Add condition. This will display
the three parameters you will need to specify to create a condition: field, operator,
and value. (see Figure 160).
Figure 160: Conditions are made up of three parameters
2. Click the select field link. The right side of the screen will display a list of
condition parameters for you to choose from (see Figure 161). The Select
conditions parameters list functions like the Report Field Editor in Figure 146
.
Figure 161: Select a condition parameter
3. Click the select link next to Loan Type.

6-14
4. Click the select operator link (see Figure 160). The right side of the screen will
display the Comparison Operators… list (see Figure 162).
Figure 162: Select a comparison operator
5. Click the select link for “= Must match”
6. Click the select value link (see Figure 160). The right side of the screen will look
like Figure 163.
Figure 163: Select a condition parameter for "value"

6-15
7. Select the Type option, and then choose FHA from the Type list.
8. Click Select. The Condition Parameters interface should look like Figure 164.
Figure 164: FHA Only condition
9. Click OK to finish creating the condition.
Complex Conditions
The Conditions Editor is able to perform advanced filtering, allowing you to create multi-
layered conditions for detailed reporting. Let‟s say you wanted to create a Month-To-
Date (MTD) report that includes all loans that were open, closed, or canceled within the
most recent month. Although it sounds easy, this is a Complex Condition because it is
multi-layered in the following fashion:
Month To Date Report
For all loans
For open loans
Between Start of Month and Today
For closed loans
Between Start of Month and Today
For canceled loans
Between Start of Month and Today
1. From the Conditions Editor Interface, click Add Group.
2. Choose a group type (see Figure 165).
Figure 165: Choose Group Type

6-16
3. Because we want to include loans that were opened OR closed OR canceled, we
will select the At least one must be true option and click OK.
4. Underneath the main group, All must be true, a sub-group named Only one
needs to be true (see Figure 166).
Figure 166: Condition sub-group
5. Now we will create a condition sub-sub-group for opened loans. Because we
want the report to only include loans opened between the Start of the current
month AND Today. Click the Add group button in the Only one needs to be
true sub-group and select the All must be true option.
6. Click Add condition in the open loan conditions sub-group.
7. Similar to Figure 164, create a condition
“[Open Date >=][Beginning of This Month]”
8. Click on Add condition to create a condition “[Open Date] <= [Today]”
9. The condition parameters will display as in Figure 167.
Figure 167: Opened Date Condition sub-group
10. Create similar sub-groups for Closed Date and Canceled Date by following
Steps 5 through 9.

6-17
11. The completed condition parameters should be displayed as in Figure 168.
Figure 168: Complex Conditions
When you are finished creating your conditions, click Back on the lower right side of the
screen to return to the Report Editor Main Interface.

6-18
Setting Date Range
Once all of the fields, field calculations, and conditions have been completed, the date
ranges for the report must be set.
1. From the Report Editor Main Interface, click Set range & run…
2. The Report Editor interface displays a screen as shown in Figure 169 .
Figure 169: Set range & run screen
3. The left side of the interface, Status event range, contains the Include only
loans with statuses in range… check box. This refers to a loan‟s status in the
past tense, as explained below:
a. Selecting the Include only loans with statuses in range… check box will
indicate that you wish to limit the report only to loans that had a specific
status within the given date range.
i. Beginning of This Month to Today with a status event of
Opened means the report will only include loans that were in an
Opened status between the beginning of the month and today,
even if their current status may be different.
b. Un-checking this box indicates that you wish to run the report on all loans
in all date ranges
4. The right side of the interface, Include only files with selected statuses, has a
check box for each different loan status. In contrast to the Statuses in range
method (mentioned in Step 3), this refers to the loan status in the present tense.
Checking any of the boxes in this area indicates that you wish to display only
loans that are currently in a particular status. In Figure 169, we are indicating that
we only want to see data for files currently in an Active and Closed status.
5. When finished setting the data range click Back to return to the main interface or
click Generate Report to create your custom report.
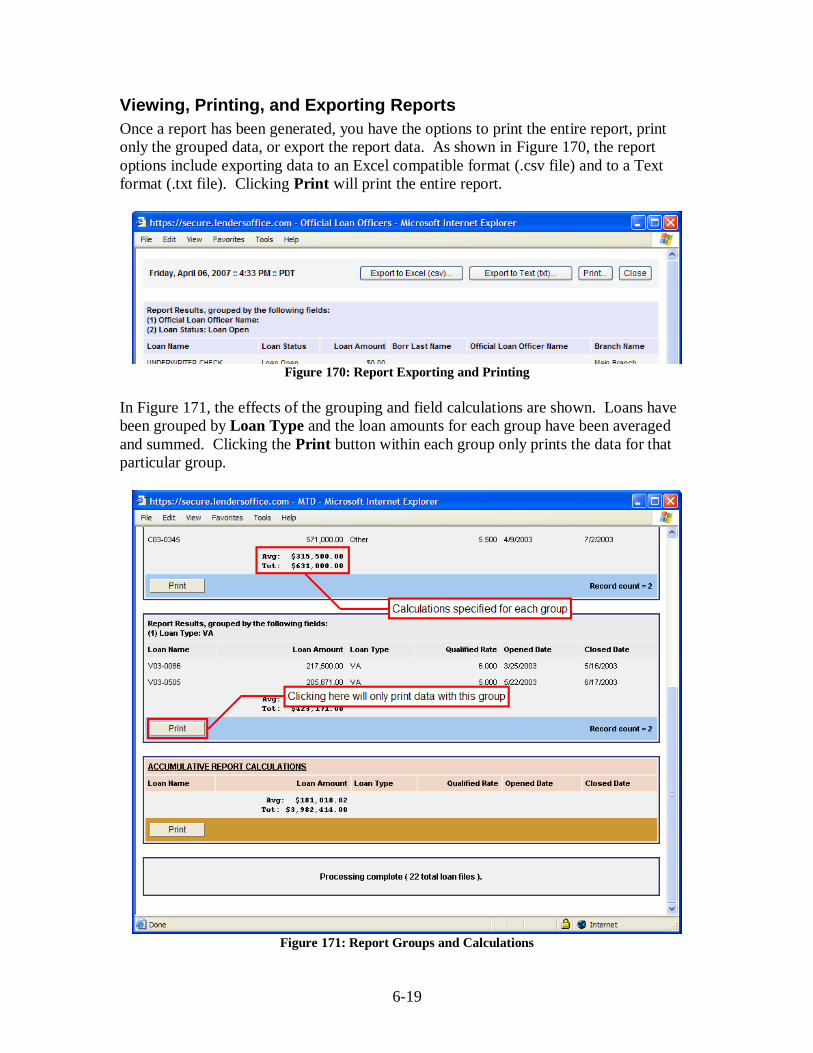
6-19
Viewing, Printing, and Exporting Reports
Once a report has been generated, you have the options to print the entire report, print
only the grouped data, or export the report data. As shown in Figure 170, the report
options include exporting data to an Excel compatible format (.csv file) and to a Text
format (.txt file). Clicking Print will print the entire report.
Figure 170: Report Exporting and Printing
In Figure 171, the effects of the grouping and field calculations are shown. Loans have
been grouped by Loan Type and the loan amounts for each group have been averaged
and summed. Clicking the Print button within each group only prints the data for that
particular group.
Figure 171: Report Groups and Calculations

© 2007 Insight Lending Solutions. All rights reserved.
Adobe ® Reader ® is a registered trademark of Adobe Systems Incorporated. Internet
Explorer, Excel, Word and/or other Microsoft products referenced herein are either
registered trademarks or trademarks of Microsoft Corporation. All other products, logos,
or brand names are either service marks, trademarks, or registered trademarks and are the
property of their respective owners.
Insight Lending Solutions makes no warranties, express or implied, in this document.
NO part of this document may be reproduced or transmitted in any form or by any means,
electronic or mechanical, for any purpose, without the express written permission of
Insight Lending Solutions.


![Final Syllabus 19[1].9.11](https://img.pdfslide.us/doc/110x75/577d211b1a28ab4e1e94826f/final-syllabus-191911.jpg)