Embed Size (px)
Citation preview
R7 HIGH FIDELITY RADIOGRAM
User guide
Brugervejledning
Bedienungsanleitung
Manual de instrucciones
Guide de l’utilisateur
Manuale utente
Gebruikershandleiding
Brukerveiledning
EN
DA
DE
ES
FR
IT
NL
NO
RA R7 user guide.indd 1 31/10/2013 14:57:38
2
Thank you for choosing our R7 high fidelity radiogram.
Inspired by 60s design, R7 is an iconic creation of which we are exceedingly proud. With its stunning looks and amazing audio quality, we guarantee that you’ll be rediscovering the joy of music and radio, all over again.
Please take the time to read this user guide as although I’m sure you’ll want to start using your R7 straight away, this guide will help you to understand its great features and get the most listening pleasure from it.
With due care, we’re confident your R7 will give you many years of listening pleasure but, should you need help or advice, please do not hesitate to contact us. As a British, family-run company, we pride ourselves on our customer service and will always do our utmost to help.
Once again, thank you for choosing Ruark Audio.
Alan O’RourkeFounder and Managing Director
RA R7 user guide.indd 2 31/10/2013 14:57:38
3
EN
DA
DE
FR
IT
ES
NL
NO
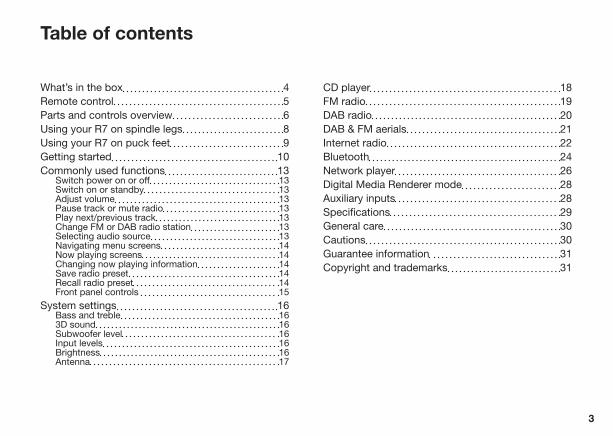
Table of contents
What’s in the box 4Remote control 5Parts and controls overview 6Using your R7 on spindle legs 8Using your R7 on puck feet 9Getting started 10Commonly used functions 13
Switch power on or off 13Switch on or standby 13Adjust volume 13Pause track or mute radio 13Play next/previous track 13Change FM or DAB radio station 13Selecting audio source 13Navigating menu screens 14Now playing screens 14Changing now playing information 14Save radio preset 14Recall radio preset 14Front panel controls 15
System settings 16Bass and treble 163D sound 16Subwoofer level 16Input levels 16Brightness 16Antenna 17
CD player 18FM radio 19DAB radio 20DAB & FM aerials 21Internet radio 22Bluetooth 24Network player 26Digital Media Renderer mode 28Auxiliary inputs 28Specifications 29General care 30Cautions 30Guarantee information 31Copyright and trademarks 31
RA R7 user guide.indd 3 31/10/2013 14:57:38
4
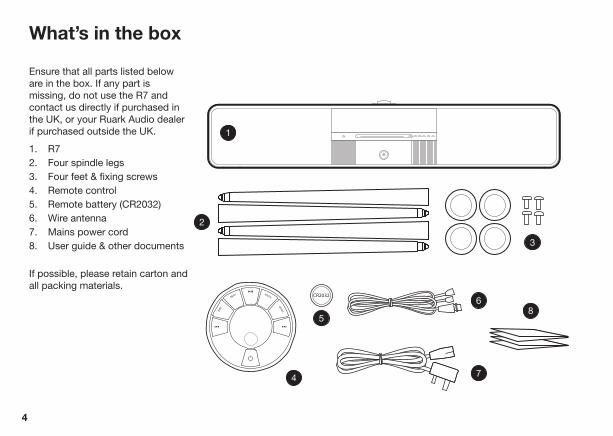
Ensure that all parts listed below are in the box. If any part is missing, do not use the R7 and contact us directly if purchased in the UK, or your Ruark Audio dealer if purchased outside the UK.
1. R72. Four spindle legs 3. Four feet & fixing screws4. Remote control 5. Remote battery (CR2032)6. Wire antenna7. Mains power cord8. User guide & other documents
If possible, please retain carton and all packing materials.
What’s in the box
1
3
4
5
7
86
2
RA R7 user guide.indd 4 31/10/2013 14:57:38
5
EN
DA
DE
FR
IT
ES
NL
NO
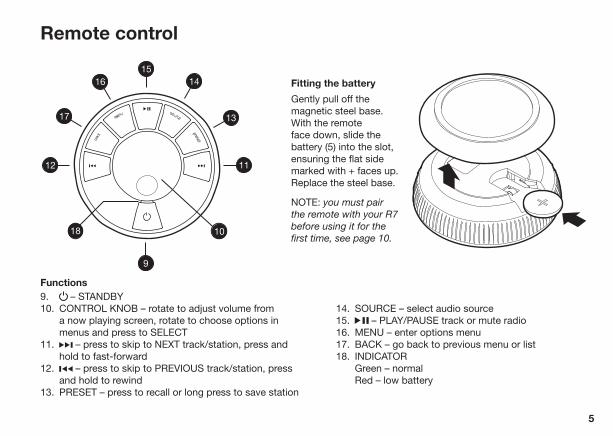
Functions9. – STANDBY10. CONTROL KNOB – rotate to adjust volume from
a now playing screen, rotate to choose options in menus and press to SELECT
11. – press to skip to NEXT track/station, press and hold to fast-forward
12. – press to skip to PREVIOUS track/station, press and hold to rewind
13. PRESET – press to recall or long press to save station
Remote control
Fitting the battery
Gently pull off the magnetic steel base. With the remote face down, slide the battery (5) into the slot, ensuring the flat side marked with + faces up. Replace the steel base.
NOTE: you must pair the remote with your R7 before using it for the first time, see page 10.
9
1112
13
14
10
16
17
15
18
14. SOURCE – select audio source15. – PLAY/PAUSE track or mute radio16. MENU – enter options menu17. BACK – go back to previous menu or list18. INDICATOR
Green – normalRed – low battery
RA R7 user guide.indd 5 31/10/2013 14:57:38
6
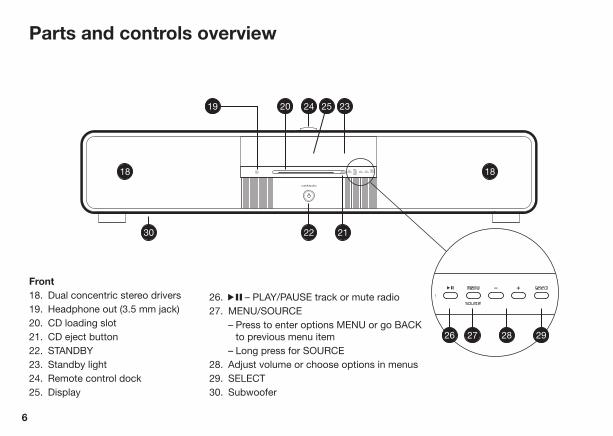
Front18. Dual concentric stereo drivers19. Headphone out (3.5 mm jack)20. CD loading slot21. CD eject button22. STANDBY23. Standby light24. Remote control dock25. Display
Parts and controls overview
23252420
2230 21
19
18 18
26. – PLAY/PAUSE track or mute radio27. MENU/SOURCE
– Press to enter options MENU or go BACK to previous menu item
– Long press for SOURCE28. Adjust volume or choose options in menus29. SELECT30. Subwoofer
26 27 28 29
RA R7 user guide.indd 6 31/10/2013 14:57:38
7
EN
DA
DE
FR
IT
ES
NL
NO
DAB / FM
Charge port5VDC 2.1A
FM
ON
OFF
31
33 39 38
34
32 37
35 36
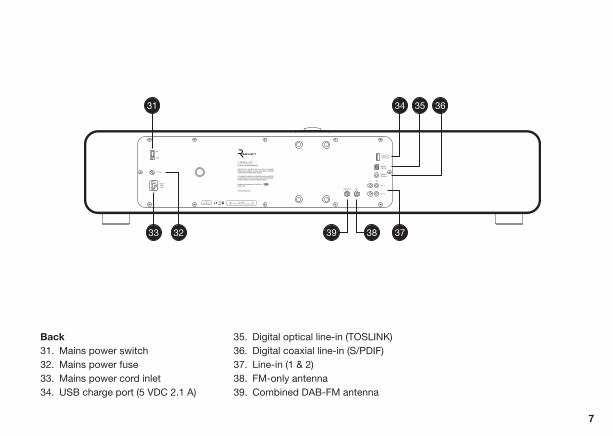
Back31. Mains power switch32. Mains power fuse33. Mains power cord inlet34. USB charge port (5 VDC 2.1 A)
35. Digital optical line-in (TOSLINK)36. Digital coaxial line-in (S/PDIF)37. Line-in (1 & 2)38. FM-only antenna39. Combined DAB-FM antenna
RA R7 user guide.indd 7 31/10/2013 14:57:39
8
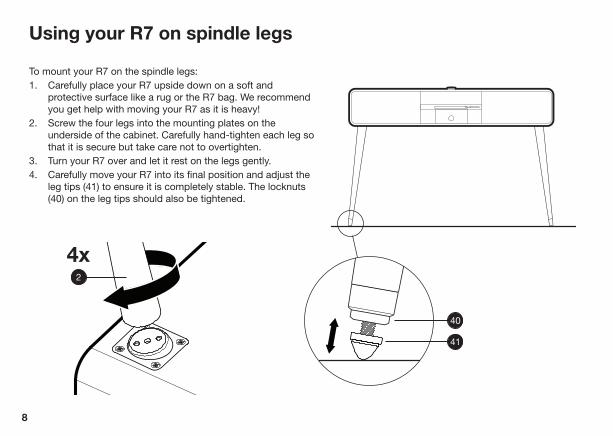
Using your R7 on spindle legs
To mount your R7 on the spindle legs:1. Carefully place your R7 upside down on a soft and
protective surface like a rug or the R7 bag. We recommend you get help with moving your R7 as it is heavy!
2. Screw the four legs into the mounting plates on the underside of the cabinet. Carefully hand-tighten each leg so that it is secure but take care not to overtighten.
3. Turn your R7 over and let it rest on the legs gently.4. Carefully move your R7 into its final position and adjust the
leg tips (41) to ensure it is completely stable. The locknuts (40) on the leg tips should also be tightened.
2
4x
41
40
RA R7 user guide.indd 8 31/10/2013 14:57:39
9
EN
DA
DE
FR
IT
ES
NL
NO
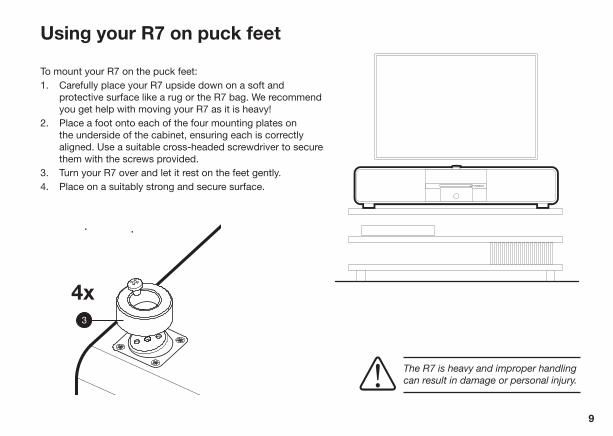
Using your R7 on puck feet
To mount your R7 on the puck feet:1. Carefully place your R7 upside down on a soft and
protective surface like a rug or the R7 bag. We recommend you get help with moving your R7 as it is heavy!
2. Place a foot onto each of the four mounting plates on the underside of the cabinet, ensuring each is correctly aligned. Use a suitable cross-headed screwdriver to secure them with the screws provided.
3. Turn your R7 over and let it rest on the feet gently.4. Place on a suitably strong and secure surface.
3
4x
The R7 is heavy and improper handling can result in damage or personal injury.
RA R7 user guide.indd 9 31/10/2013 14:57:39
10
Getting started
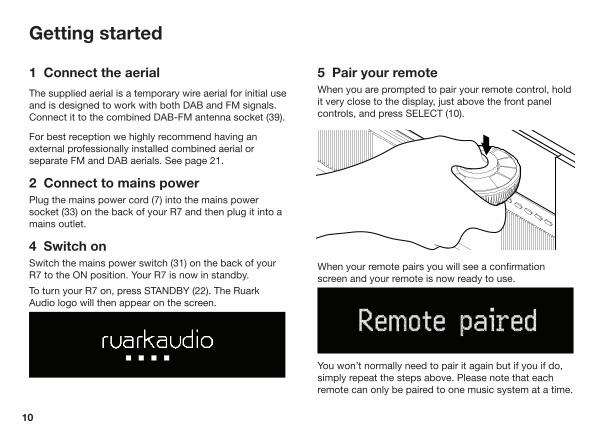
1 Connect the aerialThe supplied aerial is a temporary wire aerial for initial use and is designed to work with both DAB and FM signals. Connect it to the combined DAB-FM antenna socket (39).
For best reception we highly recommend having an external professionally installed combined aerial or separate FM and DAB aerials. See page 21.
2 Connect to mains powerPlug the mains power cord (7) into the mains power socket (33) on the back of your R7 and then plug it into a mains outlet.
4 Switch onSwitch the mains power switch (31) on the back of your R7 to the ON position. Your R7 is now in standby.
To turn your R7 on, press STANDBY (22). The Ruark Audio logo will then appear on the screen.
5 Pair your remoteWhen you are prompted to pair your remote control, hold it very close to the display, just above the front panel controls, and press SELECT (10).
When your remote pairs you will see a confirmation screen and your remote is now ready to use.
Remote paired
You won’t normally need to pair it again but if you if do, simply repeat the steps above. Please note that each remote can only be paired to one music system at a time.
RA R7 user guide.indd 10 31/10/2013 14:57:39
11
EN
DA
DE
FR
IT
ES
NL
NO
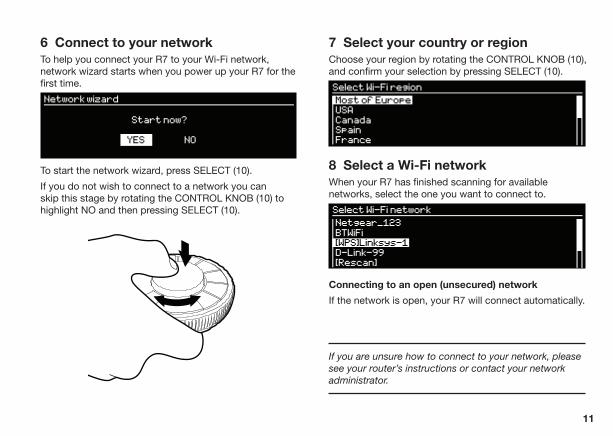
6 Connect to your networkTo help you connect your R7 to your Wi-Fi network, network wizard starts when you power up your R7 for the first time.
Network wizard
Start now?
YES NO
To start the network wizard, press SELECT (10).
If you do not wish to connect to a network you can skip this stage by rotating the CONTROL KNOB (10) to highlight NO and then pressing SELECT (10).
7 Select your country or regionChoose your region by rotating the CONTROL KNOB (10), and confirm your selection by pressing SELECT (10).
Select Wi-Fi region
SpainFrance
USA
Most of Europe
Canada
8 Select a Wi-Fi networkWhen your R7 has finished scanning for available networks, select the one you want to connect to.
Select Wi-Fi network
D-Link-99[Rescan]
BTWiFi
Netgear_123
[WPS]Linksys-1
Connecting to an open (unsecured) network
If the network is open, your R7 will connect automatically.
If you are unsure how to connect to your network, please see your router’s instructions or contact your network administrator.
RA R7 user guide.indd 11 31/10/2013 14:57:39
12
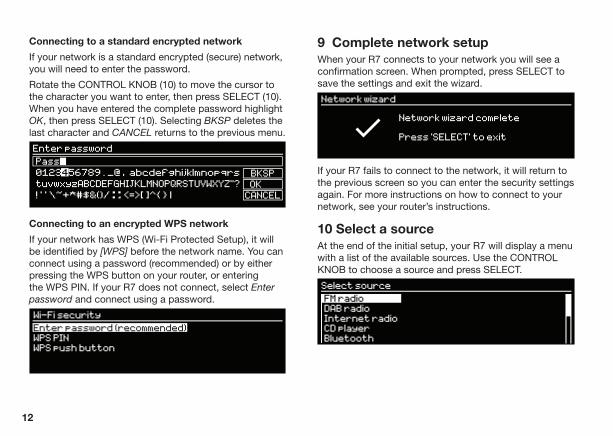
Connecting to a standard encrypted network
If your network is a standard encrypted (secure) network, you will need to enter the password.
Rotate the CONTROL KNOB (10) to move the cursor to the character you want to enter, then press SELECT (10). When you have entered the complete password highlight OK, then press SELECT (10). Selecting BKSP deletes the last character and CANCEL returns to the previous menu.
Enter password
Pass
0123456789 . _@ , abcdefghijklmnopqrs
tuvwxyzABCDEFGHIJKLMNOPQRSTUVWXYZ”?
! ‘ ’ \~+*#$&()/ : ; <=>[ ]^{ } |
BKSP
OK
CANCEL
Connecting to an encrypted WPS network
If your network has WPS (Wi-Fi Protected Setup), it will be identified by [WPS] before the network name. You can connect using a password (recommended) or by either pressing the WPS button on your router, or entering the WPS PIN. If your R7 does not connect, select Enter password and connect using a password.
Wi-Fi security
WPS PIN
Enter password (recommended)
WPS push button
9 Complete network setupWhen your R7 connects to your network you will see a confirmation screen. When prompted, press SELECT to save the settings and exit the wizard.
Network wizard
Network wizard complete
Press ‘SELECT’ to exit
If your R7 fails to connect to the network, it will return to the previous screen so you can enter the security settings again. For more instructions on how to connect to your network, see your router’s instructions.
10 Select a sourceAt the end of the initial setup, your R7 will display a menu with a list of the available sources. Use the CONTROL KNOB to choose a source and press SELECT.
Select source
CD playerBluetooth
DAB radio
FM radio
Internet radio
RA R7 user guide.indd 12 31/10/2013 14:57:39
13
EN
DA
DE
FR
IT
ES
NL
NO
Commonly used functions
Many of the functions can also be accessed from the front panel controls, see page 15.
Switch power on or offSwitch the power switch (31) to the ON or OFF position.
Switch on or standbyWith the unit powered, press STANDBY (22) on the front panel or STANDBY (9) on the remote to switch on, press again to enter standby mode.
Adjust volumeRotate the CONTROL KNOB (10) from a now playing screen.
When headphones are plugged in, only the headphone volume is adjusted so when you unplug your headphones the volume will return to the previous volume setting.
Please note that rotating the CONTROL KNOB when a menu is displayed will move the highlight and not change the volume.
Pause track or mute radioPress and then press again to resume listening.
Play next/previous trackPress or
Change FM or DAB radio stationPress or
Selecting audio sourcePress SOURCE (14) then rotate the CONTROL KNOB (10) or repeatedly press SOURCE to cycle through sources. Press SELECT (10) to change to that source or wait for a few seconds for that source to auto select.
Path annotation is used to describe where options are located in the menus, for example:
MENU > System settings > Audio > Bass
This means press MENU, select System settings, select Audio and finally select Bass
RA R7 user guide.indd 13 31/10/2013 14:57:39
14
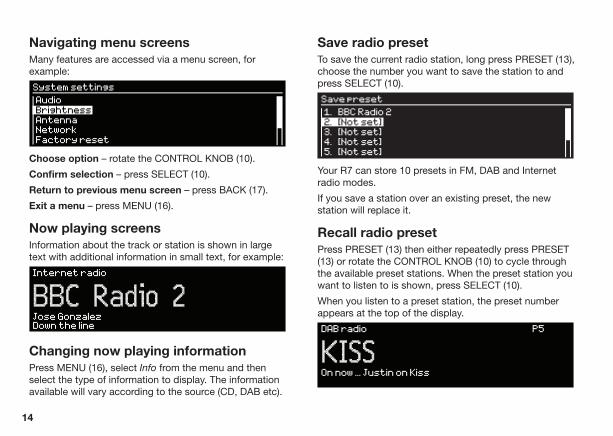
Navigating menu screensMany features are accessed via a menu screen, for example:
System settings
NetworkFactory reset
Brightness
Audio
Antenna
Choose option – rotate the CONTROL KNOB (10).
Confirm selection – press SELECT (10).
Return to previous menu screen – press BACK (17).
Exit a menu – press MENU (16).
Now playing screensInformation about the track or station is shown in large text with additional information in small text, for example:
Internet radio
Jose GonzalezDown the line
BBC Radio 2
Changing now playing informationPress MENU (16), select Info from the menu and then select the type of information to display. The information available will vary according to the source (CD, DAB etc).
Save radio presetTo save the current radio station, long press PRESET (13), choose the number you want to save the station to and press SELECT (10).
Save preset
4. [Not set]5. [Not set]
2. [Not set]
1. BBC Radio 2
3. [Not set]
Your R7 can store 10 presets in FM, DAB and Internet radio modes.
If you save a station over an existing preset, the new station will replace it.
Recall radio presetPress PRESET (13) then either repeatedly press PRESET (13) or rotate the CONTROL KNOB (10) to cycle through the available preset stations. When the preset station you want to listen to is shown, press SELECT (10).
When you listen to a preset station, the preset number appears at the top of the display.
DAB radio P5
On now ... Justin on Kiss
KISS
RA R7 user guide.indd 14 31/10/2013 14:57:39
15
EN
DA
DE
FR
IT
ES
NL
NO
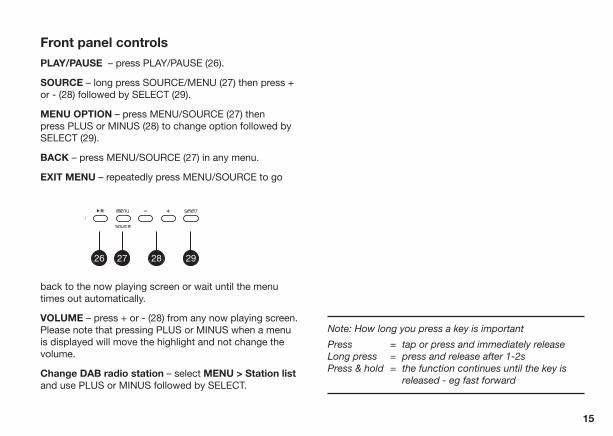
Front panel controls PLAY/PAUSE – press PLAY/PAUSE (26).
SOURCE – long press SOURCE/MENU (27) then press + or - (28) followed by SELECT (29).
MENU OPTION – press MENU/SOURCE (27) then press PLUS or MINUS (28) to change option followed by SELECT (29).
BACK – press MENU/SOURCE (27) in any menu.
EXIT MENU – repeatedly press MENU/SOURCE to go
back to the now playing screen or wait until the menu times out automatically.
VOLUME – press + or - (28) from any now playing screen. Please note that pressing PLUS or MINUS when a menu is displayed will move the highlight and not change the volume.
Change DAB radio station – select MENU > Station list and use PLUS or MINUS followed by SELECT.
Note: How long you press a key is important
Press = tap or press and immediately releaseLong press = press and release after 1-2sPress & hold = the function continues until the key is released - eg fast forward
26 27 28 29
RA R7 user guide.indd 15 31/10/2013 14:57:39
16
System settings
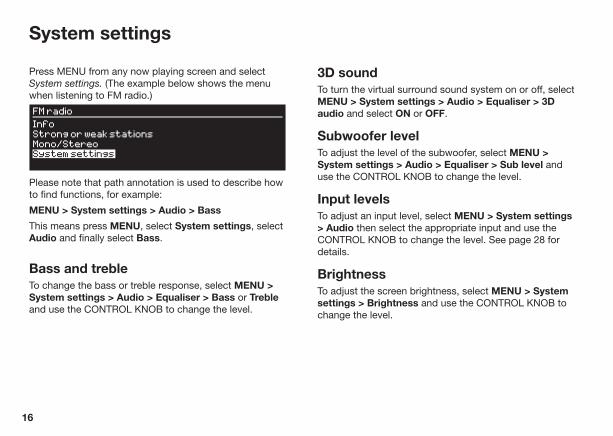
Press MENU from any now playing screen and select System settings. (The example below shows the menu when listening to FM radio.)
FM radio
System settings
Strong or weak stations
Info
Mono/Stereo
Please note that path annotation is used to describe how to find functions, for example:
MENU > System settings > Audio > Bass
This means press MENU, select System settings, select Audio and finally select Bass.
Bass and trebleTo change the bass or treble response, select MENU > System settings > Audio > Equaliser > Bass or Treble and use the CONTROL KNOB to change the level.
3D soundTo turn the virtual surround sound system on or off, select MENU > System settings > Audio > Equaliser > 3D audio and select ON or OFF.
Subwoofer levelTo adjust the level of the subwoofer, select MENU > System settings > Audio > Equaliser > Sub level and use the CONTROL KNOB to change the level.
Input levelsTo adjust an input level, select MENU > System settings > Audio then select the appropriate input and use the CONTROL KNOB to change the level. See page 28 for details.
BrightnessTo adjust the screen brightness, select MENU > System settings > Brightness and use the CONTROL KNOB to change the level.
RA R7 user guide.indd 16 31/10/2013 14:57:39
17
EN
DA
DE
FR
IT
ES
NL
NO
AntennaTo change between using a combined aerial or two separate aerials, select MENU > System settings > Antenna > Separate or Combined. See page 21 for more details.
Factory resetTo reset all the settings, delete custom settings, clear all presets and launch setup wizard, select MENU > System settings > Factory reset and select YES.
Software updateTo check whether there is a system update available for your R7, select MENU > System settings > Software update.
Network wizardFor a guided process to help you connect to a Wi-Fi network, select MENU > System settings > Network wizard.
Network profilesYour R7 automatically saves the last four wireless networks it has connected to and automatically tries to connect to whichever one of them it can find.
To see the list of saved networks, select Menu > System settings > Network > Network profile >. To delete an unwanted network select it then select YES to delete it.
Advanced network settingsThere are other advanced network settings for experienced users for manual configuration or diagnosing and fixing network problems.
RA R7 user guide.indd 17 31/10/2013 14:57:39
18
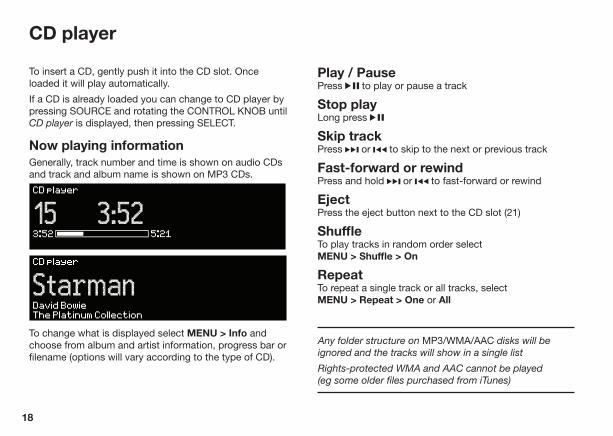
To insert a CD, gently push it into the CD slot. Once loaded it will play automatically.
If a CD is already loaded you can change to CD player by pressing SOURCE and rotating the CONTROL KNOB until CD player is displayed, then pressing SELECT.
Now playing informationGenerally, track number and time is shown on audio CDs and track and album name is shown on MP3 CDs.
CD player
3:52 5:21
15 3:52
CD player
David BowieThe Platinum Collection
Starman
To change what is displayed select MENU > Info and choose from album and artist information, progress bar or filename (options will vary according to the type of CD).
Play / PausePress to play or pause a track
Stop playLong press
Skip trackPress or to skip to the next or previous track
Fast-forward or rewindPress and hold or to fast-forward or rewind
EjectPress the eject button next to the CD slot (21)
Shuffle To play tracks in random order select MENU > Shuffle > On
Repeat To repeat a single track or all tracks, selectMENU > Repeat > One or All
CD player
Any folder structure on MP3/WMA/AAC disks will be ignored and the tracks will show in a single list
Rights-protected WMA and AAC cannot be played(eg some older files purchased from iTunes)
RA R7 user guide.indd 18 31/10/2013 14:57:39
19
EN
DA
DE
FR
IT
ES
NL
NO
FM radio
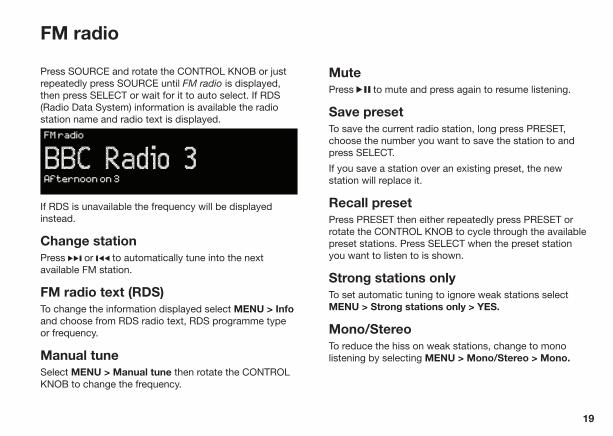
Press SOURCE and rotate the CONTROL KNOB or just repeatedly press SOURCE until FM radio is displayed, then press SELECT or wait for it to auto select. If RDS (Radio Data System) information is available the radio station name and radio text is displayed.
FM radio
Afternoon on 3
BBC Radio 3
If RDS is unavailable the frequency will be displayed instead.
Change stationPress or to automatically tune into the next available FM station.
FM radio text (RDS)To change the information displayed select MENU > Info and choose from RDS radio text, RDS programme type or frequency.
Manual tuneSelect MENU > Manual tune then rotate the CONTROL KNOB to change the frequency.
MutePress to mute and press again to resume listening.
Save presetTo save the current radio station, long press PRESET, choose the number you want to save the station to and press SELECT.
If you save a station over an existing preset, the new station will replace it.
Recall presetPress PRESET then either repeatedly press PRESET or rotate the CONTROL KNOB to cycle through the available preset stations. Press SELECT when the preset station you want to listen to is shown.
Strong stations onlyTo set automatic tuning to ignore weak stations select MENU > Strong stations only > YES.
Mono/StereoTo reduce the hiss on weak stations, change to mono listening by selecting MENU > Mono/Stereo > Mono.
RA R7 user guide.indd 19 31/10/2013 14:57:39
20
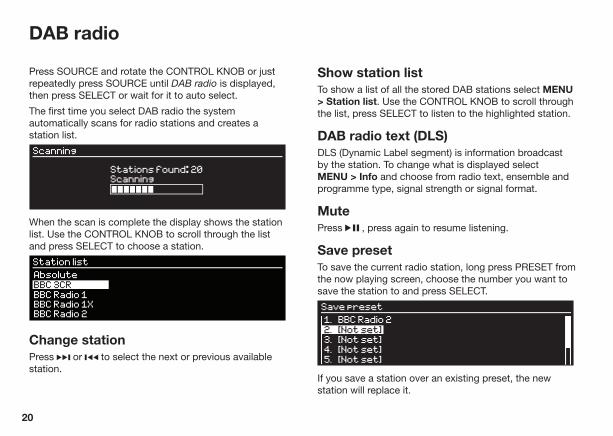
Press SOURCE and rotate the CONTROL KNOB or just repeatedly press SOURCE until DAB radio is displayed, then press SELECT or wait for it to auto select.
The first time you select DAB radio the system automatically scans for radio stations and creates a station list.
Scanning
Stations found: 20Scanning
When the scan is complete the display shows the station list. Use the CONTROL KNOB to scroll through the list and press SELECT to choose a station.
Station list
BBC 3CR
Absolute
BBC Radio 1BBC Radio 1XBBC Radio 2
Change stationPress or to select the next or previous available station.
Show station listTo show a list of all the stored DAB stations select MENU > Station list. Use the CONTROL KNOB to scroll through the list, press SELECT to listen to the highlighted station.
DAB radio text (DLS)DLS (Dynamic Label segment) is information broadcast by the station. To change what is displayed select MENU > Info and choose from radio text, ensemble and programme type, signal strength or signal format.
MutePress , press again to resume listening.
Save presetTo save the current radio station, long press PRESET from the now playing screen, choose the number you want to save the station to and press SELECT.
Save preset
4. [Not set]5. [Not set]
2. [Not set]
1. BBC Radio 2
3. [Not set]
If you save a station over an existing preset, the new station will replace it.
DAB radio
RA R7 user guide.indd 20 31/10/2013 14:57:39
21
EN
DA
DE
FR
IT
ES
NL
NO
Recall presetPress PRESET then either repeatedly press it again or rotate the CONTROL KNOB to cycle through the available preset stations. Press SELECT when the preset station you want to listen to is shown.
Secondary servicesSome DAB radio stations have one or more secondary stations associated with them. If there is a secondary station available it will appear as the next station in the station list. Select a secondary service like you would any other DAB station.
Station orderYou can choose the order of the DAB station list to be either Alphanumeric or Ensemble. Ensemble groups stations from the same broadcaster, for example all BBC stations are shown together.
To change station order, select Menu > Station order and select Alphanumeric (default) or Ensemble.
Find new stationsIf you move the system to a different part of the country, install a more sensitive aerial, or you want to add new stations to the list, you will need to perform a station scan by selecting MENU > Scan.
Remove weak or invalid stationsRemove weak (burbling) or invalid (marked with ‘?’) stations by selecting MENU > Prune stations.
DAB & FM aerialsIn strong signal areas the supplied indoor aerial will give adequate reception in both FM and DAB. However, it is only intended as a temporary measure and we highly recommend using an outdoor aerial.
Under most conditions, a combined FM/DAB aerial will give good performance, but separate outdoor FM and DAB aerials will always give the best reception.
Using a single aerial (Default setting)
Connect a 75 Ohm aerial to the connector marked DAB/FM (39), then select MENU > System settings > Antenna> Combined antenna.
Using separate aerialsConnect a 75 Ohm FM aerial to the connector marked FM (38) and a 50 Ohm DAB aerial to the one marked DAB/FM (39), then select MENU > System settings > Antenna> Separate antenna.
RA R7 user guide.indd 21 31/10/2013 14:57:39
22
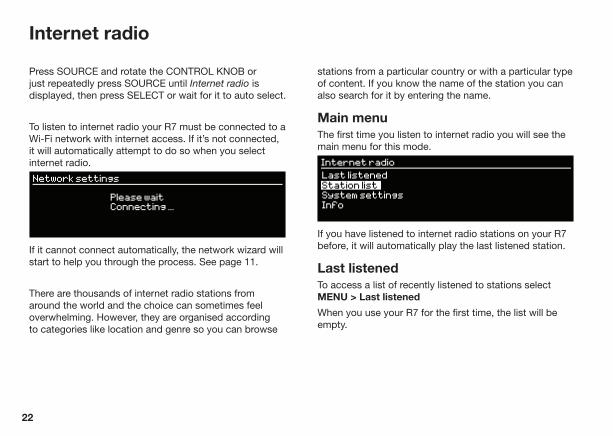
Press SOURCE and rotate the CONTROL KNOB or just repeatedly press SOURCE until Internet radio is displayed, then press SELECT or wait for it to auto select.
To listen to internet radio your R7 must be connected to a Wi-Fi network with internet access. If it’s not connected, it will automatically attempt to do so when you select internet radio.
Network settings
Please waitConnecting ...
If it cannot connect automatically, the network wizard will start to help you through the process. See page 11.
There are thousands of internet radio stations from around the world and the choice can sometimes feel overwhelming. However, they are organised according to categories like location and genre so you can browse
stations from a particular country or with a particular type of content. If you know the name of the station you can also search for it by entering the name.
Main menuThe first time you listen to internet radio you will see the main menu for this mode.
Internet radio
Info
Station list
Last listened
System settings
If you have listened to internet radio stations on your R7 before, it will automatically play the last listened station.
Last listenedTo access a list of recently listened to stations select MENU > Last listened
When you use your R7 for the first time, the list will be empty.
Internet radio
RA R7 user guide.indd 22 31/10/2013 14:57:39
23
EN
DA
DE
FR
IT
ES
NL
NO
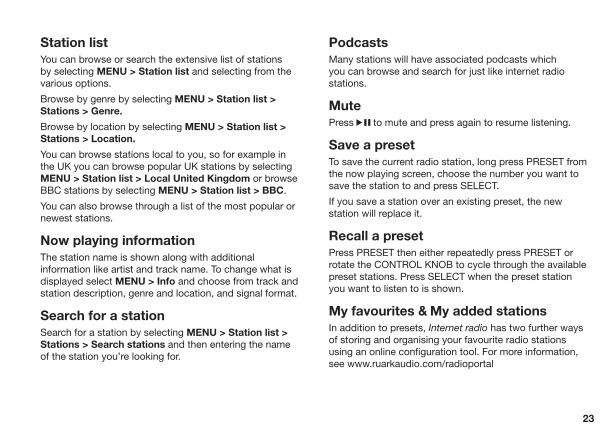
Station listYou can browse or search the extensive list of stations by selecting MENU > Station list and selecting from the various options.
Browse by genre by selecting MENU > Station list > Stations > Genre.
Browse by location by selecting MENU > Station list > Stations > Location.
You can browse stations local to you, so for example in the UK you can browse popular UK stations by selecting MENU > Station list > Local United Kingdom or browse BBC stations by selecting MENU > Station list > BBC.
You can also browse through a list of the most popular or newest stations.
Now playing informationThe station name is shown along with additional information like artist and track name. To change what is displayed select MENU > Info and choose from track and station description, genre and location, and signal format.
Search for a stationSearch for a station by selecting MENU > Station list > Stations > Search stations and then entering the name of the station you’re looking for.
PodcastsMany stations will have associated podcasts which you can browse and search for just like internet radio stations.
MutePress to mute and press again to resume listening.
Save a presetTo save the current radio station, long press PRESET from the now playing screen, choose the number you want to save the station to and press SELECT.
If you save a station over an existing preset, the new station will replace it.
Recall a presetPress PRESET then either repeatedly press PRESET or rotate the CONTROL KNOB to cycle through the available preset stations. Press SELECT when the preset station you want to listen to is shown.
My favourites & My added stationsIn addition to presets, Internet radio has two further ways of storing and organising your favourite radio stations using an online configuration tool. For more information, see www.ruarkaudio.com/radioportal
RA R7 user guide.indd 23 31/10/2013 14:57:39
24
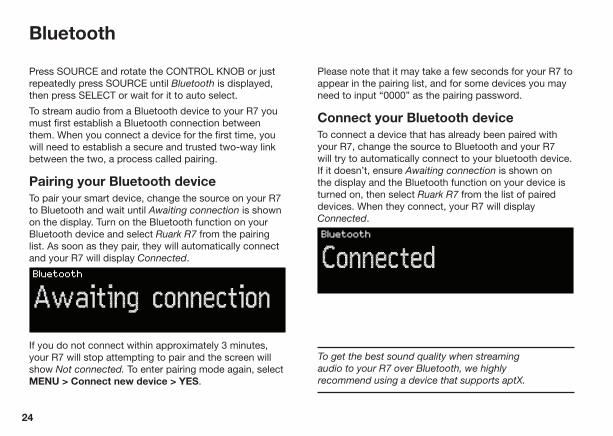
Press SOURCE and rotate the CONTROL KNOB or just repeatedly press SOURCE until Bluetooth is displayed, then press SELECT or wait for it to auto select.
To stream audio from a Bluetooth device to your R7 you must first establish a Bluetooth connection between them. When you connect a device for the first time, you will need to establish a secure and trusted two-way link between the two, a process called pairing.
Pairing your Bluetooth deviceTo pair your smart device, change the source on your R7 to Bluetooth and wait until Awaiting connection is shown on the display. Turn on the Bluetooth function on your Bluetooth device and select Ruark R7 from the pairing list. As soon as they pair, they will automatically connect and your R7 will display Connected.
Bluetooth
Awaiting connection
If you do not connect within approximately 3 minutes, your R7 will stop attempting to pair and the screen will show Not connected. To enter pairing mode again, select MENU > Connect new device > YES.
Please note that it may take a few seconds for your R7 to appear in the pairing list, and for some devices you may need to input “0000” as the pairing password.
Connect your Bluetooth deviceTo connect a device that has already been paired with your R7, change the source to Bluetooth and your R7 will try to automatically connect to your bluetooth device. If it doesn’t, ensure Awaiting connection is shown on the display and the Bluetooth function on your device is turned on, then select Ruark R7 from the list of paired devices. When they connect, your R7 will display Connected.
Bluetooth
Connected
Bluetooth
To get the best sound quality when streaming audio to your R7 over Bluetooth, we highly recommend using a device that supports aptX.
RA R7 user guide.indd 24 31/10/2013 14:57:40
25
EN
DA
DE
FR
IT
ES
NL
NO
Did you know..
R7 features Bluetooth with aptX technology and when used with compatible devices, you will experience CD-quality streaming. Look out for aptX as more and more smart devices now have it as standard.
Play audioOnce connected, audio from your bluetooth device will play through your R7. For more information on playing audio from your bluetooth device, refer to your device’s documentation.
Please note that you may need to select Ruark R7 or Bluetooth as your music player on your Bluetooth device.
Now playing informationArtist, album and track name will show if your bluetooth device and app support Bluetooth metadata.
Operating rangeThis is typically up to 10 metres (30 feet) from your R7, although obstructions such as walls will reduce this.
Auto connectYour R7 will automatically attempt to connect to the most recently paired Bluetooth device available. If your preferred device does not auto connect, clear the pairing list and pair it again.
Connecting a new deviceTo disconnect the current device and connect to a new one, select MENU > Connect new device > YES.
Pairing additional devices to your R7You can pair up to 8 devices, although you will only be able to play audio from one device at a time.
Clearing the pairing listIf your R7 does not automatically connect to your chosen Bluetooth device or if you are having trouble connecting, we recommend you clear all pairing information. To do this, select MENU > Connect new device > YES to disconnect the current device and then select MENU > Clear pairing list > YES.
You will also need to delete Ruark R7 from the pairing list on your Bluetooth device before pairing it to your R7 again. For more information, refer to your device’s documentation.
For useful hints and tips on Bluetooth, please visit www.ruarkaudio.com
RA R7 user guide.indd 25 31/10/2013 14:57:40
26
Network player
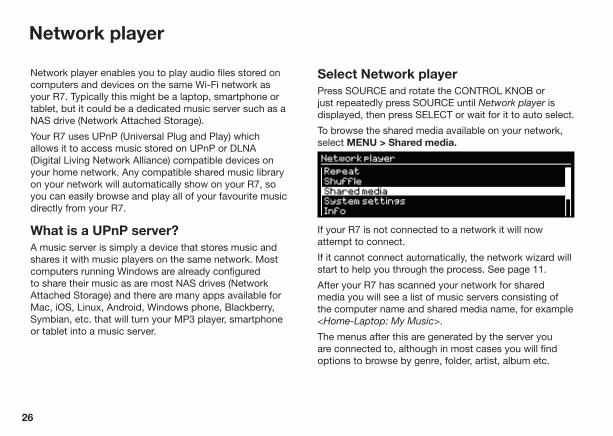
Network player enables you to play audio files stored on computers and devices on the same Wi-Fi network as your R7. Typically this might be a laptop, smartphone or tablet, but it could be a dedicated music server such as a NAS drive (Network Attached Storage).
Your R7 uses UPnP (Universal Plug and Play) which allows it to access music stored on UPnP or DLNA (Digital Living Network Alliance) compatible devices on your home network. Any compatible shared music library on your network will automatically show on your R7, so you can easily browse and play all of your favourite music directly from your R7.
What is a UPnP server?A music server is simply a device that stores music and shares it with music players on the same network. Most computers running Windows are already configured to share their music as are most NAS drives (Network Attached Storage) and there are many apps available for Mac, iOS, Linux, Android, Windows phone, Blackberry, Symbian, etc. that will turn your MP3 player, smartphone or tablet into a music server.
Select Network playerPress SOURCE and rotate the CONTROL KNOB or just repeatedly press SOURCE until Network player is displayed, then press SELECT or wait for it to auto select.
To browse the shared media available on your network, select MENU > Shared media.
Network player
System settingsInfo
Shuffle
Repeat
Shared media
If your R7 is not connected to a network it will now attempt to connect.
If it cannot connect automatically, the network wizard will start to help you through the process. See page 11.
After your R7 has scanned your network for shared media you will see a list of music servers consisting of the computer name and shared media name, for example <Home-Laptop: My Music>.
The menus after this are generated by the server you are connected to, although in most cases you will find options to browse by genre, folder, artist, album etc.
RA R7 user guide.indd 26 31/10/2013 14:57:40
27
EN
DA
DE
FR
IT
ES
NL
NO
Browse and play musicFind audio tracks by rotating the CONTROL KNOB and pressing SELECT to browse your shared media folders. If the highlighted item is a folder or album, pressing SELECT will show folders and tracks within that folder. If the item is a track, pressing SELECT will play the track.
To go back to the previous screen press BACK.
Pause playPress .
Skip trackPress to skip to the next track in the folder or album, press to skip to the start of the current track, press again to skip to the previous track.
Fast-forward or rewindPress and hold or to fast-forward or rewind.
Shuffle To play tracks in random order select MENU > Shuffle > On. To turn shuffle off, select MENU > Shuffle > Off.
Note: It may not be possible to use this function if the folder contains a large number of tracks.
Repeat To repeat a single track or all the tracks in the current folder, select MENU > Repeat > and select One or All. To turn repeat off select MENU > Repeat > Off
Now playing informationTypically, the track name is shown with additional information below. To change what is displayed select MENU > Info and choose from album and artist information, show the progress bar or signal format.
Prune serversMusic servers that are not currently available are shown with a question mark before their name eg ‘?Home-Laptop’. You can remove these servers by selecting MENU > Prune servers > YES.
Rights-protected WMA and AAC cannot be played(e.g. some older files purchased from iTunes).
RA R7 user guide.indd 27 31/10/2013 14:57:40
28
Digital Media Renderer mode
Your R7 is DLNA (Digital Living Network Alliance) compatible and functions as a DMR (Digital Media Renderer). This means you can play music to it from a compatible media server such as a smartphone app or Windows Media Player.
Whereas with network player (see page 26) you browse for music and control what you play from your R7, with DMR mode you browse for music on your smartphone or laptop and stream it to your R7. It’s similar to Bluetooth, except that it works over Wi-Fi, enabling you to stream audio at the original bit rate without any loss of fidelity.
Streaming audio to your R7There are many apps available for Mac, iOS, Linux, Android, Windows phone, etc that will turn your smartphone, tablet or laptop into a music server. You can also stream music from a Windows laptop, tablet or phone with the ‘Play To’ function.
Your R7 will automatically change to DMR mode when you select “Ruark Audio R7” as your chosen player or renderer from your device – DMR is not a mode that can be selected using the SOURCE key.
For more details refer to the documentation for your device or app.
Auxiliary inputs
Press SOURCE and rotate the CONTROL KNOB or just repeatedly press SOURCE until the desired auxiliary input is displayed, then press SELECT or wait for it to auto select.
Line inputsConnect to the Line-in inputs on the back (37) and select Line input 1 or Line input 2 as the SOURCE.
Digital inputsConnect to Digital input 1 (TOSLINK) (35) or Digital input 2 (Coaxial) (36) and select Digital input 1 or Digital input 2 as the SOURCE.
Please note that many digital sources such as Blu-ray players output multichannel surround sound as default, which will not work with your R7 unless you change the output to ‘stereo’ or ‘downmix’.
Input levelsIf you find a connected device (eg TV) is louder or quieter than other sources you can adjust the individual input levels by selecting MENU > System settings > Audio then selecting the appropriate input and using the CONTROL KNOB to change the level.
RA R7 user guide.indd 28 31/10/2013 14:57:40
29
EN
DA
DE
FR
IT
ES
NL
NO
Specifications
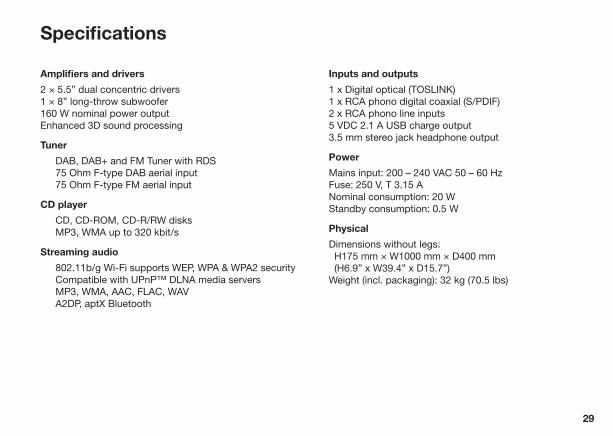
Amplifiers and drivers
2 × 5.5” dual concentric drivers1 × 8” long-throw subwoofer160 W nominal power outputEnhanced 3D sound processing
Tuner
DAB, DAB+ and FM Tuner with RDS75 Ohm F-type DAB aerial input75 Ohm F-type FM aerial input
CD player
CD, CD-ROM, CD-R/RW disksMP3, WMA up to 320 kbit/s
Streaming audio
802.11b/g Wi-Fi supports WEP, WPA & WPA2 securityCompatible with UPnP™ DLNA media serversMP3, WMA, AAC, FLAC, WAVA2DP, aptX Bluetooth
Inputs and outputs
1 x Digital optical (TOSLINK)1 x RCA phono digital coaxial (S/PDIF)2 x RCA phono line inputs 5 VDC 2.1 A USB charge output3.5 mm stereo jack headphone output
Power
Mains input: 200 – 240 VAC 50 – 60 HzFuse: 250 V, T 3.15 ANominal consumption: 20 WStandby consumption: 0.5 W
Physical
Dimensions without legs: H175 mm × W1000 mm × D400 mm (H6.9” x W39.4” x D15.7”)Weight (incl. packaging): 32 kg (70.5 lbs)
RA R7 user guide.indd 29 31/10/2013 14:57:40
30
Clean with a soft, lint-free duster or slightly dampened cloth. Do not use wax sprays or other substances as these may damage the surface finish or impair performance.
Do not expose your unit to direct sunlight, high humidity, dust, excessive vibration or extreme temperatures, all of which can affect the finish, performance and reliability of the unit.
The recommended operating temperature range is 5°C to 40°C.
Natural wood finish cabinets will vary and lighten or darken with age, particularly when exposed to sunlight.
CautionsWARNING: This appliance must be earthed.
Do not open the unit or remove panels to expose the electronics. No user serviceable parts inside.
Check that the voltage on the rating label is the same as the mains supply.
Ensure the mains socket remains accessible during use.
The plug must be removed from the socket to completely disconnect the system from mains power.
Listening through headphones or earphones at high volume can cause hearing loss.
The unit should not be exposed to dripping or splashing and no objects containing liquids, such as vases, should be placed on the unit.
Remote control batteries must not be exposed to excessive heat, such as from sunshine or fire, and used batteries must be disposed of responsibly.
The normal function of this product may be affected by strong electromagnetic interference. If you experience problems, simply reset the product to resume normal operation. If, after resetting, the product still fails to operate correctly, try using it in a different location.
Keep the unit away from naked flames such as lighted candles and heat sources such as radiators.
The unit should be positioned at least 10 cm away from adjacent objects to ensure adequate ventilation.
This symbol indicates that the product should not be disposed of as general household waste. As with any electrical equipment, please dispose of it according to local regulations.
General care
RA R7 user guide.indd 30 31/10/2013 14:57:40

31
EN
DA
DE
FR
IT
ES
NL
NO
Guarantee information Guarantee for overseas sales
We guarantee this product to be free from defects for a period of two years from date of purchase, providing due care and attention has been paid. Product failure through accidental damage (however caused), excessive wear and tear, negligence or unauthorised modification will void your guarantee.
Should you experience a problem please contact us via our website www.ruarkaudio.com or by calling directly on 01702 601410 where we will advise the course of action.
If your product needs to be returned it should be packaged in its original packing along with proof of purchase. If it is not possible to return the product by hand, then it should be sent carriage prepaid by a reputable parcel carrier. If the original packing is not available, replacement packing can be purchased from us.
The distributor in the country of purchase guarantees products purchased outside the UK. For details, please contact your local Ruark distributor or outlet.
THIS GUARANTEE IN NO WAY VARIES OR REMOVES THE PURCHASER’S STATUTORY RIGHTS. E&OE
Copyright and trademarks © 2013 Ruark Audio. All rights reserved. Ruark Audio, the Ruark Audio logo, and other Ruark Audio marks are owned by Ruark Audio and may be registered. All other trademarks are the property of their respective owners. Ruark Audio assumes no responsibility for any errors that may appear in this manual and the information contained in it may change without notice.
Bluetooth® and associated logos are registered trademarks owned by Bluetooth SIG, Inc.
aptX® and associated logos are registered trademarks owned by CSR plc.
RA R7 user guide.indd 31 31/10/2013 14:57:40
59 Tailors Court, Temple Farm Industrial Estate,Southend on Sea, Essex, SS2 5TH, UK+44 (0) 1702 601 410 www.ruarkaudio.com
2013
1031
.2
Designed and engineered in Great Britain
RA R7 user guide.indd 32 31/10/2013 14:57:40