Embed Size (px)
Citation preview

GitLET’S DO MORE THAN JUST VERSIONING
Introduction
Why Git?
Setup and Installation
Using Git with GitLab
Getting a Project
Versioning and Branches
CTRL + Z and Merging
More Reasons Why to use Git
References
Why Git?
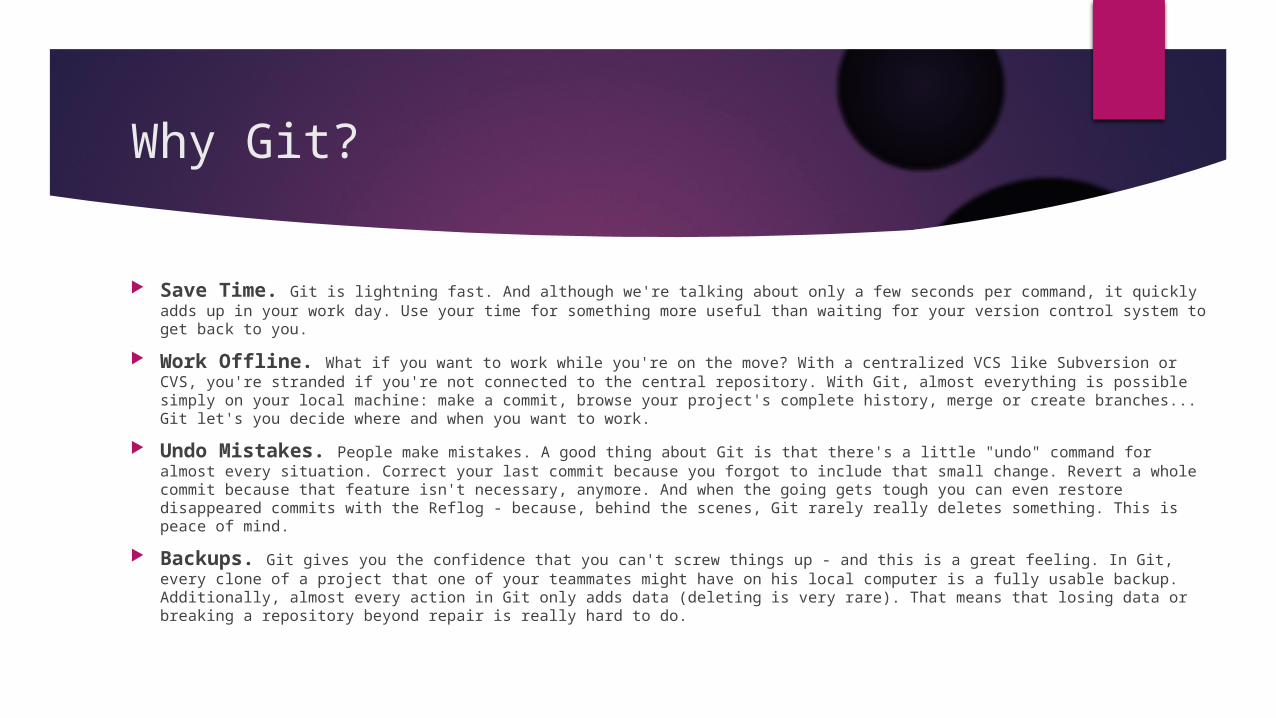
Save Time. Git is lightning fast. And although we're talking about only a few seconds per command, it quickly adds up in your work day. Use your time for something more useful than waiting for your version control system to get back to you.
Work Offline. What if you want to work while you're on the move? With a centralized VCS like Subversion or CVS, you're stranded if you're not connected to the central repository. With Git, almost everything is possible simply on your local machine: make a commit, browse your project's complete history, merge or create branches... Git let's you decide where and when you want to work.
Undo Mistakes. People make mistakes. A good thing about Git is that there's a little "undo" command for almost every situation. Correct your last commit because you forgot to include that small change. Revert a whole commit because that feature isn't necessary, anymore. And when the going gets tough you can even restore disappeared commits with the Reflog - because, behind the scenes, Git rarely really deletes something. This is peace of mind.
Backups. Git gives you the confidence that you can't screw things up - and this is a great feeling. In Git, every clone of a project that one of your teammates might have on his local computer is a fully usable backup. Additionally, almost every action in Git only adds data (deleting is very rare). That means that losing data or breaking a repository beyond repair is really hard to do.

Why Git?
Make Useful Commits: A commit is only really useful if it just contains related changes. Imagine having a commit that contains something from feature A, a little bit of feature B, and bugfix C. This is hard to understand for your teammates and can't be rolled back easily if some of the code is causing problems. Git helps you create granular commits with its unique "staging area" concept: you can determine exactly which changes shall be included in your next commits, even down to single lines. This is where version control starts to be useful.
Don’t Mix Things Up: Separation of concerns is paramount to keeping track of things. While you’re working on feature A, nothing (and no-one) else should be affected by your unfinished code. What if it turns out the feature isn’t necessary anymore? Or if, after 10 commits, you notice that you took a completely wrong approach? Branching is the answer for these problems. And while other version control systems also know branches, Git is the first one to make it work as it should: fast & easy.

Setup and Installation
Command Line vs GUI: It is actually beneficial to use both. Command Line will be best in learning and understanding as well as doing simple commands. However, when you start getting into complicated commands, it is best to use a good GUI to handle that.
Setup is easy: Go to http://git-scm.com/downloads and install for your OS. I will be showing examples on windows platform.
Open “Git Bash” and setup your global information
Setup and Installation
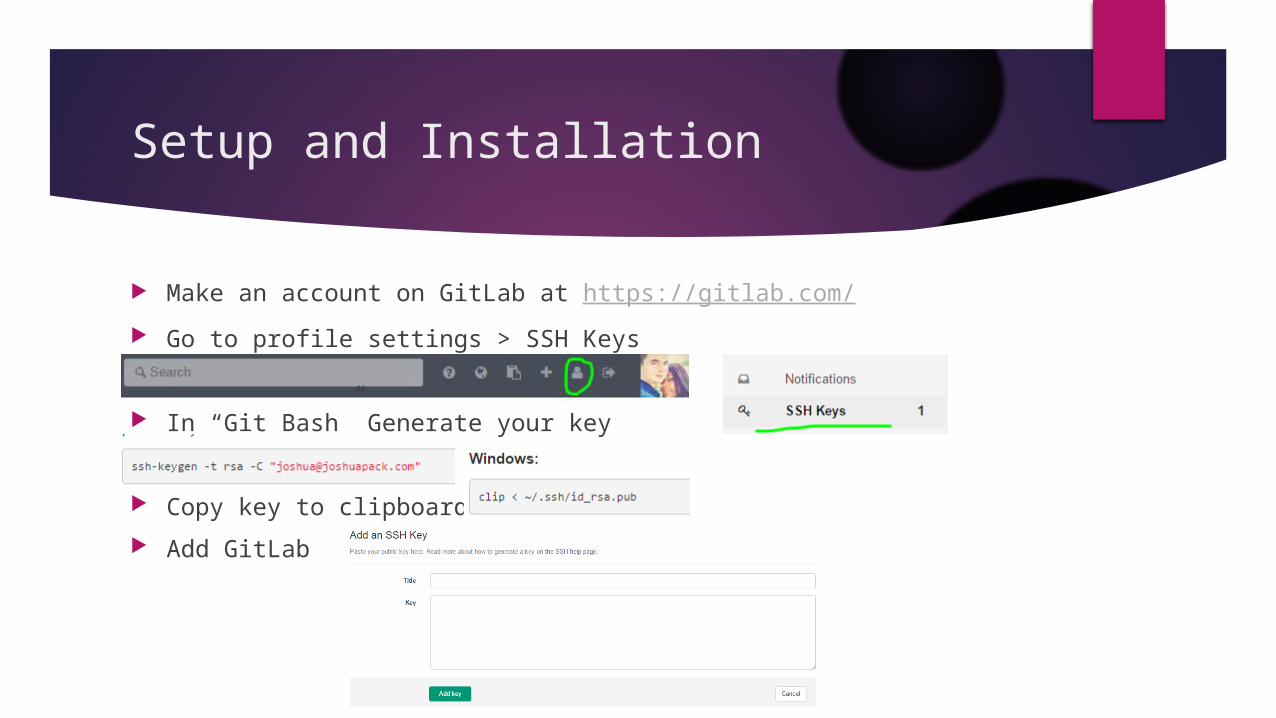
Make an account on GitLab at https://gitlab.com/
Go to profile settings > SSH Keys
In “Git Bash” Generate your key
Copy key to clipboard
Add GitLab
Using Git with GitLab
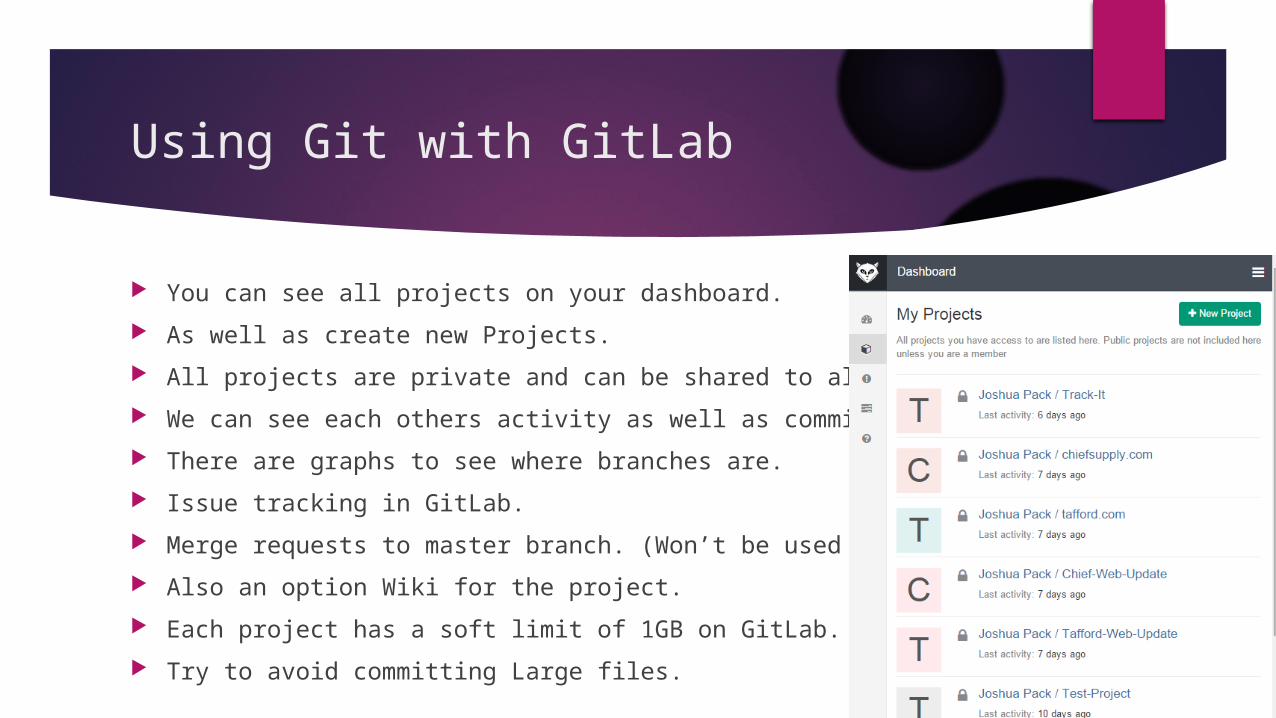
You can see all projects on your dashboard.
As well as create new Projects.
All projects are private and can be shared to all.
We can see each others activity as well as commits.
There are graphs to see where branches are.
Issue tracking in GitLab.
Merge requests to master branch. (Won’t be used much)
Also an option Wiki for the project.
Each project has a soft limit of 1GB on GitLab.
Try to avoid committing Large files.
Getting a Project
Create a folder to Hold your project.
Right click and go into “Git Bash”.
Type “git init” to create the folder as a project.
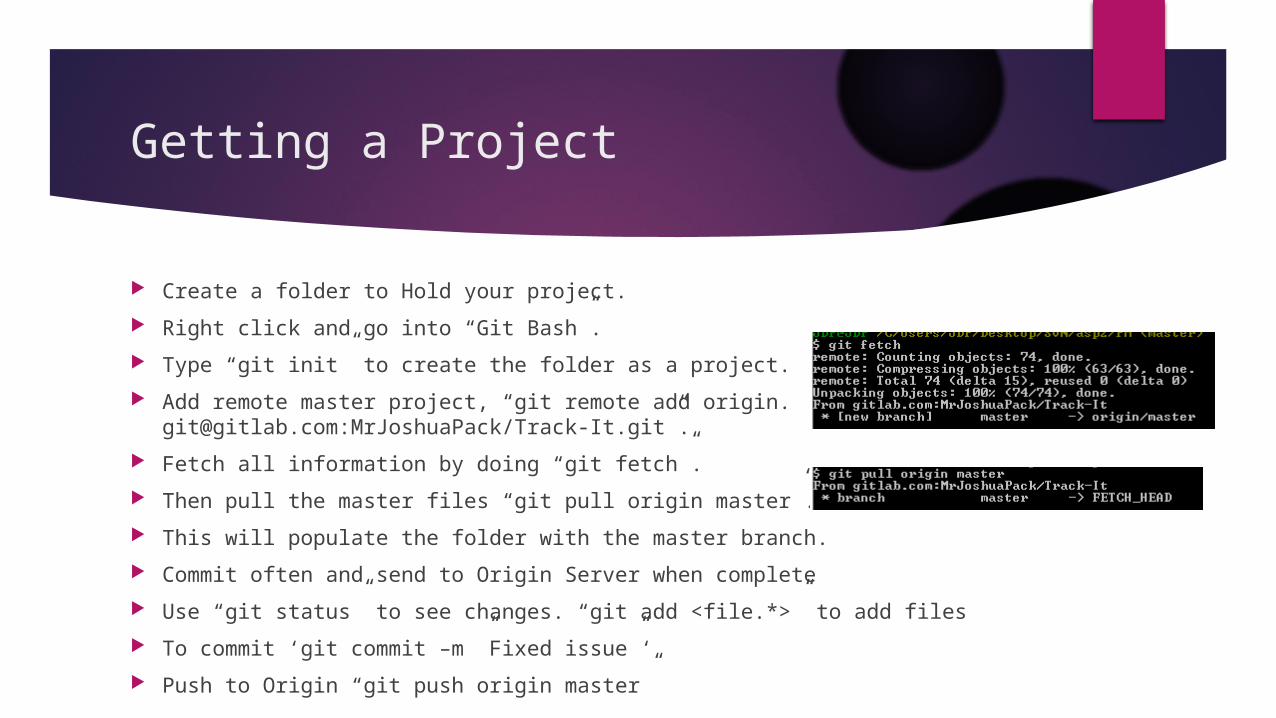
Add remote master project, “git remote add origin. [email protected]:MrJoshuaPack/Track-It.git”.
Fetch all information by doing “git fetch”.
Then pull the master files “git pull origin master”.
This will populate the folder with the master branch.
Commit often and send to Origin Server when complete
Use “git status” to see changes. “git add <file.*>” to add files
To commit ‘git commit –m ”Fixed issue”‘
Push to Origin “git push origin master”

Versioning and Branches
Versioning or tagging is used to help keep track of current platform and where you want to be.
To see current Tags(or versions) you can do the command “git tag”.
Make sure you have already fetched from server.
You create new tags by doing ‘git tag –a v1.0.1 –m “Version 1.0.1”’
Push to Origin Server “git push origin v1.0.1” to be used on production
On the production environment, it will be a git repository as well.
You can then checkout the version like so “git checkout –b PMv1.0.1 v1.0.1”. Of course a fetch maybe needed first.
If you find you have an issue simply switch the branch back to the old branch like so “git checkout PMv1.0.0”. You can check all local branch with command “git branch” the * will be next to the branch you are on.

Versioning and Branches
Creating Branches are easy and should always be done.
Need to add a hotfix? Make a branch called hotfix, once done, test it, if it works, merge it to master. Tag it to version it, then change production to newest version.
Have a feature you are implementing? Make a branch called Feature12. You don’t have to finish it, but you can switch between branchs. Say you have to do a quick edit, you go back to master, create a hotfix branch. Make needed changes and merge back into master. You can then switch back to your Feature12. Once done with feature, you can then merge it to Master. It will let you know of any conflicts. As well as you can always update branches based on Master.
I recommend reading http://git-scm.com/book/en/v2/Git-Branching-Branches-in-a-Nutshell for better understanding.
CTRL + Z and Merging
On production, it is as easy as going back to a working tag. However, sometimes we need to undo specific branches or reset things.
One of the common undos takes place when you commit too early and possibly forget to add some files, or you mess up your commit message. If you want to try that commit again, you can run commit with the --amend option. “git commit --amend”
There are other ways to go back in the tree with “git reset”. However, these can be hard to understand. I recommend reading one of the books in the references.
“git merge <branch>” If merging a branch back to master. Just make sure you checkout master branch, then merge your branch to it. Simple.
If you get an issue, it will tell you the difference. You can use difference editors, like the one from tortoise. Most likely in our development we will not see the need in getting conflicts. Use “git mergetool” to open up the diff editor.
More Reasons Why to use Git
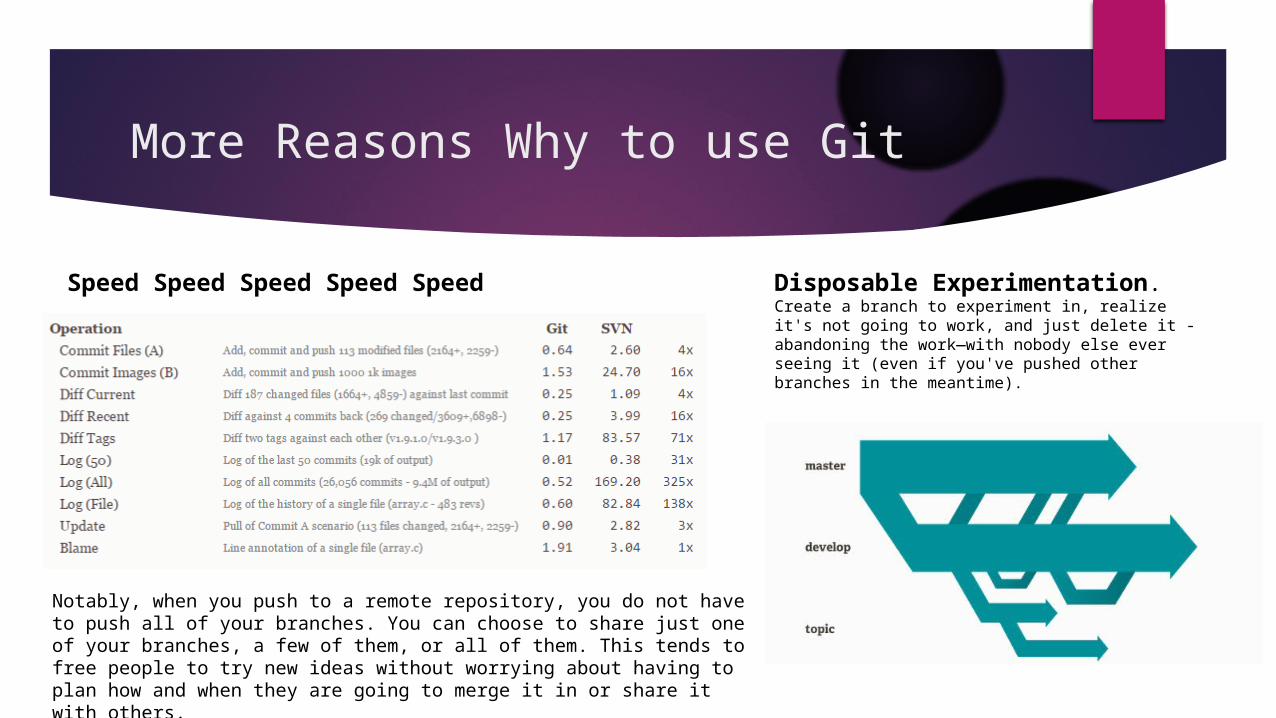
Speed Speed Speed Speed Speed Disposable Experimentation. Create a branch to experiment in, realize it's not going to work, and just delete it - abandoning the work—with nobody else ever seeing it (even if you've pushed other branches in the meantime).
Notably, when you push to a remote repository, you do not have to push all of your branches. You can choose to share just one of your branches, a few of them, or all of them. This tends to free people to try new ideas without worrying about having to plan how and when they are going to merge it in or share it with others.

References
Git e-book: http://www.git-tower.com/learn/ebook/command-line/introduction
GitLab Server Projects: https://gitlab.com/
Git Download: http://git-scm.com/downloads
Pro Git book: http://git-scm.com/book/en/v2
Cheat Sheet: http://www.git-tower.com/blog/git-cheat-sheet-detail/
Power Point by Joshua Pack


