Embed Size (px)
Citation preview

University of Botswana
Training Module for Pharmaceutical
Analysis
LECTURER’S GUIDE

Acknowledgements
Heartfelt and unlimited gratitude goes to staff of The National Drug Quality Control Laboratory and also the staff members from the University of Botswana for their commitment and active participation in the entire process
I would like to deeply express many thanks and appreciation to SCMS, Country office staff Mr. Stanley Mapiki, Mr Richard Msowoya, Mr Omphile Badubi for their active participation in providing useful field support.
Many thanks in a very special way to Ms Erin Hasselberg-SCMS and Mr. Ignatio Chiyaka -JSI, Ms. Jessica Pace-SCMS, Dr. Thomas Layloff, Senior Quality Assurance Advisor -SCMS, for providing the needed leadership throughout the process of making the development process a reality. Without their support and commitment the observed success would not have attained the present form.
This document was made possible through support provided by the President's Emergency Plan for AIDS Relief (PEPFAR) through the US Agency for International Development, under the terms of contract number GPO-I-00-05-00032-00. The opinions expressed herein are those of the author(s) and do not necessarily reflect the views of the US Agency for International Development, SCMS, JSI or the US government.
Since it is not possible to mention everyone by name, the US Agency for International Development also would like to thank all who contributed in one way or another in the preparation of the package.

Recommended Citation
Kaale, E. 2013. University of BotswanaTraining Module for Pharmaceutical Analysis Lecturer’s Guide. Submitted to the US Agency for International Development by the Supply Chain Management System (SCMS).
Adopted from A. S. Kenyon, R. D. Kirchhofer, and T. P.Layloff, ANALYTICAL METHODS FOR PHARMACEUTICAL ANALYSIS A TRAINING MANUAL, Division of Drug Analysis, Food and Drug Administration (FDA), 1114 Market Street, St. Louis, MO 63101-2045, USA.
This document may be reproduced if credit is given to SCMS and the FDA.

Contents
Acknowledgements ....................................................................................................................... ii
Contents ....................................................................................................................................... iv
Acronyms: .................................................................................................................................... xi
1 Module 1: INTRODUCTION TO PHARMACEUTICAL DOSAGE FORMS AND ANALTYICAL WEIGHING AND PREPARATION OF SAMPLES AND STANDARDS ................. 1
1.1 introduction to pharmaceutical Dosage Forms ............................................................... 2
1.1.1 Tablets ..................................................................................................................... 2
1.1.2 Capsules ................................................................................................................. 2
1.1.3 Lozenges ................................................................................................................. 2
1.1.4 Powders .................................................................................................................. 2
1.1.5 Liquids ..................................................................................................................... 2
1.1.6 Effervescent Granules ............................................................................................. 2
1.1.7 Semisolid Dosage Forms ........................................................................................ 2
1.1.8 Suppositories ........................................................................................................... 2
1.1.9 Pessaries ................................................................................................................. 2
1.1.10 Ophthalmic dosage forms: ...................................................................................... 2
1.1.11 Otic dosage forms ................................................................................................... 2
1.2 preparation of pharmaceutical Sample SOLUTIONS ..................................................... 2
1.2.1 Tablet samples ........................................................................................................ 2
1.2.2 Capsule samples ..................................................................................................... 2
1.2.3 Liquid samples ........................................................................................................ 2
1.2.4 Other types of samples ........................................................................................... 2
1.3 Preparation of standards SOLUTIONS .......................................................................... 2
1.3.1 Drying ...................................................................................................................... 2
1.3.2 Weighing ................................................................................................................. 2

1.3.3 Dissolving ................................................................................................................ 2
1.3.4 Analytical Weighing ................................................................................................. 2
1.3.5 Accuracy in Weighing .............................................................................................. 2
1.4 Case Study: Paracetamol 500 mg tablet weighing exercise .......................................... 2
1.1.1. Tablets ..................................................................................................................... 4
1.1.2. Capsules ................................................................................................................. 4
1.1.3. Lozenges ................................................................................................................. 6
1.1.4. Powders .................................................................................................................. 6
1.1.5. Liquids ..................................................................................................................... 6
1.1.6. Effervescent Granules ........................................................................................... 11
1.1.7. Semisolid Dosage Forms ...................................................................................... 12
1.1.8. Suppositories ......................................................................................................... 15
1.1.9. Pessaries ............................................................................................................... 16
1.1.10. Ophthalmic dosage forms: ................................................................................. 16
1.1.11. Otic dosage forms: ............................................................................................. 16
1.2 preparation of pharmaceutical Sample SOLUTIONS ................................................... 18
1.2.1. Tablet samples ...................................................................................................... 18
1.2.2. Capsule samples ................................................................................................... 20
1.2.3. Liquid samples ...................................................................................................... 21
1.2.4. Other types of samples ......................................................................................... 21
1.3. Preparation of standards SOLUTIONS ........................................................................ 23
1.3.1. Drying .................................................................................................................... 23
1.3.2. Weighing ............................................................................................................... 23
1.3.3. Dissolving .............................................................................................................. 24
1.3.4. Analytical Weighing ............................................................................................... 25
1.3.5. Accuracy in Weighing ............................................................................................ 26

1.4. Case Study: Paracetamol 500 mg tablet weighing exercise ........................................ 28
2. MODULE 2 PHYSICAL TESTS (DISINTEGRATION, FRIABILITY, WEIGHT VARIATION)30
2.1. Background .................................................................................................................. 32
2.2. TABLET FRIABILITY .................................................................................................... 32
2.3. DISINTEGRATION TEST ............................................................................................. 32
2.4. WEIGHT VARIATION ................................................................................................... 32
2.5. CASE STUDY: disintegration, friability, weight variation for Paracetamol tablets ........ 32
2.4.1. CAPSULES ........................................................................................................... 40
2.4.1.1. Hard Capsules.............................................................................................................. 40
2.4.1.2. Soft Capsules ............................................................................................................... 40
2.4.2. TABLETS .............................................................................................................. 41
2.4.2.1. Uncoated Tablets and Film-Coated Tablets ................................................................ 41
2.4.2.2. Coated Tablets (Other Than Film-Coated Tablets)...................................................... 41
2.5. CASE STUDY: disintegration, friability, weight variation for Paracetamol tablets ........ 41
3. Module 3 ULTRAVIOLET/VISIBLE SPECTROSCOPY TRAINING MODULE .................... 43
2 Determine the content of drug substance in a formulation by using UV-vis ........................ 43
3 Collect data, review test results and perform calculations ................................................... 43
4 Prepare certificate analysis .................................................................................................. 43
5 Release test results ............................................................................................................. 43
3.3.1 PROCEDURE ....................................................................................................... 44
3.3.2 ASSAY PREPARATION ........................................................................................ 44
3.3.3 REFERENCE STANDARD PREPARATION ......................................................... 44
3.3.4 CALCULATIONS ................................................................................................... 44
3.4.1 PROCEDURE ....................................................................................................... 44
3.4.2 CALCULATIONS ................................................................................................... 44
3.1. Background information ................................................................................................ 44
3.2. PRACTICE ANALYSIS ................................................................................................. 46
3.3. Case study: assay of Albendazole by UV ABSORBANCE USP .................................. 46
3.4. Assay of Paracetamol Phr. Int by specific absorbance method.................................... 48
4. Module 4: INFRARED SPECTROSCOPY TRAINING MODULE ........................................ 50
4.1. Background information ................................................................................................ 52
4.2. MEASURING THE IR SPECTRA ................................................................................. 55
4.2.1 Thin film of the material ......................................................................................... 55
4.2.2 Material in Solution ................................................................................................ 55
4.2.3 Solids dispersed in a mull ...................................................................................... 55
4.2.4 Solid pellet with KBr .............................................................................................. 56
4.2.5 Diamond anvil technique ....................................................................................... 56
4.2.6 Reflectance technique ........................................................................................... 56
4.2.7 Gas Measurements ............................................................................................... 56
4.3. QUANTITATIVE INFRARED SPECTROSCOPY ......................................................... 57
4.4. CASE STUDY: LABORATORY EXPERIMENT IDENTIFICATION OF AMOXICILLIN IN CAPSULES ............................................................................................................................. 60
5. Module 5: THIN-LAYER CHROMATOGRAPHY TRAINING MODULE ............................... 61
5.1 Background information ................................................................................................ 63
5.2 INTRODUCTION TLC OPERATION ............................................................................ 66
5.3 TLC OPERATING PROCEDURE ................................................................................. 68
5.3.1 PLATE SELECTION .............................................................................................. 68
5.3.2 PREPARATION OF THE TANK ............................................................................ 69
5.3.3 PREPARATION OF PLATE .................................................................................. 69
5.3.4 SAMPLE PREPARATION AND SPOTTING OF THE PLATE ............................... 71
5.3.5 DEVELOPING THE PLATE .................................................................................. 73
5.3.6 VISUALIZATION OR DETECTION ....................................................................... 73
5.4 CASE STUDY: RELATED SUBSTANCES. AMITRIPTYLINE HYDROCHLORIDE ..... 75

5.5 CASE STUDY: THIN LAYER CHROMATOGRAPHY IN GPHF MINI LAB SCREENING 75
5.6 COMMENTS ON THIN-LAYER CHROMATOGRAPHY ............................................... 81
5.7 SOURCES OF ERROR ................................................................................................ 81
5.8 MINI LAB LABORATORY SESSION ............................................................................ 83
5.8.1 CASE STUDY: 6.28 PARACETAMOL (ACETAMINOPHEN) ................................ 87
5.8.2 CASE STUDY: 6.39 CO-TRIMOXAZOLE ............................................................. 88
5.8.3 CASE STUDY: 6.11 CIPROFLOXACIN ................................................................ 89
5.8.4 CASE STUDY: 6.42 ALBENDAZOLE ................................................................... 90
5.8.5 CASE STUDY: 6.34 QUININE .............................................................................. 91
5.8.6 CASE STUDY: 6.21 LAMIVUDINE - INCL. FIXED COMBINATIONS WITH ZIDOVUDINE ....................................................................................................................... 92
5.8.7 CASE STUDY: 6.35 RIFAMPICIN ......................................................................... 93
5.8.8 Practice Session: 7.38 LUMEFANTRINE /ARTEMETHER FDC ........................... 94
5.8.9 PROFICIENCY TEST: 7.34 NEVIRAPINE - INCL. FIXED COMBINATIONS WITH LAMIVUDINE AND STAVUDINE ......................................................................................... 95
6. MODULE 6 HIGH-PERFORMANCE LIQUID CHROMATOGRAPHY ................................. 97
6.4.1 Preliminaries to getting started .............................................................................. 98
6.4.2 Preparation of mobile phase and diluting solvent .................................................. 98
6.4.3 Instrument conditions ............................................................................................ 98
6.4.4 Analysis of samples ............................................................................................... 98
6.1. High Performance Liquid Chromatography .................................................................. 99
6.2. PREAMBLE TO LABORATORY PRACTICES ........................................................... 104
6.3. PRACTICE ANALYSIS ............................................................................................... 106
6.4. Case stuDY: HPLC assay of Asprin Tablets (USP 32). .............................................. 106
6.4.1. Preliminaries to getting started ............................................................................ 107
6.4.2. Preparation of mobile phase and diluting solvent ................................................ 107

6.4.3. Instrument conditions .......................................................................................... 109
6.4.4. Analysis of samples ............................................................................................. 110
6.5. Case study ii HPLC assay of a FIXED DOSE COMBINATION OF LAMIVUDINE 300 MG AND ZIDOVUDINE 300 MG Tablets (Ph.Int). ................................................................ 142
6.5.1 Preliminaries to getting started ............................................................................ 142
6.5.2 Preparation of mobile phase and diluting solvent ................................................ 142
6.5.3 Preparation of standard sample solutions ........................................................... 144
6.5.4 INSTRUMENT CONDITIONS ............................................................................. 144
7. MODULE 7 GAS CHROMATOGRAPHY TRAINING MODULE ........................................ 146
7.1. Gas LIquid Chromatography .................................................................................. 151
7.1.1 PREAMBLE TO LABORATORY PRACTICES ....................................................... 151
7.1.2 INTRODUCTION .................................................................................................... 153
7.1.3 SETUP AND TRIAL RUN ....................................................................................... 157
7.1.4 Case study: Detemination of residual organic solvents in phynytoin tablets USP .. 159
7.1.5 ERRORS IN GAS CHROMATOGRAPHY .............................................................. 159
8. MODULE 8: DISSOLUTION TTESTING ........................................................................... 162
8.1. Concepts of Dissolution Testing ................................................................................. 168
8.1.1. WHY IN-VITRO DISSOLUTION TESTING? ........................................................... 169
8.1.2. ALIGNMENT OF DISSOLUTION UNITS ................................................................ 171
8.1.3. PREPARATION OF DISSOLUTION MEDIUM FOR RESPECTIVE DRUG ........... 173
8.1.4. PROCEDURE FOR SAMPLE DISSOLUTION BY THE BASKET METHOD .......... 173
(APPARATUS 1) ................................................................................................................... 173
8.1.5. PROCEDURE FOR SAMPLE DISSOLUTION BY PADDLE METHOD (APPARATUS 2) 175
8.1.6. ANALYSIS OF THE DISSOLVED DRUG ............................................................... 175
8.1.7. APPARATUS SUITABILITY TEST ......................................................................... 176
8.1.8. ACCEPTANCE CRITERA FOR DISSOLUTION ..................................................... 178

8.1.9. CASE STUDY: Dissolution of Paracetamol Tablets ............................................... 180

Acronyms:
As Absorbance of standard
ATW Average Tablet Weight
Au Absorbance of sample
DW Declared Weight
FID Flame ionization detector
FTIR Fourier Transform Infrared spectroscope
GC Gas Chromatography
GLC Gas Liquid Chromatography
HPTLC High Performing Thin Layer Chromatography
IR Infrared
KBr Potassium Bromide
NIR near Infrared
OD Outer Diameter
Rf Retention factor
Rr Relative retention
RS Reference standard
TLC Thin Layer Chromatography
USP United states Pharmacopoeia
UV Ultraviolet spectroscopy
Vis Visible Spectroscopy
VS Volumetric Solution
Ws Weight of standard
Wu Weight of sample

1 Module 1: INTRODUCTION TO PHARMACEUTICAL DOSAGE FORMS AND ANALTYICAL WEIGHING AND PREPARATION OF SAMPLES AND STANDARDS
Aims/Goal:
To acquire practical experience in analytical weighing procedures and skills in classical and modern methods of sample preparation
Learning Objectives On successful completion of the course students will be able to:
1. Describe different types of pharmaceutical formulations 2. Identify the different challenges these poses to analyst in selecting sample
preparation procedure 3. Identify different types of pharmaceutical formulations and the different sample
preparation required for each type. 4. Prepare pharmaceutical sample and standard solutions 5. Perform analytical weighing to support GMP conform analyses
Course Synopsis:
1. Introduction to pharmaceutical dosage forms, Preparation of pharmaceutical sample solutions, tablet samples, capsule samples, and liquid samples, Creams, Ointments, Lotions, Suppositories/pessaries , preparation of standards solutions, drying, weighing, dissolving, and analytical weighing and accuracy in weighing
Total Estimated Time: 2 Theory and 3 hours practical = 5 hours Resources/materials needed:
• Flip charts, marker pens, and masking tape/ LCD machine/laptop
• Black/white board and chalk/whiteboard markers
• Representative samples • Lab facilities

Session Content Areas 1.1 INTRODUCTION TO PHARMACEUTICAL DOSAGE FORMS
1.1.1 Tablets 1.1.2 Capsules 1.1.3 Lozenges 1.1.4 Powders 1.1.5 Liquids 1.1.6 Effervescent Granules 1.1.7 Semisolid Dosage Forms 1.1.8 Suppositories 1.1.9 Pessaries 1.1.10 Ophthalmic dosage forms: 1.1.11 Otic dosage forms
1.2 PREPARATION OF PHARMACEUTICAL SAMPLE SOLUTIONS 1.2.1 Tablet samples 1.2.2 Capsule samples 1.2.3 Liquid samples 1.2.4 Other types of samples 1.3 PREPARATION OF STANDARDS SOLUTIONS 1.3.1 Drying 1.3.2 Weighing 1.3.3 Dissolving 1.3.4 Analytical Weighing 1.3.5 Accuracy in Weighing 1.4 CASE STUDY: PARACETAMOL 500 MG TABLET WEIGHING EXERCISE
Content Method of delivery
Explain to student that this session will be divided into two sections: Introduction to pharmaceutical formulations and preparation of pharmaceutical sample solutions.
Lecturette
Tell them that we will start looking at the pharmaceutical formulation and here and the objectives:
• describe different types of pharmaceutical formulations
• Identify the different challenges these poses to analyst in selecting sample preparation procedure
PowerPoint
Slide 2
Show slide on dosages
Definition: Dosage forms are the means by which drug molecules are delivered to sites of action within the body.
slides 3-4

Content Method of delivery
The need for dosage forms:
1. Accurate dose.
2. Protection e.g. coated tablets, sealed ampules.
3. Protection from gastric juice.
4. Masking taste and odour.
5. Placement of drugs within body tissues.
6. Sustained release medication.
7. Optimal drug action.
8. Insertion of drugs into body cavities (rectal, vaginal)
9. Use of desired vehicle for insoluble drugs.

Content Method of delivery
1.1.1. Tablets
Tablets are unit solid dosage form of medicament or medicament with or without suitable diluents. They are prepared usually by compression. Tablets are generally meant for oral administration but may be used by other routes of administration. E.g. aminophylline tablets , paracetamol tablets and antacid tablets.
Slides 5-7
1.1.2. Capsules
Capsules are the solid unit dosage form of medicament in which the drug or drugs are enclosed in a practically tasteless, hard or soft soluble container of shell made up of gelatin.
Hard gelatin capsules are made up of two cylindrical halves, one slightly larger in diameter but shorter in length known as cap and the other slightly shorter in diameter but longer in length known as base.
Soft gelatin capsules are flexible in nature. They may be spherical, ovoid cylindrical or tubes. The small spherical capsules are also known as ‘pearls’. Soft gelatin capsules are used to enclose solids, semisolids or liquids.
for oral administration the capsule is placed on the tongue and swallowed with a drink of water.
Examples of hard gelatin capsules: Ampicillin capsules, multivitamin capsules.
Examples of soft gelatin capsules: chloramphenicol soft gelatin capsules.
Slides 8


1.1.3. Lozenges
Lozenges are solid dosage form of medicaments which are meant for slow dissolution in the mouth. Along with medicament they contain a sweetening agent, flavouring agent and a strong binding agent.
They may be prepared either by moulding or by compression.
Examples are compound bismuth lozenges, liquorice lozenges.
Slides 9
1.1.4. Powders
Powders are solid dosage form of medicament meant for internal and external use. The powders meant for internal use are known as oral powders whereas those meant for external use are known as dusting powders. The powders may be simple or compound. When the powders are dispensed in large quantities in a container and the patient is asked to measure a specified quantity as a dose then these powders are known as bulk powders. e.g.
1. Bulk powder for internal use; e.g. Compound sodium chloride and dextrose oral powder, Compound rhubarb oral powder
2. Bulk powder for external use; e.g. Snuffs Talc dusting powders, Tooth powder.
Slides 10
1.1.5. Liquids
Applications are liquid or viscous preparations intended for application to the skin. Usually, they are suspensions or emulsions. Most of the official preparations contain paraciticides and are intended for only a limited number of applications. They should be dispensed in coloured fluted bottles in order to distinguish them from preparations meant for internal use. The container should be labeled “FOR EXTERNAL USE ONLY”. Examples of applications are calamine application compound B.P.C. dicophane application B.P.C.
A: Syrups
Syrups are liquid oral preparations in which the vehicle is a concentrated aqueous solution of sucrose or other sugar.
N.B. Syrups generally are not issued directly to the patients when it is issued to the patients:
(i) if it is clear it is called elixir and
Slides 11-14

(ii) if it is suspension it is called mixtures.
· Simple syrup IP is a saturated solution of sucrose in purified water. The concentration of sucrose is 66.7 % w/w. Syrup containing medicinal substances are called medicated syrups and those containing aromatic or flavoured substances are known as flavoured Syrup.
Advantages of syrups
Syrups retards oxidation because it is partly hydrolyzed into reducing sugar such as dextrose and levulose.
It prevents decomposition of many vegetable substances. Syrups have high osmotic pressure which prevents the growth of bacteria, fungi and molds which are the chief causes of decomposition in solutions of vegetable matter.
They are palatable. Due to the sweetness of sugar it is a valuable vehicle for the administration of unpalatable substances.
B: Elixirs
Definition: Elixirs are clear, liquid, oral preparations of potent or nauseous drugs. They are pleasantly flavoured and usually attractively coloured and are very stable. Elixirs usually contain potent drugs, such as antibiotics, antihistamines and sedatives.
Vehicles used in elixirs are alcohol, glycerol and propylene glycol. They are used
(i) For the production of clear solution. Essential oils from flavoring agents may produce faint opalescence, hence alcohol 10 - 20% is useful for keeping oils in solution.
(ii) When potent medicaments of low solubility are required to be dispensed, a mixture of solvents that will give complete solution is used e.g. Phenobarbitone is virtually insoluble in water but a clear product can be made by dissolving it in alcohol and then diluting with glycerol and water.
e.g. One part of paracetamol is soluble in 70 parts of water, 7 parts of alcohol, 9 parts of propylene glycol or 40 parts of glycerol. In paracetamol elixir a mixture of alcohol, propylene glycol and glycerol is used as vehicle.
Other adjuncts used are:

(i) Chemical stabilizers e.g. Neomycin Elixir B.P.C. is adjusted to pH 4 to 5 with citric acid to minimize the darkening that occurs on storage e.g. Disodium edetate should be incorporated to sequester heavy metals that catalyse decomposition of antibiotic.
(ii) Colouring agents e.g. Amaranth Magenta red Tartrazine Saffron Green S Green
(iii) Sweetening agents e.g. Sucrose syrups, glycerol, sorbitol solution, invert syrup and saccharin sodium are used.
(iv) Flavours e.g. Blackcurrant Syrup in Chloral Elixir, Concentrated Raspberry Juice with invert syrup, Lemon spirit with syrup and invert syrup. Compound Orange Syrup
(v) Preservatives
· 20% alcohol, propylene glycol or glycerol are preservative
· Syrup is self-preservative due to high osmotic pressure
· The most common additional preservative in chloroform; it is used in the form of double strength water.
· Sometimes the preparations contain benzoic acid and methyl parahydroxy benzoate.
C: Linctuses
Linctuses are viscous, liquid, oral preparations that are usually prescribed for the relief of cough.
· They contain medicaments which have demulcent (which soothes the inflammed mucous membrane preventing contact with air in the surroundings), sedative or expectorant action. The viscous vehicle soothes the sore membrane of the throat.
· The usual dose is 5 ml. Linctuses should be taken in small doses, sipped and swallowed slowly without diluting it with water in order to have the maximum and prolonged effect of medicaments.
· Simple Syrup is generally used as a vehicle. For diabetic patients Sorbitol solution is used instead of Simple Syrup.
D: Liniment
Liniments are liquid, semi-liquid or occasionally semi-solid preparations

intended for application on the skin. They may be alcoholic or oily solutions or emulsions. Most are massaged onto the skin e.g. counter-irritant type. Some are applied on warm dressing or with a brush. e.g. analgesic and soothing type. Liniments must not be applied to broken skin because they would be very irritating. E.g. Soap Liniment BPC , Camphor Liniment BP, Methyl salicylate liniment BPC Alcohol is the main vehicle. In increases the penetration of counter-irritant molecules through skin.
E: Lotions
Lotions are liquid preparations for external application without friction. They are either dabbed on the skin or applied on a suitable dressing and covered with water proof material to reduce evaporation. e.g. Copper and zinc sulfate lotion is used for impetigo, Zinc sulfate and salicylic acid for ulcer Salicylic acid lotion for dandruff Salicylic acid and mercuric chloride lotion for follicular infection. N.B. Copper and Zinc sulfate have astringent action. Salicylic acid has keratolytic action.
F: Gels
Gels are aqueous colloidal suspensions of the hydrated forms of insoluble medicaments e.g. aluminium hydroxide gel, used as antacid.
G: Extracts
Extracts are concentrated preparations containing the active principles of vegetable or animal drugs. The drugs are extracted with suitable solvents and the product is concentrated o one of three types of extract -
Liquid Extract of which 1 ml usually contains the active constituents from 1 g of drug.
Dry Extract obtained by completely removing the solvent under, reduced pressure.
Soft Extract obtained by evaporation to a plastic mass.
H: Tinctures
These are alcoholic preparations containing the active principles of vegetable drugs.
They are weaker than extracts.
They are usually prepared by maceration and percolation, or may be prepared by dissolving the corresponding liquid extract of chemical substances (e.g. iodine) in alcohol or hydroalcohol solvent. e.g. Belladonna tincture, Aromatic cardamom tincture and Iodine tincture
I: Spirits
Spirits are alcoholic or hydroalcoholic solutions of volatile substances. Most are used as flavouring agents but a few have medicinal value. e.g. Chloroform Spirit, Lemon Spirit, Compound Orange Spirit.
J: Infusions
(i) Fresh Infusions are made by extracting vegetable drugs for a short time with cold or boiling water (cf. making of tea). They quickly deteriorate as a result of microbial contamination and therefore must be used within 12 hours.
(ii) Concentrated infusions are made by cold extraction with 25 % alcohol. The alcohol preserves the product for an indefinite period.
Dilution of 1 part of concentrated infusions with 10 parts of water gives a preparation corresponding fresh infusion. e.g. Concentrated Compound Gentian Infusion concentrated Senega Infusion.
1.1.6. Effervescent Granules
The effervescent granules are specially prepared solid dosage form of medicament, meant for oral intake. They contain a medicament mixed with citric acid, tartaric acid and sodium bicarbonate. Sometimes saccharin or sucrose may be added as a sweetening agent.
Ingredients used;
(i) Sodium bicarbonate: It reacts with the acids when the preparation is added to water. The evolved carbondioxide produces effervescence.
(ii) Citric acid and tartaric acid: The quantity of these is slightly more than is necessary to neutralise the sodium bicarbonate because effervescent preparations are more palatable if slightly acidic.
Tartaric acid is anhydrous but citric acid has one molecule of water of crystallization. heating liberates this water and the moist condition thus produced allows partial interaction between the acids and bicarbonates, during which more water is formed -
The water of crystallization of the citric acid and the water from the reactions makes the material coherent.
(iii) Medicaments: often inorganic salts containing water of crystallisation are incorporated e.g. magnesium and sodium sulphates, sodium phosphate and lithium citrate.
Methods of preparation
There are two methods of preparation: 1. Hot method and 2. Wet method
Hot method: A large evaporating dish is heated on water bath. All the powders are taken in that hot dish to ensure rapid evaporation of water liberated from citric acid. Thus a coherent damp mass is prepared.
The water required for granulation is provided from two sources:
1. From one molecule of water of crystallisation of citric acid which is liberated during heating.
2. The water produced from the reactions of citric acid and tartaric acid with sodium bicarbonate.
Wet method: in this method the mixed ingredients are moistened with non-
Slides 15 – 16

aqueous liquid (e.g. Alcohol) to prepare a coherent mass.
The coherent damp mass from both the methods is then passed through a No. 8 sieve and dried in an oven at a temperature not exceeding 600C. The dried granules are again passed through the sieve to break the lumps which may be formed during drying. The dried granules are packed in an air tight container.
Use: Before administration, the desired quantity is dissolved in water; the acid and bicarbonate react together producing effervescence.
The carbonated water produced from the release of carbondioxide serves to mask the bitter and saline taste of drugs.
More over carbondioxide stimulates the flow of gastric juice and helps absorption of medicament.
1.1.7. Semisolid Dosage Forms
A. Ointments
Ointments are the soft semisolid, greasy preparations meant for external application onto the skin or mucous membrane (rectum and nasal mucosa). They usually contain a medicament dissolved, suspended or emulsified in the base. Ointments are used for their emollient and protective action to the skin. e.g. compound benzoic acid ointment, cetrimide emulsifying ointment
B. Creams
Creams are viscous liquid or semisolid emulsions intended for application to the skin i.e. for external use. Creams are of two types, aqueous creams and oily creams.
In case of aqueous creams the emulsions are oil-in-water type and in case of oily creams emulsions are of water-in-oil type. Due to the presence of water soluble bases they can be easily removed from the skin. The aqueous creams have a tendency to grow bacterial and mold growth; therefore a preservative must be added in their formulation. E.g. cetomacrogol cream, cetrimide cream, hydrocortisone cream, zinc cream BPC.
Advantages of creams:
Creams are more acceptable to the patients because they are less greasy
Slides 17
Slides 18
and are easier to apply.
They interfere less with skin functions.
o/w type of creams (superior to w/o type) can be rub onto the skin more readily and are easily removed by washing. w/o can be spread more evenly.
o/w type of cream are less likely to soil clothes.
Evaporation of water from o/w type of cream causes cooling sensation.
o/w creams absorbs the discharges from the wound (liquid exudate) very quickly.
w/o creams (e.g. cold creams) restricts evaporation from the skin, it can be used on non-weeping surfaces to prevent dehydration ( in dry season), restore suppleness (softness) - this property is said to be ‘emollient’.
Disadvantages:
Since it is a semisolid preparation and containing oil in large amount, some of which are inedible, hence creams are not used for internal use. Basically creams are meant for application onto the skin.
the aqueous phase is prone to the growth of molds and bacteria hence preservatives should be used.
Sometimes rancidifications of oils take place.
Jellies (Gels)
Jellies are transparent or non-greasy semisolid preparations meant for external application to the skin or mucous membrane. They are used for medication or lubrication purposes e.g. contraceptive jellies (spermicidal action) ichthammol jelly etc. they are used for lubricating catheters, surgical gloves and rectal thermometers. The gelling agents may be gelatin, or a carbohydrate such as starch, tragacanth, sodium alginate or cellulose derivative.
Pastes
Pastes are semisolid preparations meant for external application to the skin. They generally contain large amount of finely powdered solids such as starch, zinc oxide, calcium carbonate etc. They provide a protective coating over the areas to which they are applied. The base may be anhydrous (liquid
Slides 19
Slides 20

or soft paraffin) or water-soluble (glycerol or a mucilage). Their stiffness makes them useful as protective coatings. e.g. magnesium sulfate paste., zinc and coal tar paste
Ophthalmic Ointments
Ophthalmic ointments are meant for application to the eye. They should be sterile and free from irritation. They should be packed in sterile containers which should keep the preparation sterile until whole of it is used up. e.g. atropine eye ointment, chloromycetin eye ointments
Difference between paste and ointments;
Paste -----Ointment
Paste
1. Contains a large amount of (50%) of finely powdered solids. As a result they are often very stiff.
2. When applied on the skin the paste adhere well and remain confined in the area of application.
3. They are porous so the perspiration (sweat) can escape through it.
4. They are less greasy than ointments.
Ointment
1. Ointments contain very less amount of powdered solids. They are soft.
2. Ointments are less viscous, hence spread beyond the area of application.
3. Non-porous - hence perspiration cannot escape through it.
4. More greasy than pastes.

1.1.8. Suppositories
Suppositories are special shaped solid dosage form of medicament for insertion into body cavities other than mouth. These products are so formulated that after insertion, they will either melt of dissolve in the cavity fluids to release the medicament.
Suppositories vary in shapes, sizes and weights. General suppositories from 1 to 2 mg are prepared with either cocoa-butter or glecero- gelatin base e.g. aminophylline suppositories, glycerol suppositories.
Slides 23
Content Methods of delivery
1.1.9. Pessaries
Pessaries are solid unit dosage form of medicament meant for introduction into vagina. The bases used for the manufacture of pessaries are such that at room temperature they retain the original shape but when inserted into the body cavity either it melts or dissolve in the cavity fluids to release the medicament.
They may be prepared either by moulding or by compression.
e.g. lactic acid pessaries, nystatin pessaries.
Slides 24
1.1.10. Ophthalmic dosage forms:
Eye Drops
Eye drops are saline-containing drops used as a vehicle to administer medication in the eye. Depending on the condition being treated, they may contain steroids, antihistamines or topical anesthetics. Eye drops sometimes do not have medications in them and are only lubricating and tear-replacing solutions.
Ophthalmic ointment & gel:
These are sterile semi-solid
Preparations intended for application
To the conjunctiva or eyelid margin.
Slides 25
1.1.11. Otic dosage forms:
Ear drops:
Ear drops are solutions, suspensions or emulsions of drugs that are instilled into the ear with a dropper.
It is used to treat or prevent ear infections, especially infections of the outer ear and ear canal.
Slides 26

Case Discussion:
Instructions: Divide the students into groups of 4-5 people and project slide 28 for them to discuss. Inform them that they have 15 minutes to discuss. And 15 minutes feedback presentation and discussions
Sample preparation challenges:
• Each of these different formulations possesses a different sample preparation challenges.
• Sample preparation Selection needs a consideration of the sample matrix
• Some will require complicated multi stage sample extraction
• Others just a simple extraction step
Slides 27
1.2 PREPARATION OF PHARMACEUTICAL SAMPLE SOLUTIONS
Content Method of delivery
Explain to students that: In your career as a drug analyst, you will handle many types of pharmaceutical formulations. Space does not permit describing how to handle all different types of formulations. However, a few of the most common types will be described, along with a discussion of standard preparation. It is important to remember that no matter what type of formulation is encountered, the primary goal of the analyst is to obtain a representative and homogeneous sample for analysis.
Slide 4
1.2.1. Tablet samples
Content Method of delivery
Explain that analysis of tablets is usually straightforward but the analyst must be aware of rogue samples that are not amenable to the method outlined. Proceed as follows:
Method: • At least 20 tablets are weighed accurately on a four-place balance.
The weight is recorded and the average tablet weight is calculated.
• The tablets are ground with a mortar and pestle, sieved through a 40-60 mesh drug sieve, and mixed thoroughly. All grinding should be done in a hood to prevent inhaling any drug.
• A portion is weighed into a volumetric flask, solvent is added, and the mixture is shaken (heat or ultrasound may be used if needed) to extract the active drug substance from the tablet matrix. The solution is allowed to adjust to room temperature, and diluted to volume (quantitatively, if needed).
• The solution should be filtered before further dilutions are made. With HPLC methods, in which membrane filters are used, it may be easier to filter the solutions if they are diluted first. It may be necessary to pre-filter solutions if they won't go through a 0.45 µm membrane filter. If the solution is pre-filtered, there is a possibility that some active ingredient may be absorbed by the filter.
Slide 5

Ask: Is there anything that we discussed that you do not agree with? What is it?

Note: If a large quantity of solid material is weighed and remains insoluble in the solvent, it is possible that less than the volume declared on the volumetric flask is present because some of the volume has been occupied by the solid. In this case the sample should be weighed into a container and an accurate volume of solvent should be added.
Some tablet samples may have to be handled slightly differently. Sugar-coated, enteric-coated, or time-delay tablets may pose hidden problems to the analyst. For example, colored sugar coatings, which interfere with the analysis, may have to be washed off and the tablets dried before weighing and grinding; exceptionally hard tablets may require use of a WIG-L-BUG (trade name, Crescent Inst. Co.), which uses steel balls, to reduce them to a fine powder; if grinding generates enough heat to make the tablet matrix sticky or causes the active ingredient to decompose, the composite may be prepared by putting 10 or 20 tablets into solution directly to prepare the material for analysis.
1.2.2. Capsule samples
Content Method of delivery
Explain that there are two types of capsules: hard gelatin and soft gelatin. a. Hard gelatin capsules are made up of two parts that slip together to
hold a dry powder or small beads; they are called dry powder capsules (DPC) or timed-release capsules (TRC).
• Soft gelatin capsules are one piece and usually contain a liquid or syrupy substance such as a vitamin preparation. Dry powder capsules.
• Twenty capsules are accurately weighed and the contents of each are emptied into a container. The shells are cleaned by swabbing them either with a Q-tip or a solvent (e.g., ethyl ether) that dissolves the powder but does not attack the shells.
• The powder is mixed and saved for analysis, and the dry empty shells are weighed. The average weight of the dry powder is obtained by subtracting the average weight of the shell from the average weight of the entire capsule.
• The dry powder is then handled in a manner similar to the ground tablet material. Timed release capsules. These are handled in a manner similar to the dry capsules except that the shell generally does not need to be cleaned. However, the beaded material must be weighed and then reduced to a homogeneous powder, by grinding, sieving, and mixing before analysis.
b. Soft gelatin capsules. Usually these are carefully sliced open with a scalpel and the liquid material is collected in a volumetric flask, with care not to spill any of the material. The inside of the capsule is then
Slide 6
rinsed with a suitable solvent contained in a syringe with a fine gauge needle. The rinsings are collected in the volumetric flask. The soft gelatin capsule is then discarded. Usually several capsule contents are combined as a composite and the result is calculated on the basis of an individual capsule.
1.2.3. Liquid samples
Content Method of delivery
Explain that Liquid samples may be either solutions or suspensions. Both types of samples should be mixed by shaking before sampling, but in the case of suspensions which quickly separate out, such as some suspensions for injection, it is extremely important to mix the sample and then immediately remove the portion for analysis with a pipette.
Explain that in addition, viscosity of liquid pharmaceutical formulations can vary from non-viscous (water-like) to very viscous (suspensions or magmas). Some of these formulations are solutions for injection, elixirs, syrups, etc. Samples of low viscosity are measured by using a TD (To Deliver) pipette and diluting to volume with an appropriate solvent.
Note that With more viscous samples, a TC (To Contain) or a Mohr wide-bore calibrated pipette may have to be used; then, after draining, the remaining material is rinsed out of the pipette with a suitable solvent. If samples are too viscous to be pipetted, it may be necessary to weigh them and convert to volume, using a specific gravity determination.
Ask: Are there any question?
Slide 7
1.2.4. Other types of samples
Content Method of Delivery
There are many other types of pharmaceutical formulations including creams, lotions, ointments, dental pastes, inhalators, dermal patches,
Slide 8
implants, infusions, pessaries, suppositories, etc.
Note that each of these can pose different and sometimes difficult challenges to the analyst. For example, a cream or ointment should be removed from its container before sampling, rapidly and thoroughly mixed with a spatula on a glass plate, and then returned either to its original container or to another container (in the case of samples that come in tubes).
Explain that this guide is not intended to be all-encompassing but to make you (the analyst) aware of normal procedures used for sampling. It is imperative that the analyst obtain a homogeneous and representative portion of sample for analysis.
Many times erratic or erroneous results can be traced to faulty preparation of the sample for analysis.
Ask: Are there any question?

1.3. PREPARATION OF STANDARDS SOLUTIONS 1.3.1. Drying
Content Method of delivery
Preparation of standard solutions
Explain that we will take some time talking about preparing standard solution
Slide 9
Why do we need drying?
• If a USP method is used, the monograph specifies the drying method.
• Note --In the case of USP Reference Standards, the bottle label contains the method to be used for drying. However, sometimes the methods are changed, and these changes are noted in the USP Supplements.
• If there is a difference in instructions, those in the monograph should be followed. Since many drug standards are costly or in short supply, only the quantity needed for the analysis should be dried. Some standards require elevated temperatures; others are dried at room temperature over silica gel.
• The drying time may be specified or the instructions may specify drying to constant weight. All dried standards should be kept in a desiccator until the analysis has been completed.
Slide 10
1.3.2. Weighing
Content Method of delivery
Weighing
Whenever a secondary standard (previously analyzed bulk sample) is available, it should be used. The secondary standard should be evaluated
Slide 11
before use.
Caution:
A check analysis requires the use of the Pharmacopeia standard e.g. USP standard, BP etc. Standards come in concentrated form (in most cases, 100% of active ingredient) and are usually fine powders or crystalline materials. After drying, such materials will be subject to static electricity and may have a tendency to jump around when handled with a spatula tip. The static electricity may be discharged with anti-static guns, which are available at some of the balance tables
Caution: A DUST MASK SHOULD BE WORN TO PREVENT BREATHING ANY DUST!
Note that When possible, quantities of 25 mg or more should be weighed on a four-place analytical balance. Quantities less than 25 mg (e.g., 10 mg or less), should be weighed on a semi-micro or micro balance. Weighing by difference is the technique most often used. Quantitative transfer is also acceptable.
1.3.3. Dissolving
Content Method of delivery
Dissolving
Content: The weighed sample is placed in a volumetric flask and the specified solvent is added until the flask is approximately half-filled. The flask may be put on a shaking machine or may be sonicated until the sample has dissolved.
The flask and contents are allowed to come to room temperature and diluted to the correct volume. If further dilutions are required, they must be done quantitatively.
For HPLC analysis, dissolving and diluting with the mobile phase is preferable. However, with drugs that must be dissolved in another solvent to prevent degradation or hydrolysis, all dilutions are made with the
Slide 12

recommended solvent.
It should be kept in mind that the dissolving solvent must be compatible with the mobile phase and not cause any buffering agents to precipitate out during the HPLC run. Also, with drugs that are slightly soluble in the mobile phase, care must be taken not to inject too large an amount of the drug so that it precipitates out in the column.
The solution to be assayed is filtered through a membrane filter of no greater than 0.5 um (0.45 um) porosity. Concentrations of standard and sample active ingredient should be kept nearly the same so that areas or absorbances will be comparable.
1.3.4. Analytical Weighing
Content Method of delivery
Content: All chemists have weighed materials in the laboratory and recognized the importance of the operation. The primary goal in all weighing is to be accurate because unless it is done correctly, the analytical results will be meaningless.
Mention that This training module is aimed at pointing out some basic operations which will improve the accuracy of the measurement. Modern balances are electronic with digital readout. These balances produce fast and reliable results when properly handled and cared for. Good Laboratory Practices are the rule in all weighings
Lecture

1.3.5. Accuracy in Weighing
Content Method of delivery
Accuracy in weighing
Content: The validity of any analysis depends on an accurately weighed sample. Three types of balances are currently used for drug analysis, namely, micro, semi-micro, and analytical.
The semi-micro and analytical balances can be combined into a single instrument by changing the balance sensitivity. The analytical balance weighs gram quantities to four places, the semi-micro balance weighs to five places, and the micro balance weighs to six places.
The amount of sample required and the balance capacity needed determine the type of balance used. Since all electronic balances read the weight directly, the analyst is likely to become complacent and assume that all readings are correct at all times. NOT SO!
Electronic balances depend upon a force to compensate the mass; this force depends in turn on location and environment. The balance must be placed on a vibration-free table located in a temperature-stable room free from drafts and corrosive vapors. Balances of the electronic type must be calibrated. Laboratory balances are usually calibrated by a balance service technician but these services may be performed at annual intervals. A calibration check should be done at frequent intervals. The laboratory should have a set of calibrated weights so that the analyst can easily check the calibration.
THE CHECK SHOULD BE MADE WITH CALIBRATED WEIGHTS. A calibrated 100 mg weight can serve as a very useful check on the balance and give confidence in the balance readout. The area around the balance should always be kept clean.
Slide 13-9
- Lecturette

Content Method of delivery
Spills should be avoided, but if a spill occurs, it should be cleaned up immediately. All weighing vessels, handling tools, flasks, bottles, or anything else used around the balance must be clean and dry. Weighings are done by difference to minimize errors. The weight of the tare is subtracted from the combined weight of the tare plus the sample. Electronic balances are equipped with a zero tare feature which allows setting the tare at zero so that only the weight of the sample is displayed. Several precautions can improve your accuracy, as follows:
1. Turn on the balance and allow it to warm up. If the balance has been turned off for a time, allow it to stabilize at least 60 minutes before making any measurement. Better still, leave the balance turned on permanently.
2. Brush any dust and dirt from the balance pan before and after any weighing. Check that the weighing chamber is clean.
3. Select a container as small as possible to hold the sample. Since the balance to be used depends upon the sample size and the balance capacity, do not exceed the capacity. Make sure that all containers and handling tools are clean and dry.
4. Before making any weighing, check the zero point and adjust accordingly. If this is not done, a zero point error will be included in the sample weight.
5. Keep the balance chamber closed at all times except when adding or removing the objects to be weighed, as changes in temperature, humidity, or air currents will alter the reading.
6. Handle all tare containers or objects to be weighed with either tweezers or tongs. Handling with the fingers can change the temperature or leave a grease smudge that will alter the weight. If it is necessary to handle the tare, use finger cots or gloves.
7. Make readings without delay. Allow only enough time for the samples to come to equilibrium and the display to stabilize.
8. Do not weigh any hot or cold objects, as the result will not be correct. Make sure that the temperatures of the weighed objects are at the temperature of the balance.
9. Many samples are finely divided powders which have been dried; they may be subject to static electricity which causes the particles to jump or fly around. Before weighing, discharge the static electricity with an antistatic gun. Be careful not to inhale the powders. Wear a suitable mask while handling materials of this nature. Static will be a problem when the humidity goes below 30% RH.
10. All samples will be affected by surface moisture; the amount will depend on the humidity of the laboratory. Weigh the sample at ambient temperature.

Content Method of delivery
11. 11. Volatile liquids are subject to evaporation. Weigh volatile materials in closed containers with the cap tightly sealed. Weigh hygroscopic materials in sealed, capped bottles to prevent water take-up.
12. Remove all items used around the balance area and cleanup any debris. Always leave the balance area CLEAN! Keep the balance door closed at all times except when adding or removing sample.
Ask: Does anybody have anything to say?
1.4. CASE STUDY: PARACETAMOL 500 MG TABLET WEIGHING EXERCISE
Content Method of delivery
The purpose of this experience to expose to student’s analytical and sample preparation skills. Carefully follow the precautionary instructions above to
Paracetamol stock sample solution
•
• Least 20 tablets are weighed accurately on a balance then the weight is recorded and the average tablet weight is calculated
• Tablets are ground with a mortar and pestle
• Weigh appr an amount equivalent to 200mg into a 100 ml flask add about 80 mL of a mixture of water and methanol 3:1.
• Close the flask
• Shake the flask for 1 minute
• Make up to volume with the same
• Close and shake the flask for 3 minutes
• Measure the UV absorbance of the solution
• Repeat exercise at least six times.
Calculate the average absorbance and % rsd
Amount paracetamol weighed mg Abs % rs
Case Study

execute this exercise
Methods of assessment
• Quizz • End of Term assessment • End of Course assessment

2. MODULE 2 PHYSICAL TESTS (DISINTEGRATION, FRIABILITY, WEIGHT VARIATION)
Aims/Goal
• To provide basic information about physical tests (disintegration, friability, weight variation) and their importance in a pharmaceutical testing laboratory.
• To acquire practical experience in pharmacopeial applications of disintegration, friability, weight variation testing.
• To expose students to Ibuprofen coated tablets, Paracetamol Tablets non-coated and Zinc Sulphate dispersible tablets USP Monograph as disintegration case studies, Paracetamol tablet USP Monograph as friability case study, Co-trimoxazole oral suspension USP Monograph as pH measurement case study
Learning objectives
On successful completion of this course, the student will be able to:
1. Perform various physical tests disintegration, friability, weight variation and pH measurement
2. Collect data, review test results and perform calculations 3. Prepare certificate analysis 4. Release test results
Course Synopsis:
Disintegration, friability, weight variation, pH measurement,
Total Session Time: 2 hours practical 3 hours
Materials Needed
• Flip charts, marker pens, and masking tape/ LCD machine/laptop • Black/white board and chalk/whiteboard markers • Representative samples • Lab facilities

• Paracetamol tablets

Content Areas 2.1. BACKGROUND 2.2. TABLET FRIABILITY 2.3. DISINTEGRATION TEST 2.4. WEIGHT VARIATION 2.4.1. CAPSULES 2.4.1.1. Hard Capsules 2.4.1.2. Soft Capsules 2.4.2. TABLETS 2.4.2.1. Uncoated Tablets and Film-Coated Tablets 2.4.2.2. Coated Tablets (Other Than Film-Coated Tablets) 2.5. CASE STUDY: DISINTEGRATION, FRIABILITY, WEIGHT VARIATION FOR
PARACETAMOL TABLETS
Content Method of delivery
2.1. Background
For solid dosage forms like tablets and capsules quality check also include physical tests like friability, disintegration, dissolution, hardiness and weight variation. Some off these tests are prescribed as official methods in the pharmacopeial compendia like disintegration, dissolution, and weight variation while other are non-official like friability and hardiness tests which are part of in process control parameter guiding the manufacturing process. Hardness test is less important in the contest of QC testing for regulatory compliance and will not be considered further.
slide 3 – 5

2.2. TABLET FRIABILITY
This method text provides guidance for the friability determination of compressed, uncoated tablets. The test procedure presented is generally applicable to most compressed tablets. Measurement of tablet friability supplements other physical strength measurements, such as tablet breaking force.
APPARATUS
It use a drum with an internal diameter between 283 and 291 mm and a depth between 36 and 40 mm, of transparent synthetic polymer with polished internal surfaces, and subject to minimum static build-up (see Figure 1 for a typical apparatus). One side of the drum is removable. The tablets are tumbled at each turn of the drum by a curved projection with an inside radius between 75.5 and 85.5 mm that extends from the middle of the drum to the outer wall. The outer diameter of the central ring is between 24.5 and 25.5 mm. The drum is attached to the horizontal axis of a device that rotates at 25 ± 1 rpm. Thus, at each turn the tablets roll or slide and fall onto the drum wall or onto each other.
For tablets with a unit weight equal to or less than 650 mg, take a sample of whole tablets corresponding as near as possible to 6.5 g.
For tablets with a unit weight of more than 650 mg, take a sample of 10 whole tablets.
The tablets should be carefully de-dusted prior to testing.
Accurately weigh the tablet sample, and place the tablets in the drum. Rotate the drum 100 times, and remove the tablets. Remove any loose dust from the tablets as before, and accurately weigh.
Generally, the test is run once. If obviously cracked, cleaved, or broken tablets are present in the tablet sample after tumbling, the sample fails the test. If the results are difficult to interpret or if the weight loss is greater than the targeted value, the test should be repeated twice and the mean of the three tests determined. A maximum weight loss (obtained from a single test or from the mean of three tests) of not more than 1.0% is considered acceptable for most products.
slide 9
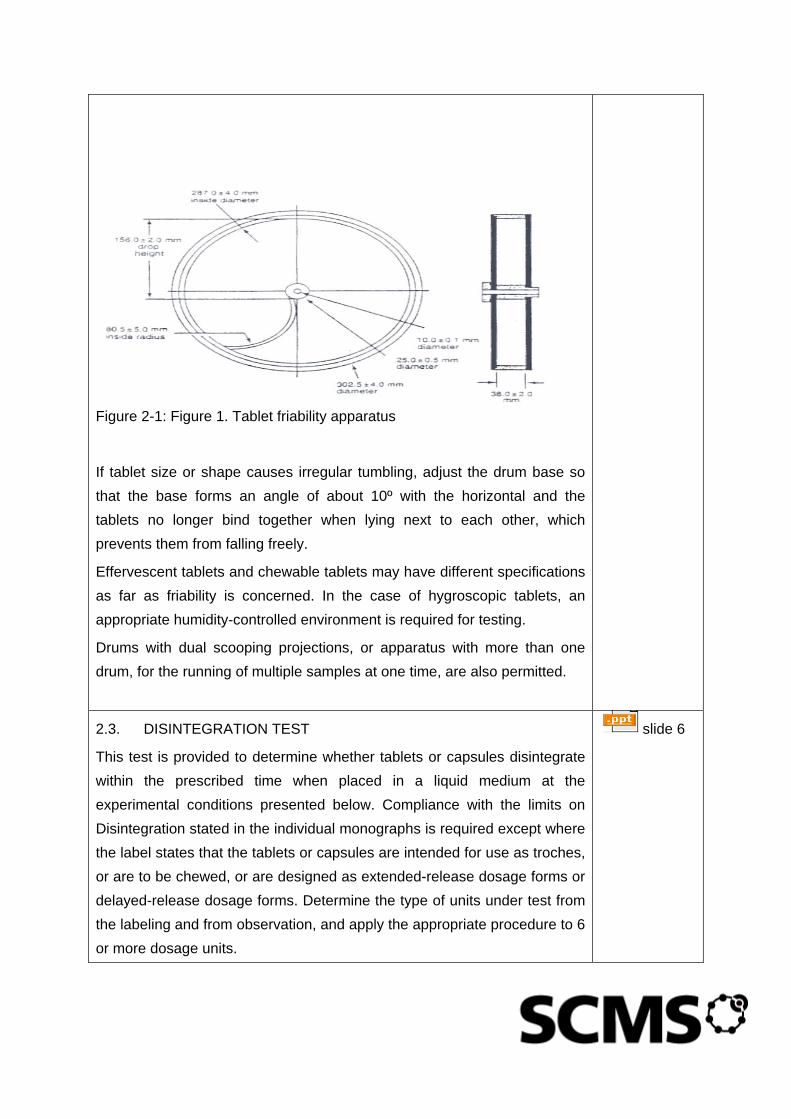
Figure 2-1: Figure 1. Tablet friability apparatus
If tablet size or shape causes irregular tumbling, adjust the drum base so that the base forms an angle of about 10º with the horizontal and the tablets no longer bind together when lying next to each other, which prevents them from falling freely.
Effervescent tablets and chewable tablets may have different specifications as far as friability is concerned. In the case of hygroscopic tablets, an appropriate humidity-controlled environment is required for testing.
Drums with dual scooping projections, or apparatus with more than one drum, for the running of multiple samples at one time, are also permitted.
2.3. DISINTEGRATION TEST
This test is provided to determine whether tablets or capsules disintegrate within the prescribed time when placed in a liquid medium at the experimental conditions presented below. Compliance with the limits on Disintegration stated in the individual monographs is required except where the label states that the tablets or capsules are intended for use as troches, or are to be chewed, or are designed as extended-release dosage forms or delayed-release dosage forms. Determine the type of units under test from the labeling and from observation, and apply the appropriate procedure to 6 or more dosage units.
slide 6

For the purposes of this test, disintegration does not imply complete solution of the unit or even of its active constituent. Complete disintegration is defined as that state in which any residue of the unit, except fragments of insoluble coating or capsule shell, remaining on the screen of the test apparatus or adhering to the lower surface of the disk, if used, is a soft mass having no palpably firm core.
APPARATUS
The apparatus consists of a basket-rack assembly, a 1000-mL, low-form beaker, 138 to 160 mm in height and having an inside diameter of 97 to 115 mm for the immersion fluid, a thermostatic arrangement for heating the fluid between 35 and 39, and a device for raising and lowering the basket in the immersion fluid at a constant frequency rate between 29 and 32 cycles per minute through a distance of not less than 53 mm and not more than 57 mm. The volume of the fluid in the vessel is such that at the highest point of the upward stroke the wire mesh remains at least 15 mm below the surface of the fluid and descends to not less than 25 mm from the bottom of the vessel on the downward stroke. At no time should the top of the basket-rack assembly become submerged. The time required for the upward stroke is equal to the time required for the downward stroke, and the change in stroke direction is a smooth transition, rather than an abrupt reversal of motion. The basket-rack assembly moves vertically along its axis. There is no appreciable horizontal motion or movement of the axis from the vertical.
Basket-Rack Assembly— The basket-rack assembly consists of six open-ended transparent tubes, each 77.5 ± 2.5 mm long and having an inside diameter of 20.7 to 23 mm and a wall 1.0 to 2.8 mm thick; the tubes are held in a vertical position by two plates, each 88 to 92 mm in diameter and 5 to 8.5 mm in thickness, with six holes, each 22 to 26 mm in diameter, equidistant from the center of the plate and equally spaced from one another. Attached to the under surface of the lower plate is a woven stainless steel wire cloth, which has a plain square weave with 1.8- to 2.2-mm apertures and with a wire diameter of 0.57 to 0.66 mm. The parts of the apparatus are assembled and rigidly held by means of three bolts passing through the two plates. A suitable means is provided to suspend the basket-rack assembly from the raising and lowering device using a point on

its axis.
The design of the basket-rack assembly may be varied somewhat, provided the specifications for the glass tubes and the screen mesh size are maintained. The basket-rack assembly conforms to the dimensions found in Error! Reference source not found..
Disks— The use of disks is permitted only where specified or allowed in the monograph. If specified in the individual monograph, each tube is provided with a cylindrical disk 9.5 ± 0.15 mm thick and 20.7 ± 0.15 mm in diameter. The disk is made of a suitable transparent plastic material having a specific gravity of between 1.18 and 1.20. Five parallel 2 ± 0.1-mm holes extend between the ends of the cylinder. One of the holes is centered on the cylindrical axis. The other holes are centered 6 ± 0.2 mm from the axis on imaginary lines perpendicular to the axis and parallel to each other. Four identical trapezoidal-shaped planes are cut into the wall of the cylinder, nearly perpendicular to the ends of the cylinder. The trapezoidal shape is symmetrical; its parallel sides coincide with the ends of the cylinder and are parallel to an imaginary line connecting the centers of two adjacent holes 6 mm from the cylindrical axis. The parallel side of the trapezoid on the bottom of the cylinder has a length of 1.6 ± 0.1 mm, and its bottom edges lie at a depth of 1.5 to 1.8 mm (RB 1-Aug-2008) from the cylinder's circumference. The parallel side of the trapezoid on the top of the cylinder has a length of 9.4 ± 0.2 mm, and its center lies at a depth of 2.6 ± 0.1 mm from the cylinder's circumference. All surfaces of the disk are smooth. If the use of disks is specified in the individual monograph, add a disk to each tube, and operate the apparatus as directed under Procedure. The disks conform to dimensions found in Error! Reference source not found..

Figure 2-2: Disintegration apparatus. (All dimensions are expressed in mm.)
PROCEDURE
Uncoated Tablets— Place 1 dosage unit in each of the six tubes of the basket and, if prescribed, add a disk. Operate the apparatus, using water or the specified medium as the immersion fluid, maintained at 37 ± 2 °C. At the end of the time limit specified in the monograph, lift the basket from the fluid, and observe the tablets: all of the tablets have disintegrated completely. If 1 or 2 tablets fail to disintegrate completely, repeat the test on 12 additional tablets. The requirement is met if not fewer than 16 of the total of 18 tablets tested are disintegrated.
Plain-Coated Tablets— Apply the test for Uncoated Tablets, operating the

apparatus for the time specified in the individual monograph.
Delayed-Release (Enteric-Coated) Tablets— Place 1 tablet in each of the six tubes of the basket and, if the tablet has a soluble external sugar coating, immerse the basket in water at room temperature for 5 minutes. Then operate the apparatus using simulated gastric fluid TS maintained at 37 ± 2 as the immersion fluid. After 1 hour of operation in simulated gastric fluid TS, lift the basket from the fluid, and observe the tablets: the tablets show no evidence of disintegration, cracking, or softening. Operate the apparatus, using simulated intestinal fluid TS maintained at 37 ± 2 as the immersion fluid, for the time specified in the monograph. Lift the basket from the fluid, and observe the tablets: all of the tablets disintegrate completely. If 1 or 2 tablets fail to disintegrate completely, repeat the test on 12 additional tablets: not fewer than 16 of the total of 18 tablets tested disintegrate completely.
Buccal Tablets— Apply the test for Uncoated Tablets. After 4 hours, lift the basket from the fluid, and observe the tablets: all of the tablets have disintegrated. If 1 or 2 tablets fail to disintegrate completely, repeat the test on 12 additional tablets: not fewer than 16 of the total of 18 tablets tested disintegrate completely.
Sublingual Tablets— Apply the test for Uncoated Tablets. At the end of the time limit specified in the individual monograph: all of the tablets have disintegrated. If 1 or 2 tablets fail to disintegrate completely, repeat the test on 12 additional tablets: not fewer than 16 of the total of 18 tablets tested disintegrate completely.
Hard Gelatin Capsules— Apply the test for Uncoated Tablets. Attach a removable wire cloth, which has a plain square weave with 1.8- to 2.2-mm mesh apertures and with a wire diameter of 0.60 to 0.655 mm, as described under Basket-Rack Assembly, to the surface of the upper plate of the basket-rack assembly. Observe the capsules within the time limit specified in the individual monograph: all of the capsules have disintegrated except for fragments from the capsule shell. If 1 or 2 capsules fail to disintegrate completely, repeat the test on 12 additional capsules: not fewer than 16 of the total of 18 capsules tested disintegrate completely.
Soft Gelatin Capsules— Proceed as directed under Hard Gelatin Capsules.
2.4. WEIGHT VARIATION
The following tests provide limits for the permissible variations in the weights

of individual tablets or capsules, expressed in terms of the allowable deviation from the average weight of a sample. Separate procedures and limits are described herein for capsules, uncoated tablets, and coated tablets that are intended for use as medicines.

2.4.1. CAPSULES
Capsules meet the requirements of the following test with respect to variation in weight of contents.
2.4.1.1. Hard Capsules
Weigh 20 intact capsules individually, and determine the average weight. The requirements are met if each of the individual weights is within the limits of 90% and 110% of the average weight.
If not all of the capsules fall within the aforementioned limits, weigh the 20 capsules individually, taking care to preserve the identity of each capsule, and remove the contents of each capsule with the aid of a small brush or pledget of cotton. Weigh the emptied shells individually, and calculate for each capsule the net weight of its contents by subtracting the weight of the shell from the respective gross weight. Determine the average net content from the sum of the individual net weights. Then determine the difference between each individual net content and the average net content: the requirements are met if (a) not more than 2 of the differences are greater than 10% of the average net content and (b) in no case is the difference greater than 25%.
If more than 2 but not more than 6 capsules deviate from the average between 10% and 25%, determine the net contents of an additional 40 capsules, and determine the average content of the entire 60 capsules. Determine the 60 deviations from the new average: the requirements are met if (a) in not more than 6 of the 60 capsules does the difference exceed 10% of the average net content and (b) in no case does the difference exceed 25%.
2.4.1.2. Soft Capsules
Proceed as directed under Hard Capsules, but determine the net weight of the contents of individual capsules as follows. Weigh the intact capsules individually to obtain their gross weights, taking care to preserve the identity of each capsule. Then cut open the capsules by means of a suitable clean, dry cutting instrument, such as scissors or a sharp open blade, and remove the contents by washing with a suitable solvent. Allow the occluded solvent to evaporate from the shells at room temperature over a period of about 30 minutes, taking precautions to avoid uptake or loss of moisture. Weigh the individual shells, and calculate the net contents. The requirements are as stated under Hard Capsules.

2.4.2. TABLETS
Tablets conform to the criteria given in the accompanying table.
2.4.2.1. Uncoated Tablets and Film-Coated Tablets
Weigh individually 20 whole tablets, and calculate the average weight. The requirements are met if the weights of not more than 2 of the tablets differ from the average weight by more than the percentage listed in the accompanying table and no tablet differs in weight by more than double that percentage.
2.4.2.2. Coated Tablets (Other Than Film-Coated Tablets)
Weigh individually 20 whole tablets, and calculate the average weight. If the coated tablets do not conform to the criteria in the accompanying table, place 20 tablets in a beaker of water at 37 , and swirl gently for not more than 5 minutes. Examine the cores for evidence of disintegration and repeat the procedure for a shorter time if disintegration has begun. Dry the cores at 50 for 30 minutes. Accurately weigh 20 individual tablet cores, and calculate the average weight.
The requirements are met if the weights of not more than 2 of the tablets differ from the average weight by more than the percentage listed in the accompanying table and no tablet differs in weight by more than double that percentage.
Criteria
Weight Variation Tolerances for Uncoated Tablets, Film-Coated Tablets, and Coated Tablets (Other Than Film-Coated Tablets)
Average Weight of Tablet, mg Percentage Difference
130 or less 10
From 130 through 324 7.5
More than 324 5
2.5. CASE STUDY: DISINTEGRATION, FRIABILITY, WEIGHT VARIATION FOR PARACETAMOL TABLETS
Carry these test as per USP


3. Module 3 ULTRAVIOLET/VISIBLE SPECTROSCOPY TRAINING MODULE
Aims/Goals
1. To acquire practical experience in pharmacopeial applications of UV-Vis absorbance in pharmaceutical quality testing.
2. To explore applications to perform assay
Learning Objectives
On successful completion of this course, the student will be able to:
2 Determine the content of drug substance in a formulation by using UV-vis
3 Collect data, review test results and perform calculations
4 Prepare certificate analysis
5 Release test results
Course Synopsis:
Introduction to UV-Vis absorbance, preparation of sample solution by extraction, content determination, identification
Total Session Time: 2 Hours Theory 6 hours lab session
Materials Needed
• Flip charts, marker pens, and masking tape/ LCD machine/laptop • Black/white board and chalk/whiteboard markers • Participant manuals/handouts • USP, BP and Int. Phr • Various Laboratory reagents and equipment • Samples and reference standards – Albendazole and Paracetamol
Content Areas

3.1 Background information 3.2 PRACTICE ANALYSIS 3.3 Case study: assay of Albendazole by UV absorbance USP 3.3.1 PROCEDURE 3.3.2 ASSAY PREPARATION 3.3.3 REFERENCE STANDARD PREPARATION 3.3.4 CALCULATIONS
3.4 Assay of Paracetamol Phr. Int by specific absorbance method 3.4.1 PROCEDURE 3.4.2 CALCULATIONS
ULTRAVIOLET/VISIBLE SPECTROSCOPY
Content Method of
delivery
Session overview
• Introduction to UV-Vis .
• Principles and limitation
• Handling of the cells
• Quantitative applications of UV-VIS Spectroscopy
• Case studies
• Albendazole
• Paracetamol
Slide 2
3.1. BACKGROUND INFORMATION
Analytical methods which are based on the absorption of visible or ultraviolet
radiation are frequently included among the official methods used for drug analysis
by the FDA. These methods usually require that the analyte be dissolved,
chemically transformed to a species which absorbs light, and diluted to a
concentration range in which absorbance measurements can produce accurate
quantitative results. Training in these methods will consist of learning or reviewing
the principles of UV/visible spectrophotometry and the corresponding
instrumentation, and a practice analysis on a typical drug sample under the
guidance of an experienced chemist, using the USP method.
Show introductory slide #3 and ASK participants the why do many molecules
including drug substances do absorb UV-Vis light?
• LET them buzz in 2 minutes and write their responses in a piece of paper
Slide 3

Content Method of
delivery
• When they are ready ask one to respond
• LET others who have a different answers also contribute
• Click to show the rest content of slide # 3 and summary
Explain to student the principles of absorption spectrometry with emphases on
determinants of extent of light absorptions being # of absorbing molecules and the
effectiveness → molar absorptivity
Slide 4
Show slide # 5, 6 and 7 and derive the relationship between transmittance and
absorbance
Ask: Is there anything that we discussed that requires clarification before we
can move to the next session?
Slide 5-7
Show slide # 8 and 9 and Explain to student that Beers law derive a quantitative
linear relationship the between concentration of light absorbing molecules and
absorbance
Ask: Is there anything that we discussed that requires clarification before we
can move to the next slides?
Slide 8-9
Explain to student the Beers law has some limitation related to chemical and
instrumental factors. These are:
• Deviations in absorptivity coefficients at high concentrations (>0.01M)
• Scattering of light due to particulates in the sample
• Fluorescence or phosphorescence of the sample
• Changes in refractive index at high analyte concentration
• Shifts in chemical equilibria as a function of concentration
• Non-monochromatic radiation
• Stray light (light scattered by the optics)
Slide10-
13
Explain to student that can be made from Quarts, glass or plastic. Several
geometric shapes are available
Open-topped rectangular standard cell (
Slide 13-
15

Content Method of
delivery
and apertured cell (b) for limited sample volume
Micro cell (a) for very small volumes and flow-through cell (b) for automated
applications
Ask: Is there any question?
Show slide # 16 and 17 and Explain to student some practical tips to handle the
cells
Ask: Is there anything that
Tell them that quantitative applications of UV falls under to category
• Single or multi calibrations
• Specific absorption method
Show slide # 19 and 26 and gave an overview
Slide 19-
26
Project Slide # 25 and introduce the laboratory session.
Inform that we are going to perform two assay procedure based on single
calibration and Specific absorbance method.
3.2. PRACTICE ANALYSIS
Before beginning the laboratory exercises below, you should have developed the
volumetric and gravimetric skills typically required in the preparation of the sample
for spectrophotometric measurement. If you are not confident that your skills in
these techniques are adequate, you should consider at this point and review or
learn afresh those procedures, because you cannot expect to obtain accurate
results from any instrumental method unless the quantitative techniques used for
sample preparation are of commensurate quality. Compendia method which is
representative of UV/visible analysis is the assay of Albendazole tablets and
Paracetamol Phr. Int.
Case Study
Laboratory
practical
session
3.3. CASE STUDY: ASSAY OF ALBENDAZOLE BY UV ABSORBANCE USP
Case Study

Content Method of
delivery
3.3.1 PROCEDURE
The purpose of the procedure is to determine the amount of active ingredient in
Albendazole tablets. You should perform the analysis under the supervision of an
experienced chemist.
Case Study
Laboratory
practical
session
3.3.2 ASSAY PREPARATION
Assay. Weigh and powder 20 tablets. Transfer a quantity of the powder containing
about 0.1 g of Albendazole, accurately weighed, to a 100-ml volumetric flask with
50 ml of anhydrous formic acid R. Heat in a water-bath at 50 °C for 15 minutes.
Cool, add water R to volume, mix, and filter through a sintered-glass filter. Transfer
10 ml of the filtrate to a 250-ml separator, add 50 ml of water R and 50 ml of
chloroform R. Shake for about 2 minutes, allow the phases to separate, and
transfer the chloroform layer to a second 250-ml separator. Wash the aqueous
layer with two portions, each of 10 ml, of chloroform R, adding the washings to the
second separator, and discard the aqueous layer. Wash the combined chloroform
extracts with a mixture of 4 ml of hydrochloric acid (0.1 mol/l) VS and 50 ml of a
previously diluted solution of 5 ml of anhydrous formic acid R with 45 ml of water R.
Transfer the chloroform layer to a 100-ml volumetric flask. Extract the aqueous
washings with two portions, each of 10 ml, of chloroform R, add these chloroform
extracts to the chloroform solution in the volumetric flask, dilute with 2-propanol R
to volume, and mix. Further dilute 5 ml of this solution to 100 ml with 2-propanol R,
and mix.
Case Study
Laboratory
practical
session
3.3.3 REFERENCE STANDARD PREPARATION
For the reference solution transfer 20 mg of Albendazole RS, accurately weighed,
to a 100-ml volumetric flask and add 90 ml of chloroform R, 7 ml of 2-propanol R,
and 2 ml of a mixture of 0.2 ml of anhydrous formic acid R and 1.8 ml of water.
Shake until the solid has dissolved, add 2-propanol R to volume, and mix. Transfer
5 ml of this solution to a 200-ml volumetric flask, dilute with 2-propanol R to
volume, and mix. For the reagent blank mix 45 ml of chloroform R with 1 ml of a
mixture of 0.1 ml of anhydrous formic acid R and 0.9 ml of water using a 100-ml
volumetric flask, dilute to volume with 2-propanol R, and mix. Transfer 5 ml of this
Case Study
Laboratory
practical
session
Content Method of
delivery
solution to a second 100-ml volumetric flask, dilute to volume with 2-propanol R,
and mix.
Without delay measure the absorbance of the sample and the reference solutions
in a 1-cm layer at the maximum at about 247 nm against a solvent cell containing
the reagent blank. Average the sample readings.
3.3.4 CALCULATIONS
. Calculate the amount in mg of C16H13N3O3 in the powdered tablets/ sample
being examined using the following formula: 20C(Au/As), in which C is the
concentration, in mg per ml, of Albendazole RS in the reference solution, and Au
and As are the absorbances for the sample and reference solutions, respectively.
The allowable percentage of the labeled amount for Albendazole is 90.0-110.0%.
Case Study
Laboratory
practical
session
3.4. ASSAY OF PARACETAMOL PHR. INT BY SPECIFIC ABSORBANCE
METHOD
The purpose of the procedure is to determine the amount of active ingredient in
Paracetamol tablets. You should perform the analysis under the supervision of an
experienced chemist.
Case Study
Laboratory
practical
session
3.4.1 PROCEDURE
Weigh and powder 20 tablets. Add a quantity of the powder equivalent to about
0.15 g of Paracetamol, accurately weighed, to 50 ml of sodium hydroxide (0.1
mol/l) VS, dilute with 100 ml of water, shake for 15 minutes, and add sufficient
water to produce 200 ml. Mix, filter, and dilute 10 ml of the filtrate to 100 ml with
water. Add 10 ml of this solution to 10 ml of sodium hydroxide (0.1 mol/l) VS and
dilute to 100 ml with water. Keep in mind that solutions must be clear (no suspension or precipitates) and spectrophotometer cells must be clean inside and out, if accurate photometric results are to be obtained. Because oils from fingerprints absorb in the ultraviolet, clean the windows of the cell carefully with a tissue made for such purposes, and do not touch them afterward. If the baseline obtained from the blank is rough or jagged, check the outsides of the cells for fingerprints or moisture. Clean the cell and repeat the blank. Before making measurements on the samples, check the
Case Study
Laboratory
practical
session

Content Method of
delivery absorbance’s of the two cells, using the solvent in both cells. Make a correction if the cells are not properly matched (perfectly matched cells do not require correction). Rinse out the solvent and replace it with the solution of the lowest concentration. Rinse the cell at least three times before going to the next higher concentration. Repeat until the highest concentration is reached. Use the UV/visible spectrophotometer to determine the absorbance of the sample solutions in the same 1 cm cell, at the absorbance maximum which occurs near 257 nm, using sodium hydroxide for the blank. Average the sample readings.
3.4.2 CALCULATIONS
Calculate the content of the active ingredient in the sample you weighed for this
analysis. Use the back of the worksheet to record all of your calculations along with
the analytical data. Determine content of C8H9NO2 using the specific absorbance
( = 715).
Case Study
Laboratory
practical
session

4. Module 4: INFRARED SPECTROSCOPY TRAINING MODULE
Aims/Goals:
• To acquire practical experience in pharmacopeial applications of Infrared Spectrophotometry as an identification tool in pharmaceutical quality testing.
Learning Objectives
On successful completion of this course, the student will be able to:
1. Prepare pharmaceutical sample by pressing KBr discs 2. Acquire IR spectrum 3. Collect data, review test results and perform interpretation 4. Prepare certificate analysis 5. Release test results
Course Synopsis:
Introduction to Infrared Spectrophotometry, preparation of pharmaceutical sample by KBr disc method, spectra overlay, spectra interpretation, identification
Total Session Time: 2 hours and 6 hours of practical’s
Materials Needed
• Flip charts, marker pens, and masking tape/ LCD machine/laptop • Black/white board and chalk/whiteboard markers • Participant manuals/handouts • USP, BP and Int. Phr • Various Laboratory reagents and equipment • Samples and reference standards –amoxicillin trihydrate
Content Areas:
4.1 Background information 4.2 MEASURING THE IR SPECTRA 4.2.1 Thin film of the material 4.2.2 Material in Solution 4.2.3 Solids dispersed in a mull.

4.2.4 Solid pellet with KBr 4.2.5 Diamond anvil technique 4.2.6 Reflectance technique 4.2.7 Gas Measurements 4.3 QUANTITATIVE INFRARED SPECTROSCOPY 4.4 CASE STUDY: LABORATORY EXPERIMENT IDENTIFICATION OF AMOXICILLIN IN
CAPSULES

Content Method of
delivery
4.1. BACKGROUND INFORMATION
EXPLAIN to participants that the Infrared spectroscopy measures the molecular
vibrations of the molecules in such vibrations as bending and stretching. Only those
molecules that have some dipole moment or interaction between atoms cause
absorption in the infrared (IR). The symmetrical molecules such as the stable
diatomic molecules (O2,N2, etc.) do not have vibrations in the infrared.
When the resonant frequency of the atoms matches the frequency of the energy
source, some absorption occurs.
EXPLAIN to participants that the infrared frequencies cover the region of the
electromagnetic series from 14000 to 20 cm-1 (wavelength in the IR region is
expressed in wave numbers, i.e., the number of waves per centimeter).
The IR region includes the far, mid and near frequencies. The most important
region, from 4000 to 400 cm-1, is the standard region, and is the one where most
analyses are done. The USP methods use infrared spectroscopy primarily as a
means of identifying the drug, but not for quantitatively measuring the strength of
the drug in the formulation. In this sense, infrared spectroscopy is a qualitative
method in which the absorption spectrum of the analyte is compared with that of a
reference standard by matching absorption peaks. However, this training module
also includes the quantitative analysis of compounds by infrared spectroscopy.
Instruments using either a salt prism or a diffraction grating to separate the
wavelengths require considerable time to measure the entire spectrum. Newer
instruments use the Fourier transform method (FTIR) for obtaining the spectrum.
This method uses an interferometer which separates all wavelengths in
approximately a few seconds, thus permitting a large number of scans. The analyst
selects the number of scans needed to produce a satisfactory spectrum. Such a
method reduces the noise level.
Many USP monographs specify the infrared spectrum for the identity test of a drug.
slide 2
slide 3
slide
4-9

The infrared spectrum of the sample is measured and compared to that of a USP
reference standard material. If the spectra match, the two substances are the same;
however isomers such as D- or L- could be present and show as a single
compound. Since infrared spectroscopy is generally not sensitive to trace quantities,
low amounts of impurities are not detected. The method is limited to measuring the
main components. Infrared spectroscopy involving pure drug substances obtained
from pharmaceutical drug preparations requires the analyst to handle small
quantities of solid materials which have been dried, and are in the form of a fine
powder. Such materials are usually subject to static electricity, which makes the
finely divided powders jump around when handled. An anti-static gun is useful to
prevent this. Most samples are prepared by making pellets of the drug with KBr. The
sample and the KBr must be thoroughly mixed. The sample constitutes about 2% of
the total mass. The following general precautions must be observed:
The pellet mold for sample preparation is a precision-fit set of molding dies with
close tolerances. Take care to fit the dies together properly; otherwise the mold will
be ruined. Clean and dry the molding dies in an oven before making the pellet.
Measure both a reference standard and a sample, and try to have the
concentrations of the two specimens as close as possible.
Use care in operating the hydraulic hand press while making the pellet. Place the
mold in the center of the press. Ascertain that the mold and press are properly
aligned before applying the pressure.
Always apply and release the pressure slowly. Use care in handling the mold to
prevent any damage; any scratches on the faces or burring of the edges will ruin the
mold. Closely follow all Good Laboratory Practices of weighing and analytical
techniques. All infrared techniques use some halide of an alkali metal (e.g., NaCl or
KBr) as the sample matrix or sample holder, and the crystals are subject to
moisture. Do not handle the faces of the crystals with your bare hands, since any
fingerprints or moisture will damage them. When the alkali metal halides pick up
moisture, they will become fogged. The modern FTIR instruments operate with a
laser light source which can damage the eye; therefore, do not look into the beam
for any reason. The laser power is very low and is safe unless you look directly into
the beam. All infrared techniques use some alkyl halide as the sample matrix or
sample holder, and these crystals are subject to moisture. When the alkyl halides
pick up moisture, the faces become opaque and the transmittance of the light is
reduced. Samples and crystals should be stored in a desiccator over silica gel. On
high humidity days, it is good practice to sweep the cell compartment with a slow
slide 7

flow of dry nitrogen while making measurements.

4.2. MEASURING THE IR SPECTRA
SHOW slide # 10 and 11 and EXPLAIN to the participant that three are several
methods for sample preparation. Refer them to general tests and specific
monograph instructions in USP for more information Sample Preparation
There are several methods for preparing samples for infrared measurement namely:
4.2.1 Thin film of the material
A thin film of the liquid sample (aka - neat technique) is spread between two salt
plates. A thin spacer approximately 0.1 mm thick can be inserted to increase
absorption, if needed. The absorption is dependent upon the film thickness and any
slight variation will cause a change in measured intensity.
4.2.2 Material in Solution
The compound is dissolved in a solvent at a very high concentration and then this
solution is transferred into a liquid cell. The solvent must have little or no absorption
in the region of interest. All solvents will show absorption at some IR wavelengths.
Solvents such as CCl4, CS2, and CHCl3 have absorption bands that allow
measurements on most compounds. Suitable analysis can be done when the
sample has some absorption band or bands that are different than the solvent. The
primary difficulty is that many compounds are not soluble in the nonpolar solvents
especially those that are polar which includes most drugs. The method can be used
for quantitative analysis when a calibration curve can be constructed based upon
Beer's Law.
4.2.3 Solids dispersed in a mull
The compound is blended with mineral oil (Nujol) by
grinding the material with the oil in an agate mortar.
The oil is added slowly until a uniform blend is made
with the consistency of a hand cream. The cream is
sandwiched between two salt plates usually without a
slide
10-11
spacer. This method is subject to some uncertainty due to uniformity of the spread
and the thickness. The material is not in solution but in a dispersion which also
causes some scattering depending upon the particle size.
4.2.4 Solid pellet with KBr
Approximately 2 % of the material is blended with 98 % of dried KBr by mixing in a
wiggle bug to get a uniform mixture. The blend is placed in a KBr disc die press and
pressure applied slowly by a hand hydraulic press until the gage registers 15000
pounds load. The load on the mold is held for 2 min. The pressure is slowly
released. A thin transparent pellet is formed. The pellet should be of uniform
distribution and the faces should be parallel. There are also several mini-types
presses used to press pellets by hand pressure. The pellet method finds the most
applications. The method is especially useful when comparing a sample with a
reference standard for identity.
4.2.5 Diamond anvil technique
This consists of simply mounting a crystal or small portion of pure material on a
diamond mount. The spectrum of the material is recorded where the diamond mount
touches the crystal. It is useful for only pure materials and is used with the Fourier
transform infrared instruments.
4.2.6 Reflectance technique
This technique is used to obtain spectra of difficult to handle material such as
paints, fabrics, can liners, etc. Spectra are obtained only of the surface of the
sample material in contact with the sample holder which is usually a thallous
bromide-iodide (KRS-5) trapazoidal shaped crystal. The sample material is applied
to the crystal to form the best contact possible before the spectrum is attempted.
Drug samples are usually evaporated onto the surface from a suitable solvent. The
KRS-5 crystal is held in a special holder which fits into the cell compartment. It is not
used much in the drug laboratory.
4.2.7 Gas Measurements
Gases are usually introduced into a gas cell which also is specially designed to fit
into the sample compartment of the infrared instrument. By adjustment of the

mirrors in the cell, path lengths of up to 10 meters can be obtained. This technique
is also uncommon in the drug laboratory.
Ask: Is there anything that we discussed that you do not agree with? What is
it?
Explain to student that although there are quantitative application of IR, but this
application of FTIR in pharmaceutical quality testing is very limited therefore it is
going to be out of the scope of this module
4.3. QUANTITATIVE INFRARED SPECTROSCOPY
Infrared Spectroscopy is based upon the amount of absorption of the material and
upon the principles of Beer's Law. The measurements are made by transmission
which is the ratio of the intensity of the light passing through the sample to the
intensity of the initial light which is expressed as T= I/I0 and the percent
transmission is the ratio multiplied by 100 which is the manner that the spectrum is
displayed. . The FTIR instruments display the spectrum in either transmission or
absorbance modes.
Beer's law state that log of the reciprocal of the transmission is linear with
concentration. The law is expressed as:
A=abc
where A is the absorbance and a and b are constants for any given condition and c
is the concentration.
The "a" is the absorption coefficient and "b" is the optical path length. The
expression reduces itself to Y=mX + b (the equation for a straight line).
This relation holds for most substances over the dilute range but deviates at the
higher concentrations. Even with small deviations, the concentration of the analyte
can be determined from a calibration curve based upon a second or third order
polynomial equation.
The quantitative application of FTIR in pharmaceutical quality testing is very limited
therefore it is going to be out of the scope of this module.
slide 8
EXPLAIN to student that during routine pharmaceutical control they will encounter
interpretation of IR spectra for the dug substances they are going to encounter.
Present to them some practical considerations on how to examine and make
interpretation of the spectra:
slide
15-25

Tell them that the in principle it is a comparative approach where a sample
spectrum is compared with the reference spectrum either acquired alongside or
available in the pharmacopeial appendix.
Refer them to PB and Clarke's Analysis of Drugs and Poisons, 4th Edition
Ask: Is there anything that we discussed that you do not agree with? What is
it?
EXPLAIN to participants some of the possible errors in infrared analysis
Quantification is difficult when the samples are prepared by the mull or pellet
methods.
Obtaining a homogeneous mixture of the sample either in the mull or pellet.
Separating the individual components of a mixture because of complicated spectra
and overlapping absorbance bands.
Making the pellets with parallel faces without striations.
The infrared method is not as sensitive as other methods and cannot be used to
detect trace amounts. High precision can be obtained but the accuracy may suffer
when compared to other methods.
Solubility problems especially with the polar drugs.
Absorption band used for quantification must be isolated and free from interference.
Measurements made in transmittance mode must be converted to absorbance
before calculating results.
Liquid cells of matched thickness are needed for qualitative and quantitative results.
Excipients in the formulation interfere with the assay or identity.
Ask: Is there anything that we discussed that requires clarification before we
can move to the laboratory session?
slide
26-27

Project Slide # 28 to introduce the laboratory session.
Inform participants that we are going to perform IR experiment for Identification of
the amoxicillin trihydrate in capsule formulation as per British Pharmacopeia
Monograph for Amoxicillin.
In this experiment you will be exposed to various skills from sample preparation,
acquisition of the spectra and interpretation

4.4. CASE STUDY: LABORATORY EXPERIMENT IDENTIFICATION OF
AMOXICILLIN IN CAPSULES
Open the capsule and take a quantity of the of the content of the capsule equivalent
to 0.5 gm of amoxicillin
2. Shake it with 5 mL of water for 5 minutes, filter, wash the residue first with
absolute alcohol and then with ether, and dry at a pressure not exceeding 0.7 kPa
for about 1 hour.
3. Weigh about 2 mg of the residue and mix with 98 mg of KBr in an agate mortar.
Grind until homogeneous. Prepare a pellet of the mixture using either the hand held
mini-press or the Carver disc press.
4. Mount the clear transparent pellet in a holder and record the infrared spectrum.
(Note the positioning of the cell so that the standard and sample can be run with the
same cell orientation).
5. Compare with a standard prepared similarly. The infrared spectra should match in
every respect peak for peak, absorption for absorption. When you compare the
spectra of the standard and the sample, you should have at least as many
absorption bands in the sample as in the standard. Identity should never be
established on fewer bands. If the bands do not match, then why not. Remember
that any other components will contribute to the spectrum. In the case of drug
analysis, the cause is usually associated with the presence of excipients.
6.The residue complies with IR absorption spectrum; Appendix IIA is concordant
with the reference spectrum of amoxicillin trihydrate (RS 011)

5. Module 5: THIN-LAYER CHROMATOGRAPHY TRAINING MODULE
Aims
• To acquire practical experience in the use of TLC as a tool of identification of drug substances and impurity profiling
Learning Objectives
On successful completion of this course, the student will be able to:
1. Perform GPHF mini lab drug screening for content determination 2. Perform test for related substance in drug substances.
Course Synopsis:
Introduction Thin-Layer Operating Procedures, Plate Selection, Preparation of the tank, Preparation of the plate, Sample preparation and spotting, developing the plate Visualization or detection, GPHF Mini lab tests
Total Time: 2 hours theory and 5 x 8hour lab session
Materials Needed • Flip charts, marker pens, and masking tape/ LCD machine/laptop • Black/white board and chalk/whiteboard markers • Participant manuals/handouts • USP, BP and Int. Phr • Various Laboratory reagents and equipment • GPHF Minilab kit and supplies • Samples and reference standards – Quinine, Paracetamol, Ciprofloxacin, Co-
trimoxazole, Artemether/lumefantrine, lamivudine/zidovudine, and nevirapine Amitriptyline
Content Areas 5.1. Background information 5.2. INTRODUCTION TLC OPERATION 5.3. TLC OPERATING PROCEDURE
4.3.1 PLATE SELECTION

4.3.2 PREPARATION OF THE TANK 4.3.3 PREPARATION OF PLATE 4.3.4 SAMPLE PREPARATION AND SPOTTING OF THE PLATE 4.3.5 DEVELOPING THE PLATE 4.3.6 VISUALIZATION OR DETECTION
5.4. CASE STUDY: RELATED SUBSTANCES. AMITRIPTYLINE HYDROCHLORIDE 5.5. CASE STUDY: THIN LAYER CHROMATOGRAPHY IN GPHF MINI LAB
SCREENING 5.6. COMMENTS ON THIN-LAYER CHROMATOGRAPHY 5.7. SOURCES OF ERROR
Content Method of delivery
Session Overview
• Introduction to TLC
• Historical background
• Separation principles & Detection
• Uses of TLC
• Advantages and disadvantages
• Modes of TLC
• Standard TLC conditions and methodology
• Evaluation and documentation
• Case studies:
• Test related substance
• Minilab screening
Slide 2
GPHF mini lab kit
DISPLAY slide 3 and give them an overview of the components of the GPHF KIT.
EXPLAIN to them the kit houses three basic tests:
• Color reaction for identification
• Disintegration test
• Semi quantitative TLC for identification and assay
Tell them the kit is portable and can be used to perform testing even in

Content Method of delivery
remote areas where access to electricity is not possible.
Make them aware that for the purse of this training we are going to focus the remaining of the session with TLC part.
5.1 BACKGROUND INFORMATION
Thin-layer chromatography (TLC) is one of the simplest of the liquid chromatography methods. Recent developments in coatings have improved TLC by introducing reverse- and normal-phase separations that use the same type of coatings as in HPLC columns. With these new advances, known as HPTLC (high performance thin-layer chromatography), TLC separations can be made comparable to those with HPLC. In fact, the method can be considered as a complement to HPLC, since information gained from TLC can be transferred directly to HPLC. Coatings are available for work in organic or aqueous mobile phases.
TLC is widely used to identify impurities in drugs. The method serves as a valuable means of quick and economical identification. TLC can be used successfully as a rapid screening technique for many drugs. One of its chief uses is determination of trace impurities in drugs. The technique will become even more useful with the new advances in high-performance thin-layer chromatography.
Slide 4-7
ASK participants to provide some advantage and disadvantages of TLC over the golden standard methods like HPLC during sample analysis especially in a resource constrained settings?
• LET them buzz in 5 minutes and write their responses in a piece of paper
• When they are ready ask one pair to WRITE on the flip chart the key advantages
• LET others who have a different answers read and the facilitator to write on a flip chart
Show slide # 8 and highlight the key points they have missed and also refer
Slide 8

Content Method of delivery
them to training materials more information.
Possible responses:
Advantages
• It is cheap and simple apparatus
• Several samples can be analyzed simultaneously.
• Great flexibility in terms of stationary and mobile phases.
• No detection problems in the case of non-elution, thermal instability and masking by solvent, since the applied substance remains on the plate.
Disadvantages
• However, Sensitivity and resolution are lower
Ask: Is there anything that we discussed that you do not agree with? What is it?
EXPLAIN to the participants that like HPLC, TLC can as well be run into two modes
Normal phase
• stationary phase is more polar than the mobile phase
• Organic solvents as mobile phase
Reversed phase
• Stationary phase is less polar than the mobile phase
• Mobile phase is a mixture of water and organic solvents
Slide 9
SHOW SLIDE #S 10,11 &12 ASK one participant at time to read the definition of the key terminology
Slide 10-12
DISPLAY animation slide # 13 and explain to them the polarity of the silica gel is brought by the exposed silanol groups
Slide 13
EXPLAIN to the participants that TLC is very versatile in the sense that a very wide selection of solvents from very polar to non-polar and their
Slide 15

Content Method of delivery
combinations
DISPLAY slide # 16 and explain to them the requirement for tank can assume several geometric shapes
Slide 16
EXPLAIN to the participants mobile phase preparation need to be measured accurately and avoid making up volume to.
Tell them that for reproducible results chamber saturation is paramount
Slide 18-19
Content Method of delivery
5.2 INTRODUCTION TLC OPERATION
The TLC operation requires handling of organic solvents, glass containers, and thin-glass plates. Careful planning is required to make the operation successful and safe. Safety glasses and laboratory coats are required for all operations of this type. The entire process involves the handling of volatile and flammable solvents. All work involving the solvents should be performed in a hood. The thin-glass chromatographic plates are fragile and are easily broken.
THE GLASS PLATES MUST BE HANDLED WITH CARE to prevent breakage and possible personal injury. The coated layers used on the plates are also fragile; they should be touched as little as possible to avoid damaging them or affecting development or visualization. The glass plates should be used in a clean laboratory area with space enough to work with small objects safely and efficiently. The plates require development to separate the materials. The visualization of the plates requires some method of detecting the spots. The most common forms of detection are examining the plate under ultraviolet light, spraying, or charring. All spraying operations must be performed in a spray chamber and in a hood. The charring operation uses H2SO4 with/without a chromate and heating. Rubber or plastic gloves should be worn to prevent any possible injury from burns. Intensities of spots are estimated visually or with the use of a densitometer. Because TLC operation uses micro quantities of solution, very small micropipettes are used. For preparation of the plates, including application of the sample, the operator should be seated at a table with plenty of clear working space.

PERFORMING A THIN-LAYER CHROMATOGRAPHY SEPARATION
THIN-LAYER CHROMATOGRAPHY EQUIPMENT
1. Glass tank with a glass lid. The top edge of the tank should be ground so that the tank and lid fit together closely to prevent evaporation. Most operations are carried out in a saturated atmosphere.
2. Saturation pads to provide a controlled atmosphere.
3. Delivery system to handle microliter quantities of sample.
4. Coated chromatographic plates.
5. Spotting template to control sample placement.
6. Spray box.
7. Spray unit.
8. UV light box or UV light source (254 and 360 nm).
All TLC operations include three phases, namely:
1. Stationary phase, which is the adsorbent;
2. Mobile phase, which is the solvent;
3. Solute phase, which is the sample.
Use of TLC procedure includes six steps, namely:
1. Sample preparation;
2. Sample application;
3. TLC chamber conditioning;
4. TLC plate development;
5. Visualization, interpretation, and quantitation.
Slide 7

5.3 TLC OPERATING PROCEDURE
5.3.1 PLATE SELECTION
TLC plates are available both uncoated and coated. Since you can buy the coated plates with many different types of coatings, it is not necessary to coat plates unless some special type of coating is desired. We will involve ourselves only with the coated plates. The plates themselves are available with glass, aluminum, paper, and polyester backings and also in a wide variety of sizes. The most common size and type used in drug analysis is the 20 X 20 cm glass plate. Most TLC measurements are done with silica coating on glass plates. In addition to the silica-coated plates, other coatings are available such as C18, C8, CCN, and CPhenyl. These coatings are similar to those used as supports in HPLC. They contain binding agents so that the plates may be used with either organic- or water-containing mobile phases. Special plates are commercially available that will permit the use of up to 50% water. If you attempt to go beyond 50% water, the coating will be removed. The wide variety of coatings makes it possible to separate components by either normal or reverse-phase methods. Plates come with a soft or hard coating. The soft coatings are used when recovery of the sample is necessary. The hard coatings are abrasion-resistant and will allow marking with a soft lead pencil. Plates are available with or without fluorescein in the coating. Plates with fluorescein allow easy detection of the developed spots under UV lighting. The type of coating on the plate is specified by the USP; usually it is silica.

5.3.2 PREPARATION OF THE TANK
1. Use a clean and dry chromatography tank to fit the size of the plate. Tanks grooved on the inside to hold multiple plates are not recommended.
2. Fill the tank with solvent to such a level that the bottom of the plate dips into the liquid 1 cm. (The tanks used for the 20 X 20 cm plates require about 100 mL of solvent to bring the liquid level to the proper position on the plate.) Make sure the origin line of spotted samples is above the developing solvent in the tank.
3. Place saturation pads around the inside of the tank, cover with the glass lid, and allow equilibrating. (Some USP methods specify no saturation pads, stated as "no equilibrium". No mention of saturation pads by the USP means the system is operated with pads.) Allow sufficient time for the developing tank to equilibrate before adding the sample plates.
Slide 18-19
5.3.3 PREPARATION OF PLATE
1. Use a dry and clean plate.
2. Avoid scoring or drawing lines on the plate that will be traversed by the developing solvent. Mark only the top of the plate to identify the end of the developing time or distance.
3. On the end of the plate opposite the spotting end, mark the edges of the surface to show the upper distance that the developing solvent must travel from the origin (usually about 15 cm). Score the plate between these marks with a sharp object.
4. Do not score along the spotting line.
Slide 22


5.3.4 SAMPLE PREPARATION AND SPOTTING OF THE PLATE
1. Accurately weigh the sample to make a desired concentration (concentrations are specified by the USP). Before application to the plate, dissolve the sample in a solvent that is as nonpolar and volatile as possible.
2. Use a microsyringe or a Microcap to deliver a fixed volume to the plate. A Microcap is a precision-bore capillary tube cut to a constant length so as to deliver a fixed volume in microliters when filled. Microcaps range in capacity from 0.5 to 200 mL.
They are disposable and a new one is used for each sample, thus eliminating any possible contamination. Drummond Wiretrol micropipettes with different volumes are calibrated with volume marks and are used to deliver the sample. This type of micropipette consists of a calibrated capillary with a removable wire plunger. Such a system combines the advantages of adisposable pipette and a microsyringe. This type of pipette must be used when the solutions are water or water mixtures because of surface tension. A separate capillary is used with each sample to avoid contamination of samples.
3. With the use of a template or guide, spot the sample slowly, using a microliter pipette along the origin line sufficiently above the bottom of the plate (approximately 2.5 cm) so it is not immersed in the developing solvent when placed in the tank.
4. Spot measured volumes of sample on the origin line across the bottom of the plate. Select a standard and sample of equal or nearly equal concentrations. Spot this standard and sample near the center of the plate on the origin line, and place sample spots of varying concentrations on the sides of the two center spots. Make the sample spots on the plate as small as possible. If the entire sample is added at once, such as the 10 mL specified in most USP analyses, a very large spot of sample will result. To avoid the large initial spot, first add a very small amount of the sample to the plate and allow that portion to dry, using a gentle stream of nitrogen gas to aid in drying the spot as it is applied. The small amount added will dry quickly since the solvent is usually volatile. Continue adding successive small amounts until the correct quantity of sample has been added. Try to keep the spot to about 2 mm diameter for best results.
4. Leave the plate in place and let it dry until you can no longer smell any
Slide 20-21

solvent.

5.3.5 DEVELOPING THE PLATE
1. Place the plate vertically with the bottom down in the solvent tank so that the liquid comes to about 1 cm on the plate. 2. Cover the tank with the lid and allow the sample to migrate up the plate. The USP specifies that the migrate should continue until a certain percentage of the total plate height is reached. If you forget to stop the migration at the time specified, it will stop automatically when the solvent front reaches the scribed line. The usual time for migration is on the order of 30 minutes to 1 hour. Some TLC systems require much longer times to develop; to reduce the time; you must change the polarity of the solvent.
3. If the solvent does not reach the pre-scored line, mark a line showing where the solvent did migrate.
4. The line where the solvent stops marks the retention distance for the solvent and is known as the solvent front. Uses the distance from the origin line to the solvent front to calculate the retention factor (Rf) as described later to calculate the retention factor (Rf).
Slide 23
5.3.6 VISUALIZATION OR DETECTION
1. Remove the plate from the tank and allow to air dry. If the coating of the plate contains fluorescein, observe the chromatogram by exposing the plate to a short-wavelength ultraviolet light source (254 nm). Place the plate with the coating surface facing towards the UV light source. 2. Alternatively, visualize the chromatogram by spraying the plate with various materials that dye the samples. The type of spray used depends upon the molecular structure of the solute. Use a small atomizer sprayer which eliminates formation of droplets and forms a uniform mist; use a spray coating box to isolate the excess spray. Identify the location of the sample. The intensity of the color developed is related to the amount present. 3. As a third method, use charring to visualize the chromatogram. Spray a mixture of 50% H2SO4/methanol, with/without potassium dichromate, onto the plate and heat to 105°C for a few minutes. The spots containing the samples will be blackened and the intensity can be measured by a densitometer.
4. Measure the distance from the initial sample location (origin) to the center of the eluted spot. Measure the distance from the origin to the solvent front. Express the Retardation Factor, Rf, as a ratio: Rf = Distance from origin to
Slide 24-27

center of spot/Distance from origin to solvent front. The Relative Retention Factor, Rr, is defined as the distance traveled by the test substance divided by the distance traveled by the standard. Rf is a measure of the separation and movement in a given TLC system, and Rr is used to determine the separating power of the system related to decomposition products or related substances. Use a TLC template as a spotting guide and a means of measuring spot size, Rf values, and sample quantities.

Content Method of delivery
5.4 CASE STUDY: RELATED SUBSTANCES. AMITRIPTYLINE HYDROCHLORIDE
Cary out the method for thin-layer chromatography, Appendix IIIa, protected from light, using silica gel G as the coating substance and a mixture of 3 volumes of diethylamine,15 volumes of ethyl acetate and 85 volumes of cyclohexane as the mobile phase by allowing the solvent front to ascend 14cm above the line of application in an unlined tank. Apply separately to the plate 10 microL of each of the following solutions.
For solution (1) extract a quantity of the powdered tablets containing 20 mg of Amitriptyline Hydrochloride with 5ml of a mixture of 1volume of 2M Hydrochloric acid and 9 volumes of ethanol (96%) , centrifuge and use the supernatant liquid.
Solution (2) contains 0.0010% w/v of dibenzosuberone EPCRS in Chloroform. Solution (3) contains 0.0040% w/v of cyclobenzaprine hydrochloride EPCRS. After removal of the plate, allow it to dry in air, spray with a freshly prepared mixture of 4 volumes of formaldehyde and 96 volumes of sulfuric acid, heat at 100 to 105 degree centigrades for 10 minutes and examine under ultraviolet light (365nm). Any spot corresponding to dibenzosuberone in the chromatogram obtained with solution (2) (0.25%). Examine the plate under ultraviolet light (254nm). Any other secondary spot in the chromatogram obtained with solution (1) is not more intense than the spot in the chromatogram obtained with solution (3) (1%). BP 2005. Pg 2224.
5.5 CASE STUDY: THIN LAYER CHROMATOGRAPHY IN GPHF MINI LAB SCREENING
Content Method of delivery
In screening for drug quality TLC procedure is used for identification and Slide 4
semi-quantitative verification of content. This will enable the analyst to address two major product risks namely; wrong drug or no drug and grossly substandard drug.
Principle
Drug is extracted from tablets and capsules with an appropriate solvent as specified in the monograph and determined by TLC with reference to an authentic secondary standard.
Equipment & reagents
• Pestle
• Aluminum foil
• Laboratory glass bottles with a filling capacity at 25 to 100 ml
• Funnel
• Set of straight pipettes (1 to 25 ml)
• 10-ml vials
• Label tape
• Marker pen
• Pencil
• Ruler
• Merck TLC aluminum plates pre-coated with silica gel 60 F 254, size 5x10 cm
• Glass micro capillaries of 2-µl filling capacity
• Hot plate
• TLC developing chamber (jar)
• Filter paper
• Pair of scissors
• UV light of 254 nm
• Safety pipette filler
• Solvents for extraction
• Solvents for mobile phase
• Reference and sample tablets
Preparation of the stock standard solution
The preparation of a stock standard solution requires a whole reference tablet

containing stated amount of drug which is crushed prior to extraction, the precise procedure being as follows. Wrap up a tablet in aluminum foil and crush it down to a fine powder using a pestle. Empty the aluminum foil over a laboratory glass bottle of appropriate capacity and wash down all residual solid with an appropriate volume of solvent using a straight pipette. Close the bottle and shake for about three minutes till most of the solids are dissolved. Allow the solution to stand for further five minutes until the undissolved residue settles below the clear supernatant liquid. This solution should be labeled as “Drug Stock Standard Solution” and contains a known concentration of the drug per ml. Freshly prepare the standard solution for each test.
Preparation of the working standard solution 100% (upper working limit)
Pipette a stated volume of the clear stock standard solution into an appropriate vial and add a state volume of diluting solvent. Close and shake the vial. The solution obtained should be labeled as ‘Drug Working Standard Solution 100% and contain a known amount of the drug per ml.This higher working standard solution represents a drug product of good quality containing 100% of the drug respectively.
Preparation of the working standard solution 80% (lower working limit)
Pipette a given volume of the stock standard solution into an appropriate and add a stated volume of a specified solvent. Close and shake the vial. The solution obtained should be labeled as ‘Drug Working Standard Solution 80%’ and contain a known amount of drug per ml. This is more dilute than the 100% working standard solution, thus, represents a drug product of poor quality containing just 80% of the amount of drug as stated on the product’s label. In the current investigation, this drug level represents the lower acceptable limit for a given product.
Preparation of the stock sample solution from a drug product claiming a stated potency per unit
The preparation of a stock sample solution requires a whole tablet or capsule from an appropriate drug product sampled in the field. The drug is extracted completely from the sample using the same procedure as for the authentic reference standard: Tablets are wrapped up into aluminium foil and crushed down to a fine powder prior to transfer into a laboratory glass bottle of a specified capacity. Powder obtained from a capsule should be transferred
directly into the laboratory glass bottle putting finally the empty cap and body shells into the bottle as well. Add a specified volume of appropriate solvent using a straight pipette, close the bottle, and shake for about three minutes till most of the solids are dissolved. Allow the solution to stand for a further five minutes until the undissolved residue settles below the clear supernatant liquid. This solution should be labeled as ‘Drug Stock Sample Solution’ and contains a known amount of total drug per ml. Freshly prepare the sample solution for each test.
Preparation of the working sample solution
Pipette a specified volume of the stock sample solution into a specified vial and add a given volume of solvent. Close and shake the vial. The solution obtained should be labeled as ‘Drug Working Sample Solution’. The expected concentrations of both drug compounds in the working sample solution should match the concentration of drug of the higher working standard solution produced above.
Spotting
Mark an origin line parallel to and about 1.5 cm from the bottom edge of the chromatoplate and apply 2 µl of each test and standard solution as shown in the picture opposite using the micro capillary pipettes supplied.
Up to five spots can be placed on a plate. Check the uniformity of all spots using UV light of 254 nm. All sports should be circular in shape and equally spaced across the origin line. Although their intensity might differ, their diameter never should. Different intensities are due to residual amounts of tablet and capsule excipients or different drug concentrations in the sample solutions. A difference in spot size, however, relates to poor spotting. Repeat this step if a homogeneous spotting is not achieved the first time.
Development
Pipette a given volume of mobile phase into the jar being used as TLC developing chamber. Close the chamber and mix thoroughly. Line the chamber’s wall with filter paper and wait for about 15 minutes thus ensuring saturation of the chamber with solvent vapour. Carefully place the loaded TLC plate into the jar. Close the jar and develop the chromatoplate until the solvent front has moved about three-quarters of the length of the plate, the developing time being about 15 minutes. Remove the plate from the chamber, mark the solvent front and allow any excess solvent to evaporate using a hot plate if

necessary.
Detection
Dry off all residual solvent, where necessary used the supplied hot plate. Observe the chromatoplate obtained with UV light of 254 nm using the battery-driven fluorescent lamp supplied. Also observe the plate in daylight after iodine staining or applied any other specified reagent.
Chromatoplate observed at 254 nm EXAMPLE SULFADOXINE/PYRIMETHAMINE Run. No. 1 Standard drug’s upper working limit representing 100% of total drug. Run. No. 2: A drug product of good quality. Run. No. 3: A drug product of poor quality. Run. No. 4: Standard drug’s lower working limit representing 80% of total drug. Observations made at 254 nm
The presence of a drug is indicated by a principal spot (s) representing individual drug components, at different travel distances. Do not release the batch unless all expected spots are visible. Additional strong spots generated by the test solution indicate drug degradation especially when associated with a smaller principal spot. Some fainter spots emerging near or on the origin line of the chromatoplate are normally caused by auxiliary agents incorporated in the different tablet or capsule formulations.
Observations made in daylight after staining with iodine or any other specified reagent
Only the spots reacting with iodine or any other specified reagent become visible for further evaluation purposes on quantities present.

Results and actions to be taken
The principal spots in the chromatogram obtained with the test solution must correspond in terms of colour, size, shape and travel distance to that in the chromatogram obtained with the lower and higher standard solution. This result must be obtained for each method of detection. If this is not achieved repeat the run with a second sample from scratch. Reject the batch if the drug content cannot be verified in a third run. For a second opinion, refer additional samples to a fully equipped drug control laboratory. Retain samples and put the batch on quarantine till a final decision on rejection or release has been taken.
Content Method of Delivery

Content Method of Delivery
5.6 COMMENTS ON THIN-LAYER CHROMATOGRAPHY
Densitometers are also used to measure spots on TLC plates but this use is not covered in this training module. Some coatings are bonded to the glass with a cross-linked-polymeric binder, making the coating useful with either organic or water/organic solvents in which the water content does not exceed 50%. Many analyses require development of an HPLC method. TLC offers an efficient and cheap way to develop a method involving the same type of column and solvent system. Data from TLC and HPLC are complementary, and can be directly transferred from one system to the other. High-performance thin-layer plates can be used to assay the main component in a drug if the analyst can apply constant volumes every time and maintain high precision. Automatic spotters are available to deliver a constant volume and to eliminate operator errors. In some cases, the HPTLC method can be used for the USP method if the HPLC instrumentation is not available. TLC has the following advantages:
Low cost compared to other methods.
Ability to screen a large number of samples.
No sample clean-up or filtering.
5.7 SOURCES OF ERROR
1. Reproducibility of sample application. Very small quantities are handled and any error in the volume applied greatly increases the final error.
2. When using a densitometer, reproducibility of positioning the spot in the center of the beam is a problem. It is very important to center the spot as you scan across, so that your readings are correct.
3. Handling of micro quantities causes some problems because all weighings and volumes are very small and any small change represents a large percentage change.
4. The sample can over- or under-migrate. Even no separation is possible. All these errors are caused by the solvent polarity not being correct. Sometimes a second solvent front is formed, causing a problem in determining the distance of migration or Rf values.

Content Method of Delivery
5. Solvents used in preparing the sample or in the developing solvent can cause decomposition of the sample, giving erroneous results. Solvents of this nature should be avoided.

Content Method of delivery
5.8 MINI LAB LABORATORY SESSION
Content Method of delivery
ASK participants to distribute themselves and occupy the training stations. Each training station per one participant.
Tell the participants that we have in place one complete set of the GPHF Minilab kit with additional supplies to support 10 training stations.
Ask them to have a look at kit and supplies and list the different components of the kit
• LET them buzz in 5 minutes and let them give their responses in a verbally
Refer them to Show GPHF Training manual pg 23-24- and highlight the key points they have missed and also refer them to training materials more information.
Ask: Is there anything that needs to be clarified on the completeness of each that training stations. Are the missing pieces? What is it?
Microsoft Word 97-2003 Document
GPHF Training manual pg 23-24-

EXPLAIN to the participants that the training is going to focus on Verification of Identity and Drug Content via Thin Layer Chromatography The other applications physical inspection remains beyond the scope of this training because it is liked to a drug registration system. While color reaction in no longer a preference for identity
ASK participants to verify that they have all documentations needed as guide to the experimental work. These include
• The Minilab’s Operation Procedures at a Glance
• Short Practical Course On The Use Of The Global Pharma Health Fund Minilab For Quality Control Of Drugs
• Mini lab protocol for paracetamol
• Mini lab protocol for co-trimoxazole
• Mini lab protocol for ciprofloxacin
• Mini lab protocol for albendazole
• Mini lab protocol for quinine
• Mini lab protocol for arthemether/lumefantrine
• Mini lab protocol for rifampicin
• Mini lab protocol for Lamivudine/Zidovudine/Nevirapine
• Mini lab protocol for Nevirapine
The Minilab’s Operation Procedures at a Glance
Microsoft Word 97-2003 Document
GPHF Training manual pg 23-24-
The Minilab’s Operation Procedures at a Glance
MINILAB’S OPERATION PROCEDURES AT A GLANCE EXPLAIN to the participants that for all experiment disintegration testing and verification of content, the general procedures are described in the A Concise Quality Control Guide On Essential Drugs Manual whereas the specific procedure where applicable the individual Drug protocols shall be followed as close as possible
The Minilab’s Operation Procedures at a Glance page 5-31
VISUAL INSPECTION
REFER, participants to open Section 3 Visual Inspection page # 10-12 and explain to them that this test works perfectly fine when liked to a drug registration system where by physical properties of the products in the market has been characterized
The Minilab’s Operation Procedures at a Glance Section 3 page 10-12
DISINTEGRATION TEST
REFER, participants to open Section 4 Disintegration Test page # 13- and explain to them that this test is applicable to solid dosage
ASK participants to recall from the previous training Introduction to pharmaceutical dosage forms Module 1 and give some examples
Answer : Tablets and capsules
The Minilab’s Operation Procedures at a Glance Section 4 page 13
TLC: Procedure
ASK participants to take a look at Section 5 TLC Testing procedure page # 14-31- and explain to them that this test works to identify and verify the content of the active medication.
Sample and reference solution preparation
Handling of different glassware in the preparation and dilutions into working solutions
Applications
Developments of the chromatoplate
Drying
Detections
Cleaning
Restoration of the glassware in the kit
The Minilab’s Operation Procedures at a Glance Section 5 page 14-31

Content Method of delivery
5.8.1 CASE STUDY: 6.28 PARACETAMOL (ACETAMINOPHEN)
Content Method of delivery
INTRODUCE the participants to section 6.28of the Concise Quality Control Guide On Essential Drugs Manual from page # 140-143
ASK participants to read the protocol and ask any question in case some instructions are not clear
Ask them to proceed with conducting the experimental work as described.
Go around to assist those who need clarification in manipulation of the apparatus to ensure quality in the process
Practical Lab session
A Concise Quality Control Guide On Essential Drugs Manual- Section 6.28 Page 140-143
DOCUMENTATION :
ASK participants to after successful experiment documentation of results is a key step.
Let fill in their results in the GPHF minilab test forms which will be used as evidence to support further regulatory actions taken.
A photo of the chromatoplate can also be taken
A Concise Quality Control Guide On Essential Drugs Manual
Page 204

Content Method of delivery
5.8.2 CASE STUDY: 6.39 CO-TRIMOXAZOLE
Content Method of delivery
REFER participants to section 6.39 of the Concise Quality Control Guide On Essential Drugs Manual from page # 184-187
ASK participants to read the protocol and ask any question in case some instructions are not clear
Ask them to proceed with conducting the experimental work as described.
Go around to assist those who need clarification in manipulation of the apparatus to ensure quality in the process
Practical Lab session
A Concise Quality Control Guide On Essential Drugs Manual - Section 6.39 Page 184-187
DOCUMENTATION :
ASK participants to after successful experiment documentation of results is a key step.
Let fill in their results in the GPHF minilab test forms which will be used as evidence to support further regulatory actions taken.
A photo of the chromatoplate can also be taken
A Concise Quality Control Guide On Essential Drugs Manual Page 204

5.8.3 CASE STUDY: 6.11 CIPROFLOXACIN
Content Method of delivery
REFER participants to section 6.11 of the Concise Quality Control Guide On Essential Drugs Manual from page # 72-75
ASK participants to read the protocol and ask any question in case some instructions are not clear
Ask them to proceed with conducting the experimental work as described.
Go around to assist those who need clarification in manipulation of the apparatus to ensure quality in the process
Practical Lab session
A Concise Quality Control Guide On Essential Drugs Manual - Section 6.11 Page
DOCUMENTATION :
TELL participants after successful experiment documentation of results is a key step.
LET fill in their results in the GPHF minilab test forms which will be used as evidence to support further regulatory actions taken.
A photo of the chromatoplate can also be taken
A Concise Quality Control Guide On Essential Drugs Manual Page 204

5.8.4 CASE STUDY: 6.42 ALBENDAZOLE
Content Method of delivery
REFER participants to section 6.42 of the Concise Quality Control Guide On Essential Drugs Manual from page # 4-7
ASK participants to read the protocol and ask any question in case some instructions are not clear
Ask them to proceed with conducting the experimental work as described.
Go around to assist those who need clarification in manipulation of the apparatus to ensure quality in the process
Practical Lab session
A Concise Quality Control Guide On Essential Drugs Manual - Section 6.42 Page 4-77
DOCUMENTATION :
TELL participants after successful experiment documentation of results is a key step.
LET fill in their results in the GPHF minilab test forms which will be used as evidence to support further regulatory actions taken.
A photo of the chromatoplate can also be taken
A Concise Quality Control Guide On Essential Drugs Manual Page 204

5.8.5 CASE STUDY: 6.34 QUININE
Content Method of delivery
REFER participants to section 6.34 of the Concise Quality Control Guide On Essential Drugs Manual from page # 164-167
ASK participants to read the protocol and ask any question in case some instructions are not clear
Ask them to proceed with conducting the experimental work as described.
Go around to assist those who need clarification in manipulation of the apparatus to ensure quality in the process
Practical Lab session
A Concise Quality Control Guide On Essential Drugs Manual - Section 6.34 Page 164-167
DOCUMENTATION :
TELL participants after successful experiment documentation of results is a key step.
LET fill in their results in the GPHF minilab test forms which will be used as evidence to support further regulatory actions taken.
A photo of the chromatoplate can also be taken
A Concise Quality Control Guide On Essential Drugs Manual Page 204

5.8.6 CASE STUDY: 6.21 LAMIVUDINE - INCL. FIXED COMBINATIONS WITH ZIDOVUDINE
Content Method of delivery
REFER participants to section 6.21 of the Concise Quality Control Guide On Essential Drugs Manual from page # 112-115
ASK participants to read the protocol and ask any question in case some instructions are not clear
Ask them to proceed with conducting the experimental work as described.
Go around to assist those who need clarification in manipulation of the apparatus to ensure quality in the process
Practical Lab session
A Concise Quality Control Guide On Essential Drugs Manual - Section 6.21 Page 112-115
DOCUMENTATION :
TELL participants after successful experiment documentation of results is a key step.
LET fill in their results in the GPHF minilab test forms which will be used as evidence to support further regulatory actions taken.
A photo of the chromatoplate can also be taken
A Concise Quality Control Guide On Essential Drugs Manual Page 204

5.8.7 CASE STUDY: 6.35 RIFAMPICIN
Content Method of delivery
REFER participants to section 6.35of the Concise Quality Control Guide On Essential Drugs Manual from page # 168-171
ASK participants to read the protocol and ask any question in case some instructions are not clear
Ask them to proceed with conducting the experimental work as described.
Go around to assist those who need clarification in manipulation of the apparatus to ensure quality in the process
Practical Lab session
A Concise Quality Control Guide On Essential Drugs Manual - Section 6.35 Page 168-171
DOCUMENTATION :
TELL participants after successful experiment documentation of results is a key step.
LET fill in their results in the GPHF minilab test forms which will be used as evidence to support further regulatory actions taken.
A photo of the chromatoplate can also be taken
A Concise Quality Control Guide On Essential Drugs Manual Page 204

5.8.8 Practice Session: 7.38 LUMEFANTRINE /ARTEMETHER FDC
Content Method of delivery
REFER participants to section 7.38 of the Concise Quality Control Guide On Essential Drugs Manual from page # 10-13
ASK participants to read the protocol and ask any question in case some instructions are not clear
Ask them to proceed with conducting the experimental work as described.
Go around to assist those who need clarification in manipulation of the apparatus to ensure quality in the process
Practical Lab session
A Concise Quality Control Guide On Essential Drugs Manual - Section 7.38 Page 10-13
DOCUMENTATION :
TELL participants after successful experiment documentation of results is a key step.
LET fill in their results in the GPHF minilab test forms which will be used as evidence to support further regulatory actions taken.
A photo of the chromatoplate can also be taken
A Concise Quality Control Guide On Essential Drugs Manual Page 204
5.8.9 PROFICIENCY TEST: 7.34 NEVIRAPINE - INCL. FIXED COMBINATIONS WITH LAMIVUDINE AND STAVUDINE
Content Method of delivery
REFER participants to section 7.34 of the Concise Quality Control Guide On Essential Drugs Manual from page # 18-21
ASK participants to read the protocol and ask any question in case some instructions are not clear
Ask them to proceed with conducting the experimental work as described.
• Provide them with two powdered sample tablet (S1, S2, S4 and S2) whereby S1 and S2 containing about 50 % and 100 % of the active Nevirapine, while S3 and S4 containing ciprofloxacin and chalk respectively
• Let them continue to run over the protocol and see how the will be able to identify the substandard
• Go around to assist those who need clarification in manipulation of the apparatus to ensure quality in the process
Practical Lab session
A Concise Quality Control Guide On Essential Drugs Manual - Section 7.34 Page 18-21
DOCUMENTATION :
TELL participants after successful experiment documentation of results is a key step.
LET fill in their results in the GPHF minilab test forms which will be used as evidence to support further regulatory actions taken.
A photo of the chromatoplate can also be taken
After experiment ask them draw a blank table on the flip chart
Sample code Identification test
Content verification
Conclusion
S1
S2
A Concise Quality Control Guide On Essential Drugs Manual Page 204

S3
S4
Evaluate the results together and assist those who did not perform well and ask them to repeat the test.

6. MODULE 6 HIGH-PERFORMANCE LIQUID CHROMATOGRAPHY
Aims/Goals 1. To acquire practical experience in pharmacopeial applications of liquid
chromatograph in pharmaceutical quality testing 2. To explore different elution modes i.e. isocratic vs gradient elution in which two case
studies: will be used Isocratic system: Aspirin Ph Eur Monograph and Gradient system: Lamivudine/Zidovudine the International Pharmacopoeia1 (USP).
Learning Objectives: On successful completion of this course, the student will be able to:
1. Prepare pharmaceutical sample and standard solutions 2. Perform system suitability check 3. Perform assay and test for related substances using HPLC technologies 4. Collect data, review test results and perform calculations 5. Prepare certificate analysis 6. Release test results
Course Synopsis: HPLC training, Preparation of mobile phase for HPLC, Quantitative and qualitative HPLC analysis, Column care, troubleshooting in HPLC analysis, Assay, test for related substances, Total Estimated Time: Theory 2 hours, lab session 14 hours
Resources/materials needed:
• Flip charts, marker pens, and masking tape/ LCD machine/laptop • Black/white board and chalk/whiteboard markers • Participant manuals/handouts • USP, BP and Int. Phr • Various Laboratory reagents and equipment • Samples and reference standards –aspirin , lamivudine and zidovudine
Session Content Areas
6.1. High Performance Liquid Chromatography 6.2. PREAMBLE TO LABORATORY PRACTICES 6.3. PRACTICE ANALYSIS 6.4. Case study I: HPLC assay of Asprin Tablets (USP 32).

6.4.1 Preliminaries to getting started 6.4.2 Preparation of mobile phase and diluting solvent
6.4.2.1 MOBILE PHASE 6.4.2.2 DILUTING SOLVENT 6.4.2.3 INSTRUMENT SETUP
6.4.3 Instrument conditions 6.4.4 Analysis of samples
6.5. Case study II HPLC assay of a FIXED DOSE COMBINATION OF LAMIVUDINE 300 MG AND ZIDOVUDINE 300 MG Tablets (Ph.Int). 6.5.1 Preliminaries to getting started 6.5.2 Preparation of mobile phase and diluting solvent 6.5.3 Preparation of standard sample solutions 6.5.4 INSTRUMENT CONDITIONS
High Performance Liquid Chromatography Content Methods of
delivery
Session overview • General components of a high performance liquid chromatograph. • Applications in pharmaceutical quality testing • Assay and related test • Preparation of mobile phases • Sample solutions • Column care • Troubleshooting of common HPLC problems
Slide 2
6.1. HIGH PERFORMANCE LIQUID CHROMATOGRAPHY
EXPLAIN to participants that the High-performance liquid chromatography (HPLC) is well-suited to the analysis of drugs and drug preparations because it can provide fast, precise, and accurate results for a wide variety of organic materials. HPLC is used for the analysis of a large fraction of the drug samples handled by many authorities like FDA, EMEA, NDQC lab In Gaborone, and it is likely that your work in the laboratory will require this analytical technique. This training aid is intended to help you quickly to acquire the skills that you will need to carry out analyses by HPLC.
Show slide 3 and ASK participants the following questions
• What do you see?
• Has any of you come across such instrumentation at your place of work?
EXPLAIN to participants some of the important pre-planning before setting up LC experiment;
• The standard to be analyzed requires treatment (drying)
• Mobile phase to be filtered and degassed before introduced
• Filter assembly
• Online degassing
• The importance of solvent priming
Slide 3--8
Content Methods of delivery
EXPLAIN to participants some of the important practical tips
• Never let your column to run dry
• Whenever you use salts/buffers remember to rinse the system and leave it under ACN/H20 or MeOH/H20
• Avoid extreme pH
• High proportion of organic solvents in a buffer mixture can lead to in-column crystallization
Slide 9
ASK participants the following questions
• What do you see as the functions of the solvent delivery systems in LC?
• What elution modes have you come across in your working place?
Project slides # 10-13 and summarize to them the functions of the solvent delivery system
Ask: Is there anything that we discussed that you do not agree with? What is it?
Slide 10-12
Explain to student that there are two major designs to introduce sample solutions into the chromatograph
These are .
• Automatic Injectors or
• Manual Injectors
Tell them that the principle requirement for whatever design is
• Reproducible introduction of the sample volume into the mobile phase flow.
Show # 13 through 16 and also refer them to addendum A for more information
Ask: Is there any question?
Slide 13-16
Show slide # 17 and explain to them that the LC column is one of the very critical piece of the system
• Substances separate as they pass through this column interacting with both stationary and mobile phases
Slide 17
Content Methods of delivery
• Depending on the affinity then an elution profile will results.
Further explain to student that there are two separation principles
Normal phase –stationary phase is more polar while running a non-polar mobile phase
• Reversed phase - stationary phase is non-polar while running a polar mobile phase
Tell them that the majority of the pharmaceutical applications of are carried using RP-LC on C18 of L1 as designated in USP.
Ask: Is there anything that we discussed that you do not agree with? What is it?
Slide 18-21
Show slide 22 and ASK participants the following questions Is there anyone who could enlighten me on what end capped column means and what is the advantage of using end capped columns against normal columns
Possible responses:
• To further deactivate the surface of the particle, a smaller reagent is used in the end-capping reaction. For example, Cl(CH3)2SiCH3 is one common end-capping reagent. You can see that substituting a methyl group for the large C18 group used above makes this reagent much smaller, allowing it to have access to some of the residual silanol groups on the surface. After this second reaction is completed, we say that the column is end-capped (see Figure on slide #22).
• The resulting stationary phase, having fewer residual silanols, will display fewer secondary interactions characteristic of silanols than a non-end capped stationary phase.
Ask: Is there anything that would require clarification?
Slide 22
ASK participants to How do you measure the quality of separation?
• LET them buzz in 5 minutes and write their responses in a piece of
Slide 23-29

Content Methods of delivery
paper
• When they are ready ask one pair to WRITE on the flip chart the key separation quality parameters
• LET others who have a different answers read and the facilitator to write on a flip chart
Show slide # 23-29 and highlight the key points they have missed and also refer them to Addendum B and C for more information.
Explain to student that during preparation of mobile phases the following consideration must be made:
• Solvents
• pH adjustments
• Filtering and Degassing
• Buffer Solutions
• Gradient solution
Slide 30
Explain to them the both the quantitative and qualitative application of the LC in pharmaceutical product quality assessment
Show slide # 31 and also refer them to Addendum E for more information.
Ask: Is there anything that we discussed that you do not agree with? What is it?
Slide 31
ASK participants to provide examples of possible sources of error during LC sample analysis?
• LET them buzz in 5 minutes and write their responses in a piece of paper
• When they are ready ask one pair to WRITE on the flip chart the the key separation quality parameters
• LET others who have a different answers read and the facilitator to write on a flip chart
Show slide # 32 and highlight the key points they have missed and also refer them to Addendum E for more information.
Slide 32
ASK students to provide some common column related problems LC analysis? Slide 33
Content Methods of delivery
• LET them discuss in 3 minutes within groups and write their responses in a piece of paper
• When they are ready ask one pair to WRITE on the flip chart the key separation quality parameters
• LET others who have a different answers read and the facilitator to write on a flip chart
Show slide # 33 and highlight the key points they have missed and also refer them to training material. Addendum E
Ask: Is there anything that we discussed that requires clarification before we can move to the laboratory session?
Project Slide # 35 and introduce the laboratory session.
Inform that we are going to perform two assay procedure based on USP monograph for aspirin and Int Phr for lamivudine Zidovudine.
In this duo experiment we shall apply both isocratic and gradient elution system to analyze the content of commercial products.

Content Methods of delivery
6.2. PREAMBLE TO LABORATORY PRACTICES
Even more than most methods of analytical chemistry, HPLC analysis requires thoughtful pre-planning if laboratory time is to be used efficiently to produce precise and accurate results. Careful planning of the analysis will also reward the analyst by eliminating wasted effort and frustration.
Elements in HPLC planning are: • If the sample or the standard to be analyzed requires treatment (such as
drying) before the analysis is begun, this procedure can be started and continued while other preparations for the analysis are underway. Analyses of some samples require several hours drying, so plan accordingly.
• If the procedure to be used requires changing the mobile phase, or if the column to be used was stored with a solvent incompatible (immiscible) with the mobile phase you intend to use, it will be necessary to purge the column and the detector by flushing them with an intermediate solvent, miscible in both the new and old mobile phases, then the new mobile phase. If you are changing mobile phases, the whole system will need to be flushed and filled with the new mobile phase. If you are unsure about the compatibility of solvents, a simple test of their miscibility in a test tube is advised.
• It is important that the mobile phase be filtered and degassed before it is
introduced into the apparatus. These operations are normally accomplished simultaneously by filtration through a glass-frit funnel having a porosity of 0.45 µm coupled to a vacuum pump and filter flask.
• It is wise to prepare enough of the mobile phase so that, even if some
unanticipated problems arise, it is unlikely that it will be necessary to prepare an additional batch of mixed, filtered, and degassed solvents. For most analyses, one to two liters will be sufficient. Most drug analyses require the use of buffer or salt solutions in the mobile phase.
RINSE OUT THE COMPLETE SYSTEM WITH WATER FOR AT LEAST 1 HOUR WHEN SHUTTING DOWN THE OPERATION FOR OVERNIGHT. • For longer storage, the instrument must be cleaned with water and
water/alcohol mixture. Make sure that the water wash is done first because the organic solvent may precipitate any salt.

6.3. PRACTICE ANALYSIS
Exercise instructions:
Before beginning the laboratory exercise below, a prior volumetric and gravimetric skills typically required in the preparation of a sample and of mobile phases for HPLC is needed..
If you are not confident that your skills in these techniques are adequate, you should stop here and review or learn afresh those procedures, because one cannot expect to obtain accurate results from an instrumental method unless the quantitative techniques used for sample preparation are of commensurate quality.
Many NDQCL samples are analyzed by methods in the United States Pharmacopoeia (USP, BP and International Pharmacopeia). In a typical pharmacopeia monograph HPLC can be used for Assay, Identification, Dissolution and test for related substances.
In the section below a case example of Aspirin tablets with isocratic elution in USP method and Zidovudine and lamivudine tablets gradient elution methods in IP methods are chosen as representative of HPLC analysis for assay of aspirin tablets and assay and related substances for lamivudine and Zidovudine tablets are presented.
Exercise
6.4. CASE STUDY: HPLC ASSAY OF ASPRIN TABLETS (USP 32).
The purpose of the procedure is to determine the amount of active ingredient in aspirin tablets and to ascertain the concentration of free salicylic acid, a decomposition (hydrolysis) product. You should perform the analysis under the supervision of an experienced chemist. This analysis is known as a reverse-phase separation under isocratic flow since the mobile phase is polar, the stationary phase is nonpolar and the flow is constant. The separation type is BPL or bonded phase liquid chromatography. This type of separation is made on the basis of differences in the polarity of the compounds. The more polar compounds elute first. All of your work must be recorded on a standard worksheet, just as if this analysis were not just a practice exercise.
Case Study
Laboratory practical session

6.4.1. Preliminaries to getting started
Every two months, a list of current USP, Phr Eur and PB reference standards are published in Pharmacopoeial Forum. Consult the most recent list to determine the appropriate standards for aspirin and salicylic acid. Dry both standards over silica gel for five hours. Dry only the quantity needed as follows: Roughly weigh out the quantity of standard needed for analysis from the USP Reference Standard bottle into a closable container. Return the USP Reference Standard bottle to stock. The time of drying is a minimum so additional drying will not harm the drugs. Both standards could be dried overnight in a desiccator over silica gel to expedite the analysis. Keep the STANDARDS in a desiccator until the analysis has been completed.
6.4.2. Preparation of mobile phase and diluting solvent
Start with making up the mobile phase and the Diluting Solvent. 6.4.2.1 MOBILE PHASE
Prepare the mobile phase for this analysis by dissolving 2 g of sodium 1-heptanesulfonate in 850 mL of water and 150 mL of acetonitrile. (NOTE--the volumes can be measured in graduate cylinders and the volumes are measured separately and not additively). After mixing thoroughly, adjust the pH to 3.4 with glacial acetic acid. Adjust the pH as follows: Pour the water solution into beaker and stir with a magnetic stirring bar. Follow the pH with a reliable pH meter.
NOTE--Always calibrate the pH meter before making any measurement on the mobile phase. Calibration is made by using standard pH buffers especially in the pH range that you are interested in. Adjust the meter to read the pH of the standard buffer, and then the meter is ready for the measurement of the mobile phase.
Carefully and slowly add the acid by means of a disposable pipette equipped with a small rubber bulb. Do not add too much acid. Vacuum filter the solution through a 0.45 µm membrane filter on a sintered-glass support to remove any dirt and to degas. The filter system consists of a vacuum flask and a sintered-glass filter funnel. The vacuum is applied by means of a pump. Prepare sufficient quantity of mobile phase to complete the analysis;

however, if you shut down the instrument overnight and still have mobile phase left for additional runs, you must sonicate the mobile phase to remove any dissolved air. Your final run will require at least 800 mL to complete the analysis.
6.4.2.2 DILUTING SOLVENT
Prepare 1 L of "Diluting Solvent", consisting of a mixture of acetonitrile and formic acid in the ratio 99:1.
6.4.2.3 INSTRUMENT SETUP
It is necessary to set up the instrument conditions before actually preparing the samples for analysis because some drugs may be unstable if allowed to stand around for any extended period (aspirin fits this behavior). The chromatographic analysis is performed using an HPLC instrument which includes a column, pump, injector, recorder, and a UV detector set at a wavelength of 280 nm. The column is 4.0 mm x 30 cm, packed with packing L-1 (a C18, octadecyl silane chemically bonded to porous silica or ceramic particles 5 to 10 micrometers in diameter). Column dimensions should be: internal diameter, from 3.9 to 4.0 mm, and length, from 25 to 30 cm. Turn on the power to all HPLC system Modules, and allow 20 to 30 minutes for the instruments to warm up. Prime the pump with the mobile phase until you have established uniform flow by observing the output to be steady and without pulsing. The flow and pulsing can be observed by directing the flow into a beaker. A check on the pump output can be measured at this time by collecting the liquid in a graduate cylinder in a fixed time. Shut off the pump and connect the column to the input of the detector with the flow in the direction as marked on the column.
NOTE –Follow the specific instrument settings described depending on the LC system you are using. With different equipment you would set the parameters to achieve the same HPLC conditions. The column must be conditioned and equilibrium established before making any solutions.
Set the pressure cutoff on the pump to a value below the maximum pressure recommended for your column. Set the flow at 0.2 mL per min; turn the

pump on again and gradually increase the flow until you reach 2 mL per minute. Watch the pressure on the column and make sure that the pressure does not exceed that recommended by the supplier. Set the response of the UV detector and monitor the output on the computer Data Module. The flow and the response are monitored on the Data Module continuously until you get a good base line -- one with zero slope and no noise. Watch the pressure on the column and observe if the pressure remains constant. Begin now to establish conditions for the analyses. Allow the instrument to continue running while you prepare the solutions, but you may want to cut back the flow to conserve the mobile phase, for example, 0.5 mL per minute.
6.4.3. Instrument conditions
Prepare a solution for making preliminary measurements to establish instrument conditions, reproducibility and suitability of the chromatographic system. These conditions can be established with a solution of a "Secondary Standard" of aspirin and salicylic acid prepared as described under STANDARD SALICYLIC ACID PREPARATION. Filter this solution as follows: Select a 0.45-µm membrane filter that won't dissolve in your solvent (see NOTE below). Place the filter in a Swinnex adapter. Draw about 5 mL of the solution into the syringe. Attach the filter adapter to the syringe. Push about 1 mL of solution through the syringe and discard the filtrate. Discharge the remaining solution through the filter into a standard HPLC vial.
NOTE--HPLC for drug analyses mostly requires use of mixed organic and aqueous solvents, but sometimes pure organic solvents are used. To be sure that the solvent and filter are compatible, use the following guide:
Filter type Compatibility • Nylon Used with most organic or aqueous solvents • Teflon Used with organic solvents only. The nylon filters are
recommended since drug analyses use mostly organic /aqueous solvent mixtures. Do not use filters made of cellulose esters since they might dissolve.
Use a RUN TIME which is set at 20 minutes for the first scouting run and set for a single injection. Reset the flow on the pump gradually to the original 2 mL per min. Allow time for the system to give a noiseless, drift-free baseline.
Optimization of the separation and integration conditions should produce a chromatogram which should be similar to the figure in Addendum D. Slight
differences may exist between your curves and the one illustrated because of differences in all parameters. You will observe peaks due to difference between the solvents in the mobile phase and the solvents in your injected solutions, and due to the compounds; you will observe narrow or up and down tick marks due to integration. A blank space is observed in the middle of the down side of the peak when proper integration is achieved. The integration will not be correct if the blank space appears anywhere else on the chromatogram. After establishing the optimum conditions, chromatograph at least six injections of the preliminary solution. Discard the first run and use the next 5 runs for the calculations. The procedure for calculations is found in Addendum C. Make calculations for tailing factor, resolution, relative standard deviation, relative retention time, and plate count. The acceptable values for each of these are listed with the respective equations.
6.4.4. Analysis of samples
The optimum parameters have been established and now you are ready to begin analysis of samples. The samples will be run under the same conditions, so keep everything running while you prepare the samples.
ANALYSIS FOR ASPIRIN AND SALICYLIC ACID
USP 32 describes the analysis of aspirin by HPLC. You should be familiar with this reference. Many drug samples hydrolyze after solutions are prepared, which could cause the analytical results to change as a function of time. This is true for the aspirin which partially hydrolyzes to salicylic acid. It requires considerable time to complete all runs because of the many injections; therefore, careful planning is required to minimize hydrolysis.
READ OVER THE INSTRUCTIONS AND CHECK ADDENDUM B TO SEE THE ORDER OF STEPS TO FOLLOW. STANDARD ASPIRIN PREPARATION
The "Standard Aspirin Preparation" is made by dissolving an accurately weighed quantity of USP Aspirin Reference Standard in sufficient Diluting
solution to obtain a solution having a known concentration of approximately 0.5 mg/mL. Accurately weigh 125 mg of USP Aspirin Reference Standard and dissolve in 250 mL of Diluting Solution. You will need a portion of this solution for the salicylic acid analysis as well as the assay.
STANDARD SALICYLIC ACID PREPARATION
Obtain the current USP Salicylic Acid Reference Standard. Accurately Weigh approximately 15 mg and dissolve in 100.0 mL of the Aspirin Standard Preparation. Pipet 5.0 mL of this solution into a 50-mL volumetric flask, dilute to volume with the Standard Aspirin Preparation, and mix. This dilution method is used so that a standard four-place analytical balance can be used and a high degree of accuracy maintained. You will now have a standard solution of salicylic acid with a concentration of approximately 0.015 mg/mL.
SAMPLE PREPARATION
Run the sample in duplicate by making two separate weighings and solutions. Accurately weigh 20 tablets, record the total weight and calculate the average tablet weight (ATW, in mg). Grind these 20 tablets to a fine powder and sieve the powder through a 60-mesh screen. (Regrind any particles retained on the sieve until all material passes through). Thoroughly mix the powder. Transfer an accurately weighed quantity equivalent to 100 mg of aspirin to a suitable container. (NOTE--100 mg of sample will not be equivalent to 100 mg of aspirin because the final dosage drug will have some excipients present). Add 20.0 mL of Diluting Solution and sonicate for 15 minutes. Centrifuge to settle any undissolved material. This solution will be termed the "Aspirin Sock Solution". Proceed immediately to the salicylic acid determination.
SALICYLIC ACID DETERMINATION
Separately chromatograph the Stock Solution of Aspirin and the Standard Salicylic Acid Solution using the conditions and parameters established in the preliminary setup. Filter all solutions, using the Swinnex adapter, into the vials of the LC system. Make three separate injections of Standard Salicylic Acid Solution, then two separate injections of the Aspirin Stock Solution, and finally two separate injections of the Standard Salicylic Acid Solution. The
first injection data are discarded.
Average the results from each pair of injections. Calculation of the percentage of salicylic acid in the aspirin tablets is accomplished as follows:
(Cs) X (5 mL/50 mL) X (20 mL /Wt Spl, mg) X (ATW/DW) X(Au/As) X 100 = % salicyclic acid in the aspirin tablet,
where Cs = concentration of Standard Salicylic Acid, mg/100 mL
ATW = average tablet weight, mg
DW = declared weight of drug per unit
Au = area under the HPLC peak for the sample
As = area under the HPLC peak for the standard
The maximum allowable percentage of salicylic acid for uncoated tablets is 0.3%. When you inject the Aspirin Stock Solution, you will get a peak for salicylic acid and the peak for the aspirin. The aspirin peak will be very intense. The salicylic acid peak will be very small compared to the aspirin peak.
(NOTE--It is possible that no salicylic acid peak will be seen in the assay sample because of no detectable quantity).
The response for the aspirin is ignored in the calculation for the salicylic acid. You will also notice an extra peak soon after injection; this peak is due to the difference between the solvent in the injected solution and the solvent in the mobile phase.
CALCULATION OF ASPIRIN ASSAY
Quantitatively dilute an accurately measured volume of the Aspirin Stock Solution as follows: Pipette 10.0 mL of the Aspirin Stock Solution into a 100-mL volumetric flask. Add Diluting Solution to correct volume and mix. The final solution is known as the "Assay preparation".
Make three separate injections of the Standard Aspirin Preparation and the Assay Preparation; disregard the data from the first injection. Make two separate injections of each of the Assay Preparations. Record the chromatograms and measure the responses expressed as areas for the major peak. Average the areas obtained from each pair of injections. Calculate the percentage of aspirin (C9H8O4) found in the tablet compared to the declared amount.

(Cs) X (20 mL/Wt Spl, mg) X (100 mL/10 mL) X (ATW/DW) X (Au/As) X 100 = % of drug in aspirin tablet
where Cs = concentration of the Standard Aspirin, mg/100 mL
ATW = average tablet weight
DW = declared weight of drug in aspirin tablet
Au = area of sample under HPLC peak
As = area of standard under HPLC peak.
For Aspirin Tablets, the allowable percentage of the labeled amount per tablet is 95 to 105% Alien

ADDENDUM A
Injection of solutions
All samples must be filtered to remove dust or other particles before injection to remove anything which might plug or damage the columns. The filtering is done as previously described for the trial run. Solutions are injected onto the column by one of two methods depending upon the instrumentation. The methods are:
(1) Manual injection
(2) Automatic injection
Manual Injection
Load the solution by means of a syringe having a needle of the correct size for the injector assembly. Draw excess solution into the syringe, remove bubbles and set syringe to the desired injection volume. Switch the valve indicator to the "LOAD" position. Insert the loaded syringe into an injector valve assembly having a fixed-volume loop. Push the syringe to force the solution into the injector loop. Make sure that the loop is loaded by observing an outflow of solution. Switch the valve manually to the "INJECT" position to make the injection. The valve remains in the "INJECT" position at all times except during the short time period required for loading.
Automatic Injection
The most common injection system will be the automatic type. The automatic injection system uses a carriage in which multiple sample vials can be placed in position for the analysis. Load the vials with standard solutions and with filtered sample solutions. Each vial will contain approximately 4 mL. The volume to be injected is set on the instrument keyboard, as is the number of injections from each sample. The automatic system allows reproducible volumes to be injected.
Parameters needed for the automatic system:
1. Volume for each injection.
2. Set the run time for each solution. Set the run time long enough to permit the curve to return completely to the base line.
3. Number of injections for the solution in each vial.

4. Delay time between runs.
NOTE All runs can be made with the same conditions or you can set up different conditions for each sample. All runs in this series require the same conditions; therefore, only one entry of parameters is required. Set the SAMPLE NUMBER to 0 (zero) to achieve the same conditions for all solutions.

ADDENDUM B
The following steps should be followed for HPLC analysis of aspirin and salicyclic acid:
1. Dry the standard or standards according to specified method.
2. Prepare the mobile phase
3. Prepare the "Diluting Solution"
4. Assemble the instrument. Put in the proper column and start flow because the column may be dirty and need to be conditioned.
5. Set up of the instrument: Set flow rate, wavelength on UV detector, and parameters on WISP and Data Module. Run mixture of Salicylic Acid and Aspirin to establish optimum conditions.
Calculate resolution, relative standard deviation, and the plate count for each component. Conditions should be optimized before proceeding with the actual analyses.
6. Prepare a mixture of salicylic acid and aspirin in approximately the same concentrations.
7. Prepare the "STANDARD SOLUTION of SALICYLIC ACID" with the Diluting Solvent.
8. Prepare the aspirin "STOCK SOLUTION" with Diluting Solvent.
9. Run the HPLC analysis for salicylic acid using the optimum conditions.
10. Prepare the "ASPIRIN ASSAY SOLUTION" by diluting "ASPIRIN STOCK SOLUTION".
11. Make up the Standard Aspirin Preparation with Diluting Solvent.
12. Run HPLC on the Aspirin Standard and the Assay preparation samples.
Data Recording
Data are recorded either by a computing data module. Peak areas are measured and calculated manually when the data are recorded on a millivolt recorder. Automatic computing modules require entering several parameters for the calculations, such as:
Volume of injection
Number of injections per vial
Run time
Sample type
Method of calculation
Other parameters


ADDENDUM C
MATHEMATICAL QUANTITIES NEEDED FOR HPLC
A. Tailing Factor
The tailing factor is calculated by the formula:
T= (W.05/2f)
Where W = the width of the peak at 5% of the height;
f = the width from the leading edge of the peak to the vertical measured from the peak.
A perfectly symmetrical peak has a tailing factor of 1.0. The USP requires this value to be no greater than 2.0. The figure illustrates how the measurements are made.

B. Relative Standard Deviation
The Relative Standard Deviation expressed as a percentage is:
%rsd
Where Xi is the area of the sample peak i and X is the average of the areas of peaks i through n in a series of n injections of the same solution. Refer to USP section (621) on Chromatography for discussion of calculations.
The Relative Standard Deviation is not more than 4.0% for the salicylic acid peak areas and not more than 2.0% for the aspirin peak areas.
C. Resolution
Resolution is a measure of the separation of two peaks. It is calculated from the widths and the retention times of the two peaks:
R = 2(t2 - t1)/(W1 + W2)
Where W1 and W2 are the peak widths, t1 and t2 are the peak retention times, and W and t must have the same units (measure both with a ruler and express in mm). If the chromatographic parameters are proper, the resolution should be not less than 2.0. The figure shows how the resolution is determined from the chromatogram.
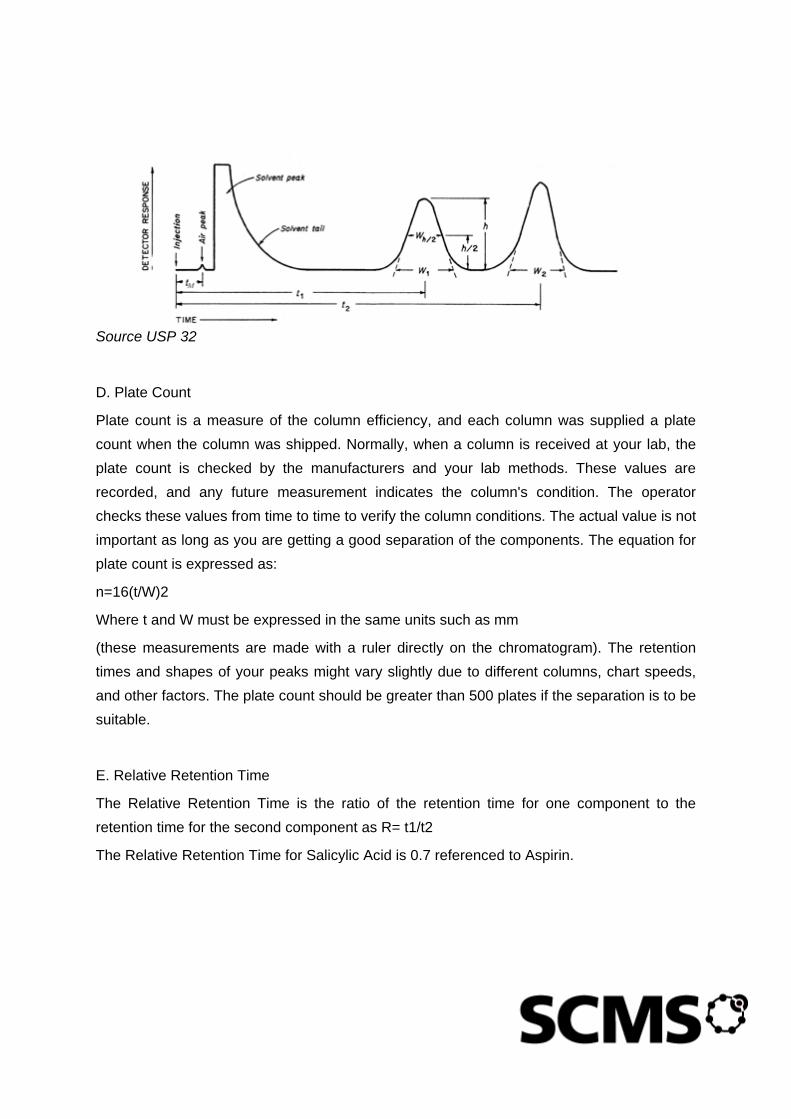
Source USP 32
D. Plate Count
Plate count is a measure of the column efficiency, and each column was supplied a plate count when the column was shipped. Normally, when a column is received at your lab, the plate count is checked by the manufacturers and your lab methods. These values are recorded, and any future measurement indicates the column's condition. The operator checks these values from time to time to verify the column conditions. The actual value is not important as long as you are getting a good separation of the components. The equation for plate count is expressed as:
n=16(t/W)2
Where t and W must be expressed in the same units such as mm
(these measurements are made with a ruler directly on the chromatogram). The retention times and shapes of your peaks might vary slightly due to different columns, chart speeds, and other factors. The plate count should be greater than 500 plates if the separation is to be suitable.
E. Relative Retention Time
The Relative Retention Time is the ratio of the retention time for one component to the retention time for the second component as R= t1/t2
The Relative Retention Time for Salicylic Acid is 0.7 referenced to Aspirin.

ADDENDUM D
Peak at 7.11 = aspirin
Peak at 5.28 = salicylic acid
Other peaks due to solvent front
Space at middle of down side of large peak will give the best integration
ADDENDUM E
LC ANALYSIS
PREPARATION OF MOBILE PHASE FOR HPLC
Handling of solvents, solid chemicals, and drugs must be done with care and cleanliness. Consider all materials to be toxic. Good laboratory practices require careful handling and the use of a hood when one mixes organic solvents, such as methanol and acetonitrile. Safety glasses must be worn at all times; rubber gloves must also be worn because the materials could cause skin irritation. Buffer solutions are to be considered as skin irritants; if they contact your skin, you should wash the affected area with copious amounts of water. Prepare all solutions in clean and dry glassware. The organic solvents must be spectroscopic grade or equivalent (impure solvents will damage the column). Water must be distilled or purified by suitable ion-exchange and filtering system.
DO NOT USE WATER THAT HAS BEEN ONLY DEIONIZED BECAUSE IT CONTAINS ORGANICS WHICH WILL DAMAGE THE COLUMNS.
1. Solvents. The USP methods specify the mobile phase, which may contain buffers or modifiers. The solutions should be made in sufficient volume for the analysis. Determine the quantity needed. For example, at a flow rate of 2 mL/min, one liter (1 L) will be required for approximately 8 hours. Make sufficient solution to allow completion of the run with some left in reserve. Avoid the use of different batches of mobile phases for a single analysis. Most mobile phases used in reverse-phase liquid chromatography contain water mixed with either methanol or acetonitrile. Some mobile phases may require addition of other compounds to control ionization. Add the solvents in proper proportion to a graduated cylinder of suitable size (e.g., 1 L) and thoroughly mix. Add the modifier in the proper amount when required.
2. pH Adjustment. The USP specifies measuring the pH on the mixed solution, so you will be measuring the apparent pH. Adjust the pH to the specified pH by carefully adding the appropriate acid or base. Pour the mixture into a beaker larger than the solution volume and stir with a Teflon-coated magnetic stirrer. Use a pH meter that you have standardized with

certified pH buffer solutions. Adjust the pH of the mobile phase by adding either base or acid as the case may be (USP method will specify the pH modifier). Make the additions carefully and slowly; use a disposable pipette attached to a small rubber bulb. USE CARE NOT TO OVERSHOOT THE DESIRED pH.
2. Filtering and Degassing. All mobile phases must be filtered and degassed before they are used in HPLC. Both are accomplished by vacuum filtration through an all-glass solvent-filtering system that has a sintered-glass support for a membrane filter. The membrane must be compatible with the solvent system and have porosity no larger than 0.5 µm. For example, acetonitrile/water systems can be filtered through a Nylon membrane. Pure organic solvents can be filtered using Teflon membranes. Solvent that has been degassed will re-equilibrate with air after 12 to 24 hours. If the same solvent is to be used the next day, it must be degassed again. It is better to prepare a fresh mobile phase each day. Degassing can be done by purging with helium bubbling through the liquid.
3. The gas is passed gently through a sintered-glass filter so that a fine dispersion of bubbles of helium passes through the solvent during the entire HPLC operation. The helium bubbles sweep dissolved air from the mobile phase, and helium itself has limited solubility. Degassing can be done by heating the mobile phase to a temperature near its boiling point. The most efficient method is the purging, but it is also the most expensive
4. Buffer Solutions. The USP lists the compositions for making standard buffers covering the pH range of 1.2 to 10. Silica supports and chemically bonded silica (such as the columns used in reverse- or normal-phase HPLC) can be used in the pH range of 2 to 8. Use of the support with a mobile phase whose pH is outside of this range will cause some of the silica to dissolve in the presence of strong acids or bases. The USP method specifies the pH used to control the ionization of the drug. Phosphate buffers are the most commonly used type for HPLC. Many mobile phases use buffer solutions along with the organic portion. USP analyses describe preparation of buffer solutions in terms of the 'Apparent pH' after the water and organic phases have been thoroughly mixed. Buffers of this type are made by adding a weighed amount of salt to the mixture and adjusting the pH by the addition of appropriate base or acid.
5. Gradient Solutions. Most drugs contain only one chemical species; therefore, a gradient is not needed and isocratic conditions can be used. Some drugs can contain more than one component and may require a gradient to separate the compounds if they differ widely in polarity See the Lamuvudine/Zidovudine case study. A gradient system may be useful in developing an isocratic system. Each solvent in a gradient is handled as a single solvent.

Each solvent must be filtered and degassed. The solvent mixtures must be compatible in all concentrations and with no precipitation of the salt, if present. To avoid the possibility of salt precipitation, DO NOT USE A 100% ORGANIC PHASE in the gradient system. Some gradients are formed by mixing two solvents, and others can be made with up to 4 solvents. The solvents required for the gradient and the rate of gradient formation will be specified.
QUANTITATIVE HPLC ANALYSIS
In all HPLC analyses you are interested in either qualitatively or quantitatively determining what is the composition of the sample. Drug analyses are primarily concerned with the quantitative aspect since you are analyzing a known drug composition. There are some occasions when the identity of the compound is not known or when no standards are available. The final step in any HPLC analysis is examination of a chromatogram to determine the amount of materials present in the sample. The chromatogram may be considered as the fingerprint of the sample contents. Interpretation of the results is most important.
SOURCES OF ERROR
Errors can occur in many places along the many steps, so be aware where these errors occur and how to avoid the pitfalls. The following possible errors may be found in HPLC operations:
(1) Sampling--material not homogeneous. In all cases the sample must be representative.
(2) Sample preparation. Samples must be prepared with the best analytical procedures.
(3) Loss of sample.
(4) Leaks in HPLC system.
(5) Overlapping or undetected peaks.
(6) Detector errors.
(7) Recorder errors.
(8) Errors in base line correction.
Any one of the above errors or combinations of these will result in unreliable data.
There are two important properties in HPLC analysis, namely: Precision and Accuracy. Precision is a measure of how reproducible your data may be. Accuracy is the measure of the true value. You can have excellent precision but poor accuracy. Precision is measured as the standard deviation, which when expressed as a percentage of the mean is called

relative standard deviation. The standard deviation or relative standard deviation gives you the spread in the data; both are measures of the repeatability of the measurement. One component of accuracy is the linearity of instrument response versus amount of drug; injecting twice as much of the drug should give twice the response. A measure of linearity is the correlation coefficient, which is one of the results obtained from a "linear regression" analysis.
HPLC can only be used to measure compounds quantitatively after calibration of the instrument. The USP uses two general methods to calibrate, namely, internal and external standards.
INTERNAL STANDARDS
Internal standards are used to compensate for variations in injection volume, flow rate, and temperature. Internal standards must fit certain properties as follows:
a. Substance must not be found in sample.
b. Peak must be well resolved from the sample peak.
c. The standard must be available in pure form.
d. Gives a detector response in the same range as that given by the sample.
Develop a calibration curve as follows:
Run a series of standard solutions which contain known, different amounts of pure drug and a constant amount of internal standard. From the chromatogram of each standard solution calculate the ratio
Rs = (area of drug/area of internal standard).
Plot Rs on the Y axis and concentration of pure drug on the X axis. The slope of this plot, R = (Rs/amount), is the response factor.
EXTERNAL STANDARDS
The external standard is the same substance as that being assayed in the sample. The USP uses this method of calibration in most cases. The external standard must be pure or the composition known through prior analysis. Many times the standard is costly or in short

supply so a secondary standard is used. The concentration of the standard solution is kept near to that of the sample solution to avoid errors. The areas of the corresponding peaks in the standard and the sample chromatograms are compared using simple ratios. The External Standard method reduces errors due to response, nature of sample, variation in concentrations, etc.
Develop a calibration curve of the area versus concentration of the external standard. Use the peak area on the Y axis and concentration on the X axis. The slope of the plot is the response factor. The amount of the component in the sample is determined from the curve. Digital electronic integrators read numbers to 5 to 6 places. Do not report results to this many significant figures because inherent errors in the measurements do not warrant them. Normally, one uses four significant figures in the calculations and rounds off the reported result to three significant figures. There is another calibration method which can be used in some cases where quantitative sampling may be a problem.
STANDARD ADDITION METHOD
Sometimes it may be necessary to determine the quantity of a substance where sampling is a problem. A method known as STANDARD ADDITION or SPIKING can be used. In this method we inject several solute ions. One of them contains only the sample, but the rest contain sample plus added known amounts of standard.
Let the unknown amount of drug in the sample be represented by X. Let this amount be zero on the X axis. Add successive quantities of the standard to the original to form X + W1, X + W2..... X + Wi. Plot the areas versus weights of standards added. Extrapolate back to zero area by a least-squares fit of the data. The negative intercept on the X axis will be the weight of the compound in the original sample. The drawing below shows how such a plot would look: The attached curve from an actual HPLC analysis of a main component and a trace substance found in aspirin show how the results are calculated. In this case the impurity is known and a standard available. The impurity can be reliably measured.

Figure 3: Standard Addition method

HPLC COLUMN CARE
The HPLC column is the most essential part of the system. All columns have a limited life, and the proper care of the column will determine the useful time. Chemists like to keep and maintain their own columns because they know the history. There are certain procedures which aid in keeping a column in good condition.
TYPES OF COLUMNS
The USP lists columns according to the types of packing used in drug analysis. The list can be separated into two general types, namely: (1) nonpolar packing for reverse-phase separations and (2) polar packing for normal-phase separations. Most drug analyses are done by reverse phase with coatings such as C18, C8, or phenyl. For example, the most widely used is a L1 packing, which has octadecyl silane chemically bonded to porous silica or ceramic microparticles whose diameters are from 5 to 10 µm. The L3 normal-phase column packing is porous silica. The USP method specifies the type and size of column for each analysis. SELECT THE CORRECT COLUMN for your specific analysis.
INITIAL INSPECTION OF COLUMN
All HPLC columns come pre-packed with a solvent suitable for long-term storage. Each column is supplied with a measured plate count and method of testing. The column should be tested according to the instructions to determine initial quality and to serve as a basis for checking column performance. Such a check is the only acceptable means to determine if the column meets specifications.
1. Connect the column in the HPLC system with the flow in the direction marked on the column. Eventually the column will be connected to the injector and the detector. Initially leave the output of the column disconnected while you are changing solvents. CAUTION. Columns are furnished with different types of end fittings. Make sure that the fittings on the column and the HPLC instrument are compatible in order to make a leak-free connection. The critical factor is the distance between the ferrule and the end of the tubing. Columns are connected and disconnected many times over their lifetimes, so each time an additional pressure must be applied to make a leak-free seal. Eventually the fittings will be damaged and must be replaced. Universal plastic fittings compatible with most columns are available to permit seals to be made with finger-tight pressure, which will increase the lifetime of the end fittings. Plastic fittings made from PEEK (polyether ether ketone) resin are

recommended. Such fittings are compatible with most HPLC solvents. Columns should be handled carefully without mechanical shocks or vibrations and kept free of wide temperature changes.
2. Start the flow at 0.2 mL/min and gradually increase the flow. Replace the original solvent with the desired solvent system. When changing solvents the flow must always be low to avoid any sudden change in pressure. When the desired mobile phase is in the column and you have obtained a steady, noise-free baseline, you are ready to check the column performance.
3. Plate Count and Resolution. There are different ways to measure plate count. Two ways of testing seem to used, namely (1) the tangent method and (2) the five sigma method. The methods of calculation are shown below:

Figure 4: Presentation of method for plate count
The tangent method assumes the peaks to be symmetrical (e.g., gaussian shaped) and uses the relation n = 16(t/W)2, where t is the retention time and W is the width of the peak at the baseline expressed in the same units. The simplest and most accurate method for measuring plate count is to measure the retention time and width with a ruler and express both in terms of millimeters. The USP uses the tangent method for expressing plate count.
In the five-sigma method, we assume the peak is gaussian; therefore, we could compute a "standard deviation" (sigma) from the distribution of the peak. In practice, the computation is made much simpler by assuming that five standard deviations (five sigma) are encompassed by the peak width measured at 4.4% of the peak height. The plate count is expressed as n = 25(t/W)2. The five sigma method gives values about one-third those of the tangent method. This method takes into account tailing in the separation and gives a measure of column performance. The method is subject to error due to the position of measuring the baseline. Both methods of calculation can be made on the same retention peak. You should try both methods initially. Select the USP method as the one to use, and record the values for future reference.
4. Plate Count. C18 Columns contain 70:30 mixture of methanol:water when shipped. Replace this solvent with a 60:40 acetonitrile:water mixture. Set the flow rate at 2 mL/min and inject a sample containing uracil and acenaphthene. The uracil is unretained and the acenaphthene will be retained for a considerable time. The uracil will give a direct measure
of the void volume of the column. The void volume is used to estimate the volume of solvent needed to clean or regenerate columns. Check value with supplier's value. The method and compounds listed in this paragraph are those suggested by Waters Associates for measuring plate count on their C18 columns; when using columns from other suppliers, follow their recommended methods. Another method for measuring plate counts and resolution is the use of a standard mixture designed to fit the type of operations normally in your laboratory. A solution of the following compounds is used to establish column characteristics for drug analysis: 50 mg of p-hydroxybenzoic acid 200 mg of propyl paraben (propyl ester of 4-hydroxybenzoic acid) 150 mg of ethyl paraben (ethyl ester of 4-hydroxybenzoic acid) 250 mg of n-butyl p-aminobenzoate dissolve the compounds in 25 mL of acetonitrile. Dilute 1 mL of this solution with 25 mL of 50% acetonitrile.
NOTE--These weights do not have to be exact as you are only interested in a good response.
Prepare a mobile phase consisting of 40:60 acetonitrile:water modified with 0.2% phosphoric acid. Set the flow rate at 2 mL/min. Set the UV detector at 254 nm. Measure the void volume by injecting about 5 mL of a solution of NH4NO3 in water (4mg/mL). (The void volume will be essentially the same for all solvents).
5. Inject about 10 µL of the solution containing the four test compounds prepared earlier. Calculate the plate count and the resolution from the chromatogram. Checks on plate count and resolution should be done at regular intervals or as a means of detecting column problems.
SOLVENTS AND SAMPLES
1. Solvents. All organic solvents must be HPLC grade or better. Impure solvents will damage the column. Water must be freshly distilled or purified by a suitable system that includes filtration, deionization, and charcoal treatment. DO NOT USE DEIONIZED WATER because it contains organic materials which will damage the column. The pH must be kept in the range of 2 to 8. Strong acids or bases will cause some dissolving of the support. Do not use water alone as the mobile phase. Use a buffer to maintain a pH of 7. Filter and degas the mobile phase by vacuum filtration before pumping it through the column.
2. Samples. If samples are dissolved in a liquid other than the mobile phase, the liquids must be compatible. Sample solutions must be free of any turbidity.

3. Guard Column. A very short column is placed at the entrance to the analytical column to protect it from insolubles. The guard column contains the same type of packing material as the main column. The packing is replaced when the guard column becomes plugged. Disposable cartridge columns are available and are often used.

CARE OF OPERATING COLUMN
1. Column Flushing. Most mobile phases used in drug analysis contain some form of salt as a buffer or ion modifier. Salt of any kind will damage the columns, pumps, and detector if allowed to remain in the system.
DO NOT LEAVE SALT OF ANY KIND IN THE COLUMN WITH NO FLOW FOR ANY PERIOD OF TIME (such as overnight or weekends).
The column must be cleaned of salt when flow is stopped overnight or for longer storage. Salts will cause corrosion and reduce resolution. When salts are in the column, never go initially to 100% organic phase as precipitation may occur in the column. Wash out any salt with purified water, and then go to other solvents. The following steps outline the procedure:
1. Flush with a solution similar to the mobile phase but with salts removed (five column volumes).
2. Flush with organic solvent used in the mobile phase, for example, 100% acetonitrile or methanol (10-20 volumes).
3. If step (2) is not adequate to remove salts, flush with 10 to 20 volumes of methylene chloride.
4. Flush with straight organic solvent (10 volumes) as in Step 2.
5. Flush with non-buffered phase.
6. Return to original mobile phase.
As a rule of thumb, the standard 30-cm column will have a void volume of approximately 3 mL, so 10 volumes would be 30 mL. The column void volume that you determined while you were measuring the column plate count and resolution is a better value to use. The flow rate can be increased to reduce time of flushing. Do not increase the flow past the point at which the column's upper pressure limit is exceeded. The volume is the key to successful flushing. Do not increase flow to the point where column pressure limits are exceeded. When changing solvents, always start with low flow and gradually increase it. Alternate to flushing. Keep continuous flow of the mobile phase at 0.1 mL/min overnight. Next day replace the solvent with freshly made and filtered mobile phase. Do not use the old solvent as it will have reached equilibrium with air and bubbles will form in the column. If it is necessary to use the old solvent, degas it again.

RULE OF THREE
A good rule to remember is the "Rule Of Three", which says that a change of 10% in the mobile phase will alter the retention time by a factor of three. Use this as a means of adjusting the mobile phase to get better retention times.
COLUMN STORAGE
Short Term (overnight or weekends): Flush column free of salts and store it loaded with a solution similar to the mobile phase being used but with salts omitted. Equilibrium will be quickly reached when you restart with the buffered mobile phase. Do not store a column filled with water alone. Alternatively, one could store the column filled with the organic/water mixture in which the organic solvent is present at greater than 50%, but longer times to reach equilibrium will be required on restarting.
Long Term:
Flush the column free of all salts with 10 to 20 column void volumes of pure water. Select a storage liquid: Use the liquid recommended by the column supplier (the original shipping solvent); if you do not know which solvent the supplier recommends, use a 70:30 mixture of methanol: water. Pump 10 column volumes of storage liquid through the column. Remove the column from the HPLC system and tightly cap both ends to prevent dry out.
COLUMN PROBLEMS
1. PRESSURE BUILDUP
The column comes with a recommendation for the maximum pressure that is advisable for its operation. The pressure should be noted when the column is initially put in service. Pressure buildup is caused by accumulation of contaminants or insoluble materials. Careful filtering of sample solutions and mobile phases will prevent pressure buildup most of the time. Use of a guard column will also aid. Most likely the buildup will be located at the entrance end of the column. The easiest thing to do is to reverse the flow in the column. (Some columns will be damaged by reverse flow; read the manufacturer's instructions before reversing the flow). Disconnect the column and reconnect only to the pumping system. Do not pass the stream through the detector. If pressure has not been reduced when you retest the column, remove. The end fitting at the column entrance end and check the stainless-

steel frit. Either replace it with a new frit or clean the old one by sonication in a dilute solution of nitric acid.
2. LOSS OF RESOLUTION
Loss of resolution of the peaks shows up as lower plate count and spreading of the bands. Peak height will also be decreased. Resolution loss is usually caused by buildup of nonpolar compounds which are soluble in the silane phase of the packing. Sample precipitation will also cause resolution loss. If at some time the pH was out of the range of 2 to 8, some of the packing may have dissolved, leaving a void at the column end. Any of these causes alter the resolution. Check the resolution you originally obtained when you first installed the column. If the cause is due to buildup of contaminants, the column can be regenerated. Follow the procedure as outlined: 1. Contaminants with polar groups. Wash the column with 25 mL of pure water; follow with 50 mL of methanol. During the methanol wash make four or five 2-mL injections of dimethylsulfoxide, using manual injection. Contaminants with nonpolar groups. Wash with 50 mL of methanol, then 50 mL of methylene chloride, then 50 ml n-heptane, and return to polar solvents by washing with methylene chloride and then 50mL of methanol. Before starting this procedure, clear the column of any salt. If the regeneration was not effective, replace the column as soon as possible. The procedures outlined are applicable to C18 columns. Other columns will have their own procedures for operation. Consult the supplier's data on the particular column. Proper care and handling of columns will greatly extend their lifetime and performance.

HPLC TROUBLESHOOTING
HPLC is a widely used method for drug analysis, and the success of an analysis depends upon proper functioning of all component parts. Since the operation of HPLC depends upon mechanical and electronic parts, it is important to recognize when the instrument is not functioning properly and to locate and repair the malfunction. Certain symptoms will locate the malfunction and lead to rapid diagnosis. The chemist can make some simple repairs which will keep the system in operation with minimum delay. Most actions described are classified as preventive maintenance and should be performed regularly. The manufacturer manual FDA provides equipment specific useful information on troubleshooting in HPLC.
Most problems in HPLC will be found in either the pump or the column and generally are flow related. A large number of problems can be prevented or reduced by carefully filtering and degassing the mobile phase after preparation. A filter should be placed on the end of the supply line in the solvent reservoir. All samples should be filtered through a membrane filter having a pore size no greater than 0.45 µm. The analyst needs to recognize when the chromatogram is not correct and when the data are reliable. Problems are of two kinds, namely:
(1) Those that the chemist can correct with little effort
(2) Those that require experienced service personnel for extensive maintenance.
This training module will emphasize problems the analyst can correct with minimum downtime and will help the analyst describe other problems to the service department.

COMMON PROBLEMS IN HPLC
PUMPING SYSTEM
(1) HIGH PRESSURE
High pressure will be experienced at some time in all HPLC operations. A buildup of impurities on the column or filters will cause increased pressure. See the "HPLC COLUMN CARE TRAINING" module for specifics on cleaning and restoring columns, and cleaning of filters. High pressure will also be observed at high flow rates or when changing solvents having different viscosities. For example, the methanol/water system is notable in exhibiting higher pressures when the concentration of methanol is increased. Refer back to the pressure observed when the column was first installed so you know when a change in pressure has occurred. Reducing the flow rate, will lower the pressure but will increase the retention time. During the entire use of the column, keep pressures within the recommended limits. Set the pumping system to shut off before the maximum pressure for the column is reached. High pressures can be caused by plugging in the pump, injector, supply lines, column, and detector. First determine the location of the blockage by working backwards beginning by disconnecting at the detector and continuing backwards to the pump by removing one part at a time. The most frequent blockage point will be found at the entrance frit of the column.
(2) NO PRESSURE
No pump pressure will be observed when the pump cannot draw solvent on the inlet side, as might be caused by plugging in the solvent inlet filter located in the solvent reservoir or a malfunction of the solvent draw-off valve. The solvent draw-off valve and manifold can be checked in the same manner as priming the pump. If the valves are not working, the solvent from the syringe will flow back into the solvent reservoir with only a slight applied pressure. If either the pump inlet or outlet valves of a single pump are stuck in any position, pulsing flow will result, causing the pressure to fluctuate. When you have flow and still no pressure, then the pressure transducer is the problem and will need to be replaced.
NOTE--The column or some other form of flow resistance must be connected to the pump to detect pressure changes.
(3) FLUCTUATING PRESSURE

Fluctuating pressure will be observed when one piston head is pumping and the other not functioning. Air bubbles entrapped in the valving system will cause one piston head to not function, giving a cyclic pressure output. Try repriming the pump with degassed mobile phase; use a 10-mL gas-tight hypodermic syringe attached to the draw-off valve and force liquid up into the outlet valves. Continue to apply the pressure on the syringe while the pump is operating. If the pressure remains erratic after several attempts to prime the pump, disconnect the column from the system. Flush out the salt solution with deionized and filtered water, then with methanol, and finally with isopropanol. Sometimes the pump outlet valves stick because of accumulation of materials on the surfaces, and isopropanol will usually remove the impurity. The whole system can be cleaned with isopropanol at high flow rates (BE SURE THAT THE COLUMN IS NOT CONNECTED AND THAT THE SYSTEM IS FREE OF SALT). The pump will need to be primed each time that it is restarted after a prolonged downtime.
(4) SOLVENT LEAKS
Leaks in any part of the HPLC system will cause erratic flow, and retention times or areas will not be correct. All connections in the system must be leak free. System leaks are due to:
1. Fittings not tight,
2. No compatible fittings, and
3. Damaged or scored fittings.
Make sure you have the proper fittings that are compatible with your system. If you don't, you can never stop the leak. All connecting tubing must be the proper size (0.009 inch ID) leading from the injector to the detector. Try first tightening the fittings using the proper sized open end wrench. Do not use adjustable wrenches to tighten fittings. Over tightening can damage fittings and cause leaks. If any fittings have been damaged, new fittings of the same kind must be installed. Leaks around the back of the piston indicate worn or deformed plunger seals and possible plunger scoring which can be caused by excessive wear or by salt deposits. When salts are deposited in the pump the sapphire plunger will be scored or show excessive wears. Regular flushing of the entire system before the HPLC is put in stand-by mode will prolong the life of the seals. The seals in both pumps are replaced by removing the pump head. (If you are not familiar with changing seals, contact the service people or look in the service manual for directions to change seals.)

BE SURE TO DISCONNECT THE COLUMN FROM THE SYSTEM BEFORE STARTING ANY FLOW TO BREAK IN SEALS.
When replacing pump seals, it is a good idea to replace seals on both pumps since both probably has equal wear. When seals have been replaced, prime the pump with methanol and start the pump flow at 0.2 mL/min (DO NOT START THE PUMP AT ANY HIGHER FLOW RATE). Gradually increase the flow rate to break in the seals and continue until everything runs smoothly. Avoid the use of halogen-containing salts whenever possible. If halogen compounds cannot be avoided, the life time of the seals will be reduced and more frequent replacement will be required. Also, halogen compounds can cause corrosion of the 316 stainless steel in the system.
DETECTING MALFUNCTIONS FROM THE CHROMATOGRAM
Many of the common problems in HPLC will show in the chromatogram since the response will be dependent on the detector, column, and pump. You need to be able to recognize problems quickly. Problems related to changes in the column plate count and resolution will show as change in the retention time, peak spreading, or both. See the "Training Module on Column Care".
1. The samples can also change the shape of the chromatogram. If some of the samples contain materials which are strongly adsorbed on the support, the curve will show tailing (curve changing from gaussian to a distorted shape). Cleaning or possible regeneration of the column is required.
2. If the leading edge of the chromatogram rises slowly, the column could be overloaded. Reduce the volume of the injections and/or concentration.
3. Sometimes a single peak will degenerate into a double peak or one with a shoulder. A dirty column or inlet frit will cause such behavior.
4. All peaks of the chromatogram are caused by some material eluting from the column and must be considered. The chemist needs to know when to accept or reject the data. Any peaks other than those expected from the injected compounds could be due to solvent, anions such as maleates, isomers or artifacts. Repeat the injection and examine the reproducibility. Impurities will show up in the repeated chromatogram at the same retention time and magnitude. Artifacts arise from previously adsorbed materials, and the positions and heights of the peaks occur at random. If the impurity peaks are separated from the peak of interest, such peaks can be ignored in the calculations. Complications arise when impurities show up under the main peak or as a shoulder or shoulders on the peak of interest. Some change in the mobile phase may be necessary to attempt separation of

impurities from the principal component. Unless the impurities can be separated from the main compounds, no determination of impurities can be made.
5. The baseline of the chromatogram must also be linear with zero slope. Solvent changes, partially retained compounds, or a dirty detector will cause the baseline to shift. Continue the flow until a steady, noise-free baseline is established. Baseline noise can be caused by bubbles, contaminants in bad solvents, contaminated column, the detector cell, leaks in the system, erratic flow, or electrical problems related to the recording system. The HPLC analysis cannot be continued until a suitable base line has been established. Never depend on the first chromatogram in a run. Use this trace to adjust sensitivity, flow rate, sample size, or other parameters needed to produce a reliable chromatogram. Replicate all samples unless otherwise instructed.
Many troubles in HPLC can be eliminated or reduced by flushing the column and instrument with water and finally with the methanol/water mixture. See "HPLC COLUMN CARE" module.

Content Method of
delivery
6.5. CASE STUDY II HPLC ASSAY OF A FIXED DOSE COMBINATION OF LAMIVUDINE 300 MG AND ZIDOVUDINE 300 MG TABLETS (PH.INT).
The purpose of the procedure is to determine the amount of active ingredient in FDC lamivudine zidovudine tablets formulation. This experiment utilizes a mixed isocratic/linear gradient elution system in order to cater for wider polarity differences among the test mixture. It uses a reversed stationary phase packed with base deactivated particles of silica gel, the surface of which has been modified with chemically bonded octadecylsilyl groups run under mixed isocratic/linear gradient flow since the mobile phase is polar and the stationary phase is nonpolar.
Case study
Laboratory practical session
6.5.1 Preliminaries to getting started
Consult the most recent list to determine the appropriate standards for lamivudine, and Zidovudine. Roughly weigh out the quantity of standard needed for analysis from the pharmacopeial Reference Standard bottle into a closable container. Return the Reference Standard bottle to stock.
Laboratory practical session
6.5.2 Preparation of mobile phase and diluting solvent
MOBILE PHASE
Prepare the mobile phase for this analysis by taking mixture of 5 volumes of methanol R and 95 volumes of buffer pH 3.8 (a 1.9 g/l solution of ammonium acetate R, previously adjusted to pH 3.8 with glacial acetic acid R) as the mobile phase A. Use 100% methanol R as mobile phase B.
Laboratory practical session

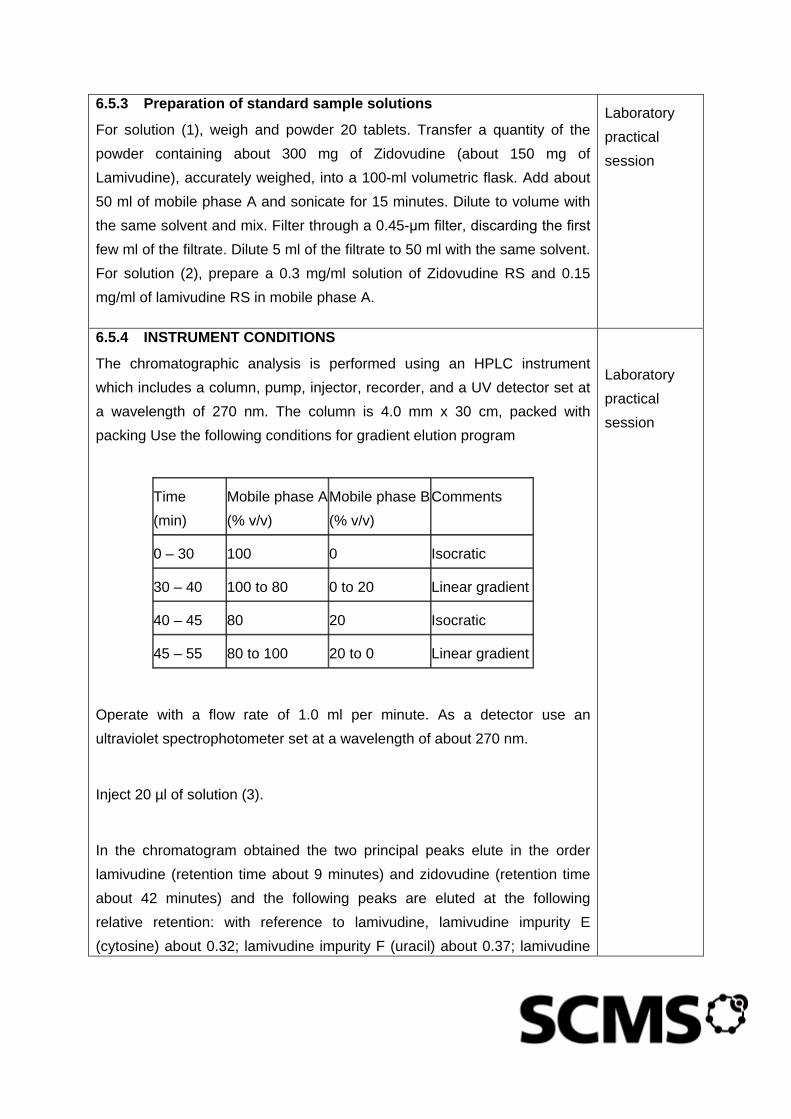
6.5.3 Preparation of standard sample solutions
For solution (1), weigh and powder 20 tablets. Transfer a quantity of the powder containing about 300 mg of Zidovudine (about 150 mg of Lamivudine), accurately weighed, into a 100-ml volumetric flask. Add about 50 ml of mobile phase A and sonicate for 15 minutes. Dilute to volume with the same solvent and mix. Filter through a 0.45-μm filter, discarding the first few ml of the filtrate. Dilute 5 ml of the filtrate to 50 ml with the same solvent. For solution (2), prepare a 0.3 mg/ml solution of Zidovudine RS and 0.15 mg/ml of lamivudine RS in mobile phase A.
Laboratory practical session
6.5.4 INSTRUMENT CONDITIONS
The chromatographic analysis is performed using an HPLC instrument which includes a column, pump, injector, recorder, and a UV detector set at a wavelength of 270 nm. The column is 4.0 mm x 30 cm, packed with packing Use the following conditions for gradient elution program
Time (min)
Mobile phase A (% v/v)
Mobile phase B (% v/v)
Comments
0 – 30 100 0 Isocratic
30 – 40 100 to 80 0 to 20 Linear gradient
40 – 45 80 20 Isocratic
45 – 55 80 to 100 20 to 0 Linear gradient
Operate with a flow rate of 1.0 ml per minute. As a detector use an ultraviolet spectrophotometer set at a wavelength of about 270 nm.
Inject 20 µl of solution (3).
In the chromatogram obtained the two principal peaks elute in the order lamivudine (retention time about 9 minutes) and zidovudine (retention time about 42 minutes) and the following peaks are eluted at the following relative retention: with reference to lamivudine, lamivudine impurity E (cytosine) about 0.32; lamivudine impurity F (uracil) about 0.37; lamivudine
Laboratory practical session

impurity B about 0.9: with reference to zidovudine, zidovudine impurity C (thymine) about 0.13; zidovudine impurity B about 1.03. The assay is not valid unless in the chromatogram obtained with solution (3) the resolution between lamivudine and lamivudine impurity B is at least 1.5 and the resolution between zidovudine and zidovudine impurity B is at least 2.0.
Inject alternately 20 µl each of solutions (1) and (2).
Measure the areas of the peak responses obtained in the chromatograms from solutions (1) and (2), and calculate the percentage content of zidovudine (C10H13N5O4) and lamivudine (C8H11N3O3S) in the tablets.
Methods of assessment
• Quiz • End of Term assessment • End of Course assessment

7. MODULE 7 GAS CHROMATOGRAPHY TRAINING MODULE
Aims and goals
• To acquire practical experience in pharmacopeial applications of Gas chromatograph in pharmaceutical quality testing.
• To exploring different applications like determination of content with Halothane assay as a case study and limit test of organic in Paracetamol active pharmaceutical ingredient
Learning Objectives:
On successful completion of this course, the student will be able to:
1. Prepare pharmaceutical sample and standard solutions 2. Perform assay for volatile drugs and limit test for residual organic solvents using GC
technologies 3. Collect data, review test results and perform calculations 4. Prepare certificate analysis 5. Release test results
Course Synopsis:
Introduction, Set up and trial analysis, Column Conditions, Analysis of Drugs, Calculations, Errors in gas chromatography, Quantitative and qualitative GC analysis
Total Time: 2 hours + 6 hours practical
Materials Needed
• Flip charts, marker pens, and masking tape/ LCD machine/laptop • Black/white board and chalk/whiteboard markers • Participant manuals/handouts • USP, BP and Int. Phr • Various Laboratory reagents and equipment (GC, analytical balance) • Samples and reference standards –phenytoin sodium tablets

Content Areas:
7.1. Gas LIquid Chromatography 7.1.1 PREAMBLE TO LABORATORY PRACTICES 7.1.2 INTRODUCTION 7.1.3 SETUP AND TRIAL RUN 7.1.4 Case study: Chromatographic purity test IN DRUGS 7.1.5 ERRORS IN GAS CHROMATOGRAPHY
Content Method of delivery
Module overview
Show slide #2 and Explain to the students that in this module we will look at the:
• General introduction to Gas liquid chromatograph.
• Preparation of Sample solutions
• Quantitative and qualitative analysis
• Possible errors
• Applications in pharmaceutical quality testing
Slide 2
Explain to participants that Gas chromatography (GC) is a tool well suited to certain types of drug analyses.
• It provides a rapid analysis of a variety of organic materials.
• The method can be applied only to those compounds that can be vaporized without degrading at the elevated temperatures required.
• Gas chromatography is extremely accurate for measuring low molecular weight compounds and detecting impurities at very low levels
Slide 3
ASK participants what they see as potential use of GC in pharmaceutical quality testing?
• Possible answers Show slide #
• Good for volatile samples (up to about 250°C)
• Control of organic impurities
• Assay of volatile drugs
Ask: Is there anything that we discussed that you do not agree with? What is it?
Slide 4
Explain to the students that
Before a gas chromatography analysis can be made, the components must be assembled.
The instrument itself contains the ovens, injectors and detectors, Instruments are made so that different types of operations can be performed by making changes in detectors, types of columns, and injectors. [refer them to figure in slide#6]
The USP method specifies the type of column, carrier gas, and detector to be used. The recommended temperature and flow rate are given. With this information, the GC system can be arranged as specified
Most drug analyses operate with the gas as the mobile phase and a liquid as the stationary phase; therefore the type of separation is known as GLC (gas-liquid chromatography).
Packed columns are used for separations. The columns usually are glass tubing about 6 mm OD by 1.8 meters (in English units, about 1/4 inch OD by 6 feet long), coiled to fit the specific instrument. Columns with this outside diameter are available in 2, 3, and 4 mm ID. The columns are packed with an inert support coated with a high-boiling liquid. The liquid coating used will depend upon the polarity of the compounds to be separated. The type of column specified by USP 32 should be selected. Each GC instrument manufacturer has a special geometric configuration for the column; therefore the column made for the instrument must be used. (NOTE-- The jet to the detector must be checked before the column is installed.) The jet must be suitable for a packed-type column.
Ask: Are there any question?
Slide 5-6
EXPLAIN to participants some of the important practical tips to set up a GC analysis
Tell them to always refer to Operating Instructions for the specific equipment make for additional information while using this section.)
Any column, whether it is used or new, may contain contaminants and must be conditioned before analytical use.
New columns may also contain volatile contaminants which must be driven off.
Ask: Is there any participant with experience with set up GC analysis to share his experience with rest of us?
Slide 7
FURTHER EXPLAIN to them a general approach to set up a run will include:
Flow rate 15-40 mL/min helium. (NOTE--The USP uses a 3 mm column but you will be using a 2 mm column, so the flow is reduced. You will need to establish the best conditions.)
Oven temperature: Set at 260°C.
Injector and detector temperature: Set at 265°C.
To condition the column, use a 265°C oven temperature for 1 hour; then cool the oven to 260°C.
Do not exceed the 265°C.
Participant are also referred to training material and addendum A for more information
Slide 8
EXPLAIN to participants that the main sample preparation and introduction techniques
Also tell them other important consideration like
Many of the analyses require extended preparation of the sample or standard,
Slide 9-10
such as drying and extraction.
Standard samples should be obtained from the laboratory supply source and dried according to directions supplied on the label if it is prescribed so by individual monograph.
The dried material should be stored in a desiccator until ready for use and kept stored until the analysis is completed.
Your analysis should be planned to include all the necessary preparations.
Explain to them the both the quantitative and qualitative application of the GC in pharmaceutical product quality assessment
Show slide # 11 and also refer them to Addendum E for more information.
Ask: Is there anything that we discussed that you do not agree with? What is it?
Slide 11
Project Slide # 12 and explain to them some of the intrinsic error associated by the use of external standard technique. Variability of injection volume can bring about remarkable errors,
Ask: How can these errors is minimized?
Let the think over and give answers….
Solution is internal standardization to compensate
Slide 12-13
Project Slide # 14 and refer the student the Current USP monograph for halothane Injection introduces the laboratory session.
Inform that we are going to perform two assay procedure based on USP monograph for aspirin and Int Phr for lamivudine Zidovudine.
In this duo experiment we shall apply both isocratic and gradient elution system to analyze the content of commercial products
DISPLAY the figure in slide 4 and use it to emphasize the QI concept by telling them to describe one example of a quality gap using existing data (actual performance) and to come up with a quick strategy to improve (desired performance/standard
Slide 14

7.1. GAS LIQUID CHROMATOGRAPHY
Gas chromatography (GC) is a tool well suited to certain types of drug analyses. It provides a rapid analysis of a variety of organic materials. The method can be applied only to those compounds that can be vaporized without degrading at the elevated temperatures required. Gas chromatography is extremely accurate for measuring low molecular weight compounds and detecting impurities at very low levels. Because of the instability of organic compounds, the method is applicable to only about 15% of the total number of compounds. There are two criteria for any sample to be analyzed by GC, namely:
the sample must be thermally stable and
the compound must have sufficient vapor pressure and must be capable of vaporizing.
7.1.1 PREAMBLE TO LABORATORY PRACTICES
The GC operation requires that gas be handled in high pressure cylinders, and that equipment be operated at elevated temperatures. Careful planning is required to ascertain the operation and proper supply of gas. All gas cylinders must be properly secured to the laboratory bench with a suitable chain or strap. Any movement of gas cylinders from the storage area to the instrument must be performed with a cylinder-handling cart. Safety glasses must be worn at all times and insulated gloves must be available if hot surfaces are to be handled. You should keep in mind that many of the surfaces of the instrument are operating at elevated temperatures, and can cause burns. The instrument must be cooled before any changes in the heated areas are attempted. Also, the gas supplies must be shut off during any changes involving opening gas lines. Many of the GC instruments are equipped with flame ionization detectors that burn with a mixture of hydrogen and air. You should keep in mind that hydrogen gas is very flammable and explosive. All connections must be free of leaks; if any leaks are found, they must be corrected immediately. The hydrogen should be left on only during the GC runs and not during extended idle time. Most drug analyses specify the use of glass columns, which are fragile. The columns are made to fit specific instruments, so no attempt should be made to force any column to fit into the system. Care must be used in handling to prevent breakage and possible personal injury.
Slide 3
Many of the analyses require extended preparation of the sample or standard, such as drying and extraction. Standard samples should be obtained from the laboratory supply source and dried according to directions supplied on the label. The dried material should be stored in a desiccator until ready for use and kept stored until the analysis is completed. Your analysis should be planned to include all the necessary preparations. All GC operations require elevated temperatures; time must be allowed for the instrument to come to equilibrium. In many cases, the sample can be prepared while the instrument is coming to equilibrium.
7.1.2 INTRODUCTION
Before a gas chromatography analysis can be made, the components must be assembled. The instrument itself contains the ovens, injectors and detectors, Instruments are made so that different types of operations can be performed by making changes in detectors, types of columns, and injectors. The USP method specifies the type of column, carrier gas, and detector to be used. The recommended temperature and flow rate are given. With this information, the GC system can be arranged as specified. Most drug analyses operate with the gas as the mobile phase and a liquid as the stationary phase; therefore the type of separation is known as GLC (gas-liquid chromatography). Packed columns are used for separations. The columns usually are glass tubing about 6 mm OD by 1.8 meters (in English units, about 1/4 inch OD by 6 feet long), coiled to fit the specific instrument. Columns with this outside diameter are available in 2, 3, and 4 mm ID. The columns are packed with an inert support coated with a high-boiling liquid. The liquid coating used will depend upon the polarity of the compounds to be separated. The type of column specified by USP 32 should be selected. Each GC instrument manufacturer has a special geometric configuration for the column; therefore the column made for the instrument must be used.
(NOTE-- The jet to the detector must be checked before the column is installed.) The jet must be suitable for a packed-type column.
Glass columns are fragile and will break if strained. In order to avoid breakage, the column should be connected to the injector and detector at the same time with a torque wrench. The glass column is connected to the metal fittings of the instrument by means of a 1/4-inch nut and ferrule or O ring. A graphite ferrule is preferred, as it will be suitable over a wide temperature range. Some instruments are equipped to handle column coils 9 inches in diameter, while others use 6-inch coils. It is possible to use the 6-inch coil in instruments having space for the 9-inch provided a suitable adapter is used. You will not be able to use the 9-inch coil in instruments designed for the 6-inch column, however.
Column connections are made with a special torque wrench to prevent too much tightening, which can result in column breakage. Most GC instruments have the capability for two detectors, and you must choose the detector

specified. The USP methods use flame ionization unless otherwise specified. The flame ionization detector (FID) is specified in this training module. (Some methods call for thermal conductivity or electron capture for the detector.) When the FID is used as the detector, the sample is burned in a flame from a mixture of hydrogen and air, converts the carbon compounds to ions that are captured by a collector to produce an electric signal proportional to the number of ions formed.
The FID system is very sensitive, but cannot be used to detect permanent gases or water. Compounds containing chlorides or silicon can cause damage to the FID because of corrosive compounds formed and silica deposits. Continued use of such compounds will require repair or replacement of the detector. The outlet from the column is connected to the FID. After making the column connection to the proper detector and injector, you are ready to arrange the gas supplies. The carrier gas will be either purified nitrogen or helium. FID has greater sensitivity with nitrogen, but helium is a good substitute. The gas is connected to the injector of the instrument through a regulated flow meter. The FID uses a mixture of hydrogen and air for the flame; both gases are supplied through a carefully regulated system.
All leaks must be eliminated. After the gas connections are made, the system should be tested for leaks with a leak test fluid, such as "SNOOP", by brushing some of the liquid around the connectors. (Also see Operating Instructions for specific equipment.) Bubbles will form if there are any leaks. After testing for leaks, you should wash away the SNOOP so that no deposit will be left. Carrier gas flow must be regulated and constant throughout the runs, if the retention times are to be meaningful. The flow rate recommended by the USP should be considered as a starting point; at the same time it should be recognized that different columns could have different flows and thus require some adjustment for maximum efficiency. The flow should be altered to achieve the best operation of the system. There are two or three injection techniques. In the most common type, the sample is injected by a method known as "direct addition to the column". In this method the cool liquid is injected directly onto the head of the column that sits inside the injector oven. The sample is vaporized and immediately starts its path through the column. This causes the peaks to be sharper and reduces tailing.
The sample is drawn into a microliter syringe to which a needle is attached (the needle may or may not have a valve to permit injection of gas samples). The

injector contains a flexible rubber septum, and the sample is injected onto the column through the septum. The septum is partially damaged each time an injection is made, and must be replaced before beginning a run. After the septum has been used for several injections, leaks will develop; the septum must be replaced when this occurs. A bent or damaged needle causes excessive damage to the septum, and should be replaced with a new needle having a sharp point and no ragged edges. GC can be run in an isothermal condition, in which the temperature remains constant throughout the run, or by a temperature gradient.
Temperature gradients are used when the components have widely separated boiling points or different solubility behaviors in the liquid phase (large difference in the polarity of the compounds). A gradient is achieved by setting an initial temperature, a rate of temperature rise, and a final temperature. When gradient temperatures are used, the instrument must be allowed to return to the initial starting temperature before the next sample is run. Systems operated by a controller or computer will automatically adjust to the initial starting temperature before the next sample is injected. Carrier gas flow is measured by a glass-bubble flow meter or an electronic meter. The gas is measured as it exits from the detector, before the detector is lighted. If you are using a bubble flow meter, a flexible rubber tube is connected between the outlet of the detector and the flow meter. A bubble is introduced into the glass flow meter by lightly squeezing an attached small rubber bulb and forcing an air bubble from a soap solution into the flow meter (a dilute soap solution will form the bubble). The glass tube has graduations with a lower and upper volume marking similar to a pipette. Flow is determined by measuring the time it takes the bubble to rise from the lower mark on the meter to the upper mark, using a stopwatch.
Some GC instruments are equipped with an electronic flow sensing meter, and the flow rate will be displayed automatically. Corrected flows for the different gases are defined by keyboard entry. A direct reading of the flow is displayed when called by the keyboard. Before beginning the laboratory exercise below, you should have developed the volumetric and gravimetric skills typically required in the preparation of a sample for GC. If you are not confident that your skills in these techniques are adequate, you should stop here and review those procedures or learn them afresh. The gas chromatograph is now assembled and you are now ready to set temperatures flow rates for maximum

efficiency, and to measure the column characteristics. New columns must be conditioned by flowing the gas through the system until a stable base line has been established.

7.1.3 SETUP AND TRIAL RUN
(Refer to Operating Instructions for the specific equipment make for additional information while using this section.) Any column, whether it is used or new, may contain contaminants and must be conditioned before analytical use. New columns may also contain volatile contaminants which must be driven off.
CONDITION THE COLUMN WITH THE FLAME LIT. The preferred carrier gas for conditioning is He, but N2 can be used. DO NOT USE HYDROGEN because the gas will exit directly into the hot oven.
COLUMN CONDITIONS:
1. Flow rate 15-40 mL/min helium. (NOTE--The USP uses a 3 mm column but you will be using a 2 mm column, so the flow is reduced. You will need to establish the best conditions.)
2. Oven temperature: Set at 260°C.
3. Injector and detector temperature: Set at 265°C.
To condition the column, use a 265°C oven temperature for 1 hour; then cool the oven to 260°C. Do not exceed the 265°C.
After the flame is lit and the chromatographic/integration conditions have been set (see ADDENDUM B), prepare a solution of halothane secondary standard at the concentration specified in the USP 32. Make a 1 mL injection, and press START RUN on the integrator. Observe the peak obtained and the baseline; the baseline should not drift substantially. The peak should elute within about 13 minutes. Check the integration marks and the shape of the peak. If the peak is too small or too big, increase or decrease the attenuation of the signal and/or the injection volume as appropriate. Change the attenuation on the integrator to lower numbers to increase the peak signal. Checks to see if the THRESH (threshold) and PKWD (peak width) need changing. The helium carrier gas flow may also have to be made faster or slower. Repeat the injection to optimize the chromatogram; observe the retention time, peak shape, and integration marks; make sure no peaks or interference is obtained in the region of Halothane. When conditions are suitable, prepare a mixed solution of halothane at the concentration specified in the USP 32 procedure, and inject it.

Optimize the conditions to achieve correct integration if this is needed. Make six injections of the mixed standard solution. Discard the first injection and calculate system suitability, based on the calculations of coefficient of variation (relative standard deviation), resolution, and tailing factor as described in Addendum A. Record all the conditions used in the analysis on your worksheet. (see Addendum B) to record the integrator conditions.

7.1.4 CASE STUDY: DETEMINATION OF RESIDUAL ORGANIC SOLVENTS IN PHYNYTOIN TABLETS USP
Under the USP Monograph for Phyntoin sodium GC is prescribed for determination of organic volatile substance Follow the instruction under this monograph to and refer to method V General chapter <467>
7.1.5 ERRORS IN GAS CHROMATOGRAPHY
When the external standard technique is used, GC measurements are subject to errors caused by differences in the injected volumes of sample and standard solutions. Each injection is in the order of a few microliters. Any small change in the injection volume causes a large change in response. The internal standard method reduces the errors involved by using a ratio of the response of the internal standard to that of the drug being analyzed, in both the sample solution and the standard solution. When ratios are used, the value obtained does not depend upon the amount injected. Calibration curves can be generated by using a series of dilutions of a stock standard solution; each diluted solution contains the same concentration of the internal standard. If the external standard method of calibration is used, a reproducible injection volume must be made for each sample and standard solution. Much more accurate results can be obtained when the internal standard method is used.
The best GC results are obtained when the retention curves are symmetrical and involve little or no tailing. Adsorption of any compounds on the support causes tailing. If the tailing is large, a column with different polarity may produce a more symmetrical peak. Adsorption usually occurs when the compounds are polar and the support is polar. Decreasing the polarity of the support will reduce the adsorption and tailing. If the compounds are polar, the column polarity must be made more nonpolar to reduce tailing. The chemistry rule of thumb, "Like Likes Like", applies in column selection. Another cause of tailing is a leak at the septum when air is introduced into the gas flow stream. You should replace the septum when you notice a normally symmetrical peak of a known compound becoming unsymmetrical. Changes in retention times may also be caused by a leaky septum. Gas flow in GC must remain constant during the entire analysis. If flow is erratic, the retention times will vary. Sometimes the base line will show noise and spikes and will deviate from linearity. A base line that shows such signs usually arises from a dirty flame detector. Check with your service department about cleaning the flame
Case study

detector if you are not familiar with the operation. After the flame detector is clean, the base line will usually return to normal.
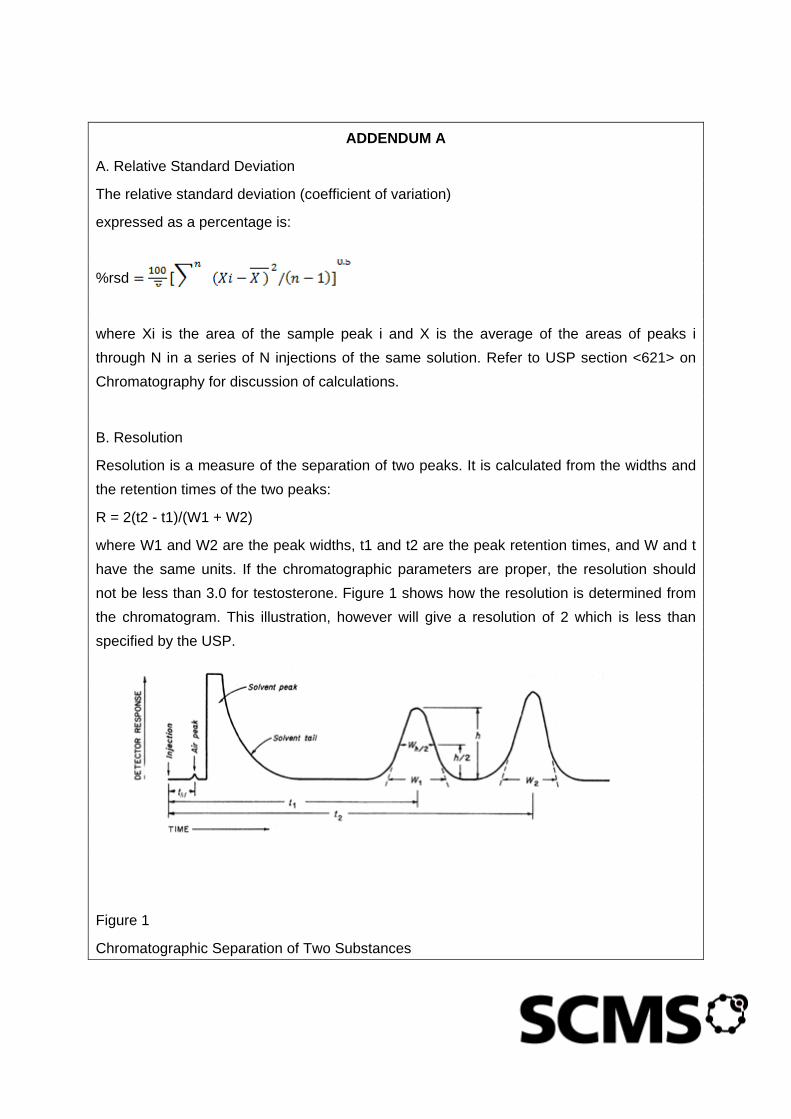
ADDENDUM A
A. Relative Standard Deviation
The relative standard deviation (coefficient of variation)
expressed as a percentage is:
%rsd
where Xi is the area of the sample peak i and X is the average of the areas of peaks i through N in a series of N injections of the same solution. Refer to USP section <621> on Chromatography for discussion of calculations.
B. Resolution
Resolution is a measure of the separation of two peaks. It is calculated from the widths and the retention times of the two peaks:
R = 2(t2 - t1)/(W1 + W2)
where W1 and W2 are the peak widths, t1 and t2 are the peak retention times, and W and t have the same units. If the chromatographic parameters are proper, the resolution should not be less than 3.0 for testosterone. Figure 1 shows how the resolution is determined from the chromatogram. This illustration, however will give a resolution of 2 which is less than specified by the USP.
Figure 1
Chromatographic Separation of Two Substances

8. MODULE 8: DISSOLUTION TTESTING Aims/Goal:
• To provide basic information about Dissolution and its importance in a pharmaceutical testing laboratory.
• To acquire practical experience in pharmacopeial applications of dissolution testing.
Learning Objectives:
On successful completion of this course, the student will be able to:
1. Identify important principles and terms in dissolution. 2. Identify how to determine which dissolution system (apparatus and dissolution
medium) should be used for a given product. 3. Identify environmental factors that can negatively affect the validity of a dissolution
test. 4. Perform dissolution test (Prepare Media and Fill Dissolution Vessels, Prepare Bath
for Samples and Place Samples in Vessels, Remove Stated Aliquot and Filter) 5. Collect data, review test results and perform calculations 6. Prepare certificate analysis 7. Release test results
Course Synopsis:
Dissolution testing, Dissolution rate, Dissolution apparatus, Dissolution system, Single time-point test, Profile test, uncoated tablets, enteric coated tablets, Compendial monograph, Suitability test, Dissolution media, Value Q
Total Session Time: 2 hours and 6 hours lab session
Materials Needed
• Flip charts, marker pens, and masking tape/ LCD machine/laptop
• Black/white board and chalk/whiteboard markers
• Participant manuals/handouts
• USP, BP and Int. Phr
• Various Laboratory reagents and equipment
• Samples and reference standards –paracetamol

Content Areas:
8.1 CONCEPTS OF DISSOLUTION TESTING 8.1.1 ALIGNMENT OF DISSOLUTION UNITS 8.1.2 PREPARATION OF DISSOLUTION MEDIUM FOR RESPECTIVE DRUG 8.1.3 PROCEDURE FOR SAMPLE DISSOLUTION BY THE BASKET METHOD 8.1.4 PROCEDURE FOR SAMPLE DISSOLUTION BY PADDLE METHOD (APPARATUS
2) 8.1.5 ANALYSIS OF THE DISSOLVED DRUG 8.1.6 REFERENCES 8.1.7 APPARATUS SUITABILITY TEST 8.1.8 PREPARATION OF STANDARDS FOR SUITABILITY TEST 8.1.9 CASE STUDY: Dissolution of Paracetamol Tablets
Content Method of delivery
DISPLAY slide 2 and 3 and give an overview of the this module
Tell them that in this module we will
• Identify important principles and terms in dissolution.
• Identify how to determine which dissolution system (apparatus and dissolution medium) should be used for a given product.
• Identify environmental factors that can negatively affect the validity of a dissolution test.
• Perform dissolution testing (Prepare Media and Fill Dissolution Vessels, Prepare Bath for Samples and Place Samples in Vessels, Remove Stated Aliquot and Filter)
• Collect data, review test results and perform calculations
• Prepare certificate analysis
Release test results
Ask: Is there anything that need clarification before we embark on detailed discussions
Slide 2-3
ASK participants to define what is ‘’dissolution testing’’
• LET them buzz in 3 minutes and write their responses in a piece of paper
Slide 4

Content Method of delivery
• When they are ready ask one pair to WRITE on the flip chart
• LET others who have a different answers read and the facilitator to write on a flip chart
CLICK on the slide and tell them that
Dissolution Testing measures the portion (%) of the API that (1) has been released from tablets/capsules and (2) has dissolved in the dissolution medium during controlled testing conditions within a defined period
Ask: Is there anything that we discussed that you need clarification?
EXPLAIN to participants that drug absorption from a solid dosage form after oral administration depends:
• on the release of the drug substance from the drug product (tablets, capsules, granules, suspension, etc.)
• the dissolution or solubilization of the drug under physiological conditions, and
• the permeability across the gastrointestinal tract.
TELL them that because of the critical nature of the first two of these steps, in vitro dissolution may be relevant to the prediction of in vivo performance of the drug under consideration.
Slide 5
EXPLAIN to participants that release from solid oral dosage forms can be classified as follows:
• Immediate release typically means that 75% of the API is dissolved within 45 minutes
• Rapidly dissolving: ≥ 85% in ≤ 30 minutes
• Very rapidly dissolving: ≥ 85% in ≤ 15 minutes
Slide 6
EXPLAIN to participants that Dissolution testing in immediate-release (IR) solid dosage forms poses many challenges: These are:
Slide 7

Content Method of delivery
• developing and validating the test method
• ensuring that the method is discriminatory
• Addressing the potential for an in vivo–in vitro relationship (IVIVR) or correlation (IVIVC).
ASK participants to Why in-vitro dissolution testing?
• LET them buzz in 5 minutes and write their responses in a piece of paper
• When they are ready ask one pair to WRITE on the flip chart possible application of the dissolution data
• LET others who have a different answers read and the facilitator to write on a flip chart
Show slide # 8-12 and highlight the key application points
• For selection of the formulation in the development phase
• It is a requirement for comparative dissolution data for the bio-batch and innovator batch
• Demonstration of in vivo bioequivalence of one or more of the lower strength(s) of an FPP to support waiver application
• Comparison of the release properties of pivotal batches
• Selection of the dissolution specifications for product release & stability purposes
• Post-approval amendment application
Ask: Is there anything that would require clarification?
Slide 8-14
Show slide # 15 explain to them important variables affecting dissolution release worth consideration
• characteristics of the API e.g., particle size, crystal form, bulk density
• product composition e.g., drug loading, and the identity, type, and levels of excipients
• manufacturing process e.g., compression forces, equipment
• effects of stability storage conditions e.g., temperature, humidity
However, emphasize to the participant that these factor are taken care during product development and manufacturing
Slide 15
Content Method of delivery
EXPLAIN to participants that dissolution testing determines the cumulative amount of drug that goes into solution as a function of time, it involves two step mechanism
Slide 16-18
DISPLAY content of slide # 19 and explain to the participant that selection of the dissolution medium need the following consideration
• based on the solubility data and the dose range of the drug product to ensure that sink conditions are meet
Ask: Is there anything that would require clarification?
Slide 21-22
EXPLAIN to participants that DT is applicable to the following formulation.
• immediate release dosage forms
• powders, granules / beads, tablets, capsules
• controlled release dosage forms
• powders, granules / beads, tablets, capsules
• transdermal systems
• implants
• Suspensions
Ask: Why is it necessary to dissolution testing for suspension?
Response:
Suspension is made of undissolved solids suspended in a vehicle.
Slide 24
DISPLAY slide # 25&26 and explain to the participant that the different official apparatus and tell them the most commonly used are:
• Rotating Basket (Ph.Eur./BP/JP)
• Paddle (Ph.Eur./BP/JP)
Slide 25/26
GIVE an over view of the two common apparatus, with emphasis on the advantage/disadvantage, scope
Explain also the need for apparatus suitability check for which current recommended approach is the use of tools to do extensive mechanical calibration
Ask: Is there anything that would require clarification?
Slide 27-38
Content Method of delivery
Explain to the participants that DT can be performed in either as a:
Single Point
• 6 tablets ≥ Q stated in pharmacopeia
• At a specified time 30, or 45, or 60 minute
Release profile
• 6 tablets ≥ Q stated in pharmacopeia
• At a specified time 15, 30, 45, 60 75, 90, 105, 120 minutes
Ask: Is there anything that we discussed that requires clarification before we can move to the laboratory session?
Slide 27-38
Project Slide # 41 and introduce the laboratory session.
Inform that we are going to perform Dissolution of Paracetamol Tablets o.

Content Method of delivery
8.1. CONCEPTS OF DISSOLUTION TESTING
In vitro dissolution testing serves as an important tool for characterizing the biopharmaceutical quality of a product at different stages in its lifecycle. In early drug development in vitro dissolution properties are supportive for choosing between different alternative formulations candidates for further development and for evaluation of active ingredients/drug substances. In vitro dissolution data are supportive in the evaluation and interpretation of possible risks, especially in the case of controlled/modified-release dosage forms - e.g. as regards dose dumping, food effects on bioavailability or interaction with other drugs, which influence gastrointestinal environmental conditions. Biopharmaceutical aspects are as important for stability concerns as they are for batch release after production, in vitro dissolution being of high relevance in quality control and quality assurance. Last but not least, in vitro dissolution data will be of great importance when assessing changes in production site, manufacturing process or formulation and assist in decisions concerning the need for bioavailability studies.
None of these purposes can be fulfilled by an in vitro test system without sufficient reliability. Reliability here would be defined as the system being experimentally sound, yielding precise, accurate, repeatable results and with sufficient knowledge of the in vivo relevance of the dissolution data obtained.
Since in vitro dissolution is a physical test, defined by convention and is of a destructive nature, proving reliability requires special attention. It therefore is within the scope of these Guidelines to define suitable testing equipment and experimental design as well as to suggest the background for adequate physical and analytical validation, together with verification procedures according to the state of biopharmaceutical science.
The Guidelines are primarily dedicated to solid oral products. However, the general concepts may be adapted to in vitro dissolution testing of drug substances/powders, semisolid oral products, suppositories and, with distinct restrictions, to other non-oral products.
Most drugs in the form of tablets or capsules are required to dissolve in the body within a certain time. Many of the tablets have a coating to achieve a certain time or place of release in the body. Dissolution means the dissolving of the solid drug in the formulation into a specified medium (solvent). Soft capsules may or may not have a dissolution specification because this form of dosage usually contains a liquid. The container of commercial tablets or capsules bears labeling which indicates the amount of active drug

Content Method of delivery
per unit. The result of the dissolution measurement in the USP 32 is expressed as "Q", which is the percentage of the labeled amount of active drug released in the specified time. Methods have been developed for measuring dissolution by using water or simulated body fluid mixtures. The in-vitro dissolution test correlates closely with the ability of the drug to dissolve in the human system. Some drugs require that solubility be measured as a function of time; others specify a fixed time only.
This module is aimed at assisting the analyst to develop the necessary skills for measuring drug dissolution in a quantitative manner.
The following references form a part of the training and should be studied before the laboratory portion of this module is performed:
1. Cox, D.C., Furman, W.B., Moore, T.W., and Wells, C.E.
Guidelines for Dissolution Testing: An addendum, Pharmaceutical Technology, Vol.8, No. 2, February 1984, pages 42-44 (copy attached)*.
2. USP 32, 711, page 1578, describing DISSOLUTION.
The MOC will have the Hanson dissolution instrument which consists of three basic components, as follows: DDA:
1. Temperature-controlled bath set at 37 % 0.5°C. The water level in the bath should be adjusted to just below the water level in the vessel when either 500 or 900 mL is used inside the vessel.
2. Six covered vessels, each 1000 mL capacity with a hemispherical bottom. The vessels may be either transparent glass or plastic.
3. Variable speed stirrers. All stirrers operate at the same speed and are driven by a belt and gears.
Dissolution can be measured by two different methods: (1) the basket method and (2) the paddle method. The USP designates the basket method as "Apparatus 1" and the paddle method as "Apparatus 2".
8.1.1. WHY IN-VITRO DISSOLUTION TESTING?
For selection of the formulation in the development phase
It is a requirement for comparative dissolution data for the bio-batch and innovator batch
Demonstration of in vivo bioequivalence of one or more of the lower strength(s) of an

Content Method of delivery
Finished Pharmaceutical product (FFP)
Comparison of the release properties of pivotal batches
Selection of the dissolution specifications for product release & stability purposes
Post-approval amendment application
INSTRUMENT SETUP
Setting up the instrument and aligning the system is the most important step in dissolution measurements. Follow the procedure carefully.
PRELIMINARIES
Before beginning the instrument setup, obtain the following standards and dry them according to instructions of the USP:
1. USP Aspirin Reference Standard.
2. USP Salicylic Acid Calibrator Standard (non-disintegrating type).
3. USP Prednisone Calibrator Standard (disintegrating type).
Store all standards in a desiccator until the analysis is complete.

Content Method of delivery
8.1.2. ALIGNMENT OF DISSOLUTION UNITS
A. Adjust the bottom of the unit until the base is level, as indicated by a bubble level.
B. Level the individual vessels by placing tape underneath each vessel.
1. The Hanson unit, vessels and vessel positions are numbered 1 to 6, starting from the front of the unit, left to right, then the back of the unit, left to right.
2. Glass vessels are not interchangeable. Once leveled, they should be marked and from then on placed in the same hole of the instrument facing the same direction.
C. With a bubble level, make the paddle or basket shafts vertical by using the adjustments on the sides and the back of the Hanson dissolution unit.
D. Center the Hanson units.
1. Center the vessels with the centering tool for the Hanson units.
2. Put water in each vessel to keep it from floating if water is in the dissolution bath. If the shafts are Teflon-coated, turn them upside down. Place a centering tool on each shaft; lower it several times on top of the vessel until it centers. Tighten the three retaining rings.
3. Plastic vessels are interchangeable after centering.
4. Glass vessels are not interchangeable. Once centered they should be marked and from then on placed in the same hole of the apparatus, facing the same direction.
E. Adjust the height of each shaft to 25 % 2 mm from the bottom of the paddle or basket to the inside bottom of the vessel, using a depth gauge. On the Hanson unit, set the lower collar on each of the three stainless steel rods 4.5 cm from the base of the unit. On both units, lower the assembly to rest on the collars.
Place the depth gauge on the bottom of each vessel, lower the paddle or shaft containing the basket to the top of the gauge, and tighten the shafts. When using baskets, mark their positions
by wrapping tape on the top of the shafts .
F. Keep the vibration of dissolution apparatus to a minimum.
1. The external heater/circulator must not touch the dissolution apparatus.
2. The dissolution apparatus motor or other motors nearby must not cause shafts to vibrate.
G. Make sure that the belts drive of the apparatus rotates smoothly; oil, grease, or

Content Method of delivery
change bearings if necessary.
H. Fill the dissolution water bath so the level is just below the water level in the vessels when they are filled with 500 or 900 mL.
I. Add Clear Bath (part number 105540, Spectrum Medical Industries, Inc., 60916 Terminal Annex, Los Angeles, CA 90060), 5-6 drops per gallon, to the bath to prevent algae formation.
J. If desired, put the holding tank heater and the heaters used for the Hanson and Distek unit on timers so that the water is preheated when you come in.

Content Method of delivery
8.1.3. PREPARATION OF DISSOLUTION MEDIUM FOR RESPECTIVE DRUG
A. Degas all dissolution medium daily, as follows: Fill a glass carboy with up to 18 liters of dissolution medium (the USP method specifies the medium for each drug), and place the 2-holed stopper with the two pieces of glass tubing into the carboy (the carboy must have some glass tape on the outside to prevent implosion). Turn on the vacuum, allow air to be introduced into the bottom of the carboy, set the pressure to 140-150 mm mercury, and degas for at least 20 minutes with a high velocity vacuum pump (low velocity systems will not work).
B. Treat the degassed medium as follows:
1. Siphon the degassed medium into six 500 or 900 mL volumetric flasks, filling to the mark. Place in a water bath at approximately 38°C until the medium equilibrates (approximately 20 minutes).
2. Slowly pour the contents of each flask of the equilibrated medium down the inside walls of the dissolution vessels. This helps prevent splashing and introduction of air into the vessels.
3. Check the temperature of the dissolution medium in the vessel. The temperature must be 37 % 0.5°C before the test begins.
8.1.4. PROCEDURE FOR SAMPLE DISSOLUTION BY THE BASKET METHOD
(APPARATUS 1)
A. Place one tablet in each basket and attach to the basket shaft. When the baskets are out of the bath, they are in the up position.
B. Start rotation, check the revolutions per minute (rpm) of the shaft with a stopwatch, and adjust if necessary.
C. Lower basket shaft #1 to the preset depth into vessel #1 and lower each of the next numbered baskets into its vessel at 1 minute intervals thereafter.
D. Place the evaporation cover on each vessel.
E. At the end of the specified dissolution time withdraw an aliquot of dissolution medium from vessel #1. (NOTE: The following steps described in section E are for manual operation.)
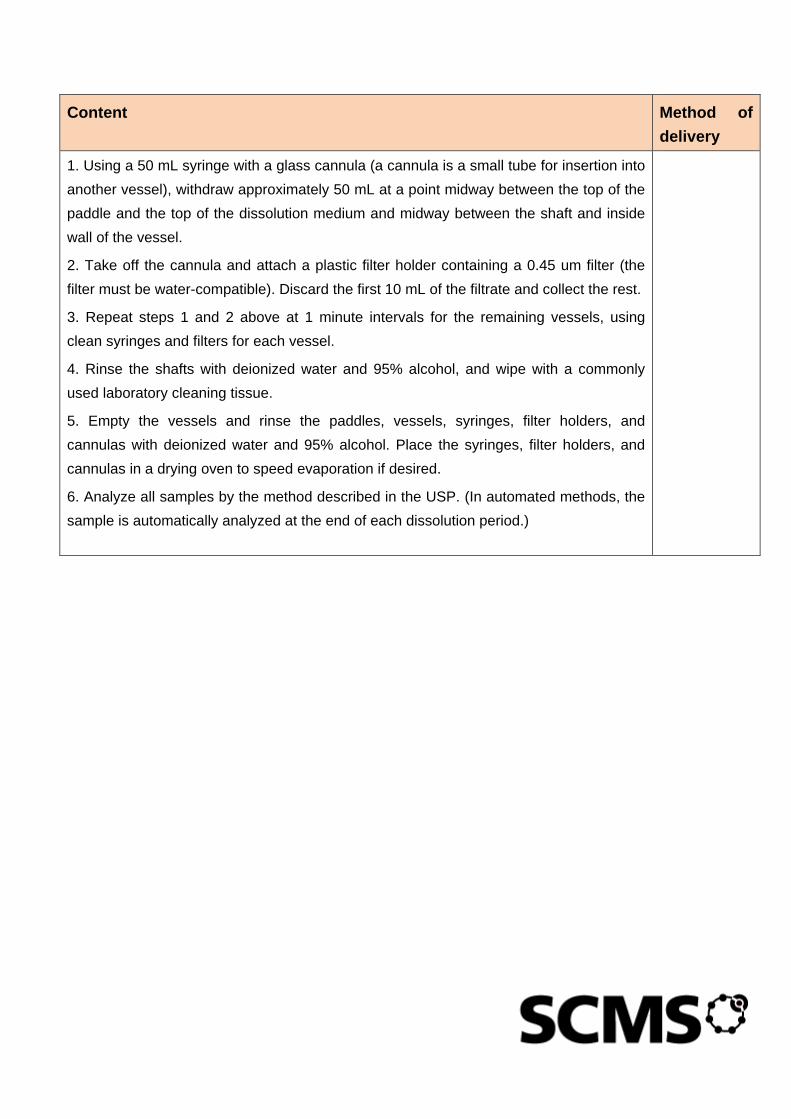
Content Method of delivery
1. Using a 50 mL syringe with a glass cannula (a cannula is a small tube for insertion into another vessel), withdraw approximately 50 mL at a point midway between the top of the paddle and the top of the dissolution medium and midway between the shaft and inside wall of the vessel.
2. Take off the cannula and attach a plastic filter holder containing a 0.45 um filter (the filter must be water-compatible). Discard the first 10 mL of the filtrate and collect the rest.
3. Repeat steps 1 and 2 above at 1 minute intervals for the remaining vessels, using clean syringes and filters for each vessel.
4. Rinse the shafts with deionized water and 95% alcohol, and wipe with a commonly used laboratory cleaning tissue.
5. Empty the vessels and rinse the paddles, vessels, syringes, filter holders, and cannulas with deionized water and 95% alcohol. Place the syringes, filter holders, and cannulas in a drying oven to speed evaporation if desired.
6. Analyze all samples by the method described in the USP. (In automated methods, the sample is automatically analyzed at the end of each dissolution period.)
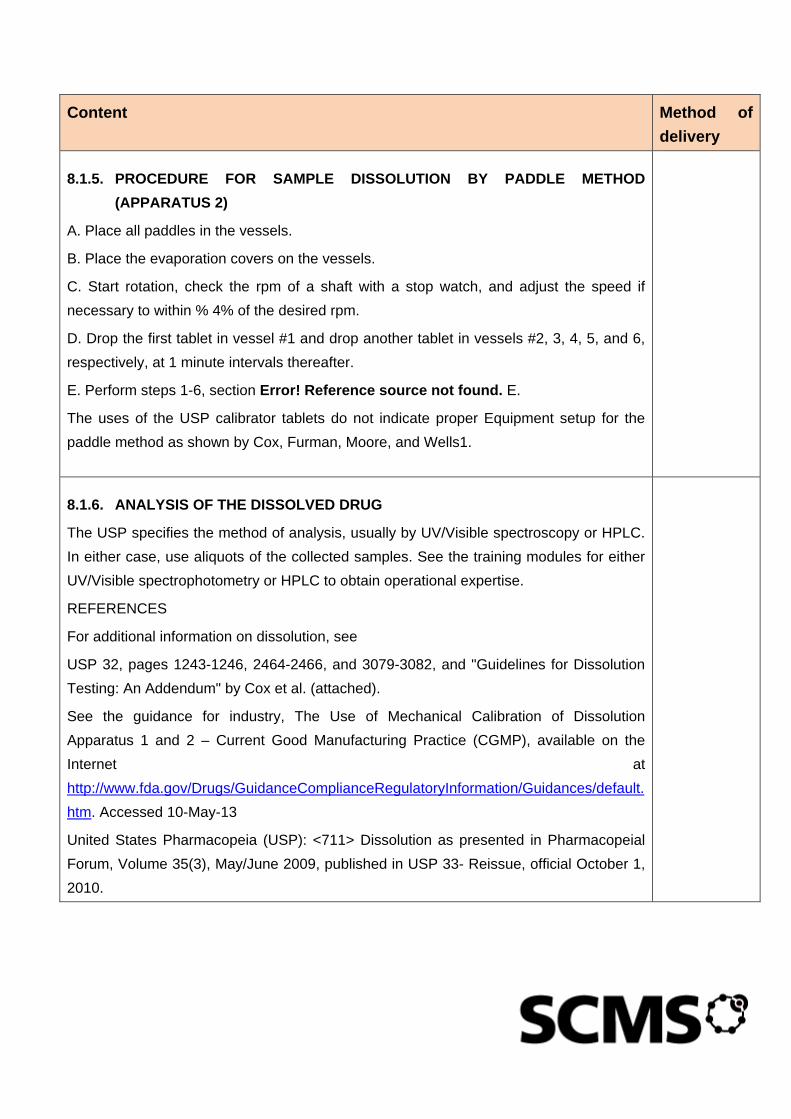
Content Method of delivery
8.1.5. PROCEDURE FOR SAMPLE DISSOLUTION BY PADDLE METHOD (APPARATUS 2)
A. Place all paddles in the vessels.
B. Place the evaporation covers on the vessels.
C. Start rotation, check the rpm of a shaft with a stop watch, and adjust the speed if necessary to within % 4% of the desired rpm.
D. Drop the first tablet in vessel #1 and drop another tablet in vessels #2, 3, 4, 5, and 6, respectively, at 1 minute intervals thereafter.
E. Perform steps 1-6, section Error! Reference source not found. E.
The uses of the USP calibrator tablets do not indicate proper Equipment setup for the paddle method as shown by Cox, Furman, Moore, and Wells1.
8.1.6. ANALYSIS OF THE DISSOLVED DRUG
The USP specifies the method of analysis, usually by UV/Visible spectroscopy or HPLC. In either case, use aliquots of the collected samples. See the training modules for either UV/Visible spectrophotometry or HPLC to obtain operational expertise.
REFERENCES
For additional information on dissolution, see
USP 32, pages 1243-1246, 2464-2466, and 3079-3082, and "Guidelines for Dissolution Testing: An Addendum" by Cox et al. (attached).
See the guidance for industry, The Use of Mechanical Calibration of Dissolution Apparatus 1 and 2 – Current Good Manufacturing Practice (CGMP), available on the Internet at http://www.fda.gov/Drugs/GuidanceComplianceRegulatoryInformation/Guidances/default.htm. Accessed 10-May-13
United States Pharmacopeia (USP): <711> Dissolution as presented in Pharmacopeial Forum, Volume 35(3), May/June 2009, published in USP 33- Reissue, official October 1, 2010.

8.1.7. APPARATUS SUITABILITY TEST
After the dissolution apparatus is set up, it must be calibrated with USP calibrator standards. Use both the USP disintegrating type (Prednisone 50 mg, current lot) and the non-disintegrating
type (Salicylic Acid 300 mg, current lot) at 50 rpm with Apparatus 1 (basket). Use Tables 1 and 2 for the preparation and suitability requirements. If the results fall outside the specifications for standard solute (Table 3), check the apparatus and solvent to find the source of the trouble. If the results are acceptable, proceed with the sample of aspirin tablets by the method in pages USP32–NF27 Page 1585.
PREPARATION OF STANDARDS FOR SUITABILITY TEST
The following is a guide for the preparation of standard solutions and the dilutions (if needed) for the analysis of the calibrator tablets. The guide is given for Apparatus 1 and 2 at 50 rpm.
PREDNISONE
Prepare a 25 mg/25 mL stock solution of USP Prednisone Reference Standard in 50% ethanol.
Prepare 12 liters of deionized water and degas as for a dissolution medium. Make all dilutions with the dissolution medium and measure the UV absorbance at 242 nm. Use the dissolution medium as reference for UV. The percent of prednisone is calculated by the relation:
(Cs) X (Au/As) X (2 mL/200 mL) X (900 mL/50 mg) X 100 = %
Prednisone
where: Cs = concentration of standard prednisone, mg/25 mL
Au = absorbance of the sample
As = absorbance of the standard.
SALICYLIC ACID
Prepare 9 liters of pH 7.4 buffer by weighing and mixing 61.25 g of potassium phosphate monobasic and 27.23 g of 50% aqueous NaOH solution. Use a pH meter to adjust to pH 7.4, if necessary. This buffer is the dissolution medium.
Prepare a 25 mg/25 mL stock solution of USP Salicylic Acid

Reference Standard in 95% ethanol.
Make all dilutions with the dissolution medium. Measure the UV absorption at 296 nm. Calculate the percentage of salicylic acid by the relation:
(Cs) X (Au/As) X (3 mL/200 mL) X (15 mL/50 mL) X (900 mL/300
mg) X 100 = % Salicylic acid
where: Cs = concentration of standard salicyclic acid, mg/25
Au = absorbance of the sample
As = absorbance of the standard.
If the calibrators show that the apparatus requirements are met, proceed with the aspirin dissolution test. Use the procedure for aspirin tablets described in USP32–NF27. Make up 9 liters of an acetate buffer for the dissolution medium by weighing 26.91 g of sodium acetate trihydrate and 14.94 mL of glacial acetic acid and diluting to the required volume with deionized water.
Prepare a standard solution of aspirin by weighing an amount of USP Aspirin Reference Standard approximately equivalent to 100% dissolution (i.e., 325 mg of aspirin in 500 mL of acetate buffer equals 65 mg per 100 mL) into a 100 mL volumetric flask.
(NOTE--Do not exceed the 65 mg weight.) You may use some alcohol to dissolve the pure aspirin, but do not exceed 1%, based upon the final concentration. In this case, add 1 mL of alcohol to the weighed powder, and dilute to volume with the acetate buffer.
Perform all dissolution tests in units of six tablets. When the criteria are met at any stage, do not perform any further testing. If there is failure at any stage, proceed to the next stage of testing until all three stages have been completed. The sample is not considered to fail to meet specifications until all three stages of test have been completed. If one or more tablets fall below Q-25, or if more than two tablets fall below Q-15, stop the test after 12 units. A minimum of six units and a maximum of 24 units are required for any acceptance or rejection of the drug.
Sampling may be done manually or automatically. If automatic sampling is available, the time of sampling must be entered into the program before measuring (see the discussion under Hewlett-Packard Automatic Sampling System). The dissolved sample and the standard are measured by UV at 265 % 2 nm.
The amount dissolved is calculated by the relation:
(Cs) X (Au/As) X (500 mL/325 mg) X 100 = % Aspirin
where Cs = concentration of standard aspirin, mg/100 mL
Au = absorbance of the sample

As = absorbance of the standard.
The acceptance criterion for aspirin is 80% dissolved in 30 minutes.
USP defines the amount dissolved as a percentage of the labeled amount of the active ingredient as "Q". All dissolution measurements have an acceptance criterion as shown in the Table .
8.1.8. ACCEPTANCE CRITERA FOR DISSOLUTION
Stage No. samples tested
Criteria
S1 6 Each unit not less than (Q + 5%)
S2 12 Average of 12 units (S1+ S2) is equal to or greater than Q, and no unit less than (Q -15%)
S3 24 Average of 24 units (S1+S2+S3) is equal to or greater than Q; not more than 2 units less than Q -15% and no unit less than (Q -25%).
DISSOLUTION BY APPARATUS #2
If time permits, test the calibrators and aspirin sample by the paddle procedure.
Many of the USP dissolution methods specify Apparatus #2, which is the paddle method. The setup of the instrument and the alignment of the vessels and shafts are the same as those specified for the basket method. The difference is in the manner of introducing the sample into the medium and the type of stirrer. All other operations are the same as these described for the basket method.
Drop the tablets down the side of the vessel. Mount each capsule in helix-shaped wire holders and drop them down the side of the vessel so that the capsule will sink. After aligning and filling the vessels with the medium, lower all stirrers into the medium and start rotation. Set the stirring speed to within % 4% of the designated rate with a stopwatch. Drop the first tablet (or weighed capsule) down the side of vessel #1. After a short delay, e.g., one minute, drop the next tablet into vessel #2 and so on, until all six samples have been added to the respective vessel. Sample each vessel and filter after the dissolution time is reached. When all six samples have been completed, wash off all stainless steel parts of the apparatus with deionized water and rinse them with 95% alcohol. Dry the parts with a lab cleaning tissue. When using acid dissolution medium, do this immediately after completing the test to prevent corrosion.

SUMMARY OF STEPS IN DISSOLUTION
1. Dry the standards.
2. Set up the instrument and align all components.
3. Prepare the dissolution medium for salicylic acid
(phosphate buffer, pH 7.4) for instrument suitability and degas.
4. Prepare a standard solution of salicylic acid in dissolution solution, and perform the dissolution test on the USP dissolution standard (non-disintegrating type). Measure the amount of salicylic acid by UV at 296 nm.
5. Prepare the dissolution medium for prednisone (deionized water) and degas.
6. Prepare a standard solution of USP Prednisone Reference Standard in dissolution medium, and perform the dissolution test on the USP dissolution standard (disintegrating type). Measure the amount of prednisone by UV at 242 nm.
7. Determine the instrument suitability. If instrument standards are not met, determine the cause.
8. Prepare the dissolution solution for aspirin (acetate buffer, pH 4.5) and degas.
9. Prepare the aspirin standard, using 1% alcohol, and perform the dissolution test on aspirin, using Apparatus I (basket). Measure the amount of aspirin by UV at 265 nm.
10. Calculate the results.
11. Determine if the sample meets USP specifications.
12. Repeat all of the above steps, except those for the standard preparations, using the Apparatus II (paddle method).

8.1.9. CASE STUDY: DISSOLUTION OF PARACETAMOL TABLETS
Medium: pH 5.8 phosphate buffer (see Buffer Solutions in the section Reagents, Indicators, and Solutions); 900 mL.
Apparatus 2: 50 rpm.
Time: 30 minutes.
Procedure— Determine the amount of C8H9NO2 dissolved by employing UV absorption at the wavelength of maximum absorbance at about 243 nm on filtered portions of the solution under test, suitably diluted with Dissolution Medium, if necessary, in comparison with a Standard solution having a known concentration of USP Acetaminophen RS in the same Medium.
Tolerances— Not less than 80% (Q) of the labeled amount of C8H9NO2 is dissolved in 30 minutes.