Embed Size (px)
DESCRIPTION
hp
Citation preview

UniBeast: Install OS X Mountain Lion on Any Supported Intel-based PC
Installing or updating to the latest version of OS X on a PC is simpler than ever. This guide requires no programming or coding experience and all of the tools areavailable right here on tonymacx86.com.
UniBeast Overview 1. Purchase the OS X Mountain Lion Application from the Mac App Store 2. Prepare a UniBeast USB flash drive3. Install OS X Mountain Lion 4. Install the bootloader and drivers using MultiBeast
In order to start fresh, you'll need access to a functional computer running Mac OS X Snow Leopard 10.6.6 or later. This is a requirement, as you need OS X to createthe installation drive. To start from scratch, booting the 10.6 Snow Leopard Retail DVD directly, check out iBoot + MultiBeast. For a quick rundown of recommendedBIOS settings, check out this post.
STEP 1: Purchase OS X Mountain Lion The operating system is not free. Purchase and download the Application from the Mac App Store using an Apple ID on any Mac or functional computer running OS X10.6.6 or later.
STEP 2: Create a Bootable USB Drive Using UniBeastTake a deep breath and take your time- this is pretty simple, but it's easy to miss things if you rush. Follow each step to the letter.
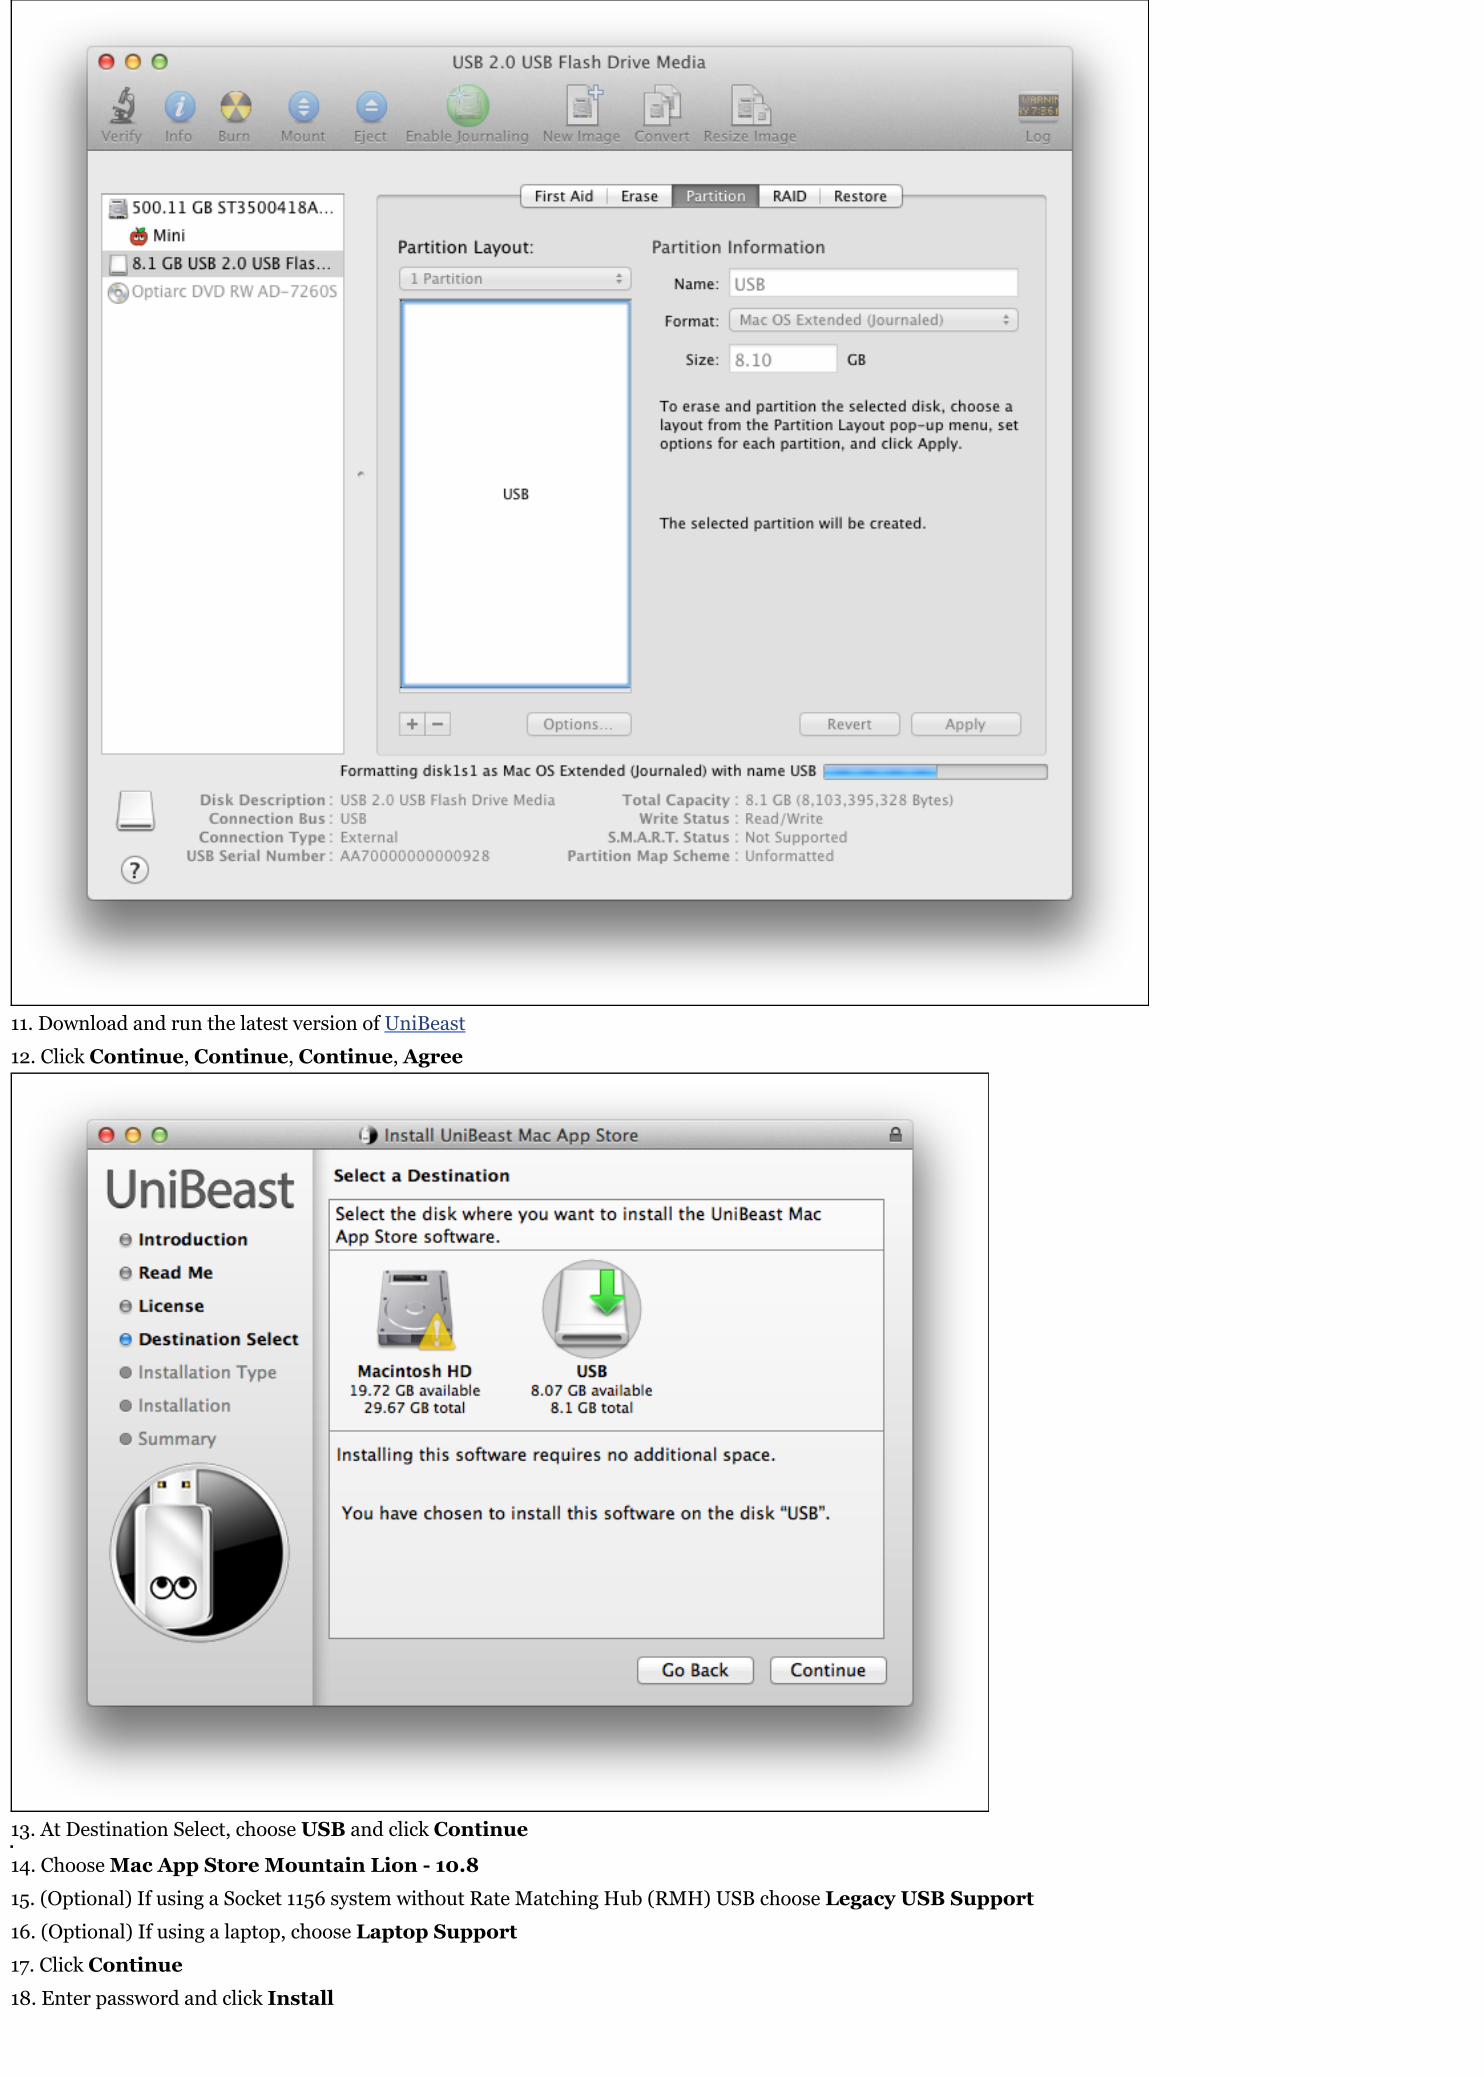
1. Insert the USB drive into a USB 2.0 port2. Open /Applications/Utilities/Disk Utility3. Highlight the USB drive in left column
4. Click on the Partition tab5. Click Current and choose 1 Partition
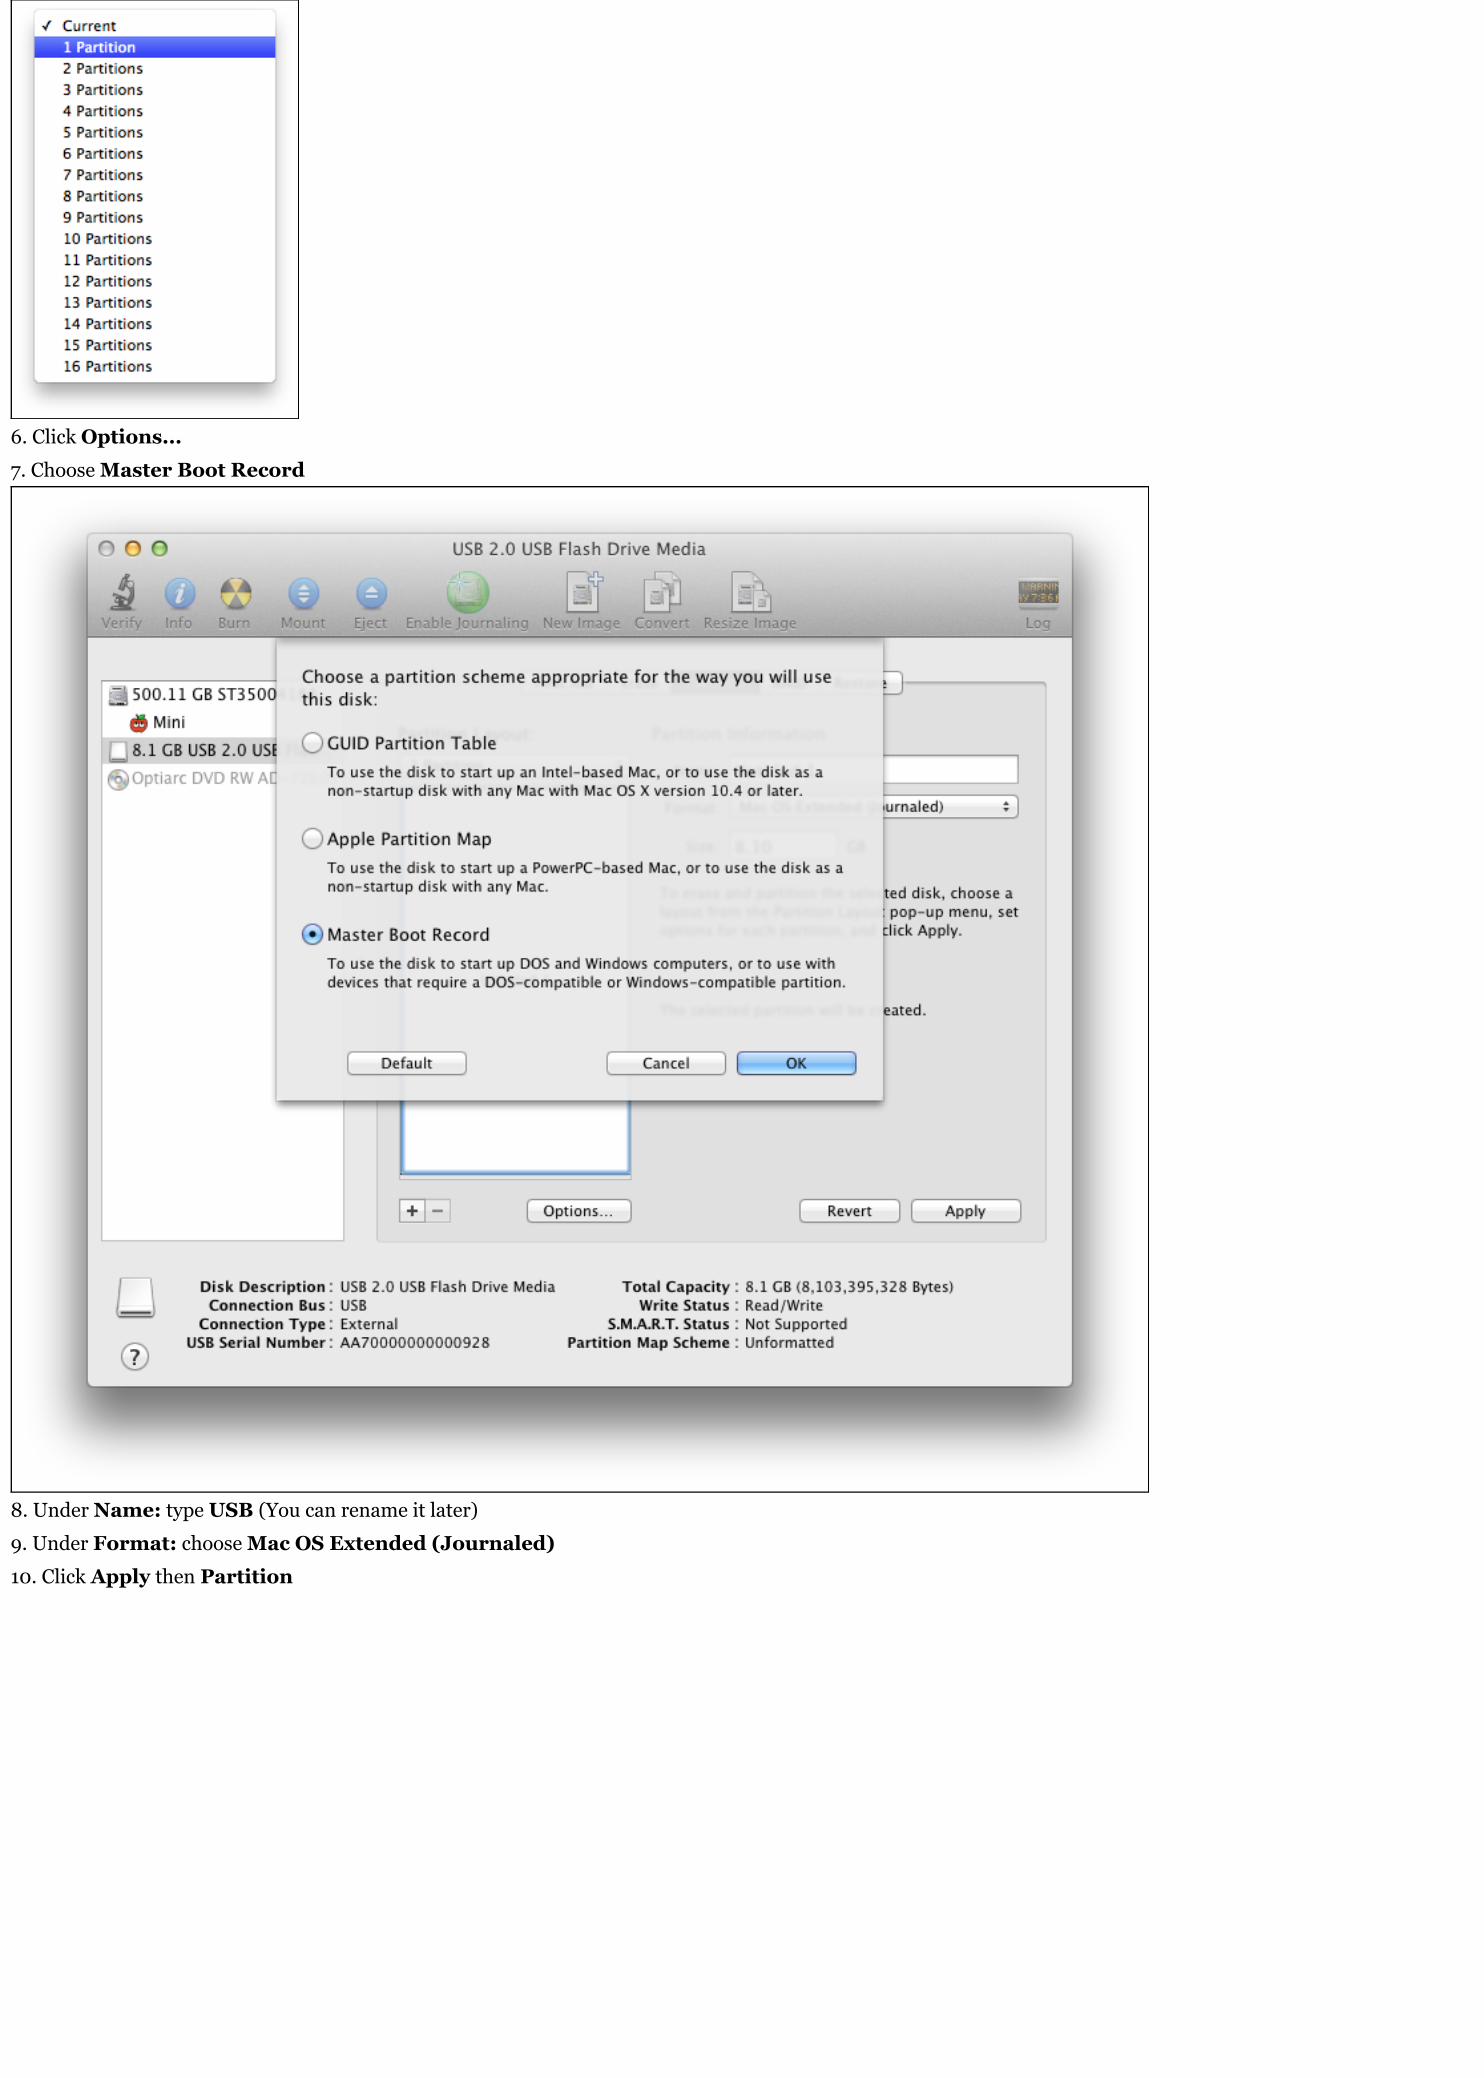
6. Click Options...7. Choose Master Boot Record
8. Under Name: type USB (You can rename it later)9. Under Format: choose Mac OS Extended (Journaled)10. Click Apply then Partition
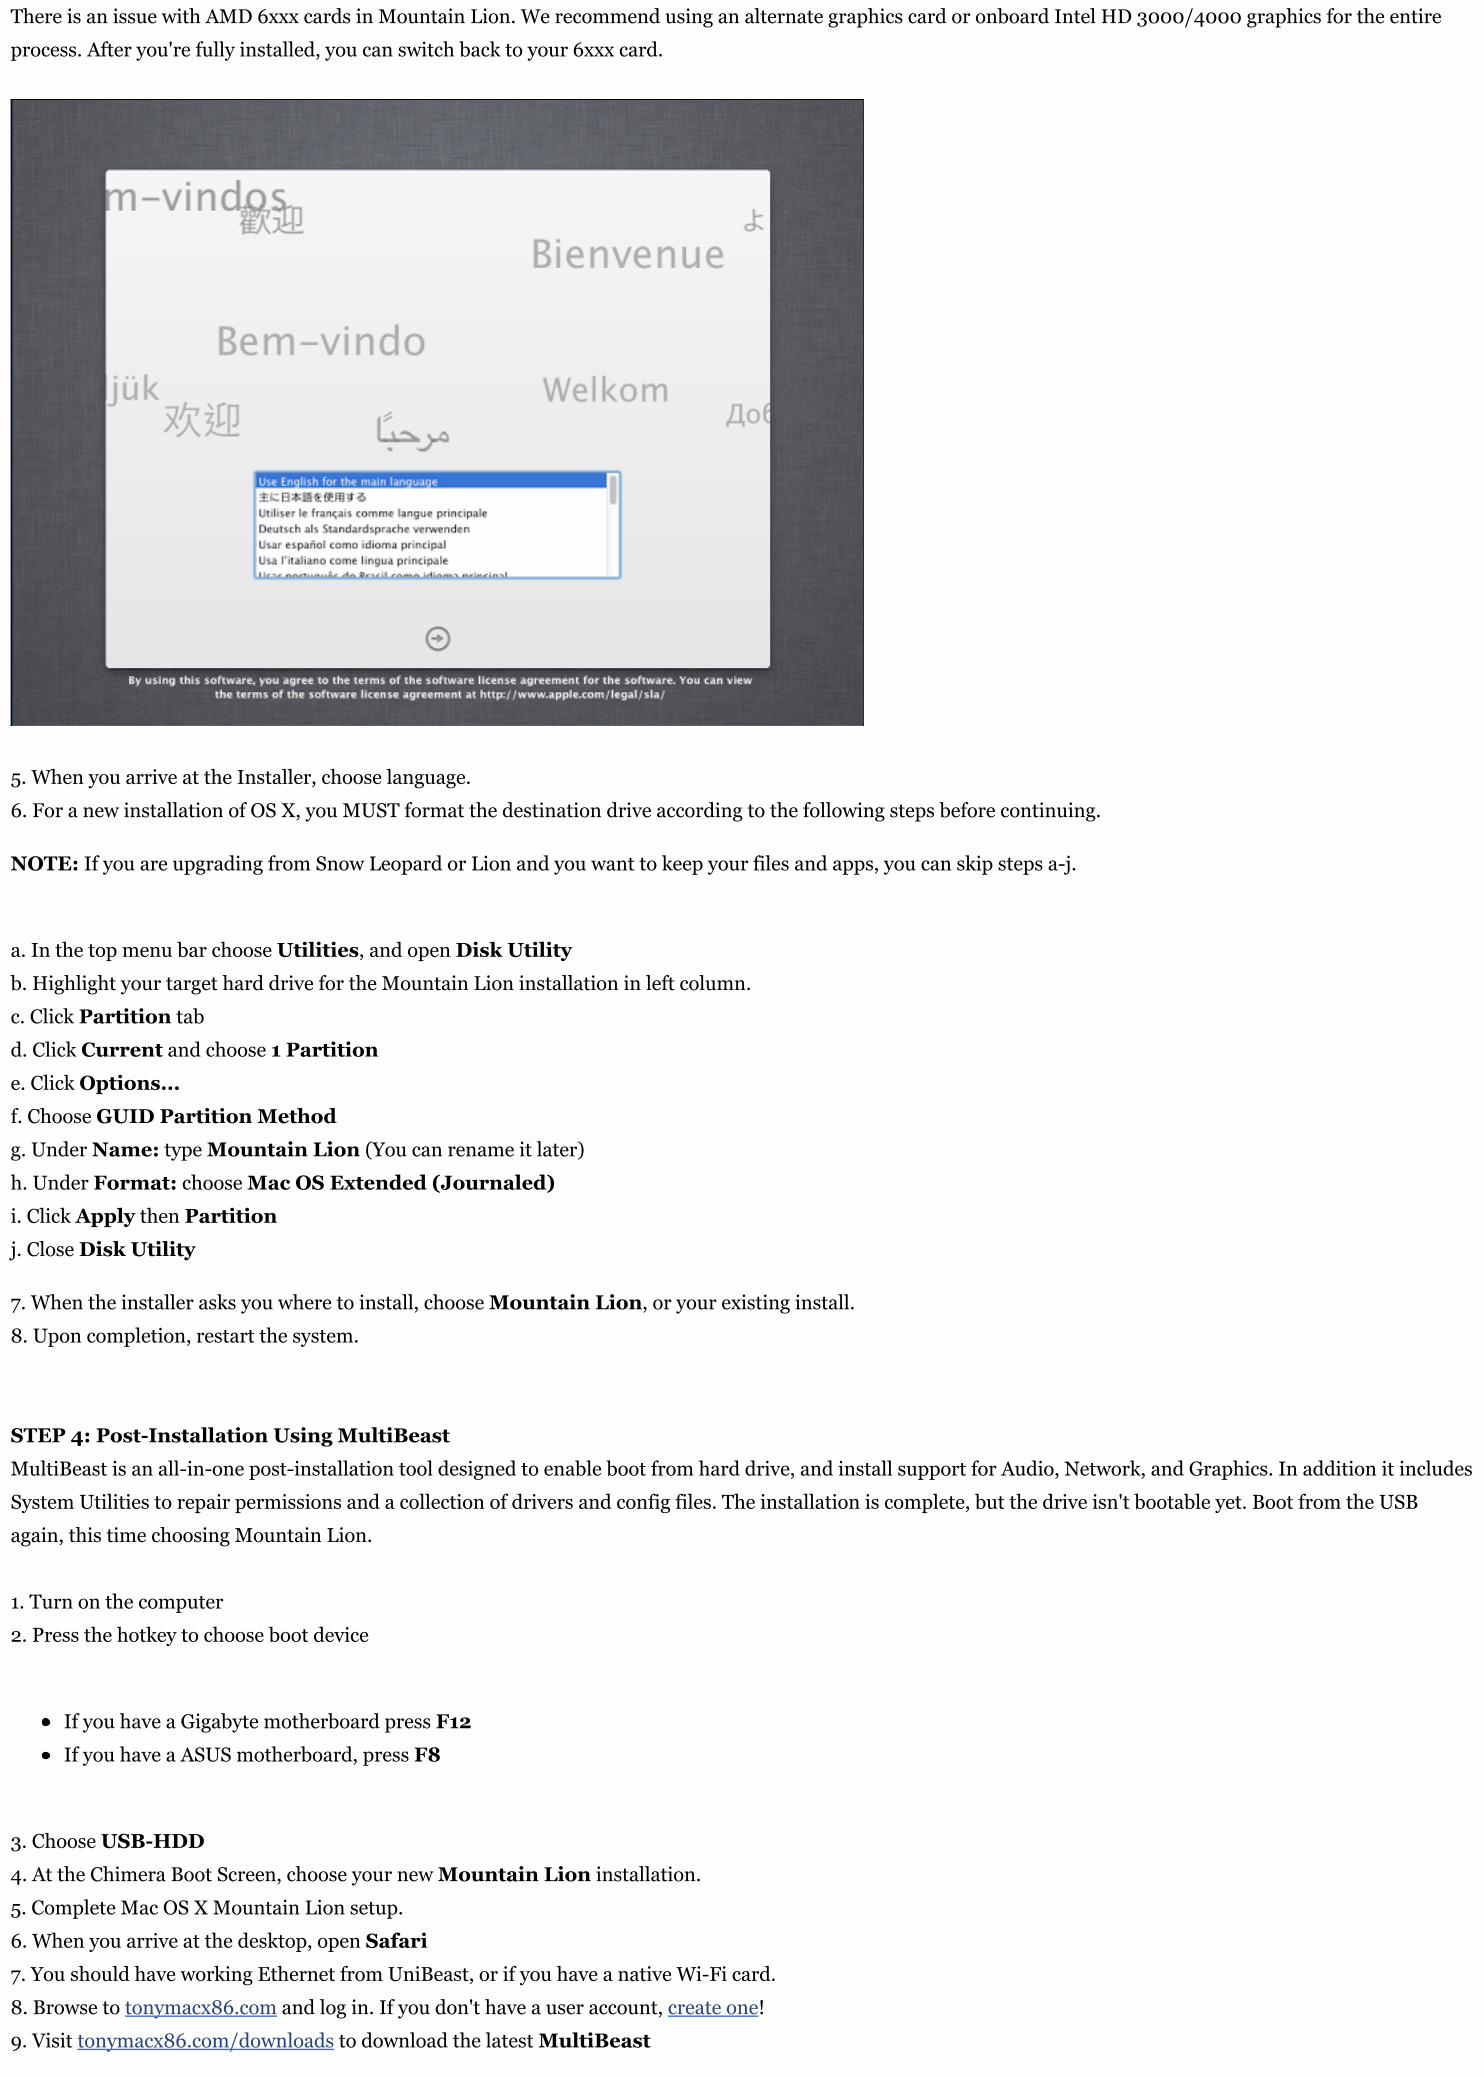
11. Download and run the latest version of UniBeast 12. Click Continue, Continue, Continue, Agree
13. At Destination Select, choose USB and click Continue
14. Choose Mac App Store Mountain Lion - 10.815. (Optional) If using a Socket 1156 system without Rate Matching Hub (RMH) USB choose Legacy USB Support16. (Optional) If using a laptop, choose Laptop Support 17. Click Continue18. Enter password and click Install

The process will only take about 10-15 minutes, depending on system and drive speed, but may show hours. This is normal. Do not unplug or stop during this time.
STEP 3: Install OS X Mountain LionYou're almost done! All you need to do is boot from the USB drive and install! Set your BIOS or UEFI to Optimized Defaults, and your hard drive to AHCI mode.
1. Turn on the computer2. Press the hotkey to choose boot device
If you have a Gigabyte motherboard press F12If you have a ASUS motherboard, press F8
3. Choose USB-HDD

4. At the Chimera Boot Screen, choose USB and hit Enter
Optional Boot Arguments & Troubleshooting TipsFor some hardware, it may be more difficult to get to the installation screen. For maximum compatibility, we recommend using integrated graphics (HD 3000/4000)for the installation, then adding your discrete graphics card after a successful installation.
You may have to type extra boot arguments in the system at the boot screen you see above. You can hit arrow-down as well on the boot screen to access boot options.Here are a list of things you can try in order to troubleshoot booting to the installer. You will have to troubleshoot this part yourself according to your own hardwarespecs. We've provided a few tips below.
Black Screen, White Screen, Flickering ScreenIt's your graphics or possibly your choice of graphics port. The DVI or the HDMI port are usually the most compatible for installation. Reboot and try another port orone of the following flags.
npci=0x3000This setting may be necessary on motherboards using Fermi and Kepler NVIDIA cards for installation.
PCIRootUID=0UniBeast has PCIRootUID=1 set by default for the most universal support for recommended builds. Set it manually to 0 by typing this command at the boot screenabove.
GraphicsEnabler=No You can install without graphics card injection. This can solve many issues, allowing you to access the installer screen.
-vVerbose Mode- allowing you to see the loading of the OS instead of the Apple Boot Screen.
-xSafe Mode- loads only basic drivers. Sometimes a cure-all to reach the installer.
Special Instructions for AMD 6xxx Graphics Cards:
There is an issue with AMD 6xxx cards in Mountain Lion. We recommend using an alternate graphics card or onboard Intel HD 3000/4000 graphics for the entireprocess. After you're fully installed, you can switch back to your 6xxx card.
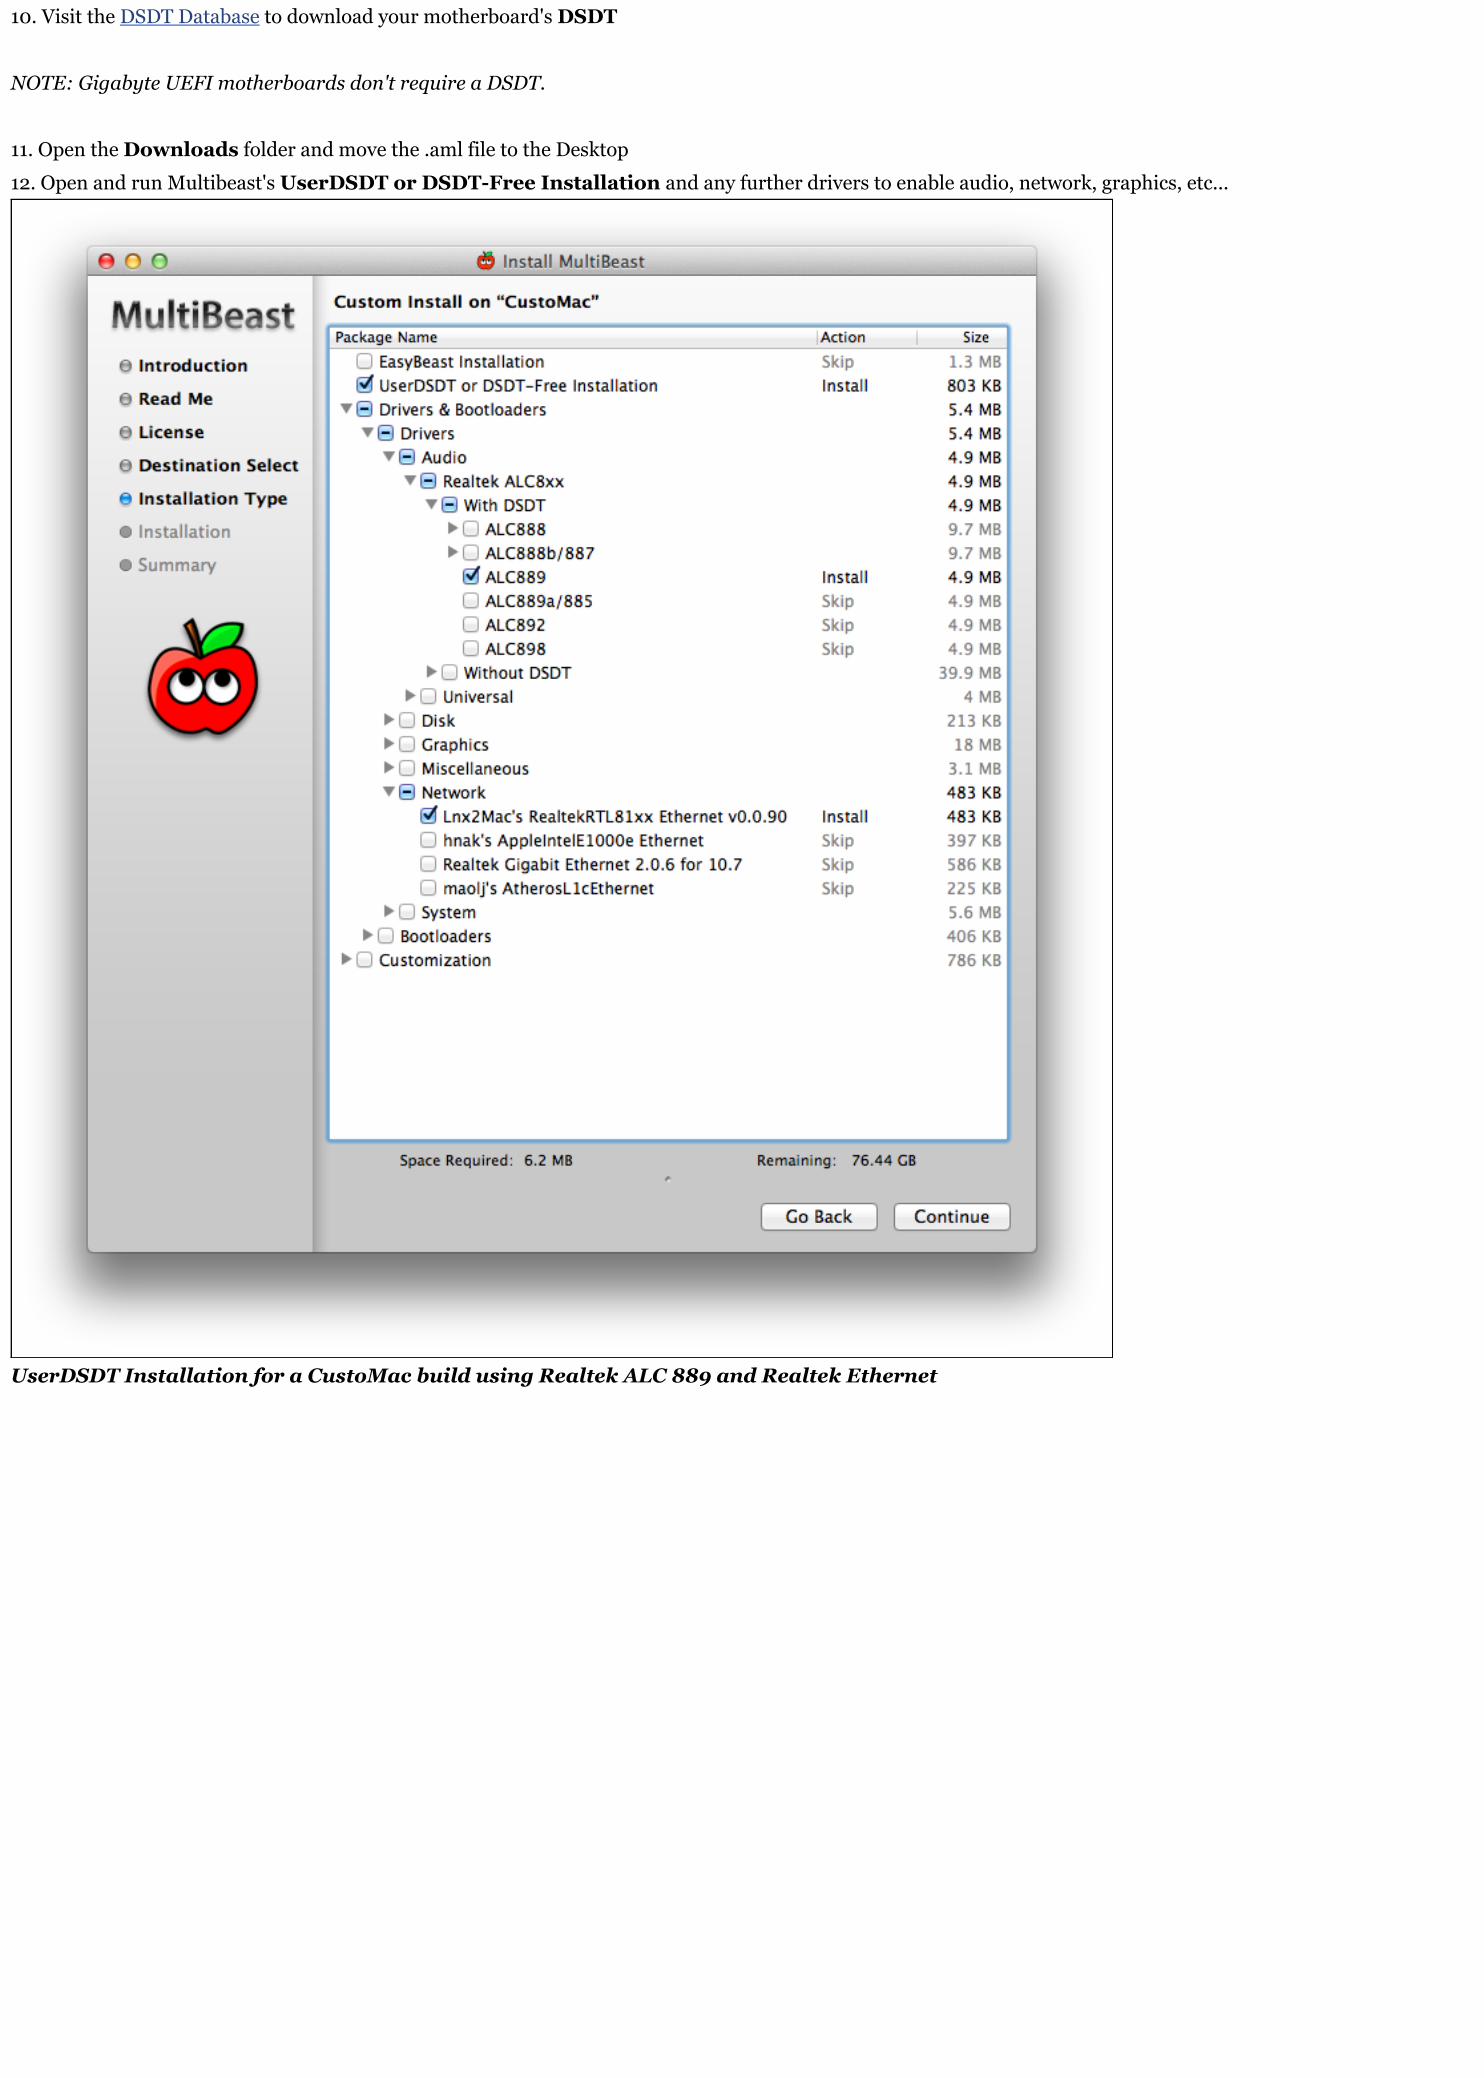
5. When you arrive at the Installer, choose language.6. For a new installation of OS X, you MUST format the destination drive according to the following steps before continuing.
NOTE: If you are upgrading from Snow Leopard or Lion and you want to keep your files and apps, you can skip steps a-j.
a. In the top menu bar choose Utilities, and open Disk Utilityb. Highlight your target hard drive for the Mountain Lion installation in left column. c. Click Partition tabd. Click Current and choose 1 Partitione. Click Options...f. Choose GUID Partition Methodg. Under Name: type Mountain Lion (You can rename it later)h. Under Format: choose Mac OS Extended (Journaled)i. Click Apply then Partitionj. Close Disk Utility
7. When the installer asks you where to install, choose Mountain Lion, or your existing install.8. Upon completion, restart the system.
STEP 4: Post-Installation Using MultiBeastMultiBeast is an all-in-one post-installation tool designed to enable boot from hard drive, and install support for Audio, Network, and Graphics. In addition it includesSystem Utilities to repair permissions and a collection of drivers and config files. The installation is complete, but the drive isn't bootable yet. Boot from the USBagain, this time choosing Mountain Lion.
1. Turn on the computer2. Press the hotkey to choose boot device
If you have a Gigabyte motherboard press F12If you have a ASUS motherboard, press F8
3. Choose USB-HDD4. At the Chimera Boot Screen, choose your new Mountain Lion installation.5. Complete Mac OS X Mountain Lion setup.6. When you arrive at the desktop, open Safari7. You should have working Ethernet from UniBeast, or if you have a native Wi-Fi card.8. Browse to tonymacx86.com and log in. If you don't have a user account, create one!9. Visit tonymacx86.com/downloads to download the latest MultiBeast
10. Visit the DSDT Database to download your motherboard's DSDT
NOTE: Gigabyte UEFI motherboards don't require a DSDT.
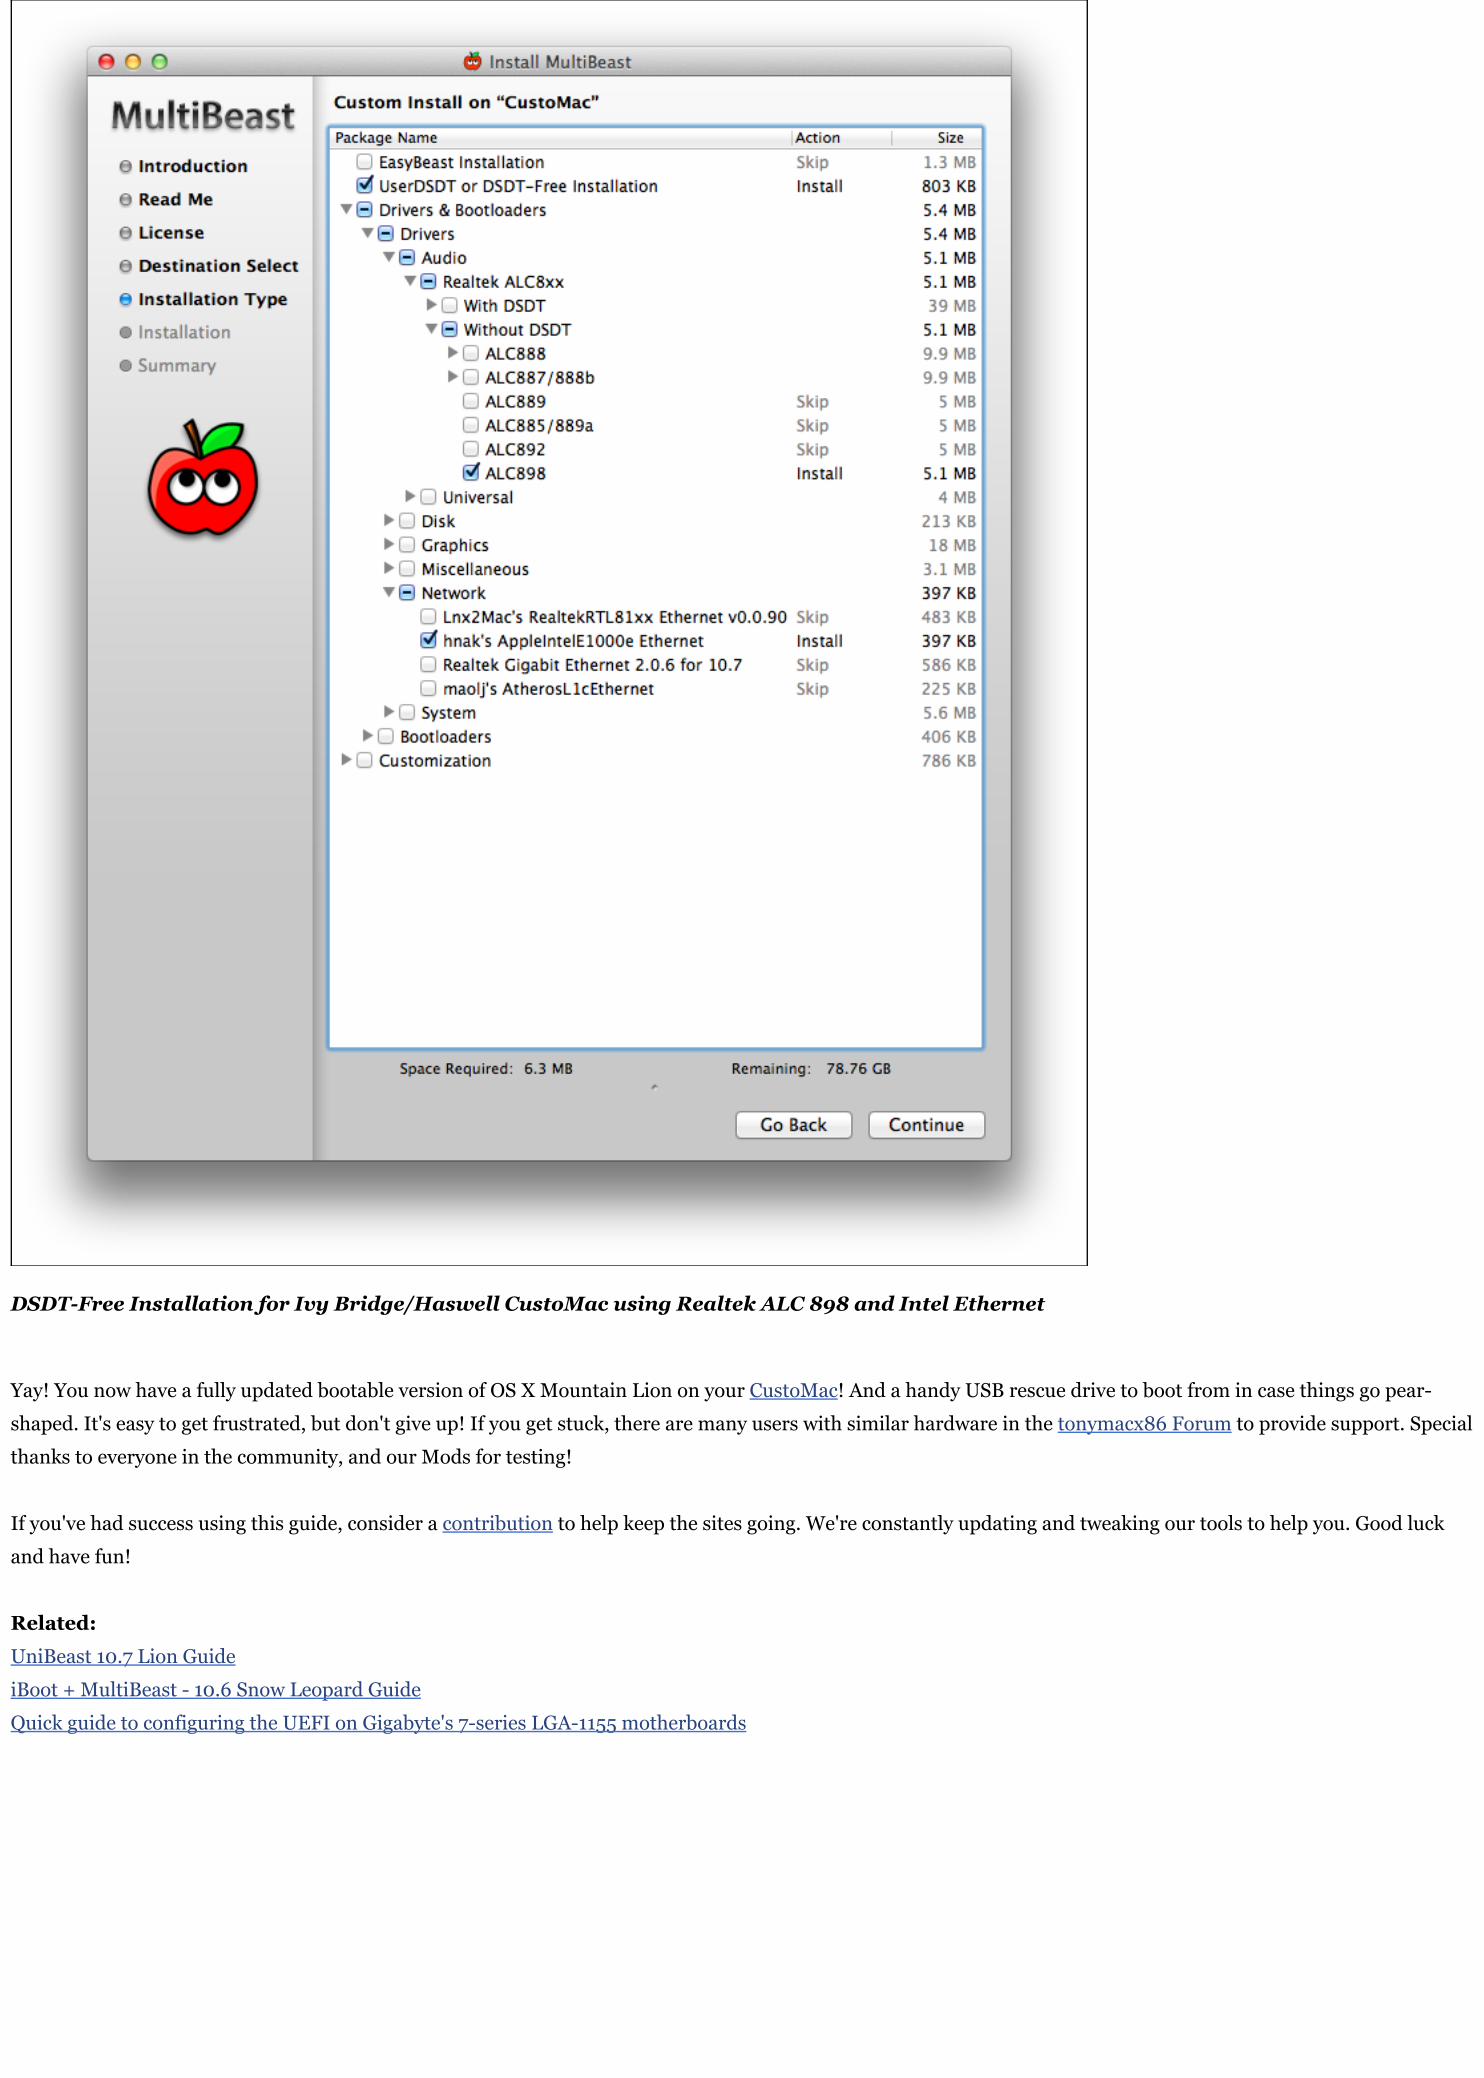
11. Open the Downloads folder and move the .aml file to the Desktop12. Open and run Multibeast's UserDSDT or DSDT-Free Installation and any further drivers to enable audio, network, graphics, etc...
UserDSDT Installation for a CustoMac build using Realtek ALC 889 and Realtek Ethernet
DSDT-Free Installation for Ivy Bridge/Haswell CustoMac using Realtek ALC 898 and Intel Ethernet
Yay! You now have a fully updated bootable version of OS X Mountain Lion on your CustoMac! And a handy USB rescue drive to boot from in case things go pear-shaped. It's easy to get frustrated, but don't give up! If you get stuck, there are many users with similar hardware in the tonymacx86 Forum to provide support. Specialthanks to everyone in the community, and our Mods for testing!
If you've had success using this guide, consider a contribution to help keep the sites going. We're constantly updating and tweaking our tools to help you. Good luckand have fun!
Related:UniBeast 10.7 Lion GuideiBoot + MultiBeast - 10.6 Snow Leopard GuideQuick guide to configuring the UEFI on Gigabyte's 7-series LGA-1155 motherboards


![Organisation & Technology Questionnaire [6] Qu-aire and Checklist.pdf · Operating System: Mac OS X Mountain Lion (10.8) Mac OS X Mountain Lion Server (10.8) Mac OS X Lion (10.7)](https://img.pdfslide.us/doc/110x75/601a3d4e9adcbe68367d5f3a/organisation-technology-questionnaire-6-qu-aire-and-checklistpdf-operating.jpg)