Embed Size (px)
Citation preview

W H I T E P A P E R
VERITAS Volume Manager for Windows Technical Review Guide
Understanding Options, Benefits and Features Of Using VERITAS Volume Manager
March, 2003
VERSION 1.0 1
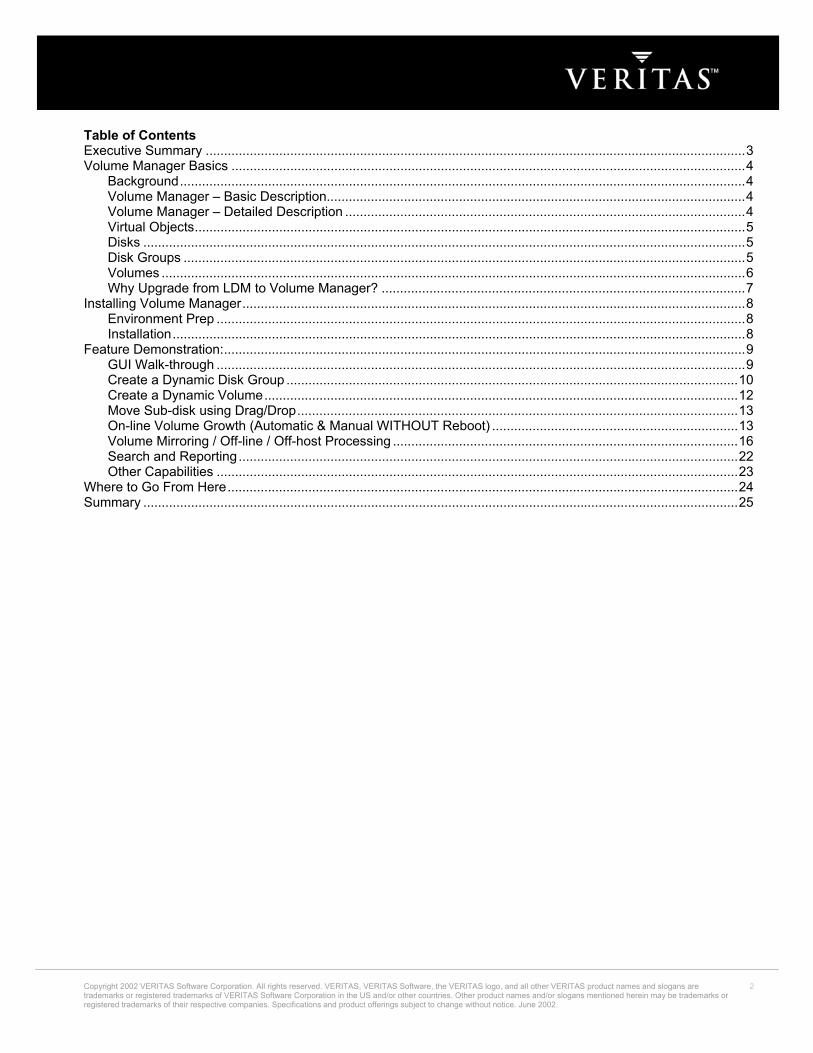
Table of Contents Executive Summary ...................................................................................................................................................3 Volume Manager Basics ............................................................................................................................................4
Background..........................................................................................................................................................4 Volume Manager – Basic Description..................................................................................................................4 Volume Manager – Detailed Description .............................................................................................................4 Virtual Objects......................................................................................................................................................5 Disks ....................................................................................................................................................................5 Disk Groups .........................................................................................................................................................5 Volumes ...............................................................................................................................................................6 Why Upgrade from LDM to Volume Manager? ...................................................................................................7
Installing Volume Manager.........................................................................................................................................8 Environment Prep ................................................................................................................................................8 Installation............................................................................................................................................................8
Feature Demonstration:..............................................................................................................................................9 GUI Walk-through ................................................................................................................................................9 Create a Dynamic Disk Group ...........................................................................................................................10 Create a Dynamic Volume.................................................................................................................................12 Move Sub-disk using Drag/Drop........................................................................................................................13 On-line Volume Growth (Automatic & Manual WITHOUT Reboot) ...................................................................13 Volume Mirroring / Off-line / Off-host Processing ..............................................................................................16 Search and Reporting........................................................................................................................................22 Other Capabilities ..............................................................................................................................................23
Where to Go From Here...........................................................................................................................................24 Summary ..................................................................................................................................................................25
Copyright 2002 VERITAS Software Corporation. All rights reserved. VERITAS, VERITAS Software, the VERITAS logo, and all other VERITAS product names and slogans are trademarks or registered trademarks of VERITAS Software Corporation in the US and/or other countries. Other product names and/or slogans mentioned herein may be trademarks or registered trademarks of their respective companies. Specifications and product offerings subject to change without notice. June 2002.
2

EXECUTIVE SUMMARY Why is VERITAS Volume Manager (VxVM) a big deal? What if every employee in your company uses Microsoft Exchange to handle their email and the Exchange server’s database becomes corrupt? How long will it take to recover? If restoring it from tape or running ESEUtil it could take days while employee productivity drops to zero. With Volume Manager, the restore can be done in minutes. Even better, you NEVER have to take the Exchange server off-line to protect its database. The same capability applies to any mission critical application. If it goes down (planned or unplanned), your company is losing money. Through Volume Manager’s management of the physical storage structure, you’re able to manipulate these storage parameters (e.g. re-size storage, backup, re-appropriation, etc.) while the application remains on-line and available. This is why Volume Manager is a big deal. Windows 2000 made a dramatic upgrade in the area of storage management when it incorporated the basic volume management technology features of Volume Manager. This storage virtualization technology abstracts your physical disks from the logical volumes seen by the O/S and applications, thus allowing you much greater flexibility in the way you manage your storage. What administrators see in Windows 2000 Disk Management snap-in of the Microsoft Management Console (MMC) is a light version of Volume Manager, called Logical Disk Manager (LDM). LDM contains a subset of the capabilities of Volume Manager, which when installed on Windows 2000 or Windows NT adds several features that go beyond LDM. Volume Manager doesn’t just replace the MMC snap-in, it adds a much more sophisticated set of storage services to Windows 2000. Once Windows 2000 is upgraded with Volume Manager, you are better able to manage multi-disk direct server-attached (DAS) storage, JBODs (just a bunch of disks), Storage Area Networks (SAN), or RAID arrays. Allowing Volume Manager to manage all disks of any kind in any location more efficiently saves money by freeing your company and applications from expensive proprietary storage. The purpose of this document is to introduce you to the benefits of using Volume Manager, the features that make it happen and how you can use Volume Manager to solve real-world storage problems today. To demonstrate the benefits of Volume Manager, you’re going to install Volume Manager on your own system and perform the following:
• Install Volume Manager • Create a Dynamic Disk Group and Dynamic Volume • Move the contents of a sub-disk w/ simple drag/drop • Demonstrate how a Dynamic Volume can be re-sized manually and automatically WITHOUT reboot • And much more..
To accomplish these tasks, you’ll need administrator access to a system that has a minimum of 2 physical non-system disks. Before we get started, here’s some background.
Copyright 2002 VERITAS Software Corporation. All rights reserved. VERITAS, VERITAS Software, the VERITAS logo, and all other VERITAS product names and slogans are trademarks or registered trademarks of VERITAS Software Corporation in the US and/or other countries. Other product names and/or slogans mentioned herein may be trademarks or registered trademarks of their respective companies. Specifications and product offerings subject to change without notice. June 2002.
3

VOLUME MANAGER BASICS Background Many Windows system administrators tend to think of a physical disk as equal to a volume. There are historical reasons why this is so, based on the original handling of partitions and volumes by Windows NT4. In the startup phase of the Windows operating system, the OS Loader reads the Master Boot Record (MBR) of a disk for information about the partitions that exist on the disk. Windows NT 4’s partitioning scheme, while appropriate for small systems that were managing 20 MB to 100 MB disks two decades ago, is inadequate for managing the mainframe-like storage available in today’s server environments. Logical Disk Manager (LDM) is the disk and volume manager that comes with Windows 2000. VERITAS developed LDM in cooperation with Microsoft to address the need for larger storage volumes and simple storage formats (e.g. mirrored or concatenated). Unfortunately, LDM only addresses part of the problem. Applications that require large storage are now also being asked to be highly available (e.g. minimum, reducing, and even non-existent maintenance windows). This is where Volume Manager shines. Volume Manager – Basic Description Both LDM and Volume Manager create a virtual layer of storage above the physical device level and below the operating system and applications by using “virtual storage objects”. The virtual storage object that is visible to users and applications is called a volume. A volume is a virtual object that stores data and is made up of space from one or more physical disks on which the data is physically stored. Volumes created by Volume Manager appear to the operating system just like partitions. All users and applications access volumes as contiguous address space ia manner similar to accessing a physical disk.
n
•
•
A hardware-based RAID functions much like Volume Manager. It presents a set of disks, also called spindles, to the operating system as devices. A single device may be composed of multiple disks, or a disk may be presented as multiple devices, or a combination of these techniques may be used. These devices are the hardware equivalent of Volume Manager Volumes. Volume Manager sees and can make use of these devices as if they were disks.
Volume Manager – Detailed Description Volume Manager and LDM both create virtual objects on both dynamic disks and basic disks and establish logical connections between those objects and the underlying physical devices. However, Volume Manager extends control of basic disks over LDM. When a basic disk is upgraded to a dynamic disk, Volume Manager creates two regions on the disk:
Public region: The public region consists of the majority of the space on the disk and represents the available space that Volume Manager can use to assign to volumes. Private region: The private region stores information about virtual objects like the Volume Manager name for the disk, which system "owns" that disk, which storage pool (disk group) the disks belongs to, and a globally unique identifier (GUID) for that disk
The private region's ability to hold this information means that the disk group is now not dependent on the registry in a single system. The disk group can, therefore, be switched between systems without having to download and update registry info.
Copyright 2002 VERITAS Software Corporation. All rights reserved. VERITAS, VERITAS Software, the VERITAS logo, and all other VERITAS product names and slogans are trademarks or registered trademarks of VERITAS Software Corporation in the US and/or other countries. Other product names and/or slogans mentioned herein may be trademarks or registered trademarks of their respective companies. Specifications and product offerings subject to change without notice. June 2002.
4

Virtual Objects A volume is a virtual object that records and retrieves data from one or more physical disks. Volumes are one of a variety of virtual object types used by Volume Manager for storage management.
Volume Manager virtual objects include:
Dynamic and basic disks • • • • •
Disk groups Volumes Subdisks Plexes
Disks Volume Manager defines all physical disks that it manages as either basic or dynamic disks. Each dynamic or basic disk corresponds to one physical disk. Basic Disks When you install Windows 2000, your physical disks are automatically initialized as basic. As stated earlier, a basic disk’s space is organized in a partition-oriented scheme rather than in dynamic volumes. Dynamic Disks After installing Volume Manager, you can upgrade the disks to dynamic. On a dynamic disk, space is organized in dynamic volumes (explained later) created with Volume Manager. Disk Groups Disk groups enable you to organize disks into logical collections. You assign disks to disk groups for management purposes, such as to hold the data for a specific application or set of applications. For example, data for MS Exchange can be placed in a disk group called exchdg. For example, a customer may wish to store their application data on a JBOD (Just Bunch of Disks) that consists of 6 physical 30GB disks. Using Volume Manager disk groups, this JBOD could be configured as a single 180GB concatenated volume or as a 90GB “mirrored” volume or as a 30GB “striped” volume. In all cases, changes can be made from one configuration to another without a system re-boot. Disk groups also enable high availability, because a disk group and its components can be moved as a unit from one host machine to another. Physical disks can be simultaneously seen by two or more hosts, but can be accessed by only one host at a time. If one host crashes, the other host can take over the failed host's disk drives, as well as its disk groups. This is known as a Clustered Disk Group and is the only way a server and its storage can be clustered with Microsoft Cluster Server or Veritas Cluster Server. There are three types of disk groups: dynamic disk group, cluster disk group, and basic disk group. Basic Disk Group Volume Manager has a single disk group for all basic disks. All non-dynamic disks are assigned to the Basic disk group. No persistent record is kept of these disks in Volume Manager and they must rebuild the Basic disk group membership every time it is stopped and restarted (for example, a reboot).
Copyright 2002 VERITAS Software Corporation. All rights reserved. VERITAS, VERITAS Software, the VERITAS logo, and all other VERITAS product names and slogans are trademarks or registered trademarks of VERITAS Software Corporation in the US and/or other countries. Other product names and/or slogans mentioned herein may be trademarks or registered trademarks of their respective companies. Specifications and product offerings subject to change without notice. June 2002.
5
Dynamic Disk Groups A dynamic disk group is comprised of dynamic disks (disks with a public and private region). Disks within a dynamic group can only belong to that group. For example, to prevent corruption, a disk could not simultaneously belong to both the acctdg and hrdg disk groups. Cluster Disk Groups Cluster disk groups are a special type of dynamic disk group. A cluster disk group is designed to be moved between systems. In the event the first system is unable to access the cluster disk group, another system can take control of that group. A cluster disk group has multiple layers of protection so that only one system in the cluster can make use of the disk group at any time—preventing data corruption. Subdisks You can divide a dynamic disk into one or more subdisks. A subdisk is a set of contiguous disk blocks that represent a specific portion of a dynamic disk, which is mapped to a specific region of a physical disk. A subdisk is a subsection of a dynamic disk's public region. A subdisk is the smallest unit of storage in Volume Manager. Therefore, subdisks are the building blocks for Volume Manager objects. Plexes Volume Manager uses subdisks to build virtual objects called plexes. A plex is a structured collection of subdisks that represents one copy of the data in a volume. Volumes A volume is a logical entity that is comprised of portions of one or more physical disks. Volumes are virtual storage devices that are used by applications in a manner similar to physical disk partitions. Due ttheir virtual nature, volumes are not restricted by thephysical size constraints that apply to a physical disk.
o
• • •
There are two types of volumes: Dynamic and Basic Basic Volumes In Volume Manager, basic volumes refer to all the volumes that are on basic disks:
Primary and extended partitions Simple logical drives that reside on extended partitions RAID volumes that were created in LDM
With Volume Manager, you can manage these basic volumes, but you cannot create new basic volumes. Whenever you upgrade a basic disk to dynamic, any basic volumes on the disk are also upgraded to dynamic volumes. Dynamic Volumes Dynamic volumes are volumes created on dynamic disks. A Dynamic volume always contains at least one plex and can also contain multiple plexes. These plexes are composed of subdisks from one or more dynamic disks. When assigning volume names, you can assign meaningful names that reflect the nature or use of the data in the volumes. For example, two volumes in exchdg can be sgvol, a volume that contains the MS Exchange storage group, and tlvol, a volume that contains MS Exchange Transaction Log.
Copyright 2002 VERITAS Software Corporation. All rights reserved. VERITAS, VERITAS Software, the VERITAS logo, and all other VERITAS product names and slogans are trademarks or registered trademarks of VERITAS Software Corporation in the US and/or other countries. Other product names and/or slogans mentioned herein may be trademarks or registered trademarks of their respective companies. Specifications and product offerings subject to change without notice. June 2002.
6

Dynamic Volume Layouts A volume's layout describes, in general terms, the number and default type of plexes that make up the volume. Dynamic volume layouts are based on the concept of disk spanning, which is the ability to logically combine multiple physical disks into a single map. This map is presented as a single device to whatever application is requesting I/O to that device. The map can be contiguous, in the case of a concatenated plex, or interleaved, in the case of a striped plex. Calculation of I/O offsets, no matter what the layout, is handled by Volume Manager. Finally, with Volume Manager you can change the dynamic volume layout without disrupting applications or file systems that are using the dynamic volume. A dynamic volume layout can be configured and tuned while the dynamic volume remains accessible.
Common dynamic volume layouts include:
Concatenated – All subdisks are arranged both sequentially and contiguously to create a single large volume to accommodate applications like databases that require more space than a single subdisk can provide.
•
•
•
•
Striped – Data is spread evenly across multiple disks providing higher data I/O response because requests can be serviced by more than one device. RAID-5 - A RAID-5 volume uses striping to spread data and parity evenly across multiple disks in an array with each stripe containing a parity stripe unit and data stripe units. Mirrored – Uses multiple plexes to duplicate the information contained in a volume. Volume Manager allows a volume to be mirrored up to 32 different locations simultaneously.
Why Upgrade from LDM to Volume Manager? Now that you know how Volume Manager and it’s cousin LDM work, why should you consider using Volume Manager? This table compares the features available in Logical Disk Manager (LDM), the disk and volume manager that comes with Windows 2000, and Volume Manager for Windows 2000. VERITAS developed LDM in cooperation with Microsoft. The fully featured VERITAS Volume Manager for Windows 2000 is an upgrade that replaces LDM, extending its capabilities.
LDM Features Volume Manager Features Dynamic volume functions: Creates, formats, and deletes concatenated, mirrored, striped, and RAID-5 volume layout types
Dynamic volume functions: Has the same layout types plus mirrored striped volumes
Volume limitations: Adds mirrors to simple volumes only
Volume limitations: Adds mirrors to all volume types except RAID-5
Mirrored volume: Two mirrors only
Mirrored volume: Up to 32 mirrors
Spanned, striped, and RAID-5: Up to 32 disks
Spanned, striped, and RAID-5: Up to 256 disks
Extends only concatenated volumes
Extends all volume types
Copyright 2002 VERITAS Software Corporation. All rights reserved. VERITAS, VERITAS Software, the VERITAS logo, and all other VERITAS product names and slogans are trademarks or registered trademarks of VERITAS Software Corporation in the US and/or other countries. Other product names and/or slogans mentioned herein may be trademarks or registered trademarks of their respective companies. Specifications and product offerings subject to change without notice. June 2002.
7

Only one dynamic disk group Multiple dynamic disk groups Advanced features: LDM does not have these Volume Manager advanced features.
Advanced features: Hot Spare, Hot Relocation, Undo Hot Relocation, and Hot Relocation Customization; Dirty Region Logging; RAID-5 Logging; Disk Replacement; Disk Evacuation; Subdisk Split, Move, and Join; Pager and Email Notification; FastResync; Snapshot Commands; Dynamic Group Split and Join.
INSTALLING VOLUME MANAGER Environment Prep To complete the exercises below and see first-hand how easy Volume Manager is to install, configure and use, you will need a Windows 2000 Server with at least 2 non-system disks and administrator access. Installation Installation Requirements
• Windows 2000 Server, Advanced Server, or Datacenter Server • Microsoft Windows 2000 Server Pack 2 or higher is required • 150 MB of disk space is required for full installation including optional programs. At least 10 MB of
additional disk space is needed for the proper operation of the software. • The minimum requirement for system memory is 128 MB; 256 MB is recommended for optimal
functioning • 400 MHz or faster Pentium is suggested. • Minimum resolution of 800 x 600 pixels is required for the monitor, but a higher resolution, such as 1024 x
768 pixels, is recommended. If you plan to use large fonts, a resolution of 1024 x 768 pixels is required. • You must have administrator privileges to install this product.
NOTE: Only one instance of Volume Manager should be running on a computer at a time. If you have a previous version of Volume Manager already installed, uninstall it before installing Volume Manager 3.1 for Windows 2000. The exceptions are Volume Manager 2.7 and 3.0, which can be upgraded without uninstalling. Installing VERITAS Volume Manager
1. To begin the installation, insert the CD on the test system. 2. Dbl-click on launch.exe in the root directory of the Volume Manager 3.1 for Windows 2000 program CD. 3. In the popup window that appears indicating that the VERITAS Enterprise Administrator will be installed
before Volume Manager 3.1 is installed, click Yes to continue. 4. Click Next to continue the installation wizard. 5. When a message appears about the VEA language pack being installed, click OK to remove the
message from the screen. The Setup Type screen appears. 6. Choose an installation setup type (Select Server) and click Next.
• Client – Installs only the client allowing storage to be managed remotely. • Client with Remote Cluster Support – Installs the client and Remote Cluster Support. • Server – Installs the client, the server, and any additional features the license key will permit. The key
listed here is an evaluation key that will enable all the advanced features of Volume Manager and permit use for 60 days. Eval Key: IJPZ-NPRX-8PJU-2RPP-RBSO-4LZN-P
7. Enter appropriate information in the Customer Information screen and license key provided and click Next.
Copyright 2002 VERITAS Software Corporation. All rights reserved. VERITAS, VERITAS Software, the VERITAS logo, and all other VERITAS product names and slogans are trademarks or registered trademarks of VERITAS Software Corporation in the US and/or other countries. Other product names and/or slogans mentioned herein may be trademarks or registered trademarks of their respective companies. Specifications and product offerings subject to change without notice. June 2002.
8

8. In the Custom Setup screen the Volume Manager 3.1 disable DMP Support and Volume Manager VVR
Support options--MSCS Support and Volume Manager 3.1 VCS Support options should already be disabled. Click Next when finished.
9. At the Ready to Install screen, click Install to install Volume Manager. A screen will appear indicating install is running.
10. Click Cancel when the Online Registration Wizard screen appears. 11. Click Finish on the screen indicating the installation has completed. 12. Click Yes when asked to reboot. NOTE: You may be asked to reboot a second time if your computer
already has dynamic boot or system volumes that were active in Windows 2000 Disk Management (the light version of Volume Manager that included with Windows 2000).
13. After your system reboots, log back in. Volume Manager is now installed. FEATURE DEMONSTRATION: Now that VM is installed on the system, we’re going to:
• Provide a brief description of the VEA console • Create a Dynamic Disk Group • Upgrade Basic disks to Dynamic disks • Demonstrate moving an entire sub-disk from one physical disk to another using Drag/Drop • Create a Dynamic Volume • Re-size a volume without rebooting and demonstrate how this can be done without admin intervention • Mirror a Volume • Demonstrate off-host processing - Take a snapshot, access snapshot volume, and resync the snapshot
using FastResync. • Demonstrate Searching and Reporting
GUI Walk-through Description: This topic will walk you through using the VERITAS Enterprise Administrator (VEA) console. The VEA console enables cross-platform, cross-enterprise volume and storage management.
1. To launch VEA, select Start > Programs > VERITAS Enterprise Administrator. The VEA console comes up, the Volume Manager program is activated, and the Connection dialog box is displayed.
2. Click the More button to expand the Connection dialog box.
3. Enter the name of the server you wish to connect to, or select it from the drop-down menu. Enter your user name and password. Note: You need to have Administrator rights to access the computer. Make sure to select the “Remember password” box to save the user name and password you enter.
4. Click OK to connect and the managed server should appear in the Tree View. When launched for the first time, all disk storage will be shown as basic disks in the BasicGroup disk group.
VEA provides a variety of ways to view and manipulate Volume Manager objects. When you launch VEA, the VEA main window is displayed.
Copyright 2002 VERITAS Software Corporation. All rights reserved. VERITAS, VERITAS Software, the VERITAS logo, and all other VERITAS product names and slogans are trademarks or registered trademarks of VERITAS Software Corporation in the US and/or other countries. Other product names and/or slogans mentioned herein may be trademarks or registered trademarks of their respective companies. Specifications and product offerings subject to change without notice. June 2002.
9

The VEA main window consists of the following components:
• A hierarchical object tree, located in the left pane of the main window, provides a dynamic display of Volume Manager storage objects and other objects on the system.
• Tabbed views, located in the right pane of the main window, lists information about the object selected in the object tree.
• A menu bar and toolbar provide access to tasks. • A status area, located at the bottom of the main window, displays information on processes initiated
by the program.
For more information on the VEA Admin Console, see the Volume Manager Quick Start Guide and Volume Manager User’s Guide on the CD.
Create a Dynamic Disk Group Description: A dynamic disk is a physical disk that can contain dynamic volumes created with Volume Manager. A dynamic volume organizes space on one or more physical disks by using a specific type of volume layout such as: simple, spanned (concatenated), mirrored, striped, RAID-5, and mirrored-striped. To create a new dynamic disk group:
1. Within the VEA console, rt.-click the Disk Groups folder 2. Select New Dynamic Disk Group from the context menu that comes up.
The New Dynamic Disk Group Wizard screen appears. 3. Click Next to continue.
A screen comes up for defining the attributes of the dynamic disk group.
Copyright 2002 VERITAS Software Corporation. All rights reserved. VERITAS, VERITAS Software, the VERITAS logo, and all other VERITAS product names and slogans are trademarks or registered trademarks of VERITAS Software Corporation in the US and/or other countries. Other product names and/or slogans mentioned herein may be trademarks or registered trademarks of their respective companies. Specifications and product offerings subject to change without notice. June 2002.
10

4. Enter the name of the dynamic disk group (DynGrp1), and include at least 2 non-system disks by highlighting and selecting Add>. Do not select the system (boot) disk.
5. Leave the disk group Types checkboxes blank. Note: For more information on optional Disk Group Types, see the Volume Manager Quick Start Guide.
6. Choose Next to continue. Normally, you would add all the disks you want in the group. If you want to add more physical disks later, you can add them to the disk group using Add Disks to Dynamic Disk Group command.
7. Select Next at Summary screen. 8. The prompt below denotes the Basic disks will be upgraded to Dynamic. Select Yes.
9. Click Finish in the final screen.
NOTE: After creating the Dynamic disks, Volume Manager will import the entire disks and create Basic Volumes. The Basic volume encompasses the entire disk of each imported disk preventing the ability to have more than 1 volume per disk. Therefore, before creating Dynamic volumes, these Basic volumes must be removed. To remove the Basic volumes:
a. In the tree view, rt.-click on any of the volumes except system volume (C: ). Select Delete Volume.
b. Repeat this until all volumes except system volume have been removed.
Once the Basic volumes have been removed, you’re ready to create new Dynamic volumes.
Copyright 2002 VERITAS Software Corporation. All rights reserved. VERITAS, VERITAS Software, the VERITAS logo, and all other VERITAS product names and slogans are trademarks or registered trademarks of VERITAS Software Corporation in the US and/or other countries. Other product names and/or slogans mentioned herein may be trademarks or registered trademarks of their respective companies. Specifications and product offerings subject to change without notice. June 2002.
11

Create a Dynamic Volume Description: Dynamic volumes are one of the many virtual storage objects used by Volume Manager to manage storage. As the name describes, Dynamic volumes are re-sizable “on the fly” without a need for system reboots. They appear to the o/s and applications as a complete disk eliminating the need for application changes in the event storage modifications are made. To create a new dynamic volume:
1. Rt.-click a dynamic disk in the tree view, the right pane, or the Disk View tab, and select New Volume from the context menu that comes up.
2. The New volume wizard appears. Click Next to continue.
3. Select the attributes listed in the picture above, and click Next to continue. This will create a volume in the Dynamic disk group DynGrp1 and be named DynVol1 with a size of 1GB.
4. In the Assign Disks for Volume screen, select Manually select disks and highlight one of the disks. Select Next to continue.
5. Select H: for the drive letter and click Next. 6. In the Create File System dialog, select NTFS and checkmark the Quick Format checkbox. Click Next. 7. Click Finish 8. Verify:
a. To see the newly created volume in the VEA console, highlight the Volumes folder in the left pane. In the right pane Volumes tab, there should be two volumes and should look like: Name Group Name Status C: Basic Group Healthy (Boot, System, Page File) DynVol1(H:) DynGrp1 Healthy
b. With the Volumes folder highlighted, select the Disks tab in the right pane. This view should look
familiar to those that have used Disks Administrator (LDM). If you only have 3 disks in your system, the view should show the system disk, a completely blank disk (showing only disk size),
Copyright 2002 VERITAS Software Corporation. All rights reserved. VERITAS, VERITAS Software, the VERITAS logo, and all other VERITAS product names and slogans are trademarks or registered trademarks of VERITAS Software Corporation in the US and/or other countries. Other product names and/or slogans mentioned herein may be trademarks or registered trademarks of their respective companies. Specifications and product offerings subject to change without notice. June 2002.
12

and the third disk showing the 1GB Dynamic volume and the amount of space on disk not yet used.
c. Verify the new volume functions properly by copying test data from the system volume to the DynVol1 (H:) volume using Windows Explorer.
Move Sub-disk using Drag/Drop Description: Another virtual storage object Volume Manager uses is the Sub-disk. You can divide a dynamic disk into one or more subdisks. A subdisk is a set of contiguous disk blocks that represent a specific portion of a dynamic disk, which is mapped to a specific region of a physical disk and is a subsection of a dynamic disk's public region. A subdisk is the smallest unit of storage in Volume Manager. Therefore, subdisks are the building blocks for Volume Manager objects. By creating a Dynamic volume comprised of multiple subdisks and tracking sub-disk I/O activity, an administrator can identify and then easily act on the performance bottleneck by moving the sub-disk to a different disk and/or controller. The exercise below demonstrates how easy this is. NOTE: If you are unable to perform a drag/drop, make sure this option is enabled. You can do this by selecting Preferences from the Tools menu, highlighting the Volume Manager General tab and selecting the Enable disk group drag/drop option. To move a sub-disk using the VEA console:
1. Using the VEA console, highlight the Volumes folder and select the Disk view tab in the right pane. 2. Using the mouse, select the DynVol H: volume, drag and drop it on the other physical disk.
Immediately following the “drop” of the sub-disk to the new disk, select the Tasks tab in the lower pane. This will show the status of the move. This operation will not only move the volume to a completely separate disk and possibly a separate controller but it will also move all data stored on this disk all while the application accessing the data is on-line and available.
On-line Volume Growth (Automatic & Manual WITHOUT Reboot) Description: On-line volume growth is one of the strongest features of Volume Manager. By allowing a volume to grow without the need for reboot, applications, such as Exchange, stay online and available to users. For example, Microsoft recommends the volume used for storing Exchange databases be sized so that 50% of the volume is empty. So, if the Exchange volume is 180GB, 90GB must be empty. This is not very cost-effective. With Volume Manager, the volume can be configured with a minimum of space free. As the volume expands during heavy usage, the volume can be grown manually as needed or even automatically while Exchange remains available using the method described below. For our demonstration, select a single disk and size it to be a total of 1GB Resizing a Dynamic Volume manually: To extend a dynamic volume across one or more dynamic disks:
1. Using the VEA console, rt-click the dynamic volume (DynVol1) that you want to extend and select Resize Volume.
Copyright 2002 VERITAS Software Corporation. All rights reserved. VERITAS, VERITAS Software, the VERITAS logo, and all other VERITAS product names and slogans are trademarks or registered trademarks of VERITAS Software Corporation in the US and/or other countries. Other product names and/or slogans mentioned herein may be trademarks or registered trademarks of their respective companies. Specifications and product offerings subject to change without notice. June 2002.
13
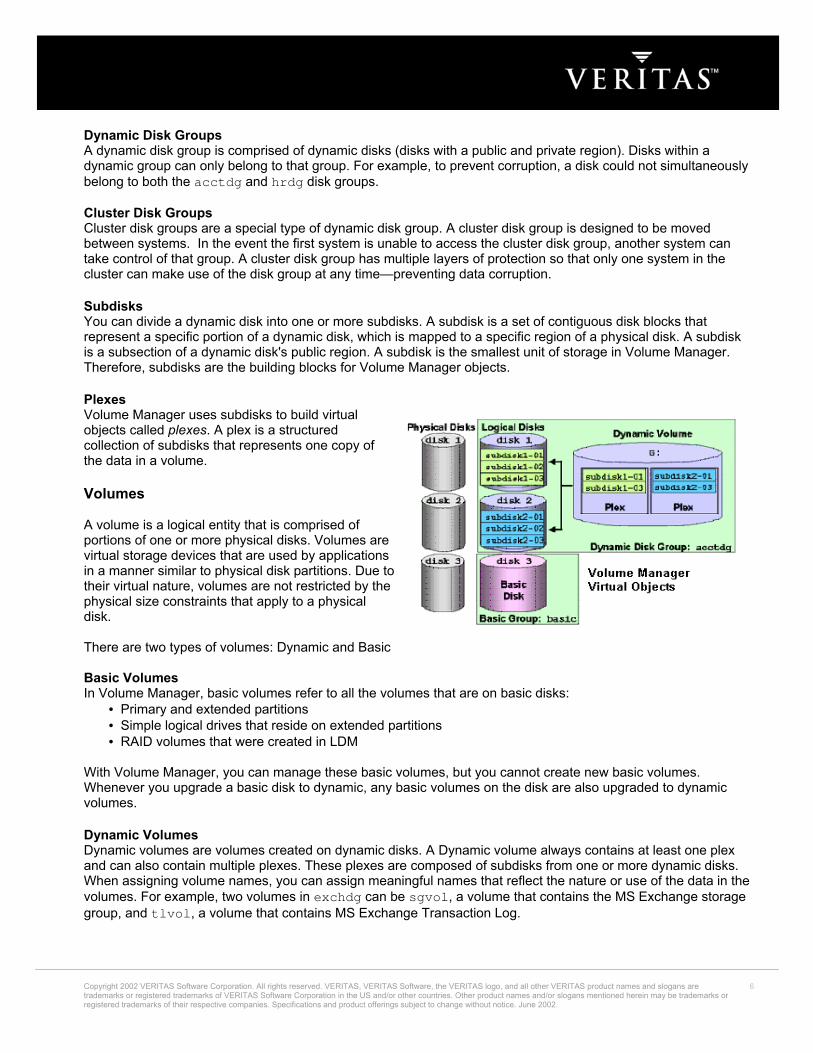
2. The Resize Volume window is displayed.
a. Enter 2.0 GB in the "New volume size" field. This will add 1GB to the dynamic volume.
Using the "Add by" option, you add a specific size to the volume by entering a size in the box. Using the "New volume size" option you specify the total volume size that you want.
b. Select “Manually assign destination disks” option and add the same disk created in the previous exercise. Selecting “Auto assign destination disks” allows Volume Manager to select the appropriate disks based upon the sizing criteria specified. This selection can be tsame single disk assigned when the volume was created or it could consist of portions of multiple physical disks.
he
c. Click OK to complete the procedure.
Note there is no need to reboot your system.
3. Verify Change: a. Minimize the VEA console and open Windows Explorer b. Copy more data to verify the volume can hold more than 1GB of data but less than 2.0GB.
Resizing a Dynamic Volume automatically: Volume Manager can be configured to resize a volume automatically based on pre-defined parameters. In this exercise below, we’ll set our volume to add 150MB of volume capacity if the volume fills up. Then, we’ll simulate an application filling up the volume by copying files with Windows Explorer and watch the volume automatically re-size. To accomplish this, two steps must be configured: 1. Monitor capacity 2. Configure a rule to act on the capacity monitor results. To resize the Volume automatically:
1. Capacity monitoring is a feature of Volume Manager that alerts you when any volume reaches certain size thresholds. When you select the Capacity Monitoring function through the Control Panel or context-sensitive menu, you access a window that enables you to set default settings for any and all dynamic volumes on the selected server. By enabling Capacity Monitoring, Volume Manager will use the event to trigger a command to grow the volume. To turn on Capacity Monitoring: a. In the left pane, right-click on the DynVol1 volume and select Capacity Monitoring b. Click the Enable Capacity Monitoring checkbox. Leave all settings at their default except
Minimum time between alerts if condition persists (sec). Change this option from 100 to 3600.
c. Click OK.
2. Access the Rules wizard. a. Select the Control Panel icon in the left pane of the VEA GUI. b. Dbl-click the Rule Management icon in the Control Panel icon group that now appears in the
right pane of the window, and dbl-click the Rule Manager icon from the window that comes up. c. Select New in the Rule Manager window that appears, and the first screen of the Rules wizard
comes up. Click Next to continue.
3. Select a rule based on the alert name Volume capacity reached error condition. a. In the second screen of the Rules wizard, highlight a rule based on alert name and click Next.
Copyright 2002 VERITAS Software Corporation. All rights reserved. VERITAS, VERITAS Software, the VERITAS logo, and all other VERITAS product names and slogans are trademarks or registered trademarks of VERITAS Software Corporation in the US and/or other countries. Other product names and/or slogans mentioned herein may be trademarks or registered trademarks of their respective companies. Specifications and product offerings subject to change without notice. June 2002.
14

b. In the next screen, click on the text click here to select names, select Volume capacity
reached error condition from the pull-down list in the Select Alert Names dialog box, and click OK. Then click Next to continue.
4. Select the actions associated with the rule.
a. In the Select Actions screen that comes up next, click Execute a command at the command prompt checkbox and leave the Send Notifications checkbox empty. NOTE: Under normal conditions, it is recommended a list of recipients be defined as well as Event Notification so that the appropriate personnel are aware of the increased storage requirement and of the volume resizing.
b. In the lower pane, click the click here to define a command. c. In the Configure Command Action window that appears, type the path for the command file. The
typical path is: C:\Program Files\VERITAS\Volume Manager 3.1\Sig\volgrow.cmd d. Select Insert button (far right of the four buttons), from the pop-up window. e. Select Device Name and click Insert. f. The Configure Command Action dialog box now will look similar to the example below.
g. Click OK to accept the command.
5. Click Next to continue to display the Set Rule Properties screen. Enter a name for the rule in the entry box provided near the top of the window. Verify the description and then click Finish. NOTE: The Rule Manager window comes up. The new rule should be listed. NOTE: The included volgrow.cmd script is set to grow a volume by 150MB. The growby size can be changed by modifying the volgrow.cmd script to a desired number. Read the comments in the script for more information.
6. Verify: In this test, we will demonstrate Volume Manager’s capability to automatically re-size the volume in increments of 150MB without interrupting the flow of data to the volume. a. In the VEA console, highlight the volume to be automatically resized and position the console on
screen to allow view of the Console tab in the lower portion of the VEA console. b. Using Windows Explorer, copy approximately 200MB more data to the volume than the volume
has space for. During the copy operation, note the messages that appear in the Console tab of the VEA console. These messages will be sent from the Capacity Monitoring setting configured earlier. As the volume runs out of space, there will be additional messages that appear showing the volume being resized. When the data copy process completes, note the new size of the volume by rt.-clicking on the volume in the VEA console and selecting Properties.
Copyright 2002 VERITAS Software Corporation. All rights reserved. VERITAS, VERITAS Software, the VERITAS logo, and all other VERITAS product names and slogans are trademarks or registered trademarks of VERITAS Software Corporation in the US and/or other countries. Other product names and/or slogans mentioned herein may be trademarks or registered trademarks of their respective companies. Specifications and product offerings subject to change without notice. June 2002.
15

Why should you care? Using Volume Manager, you’ve created a dynamic volume that, once created, can be resized and reconfigured while applications remain on-line and available. In the specific example above, the volume was resized manually to simulate resolving a low disk space situation. The volume was also configured to resize automatically to resolve low disk space issues without administrator intervention. Had this not been configured, an application could have shut down awaiting administrator involvement—preventing user access. One final note, the resizing process does not care what configuration type is used—RAID-5, mirrored, striped, etc.
Volume Mirroring / Off-line / Off-host Processing Description: In this section, we’ll use Volume Manager to create a mirror of our dynamic volume to a separate physical disk and we’ll copy data to the volume to ensure redundancy. Then, we’ll use Volume Manager’s ability to “snap” off a copy of the volume and demonstrate how the data can be made available for data mining or backup (off-host processing). Finally, we’ll re-add the mirror (“snap back”) to demonstrate the re-sync capabilities of Volume Manager. Note: There are two ways to create a volume from a mirror of another volume to facilitate data testing, data mining, or backup: One, by “Breaking” a mirror or by “Snapping” the volume. Breaking a mirror allows a mirrored volume to be “broken off”. When done, Volume Manager will create a new volume that is an identical copy of the mirrored volume, assign it a drive letter, and allow the new volume to be used for data mining or other off-host processing tasks. Once the data has been broken away, it cannot be re-mirrored with the original volume. Meanwhile, snapping a volume does the same as breaking a mirror (exact copy of the mirrored volume at that point in time) with the exception that the volume can be re-added (snapped back) and the data is re-synchronized at the block level instead of re-copied. Therefore, snapping is preferred when the desire is to take point-in-time copies of data for off-host processing such as backups while mirroring is good for data redundancy. Volume Mirroring To Mirror a Volume using the VEA console:
1. In the VEA console, select the 2GB volume you created earlier (DynVol1). Right-click on it to bring up the context menu. Select Mirror, and then click Add on the submenu to access the Add Mirror dialog box.
2. Accept the default number of mirrors (1) you want to add
to the volume and manually assign the second physical disk as the destination for the mirror.
3. Click OK to add the mirror and note the events d
in the Console and Tasks tab of the VEA console demonstrate the results. Further evidence of the disks that contain mirrored volumes can be seen by:
isplayed
a. Highlight the Dynamic volume in the left pane. b. Select the Disk View tab and note two physical
disks are displayed showing volumes on both disks are mirrored OR
Copyright 2002 VERITAS Software Corporation. All rights reserved. VERITAS, VERITAS Software, the VERITAS logo, and all other VERITAS product names and slogans are trademarks or registered trademarks of VERITAS Software Corporation in the US and/or other countries. Other product names and/or slogans mentioned herein may be trademarks or registered trademarks of their respective companies. Specifications and product offerings subject to change without notice. June 2002.
16

c. Select the Mirrors tab and note the volume mirror characteristics.
4. Verify: To demonstrate the volume is mirrored, we’re going to copy data to the volume, “break” the mirror and note the data on both the original volume and the mirrored volume are the same. To begin this test: a. Copy data to the original volume. As data is copied, it will be mirrored to both physical disks. b. In the left pane, rt.-click on the volume that is mirrored and select Mirror > Break.
c. Accept the defaults and note the pre-assigned drive letter. Select OK.
Note the new drive letter appears making the once-mirrored volume now a separately addressable volume.
d. Verify: Using Windows Explorer, view the data on the newly-created volume and compare with the original volume. Once satisfied, highlight the newly created volume and remove it. Remove it by: selecting the Mirror > Remove option in the VEA console.
Copyright 2002 VERITAS Software Corporation. All rights reserved. VERITAS, VERITAS Software, the VERITAS logo, and all other VERITAS product names and slogans are trademarks or registered trademarks of VERITAS Software Corporation in the US and/or other countries. Other product names and/or slogans mentioned herein may be trademarks or registered trademarks of their respective companies. Specifications and product offerings subject to change without notice. June 2002.
17

Offline and Off-Host Processing Solutions By integrating the Volume Manager features of snapshots and FastResync, you can move data offline or to another host in order to perform data processing activities, such as backup, decision support, testing, and database error recovery.
Common Offline and Off-Host Processing Tasks
Decision support analysis and reporting: Because snapshots hold a point-in-time copy of a production database, you can construct a copy of the database by using snapshots to perform decision support analysis and business reporting. With FastResync enabled, you can quickly resynchronize the database copy with the data in the primary database as needed.
•
•
•
•
• •
•
Testing and training: Development or service groups can use snapshots as test data for new applications. Snapshot data provides developers, system test engineers, and QA groups with a realistic basis for testing the robustness, integrity, and performance of new applications. Data backup: If your business requires high availability, you cannot afford the downtime involved in backing up critical data offline. By taking a snapshot of your data and backing up from a snapshot, your business-critical applications can continue to run without extended downtime and without impacting performance. Database error recovery: Logic errors caused by an administrator or an application program can compromise the integrity of a database. By restoring database table files from a snapshot copy with FastResync enabled, you can recover a database more quickly than by full restoration from tape or other backup media.
VERITAS FlashSnap FlashSnap is a separately licensable feature that combines several VERITAS technologies to perform offline and off-host processing tasks. VERITAS FlashSnap is a multi-step process that enables you to create independently addressable multipurpose volumes (MPVs) that are mirrors of the volumes on your server and move the MPV to a remote server. Therefore, you can perform these activities without affecting mission-critical applications on the original working server. Even when FlashSnap is performed on the same server, its very efficient mirror break-off and join process is much faster and takes less CPU availability than other mirror break-off procedures that use ordinary mirroring. FlashSnap is made possible by several features in Volume Manager. These features are:
Snapshot Commands - Use the Snapshot commands to create the mirrored volumes or MPVs. Dynamic Disk Group Split and Join - Dynamic Disk Group Split and Join (DGSJ) is similar to Snapshot with the exception that entire groups of disks can be split from one group and joined to another. This is incredibly useful for server applications that require high availability and perform heavy I/O. In this case, a group of disks can be physically controlled by a separate host yet are members of a dynamic disk group storing data for the host server application. This functionality allows splitting a mirror for backup and having a separate server handle the backup. After the backup is completed, the split-off disk group is moved back to the original server and joined to its former disk group, and the mirror is re-associated with its mirror set and resynchronized. DGSJ also can be performed on the same server for same-host backup or for reorganizing the disk groups on the server. FastResync - FastResync supports re-synchronizing of mirrors by copying only changes for the temporarily split mirror by using FastResync logging. This reduces the time that it takes to rejoin a split mirror with the mirror set and also reduces the server CPU cycles needed to complete the resynchronization.
Creating a Snapshot Copy of a Volume Creating a volume snapshot provides a method for backing up the data contained in a volume with minimal interruption to users. A volume snapshot is an exact copy, or temporary mirror, of a volume at a specific point in time. When you create a snapshot, you create a temporary mirror of an existing volume. This mirror is then detached from the volume and placed into a new volume, called the snapshot volume. You can then backup the snapshot volume at a convenient time. When finished with the snapshot volume, it can be snapped back allowing for FastResync and continued mirror operation.
Copyright 2002 VERITAS Software Corporation. All rights reserved. VERITAS, VERITAS Software, the VERITAS logo, and all other VERITAS product names and slogans are trademarks or registered trademarks of VERITAS Software Corporation in the US and/or other countries. Other product names and/or slogans mentioned herein may be trademarks or registered trademarks of their respective companies. Specifications and product offerings subject to change without notice. June 2002.
18

Volume Snapshot Phases Volume snapshots have three primary phases:
1. The snapstart phase The snapstart phase creates a snapshot mirror of the volume to be backed up. The snapstart phase of this task may take a long time, depending on the size of the volume. The copy procedure used by Volume Manager during the snapstart phase is an atomic copy, which is similar to a full backup of the volume.
2. The snapshot phase
The snapshot phase detaches the mirror from the original volume and creates a new volume, which is called the snapshot volume. The snapshot volume is an exact copy of the original volume at the time the snapshot phase begins. If FlashSnap has also been purchased, Volume Manager will automatically enable the FastResync capability in the event the volume is snapped back.
3. The snapback phase Using snapback reattaches the snapshot to the volume after you are done using it. Using snapclear permanently disconnects the snapshot from the volume. If the FlashSnap option was purchased, Volume Manager will apply only the volume updates that have taken place since the mirror was snapped off. NOTE: For more information on the other phases of Snap, snapabort and snapclear, refer to the Volume Manager User’s Guide or the on-line help.
Creating a Snapshot Mirror: To create a snapshot copy of a volume:
1. Right-click the volume to be copied to a snapshot, and select Snap >Snap Start.
Select "Manually select disks" to specify a separate physical disk that can be used as the destination for the snapshot mirror. When you are satisfied with your disk selection, click OK to begin the snap creation process. In the Tasks tab, you can view the status of creating the snap.
Copyright 2002 VERITAS Software Corporation. All rights reserved. VERITAS, VERITAS Software, the VERITAS logo, and all other VERITAS product names and slogans are trademarks or registered trademarks of VERITAS Software Corporation in the US and/or other countries. Other product names and/or slogans mentioned herein may be trademarks or registered trademarks of their respective companies. Specifications and product offerings subject to change without notice. June 2002.
19

After the Snap Start command completes, a new snapshot mirror is attached to DynVol1 (D:). The new mirror is added to the Mirrors tab for the volume and given a “snapshot” icon. After the snapshot mirror is synchronized with the volume, its status becomes Snap Ready.
In addition to creating the Snap Volume, the disk change object (DCO) log is created. The DCO volume is created to track the regions on a volume that are changed while a mirror is detached facilitating FastResync when re-associating the Snap volume. The DCO volume is not included in the tree view of the VEA. To view the DCO volume, select the Disk View tab.
Copyright 2002 VERITAS Software Corporation. All rights reserved. VERITAS, VERITAS Software, the VERITAS logo, and all other VERITAS product names and slogans are trademarks or registered trademarks of VERITAS Software Corporation in the US and/or other countries. Other product names and/or slogans mentioned herein may be trademarks or registered trademarks of their respective companies. Specifications and product offerings subject to change without notice. June 2002.
20

Creating a Snapshot Volume: To detach a snapshot copy of a volume:
1. Right-click the snapshot volume, and select Snap > Snap Shot. 2. In the next window, accept the defaults for Automatic mirror selection and Assign a drive letter
settings and select OK.
The snapshot mirror is detached from the original volume, and a new volume is created that is associated with the snapshot mirror. This process usually takes less than a minute. When complete, the snapshot mirror is no longer displayed on the Mirrors tab for the original volume. The new snapshot volume is displayed under the Volumes folder in the tree view. Volume Manager assigns it the next available drive letter unless otherwise specified.
At this point, the volume is a completely separate volume that is an exact copy of the previous volume. Operations such as backup can now point to this volume and perform their operation without any application disruption. Meanwhile, the DCO log is tracking the changes made to the primary volume while the snapped volume is detached.
3. Verify: To verify, we’re going to do the same test we did to verify a mirrored volume was successfully broken off.
a. Using Windows Explorer, note there are now two volumes available, they are the same size and have the same amount of data on them.
b. Using Windows Explorer, copy more data from the system volume to the primary data volume (not the snapped volume).
c. Using Notepad, create a file on the snapped volume and insert some text.
Note in each case, the volumes act completely independently of each other and that you’re able to add, edit and remove data from either volume. Once the Volume is snapped back, the data on both volumes will be synchronized based upon the changes recorded in the DCO log. If you choose to synchronize using the original volume, the text file that was created on the snapped volume will be removed. If you choose to synchronize the shapshot, all the data that was added to the original volume will be removed and the text file will remain. By default, Volume Manager synchronizes to the original volume.
Re-associating a Snapshot Volume: You can re-associate a snapshot copy of a volume with the original volume. The snapshot volume is resynchronized so the volumes are consistent and the snapshot volume is removed.
Copyright 2002 VERITAS Software Corporation. All rights reserved. VERITAS, VERITAS Software, the VERITAS logo, and all other VERITAS product names and slogans are trademarks or registered trademarks of VERITAS Software Corporation in the US and/or other countries. Other product names and/or slogans mentioned herein may be trademarks or registered trademarks of their respective companies. Specifications and product offerings subject to change without notice. June 2002.
21

To re-associate a snapshot volume with its original volume:
1. Right-click the snapshot volume, and select Snap >In the next wind
Snap Back. 2. ow, accept the default setting to
click
3. : Once the volume has re-synchronized, note the
a. The snapshot volume is no longer separately
b. reated on the snapped volume is gone.
earch and Reporting
sing the Search command, it is possible to generate a wide variety of reports that provide information on the
the example below, we will conduct a search for free space across all the disks managed by Volume Manager
by selecting Search from the Tools menu. er that have at least 1GB of free
the Look for field. GB in the Search criteria fields.
rch criteria can be added for ch
Resynchronize using the original volume and OK. Verifyfollowing:
addressable The text file c
S Udisk groups, disks, and volumes on each server. The results of these searches can be saved and imported intoMicrosoft Excel or any other application that accepts tab-delimited text files. The results can be sorted, displayedas graphs or charts, and imported into written reports or Microsoft PowerPoint presentations. Inand save the results to a report.
1. Launch the Search dialog2. In this search, we will look for all the disks managed by Volume Manag
space. To do this: a. Select Disks inb. Select Free space, At least, and 1c. Select Add button to add the search criteria. If desired, additional sea
more refined searches. For now, we’ll just search for available disk space. When done, you’re Seardialog should like:
3. Press Search Now to conduct the search. The result should look similar to that below where disks with at
least 1GB free will be shown.
Copyright 2002 VERITAS Software Corporation. All rights reserved. VERITAS, VERITAS Software, the VERITAS logo, and all other VERITAS product names and slogans are trademarks or registered trademarks of VERITAS Software Corporation in the US and/or other countries. Other product names and/or slogans mentioned herein may be trademarks or registered trademarks of their respective companies. Specifications and product offerings subject to change without notice. June 2002.
22

4. Select the Save Results button and save the file to the desired location without providing an extension. Volume Manager will save the file at the specified location with a .txt extension. The results are now viewable in Excel similar to below:
5. o open the file in MS Excel, launch Excel and select File > Open to open the .txt file saved by the enu.
6. : st describes your data. Select the Delimited
b. oose a delimiter. Select the Tab radio button and click Next. k Next.
ther Capabilities
igh Availability: Dynamic Multipathing s fault tolerance to disk storage by making use of multiple paths
or a
TVolume Manager search. Make sure to select “All Files (*.*)” from the “Files of type” drop-down mNavigate to the correct file and click the Open button. In the Text Import wizard that appears, do the followinga. In step 1 you are asked to choose the file type that be
radio button and click Next. In step 2 you are asked to ch
c. In step 3 you are asked to choose the data format. Select the General radio button and clicd. Click Finish, and your report will appear in Excel.
O HThe Dynamic Multipathing (DMP) option addbetween a computer and a disk in a storage array. A path is the connection between the computer and the storage array’s disks and consists of a host adapter and a SCSI bus connection to one or more SCSI disks fiber optic channel connected to a hub or switch. Thus, multiple paths are made possible by connecting two or more host bus adapters (HBAs) with either SCSI or fiber optic cabling to the storage array. The DMP software
Copyright 2002 VERITAS Software Corporation. All rights reserved. VERITAS, VERITAS Software, the VERITAS logo, and all other VERITAS product names and slogans are trademarks or registered trademarks of VERITAS Software Corporation in the US and/or other countries. Other product names and/or slogans mentioned herein may be trademarks or registered trademarks of their respective companies. Specifications and product offerings subject to change without notice. June 2002.
23

manages the multiple paths so that only one path to the data on each of the array’s disks is accessible at a timeto the host computer. If a path to a disk fails, DMP will automatically transmit data to and from the disk over an alternate path.
erformance Tuning: S.M.A.R.T Monitoring (S.M.A.R.T.) is available on many new SCSI disks.
disk ake
e
erformance Tuning: Historical Statistics Collection and Graphing nitor one or more storage objects (disks,
tics
PSelf-Monitoring, Analysis and Reporting technology S.M.A.R.T. provides a way for disks to self-check certain physical conditions that are useful predictors offailure and send an alert when conditions indicate that a failure may soon occur. This allows administrators to tpreventative action to protect the data on the disk. In order to receive alerts in the Volume Manager Event Log, S.M.A.R.T. monitoring must be enabled for the global configuration and also on each disk you want checked. Thdefault is to have S.M.A.R.T. monitoring disabled. PThe historical statistics collection and graphing function allows you to mosubdisks, or volumes) over time and to create individual graphs for these storage objects. You invoke the graphing function by rt.-clicking a storage object and then selecting the command Graph Historical StatisInformation from the context menu that appears. However, the command will not be available on the context menu without being setup first. This information can be very useful when determining device load over time or determining critical I/O bottlenecks. An example of statistic graphing is below:
WHERE TO GO FROM HERE y now you’ve seen first-hand a few of the powerful capabilities of Volume Manager for Windows v3.1 and how
VERITAS Volume Manager Best Practices – 18 best practices for on-line volume management ulti-
.veritas.com/downloads/pro/vm_best_practices_wp_3_18_02.pdf
Bapplications, administrators, and enterprises can benefit. Below are a few links for more information on specific areas where Volume Manager adds value.
•including RAID Configurations, Capacity Management, I/O Performance Tuning, and Dynamic Mpathing. http://eval
Copyright 2002 VERITAS Software Corporation. All rights reserved. VERITAS, VERITAS Software, the VERITAS logo, and all other VERITAS product names and slogans are trademarks or registered trademarks of VERITAS Software Corporation in the US and/or other countries. Other product names and/or slogans mentioned herein may be trademarks or registered trademarks of their respective companies. Specifications and product offerings subject to change without notice. June 2002.
24

• usiness Value: Virtual Volume Management in Windows – Advantages of Virtual Volume B
Management and how it can save you money. _vol_mgmt.pdf http://eval.veritas.com/downloads/pro/biz_value_of
• ws Comparison: MS Logical Disk Manager & Volume Manager for Windo http://eval.veritas.com/downloads/pro/vm_and_ldm_comparison_3_18_02.pdf
• s involved in using
ing_07aug02.pdf
Volume Manager for Windows with MSCS – An overview of the componentMicrosoft Cluster Server including the key component: dynamic disks
http://eval.veritas.com/downloads/pro/volume_mgr/vm_mscs_campuscluster
•
oadList.jhtml?productId=volumemanagerwin#datasheets
Additional Whitepapers and Usage Guides
http://veritas.com/products/listing/ProductDownl
UMMARY saves you money by managing all storage of any kind in any location efficiently—maintaining
er and creation of a Dynamic Disk Group
ulated off-host processing and then resynchronization
h
running out of disk space. To add more storage, you need to take the server sing
the
lume Manager for virtual storage management include:
ady own to provide additional levels
• ta
S
olume Manager Vapplication availability. This document introduced to you just a few of the many features within Volume Managerdemonstrating “how” Volume Manager works and how it can solve real-world problems. Specifically, we covered:
• Basics of Volume Manager • Installation of Volume Manag• A brief walk-through of the VERITAS Enterprise Administrator console • Sub-disk move via drag/drop
reboot • On-line growth without system• Create a mirrored volume
ume and sim• Create a snapshot of a vol• Demonstrated both Searching and how to create reports • Provided links to additional information
W y Use Volume Manager? Imagine your Exchange serverdown, attach a new drive, and resize the volume—disrupting service to users. If your Exchange server was uVolume Manager Storage, you could simply resize the volume—assigning storage from a separate physical disk or even from a totally separate controller/disk array—all while the Exchange server remains up and servicing users. Even better, using Volume Manager you could also “mirror” the Exchange volume to another volume, “break” that mirror away to facilitate backing up to tape, and then re-attach the mirror without any disruption toproduction server.
enefits of using VoB
• High Availability: Volume Manager can be applied to hardware you alreof RAID, system and path redundancies, and other features that will keep your systems up and running “24/forever.” With dynamic volume creation and online volume growth, there is no need to reboot or plan downtime for storage reconfigurations. Enhanced Performance: Volume Manager lets you optimize storage performance patterns by identifyingstorage bottlenecks and allowing you to migrate data to other devices, even while applications and their daremain online and available. Data can be spread across several disks within an array to distribute or balance I/O operations across the disks. Using parallel I/O across multiple disks improves I/O performance by increasing data transfer speed and overall throughput for the array.
Copyright 2002 VERITAS Software Corporation. All rights reserved. VERITAS, VERITAS Software, the VERITAS logo, and all other VERITAS product names and slogans are trademarks or registered trademarks of VERITAS Software Corporation in the US and/or other countries. Other product names and/or slogans mentioned herein may be trademarks or registered trademarks of their respective companies. Specifications and product offerings subject to change without notice. June 2002.
25

Automation: Ability to automate the management of storage including growth without administrator intervention or server re-boots.
•
•
•
•
Simplified, Centralized Storage Management: Volume Manager enables online administration from a single management console across multiple hosts. The easy-to-use interface simplifies disk administration tasks, such as adding or moving storage resources or data. Heterogeneous storage management: Abstraction of physical disks allows you to work with storage equipment from multiple vendors, and provides you with capabilities to migrate volumes dynamically, giving you more equipment choices. You no longer need to be locked into single vendor solutions. Furthermore, you can use the storage you have more efficiently by creating and managing volumes better, thus saving on additional disk purchases. Complex multi-disk configuration: Volume Manager virtual objects enable you to create complex disk configurations that enhance performance and reliability. Multi-disk configurations, such as striping, mirroring, or RAID configurations, can provide data redundancy, performance improvements, and high availability.
The features and functions highlighted above were meant to be just an introduction to VERITAS Volume Manager. If you manage large disk arrays, have applications that require high availability and large single volumes for storing data, and/or you plan to deploy either Microsoft Cluster Server or VERITAS Cluster Server, Volume Manager is an absolute must-have.
Copyright 2002 VERITAS Software Corporation. All rights reserved. VERITAS, VERITAS Software, the VERITAS logo, and all other VERITAS product names and slogans are trademarks or registered trademarks of VERITAS Software Corporation in the US and/or other countries. Other product names and/or slogans mentioned herein may be trademarks or registered trademarks of their respective companies. Specifications and product offerings subject to change without notice. June 2002.
26

VERITAS Software Corporation Corporate Headquarters 350 Ellis Street Mountain View, CA 94043 650-527-8000 or 866-837-4827
For additional information about VERITAS Software, its products, or the location of an office near you, please call our corporate headquarters or visit our Web site at www.veritas.com.
Copyright 2002 VERITAS Software Corporation. All rights reserved. VERITAS, VERITAS Software, the VERITAS logo, and all other VERITAS product names and slogans are trademarks or registered trademarks of VERITAS Software Corporation in the US and/or other countries. Other product names and/or slogans mentioned herein may be trademarks or registered trademarks of their respective companies. Specifications and product offerings subject to change without notice. June 2002.
27


![Understanding Equity Options[1]](https://img.pdfslide.us/doc/110x75/577d33c61a28ab3a6b8bb64a/understanding-equity-options1.jpg)