Embed Size (px)
Citation preview
Major Project Technical Document
UCA Rochester – CG Arts and Animation
By Paul Lavey
How to create HDR Image Based Lighting for a 3D Scene
This document will detail the process used to create a custom High Dynamic Range (HDR) photo,
which can then be utilized in 3D software as an image based lighting system.
This technique uses the following software and equipment.
A digital SLR camera with a zoom lens capable of shooting RAW images and a sturdy tripod.
A chrome sphere with a sturdy tripod.
A copy of HDR Shop
A copy of Adobe Photoshop
A copy of Autodesk Maya
Setting Up The Shoot
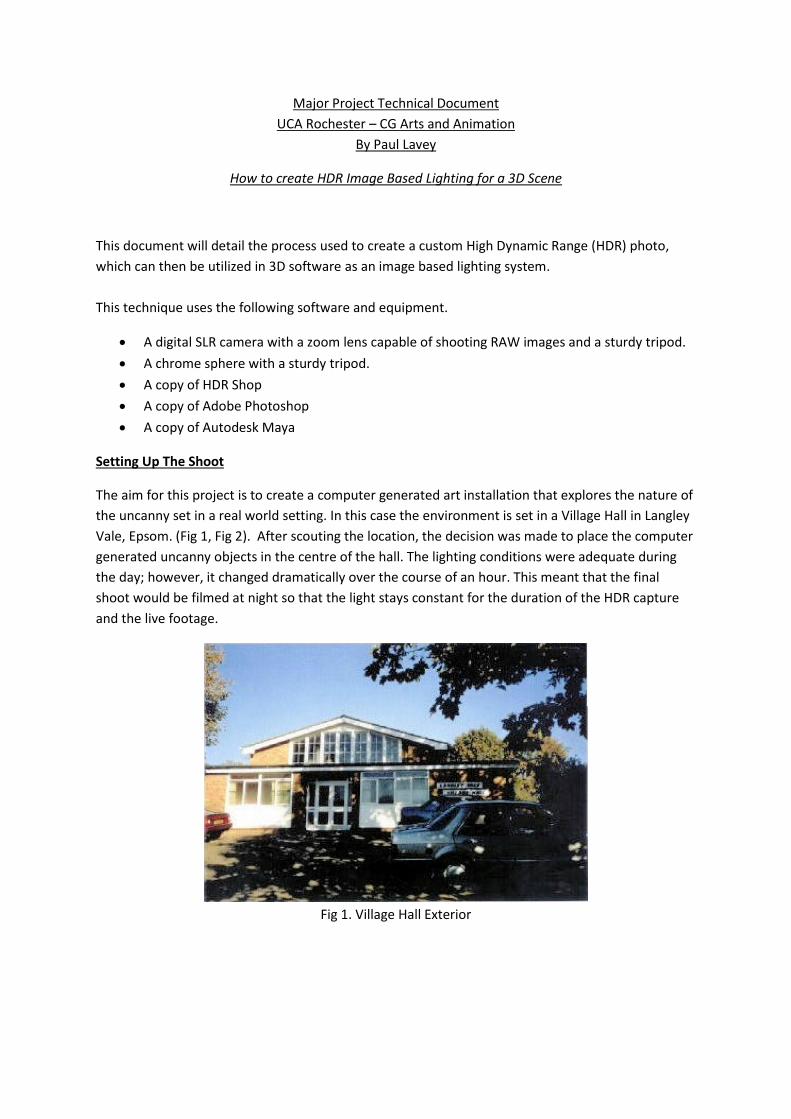
The aim for this project is to create a computer generated art installation that explores the nature of
the uncanny set in a real world setting. In this case the environment is set in a Village Hall in Langley
Vale, Epsom. (Fig 1, Fig 2). After scouting the location, the decision was made to place the computer
generated uncanny objects in the centre of the hall. The lighting conditions were adequate during
the day; however, it changed dramatically over the course of an hour. This meant that the final
shoot would be filmed at night so that the light stays constant for the duration of the HDR capture
and the live footage.
Fig 1. Village Hall Exterior
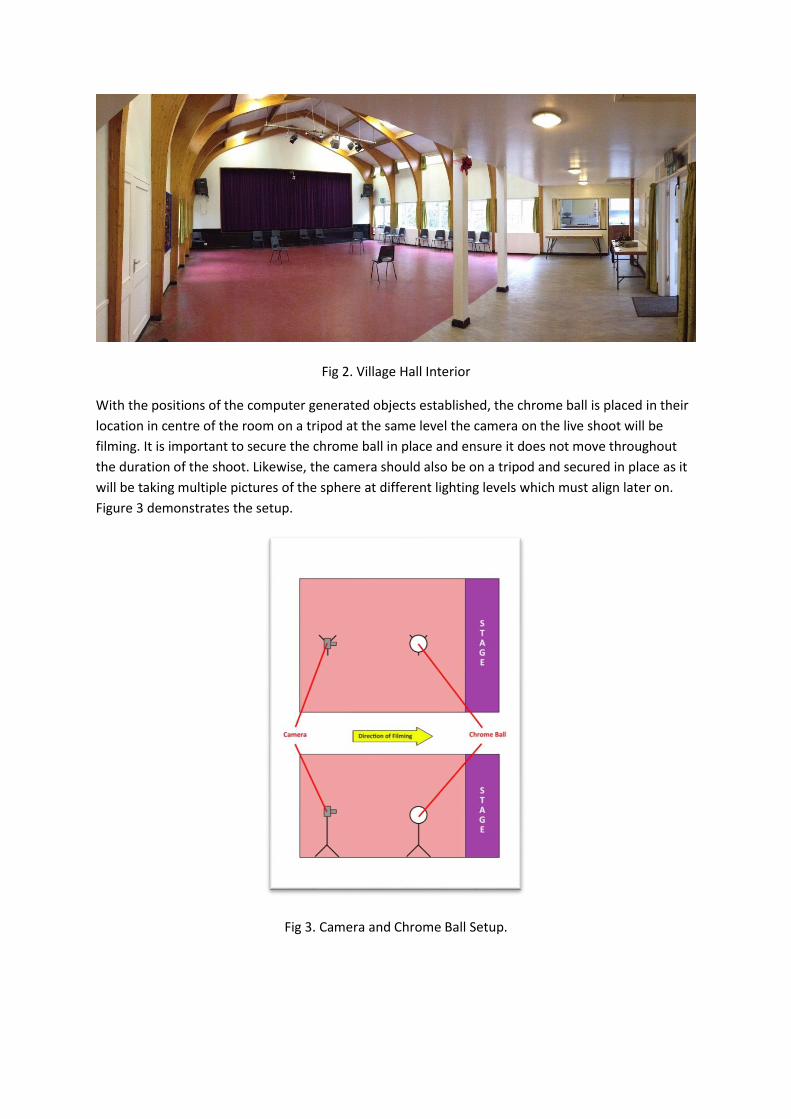
Fig 2. Village Hall Interior
With the positions of the computer generated objects established, the chrome ball is placed in their
location in centre of the room on a tripod at the same level the camera on the live shoot will be
filming. It is important to secure the chrome ball in place and ensure it does not move throughout
the duration of the shoot. Likewise, the camera should also be on a tripod and secured in place as it
will be taking multiple pictures of the sphere at different lighting levels which must align later on.
Figure 3 demonstrates the setup.
Fig 3. Camera and Chrome Ball Setup.
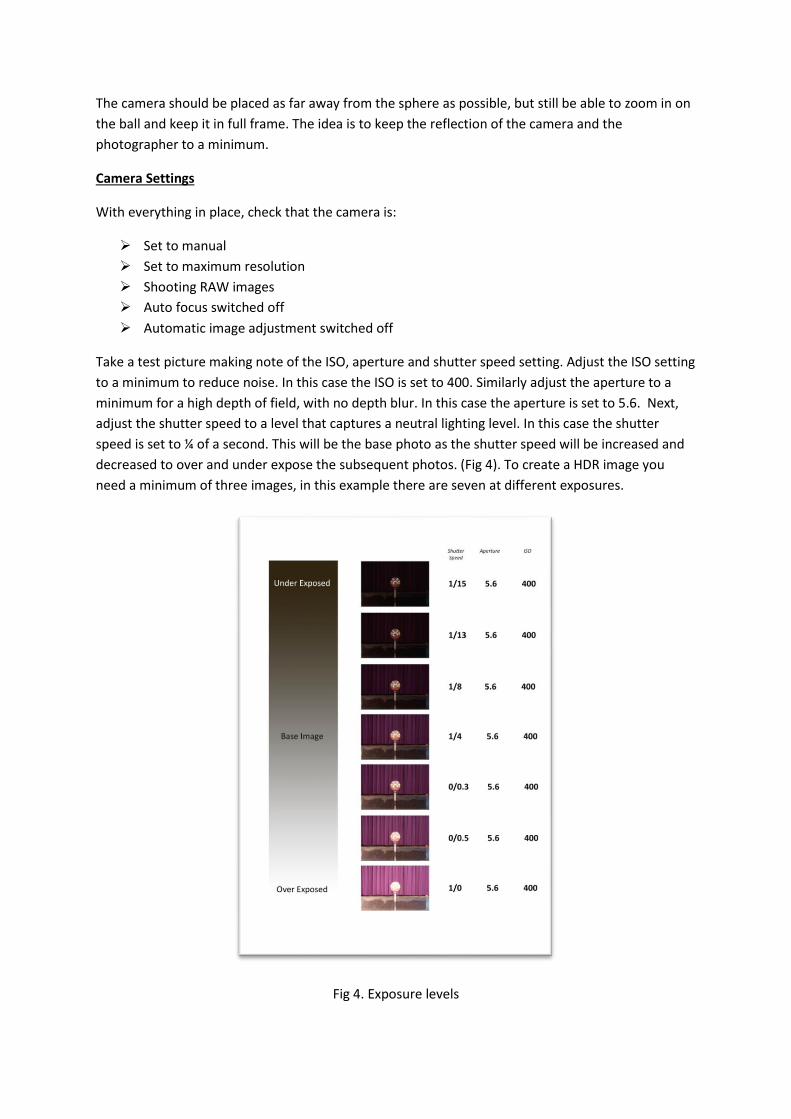
The camera should be placed as far away from the sphere as possible, but still be able to zoom in on
the ball and keep it in full frame. The idea is to keep the reflection of the camera and the
photographer to a minimum.
Camera Settings
With everything in place, check that the camera is:
Set to manual
Set to maximum resolution
Shooting RAW images
Auto focus switched off
Automatic image adjustment switched off
Take a test picture making note of the ISO, aperture and shutter speed setting. Adjust the ISO setting
to a minimum to reduce noise. In this case the ISO is set to 400. Similarly adjust the aperture to a
minimum for a high depth of field, with no depth blur. In this case the aperture is set to 5.6. Next,
adjust the shutter speed to a level that captures a neutral lighting level. In this case the shutter
speed is set to ¼ of a second. This will be the base photo as the shutter speed will be increased and
decreased to over and under expose the subsequent photos. (Fig 4). To create a HDR image you
need a minimum of three images, in this example there are seven at different exposures.
Fig 4. Exposure levels
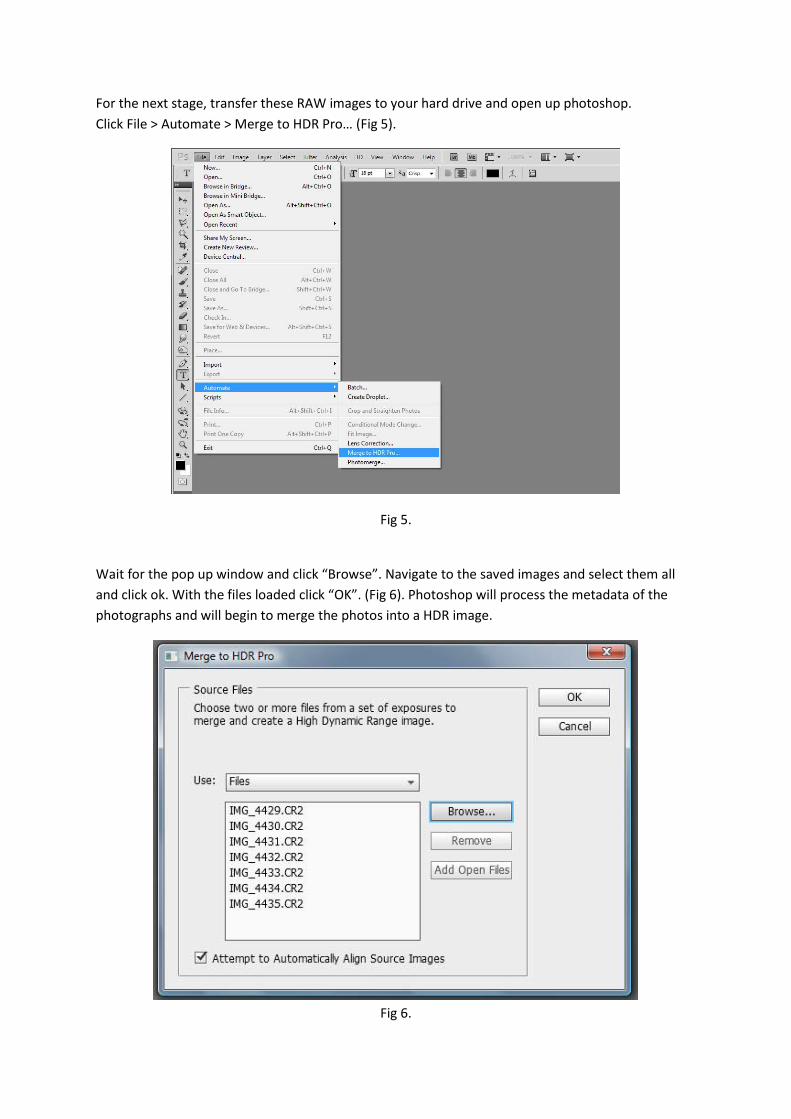
For the next stage, transfer these RAW images to your hard drive and open up photoshop.
Click File > Automate > Merge to HDR Pro… (Fig 5).
Fig 5.
Wait for the pop up window and click “Browse”. Navigate to the saved images and select them all
and click ok. With the files loaded click “OK”. (Fig 6). Photoshop will process the metadata of the
photographs and will begin to merge the photos into a HDR image.
Fig 6.
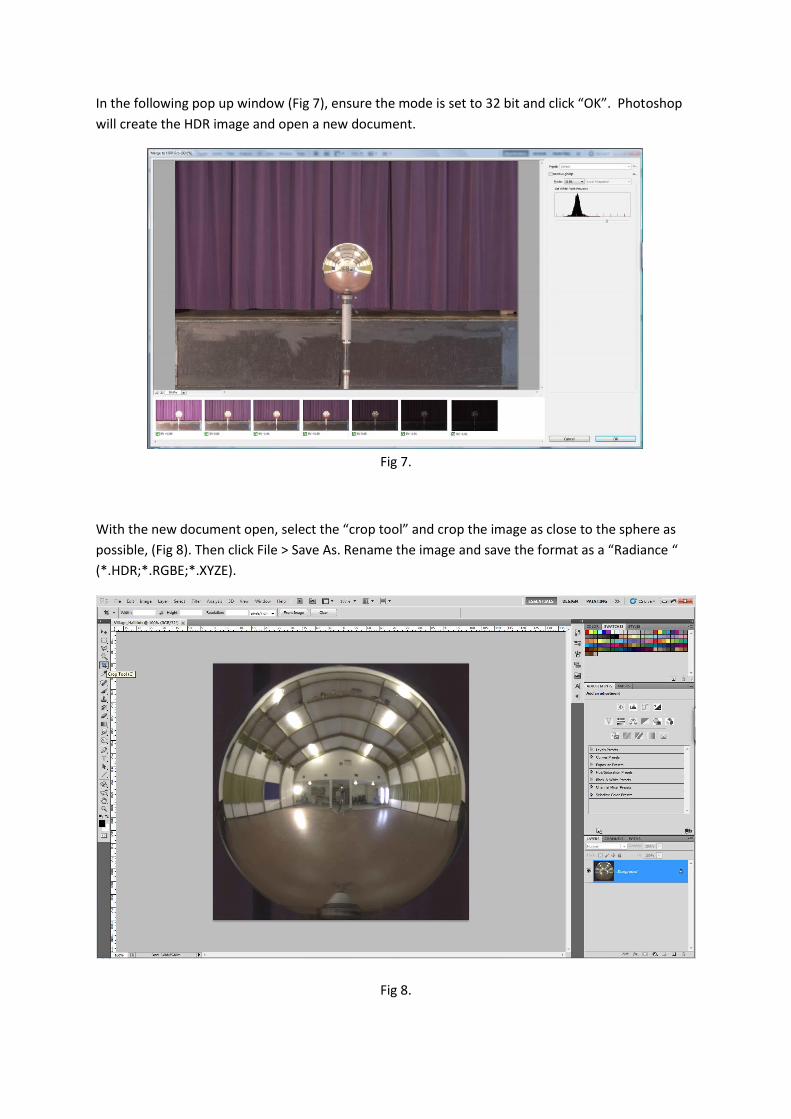
In the following pop up window (Fig 7), ensure the mode is set to 32 bit and click “OK”. Photoshop
will create the HDR image and open a new document.
Fig 7.
With the new document open, select the “crop tool” and crop the image as close to the sphere as
possible, (Fig 8). Then click File > Save As. Rename the image and save the format as a “Radiance “
(*.HDR;*.RGBE;*.XYZE).
Fig 8.
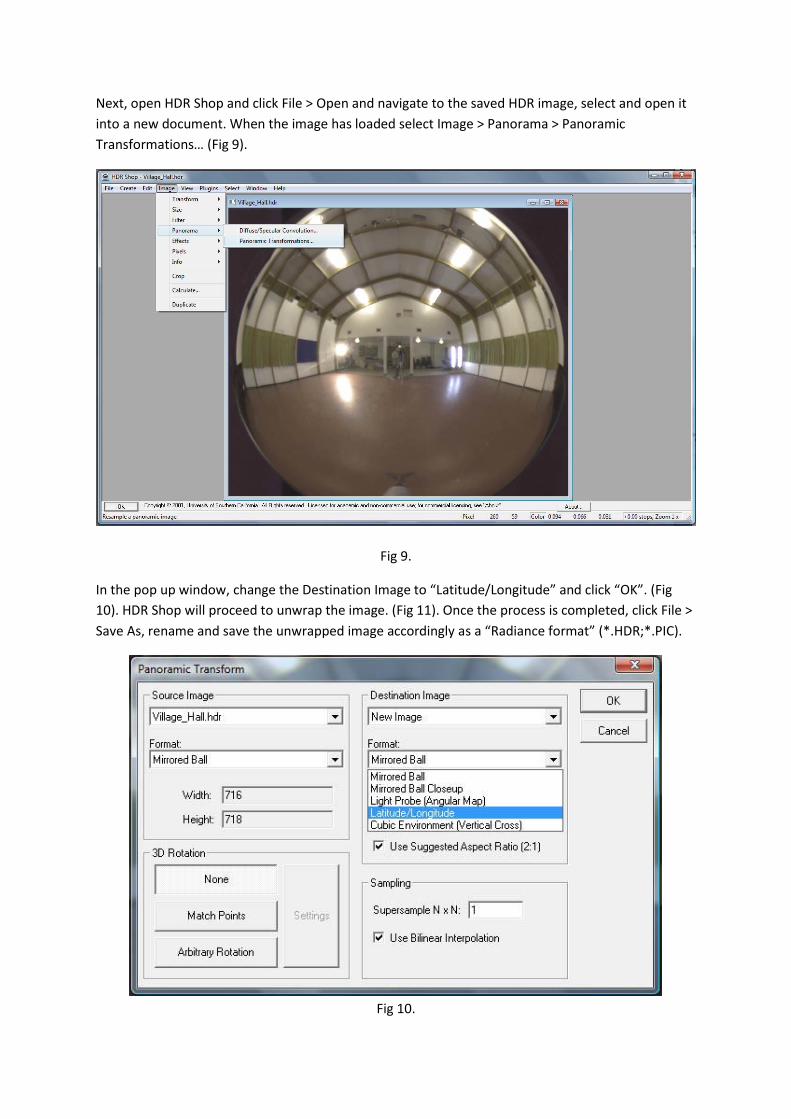
Next, open HDR Shop and click File > Open and navigate to the saved HDR image, select and open it
into a new document. When the image has loaded select Image > Panorama > Panoramic
Transformations… (Fig 9).
Fig 9.
In the pop up window, change the Destination Image to “Latitude/Longitude” and click “OK”. (Fig
10). HDR Shop will proceed to unwrap the image. (Fig 11). Once the process is completed, click File >
Save As, rename and save the unwrapped image accordingly as a “Radiance format” (*.HDR;*.PIC).
Fig 10.
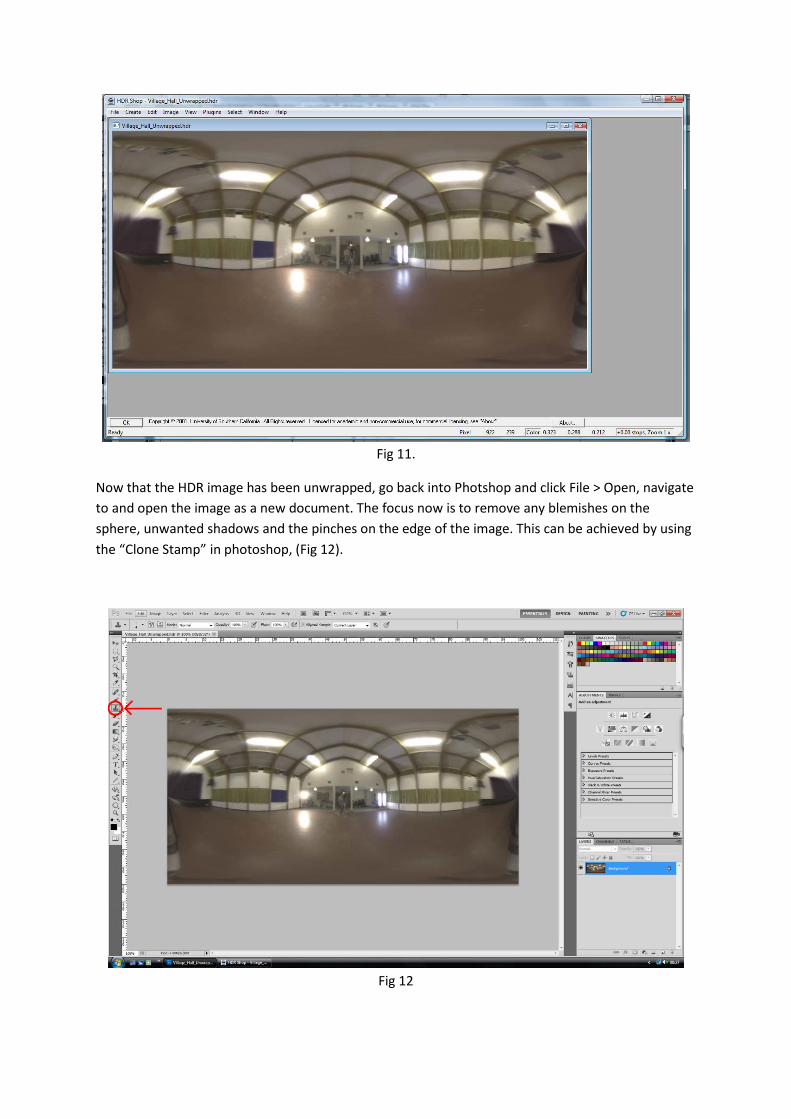
Fig 11.
Now that the HDR image has been unwrapped, go back into Photshop and click File > Open, navigate
to and open the image as a new document. The focus now is to remove any blemishes on the
sphere, unwanted shadows and the pinches on the edge of the image. This can be achieved by using
the “Clone Stamp” in photoshop, (Fig 12).
Fig 12
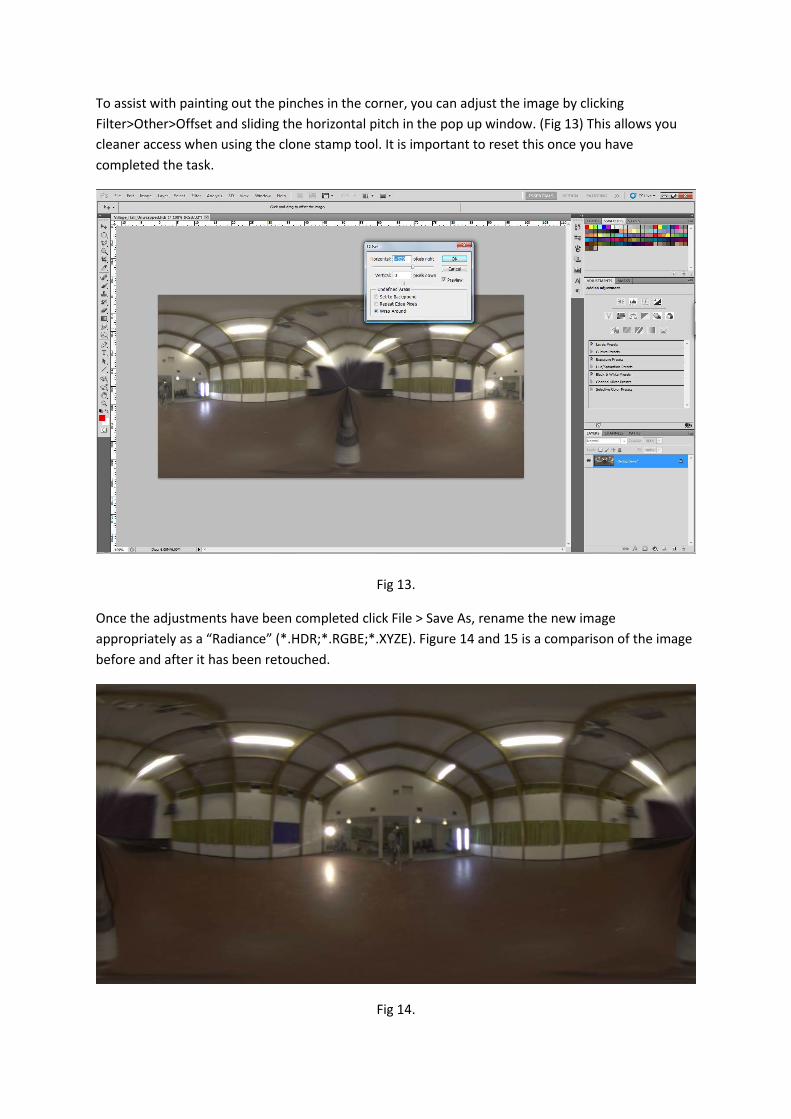
To assist with painting out the pinches in the corner, you can adjust the image by clicking
Filter>Other>Offset and sliding the horizontal pitch in the pop up window. (Fig 13) This allows you
cleaner access when using the clone stamp tool. It is important to reset this once you have
completed the task.
Fig 13.
Once the adjustments have been completed click File > Save As, rename the new image
appropriately as a “Radiance” (*.HDR;*.RGBE;*.XYZE). Figure 14 and 15 is a comparison of the image
before and after it has been retouched.
Fig 14.
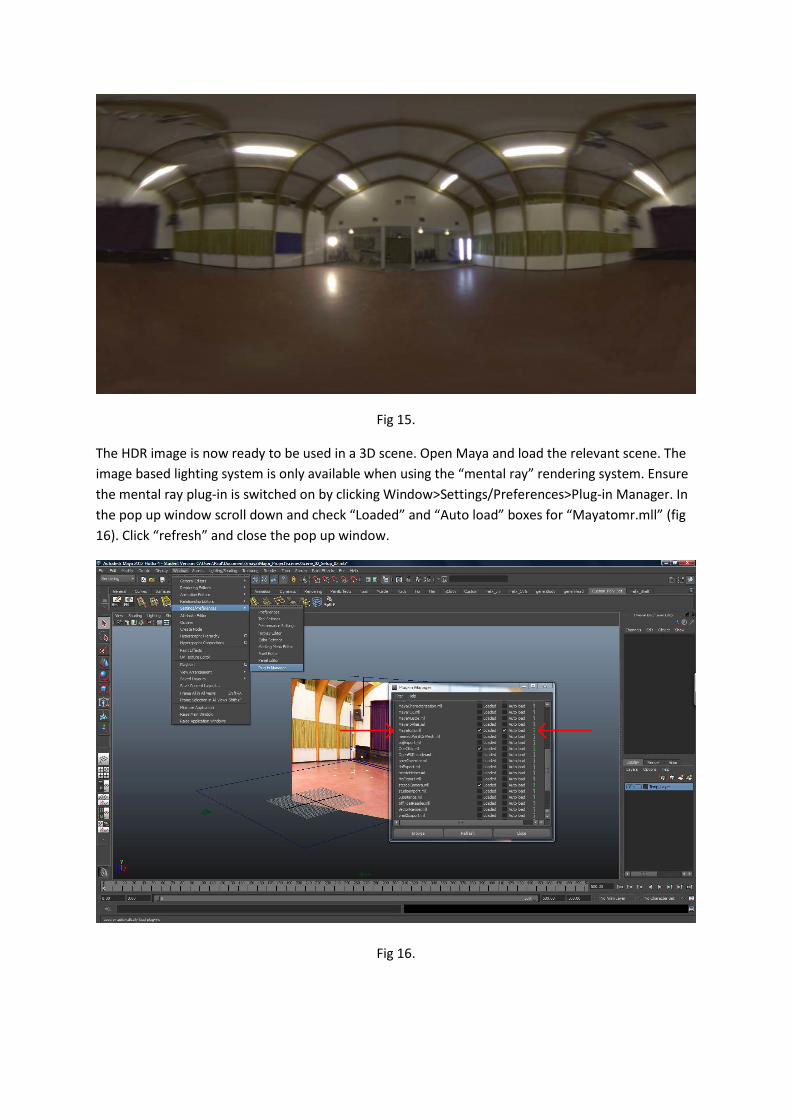
Fig 15.
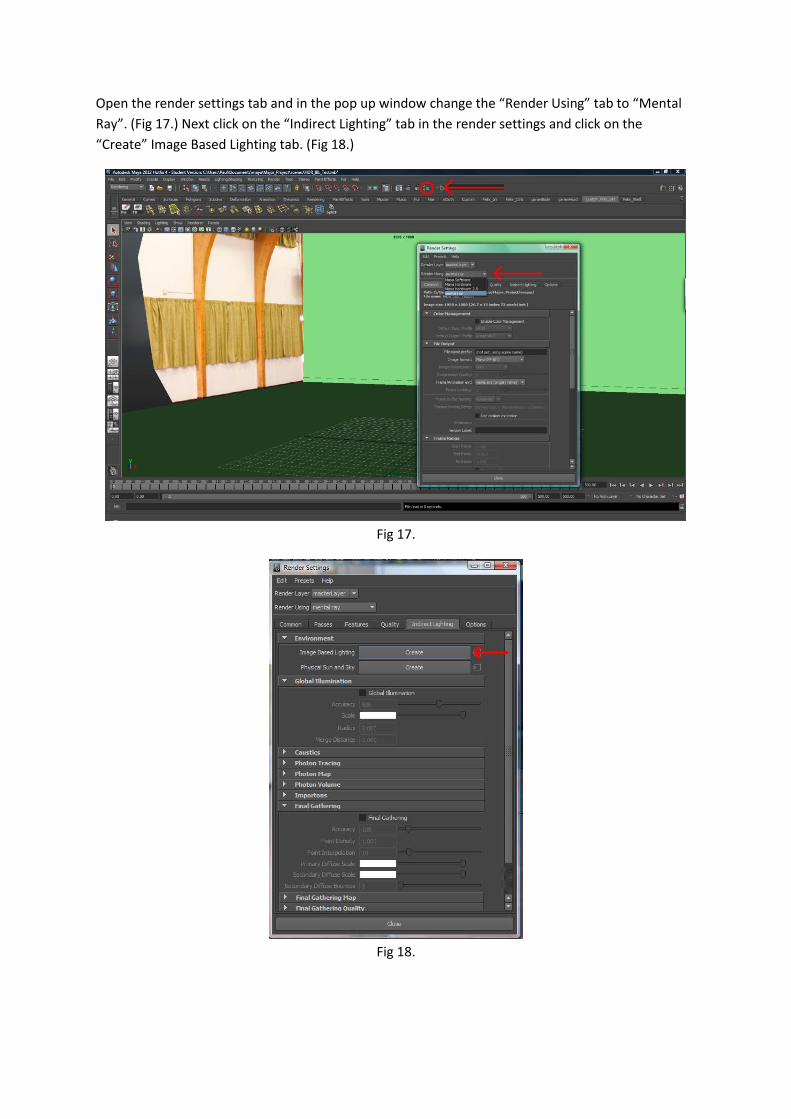
The HDR image is now ready to be used in a 3D scene. Open Maya and load the relevant scene. The
image based lighting system is only available when using the “mental ray” rendering system. Ensure
the mental ray plug-in is switched on by clicking Window>Settings/Preferences>Plug-in Manager. In
the pop up window scroll down and check “Loaded” and “Auto load” boxes for “Mayatomr.mll” (fig
16). Click “refresh” and close the pop up window.
Fig 16.
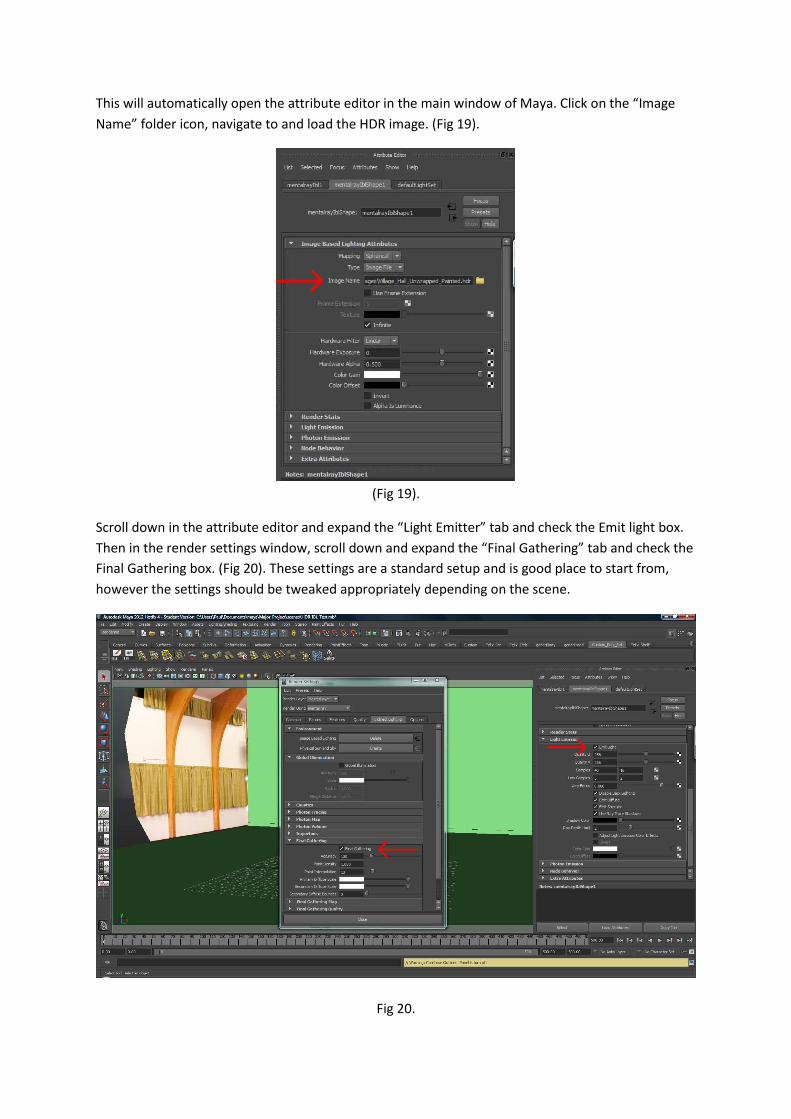
Open the render settings tab and in the pop up window change the “Render Using” tab to “Mental
Ray”. (Fig 17.) Next click on the “Indirect Lighting” tab in the render settings and click on the
“Create” Image Based Lighting tab. (Fig 18.)
Fig 17.
Fig 18.
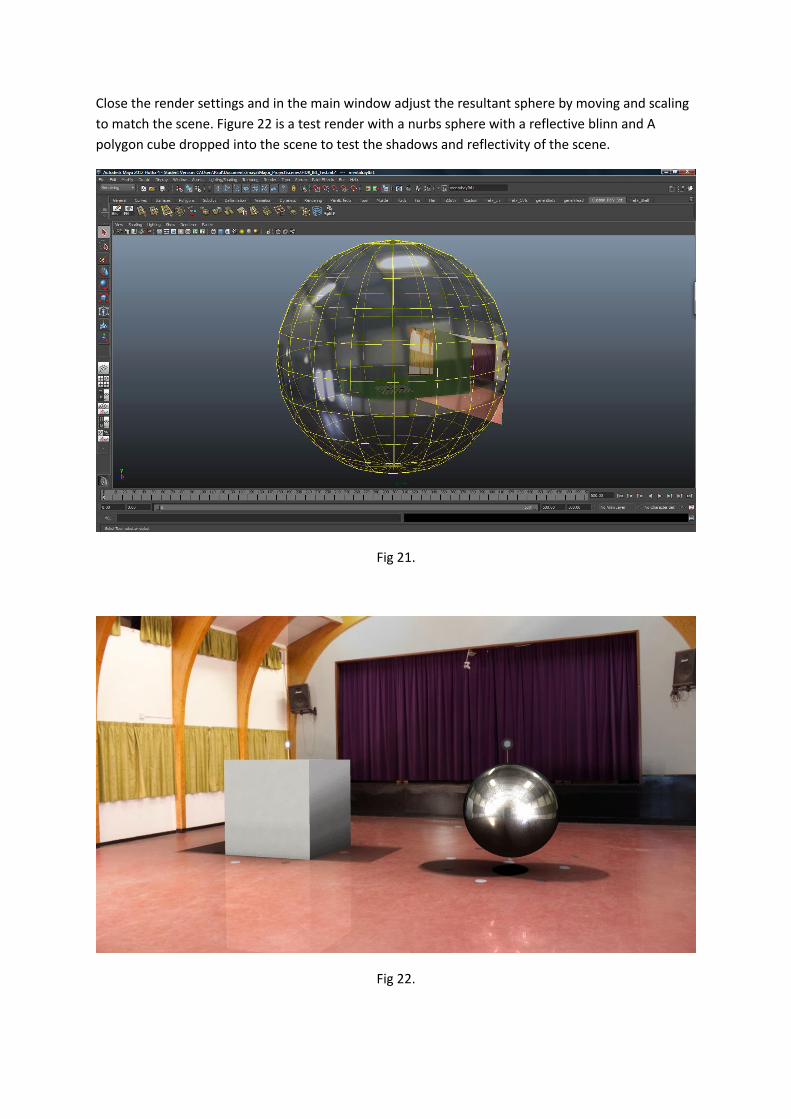
This will automatically open the attribute editor in the main window of Maya. Click on the “Image
Name” folder icon, navigate to and load the HDR image. (Fig 19).
(Fig 19).
Scroll down in the attribute editor and expand the “Light Emitter” tab and check the Emit light box.
Then in the render settings window, scroll down and expand the “Final Gathering” tab and check the
Final Gathering box. (Fig 20). These settings are a standard setup and is good place to start from,
however the settings should be tweaked appropriately depending on the scene.
Fig 20.
Close the render settings and in the main window adjust the resultant sphere by moving and scaling
to match the scene. Figure 22 is a test render with a nurbs sphere with a reflective blinn and A
polygon cube dropped into the scene to test the shadows and reflectivity of the scene.
Fig 21.
Fig 22.