Embed Size (px)
Citation preview

15-Jun.2020 Ver1.3
TAIYO YUDEN CO., LTD.
1 / 25
TY’s app 5.0
FAQ

15-Jun.2020 Ver1.3
TAIYO YUDEN CO., LTD.
2 / 25
Revision History
Version Date Description
1.0 2020/2/7 Release
1.1 2020/5/15 Corrected a misprint.
1.2 2020/5/21 Fixed typos.
1.3 2020/6/15 Unified application name
Fixed a formula for calculating connection timeout values

15-Jun.2020 Ver1.3
TAIYO YUDEN CO., LTD.
3 / 25
Table of contents
Q1-1:How to enable auto-advertising/scanning? ...............................................................4
Q1-2:How to change the advertising/scan interval time? .................................................4
Q1-3:How to change the timeout time for advertising/scan? ...........................................4
Q1-4:How to change the connection interval and connection timeout (SuperVision
Time)? ......................................................................................................................................5
Q1-5:How to Activate Bonding? ..........................................................................................5
Q1-6:How to Activate Whitelist? ........................................................................................6
Q1-7:How to Activate Pairing? .........................................................................................6
Q1-8:How to rewrite firmware with DFU function? .......................................................7
Q1-9:What will happen if more than 20 bytes of data are sent at a time after the
connection is complete? ..........................................................................................................8
Q1-10:How to set up iBeacon, Company ID? ...................................................................8
Q1-11:How to set the scan filter? .....................................................................................8
Q1-12:How to initialize the settings? ............................................................................ 10
Q1-13:How to set the Advertising Mode Long Range/2Mbps? ..................................... 11
Q1-14:How to set the security level? .............................................................................. 11
Q1-15:How to switch between Command Mode and Through Mode? ........................ 13
Q1-16:How to switch between interfaces? .................................................................... 14
Q1-17:How to display the RSSI value when receiving advertising data? .................. 16
Q1-18:How to set up LE Secure Connection? ............................................................... 16

15-Jun.2020 Ver1.3
TAIYO YUDEN CO., LTD.
4 / 25
Q1-1:How to enable auto-advertising/scanning?
A1-1:To enable auto-advertising/scanning, follow these steps.
I. Execute the “$SASM:1” command with advertising and scanning stopped to enable
AutoStart (to disable it, use the “$SASM:0” command to do the same).)
II. Execute the “$SAVE” command to save the settings.
III. Execute the “$SRST” command to confirm that advertisements/scanning will start
automatically after resetting.
Note: The device will begin auto-advertising/scanning after power up/reset or after the
BLE connection has been lost. If the advertisement/scan times out, the automatic
advertisement/scan will not be performed.
Q1-2:How to change the advertising/scan interval time?
A1-2:If you want to change the advertising interval time, change the first parameter of
the “$ADS1” command to an arbitrary time.
Example: 1 second “$ADS1:1000:60”
To change the scan interval time, change the second parameter of the $SCS1
command to an arbitrary time.
Example:1second “$SCS1:10:1000:60”
Q1-3:How to change the timeout time for advertising/scan?
A1-3:If you want to change the advertising timeout time, change the second parameter
of the "$ADS1" command to an arbitrary time. If you want to disable the timeout
time, set the value to "0".
Example: 60 seconds “$ADS1:100:60”
Example: Timeout disabled “$ADS1:100:0”
If you want to change the scan timeout time, change the third parameter of the
$SCS1 command to an arbitrary time. If you want to disable the timeout time,
set the value to "0".
Example: 60 seconds “$SCS1:10:20:60”
Example: Timeout disabled “$SCS1:10:20:0”
Note: Please refer to “Data Report” for details on how to set it up.

15-Jun.2020 Ver1.3
TAIYO YUDEN CO., LTD.
5 / 25
Q1-4:How to change the connection interval and connection timeout (SuperVision
Time)?
A1-4:If you want to change the connection interval, change the first and second
parameters of the "$SCPR" command to an arbitrary time. If you want to change
the connection timeout, change the fourth parameter of the "$SCPR" command
to an arbitrary time. The value of the connection timeout can be set to (1 +
latency) * Interval Max * 2 should be set to a minimum value that is greater
than this value.
Example : connection interval minimum 0.1 seconds, maximum 0.2 seconds,
connection timeout 4 seconds.
“$SCPR:100:200:0:4000”
Note: Please refer to “Data Report” for details on how to set it up.
Q1-5:How to Activate Bonding?
A1-5:To enable Bonding, run the following command.
I. Execute the “$SBND:1” command.
II. Execute the “$SAVE” command to save the configuration, then execute the “$SRST”
command to reset the device.
III. If you connect with pairing setting, “$EBOND:number” event will be output and
Bonding will be completed.

15-Jun.2020 Ver1.3
TAIYO YUDEN CO., LTD.
6 / 25
[Bonding]
Note: The maximum number of Bonding information can be 8 addresses, please delete
the Bonding information when you want to perform Bonding on new device
when the maximum number of Bonding information is reached.
Q1-6:How to Activate Whitelist?
A1-6:To enable Whitelist, follow the steps below.
I. Execute the “$SWHT:1” command to enable the Whitelist.
II. Execute the “$SAVE” command to save the configuration, then execute the “$SRST”
command to reset the device.
Note: If you want to use the Whitelist function, you need to make a bonding with the
target device in advance.
By enabling Whitelist, Central will receive Advertising data only from devices
that have bonded, and Peripheral will only make scan and connection requests
from devices that have bonded.
Note: Please refer to “Data Report” for details on how to set it up.
Q1-7:How to Activate Pairing?
A1-7:To enable pairing, the security level must be set to "2" or higher. You can change
the security level by executing the command with the “$SSEC:number”

15-Jun.2020 Ver1.3
TAIYO YUDEN CO., LTD.
7 / 25
command.
Example:”$SSEC:2”
Note: For details on how to set the security level, refer to “Q1-14: How to set the security
level”.
Q1-8:How to rewrite firmware with DFU function?
A1-8:In order to perform rewriting with the DFU function, the device must be put into
DFU mode.
To put the device into DFU mode, set DFU pin (P0.16) to low and perform a
reset to enter DFU mode.
After shifting to DFU mode, you can rewrite the firmware by using "nRFgo
Studio" which is a tool provided by Nordic.
Note: Please visit Nordic's official website for information on how to obtain and use
nRFgo Studio.
Download page:https://www.nordicsemi.com/Products/Low-power-short-range-
wireless/nRF24-series

15-Jun.2020 Ver1.3
TAIYO YUDEN CO., LTD.
8 / 25
Q1-9:What will happen if more than 20 bytes of data are sent at a time after the
connection is complete?
A1-9:There are two types of connection modes after the connection is complete, and the
behavior when sending more than 20 bytes of data is different for each.
When using Command Mode, if you try to send more than 20 bytes of data at a
time, an error will be displayed and data cannot be sent. If you want to send
data at once, please set the limit to 20 bytes or less.
When using Through Mode, it is possible to send more than 20 bytes of data at
a time. However, since normal command operations cannot be performed in
Through Mode, switch to Command Mode before performing a command
operation.
Note: When more than 20 bytes of data are sent at once, the display of the received device
depends on the processing content of the received device.
Q1-10:How to set up iBeacon, Company ID?
A1-10:The iBeacon data can be configured with the “$ADS5” command to set the
proximity UUID, major, minor, and measurement power. iBeacon's Company ID
is fixed to Apple's “0x004C”.
If you want to use iBeacon, you will need to change the advertising mode
settings. Changes can be made to the settings using the “$ADS6:2” or “$ADS6:4”
command.
Note: For information on the licensing of iBeacon, please refer to
“https://developer.apple.com/ibeacon/”.
Q1-11:How to set the scan filter?
A1-11:In TY’ app 5.0, it is possible to set a scan filter at scan execution time. You can
set two types of scan filters, “Device Name” and “TAIYO YUDEN Service
UUID”. The setting method is as follows.
[Device name filter]
I. Execute the command “$SCS3:device name” (device name must be less than 29 bytes).
II. Execute the “$SAVE” command to save the configuration, then execute the “$SRST”
command to reset the device.

15-Jun.2020 Ver1.3
TAIYO YUDEN CO., LTD.
9 / 25
[Taiyo Yuden Service UUID Filter]
I. Execute the command "$SCS3:1" to enable the filter.
II. Execute the “$SAVE” command to save the configuration, then execute the “$SRST”
command to reset the device.

15-Jun.2020 Ver1.3
TAIYO YUDEN CO., LTD.
10 / 25
P0.13 low
“$EBOOT:DFLT <CR><LF>”
“$EBOOT:DFLT <CR><LF>”
“$FRST:CONFIRM<CR><LF>”
Q1-12:How to initialize the settings?
A1-12:If you want to initialize the settings, you can do so in the following two ways.
When the initialization is executed, the parameter of the “$EBOOT” event
after rebooting will be set from OK to DFLT.
1. Resetting the device with the Factory reset pin(P0.13) in the low state.
2. Execute the command “$FRST: CONFIRM”.
[Factory reset pin]
[FRST command]
HOST Module
Initialize process
Reset
Mode
HOST Module
Initialize process
Reset
Mode

15-Jun.2020 Ver1.3
TAIYO YUDEN CO., LTD.
11 / 25
Q1-13:How to set the Advertising Mode Long Range/2Mbps?
A1-13:To set the mode to Long Range/2Mbps, perform the following steps.
I. Execute the “$ADS6:3” (connectable) or “$ADS6:4” (beacon) command to set the
Advertising Mode.
II. Execute the “$ADS8:1:1” or “$ADS8:1:2” command to set the PHY primary to 1
(Coded).
If you want to communicate at 2 Mbps, set the secondary to “2 (2 Mbps)”.
III. Execute the "$SAVE" command to save the settings.
IV. Execute the "$SRST" command to reset the system. After rebooting, the mode setting
of Long Range/2Mbps is completed.
[ Long Range/2Mbps mode setting example]
Note: Since Central always scans in the Extended mode, the Long Range/2Mbps setting
in Advertising Mode is not necessary.
If you want to make sure your settings are reflected, you can either run the
“$ADG6” or “$ADG8” commands, or you can check from the Central scan results
after advertsising has started.
Q1-14:How to set the security level?
A1-14:Perform the following steps.
I. Execute the “$SIOC:Parameter” command to set IO capabilities to the security level
you want to set.
II. Execute the “$SSEC:Parameters” command to set the security level.
III. Execute the “$SAVE” command to save the settings.
IV. Execute the “$SRST” command to reset the system. If you want to check if the
settings are reflected after rebooting, you can execute the “$GIOC” and “$GSEC”
commands respectively.

15-Jun.2020 Ver1.3
TAIYO YUDEN CO., LTD.
12 / 25
“$GIOC<CR><LF>”
“$GIOC:2<CR><LF>”
“$SIOC:2<CR><LF>”
“$SIOC:OK<CR><LF>”
“$GSEC:4<CR><LF>”
“$SSEC:4<CR><LF>”
“$SSEC:OK<CR><LF>”
“$SAVE:OK<CR><LF>”
“$SAVE<CR><LF>”
“$RSRT<CR><LF>”
“$SRST:OK<CR><LF>”
“$GSEC<CR><LF>”
[Example of security level setting]
HOST Module
Automatically check the configuration of IO
capabilities and output an error if the
security level is not met.
If you want to make sure that the settings are
reflected after the reset, do the following.

15-Jun.2020 Ver1.3
TAIYO YUDEN CO., LTD.
13 / 25
P0.25 high
“$EMODE:C <CR><LF>”
P0.25 low
“$EMODE:T <CR><LF>”
Q1-15:How to switch between Command Mode and Through Mode?
A1-15:After the BLE module connection is complete, two communication modes can be
selected. You can switch between the two by following the steps below.
Command Mode: Set the mode selection Pin(P0.25) to high
Through Mode: Set the mode selection Pin(P0.25) to low (default state
immediately after connection).
[Command Mode]
[Through Mode(default)]
HOST Module
Command Mode
Mode
Connection established
HOST Module
Through Mode
Mode
Connection established

15-Jun.2020 Ver1.3
TAIYO YUDEN CO., LTD.
14 / 25
P1.01 high
“$EBOOT:DFLT <CR><LF>”
Note: Please refer to the “Data Report” for the specifications of each mode.
Q1-16:How to switch between interfaces?
A1-16:TY’s app 5.0 supports three types of interfaces, UART, USB and SPI Slave, and
each interface can be switched from a specific GPIO_Pin before boot.
The switchover method is as follows
USB:USB interface selection Pin(P1.01) can be set to high
UART:USB interface selection Pin (P1.01) is low & UART/SPI Slave interface selection
Pin (P1.03) is high (default)
SPI Slave:USB interface selection Pin (P1.01) is low & & UART/SPI Slave interface
selection Pin (P1.03) is low.
[USB interface]
HOST Module
USB Interface
Mode
Power On
Mode

15-Jun.2020 Ver1.3
TAIYO YUDEN CO., LTD.
15 / 25
P1.01 low && P1.03 high
“$EBOOT:DFLT <CR><LF>”
P1.01 low && P1.03 low
“$EBOOT:DFLT <CR><LF>”
[UART interface]
[SPI Slave interface]
Note: For the specifications of each interface, please refer to the “Data Report”.
HOST Module
UART Interface
Mode
Power On
Mode
HOST Module
SPI Slave Interface
Mode
Power On
Mode

15-Jun.2020 Ver1.3
TAIYO YUDEN CO., LTD.
16 / 25
Q1-17:How to display the RSSI value when receiving advertising data?
A1-17:TY’s app 5.0 outputs the Advertising Report when it receives Advertising data.
The RSSI value is included in the output result, so you don't need to set it to
display it.
Q1-18:How to set up LE Secure Connection?
A1-18:This section describes the setup procedures for Just Work, Numeric Comparison,
Passkey Entry, and Out of Band (OOB).
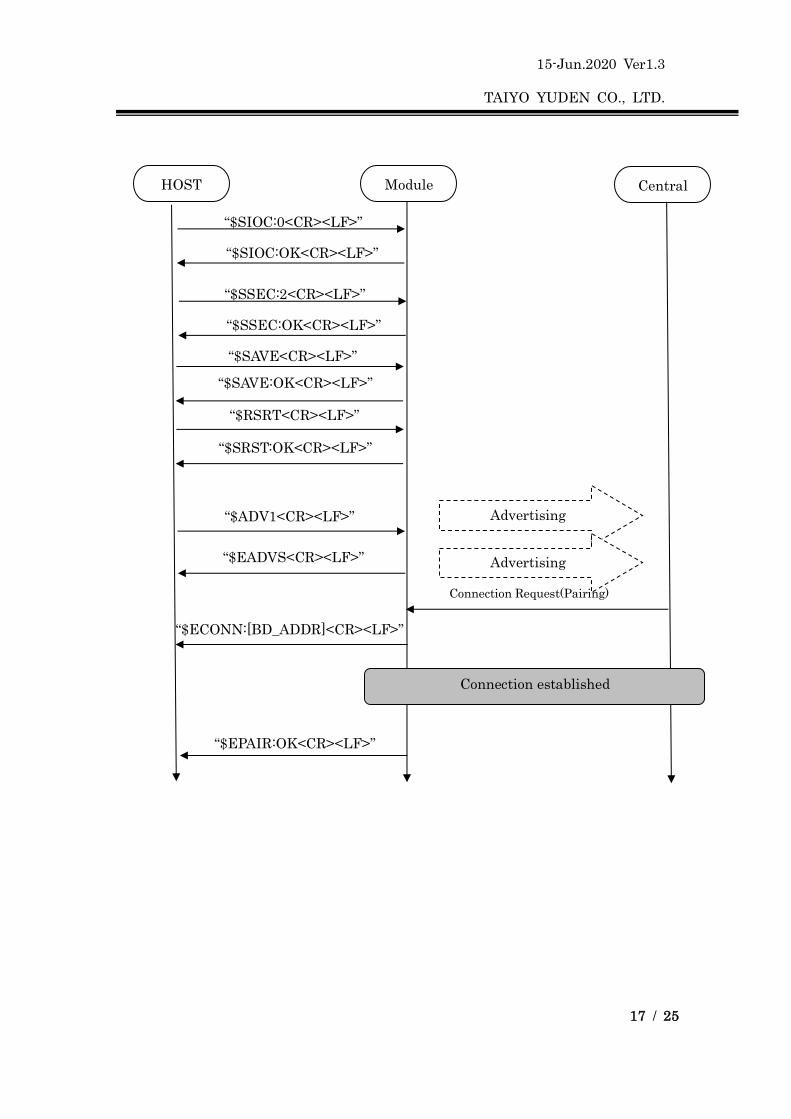
[Just Work]
I. Execute the command “$SIOC:0” on the module on the peripheral side and set IO
Capabilities to 0.
II. Execute the command “$SSEC:2” on the peripheral side module and set the security
level to 2.
III. Execute the “$SAVE” command to save the configuration, then execute the “$SRST”
command to reset the device.
IV. Execute the “$ADV1” command to start advertising, and then execute the
“$MCON:address” to connect to the central device, and confirm that pairing is done
and “$EPAIR:OK” is output.
15-Jun.2020 Ver1.3
TAIYO YUDEN CO., LTD.
17 / 25
“$ADV1<CR><LF>”
“$EADVS<CR><LF>”
“$SIOC:0<CR><LF>”
“$SIOC:OK<CR><LF>”
“$ECONN:[BD_ADDR]<CR><LF>”
Connection Request(Pairing)
“$SSEC:2<CR><LF>”
“$SSEC:OK<CR><LF>”
“$SAVE:OK<CR><LF>”
“$SAVE<CR><LF>”
“$RSRT<CR><LF>”
“$SRST:OK<CR><LF>”
HOST Module
Advertising
Advertising
Central
“$EPAIR:OK<CR><LF>”
Connection established

15-Jun.2020 Ver1.3
TAIYO YUDEN CO., LTD.
18 / 25
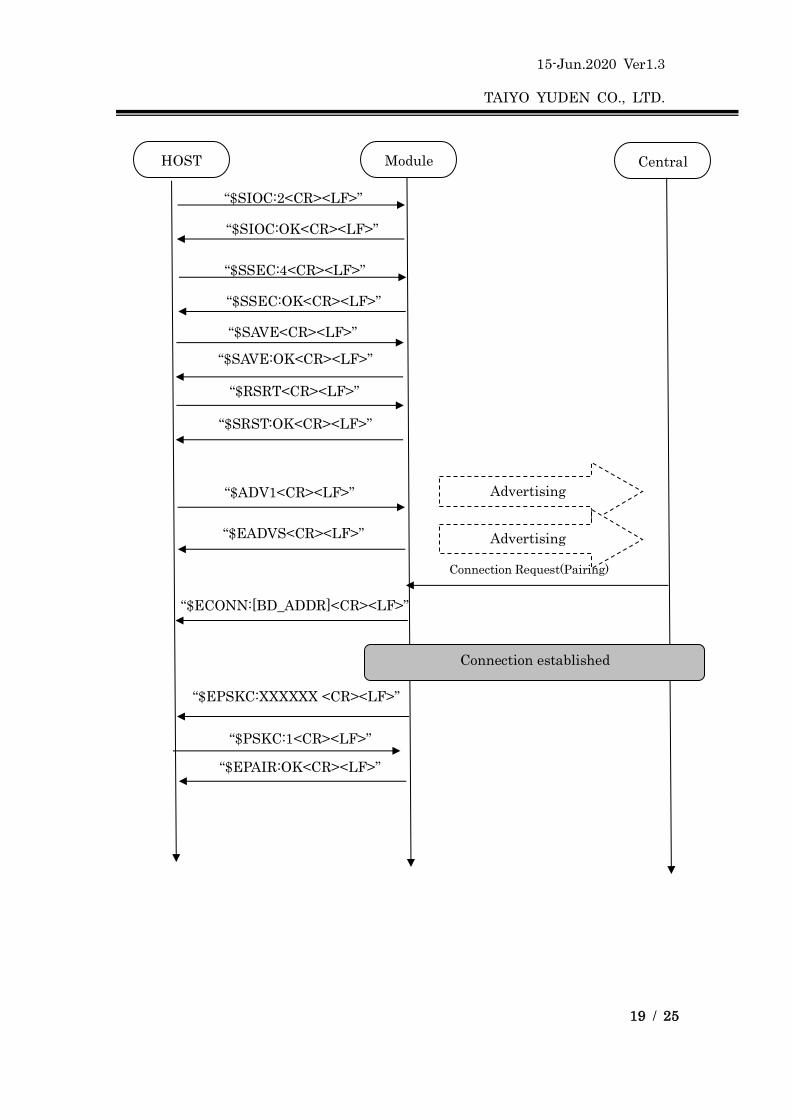
[Numeric Comparison]
I. Execute the command “$SIOC:2” on both the peripheral and central modules and set
IO Capabilities to 2.
II. Execute the “$SSEC:4” command on both the peripheral and central modules and set
the security level to 4.
III. In both modules, execute the “$SAVE” command to save the settings, and then
execute the “$SRST” command to reset the device.
IV. Start to advertise and connect to the central device by executing “$MCON:address”
on the central module and confirm that “$EPSKC:6-digit number" is output.
V. If the numbers of “$EPSKC” in both modules are the same, confirm that the
authentication is performed with “$PSKC:1”, the pairing is performed, and
“$EPAIR:OK” is output. If they do not match, close the connection with “$PSKC:0”.
15-Jun.2020 Ver1.3
TAIYO YUDEN CO., LTD.
19 / 25
“$ADV1<CR><LF>”
“$EADVS<CR><LF>”
“$SIOC:2<CR><LF>”
“$SIOC:OK<CR><LF>”
“$ECONN:[BD_ADDR]<CR><LF>”
Connection Request(Pairing)
“$SSEC:4<CR><LF>”
“$SSEC:OK<CR><LF>”
“$SAVE:OK<CR><LF>”
“$SAVE<CR><LF>”
“$RSRT<CR><LF>”
“$SRST:OK<CR><LF>”
“$EPSKC:XXXXXX <CR><LF>”
“$PSKC:1<CR><LF>”
HOST Module
Advertising
Advertising
Central
“$EPAIR:OK<CR><LF>”
Connection established

15-Jun.2020 Ver1.3
TAIYO YUDEN CO., LTD.
20 / 25
[Passkey Entry(Peripheral_Passkey screen output)]
I. Execute “$SIOC:1” command on the peripheral module and “$SIOC:3” command on
the central module, and set IO Capabilities to 1 and 3, respectively.
II. Execute the “$SSEC:4” command on both the peripheral and central modules and set
the security level to 4.
III. In both modules, execute the “$SAVE” command to save the settings, and then
execute the “$SRST” command to reset the device.
IV. Start to advertise and connect to the central device by executing “$MCON:address”
on the central module, and confirm that “$EPSD:6-digit number" is output.
V. Confirm that the authentication is completed and “$EPAIR:OK” is output after the
operation on the central side is performed.

15-Jun.2020 Ver1.3
TAIYO YUDEN CO., LTD.
21 / 25
“$ADV1<CR><LF>”
“$EADVS<CR><LF>”
“$SIOC:1<CR><LF>”
“$SIOC:OK<CR><LF>”
“$ECONN:[BD_ADDR]<CR><LF>”
Connection Request(Pairing)
“$SSEC:4<CR><LF>”
“$SSEC:OK<CR><LF>”
“$SAVE:OK<CR><LF>”
“$SAVE<CR><LF>”
“$RSRT<CR><LF>”
“$SRST:OK<CR><LF>”
“$EPSKD:XXXXXX <CR><LF>”
HOST Module
Advertising
Advertising
Central
“$EPAIR:OK<CR><LF>”
Connection established

15-Jun.2020 Ver1.3
TAIYO YUDEN CO., LTD.
22 / 25
[Passkey Entry(Peripheral_Passkey input)]
I. Execute “$SIOC:3” command on the peripheral module and “$SIOC:1” command on
the central module, and set IO Capabilities to 3 and 1, respectively.
II. Execute the “$SSEC:4” command on both the peripheral and central modules and set
the security level to 4.
III. In both modules, execute the “$SAVE” command to save the settings, and then
execute the “$SRST” command to reset the device.
IV. Start to advertise and connect to the central device by executing “$MCON:address”
on the central module, and make sure that “$EPSI” is output.
V. Execute “$PSKI:XXXXXXX” using the number following “$EPSD:” displayed on the
central side, and make sure “$PSKI:OK” is output.
VI. Verify that the authentication is completed and "$EPAIR:OK" is output.

15-Jun.2020 Ver1.3
TAIYO YUDEN CO., LTD.
23 / 25
“$ADV1<CR><LF>”
“$EADVS<CR><LF>”
“$SIOC:3<CR><LF>”
“$SIOC:OK<CR><LF>”
“$ECONN:[BD_ADDR]<CR><LF>”
Connection Request(Pairing)
“$SSEC:4<CR><LF>”
“$SSEC:OK<CR><LF>”
“$SAVE:OK<CR><LF>”
“$SAVE<CR><LF>”
“$RSRT<CR><LF>”
“$SRST:OK<CR><LF>”
“$EPSKI <CR><LF>”
HOST Module
Advertising
Advertising
Central
“$PAKI:XXXXXX<CR><LF>”
Connection established
“$PAKI:OK<CR><LF>”
“$EPAIR:OK <CR><LF>”
15-Jun.2020 Ver1.3
TAIYO YUDEN CO., LTD.
24 / 25
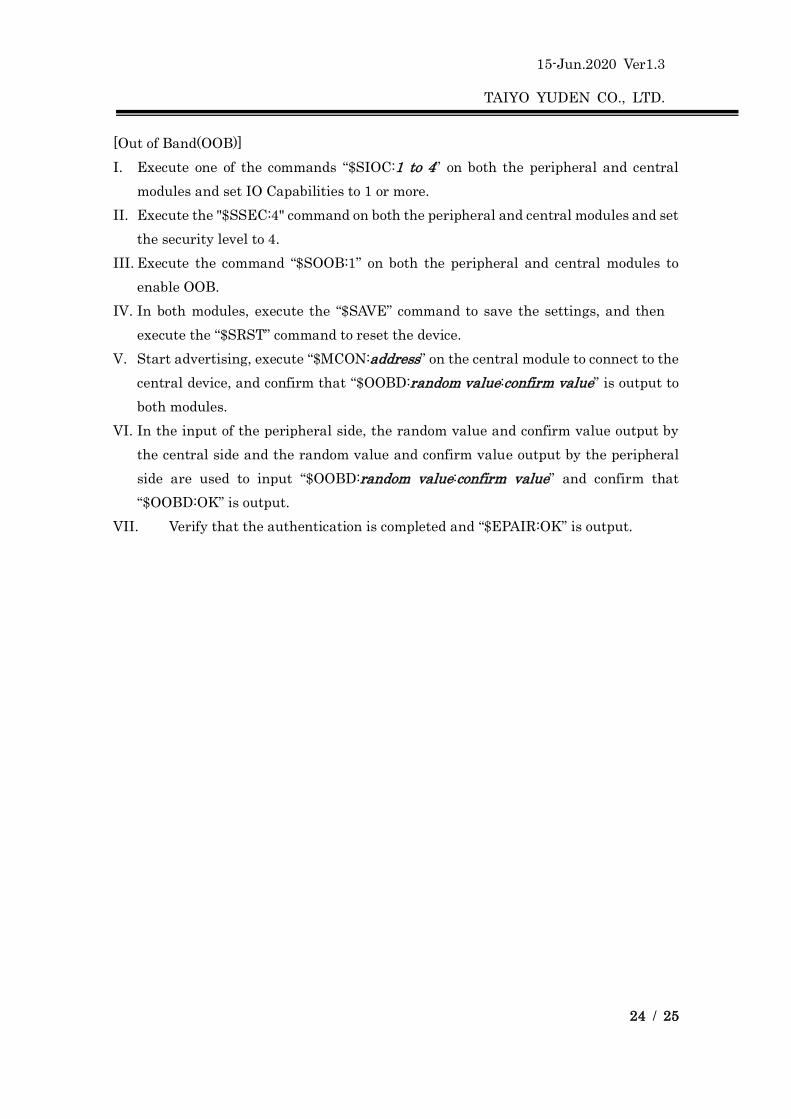
[Out of Band(OOB)]
I. Execute one of the commands “$SIOC:1 to 4” on both the peripheral and central
modules and set IO Capabilities to 1 or more.
II. Execute the "$SSEC:4" command on both the peripheral and central modules and set
the security level to 4.
III. Execute the command “$SOOB:1” on both the peripheral and central modules to
enable OOB.
IV. In both modules, execute the “$SAVE” command to save the settings, and then
execute the “$SRST” command to reset the device.
V. Start advertising, execute “$MCON:address” on the central module to connect to the
central device, and confirm that “$OOBD:random value:confirm value” is output to
both modules.
VI. In the input of the peripheral side, the random value and confirm value output by
the central side and the random value and confirm value output by the peripheral
side are used to input “$OOBD:random value:confirm value” and confirm that
“$OOBD:OK” is output.
VII. Verify that the authentication is completed and “$EPAIR:OK” is output.

15-Jun.2020 Ver1.3
TAIYO YUDEN CO., LTD.
25 / 25
“$ADV1<CR><LF>”
“$EADVS<CR><LF>”
“$SIOC:1~4<CR><LF>”
“$SIOC:OK<CR><LF>”
“$ECONN:[BD_ADDR]<CR><LF>”
Connection Request(Pairing)
“$SSEC:4<CR><LF>”
“$SSEC:OK<CR><LF>”
“$SAVE:OK<CR><LF>”
“$SAVE<CR><LF>”
“$RSRT<CR><LF>”
“$SRST:OK<CR><LF>”
“$OOBD:AA…AA:BB…BB <CR><LF>”
“$SOOB:1<CR><LF>”
“$SOOB:OK<CR><LF>”
AA...AA:BB...BB is the random
value and confirm value on the
peripheral side
CC...CC:DD...DD is the random value
and confirm value displayed on the
central side.
[Example of the peripatetic side]
HOST Module
Advertising
Advertising
Central
“$OOBD:CC…CC:DD…DD <CR><LF>”
Connection established
“$OOBD:OK<CR><LF>”
“$EPAIR:OK <CR><LF>”

![Notice for TAIYO YUDEN Products [ For General … for TAIYO YUDEN Products [ For General Electronic Equipment ] Please read this notice before using the TAIYO YUDEN products. REMINDERS](https://img.pdfslide.us/doc/110x75/5c85e46209d3f2700a8b9840/notice-for-taiyo-yuden-products-for-general-for-taiyo-yuden-products-for-general.jpg)

![Notice for TAIYO YUDEN Products (General Environment) ] · PDF fileNotice for TAIYO YUDEN Products [ For General Electronic Equipment (General Environment) ] Please read this notice](https://img.pdfslide.us/doc/110x75/5a7a28887f8b9adf778d5450/notice-for-taiyo-yuden-products-general-environment-for-taiyo-yuden-products.jpg)


![Notice for TAIYO YUDEN Products [ For General Electronic Equipment ] · 2019. 2. 28. · Notice for TAIYO YUDEN Products [ For General Electronic Equipment ] Please read this notice](https://img.pdfslide.us/doc/110x75/61469ebd7599b83a5f0056b0/notice-for-taiyo-yuden-products-for-general-electronic-equipment-2019-2-28.jpg)


![Notice for TAIYO YUDEN Products (General … · Notice for TAIYO YUDEN Products [ For General Electronic Equipment (General Environment) ] Please read this notice before using the](https://img.pdfslide.us/doc/110x75/5b9dc92509d3f2a4348c8986/notice-for-taiyo-yuden-products-general-notice-for-taiyo-yuden-products-for.jpg)

![Notice for TAIYO YUDEN Products - Mouser · PDF fileNotice for TAIYO YUDEN Products [ For High Quality and/or Reliability Equipment (Automotive / Industrial Equipment) ] Please read](https://img.pdfslide.us/doc/110x75/5a7a28887f8b9adf778d544d/notice-for-taiyo-yuden-products-mouser-for-taiyo-yuden-products-for-high-quality.jpg)