Embed Size (px)
Citation preview
1
TYPOGRAPHY & COMPUTER APPLICATIONS (ENGLISH) (817)
THEORY
Unit-1
PART- I INTRODUCTION TO TYPOGRAPHY
1.1 INTRODUCTION:
In the olden days when the Typewriter was not in existence, the letters, documents etc.
used to be written with Pen. Writing with Pen was time-consuming but the invention of
Typewriter has brought a major change in the transmission of information in a neat, clean
and legible manner.
It will be interesting for you to know that Typewriter has been a source of getting jobs
to millions of people all over the world. Since you have taken this subject, you may also
be able to get a job as Junior Assistant, Computer Operator, Data Operator, Front Office
Assistant, Office Assistant and similar other jobs in Public or in Private Sector Offices by
learning the useful skill of Typewriting/Typography either on the Typewriter or on the
Computer. The matter typed on Typewriter or Computer is most attractive and distinctly
more legible as compared to handwritten matter.
In this Unit you will be taught about the origin and development of Typewriters,
importance of typewriters, various categories of Typewriters. You will also be briefly
taught about the Computers and Laptops.
1.1 LEARNING OBJECTIVES
After going through this Unit, you will be able to:
- Know the history of typewriter;
- Define Typography
- Understand the importance of learning typewriting on typewriter or computer;
- Identify various types of Typewriters
- Know that this is a job-oriented course;

2
- Distinguish between various types of typewriters;
- Define Standard Typewriter;
- Enlist the salient features of Electronic Typewriter
- Justify the use of Typewriter or computer over hand writing
- Know about computer and laptop;
- Acquire the skill of typewriting on typewriter or computer or laptop.
1.2 THE TYPEWRITER
The Typewriter is a machine which produces characters resembling to those of
ordinary printed matter. These characters are printed on the paper one by one by
mechanical means with each depression of the key on the Keyboard of the typewriter.
The machine on which you will learn typewriting to produce print-like matter is
known as typewriter. The process of producing print like impressions on the
typewriter or Computer or Laptop is known as Typography.
1.3 ORIGIN AND DEVELOPMENT OF TYPEWRITER:
Before the invention of Typewriter, the work of writing letters, reports, documents,
court judgments etc. was being done in long hand. To overcome this lengthy and
tiring process of writing documents in long hand, an effort was made in this direction
in Western countries. First attempt to invent a Typewriter was made by Mr. Henry
Mill, an engineer in England in the year 1714, during the reign of Queen Anne, but he
did not succeed.
Second worthwhile attempt was made by Mr. W.A. Burt of U.S.A. in 1829. He
succeeded in producing some kind of a machine which was known as „Burt
Typographer‟. But this machine was not at all perfect. The model produced by Burt
was destroyed in a fire accidently.
After this, many engineers and mechanics tried to build a typewriter but they could
not produce a successful model. It was in the year 1868, when Mr. Christopher
Lantham Sholes of USA, assisted by Carlos Glidden and Samuel Soule, succeeded in
inventing the first efficient and practical typewriter. Christopher Lantham Sholes is
thus called the inventor and father of the typewriter.

3
Sholes later on built various other models during the next six years making some or the
other improvements, but all these models could type only CAPITAL LETTERS.
However, the features of this machine remained standard in all the machines even
today.
After Sholes successfully produced a model of the typewriter, the work of
manufacturing was entrusted to M/s. E. Remington & Sons of U.S.A., who produced
the first model of the Remington Typewriter in 1874. This machine looked like a
sewing machine. The Remington Company made various improvements in the
machines.
Dr. August Dvorak of Washington designed a modified Keyboard for typewriter on
which one could type for hours together, but somehow his modified keyboard could
not become popular.
Originally, typewriting was done with only two fingers which is known as Sight
method of Typewriting. Till 1877, only the Sight method of Typewriting was used. In
1878 Mr. Charles McGurin, an American Typist, introduced Touch Method of
Typewriting, which helped the typists to type without looking at the keyboard with all
the fingers of both the hands.. This created a revolution in the history of the
typewriter. Mr. McGurin demonstrated to the world that he could type at a speed of 90
words per minute on a Remington Typewriter by using the Touch Method of
Typewriting.
Remington Company introduced an additional key in the Keyboard known as Shift
Key. With the help of this key, both capital and lower capital letters could be typed.
Soon after these improvements, the demand for typewriter increased. To meet the
demand, Remington Company opened their agencies in U.K., India, Australia and
some other countries. The first agency of Typewriters was started in India in 1896
In the meantime some other companies started manufacturing their makes of
typewriters, the major among them being the Underwood Company, which perfected
the first Standard Typewriter in 1896.
In the first quarter of twentieth century, need was felt to manufacture different
categories of typewriters which could meet the requirements of the typists in different
situations. Noiseless Typewriter, which reduced the noise while typing, was
introduced in the market in 1925.
To meet the requirements of those typists who used to travel with their Officers,
Portable Typewriter was introduced in the market in 1931.
4
The Typewriter Companies introduced an Electric Typewriter which made its
appearance in the market in the year 1938. This enabled the typists to do more work
without getting tired.
So far the typewriters with only English keyboard were available but by the middle of
the Twentieth Century typewriters with keyboards in different languages including
Hindi language came into the market.
Electronic Typewriter is an improved version of Electric Typewriter with many
additional features.
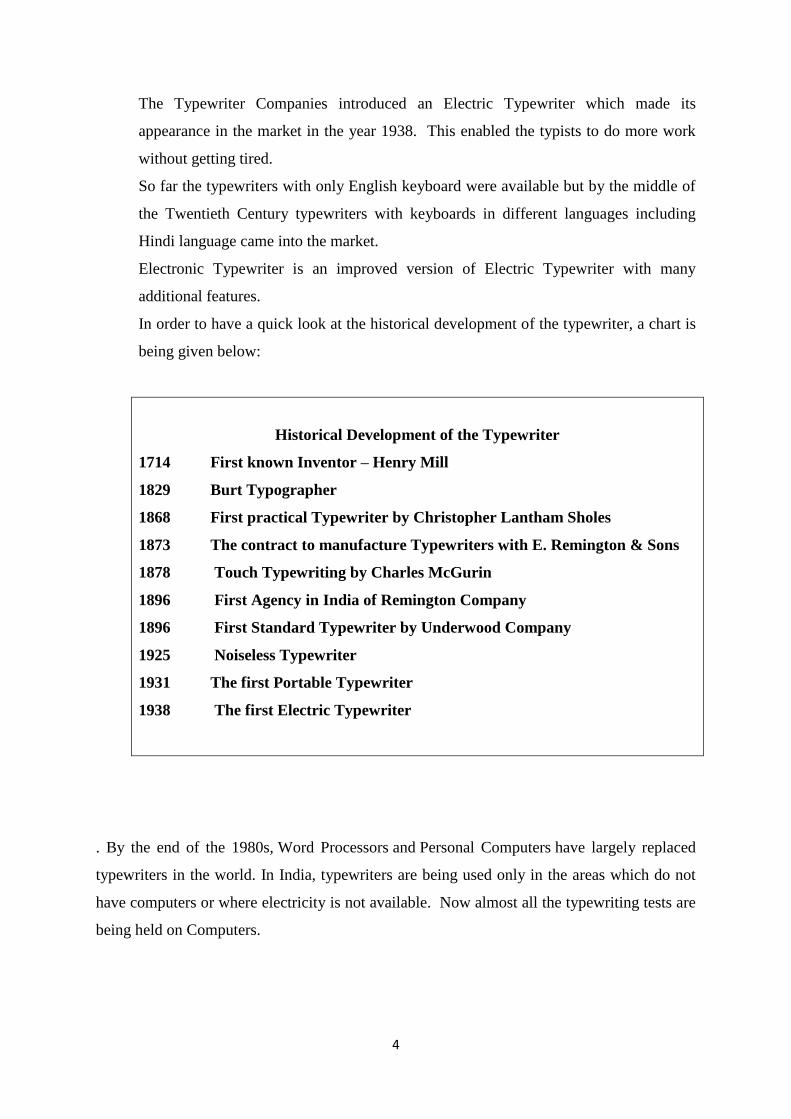
In order to have a quick look at the historical development of the typewriter, a chart is
being given below:
Historical Development of the Typewriter
1714 First known Inventor – Henry Mill
1829 Burt Typographer
1868 First practical Typewriter by Christopher Lantham Sholes
1873 The contract to manufacture Typewriters with E. Remington & Sons
1878 Touch Typewriting by Charles McGurin
1896 First Agency in India of Remington Company
1896 First Standard Typewriter by Underwood Company
1925 Noiseless Typewriter
1931 The first Portable Typewriter
1938 The first Electric Typewriter
. By the end of the 1980s, Word Processors and Personal Computers have largely replaced
typewriters in the world. In India, typewriters are being used only in the areas which do not
have computers or where electricity is not available. Now almost all the typewriting tests are
being held on Computers.

5
1.4 IMPORTANCE OF TYPEWRITER/COMPUTER
There are many advantages of using a typewriter/Computer, as given below:
- Provides jobs to millions of people:
Before the Computers came into existence, the Typewriters have provided jobs to
millions of boys and girls in both the public and private sectors. Majority of employees
in the Government and Private Offices have been appointed after passing the Typewriting
Tests on Typewriters. Till recently the Staff Selection Commission, which makes
appointments of office staff for the Central Government Offices all over the country, has
been conducting Typewriting Tests on Typewriters. It is only for the last two years, the
typewriting tests are being conducted on Computers. The typewriting on Computers is
also done by using the Touch Method of Typewriting, which enhances the typewriting
speed in comparison to the persons using the Keyboard with only two fingers of both the
hands.
- It is a desirable Skill:
Typewriting has become a desirable skill like the other professions. It is learnt not
only by the boys and girls desirous of getting jobs but also by many other persons
Executives, Lawyers, Doctors, Engineers, Students, teachers and business men who use
it for doing their personal and confidential work. Now-a-days the Computers are being
used by everybody.
- It has replaced Pen:
The use of Typewriter/Computer has replaced the Pen which was being used for writing
various documents in longhand, which was time-consuming and tiring.
- It ensures Speed and Accuracy:
The work on Typewriter/Computer can be done with a much higher speed in comparison
to the work done by Pen. It ensures greater accuracy.
6
- It saves time and energy:
The work done on Typewriter/Computer is done at a faster speed without much effort, it
results in the saving of time and energy of its Operator.
- It produces work which is impressive in look:
Work done on Typewriter/Computer can be read easily and is more impressive in look
when it is properly displayed. Handwritten work takes longer time and if the handwriting
of the person is not good, sometimes it becomes very difficult to read the handwritten
documents.
- It develops concentration:
One can typewrite accurately only when one works with full concentration. The habits
formed while typing improves concentration which is an important character trait for
doing any other type of work.
- It helps Blind people:
Typewriting can also be learnt by blind persons by using the „Braille‟
Typewriters/Computers which are specially designed for this purpose.
1.5 CATEGORIES OF TYPEWRITERS
There are the following five categories of typewriters:
Standard Typewriter
Noiseless Typewriter
Portable Typewriter
Electric Typewriter
Electronic Typewriter
These are explained below:
1.5.1 STANDARD TYPWRITER
“Standard” means “that which is recognized as a rule or model of approved merit or
excellence”. The expression “Standard Typewriter” signifies that the machine is a model of

7
excellence for the purpose it is used, namely, to write rapidly, accurately and neatly. The
Standard Typewriter was perfected by the Underwood Company in 1896*.
All the Standard Typewriters have the following common features:
A four-row (bank) Keyboard;
The arrangement of keys in a similar order of letters;
A single shift operation for capitals and additional characters; and
Visibility of writing by “front upstroke typebar action”, which means that the type is
arranged in a semi-circle in front of the machine and strikes upwards on the paper.
Any typewriter which does not have any or all these features is called a non-standard
typewriter. Prior to the invention of the Standard Typewriter in 1896, all the
typewriters were non-standard typewriters. Now only standard typewriters are
manufactured
1.5.2 NOISELESS TYPEWRITER:
This Typewriter works on the principle of “pressure printing” instead of usual stroking
method and, therefore, it makes less noise than any other ordinary typewriter. The first
noiseless typewriter with three rows of keys was produced in 1910 but it had certain defects.
A perfect Noiseless Typewriter was produced in 1925.
This typewriter is used by the Operator, when he/she has to sit in the room of the Officer and
to type close to him. However, these typewriters are not manufactured and are in very rare
use. The main drawback of this typewriter was that it could hardly produce 2-3 copies at a
time as all the subsequent copies were not clear.
. 1.5.3 PORTABLE TYPEWRITER:
The Portable Typewriter has all the features of a Standard Typewriter but its weight is light.
It is used by travelling Operators. It is also useful for professionals, businessmen, journalists,
doctors, executives and others who have to travel frequently and require letters, documents to
be typed during the course of their business tours. Since the machine is very light and takes
up little space, it can be carried as easily as an attaché case.
All Portable Typewriters have a four-row (bank) keyboard and their operation is similar to
that of a standard typewriter. Portable typewriters came in the market in 1931.

8
1.5.4 ELECTRIC TYPEWRITERS:
The first electric typewriter was produced by the Blickensderfer Manufacturing Company,
of Stamford, Connecticut, in 1902, followed by the improved versions by various
manufacturers in 1914. Ultimately, an improved version of the electric typewriter came in
1938. It used a cylindrical type-wheel rather than individual type-bars like the manual
typewriters but it was not a commercial success, because at that time electricity had not been
standardized and voltage differed from city to city. The Olympia typewriters were most
successful in Germany between 1950 and 1970.
Many electric typewriters have dispensed with type bars and instead use a small round-
shaped head, commonly known as „golf ball‟. The surface of the head carries all the
characters needed to match with those of the keyboard. When the keys are operated on the
keyboard, the typing head revolves to the required printing position and prints the character.
The golf ball can be easily replaced by a printing head with different type faces.
Main advantages of this typewriter are:
(a) There is no need to use the hands to return the carriage from left to right
position;
(b) A very light and feather touch is needed for the operation of the keyboard;
(c) The Operator does not tire even after many hours of work;
(d) There is uniformity of impression on the paper;
(e) Neat work is produced.
(f) Different type-faces can be taken by changing the golf ball;
(g) Mathematical typewriting can be done by changing the ordinary golf ball to
the one having mathematical signs whereas the same facility is not available in
the ordinary manual typewriter.
1.5.5 ELECTRONIC TYPEWRITER:
Electronic Typewriter is an improvement in the Electric Typewriter. This typewriter has
been introduced in the Indian market since 1982. Electronic Typewriters are based on the
sophisticated micro-processor computer technology. These are operated by microchips. All
the character keys are the same as on the manual and electric typewriters. There are major
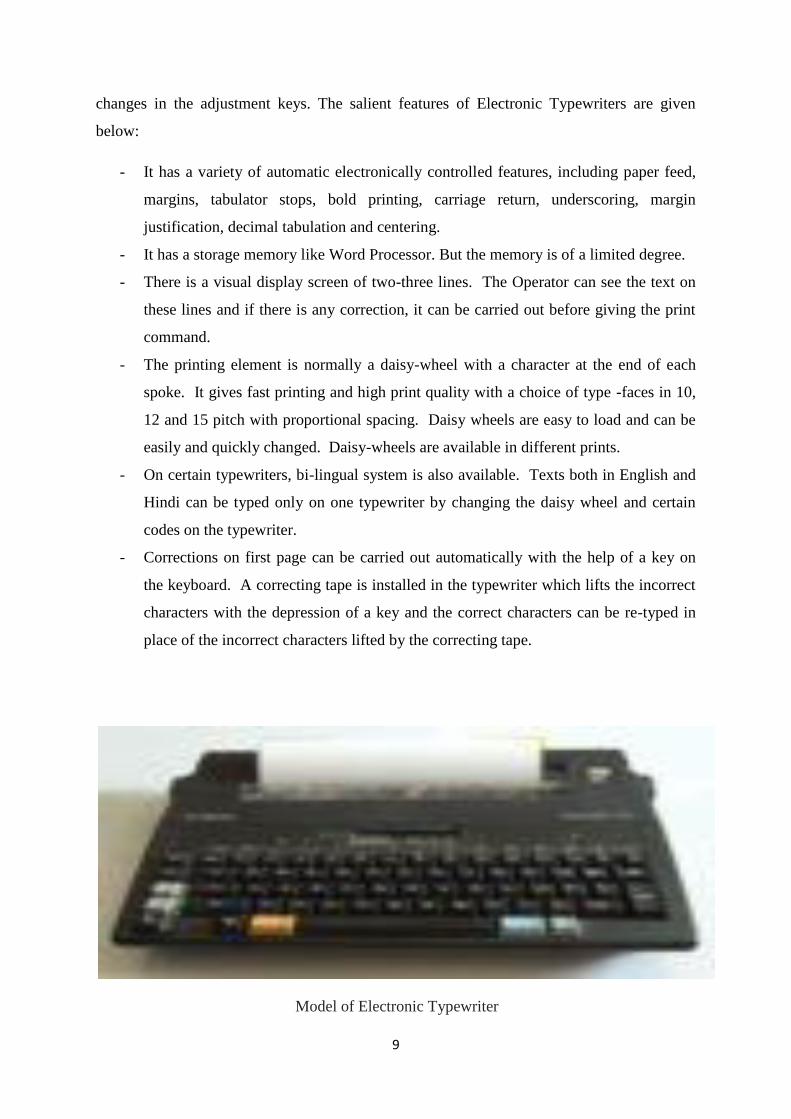
9
changes in the adjustment keys. The salient features of Electronic Typewriters are given
below:
- It has a variety of automatic electronically controlled features, including paper feed,
margins, tabulator stops, bold printing, carriage return, underscoring, margin
justification, decimal tabulation and centering.
- It has a storage memory like Word Processor. But the memory is of a limited degree.
- There is a visual display screen of two-three lines. The Operator can see the text on
these lines and if there is any correction, it can be carried out before giving the print
command.
- The printing element is normally a daisy-wheel with a character at the end of each
spoke. It gives fast printing and high print quality with a choice of type -faces in 10,
12 and 15 pitch with proportional spacing. Daisy wheels are easy to load and can be
easily and quickly changed. Daisy-wheels are available in different prints.
- On certain typewriters, bi-lingual system is also available. Texts both in English and
Hindi can be typed only on one typewriter by changing the daisy wheel and certain
codes on the typewriter.
- Corrections on first page can be carried out automatically with the help of a key on
the keyboard. A correcting tape is installed in the typewriter which lifts the incorrect
characters with the depression of a key and the correct characters can be re-typed in
place of the incorrect characters lifted by the correcting tape.
Model of Electronic Typewriter

10
1.5.6 Computers
Information Technology has played a vital role in our lives. All of us are using this
technology in our day to day functioning. Computer is one of the most modern devices that is
being used by majority of people in their homes and offices. It is the most revolutionary
invention. Computer functions through hardware and software. Hardware represents the
physical components of the computer and software represents the set of programs that govern
the operation of a computer system and make the hardware run.
Computers are being used everywhere. Our most of the services have been computerized
such as railways, banking, airways, electricity, hotels, schools, colleges, shops, big malls,
industries, defence, etc. The main characteristics of computer are: Speed, high storage
capacity, accuracy, reliability, and versatility. You will read more about the Computers in
the following pages.
1.5.7 Laptops
Laptops are those computers which could be operated by putting it in your laps. These are
used in businesses and at home to communicate on computer network, for word processing
and to play games. These laptops have large amount of internal memory to store different
programs and documents. These laptops are equipped with a keyboard; a mouse, track ball or
other pointing devices and a video display, Monitor or LCD to display information. They
have similar hardware and software as other PCs have. Laptop computers (also called
notebooks) can be carried from one place to other very easily and conveniently like portable
typewriter.
REVIEW QUESTIONS
1. What do you understand by Typography?
2. Who is called the Inventor/Father of the Typewriter?
3. Who invented Touch method of Typewriting?
4. Which Company introduced the additional key in the Keyboard known as Shift Key?
5. In which year the first agency of Typewriters started in India?
6. Name the Typewriter invented by Mr. W.A. Burt in the year 1829.
7. How many categories of typewriters are there? Explain any two.
8. What are the advantages of Typewriter/Computer?

11
9. What do you understand by a Standard Typewriter? Enlist its salient features.
10. What are the advantages of Electric Typewriter?
11. Write the salient features of an Electronic Typewriter.
12. Fill in the blanks with appropriate words in the following sentences:
The Electronic Typewriters were introduced in Indian market in the year ______.
The _________Typewriter has all the features of a Standard Typewriter except its weight
is light.
The Noiseless Typewriter works on the principle of ___________printing instead of
usual stroking method.
There are _________ categories of Typewriters.
The first Standard Typewriter was manufactured by Underwood Company in the year
__________.
The first attempt to invent a Typewriter was made in the year 1714 by
Mr._____________.
***************

12
Unit-2
KEYBOARD OPERATIONS
2.1 INTRODUCTION:
In the last Unit, you have read about the invention of typewriter by Christopher Latham
Sholes, particularly the „keyboard‟, which is the crucial part of the typewriter. Keys of letters
were not positioned alphabetically on the board, called the keyboard. The keyboard had been
designed in four rows, each row having 10-11 letter-keys. People used different methods for
the operation of this keyboard. Every method had some merits and demerits. In this unit you
will also learn the operation of Home Row, Top Row, Bottom Row, and the Row for
Operation of Numbers and Signs.
2.2 LEARNING OBJECTIVES
After going through this unit, you will be able to:
Know the keyboard used in typewriters vis-à-vis computers/laptops.
Know the correct sitting posture of a typist.
Selection of right height chair & table.
Placement of machine on the table .
Methods of operation of keyboard.
Merits & demerits of both methods.
Learn of home row, upper row, bottom row and special row of numbers etc.
2.3 KEYBOARD
The first successful arrangement of letter keys on the keyboard was designed by Sholes &
Glidden. His team worked day and night for the smooth functioning of their machine,
particularly the keyboard. Some suggested the fixing of English letters alphabetically while
others suggested some alternative methods but after a thorough trial of the suggested ways,
the styles suggested by the people proved to be unworthy. Ultimately, the Sholes‟ layout of
keys has become the standard for English-language typewriter and computer keyboards. The
Computer keyboard is popularly known as “QWERTY keyboard‟. Q,W,E,R,T and Y being
the six alphabets put on the top row of the standard keyboard. They became the reason of
naming it as QWERTY keyboard. In a „universal‟ typewriter, there were 46 keys typing 92

13
characters including signs. Although typewriters in the advanced information technology
have become redundant, yet the keyboard used in computers is the same as used by Sholes in
typewriters. Layout of the keyboard has changed very little ever since it was introduced.
Numbers of keys on a typical keyboard vary from 82 keys to 108 keys.
2.3.1 QWERTY KEYBOARD
. Function Keys
Modifier Typing Keys/Character Keys
Keys Space Bar Cursor Keys Numeric Pad
2.3.2 Keys of Keyboard
There are different keys on the keyboard of the computers – these are consisting of
alphanumeric or character keys for typing, and for altering the functions of other keys are
called modifier keys. Navigation keys are used for moving the text cursor on the screen and
function keys – such as Esc and break – for special actions, and often a numeric keypad to
facilitate calculations.
There is a difference between the mechanical layouts of the different Computers of the
different countries –relating to number of keys and their positions also.
- Character keys
The basic section of a keyboard is consisting of character keys, which can be used to type
letter and other characters. There are three rows of keys for typing letters and punctuation
signs, an upper row for typing digits and special symbols, and the space bar on the bottom

14
row. The positioning of the character keys is similar to the keyboard of a typewriter. That is
the reasons; the keyboard is called the Universal keyboard.
- Modifier Key
Besides the character keys, a keyboard consists of special keys that do nothing by themselves
but modify the functions of other keys. For example, we can alter the output of the character
key with the use of shift key - such as - Ctrl key (control) and Alt (alternate) keys are used for
other keys.
2.3.3 SITTING POSTURE
There should be a perfect sitting posture for typing on the keyboard. Body must be upright
and shoulders should be relaxed, your feet should be flat on the floor. For the perfect sitting
posture, the following guidelines should be followed:
(a) Use cushioned chair that helps you keep your body straight. The chair so selected should
be adjustable, so that you can set the height of the chair to rest your feet flat on the floor.
Keep your feet on the floor or on a footrest. Some people like sitting in a slightly lounged
position as it creates less stress on the back.
(b) Support your lower back.
(c) In typing-mode, never cross legs.
(d) Both the feet should touch the floor maintaining a distance of about 15 cm between the
two feet.
(e) Have a comfortable chair with adjustable armrests, if possible.
(f) Have a cushioned seat.
(g) Your keyboard should be at a height that allows your elbows to be bent and close to your
sides.
- Chair & Table
If the typist has furniture shaped to support his/her body, best posture, they can stay focused
on the work, or operate in front of them. Determine the best chair height by seating with
knees at 90° and feet flat on the floor. The distance from the floor to the seating surface is the
chair height you want.

15
- Placement of Machine
Generally, the typewriter is kept in the centre of the table when not in use so that it does not
get hit by any person passing by. When the machine is in use, its frontal edge should be kept
in level with that of the front edge of the table. This guideline may not be true in the case of
those who are lesser in normal height.
2.4 METHODS OF KEYBOARD OPERATION
Keyboard can be operated by looking and without looking at the keyboard. The method of
operating the keyboard without looking at the keyboard is called the Touch method of typing
and the method of typing while looking at the keyboard is called the sight method of typing.
In the early days of invention of the typewriter, only one method of typewriting was used i.e.
„Sight method‟ and the typing used to be done with the help of one or two fingers of both the
hands by looking at the keyboard. This method was later on substituted with another method
i.e. „Touch Method‟.
Both the typing methods are explained as under:
- Sight Method
The Sight method was the only prevalent method right from the very beginning when the first
typewriter was invented in 1714 till 1878, when another method of typewriting known as
“Touch Method” was introduced by an American Typist Mr. Charles McGurin.
Sight Method is a common style of typing, in which the typist must find and press each key
individually. This is usually slower than touch typing, as the typist must find each key by
sight. Use of this method may also prevent the typist from being able to see what has been
typed without glancing away from the keys. Although good accuracy may be achieved, but
the typing errors that are made may not be noticed immediately. There is also the
disadvantage that because fewer fingers (almost forefingers of both hands) are used, they are
forced to move a much greater distance.
Although learning to typewriter by sight method was an arduous process, yet students did
learn by this method to typewrite with remarkable speed.
This method is not a scientific one and therefore in the present days, this method of
typewriting is not being used very much. In this method the typist cannot concentrate on the

16
copy. Though this system is easy to learn in the beginning, but it is useless for acquiring high
speed in typewriting.
- ADVANTAGES OF SIGHT METHOD OF TYPEWRITING
The advantages of sight method of typewriting are as under:
1.Though unscientific method, but it is very easy to learn without the help of a teacher.
2.There is no need to learn the keyboard
3.It is really helpful to those people who do not want to appoint the secretary and want to
do the confidential work themselves.
4.There is no need to appoint the Secretary/P.A./Stenographer
5.It is a very short process and there is no need of concentration.
- DISADVANTAGES OF SIGHT METHOD OS TYPEWRITING
1.As the typing is done only with two forefingers of both the hands, more time and energy
is spent.
2.The typist gets tired by using this method because of the frequent movement of eyes
both on the keyboard and the matter to be typed.
3.All the fingers of both hands are not used, only forefingers of both hands are used.
4.There are more chances of omission of words or lines, as the typist has to look both on
the typing matters as well as on the keyboard and in doing so, omissions are possible.
5.High speed cannot be attained by using this method.
- TOUCH METHOD OF TYPEWRITING
Touch system means mentally locating the position of the keys by sense of touch without
looking at the keyboard. This method was introduced by Mr. Charles McGurin, an American
Typist in 1878.
The basic technique stands in contrast to sight method as the typist keeps his eyesight on the
source copy at all times. Touch typing also involves the use of the home row method, where
typist keeps their wrists up, rather than resting them on a desk or keyboard. In this method
the typist has to keep his eyesight only on the notebook from which the matter has to be
typed. This operation of keys is called by sense of location and not by sight. This method is
17
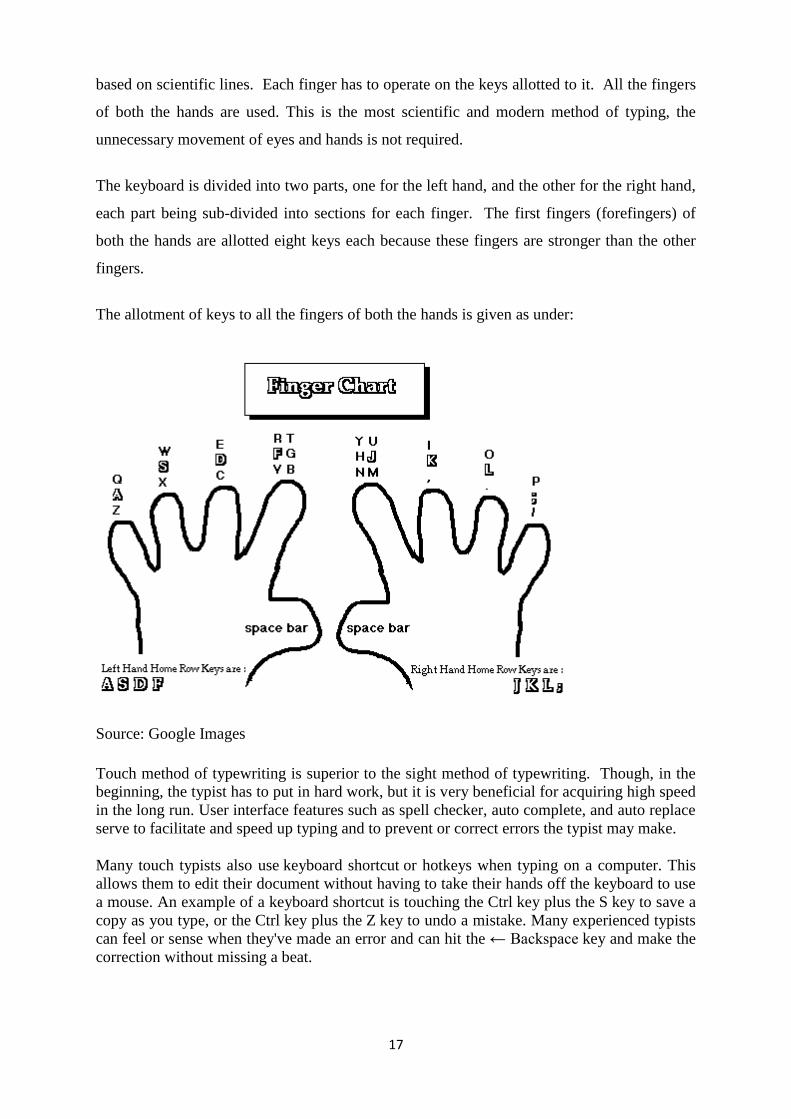
based on scientific lines. Each finger has to operate on the keys allotted to it. All the fingers
of both the hands are used. This is the most scientific and modern method of typing, the
unnecessary movement of eyes and hands is not required.
The keyboard is divided into two parts, one for the left hand, and the other for the right hand,
each part being sub-divided into sections for each finger. The first fingers (forefingers) of
both the hands are allotted eight keys each because these fingers are stronger than the other
fingers.
The allotment of keys to all the fingers of both the hands is given as under:
Source: Google Images
Touch method of typewriting is superior to the sight method of typewriting. Though, in the
beginning, the typist has to put in hard work, but it is very beneficial for acquiring high speed
in the long run. User interface features such as spell checker, auto complete, and auto replace
serve to facilitate and speed up typing and to prevent or correct errors the typist may make.
Many touch typists also use keyboard shortcut or hotkeys when typing on a computer. This
allows them to edit their document without having to take their hands off the keyboard to use
a mouse. An example of a keyboard shortcut is touching the Ctrl key plus the S key to save a
copy as you type, or the Ctrl key plus the Z key to undo a mistake. Many experienced typists
can feel or sense when they've made an error and can hit the ← Backspace key and make the
correction without missing a beat.
18
- ADVANTAGES OF TOUCH METHOD OF TYPEWRITING
The advantages of touch method of typewriting are as under:
1. Saving of time and energy as the work is distributed amongst all the fingers of both the
hands and it can also be specified as division of labour among all the fingers of the
hands.
2. The matter can be typed quickly due to less unnecessary movement of hands and eyes.
3. The high speed of typewriting can be achieved.
4. The typist does not tire even after many hours of work because the work is divided
among all the fingers.
5. This method ensures uniform impression and the matter typed with Touch Method
gives a pleasing appearance.
6. There is less possibility of omission of words or lines. Unnecessary movement of eyes
is also avoided.
7. The typist is not required to look at the keyboard.
8. Rhythm is maintained in this method of typewriting.
9. The typist can concentrate very well on the matter to be typed.
- DISADVANTAGES OF TOUCH METHOD OF TYPEWRITING
The disadvantages of this system are that the typist has to memorise the keyboard, the
location of keys, the different rows of the keyboard and besides this the typist has to
concentrate his eyesight on the note book. Keys have to be operated as per the universal
method of typing.
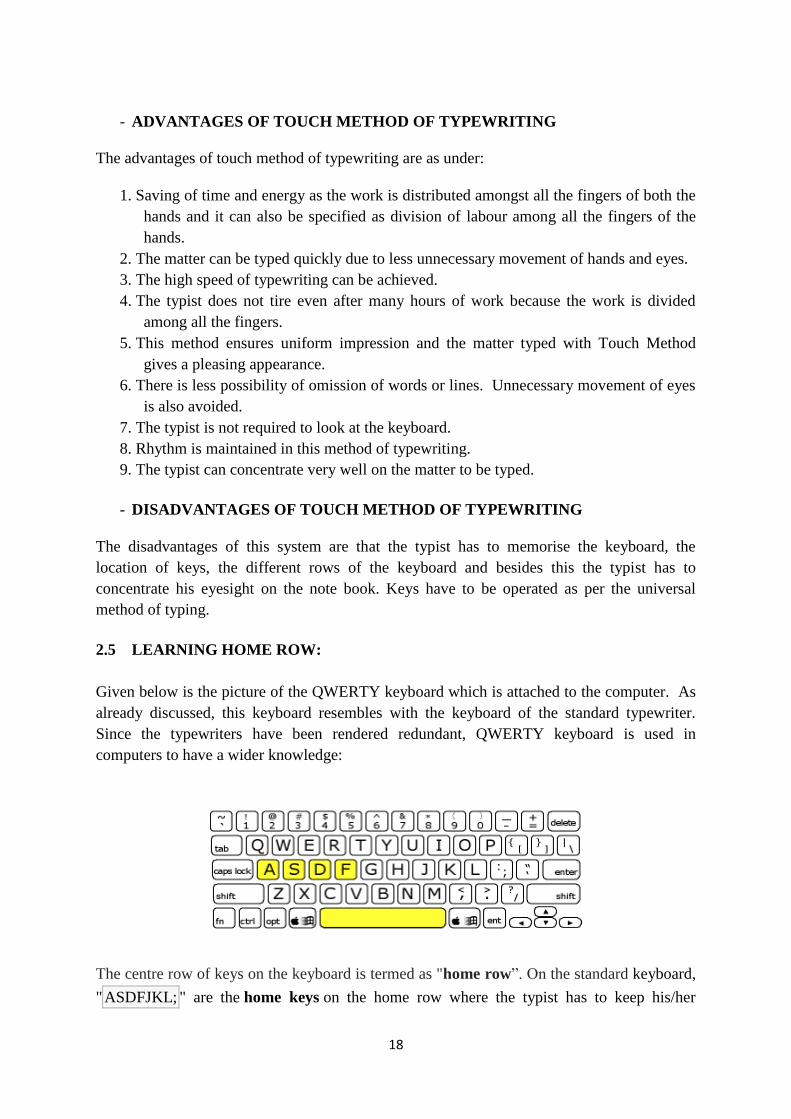
2.5 LEARNING HOME ROW:
Given below is the picture of the QWERTY keyboard which is attached to the computer. As
already discussed, this keyboard resembles with the keyboard of the standard typewriter.
Since the typewriters have been rendered redundant, QWERTY keyboard is used in
computers to have a wider knowledge:
The centre row of keys on the keyboard is termed as "home row”. On the standard keyboard,
" ASDFJKL; " are the home keys on the home row where the typist has to keep his/her
19
fingers. These fingers return to their home after depressing other keys on the keyboard. The
typist needs to hold the fingers lightly above the home keys. Students are advised to practice
the operation of Home Keys keeping in mind the following principles:
1) Make your four fingers of both hands to hover around the home keys in such a way
that they touch the keys lightly
2) Depress the keys of your left hand fingers and type: a s d f g
3) Depress the space bar with right thumb.
4) Depress the keys allotted to your right hand fingers and type: ; l k j h
5) Letters „f‟ and „g‟ are typed by the left hand fore-finger while letters „j‟ and „h‟ are
typed by the fore-finger of right hand.
6) Ultimately go on practicing: asdfg lkjh asdfg ;lkjh .
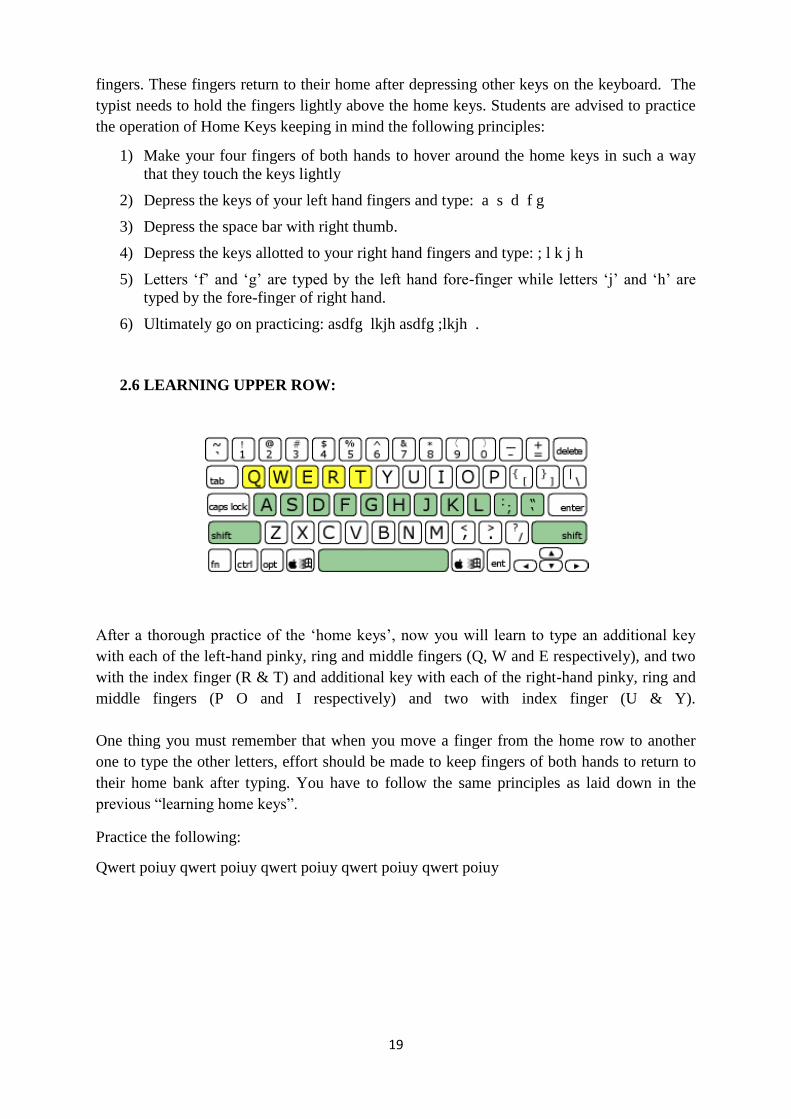
2.6 LEARNING UPPER ROW:
After a thorough practice of the „home keys‟, now you will learn to type an additional key
with each of the left-hand pinky, ring and middle fingers (Q, W and E respectively), and two
with the index finger (R & T) and additional key with each of the right-hand pinky, ring and
middle fingers (P O and I respectively) and two with index finger (U & Y).
One thing you must remember that when you move a finger from the home row to another
one to type the other letters, effort should be made to keep fingers of both hands to return to
their home bank after typing. You have to follow the same principles as laid down in the
previous “learning home keys”.
Practice the following:
Qwert poiuy qwert poiuy qwert poiuy qwert poiuy qwert poiuy

20
2.7 LEARNING BOTTOM ROW
Before going to the bottom row, adjust your fingers of both hands on Home Keys. In
reaching the bottom row you'll be tapping on 5 more keys with your right-hand fingers: B&
N for the right-hand index finger, M for the middle, the comma for the ring, full stop for the
pinky finger. The pinky will also handle the question mark, which is on the same key as the
slash, but with the shift key. 5 more keys with your left-hand fingers: C V for the left-hand
index finger, X for middle, Z for the ring and pinky finger is used to press the Shift Key :zxcv
.,mnb zxcv .,mnb zxcv .,mnb zxcv .,mnb
Practice :
zxcv .,mnb zxcv .,mnb zxcv .,mnb zxcv .,mnb zxcv .,mnb zxcv .,mnb zxcv .,mnb zxcv .,mnb
ZXCV .,MNB ZXCV .,MNBZXCV .,MNBZXCV .,MNB ZXCV .,MNB ZXCV
.,MNBZXCV .,MNBZXCV .,MNB
2.8 LEARNING NUMBER ROW:
Typist should look at the keyboard and try to memorize the numbers and the fingers allocated
for the depression of each key. It goes from 1 to 0 (think of "0" as "10" for this!), starting the
count with the left-hand pinky finger, ending with the right-hand pinky finger. Instead of
counting the thumbs use the index fingers for two numbers.
Before starting, keep your fingers on the home keys, making a light contact with keys of the
keyboard. With the help of your fingers of left hand practice 12345 and after pressing the
space bar depress the keys 09876 with the fingers of your right hand. Again repeat the same
process.
Type repeatedly:

21
12 12 34 34 123 1234 123 1234 12345 09 09 09 09 90 90 90 890 890 890 8907890
7890 7890 7890 7890 67890 67890 09876 12345 09876 12345 09876 12345 09876 12345
21 21 21 21 23 12 121 123 2345 9876 9876 9876 76 98 89 09 90 67890 34890
Numeric Keypad
To use this to type numbers on computers , you have to press the Num Lock key. There may
be an indicator light at the top of the keyboard or on the „Num Lock‟ key itself to show that
it‟s on.
2.9 LEARNING SPECIAL SIGNS AND SYMBOLS & ROMAN NUMBERS
In universal keyboard, although four row keys are there but different manufacturers have
added Special sign keys. The location of those keys has also been at different places. In the
olden times, besides the special signs even the division sign, exclamation sign, dollar etc.
were not allocated on the keyboard.
Now a days, the keyboard that is used for computers, is divided into two parts. On the left
side, there is a QWERTY keyboard; while on the right hand side, there is the location of
numerals and special signs. Whenever any user has to make use of numerals, the typist then
restricts his hands to the right-hand side portion of the keyboard from where the numerals
could be typed easily and conveniently. There is no hard and fast rule for the operation of
22
such keys. The golden rule is to remember the whole keyboard and the proper location of
symbols.
Review Questions:
1.Who invented the keyboard of Typewriter?
2.What is a Standard/Universal keyboard?
3.Define character keys & adjustment keys on the keyboard.
4.Why now a days, the keyboard is called a QWERTY keyboard?
5.Explain the different methods of operating the keyboard.
6.Why touch system is superior to the sight system?
7.Explain what should be the sitting posture of the typist.
8.Name the Home keys.
9.Difference between the horizontal and vertical approach to typing.
10. Name the row on which the fingers should always hover upon before typing.
11. Explain the use of backspace key.
State True or False
1.In typing mode, legs should be crossed
2.Place the typewriter in the middle when in use
3.QWERTY keyboard is different from Universal keyboard of typewriter.
4.In Universal keyboard, keys are arranged alphabetically.
5.Capital letters can be typed by the use of shift key.
6.Space bar is struck by one finger only.
7.For attaining accuracy and speed in typing, physical fitness is must.
8.Home row is called the second row.
9.Chair of the typist should be armless.
Fill in the blanks:
1.The posture of the typist should be ………………
2.Typing material should be kept on………….. side of the typist.
3.Touch system is preferred to --------------system of typing.
4.Backspace key is used for ………………..

23
Unit-3
Part II: Computer Applications
Computer Hardware
3.1 Introduction
Hardware refers to the physical components of a computer. Hardware includes storage
devices, input devices, output devices and other physical parts of computer. The hardware is
not changed frequently, in contrast with software and data.
3.2 Objective
After going through this unit you would be able to:
Identify the hardware devices
Use the storage devices
Functions of input devices
Use the output devices
Connect the different devices to computer
3.3 Storage Devices
3.3.1 Floppy Disk
It is a disk made of Mylar plastic and enclosed in square plastic jacket. It is 3.5 inch in
diameter. The capacity of a 3.5 inch floppy is 1.44 megabytes. It is cheaper than other storage
devices and is portable. It is useful in transferring data from one computer to another. They
are small, inexpensive, easy to store. The floppy is a low cost device particularly suitable for
personal computer system.
3.3.2 Hard Disk
Hard Disk has a much larger storage capacity than a floppy disk. It is fitted inside the
computer and cannot be seen by us. It consists of one or more platters divided into concentric
tracks and sectors. It is mounted on a central spindle, like a stack. It can be read by a
read/write head that pivots across the rotating disks. The data is stored on the platters covered

24
with magnetic coating. Nowadays, hard disks are available that can store upto 1 Terabyte of
data.
3.3.3 Compact Disks
The compact disks or CDs are optical media. The CDs are cheap and have a storage capacity
of upto 700 MB. There are three types of CDs:
(i) CD-ROM (Compact Disk-Read Only Memory) this is used to store information
and cannot be used to store data.
(ii) CD-R (Compact Disk-Recordable) Data can be recorded on these disks only once.
(iii) CD-RW (Compact Disk-Rewritable) CD-RW is an erasable disk you can write on
multiple times.
3.3.4 DVDs– DVD is an optical storage device which looks like compact disc
(i) DVD-ROM (Digital Video Disk-Read Only Memory) DVD-ROM is high
capacity optical disk capable of storing 4.7GB to 17GB.
(ii) DVD-R (DVD-Recordable) It allows users to write on the disc once but read it
many times.
(iii) DVD-RW (DVD-Rewritable) - Data can be erased and read many times on them.
3.3.5 Pen Drives
They are tiny devices which are about the size of small pen and which plug into an USB port.
They vary in capacity and can store 1 GB and upto 1 TB. Due to their size; they are more
convenient and compact for backup and transferring data. They are free from scratch and dust
problems that exist in other storage media.

25
3.4 Input Devices
An input device is used to enter the data and instructions into the computer. Keyboard is the
most common input device. The other input devices available are Mouse, Joystick, Scanner,
Optical Character Recognition (OCR), Magnetic Ink Character Recognition (MICR),
Microphone etc.
3.4.1 Keyboard
Keyboard is a typewriter like device which is used to type the letters, digits and commands.
The basic QWERTY layout of characters is maintained to make it easy to use. The additional
keys are used to perform special functions such as loading a program, editing a text, etc. They
are known as function keys and vary in number from one keyboard to another.
3.4.2 Mouse
The mouse is pointing device that allows the user to point to a specific position on the screen.
It has a roller on its base. It controls the movement of pointer on screen. When a mouse
moves on a flat surface, the cursor on the screen also moves in the direction of mouse‟s
movement. It has two or three buttons and it may or may not have a wheel. Left button of
mouse is used to execute the operation associated with it. Right button/ Middle button are
associated with special operations in different situations.
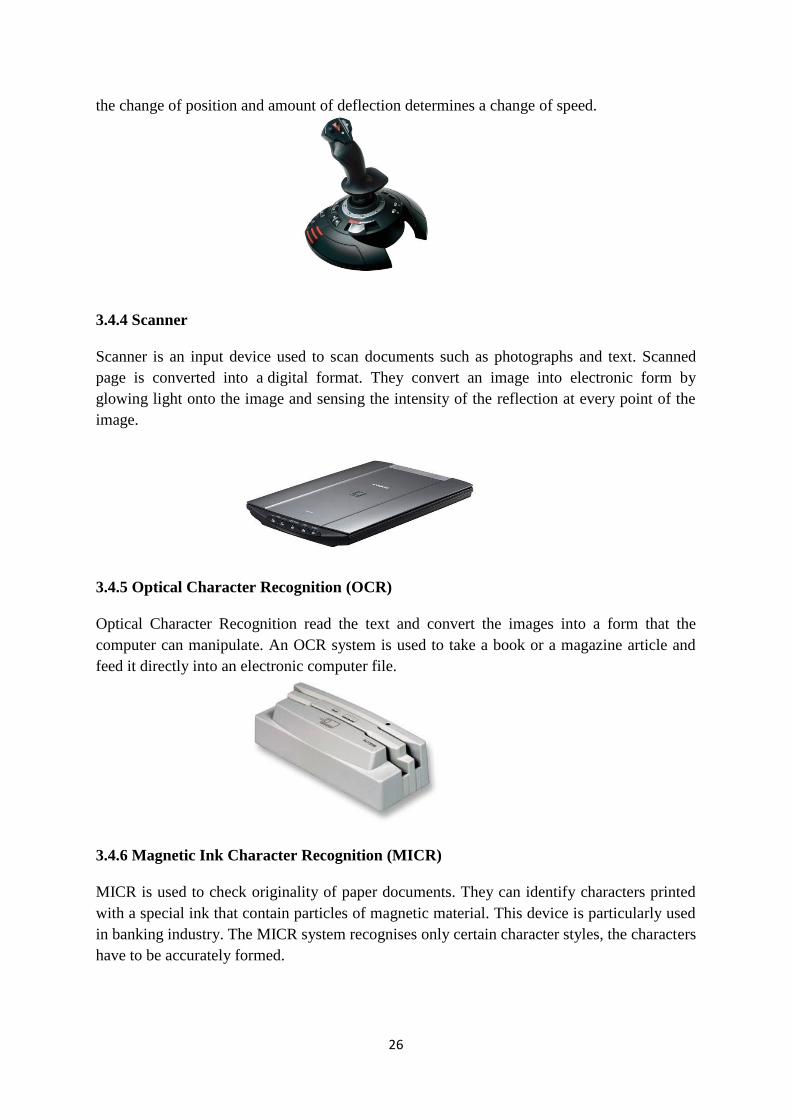
3.4.3 Joystick
Joystick is a remote control device for a computer which is merely used for playing video
games to indicate position. These are relative locators, where the direction of push determines
26
the change of position and amount of deflection determines a change of speed.
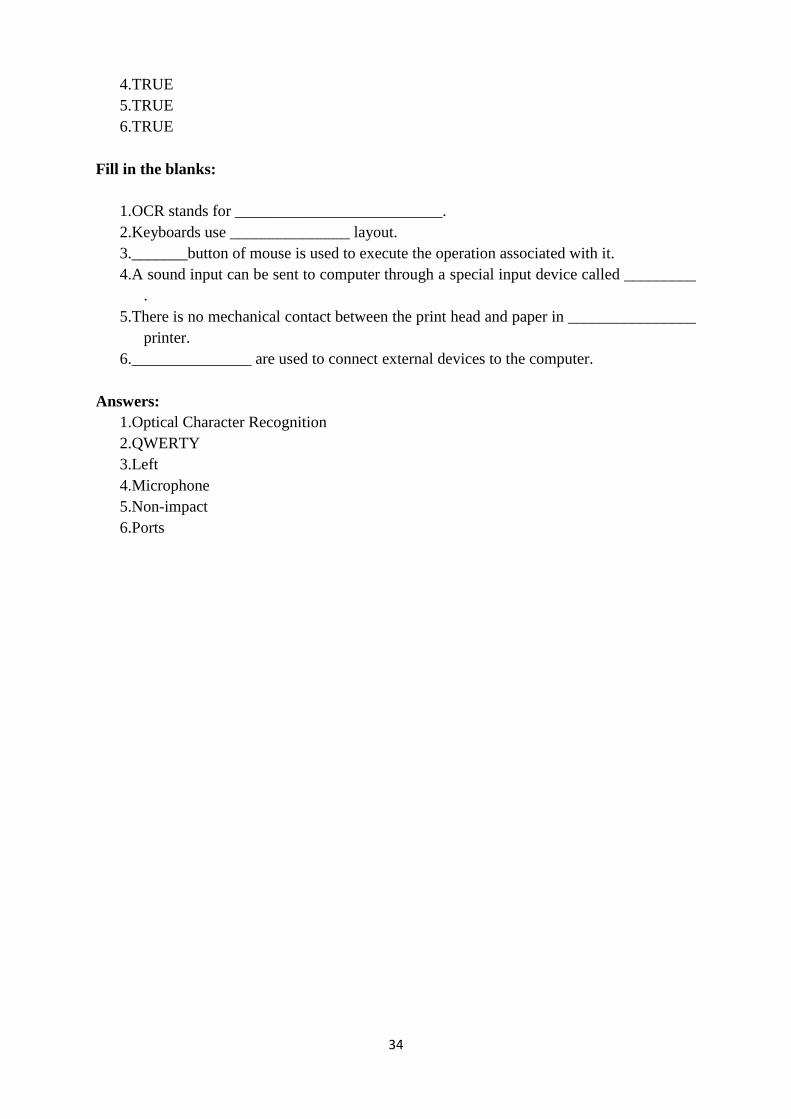
3.4.4 Scanner
Scanner is an input device used to scan documents such as photographs and text. Scanned
page is converted into a digital format. They convert an image into electronic form by
glowing light onto the image and sensing the intensity of the reflection at every point of the
image.
3.4.5 Optical Character Recognition (OCR)
Optical Character Recognition read the text and convert the images into a form that the
computer can manipulate. An OCR system is used to take a book or a magazine article and
feed it directly into an electronic computer file.
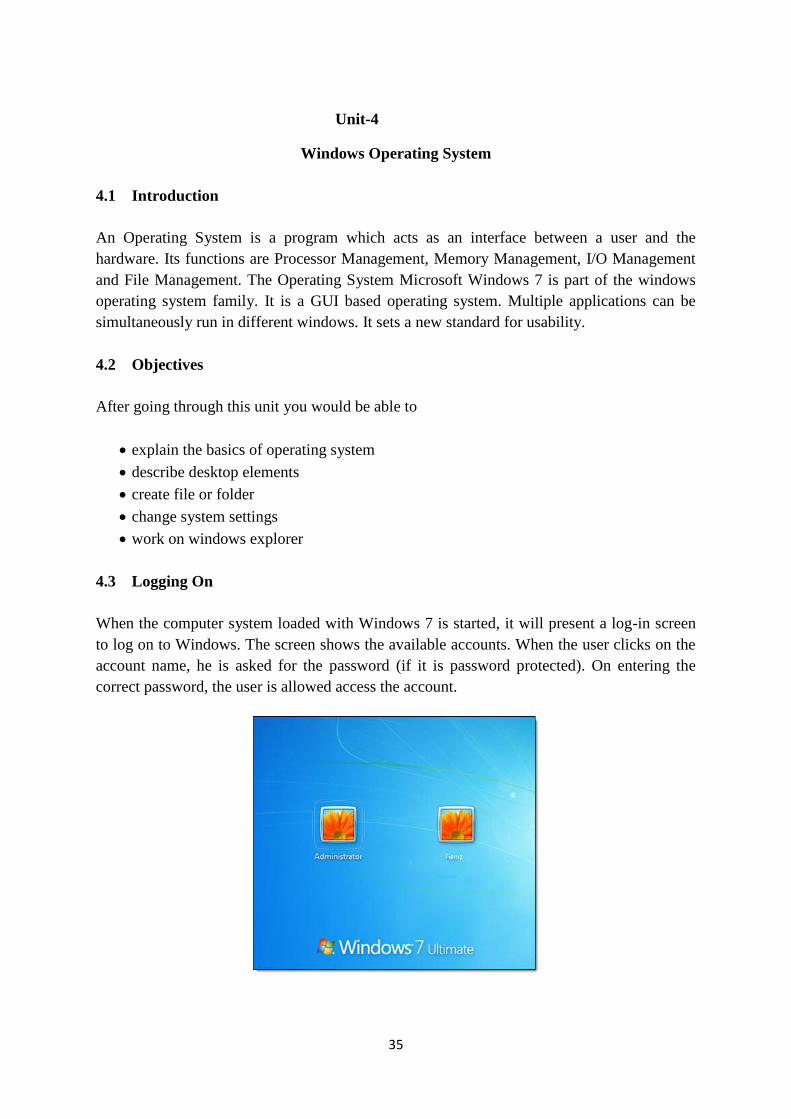
3.4.6 Magnetic Ink Character Recognition (MICR)
MICR is used to check originality of paper documents. They can identify characters printed
with a special ink that contain particles of magnetic material. This device is particularly used
in banking industry. The MICR system recognises only certain character styles, the characters
have to be accurately formed.

27
3.4.7 Optical Mark Recognition (OMR)
Optical Mark Recognition (also called mark sense reader) is a device which can read pencil
or pen marks made in paper. It is widely used in tests such as aptitude tests.
3.4.8 Bar Code Reader
The devices are usually used in bookshops, super markets etc. Bar-code readers are
photoelectric scanners that can read the bar codes or vertical zebra striped marks, printed on
products. Supermarkets use a bar code system called the Universal Product Code (UPC). The
bar code identifies the product which has a description and the latest price of the product in
the computer. The computer automatically tells the Point of Sales (POS) terminal what the
price is.
3.4.9 Microphone (Mic)
A sound input can be sent to computer through a special input device called microphone or
mic. A mic converts the sound received into computer‟s format, which is called digitized

28
sound or digital audio. A sound card is needed in the computer to use mic.
3.5 Output Devices
Output devices receive information from the CPU and present it to the user in the desired
form. Output devices include Monitor, printers, plotters, speakers etc.
3.5.1 Monitor
Monitor is the most common form of output from a computer. It displays information in a
similar way to that shown on a television screen. It displays the information as it is typed and
also displays the processed result or the output. The monitor is made up of thousands of tiny
coloured dots called pixels.
The different types of monitor are Cathode-Ray Tube (CRT), Liquid Crystal Display (LCD),
Plasma, Touch Screen and Organic Light Emitting Display (OLED).
3.5.2 Printer
Printer is a device that prints text or illustrations on paper and in many cases on
transparencies and other media. Printers can be divided into two categories.
(i) Impact Printer – In these printers, there is mechanical contact between the print head and
paper.
e.g. Line printers, drum printers, daisy wheel printers and dot-matrix printers.
(ii) Non-Impact Printer – In these printers, there is no mechanical contact between the print

29
head and paper.
e.g. Electromagnetic printers, Thermal printers, Electrostatic printer, Inkjet Printers, Laser
printers
3.5.2.1 Dot-Matrix Printer
It is the most popular serial printers, i.e., it prints one character at a time. In DMPs, the
printing head contains a vertical array of pins. As the head moves across the paper, selected
pins fire against an inked ribbon to form a pattern of dots on the paper. There are 80 column
DMPs and 132 column DMPs available in the market.
3.5.2.2 Ink-Jet Printer
Inkjet printers are character printers that form characters and all kinds of images by spraying
small drops of ink onto the paper. Their resolution is more than 500dpi. They produce high
quality output. They are popular as portable printers. In addition, colour ink-jet printers
provide an inexpensive way to print full-colour documents.
3.5.2.3 Laser Printer
The desired output image is written on a copier drum with the help of a light beam controlled
by a computer. With this certain parts of the drum surface get electrically charged, then this
drum surface is exposed to the laser beam. These laser exposed areas attract a toner that
forms the image by attaching itself to the laser generated charges on the drum. The toner is
then permanently fused on paper with hot air pressure.
They are quiet and are capable of producing very high point quality. The speed of laser
printers can be upto 10-15 pages per minute.

30
3.5.3 Plotter
Plotter is a device that draws pictures on paper based on commands from a computer. It uses
pen to draws lines and it can produce continuous lines, whereas printers can only simulate
lines by printing a closely spaced series of dots. Multi-colour plotters use coloured pens to
draw different colours.
In general, plotters are considerably more expensive than printers. They are used in
engineering applications.
3.5.4 Speakers
Speakers receive the sound in form of electric current from the sound card and then convert it
to sound format.
3.4 Ports
Ports are used to connect external devices to the computer. These are the connecting points of
various devices to the computer. There exist several types of ports like serial port, parallel
port, USB port, AGP port etc.

31
3.4.1 Serial Ports
Serial Ports also called Communication (COM) or RS232 ports. They transfer data serially a
bit at a time. It needs only wire to transmit 8 bits. They are in the form of 9-pin or 25-pin
male connector. They are used to connect devices like mouse, modem, printers.
3.6.2 Parallel Ports
Parallel ports can send or receive a byte (8-bit) at a time. 8-bits are transmitted parallel to
each other. They are in the form of 25-pin female connector. They are used to connect
printer, scanner, CD writer, Zip drive, external hard disk drive, tape backup drive etc.
3.6.3 USB (Universal Serial Bus) Ports
A USB port is a cable connection interface for personal computers and consumer electronic
devices. USB ports are used to connect USB devices and transfer digital data over USB
cables. They can also supply electric power across the cable to devices that need it. They are
used to connect printers, scanners, mouse, digital camera, speakers etc.

32
3.6.4 AGP (Accelerated Graphics Port) Ports
The AGP port is used to connect to graphic card that provides high-speed video performance
required in games and other multimedia applications.
3.4.5 Infrared Port (IR Port)
An IR Port is a port, which sends and receives infrared signals from other devices. IR is the
same technology used to control a TV set with a remote control.
3.6.6 Bluetooth
Bluetooth is used to interconnect mobile phones, computers, and personal digital assistants
using a short-range wireless connection.
3.6.7 PS-2 Port
A PS-2 (Personal System/2) port is an electronic plug found on computers. It accepts a PS/2
cable with a mini-DIN connector and is used to plug in a keyboard or mouse.

33
3.6.8 Firewire
Firewire is a Serial Bus for connecting devices to computer. It has a single plug- and -socket
connection on which up to 63 devices can be attached with data transfer speeds upto
400Mbps (Megabits per second).
(All images drawn from Google images)
Review Questions:
1.What are input devices?
2.Explain three input devices used as a storage medium.
3.What is a printer? Explain different types of printers.
4.What is a port? What are the different types of ports available on a computer?
5.What is a monitor? What are the different types of monitors available in market?
6.Explain the below input devices:
a. Mouse
b. Keyboard
c. Joystick
7.What are the different types of Compact disks available in market?
State TRUE or FALSE:
1.A CD can have a storage capacity upto 700MB.
2.Printer is an input device.
3.Joystick is used for typing.
4.Every barcode has a Universal Product Code.
5.An inkjet printer is better than a dot printer
6.Bluetooth is a short-range wireless device.
Answer:
1.TRUE
2.FALSE
3.FALSE
34
4.TRUE
5.TRUE
6.TRUE
Fill in the blanks:
1.OCR stands for __________________________.
2.Keyboards use _______________ layout.
3._______button of mouse is used to execute the operation associated with it.
4.A sound input can be sent to computer through a special input device called _________
.
5.There is no mechanical contact between the print head and paper in ________________
printer.
6._______________ are used to connect external devices to the computer.
Answers:
1.Optical Character Recognition
2.QWERTY
3.Left
4.Microphone
5.Non-impact
6.Ports
35
Unit-4
Windows Operating System
4.1 Introduction
An Operating System is a program which acts as an interface between a user and the
hardware. Its functions are Processor Management, Memory Management, I/O Management
and File Management. The Operating System Microsoft Windows 7 is part of the windows
operating system family. It is a GUI based operating system. Multiple applications can be
simultaneously run in different windows. It sets a new standard for usability.
4.2 Objectives
After going through this unit you would be able to
explain the basics of operating system
describe desktop elements
create file or folder
change system settings
work on windows explorer
4.3 Logging On
When the computer system loaded with Windows 7 is started, it will present a log-in screen
to log on to Windows. The screen shows the available accounts. When the user clicks on the
account name, he is asked for the password (if it is password protected). On entering the
correct password, the user is allowed access the account.

36
4.4 Switching between Accounts
When one user is logged in and another user wants to use his account, the first user can Log
Off and the second user can Log in. The programs of the first account are then closed. The
screen with all the user accounts is then displayed. The second user can now log into the
required account.
If the first user does not want to close his windows session and needs to resume his work
after the second user has completed his task, than it is possible to Switch User. This allows
the first user to keep his programs on while the second user completes his task.
4.5 Features of the Windows System.
4.5.1 Desktop
The desktop is the area one see when the computer is turned on. It consists of the icons on top
of it, as well as the Start button and other features. The desktop is used to temporarily store
information or to move the documents and windows.
4.5.2 Icon
Icons are small pictures that represent different programs, file, folders or saved items.
Double-clicking on the icon accesses the information icons represent.
4.5.3 Window
When a program is opened, file or folder is shown in the screen called window. Windows can
be moved and resized and many different applications can be operated at the same time.
4.5.4 Dialogue Box
When the computer is asked to do certain commands, such as to save the work, the computer
will need more information, and this will appear in a dialogue box. The dialogue boxes
contain options and commands to execute.

37
4.5.5 Start Menu
In the lower left-hand corner of the Windows screen is the Start button. When you click on
the button a menu will appear, which is called the Start menu. The menu gives access to all
the different parts and functions of the computer.
Overview of all the options
Task Description
All Programs Displays a list of installed program, which a user can start or use.
Documents Displays a list of document used by the current user.
Pictures Displays a list of pictures/photos used by the current user.
Music Displays a list of music/songs used by the current user.
Computer Display the disk drive and other hardware connected to your
computer.
Control Panel Displays a list of utility to configure the computer system and
install software and hardware.
Devices and
Printers
Displays a list of currently installed devices and printers in the
computer system.
Help and Support Starts the Windows 7 Help and Support program
to find how to do a task in windows.
Shut Down Choose Shut Down to turn off computer.
Other options are
Switch user – to switch to another user
log off – to log off
lock – to lock the computer
Restart – to restart the computer
Sleep – to save energy.

38
4.5.6 Task Bar
At the very bottom of the screen is a horizontal bar called the task bar (Figure 1). This bar
contains (from left to right) the Start button, shortcuts to various programs, minimized
programs, and another section of shortcuts that includes sound volume, printers and the time.
Fig 1
4.5.7 Tab Menu
Tab menus, which are present in dialogue boxes, are menus which represent many different
“pages” of information. To access each “page,” click on the tab at the top of the dialogue box.
4.6 Opening and Closing Application
To Open an Application there are two options:
Open the Start Menu and click on the name of the application. Find the icon for the
application and either double click it or right click and click Open.
To Close an Application:
The applications can be closed by selecting Quit or Exit under File menu. If file menu is not
available, click on the “X” button in the upper right-hand corner of the application‟s window.
39
4.5 Manipulating Windows
The sizes of the windows on the screen can be changed so that more windows are visible.
Following is a list of common features.
4.5.1 Maximize
This function allows to concentrate on one application by making its window cover the entire
screen.
4.5.2 Minimize
This function allows to keep an application running, but remove it from the desktop area so
that other applications can be accessed. The minimized application becomes a bar at the
bottom of the screen, and can be accessed by clicking on the bar.
4.5.3 Resize
If an application window is not maximized, it can be resized to see more or less of the
content. If a mouse pointer is moved on one of the edges of the window, it will become a
two-way arrow. At this point, keep down the left mouse button and drag the perimeter of the
window in or out. When the mouse button is released, the window will resize to the
specifications.
Close
The function closes and exits the application that is running. However, if the running applica-
tion is Microsoft Word, the window of each document will have a close button, and clicking
this button will only close that particular document, and not the entire program.

40
4.6 Using Computer Folder
Computer displays the contents of floppy, hard disk, CD-ROM and Network drives. The
external devices like external hard drive and USB flash drives can also be accessed. The
available space in these devices can also be found using this folder.
To use Computer, click on Start, and then click on Computer.
4.6.1 Using Windows Explorer
4.6.2 Navigation Pane
The default view of the navigation pane, that appears at the left side of Windows Explorer,
shows four or five node: Favourites, Libraries, Homegroup, Computer and Network.

41
4.6.3 Details Pane
Running across the bottom of the window, the details pane displays properties for the current
selection. One can adjust its height by dragging the top border up or down. The details pane
is shown by default but can be hidden.
4.6.4 Preview Pane
A button on the toolbar allows to show or hide the preview pane with a single click. If the
currently selected file has a preview handler, the file‟s contents are displayed in the preview
pane.
4.6.5 Library Pane
This navigation aid appears by default above the file list when a library is selected. It can be
hidden. Use the library pane to customize the library or to arrange the files by different
properties.
4.6.6 Toolbar
Toolbar is used for changing the appearance of files and folders, burning files to a CD, or
starting a digital picture slide show. The toolbar's buttons change to show only the tasks that
are relevant. For example, if a picture file is clicked, the toolbar shows different buttons than
it would if a music file is clicked.
4.6.7 Address bar
Use the address bar to navigate to a different folder or library or to go back to a previous one.
4.6.8 Search box
To look for an item in the current folder or library, type a word or phrase in the search box.
The search begins as soon as you begin typing-so if you type "B," for example, all the files
with names starting with the letter B will appear in the file list.
4.7 Control Panel
Control Panel is used for making the changes in settings of Windows. These settings control
how Windows looks and works and they allow to set up Windows. Some of the functions of
control panel are:
Add hardware/software components
Remove hardware/software components
Setting user accounts
Change the system settings
Setting the date and time
Changing keyboard and mouse settings

42
System administration
4.8 Locating Files and Folders
To locate document or folder, one can use the Search companion to locate it in the local
storage such as Hard Disk, Floppy, CD or in the network drive (if the system is part of a
network). The Indexing Service provided by the Search maintains an index of all the files on
the computer, making searches faster.
To search for a file or folder
Click the Start button, type a word or part of a word in the search box. As you type, items that
match your text will appear on the Start menu. The search is based on text in the file name,
text in the file, tags, and other file properties.
4.9 Creating a folder
A folder is a location where one can store the files. Any number of folders can be created and
folders inside other folders (subfolders) can be stored. To create a new folder:
43
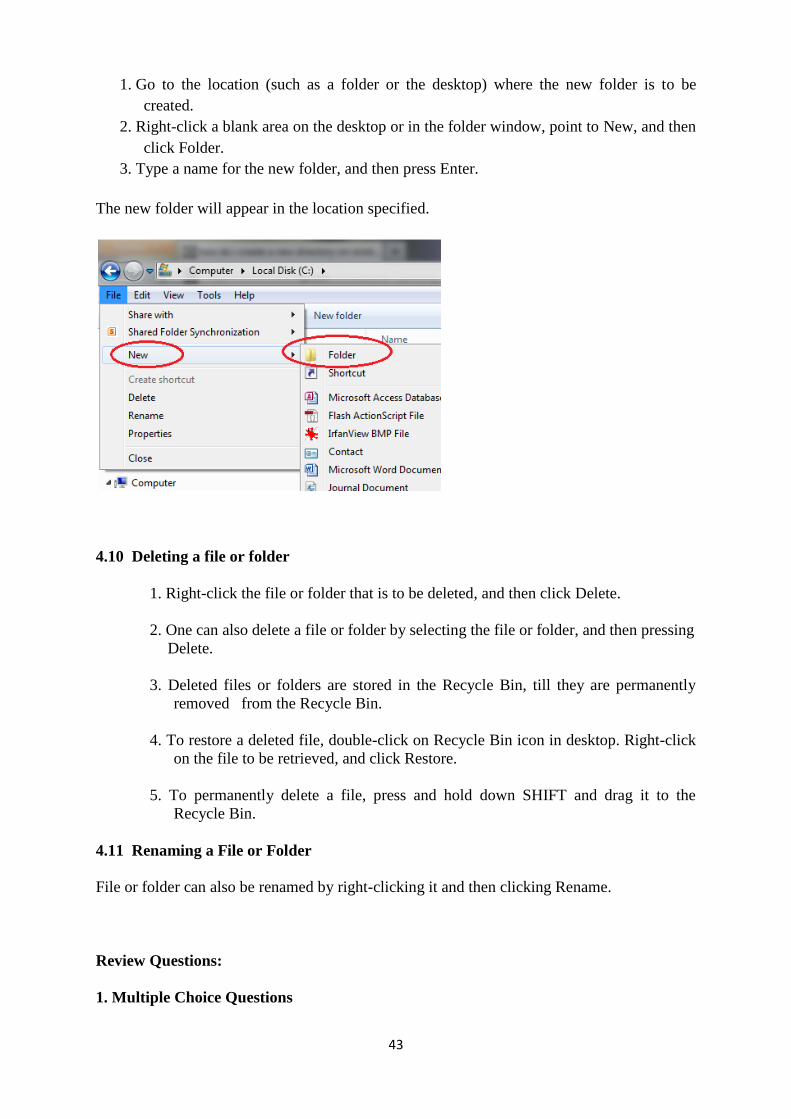
1. Go to the location (such as a folder or the desktop) where the new folder is to be
created.
2. Right-click a blank area on the desktop or in the folder window, point to New, and then
click Folder.
3. Type a name for the new folder, and then press Enter.
The new folder will appear in the location specified.
4.10 Deleting a file or folder
1. Right-click the file or folder that is to be deleted, and then click Delete.
2. One can also delete a file or folder by selecting the file or folder, and then pressing
Delete.
3. Deleted files or folders are stored in the Recycle Bin, till they are permanently
removed from the Recycle Bin.
4. To restore a deleted file, double-click on Recycle Bin icon in desktop. Right-click
on the file to be retrieved, and click Restore.
5. To permanently delete a file, press and hold down SHIFT and drag it to the
Recycle Bin.
4.11 Renaming a File or Folder
File or folder can also be renamed by right-clicking it and then clicking Rename.
Review Questions:
1. Multiple Choice Questions

44
a) Combination of characters that allows access to a computer
(i) Gadget (ii) Window explorer
(iii) Password (iv) Icon
b) Windows displays various options to shut down. Which is suitable at the end of day?
(i) Shut Down
(ii) Restart
(iii) Sleep
(iv) Hibernate
c) A _______ is a named location on a disk where files are stored
(i) Folder
(ii) Pod
(iii) Version
(iv) None of the above
d) Taskbar is used for
(i) Navigation program
(ii) Switching between program
(iii) Start a program
(iv) All of above
2. Write the steps to create a folder.
3. Differentiate between Switch user option and Log off option.
4. Write the uses of the following
(a) Control Panel
(b) Windows Explorer
(c) Task bar
(d) Computer
5. What is Operating System?
6. How do you Locate a file/folder?

45
UNIT-5
INTRODUCTION TO OFFICE
5.1 Introduction to Word
MS-Word is powerful word-processing software which consists of many features. It has
become an integral component of MS-Office; and is increasingly becoming available. It
is used to create documents and provides the options to edit and format the text that we
type. Using MS-Word, we can create, revise, print and record documents for future use.
It not only provides many built-in features to enhance the look of a document but also
performs a variety of useful and tedious tasks automatically. Using MS-Word, we can
do the following:
1. Text Basics
2. Proofing Features
3. Working with Hyperlinks
4. Formatting Text
5. Working with Text Boxes
6. Inserting Clip Art
7. Working with Shapes
8. Using a Template
9. Working with Lists
10. Line and Paragraph Spacing
11. Modifying Page Layout
12. Working with Pictures
13. Columns and Ordering
14. Working with Headers and Footers
15. Working with Tables
16. Using Smart Art Graphics
17. Using Indents and Tabs
18. Applying Styles and Themes Using Mail Merge
19. Using Mail Merge

46
It also provides a task pane, which helps in creating or Opening a document, Reveal
Formatting, Mail Merge, Search, Clip Art. The following illustration shows a word
documents in Print Layout View.
5.2 Introduction to Excel
Microsoft Excel allows one to gather, organize, and manage data effectively. It is a software
facilitating data entry into an electronic spread sheet which performs complex mathematical
calculations and analysis.
An Excel file is made up of Worksheets, which collectively are called a Workbook.
Worksheets are like pages within a workbook and can contain data or be blank. Worksheets
can contain information and work independently or can be linked together to form a
workbook.
Each worksheet contains horizontal rows and vertical columns to form a matrix. The
maximum number of rows is 65,536 and 256 columns in an individual worksheet. Row
headers are mentioned in numbers from 1 to the last 65,536 in which you can enter the data.
Thus a large amount of data can be handled in a single worksheet. The formulas can be
entered in selected cells to carry out the calculations automatically. Further each workbook
can have 256 worksheets but by default it shows three sheets. The various powerful tools are
mentioned below:
Using in-built functions
Absolute and relative referencing
Formatting options
Financial functions
Auto Format options.
Data sorting
Filtering data
Advanced filtering
Subtotals
Consolidation
Pivot Tables
Using external data sources

47
Using Goal Seek
Excel is similar in appearance to other Office XP applications, with familiar toolbars and
menus.
5.3 Introduction to Power Point
Microsoft PowerPoint is a slide show presentation program developed by Microsoft. It is
useful to develop the slide-based presentation format and is currently one of the most
commonly used presentation programs available. It consists of a number of individual pages
or slides. Slides contain text, graphics, sound, movies and other objects. The presentation can
be printed, displayed live on a computer or navigated through at the command of the
presenter. Few important tools are mentioned here:
Slide layouts
Slide views outline, slide slideshow, slide sorter
AutoContent wizard
Organizing the presentation
Using Slide master
Choosing colour schemes
Applying special effects
Producing a slide show and creating an executable file
Using Microsoft Graph
Inserting organization chart

48
5.4 Introduction of Outlook
Microsoft Outlook is a comprehensive tool that enables to manage our email, calendar,
contacts, tasks and more all in one place. Outlooks can be used effectively to:
Email management: Create rules that automatically process e-mail; work with multiple
e-mail accounts; create categories to keep track of messages, appointment, contacts, and
other items; and search for a specific e-mail message, contact, or calendar item.
Communicate efficiently. Take advantage of the integration of Outlook e-mail tools with
other Microsoft. Office programs: Send a document from Microsoft word, with an
introduction; edit your e-mail by using the tools in Word; and use Smart Tags. Use instant
messaging to communicate in real time.
Managing contacts:. Save information about contacts, such as addresses and phone and
fax numbers, and file that information in the way that works best for you; Microsoft Share
Point Server is used for multiple users in an organization such as shared mailboxes and
calendars.
Manage Tasks To-Do Lists. See the outlook calendar to organize meetings and
appointments; schedule or propose meetings and conferences for times when most people
are free.

49
5.5 Working with the Office Assistant
The Office Assistant can answer your questions, offer tips, and provide help for a variety of
features specific to the program you‟re using. The Assistant is shared by all Microsoft Office
programs. Any changes you make to its options such as the types of tips it displays will affect
the Assistant in all of your Office programs. The Office Assistant is a feature included in
Microsoft Office 97 and subsequent versions until Office 2007. The main one has been
dubbed “Clippit” or “Clippy” after its default animated paperclip representation. (Clippit is
the default assistant‟s official name). The office assistant can be customised to show the
desired assistant.
The Assistant can display help in the following ways:
Suggested Help- The assistant suggest and help in topics that are relevant to a
specific task going to be performed.
Help with wizards- Help is available from the Assistant even while working with
some of the wizards. The assistant can be easily turned off as and when required.
Tips- The Assistant provides tips on how to use features or keyboard shortcuts more
effectively. A tip is available when a yellow light bulb appears next to the Assistant.
The Assistant also displays a tip watch time when an Office application starts.
Messages- When the Assistant is turned on, program and system messages are
displayed in the Assistant balloon by default. The messages can also be seen in a
dialogue box if required.
And
To open to Office Assistant or Help window, use the Help button located on the Main Menu.
If the Office Assistant option is turned ON, the Assistant is visible by clicking the Help
button. If the Office Assistant option is turned OFF, only the Help window is displayed.
When the Office Assistant is turned ON, simply right click on the Assistant and then on
selection of Hide can hide it. To revert back to the Assistant, click the Help menus and select
the Office Assistant option. At the time of creation of a new document, the Office Assistant
Note: When the Assistant displays a Microsoft Outlook reminder, it can’t
display a tip at the same time. Click a button in the reminder to close it,
and then the tip will appear.

50
(if ON) will appear and offers help. Initially the Office Assistant will prompt with “what
would you like to do?”.
5.6 Office Shortcut Bar
The Microsoft Office Shortcut Bar provides quick and easy access to the resources needed
most often. It allows one to quickly start a new letter, create a financial spreadsheet, open a
slide presentation, send an email, schedule an appointment, and do much, much more!
5.6.1 Customizing the Office Shortcut Bar
The Microsoft Office Shortcuts Bar may already be visible on the screen. If it is not, then
launch it manually. To launch the Microsoft Office shortcut Bar simply follow the given
instruction:
Click on Start Program of Microsoft Office Tools and Microsoft Office Shortcut Bar.
The Office Shortcut Bar can be dragged anywhere on the screen, or it can also be hidden
automatically to temporarily move it out of the way. To Auto Hide the Office Shortcut Bar:
1. Right- click on a blank part of the Office Shortcut Bar.
2. Notice the options that are available, including the option to display quick access to
the Desktop or the Favourites.
3. Click on Auto Hide.
4. To make the Office Shortcut Bar reappear, simply move the cursor to the edge of the
screen where the Office shortcut Bar is docked. See it pop into view.
The Office Shortcut typically displays only the Office toolbar. Additional shortcut buttons
and toolbars are available but hidden. To display hidden Office shortcut Bar buttons or
toolbars:
1. Right-Click the background of any toolbar on the Office shortcut Bar.
2. Click Customize on the shortcut menu.
3. Choose the buttons Tab.
4. Select the icons to be displayed as buttons by putting a check mark against them.
To add frequently used documents and program as toolbar buttons, simply drag the document
or program onto the office shortcut bar.

51
5.6.2 To exit the Office Shortcut Bar:
1. Click on the Office Shortcut Bar menu (multi-coloured squares at the end of
bar).
2. Click on Exit.
5.7 The Web Toolbar
The Web toolbar contains buttons for inserting hyperlinks, paging back or forward on the
Web, and opening Microsoft Internet Explorer. The Web toolbar in most Office XP programs
works much like the basic Microsoft Internet Explorer toolbar, allow users to type Web
addresses, maintain a favourites life, and more. The following figure displays the function of
each of the buttons along with the web toolbar.
Points to remember
Microsoft Word is an application software used for creating, editing, formatting and
printing of any sort of document. It can be used for writing letters, essays, reports,
memos, catalogues, newsletters etc.
Microsoft Excel is a software facilitating data entry into an electronic spreadsheet to
do complex mathematical calculations and analysis.
Microsoft PowerPoint is a set of screens (called slides) that allows one to create visual
aids for making presentations by using animation tools, design templates and
formatting techniques.
Microsoft Access helps in developing database management solutions with easy to
use customization tools.
Microsoft Office Outlook is a personal information manager from Microsoft mainly
used as an e-mail application.
The Microsoft Office Shortcut Bar provides quick and easy access to the resources
needed most often.
The Web toolbar in most Office XP programs works much like the basic Microsoft
Internet Explorer toolbar, allowing users to type Web addresses, maintain a favourites
list, and more.
Review questions
1. Mention the usage of:

52
a) Word
b) PowerPoint
c) Excel
d) MS-Access
2. Mr. Deepak wants to create an electronic presentation on environment for his class.
Which of the following application is most suitable for this purpose?
a) PowerPoint
b) Excel
c) Access
3. Which of the two, Microsoft office shortcut bar or the Web toolbar, works like the
Internet Explorer toolbar?
4. Ms. Kavita wants to store data (R. No, Name, Marks Obtained, Maximum Marks) of
the class test conducted by her and instantly calculate grades, highest, lowest and
average marks of her class. Which of the application will be suitable for this purpose?
5. Mention any three common usages of MS-Outlook.

53
6.1 PROCESSING WITH WORD:
BEGINNING WITH WORD
Microsoft word, which is a full-featured word processing program, helps you to create,
process and revise your document such as letters, resumes, announcements and reports. The
various features of Word help in the simple production of document. The borders, shading,
tables, graphics, pictures and Web addresses can easily be added in the documents. Word can
create a template, which is a form one can use and customize as per the requirement.
Word can detect the syntax errors while you are typing, in a variety of languages. Word‟s
thesaurus allows you to add variety and precision to your writing. Word can also format text
such as headings, lists, fractions, borders and Web addresses. With the help of Internet, a
copy of ay word document can also be sent via e-mail addresses within fraction of seconds.
Some features of MS-Word are:
a) EDIT DOCUMENT
Word offers many time-saving features to help you edit text in a document. You can add,
delete and rearrange text. You can also quickly count the number of words in a document,
check your document for spelling and grammar errors and use Word‟s thesaurus to find more
suitable words.
b) FORMAT DOCUMENT
Word provides us the feature of formatting a document to enhance the appearance of the
document. You can use various fonts, styles and colours, to emphasize important text. You
can also adjust the spacing between lines to text, change the margins, and create newspaper
columns.
c) TABLES AND GRAPHICS
Word can help to create tables to neatly display columns of information in a document. You
can also add graphics, such as AutoShapes and clip art images to a document to illustrate
ideas.
UNIT-6
MS-WORD
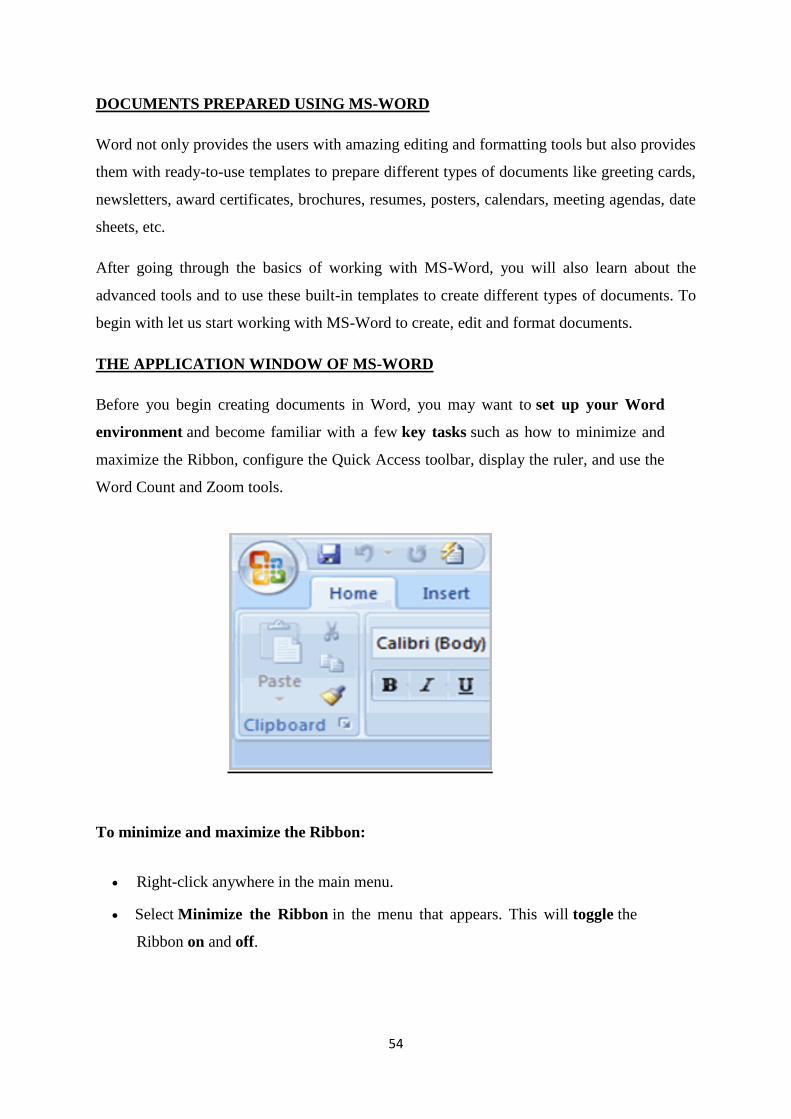
54
DOCUMENTS PREPARED USING MS-WORD
Word not only provides the users with amazing editing and formatting tools but also provides
them with ready-to-use templates to prepare different types of documents like greeting cards,
newsletters, award certificates, brochures, resumes, posters, calendars, meeting agendas, date
sheets, etc.
After going through the basics of working with MS-Word, you will also learn about the
advanced tools and to use these built-in templates to create different types of documents. To
begin with let us start working with MS-Word to create, edit and format documents.
THE APPLICATION WINDOW OF MS-WORD
Before you begin creating documents in Word, you may want to set up your Word
environment and become familiar with a few key tasks such as how to minimize and
maximize the Ribbon, configure the Quick Access toolbar, display the ruler, and use the
Word Count and Zoom tools.
To minimize and maximize the Ribbon:
Right-click anywhere in the main menu.
Select Minimize the Ribbon in the menu that appears. This will toggle the
Ribbon on and off.

55
The check mark beside Minimize the Ribbon indicates that the feature is active.
To add commands to the Quick Access toolbar:
Click the arrow to the right of the Quick Access toolbar.
Select the command you want to add from the drop-down list. It will appear in
the Quick Access toolbar.
The Save, Undo, and Redo commands appear by default in the Quick Access toolbar. You
may want to add other commands to make using specific Word features more convenient for
you.
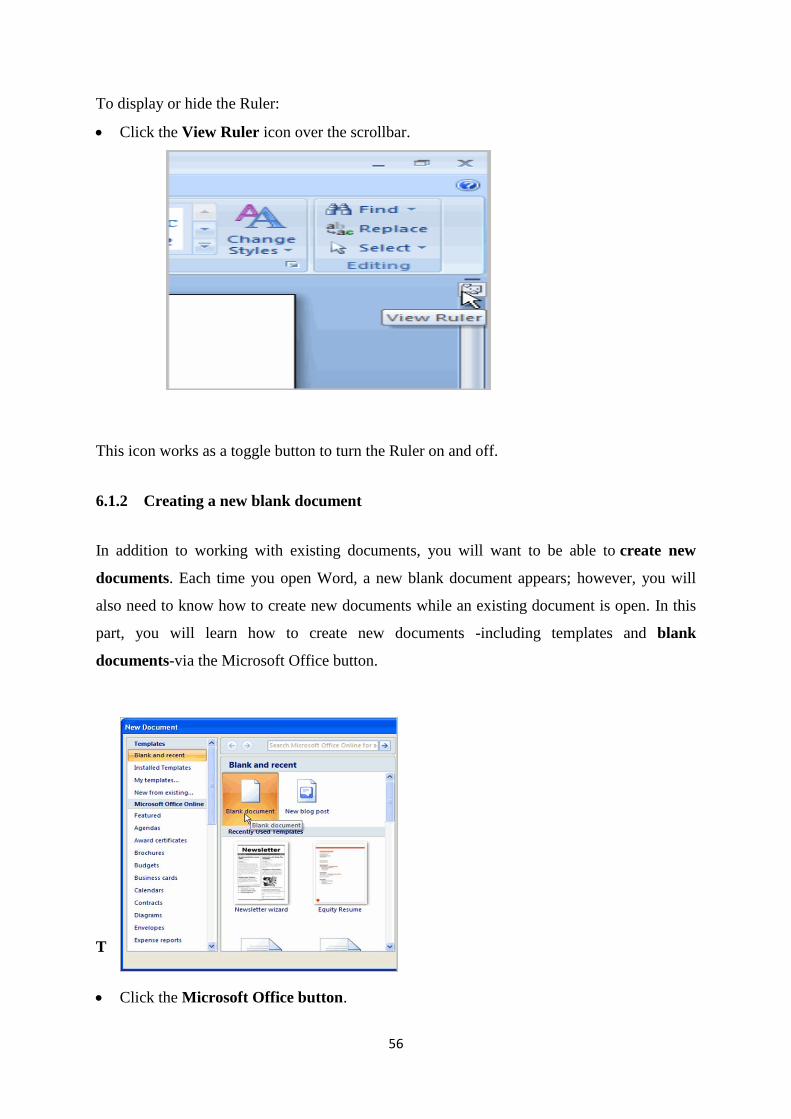
56
To display or hide the Ruler:
Click the View Ruler icon over the scrollbar.
This icon works as a toggle button to turn the Ruler on and off.
6.1.2 Creating a new blank document
In addition to working with existing documents, you will want to be able to create new
documents. Each time you open Word, a new blank document appears; however, you will
also need to know how to create new documents while an existing document is open. In this
part, you will learn how to create new documents -including templates and blank
documents-via the Microsoft Office button.
To create a new blank document:
Click the Microsoft Office button.
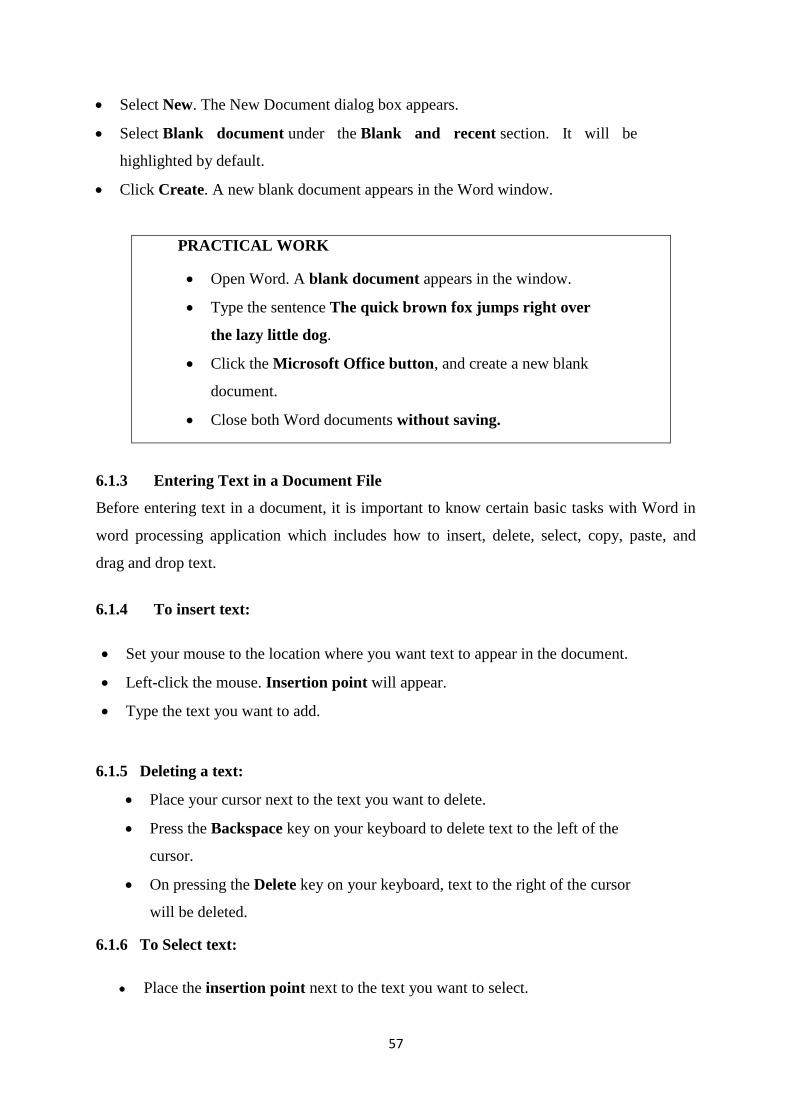
57
Select New. The New Document dialog box appears.
Select Blank document under the Blank and recent section. It will be
highlighted by default.
Click Create. A new blank document appears in the Word window.
PRACTICAL WORK
Open Word. A blank document appears in the window.
Type the sentence The quick brown fox jumps right over
the lazy little dog.
Click the Microsoft Office button, and create a new blank
document.
Close both Word documents without saving.
6.1.3 Entering Text in a Document File
Before entering text in a document, it is important to know certain basic tasks with Word in
word processing application which includes how to insert, delete, select, copy, paste, and
drag and drop text.
6.1.4 To insert text:
Set your mouse to the location where you want text to appear in the document.
Left-click the mouse. Insertion point will appear.
Type the text you want to add.
6.1.5 Deleting a text:
Place your cursor next to the text you want to delete.
Press the Backspace key on your keyboard to delete text to the left of the
cursor.
On pressing the Delete key on your keyboard, text to the right of the cursor
will be deleted.
6.1.6 To Select text:
Place the insertion point next to the text you want to select.
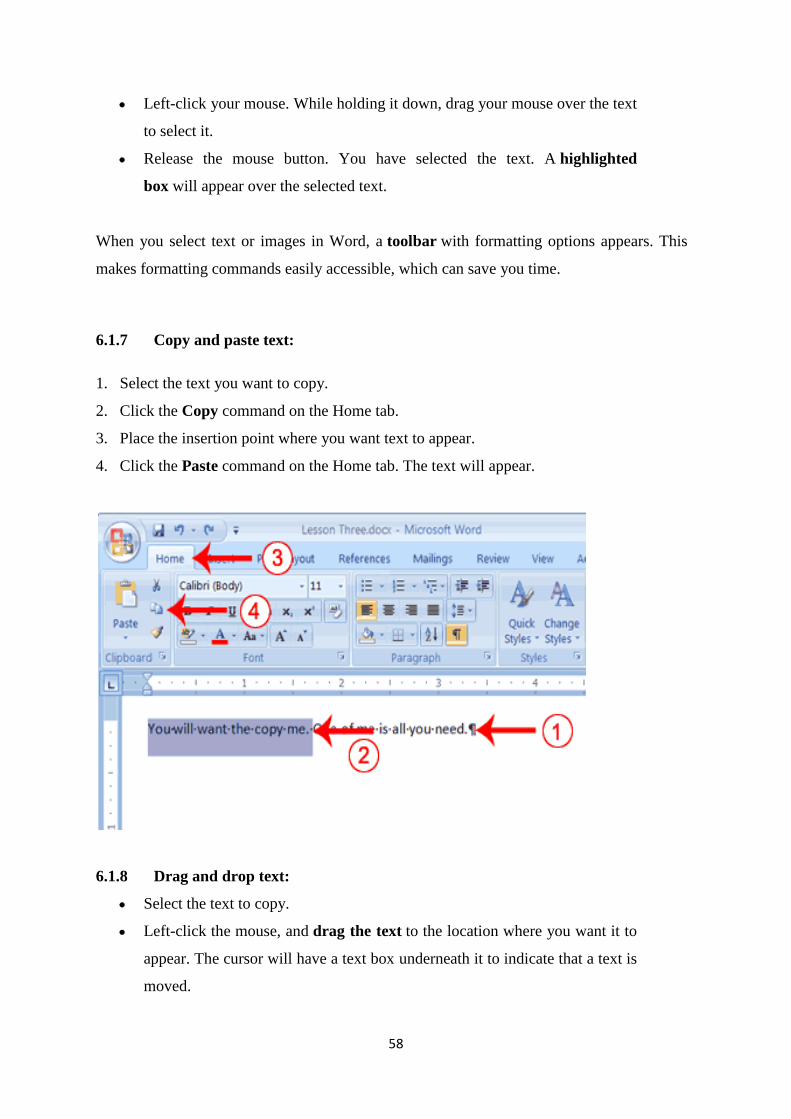
58
Left-click your mouse. While holding it down, drag your mouse over the text
to select it.
Release the mouse button. You have selected the text. A highlighted
box will appear over the selected text.
When you select text or images in Word, a toolbar with formatting options appears. This
makes formatting commands easily accessible, which can save you time.
6.1.7 Copy and paste text:
1. Select the text you want to copy.
2. Click the Copy command on the Home tab.
3. Place the insertion point where you want text to appear.
4. Click the Paste command on the Home tab. The text will appear.
6.1.8 Drag and drop text:
Select the text to copy.
Left-click the mouse, and drag the text to the location where you want it to
appear. The cursor will have a text box underneath it to indicate that a text is
moved.
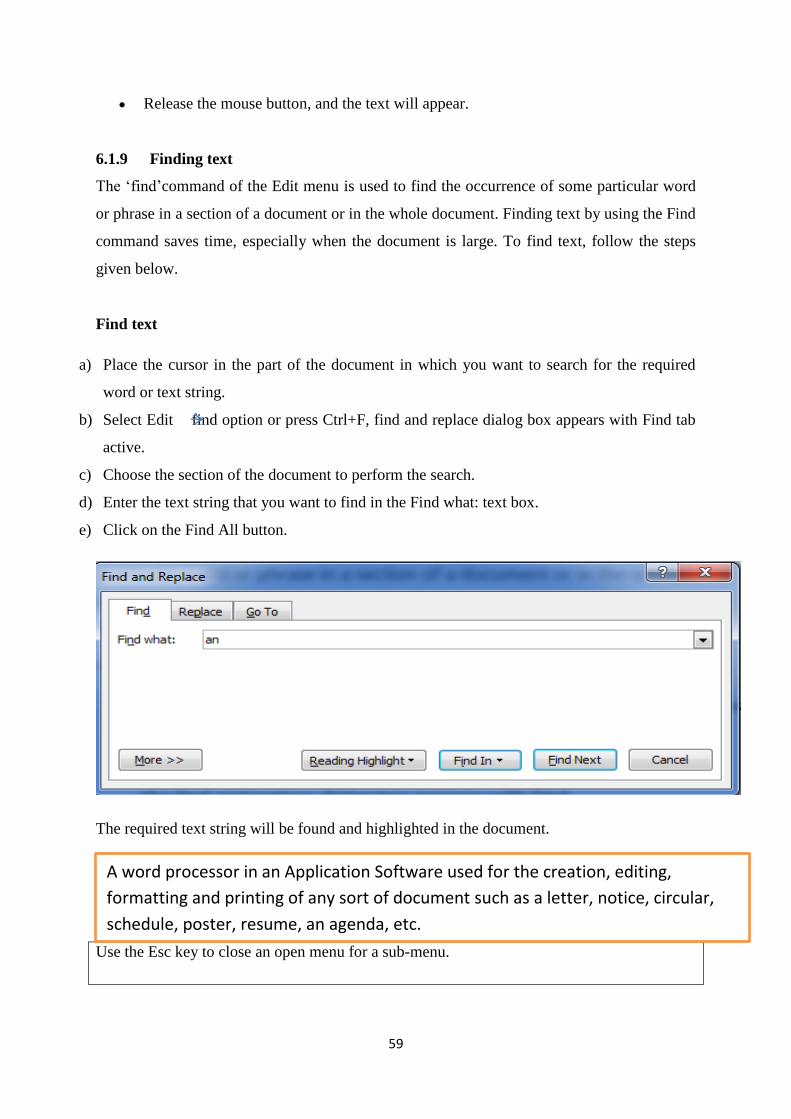
59
Release the mouse button, and the text will appear.
6.1.9 Finding text
The „find‟command of the Edit menu is used to find the occurrence of some particular word
or phrase in a section of a document or in the whole document. Finding text by using the Find
command saves time, especially when the document is large. To find text, follow the steps
given below.
Find text
a) Place the cursor in the part of the document in which you want to search for the required
word or text string.
b) Select Edit find option or press Ctrl+F, find and replace dialog box appears with Find tab
active.
c) Choose the section of the document to perform the search.
d) Enter the text string that you want to find in the Find what: text box.
e) Click on the Find All button.
The required text string will be found and highlighted in the document.
Use the Esc key to close an open menu for a sub-menu.
A word processor in an Application Software used for the creation, editing,
formatting and printing of any sort of document such as a letter, notice, circular,
schedule, poster, resume, an agenda, etc.

60
6.1.10 Replacing a text
We can use the replace command from the Edit menu to change some / all of the occurrences
of a word or phrase in a document with another word or phrase. Follow the steps given below
to do this and replace some / all occurrences of a particular word / phrase with some other
word/ phrase.
Replacing text
1. Select Edit Place Or Press Ctrl+H. The find and Replace dialog box will open.
Type the word that you want to find in the Find what text box.
2. In the Replace with text box type the replacement text.
3. Click on the More button in the find and replace dialog box to customize the replacement.
4. The use of each of these options are as given below:
a. Match case: This option finds and replaces only those words in the document that contain
the exact case as mentioned in the text term in the Find what text box. For example, if this
option is enabled and the search term is “they”, words like “THEY” or “They” will ignore.

61
b. Find whole words only: This option finds and replaces the text that is a complete word
and not a part of or embedded in another word. For example, with this option enabled, the
search term “they” if it is part of or embedded in another word, will be ignored.
c. Sound like: It find and replaces text that sound like the typed text in the Find what text
box. For example, the words like they, say, hay, gay etc. will be found and replaced.
d. Find all word forms: It finds and replaces all variations of the chosen word. For
example, “” lion and lions”, “come” and “came”.
4) Click on the Find Next button.
5) The text mentioned in the Find what box will get highlighted. Click on the replace button
to replace the found text. Or click on the replace. All button to replace all occurrences of the
text in the „Find what text box throughout the document with the text entered in the Replace
with text box. The replacements will be made.
6.1.11 Using Find and Replace text:
Click the Replace command on the Home tab. The Find and Replace dialog box
appears.
Enter text in the Find field that you want to locate in your document.

62
Enter text in the Replace field that will replace the text in the Find box.
Click on OK. The change is made in the document.
You can also use the Find command to locate specific information in a document. For
example, it would be difficult to find the words in 25 pages report. Above all, it would be
time consuming to search the document for a specific topic. You can use the Find command
to locate all instances of a word or phrase in the document. This is a great way to save
time when working with longer documents.
6.1.12 Auto correction
Auto Correct saves us from repetitively typing the frequently used text. To insert Auto
Correct in a document we should first define the Auto Correct entry. To create an Auto
Correct entry follow the steps given:
Define and Insert Auto correct in a document
a) Click on Insert Auto Correct option. The Auto Correct dialog box will appear with Auto
Text tab active.
b) Type the required Autocorrect in the „Enter Autocorrect entries here‟ field. Click on Add
button. Then click on OK> The Autocorrect entry has now been defined.
(c) You can now insert it in any document
any number of times by typing first
few (minimum 4) characters of the
AutoText entry name. If you do not
type at least first four characters of this
Auto correct entry Auto Correct
indication will not be displayed.
(d) When MS-Word suggest the complete
Auto correct entry, press Enter or F3
Use the Tab key to move to the next option or option group in an open dialog box.
63
key to accept the entry. To reject the
Auto Text entry, keep on typing.
AUTO FORMATTING
The AutoFormat feature automatically applies formatting to the text while being typed or as
soon as the text is typed. Auto Format also automatically creates symbols, fractions and
ordinal numbers. To automatically format a document:
1) Choose the AutoFormat option form the Format menu.
2) To choose the type of automatic changes Word makes, click on the Options button.
Select or clear the desired options and then click OK.
3) Click a document type to apply the most appropriate formatting.
4) Opt for any one of the following:
To have Word automatically format the document, click AutoFormat now. Word
automatically formats and closes the dialog box.
To review and accept or reject each change, click AutoFormat and review each
change. A dialog box displaying all the formatting option is displayed which can be
reviewed one by one and then the dialog box can be closed.
6.1.13 Correction of mistakes
Microsoft Word automatically correct the most common types of mistakes. Generally every
person has a set of words the spelling of which are very often confused resulting in wrong
spellings and wrong typing. These words are generally picked up by the spell checker to be
Delete the AutoCorrect Entry from the AutoCorrect dialog box by selecting it and
clicking on the Delete button.
64
corrected later. The following instructions will help us to go through the process of adding
common mistakes to the AutoCorrect function. There are two ways to do this.
OPTION ONE
The easiest way is to run the spell checker against a document and add the words as you fix
them.
1) Press the F7 function key to run the spell checker.
2) When the spell checker comes to a commonly misspelled or mistyped word click on the
Auto Correct button.
OPTION TWO
This is the elaborated method which will give you more control over what is added to the
Auto Correct list. These are also the same steps you would take to correct or delete and entry
in the Auto Correct word list.
1) Click on the Format menu, then click on AutoFormat, now click the options button.
2) Select the Auto Correct tab at the top of the new window.
Text is added in a document file by simply typing it at the cursor position. As the text is being
typed, the cursor will keep on moving to the right side, indicating the next position to type in.
As we type, the text automatically wraps to the next line at the right margin of each line but
the cursor stays in the same paragraph. This is termed as Word wrapping. A new paragraph
starts only when the Enter key is pressed.
SAVING THE DOCUMENT
After adding text to a newly created document you can save it to a hard disk or some other
storage device by an appropriate name using either the Save As or Save option of the file
menu.
While typing, the words that extend beyond the right margin are automatically
wrapped around to the next line. This feature in a word-processing software is
termed as Word wrapping.

65
6.1.14 Save as command:
Click the Microsoft Office button.
Select Save As Word Document. The Save As dialog box appears.
Select the location where you want to save the document using the drop-
down menu enter a name for the document.
Click the Save button.
6.1.15 To use the Save command:
Click the Microsoft Office button.
Select Save from the menu.

66
Using the Save command saves the document in its current location using the same file
name. If you are saving for the first time and select Save, the Save As dialog box will
appear.
PRACTICAL WORK
Open an existing Word document.
Save the document with the file
name office
Save the same document
Close the document.
We can add images / tables in a document file which may include text, images, tables,
bulleted lists, hyperlinks etc.
It is also possible to insert new text or replace the existing text while typing. This is done by
keeping the Insert key on/off.

67
The Insert key works as a toggle key. If you press it once, the overtyping (OVR) mode gets
turned ON, and pressing it again turns it OFF (i.e., the Insert mode is turned ON). The status
of the insert/ overtyping mode is displayed on the status bar
a) Editing Text
Editing text means making corrections to it or manipulating it in a way one likes. This may
include inserting, deleting, copying, finding and replacing a particular text in a document(s).
In order to perform any of these editing operations, we need to use the editing commands that
can be found under the Edit menu (shown in the figure) or in the form of Shortcut icons on
the Standard toolbar. This section shows us how to perform
editing operations on text.
Proofing Features
Word provides you with several proofing features that will help you produce professional,
error-free documents. In this part, you will learn about the various proofing features,
including the Spelling & Grammar tool.
Line colours
Word automatically checks the document for spelling and grammar errors by default.
These errors are indicated by coloured wavy lines.
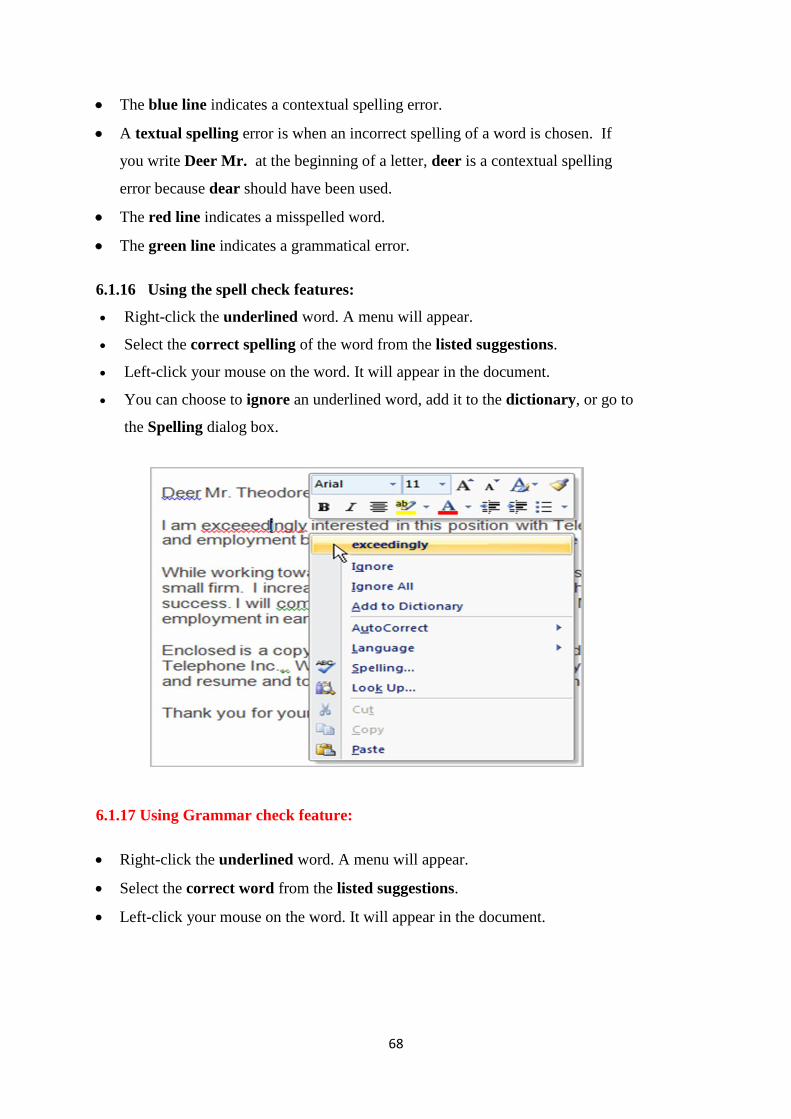
68
The blue line indicates a contextual spelling error.
A textual spelling error is when an incorrect spelling of a word is chosen. If
you write Deer Mr. at the beginning of a letter, deer is a contextual spelling
error because dear should have been used.
The red line indicates a misspelled word.
The green line indicates a grammatical error.
6.1.16 Using the spell check features:
Right-click the underlined word. A menu will appear.
Select the correct spelling of the word from the listed suggestions.
Left-click your mouse on the word. It will appear in the document.
You can choose to ignore an underlined word, add it to the dictionary, or go to
the Spelling dialog box.
6.1.17 Using Grammar check feature:
Right-click the underlined word. A menu will appear.
Select the correct word from the listed suggestions.
Left-click your mouse on the word. It will appear in the document.

69
The spelling and grammar check can be used after completing the document also by
clicking the Spelling & Grammar command on the Review tab.
Review questions
1. What is the use of Word Processing?
2. What is the difference between moving and copying the text?
3. Write the steps of creating a new document.
4. What are the menus which are available in MS-Word?
5. What is the difference between the Save and Save As option?
6. What are short keys? How are they helpful to us while preparing a document?
7. Write the steps of saving a new document using Microsoft Word?
8. Write the short keys that will help us to :
a) Center the selected text
b) Begin a document
c) Text Bold
9. What is the function of the UNDO command?
10. Name the types of objects that can be inserted in a word document.
11. What is the use of Find and Replace option in the Edit Menu?
12. Enumerate the different features of MS word?

70
13. Write the steps of Auto correction in a document.
6.2 Formatting with word
6.2.1 Formatting the Text
Formatting of Text helps to create and design effective documents, you need to know.
In addition to this, formatted text helps to draw the attention of the reader to specific
parts of the document and also helps to communicate our message.
In this part of the chapter, you will learn to format the font size, style, and colour of
text. We will also learn how to use the bold, italic, underline, and change case
commands in Word.
To format font size:
Select the text you want to modify.
Left-click the drop-down arrow next to the font size box on the Home tab. The
font size drop-down menu appears.
Move your cursor to the various font sizes available. A list of the font sizes will
appear in the document.
Left-click the font size you want to use. The font size will change in the
document.

71
To format font style:
Select the text you want to modify.
Left-click the drop-down arrow next to the font style box on the Home tab.
The font style drop-down menu appears.
Drag your cursor over the various font styles. A list showing all the fonts will
appear in the document.
Left-click the font style you wish to use. The font style will make the desired
changes in the document.
To Format font Colour
Select the text you want to modify.
Left-click the drop-down arrow next to the font colour box on the Home tab.
The font colour menu appears.
Drag your cursor over the various font colours. A list of all the colour choice
will appear in the document.
72
Left-click the font colour you want to use. The font colour will be
changed in the document.
To use the bold, italic, and underline commands:
Select the text you want to modify.
Click the bold, italic, or underline command on the Home tab.
6.2.2 Changing the text case:
Select the text you want to change.

73
Click the Change Case command in the Font group on the Home tab.
Select any one of the case options available from the list.
6.2.3 Applying Bullets and Numbers
Bullet and number lists can be used in the documents to arrange and format text to
draw importance. This part will help us to learn to modify existing bullets, insert
new bulleted and numbered lists, and select symbols as bullets.
PRACTICAL WORK
Create a new blank Word document with the name „Office‟.
Insert text into the document.
Set the font size to 12 of the imaginary text.
Set the font style to Roman of the text.
Change the font colour of the text.
Try using different cases using the Change Case command.
Try four alignment commands too.
74
6.2.4 Inserting a new list:
Select the text to be formatted as a list.
Click the Bullets or Numbering commands on the Home tab.
Left-click the bullet or numbering style to be formatted. It will appear in the
document.
Position your cursor at the end of a list item, and press the Enter key to add an
item to the list.
Select the list and click the Bullets or Numbering commands to remove
numbers or bullets from a list
6.2.5 Selecting an alternate bullets or number or style:
Select all the text in an existing list.
Click on the Bullets or Numbering commands on the Home tab.
Left-click to select an alternate bullet or numbering style.
6.2.6 Using a symbol as a bullet:
Select an existing list.
Click on the „Bullets’ command.
Select „Define New Bullet’ from the list. The Define New Bullet dialog box will
appear.
Click on the Symbol button. The Symbol dialog box will appear.
Click on the Font: drop-down box, and select a font category.
Left-click on a symbol to select it.
Click OK. The symbol will now appear in the Preview section of the Define
New Bullet dialog box.
Click OK to apply the symbol to the list in the document.
Pictures can also be used as a bullet by clicking on the Picture button in the
Define New Bullet dialog box. Then locate the image file on the computer.

75
6.2.7 Changing the bullet colour:
Select the existing list.
Click on Bullets command.
The Define New Bullet dialog box will appears on selection of Define New
Bullet
Click on the Font button. The Font dialog box appears.
Click on the Font colour: drop-down box.
Left-click a colour to select it.
Click OK. The bullet colour will appear in the Preview section of the Define
New Bullet dialog box.
Click OK to apply the bullet colour to the list in the document.
6.2.8 Changing the text alignment:
Select the text to be modified.
Select any one of the four alignment options from the Paragraph group on the
Home tab.
o Left Align: This command will align all the selected text to the left margin.
o Center Align: This command will help to align the text at equal distance
from the left and right margins.
o Right Align: It will align all of the selected text to the right margin.
o Justify: This command will align text equally to the right and left margins as
used in many books, newsletters, and newspapers.

76
6.2.9 Using Indents and Tabs
When we start a line of text further from the margin than the main part of the text, it
is called Indenting. This is a great way of drawing attention to a specific text.
There are several ways of indenting the text in Word. This can save time and make
the editing process go smoothly.
In this part of the chapter, the use of the tab selector and the horizontal ruler to set
tabs and indents will be taken up, as well as how to use the increase and
decrease indent commands.
To indent using the Tab key:
The most common way to indent is to use the Tab key. This method is best for
indenting one line of text rather than multiple lines.
Place the insertion point to the left of the text to be indented.
Press the Tab key. This will indent the line 1/2 inch by default.

77
To use the Indent commands:
It will become difficult to use the Tab key to indent multiple lines iftext is added or
deleted later. Indenting multiple lines is best done using the Indent commands.
Select the text to be indented.
Click on the Increase Indent command to increase the indent. The default is
1/2 inch. Press the command multiple times.
Click on the Decrease Indent command to decrease the indent.
6.2.10 Modifying the default settings:
Click on Page Layout tab.
Click on the text to be modified.
Use the arrows or enter text in the fields to modify the Left and Right Indents.
Tab options include:
First Line Indent: Insert the indent marker on the ruler, and indent the first line
of text in a paragraph.
Hanging Indent: Insert the hanging indent marker, and it will indent all lines
other than the first line.
Left Tab : Moves text to the right when typed.
Center Tab : It centres the text according to the tab.
Right Tab : Moves text to the left when typed.
Decimal Tab : Aligns decimal numbers using the decimal point.
Bar Tab : Draws a vertical line on the document.

78
6.2.11 Setting a tab stop:
Click on the tab selector till the First Line Indent icon is visible.
The First Line Indent icon will appear left-click at any point on the horizontal
ruler.
To start a new paragraph, press the Enter key and the insertion point will
automatically indent to that point.
Left-click and drag the tab stop back and forth on the ruler to move a tab stop once
you have inserted it.
6.2.12 Hanging indent is also done in the same way; however, this tab stop changes
all other lines in a paragraph.
6.2.13 Setting left, center, right, and decimal tab stops:
Click the tab selector until the tab stop appears.
Left-click the location on the horizontal ruler where you want your text to
appear.

79
Press the Tab key to reach the tab stop.
PRACTICAL WORK
Practice using the Tab key to indent the first line of a paragraph.
Select some text, and use the Increase and Decrease Indent commands to see
how they change the text.
Explore the tab selector and all of the tab stops. Practice using each one.
6.3 Line and Paragraph Spacing
Line spacing is the space to be created between each line in a paragraph. We have
the option of creating the line spacing to be single spaced, double spaced or multiple
spaced. This is an important part of creating effective document in the document
designing. This part will help us to learn how to modify line and paragraph spacing
in various ways.
6.3.1 Formatting line spacing:
Select the text to be formatted.
Click on the Line spacing command in the Paragraph group on the Home tab.

80
Select a spacing option
OR
Select Line Spacing Options. The Paragraph dialog box appears.
Use the Line spacing drop-down menu to select a spacing option.
Change the before and after points as per requirement to adjust line spacing.
Click OK.
6.4 Paragraph spacing
Just as the line spacing is the spacing between two lines, paragraph spacing is chosen
for spacing between two paragraphs. Extra spaces, where required, are added
between paragraphs, headings, or subheadings. Extra spacing between paragraphs
makes the matter more clear for the document to be read easily.
6.4.1 Formatting paragraph spacing:
Select the paragraph or paragraphs to be formatted.
On the Home table click the Line and Paragraph spacing command. Click on
Add Space Before Paragraph or Remove Space After Paragraph from the
menu. Click on Line Spacing Options to manually set the spacing.
OR
Select Line Spacing Options. The Paragraph dialog box will appear.

81
Change the Before and After points in the Paragraph section.
Click OK.
PRACTICAL WORK
Change the line spacing of a imaginary document.
Change the line spacing of a paragraph of text.
Change the paragraph spacing between body of the document and a heading.
Rulers Bar:
The rulers bar shows the page margins, position of tabs, indents and columns, It is useful to
format a document quickly.
6.5.1 Modifying with Page Layout
Sometimes, the default page layout settings in Word is not sufficient for the
document to be created, therefore, we have to modify these settings. In addition to
this, the page formatting is also required to be changed depending on the document
to be created. In this part of the chapter, you will learn how to change the page
orientation, paper size, and page margins, as well as how to insert a break.
6.5

82
6.5.2 Changing page orientation:
Select the Page Layout tab.
Click the Orientation command in the Page Setup group.
Left-click either Portrait or Landscape to change the page orientation.
By opting for Landscape formatting, everything on the page will be
oriented horizontally, while by the option of portrait format, everything will be
oriented vertically.
6.5.3 Changing page size:
Select the Page Layout tab.
Left-click the Size command, and a drop-down menu will appear. The current
paper size is highlighted.
Left-click a size option to select it. The page size of the document changes.

83
6.5.4 Formatting page margins:
Select the Page Layout tab.
Click the Margins command. A menu of options appears. Normal is selected by
default.
Left-click the predefined margin size you want.
OR
Select Custom Margins from the menu. The Page Setup dialog box appears.
The desired margin size is entered in the appropriate fields.
You can always access the Page Setup dialog box by clicking the small arrow in the
bottom-right corner of the Page Setup group.
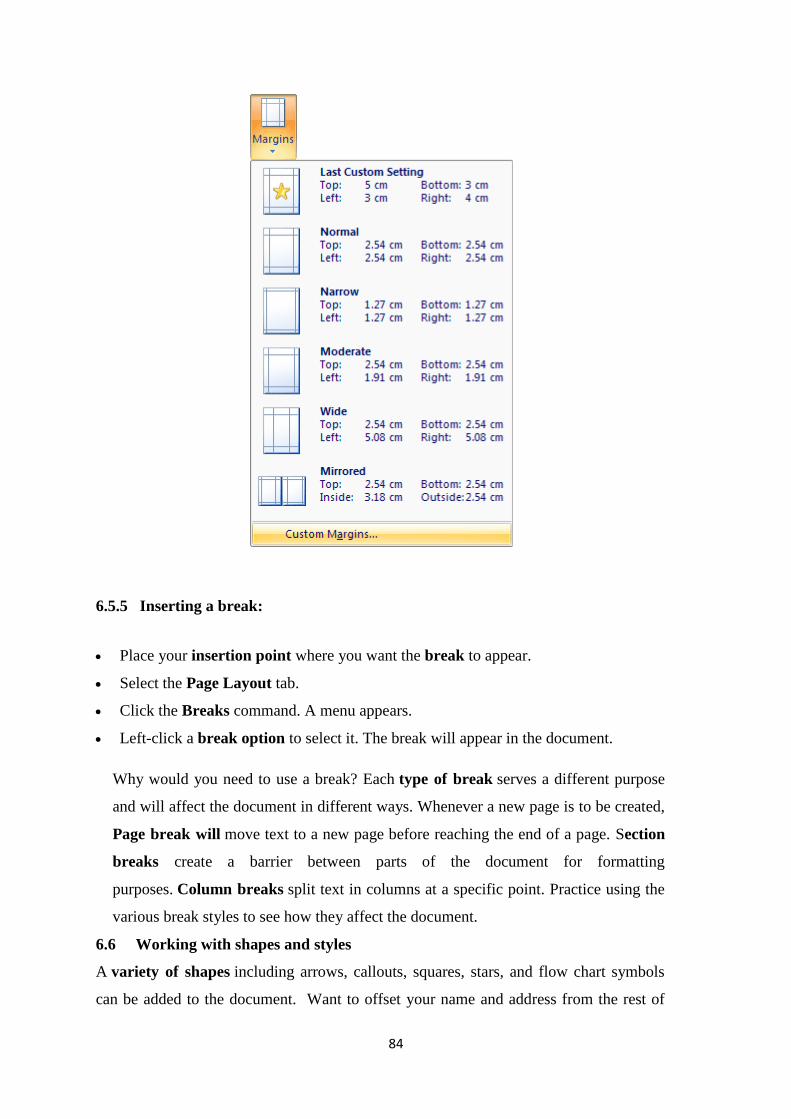
84
6.5.5 Inserting a break:
Place your insertion point where you want the break to appear.
Select the Page Layout tab.
Click the Breaks command. A menu appears.
Left-click a break option to select it. The break will appear in the document.
Why would you need to use a break? Each type of break serves a different purpose
and will affect the document in different ways. Whenever a new page is to be created,
Page break will move text to a new page before reaching the end of a page. Section
breaks create a barrier between parts of the document for formatting
purposes. Column breaks split text in columns at a specific point. Practice using the
various break styles to see how they affect the document.
6.6 Working with shapes and styles
A variety of shapes including arrows, callouts, squares, stars, and flow chart symbols
can be added to the document. Want to offset your name and address from the rest of

85
your resume? Use a line. Need to show the progress of a document through your office?
Use a flow chart. Visual appeal and clarity to many documents can be added even if
we may not need shapes in every document.
In this Chapter, you will learn how to insert a shape and format it by changing its fill
colour, outline colour, shape style, and shadow effects. Additionally, you will learn to
apply 3D effects to shapes that have this option.
6.6.1 Inserting a shape:
Select the Insert tab.
Click the Shape command.
Left-click a shape from the menu. Your cursor is now a cross shape.
Left-click your mouse and while holding it down, drag your mouse until the
shape is the desired size.
Release the mouse button.
6.6.2 Changing shape style:
Select the shape. A new Format tab appears with Drawing Tools.
Click on the More drop-down arrow in the Shapes Style group to display more
style options.
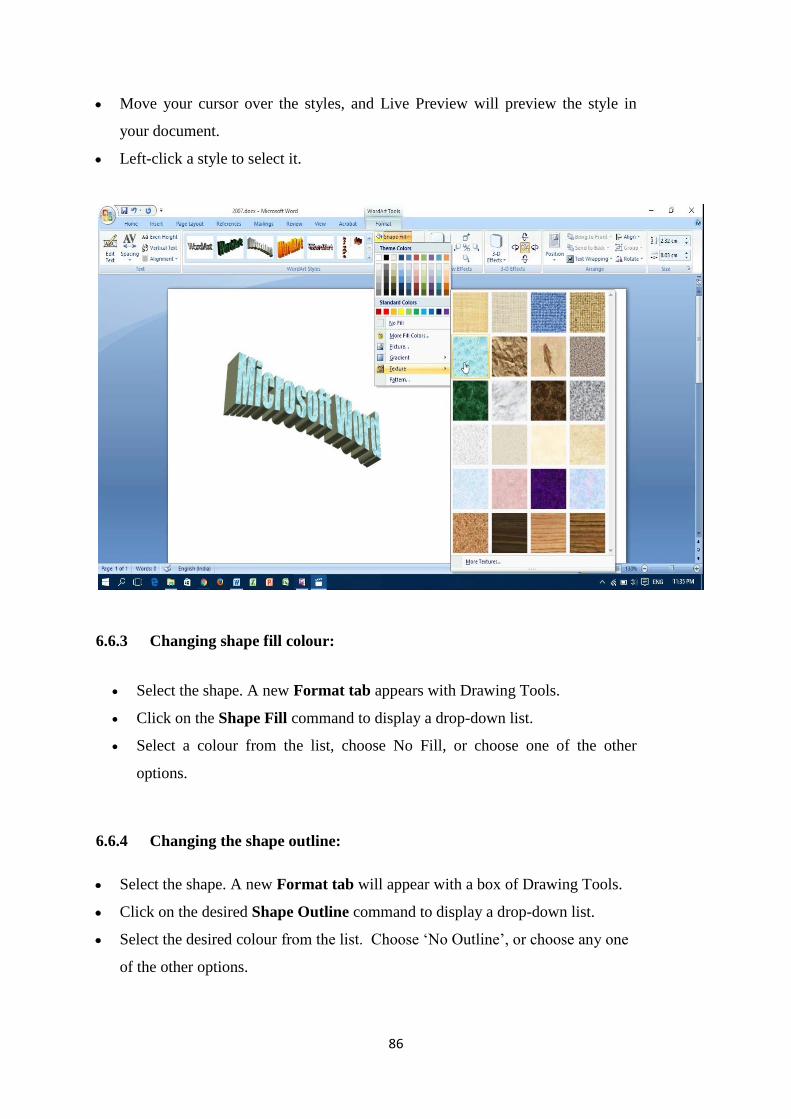
86
Move your cursor over the styles, and Live Preview will preview the style in
your document.
Left-click a style to select it.
6.6.3 Changing shape fill colour:
Select the shape. A new Format tab appears with Drawing Tools.
Click on the Shape Fill command to display a drop-down list.
Select a colour from the list, choose No Fill, or choose one of the other
options.
6.6.4 Changing the shape outline:
Select the shape. A new Format tab will appear with a box of Drawing Tools.
Click on the desired Shape Outline command to display a drop-down list.
Select the desired colour from the list. Choose „No Outline‟, or choose any one
of the other options.
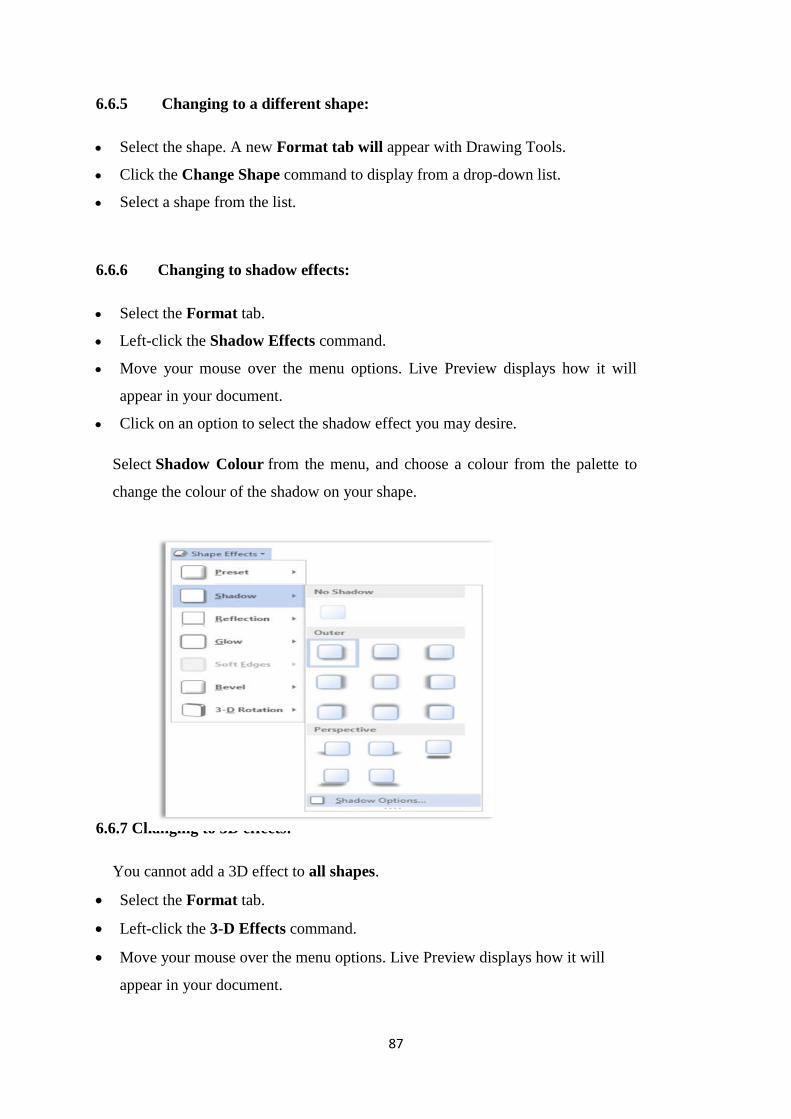
87
6.6.5 Changing to a different shape:
Select the shape. A new Format tab will appear with Drawing Tools.
Click the Change Shape command to display from a drop-down list.
Select a shape from the list.
6.6.6 Changing to shadow effects:
Select the Format tab.
Left-click the Shadow Effects command.
Move your mouse over the menu options. Live Preview displays how it will
appear in your document.
Click on an option to select the shadow effect you may desire.
Select Shadow Colour from the menu, and choose a colour from the palette to
change the colour of the shadow on your shape.
6.6.7 Changing to 3D effects:
You cannot add a 3D effect to all shapes.
Select the Format tab.
Left-click the 3-D Effects command.
Move your mouse over the menu options. Live Preview displays how it will
appear in your document.

88
Click an option to select the 3D effect.
6.6.8 Format Painter Tool
Microsoft Word has a feature called Format Painter that allows a user to copy and paste
formats much in the same way as text is copied and pasted. To used the Format Painter
follow these steps:
Copy text format using the Format Painter tool
1) Start with the normal, default text formatting.
2) Select the first block of text to be formatted.
3) Make all the formatting changes manually.
4) After the changes are made, click on the Format Painter tool to the immediate right of
the Paste button on the Standard toolbar.
5) This temporarily transfers the formatting to the clipboard.
6) The Mouse pointer now appears as the standard I-beam pointer with a paint brush
tagging along.
7) Move the Mouse pointer to the beginning of the next text (usually a paragraph) to be
formatted.
8) Select the text by holding the left Mouse button down and dragging it over the text to
be formatted.
9) Release the Mouse button. All the formats will be pasted into the selected text.
10) e Mouse pointer returns to its original default shape
6.7 Printing
Once you complete your document, you may want to print it for various reasons. The
three basic features of printing in Word, including Print Preview, Quick Print, and
traditional Print are covered under it.
6.7.1 Preview of document before printing:
Click the Microsoft Office button.
10) The Mouse pointer returns to its original default shape.
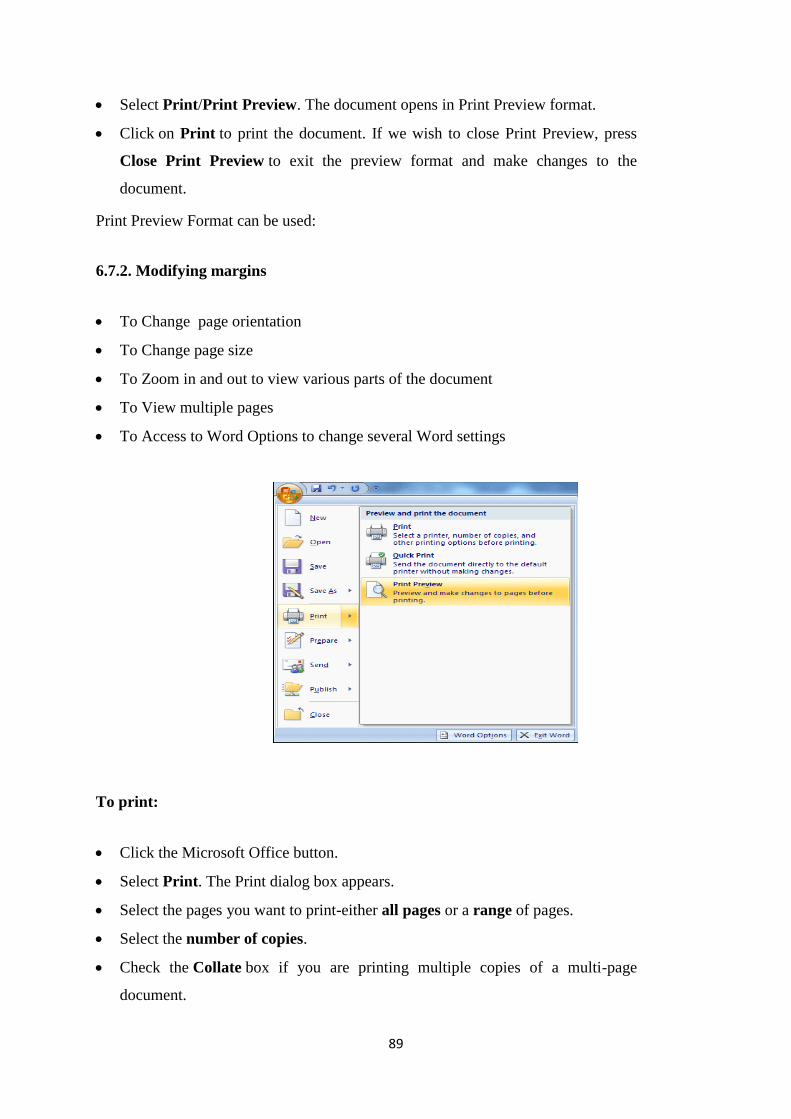
89
Select Print/Print Preview. The document opens in Print Preview format.
Click on Print to print the document. If we wish to close Print Preview, press
Close Print Preview to exit the preview format and make changes to the
document.
Print Preview Format can be used:
6.7.2. Modifying margins
To Change page orientation
To Change page size
To Zoom in and out to view various parts of the document
To View multiple pages
To Access to Word Options to change several Word settings
To print:
Click the Microsoft Office button.
Select Print. The Print dialog box appears.
Select the pages you want to print-either all pages or a range of pages.
Select the number of copies.
Check the Collate box if you are printing multiple copies of a multi-page
document.

90
Select a printer from the drop-down list.
Click OK.
To print via Quick Print:
Click the Microsoft Office button.
Select Print /Quick Print.
The document will automatically print to the default printer.
PRACTICAL WORK
Open an existing document.
View the document in Print Preview.
Close the Print Preview format without printing.
Print two copies of the document.
6.8 Hyperlink
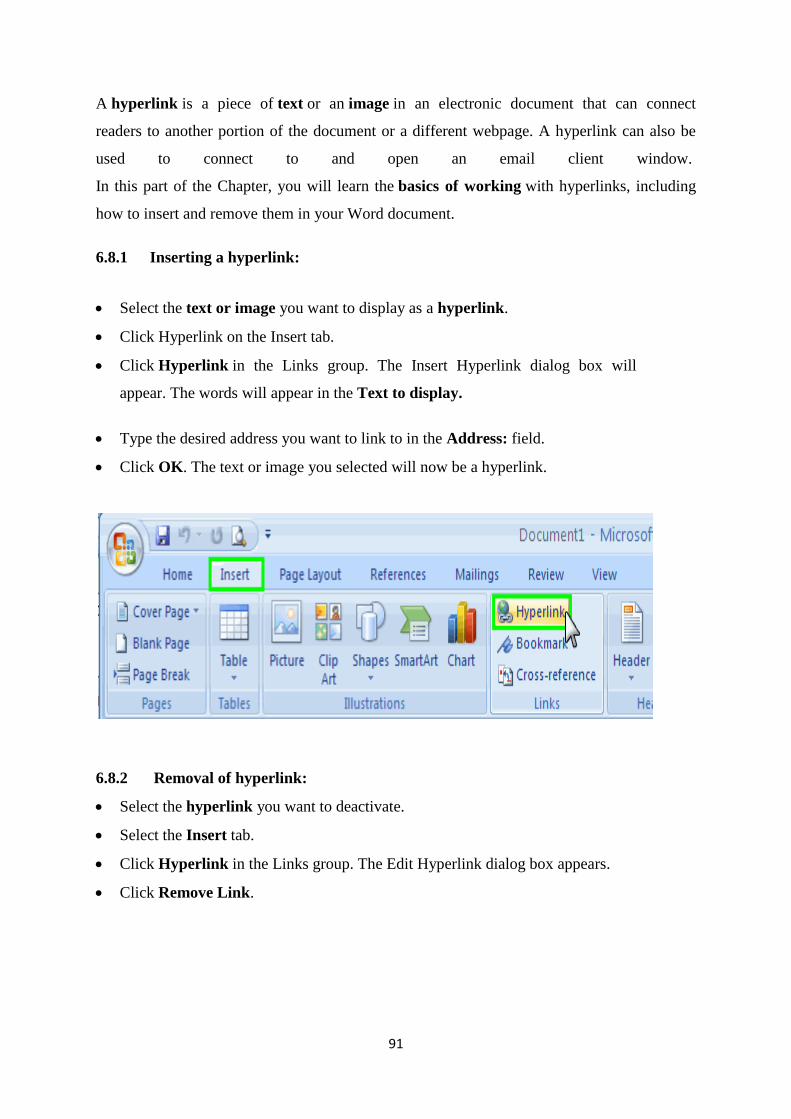
91
A hyperlink is a piece of text or an image in an electronic document that can connect
readers to another portion of the document or a different webpage. A hyperlink can also be
used to connect to and open an email client window.
In this part of the Chapter, you will learn the basics of working with hyperlinks, including
how to insert and remove them in your Word document.
6.8.1 Inserting a hyperlink:
Select the text or image you want to display as a hyperlink.
Click Hyperlink on the Insert tab.
Click Hyperlink in the Links group. The Insert Hyperlink dialog box will
appear. The words will appear in the Text to display.
Type the desired address you want to link to in the Address: field.
Click OK. The text or image you selected will now be a hyperlink.
6.8.2 Removal of hyperlink:
Select the hyperlink you want to deactivate.
Select the Insert tab.
Click Hyperlink in the Links group. The Edit Hyperlink dialog box appears.
Click Remove Link.

92
6.9 Clip Art
Clip Art is an art of inserting illustrations into a document in order to make it more
appealing. It is used extensively and it comes in many forms both electronic and
printed. These illustrations include clip art, pictures, Smart Art, and charts. This Art
can be used in both personal and commercial projects.
This part of the chapter will suggest how to search for and locate clip art and insert it
into the documents.
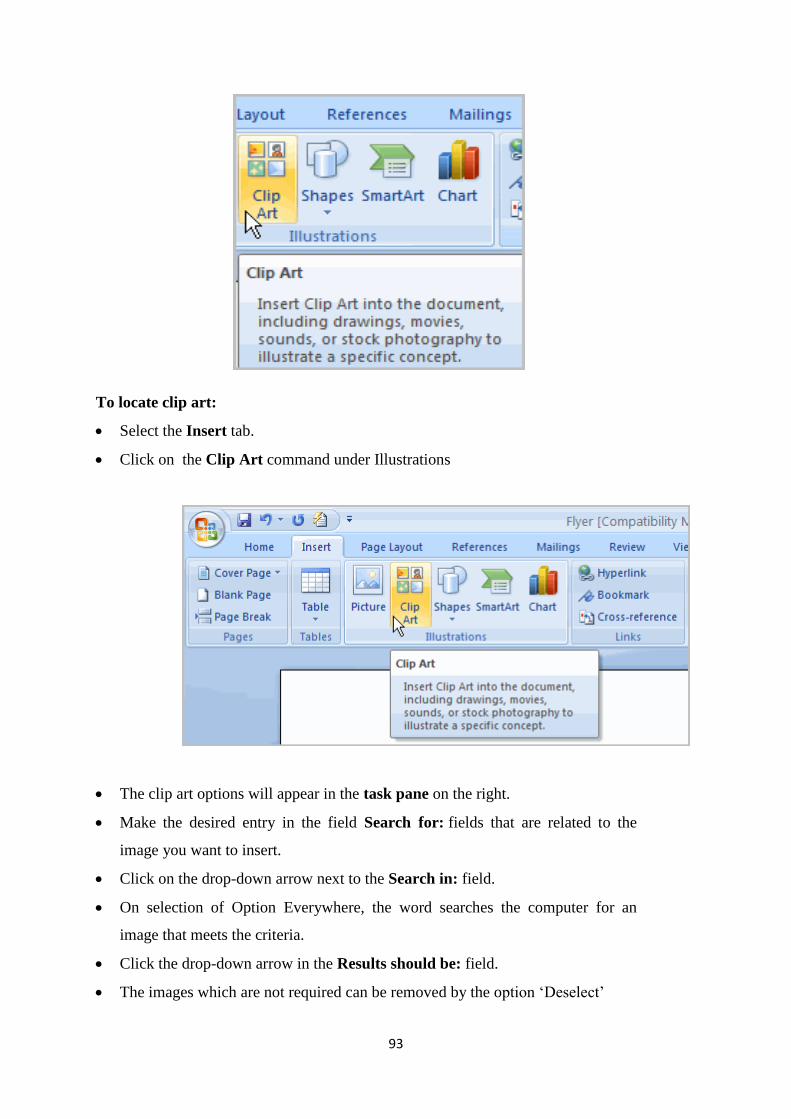
93
To locate clip art:
Select the Insert tab.
Click on the Clip Art command under Illustrations
The clip art options will appear in the task pane on the right.
Make the desired entry in the field Search for: fields that are related to the
image you want to insert.
Click on the drop-down arrow next to the Search in: field.
On selection of Option Everywhere, the word searches the computer for an
image that meets the criteria.
Click the drop-down arrow in the Results should be: field.
The images which are not required can be removed by the option „Deselect‟

94
Click Go.
6.9.1 Inserting a clip art:
Clip art search will help to review the desired results.
Insertion point in the document will be placed where you want to insert clip art.
It will appear in the document with the Left-click on an image in the task pane
OR
Left-click the arrow next to an image in the task pane.
Select Insert, Copy, or any of the other options on the list.

95
6.10 Using Template
A predesigned document used to create new documents with the same formatting is known
as Template. With this option, many of the more important document design decisions are
predetermined such as margin size, font style and size, and spacing
This part of the chapter will help us to know how to create a new document with a template
and insert text, as well as basic information about how templates work in Word 2007.
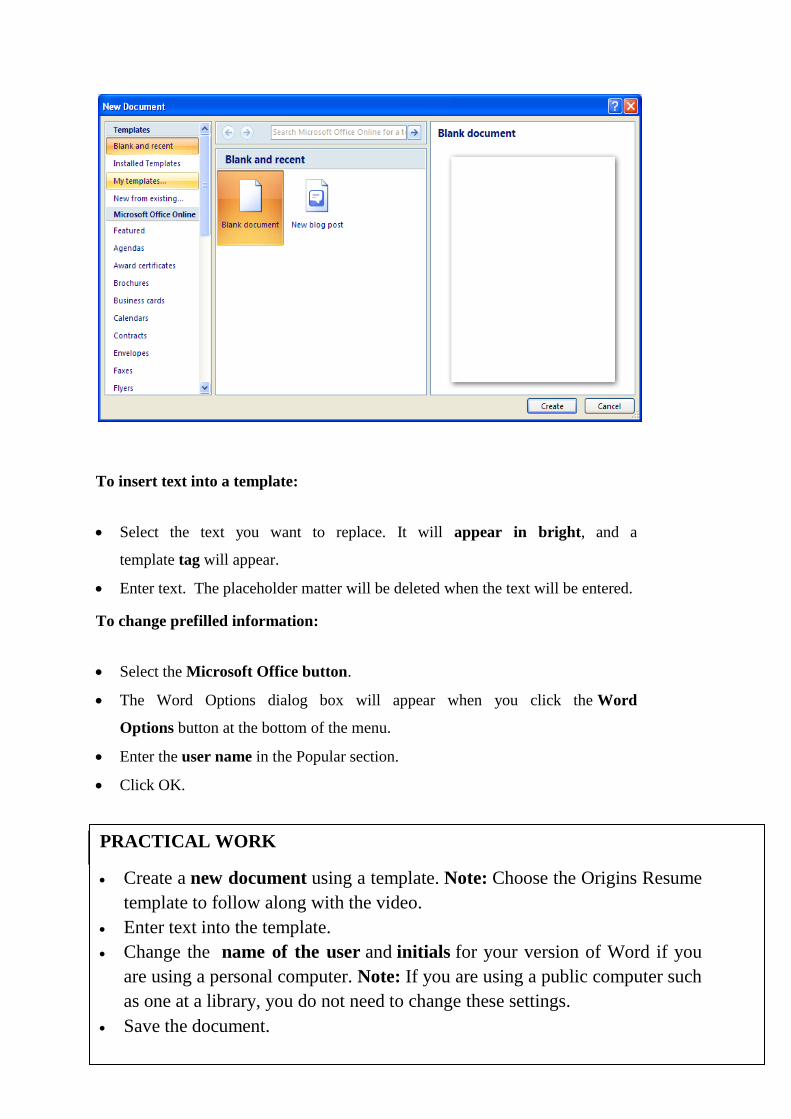
96
To insert text into a template:
Select the text you want to replace. It will appear in bright, and a
template tag will appear.
Enter text. The placeholder matter will be deleted when the text will be entered.
To change prefilled information:
Select the Microsoft Office button.
The Word Options dialog box will appear when you click the Word
Options button at the bottom of the menu.
Enter the user name in the Popular section.
Click OK.
6.11 Working with Text Borders
PRACTICAL WORK
Create a new document using a template. Note: Choose the Origins Resume
template to follow along with the video.
Enter text into the template.
Change the name of the user and initials for your version of Word if you
are using a personal computer. Note: If you are using a public computer such
as one at a library, you do not need to change these settings.
Save the document.
97
6.11 Working with Text Boxes
If we want to insert a text into the document in order to highlight a specific text
or if we want to easily move the text around within a document, we can place
tax boxes anywhere in the document .
This part of the lesson will make you learn how to insert a text box and format it
in various ways, including resizing and moving it and changing the text box
shape, colour, and outline.
To insert a text box:
Click on the Insert tab.
Click on the Text Box command in the Text group.
Select a text box already built in on your or Draw Text Box from
the menu.
If you select Built-in text box, left-click the text box you want to use
and it will appear in the document.
OR
On selection of Draw Text Box, a crosshair cursor will appear. Left-
click on your mouse while holding it down will help you to get the box
of the desired size.
Release the mouse button.

98
To change text box style:
Select the text box. A new Format tab appears with Text Box Tools.
Select the Format tab.
If you want to view more style options, click on the More drop-down
arrow in the Text Box Style
Move your cursor over the styles, and click on Live Preview for the
preview of the style in your document.
Left-click on the style will select it.
To change shapes fill:
Select the text box. A new Format tab appears with Text Box Tools.
To display a drop-down list, click the Shape Fill command.
Select a colour from the list, Choose No Fill, or choose any one of the
other options.

99
To change the shape outline:
Select the text box. A new Format tab appears with Text Box Tools.
Click the Shape Outline command to display a drop-down list.
Select a colour from the list, choose No Outline, or choose one of the
other options.
To change the text box shape:
Select the text box. A new Format tab appears with Text Box Tools.
Click the Change Shape command to display a drop-down list.
Select a shape from the list.
6.12 To move a text box:
Left-click the text box. Your cursor becomes a cross with arrows on
each end.
While holding the mouse button, drag the text box to the desired
location on the page.
Release the mouse button.
To resize a text box:
Select the text box.
Left-click on any of the sizing handles.
Hold down the mouse button and drag the sizing handle until the text
box appears of the desired size.
The Format Painter command will help you to easily format text such as
colour, font style and size to appear like other texts in the document. This
command will assist you to copy all of the formatting from one page and
apply it to another. Click on the Format Painter command on the Home tab
after you select the text that is to be formatted. The pointer will change to a

100
paint brush icon. By the use of the brush over the selection, apply the
formatting. The new text now appears modified Press ESC to stop
formatting.
To change the order of objects:
Right-click the object you want to move.
Select Order.
Select a menu option that will arrange the item in the desired way.
The text and image will now be displayed layered on top of the shape
Using Styles and Themes
Styles and themes in Word can help to create professional-looking documents easily.
A style is a combination of font style, colour and size. Size of text can be applied to
the text when selected. A theme is a group of choices used for formatting and can be
applied to an entire document.
This chapter will help you to know how to apply, modify, and create a style; use style
sets; apply a document theme; and create a custom theme.
To create a new style:
Press the arrow in the bottom of the right corner of the Styles group. This will
open the Styles task pane.
Click on the New Style button, and a dialog box will appear.
Select a name for the style, and finalize all the changes in formatting styles.
Select the button which is available beside New Document so the style will be
available to use in all the documents.
Click on OK. The new style will appear in the list.
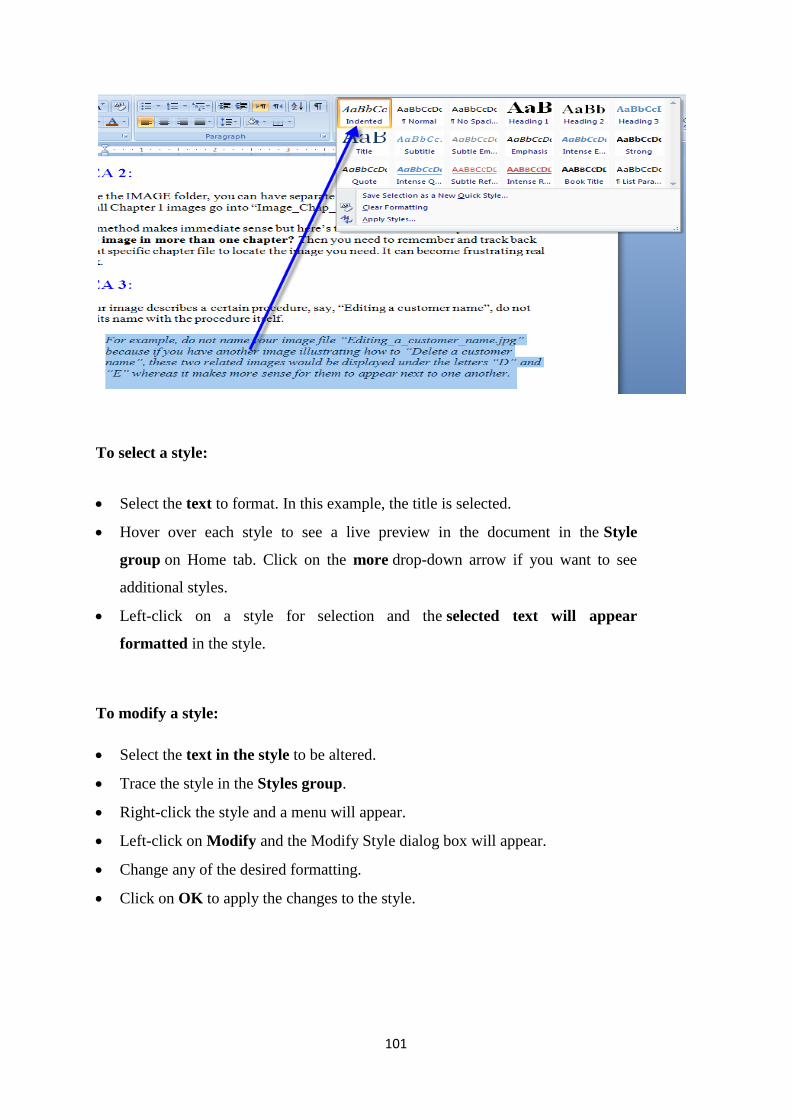
101
To select a style:
Select the text to format. In this example, the title is selected.
Hover over each style to see a live preview in the document in the Style
group on Home tab. Click on the more drop-down arrow if you want to see
additional styles.
Left-click on a style for selection and the selected text will appear
formatted in the style.
To modify a style:
Select the text in the style to be altered.
Trace the style in the Styles group.
Right-click the style and a menu will appear.
Left-click on Modify and the Modify Style dialog box will appear.
Change any of the desired formatting.
Click on OK to apply the changes to the style.

102
To apply a style set:
Click on the Change Styles command.
Select Style Set from the menu.
Left-click on a style set to select it. The change will be shown in the entire
document.
Style sets is a combination of title, heading, and paragraph styles. It enables
to format all the parts of the document at once rather than formatting title and
headings separately.
The colours and fonts of a style set can by modified quickly from the Change Styles
command; however, the themes feature is more practical and easier to use.
To apply a theme:
Press the Page Layout tab.
Click on the Themes command.
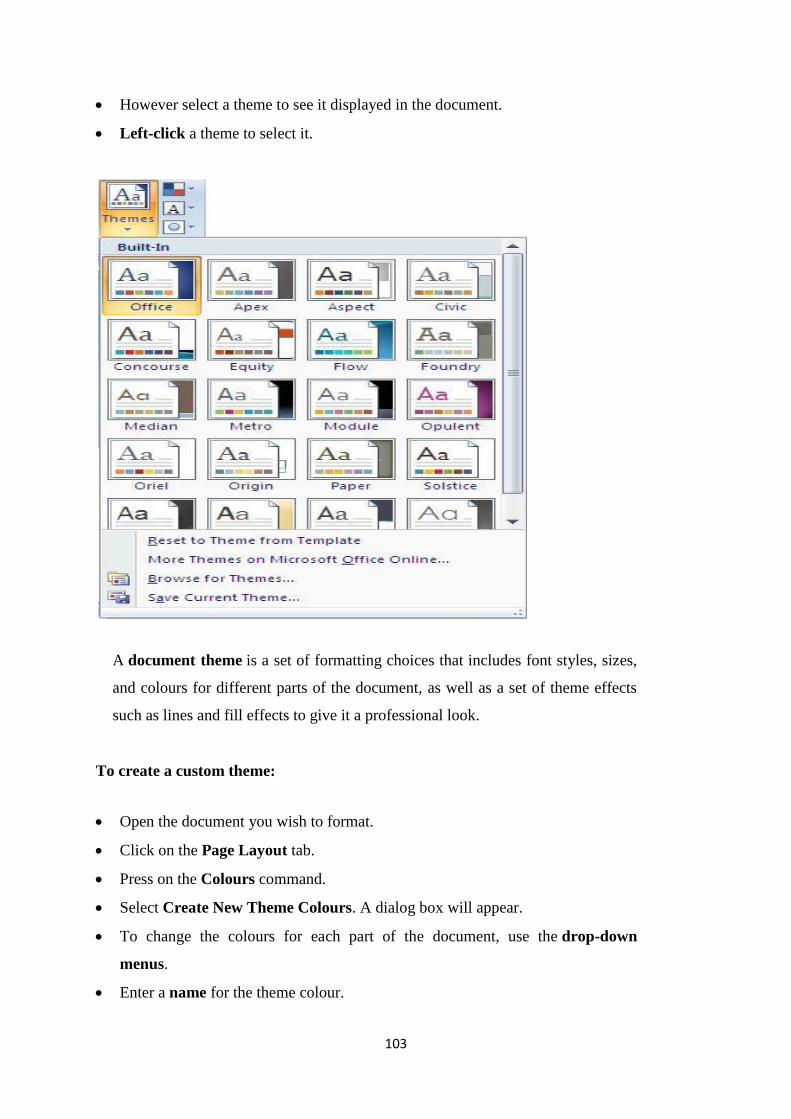
103
However select a theme to see it displayed in the document.
Left-click a theme to select it.
A document theme is a set of formatting choices that includes font styles, sizes,
and colours for different parts of the document, as well as a set of theme effects
such as lines and fill effects to give it a professional look.
To create a custom theme:
Open the document you wish to format.
Click on the Page Layout tab.
Press on the Colours command.
Select Create New Theme Colours. A dialog box will appear.
To change the colours for each part of the document, use the drop-down
menus.
Enter a name for the theme colour.

104
Click on Save.
Click on the Fonts command.
Select Create New Theme Fonts. A dialog box will appear.
Use the drop-down menus to change the fonts in the dialog box.
Enter a name for theme font.
Click on Save.
Press the Effects command, and select an option from the drop-down menu.
Click the Themes command.
Select Save Current Theme. A dialog will appear.
Enter a theme name, and click on Save. The theme will be available to use with
other documents.
Using Smart Graphics
The use of Smart Art you will enable you to communicate the information visually
and that too quickly and easily rather than simply using text. Illustrations can help to
leave an impact in your document, and it makes use of graphics easy.
This part of the chapter will help us to learn how to insert a Smart Art graphic, change
the colour and effects of the illustrations and modify it in several ways.

105
To insert a Smart Art illustration:
Keep the insertion point in the document where the graphic is to appear.
Click on the Insert tab.
Select the Smart Art command in the illustrations group. A dialog box will
appear.
By clicking on, the options will appear. Select a category on the left of the
dialog box, and finalize the Smart Art graphics that appear in the centre.
Left-click on a graphic to select it.
Click OK.
To see more details about a graphic, left-click any image, and a larger version of
the graphic and additional text details will appear on the right side of the dialog
box.
To add text to a Smart Art graphic:
Select the graphic. Firstly the text box is selected. If the task pane on the
left of the graphic is visible, the insertion point will appear in it. Click the
arrow to open the task pane, if the task pane is not visible.
When we will enter text into the task pane fields, the information will appear
in the graphic.
OR
Click X to close the task pane.
Type the text in the text box in the graphic.
Continue to enter text in the text box graphics.
The text entered will automatically resize to fit it inside the box.
To add a shape to a graphic:
After selecting the graphic, the Smart Art Tools Design and Format tabs will
appear.

106
Click on Design tab and again click on the Add Shape command in the
Graphics group.
Select one of the shapes nearby the desired location, after you decide where
you want the new shape to appear.
Select Add Shape Before or Add Shape After.
The Promote and Demote commands will allow you to move shapes and customize
the graphic instead of using the predefined default illustrations.
6.13 Moving the shapes, using promote or demote commands
Select the graphic. The Smart Art Tools Design and Format tabs appear on the
Ribbon.
Select the Design tab.
Select the shape you want to move.
In the Create Graphic group, click on the Promote or Demote command.
To change the graphic style:
Select the graphic. The Smart Art Tools Design and Format tabs appear on the
Ribbon.
Select the Design tab and Left-click a style to select it.
Click the More arrow to see all the style options. Hover over each to display a live
preview of the style in your document.
6.14 Changing of colour scheme:
On selecting the graphic, the Smart Art Tools Design and Format tabs will
appear.
Select the Design tab.
By clicking on the Change Colour command, a menu of colour schemes will
appear.
Left-click an option to select it.

107
When you want to switch to another graphic, go through the options in
the Layout group but keep the existing text. You also can select the Format tab
to access additional formatting options, including fill, text, and line colour.
Some of the options will differ from graphic to graphic. Be careful while
browsing the Smart Art Tools tabs, and explore the active commands.
Review Questions
1. Write down the advantages of Print Preview feature. Why it is important?
2. Write different steps involved in resizing a document.
3. How manual page break can be inserted in a document?
4. Write different steps of adding numbers and bullets to the document?
5. What is the use of Indentation and spacing in a document?
6. What are different steps involved in auto-formatting Text in a document?
7. How many types of alignments can be applied to text?
8. Write down the steps to change line spacing in a document.
9. What are two ways to insert pictures in a document?
6.15 Managing Documents and Customizing Word
6.15.1 Document Properties
Document properties are details about a file that describe or identify it. Document properties
as title, author name, subject and keywords that identify the topic of the document or
contents.
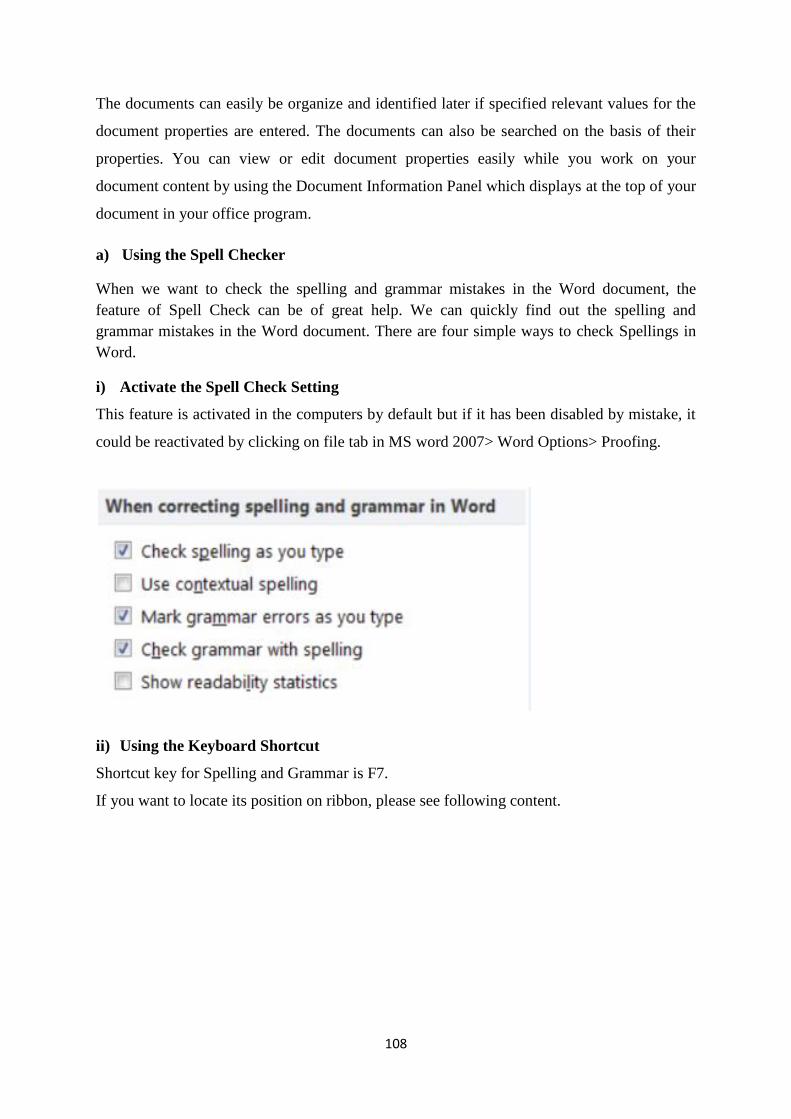
108
The documents can easily be organize and identified later if specified relevant values for the
document properties are entered. The documents can also be searched on the basis of their
properties. You can view or edit document properties easily while you work on your
document content by using the Document Information Panel which displays at the top of your
document in your office program.
a) Using the Spell Checker
When we want to check the spelling and grammar mistakes in the Word document, the
feature of Spell Check can be of great help. We can quickly find out the spelling and
grammar mistakes in the Word document. There are four simple ways to check Spellings in
Word.
i) Activate the Spell Check Setting
This feature is activated in the computers by default but if it has been disabled by mistake, it
could be reactivated by clicking on file tab in MS word 2007> Word Options> Proofing.
ii) Using the Keyboard Shortcut
Shortcut key for Spelling and Grammar is F7.
If you want to locate its position on ribbon, please see following content.
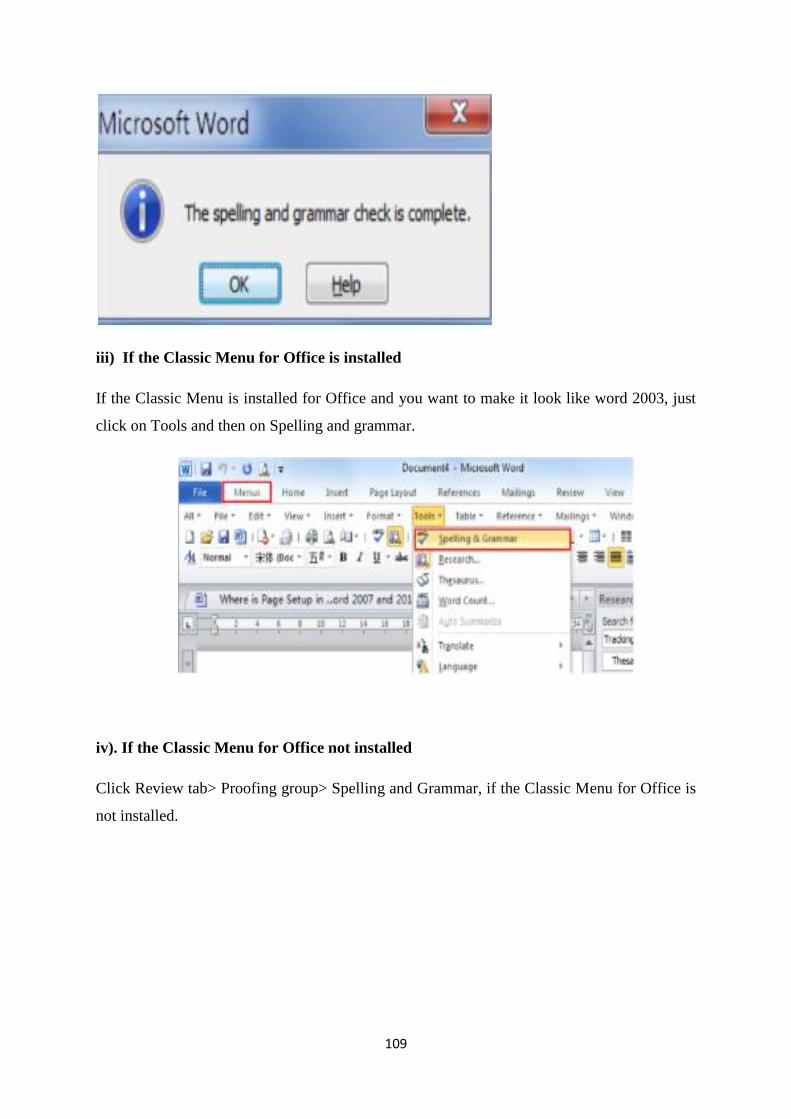
109
iii) If the Classic Menu for Office is installed
If the Classic Menu is installed for Office and you want to make it look like word 2003, just
click on Tools and then on Spelling and grammar.
iv). If the Classic Menu for Office not installed
Click Review tab> Proofing group> Spelling and Grammar, if the Classic Menu for Office is
not installed.

110
Using Automatic Hyphenation
Hyphenating allows more text to be fitted on a page. It also tightens justified paragraphs and
reduces the ragged appearance of unjustified text. When the automatic hyphenation is turned
on, Word automatically inserts hyphens where they are needed in the document. Even in case
of editing the document later and changing line breaks, Word automatically re-hyphenates the
document. To use this feature, perform the following steps:
Choose the Language option from the Tools menu.
Select the Hyphenation option from the pop-up menu.
Select the automatically hyphenate document check box.
In the Hyphenation zone box, enter the amount of space to leave between the end of the
last word in a line and the right margin.
To reduce the number of hyphens, make the hyphenation zone wider.
To reduce the raggedness of the right margin, make the hyphenation zone narrower.
Enter the number of consecutive lines that can be hyphenated.
6.15.2 a) Using the Thesaurus
Choose the Language option from the Tools menu.
Select the Thesaurus option from the pop-up menu.
A list of meanings and synonyms are given in the windows.
Double-click on the words in the Meanings box or click the Look up button to view
similar words.
111
Double-click words in the Replace with synonym box to view synonyms of those words.
Highlight the word to be added and click the replace button.
b) Using customized features in Word:
Word is programmed with a lot of commands, options, and automated features. But it allows
users to customize what is displayed and how to respond to your input. The customized
features can help to improve the productivity and also avoid frustration.
The following tips will show you how to customize the Word window.
i) Displaying the Styles Area
The Styles area will help you apply formatting consistently by displaying the styles
applied to each paragraph.
ii) Eliminating Document Buttons
If a cluttered taskbar is slowing you down, you can opt to eliminate only one button in
the taskbar.
iii) Change the Office Assistant
If you like the animated office assistant, but you‟re getting a little tired of Clip pit, Microsoft
has included a whole gallery of assistants for you to choose from.
iv) Turn Off the Office Assistant
Some users find the animated office assistants less amusing than downright annoying. If
you‟re one of the people, you can turn this feature off.
v) Turning On/Off Word’s Task Pane
The Task Pane provides quick access to certain commands, but many users may find that they
would prefer to free up the screen space. Find out how to turn it on or off and choose whether
you want it to open with word.
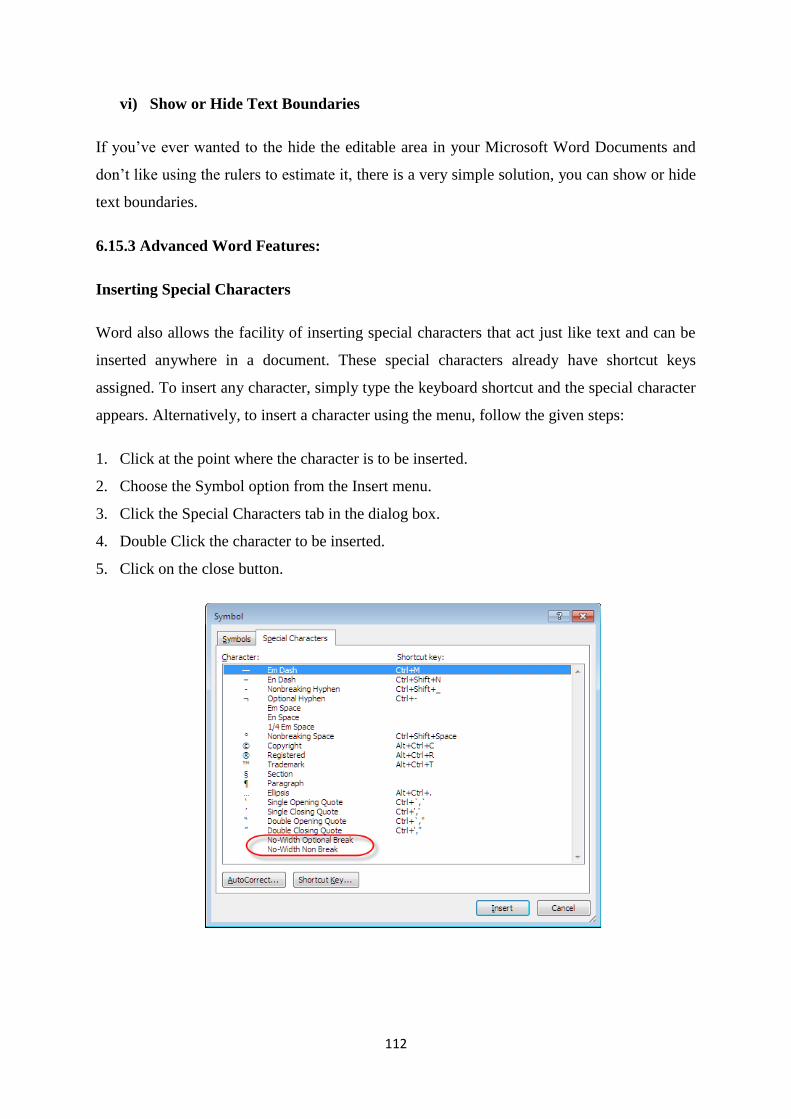
112
vi) Show or Hide Text Boundaries
If you‟ve ever wanted to the hide the editable area in your Microsoft Word Documents and
don‟t like using the rulers to estimate it, there is a very simple solution, you can show or hide
text boundaries.
6.15.3 Advanced Word Features:
Inserting Special Characters
Word also allows the facility of inserting special characters that act just like text and can be
inserted anywhere in a document. These special characters already have shortcut keys
assigned. To insert any character, simply type the keyboard shortcut and the special character
appears. Alternatively, to insert a character using the menu, follow the given steps:
1. Click at the point where the character is to be inserted.
2. Choose the Symbol option from the Insert menu.
3. Click the Special Characters tab in the dialog box.
4. Double Click the character to be inserted.
5. Click on the close button.
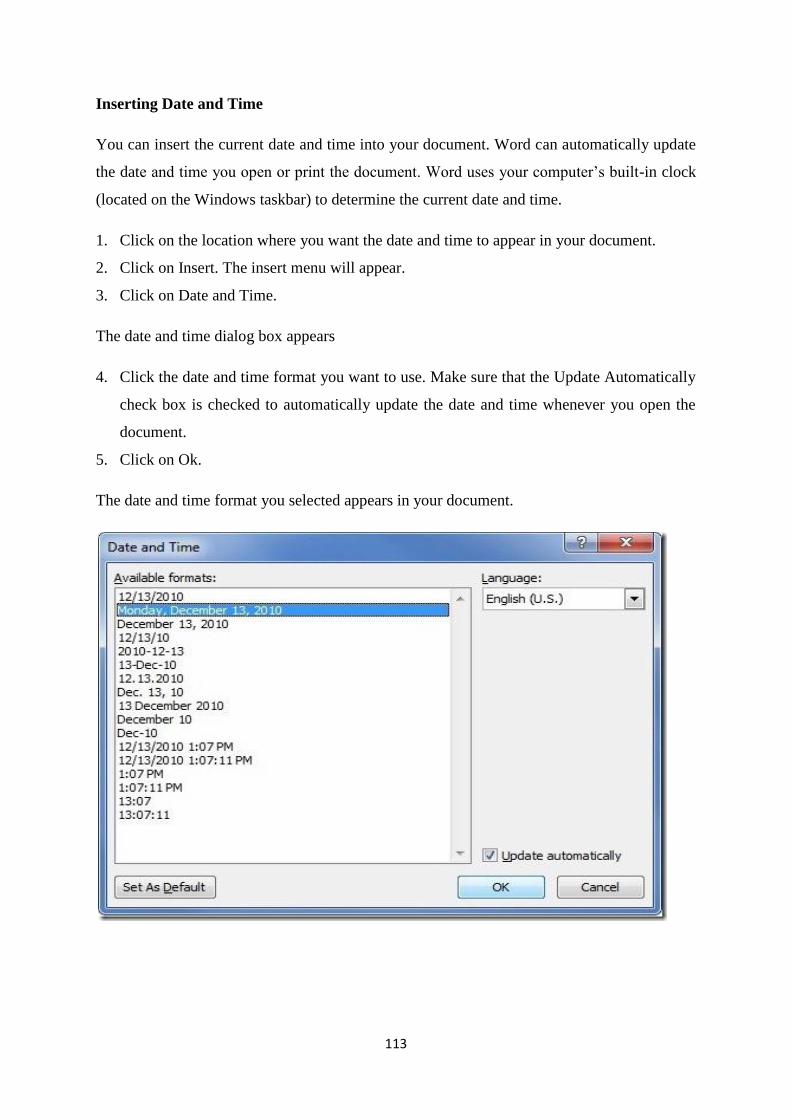
113
Inserting Date and Time
You can insert the current date and time into your document. Word can automatically update
the date and time you open or print the document. Word uses your computer‟s built-in clock
(located on the Windows taskbar) to determine the current date and time.
1. Click on the location where you want the date and time to appear in your document.
2. Click on Insert. The insert menu will appear.
3. Click on Date and Time.
The date and time dialog box appears
4. Click the date and time format you want to use. Make sure that the Update Automatically
check box is checked to automatically update the date and time whenever you open the
document.
5. Click on Ok.
The date and time format you selected appears in your document.
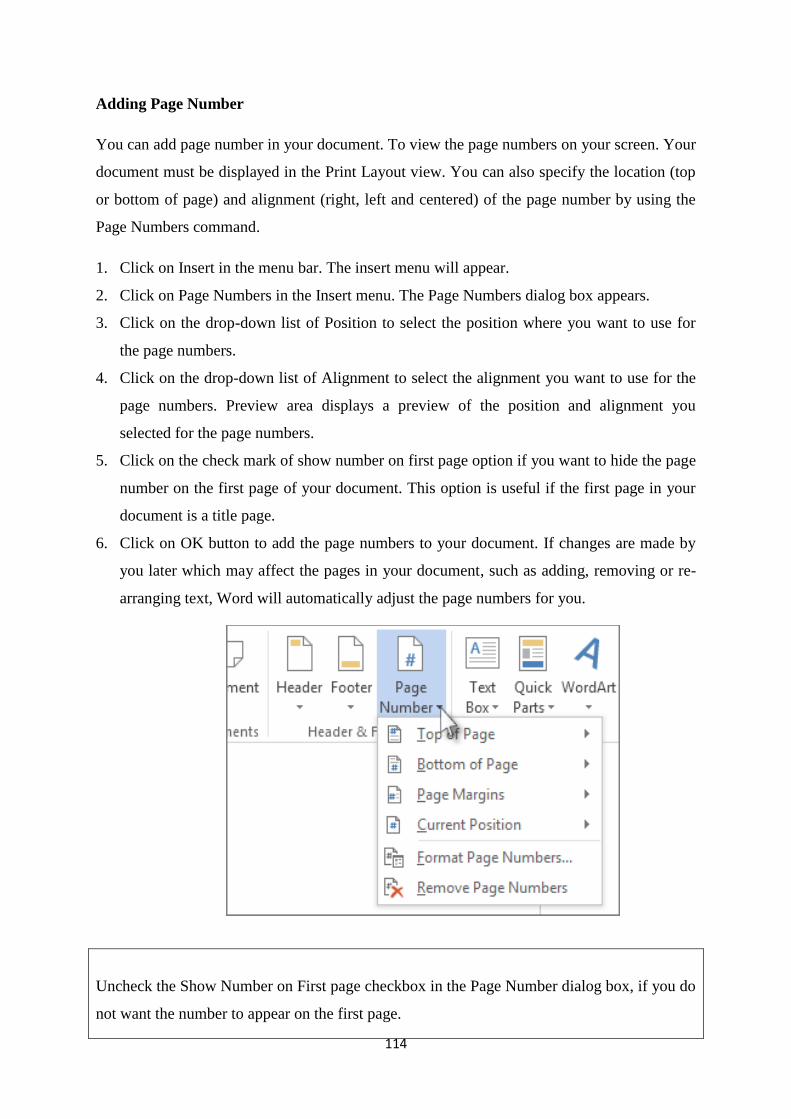
114
Adding Page Number
You can add page number in your document. To view the page numbers on your screen. Your
document must be displayed in the Print Layout view. You can also specify the location (top
or bottom of page) and alignment (right, left and centered) of the page number by using the
Page Numbers command.
1. Click on Insert in the menu bar. The insert menu will appear.
2. Click on Page Numbers in the Insert menu. The Page Numbers dialog box appears.
3. Click on the drop-down list of Position to select the position where you want to use for
the page numbers.
4. Click on the drop-down list of Alignment to select the alignment you want to use for the
page numbers. Preview area displays a preview of the position and alignment you
selected for the page numbers.
5. Click on the check mark of show number on first page option if you want to hide the page
number on the first page of your document. This option is useful if the first page in your
document is a title page.
6. Click on OK button to add the page numbers to your document. If changes are made by
you later which may affect the pages in your document, such as adding, removing or re-
arranging text, Word will automatically adjust the page numbers for you.
Uncheck the Show Number on First page checkbox in the Page Number dialog box, if you do
not want the number to appear on the first page.

115
Working with Pictures
Pictures can be added to Word documents and then formatted in various ways.
The picture tools will help to make it easy to incorporate images into your documents
and improve these images in innovative ways.
This part of the chapter will guide us as to how- to insert a picture from your
computer, change the picture style and shape, add a border, and crop and compress
pictures.
To insert a picture:
Place the cursor on insertion point where you want the image to appear.
Select the Insert tab.
Click on the Picture command. The Insert Picture dialog box will appear.
Select the image file on your computer.
Click on Insert, and it will appear in your document.
Left-click a corner sizing handle, and while holding down the mouse button
resize the image. The image retains its proportions.
To wrap text around an image:
Select the image.
Select the Picture Tools Format tab.

116
Click the Text Wrapping command in the Arrange group.
Left-click a menu option to select it. In this example, we selected Tight.
Move the image around to see how the text wraps for each setting.
The Position button has predefined text wrapping settings which is located to
the left of the Text Wrapping button.
Click the Position button, and a drop-down list of text wrapping options will
appear. Hover over an option to see what it does.
Click the Text Wrapping command and select More Layout Options if you are not
able to get your text to wrap the way you want.
You can make more precise changes in the Advanced Layout dialog box that appears.
To crop an image:
Select the image.
Select the Format tab.
The black cropping handles appear when we will click on the Crop command.
Left-click and move a handle to crop an image.
Click the Crop command to deselect the crop tool.
Corner handles will crop the image proportionally.
To compress a picture:
Select the picture.
Select the Format tab.
Select the Compress Pictures command in the Adjust group. A dialog box will
appear.
To access the Compression Setting dialog box, click on the Options button.
Choose the target output.
Change any of the default picture settings you want.
Click on OK in the Compression Settings dialog box.
Click on OK in the Compress Pictures dialog box.
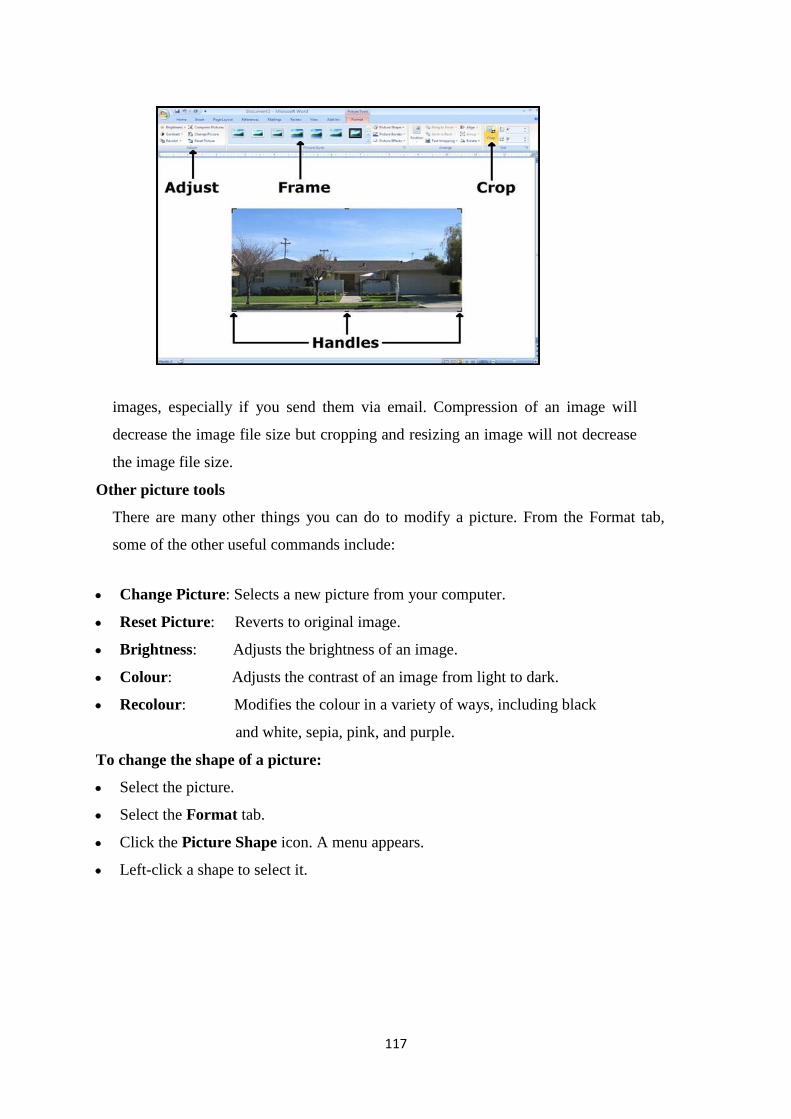
117
You will have to check the file size of your images and documents that include
images, especially if you send them via email. Compression of an image will
decrease the image file size but cropping and resizing an image will not decrease
the image file size.
Other picture tools
There are many other things you can do to modify a picture. From the Format tab,
some of the other useful commands include:
Change Picture: Selects a new picture from your computer.
Reset Picture: Reverts to original image.
Brightness: Adjusts the brightness of an image.
Colour: Adjusts the contrast of an image from light to dark.
Recolour: Modifies the colour in a variety of ways, including black
and white, sepia, pink, and purple.
To change the shape of a picture:
Select the picture.
Select the Format tab.
Click the Picture Shape icon. A menu appears.
Left-click a shape to select it.
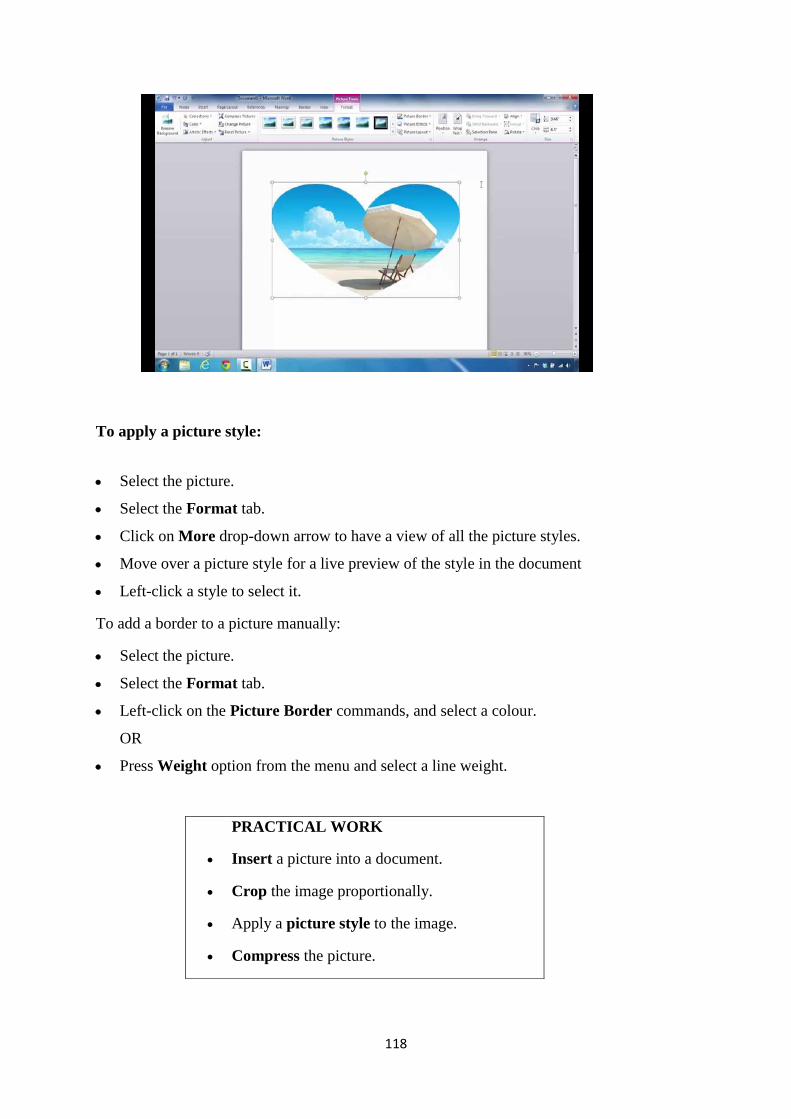
118
To apply a picture style:
Select the picture.
Select the Format tab.
Click on More drop-down arrow to have a view of all the picture styles.
Move over a picture style for a live preview of the style in the document
Left-click a style to select it.
To add a border to a picture manually:
Select the picture.
Select the Format tab.
Left-click on the Picture Border commands, and select a colour.
OR
Press Weight option from the menu and select a line weight.
PRACTICAL WORK
Insert a picture into a document.
Crop the image proportionally.
Apply a picture style to the image.
Compress the picture.

119
Inserting Scanned and Digital Camera Images
1. Set up the picture in the scanning device.
2. Choose the picture option from the insert menu and then click from Scanner or
Camera.
3. In case more than one device is attached to the computer, select the device to be used
from the Device list.
4. Do one of the following:
If the selected device is a scanner, and default settings are to be used for scanning the
image, click Web Quality (in case the picture is to be displayed on the screen) or Print
Quality (in case the picture is to be printed) and then click insert to scan the picture.
If the selected device is not a scanner (for example, if it‟s a digital camera) or to
customize any settings before scanning the picture, click custom insert. Follow the
instructions that come with the device being used.
6.15.4 Creating and using auto text entries
Auto text feature can be used to store text you frequently use, such as a mailing address, legal
disclaimer or closing remark. It enables you to insert the text into your documents.
1. Type the text you want to store as an Auto Text entry.
2. Select the text.
3. Click on Insert.
4. Click on Auto Text.
5. Click on New.
6. The Create Auto text dialog box appears. This area displays a name for the Auto Text
entry. To use a different name, type the name.
7. Click on OK to create the Auto Text entry.
To see the Auto Text entry, select the Insert→ Auto Text → Auto Text tab.

120
6.15.5 Working with tables
A table is a grid of cells arranged in rows and columns. Tables can be customized and
are useful for various tasks such as presenting text information and numerical data.
To insert a blank table:
Put the insertion point in the desired place where the table is to appear.
Select the Insert tab.
Click the Table command.
Drag your mouse over the diagram squares to select the number of columns and
rows in the table.
Left-click your mouse and the table appears in the document.
Enter text into the table.
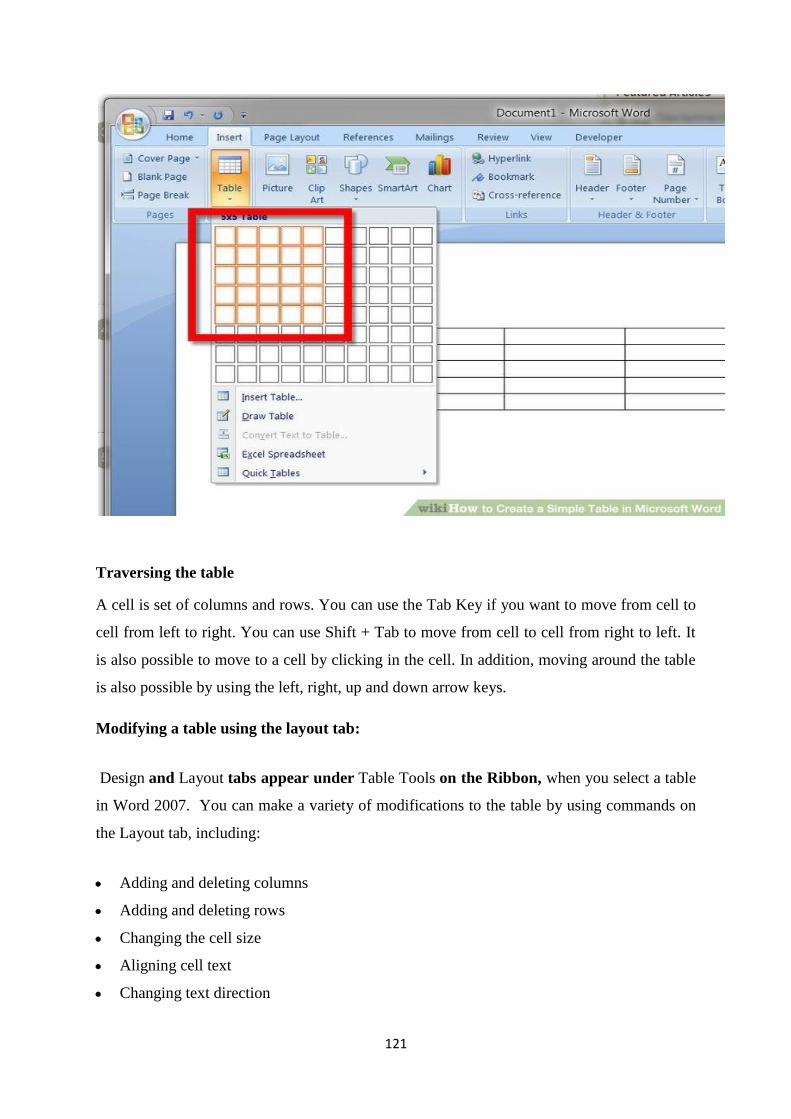
121
Traversing the table
A cell is set of columns and rows. You can use the Tab Key if you want to move from cell to
cell from left to right. You can use Shift + Tab to move from cell to cell from right to left. It
is also possible to move to a cell by clicking in the cell. In addition, moving around the table
is also possible by using the left, right, up and down arrow keys.
Modifying a table using the layout tab:
Design and Layout tabs appear under Table Tools on the Ribbon, when you select a table
in Word 2007. You can make a variety of modifications to the table by using commands on
the Layout tab, including:
Adding and deleting columns
Adding and deleting rows
Changing the cell size
Aligning cell text
Changing text direction
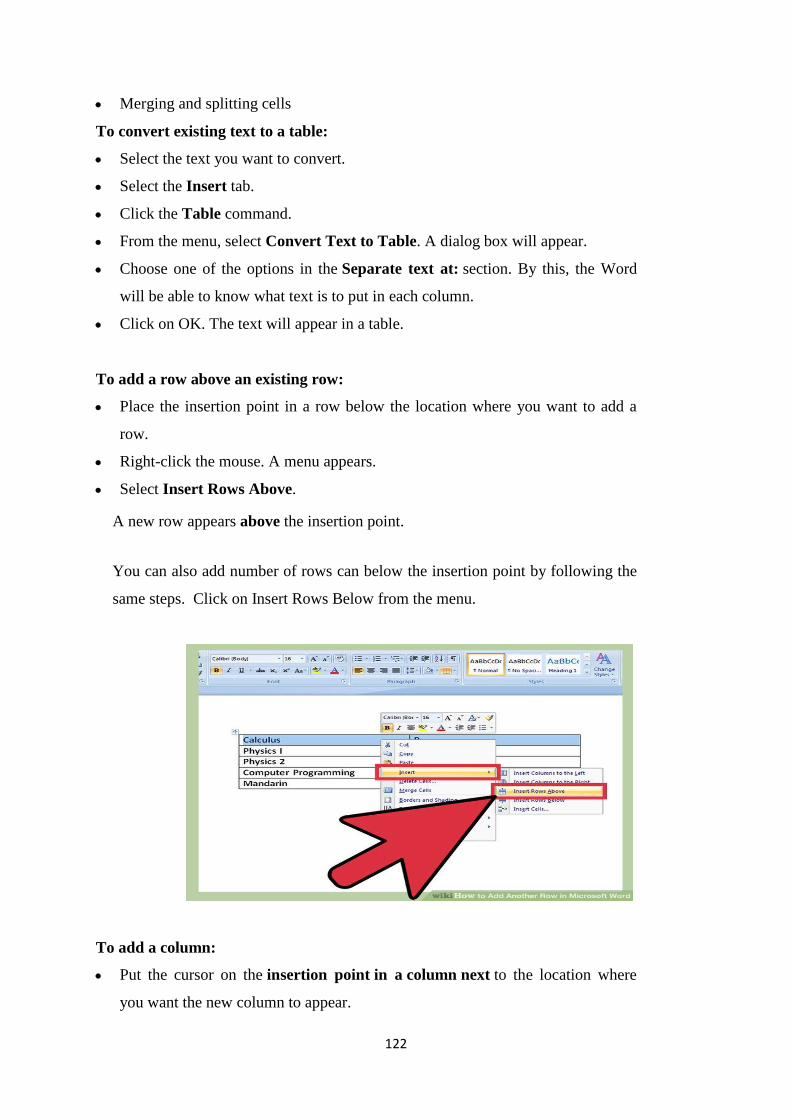
122
Merging and splitting cells
To convert existing text to a table:
Select the text you want to convert.
Select the Insert tab.
Click the Table command.
From the menu, select Convert Text to Table. A dialog box will appear.
Choose one of the options in the Separate text at: section. By this, the Word
will be able to know what text is to put in each column.
Click on OK. The text will appear in a table.
To add a row above an existing row:
Place the insertion point in a row below the location where you want to add a
row.
Right-click the mouse. A menu appears.
Select Insert Rows Above.
A new row appears above the insertion point.
You can also add number of rows can below the insertion point by following the
same steps. Click on Insert Rows Below from the menu.
To add a column:
Put the cursor on the insertion point in a column next to the location where
you want the new column to appear.

123
Right-click the mouse. A menu appears.
Select Insert. Insert Columns to the Left or Insert Columns to the Right. A
new column will appear.
To delete a row or column:
Select the row or column.
Right-click your mouse and a menu appears.
Select Delete Columns or Delete Rows.
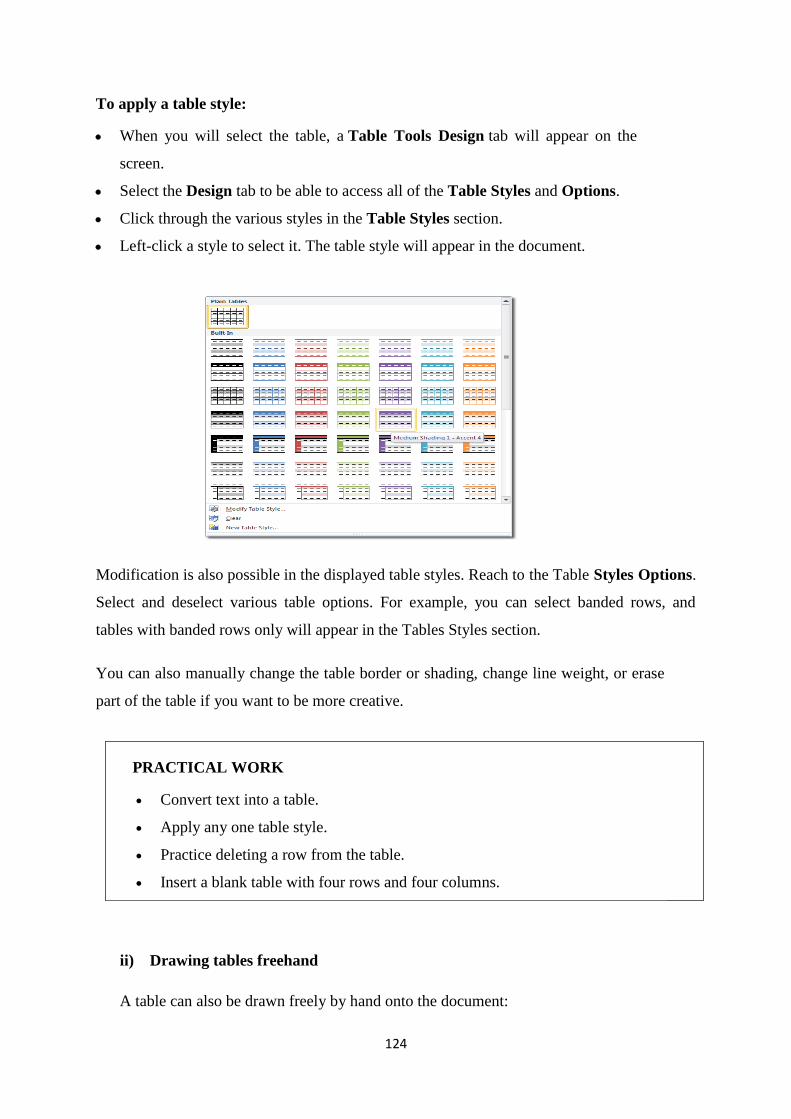
124
To apply a table style:
When you will select the table, a Table Tools Design tab will appear on the
screen.
Select the Design tab to be able to access all of the Table Styles and Options.
Click through the various styles in the Table Styles section.
Left-click a style to select it. The table style will appear in the document.
Modification is also possible in the displayed table styles. Reach to the Table Styles Options.
Select and deselect various table options. For example, you can select banded rows, and
tables with banded rows only will appear in the Tables Styles section.
You can also manually change the table border or shading, change line weight, or erase
part of the table if you want to be more creative.
PRACTICAL WORK
Convert text into a table.
Apply any one table style.
Practice deleting a row from the table.
Insert a blank table with four rows and four columns.
ii) Drawing tables freehand
A table can also be drawn freely by hand onto the document:

125
1. Draw the table by selecting the Draw Table option from the Table menu. The cursor is
now the image of a pencil and the Table‟s and Border‟s toolbar appears.
2. Draw the cells of the table with the mouse. Click the Eraser button and drag the
mouse over the area to be deleted if you want to correct/alter the table.
3. To draw more cells, click on the Draw Table button.
6.15.6 Adding header and footer
You can make your document look professional and polished by utilizing the header
and footer sections. By header, we mean a section of the document which appears in
the top margin, while by footer we mean a section of the document that appears in
the bottom of the margin. Headers and footers generally contain information such as
page number, date, and document name.
To insert a header or footer:
Select the Insert tab.
Click either the Header or Footer command. A menu appears with a list
of built-in options you can use.
With the left-click on the built-in options, it will appear in the document.
OR
Left-click on the Blank to select it.
The Design tab with Header and Footer tools will be active.
Type the required information into the header or footer.

126
To insert the date or time into a header or footer:
You can also click on the Date & Time command when the header or footer
section is active.
Select a date format in the dialog box that appears.
Click on OK. The date and time will appear in the document.
Other header and footer options
You can also design these sections of the document with various other header and footer
options available. You can see all of your design options from the Header and Footer
Tools Design tab.
ii) Adding Footnotes and Endnotes
Footnotes and Endnotes are used to explain, comment, or provide references for text in a
document. Footnotes are used for detailed comments and Endnotes for citation of sources.
Footnotes are placed at the end of each page by default and Endnotes at the end of the
document. This placement is however changeable. A footnote or an endnote has two parts-
the note reference mark and the corresponding note text. You can add note text of any length
and format note text just like any other text. To insert Footnotes/ Endnotes perform the
following steps:
1) In the Print Layout view, click the point where the note reference mark is to be inserted.
2) Choose the Reference option from the Insert menu.
3) Choose the Footnote option.
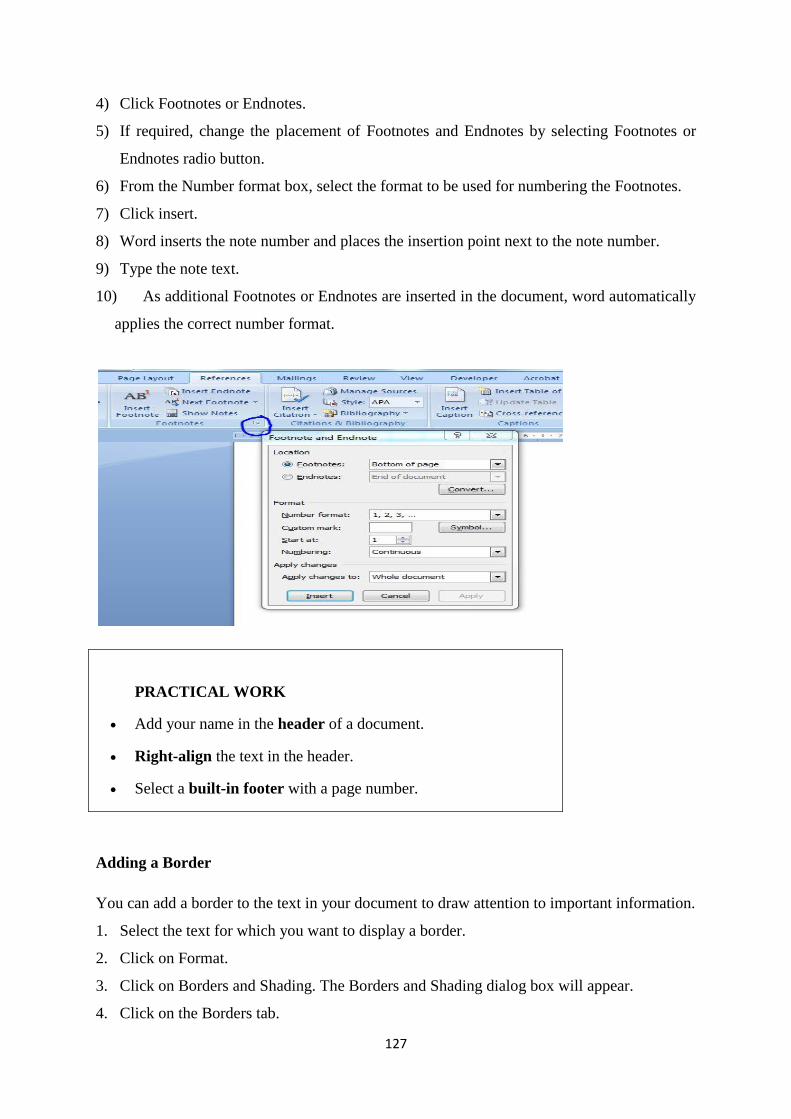
127
4) Click Footnotes or Endnotes.
5) If required, change the placement of Footnotes and Endnotes by selecting Footnotes or
Endnotes radio button.
6) From the Number format box, select the format to be used for numbering the Footnotes.
7) Click insert.
8) Word inserts the note number and places the insertion point next to the note number.
9) Type the note text.
10) As additional Footnotes or Endnotes are inserted in the document, word automatically
applies the correct number format.
PRACTICAL WORK
Add your name in the header of a document.
Right-align the text in the header.
Select a built-in footer with a page number.
Adding a Border
You can add a border to the text in your document to draw attention to important information.
1. Select the text for which you want to display a border.
2. Click on Format.
3. Click on Borders and Shading. The Borders and Shading dialog box will appear.
4. Click on the Borders tab.
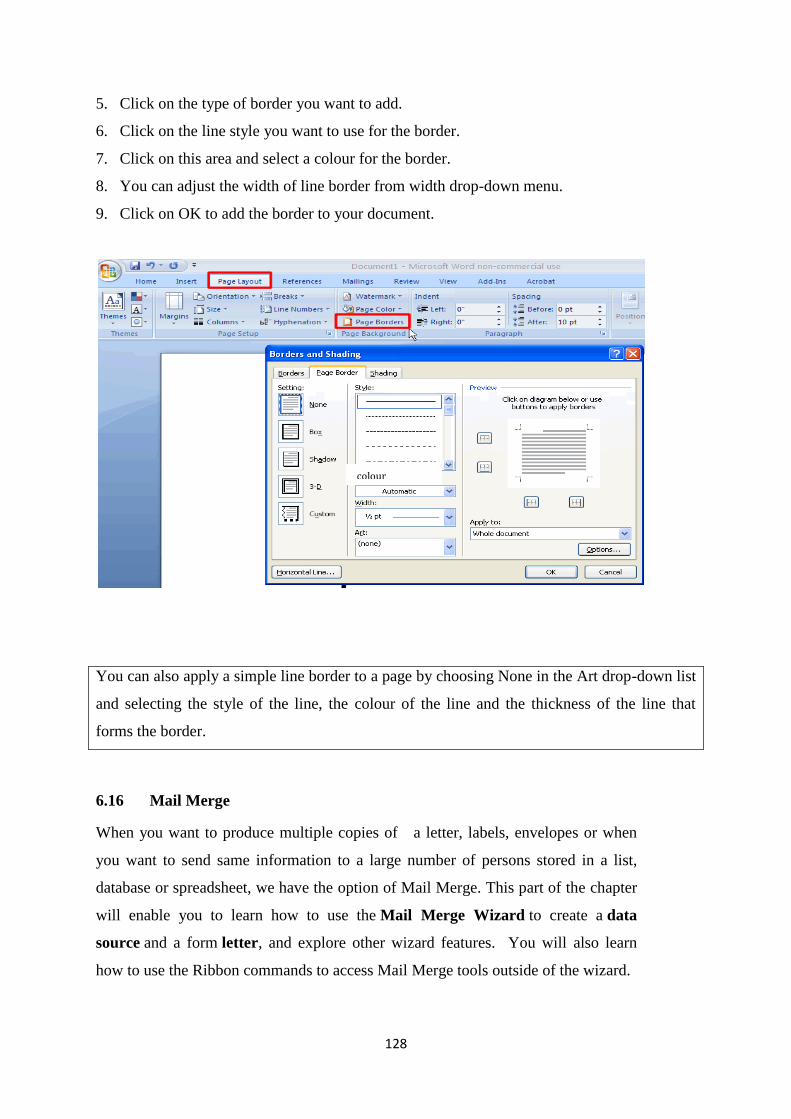
128
5. Click on the type of border you want to add.
6. Click on the line style you want to use for the border.
7. Click on this area and select a colour for the border.
8. You can adjust the width of line border from width drop-down menu.
9. Click on OK to add the border to your document.
You can also apply a simple line border to a page by choosing None in the Art drop-down list
and selecting the style of the line, the colour of the line and the thickness of the line that
forms the border.
6.16 Mail Merge
When you want to produce multiple copies of a letter, labels, envelopes or when
you want to send same information to a large number of persons stored in a list,
database or spreadsheet, we have the option of Mail Merge. This part of the chapter
will enable you to learn how to use the Mail Merge Wizard to create a data
source and a form letter, and explore other wizard features. You will also learn
how to use the Ribbon commands to access Mail Merge tools outside of the wizard.
colour
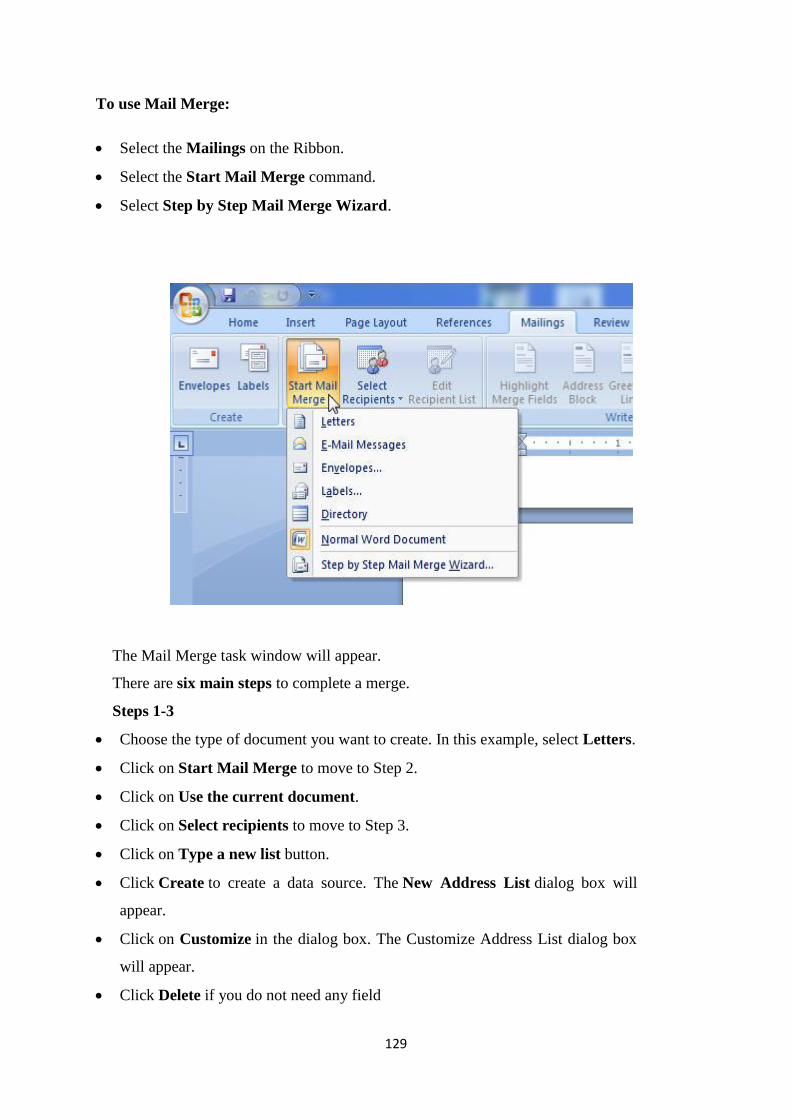
129
To use Mail Merge:
Select the Mailings on the Ribbon.
Select the Start Mail Merge command.
Select Step by Step Mail Merge Wizard.
The Mail Merge task window will appear.
There are six main steps to complete a merge.
Steps 1-3
Choose the type of document you want to create. In this example, select Letters.
Click on Start Mail Merge to move to Step 2.
Click on Use the current document.
Click on Select recipients to move to Step 3.
Click on Type a new list button.
Click Create to create a data source. The New Address List dialog box will
appear.
Click on Customize in the dialog box. The Customize Address List dialog box
will appear.
Click Delete if you do not need any field

130
Click on Yes to confirm if you want to delete any field.
Click on Add. The Add Field dialog box will appear.
Enter the new field name.
Click on OK.
Continue to add any fields necessary.
Click on OK to close the Customize Address List dialog box.
To customize the new address list:
Make the entry of necessary data in the New Address List dialog box.
Click on New Entry to enter another record.
Click on Close when you have entered all of your data records.
Enter the file name you want to save in the data list.
Select the location where you want to save the file.
Click on Save. The Mail Merge Recipients dialog box will appear and will
display all the data recorded in the list.
Confirm that the data list is correct, and click OK.
Click on Write your letter to move to Step 4.
Steps 4-6
Type a letter in the Word document, or use an open existing document.
To insert recipient data from the list:
Bring the cursor to the point in the document where you want the
information to appear.
Select Address block, Greeting line, or Electronic postage from the
task pane. A dialog box with options will appear based on your
selection.
OR
Select More Items. The Insert Merge Field dialog box will appear.
Select the area you want to insert in the document.
Click Insert. Notice that a placeholder appears where information from the
data record will eventually appear.
Repeat these steps each time you need to enter information from your data
record.
131
Click on Preview of letters in the task pane once you have completed your
letter.
Preview the letters to make sure the information from the data record appears
correctly in the letter.
Click on Complete the merge.
Click on Print to print the documents
Click on OK in the Merge to Printer dialog box.
Click on OK to send the letters to the printer.
The Mail Merge Wizard allows you to complete the merge process in a variety of ways.
You can practice different functions in Mail Merge to have a command on this function
on document, letters, labels and envelopes using the different types of data sources.
The best way to learn how to use the different functions in Mail Merge is to try to
develop several of the different documents-letters, labels, and envelopes-using the
different types of data sources.
PRACTICAL WORK
Open a new blank Word document.
Open the Mail Merge task pane.
Prepare a data list, and practice adding and removing fields.
Explore the different Mail Merge features until you are familiar with them.
6.17 An Overview of MS-Word
MS- Word is powerful word-processing software consisting of many features. It has become
an integral components of MS-Office; the office applications suite, and is increasingly
becoming available only in this form, rather than as a stand-alone program. It is used to create
documents and provides the options to edit and format the text that we type. Using MS-Word,
we can create, revise, print and record documents for future use. It not only provides many
built-in features to enhance the look of a document but also performs a variety of useful and
tedious tasks automatically. Using MS-Word, we can do the following:
Type and edit text.
Format text in various font styles, colours and sizes.

132
Check for spelling and grammatical errors.
Get help with language through the built-in thesaurus.
Insert symbols, tables, images, hyperlinks, etc.
Make Bulleted and Numbered lists.
Format the text in various ways, like adding custom borders and shading to a document.
Print mailers and envelopes in bulk using the Mail Merge Wizard.
Create different types of documents like resumes, agendas, pamphlets, etc., using the
built-in template.
Print multiple copies of a document in various styles and many more things.
Points to Remember
Microsoft Word is a word (text) processing or documentation software used for
creating, editing, formatting and printing text such as letters, essays, reports, memos,
catalogues, newsletters etc.
Some of the most useful features of Word are editing, formatting, find and replace and
spell check.
Editing involves changing the content of a document. This may be accomplished
using features like cut, copy and paste features.
Text can be moved from one location to another using Cut and Paste operations.
Text can be copies using Copy and Paste operations.
Formatting involves changing the appearance of the document using features like
changing font type, style and size.
Saving a file transfers the document from memory to a storage medium such as hard
disk or pen drive.
Find and Replace feature can be used to locate multiple occurrences of a word or
phrase (even special characters and formats) in a document and replace them with
alternate words and phrases.
Word allows aligning text and paragraphs in four ways namely – left, right, center and
justified.
Auto Correct feature is used to correct common spelling errors as the text is being
typed.
Auto Format feature is used to automatically apply formatting to the text being typed.
Tab Stops are defined as a position set for placing and aligning text on a page.
133
Indenting allows the user to set off a paragraph from other text.
Bulleted or Numbered lists can be easily created using the Bullets and Numbering
feature.
Pages can be formatted by changing the paper size, orientation or by adding headers
and footers.
Footnote is an explanation or reference to other material, printed at the end of a
document.
The Spelling and Grammar check feature may be used to proofread documents for
grammatical and spelling errors.
Thesaurus can be used to look up synonyms and word meanings as and when
required.
Tables are a way of organizing information into rows and columns. Word also allows
the user to draw customized tables.
QUICK GLIMPSE OF
Office Ribbon
The Ribbon has replaced the traditional menus which were present in the previous versions
of MS Office. The Ribbon commands are organized into tabs that group related commands
together. The Ribbon has three parts: Tabs, Groups and Commands.
Tabs: Tabs are placed at the top of the Ribbon. Each Tab represents core tasks we do in a
given program.
Groups: Groups are sets of related commands.
Commands: Commands are arranged in groups. A command can be a button, a menu, or a
box where you enter information.
For example, the Home tab contains the commonly used commands for writing documents:
font formatting commands (Font group), Paragraph options (Paragraph group), and text
styles (Styles group).

134
File Tab
The Office Button in MS Office 2007 has been replaced by the File tab in the newer versions
(Office 2010 onwards). On clicking the File tab, the same basic commands which were
available in older versions of Office are displayed along with some new commands.
Quick Access Toolbar
You can easily add the commands of your choice to the Quick Access Toolbar.
The Quick Access Toolbar is located above the Ribbon, on top of File tab. The commands
placed on the Quick Access Toolbar are always visible on the screen.
New Keyboard Shortcuts
There are shortcuts, also called Key Tips, for every single button on the Ribbon. Press Alt
key to make the key tips display.
Common Keys of MS- Office
CTRL+N To open a new document
CTRL+O Open a document
CTRL+W Close a document
CTRL+S Save a document
CTRL+F Find Text
CTRL+H Replace Text
CTRL+G Go to a page
CTRL+Z Undo last action
CTRL+Y Redo or repeat last action
CTRL+P Print a document
CTRL+E Center align a paragraph
CTRL+J Justify align a paragraph
CTRL+L Left align a paragraph
CTRL+R Right align a paragraph

135
Review Questions:
1. What is the Thesaurus used for?
2. What is the difference between Auto Text and Auto Correct?
3. You have typed a document and you want to check the spelling mistakes. What would
you do?
4. What is the system of adding a new row in a table?
5. What are Headers and Footers? What are they used for?
6. How manual page break can be inserted in a document?
7. Write any three table properties and how they can be changed?
8. How can we add a new row in a table?
9. Write the steps if we have to add a new column in a table.
10. Define the following:
a) Inserting a Picture
b) Adding a Border
c) Document Properties
d) Inserting Date and Time