Embed Size (px)
Citation preview

TYPO3 4.3 Multimedia Cookbook
Dan Osipov
Chapter No. 4"Rendering Images"

For More Information: www.PacktPub.com/typo3-4-3-multimedia-cookbook/book
In this package, you will find:A Biography of the author of the book
A preview chapter from the book, Chapter NO.4 "Rendering Images"
A synopsis of the book’s content
Information on where to buy this book
About the AuthorDan Osipov has over 12 years of web development, graphic design, as well as systemarchitecture and application development experience. He has worked on variousmultipurpose sites, including e-commerce, educational, informational, and dynamic newssites. For the last 4 years, he has worked in the media industry, designing and maintainingan online presence for journals and newspapers.
At the moment of writing, Dan was employed at Calkins Media, where he worked onusing TYPO3 as the CMS system powering high traffic, dynamic news sites, likephillyBrubs. com and Timesonline.com. He is also a member of the Digital AssetManagement team, focused on the development of the DAM extension for TYPO3.
I would like to thank the Phillyburbs team, as their needs served as aninspiration for a lot of the material in this book. I would like to thank theTYPO3 community at large for "inspiring people to share". Last, but notleast, I would like to thank my family for their understanding and support.

For More Information: www.PacktPub.com/typo3-4-3-multimedia-cookbook/book
TYPO3 4.3 Multimedia CookbookTYPO3 is one of the world's leading open source content management systems, writtenin PHP, which can be used to create and customize your website. Along with text content,you can display high quality images, audio, and video to your site's visitors by usingTYPO3. It is essential to manage various types of multimedia files in contentmanagement systems for both editors and the users on the frontend of the site.
This book gives you the step-by-step process for organizing an effective multimediasystem. It also gives solutions to commonly encountered problems, and offers a variety oftools for dealing with multimedia content. The author's experience in large-scale systemsenables him to share his effective solutions to these problems.
What This Book CoversChapter 1, Getting Started introduces the reader to TYPO3, and helps set up a basicwebsite; where the material in this chapter alone is not enough, the user is directed toother resources to fill in the gaps of knowledge in order to proceed further.
Chapter 2, Managing Digital Assets introduces the reader to the concept of digital assetmanagement. Accounts for various groups of users (editors, administrators, web users)are created and assigned permissions. We also create a first extension that allows webusers to upload files into the system.
Chapter 3, Operating with Metadata in Media Files expands upon the digital assetmanagement idea, and cover file metadata, which can be used to classify files. Thechapter covers various types and formats of metadata, and how it can beextracted in TYPO3.
Chapter 4, Rendering Images covers how images can be included on a TYPO3-drivenwebsite using content elements and a TYPO3 script. It also covers how to embed imagesin Rich Text Editor. You will learn to render links to media fi les, create a gallery, andrender metadata using a DAM object.
Chapter 5, Rendering Video and Audio explains how you will render audio and videousing media content object, TypoScript Object, content elements, and rgmediaimagesextension. You will play video using a custom media player and Flash Media Server. Wewill also create new plugins for rendering audio files.

For More Information: www.PacktPub.com/typo3-4-3-multimedia-cookbook/book
Chapter 6, Connecting to External APIs shows how external services, specificallyAmazon S3, Flickr, and YouTube, can be leveraged to expand the system. We pullin files from YouTube and Flickr. We also use Amazon S3 to provide us withlimitless storage.
Chapter 7, Creating Services covers services and hooks—powerful concepts in TYPO3,which allow individual sites to add different processing capabilities depending on thesystem. We use services to parse metadata, and convert files.
Chapter 8, Automating Processes describes how some processes and workflowscould be automated; making the computer do all the hard work, while the editor overseesthe process.
For More Information: www.PacktPub.com/typo3-4-3-multimedia-cookbook/book
4Rendering Images
In this chapter, we will cover:
Rendering images using content elements
Embedding images in RTE
Rendering images using TypoScript
Rendering links to fi les using the <media> tags
Creating a gallery using ce_gallery
Rendering metadata from a DAM object

For More Information: www.PacktPub.com/typo3-4-3-multimedia-cookbook/book
Rendering Images
70
Rendering images using content elements Content elements offer a variety of ways for editors to include images. We will examine these here. Here is a typical selection menu that editor is presented with:
A great way to start is to assemble pages from the Regular text element and the Text with image elements.
Getting readyMake sure Content (default) is selected in Include static, and the CSS Styled Content template is included in the Include static (from extensions) fi eld of the template record of the current page or any page above it in the hierarchy (page tree). To verify, go to the Template module, select the appropriate page, and click edit the whole template record.

For More Information: www.PacktPub.com/typo3-4-3-multimedia-cookbook/book
Chapter 4
71
How to do it...1. Create the Text with image element.
2. Under the Text tab, enter the text you want to appear on the page.
You can use the RTE (Rich Text Editor) to apply formatting, or disable it. We will cover RTE in more detail later in this chapter.
3. Under the Media tab, select your image settings. If you want to upload the image, use the fi rst fi eld. If you want to use an existing image, use the second fi eld.
4. Under Position, you are able to select where the image will appear in relation to the text.

For More Information: www.PacktPub.com/typo3-4-3-multimedia-cookbook/book
Rendering Images
72
How it works...When the page is rendered in the frontend, the images will be placed next to the text you entered, in the position that you specify. The specifi c look will depend on the template that you are using.
There's more...An alternative to the Text with images is an Images only content element. This element gives you similar options, except limits the options to just a display of images. The rest of the options are the same.
You can also resize the image, add caption, alt tags for accessibility and search engine optimization, and change default processing options. See the offi cial TYPO3 documentation for details of how these fi elds work, (http://typo3.org/documentation/document-library/).
See also
Render video and audio using content elements and rgmediaimages extension
Embedding images in RTE Rich Text Editor is great for text entry. By default, TYPO3 ships with htmlArea RTE as a system extension. Other editors are available, and can be installed if needed.
Images can be embedded and manipulated within the RTE. This provides one place for content editors to use in order to arrange content how they want it to appear at the frontend of the site. In this recipe, we will see how this can be accomplished. The instructions apply to all forms that have RTE-enabled fi elds, but we will use the text content element for a simple demonstration.

For More Information: www.PacktPub.com/typo3-4-3-multimedia-cookbook/book
Chapter 4
73
Getting readyIn the Extension Manager, click on htmlArea RTE extension to bring up its options. Make sure that the Enable images in the RTE [enableImages] setting is enabled. If you have a recent version of DAM installed (at least 1.1.0), make sure that the Enable the DAM media browser [enableDAMBrowser] setting is unchecked. This setting is deprecated, and is there for installations using older versions of DAM.
How to do it...1. Create a new Regular text element content element.
2. In the RTE, click on the icon to insert an image as shown in the following screenshot:
3. Choose a fi le, and click on the icon to insert it into the Text area. You should see the image as it will appear at the frontend of the site.

For More Information: www.PacktPub.com/typo3-4-3-multimedia-cookbook/book
Rendering Images
74
4. Save and preview. The output should appear similar to the following screenshot:
How it works... When you insert an image through the RTE, the image is copied to uploads folder, and included from there. The new fi le will be resampled and sized down, so, it usually occupies less space and is downloaded faster than the original fi le. TYPO3 will automatically determine if the original fi le has changed, and update the fi le used in the RTE—but you should still be aware of this behaviour.
Furthermore, if you have DAM installed, and you have included an image from DAM, you can see the updated record usage. If you view the record information, you should see the Content Element where the image is used:

For More Information: www.PacktPub.com/typo3-4-3-multimedia-cookbook/book
Chapter 4
75
There's more...There are a few other things you can do in RTE with the images. We will cover:
Other modes of inclusion
Resizing images
Setting maximum dimensions of images
Using TinyMCE for embedding images
Other modes of inclusion When you bring up the Insert Image wizard, it has three or more tabs (depending on the extensions you have installed). We've included the image using the default New Magic Image tab. Let's see what the other tabs do.
New Plain Image Plain image inserts the image directly, without creating a copy. If you resize the image in RTE, it will be resized in HTML, but the original fi le will stay intact. This is different from the resampling behaviour of the Magic Image.
Drag 'n' Drop Drag 'n' Drop allows you to choose an image in the wizard, and drag it into the RTE. Once you release the mouse button, the image will be inserted into text where your cursor was placed.
UploadUpload tab appears if you have the DAM extension installed. The tab provides a convenient place to upload images to the server, and include them in the RTE right away, without a need to browse to other modules. This wizard is DAM compatible, so any fi les that are uploaded will be indexed by the DAM.

For More Information: www.PacktPub.com/typo3-4-3-multimedia-cookbook/book
Rendering Images
76
Current Image If you select an image in the RTE, and then click on the Insert Image button, you will get the Insert Image wizard with a new tab—Current Image. Here, you can modify some image properties, or replace the image using the other tabs.
Resizing images Images can be resized easily within the RTE. To resize an image, click on it, then click and drag one of the corners, or a side to size the image down or up:

For More Information: www.PacktPub.com/typo3-4-3-multimedia-cookbook/book
Chapter 4
77
Setting maximum dimensions of images You can set maximum dimension constraints for all the images added to the RTE. To do so, add the following to Page TSconfig:
RTE.default.buttons.image.options.magic.maxWidth = 640RTE.default.buttons.image.options.magic.maxHeight = 480
Using TinyMCE for embedding images Another popular RTE that TYPO3 supports is TinyMCE. It can be enabled by uninstalling rtehtmlarea and installing the tinyrte extension. Although the interface looks different, the possibilities for image embedding are the same. You can click a button in the toolbar, which brings up a popup window allowing you to select the image you want—as shown in the following screenshots:

For More Information: www.PacktPub.com/typo3-4-3-multimedia-cookbook/book
Rendering Images
78
Rendering images using TypoScript All the content objects available can be created using TypoScript. We will look at the IMAGE content object . Despite its simplicity, there are various situations, in which it is useful. For example, you might need to render an image on several pages, but don't want to include it in the template because it is dynamic. Using TypoScript, you can use conditionals to control which image is rendered, wrap the image in a link, and more. Here, we will fi rst create a simple image, and then see what other options can be given.
How to do it...1. Modify the template on any page.
2. Add the following code to the setup fi eld, substituting page.12 with the path to the object or marker where you want the image to appear:
page.12 = IMAGEpage.12 { file = fileadmin/image.jpg
}
3. Save, clear cache (if necessary), and preview the page.
How it works... Content objects take certain parameters as an input, and provide HTML as output. In this case, the input is just a path to a fi le, but it could be more involved—for examples, see the There's more... section.
Check the chapter in TSRef about IMAGE object: http://typo3.org/documentation/document-library/references/doc_core_tsref/4.3.0/view/1/7/#id2519243.
There's more...There are more options besides fi le that can be passed to the object.

For More Information: www.PacktPub.com/typo3-4-3-multimedia-cookbook/book
Chapter 4
79
Adding alternative text to images Alternative text (alt tag) can be added to the image using:
page.12.altText = Alternative text
Likewise, a title tag can be added simply by:
page.12.titleText = Title text
Of course, the values don't have to be hardcoded in, but can come from anywhere in the system by applying stdWrap properties.
Wrapping the image in a link One useful option is having the image as a link. This can be easily done using stdWrap:
page.12.stdWrap.typolink { parameter.data = 123 }
where 123 is the page ID that you want to link to.
Executing from an extension Much like the media object, covered in Chapter 5 the IMAGE object can be created from an extension, using the following code:
$cObj->cImage($file, $conf);
Here, $file is the path to the fi le (which will be resolved by TYPO3, and converted or resized if necessary) and $conf is the confi guration array for the image object.
See also
Rendering audio and video using media TypoScript object
Rendering links to fi les using <media> tags Imagine, for a second, a dark world of web development without content management systems. You have a simple website with some text and links to fi les to be downloaded. Now, imagine that you need to move the fi les into a different folder. You would have to go through each page, and update the links to point to the new location of the fi le.

For More Information: www.PacktPub.com/typo3-4-3-multimedia-cookbook/book
Rendering Images
80
In DAM, the physical fi le is separate from the record describing the fi le. Thanks to this separation, the pages can link to the DAM record, instead of the physical fi le. If the fi le is moved, only the DAM record will need to be updated (which happens automatically if you move the fi le within DAM modules), and all links will automatically update. We will now explore how the <media> HTML tag can be used to take advantage of this feature.
Getting readyMake sure both DAM and htmlArea RTE extensions are installed. In the Extension Manager click on the DAM extension to get an overview of enable confi guration. Make sure that the media tag option is enabled.
How to do it...1. Create a new Regular text element on a page.
2. Enter the HTML mode in the RTE:
3. Type in <media 1234>Link text</media>, replacing 1234 with the UID of the DAM record, and link the text with the text you want to appear inside the link.

For More Information: www.PacktPub.com/typo3-4-3-multimedia-cookbook/book
Chapter 4
81
You can fi nd the UID of the record in the information panel.
4. Save and preview.
How it works... The advantage of the <media> tag is that instead of linking to a fi le, you're linking to a DAM record. The record, in turn, points to the physical fi le—so if you move the fi les around, all links will be updated automatically.
There's more...It may be possible that after enabling all the options in the Extension Manager, the <media> tags are encoded by RTE, and appear in the frontend unparsed. In that case, you need to enter the following options in Page TSconfig:
// Add txdam_media to RTE processing rulesRTE.default.proc.overruleMode = ts_css,txdam_media
// Use same RTE processing rules in FERTE.default.FE.proc.overruleMode = ts_css,txdam_media
// RTE processing rules for bodytext column of tt_content tableRTE.config.tt_content.bodytext.proc.overruleMode = ts_css,txdam_mediaRTE.config.tt_content.bodytext.types.text.proc.overruleMode = ts_css,txdam_mediaRTE.config.tt_content.bodytext.types.textpic.proc.overruleMode = ts_css,txdam_media

For More Information: www.PacktPub.com/typo3-4-3-multimedia-cookbook/book
Rendering Images
82
Accessing Page TSconfi g To access Page TSconfig, right-click on a page in the page tree, and choose Edit page properties:
Alternatively, you can browse to the page in the Page module, and click the Edit page properties button either in the module body, or in the docheader —the bar across the top of the module housing the control buttons.
From there, the Page TSConfig is available under the Options tab:

For More Information: www.PacktPub.com/typo3-4-3-multimedia-cookbook/book
Chapter 4
83
Creating a gallery using ce_gallery There are multiple galleries available for TYPO3. Each has its own advantages, and an entire book can be dedicated to comparing the various extensions. We will install and confi gure only one as an example. ce_gallery has an advantage that it is very easy to set up and customize, and relies completely on DAM for content and organization.
Getting ready Make sure you have the extensions DAM and dam_catedit installed. Create a root category, and a few categories under it. Assign a few JPG images to each category. Refer to the Chapter 2 recipe Setting up a category tree for more information about categories.
How to do it...1. Install ce_gallery. Accept database and fi lesystem changes.
2. In a template record, include the static template Photogallery (CSS) (ce_gallery).
3. Add a Plugin content element of type Photogallery to a page
4. In the General tab, uncheck the Slimbox (pmkslimbox needed) checkbox.
5. In the Categories tab, select the root category and check the box that says Recursive:
For More Information: www.PacktPub.com/typo3-4-3-multimedia-cookbook/book
Rendering Images
84
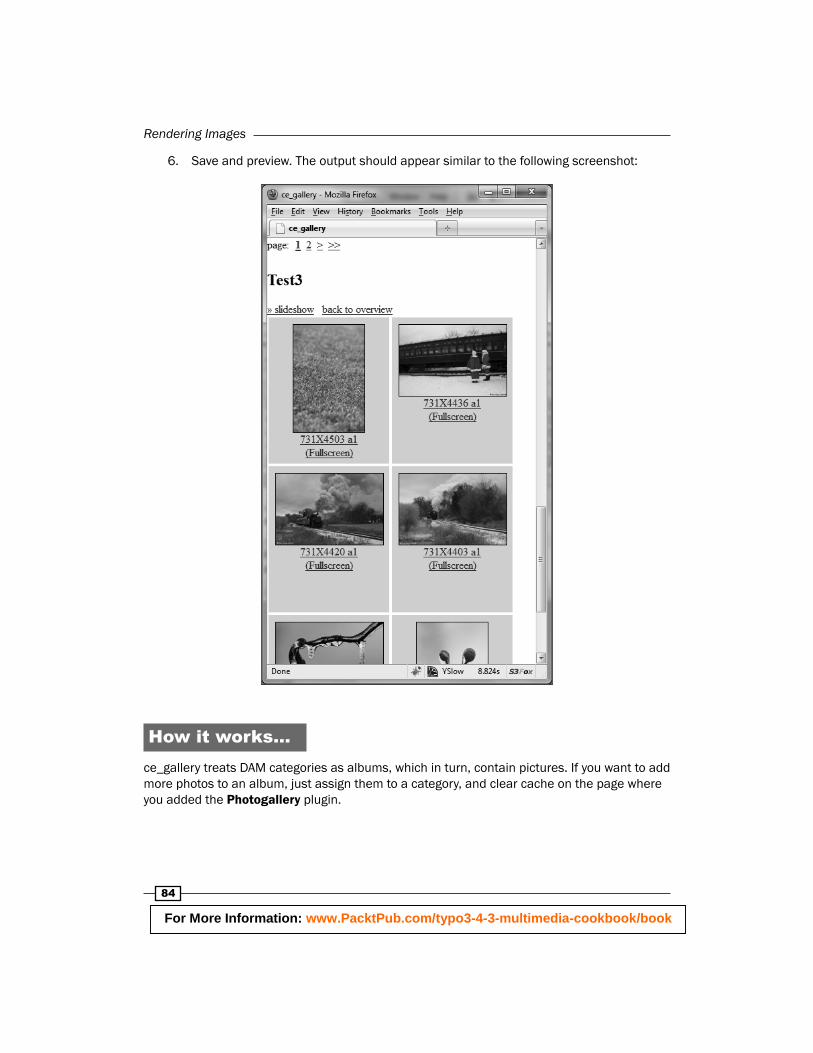
6. Save and preview. The output should appear similar to the following screenshot:
How it works... ce_gallery treats DAM categories as albums, which in turn, contain pictures. If you want to add more photos to an album, just assign them to a category, and clear cache on the page where you added the Photogallery plugin.

For More Information: www.PacktPub.com/typo3-4-3-multimedia-cookbook/book
Chapter 4
85
There's more...In this section, we will see how to use Slimbox for displaying images and utilize batch process while creating a gallery.
Using Slimbox for displaying images To make use of the Slimbox, you need to install the extension pmkslimbox . Once it is installed, include the static template it provides in the page template. When this is done, edit the Photogallery content element, and check the Slimbox (pmkslimbox needed) checkbox that we had unchecked earlier. Now, instead of linking to another page to display the image, the image will be loaded into the same page using AJAX. For example, this is how your image will look when someone clicks on the thumbnail:
Utilizing batch processing If you have several photos that you want to assign to a category, you can use DAM's batch operations. Here is what you can do:

For More Information: www.PacktPub.com/typo3-4-3-multimedia-cookbook/book
Rendering Images
86
Build your selection: You can use the various controls provided by DAM to choose fi les from multiple folders, of different types, or you can even search the metadata.
Once you have the selection built, select Process from the submodule selector. Under the Categories fi eld, select the category you want to add the objects to. If the objects are assigned to other categories, and you don't want to lose that connection, check the box next to the Categories fi eld, and the new category will be added to whatever categories the objects are already assigned to. Click Process when you're done.

For More Information: www.PacktPub.com/typo3-4-3-multimedia-cookbook/book
Chapter 4
87
See also
Setting up a category tree
Rendering metadata from a DAM object We'll use some very basic TypoScript and see how metadata stored in DAM records can be rendered on a page, along with the media objects, or even in them. This is commonly used for inserting accessibility tags (alt and title) into images.
How to do it...1. Create a Template on the page.
2. In the setup fi eld, add the following, replacing page.17 with a path to the object you want to place the content in, and replacing 1234 with the UID for a DAM record, whose caption you would like to display:
page.17 = TEXTpage.17.data = DB:tx_dam:1234:caption
3. Save and preview.
How it works... Data property is available wherever stdWrap is applied. So, you can display any of the metadata available in the DAM record, almost anywhere. Furthermore, because stdWrap properties are recursive, you can apply further processing to the values.
For more information about stdWrap, see the section of TSRef: http://typo3.org/documentation/document-library/references/doc_core_tsref/4.3.0/view/1/5/#id2360021.
In this case, we are using the data property to fetch a record from the database. The syntax for doing so is DB:table:UID:field. So, in the example above, we are taking the caption fi eld of record with the UID 1234 from tx_dam table.
Refer to ext_tables.sql in the extension directory for a complete database schema.

For More Information: www.PacktPub.com/typo3-4-3-multimedia-cookbook/book
Rendering Images
88
TypoScript is extremely powerful, so you should read into the details to see what else you can do with it.
There's more...We can use this method to add a caption to an image, added through TypoScript.
page.16 = IMAGEpage.16.altText.data = DB:tx_dam:1585:caption
See also
Rendering images using TypoScript

For More Information: www.PacktPub.com/typo3-4-3-multimedia-cookbook/book
Where to buy this bookYou can buy TYPO3 4.3 Multimedia Cookbook from the Packt Publishing website:http://www.packtpub.com/typo3-4-3-multimedia-cookbook/book.
Free shipping to the US, UK, Europe and selected Asian countries. For more information, pleaseread our shipping policy.
Alternatively, you can buy the book from Amazon, BN.com, Computer Manuals andmost internet book retailers.
www.PacktPub.com


![Typo3 Tutorial - NDSU · Typo3 Tutorial – Overview – Typo3 Module [ Page 8 ] Last modified 01/11/2007 Figure 5 - TYPO3 context menu. You can access your content information to](https://img.pdfslide.us/doc/110x75/5ad0b5877f8b9a8b1e8e3707/typo3-tutorial-ndsu-tutorial-overview-typo3-module-page-8-last-modified.jpg)