Embed Size (px)
Citation preview
2 pocket roll plant master (RevC-2 18 21-08-18 Safety Switch) FROM AUGUST 2018 on
Please store this document safely and ensure it is available at all times
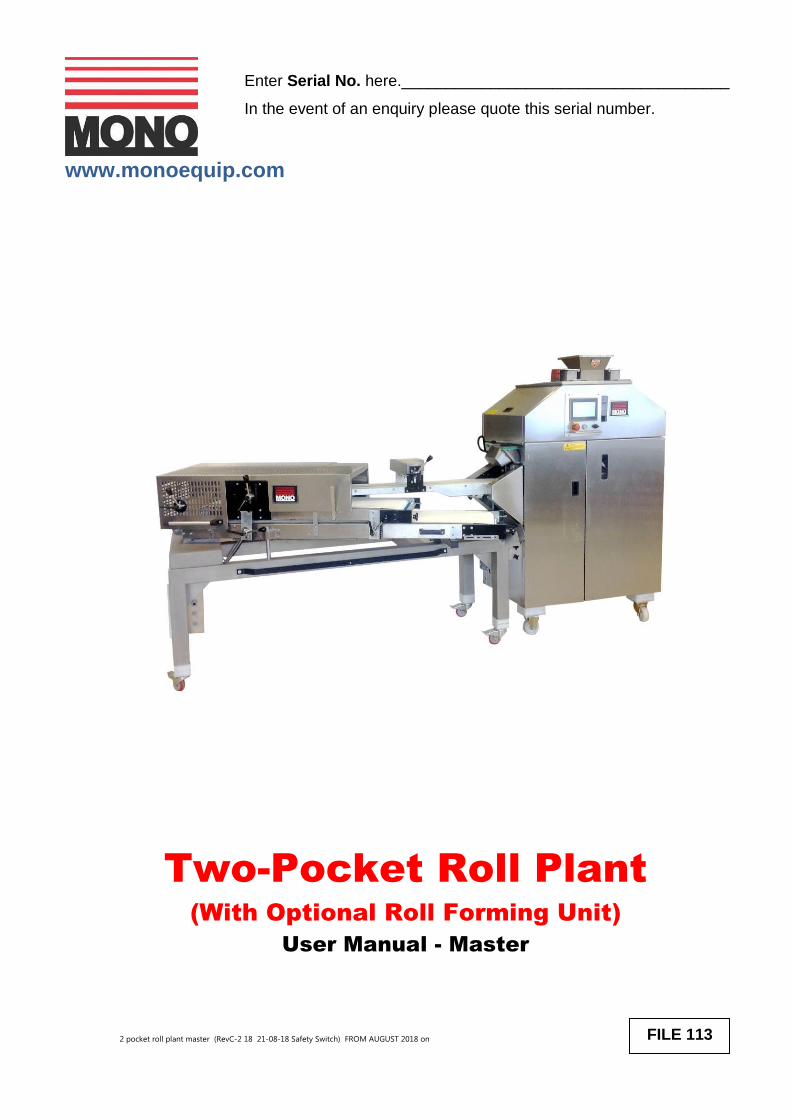
Two-Pocket Roll Plant
(With Optional Roll Forming Unit)
User Manual - Master
Enter Serial No. here._____________________________________
In the event of an enquiry please quote this serial number.
www.monoequip.com
FILE 113
2 pocket roll plant master (RevC-2 18 21-08-18 safety switch) 2
2 pocket roll plant master (RevC-2 18 21-08-18 safety switch) 3
Contents: 1. Introduction
2. Dimensions
2.1. Two-Pocket Roll Plant
2.2. With Roll Forming Unit
3. Specifications
4. Safety Guide
4.1. General Safety Precautions
5. Installation
5.1. The Two-Pocket Roll Plant
5.2. Connecting the Roll Forming Unit (if purchased)
6. Isolation
7. Operating Instructions – Two-Pocket Roll Plant
7.1. Start Up
7.2 Engineering Settings
7.2.1. HMI Configuration
7.2.1.1 Offline
7.2.1.2 System (Date & Time, Brightness etc.)
7.2.1.3 Diagnostics
7.2.2. Service Menu
7.3. Information Screen
7.4. Alarms Log
7.5. Automatic Mode
7.6. Manual Mode
7.6.1. To Save a Product Recipe
7.6.2. To Edit or Copy a Product Recipe
7.7. Recipe Mode
7.7.1. To Backup All Product Recipes
7.7.2. To Restore All Product Recipes
7.7.3. To Delete Product Recipes
8. Operating Instructions - Roll Forming Unit (if fitted) 9. Two-Pocket Roll Plant Cleaning and Maintenance
9.1 General Advice
9.2. Flour Dusters
9.3. Dough Hopper
9.4. Pre-Scaler
9.5. Filling Chamber and Filling Piston
9.6. Drum and Rounder
9.7. Pressure Roller and Cleaning Brushes
9.8. Oil Reservoir
9.9 The Flour Dust Catcher
10. Roll Forming Unit Cleaning and Maintenance (if fitted)
2 pocket roll plant master (RevC-2 18 21-08-18 safety switch) 4
10.1. General Advice
10.2. The Cleaning Position
10.3. Belts, Brushes, Rollers & Guides
10.4. Belt Tensioning Adjustment
10.5. Lubricating the Bearings, the Adjustment Levers & the Support Cross Bar
11. Recommended Cleaning Schedule
12. Manual Operation – Power OFF
13. Hints & Tips
14. Electrical information – Two Pocket Roll Plant
15. Alarm Messages
16. Environmental Disposal
17. Service and Spares – Contact Details
2 pocket roll plant master (RevC-2 18 21-08-18 safety switch) 5
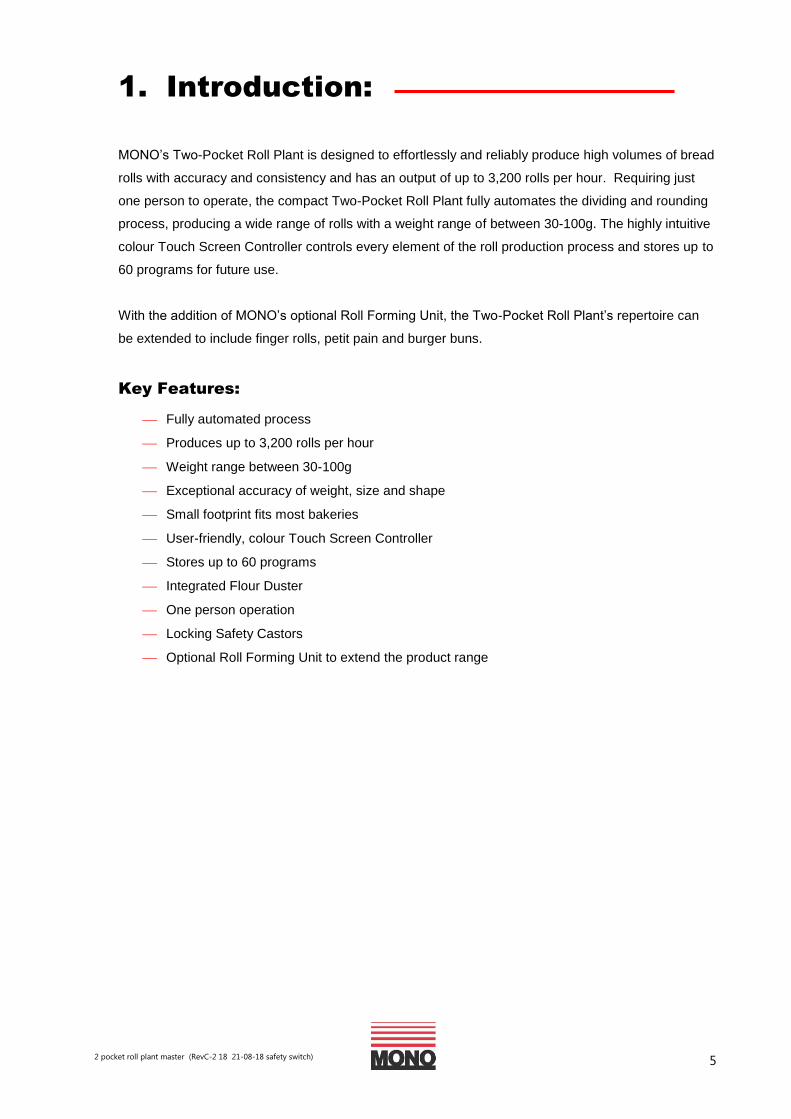
1. Introduction:
MONO’s Two-Pocket Roll Plant is designed to effortlessly and reliably produce high volumes of bread
rolls with accuracy and consistency and has an output of up to 3,200 rolls per hour. Requiring just
one person to operate, the compact Two-Pocket Roll Plant fully automates the dividing and rounding
process, producing a wide range of rolls with a weight range of between 30-100g. The highly intuitive
colour Touch Screen Controller controls every element of the roll production process and stores up to
60 programs for future use.
With the addition of MONO’s optional Roll Forming Unit, the Two-Pocket Roll Plant’s repertoire can
be extended to include finger rolls, petit pain and burger buns.
Key Features:
Fully automated process
Produces up to 3,200 rolls per hour
Weight range between 30-100g
Exceptional accuracy of weight, size and shape
Small footprint fits most bakeries
User-friendly, colour Touch Screen Controller
Stores up to 60 programs
Integrated Flour Duster
One person operation
Locking Safety Castors
Optional Roll Forming Unit to extend the product range
2 pocket roll plant master (RevC-2 18 21-08-18 safety switch) 6
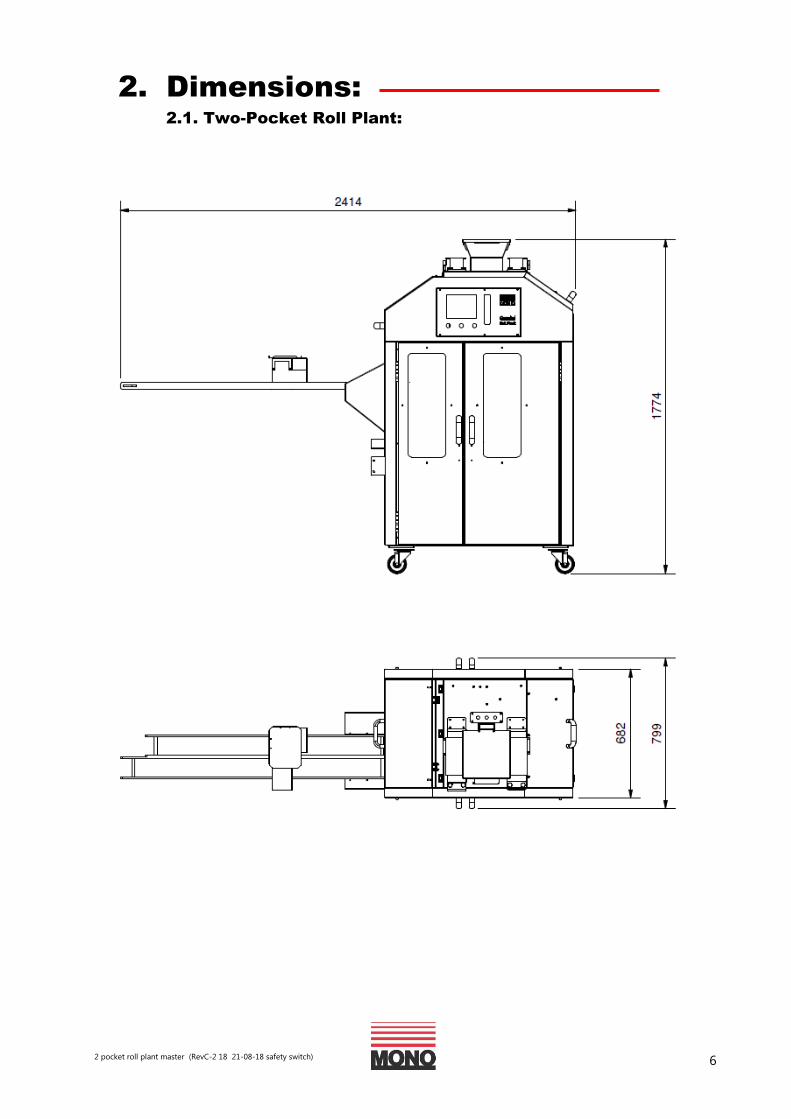
2. Dimensions:
2.1. Two-Pocket Roll Plant:

2 pocket roll plant master (RevC-2 18 21-08-18 safety switch) 7
2.2. With Roll Forming Unit:
2 pocket roll plant master (RevC-2 18 21-08-18 safety switch) 8
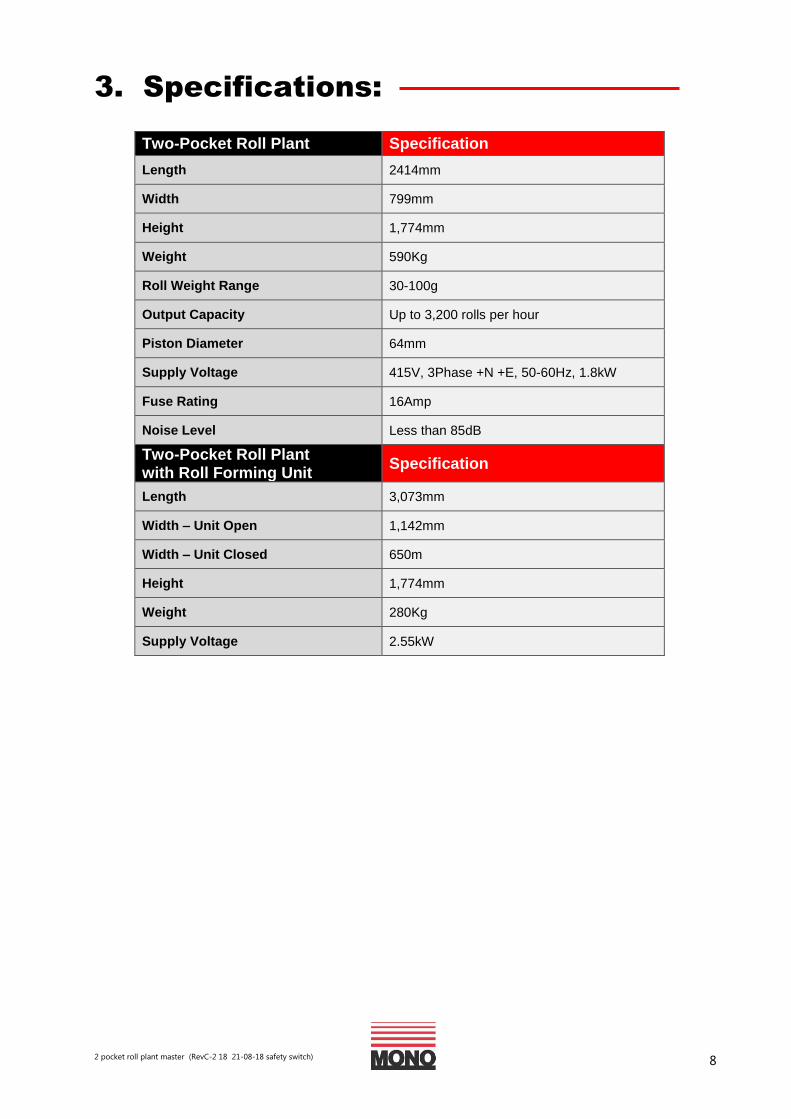
3. Specifications:
Two-Pocket Roll Plant Specification
Length 2414mm
Width 799mm
Height 1,774mm
Weight 590Kg
Roll Weight Range 30-100g
Output Capacity Up to 3,200 rolls per hour
Piston Diameter 64mm
Supply Voltage 415V, 3Phase +N +E, 50-60Hz, 1.8kW
Fuse Rating 16Amp
Noise Level Less than 85dB
Two-Pocket Roll Plant with Roll Forming Unit
Specification
Length 3,073mm
Width – Unit Open 1,142mm
Width – Unit Closed 650m
Height 1,774mm
Weight 280Kg
Supply Voltage 2.55kW
2 pocket roll plant master (RevC-2 18 21-08-18 safety switch) 9
4. Safety Guide:
4.1. General Safety Precautions:
Ensure this Manual is read thoroughly before operating the machine
The equipment must be installed by qualified personnel only
Ensure the mains power supply matches the power requirements of the machine
All machine operators should be fully trained before operating the machine
Always ensure hands are dry before touching any electrical components including cables,
switches and plugs
Ensure the machine is switched OFF at the mains isolator when not in use
Never use the machine in a faulty condition and always report any damage immediately
No one under the age of 16 should be permitted to operate this machine
No loose clothing, ties or jewellery should be worn when operating the machine
Only trained personnel should be permitted to remove any part of the machine that requires the
use of tools
Never operate the machine with any panels removed
Safety guards should not be removed under any circumstances
A responsible manager should carry out daily Safety Checks on the machine
Do not strike the Touch Screen Controller with a hard or pointed object, or press the panel with
excessive force
Hand contact with moving surfaces may cause friction burns to skin
Ensure the machine is switched off at the mains isolator before any cleaning or
maintenance work takes place
Do NOT attempt to clean the moulding areas when the machine is running
Do NOT insert hands or any other item into the Flour Duster when the machine is running
As flour dust can be highly combustible please ensure only an ATEX approved Safety
Vacuum Cleaner is used for cleaning purposes
MAINTENANCE OPERATIONS MUST BE MADE WITH MACHINE DISCONNECTED
FROM THE POWER SUPPLY
DO NOT ATTEMPT TO CLEAN THE MOULDING AREAS WHEN THE MACHINE IS RUNNING
DO NOT INSERT HANDS INTO FLOUR DUSTER WHEN THE
MACHINE IS RUNNING
2 pocket roll plant master (RevC-2 18 21-08-18 safety switch) 10
5. Installation:
5.1. The Two-Pocket Roll Plant
The machine is fitted with 2 fixed and 2 lockable swivel castors for ease of positioning and
safety
The machine can be picked up using a forklift or pallet truck under the main frame between
the wheels
Ensure the machine is standing level on a solid floor
When installing the machine, the operator should make the following areas accessible:
o Control panel
o Side panels
o Back panel
This will aid cleaning during use, without the need to move the machine
The electrical connection is made using a 16 Amps plug
The terminal value of the machine is 10 Amps at 415V 3 phases
An electrical wiring diagram can be found inside the fuse box
Turn the main isolator switch to ‘’I’’ position, to power ON
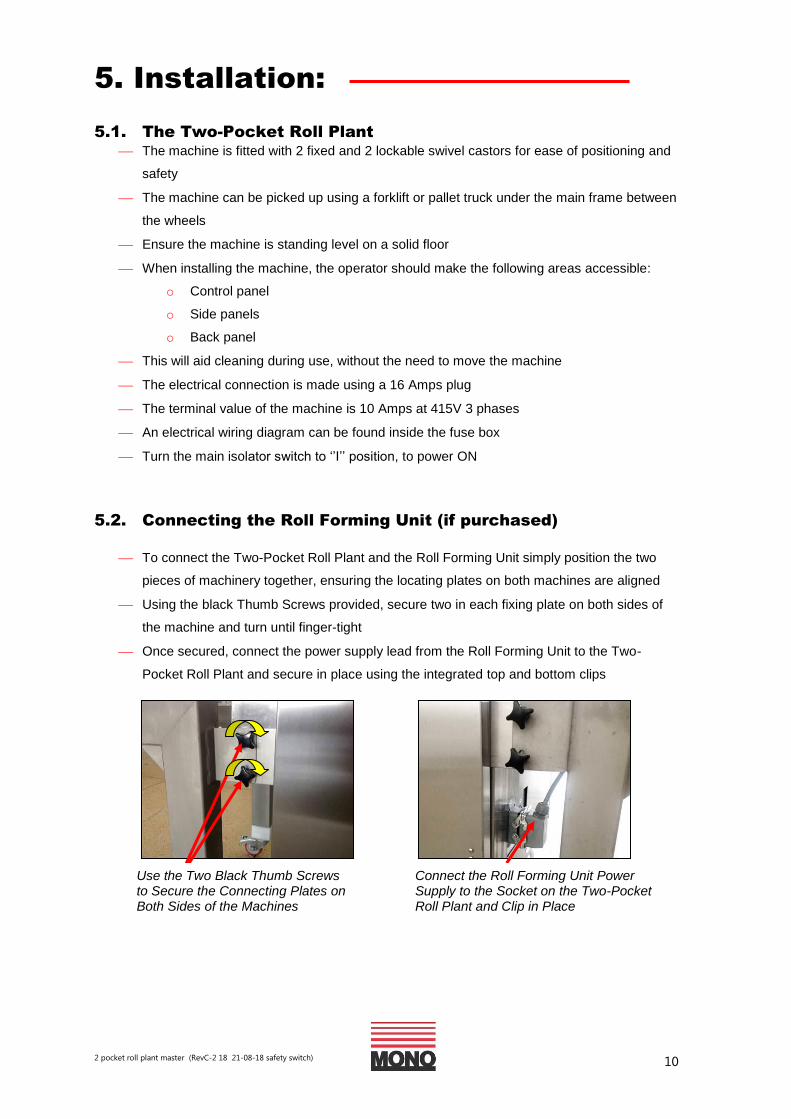
5.2. Connecting the Roll Forming Unit (if purchased)
To connect the Two-Pocket Roll Plant and the Roll Forming Unit simply position the two
pieces of machinery together, ensuring the locating plates on both machines are aligned
Using the black Thumb Screws provided, secure two in each fixing plate on both sides of
the machine and turn until finger-tight
Once secured, connect the power supply lead from the Roll Forming Unit to the Two-
Pocket Roll Plant and secure in place using the integrated top and bottom clips
Use the Two Black Thumb Screws to Secure the Connecting Plates on Both Sides of the Machines
Connect the Roll Forming Unit Power Supply to the Socket on the Two-Pocket Roll Plant and Clip in Place
2 pocket roll plant master (RevC-2 18 21-08-18 safety switch) 11
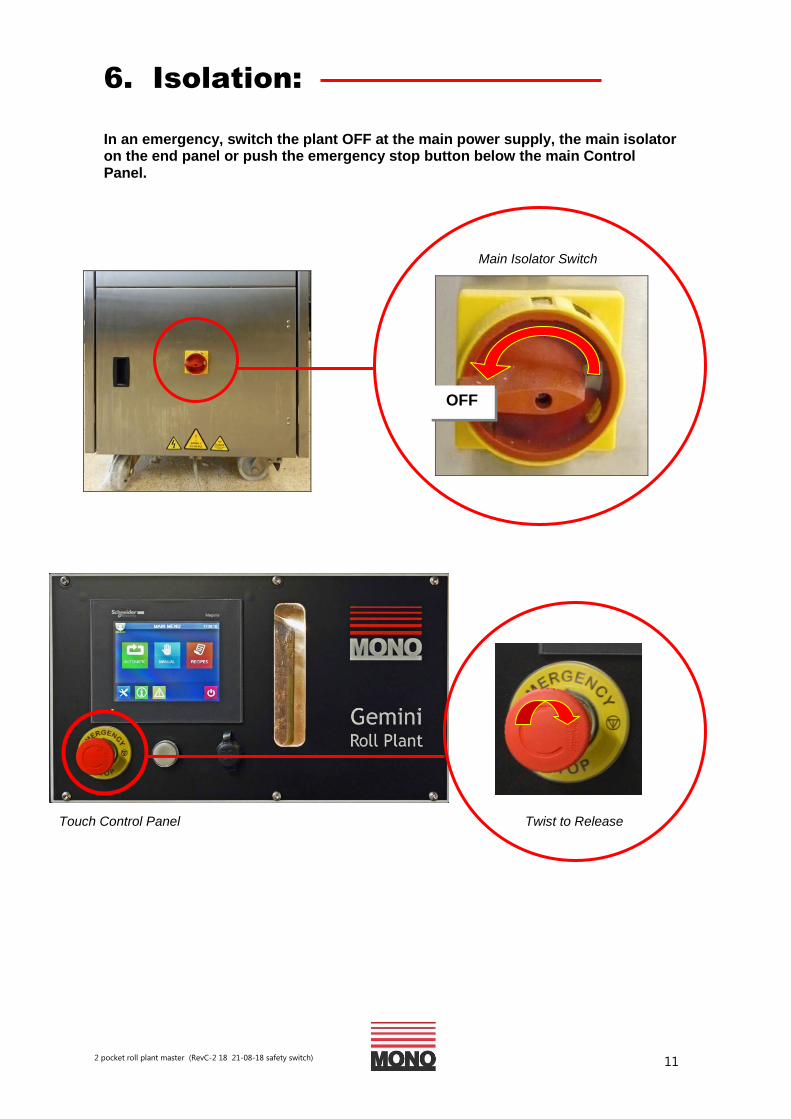
6. Isolation:
In an emergency, switch the plant OFF at the main power supply, the main isolator on the end panel or push the emergency stop button below the main Control Panel.
Main Isolator Switch
Twist to Release Touch Control Panel
OFF
2 pocket roll plant master (RevC-2 18 21-08-18 safety switch) 12
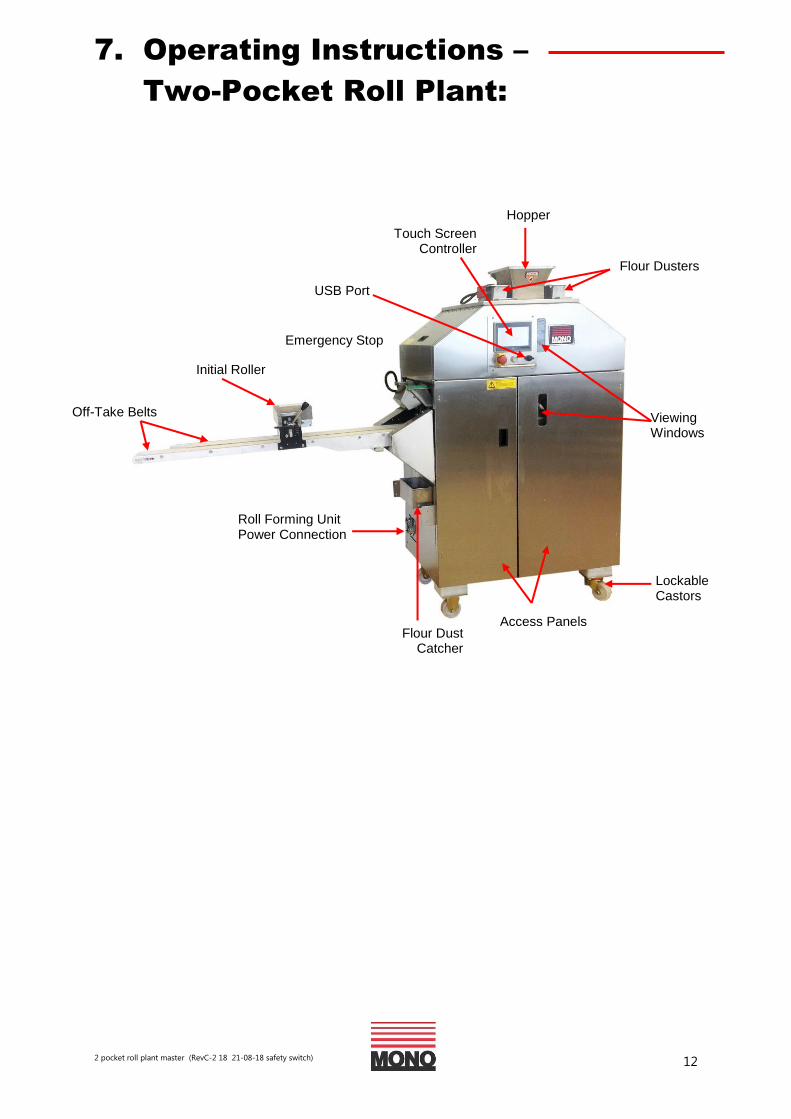
7. Operating Instructions –
Two-Pocket Roll Plant:
Hopper
Flour Dusters
USB Port
Touch Screen Controller
Emergency Stop
Off-Take Belts
Initial Roller
Roll Forming Unit Power Connection
Flour Dust Catcher
Viewing Windows
Lockable Castors
Access Panels
2 pocket roll plant master (RevC-2 18 21-08-18 safety switch) 13
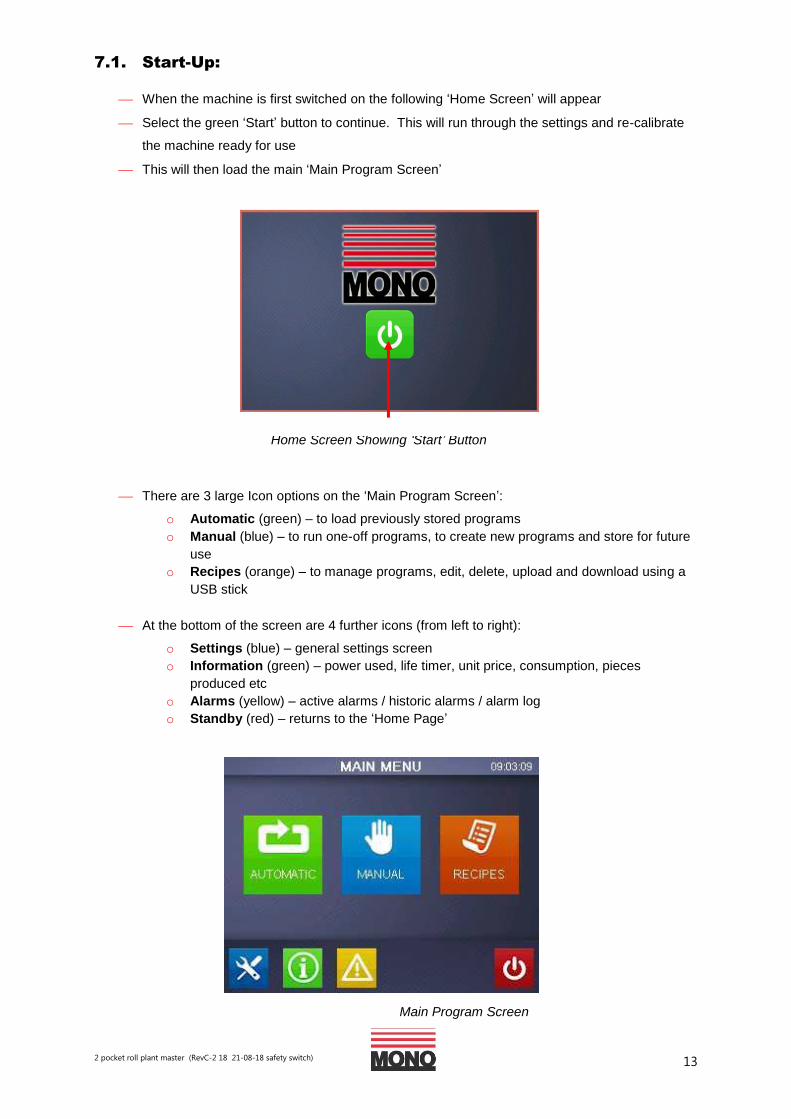
7.1. Start-Up:
When the machine is first switched on the following ‘Home Screen’ will appear
Select the green ‘Start’ button to continue. This will run through the settings and re-calibrate
the machine ready for use
This will then load the main ‘Main Program Screen’
There are 3 large Icon options on the ‘Main Program Screen’:
o Automatic (green) – to load previously stored programs
o Manual (blue) – to run one-off programs, to create new programs and store for future
use
o Recipes (orange) – to manage programs, edit, delete, upload and download using a
USB stick
At the bottom of the screen are 4 further icons (from left to right):
o Settings (blue) – general settings screen
o Information (green) – power used, life timer, unit price, consumption, pieces
produced etc
o Alarms (yellow) – active alarms / historic alarms / alarm log
o Standby (red) – returns to the ‘Home Page’
Home Screen Showing ‘Start’ Button
Main Program Screen
2 pocket roll plant master (RevC-2 18 21-08-18 safety switch) 14
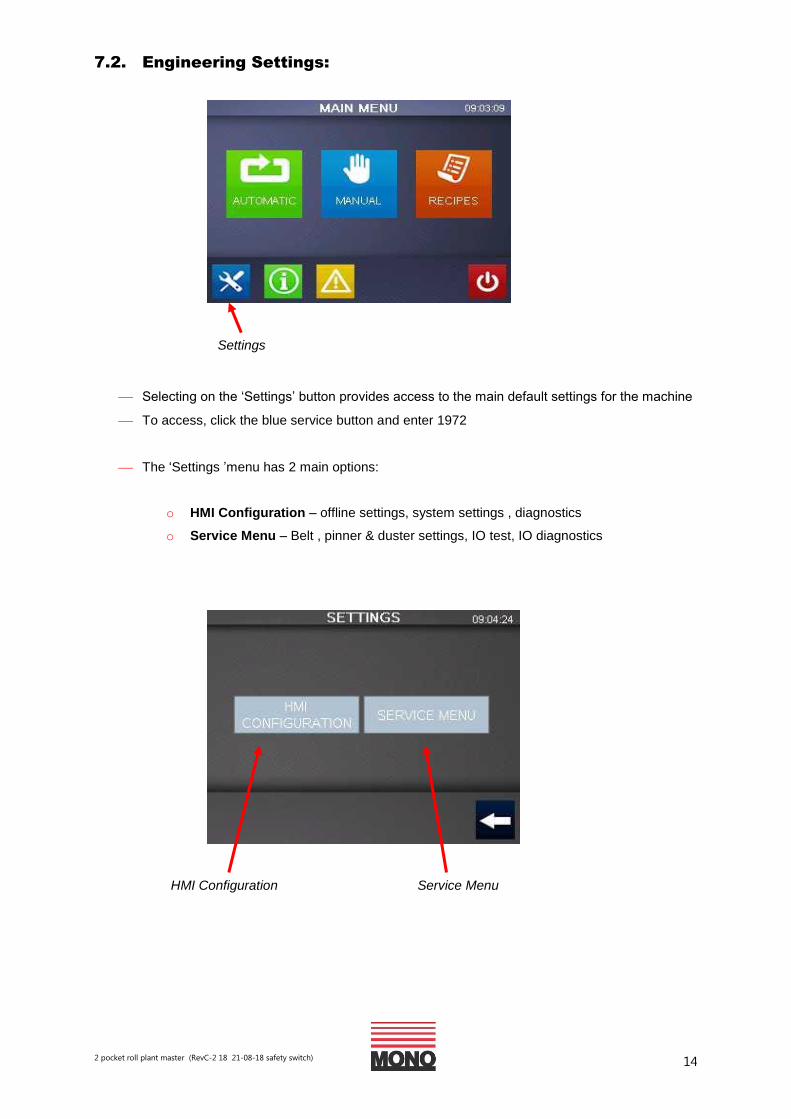
7.2. Engineering Settings:
Selecting on the ‘Settings’ button provides access to the main default settings for the machine
To access, click the blue service button and enter 1972
The ‘Settings ’menu has 2 main options:
o HMI Configuration – offline settings, system settings , diagnostics
o Service Menu – Belt , pinner & duster settings, IO test, IO diagnostics
HMI Configuration Service Menu
Settings

2 pocket roll plant master (RevC-2 18 21-08-18 safety switch) 15
7.2.1 HMI Configuration:
The HMI configuration page has 3 main option tabs:
o Offline
o System
o Diagnostics
7.2.1.1 Offline:
The Offline tab enables access to settings regarding the HMI only
7.2.1.2 System:
The system tab enables access to:
o Stylus – Used for screen calibration
o Date / Time – For setting the Date & Time
o Restart - To restart the operating system
o Language – N/A
o Ver. Info – Display system runtime versions
o Memory – Memory statistics
o Brightness – Screen brightness adjustment
o Option – N/A
7.2.1.3 Diagnostics:
The Diagnostics tab enables access to:
o Variables – N/A
o Statistics – Displays communication statistics
2 pocket roll plant master (RevC-2 18 21-08-18 safety switch) 16
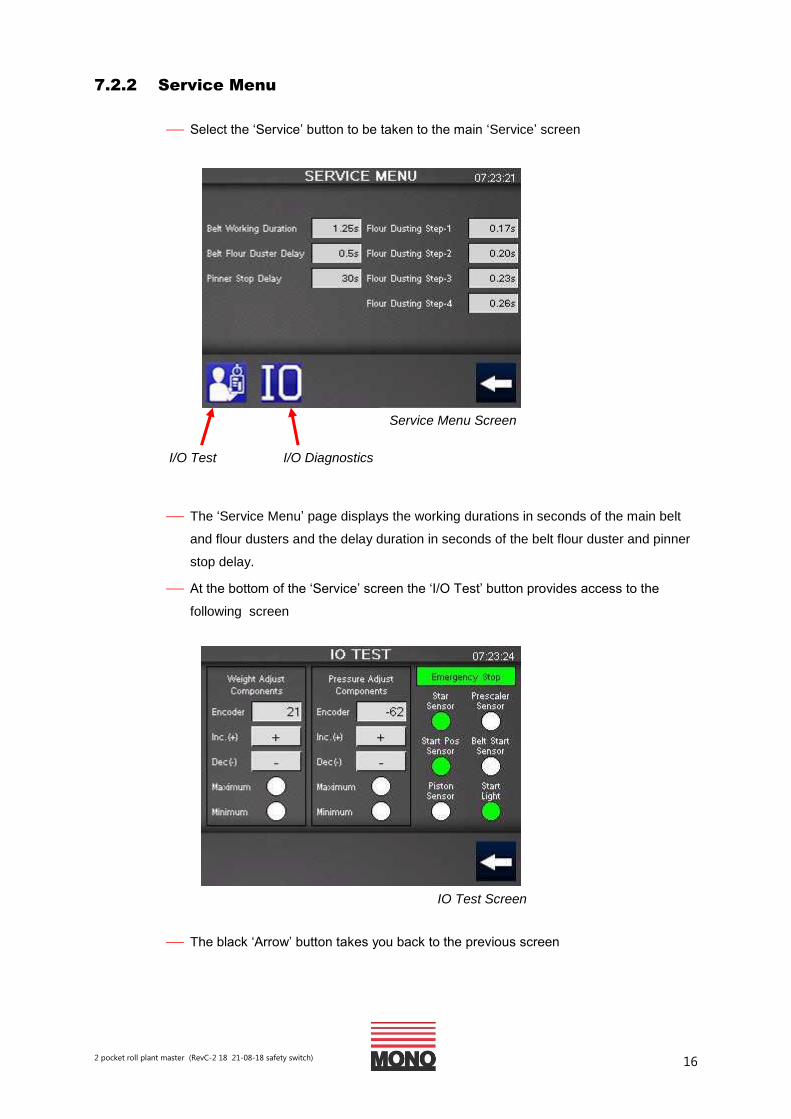
7.2.2 Service Menu
Select the ‘Service’ button to be taken to the main ‘Service’ screen
The ‘Service Menu’ page displays the working durations in seconds of the main belt
and flour dusters and the delay duration in seconds of the belt flour duster and pinner
stop delay.
At the bottom of the ‘Service’ screen the ‘I/O Test’ button provides access to the
following screen
The black ‘Arrow’ button takes you back to the previous screen
I/O Diagnostics I/O Test
Service Menu Screen
IO Test Screen
2 pocket roll plant master (RevC-2 18 21-08-18 safety switch) 17
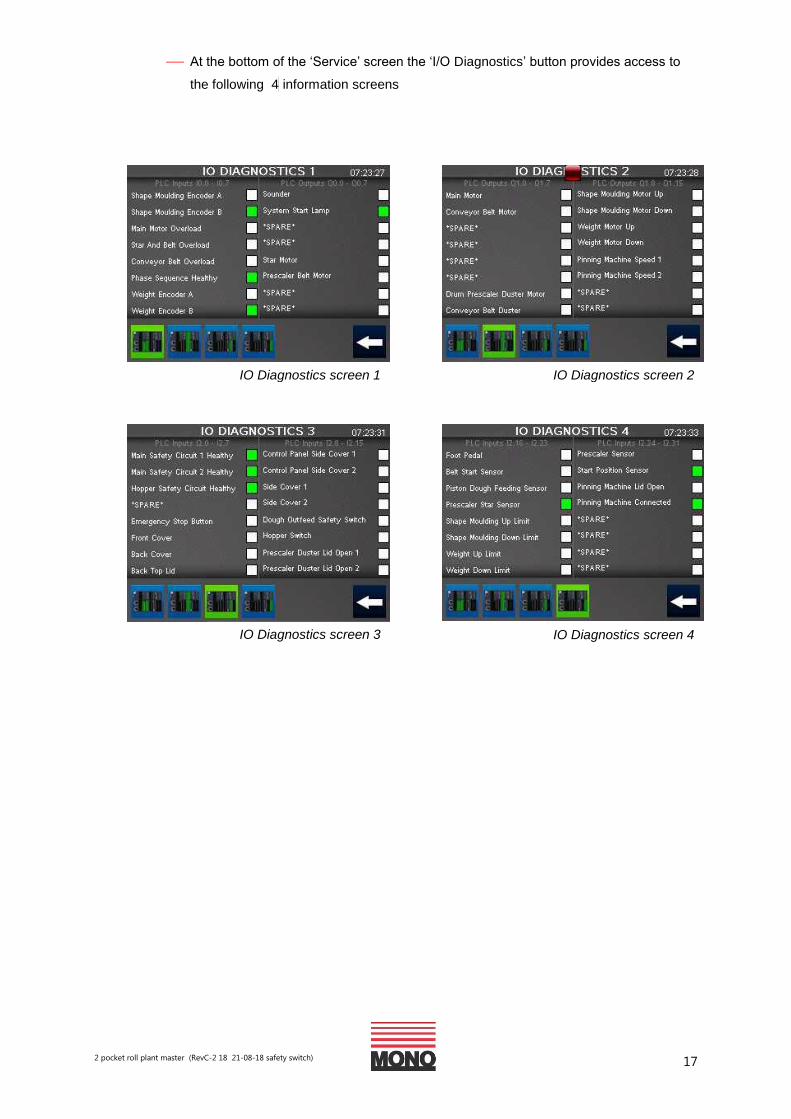
At the bottom of the ‘Service’ screen the ‘I/O Diagnostics’ button provides access to
the following 4 information screens
IO Diagnostics screen 1 IO Diagnostics screen 2
IO Diagnostics screen 3 IO Diagnostics screen 4
2 pocket roll plant master (RevC-2 18 21-08-18 safety switch) 18
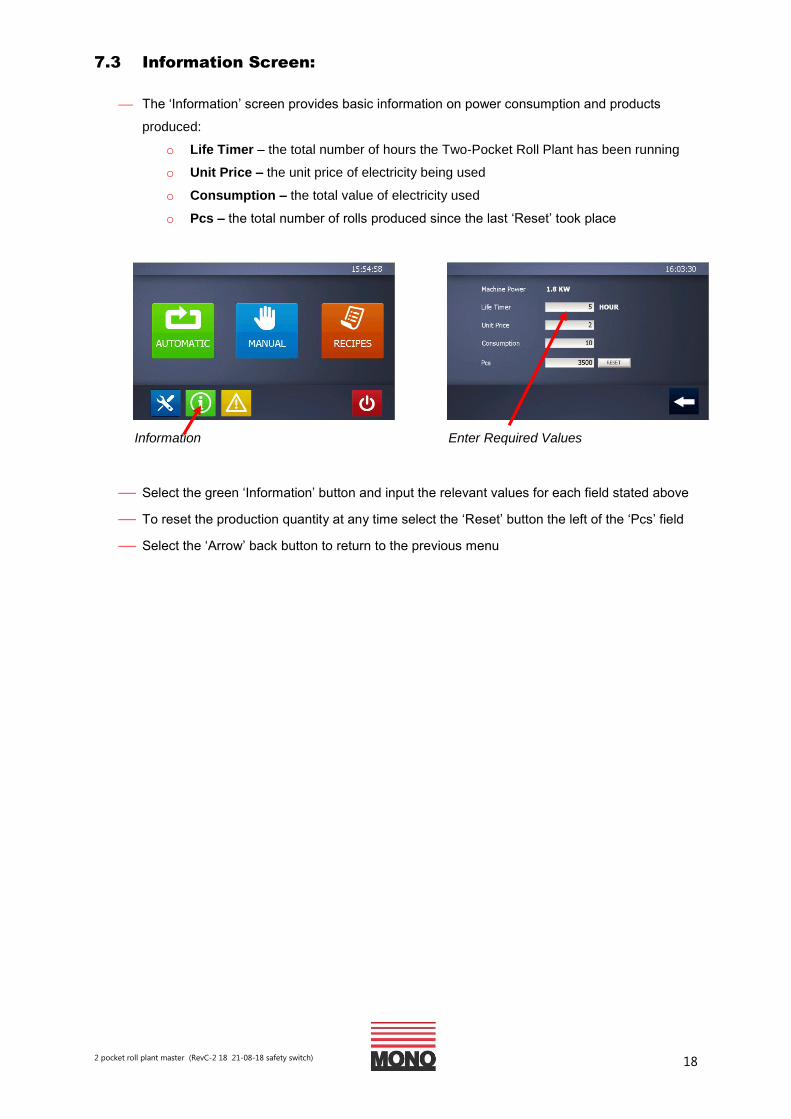
7.3 Information Screen:
The ‘Information’ screen provides basic information on power consumption and products
produced:
o Life Timer – the total number of hours the Two-Pocket Roll Plant has been running
o Unit Price – the unit price of electricity being used
o Consumption – the total value of electricity used
o Pcs – the total number of rolls produced since the last ‘Reset’ took place
Select the green ‘Information’ button and input the relevant values for each field stated above
To reset the production quantity at any time select the ‘Reset’ button the left of the ‘Pcs’ field
Select the ‘Arrow’ back button to return to the previous menu
Enter Required Values Information
2 pocket roll plant master (RevC-2 18 21-08-18 safety switch) 19
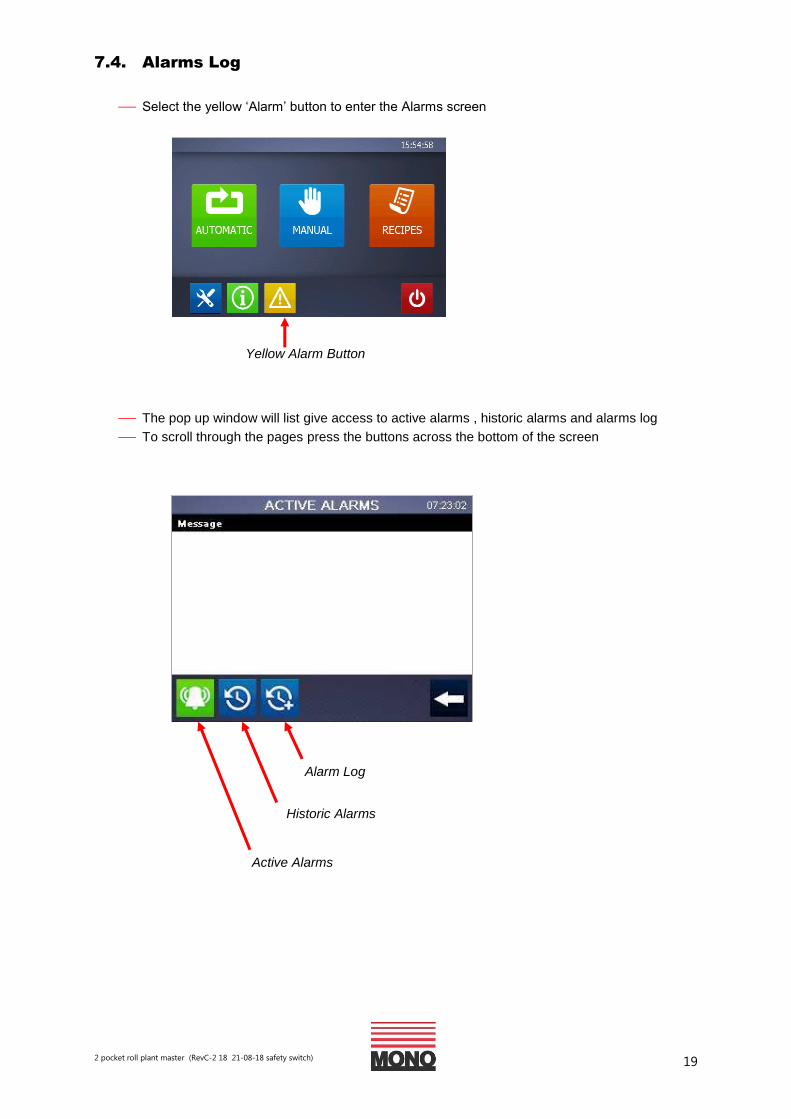
7.4. Alarms Log
Select the yellow ‘Alarm’ button to enter the Alarms screen
The pop up window will list give access to active alarms , historic alarms and alarms log
To scroll through the pages press the buttons across the bottom of the screen
Yellow Alarm Button
Alarm Log
Active Alarms
Historic Alarms
2 pocket roll plant master (RevC-2 18 21-08-18 safety switch) 20
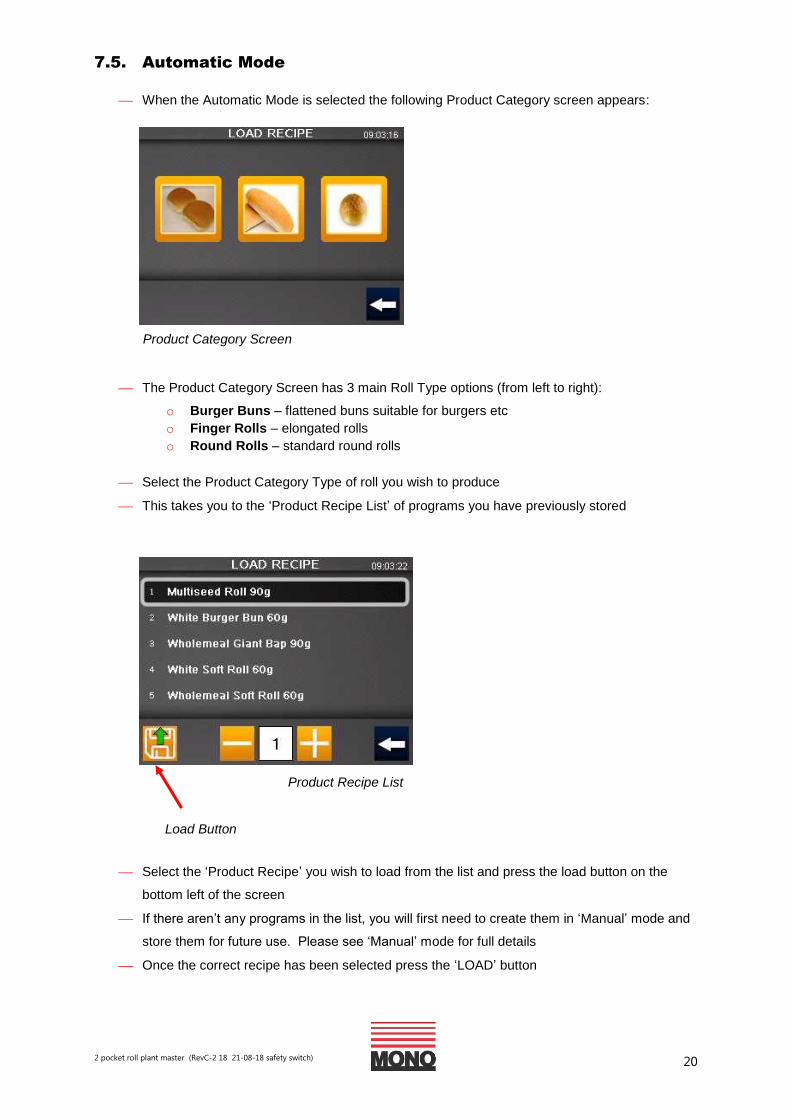
7.5. Automatic Mode
When the Automatic Mode is selected the following Product Category screen appears:
The Product Category Screen has 3 main Roll Type options (from left to right):
o Burger Buns – flattened buns suitable for burgers etc
o Finger Rolls – elongated rolls
o Round Rolls – standard round rolls
Select the Product Category Type of roll you wish to produce
This takes you to the ‘Product Recipe List’ of programs you have previously stored
Select the ‘Product Recipe’ you wish to load from the list and press the load button on the
bottom left of the screen
If there aren’t any programs in the list, you will first need to create them in ‘Manual’ mode and
store them for future use. Please see ‘Manual’ mode for full details
Once the correct recipe has been selected press the ‘LOAD’ button
Product Category Screen
Load Button
Product Recipe List
2 pocket roll plant master (RevC-2 18 21-08-18 safety switch) 21
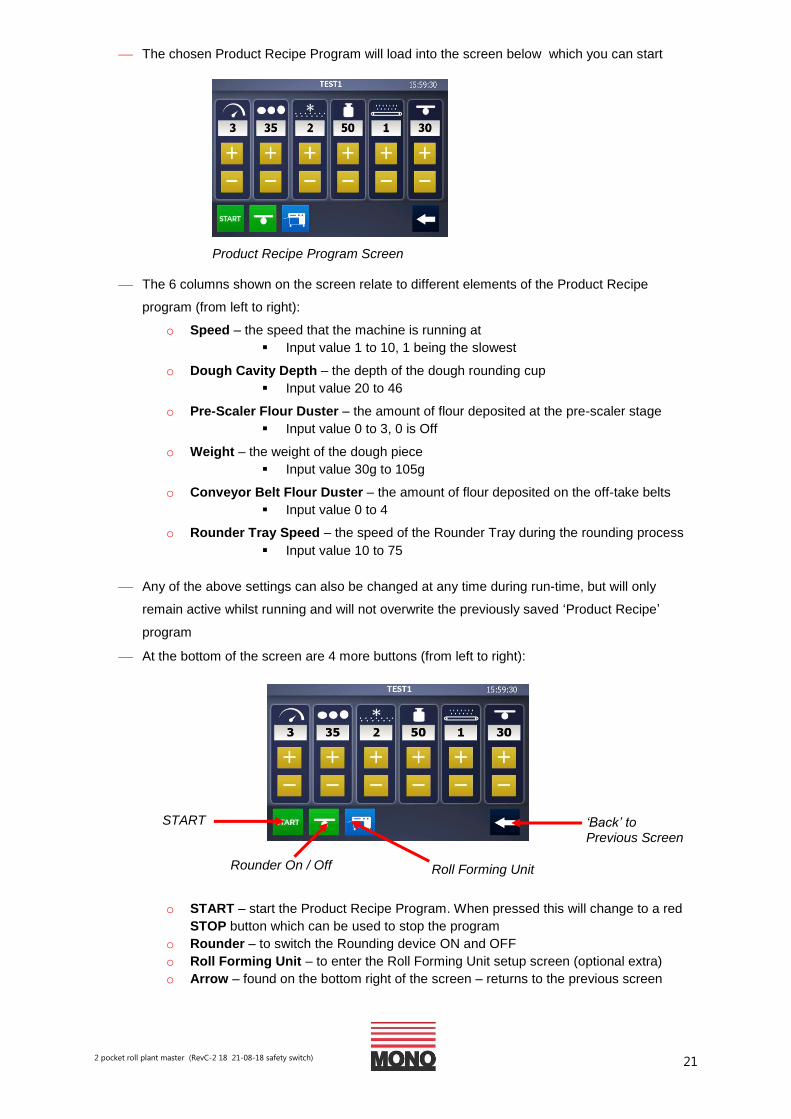
The chosen Product Recipe Program will load into the screen below which you can start
The 6 columns shown on the screen relate to different elements of the Product Recipe
program (from left to right):
o Speed – the speed that the machine is running at
Input value 1 to 10, 1 being the slowest
o Dough Cavity Depth – the depth of the dough rounding cup
Input value 20 to 46
o Pre-Scaler Flour Duster – the amount of flour deposited at the pre-scaler stage
Input value 0 to 3, 0 is Off
o Weight – the weight of the dough piece
Input value 30g to 105g
o Conveyor Belt Flour Duster – the amount of flour deposited on the off-take belts
Input value 0 to 4
o Rounder Tray Speed – the speed of the Rounder Tray during the rounding process
Input value 10 to 75
Any of the above settings can also be changed at any time during run-time, but will only
remain active whilst running and will not overwrite the previously saved ‘Product Recipe’
program
At the bottom of the screen are 4 more buttons (from left to right):
o START – start the Product Recipe Program. When pressed this will change to a red
STOP button which can be used to stop the program
o Rounder – to switch the Rounding device ON and OFF
o Roll Forming Unit – to enter the Roll Forming Unit setup screen (optional extra)
o Arrow – found on the bottom right of the screen – returns to the previous screen
Product Recipe Program Screen
START
Rounder On / Off
‘Back’ to Previous Screen
Roll Forming Unit
2 pocket roll plant master (RevC-2 18 21-08-18 safety switch) 22
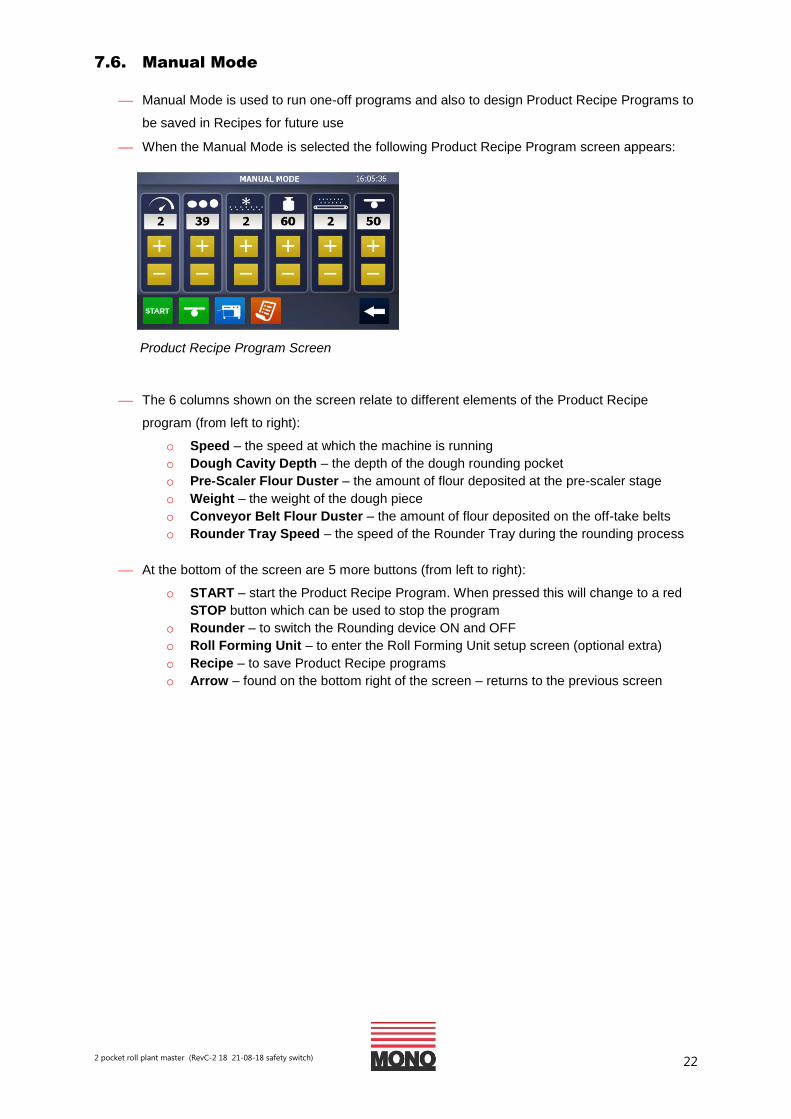
7.6. Manual Mode
Manual Mode is used to run one-off programs and also to design Product Recipe Programs to
be saved in Recipes for future use
When the Manual Mode is selected the following Product Recipe Program screen appears:
The 6 columns shown on the screen relate to different elements of the Product Recipe
program (from left to right):
o Speed – the speed at which the machine is running
o Dough Cavity Depth – the depth of the dough rounding pocket
o Pre-Scaler Flour Duster – the amount of flour deposited at the pre-scaler stage
o Weight – the weight of the dough piece
o Conveyor Belt Flour Duster – the amount of flour deposited on the off-take belts
o Rounder Tray Speed – the speed of the Rounder Tray during the rounding process
At the bottom of the screen are 5 more buttons (from left to right):
o START – start the Product Recipe Program. When pressed this will change to a red
STOP button which can be used to stop the program
o Rounder – to switch the Rounding device ON and OFF
o Roll Forming Unit – to enter the Roll Forming Unit setup screen (optional extra)
o Recipe – to save Product Recipe programs
o Arrow – found on the bottom right of the screen – returns to the previous screen
Product Recipe Program Screen
2 pocket roll plant master (RevC-2 18 21-08-18 safety switch) 23
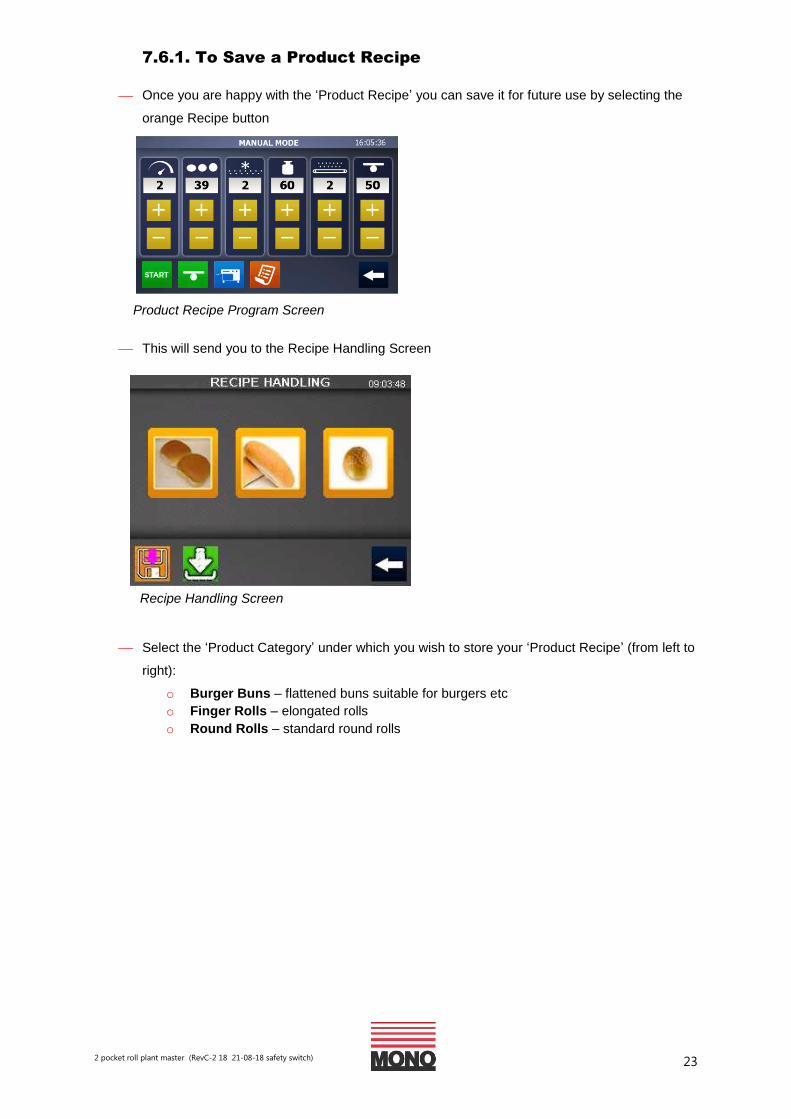
7.6.1. To Save a Product Recipe
Once you are happy with the ‘Product Recipe’ you can save it for future use by selecting the
orange Recipe button
This will send you to the Recipe Handling Screen
Select the ‘Product Category’ under which you wish to store your ‘Product Recipe’ (from left to
right):
o Burger Buns – flattened buns suitable for burgers etc
o Finger Rolls – elongated rolls
o Round Rolls – standard round rolls
Product Recipe Program Screen
Recipe Handling Screen

2 pocket roll plant master (RevC-2 18 21-08-18 safety switch) 24
Scroll to the next available space and select the ‘Save’ button
Enter the name of the product you wish to save for future use
Press the ‘Arrow’ button to return to Main Menu
Save Recipe Screen
2 pocket roll plant master (RevC-2 18 21-08-18 safety switch) 25
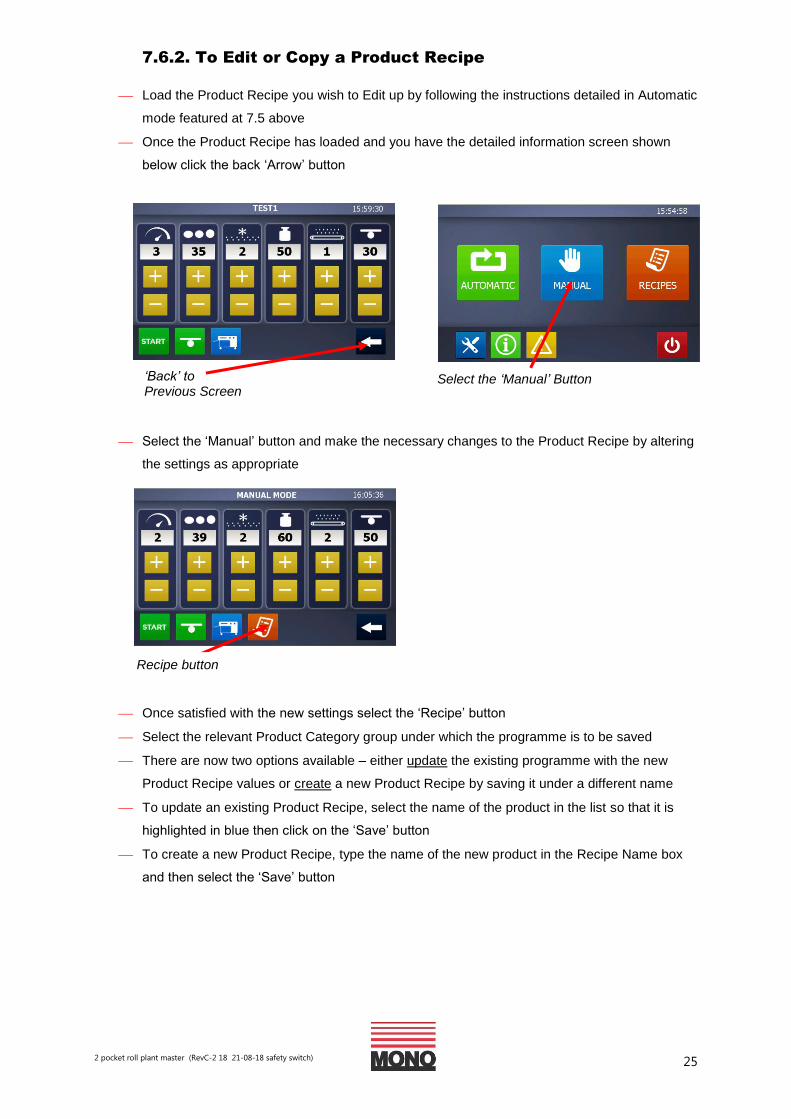
7.6.2. To Edit or Copy a Product Recipe
Load the Product Recipe you wish to Edit up by following the instructions detailed in Automatic
mode featured at 7.5 above
Once the Product Recipe has loaded and you have the detailed information screen shown
below click the back ‘Arrow’ button
Select the ‘Manual’ button and make the necessary changes to the Product Recipe by altering
the settings as appropriate
Once satisfied with the new settings select the ‘Recipe’ button
Select the relevant Product Category group under which the programme is to be saved
There are now two options available – either update the existing programme with the new
Product Recipe values or create a new Product Recipe by saving it under a different name
To update an existing Product Recipe, select the name of the product in the list so that it is
highlighted in blue then click on the ‘Save’ button
To create a new Product Recipe, type the name of the new product in the Recipe Name box
and then select the ‘Save’ button
Select the ‘Manual’ Button
Recipe button
‘Back’ to Previous Screen
2 pocket roll plant master (RevC-2 18 21-08-18 safety switch) 26
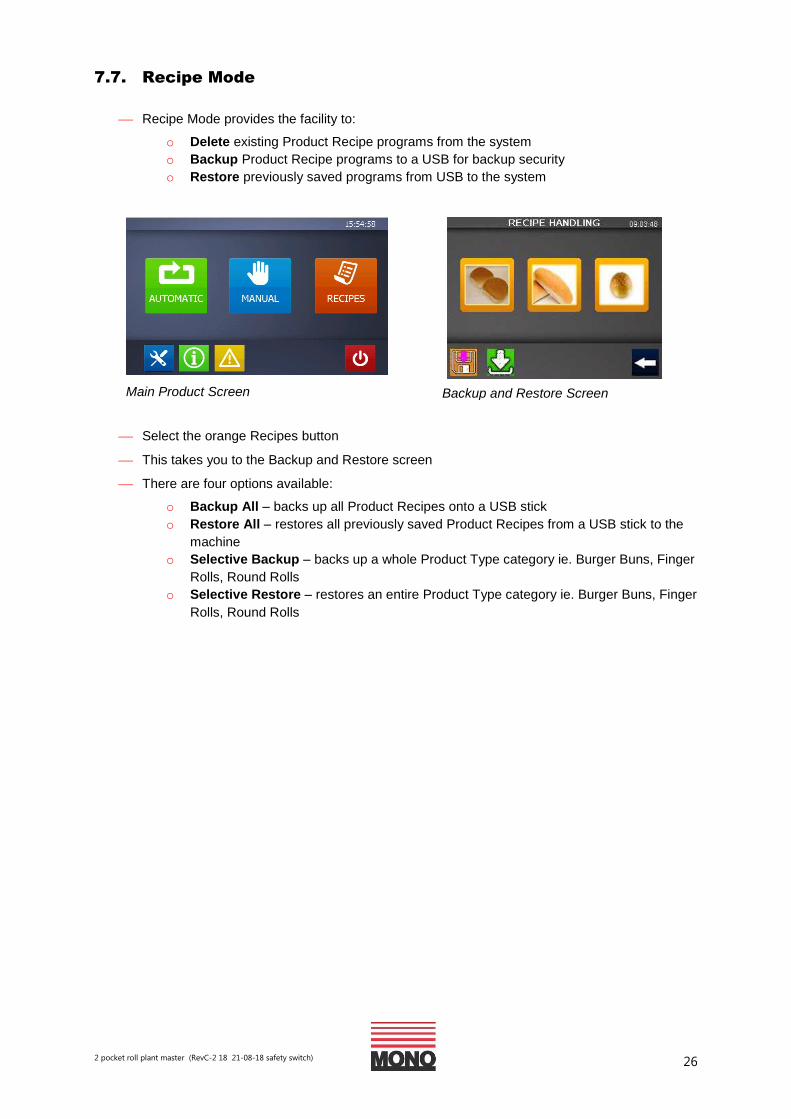
7.7. Recipe Mode
Recipe Mode provides the facility to:
o Delete existing Product Recipe programs from the system
o Backup Product Recipe programs to a USB for backup security
o Restore previously saved programs from USB to the system
Select the orange Recipes button
This takes you to the Backup and Restore screen
There are four options available:
o Backup All – backs up all Product Recipes onto a USB stick
o Restore All – restores all previously saved Product Recipes from a USB stick to the
machine
o Selective Backup – backs up a whole Product Type category ie. Burger Buns, Finger
Rolls, Round Rolls
o Selective Restore – restores an entire Product Type category ie. Burger Buns, Finger
Rolls, Round Rolls
Main Product Screen Backup and Restore Screen
2 pocket roll plant master (RevC-2 18 21-08-18 safety switch) 27
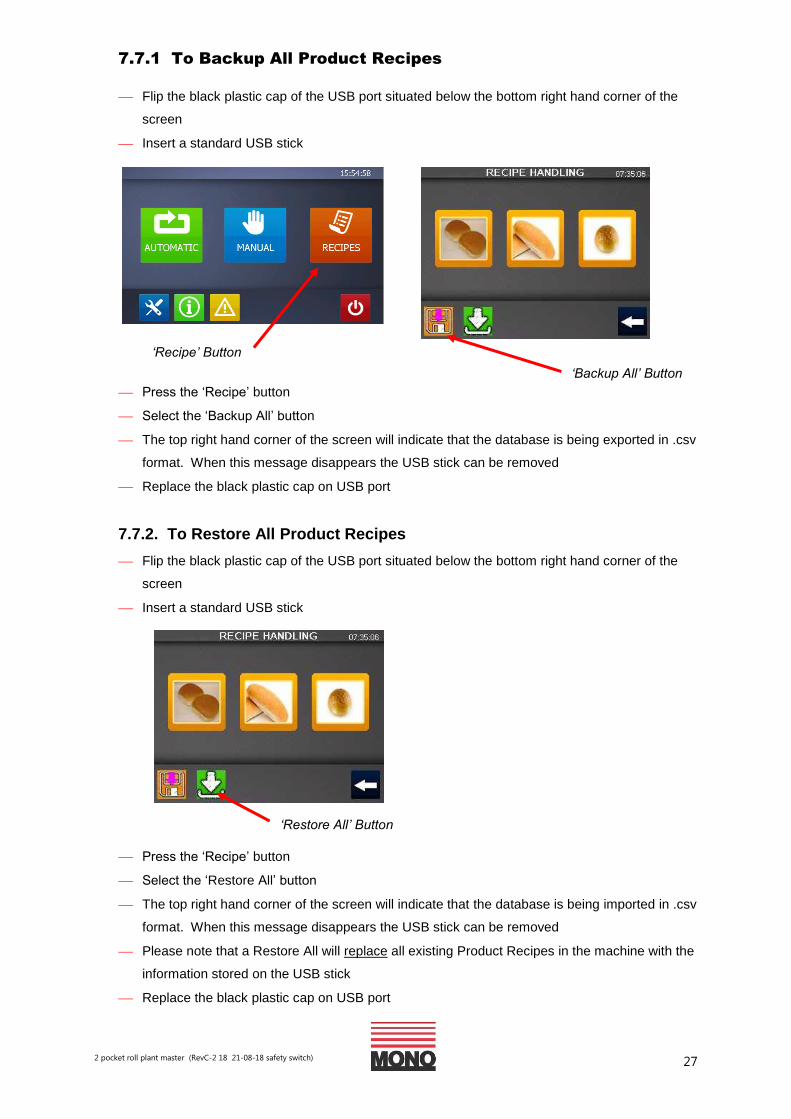
7.7.1 To Backup All Product Recipes
Flip the black plastic cap of the USB port situated below the bottom right hand corner of the
screen
Insert a standard USB stick
Press the ‘Recipe’ button
Select the ‘Backup All’ button
The top right hand corner of the screen will indicate that the database is being exported in .csv
format. When this message disappears the USB stick can be removed
Replace the black plastic cap on USB port
7.7.2. To Restore All Product Recipes
Flip the black plastic cap of the USB port situated below the bottom right hand corner of the
screen
Insert a standard USB stick
Press the ‘Recipe’ button
Select the ‘Restore All’ button
The top right hand corner of the screen will indicate that the database is being imported in .csv
format. When this message disappears the USB stick can be removed
Please note that a Restore All will replace all existing Product Recipes in the machine with the
information stored on the USB stick
Replace the black plastic cap on USB port
‘Restore All’ Button
‘Backup All’ Button
‘Recipe’ Button
2 pocket roll plant master (RevC-2 18 21-08-18 safety switch) 28
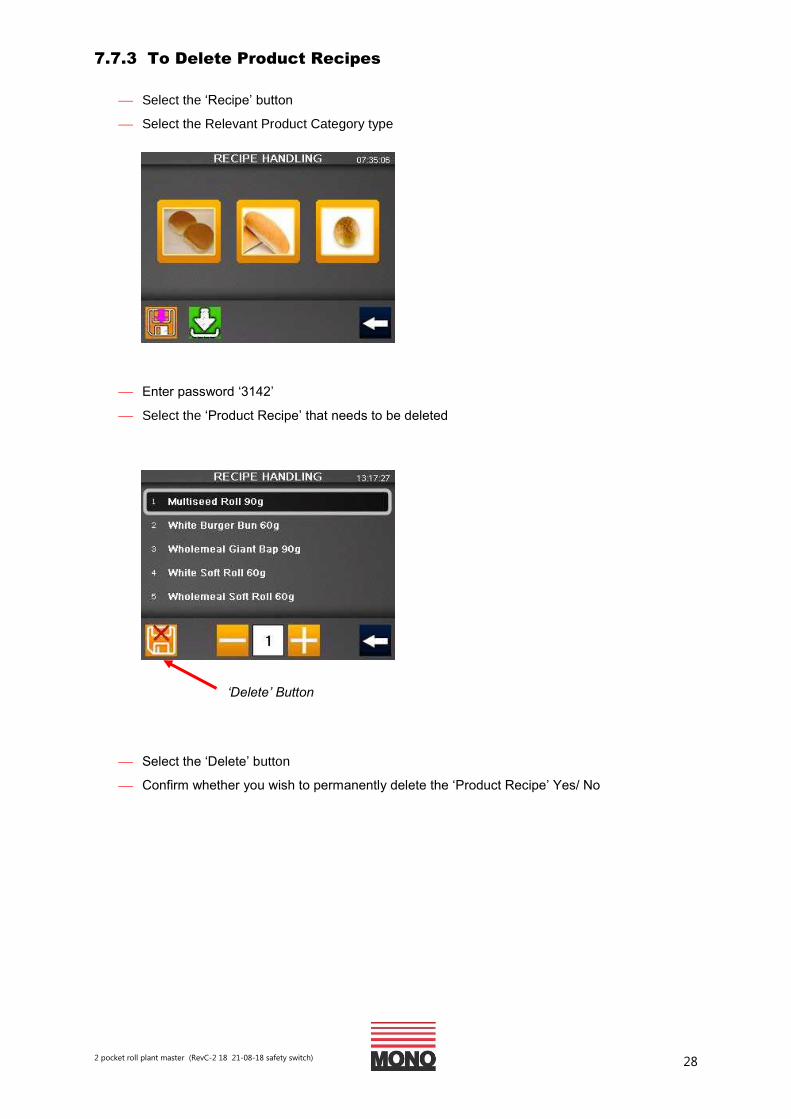
7.7.3 To Delete Product Recipes
Select the ‘Recipe’ button
Select the Relevant Product Category type
Enter password ‘3142’
Select the ‘Product Recipe’ that needs to be deleted
Select the ‘Delete’ button
Confirm whether you wish to permanently delete the ‘Product Recipe’ Yes/ No
‘Delete’ Button

2 pocket roll plant master (RevC-2 18 21-08-18 safety switch) 29
8. Operating Instructions –
Roll Forming Unit (if fitted)
The Roll Forming Unit is available as an optional extra to the Two-Pocket Roll Plant and
provides the additional facility to produce a wider range of roll including Burger Buns and
Finger Rolls
The roll shapes can be created by adjusting a series of rollers and pressure belts which mould
the round roll output from the Two-Pocket Roll Plant into either a flattened burger roll or an
enlongated finger roll
There are 5 key devices on the Roll Forming Unit to achieve the desired results:
1. Initial Roller – provides first flattening (burger buns)
2. Secondary Roller – provides further reduction (burger buns)
3. Finger Roller Positioning Guide – positions dough piece on bottom belt
4. Upper Pressure Belt Left Side – height adjustment for final product
5. Upper Pressure Belt – Right Side – height adjustment for final product
Also located at the front of each Belt are two Belt Tensioners which can be used to adjust the
tension of the top and bottom belts should the need arise
Once the desired roll size, shape and dimensions have been achieved the values from each of
the Rollers and Belts needs to be transferred into the Product Recipe program for future use
Lower Belt Access Handle Roll Forming Unit Cover Handle
Off-take Belt Height Adjustment
4. Upper Pressure Belt Height Adjustment - Left
5. Upper Pressure Belt Height Adjustment - Right
1.Initial Roller
2.Secondary Roller
3. Finger Roll Positioning Guide
Belt Tensioners
1 2
3
4
5
2 pocket roll plant master (RevC-2 18 21-08-18 safety switch) 30
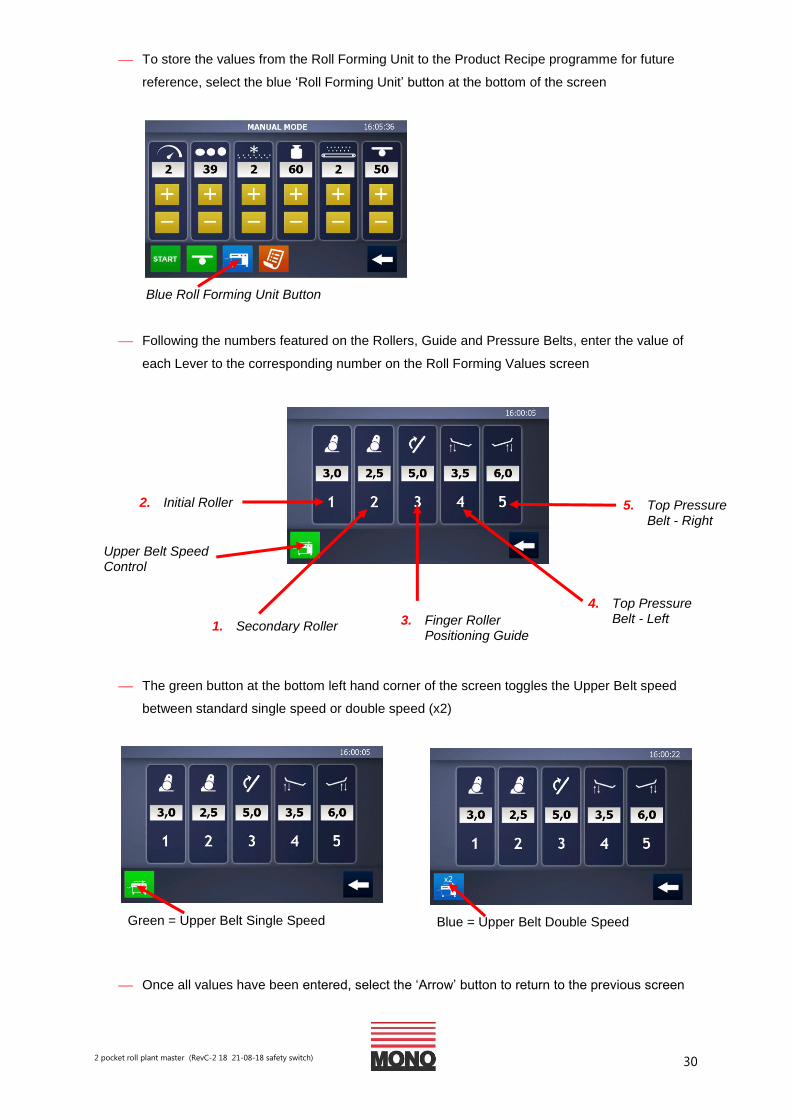
To store the values from the Roll Forming Unit to the Product Recipe programme for future
reference, select the blue ‘Roll Forming Unit’ button at the bottom of the screen
Following the numbers featured on the Rollers, Guide and Pressure Belts, enter the value of
each Lever to the corresponding number on the Roll Forming Values screen
The green button at the bottom left hand corner of the screen toggles the Upper Belt speed
between standard single speed or double speed (x2)
Once all values have been entered, select the ‘Arrow’ button to return to the previous screen
Green = Upper Belt Single Speed Blue = Upper Belt Double Speed
Blue Roll Forming Unit Button
4. Top Pressure Belt - Left 3. Finger Roller
Positioning Guide 1. Secondary Roller
Upper Belt Speed Control
5. Top Pressure Belt - Right
2. Initial Roller

2 pocket roll plant master (RevC-2 18 21-08-18 safety switch) 31
9. Two-Pocket Roll Plant -
Cleaning & Maintenance
Note: Switch Off and Isolate the Machine from the Mains Power Supply Before Commencing any Cleaning or Maintenance Work
9.1 General Advice:
Always ensure the machine is disconnected from the main power supply before cleaning
To obtain optimum performance and results it is essential to follow the recommended
Cleaning Schedule
For speed and efficiency ALWAYS clean the Two-Pocket Roll Plant from the top down
All surfaces coming into contact with dough should be cleaned daily
Remove all scraps of dough from the filling chamber and clean with food-based oil from a
spray can
Do not use jets of water to clean the machine or control panel
Do not use solvents which could damage the paint and synthetic materials
Only plastic scrapers and brushes should be used – do not use steel scrapers
Compressed air should not be used to clean the machine, however, the use of an appropriate
ATEX approved Safety Vacuum cleaner is recommended. Please see Safety Guidelines for
details
All external surfaces should be wiped down with a damp cloth and cleaner
9.2 The Flour Dusters:
The two Flour Dusters situated either side of the Hopper can be cleaned using a stiff brush
Both Flour Dusters can be removed from the machine for a more thorough cleaning by sliding
the Retaining Plates to the unlocked position and easing the Flour Duster out front side first
It is also advisable to vacuum clean the Flour Dusters to prevent infestation using an ATEX
approved Safety Vacuum Cleaner
When replacing the Flour Dusters insert the cog-end of the unit first then lower the remainder
of the Flour Duster into position, then slide the Retaining Plates back into the locked position
Slide the Retaining Plate to the Unlocked Position on Each Sides of the Flour Duster
Lift the Front of the Flour Duster Upwards to Remove and Insert the Cog-End First in Order to Replace
2 pocket roll plant master (RevC-2 18 21-08-18 safety switch) 32
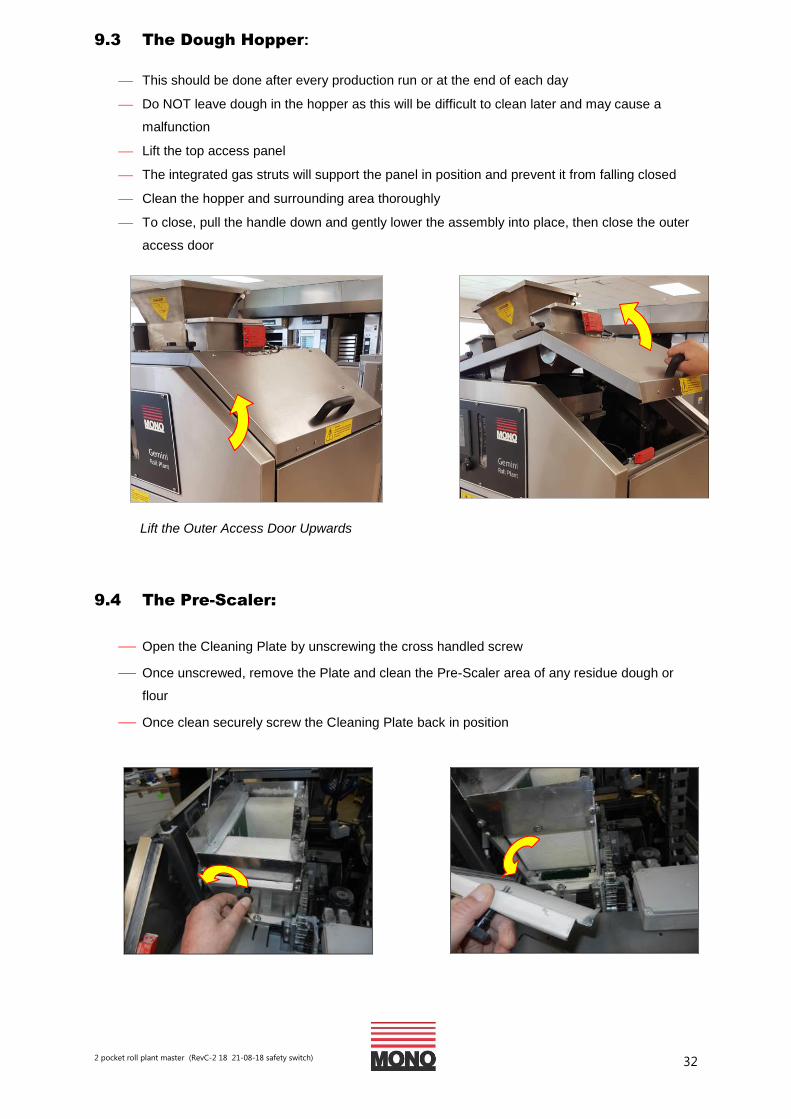
9.3 The Dough Hopper:
This should be done after every production run or at the end of each day
Do NOT leave dough in the hopper as this will be difficult to clean later and may cause a
malfunction
Lift the top access panel
The integrated gas struts will support the panel in position and prevent it from falling closed
Clean the hopper and surrounding area thoroughly
To close, pull the handle down and gently lower the assembly into place, then close the outer
access door
9.4 The Pre-Scaler:
Open the Cleaning Plate by unscrewing the cross handled screw
Once unscrewed, remove the Plate and clean the Pre-Scaler area of any residue dough or
flour
Once clean securely screw the Cleaning Plate back in position
Lift the Outer Access Door Upwards
2 pocket roll plant master (RevC-2 18 21-08-18 safety switch) 33
9.5 The Filling Chamber and Filling Piston:
Loosen the Retaining Knob positioned on the top left hand side of the Piston Plate sufficiently
to allow the Plate to be removed
Grab the handle on the Piston Plate and pull towards you to remove
Lift Piston upwards over the roller and remove completely
Clean the Piston thoroughly and return to its position
Clean the filling chamber
Ensure that the two perspex side panels are clear of flour dust
Replace the Piston Plate and hand tighten the retaining knob
Remove Piston Plate to Access Piston
Loosen Retaining Knob

2 pocket roll plant master (RevC-2 18 21-08-18 safety switch) 34
9.6 The Drum and Rounder:
Open the access door upwards
Press the Release Button to release the Handle
Rotate the Handle anti-clockwise until it stops to release the retaining pin
Grabbing both handles firmly pull the Rounding Unit forwards. The Unit is quite heavy but is
supported by gas struts which prevents it from falling back into place
Clean all accessible areas including the Base Plate, Side Guides, Rounding Plate and
Chambers with a plastic scraper or brush
Remove the Piston Plate to clean the pre-scaling area from this side of the machine
The metal pieces of the drum should be oiled weekly to ensure easy movement
The Rounding Plate, especially the grooves can be cleaned with a stiff brush
For maintenance, the Rounding Plate can also be removed by pivoting the plate and releasing
the 6 countersunk screws. This will need to be done if the groves are no longer sharp.
Lift Piston Plate to Clean Rounding Plate Rounding Chambers
Press the Button to Release the Handle
Rotate the Handle Completely to the Left
Grab hold of Both Handles and Pull Forwards
2 pocket roll plant master (RevC-2 18 21-08-18 safety switch) 35
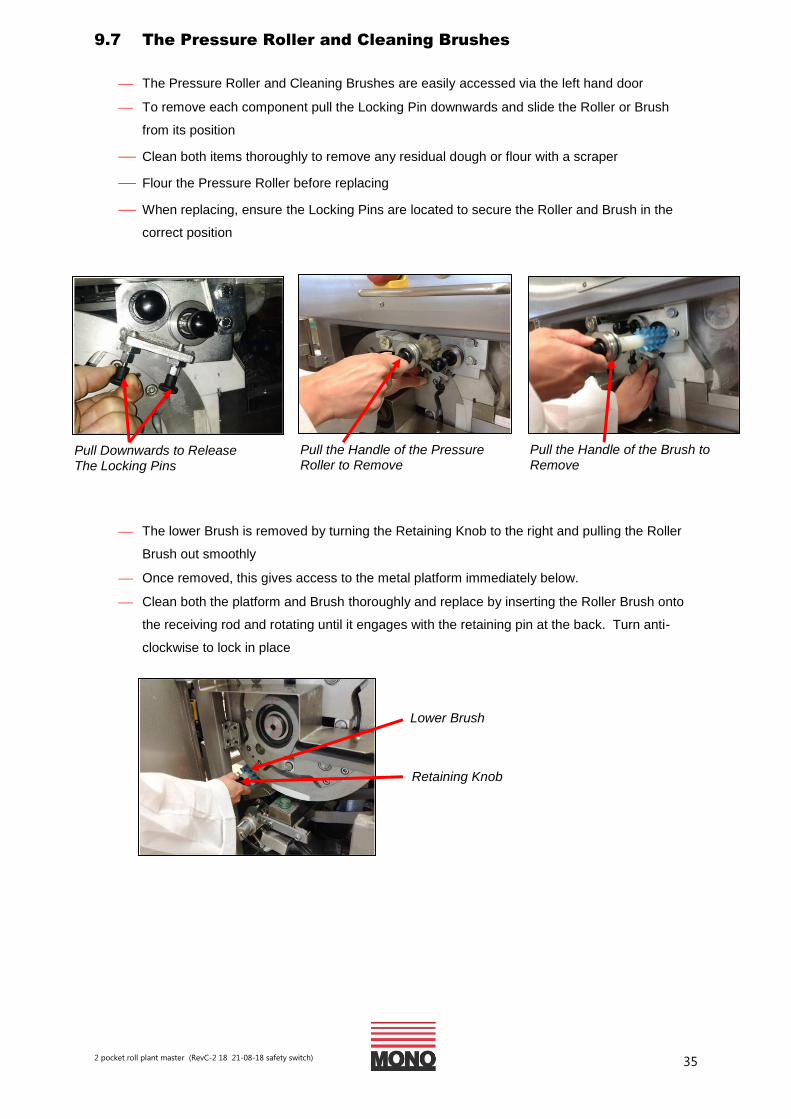
9.7 The Pressure Roller and Cleaning Brushes
The Pressure Roller and Cleaning Brushes are easily accessed via the left hand door
To remove each component pull the Locking Pin downwards and slide the Roller or Brush
from its position
Clean both items thoroughly to remove any residual dough or flour with a scraper
Flour the Pressure Roller before replacing
When replacing, ensure the Locking Pins are located to secure the Roller and Brush in the
correct position
The lower Brush is removed by turning the Retaining Knob to the right and pulling the Roller
Brush out smoothly
Once removed, this gives access to the metal platform immediately below.
Clean both the platform and Brush thoroughly and replace by inserting the Roller Brush onto
the receiving rod and rotating until it engages with the retaining pin at the back. Turn anti-
clockwise to lock in place
Locking Pins
Pull Downwards to Release The Locking Pins
Pull the Handle of the Pressure Roller to Remove
Pull the Handle of the Brush to Remove
Lower Brush
Retaining Knob
2 pocket roll plant master (RevC-2 18 21-08-18 safety switch) 36
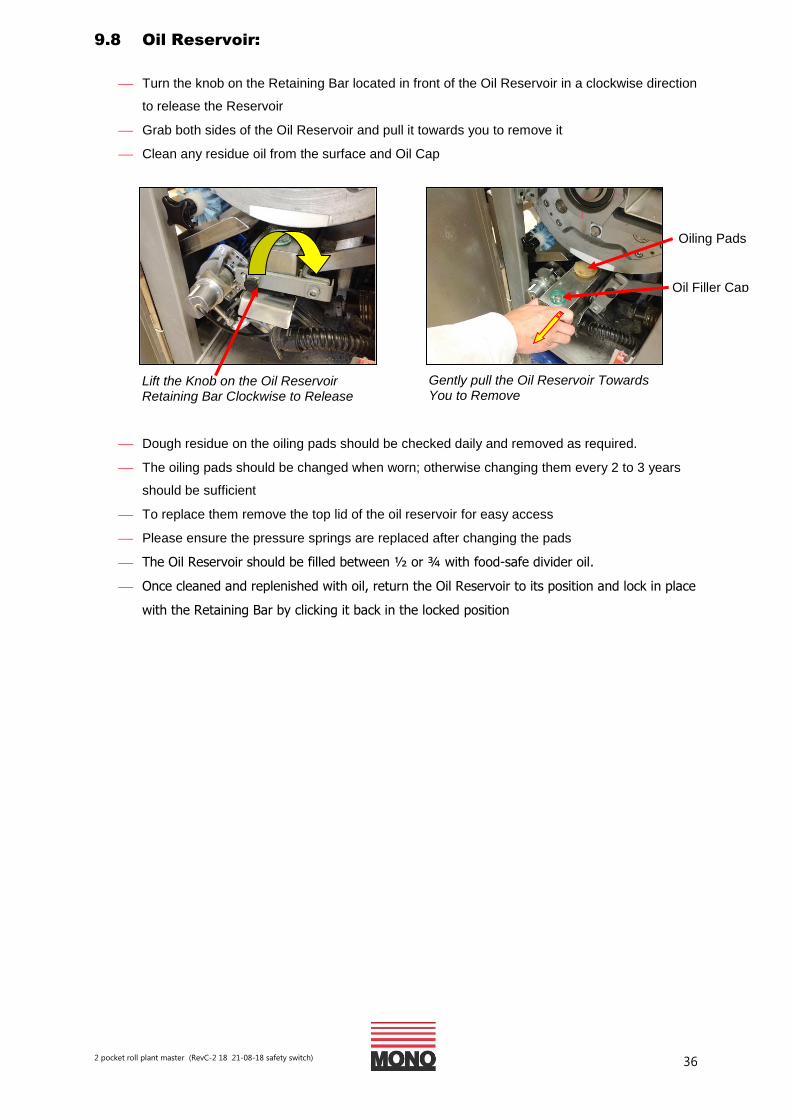
9.8 Oil Reservoir:
Turn the knob on the Retaining Bar located in front of the Oil Reservoir in a clockwise direction
to release the Reservoir
Grab both sides of the Oil Reservoir and pull it towards you to remove it
Clean any residue oil from the surface and Oil Cap
Dough residue on the oiling pads should be checked daily and removed as required.
The oiling pads should be changed when worn; otherwise changing them every 2 to 3 years
should be sufficient
To replace them remove the top lid of the oil reservoir for easy access
Please ensure the pressure springs are replaced after changing the pads
The Oil Reservoir should be filled between ½ or ¾ with food-safe divider oil.
Once cleaned and replenished with oil, return the Oil Reservoir to its position and lock in place
with the Retaining Bar by clicking it back in the locked position
Oiling Pads
Oil Filler Cap
Gently pull the Oil Reservoir Towards You to Remove
Lift the Knob on the Oil Reservoir Retaining Bar Clockwise to Release
2 pocket roll plant master (RevC-2 18 21-08-18 safety switch) 37
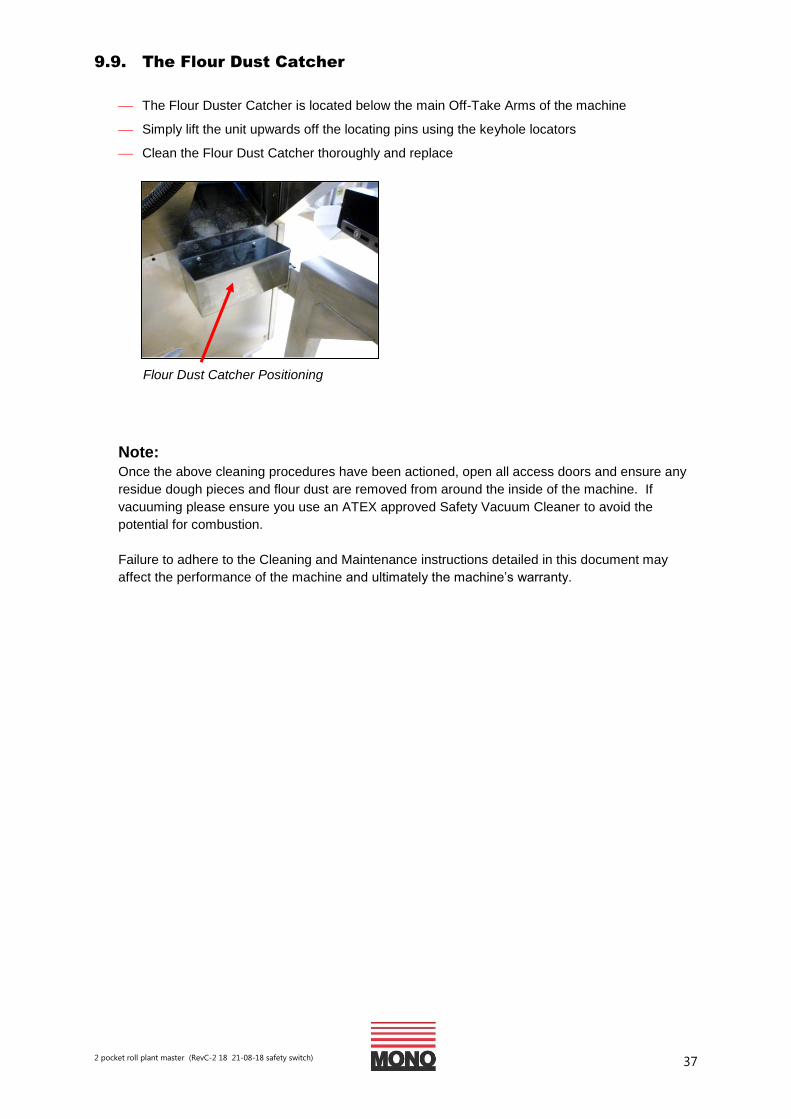
9.9. The Flour Dust Catcher
The Flour Duster Catcher is located below the main Off-Take Arms of the machine
Simply lift the unit upwards off the locating pins using the keyhole locators
Clean the Flour Dust Catcher thoroughly and replace
Note: Once the above cleaning procedures have been actioned, open all access doors and ensure any
residue dough pieces and flour dust are removed from around the inside of the machine. If
vacuuming please ensure you use an ATEX approved Safety Vacuum Cleaner to avoid the
potential for combustion.
Failure to adhere to the Cleaning and Maintenance instructions detailed in this document may
affect the performance of the machine and ultimately the machine’s warranty.
Flour Dust Catcher Positioning
2 pocket roll plant master (RevC-2 18 21-08-18 safety switch) 38
10. Roll Forming Unit - Cleaning and
Maintenance (if fitted):
Note: Switch Off and Isolate the Two-Pocket Roll Plant from the Mains Power Supply Before Commencing any Cleaning or Maintenance Work is Carried out on the Roll Forming Unit
10.1 General Advice:
Always ensure the Two-Pocket Roll Plant is disconnected from the mains power supply before
cleaning the Roll Forming Unit
To obtain optimum performance and results it is essential to follow the recommended
Cleaning Schedule
For speed and efficiency ALWAYS clean the Roll Forming Unit from the top down
All surfaces coming into contact with dough should be cleaned daily
Remove all scraps of dough from the rollers, brushes and belt systems
Do not use jets of water to clean any part of the machine
Do not use solvents which could damage the paint and synthetic materials
Only plastic scrapers and brushes should be used – do not use steel scrapers
Compressed air should not be used to clean the machine, however, the use of an appropriate
ATEX approved Safety Vacuum cleaner is recommended. Please see Safety Guidelines for
details
All external surfaces should be wiped down with a damp cloth and cleaner
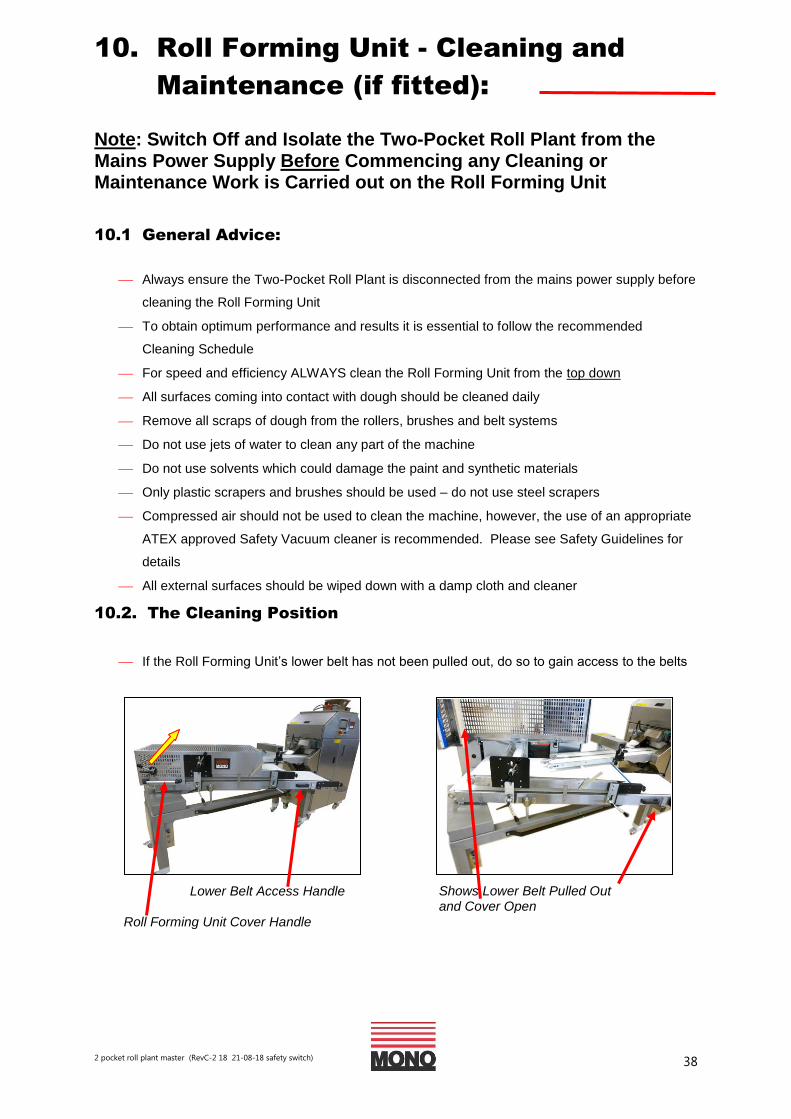
10.2. The Cleaning Position
If the Roll Forming Unit’s lower belt has not been pulled out, do so to gain access to the belts
Shows Lower Belt Pulled Out and Cover Open
Lower Belt Access Handle
Roll Forming Unit Cover Handle
2 pocket roll plant master (RevC-2 18 21-08-18 safety switch) 39
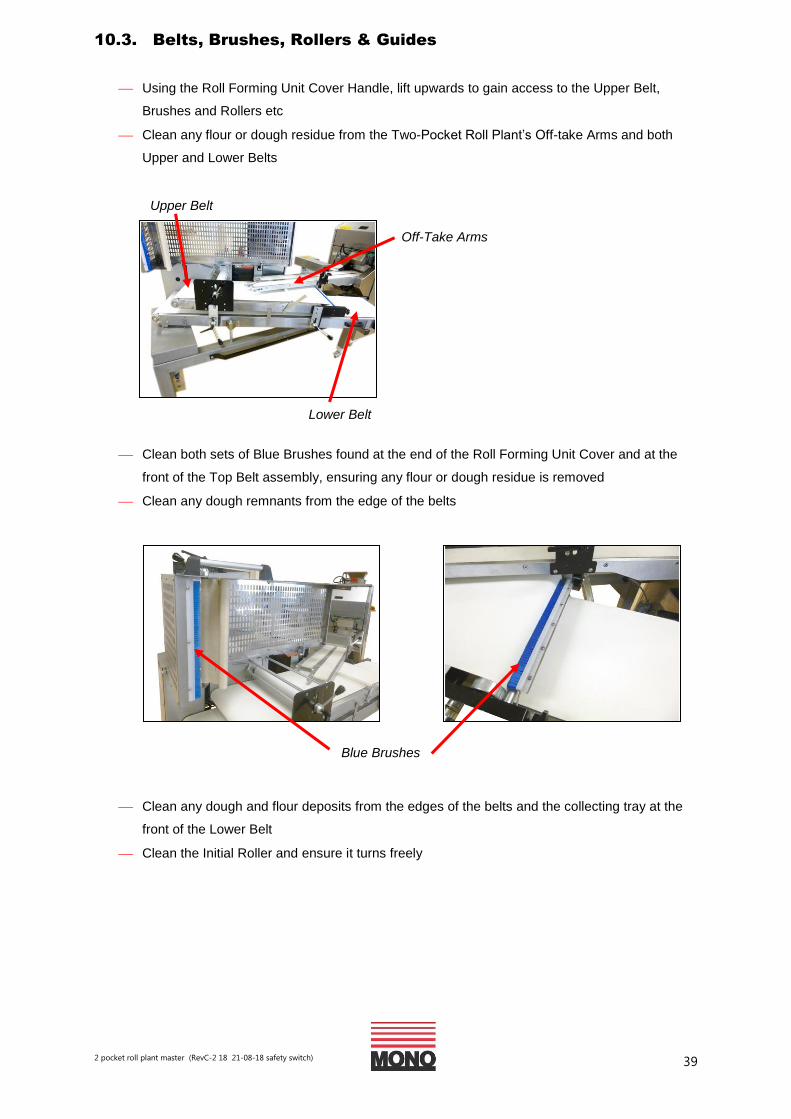
10.3. Belts, Brushes, Rollers & Guides
Using the Roll Forming Unit Cover Handle, lift upwards to gain access to the Upper Belt,
Brushes and Rollers etc
Clean any flour or dough residue from the Two-Pocket Roll Plant’s Off-take Arms and both
Upper and Lower Belts
Clean both sets of Blue Brushes found at the end of the Roll Forming Unit Cover and at the
front of the Top Belt assembly, ensuring any flour or dough residue is removed
Clean any dough remnants from the edge of the belts
Clean any dough and flour deposits from the edges of the belts and the collecting tray at the
front of the Lower Belt
Clean the Initial Roller and ensure it turns freely
Off-Take Arms
Upper Belt
Lower Belt
Blue Brushes
2 pocket roll plant master (RevC-2 18 21-08-18 safety switch) 40
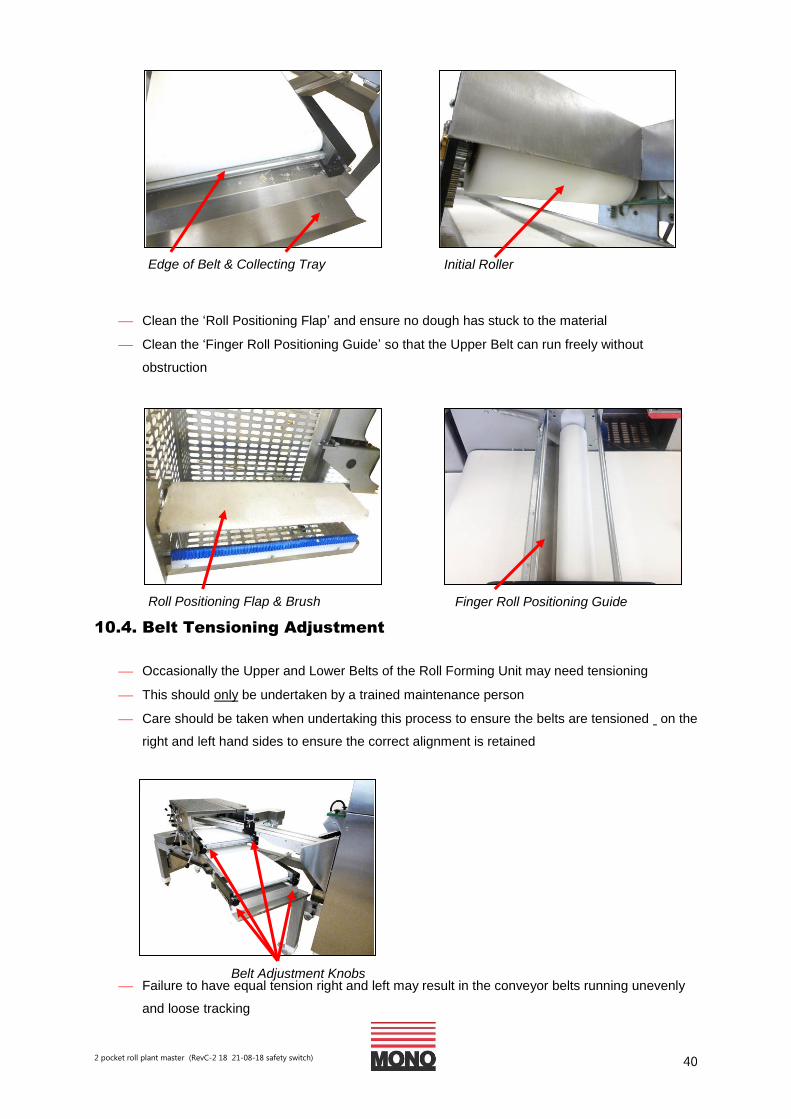
Clean the ‘Roll Positioning Flap’ and ensure no dough has stuck to the material
Clean the ‘Finger Roll Positioning Guide’ so that the Upper Belt can run freely without
obstruction
10.4. Belt Tensioning Adjustment
Occasionally the Upper and Lower Belts of the Roll Forming Unit may need tensioning
This should only be undertaken by a trained maintenance person
Care should be taken when undertaking this process to ensure the belts are tensioned on the
right and left hand sides to ensure the correct alignment is retained
Failure to have equal tension right and left may result in the conveyor belts running unevenly
and loose tracking
Roll Positioning Flap & Brush Finger Roll Positioning Guide
Edge of Belt & Collecting Tray Initial Roller
Belt Adjustment Knobs
2 pocket roll plant master (RevC-2 18 21-08-18 safety switch) 41
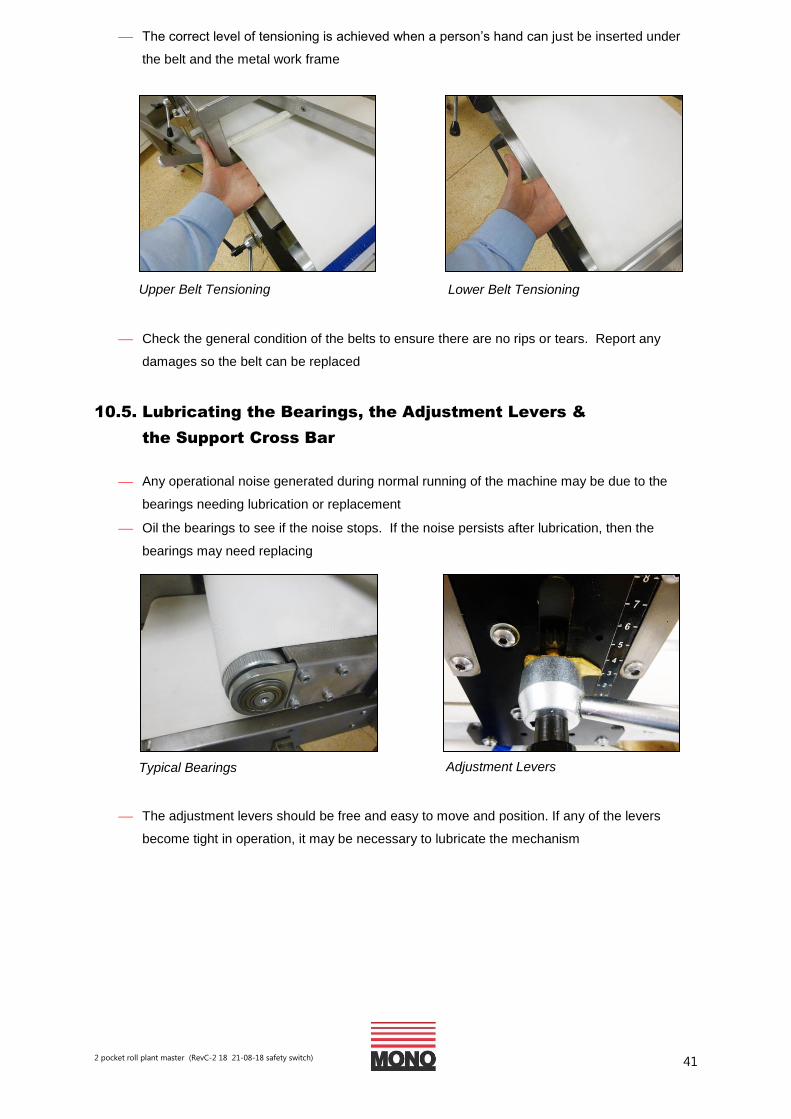
The correct level of tensioning is achieved when a person’s hand can just be inserted under
the belt and the metal work frame
Check the general condition of the belts to ensure there are no rips or tears. Report any
damages so the belt can be replaced
10.5. Lubricating the Bearings, the Adjustment Levers &
the Support Cross Bar
Any operational noise generated during normal running of the machine may be due to the
bearings needing lubrication or replacement
Oil the bearings to see if the noise stops. If the noise persists after lubrication, then the
bearings may need replacing
The adjustment levers should be free and easy to move and position. If any of the levers
become tight in operation, it may be necessary to lubricate the mechanism
Upper Belt Tensioning Lower Belt Tensioning
Typical Bearings Adjustment Levers
2 pocket roll plant master (RevC-2 18 21-08-18 safety switch) 42
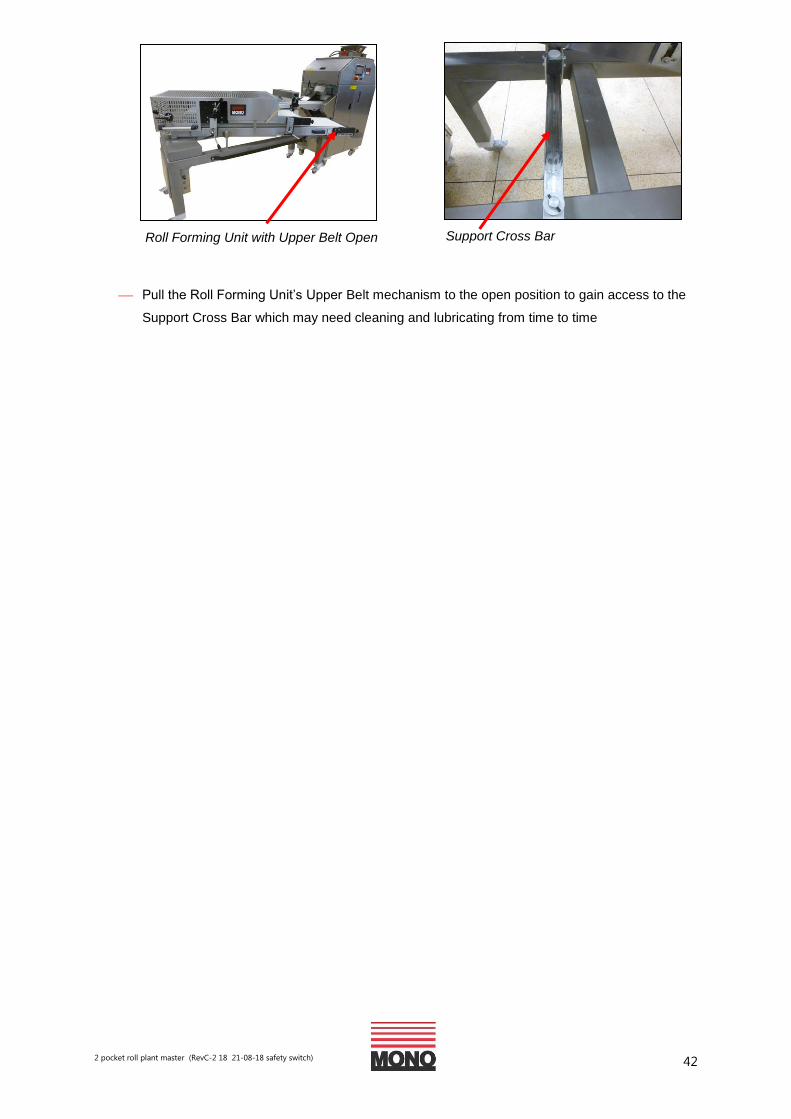
Pull the Roll Forming Unit’s Upper Belt mechanism to the open position to gain access to the
Support Cross Bar which may need cleaning and lubricating from time to time
Roll Forming Unit with Upper Belt Open Support Cross Bar
2 pocket roll plant master (RevC-2 18 21-08-18 safety switch) 43
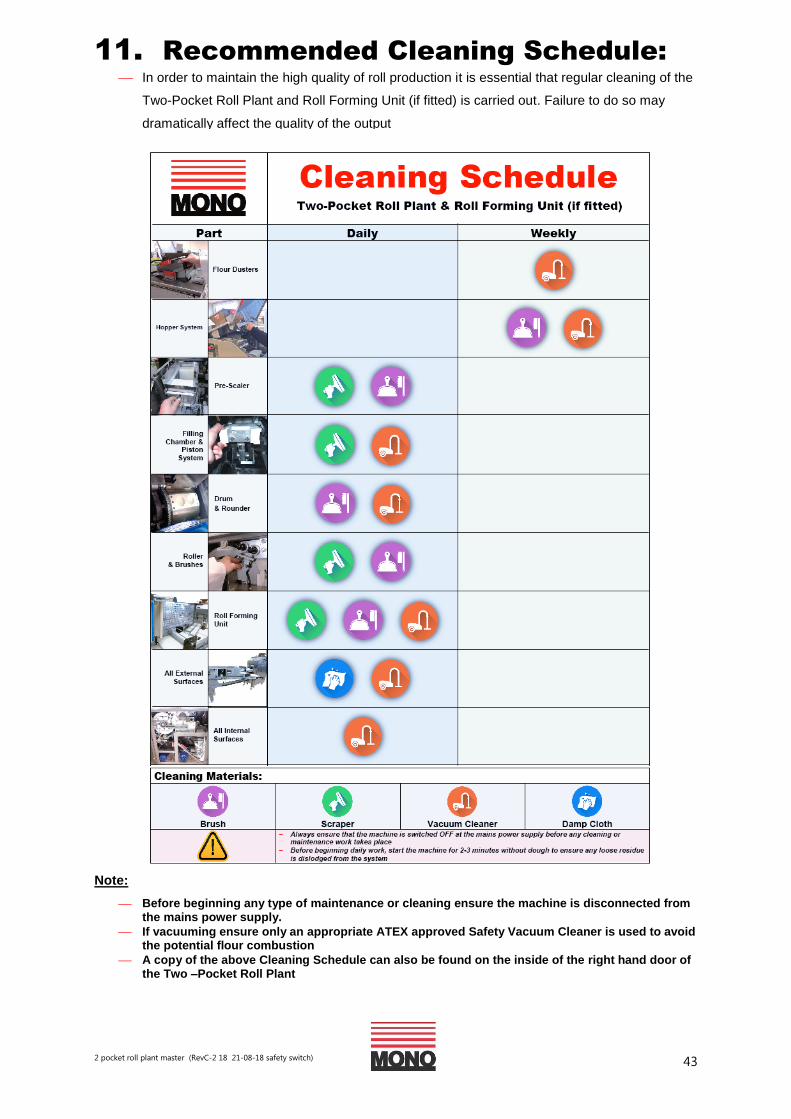
11. Recommended Cleaning Schedule:
In order to maintain the high quality of roll production it is essential that regular cleaning of the
Two-Pocket Roll Plant and Roll Forming Unit (if fitted) is carried out. Failure to do so may
dramatically affect the quality of the output
Note:
Before beginning any type of maintenance or cleaning ensure the machine is disconnected from the mains power supply.
If vacuuming ensure only an appropriate ATEX approved Safety Vacuum Cleaner is used to avoid the potential flour combustion
A copy of the above Cleaning Schedule can also be found on the inside of the right hand door of the Two –Pocket Roll Plant
2 pocket roll plant master (RevC-2 18 21-08-18 safety switch) 44
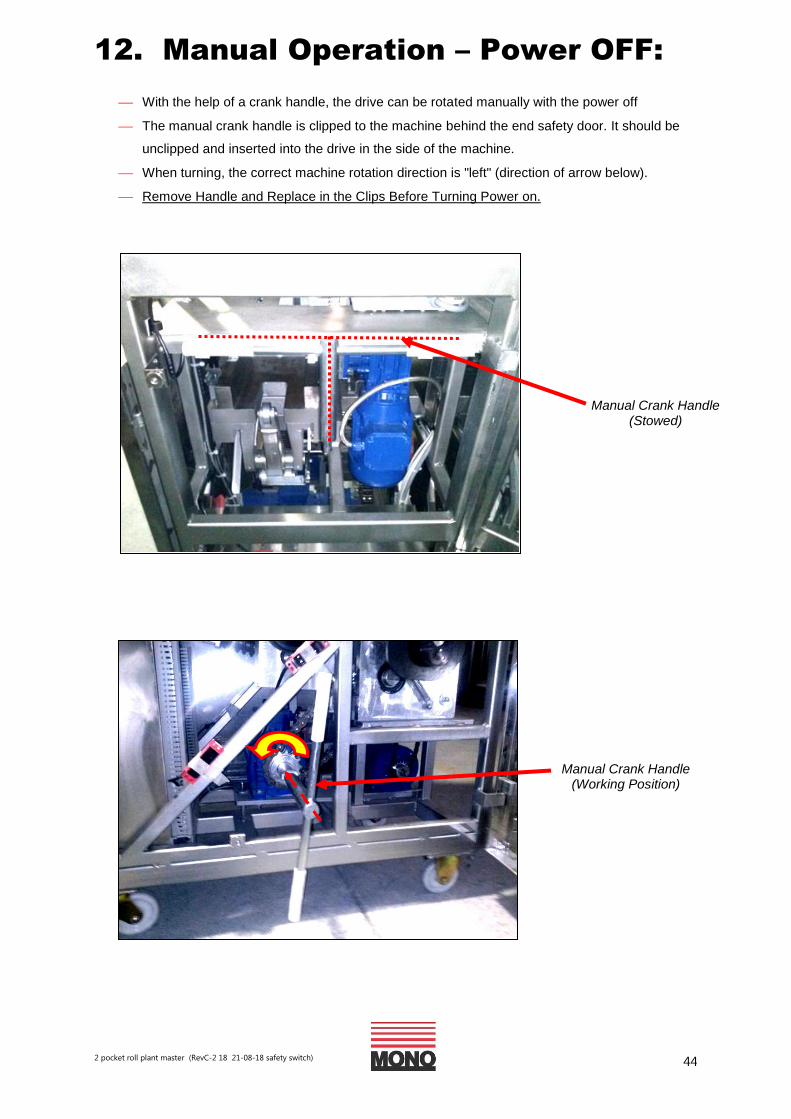
12. Manual Operation – Power OFF:
With the help of a crank handle, the drive can be rotated manually with the power off
The manual crank handle is clipped to the machine behind the end safety door. It should be
unclipped and inserted into the drive in the side of the machine.
When turning, the correct machine rotation direction is "left" (direction of arrow below).
Remove Handle and Replace in the Clips Before Turning Power on.
Manual Crank Handle (Working Position)
Manual Crank Handle (Stowed)
2 pocket roll plant master (RevC-2 18 21-08-18 safety switch) 45
13. Hints & Tips:
For best results, ensure the dough piece is gently stretched into an elongated shape
before loading into the Hopper
For best results, it is advised not to cut the dough into too many pieces
The Product Recipe settings on Two-Pocket Roll Plant are based on the current QPIG
which are the optimum settings to produce the best quality product
Always check the weight of the dough pieces at the start of production and tweak the
settings if required. Continue to check the weights at regular intervals to ensure
consistency
Transfer the Roll Forming Unit values from the Screen to the actual belt settings to ensure
the correct shape is achieved before operating the machine.
For finger roll production, ensure that the Upper Belt runs at a faster speed than the
Lower Belt
The Two-Pocket Roll Plant and Roll Forming Unit works well with a wide range of doughs
and it shouldn’t be necessary to remove water from the recipes in order for it to work
effectively
The Two-Pocket Roll Plant and Roll Forming Unit have been designed to provide full
access to the internal workings for thorough cleaning
As flour dust can be highly combustible please ensure ONLY an ATEX approved Safety
Vacuum Cleaner is used for cleaning purposes
For a quick guide to the cleaning process refer to the Cleaning Schedule which can be
found on the inside of the left hand door of the main Two-Pocket Roll Plant
2 pocket roll plant master (RevC-2 18 21-08-18 safety switch) 46
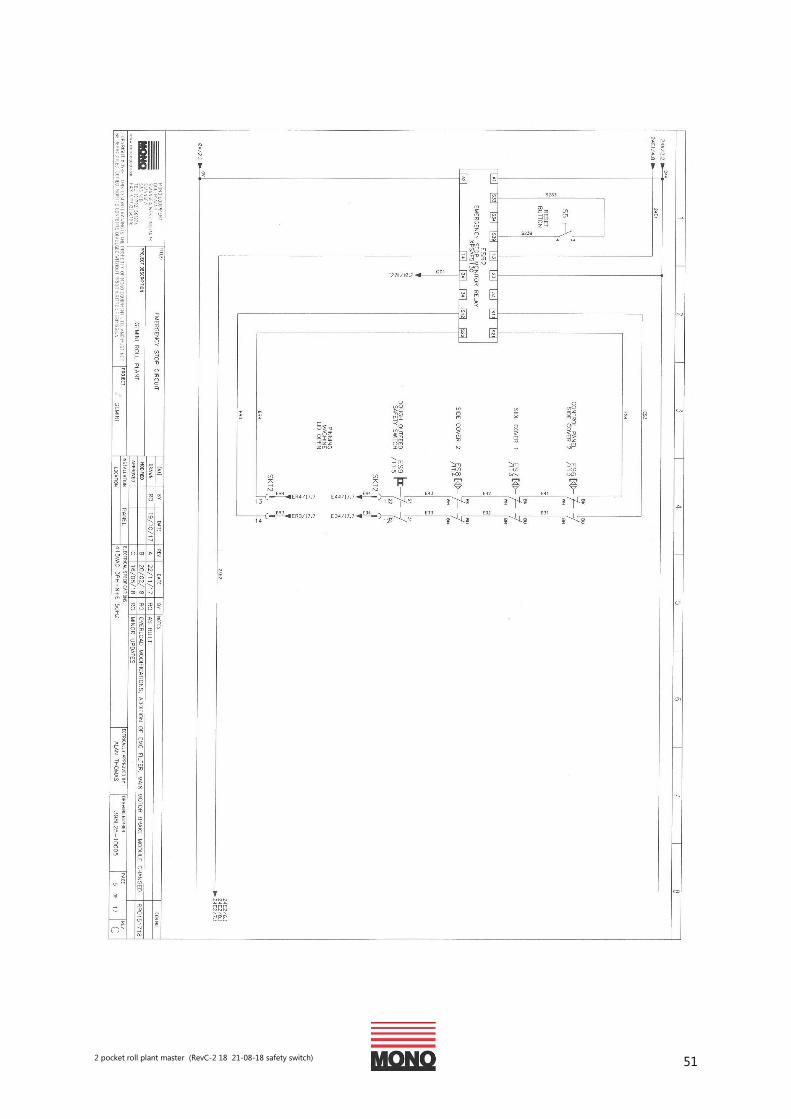
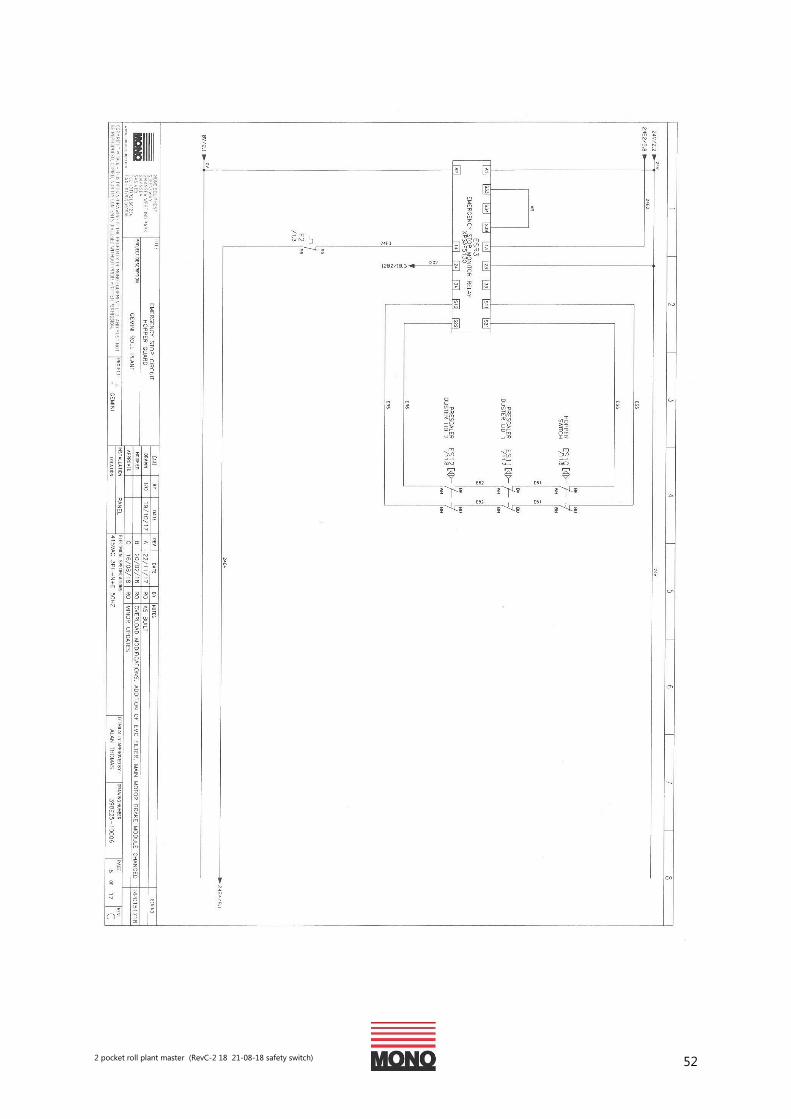
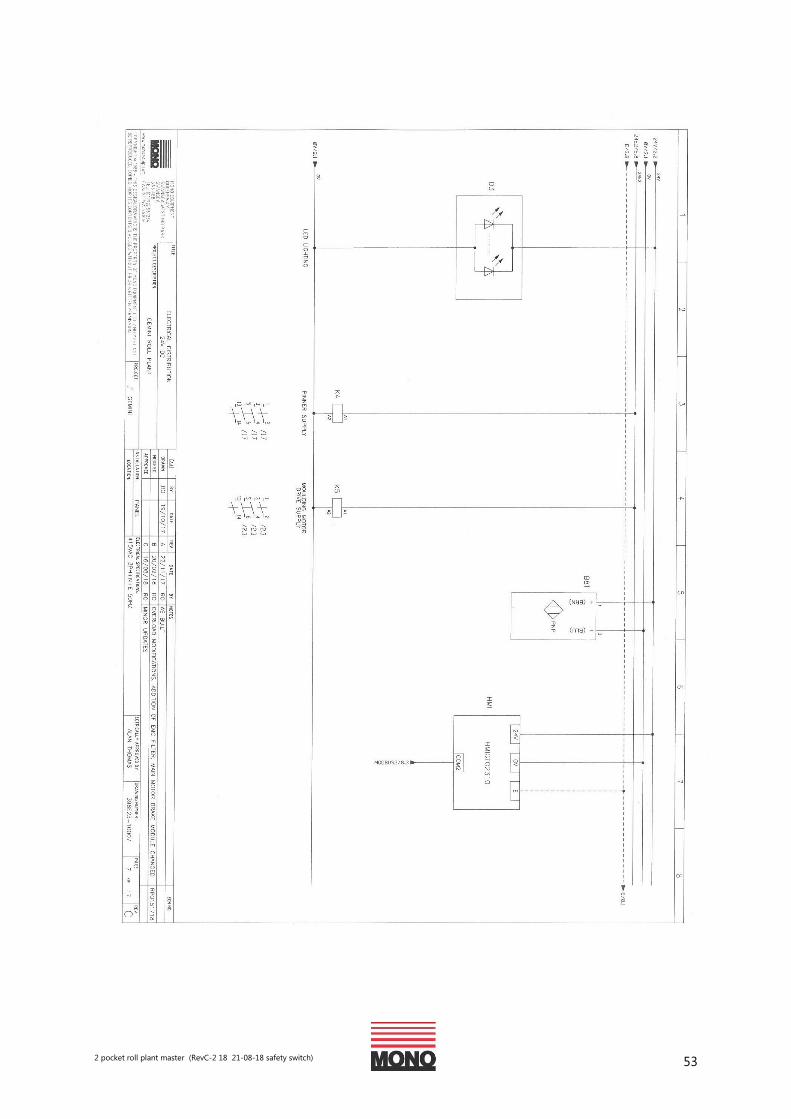
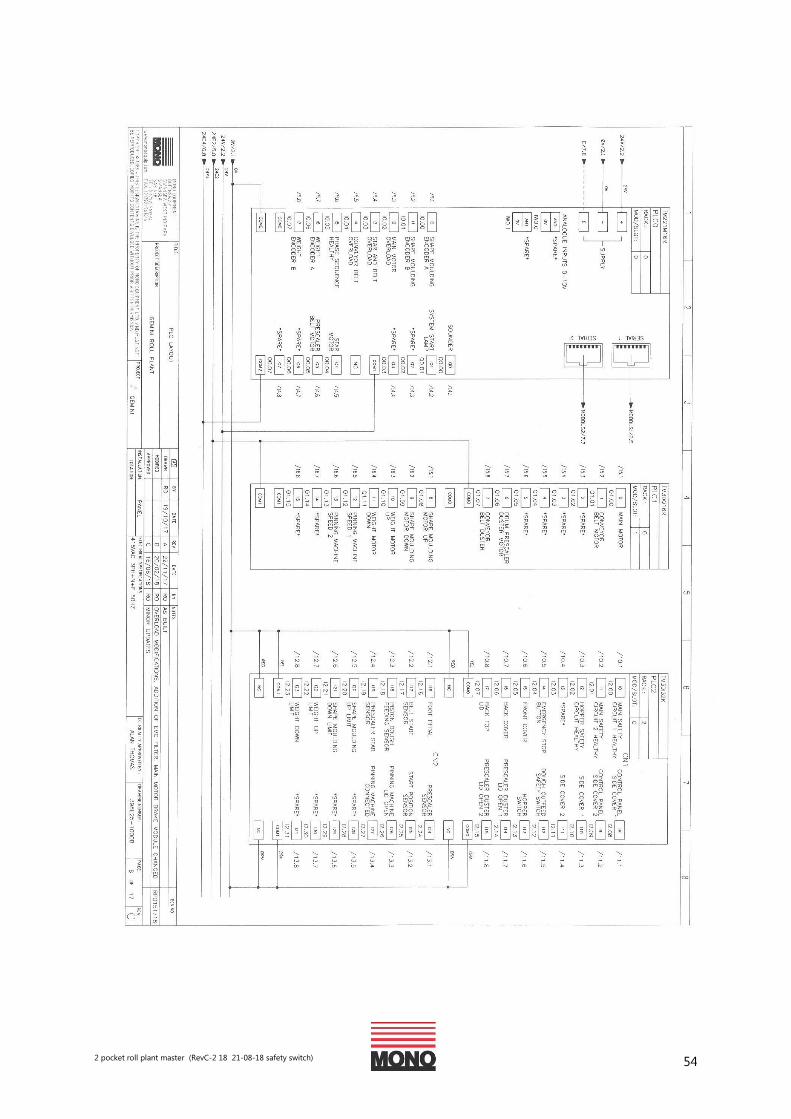
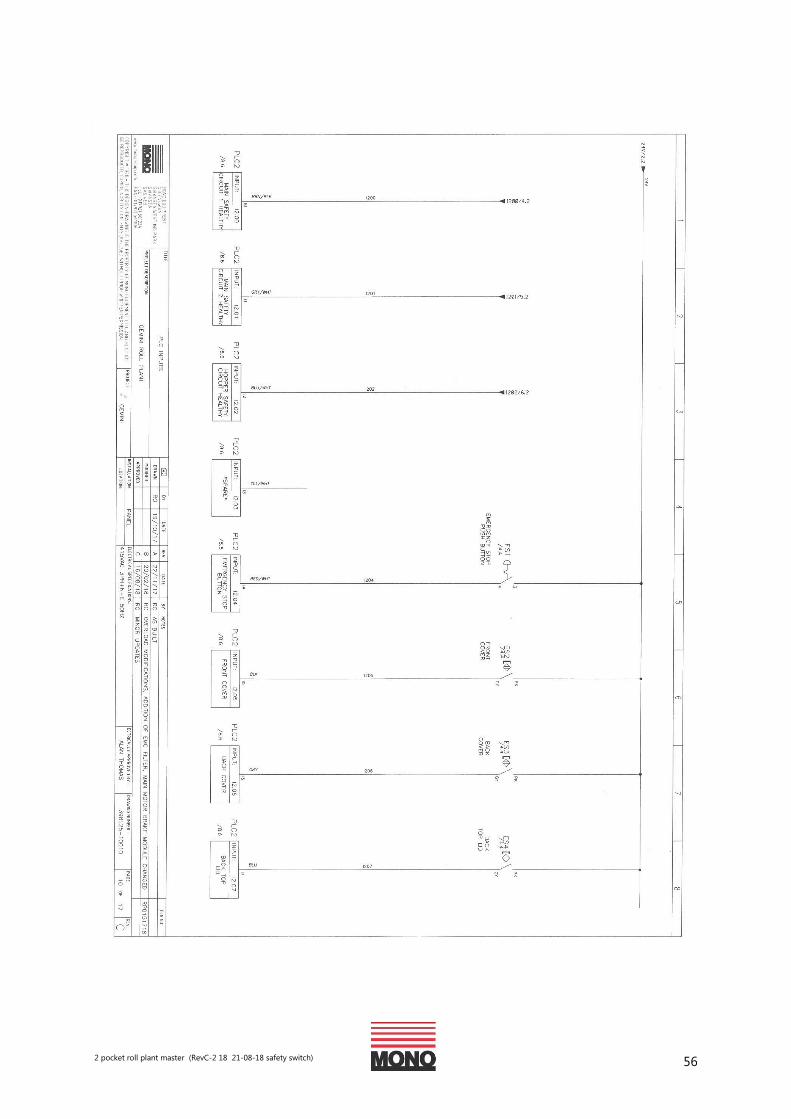
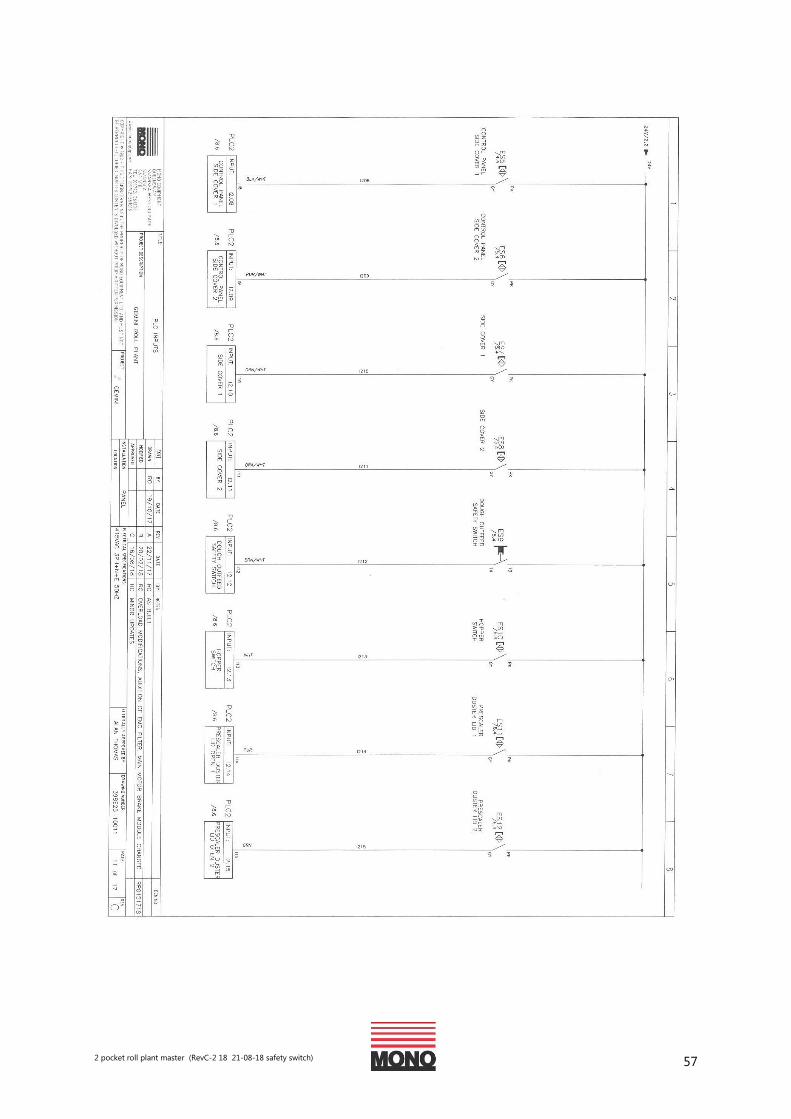
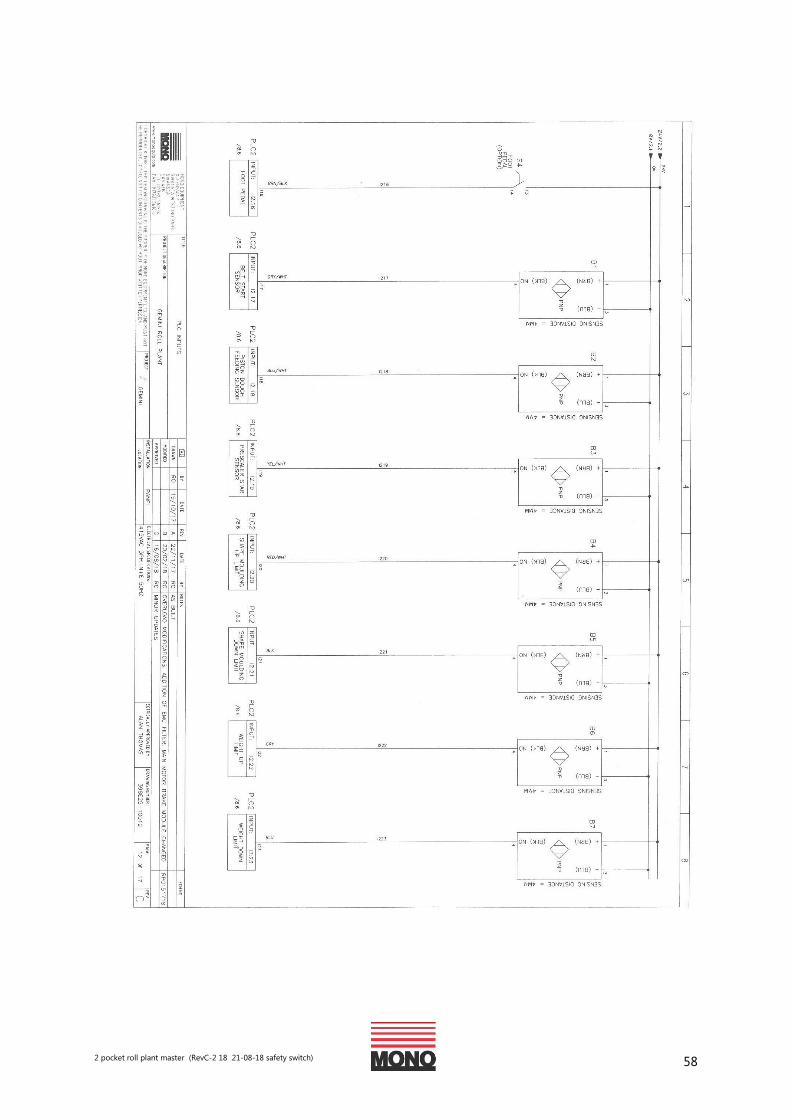
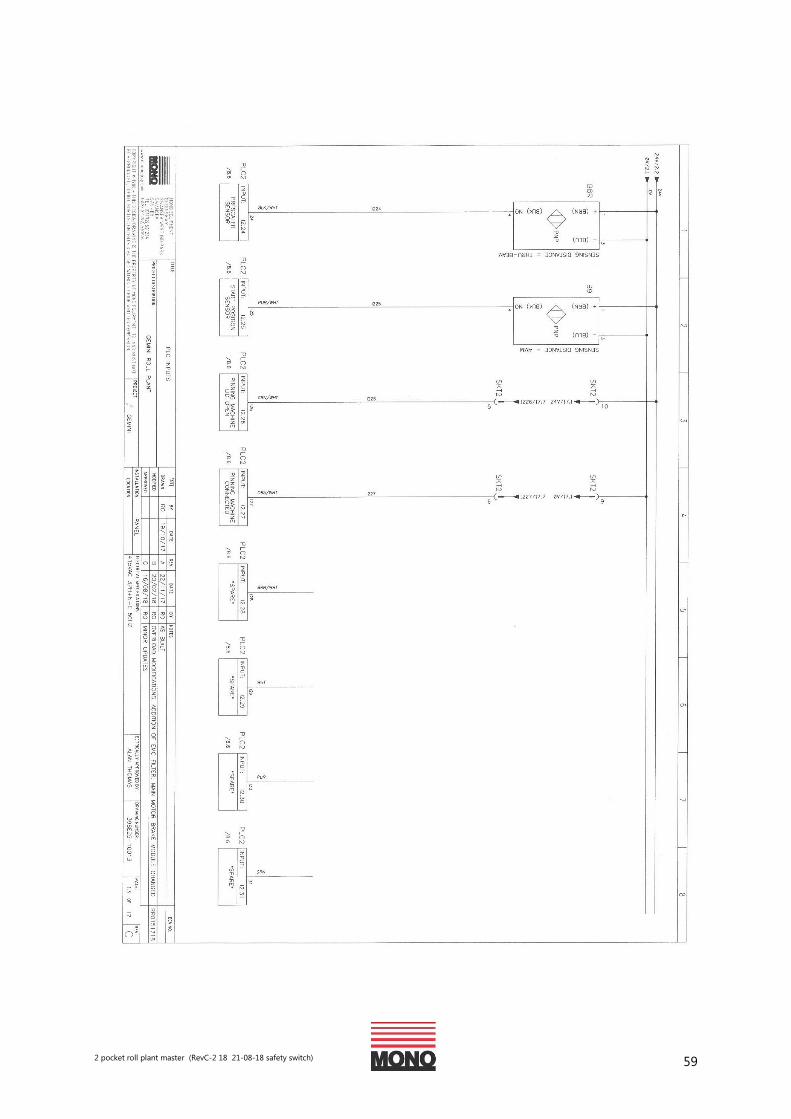
14. Electrical Information – Roll Plant:
2 pocket roll plant master (RevC-2 18 21-08-18 safety switch) 47
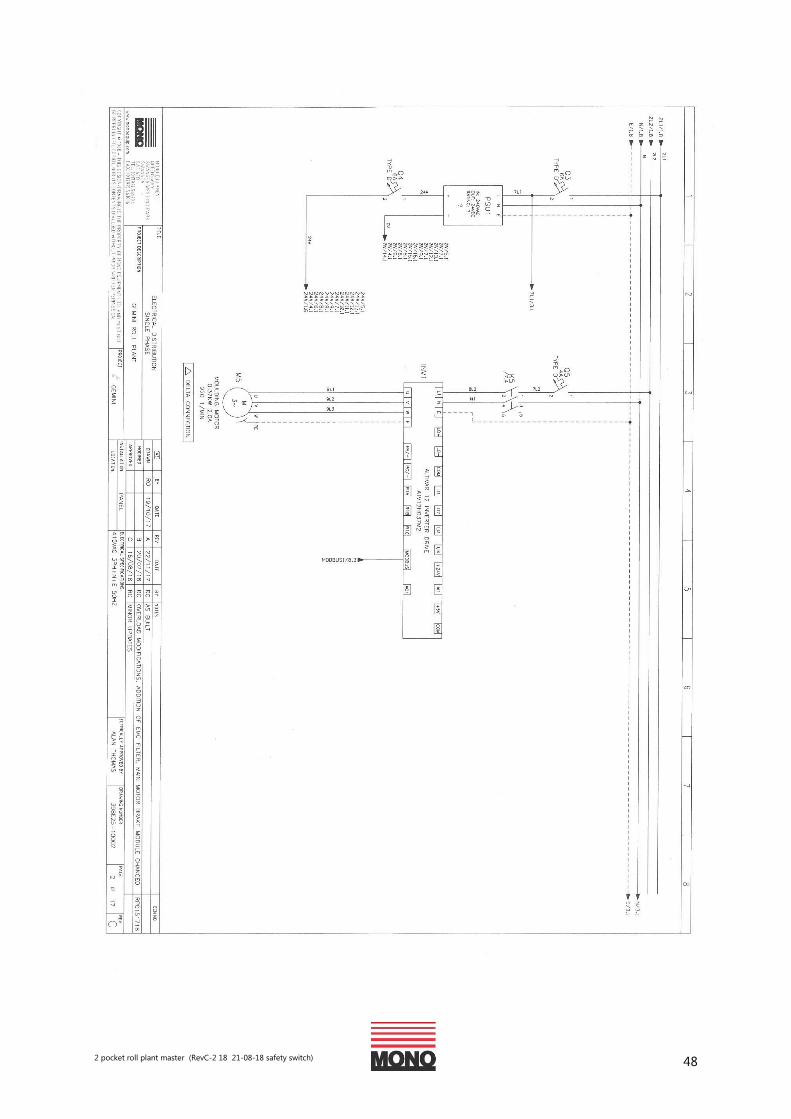
2 pocket roll plant master (RevC-2 18 21-08-18 safety switch) 48
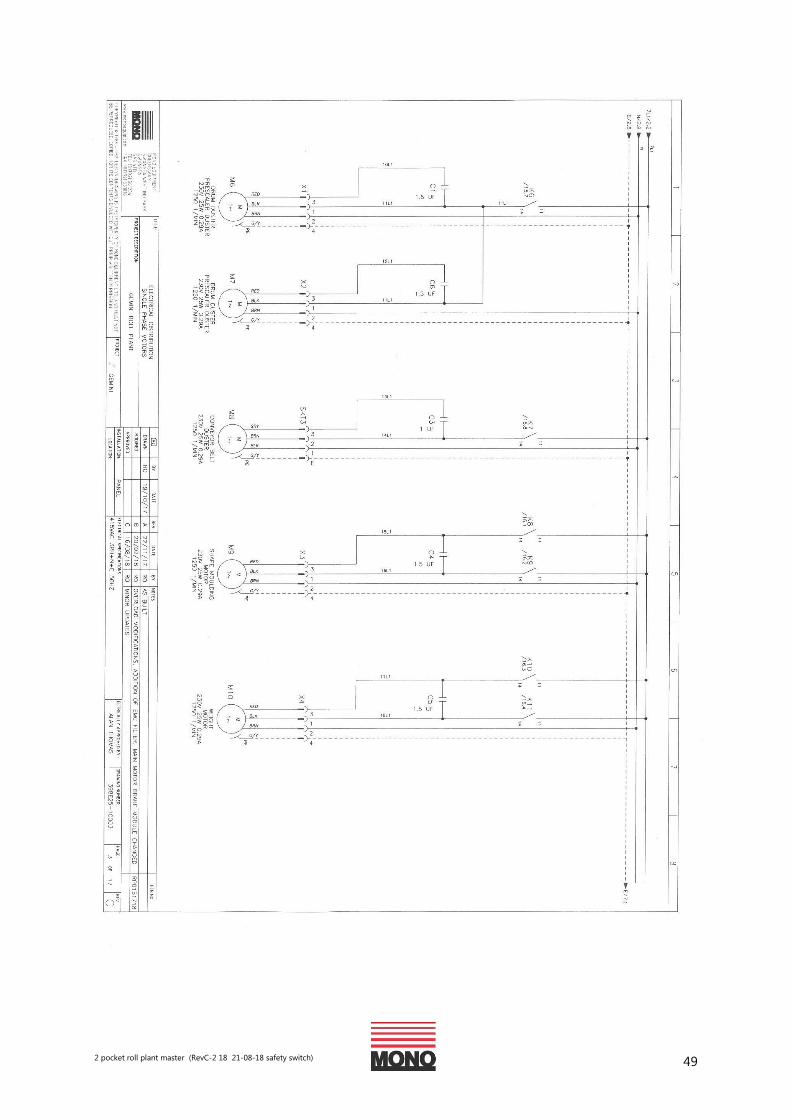
2 pocket roll plant master (RevC-2 18 21-08-18 safety switch) 49
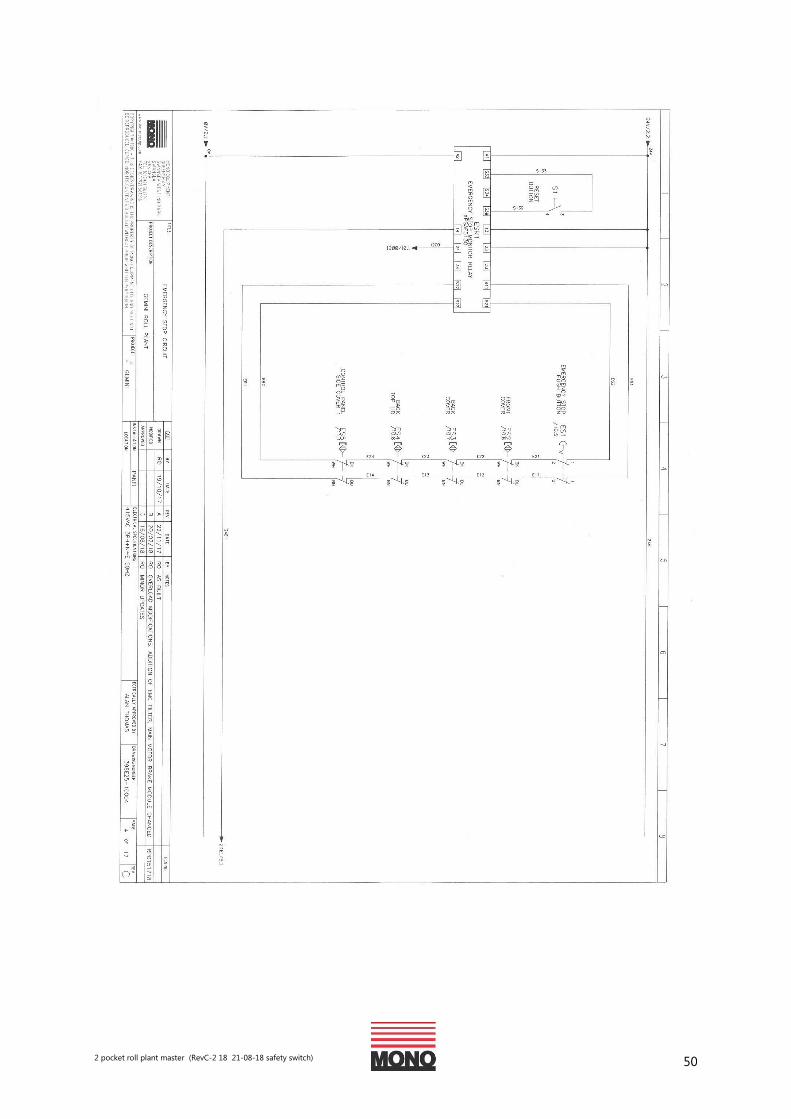
2 pocket roll plant master (RevC-2 18 21-08-18 safety switch) 50
2 pocket roll plant master (RevC-2 18 21-08-18 safety switch) 51
2 pocket roll plant master (RevC-2 18 21-08-18 safety switch) 52
2 pocket roll plant master (RevC-2 18 21-08-18 safety switch) 53
2 pocket roll plant master (RevC-2 18 21-08-18 safety switch) 54

2 pocket roll plant master (RevC-2 18 21-08-18 safety switch) 55
2 pocket roll plant master (RevC-2 18 21-08-18 safety switch) 56
2 pocket roll plant master (RevC-2 18 21-08-18 safety switch) 57
2 pocket roll plant master (RevC-2 18 21-08-18 safety switch) 58
2 pocket roll plant master (RevC-2 18 21-08-18 safety switch) 59
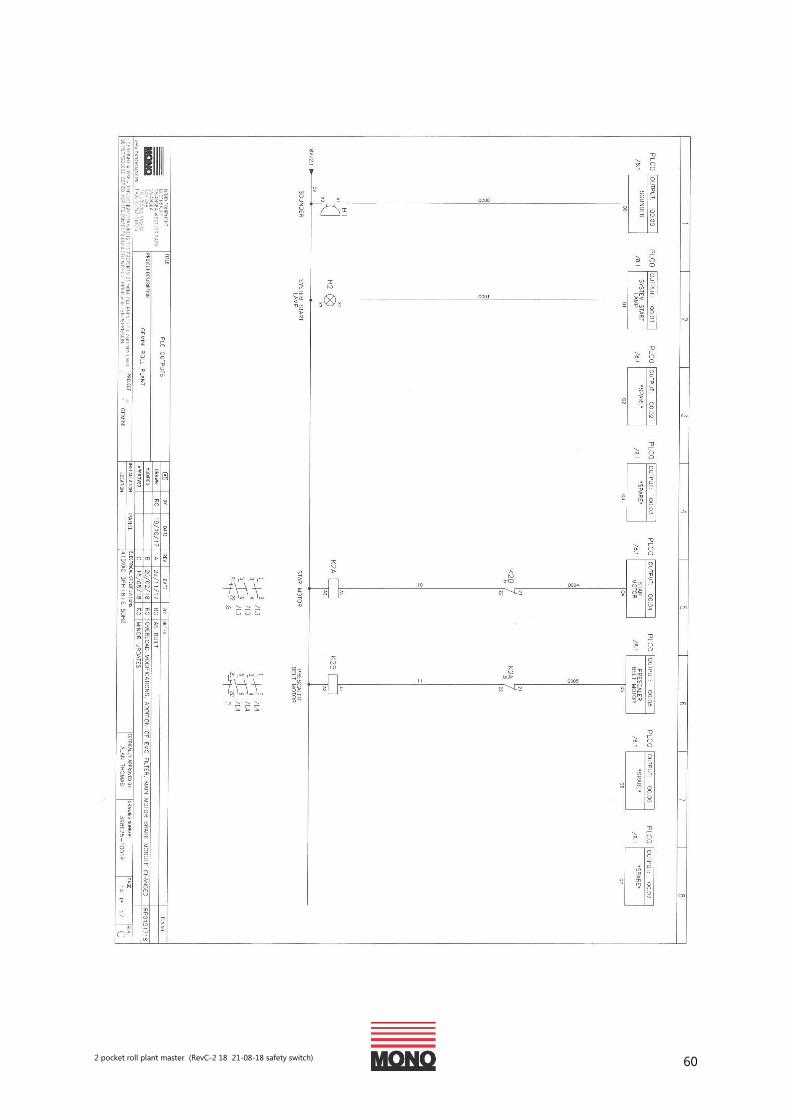
2 pocket roll plant master (RevC-2 18 21-08-18 safety switch) 60
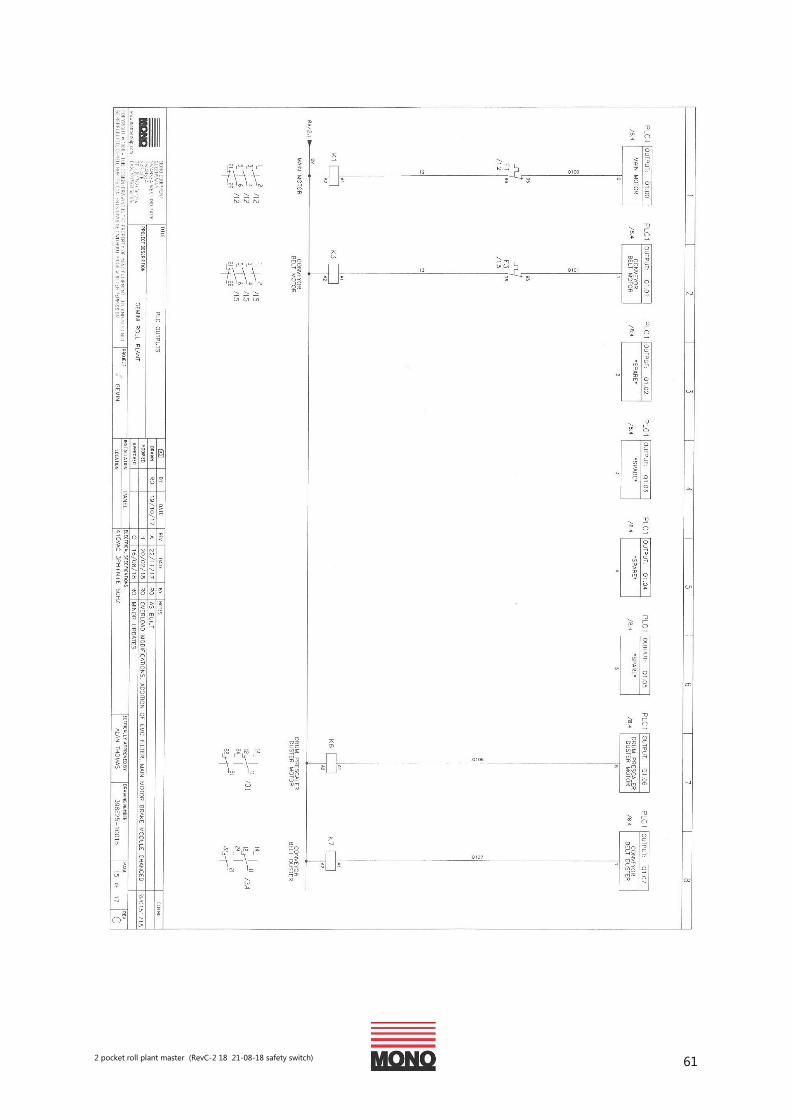
2 pocket roll plant master (RevC-2 18 21-08-18 safety switch) 61
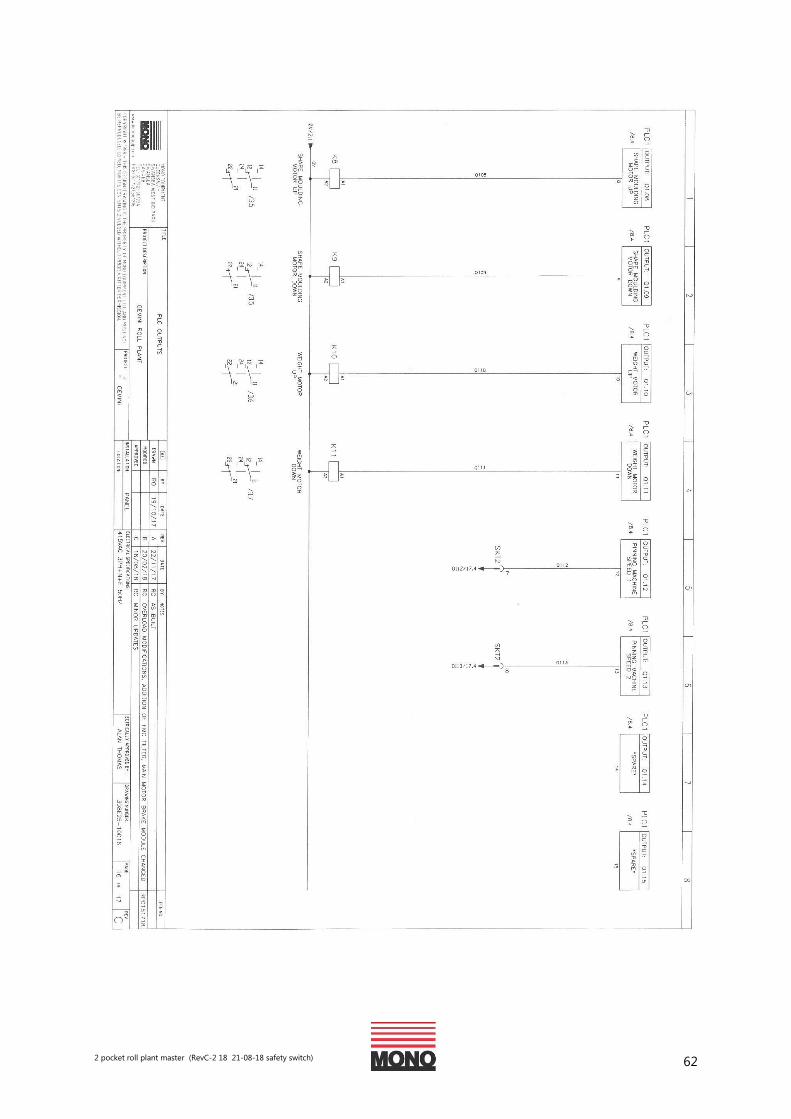
2 pocket roll plant master (RevC-2 18 21-08-18 safety switch) 62
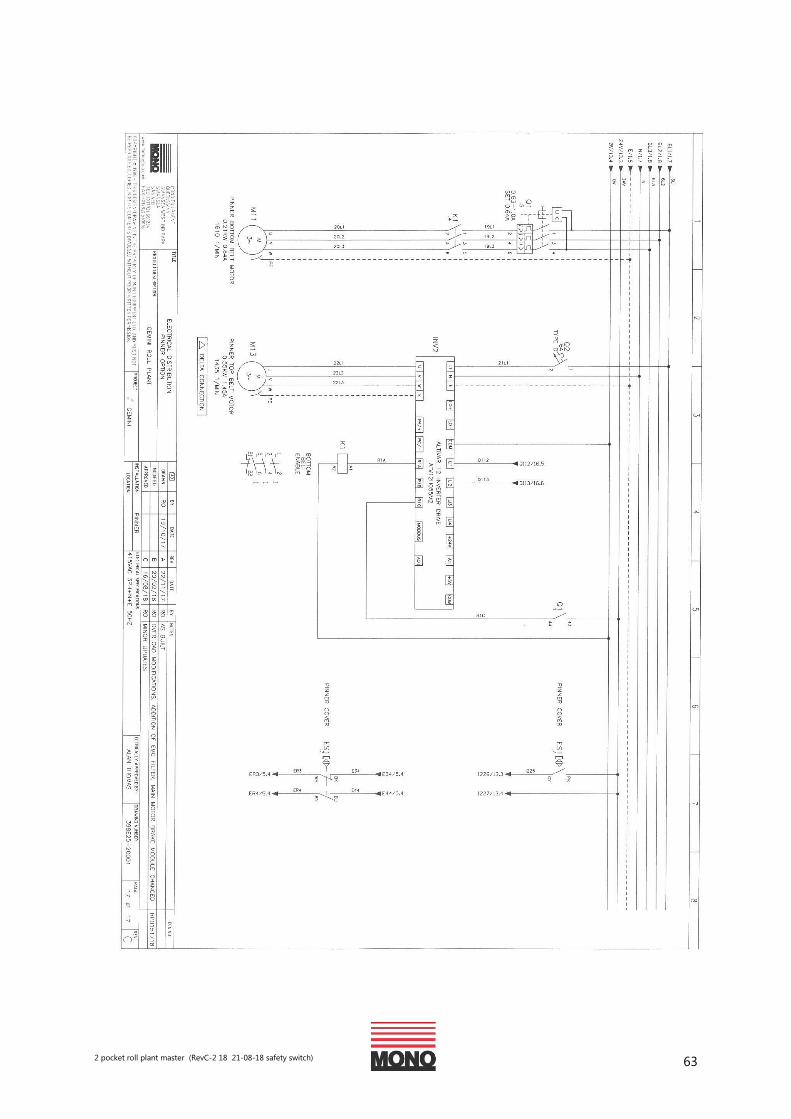
2 pocket roll plant master (RevC-2 18 21-08-18 safety switch) 63

2 pocket roll plant master (RevC-2 18 21-08-18 safety switch) 64
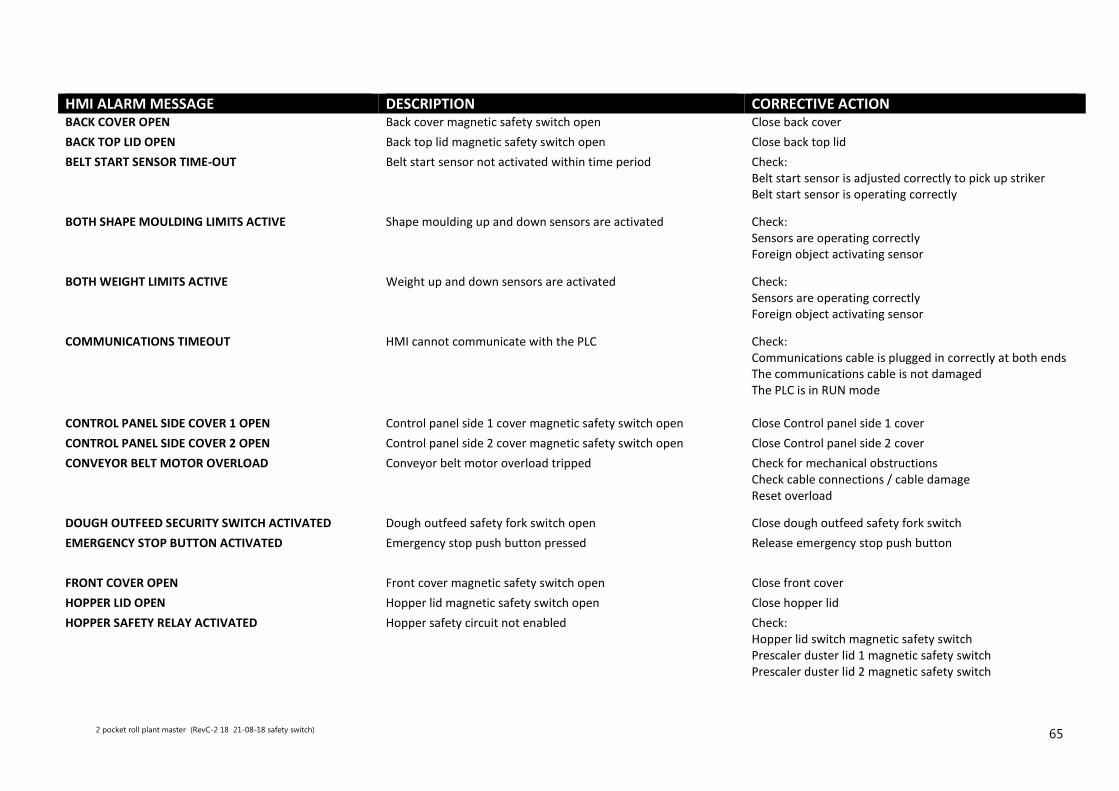
15. ALARM MESSAGES:
2 pocket roll plant master (RevC-2 18 21-08-18 safety switch) 65
HMI ALARM MESSAGE DESCRIPTION CORRECTIVE ACTION BACK COVER OPEN Back cover magnetic safety switch open Close back cover
BACK TOP LID OPEN Back top lid magnetic safety switch open Close back top lid
BELT START SENSOR TIME-OUT Belt start sensor not activated within time period Check: Belt start sensor is adjusted correctly to pick up striker Belt start sensor is operating correctly
BOTH SHAPE MOULDING LIMITS ACTIVE Shape moulding up and down sensors are activated Check: Sensors are operating correctly Foreign object activating sensor
BOTH WEIGHT LIMITS ACTIVE Weight up and down sensors are activated Check: Sensors are operating correctly Foreign object activating sensor
COMMUNICATIONS TIMEOUT HMI cannot communicate with the PLC Check: Communications cable is plugged in correctly at both ends The communications cable is not damaged The PLC is in RUN mode
CONTROL PANEL SIDE COVER 1 OPEN Control panel side 1 cover magnetic safety switch open Close Control panel side 1 cover
CONTROL PANEL SIDE COVER 2 OPEN Control panel side 2 cover magnetic safety switch open Close Control panel side 2 cover
CONVEYOR BELT MOTOR OVERLOAD Conveyor belt motor overload tripped Check for mechanical obstructions Check cable connections / cable damage Reset overload
DOUGH OUTFEED SECURITY SWITCH ACTIVATED Dough outfeed safety fork switch open Close dough outfeed safety fork switch
EMERGENCY STOP BUTTON ACTIVATED Emergency stop push button pressed Release emergency stop push button
FRONT COVER OPEN Front cover magnetic safety switch open Close front cover
HOPPER LID OPEN Hopper lid magnetic safety switch open Close hopper lid
HOPPER SAFETY RELAY ACTIVATED Hopper safety circuit not enabled Check: Hopper lid switch magnetic safety switch Prescaler duster lid 1 magnetic safety switch Prescaler duster lid 2 magnetic safety switch
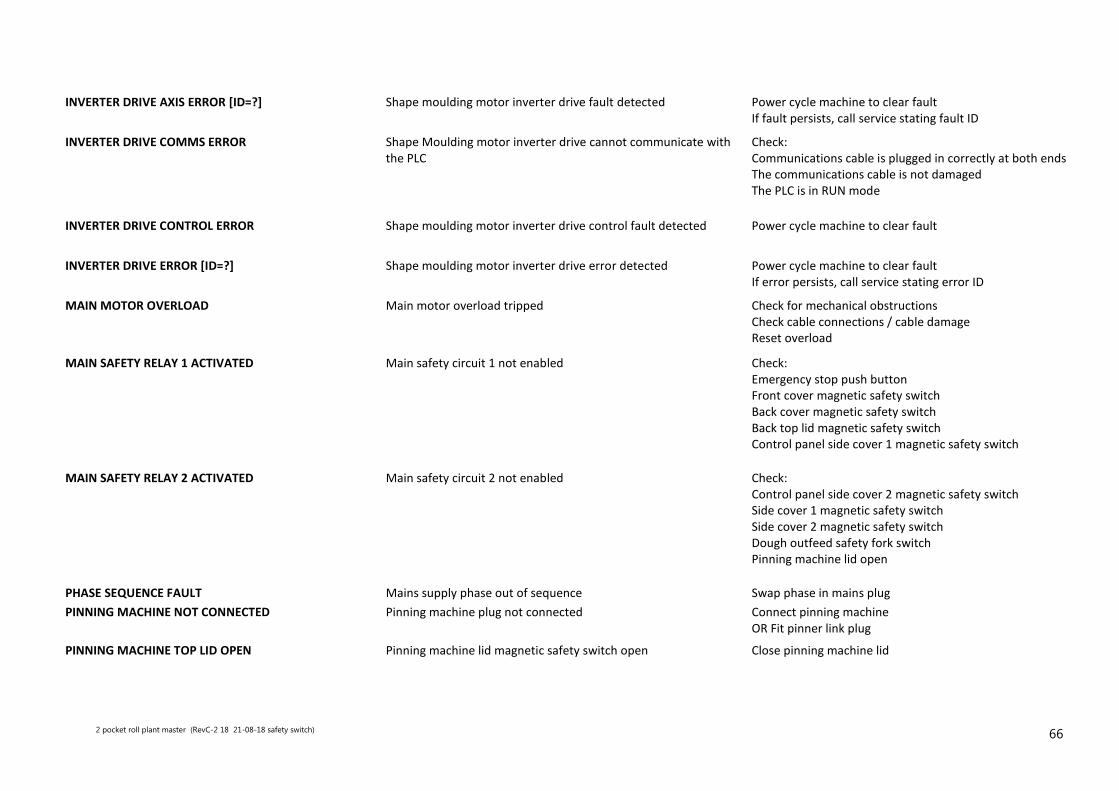
2 pocket roll plant master (RevC-2 18 21-08-18 safety switch) 66
INVERTER DRIVE AXIS ERROR [ID=?] Shape moulding motor inverter drive fault detected Power cycle machine to clear fault If fault persists, call service stating fault ID
INVERTER DRIVE COMMS ERROR Shape Moulding motor inverter drive cannot communicate with the PLC
Check: Communications cable is plugged in correctly at both ends The communications cable is not damaged The PLC is in RUN mode
INVERTER DRIVE CONTROL ERROR Shape moulding motor inverter drive control fault detected Power cycle machine to clear fault
INVERTER DRIVE ERROR [ID=?] Shape moulding motor inverter drive error detected Power cycle machine to clear fault If error persists, call service stating error ID
MAIN MOTOR OVERLOAD Main motor overload tripped Check for mechanical obstructions Check cable connections / cable damage Reset overload
MAIN SAFETY RELAY 1 ACTIVATED Main safety circuit 1 not enabled Check: Emergency stop push button Front cover magnetic safety switch Back cover magnetic safety switch Back top lid magnetic safety switch Control panel side cover 1 magnetic safety switch
MAIN SAFETY RELAY 2 ACTIVATED Main safety circuit 2 not enabled Check: Control panel side cover 2 magnetic safety switch Side cover 1 magnetic safety switch Side cover 2 magnetic safety switch Dough outfeed safety fork switch Pinning machine lid open
PHASE SEQUENCE FAULT Mains supply phase out of sequence Swap phase in mains plug
PINNING MACHINE NOT CONNECTED Pinning machine plug not connected Connect pinning machine OR Fit pinner link plug
PINNING MACHINE TOP LID OPEN Pinning machine lid magnetic safety switch open Close pinning machine lid
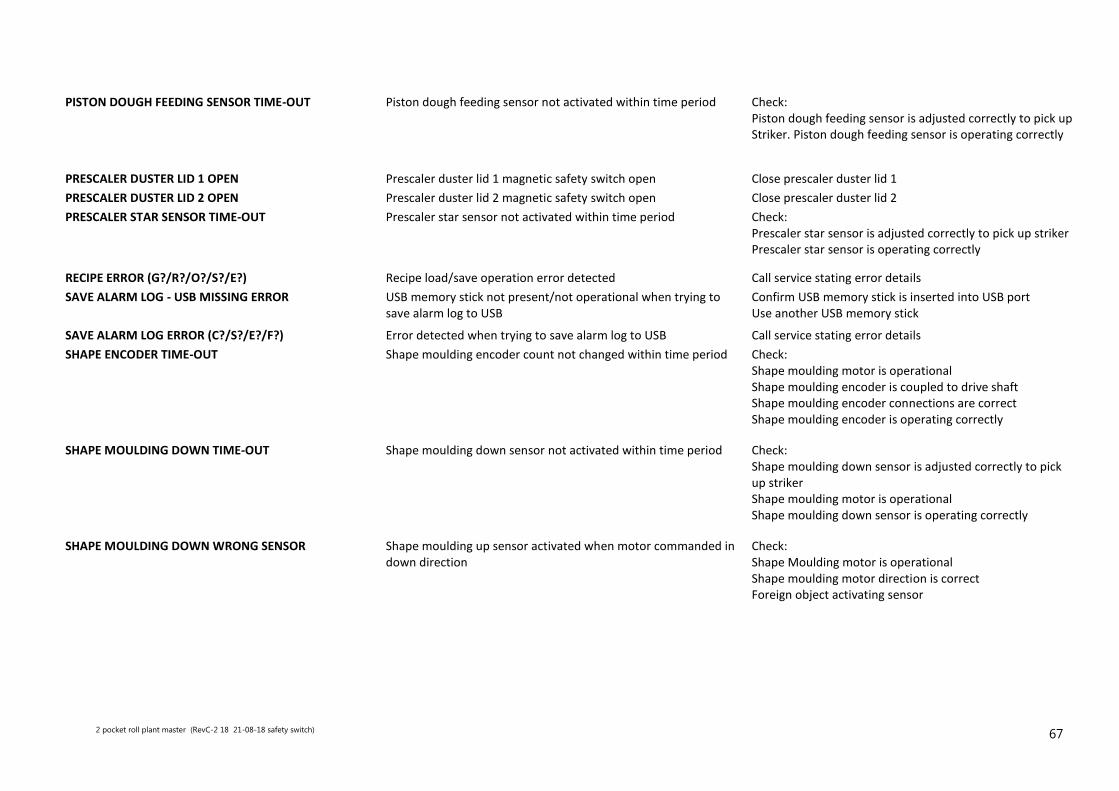
2 pocket roll plant master (RevC-2 18 21-08-18 safety switch) 67
PISTON DOUGH FEEDING SENSOR TIME-OUT Piston dough feeding sensor not activated within time period Check: Piston dough feeding sensor is adjusted correctly to pick up Striker. Piston dough feeding sensor is operating correctly
PRESCALER DUSTER LID 1 OPEN Prescaler duster lid 1 magnetic safety switch open Close prescaler duster lid 1
PRESCALER DUSTER LID 2 OPEN Prescaler duster lid 2 magnetic safety switch open Close prescaler duster lid 2
PRESCALER STAR SENSOR TIME-OUT Prescaler star sensor not activated within time period Check: Prescaler star sensor is adjusted correctly to pick up striker Prescaler star sensor is operating correctly
RECIPE ERROR (G?/R?/O?/S?/E?) Recipe load/save operation error detected Call service stating error details
SAVE ALARM LOG - USB MISSING ERROR USB memory stick not present/not operational when trying to save alarm log to USB
Confirm USB memory stick is inserted into USB port Use another USB memory stick
SAVE ALARM LOG ERROR (C?/S?/E?/F?) Error detected when trying to save alarm log to USB Call service stating error details
SHAPE ENCODER TIME-OUT Shape moulding encoder count not changed within time period Check: Shape moulding motor is operational Shape moulding encoder is coupled to drive shaft Shape moulding encoder connections are correct Shape moulding encoder is operating correctly
SHAPE MOULDING DOWN TIME-OUT Shape moulding down sensor not activated within time period Check: Shape moulding down sensor is adjusted correctly to pick up striker Shape moulding motor is operational Shape moulding down sensor is operating correctly
SHAPE MOULDING DOWN WRONG SENSOR Shape moulding up sensor activated when motor commanded in down direction
Check: Shape Moulding motor is operational Shape moulding motor direction is correct Foreign object activating sensor
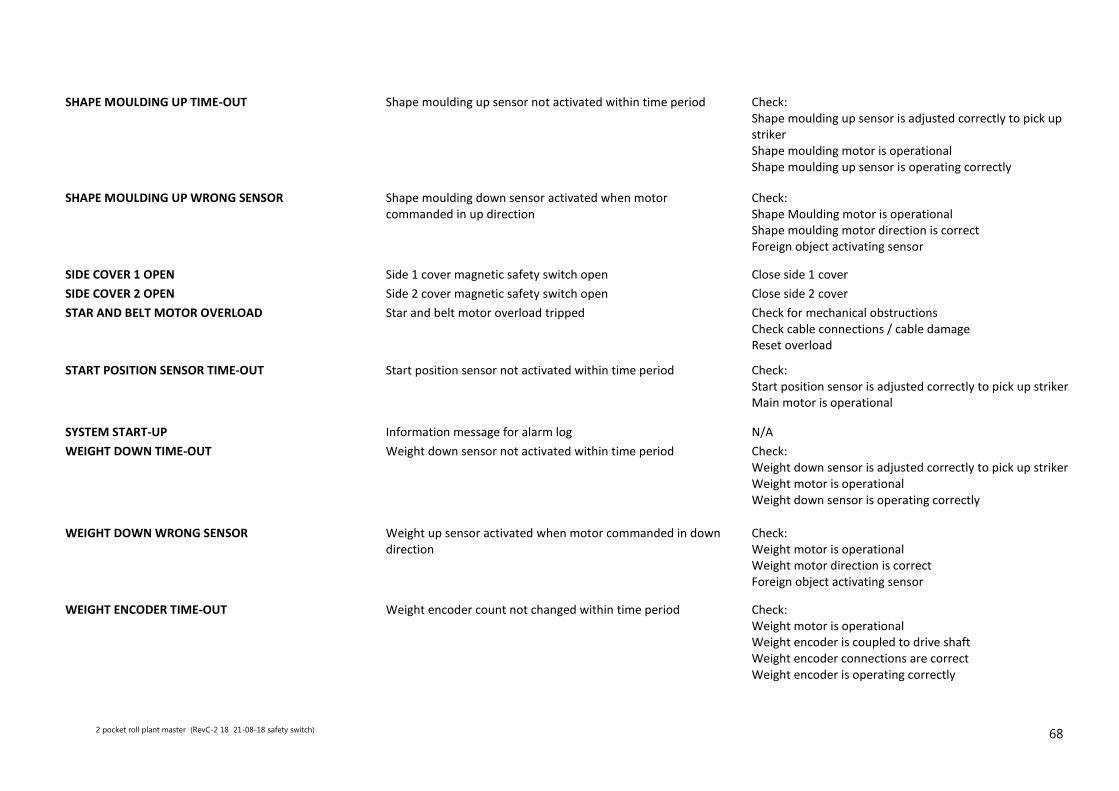
2 pocket roll plant master (RevC-2 18 21-08-18 safety switch) 68
SHAPE MOULDING UP TIME-OUT Shape moulding up sensor not activated within time period Check: Shape moulding up sensor is adjusted correctly to pick up striker Shape moulding motor is operational Shape moulding up sensor is operating correctly
SHAPE MOULDING UP WRONG SENSOR Shape moulding down sensor activated when motor commanded in up direction
Check: Shape Moulding motor is operational Shape moulding motor direction is correct Foreign object activating sensor
SIDE COVER 1 OPEN Side 1 cover magnetic safety switch open Close side 1 cover
SIDE COVER 2 OPEN Side 2 cover magnetic safety switch open Close side 2 cover
STAR AND BELT MOTOR OVERLOAD Star and belt motor overload tripped Check for mechanical obstructions Check cable connections / cable damage Reset overload
START POSITION SENSOR TIME-OUT Start position sensor not activated within time period Check: Start position sensor is adjusted correctly to pick up striker Main motor is operational
SYSTEM START-UP Information message for alarm log N/A
WEIGHT DOWN TIME-OUT Weight down sensor not activated within time period Check: Weight down sensor is adjusted correctly to pick up striker Weight motor is operational Weight down sensor is operating correctly
WEIGHT DOWN WRONG SENSOR Weight up sensor activated when motor commanded in down direction
Check: Weight motor is operational Weight motor direction is correct Foreign object activating sensor
WEIGHT ENCODER TIME-OUT Weight encoder count not changed within time period Check: Weight motor is operational Weight encoder is coupled to drive shaft Weight encoder connections are correct Weight encoder is operating correctly
2 pocket roll plant master (RevC-2 18 21-08-18 safety switch) 69
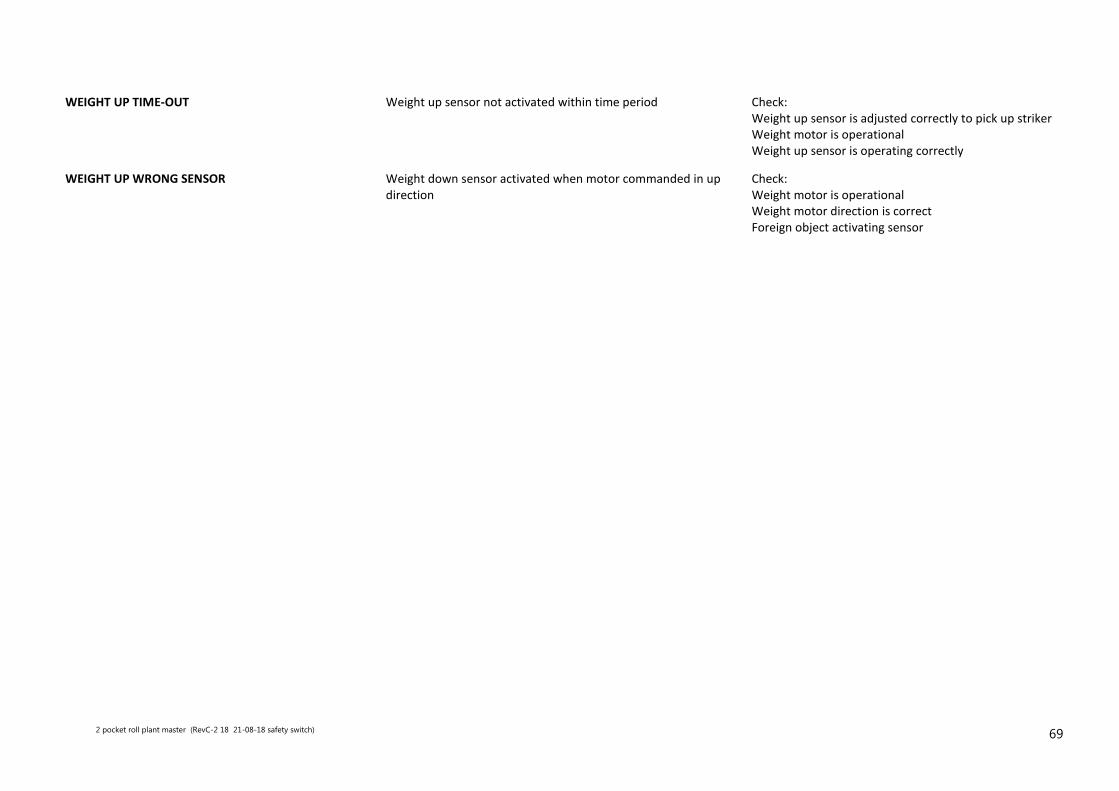
WEIGHT UP TIME-OUT Weight up sensor not activated within time period Check: Weight up sensor is adjusted correctly to pick up striker Weight motor is operational Weight up sensor is operating correctly
WEIGHT UP WRONG SENSOR Weight down sensor activated when motor commanded in up direction
Check: Weight motor is operational Weight motor direction is correct Foreign object activating sensor
2 pocket roll plant master (RevC-2 18 21-08-18 safety switch) 70
16. Environmental Disposal:
Care should be taken when deposing of the machine when it comes to the end of its working
life
All parts should be disposed of in the most appropriate, environmentally-friendly manner
possible, either by recycling or other means of disposal which complies with local regulations
Only dispose of the machine safely and legally
The Environmental Protection Act 1990 applies in the UK
2 pocket roll plant master (RevC-2 18 21-08-18 safety switch) 71
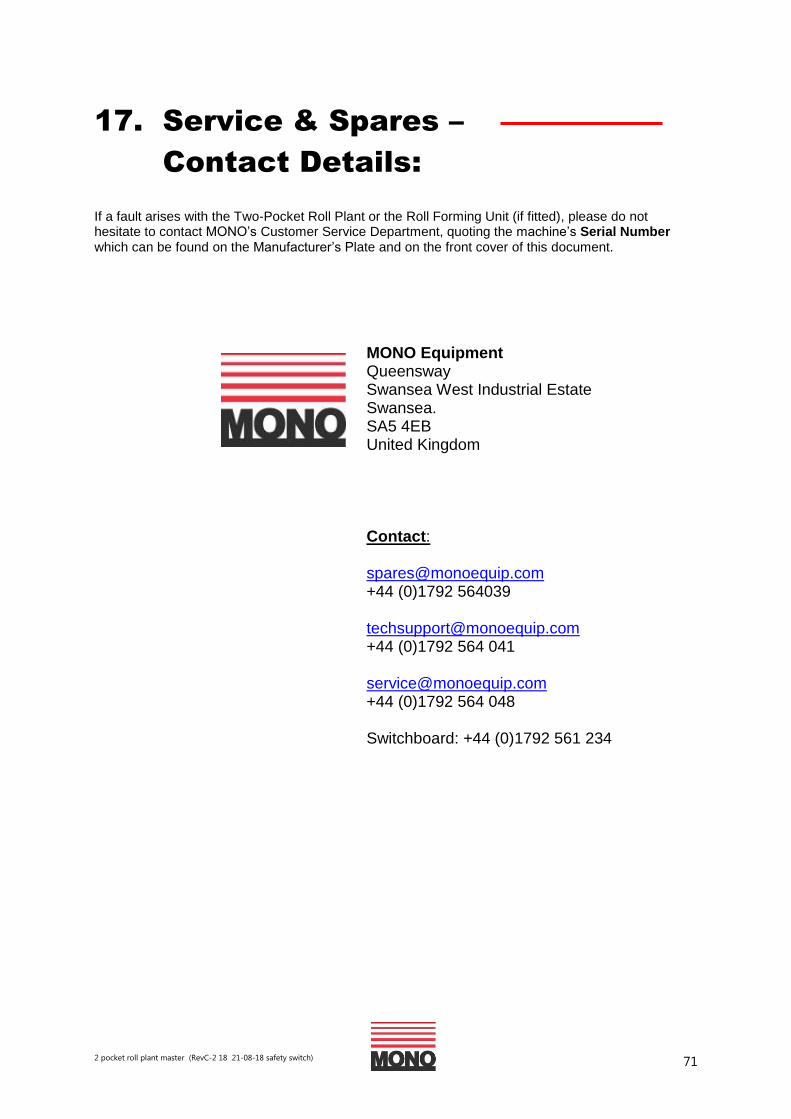
17. Service & Spares –
Contact Details:
If a fault arises with the Two-Pocket Roll Plant or the Roll Forming Unit (if fitted), please do not hesitate to contact MONO’s Customer Service Department, quoting the machine’s Serial Number which can be found on the Manufacturer’s Plate and on the front cover of this document.
MONO Equipment Queensway Swansea West Industrial Estate Swansea. SA5 4EB United Kingdom Contact: [email protected] +44 (0)1792 564039 [email protected] +44 (0)1792 564 041 [email protected] +44 (0)1792 564 048 Switchboard: +44 (0)1792 561 234