Embed Size (px)
Citation preview
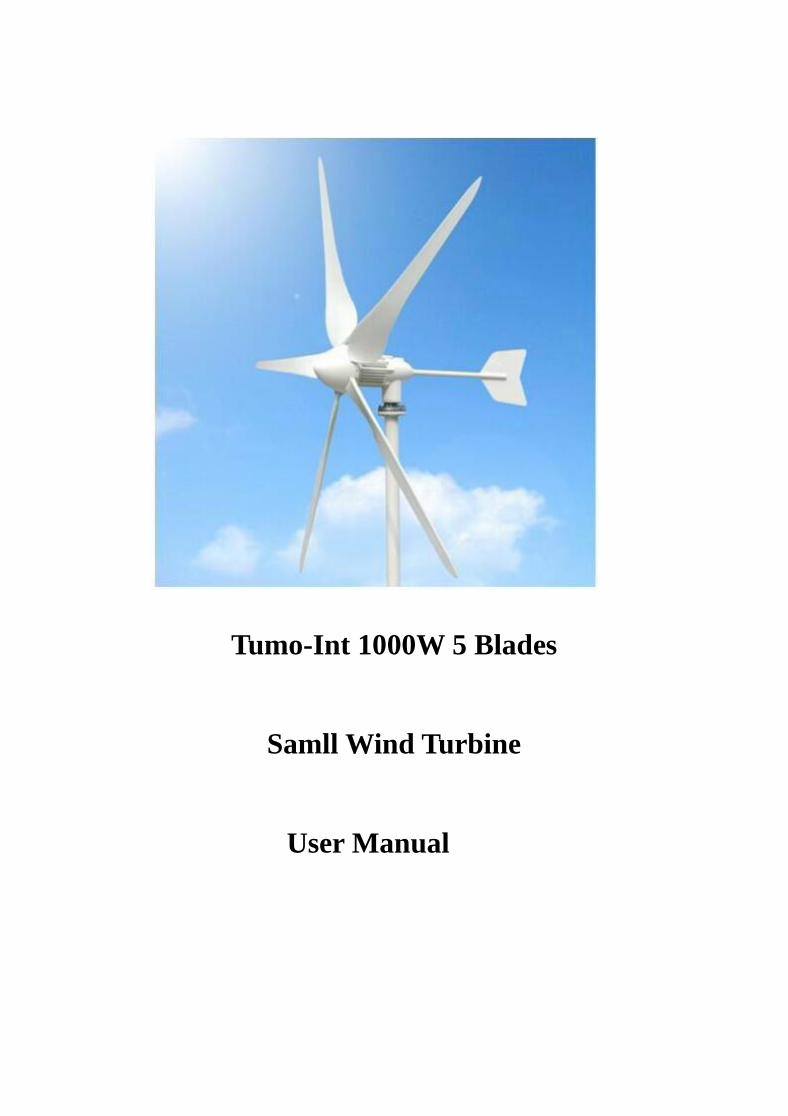
Tumo-Int 1000W 5 Blades
Samll Wind Turbine
User Manual

Copyright
Copyright © 2016 Tumo-Int Corporation Limitd.
All rights reserved.
Trademarks
All product, font and company names mentioned in this manual may be trademarks or registered trademarks of their respective companies.

Preface
Dear user:
Thank you for your purchase of Tumo-Int wind turbine. We believe you will find it easy to install, moreover, we are confident you will experience
years of dependable service from it.
Please make sure you have read the manual carefully before any assembly, installation or operation of Tumo-Int wind turbine, which is helpful for better & safe operation of Tumo-Int wind turbine. If any property loss due to the failure to follow the requirements and instructions of this manual, Tumo-Int Corporation Limitd (hereinafter, Tumo-Int) will not be liable for it.
This manual can help you better understand and properly use the Tumo-Int series small wind turbine, but any contents of hardware will not be included.
Concerning to the product configuration, please refer to the related contract (if any) or the distributor. Pictures in the manual are for reference only. If any
difference from objects, please be subject to objects.
If you have any questions or comments, we would like to hear from you, and please call during working hours (Monday-Friday 9:00a.m. to 6:00 p.m.
Beijing Time) if you need. Office number: +86-20-28148798.
Sincerely,
Tumo-Int
Serial number and Model number
Serial number _______________
Model number _______________
Safety Instructions
PLEASE READ THESE INSTRUCTIONS CAREFULLY BEFORE ASSEMBLING, INSTALLATING OR OPERATING OF YOUR WIND TURBINE.
1. Before small wind turbine installation, you must know:
1) Do not install wind turbine on a windy day or dusty day with wind speed more than 8m/s.
2) Wearing wet gloves or clothes are forbidden.
3) Installing or maintaining wind turbine must be under professionals’ guidance or contacting distributors.
4) Please Using cables as the standard mentioned in this user manual section 4 (wire size selection), cables too thin or with poor quality may lead to
leakage or fires and line losses.
5) Non-professionals do not open the controller and inverter enclosure, any warranty claim will not be accepted if controller or inverter opened
unauthorized.
6) Grounding device installation must be in accordance with application standard and installation instruction.
7) Battery wiring may splash spark, please makes sure without any inflammables near the work environment.
8) Please do not place the controller, inverter and battery at damp, rain, vibration, corrosion and strong electromagnetic interference environment, the
places in direct sunlight, near heater or other heat sources are not allowed either.
2. Selection and installation requirements of controller and inverter:
1) Controller specification should be accordance with voltage, power, current of battery, solar panel battery set, and wind turbine and laden.
2) It is appropriated to install controller and battery in the same distribution box, and place it at a drafty room out of people reaching. Take some
methods to prevent children from entering or stretching out hands into box.
3) Controller and battery installation should be accordance with relevant electrical equipment installation specification and comply with the operation
specification constituted by manufacturer.
4) It is appropriated to use sealed lead acid battery for distribution box at inhabited room.
3. Wiring requirements:
1) The hardwired connect between components in system should be fixed and reliable. Do not use plugs or sockets.
4
2) Connect between system output terminal and external circuit should be fixed, or use socket for system output terminal.
3) Do not use two-way plug adapter for the connection of system’s output terminal with external circuit.
4) Apart from the installation of the permanent circuit, any cables or wires that might be damaged due to outdoor exposure should be sheathed with
conduit for protection.
4. Safety Precautions:
Operating personnel must full understand the safety precaution. Safety relies on our joined effort.
1) All operations must:
a. Follow instruction in this manual.
b. Operated by specialize workers.
c. Wrong operation might result in accident and injury to workers and equipments.
2) Operating personnel must master:
a. Equipment recognition
b. Correct equipment operation ability
c. Relevant safety knowledge
5
In this manual:
WARNING: Indicates risk of severe injury or death or possible severe damage to equipment - proceed
with caution and follow instructions.
TIP: Indicates instruction or advice that may simplify or ease task or operation.
IMPORTANT: Indicates instruction or advice that is critical for correct assembly or operation. Damage to
equipment may result if not heeded.
Warranty
Tumo-Int Corporation Limitd provides 1 year warranty for wind turbine from the date of shipment, warranty covers all parts of wind turbine damaged
within warranty period, free replacement part or complete wind turbine will only be provided after remote troubleshooting and analysis of the problem by
technicians, Tumo-Int hold the rights of providing the most appropriate solutions in terms of parts & complete turbine replacement and means of
shipment.
Restrictions
Following defects will not be covered in this warranty:
1. Wind turbine has not been installed, operated, repaired, or maintained in accordance with instructions supplied by Tumo-int; has been altered or
modified unauthorized.
2. Damage caused by abnormal physical, thermal or electrical stress, negligence, misuse.
3. Damage caused by force majeure like lightning, hurricane force winds, flood, earthquake etc.
4. Damage caused by the use of any unauthorized controller, inverter or tower not provided or confirmed by Tumo-Int.
Warranty Claim Procedures
In order to get service under this warranty, customer must provide Tumo-Int with following information for analysis:
1. Serial number of wind turbine, running time, malfunction date.
2. Detailed description of the defects and corresponding test result has been done in accordance with the troubleshooting Tumo-Int provided.
3. Tumo-Int technician may ask for some extra testing in order to identify the defects so solutions could be provided promptly and precisely. Tumo-int
series wind turbine users are liable to conduct these extra testing and provide referable test result.
4. Installation pictures (see details on the installation location and its surrounding).
5. Damaged machine pictures or videos.
6. Tumo-Int technician will provide final solution according to defect description and the test result of troubleshooting.
7

Customer is responsible for shipping the defect or damage part for repairing if needed, then Tumo will repair or replace with new one for free and ship to
owner on Tumo-int cost, if no defected piece ship back to us but need replacement, Tumo-Int will provide the part for free but shipping expense will be at
buyer side.
Consequential Losses
Tumo-Int is not responsible for any responsibility of consequential losses. Consequential losses mean:
1. Indirect, unexpected or special losses or damages;
2. Losses of margin or expected margin of products or any ways related with products
8
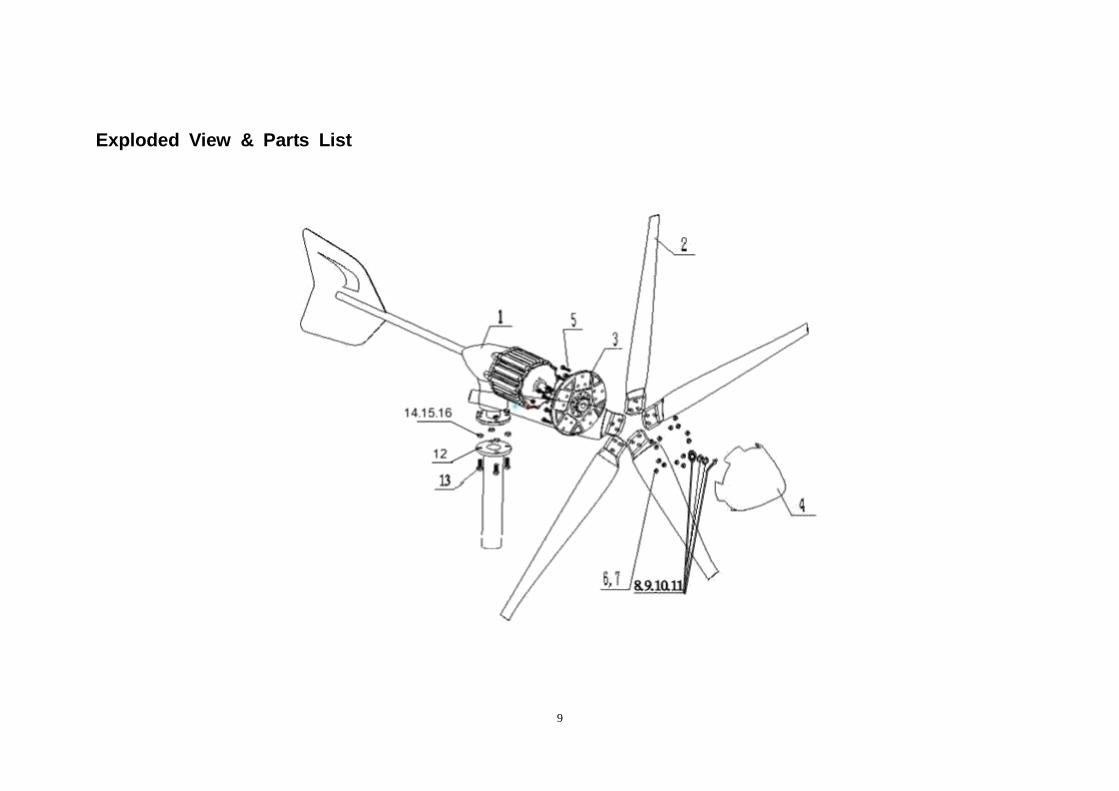
Exploded View & Parts List
9
Flange connection wind turbine parts list
Item Description Qty Remarks
1 Tail vane 1
2 Blades 5
3 Hub 1
4 Nosecone 1
5 Hex bolt M8×40 15 For mounting blades on the hub
6 Flat washer Ø8 15
7 Nylock nut M8 15
8 Flat washer Ø16 1
For mounting hub on the rotor shaft 9 Spring washer Ø16 1
10 Hex nut M16×1.5 1
11 Cotter Ø4×28 1
12 Lower flange 1
For connecting lower flange onto the
top tower
13 Hex bolt M10×40 4
14 Flat washer Ø10 4
15 Spring washer Ø10 4
16 Nut M10 4
10
11
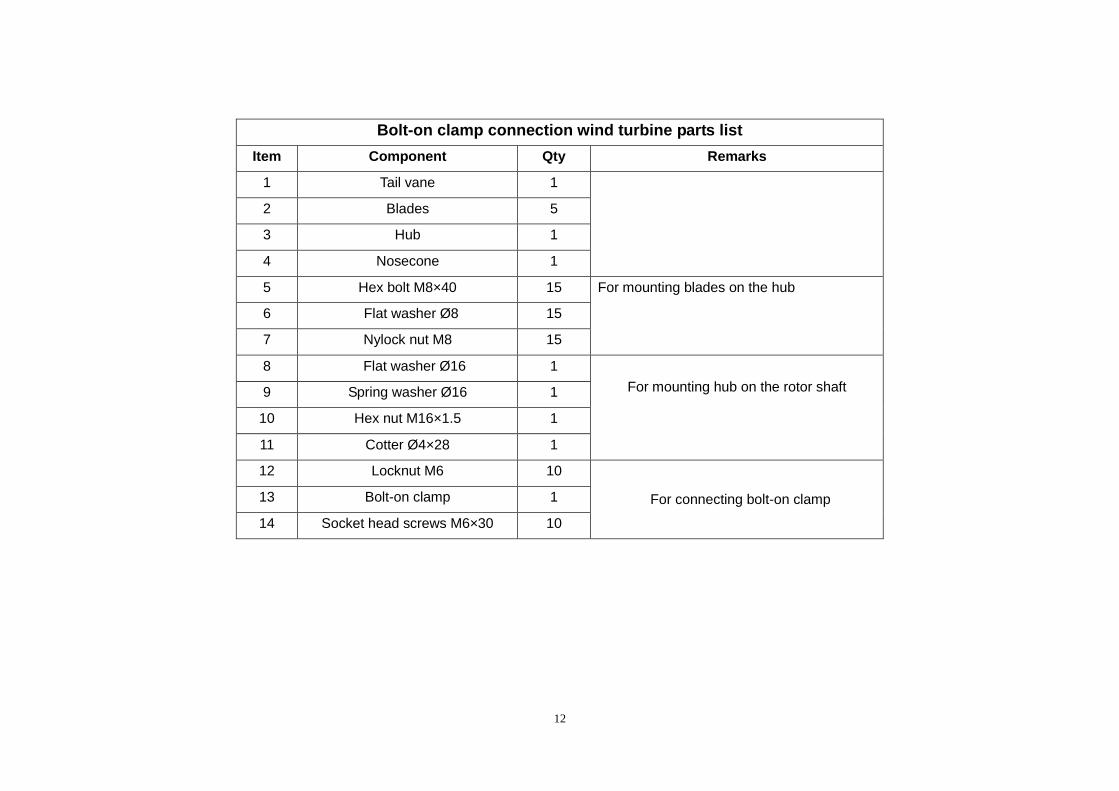
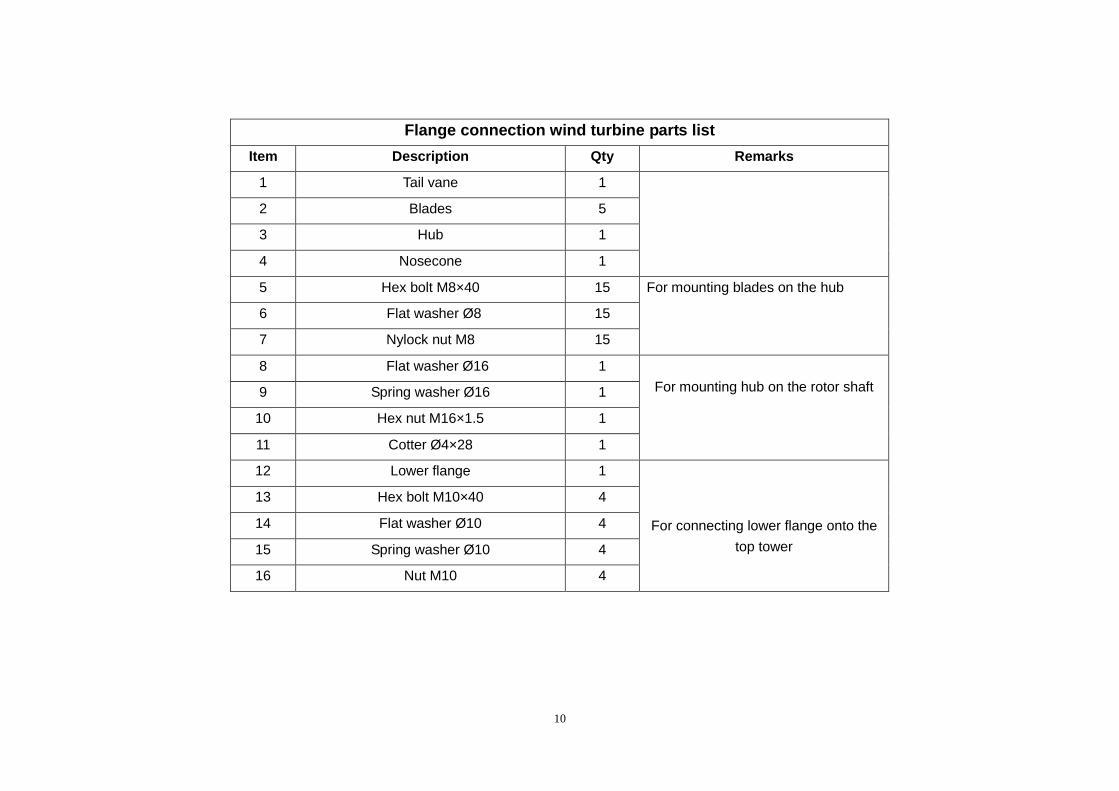
Bolt-on clamp connection wind turbine parts list
Item Component Qty Remarks
1 Tail vane 1
2 Blades 5
3 Hub 1
4 Nosecone 1
5 Hex bolt M8×40 15 For mounting blades on the hub
6 Flat washer Ø8 15
7 Nylock nut M8 15
8 Flat washer Ø16 1
For mounting hub on the rotor shaft 9 Spring washer Ø16 1
10 Hex nut M16×1.5 1
11 Cotter Ø4×28 1
12 Locknut M6 10
For connecting bolt-on clamp 13 Bolt-on clamp 1
14 Socket head screws M6×30 10
12

1. Technical Specifications
Model 1000W 5 Blades
Rated Power 1000W
Max. Power 1200W
Rated Voltage 24Vdc 48Vdc 110Vdc 180Vdc
Rated rotation speed 750rpm
Start-up Wind Speed 2.0m/s
Cut-in Wind Speed 2.5m/s
Rated Wind Speed 12m/s
Survival Wind Speed 50m/s
Rotor Diameter 1.96m
Blades Quantity 5
Swept area 3.01m²
Noise Level <20 dB (5m behind turbine @5m/s gusting)
Generator Type Three phase PMA
Wind Turbine Type Upwind
Tower connection Flange connection or bolt-on clamp
Temperature -40°C~60°C
Strong wind protection mode electromagnetic brake, blades aerodynamic brake
Service life 15 years
Net weight 28kg
Gross weight 32kg
Package size 146×53×27cm
13
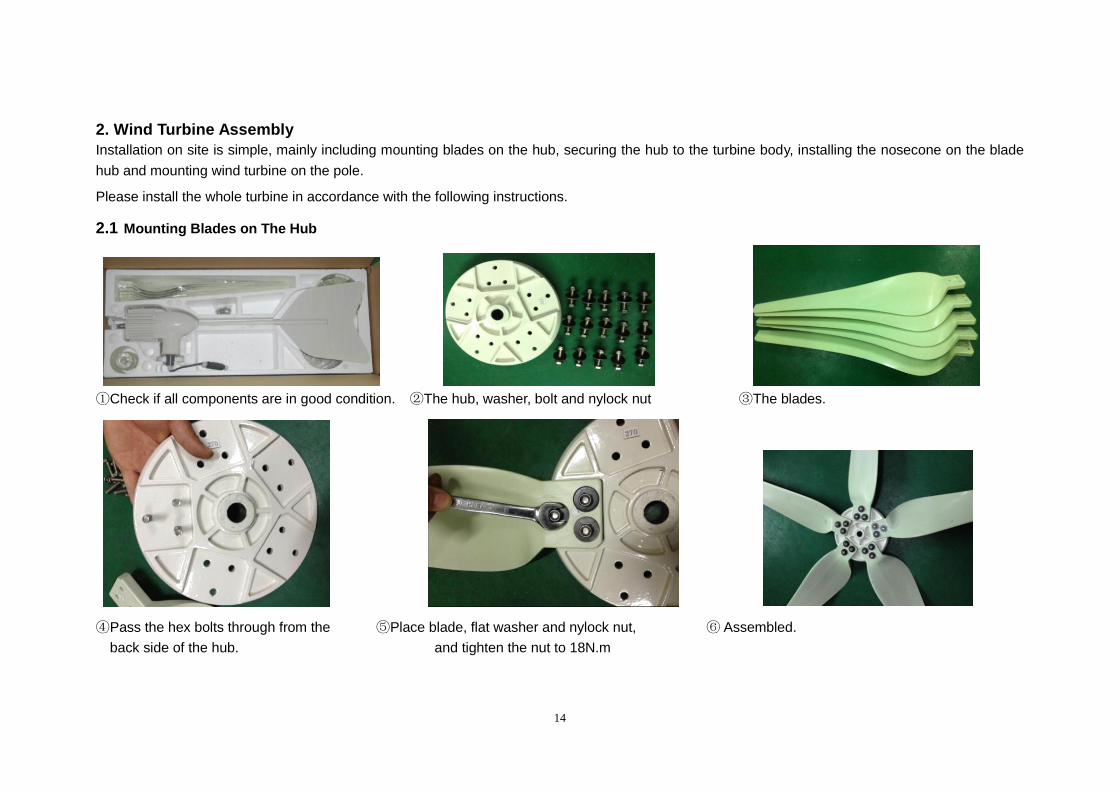
2. Wind Turbine Assembly
Installation on site is simple, mainly including mounting blades on the hub, securing the hub to the turbine body, installing the nosecone on the blade
hub and mounting wind turbine on the pole.
Please install the whole turbine in accordance with the following instructions.
2.1 Mounting Blades on The Hub
①Check if all components are in good condition. ②The hub, washer, bolt and nylock nut ③The blades.
④Pass the hex bolts through from the ⑤Place blade, flat washer and nylock nut, ⑥ Assembled.
back side of the hub. and tighten the nut to 18N.m
14
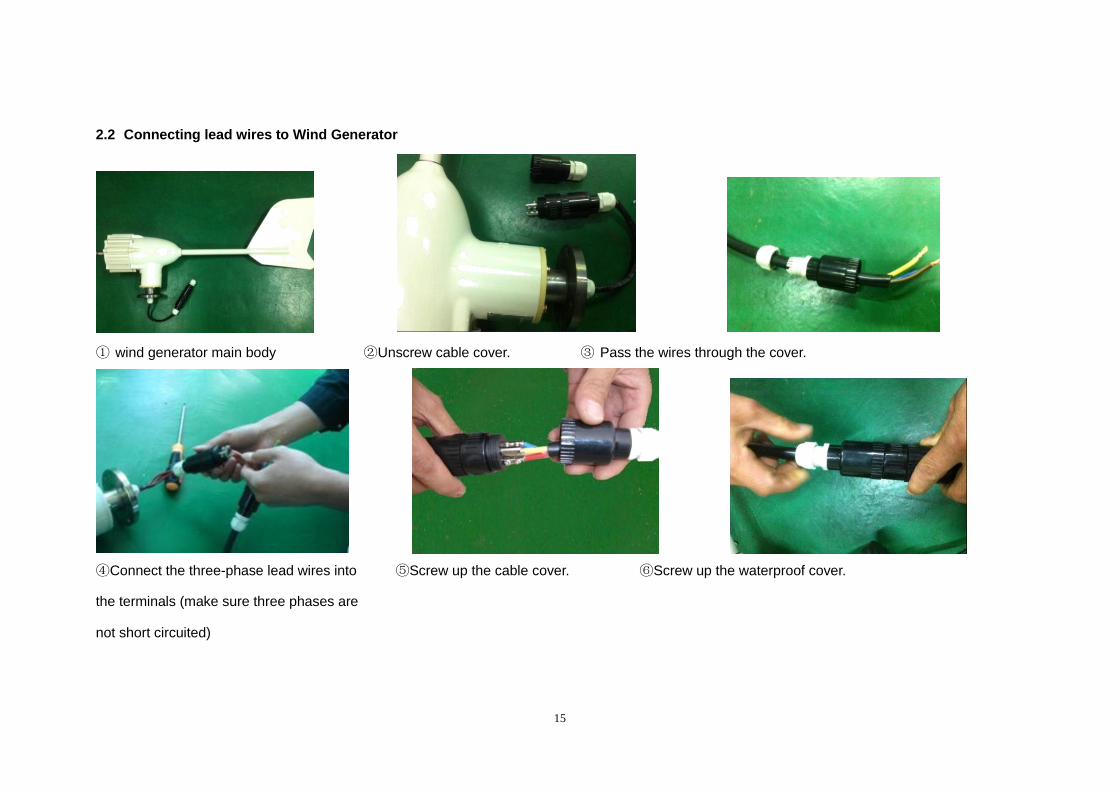
2.2 Connecting lead wires to Wind Generator
① wind generator main body ②Unscrew cable cover. ③ Pass the wires through the cover.
④Connect the three-phase lead wires into ⑤Screw up the cable cover. ⑥Screw up the waterproof cover.
the terminals (make sure three phases are
not short circuited)
15
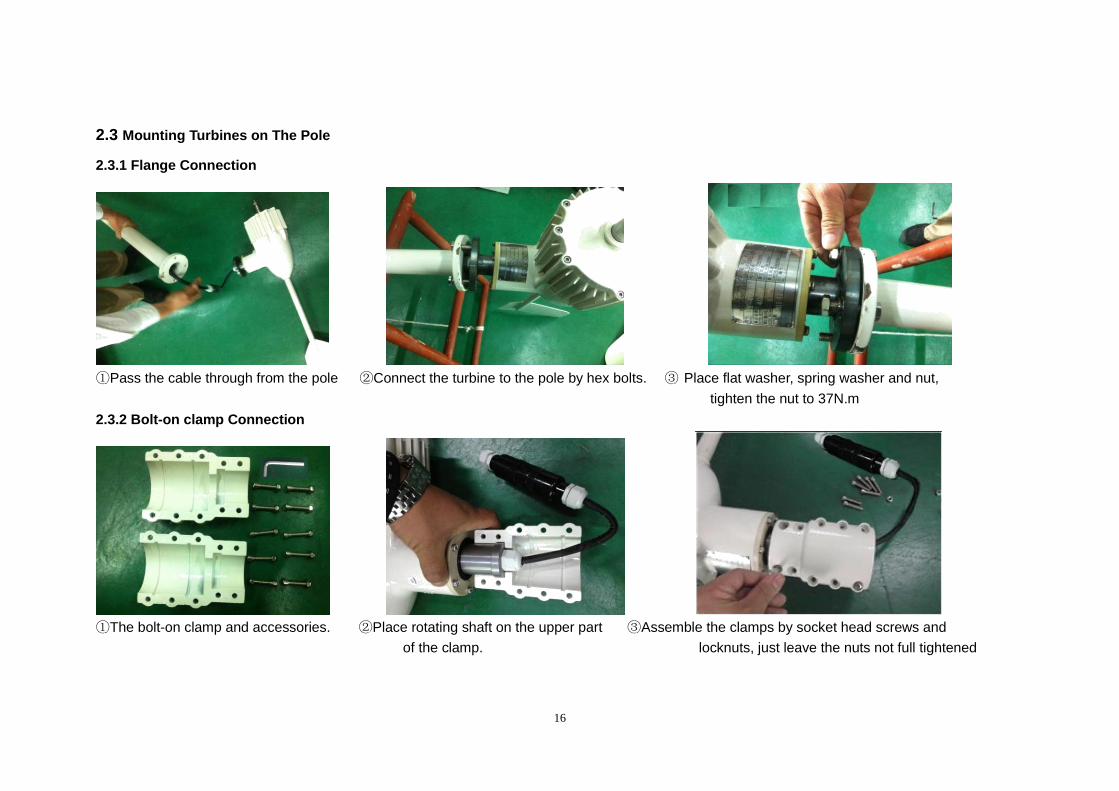
2.3 Mounting Turbines on The Pole
2.3.1 Flange Connection
①Pass the cable through from the pole ②Connect the turbine to the pole by hex bolts. ③ Place flat washer, spring washer and nut,
tighten the nut to 37N.m
2.3.2 Bolt-on clamp Connection
①The bolt-on clamp and accessories. ②Place rotating shaft on the upper part ③Assemble the clamps by socket head screws and
of the clamp. locknuts, just leave the nuts not full tightened
16
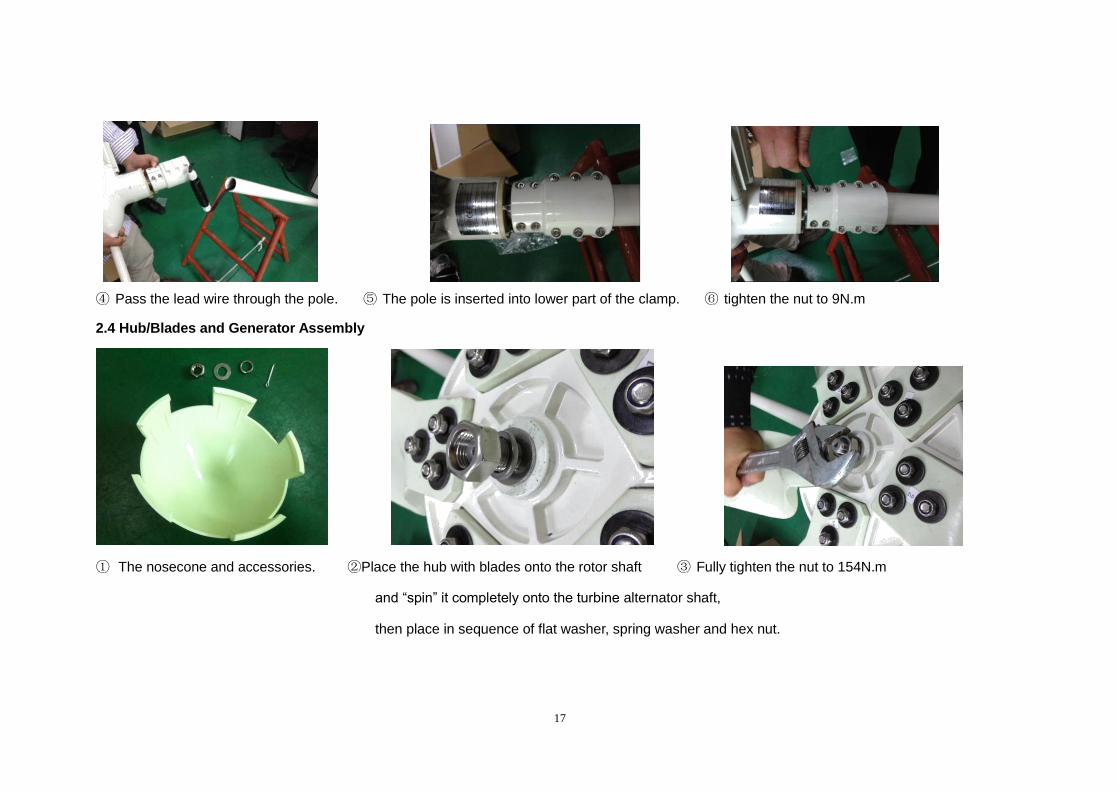
④ Pass the lead wire through the pole. ⑤ The pole is inserted into lower part of the clamp. ⑥ tighten the nut to 9N.m
2.4 Hub/Blades and Generator Assembly
① The nosecone and accessories. ②Place the hub with blades onto the rotor shaft ③ Fully tighten the nut to 154N.m
and “spin” it completely onto the turbine alternator shaft,
then place in sequence of flat washer, spring washer and hex nut.
17
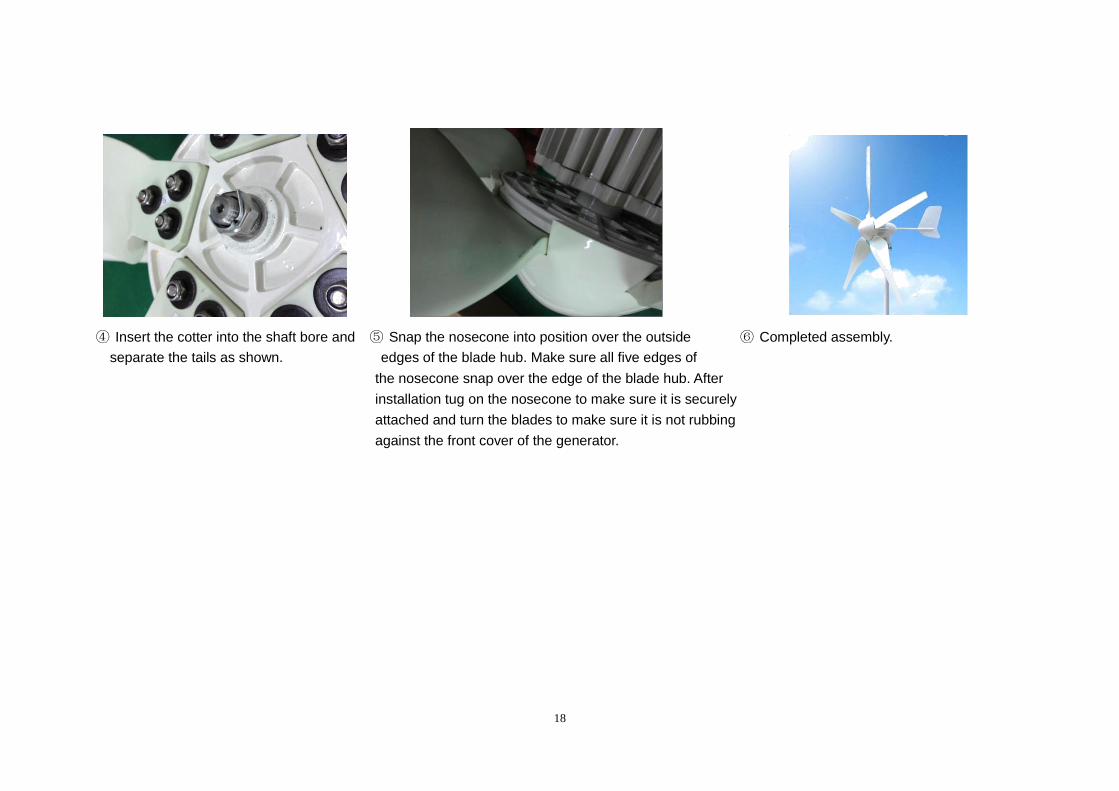
④ Insert the cotter into the shaft bore and ⑤ Snap the nosecone into position over the outside ⑥ Completed assembly.
separate the tails as shown. edges of the blade hub. Make sure all five edges of
the nosecone snap over the edge of the blade hub. After
installation tug on the nosecone to make sure it is securely
attached and turn the blades to make sure it is not rubbing
against the front cover of the generator.
18
3. Tower Installation
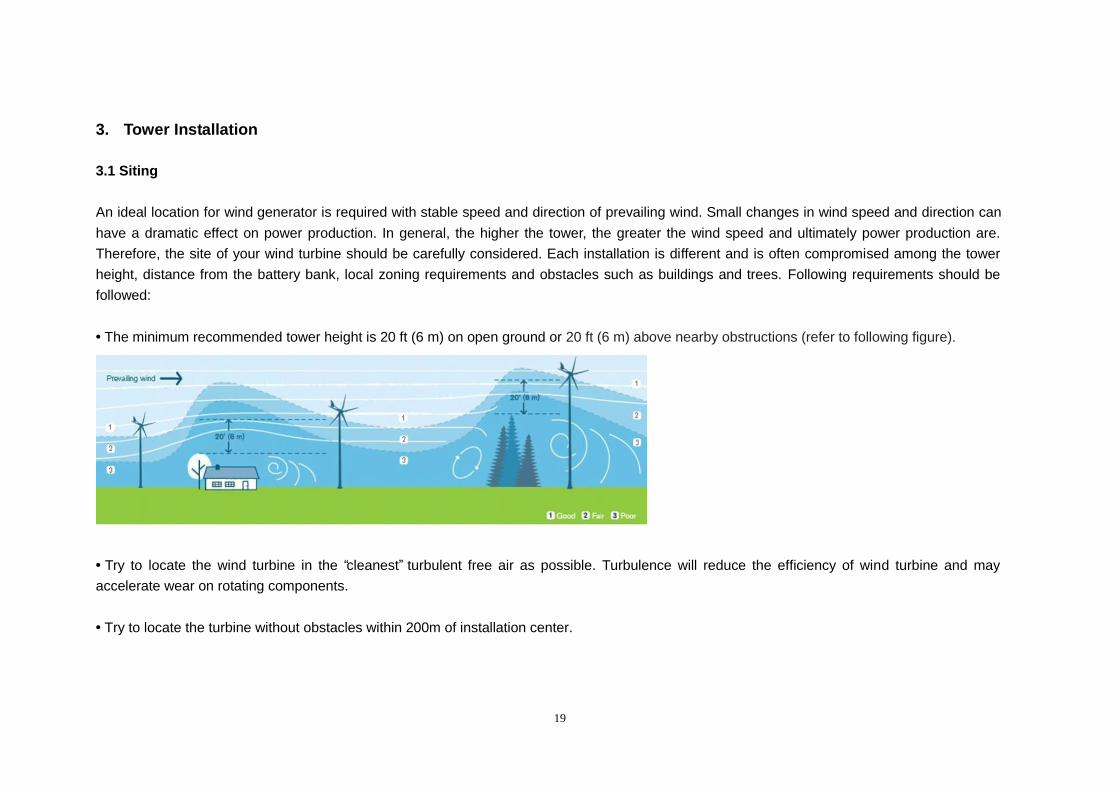
3.1 Siting
An ideal location for wind generator is required with stable speed and direction of prevailing wind. Small changes in wind speed and direction can
have a dramatic effect on power production. In general, the higher the tower, the greater the wind speed and ultimately power production are.
Therefore, the site of your wind turbine should be carefully considered. Each installation is different and is often compromised among the tower
height, distance from the battery bank, local zoning requirements and obstacles such as buildings and trees. Following requirements should be
followed:
• The minimum recommended tower height is 20 ft (6 m) on open ground or 20 ft (6 m) above nearby obstructions (refer to following figure).
• Try to locate the wind turbine in the “cleanest” turbulent free air as possible. Turbulence will reduce the efficiency of wind turbine and may
accelerate wear on rotating components.
• Try to locate the turbine without obstacles within 200m of installation center.
19

• The installation distance between two turbines should be 8-10 times of the rotor diameter.
• Installation site should be complied with local regulations.
Safety must be the primary concern when selecting the mounting location. Even if installing the wind turbine in a less ideal location, don’t attempt to
mount the turbine while blades are spinning. Safety has precedence over efficiency.
WARNING: Even if installing the turbine in a less windy location, the three-phase wires must be short circuited during installation to prevent the
turbine from turning.
3.2 Design Requirements
The tower has a direct effect on the safety of the wind turbine. Tumo offers some tower choices for Tumo-Int wind turbine. The following section
provides a summary of the available towers.
20
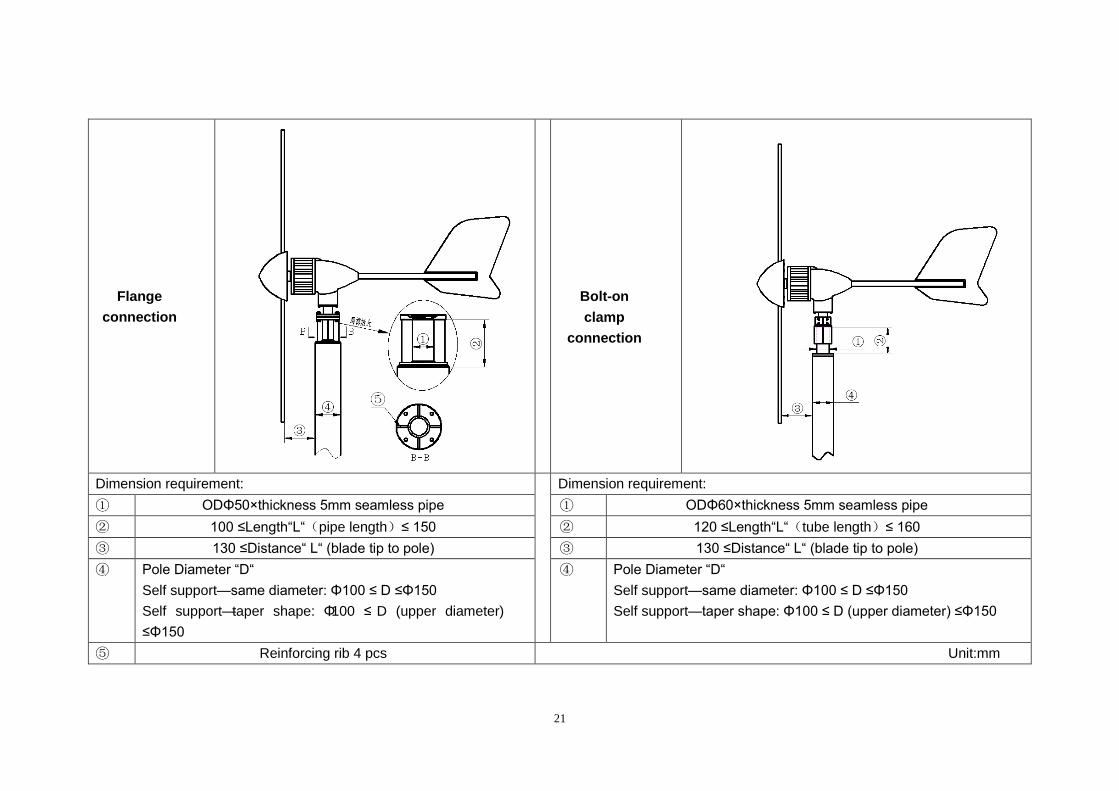
Flange
connection
Bolt-on
clamp
connection
Dimension requirement: Dimension requirement:
① ODΦ50×thickness 5mm seamless pipe ① ODΦ60×thickness 5mm seamless pipe
② 100 ≤Length“L“(pipe length)≤ 150 ② 120 ≤Length“L“(tube length)≤ 160
③ 130 ≤Distance“ L“ (blade tip to pole) ③ 130 ≤Distance“ L“ (blade tip to pole)
④ Pole Diameter “D“
Self support—same diameter: Φ100 ≤ D ≤Φ150
Self support—taper shape: Φ100 ≤ D (upper diameter)
≤Φ150
④ Pole Diameter “D“
Self support—same diameter: Φ100 ≤ D ≤Φ150
Self support—taper shape: Φ100 ≤ D (upper diameter) ≤Φ150
⑤ Reinforcing rib 4 pcs Unit:mm
21
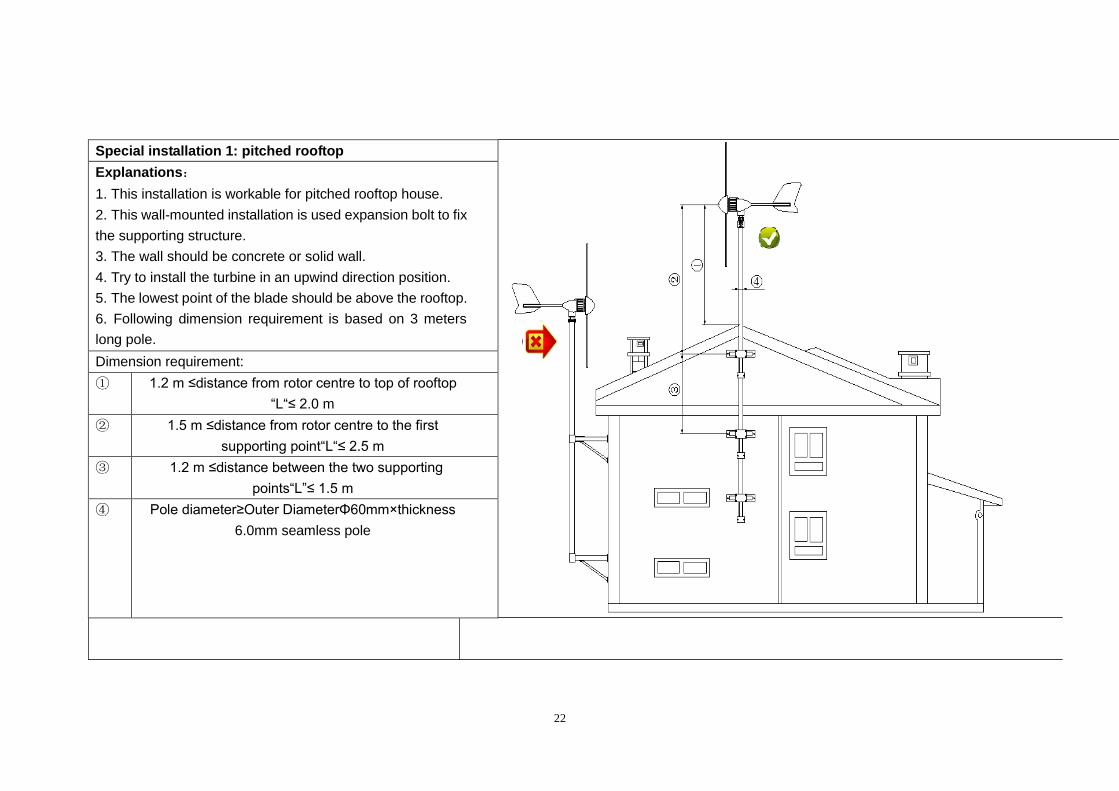
Special installation 1: pitched rooftop
Explanations:
1. This installation is workable for pitched rooftop house.
2. This wall-mounted installation is used expansion bolt to fix
the supporting structure.
3. The wall should be concrete or solid wall.
4. Try to install the turbine in an upwind direction position.
5. The lowest point of the blade should be above the rooftop.
6. Following dimension requirement is based on 3 meters
long pole.
Dimension requirement:
① 1.2 m ≤distance from rotor centre to top of rooftop
“L“≤ 2.0 m
② 1.5 m ≤distance from rotor centre to the first
supporting point“L“≤ 2.5 m
③ 1.2 m ≤distance between the two supporting
points“L”≤ 1.5 m
④ Pole diameter≥Outer DiameterΦ60mm×thickness
6.0mm seamless pole
22
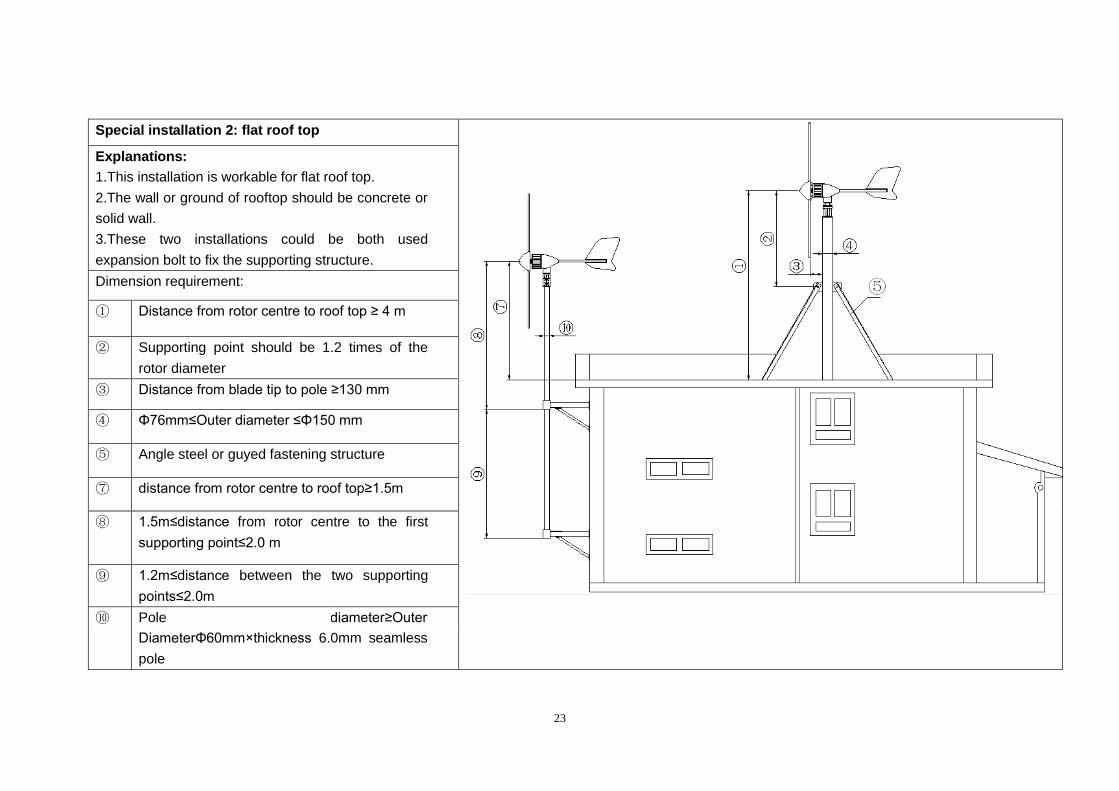
Special installation 2: flat roof top
Explanations:
1.This installation is workable for flat roof top.
2.The wall or ground of rooftop should be concrete or
solid wall.
3.These two installations could be both used
expansion bolt to fix the supporting structure.
Dimension requirement:
① Distance from rotor centre to roof top ≥ 4 m
② Supporting point should be 1.2 times of the
rotor diameter
③ Distance from blade tip to pole ≥130 mm
④ Φ76mm≤Outer diameter ≤Φ150 mm
⑤ Angle steel or guyed fastening structure
⑦ distance from rotor centre to roof top≥1.5m
⑧ 1.5m≤distance from rotor centre to the first
supporting point≤2.0 m
⑨ 1.2m≤distance between the two supporting
points≤2.0m
⑩ Pole diameter≥Outer
DiameterΦ60mm×thickness 6.0mm seamless
pole
23
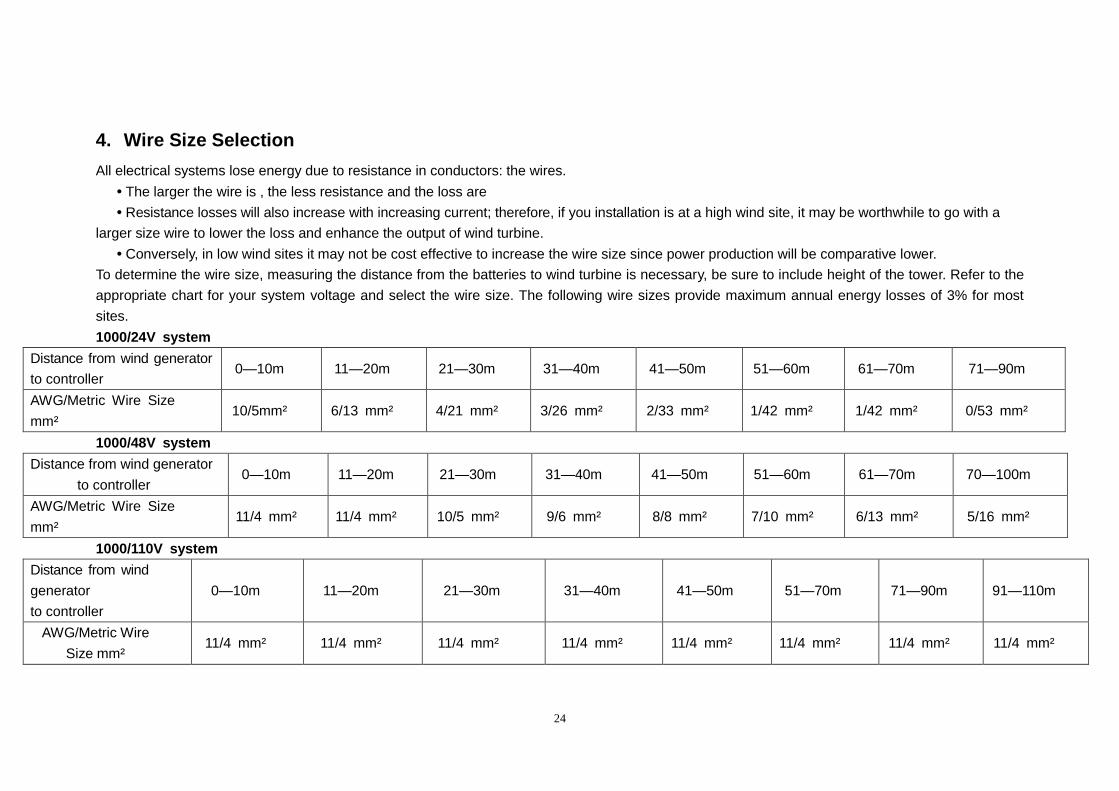
4. Wire Size Selection
All electrical systems lose energy due to resistance in conductors: the wires.
• The larger the wire is , the less resistance and the loss are
• Resistance losses will also increase with increasing current; therefore, if you installation is at a high wind site, it may be worthwhile to go with a
larger size wire to lower the loss and enhance the output of wind turbine.
• Conversely, in low wind sites it may not be cost effective to increase the wire size since power production will be comparative lower.
To determine the wire size, measuring the distance from the batteries to wind turbine is necessary, be sure to include height of the tower. Refer to the
appropriate chart for your system voltage and select the wire size. The following wire sizes provide maximum annual energy losses of 3% for most
sites.
1000/24V system
Distance from wind generator
to controller 0—10m 11—20m 21—30m 31—40m 41—50m 51—60m 61—70m 71—90m
AWG/Metric Wire Size
mm² 10/5mm² 6/13 mm² 4/21 mm² 3/26 mm² 2/33 mm² 1/42 mm² 1/42 mm² 0/53 mm²
1000/48V system
Distance from wind generator
to controller 0—10m 11—20m 21—30m 31—40m 41—50m 51—60m 61—70m 70—100m
AWG/Metric Wire Size
mm² 11/4 mm² 11/4 mm² 10/5 mm² 9/6 mm² 8/8 mm² 7/10 mm² 6/13 mm² 5/16 mm²
1000/110V system
Distance from wind
generator
to controller
0—10m 11—20m 21—30m 31—40m 41—50m 51—70m 71—90m 91—110m
AWG/Metric Wire
Size mm² 11/4 mm² 11/4 mm² 11/4 mm² 11/4 mm² 11/4 mm² 11/4 mm² 11/4 mm² 11/4 mm²
24
5. Troubleshooting
5.1 Wind Turbine Troubleshooting
5.1.1 Wind Turbine Vibration
Wind turbine vibration is mainly caused by the following factors:
1) The blades mounting bolts get loose and need to be tightened;
2) The surface of blades gets frozen and needs to be removed;
3) The blades have been distorted, defected and need to be replaced.
4) The tower is not strong enough or guy rope gets loose, and needs to be reinforced or tightened;
5) The wind turbine operates lacking phase, need to check if the three-phase output voltage is balanced or not by testing with multimeter.
IMPORTANT: Turbine operation should be stopped as soon as abnormal vibration happened till problems solved to avoid personnel or
machine damaged.
5.1.2 Wind Turbine Insensitive to Adjust Rotor Direction
1) Tumo-Int wind turbine mainly adopts tail yawing to adjust the blades direction, if it is not sensitive to adjust blades direction, reasons may be:
the turbine alternator shaft is damaged, or the tower is out of plumb.
2) The tower flange is not matching with the flange on turbine, which cause the interference to adjust the wind turbine facing direction. ① check
if the flange is provided by Tumo-Int or in accordance with Tumo-Int flange drawing; ② check if the flange on turbine is loose, and if the axis
of rotation fall into the tower.
3) The wind turbine is in a swinging or seeking status: ① the wind turbulence caused by natural factors is normal; ② improperly located, if
turbulence is caused by buildings, wind turbine should re-locate another good position.
25

5.1.3 Rotation seed Dramatically Decreases
Wind turbine rotation speed dramatically decreases under heavy wind condition, which can be mainly divided into normal deceleration and
abnormal deceleration:
1) Turbine normal deceleration is due to wind turbine over-speed protection, for example, dump load, electromagnetic braking and blades
aerodynamic braking. These are regular protection ways to protect the wind turbine and the whole system in high wind.
2) Turbine abnormal deceleration is mainly due to friction between rotor and stator, bearing damaged, generator burned, blades deformation
or damaged, turbine or pole shake heavily, in case of these situations, please disconnect wind turbine from controller and put three-phase in
short circuit mode, then contact supplier to solve the problem.
5.1.4 Generator Abnormal AC Output
1) Generator abnormal which is due to long connecting wire or small wire size which results in high pressure drop, therefore, selection of wire
size should refer to 6.5 regulations and requirements.
2)Check if the wind turbine three-phrase output performs well, check the voltage of each two of the output phases are balanced.
3) Generator three-phase output voltage is imbalanced. Voltage unbalanced rate shall not exceed 10% (same wind speed or rotational speed)
in accordance with related national standards, if exceeded, the generator fails, please contact supplier to solve the problem.
4) Generator has no output voltage under heavy wind condition, check whether generator is under short-circuit mode or not (reference: 5.2)
and three-phase resistance values is balanced or not (uncharged operation), if imbalanced, the generator fails, please contact supplier to solve
problems.
WARNING: Never check the wind turbine while the blades are spinning or on a windy day.
5.1.5 Abnormal Noise
1) Friction between rotor and stator, or bearing damaged - please contact supplier to solve the problem.
2) Check if wind turbine is rotating abnormally, or noise generated by self-vibration.(reference:5.1.1)
26
5.2 System Troubleshooting
5.2.1 Off-grid wind and solar hybrid system
5.2.1.1 Solar Output Voltage Too Low or No Output
1) Check whether solar panel lead is short circuit, circuit break, open circuit or not.
2) Check whether solar panel is damaged or accumulated too much dust, etc.
5.2.1.2 Abnormal charging
Wind turbine does not charge battery is mainly caused by:
1) Wind speed is too low to reach cut in point. For the off-grid system, when the DC input voltage is higher than battery voltage, it starts to
charge the battery, otherwise it will be no charging.
2) Wind speed is high, but Wind Turbine Does Not Charge Battery
a. The wind turbine DC output voltage is lower than battery’s: ①check whether the output of wind turbine is normal (reference: 5.1.4);
②check whether the rotation speed of wind turbine is normal.
b. The wind turbine DC output voltage is higher than battery’s: ① check whether the system wiring is correct and each terminal wiring is well
connected; ② check whether the controller could rectify power normally. (refer to controller user manual)
c. The type of battery and controller does not match, replace the battery (lead-acid or AGM gel battery is recommended);
d. The battery reached saturation, so wind turbine is on braking mode because of overcharge protection function of the controller
5.2.1.3 Abnormal output
1) Control mode of controller is set incorrectly or damaged and need a replacement. (Reference: controller user manual)
2) Battery is under over-discharge state, check the battery voltage and need to exclude the reason of low battery voltage. (Reference:
5.2.1.2)
27
5.2.2 Grid-tied Wind Turbine System
5.2.2.1 No power feed into grid
1) Wind speed is too low, wind turbine still haven’t reach it’s cut-in wind speed, so no current generated in less than 2.5m/s wind speed.
2) Wind speed is too high, wind turbine output voltage reach the over-voltage point, controller short-circuit braking system protect the wind
turbine and the whole system, the system will restore automatically when the wind speed decrease.
3) The controller short-circuit brake was switched on manually, it will restore when switch on the short-circuit switch manually.
4) On-grid inverter is in disconnected from grid or damaged. (Reference: inverter user manual)
5) Check whether controller DC output voltage is normal. Troubleshooting: ①wind turbine troubleshooting (Reference:5.1.4); ② check whether
the controller is damaged (Reference: controller user manual).
6) Check whether the system wiring is correct, note that electrodes should be connected in a right way, the system will restore by automatically
after reconnected.
7) The wind turbine output characteristics and inverter does not match; solutions: ① replace wind turbine; ② replace on-grid inverter; ③ adjust the
internal parameters (power curve and power factor setting)of the on-grid inverter.
8) Check whether the wiring is loose, poor contact and the state-grid is stable.
5.2.2.2 Low charging power
1) Wind turbine output voltage is low; main reasons: ① low wind speed; ②wind turbine troubleshooting (Reference: 5.1.4).
2) The wind turbine output characteristics and inverter does not match; solutions: ① replace wind turbine; ②replace the on-grid inverter; ③ adjust
the internal parameters of on-grid inverter.
28
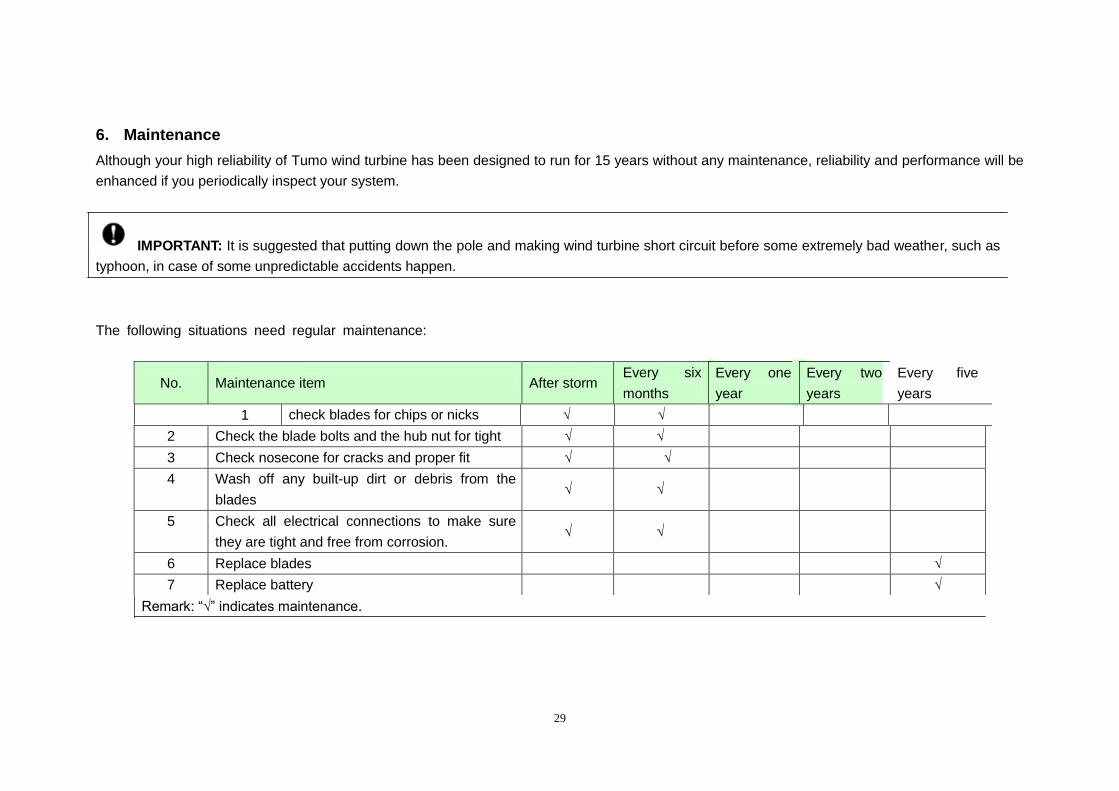
6. Maintenance
Although your high reliability of Tumo wind turbine has been designed to run for 15 years without any maintenance, reliability and performance will be
enhanced if you periodically inspect your system.
IMPORTANT: It is suggested that putting down the pole and making wind turbine short circuit before some extremely bad weather, such as
typhoon, in case of some unpredictable accidents happen.
The following situations need regular maintenance:
Every one
year
Every two
years
Every five
years
Remark: “√” indicates maintenance.
29
No. Maintenance item After storm Every six
months
1 check blades for chips or nicks √ √
2 Check the blade bolts and the hub nut for tight √ √
3 Check nosecone for cracks and proper fit √ √
4 Wash off any built-up dirt or debris from the
blades √ √
5 Check all electrical connections to make sure
they are tight and free from corrosion. √ √
6 Replace blades √
7 Replace battery √

Appendix I
Definition of 50m/s survival wind speed of Tumo wind turbine
Tumo-Int wind turbine is strict in accordance with following standards:
GB/T 10760.1 Generator of Off-grid Wind Turbine Generator System Part 1:Technology condition
GB/T 13981-2009 Design General Requirements for Small Wind Turbine Generator System
GB 17646 Safety of Small Wind Turbine Generator System
GB/T 19068.1 Off-grid Wind turbine Generator Systems Part 1:Technology condition
JB/T 10399-2004 Rotor Blades for Off-grid Wind Turbine Generator System
JB/T 10402.1-2004 Yaw System of Wind turbine Generator Systems Part 1:Technology condition
JB/T 10403-2004 Tower for Off-grid Wind Turbine Generator System
JB/T 10405―2004 Technical Condition for Foundation and Linkage of Off-grid Wind Turbine Generator System
NY/T 1137-2006 Installation Specification of Small Wind Turbine Generator System
Our wind turbine belongs to Class III in accordance with wind turbine international grade, please refer to following chart,
In order to be compatible with extreme load of international safety standard, while calculation of the load, the and all of wind speed which is
calculated by should be reduced by 7%.
As we all know, the huge wind, storm or hurricane usually does not last for a long time, assuming a huge wind occurred once in 50 years, the average
maximum wind speed within 5 seconds at hub height is represented by , it is calculated by multiply coefficient 1.4, that is =1.4
From above explanation, the survival wind speed of Class III wind turbine is:
=1.4 -1.4 *7%=1.4*37.5-1.4*37.5*7%=52.5-3.68=48.82m/s (<50m/s)
30

So this is why the survival wind speed is 50m/s.
Generally speaking, the safety and operation of wind turbine is closely related with matching components, correct pole installation, correct system cable connection, these three factors we could control and we have to do them well, However, wind turbines are installed outdoors, it is also close with natural
environment situations, in case of force majeure factors, such as storm, earthquake, or attacked by hailstone, dust, wind turbines may be damaged.
31

Appendix II (Source: National Weather Service Portland, http://weather.gov/portland)
32


![Brian Mitchell (bmitchel@mcs.drexel.edu) - Drexel University MCS680-FCS 1 Running Time of Programs int MSTWeight(int graph[][], int size) { int i,j; int](https://img.pdfslide.us/doc/110x75/56649e7d5503460f94b809b4/brian-mitchell-bmitchelmcsdrexeledu-drexel-university-mcs680-fcs-1-running.jpg)


![FOR JUDGEMENT · sthalekar[int], ritesh agrawal[int], ram lal roy[int], rakesh kumar-i[int], rajkumari a banju[int], purvish jitendra malkan[int], praveena gautam[int], praveen jain[int],](https://img.pdfslide.us/doc/110x75/60315236cd2017262f2021dd/for-judgement-sthalekarint-ritesh-agrawalint-ram-lal-royint-rakesh-kumar-iint.jpg)


![INT} || 13 INT]](https://img.pdfslide.us/doc/110x75/61cab154ad2220048e4756f8/int-13-int.jpg)
![class Stack { int data[]; int first; int max; Stack(int dimensione) {](https://img.pdfslide.us/doc/110x75/5681320a550346895d985f71/class-stack-int-data-int-first-int-max-stackint-dimensione-.jpg)