Embed Size (px)
Citation preview

Troubleshooting in floorcoatingsCause, repair and prevention
floors
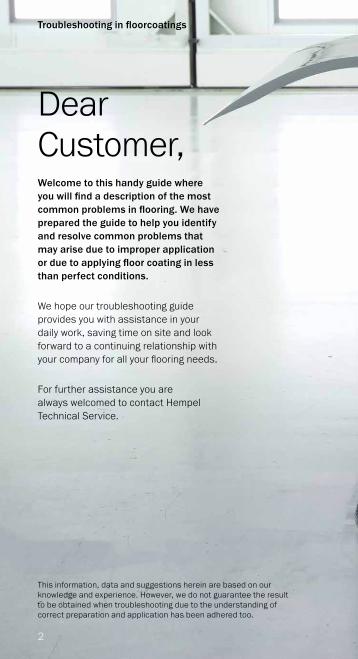
Dear Customer,Welcome to this handy guide where you will find a description of the most common problems in flooring. We have prepared the guide to help you identify and resolve common problems that may arise due to improper application or due to applying floor coating in less than perfect conditions.
We hope our troubleshooting guide provides you with assistance in your daily work, saving time on site and look forward to a continuing relationship with your company for all your flooring needs.
For further assistance you are always welcomed to contact Hempel Technical Service.
2
Troubleshooting in floorcoatings
This information, data and suggestions herein are based on our knowledge and experience. However, we do not guarantee the result to be obtained when troubleshooting due to the understanding of correct preparation and application has been adhered too.

3
Strata Ultimate protection for floorsStrata provides ultimate protection for concrete floors. Offering best-in-class abrasion resistance and mechanical strength, it has been developed to reduce the need for cyclical maintenance whilst offering high standards in sustainability.
Strata products are ideal for demanding applications and total solutions.
Troubleshooting in floorcoatings
4
Troubleshooting in floorcoatings
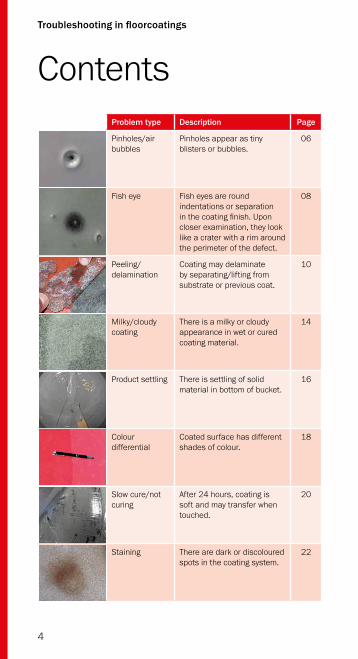
ContentsProblem type Description Page
Pinholes/air bubbles
Pinholes appear as tiny blisters or bubbles.
06
Fish eye Fish eyes are round indentations or separation in the coating finish. Upon closer examination, they look like a crater with a rim around the perimeter of the defect.
08
Peeling/delamination
Coating may delaminate by separating/lifting from substrate or previous coat.
10
Milky/cloudy coating
There is a milky or cloudy appearance in wet or cured coating material.
14
Product settling There is settling of solid material in bottom of bucket.
16
Colour differential
Coated surface has different shades of colour.
18
Slow cure/not curing
After 24 hours, coating is soft and may transfer when touched.
20
Staining There are dark or discoloured spots in the coating system.
22

5
Troubleshooting in floorcoatings
Problem type Description Page
Yellowing Topcoat has developed a yellow hue.
24
Irregular particles
Usually small, irregular particles in the paint film caused by foreign matter.
26
Orange peel Orange peel is a stipple finish appearance in the final topcoat of epoxy or urethaneflooring system.
28
Peeling in parking areas
System is delaminating and peeling in areas where tyres are consistently in contact with the coating.
30
Supporting informationCalculating coverage rates 32
Notes 33

6
Troubleshooting in floorcoatings
Pinholes/air bubblesDescriptionPinholes appear as tiny blisters or bubbles. When these blisters pop they usually leave a round crater and the pinhole should be easily seen through the film.
CauseOutgassing: Air escapes from porous concrete and becomes trapped in the coating.
Air movement: Excessive air movement from vents, doors or other sources may cause flash drying and prevent necessary air release from coating.
Temperature/humidity: Too hot or too humid conditions can result in rapid drying that results in air entrapment in coating.
Direct sunlight: Floors exposed to direct sunlight can tack off before sufficient air release has occurred, forming bubbles.
Improper mixing: Fast speed mixing equipment and improper mixing procedures may result in entrapped air.
Roller covers: Too short or too long of a nap roller can cause air to be introduced into the coating causing air bubbles.
Surface prep: Aggressive shot-blasting or sandblasting will open up pores in the concrete causing air to become trapped when coating is applied.
7
Troubleshooting in floorcoatings
Repair1. Sand affected areas to a smooth, flat finish with #60 grit
sandpaper.
2. Fill large craters with 100% solids epoxy material.
3. Vacuum to remove dust and debris.
4. Re-apply the used floor coating.
PreventionOutgassing: For very porous concrete it may be necessary to pre-prime with a solvent-borne primer.
Air movement: Avoid any condition that can generate fast air movement across the coating. When providing ventilation, always exhaust air rather than blowing with fans.
Temperature/humidity: Wait until the temperature and humidity are within the ranges specified in the product data sheet to apply the material.
Direct sunlight: Prevent direct sunlight exposure during initial cure.
Improper mixing: Use slow speed mixing equipment with a paddle-type blade. If air is introduced into the material, let stand until air is visibly released.
Roller covers: Use the appropriate length short haired roller and apply without vigorous rolling. De-air with a spike roller if necessary.
Surface prep: Avoid aggressive shot-blasting. Sandblasting is not a proper surface preparation method for Strata flooring systems.

8
Troubleshooting in floorcoatings
Fish eye
DescriptionFish eyes are round indentations or separation in the coating finish. Upon closer examination, they look like a crater with a rim around the perimeter of the defect along with a very small dot in the center – hence the name “fish eye”.
CauseSilicone contaminants: Certain manufacturing processes such as welding or spraying can deposit silicones on the floor causing fish eyes to appear.
Oil/grease contaminants: Oil or grease contaminants can cause the coating to function improperly and fish eyes to appear.

9
Troubleshooting in floorcoatings
RepairSilicone contaminants:
1. For minor fish eyes, abrade with #60 grit sandpaper.
2. For widespread fish eyes, completely remove coating.
3. Solvent wipe to remove contaminants.
4. Recoat the area.
Oil/grease contaminants:
1. Remove the coating by grinding, stripping or other suitable methods.
2. Clean the substrate, removing all contaminants.
3. Recoat the area.
PreventionSilicone contaminants: Become familiar with certain types of operations and test areas prior to application. Properly prepare the substrate before coating.
Oil/grease contaminants: Degrease surface properly. After degreasing, surface may need to be scarified. If all contaminants cannot be removed, contact Hempel technical service.

10
Troubleshooting in floorcoatings
Peeling/delaminationDescriptionCoating is peeling or de-bonding from either the substrate or between layers of coating.
Delamination from substrate
CauseInadequate cleaning: Coating will not adhere to oil, grease or other contaminants.
No primer used: Without primer, peeling/delamination may occur.
Moisture vapor transmission: Water vapor penetrating through the substrate can cause peeling/delamination. After removing delaminated areas, moisture may be visible or the concrete may be dark in appearance.

11
Troubleshooting in floorcoatings
RepairInadequate cleaning:
1. The coating must be removed by stripping, shot-blasting or other suitable means.
2. Re-apply the coating after proper surface preparation.
No primer used:
1. Remove any coating that is not tightly bonded by stripping, shot-blasting, or other suitable means.
2. Prime and recoat after proper surface preparation.
Moisture vapor transmission:
1. Remove any coating that is not tightly bonded by stripping, shot-blasting, or other suitable means.
2. Consult Hempel technical services if this condition exists.
PreventionInadequate cleaning: Properly clean the substrate and provide a suitable profile for adhesion by stripping, shot-blasting, or other suitable means.
No primer used: Use a suitable primer prior to coating the substrate after proper surface preparation.
Moisture vapor transmission:
- Substrates in contact with ground must have a properly installed, effective vapor barrier to help prevent potential problems resulting from hydrostatic, capillary or moisture vapor pressure.
- Always perform a calcium chloride test to ASTM F1869 standards prior to installation. Test results should yield no more than 3 pounds of moisture per 1,000 square feet per 24 hours.
- When calcium chloride test results are higher than 3 pounds per 1,000 square feet per 24 hours, consult Hempel technical service.

12
Troubleshooting in floorcoatings
Peeling/delaminationDelamination between coats
RepairBeyond recoat window:
1. Remove all loose, peeling, or un-bonded material.
2. Sand surface using a circular floor sander with #60 grit sandpaper.
3. Vacuum surface to remove any dust or debris left by sanding.
4. Solvent wipe the floor with Xylene.
5. Reapply coating as per the method statement.
Surface contamination:
1. Surface needs to be clean/dry of any contaminants prior to coating. Vacuum or mop any water or dust. Oil or grease will need to be removed first by using an industrial-type degreaser.
2. Make sure the surface is completely dry before applying next coat. If surface has gone beyond the 24 hour recoat window, it will need to be sanded using a circular floor sander and #60 grit sandpaper.
Cause Beyond recoat window: Coating was not applied within 24 hours of previous coat.
Surface contamination: Surface was contaminated by water, humidity, oil, grease, or dust.
Improper mixing: Coating was not mixed at proper mix ratio or not mixed for a minimum of 3 minutes.
13
Troubleshooting in floorcoatings
3. Vacuum surface to remove any dust or debris left over from sanding.
4. Solvent wipe the surface using Xylene.
5. Re-apply coating as per the product data sheet or method statement.
Improper mixing:
1. Remove any loose, peeling, or uncured coating.
2. Remove all uncured material by solvent wiping with Xylene.
3. Sand surface using a circular floor sander and #60 grit sandpaper.
4. Vacuum surface to remove any dust or debris resulting from sanding.
5. Solvent wipe surface with Xylene.
6. Re-apply coating as per the product data sheet or method statement.
PreventionBeyond recoat window: Each coat needs to be applied within the recoat interval as per the product data sheet.
Surface contamination: Check substrate carefully before applying coating. Remove any existing contaminants.
Improper mixing: Follow mixing instructions product data sheet or method statement.

14
Troubleshooting in floorcoatings
Milky/cloudy coatingDescriptionThere is a milky or cloudy appearance in wet or cured coating material.
Cause Moisture: Moisture in the concrete or high humidity levels can cause moisture to be present on the surface when the material is applied, or before it is fully cured. This can result in a milky appearance or greasy film. This condition is sometimes referred to as “blush” and is more prevalent with certain epoxies.
Thick application: A milky or cloudy appearance may result from the coating being applied too thick. In this case, the milky appearance will be more noticeable if the coating is clear.
15
Troubleshooting in floorcoatings
RepairMoisture:
1. Remove affected material by sanding with #60 grit sandpaper.
2. Apply additional coats when humidity is at acceptable levels.
3. If a “greasy” film appears, solvent wipe with Xylene.
Thick application:
1. Remove affected material by sanding with #60 grit sandpaper.
2. If a greasy film appears, solvent wipe with Xylene.
PreventionMoisture: Test the concrete for moisture per ASTM standards prior to application. Apply material when humidity levels are low.
Thick application: Apply material in accordance with guide specifications on material thickness/coverage rates.

16
Troubleshooting in floorcoatings
Product settling
DescriptionSolid material settles in the bottom of the bucket. This typically occurs in the pigmented/colour side of a product.
Cause Time: Some products have a tendency to settle over time.

17
Troubleshooting in floorcoatings
Prevention• If there are signs of pigment settling, special care needs to be
taken during initial mixing.
• Make sure mixing paddle reaches bottom of bucket and mix the settled material well to ensure pigments are dispersed back into product.
• Always pre-mix pigmented side before adding hardener.
• If settlement is pasty or dry and does not mix back into material, do not use.
18
Troubleshooting in floorcoatings
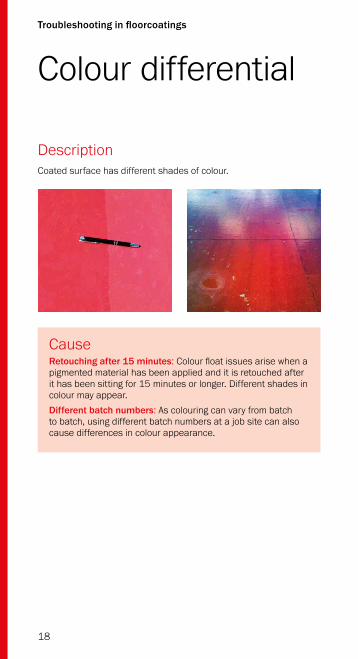
Colour differential
DescriptionCoated surface has different shades of colour.
Cause Retouching after 15 minutes: Colour float issues arise when a pigmented material has been applied and it is retouched after it has been sitting for 15 minutes or longer. Different shades in colour may appear.
Different batch numbers: As colouring can vary from batch to batch, using different batch numbers at a job site can also cause differences in colour appearance.
19
Troubleshooting in floorcoatings
Repair1. Backroll entire area with an short haired roller going from side
to side.
2. Recoat the entire area with material from the same production batch.
3. If batch numbers are different, box the pigmented side first before adding hardener.
PreventionRetouching after 15 minutes: If material needs to be retouched for any reason, it should be done within 10 minutes of application.
Different production batch numbers: When applying the topcoat, make sure you have enough material from the same production batch. If not, you will need to box the topcoat material. Boxing is the process of combining all the coating you will be using as the final coat into one container. This is especially important when coating a large surface area or if there is insufficient coating from a single production batch, where a colour variation from one batch to another is likely. You will need to box the pigmented side before adding hardner.

20
Troubleshooting in floorcoatings
Slow cure/ not curingDescriptionThe material does not fully cure or is still soft after 24 hours.
Repair1. Fully remove the uncured coating down to the clean substrate
by solvent wiping, scraping, grinding or shot-blasting.
2. Recoat per the instructions in the product data sheet or method statement.
Cause• Improper mix ratio
• Improper mixing
• Cold materials
• Cold ambient temperatures
• Cold surface temperatures

21
Troubleshooting in floorcoatings
PreventionImproper mix ratio: Always read and follow the mix ratios printed on the bucket labels or on the product data sheet. Always use some type of measuring device: i.e., plastic buckets that have premeasured increments printed on them, gallon or quart cans.
Improper mixing: Always pre-mix the pigmented part (the base) before adding the curing agent. Stir the base continously while adding the curing agent. Mix until the mixture is homogeneous.
Cold materials: When dealing with epoxies and urethanes, cold material will result in slower than normal cure times and can affect their physical properties once cured. Cold materials are more difficult to mix, roll out and level. Before applying materials in cold temperatures, they should be stored in a heated environment or heated storage container at the ideal temperature listed on the product data sheet. The longer the materials can be stored in a heated environment, the better they will perform.
Cold ambient temperatures: This condition will also cause slower than normal cure of epoxies and urethanes. It will also make them more difficult to roll out and level. It can cause bubbling/blister issues because the viscosity of the epoxy has increased due to the colder temperatures, preventing entrapped vapor in the substrate from escaping. Before application, the temperature in the application area should be at normal service temperature for a minimum of 48 hours. If necessary, utilise forced heat by means of portable heaters.
Cold surface temperatures: Concrete surfaces that are 10°C or lower will drastically slow normal curing of epoxies and urethanes and can slow the cure as much as 6 hours or more. It can also affect the cured physical properties, making some epoxies flexible. Cold substrate temperatures can prevent epoxies from “wetting out” or penetrating into the concrete surface, thus causing adhesion issues. Before application, service temperatures should be at normal operating conditions, above 10°C and below 75 % relative humidity, for a minimum of 48 hours. If this cannot be achieved, the use of forced heat may be necessary.
Note: Never coat over uncured material.

22
Troubleshooting in floorcoatings
Staining
DescriptionThere are dark or discoloured spots in the coating system.
CauseChemical exposure or spills: Floor has been exposed to chemicals.
Tyre marks: Floor has been exposed to vehicular traffic.

23
Troubleshooting in floorcoatings
Repair1. Solvent wipe and/or sand stained areas to remove the stain.
2. Apply additional coating.
PreventionChemical exposure/spills: In general, epoxies and urethanes do not reach full chemical cure for 7 days. It is important that the completed system is allowed to fully cure for a minimum of 24 hours for foot traffic, and 7 days for forklift or heavy loads. Before the floor is subject to chemical exposure/spills, it should be allowed to cure for a minimum of 7 days. Spills should be cleaned immediately and not allowed to remain on the surface for any length of time.
Tyre marks: Let final topcoat cure for a minimum of 7 days. To help avoid tyre marks, it may be necessary to place a rubber mat or carpet in areas exposed to tyre traffic or use light coloured tyres instead of black.

24
Troubleshooting in floorcoatings
Yellowing
DescriptionTopcoat has developed a yellow hue. This problem will affect epoxies regardless if the epoxy is clear or not.
Cause• Epoxy has been exposed to partial or direct sunlight.
25
Troubleshooting in floorcoatings
RepairRemoval for all floor types:
1. Remove any dirt, grease, oil or any other contaminants by pressure washing. Heavy oil or grease will need to be removed first by using an industrial-type degreaser.
2. Once floor is dry, sand entire area using #60 grit sandpaper with a circular floor sanding machine.
3. Clean floor to remove dust/debris from sanding.
After removal:
Smooth pigmented (solid colour) epoxy floors:
4. Apply 1 or 2 coats of PU topcoat.
Textured systems:
4. Re-apply one broadcast application.
5. Apply both seal coats using 100% solids pigmented epoxy.
6. Apply one final coat of PU topcoat.
Prevention• On pigmented epoxy floors exposed to excessive UV or direct
sunlight, it will be necessary to apply one coat of PU coating.

26
Troubleshooting in floorcoatings
Irregular particles
DescriptionUsually small, irregular particles in the paint film caused by foreign matter – e.g. dust, dirt, fibres from the roller. Can occur in different sizes, shapes, types and patterns.
Cause• Poor cleaning of the substrate prior to application of
the coating.
• Loose fibres from the roller.
• Contamination from the air.

27
Troubleshooting in floorcoatings
Repair• For severe faults, sand out the problem and repaint.
Prevention• Proper vacuum cleaning of the substrate prior to application.
• Use a good quality roller designed for the type of floor coating used. Pre-clean the roller to remove any loose fibres prior to use.

28
Troubleshooting in floorcoatings
Orange peel
DescriptionOrange peel is a stipple finish appearance in the final topcoat of epoxy or urethane flooring system. Some flooring manufacturers offer this finish as part of their systems; however, it is not always desirable to the customer.
CauseCold substrate/materials: If the substrate temperature is below 10°C, the epoxy or urethane will not flow and level out, and can produce the orange peel finish. This will be more prevalent if the topcoat is applied in a thin layer, somewhere between 75-150 micron film thickness, wet. The combination of a cold substrate and cold materials can readily produce this type of finish.
Hot substrate/materials: Hot temperatures can also result in an orange peel finish. If the substrate is above 35°C, the topcoat may cure too quickly. This rapid curing will cause the material not to flow and level out. Just as in cold temperatures, thin topcoat layers, hot substrate temperatures and hot material can produce an orange peel finish.

29
Troubleshooting in floorcoatings
Repair1. To remove the orange peel finish, the floor will need to be sanded
with a circular floor sander using 60-80 grit sandpaper. Sand the floor to a smooth finish.
2. Vacuum thoroughly to remove dirt/debris and solvent wipe with Xylene.
3. Apply topcoat material.
PreventionHot or cold substrate/materials: Keep the substrate at 15°C or above and store materials in dry and ventilated location, far from heat and direct sunlight.

30
Troubleshooting in floorcoatings
Peeling in parking areasDescriptionFlooring system is delaminating and peeling in areas where tyres are consistently in contact with the coating.
Cause Thin system application: A floor coating system applied at insufficient coverage rates may delaminate.
Project specification: The applied system was not designed for project conditions.
Poor surface preparation: Substrate was not properly prepared for acceptance of coating system.
Improper cure time: Coating was not fully cured.

31
Troubleshooting in floorcoatings
Repair1. Remove all loose, peeling, or unbonded material.
2. Remove oil or grease by using an industrial-type degreaser. Deeply penetrated contaminants may require removal by mechanical methods.
3. Abrade concrete to a CSP2 or CSP3 surface profile.
4. Ensure substrate is clean and dry prior to coating.
5. Re-apply coating as per the product data sheet or method statement.
PreventionPoor surface preparation: Mechanically prepare substrate to industry standard CSP2 or CSP3. Ensure substrate is clean and dry.
Project specification/thin system application: Ensure that the appropriate system is specified for existing project conditions and intended use. Install coatings at recommended application rates.
Improper cure time: It is important that the completed system is allowed to fully cure for a minimum of 24 hours for foot traffic, and 7 days for forklift or heavy loads. Before the floor is subject to chemical exposure/spills, it should be allowed to cure for a minimum of 7 days.

32
Troubleshooting in floorcoatings
Calculating coverage ratesCoverage rates: Theoretical vs actualTheoretical coverages are those calculated for glass-smooth surfaces with no allowances made for loss. Manufacturers publish theoretical coverages instead of actual coverages because they cannot anticipate job or surface conditions. Therefore, published coverage rates should only be used as a guide for estimating material requirements for a given job.
Actual coverage will be less than theoretical coverage. When coatings are applied over concrete, many factors such as the surface texture, overspray loss, container residue, equipment characteristics, applicator technique, etc. will directly affect the amount of coating material required to meet the designed in-place dry film thickness (DFT). Therefore, it is very important that additional material be added to the theoretical quantities to ensure that the proper coating thickness is applied. Items to consider are:
Shot-blasted concrete: Even though the surface texture appears to be fairly smooth, this surface can require 5% to 15% additional material to the theoretical amount.
Miscellaneous loss: A miscellaneous factor must be added to the theoretical coverage rate to cover losses due to material left in containers, equipment problems, etc. Use a percentage factor of between 3% to 10%, depending on the contractor’s experience and efficiency.
Calculating actual coverageTo determine total material requirements for a job, add estimated losses due to field conditions to theoretical coverages. Depending on jobsite conditions, up to 50 per cent additional material may be required to meet the designed in-place dry film thickness (DFT).

33
Troubleshooting in floorcoatings
Notes

34
Troubleshooting in floorcoatings
Notes

35
Troubleshooting in floorcoatings
Notes
hempel.com
The Hempel Group Head OfficeHempel A/SLundtoftegaardsvej 912800 Kgs. LyngbyDenmark
Tel: +45 4593 3800Email: [email protected]
Since 1915 Hempel has been producing protective coatings that help customers to safeguard their assets whilst keeping them looking their best. Today we are a world-leading supplier of trusted solutions in the Protective, Decorative, Marine, Container and Yacht markets. Employing over 5,000 people, across 80 countries worldwide, with 28 factories and more than 150 stock points globally. This includes many recognised brands like Crown Paints, Schaepman and Jones-Blair.
V1_DEC_15