Embed Size (px)
Citation preview
Town of Bristol Fire Department
Standard Operating Procedure
(S.O.P)
Manual
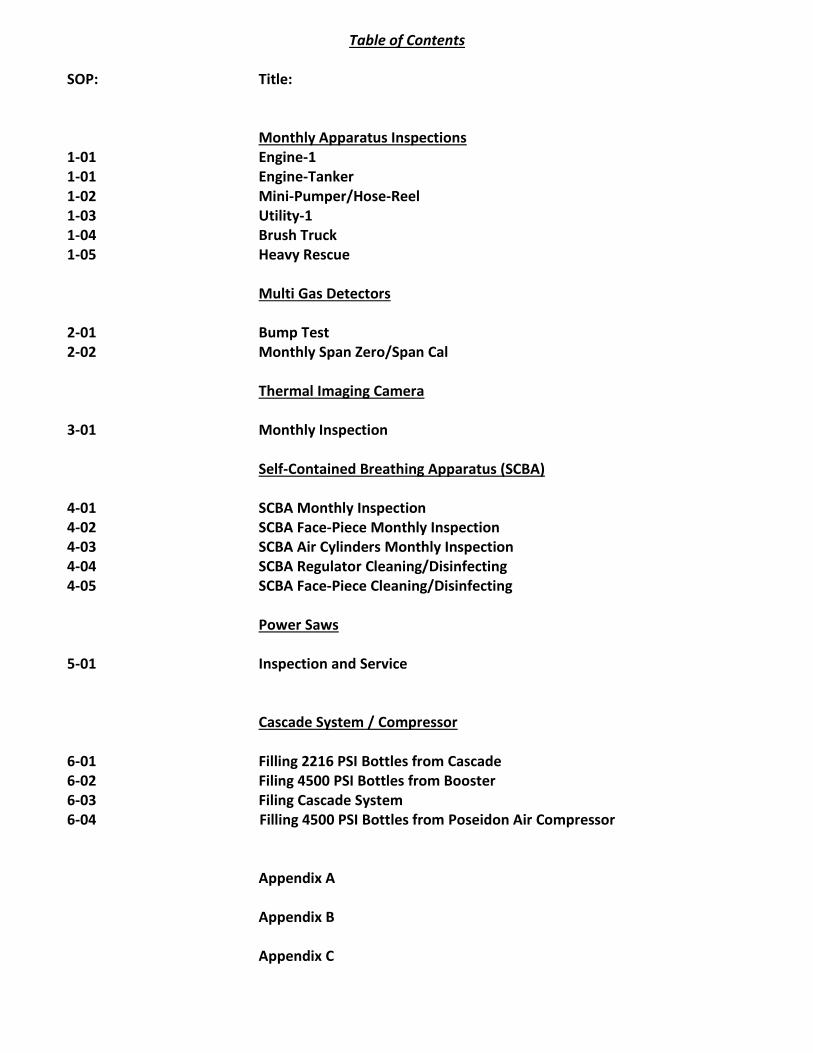
Table of Contents
SOP: Title:
Monthly Apparatus Inspections 1-01 Engine-1 1-01 Engine-Tanker 1-02 Mini-Pumper/Hose-Reel 1-03 Utility-1 1-04 Brush Truck 1-05 Heavy Rescue
Multi Gas Detectors 2-01 Bump Test 2-02 Monthly Span Zero/Span Cal
Thermal Imaging Camera 3-01 Monthly Inspection
Self-Contained Breathing Apparatus (SCBA) 4-01 SCBA Monthly Inspection 4-02 SCBA Face-Piece Monthly Inspection 4-03 SCBA Air Cylinders Monthly Inspection 4-04 SCBA Regulator Cleaning/Disinfecting 4-05 SCBA Face-Piece Cleaning/Disinfecting
Power Saws 5-01 Inspection and Service Cascade System / Compressor 6-01 Filling 2216 PSI Bottles from Cascade 6-02 Filing 4500 PSI Bottles from Booster 6-03 Filing Cascade System 6-04 Filling 4500 PSI Bottles from Poseidon Air Compressor Appendix A Appendix B Appendix C

Town of Bristol Fire Department Standard Operating Procedures
SECTION
1-01
Monthly Apparatus Inspection
Engine-1
REVISION 04-01-2016
NEXT REVISION DATE 4-01-2017
Purpose: To develop a schedule for inspecting Engine-1 to ensure all equipment and tools assigned to the engine are accounted for, are located in proper compartment and to insure all equipment is in good working order. Definitions:
1) Checklist - List of all tasks that need to be completed (See Appendix A). 2) Inventory List - List of equipment and tools that are assigned to Engine-1 and which
compartment they are assigned (See Appendix B). Scope: All equipment and tools assigned to Engine-1. Responsibility: It is the responsibility of each company or apparatus group to complete their assigned apparatus/equipment inspection for the month. Policy: Engine-1 will be inspected prior to the monthly business meeting using appropriate checklist. Checklists will be completed and returned to the OIC prior to monthly meeting. Procedure:
I. Complete Checklist – (See Appendix A) 1) Complete Inventory Sheet (See Appendix B)
a) Using inventory sheet verify all equipment and tools are located in the compartment they are assigned. If tools are missing note on inventory sheet. If tools are found in incorrect compartment relocate to correct compartment
b) Verify all equipment and tools are in good working order 2) Flashlights
a) Ensure all Survivor flashlights work properly b) Switch battery in flashlight with one in charger c) Replace flashlight and verify it is charging d) Ensure all Box Light flashlights work properly e) Replace flashlight and verify it is charging
3) Handheld Radios a) Ensure all handheld radios work properly b) Verify they are set on Bristol Repeater channel c) Replace radio and verify it is charging
4) Fire Extinguishers a) Verify pressure b) Remove extinguisher and turn upside down. Hit bottom lightly with rubber
mallet to keep chemicals from settling on bottom
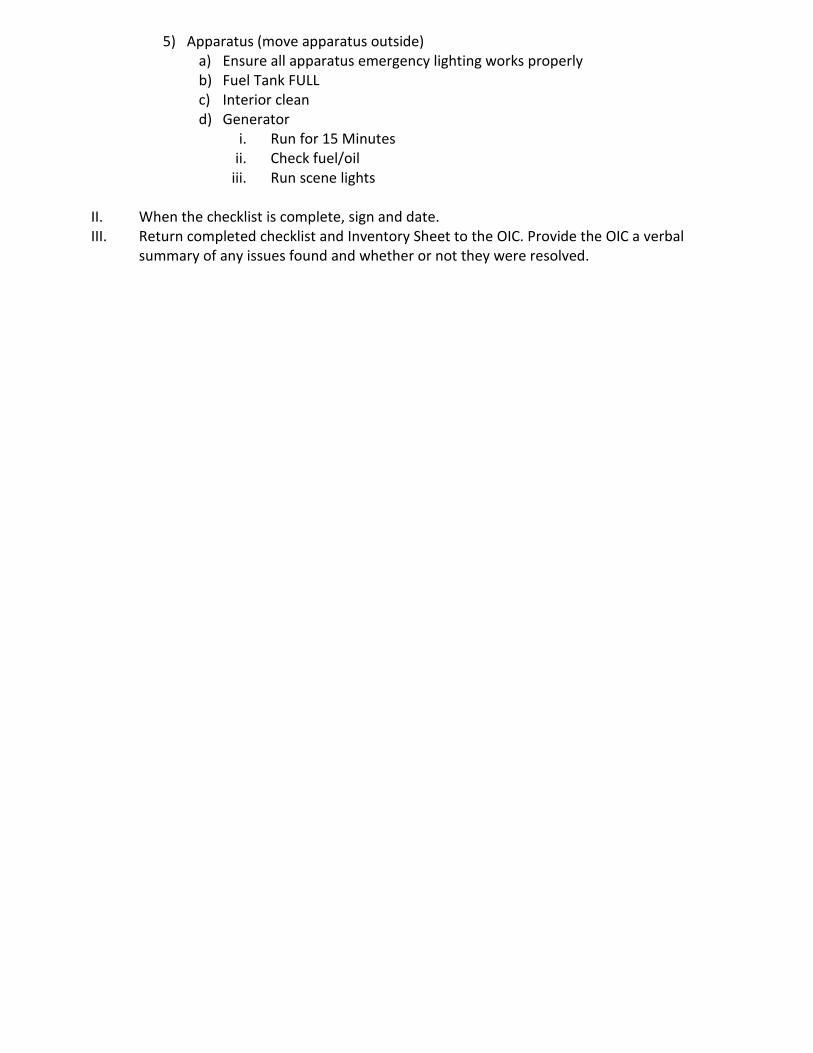
5) Apparatus (move apparatus outside)
a) Ensure all apparatus emergency lighting works properly b) Fuel Tank FULL c) Interior clean d) Generator
i. Run for 15 Minutes ii. Check fuel/oil
iii. Run scene lights
II. When the checklist is complete, sign and date. III. Return completed checklist and Inventory Sheet to the OIC. Provide the OIC a verbal
summary of any issues found and whether or not they were resolved.
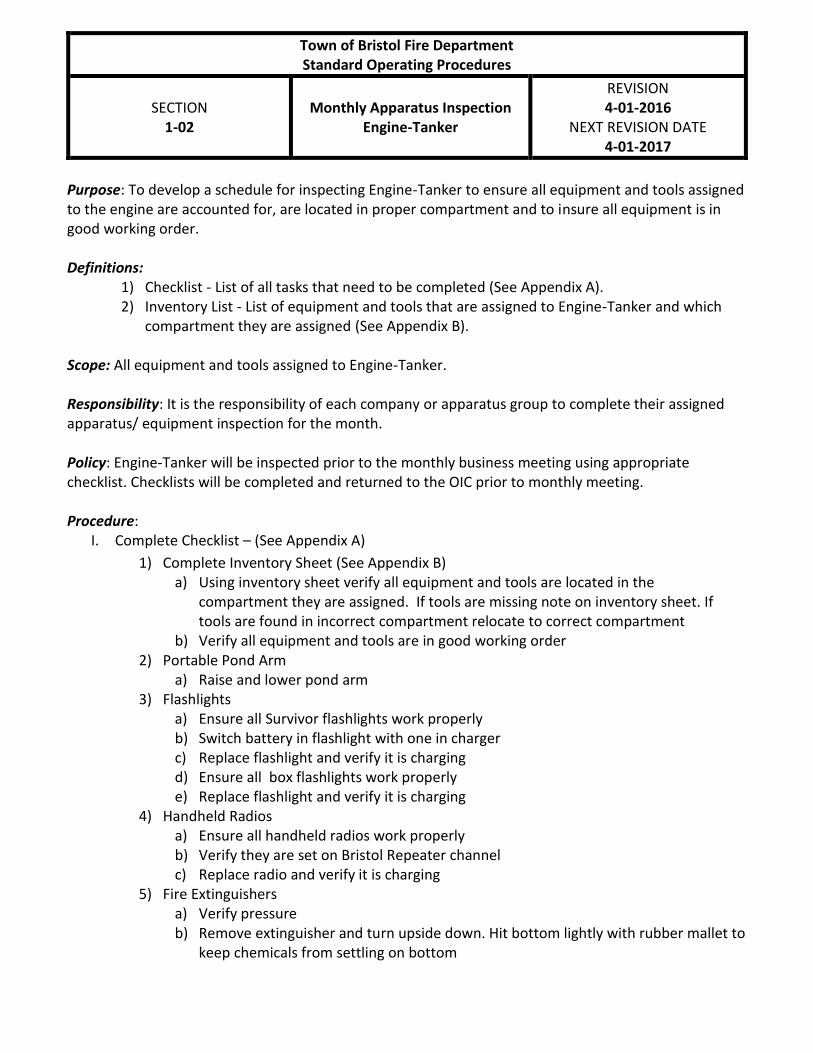
Town of Bristol Fire Department Standard Operating Procedures
SECTION
1-02
Monthly Apparatus Inspection
Engine-Tanker
REVISION 4-01-2016
NEXT REVISION DATE 4-01-2017
Purpose: To develop a schedule for inspecting Engine-Tanker to ensure all equipment and tools assigned to the engine are accounted for, are located in proper compartment and to insure all equipment is in good working order. Definitions:
1) Checklist - List of all tasks that need to be completed (See Appendix A). 2) Inventory List - List of equipment and tools that are assigned to Engine-Tanker and which
compartment they are assigned (See Appendix B). Scope: All equipment and tools assigned to Engine-Tanker. Responsibility: It is the responsibility of each company or apparatus group to complete their assigned apparatus/ equipment inspection for the month. Policy: Engine-Tanker will be inspected prior to the monthly business meeting using appropriate checklist. Checklists will be completed and returned to the OIC prior to monthly meeting. Procedure:
I. Complete Checklist – (See Appendix A)
1) Complete Inventory Sheet (See Appendix B) a) Using inventory sheet verify all equipment and tools are located in the
compartment they are assigned. If tools are missing note on inventory sheet. If tools are found in incorrect compartment relocate to correct compartment
b) Verify all equipment and tools are in good working order 2) Portable Pond Arm
a) Raise and lower pond arm 3) Flashlights
a) Ensure all Survivor flashlights work properly b) Switch battery in flashlight with one in charger c) Replace flashlight and verify it is charging d) Ensure all box flashlights work properly e) Replace flashlight and verify it is charging
4) Handheld Radios a) Ensure all handheld radios work properly b) Verify they are set on Bristol Repeater channel c) Replace radio and verify it is charging
5) Fire Extinguishers a) Verify pressure b) Remove extinguisher and turn upside down. Hit bottom lightly with rubber mallet to
keep chemicals from settling on bottom
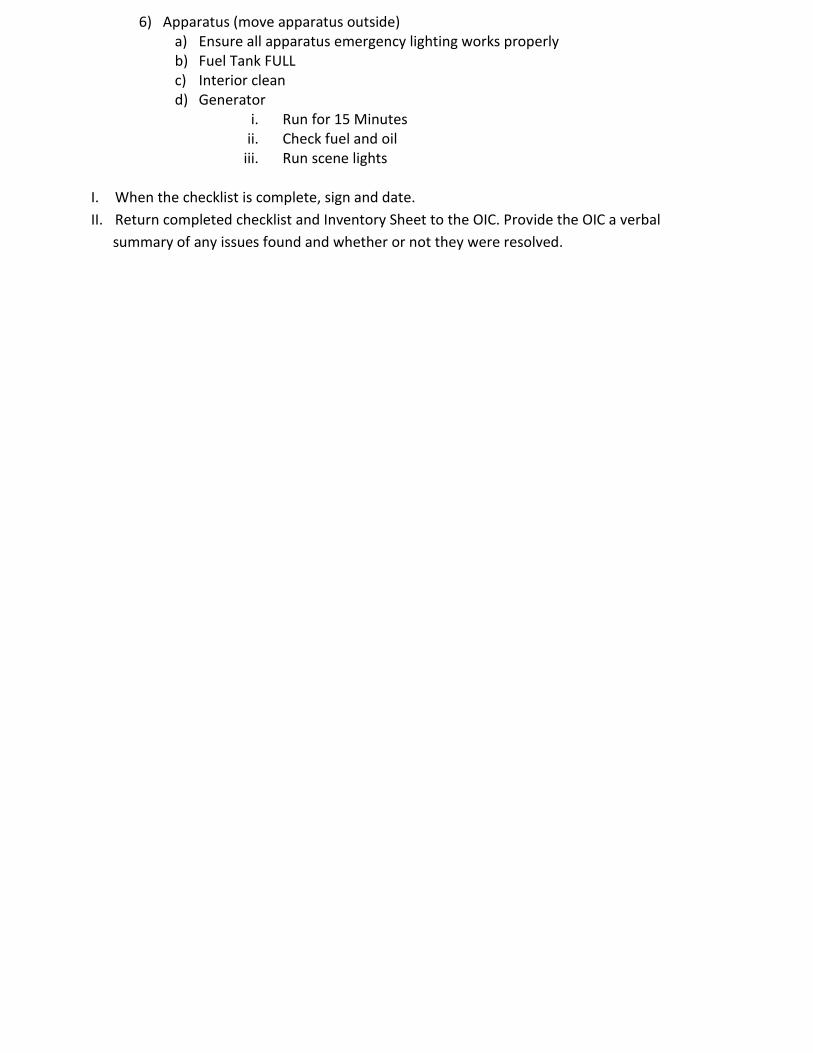
6) Apparatus (move apparatus outside) a) Ensure all apparatus emergency lighting works properly b) Fuel Tank FULL c) Interior clean d) Generator
i. Run for 15 Minutes ii. Check fuel and oil
iii. Run scene lights
I. When the checklist is complete, sign and date.
II. Return completed checklist and Inventory Sheet to the OIC. Provide the OIC a verbal
summary of any issues found and whether or not they were resolved.
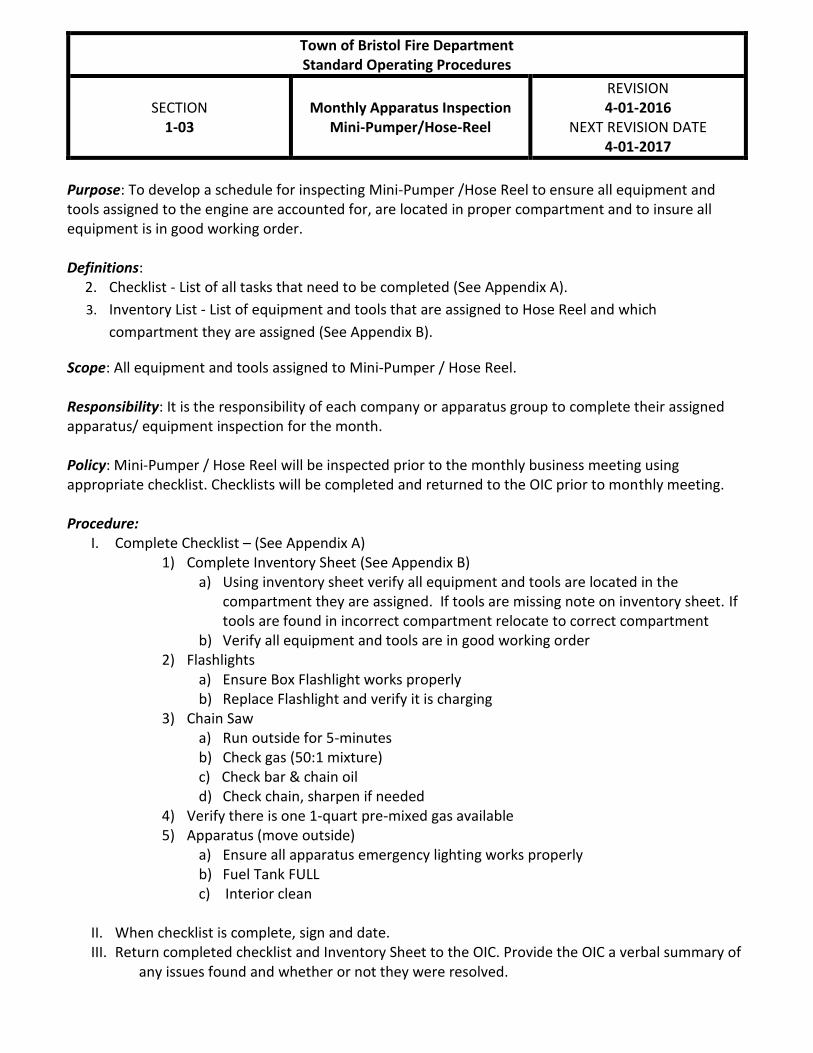
Town of Bristol Fire Department Standard Operating Procedures
SECTION
1-03
Monthly Apparatus Inspection
Mini-Pumper/Hose-Reel
REVISION 4-01-2016
NEXT REVISION DATE 4-01-2017
Purpose: To develop a schedule for inspecting Mini-Pumper /Hose Reel to ensure all equipment and tools assigned to the engine are accounted for, are located in proper compartment and to insure all equipment is in good working order. Definitions:
2. Checklist - List of all tasks that need to be completed (See Appendix A).
3. Inventory List - List of equipment and tools that are assigned to Hose Reel and which
compartment they are assigned (See Appendix B).
Scope: All equipment and tools assigned to Mini-Pumper / Hose Reel. Responsibility: It is the responsibility of each company or apparatus group to complete their assigned apparatus/ equipment inspection for the month. Policy: Mini-Pumper / Hose Reel will be inspected prior to the monthly business meeting using appropriate checklist. Checklists will be completed and returned to the OIC prior to monthly meeting. Procedure:
I. Complete Checklist – (See Appendix A) 1) Complete Inventory Sheet (See Appendix B)
a) Using inventory sheet verify all equipment and tools are located in the compartment they are assigned. If tools are missing note on inventory sheet. If tools are found in incorrect compartment relocate to correct compartment
b) Verify all equipment and tools are in good working order 2) Flashlights
a) Ensure Box Flashlight works properly b) Replace Flashlight and verify it is charging
3) Chain Saw a) Run outside for 5-minutes b) Check gas (50:1 mixture) c) Check bar & chain oil d) Check chain, sharpen if needed
4) Verify there is one 1-quart pre-mixed gas available 5) Apparatus (move outside)
a) Ensure all apparatus emergency lighting works properly b) Fuel Tank FULL c) Interior clean
II. When checklist is complete, sign and date. III. Return completed checklist and Inventory Sheet to the OIC. Provide the OIC a verbal summary of
any issues found and whether or not they were resolved.
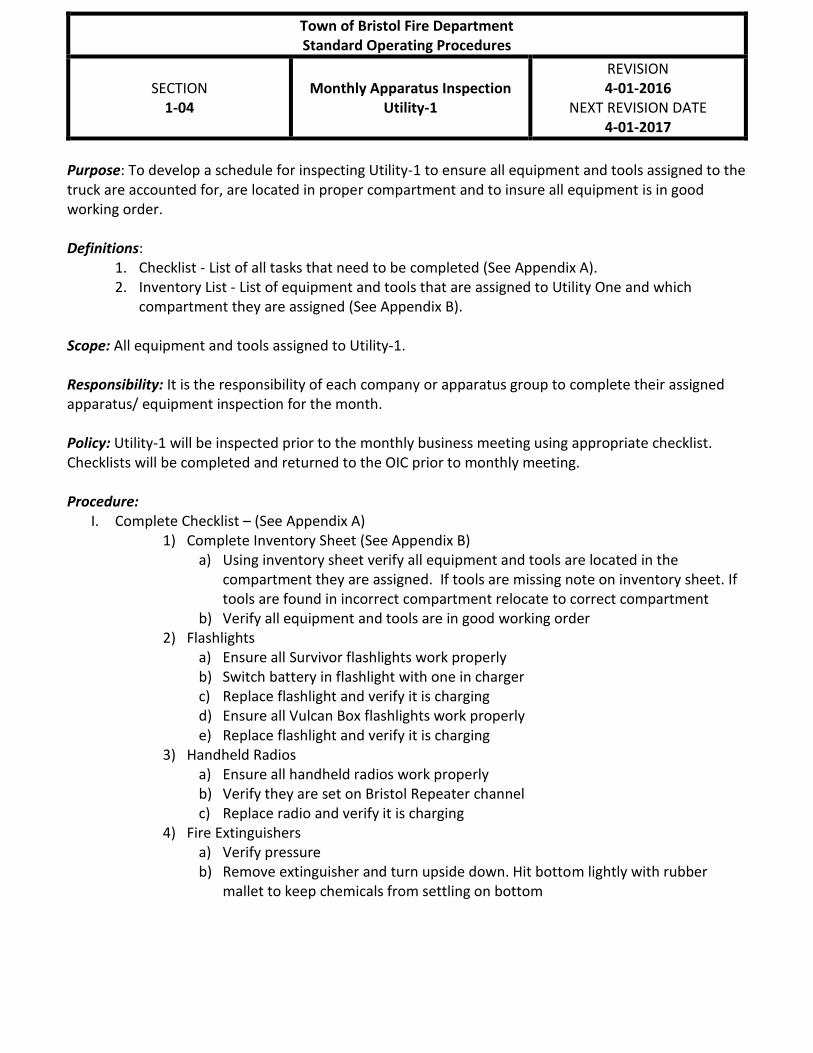
Town of Bristol Fire Department Standard Operating Procedures
SECTION
1-04
Monthly Apparatus Inspection
Utility-1
REVISION 4-01-2016
NEXT REVISION DATE 4-01-2017
Purpose: To develop a schedule for inspecting Utility-1 to ensure all equipment and tools assigned to the truck are accounted for, are located in proper compartment and to insure all equipment is in good working order. Definitions:
1. Checklist - List of all tasks that need to be completed (See Appendix A). 2. Inventory List - List of equipment and tools that are assigned to Utility One and which
compartment they are assigned (See Appendix B). Scope: All equipment and tools assigned to Utility-1. Responsibility: It is the responsibility of each company or apparatus group to complete their assigned apparatus/ equipment inspection for the month. Policy: Utility-1 will be inspected prior to the monthly business meeting using appropriate checklist. Checklists will be completed and returned to the OIC prior to monthly meeting. Procedure:
I. Complete Checklist – (See Appendix A) 1) Complete Inventory Sheet (See Appendix B)
a) Using inventory sheet verify all equipment and tools are located in the compartment they are assigned. If tools are missing note on inventory sheet. If tools are found in incorrect compartment relocate to correct compartment
b) Verify all equipment and tools are in good working order 2) Flashlights
a) Ensure all Survivor flashlights work properly b) Switch battery in flashlight with one in charger c) Replace flashlight and verify it is charging d) Ensure all Vulcan Box flashlights work properly e) Replace flashlight and verify it is charging
3) Handheld Radios a) Ensure all handheld radios work properly b) Verify they are set on Bristol Repeater channel c) Replace radio and verify it is charging
4) Fire Extinguishers a) Verify pressure b) Remove extinguisher and turn upside down. Hit bottom lightly with rubber
mallet to keep chemicals from settling on bottom
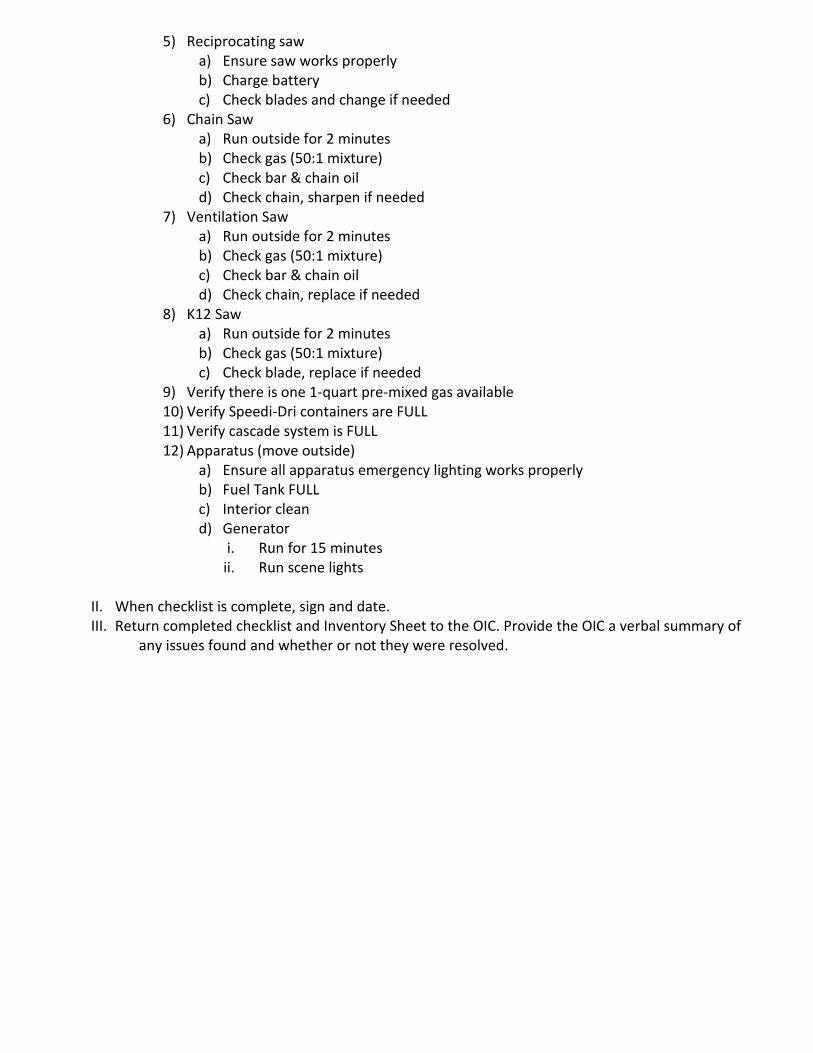
5) Reciprocating saw
a) Ensure saw works properly b) Charge battery c) Check blades and change if needed
6) Chain Saw a) Run outside for 2 minutes b) Check gas (50:1 mixture) c) Check bar & chain oil d) Check chain, sharpen if needed
7) Ventilation Saw a) Run outside for 2 minutes b) Check gas (50:1 mixture) c) Check bar & chain oil d) Check chain, replace if needed
8) K12 Saw a) Run outside for 2 minutes b) Check gas (50:1 mixture) c) Check blade, replace if needed
9) Verify there is one 1-quart pre-mixed gas available 10) Verify Speedi-Dri containers are FULL 11) Verify cascade system is FULL 12) Apparatus (move outside)
a) Ensure all apparatus emergency lighting works properly b) Fuel Tank FULL c) Interior clean d) Generator
i. Run for 15 minutes ii. Run scene lights
II. When checklist is complete, sign and date. III. Return completed checklist and Inventory Sheet to the OIC. Provide the OIC a verbal summary of
any issues found and whether or not they were resolved.
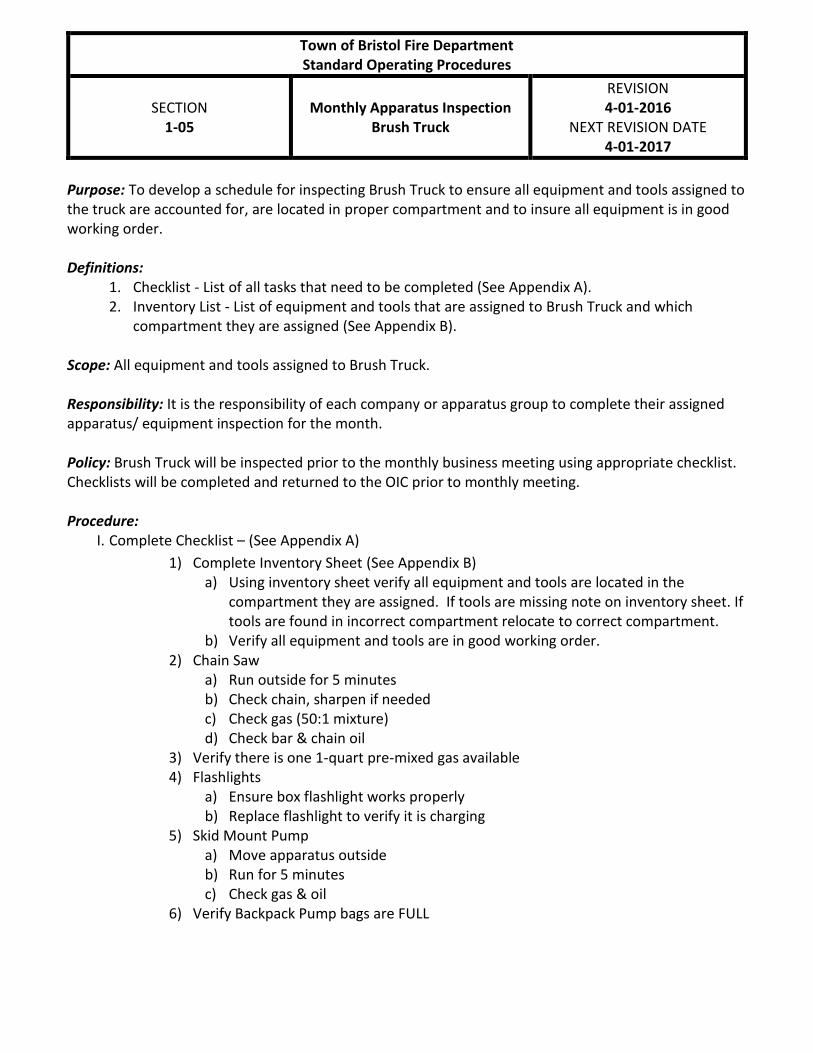
Town of Bristol Fire Department Standard Operating Procedures
SECTION
1-05
Monthly Apparatus Inspection
Brush Truck
REVISION 4-01-2016
NEXT REVISION DATE 4-01-2017
Purpose: To develop a schedule for inspecting Brush Truck to ensure all equipment and tools assigned to the truck are accounted for, are located in proper compartment and to insure all equipment is in good working order. Definitions:
1. Checklist - List of all tasks that need to be completed (See Appendix A). 2. Inventory List - List of equipment and tools that are assigned to Brush Truck and which
compartment they are assigned (See Appendix B). Scope: All equipment and tools assigned to Brush Truck. Responsibility: It is the responsibility of each company or apparatus group to complete their assigned apparatus/ equipment inspection for the month. Policy: Brush Truck will be inspected prior to the monthly business meeting using appropriate checklist. Checklists will be completed and returned to the OIC prior to monthly meeting. Procedure:
I. Complete Checklist – (See Appendix A)
1) Complete Inventory Sheet (See Appendix B) a) Using inventory sheet verify all equipment and tools are located in the
compartment they are assigned. If tools are missing note on inventory sheet. If tools are found in incorrect compartment relocate to correct compartment.
b) Verify all equipment and tools are in good working order. 2) Chain Saw
a) Run outside for 5 minutes b) Check chain, sharpen if needed c) Check gas (50:1 mixture) d) Check bar & chain oil
3) Verify there is one 1-quart pre-mixed gas available 4) Flashlights
a) Ensure box flashlight works properly b) Replace flashlight to verify it is charging
5) Skid Mount Pump a) Move apparatus outside b) Run for 5 minutes c) Check gas & oil
6) Verify Backpack Pump bags are FULL

7) Apparatus
a) Ensure all apparatus emergency lighting works properly b) Fuel Tank FULL c) Interior clean
II. When checklist is complete, sign and date.
III. Return completed checklist and Inventory Sheet to the OIC. Provide the OIC a verbal summary of
any issues found and whether or not they were resolved.
Town of Bristol Fire Department Standard Operating Procedures
SECTION
1-06
Monthly Apparatus Inspection
Heavy Rescue
REVISION 4-01-2016
NEXT REVISION DATE 4-01-2017
Purpose: To develop a schedule for inspecting Heavy Rescue to ensure all equipment and tools assigned to the truck are accounted for, are located in proper compartment and to insure all equipment is in good working order. Definitions:
1. Checklist - List of all tasks that need to be completed (See Appendix A). 2. Inventory List - List of equipment and tools that are assigned to Heavy Rescue and which
compartment they are assigned (See Appendix B). Scope: All equipment and tools assigned to Heavy Rescue. Responsibility: It is the responsibility of each company or apparatus group to complete their assigned apparatus/ equipment inspection for the month. Policy: Heavy Rescue will be inspected prior to the monthly business meeting using appropriate checklist. Checklists will be completed and returned to the OIC prior to monthly meeting. Procedure:
I. Complete Checklist – (See Appendix A) 1) Complete Inventory Sheet (See Appendix B)
a) Using inventory sheet verify all equipment and tools are located in the compartment they are assigned. If tools are missing note on inventory sheet. If tools are found in incorrect compartment relocate to correct compartment
b) Verify all equipment and tools are in good working order 2) Flashlights
a) Ensure all Survivor flashlights work properly b) Replace flashlight and verify it is charging
3) Fire Extinguishers a) Verify pressure b) Remove extinguisher and turn upside down. Hit bottom lightly with rubber
mallet to keep chemicals from settling on bottom. 4) Holmatro Tools
a) Run outside for 5 minutes b) Verify lights work c) Check hydraulic oil d) Check gas/oil
5) Reciprocating Saw
a) Ensure saw works properly b) Verify battery is charging c) Check blades and change if needed
6) Circular Cutting Saw a) Ensure saw works properly b) Check blade and change if needed
7) GPS – Check battery 8) Verify spare gas can is FULL 9) Verify Speedi-Dri containers are FULL 10) Apparatus (move outside)
a) Ensure all apparatus emergency lighting works properly b) Fuel Tank Full c) Interior clean d) Generator
i. Run for 15 minutes ii. Check gas and oil
iii. Run scene lights
I. When checklist is complete, sign and date. II. Return completed checklist and Inventory Sheet to the OIC. Provide the OIC a verbal summary of
any issues found and whether or not they were resolved.
Town of Bristol Fire Department Standard Operating Procedures
SECTION
2-01
Bump Test - Multi Gas Detector
REVISION 04-01-2016
NEXT REVISION DATE 04-01-2017
Purpose: To develop a schedule for inspecting Multi Gas Detectors to insure they are in good working order.
Scope: All Multi Gas Detectors owned by Bristol Fire Department. Responsibility: It is the responsibility of the fire fighter assigned to the Multi Gas Detector on each incident to perform a Fresh Air Setup, Bump Test. It is the responsibility of each company to complete their assigned apparatus/ equipment inspection for the month. Only individuals with who have completed MSA’s online training can perform monthly Multi Gas Detector inspection. Policy: All Multi Gas Detectors (MGD) will be run through a Fresh Air Setup (FAS) and a Bump Test prior to any incident they will be put into service. The report/results will be printed in the notebook for that Multi Gas Detector. Bump Test will be done in the passenger compartment of Utility 1 in route to the incident. After arrival the detectors will be moved to fresh air away from the truck and ran through a FAS. All MGD’s will also be run through a monthly calibration, including ZERO CAL followed by SPAN CAL, the first of the month and the report/results will be printed in the notebook for the MGD. Checklists will be completed and returned to the OIC prior to monthly business meeting. If a detector fails the Bump Test a ZERO CAL/SPAN CAL must be completed. If detector fails ZERO CAL/SPAN CAL it will be taken out of service. Procedure:
I.
Performing a FAS and Bump Test
1) Turn the power ON 2) After MGD has gone through startup cycle – FAS will show. Skip the FAS by pressing ▼ 3) From the normal measure screen press the ▼button to display “BUMP TEST”
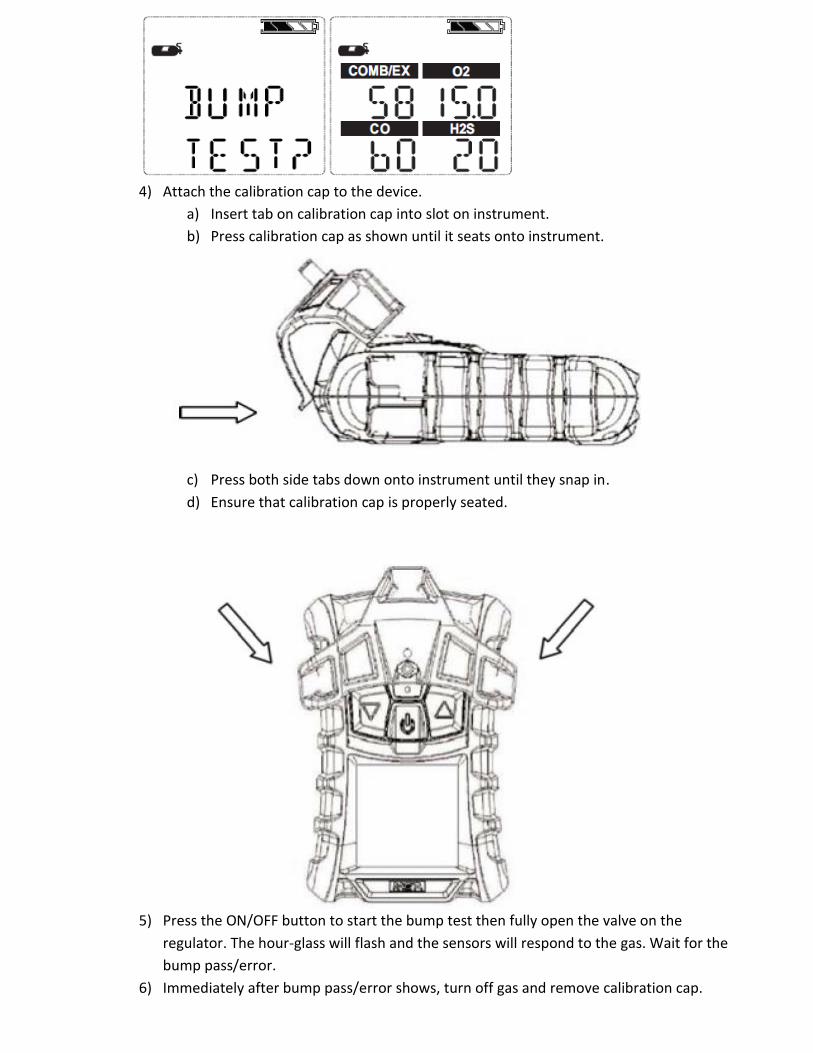
4) Attach the calibration cap to the device.
a) Insert tab on calibration cap into slot on instrument.
b) Press calibration cap as shown until it seats onto instrument.
c) Press both side tabs down onto instrument until they snap in.
d) Ensure that calibration cap is properly seated.
5) Press the ON/OFF button to start the bump test then fully open the valve on the
regulator. The hour-glass will flash and the sensors will respond to the gas. Wait for the
bump pass/error.
6) Immediately after bump pass/error shows, turn off gas and remove calibration cap.
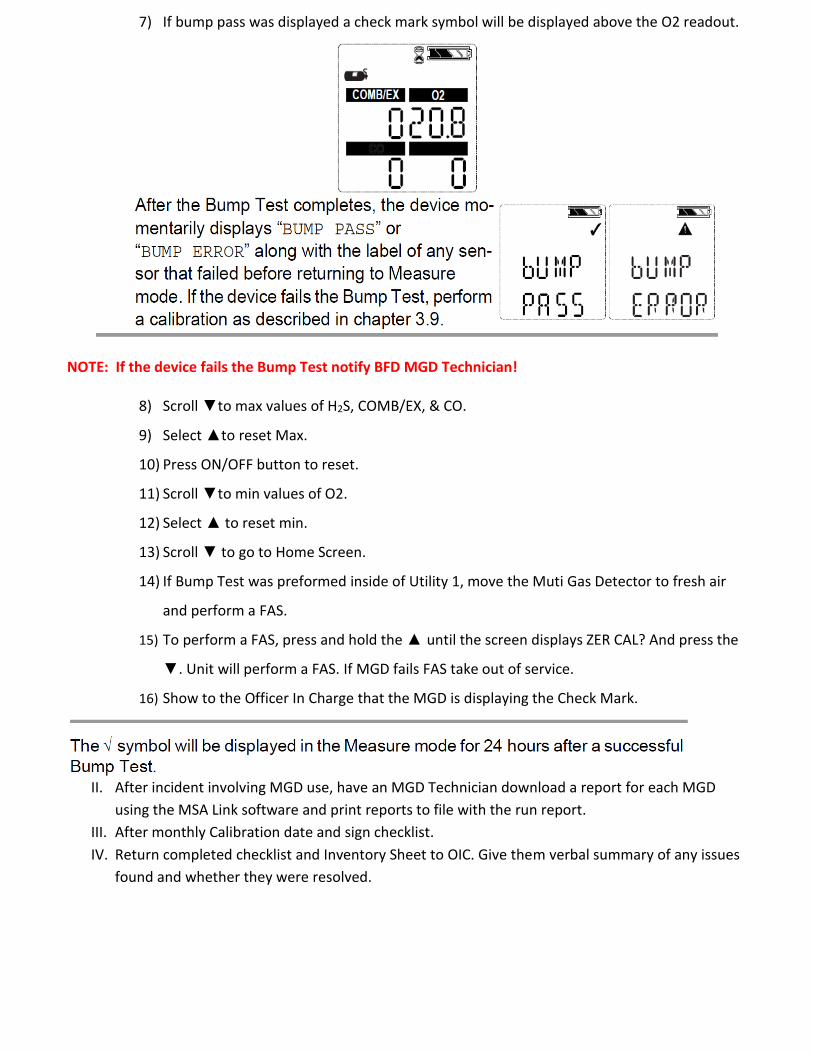
7) If bump pass was displayed a check mark symbol will be displayed above the O2 readout.
NOTE: If the device fails the Bump Test notify BFD MGD Technician!
8) Scroll ▼to max values of H2S, COMB/EX, & CO.
9) Select ▲to reset Max.
10) Press ON/OFF button to reset.
11) Scroll ▼to min values of O2.
12) Select ▲ to reset min.
13) Scroll ▼ to go to Home Screen.
14) If Bump Test was preformed inside of Utility 1, move the Muti Gas Detector to fresh air
and perform a FAS.
15) To perform a FAS, press and hold the ▲ until the screen displays ZER CAL? And press the
▼. Unit will perform a FAS. If MGD fails FAS take out of service.
16) Show to the Officer In Charge that the MGD is displaying the Check Mark.
II. After incident involving MGD use, have an MGD Technician download a report for each MGD
using the MSA Link software and print reports to file with the run report.
III. After monthly Calibration date and sign checklist.
IV. Return completed checklist and Inventory Sheet to OIC. Give them verbal summary of any issues
found and whether they were resolved.
Town of Bristol Fire Department Standard Operating Procedures
SECTION
2-02
Monthly SPAN ZERO/SPAN CAL
Multi Gas Detector (MGD)
REVISION 4-01-2016
NEXT REVISION DATE 4-01-2017
Purpose: To develop a schedule for calibrating Multi Gas Detectors to insure they are in good working order. Scope: All Multi Gas Detectors owned by Bristol Fire Department. Responsibility: It is the responsibility of the Captain assigned to Multi Gas Detector inspection for the month to complete calibration. Only individuals with who have completed MSA’s online training can perform monthly Multi Gas Detector calibrations. Policy: All Multi Gas Detectors will be run through a Calibration Test once a year. Results will be logged in Multi Gas Detectors notebook. Procedure:
I. Calibration Test a) From the home screen press the ▼ button for 3 seconds b) Press the On/Off button to confirm the SPAN ZERO c) After SPAN ZERO is complete it will go to SPAN CAL d) Attach calibration cap e) Connect tube from calibration gas to calibration cap, open valve f) Press On/Off button to calibrate g) After test is complete SPAN PASS should display h) If instrument fails calibration it will be taken out of service i) After SPAN CAL is complete download and print a report from the MSA Link
Software and log in MGD binder.
Town of Bristol Fire Department Standard Operating Procedures
SECTION
3-01
Monthly Inspection
Thermal Imaging Camera (TIC)
REVISION 04-01-2016
NEXT REVISION DATE 4-01-2017
Purpose: To develop a schedule for inspecting Thermal Imaging Cameras to insure they are in good working order. Definitions:
Checklist - List of all tasks that need to be completed (See Appendix A).
Scope: All Thermal Imaging Cameras owned by Bristol Fire Department. Responsibility: It is the responsibility of each company to complete their assigned apparatus/ equipment inspection for the month. Policy: Thermal Imaging Cameras will be inspected prior to the monthly business meeting using appropriate checklist. Checklists will be completed and returned to the OIC prior to monthly meeting. Procedure:
I. Complete Checklist – (See Appendix A) 1) Verify camera is working 2) Switch battery in camera with one in charger 3) Replace camera and verify it is charging 4) Replace battery and verify it is charging
II. When checklist is complete, date and sign it.
III. Return completed checklist and Inventory Sheet to OIC. Give them verbal summary of any issues found and whether they were resolved.
Town of Bristol Fire Department Standard Operating Procedures
SECTION
4-01
Monthly Apparatus Inspection
Self-Contained Breathing Apparatus (SCBA)
REVISION 04-01-2016
NEXT REVISION DATE 04-01-2017
Purpose: To develop a schedule for inspecting Self-Contained Breathing Apparatus (SCBA) to insure they are in good working order. Definitions:
Inspection Form - List of all tasks that need to be completed (See Appendix C). Scope: All SCBA units owned by Bristol Fire Department. Responsibility: It is the responsibility of each firefighter who is issued an SCBA face piece to complete this inspection each month. Policy: All SCBA units will be inspected prior to the monthly business meeting using appropriate checklist and results will be logged in notebook. Inspection Forms will be completed and returned to the OIC prior to monthly business meeting. If a SCBA unit fails an inspection, it will be taken out of service. Procedure:
I. Complete Inspection Form (See Appendix C)
1) Remove SCBA from apparatus and place on floor or bench 2) Inspect mounting bracket for damage or wear 3) Visually inspect the complete SCBA unit for worn or aging rubber parts and damaged
components 4) Remove cylinder from the harness and check hydrostatic test date to ensure it is
current 5) Visually inspect cylinder for large dents or gouges. Cylinders, which show exposure to
high heat or flame, such as, paint turned brown or black, decals charred or missing or gauge lens melted, shall be removed from service
6) Inspect shoulder straps and waist belt and check all buckles and fasteners for damage 7) Examine back plate for damage, cracks, or rust 8) Insure that all connection points between the cylinder and the SCBA harness operate
properly and are free of damage or corrosion 9) Reattach cylinder to the harness 10) Check all hoses and connection points for wear, cuts, or damage 11) Activate cylinder valve and compare pressure gauge readings on cylinder and pack 12) Attach face piece and check regulator for proper operation; test PASS alarm and low
pressure alarm and heads up display 13) Don the face piece or hold the face piece to the face to effect a good seal 14) Inhale sharply to automatically start the flow of air 15) Breathe normally from the face piece to ensure proper operation 16) Remove face piece from face. Air shall flow freely from the face piece 17) Fully depress the center of the donning switch on the top of regulator and release.
The flow of air from the face piece shall stop

18) Return unit to mounting bracket in ready condition 19) Complete BFD Monthly/Usage SCBA Inspection Form
I. When Inspection Form is complete, date and sign it
II. Return completed Inspection Form to the OIC. Give them a verbal summary of any issues found and whether they were resolved
Town of Bristol Fire Department Standard Operating Procedures
SECTION
4-02
SCBA Face-Piece Monthly
Inspection
REVISION 04-01-2016
NEXT REVISION DATE 04-01-2017
Purpose: To develop a schedule for inspecting a Firefighters personal SCBA face-piece to insure they are in good working order. Definitions:
Inspection Form - List of all tasks that need to be completed (See appendix C) Scope: All SCBA face piece owned by the Bristol Fire Department Responsibility: It is the responsibility of each firefighter who is issued an SCBA face-piece to complete this inspection each month. Policy: All SCBA face-pieces will be inspected prior to the monthly business meeting using the appropriate checklist. Checklists will be completed and returned to the OIC prior to the monthly business meeting. If an SCBA face-piece fails inspection, it will be taken out of service. Procedure:
I. Complete Inspection Form (See Appendix C) 1) Examine the face-piece assembly for damaged or worn components. The face-piece
must be complete and in serviceable condition with no worn, loose or damaged components. Inspect the face piece as follows:
a) Inspect the face piece seal and other rubber components for de-formation, wear, damage or cracks
b) Inspect the lens for cracks, gouges, scratches or any condition that could impair the operation of the face piece or the users vision
c) Inspect the lens frame for damage such as cracks or distortion d) Check that all lens frame retainers are present and installed correctly e) Check that all harness anchors are present and installed correctly f) Inspect the head harness for correct installation with all straps oriented correctly g) Inspect the head harness for damaged or worn components. h) Inspect the voice emitters for damage. Verify they are properly installed and
secure i) Inspect the nose cup for cuts or damage. Check for damage to nose cup where
regulator attaches j) Verify the face piece is clean (use a mild household detergent) k) Don mask and perform a seal check l) Adjust head straps to full outward position
II. When Inspection Form is complete, date and sign it
III. Return completed Inspection Form to the OIC. Give them a verbal summary of any issues found
and whether they were resolved
Town of Bristol Fire Department Standard Operating Procedures
SECTION
4-03
SCBA Air Cylinders Monthly
Inspection
REVISION 04-01-2016
NEXT REVISION DATE 04-01-2017
Purpose: To develop a schedule for inspecting the Bristol Fire Departments SCBA Cylinders to insure they are in good working order. Definitions:
Inspection Form - List of all tasks that need to be completed (See appendix C) Scope: All SCBA Air Cylinders owned by the Bristol Fire Department Responsibility: It is the responsibility of each Company to complete their required inspections each month. Policy: All SCBA Air Cylinders will be inspected prior to the monthly business meeting using the appropriate checklist. Checklists will be completed and returned to the OIC prior to the monthly business meeting. If an SCBA Cylinder fails inspection, it will be taken out of service and ORANGE TAGGED. Procedure:
I. Complete Inspection Form (See Appendix C) 1) Remove Air Cylinder from harness assembly 2) Check cylinder pressure gauge for “Full” indication. If cylinder is less than full, charge
cylinder 3) Visually inspect air cylinder and valve assembly for damage such as dents or gouges in
composite wrapping. Any cylinder found to show damage or exposure to high heat or flame, or cracks in the composite wrapping and/or bulging of cylinder walls, shall be removed from service and emptied of compressed air
4) Check hydrostatic date to make sure it is current. The date manufacturers mark on the cylinder is the first hydrostatic test date. Hydrostatic test are required every 5 years
5) Check cylinder valve hand wheel for damage and the threads on the cylinder valve outlet 6) Check relief valve (burst disc) for damage or dirt 7) If necessary, using a mild detergent and water, clean the cylinder with a stiff brush
Town of Bristol Fire Department Standard Operating Procedures
SECTION
4-04
SCBA Regulator
Cleaning/Disinfecting
REVISION 04-01-2016
NEXT REVISION DATE 04-01-2017
Purpose: To outline the correct way to clean a SCBA regulator after each use. Scope: All SCBA regulators owned by the Town of Bristol Fire Department Responsibility: It is the responsibility of each firefighter who has worn an SCBA during a call or at training. Policy: All SCBA regulators will be cleaned after every use. Procedure:
I. Remove the regulator from the face-piece II. Remove any obvious debris from the external surface with warm (up to 110 degrees F)
detergent solution and rinse thoroughly under gently flowing tap water. III. Inspect the inside of the regulator opening. If excessive debris is present, forward air-pak to
SCOTT trained authorized personnel for thorough cleaning. IV. Depress the donning / air save switch, close the purge valve. V. To disinfect/sanitize the regulator, spray 6 full pumps of Westcodyne disenfectent/sanitizer
into the regulator opening. Make sure to also wet the immediate area around the opening. Swirl to completely cover interior components.
VI. Turn the regulator opening face down and shake out excess liquid. ALLOW TEN (10) MINUTES OF CONTACT TIME TO CLEAN PRIOR TO RINSING.
VII. Rinse regulator with gently flowing tap water VIII. Shake excess water out of regulator. Completely air dry the regulator before using. NOTE: DO NOT SUBMERGE THE REGULATOR IN WATER USE HAIR DRYER ON LOW HEAT DO NOT USE SHOP AIR FOR DRYING REGULATOR IX. Perform SCBA Bench Test and return SCBA to service.
Town of Bristol Fire Department Standard Operating Procedures
SECTION
4-05
SCBA Face-Piece
Cleaning/Disinfecting
REVISION 04-01-2016
NEXT REVISION DATE 04-01-2017
Purpose: To outline the correct way to clean a SCBA face-piece after each use. Scope: All SCBA face-pieces owned by the Town of Bristol Fire Department Responsibility: It is the responsibility of each firefighter who has worn an SCBA during a call or at training. Policy: All SCBA face-pieces will be cleaned after every use. Procedure:
I. With the face-piece removed from the regulator, carefully wash the face-piece with warm (up to 110 degrees F) soap solution in spray bottle and rinse thoroughly in clean gently flowing tap water. NOTE:
The nose cup is designed to be an integral part of the face-piece and does not need to be disassembled for cleaning.
II. Disinfect/sanitize the face-piece by spraying 3-4 pumps of Westcodyne solution on the regulator side of the mask and 3 full pumps on the face side of the mask, wetting the entire mask including all rubber and plastic pieces.
III. ALLOW TEN (10) MINUTES OF CONTACT TIME TO CLEAN PRIOR TO RINSING. IV. Rinse with gently flowing tap water. V. Shake excess water off face-piece and then dry with a clean lint free cloth or gently blow
dry on low until all moisture is gone. NOTE: The Kevlar and nylon head harness are made of a porous material. SCOTT recommends Westcodyne sanitizer may not be effective on porous material. NOTE: Do not use shop air to dry face-piece Do not use paper towels to dry off face-piece.
Town of Bristol Fire Department Standard Operating Procedures
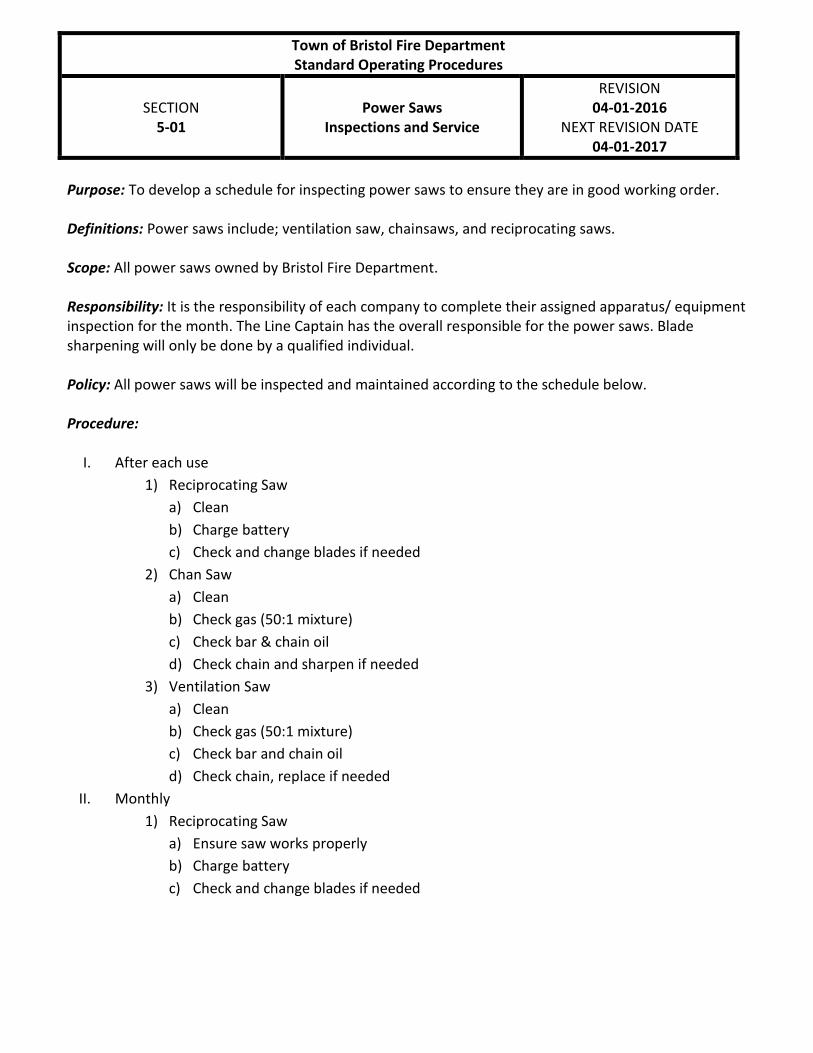
SECTION
5-01
Power Saws
Inspections and Service
REVISION 04-01-2016
NEXT REVISION DATE 04-01-2017
Purpose: To develop a schedule for inspecting power saws to ensure they are in good working order. Definitions: Power saws include; ventilation saw, chainsaws, and reciprocating saws. Scope: All power saws owned by Bristol Fire Department. Responsibility: It is the responsibility of each company to complete their assigned apparatus/ equipment inspection for the month. The Line Captain has the overall responsible for the power saws. Blade sharpening will only be done by a qualified individual. Policy: All power saws will be inspected and maintained according to the schedule below. Procedure:
I. After each use
1) Reciprocating Saw
a) Clean
b) Charge battery
c) Check and change blades if needed
2) Chan Saw
a) Clean
b) Check gas (50:1 mixture)
c) Check bar & chain oil
d) Check chain and sharpen if needed
3) Ventilation Saw
a) Clean
b) Check gas (50:1 mixture)
c) Check bar and chain oil
d) Check chain, replace if needed
II. Monthly
1) Reciprocating Saw
a) Ensure saw works properly
b) Charge battery
c) Check and change blades if needed
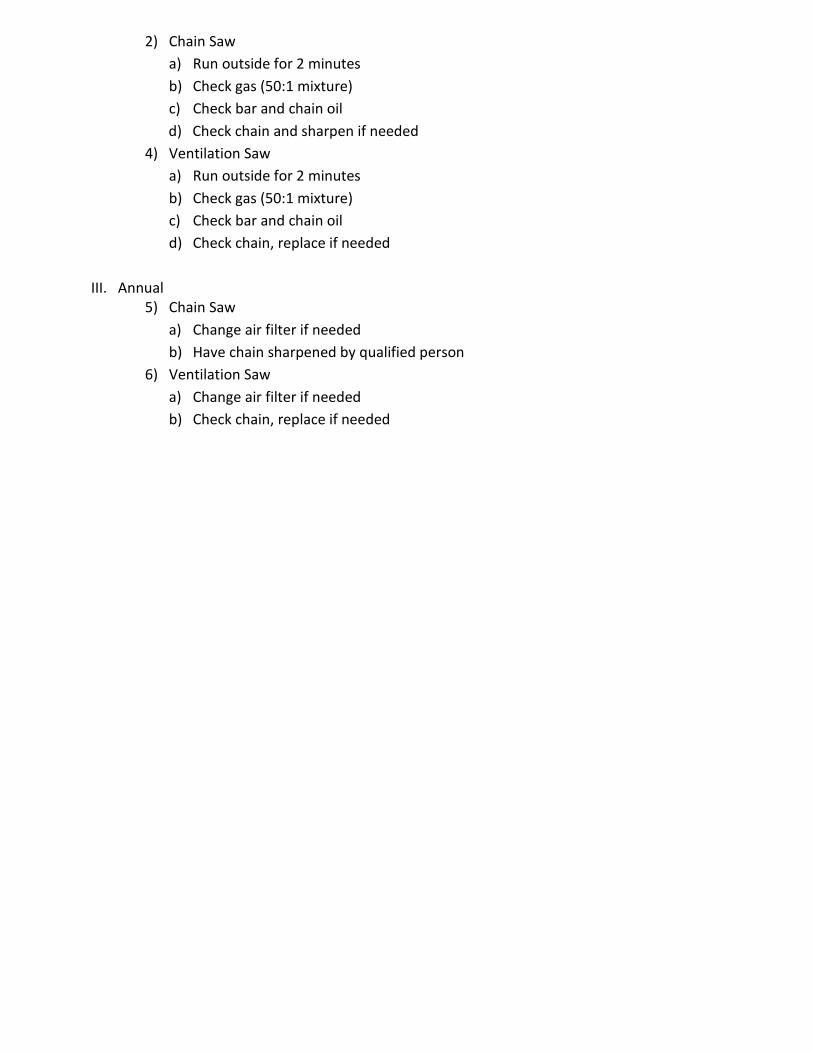
2) Chain Saw
a) Run outside for 2 minutes
b) Check gas (50:1 mixture)
c) Check bar and chain oil
d) Check chain and sharpen if needed
4) Ventilation Saw
a) Run outside for 2 minutes
b) Check gas (50:1 mixture)
c) Check bar and chain oil
d) Check chain, replace if needed
III. Annual 5) Chain Saw
a) Change air filter if needed
b) Have chain sharpened by qualified person
6) Ventilation Saw
a) Change air filter if needed
b) Check chain, replace if needed
Town of Bristol Fire Department Standard Operating Procedures
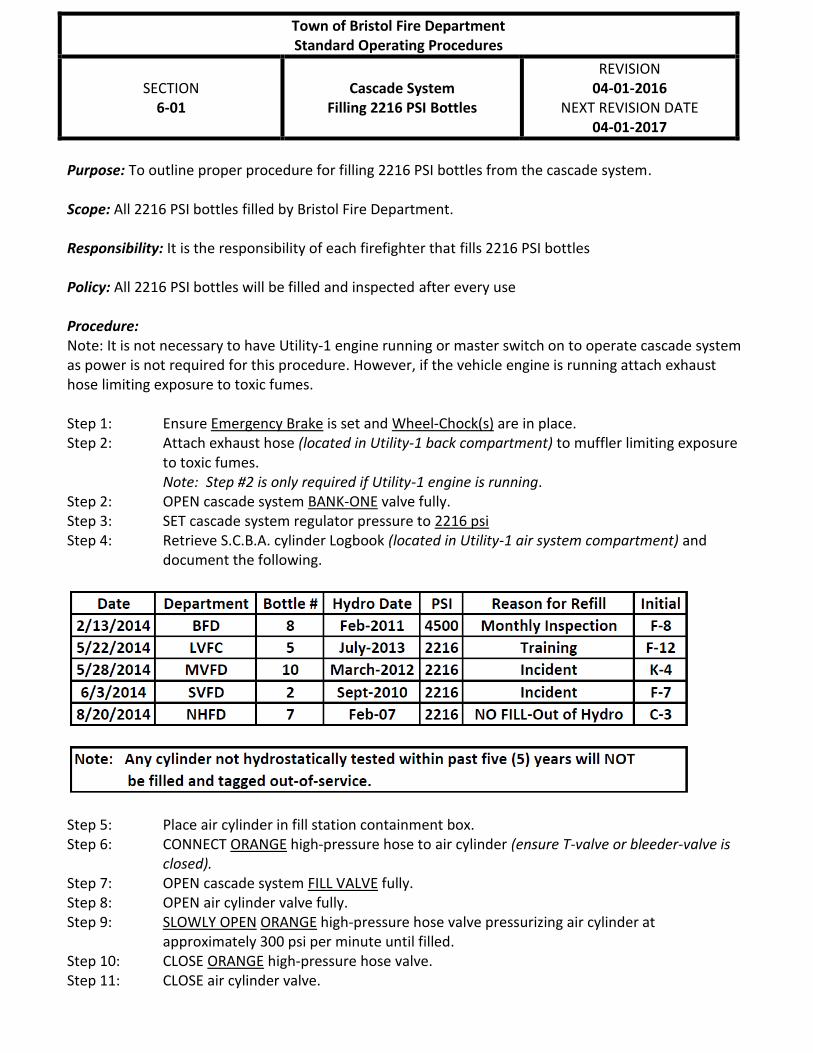
SECTION
6-01
Cascade System
Filling 2216 PSI Bottles
REVISION 04-01-2016
NEXT REVISION DATE 04-01-2017
Purpose: To outline proper procedure for filling 2216 PSI bottles from the cascade system. Scope: All 2216 PSI bottles filled by Bristol Fire Department. Responsibility: It is the responsibility of each firefighter that fills 2216 PSI bottles Policy: All 2216 PSI bottles will be filled and inspected after every use Procedure: Note: It is not necessary to have Utility-1 engine running or master switch on to operate cascade system as power is not required for this procedure. However, if the vehicle engine is running attach exhaust hose limiting exposure to toxic fumes. Step 1: Ensure Emergency Brake is set and Wheel-Chock(s) are in place. Step 2: Attach exhaust hose (located in Utility-1 back compartment) to muffler limiting exposure
to toxic fumes. Note: Step #2 is only required if Utility-1 engine is running.
Step 2: OPEN cascade system BANK-ONE valve fully. Step 3: SET cascade system regulator pressure to 2216 psi Step 4: Retrieve S.C.B.A. cylinder Logbook (located in Utility-1 air system compartment) and
document the following.
Step 5: Place air cylinder in fill station containment box. Step 6: CONNECT ORANGE high-pressure hose to air cylinder (ensure T-valve or bleeder-valve is
closed). Step 7: OPEN cascade system FILL VALVE fully. Step 8: OPEN air cylinder valve fully. Step 9: SLOWLY OPEN ORANGE high-pressure hose valve pressurizing air cylinder at
approximately 300 psi per minute until filled. Step 10: CLOSE ORANGE high-pressure hose valve. Step 11: CLOSE air cylinder valve.
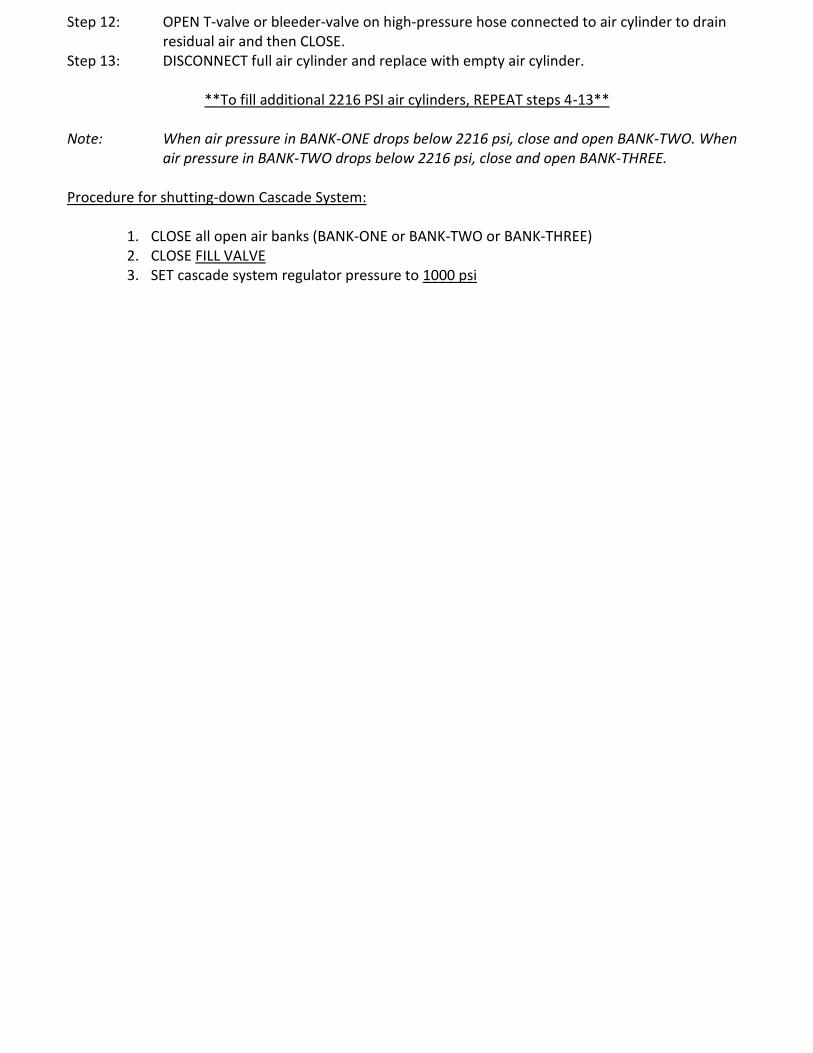
Step 12: OPEN T-valve or bleeder-valve on high-pressure hose connected to air cylinder to drain residual air and then CLOSE.
Step 13: DISCONNECT full air cylinder and replace with empty air cylinder.
**To fill additional 2216 PSI air cylinders, REPEAT steps 4-13** Note: When air pressure in BANK-ONE drops below 2216 psi, close and open BANK-TWO. When
air pressure in BANK-TWO drops below 2216 psi, close and open BANK-THREE. Procedure for shutting-down Cascade System:
1. CLOSE all open air banks (BANK-ONE or BANK-TWO or BANK-THREE) 2. CLOSE FILL VALVE 3. SET cascade system regulator pressure to 1000 psi
Town of Bristol Fire Department Standard Operating Procedures
SECTION
6-02
Air Booster System
Filling 4500 PSI Bottles
REVISION 04-01-2016
NEXT REVISION DATE 04-01-2017
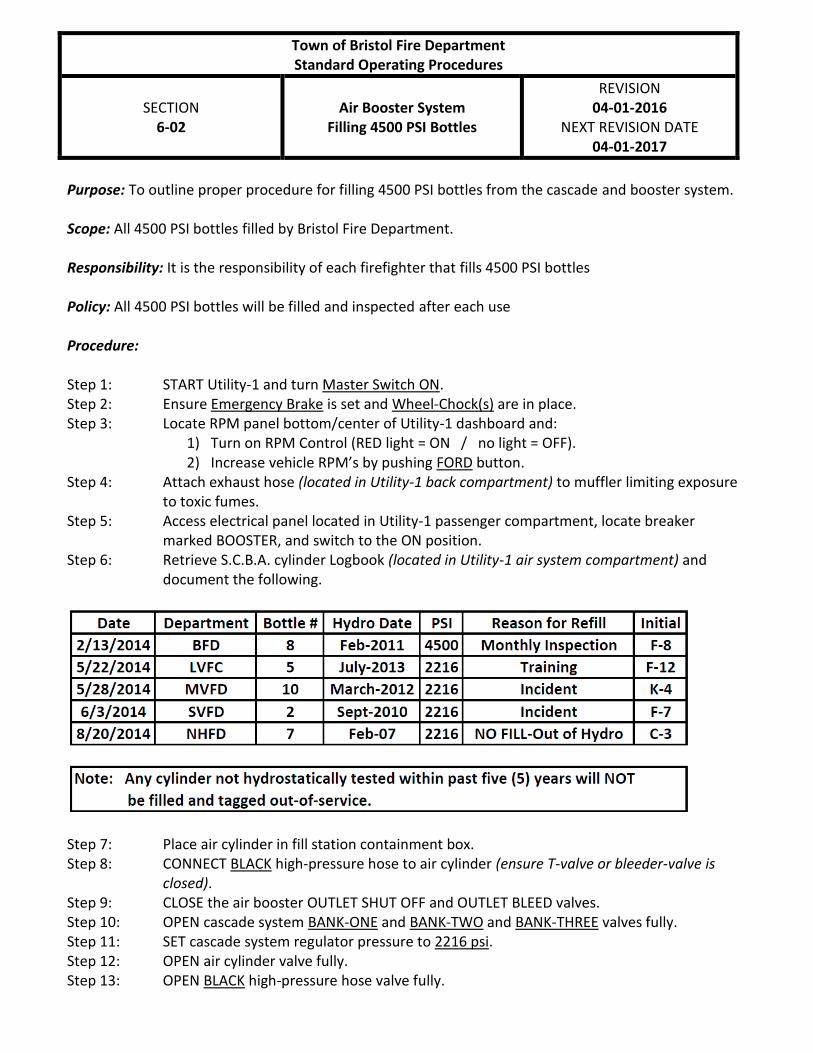
Purpose: To outline proper procedure for filling 4500 PSI bottles from the cascade and booster system. Scope: All 4500 PSI bottles filled by Bristol Fire Department. Responsibility: It is the responsibility of each firefighter that fills 4500 PSI bottles Policy: All 4500 PSI bottles will be filled and inspected after each use Procedure: Step 1: START Utility-1 and turn Master Switch ON. Step 2: Ensure Emergency Brake is set and Wheel-Chock(s) are in place. Step 3: Locate RPM panel bottom/center of Utility-1 dashboard and:
1) Turn on RPM Control (RED light = ON / no light = OFF). 2) Increase vehicle RPM’s by pushing FORD button.
Step 4: Attach exhaust hose (located in Utility-1 back compartment) to muffler limiting exposure to toxic fumes.
Step 5: Access electrical panel located in Utility-1 passenger compartment, locate breaker marked BOOSTER, and switch to the ON position.
Step 6: Retrieve S.C.B.A. cylinder Logbook (located in Utility-1 air system compartment) and document the following.
Step 7: Place air cylinder in fill station containment box. Step 8: CONNECT BLACK high-pressure hose to air cylinder (ensure T-valve or bleeder-valve is
closed). Step 9: CLOSE the air booster OUTLET SHUT OFF and OUTLET BLEED valves. Step 10: OPEN cascade system BANK-ONE and BANK-TWO and BANK-THREE valves fully. Step 11: SET cascade system regulator pressure to 2216 psi. Step 12: OPEN air cylinder valve fully. Step 13: OPEN BLACK high-pressure hose valve fully.
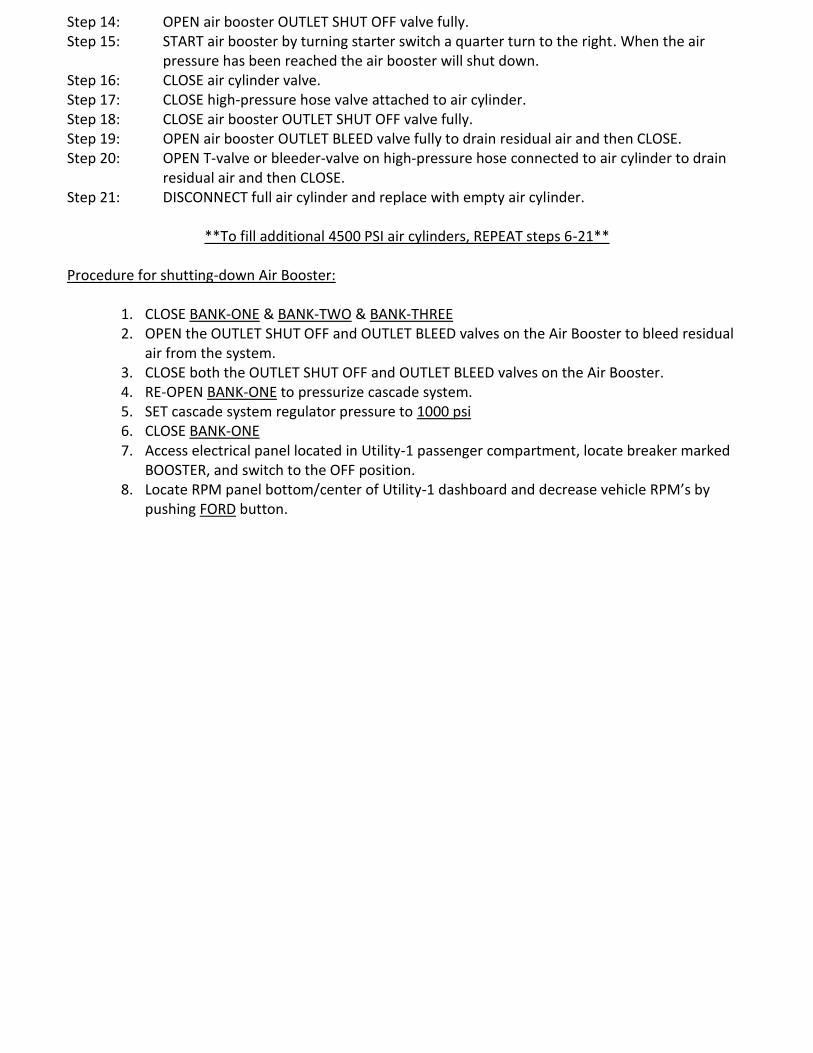
Step 14: OPEN air booster OUTLET SHUT OFF valve fully. Step 15: START air booster by turning starter switch a quarter turn to the right. When the air
pressure has been reached the air booster will shut down. Step 16: CLOSE air cylinder valve. Step 17: CLOSE high-pressure hose valve attached to air cylinder. Step 18: CLOSE air booster OUTLET SHUT OFF valve fully. Step 19: OPEN air booster OUTLET BLEED valve fully to drain residual air and then CLOSE. Step 20: OPEN T-valve or bleeder-valve on high-pressure hose connected to air cylinder to drain
residual air and then CLOSE. Step 21: DISCONNECT full air cylinder and replace with empty air cylinder.
**To fill additional 4500 PSI air cylinders, REPEAT steps 6-21** Procedure for shutting-down Air Booster:
1. CLOSE BANK-ONE & BANK-TWO & BANK-THREE 2. OPEN the OUTLET SHUT OFF and OUTLET BLEED valves on the Air Booster to bleed residual
air from the system. 3. CLOSE both the OUTLET SHUT OFF and OUTLET BLEED valves on the Air Booster. 4. RE-OPEN BANK-ONE to pressurize cascade system. 5. SET cascade system regulator pressure to 1000 psi 6. CLOSE BANK-ONE 7. Access electrical panel located in Utility-1 passenger compartment, locate breaker marked
BOOSTER, and switch to the OFF position. 8. Locate RPM panel bottom/center of Utility-1 dashboard and decrease vehicle RPM’s by
pushing FORD button.
Town of Bristol Fire Department Standard Operating Procedures
SECTION
6-03
Cascade System Filling Procedure
REVISION 04-01-2016
NEXT REVISION DATE 04-01-2017
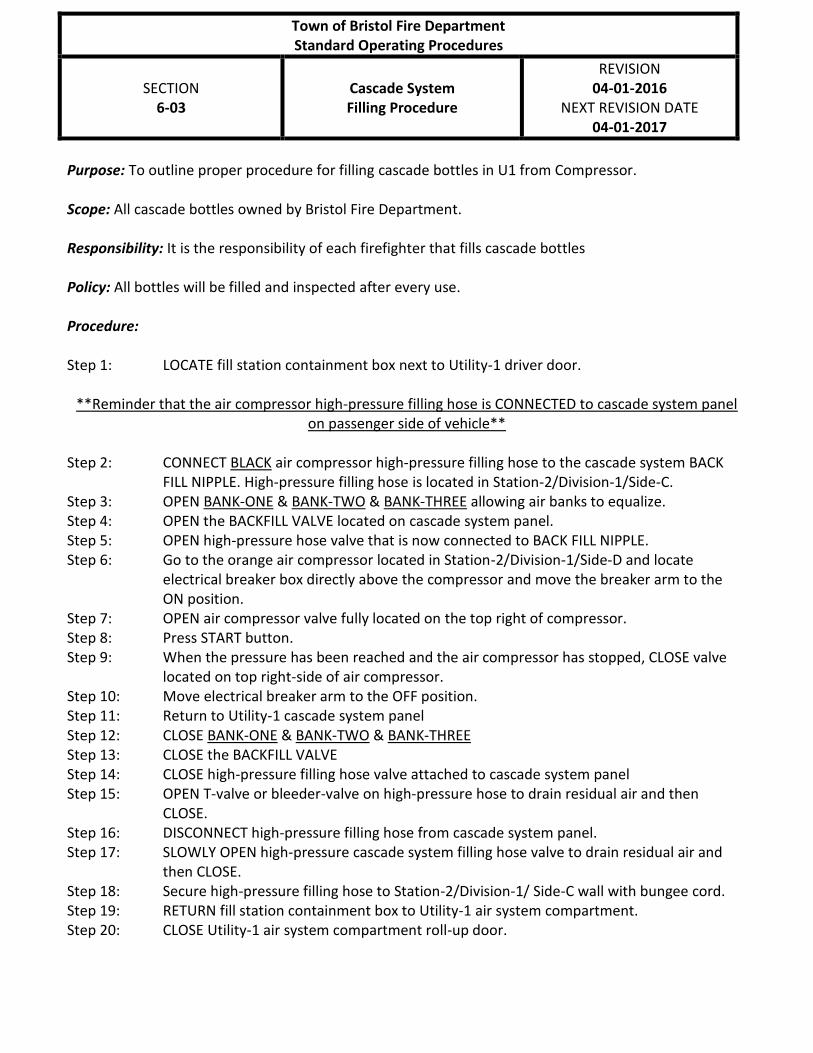
Purpose: To outline proper procedure for filling cascade bottles in U1 from Compressor. Scope: All cascade bottles owned by Bristol Fire Department. Responsibility: It is the responsibility of each firefighter that fills cascade bottles Policy: All bottles will be filled and inspected after every use. Procedure: Step 1: LOCATE fill station containment box next to Utility-1 driver door.
**Reminder that the air compressor high-pressure filling hose is CONNECTED to cascade system panel
on passenger side of vehicle** Step 2: CONNECT BLACK air compressor high-pressure filling hose to the cascade system BACK
FILL NIPPLE. High-pressure filling hose is located in Station-2/Division-1/Side-C. Step 3: OPEN BANK-ONE & BANK-TWO & BANK-THREE allowing air banks to equalize. Step 4: OPEN the BACKFILL VALVE located on cascade system panel. Step 5: OPEN high-pressure hose valve that is now connected to BACK FILL NIPPLE. Step 6: Go to the orange air compressor located in Station-2/Division-1/Side-D and locate
electrical breaker box directly above the compressor and move the breaker arm to the ON position.
Step 7: OPEN air compressor valve fully located on the top right of compressor. Step 8: Press START button. Step 9: When the pressure has been reached and the air compressor has stopped, CLOSE valve
located on top right-side of air compressor. Step 10: Move electrical breaker arm to the OFF position. Step 11: Return to Utility-1 cascade system panel Step 12: CLOSE BANK-ONE & BANK-TWO & BANK-THREE Step 13: CLOSE the BACKFILL VALVE Step 14: CLOSE high-pressure filling hose valve attached to cascade system panel Step 15: OPEN T-valve or bleeder-valve on high-pressure hose to drain residual air and then
CLOSE. Step 16: DISCONNECT high-pressure filling hose from cascade system panel. Step 17: SLOWLY OPEN high-pressure cascade system filling hose valve to drain residual air and
then CLOSE. Step 18: Secure high-pressure filling hose to Station-2/Division-1/ Side-C wall with bungee cord. Step 19: RETURN fill station containment box to Utility-1 air system compartment. Step 20: CLOSE Utility-1 air system compartment roll-up door.
Town of Bristol Fire Department Standard Operating Procedures
SECTION
6-04
Filling 4500 PSI Cylinders Poseidon Air Compressor
REVISION 04-01-2016
NEXT REVISION DATE 04-01-2017
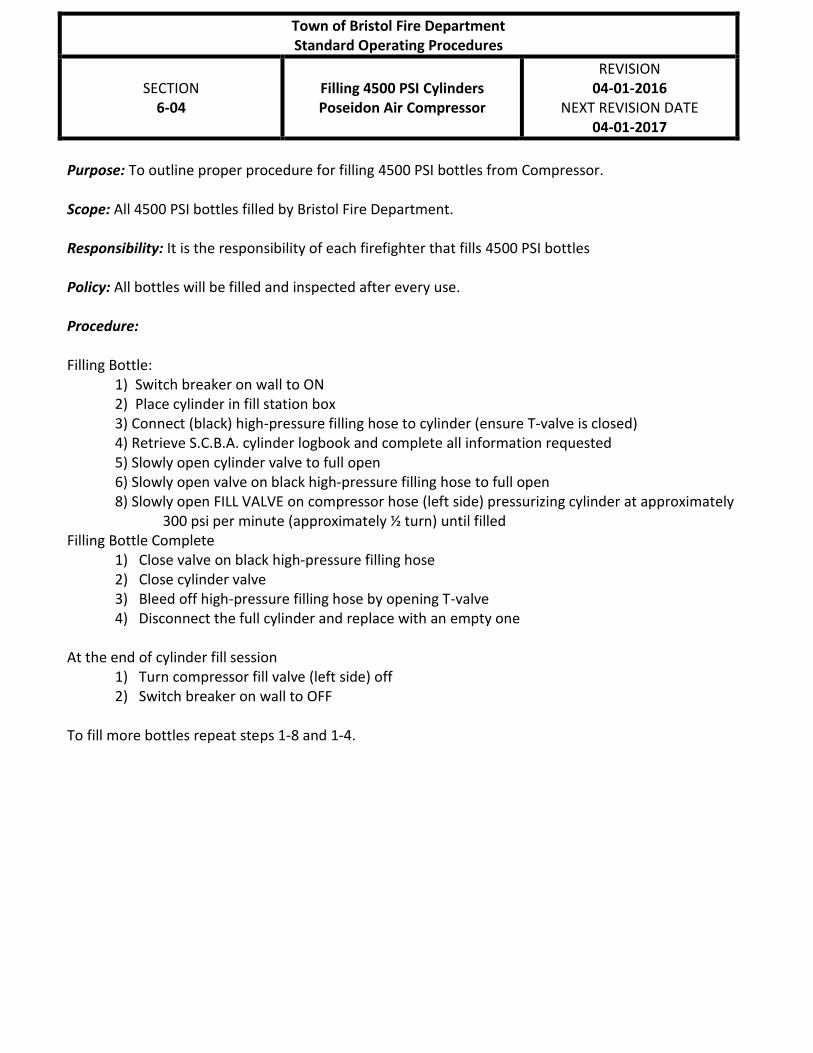
Purpose: To outline proper procedure for filling 4500 PSI bottles from Compressor. Scope: All 4500 PSI bottles filled by Bristol Fire Department. Responsibility: It is the responsibility of each firefighter that fills 4500 PSI bottles Policy: All bottles will be filled and inspected after every use. Procedure: Filling Bottle: 1) Switch breaker on wall to ON
2) Place cylinder in fill station box 3) Connect (black) high-pressure filling hose to cylinder (ensure T-valve is closed) 4) Retrieve S.C.B.A. cylinder logbook and complete all information requested 5) Slowly open cylinder valve to full open 6) Slowly open valve on black high-pressure filling hose to full open 8) Slowly open FILL VALVE on compressor hose (left side) pressurizing cylinder at approximately
300 psi per minute (approximately ½ turn) until filled Filling Bottle Complete
1) Close valve on black high-pressure filling hose 2) Close cylinder valve 3) Bleed off high-pressure filling hose by opening T-valve 4) Disconnect the full cylinder and replace with an empty one
At the end of cylinder fill session 1) Turn compressor fill valve (left side) off 2) Switch breaker on wall to OFF
To fill more bottles repeat steps 1-8 and 1-4.

Appendix A

Engine- 1 Fire
Flashlights Handheld Radio Exinguisher Apparatus Generator
Com
plet
e In
vent
ory Che
ck
Run
Ver
ify C
harg
ing
Switc
h Bat
terie
s (S
urvivo
r's)
Run
Ver
ify C
harg
ing
Che
ck C
hann
el S
ettin
g
Che
ck P
ress
ure
Un-
Set
tle C
hem
icals
Che
ck A
ll Em
erge
ncy Ligh
ts
Fuel T
ank Ful
l
Inte
rior C
lean
Run
Che
ck F
uel
Run
Sce
ne L
ight
s
Com
plet
ed b
y:
Dat
e
January
February
March
April
May
June
July
August
September
October
November
December

Engine-Tanker Fire
Flashlight Handheld Radio Exinguisher Apparatus Generator
Com
plet
e In
vent
ory Che
ck
Lower
Por
table
Pon
d Arm
Run
Ver
ify C
harg
ing
Switc
h Bat
terie
s (S
urvivo
r's)
Run
Ver
ify C
harg
ing
Che
ck C
hann
el S
ettin
g
Che
ck P
ress
ure
Un-
Set
tle C
hem
icals
Che
ck A
ll Em
erge
ncy Ligh
ts
Fuel T
ank Ful
l
Inte
rior C
lean
Run
Run
Sce
ne L
ight
s
Com
plet
ed b
y:
Dat
e
January
February
March
April
May
June
July
August
September
October
November
December

Mini - Pumper / Hose Reel
Flashlight Chainsaw Apparatus
Com
plet
e In
vent
ory Che
ck
Run
Ver
ify C
harg
ing
Run
Che
ck G
as (5
0:1)
/ Bar
Oil
Sha
rpen
Cha
in
Spare
Gas
(50:
1)
Che
ck A
ll Em
erge
ncy Ligh
ts
Fuel T
ank Ful
l
Inte
rior C
lean
Com
plet
ed b
y:
Dat
e:
January
February
March
April
May
June
July
August
September
October
November
December

Utility-1 Handheld Fire Reciprocating
Flashlights Radio Extinguisher Saw Chain Saw K12 Vent Saw Apparatus Generator
Com
plet
e In
vent
ory Che
ck
Ver
ify C
harg
ing
Switc
h Bat
terie
s (S
urvivo
r's)
Run
Ver
ify C
harg
ing
Che
ck C
hann
el S
ettin
g
Che
ck P
ress
ure
Un-
Set
tle C
hem
ical
s
Run
Cha
rge
Bat
tery
Che
ck /
Cha
nge
Blade
Run
Che
ck G
as (5
0:1)
/ Bar
Oil
Sha
rpen
Cha
in
Run
Che
ck G
as (5
0:1)
Che
ck B
lade
Run
Che
ck G
as (5
0:1)
/ Bar
Oil
Che
ck C
hain
Spare
Gas
(50
:1)
Spe
ediD
ri Ful
l
Cas
cade
Sys
tem
Full
Che
ck A
ll Em
erge
ncy
Ligh
ts
Fuel T
ank Ful
l
Inte
rior C
lean
Run
Run
Trip
od S
cene
Light
s
Com
plet
ed b
y:
Dat
e:
January
February
March
April
May
June
July
August
September
October
November
December

Brush Truck
Flashlight Chain Saw Apparatus Skid Unit
Com
plet
e In
vent
ory
Che
ck
Run
Verify
Cha
rging
Run
Che
ck G
as (5
0:1)
/ Bar
Oil
Sharp
en C
hain
Che
ck A
ll Em
erge
ncy
Ligh
ts
Fuel T
ank
Full
Inte
rior C
lean
Che
ck G
as/O
il
Foam
Tan
k Ful
l
Wat
er T
ank Ful
l
Bladd
er B
ags ar
e Ful
l
Com
plet
ed b
y:
Dat
e:
January
February
March
April
May
June
July
August
September
October
November
December

Heavy Rescue Fire
Flashlight Extinguisher Holmatro Tools Reciprocating Saw Circular Saw GPS Generator Apparatus
Com
plet
e In
vent
ory Che
ck
Run
Ver
ify C
harg
ing
Che
ck P
ress
ure
Un-
Set
tle C
hem
icals
Run
Che
ck B
atte
reis fo
r Light
s
Che
ck H
ydra
ulic O
il
Che
ck G
as/O
il
Run
Cha
rge
Bat
tery
Che
ck/ C
hang
e Blade
Run
Che
ck B
lade
Che
ck B
atte
ry
Run
Run
Sce
ne L
ight
s
Spare
Gas
Can
Ful
l
Spe
ediD
ri Ful
l
Che
ck A
ll Em
erge
ncy Ligh
ts
Fuel T
ank Ful
l
Inte
rior C
lean
Com
plet
ed b
y:
Dat
e:
January
February
March
April
May
June
July
August
September
October
November
December

U1 E1
TIC TIC
Run
Switc
h Bat
terie
s
Verify
Cha
rging
Run
Switc
h Bat
terie
s
Verify
Cha
rging
Com
plet
ed b
y:
Dat
e
January
February
March
April
May
June
July
August
September
October
November
December

Appendix B
Engine One Cab Quantity
1 SCBA's (in seats) 5
2 Clip Board w/ CO Forms 1
3 Flood Light 1
4 Thermal Imaging Camera 1
5 Teddy Bears
6 GIS Maps 2
7 Emergency Response Guide 1
8 Safety Vests (under each seat) 6
9 Fire Extinguisher (CO2) 1
10 Fire Extinguisher (ABC) 1
11 Smoke and CO detector Instalation Matrix 1
12 Water Can 1
13 Hand Held Radios 6
14 Survivor Lights 5
15 Box Light 2
16 Bottled Water (Under Rear Seat)
Engine One Compartment 1 (Driver's Side) Quantity
1 2 1/2 inch Double Male 2
2 2 1/2 inch Double Female 2
3 5 inch Storz to 2 1/2inch Male 2
4 5 inch Storz to 2 1/2 inch Female 2
5 6 inch Female to 5 inch Storz 1
6 5 inch Storz to 4 inch Storz 1
7 Spanner Wrenches (Large) 2
8 Rubber Mallet 1
9 3 lb Hammer 1
10 Hydrant Wrench 1
11 6 inch Double Female 1
12 Transfer Valve / Ball Valve 1
13 5 inch Storz Cap 1
14 Hose Strap 2
15 Water Thief 1
16 Gasket for Hard Suction 1
17 1 1/2 inch Double Male (National Standard to National Pipe) 1
18 Blue Tow Chain 1
19 Hydrant Bag 1
2 1/2 inch Gate 2
Hydrant Wrench 1
2 1/2 inch Double Female 1
2 1/2 inch Double Male 1
Spanner Wrench (Small) 2
Spanner Wrench (Large) 2
-
4/19/2016
Engine One Compartment 2 (Driver's Side) Quantity
1 Bolt Cutters 1
2 Halligan Bar ( Small) 1
3 Halligan Bar ( Large) 1
4 Pick Head Ax 1
5 Flat Head Ax 2
6 Pry Bar 1
7 Crow Bar 1
8 Road Flares
9 Firemaxx Tool 1
10 FUBAR Tool 1
11 A-Tool 1
12 Sledge Hammer 1
13 Sheetrock Hook 1
Engine One Compartment 3 (Driver's Side) Quantity
1 1 3/4 inch Automatic Nozzle 1
3 4 ft D-Handled Pike Pole 2
5 Low Flow Strainer 1
7 Box Strainer 1
9 Music Stand 1
10
Engine One Wheel Compartment (Driver's Side) Quantity
1 Air Bottle 1
Engine One (Driver's Side) Quantity
1 Wheel Chock 1
2 10 ft of 6 Inch Hard Suction 1
Engine One Rear Step Quantity
1 8 ft Pike Pole 1
2 6 ft Pike Pole 1
3 1500 Gallon Portable Pond 1
4 Traffic Cones 7
5 10 ft Attic Ladder 1
Engine One Compartment 1 (Passenger's Side) Quantity
1 Base For Deck Gun 1
2 Widow Nozzle for Deck Gun 1
3 High Rise Pack 1
4 5 Gallon Pail of Foam 1
Engine One Compartment 2 (Passenger's Side) Quantity
1 Honda 6500 Generator 1
2 Converter Box 1
3 100 ft Cord Reel 1
4 Jumper Cables 1
Engine One Compartment 3 (Passenger's Side) Quantity
1 16 ft Roof Ladder 1
2 35 ft Extention Ladder 1
3 Wheel Chock 1
4 10 ft of 6 inch Hard Suction 1
4/19/2016
Engine Tanker Front Truck Cab
1 SCBA's (in seats) 5
2 Clip Board w/ CO forms 1
3 Emergency Response Guide 1
4 Handheld Radio 2
5 Survivor Lights 6
6 Large Handheld Flashlights 2
7 Safety Vest (Under Seats) 6
8 Water Can 1
9 Fire Extinguisher (ABC) 1
10 Smoke and CO detector Instalation Matrix 1
11 Bottled Water (Under Rear Seat)
Engine Tanker Compartment 1 (Driver's Side) Quantity
1 Wheel Chocks 2
2 Steamer to 5 inch Storz Hydrant Valve 1
3 Spanner Wrench (Large) 1
4 Airline Toolbox 1
5 Rubber Mallet 2
Engine Tanker Compartment 2 (Driver's Side) Quantity
1 Hydrant Bag 1
2 1/2 inch Gate 2
Hydrant Wrench 1
Spanner Wrench (Large) 2
Spanner Wrench (Small) 2
2 1/2 inch Double Male 2
2 1/2 inch Double Female 1
2 Spanner Wrench (Small) 2
3 Spanner Wrench (Large) 1
4 Hydrant Wrench 2
5 2 1/2 inch Double Male 2
6 2 1/2 inch Double Female 2
7 6 inch Venturi Appliance 1
8 5 inch Storz to 4 inch Storz 2
9 5 inch Storz to 2 1/2 Male 1
10 5 inch Storz to 2 1/2 Female 1
11 Storz Cap 1
12 6 inch Double Female 1
13 6 inch to 5 inch Storz 1
Engine Tanker Compartment 3 & 4 (Driver's Side) Quantity
1 Halligan Bar ( Large) 1
2 6 ft Pike Pole 1
3 Grift Hook (Small) 1
4 Halligan Bar ( Small) 1
5 Bolt Cutters 1
6 Flat Head Ax 1
7 Crow Bar 1
8 4 ft D-Handle Pike Pole 2
9 Pick Head Ax 1
Engine Tanker Compartment 5 (Driver's Side) Quantity
1 Positive Pressure Fan 1
2 Low Flow Strainer 1
3 Fire Extinguisher (ABC) 1
4/19/2016
4 1 3/4 inch Combination Nozzle 1
5 2 1/2 inch Smooth Bore 1
6 Rope 1
7 Extention Cord 1
Engine Tanker Wheel Compartment (Drivers Side) Quantity
1 Air Bottle 1
2 10 ft of 6 inch Hard Suction Hose 1
Engine Tanker Rear Step
1 28 ft Extention Ladder 1
2 Attic Ladder 1
3 16 ft Roof Ladder 1
4 Pike Pole 2
5 Cones 7
Engine Tanker Compartment 1 (Passenger Side) Quantity
1 Bottled Water
2 Speedy Dri 1
3 Shepard Hook 1
4 High Rise Pack 1
5 Air Bottle 1
Engine Tanker Passenger Side Quantity
1 2000 Gallon Portable Pond 1
2 10 ft of 6 inch Hard Suction Hose
4/19/2016
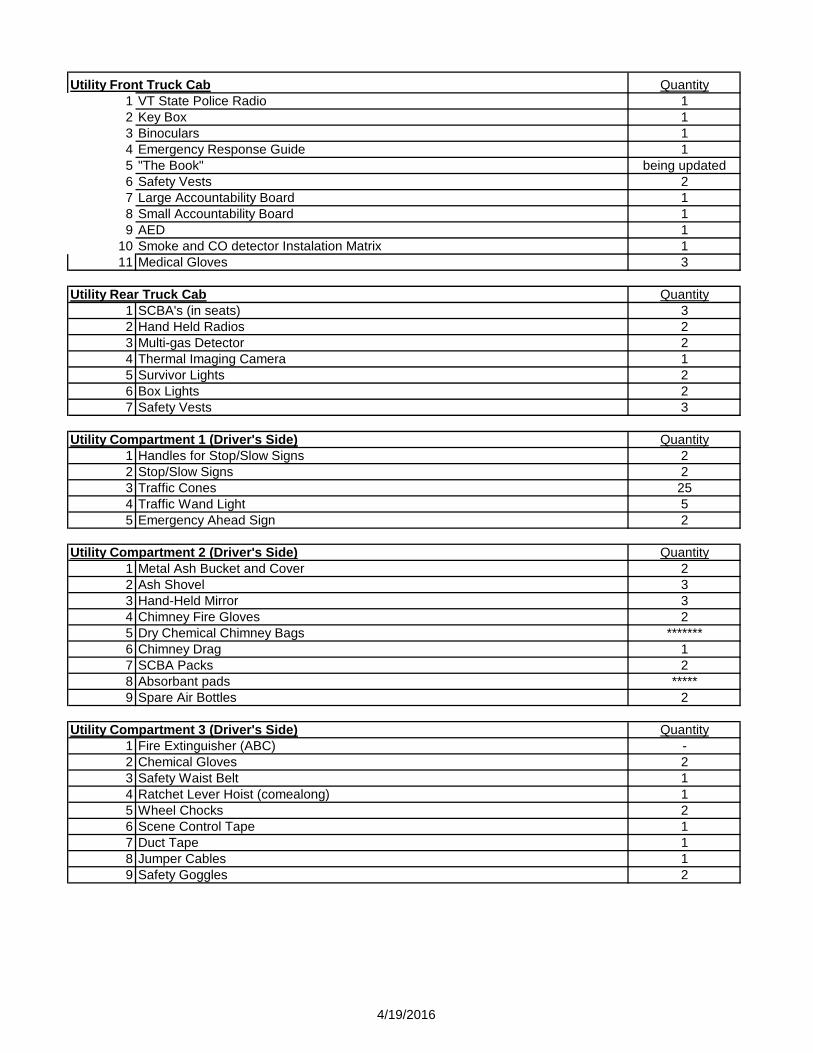
Utility Front Truck Cab Quantity
1 VT State Police Radio 1
2 Key Box 1
3 Binoculars 1
4 Emergency Response Guide 1
5 "The Book" being updated
6 Safety Vests 2
7 Large Accountability Board 1
8 Small Accountability Board 1
9 AED 1
10 Smoke and CO detector Instalation Matrix 1
11 Medical Gloves 3
Utility Rear Truck Cab Quantity
1 SCBA's (in seats) 3
2 Hand Held Radios 2
3 Multi-gas Detector 2
4 Thermal Imaging Camera 1
5 Survivor Lights 2
6 Box Lights 2
7 Safety Vests 3
Utility Compartment 1 (Driver's Side) Quantity
1 Handles for Stop/Slow Signs 2
2 Stop/Slow Signs 2
3 Traffic Cones 25
4 Traffic Wand Light 5
5 Emergency Ahead Sign 2
Utility Compartment 2 (Driver's Side) Quantity
1 Metal Ash Bucket and Cover 2
2 Ash Shovel 3
3 Hand-Held Mirror 3
4 Chimney Fire Gloves 2
5 Dry Chemical Chimney Bags *******
6 Chimney Drag 1
7 SCBA Packs 2
8 Absorbant pads *****
9 Spare Air Bottles 2
Utility Compartment 3 (Driver's Side) Quantity
1 Fire Extinguisher (ABC) -
2 Chemical Gloves 2
3 Safety Waist Belt 1
4 Ratchet Lever Hoist (comealong) 1
5 Wheel Chocks 2
6 Scene Control Tape 1
7 Duct Tape 1
8 Jumper Cables 1
9 Safety Goggles 2
4/19/2016
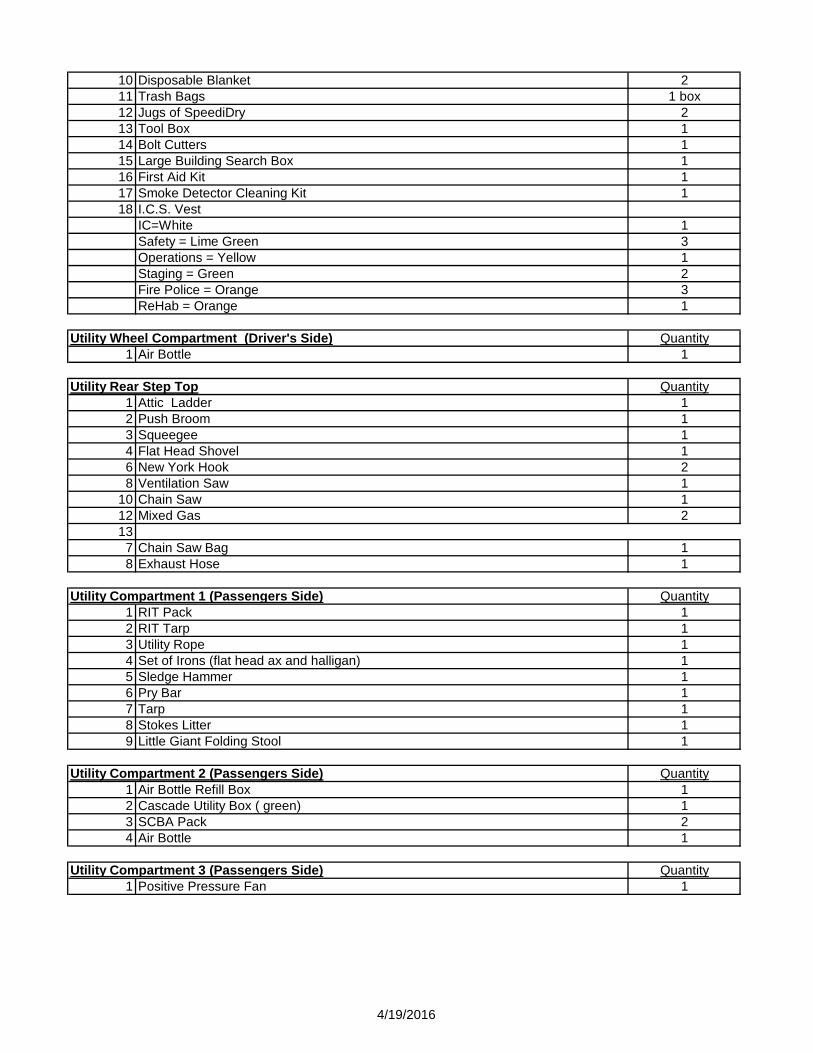
10 Disposable Blanket 2
11 Trash Bags 1 box
12 Jugs of SpeediDry 2
13 Tool Box 1
14 Bolt Cutters 1
15 Large Building Search Box 1
16 First Aid Kit 1
17 Smoke Detector Cleaning Kit 1
18 I.C.S. Vest
IC=White 1
Safety = Lime Green 3
Operations = Yellow 1
Staging = Green 2
Fire Police = Orange 3
ReHab = Orange 1
Utility Wheel Compartment (Driver's Side) Quantity
1 Air Bottle 1
Utility Rear Step Top Quantity
1 Attic Ladder 1
2 Push Broom 1
3 Squeegee 1
4 Flat Head Shovel 1
6 New York Hook 2
8 Ventilation Saw 1
10 Chain Saw 1
12 Mixed Gas 2
13
7 Chain Saw Bag 1
8 Exhaust Hose 1
Utility Compartment 1 (Passengers Side) Quantity
1 RIT Pack 1
2 RIT Tarp 1
3 Utility Rope 1
4 Set of Irons (flat head ax and halligan) 1
5 Sledge Hammer 1
6 Pry Bar 1
7 Tarp 1
8 Stokes Litter 1
9 Little Giant Folding Stool 1
Utility Compartment 2 (Passengers Side) Quantity
1 Air Bottle Refill Box 1
2 Cascade Utility Box ( green) 1
3 SCBA Pack 2
4 Air Bottle 1
Utility Compartment 3 (Passengers Side) Quantity
1 Positive Pressure Fan 1
4/19/2016
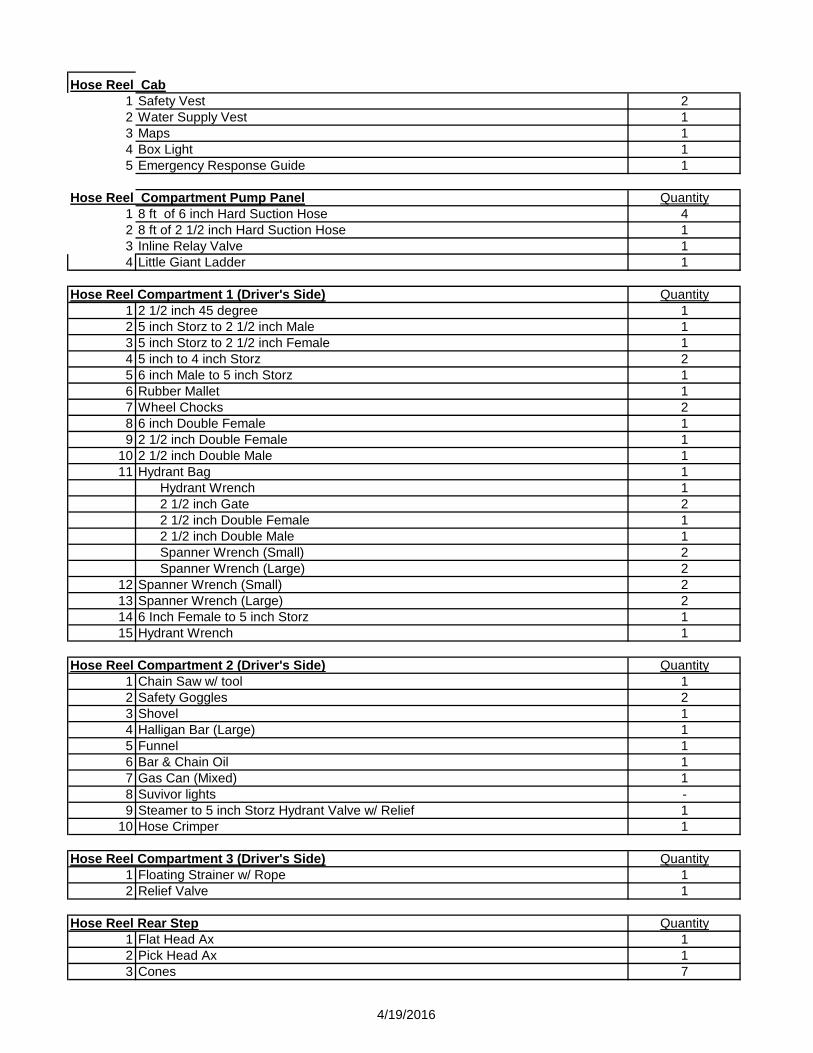
Hose Reel Cab
1 Safety Vest 2
2 Water Supply Vest 1
3 Maps 1
4 Box Light 1
5 Emergency Response Guide 1
Hose Reel Compartment Pump Panel Quantity
1 8 ft of 6 inch Hard Suction Hose 4
2 8 ft of 2 1/2 inch Hard Suction Hose 1
3 Inline Relay Valve 1
4 Little Giant Ladder 1
Hose Reel Compartment 1 (Driver's Side) Quantity
1 2 1/2 inch 45 degree 1
2 5 inch Storz to 2 1/2 inch Male 1
3 5 inch Storz to 2 1/2 inch Female 1
4 5 inch to 4 inch Storz 2
5 6 inch Male to 5 inch Storz 1
6 Rubber Mallet 1
7 Wheel Chocks 2
8 6 inch Double Female 1
9 2 1/2 inch Double Female 1
10 2 1/2 inch Double Male 1
11 Hydrant Bag 1
Hydrant Wrench 1
2 1/2 inch Gate 2
2 1/2 inch Double Female 1
2 1/2 inch Double Male 1
Spanner Wrench (Small) 2
Spanner Wrench (Large) 2
12 Spanner Wrench (Small) 2
13 Spanner Wrench (Large) 2
14 6 Inch Female to 5 inch Storz 1
15 Hydrant Wrench 1
Hose Reel Compartment 2 (Driver's Side) Quantity
1 Chain Saw w/ tool 1
2 Safety Goggles 2
3 Shovel 1
4 Halligan Bar (Large) 1
5 Funnel 1
6 Bar & Chain Oil 1
7 Gas Can (Mixed) 1
8 Suvivor lights -
9 Steamer to 5 inch Storz Hydrant Valve w/ Relief 1
10 Hose Crimper 1
Hose Reel Compartment 3 (Driver's Side) Quantity
1 Floating Strainer w/ Rope 1
2 Relief Valve 1
Hose Reel Rear Step Quantity
1 Flat Head Ax 1
2 Pick Head Ax 1
3 Cones 7
4/19/2016
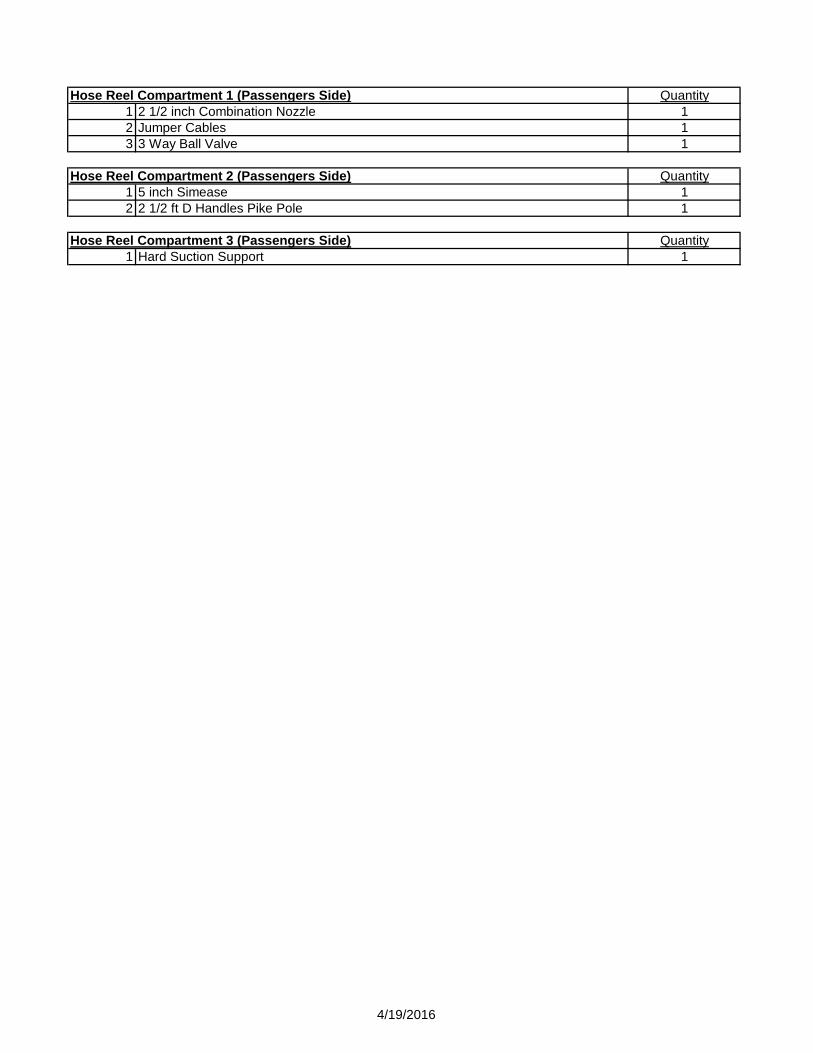
Hose Reel Compartment 1 (Passengers Side) Quantity
1 2 1/2 inch Combination Nozzle 1
2 Jumper Cables 1
3 3 Way Ball Valve 1
Hose Reel Compartment 2 (Passengers Side) Quantity
1 5 inch Simease 1
2 2 1/2 ft D Handles Pike Pole 1
Hose Reel Compartment 3 (Passengers Side) Quantity
1 Hard Suction Support 1
4/19/2016
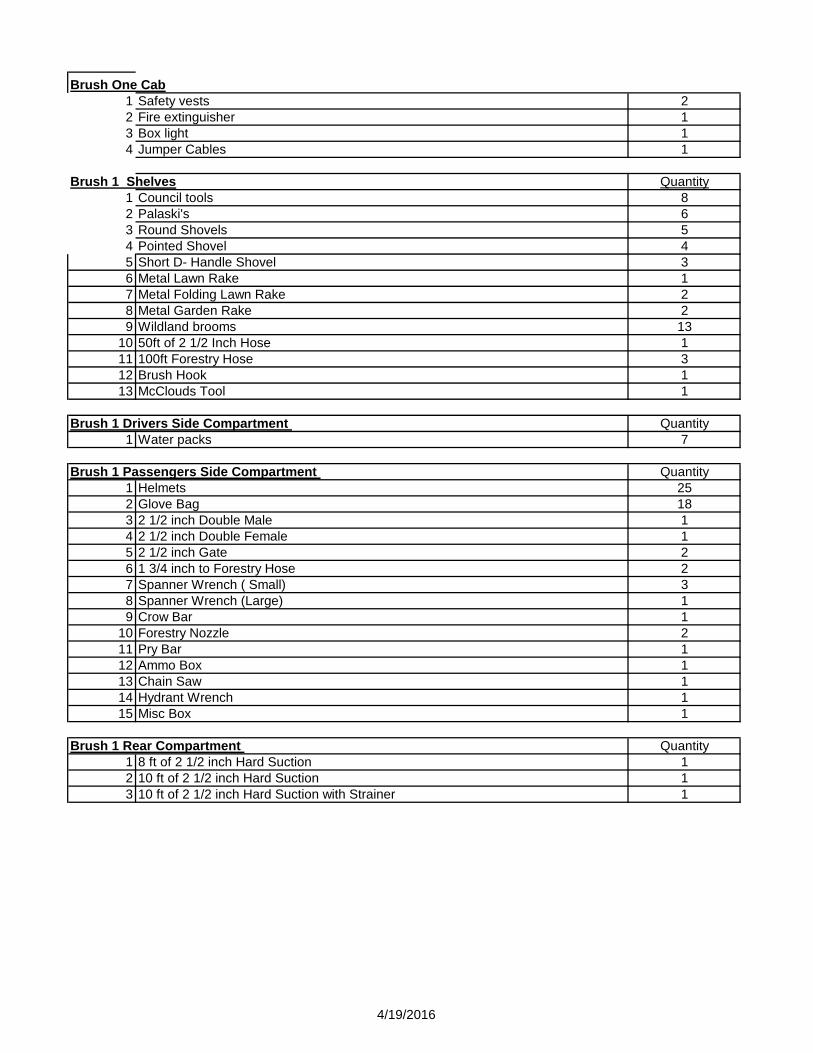
Brush One Cab
1 Safety vests 2
2 Fire extinguisher 1
3 Box light 1
4 Jumper Cables 1
Brush 1 Shelves Quantity
1 Council tools 8
2 Palaski's 6
3 Round Shovels 5
4 Pointed Shovel 4
5 Short D- Handle Shovel 3
6 Metal Lawn Rake 1
7 Metal Folding Lawn Rake 2
8 Metal Garden Rake 2
9 Wildland brooms 13
10 50ft of 2 1/2 Inch Hose 1
11 100ft Forestry Hose 3
12 Brush Hook 1
13 McClouds Tool 1
Brush 1 Drivers Side Compartment Quantity
1 Water packs 7
Brush 1 Passengers Side Compartment Quantity
1 Helmets 25
2 Glove Bag 18
3 2 1/2 inch Double Male 1
4 2 1/2 inch Double Female 1
5 2 1/2 inch Gate 2
6 1 3/4 inch to Forestry Hose 2
7 Spanner Wrench ( Small) 3
8 Spanner Wrench (Large) 1
9 Crow Bar 1
10 Forestry Nozzle 2
11 Pry Bar 1
12 Ammo Box 1
13 Chain Saw 1
14 Hydrant Wrench 1
15 Misc Box 1
Brush 1 Rear Compartment Quantity
1 8 ft of 2 1/2 inch Hard Suction 1
2 10 ft of 2 1/2 inch Hard Suction 1
3 10 ft of 2 1/2 inch Hard Suction with Strainer 1
4/19/2016
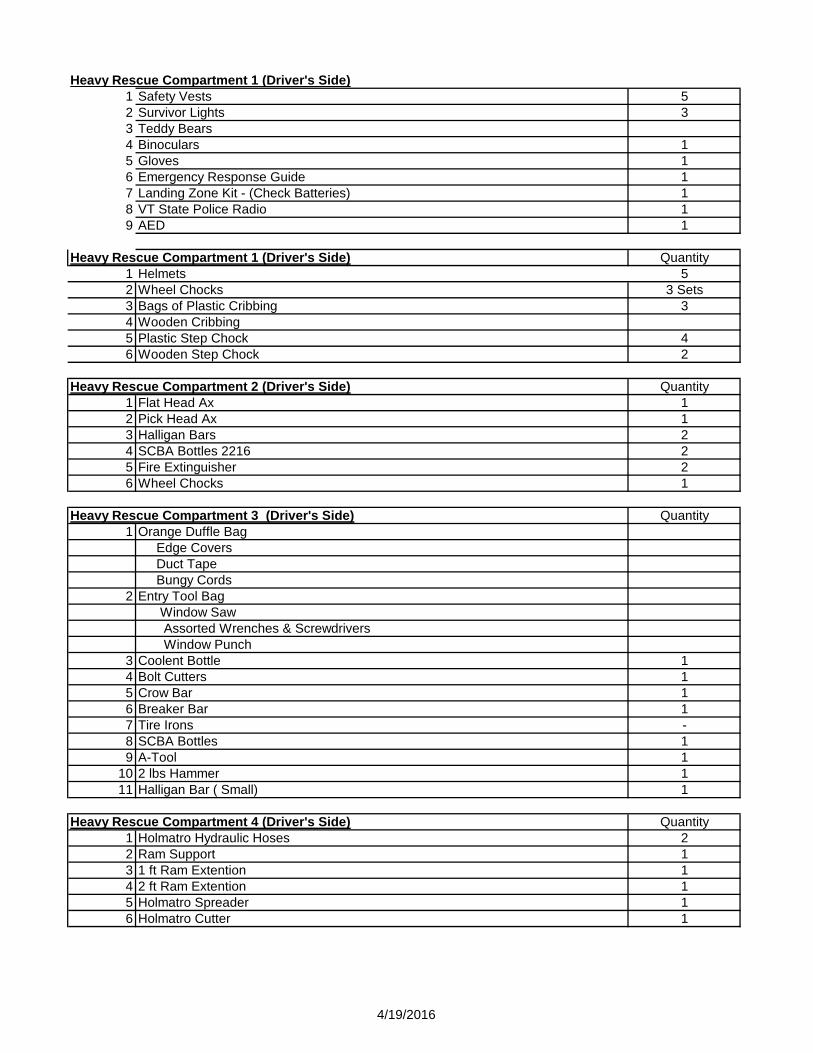
Heavy Rescue Compartment 1 (Driver's Side)
1 Safety Vests 5
2 Survivor Lights 3
3 Teddy Bears
4 Binoculars 1
5 Gloves 1
6 Emergency Response Guide 1
7 Landing Zone Kit - (Check Batteries) 1
8 VT State Police Radio 1
9 AED 1
Heavy Rescue Compartment 1 (Driver's Side) Quantity
1 Helmets 5
2 Wheel Chocks 3 Sets
3 Bags of Plastic Cribbing 3
4 Wooden Cribbing
5 Plastic Step Chock 4
6 Wooden Step Chock 2
Heavy Rescue Compartment 2 (Driver's Side) Quantity
1 Flat Head Ax 1
2 Pick Head Ax 1
3 Halligan Bars 2
4 SCBA Bottles 2216 2
5 Fire Extinguisher 2
6 Wheel Chocks 1
Heavy Rescue Compartment 3 (Driver's Side) Quantity
1 Orange Duffle Bag
Edge Covers
Duct Tape
Bungy Cords
2 Entry Tool Bag
Window Saw
Assorted Wrenches & Screwdrivers
Window Punch
3 Coolent Bottle 1
4 Bolt Cutters 1
5 Crow Bar 1
6 Breaker Bar 1
7 Tire Irons -
8 SCBA Bottles 1
9 A-Tool 1
10 2 lbs Hammer 1
11 Halligan Bar ( Small) 1
Heavy Rescue Compartment 4 (Driver's Side) Quantity
1 Holmatro Hydraulic Hoses 2
2 Ram Support 1
3 1 ft Ram Extention 1
4 2 ft Ram Extention 1
5 Holmatro Spreader 1
6 Holmatro Cutter 1
4/19/2016

7 Holmatro Ram 1
8 Tarp 1
Heavy Rescue Compartment 1 (Passenger's Side) Quantity
1 Jugs of Speedi Dry 3
2 Water
3 3 Ton Chain Fall 1
4 2 Ton Bottle Jack 3
5 Rags 1
6 First Aid Kit 1
7 Tarp 1
8 Push Broom 2
9 Caution Tape
10 Soap 1
11 Bags of Utility Rope 3
Heavy Rescue Compartment 2 (Passenger's Side) Quantity
1 Honda Generator 1
2 Wheel Chocks 1
3 Stabalizer Struts / Bag 4
4 Extention Cords 4
6 Quantity
8 Hammer Tools Box 1
10 Sawzall 1
12 Life Vests 4
13
Heavy Rescue Compartment 4 (Passenger's Side) Quantity
1 Halmatro Spreader 1
2 Holmatro Cutter 1
3 Holmatro Hydraulic Hoses 2
4 Ram Support 1
Heavy Rescue Rear Compartment Quantity
1 Stokes Litter 1
2 Traffic Cones 20
3 Round Head Shovel 1
4 Flat Head Shovel 2
5 Holmatro Hydraulic Pump 2
6 Spare Gas Can 1
7 Funnel 1
8 Stop / Slow Sign w/ Handle 2
4/19/2016

Appendix C
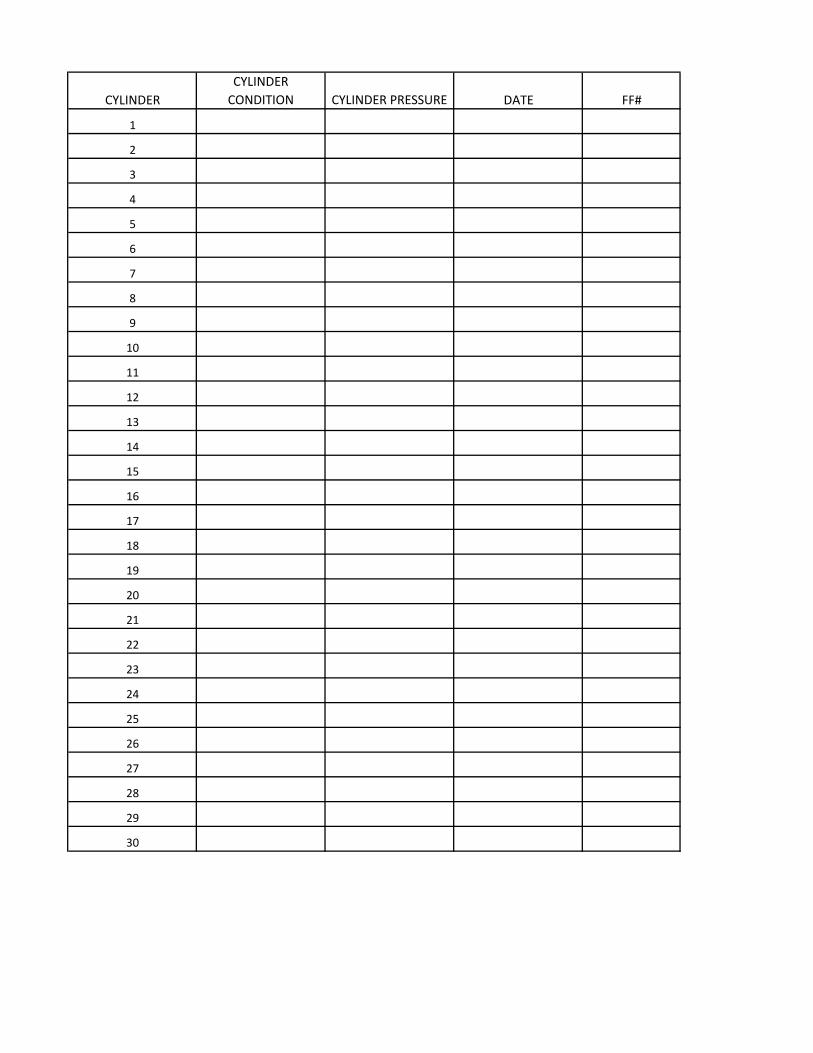
CYLINDER
CYLINDER
CONDITION CYLINDER PRESSURE DATE FF#
1
2
3
4
5
6
7
8
9
10
11
12
13
14
15
16
17
18
19
20
21
22
23
24
25
26
27
28
29
30
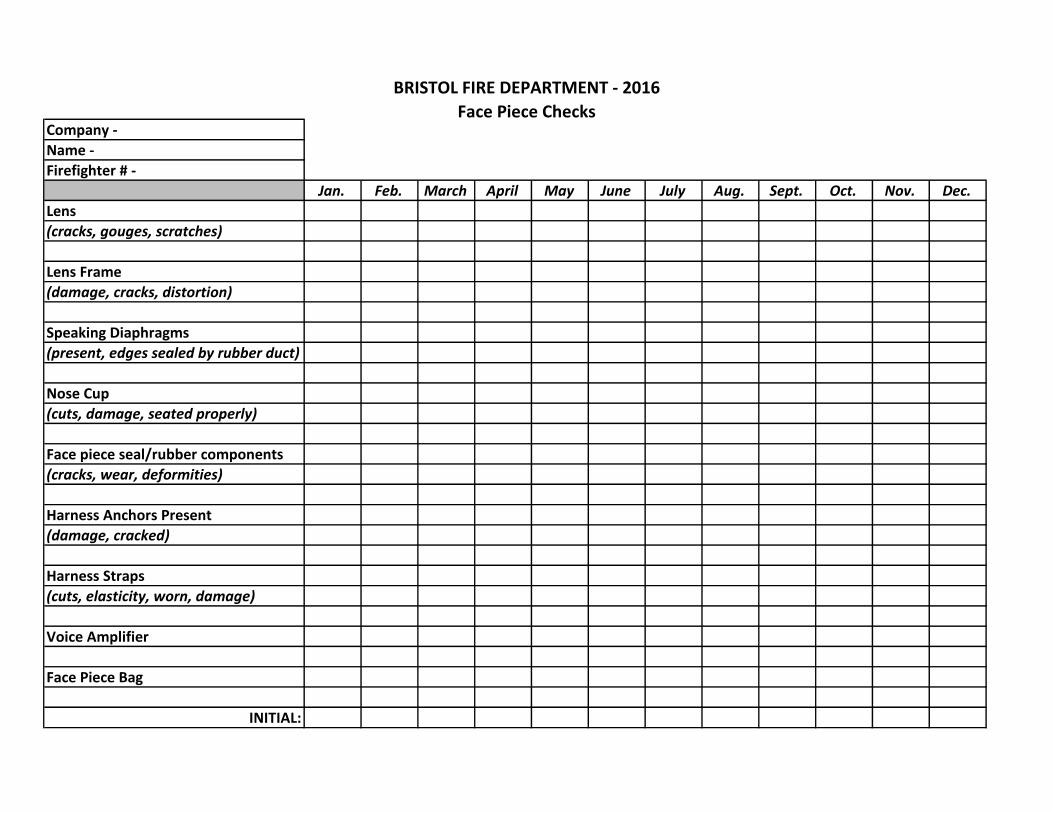
BRISTOL FIRE DEPARTMENT - 2016
Face Piece ChecksCompany -
Name -
Firefighter # -
Jan. Feb. March April May June July Aug. Sept. Oct. Nov. Dec.
Lens
(cracks, gouges, scratches)
Lens Frame
(damage, cracks, distortion)
Speaking Diaphragms
(present, edges sealed by rubber duct)
Nose Cup
(cuts, damage, seated properly)
Face piece seal/rubber components
(cracks, wear, deformities)
Harness Anchors Present
(damage, cracked)
Harness Straps
(cuts, elasticity, worn, damage)
Voice Amplifier
Face Piece Bag
INITIAL:

INSPECTION MOUNTING CYLINDER CYLINDER BELTS BACK HOSES & FACE PASS
DATE TYPE BRACKET WEAR PRESSURE & STRAPS PLATE CONNECTIONS PIECE DEVICE FF #
Comments: