Embed Size (px)
Citation preview

Contents are Confidential – Wright Internal Use Only
Insert Name of Presenter
TORNIER
AEQUALIS™ APPROACH™Shoulder Arthroplasty Program
Delivering efficiency & repeatabil itythroughout the continuum of patient care
Contents are Confidential – Wright Internal Use Only
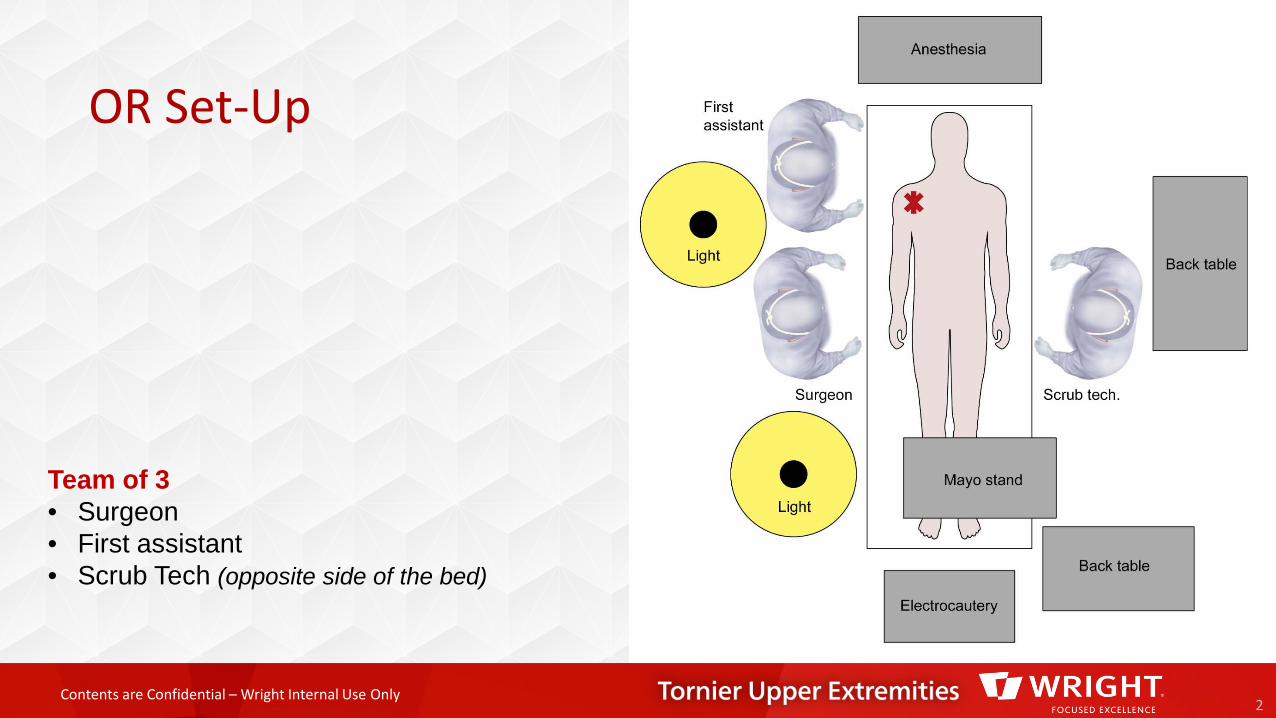
OR Set-Up
2
Team of 3 • Surgeon• First assistant• Scrub Tech (opposite side of the bed)
Contents are Confidential – Wright Internal Use Only
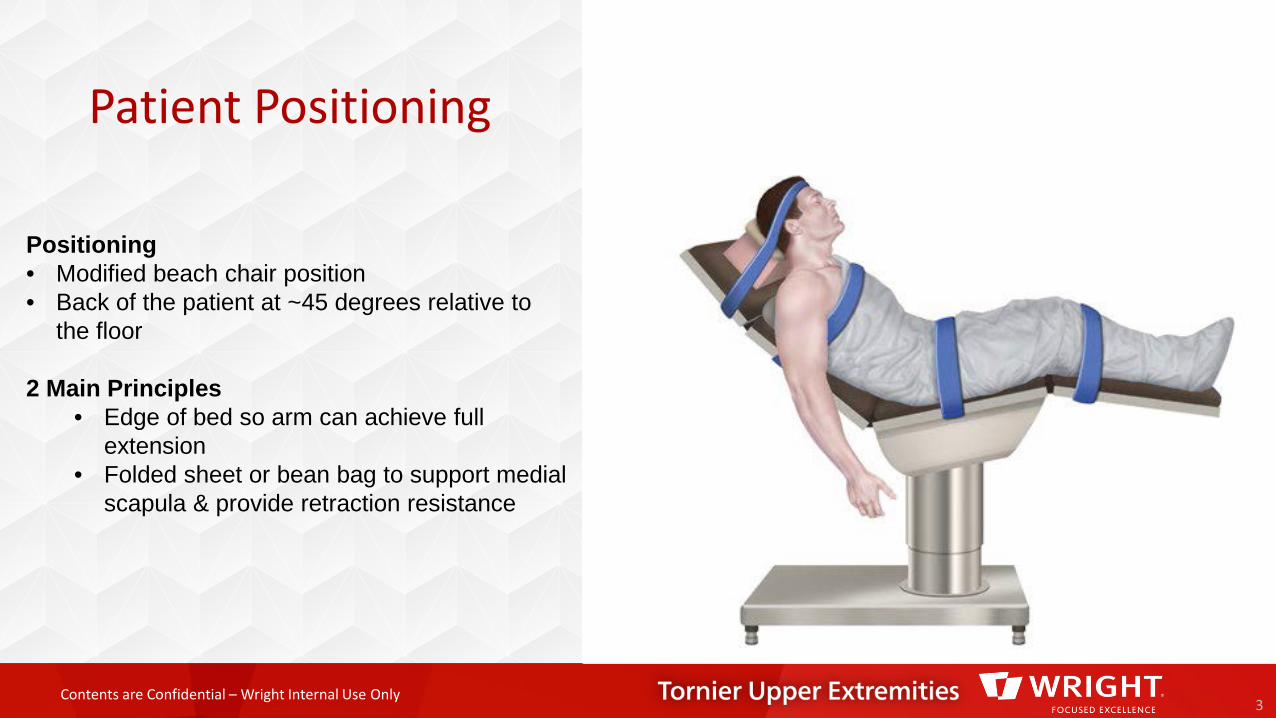
Patient Positioning
3
Positioning• Modified beach chair position• Back of the patient at ~45 degrees relative to
the floor
2 Main Principles• Edge of bed so arm can achieve full
extension• Folded sheet or bean bag to support medial
scapula & provide retraction resistance
Contents are Confidential – Wright Internal Use Only
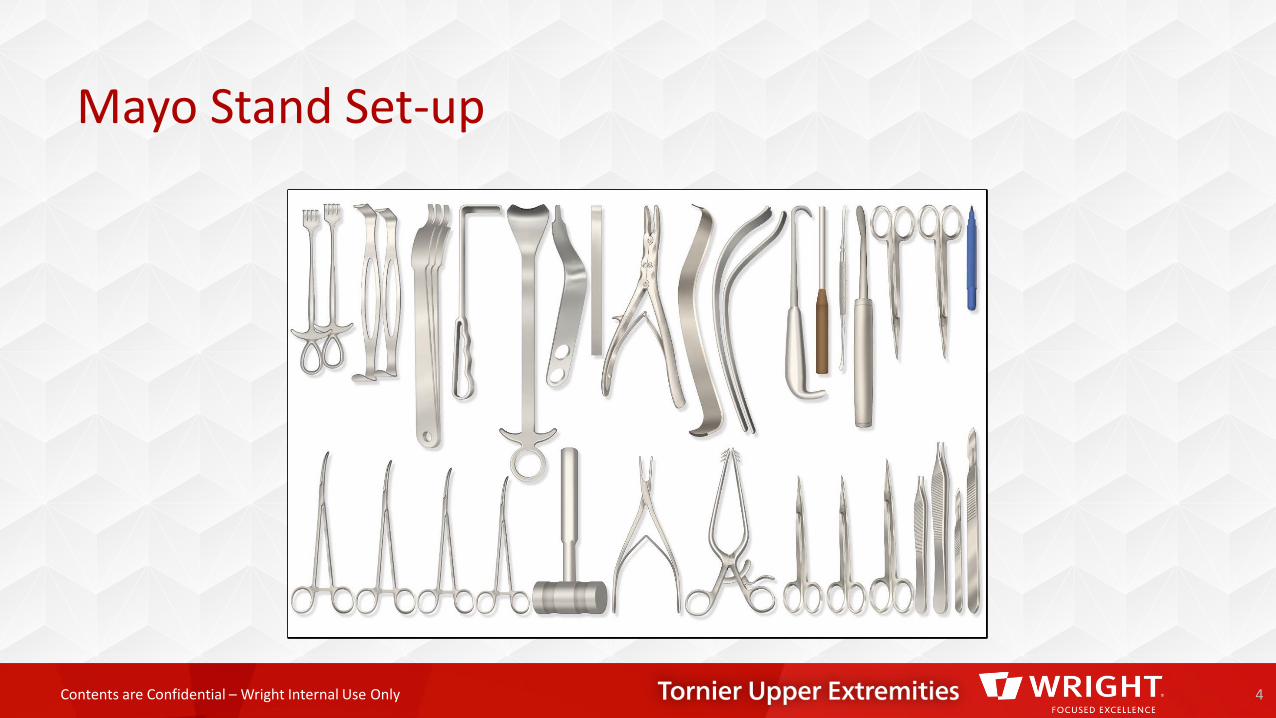
Mayo Stand Set-up
4
Contents are Confidential – Wright Internal Use Only
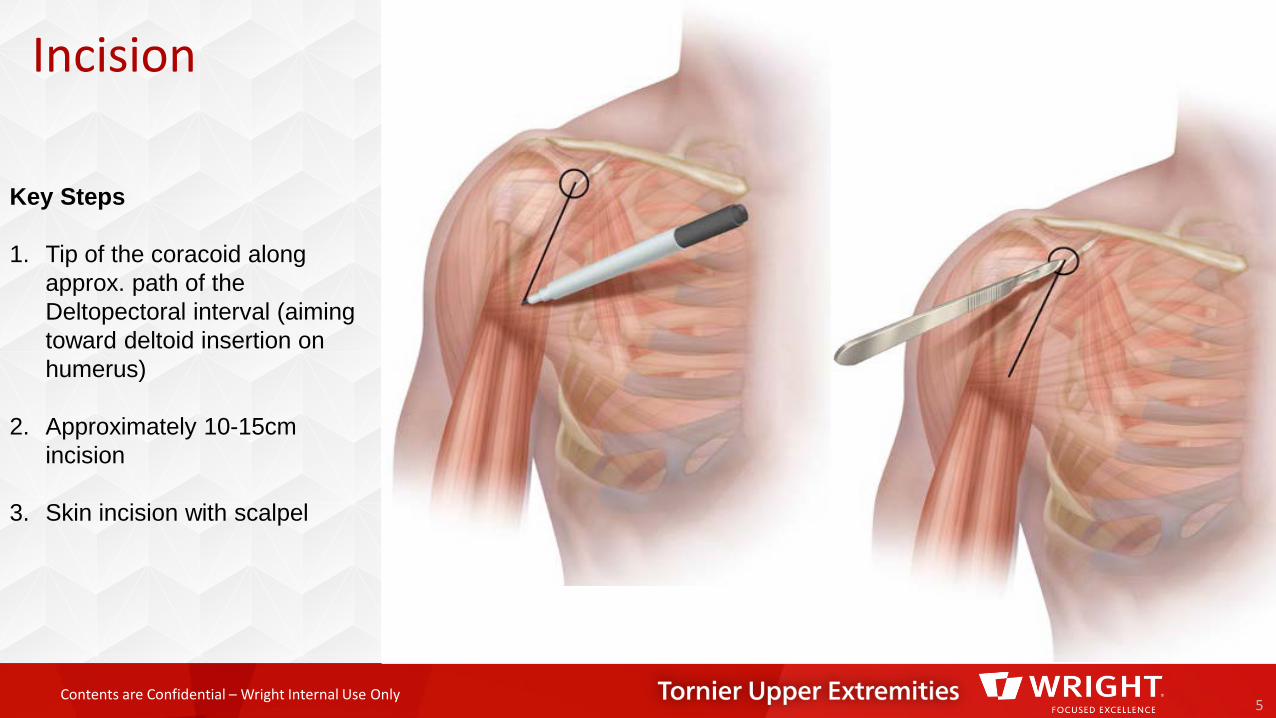
Incision
5
Key Steps
1. Tip of the coracoid along approx. path of the Deltopectoral interval (aiming toward deltoid insertion on humerus)
2. Approximately 10-15cm incision
3. Skin incision with scalpel
Contents are Confidential – Wright Internal Use Only
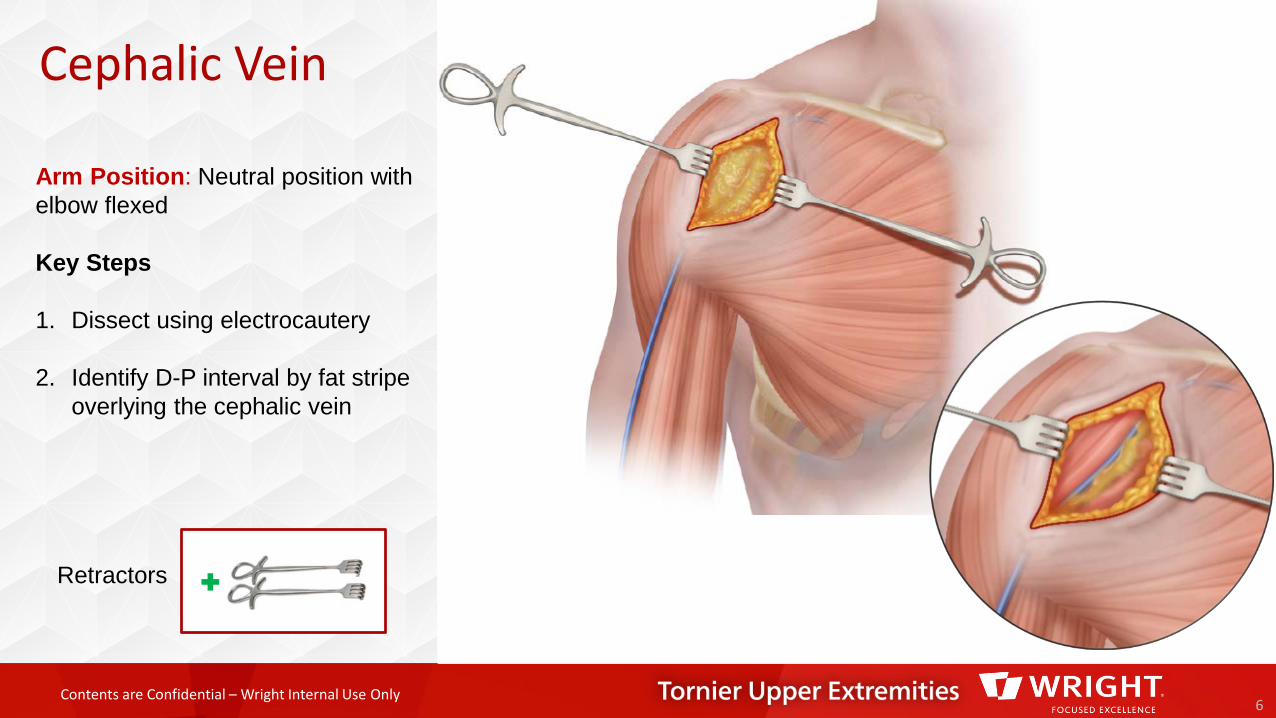
Cephalic Vein
6
Retractors
Arm Position: Neutral position with elbow flexed
Key Steps
1. Dissect using electrocautery
2. Identify D-P interval by fat stripe overlying the cephalic vein
Contents are Confidential – Wright Internal Use Only
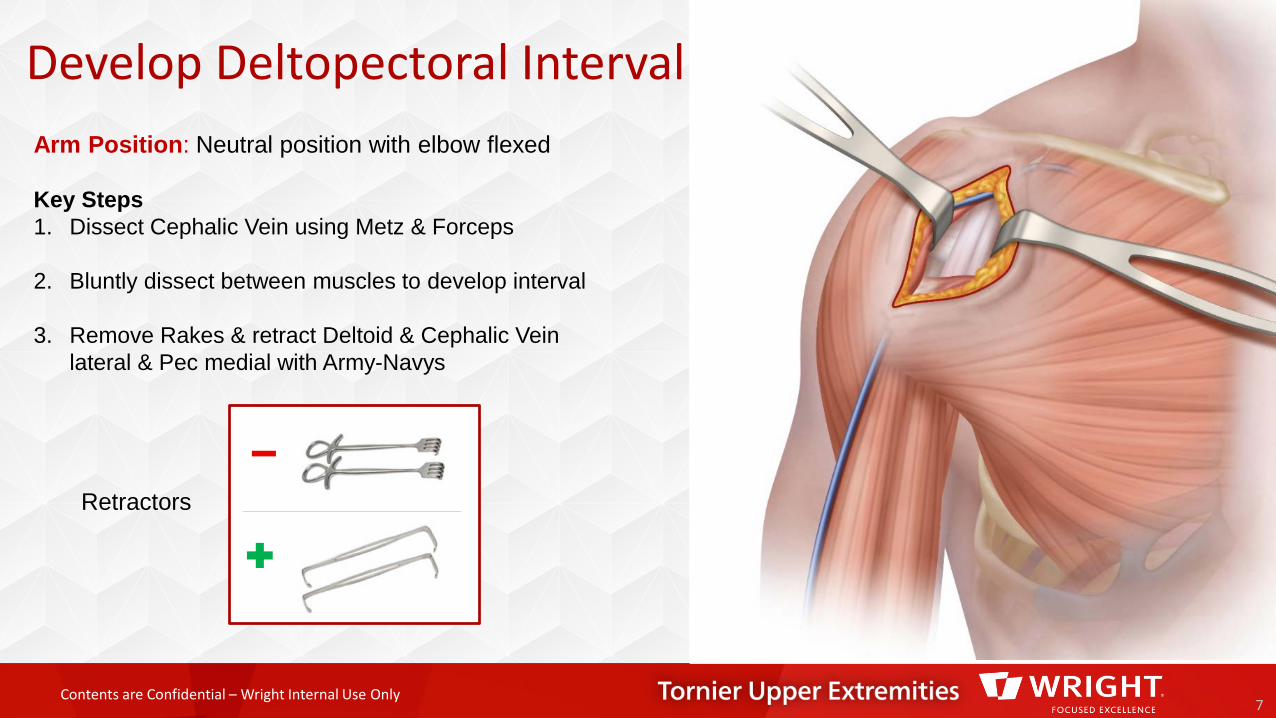
Develop Deltopectoral Interval
7
Retractors
Arm Position: Neutral position with elbow flexed
Key Steps1. Dissect Cephalic Vein using Metz & Forceps
2. Bluntly dissect between muscles to develop interval
3. Remove Rakes & retract Deltoid & Cephalic Vein lateral & Pec medial with Army-Navys
Contents are Confidential – Wright Internal Use Only8
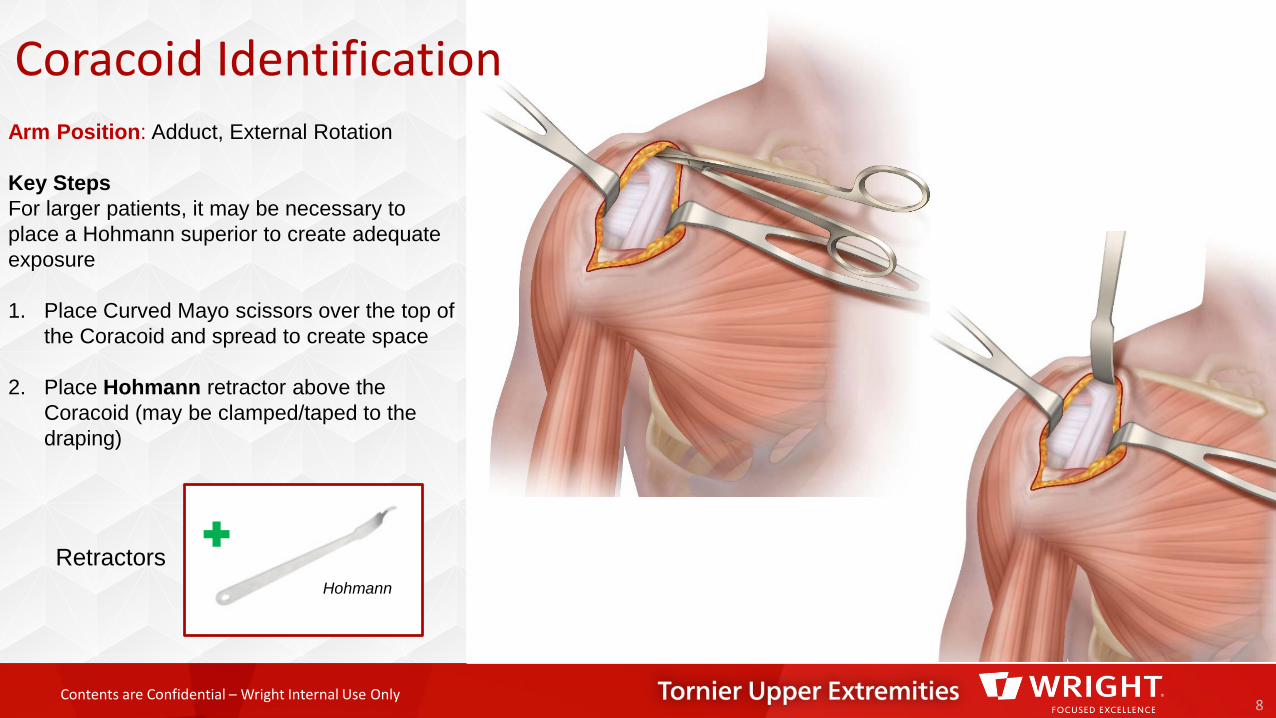
RetractorsHohmann
Arm Position: Adduct, External Rotation
Key StepsFor larger patients, it may be necessary to place a Hohmann superior to create adequate exposure
1. Place Curved Mayo scissors over the top of the Coracoid and spread to create space
2. Place Hohmann retractor above the Coracoid (may be clamped/taped to the draping)
Coracoid Identification
Contents are Confidential – Wright Internal Use Only
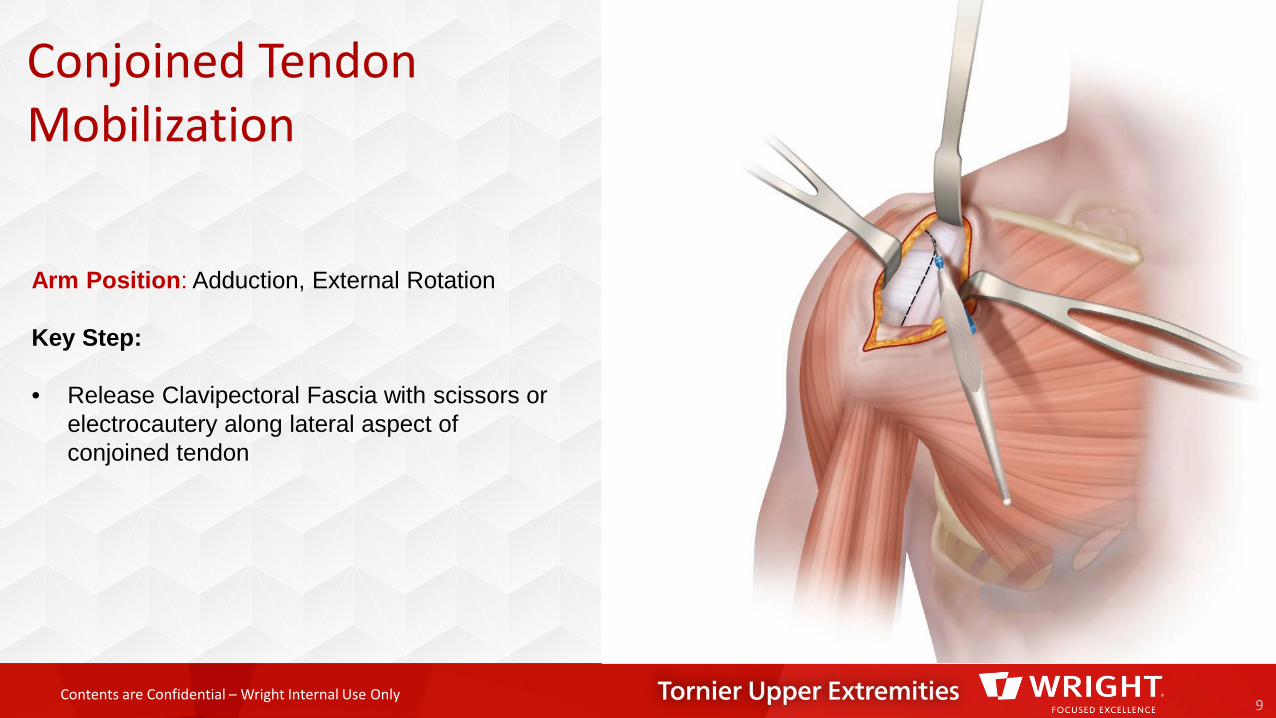
Conjoined Tendon Mobilization
9
Arm Position: Adduction, External Rotation
Key Step:
• Release Clavipectoral Fascia with scissors or electrocautery along lateral aspect of conjoined tendon
Contents are Confidential – Wright Internal Use Only
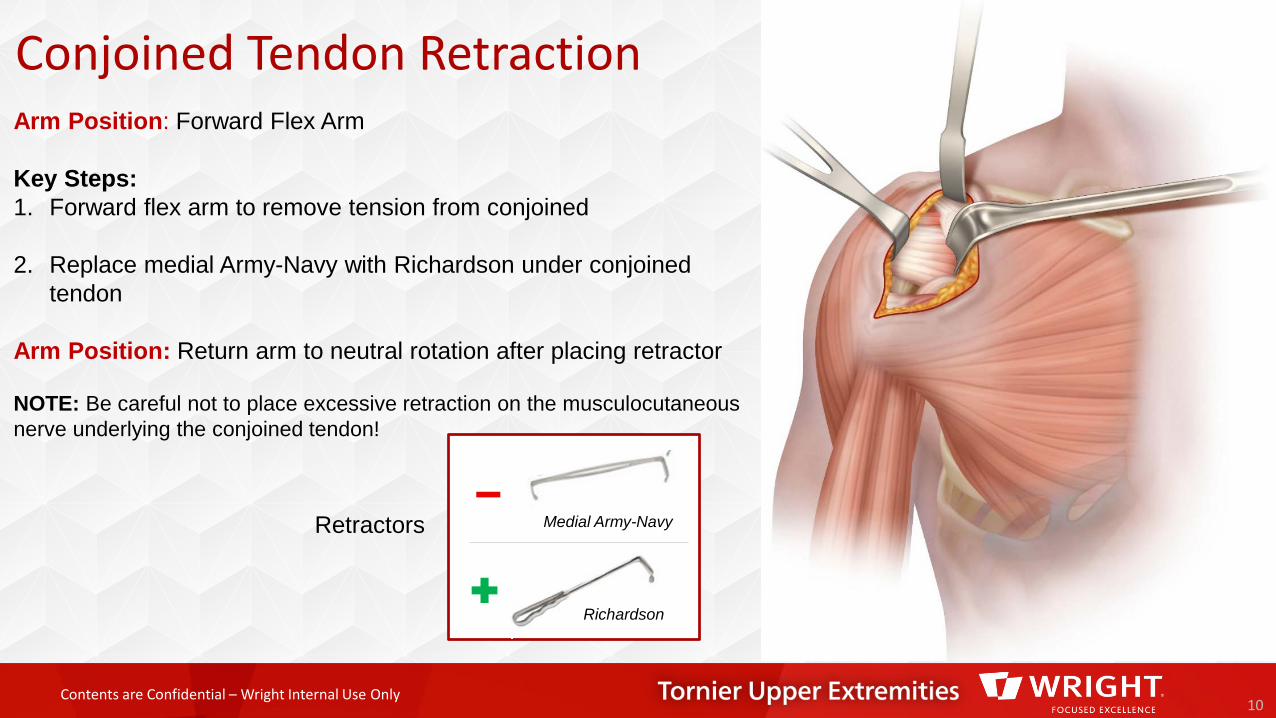
Conjoined Tendon Retraction
10
Arm Position: Forward Flex Arm
Key Steps:1. Forward flex arm to remove tension from conjoined
2. Replace medial Army-Navy with Richardson under conjoined tendon
Arm Position: Return arm to neutral rotation after placing retractor
NOTE: Be careful not to place excessive retraction on the musculocutaneous nerve underlying the conjoined tendon!
Retractors Medial Army-Navy
Richardson
Contents are Confidential – Wright Internal Use Only
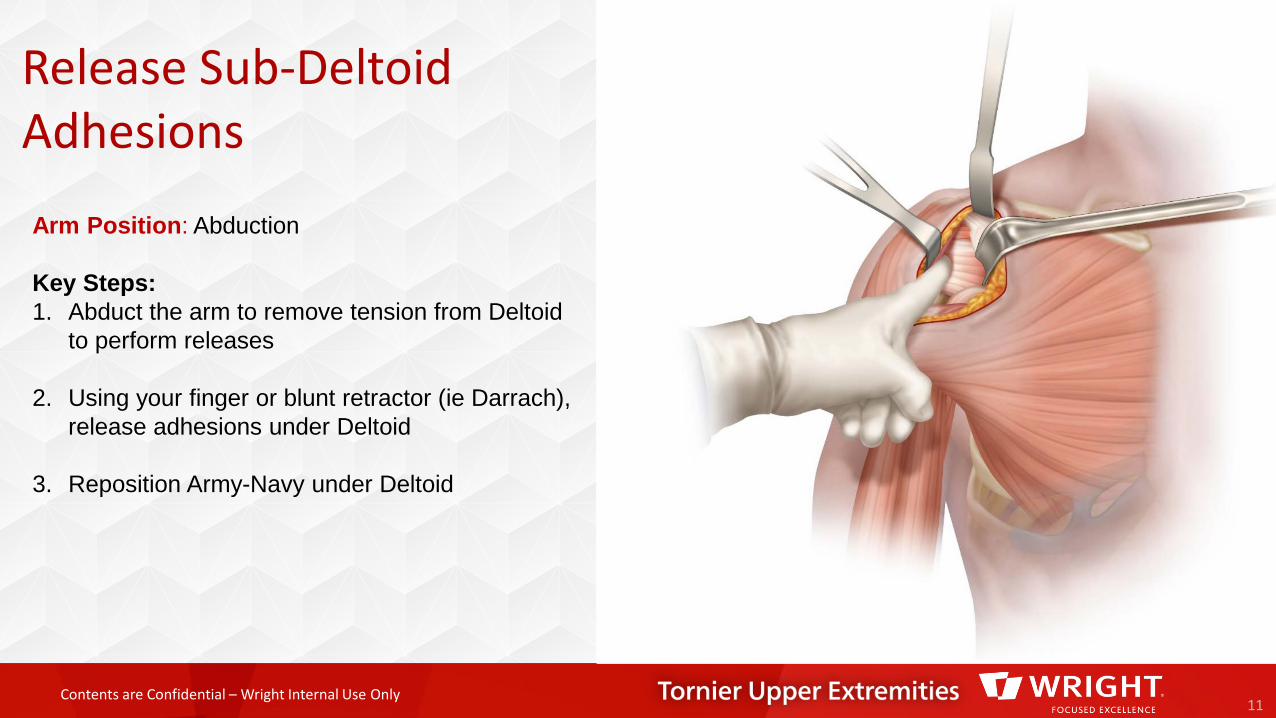
Release Sub-Deltoid Adhesions
11
Arm Position: Abduction
Key Steps:1. Abduct the arm to remove tension from Deltoid
to perform releases
2. Using your finger or blunt retractor (ie Darrach), release adhesions under Deltoid
3. Reposition Army-Navy under Deltoid
Contents are Confidential – Wright Internal Use Only
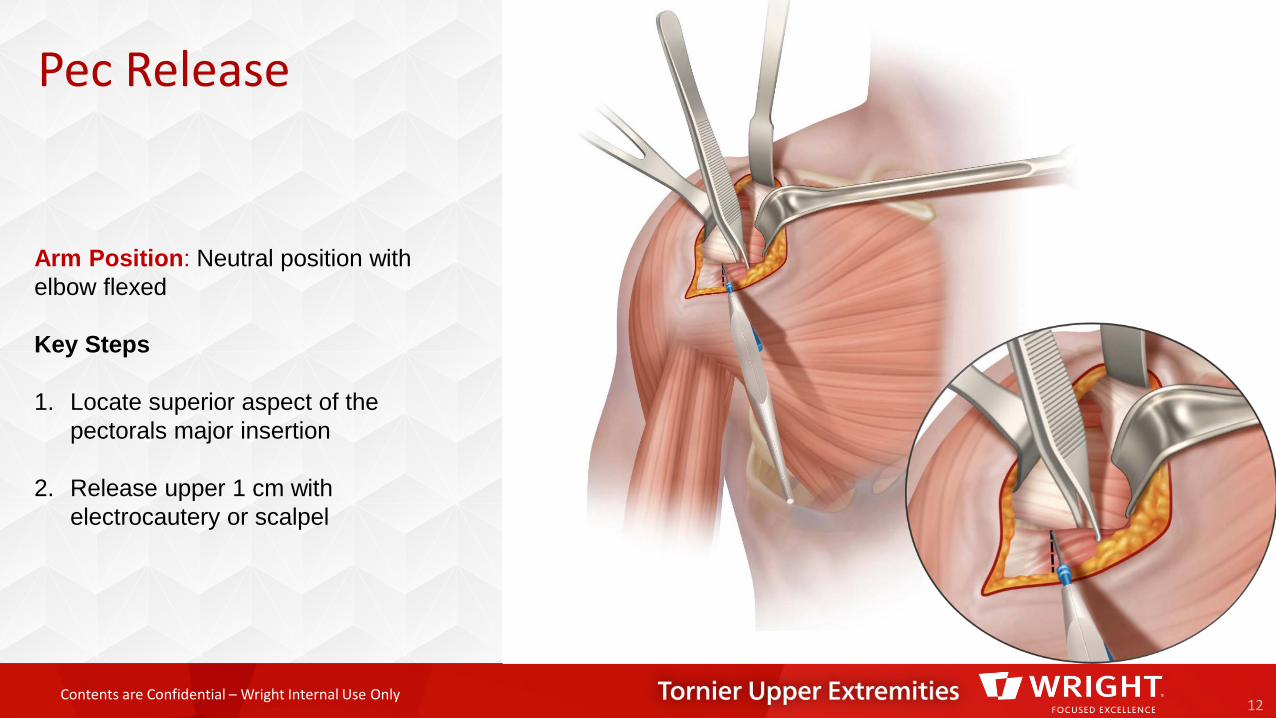
Pec Release
12
Arm Position: Neutral position with elbow flexed
Key Steps
1. Locate superior aspect of the pectorals major insertion
2. Release upper 1 cm with electrocautery or scalpel
Contents are Confidential – Wright Internal Use Only
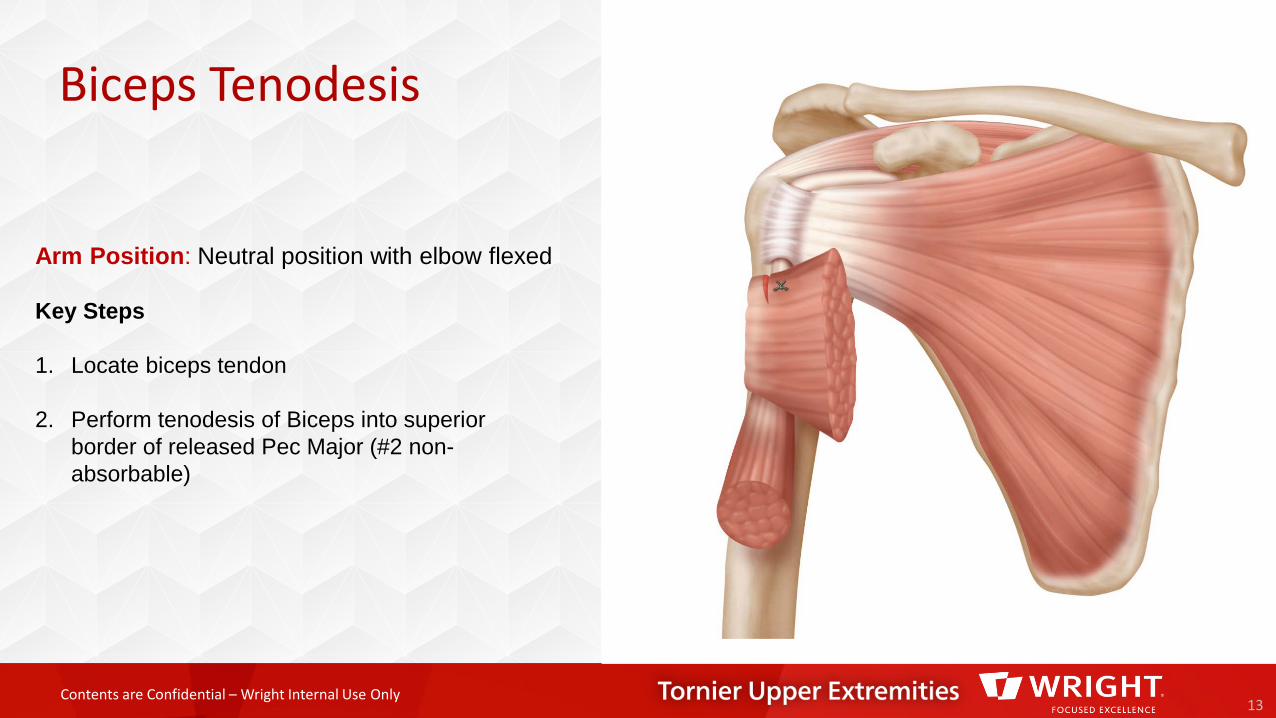
Biceps Tenodesis
13
Arm Position: Neutral position with elbow flexed
Key Steps
1. Locate biceps tendon
2. Perform tenodesis of Biceps into superior border of released Pec Major (#2 non-absorbable)
Contents are Confidential – Wright Internal Use Only
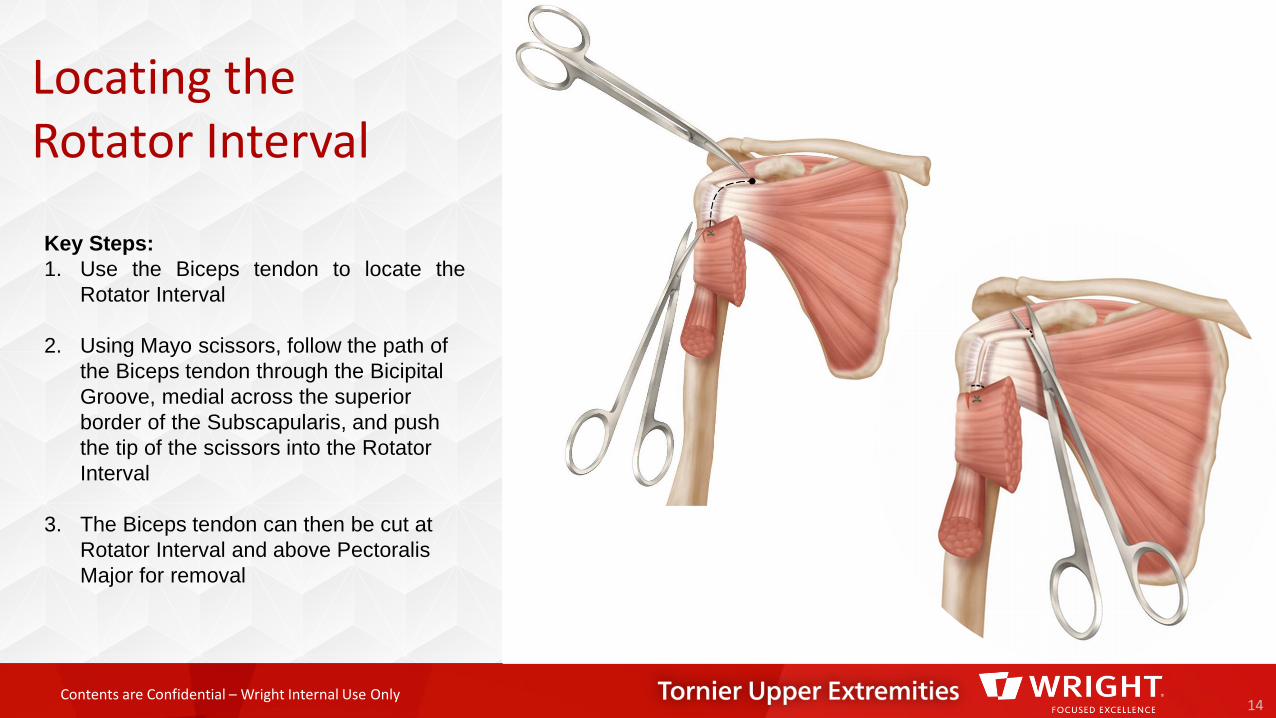
Locating the Rotator Interval
14
Key Steps:1. Use the Biceps tendon to locate the
Rotator Interval
2. Using Mayo scissors, follow the path of the Biceps tendon through the Bicipital Groove, medial across the superior border of the Subscapularis, and push the tip of the scissors into the Rotator Interval
3. The Biceps tendon can then be cut at Rotator Interval and above Pectoralis Major for removal
Contents are Confidential – Wright Internal Use Only15
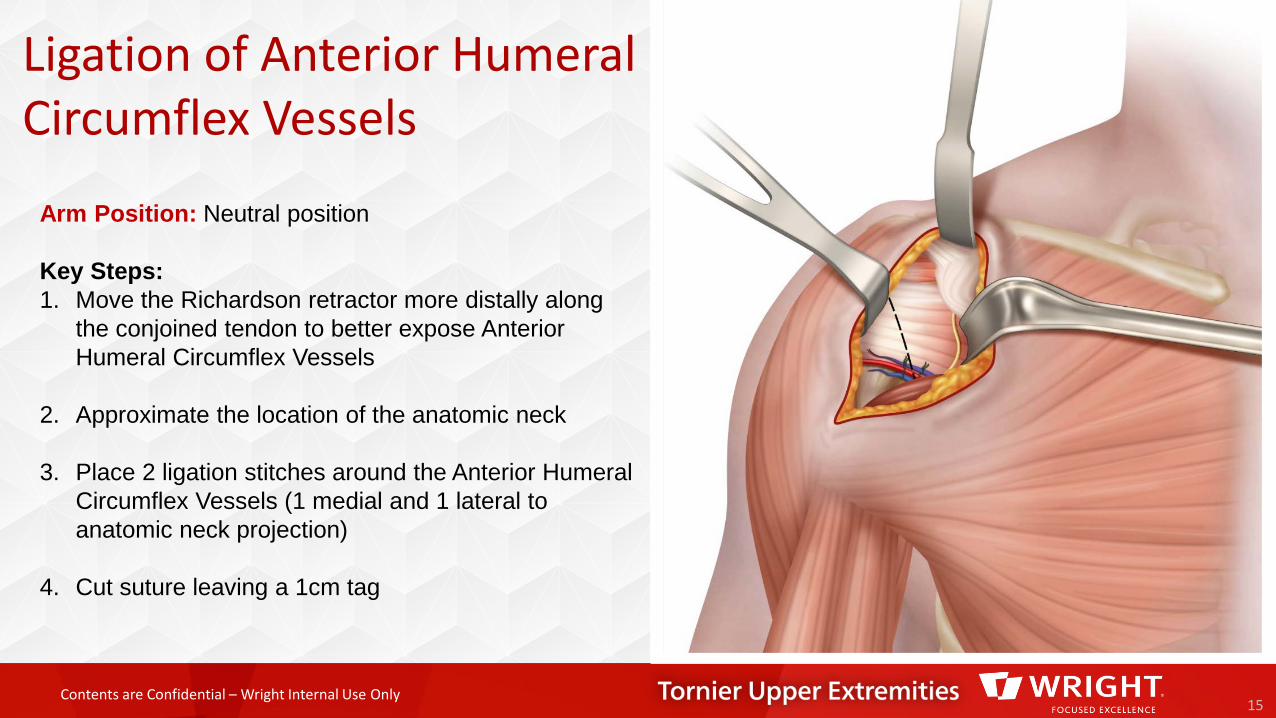
Arm Position: Neutral position
Key Steps:1. Move the Richardson retractor more distally along
the conjoined tendon to better expose Anterior Humeral Circumflex Vessels
2. Approximate the location of the anatomic neck
3. Place 2 ligation stitches around the Anterior Humeral Circumflex Vessels (1 medial and 1 lateral to anatomic neck projection)
4. Cut suture leaving a 1cm tag
Ligation of Anterior Humeral Circumflex Vessels
Contents are Confidential – Wright Internal Use Only
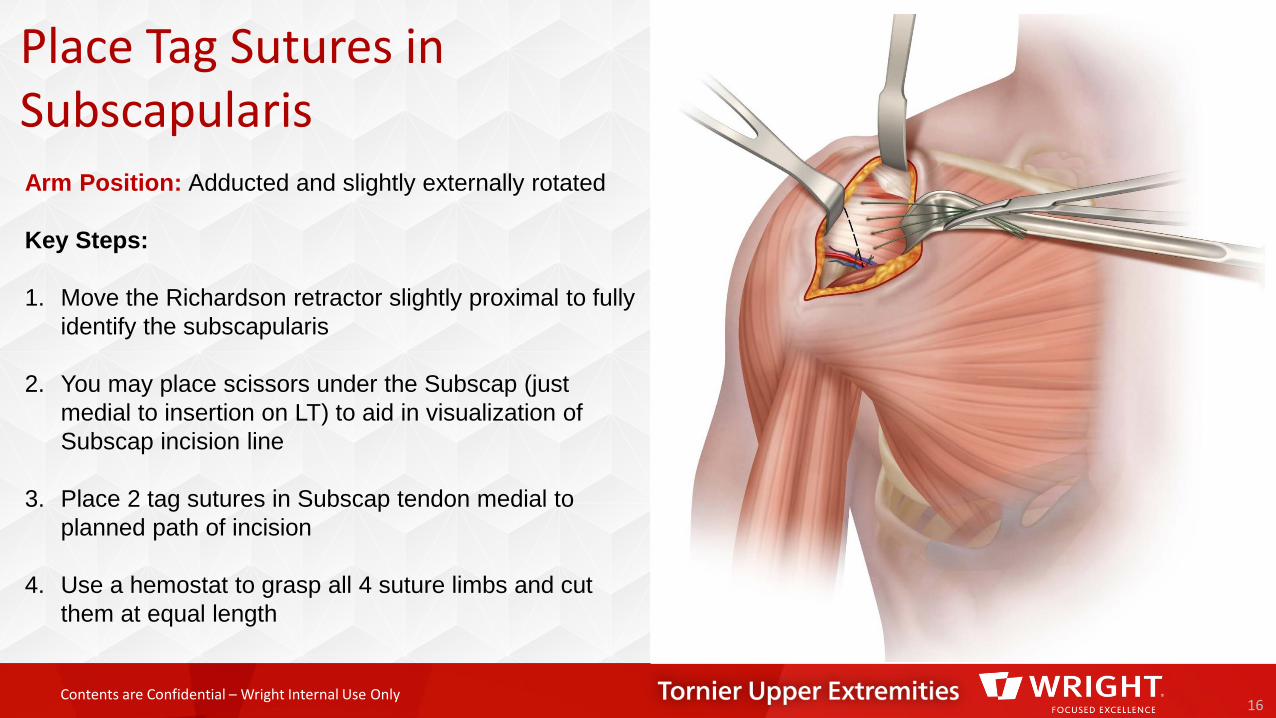
Place Tag Sutures in Subscapularis
16
Arm Position: Adducted and slightly externally rotated
Key Steps:
1. Move the Richardson retractor slightly proximal to fully identify the subscapularis
2. You may place scissors under the Subscap (just medial to insertion on LT) to aid in visualization of Subscap incision line
3. Place 2 tag sutures in Subscap tendon medial to planned path of incision
4. Use a hemostat to grasp all 4 suture limbs and cut them at equal length
Contents are Confidential – Wright Internal Use Only
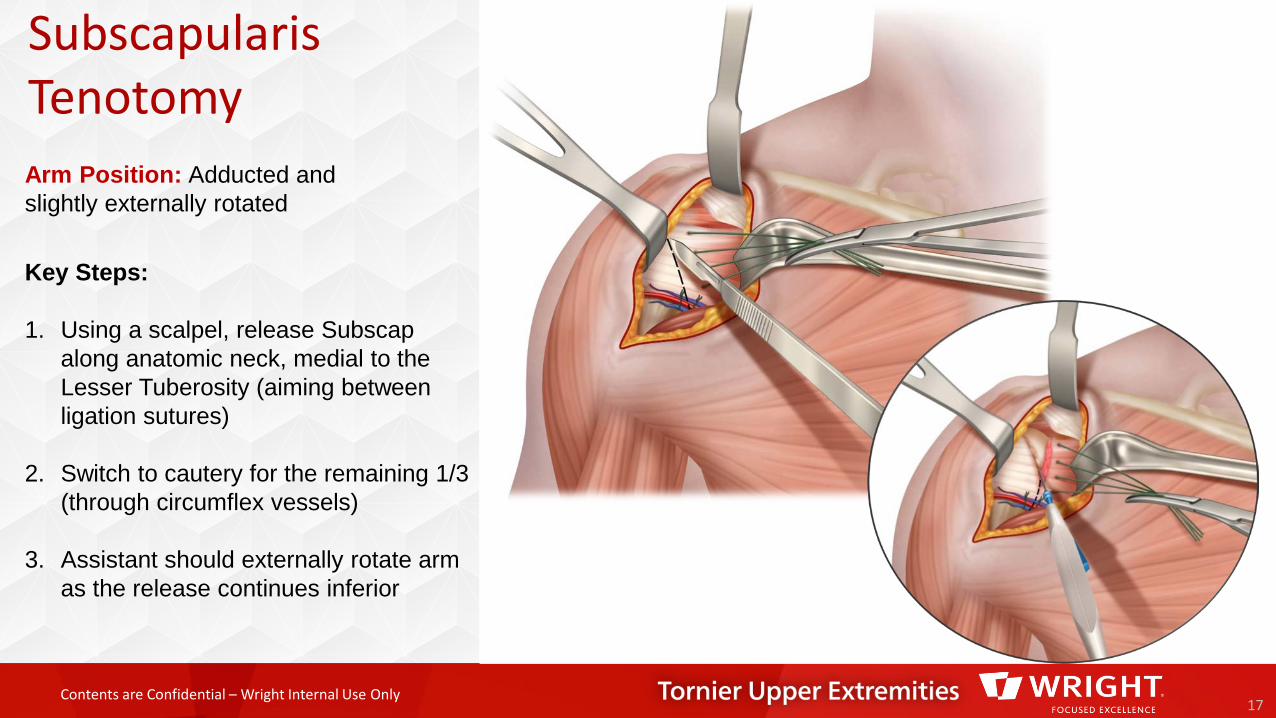
Subscapularis Tenotomy
17
Key Steps:
1. Using a scalpel, release Subscapalong anatomic neck, medial to the Lesser Tuberosity (aiming between ligation sutures)
2. Switch to cautery for the remaining 1/3 (through circumflex vessels)
3. Assistant should externally rotate arm as the release continues inferior
Arm Position: Adducted and slightly externally rotated
Contents are Confidential – Wright Internal Use Only
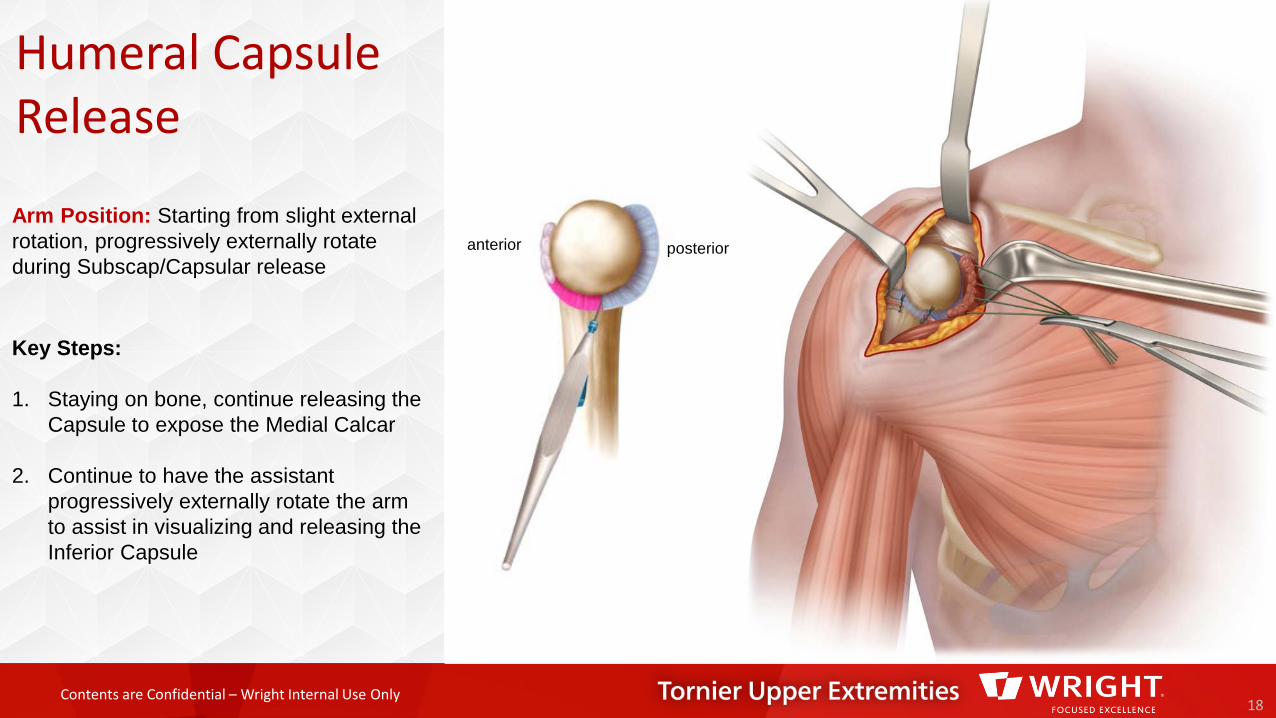
Humeral Capsule Release
18
Key Steps:
1. Staying on bone, continue releasing the Capsule to expose the Medial Calcar
2. Continue to have the assistant progressively externally rotate the arm to assist in visualizing and releasing the Inferior Capsule
Arm Position: Starting from slight external rotation, progressively externally rotate during Subscap/Capsular release
anterior posterior
Contents are Confidential – Wright Internal Use Only
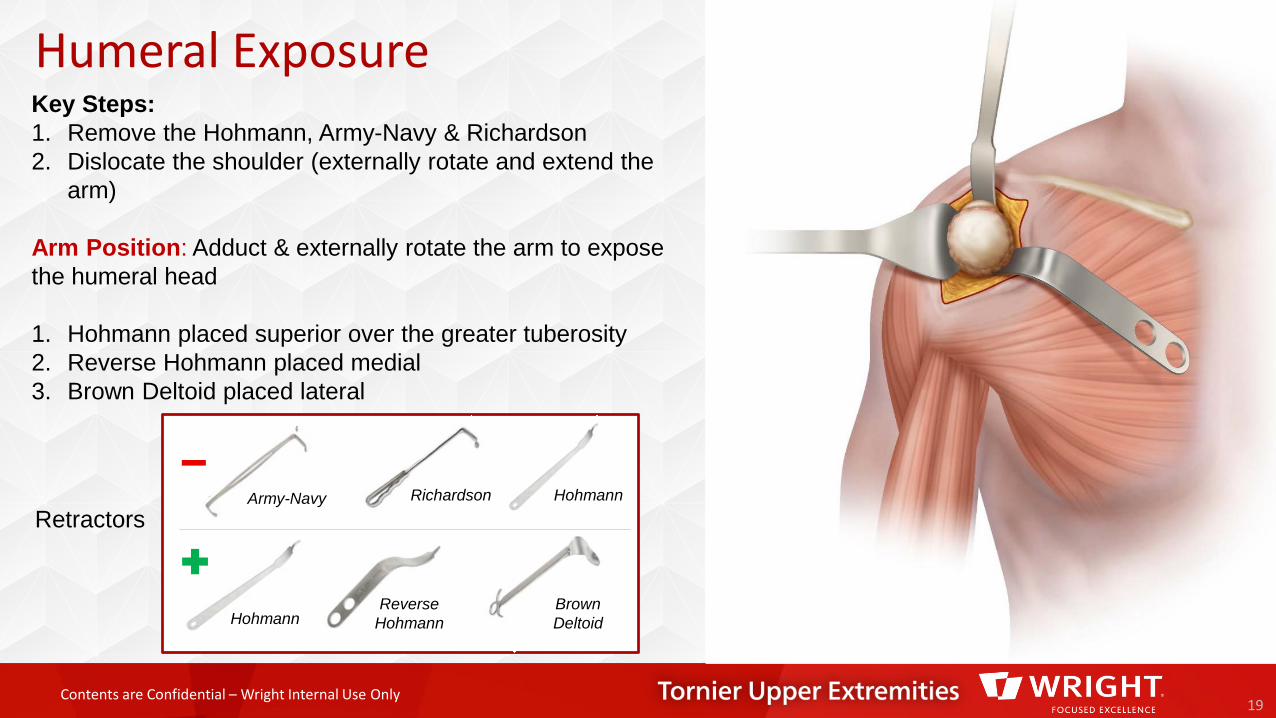
Humeral Exposure
19
Retractors
HohmannReverse
HohmannBrown Deltoid
HohmannRichardsonArmy-Navy
Key Steps:1. Remove the Hohmann, Army-Navy & Richardson2. Dislocate the shoulder (externally rotate and extend the
arm)
Arm Position: Adduct & externally rotate the arm to expose the humeral head
1. Hohmann placed superior over the greater tuberosity 2. Reverse Hohmann placed medial3. Brown Deltoid placed lateral

Contents are Confidential – Wright Internal Use Only20
Arm Position: Adduction & external rotation
Key Steps:
1. Outline Osteophytes with electrocautery
2. Use a ½ inch straight osteotome & mallet and/or Rongeur to remove Osteophytes
Remove Osteophytes
Contents are Confidential – Wright Internal Use Only
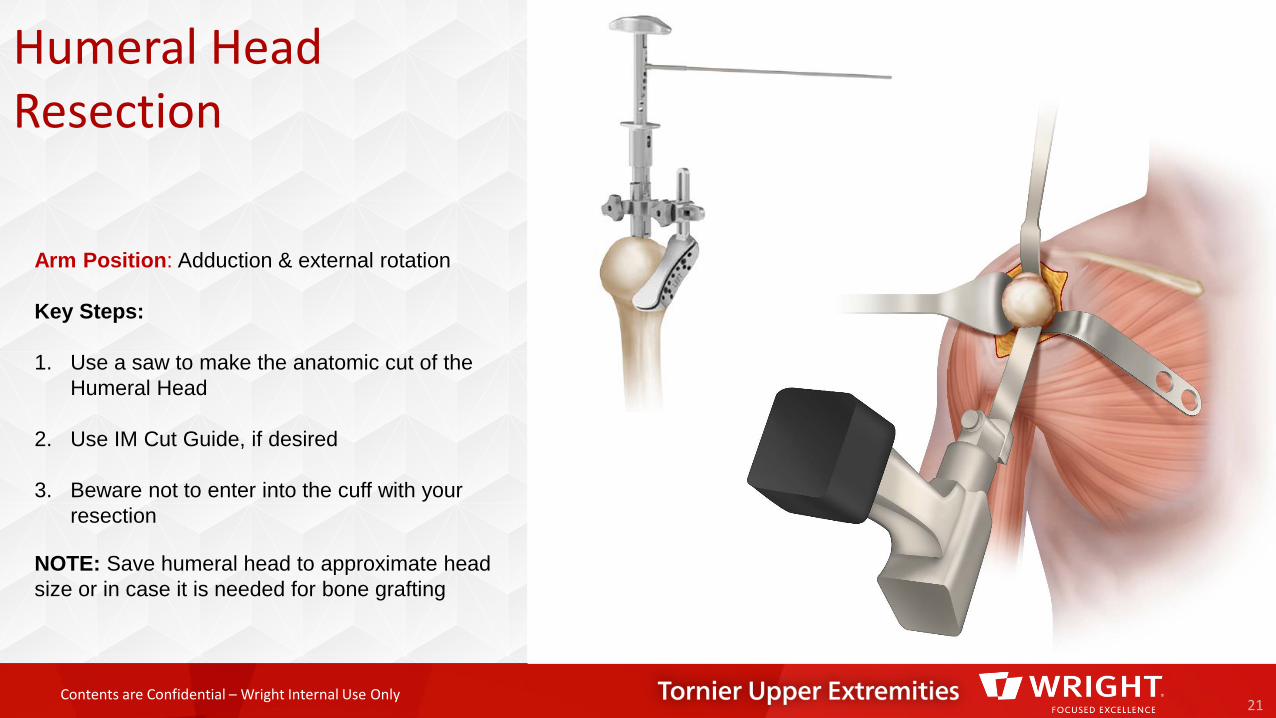
Humeral Head Resection
21
Arm Position: Adduction & external rotation
Key Steps:
1. Use a saw to make the anatomic cut of the Humeral Head
2. Use IM Cut Guide, if desired
3. Beware not to enter into the cuff with your resection
NOTE: Save humeral head to approximate head size or in case it is needed for bone grafting
Contents are Confidential – Wright Internal Use Only
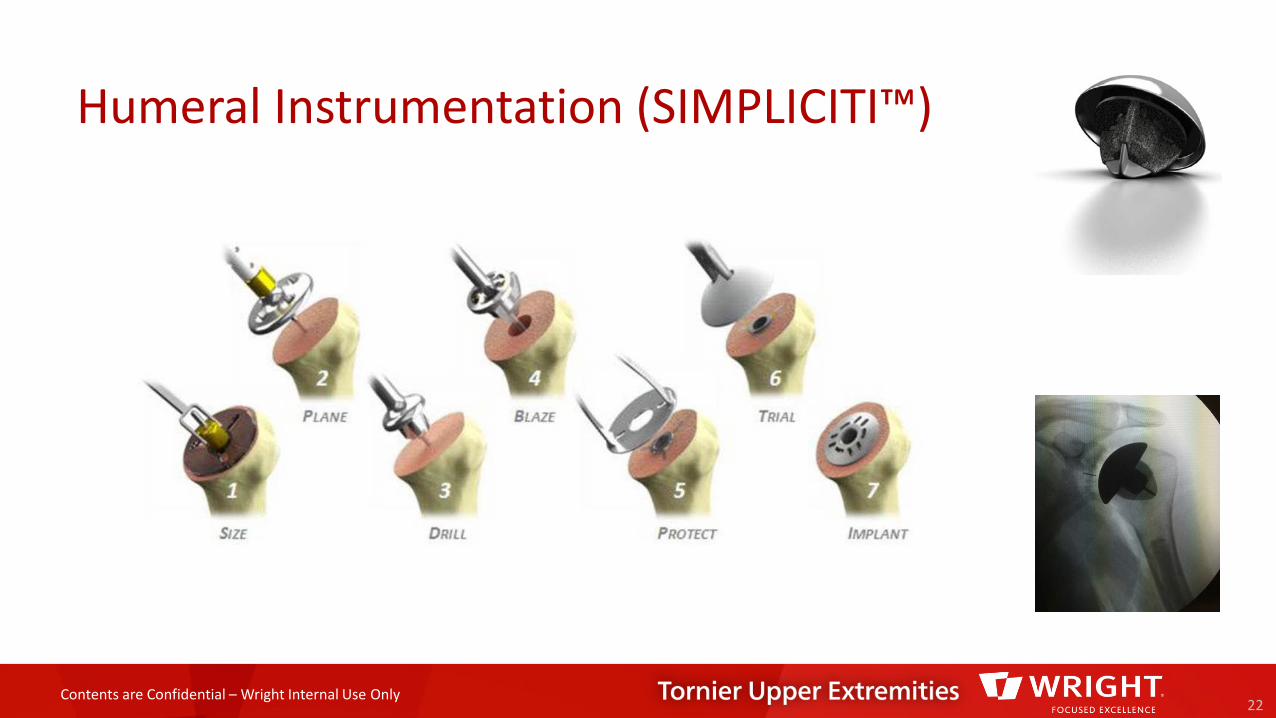
Humeral Instrumentation (SIMPLICITI™)
22

Contents are Confidential – Wright Internal Use Only
Humeral Instrumentation (AEQUALIS ASCEND™ FLEX)
23
Contents are Confidential – Wright Internal Use Only
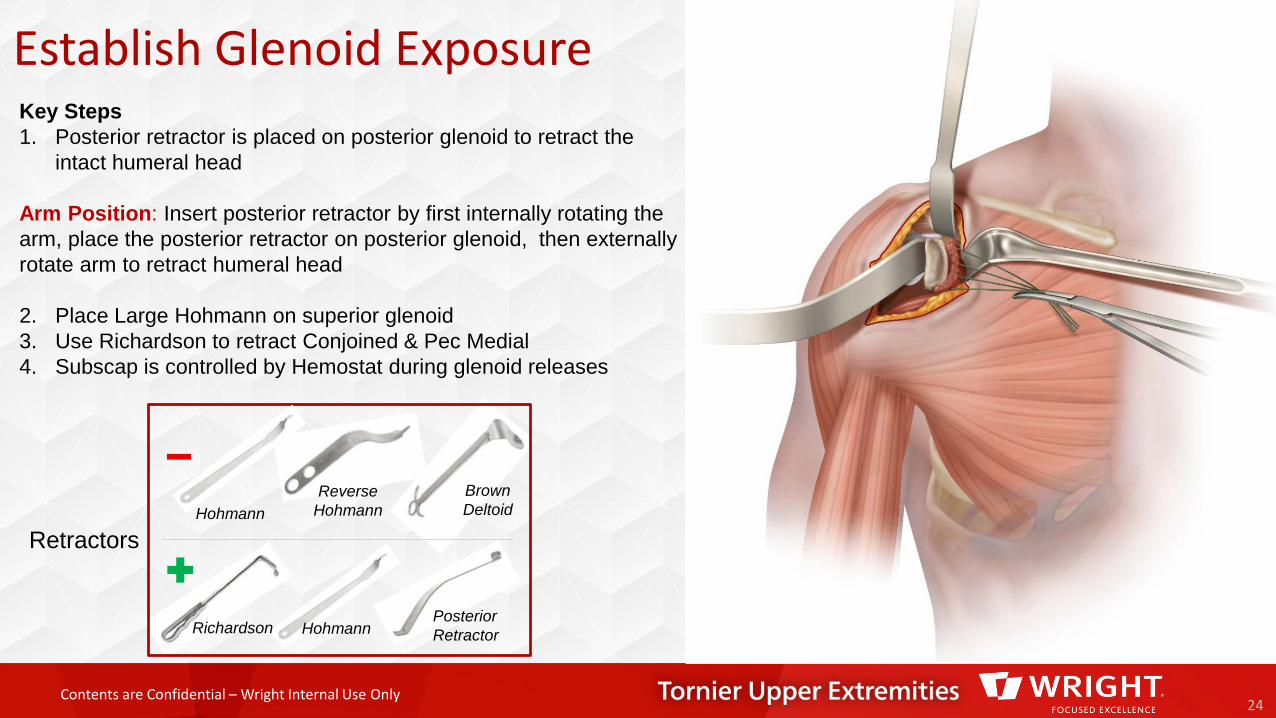
Establish Glenoid Exposure
24
Retractors
Posterior RetractorRichardson Hohmann
HohmannReverse
HohmannBrown Deltoid
Key Steps1. Posterior retractor is placed on posterior glenoid to retract the
intact humeral head
Arm Position: Insert posterior retractor by first internally rotating the arm, place the posterior retractor on posterior glenoid, then externally rotate arm to retract humeral head
2. Place Large Hohmann on superior glenoid3. Use Richardson to retract Conjoined & Pec Medial4. Subscap is controlled by Hemostat during glenoid releases
Contents are Confidential – Wright Internal Use Only
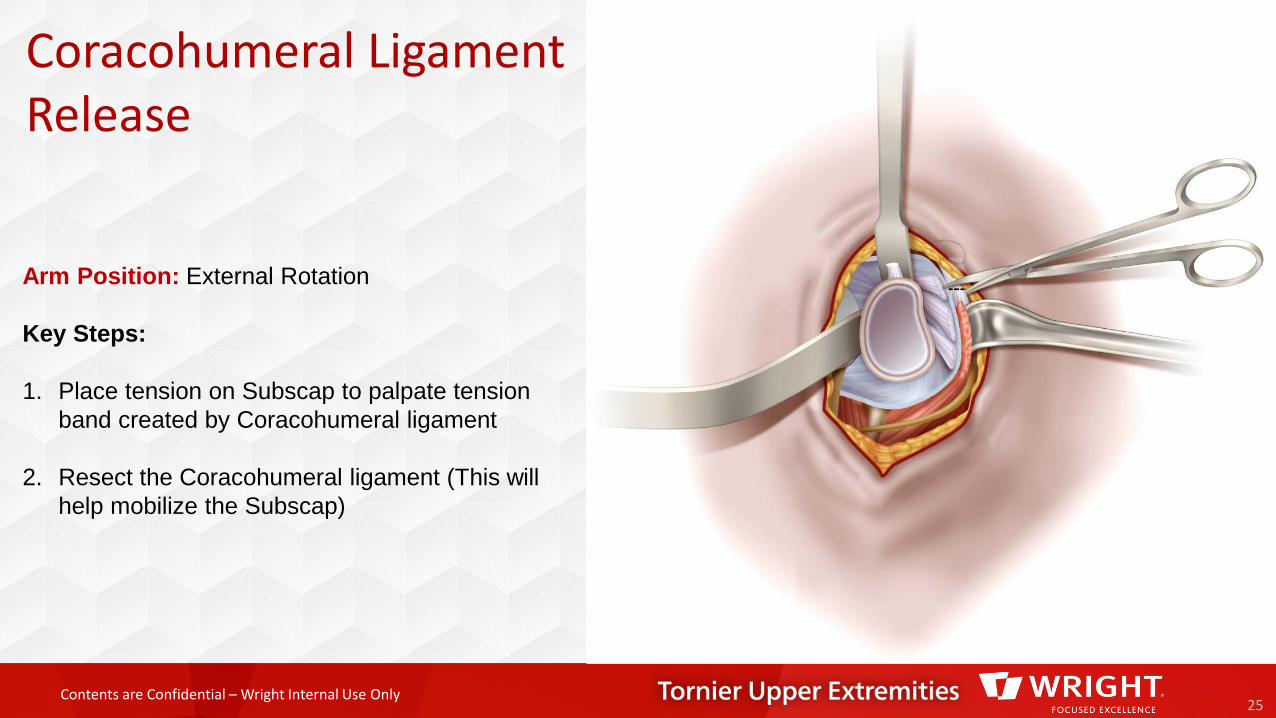
Coracohumeral Ligament Release
25
Arm Position: External Rotation
Key Steps:
1. Place tension on Subscap to palpate tension band created by Coracohumeral ligament
2. Resect the Coracohumeral ligament (This will help mobilize the Subscap)
Contents are Confidential – Wright Internal Use Only
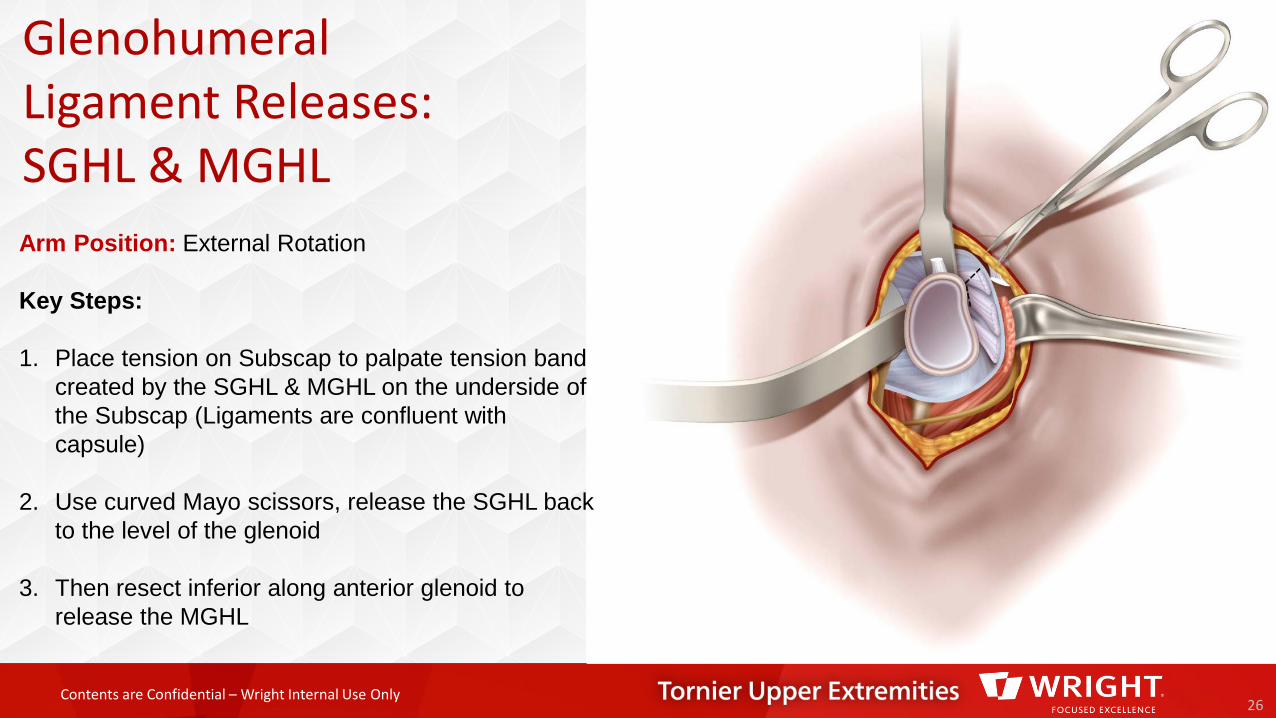
GlenohumeralLigament Releases: SGHL & MGHL
26
Arm Position: External Rotation
Key Steps:
1. Place tension on Subscap to palpate tension band created by the SGHL & MGHL on the underside of the Subscap (Ligaments are confluent with capsule)
2. Use curved Mayo scissors, release the SGHL back to the level of the glenoid
3. Then resect inferior along anterior glenoid to release the MGHL
Contents are Confidential – Wright Internal Use Only
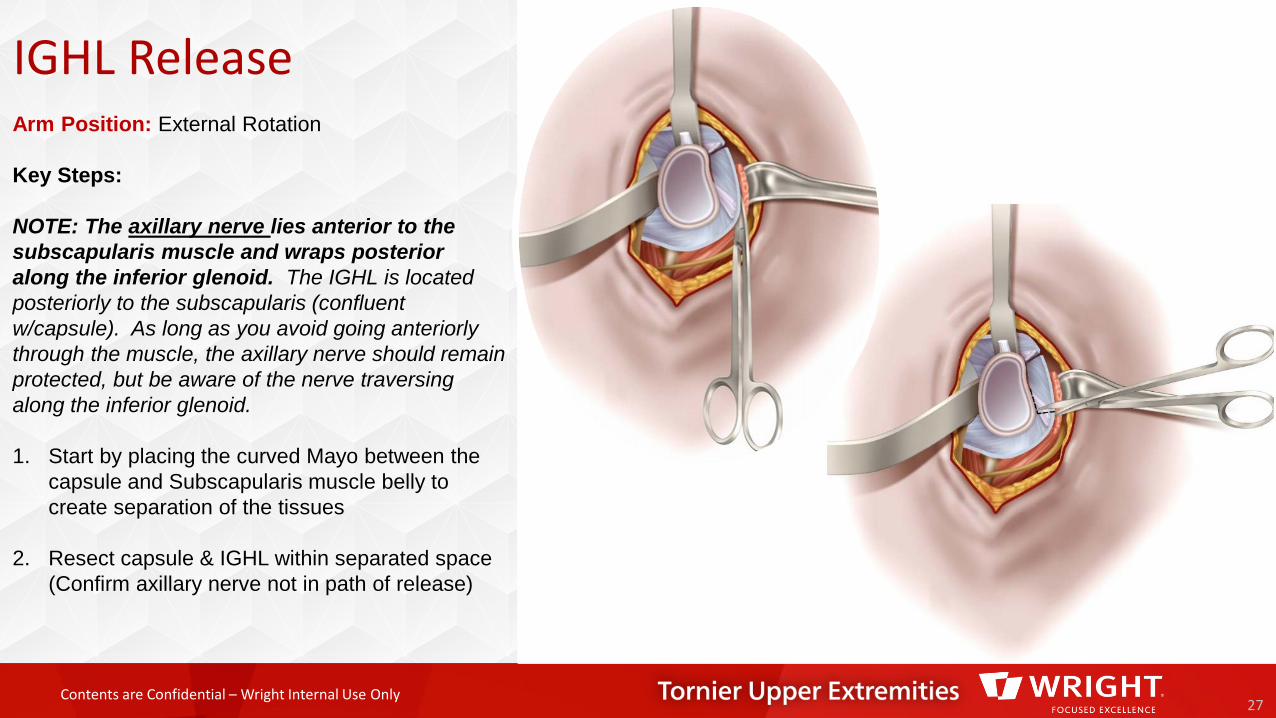
IGHL Release
27
Arm Position: External Rotation
Key Steps:
NOTE: The axillary nerve lies anterior to the subscapularis muscle and wraps posterior along the inferior glenoid. The IGHL is located posteriorly to the subscapularis (confluent w/capsule). As long as you avoid going anteriorly through the muscle, the axillary nerve should remain protected, but be aware of the nerve traversing along the inferior glenoid.
1. Start by placing the curved Mayo between the capsule and Subscapularis muscle belly to create separation of the tissues
2. Resect capsule & IGHL within separated space (Confirm axillary nerve not in path of release)
Contents are Confidential – Wright Internal Use Only
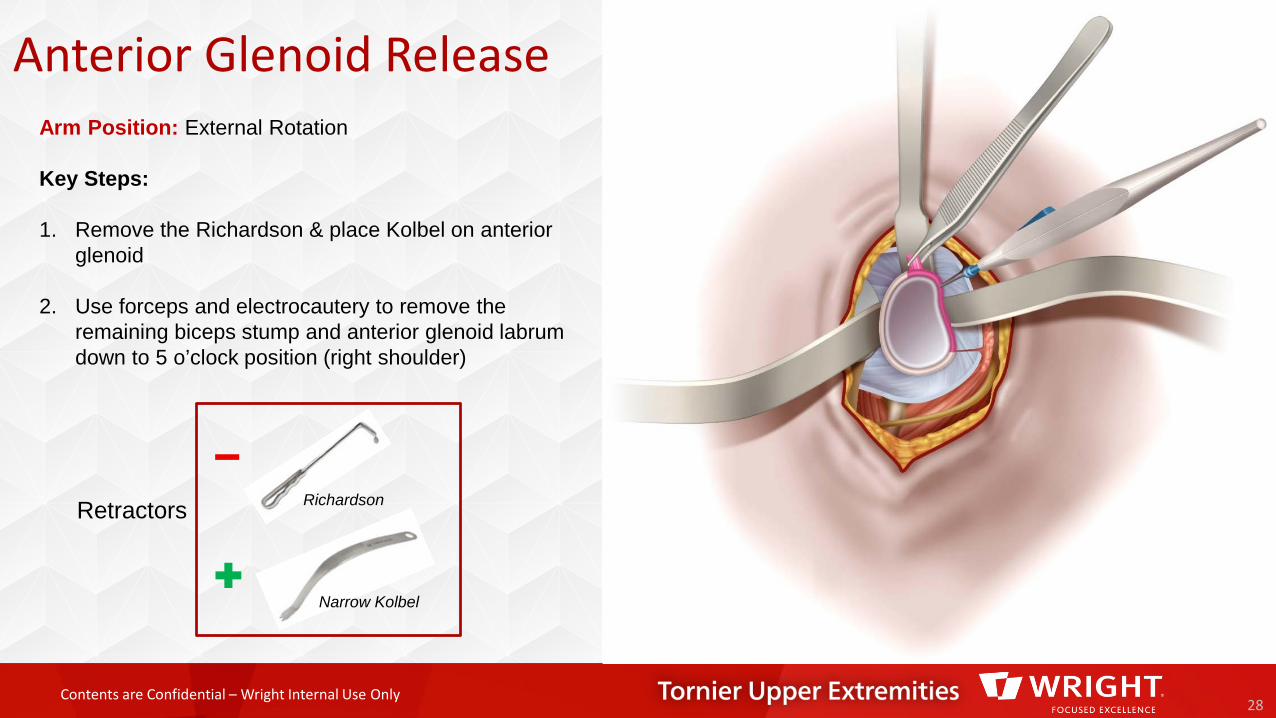
Anterior Glenoid Release
28
Retractors
Narrow Kolbel
Richardson
Arm Position: External Rotation
Key Steps:
1. Remove the Richardson & place Kolbel on anterior glenoid
2. Use forceps and electrocautery to remove the remaining biceps stump and anterior glenoid labrum down to 5 o’clock position (right shoulder)
Contents are Confidential – Wright Internal Use Only
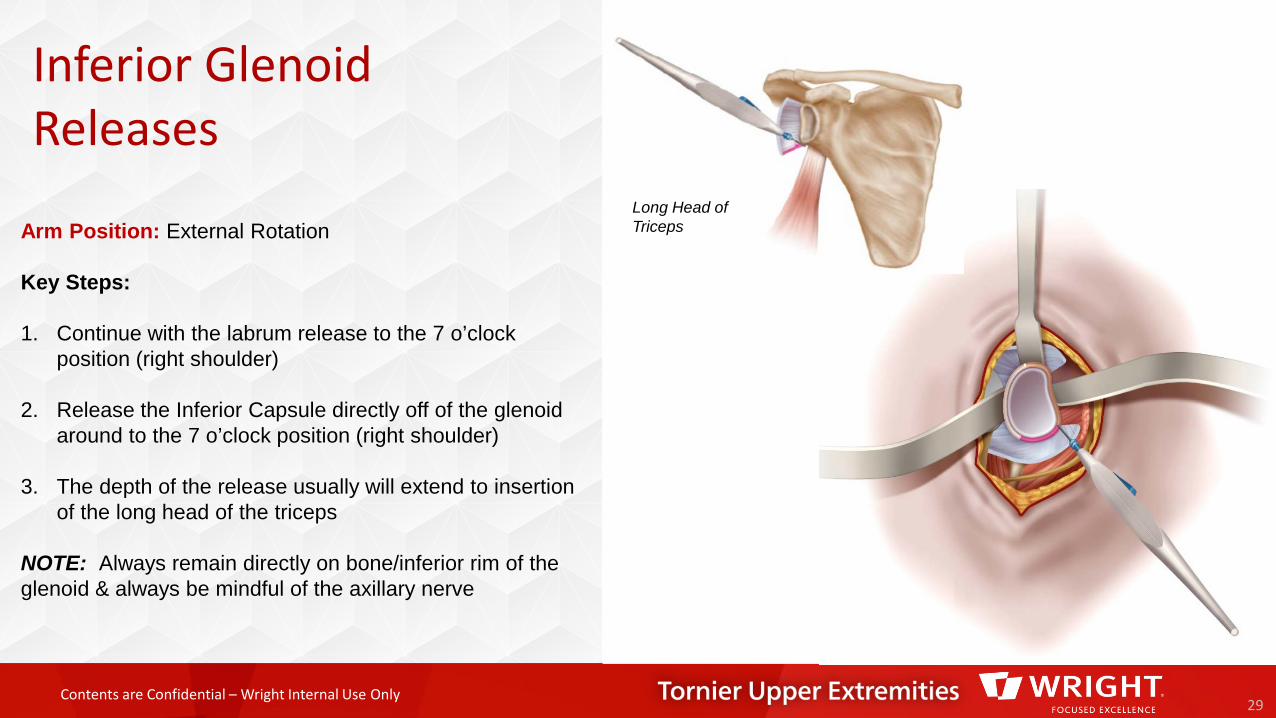
Inferior Glenoid Releases
29
Long Head of TricepsArm Position: External Rotation
Key Steps:
1. Continue with the labrum release to the 7 o’clock position (right shoulder)
2. Release the Inferior Capsule directly off of the glenoid around to the 7 o’clock position (right shoulder)
3. The depth of the release usually will extend to insertion of the long head of the triceps
NOTE: Always remain directly on bone/inferior rim of the glenoid & always be mindful of the axillary nerve
Contents are Confidential – Wright Internal Use Only
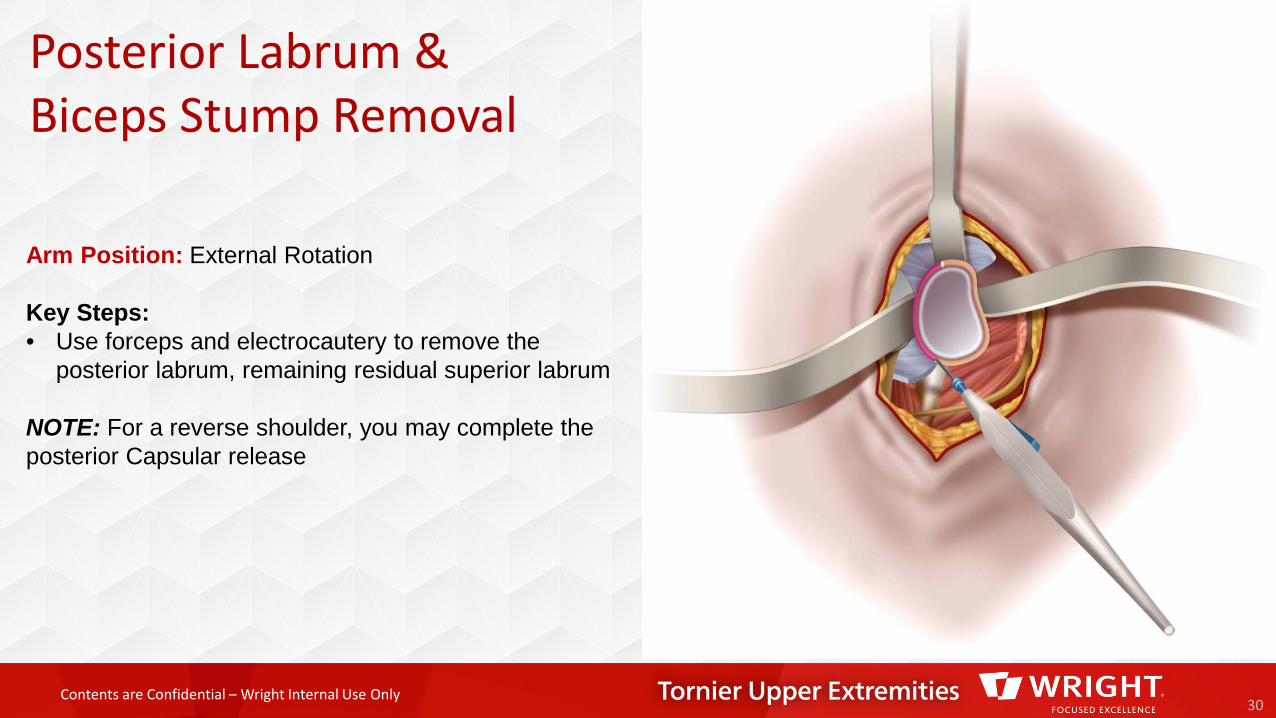
Posterior Labrum & Biceps Stump Removal
30
Arm Position: External Rotation
Key Steps:• Use forceps and electrocautery to remove the
posterior labrum, remaining residual superior labrum
NOTE: For a reverse shoulder, you may complete the posterior Capsular release
Contents are Confidential – Wright Internal Use Only
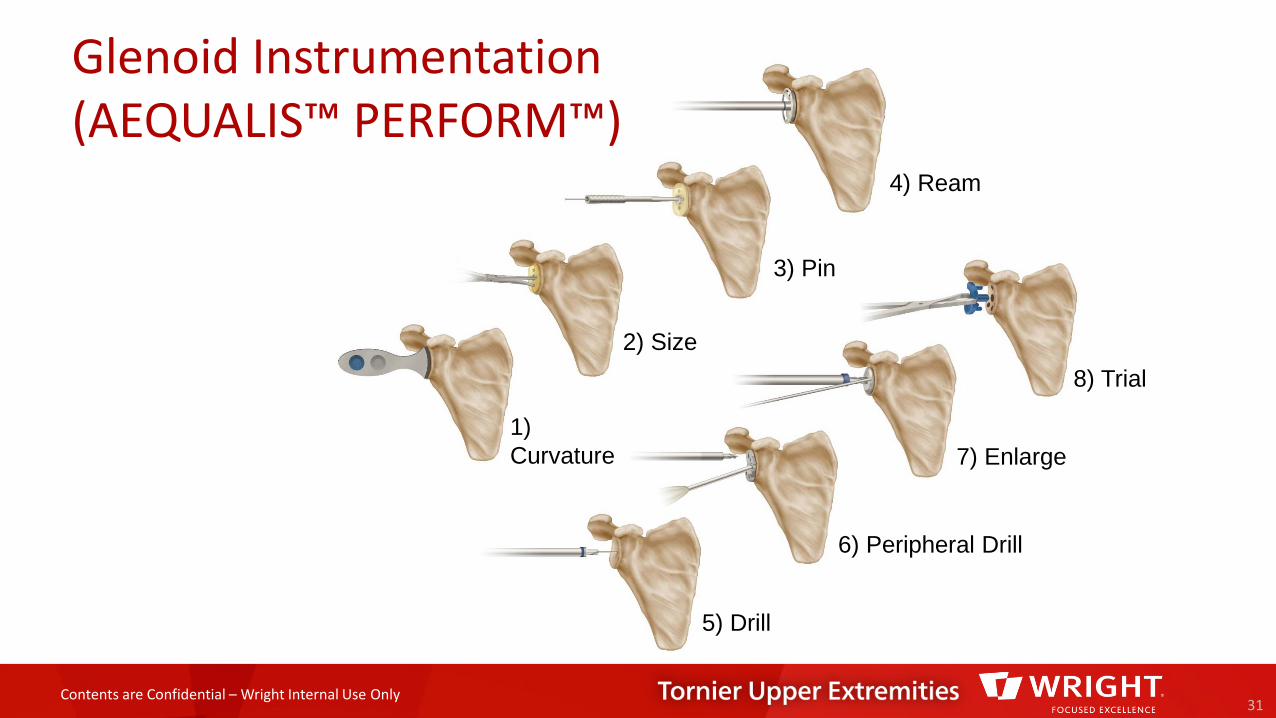
Glenoid Instrumentation (AEQUALIS™ PERFORM™)
31
1) Curvature
2) Size
3) Pin
4) Ream
8) Trial
6) Peripheral Drill
7) Enlarge
5) Drill
Contents are Confidential – Wright Internal Use Only
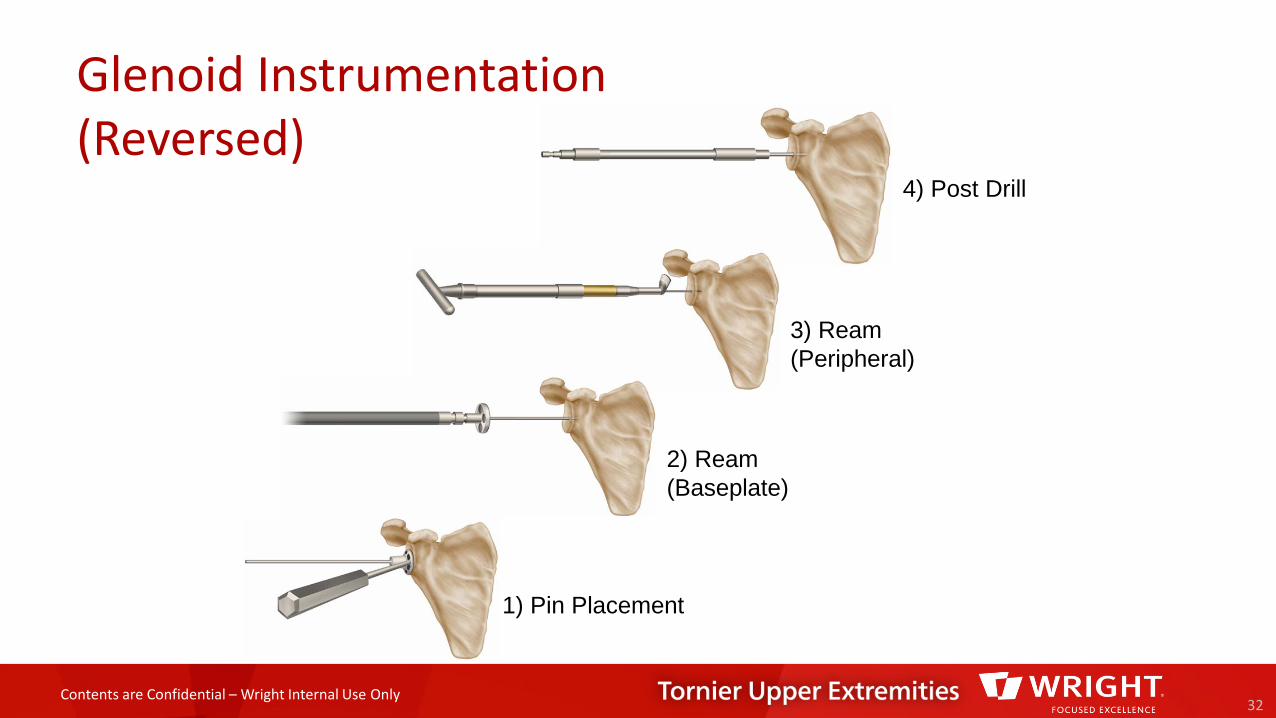
Glenoid Instrumentation (Reversed)
32
1) Pin Placement
2) Ream (Baseplate)
3) Ream (Peripheral)
4) Post Drill
Contents are Confidential – Wright Internal Use Only
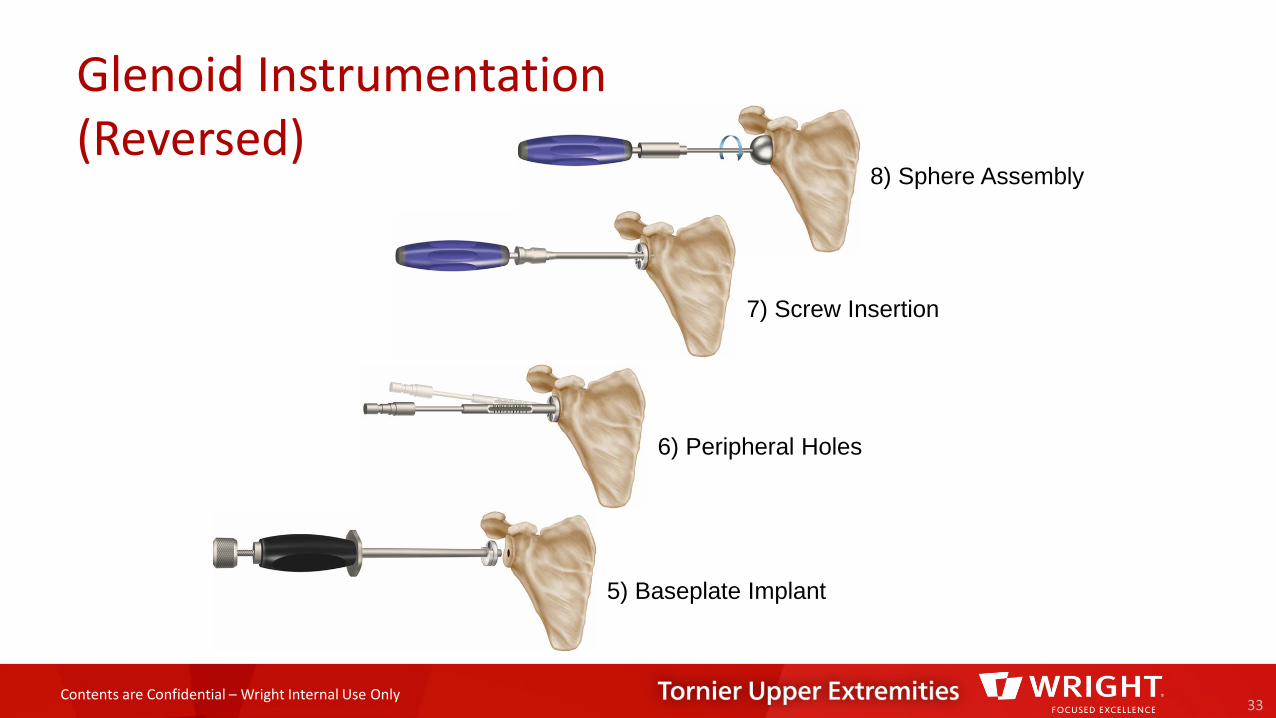
Glenoid Instrumentation (Reversed)
33
5) Baseplate Implant
6) Peripheral Holes
7) Screw Insertion
8) Sphere Assembly
Contents are Confidential – Wright Internal Use Only
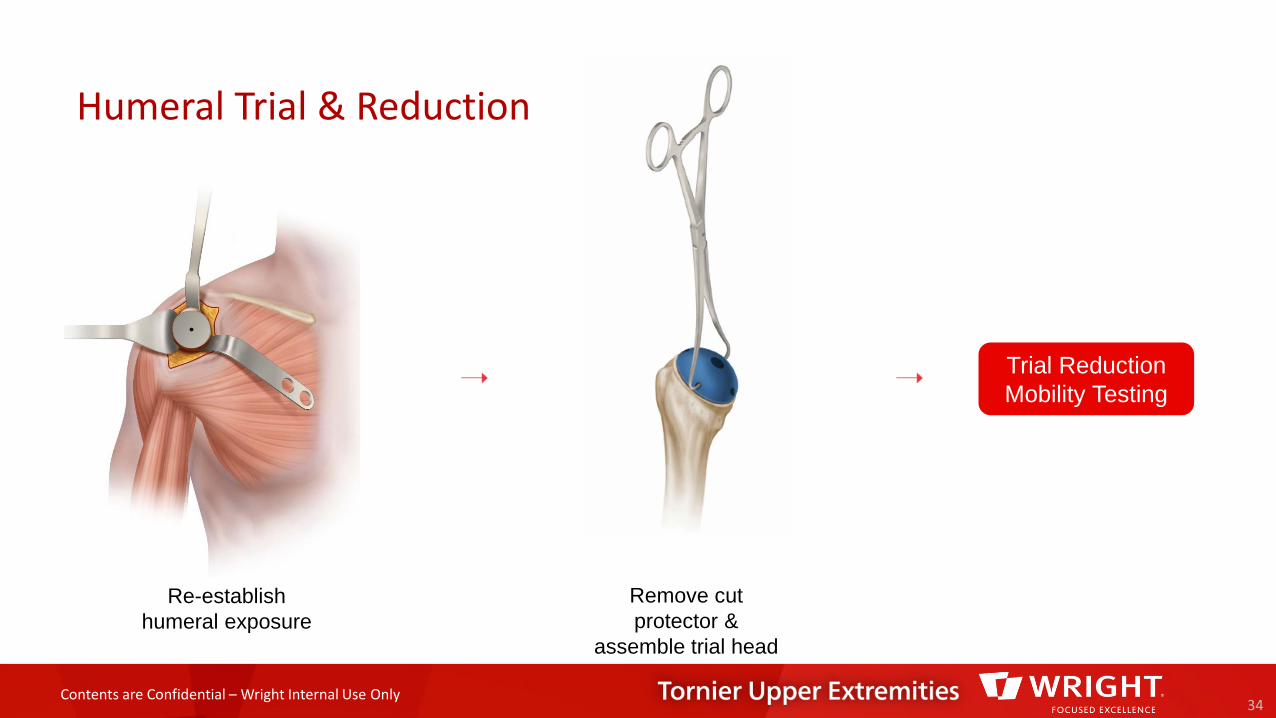
Humeral Trial & Reduction
34
Re-establish humeral exposure
Trial Reduction Mobility Testing
Remove cut protector &
assemble trial head
Contents are Confidential – Wright Internal Use Only
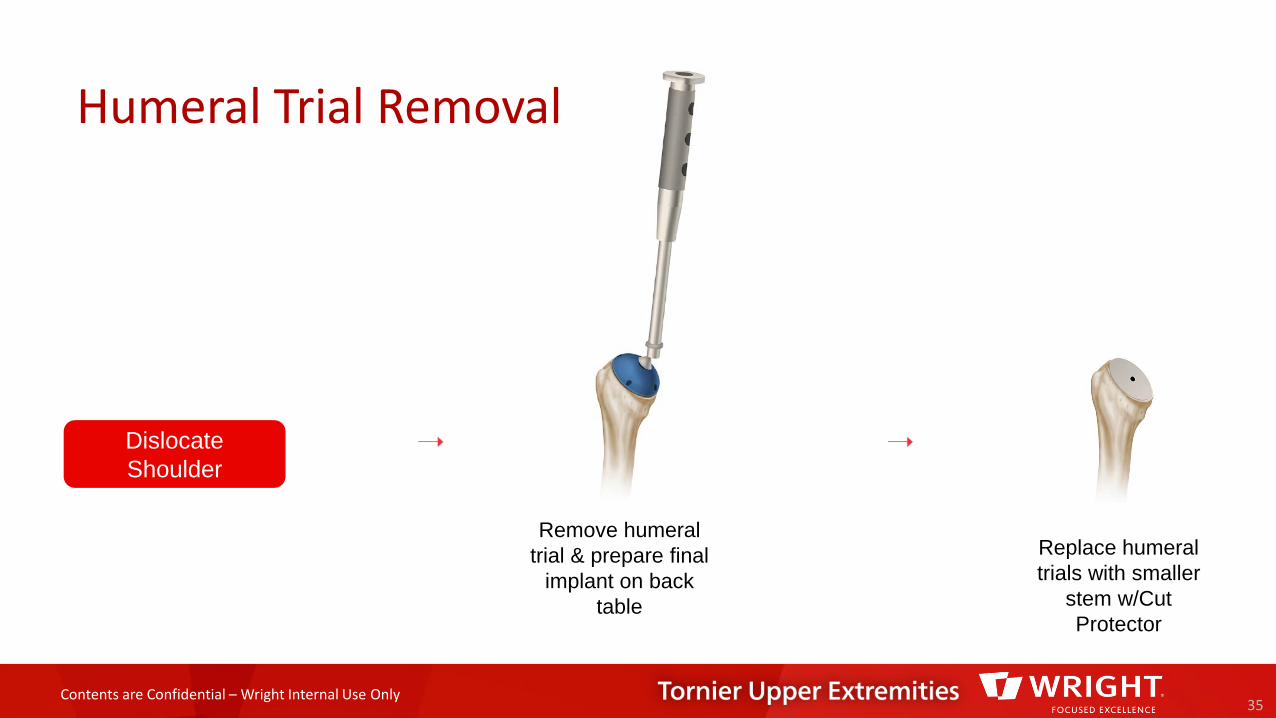
Humeral Trial Removal
35
Replace humeral trials with smaller
stem w/Cut Protector
Remove humeral trial & prepare final
implant on back table
Dislocate Shoulder
Contents are Confidential – Wright Internal Use Only
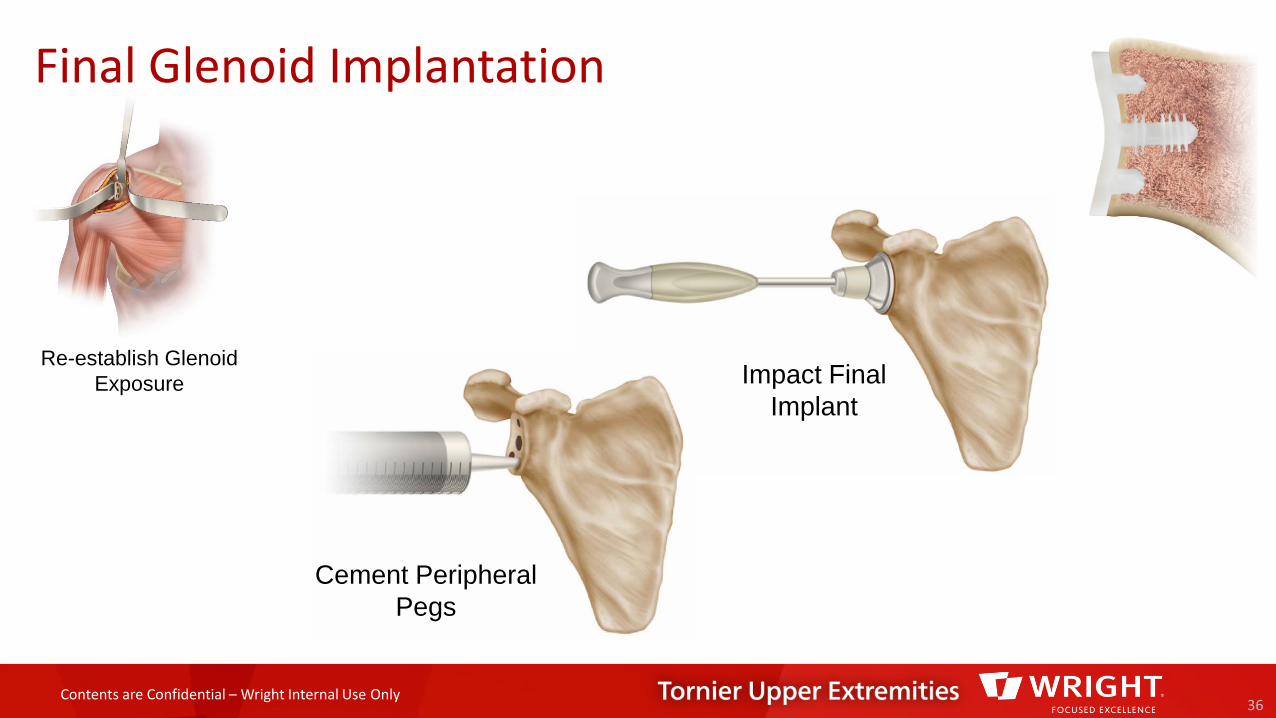
Final Glenoid Implantation
36
Cement Peripheral Pegs
Impact Final Implant
Re-establish Glenoid Exposure
Contents are Confidential – Wright Internal Use Only
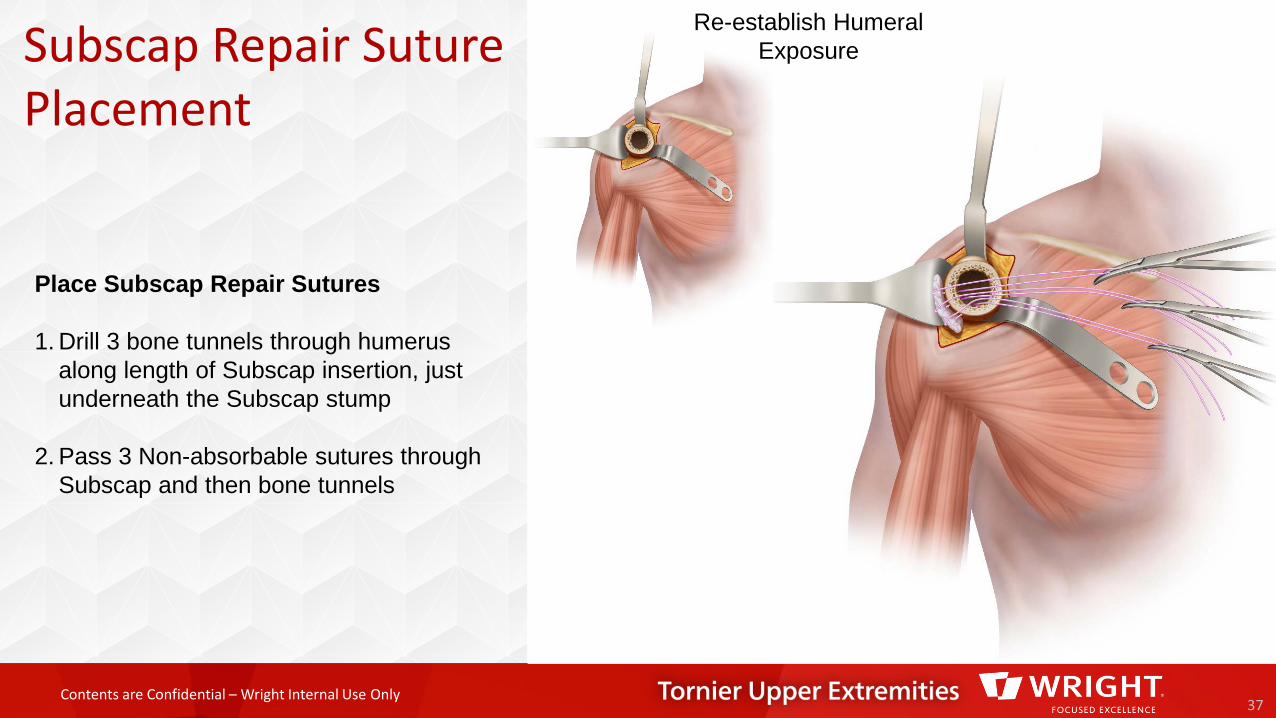
Subscap Repair Suture Placement
37
Re-establish Humeral Exposure
Place Subscap Repair Sutures
1. Drill 3 bone tunnels through humerusalong length of Subscap insertion, just underneath the Subscap stump
2. Pass 3 Non-absorbable sutures through Subscap and then bone tunnels
Contents are Confidential – Wright Internal Use Only
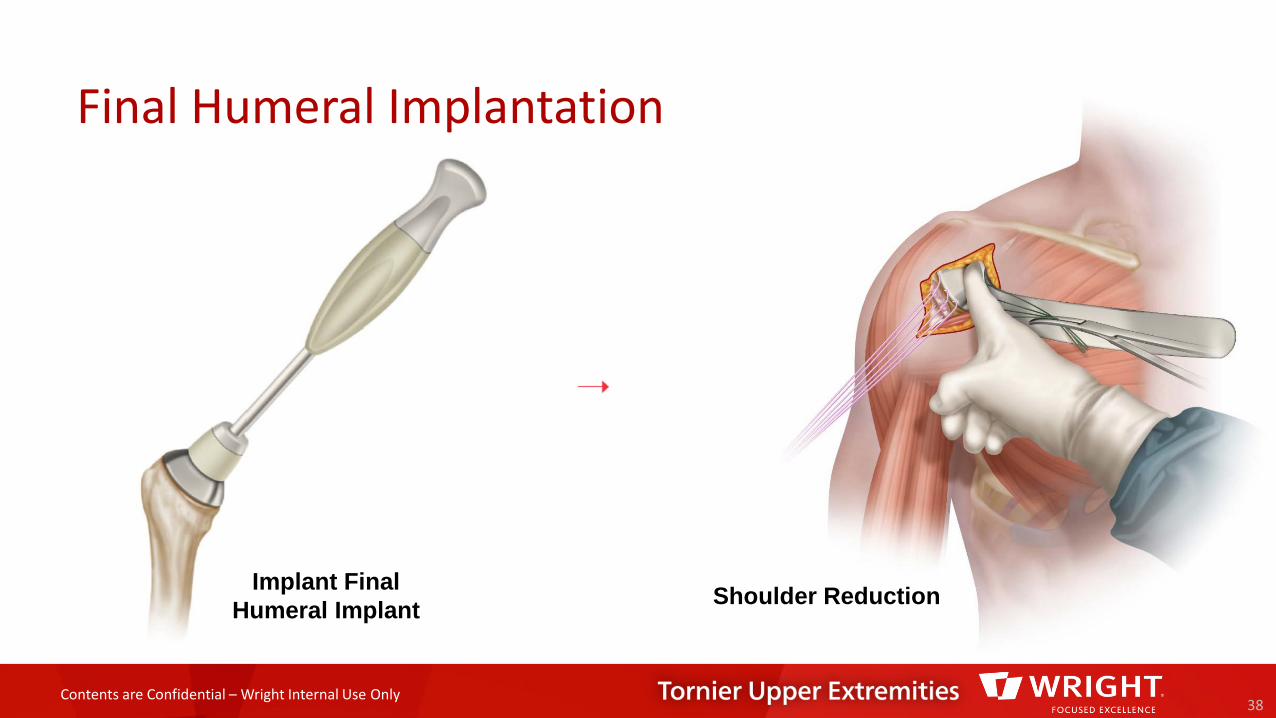
Final Humeral Implantation
38
Implant Final Humeral Implant Shoulder Reduction
Contents are Confidential – Wright Internal Use Only
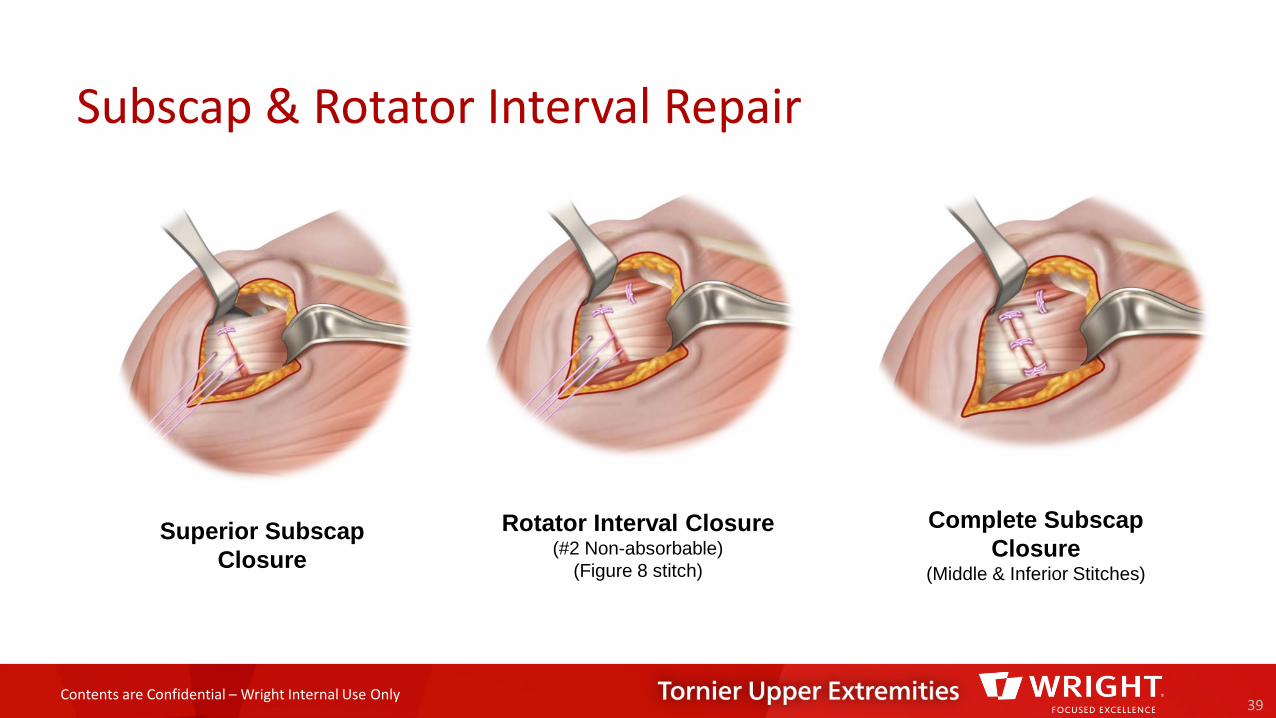
Subscap & Rotator Interval Repair
39
Superior SubscapClosure
Rotator Interval Closure(#2 Non-absorbable)
(Figure 8 stitch)
Complete SubscapClosure
(Middle & Inferior Stitches)
Contents are Confidential – Wright Internal Use Only
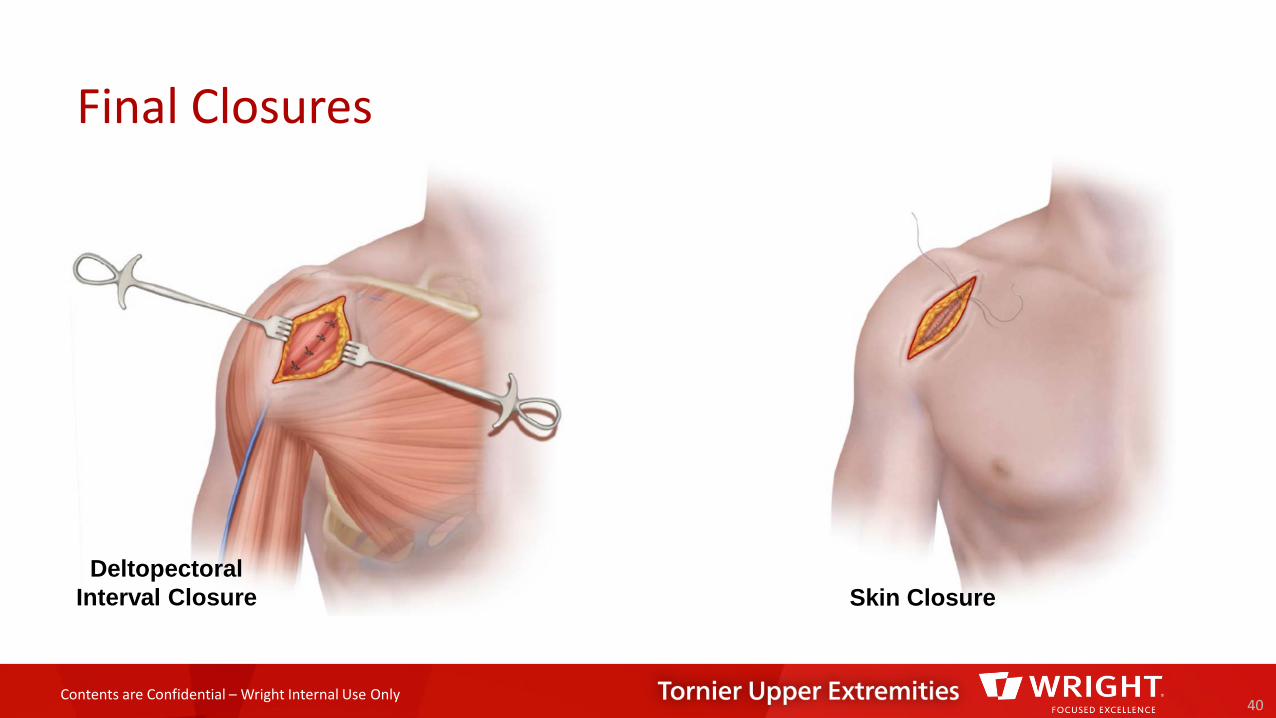
Final Closures
40
DeltopectoralInterval Closure Skin Closure

Contents are Confidential – Wright Internal Use Only
Proper surgical procedures and techniques are the responsibility of the medical professional. This material is furnished for information purposes only. Each surgeonmust evaluate the appropriateness of the material based on his or her personal medical training and experience. Prior to use of any Tornier implant system, thesurgeon should refer to the product package insert for complete warnings, precautions, indications, contraindications and adverse effects. Package inserts are alsoavailable by contacting Wright. Contact information can be found in this document and the package insert.
™ and ® denote Trademarks and Registered Trademarks of Wright Medical Group N.V., or its affiliates..©2016 Wright Medical Group N.V. or its affiliates. All Rights Reserved.
CAW-3939 REV A ECN 160529 18-Apr-16
10801 Nesbitt Ave SBloomington, MN 55437888 867 6437952 426 7600www.tornier.com
1023 Cherry RoadMemphis, TN 38117800 238 7117901 867 9971www.wright.com