Embed Size (px)
Citation preview
TOON BOOM ANIMATION INC.
4200 Saint-Laurent, Suite 1020Montreal, Quebec, CanadaH2W 2R2
+1 514 278 8666
Toon BoomHarmony 17Control Center User Guide
Legal NoticesToon Boom Animation Inc.4200 Saint-Laurent, Suite 1020Montreal, Quebec, CanadaH2W 2R2
Tel: +1 514 278 8666Fax: +1 514 278 2666
toonboom.com
Disclaimer
The content of this document is the property of Toon Boom Animation Inc. and is copyrighted. Any reproduction in whole or in part is strictly prohibited.
The content of this document is covered by a specific limited warranty and exclusions and limit of liability under the applicable License Agreement as supplemented by the special terms and conditions for Adobe®Flash® File Format (SWF). For details, refer to the License Agreement and to those special terms and conditions.
Trademarks
Toon Boom® is a registered trademark. Harmony™ and the Toon Boom logo are trademarks of Toon Boom Animation Inc. All other trademarks of the property of their respective owners.
Publication Date
02-10-2020
Copyright © 2020 Toon Boom Animation Inc., a Corus Entertainment Inc. company. All rights reserved.
1
Harmony 17 Control Center Guide
Table of Contents
Table of ContentsTable of Contents 2
About Control Center 4
Chapter 1: Starting Control Center 6
Chapter 2: User Interface 8
Chapter 3: Users 10
Viewing User Lists in Control Center 11
Adding Users in Control Center 12
Deleting Users in Control Center 14
Editing User Information in Control Center 15
About the usabatch User Account 17
User Types and Restrictions 18
Chapter 4: Environments, Jobs and Scenes 22
About Environments in Control Center 25
Creating Environments in Control Center 26
Deleting Environments in Control Center 28
About Jobs in Control Center 29
Creating Jobs in Control Center 30
Changing Job Stages in Control Center 32
Changing Job Priorities in Control Center 34
Deleting Jobs in Control Center 35
About Scenes 36
Creating Scenes in Control Center 37
Deleting Scenes in Control Center 40
Moving Scenes in Control Center 41
Renaming Scenes in Control Center 43
Changing Scene Priorities in Control Center 44
Changing Scene Stages in Control Center 45
Reordering Scenes in Control Center 46
Clearing Scenes in Control Center 48
2
Copying Scenes 49
About Elements and Drawings in Control Center 51
Chapter 5: Importing and Exporting Scenes 52
Exporting Scenes from Control Center 53
Importing Scenes to Control Center 58
About Asset Remapping for Exported and Imported Scenes 63
Configuring Palette, Texture and Image Remapping 65
Remapping Palettes, Textures and Images for an Exported Scene 78
Remapping Palettes, Textures and Images when Importing a Scene 79
Remapping Palettes, Textures and Images in a Scene on Demand 81
Checking the Path of Palettes, Textures and Linked Drawings After Remapping 83
About Locked and Checked Out Scenes 86
Chapter 6: Troubleshooting 88
Chapter 7: Commands 90
3
Harmony 17 Control Center Guide
About Control Center
About Control CenterUsing Harmony Server has the advantage that it centralizes your entire production on your server and organizes it into structured database. The key piece of Harmony Server is the Control Center module. From Control Center, you can manage your production database, users, visualize your rendering queue and more.
This chapter explains the general administrative tasks which must be performed to successfully run the Harmony solution.
4

5
Harmony 17 Control Center Guide
Chapter 1: Starting Control Center
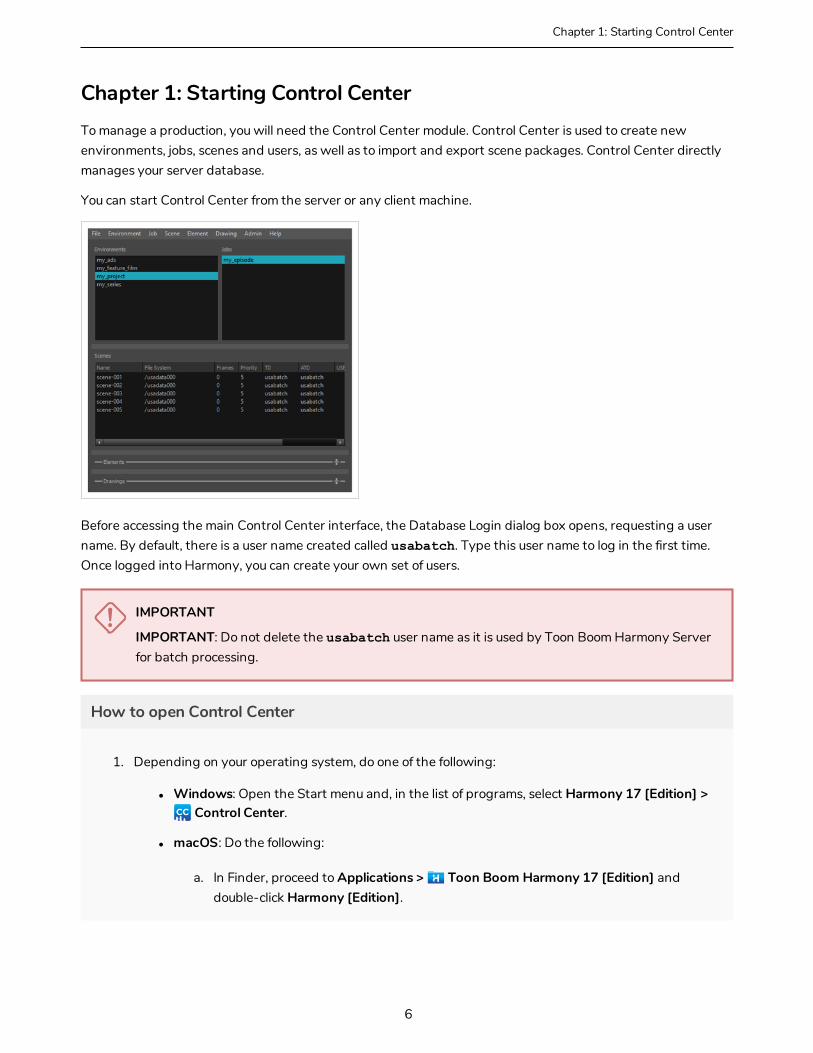
Chapter 1: Starting Control CenterTo manage a production, you will need the Control Center module. Control Center is used to create new environments, jobs, scenes and users, as well as to import and export scene packages. Control Center directly manages your server database.
You can start Control Center from the server or any client machine.
Before accessing the main Control Center interface, the Database Login dialog box opens, requesting a user name. By default, there is a user name created called usabatch. Type this user name to log in the first time. Once logged into Harmony, you can create your own set of users.
IMPORTANT
IMPORTANT: Do not delete the usabatch user name as it is used by Toon Boom Harmony Server for batch processing.
How to open Control Center
1. Depending on your operating system, do one of the following:
l Windows: Open the Start menu and, in the list of programs, select Harmony 17 [Edition] > Control Center.
l macOS: Do the following:
a. In Finder, proceed to Applications > Toon Boom Harmony 17 [Edition] and double-click Harmony [Edition].
6
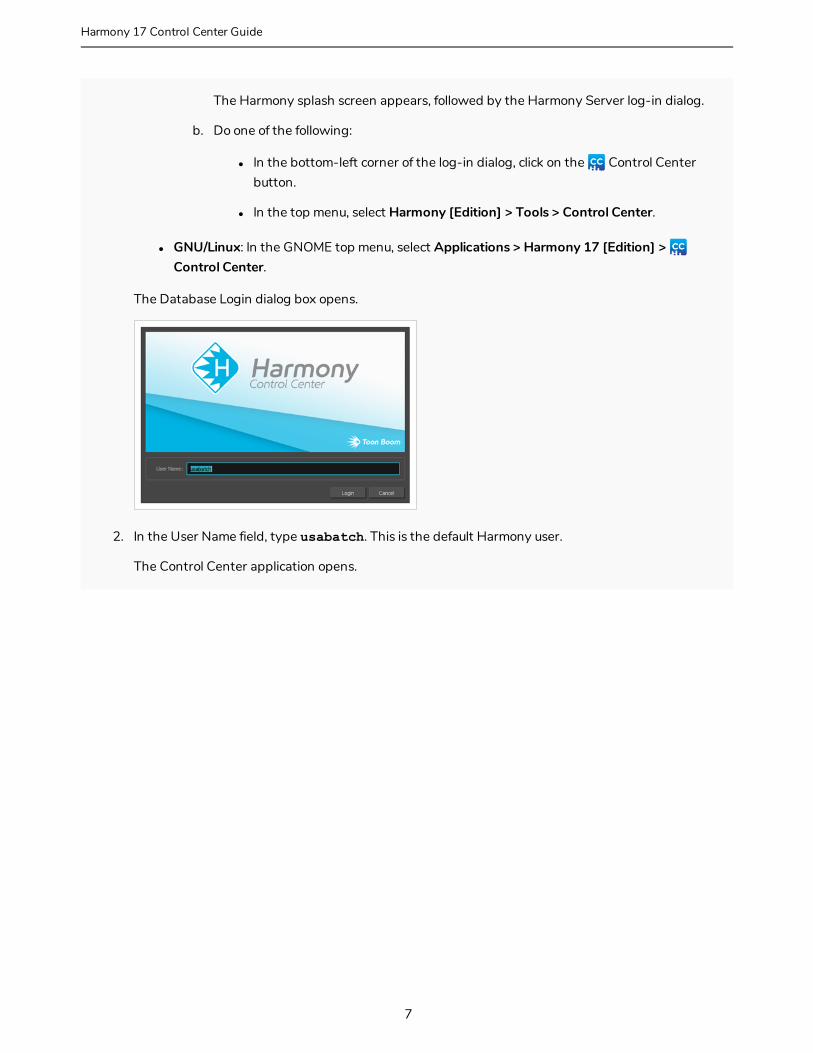
The Harmony splash screen appears, followed by the Harmony Server log-in dialog.
b. Do one of the following:
l In the bottom-left corner of the log-in dialog, click on the Control Center button.
l In the top menu, select Harmony [Edition] > Tools > Control Center.
l GNU/Linux: In the GNOME top menu, select Applications > Harmony 17 [Edition] > Control Center.
The Database Login dialog box opens.
2. In the User Name field, type usabatch. This is the default Harmony user.
The Control Center application opens.
7
Harmony 17 Control Center Guide
Chapter 2: User Interface
Chapter 2: User Interface
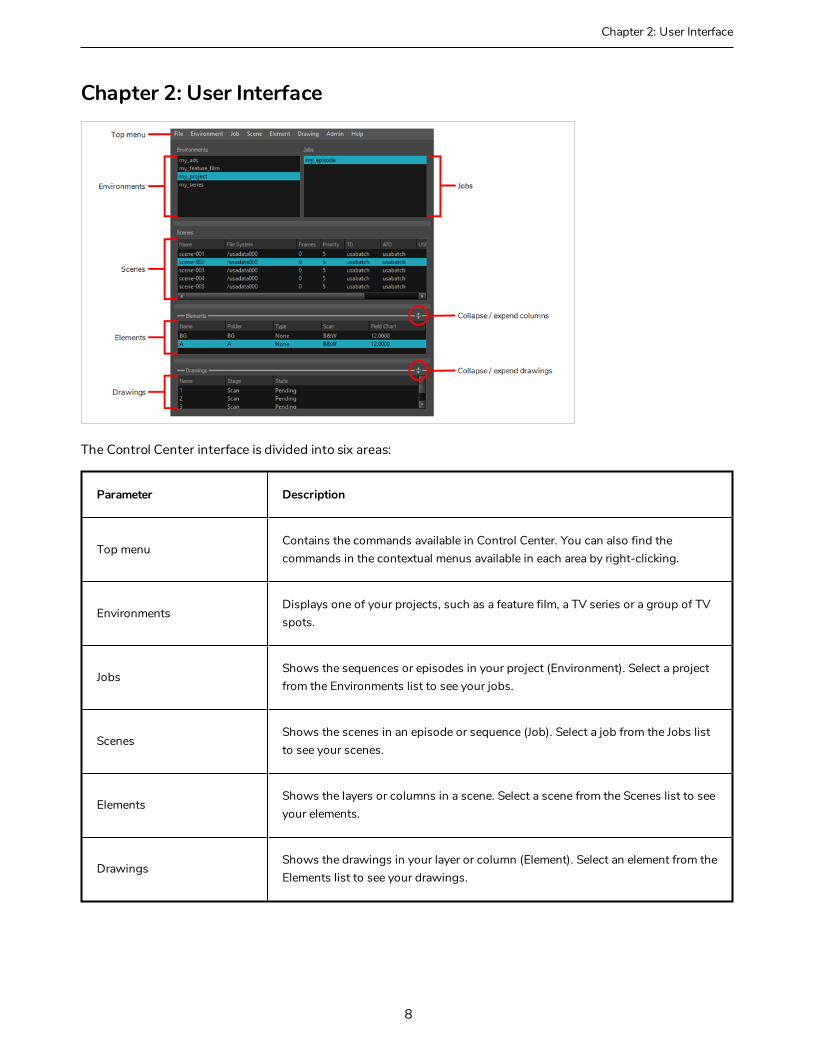
The Control Center interface is divided into six areas:
Parameter Description
Top menuContains the commands available in Control Center. You can also find the commands in the contextual menus available in each area by right-clicking.
EnvironmentsDisplays one of your projects, such as a feature film, a TV series or a group of TV spots.
JobsShows the sequences or episodes in your project (Environment). Select a project from the Environments list to see your jobs.
ScenesShows the scenes in an episode or sequence (Job). Select a job from the Jobs list to see your scenes.
ElementsShows the layers or columns in a scene. Select a scene from the Scenes list to see your elements.
DrawingsShows the drawings in your layer or column (Element). Select an element from the Elements list to see your drawings.
8
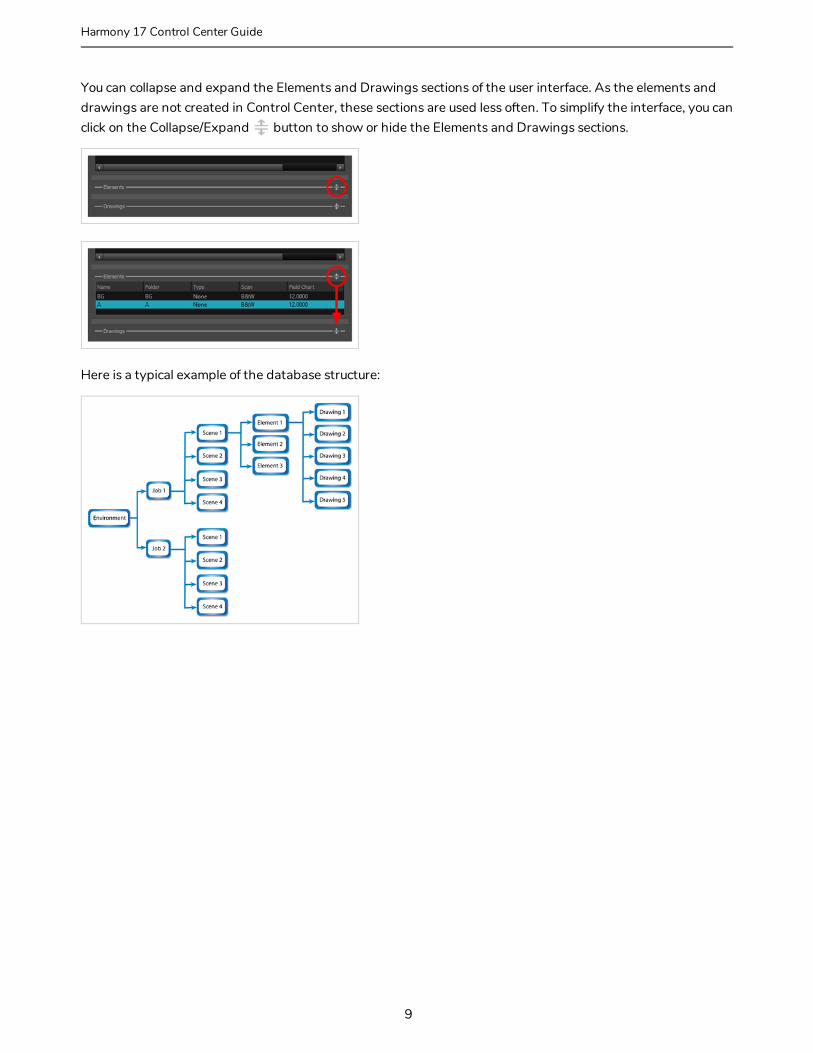
You can collapse and expand the Elements and Drawings sections of the user interface. As the elements and drawings are not created in Control Center, these sections are used less often. To simplify the interface, you can click on the Collapse/Expand button to show or hide the Elements and Drawings sections.
Here is a typical example of the database structure:
9
Harmony 17 Control Center Guide
Chapter 3: Users
Chapter 3: UsersIn order to run any Harmony Server application, a project collaborator must log in to the database using a username that has been created by a server administrator beforehand.
In a studio productions with several project collaborators, each person is typically assigned different tasks, such as ink and paint or compositing. Users should be created for each project collaborator, and these users should be assigned the appropriate user type to make sure they have the proper permissions. For example, an user of the Ink and Paint type can only load a scene in the Paint application, meaning they are not able to make changes to a scene that exceeds their mandate.
By default, a database has two users, usabatch and BATCH. Those users should not be used by project collaborators. They are created when creating a new Harmony Server database to handle batch processing tasks.
Viewing User Lists in Control Center 11
Adding Users in Control Center 12
Deleting Users in Control Center 14
Editing User Information in Control Center 15
About the usabatch User Account 17
User Types and Restrictions 18
10
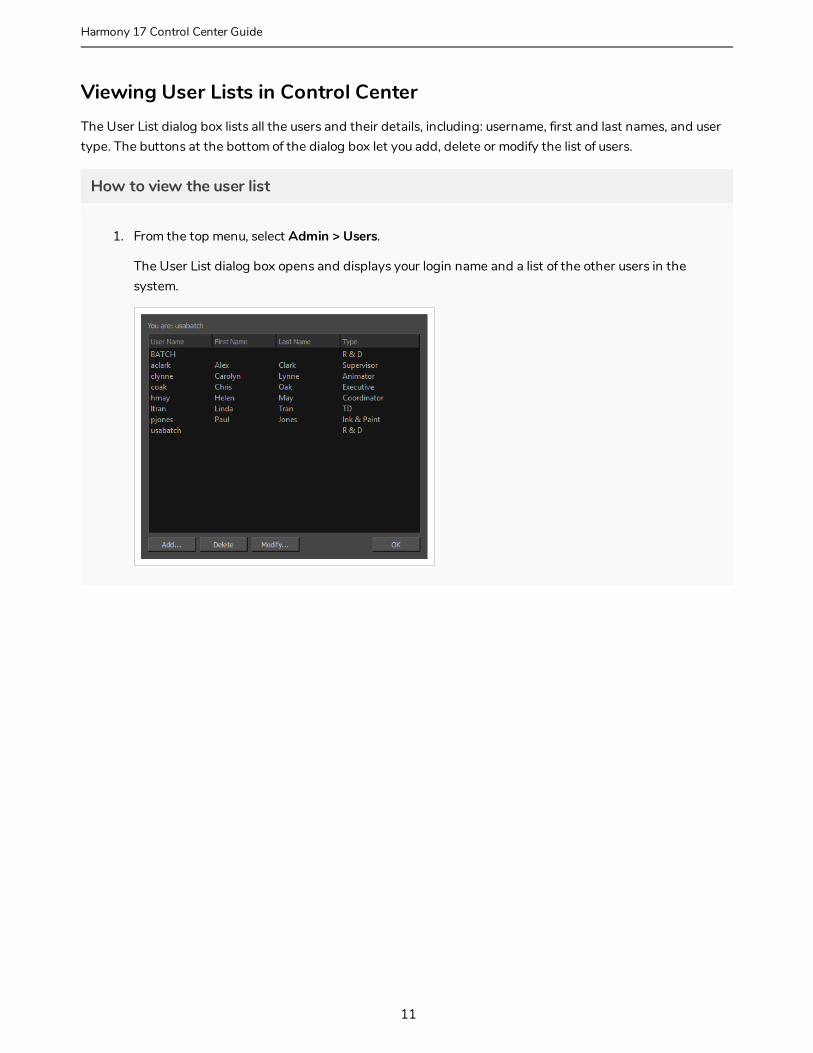
Viewing User Lists in Control CenterThe User List dialog box lists all the users and their details, including: username, first and last names, and user type. The buttons at the bottom of the dialog box let you add, delete or modify the list of users.
How to view the user list
1. From the top menu, select Admin > Users.
The User List dialog box opens and displays your login name and a list of the other users in the system.
11
Harmony 17 Control Center Guide
Chapter 3: Users
Adding Users in Control CenterAll Harmony users must have their name on the user list to log in to any application. The system uses the login to track activities; it is not a security lockout.
Each user also has a user "type" assigned to it which allows access to only some of the Harmony modules.
How to add a user to Harmony
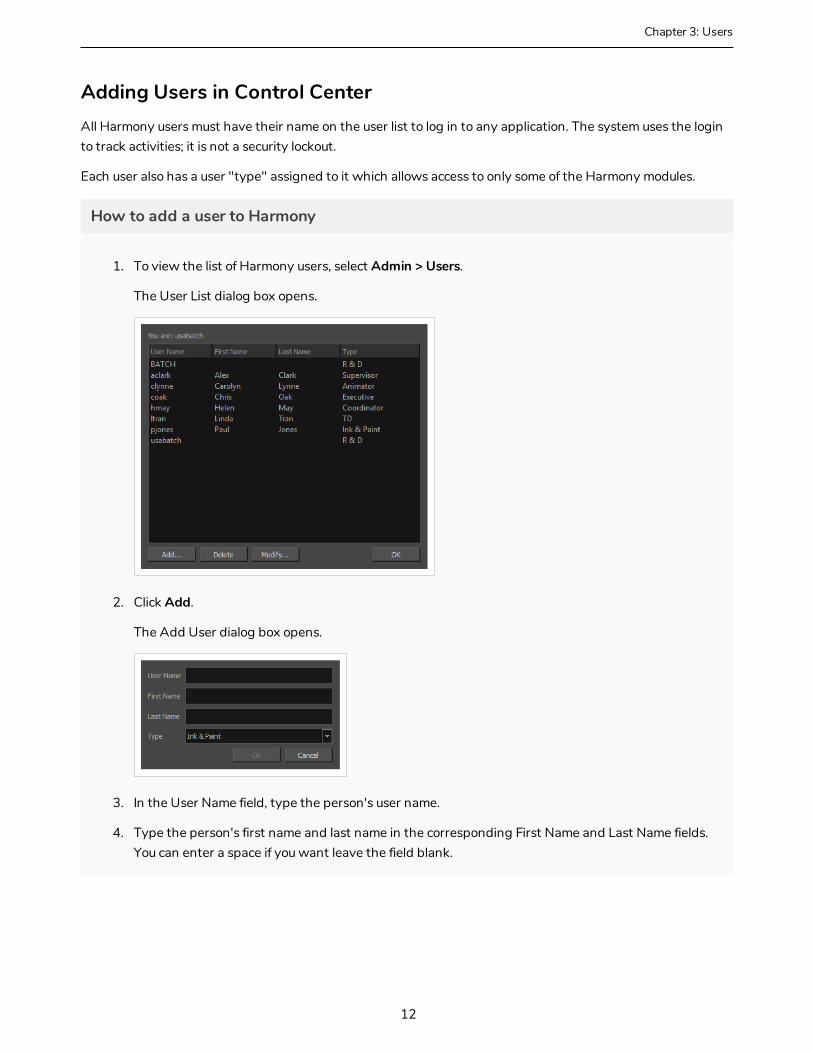
1. To view the list of Harmony users, select Admin > Users.
The User List dialog box opens.
2. Click Add.
The Add User dialog box opens.
3. In the User Name field, type the person's user name.
4. Type the person's first name and last name in the corresponding First Name and Last Name fields. You can enter a space if you want leave the field blank.
12
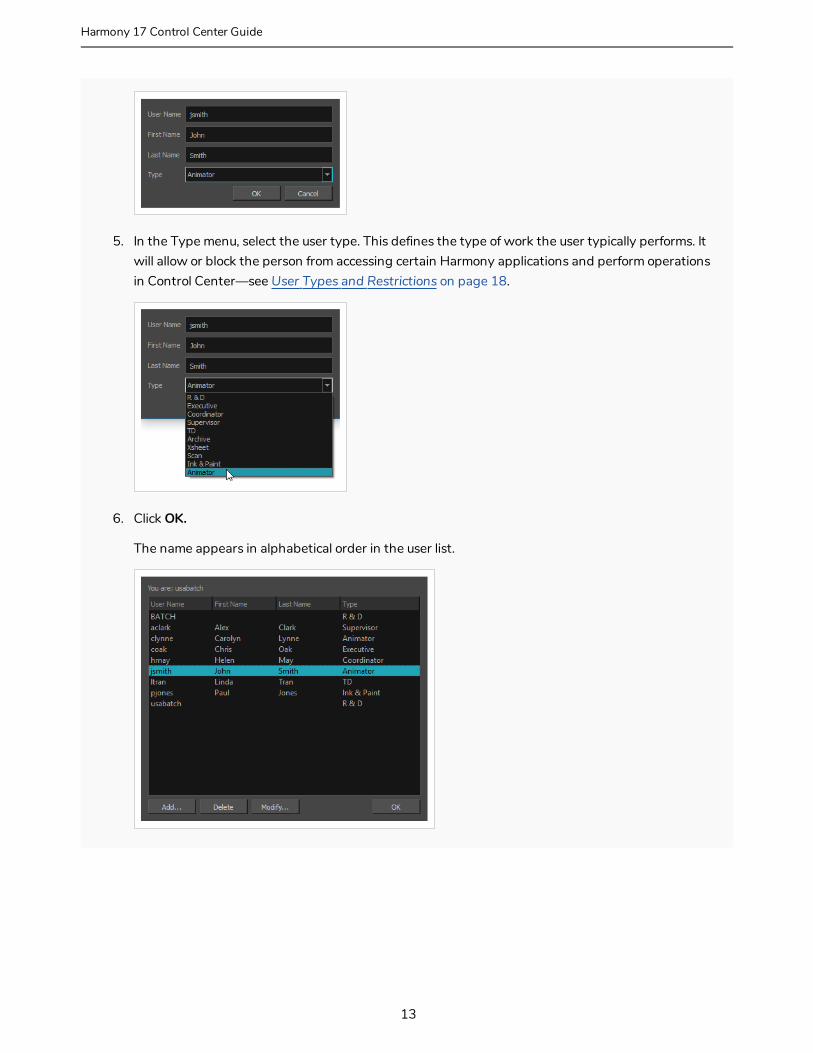
5. In the Type menu, select the user type. This defines the type of work the user typically performs. It will allow or block the person from accessing certain Harmony applications and perform operations in Control Center—see User Types and Restrictions on page 18.
6. Click OK.
The name appears in alphabetical order in the user list.
13
Harmony 17 Control Center Guide
Chapter 3: Users
Deleting Users in Control CenterAs your studio network grows and evolves, you may need to delete old or obsolete user profiles from your system. After you delete a user profile, the person who used that profile will no longer be able to access Harmony. You cannot delete yourself from the user list. If you accidentally delete a name, you must follow the procedure for adding a user to put the user back into the system.
How to delete a user
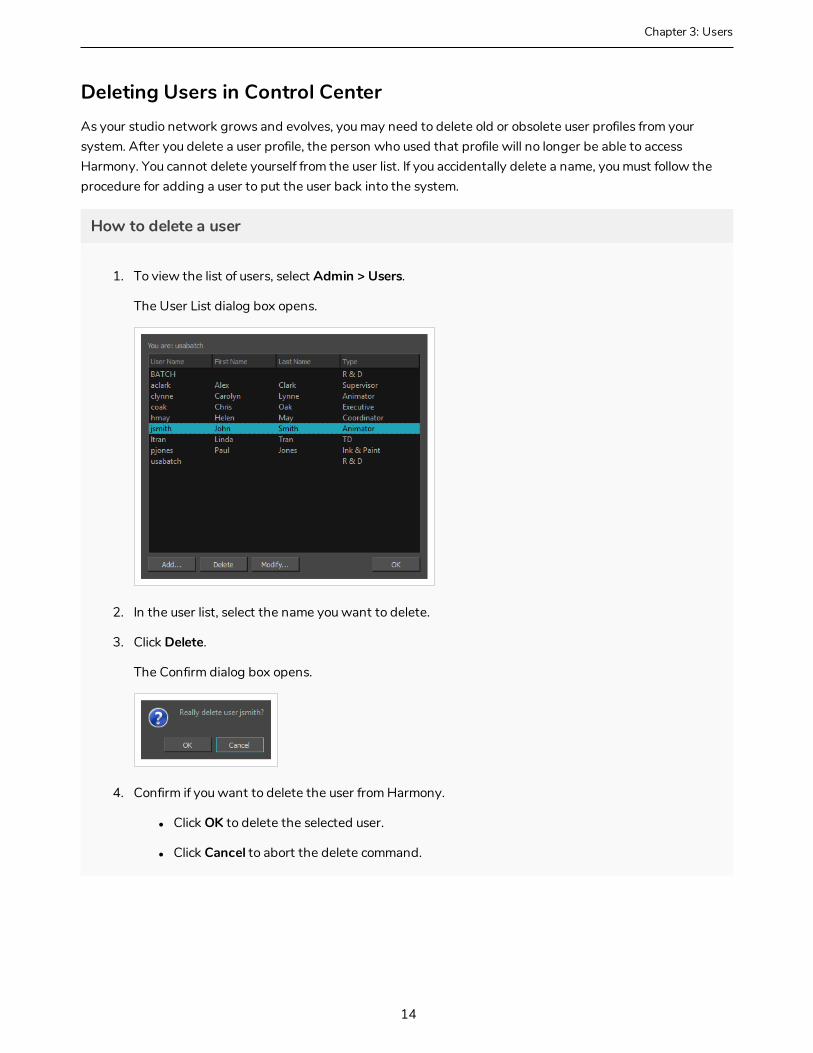
1. To view the list of users, select Admin > Users.
The User List dialog box opens.
2. In the user list, select the name you want to delete.
3. Click Delete.
The Confirm dialog box opens.
4. Confirm if you want to delete the user from Harmony.
l Click OK to delete the selected user.
l Click Cancel to abort the delete command.
14
Editing User Information in Control CenterYou can edit the user profiles at any time to update the user information.
NOTE
NOTE: To change your own user profile, login as usabatch (the default user).
How to modify user information
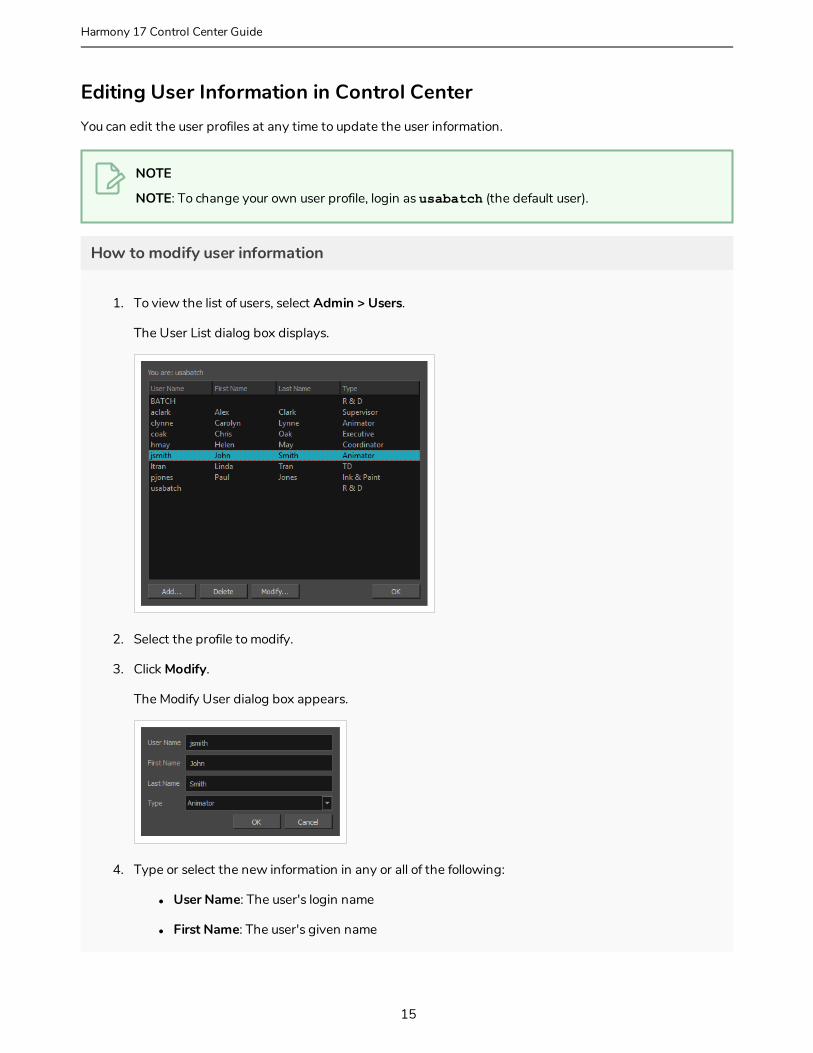
1. To view the list of users, select Admin > Users.
The User List dialog box displays.
2. Select the profile to modify.
3. Click Modify.
The Modify User dialog box appears.
4. Type or select the new information in any or all of the following:
l User Name: The user's login name
l First Name: The user's given name
15
Harmony 17 Control Center Guide
Chapter 3: Users
l Last Name: The user's family name
l Type: The type of user. This also affects the user's privileges—see User Types and Restrictions on page 18.
5. Click OK.
16
About the usabatch User AccountThe usabatch user account is the go-to account used by Harmony for batch processing and background services. It can exist on two levels:
l As a Harmony Server account on your database. This user account processes all batch processing tasks such as rendering scenes and vectorizing drawings. If this user does not exist, the batch processing service will not be able to perform these tasks.
l As a user account on your machine's operating system. This user account is created during the configuration of your machine to connect to the Harmony database and run background services. Without this user, background services will not be able to launch, be them the batch processing service or services such as the database server or the WebCC server.
NOTE
The creation of the usabatch user account on the operating system is not required if you are running background services using Service Launcher, which launches on user log-in under the logged-in user's account. For more information, refer to the Service Launcher chapter of the Installation Guide.
On the Harmony database, usabatch is automatically created when creating the database's base file system. If this user is deleted, you can create it again. Make sure its username is usabatch and that its user type is one with all privileges, such as R & D, Coordinator, Supervisor, Executive or TD—see Adding Users in Control Center on page 12
On Windows, the user usabatch is automatically created when you install a service using the Configuration Wizard. On macOS and GNU/Linux, the creation of the user usabatch is part of the procedure for installing a background service in the Installation Guide.
17
Harmony 17 Control Center Guide

Chapter 3: Users
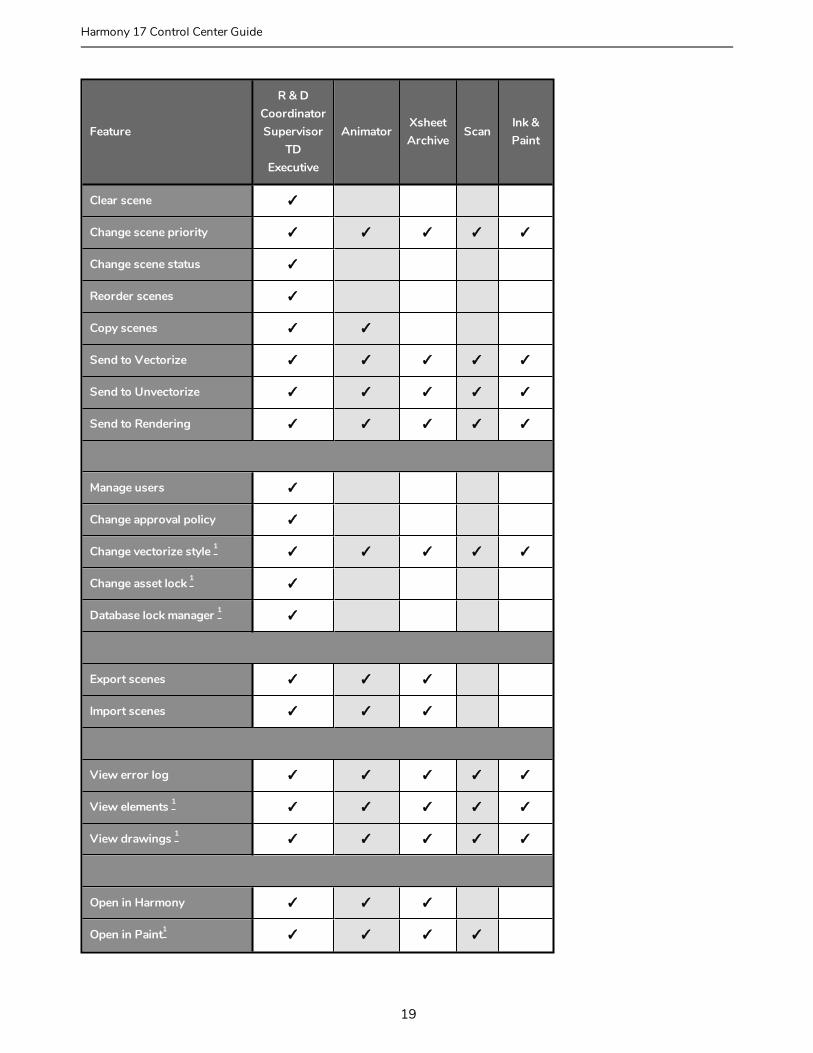
User Types and RestrictionsHere are the different user types available and their restrictions/permissions:
Feature
R & DCoordinatorSupervisor
TDExecutive
AnimatorXsheetArchive
ScanInk & Paint
Create environment ✓
Change asset lock on environment
✓
Delete environment ✓
View vectorize queue 1 ✓ ✓ ✓ ✓ ✓
View render queue 1 ✓ ✓ ✓ ✓ ✓
Create job ✓ ✓
Change job priority ✓ ✓ ✓ ✓ ✓
Change job status ✓
Delete job ✓
Create scene ✓ ✓ ✓ ✓
Delete scene ✓
Unlock scenes locked by another user
✓
Unlock scene version locked by another user
✓
Unlock scene locked by oneself
✓ ✓ ✓
Unlock scene version locked by oneself
✓ ✓ ✓
Move scene 1 ✓
Rename scene ✓
18
Feature
R & DCoordinatorSupervisor
TDExecutive
AnimatorXsheetArchive
ScanInk & Paint
Clear scene ✓
Change scene priority ✓ ✓ ✓ ✓ ✓
Change scene status ✓
Reorder scenes ✓
Copy scenes ✓ ✓
Send to Vectorize ✓ ✓ ✓ ✓ ✓
Send to Unvectorize ✓ ✓ ✓ ✓ ✓
Send to Rendering ✓ ✓ ✓ ✓ ✓
Manage users ✓
Change approval policy ✓
Change vectorize style 1 ✓ ✓ ✓ ✓ ✓
Change asset lock 1 ✓
Database lock manager 1 ✓
Export scenes ✓ ✓ ✓
Import scenes ✓ ✓ ✓
View error log ✓ ✓ ✓ ✓ ✓
View elements 1 ✓ ✓ ✓ ✓ ✓
View drawings 1 ✓ ✓ ✓ ✓ ✓
Open in Harmony ✓ ✓ ✓
Open in Paint1✓ ✓ ✓ ✓
19
Harmony 17 Control Center Guide
Chapter 3: Users
Feature
R & DCoordinatorSupervisor
TDExecutive
AnimatorXsheetArchive
ScanInk & Paint
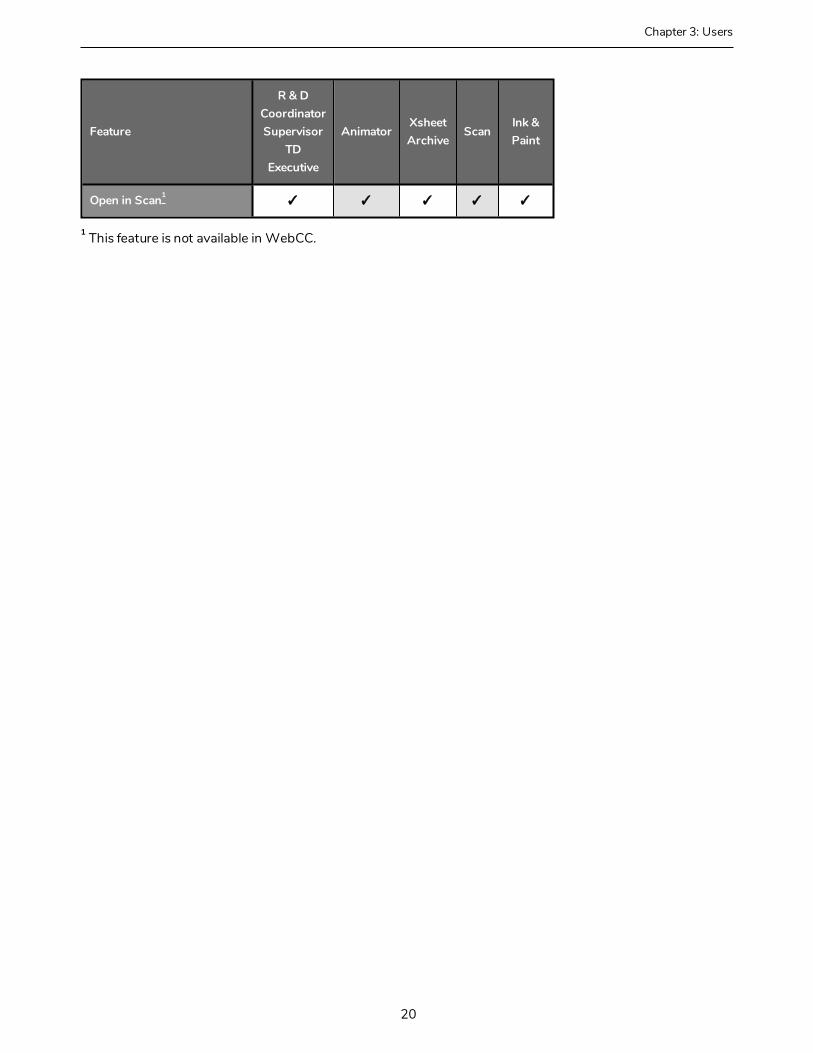
Open in Scan1✓ ✓ ✓ ✓ ✓
1 This feature is not available in WebCC.
20

21
Harmony 17 Control Center Guide

Chapter 4: Environments, Jobs and Scenes
Chapter 4: Environments, Jobs and ScenesEvery project you create with the Harmony solution starts with an environment; it is the highest level in Control Center. You can build a complete environment by adding jobs, scenes, elements and drawings.
Control Center divides your animation project into the following hierarchy, which organizes the sections of your animated projects:
• Environment: This is the name of your animation project.
Example: adventure_movie
• Jobs: These are the major sections of an environment, such as sequences or episodes.
Example: adv_seq_001, adv_seq_002
IMPORTANT
All jobs are stored in the same location in the Harmony database. Be sure to prefix all job names appropriately, so you can identify the project it belongs to. Each job must have a different name. You cannot give two jobs the same name.
• Scene: These are the different shots in a job.
Scenes are contained in their respective job folder in the Harmony database. Prefix all scenes names appropriately, so you can identify which environment and job they belong to.
Example: sc_001, sc_002
• Elements: These are the different layers and columns in your scenes.
22
If you have not created an exposure sheet yet, the Frames column in the Scenes list displays 0 and no elements appear in the Elements or Drawings list.
For example, scene 002 of show_episode_6 could have the following elements:
• A background called bg.
• A character called tony.
• A highlight effect called hl.
You would then find these elements under job 002 and the show_episode_6 scene. The Elements list would display the element names, types of elements in a scene, the type of scans, and the size of the field chart.
• Drawings: These are actual drawings of the elements (layers) in your scene.
For example, the tony element in 002 of show_episode_6 could consist of 35 drawings. To find these drawings, you would look under Drawings to see the keyframes, state, and stage of each drawing.
As your projects come and go, you will probably want to start cleaning up your database, as well as your server's hard disk, by removing old and obsolete environments and their associated animation data.
IMPORTANT
After you delete a scene, job, or environment, the associated data is permanently removed from your storage disks. Make sure you really want to erase these items before you delete them as there is no way to retrieve the data after it has been erased.
You might want to export old environments and archive them somewhere else before you delete them from your system.
WARNING
If you are working in a mixed Windows/macOS/GNU/Linux environment or share files with other studios that do, you should use lowercase letters to name the various items in your animation projects and not include any spaces in component name. For example, write the_show instead of The Show. This recommendation is due to the fact that GNU/Linux is case-sensitive while Windows is not.
About Environments in Control Center 25
Creating Environments in Control Center 26
Deleting Environments in Control Center 28
About Jobs in Control Center 29
Creating Jobs in Control Center 30
Changing Job Stages in Control Center 32
Changing Job Priorities in Control Center 34
23
Harmony 17 Control Center Guide
Chapter 4: Environments, Jobs and Scenes
Deleting Jobs in Control Center 35
About Scenes 36
Creating Scenes in Control Center 37
Deleting Scenes in Control Center 40
Moving Scenes in Control Center 41
Renaming Scenes in Control Center 43
Changing Scene Priorities in Control Center 44
Changing Scene Stages in Control Center 45
Reordering Scenes in Control Center 46
Clearing Scenes in Control Center 48
Copying Scenes 49
About Elements and Drawings in Control Center 51
24
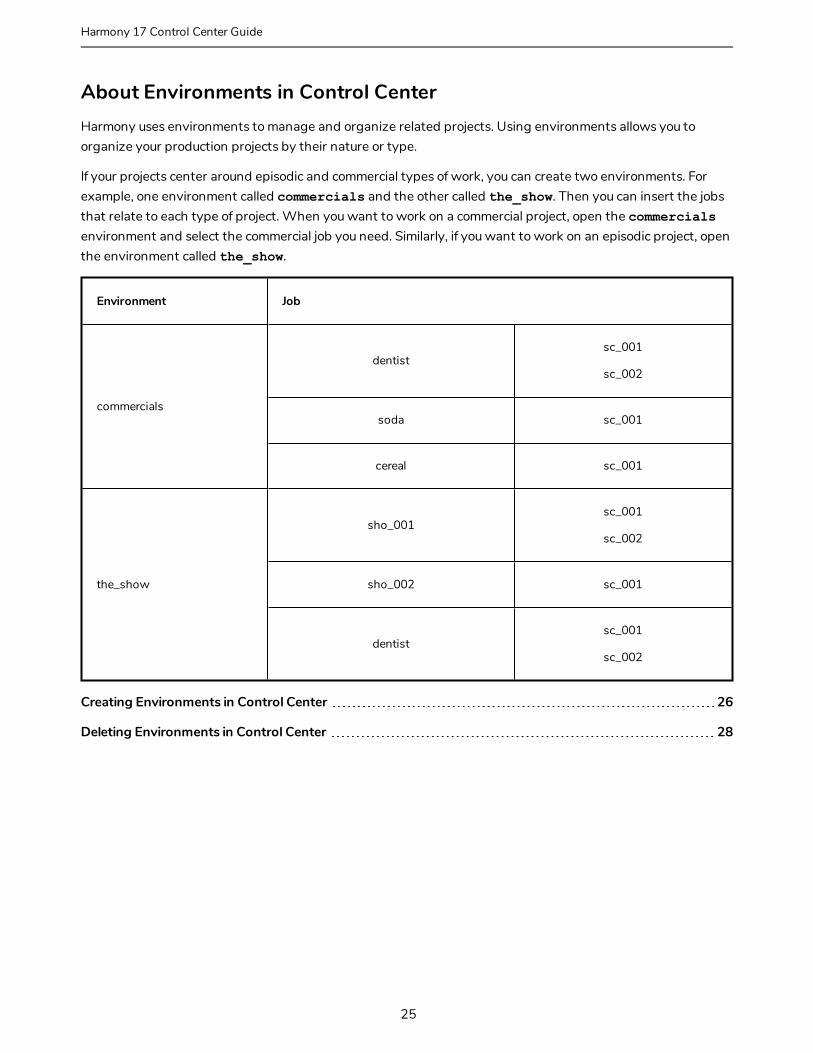
About Environments in Control CenterHarmony uses environments to manage and organize related projects. Using environments allows you to organize your production projects by their nature or type.
If your projects center around episodic and commercial types of work, you can create two environments. For example, one environment called commercials and the other called the_show. Then you can insert the jobs that relate to each type of project. When you want to work on a commercial project, open the commercials environment and select the commercial job you need. Similarly, if you want to work on an episodic project, open the environment called the_show.
Environment Job
commercials
dentistsc_001
sc_002
soda sc_001
cereal sc_001
the_show
sho_001sc_001
sc_002
sho_002 sc_001
dentistsc_001
sc_002
Creating Environments in Control Center 26
Deleting Environments in Control Center 28
25
Harmony 17 Control Center Guide
Chapter 4: Environments, Jobs and Scenes
Creating Environments in Control CenterCreate environments in order to manage and organize you studio's projects.
How to create an environment in Control Center
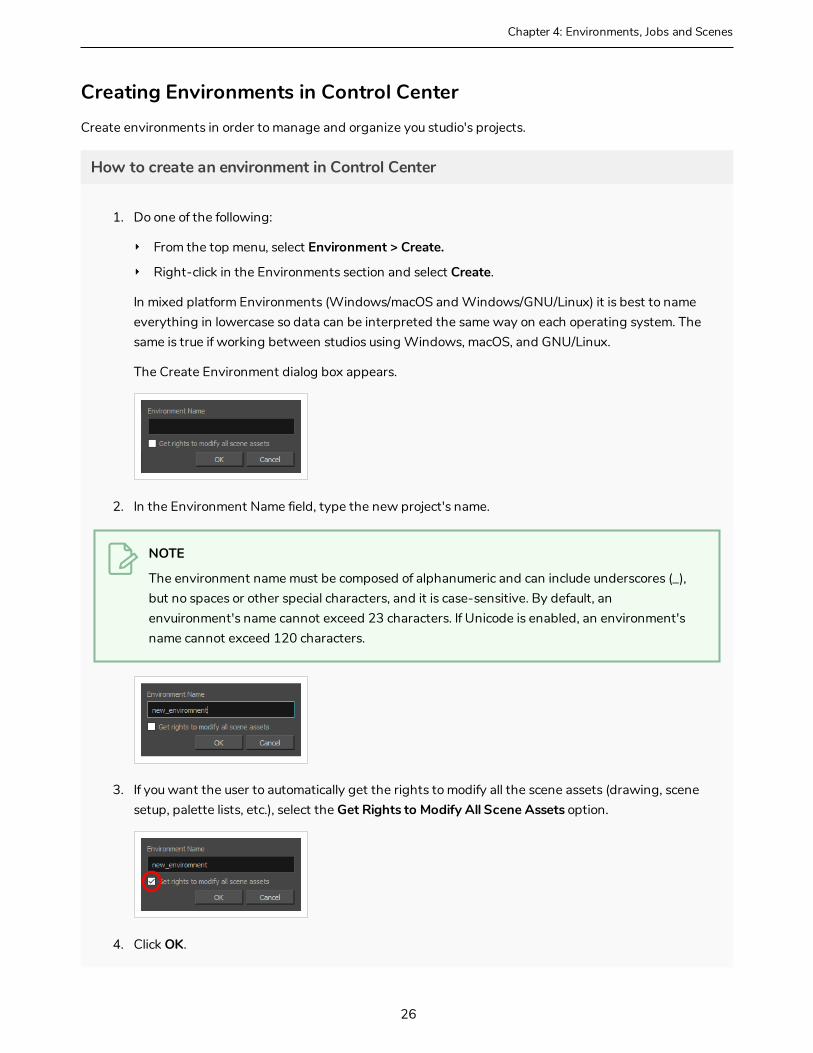
1. Do one of the following:
‣ From the top menu, select Environment > Create.
‣ Right-click in the Environments section and select Create.
In mixed platform Environments (Windows/macOS and Windows/GNU/Linux) it is best to name everything in lowercase so data can be interpreted the same way on each operating system. The same is true if working between studios using Windows, macOS, and GNU/Linux.
The Create Environment dialog box appears.
2. In the Environment Name field, type the new project's name.
NOTE
The environment name must be composed of alphanumeric and can include underscores (_), but no spaces or other special characters, and it is case-sensitive. By default, an envuironment's name cannot exceed 23 characters. If Unicode is enabled, an environment's name cannot exceed 120 characters.
3. If you want the user to automatically get the rights to modify all the scene assets (drawing, scene setup, palette lists, etc.), select the Get Rights to Modify All Scene Assets option.
4. Click OK.
26

The new environment appears in alphabetical order in the Environments list.
After you create an environment, you must add it to the Batch Processing queue so it can vectorize and render the drawings and scenes automatically. You only have to add the environment to the Batch Processing queue once.
27
Harmony 17 Control Center Guide
Chapter 4: Environments, Jobs and Scenes
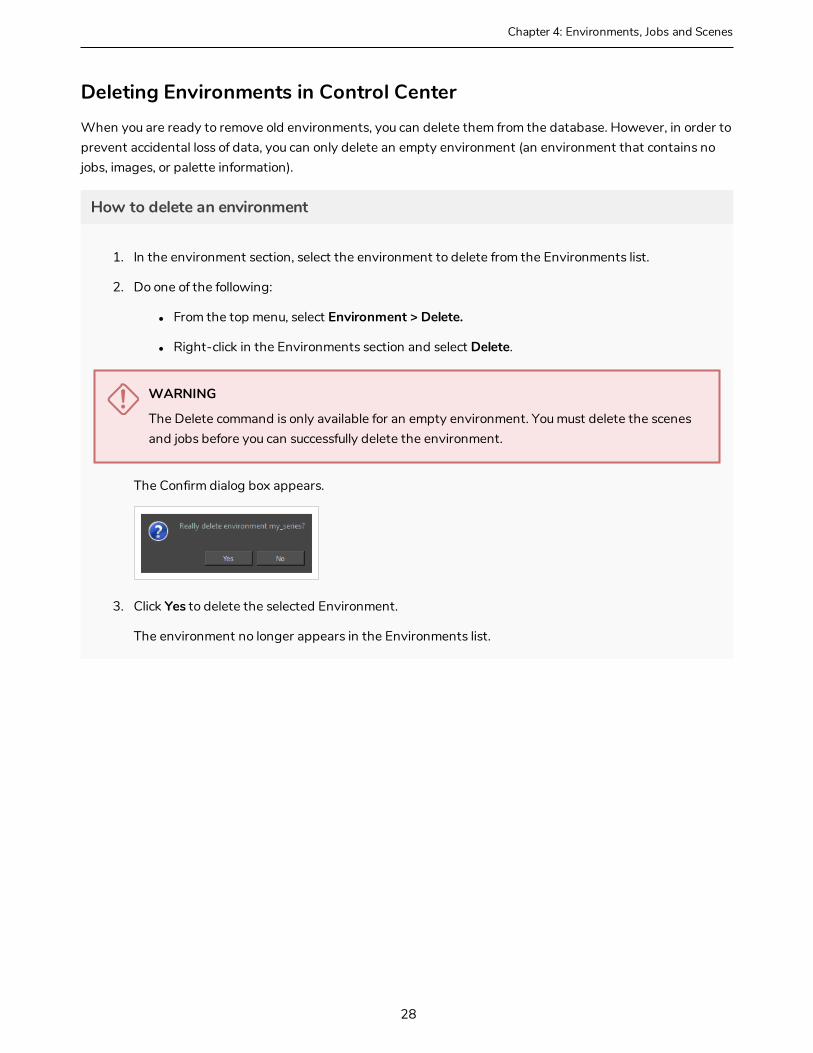
Deleting Environments in Control CenterWhen you are ready to remove old environments, you can delete them from the database. However, in order to prevent accidental loss of data, you can only delete an empty environment (an environment that contains no jobs, images, or palette information).
How to delete an environment
1. In the environment section, select the environment to delete from the Environments list.
2. Do one of the following:
l From the top menu, select Environment > Delete.
l Right-click in the Environments section and select Delete.
WARNING
The Delete command is only available for an empty environment. You must delete the scenes and jobs before you can successfully delete the environment.
The Confirm dialog box appears.
3. Click Yes to delete the selected Environment.
The environment no longer appears in the Environments list.
28
About Jobs in Control CenterWithin each environment is a list of jobs. These jobs contain all the segments for your animated sequence. If you are creating a weekly television series called The Show, you could name your job show_ep_06 (the_show would be the name of your environment).
If each episode was composed of 100 animated shots, each job would contain 100 scenes.
If you want to remove a job and its data from the Harmony database and archive it, you can export the job from Control Center.
IMPORTANT
You cannot archive a job by deleting the job. If you want to archive a job, you should export it to a new location where it can be stored permanently.
Creating Jobs in Control Center 30
Changing Job Stages in Control Center 32
Changing Job Priorities in Control Center 34
Deleting Jobs in Control Center 35
29
Harmony 17 Control Center Guide

Chapter 4: Environments, Jobs and Scenes
Creating Jobs in Control CenterEvery job must be created under an environment. Each job must have a unique name. Two jobs cannot have the same name, even if they appear in two different environments, because all the jobs are in the same folder on the server.
How to create a job
1. In the Environments section, select the project in which you want to create a job.
2. Do one of the following:
l From the top menu, select Job > Create.
l Right-click in the Jobs section and select Create.
The Create Job dialog box appears.
3. In the Name field, type the name of the job you want to create.
NOTE
The job name must be composed of alphanumeric and can include underscores (_), but no spaces or other special characters, and it is case-sensitive. By default, a job's name cannot exceed 23 characters. If Unicode is enabled, a job's name cannot exceed 120 characters.
4. In the TD menu, select a technical director (TD). You must select a technical director to create the job.
A TD is usually the person who oversees the animation project and makes sure the work is done properly. Select the person who most closely resembles this definition. If you do not have a particular user for the task, you can simply assign usabatch.
When you create your Harmony users, you can label a user as a technical director (TD).
5. In the ATD menu, select an assistant technical director (ATD). You must select an assistant technical director to create the job. If you do not have an ATD, select the same person for the TD and ATD jobs.
30
In some studios, the responsibilities of the technical director can be shared by more than one person. This second person is the ATD.
The technical director and assistant technical director you select appear in the Scenes list for each scene of the job.
6. In the Approval menu, select how Harmony will mark the various stages the scenes will pass in your production schedule.
l Automatic: When you work on your scenes, Harmony automatically approves their status at each stage
l Manual: When you work on the scenes, the technical director or the assistant technical director must approve their status at each stage using the Change Stage command (available in the Scene menu).
7. Drag the slider to adjust the priority. 0 = the highest priority for processing through the Vectorize or Render queue and 10 = a priority of 10 is the least important. Items with higher priorities pass in front of other projects with lower priorities in the Vectorize and Render queues even if there is already a queue processing.
If you do not know what priority to assign to your project, you can leave it at 5. You can always change it later.
8. Click OK.
Control Center adds your new job to the selected environment and it appears in alphabetical order in the Jobs list.
31
Harmony 17 Control Center Guide
Chapter 4: Environments, Jobs and Scenes
Changing Job Stages in Control CenterAs you continue working on your animation project, you may want to update the status of the jobs in your environment. This status can display one of three things:
l The stage the job has reached
l When the job will be vectorized
l When the job will be rendered
As you complete your animation project, you can update a job's status to reflect where it is in the overall production process. You can classify jobs as being "In Production" or "Completed".
l In Production: The job is still a work in progress. The other nodes can still access this job.
l Completed: The job is finished. The Harmony database still has all the job's components (scenes, elements, drawings), but the job neither appears nor is accessible from the Harmony applications.
In most cases, you would mark a job as "Completed" after it has been finalized (inked, painted, rendered) and transferred to a medium, such as Blu-ray, or sent to post-production.
You can change a job's status from "Completed" to "In Production" at any time to continue working on it.
Changing the job's stage from In Production to Completed only hides the job in the Control Center window; all the associated files with the job are still on your system.
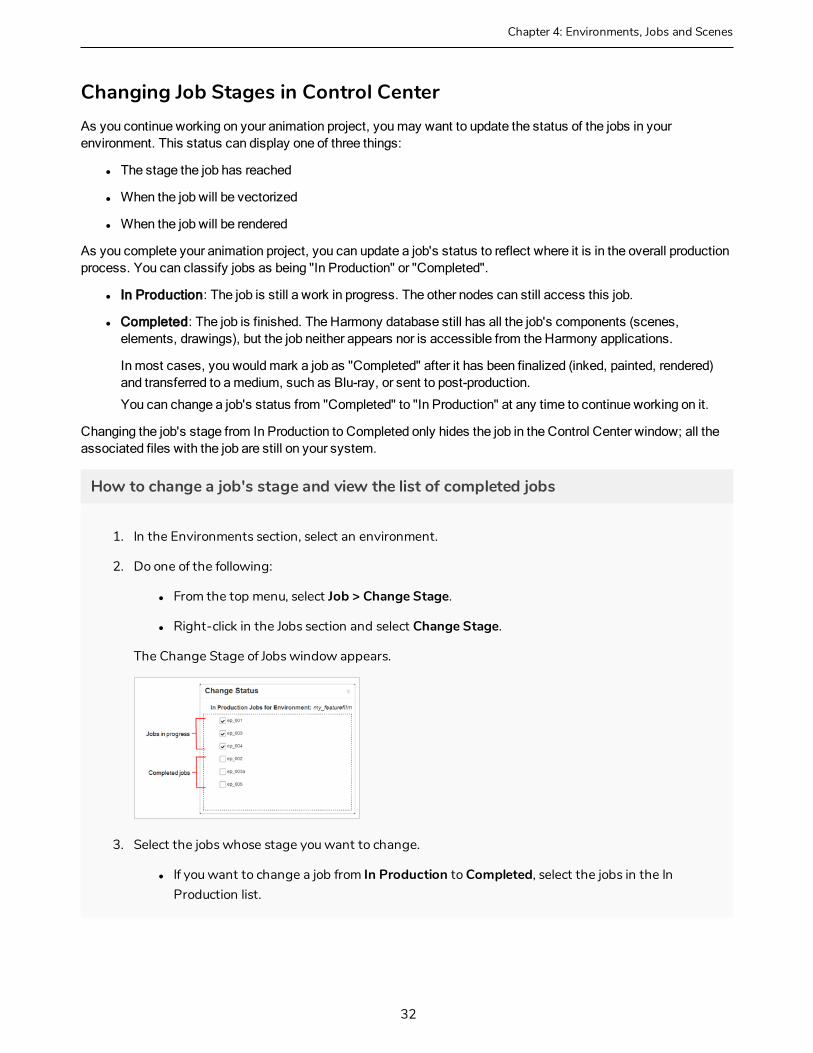
How to change a job's stage and view the list of completed jobs
1. In the Environments section, select an environment.
2. Do one of the following:
l From the top menu, select Job > Change Stage.
l Right-click in the Jobs section and select Change Stage.
The Change Stage of Jobs window appears.
3. Select the jobs whose stage you want to change.
l If you want to change a job from In Production to Completed, select the jobs in the In Production list.
32
l If you want to change a job from Completed to In Production, select the jobs in the Completed list.
4. Click one of the Change buttons to change the job's status.
l Click the Change to Completed button to change a job that is in production.
l Click the Change to In Production button to change a job that is completed.
5. Click OK.
33
Harmony 17 Control Center Guide
Chapter 4: Environments, Jobs and Scenes
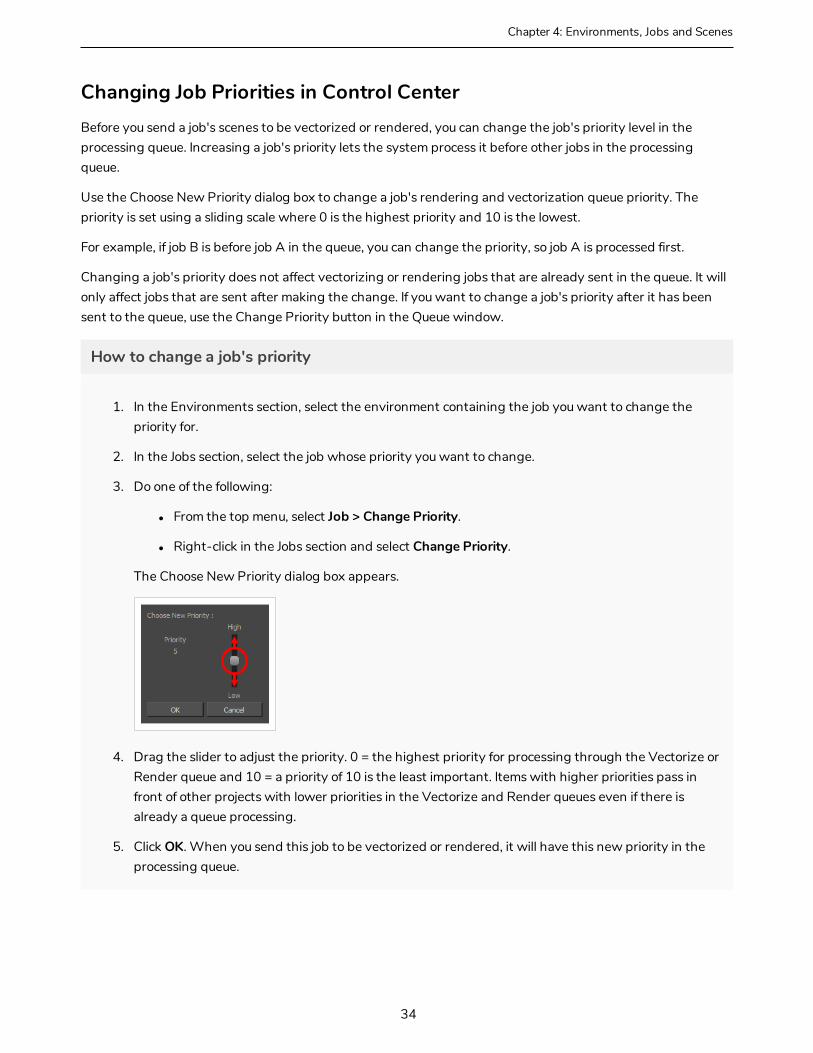
Changing Job Priorities in Control CenterBefore you send a job's scenes to be vectorized or rendered, you can change the job's priority level in the processing queue. Increasing a job's priority lets the system process it before other jobs in the processing queue.
Use the Choose New Priority dialog box to change a job's rendering and vectorization queue priority. The priority is set using a sliding scale where 0 is the highest priority and 10 is the lowest.
For example, if job B is before job A in the queue, you can change the priority, so job A is processed first.
Changing a job's priority does not affect vectorizing or rendering jobs that are already sent in the queue. It will only affect jobs that are sent after making the change. If you want to change a job's priority after it has been sent to the queue, use the Change Priority button in the Queue window.
How to change a job's priority
1. In the Environments section, select the environment containing the job you want to change the priority for.
2. In the Jobs section, select the job whose priority you want to change.
3. Do one of the following:
l From the top menu, select Job > Change Priority.
l Right-click in the Jobs section and select Change Priority.
The Choose New Priority dialog box appears.
4. Drag the slider to adjust the priority. 0 = the highest priority for processing through the Vectorize or Render queue and 10 = a priority of 10 is the least important. Items with higher priorities pass in front of other projects with lower priorities in the Vectorize and Render queues even if there is already a queue processing.
5. Click OK. When you send this job to be vectorized or rendered, it will have this new priority in the processing queue.
34
Deleting Jobs in Control CenterYou should only delete jobs that you no longer need or that have already been exported to an archive (using the Export command available in the Admin menu).
When you delete a job, the following components are permanently removed:
l Scenes
l Elements
l Drawings
l Database information associated with the selected job
l Palettes stored under the selected job
Before you delete a job:
l Make sure no one else is currently using the job. Failure to do this may result in file corruption and loss of your work.
l Wait until everyone is offline. This ensures no one can open the data files while you delete them.
NOTE
You cannot delete a job if it still contains scenes.
How to delete a job
1. In the Environments section, select the environment containing the job you want to delete.
2. In the Jobs section, select the job you want to delete.
3. Do one of the following:
l From the top menu, select Job > Delete.
l Right-click in the Jobs section and select Delete.
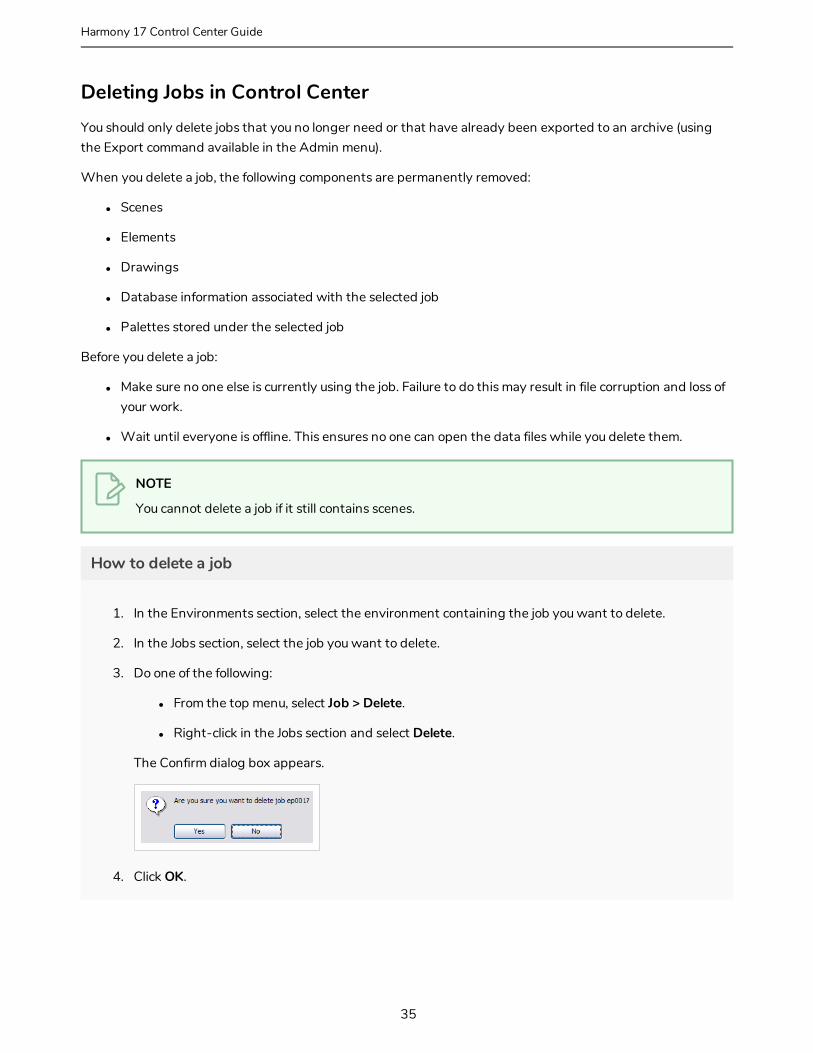
The Confirm dialog box appears.
4. Click OK.
35
Harmony 17 Control Center Guide
Chapter 4: Environments, Jobs and Scenes
About ScenesAfter you create a scene, you can view the corresponding elements and drawings in the Control Center window. When you select the environment and the job, the corresponding scenes for the selected job appears in the Scenes list in the Control Center window.
For each scene in your job, you must create a unique exposure sheet to lay out the drawings, camera effects, audio tracks, and other special effects for that scene.
Creating Scenes in Control Center 37
Deleting Scenes in Control Center 40
Moving Scenes in Control Center 41
Renaming Scenes in Control Center 43
Changing Scene Priorities in Control Center 44
Changing Scene Stages in Control Center 45
Reordering Scenes in Control Center 46
Clearing Scenes in Control Center 48
Copying Scenes 49
36

Creating Scenes in Control CenterWhen creating your scene, you must select the path where you want to store the scene data and where you want the new scene to appear in the Scenes list. You can create a single scene or create multiple scenes all at once.
You do not have to enter the word "scene" when entering scene names. The system automatically adds scene- in front of the name. For example, when you type"3" in the Scene Name field, the scene name automatically displays as "scene-3" throughout the file system. The scene name will have "scene-" as a prefix, but that will only be visible when looking at the scene on the file system. The scene will appear without this prefix in all the Harmony applications.
How to create a scene
1. In the Environments section, select the environment containing the job you want to add scenes in.
2. In the Jobs section, select the job you want to add scenes in.
3. Do one of the following:
l In the Scene section, select Scene> Create.
l Right-click in the Scenes section and select Create.
The Create Scene dialog box appears.
4. Click in the Scene Name(s) field and enter the name for the first scene you want to create.
5. Press the Enter/Return keyboard shortcut to move onto the next scene.
6. Enter the name of the next scene you want to create.
37
Harmony 17 Control Center Guide
Chapter 4: Environments, Jobs and Scenes
NOTE
By default, when creating a new scene or renaming a scene, the scene's name cannot exceed 23 characters. If Unicode is enabled, the scene's name can not exceed 119 characters.
When creating scenes in Control Center, you should enter the scene names exactly as they appear on the actual animation. This ensures that the information in your environment is consistent with the actual animation.
The job and scene names are alphanumeric and can include underscores (_), but no spaces, or other special characters. The environment name is case-sensitive.
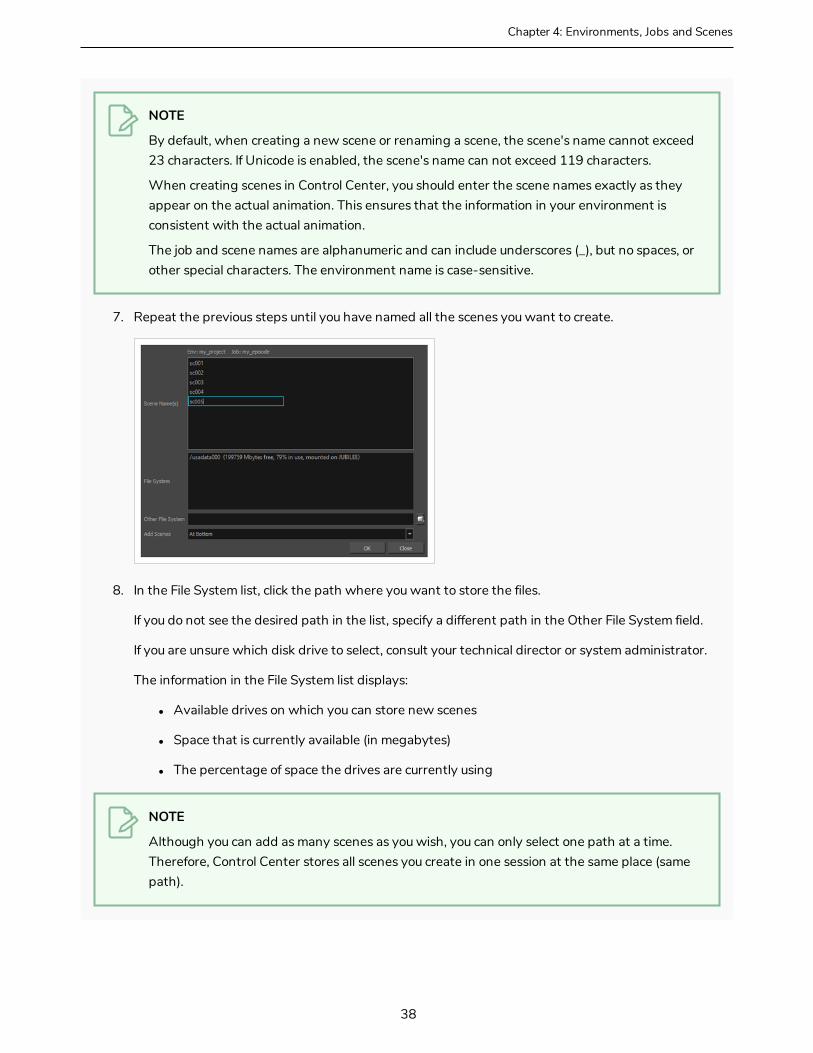
7. Repeat the previous steps until you have named all the scenes you want to create.
8. In the File System list, click the path where you want to store the files.
If you do not see the desired path in the list, specify a different path in the Other File System field.
If you are unsure which disk drive to select, consult your technical director or system administrator.
The information in the File System list displays:
l Available drives on which you can store new scenes
l Space that is currently available (in megabytes)
l The percentage of space the drives are currently using
NOTE
Although you can add as many scenes as you wish, you can only select one path at a time. Therefore, Control Center stores all scenes you create in one session at the same place (same path).
38
9. Select where you want to place the scene in the Scenes list from the Add Scenes menu. These are the options:
‣ At Bottom: Places the new scenes at the bottom of the list
‣ At Top: Places the new scenes at the top of the list
‣ Before Selected: Places the new scenes before the selected scene
‣ After Selected: Places the new scenes after the selected scene
‣ Name Sort: Arranges the new scenes alphabetically.
NOTE
To use the After Selected and Before Selected options, you must select another scene from the Scene list in the Control Center window.
10. Click OK.
The new scene is created and displayed in the Scenes list. If you do not want to create the scene, click Cancel.
39
Harmony 17 Control Center Guide
Chapter 4: Environments, Jobs and Scenes
Deleting Scenes in Control CenterWhen you delete a scene, you not only remove the scene from the Control Center window, but you also permanently remove all the information associated with the scene including:
l Exposure sheet (and all associated versions)
l Elements
l Drawings
l Database information
l Any palettes stored in that scene's palette library
Before you delete a scene:
l Make sure that you really want to remove all this information from the system
l Are you going to use the scene in the future?
l Do you need to archive the scene for future use?
l Make sure no one else is currently using the scene.
l failure to do this may result in file corruption and loss of your work.
l Wait until everyone is offline. This ensures no one can open the scene while you delete it.
How to delete a scene
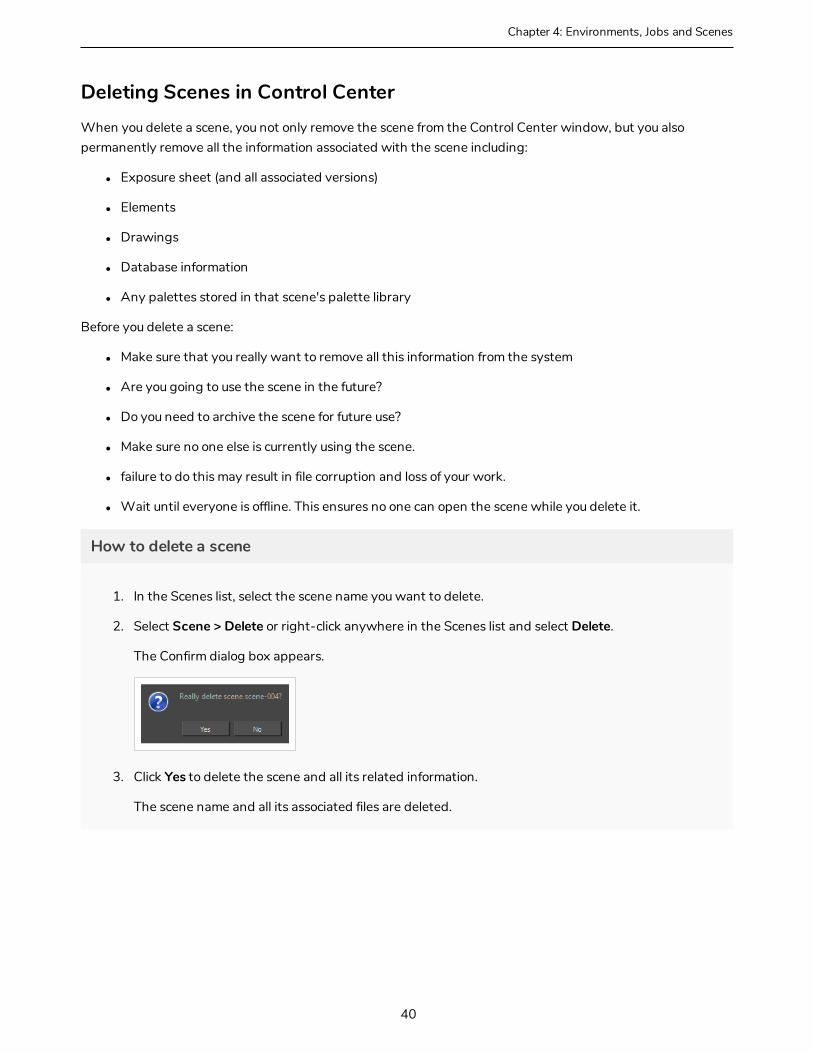
1. In the Scenes list, select the scene name you want to delete.
2. Select Scene > Delete or right-click anywhere in the Scenes list and select Delete.
The Confirm dialog box appears.
3. Click Yes to delete the scene and all its related information.
The scene name and all its associated files are deleted.
40
Moving Scenes in Control CenterWhen you create a scene, it and its associated files are stored on one drive. If you find you are running out of space, you can move a scene to another drive. However, you can consolidate all the scenes for a particular job in a single directory allowing you to find related information quickly. You may also want to file your scenes in specific directories, creating a customized directory system. The Move command lets you move scene data from one file system to another.
Before you move a scene's data:
l Make sure no one else is currently using the scene's data. Failure to do this may result in file corruption and loss of your work.
l Wait until everyone is offline. This ensures no one can open the data files while you move them.
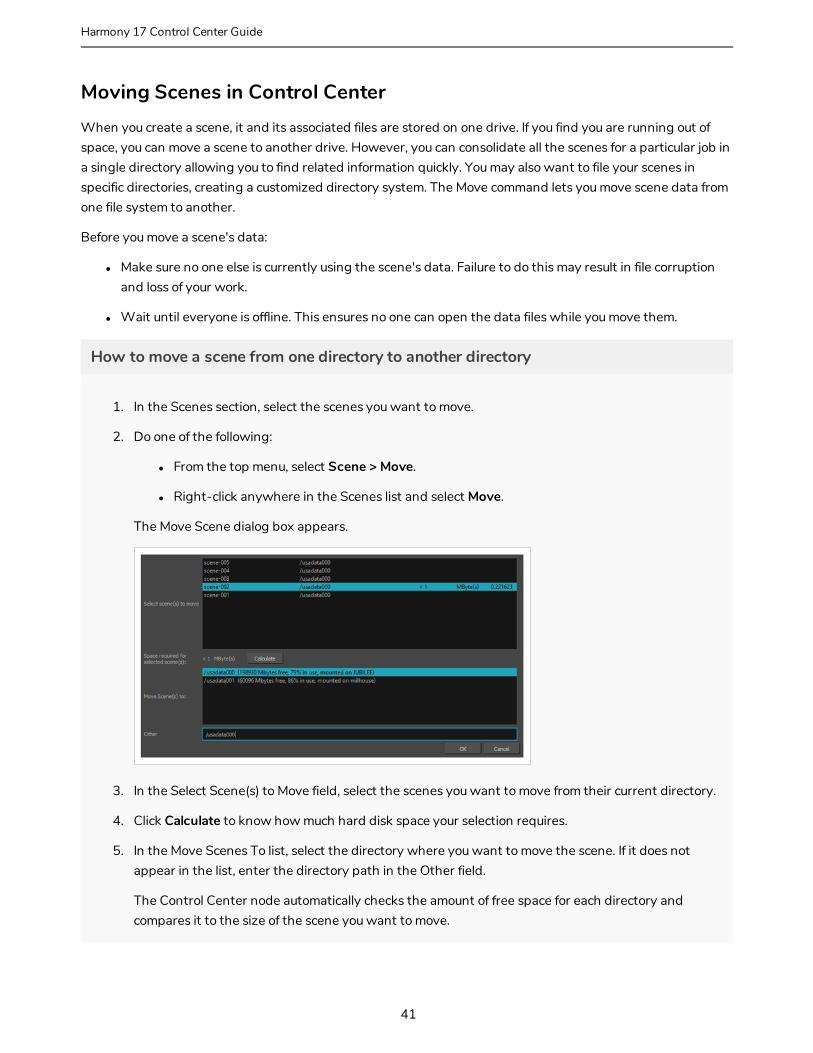
How to move a scene from one directory to another directory
1. In the Scenes section, select the scenes you want to move.
2. Do one of the following:
l From the top menu, select Scene > Move.
l Right-click anywhere in the Scenes list and select Move.
The Move Scene dialog box appears.
3. In the Select Scene(s) to Move field, select the scenes you want to move from their current directory.
4. Click Calculate to know how much hard disk space your selection requires.
5. In the Move Scenes To list, select the directory where you want to move the scene. If it does not appear in the list, enter the directory path in the Other field.
The Control Center node automatically checks the amount of free space for each directory and compares it to the size of the scene you want to move.
41
Harmony 17 Control Center Guide
Chapter 4: Environments, Jobs and Scenes
If there is not enough disk space on a particular drive/mount point to store the scene, the directory displays a not "enough space message". Choose another disk from the list.
6. Click OK.
42
Renaming Scenes in Control CenterAs you work on your scenes, their nature and contents may change and the name you gave the scene when you began the project may no longer reflect its contents. In this case, you can rename the scene to more accurately reflect its contents.
Before you rename a scene:
l Make sure no one else is currently using the scene.
Failure to do this may result in file corruption and loss of your work.
l Wait until everyone is offline. This ensures no one can open the scene while you rename it.
How to rename a scene
1. In the Scenes section, select the scene to rename.
2. Do one of the following:
l From the top menu, select Scene > Rename.
l Right-click anywhere in the Scenes list and select Rename.
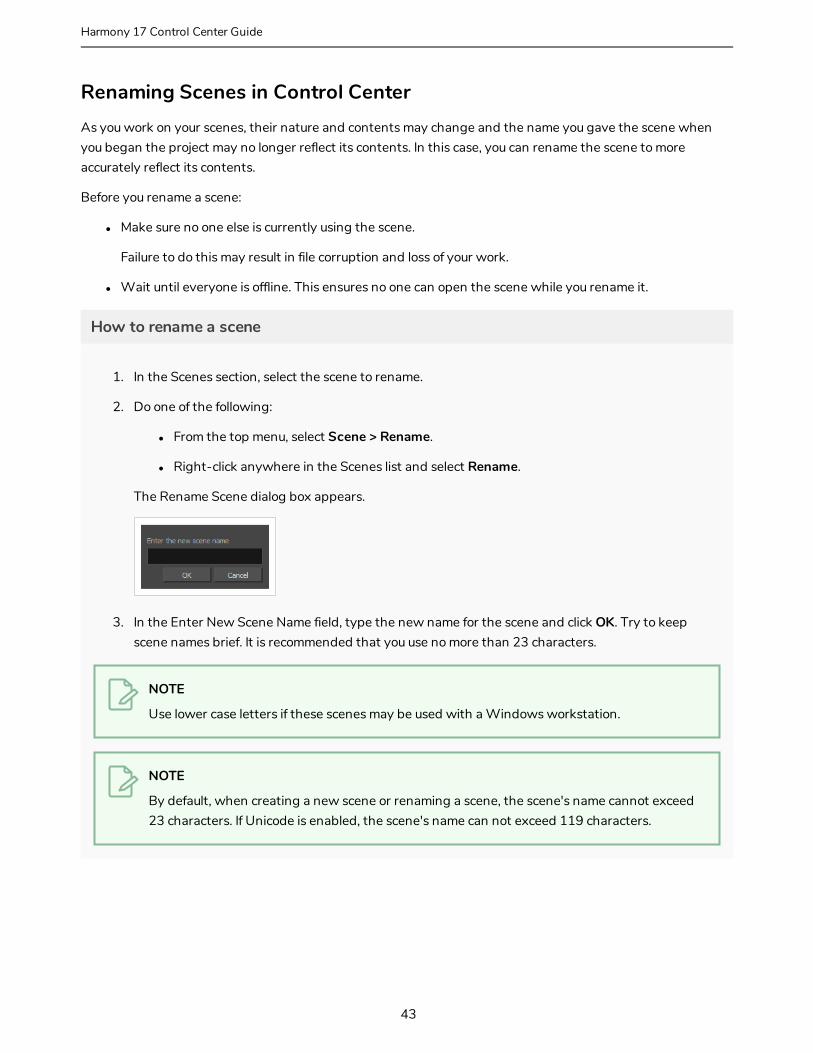
The Rename Scene dialog box appears.
3. In the Enter New Scene Name field, type the new name for the scene and click OK. Try to keep scene names brief. It is recommended that you use no more than 23 characters.
NOTE
Use lower case letters if these scenes may be used with a Windows workstation.
NOTE
By default, when creating a new scene or renaming a scene, the scene's name cannot exceed 23 characters. If Unicode is enabled, the scene's name can not exceed 119 characters.
43
Harmony 17 Control Center Guide

Chapter 4: Environments, Jobs and Scenes
Changing Scene Priorities in Control CenterYou can change the scene's priority level in the processing queue. Increasing a scene's priority lets the system process it before other scenes in the processing queue.
Use the Choose New Priority dialog box to change a scene's rendering and vectorization queue priority. The priority is set using a sliding scale where 0 is the highest priority and 10 is the lowest. If a scene has already been sent to the queue changing the priority at this point will not affect its priority in the queue. Changes will only be applied next time it is sent to the queue. To change a scene's priority after it's been sent to the queue, use the Change Priority button in the Queue window.
For example, If scene B comes before scene A in the queue, you can change the scene's priority so that scene A will be processed first.
How to change a scene's priority
1. Select the environment, the job and the scene you want to prioritize.
2. Do one of the following:
l From the top menu, select Scene > Change Priority.
l Right-click anywhere in the Scenes list and select Change Priority.
The Choose New Priority dialog box appears.
3. Drag the slider to adjust the priority. 0 = the highest priority for processing through the Vectorize or Render queue and 10 = a priority of 10 is the least important. Items with higher priorities pass in front of other projects with lower priorities in the Vectorize and Render queues even if there is already a queue processing.
4. Click OK.
The new scene priority appears in the Scenes list in the Priority column.
44
Changing Scene Stages in Control CenterThe Change Status command allows you to change the approval stage name of a selected scene that is in Manual approval mode. You can also create customized approval stages that reflect the approval process in your production environment.
A scene's status is a method of tracking its progress in your production; the scene's current status does not stop you from advancing the scene to other stages.
Changing a scene's status and making manual approvals allows you to assign and change a scene's approval stages to keep track of its current status. For example, if you have a scene whose drawings are being scanned, you will mark it as the Scan stage. After you begin adding colour to these line drawings, you can change the scene's stage to Paint. If the selected scene has an automatic approval policy, the Change Stage command will be inactive in the Scene menu. To change a scene's status, you must ensure that the approval policy is set to Manual.
How to change a scene's status
1. In the Scenes section, select a scene.
2. Do one of the following:
l From the top menu, select Scene > Change Status.
l Right-click anywhere in the Scenes list and select Change Status.
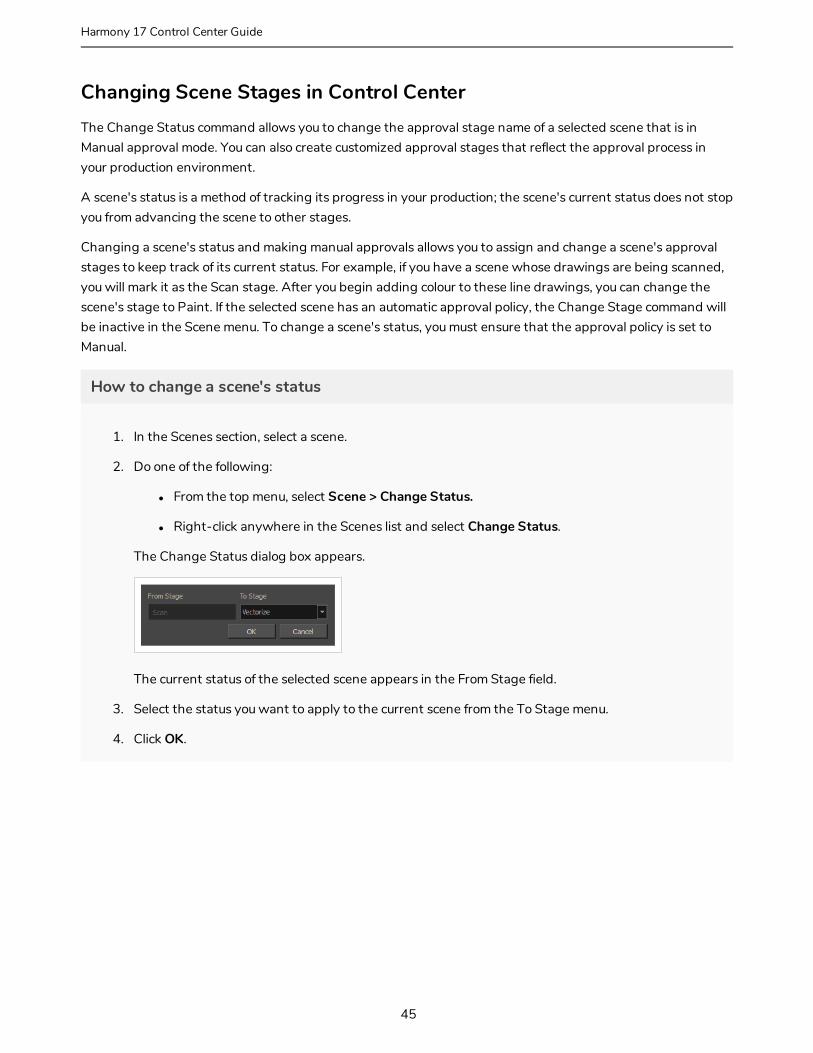
The Change Status dialog box appears.
The current status of the selected scene appears in the From Stage field.
3. Select the status you want to apply to the current scene from the To Stage menu.
4. Click OK.
45
Harmony 17 Control Center Guide
Chapter 4: Environments, Jobs and Scenes
Reordering Scenes in Control CenterYou can change the sequence of scenes in your job, which affects the order in which the scenes appear in the job throughout the system. You can place a scene anywhere in the Scenes list or you can sort them alphanumerically.
How to reorder scenes
1. Select the job whose scenes you want to re-sequence from the Jobs panel.
2. Do one of the following:
l From the top menu, select Scene > Reorder.
l Right-click anywhere in the Scenes list and select Reorder.
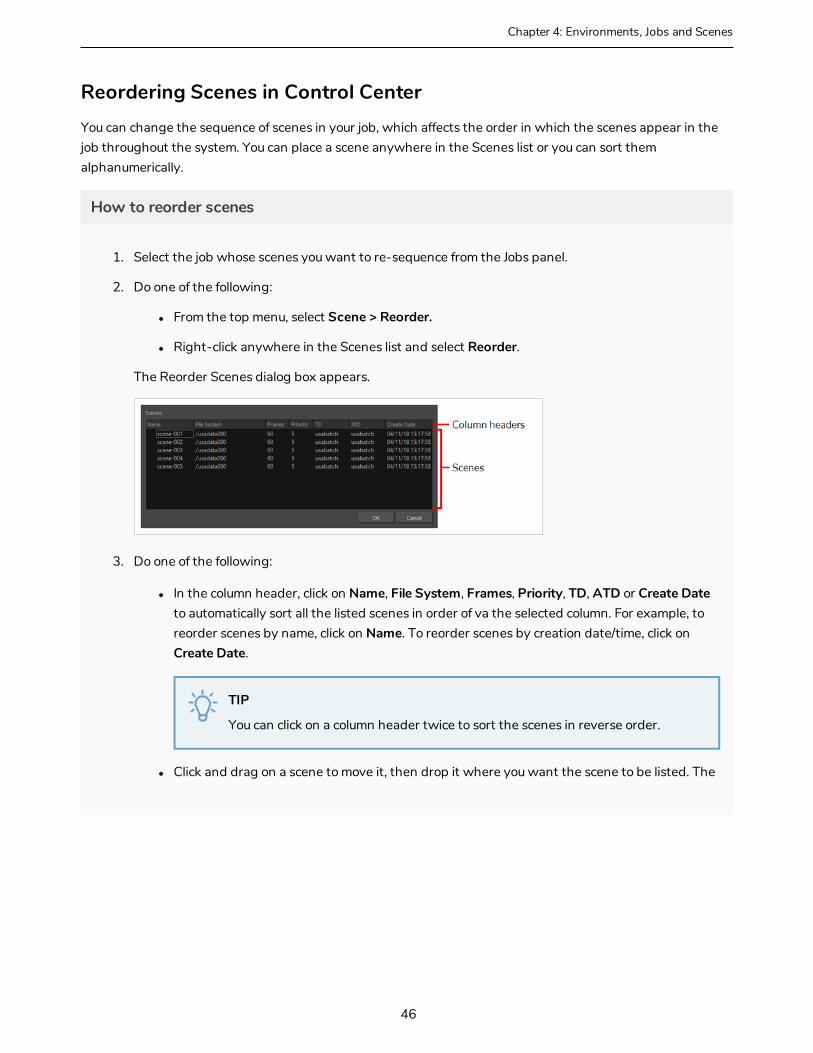
The Reorder Scenes dialog box appears.
3. Do one of the following:
l In the column header, click on Name, File System, Frames, Priority, TD, ATD or Create Date to automatically sort all the listed scenes in order of va the selected column. For example, to reorder scenes by name, click on Name. To reorder scenes by creation date/time, click on Create Date.
TIP
You can click on a column header twice to sort the scenes in reverse order.
l Click and drag on a scene to move it, then drop it where you want the scene to be listed. The
46
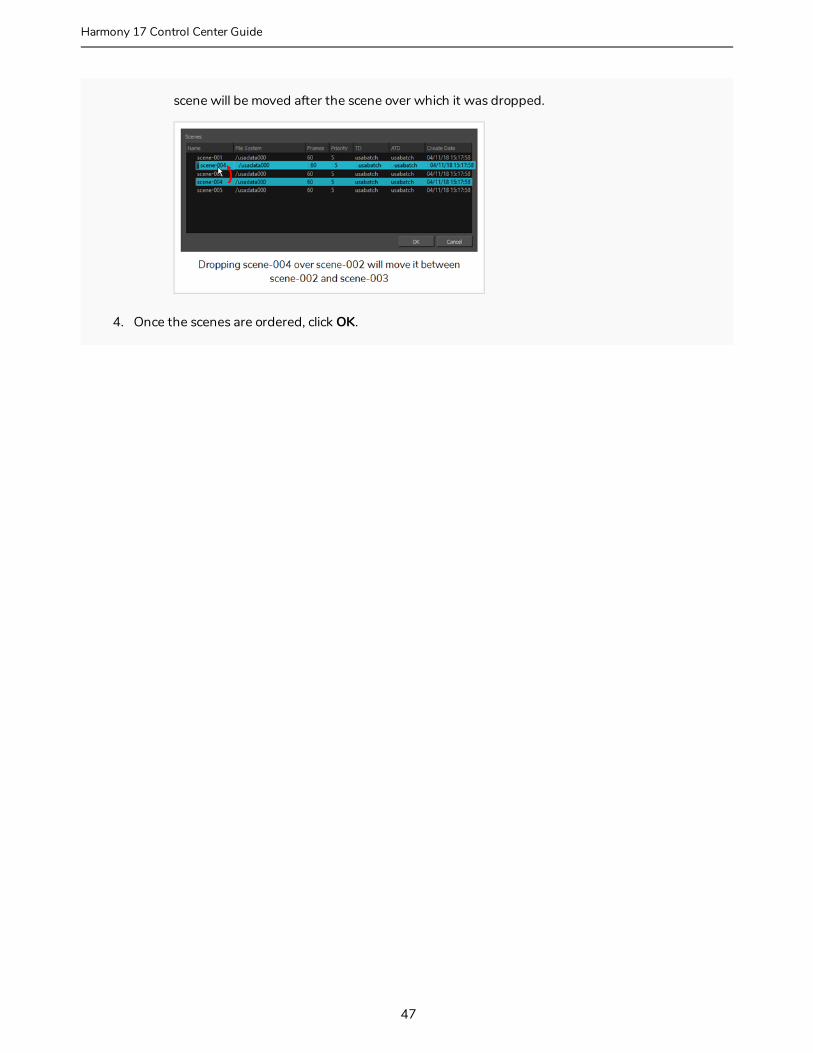
scene will be moved after the scene over which it was dropped.
4. Once the scenes are ordered, click OK.
47
Harmony 17 Control Center Guide
Chapter 4: Environments, Jobs and Scenes
Clearing Scenes in Control CenterIf you must restart a scene from scratch, you can completely erase a scene's exposure sheet. When you clear a scene, you delete all exposure sheet database information and reset the scene as if it were completely new. You are only deleting the files from the database; Control Center does not actually delete any image files (drawings, scan, final frames). If you have questions concerning the contents of a scene, you should contact the technical director responsible for the scene in question.
If you must clear a scene from Control Center, make sure no one else is currently using the scene's data. If you clear a scene that someone else is working on at that moment, you run the risk of corrupting the files and losing work.
If you must clear a scene, you should wait until everyone is offline to ensure that no one can open the data files while you clear them from Control Center.
How to clear a scene
1. Select the environment, job or scene you want to clear.
2. Do one of the following:
l From the top menu, select Scene > Clear.
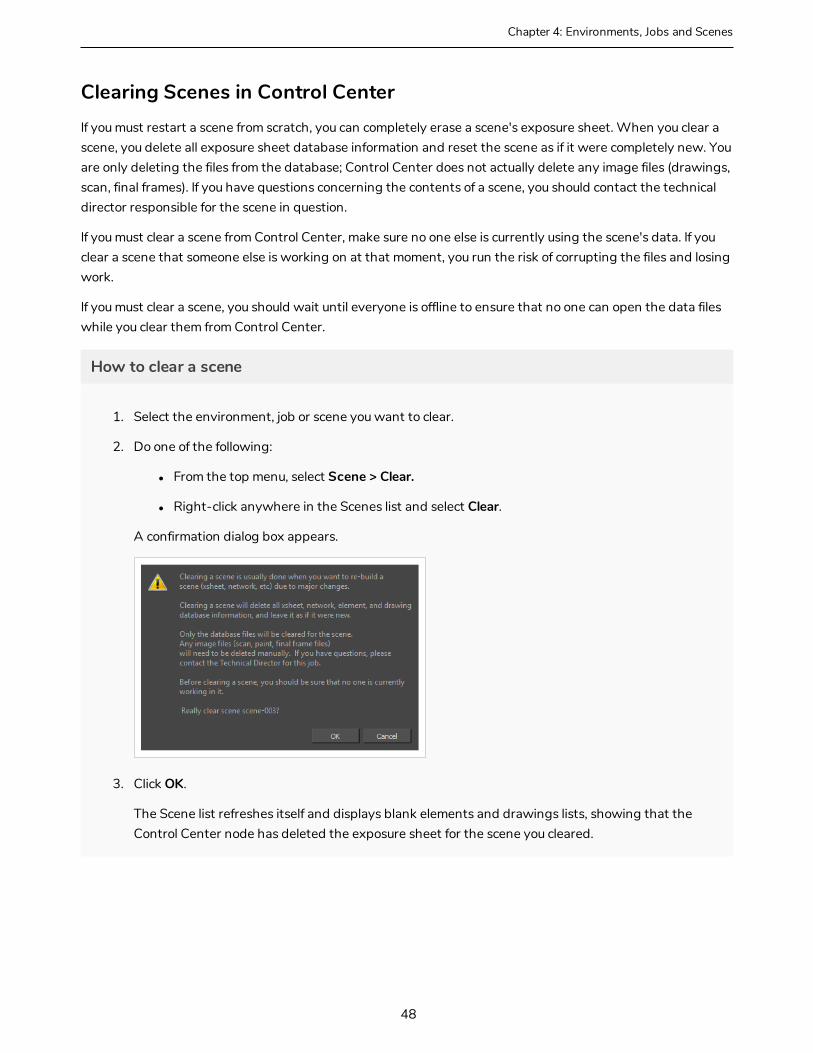
l Right-click anywhere in the Scenes list and select Clear.
A confirmation dialog box appears.
3. Click OK.
The Scene list refreshes itself and displays blank elements and drawings lists, showing that the Control Center node has deleted the exposure sheet for the scene you cleared.
48
Copying ScenesThe copy command lets you copy a scene's content over to another existing scene. You can choose to copy all of a scene's data, or only its exposure sheet.
IMPORTANT
This will overwrite the target scene with the content of the source scene.
How to copy an exposure sheet to another scene
1. Select the environment and the job from the Control Center window.
2. Do one of the following:
l From the top menu, select Scene > Copy.
l Right-click anywhere in the Scenes list and select Copy.
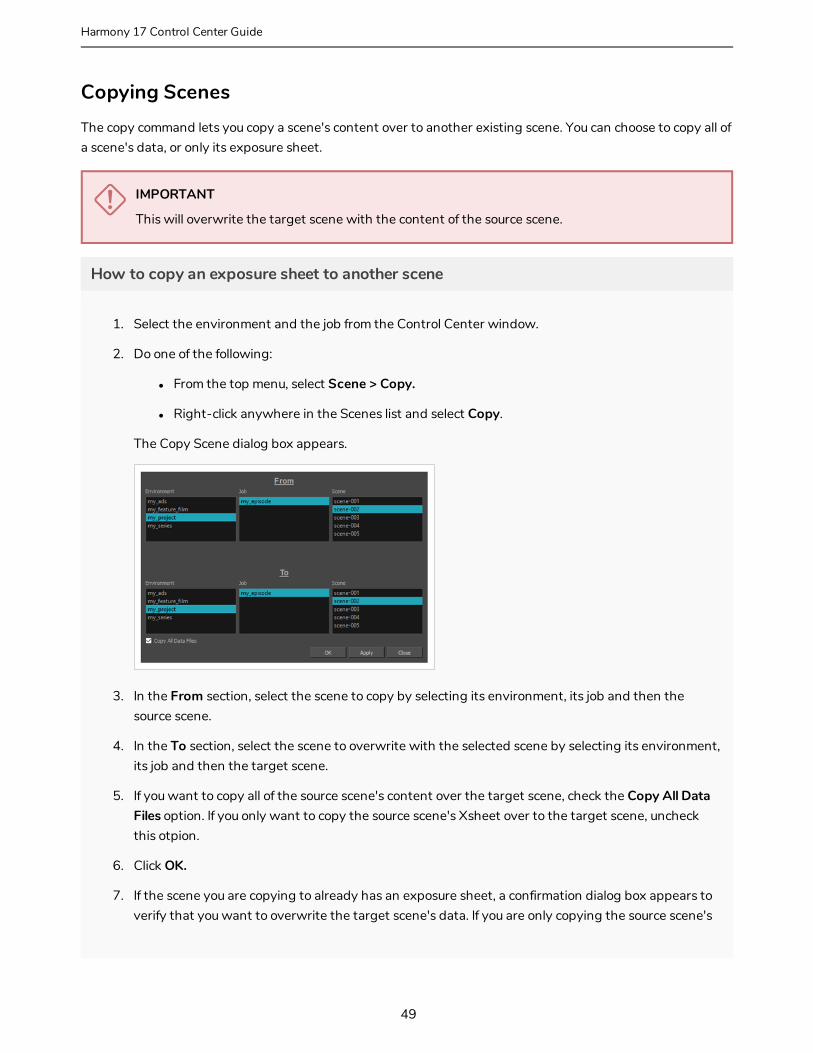
The Copy Scene dialog box appears.
3. In the From section, select the scene to copy by selecting its environment, its job and then the source scene.
4. In the To section, select the scene to overwrite with the selected scene by selecting its environment, its job and then the target scene.
5. If you want to copy all of the source scene's content over the target scene, check the Copy All Data Files option. If you only want to copy the source scene's Xsheet over to the target scene, uncheck this otpion.
6. Click OK.
7. If the scene you are copying to already has an exposure sheet, a confirmation dialog box appears to verify that you want to overwrite the target scene's data. If you are only copying the source scene's
49
Harmony 17 Control Center Guide

Chapter 4: Environments, Jobs and Scenes
Xsheet, this will only overwrite the target scene's Xsheet. If you are copying all of the source scene's data file, this will overwrite all of the target scene's data files.
l Click Yes if you want to copy over the existing scene.
l Click No to cancel or to select a different target scene.
The data in the source scene is copied over to the target scene. You can open the target scene in Harmony to verify that it contains the source scene's data.
50
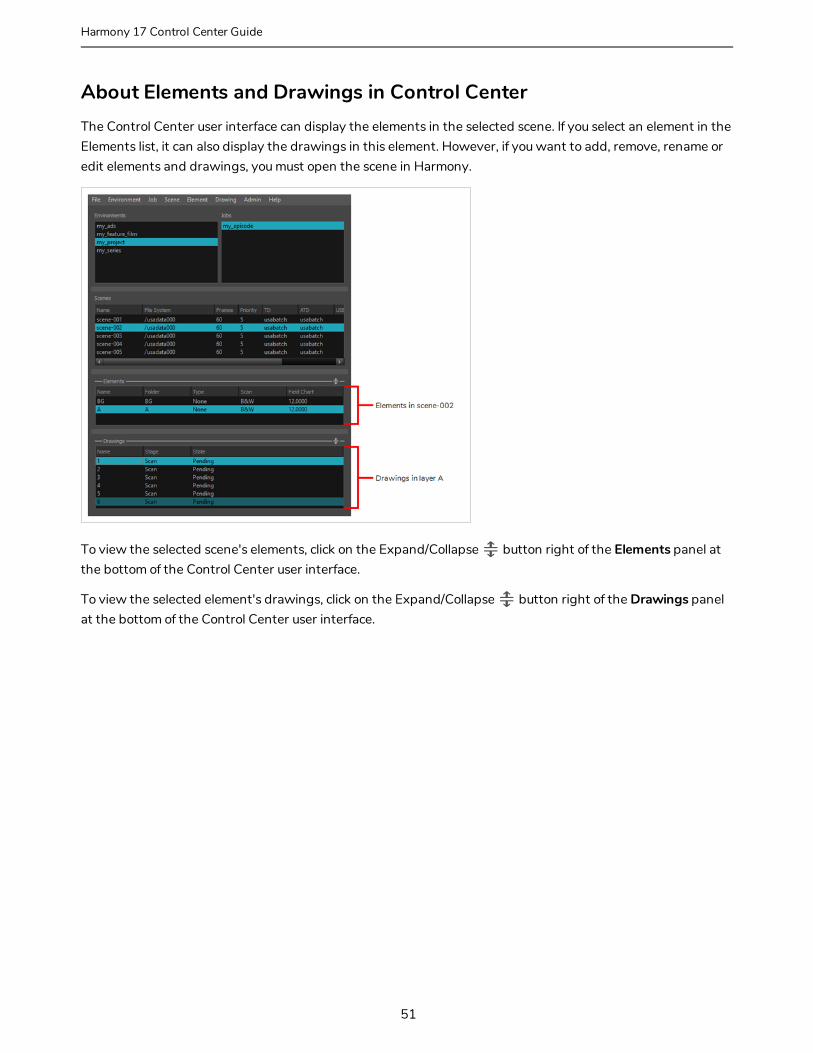
About Elements and Drawings in Control CenterThe Control Center user interface can display the elements in the selected scene. If you select an element in the Elements list, it can also display the drawings in this element. However, if you want to add, remove, rename or edit elements and drawings, you must open the scene in Harmony.
To view the selected scene's elements, click on the Expand/Collapse button right of the Elements panel at the bottom of the Control Center user interface.
To view the selected element's drawings, click on the Expand/Collapse button right of the Drawings panel at the bottom of the Control Center user interface.
51
Harmony 17 Control Center Guide
Chapter 5: Importing and Exporting Scenes
Chapter 5: Importing and Exporting ScenesYou can export your scene to work offline from a location where the Harmony server is not located. An example would be from the studio to your home. When you return to the studio, you can then import your scene to reintegrate it back into the Harmony environment.
If your scene has shared images, textures (used colour-overrides) and palettes stored at the environment or job level on the Harmony server, these links will be broken when you export your file. You can create presets to point to where these linked files are located. For example, you can store your images, textures and palettes somewhere on your home computer and create a preset to point to where these files are located. Then when you get back to the studio, you can select another preset that points to where the files are located on the Harmony server.
52
Exporting Scenes from Control CenterYou can use Control Center's export utility to migrate scenes from the database. You can either export them to offline, which makes it possible to open and work on the scene in Harmony without being connected to the database. You can also export them as database scene packages for backup, archival or to transport them to another database.
If you export a database scene package, it will include, among the exported files, two additional files:
l README.txt: Contains export statistics, such as creation date and user ID.
l IEContents.dat: Specifies export parameters. This file allows Control Center to import the scenes back to a database.
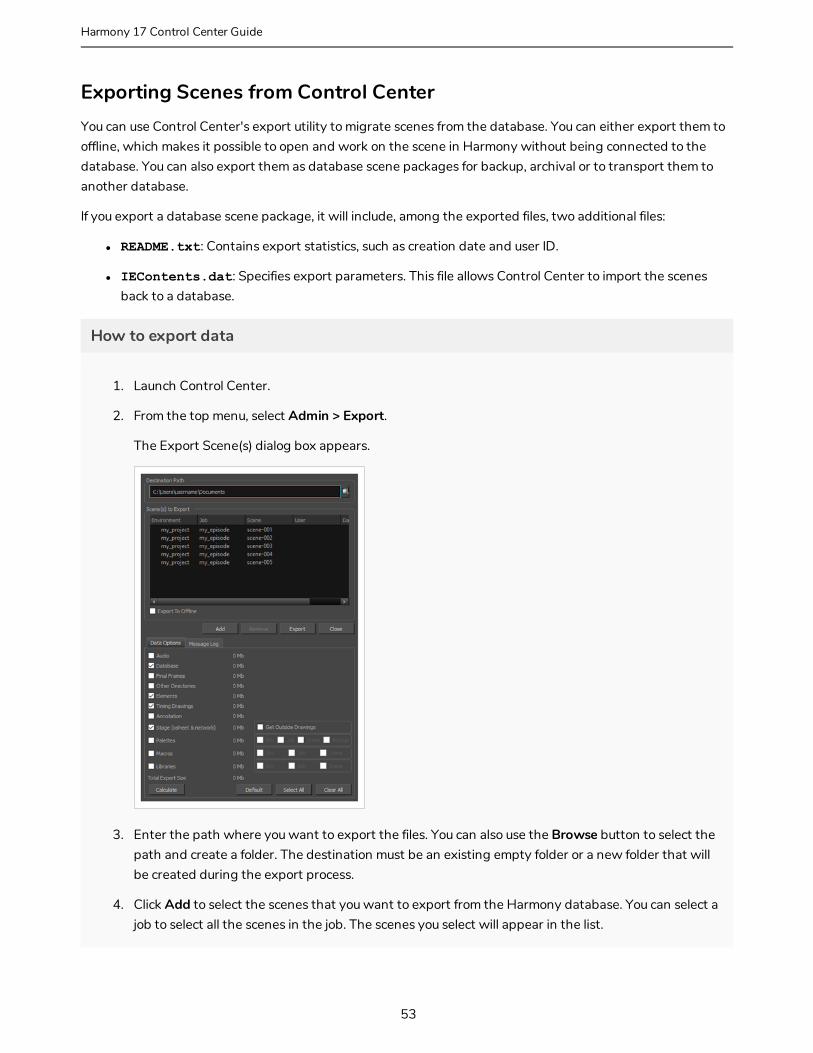
How to export data
1. Launch Control Center.
2. From the top menu, select Admin > Export.
The Export Scene(s) dialog box appears.
3. Enter the path where you want to export the files. You can also use the Browse button to select the path and create a folder. The destination must be an existing empty folder or a new folder that will be created during the export process.
4. Click Add to select the scenes that you want to export from the Harmony database. You can select a job to select all the scenes in the job. The scenes you select will appear in the list.
53
Harmony 17 Control Center Guide
Chapter 5: Importing and Exporting Scenes
5. Select one or more scenes and click Remove to remove scenes from the export list.
6. If you want to export your scenes as offline scenes that you can open in Harmony Stand Alone, check the Export to Offline option. If this option is not enabled, your scenes will be exported in a database package that can only be imported into a database.
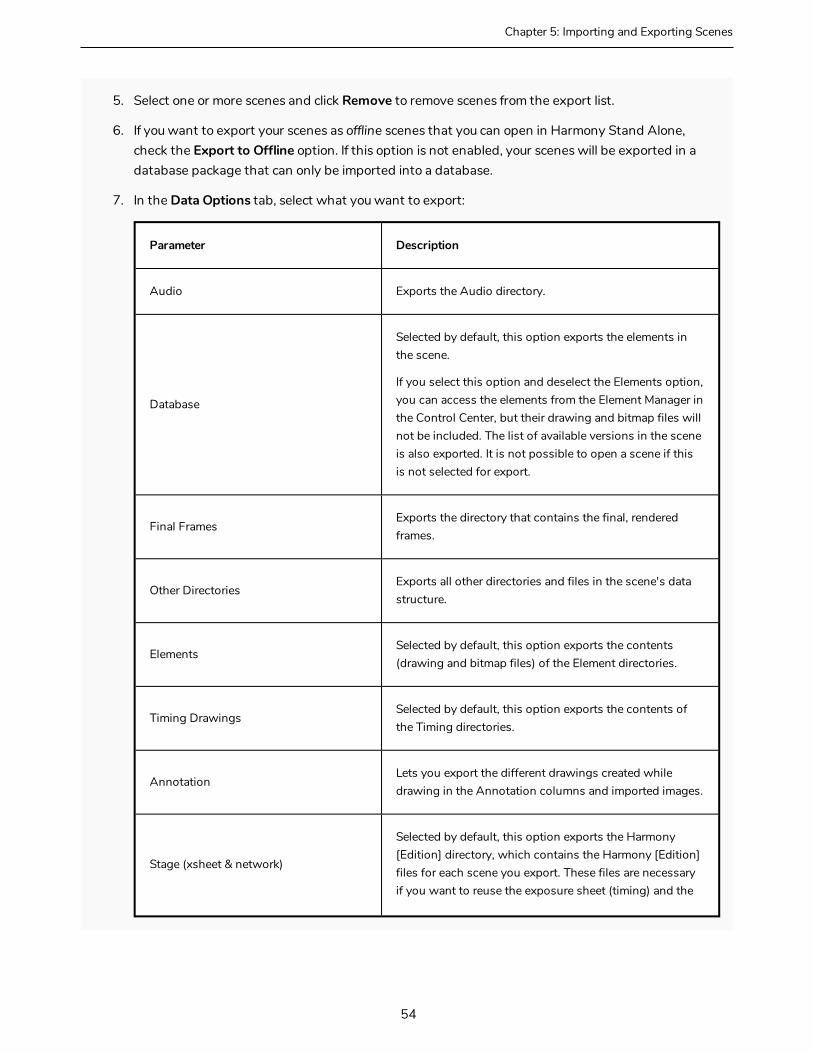
7. In the Data Options tab, select what you want to export:
Parameter Description
Audio Exports the Audio directory.
Database
Selected by default, this option exports the elements in the scene.
If you select this option and deselect the Elements option, you can access the elements from the Element Manager in the Control Center, but their drawing and bitmap files will not be included. The list of available versions in the scene is also exported. It is not possible to open a scene if this is not selected for export.
Final FramesExports the directory that contains the final, rendered frames.
Other DirectoriesExports all other directories and files in the scene's data structure.
ElementsSelected by default, this option exports the contents (drawing and bitmap files) of the Element directories.
Timing DrawingsSelected by default, this option exports the contents of the Timing directories.
AnnotationLets you export the different drawings created while drawing in the Annotation columns and imported images.
Stage (xsheet & network)
Selected by default, this option exports the Harmony [Edition] directory, which contains the Harmony [Edition] files for each scene you export. These files are necessary if you want to reuse the exposure sheet (timing) and the
54
node structure from the original scene.
If this option is selected, you can select the Get Outside Drawings option to copy drawings into the scene folder that is referred to by the Timing columns and their Element (Drawing) nodes.
Palettes
Exports the palette-library directories. Decide if you want to export the palette-library from the environment, job or scene level. When you select a level, the palette-library in lower-level directories will also be exported.
Check Backup if you want to export the palette-list file which is necessary for the scene to know which palettes to use. In most cases, you should select this option as well as the Scene option.
Macros
Exports the macros (customized effect and node connections) that were created and stored in the environment, jobs or scenes to be exported. This is necessary if you have legacy scenes with macros.
Libraries Exports templates created at the selected levels.
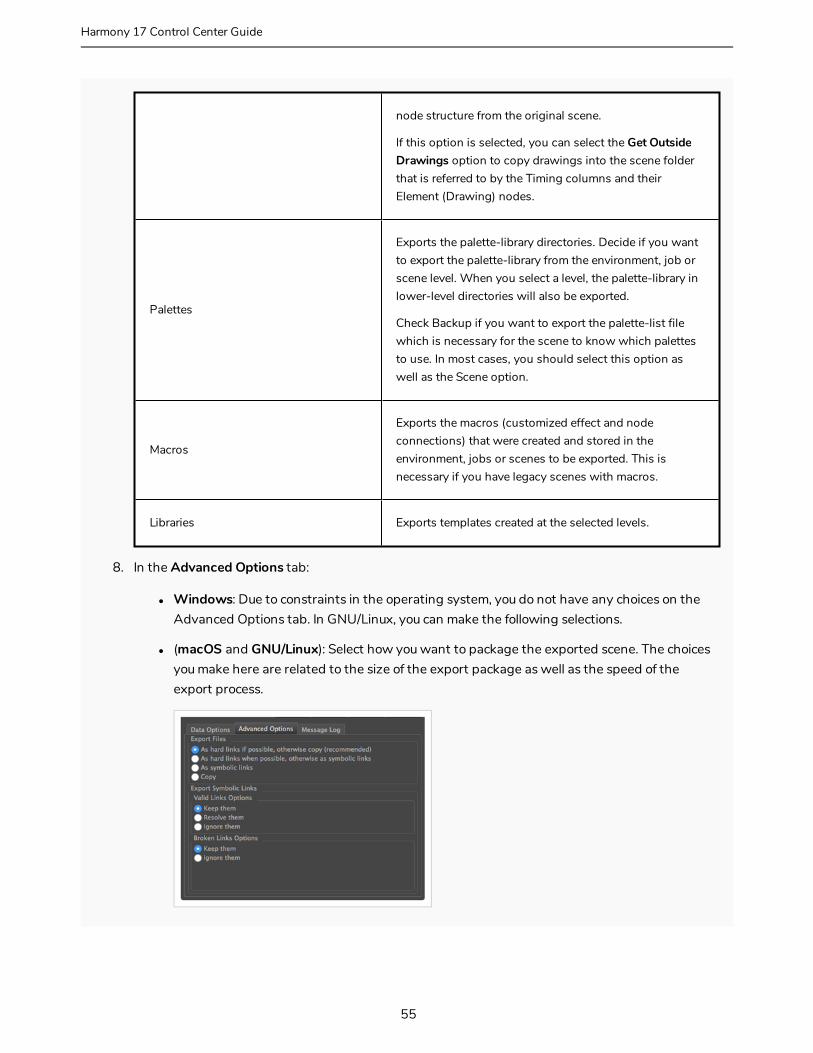
8. In the Advanced Options tab:
l Windows: Due to constraints in the operating system, you do not have any choices on the Advanced Options tab. In GNU/Linux, you can make the following selections.
l (macOS and GNU/Linux): Select how you want to package the exported scene. The choices you make here are related to the size of the export package as well as the speed of the export process.
55
Harmony 17 Control Center Guide

Chapter 5: Importing and Exporting Scenes
Select one of the following options in the Exporting Files section:
Parameter Description
As hard links if possible, otherwise copy
Speeds up the export process by making hard links to the original files on the file system. Hard links keep disk space usage to a minimum and ensure a quick export process.
If it is not possible to create hard links (because the links cross file systems, for example), the entire contents will be copied to the destination directory, which will be a slower process that will take up more space on your file system.
As hard links when possible, otherwise symbolic links
Ensures a quicker export process. However, if symbolic links are used and the original file is deleted, the symbolic link will be broken.
As symbolic links
Exports the scene using symbolic links to the original scene files (when importing, imports the scene using symbolic links to the export directory). While this process will reduce the size of the export directory, if the original file is deleted, the symbolic link will be broken.
Copy
Copies all scene data to the export location. This produces the largest export package and therefore takes the longest to complete. However, it is the simplest method.
In the Valid Links Options section, select one of the following options:
Parameter Description
Keep them Maintains symbolic links.
Resolve themRemoves symbolic links, replacing them with the actual files. When you use this option, the export
56

package will contain real files, rather than symbolic links.
Ignore themDoes not include valid symbolic links in the export package.
In the Broken Links Options section, select of the following options:
Parameter Description
Keep themKeeps symbolic links to missing files. When the missing files are placed in the path searched by the symbolic link, broken links will be valid again.
Ignore themDoes not include broken symbolic links in the export package.
9. Click Calculate to get a preview of the size of your export package.
10. Click Export.
The selected files and components are exported. Use the Message Log tab to view messages generated during the export process.
57
Harmony 17 Control Center Guide
Chapter 5: Importing and Exporting Scenes
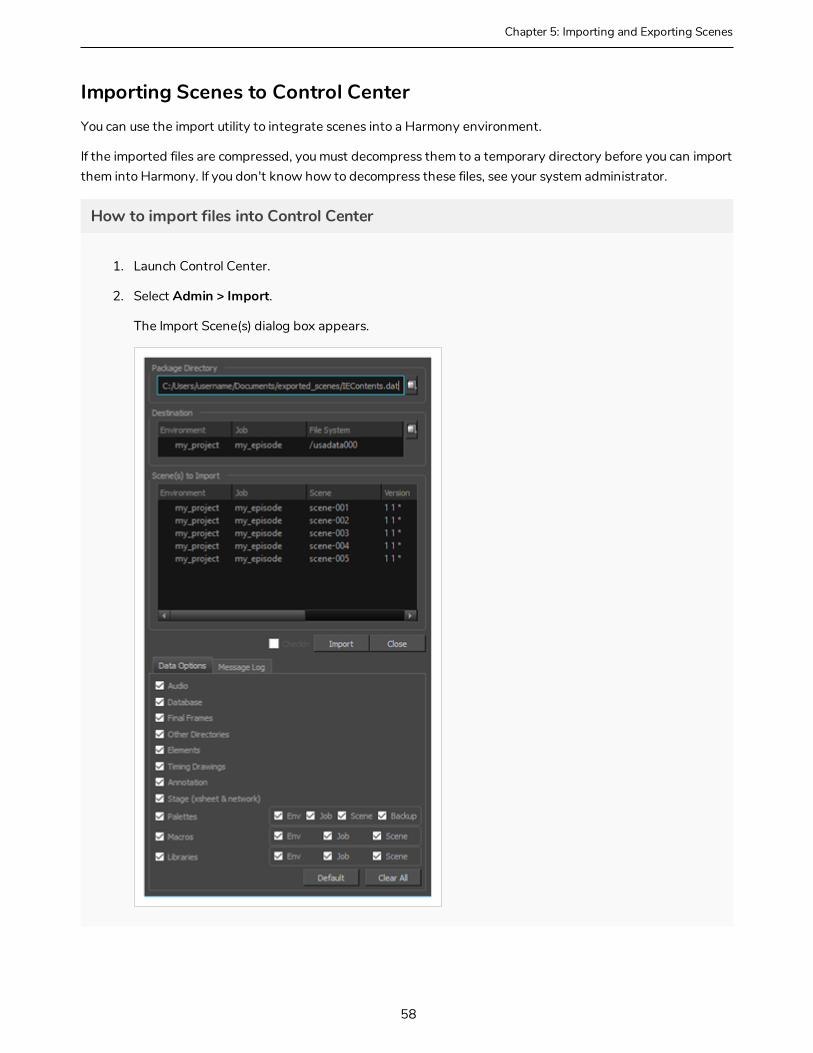
Importing Scenes to Control CenterYou can use the import utility to integrate scenes into a Harmony environment.
If the imported files are compressed, you must decompress them to a temporary directory before you can import them into Harmony. If you don't know how to decompress these files, see your system administrator.
How to import files into Control Center
1. Launch Control Center.
2. Select Admin > Import.
The Import Scene(s) dialog box appears.
58
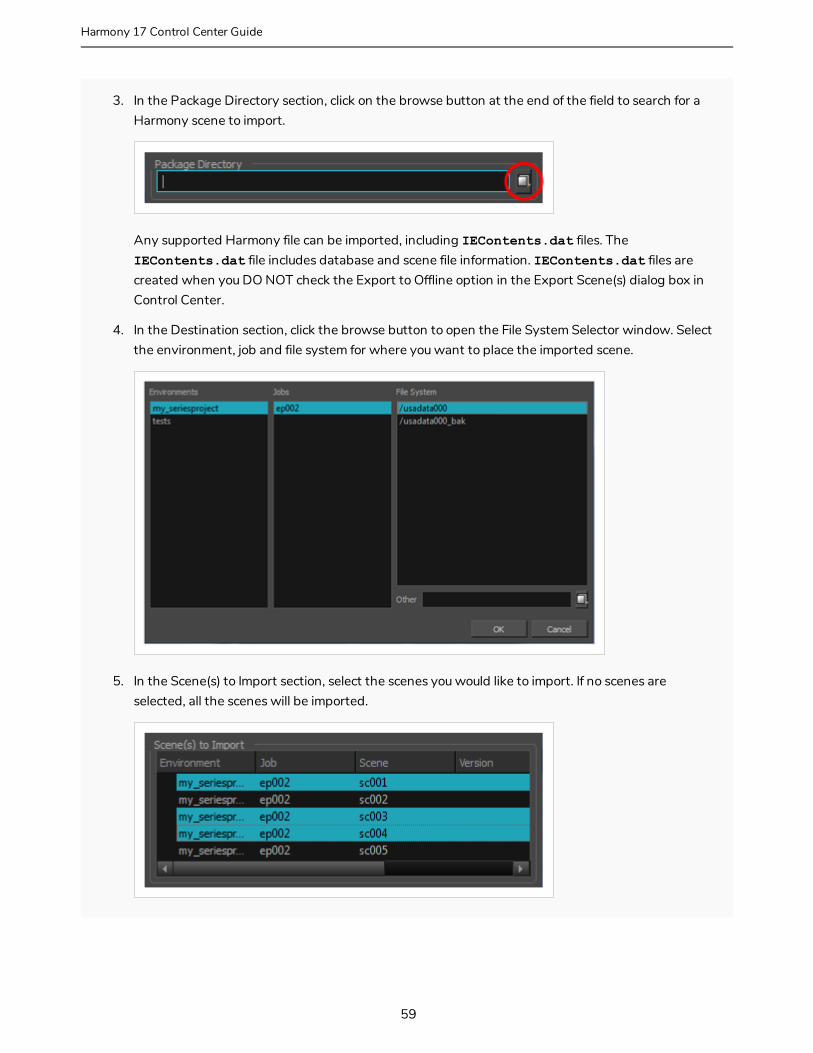
3. In the Package Directory section, click on the browse button at the end of the field to search for a Harmony scene to import.
Any supported Harmony file can be imported, including IEContents.dat files. The IEContents.dat file includes database and scene file information. IEContents.dat files are created when you DO NOT check the Export to Offline option in the Export Scene(s) dialog box in Control Center.
4. In the Destination section, click the browse button to open the File System Selector window. Select the environment, job and file system for where you want to place the imported scene.
5. In the Scene(s) to Import section, select the scenes you would like to import. If no scenes are selected, all the scenes will be imported.
59
Harmony 17 Control Center Guide
Chapter 5: Importing and Exporting Scenes
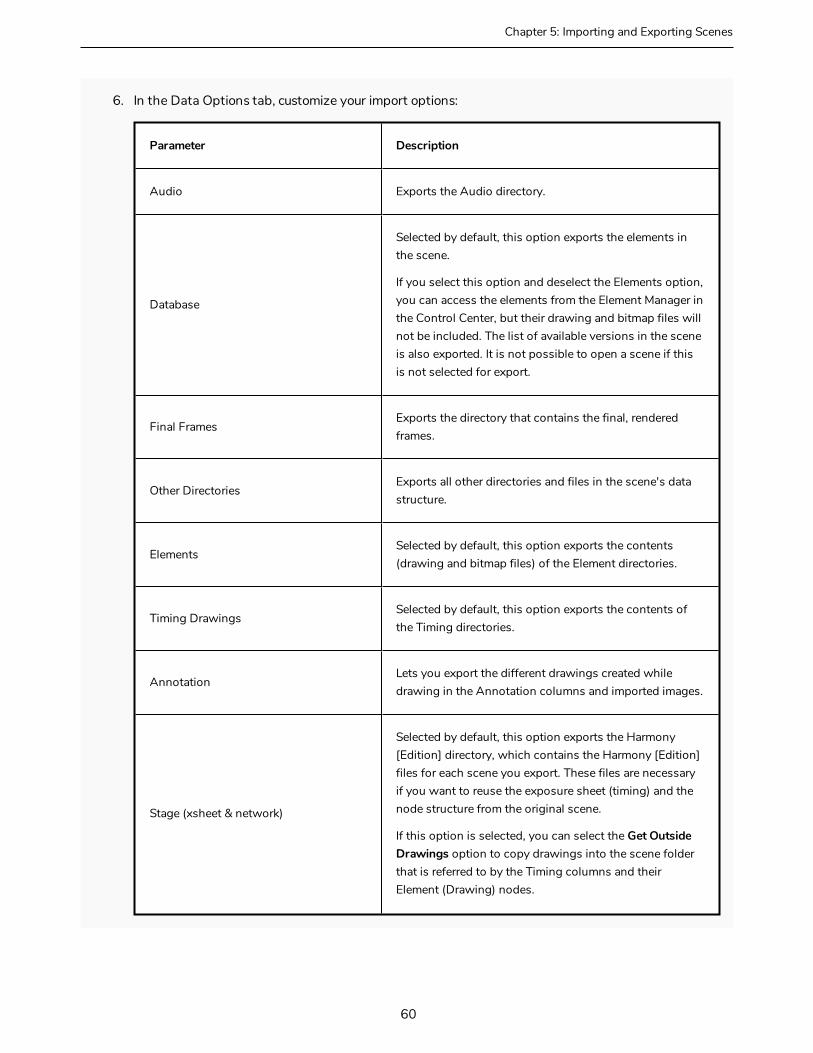
6. In the Data Options tab, customize your import options:
Parameter Description
Audio Exports the Audio directory.
Database
Selected by default, this option exports the elements in the scene.
If you select this option and deselect the Elements option, you can access the elements from the Element Manager in the Control Center, but their drawing and bitmap files will not be included. The list of available versions in the scene is also exported. It is not possible to open a scene if this is not selected for export.
Final FramesExports the directory that contains the final, rendered frames.
Other DirectoriesExports all other directories and files in the scene's data structure.
ElementsSelected by default, this option exports the contents (drawing and bitmap files) of the Element directories.
Timing DrawingsSelected by default, this option exports the contents of the Timing directories.
AnnotationLets you export the different drawings created while drawing in the Annotation columns and imported images.
Stage (xsheet & network)
Selected by default, this option exports the Harmony [Edition] directory, which contains the Harmony [Edition] files for each scene you export. These files are necessary if you want to reuse the exposure sheet (timing) and the node structure from the original scene.
If this option is selected, you can select the Get Outside Drawings option to copy drawings into the scene folder that is referred to by the Timing columns and their Element (Drawing) nodes.
60
Palettes
Exports the palette-library directories. Decide if you want to export the palette-library from the environment, job or scene level. When you select a level, the palette-library in lower-level directories will also be exported.
Check Backup if you want to export the palette-list file which is necessary for the scene to know which palettes to use. In most cases, you should select this option as well as the Scene option.
Macros
Exports the macros (customized effect and node connections) that were created and stored in the environment, jobs or scenes to be exported. This is necessary if you have legacy scenes with macros.
Libraries Exports templates created at the selected levels.
7. Check the Remap Paths for Linked Palettes and Images option if your scene contains palettes, images or textures linked to a an offline location. Then from the drop-down list, select the preset that points to the location on the server where copies of these same files are located—see About Asset Remapping for Exported and Imported Scenes on page 63.
8. Check the Check In option (beside the Import button), if your scene was checked out during export. If your scene was not checked out, this option remains disabled.
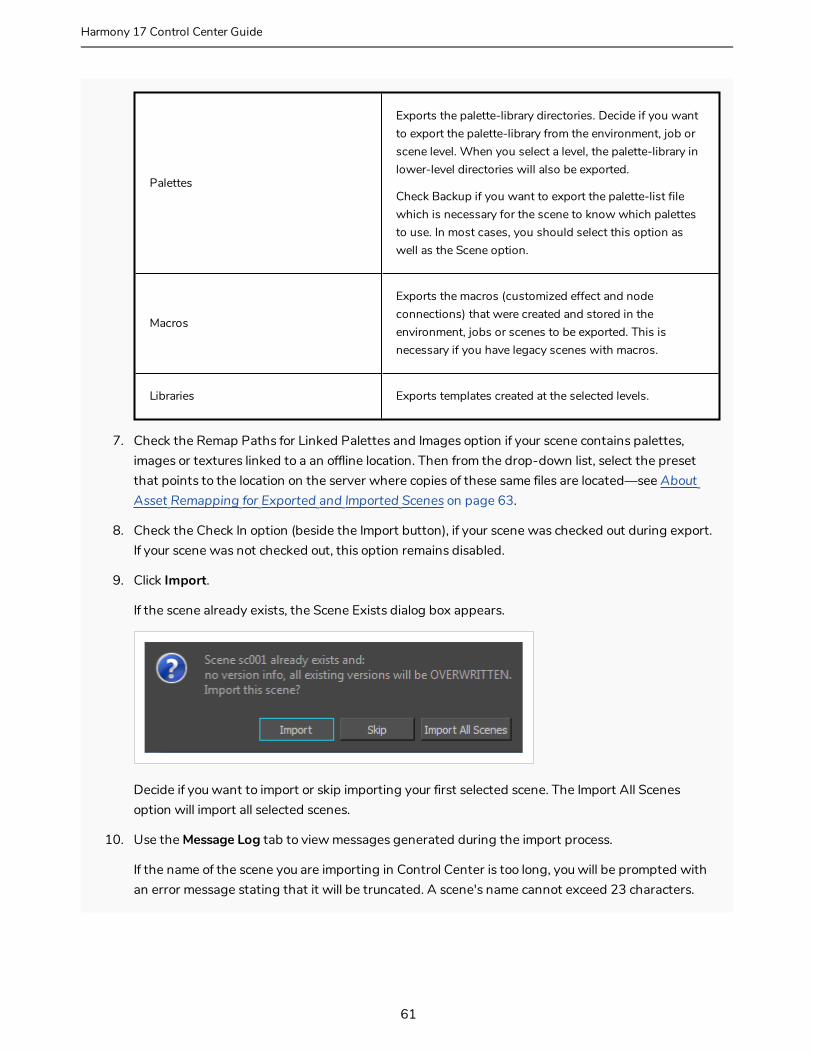
9. Click Import.
If the scene already exists, the Scene Exists dialog box appears.
Decide if you want to import or skip importing your first selected scene. The Import All Scenes option will import all selected scenes.
10. Use the Message Log tab to view messages generated during the import process.
If the name of the scene you are importing in Control Center is too long, you will be prompted with an error message stating that it will be truncated. A scene's name cannot exceed 23 characters.
61
Harmony 17 Control Center Guide

Chapter 5: Importing and Exporting Scenes
If you are importing scenes that were exported from the Harmony Network, or worked on in Harmony Stand Alone, the system will try to retrieve the version name.
62
About Asset Remapping for Exported and Imported ScenesIf your pipeline often involves exporting scenes from a database to offline so that you can work on them in Harmony Stand Alone, you might encounter the following issues:
l Exporting each scene you work on with its job and environment palettes uses up a lot of storage space and bandwidth.
l Scenes that use externally sourced palettes, textures or drawings cannot have access to these assets if they get exported from the database and opened on a different machine.
With asset remapping, it is possible to systematically remap the path to assets used by your scenes when exporting and importing them. Remapping allows you to tell Harmony that, when a scene uses palettes, textures or linked images from a specific location, to look for them in a different location instead.
Hence, provided that you organize your workflow so as to have job assets, environment assets and externally sourced assets stored in a specific space on your workstation, you do not need to export these assets with your scenes. You can simply keep them on your workstation and, after exporting a scene from the database, instruct Harmony to source assets from these locations on your computer rather than from their original location on their database.
Likewise, if you re-import an exported scene into the database, you can use remapping to make the scene source those assets from their database location again, instead of the location you remapped them to when you exported the scene. Since remapping assets is permanent, it is required to revert the effect of remapping when you import a scene that was remapped back into the database.
Remapping is done in two steps:
l Configuring the remapping rules. To do this, you will have to create remapping rules in an .xml document. Rules specify where to remap assets based on their type and, optionally, their original location.
63
Harmony 17 Control Center Guide
Chapter 5: Importing and Exporting Scenes
l Applying the remapping rules. When you open an exported scene in Harmony Stand Alone, if you have remapping rules configured, you will be prompted to apply one of your remapping rule sets to the scene before you start working on it. When importing a scene back into the database, you can apply a remapping rule to it as it is being imported.
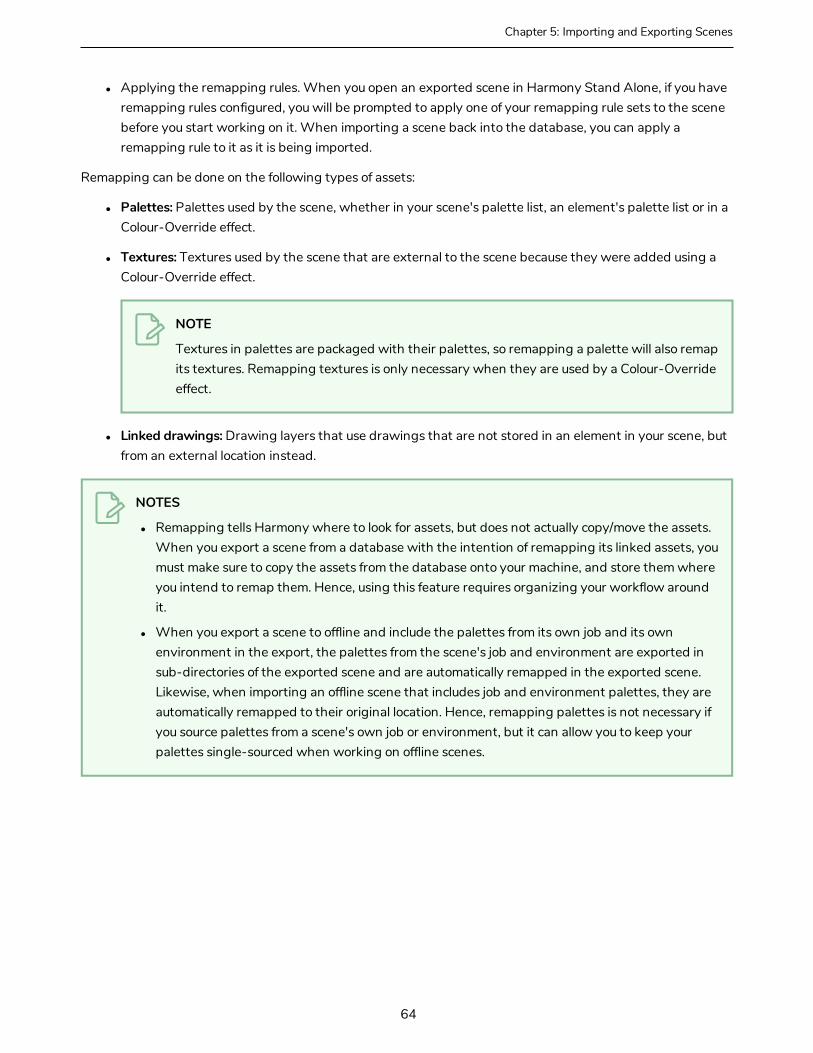
Remapping can be done on the following types of assets:
l Palettes: Palettes used by the scene, whether in your scene's palette list, an element's palette list or in a Colour-Override effect.
l Textures: Textures used by the scene that are external to the scene because they were added using a Colour-Override effect.
NOTE
Textures in palettes are packaged with their palettes, so remapping a palette will also remap its textures. Remapping textures is only necessary when they are used by a Colour-Override effect.
l Linked drawings: Drawing layers that use drawings that are not stored in an element in your scene, but from an external location instead.
NOTES
l Remapping tells Harmony where to look for assets, but does not actually copy/move the assets. When you export a scene from a database with the intention of remapping its linked assets, you must make sure to copy the assets from the database onto your machine, and store them where you intend to remap them. Hence, using this feature requires organizing your workflow around it.
l When you export a scene to offline and include the palettes from its own job and its own environment in the export, the palettes from the scene's job and environment are exported in sub-directories of the exported scene and are automatically remapped in the exported scene. Likewise, when importing an offline scene that includes job and environment palettes, they are automatically remapped to their original location. Hence, remapping palettes is not necessary if you source palettes from a scene's own job or environment, but it can allow you to keep your palettes single-sourced when working on offline scenes.
64
Configuring Palette, Texture and Image RemappingIn order to be able to automatically remap palettes, textures and images after exporting or importing scenes, you must create remapping presets.
A remapping preset determines the path in which to look for palettes, textures and linked drawings in the scene. These presets can be made to remap the path for all palettes, textures or linked drawings in the scene, or to only remap paths that match certain patterns.
You can configure several presets. You will be prompted to apply one (or none) of the configured remapping presets when opening a scene in Harmony Stand Alone and when importing a scene in Control Center.
To support a workflow where you export scenes from a database, work on them offline then reimport them into the database, you should at least have one preset to remap the assets to a path on your computer after you exported a scene, and one to remap them back to their original path in the database after you reimport them.
How to create remapping presets
1. Obtain a copy of the palettes, linked textures and linked drawings used by your scenes and store them in a specific, safe location on your machine. Make note of the location in which you stored each type of asset.
2. In a text editor with administrator privileges, open the relink.xml file located in Harmony's etc subdirectory:
l On Windows:
a. Open the Start menu and, in the Programs list, go to Windows Accessories.
b. Right-click on Notepad and select More > Run as administrator.
c. In the top menu, select File > Open
d. Browse to and open the following file:
C:\Program Files (x86)\Toon Boom Animation\Toon Boom Harmony 17 [Edition]\etc\relink.xml
l On macOS: In a terminal, type in the following command:
$ sudo vi /Applications/Toon Boom Harmony 17 [Edition]/Harmony [Edition].app/Contents/tba/etc/relink.xml
l On GNU/Linux: In a terminal, type in the following command:
$ sudo gedit /usr/local/ToonBoomAnimation/harmony[Edition]_17/etc/relink.xml
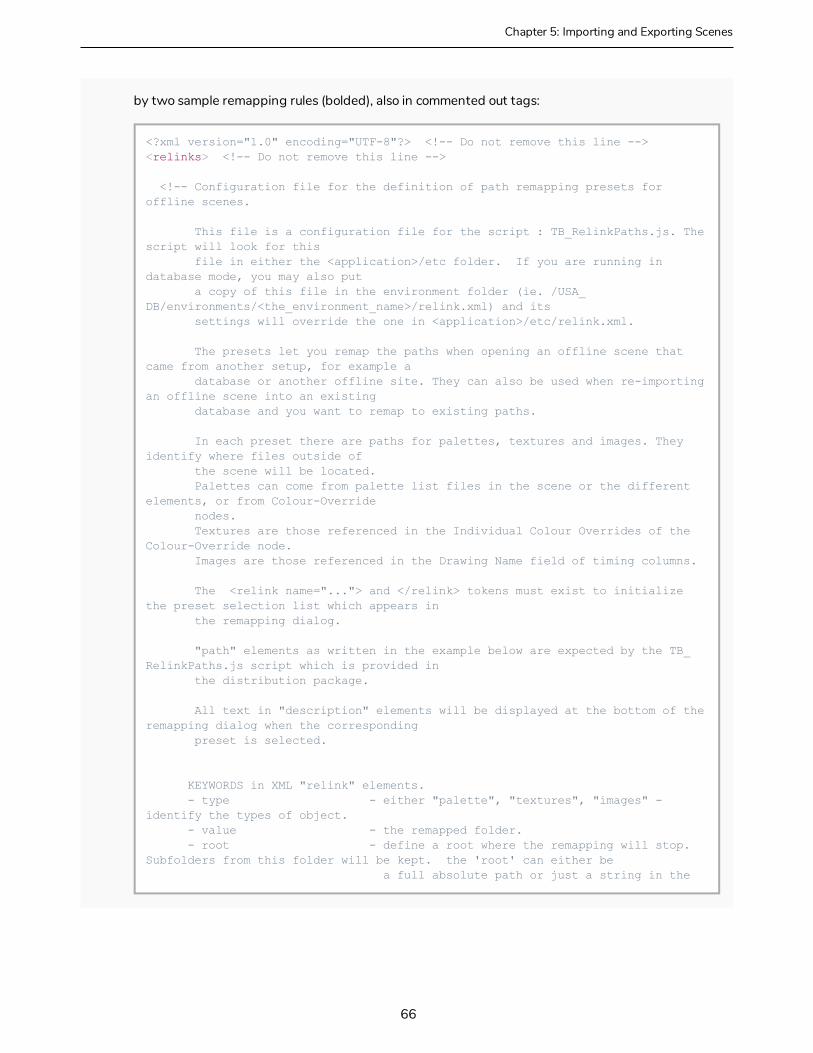
3. The default relink.xml file will look as follows, with instructions in a commented out tag, followed
65
Harmony 17 Control Center Guide
Chapter 5: Importing and Exporting Scenes
by two sample remapping rules (bolded), also in commented out tags:
<?xml version="1.0" encoding="UTF-8"?> <!-- Do not remove this line --><relinks> <!-- Do not remove this line --> <!-- Configuration file for the definition of path remapping presets for offline scenes. This file is a configuration file for the script : TB_RelinkPaths.js. The script will look for this file in either the <application>/etc folder. If you are running in database mode, you may also put a copy of this file in the environment folder (ie. /USA_DB/environments/<the_environment_name>/relink.xml) and its settings will override the one in <application>/etc/relink.xml. The presets let you remap the paths when opening an offline scene that came from another setup, for example a database or another offline site. They can also be used when re-importing an offline scene into an existing database and you want to remap to existing paths. In each preset there are paths for palettes, textures and images. They identify where files outside of the scene will be located. Palettes can come from palette list files in the scene or the different elements, or from Colour-Override nodes. Textures are those referenced in the Individual Colour Overrides of the Colour-Override node. Images are those referenced in the Drawing Name field of timing columns. The <relink name="..."> and </relink> tokens must exist to initialize the preset selection list which appears in the remapping dialog. "path" elements as written in the example below are expected by the TB_RelinkPaths.js script which is provided in the distribution package. All text in "description" elements will be displayed at the bottom of the remapping dialog when the corresponding preset is selected. KEYWORDS in XML "relink" elements. - type - either "palette", "textures", "images" - identify the types of object. - value - the remapped folder. - root - define a root where the remapping will stop. Subfolders from this folder will be kept. the 'root' can either be a full absolute path or just a string in the
66
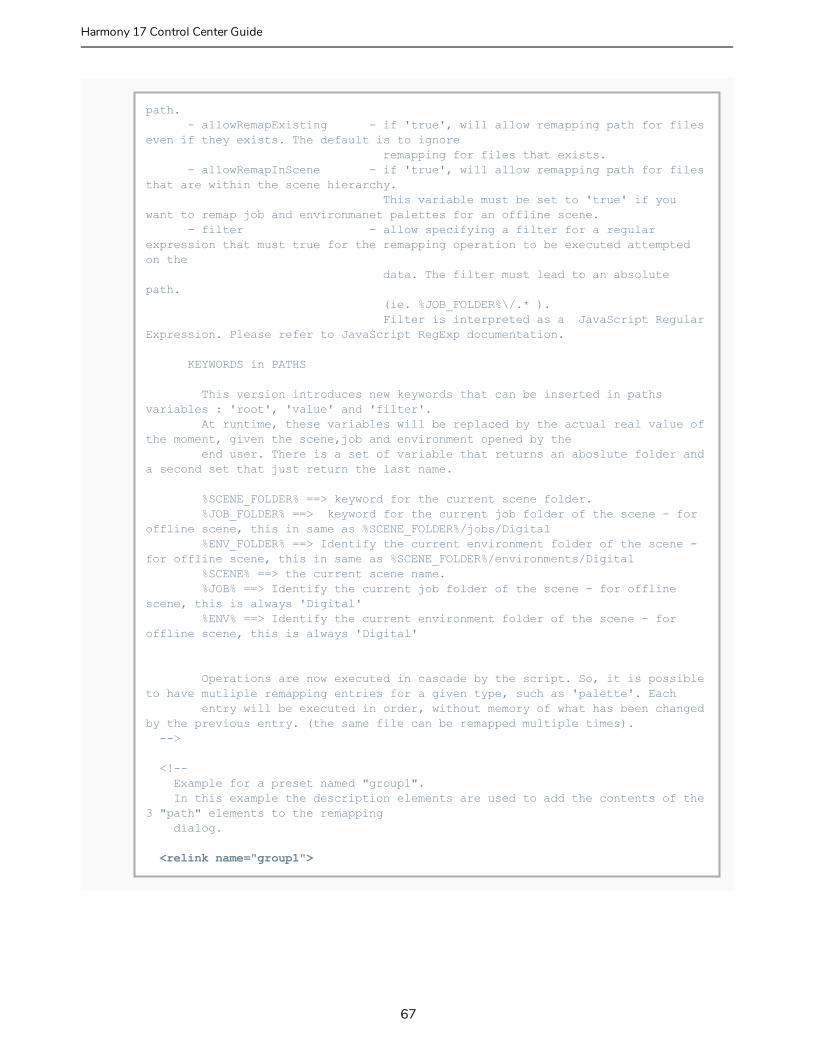
path. - allowRemapExisting - if 'true', will allow remapping path for files even if they exists. The default is to ignore remapping for files that exists. - allowRemapInScene - if 'true', will allow remapping path for files that are within the scene hierarchy. This variable must be set to 'true' if you want to remap job and environmanet palettes for an offline scene. - filter - allow specifying a filter for a regular expression that must true for the remapping operation to be executed attempted on the data. The filter must lead to an absolute path. (ie. %JOB_FOLDER%\/.* ). Filter is interpreted as a JavaScript Regular Expression. Please refer to JavaScript RegExp documentation. KEYWORDS in PATHS This version introduces new keywords that can be inserted in paths variables : 'root', 'value' and 'filter'. At runtime, these variables will be replaced by the actual real value of the moment, given the scene,job and environment opened by the end user. There is a set of variable that returns an aboslute folder and a second set that just return the last name. %SCENE_FOLDER% ==> keyword for the current scene folder. %JOB_FOLDER% ==> keyword for the current job folder of the scene - for offline scene, this in same as %SCENE_FOLDER%/jobs/Digital %ENV_FOLDER% ==> Identify the current environment folder of the scene - for offline scene, this in same as %SCENE_FOLDER%/environments/Digital %SCENE% ==> the current scene name. %JOB% ==> Identify the current job folder of the scene - for offline scene, this is always 'Digital' %ENV% ==> Identify the current environment folder of the scene - for offline scene, this is always 'Digital' Operations are now executed in cascade by the script. So, it is possible to have mutliple remapping entries for a given type, such as 'palette'. Each entry will be executed in order, without memory of what has been changed by the previous entry. (the same file can be remapped multiple times). --> <!-- Example for a preset named "group1". In this example the description elements are used to add the contents of the 3 "path" elements to the remapping dialog. <relink name="group1">
67
Harmony 17 Control Center Guide
Chapter 5: Importing and Exporting Scenes
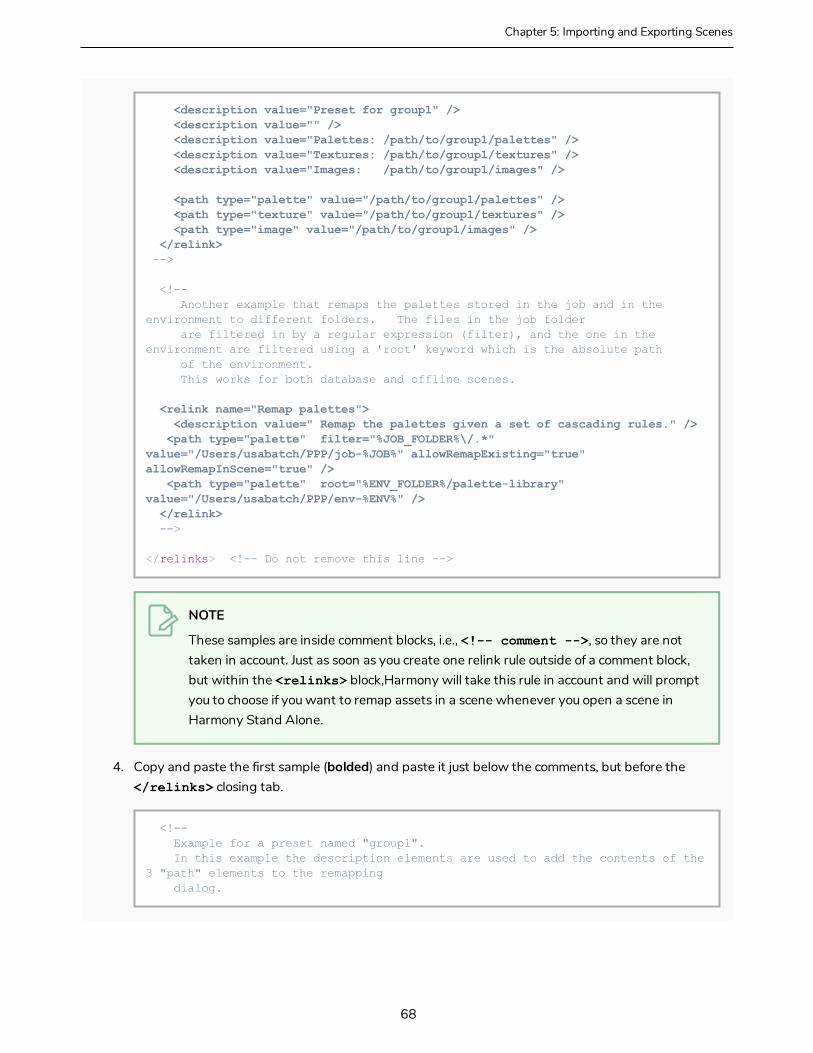
<description value="Preset for group1" /> <description value="" /> <description value="Palettes: /path/to/group1/palettes" /> <description value="Textures: /path/to/group1/textures" /> <description value="Images: /path/to/group1/images" /> <path type="palette" value="/path/to/group1/palettes" /> <path type="texture" value="/path/to/group1/textures" /> <path type="image" value="/path/to/group1/images" /> </relink> --> <!-- Another example that remaps the palettes stored in the job and in the environment to different folders. The files in the job folder are filtered in by a regular expression (filter), and the one in the environment are filtered using a 'root' keyword which is the absolute path of the environment. This works for both database and offline scenes. <relink name="Remap palettes"> <description value=" Remap the palettes given a set of cascading rules." /> <path type="palette" filter="%JOB_FOLDER%\/.*" value="/Users/usabatch/PPP/job-%JOB%" allowRemapExisting="true" allowRemapInScene="true" /> <path type="palette" root="%ENV_FOLDER%/palette-library" value="/Users/usabatch/PPP/env-%ENV%" /> </relink> --> </relinks> <!-- Do not remove this line -->
NOTE
These samples are inside comment blocks, i.e., <!-- comment -->, so they are not taken in account. Just as soon as you create one relink rule outside of a comment block, but within the <relinks> block,Harmony will take this rule in account and will prompt you to choose if you want to remap assets in a scene whenever you open a scene in Harmony Stand Alone.
4. Copy and paste the first sample (bolded) and paste it just below the comments, but before the </relinks> closing tab.
<!-- Example for a preset named "group1". In this example the description elements are used to add the contents of the 3 "path" elements to the remapping dialog.
68
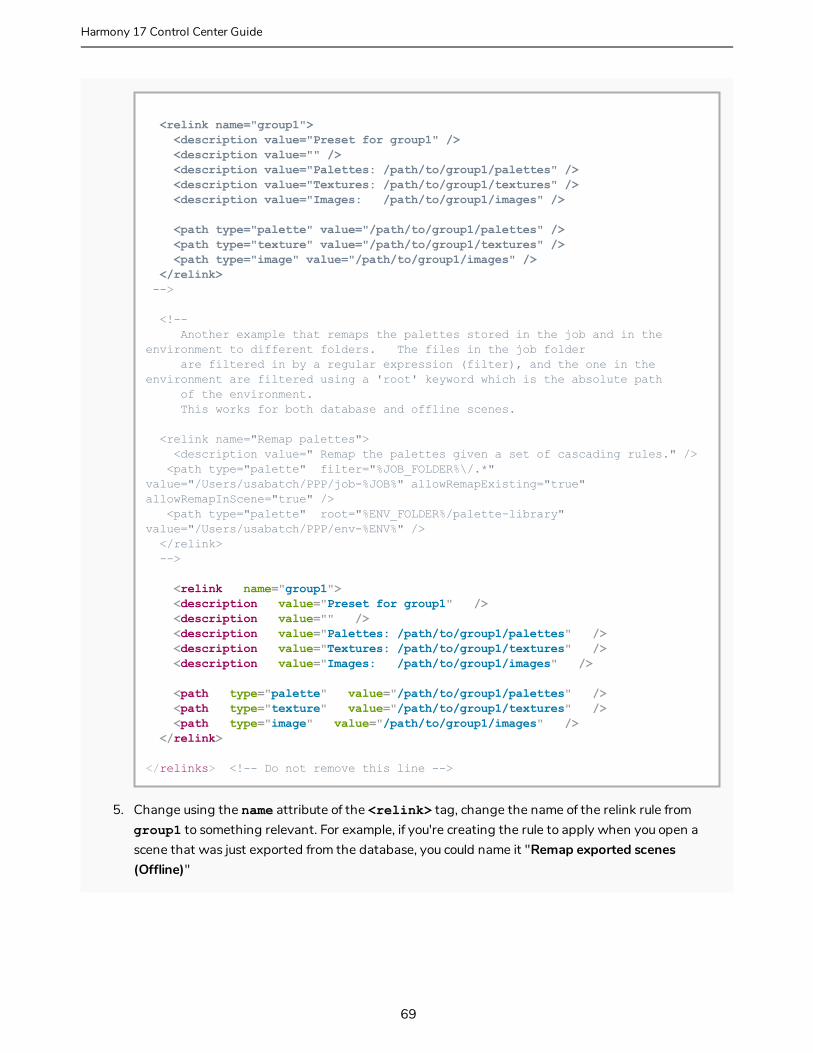
<relink name="group1"> <description value="Preset for group1" /> <description value="" /> <description value="Palettes: /path/to/group1/palettes" /> <description value="Textures: /path/to/group1/textures" /> <description value="Images: /path/to/group1/images" /> <path type="palette" value="/path/to/group1/palettes" /> <path type="texture" value="/path/to/group1/textures" /> <path type="image" value="/path/to/group1/images" /> </relink> --> <!-- Another example that remaps the palettes stored in the job and in the environment to different folders. The files in the job folder are filtered in by a regular expression (filter), and the one in the environment are filtered using a 'root' keyword which is the absolute path of the environment. This works for both database and offline scenes. <relink name="Remap palettes"> <description value=" Remap the palettes given a set of cascading rules." /> <path type="palette" filter="%JOB_FOLDER%\/.*" value="/Users/usabatch/PPP/job-%JOB%" allowRemapExisting="true" allowRemapInScene="true" /> <path type="palette" root="%ENV_FOLDER%/palette-library" value="/Users/usabatch/PPP/env-%ENV%" /> </relink> --> <relink name="group1"> <description value="Preset for group1" /> <description value="" /> <description value="Palettes: /path/to/group1/palettes" /> <description value="Textures: /path/to/group1/textures" /> <description value="Images: /path/to/group1/images" /> <path type="palette" value="/path/to/group1/palettes" /> <path type="texture" value="/path/to/group1/textures" /> <path type="image" value="/path/to/group1/images" /> </relink> </relinks> <!-- Do not remove this line -->
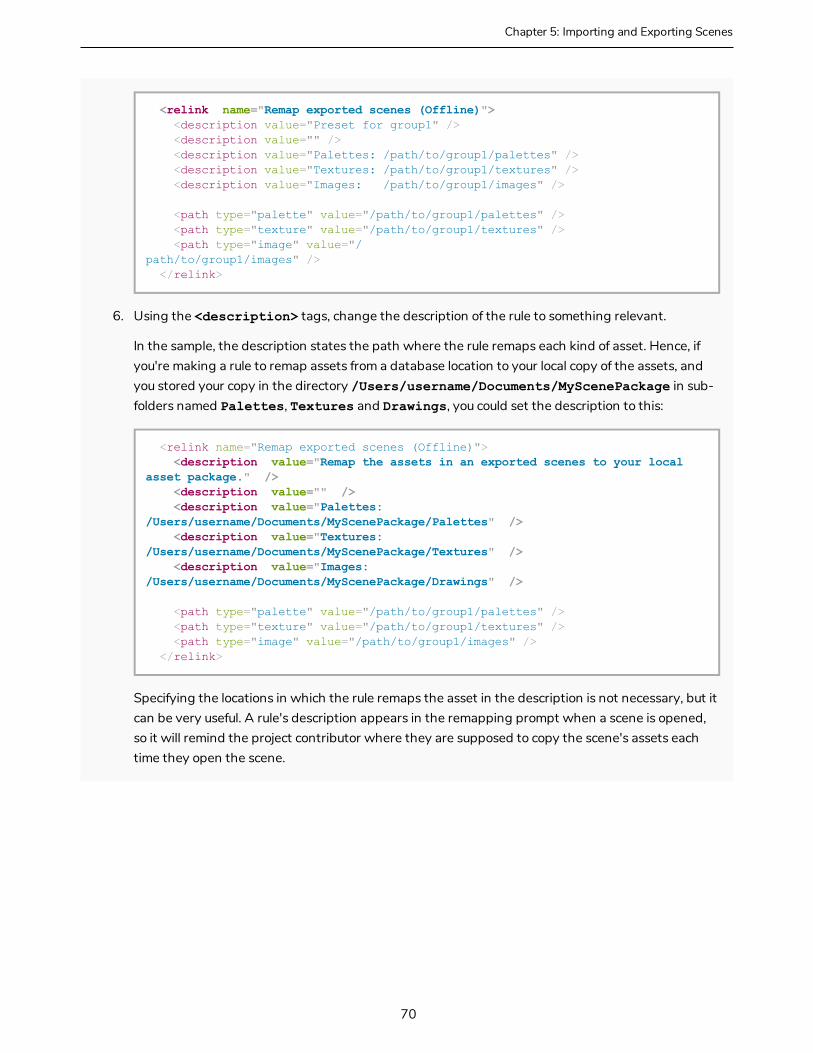
5. Change using the name attribute of the <relink> tag, change the name of the relink rule from group1 to something relevant. For example, if you're creating the rule to apply when you open a scene that was just exported from the database, you could name it "Remap exported scenes (Offline)"
69
Harmony 17 Control Center Guide
Chapter 5: Importing and Exporting Scenes
<relink name="Remap exported scenes (Offline)"> <description value="Preset for group1" /> <description value="" /> <description value="Palettes: /path/to/group1/palettes" /> <description value="Textures: /path/to/group1/textures" /> <description value="Images: /path/to/group1/images" /> <path type="palette" value="/path/to/group1/palettes" /> <path type="texture" value="/path/to/group1/textures" /> <path type="image" value="/ path/to/group1/images" /> </relink>
6. Using the <description> tags, change the description of the rule to something relevant.
In the sample, the description states the path where the rule remaps each kind of asset. Hence, if you're making a rule to remap assets from a database location to your local copy of the assets, and you stored your copy in the directory /Users/username/Documents/MyScenePackage in sub-folders named Palettes, Textures and Drawings, you could set the description to this:
<relink name="Remap exported scenes (Offline)"> <description value="Remap the assets in an exported scenes to your local asset package." /> <description value="" /> <description value="Palettes: /Users/username/Documents/MyScenePackage/Palettes" /> <description value="Textures: /Users/username/Documents/MyScenePackage/Textures" /> <description value="Images: /Users/username/Documents/MyScenePackage/Drawings" /> <path type="palette" value="/path/to/group1/palettes" /> <path type="texture" value="/path/to/group1/textures" /> <path type="image" value="/path/to/group1/images" /> </relink>
Specifying the locations in which the rule remaps the asset in the description is not necessary, but it can be very useful. A rule's description appears in the remapping prompt when a scene is opened, so it will remind the project contributor where they are supposed to copy the scene's assets each time they open the scene.
70
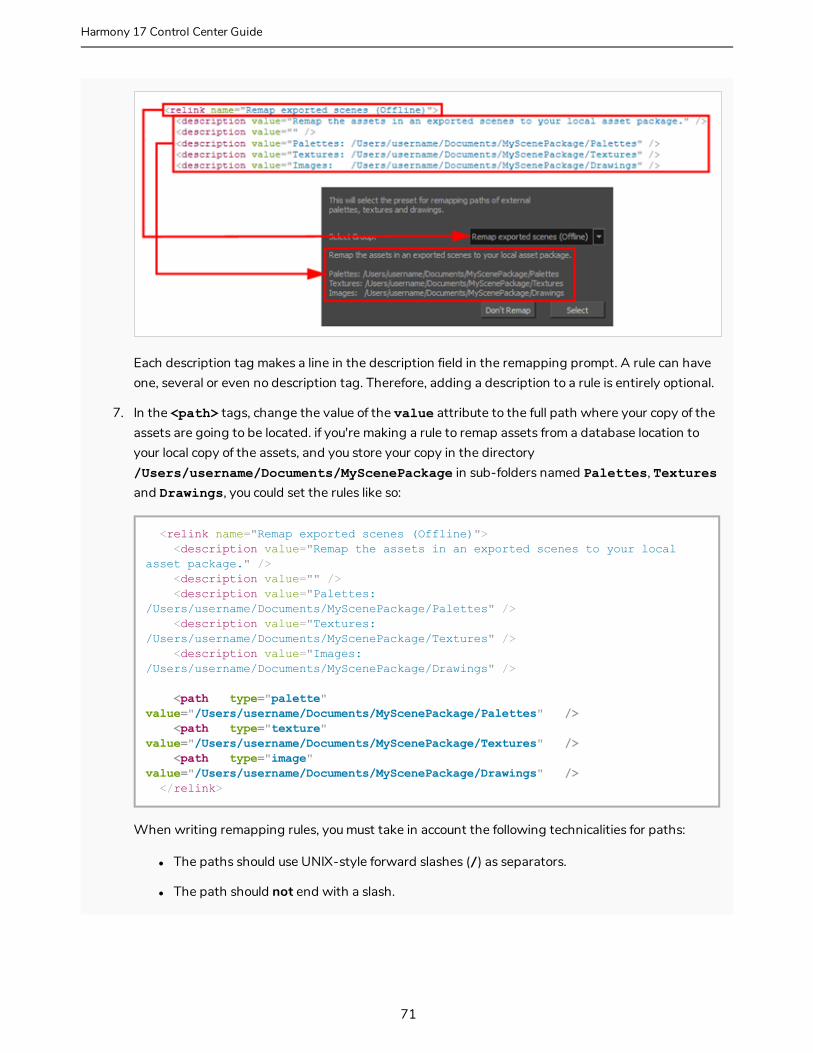
Each description tag makes a line in the description field in the remapping prompt. A rule can have one, several or even no description tag. Therefore, adding a description to a rule is entirely optional.
7. In the <path> tags, change the value of the value attribute to the full path where your copy of the assets are going to be located. if you're making a rule to remap assets from a database location to your local copy of the assets, and you store your copy in the directory /Users/username/Documents/MyScenePackage in sub-folders named Palettes, Textures and Drawings, you could set the rules like so:
<relink name="Remap exported scenes (Offline)"> <description value="Remap the assets in an exported scenes to your local asset package." /> <description value="" /> <description value="Palettes: /Users/username/Documents/MyScenePackage/Palettes" /> <description value="Textures: /Users/username/Documents/MyScenePackage/Textures" /> <description value="Images: /Users/username/Documents/MyScenePackage/Drawings" /> <path type="palette" value="/Users/username/Documents/MyScenePackage/Palettes" /> <path type="texture" value="/Users/username/Documents/MyScenePackage/Textures" /> <path type="image" value="/Users/username/Documents/MyScenePackage/Drawings" /> </relink>
When writing remapping rules, you must take in account the following technicalities for paths:
l The paths should use UNIX-style forward slashes (/) as separators.
l The path should not end with a slash.
71
Harmony 17 Control Center Guide
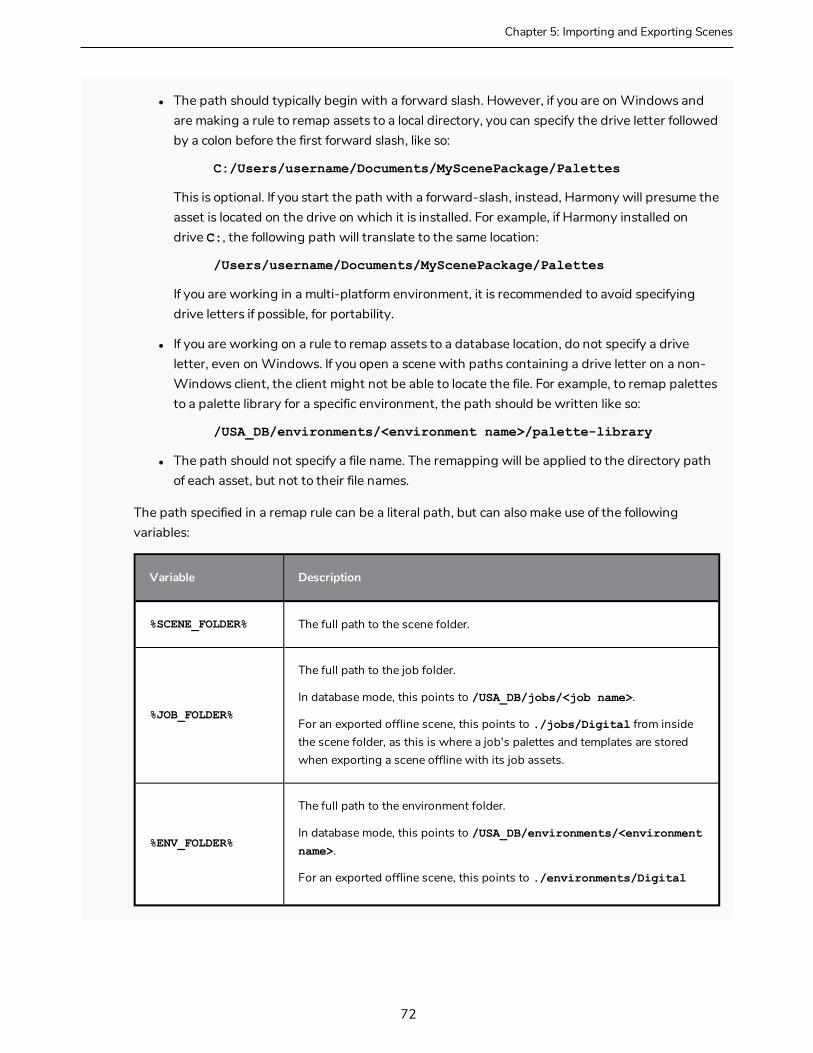
Chapter 5: Importing and Exporting Scenes
l The path should typically begin with a forward slash. However, if you are on Windows and are making a rule to remap assets to a local directory, you can specify the drive letter followed by a colon before the first forward slash, like so:
C:/Users/username/Documents/MyScenePackage/Palettes
This is optional. If you start the path with a forward-slash, instead, Harmony will presume the asset is located on the drive on which it is installed. For example, if Harmony installed on drive C:, the following path will translate to the same location:
/Users/username/Documents/MyScenePackage/Palettes
If you are working in a multi-platform environment, it is recommended to avoid specifying drive letters if possible, for portability.
l If you are working on a rule to remap assets to a database location, do not specify a drive letter, even on Windows. If you open a scene with paths containing a drive letter on a non-Windows client, the client might not be able to locate the file. For example, to remap palettes to a palette library for a specific environment, the path should be written like so:
/USA_DB/environments/<environment name>/palette-library
l The path should not specify a file name. The remapping will be applied to the directory path of each asset, but not to their file names.
The path specified in a remap rule can be a literal path, but can also make use of the following variables:
Variable Description
%SCENE_FOLDER% The full path to the scene folder.
%JOB_FOLDER%
The full path to the job folder.
In database mode, this points to /USA_DB/jobs/<job name>.
For an exported offline scene, this points to ./jobs/Digital from inside the scene folder, as this is where a job's palettes and templates are stored when exporting a scene offline with its job assets.
%ENV_FOLDER%
The full path to the environment folder.
In database mode, this points to /USA_DB/environments/<environment name>.
For an exported offline scene, this points to ./environments/Digital
72
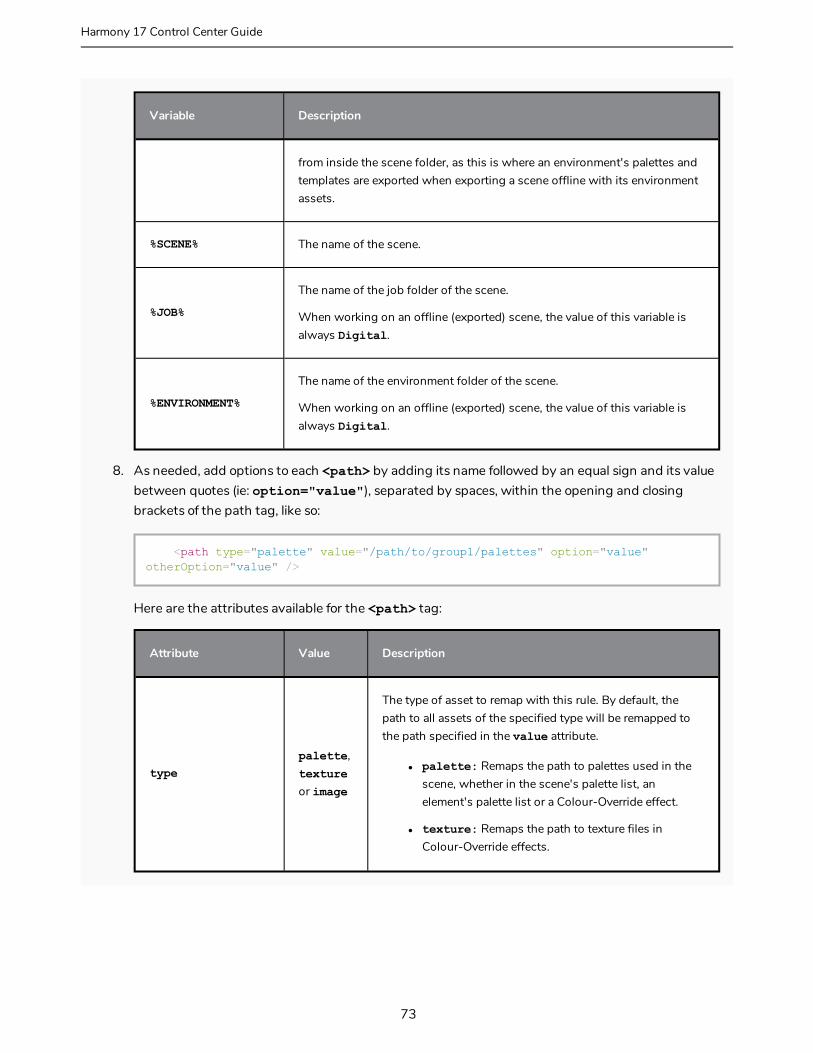
Variable Description
from inside the scene folder, as this is where an environment's palettes and templates are exported when exporting a scene offline with its environment assets.
%SCENE% The name of the scene.
%JOB%
The name of the job folder of the scene.
When working on an offline (exported) scene, the value of this variable is always Digital.
%ENVIRONMENT%
The name of the environment folder of the scene.
When working on an offline (exported) scene, the value of this variable is always Digital.
8. As needed, add options to each <path> by adding its name followed by an equal sign and its value between quotes (ie: option="value"), separated by spaces, within the opening and closing brackets of the path tag, like so:
<path type="palette" value="/path/to/group1/palettes" option="value" otherOption="value" />
Here are the attributes available for the <path> tag:
Attribute Value Description
typepalette, texture or image
The type of asset to remap with this rule. By default, the path to all assets of the specified type will be remapped to the path specified in the value attribute.
l palette: Remaps the path to palettes used in the scene, whether in the scene's palette list, an element's palette list or a Colour-Override effect.
l texture: Remaps the path to texture files in Colour-Override effects.
73
Harmony 17 Control Center Guide
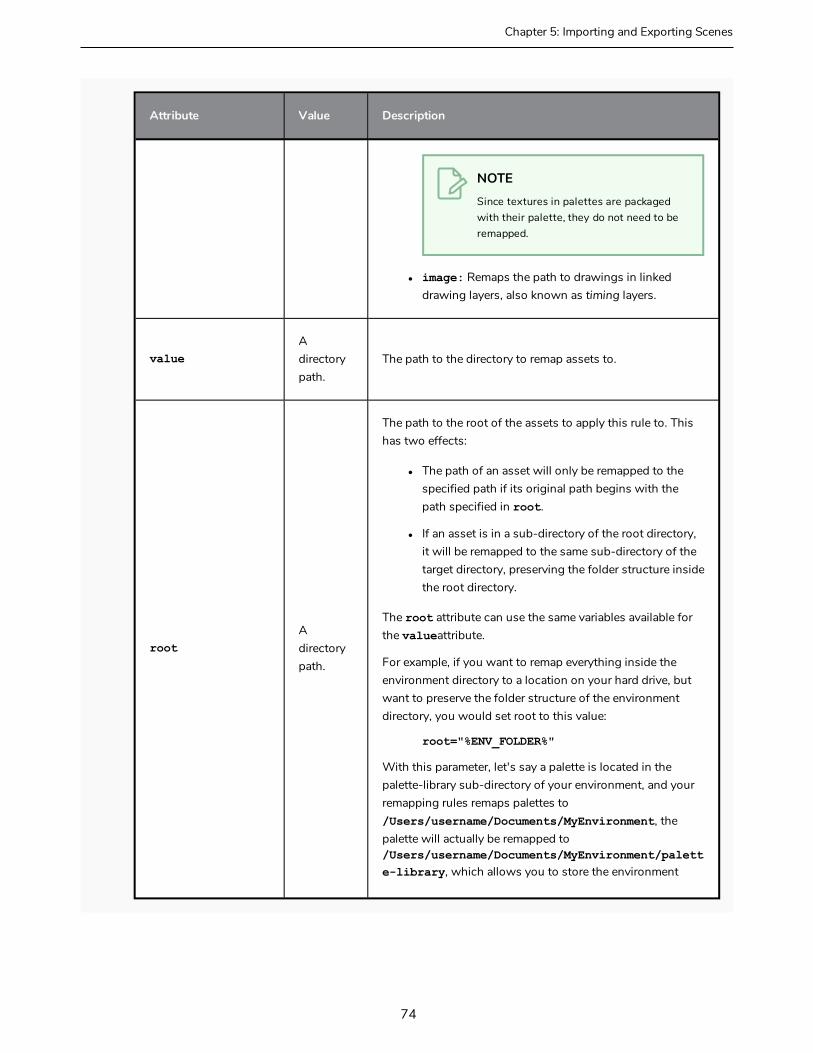
Chapter 5: Importing and Exporting Scenes
Attribute Value Description
NOTE Since textures in palettes are packaged with their palette, they do not need to be remapped.
l image: Remaps the path to drawings in linked drawing layers, also known as timing layers.
valueA directory path.
The path to the directory to remap assets to.
rootA directory path.
The path to the root of the assets to apply this rule to. This has two effects:
l The path of an asset will only be remapped to the specified path if its original path begins with the path specified in root.
l If an asset is in a sub-directory of the root directory, it will be remapped to the same sub-directory of the target directory, preserving the folder structure inside the root directory.
The root attribute can use the same variables available for the valueattribute.
For example, if you want to remap everything inside the environment directory to a location on your hard drive, but want to preserve the folder structure of the environment directory, you would set root to this value:
root="%ENV_FOLDER%"
With this parameter, let's say a palette is located in the palette-library sub-directory of your environment, and your remapping rules remaps palettes to /Users/username/Documents/MyEnvironment, the palette will actually be remapped to /Users/username/Documents/MyEnvironment/palette-library, which allows you to store the environment
74
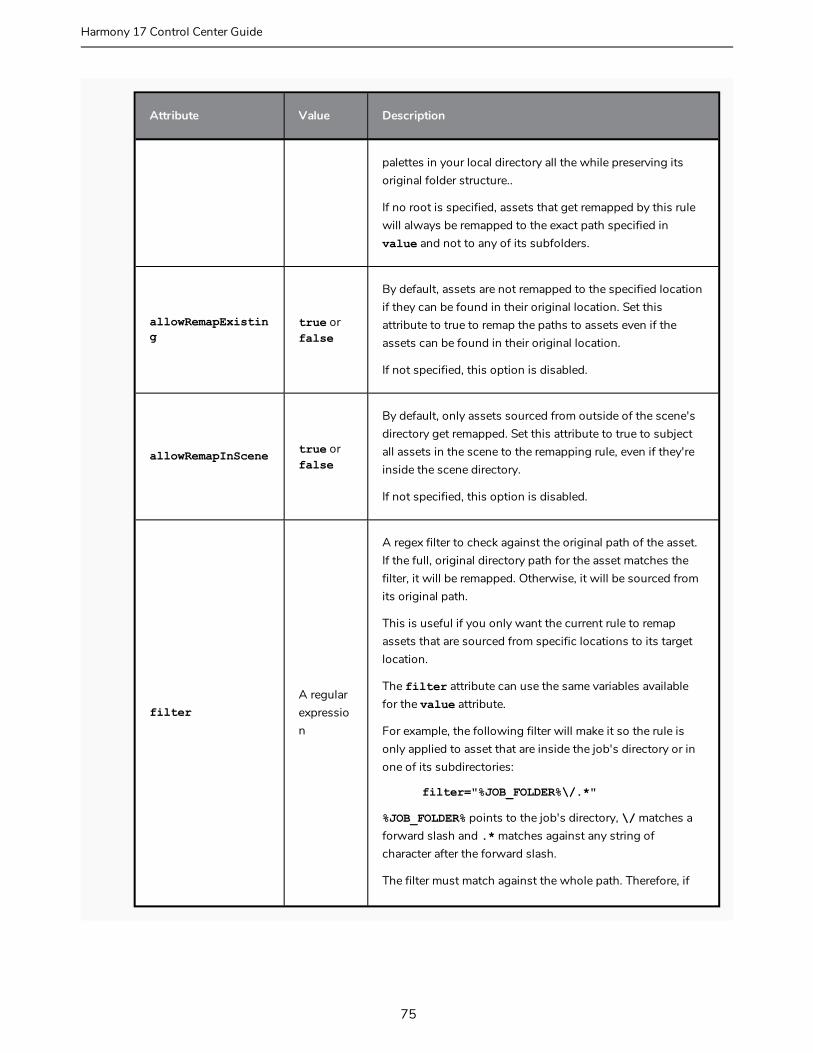
Attribute Value Description
palettes in your local directory all the while preserving its original folder structure..
If no root is specified, assets that get remapped by this rule will always be remapped to the exact path specified in value and not to any of its subfolders.
allowRemapExisting
true or false
By default, assets are not remapped to the specified location if they can be found in their original location. Set this attribute to true to remap the paths to assets even if the assets can be found in their original location.
If not specified, this option is disabled.
allowRemapInScene true or false
By default, only assets sourced from outside of the scene's directory get remapped. Set this attribute to true to subject all assets in the scene to the remapping rule, even if they're inside the scene directory.
If not specified, this option is disabled.
filterA regular expression
A regex filter to check against the original path of the asset. If the full, original directory path for the asset matches the filter, it will be remapped. Otherwise, it will be sourced from its original path.
This is useful if you only want the current rule to remap assets that are sourced from specific locations to its target location.
The filter attribute can use the same variables available for the value attribute.
For example, the following filter will make it so the rule is only applied to asset that are inside the job's directory or in one of its subdirectories:
filter="%JOB_FOLDER%\/.*"
%JOB_FOLDER% points to the job's directory, \/ matches a forward slash and .* matches against any string of character after the forward slash.
The filter must match against the whole path. Therefore, if
75
Harmony 17 Control Center Guide
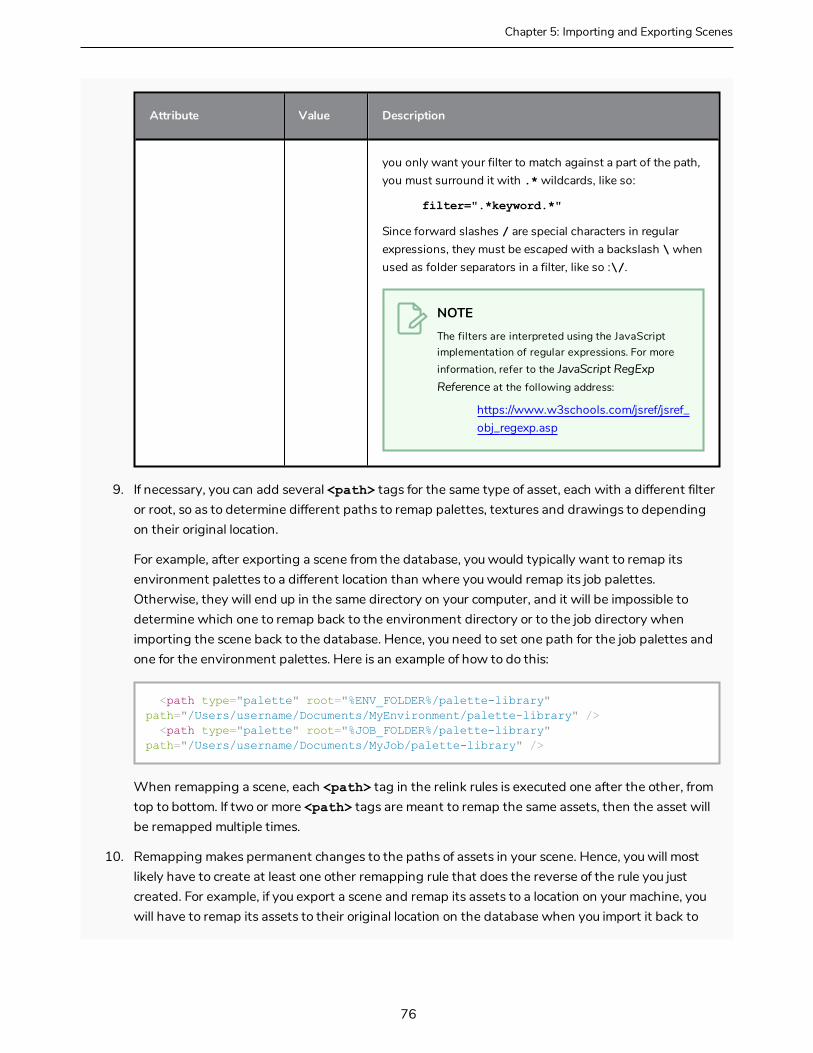
Chapter 5: Importing and Exporting Scenes
Attribute Value Description
you only want your filter to match against a part of the path, you must surround it with .* wildcards, like so:
filter=".*keyword.*"
Since forward slashes / are special characters in regular expressions, they must be escaped with a backslash \ when used as folder separators in a filter, like so :\/.
NOTE The filters are interpreted using the JavaScript implementation of regular expressions. For more information, refer to the JavaScript RegExp Reference at the following address:
https://www.w3schools.com/jsref/jsref_obj_regexp.asp
9. If necessary, you can add several <path> tags for the same type of asset, each with a different filter or root, so as to determine different paths to remap palettes, textures and drawings to depending on their original location.
For example, after exporting a scene from the database, you would typically want to remap its environment palettes to a different location than where you would remap its job palettes. Otherwise, they will end up in the same directory on your computer, and it will be impossible to determine which one to remap back to the environment directory or to the job directory when importing the scene back to the database. Hence, you need to set one path for the job palettes and one for the environment palettes. Here is an example of how to do this:
<path type="palette" root="%ENV_FOLDER%/palette-library" path="/Users/username/Documents/MyEnvironment/palette-library" /> <path type="palette" root="%JOB_FOLDER%/palette-library" path="/Users/username/Documents/MyJob/palette-library" />
When remapping a scene, each <path> tag in the relink rules is executed one after the other, from top to bottom. If two or more <path> tags are meant to remap the same assets, then the asset will be remapped multiple times.
10. Remapping makes permanent changes to the paths of assets in your scene. Hence, you will most likely have to create at least one other remapping rule that does the reverse of the rule you just created. For example, if you export a scene and remap its assets to a location on your machine, you will have to remap its assets to their original location on the database when you import it back to
76

the database, or else the assets will be missing when opening the imported scene from the database. Repeat the previous steps until you have all the filters required for the needs of your workflow.
77
Harmony 17 Control Center Guide
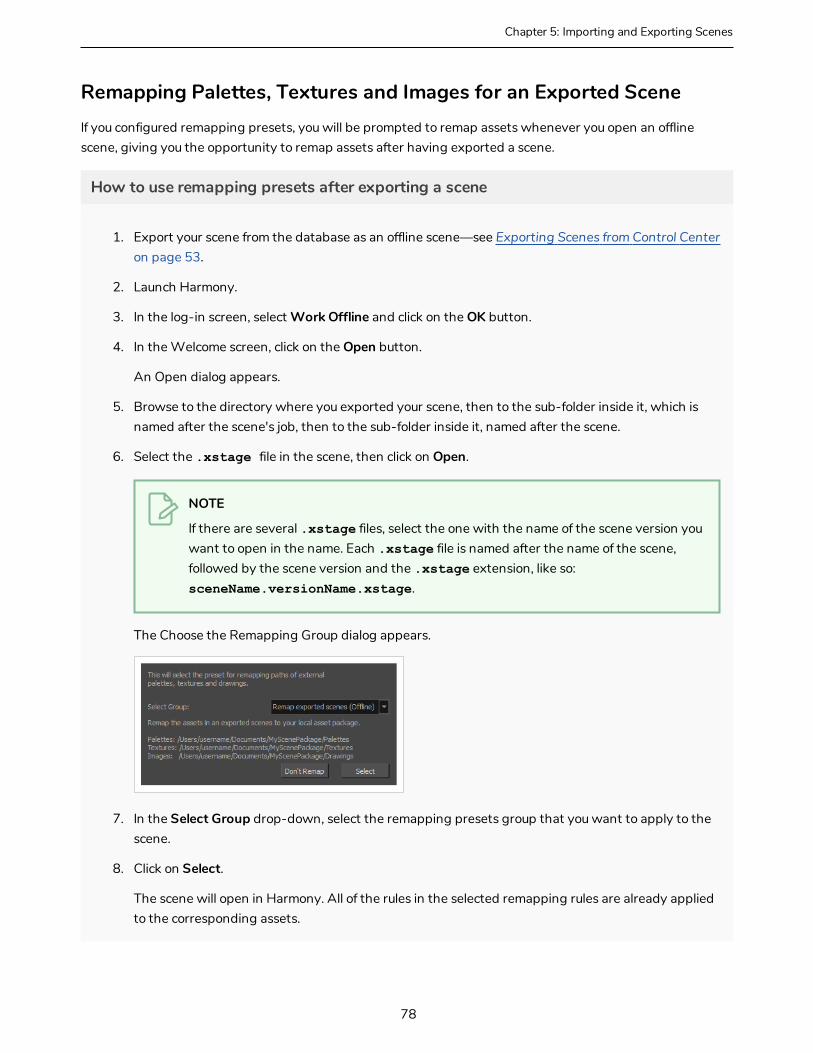
Chapter 5: Importing and Exporting Scenes
Remapping Palettes, Textures and Images for an Exported SceneIf you configured remapping presets, you will be prompted to remap assets whenever you open an offline scene, giving you the opportunity to remap assets after having exported a scene.
How to use remapping presets after exporting a scene
1. Export your scene from the database as an offline scene—see Exporting Scenes from Control Center on page 53.
2. Launch Harmony.
3. In the log-in screen, select Work Offline and click on the OK button.
4. In the Welcome screen, click on the Open button.
An Open dialog appears.
5. Browse to the directory where you exported your scene, then to the sub-folder inside it, which is named after the scene's job, then to the sub-folder inside it, named after the scene.
6. Select the .xstage file in the scene, then click on Open.
NOTE
If there are several .xstage files, select the one with the name of the scene version you want to open in the name. Each .xstage file is named after the name of the scene, followed by the scene version and the .xstage extension, like so: sceneName.versionName.xstage.
The Choose the Remapping Group dialog appears.
7. In the Select Group drop-down, select the remapping presets group that you want to apply to the scene.
8. Click on Select.
The scene will open in Harmony. All of the rules in the selected remapping rules are already applied to the corresponding assets.
78

Remapping Palettes, Textures and Images when Importing a SceneIf you configured remapping presets, you can apply one to a scene when importing it Control Center.
Delete this text and replace it with your own content.
1. Launch Control Center.
2. In the top menu, select Admin > Import.
3. Right of the Package Directory field, click on the Browse button.
An Open dialog appears.
4. Browse to and select the .xstage file for the scene you want to import.
5. Click on Open.
6. Right of the Destination field, click on the Browse button.
A File System Selector dialog appears.
7. Select the Environments, Jobs and File System lists, select the environment, the job and the file system to which you want to import the scene.
8. Click on OK.
9. In the Data Options section, select the types of data you want to import with the scene into the database—see Importing Scenes to Control Center on page 58.
10. Check the Remap Paths for Linked Palettes and Images option.
79
Harmony 17 Control Center Guide
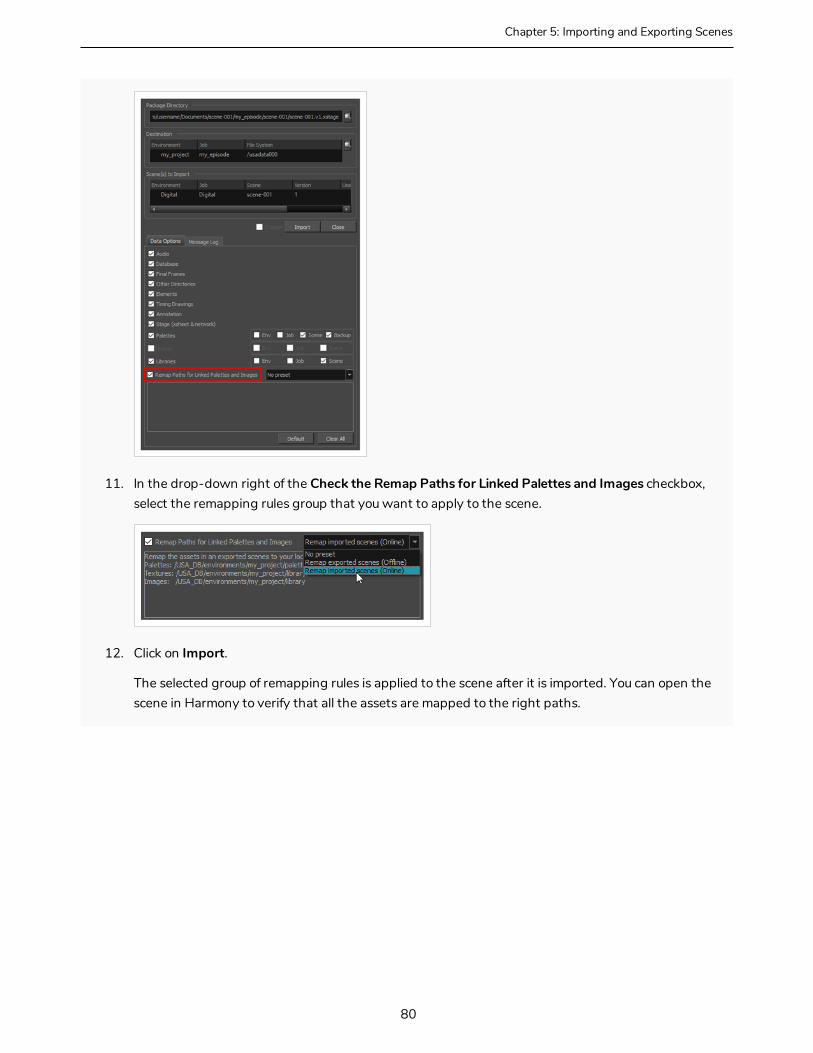
Chapter 5: Importing and Exporting Scenes
11. In the drop-down right of the Check the Remap Paths for Linked Palettes and Images checkbox, select the remapping rules group that you want to apply to the scene.
12. Click on Import.
The selected group of remapping rules is applied to the scene after it is imported. You can open the scene in Harmony to verify that all the assets are mapped to the right paths.
80
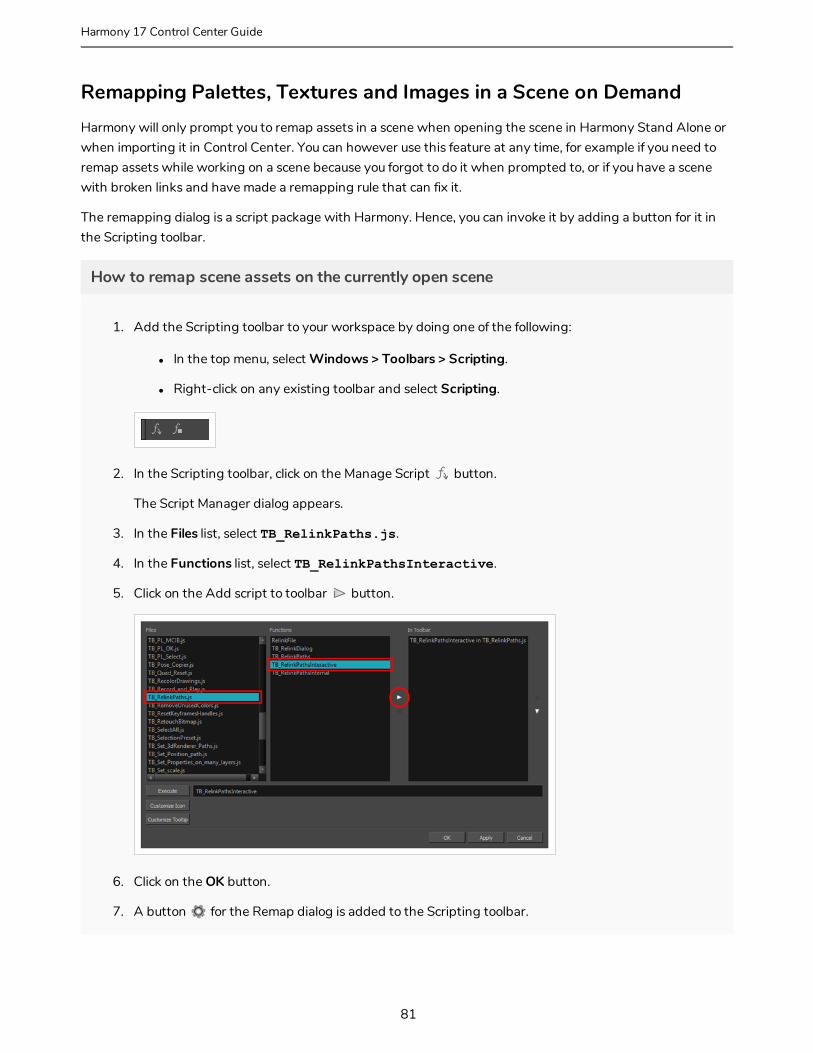
Remapping Palettes, Textures and Images in a Scene on DemandHarmony will only prompt you to remap assets in a scene when opening the scene in Harmony Stand Alone or when importing it in Control Center. You can however use this feature at any time, for example if you need to remap assets while working on a scene because you forgot to do it when prompted to, or if you have a scene with broken links and have made a remapping rule that can fix it.
The remapping dialog is a script package with Harmony. Hence, you can invoke it by adding a button for it in the Scripting toolbar.
How to remap scene assets on the currently open scene
1. Add the Scripting toolbar to your workspace by doing one of the following:
l In the top menu, select Windows > Toolbars > Scripting.
l Right-click on any existing toolbar and select Scripting.
2. In the Scripting toolbar, click on the Manage Script button.
The Script Manager dialog appears.
3. In the Files list, select TB_RelinkPaths.js.
4. In the Functions list, select TB_RelinkPathsInteractive.
5. Click on the Add script to toolbar button.
6. Click on the OK button.
7. A button for the Remap dialog is added to the Scripting toolbar.
81
Harmony 17 Control Center Guide
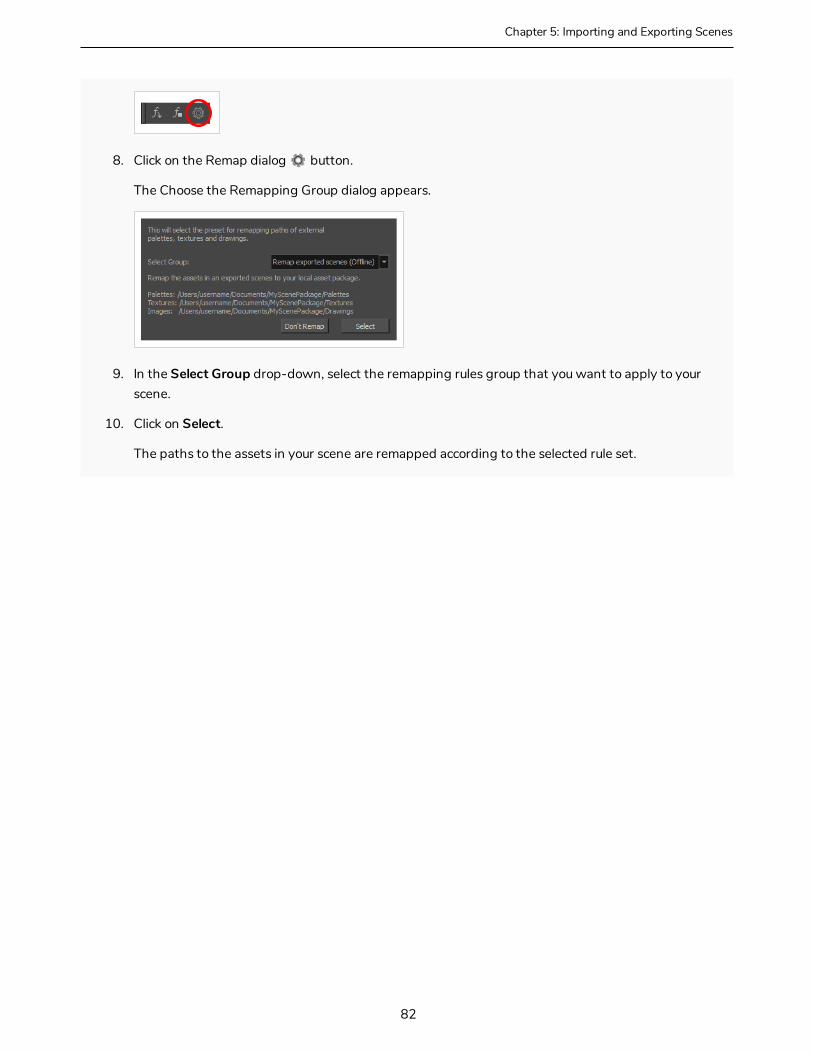
Chapter 5: Importing and Exporting Scenes
8. Click on the Remap dialog button.
The Choose the Remapping Group dialog appears.
9. In the Select Group drop-down, select the remapping rules group that you want to apply to your scene.
10. Click on Select.
The paths to the assets in your scene are remapped according to the selected rule set.
82
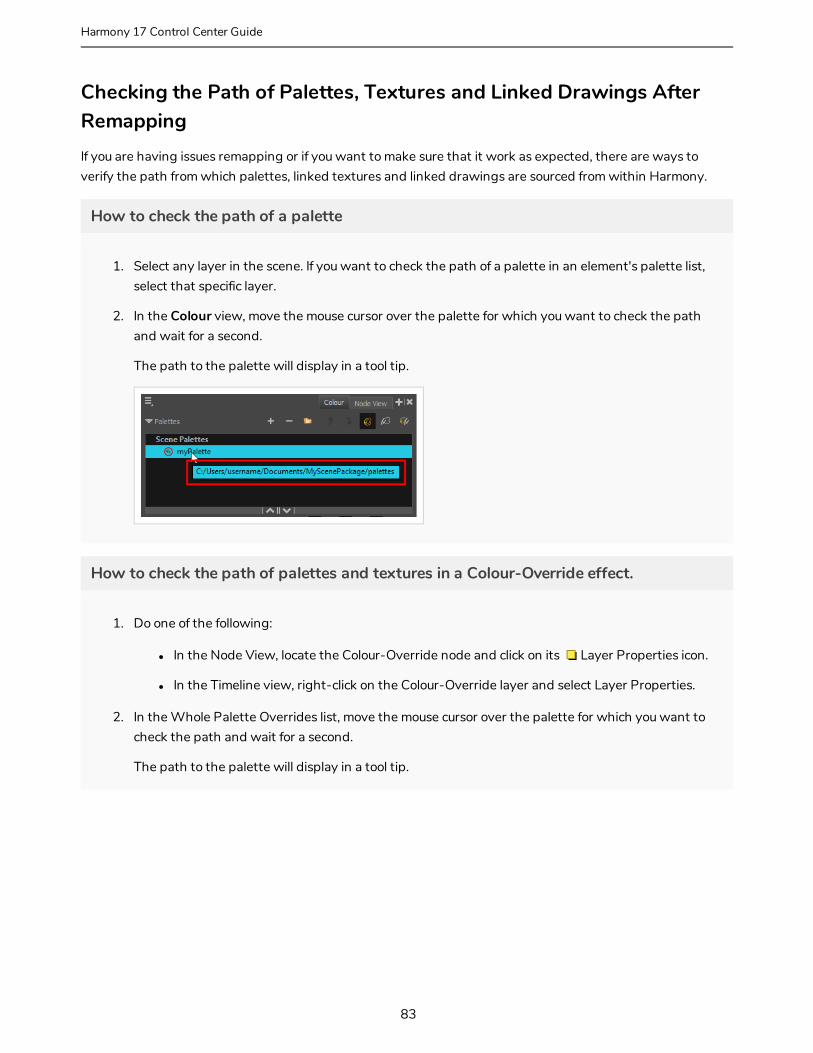
Checking the Path of Palettes, Textures and Linked Drawings After Remapping If you are having issues remapping or if you want to make sure that it work as expected, there are ways to verify the path from which palettes, linked textures and linked drawings are sourced from within Harmony.
How to check the path of a palette
1. Select any layer in the scene. If you want to check the path of a palette in an element's palette list, select that specific layer.
2. In the Colour view, move the mouse cursor over the palette for which you want to check the path and wait for a second.
The path to the palette will display in a tool tip.
How to check the path of palettes and textures in a Colour-Override effect.
1. Do one of the following:
l In the Node View, locate the Colour-Override node and click on its Layer Properties icon.
l In the Timeline view, right-click on the Colour-Override layer and select Layer Properties.
2. In the Whole Palette Overrides list, move the mouse cursor over the palette for which you want to check the path and wait for a second.
The path to the palette will display in a tool tip.
83
Harmony 17 Control Center Guide
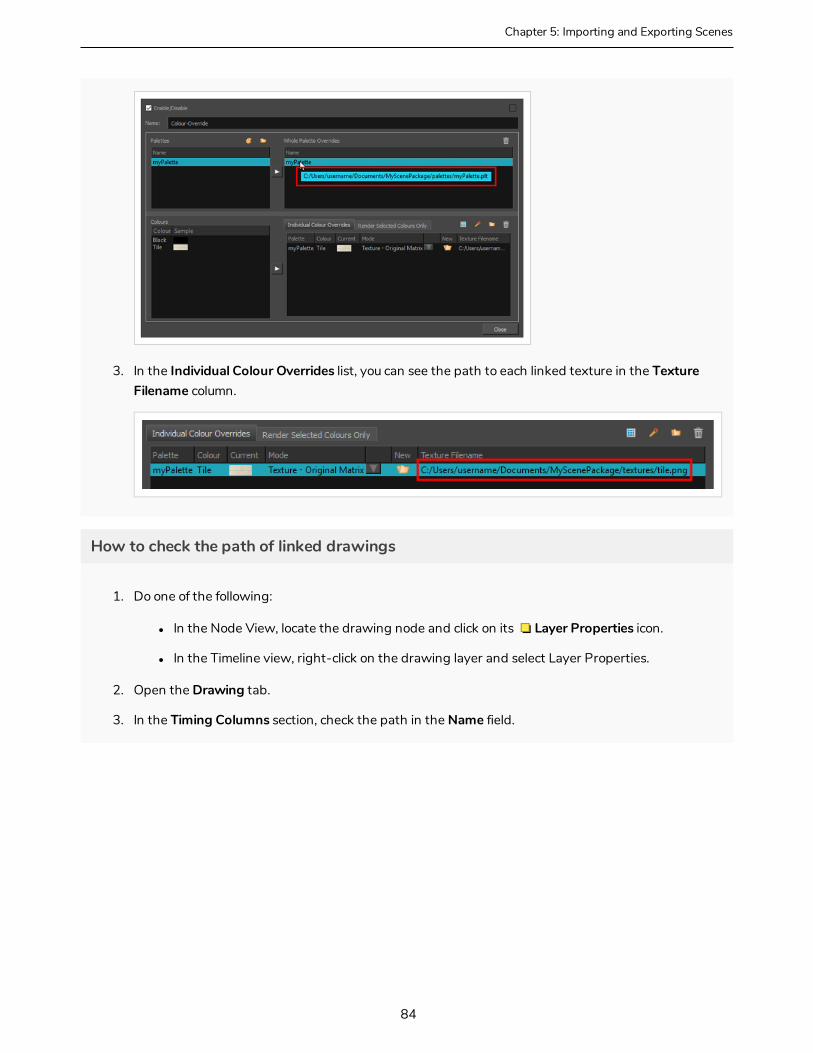
Chapter 5: Importing and Exporting Scenes
3. In the Individual Colour Overrides list, you can see the path to each linked texture in the Texture Filename column.
How to check the path of linked drawings
1. Do one of the following:
l In the Node View, locate the drawing node and click on its Layer Properties icon.
l In the Timeline view, right-click on the drawing layer and select Layer Properties.
2. Open the Drawing tab.
3. In the Timing Columns section, check the path in the Name field.
84
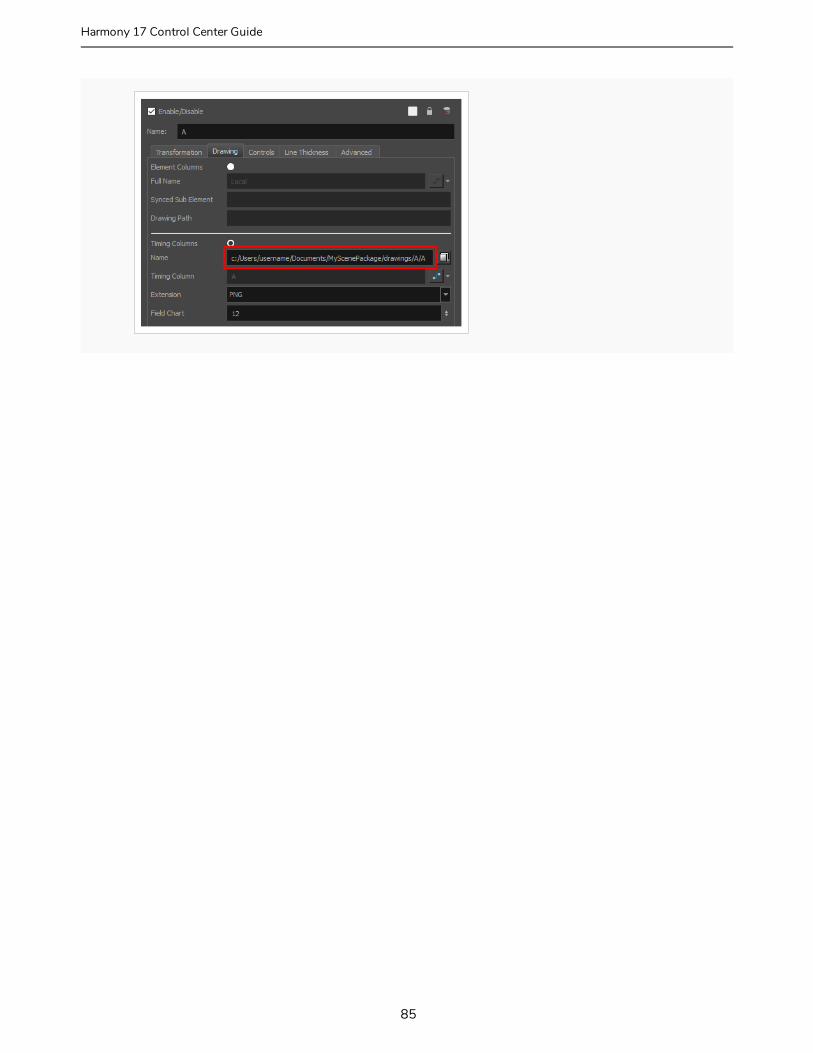
85
Harmony 17 Control Center Guide
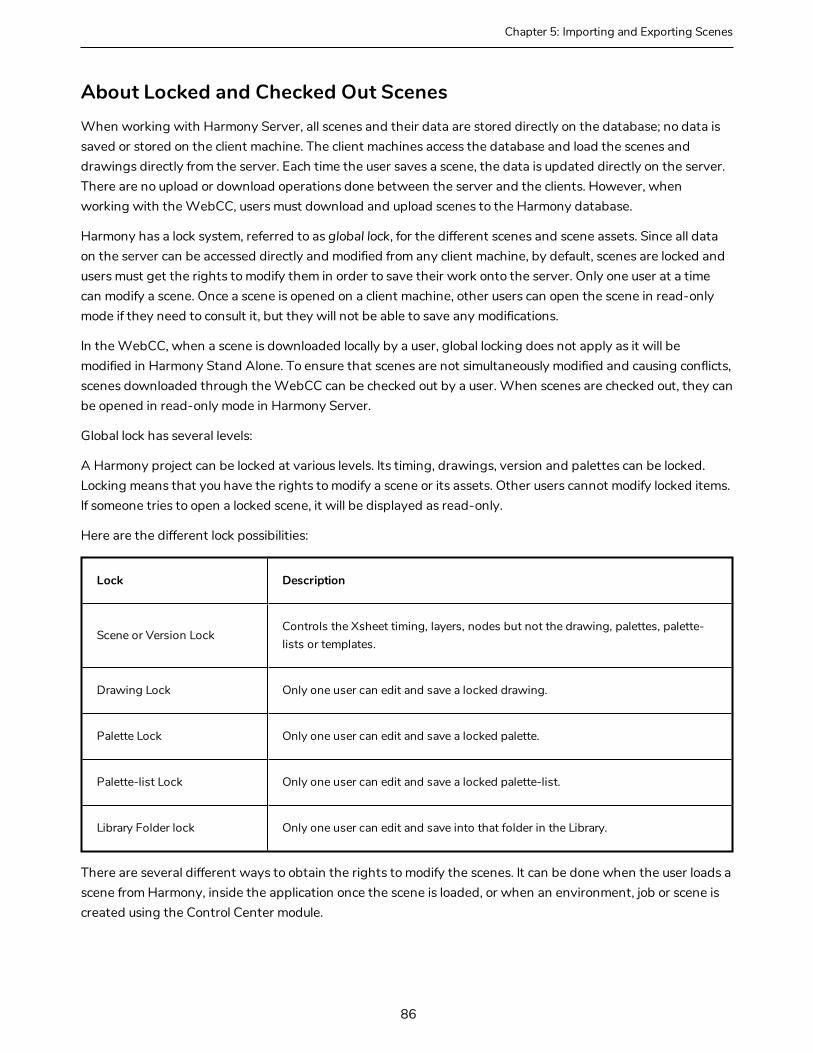
Chapter 5: Importing and Exporting Scenes
About Locked and Checked Out ScenesWhen working with Harmony Server, all scenes and their data are stored directly on the database; no data is saved or stored on the client machine. The client machines access the database and load the scenes and drawings directly from the server. Each time the user saves a scene, the data is updated directly on the server. There are no upload or download operations done between the server and the clients. However, when working with the WebCC, users must download and upload scenes to the Harmony database.
Harmony has a lock system, referred to as global lock, for the different scenes and scene assets. Since all data on the server can be accessed directly and modified from any client machine, by default, scenes are locked and users must get the rights to modify them in order to save their work onto the server. Only one user at a time can modify a scene. Once a scene is opened on a client machine, other users can open the scene in read-only mode if they need to consult it, but they will not be able to save any modifications.
In the WebCC, when a scene is downloaded locally by a user, global locking does not apply as it will be modified in Harmony Stand Alone. To ensure that scenes are not simultaneously modified and causing conflicts, scenes downloaded through the WebCC can be checked out by a user. When scenes are checked out, they can be opened in read-only mode in Harmony Server.
Global lock has several levels:
A Harmony project can be locked at various levels. Its timing, drawings, version and palettes can be locked. Locking means that you have the rights to modify a scene or its assets. Other users cannot modify locked items. If someone tries to open a locked scene, it will be displayed as read-only.
Here are the different lock possibilities:
Lock Description
Scene or Version LockControls the Xsheet timing, layers, nodes but not the drawing, palettes, palette-lists or templates.
Drawing Lock Only one user can edit and save a locked drawing.
Palette Lock Only one user can edit and save a locked palette.
Palette-list Lock Only one user can edit and save a locked palette-list.
Library Folder lock Only one user can edit and save into that folder in the Library.
There are several different ways to obtain the rights to modify the scenes. It can be done when the user loads a scene from Harmony, inside the application once the scene is loaded, or when an environment, job or scene is created using the Control Center module.
86

87
Harmony 17 Control Center Guide
Chapter 6: Troubleshooting
Chapter 6: TroubleshootingIf you have any problems exporting in Harmony, review the instructions to make sure you have followed them completely. If you continue to have problems, consult the following list to troubleshoot common import and export problems.
Problem: Import or Export Not Successful
If the transfer is not successful, an error dialog box appears to describe the problem. The most common reason for a failed transfer is due to your current network permissions. See your system administrator for help.
If the transfer fails in the middle of the process, the files that were imported or exported may be corrupt or incomplete.
l For a failed import, use Control Center to delete the scene.
l For a failed export, manually delete the incomplete export folder.
If you click the Message Log tab, you can see more detailed descriptions, including error messages.
88

89
Harmony 17 Control Center Guide
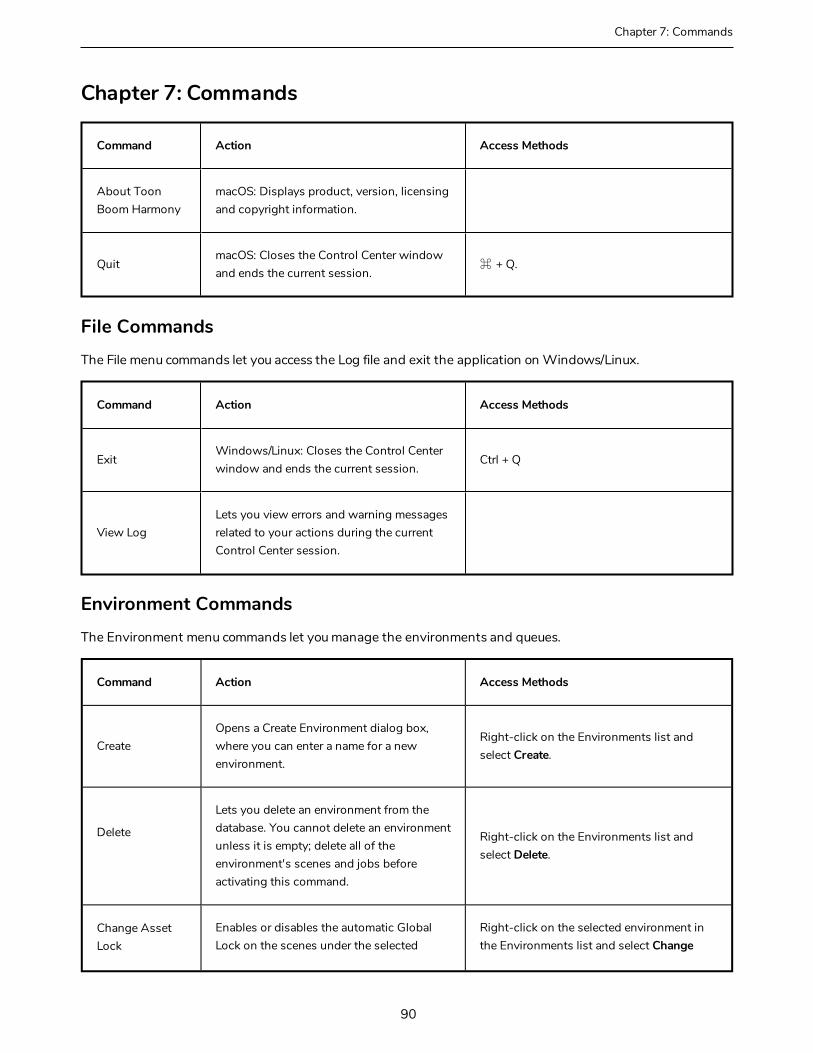
Chapter 7: Commands
Chapter 7: Commands
Command Action Access Methods
About Toon Boom Harmony
macOS: Displays product, version, licensing and copyright information.
QuitmacOS: Closes the Control Center window and ends the current session.
⌘ + Q.
File CommandsThe File menu commands let you access the Log file and exit the application on Windows/Linux.
Command Action Access Methods
ExitWindows/Linux: Closes the Control Center window and ends the current session.
Ctrl + Q
View LogLets you view errors and warning messages related to your actions during the current Control Center session.
Environment CommandsThe Environment menu commands let you manage the environments and queues.
Command Action Access Methods
CreateOpens a Create Environment dialog box, where you can enter a name for a new environment.
Right-click on the Environments list and select Create.
Delete
Lets you delete an environment from the database. You cannot delete an environment unless it is empty; delete all of the environment's scenes and jobs before activating this command.
Right-click on the Environments list and select Delete.
Change Asset Lock
Enables or disables the automatic Global Lock on the scenes under the selected
Right-click on the selected environment in the Environments list and select Change
90
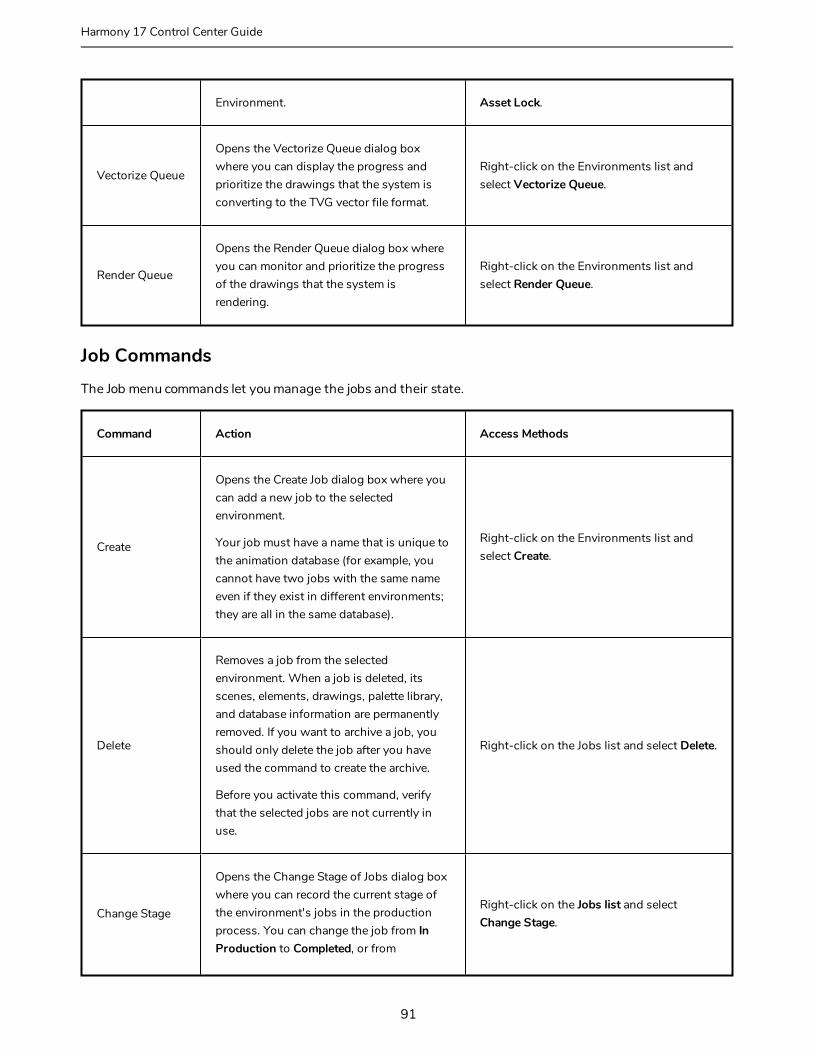
Environment. Asset Lock.
Vectorize Queue
Opens the Vectorize Queue dialog box where you can display the progress and prioritize the drawings that the system is converting to the TVG vector file format.
Right-click on the Environments list and select Vectorize Queue.
Render Queue
Opens the Render Queue dialog box where you can monitor and prioritize the progress of the drawings that the system is rendering.
Right-click on the Environments list and select Render Queue.
Job CommandsThe Job menu commands let you manage the jobs and their state.
Command Action Access Methods
Create
Opens the Create Job dialog box where you can add a new job to the selected environment.
Your job must have a name that is unique to the animation database (for example, you cannot have two jobs with the same name even if they exist in different environments; they are all in the same database).
Right-click on the Environments list and select Create.
Delete
Removes a job from the selected environment. When a job is deleted, its scenes, elements, drawings, palette library, and database information are permanently removed. If you want to archive a job, you should only delete the job after you have used the command to create the archive.
Before you activate this command, verify that the selected jobs are not currently in use.
Right-click on the Jobs list and select Delete.
Change Stage
Opens the Change Stage of Jobs dialog box where you can record the current stage of the environment's jobs in the production process. You can change the job from In Production to Completed, or from
Right-click on the Jobs list and select Change Stage.
91
Harmony 17 Control Center Guide
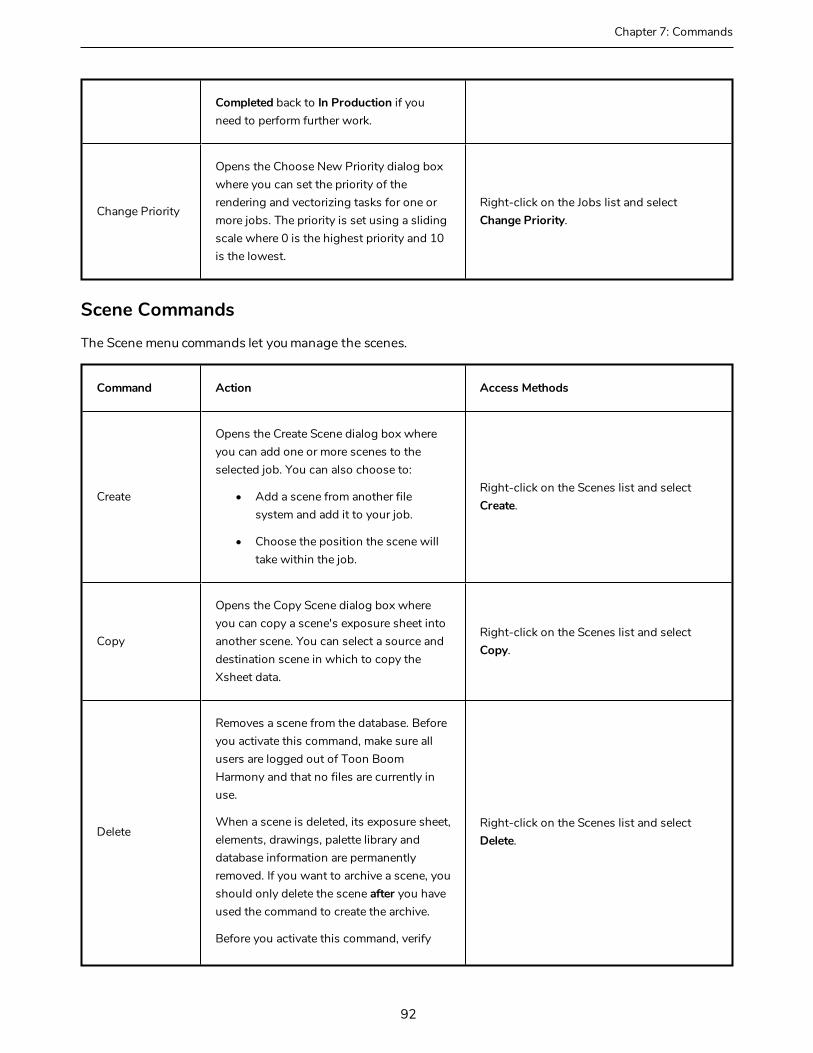
Chapter 7: Commands
Completed back to In Production if you need to perform further work.
Change Priority
Opens the Choose New Priority dialog box where you can set the priority of the rendering and vectorizing tasks for one or more jobs. The priority is set using a sliding scale where 0 is the highest priority and 10 is the lowest.
Right-click on the Jobs list and select Change Priority.
Scene CommandsThe Scene menu commands let you manage the scenes.
Command Action Access Methods
Create
Opens the Create Scene dialog box where you can add one or more scenes to the selected job. You can also choose to:
• Add a scene from another file system and add it to your job.
• Choose the position the scene will take within the job.
Right-click on the Scenes list and select Create.
Copy
Opens the Copy Scene dialog box where you can copy a scene's exposure sheet into another scene. You can select a source and destination scene in which to copy the Xsheet data.
Right-click on the Scenes list and select Copy.
Delete
Removes a scene from the database. Before you activate this command, make sure all users are logged out of Toon Boom Harmony and that no files are currently in use.
When a scene is deleted, its exposure sheet, elements, drawings, palette library and database information are permanently removed. If you want to archive a scene, you should only delete the scene after you have used the command to create the archive.
Before you activate this command, verify
Right-click on the Scenes list and select Delete.
92
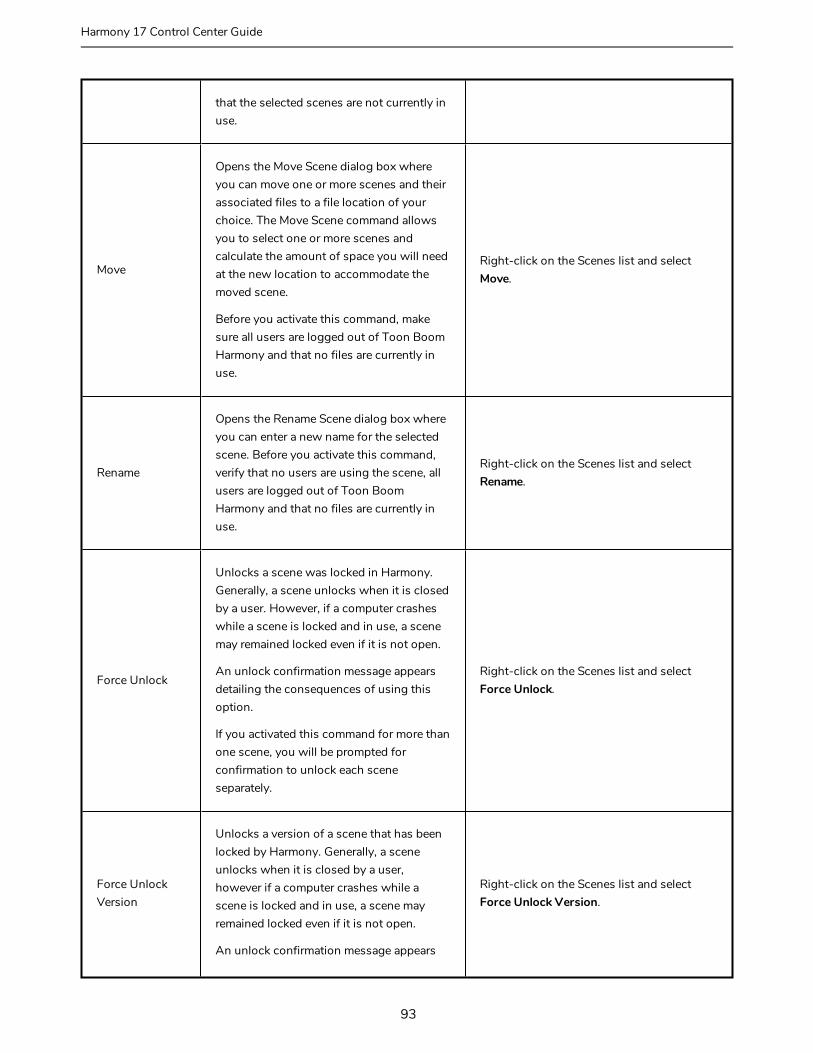
that the selected scenes are not currently in use.
Move
Opens the Move Scene dialog box where you can move one or more scenes and their associated files to a file location of your choice. The Move Scene command allows you to select one or more scenes and calculate the amount of space you will need at the new location to accommodate the moved scene.
Before you activate this command, make sure all users are logged out of Toon Boom Harmony and that no files are currently in use.
Right-click on the Scenes list and select Move.
Rename
Opens the Rename Scene dialog box where you can enter a new name for the selected scene. Before you activate this command, verify that no users are using the scene, all users are logged out of Toon Boom Harmony and that no files are currently in use.
Right-click on the Scenes list and select Rename.
Force Unlock
Unlocks a scene was locked in Harmony. Generally, a scene unlocks when it is closed by a user. However, if a computer crashes while a scene is locked and in use, a scene may remained locked even if it is not open.
An unlock confirmation message appears detailing the consequences of using this option.
If you activated this command for more than one scene, you will be prompted for confirmation to unlock each scene separately.
Right-click on the Scenes list and select Force Unlock.
Force Unlock Version
Unlocks a version of a scene that has been locked by Harmony. Generally, a scene unlocks when it is closed by a user, however if a computer crashes while a scene is locked and in use, a scene may remained locked even if it is not open.
An unlock confirmation message appears
Right-click on the Scenes list and select Force Unlock Version.
93
Harmony 17 Control Center Guide

Chapter 7: Commands
detailing the consequences of using this option.
If you activated this command for more than one scene, you will be prompted for confirmation to unlock each scene separately.
Force Checkin
Checks in a scene that was checked out, but not checked back in.
Use this command only in extreme cases. Otherwise, two versions of the same scene will be in use, which will cause conflicts.
Checkin Checks in a scene that you checked out.
CheckoutChecks out a scene. If a scene is already checked out, it is available as read-only and you cannot make any changes to it.
Change Priority
Opens the Choose New Priority dialog box where you can set the priority of the rendering and vectorizing tasks for one or more scenes. The priority is set using a sliding scale where 0 is the highest priority and 10 is the lowest.
Activating this command affects all subsequent scenes you create. You can change the priority of a scene already sent to the batch processing queue by using the Change Priority button in the queue.
Right-click on the Scenes list and select Change Priority.
Change Stage
Opens the Change Scene Stage dialog box where you can record the current stage of progress in a scene in an environment or a production.
This command is inactive if the scene's approval policy has been set to Manual in the Change Approval Policy dialog box.
Right-click on the Scenes list and select Change Stage.
ReorderOpens the Reorder Scenes dialog box where you can change the sequence of the scenes in a job.
Right-click on the Scenes list and select Reorder.
94
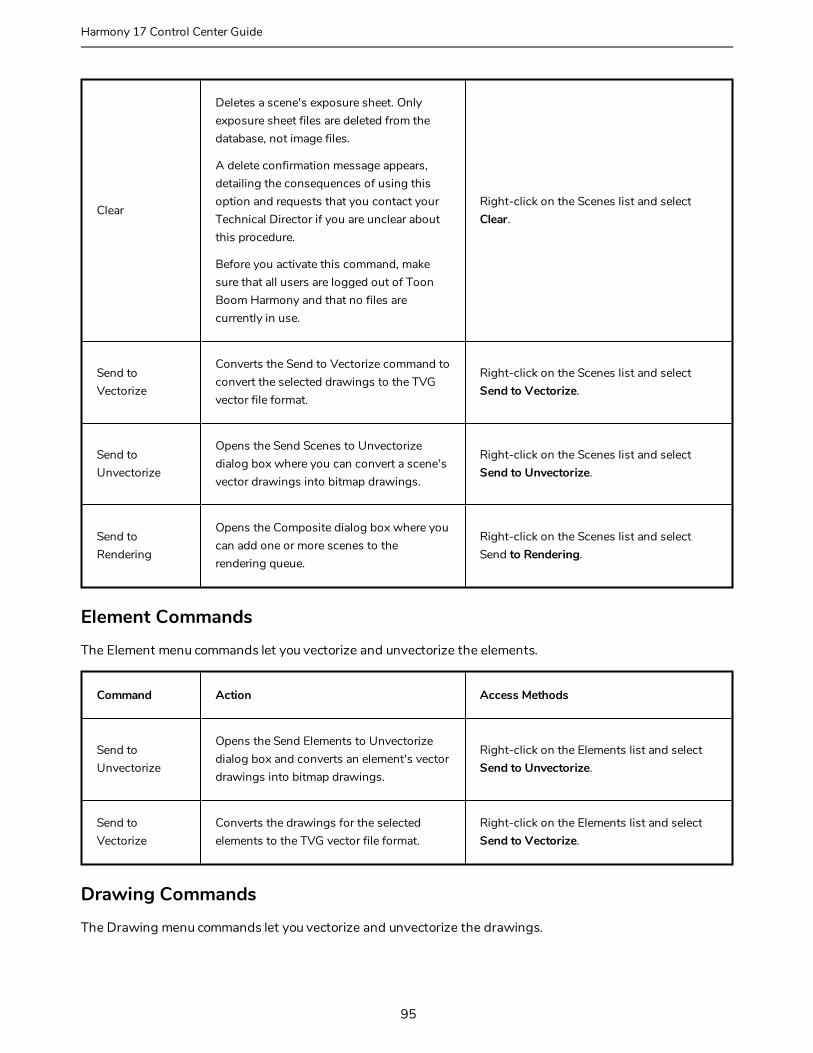
Clear
Deletes a scene's exposure sheet. Only exposure sheet files are deleted from the database, not image files.
A delete confirmation message appears, detailing the consequences of using this option and requests that you contact your Technical Director if you are unclear about this procedure.
Before you activate this command, make sure that all users are logged out of Toon Boom Harmony and that no files are currently in use.
Right-click on the Scenes list and select Clear.
Send to Vectorize
Converts the Send to Vectorize command to convert the selected drawings to the TVG vector file format.
Right-click on the Scenes list and select Send to Vectorize.
Send to Unvectorize
Opens the Send Scenes to Unvectorize dialog box where you can convert a scene's vector drawings into bitmap drawings.
Right-click on the Scenes list and select Send to Unvectorize.
Send to Rendering
Opens the Composite dialog box where you can add one or more scenes to the rendering queue.
Right-click on the Scenes list and select Send to Rendering.
Element CommandsThe Element menu commands let you vectorize and unvectorize the elements.
Command Action Access Methods
Send to Unvectorize
Opens the Send Elements to Unvectorize dialog box and converts an element's vector drawings into bitmap drawings.
Right-click on the Elements list and select Send to Unvectorize.
Send to Vectorize
Converts the drawings for the selected elements to the TVG vector file format.
Right-click on the Elements list and select Send to Vectorize.
Drawing CommandsThe Drawing menu commands let you vectorize and unvectorize the drawings.
95
Harmony 17 Control Center Guide
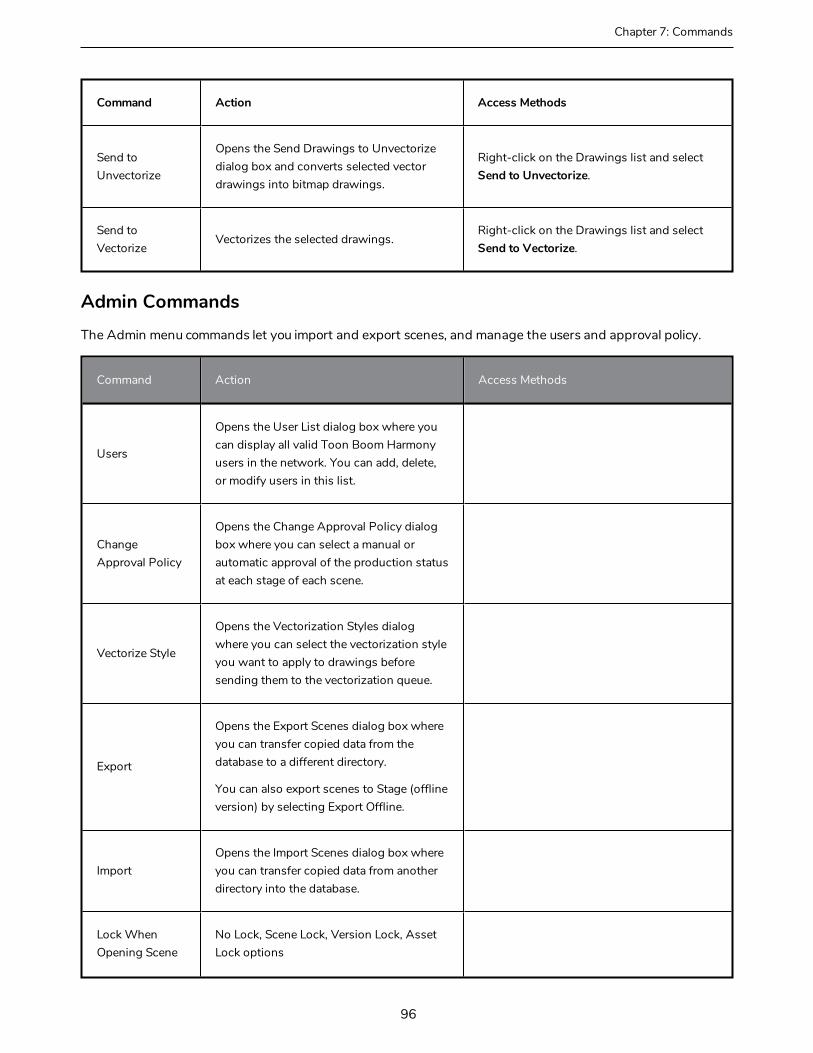
Chapter 7: Commands
Command Action Access Methods
Send to Unvectorize
Opens the Send Drawings to Unvectorize dialog box and converts selected vector drawings into bitmap drawings.
Right-click on the Drawings list and select Send to Unvectorize.
Send to Vectorize
Vectorizes the selected drawings.Right-click on the Drawings list and select Send to Vectorize.
Admin CommandsThe Admin menu commands let you import and export scenes, and manage the users and approval policy.
Command Action Access Methods
Users
Opens the User List dialog box where you can display all valid Toon Boom Harmony users in the network. You can add, delete, or modify users in this list.
Change Approval Policy
Opens the Change Approval Policy dialog box where you can select a manual or automatic approval of the production status at each stage of each scene.
Vectorize Style
Opens the Vectorization Styles dialog where you can select the vectorization style you want to apply to drawings before sending them to the vectorization queue.
Export
Opens the Export Scenes dialog box where you can transfer copied data from the database to a different directory.
You can also export scenes to Stage (offline version) by selecting Export Offline.
ImportOpens the Import Scenes dialog box where you can transfer copied data from another directory into the database.
Lock When Opening Scene
No Lock, Scene Lock, Version Lock, Asset Lock options
96
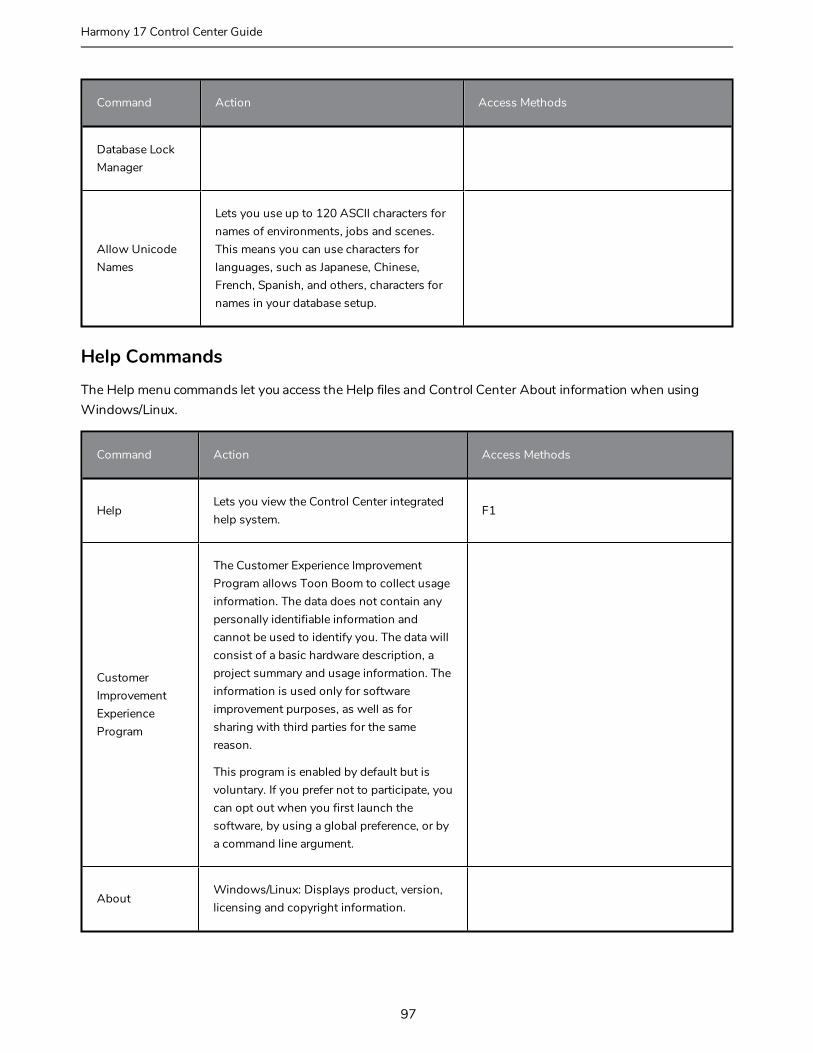
Command Action Access Methods
Database Lock Manager
Allow Unicode Names
Lets you use up to 120 ASCII characters for names of environments, jobs and scenes. This means you can use characters for languages, such as Japanese, Chinese, French, Spanish, and others, characters for names in your database setup.
Help CommandsThe Help menu commands let you access the Help files and Control Center About information when using Windows/Linux.
Command Action Access Methods
HelpLets you view the Control Center integrated help system.
F1
Customer Improvement Experience Program
The Customer Experience Improvement Program allows Toon Boom to collect usage information. The data does not contain any personally identifiable information and cannot be used to identify you. The data will consist of a basic hardware description, a project summary and usage information. The information is used only for software improvement purposes, as well as for sharing with third parties for the same reason.
This program is enabled by default but is voluntary. If you prefer not to participate, you can opt out when you first launch the software, by using a global preference, or by a command line argument.
AboutWindows/Linux: Displays product, version, licensing and copyright information.
97
Harmony 17 Control Center Guide


![Toon the Cartoon RPG - SJG - Son of Toon [SJG7603]](https://img.pdfslide.us/doc/110x75/547f604eb479598e508b4f06/toon-the-cartoon-rpg-sjg-son-of-toon-sjg7603.jpg)