Embed Size (px)
Citation preview
To submit a Requisition in Self-Service Banner (SSB) Finance: From the Self-Service Banner (SSB) main menu, select Finance and choose Requisition.
NOTE: Self-Service Banner (SSB) session will time out after 30 minutes of inactivity. Requisitions, once started, are not saved, so if you leave your session for 30 minutes or more, you will need to begin the requisition from scratch. As long as you are entering data, the system will not consider your session inactive.
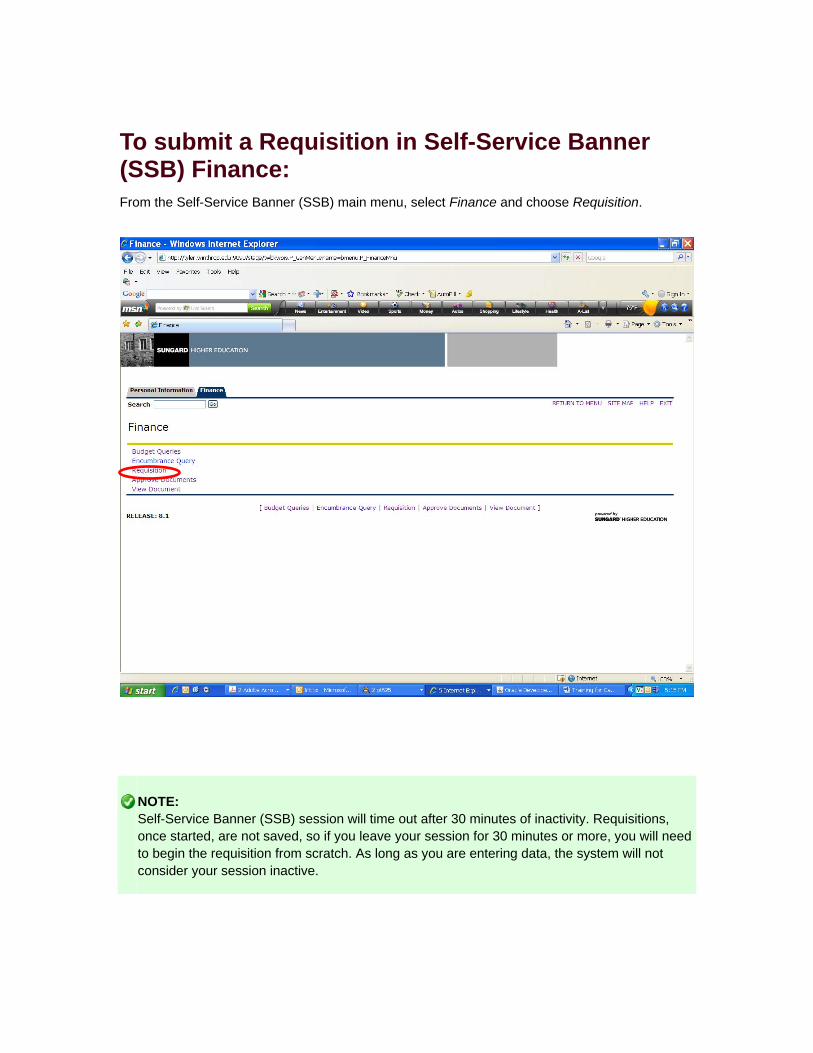
Requestor Information The next few input boxes are for information relating to the Requestor (that's you!). The Requestor Name, Chart of Accounts, Organization, Currency Code, Discount Code, Ship Code, and Attention To are pre-populated and should not be changed.
NOTE: The Discount Code is populated based on the vendor selected. If Winthrop has a discount contract with a vendor, that information is entered into the system and the Discount Code is populated accordingly. If you change this field, you will receive an error, and the system will not allow you to submit the Requisition.
NOTE: Ship Code will always be populated with "CENTR", which refers to Central Receiving. If you need your items to be delivered to a different address, please detail this in the Document Text popup.
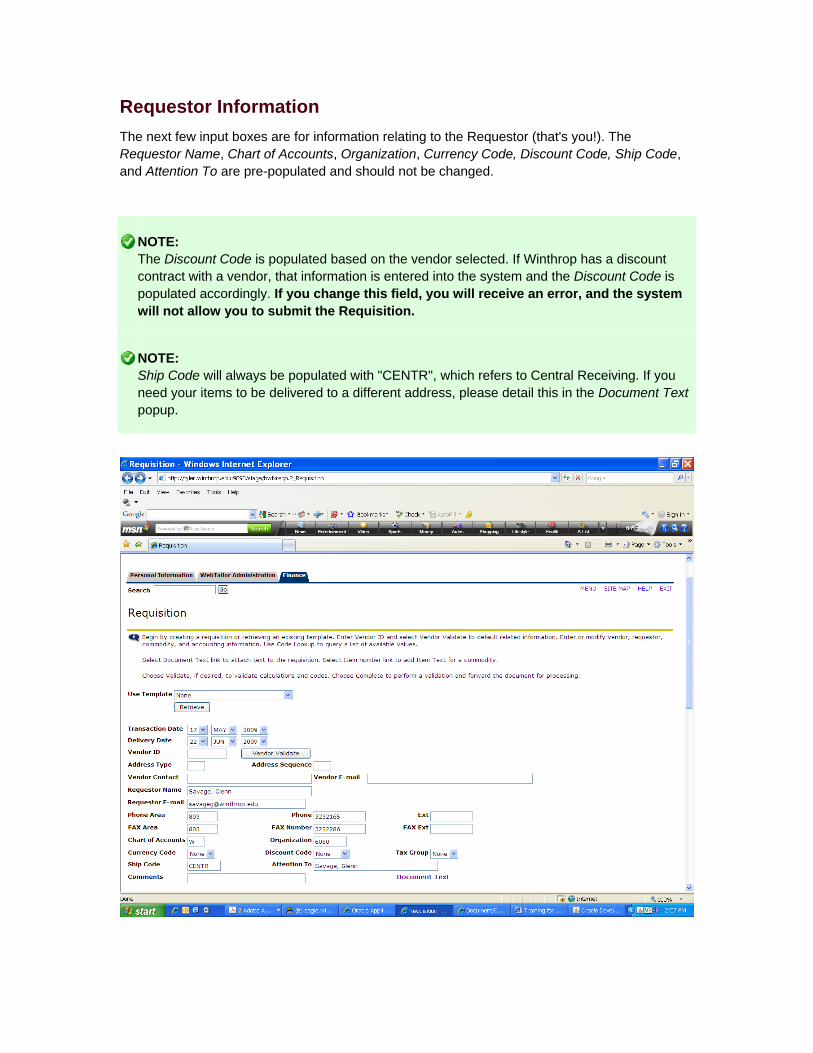
Retrieving a Saved Template If you have already saved a template and wish to retrieve it to base your new requisition upon, you will select the template name from the Use Template dropdown and click "Retrieve". This will populate the input fields with saved template information.
NOTE: Templates do not store Delivery Date, Document Text, or Commodity Item Text; these must be updated prior to submitting the new requisition based on the retrieved template.
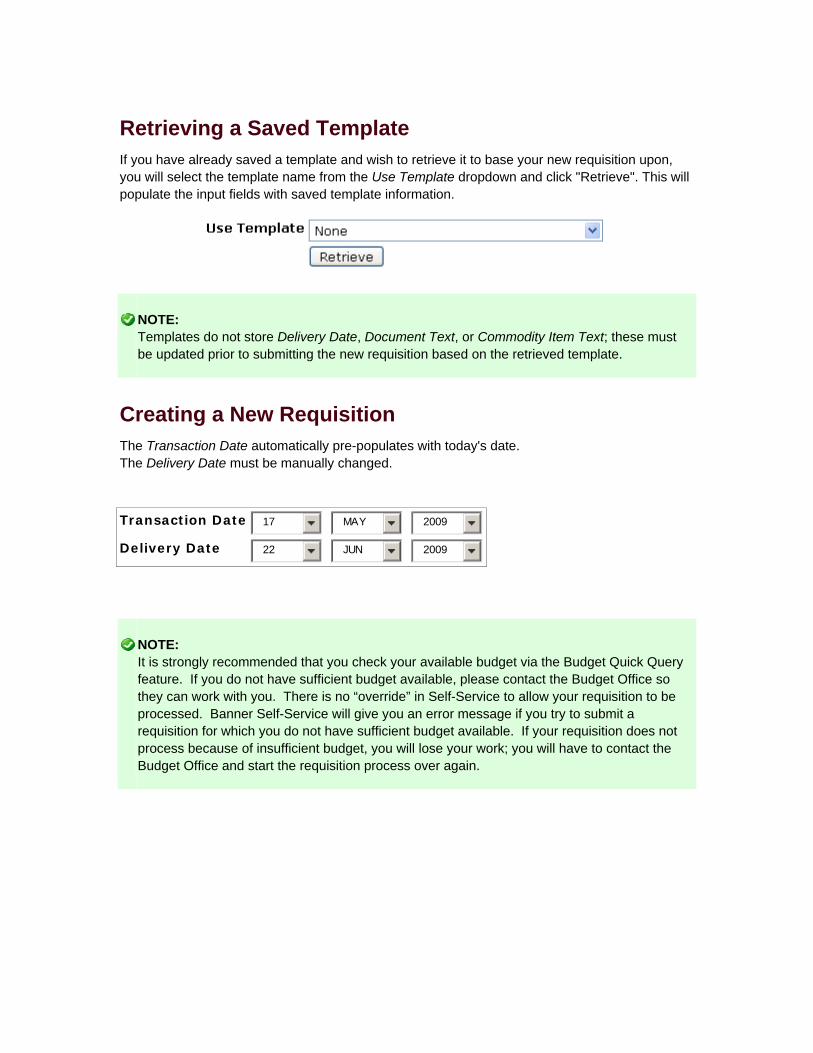
Creating a New Requisition The Transaction Date automatically pre-populates with today's date. The Delivery Date must be manually changed.
Transaction Date 17
MAY 2009
Delivery Date 22
JUN 2009
NOTE: It is strongly recommended that you check your available budget via the Budget Quick Query feature. If you do not have sufficient budget available, please contact the Budget Office so they can work with you. There is no “override” in Self-Service to allow your requisition to be processed. Banner Self-Service will give you an error message if you try to submit a requisition for which you do not have sufficient budget available. If your requisition does not process because of insufficient budget, you will lose your work; you will have to contact the Budget Office and start the requisition process over again.
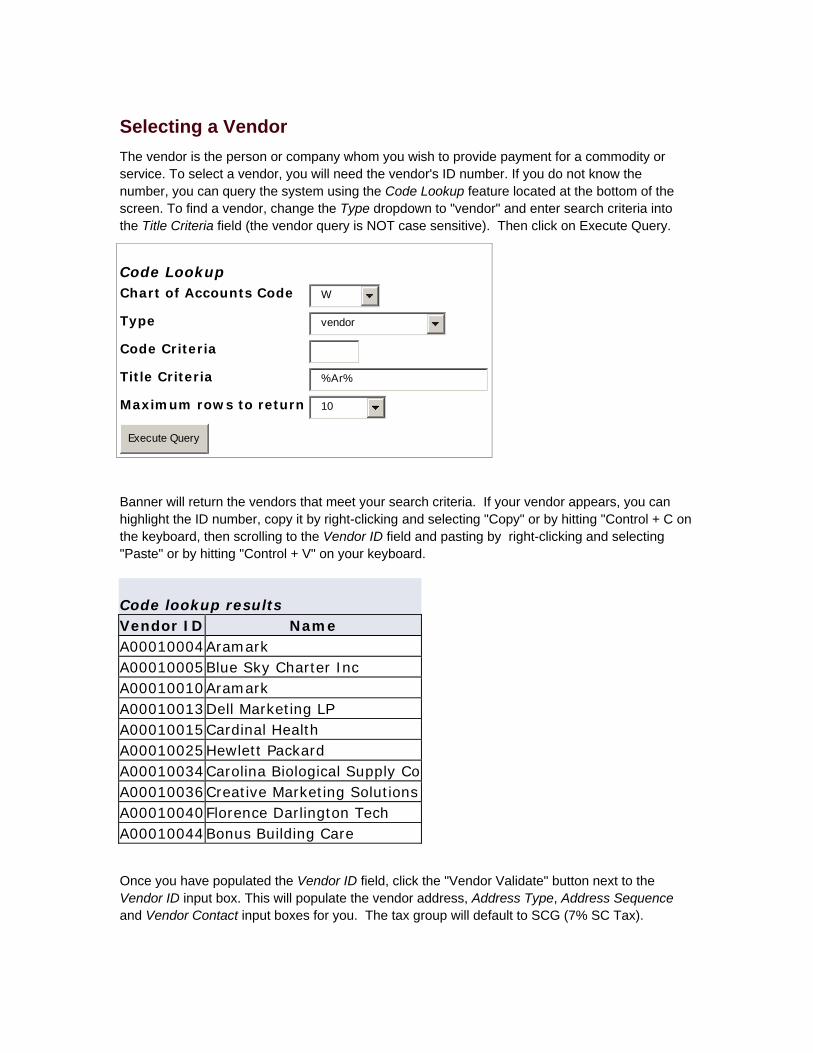
Selecting a Vendor The vendor is the person or company whom you wish to provide payment for a commodity or service. To select a vendor, you will need the vendor's ID number. If you do not know the number, you can query the system using the Code Lookup feature located at the bottom of the screen. To find a vendor, change the Type dropdown to "vendor" and enter search criteria into the Title Criteria field (the vendor query is NOT case sensitive). Then click on Execute Query.
Code Lookup Chart of Accounts Code W
Type vendor
Code Criteria
Title Criteria %Ar%
Maximum rows to return 10
Execute Query
Banner will return the vendors that meet your search criteria. If your vendor appears, you can highlight the ID number, copy it by right-clicking and selecting "Copy" or by hitting "Control + C on the keyboard, then scrolling to the Vendor ID field and pasting by right-clicking and selecting "Paste" or by hitting "Control + V" on your keyboard.
Code lookup results Vendor ID Name A00010004 Aramark A00010005 Blue Sky Charter Inc A00010010 Aramark A00010013 Dell Marketing LP A00010015 Cardinal Health A00010025 Hewlett Packard A00010034 Carolina Biological Supply Co A00010036 Creative Marketing Solutions A00010040 Florence Darlington Tech A00010044 Bonus Building Care
Once you have populated the Vendor ID field, click the "Vendor Validate" button next to the Vendor ID input box. This will populate the vendor address, Address Type, Address Sequence and Vendor Contact input boxes for you. The tax group will default to SCG (7% SC Tax).
If Vendor cannot be found
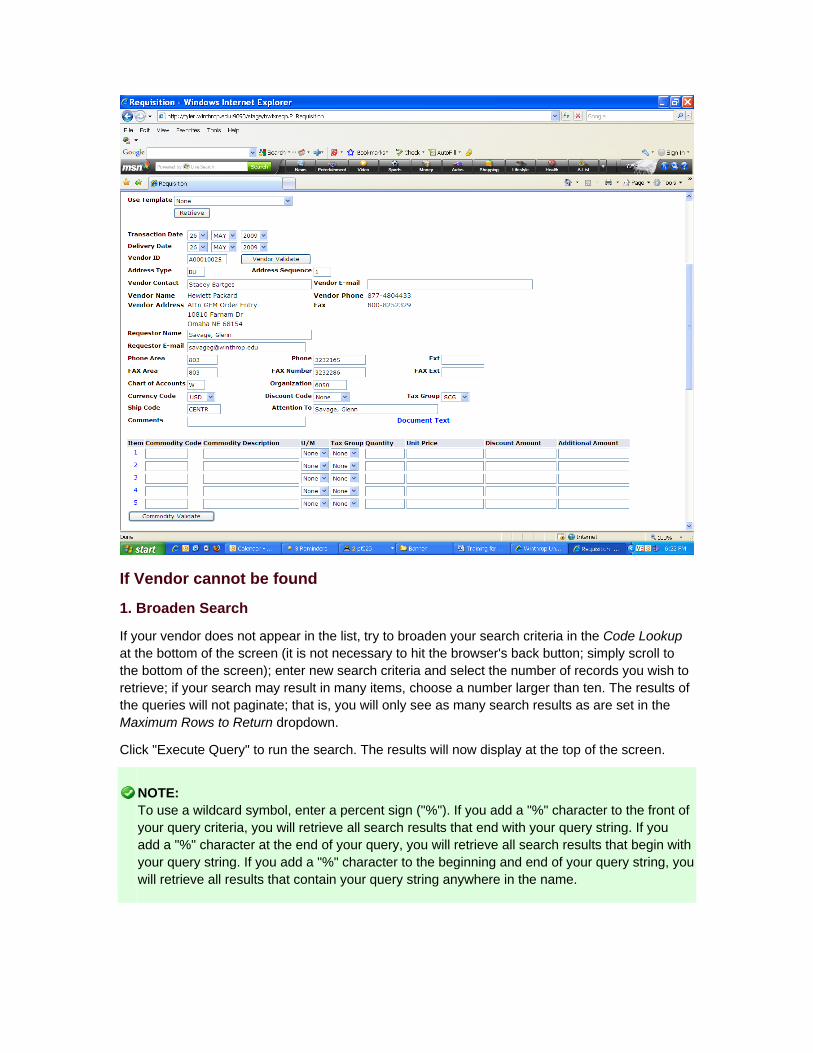
1. Broaden Search
If your vendor does not appear in the list, try to broaden your search criteria in the Code Lookup at the bottom of the screen (it is not necessary to hit the browser's back button; simply scroll to the bottom of the screen); enter new search criteria and select the number of records you wish to retrieve; if your search may result in many items, choose a number larger than ten. The results of the queries will not paginate; that is, you will only see as many search results as are set in the Maximum Rows to Return dropdown.
Click "Execute Query" to run the search. The results will now display at the top of the screen.
NOTE: To use a wildcard symbol, enter a percent sign ("%"). If you add a "%" character to the front of your query criteria, you will retrieve all search results that end with your query string. If you add a "%" character at the end of your query, you will retrieve all search results that begin with your query string. If you add a "%" character to the beginning and end of your query string, youwill retrieve all results that contain your query string anywhere in the name.
2. Use Document Text
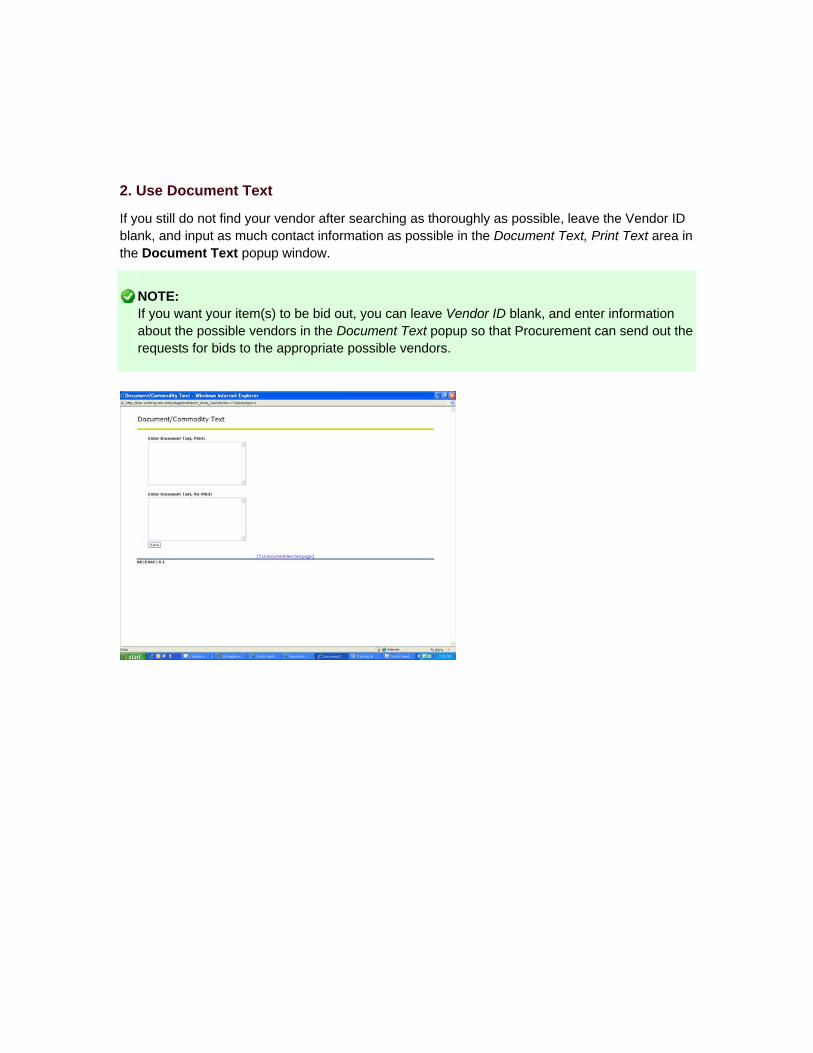
If you still do not find your vendor after searching as thoroughly as possible, leave the Vendor ID blank, and input as much contact information as possible in the Document Text, Print Text area in the Document Text popup window.
NOTE: If you want your item(s) to be bid out, you can leave Vendor ID blank, and enter information about the possible vendors in the Document Text popup so that Procurement can send out the requests for bids to the appropriate possible vendors.

Document Text Clicking the Document Text link will bring up a popup window with two text areas.
The first, Enter Document Text, Print is where you will enter all information not otherwise captured in the Requisition form that needs to display on the Purchase Order/Invoice that will be generated by Procurement. This includes any vendor information not captured already, information about vendors to whom a bid request might be sent, a description of the commodities being ordered, etc. Document Text, No Print
The second, Enter Document Text, No Print, is provided for you to input information that you wish to provide to Procurement, but that will not appear on the Purchase Order or Invoice. This is useful if you are unsure whether or not you have entered your accounting information, for example.
Saving Document Text
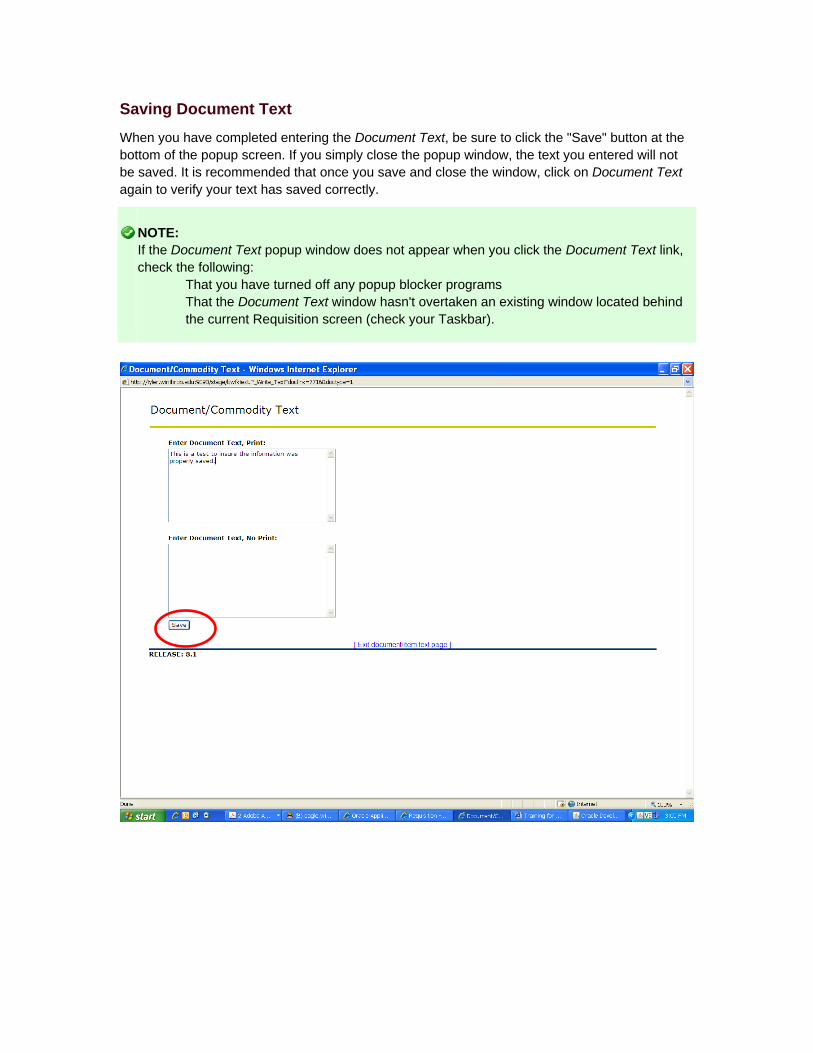
When you have completed entering the Document Text, be sure to click the "Save" button at the bottom of the popup screen. If you simply close the popup window, the text you entered will not be saved. It is recommended that once you save and close the window, click on Document Text again to verify your text has saved correctly.
NOTE: If the Document Text popup window does not appear when you click the Document Text link, check the following:
That you have turned off any popup blocker programs That the Document Text window hasn't overtaken an existing window located behind
the current Requisition screen (check your Taskbar).
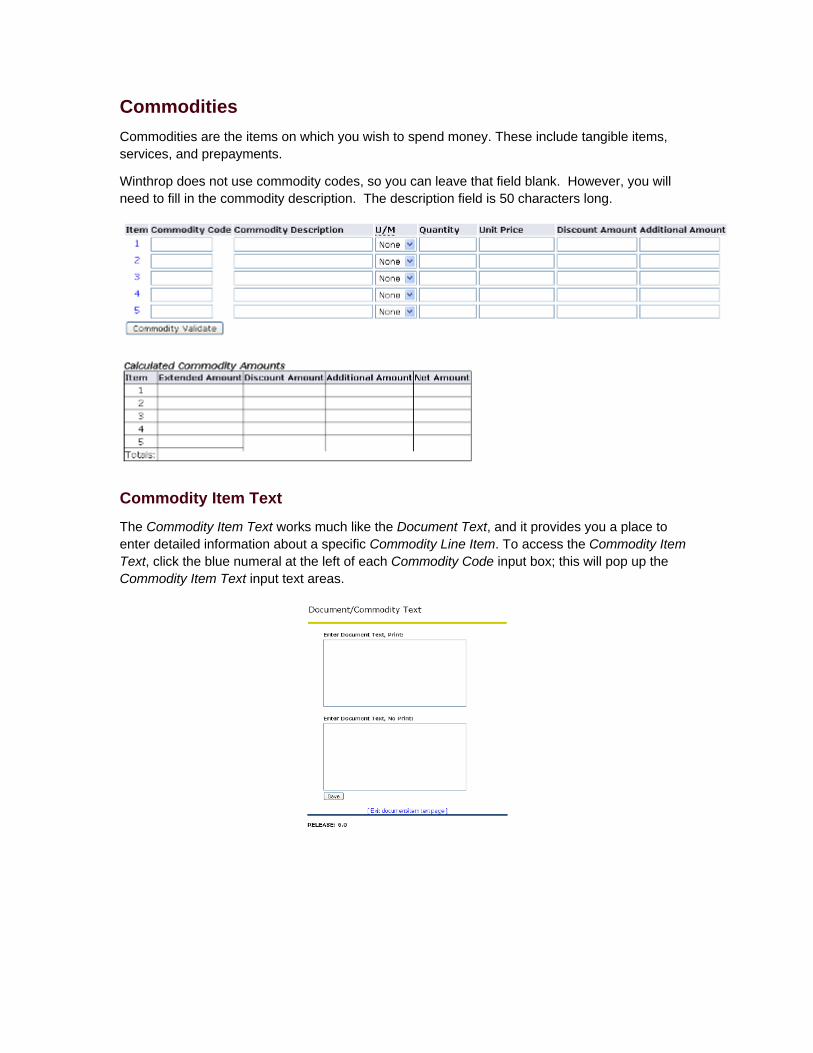
Commodities Commodities are the items on which you wish to spend money. These include tangible items, services, and prepayments.
Winthrop does not use commodity codes, so you can leave that field blank. However, you will need to fill in the commodity description. The description field is 50 characters long.
Commodity Item Text
The Commodity Item Text works much like the Document Text, and it provides you a place to enter detailed information about a specific Commodity Line Item. To access the Commodity Item Text, click the blue numeral at the left of each Commodity Code input box; this will pop up the Commodity Item Text input text areas.
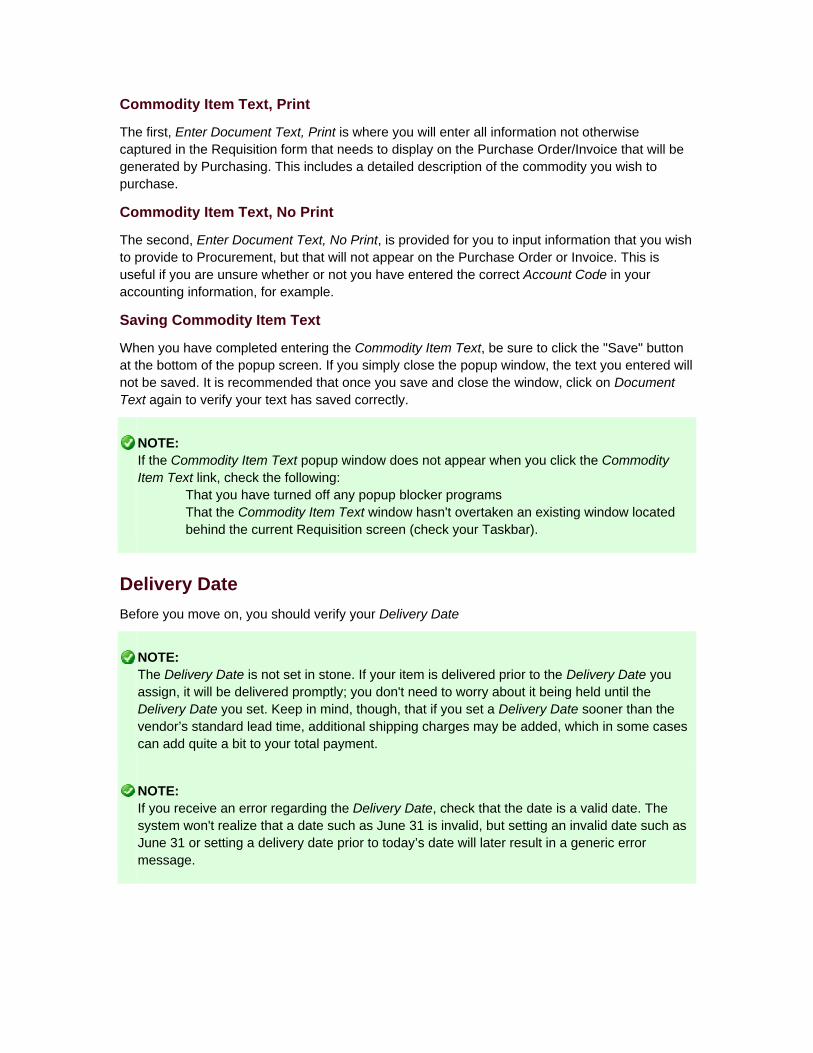
Commodity Item Text, Print
The first, Enter Document Text, Print is where you will enter all information not otherwise captured in the Requisition form that needs to display on the Purchase Order/Invoice that will be generated by Purchasing. This includes a detailed description of the commodity you wish to purchase.
Commodity Item Text, No Print
The second, Enter Document Text, No Print, is provided for you to input information that you wish to provide to Procurement, but that will not appear on the Purchase Order or Invoice. This is useful if you are unsure whether or not you have entered the correct Account Code in your accounting information, for example.
Saving Commodity Item Text
When you have completed entering the Commodity Item Text, be sure to click the "Save" button at the bottom of the popup screen. If you simply close the popup window, the text you entered will not be saved. It is recommended that once you save and close the window, click on Document Text again to verify your text has saved correctly.
NOTE: If the Commodity Item Text popup window does not appear when you click the Commodity Item Text link, check the following:
That you have turned off any popup blocker programs That the Commodity Item Text window hasn't overtaken an existing window located
behind the current Requisition screen (check your Taskbar).
Delivery Date Before you move on, you should verify your Delivery Date
NOTE: The Delivery Date is not set in stone. If your item is delivered prior to the Delivery Date you assign, it will be delivered promptly; you don't need to worry about it being held until the Delivery Date you set. Keep in mind, though, that if you set a Delivery Date sooner than the vendor’s standard lead time, additional shipping charges may be added, which in some cases can add quite a bit to your total payment.
NOTE: If you receive an error regarding the Delivery Date, check that the date is a valid date. The system won't realize that a date such as June 31 is invalid, but setting an invalid date such as June 31 or setting a delivery date prior to today’s date will later result in a generic error message.
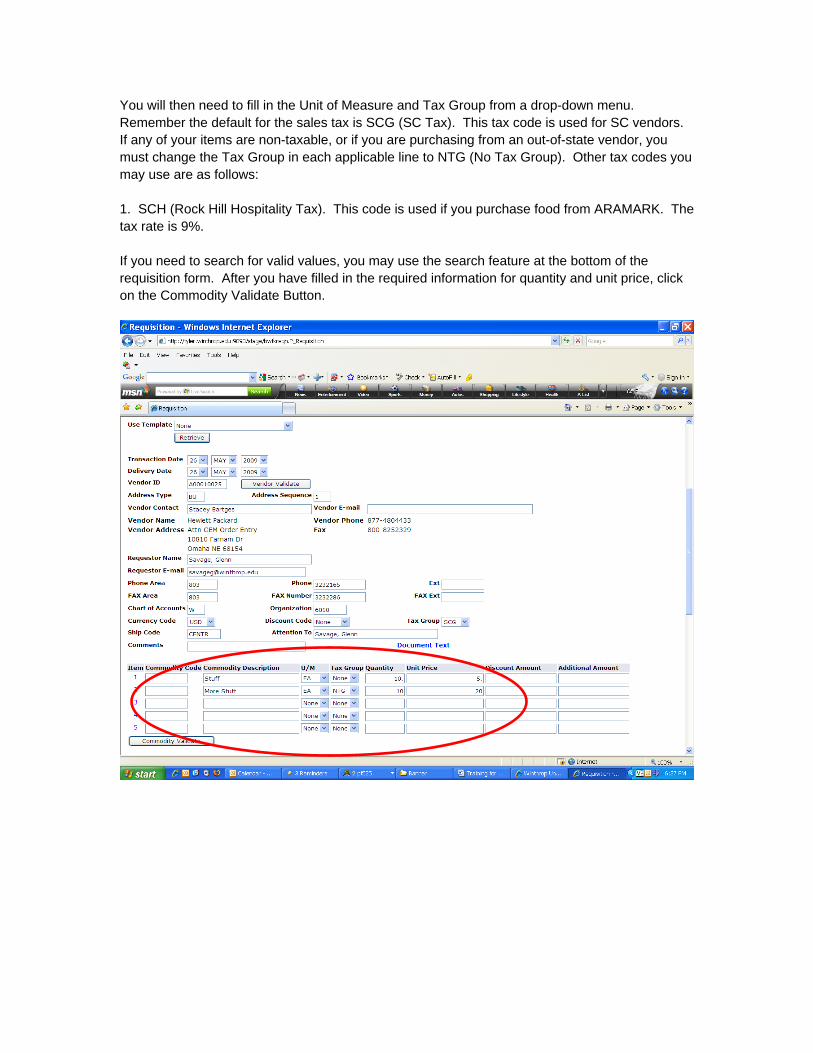
You will then need to fill in the Unit of Measure and Tax Group from a drop-down menu. Remember the default for the sales tax is SCG (SC Tax). This tax code is used for SC vendors. If any of your items are non-taxable, or if you are purchasing from an out-of-state vendor, you must change the Tax Group in each applicable line to NTG (No Tax Group). Other tax codes you may use are as follows: 1. SCH (Rock Hill Hospitality Tax). This code is used if you purchase food from ARAMARK. The tax rate is 9%. If you need to search for valid values, you may use the search feature at the bottom of the requisition form. After you have filled in the required information for quantity and unit price, click on the Commodity Validate Button.
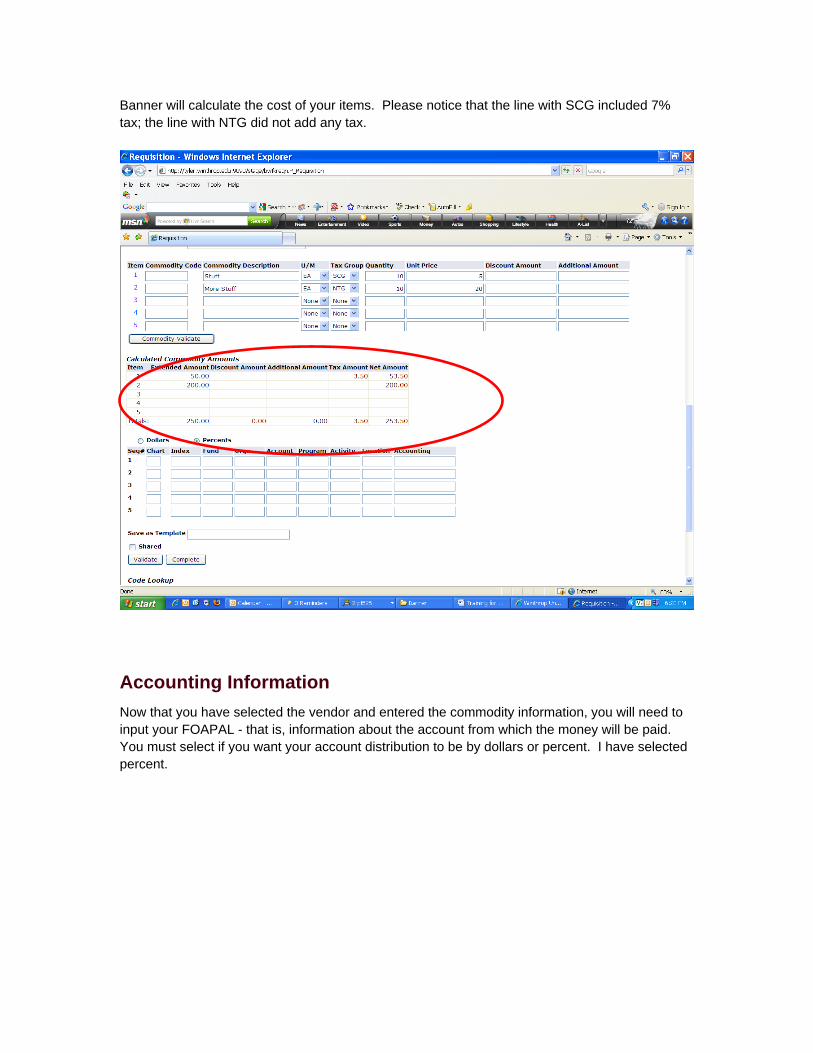
Banner will calculate the cost of your items. Please notice that the line with SCG included 7% tax; the line with NTG did not add any tax.
Accounting Information Now that you have selected the vendor and entered the commodity information, you will need to input your FOAPAL - that is, information about the account from which the money will be paid. You must select if you want your account distribution to be by dollars or percent. I have selected percent.
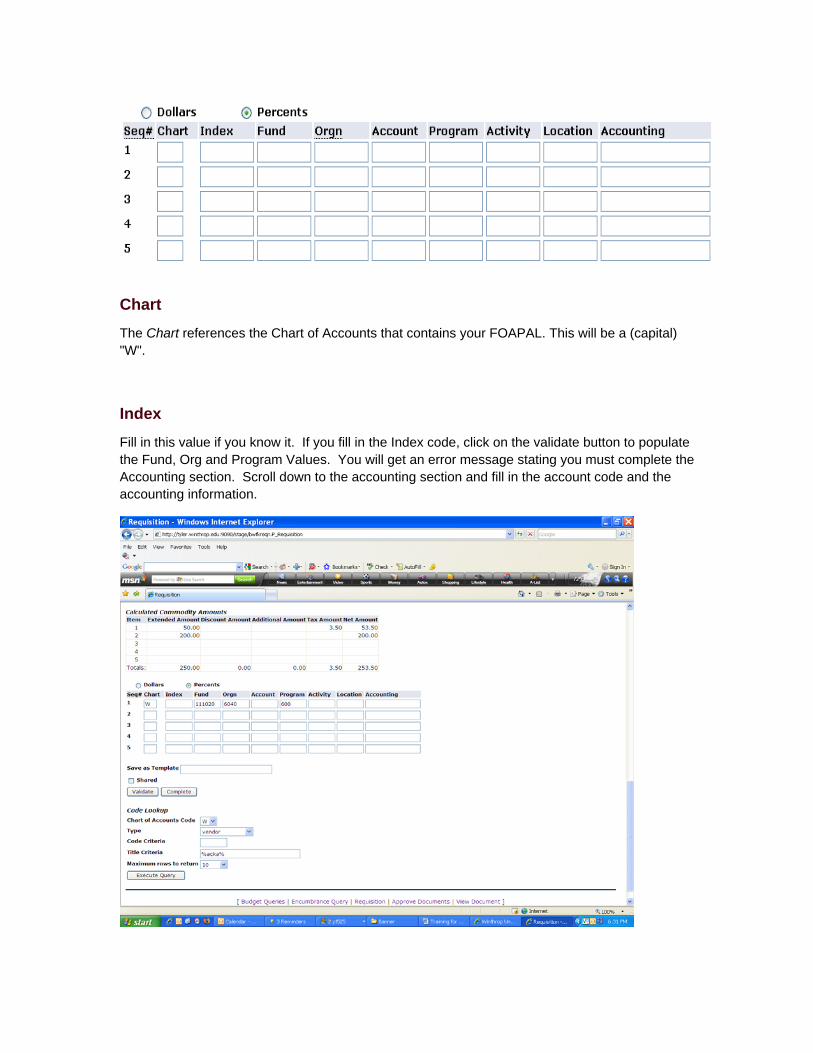
Chart
The Chart references the Chart of Accounts that contains your FOAPAL. This will be a (capital) "W".
Index
Fill in this value if you know it. If you fill in the Index code, click on the validate button to populate the Fund, Org and Program Values. You will get an error message stating you must complete the Accounting section. Scroll down to the accounting section and fill in the account code and the accounting information.
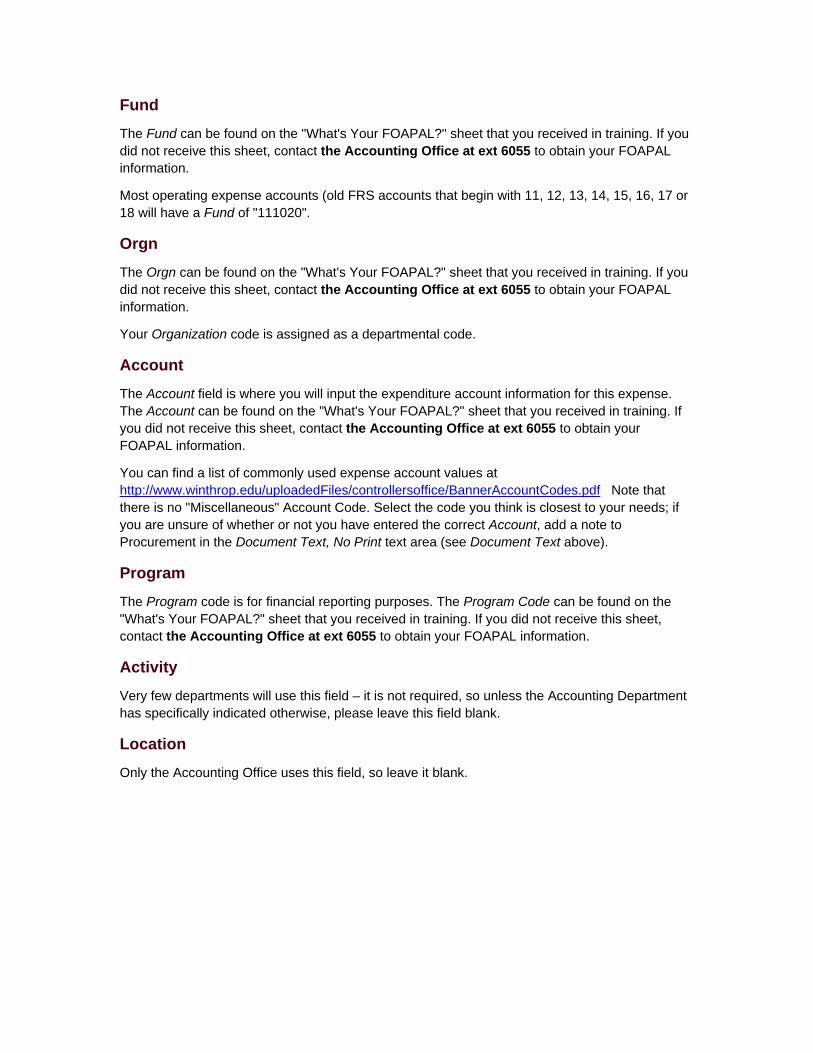
Fund
The Fund can be found on the "What's Your FOAPAL?" sheet that you received in training. If you did not receive this sheet, contact the Accounting Office at ext 6055 to obtain your FOAPAL information.
Most operating expense accounts (old FRS accounts that begin with 11, 12, 13, 14, 15, 16, 17 or 18 will have a Fund of "111020".
Orgn
The Orgn can be found on the "What's Your FOAPAL?" sheet that you received in training. If you did not receive this sheet, contact the Accounting Office at ext 6055 to obtain your FOAPAL information.
Your Organization code is assigned as a departmental code.
Account
The Account field is where you will input the expenditure account information for this expense. The Account can be found on the "What's Your FOAPAL?" sheet that you received in training. If you did not receive this sheet, contact the Accounting Office at ext 6055 to obtain your FOAPAL information.
You can find a list of commonly used expense account values at http://www.winthrop.edu/uploadedFiles/controllersoffice/BannerAccountCodes.pdf Note that there is no "Miscellaneous" Account Code. Select the code you think is closest to your needs; if you are unsure of whether or not you have entered the correct Account, add a note to Procurement in the Document Text, No Print text area (see Document Text above).
Program
The Program code is for financial reporting purposes. The Program Code can be found on the "What's Your FOAPAL?" sheet that you received in training. If you did not receive this sheet, contact the Accounting Office at ext 6055 to obtain your FOAPAL information.
Activity
Very few departments will use this field – it is not required, so unless the Accounting Department has specifically indicated otherwise, please leave this field blank.
Location
Only the Accounting Office uses this field, so leave it blank.
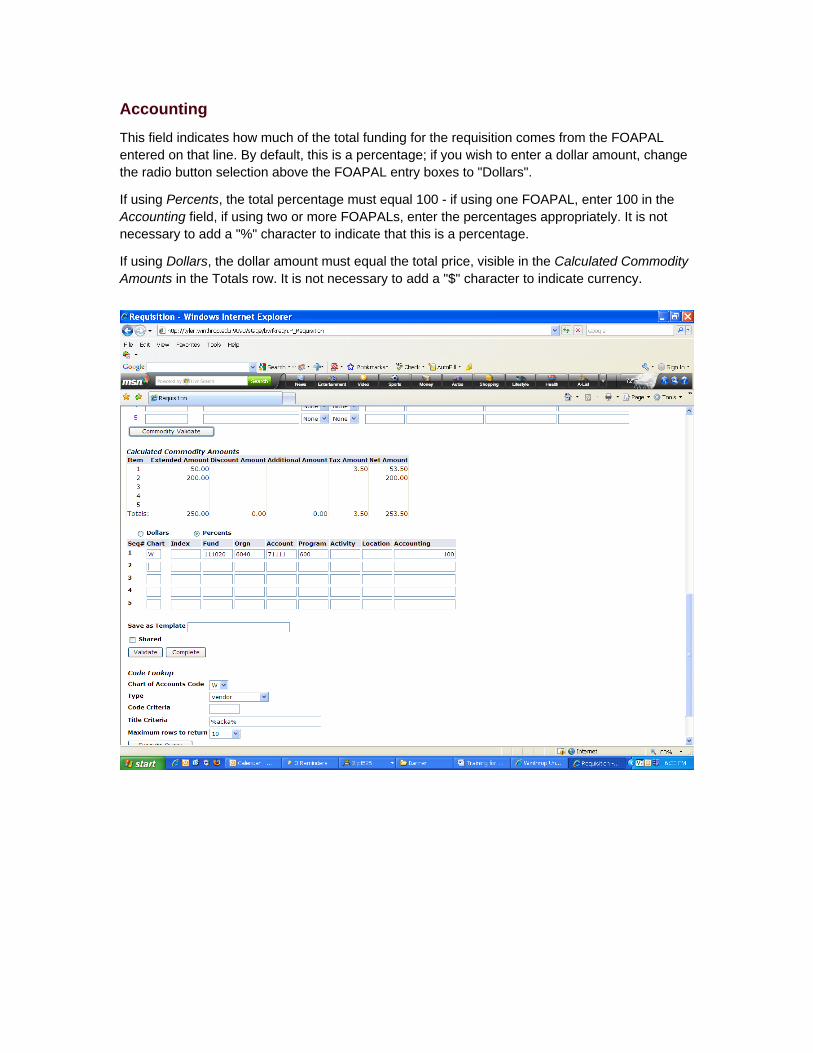
Accounting
This field indicates how much of the total funding for the requisition comes from the FOAPAL entered on that line. By default, this is a percentage; if you wish to enter a dollar amount, change the radio button selection above the FOAPAL entry boxes to "Dollars".
If using Percents, the total percentage must equal 100 - if using one FOAPAL, enter 100 in the Accounting field, if using two or more FOAPALs, enter the percentages appropriately. It is not necessary to add a "%" character to indicate that this is a percentage.
If using Dollars, the dollar amount must equal the total price, visible in the Calculated Commodity Amounts in the Totals row. It is not necessary to add a "$" character to indicate currency.
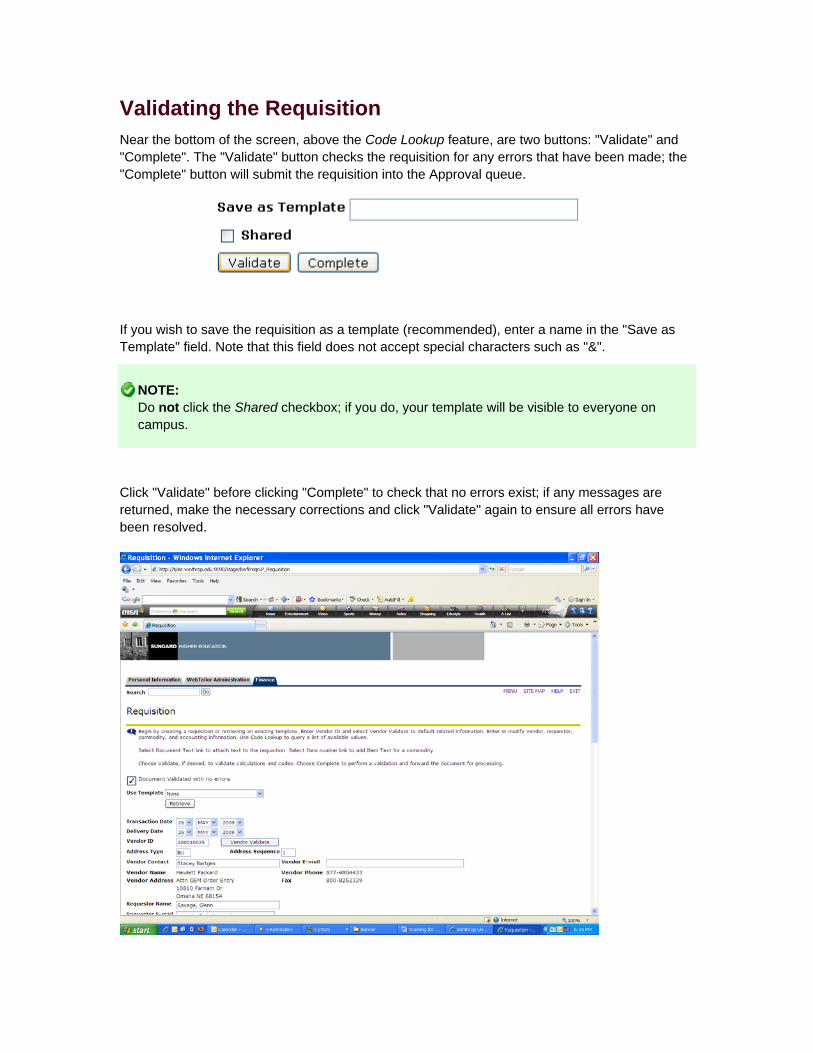
Validating the Requisition Near the bottom of the screen, above the Code Lookup feature, are two buttons: "Validate" and "Complete". The "Validate" button checks the requisition for any errors that have been made; the "Complete" button will submit the requisition into the Approval queue.
If you wish to save the requisition as a template (recommended), enter a name in the "Save as Template" field. Note that this field does not accept special characters such as "&".
NOTE: Do not click the Shared checkbox; if you do, your template will be visible to everyone on campus.
Click "Validate" before clicking "Complete" to check that no errors exist; if any messages are returned, make the necessary corrections and click "Validate" again to ensure all errors have been resolved.
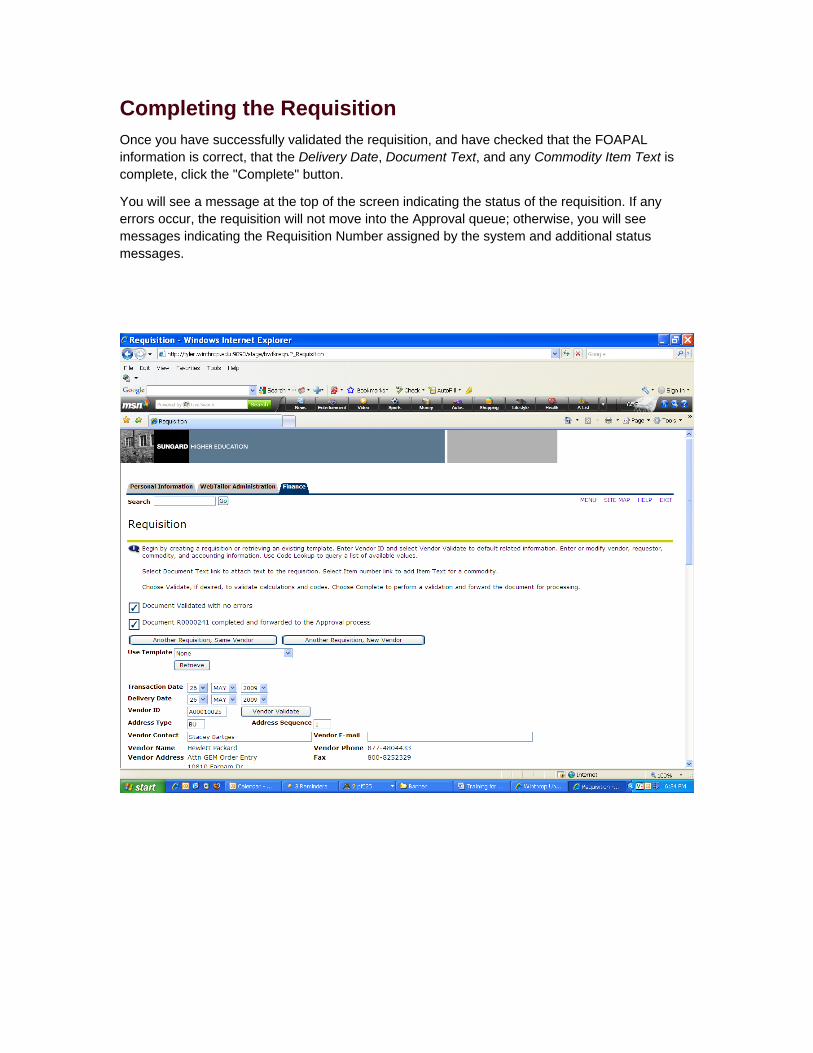
Completing the Requisition
Once you have successfully validated the requisition, and have checked that the FOAPAL information is correct, that the Delivery Date, Document Text, and any Commodity Item Text is complete, click the "Complete" button.
You will see a message at the top of the screen indicating the status of the requisition. If any errors occur, the requisition will not move into the Approval queue; otherwise, you will see messages indicating the Requisition Number assigned by the system and additional status messages.
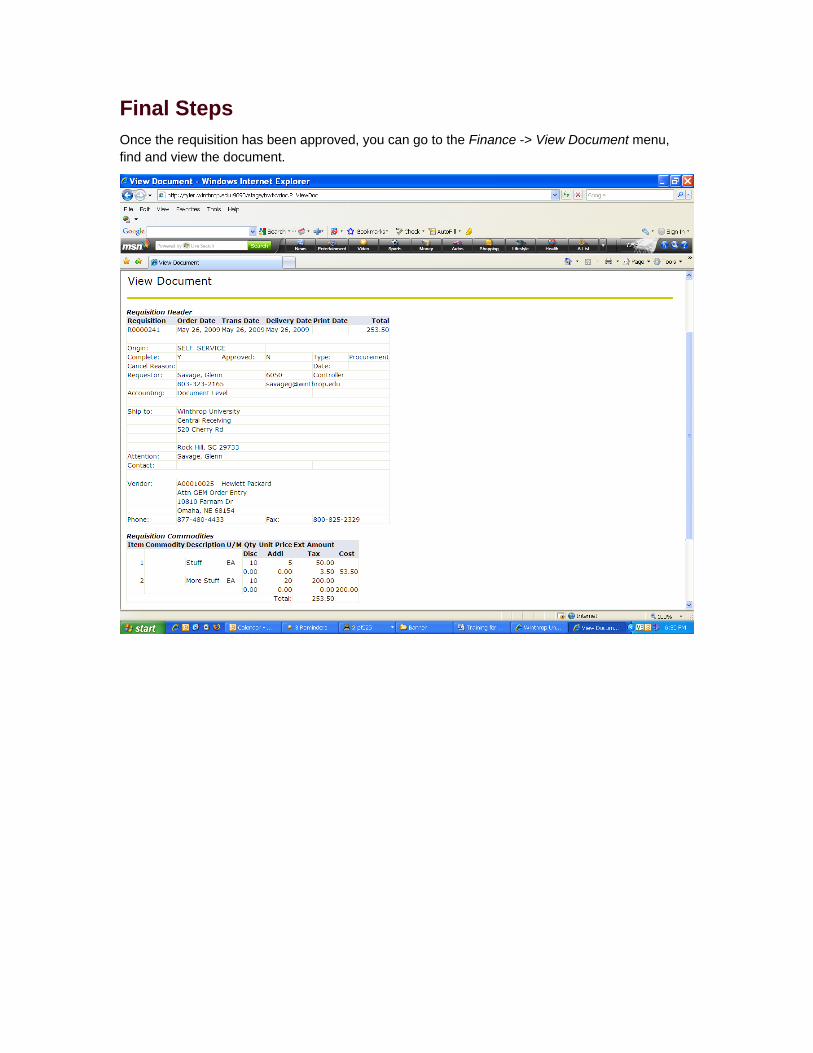
Final Steps Once the requisition has been approved, you can go to the Finance -> View Document menu, find and view the document.
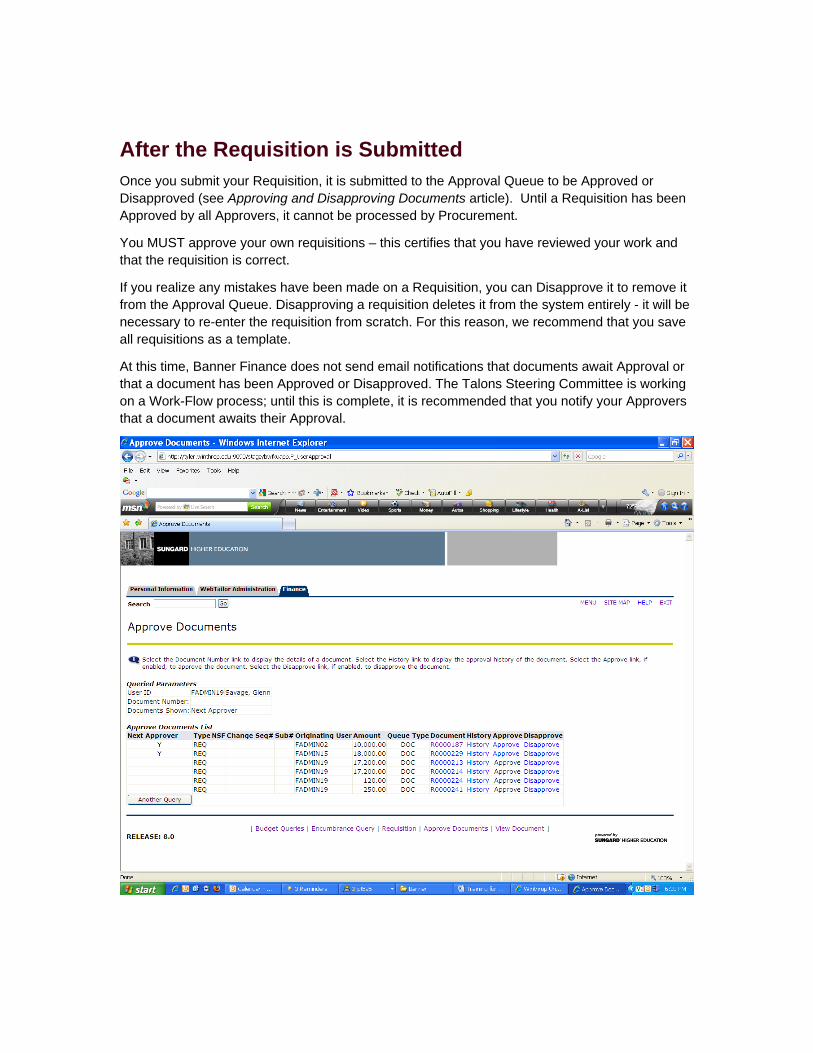
After the Requisition is Submitted Once you submit your Requisition, it is submitted to the Approval Queue to be Approved or Disapproved (see Approving and Disapproving Documents article). Until a Requisition has been Approved by all Approvers, it cannot be processed by Procurement.
You MUST approve your own requisitions – this certifies that you have reviewed your work and that the requisition is correct.
If you realize any mistakes have been made on a Requisition, you can Disapprove it to remove it from the Approval Queue. Disapproving a requisition deletes it from the system entirely - it will be necessary to re-enter the requisition from scratch. For this reason, we recommend that you save all requisitions as a template.
At this time, Banner Finance does not send email notifications that documents await Approval or that a document has been Approved or Disapproved. The Talons Steering Committee is working on a Work-Flow process; until this is complete, it is recommended that you notify your Approvers that a document awaits their Approval.