Embed Size (px)
Citation preview
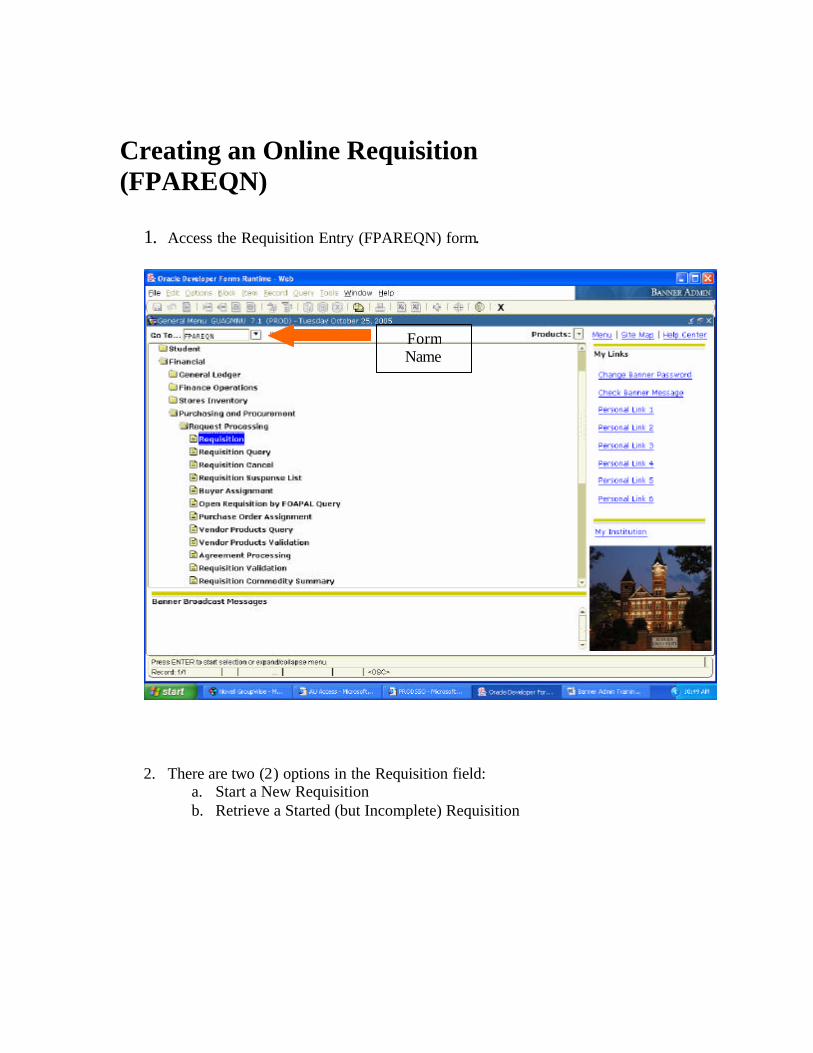
Creating an Online Requisition (FPAREQN)
1. Access the Requisition Entry (FPAREQN) form.
2. There are two (2) options in the Requisition field:
a. Start a New Requisition b. Retrieve a Started (but Incomplete) Requisition
Form Name
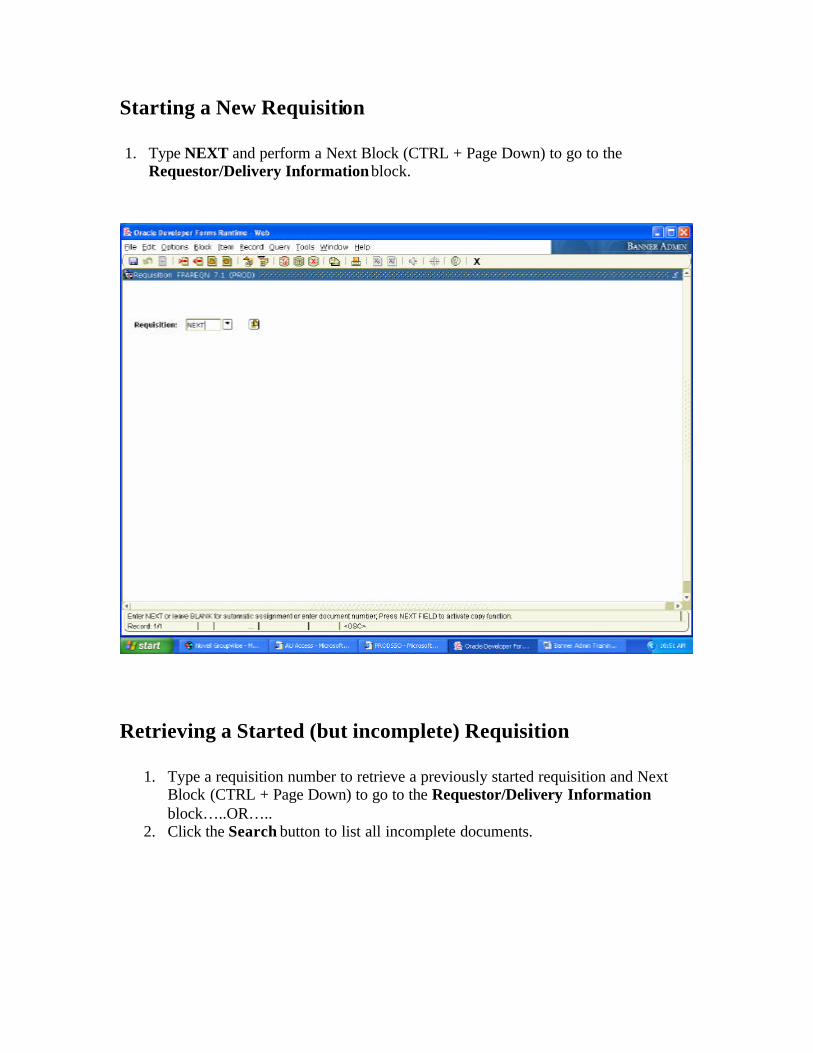
Starting a New Requisition 1. Type NEXT and perform a Next Block (CTRL + Page Down) to go to the
Requestor/Delivery Information block.
Retrieving a Started (but incomplete) Requisition
1. Type a requisition number to retrieve a previously started requisition and Next Block (CTRL + Page Down) to go to the Requestor/Delivery Information block…..OR…..
2. Click the Search button to list all incomplete documents.
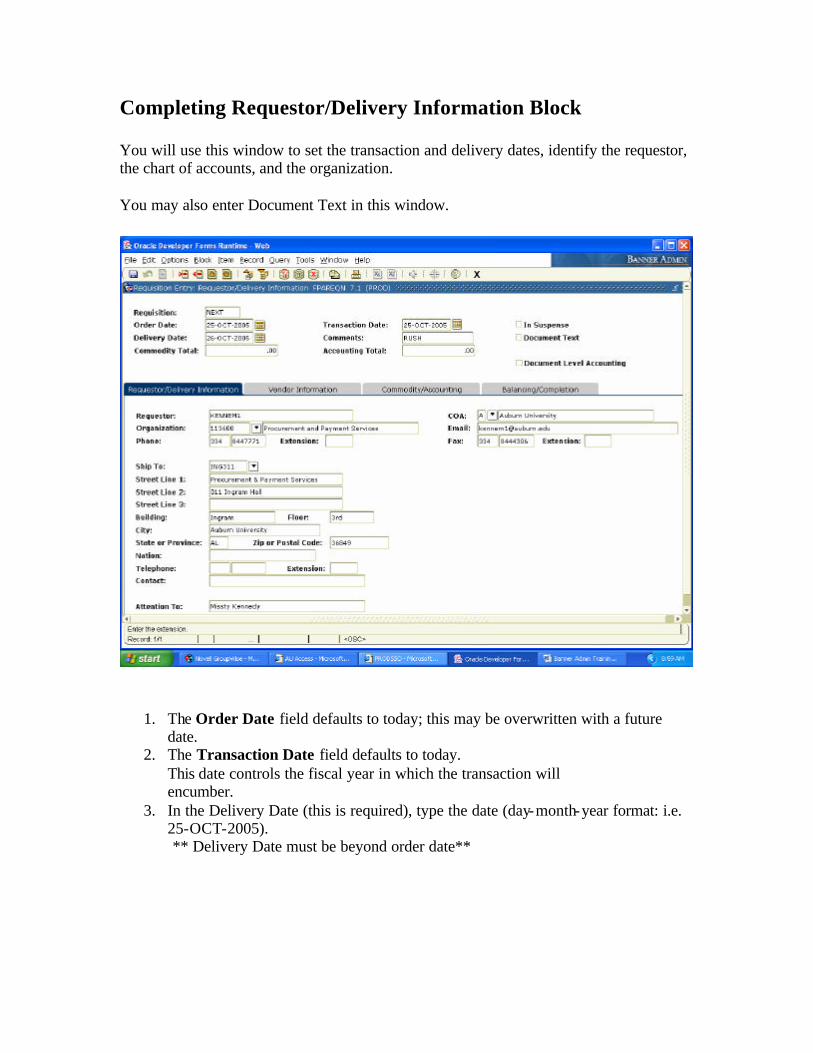
Completing Requestor/Delivery Information Block You will use this window to set the transaction and delivery dates, identify the requestor, the chart of accounts, and the organization. You may also enter Document Text in this window.
1. The Order Date field defaults to today; this may be overwritten with a future date.
2. The Transaction Date field defaults to today. This date controls the fiscal year in which the transaction will encumber.
3. In the Delivery Date (this is required), type the date (day-month-year format: i.e. 25-OCT-2005). ** Delivery Date must be beyond order date**
4. Use the Comments field (maximum 30 characters) for instructions to Procurement when converting the Requisition to a PO, such as RUSH order, or See Document Text. This field will not print on the purchase order.
5. Requestor: This defaults to the user id of the person entering the requisition. 6. The COA (Chart of Accout) should always default to “A”. 7. Organization: This defaults based on the security set you for the requestor. 8. Enter your email address in the Email field. We will no longer be sending hard
copies of PO’s. The requestor will not receive an email with the PO number after the PO has been issued.
9. Please enter phone and fax numbers into the related fields. 10. Enter the Ship To code that has been assigned to you by Missty Kennedy. If you
do not have a Ship To code, please contact Missty Kennedy at [email protected] to obtain one.
11. In the Attention To field, type the name of the individual requesting product. This will be the name that prints on the PO.
Adding Document Text
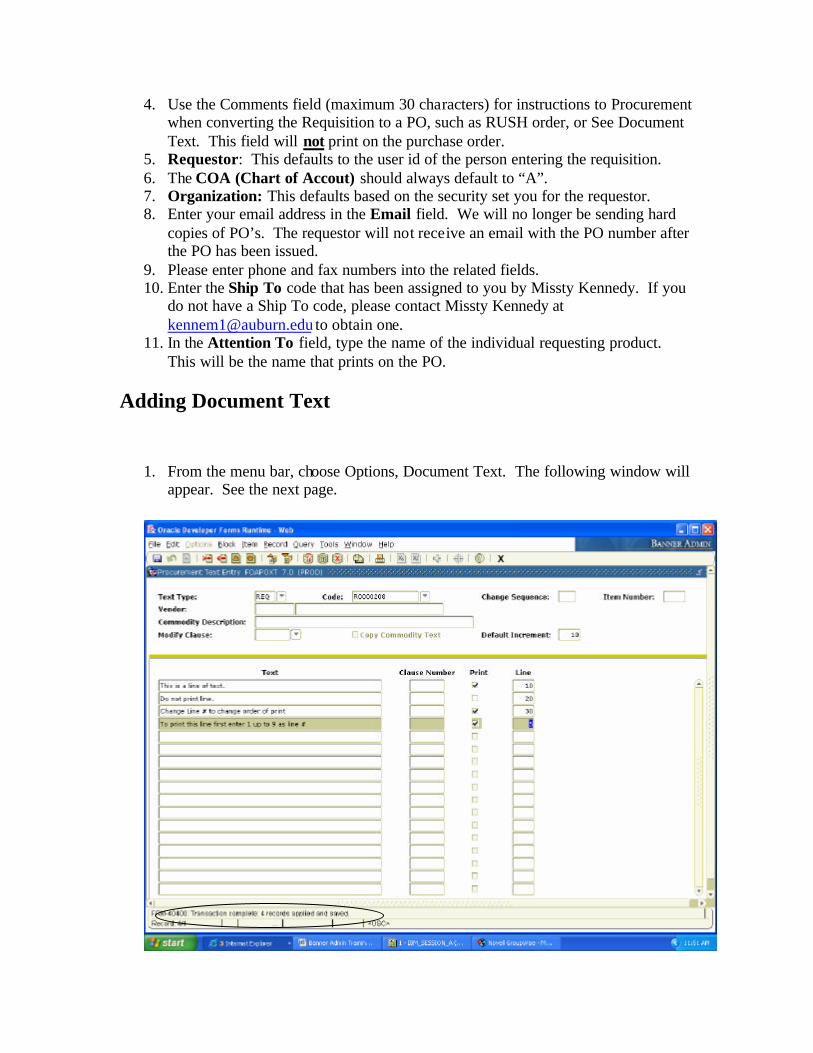
1. From the menu bar, choose Options, Document Text. The following window will appear. See the next page.
2. Click your cursor in the first blank text line of the Text box to type in document
text. This field is limited to 40 characters. If the document text surpasses 40 characters, arrow down to the next blank line to continue typing the message.
3. Leave the Print check box checked if text is to print on PO, or uncheck for internal notes to Procurement.
Note: Non-printing notes DO NOT display in Banner Admin for approvers to view. If a note is intended to support approvals of your document, DO NOT uncheck Print. 4. Press Save (F10, Save Icon, or File Save)
Note: The system will assign a Line number when you save. The line number indicates the order in which the text prints. If you wish to add a line that should precede a previously entered text line when printed, you can manually assign a number that would reorder the lines when printing. Document text can be entered from any block/window until the Requisition has been completed.
5. Click the Exit button (Black X button). 6. Next Block (CRTL + Page Down) to go to Vendor Information block.

Completing the Vendor Information Block The first four lines in this window display information established from the previous forms.
1. In the Vendor field, type a Vendor ID and go to the next block….OR… 2. Click the Search button to conduct a vendor search.
Conducting a Vendor Search
1. Click the Search button to display a pop-up window with two options: 2. Click Entity Name/ID Search (FTIIDEN) to bring up the Entity Name/ID
Search window. 3. Type vendor name (e.g. %Dell%) in the Last Name field.
HINT: Enter the wildcard symbol (%) both in front of and after the name to conduct a thorough search.
Vendor Information Block
Document Text check box is checked meaning that text is included Search
Button
Notice that the Requisition # is now assigned.
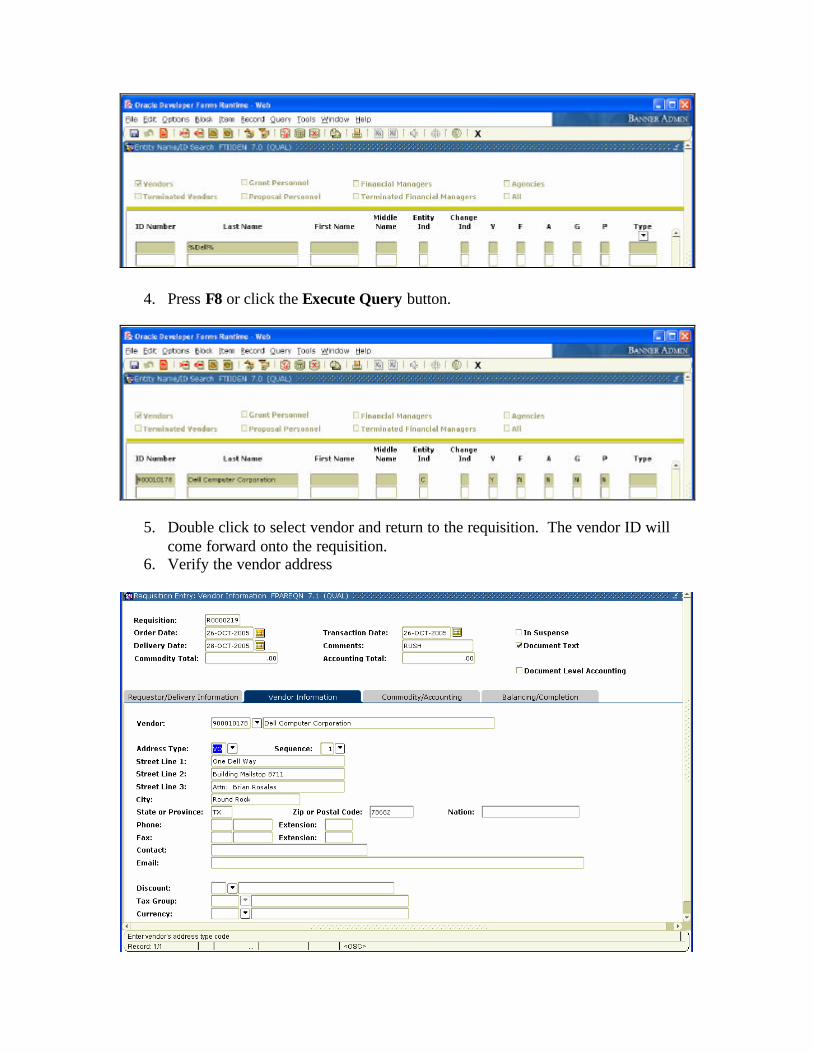
4. Press F8 or click the Execute Query button.
5. Double click to select vendor and return to the requisition. The vendor ID will
come forward onto the requisition. 6. Verify the vendor address
Note: The Address Code should always be VO (Vendor Order) type.
7. If the correct Address is not displayed, click the Search button for Sequence. Double click to select the correct address.
8. Next Block (CTRL + Page Down) to go to the Commodity/Accounting Information block.
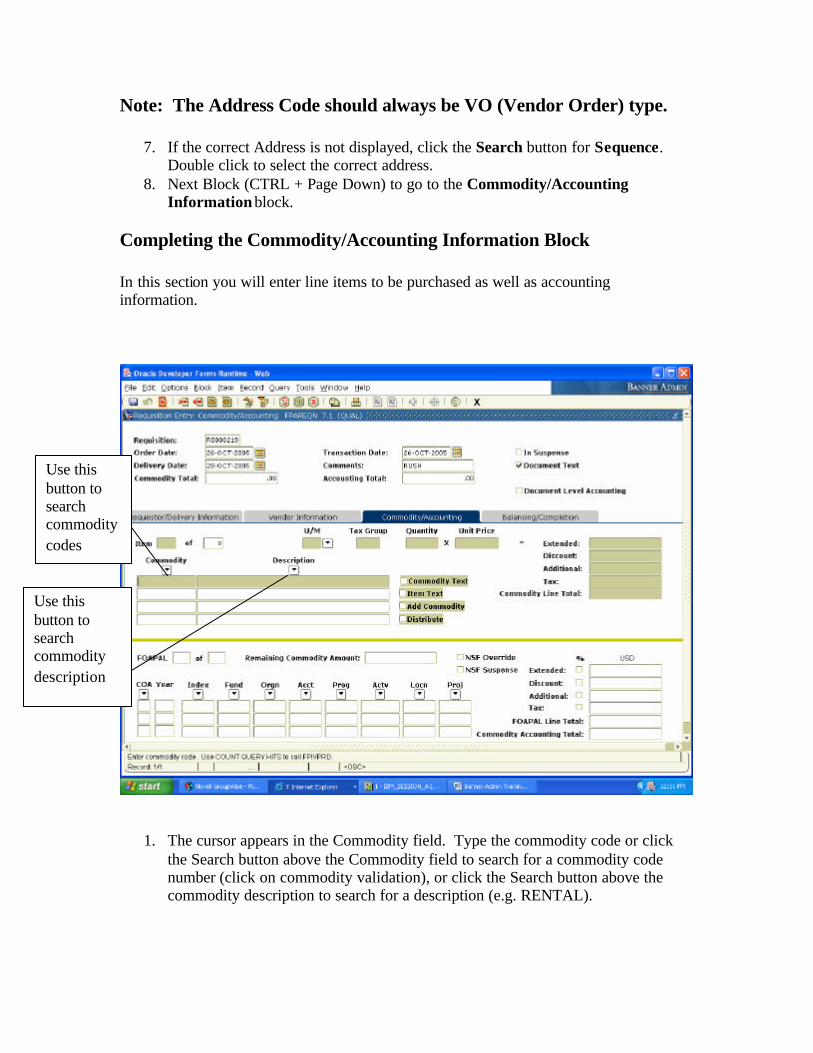
Completing the Commodity/Accounting Information Block In this section you will enter line items to be purchased as well as accounting information.
1. The cursor appears in the Commodity field. Type the commodity code or click the Search button above the Commodity field to search for a commodity code number (click on commodity validation), or click the Search button above the commodity description to search for a description (e.g. RENTAL).
Use this button to search commodity codes
Use this button to search commodity description
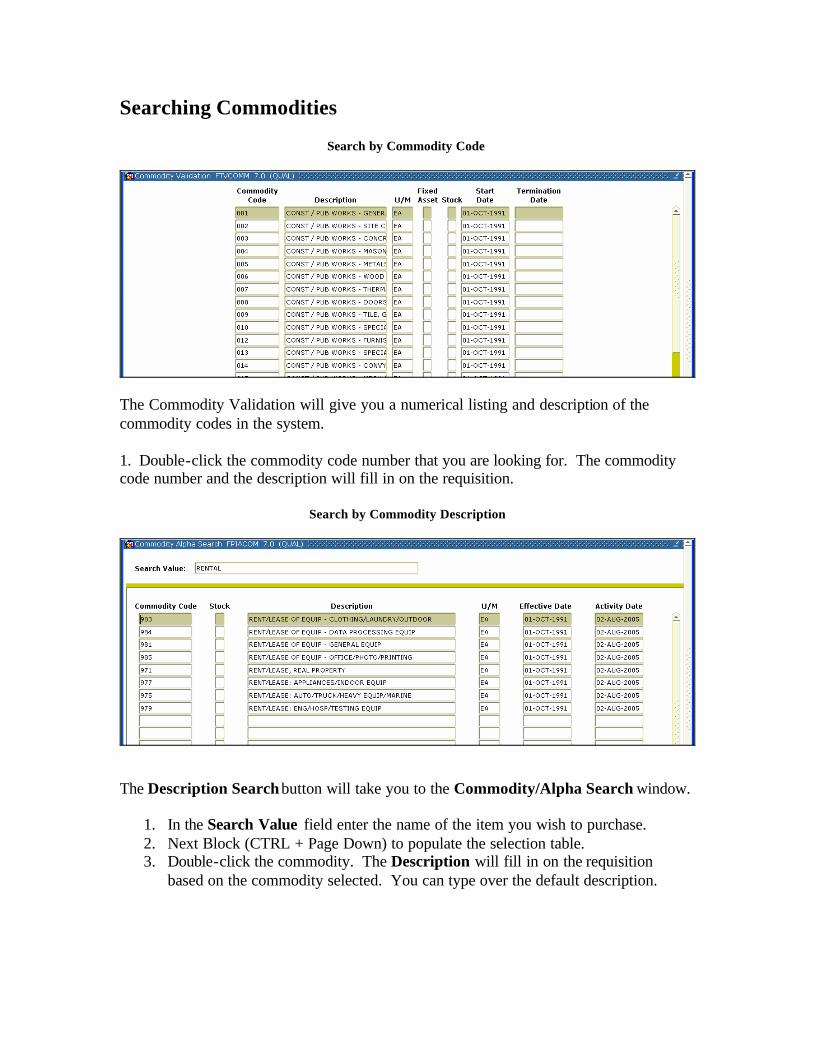
Searching Commodities
Search by Commodity Code
The Commodity Validation will give you a numerical listing and description of the commodity codes in the system. 1. Double-click the commodity code number that you are looking for. The commodity code number and the description will fill in on the requisition.
Search by Commodity Description
The Description Search button will take you to the Commodity/Alpha Search window.
1. In the Search Value field enter the name of the item you wish to purchase. 2. Next Block (CTRL + Page Down) to populate the selection table. 3. Double-click the commodity. The Description will fill in on the requisition
based on the commodity selected. You can type over the default description.
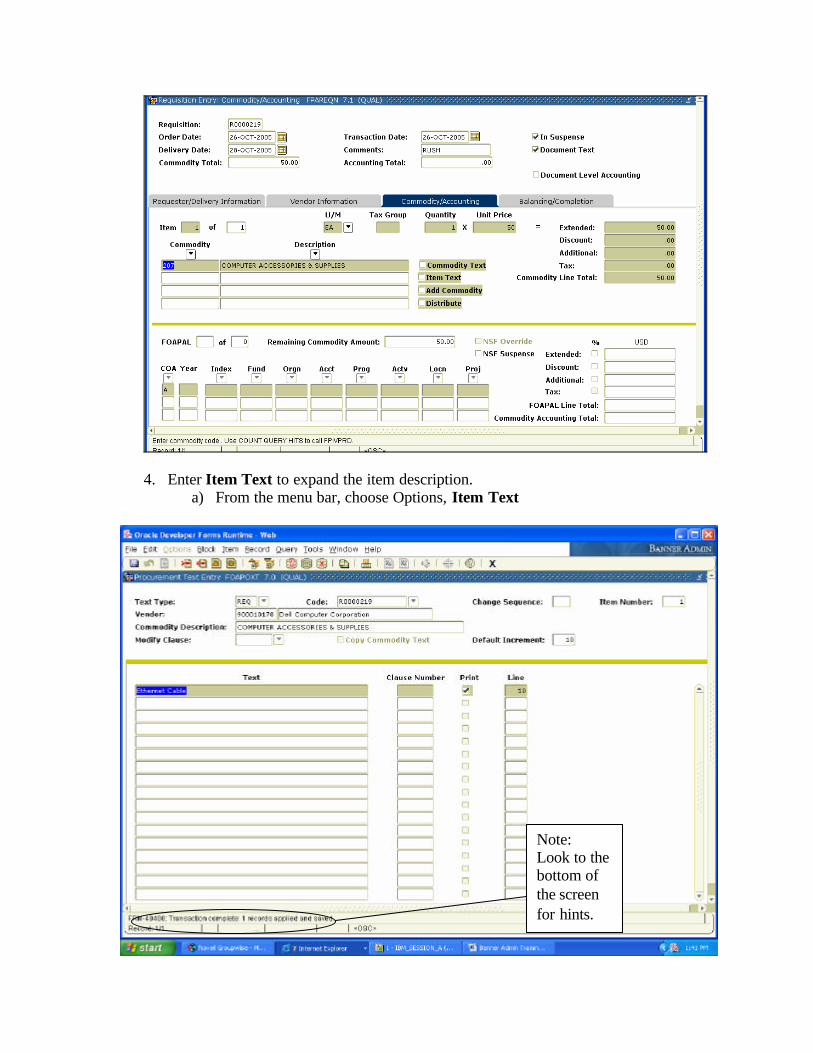
4. Enter Item Text to expand the item description.
a) From the menu bar, choose Options, Item Text
Note: Look to the bottom of the screen for hints.
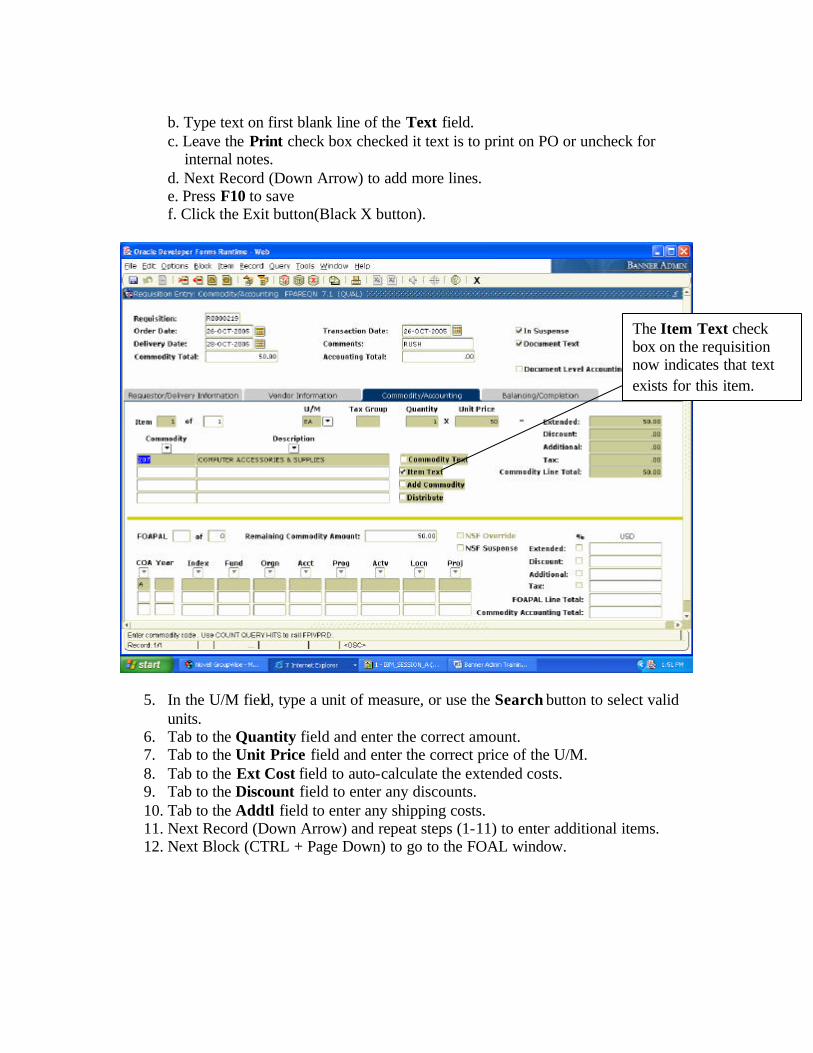
b. Type text on first blank line of the Text field.
c. Leave the Print check box checked it text is to print on PO or uncheck for internal notes. d. Next Record (Down Arrow) to add more lines. e. Press F10 to save f. Click the Exit button(Black X button).
5. In the U/M field, type a unit of measure, or use the Search button to select valid units.
6. Tab to the Quantity field and enter the correct amount. 7. Tab to the Unit Price field and enter the correct price of the U/M. 8. Tab to the Ext Cost field to auto-calculate the extended costs. 9. Tab to the Discount field to enter any discounts. 10. Tab to the Addtl field to enter any shipping costs. 11. Next Record (Down Arrow) and repeat steps (1-11) to enter additional items. 12. Next Block (CTRL + Page Down) to go to the FOAL window.
The Item Text check box on the requisition now indicates that text exists for this item.

Entering the FOAP (Accounting Information)
The COA (Chart of Accounts) will pre-fill to your default chart, FY will pre-fill based on the Transaction.
1. Enter the correct FUND 2. Enter the correct Orgn 3. Enter the Account 4. Enter the Program
Hint To Query on Account: Enter 7% in the search value to limit results to only Supply & Expense Account Codes.
5. Press Tab twice to go to the USD Ext field. 6. Press Tab again to allocate all expenses to this FOAP…OR…Type the exact
dollar ($) amount to be charged to this FOAP…OR… Select the check box to allocate by %. Press Tab. Type the percentage to be allocated to this FOAP.
7. Continue to tab through fields until back to COA (Chart of Accounts). 8. To enter second FOAP, Next Record (Down Arrow) and repeat steps 1-7 until
amount displayed in Remaining Comm Amt = 0. 9. Next Block (CTRL + Page Down) to go to the Balancing/Completion block.
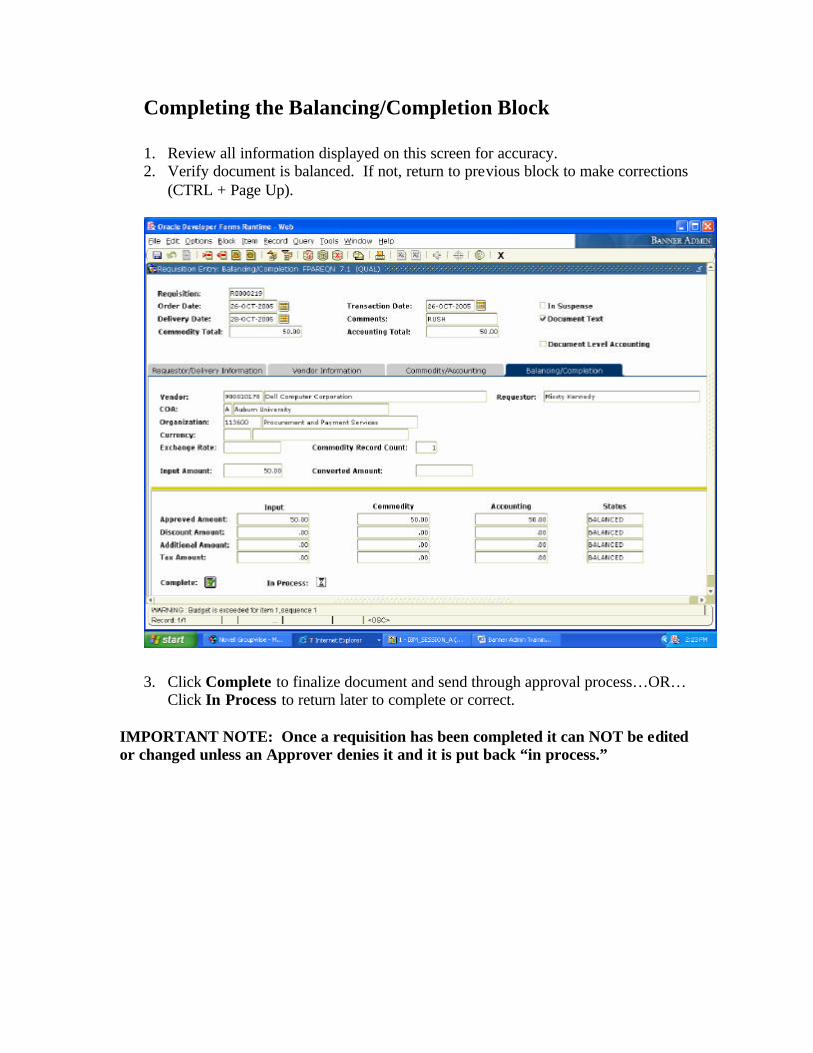
Completing the Balancing/Completion Block 1. Review all information displayed on this screen for accuracy. 2. Verify document is balanced. If not, return to previous block to make corrections
(CTRL + Page Up).
3. Click Complete to finalize document and send through approval process…OR… Click In Process to return later to complete or correct.
IMPORTANT NOTE: Once a requisition has been completed it can NOT be edited or changed unless an Approver denies it and it is put back “in process.”
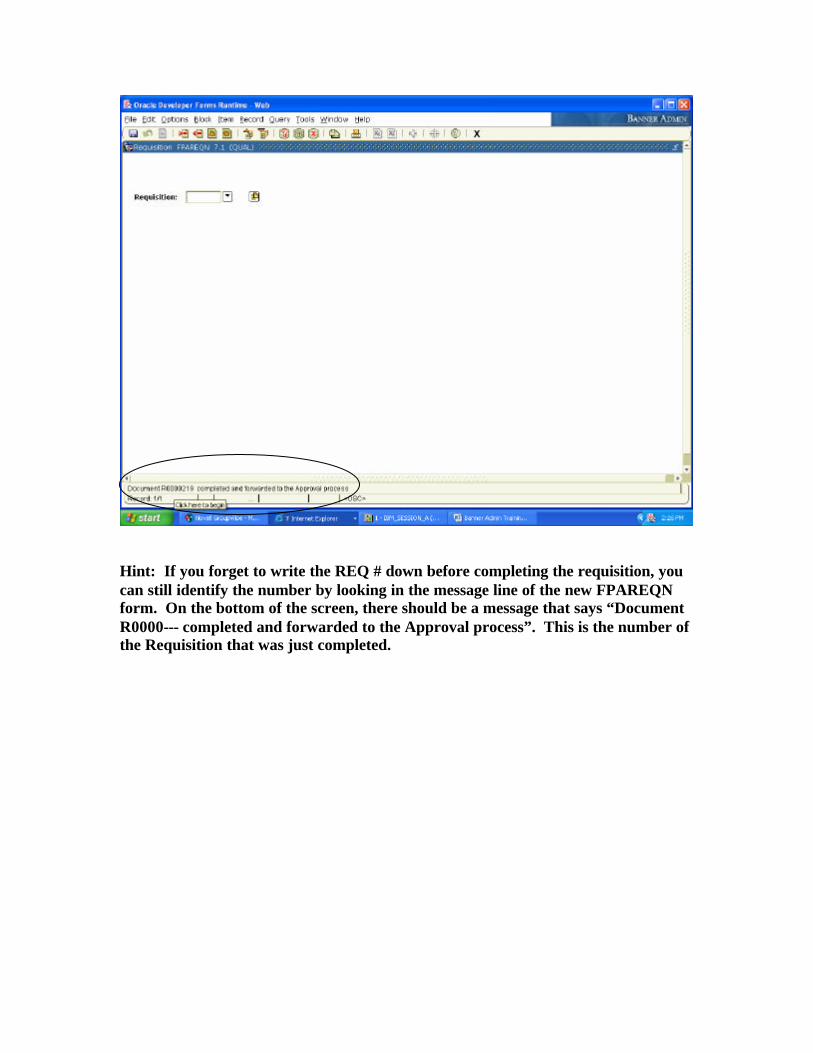
Hint: If you forget to write the REQ # down before completing the requisition, you can still identify the number by looking in the message line of the new FPAREQN form. On the bottom of the screen, there should be a message that says “Document R0000--- completed and forwarded to the Approval process”. This is the number of the Requisition that was just completed.
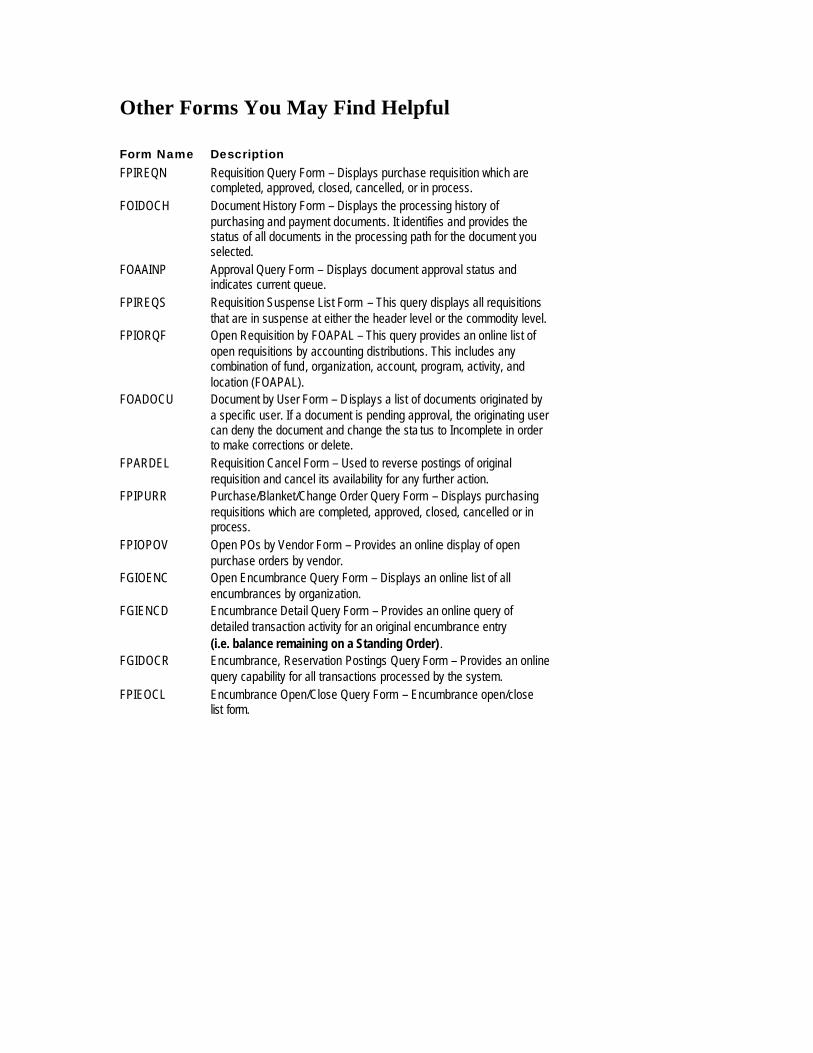
Other Forms You May Find Helpful Form Name Description FPIREQN Requisition Query Form – Displays purchase requisition which are
completed, approved, closed, cancelled, or in process. FOIDOCH Document History Form – Displays the processing history of
purchasing and payment documents. It identifies and provides the status of all documents in the processing path for the document you selected.
FOAAINP Approval Query Form – Displays document approval status and indicates current queue.
FPIREQS Requisition Suspense List Form – This query displays all requisitions that are in suspense at either the header level or the commodity level.
FPIORQF Open Requisition by FOAPAL – This query provides an online list of open requisitions by accounting distributions. This includes any combination of fund, organization, account, program, activity, and location (FOAPAL).
FOADOCU Document by User Form – D isplays a list of documents originated by a specific user. If a document is pending approval, the originating user can deny the document and change the sta tus to Incomplete in order to make corrections or delete.
FPARDEL Requisition Cancel Form – Used to reverse postings of original requisition and cancel its availability for any further action.
FPIPURR Purchase/Blanket/Change Order Query Form – Displays purchasing requisitions which are completed, approved, closed, cancelled or in process.
FPIOPOV Open POs by Vendor Form – Provides an online display of open purchase orders by vendor.
FGIOENC Open Encumbrance Query Form – Displays an online list of all encumbrances by organization.
FGIENCD Encumbrance Detail Query Form – Provides an online query of detailed transaction activity for an original encumbrance entry (i.e. balance remaining on a Standing Order) .
FGIDOCR Encumbrance, Reservation Postings Query Form – Provides an online query capability for all transactions processed by the system.
FPIEOCL Encumbrance Open/Close Query Form – Encumbrance open/close list form.