Embed Size (px)
Citation preview

Planning
Before making your final decisions, you should seriously consider what you want from the new deck. Do you seek a place in the sun or protection from the sun. Will the new deck be part of your interior-exterior entertainment area, around the pool, or at the front or back door.
Often a deck and attached covered pergola are designed together. You will need to decide if the deck roof or cover should give protection from rain or be an open pergola, perhaps covered by deciduous plantings to allow for winter sun to reach the deck.
Also examine the style of your house because a few simple details could fit your new deck into this same style. Don’t forget that stains and paints can also be chosen to blend the new construction into the old.
Pool Decks
In the particular case of decks around pools you must ensure that the construction will provide the safety features demanded by Local Government regulations particularly those related to isolation safety fences and gates around domestic swimming pools.
Decks Railing
To satisfy concerns about safety of above-ground decks, it may be essential that your deck design does include balustrade/railing complying with Local Government regulations. (see later)
Local Government Approvals
Construction of outdoor works such as a deck, a pergola, garden sheds, fences etc., will probably need approval by your local authority and we recommend that your Local Councils be consulted early, before detailed planning is commenced. Obtain from Council Officers any information about relevant regulations, the number of and detail required on plans, scale of drawings and what permits (e.g. owner-builders permit?) are required before work commences.
Timber Selection
Timber decks are usually exposed to the weather but in some designs the supporting timber posts may also be embedded in, or in contact with, the ground. Generally, timber species should be selected so that acceptable performance under those hazardous conditions could be expected.
For the high hazard of in-ground contact or exposure, highly durable timber such as some selected species of native hardwoods (tallowwood, turpentine, ironbark, etc.) sapwood free cypress pine, or preservative treated timbers [which have been treated for hazard level 4 or 5 (H4 or H5)] should be preferred.
For the timber above ground but exposed to weather, durable hardwoods (above named species plus blackbutt, spotted gum, messmate/stringybarks etc.) plus timber which has been preservative treated (at least) for hazard level 3 (H3) could be specified.
Timber treated with copper chrome arsenate (CCA) after 7th June 2006 is not permitted to be used in domestic decking or handrails. Alternative timber preservative treatments are permitted to be used.
Decks provide prac-tical, economical,
outdoor living or recreational areas on level or sloping ground around the house or swimming pool. This project guide outlines some of the points that need to be considered when building a simple timber deck.
Note 1. Your TABMA timber supplier would be able to advise on availability and selection of timbers for these special applications.
Note 2. Most of the structural timber sizes sold as preservative treated in NSW (and Queensland) must be clearly identified by a registered brand. Consult Your timber supplier about availability, grading and branding.
Timber treated with CCA must be branded with the words “Treated with copper chrome arsenate” (except for some small dimension timber).
Limitations on this Deck Design
Member sizes have been designed using design criteria for a high, small area deck (worst case), as per AS/NZS 1170.1 Structural Design Actions. Therefore this design criteria may not be applicable in all deck designs.
Timber Section Size
The timber sizes to be specified will generally depend on the type and grade of timber chosen and considerable variation is possible if the designer chooses. However, most timber merchants will offer timber suitable for deck construction and the most readily identifiable is ‘decking’. Other timber grades and sizes are available from Australian Standard AS1684 Residential Timber Framed Construction.
Timber Decking
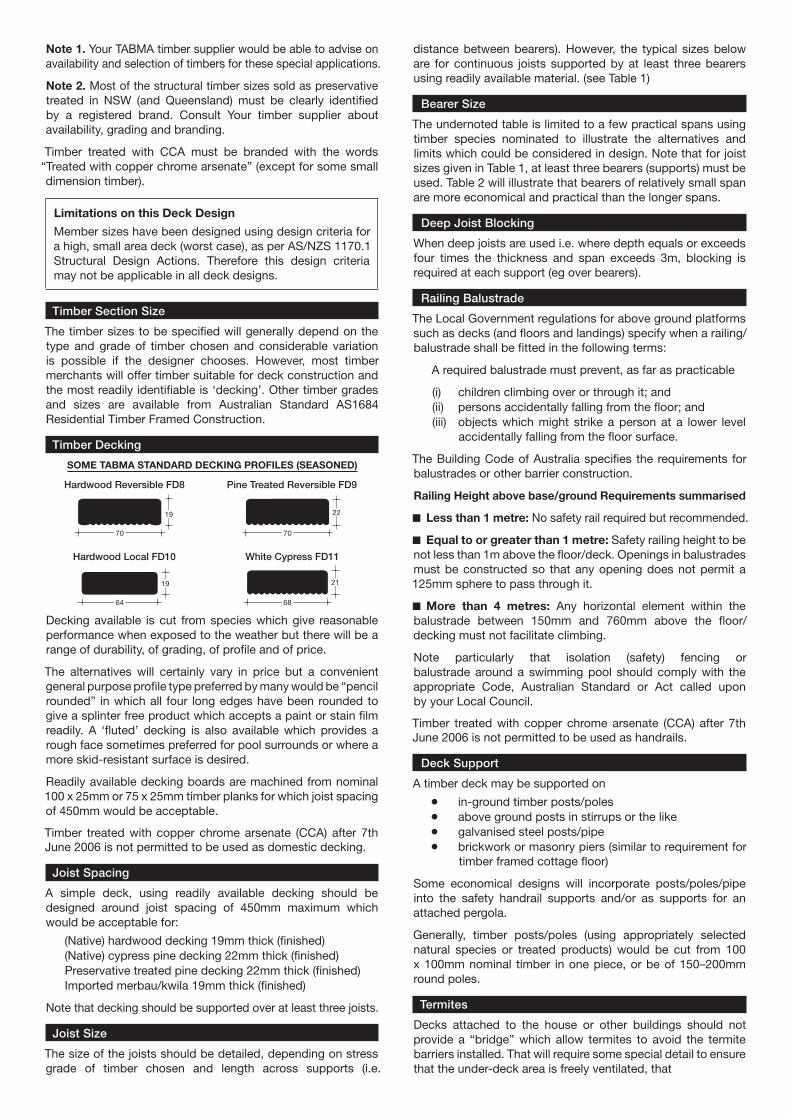
SOME TABMA STANDARD DECKING PROFILES (SEASONED)
Hardwood Reversible FD8 Pine Treated Reversible FD9
70
19
70
22
Hardwood Local FD10 White Cypress FD11
64
19
68
21
Decking available is cut from species which give reasonable performance when exposed to the weather but there will be a range of durability, of grading, of profile and of price.
The alternatives will certainly vary in price but a convenient general purpose profile type preferred by many would be “pencil rounded” in which all four long edges have been rounded to give a splinter free product which accepts a paint or stain film readily. A ‘fluted’ decking is also available which provides a rough face sometimes preferred for pool surrounds or where a more skid-resistant surface is desired.
Readily available decking boards are machined from nominal 100 x 25mm or 75 x 25mm timber planks for which joist spacing of 450mm would be acceptable.
Timber treated with copper chrome arsenate (CCA) after 7th June 2006 is not permitted to be used as domestic decking.
Joist Spacing
A simple deck, using readily available decking should be designed around joist spacing of 450mm maximum which would be acceptable for:
(Native) hardwood decking 19mm thick (finished)(Native) cypress pine decking 22mm thick (finished)Preservative treated pine decking 22mm thick (finished)Imported merbau/kwila 19mm thick (finished)
Note that decking should be supported over at least three joists.
Joist Size
The size of the joists should be detailed, depending on stress grade of timber chosen and length across supports (i.e.
distance between bearers). However, the typical sizes below are for continuous joists supported by at least three bearers using readily available material. (see Table 1)
Bearer Size
The undernoted table is limited to a few practical spans using timber species nominated to illustrate the alternatives and limits which could be considered in design. Note that for joist sizes given in Table 1, at least three bearers (supports) must be used. Table 2 will illustrate that bearers of relatively small span are more economical and practical than the longer spans.
Deep Joist Blocking
When deep joists are used i.e. where depth equals or exceeds four times the thickness and span exceeds 3m, blocking is required at each support (eg over bearers).
Railing Balustrade
The Local Government regulations for above ground platforms such as decks (and floors and landings) specify when a railing/balustrade shall be fitted in the following terms:
A required balustrade must prevent, as far as practicable
(i) children climbing over or through it; and(ii) persons accidentally falling from the floor; and(iii) objects which might strike a person at a lower level
accidentally falling from the floor surface.
The Building Code of Australia specifies the requirements for balustrades or other barrier construction.
Railing Height above base/ground Requirements summarised
Less than 1 metre: No safety rail required but recommended.
Equal to or greater than 1 metre: Safety railing height to be not less than 1m above the floor/deck. Openings in balustrades must be constructed so that any opening does not permit a 125mm sphere to pass through it.
More than 4 metres: Any horizontal element within the balustrade between 150mm and 760mm above the floor/decking must not facilitate climbing.
Note particularly that isolation (safety) fencing or balustrade around a swimming pool should comply with the appropriate Code, Australian Standard or Act called upon by your Local Council.
Timber treated with copper chrome arsenate (CCA) after 7th June 2006 is not permitted to be used as handrails.
Deck Support
A timber deck may be supported on
in-ground timber posts/poles above ground posts in stirrups or the like galvanised steel posts/pipe brickwork or masonry piers (similar to requirement for
timber framed cottage floor)
Some economical designs will incorporate posts/poles/pipe into the safety handrail supports and/or as supports for an attached pergola.
Generally, timber posts/poles (using appropriately selected natural species or treated products) would be cut from 100 x 100mm nominal timber in one piece, or be of 150–200mm round poles.
Termites
Decks attached to the house or other buildings should not provide a “bridge” which allow termites to avoid the termite barriers installed. That will require some special detail to ensure that the under-deck area is freely ventilated, that
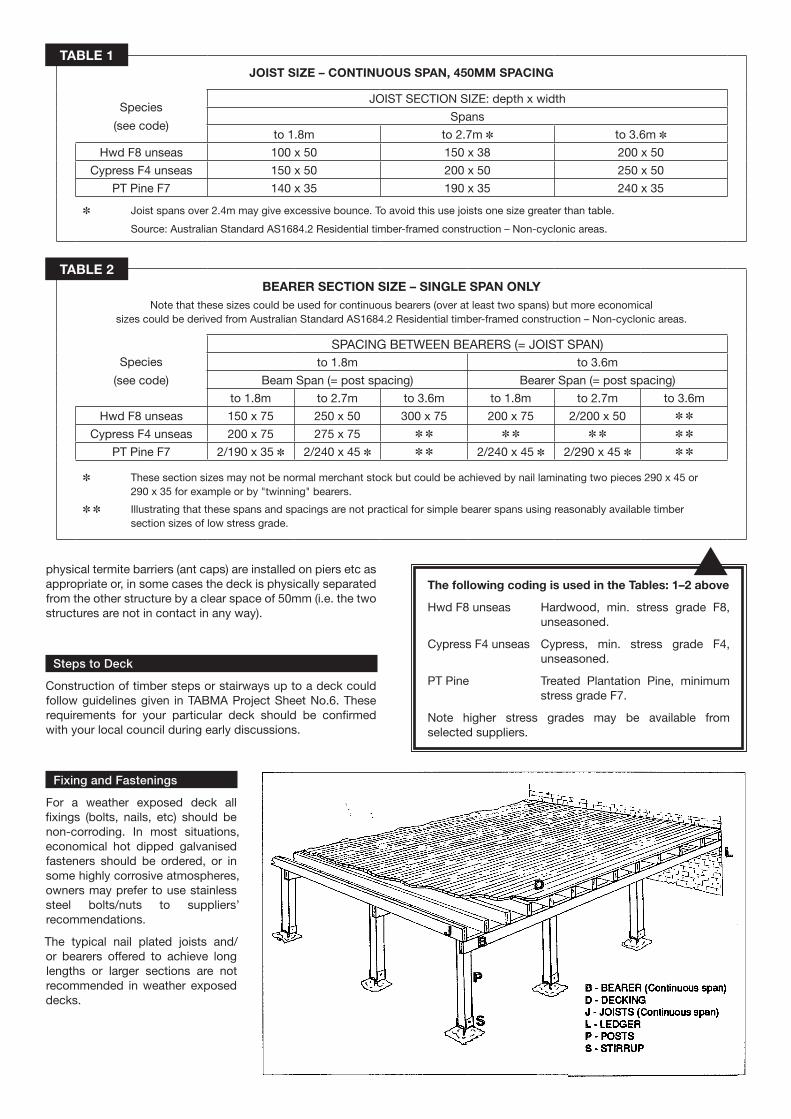
The following coding is used in the Tables: 1–2 above
Hwd F8 unseas Hardwood, min. stress grade F8, unseasoned.
Cypress F4 unseas Cypress, min. stress grade F4, unseasoned.
PT Pine Treated Plantation Pine, minimum stress grade F7.
Note higher stress grades may be available from selected suppliers.
physical termite barriers (ant caps) are installed on piers etc as appropriate or, in some cases the deck is physically separated from the other structure by a clear space of 50mm (i.e. the two structures are not in contact in any way).
Steps to Deck
Construction of timber steps or stairways up to a deck could follow guidelines given in TABMA Project Sheet No.6. These requirements for your particular deck should be confirmed with your local council during early discussions.
Fixing and Fastenings
For a weather exposed deck all fixings (bolts, nails, etc) should be non-corroding. In most situations, economical hot dipped galvanised fasteners should be ordered, or in some highly corrosive atmospheres, owners may prefer to use stainless steel bolts/nuts to suppliers’ recommendations.
The typical nail plated joists and/or bearers offered to achieve long lengths or larger sections are not recommended in weather exposed decks.
JOIST SIZE – CONTINUOUS SPAN, 450MM SPACING
Species
(see code)
JOIST SECTION SIZE: depth x width
Spans
to 1.8m to 2.7m ✽ to 3.6m ✽
Hwd F8 unseas 100 x 50 150 x 38 200 x 50
Cypress F4 unseas 150 x 50 200 x 50 250 x 50
PT Pine F7 140 x 35 190 x 35 240 x 35
✽ Joist spans over 2.4m may give excessive bounce. To avoid this use joists one size greater than table.
Source: Australian Standard AS1684.2 Residential timber-framed construction – Non-cyclonic areas.
BEARER SECTION SIZE – SINGLE SPAN ONLYNote that these sizes could be used for continuous bearers (over at least two spans) but more economical
sizes could be derived from Australian Standard AS1684.2 Residential timber-framed construction – Non-cyclonic areas.
Species
(see code)
SPACING BETWEEN BEARERS (= JOIST SPAN)to 1.8m to 3.6m
Beam Span (= post spacing) Bearer Span (= post spacing)
to 1.8m to 2.7m to 3.6m to 1.8m to 2.7m to 3.6m
Hwd F8 unseas 150 x 75 250 x 50 300 x 75 200 x 75 2/200 x 50 ✽ ✽
Cypress F4 unseas 200 x 75 275 x 75 ✽ ✽ ✽ ✽ ✽ ✽ ✽ ✽
PT Pine F7 2/190 x 35 ✽ 2/240 x 45 ✽ ✽ ✽ 2/240 x 45 ✽ 2/290 x 45 ✽ ✽ ✽
✽ These section sizes may not be normal merchant stock but could be achieved by nail laminating two pieces 290 x 45 or 290 x 35 for example or by "twinning" bearers.
✽ ✽ Illustrating that these spans and spacings are not practical for simple bearer spans using reasonably available timber section sizes of low stress grade.
TABLE 1
TABLE 2
After acquiring the appropriate design approvals and building permits the deck can be constructed using a typical sequence as follows:
1 Estimate materials required and place order on your timber and hardware supplier, and/or consult with your supplier who may have a estimating and quoting service available.
2 Prepare site and locate footings/post holes using string line, line level, pegs and footing stirrups. Clearly establish where posts or piers etc are to be centred and prepare appropriate footings – post hole and blob footing/pier footing/footing for post stirrups or anchor bases. Pour concrete and allow to cure for recommended time (say 7 days).
3 Erect deck supports – posts/poles/piers. Provide temporary bracing as required to hold them in place.
4 Locate Bearers on supports and fix in place as appropriate, then provide permanent bracing between post and bearer if required. Note that traditional bolting and nail fixing would be adequate but the increasing range of prefabricated galvanised steel special or multipurpose brackets could offer effective and convenient alternatives.
5 Locate joists on bearers and attach to provide 450mm spacing. lnstall blocking necessary, install permanent post to joist bracing if required. (A precautionary prime/seal of all end grain of joists and strutting before fixing would be good practice).
6 Apply a weed control measure under the deck particularly under low level decks where the under-deck area is difficult to access.
7 Paint/stain (first coat), all deck framework as desired, paying particular attention to upper edges of bearers and joists and an exposed end grain.
8 Cut to fit and install guard rail supports if necessary then cut and fix decking, ensuring all pieces are supported over at least three joists (i.e. at least two spaces). Again a precautionary first coat of paint/stain all round applied to all decking before fixing, paying particular attention to end grain would be good practice.
Generally it is good practice to pre-drill nail holes at ends of boards (e.g. at butt-joins) to avoid splitting.
Use two nails to fix decking to each joist, sized for penetration of about 30mm into hardwood and cypress joists and about 38mm into softwood joists. Special contorted shank nails (twist or ring shank) are preferred for nailing into P.T. Pine joists but would also give superior fixing to hardwood joists.
Space decking about 1mm for unseasoned decking to allow for shrinkage, or about 4mm for seasoned decking.
9 Install railing, balusters, fascias, other trimwork as required.
10 Finish with paint/stain as desired.
Special Note. All timber exposed to weather (sun, rain, dew) will undergo colour change and some surface checking (fine cracking) and erosion of the surface. The effects of weathering can be minimised by timber selection and by coating exposed components with suitable water repellent solutions, exterior quality stains, or exterior quality outdoor furniture or decking paints, used to manufacturers recommendations and maintained as deterioration is observed.
This brochure was prepared with the assistance and co-operation of the Timber Development Association NSW Ltd.
For further information see www.timber.net.au
Copyright Owner: Timber and Building Materials Association (NSW) Limited
Supplied by
Disclaimer: While the Timber and Building Materials Association (NSW) Limited (TABMA) and its members believe this publication is an invaluable guide to this project, the Association cannot guarantee that every statement is without flaw. Therefore, the Association and its members hereby disclaim all liability for errors or omissions of any kind, whether they be negligent or otherwise, or for any loss, damage or other consequence which may arise from any person relying on information stated in this publication.
STEP BY STEP