Embed Size (px)
Citation preview

User’s Manual No. 980346-001 Rev. A
©2001 Zebra Technologies Corporation
2824
Thermal PrinterUser’s Manual

ii 980346-001 Rev. A

FOREWORDThis manual provides installation and operation information for the LP 2824 series printers, manu-factured by Zebra Technologies Corporation, Camarillo, California.
COPYRIGHT NOTICEThis document contains information proprietary to Zebra Technologies Corporation. This docu-ment and the information contained within is copyrighted by Zebra Technologies Corporation andmay not be duplicated in full or in part by any person without written approval from Zebra Technol-ogies Corporation. While every effort has been made to keep the information contained within cur-rent and accurate as of the date of publication, no guarantee is given or implied that the documentis error-free or that it is accurate with regard to any specification. Zebra Technologies Corporationreserves the right to make changes, for the purpose of product improvement, at any time.
TRADEMARKSLP 2824 is a service mark of Zebra Technologies Corporation. Windows and MS-DOS are regis-tered trademarks of Microsoft Corp. All other marks are trademarks or registered trademarks oftheir respective holders.
LP 2824 Thermal Printers
European Council Directive Compliance to Standards
89/336/EEC
EMC Directive
EN 55022-B 1995 RF Emissions control
92/31/EE EN 50082-1 1997 Immunity to Electro-magnetic Disturbances
IEC 1000-3-2 Harmonic Emmissions
IEC 1000-3-3 Voltage Variation
CB Schema EN 60950 Safety
FCC - DECLARATION OF CONFORMITY:Model: LP 2824 conforms to the following specification:
FCC Part 15, Subpart B, Section 15.107(a) and Section 15.109(a) Class B digital de-vice
Supplemental Information:This device complies with Part 15 of the FCC Rules. Operation is subject to the following Two Con-ditions: (1) This device may not cause harmful interference , and (2) this device must accept anyinterference received, including interference that may cause undesired operation.
INDUSTRY CANADA NOTICE:This device complies with Industry Canada ICS-003 class B requirements.
Cet equipement est conforme a l’ICS-003 classe B de la norm Industrielle Canadian
980346-001 Rev. A iii

SHOCK HAZARD WARNING:The printer and power supply should never be operated in alocation where either one can get wet. Personal injury couldresult.
MEDIA WARNING:Always use high quality approved labels, tags and transferribbons. If adhesive backed labels are used that DO NOT lay flaton the backing liner, the exposed edges may stick to the labelguides and rollers inside the printer, causing the label to peeloff from the liner and jam the printer. Approved supplies can beordered from your dealer.
RELOADING HINT:If you should run out of labels while printing, DO NOT turn thepower switch OFF (0) while reloading or data loss may result.The printer will automatically a new label roll is loaded.
STATIC DISCHARGE:The discharge of electrostatic energy that accumulates on thesurface of the human body or other surfaces can damage ordestroy the print head or electronic components used in thisdevice.DO NOT TOUCH the print head or the electronic componentsunder the top cover.
THERMAL PRINTING:The print head becomes hot while printing. To protect fromdamaging the print head and risk of personal injury, avoidtouching the print head. Use only the cleaning pen to performmaintenance.
iv 980346-001 Rev. A

980346-001 Rev. A v
TABLE OF CONTENTS
Installation and Operation . . . . . . . . . . . . . . . . . 1Unpacking Your Printer . . . . . . . . . . . . . . . . . . . . 2Getting To Know Your Printer . . . . . . . . . . . . . . . . . 3Installation . . . . . . . . . . . . . . . . . . . . . . . . . . . 4AutoSense Gap Sensor Adjustment . . . . . . . . . . . . . . 8Label Dispenser Option . . . . . . . . . . . . . . . . . . . . 10Using Fan-Fold Media . . . . . . . . . . . . . . . . . . . . . 11
Appendix A - Troubleshooting . . . . . . . . . . . . . . . . 13Serial Interface Cable Wiring. . . . . . . . . . . . . . . . . . 17Cash Drawer Cable Wiring . . . . . . . . . . . . . . . . . . 18Parallel Interface Cable Wiring . . . . . . . . . . . . . . . . . 19Cleaning the Print Head . . . . . . . . . . . . . . . . . . . . 20Preparing Media, Paper, and Labels Before Loading . . . . . 21

vi 980346-001 Rev. A

1Installation and Operation
This section provides information on theinstallation and operation of the printer.
The printer is a low cost, desktop direct thermalprinter. The printer is specifically designed forprinting labels, tags or continuous receipts (withor without bar codes) from any DOS™, Win-dows™or ASCII-based compatible host.
980346-001 Rev. A 1

Unpacking Your Printer
2 980346-001 Rev. A
Installation and Operation

Getting To KnowYour Printer
980346-001 Rev. A 3
Installation and Operation

Installation The following steps will guide you through theinstallation of the printer and software.
Step ➊ Attach Power Supply To The Printer
See the SHOCK HAZARD WARNING on pageiv.
4 980346-001 Rev. A
Installation and Operation
Power OFF
Check Voltage
Plug inPower
Module
Plug inPower
Cord
Plug Power Cordinto a Suitable
AC Outlet

Step ➋ Attach Interface Cable
The printer has either a parallel interface or aserial interface (with optional RJ-11 connector).
For additional information on serial cable wir-ing, refer to Appendix A.
980346-001 Rev. A 5
Installation and Operation
Parallel Interface
Power OFF
RJ-11 Interface(Optional)
Serial Interface

Step ➌ Load Labels
6 980346-001 Rev. A
Installation and Operation
MOVIE
Open Cover
Power ON
Adjust Holders
1.0 inch2.5 cm
1.5 inch3.8 cm
MOVIE

Load Labels - continued
980346-001 Rev. A 7
Installation and Operation
Install Roll
Remove OutsideLength
For more infor-mation refer toappendix A
MOVIE

Load Labels - continued
If the indicator remains dark, see Appendix A -Troubleshooting.
8 980346-001 Rev. A
Installation and Operation
Close Cover
Tap Feed Button
Thread ThroughGuides

Step � AutoSense Gap Sensor Adjustment
Perform this procedure when loading a newroll. If your printer has the label dispenseroption, turn OFF the label taken sensor.
980346-001 Rev. A 9
Installation and Operation
Power ON
HoldFeed Button
Power OFF
MOVIE

AutoSense Gap Sensor Adjustment - continued
If the indicator remains orange or red, see thetroubleshooting steps.
10 980346-001 Rev. A
Installation and Operation
4 MO3351F 16 V3.21
Serial port : 96,N,8,1
Image buffer size:245K
Fmem:000,0K,019.9K avl
Gmem:000K,0241K avl
E
I8,0,001 rY
S2 D8 R016,000 ZT UN
q800 Q1029,025
Option:
04 08 13
now in DUMP
mem:000K,0241K avl
Printer AdvancesMedia and PrintsStatus Summary
Note: Printer is indiagnostic dump mode
Tap Feed ButtonTo Begin Normal
Operation
Note: Printer prints“out of DUMP”
When IndicatorFlashes, Release
Feed Button

Label Dispenser Option
980346-001 Rev. A 11
Installation and Operation
Open Door
Use a Stylus toSwitch On the
Label Taken Sensor
Remove SeveralLabels
Push LinerThrough Slot
Close Door
MOVIE

Using Fan-Fold Media
12 980346-001 Rev. A
Installation and Operation
Open Guides toWidth of Media
Lock Guidesin Place
Thread MediaThrough Guides
Insert Media

Step ➎ Install Software
Start your computer and follow the installationinstructions on the compact disc (CD).
980346-001 Rev. A 13
Installation and Operation

14 980346-001 Rev. A
Installation and Operation

Appendix A - Troubleshooting
Problem Solution or Reason
STATUS Indicator
Does not light when powerswitch is turned to ON (I)position.
1. Check power connections from A.C.outlet to power supply to printer.
Lights GREEN, but printerwill not print.
1. Check interface cable connections fromcomputer to printer.
2. Make sure top cover is locked closed.
Blinks GREEN-RED-RED.1. Operator has paused the printer during
a batch job. Tap the FEED button tocontinue.
Lights AMBER. 1. Printer has encountered a syntax orcommand error.
Blinks RED. 1. The optional cover open sensor is ac-tive. Press top cover to close and lock.
Lights RED.1. Media is out. Reload a new source of
media so printer can continue printing.2. Power-up failure.
Blinks GREEN-AMBER. 1. AutoSense in process. Wait until printerdispenses a status report.
Lights AMBER-RED. 1. Download in process.
Operation
Printer appears to beworking (media is being fedout), but nothing is printed.
1. Verify that the labels are the correcttype (direct thermal).
2. Check that the roll is loaded with the di-rect thermal side facing up.
3. Clean the print head with cleaning pen.4. Ensure top cover is locked closed.
Printing is faded or poorquality.
1. Clean the print head with cleaning pen.2. Adjust print speed/darkness in software.
980346-001 Rev. A 15
Problem Solution or Reason
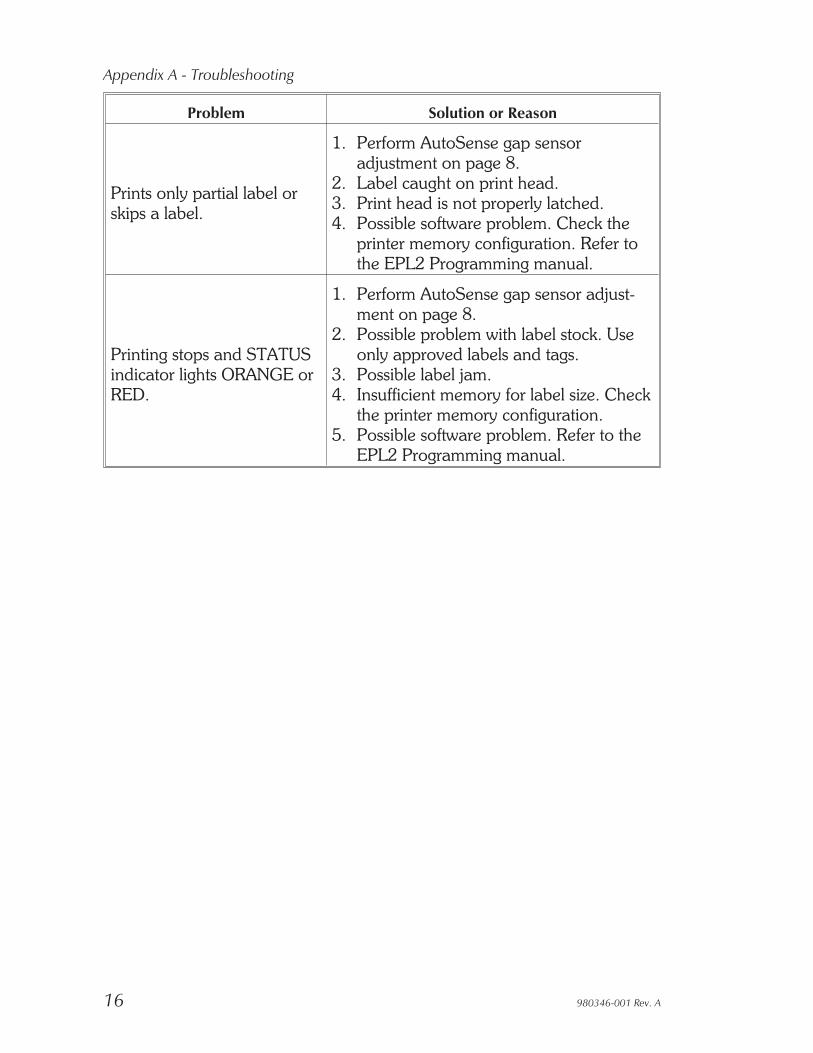
Prints only partial label orskips a label.
1. Perform AutoSense gap sensoradjustment on page 8.
2. Label caught on print head.3. Print head is not properly latched.4. Possible software problem. Check the
printer memory configuration. Refer tothe EPL2 Programming manual.
Printing stops and STATUSindicator lights ORANGE orRED.
1. Perform AutoSense gap sensor adjust-ment on page 8.
2. Possible problem with label stock. Useonly approved labels and tags.
3. Possible label jam.4. Insufficient memory for label size. Check
the printer memory configuration.5. Possible software problem. Refer to the
EPL2 Programming manual.
16 980346-001 Rev. A
Appendix A - Troubleshooting

Serial InterfaceCable Wiring
The figure below displays the cable wiringrequired to use the printer's RS-232 serialinterface.
980346-001 Rev. A 17
Appendix A - Troubleshooting
N/CRxDTxDDTRGNDDSRRTS
RICTS
PrinterHost112233445566778899
DB-9Pin #
DB-9Pin #
Female DB-9 to Male DB-9Cable P/N 300017-006 (6') or 300017-010 (10')
N/CRxDTxDDTRGNDDSRRTS
RICTS
PrinterHost18233242057667485922
DB-25Pin #
DB-9Pin #
Female DB-25 to Male DB-9Cable P/N 300018-006 (6')
*+5 volts at 150 mA for external device (e.g. KDU or scanner)
+5 Volts*TxDRxDN/CGNDRDYN/C
N/CRDY
+5 Volts*TxDRxDN/CGNDRDYN/C
N/CRDY

18 980346-001 Rev. A
Cash DrawerCable Wiring
The figure below displays the pin assignmentsfor the printer's retail cash drawer interface. Re-fer to the cash draw manufacturer's documenta-tion for proper drawer wiring.
*+24 volts D.C. at no greater than 1.5 amps.
Appendix A - Troubleshooting
PRINTERRJ-11
Pin No.
Male RJ-11
SGND/SDRV1/Sense+24V*/SDRV2LGND
123456

980346-001 Rev. A 19
Parallel InterfaceCable Wiring
The figure below displays the cable wiringrequired to use the printer's Centronics parallelinterface.
+5 volts at 300 mA for external device (e.g. KDU or scanner)
Appendix A - Troubleshooting
PRINTERDB-25Pin No.
CentronicsPin No.
Female DB-25 to Male Centronics(Cable)
HOST
STROBEDATA 0DATA 1DATA 2DATA 3DATA 4DATA 5DATA 6DATA 7ACK/BUSY
PAPER ERR.READY
INITERROR/
N/AN/AN/A
SIG. GNDSIG. GNDSIG. GNDSIG. GNDSIG. GNDSIG. GNDSIG. GND
STROBEDATA 0DATA 1DATA 2DATA 3DATA 4DATA 5DATA 6DATA 7ACK/BUSY
PAPER ERR.READY
INITERROR/
N/AN/A+5V
SIG. GNDSIG. GNDSIG. GNDSIG. GNDSIG. GNDSIG. GND
12345678910111213141516171819202122232425
12345678910111213141516171819202122232425

20 980346-001 Rev. A
Cleaning thePrint Head
When you load new media, you can also cleanthe print head.
Appendix A - Troubleshooting
Rub Cleaning PenAcross Dark Area
of Print Head
Wait One MinuteBefore Closing
Printer
Do Not Clean Roller
MOVIE
980346-001 Rev. A 21
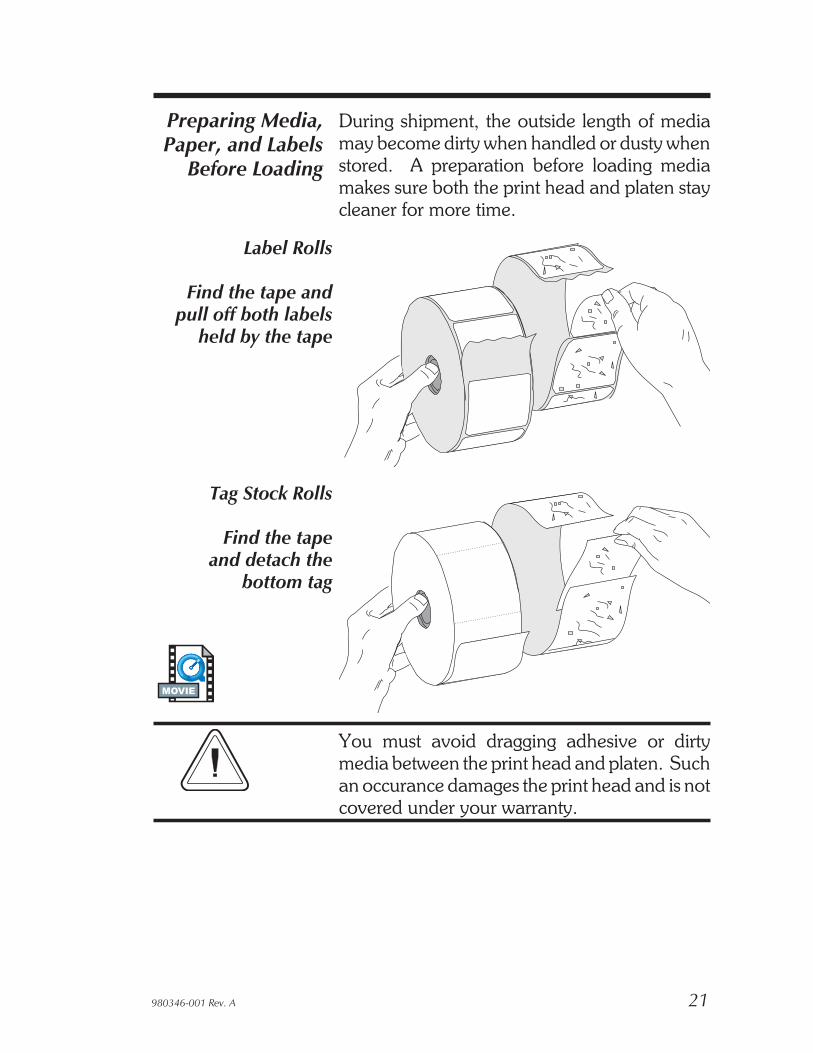
Preparing Media,Paper, and Labels
Before Loading
During shipment, the outside length of mediamay become dirty when handled or dusty whenstored. A preparation before loading mediamakes sure both the print head and platen staycleaner for more time.
You must avoid dragging adhesive or dirtymedia between the print head and platen. Suchan occurance damages the print head and is notcovered under your warranty.
Label Rolls
Find the tape andpull off both labels
held by the tape
Tag Stock Rolls
Find the tapeand detach the
bottom tag
MOVIE

980346- 001A