Embed Size (px)
Citation preview

I N S T R U C T I O N S &A S S E M B L Y F O R :Maltby Iron/HybridBending Machine
Code: MA2017
4820 Jacksontown Road | P.O. Box 3008 • Newark, Ohio 43058-3008 | Toll Free: 800-848-8358 • FAX: 800-800-3290 | Canada Toll Free: 800-387-5331e-mail: [email protected] website: www.golfworks.comSHIPPING
CODE
NN
Features:• Consistent to within + - .5 degrees.• Heavy Duty construction.• Smooth sliding Protractor Assembly measures right or left handed clubs without any disassembly required.• Securely clamps, measures and bends any number and type of iron head and hybrid, right or left hand.• Unique Shaft Guide assures the shaft is in the proper position when recording loft and lie readings.• Brass Soling Discs feature a radius flat top that securely clamps any iron and most hybrids, flat sole or radius sole, right or left handed.• Brass Clamping Top Jaw secures iron heads without marring the finish.• Hybrid Rubber Top Jaw attachment installs quickly to allow easy bending of most hybrids without marring the finish.• Clamping mechanism is designed to prevent slippage when pressure is applied during the bending operation.• Brass Toe Stop helps prevent slippage.• Heavy duty T-Bar bolt moves smoothly for quick and secure tightening of heads.• Short Hosel Bending Bar (GW1036) and Adjustable, Non-Marring Brass Bending Bar (BNMB) included.• Protractor assembly easily adjusts in height to measure wedges and long hosels.• Can be bench mounted or floor mounted with the use of The Golfworks Heavy Duty Machine Stand (MA2003)(recommended).• Complete instructions included.
Instructions for the Maltby Iron/Hybrid Bending MachineUSING THE IRON/HYBRID BENDING MACHINEThe Maltby Design Premium Iron / Hybrid Bending (MA2017) Machine can be bench mounted or mounted on a separate heavy duty stand (MA2003). It is recommended that the unit be mounted on the stand to allow 360 degreeaccess while using. If bench mounted, the bench should be mounted to a wall or floor and the unit should be mountedon the edge of the workbench over one of the load bearing legs. If the stand mount is used, the stand should bemounted to a solid floor to provide a sturdy base.
THE
GOLFWORKS®

4820 Jacksontown Road | P.O. Box 3008 • Newark, Ohio 43058-3008 | Toll Free: 800-848-8358 • FAX: 800-800-3290 | Canada Toll Free: 800-387-5331e-mail: [email protected] website: www.golfworks.com
PREPARING THE MACHINE TO BEND AN IRONThe Maltby Design Iron / Hybrid Bending (MA2017) Machine is designed with set loft and lie degree readingsCNC milled into the top of the main bracket (photo 1). The club number (1-9, PW, GW, SW, LW, UW) is CNCmilled on the side of the main bracket (photo 2). To set theunit to bend an iron, simply remove the pin (photo 3), slidethe T bar housing that is attached to the inner bracket to theproper position. The inner bracket has a hole that lines upwith the outer bracket holes. Simply position the innerbracket on the club number that you want to bend or measure and insert the pin (photo 4).
PLACING THE IRON INTO THE MACHINEThe Maltby Design Iron / Hybrid machine is designed to holdany model iron securely without marring the head. This is accomplished by the use of specially designed flat top brasssoling discs with slight concave radius and the specially designed brass top jaw (see photo 5). The unit also has a brasstoe stop (see photo 6) to prevent slippage when bending the lieof a club.
Photo 6 also shows the proper positioning of the iron headwhen clamped into the MA2017. A key feature of theMA2017 is the face alignment aid. With the face of the ironflush against the inside bracket and the sole touching boththe heel sole disc and the toe sole disc, you can line up thegrooves of any iron with the alignment aid. The groovesshould be parallel to the edge of the face alignment aid.Once you have the head in this position, hold the head in position with one hand and tighten down the T bar with the other. Watch to see if the head moves and re-adjust asnecessary to maintain the proper face position, as shown in photo 6. Be sure the toe stop is adjusted so that it istouching the toe. This will prevent slippage when making lie adjustments. Photos 7A and 7B show the club properlyplaced into the machine and the position of the sliding protractor for right handed clubs (A) and for left handedclubs (B).
Once the club is secure in the machine, slide the loft and lieprotractor into position. The shaft alignment socket slidesforward from the protractor (photo 8A) and should be positioned flush up against the shaft (photo 8B). The socket is designed to easily slide up against the shaft and into position. With the socket and protractor in position, accurate reading of the loft and lie can be taken.
1 2
3 4
5 6
7B7A
8B8A

4820 Jacksontown Road | P.O. Box 3008 • Newark, Ohio 43058-3008 | Toll Free: 800-848-8358 • FAX: 800-800-3290 | Canada Toll Free: 800-387-5331e-mail: [email protected] website: www.golfworks.com
READING THE LIE AND LOFT MEASUREMENTThe MA2017 has two scales on the protractor assembly.Photo 9 shows the lie reading protractor scale and the photo 10 shows the loft reading protractor scale. The lie reading isan actual reading. Once the club is in position, the pointer onthe lie scale will indicate what the lie angle of the club beingmeasured is. In photo 9, the pointer is pointing at “63”, whichtranslates into a lie reading of 63 degrees. Lie readings can betaken from 53 degrees to 77 degrees for right and left handedclubs. The scale indicates “RH” for the right handed clubreadings and “LH” for the left handed club readings.
Photo 10 shows the loft reading scale. The readings are not in actual degrees, like the lie, but are presented in “S” forstrong or “W” for weak. The scale is designed to measure from 5 degrees strong to 5 degrees weak. The base number forthe club you are measuring is the lower number (loft number) on the scale engraved on the top bracket as shown in photo 1. These numbers are the industry average lofts. When measuring any particular club, the loft reading will beregistered as either weak or strong or “0”. If the pointer points at “0”, the clubs loft is the same as the scale on the topbracket. If the pointer points toward the S side of the 0, the loft is strong by the number of degrees indicated by thepointer (between 1 and 5 degrees). If the pointer points toward the W side of the 0, the loft of the club is weak by the number of degrees indicated by the pointer (between 1 and 5 degrees).
EXAMPLE: 5 iron is placed into the MA2017. The industry standard measurements engraved on the top bracket indicatea lie of 60 degrees and a loft of 27 degrees. Once the club is positioned properly and the readings are taken, the liepointer indicates 60 degrees. The loft pointer is 2 marks toward the S side of the 0 on the loft scale. This indicates the loftis 2 degrees stronger than the machine standard of 27 degrees. So, the actual loft is 25 degrees. Remember, strong meansless loft and weak means more loft.
BENDINGThe MA2017 comes with an adjustable non-marring bendingbar (BNMB) and a short hosel bending bar (GW1036). To adjust the lie of an iron, select the bending bar best suited forthe iron design and place the bending bar on the hosel of theiron as shown in photo 11A (non-marring bending bar) orphoto 11B (short hosel bending bar). The bar should be positioned parallel to the face (photos 11A, 11B). The bending bar jaws must be below the ferrule to prevent damageto the ferrule. If using the non-marring bending bar, tightenthe brass jaws securely around the hosel of the club. If usingthe short hosel bending bar, simply position the bar in themiddle of the hosel. A short, quick application of pressure ora constant pressure are the two techniques that are used. Thematerial of the club head and the experience and preference of the user will dictate which technique is used. To flatten thelie, pressure downward on the bar will bend the hosel to a flatter lie. Pressure upward will bend the hosel to make theiron more upright. It is recommended that the lie is re-checked at regular intervals during the bending process.
Once you have finished applying pressure to bend the club, re-check the postion of the head to be sure the head did not slip.The grooves should still be parallel to the face alignment guide.If the head has moved, re-position the head, re-measure, and determine if the head was bent. Continue the procedure as needed to achieve the desired result.
To adjust the loft of an iron place the bending bar on the hosel of an iron as shown in photo 12A (adjustable bar) or Photo 12B (short hosel bar). The bar should be positioned perpendicular to the face. By applying pressure downward on the hosel, you will increase the loft. By applying pressure towards the back of the iron or upward, the loft will be decreased.
9 10
12B12A
11B11A

4820 Jacksontown Road | P.O. Box 3008 • Newark, Ohio 43058-3008 | Toll Free: 800-848-8358 • FAX: 800-800-3290 | Canada Toll Free: 800-387-5331e-mail: [email protected] website: www.golfworks.com
**SPECIAL NOTES: Not all irons are made of the same materials. Some materials are more easily bent than others.The only sure way to determine whether an iron can be bent is to try it. Generally, 17-4 stainless and 431 stainlessheads can be bent up to 2 degrees. Depending on the heat treatment of the material, some may be bent more than 2 degrees and some may not be bendable at all. Most Carbon Steel heads can be bent more than 2 degrees. Again, theonly sure way to tell is to put the club in the machine and apply a constant pressure. You should be able to tell rightaway if the club is bendable or not. Using old clubs and practicing is a great way to develop the feel required to accurately and properly bend irons.
The length of the hosel on an iron is also a determining factor in the amount an iron can be bent. Generally, theshorter the hosel, the less the hosel can be bent.
Some short hosel designs may require a special or customized bending bar for adjustments to be possible. If thebending bar you are using will not fit entirely on the hosel, do not use it and do not attempt to bend the iron.
BENDING LEFT HANDED CLUBSThe only part of the MA2017 that requires disassembly foruse with left hand clubs is the Brass Toe Stop. Using an Allenwrench, simply loosen and remove the toe stop bolt with thebrass toe stop disc attached (photo 13). Move to the oppositeside of the machine and re-insert as shown in photo 14. Approximately 8 turns for the bolt should be sufficient to position the bolt securely into the bracket. Adjust the toe stopdisc as needed. The Sliding Protractor Assembly will simplyslide to the Left Hand measuring side of the machine.
MEASURING AND BENDING HYBRIDSThe MA2017 was designed so that most hybrid club head designs can be secured, measuredand adjusted using the same procedures used when bending iron clubs. Since there are a widevariety of loft options, when placing a hybrid club in the MA2017, choose the loft position ofthe machine that is the closest to that designated on the clubhead, or closest to the loft measuredon a golf club gauge. For example: The loft of the hybrid is designated as 20˚. Position thepin in the #3 slot where the loft designation of the machine is 21˚. Once the head is secured inthe machine and the loft and lie protractor are placed in the correct position on the shaft, youwould get the actual lie reading of the head, and the loft would read 1˚ “S”, or 1˚ “Strong”.This assumes the head is actually the 20˚ loft that is marked on the head.
PLACING A HYBRID INTO THE MACHINEThe Maltby Design Iron / Hybrid machine is designed to hold most models of hybrids securely without marring the head. This is accomplished by the use of specially designed flat top brass soling discs with slight concave radius and the specially designed hybrid rubberface top jaw adaptor (see photo 15). The unit also has a brass toe stop (see photo 16) to prevent slippage when bending the lie of a club. Special Caution: If the hybrids finish ispainted (most models have a painted finish), damage to the finish can occur during the bending process if the brass toe stop is allowed to contact the toe of the head. It is recommended that on hybrid heads only, the toe stop be positioned away from the toe of theclub to prevent any marring or scratching of the finish during the bending process. The backslide bolt clamp and the top clamp should hold the head securely during the bending process,without the need for the toe stop.
Before placing a hybrid club into the machine, the hybrid top jaw adaptor must be installed.To install, first remove the brass top jaw by unscrewing the bolt in the center of the top jaw(see photo 17). You should be able to do this by hand. The design is meant to hold the jawsin place, bull allow them to swivel, so it should not be too tight. If needed, the Allen wrenchtool provided can be used. The jaw bolt requires the 6 mm wrench.
13 14
16
15
17

4820 Jacksontown Road | P.O. Box 3008 • Newark, Ohio 43058-3008 | Toll Free: 800-848-8358 • FAX: 800-800-3290 | Canada Toll Free: 800-387-5331e-mail: [email protected] website: www.golfworks.com
Once the brass top jaw is removed, simply replace it with the hy-brid top jaw adaptor (see photo 18). Position the hybrid adaptorin the same position as the brass jaw, insert the 6 mm bolt andhand tighten.
Since the face height of most hybrids is much shallower thanirons, the top face alignment aid may not be of use on hybrids.In this case, the operator can use the bottom face alignment aidor simply position the head by sight, with the sole centered onthe brass sole pads and the grooves on the face as parallel to theground line as possible (see photo 19). The face of the hybridshould be flush against the inside bracket and the sole should betouching both the heel brass sole pad and the toe brass sole pad.If the hybrid has bulge and roll radius on the face, not all parts ofthe face will be flush against the inside bracket, however thehead can still be secured in the groove parallel position. Thegrooves should be parallel to the edge of the face alignment aidand/or the ground line. Once you have the head in this position,hold the head in position with one hand and tighten down the T bar with the other hand.
**SPECIAL NOTES: Do not over tighten. The crown of manyhybrids is thin and too much downward pressure can causethe crown to be damaged. Watch to see if the head movesand re-adjust as necessary to maintain the proper face position, as shown in Photo 19. The MA2017 has a back T bar bolt with a quick thread release for easy positioning(see photo 20). Once the head is secured by the top T barbolt, tighten the back T bar bolt against the back of the hybrid (see photo 21). The round nylon pad on the back T bar bolt prevents marring or scratching of the f inish.Tighten firmly against the back of the club head (see photo22). This is key to preventing slippage of the head during thebending process, especially on toe to heel radius designs. Besure the toe stop is adjusted so that it does not touch the toe(if the finish of the hybrid is painted, marring or scratchingmay occur during the adjustment process if the brass toestop is touching the toe of the hybrid). Photos 23A and 23Bshow the club properly placed into the machine and the position of the sliding protractor for right handed clubs (A)and for left handed clubs (B).Once the club is secure in the machine, slide the loft and lieprotractor into position. The shaft alignment socket slidesforward from the protractor (photo 24A) and should be positioned flush up against the shaft (photo 24B). The socket is designed to easily slide up against the shaft and into position. With the socket and protractor in position, accurate reading of the loft and lie can be taken.
READING THE LIE AND LOFT MEASUREMENTThe MA2017 has two scales on the protractor assembly. Photo 25 shows the lie reading protractor scale and photo 26shows the loft reading protractor scale. The lie reading is an actual reading. Once the club is in position, the pointer on the liescale will indicate what the lie angle of the club being measuredis. In photo 25, the pointer is pointing at “62”, which translatesinto a lie reading of 62 degrees. Lie readings can be taken from53 degrees to 77 degrees for right and left handed clubs. Thescale indicates “RH” for the right handed club readings and“LH” for the left handed club readings.
2120
1918
22
23B
23A
24A
24B 25
4820 Jacksontown Road | P.O. Box 3008 • Newark, Ohio 43058-3008 | Toll Free: 800-848-8358 • FAX: 800-800-3290 | Canada Toll Free: 800-387-5331e-mail: [email protected] website: www.golfworks.com
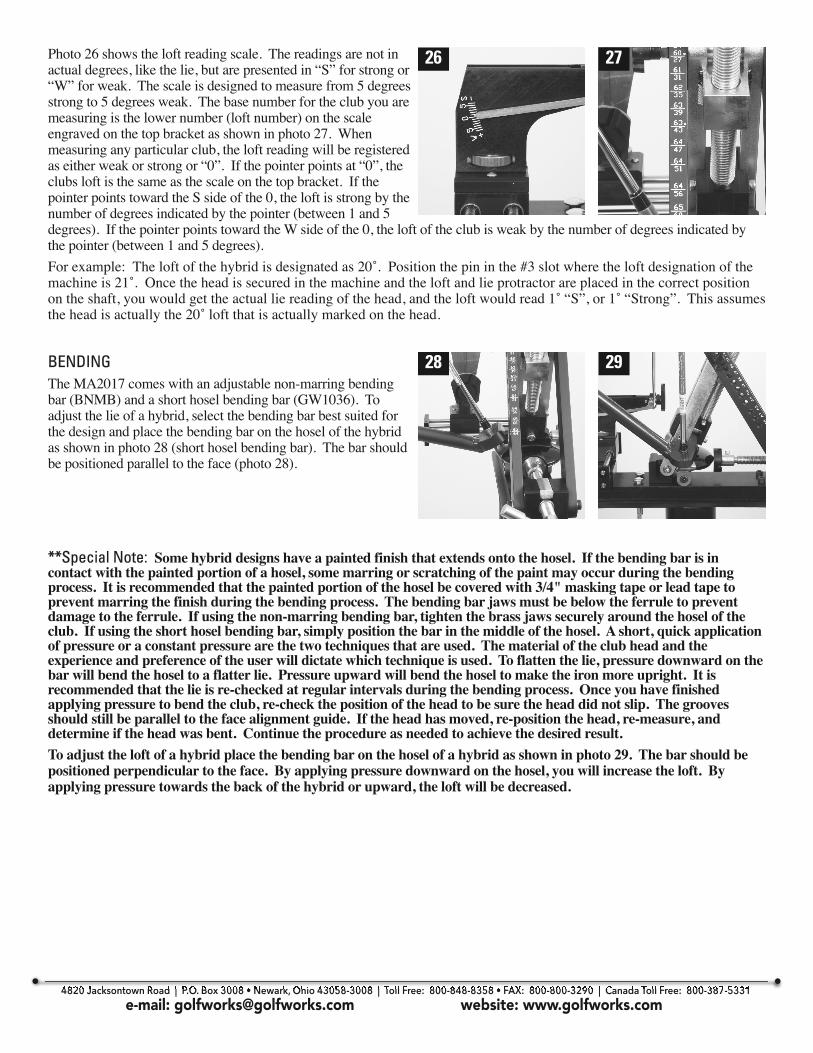
Photo 26 shows the loft reading scale. The readings are not inactual degrees, like the lie, but are presented in “S” for strong or“W” for weak. The scale is designed to measure from 5 degreesstrong to 5 degrees weak. The base number for the club you aremeasuring is the lower number (loft number) on the scale engraved on the top bracket as shown in photo 27. When measuring any particular club, the loft reading will be registeredas either weak or strong or “0”. If the pointer points at “0”, theclubs loft is the same as the scale on the top bracket. If thepointer points toward the S side of the 0, the loft is strong by thenumber of degrees indicated by the pointer (between 1 and 5 degrees). If the pointer points toward the W side of the 0, the loft of the club is weak by the number of degrees indicated bythe pointer (between 1 and 5 degrees).
For example: The loft of the hybrid is designated as 20˚. Position the pin in the #3 slot where the loft designation of themachine is 21˚. Once the head is secured in the machine and the loft and lie protractor are placed in the correct positionon the shaft, you would get the actual lie reading of the head, and the loft would read 1˚ “S”, or 1˚ “Strong”. This assumesthe head is actually the 20˚ loft that is actually marked on the head.
BENDINGThe MA2017 comes with an adjustable non-marring bendingbar (BNMB) and a short hosel bending bar (GW1036). To adjust the lie of a hybrid, select the bending bar best suited forthe design and place the bending bar on the hosel of the hybridas shown in photo 28 (short hosel bending bar). The bar shouldbe positioned parallel to the face (photo 28).
**Special Note: Some hybrid designs have a painted finish that extends onto the hosel. If the bending bar is in contact with the painted portion of a hosel, some marring or scratching of the paint may occur during the bendingprocess. It is recommended that the painted portion of the hosel be covered with 3/4" masking tape or lead tape to prevent marring the finish during the bending process. The bending bar jaws must be below the ferrule to preventdamage to the ferrule. If using the non-marring bending bar, tighten the brass jaws securely around the hosel of theclub. If using the short hosel bending bar, simply position the bar in the middle of the hosel. A short, quick applicationof pressure or a constant pressure are the two techniques that are used. The material of the club head and the experience and preference of the user will dictate which technique is used. To flatten the lie, pressure downward on thebar will bend the hosel to a flatter lie. Pressure upward will bend the hosel to make the iron more upright. It is recommended that the lie is re-checked at regular intervals during the bending process. Once you have finished applying pressure to bend the club, re-check the position of the head to be sure the head did not slip. The groovesshould still be parallel to the face alignment guide. If the head has moved, re-position the head, re-measure, and determine if the head was bent. Continue the procedure as needed to achieve the desired result.
To adjust the loft of a hybrid place the bending bar on the hosel of a hybrid as shown in photo 29. The bar should bepositioned perpendicular to the face. By applying pressure downward on the hosel, you will increase the loft. By applying pressure towards the back of the hybrid or upward, the loft will be decreased.
26 27
28 29

4820 Jacksontown Road | P.O. Box 3008 • Newark, Ohio 43058-3008 | Toll Free: 800-848-8358 • FAX: 800-800-3290 | Canada Toll Free: 800-387-5331e-mail: [email protected] website: www.golfworks.com
**Special Notes: Not all hybrids are made of the same materials. Some materials are more easily bent than others. Some designs may have a different material in the face that is welded to the body. In this instance, bendingis not recommended. The only sure way to determine whether a hybrid can be bent is to try it. Generally, 17-4stainless heads (the most common material used) can be bent up to 2 degrees. Shorter hosel designs may be less.Depending on the heat treatment of the material, some may be bent more than 2 degrees and some may not bebendable at all. Again, the only sure way to tell is to put the club in the machine and apply pressure. You shouldbe able to tell right away if the club is bendable or not. Using old clubs and practicing is a great way to develop thefeel required to accurately and properly bend hybrids.
The length of the hosel on a hybrid is also a determining factor in the amount a hybrid can be bent. Generally, theshorter the hosel, the less the hosel can be bent. Some short hosel designs may require a special or customizedbending bar for adjustments to be possible. If the bending bar you are using will not fit entirely on the hosel, do not use it and do not attempt to bend the hybrid.
BENDING LEFT HANDED CLUBSThe only part of the MA2017 that requires disassembly for usewith left hand clubs is the Brass Toe Stop. Using the Allenwrench, simply loosen and remove the toe stop bolt with thebrass toe stop disc attached (photo 30). Move to the oppositeside of the machine and re-insert as shown in photo 31. Approximately 8 turns for the bolt should be sufficient to position the bolt securely into the bracket. Adjust the toe stopdisc as needed.
The Sliding Protractor Assembly will simply slide to the lefthand measuring side of the machine. No disassembly is required.
CONTENTS:In the box you should receive the following:1 Maltby Design Iron / Hybrid Bending Machine (MA2017)1 Non-marring, adjustable bending bar (BNMB)1 Short Hosel bending bar (GW1036)1 Hybrid Top Jaw Adaptor (part of the MA2017)1 Allen Wrench tool (part of the MA2017)1 Custom Loft and Lie sheets, pad of 50 (GAA)
REPLACEABLE PARTS:Brass top jaw (MA2017BTJ)Hybrid adaptor top jaw (MA2017HA)Brass soling pads (MA2017SP)Brass toe stop (MA2004TS)
** SPECIAL NOTE: The brass parts o the MA2017 are designed to prevent the marring of clubheads, while securing the head for adjustment. Due to the soft nature of the brass material, over time the brass parts of theMA2017 may need to be replaced. These parts are available through The Golfworks.
3130