Embed Size (px)
Citation preview

OWNER’S MANUAL
THE WORLD’S FINEST
Millenium 4000 Juicer

Congratulations! In choosing the Millenium 4000 Juicer, you’ve taken an important step towards a healthy lifestyle. Countless studies show that a diet rich in fruits and vegetables can lower the incidence of heart problems, cancer and the degenerative diseases of aging. The evidence is so convincing, in fact, that the US Recommended Daily intake of fruits and vegetables has increased. The Millenium 4000 Juicer includes a number of features that bring the power and durability of commercial juicers directly to your kitchen countertop. Fresh, wholesome vegetable and fruit juices of the highest quality have never been easier to prepare. It’s a quality you can see in the color of the juice itself; darker, richer colors contain more of the pigments and nutrients you desire, while the extracted pulp is pale in color.
The juice extracted by the Millenium 4000 Juicer will likely be richer, sweeter and more full bodied than any juice you’ve tasted before. With the introduction of the Millenium 4000 Juicer, we have developed a juicer with refined and enhanced capabilities, while requiring less space on your countertop.
It’s a quality you can see; it’s a quality you can taste.
Plastaket Manufacturing Company, Inc.

TAP nature’s bounty. TASTE nature’s goodness.
Use the Millenium 4000 Juicer to enhance your diet with a variety of fresh, great-tasting fruit and vegetable juices:
• Vegetable juices• Fruit juices • Wheatgrass & leafy greens juices
If variety is the spice of life, then the Millenium 4000 Juicer is, quite literally, just what the doctor ordered. Treat your taste buds to sensations like:
• Fruit & Vegetable sauces and purees• Fruit Whips• Baby foods• Nut butters
Table of Contents
Important Safeguards ............ 2
Juicer Parts .................... 3
Juicer Assembly (Exploded View).. 4
Table 1. Recommended Assembly ... 5
Assembly Instructions ........... 6
Juicing Instructions ........... 14
Homogenizing Instructions ...... 15
Shredding Instructions ......... 16
Disassembly and Cleaning ....... 17
Troubleshooting ................ 18
Foreign Language Instructions .. 19
Limited Warranty ............... 51
Warranty Registration Card ..... 52

Some models shipped outside of the U.S. may need wiring changes to adapt to local electrical standards. Contact Plastaket Manufacturing Company for information @ www.championjuicer.com.
Damage or Breakage in Transit Every Millenium 4000 Juicer is insured against shipping damage or breakage. Inspect your juicer carefully before initial operation.
In the event of damage or breakage, contact your place of purchase and the shipper for further instructions.
Do not return the juicer or any components to Plastaket Manufacturing Company without prior notification to the shipper or Plastaket Manufacturing Company 209-369-2154.
1. Read all assembly and operating instructions prior to use. Incorrect assembly and/or operation of the juicer can cause difficulty in operating the juicer safely and/or efficiently.2. To protect against electrical hazards, NEVER immerse juicer in water.3. THIS MACHINE SHOULD NOT BE OPERATED BY CHILDREN.4. Use only as described in this manual.5. Do not operate juicer unless fully assembled. 6. The blades in the grinding auger are sharp. Handle carefully.7. Operate the juicer only at voltage specified.8. The use of accessories other than those designed and provided by Plastaket is prohibited.9. Use only the tamper when pushing product down feeding tube.10. Avoid contacting moving parts.11. If food becomes lodged in the feeding tube, that cannot be cleared using tamper, turn motor off, unplug juicer cord and disassemble juicer to remove remaining food.12. During all operations, AVOID EXCESSIVELY
LARGE PORTIONS of produce that might get stuck in the feeding tube or overload the processing chamber. Generally LESS IS BETTER!13. TURN OFF JUICER IMMEDIATELY when any unusual sounds, smells or heat are detected. Unplug the juicer cord, disassemble parts, rinse, inspect and reassemble. 14. THE JUICER SHOULD NOT BE LEFT RUNNING when not juicing or while unattended. 15. Do not operate the juicer with a damaged cord or plug or after the juicer has been dropped or damaged in any manner.16. Always use handle when moving the juicer. Turn off and unplug juicer prior to moving. When carrying juicer, the bottom of the juicer may be supported with other hand, if so desired. 17. Unplug juicer cord from electrical outlet when not in use and before cleaning.18. Do not let the cord hang over edge of table or counter.19. Outdoor use of the juicer is not recommended.20. Do not place juicer or parts near any hot surface.
21. Save these instructions.
Important SafeguardsWhen using the Millenium 4000 Juicer, basic safety precautions should always be practiced including the following:
2
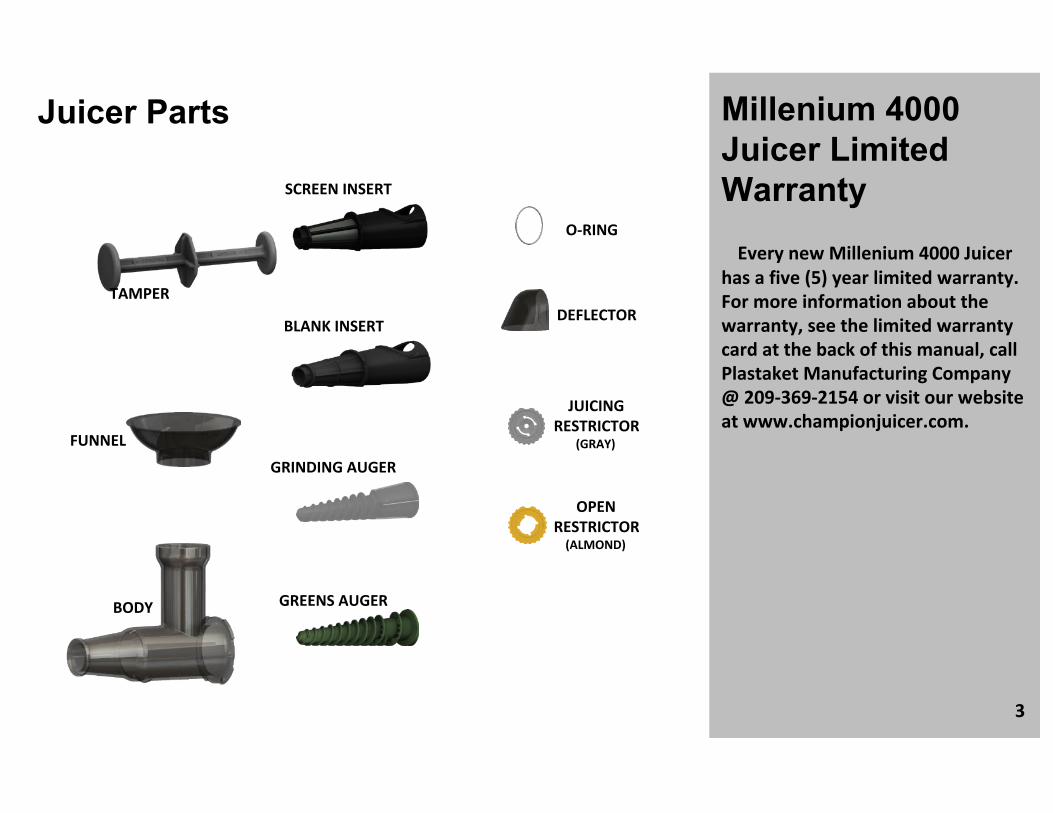
Juicer Parts
TAMPER
OPEN RESTRICTOR
(ALMOND)
BODY GREENS AUGER
GRINDING AUGER
FUNNEL
SCREEN INSERT
BLANK INSERTDEFLECTOR
O-RING
Millenium 4000 Juicer Limited Warranty Every new Millenium 4000 Juicer has a five (5) year limited warranty. For more information about the warranty, see the limited warranty card at the back of this manual, call Plastaket Manufacturing Company @ 209-369-2154 or visit our website at www.championjuicer.com.
JUICING RESTRICTOR
(GRAY)
3
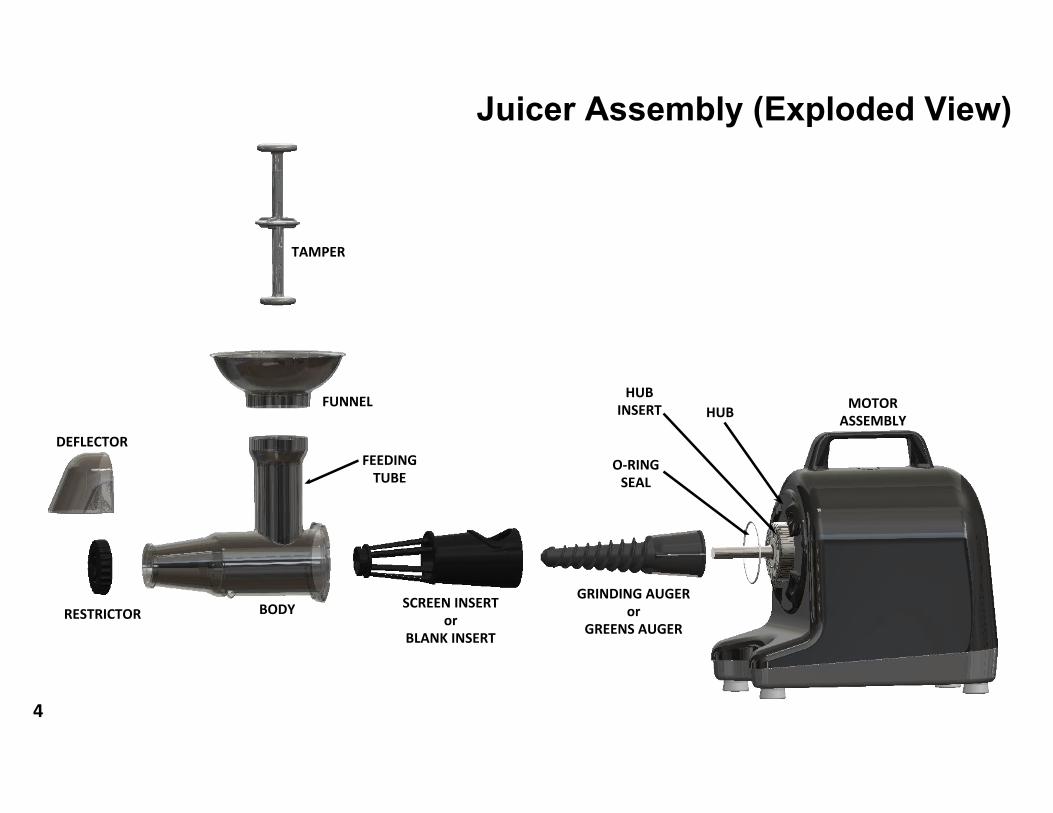
Juicer Assembly (Exploded View)
O-RING SEAL
TAMPER
SCREEN INSERTor
BLANK INSERT
BODY
FUNNEL
RESTRICTOR
DEFLECTOR
MOTOR ASSEMBLY
GRINDING AUGERor
GREENS AUGER
HUB
FEEDING TUBE
HUB INSERT
4

5* For juicing vegetables and fruits and adding greens.
Table 1. Recommended Assembly
PRODUCT PRODUCEINSERT AUGER RESTRICTOR
SCREEN BLANK GREENS (green)
GRINDING (black)
JUICING (Gray)
OPEN (Almond)
JUICE VEGETABLES X X X
JUICE FRUIT X X X X
JUICE WHEATGRASS X X * X
JUICE GREENS LEAFY X X * X
JUICE GREENS NON-FIBROUS X X X X
SMOOTHIE FROZEN FRUIT X X X X
NUT BUTTER NUTS - DRY ROASTED X X X X
SAUCE TOMATOES, APPLES, ETC. X X X X
SOUP, BABY FOOD
COOKED VEGETABLES X X X X
SALAD, COLESLAW
CARROTS, BEETS, ONIONS, CABBAGE X X X

Assembly Instructions
1. Apply a light coating of olive or coconut oil to the o-ring seal. Install the o-ring seal over the hub insert.
Note: The o-ring seal is initially installed over the hub insert.
2. Apply a light coating of olive or coconut oil onto the motor shaft.
6

Assembly Instructions
3. Slide the back of auger onto the motor shaft and rotate until the flat in the auger and the flat on the motor shaft are aligned. Continue to slide the auger onto the motor shaft until the auger stops against the end of the motor shaft.
a. Use the GRINDING auger ( gray) for juicing of vegetables, such as carrots and beets, for juicing of non-fibrous greens, for juicing of most fruits and for homogenizing.
b. Use the GREENS auger ( green) for juicing of wheatgrass, most leafy greens and for shredding.
7

Assembly Instructions
4. Slide the screen insert into the body so that the insert top opening is in line with the feeding tube. The grooves in the insert must be aligned to the body ribs. If the fit is tight, recheck the alignment. Using your thumb, apply forward pressure to the front of the top opening of the insert to assure that it is completely seated in the body.
a. Use the screen insert for all juicing operations. b. Use the blank insert for non-juicing operations, such as blending, pureeing, homogenizing and shredding.
Note: The screen insert is initially installed inside the body.
8

Assembly Instructions
c. Rotate the restrictor counter-clockwise until it stops.
I. Use the juicing restrictor (gray) for all juicing and most homogenizing operations. II. Use the open restrictor (almond) for some homogenizing operations and for shredding.
5. Install the restrictor to the front of the body as follows:
a. Slide the cone end (back) of the restrictor over the front of the body.b. Align the large groove (top) of the restrictor to the tab on the front of the body (tab
is located 90 degrees clockwise from the feeding tube looking from the front). Apply light pressure and rotate slowly back and forth until the restrictor slides into the insert’s front opening.
9

Assembly Instructions
6. Install the body assembly onto the hub of the motor assembly as follows:
a. Slide the body assembly over the auger and against the hub of the motor assembly.b. With the feeding tube slightly clockwise of vertical, align the body flange openings
to the hub lugs and then rotate counter-clockwise against the stops.
Note: The feeding tube must be at the top.
Note: THE JUICER WILL NOT OPERATE UNLESS THE BODY ASSEMBLY IS PROPERLY INSTALLED ONTO THE HUB OF THE MOTOR ASSEMBLY.
10

Assembly Instructions
7. Install the deflector to the restrictor by aligning the tabs of the deflector with the grooves of the restrictor and sliding the deflector down from the top.
11
Assembly Instructions
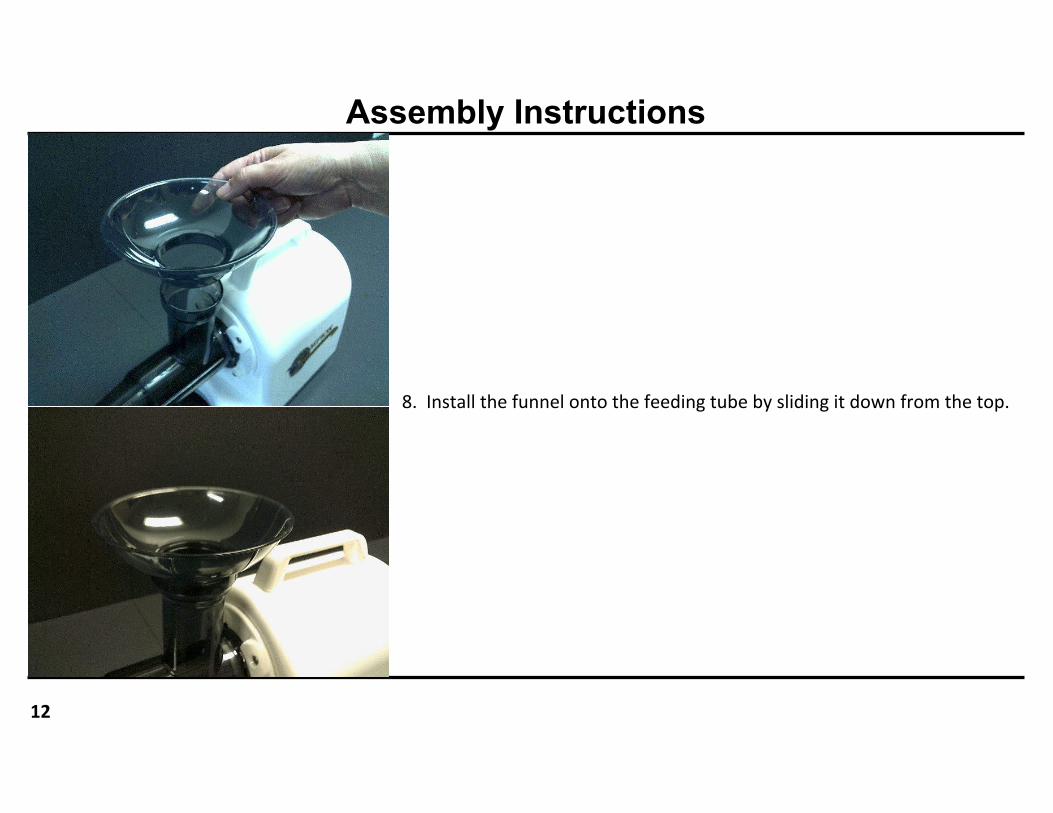
8. Install the funnel onto the feeding tube by sliding it down from the top.
12

Assembly Instructions
9. The tamper is designed to be used in either direction. Use the tamper with its smaller diameter face down when using the greens auger. Use the tamper with its larger diameter face down when using the grinding auger. Each face of the tamper is identified as “GRINDING” or “GREENS” on the handle.
10. The juicer is fully assembled.
13

Juicing InstructionsPRODUCE RECOMMENDATIONS
1. Vegetables to juice include root vegetables, wheatgrass and leafy greens. 2. Fruits to juice include most fruits. Fruits such as apples and pears must be fresh and crisp for proper cutting of the peals and maximum juice extraction. If your produce is not fresh, peal removal or replacement with fresher produce is recommended prior to juicing.
PRODUCE PREPARATION1. Clean all vegetables and fruits thoroughly by soaking in water or brushing and then rinsing.2. All produce with thick skins, such as oranges or with large pits, such as peaches, should have them removed.3. All feeding portions should be no larger than 1¼ inches cross section to assure adequate clearance in feeding tube. 4. For very fibrous vegetables, such as celery, cut to 2 inches or less in length to prevent wrapping of fibers around grinding auger blades. 5. Wheatgrass should be cut to a length of no more than 4 inches.6. For other greens, such as kale or chard, remove stalks greater than ¼” diameter and tear or cut pieces to about 3 inches x 3 inches.7. When juicing grapes, use seedless grapes only.8. Pomegranates are a special case. In addition to removal of its peel, it should have its internal membranes removed (i.e. juice the seeds only).
JUICING (See Table 1, page 5)1. Generally, use the grinding auger (gray) for most vegetables and fruits and use the greens auger (green) for wheatgrass and leafy greens. However, for juice blends that include vegetables, fruits and greens, use the grinding auger and alternate the types of produce as you juice.
2. Install the screen insert.3. Install the juicing restrictor (gray).4. Installation of the deflector is recommended. When juicing, always use the deflector.5. Installation of the funnel is recommended when juicing small items, such as cherry tomatoes or grapes. 6. Place bowls under the body assembly. 7. Turn on the juicer.8. Use the tamper with its “GRINDING” face (larger diameter end) down when using the grinding auger; use the tamper with its “GREENS” face (smaller diameter end) down when using the greens auger. Using the tamper, push the material down the feeding tube. If the pulp begins to back up in the feeding tube, allow extra time for pulp to expel prior to additional feeding. 9. Re-feeding of the pulp is optional for more yield. Discontinue re-feeding when negligible additional juice is produced.
14

Homogenizing InstructionsPRODUCE RECOMMENDATIONS
Nut Butters - Use only DRY ROASTED & SHELLED nuts. Fruit Whips - Fruits such as bananas, strawberries and pineapple make the best whips. Soups & Baby Food - Vegetables such as potatoes, broccoli and tomatoes. Sauces – Fruits and vegetables, such as apples, pears, tomatoes and avocados.
PRODUCE PREPARATIONFruit Whips - Freeze the fruits after skins and/or large seeds are removed. Cut all fruits into feedable size chunks (about 1¼ inch x 1¼ inch x 3 inches or less) prior to freezing.Soups & Baby Foods - The vegetables need to be skinned and then pre-cooked, preferably in boiling water. Homogenize after they have been allowed to cool.Sauces - To achieve a smooth, consistent sauce, items with skins, large seeds, cores and/or pits must have them removed. Most vegetables and some fruits should be pre-cooked, preferably in boiling water. Homogenize after they are allowed to cool.
HOMOGENIZING. (See Table 1, page 5)
1. Install the juicing restrictor (gray) for the finest texture or the open restrictor (almond) for the coarsest texture.2. Install the grinding auger (gray).3. Install the funnel when homogenizing small items. 4. Place bowl under the front opening of the body.
Note: For small items such as nuts and berries, the feeding tube should be partially filled and the tamper should be inserted prior to starting the motor to prevent material from being flung out by the auger.
5. Turn on the juicer. 6. Using the tamper with its “GRINDING” face (larger diameter end) down, push the material down the feeding tube.
Note: If the processing chamber begins to back up, allow extra time for the homogenized material to expel prior to additional feeding.
15
Shredding InstructionsPRODUCE RECOMMENDATIONS
Hard vegetables, such as carrots, beets, onions and cabbage.
PRODUCE PREPARATION
1. Clean all vegetables thoroughly by soaking in water or brushing and then rinsing.2. All vegetables should be cut into easy to feed size; about 1¼ inch maximum cross-section by 3 to 4 inches in length.
SHREDDING (See Table 1, page 5)
1. Install the greens auger (green). 2. Install the blank insert. 3. Install the open restrictor (almond).4. Install the deflector.5. Installation of the funnel is recommended when shredding small items. 6. Place the bowl under the front opening of the body assembly. 7. Turn on the juicer.8. Using the tamper with its “GRINDING” face (larger diameter end) down, push the material down the feeding tube.
Note: If the processing chamber begins to back up, allow extra time for the shredded material to expel prior to additional feeding.
16

Disassembly & Cleaning Instructions1. Unplug the juicer.2. Slide the deflector up and off of the restrictor.3. Slide the funnel up and off of the feeding tube.4. Remove the restrictor by rotating clockwise and sliding off of face of the body.5. Remove the body assembly by rotating clockwise and sliding forward away from the motor assembly.6. While holding the body assembly in one hand, push on the face of the insert which protrudes beyond the face of the body. The insert should be free from the body. If insert becomes stuck, grab the insert’s top opening to pull the insert out from the back of the body. 7. Slide the auger forward and off of the motor shaft.
Caution: The cutting blades of the Grinding Auger are sharp so use a cloth or a paper towel to grip the auger.
8. Remove the o-ring from the hub insert using fingers. Note: Do not pry the o-ring using a knife or other sharp object as this will damage the o-ring.9. Clean, dry and inspect the o-ring. 10. Clean the hub and motor assembly using a soft damp cloth. Pat the surfaces dry using a soft dry cloth.
Note: Do not use anything abrasive as this may permanently scratch or dull the finish. Gently towel dry gently or allow to air dry.
Caution: DO NOT SUBMERSE THE MOTOR ASSEMBLY IN WATER.
11. Put a light coating of olive oil or coconut oil on o-ring and re-assemble over the hub insert. 12. Clean the bottoms of the motor assembly feet to prevent build-up of residue.13. Brush or scrub and then rinse the parts and set aside to air dry or place in dishwasher for final cleaning.
Note: The screen of the screen insert requires additional brushing on the inside and outside to totally remove all particles. Clean the screen insert as follows:
14. After thoroughly rinsing the inside and outside of the screen insert to remove excess debris, use a brush on the inside front and while moving the brush axially forward and backward slowly rotate the insert. Then brush the outside screen surfaces while water is flowing over the area. Repeat inside and then outside brushing as required until all of the screen is clean. 15. Clean the auger using the brush provided. With the grinding auger, brushing of the cutting teeth may be required to remove all debris.
Note: Rinsing the auger may introduce some moisture into the hole at the rear of the auger. Store the auger vertically with its base end down until dry.
16. Do not reassemble until all of the parts are completely dry. 17

18
TroubleshootingSYMPTOM CAUSE SOLUTION
Motor does not start.
Body is not properly assembled to hub. Check assembly.Magnet in body flange is missing. Replace magnet.ON/OFF Switch is off. Turn on switch.Power supply is bad. Check plug and circuit breaker.Proximity switch is bad. Replace proximity switch.ON/OFF Switch is bad. Replace ON/OFF switch.Motor bad. Replace motor.
Motor stalls.Feeding too much material and/or too fast. Feed material more slowly.Auger worn. Replace auger.Restrictor worn. Replace restrictor.
Juice/pulp slinging from restrictor. Deflector not installed. Install deflector.
Excessive or unusual noise. Improper assembly. Re-assemble.Part damage. Replace damaged parts.
Excessive heat in juice or pulp.Feeding too much material and/or too fast. Feed material more slowly.Auger worn. Replace auger.Restrictor worn. Replace restrictor.
Leakage of juice at flange of body.O-ring missing. Install o-ring.O-ring damaged or worn. Replace o-ring.Body damaged. Replace body.
Material backs up in feeding tube.
Feeding too much material and/or too fast. Feed a clump or two of pulp to clear chamber.
Restrictor is plugged.Turn off power, remove restrictor, turn on power; chamber will clear. Turn off power.Clean and re-install restrictor. Resume.
Low YieldMaterial being juiced is dry. Replace with fresh material.Restrictor is missing. Install restrictor.Nature of material being juiced. Re-feed material.

Limited WarrantyPLASTAKET MANUFACTURING COMPANY, INC. 6220 EAST HIGHWAY 12, LODI, CA 95240, 209-369-2154
The Millenium 4000 Juicer, except as noted below, is warranted by Plastaket Manufacturing Company, Inc. (Plastaket) only to the original consumer or other person for whom the original consumer purchased it as a gift, to be free from defects in material and workmanship under normal use for a period of five (5) years from the date of its original consumer purchase (date of purchase). Normal wear of the grinding auger is covered for a period not to exceed one (1) year. Motor defects resulting from motor shaft seal failure are covered for a period not to exceed three (3) years. If there should be a defect covered by this warranty within the warranty period, Plastaket will at its election either repair or replace the Millenium 4000 Juicer or defective part, free of charge, provided it is properly packaged and delivered to Plastaket. Within the Continental United States only, the freight will be paid by Plastaket for up to 90 days from the date of purchase. The method of freight will be at the discretion of Plastaket. This warranty does not cover loss or damage due to abuse, mishandling, alteration, accident, failure to follow operating instructions, or damage caused by parts or service not authorized by Plastaket. Plastaket will not be liable for commercial, consequential or incidental damages. Since some states do not allow this limitation, it may not apply to you.Any part damaged by a cause not within the coverage of this warranty may be purchased from Plastaket at the current list price. In case of damage during shipment of your new Millenium 4000 Juicer, do NOT send the juicer
Important – Please complete and return the Warranty Registration Card to Plastaket within 30 days of the date of purchase. Removal of or rendering serial number illegible on juicer voids your warranty. YOU MAY REGISTER ONLINE AT WWW.CHAMPIONJUICER.COM.
Back to Plastaket. Immediately report such damage to the delivering carrier and have the carrier fill out an inspection report. Contact the place of purchase for further instructions. This warranty provides specific legal rights and you may also have other rights which vary from state to state. Any communications with Plastaket regarding this warranty must contain the following information:
1. Your name and present address.2. Juicer serial number (See at bottom of juicer).3. Copy of the dated purchase receipt.4. Name and address of the dealer.5. Description of the problem.6. In case of damage during shipment, the name of the delivery carrier.
Date of Purchase* ______________________________________
Juicer purchased from ___________________________________
City ___________________ State ______________ Zip ________
* Requires a copy of the dated purchase receipt.
20

Warranty Registration CardPlease complete registration, detach, fold, seal and mail to Plastaket Manufacturing Company Inc. or you may register online at www.championjuicer.com within 30 days after date of original consumer purchase. PLEASE PRINT CLEARLY.
PRINT SERIAL NUMBER HERE
Date of Original Consumer Purchase ________________________ Date this card was mailed to Plastaket _____________________________
Name of Purchaser ___________________________________________________________________________________________________
Street Address __________________________________________ City _________________________________ State _____ Zip __________
Millenium Juicer purchased from ________________________________________________________________________________________
Street / Web Address ____________________________________ City __________________________________ State _____ Zip __________
The following requested information is OPTIONAL and is for Plastaket’s use only and will not be shared with any other companies or organizations. Your cooperation is appreciated.
Sex: M F Age: Less than 21 21 – 40 41 – 64 65 or older
Marital Status: M S
How did you hear about the Millenium Juicer? Internet Friend/Family Brochure / Magazine
Why did you purchase a Millenium juicer? Appearance Price Quality Warranty
21

THE WORLD’S FINEST
Millenium 4000 Juicerby Plastaket Manufacturing Company Inc.6220 E. Highway 12, Lodi, California 95240www.championjuicer.comPhone: 209-369-2154, Fax: 209-369-7455