Embed Size (px)
Citation preview
1Men of Iron BATTLE BOOK
© 2005 GMT Games, LLC
© 2005 GMT Games, LLCP.O. Box 1308, Hanford, CA 93232-1308www.GMTGames.com #0502
Preface ............................................................. 2
FALKIRK Scotland, 22 July 1298 ........................... 2
COURTRAI, Flanders, 11 July 1302 ....................... 5
BANNOCKBURN, Scotland, 23-24 June, 1314 ..... 8
CREÇY, France, 26 August 1346 ............................ 11
Table of Contents
Volume I
The Rebirth of Infantry:14th Century Europe
The Battles of Falkirk, Courtrai, Bannockburn,Creçy, Poitiers, and Najera
POITIERS, France, September 19, 1356 ................. 14
NAJERA, Castile (Spain); 3 April 1367 .................. 18
Sources ..................................................................... 21
Counter scans ........................................................... 22
B AT T L E B O O K
Wa r f a r e i n T h e M i d d l e A g e s

2 Men of Iron BATTLE BOOK
© 2005 GMT Games, LLC
PREFACEEurope in the 14th century is rife with battles. Big battles, smallbattles, ambushes, raids, skirmishes ... fighting was the mainoccupation of the upper classes, and these folks took their jobsseriously, as the political situation was slowly changing fromfeudalism to an early form of nationalism. There’s no shortageof possible subject matter.
Unfortunately, there is a shortage of specific, reliable informa-tion, even on the battles for which there is a lot of information.For example, lots of folks wrote about Poitiers; none of themseem to agree. Aside from the usual numbers questions, there ismuch discussion on how armies and men actually fought thesebattles ... the tactics of the day.
For example, a major question is where exactly did all thosearchers deploy in the battle line? Read five books, get five an-swers.
What we do see is an increased number of archers and a greaterreliance on those troops, often deployed with infantry, usually,but not always, on their wings. Men-at-Arms still foughtmounted, but, in more than half of the battles, they dismounted.And much use was made of barriers, both natural and man-made.With sagacious use of all of these in a combined defense, it wasbecoming harder and harder to win as an attacker.
Note on Selecting UnitsMany units appear in more than one battle. They are made iden-tifiable for scenario purposes by their Command Color Stripe.In the Deployment sections of each battle they are so listed, alongwith the numbers of units to be used when that Command Colorhas more than are needed.
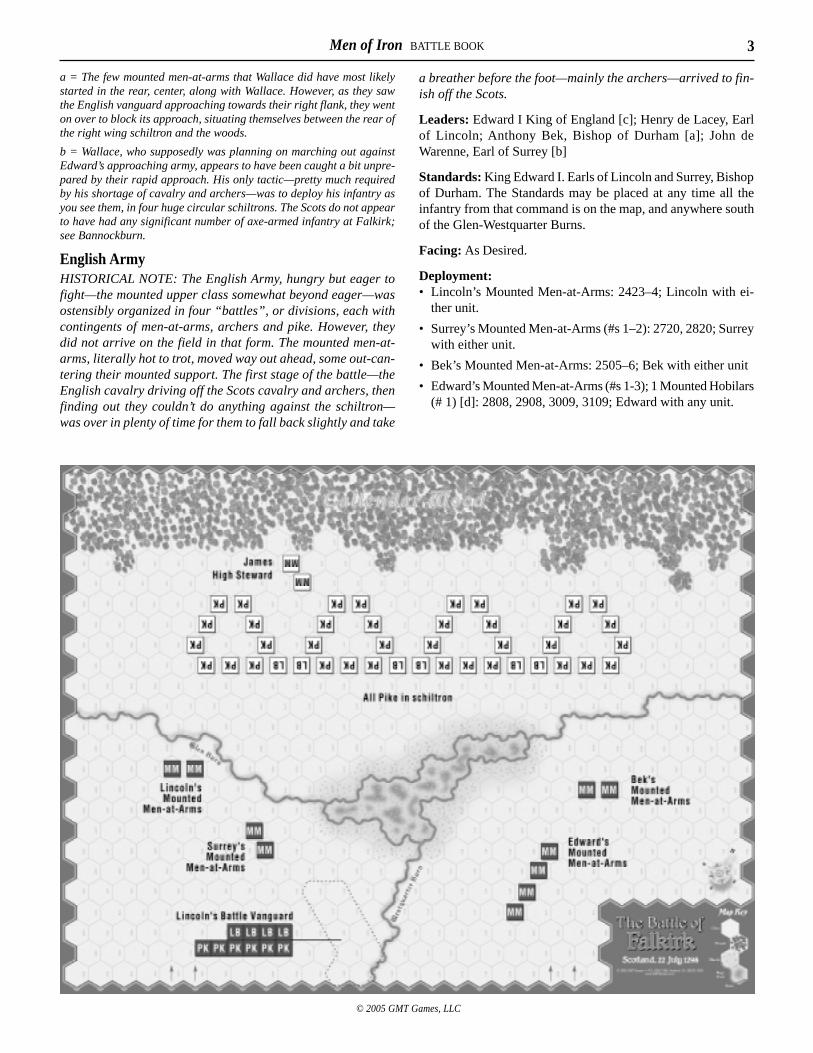
FALKIRKScotland, 22 July 1298
Historical BackgroundIn 1298, Edward I, King of England, smarting from the disasterthe previous year at Stirling Bridge, where his army, under theEarl of Surrey, had been grandly snookered by the rambunctiousWilliam Wallace (Edward had been busy elsewhere), decided itwas time to start hammering the Scots.
Calling in all of his lords—and many of them did come—andhiring the usual contingent of Welsh infantry, longbow and pike,but in significantly large numbers (around 10,000 or so), Ed-ward headed north to wreak vengeance and, as a not inconse-quential sideshow, subjugate all of Scotland.
In the meantime, Wallace, whose position as head of the Scotsrested solely on his popularity gleaned from military successand not any standing in Scots nobility, was doing his best toround up another army, not always easy to do in Scotland.
Edward, eager for battle, pushed his excellent army to the edge,easily outpacing the availability of food. Wallace, aware thatEdward’s army, mostly Welsh foot, was close to the breakingpoint from lack of food, prepared to attack the approaching En-glish.
Edward, though, had no intention of allowing his position to bedefensive, and, having been informed that Wallace’s army wasonly 15 or so miles ahead, called off breakfast (not that therewas much to have) and pushed his men forward. This seems tohave caught Wallace unaware and, because of his shortage ofcavalry and archers, he could not withdraw without sufferinggreat losses. So, with no other option available, he chose thebest ground available and deployed in the best method he knewto minimize the impact of the considerable English mounted arm.
His real problem was that he had few archers, and, for all intentsand purposes, he now had a huge pike army deployed so defen-sively that they could not move.
The advance of the mounted English men-at-arms quickly dis-patched the few Scots cavalry, but found it difficult to penetratethe schiltron. So they simply waited for their longbows and piketo arrive. The English longbows, unopposed by similar Scotsunits, shot the schiltron to ribbons, and the English pike infantrymoved in to finish it all up.
General Play NoteThis battle is basically for solitaire, as the Scots infantry schiltronwas basically immobile (until it broke and ran). In essence, giventhis situation, it is almost impossible for the English to “lose.”We have provided an alternative for possible face-to-face play.Maybe you can do better than Wallace, who didn’t do well at allhere.
Playing Time is about an hour.
INITIAL DEPLOYMENTS
Scots ArmyLeaders: William Wallace; James, High Steward (cavalry); SirJohn Stewart (archers)
Standard: William Wallace (not used in the historical scenario).
Deployment:• Mounted Men-at-Arms: 1419, 1518 (James with either unit) [a]
• Archers: 1908-09, 1913-14, 1918-19; John Stewart anywhereyou wish.
• Pike [b]: 1905-7, 1910-12, 1915-17, 1920-22, 1805, 1808,1810, 1813, 1815, 1818, 1820, 1823, 1705, 1707, 1710, 1712,1715, 1717, 1720, 1722, 1606-7, 1611-12, 1616-17, 1621-22.Note: 36 Scots pikemen are needed. Use all the Scots PK, ex-cept for Robert I’s #1–4.
• Wallace: Wherever you want.
The Pike units all start in Schiltron (see below); facing shouldbe such that no unit’s Rear is exposed. (And no snide comments,either.)
3Men of Iron BATTLE BOOK
© 2005 GMT Games, LLC
a = The few mounted men-at-arms that Wallace did have most likelystarted in the rear, center, along with Wallace. However, as they sawthe English vanguard approaching towards their right flank, they wenton over to block its approach, situating themselves between the rear ofthe right wing schiltron and the woods.
b = Wallace, who supposedly was planning on marching out againstEdward’s approaching army, appears to have been caught a bit unpre-pared by their rapid approach. His only tactic—pretty much requiredby his shortage of cavalry and archers—was to deploy his infantry asyou see them, in four huge circular schiltrons. The Scots do not appearto have had any significant number of axe-armed infantry at Falkirk;see Bannockburn.
English ArmyHISTORICAL NOTE: The English Army, hungry but eager tofight—the mounted upper class somewhat beyond eager—wasostensibly organized in four “battles”, or divisions, each withcontingents of men-at-arms, archers and pike. However, theydid not arrive on the field in that form. The mounted men-at-arms, literally hot to trot, moved way out ahead, some out-can-tering their mounted support. The first stage of the battle—theEnglish cavalry driving off the Scots cavalry and archers, thenfinding out they couldn’t do anything against the schiltron—was over in plenty of time for them to fall back slightly and take
a breather before the foot—mainly the archers—arrived to fin-ish off the Scots.
Leaders: Edward I King of England [c]; Henry de Lacey, Earlof Lincoln; Anthony Bek, Bishop of Durham [a]; John deWarenne, Earl of Surrey [b]
Standards: King Edward I. Earls of Lincoln and Surrey, Bishopof Durham. The Standards may be placed at any time all theinfantry from that command is on the map, and anywhere southof the Glen-Westquarter Burns.
Facing: As Desired.
Deployment:• Lincoln’s Mounted Men-at-Arms: 2423–4; Lincoln with ei-
ther unit.
• Surrey’s Mounted Men-at-Arms (#s 1–2): 2720, 2820; Surreywith either unit.
• Bek’s Mounted Men-at-Arms: 2505–6; Bek with either unit
• Edward’s Mounted Men-at-Arms (#s 1-3); 1 Mounted Hobilars(# 1) [d]: 2808, 2908, 3009, 3109; Edward with any unit.
4 Men of Iron BATTLE BOOK
© 2005 GMT Games, LLC
• Lincoln’s Battle (Vanguard): (4 LB Archers #s 1-4; 6 PikeInfantry #s 1–4, 8–9): 3017–18, 3116–17, 3216–17, 3315–16, 3416–17.
All other Foot arrives as reinforcements.
a = Bek, the Bishop of Durham—and far more a soldier than a church-man—was the one who tried to halt the headlong rush of the spirited,but not overly bright, mounted nobles, only to be told by one RalphBassett to go say a mass. This was a day for fighting.
b = Warenne was the commander of the English army at the disaster atStirling Bridge. That meager performance obviously did not greatlyhurt his standing with Edward.
c= Edward has a reduced Movement Capability. The evening beforethe battle his horse stepped on him while he was on the ground, break-ing a couple of his ribs. He fought in some pain.
d = These are Gascons.
ENGLISH REINFORCEMENTSMost of the English foot—archers and pike—arrive as “rein-forcements.” They do this in three separate groups, and in theorder listed, along with their Entrance hexes.
#1: Bek’s Battle: 4 LB Archers (#s 1-4), 6 Pike Infantry (#’s 1-6) (3407-8).
#2: Edward’s Battle: Dismounted Hobilar/CB (#2)[d]; 5 LB Ar-chers; 7 Pike infantry (#’s 1-7) (3407-8).
#3: Surrey’s Battle: 4 LB Archers, 6 Pike Infantry (3422-3).
Procedure: Any single group of foot can be brought in whentheir commander is activated, as long as the lower numberedReinforcements have already been so brought in. If not, theymay not enter. (All the commanders are already on the map.)Units entering thru the same hex as the unit that did so beforethem do so in columnar fashion, each entering unit paying a costin MP equal to the number of units in front of them.
HISTORICAL NOTE: It is not quite clear whether the foot foughtin “battles,” or all together.
WHO GOES FIRST?The English.
ACTIVATION (HISTORICAL/SOLITAIRE PLAY)DESIGN NOTE: As their is very little for the Scots to do—mostof his units can’t move or attack—we have semi-abandoned theusual activation system.
The only time the Scots get to “go” is when the English fail aContinuity dieroll. The Scots cannot seize Activation. When theScots do get activated, they may use all their units.
PLAY NOTE: For this version, the Scots leaders are mostly win-dow dressing.
TERRAINThe battlefield of Falkirk—or at least what many consider thesite; no one is truly sure—is relatively flat, with a slight risetowards where the Scots are deployed. The rise does not seem to
have had any impact on the battle.
The two burns are shallow, but with somewhat difficult “banks”.The confluence of the two burns, the bog of pools and marsh inthe center, was impassable, a fact that the English did not seeuntil Lincoln’s mounted men-at-arms rode up to it, halted thendecided to ride around it. We have started the game slightly afterthat decision.
THE SCOTS SCHILTRONSAlthough it is often used to delineate a “command,” schiltronwas a phalanx-like, hollow formation of pike infantry that, as agame rule, contains many of the elements of Shield Wall (14.1).Often, when faced with flank/rear attack, the units in the rearwould turn and face in the opposite direction, creating a medi-eval version of “square.” Moreover, the infantry was trained touse their pikes to form a wall of “points” that few cavalry unitscould break, or even choose to try.
HISTORICAL NOTE: Wallace—who is often credited with com-ing up with the idea, although it is more likely he adapted itfrom prior use and trained his troops in how to use it best—hasformed his pike into four, circular schiltrons. It was his ordersthat the pike stay in schiltron, because they were not going todo well against the large force of English cavalry if they left it.
Therefore, in the Historical, solitaire game, the Scots Pike staysin Schiltron unless Retired (and thereby eliminated).
Pike in Schiltron:• May not move or attack.
• If they are adjacent to another pike in schiltron their Flankhexsides are treated as frontal. But they do have a Rear, andare subject to any dieroll modifiers for being attacked throughthe rear.
• Mounted units may not Charge thru the Frontal hexside of aSchiltron formation unit; they may Shock normally, but do soonly upon passing a Charge Reluctance dieroll. Use the sec-tion of the Reluctance Chart that refers to Scots Schiltrons.
• Units in Schiltron that become Disordered remain in Schil-tron.
• Units in Schiltron ignore all retreat results.
• And, for this battle, a Retired result is changed to an Elimi-nated.
PLAY NOTE: The Schiltron rule for Falkirk is slightly differentthan that for Bannockburn.
ENGLISH HOBILARSKing Edward’s Gascon Corps is with him, about 400-450crossbowmen, some of whom were mounted (and part of whatappears to have been the Royal Household troops). This solitaryhobilar unit that the English have may, as usual, fight mountedor dismounted. (It appears to have done both.)
SCOTS FLIGHTIn the historical version, the Scots do not have a Standard, whichmeans they may not Rally. This means, for Cavalry and Pike,

5Men of Iron BATTLE BOOK
© 2005 GMT Games, LLC
that any Retired result is treated as Eliminated [a].
However, for Archers, for any Archer that incurs a retired result,roll one die:
• If the dieroll is a 0-6, the unit is Eliminated.
• If the dieroll is a 7-9, place that archer in the center of thenearest (Scots player’s decision) schiltron, out of which it mayfire. It is considered Disordered, but may rally the next timethe Scots are activated.
a = Much discussion as to whether the cavalry bolted and ran becausethe fix was in (doubtful) or because they were simply no match for theEnglish. A few of the mounted men-at-arms did make their way into thecenter of the schiltrons to provide some back-up, on foot. Not enough tomake it part of the game.
NON-HISTORICAL SCENARIOIf players wish to have a more active Scot, and/or to see if theycould do better than Wallace (which shouldn’t be too high a barto leap over), you can play the game without the immobile de-ployment Wallace used.
The Scots set up first. (The English do not change their deploy-ments/arrivals.) They may deploy their units in any formationthey wish, on or north of the 1900 row, inclusive, but not in awoods hex.
Activation and Continuity are normal; Wallace commands thepike. See the Bannockburn rules for having individual units as-sume schiltron (for those not starting therein).
Use the normal Rally rules, and the Scots get Wallace’s Stan-dard, which is placed where you deploy Wallace. The change ofRetired results to Eliminated does not apply. We will assume,for game’s sake, that Foot in a bad way don’t bolt into the woodsfor safety, as they did in the actual battle.
DESIGN NOTE: Playtesters said the Scots actually have achance here… not much of a chance, but a chance.
PLAY NOTE: Someone will quickly figure out that you can lineup all the Scots from one end of the map to the other, thereby“blocking” any flanking movement. You should not allow anyScots units within two hexes of the east/west edges of the map,if alone to represent that the English had superior numbers and,if lined up similarly, would still outflank the Scots.
FLIGHT LEVELSBalance: Wallace, and his army, are the wrong troops in thewrong place, at the wrong time. Falkirk shows what happenswhen good infantry, deployed and trained (and done so quitewell) to resist heavy cavalry, cannot do so when such deploy-ment is not combined with, and supported by, sufficient archersand cavalry. Because of this, the English should have minimaltrouble winning. Maybe more if a Scots player can come upwith a better plan, other than hiding in the woods.
DESIGN NOTE: In the Historical version, once the Scots cav-alry and archers have been driven off, the English shouldn’tlose a man.
No Flight Level points are given for standards. Wallace is con-sidered a “king”.
• The English Flight Level is 45. However, if you play the his-torical version and you go above 10, you should retire in shame.
• The Scots Flight Level is 35.
COURTRAIFlanders, 11 July 1302
Historical BackgroundCourtrai, one of the major battles in the long rebellion wars be-tween France and the Flemish (who were not very happy withthe overlordship of their neighbors) is considered as the firstbattle, outside of England and Scotland, to show the superiorityof a well-placed, purely infantry army when faced by a mostlymounted force. The Flemish did not have many missile units,but their position and adaptation of a purely defensive stanceagainst an army that ignored the realities of what was beforethem, proved a valuable lesson.
The Flemish infantry, mostly local militia strengthened by the fewmen-at-arms the locals could dismount to fight with them, de-ployed behind a series of streams, behind which they dug rows ofditches to make it difficult for the mounted French to advance.
The French, totally disdaining their lower class opposition, in-sisted on launching several mounted charges across this diffi-cult defensive terrain, charges that were completely disastrous,especially as the Flemish went into Shield Wall. By the time theFrench decided to use their foot, it didn’t make any difference.Momentum had shifted to the Flemish, and the French weredriven from the field. Because of the Flemish success in takingprizes, this battle is known as The Battle of the Golden Spurs.
Playing Time:About two hours.
INITIAL DEPLOYMENTS
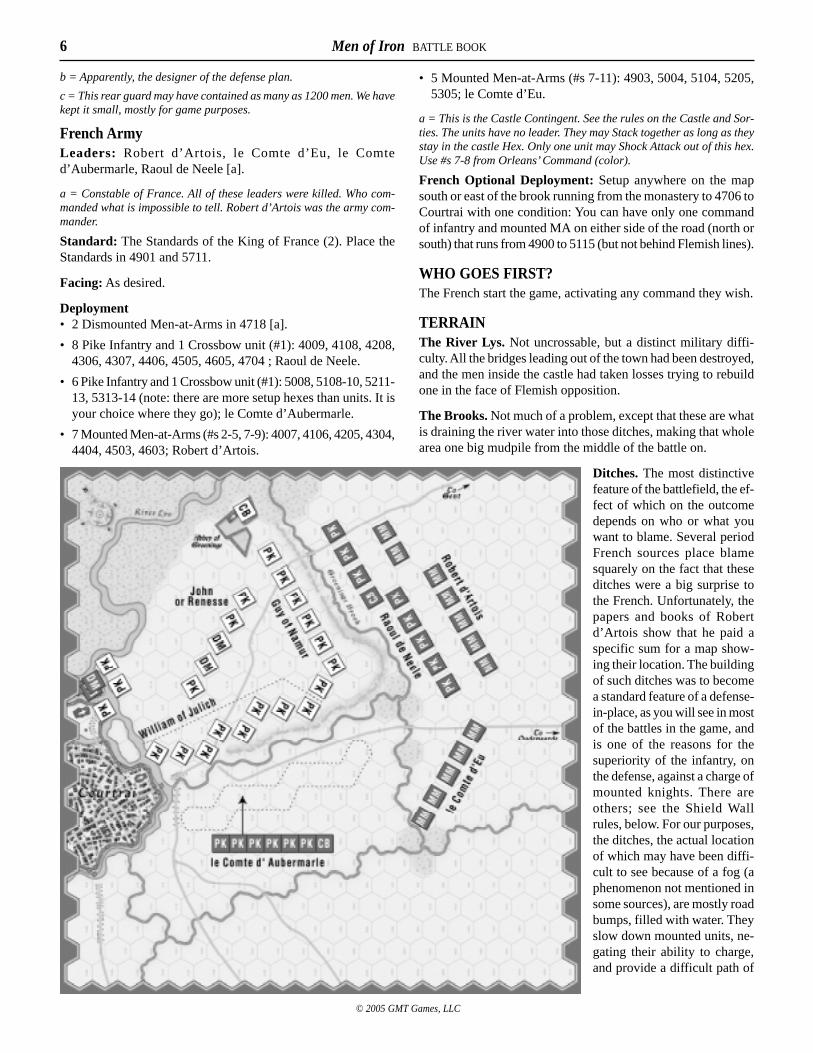
Flemish ArmyLeaders: Guy of Namur, William of Julich, John of Renesse
Standard: The Standard of the Town of Courtrai. Place wheredesired.
Facing: As desired.
Deployment:• 4618, 4717, 4818: 3 Pike Infantry (Guarding any sortie from
the Castle; from John’s command) [c].
• 4312, 4413, 4513, 4614, 4714: 2 Dismounted Men-at-Arms,3 Pike Infantry; John of Renesse [b].
• 3912, 4111, 4211, 4310, 4410, 4509, 4609, 4709; 7 Pike In-fantry, 1 Crossbow; Guy of Namur [a]).
• 4810-12, 4912-13, 5014-16; 8 Pike Infantry; William of Julich.
a = The overall commander.
6 Men of Iron BATTLE BOOK
© 2005 GMT Games, LLC
b = Apparently, the designer of the defense plan.
c = This rear guard may have contained as many as 1200 men. We havekept it small, mostly for game purposes.
French ArmyLeaders: Robert d’Artois, le Comte d’Eu, le Comted’Aubermarle, Raoul de Neele [a].
a = Constable of France. All of these leaders were killed. Who com-manded what is impossible to tell. Robert d’Artois was the army com-mander.
Standard: The Standards of the King of France (2). Place theStandards in 4901 and 5711.
Facing: As desired.
Deployment• 2 Dismounted Men-at-Arms in 4718 [a].
• 8 Pike Infantry and 1 Crossbow unit (#1): 4009, 4108, 4208,4306, 4307, 4406, 4505, 4605, 4704 ; Raoul de Neele.
• 6 Pike Infantry and 1 Crossbow unit (#1): 5008, 5108-10, 5211-13, 5313-14 (note: there are more setup hexes than units. It isyour choice where they go); le Comte d’Aubermarle.
• 7 Mounted Men-at-Arms (#s 2-5, 7-9): 4007, 4106, 4205, 4304,4404, 4503, 4603; Robert d’Artois.
• 5 Mounted Men-at-Arms (#s 7-11): 4903, 5004, 5104, 5205,5305; le Comte d’Eu.
a = This is the Castle Contingent. See the rules on the Castle and Sor-ties. The units have no leader. They may Stack together as long as theystay in the castle Hex. Only one unit may Shock Attack out of this hex.Use #s 7-8 from Orleans’ Command (color).
French Optional Deployment: Setup anywhere on the mapsouth or east of the brook running from the monastery to 4706 toCourtrai with one condition: You can have only one commandof infantry and mounted MA on either side of the road (north orsouth) that runs from 4900 to 5115 (but not behind Flemish lines).
WHO GOES FIRST?The French start the game, activating any command they wish.
TERRAINThe River Lys. Not uncrossable, but a distinct military diffi-culty. All the bridges leading out of the town had been destroyed,and the men inside the castle had taken losses trying to rebuildone in the face of Flemish opposition.
The Brooks. Not much of a problem, except that these are whatis draining the river water into those ditches, making that wholearea one big mudpile from the middle of the battle on.
Ditches. The most distinctivefeature of the battlefield, the ef-fect of which on the outcomedepends on who or what youwant to blame. Several periodFrench sources place blamesquarely on the fact that theseditches were a big surprise tothe French. Unfortunately, thepapers and books of Robertd’Artois show that he paid aspecific sum for a map show-ing their location. The buildingof such ditches was to becomea standard feature of a defense-in-place, as you will see in mostof the battles in the game, andis one of the reasons for thesuperiority of the infantry, onthe defense, against a charge ofmounted knights. There areothers; see the Shield Wallrules, below. For our purposes,the ditches, the actual locationof which may have been diffi-cult to see because of a fog (aphenomenon not mentioned insome sources), are mostly roadbumps, filled with water. Theyslow down mounted units, ne-gating their ability to charge,and provide a difficult path of
7Men of Iron BATTLE BOOK
© 2005 GMT Games, LLC
retreat for heavily armored men.
The Town of Courtrai and the Buildings (Monastery, CastleChurch, et al). No unit may ever enter the Monastery hexes.(There are 5 of these, 3912 is not one of them). One unit—foot,not mounted—may enter an unoccupied Castle or Church (al-though we doubt this will ever happen in the game), and theMovement Costs to do so, and the defensive benefits for same,as well as the Town of Courtrai, are given on the Terrain Charts.For whatever it’s worth, all buildings and town hexes block LOS.
Roads. The roads negate the costs of entering town hexes andcrossing the brooks where the road actually crosses that brook.If it doesn’t, it does not negate the cost. Roads do not negate theeffect/cost of Ditches. A unit may not use Road movement costwhen moving adjacent to an enemy unit.
THE CASTLE CONTINGENT: SORTIESThe French held the Castle of Courtrai with a small contingentof men-at-arms. At least once during the battle they tried tobreak out to cause disruption in the rear of the Flemish lines, aprospect Guy foresaw by placing a unit to guard against anysuch event.
The French may try to sortie out of the castle and the Church(hex). A Sortie is considered an activation of a command; here,a command with one unit and no leader (although the unit isconsidered as being In Command). The Castle Contingent maybe activated any time instead of die rolling for Continuity. Nodieroll is required; the activation is automatic, but the Castlecontingent may not be activated any time other than instead of aContinuity dieroll. After completion, the activation process con-tinues normally.
If the Castle Contingent incurs a Retire result, it retires to thecastle or church (which it treats as a Standard), unless the castle/church is occupied by the Flemish. If that is the case, the contin-gent unit is, instead, eliminated.
GOEDEDAAGSMuch of the Flemish Pike Infantry was equipped withgoededaags, long pike-like things used to pull riders off a horse.Interspersed with the usual pikemen, these “peasants” proved tobe a major force during the battle, bringing the Mounted UpperClassmen down to their level.
Whenever a Mounted Men-at-Arms unit either attacks a PikeInfantry that is not in Shield Wall, or is attacked by a Pike Infan-try, and the Men-at-Arms unit suffers any sort of negative result,roll one die:
• If the DR is a 0–4, the mounted unit is immediately Unhorsed(in addition to any other result). Replace the mounted unitwith an Unhorsed, as per the rules.
• If the DR is a 5–9, no additional results.
SHIELD WALLThe French may not use Shield Wall, and Flemish units in ShieldWall may not use the effect of Goededaags.
DITCHES AND RETREATSThought things were bad for the French knights? They’re aboutto get worse.
Mounted units may not charge through, charge into, or start aCharge in, a Ditch Hex.
Whenever a Mounted Men-at-Arms unit (even if it becomes Un-horsed during that combat) suffers a negative result while in aDitch hex, or must Retire (and in order to reach his Standardmust go through a Ditch hex), the French player rolls a die:
• If the DR is a 0–4, that unit is, instead eliminated.• If the DR is a 5–9, no other result.
HISTORICAL AND DESIGN NOTE: The French suffered mostof their losses as their knights tried to retreat back through theby now thoroughly muddy quagmire of the ditches. Many, bur-dened with armor and trapped beneath their horses, which werealso hapless in the mud after falling, simply could not moveand perished beneath the rapidly building piles of bodies. Muchdiscourse on whether the ditches truly lost the battle for theFrench, or if they were just another contributing factor.
OPTIONAL RULE: For balance purposes, players can ignorethis rule (even as they ignore the realities of the situation).
FLIGHT LEVELSFlemish Flight Point Bonus: Any Flemish unit Eliminated orForced to Retire by a French Men-at-Arms unit is worth double(2x) its usual Flight Points. Use a “Retired by Men-at-Arms”marker for those units; place the units so eliminated in the ap-propriate box on the map.
DESIGN NOTE: Not about to let the lower class foot types getany of the glory, the French knights insisted on ignoring theearly efforts of their pike, withdrew their infantry, and charged.We’ll make it worth your while to try it.
The Castle Contingent: If either of the units that starts insidethe castle (4718) manage to enter any hex East of the River Lysand south of the brook running from 5215 to 4807, or east of thebrook running from 3811 to 4705, the Flemish incur 5 FlightPoints the instant it happens, regardless what happens afterwards.
No Flight Level points are given for standards or occupying anyspecific hex.
• The Flemish Flight Level is 35. (This is rather high, vis a visother battles, because of the source—noted high morale of theFlemish in defending their city. Makes the French look twiceat the Men-at-Arms bonus rule, above).
• The French Flight Level is 35.
Balance: If you play this battle with all the historical rules, youwill find it very hard to win as the French. We have weighted theFlight levels towards a less disastrous day for the French.

8 Men of Iron BATTLE BOOK
© 2005 GMT Games, LLC
BANNOCKBURNScotland, 23-24 June, 1314
Historical BackgroundVery briefly, The Scots, under King Robert I, had captured muchof Scotland and were raiding the north counties of England. Thethreat to the English stronghold at Stirling Castle was real, andKing Edward II was most interested in regaining whatever repu-tation he had, most of it dissipated after his futile campaigns of1310-11. To counter the growing Bruce threat, Edward II gath-ered an army quite large for the time (over 15,000 men), and afairly good one, and headed north to relieve the threat againstStirling and, Edward hoped, to smash Bruce’s much smaller force.
Edward, however, was in somewhat of a hurry and ignored theadvice of his lords, many of whom were familiar with the Scots.Marching north at a brisk pace, his vanguard caught up with theScots army just south of Stirling Castle, blocking the approachwith the help of some heavy woods and a rather precipitous burn,a stream difficult to cross because of the heavy growth along itsmuddy and treacherous banks: The Bannock Burn.
Gloucester and most of the English mounted men-at-arms swungeast and north, crossing over the burn at the village and makinga rash attack against the command of the Earl of Moray, justsouth of St, Ninian’s kirk. As often happened in these days, theScots went into schiltron and the charge was repulsed. KingRobert did much for the morale of his army by defeating Henryof Bohun in a classic one-on-one battle. Henry lost when Robert’sbattle-axe slammed through Henry’s helmet and cut his head intwo. Very impressive.
While this was going on, Edward’s main battle force, his foot,marched and straggled in much disarray towards the battlefield,arriving in dribs and drabs through the late evening. With theScots holding the road to Stirling, the infantry was forced tospend a brief night—at that time of the year it is dark only forabout 4 hours—camped on the boggy, wet and uncomfortableportion of the Carse of Balquhiderock, or with Edward’s bag-gage train, some distance south of the burn.
At sunrise, much of the English infantry was still arriving, somewere struggling to get up and onto the field, while the reststruggled to form some sort of line behind the deployed heavycavalry. Exactly what then happened is difficult to determine.However, it appears that an initial charge by the English mountedknights was thrown back, at which point the Scots went on theattack, pouring down from their position into the bedraggled,tired and still forming English foot, driving everyone from thefield in a massive retreat.
DESIGN NOTE: It is difficult to find two sources—period ormodern—that agree as to exactly where the battle took place,or who was deployed where. For one, the terrain has changedmuch since the 14th century. What you have below is what wefelt is the most likely deployment, although not the only onepossible given the facts.
The battle simulated below does not include the small engage-ments of the first day of Bannockburn, as they do not make veryinteresting situations.
PLAYING TIME AND BALANCEPlaying Time ran about two hours for the playtesters.
As designed—somewhat ahistorically—this is a fairly balancedscenario. We have provided adjustments to reflect a greater his-torical reality.
INITIAL DEPLOYMENTS
Scots ArmyLeaders: Robert I (Bruce), King of Scots; Edward Bruce, Earlof Carrick; Thomas Randolph, Earl of Moray.
Standard: King Robert, Earl of Carrick, Earl of Moray. Placedwithin 3 hexes of the Leader to whom they apply.
Facing: All units are faced towards the English Army.
Deployment• Moray’s Command: 3 LB Archers [a] (4424, 4523-4), 6 Pike
Infantry and 2 Axe Infantry [c] (4623, 4722, 4822, 4624, 4723,4823). Earl of Moray in 4722.
• King Robert’s Command: 4 Pike Infantry and 2 Axe Infantry[c] (4921, 5021, 5120, 5220), 4 Pike Infantry (4922, 5022,5121, 5221); King Robert in 5021.
• Edward Bruce’s Command: 3 LB Archers (5517, 5617, 5618);6 Pike Infantry and 2 Axe Infantry [c] (5319, 5419, 5518, 5420,5519, 5619). Earl of Carrick (Edward Bruce) in 5419.
• Hobilars [b]: Both in any hexes on Old Roman Road between4923 and 5721. These may start mounted or dismounted.
All Scots pike are in Schiltron.
a = It is somewhat unclear as to whether or not the Scots had longbows,but the evidence seems to indicate that they did, and that their weaponswere no different from those of the Welsh. This position is based on thediscussion of what we call the Longbow in Bradbury’s “The MedievalArcher”. English missile superiority was not so much because of thetype of weapon, but because of the number of archers used, and howthey were used. It was a question of tactics, not weaponry.
b = It appears from some sources that these units started mounted, thendismounted to join the infantry. When the English Army started to rout,they re-mounted and joined the pursuit.
c = See the Special rules on Axe Infantry, below.
English ArmyHISTORICAL NOTE: The English Army was in considerabledisarray. The mounted men-at-arms were the only units formedand in place. The rest of the army, all the foot, had spent abrutal night (which was rather short, lasting from just beforemidnight to around 3:15 AM . . . those long summer nights upnorth can be hell on soldiers) in the marshy bog of the carseand the English camp, south of Bannockburn about where thecharts and tables box is. The foot was just starting to form up,with much of the army still straggling towards the battlefield,when the English Men-at-Arms started the battle.

9Men of Iron BATTLE BOOK
© 2005 GMT Games, LLC
There are two specific results of this. Most of the foot isscrambled all over the place—virtually negating the numericalsuperiority the English had in pike infantry—and the pike in-fantry is all Disordered.
Leaders [a]: Edward II King of England; Gilbert de Clare, Earlof Gloucester; Humphrey do Bohun,. Earl of Hereford; RobertClifford, Henry Beaumont.
Standard: King Edward II. Placed within 3 hexes of Edward.
Facing: As the English Player desires.
Deployment:• Gloucester and 1 Mounted Men-at-Arms #1): 5115.
• 9 Men-at-Arms (#s 2-10): 4515-16, 4615-16, 4714-15. 4814-15, 4914; Hereford in 4715; King Edward in 4713.
• 13 LB Archers: 4317-19, 4419-20, 4519, 4216, 4109, 4910-11, 5011-12, 5810 (Edward’s Command Color) (#’s 1-13).
• 2 Crossbow Archers: 5213. 4709 (Edward’s Command Color).
• 16 Pike Infantry [b]: 4011, 4208, 4215, 4309, 4412-13, 4510,4608, 4611, 4613, 4712, 4812, 5009, 5411, 5711, 6008(Edward’s Command Color).
• Clifford and Beaumont, wherever desired.
• In the English Camp: 3 LB Archers (#’s 14-16), 4 Pike Infan-try [b]
Disordered: All Pike Infantry start the game Disordered.
a = While we know the names of most of the major English Command-ers, other than Gloucester and Hereford leading the cavalry, there islittle indication who was elsewhere, or what they were doing. We havehad to assign leaders to commands they may not actually have com-manded, a problem exacerbated by the fact that most of the army wasnot fully formed.
b = We suggest randomly choosing, from the numbers available in thisCommand Color, which ones to go where (as they do differ slightly inabilities) randomly and blindly.
Alternate DeploymentIf you wish, you can alter the balance somewhat, in favor of theEnglish, by:
• Deploying the Cavalry as stated.
• Deploying 8 Longbow units within 2 hexes of 4418.
• Deploying 4 Longbow units within 1 hex of 4911.
• Deploying all the Pike infantry, all Crossbows, and 4 Longbowsas desired, but “behind” (east) of King Edward II. E.g., a linefrom 4115 to 5210 would be one such placement.
10 Men of Iron BATTLE BOOK
© 2005 GMT Games, LLC
If you want to give them an ever bigger leg up, the pike do notstart Disordered.
WHO GOES FIRST?There is some disagreement as to who actually “went first”.Most—but not all—sources say the English started proceedings.There is enough disagreement for us to let this be decided byhigh dieroll.
TERRAINThe Burns. These small, but treacherously banked, streams wereformidable obstacles to tactical movement. They define the pa-rameters of the battlefield.
Mounted units may not shock or charge across a Burn hex di-rectly into an enemy occupied hex. Moreover, any mounted unitthat crosses a burn hexside, other than by using a bridge or ford,must roll for Disorder. Roll one die, add the units’ DefensiveRating:
• If the adjusted DR is a 5 or higher, that unit is Disorderedimmediately upon crossing.
• If lower than 5, nothing happens.
Bridges and Fords. These may be used only if the moving unitis not going to move directly into a hex adjacent to an enemyunit. Otherwise—and for combat—the burn’s MP must be used.
The Boggy Carse. The eastern portion of the Carse ofBalquhiderock was a swampy, watery bog. The watery portionwas a series of low pools that covered the area, making life forthe encamped British foot miserable. The movement costs areon the Terrain Chart, but note that a unit Shock attacking orCharging from a Bog hex incurs a –1 drm (foot), or a –2 drm(Mounted men-at-arms), regardless where the defender is. Bogshave no effect on Fire.
St. Ninian’s Kirk. This was the focal point for the Scot leftflank, it has no effect on battle or movement.
Potholes. To guard against the approaching English, Robert, inthe fashion of the day, dug a line of potholes behind which hedeployed one of his commands on June 23. There does not ap-pear to have been any effort by the English in this direction,other than tangential—Bruce gets to lop off the head of the rashHenry de Bohun—and there is no further mention of them inreports. Their effect is on the terrain tables.
THE SCOTS SCHILTRONAlthough it is often used to delineate a ‘command”, schiltronwas a phalanx-like, hollow formation of pike infantry that, as agame rule, contains many of the elements of Shield Wall (14.1).Often, when faced with flank/rear attack, the units in the rearwould turn and face in the opposite direction, creating a medi-eval version of “square”. Moreover, the infantry was trained touse their pikes to form a wall of “points” that few cavalry unitscould break, or even choose to try.
Scots Pike infantry has the capability of doing this at the start ofany activation (for the units in question). Any Scots Pike Infan-
try that is not disordered or adjacent to an enemy unit may gointo “schiltron” simply by announcing it, and placing a“schiltron” marker on top.
Pike in schiltron:• may not move or attack (but see mechanic for Axe infantry,
below)
• If they are adjacent to another pike unit in schiltron their Flankhexsides are treated as frontal. But they do have a Rear, andare subject to any dieroll modifiers for being attacked throughthe rear.
• Mounted units may not Charge a unit in Schiltron; they mayShock normally, but do so only upon passing a Charge Reluc-tance dieroll. Use the section of that Chart that refers to ScotsSchiltrons.
• A disordered unit cannot form Schiltron. However, units inSchiltron that become Disordered can remain in Schiltron.
• Units in Schiltron ignore all retreat results.
Pike in schiltron may leave that status at the start of any activa-tion in which they are not adjacent to an enemy unit. They maybe disordered when they do so, and they regain their printedMovement Allowance.
PLAY NOTE: Entire Scots commands would go into schiltronformation at the same time. You don’t have to do this, but it doesmake for a nifty defense, especially when one throws in an axeunit or two.
AXE UNITSIn an interesting exception to the Stacking rules, any one AxeInfantry may stack (beneath) any Scots unit in schiltron:
• The Axe unit is not in schiltron and has no effect on any com-bat strength or adjustments. It will suffer any negative resultthat the pike above it does.
• The Axe unit may move from its hex at any time that com-mand is activated, which means it may rush out and attack!
Axe units may not pass through pike units.
SCOTS HOBILARSThe Scots have two units of light cavalry—what the game termshobilars—that acted rather independently during the battle:Keith’s and Douglas’s.
• When dismounted, they are treated as Dismounted Men-at-Arms (and their Shock defense ratings reflect their somewhatlesser capabilities in that status). They are not missile capable.
• There is no Leader for the Hobilars. Both Hobilars are consid-ered to have an Activation Rating of ‘5’, and both are acti-vated together. No Command Range applies.
ENGLISH DISORDERVirtually all of the foot units in the English Army were in a stateof almost total disarray. That situation hobbles the English Playergreatly. So, we have two ways to go one this.
11Men of Iron BATTLE BOOK
© 2005 GMT Games, LLC
Competitive game: The standard Rally rules for disordered unitsare in effect.
Historical game: Disordered English units may be Rallied onlyif in Command range of one of the foot Leaders (below).
ENGLISH COMMANDSAs noted, just who is leading what for the English is rather cloudy.This requires us, as game designers, to apply some rules thatprobably do not reflect what was going on. However, this IS agame ... not Reality.
The English Mounted Men-at-Arms are commanded by two lead-ers: Gloucester and Hereford. Both may command any/all of thecavalry (within Range). This means you can activate Gloucester(and all cavalry within range) immediately followed by activat-ing Hereford (and all cavalry within Range). However, activat-ing Gloucester does not allow you to move/use Hereford, andvice versa. Be creative.
There is no specific leader for the English Foot. Three Leaderscan command any foot units—pike or archer: King Edward,Clifford and Beaumont. Any of those, when activated, can acti-vate any pike or archers within range. The downside is that meansthat units outside their range cannot do anything.
However… the English player may chose any Free Activation(an activation where no die roll is necessary) to activate all footunits that, at that instant, are not within a foot leader’s range.Units so activated may only move, and they may not move adja-cent to enemy units. They may not Fire, Shock, nor Rally.
DESIGN NOTE: The ratings we have given the English “foot’commanders are for play balance purposes. If you wish to get amore historical perspective of Reality, lower the Activation andRange of both Clifford and Beaumont by one.
THE ENGLISH CAMPThere is a box for The English Camp (bottom/south of map). Sev-eral units start in there. These are treated as units outside LeaderRange, and are activated under that rule. They enter the gamethrough 6008, with each entering unit paying the movement costsincurred by the previous units (in addition to terrain costs).
FLIGHT LEVELSBalance: When using (our version of) the historical deployment,the Scots are heavily favored. The Alternate (non-historical, let’signore Reality) English deployment goes a far way to even thingsup. We also suggest upping the English Flight level by 10 pointsfor better balance (but less historicity).
No Flight Level points are given for standards.• The English Flight Level is 40.• The Scots Flight Level is 30.
CREÇYFrance, 26 August 1346
Historical BackgroundCreçy is the first major battle of what we call The HundredYears War, and the classic example of how infantry and ar-chers, on defensible ground, are extremely difficult to over-come with a mounted force.
The French had been chasing Edward III’s much smaller forceall over northern France. Edward finally decided to turn and faceKing Philip on a good defensive position, a rise just to the eastof the village of Creçy, protected on one side by a river and theother by a forest and village. As further protection, Edward hada series of potholes dug at the base of the rise making it difficultfor mounted men to advance with speed.
The French Army was strung out for miles, and a heavy rain haddone little for the equipment of the vanguard, vaunted Genoesecrossbowmen. Still, they advanced to attack the English right,only to be outshot, and decidedly so, by the English longbows.As they were retiring to regroup, Alençon’s command arrivedand, as was typical of the French men-at-arms, immediatelycharged, riding down a large number of crossbowmen who gotin their way.
In the first of several, similar charges, the French horses stumbledacross the potholes, reaching the solid wall of English spears ata walk. The horses refused to charge, the English longbowsriddled the mounted force, and then the English knights shot outfrom behind the line to finish off the French, many of whom hadbeen unhorsed and were useless.
This happened over and over, as the French army, all mounted—their foot and equipment was far to the rear—valued chivalryover common sense and sound tactics. The end result was asmashing English victory, and a stunned French army.
Playing Time ran about two hours for the playtesters.
INITIAL DEPLOYMENTS
English ArmyLeaders: King Edward III; Edward, Prince of Wales [c]; Earlsof Arundel and Northampton; Godfrey de Harcourt [d]
Standard: The Standard of King Edward is used for all units. Itmay be placed anywhere within 3 hexes of where Edward, him-self, is initially placed.
Facing: All units start facing in whatever direction the playerwishes.
Deployment:• Right Wing: 9 Longbows (#s 1–7, 17–18) and 3 Pike Infantry
(#s 8-10): 5410, 5309, 5209, 5108, 5008, 4908, 4809, 4709,4610-13; Godfrey de Harcourt [d] anywhere within CommandRange of one of these LB.

12 Men of Iron BATTLE BOOK
© 2005 GMT Games, LLC
• Left Wing: 9 Longbows and 3 Pike Infantry (#s 5–7): 4513–17, 4618–22, 4722, 4823; The Earl of Arundel anywhere withinCommand Range of one of these LB.
• Right Wing Dismounted Men-at-Arms (5): 4910–14; Edward,Prince of Wales [c] in any of those hexes. Note: use the light-red striped Edward Prince of Wales command—not the goldones.
• Left Wing Dismounted Men-at-Arms (5, #s 2–6)): (4917–21);The Earl of Northampton in any of those hexes.
• Reserve: 3 Longbows, 2 Pike Infantry (#s 8–9) and 3 Dis-mounted Men-at-Arms (#s 1–3): in a Road hex from 5213 to5119, inclusive; King Edward III in any of those hexes.
• Bombards [b] (2): 5510 and 4613.
• Hobilars [a] (CB) (2): Any hex adjacent to, but outside, theWagon Lager. These are from King Edward’s command, andthey start mounted.
a = In all likelihood, these Hobilars were Gascons, and thus mountedcrossbowmen. They do not appear to have been involved in any of thefighting.
b = See the note, below, on these.
c = Known far and wide, but not during his lifetime, as The Black Prince.
d = Godfrey was from Normandy and considered a “traitor” by theFrench.
French ArmyLeaders: King Philip VI; John of Luxembourg, King of Bohemia[c]; Charles, Comte d’Alençon [b]; Carlo Grimaldi [a], OttoneDoria
a= Carlo Grimaldi was the founder of the present ruling family of thePrincipality of Monaco. Say goodnight, Gracie . . .
b = The king’s younger brother.
c = John was very old, and very blind. Still, he insisted on fighting upfront with his men. Cost him his life.
Standards: King Philip, John Luxembourg, Genoa, Alencon.Place anywhere on the map when the command is activated orhas entered entirely as a reinforcement.
Facing: In whatever direction the player wishes.
Deployment• All Genoese Crossbowmen (23): 4105-13, 4005-13, 3905-09;
Grimaldi and Doria stacked with any CB in their command. [a]
• Alençon’s Command. Mounted Men-at-Arms (12): 3708-14,3610-14. Alençon is stacked with any unit in his command.

13Men of Iron BATTLE BOOK
© 2005 GMT Games, LLC
The remaining units enter as Reinforcements; see below.
a = Grimaldi’s Genovese Crossbowmen and John’s mounted Men-at-Arms share the same command color stripe. They are separate com-mands, easily distinguishable by unit type.
WHO GOES FIRST?Historical: The French start the game, activating either of theCrossbow commands.
Free Choice: French still go first, but may activate whom theywish.
FRENCH REINFORCEMENTSThe French have two additional battles of mounted Men-at-Armsthey can bring in. Moreover, John’s Command must enter be-fore King Philip’s.
• John of Luxembourg’s Command [a], see above: 8 MountedMen-at-Arms, and John. These may enter through hexes 3604and 3610, inclusive. These cannot be brought in during theFrench Player’s first activation in the game.
• King Philip’s Command: 7 Mounted Men-at-Arms (#s 1–7)and King Philip. These may (all) enter through either roadhex 3609 or 3616. They may not enter until:
1. John’s Command has entered.
2. The French Player rolls an even number on the die. If theFrench player tries to activate this command but rolls anodd number, he may transfer that activation to any othercommand, without another die roll.
HISTORICAL NOTE: The French had a large contingent of lo-cal levies and town militia—what the game would consider(rather poor) Pike infantry. However, they were far to the rear,with the French baggage train, and they never got into the battle.
TERRAINSeveral features are not self-explanatory.
Clear. Normally, this would be the usual 1 MP to enter. How-ever, it had rained quite heavily immediately preceding the battle(and see the rules on Crossbows), and the low-lying valleys,close to the marshy areas of the river, were very muddy anddifficult to traverse. Therefore, all Level one clear hexes cost 2MP to enter, a definite disadvantage for the French.
DESIGN NOTE: If you want to give the game a bit more bal-ance, ignore this rule.
Potholes. It appears that the English, having played such gameswith the Scots for years, dug small holes to the front of theirentire line. These holes were hard to see by incoming mountedunits, causing many mounts to stumble, fall, and unhorse theirriders. Therefore, any mounted MA moving into a hex with apothole must undergo a Stumble Dieroll:
• If the dieroll is a 0–2 the riders are unhorsed. Replace themounted unit with an Unhorsed Men-at-Arms unit (they’reall the same, so it matters little which one), and its movementis finished for that turn. It may not shock that activation, andthe unit may not re-mount.
• If the dieroll is 3–9, the unit remains mounted but incurs theuse of an additional MP. If it doesn’t have any left, treat it asNo Effect.
Elevations. The right side of the hill that the English deployedon was rather steep, enough so that the French did not considerattacking across that side. The additional movement and attackdifficulties are noted on the various charts and tables. The steepslopes have no effect on Fire other than the change in elevation.
Roads. The roads appear to have been relatively unaffected bythe rain. Units may use Road costs only if they are not using theRoad to move adjacent to an enemy unit of any kind.
THE GENOESE CROSSBOWMENThe only foot that the French had at the battle were their largecontingent of Genoese crossbowmen, considered the finest oftheir type in Europe (even if the Pope had outlawed their use).However, Creçy was not their finest day, and many French his-torians have labeled them cowards, turncoats and the sole causeof the French defeat. We, along with the majority of historians,think the French missed the point of the whole exercise.
Firstly, understand that the crossbows used at this time were ofwooden construction, not the metal crossbows of a century later.As such, they were not as efficient nor as powerful as the latter,or the Longbow—which had greater range and penetrating powerthan the wooden crossbow (some 375 yards max to maybe 250yards max). Conversely, the shorter, heavier crossbow quarreloften made up in stoutness what it lost in momentum, in termsof penetration, vis a vis the longbow.
For those players who want as much historical flavor as pos-sible, we recommend using the following rules. Others, not wish-ing to burden the French any more than they already are, canignore them.
Rain. Most (but not all) sources say that the rainfall hurt thecrossbowmen much more than the longbow archers. The latter,anticipating the humidity, had unstrung their bows, somethingthe Genoese apparently did not do while on the march. To ac-count for this negative effect, subtract two (–2) from all cross-bow fire.
DESIGN NOTE: Some sources state that the crossbows werevirtually useless. We don’t go quite that far.
Shields: It appears that the Shields used by the Crossbow teams—the crossbowmen operated in teams of firers, rewinders and pro-tector/shield holders—were in the baggage train in the rear, un-available. This rendered the crossbowmen even more suscep-tible to enemy archery. When firing on crossbowmen, Longbowsadd one (+1) to their Fire dieroll.
BOMBARDSIt is pretty well established in most sources that the English didhave bombards—small, very primitive, cannon—at Creçy. (Thearguments for and against are well-presented in Burne’s book.)Apparently, they scared the living daylight out of the Genoesecrossbowmen. It is also, it would seem, the first recorded in-

14 Men of Iron BATTLE BOOK
© 2005 GMT Games, LLC
stance of the use of guns in a European field battle.
Each bombard unit may fire only twice in the game and onlyonce per activation. However, a bombard may fire at any time,even in the middle of a French activation. Use a Bombard Firedto indicate it has fired once; remove after the second shot.
Bombards fire like missile units, through their frontal hexes. Rollone die and consult the Bombard Fire Table. Subtract from theDR the number of intervening hexes between the bombard andthe target. There is no other DRM for bombards. Thus, an adja-cent unit would have no DRM, and a target unit three hexesaway, with two intervening hexes, would incur a –2 DRM. Bom-bards have the same LOS as crossbows.
Bombards may not move. They may stack with any one friendlyfoot unit. They are not affected by enemy missile fire. However,if alone in a hex and an enemy unit moves adjacent, or the unit itis stacked with leaves that hex for any reason as a result of Shock,the Bombard is destroyed.
CHIVALRY AND AGGRESSIONOne of the causes of the French defeat at Creçy, as at several ofthe battles of the early years of the entire war, was the ten-dency of French mounted men-at-arms—the “knights”—tocombine their sense of chivalrous honor, their natural tendencyto attack, and a relative condescension to the capabilities ofthe English into ill-planned, piece-meal, full frontal chargesthat, given the excellent defensive capabilities of the Englishweapons and tactical thinking of the time, usually spelled di-saster. At Creçy, various contingents of the French cavalrycharged more than a dozen times.
For players wishing as much historicity as we can muster in aminimal number of pages of rules, we suggest they use the fol-lowing rules. Those of you who want to see what would havehappened had the French knights been somewhat cleverer canignore them.
Any time any of the three French leaders of Men-at-Arms isactivated, and that leader is within four hexes of any Englishcombat unit, all Men-at-Arms—regardless of their condition—in his Command must attempt to Charge the enemy. They mustdo so in a direct a path as possible, even if this means movingthrough any Genoese CB units in their path (which they can do,as per 8.0). They may not change facing unless it is absolutelynecessary to do so to reach the most accessible enemy unit.
If a French Men-at-Arms unit moves through a hex with a CBunit, that CB is immediately Disordered. If it is already Disor-dered, it is eliminated.
THE ENGLISH WAGON TRAINWe are, of course, referring, to the hexes at the western edge ofthe map (near the Forest of Crecy), a lager of wagons whichcontained Edward’s baggage and all his men-at-arms’ horses.
The wagons are guarded by several hundred hobilars, light cav-alry usually used on the flanks of deployed archers as protec-tion. The hobilars are considered under the command of King
Edward III, and are activated by him, but they are always treatedas In Command for all purposes, regardless of their distance fromEdward.
If any French combat unit is inside the lager at the end of anyactivation, the English incur one (1) Flight Point.
NOTES ON ENGLISH DEPLOYMENTThe deployment of the English army, as described by historians,varies almost as widely as the number of purveyors of this infor-mation. For those of you who do like to read the sources, wesuggest using the deployment as described by David Nicolle,with the longbowmen and spearmen intermixed in one line, andthe men-at-arms somewhat to the rear. Other sources state themen-at-arms were in the center of the front two lines, with thespears on each side and the archers on the flanks. As noted above,the hobilars may or may not have been assigned to guard duty; itis possible they were dismounted and mixed in with the spear-carrying infantry. We believe otherwise. If you like to experi-ment in this area, feel free to do so.
FLIGHT LEVELSBalance: If you play this battle with all the historical rules, youwill find it very hard to win as the French. If not, well, KingEdward still has a good position, but you, as the sagacious gameryou are, have far more insight into how to attack it than PhilipVI and his commanders.
No Flight Level points are given for bombards or standards.
• The English Flight Level is 40.• The French Flight Level is 50.
POITIERSFrance, September 19, 1356
Historical BackgroundPoitiers is one of the most covered battles in medieval history,yet the one with the most differences, not about what happened,but exactly why and how.
Again we have the French chasing a much smaller English armythat was on a glorified pillage and loot mission, led by Edward,Prince of Wales, this time all over central France. Edward’s armyran into a problem just south of Poitiers; behind it was the Frencharmy, in front of it was a river that, in crossing, would put theEnglish in great danger. So, Edward turned to face the French,picking out, yet again, the best possible position for his archersand foot.
While the English left was guarded by a difficult marshy low-land, his front, atop a small rise, was behind what appears to bea line of low hedges—sources differ greatly on this—to whichEdward added some ditches to protect his right flank.

15Men of Iron BATTLE BOOK
© 2005 GMT Games, LLC
Again, the French approached in waves, as you can see fromthe game rules below. However, this time, the French weren’tgoing to charge head-on into the English defensive position.(The vanguard, mercenary Germans, were of a different mindand the instant they saw the English they put spur to horse andproved, yet again, that when honor supersedes intelligence, badthings happen.) The French dismounted their men-at-arms(mostly), even removing their foot armor to aid in walking.Unfortunately, they dismounted quite a distance from the En-glish line, and that, plus the lack of adequate footwear, ren-dered most of the French ‘foot” rather uncomfortable and notquite as up to the task at hand.
The result was much the same as at Creçy, although Poitiers wasa much closer battle in terms of final result, with the outcomedependent, to a great extent, on the initiative of Captal de Buch,who commandeered a group of mounted English knights, sweptaround the French left whaling away at the hedges, and surprisedthe men to their rear.
Two important battles in ten years had shown the French thevirtual impossibility of breaking a defensive position held bygood foot supported by missile fire. 60 years later, at Agincourt,they still hadn’t assimilated those lessons.
INITIAL DEPLOYMENTSEnglish ArmyLeaders: Edward, Prince of Wales; Earls of Warwick andSalisbury; Captal de Buch.
Standard: The Standard of Prince Edward is used for all units.Placed in 3012 [d].
Facing: All units start facing in whatever direction the playerwishes.
Deployment:• Longbows (8): Salisbury’s (#2-5) in 2511, 2512, 2514 and
2611, Warwick’s (#s 13-16) in 2517, 2518, 2519, 2520.
• Dismounted Men-at-Arms (9): 2515, 2516, 2617, 2619(Warwick #s 2-5) with Warwick (2617) [a]; 2513, 2613, 2615(Salisbury #s 2-4) with Salisbury (2613) [a]; 2814, 2817 (thesetwo under the command of Edward, #s 3-4)
• Mounted Men-at-Arms (2, #s 1-2) 2815, 2816; Edward, Princeof Wales (2815).
• Hobilars (mounted) [c] (2); 2911, 2918.
16 Men of Iron BATTLE BOOK
© 2005 GMT Games, LLC
• Captal de Buch [b] in 2911.
• Wagons (2): 2811, 2910.
a = Warwick’s left wing was also commanded by the Earl of Oxford;Salisbury’s right by the Earl of Suffolk. For game purposes, we havemerged the two on each wing.
b = Jean de Greilly, one of the Gascons in the English army. He has no“command”; see rules on him, below.
c = The Hobilars are part of Prince Edward’s command.
d = This Standard works for all units in the English Army.
HISTORICAL NOTE: There is much disagreement as to exactlyhow the English foot deployed, centering mostly on whether thearchers formed solely as wings to the dismounted men-at-armsin the center, or placed between the heavy infantry, as we havedone. All of this appears to depend on one’s definition of a singleword found in Froissart: “herce,” used to describe the mannerin which English armies deployed their infantry. We have opted,at Poitiers, to the “hedgehog-like” interpretation. We shouldpoint out, though, that in the majority of battles, the Englishtended to place their archers on the wings.
French DeploymentLeaders: King Jean II, Charles, Duke of Normandy, The Dukeof Orleans, Count Saarbruken.
Standards: The French get Standards for each of the four Battlesthey have: Saarbruken’s, The Dauphin’s, The Duke of Orleans’,and King Jean’s. The French Standards are placed, permanently,when and where the French player wishes, except that no Stan-dard may be within five hexes (four intervening) of any hex inwhich an English combat unit is initially deployed. The Clermontand Audrehem units use the First Battle’s (Saarbruken’s) stan-dard. Standards are placed when that battle is activated; if nostandard has been placed, units incurring a Retire are, instead,eliminated.
Facing: All units start facing in whatever direction the playerwishes.
Deployment:• The Van: The Clermont (2114) and Audrehem (2115) mounted
Men-at-Arms [a].
• First Battle: 4 German mounted Men-at-Arms (#s 4-7) in 1713-16 and 5 Genoese Crossbows (#1-5) in 1711-12, 1717-19;Saarbruken in any hex [a].
• Second Battle: 9 Dismounted [b] Men-at-Arms (1311-19),Charles, Duke of Normandy (the Dauphin) in any hex.
• Third Battle: 9 Dismounted Men-at-Arms (1012-20), the Dukeof Orleans in any hex [c].
a = It appears that Marshals Clermont and Audrehem commanded theentire first battle. However, both Clermont and Audrehem started offthe fray by charging the English line with their French Men-at-arms.The rest of the first battle, consisting of crossbowmen and mountedGerman knights—sources disagree on exactly what these units were—was under the command of several German counts, of which Saarbrukenis our representative.
b = Some historians state that the French, convinced that the reasonthey had lost at Créçy was because they fought mounted, decided to
dismount, for the most part, for this battle. To make it easier for theheavily weighted knights, they even cut off the points on their boots andshortened their lances. It never occurred to them that dismounting wasa defensive tactic, and that, offensively, they would have to walk up to amile and a half in all that armor to even reach the English.
The reality is that the French had been fighting dismounted for years;they understood the reasons for such and such a tactic was not un-known to them. The only difficulty for them in adapting such a posturewas convincing their over-heated aristocracy that it was socially ac-ceptable to walk around like the peasants.
c = The younger brother of Normandy, and not yet 21. See the specialrules for this battle.
WHO GOES FIRST?Historical: The French start the game, activating the Clermontand Audrehem mounted Men-at-Arms, ordering them to Charge.
Free Choice: French still go first, but may activate whom theywish.
FRENCH REINFORCEMENTSThe fourth, and largest, battle of twelve (12) dismounted Men-at-Arms under the command of King Jean II, was somewhat tothe rear, almost out of touch with the first battles. This battlemay be brought in at any time the French player wishes to acti-vate Jean—either with or without a dieroll. The units may enterthrough any hexes between 1008-20, inclusive.
TERRAINSeveral features are not self-explanatory.
Clear. Well, there’s clear and then there’s sort of clear. Much ofwhat the map shows as clear, especially around the Maupertuisarea, was broken scrub, vineyards, and assorted other flora thatmade military movement, if not difficult, at least “slower”.
The Hedge. This feature is one of the factors around which somedisagreement swirls. We have to take a stance, so this is ourinterpretation. This row of thorn bushes, which was difficult topenetrate, proved a formidable barrier in the opening hour ofbattle, and its effect is mentioned by several “period” sources.Then it is never mentioned again (in later hours of the battle), asif the units that finally got through managed to tramp it down,well within the realms of probability. The rule, therefore, is oncea unit has crossed the hedge, the hedge is no longer a barrier (oreven present). We’ve got some counters to place along the hex-sides for that purpose. And yes, there is no hedge between 2414and 2513 (anything to help the French).
The Trench. Dug by Prince Edward to protect his right flank. Itis reinforced by his wagons, just returned from their brief at-tempt to retreat back across the Moisson River, to the South.
Roads. The Roman Road was, most likely, a cobblestone spe-cial, as were all Roman. The others are the usual dirt tracks/roads.
Maupertuis. Today a large farm, it appears that back in the XIVthcentury it was more of a small village. So we treat it as a village.

17Men of Iron BATTLE BOOK
© 2005 GMT Games, LLC
THE DUKE OF ORLEANS’ BATTLEYoung and inexperienced, the Duke of Orleans, upon seeing menfrom the two battles in front of him fleeing to the rear, orderedhis men off the field. Players who wish to get as much historicalflavor as possible should use the following rule.
Every time the French Player activates Orleans—with or with-out a dieroll—he checks to see if his battle sticks around. Totalthe French Flight Points and roll the die. If the total is 25 orhigher, Orleans’ battle, and all of its units, are immediately re-moved from play. If they do flee, they do not count towardsFlight level.
CLERMONT AND AUDREHEMThe two mounted men-at-arms, the Clermont and Audrehemunits, are considered one (separate) Command. There is no leader,per se, but the two are always In Command.
CAPTAL de BUCHThis Gascon “general” is represented here not because he was amajor leader, but because of his position in the history of the battle.It was the Captal who took a small group of men, late in the battle,circled around the hill on the English right, and attacked Jean’sbattle’s flank, driving it from the field to end the fray.
To that end, the English Player may consider the Captal de Buchas a leader for any units in his (limited) range for whatever pur-pose he can come up with.
CHIVALRY AND AGGRESSIONOne of the causes of French defeat at several of the battles of the13th-14th centuries was the tendency of French mounted men-at-arms—the “knights”—to combine their sense of chivalroushonor, their natural tendency to attack, and a relative condescen-sion to the capabilities of the English into ill-planned, piece-meal, full frontal charges that, given the excellent defensive ca-pabilities of the English weapons and tactical thinking of thetime, usually spelled disaster.
For players wishing as much historicity as we can muster in aminimal number of pages of rules, we suggest they use the fol-lowing rules. Those of you who want to see what would havehappened had the French knights been somewhat less blindlyaggressive can ignore them.
Any time any French command with mounted Men-at-Arms isactivated, and that leader is within four hexes of any Englishcombat unit, all mounted Men-at-Arms—regardless of theircondition—in his Command must attempt to Charge the en-emy. They must do so in a direct a path as possible, even if thismeans moving through any Genoese CB units in their path(which they can do, as per 8.0). They may not change facingunless it is absolutely necessary to do so to reach the mostaccessible enemy unit.
If a French mounted Men-at-Arms unit moves through a hexwith a CB unit, that CB is immediately Disordered. If it is al-ready Disordered, it is eliminated.
FRENCH MEN-AT-ARMSThe French Mounted Men-at-Arms, except for the Clermont andAudrehem units, may dismount and fight that way, if the playerwishes. Counters are provided for both statuses.
Shield Wall: French dismounted Men-at-Arms may not useShield Wall.
CROSSBOWMENThe Crossbowmen cannot be rallied. Therefore, treat any Re-tired result as Eliminated.
THE ENGLISH WAGON TRAINThe wagons are considered part of Prince Edward’s command.However, if he activates a wagon for movement, he may notmove any combat units of his command.
If any French combat unit ends its movement adjacent to an En-glish wagon, which is not on the other side of a trench hexside,and not adjacent to an English combat unit, that Wagon is re-moved.
FLIGHT LEVELSBalance: The French fought better at Poitiers than they did atCréçy, but the deployment, terrain, and lack of French coordi-nated command still makes this a very difficult win for the Frenchplayer.
Each lost wagon adds two (2) to the English Flight Points. NoFlight Level points are given for standards.
• The English Flight Level is 30.• The French Flight Level is 45.
NájeraCastile (Spain); 3 April 1367
Historical BackgroundThis battle, the largest in the game, allows us to see what hasdeveloped into the standard western European army against amuch different, almost Eastern, tactical system heavily depen-dent on cavalry.
Edward, Prince of Wales, seeks to expand the income of his duchyof Aquitaine by extending its territories over the Pyrennes. Hegathers together a large army for the period, some English men-at-arms, lots of longbows, and a hefty assortment of mercenar-ies from the bands of brigands called the free companies, in-cluding the Great Company. Standing against him is the politi-cal power of usurper King Henry of Trastàmore, inept and fad-ing ruler of Castile.
Henry deployed expecting Edward to approach his position alongthe road from the east. But The Prince, instead, marched behindsome hills to his right and emerged directly onto Henry’s leftflank. Henry’s army, gathered and trained to fight the light cav-
18 Men of Iron BATTLE BOOK
© 2005 GMT Games, LLC
alry armies of the Moors, was of the wrong make-up for Edward’sheavier, but still maneuverable combined arms. And the major-ity of the Castilian light cavalry, the genitors, were nowhere nearthe missile cavalry of, say, the steppe tribes and Mamluks. Whilethey were pretty good at what they did, what they did wasn’twhat the Castilians needed to hold off Edward.
Edward’s longbows made fast work of most of the genitors, asHenry furiously attempted to swing his army into position. Hisfoot was, for the most part, poor, and most of them drownedtrying to flee across the river.
While Nájera was one of The Prince’s great victories—althoughof no lasting strategic or political importance—it might havegone the other way, had Henry’s army been in position, and hadnot The Prince’s individual commanders all not had such a “good”day. But it did show that the heavier combined arms approach—men-at-arms both mounted and dismounted, supported by well-placed longbows—was more than a match for the armies thathad been fighting fast, light cavalry battles for centuries.
Playing Time ran about three hours for the playtesters.
INITIAL DEPLOYMENTSThe Army of Henry the Bastard [a] of Trastàmora,King of CastileDESIGN NOTE: This is the largest army in this game; not, how-ever, the best.
HISTORICAL NOTE: The Castilian Army is set up expectingthe English army to march in from Navarette down the road.Henry chose to not use the Najarilla River as his line of defenseas it would have forced his cavalry to act on the defensive, some-thing they were not very good at ... as you shall see. Instead, heused the smaller Talde River (really a large stream) as a natu-ral defense, which would have been a good position, had Ed-ward arrived via the road. Prince Edward, as you shall see inthe English deployment, had other plans.
Leaders: King Henry; Bertrand de Guesclin [c]; Don Tello;Alfonso Count of Denia; Gomez Carillo [d].
Standards: The Standard of the Kingdom of Castile. Place inany hex in Najera.
Facing: All units start facing Northeast (towards the lower RHcorner of the map).
Deployment:• The Van: 3 French Routier Dismounted Men-at-Arms; 1
Castilian Mounted Men-at-Arms: De Guesclin. 2513, 2314,2115, 1916. 2 Crossbows: 2613, 1817. 2 Slingers: 2217, 2416[e]. Note: We have supplied mounted versions of the 3 FrenchRoutier units if players wish to mount these units.
• Second line, Left Wing: 4 Castilian Mounted Men-at-Arms, 8Genitors [b], Don Tello: 2809-10, 2708-10, 2609-11, 2509-11, 2410. 2 Crossbows: 2909, 2412.
• Second Line, Center: 4 Castilian Mounted Men-at-Arms, 8Genitors [b], King Henry: 2212, 2110-12, 2011-13, 1911-13,1812-13. 2 Crossbows: 2311, 1814.
• Second Line, Right Wing: 4 Castilian Mounted Men-at-Arms,8 Genitors [b], Alfonso, Count of Denia: 1715, 1614-16, 1514-16, 1415-17, 1315-16. 2 Crossbows: 1815, 1317.
• Rear: 30 Pike infantry, 6 Crossbows; Gomez Carillo: In straightlines, 1312-2407, 1212-2306, 1211-2305.
a = The illegitimate son of Alfonso XI King of Castile and his mistress,Leonora de Guzman (both key figures in the French grand opera byDonizetti, “La Favorite”). Henry has been contesting the kingdom withhis brother, the legitimate heir and depressingly named Pedro the Cruel,whom he has recently deposed.
b = Genitor is the English version of the Spanish/Moorish word for theSpanish Light Cavalry of the era. Fashioned after their Moorish coun-terparts, whom they had been facing for centuries, the Spanish genitorswere better armed, but still fought mostly with Harass & Disperse tac-tics, using their lance-like javelins for throwing at a full gallop or, forthe rare times they chose to close, as lances.
c = The great commander of the French free companies (routiers), hebrought with him some excellent French men-at-arms, including someof the nobility that had been at Poitiers (e.g., Audrehem).
d = Actually, Gomez was with the Count of Denia in the second line.However, none of our sources list anyone commanding the mass of Span-ish infantry in the rear—probably none of them wanted to be associ-ated with such rabble—and we had to have someone, and his name wasavailable.
e = The Spanish armies still made use of slingers, who had not changedmuch since their heyday in the Roman era. While they could be effec-tive in terms of providing a hail of rocks and stones, they had no othercapabilities and usually melted away at the first sign of close combat.The presence of slingers at Najera is noted; how many is anyone’s guess.They had no impact on the outcome.
The Army of Edward, Prince of WalesHISTORICAL NOTE: As you see from the units available, thisis mostly a “French” Army—more specifically, Gascon withscattered Bretons—than English. Edward gathered a large force,many of them from the free companies. He actually had to turnaway many of the latter because he couldn’t afford to (promiseto) pay them. The whole enterprise was going to bankrupt himanyway.
Leaders: Edward, Prince of Wales; John Chandos; The Captalde Buch; Thomas Percy; James, King of Majorca.
Standards: The Cross of St. George. It is placed on the mapduring the activation in which the First Wave (Second Line) en-ters. It may be placed in any hex through which English Rein-forcements may enter. Any English units forced to Retire beforethe Standard is placed are, instead, eliminated.
Deployment
No units start on the map.
Reinforcements for the Army of Prince EdwardThe English enter in three waves, through hexes stated below.
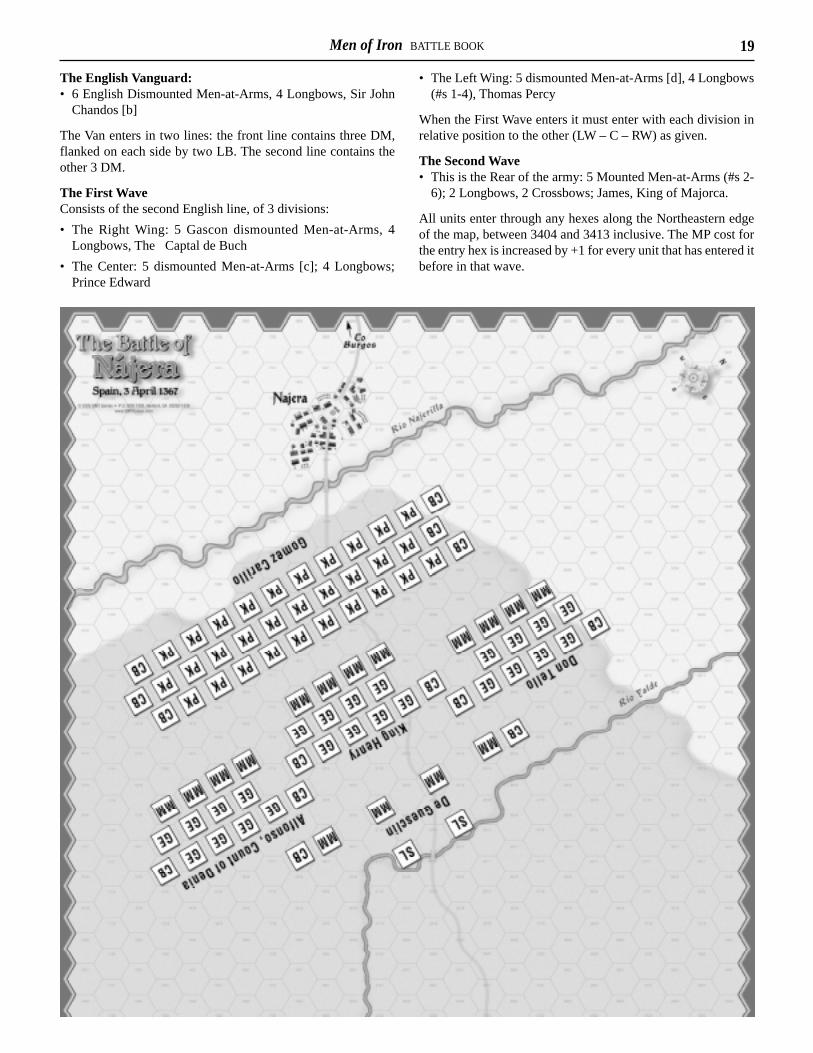
19Men of Iron BATTLE BOOK
© 2005 GMT Games, LLC
The English Vanguard:• 6 English Dismounted Men-at-Arms, 4 Longbows, Sir John
Chandos [b]
The Van enters in two lines: the front line contains three DM,flanked on each side by two LB. The second line contains theother 3 DM.
The First WaveConsists of the second English line, of 3 divisions:
• The Right Wing: 5 Gascon dismounted Men-at-Arms, 4Longbows, The Captal de Buch
• The Center: 5 dismounted Men-at-Arms [c]; 4 Longbows;Prince Edward
• The Left Wing: 5 dismounted Men-at-Arms [d], 4 Longbows(#s 1-4), Thomas Percy
When the First Wave enters it must enter with each division inrelative position to the other (LW – C – RW) as given.
The Second Wave• This is the Rear of the army: 5 Mounted Men-at-Arms (#s 2-
6); 2 Longbows, 2 Crossbows; James, King of Majorca.
All units enter through any hexes along the Northeastern edgeof the map, between 3404 and 3413 inclusive. The MP cost forthe entry hex is increased by +1 for every unit that has entered itbefore in that wave.

20 Men of Iron BATTLE BOOK
© 2005 GMT Games, LLC
Historical Activation: An English Wave may enter under anyform of activation that the basic rules allow, including continu-ity seizure. For this purpose, the first wave uses Prince Edward’srating to bring on all three divisions of the wave.
Balanced Play Activation: Each Wave enters in any EnglishFree (no dieroll needed) Activation. As soon as the units in eachwave are on they activate under standard rules.
a = The contingents from Castile and Aragon were dissidents fightingagainst Henry’s rule, many of them provided by Pedro the Cruel, withwhom Prince Edward had some convoluted diplomatic agreement.
b = The nominal commander of the vanguard was John of Gaunt, theDuke of Lancaster. However, his youth and inexperience meant thattrue command was in the hands of Chandos.
c = These men-at-Arms are from The Great Company, Castille, andAragon
d = Gascons
HISTORICAL NOTE: How did the English emerge onto theCastilian flank so easily? There’s a series of ridges north of theroad, which easily hid Edward’s flanking move until he emergedon Henry, who fully expected to see the English come marchingdown the road.
WHO GOES FIRST?The English start the game. They activate The Vanguard, andthen play passes automatically to the Castilians, at which pointthe normal activation rules take over.
TERRAINThe battlefield was a treeless, fairly flat plain. The sole majorterrain feature is the Najarilla River. This river is not crossablein a military sense (except by the bridge), at least not during abattle, and there is no reason to do so during the game. How-ever, as you will see in the Retire/Retreat rules below, it had amajor impact on the destruction of the Castilian army.
GENITORSThe Spanish Light cavalry, genitors, were not reallysuited to Western European combat of the 14th cen-tury. Javelin-armed, they have some unusual capa-bilities and drawbacks.
Fire: Genitors, as noted in 9.0, may fire as part of Movement. Indoing so, they may ignore the requirement of stopping in anyenemy ZOC. They do pay one extra MP to leave one though.This ability is available only if they fire during movement.
As genitors carried only two javelins (which they used with quitedeadly accuracy), they may fire only once (regardless when theydo so), after which they are Out of Missiles (place such a markeratop the unit). Any Genitor may be rearmed when activated(again), as long as it is at least three hexes from any enemy unitand does not move that activation.
Shock: Genitors may not Charge. They may Shock, using thestandard rules, but they may move adjacent to an enemy unit forShock purposes only if they pass a Charge Reluctance dieroll.Use the following dieroll right before entering the adjacent hex:
• If the DR is a 0–2, the attacking unit successfully closes andmay Shock.
• If the DR is a 3–9, they may not move adjacent to the targetenemy unit; they stop in the hex they were in when the diewas rolled.
Genitors may not Fire and Shock in the same activation, andgenitors without missiles may not Shock. Moreover, if Shockattacked in that status, the attacker gets a +2 DRM.
Genitors do not exert a Zone of Control.
MOUNTED OR DISMOUNTED?The Spanish Men-at-Arms had (literally) not heard about tacti-cal developments in France and England in the previous 50 years.They never, ever dismounted, having even more disdain of do-ing so—and the social implications therein—than their Frenchcounterparts.
However, Edward’s Reserve line, you’ll notice, is mounted, anunusual status for English armies of this era. For one, the En-glish army is not on the defensive here, and two, Edward plannedon using them to purse and destroy fleeing enemy (which theydid).
The English Player has a choice. While his reserve must enterthe game mounted, he may dismount these units (all at once, notjust some) if he so wishes. This takes one full activation, nomovement allowed. Simply exchange the dismounted unit forthe mounted one. Once dismounted, they may not mount again.
SHIELD WALLCastillian pike infantry may not use Shield Wall.
CASTILIAN RETIRE AND RETREATYou will note that the Castilian Standard, around which theywill rally when retired, is in the village of Najera. That meansthat any unit Retiring must have crossed the Najarilla River toget there.
Any Castilian unit (not including the one in the English army)that incurs a Retire result may retire to the Castilian Standardonly if it can trace a line of hexes, of any length, across thebridge that is unoccupied/uninterrupted by any combat unit (ofeither side) or is not in an enemy ZOC. If it cannot do so, it isEliminated instead (drowned trying to flee across the river, afate suffered by many, many Castilians).
ALTERNATE DEPLOYMENTSFor play balance, and change of scenery, players may game thebattle using one of two alternate deployments, both of whichwill help the Castilians.
English Road EntryThis posits that Edward did exactly what Henry thought he woulddo, march towards his army from Navarette directly down theroad. In that case, the following English Deployment is used(the Castilians remain the same). For units in each command,see the standard deployment.
21Men of Iron BATTLE BOOK
© 2005 GMT Games, LLC
• The English Van: Any hex ending in -21, between 2321 and3221, inclusive.
• Second Line, LW: Any hex ending in -24, between 2024 and2424, inclusive, and any hex ending in -25, between 2125-2415.
• Second Line, Center: Any hex ending in -24, between 2624and 3024, inclusive, and any hex ending in -25, between 2625-2915.
• Second Line, LW: Any hex ending in -24, between 3224 and3624, inclusive, and any hex ending in -25, between 3225-3515.
• Rear Line: In hexes on Southeast edge of the map, between2327 and 3127 inclusive.
Castilian Facing WheelThis assumes that Henry spots Edwards approach along his leftflank and redeploys his army to face in that direction. The En-glish deploy/enter as in standard situation.
The Castilian Army may deploy in any fashion that player wishes,within the following boundaries:
• All units must be south of the Najarilla River.
• No unit may be N/NE of the 27-row (they may deploy in thatrow).
• No unit may deploy in any hex ending in a number higherthan -18.
The Castilian Army may change its lines from the historical ones,but all commands remain the same.
FLIGHT LEVELSBalance: Historically, this was an English blowout. Using thehistorical deployments and situation, we feel that the Englishwill win handily. Using the alternate set-ups increases Castilianchances.
Slingers that suffer any negative result are automatically elimi-nated. However, they incur only one (1) Flight point when sodestroyed.
• The English Flight Level is 45.• The Castilian Flight Level is 60.
SOURCESArmstrong, Peter, Stirling Bridge & Falkirk 1297-98
Armstrong, Peter, Bannockburn 1314
Bradbury, Jim, The Medieval Archer
Burne, Alfred H., The Crécy War
Delbruk, Hans, History of the Art of War, Vol III
DeVries, Kelly, Infantry Warfare in the Early Fourteenth Cen-tury
Gravett, Christopher, English Medieval Knight 1200-1300
Gunn, Robert M., “The Battle of Falkirk (1298)”(www.scotwebshops.com/history/features/falkirk)
Heath, Ian, Armies of the Middle Ages, Vol I
Nicolle, David, Medieval Warfare Source Book, Vol I
Nicolle, David, Crecy 1346
Norman, A.V.B., and Pottinger, Don, English Weapons &Warfare, 449-1660
Oman, Sir Charles, A History of The Art of War in the MiddleAges, Vol. Two
Payne-Gallwey, Ralph, The Book of the Crossbow
Rogers, Clifford J., Medieval Warfare
Rothero, Christopher, The Armies of Crécy and Poitiers
Seymour,William, Battles in Britain, 1066-1746
Sumption, Jonathon, The Hundred Years War I
Verbruggen, J.F. and Kelly DeVries (Editor),The Battle ofthe Golden Spurs (Courtrai, 11 July 1302): A Contributionto the History of Flanders' War of Liberation, 1297-1305(Warfare in History)

22 Men of Iron BATTLE BOOK
© 2005 GMT Games, LLC

23Men of Iron BATTLE BOOK
© 2005 GMT Games, LLC
24 Men of Iron BATTLE BOOK
© 2005 GMT Games, LLC
GMT Games, LLCP.O. Box 1308, Hanford, CA 93232-1308
www.GMTGames.com