Embed Size (px)
Citation preview

GreenBox 100The portable hydrogen fuel-cell generators
Installation and instructions user manual
WARNING: FIRE OR EXPLOSION HAZARD
PLEASE READ AND FOLLOW THIS MANUAL WITH CARE PRIOR TO INSTALLATION AND USE Failure to follow safety warnings exactly could result in serious injury, death or property damage:- If for indoor use please operate in vented indoor room or with open windows within a suggested temperature of 5-20°C. - If for outdoor use please operate in vented area protected from rain and drops accordingly with IP20 protection grade of generator and within suggested temperature of +5/+20°C (temperature limits range +5/+35°C).- Do not store or use gasoline or other flammable vapours and liquids in the vicinity of this or any other appliance. - Installation and service must be performed strictly following instructions as described this manual
Designed & manufactured by H2planet in Italy
H2planet by Hydro2Power SRLViale Montegrappa 23/A, 20069 Vaprio d’Adda (MI)ITALY
GreenBox 100 (STD, DC)Hydrogen PEM fuel-cell power generatorOutput: Schuko (CEE 7/4) + USA & Canada (NEMA 5)/Russia (GOST 7396.1-89)/UK and Asia (BS 546)/Italy (CEI 23-16/VII) @ 110-230VAC 50Hz (other sockets available on request: 100/110/115/120/200/220/240VAC @50/60Hz), 13VDC, USB (1A max), requested DC (only in DC model)Max power peak: 75W
Refer to GreenBox's fuel information chapter of this manual for more details.
Fuel: H2 hydrogen ultrapure gas minimum 4.5 (99.995% purity), recommended 5.0 (99.999% purity)H2 fuel pressure: 6-10bar. MAXIMUM 10,5 bar H2 fuel max. consumption: 1,5 l/min.Temperature range: +5/+35°CINDOOR USE OR OUTDOOR PROTECTED USE ONLY (ideal temperature 5-20°C, no condensation)Max. heat by product air output: 75W
Manufactured in compliance with international standards:IEC 62282-3-1, 62282-3-1, 62282-3-3

DISCLAIMER: all the informations, pictures and schemes contained in this manual may be varying according to new products releases and versions as well as new improvements over performances, components and regulations. External features and colours might be thus changing depending also on suppliers of single components composing the product in its entire appearance.
Scope of the manual..................................................................6Introduction............................................................................6Hydrogen chain by H2planet........................................................ 7
Technical specifications GreenBox Powerbox 100 Standard......................................................8Technical specifications GreenBox Powerbox 100 DC Version....................................................9List of add-on options.................................................................................................. 9Proper use............................................................................................................... 10List of the goods inside the box..................................................................................... 10Description.............................................................................................................. 10Product acceptance.................................................................................................... 11
Installation............................................................................11Safety and precautions................................................................................................ 11Requirements of the installation site and warnings..............................................................12Grounding instructions................................................................................................ 13Gas connection......................................................................................................... 13Electrical connection.................................................................................................. 14Internet remote control (available only with iGreen/iHub add-on option)..................................15
Switches and buttons on the top panel.........................................15OFF(EMERGENCY)/STANDBY key..................................................................................... 16RUN/OFF switch........................................................................................................ 17SCROLL button.......................................................................................................... 17
Plugs and sockets on right-hand side panel....................................18AC main sockets (standard versions)................................................................................ 1813VDC sockets.......................................................................................................... 18USB port................................................................................................................. 18SIM card slit (iGreen/iHub options only)........................................................................... 18DC output socket (DC versions only)................................................................................ 19
First start-up.......................................................................... 19Automatic charge of internal battery.............................................................................. 21
Emergency shut down...............................................................21Use of GreenBox timer..............................................................21
Timer manual start-up................................................................................................ 21Timer automatic start-up............................................................................................. 22Reset..................................................................................................................... 23Settings time and day................................................................................................. 23Permanently ON, permanently OFF, AUTO......................................................................... 23Control, modification and delete commutation points.......................................................... 25 Skip function (soft-override)........................................................................................ 25Programming errors................................................................................................... 25
Maintenance..........................................................................26Visual inspections...................................................................................................... 26Ordinary maintenance................................................................................................. 26Programmed maintenance service H2planet Care Plan.......................................................... 26GreenBox storage...................................................................................................... 27
Suggestions and advices............................................................ 27Not to do operations.................................................................................................. 27Suggested operations.................................................................................................. 27
Troubleshooting......................................................................28Start-up phase.......................................................................................................... 28Shut-down (power off) phase........................................................................................ 28Overload................................................................................................................. 28
Error messages.......................................................................29

H2 in the box........................................................................................................... 29Temperature limits.................................................................................................... 29Battery charging....................................................................................................... 29Restart unit............................................................................................................. 29
Original parts.........................................................................30Battery restoring procedure.......................................................30GreenBox's fuel informations......................................................30Contacts................................................................................32Manufacturer notes..................................................................32User notes............................................................................. 33

Scope of the manual
This user manual provides the user and installer with instructions for user-friendly installation, usage and maintenance for GreenBox portable fuel-cell generator series by H2planet.
Introduction
Congratulations for buying a GreenBox fuel cell system by H2planet, the power generation experience running an hydrogen fuel-cell that allows you to switch to the hydrogen era in a simple, safe and suitable way. Move, start-up, zero emissions.
GreenBox provides you clean power wherever you need with no pollutant by product gases, and in a fully independent way from power grid simply hooking up to hydrogen pressurised cylinders or through compatible H2planet MyH2 CE certified hydrides canisters product line. You can use various output AC (Standard version only: 230VAC/110VAC @ 50Hz, max 75W) / DC (DC version only: 12-24VDC, max 80W) + DC (13V max 5W), USB 2.0 (max 5W, 5V) to power every load, with the only limit of GreenBox maximum power rate.
GreenBox can feed:
- small drills and every kind of work tools.
- bulb lamps, energy saving bulbs (CFL), LED lamps, etc.
- direct current motors and loads (12-24VDC exit version only)
- mobile phones, smartphones, MP3 players, cameras,GPS, GPRS
For a safe use, choose a good place where to install your GreenBox strictly following the safety and precautions chapter.
GreenBox is designed exclusively for indoor/outdoor only under specified safety and precautions described in this manual. Do not use under water or rain.
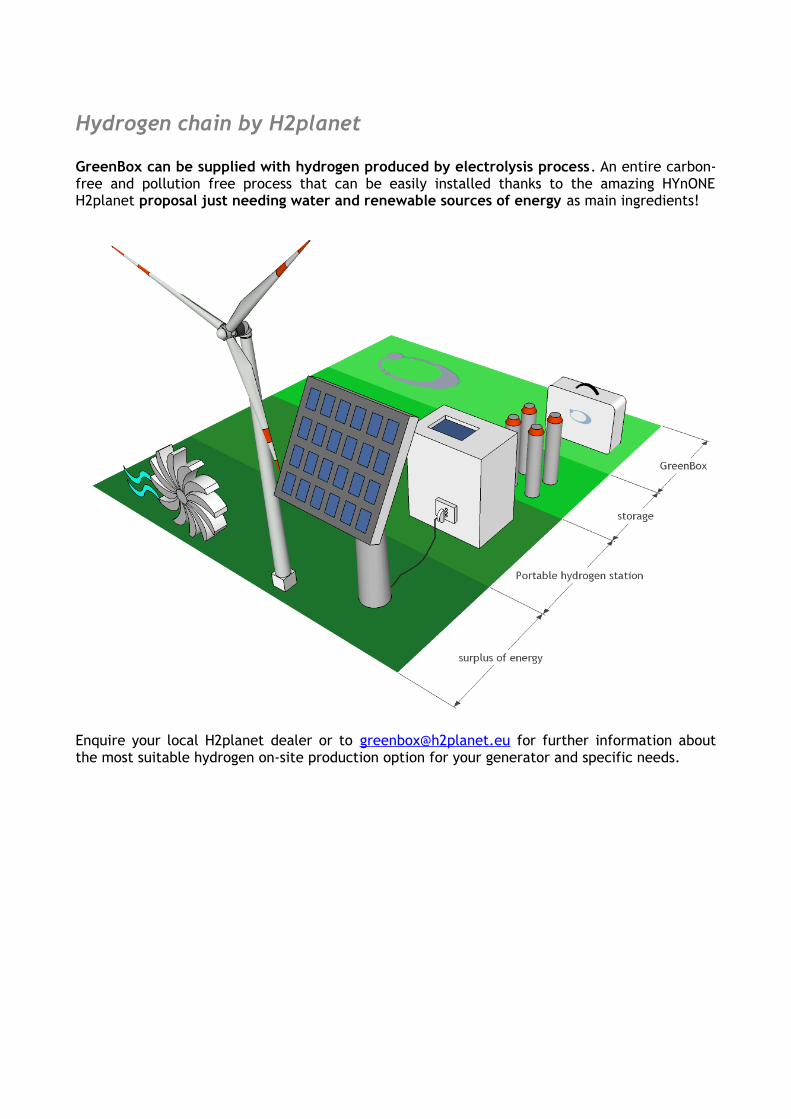
Hydrogen chain by H2planet
GreenBox can be supplied with hydrogen produced by electrolysis process. An entire carbon-free and pollution free process that can be easily installed thanks to the amazing HYnONE H2planet proposal just needing water and renewable sources of energy as main ingredients!
Enquire your local H2planet dealer or to [email protected] for further information about the most suitable hydrogen on-site production option for your generator and specific needs.
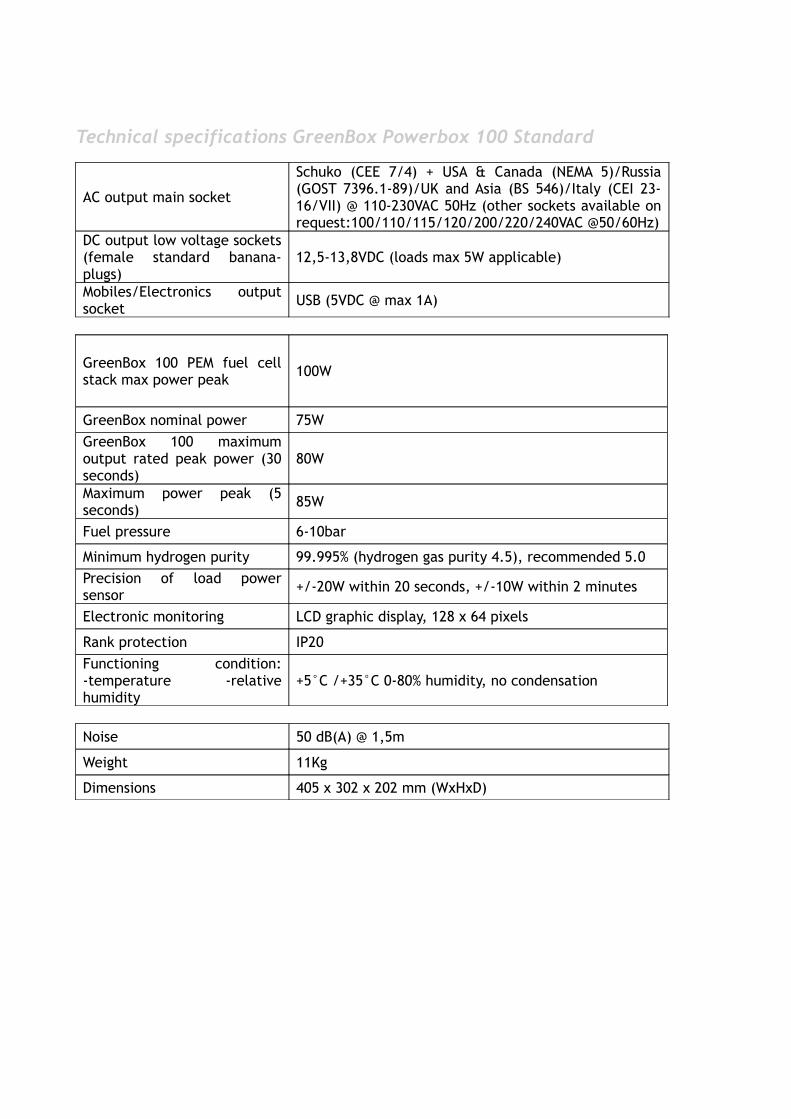
Technical specifications GreenBox Powerbox 100 Standard
AC output main socket
Schuko (CEE 7/4) + USA & Canada (NEMA 5)/Russia (GOST 7396.1-89)/UK and Asia (BS 546)/Italy (CEI 23-16/VII) @ 110-230VAC 50Hz (other sockets available on request:100/110/115/120/200/220/240VAC @50/60Hz)
DC output low voltage sockets (female standard banana-plugs)
12,5-13,8VDC (loads max 5W applicable)
Mobiles/Electronics output socket
USB (5VDC @ max 1A)
GreenBox 100 PEM fuel cell stack max power peak
100W
GreenBox nominal power 75W
GreenBox 100 maximum output rated peak power (30 seconds)
80W
Maximum power peak (5 seconds)
85W
Fuel pressure 6-10bar
Minimum hydrogen purity 99.995% (hydrogen gas purity 4.5), recommended 5.0
Precision of load power sensor
+/-20W within 20 seconds, +/-10W within 2 minutes
Electronic monitoring LCD graphic display, 128 x 64 pixels
Rank protection IP20
Functioning condition: -temperature -relative humidity
+5°C /+35°C 0-80% humidity, no condensation
Noise 50 dB(A) @ 1,5m
Weight 11Kg
Dimensions 405 x 302 x 202 mm (WxHxD)
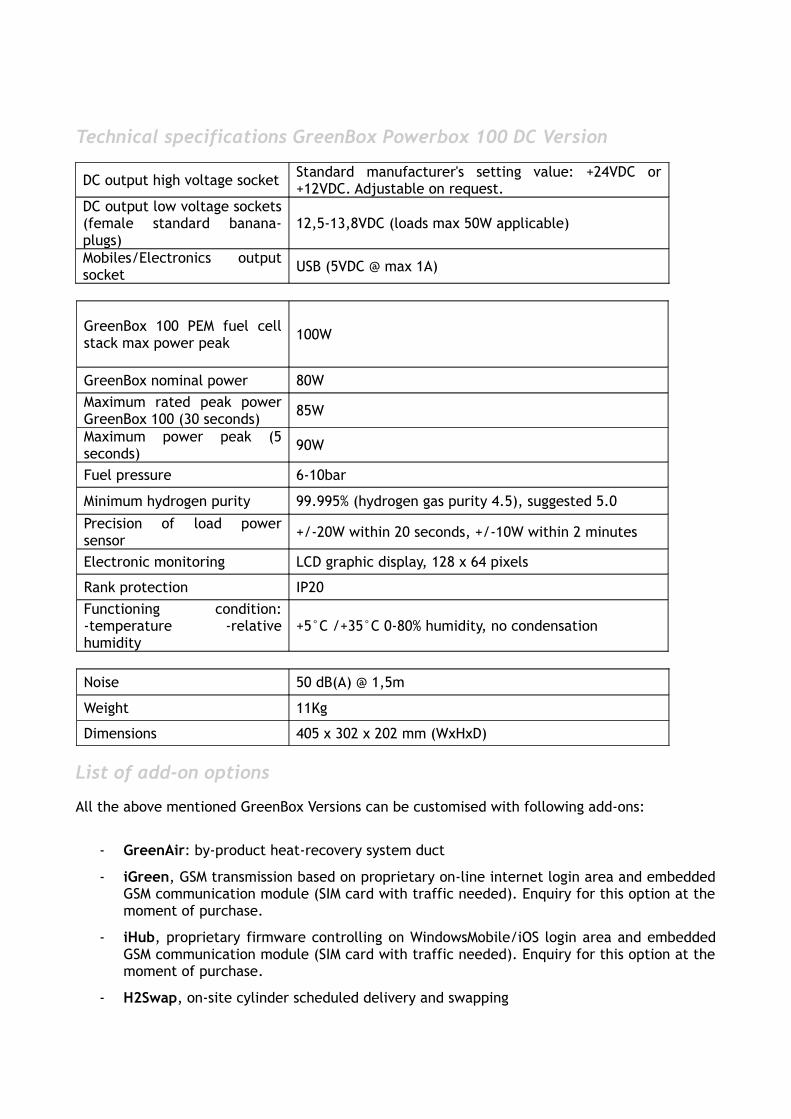
Technical specifications GreenBox Powerbox 100 DC Version
DC output high voltage socket Standard manufacturer's setting value: +24VDC or +12VDC. Adjustable on request.
DC output low voltage sockets (female standard banana-plugs)
12,5-13,8VDC (loads max 50W applicable)
Mobiles/Electronics output socket
USB (5VDC @ max 1A)
GreenBox 100 PEM fuel cell stack max power peak
100W
GreenBox nominal power 80W
Maximum rated peak power GreenBox 100 (30 seconds)
85W
Maximum power peak (5 seconds)
90W
Fuel pressure 6-10bar
Minimum hydrogen purity 99.995% (hydrogen gas purity 4.5), suggested 5.0
Precision of load power sensor
+/-20W within 20 seconds, +/-10W within 2 minutes
Electronic monitoring LCD graphic display, 128 x 64 pixels
Rank protection IP20
Functioning condition: -temperature -relative humidity
+5°C /+35°C 0-80% humidity, no condensation
Noise 50 dB(A) @ 1,5m
Weight 11Kg
Dimensions 405 x 302 x 202 mm (WxHxD)
List of add-on options
All the above mentioned GreenBox Versions can be customised with following add-ons:
- GreenAir: by-product heat-recovery system duct
- iGreen, GSM transmission based on proprietary on-line internet login area and embedded GSM communication module (SIM card with traffic needed). Enquiry for this option at the moment of purchase.
- iHub, proprietary firmware controlling on WindowsMobile/iOS login area and embedded GSM communication module (SIM card with traffic needed). Enquiry for this option at the moment of purchase.
- H2Swap, on-site cylinder scheduled delivery and swapping
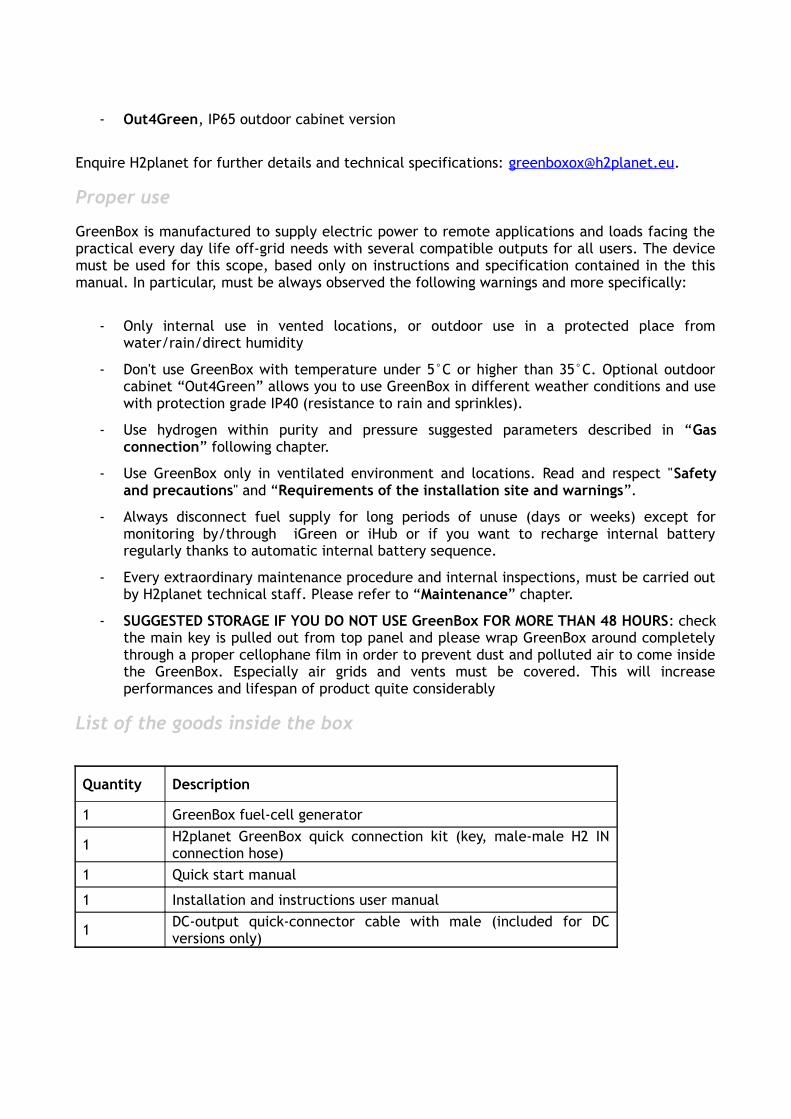
- Out4Green, IP65 outdoor cabinet version
Enquire H2planet for further details and technical specifications: [email protected].
Proper use
GreenBox is manufactured to supply electric power to remote applications and loads facing the practical every day life off-grid needs with several compatible outputs for all users. The device must be used for this scope, based only on instructions and specification contained in the this manual. In particular, must be always observed the following warnings and more specifically:
- Only internal use in vented locations, or outdoor use in a protected place from water/rain/direct humidity
- Don't use GreenBox with temperature under 5°C or higher than 35°C. Optional outdoor cabinet “Out4Green” allows you to use GreenBox in different weather conditions and use with protection grade IP40 (resistance to rain and sprinkles).
- Use hydrogen within purity and pressure suggested parameters described in “Gas connection” following chapter.
- Use GreenBox only in ventilated environment and locations. Read and respect "Safety and precautions" and “Requirements of the installation site and warnings”.
- Always disconnect fuel supply for long periods of unuse (days or weeks) except for monitoring by/through iGreen or iHub or if you want to recharge internal battery regularly thanks to automatic internal battery sequence.
- Every extraordinary maintenance procedure and internal inspections, must be carried out by H2planet technical staff. Please refer to “Maintenance” chapter.
- SUGGESTED STORAGE IF YOU DO NOT USE GreenBox FOR MORE THAN 48 HOURS: check the main key is pulled out from top panel and please wrap GreenBox around completely through a proper cellophane film in order to prevent dust and polluted air to come inside the GreenBox. Especially air grids and vents must be covered. This will increase performances and lifespan of product quite considerably
List of the goods inside the box
Quantity Description
1 GreenBox fuel-cell generator
1 H2planet GreenBox quick connection kit (key, male-male H2 IN connection hose)
1 Quick start manual
1 Installation and instructions user manual
1 DC-output quick-connector cable with male (included for DC versions only)
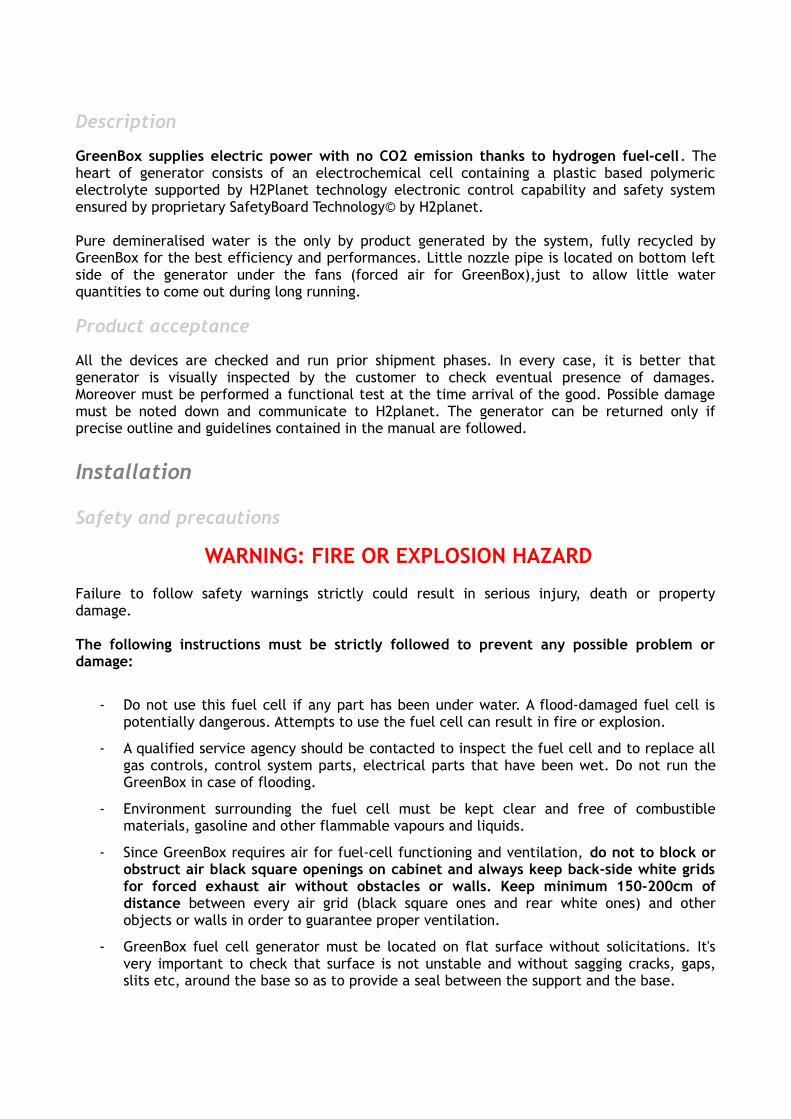
Description
GreenBox supplies electric power with no CO2 emission thanks to hydrogen fuel-cell. The heart of generator consists of an electrochemical cell containing a plastic based polymeric electrolyte supported by H2Planet technology electronic control capability and safety system ensured by proprietary SafetyBoard Technology© by H2planet.
Pure demineralised water is the only by product generated by the system, fully recycled by GreenBox for the best efficiency and performances. Little nozzle pipe is located on bottom left side of the generator under the fans (forced air for GreenBox),just to allow little water quantities to come out during long running.
Product acceptance
All the devices are checked and run prior shipment phases. In every case, it is better that generator is visually inspected by the customer to check eventual presence of damages. Moreover must be performed a functional test at the time arrival of the good. Possible damage must be noted down and communicate to H2planet. The generator can be returned only if precise outline and guidelines contained in the manual are followed.
Installation
Safety and precautions
WARNING: FIRE OR EXPLOSION HAZARD
Failure to follow safety warnings strictly could result in serious injury, death or property damage.
The following instructions must be strictly followed to prevent any possible problem or damage:
- Do not use this fuel cell if any part has been under water. A flood-damaged fuel cell is potentially dangerous. Attempts to use the fuel cell can result in fire or explosion.
- A qualified service agency should be contacted to inspect the fuel cell and to replace all gas controls, control system parts, electrical parts that have been wet. Do not run the GreenBox in case of flooding.
- Environment surrounding the fuel cell must be kept clear and free of combustible materials, gasoline and other flammable vapours and liquids.
- Since GreenBox requires air for fuel-cell functioning and ventilation, do not to block or obstruct air black square openings on cabinet and always keep back-side white grids for forced exhaust air without obstacles or walls. Keep minimum 150-200cm of distance between every air grid (black square ones and rear white ones) and other objects or walls in order to guarantee proper ventilation.
- GreenBox fuel cell generator must be located on flat surface without solicitations. It's very important to check that surface is not unstable and without sagging cracks, gaps, slits etc, around the base so as to provide a seal between the support and the base.
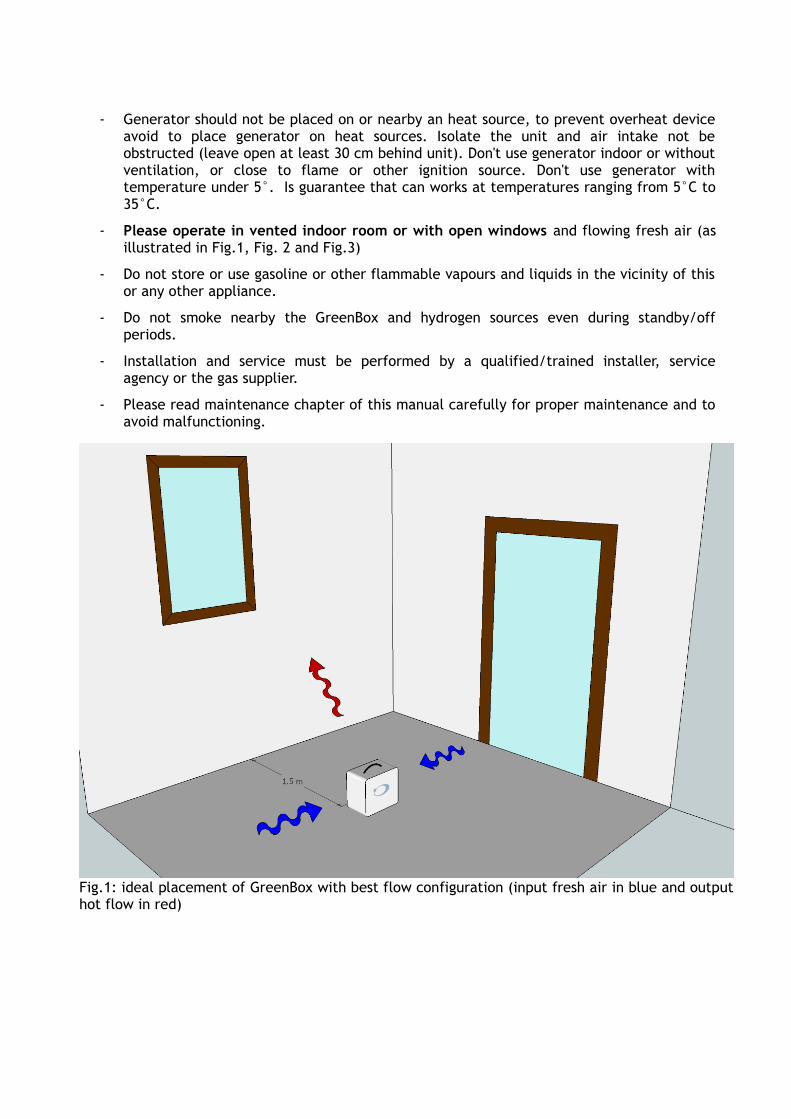
- Generator should not be placed on or nearby an heat source, to prevent overheat device avoid to place generator on heat sources. Isolate the unit and air intake not be obstructed (leave open at least 30 cm behind unit). Don't use generator indoor or without ventilation, or close to flame or other ignition source. Don't use generator with temperature under 5°. Is guarantee that can works at temperatures ranging from 5°C to 35°C.
- Please operate in vented indoor room or with open windows and flowing fresh air (as illustrated in Fig.1, Fig. 2 and Fig.3)
- Do not store or use gasoline or other flammable vapours and liquids in the vicinity of this or any other appliance.
- Do not smoke nearby the GreenBox and hydrogen sources even during standby/off periods.
- Installation and service must be performed by a qualified/trained installer, service agency or the gas supplier.
- Please read maintenance chapter of this manual carefully for proper maintenance and to avoid malfunctioning.
Fig.1: ideal placement of GreenBox with best flow configuration (input fresh air in blue and output hot flow in red)
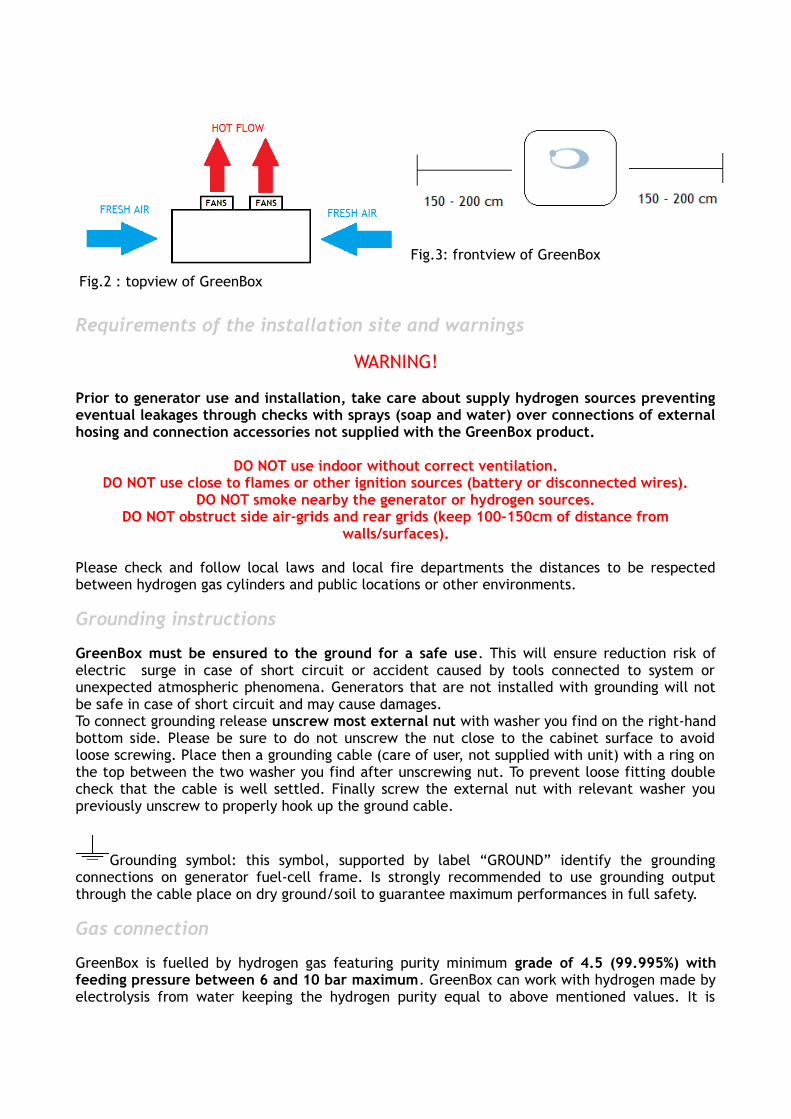
Fig.2 : topview of GreenBox
Fig.3: frontview of GreenBox
Requirements of the installation site and warnings
WARNING!
Prior to generator use and installation, take care about supply hydrogen sources preventing eventual leakages through checks with sprays (soap and water) over connections of external hosing and connection accessories not supplied with the GreenBox product.
DO NOT use indoor without correct ventilation.DO NOT use close to flames or other ignition sources (battery or disconnected wires).
DO NOT smoke nearby the generator or hydrogen sources.DO NOT obstruct side air-grids and rear grids (keep 100-150cm of distance from
walls/surfaces).
Please check and follow local laws and local fire departments the distances to be respected between hydrogen gas cylinders and public locations or other environments.
Grounding instructions
GreenBox must be ensured to the ground for a safe use. This will ensure reduction risk of electric surge in case of short circuit or accident caused by tools connected to system or unexpected atmospheric phenomena. Generators that are not installed with grounding will not be safe in case of short circuit and may cause damages.To connect grounding release unscrew most external nut with washer you find on the right-hand bottom side. Please be sure to do not unscrew the nut close to the cabinet surface to avoid loose screwing. Place then a grounding cable (care of user, not supplied with unit) with a ring on the top between the two washer you find after unscrewing nut. To prevent loose fitting double check that the cable is well settled. Finally screw the external nut with relevant washer you previously unscrew to properly hook up the ground cable.
Grounding symbol: this symbol, supported by label “GROUND” identify the grounding connections on generator fuel-cell frame. Is strongly recommended to use grounding output through the cable place on dry ground/soil to guarantee maximum performances in full safety.
Gas connection
GreenBox is fuelled by hydrogen gas featuring purity minimum grade of 4.5 (99.995%) with feeding pressure between 6 and 10 bar maximum. GreenBox can work with hydrogen made by electrolysis from water keeping the hydrogen purity equal to above mentioned values. It is
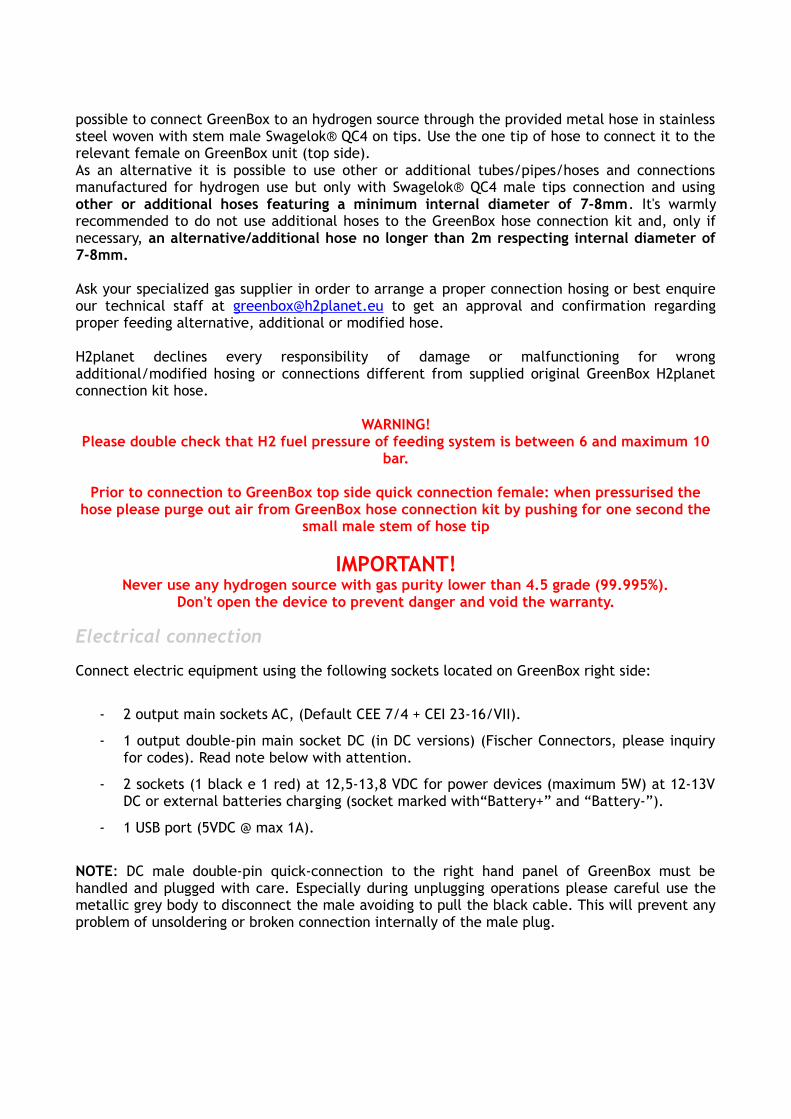
possible to connect GreenBox to an hydrogen source through the provided metal hose in stainless steel woven with stem male Swagelok® QC4 on tips. Use the one tip of hose to connect it to the relevant female on GreenBox unit (top side).As an alternative it is possible to use other or additional tubes/pipes/hoses and connections manufactured for hydrogen use but only with Swagelok® QC4 male tips connection and using other or additional hoses featuring a minimum internal diameter of 7-8mm. It's warmly recommended to do not use additional hoses to the GreenBox hose connection kit and, only if necessary, an alternative/additional hose no longer than 2m respecting internal diameter of 7-8mm.
Ask your specialized gas supplier in order to arrange a proper connection hosing or best enquire our technical staff at [email protected] to get an approval and confirmation regarding proper feeding alternative, additional or modified hose.
H2planet declines every responsibility of damage or malfunctioning for wrong additional/modified hosing or connections different from supplied original GreenBox H2planet connection kit hose.
WARNING!Please double check that H2 fuel pressure of feeding system is between 6 and maximum 10
bar.
Prior to connection to GreenBox top side quick connection female: when pressurised the hose please purge out air from GreenBox hose connection kit by pushing for one second the
small male stem of hose tip
IMPORTANT!Never use any hydrogen source with gas purity lower than 4.5 grade (99.995%).
Don't open the device to prevent danger and void the warranty.
Electrical connection
Connect electric equipment using the following sockets located on GreenBox right side:
- 2 output main sockets AC, (Default CEE 7/4 + CEI 23-16/VII).
- 1 output double-pin main socket DC (in DC versions) (Fischer Connectors, please inquiry for codes). Read note below with attention.
- 2 sockets (1 black e 1 red) at 12,5-13,8 VDC for power devices (maximum 5W) at 12-13V DC or external batteries charging (socket marked with“Battery+” and “Battery-”).
- 1 USB port (5VDC @ max 1A).
NOTE: DC male double-pin quick-connection to the right hand panel of GreenBox must be handled and plugged with care. Especially during unplugging operations please careful use the metallic grey body to disconnect the male avoiding to pull the black cable. This will prevent any problem of unsoldering or broken connection internally of the male plug.
Internet remote control (available only with iGreen/iHub add-on option)
It is possible to control GreenBox remotely through SafetyBoard©PRO Version installed on GreenBox that includes a GSM module that can transmit data/informations about the device and H2 gas autonomy through the web or/and through a proper mobile dedicated interface. All the data are transferred through the internet with GSM embedded transmitter that can be integrated to device and fuelled by GreenBox if necessary. GSM embedded transmitter allows to monitor your GreenBox through the web using thus two kind of convenient subscriptions and easy to use add-on services:
iGreen add-on service: internet access through the most common browsers (Internet Explorer, Firefox Mozilla, Chrome, etc.) with a dedicated login area to monitor one or more GreenBox units at same time. This service is based on GSM module and connection powered through a very simple and commonly diffused low cost SMS SIM card that must be placed into GreenBox dedicated port.
iGreen allows the user thanks to H2planet dedicated web-platform:
- to receive start-up SMS and/or email communication
- to monitor GreenBox performances and gas levels
- to monitor GreenBox location
- to start-up/shut-down GreenBox on needs
- to receive errors SMS/emails in case of eventual problems
- to restore GreenBox functioning through a reset button
iHub add-on service: monitoring on-line mobile designed and formatted webpage with immediate easy monitoring through cellphones such as iPhone (iOS), Windows Mobile and Android based mobiles Smartphones. This service is based on GSM module and connection powered through a very simple and commonly diffused low cost SMS SIM card that must be placed into GreenBox dedicated port. iHub allows the user thanks to H2planet dedicated mobile format designed webpage:
- to receive start-up SMS and/or email communications
- to monitor GreenBox performances and gas levels
- to monitor GreenBox location
- to start-up/shut-down GreenBox on needs
- to receive errors SMS/emails in case of eventual problems
- to restore GreenBox functioning through a reset button
Switches and buttons on the top panel
SafetyBoard© controls GreenBox through 3 elements key, switch buttons:
1. OFF/STANDBY2. RUN/STOP3. SCROLL
The first button switches SafetyBoard© electronic board on featuring safety control capabilities and allows continuous monitoring of hydrogen leaks when connected to hydrogen sources. The second button starts-up generator within 120 seconds with a procedure of boot drive and internal functions checking for battery recharge and fuel-cell auxiliaries powering. The third button allows to monitor functional parameters of GreenBox with the possibility to control the main values that determine performances of the system.
OFF(EMERGENCY)/STANDBY key
OFF (EMERGENCY)/STANDBY key is the main powering device of GreenBox fuel-cell generator.
This key when operated allows both to feed electronic board controlling through SafetyBoard© technology, and to switch off the device in case of malfunctioning or emergency therefore stopping immediately hydrogen supply flow and switching GreenBox off.
Turning the key on STANDBY you'll start hydrogen sensor controlling system to prevent every unsafe situation, detecting also the smallest leak of hydrogen gas featuring a safety margin 50 times safer than the IEC international norms for fuel-cell systems. In this way you will also feed SafetyBoard© for monitoring pressure parameters of hydrogen supply and voltage of auxiliary internal battery. The switch doesn't emit sounds or lights during start up so always check the positioning of the key on command control-panel over the GreenBox top prior to store the product.
This key allows:
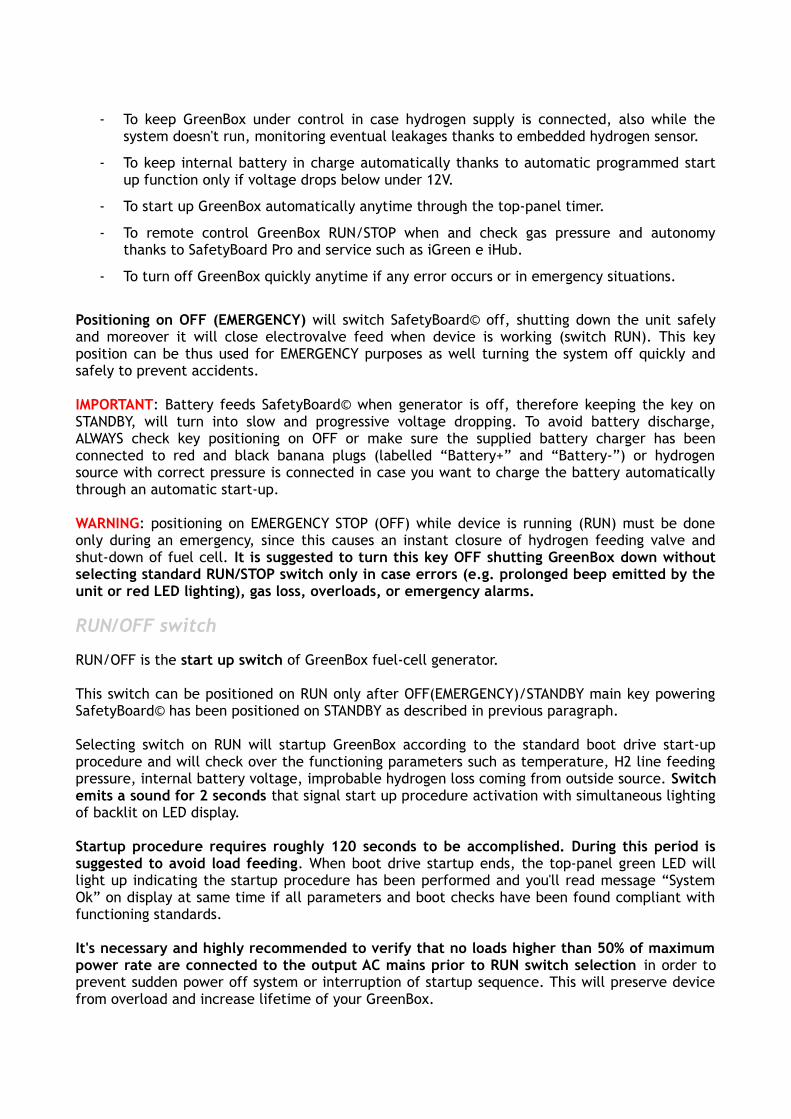
- To keep GreenBox under control in case hydrogen supply is connected, also while the system doesn't run, monitoring eventual leakages thanks to embedded hydrogen sensor.
- To keep internal battery in charge automatically thanks to automatic programmed start up function only if voltage drops below under 12V.
- To start up GreenBox automatically anytime through the top-panel timer.
- To remote control GreenBox RUN/STOP when and check gas pressure and autonomy thanks to SafetyBoard Pro and service such as iGreen e iHub.
- To turn off GreenBox quickly anytime if any error occurs or in emergency situations.
Positioning on OFF (EMERGENCY) will switch SafetyBoard© off, shutting down the unit safely and moreover it will close electrovalve feed when device is working (switch RUN). This key position can be thus used for EMERGENCY purposes as well turning the system off quickly and safely to prevent accidents.
IMPORTANT: Battery feeds SafetyBoard© when generator is off, therefore keeping the key on STANDBY, will turn into slow and progressive voltage dropping. To avoid battery discharge, ALWAYS check key positioning on OFF or make sure the supplied battery charger has been connected to red and black banana plugs (labelled “Battery+” and “Battery-”) or hydrogen source with correct pressure is connected in case you want to charge the battery automatically through an automatic start-up.
WARNING: positioning on EMERGENCY STOP (OFF) while device is running (RUN) must be done only during an emergency, since this causes an instant closure of hydrogen feeding valve and shut-down of fuel cell. It is suggested to turn this key OFF shutting GreenBox down without selecting standard RUN/STOP switch only in case errors (e.g. prolonged beep emitted by the unit or red LED lighting), gas loss, overloads, or emergency alarms.
RUN/OFF switch
RUN/OFF is the start up switch of GreenBox fuel-cell generator.
This switch can be positioned on RUN only after OFF(EMERGENCY)/STANDBY main key powering SafetyBoard© has been positioned on STANDBY as described in previous paragraph.
Selecting switch on RUN will startup GreenBox according to the standard boot drive start-up procedure and will check over the functioning parameters such as temperature, H2 line feeding pressure, internal battery voltage, improbable hydrogen loss coming from outside source. Switch emits a sound for 2 seconds that signal start up procedure activation with simultaneous lighting of backlit on LED display.
Startup procedure requires roughly 120 seconds to be accomplished. During this period is suggested to avoid load feeding. When boot drive startup ends, the top-panel green LED will light up indicating the startup procedure has been performed and you'll read message “System Ok” on display at same time if all parameters and boot checks have been found compliant with functioning standards.
It's necessary and highly recommended to verify that no loads higher than 50% of maximum power rate are connected to the output AC mains prior to RUN switch selection in order to prevent sudden power off system or interruption of startup sequence. This will preserve device from overload and increase lifetime of your GreenBox.

Proceed with loads disconnection before switch is positioned on STOP. When selected on STOP a sound similar to startup one will be repeated 2 times. Also, in this situation is suggested to power off GreenBox after 2-3 minutes from loads disconnection in order to facilitate cooling process and internal blower fans progressive work reduction. This will increase lifespan of your GreenBox as well and will preserve it from sudden current droppage.
WARNING: positioning switch on STOP doesn't determine power off in case GreenBox is in alarm or it is turned off with overloads or heavy loads suddenly. In this case ALWAYS turn the OFF (EMERGENCY)/STANDBY key on EMERGENCY position.
SCROLL button
SCROLL button allows to visualize functioning parameters of your GreenBox among which:
- Temperature
- Fuel cells voltage
- Internal battery voltage
- Eventual hydrogen leakages
- Power meter consumption
- Inlet pressure
- Running hours counter
Plugs and sockets on right-hand side panel
AC main sockets (standard versions)
Every AC main socket you find on left-hand side of unit is protected by a small transparent silicon door and equipped with 2 sockets depending on Euro/US/UK/Japan version you purchased:
- 1 schuko or US/Japan/UK standard
- 1 Euro standard or US/Japan/UK standard)
Use these sockets according to the technical specifications you can find on labelling on GreenBox back-side or in the specifications tables you find in the technical specifications paragraphs in the first pages of this manual. Please double-check you refer to your model correctly.
13VDC sockets
You can use 13VDC red and black output sockets you can find on left-hand side of GreenBox to feed 12-13VDC loads up to a maximum of 5-10W roughly. This output sockets can be useful for battery charging purpose or to feed external loads within these limits. To avoid short circuit effects, it's strongly recommended to connect an external fuse (1Ampere maximum) in series to

loads. To charge the internal battery through an external charger, please ensure it can charge batteries @12V, 4Ah.
USB port
You can use USB port to feed loads at 5VDC up to a maximum of 1A. Please check the limit of 1A is respected being the device protected by an internal fuse. This port is extremely useful to feed electronics, to charge mobiles/PDAs or other electronics devices as well as to feed other loads working at 5V max. 1A.
SIM card slit (iGreen/iHub options only)
SD SIM card slit on left side allows the user to monitor GreenBox by SMS and the internet thanks to a simple SIM card with SMS traffic active. In order to run this option is previously required to register your GreenBox on the H2planet dedicated website (www.h2p.eu/iGreen) or inquiring H2planet for registration of your mobile number related to your SIM card.
You can use SIM card slit on left-hand side of unit in case you need to monitor and control GreenBox unit remotely through iGreen or iHub add-on options. Prior to use of SIM card check a proper fare contract has been activated together with SIM card in order to save money and to control the GreenBox as better as possible.
Please insert the SD SIM card in the direction here indicated keeping cut edge on left side and magnetic chip underneath:
use a small flat screwdriver to VERY GENTLY push the SIM card until it clicks kept into the small slit. Be very careful in applying a smooth force during insertion. When inserted push gently on SIM card profile with a flat screwdriver to push out the SIM card until it clicks out the SD SIM.Prior to run it verify with H2planet technical staff ([email protected]) that your monitoring private account on dedicated website has been properly activated with assigned mobile phone numbers and/or emails whose will be receiving the communications. This will enable you to receive SMS and emails as soon as unit will be started up and allow on-line monitoring of GreenBox working parameters.
Please remind to select GSM ON/OFF power button prior to main key positioning to STANDBY. Selecting GSM ON/OFF after turning main key to STANDBY could result in erroneous transmissions.
DC output socket (DC versions only)
This output socket allows to use an adjustable precalibrated DC output defined at the moment of order and customised on customer's needs. The voltage is adjustable on request.
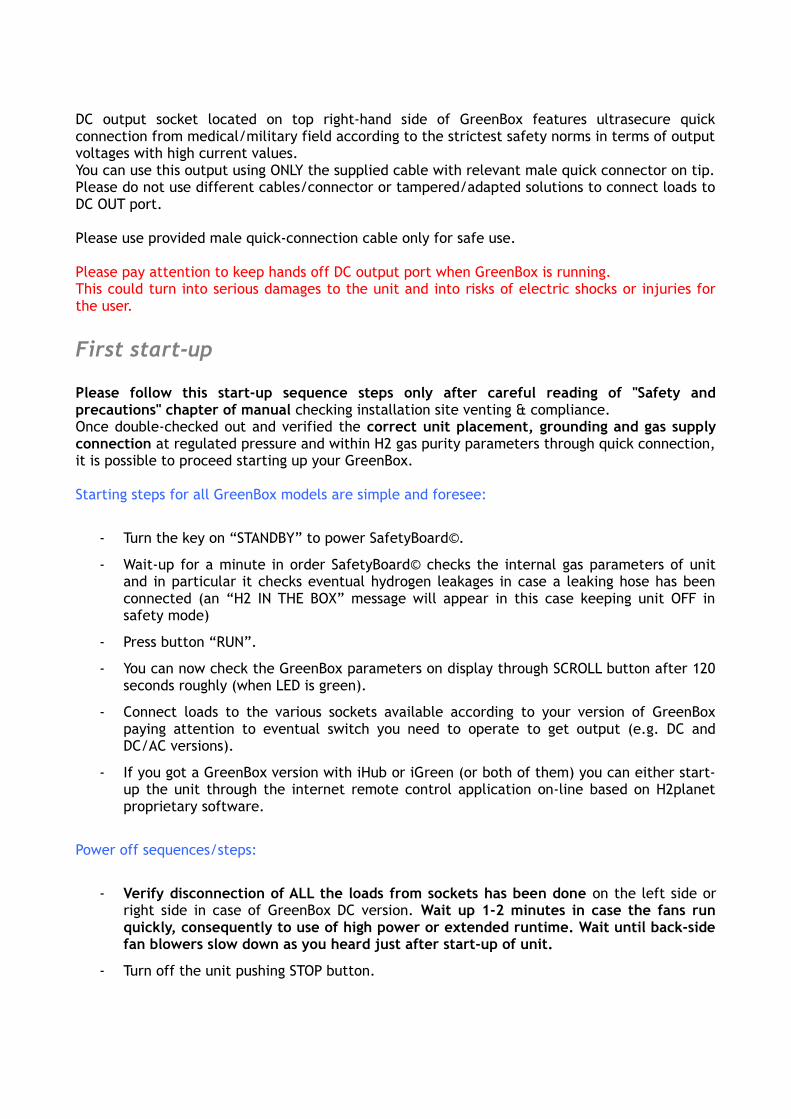
DC output socket located on top right-hand side of GreenBox features ultrasecure quick connection from medical/military field according to the strictest safety norms in terms of output voltages with high current values.You can use this output using ONLY the supplied cable with relevant male quick connector on tip. Please do not use different cables/connector or tampered/adapted solutions to connect loads to DC OUT port.
Please use provided male quick-connection cable only for safe use.
Please pay attention to keep hands off DC output port when GreenBox is running.This could turn into serious damages to the unit and into risks of electric shocks or injuries for the user.
First start-up
Please follow this start-up sequence steps only after careful reading of "Safety and precautions" chapter of manual checking installation site venting & compliance.Once double-checked out and verified the correct unit placement, grounding and gas supply connection at regulated pressure and within H2 gas purity parameters through quick connection, it is possible to proceed starting up your GreenBox.
Starting steps for all GreenBox models are simple and foresee:
- Turn the key on “STANDBY” to power SafetyBoard©.
- Wait-up for a minute in order SafetyBoard© checks the internal gas parameters of unit and in particular it checks eventual hydrogen leakages in case a leaking hose has been connected (an “H2 IN THE BOX” message will appear in this case keeping unit OFF in safety mode)
- Press button “RUN”.
- You can now check the GreenBox parameters on display through SCROLL button after 120 seconds roughly (when LED is green).
- Connect loads to the various sockets available according to your version of GreenBox paying attention to eventual switch you need to operate to get output (e.g. DC and DC/AC versions).
- If you got a GreenBox version with iHub or iGreen (or both of them) you can either start-up the unit through the internet remote control application on-line based on H2planet proprietary software.
Power off sequences/steps:
- Verify disconnection of ALL the loads from sockets has been done on the left side or right side in case of GreenBox DC version. Wait up 1-2 minutes in case the fans run quickly, consequently to use of high power or extended runtime. Wait until back-side fan blowers slow down as you heard just after start-up of unit.
- Turn off the unit pushing STOP button.
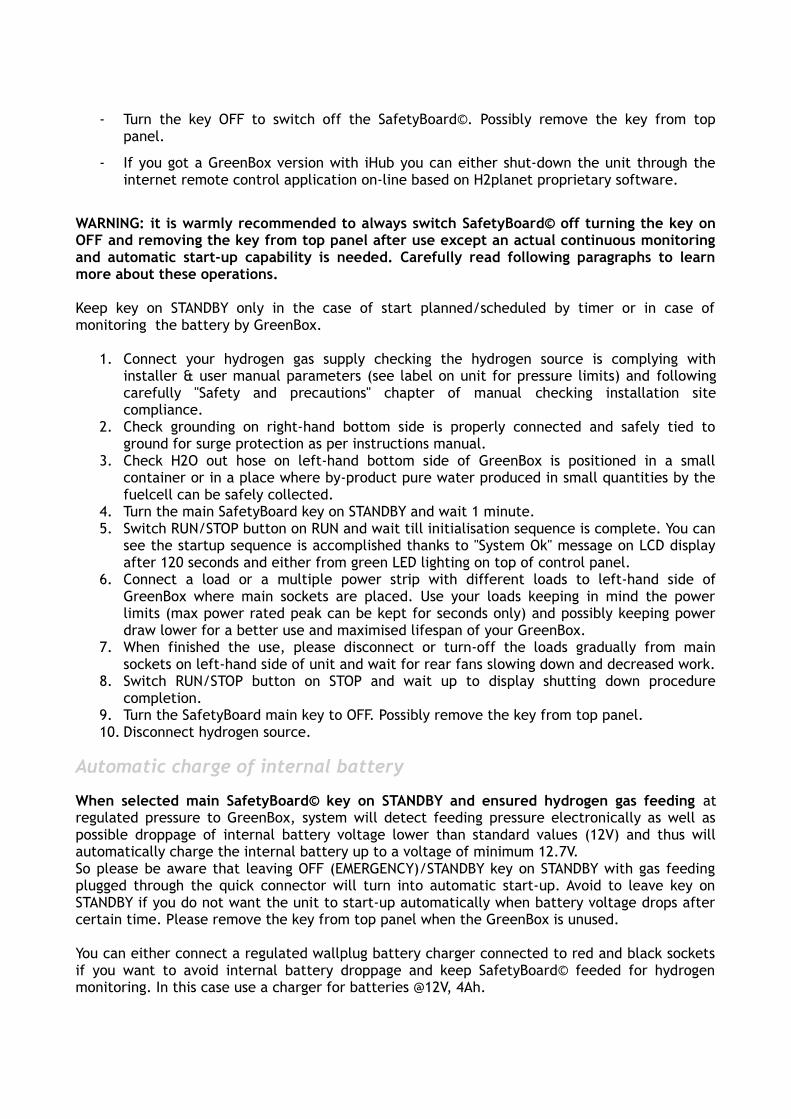
- Turn the key OFF to switch off the SafetyBoard©. Possibly remove the key from top panel.
- If you got a GreenBox version with iHub you can either shut-down the unit through the internet remote control application on-line based on H2planet proprietary software.
WARNING: it is warmly recommended to always switch SafetyBoard© off turning the key on OFF and removing the key from top panel after use except an actual continuous monitoring and automatic start-up capability is needed. Carefully read following paragraphs to learn more about these operations.
Keep key on STANDBY only in the case of start planned/scheduled by timer or in case of monitoring the battery by GreenBox.
1. Connect your hydrogen gas supply checking the hydrogen source is complying with installer & user manual parameters (see label on unit for pressure limits) and following carefully "Safety and precautions" chapter of manual checking installation site compliance.
2. Check grounding on right-hand bottom side is properly connected and safely tied to ground for surge protection as per instructions manual.
3. Check H2O out hose on left-hand bottom side of GreenBox is positioned in a small container or in a place where by-product pure water produced in small quantities by the fuelcell can be safely collected.
4. Turn the main SafetyBoard key on STANDBY and wait 1 minute.5. Switch RUN/STOP button on RUN and wait till initialisation sequence is complete. You can
see the startup sequence is accomplished thanks to "System Ok" message on LCD display after 120 seconds and either from green LED lighting on top of control panel.
6. Connect a load or a multiple power strip with different loads to left-hand side of GreenBox where main sockets are placed. Use your loads keeping in mind the power limits (max power rated peak can be kept for seconds only) and possibly keeping power draw lower for a better use and maximised lifespan of your GreenBox.
7. When finished the use, please disconnect or turn-off the loads gradually from main sockets on left-hand side of unit and wait for rear fans slowing down and decreased work.
8. Switch RUN/STOP button on STOP and wait up to display shutting down procedure completion.
9. Turn the SafetyBoard main key to OFF. Possibly remove the key from top panel.10. Disconnect hydrogen source.
Automatic charge of internal battery
When selected main SafetyBoard© key on STANDBY and ensured hydrogen gas feeding at regulated pressure to GreenBox, system will detect feeding pressure electronically as well as possible droppage of internal battery voltage lower than standard values (12V) and thus will automatically charge the internal battery up to a voltage of minimum 12.7V.So please be aware that leaving OFF (EMERGENCY)/STANDBY key on STANDBY with gas feeding plugged through the quick connector will turn into automatic start-up. Avoid to leave key on STANDBY if you do not want the unit to start-up automatically when battery voltage drops after certain time. Please remove the key from top panel when the GreenBox is unused.
You can either connect a regulated wallplug battery charger connected to red and black sockets if you want to avoid internal battery droppage and keep SafetyBoard© feeded for hydrogen monitoring. In this case use a charger for batteries @12V, 4Ah.
Emergency shut down
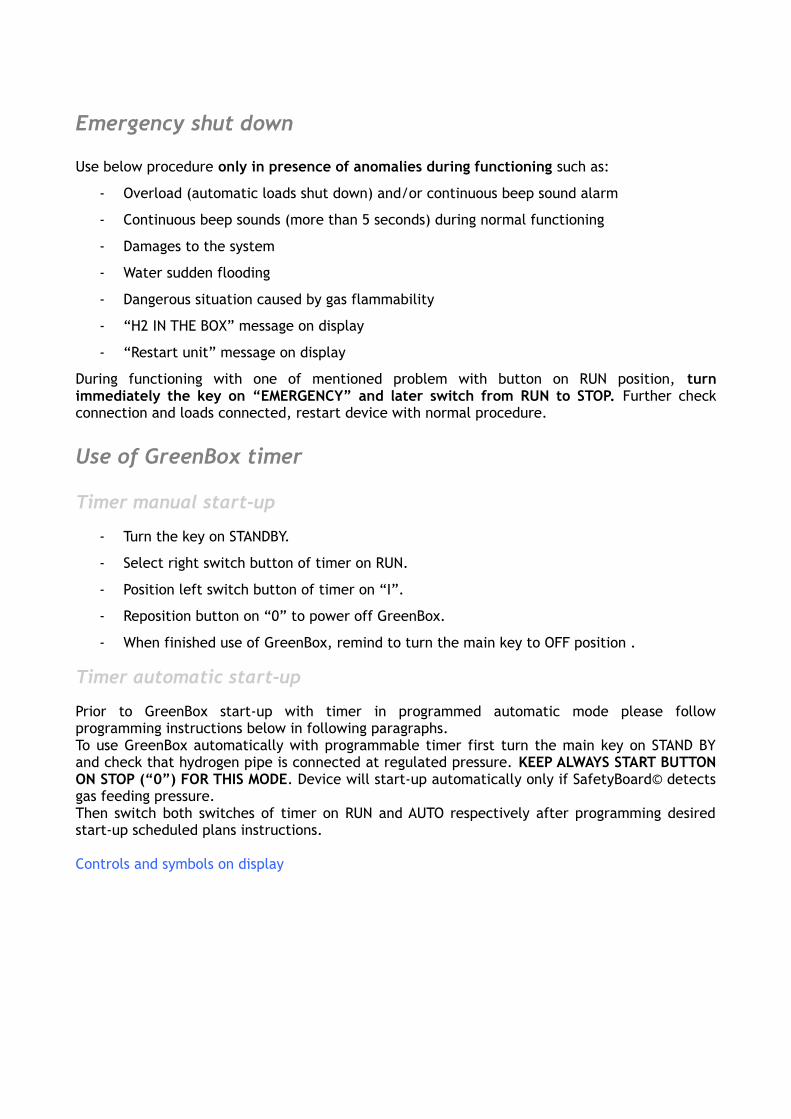
Use below procedure only in presence of anomalies during functioning such as:
- Overload (automatic loads shut down) and/or continuous beep sound alarm
- Continuous beep sounds (more than 5 seconds) during normal functioning
- Damages to the system
- Water sudden flooding
- Dangerous situation caused by gas flammability
- “H2 IN THE BOX” message on display
- “Restart unit” message on display
During functioning with one of mentioned problem with button on RUN position, turn immediately the key on “EMERGENCY” and later switch from RUN to STOP. Further check connection and loads connected, restart device with normal procedure.
Use of GreenBox timer
Timer manual start-up
- Turn the key on STANDBY.
- Select right switch button of timer on RUN.
- Position left switch button of timer on “I”.
- Reposition button on “0” to power off GreenBox.
- When finished use of GreenBox, remind to turn the main key to OFF position .
Timer automatic start-up
Prior to GreenBox start-up with timer in programmed automatic mode please follow programming instructions below in following paragraphs.To use GreenBox automatically with programmable timer first turn the main key on STAND BY and check that hydrogen pipe is connected at regulated pressure. KEEP ALWAYS START BUTTON ON STOP (“0”) FOR THIS MODE. Device will start-up automatically only if SafetyBoard© detects gas feeding pressure.Then switch both switches of timer on RUN and AUTO respectively after programming desired start-up scheduled plans instructions.
Controls and symbols on display
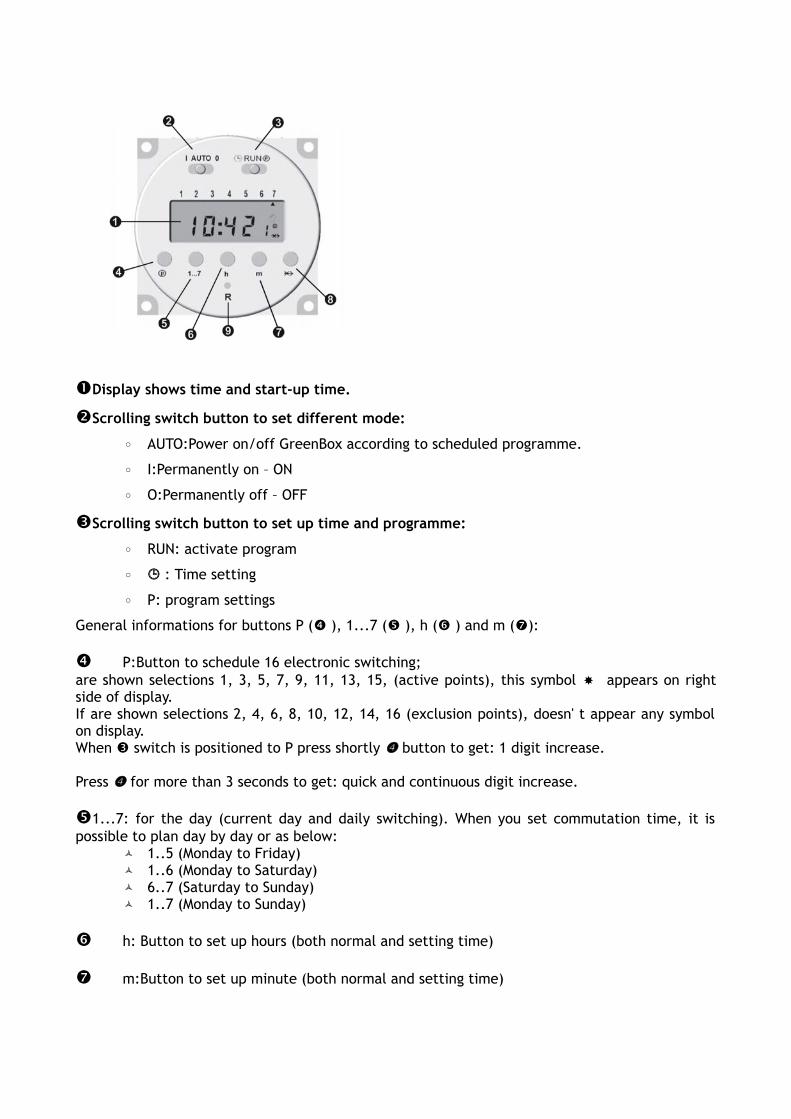
Display shows time and start-up time.
Scrolling switch button to set different mode:
◦ AUTO:Power on/off GreenBox according to scheduled programme.
◦ I:Permanently on – ON
◦ O:Permanently off – OFF
Scrolling switch button to set up time and programme:
◦ RUN: activate program
◦ : Time setting
◦ P: program settings
General informations for buttons P ( ), 1...7 ( ), h ( ) and m ():
P:Button to schedule 16 electronic switching;are shown selections 1, 3, 5, 7, 9, 11, 13, 15, (active points), this symbol appears on right side of display.If are shown selections 2, 4, 6, 8, 10, 12, 14, 16 (exclusion points), doesn' t appear any symbol on display.When switch is positioned to P press shortly button to get: 1 digit increase.
Press for more than 3 seconds to get: quick and continuous digit increase.
1...7: for the day (current day and daily switching). When you set commutation time, it is possible to plan day by day or as below:
1..5 (Monday to Friday) 1..6 (Monday to Saturday) 6..7 (Saturday to Sunday) 1..7 (Monday to Sunday)
h: Button to set up hours (both normal and setting time)
m:Button to set up minute (both normal and setting time)
:Function Skip:Pressing button Skip ' ' you invert system working principle.
e.g.: if the timer is in mode „on“, will power off immediately and viceversa.
R:reset button, will cancel all the settings and setting data and time of timer
Reset
Before to set the first programme, you have to reset:
1. Ensure that scrolling switch is on RUN.2. Press button R () with a tip for a couple of seconds.
Display will start to flash 12:00 or 0:00.
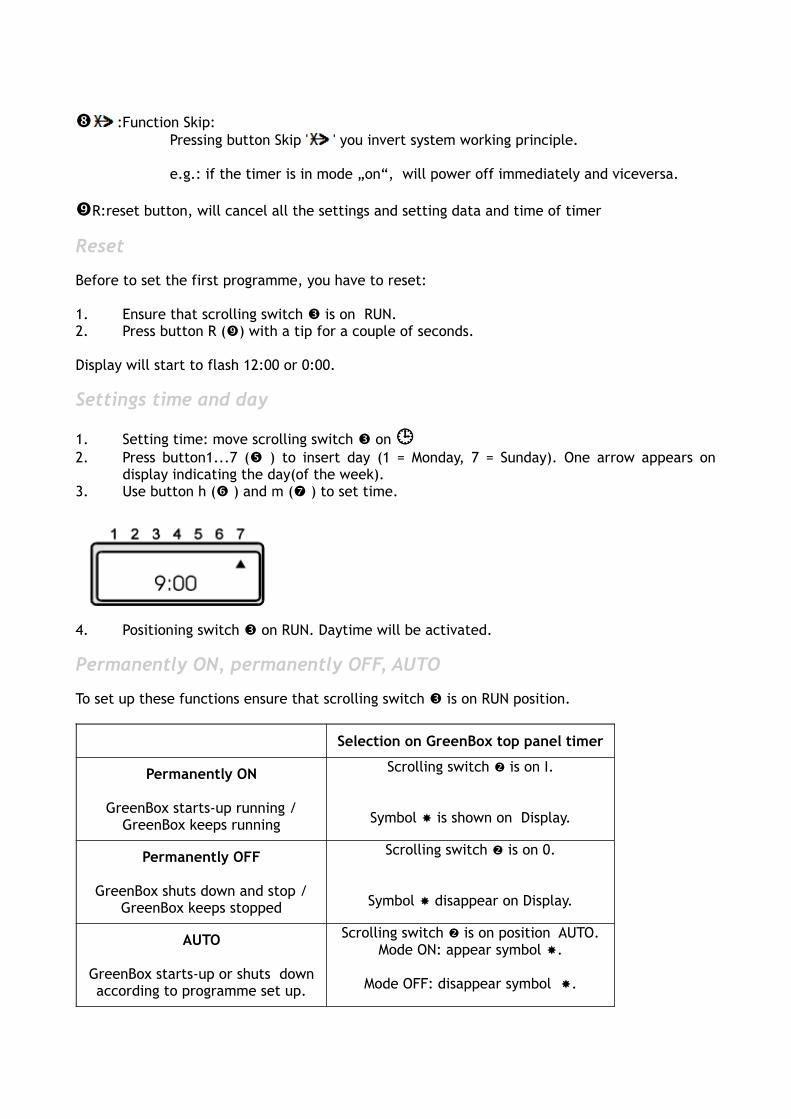
Settings time and day
1. Setting time: move scrolling switch on 2. Press button1...7 ( ) to insert day (1 = Monday, 7 = Sunday). One arrow appears on
display indicating the day(of the week).3. Use button h ( ) and m ( ) to set time.
4. Positioning switch on RUN. Daytime will be activated.
Permanently ON, permanently OFF, AUTO
To set up these functions ensure that scrolling switch is on RUN position.
Selection on GreenBox top panel timer
Permanently ON
GreenBox starts-up running / GreenBox keeps running
Scrolling switch is on I.
Symbol is shown on Display.
Permanently OFF
GreenBox shuts down and stop / GreenBox keeps stopped
Scrolling switch is on 0.
Symbol disappear on Display.
AUTO
GreenBox starts-up or shuts down according to programme set up.
Scrolling switch is on position AUTO.Mode ON: appear symbol .
Mode OFF: disappear symbol .
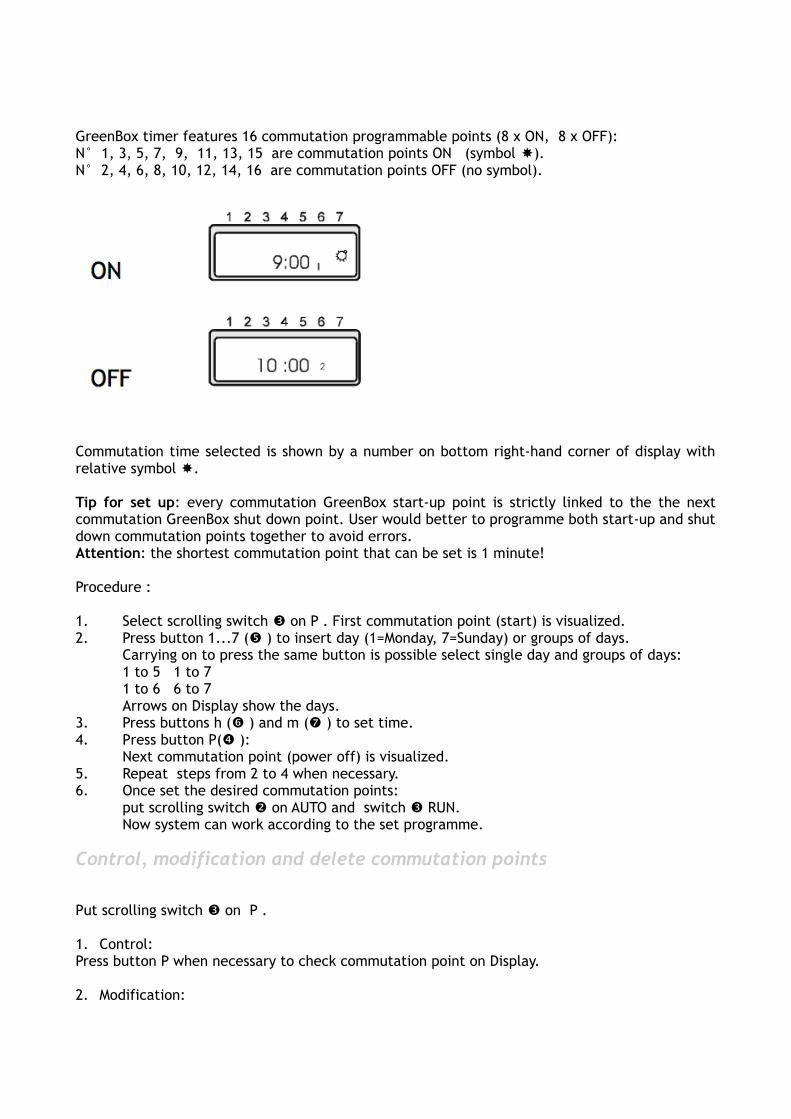
GreenBox timer features 16 commutation programmable points (8 x ON, 8 x OFF):N° 1, 3, 5, 7, 9, 11, 13, 15 are commutation points ON (symbol ).N° 2, 4, 6, 8, 10, 12, 14, 16 are commutation points OFF (no symbol).
Commutation time selected is shown by a number on bottom right-hand corner of display with relative symbol .
Tip for set up: every commutation GreenBox start-up point is strictly linked to the the next commutation GreenBox shut down point. User would better to programme both start-up and shut down commutation points together to avoid errors.Attention: the shortest commutation point that can be set is 1 minute!
Procedure :
1. Select scrolling switch on P . First commutation point (start) is visualized.2. Press button 1...7 ( ) to insert day (1=Monday, 7=Sunday) or groups of days.
Carrying on to press the same button is possible select single day and groups of days:1 to 5 1 to 71 to 6 6 to 7 Arrows on Display show the days.
3. Press buttons h ( ) and m ( ) to set time.4. Press button P( ):
Next commutation point (power off) is visualized.5. Repeat steps from 2 to 4 when necessary.6. Once set the desired commutation points:
put scrolling switch on AUTO and switch RUN.Now system can work according to the set programme.
Control, modification and delete commutation points
Put scrolling switch on P .
1. Control:Press button P when necessary to check commutation point on Display.
2. Modification:
Use button P to position on commutation point you want to modify.Press buttons 1...7 ( ) to change days of week.Press buttons h ( ) and m ( ) to modify time, as previously described.
3. Cancellation:Use button P to position on commutation point you want to modify.Subsequently press button” ” ( ) and P ( ) at the same time for 3–4 seconds.On Display will flash 0:00 and commutation point is now cancelled.
If control, modification or cancellation are completed, put scrolling switch on RUN.
Skip function (soft-override)
Skip function changes commutation setting of GreenBox timer to the next programme set.
e.g.: if device is on mode ON, pushing button Skip ‘ ‘ immediately turns on OFF and viceversa.
1. Position scrolling switch on RUN.
2. Press button Skip ‘ ‘. Device will change commutation accordingly with next set points. Symbol Skip ( ) is shown on Display (wait 3-4 seconds).
3. Afterwards pushing button Skip ‘ ‘ you restore function Skip.
Warning for function Skip:
- Indication/prompt number and symbol on display of timer appears after 3 seconds.
- Function Skip comes up only till achievement of next commutation point planned. At this point Function Skip is null and programmed commutation cycles are active back again.
Programming errors
Every start-up commutation point is related to next shut-down commutation point. For this reason ON/OFF commutation points cycles could lead to some mistakes during programming phases:
Activation ON Deactivation OFFa) Programmed start No settingsb) No settings Deactivation plannedc) Group of days (e.g. 1, 2, 3, 4, 5) Different group of days(e.g. 1, 2, 3, 4, 5, 6)d) Group of days Day of weeke) Programmed activation time
(e.g. Wednesday, 09:00)Disabling set time is prior than the activation time on the same days (e.g. Wednesday, 08:59)
f) Start-up/shut-down set with same time (es. Wednesday, 09:00)
Maintenance
Visual inspections
Please always check no obstruction occurs at both side air intakes of GreenBox and take care of backside ventilation respecting 100-150cm distances suggest in previous safety norms related chapters/paragraphs.
Check every electrical connection has been properly done and no wires or gas connection are tampered or broken.
Ordinary maintenance
Ordinary maintenance is simple and free.
Every 50hours running time is warmly suggested to:
- Clean side air-intakes filters at both right and left side of your GreenBox and, if necessary, replace rockwool filters and plastic net whose purpose is stopping external impurities and dust. Remind to use GreenBox original spare parts by H2planet.
- Check periodically internal battery status and in any case once every 1-2 months in case of rare usage. You can make this measuring battery voltage status between red and black output sockets placed at right-hand side and verifying voltage is higher than 12,4V avoiding that internal battery drops under 12,3V DC. If the battery voltage is lower than 12V proceed like this: use two banana plugs and a standard battery charger for 12V lead acid batteries to relevant red and black female sockets on top left-hand side of GreenBox. In this case use a charger for batteries @12V 4Ah. If you do not have a battery charger available run the unit according to the instructions in order to recharge it and run fro roughly 10 minutes the unit without loads applied.
- Use GreenBox at least for 10 minutes with small loads applied once every 2 weeks to guarantee proper humidification of PEM fuel-cell stack and good performances and maximise life of generator.
- Verify that voltage of fuel cell without loads applied by selecting the parameter SCROLL button is in the range indicated in this manual.
- Use a clean soft cloth to polish unit with water and soft soap or silicon spray in case of stains on GreenBox surface.
- Remove dust from top panel gently with a soft cloth at least once per month taking care of display on top panel avoiding to push it. Display is delicate and can be broken.
Programmed maintenance service H2planet Care Plan
For a longer GreenBox life and better performances is recommended to subscribe H2Planet Care Plan for checking and replacement of internal battery and electronic board complete check-up, filter changing with cleaning internal by skilled H2planet personnel. Maintenance H2planet Care Plan foresees and includes extra-ordinary maintenance procedures performed by our technical staff on site if purchased with GreenBox unit or through shipping GreenBox unit to our H2planet Service Center for a general check-up.
Extra-ordinary maintenance by H2planet according to H2planet Care Plan is recommended be performed every 300 hours running.
You can contact our staff anytime at [email protected] for further informations for subscription to such a service or to ship the unit to our H2planet Service Center.
GreenBox storage
SUGGESTED STORAGE IF YOU DO NOT USE GreenBox FOR MORE THAN 48 HOURS: check the main key is pulled out from top panel and please wrap GreenBox around completely through a proper cellophane film in order to prevent dust and polluted air to come inside the GreenBox. Especially air grids and vents must be covered. This will increase performances and lifespan of product quite considerably.
Suggestions and advices
Follow the here below listed suggestions following up to H2planet experience in manufacturing and operation of fuel-cell technology and its developments. It's warmly recommended to follow these advices as shown in next paragraphs in order to prevent what is to be avoided and to follow instead recommended procedures to get the most of performances from your GreenBox maximizing attended lifespan.
Not to do operations
- Connecting loads higher than 50% of maximum power rate to output AC and DC before “System Ok” message on display and relevant green LED light up after boot drive start-up procedure completion.
- Connecting only pure resistive loads such as lamp bulbs with power draw higher than 75W for periods longer than 30 seconds.
- Sudden disconnection from GreenBox AC mains of working loads between 70-80W (e.g. lamps, electric dryers, drills, etc.). It's highly preferable and suggested to decrease loads disconnection progressively during usage, especially when dropping from loads of 75 W.
- Powering off generator after use oh high loads keeping fan-blowers and ventilation system under stress and cooling GreenBox.
Suggested operations
- Please always wait 1 minute between turning main key on top panel of GreenBox and RUN button selection. This will guarantee correct adjustment and reading of internal parameters and checks over the unit thanks to boot drive operations performed by SafetyBoard©.
- In case there are several loads connected in AC of different kind (resistive and inductive) such as lamps, drill and tools, please disconnect loads one by one using power strip connected to the GreenBox mains avoiding to disconnect all loads simultaneously getting from maximum power draw to zero power draw instantly.
- Please guarantee good ventilation before starting up the system, in particular in case of functioning with environment temperature over 30°C.

- Switch on device for a period of minimum 15-20 minutes minimizing, where's possible, power on/off cycles.
- Wait for 1-2 minutes for further reliability of power absorption data on display, sensors will take a while to adjust and settle in terms of values.
- It's always suggested to power off SafetyBoard© turning main key off when finished the use. Keep the key selected on STANDBY only if necessary to start automatically through timer or in case you want to continuously monitor internal functioning parameters through the internal battery voltage.
- In case you need to keep SafetyBoard© on STANDBY please use and keep connected a standard lead acid battery charger as described in “Automatic charge of internal battery” or “Battery restoring procedure” paragraphs. This will guarantee you a good charge of internal battery avoiding automatic start-up of GreenBox for battery recharging and will limit hydrogen consumption as well start-up/shut-down cycles of generator.
Troubleshooting
Start-up phase
System shuts-down during start-up after selection of switch to RUN.This could happen when generator is not used from a long period due to low voltage values of internal support battery.
SOLUTION: check first voltage of red and black sockets is settled on a value of minimum 12,5V. Turn the key of main switch on OFF and turn it again on STANDBY. Start again system using switch button RUN checking no loads are connected prior to start-up phase. In case problem occurs again please charge the internal battery through a proper lead acid battery charger (12V, 4Ah) using red and black sockets “Battery+” and “Battery-” to interface battery charger with.
Systems shows red LED after positioning main key on STANDBY and RUN.Typically this happens when main key is turned on STANDBY and immediately after repositioned on OFF. This is normally due to an electronic failure due to an excess of speed in turning key on STANDBY and OFF immediately after or viceversa.
SOLUTION: turn main key OFF, wait up 3 seconds and turn it to STANDBY. RUN GreenBox again selecting relevant switch checking no load is connected to left-hand or right-hand sides.
Shut-down (power off) phase
Device doesn't power off positioning switch on STOP.This can be caused by a fake contact when you are selecting switches or by an erroneous shut-down procedure if you shut-down unit with loads applied.
SOLUTION: Turn the key of main key on EMERGENCY and turn it again on STANDBY. Start system again selecting RUN switch.
Overload
System shuts off stopping loads feeding for protection. When a very high load is applied after few seconds from start-up a prolonged beep sound can be heard together.
This can be caused by an overload due to fact you are using power load over fuel-cell system capabilities or for unreachable sudden peaks.
SOLUTION: turn the key of main key on EMERGENCY and turn it again on STANDBY only after 5 minutes. Start the system again selecting RUN switch checking no such high loads are applied. Do not never exceed 85W.
System does emit “beep” sound for several secondsThis can be caused by an overload due to fact you are using power load over fuel-cell system capabilities or for unreachable sudden peaks.
SOLUTION: turn the key of main key on EMERGENCY and turn it again on STANDBY only after 5 minutes. Start the system again selecting RUN switch checking no such high loads are applied. Do not never exceed 75W for first 3 minutes.
Error messages
H2 in the box
THIS MESSAGE ERROR CAN OCCUR BOTH DURING RUNNING OF GreenBox OR JUST IN STANDBY MODE WITH KEY TURNED ON STANDBY.
Possible hydrogen leakages up to 40 times below limits of flammability of mixture hydrogen and air are pointed out by system to maintain high safety margins EVEN IF ONLY THE KEY OF GreenBox IS TURNED ON STANDBY.
When GreenBox is running such a messages follows to instant shut-down procedure to comply with IEC safety norms. When unit is stopped an “H2 IN THE BOX” message will be readable on display and the red LED on top panel will be immediately lightning.
When GreenBox is ON STANDBY an “H2 IN THE BOX” message will be readable on display and the red LED on top panel will be immediately lightning.
IN BOTH CASES PLEASE TURN OFF KEY ON EMERGENCY POSITION IMMEDIATELY, DISCONNECT H2 SUPPLY HOSE QUICKLY FROM UNIT AND VENT OUT HYDROGEN GAS OPENING WINDOWS OR THROUGH FORCED AIR VENTING SYSTEM IF ANY.
Temperature limits
Possible temperature limits reached. This is indicated on display through an “OVERTEMPERATURE” message and in case of temperature above 50°C the unit will stop automatically.
Battery charging
“Battery charging” message is indicated on display when GreenBox starts-up automatically to charge internal battery. This can happen only when a gas hose with regulated pressure is connected.
Restart unit
This message will appear on display when a malfunction or an error occurred during functioning. Please turn the main key OFF and turn it again on STANDBY and restart the unit selecting button on RUN.
Original parts
Below table show/supply list and description of generator spare. Moreover please refer to the corresponding figure.
Battery restoring procedure
DO NOT CONNECT TO THE SYSTEM DIFFERENT BATTERY CHARGERS FROM HERE BELOW MENTIONED 12VDC STANDARD BATTERY CHARGERS OR DIFFERENT VOLTAGES. THIS COULD TURN INTO DANGEROUS SITUATIONS CAUSING EXPLOSIONS AND SERIOUS INJURIES.
Please follow the here listed procedures for full restoring of GreenBox's internal battery and to fix any internal battery voltage droppage problems that can occur as a consequence of long periods of unuse (1-2 months). This restoring procedure is particularly indicated whenever voltage of internal battery is found lower than 12,3V between red and black female sockets on left-hand GreenBox side panel. This procedure requires a 12VDC battery charger designed for lead acid batteries of 4Ah with proper male banana plugs on tips of positive and negative output charger poles.
Please refer to battery charging specifications in order to double check the lead acid battery charger is compliant to the use with GreenBox 100.
1. Please verify the GreenBox main key is positioned to OFF and RUN/STOP switch to STOP (“0”).
2. Connect battery charger output cables through proper male banana plugs on tips connecting red (+) and black (-) poles to the relevant red and black sockets on left-hand side of GreenBox.
3. Please keep the charger connected until the measured values reach 13,4VDC (measured in parallel over red and black sockets without charger connected).
GreenBox's fuel informations
Product Name: Hydrogen Chemical Name: Hydrogen Synonyms: None Formula: H2 Chemical Family: Permanent Gas Composition/Information on Ingredients Substance / Mixtures: Substance Minimum purity grade needed: 4.5 (99.995%), dry gasMaximum CO concentration: 5 ppmMaximum H20 concentration: 45 ppmSuggested purity grade: 5.0 (99.999%), dry gas
Hazards Identification
EMERGENCY OVERVIEW DANGER! Flammable high-pressure gas. Can form explosive mixtures with air. May ignite if valve is opened to air. Burns with invisible flame. May cause dizziness and drowsiness. Self-contained breathing apparatus may be required by rescue workers. Odour: None
First Aid MeasuresINHALATION: Remove to fresh air. If not breathing, give artificial respiration. If breathing is difficult, qualified personnel may give oxygen. Call a physician. SKIN CONTACT: Wash with soap and water. If irritation persists, seek medical attention. SWALLOWING: An unlikely route of exposure. This product is a gas at normal temperature and pressure. EYE CONTACT: Flush eyes thoroughly with water for at least 15 minutes. Hold the eyelids open and away from the eyeballs to ensure that all surfaces are flushed thoroughly. See a physician, preferably an ophthalmologist, immediately.
Fire Fighting Measures FLASH POINT (test method): Flammable gasAUTOIGNITION TEMPERATURE: 550°C FLAMMABLE LIMITS IN AIR, % by volume: LOWER: 4% UPPER: 75% EXTINGUISHING MEDIA: CO2, dry chemical, water spray, or fog
Accidental Release Measures STEPS TO BE TAKEN IF MATERIAL IS RELEASED: DANGER! Flammable. Forms explosive mixtures with air. (See section 5.) Immediately evacuate all personnel from danger area. Use self-contained breathing apparatus where needed. Remove all sources of ignition if without risk. Reduce gas with fog or fine water spray. Shut off flow if without risk. Ventilate area. Flammable gas may spread from leak. Before entering area, especially confined areas, check atmosphere with an appropriate device.
Handling and Storage PRECAUTIONS TO BE TAKEN: pipeline have to placed in area at temperature under 50°C.
Physical and Chemical Properties MOLECULAR WEIGHT: 2.016 GAS DENSITY at 21,1°C and 1 atm: 0.08342 kg/m3 SOLUBILITY IN WATER: 1,6 mg/l PERCENT VOLATILES BY VOLUME: 100% BOILING POINT at 1 atm:-253°C MELTING POINT at 1 atm:-259.2 APPEARANCE, ODOR, AND STATE: Colourless, odourless, tasteless gas at normal temperature and pressure
Stability and Reactivity STABILITY: Unstable Stable INCOMPATIBILITY (materials to avoid): Oxidizing agents, lithium, halogens Toxicological Information Hydrogen is a simple asphyxiant.
Ecological Informations No adverse ecological effects expected. Hydrogen does not contain any Class I or Class II ozonedepleting chemicals. Hydrogen is not listed as a marine pollutant by DOT.
Disposal Considerations WASTE DISPOSAL METHOD: Do not attempt to dispose of residual or unused quantities.
Contacts
For any doubt you can rely on experience and keeping our tech-staff at your disposal calling +39.(0)2.9098.9883 or writing us to [email protected] or [email protected] .
Designed & manufactured by H2planet in Italy
H2planet by Hydro2Power SRLViale Montegrappa 23/A, 20069 Vaprio d’Adda (MI)ITALY
www.h2planet.eu
Manufacturer notes
H2planet by Hydro2Power SRL reserves the right to change GreenBox product technical specifications, properties of components or user interface from what contained in advertised general brochures with the solely scope of improving user product operation and/or safety.

User notes