Embed Size (px)
Citation preview

A Helpful Resource of the
PERCUSSIVE ARTS SOCIETY EDUCATION COMMITTEE
THE PAS EDUCATORS’ COMPANION
Volume 2 Fall 2015

The PAS Educators’ Companion is a publication of the Percussive Arts Society focusing on providing percussion education resources to the music education community.
THE PAS EDUCATORS’ COMPANION
THE COMPANION STAFF James Corcoran Pete DeSalvo Joshua Knight Jonathan Latta Brian Nozny Josh Torres Michael Sammons Ben Stiers
PAS EXECUTIVE COMMITTEE Julie Hill, President
Brian Zator, President-elect George Barrett, First Vice President Paul Buyer, Second Vice President
Chris Hanning, Secretary John R. Beck, Immediate Past President Jeff Hartsough, Executive Director
CONTACT PAS 110 W. Washington Street, Suite A, Indianapolis, IN 46204 Telephone: (317) 974-4488 Fax: (317) 974-4499 E-mail: [email protected] Web: www.pas.org
COPYRIGHT © 2015 by the Percussive Arts Society. Reproduction of any part of this publication without permission from PAS is
prohibited by law.
Volume 2 Fall 2015

THE PAS EDUCATORS’ COMPANION
SMOOTH OPERATOR: HELPING YOUR PERCUSSIONISTS IMPROVE THEIR MULTIPLE BOUNCE ROLLS 4 Joe Tornello A PLAN FOR PERCUSSION SECTION SUCCESS 8 James Doyle ENHANCING STUDENT TIMPANI SKILLS 12 Steve Hemphill ADDRESSING YOUR PERCUSSIONISTS’ NEEDS: ON AND OFF THE PODIUM 16 Tommy Dobbs THE LAND OF MISFIT TOYS: AN INTRODUCTION TO THE SECOND LINE OF ACCESSORY PERCUSSION 20 Benjamin Fraley #MUSICIANSTOO: DEVELOPING THE MUSICAL PERCUSSIONIST THROUGH AN INCLUSIVE WARM-UP ROUTINE (PART 1) 27 Brandon Arvay
Volume 2 Fall 2015

The PAS Educators’ Companion, Volume I 4
SMOOTH OPERATOR: HELPING YOUR PERCUSSIONISTS IMPROVE THEIR MULTIPLE BOUNCE ROLLS Joe Tornello
We have all stood on the podium or listened to another band and said, “Why does that drum roll sound so bad!” Sometimes it is the tuning of the drum that makes the sound less than desirable, or a mis-matched pair of sticks, but oftentimes it is the percussionist who is not making adjustments based on the music. Below you’ll find some tips for helping your percussionists improve their multiple bounce rolls, enabling them to be a “smooth operator!”
There are several key factors that influence the quality of a multiple bounce roll. First, the quality and length of the buzzes in each hand will significantly influence the success of the roll. Second, the dynamic(s) that is indicated in the music, or being requested by the conductor, will require the percussionist to physically adjust the roll. Third, the tempo(i) in which the roll is being performed will dictate certain actions to be taken by the percussionist.
When working to perform multiple bounce rolls, the developing percussionist, and even those who are accomplished, must work to master the quality of the bounces in each hand. Often times the first several bounces are too open, making it very challenging to make the roll sound “smooth.” Also, if too much pressure is applied, the roll will sound choppy from hand to hand due to the sustained sound not being long enough in each hand.
In an effort to improve the sounds in each hand, refer to figure 1a and 1b below. Start by
letting your percussionists work with only one hand at a time. A visual representation of what you and the students should listen for is shown in Figure 1b. Ask the students to listen for an even sound in each hand, being careful not to allow too much space between each note of the multiple bounces. By focusing on the sound and quality of the buzz in each hand, the student has the ability to isolate issues that are typically not obvious when both hands are working together. Much of the early practicing will be trial and error by each student, finding what does or does not work for him or her. Strive to make the sustained sound or bounces in each hand last as long as possible, but again, careful to create a smooth decay without too much space early in the figure.

The PAS Educators’ Companion, Volume I 5
I will save any discussion of technique for another article, as there are many preferences and
expectations to consider. The basic concept to keep in mind is to use a relaxed grip; simply let the stick and head work in harmony, allowing the stick to bounce freely. As this is repeated several times, you can ask your students to start to manipulate the bounces so there is a smooth decay. Increasing or decreasing the downward weight after the initial striking of the head will be required to improve the quality and duration of the subsequent bounces. If there is too much space near the attack of each hand, then slightly more downward weight is required. If the sustain is very short, simply ask the student to relax and use less downward energy. When teaching your students, avoid using words like “pressure” or “force.” It is easy to say “you need more pressure to close the space of the notes,” but often that gives students the wrong impression. Terms such as “weight” and “energy” help reduce the stiff motions that percussionists attempt to avoid.
The second area that often causes challenges in creating smooth rolls is the dynamic in which the rolls must be played. How often do we see figure 2a or 2b written in our repertoire? Typically most students are not aware of what changes should be made to perform the figure appropriately. For each multiple bounce roll, whether one count or sixteen counts, a base rhythm should be applied. The underlying base rhythm will help your students keep better time while rolling and will increase the quality of the roll.
When increasing the dynamic of a roll, the base rhythm must gradually get faster in order to keep a sustained and sound smooth, see Figure 3a. Similarly, when a diminuendo is required while sustaining a roll, the base rhythm must gradually slow down, see Figure 3b. Depending on the current ability of your students, you may only want to practice the first measure of Figure 3a and the last measure of 3b. Once the students can play the rhythm, add the crescendo or decrescendo, then buzz each stroke. As your students become more advanced you can add the remaining figures appropriately. It is unlikely that a performer would need to play through the entire exercise in order to play a roll of 12 counts, but practicing the full exercise will prove to be helpful in several ways. This can help build endurance, solidify long roll tone quality, and improve rhythmic accuracy.

The PAS Educators’ Companion, Volume I 6
The variety of rhythmic figures can become a game for students to create their own effective exercises of a similar nature. Ask your students to provide numbers, between three and eight, representing the number of notes in each beat of the exercise. The result might look something like figure 4. This will help with mindfulness of hand motions while rolling. Once the students are able to play each rhythmic pattern, add a buzz on each stroke, simulating a multiple bounce roll with varying base rhythms. Additionally, these creative exercises can help to even out hand dexterity. Many students are often not asked to play triplets, quintuplets and other odd number figures. Also, requiring students to begin a rhythmic figure on the non-dominant hand will improve coordination and their comfort level with starting and releasing rolls on either hand.
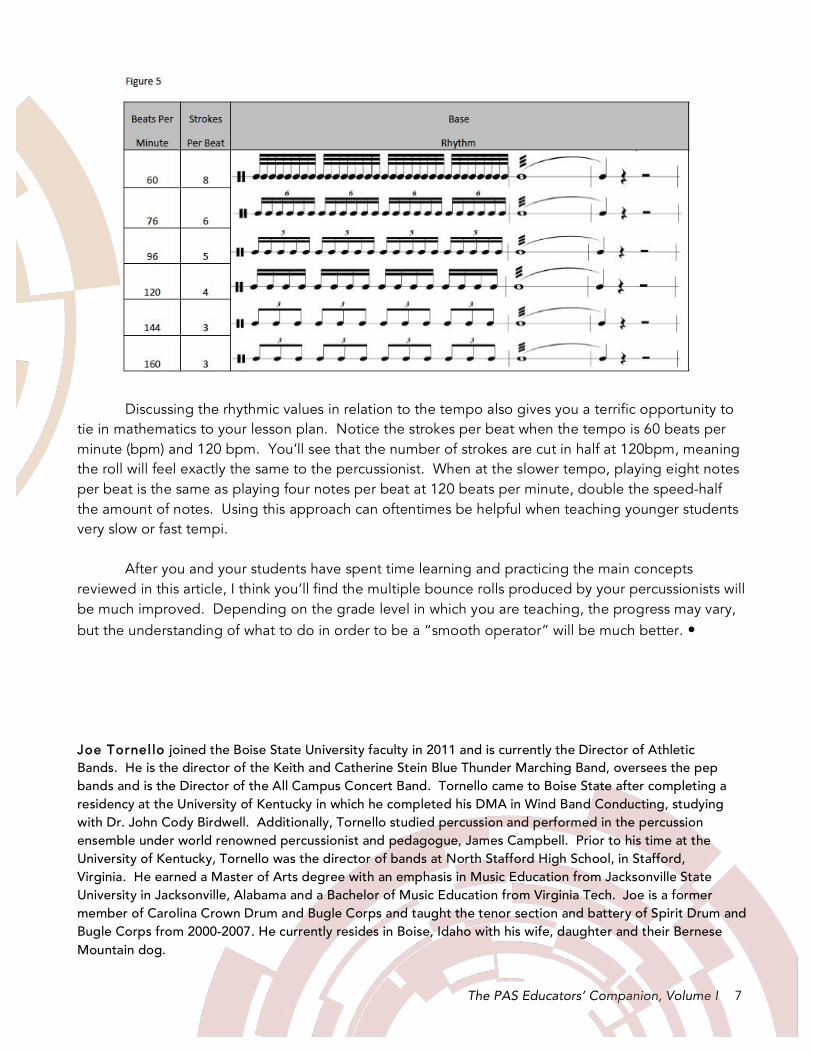
The third area that influences a percussionist’s roll is the tempo at which the figure is written. Once the concepts discussed in the previous paragraphs are mastered, adjusting the base rhythm with the tempo is critical to help the roll sound smooth. As the director, if you expect to play a piece at 160 beats per minute, both you and the student must realize that rolling with a sixteenth note base rhythm is going to be way to fast. Similarly, playing a phrase at 80 beats per minute with a base rhythm of eighth note triplets, and expecting the roll to sound smooth, is unrealistic. See Figure 5 for a general guide to help associate the appropriate base rhythm with common tempi. This is a very rough guide and does not take into consideration dynamics at either the soft or loud extremes. Depending on the performer’s ability to sustain the buzz in each hand, the strokes per beat may need to be adjusted slightly. This will give you a solid reference point for many common musical tempi.
The PAS Educators’ Companion, Volume I 7
Discussing the rhythmic values in relation to the tempo also gives you a terrific opportunity to
tie in mathematics to your lesson plan. Notice the strokes per beat when the tempo is 60 beats per minute (bpm) and 120 bpm. You’ll see that the number of strokes are cut in half at 120bpm, meaning the roll will feel exactly the same to the percussionist. When at the slower tempo, playing eight notes per beat is the same as playing four notes per beat at 120 beats per minute, double the speed-half the amount of notes. Using this approach can oftentimes be helpful when teaching younger students very slow or fast tempi.
After you and your students have spent time learning and practicing the main concepts
reviewed in this article, I think you’ll find the multiple bounce rolls produced by your percussionists will be much improved. Depending on the grade level in which you are teaching, the progress may vary, but the understanding of what to do in order to be a “smooth operator” will be much better. • Joe Tornel lo joined the Boise State University faculty in 2011 and is currently the Director of Athletic Bands. He is the director of the Keith and Catherine Stein Blue Thunder Marching Band, oversees the pep bands and is the Director of the All Campus Concert Band. Tornello came to Boise State after completing a residency at the University of Kentucky in which he completed his DMA in Wind Band Conducting, studying with Dr. John Cody Birdwell. Additionally, Tornello studied percussion and performed in the percussion ensemble under world renowned percussionist and pedagogue, James Campbell. Prior to his time at the University of Kentucky, Tornello was the director of bands at North Stafford High School, in Stafford, Virginia. He earned a Master of Arts degree with an emphasis in Music Education from Jacksonville State University in Jacksonville, Alabama and a Bachelor of Music Education from Virginia Tech. Joe is a former member of Carolina Crown Drum and Bugle Corps and taught the tenor section and battery of Spirit Drum and Bugle Corps from 2000-2007. He currently resides in Boise, Idaho with his wife, daughter and their Bernese Mountain dog.

The PAS Educators’ Companion, Volume I 8
A PLAN FOR PERCUSSION SECTION SUCCESS James Doyle
Success in the contemporary band/orchestra percussion section depends on four equally important areas: skilled percussionists, well-maintained and sufficient instruments, quality and appropriate repertoire, and a structured approach to organizing the percussion section. It is the latter skill that is rarely taught, yet is crucial to the success of the percussionist and the ensemble as a whole. Init ial Considerations
Planning part assignments, instrument set-ups and ensuring all the necessary instruments, sticks, mallets, and music make it to the concert hall requires a student leader with careful attention to detail. The instrumental director can train responsible individuals for this task while building organizational skills necessary for success in future ensembles. Often the best percussionist also serves as the section leader; however there may be other options to consider. The “first chair” player may not be the most organized, while the most organized student may not be the best player. Consider pairing the two with representative titles, principal and section leader, delineated based on responsibilities. It may be beneficial to involve both in the part assigning process. The principal
percussionist may make musical decisions within the section and answer to the conductor. The section leader may be responsible for keeping the section organized, parts assigned, and instruments maintained. Personnel and Philosophy
What are the strengths and weaknesses of the students in the percussion section? How does your philosophy of education influence part assigning? Should each student have the opportunity to play challenging parts? Are all percussionists required to play keyboard percussion parts? Is the educational value of students learning new instruments as important as the final product at the performance? Once these pertinent “big picture” questions are answered, assess the percussion parts. An ideal situation would be for the percussionists, on any given concert, to play the snare drum, timpani, keyboard percussion, as well as triangle, tambourine, crash cymbals, and other accessory instruments. These accessory instruments are just as important as any other instrument, and typically utilize techniques requiring serious study.

The PAS Educators’ Companion, Volume I 9
Additionally, the contemporary repertoire often requires a single percussionist to play multiple instruments throughout the course of the same composition. This requires a well-rounded percussionist, capable of moving quickly and quietly from instrument to instrument while changing sticks and mallets with comfort and ease. The Repertoire
What level of musicianship does the repertoire require? Take a look at the parts and assess the difficulty of various sections within the music. Consider the editor/publishers do not necessarily make part assignments. Even though the part may say “Percussion I,” there could be moments in which three percussionists are required to cover the part. Similarly, published parts may suggest six percussionists, but in all actuality, only four are needed. A well-organized percussion section is capable of moving from one part to the next within the same piece in order to cover all parts. A percussionist may need to play xylophone on “Percussion I” for eight measures, then crash cymbals on “Percussion III” before settling on snare drum and temple blocks on “Percussion II” for the remainder of the piece. Make note of the tempos, fermatas, and other details that will determine the amount of time the percussionist will have to change parts. Read through the parts and the score to determine how many players are actually needed. Notate the number of percussionists needed and compare to the number available in the ensemble. If too few percussionists are available or there are fewer parts to play than percussionists, more difficult choices must be made. Philosophical points to consider include adding parts, determining which parts to leave out, or searching for new repertoire.
Instrumentation
Make a list of instruments needed for the entire program. Does the repertoire require instruments that are not part of the standard instrument inventory? Do instruments need to be purchased, borrowed, or are there common substitutions (see attachment A)? Be sure to read through each part and notate the required instruments in the upper left-hand corner. Not all publishers print the entire list of instruments on the parts, and the instrumentation printed in the score may be vague. Reading the notation may be required to determine the actual instrument intentions of the composer. For example, the score may read “cymbals” but the part notates soft rolls, indicative of suspended cymbal. Once all of the instruments are determined, add the list directly to the packing sheet (see attachment B). This will prevent last minute problems on the day of the performance.
Part Assignments
With the growth of available instrumentation in the percussion section and composers’ willingness to exploit the instruments, the expectations of the percussion section are constantly evolving. When assigning parts, consider your educational philosophy and begin pairing players with parts. This process is akin to making battle plans! A large workspace is recommended so that each part can be compared carefully and simultaneously. The flow of percussionists covering parts is a dance that should appear smooth, systematic, and effortless. Consider percussionists may need to move from one part to another, from music stand to music stand, change instruments frequently, occasionally hand another percussionist

The PAS Educators’ Companion, Volume I 10
a mallet and even turn pages for other players. The section leader and/or principal may wish to list the required instruments in the upper left-hand corner and suggested sticks and mallets in the upper right-hand corner. If the section leader can notate as many of these considerations as possible, the first rehearsal will progress smoothly. Sometimes additional parts need to be acquired prior to rehearsal due to quick changes from instrument to instrument. Check with the publisher regarding the acquisition of additional parts or consult copyright policy regarding photocopies. Setting Up the Section
How is your rehearsal room set up? Does it reflect the set-up of the performance venue? This is very important to avoid last minute confusion and difficulty performing at the actual concert venue. With the list of instruments for the upcoming concert, part assignments and instrument placement can be determined before the first rehearsal. Create a sketch of the percussion section layout that requires minimal resets of instruments between pieces. Be sure to include mallet stands and trap tables in the sketch. It may be useful to take digital photos to keep on file for future reference. There are numerous generic set-ups of the percussion section, such as placing the timpani near the low brass or the concert bass drum in the middle, but variations may be necessary depending on the repertoire. Also, if an additional suspended cymbal positioned on the opposite side of the setup prevents a percussionist from running across the stage or a time-consuming move between works, it is well worth the minimal addition of a cymbal. The goal of the percussion section should be to flow smoothly from part to part and piece
to piece. With a pre-planned flow, the musicians can focus on the execution of the parts and the musical experience as a whole. Sharing Information
Post the part assignments in the percussion section, place a copy with the conductor’s score, and make folders for each member of the percussion section with their marked parts and part assignment sheet. The suggested set-up of the percussion section should also be posted in the percussion section and placed in folders. Another consideration is for each player to have a specific task as part of the setup process. Give each student a job, such as uncover and arrange keyboard instruments, and post the assignments. With this information readily available to all, individual responsibility is nurtured and rehearsal flow is achievable. Personal responsibility will be fostered and the percussionists can focus on playing soon after entering the rehearsal.
Additional Considerations - Posting the rehearsal schedule in advance will allow the percussion section to set-up prior to the beginning of rehearsal. By writing the rehearsal order on the board prior to class, the percussionists will share a common goal immediately upon arrival. - Establish the expectation that no one plays or warms up before the entire section is set up will expedite the process while fostering teamwork. - At the last rehearsal before the concert, pack the parts into folders by stand position and in concert order. Name each stand position and folder (ex. xylophone folder/xylophone stand) and

The PAS Educators’ Companion, Volume I 11
transport the music together. Pack all instruments, required sticks/mallets, and music stands carefully and ensure everything travels as a unit. Requiring the entire percussion section to accomplish this process as a group is highly recommended. - All percussionists should be a part of set-up and teardown for every rehearsal and performance. A culture of teamwork enhances the attitude of a section and ultimately their ability to perform together. Organizing the set-up/teardown on the packing sheet will clarify individual tasks and shorten the time needed for these activities. Conclus ion
The musical success of the percussion section, and ultimately the ensemble, is reliant on the skills of the individuals, the quality of instruments, the selected repertoire, and how these aspects are organized into a whole. The best percussion sections play well together, work well together, and stay organized. Developing the skillset of organization is an essential aspect of the learning process and prepares students for future experiences at the collegiate and professional level. By utilizing the above steps- the part assignment sheet, common substitutions, and the packing sheet- a higher degree of organization in the percussion section is possible. A strong sense of organization, from the first rehearsal through the teardown of the concert, will allow the talents, training, and spirit of the percussion section to shine through in every performance. •
James Doyle is Assistant Professor of Music at Adams State University where he teaches undergraduate and graduate courses in percussion, pedagogy, world music, music business, and directs the Rocky Mountain Pan Handlers Steel Band and the ASU Percussion Ensemble. He's also on the applied teaching faculty at the University of Nevada, Las Vegas and is host of the Adams State/Yamaha Summer Percussion Camp. James regularly performs with The Music in the Mountains Festival Orchestra, the San Juan Symphony, the Chamber Orchestra of Colorado Springs, the Animas Music Festival, the ASU Faculty Jazz Combo, the Doyle-Kane Duo for flute and percussion, and numerous commercial artists throughout the Rocky Mountain region and Las Vegas, Nevada. Before accepting his position at ASU, James served as principal percussionist with the Air Force Band of the Golden West where he spent six years touring, recording, and performing throughout the western United States, while maintaining an active freelancing schedule in the San Francisco Bay area. A native of St. Louis, Missouri, James earned a bachelor’s degree in music education from the University of Central Missouri, a master’s degree in percussion performance from Louisiana State University, and is pursuing a Doctorate of Musical Arts from the University of Nevada, Las Vegas.

The PAS Educators’ Companion, Volume I 12
ENHANCING STUEDNT TIMPANI SKILLS Steve Hemphill
Timpani often serve as the percussive backbone in band and orchestral repertoire, providing dramatic power and musical weight into the sonic landscape. On occasion, percussion students shy away from the tuning requirements associated with timpani performance or defer to the student(s) who have more developed aural skills, thus foregoing the rewarding musical experiences which timpani have to offer in band and orchestra programs. Below are some tips and priorities to aid young percussionists in developing their timpani performance capabilities.
Many professional timpanists advocate for ear training and melodic interval study as a first priority in timpani training. This introduction commonly involves exercises at a piano or other keyboard instrument and becoming familiar with a listing of familiar melodies (see at the end) which aid in interval recall. Becoming acquainted with the drum sizes (for a typical scholastic set of timpani: 23”-26”-29”-32”), leads to learning the intervallic range of each drum, a critical discovery which I often relate to a parallel necessary understanding of scale fingerings for a clarinet student. A common progression for timpani tuning is the use of a percussion keyboard instrument with which to match pitch, then moving toward a chromatic pitch pipe (the F-F circular pipe is common), and finally arriving at the A=440 tuning fork (or Bb for band use) for silent functioning and advancement of “relative” interval training. This progression provides for two purposes: complying with some states’ festival/audition rules disallowing the use of keyboards or electronics for timpani tuning and preparing timpanists for the quick-paced expectations of live concerts.
Immediately, the student timpanist should pursue characteristic tone production as a top priority, perhaps developing new habits of technical “lift” as opposed to “down stroke” drumming techniques commonly associated with drum line activity. Teachers can work with students to have them internalize the rebound and lift and be always aware of the quality of sound that is created by that type of stroke. A relaxed, buoyant stroke allows for enhanced timpani resonance (ring) while minimizing acoustic attack, somewhat similar to a bowed string instrument. The playing spots/areas on each drum should be carefully defined, perhaps 3 to 4.5 inches inward from the counterhoop, proportional to each drum size. Appropriate attention must be given to the specific and consistent spatial set-up of the drums in an arced semi-circle, enabling the performer to strike the drums with a high-level consistent placement – without looking at the drums (the performer’s sight-line often will be engaged with the print music and conductor). While standing may be a preferred approach to timpani
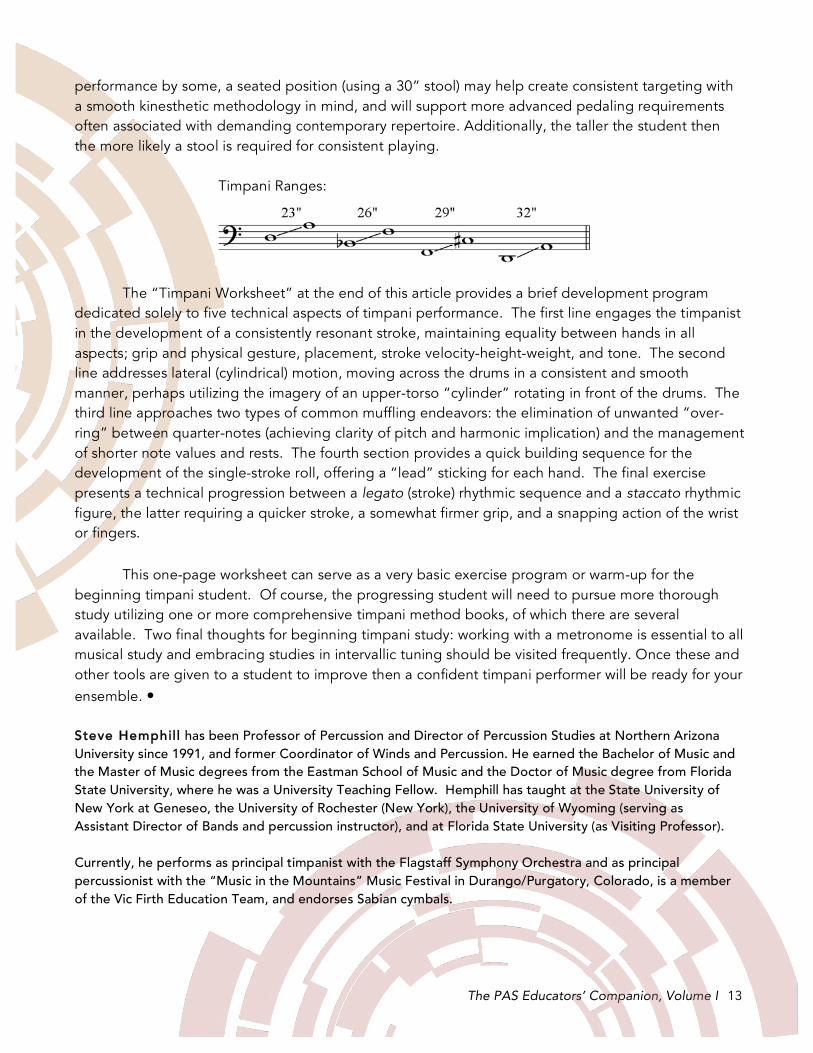
The PAS Educators’ Companion, Volume I 13
performance by some, a seated position (using a 30” stool) may help create consistent targeting with a smooth kinesthetic methodology in mind, and will support more advanced pedaling requirements often associated with demanding contemporary repertoire. Additionally, the taller the student then the more likely a stool is required for consistent playing. Timpani Ranges:
The “Timpani Worksheet” at the end of this article provides a brief development program dedicated solely to five technical aspects of timpani performance. The first line engages the timpanist in the development of a consistently resonant stroke, maintaining equality between hands in all aspects; grip and physical gesture, placement, stroke velocity-height-weight, and tone. The second line addresses lateral (cylindrical) motion, moving across the drums in a consistent and smooth manner, perhaps utilizing the imagery of an upper-torso “cylinder” rotating in front of the drums. The third line approaches two types of common muffling endeavors: the elimination of unwanted “over-ring” between quarter-notes (achieving clarity of pitch and harmonic implication) and the management of shorter note values and rests. The fourth section provides a quick building sequence for the development of the single-stroke roll, offering a “lead” sticking for each hand. The final exercise presents a technical progression between a legato (stroke) rhythmic sequence and a staccato rhythmic figure, the latter requiring a quicker stroke, a somewhat firmer grip, and a snapping action of the wrist or fingers.
This one-page worksheet can serve as a very basic exercise program or warm-up for the beginning timpani student. Of course, the progressing student will need to pursue more thorough study utilizing one or more comprehensive timpani method books, of which there are several available. Two final thoughts for beginning timpani study: working with a metronome is essential to all musical study and embracing studies in intervallic tuning should be visited frequently. Once these and other tools are given to a student to improve then a confident timpani performer will be ready for your ensemble. • Steve Hemphill has been Professor of Percussion and Director of Percussion Studies at Northern Arizona University since 1991, and former Coordinator of Winds and Percussion. He earned the Bachelor of Music and the Master of Music degrees from the Eastman School of Music and the Doctor of Music degree from Florida State University, where he was a University Teaching Fellow. Hemphill has taught at the State University of New York at Geneseo, the University of Rochester (New York), the University of Wyoming (serving as Assistant Director of Bands and percussion instructor), and at Florida State University (as Visiting Professor). Currently, he performs as principal timpanist with the Flagstaff Symphony Orchestra and as principal percussionist with the “Music in the Mountains” Music Festival in Durango/Purgatory, Colorado, is a member of the Vic Firth Education Team, and endorses Sabian cymbals.

Timpani Tuning:
Melodies for Interval Association
ASCENDING
• minor 2nd: Jaws; Ode to Joy (Beethoven’s 9th Symphony); White Christmas; chromatic scale
• Major 2nd: Do-Re-Mi; Country Roads; Can-Can; Silent Night; London Bridge; Happy Birthday;
major scale
• minor 3rd: Brahms’ Lullaby; Edelweiss; What Child Is This (Greensleeves); Georgia
• Major 3rd: Marines’ Hymn; When the Saints Go Marching In; Gonna Fly Now (Rocky); major
triad
• Perfect 4th: Here Comes The Bride; There's No Business Like Show Business...; Reveille; Taps;
Mexican Hat Dance; Oh Taunnumbaum; The Farmer in the Dell: Jeopardy Theme
• Tritone: Maria (West Side Story); The Simpson’s Theme
• Perfect 5th: Twinkle, Twinkle Little Star; 2001 Space Odyssey; Star Wars Theme
• minor 6th: Theme from Love Story; The Entertainer (notes 3-4)
• Major 6th: My Bonnie Lies Over the Ocean; NBC; It Came Upon A Midnight Clear
• minor 7th: There's A Place For Us (West Side Story); Have You Driven a Ford, Lately? (TV
Commercial);
• Major 7th: Bali-Hai (from South Pacific; musical, notes 2-3); Star Trek TV Theme
• Octave: Somewhere Over The Rainbow; When You Wish Upon A Star; The Weather
Outside Is Frightful (Let It Snow...); Take Me Out To The Ball Game
DESCENDING
• minor 2nd: Joy To The World; Habenera (opera Carmen); God Bless America; Für Elise;
chromatic scale
• Major 2nd: Mary Had A Little Lamb; Three Blind Mice; Mambo (Westside Story); Yesterday
• minor 3rd: The Star Spangled Banner; "bridge" section from Over The Rainbow; Hey Jude;
This Old Man; America the Beautiful
• Major 3rd: Swing Low-Sweet Chariot; Beethoven's 5th Symphony (Opening); Sentimental
Journey; Summer Time; cuckoo clock
• Perfect 4th: I've Been Working On The Railroad; Old Mac Donald; Born Free; Oh My Darling;
O, Come All Ye Faithful
• Tritone: European Siren
• Perfect 5th: Feelings; Flintstones (TV cartoon theme)
• minor 6th: Theme from Love Story
• Major 6th: Nobody Knows The Trouble I've Seen; Over There; Music of the Night (Phantom of
the Opera)
• minor 7th: Opening theme from An American in Paris (George Gershwin); Hurray For
Hollywood
• Major 7th: I Love You (Cole Porter)
• Octave: Scherzo from Beethoven’s 9th Symphony (or simply invert an ascending octave)
________________________________________________________________________________
Improve the list with selected melodies that are familiar, specifically, to you. Melodies will only
help if you are very familiar with them.

R R R R L L L L
Start: q = 90
R L R L R L R L
R L R L R L R L R L R L
R L R L R L R L R L R L R L R L
R L R L R L R L R L R L R L R L R L R L
R R
L L
R L R L R L R L R L R L R L R L R L R L R L R
FDAG
STROKES: Relax; Lift; Maintain Evenness with Equal Stick Heights
8x 8x 8x 8x1
Timpani WorksheetDeveloping Fundamental Technique
(Work with a metronome often)
Steve Hemphill
4 Timpani
MOVING around the drums: consistently play in exact spot on each drum - smooth and even torso rotation (slight)
8x 8x3 3
3 3
2
MUFFLING: spread middle-ring-little fingers - place lightly in exact playing spot (simultaneously muffle most recent quarter-note upon new quarter-note attack)4x3
ROLL DEVELOPMENT: full lifting strokes
4x
6 6
6 64
4x
STACCATO STROKES: quicken stroke lift with slight pinch between thumb/forefinger
4x Relaxed Legato... Quick-stroke Staccato...
3 3 3 3
5

The PAS Educators’ Companion, Volume I 16
ADDRESSING YOUR PERCUSSIONISTS’ NEEDS: ON AND OFF THE PODIUM Tommy Dobbs
The knowledge expected and required of music educators goes far beyond what meets the eye. Elementary and secondary school band and orchestra directors must display a thorough understanding of how each instrument works and sounds, while being able to assess and correct issues in a moment’s notice. This can be difficult because podium time is sacred and all too limited, necessitating an approach that reaches the most students in the least amount of time. During a set amount of time, it is not always possible to address all of the issues within each section of the ensemble. Because of this, the percussion section can often be found counting rests or suffering through the inevitable, “Tacet Rehearsal.” Having experienced this both in the ensemble and on the podium, I have constructed a few thoughts that may be helpful when addressing the percussion section in future rehearsals. Podium Demeanor Verbal Communication “Use a harder mallet” is a phrase familiar to all percussionists and directors. This phrase, although sometimes correct, can be interpreted in various ways. When I am asked this, my first thought is; “Do they mean louder? Brighter? Darker? Warmer? Piercing? Articulate? Or maybe, just deafening?! I have come to ask these subconscious questions after years of performing in various ensembles and under many directors. But for a middle or high school student, they might just see it as “Great! I’m going to get this 2x4 with a brick on the end and hit this xylophone until it breaks.” As directors and teachers, we know that this is not outside the realm of possibility for an enthusiastic fourteen year old. A more specific, descriptive phrase in place of this abovementioned statement can transform this moment into a great teaching tool for your student. For example, if during your ensemble’s rehearsal you feel that the xylophone player needs to match the volume and timbre of the flute section—instead of asking, “can you use a harder mallet?”— consider asking the percussionist to listen over to the flute section and think about using a brighter, more articulate mallet. Now, the percussionist is aware of their role in supporting a melodic line and is encouraged
The PAS Educators’ Companion, Volume I 17
to make conscious decisions on how their sound will fit into the overall texture of the ensemble. Likewise, with the incorporation of terms like brighter, warmer, darker, lighter, and heavier, you are slowly exposing the student to a heightened level of musical thought. Rehearsal Technique Directors know how critical it is to incorporate as many sections as possible during a rehearsal to maintain focus and progress. However, it can be difficult to keep the percussionists as engaged as other sections because they are not usually part of the intonation, harmony, or melody discussions. In fact, percussionists often get relegated to keeping time on the snare drum while the director addresses a rhythmic issue within another section. While this is a useful substitute for a metronome, asking the percussionist to do this only perpetuates the stereotype that we are just “time-keepers” and prevents the section from thinking they are an integral part of the ensemble. Having dealt with this stereotype, I propose another option. Instead of asking the percussionist to keep quarter notes on the snare drum, why not try asking another section (trumpets, oboes, tubas) to clap or count out loud? While the focus needs to be on addressing the initial issue, this could present a situation where the new clappers recognize the importance of developing a strong sense of pulse, and everyone, not just the percussionists, feels responsible for maintaining the beat. Then, after you address the initial issue, you now have the impetus for another important musical lesson about pulse. Rehearsal Scheduling After a discussion with fellow percussionists, Benjamin Fraley and Jamie Wind Whitmarsh, a thought about rehearsal scheduling arose. Directors know the percussion section always needs time to setup for rehearsals and that the length of time varies depending on the programmed repertoire. This can pose a challenge when a piece has a particularly large or complex percussion section. I am by no means saying we don’t enjoy playing Maslanka’s Symphony No. 5 or Bernstein’s Westside Story. However, if your program includes these two pieces, maybe consider scheduling them on different rehearsal days. This would eliminate the loss of valuable rehearsal time to setup changes, thereby increasing the amount of rehearsal time for each piece. Most importantly, this allows the percussion section to focus on the issues specific to that setup and to strategically plan the logistics for the upcoming performance. Logistics are a constant concern for percussionists. When programing a concert, it is imperative to consider the instrumentation, available space, and setup time for the section. As in rehearsal scheduling, programing multiple works with large setups can present challenges in performance. I can guarantee your percussionists will greatly appreciate having an intermission between pieces with large setup changes. Changing a fifteen-piece drum setup in two minutes is both mentally and physically taxing, especially when added to the stress of performing. However, strategic programming and appropriate intermission placement can help to both eliminate setup mistakes and to put your percussionists into a position to focus on their performance rather than a frantic struggle with equipment.

The PAS Educators’ Companion, Volume I 18
Gear Thoughts: Before You Break The Bank “Additional funds.” Two words directors love to hear. However, the reality is that purchasing percussion gear is expensive. Thus, the concluding paragraphs are geared towards exposing ways for you to get more for your percussionists without the high price tag. Referring back to the “use a harder mallet” comment above, having the ability to change the timbre of an instrument can eliminate the need to purchase an additional one. Before you purchase a $3000-$12,000 instrument, consider spending a few hundred dollars on five to ten pairs of mallets for the keyboard instruments and timpani. There are many mallet options and each can produce drastic differences in the color and timbre of the instrument. For example, a soft rubber xylophone mallet will produce a quieter, warmer sound, while a hard plastic xylophone mallet will produce a brighter, more articulate sound. Likewise, a large, cartwheel-style timpani mallet will produce a full, rounded sound while a smaller, wooden-ball mallet will produce a powerful, direct sound on the instrument. While purchasing various mallets and drumheads can be beneficial, there is no substitute for purchasing additional cymbals and auxiliary instruments to round out your percussion inventory. That being said, knowing where and when to search can save you hundreds of dollars. Online stores such as eBay and Craigslist, and percussion distributors like Steve Weiss Music, Percussion Source, and Lone Star Percussion are excellent starting points. However, there are also Facebook Group Pages now being used to sell extra or unwanted instruments. Facebook Pages like Timpani and Percussion Swap Shop, Orchestral Percussion Talk, University Percussion Teachers, Timpani Shop Talk, and Mallet Enthusiasts are a hotbed of professional percussionists who post ads for selling gear and provide current information regarding percussion performance. Groups like theses are a great resource for understanding the inner workings of the twenty-first century percussionist. Knowing when to search these sites can also prove beneficial. I have found that the beginnings and ends of semesters are prime time for purchasing gear. At the start of the semester you will find many online stores cutting prices and giving “back-to-school” discounts. Likewise, the end of the semester is a great time to monitor eBay, Craigslist, and Facebook Pages. It is a sad day when a percussionist leaves the family. However, it does mean that you’ll find students selling their instruments and mallets, which means you can expect lower prices. I hope you have found these thoughts to be helpful. To supplement this article, please visit www.tommydobbspercussion.com for additional links, articles, and comments. •
The PAS Educators’ Companion, Volume I 19
Tommy Dobbs is the Visiting Instructor of Percussion at the University of Arkansas-Fort Smith and is currently completing his DM at Florida State University. He is the Principal Percussionist for the Fort Smith Symphony and Treasurer for the Arkansas Chapter of PAS. In 2014, he won the Eastern Music Festival’s Percussion Internship and performed in Carnegie Hall as a founding member of What Is Noise, a new music ensemble. He is a proud endorser of Grover Pro Percussion and Innovative Percussion Inc.

The PAS Educators’ Companion, Volume I 20
THE LAND OF MISFIT TOYS: AN INTRODUCTION TO THE SECOND LINE OF ACCESSORY PERCUSSION Benjamin Fraley
The world of percussion is vast in its many instruments and techniques. Remaining current with every percussion instrument is part of the challenge and fun of being a well-rounded percussionist. Excluding the immense and diverse amount of percussion found in non-western studies (world music), the standard western classical percussion family is in itself, an eclectic mix of instruments and techniques to be mastered. Typically, within this genre, there is more of a focus on solo oriented instruments including snare drum, mallet instruments and timpani. Accessory instruments such as bass drum, cymbals, tambourine and triangle are often studied less by students. Furthermore, there is a second line of accessory percussion instruments that are often misunderstood, misinterpreted or unknown to both students and conductors alike. This article will shed light on these “misfit toys” that are not typically discussed in terms of performance or details and should prove a valuable resource for the conductor in working with these instruments and their performers from the podium. Mark Tree A mark tree is often mislabeled as wind chimes. Wind chimes are arranged in a circle formation and are more likely found on someone’s front porch rather than in a percussion section. A mark tree is made of graduated metal cylinders that are hung from a single piece of wood. Companies that make mark trees have various models. However, any model that is between the size of 12” – 16” would be adequate. Mark trees are played by moving one’s hand through the cylinders in a fluid motion. The desired sound is reminiscent of a dream or magical occurrences.

The PAS Educators’ Companion, Volume I 21
Bell Tree The bell tree is another instrument in which the name can easily cause resemblance to a different instrument altogether. The best way to remember what a bell tree looks like is to remember that all the graduated bells fit together in a frame that looks like a tree. A bell tree produces a similar scaled effect as the mark tree, but the timbre is different and played with an acrylic or metal beater as opposed to the hand. The bell tree can be played either vertically or horizontally; whichever is easiest for the student.
Claves Claves are not only an instrument but refer to a specific rhythm. Here, we will discuss claves as an instrument being two cylindrical pieces of wood (usually rosewood) that create a clear resonant sound when struck against each other. The important thing to note about claves is that they will sound the best when they are not muffled. This means the claves should make as little contact as possible with the player’s hands. The clave that will do the striking is held basically like a drum stick (matched grip), but make sure that the clave is held with the fingers and note against the palm. The clave that is being struck is held in a cradle fashion in the opposite hand. The fingers are curled in towards the palm in order to make a resonating chamber and to support the clave. Strike the clave in the middle with the edge of the clave in your striking hand. The sound should be clear, resonant, and bright.

The PAS Educators’ Companion, Volume I 22
Wood Blocks Wood blocks made of real New England Rock Maple wood are often overlooked for more durable, plastic versions. Real wood blocks however can be just as durable and in most classical orchestral or wind band situations, have a superior sound and musical impact when performed with the proper technique. Recommend mallets for use on wood blocks are rubber, plastic, or hard cord (tightly wrapped yarn) mallets. The opening of the wood block should face towards the audience when possible. The most common beating spot is just off center of the middle of the wood block towards the opening in order to create the most resonant, desired sound. This means that there has to be space underneath the wood block so that it does not sound muffled. Avoid putting wood blocks on a trap stand with thick carpet or towels. Instead, when possible, hold the woodblock up, as you might when playing tambourine and/or triangle. If you have to place the wood block on a trap stand, use a piece of foam to place the woodblock on. Temple Blocks In keeping with our Sleigh Ride theme, let’s discuss temple blocks. Temple blocks are graduated cousins of woodblocks, having changed very little from their original forms and use in temples. Almost all temple blocks are made of wood or a synthetic plastic and are set on a frame. Wood temple blocks will produce the most characteristic sound and when performed with the proper technique, are as durable as plastic. Temple blocks are akin to woodblocks in that the beating spot and mallet choice used are similar. However, the openings of the temple blocks should face the player for the easiest playing. Log Drums Log drums are also known as split drums. Log drums are so named because the earliest form of these instruments were literally logs. Log drums are enclosed wooden boxes in which the beating spots or tongues have been cut. There are usually two tongues per log drum but some may have more. Log drums are played with rubber mallets towards the edges of each tongue. The desired sound is a resonant, hollow sound.

The PAS Educators’ Companion, Volume I 23
Anvi ls and Brake Drums If you are a conductor of either a band or orchestra, there is a good chance that at some point you will program Gustav Holst’s Second Suite in F or Giuseppe Verdi’s Il Trovatore. In that case, you will need to know a thing or two about anvils and brake drums. Some percussion companies actually make a musical instrument called an anvil. The purpose of having a “musical” anvil is to specify the sound of the instrument and to minimize the need for an actual anvil. These anvils generally come with a special mallet specific for that instrument in order to get the desired sound. In place of an anvil, a brake drum is an acceptable substitute. Brake drums are parts from literal cars. They are not sold by music stores or music instrument manufacturers and are best acquired by visiting a junk-yard. Regardless, they are musical instruments and are used widely through the percussion repertoire. They are typically struck with metal beaters (NOT your good triangle beaters). Metal beaters are played on the inner circle of the brake drum and produce a piercing metal sound.
Finger Cymbals Finger cymbals ARE cymbals; just not played like crash cymbals. Traditionally, finger cymbals are attached to the index finger and thumb and played in a manner reminiscent of Arabic music and dance. For classical percussion use, the finger cymbals will be held parallel to the floor. While suspending one cymbal in one hand, strike with the other by dropping one edge of one cymbal into the other. The sound you want to achieve is bright and articulate.
Flexatone The flexatone is another example of an instrument that originated as a “foley instrument”. The flexatone behaves very similar to a musical saw. The more tension there is in the bow of the metal, the higher the pitch will be. The flexatone is played by holding the instrument in your dominant hand with your fingers beneath the frame and your thumb at the edge of the metal sheet. As you shake the instrument back and forth causing the wooden beaters to strike

The PAS Educators’ Companion, Volume I 24
Slap Stick Slapsticks are also known as whips or whip cracks. The slapstick is a prime example of an instrument that originated as a “folly instrument” from vaudeville shows becoming a staple in the percussion section. The slapstick is required for many pieces in the musical repertoire, but is most famous in Leroy Anderson’s Sleigh Ride. The slapstick comes in two forms: one with a hinge that connects the two pieces of wood that are played with both hands (slapstick), and another that has a spring loaded hinged meant to be played with just one hand (more of a whip action). Either is acceptable. However, the two handed slapstick is typically easier to operate more accurately.
Sleigh Bells Sleigh Bells are another Sleigh Ride favorite instrument. Conventional sleigh bells are made today by attaching “jingle” bells to a piece of wood with a handle. The most common technique is to hold the sleigh bells in your non-striking hand with the butt of the handle facing upward. Your striking hand will then strike the butt end of the handle in order to perform the rhythms. Especially in a piece like Sleigh Ride, the goal of the percussionist playing is to articulate the rhythm accurately.

The PAS Educators’ Companion, Volume I 25
Vibraslap The vibraslap is the modern take on an instrument known as a quijada. A quijada is literally a donkey’s jaw bone (the jaw bone is dried and separate from the body of the deceased animal). When the jaw bone is held at the “chin” and struck at the joint, the remaining teeth in the jaw rattle. The vibraslap behaves in a similar way. The vibraslap is held in the non-striking hand at the middle point between the two ends of the instrument. The sphere is struck with sound. The goal is allow the instrument to vibrate / resonate as freely as possible.
Maracas Maracas are rattles from Central and South America. Small gourds are dried and filled with grains or beads and attached to a handle in order to create maracas. Simple in construction, maracas can be extremely virtuosic instruments if played correctly. Joropo music is an excellent example of virtuosic maraca playing. The important thing to keep in mind about playing maracas is that the rhythms should be articulate. This idea is very much dependent on what the gourds are
made of and what materials are used inside the gourd. Maracas can be held in a match grip fashion as if they were snare drum sticks. Articulation is best achieved by snapping the wrist in order to get a fast reaction from the materials inside. Practicing beginning to intermediate snare drum etudes and/or exercises is a great way to start learning maraca technique. Castanets Castanets, like the finger cymbals, have a traditional usage in music and dance (Think Bizet’s Carmen). Classically, the have myths pertaining to how they are performed. Castanets are either fixed to a castanet machine or to handles. Both have tension adjustment built in so that the action can be tight or lose depending on player preferences. Performing with the castanets held is always preferred. This will give a more characteristic sound and style. The castanet machine is used for fast changes when there is not
The PAS Educators’ Companion, Volume I 26
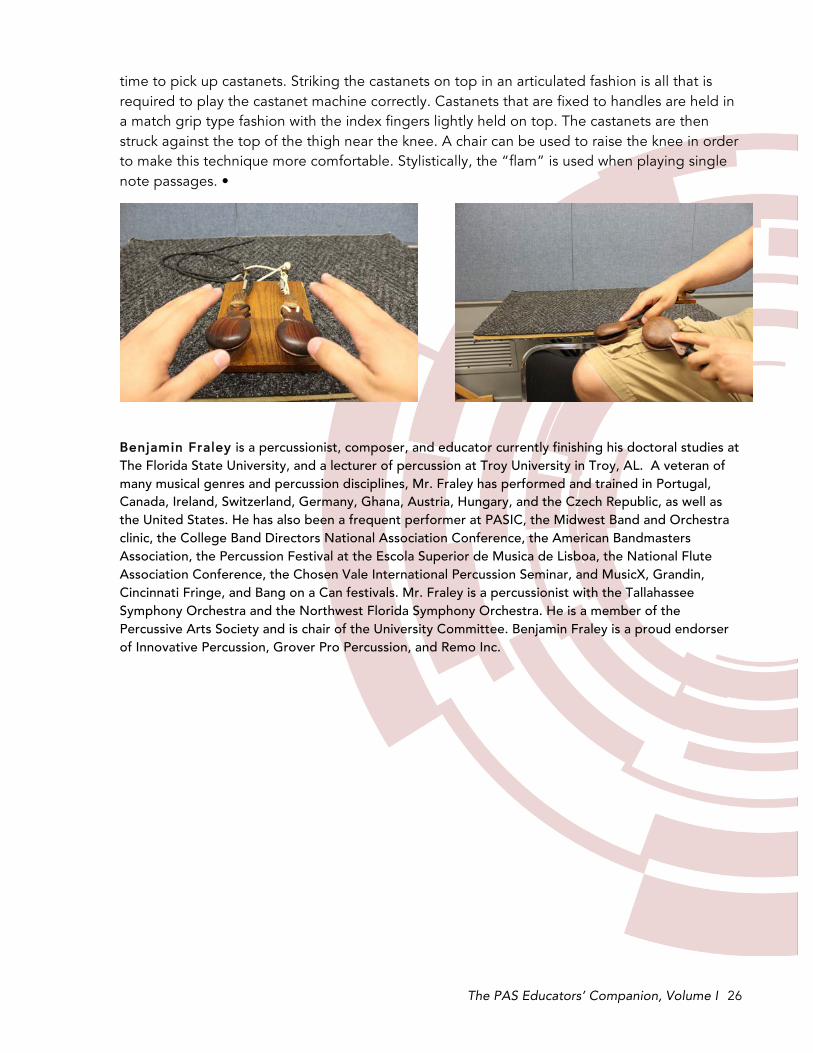
time to pick up castanets. Striking the castanets on top in an articulated fashion is all that is required to play the castanet machine correctly. Castanets that are fixed to handles are held in a match grip type fashion with the index fingers lightly held on top. The castanets are then struck against the top of the thigh near the knee. A chair can be used to raise the knee in order to make this technique more comfortable. Stylistically, the “flam” is used when playing single note passages. •
Benjamin Fraley is a percussionist, composer, and educator currently finishing his doctoral studies at The Florida State University, and a lecturer of percussion at Troy University in Troy, AL. A veteran of many musical genres and percussion disciplines, Mr. Fraley has performed and trained in Portugal, Canada, Ireland, Switzerland, Germany, Ghana, Austria, Hungary, and the Czech Republic, as well as the United States. He has also been a frequent performer at PASIC, the Midwest Band and Orchestra clinic, the College Band Directors National Association Conference, the American Bandmasters Association, the Percussion Festival at the Escola Superior de Musica de Lisboa, the National Flute Association Conference, the Chosen Vale International Percussion Seminar, and MusicX, Grandin, Cincinnati Fringe, and Bang on a Can festivals. Mr. Fraley is a percussionist with the Tallahassee Symphony Orchestra and the Northwest Florida Symphony Orchestra. He is a member of the Percussive Arts Society and is chair of the University Committee. Benjamin Fraley is a proud endorser of Innovative Percussion, Grover Pro Percussion, and Remo Inc.

The PAS Educators’ Companion, Volume I 27
#MUSICIANSTOO: DEVELOPING THE MUSICAL PERCUSSIONIST THROUGH AN INCLUSIVE BAND WARM-UP ROUTINE Brandon Arvay
PART ONE:
INTRODUCTION
The full band warm up is an integral component of any band rehearsal. It is a special time dedicated to the development and maintenance of student performance skills, including musical tone, technique, ensemble balance, and section blend. This time also serves to focus the mind during a long academic day, while physically preparing the students for the musical performance tasks required throughout the rehearsal. Unfortunately, this precious time is often overlooked by band directors who tell the percussionists to “stay out of the way” while the band warms up.1 Sometimes, they are even encouraged to set up their instruments during the warm up period. This happens for many reasons, including class scheduling constraints or a director’s lack of confidence in percussion proficiency. Student percussionists are best served when they are treated and spoken to as musicians and not simply rhythmic technicians. The full band warm up is an opportunity for percussionists to appreciate the transfer of musical concepts and techniques from one percussion instrument to another. It is also an opportunity for them to continue growing musically on instruments they may not be assigned to play in a particular concert program. Part 1 of this article presents considerations for enhancing student musicianship as well as instructions for implementing this warm up system. Warm up exercises can vary almost as much as the instruments on which percussionists are expected to functionally perform. Percussion instruments share many physical approaches, yet retain some instrument-specific performance skills. For example: a tenuto note on snare drum is an arm motion starting with the stick “up”/ending “down”, while a tenuto note on hand cymbals starts with the cymbals apart and ending with them very close together. Percussion instruments serve three different purposes in the band literature: melodic (on top of the texture), harmonic/rhythmic (musically supportive and within the texture), and coloristic
The PAS Educators’ Companion, Volume I 28
(special musical highlights). These three percussive roles are explored within the exercises outlined in the next paragraph. Each instrument also requires its own progression of performance skills. The sample exercises included in this article are designed to be adapted to any warm up routine, while addressing all the above concerns. MUSICAL CONSIDERATIONS FOR PERCUSSION
Warm up exercises for woodwinds, brass, and percussionists focus on the following four areas of musicality: Tone, Articulation, Rhythm, and Fingers and Flexibility.1 Each instrument has unique musical and technical skills to develop. These skills are outlined below. TONE: WW/Brass Considerations: Air (free blowing, warm) Posture (sit up straight, feet flat, head level, shoulders strong, but relaxed, instrument
held appropriate height/angle) Embouchure (efficient; appropriate firmness) Tuning (Listening, fingering, oral cavity/tongue position, instrument length)
Percussion Considerations1: Posture (flat feet/shoulder-width, knees relaxed, hips centered, straight back, head level, relaxed shoulders and elbows)
Grip = Embouchure (fully-supportive hand; relaxed, yet firm fingers) Stroke = Air (smooth, connecting, free-flowing) Tuning (instrument, grip, stroke, playing area, implement)
ARTICULATION: WW/Brass Considerations:
Wind players must develop finger, tongue, and air independence. This is accomplished through regular practice of tenuto, staccato, legato, and marcato articulations. The type of tongue action required for a legato note is drastically different than the type of tongue a marcato note uses. Interestingly, similarities may be found between the action of the tongue on a reed or in a mouthpiece and the action of a percussion implement on a surface.
Percussion Considerations:
STRIKE INSTRUMENTS1: Legato (fully-supportive grip, smooth & connected wrist stroke and lift) Staccato (firm grip, quick wrist stroke and lift) - looks similar to upstroke

The PAS Educators’ Companion, Volume I 29
Tenuto (fully-supportive grip, heavy arm stroke with little rebound) Marcato (firm grip, quick arm stroke and lift) - combination of staccato grip and stroke, but with tenuto arm
CRASH INSTRUMENTS: Same considerations as the strike instruments. Think of the moving crash instrument as the implement and the motionless instrument as the striking surface. For example, legato notes on hand cymbals require a moderate hand speed that begins with the cymbals apart and ends with them apart while maintaining a fully-supportive grip on the straps. A tenuto note requires a fully-supportive grip and a moderate hand speed where the cymbals begin apart and end very close together.
SHAKE INSTRUMENTS: Shake instruments, such as sleigh bells and shakers, manipulate their articulations largely by changing their attack qualities with proportional variations of velocity and height. The faster the instrument is moved, the harder the impact of the shaker beads on the inside-wall of the instrument, resulting in a sharper, more articulate attack. A softer attack and longer note is created when these instruments are moved slower. Additionally, the larger the motion, the louder the sound. The smaller the motion, the softer the sound. Tambourine players should practice playing both shake and thumb rolls during any of these exercises.
SCRAPE INSTRUMENTS: Articulations on scrape instruments, such as guiro or brushes on a drum, are performed by changing the length of the scrape action. Short scrapes result in short sounds. Long scrape result in long sounds. Dynamics can be altered through implement pressure on the surface in addition to scrape speed. A fast speed results in louder sound. A slower speed results in a softer sound.
RHYTHM: WW/Brass Considerations: It is important for ALL band students to sight read a variety of rhythms in different meters, styles, tempi, and keys. These variations challenge the students in unique ways and develop the player’s physical and mental flexibility and dexterity. Different rhythms require different uses of the tongue, fingers, and air. With regular reading, wind players learn to

The PAS Educators’ Companion, Volume I 30
overcome their many tendencies (Examples: shortening dotted notes and lengthening the notes that follow; playing the first two notes of a triplet too long).
Percussion Considerations:
Percussionists must learn to overcome the challenges of performing different rhythms on many types of instruments. Alterations of the rhythms (dynamics, tempo, style, etc.) can provide further challenges. Each category of instruments presents distinct problems for the percussionist to conquer.
STRIKE INSTRUMENTS: Percussionists are expected to be rhythm technicians. Because they are often required to perform complicated rhythmic content, keep the students on their feet by having them read a wide variety of rhythms in different meters and tempos during warm ups. A strong variety of rhythms will challenge the students’ ability to perform stick control, two-height, embellishment, and roll passages.
Remember, the roll base will change depending on the length of the note, tempo, and style. Shorter rhythms use less strokes than longer rhythms. And long rhythms at a fast tempo may also require fewer strokes to create a sustained sound. Fast rhythms require careful consideration of stickings. Generally, the more repeated strokes performed by the same hand, the weaker each subsequent stroke sounds. This natural effect may be useful for certain phrasing and style considerations. Alternating sticking is the default method for performing rhythms on strike instruments. However, it is necessary to develop dexterity through a series of “stick control” exercises which include a variety of rhythms and sticking combinations.
CRASH INSTRUMENTS: Crash instruments, such as hand cymbals and claves, are typically performed by keeping one instrument motionless while using the other instrument as the implement (the mover). This limits the speed and rhythms the player can perform. Therefore, when developing the rhythmic content of warm up exercises, their rhythms appear to be simpler. However, it is important to challenge your percussionists by presenting fast or complicated rhythm passages that will require the players to discover and develop some techniques for themselves.

The PAS Educators’ Companion, Volume I 31
SHAKE INSTRUMENTS: It can be very difficult to perform rapidly changing rhythms on shake instruments, perhaps why these instruments are commonly found playing simpler repeating rhythms for long stretches of time. However, it is necessary to challenge the percussionists to perform difficult changing rhythms. Percussionists will notice it is a matter of “hurry up and wait” to perform these rhythms. To achieve a clear articulation, the instrument will need to be moved quickly. This quick motion makes the space between notes a little longer, resulting in a slightly elongated pause.
SCRAPE INSTRUMENTS: Rhythms on scrape instruments combine the stroke considerations of strike instruments with the limited rhythmic vocabulary of crash instruments. Stickings—the up and down motions—should be chosen so the implement can smoothly glide along the instrument to protect the integrity of tone and timing.
FINGERS AND FLEXIBILITY WW/Brass Considerations:
Wind players and percussionists all share the need to strengthen and expand their facility. And each instrument requires special individual attention to acquire this facility. Because of the unique challenges presented by each woodwind, brass, and percussion instrument, band directors at all levels must be creative when developing a curriculum of flexibility exercises. Woodwind players need to work on “crossing the break”, flip-flops, or ring/little finger technique. Brass players must work on lip slurs, flip-flops, or ring finger technique.
Percussion Considerations:
Percussionists have unique control needs, including dynamic range, speed, navigating large instruments, and rhythmic clarity.
Playing softly on strike instruments can be very difficult. It is important to
use the appropriate muscle groups for playing a particular passage. For example, it takes some experimenting to know how to use a large muscle group (i.e. the arm) for playing soft articulate passages and how the fingers aid in the performance of fast single strokes.
The PAS Educators’ Companion, Volume I 32
Rapid changes in dynamics cause problems for strike instruments. It is important to keep a consistent tone while changing height. This will require the player to try altering the grip, stroke, finger pressure, stickings, playing areas, and timing of the stroke. The percussionist may even consider changing the specific instrument model to an instrument that aids the musical performance. As the players gain control of basic rhythms (quarter notes, eighth notes, eighth notes), slowly introduce quicker rhythms within the same technique exercise patterns. For example, replace a series of eighth notes with sixteenth notes. Instead of changing all four eighth notes, try changing the first and third eighth notes with two sixteenth notes each. Tambourine players should be challenged to add faster rhythms while exploring the knee-fist technique.
Another example of changing basic exercises to become more challenging is to have your percussionists play Stick Control exercises as streams of triplets or sixteenths. This will change the player’s control and reading capabilities. It is also necessary to experiment with playing basic rhythms with stickings that do not flow naturally. Have the percussionists play extended phrases of rhythms on a single hand to improve dexterity and increase wrist and finger control.
Performing leaps on timpani and mallet instruments is difficult because of the increased eye movement around the instruments while managing a large distance between notes. Large leaps require the player to rely on muscle memory and a lot of mental focus. Leaps also present issues with tone (inaccurate playing areas and grip changes), rhythms and stickings, and phrasing.
Playing evenly across the entire range of musical instruments is challenging for any instrumentalist. For percussionists, the particular instrument model, stick/mallet, and playing area all affect the projection of the musical sound. In general, a softer mallet will effortlessly produce long notes with little attack, but will require a firmer grip and faster stroke to produce a clearer attack.
MUSICAL PHRASING1 All percussion instruments rely on special treatments of the attack of each note to create the illusion of note length control. Even the most sustaining instruments require repeated attacks to create a sustained and stable sound. Phrasing is created by using similar approaches on all percussion instruments to add direction to the music. Repeated rhythms on the same note need to groove and emphasize the meter with agogic accents on the

The PAS Educators’ Companion, Volume I 33
beginning of each measure or note grouping. A stream of ascending pitches may crescendo while a stream of descending pitches may decrescendo. Sustained notes must avoid becoming stagnant by getting louder of softer. When playing unmarked lyrical passages, such as excerpts from a Bach cello suite, the percussionist must make choices to create the appropriate musical style. Any of the ideas mentioned earlier are good places to start. However, the percussionists must learn to manipulate the attacks and natural instrument resonance to create an artistic sound. Percussionists must also have the appropriate implements that provide musical flexibility and nuance to perform artistically. Remember, there is no such thing as “the loud mallets” or “the quiet mallets.” The player makes dynamic and style decisions, not the implements. The player should choose sticks and mallets that allow him or her to play all the desired musical nuances with the understanding that he or she is solely responsible for creating those nuances through stroke manipulation. To discover ways to perform music artistically, think of how a cellist would perform. For example, to play a stream of notes connected by a single slur, the cellist begins with a strong bow motion with the arm. This initial attack isn’t abrasive or brittle. It’s dark and weighty, a sound created by using the arm to initiate it. The second note is naturally softer because the bow simply slides over the string to create the sounding note. The first few notes which follow the attack note are what I call “hiding within the resonance” of the initial arm stroke. The first sound was so big and resonant that its resonance is still heard through the first few notes of the stream. This lingering resonance creates the illusion that the notes are all connected together without a break between them, just like the air between a woodwind note or the bow motion of a cellist. HOW TO USE THIS SYSTEM PITCHED PERCUSSION Pitched percussion instruments, such as timpani and mallet instruments, are tuned to include specific pitches, each with a variety of ranges. These pitches provide the unique opportunity for percussionists to perform melodic and harmonic roles within a music ensemble. Think of the pitched percussion parts as a third melodic section independent of the woodwinds and brass, but dependent on the structure of the woodwinds and brass exercises. A flute part, for example, is a good place to start for mallet players because its clef, range, and reading requirements are similar to those of mallet instruments. It is also useful to develop bass clef reading skills by reading from the trombone and tuba parts on the lower octaves of the marimba. Mallet instruments can use any C-instrument parts

The PAS Educators’ Companion, Volume I 34
(flute, oboe, bassoon, trombone, or tuba) during the warm up routine. Timpani can use improvised parts, director-written parts, or tuba parts. Instead of the pitched-instrument percussionists simply reading a wind instrument part of every exercise and rolling the entire time, have them insert different rhythms in the space of the long tones. Stickings, dynamics, and pitch and rhythmic contours can also be altered. For rhythm and sticking ideas, have the mallet players reference the Strike Percussion part within the Long Tones chart while reading from a woodwind or brass part. Warm ups may be played on any mallet instrument. However, some instruments, such as glockenspiel and chimes, have a limited range and may require rapid and regular transpositions. Because of the challenges on these particular instruments, it may be best to limit warm ups to marimba, vibraphone, and xylophone. Of course, it is useful to have a student warm up on another instrument if they perform it in the concert program and need more time behind the instrument. NON-PITCHED PERCUSSION All percussion instruments are classified by the method in which they are performed: strike, crash, shake, and scrape. Based on their classification, the non-pitched percussion instruments—ones that do not produce a definite pitch—are all included in the warm up by using specially-designed exercises. These instruments primarily serve rhythmic and coloristic musical roles, but occasionally get soloist treatment. Rhythmic and coloristic material tend to be musically undemanding. The sample exercises not only prepare percussionists for these moments, but also for long soloistic passages. These exercises include a variety of rhythms and stickings created for specific ability levels to use on any non-pitched percussion instrument. Each pattern is designed to be flexible and used with virtually any full band exercise. Additionally, the patterns are presented in a progression that allows the percussionists to establish and develop tone, coordination, control, and ensemble skills in all four areas of non-pitched percussion. On World Percussion instruments, such as congas and bongos, it is practical to explore the different tones, special techniques, and style patterns during the full band warm up. This is possible by reading the Strike Percussion part and assigning each hand to a different or same tone, for example, while altering the written stickings to explore Afro-Cuban tumbao and martillo patterns.

The PAS Educators’ Companion, Volume I 35
Because each warm up exercise may last only a few repetitions in a single rehearsal routine, the director may choose a series of patterns for the percussionists that will help them build a skill found within the concert program. (Examples of non-pitched percussion exercises will be included in Part Two.) A list of popular pitched and non-pitched percussion instruments is included at the end of this article. DEVELOP A ROUTINE: 1) Select and announce the woodwind, brass, pitched percussion patterns 2) Announce the relevant information concerning key, articulation, rhythm, etc. 3) Announce the non-pitched percussion pattern 4) Announce the relevant information concerning articulation, rhythm, sticking, etc. 5) Play! EXAMPLE:
1) “Woodwinds and brass play the F-Major scale in whole notes, one octave down. Brass, play the F-Major lip slur Pattern #1. Pitched percussion play four alternating quarter notes for every written note.”
2) “Pitched percussion, brass, and woodwinds, play legato.” 3) Non-pitched percussion, play #5 of your Long Tones page.” 4) “Also, non-pitched percussion, please observe that the pattern changes to
double strokes at m. 5.
It may look as though it takes a long time to recite so many instructions just for one exercise. You're right! However, a routine that both students and directors can rely on adds structure and order to a rehearsal. It also helps to create an engaging and exciting performance environment. Though the first rehearsals may take a little explanation of the instructions for each section of the band, maintaining a routine order of exercises will greatly speed up the process of giving instructions and will allow for more playing time. Remember, though a routine order of varying exercises is important, it is necessary that each exercise continues to challenge and develop the skills of the student performers. Also, generate a list of skills the students will need to be able to perform by the end of the semester. Form a timeline and structure for when and how each skill will be incorporated into the routine.

The PAS Educators’ Companion, Volume I 36
STATION ROTATIONS
Try using a rotation system to give each student the opportunity to experience as many instruments during a single rehearsal and semester as possible. There are many possible rotation systems, so feel free to try other ways that best fit your rehearsal setting. No matter the system, always include snare drum, mallet instruments, timpani, and a variety of accessory and world instruments. The world instruments and accessories should change on a regular basis to expose students to as many as possible. The accompanying exercises are designed for any possible percussion instrument to be played and are arranged by their performance classification: strike, scrape, crash, and shake.
ROTATION EXAMPLE #1:
One possible system is to have the students perform the entire warm up routine on a single instrument. The students would rotate through a different station each day. EXAMPLE 1:
John Doe Warm Up Instrument Assignment
Monday: Snare Drum
Tuesday: Marimba
Wednesday: Triangle
Thursday: Bass Drum
Friday: Hand Cymbals
An advantage to this system is that it gives the students a lot of time to get comfortable with the tasks on one instrument at a time. However, it is not inclusive and may limit the potential for seeing the transfer of skills from instrument to instrument.

The PAS Educators’ Companion, Volume I 37
ROTATION EXAMPLE #2:
A second possible system is to have the students rotate around all the stations in a single warm up period. Each station has one instrument and a copy of the percussion warm up exercises. Students must begin at a different station each day so they can perform all the exercises at all the stations in a week.
EXAMPLE 2:
Community High School Rehearsal Warm Up Rotation
John Doe Warm Up Instrument Assignment
Monday: Begin on Snare Drum
Tuesday: Begin on Marimba
Wednesday: Begin on Triangle
Thursday: Begin on Bass Drum
Friday: Begin on Hand Cymbals
Instrument Order: Snare Drum, Marimba, Triangle, Bass Drum, Hand Cymbals
An advantage of this system is that the students perform on every instrument at each rehearsal. A disadvantage of this system is that it may take a moment for the students to get set at each new instrument station. In Part 2, I’ll provide specific examples of stick control, two-height, embellishment, and articulation exercises to use within this system. Of course, these examples serve as a starting point for directors and instructors to assemble personalized exercises. I’ll also provide ideas on how to include these exercises within five popular band warm ups. •

The PAS Educators’ Companion, Volume I 38
PITCHED PERCUSSION INSTRUMENTS1 Glockenspiel Vibraphone Xylophone Marimba Chimes Crotales Steel Pan Timpani Almglocken NON-PITCHED PERCUSSION INSTRUMENTS STRIKE Snare Drum Bass Drum Concert Toms Djembe Cajón Congas Bongos Tambourine Triangle Tam tam Suspended Cymbal Woodblock CRASH Hand Cymbals Claves SCRAPE Guiro Brushes on Snare Drum SHAKE Tambourine Shakers
The PAS Educators’ Companion, Volume I 39
Dr. Brandon Arvay currently lives in Lexington, KY where he serves as Adjunct Instructor of Percussion at Centre College, regularly performs with the Lexington Philharmonic Orchestra, and serves as the percussion instructor for the Central Kentucky Youth Orchestras. He holds degrees from the University of South Carolina (B.M.E.), Colorado State University (M.M.), and the University of Kentucky (D.M.A.). He has conducted and coached a variety of ensembles, including the award-winning University of Kentucky Percussion Ensemble at the 2014 Percussive Arts Society International Convention. In his travels, he has performed throughout China and was featured on China Central Television. For more information on Brandon’s activities, please visit www.brandonarvay.com. End Notes ______________________________ 1 This is a common phrase in middle school, high school, and college band rehearsals I have attended. 1 From Scott Atchison’s “Full Band Sonority.” 1 Check out Julie Davila’s FUNdamentals article on these topics here: http://www.pas.org/docs/default-source/pasic-archives/gripstrokes.pdf?sfvrsn=0 1 For more information on these percussion concepts of Strike, Crash, Scrape, and Shake, see James Campbell’s source entries in “Band Expressions” by Alfred Publishing Company. 1 For more information on musical phrasing, click here: http://www.pas.org/docs/default-‐source/SoundEnhancedPdfs/rhythmic-‐interpretation-‐articulation-‐markings-‐and-‐musical-‐shape.pdf