Embed Size (px)
Citation preview
The Master Spy Editor
Copyright © 1988, Applied Research Kernel, all rights reserved worldwide.
Author: Richard Howe
For the Sinclair QL, CST Thor, and compatibles.
IF IMPATIENT
Getting Started on Page 7
Hetp! (perhaps) on Page 34
ELSE
Introduction on Page 5 Design on Page 10
Commands 1 & 2 starting on Page 19 Coffee
Getting Started on Page 7
END IF
CONTENTS MASTER SPY
2. Contents : You’re looking at it now.
3. Bits & Pieces : : General information.
4. Applied Research Kernel : Who ? What ?
5. Introduction : : What the Master Spy is about.
7. Getting Started : Executing the system.
10. Design : : How the Master Spy actually works.
Consoles Status Line View Stack Heap Allocation Heap Fragmentation Lines Blocks Printers Overwrite 19. Comands 1 : : A list of commands.
22. Commands 2 : : Descriptions of commands.
29. Configuration : How to customise the Spy.
34. Help ! : : Just in case.
MASTER SPY BITS & PIECES
A.R.K. Distribution Corve Farmhouse Chale Green VENTNOR Isle of Wight P038 2LA U.K. TELEPHONE U.K. (0983) 79 496 All information is provided in good faith. A.R.K. Distribution reserve the right to alter the specification of this product and can accept no responsibility for any loss or damage arising from the information contained in this manual or from the use of the product. The medium on which the software is supplied is guaranteed for four weeks from the date of purchase, against any physical defect. If it should fail, please return it to the Kernel, without the manual, for replacement. Please note that the supplied software and manual are copyright, and may only be copied for your own use. Unauthorised duplication of the software or manual in any form is prohibited. My thanks to Angela Hammett for her moral support during the Spy, and Master Spy’s development.

APPLIED RESEARCH KERNEL MASTER SPY
A.R.K. Distribution was formed in May- 1986 with the object of designing, retailing, and distributing business oriented software. The computers used to fulfil the brief include Sinclair QL’s, lCL OPD’s and IBM PCs. In the medium term we will also be using Commodore Amiga’s. The first software systems produced were our database managers running under Xchange, Archive and the Archive Run Time Modules. The first application called ‘Cardfile’, is an address maintenance system with provision for personal, company and mail addresses together with some other details. This was transferred to the PC format in 1986. Due to the demand for more general notes space, the second product ‘Mailfile’ was produced with over 900 characters of notes space per record instead of the personal and company addresses. The third system ‘Librarian’ is rather different, being designed for the storage of information on books and articles. All these systems have versions for the standard and expanded QL. Those who first bought Cardfile or Mailfile requested a ‘Mailmerge’ program to enable the fast reproduction of custom letters and schedules, so a system was written in assembler which is still the fastest and cheapest at £9.95. The work done has resulted in ‘Archivist’, our most popular database manager to date. This system was transferred for use on the ICL OPD/Nerljn Tonto in 1987. Archivist is currently in use managing data from mail lists to dental records. Archivist MP (Multi-file Programmable) was launched in 1988 and offers multi—file search and switch facilities. It has been used as the basis for a hotel management system. We at A.R.K. have become increasingly disillusioned with the little support offered by Psion to those who program using their Xchange products. There is little point in writing under Xchange Archive on the PC as we don’t know who has it and therefore we cannot tell those people that we have a product for it ! This has led to us producing more 68000 assembler work which depends on no other company for support. The ‘Spy’ file editor was 6 months in the making and has now resulted, after many more months, in this multi—window, multi—view ‘Master Spy-’ system with many additional facilities. Looking to the future, we believe that most popular small computer systems (hopefully- including the QL) will eventually be emulated faster on Transputer and other ‘parallel’ home micros. If this proves to be the case, then software designed and purchased now will not be made wholly redundent by any computer company’s policies and failures. Whether an emulator appears for the QL will, of course, depend on whether a software writer perceives a market for one at the time that a popular parallel micro appears.
MASTER INTRODUCTION
So here we have it. After 800K of assembler source, and many months of hard slog. Up until the Spy, I have always developed assembler source code by multi—tasking the ‘Metacomco EDitor’ together with the standard ‘CST Assembler’. The assembler was a straight forward choice because of its speed and size. The editor was chosen because its small size was ideal for the working environment. Unfortunately ED was far too slow and unresponsive. The main alternative ‘The Editor’ was rejected because despite its programmability and speed it was far too big for an environment requiring : debugging / assembling / testing / crashing / re—loading / debugging / re—assembling etc. I still use a copy of the Editor for those occasions when a program is the only solution to an editing challenge. Another problem was the ‘one file per editor limit’. The only way to work with several files was to exec several editors and switch between them with CTRL C. This wasted far too much memory and degraded the assemblers performance because less memory space was available for slave blocks which hold copies of media sectors. There was clearly a need for a small, fast, multi—file editor : The Spy was born. The ‘Master Spy’ is a much improved version supporting many unique options to make programming life easier. The Spy and Master Spy editors are not wordprocessors. They are designed primarily for programmers and deliberately leave out wordprocessor features which would restrict their speed on a machine which already has relatively slow screen handling. There is no provision made for margins as each lateral cursor movement would have to be checked against the presence of any margin so degrading the performance of the system. Most programmers don’t use margins anyway.
In the near future we hope to bring out a new system based on the Master Spy but including comprehensive output format control and printer drivers. We may even call it a wordprocessor. To maintain the highest speed it will follow the procedure : ‘Type it, Format it, Print it’ rather than Quill’s slow but more coherent format it as we go’ method. Which one people will prefer will clearly depend on the type of user they are. At least the Spy Wordprocessor won’t take take you back to the beginning of the document each time you save it ! And it will have the ability to process multiple files, with multiple views on each file. What it can do : * The Master Spy is a fully multi-tasking editor which can be executed alongside other jobs. * Its basic element is the ‘View’ with each file having between one and five views looking at it. * Master Spy can stack as many views as you want, up to your hardware system’s limit. * Each view has its own ‘real window’ enabling fast access to any of the stacked views. * When a file has more than one view on it, each view can modify the file regardless of file position. * Readable files can be of any type from binary to text, and files can be stripped to text if required. * Lazy screen technology is used to ensure near instant cursor response when required. * Being written in assembler the Master Spy is a very fast and compact system with no extension files. * All Master Spy commands are available with a single or combination keypress, or through the <F3> menu. * Multi—line strings are properly formatted during editing, with no ‘Line too long’ error messages. * The Master Spy can read itself, enable its customisation, and then write itself as an executable file. * All 256 byte size codes can be ‘poked’ in both insert and overwrite modes. * Full instructions are given to enable a very high level of customisation for the task in hand. * As a single program of under 35K, the Master Spy can load in under 8 seconds from disk. * The Master Spy editor is independent, requiring no secondary or extension files to run. * Ideal for use under multi—tasking ‘front end’ systems like QRAM Utilities. * Exceptionally fast Search and Exchange facilities save time and increase productivity. * The status line information can be switched between Off, Basic, and Advanced. * Comprehensive view and system information is available through the Kernel option. * Efficient use of memory is guaranteed with computer assisted allocation for each view opened. * Blocks of lines can be transferred globally between, and locally within, files. * A line cut and paste facility allows immediate line re—positioning without resort to block operations. * Optional customisable split screen scrolling improves speed of cursor positioning and usability. * A panning facility allows coherent left and right movement across a files contents. Possible applications * Fast program development in most languages from assembler to Superbasic. * Creation and modification of large format documents up to 32767 columns. * Analysis and modification of any file containing text, binary or both including rndv/flp conversion. * Communications in which files with modem control codes can be produced. * Modification of exec files which can be written maintaining executable/data status. * Some limited wordprocessing and data management including address list maintenance. * Recovery of information from corrupt files like Quill docs and Archive dbfs.
MASTER SPY GETTING STARTED
Thank you for buying this copy of the Master Spy file editor. The Master Spy Editor is an unprotected software system. If copies of the program are distributed without authorisation then this will inevitably restrict future research and development, and may lead to the abandonment of future products. Please support the future of your QL and all the programmers that still develop systems for it by refusing to pirate copyright programs for others. The contents of the original medium should look like this Boot : A small SuperBasic program which exec’s (loads & runs) the Master Spy from reset and F1 Master : Master Spy for use with monitors. TVMaster : Master Spy for use with televisions. Help : A ‘help’ file which can be accessed during editing by pressing Fl. Boot_bak : Backup of the boot program. Master_bak : Backup of the monitor version.
TvMaster_bak : Backup of the TV version. Help_bak : Backup of the help file. THE BACKUP PROCEDURE 1. Back up ALL the files provided to a new safe medium. 2. IF you own QRAM, TaskMaster or other front ends Copy the file ‘Master to your working disk and follow the front ends installation procedure. ELSE Back up ALL the files to a second new medium and use this to load the system each time. ENDIF 3. Store the original and first copy in a safe place. The only file of any real importance is ‘Master’, or the TV version ‘TVMaster’. If the program will not copy successfully then try swopping drives. If this fails there are backup copies (_bak). If these also fail then please call us at the Kernel. To start Master Spy using the ‘Boot’ program 1. Place the medium with Boot, Master, and TVMaster in drive 1. 2. Reset the computer. 3. Press Fl. 4. Indicate your preference for the Monitor or Television version by pressing ‘N’ or ‘T’. To start Master Spy directly from SuperBasic
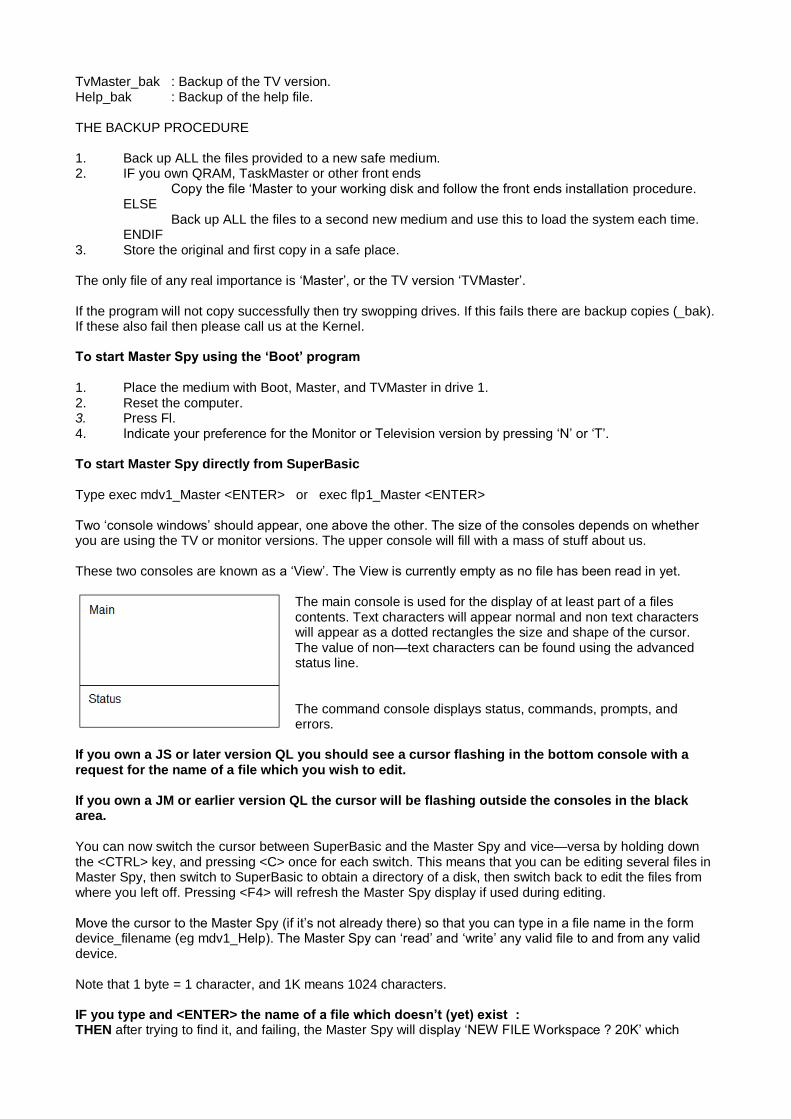
Type exec mdv1_Master <ENTER> or exec flp1_Master <ENTER> Two ‘console windows’ should appear, one above the other. The size of the consoles depends on whether you are using the TV or monitor versions. The upper console will fill with a mass of stuff about us. These two consoles are known as a ‘View’. The View is currently empty as no file has been read in yet.
The main console is used for the display of at least part of a files contents. Text characters will appear normal and non text characters will appear as a dotted rectangles the size and shape of the cursor. The value of non—text characters can be found using the advanced status line. The command console displays status, commands, prompts, and errors.
If you own a JS or later version QL you should see a cursor flashing in the bottom console with a request for the name of a file which you wish to edit. If you own a JM or earlier version QL the cursor will be flashing outside the consoles in the black area. You can now switch the cursor between SuperBasic and the Master Spy and vice—versa by holding down the <CTRL> key, and pressing <C> once for each switch. This means that you can be editing several files in Master Spy, then switch to SuperBasic to obtain a directory of a disk, then switch back to edit the files from where you left off. Pressing <F4> will refresh the Master Spy display if used during editing. Move the cursor to the Master Spy (if it’s not already there) so that you can type in a file name in the form device_filename (eg mdv1_Help). The Master Spy can ‘read’ and ‘write’ any valid file to and from any valid device. Note that 1 byte = 1 character, and 1K means 1024 characters. IF you type and <ENTER> the name of a file which doesn’t (yet) exist : THEN after trying to find it, and failing, the Master Spy will display ‘NEW FILE Workspace ? 20K’ which
is saying ‘I can’t find the file so I’m assuming it’s a new one, is 20K enough space to hold it ?‘. Press <ESC> to re—edit the file name or <ENTER> to accept that a new file is to be created under the name given, and that 20K is fine. IF you type and <ENTER> the name of of an existing file : THEN the Master Spy will find it, read its header and display ‘OLD FILE Workspace 35K ?‘, or similar. This is saying ‘I’ve found it, and after due consideration I reckon 35K will be fine, providing you don’t intend to import large blocks of lines from other files !‘. Press <ESC> to re—edit the file name or <ENTER> to allocate the memory and read the file. If you intend ‘major surgery’ then consider increasing the workspace to make sure you will have enough. Once you are in ‘edit mode’ options for editing the file are now available with a single or combination keypress. However, if you are new to the Master Spy then pressing <F3> will offer a list of commands in a window in the centre of the screen. The <F3> list is designed to help beginners and once proficient you will find it quicker to access the options directly. You can change the size, shape and position of the views with <F4> and ‘Read’ new files for editing with <CTRL><R> or <F3> then <R>. You can create a separate ‘View’ of the current file with <CTRL><V> or <F3> then <V> though because the new view appears directly over the existing view you may like to re—position it to avoid confusion. All the available commands are listed in the Commands 1 / 2 section of the manual. It’s all yours.
DESIGN MASTER SPY
CONSOLES
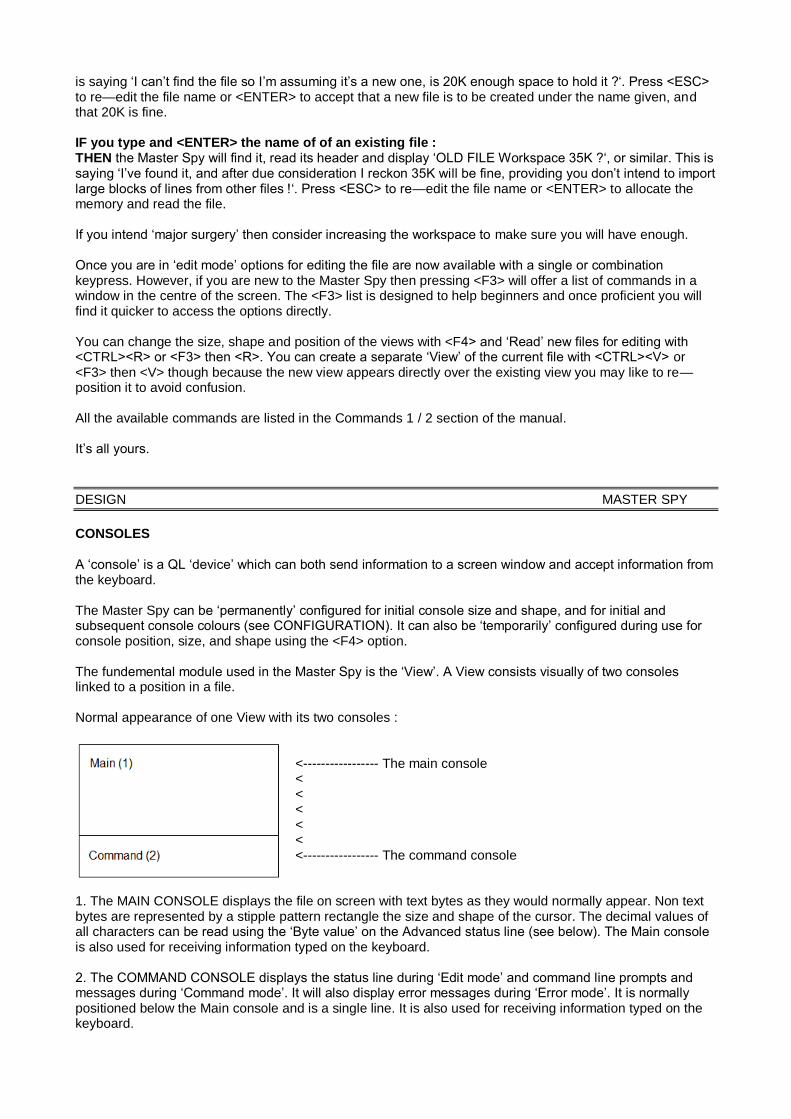
A ‘console’ is a QL ‘device’ which can both send information to a screen window and accept information from the keyboard. The Master Spy can be ‘permanently’ configured for initial console size and shape, and for initial and subsequent console colours (see CONFIGURATION). It can also be ‘temporarily’ configured during use for console position, size, and shape using the <F4> option. The fundemental module used in the Master Spy is the ‘View’. A View consists visually of two consoles linked to a position in a file. Normal appearance of one View with its two consoles :
<----------------- The main console < < < < < <----------------- The command console
1. The MAIN CONSOLE displays the file on screen with text bytes as they would normally appear. Non text bytes are represented by a stipple pattern rectangle the size and shape of the cursor. The decimal values of all characters can be read using the ‘Byte value’ on the Advanced status line (see below). The Main console is also used for receiving information typed on the keyboard. 2. The COMMAND CONSOLE displays the status line during ‘Edit mode’ and command line prompts and messages during ‘Command mode’. It will also display error messages during ‘Error mode’. It is normally positioned below the Main console and is a single line. It is also used for receiving information typed on the keyboard.
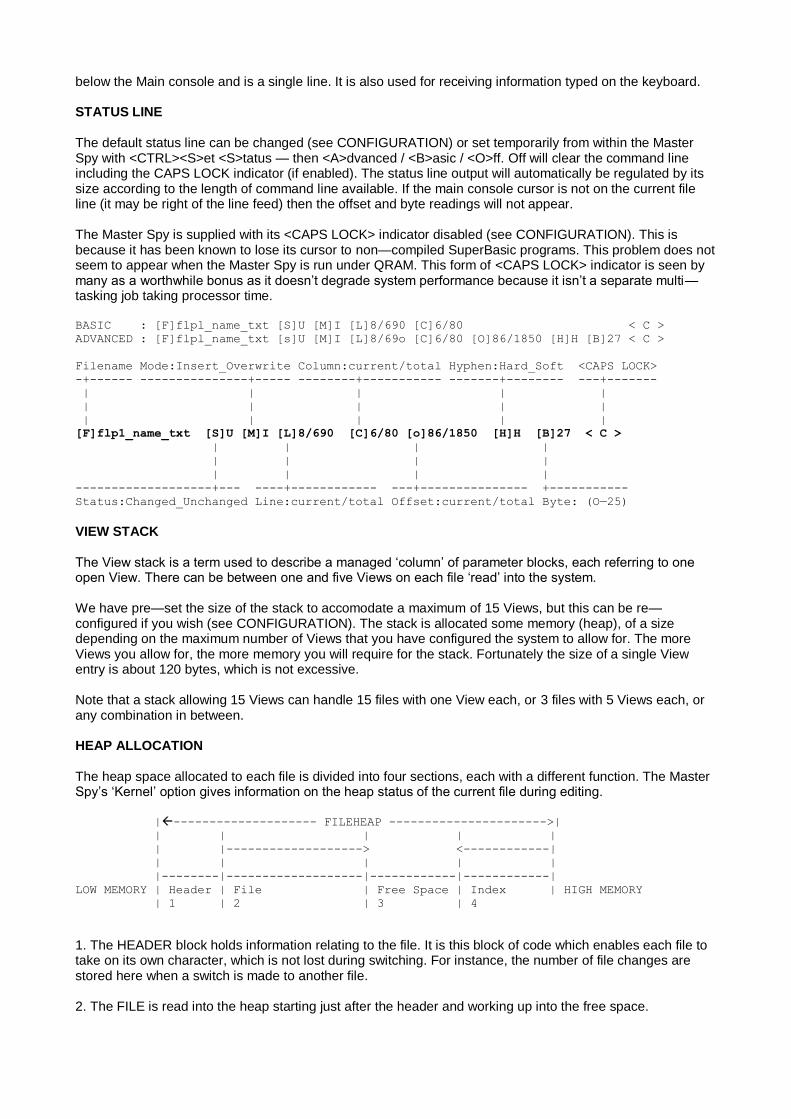
below the Main console and is a single line. It is also used for receiving information typed on the keyboard. STATUS LINE The default status line can be changed (see CONFIGURATION) or set temporarily from within the Master Spy with <CTRL><S>et <S>tatus — then <A>dvanced / <B>asic / <O>ff. Off will clear the command line including the CAPS LOCK indicator (if enabled). The status line output will automatically be regulated by its size according to the length of command line available. If the main console cursor is not on the current file line (it may be right of the line feed) then the offset and byte readings will not appear. The Master Spy is supplied with its <CAPS LOCK> indicator disabled (see CONFIGURATION). This is because it has been known to lose its cursor to non—compiled SuperBasic programs. This problem does not seem to appear when the Master Spy is run under QRAM. This form of <CAPS LOCK> indicator is seen by many as a worthwhile bonus as it doesn’t degrade system performance because it isn’t a separate multi—tasking job taking processor time. BASIC : [F]flpl_name_txt [S]U [M]I [L]8/690 [C]6/80 < C >
ADVANCED : [F]flpl_name_txt [s]U [M]I [L]8/69o [C]6/80 [O]86/1850 [H]H [B]27 < C >
Filename Mode:Insert_Overwrite Column:current/total Hyphen:Hard_Soft <CAPS LOCK>
-+------ ---------------+----- --------+----------- -------+-------- ---+-------
| | | | |
| | | | |
| | | | |
[F]flp1_name_txt [S]U [M]I [L]8/690 [C]6/80 [o]86/1850 [H]H [B]27 < C >
| | | |
| | | |
| | | |
-------------------+--- ----+------------ ---+--------------- +-----------
Status:Changed_Unchanged Line:current/total Offset:current/total Byte: (O—25)
VIEW STACK The View stack is a term used to describe a managed ‘column’ of parameter blocks, each referring to one open View. There can be between one and five Views on each file ‘read’ into the system. We have pre—set the size of the stack to accomodate a maximum of 15 Views, but this can be re—configured if you wish (see CONFIGURATION). The stack is allocated some memory (heap), of a size depending on the maximum number of Views that you have configured the system to allow for. The more Views you allow for, the more memory you will require for the stack. Fortunately the size of a single View entry is about 120 bytes, which is not excessive. Note that a stack allowing 15 Views can handle 15 files with one View each, or 3 files with 5 Views each, or any combination in between. HEAP ALLOCATION
The heap space allocated to each file is divided into four sections, each with a different function. The Master Spy’s ‘Kernel’ option gives information on the heap status of the current file during editing. |-------------------- FILEHEAP ---------------------->|
| | | | |
| |-------------------> <------------|
| | | | |
|--------|-------------------|------------|------------|
LOW MEMORY | Header | File | Free Space | Index | HIGH MEMORY
| 1 | 2 | 3 | 4
1. The HEADER block holds information relating to the file. It is this block of code which enables each file to take on its own character, which is not lost during switching. For instance, the number of file changes are stored here when a switch is made to another file. 2. The FILE is read into the heap starting just after the header and working up into the free space.
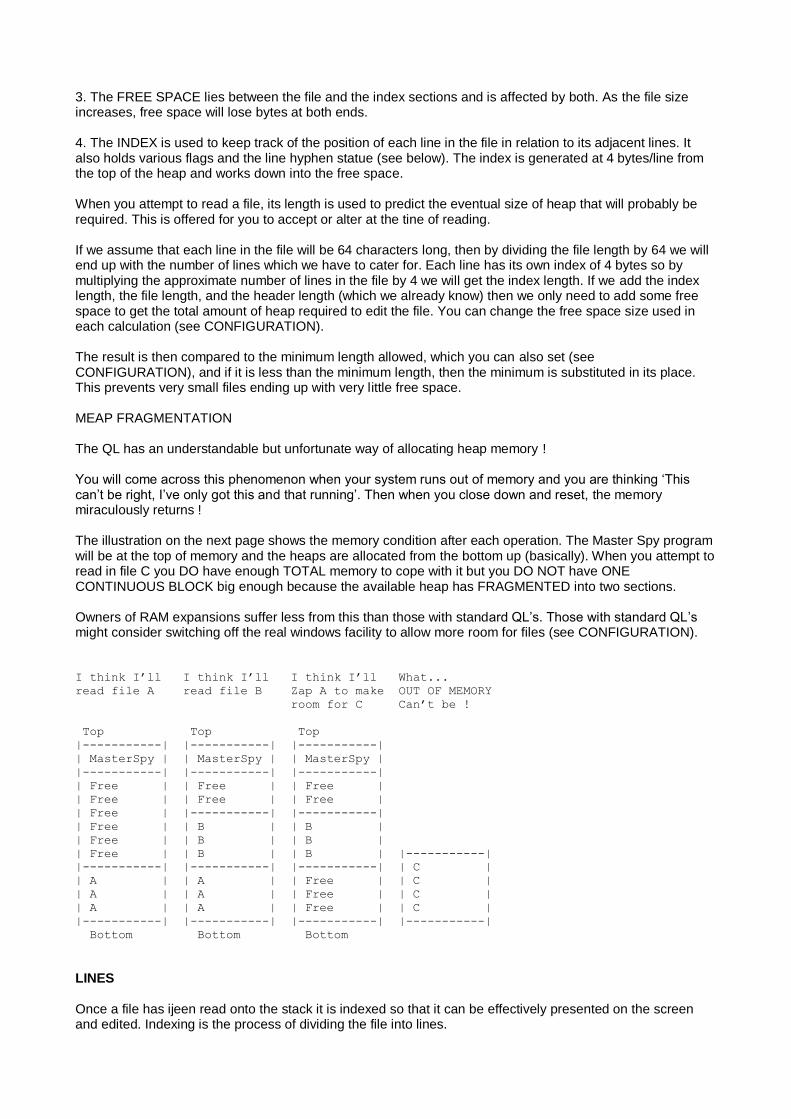
3. The FREE SPACE lies between the file and the index sections and is affected by both. As the file size increases, free space will lose bytes at both ends. 4. The INDEX is used to keep track of the position of each line in the file in relation to its adjacent lines. It also holds various flags and the line hyphen statue (see below). The index is generated at 4 bytes/line from the top of the heap and works down into the free space. When you attempt to read a file, its length is used to predict the eventual size of heap that will probably be required. This is offered for you to accept or alter at the tine of reading. If we assume that each line in the file will be 64 characters long, then by dividing the file length by 64 we will end up with the number of lines which we have to cater for. Each line has its own index of 4 bytes so by multiplying the approximate number of lines in the file by 4 we will get the index length. If we add the index length, the file length, and the header length (which we already know) then we only need to add some free space to get the total amount of heap required to edit the file. You can change the free space size used in each calculation (see CONFIGURATION). The result is then compared to the minimum length allowed, which you can also set (see CONFIGURATION), and if it is less than the minimum length, then the minimum is substituted in its place. This prevents very small files ending up with very little free space. MEAP FRAGMENTATION The QL has an understandable but unfortunate way of allocating heap memory ! You will come across this phenomenon when your system runs out of memory and you are thinking ‘This can’t be right, I’ve only got this and that running’. Then when you close down and reset, the memory miraculously returns ! The illustration on the next page shows the memory condition after each operation. The Master Spy program will be at the top of memory and the heaps are allocated from the bottom up (basically). When you attempt to read in file C you DO have enough TOTAL memory to cope with it but you DO NOT have ONE CONTINUOUS BLOCK big enough because the available heap has FRAGMENTED into two sections. Owners of RAM expansions suffer less from this than those with standard QL’s. Those with standard QL’s might consider switching off the real windows facility to allow more room for files (see CONFIGURATION). I think I’ll I think I’ll I think I’ll What...
read file A read file B Zap A to make OUT OF MEMORY
room for C Can’t be !
Top Top Top
|-----------| |-----------| |-----------|
| MasterSpy | | MasterSpy | | MasterSpy |
|-----------| |-----------| |-----------|
| Free | | Free | | Free |
| Free | | Free | | Free |
| Free | |-----------| |-----------|
| Free | | B | | B |
| Free | | B | | B |
| Free | | B | | B | |-----------|
|-----------| |-----------| |-----------| | C |
| A | | A | | Free | | C |
| A | | A | | Free | | C |
| A | | A | | Free | | C |
|-----------| |-----------| |-----------| |-----------|
Bottom Bottom Bottom
LINES Once a file has ijeen read onto the stack it is indexed so that it can be effectively presented on the screen and edited. Indexing is the process of dividing the file into lines.
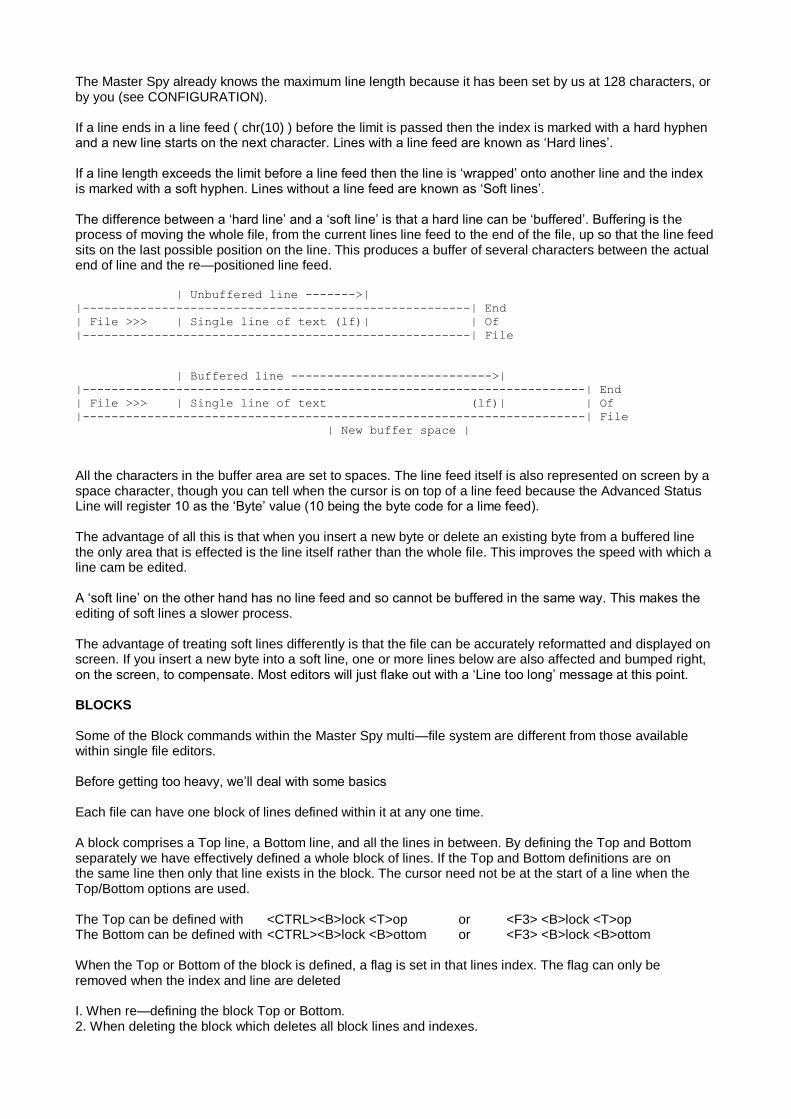
The Master Spy already knows the maximum line length because it has been set by us at 128 characters, or by you (see CONFIGURATION). If a line ends in a line feed ( chr(10) ) before the limit is passed then the index is marked with a hard hyphen and a new line starts on the next character. Lines with a line feed are known as ‘Hard lines’. If a line length exceeds the limit before a line feed then the line is ‘wrapped’ onto another line and the index is marked with a soft hyphen. Lines without a line feed are known as ‘Soft lines’. The difference between a ‘hard line’ and a ‘soft line’ is that a hard line can be ‘buffered’. Buffering is the process of moving the whole file, from the current lines line feed to the end of the file, up so that the line feed sits on the last possible position on the line. This produces a buffer of several characters between the actual end of line and the re—positioned line feed. | Unbuffered line ------->|
|------------------------------------------------------| End
| File >>> | Single line of text (lf)| | Of
|------------------------------------------------------| File
| Buffered line ---------------------------->|
|----------------------------------------------------------------------| End
| File >>> | Single line of text (lf)| | Of
|----------------------------------------------------------------------| File
| New buffer space |
All the characters in the buffer area are set to spaces. The line feed itself is also represented on screen by a space character, though you can tell when the cursor is on top of a line feed because the Advanced Status Line will register 10 as the ‘Byte’ value (10 being the byte code for a lime feed). The advantage of all this is that when you insert a new byte or delete an existing byte from a buffered line the only area that is effected is the line itself rather than the whole file. This improves the speed with which a line cam be edited. A ‘soft line’ on the other hand has no line feed and so cannot be buffered in the same way. This makes the editing of soft lines a slower process. The advantage of treating soft lines differently is that the file can be accurately reformatted and displayed on screen. If you insert a new byte into a soft line, one or more lines below are also affected and bumped right, on the screen, to compensate. Most editors will just flake out with a ‘Line too long’ message at this point. BLOCKS Some of the Block commands within the Master Spy multi—file system are different from those available within single file editors. Before getting too heavy, we’ll deal with some basics Each file can have one block of lines defined within it at any one time. A block comprises a Top line, a Bottom line, and all the lines in between. By defining the Top and Bottom separately we have effectively defined a whole block of lines. If the Top and Bottom definitions are on the same line then only that line exists in the block. The cursor need not be at the start of a line when the Top/Bottom options are used. The Top can be defined with <CTRL><B>lock <T>op or <F3> <B>lock <T>op The Bottom can be defined with <CTRL><B>lock <B>ottom or <F3> <B>lock <B>ottom When the Top or Bottom of the block is defined, a flag is set in that lines index. The flag can only be removed when the index and line are deleted I. When re—defining the block Top or Bottom. 2. When deleting the block which deletes all block lines and indexes.

3. When deleting a line and its index using one of the line delete options. All other changes to the file should simply move the indexes relative to one another. You can even type new lines into the middle of a block and it won’t lose its top and bottom. The only confusion can occur when soft lines are involved. Due to complex re—indexing routines the blocks may occasionally be knocked out by a line as soft lines are split, but this is rare. For clarity and balanced design it was decided to introduce the concept of ‘Local’ and ‘Global’ block management. Once the block Top and Bottom have been defined, the block can be subject to the Local options ‘Copy’ Delete’ and ‘Write’ and the Global option ‘Put’. Local block management is similar to that available in a single file system. When Local commands are used they only- affect the current file. No additional memory is required because the ‘Free Space’ is used in the files own heap. Global block management is different in a number of respects. The options available are ‘Get’ ‘Put and ‘Zap’. The most important difference is that a Global block is allocated its own heap space (memory). This makes it independent of all other file activity and ensures that the block is available to any of the files on the stack. A block, which has been defined within the current file with Top/Bottom can be ‘Put’ into its own new heap space. You can then ‘Get’ the block and place it at the cursor line anywhere in any file on the stack. If you wish to free some memory for other purposes you can ‘Zap’ the block. If a Global block already- exists and you try to ‘Put’ another, then you will be offered the option to ‘overwrite’ the existing block which deletes the old block and creates a new one. PRINTERS The Spy and Master Spy editors do not support any pre—defined printer drivers ! The Spy Wordprocessor will include drivers and this is due to be released in January 89 (1989 !). For those determined to use this as a wordprocessor you can import Master Spy text files into Quill for final formatting. Programmers normally only require listings and these can be printed simply by ‘writing’ files or blocks of lines to ‘ser1’ or ‘par_’ instead of to a device/filename combination. With your printer connected to ser1 : Print a file with <CTRL><W> ser1 <ENTER> With your printer connected to ser1 and your block Top/Bottom defined. Print a block of lines with <CTRL><B> <W> ser1 <ENTER> Because of the Master Spy’s ability to accept any of the 255 byte sized codes you can poke printer codes directly into the Master Spy. This is tedious and time consuming. Fortunately another company can help QL owners out here : PSIENTIFIC SOFTWARE have written a program called ‘KEYDEFINE’ for £10 which will multi-task with the Master Spy. KeyDefine is a background task which monitors what you are typing. When you press a certain combination of keys it jumps in and replaces them with a pre—defined sequence of bytes. For instance pressing <ALT><U> might be used to get KeyDefine to poke the codes to turn your printer’s ‘underline’ facility on. This makes a bit of a mess of the screen but it does work well with the Master Spy because if the insertion of new codes leads to the line going beyond its limit, then instead of flaking out with ‘Line too long’ the Master Spy will character wrap the line (push the line feed onto the next line). The printer will not be affected by the screen presentation of the file. KeyDefine will naturally slow down your system a touch while it is running in the background, as will any other programs which demand processor time. Unfortunately it appears that KeyDefine is not compatible with the Thor because of its use of KEYROW.
OVERWRITE
Once you have chosen to edit a file in overwrite mode you cannot insert or delete any characters from the file, you can only change those characters which already exist. If you read an executable binary file the Master Spy will start off in overwrite mode. This is because inserting’ chatacters into such a file will almost certainly destroy the coherence of the code. You can toggle to Insert with <F5> if you feel destructive of course If the cursor is not on the current line because it is to the right of a line feed, then it is effectively pointing to a position outside the file. Any keys pressed or characters poked in this position will be ignored.
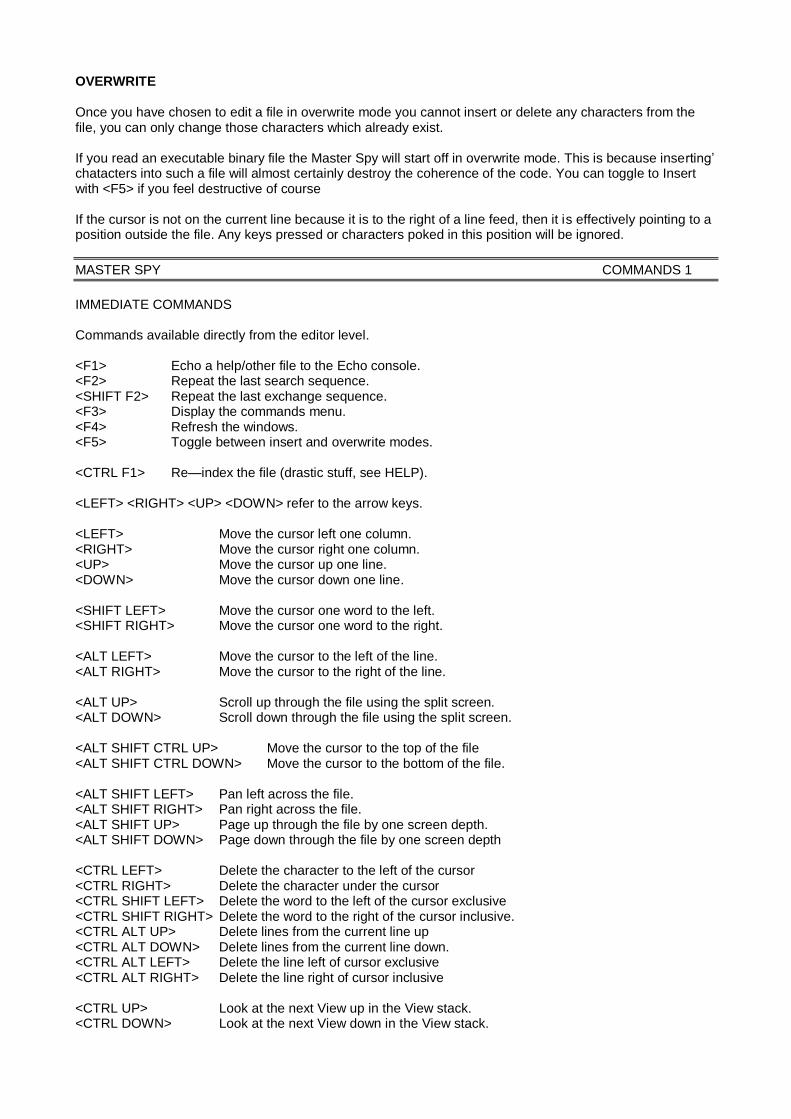
MASTER SPY COMMANDS 1
IMMEDIATE COMMANDS Commands available directly from the editor level. <F1> Echo a help/other file to the Echo console. <F2> Repeat the last search sequence. <SHIFT F2> Repeat the last exchange sequence. <F3> Display the commands menu. <F4> Refresh the windows. <F5> Toggle between insert and overwrite modes. <CTRL F1> Re—index the file (drastic stuff, see HELP). <LEFT> <RIGHT> <UP> <DOWN> refer to the arrow keys. <LEFT> Move the cursor left one column. <RIGHT> Move the cursor right one column. <UP> Move the cursor up one line. <DOWN> Move the cursor down one line. <SHIFT LEFT> Move the cursor one word to the left. <SHIFT RIGHT> Move the cursor one word to the right. <ALT LEFT> Move the cursor to the left of the line. <ALT RIGHT> Move the cursor to the right of the line. <ALT UP> Scroll up through the file using the split screen. <ALT DOWN> Scroll down through the file using the split screen. <ALT SHIFT CTRL UP> Move the cursor to the top of the file <ALT SHIFT CTRL DOWN> Move the cursor to the bottom of the file. <ALT SHIFT LEFT> Pan left across the file. <ALT SHIFT RIGHT> Pan right across the file. <ALT SHIFT UP> Page up through the file by one screen depth. <ALT SHIFT DOWN> Page down through the file by one screen depth <CTRL LEFT> Delete the character to the left of the cursor <CTRL RIGHT> Delete the character under the cursor <CTRL SHIFT LEFT> Delete the word to the left of the cursor exclusive <CTRL SHIFT RIGHT> Delete the word to the right of the cursor inclusive. <CTRL ALT UP> Delete lines from the current line up <CTRL ALT DOWN> Delete lines from the current line down. <CTRL ALT LEFT> Delete the line left of cursor exclusive <CTRL ALT RIGHT> Delete the line right of cursor inclusive <CTRL UP> Look at the next View up in the View stack. <CTRL DOWN> Look at the next View down in the View stack.

<SHIFT ENTER> Intelligent Newline with auto indent. <ESC> Escape to the previous command level. <ENTER> Break a line at the cursor. <TABULATE> Tabulate according to the set tab distance. <CTRL B> Block Use the BLOCK menu. <CTRL D> Down Search for a string DOWN from the current position. <CTRL E> Exchange EXCHANGE two strings with Repeat and Query options. <CTRL K> Kernel Display the Master Spy KERNEL information. <CTRL L> Line Cut a LINE from the file, or Paste a line to the file. <CTRL H> Move MOVE the cursor to top, bottom, line, offset or mark. <CTRL P> Poke POKE a byte to the current cursor position. <CTRL Q> Quit QUIT the Master Spy completely. <CTRL B> Read READ a new file in to the Master Spy stack. <CTRL S> Set SET system parameters to different values. <CTRL T> Tools TOOLS like Wordcount and byte range stripping. <CTRL U> Up Search for a string UP from the current position. <CTRL V> View Create a new VIEW on the current file. <CTRL W> Write WRITE the current file to any device. <CTRL Z> Zap ZAP the current file from the stack. SECONDARY COMMAND MENUS
F3 : Includes all the options listed above with explanations. BLOCK : Bottom Copy Delete Top Write / Get Put Zap / <ESC> MOVE : Bottom Line Mark Offset Top <ESC> SET : Columns Mark Priority Status Tab <ESC> TOOLS : Strip Wordcount <ESC>
COMMANDS 2 MASTER SPY
BLOCK
Input Press <F3> then <B> or hold down <CTRL> and press <B> Effect Manage blocks of lines Locally (within) or Globally (between) files. For information on block
management theory see DESIGN/BLOCKS.
Notes Displays a sub—menu ;
BLOCK : Bottom Copy Delete Top Write / Get Put Zap / <ESC>
The menu is subdivided into two main sections to avoid confusion between ‘Local’ and ‘Global’ block operations. The <ESC> key will return you to the editor level. Also see ‘LINE’ in this chapter as it works in a similar way with single lines.
LOCAL options which affect the current file. Bottom Define the bottom line of a block of lines in the current file. The bottom line in the block can be defined by moving the cursor to the bottom line and pressing <CTRL><B>lock <B>ottom or <F3> <B>lock <B>ottom. Copy Copy a previously defined block of lines (using top/bottom) in the current file to the current cursor line. After the operation there will be two copies of the block in the file. Delete Delete a previously defined block from the current file. The deletion is inclusive of the block top/bottom lines. Top Define the top line of a block of lines in the current file. The top line in the block can be

defined by moving the cursor to the top line and pressing <CTRL><B>lock <T>op or <P3> <B>lock <T>op. Write Write a previously defined block of lines to a device. This can be used to direct output to a printer (ser1 or par_) or to the screen (scr_) or even to a pipe, as well as to a file. GLOBAL options which relate to the independent Global block. Get Get the current Global block and paste a copy of it, starting on the cursor line. The Global block is kept after the operation. Put Create or optionally overwrite a Global block outside the current Spy system and then copy a previously defined Local block (using Top/Bottom) to it from the current file. Zap Zap the current Global block and free its heap space.
DOWN
Input Press <F3> then <D> or hold down <CTRL> and press <D> Effect Search for a text string down from the cursor position + 1. Notes The command line will ask for a string of text and will offer any previously entered text which can be
accepted by pressing <ENTER> or rejected by typing a new string, or altered with the help of the left/right arrow keys. The Master Spy will then start a case dependent search for the string from the current cursor position +1 in the current file. This operation can be repeated in the chosen direction by pressing the <F2> function key.
EXCHANGE
Input Press <F3> then <E> or hold down <CTRL> and press <E>
Effect Exchange strings up, or down from the current cursor position. Notes Indicate your intention to exchange upwards or downwards in the file from the current cursor
position. Then indicate whether the exchange is to be repeated till the start, or end of file, and finally indicate whether you wish to query each exchange before it is carried out. This operation can be repeated by holding down <SHIFT> and pressing the <F2> function key.
KERNEL Input Press <F3> then <K> or hold down <CTRL> and press <K>. Effect Display Spy information Notes This display’s comprehensive information on the systems status and includes a list of all the Views
on the stack. It also displays lines from any local and global blocks.
LINE
Input Press <F3> then <L> or hold down <CTRL> and press <L>. Effect Cut the current line from the file, OR Paste a line to the file at the current position.
Notes If no line has previously been Cut, then the current line will be cut to a new memory block outside the current files heap area. This is rather like ‘Putting’ a global block of lines to memory but only operates on one line at a time. If a line has previously been Cut from one of the files on the stack then Paste it from the memory block to the current cursor line, then remove the line from global memory and wait for another ‘Cut’.
MOVE
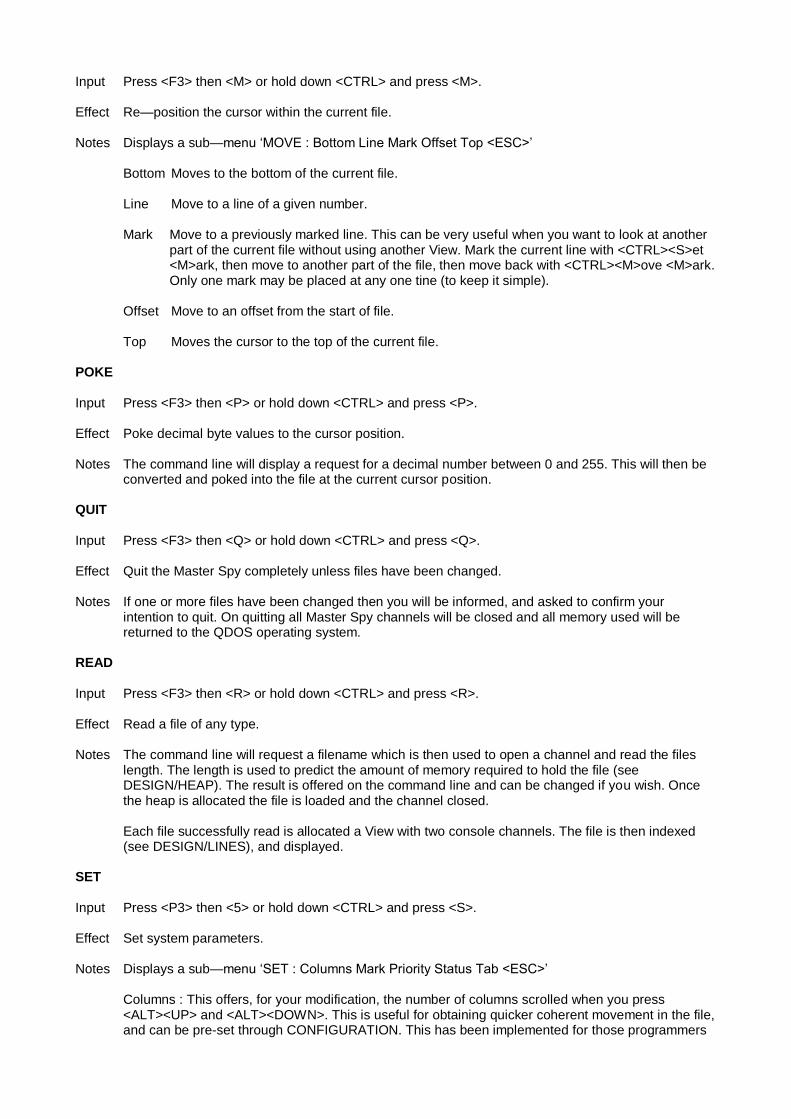
Input Press <F3> then <M> or hold down <CTRL> and press <M>. Effect Re—position the cursor within the current file. Notes Displays a sub—menu ‘MOVE : Bottom Line Mark Offset Top <ESC>’
Bottom Moves to the bottom of the current file. Line Move to a line of a given number. Mark Move to a previously marked line. This can be very useful when you want to look at another
part of the current file without using another View. Mark the current line with <CTRL><S>et <M>ark, then move to another part of the file, then move back with <CTRL><M>ove <M>ark. Only one mark may be placed at any one tine (to keep it simple).
Offset Move to an offset from the start of file. Top Moves the cursor to the top of the current file.
POKE Input Press <F3> then <P> or hold down <CTRL> and press <P>. Effect Poke decimal byte values to the cursor position. Notes The command line will display a request for a decimal number between 0 and 255. This will then be
converted and poked into the file at the current cursor position. QUIT
Input Press <F3> then <Q> or hold down <CTRL> and press <Q>.
Effect Quit the Master Spy completely unless files have been changed.
Notes If one or more files have been changed then you will be informed, and asked to confirm your
intention to quit. On quitting all Master Spy channels will be closed and all memory used will be returned to the QDOS operating system.
READ Input Press <F3> then <R> or hold down <CTRL> and press <R>.
Effect Read a file of any type.
Notes The command line will request a filename which is then used to open a channel and read the files
length. The length is used to predict the amount of memory required to hold the file (see DESIGN/HEAP). The result is offered on the command line and can be changed if you wish. Once the heap is allocated the file is loaded and the channel closed.
Each file successfully read is allocated a View with two console channels. The file is then indexed (see DESIGN/LINES), and displayed.
SET
Input Press <P3> then <5> or hold down <CTRL> and press <S>.
Effect Set system parameters.
Notes Displays a sub—menu ‘SET : Columns Mark Priority Status Tab <ESC>’
Columns : This offers, for your modification, the number of columns scrolled when you press <ALT><UP> and <ALT><DOWN>. This is useful for obtaining quicker coherent movement in the file, and can be pre-set through CONFIGURATION. This has been implemented for those programmers
who, like me, position the cursor according to important labels and code on the left of screen rather than any textual notes on the right. Entering 0 will enable full screen scrolling.
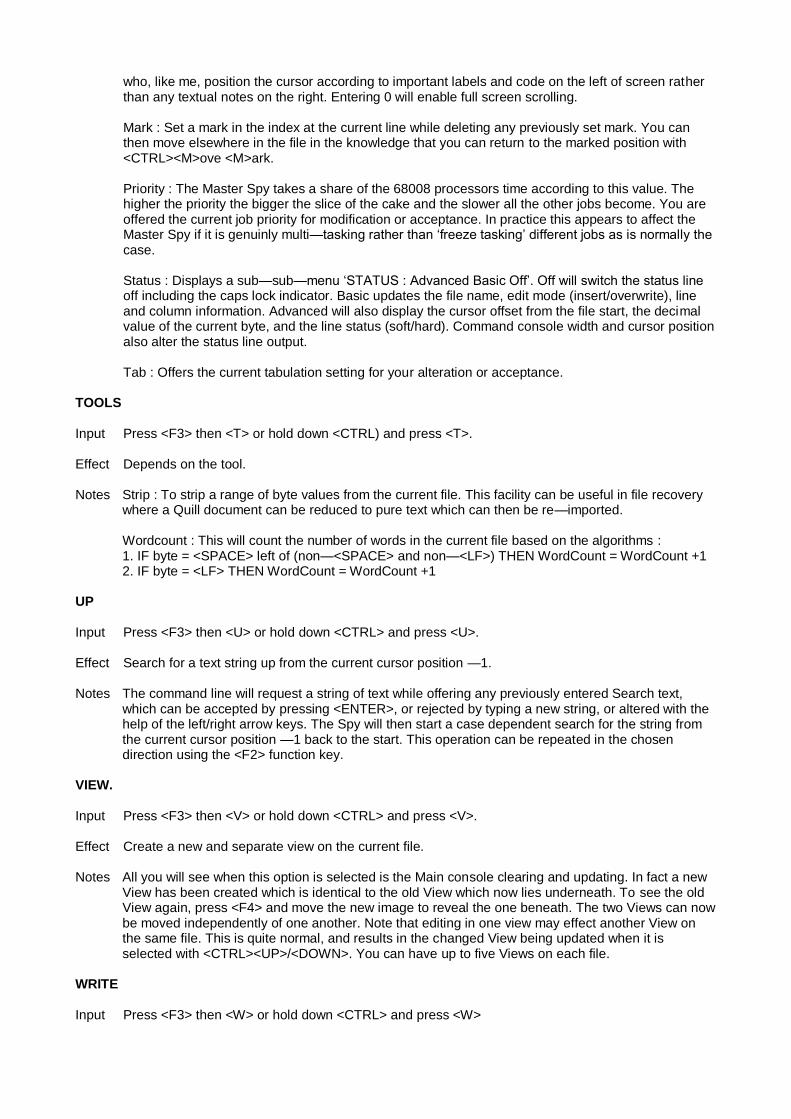
Mark : Set a mark in the index at the current line while deleting any previously set mark. You can then move elsewhere in the file in the knowledge that you can return to the marked position with <CTRL><M>ove <M>ark.
Priority : The Master Spy takes a share of the 68008 processors time according to this value. The higher the priority the bigger the slice of the cake and the slower all the other jobs become. You are offered the current job priority for modification or acceptance. In practice this appears to affect the Master Spy if it is genuinly multi—tasking rather than ‘freeze tasking’ different jobs as is normally the case.
Status : Displays a sub—sub—menu ‘STATUS : Advanced Basic Off’. Off will switch the status line off including the caps lock indicator. Basic updates the file name, edit mode (insert/overwrite), line and column information. Advanced will also display the cursor offset from the file start, the decimal value of the current byte, and the line status (soft/hard). Command console width and cursor position also alter the status line output.
Tab : Offers the current tabulation setting for your alteration or acceptance.
TOOLS
Input Press <F3> then <T> or hold down <CTRL) and press <T>. Effect Depends on the tool. Notes Strip : To strip a range of byte values from the current file. This facility can be useful in file recovery
where a Quill document can be reduced to pure text which can then be re—imported. Wordcount : This will count the number of words in the current file based on the algorithms : 1. IF byte = <SPACE> left of (non—<SPACE> and non—<LF>) THEN WordCount = WordCount +1 2. IF byte = <LF> THEN WordCount = WordCount +1
UP
Input Press <F3> then <U> or hold down <CTRL> and press <U>. Effect Search for a text string up from the current cursor position —1. Notes The command line will request a string of text while offering any previously entered Search text,
which can be accepted by pressing <ENTER>, or rejected by typing a new string, or altered with the help of the left/right arrow keys. The Spy will then start a case dependent search for the string from the current cursor position —1 back to the start. This operation can be repeated in the chosen direction using the <F2> function key.
VIEW.
Input Press <F3> then <V> or hold down <CTRL> and press <V>. Effect Create a new and separate view on the current file. Notes All you will see when this option is selected is the Main console clearing and updating. In fact a new
View has been created which is identical to the old View which now lies underneath. To see the old View again, press <F4> and move the new image to reveal the one beneath. The two Views can now be moved independently of one another. Note that editing in one view may effect another View on the same file. This is quite normal, and results in the changed View being updated when it is selected with <CTRL><UP>/<DOWN>. You can have up to five Views on each file.
WRITE
Input Press <F3> then <W> or hold down <CTRL> and press <W>
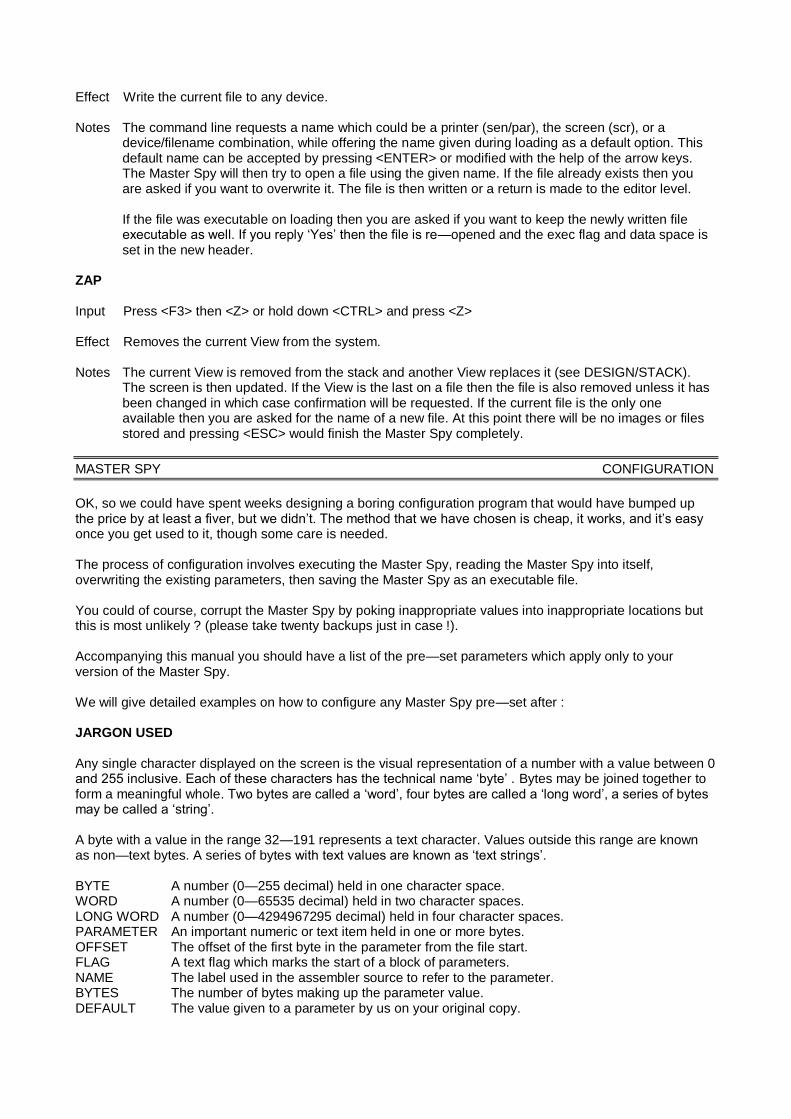
Effect Write the current file to any device. Notes The command line requests a name which could be a printer (sen/par), the screen (scr), or a
device/filename combination, while offering the name given during loading as a default option. This default name can be accepted by pressing <ENTER> or modified with the help of the arrow keys. The Master Spy will then try to open a file using the given name. If the file already exists then you are asked if you want to overwrite it. The file is then written or a return is made to the editor level. If the file was executable on loading then you are asked if you want to keep the newly written file executable as well. If you reply ‘Yes’ then the file is re—opened and the exec flag and data space is set in the new header.
ZAP Input Press <F3> then <Z> or hold down <CTRL> and press <Z> Effect Removes the current View from the system. Notes The current View is removed from the stack and another View replaces it (see DESIGN/STACK).
The screen is then updated. If the View is the last on a file then the file is also removed unless it has been changed in which case confirmation will be requested. If the current file is the only one available then you are asked for the name of a new file. At this point there will be no images or files stored and pressing <ESC> would finish the Master Spy completely.
MASTER SPY CONFIGURATION
OK, so we could have spent weeks designing a boring configuration program that would have bumped up the price by at least a fiver, but we didn’t. The method that we have chosen is cheap, it works, and it’s easy once you get used to it, though some care is needed. The process of configuration involves executing the Master Spy, reading the Master Spy into itself, overwriting the existing parameters, then saving the Master Spy as an executable file. You could of course, corrupt the Master Spy by poking inappropriate values into inappropriate locations but this is most unlikely ? (please take twenty backups just in case !). Accompanying this manual you should have a list of the pre—set parameters which apply only to your version of the Master Spy. We will give detailed examples on how to configure any Master Spy pre—set after : JARGON USED Any single character displayed on the screen is the visual representation of a number with a value between 0 and 255 inclusive. Each of these characters has the technical name ‘byte’ . Bytes may be joined together to form a meaningful whole. Two bytes are called a ‘word’, four bytes are called a ‘long word’, a series of bytes may be called a ‘string’. A byte with a value in the range 32—191 represents a text character. Values outside this range are known as non—text bytes. A series of bytes with text values are known as ‘text strings’. BYTE A number (0—255 decimal) held in one character space. WORD A number (0—65535 decimal) held in two character spaces. LONG WORD A number (0—4294967295 decimal) held in four character spaces. PARAMETER An important numeric or text item held in one or more bytes. OFFSET The offset of the first byte in the parameter from the file start. FLAG A text flag which marks the start of a block of parameters. NAME The label used in the assembler source to refer to the parameter. BYTES The number of bytes making up the parameter value. DEFAULT The value given to a parameter by us on your original copy.

RANGE The range of values which can be poked (not all may work !) DESCRIPTION A brief description of the function of the parameter. PEPARATION
1. Execute the Master Spy as described in GETTING STARTED (exec mdv1_Master from Basic). 2. Read the Master Spy into itself by typing its name and pressing <ENTER>. 3. Once the Master Spy has loaded you will see lots of junk on the screen ! Since most of the bytes which make up the Master Spy are outside the text range they are represented on screen by cursor size rectangles of dots. 4. Hold down <CTRL> and press <S>et then press <S>tatus then press <A>dvanced to enable the Advanced status line as we will need the ‘Offset’ reading. 5. Check that the Master Spy is in ‘overwrite mode’ (see command line) and toggle <F5> if not. 6. Hold down <CTRL> and press <D>own to search down through the file. 7. Type ‘PARS’ <ENTER> at the prompt for a string. 8. The cursor should now be on the ‘P’ in PARS at the start of all the Master Spy’s parameters. From here we can use a parameters flag (two text characters) to find it. You should start from this position in each of the following examples. Each parameter has a single line on the parameter sheet. You may find a ruler useful to pick out this line for easy reference. EXAMPLE 1 Task : Change the Master Spy to display the ‘Advanced’ instead of the ‘Basic’ status line on start up. To do this we need to change one byte next to the flag ‘ST’ at the offset given on the parameter sheet (find the line with the name FG_STATUS). Hold down <CTRL> and press <D>own then ST <ENTER> at the prompt to find the Flag relating to the status line which is also shown on the parameter sheet. Once the cursor is on the ‘3’ in ST move right until you are at the ‘Offset’ on the parameter sheet. The ‘Byte value’ [B] on the status line should now indicate that the current status parameter has a value of 1 (the Basic status line setting). If it hasn’t then either you are in the wrong place or the Master Spy has been previously re—configured. To change the byte to enable the Advanced status line, hold down <CTRL> and press <P>oke then type 2 <ENTER>. The cursor will move right one character having overwritten the previous value 1 with the new value 2 which will enable the advanced status line on startup. The file can now be re—saved by holding down <CTRL> and pressing <W>rite then <ENTER> to accept the ‘read’ filename. You will also be asked if the file is to stay executable, press <Y>es. EXAMPLE 2 Task : Change the Master Spy to allow a maximum line length of 256 bytes instead of the current 128. Find the name EL_MXBYTS on the parameter sheet. The ‘Bytes’ column indicates that there are two bytes to be changed here as the parameter has a word size value (0—65535). In practice any value over 32767 will result in corruption. Also the value should not be under the width in columns of the main console. THE STRUCTURE OF A 2 BYTE (WORD) PARAMETER Byte 1 (at Offset) Number of 256’s in the value Byte 2 (1 after Offset) Number of 1’s in the value From the above we can see that the new parameter will require a ‘1’ at the offset and a ‘0’ one after the offset to result in a total value of 256. From ‘PARS’ hold down <CTRL> and press <D>own then EL <ENTER> at the prompt to find the ‘Flag’ relating to the line size limit (as shown on the parameter sheet).
Once you are on the ‘E’ in EL move right until you are at the offset given on the parameter sheet. This should be the first byte. The ‘Byte value’ [B] on the status line should now read 0 (the number of 256’s in 128 !). If it hasn’t then either you are in the wrong place or the Master Spy has been previously re—configured. To change the ‘0’ to ‘1’ hold down <CTRL> and press <P>oke then type 1 <ENTER>. The cursor will move right one character having overwritten the previous value. The cursor should now be over the second byte in the word which should read ‘128’. To change this, hold down <CTRL> and press <P>oke then type 0 <ENTER>. The file can now be written by holding down <CTRL> and pressing <W>rite then <ENTER> to accept the load filename. EXAMPLE 3 Reduce the ‘minimum’ length of heap allocatable to any file from 20K to 15K. To do this we need to change four bytes next to the flag ‘HP’ at the offset given on the parameter sheet. Find the name HP_MINLEN on the parameter sheet. The ‘Bytes’ column indicates that there are four bytes to be changed here as the parameter has a long word size value (0—42949672). In practice there is little point in setting this at more than 20K (20480 Bytes) or less than 1K (1024 bytes). CHANGING 4 BYTE (LONG WORD) PARAMETERS Byte 1 (at Offset) Number of 16777216’s in the value Byte 2 (1 after Offset) Number of 65536’s in the value Byte 3 (2 after 0ffset) Number of 256’s in the value Byte 4 (3 after Offset) Number of 1’s in the value Hold down <CTRL> and press <D>own then HP <ENTER> at the prompt to find the Flag relating to the status line which is also shown on the parameter sheet. Once you are on the ‘H’ in HP move right until you are at the offset given on the parameter sheet for HP_MINLEN. Using the rules above : 20K (20480 bytes) converts to 0,0,80,0 decimal because 80 * 256 20480 15K (15360 Bytes) converts to 0,0,60,0 decimal because 60 * 256 15360 The status line ‘Byte value’ [B] should now show a value of 0 for the current byte. The next byte should also be 0, but the next should be 80. This is the one to change. Hold down <CTRL> and press <P>oke then type 60 <ENTER>. The cursor will move right one character having overwritten the previous value of 80. The cursor should now be on a byte of value 0. The file can now be re—saved by holding down <CTRL> and pressing <W>rite then <ENTER> to accept the existing filename. When asked if you want to maintain the files ‘executable’ status type <Y>es.
HELP MASTER SPY
There are five main kinds of fault which can occur with a computer system. 1. User errors 2. Mains power faults 3. Hardware faults 4. Software bugs 5. ROM bugs
User errors are usually trapped successfully by the software. Mains power faults become apparent if the system crashes or hangs regularly during your use of standard well debugged systems like the Psion suite (?). Hardware faults tend to be permanent and consistent. They may reveal themselves in anything from complete destruction to a gradual breakdown due to heat or use related deterioration. ROM bugs do exist but rarely show themselves because programmers using ROM routines usually avoid those calls which are affected. SOFTWARE BUGS
Of the five errors listed we are primarily concerned with software related faults. These can be separated into two main categories 1. Faults caused within the software system. 2. Faults caused by two or more software jobs interacting in such a way that the computer system does not work properly. If you suffer from a fault while running the Master Spy then please attempt to repeat the fault generating sequence to confirm its existence. We will upgrade your Master Spy free of charge if you find and document a bug in such a way that we can correct it for you. If something unexplained happens but you can’t pin it down, please call anyway as we may have reports from others which confirm that a fault does exist in a general area which can then be targetted. We have included a bug report sheet with the manual and this should be used to describe the fault and its affect on your system to us. Please send your bug report sheets back to us at the Kernel and we will reply as soon as possible after testing the bug. Please do not send your master cartridge until we have written back to confirm your findings. SAVING THE SITUATION
There are four levels of internal fault which increase in seriousness. 1 . Screen corruption Press <F4> to refresh the images. If the screen is still corrupt then the index may
also be corrupt.
2. Index corruption : After trying <F4> and failing to correct the screen, hold down <CTRL> and press <Fl> to re—generate the index according to the file. This removes all block and other markings but is usually successful. You may find that lines have shifted or expanded where the problem occured.
3. File corruption Fortunately the Master Spy can load and edit even a corrupt file so write the file if you can, then re—read it and edit out the corruption.
4. Crash or hang This is the worst that can happen and the situation cannot be saved unless you can flip out with <CTRL><C> and recover in some way.

The MASTER SPY BUG REPORT SHEET The MASTER SPY
GENERAL What happened ?
KEYPRESSES The last four key-presses, starting with the one before the fault. . 1. 2. 3. 4.
STATUS LINE : Please switch to Advanced status line if possible. <CTRL S> <S> <A> File name : Offset current/total : Mode insert/overwrite : Hyphen value : Line current/total : Byte value : Column current/total : MASTER SPY VERSION NUMBER ( On title screen ) : NOTES :
A.R.K. Distribution, Corve Farmhouse, Corve Lane, Chale Green, VENTNOR, Isle of Wight, P038 2LA, U.K.