Embed Size (px)
Citation preview
1
SPY-DVR16HYB2&SPY-DVR16HYB2ND
Instructions
1.0INTRODUCTION1.1Mainmenu2.0SPLITSCREEN3.0SYSTEMSETUP3.1GeneralSetup3.2TimeSetup3.3HDDSetup3.4ScreenSetup3.5EncodeSetup3.6PTZSetup3.7ChannelOSD3.8VideoDetection3.9Bitrate3.10RecordPlane3.11NetworkSetup3.12DDNS3.13FTP
3.14PPPoE3.15E-MAIL3.16SystemVersion3.17HDDInfo3.18SystemLog3.19User3.20SystemUpgrade3.21SystemMaintenance3.22FactorySettings4.0VIDEOPLAYBACK5.0VIDEOBACKUP6.0COLORADJUST7.0CHANNELMODE8.0VIDEOMANAGE
2
CongratulationsonpurchasingtheSpyClopsH.264DVRSecuritySystemSystemSpecifications:
• Multi-cameradigitalvideorecorderwhichincludesmotiondetection,keybuzzeralarm,e-mailandareamasking.
• TheDVRusesstateoftheartH.264videocompressiontechnologytomaximizeyourrecordingtimeandoptimizeyourvideoquality.H.264compressionsavesharddrivespaceandsupportsfasterdatatransfer.
• DatastoredintheDVRcaneasilyandquicklybebackedupviaaUSBdrive• Upto16cameracapacitysoupgradingyoursysteminthefuturewillbeeasyandtroublefree• AppleandAndroidsupportedmobileappsoyoucanviewyourvideofeedfromanywhereremotely• AnembeddedLinuxoperatingsystemprovidesyouwithstabilityandexcellentnetworkcapabilities• UpgradedDVRHardDrivespecificallydesignedforCCTVuse• 2USBportsinback• Idealforresidentialandcommercialinstallations
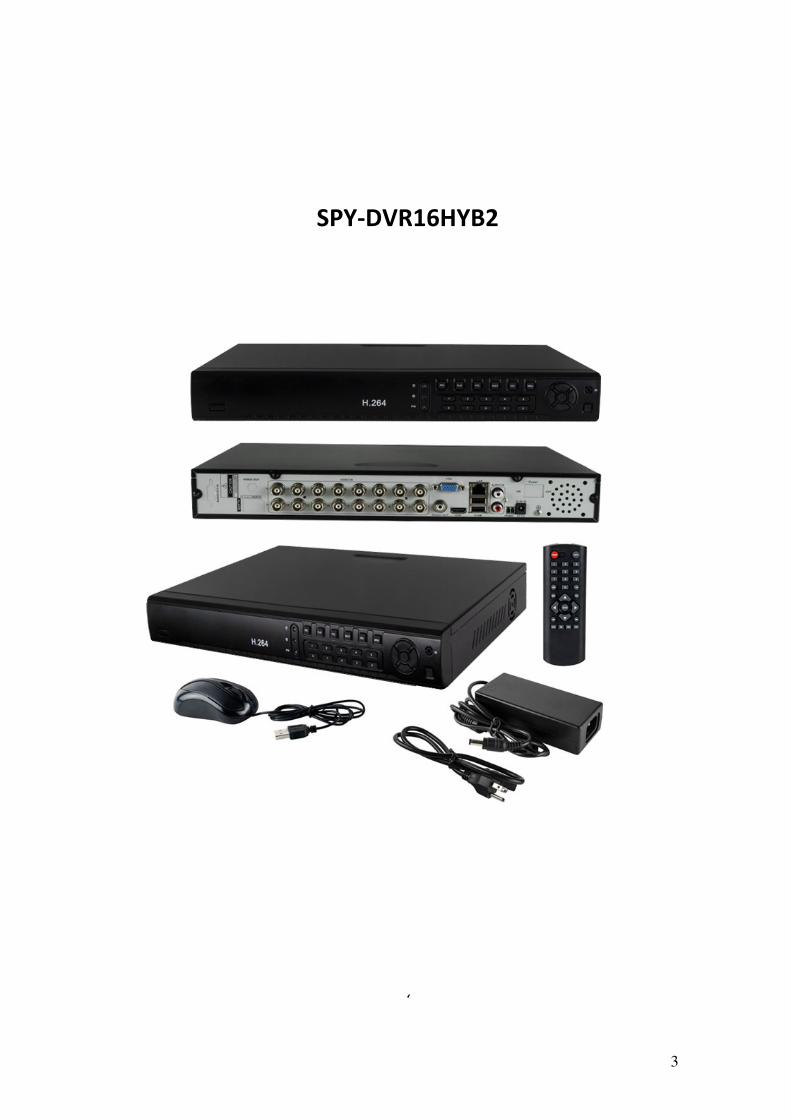
YourSystemIncludes:• 16channelH.264networkableDVR• Pre-installedupgradedDVRHardDrive(SPY-DVR16HYB2only)SPY-DVR16HYB2NDdoesnotinclude
HardDrive• Poweradapter• USBmouse• DVRremote
3
SPY-DVR16HYB2
‘
4
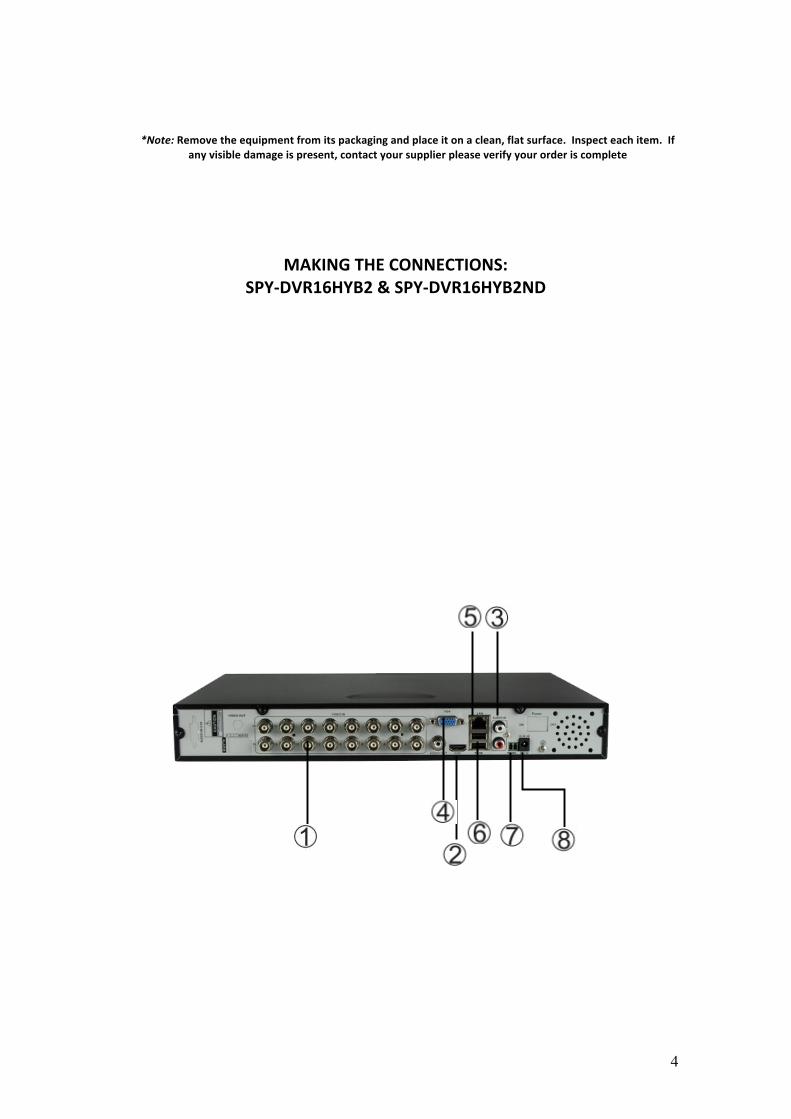
*Note:Removetheequipmentfromitspackagingandplaceitonaclean,flatsurface.Inspecteachitem.Ifanyvisibledamageispresent,contactyoursupplierpleaseverifyyourorderiscomplete
MAKINGTHECONNECTIONS:SPY-DVR16HYB2&SPY-DVR16HYB2ND
5
1.BNCvideoinfromcameras
2.HDMIoutput
3.RCAaudioINandOUT
4.VGAoutputtomonitor
5.RJ45Ethernetport
6.Mouse/USBbackup
7.RS485portforPTZcameracontrol
8.DC12Vadapterport
1.0INTRODUCTION
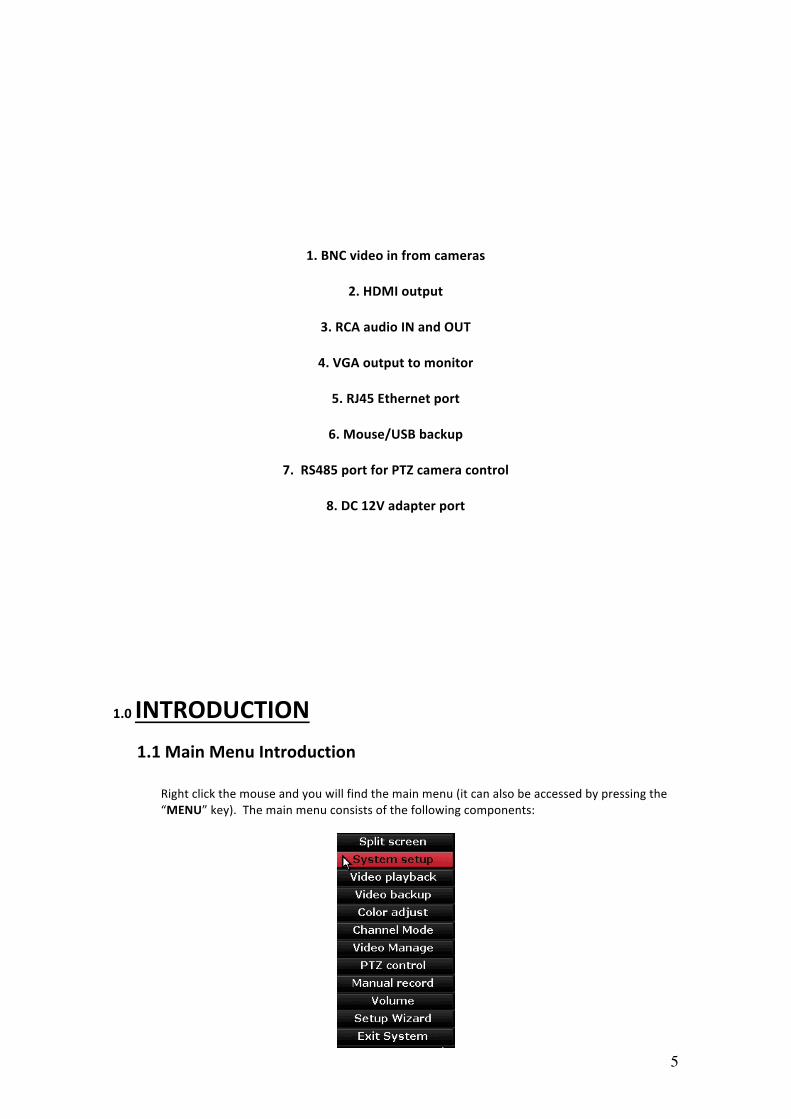
1.1 MainMenuIntroductionRightclickthemouseandyouwillfindthemainmenu(itcanalsobeaccessedbypressingthe“MENU”key).Themainmenuconsistsofthefollowingcomponents:
6
• SplitScreen• SystemSetup
• VideoPlayback
• VideoBackup
• Coloradjust
• ChannelMode
• VideoManage
• PTZcontrol
• Manualrecord• Volume
• SetupWizard
• ExitSystem
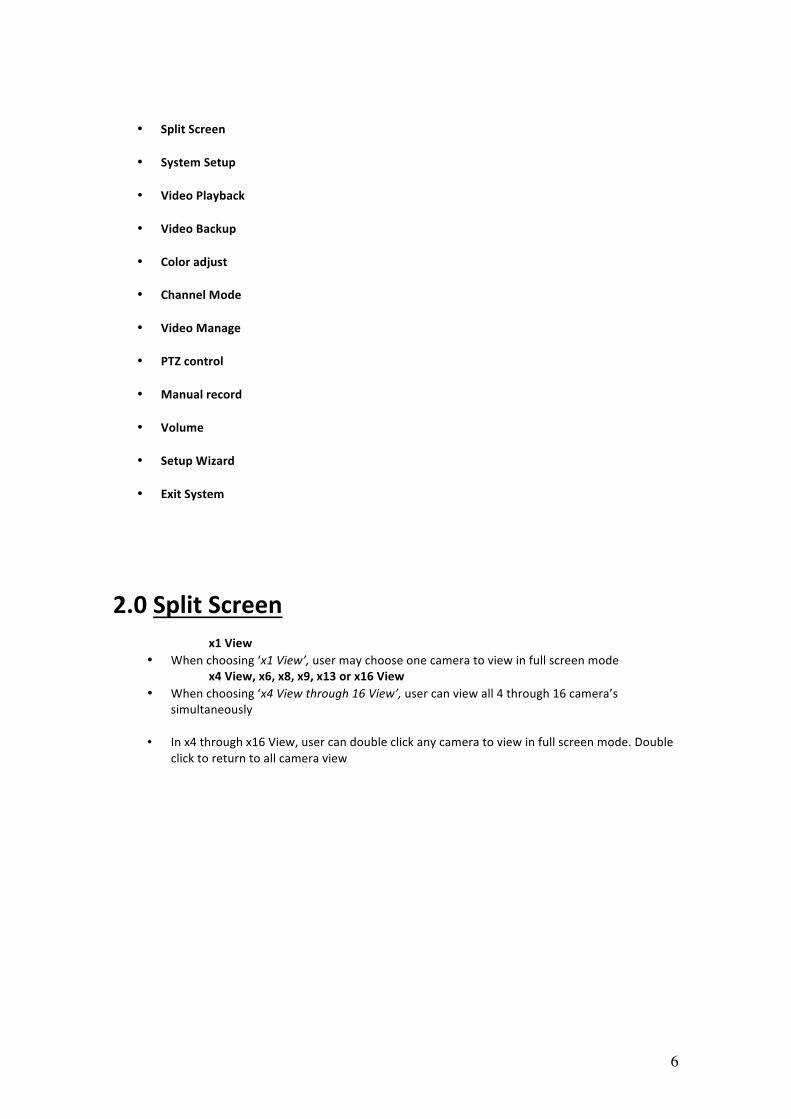
2.0SplitScreen x1View
• Whenchoosing‘x1View’,usermaychooseonecameratoviewinfullscreenmode x4View,x6,x8,x9,x13orx16View• Whenchoosing‘x4Viewthrough16View’,usercanviewall4through16camera’s
simultaneously• Inx4throughx16View,usercandoubleclickanycameratoviewinfullscreenmode.Double
clicktoreturntoallcameraview
7
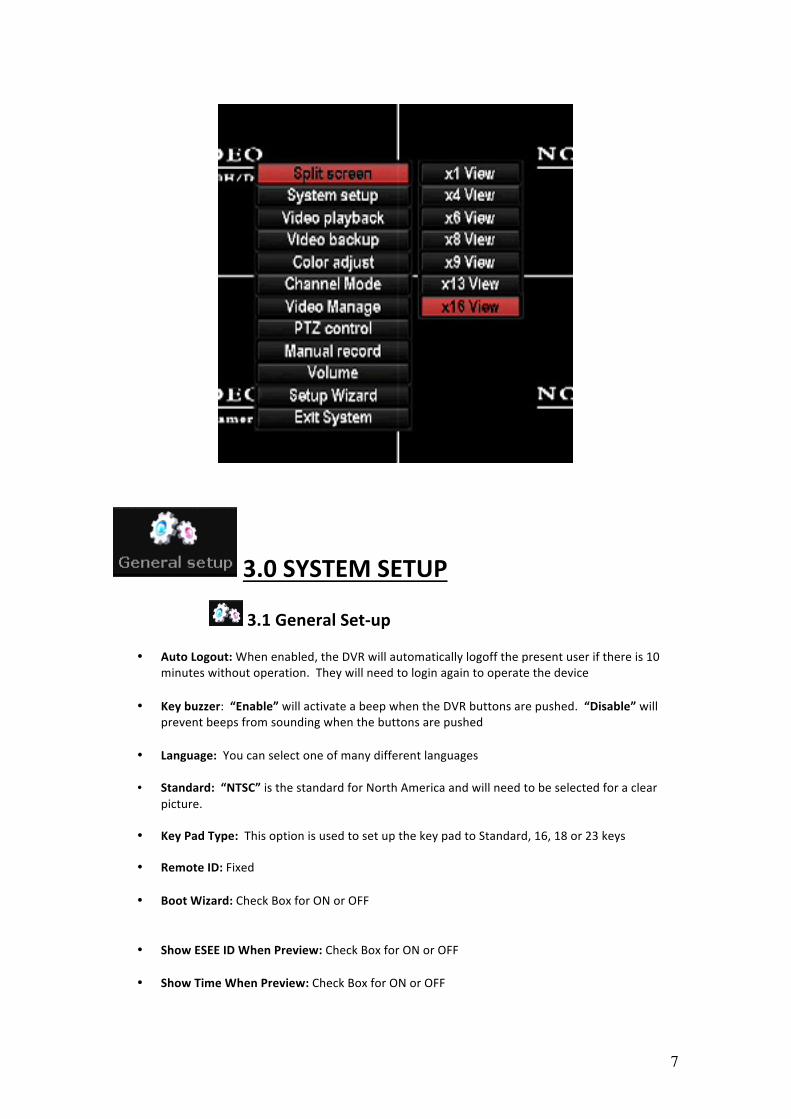
3.0SYSTEMSETUP
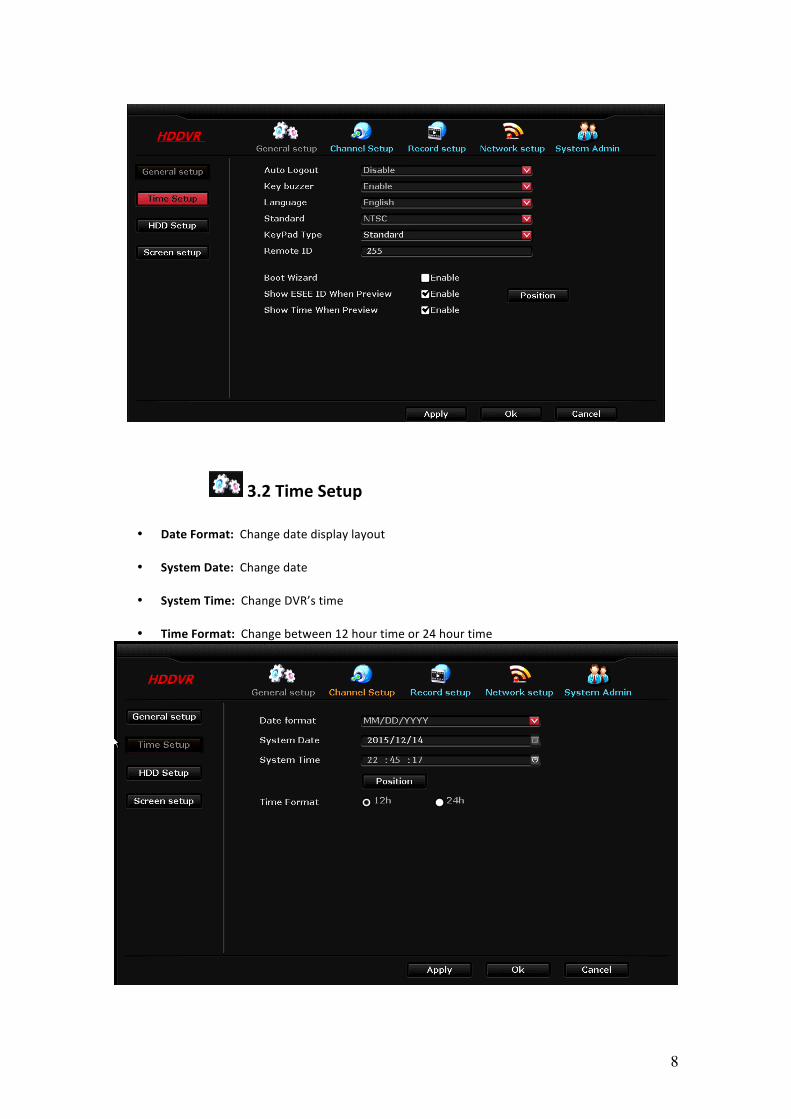
3.1GeneralSet-up
• AutoLogout:Whenenabled,theDVRwillautomaticallylogoffthepresentuserifthereis10minuteswithoutoperation.Theywillneedtologinagaintooperatethedevice
• Keybuzzer:“Enable”willactivateabeepwhentheDVRbuttonsarepushed.“Disable”willpreventbeepsfromsoundingwhenthebuttonsarepushed
• Language:Youcanselectoneofmanydifferentlanguages
• Standard:“NTSC”isthestandardforNorthAmericaandwillneedtobeselectedforaclearpicture.
• KeyPadType:ThisoptionisusedtosetupthekeypadtoStandard,16,18or23keys• RemoteID:Fixed
• BootWizard:CheckBoxforONorOFF
• ShowESEEIDWhenPreview:CheckBoxforONorOFF
• ShowTimeWhenPreview:CheckBoxforONorOFF
8
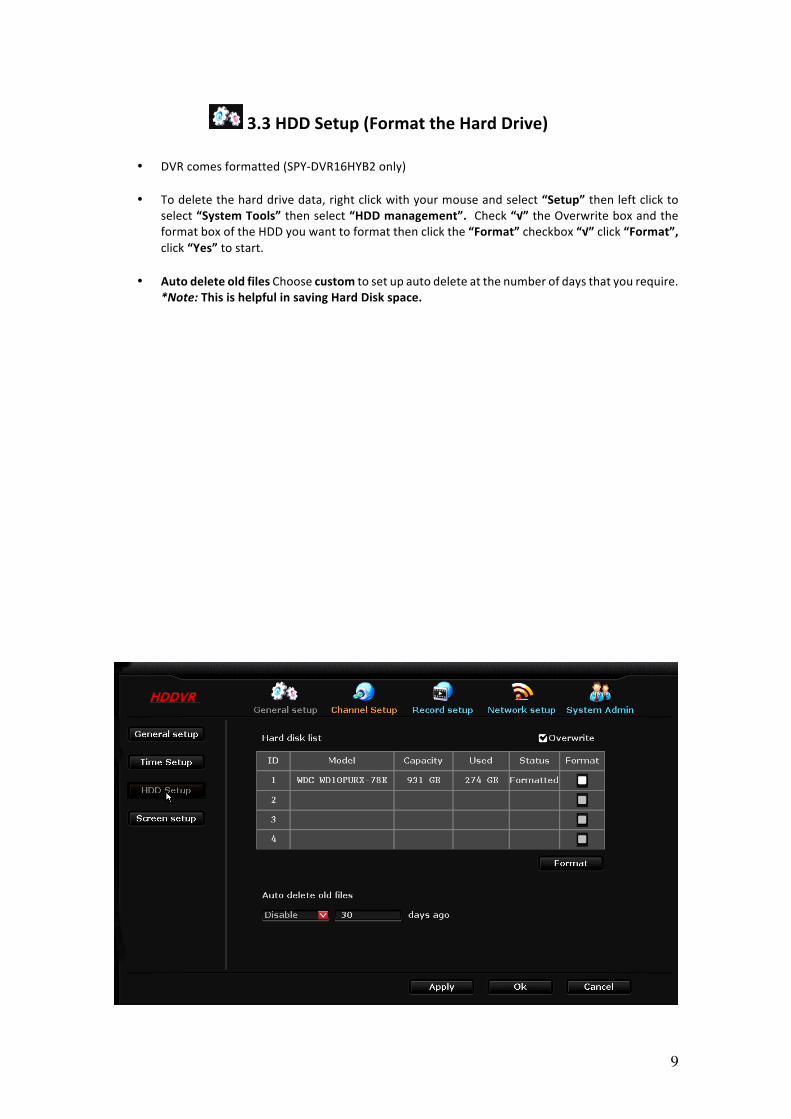
3.2TimeSetup
• DateFormat:Changedatedisplaylayout
• SystemDate:Changedate
• SystemTime:ChangeDVR’stime
• TimeFormat:Changebetween12hourtimeor24hourtime
9
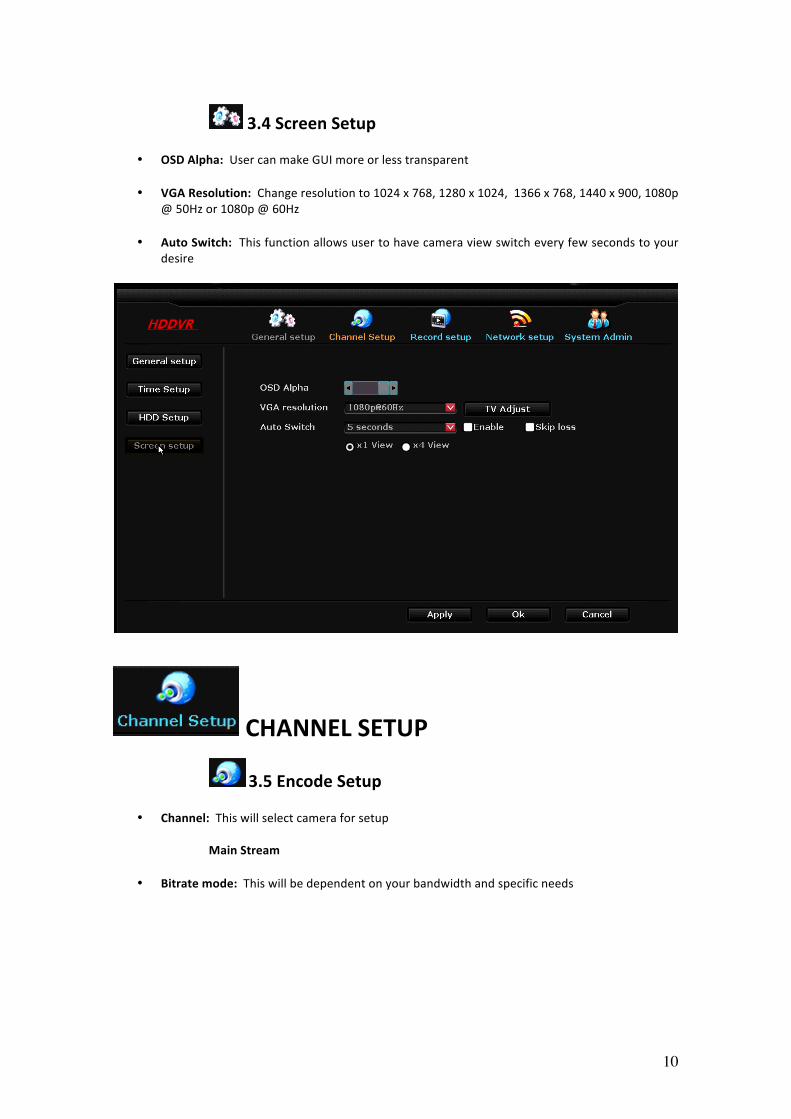
3.3HDDSetup(FormattheHardDrive)
• DVRcomesformatted(SPY-DVR16HYB2only)• Todeletetheharddrivedata,rightclickwithyourmouseandselect“Setup”thenleftclickto
select“SystemTools”thenselect“HDDmanagement”.Check“√”theOverwriteboxandtheformatboxoftheHDDyouwanttoformatthenclickthe“Format”checkbox“√”click“Format”,click“Yes”tostart.
• AutodeleteoldfilesChoosecustomtosetupautodeleteatthenumberofdaysthatyourequire.
*Note:ThisishelpfulinsavingHardDiskspace.
10
3.4ScreenSetup
• OSDAlpha:UsercanmakeGUImoreorlesstransparent
• VGAResolution:Changeresolutionto1024x768,1280x1024,1366x768,1440x900,1080p@50Hzor1080p@60Hz
• AutoSwitch:Thisfunctionallowsusertohavecameraviewswitcheveryfewsecondstoyourdesire
CHANNELSETUP
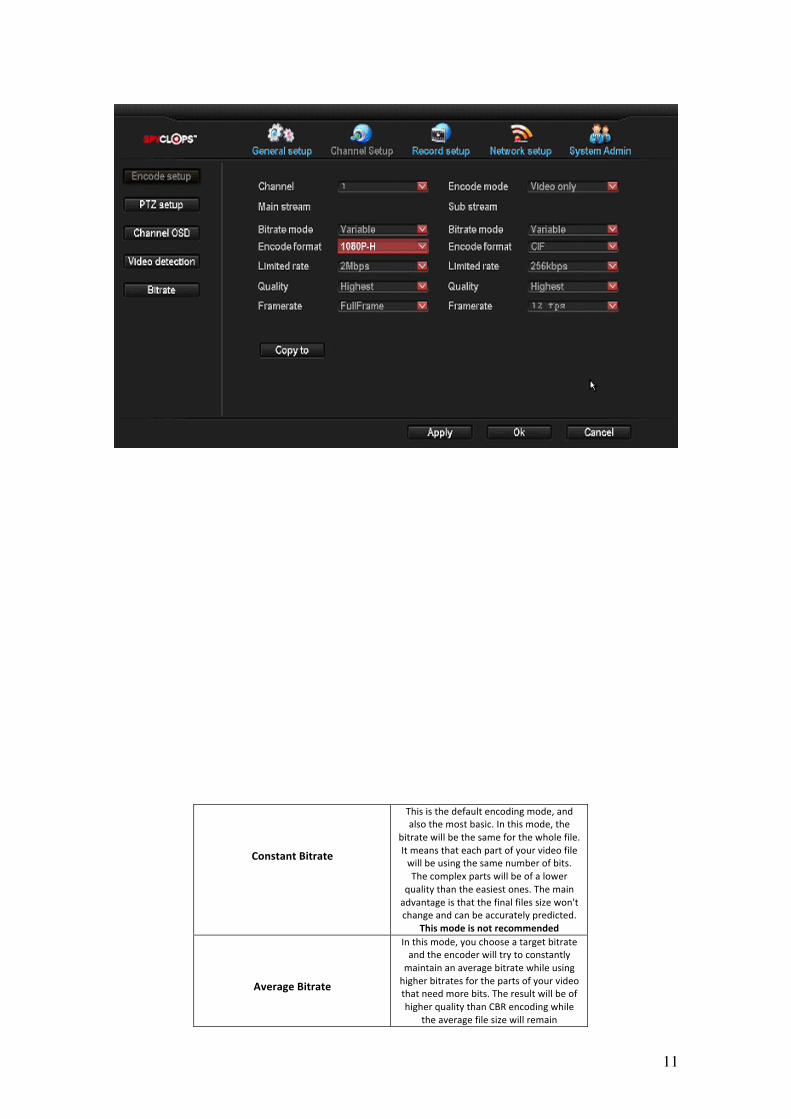
3.5EncodeSetup
• Channel:Thiswillselectcameraforsetup
MainStream
• Bitratemode:Thiswillbedependentonyourbandwidthandspecificneeds
11
ConstantBitrate
Thisisthedefaultencodingmode,andalsothemostbasic.Inthismode,the
bitratewillbethesameforthewholefile.Itmeansthateachpartofyourvideofilewillbeusingthesamenumberofbits.Thecomplexpartswillbeofalower
qualitythantheeasiestones.Themainadvantageisthatthefinalfilessizewon'tchangeandcanbeaccuratelypredicted.
Thismodeisnotrecommended
AverageBitrate
Inthismode,youchooseatargetbitrateandtheencoderwilltrytoconstantlymaintainanaveragebitratewhileusinghigherbitratesforthepartsofyourvideothatneedmorebits.TheresultwillbeofhigherqualitythanCBRencodingwhile
theaveragefilesizewillremain
12
predictable,sothismodeishighlyrecommendedoverCBR.
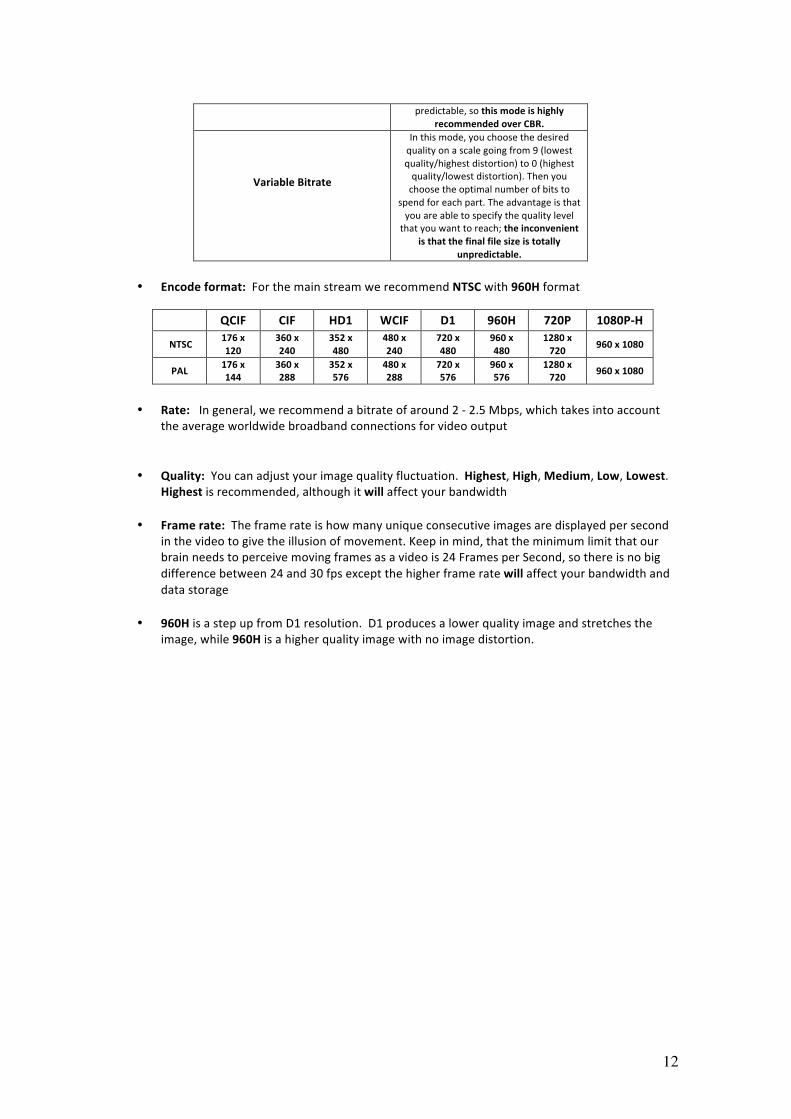
VariableBitrate
Inthismode,youchoosethedesiredqualityonascalegoingfrom9(lowestquality/highestdistortion)to0(highestquality/lowestdistortion).Thenyouchoosetheoptimalnumberofbitsto
spendforeachpart.Theadvantageisthatyouareabletospecifythequalitylevelthatyouwanttoreach;theinconvenient
isthatthefinalfilesizeistotallyunpredictable.
• Encodeformat:ForthemainstreamwerecommendNTSCwith960Hformat
QCIF CIF HD1 WCIF D1 960H 720P 1080P-H
NTSC 176x120
360x240
352x480
480x240
720x480
960x480
1280x720 960x1080
PAL 176x144
360x288
352x576
480x288
720x576
960x576
1280x720 960x1080
• Rate:Ingeneral,werecommendabitrateofaround2-2.5Mbps,whichtakesintoaccount
theaverageworldwidebroadbandconnectionsforvideooutput • Quality:Youcanadjustyourimagequalityfluctuation.Highest,High,Medium,Low,Lowest.
Highestisrecommended,althoughitwillaffectyourbandwidth• Framerate:Theframerateishowmanyuniqueconsecutiveimagesaredisplayedpersecond
inthevideotogivetheillusionofmovement.Keepinmind,thattheminimumlimitthatourbrainneedstoperceivemovingframesasavideois24FramesperSecond,sothereisnobigdifferencebetween24and30fpsexceptthehigherframeratewillaffectyourbandwidthanddatastorage
• 960HisastepupfromD1resolution.D1producesalowerqualityimageandstretchestheimage,while960Hisahigherqualityimagewithnoimagedistortion.
13
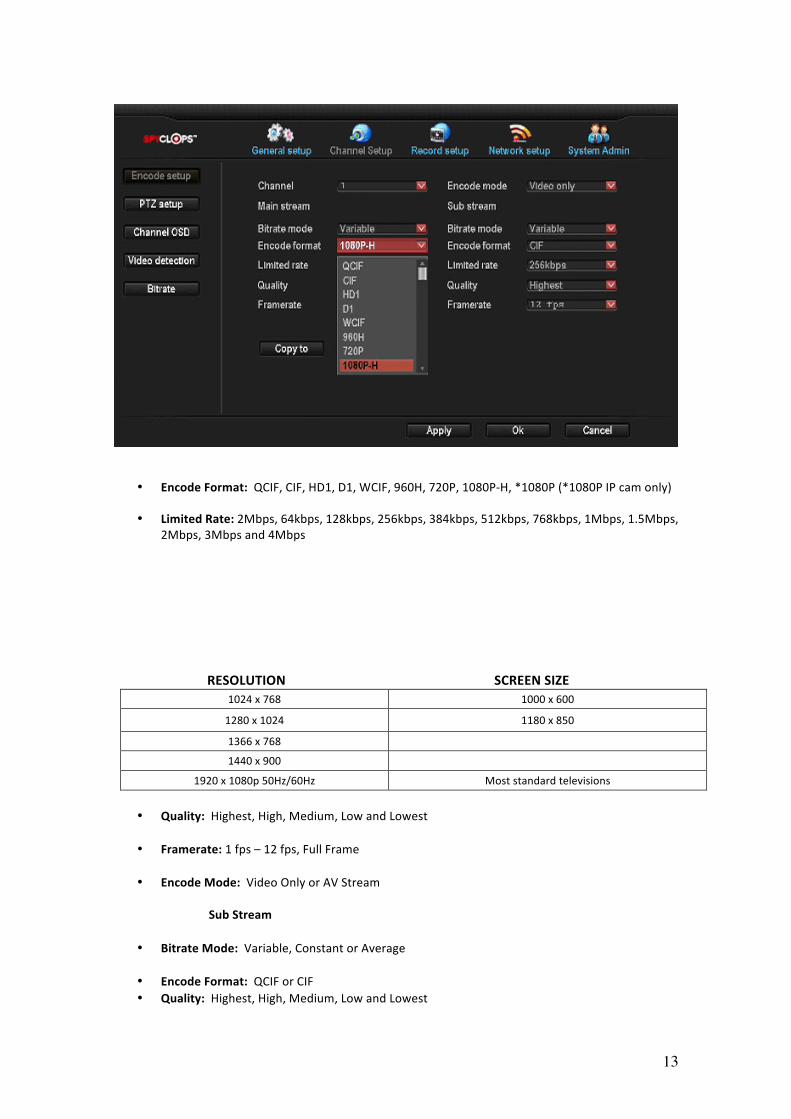
• EncodeFormat:QCIF,CIF,HD1,D1,WCIF,960H,720P,1080P-H,*1080P(*1080PIPcamonly)
• LimitedRate:2Mbps,64kbps,128kbps,256kbps,384kbps,512kbps,768kbps,1Mbps,1.5Mbps,
2Mbps,3Mbpsand4Mbps
RESOLUTIONSCREENSIZE1024x768 1000x600
1280x1024 1180x850
1366x768
1440x900 1920x1080p50Hz/60Hz Moststandardtelevisions
• Quality:Highest,High,Medium,LowandLowest
• Framerate:1fps–12fps,FullFrame
• EncodeMode:VideoOnlyorAVStream
SubStream
• BitrateMode:Variable,ConstantorAverage
• EncodeFormat:QCIForCIF • Quality:Highest,High,Medium,LowandLowest
14
• Framerate:1fps–12fps
• CopyTo:Thisbuttonallowsusertocopysettingsto1-16camerasorallcameras
.
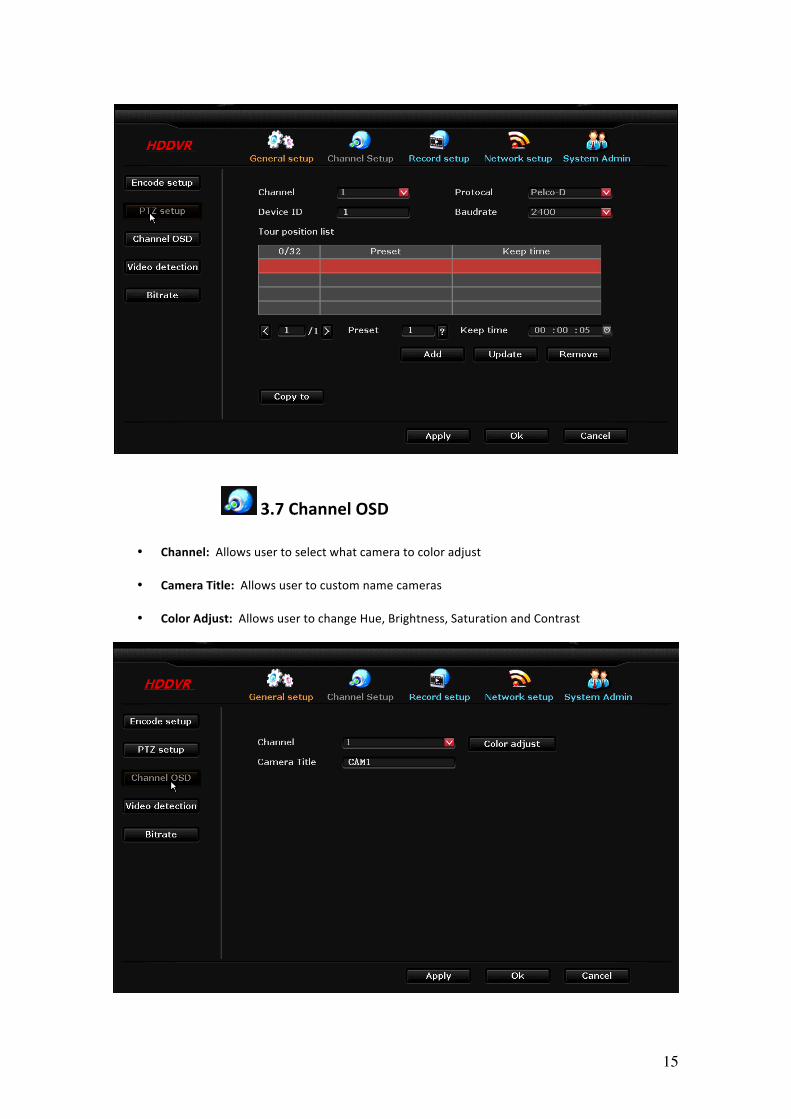
3.6PTZSetup
*Note:TocontrolanalogPTZ,YoumustconnectthewirestotheRS-485portonthebackoftheDVR
• Channel:Choosewhichcameraviewyouwanttoworkwith.• Protocol:Choosethe“protocol”requiredforyourdevice.BothprotocolsrequireanadditionalRS-485datacable.• DeviceID:AssignanIDnumbertoeachchannel(cameraview).• Baudrate:Wesuggestusinga“baudrate”nohigherthan9600toavoiderrors.Pleasereferto
yourcamerasspecificationsforthebaudratethatisbestforyourdevice.• Tourpositionlist:Thisiswhereyousetupeachcamera“tour”.First,highlightthelineinwhich
youwanttoaddyourpreset,thenclicktheboxwiththequestionmark.Usethisboxtopositionthecameratothedesiredview,thenclickstore.Youthenneedtoassignhowyouwanteachpositiontoholdbyselecting“keeptime”.Ifyouchangeapreset,simplyclick“update”afteryouare done reconfiguring. To delete a preset, highlight the tour you want to delete and click“remove”.
• CopyTo:Usercancopysettingstooneorallcameras
15
3.7ChannelOSD
• Channel:Allowsusertoselectwhatcameratocoloradjust• CameraTitle:Allowsusertocustomnamecameras• ColorAdjust:AllowsusertochangeHue,Brightness,SaturationandContrast
16
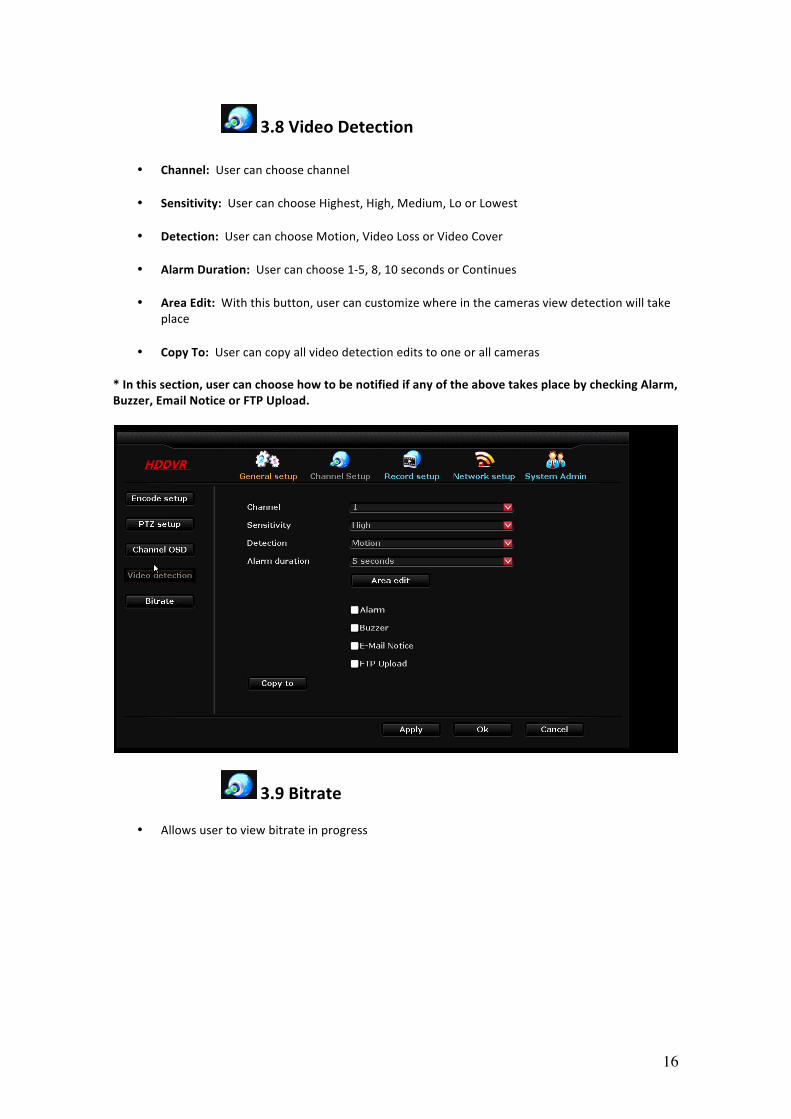
3.8VideoDetection
• Channel:Usercanchoosechannel
• Sensitivity:UsercanchooseHighest,High,Medium,LoorLowest
• Detection:UsercanchooseMotion,VideoLossorVideoCover
• AlarmDuration:Usercanchoose1-5,8,10secondsorContinues
• AreaEdit:Withthisbutton,usercancustomizewhereinthecamerasviewdetectionwilltakeplace
• CopyTo:Usercancopyallvideodetectioneditstooneorallcameras
*Inthissection,usercanchoosehowtobenotifiedifanyoftheabovetakesplacebycheckingAlarm,Buzzer,EmailNoticeorFTPUpload.
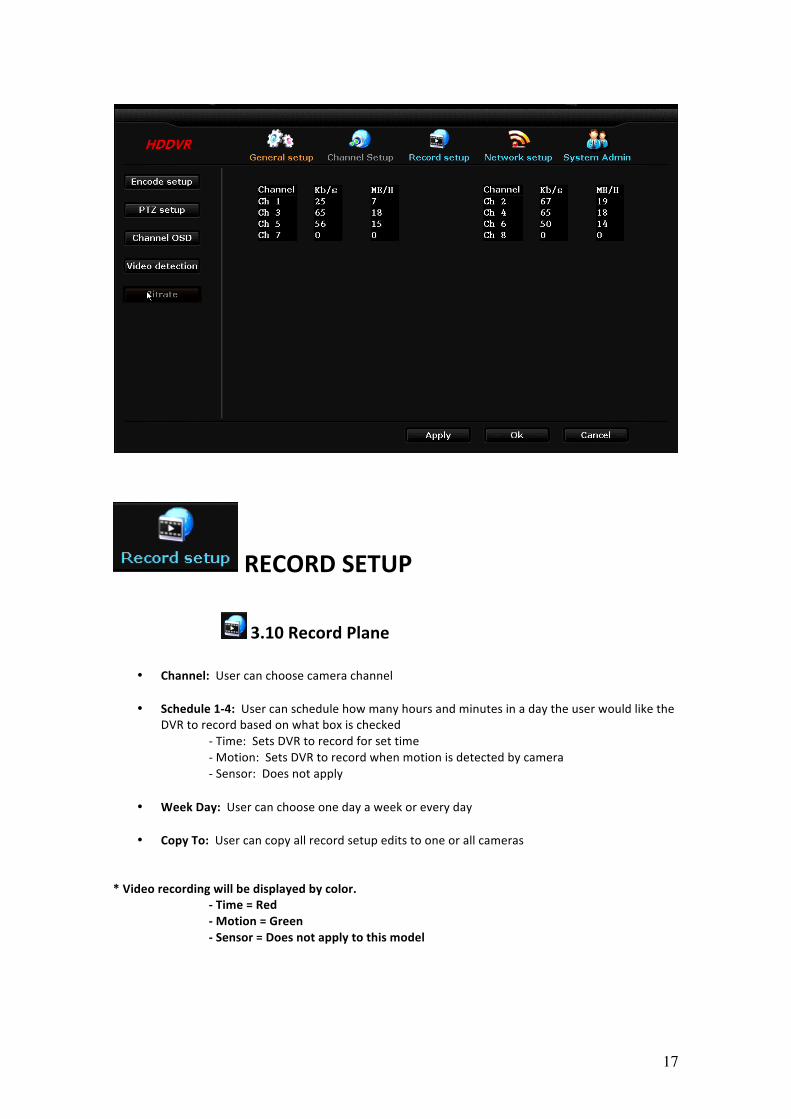
3.9Bitrate
• Allowsusertoviewbitrateinprogress
17
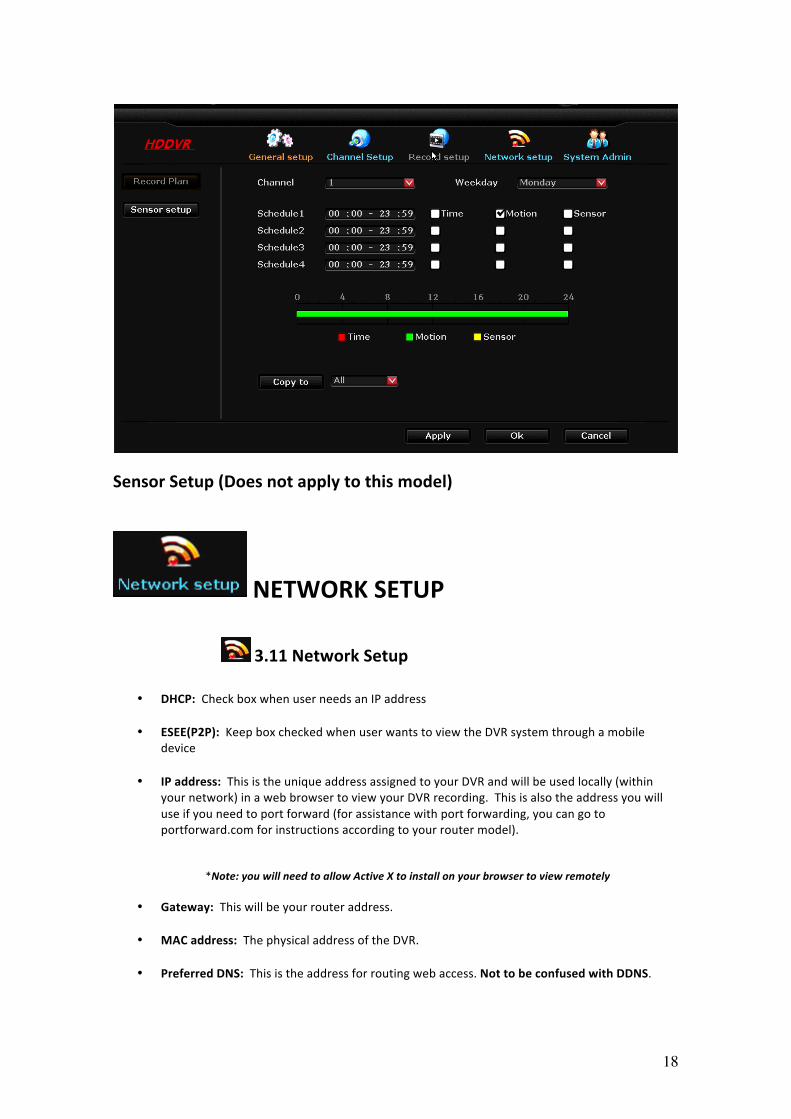
RECORDSETUP 3.10RecordPlane
• Channel:Usercanchoosecamerachannel
• Schedule1-4:UsercanschedulehowmanyhoursandminutesinadaytheuserwouldliketheDVRtorecordbasedonwhatboxischecked -Time:SetsDVRtorecordforsettime -Motion:SetsDVRtorecordwhenmotionisdetectedbycamera -Sensor:Doesnotapply
• WeekDay:Usercanchooseonedayaweekoreveryday
• CopyTo:Usercancopyallrecordsetupeditstooneorallcameras
*Videorecordingwillbedisplayedbycolor. -Time=Red -Motion=Green -Sensor=Doesnotapplytothismodel
18
SensorSetup(Doesnotapplytothismodel)
NETWORKSETUP 3.11NetworkSetup
• DHCP:CheckboxwhenuserneedsanIPaddress
• ESEE(P2P):KeepboxcheckedwhenuserwantstoviewtheDVRsystemthroughamobiledevice
• IPaddress:ThisistheuniqueaddressassignedtoyourDVRandwillbeusedlocally(withinyournetwork)inawebbrowsertoviewyourDVRrecording.Thisisalsotheaddressyouwilluseifyouneedtoportforward(forassistancewithportforwarding,youcangotoportforward.comforinstructionsaccordingtoyourroutermodel).
*Note:youwillneedtoallowActiveXtoinstallonyourbrowsertoviewremotely
• Gateway:Thiswillbeyourrouteraddress.
• MACaddress:ThephysicaladdressoftheDVR.
• PreferredDNS:Thisistheaddressforroutingwebaccess.NottobeconfusedwithDDNS.
19
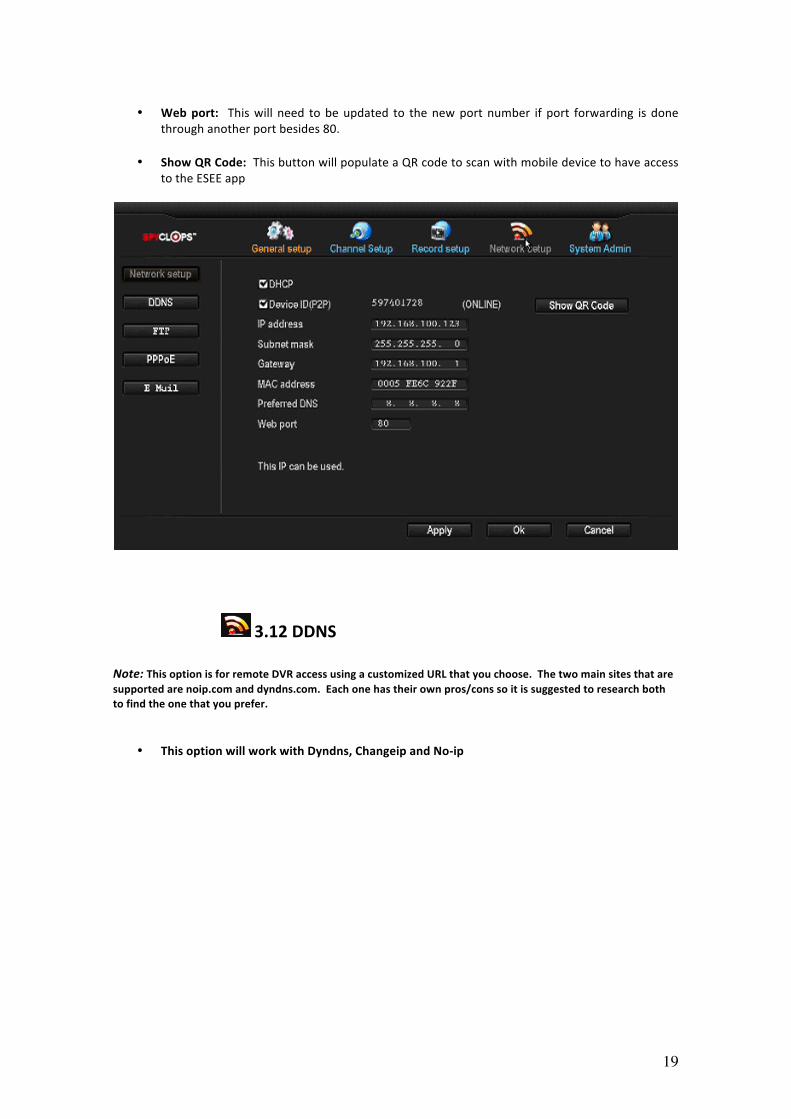
• Webport: Thiswill need tobeupdated to thenewportnumber if port forwarding is donethroughanotherportbesides80.
• ShowQRCode:ThisbuttonwillpopulateaQRcodetoscanwithmobiledevicetohaveaccesstotheESEEapp
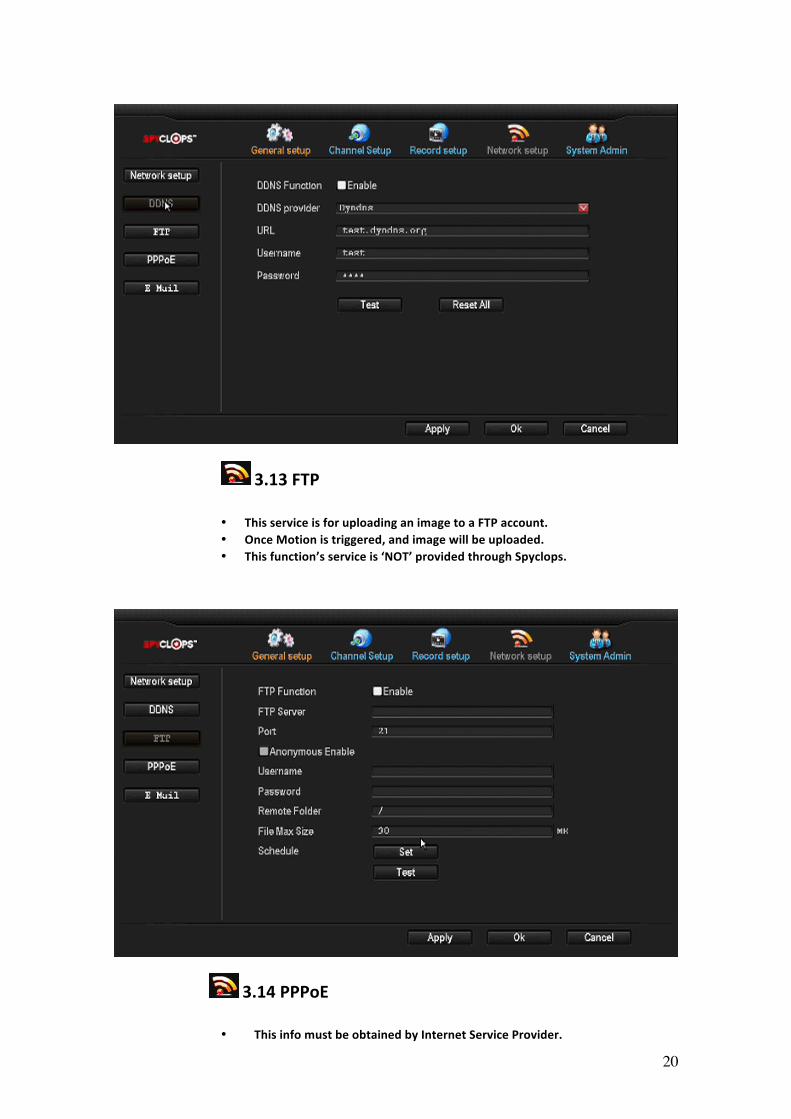
3.12DDNS
Note:ThisoptionisforremoteDVRaccessusingacustomizedURLthatyouchoose.Thetwomainsitesthataresupportedarenoip.comanddyndns.com.Eachonehastheirownpros/conssoitissuggestedtoresearchbothtofindtheonethatyouprefer.
• ThisoptionwillworkwithDyndns,ChangeipandNo-ip
20
3.13FTP
• ThisserviceisforuploadinganimagetoaFTPaccount.• OnceMotionistriggered,andimagewillbeuploaded.• Thisfunction’sserviceis‘NOT’providedthroughSpyclops.
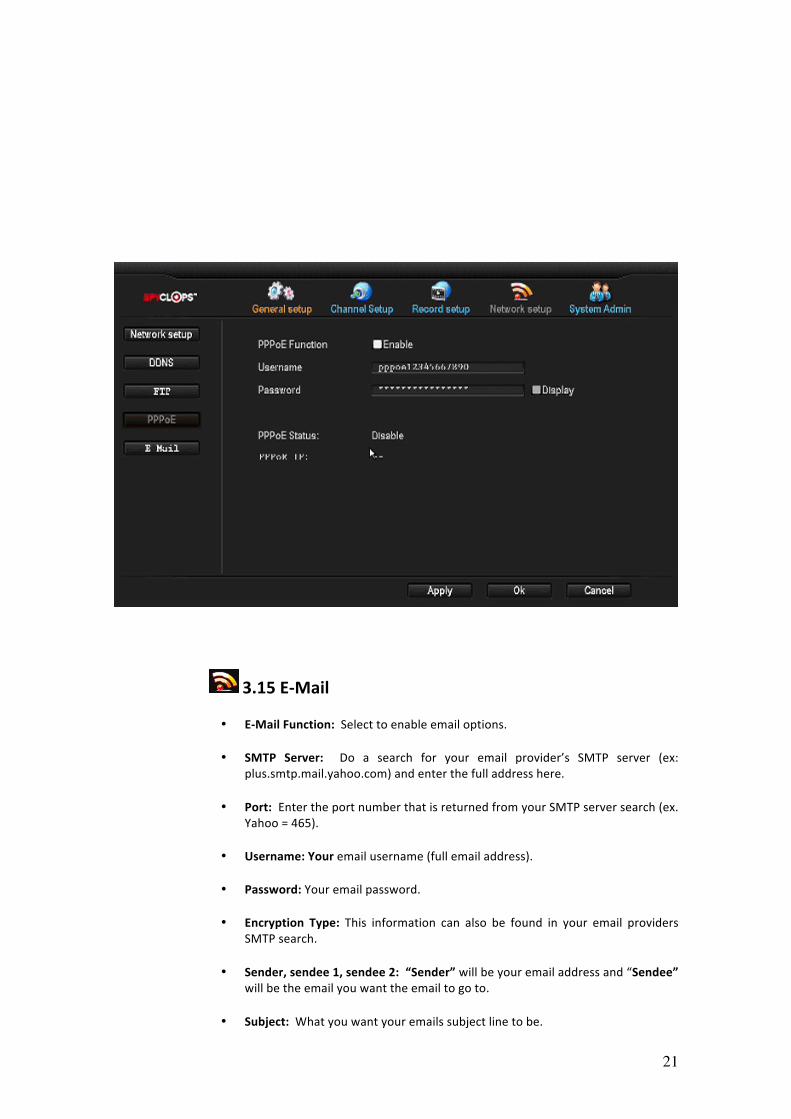
3.14PPPoE
• ThisinfomustbeobtainedbyInternetServiceProvider.
21
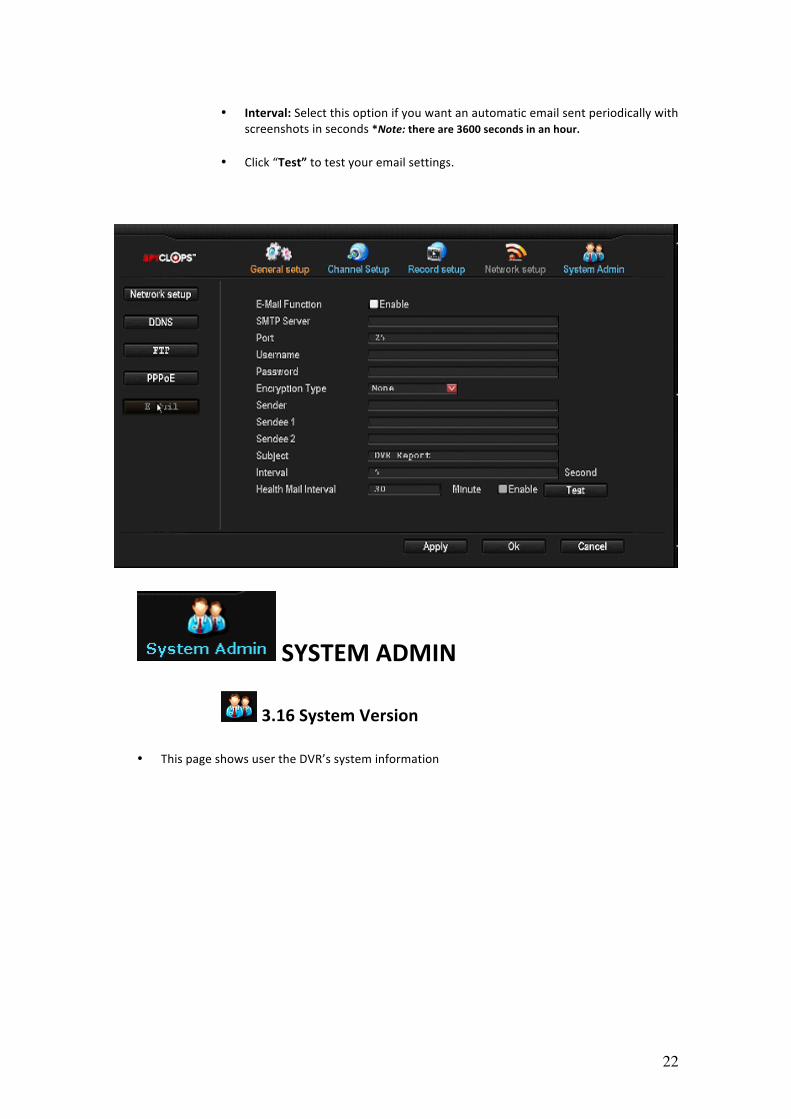
3.15E-Mail
• E-MailFunction:Selecttoenableemailoptions.
• SMTP Server: Do a search for your email provider’s SMTP server (ex:
plus.smtp.mail.yahoo.com)andenterthefulladdresshere.
• Port:EntertheportnumberthatisreturnedfromyourSMTPserversearch(ex.Yahoo=465).
• Username:Youremailusername(fullemailaddress).
• Password:Youremailpassword.
• Encryption Type: This information can also be found in your email providers
SMTPsearch.
• Sender,sendee1,sendee2:“Sender”willbeyouremailaddressand“Sendee”willbetheemailyouwanttheemailtogoto.
• Subject:Whatyouwantyouremailssubjectlinetobe.
22
• Interval:Selectthisoptionifyouwantanautomaticemailsentperiodicallywithscreenshotsinseconds*Note:thereare3600secondsinanhour.
• Click“Test”totestyouremailsettings.
SYSTEMADMIN
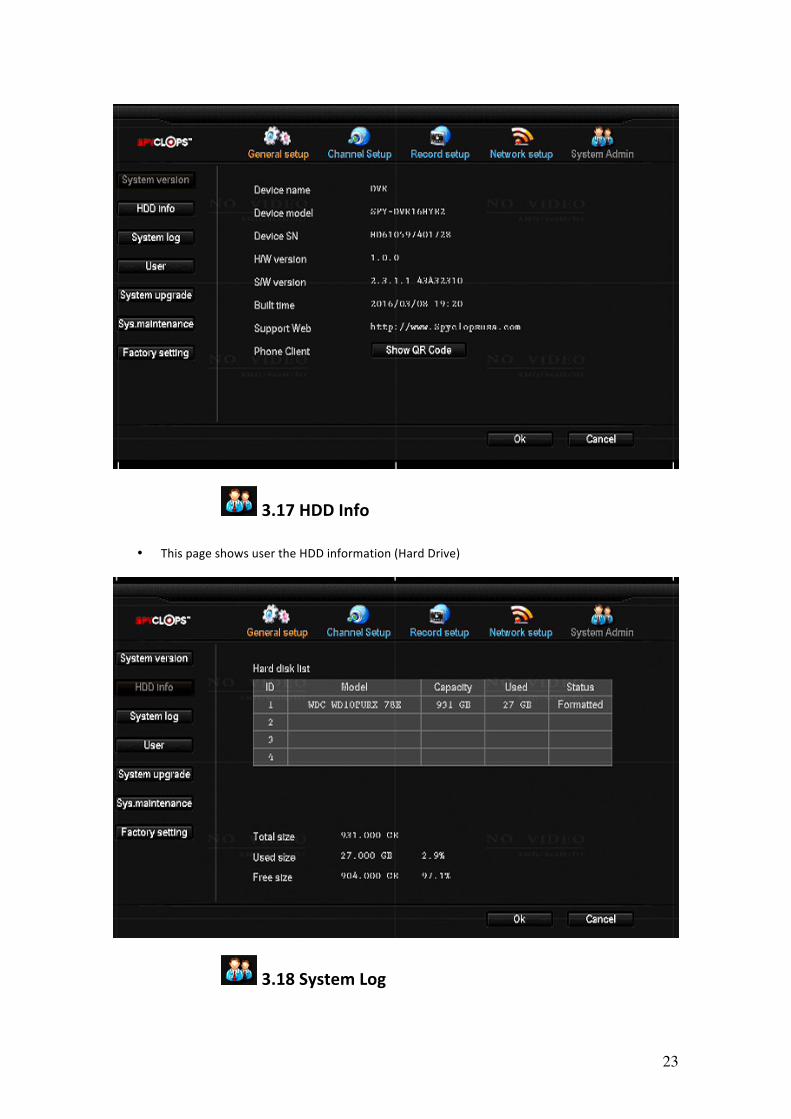
3.16SystemVersion• ThispageshowsusertheDVR’ssysteminformation
23
3.17HDDInfo
• ThispageshowsusertheHDDinformation(HardDrive)
3.18SystemLog
24
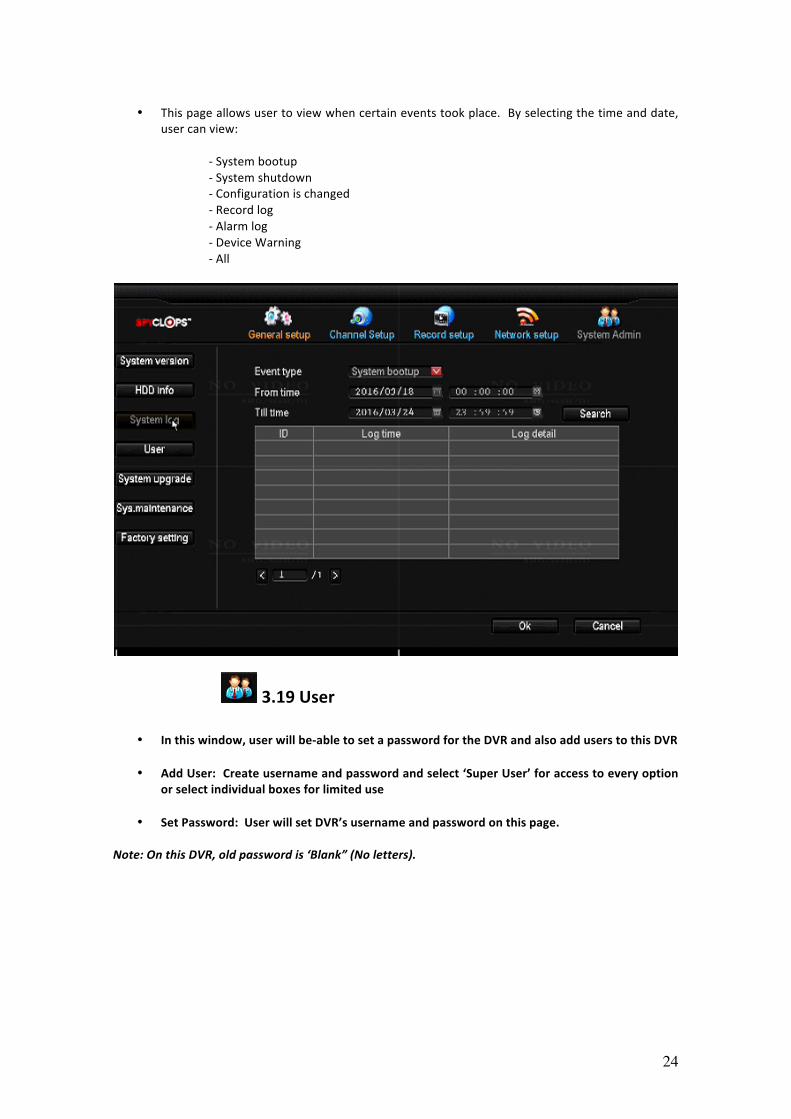
• Thispageallowsusertoviewwhencertaineventstookplace.Byselectingthetimeanddate,usercanview: -Systembootup -Systemshutdown -Configurationischanged -Recordlog -Alarmlog -DeviceWarning -All
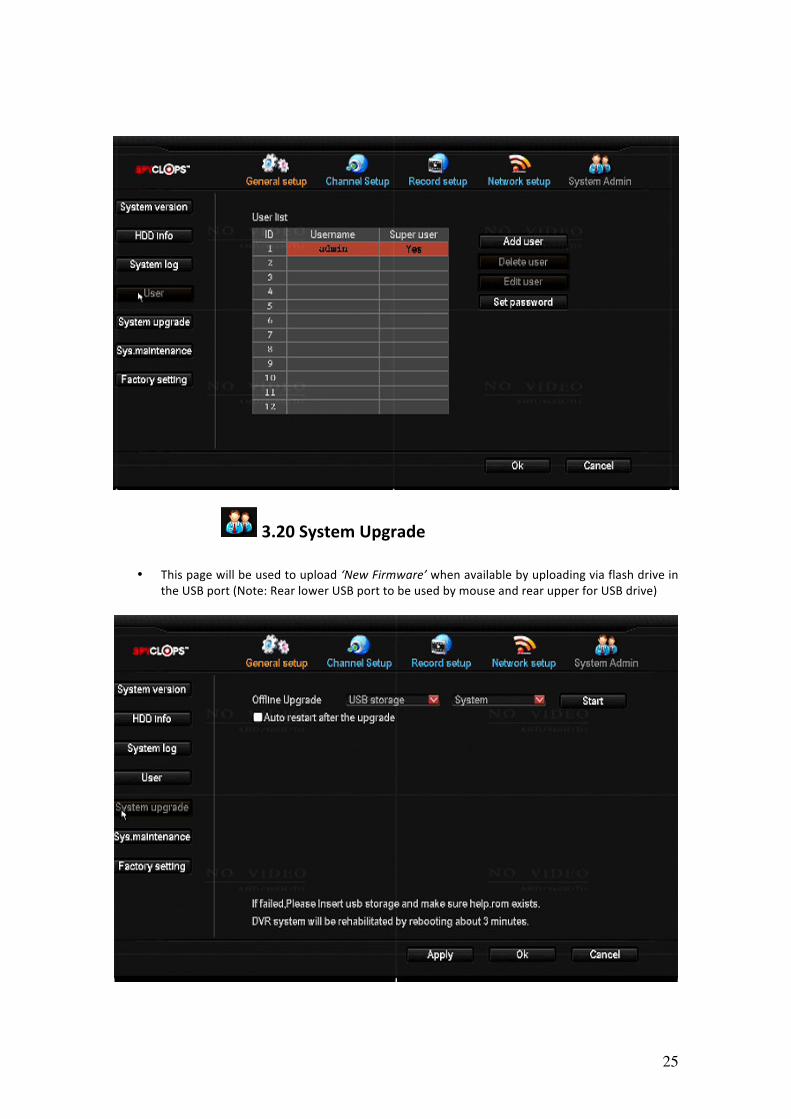
3.19User• Inthiswindow,userwillbe-abletosetapasswordfortheDVRandalsoadduserstothisDVR
• AddUser:Createusernameandpasswordandselect‘SuperUser’foraccesstoeveryoption
orselectindividualboxesforlimiteduse
• SetPassword:UserwillsetDVR’susernameandpasswordonthispage.
Note:OnthisDVR,oldpasswordis‘Blank”(Noletters).
25
3.20SystemUpgrade
• Thispagewillbeusedtoupload‘NewFirmware’whenavailablebyuploadingviaflashdriveintheUSBport(Note:RearlowerUSBporttobeusedbymouseandrearupperforUSBdrive)
26
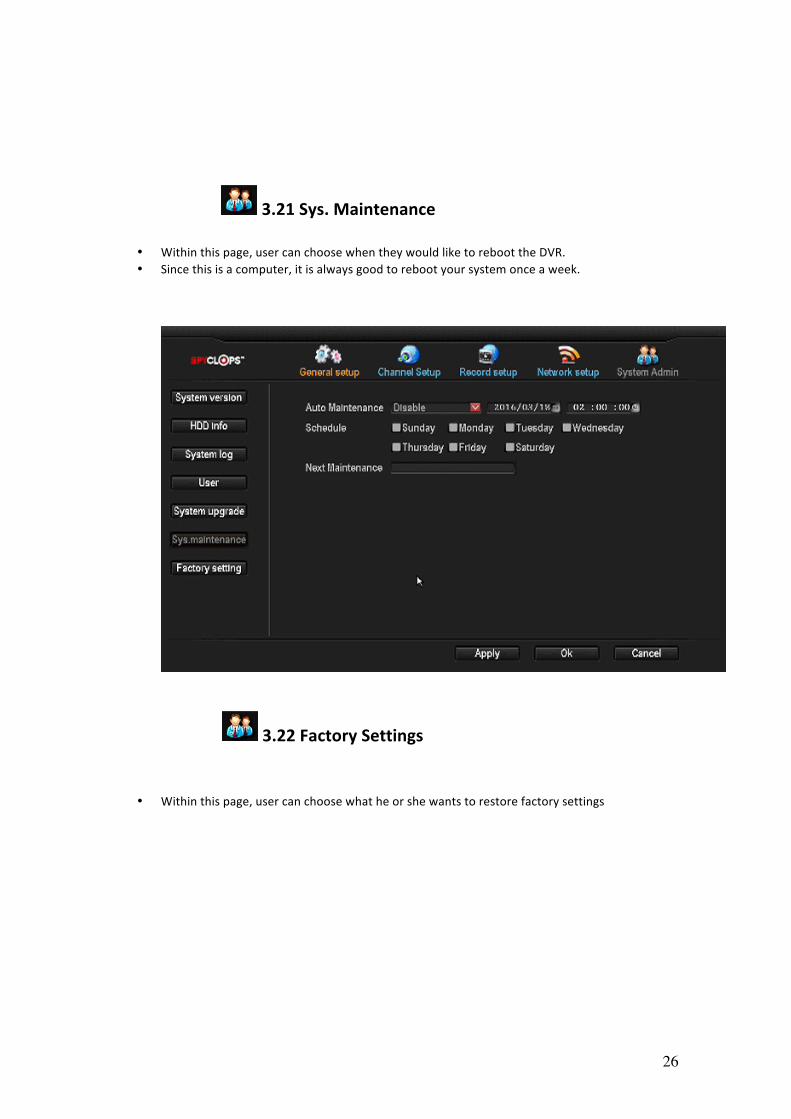
3.21Sys.Maintenance
• Withinthispage,usercanchoosewhentheywouldliketoreboottheDVR.• Sincethisisacomputer,itisalwaysgoodtorebootyoursystemonceaweek.
3.22FactorySettings
• Withinthispage,usercanchoosewhatheorshewantstorestorefactorysettings
27
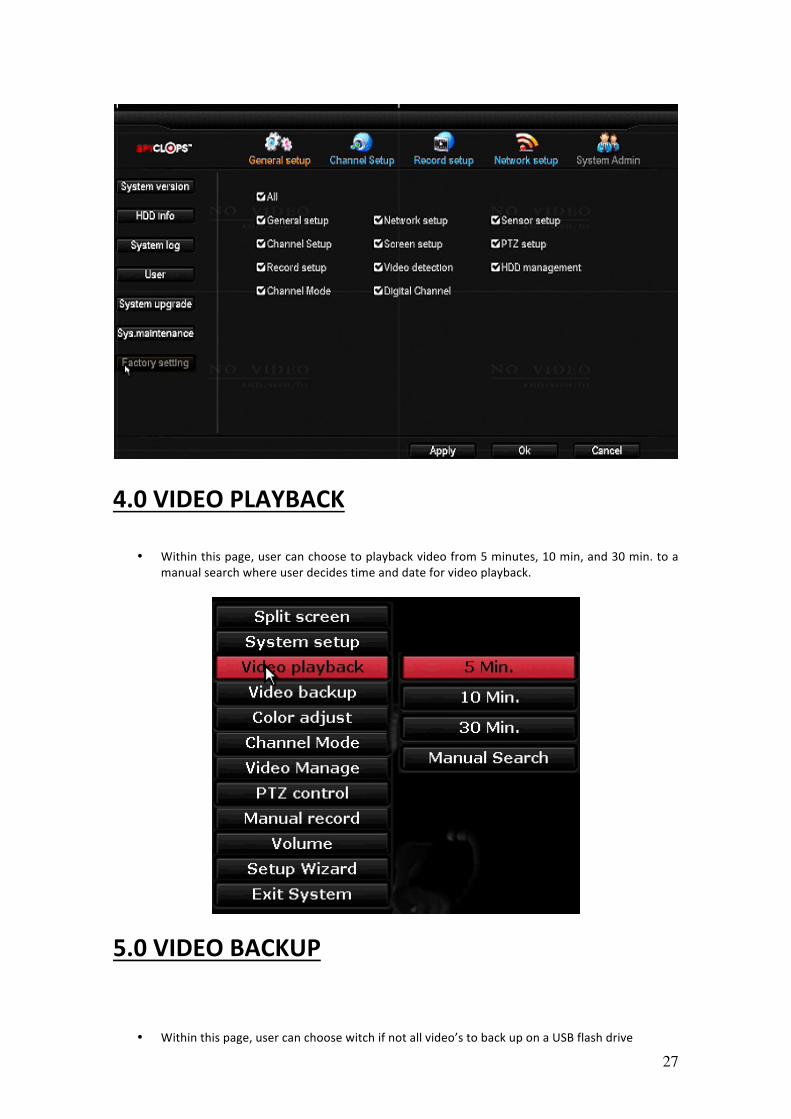
4.0VIDEOPLAYBACK
• Withinthispage,usercanchoosetoplaybackvideofrom5minutes,10min,and30min.toamanualsearchwhereuserdecidestimeanddateforvideoplayback.
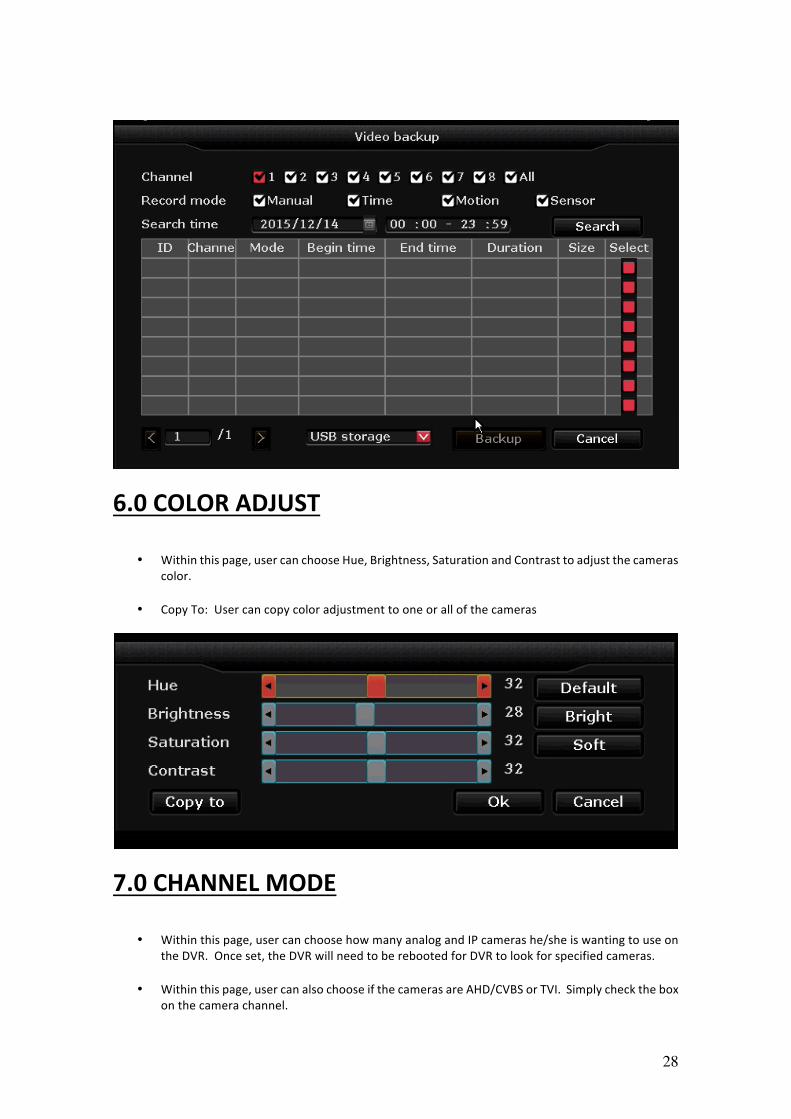
5.0VIDEOBACKUP
• Withinthispage,usercanchoosewitchifnotallvideo’stobackuponaUSBflashdrive
28
6.0COLORADJUST
• Withinthispage,usercanchooseHue,Brightness,SaturationandContrasttoadjustthecamerascolor.
• CopyTo:Usercancopycoloradjustmenttooneorallofthecameras
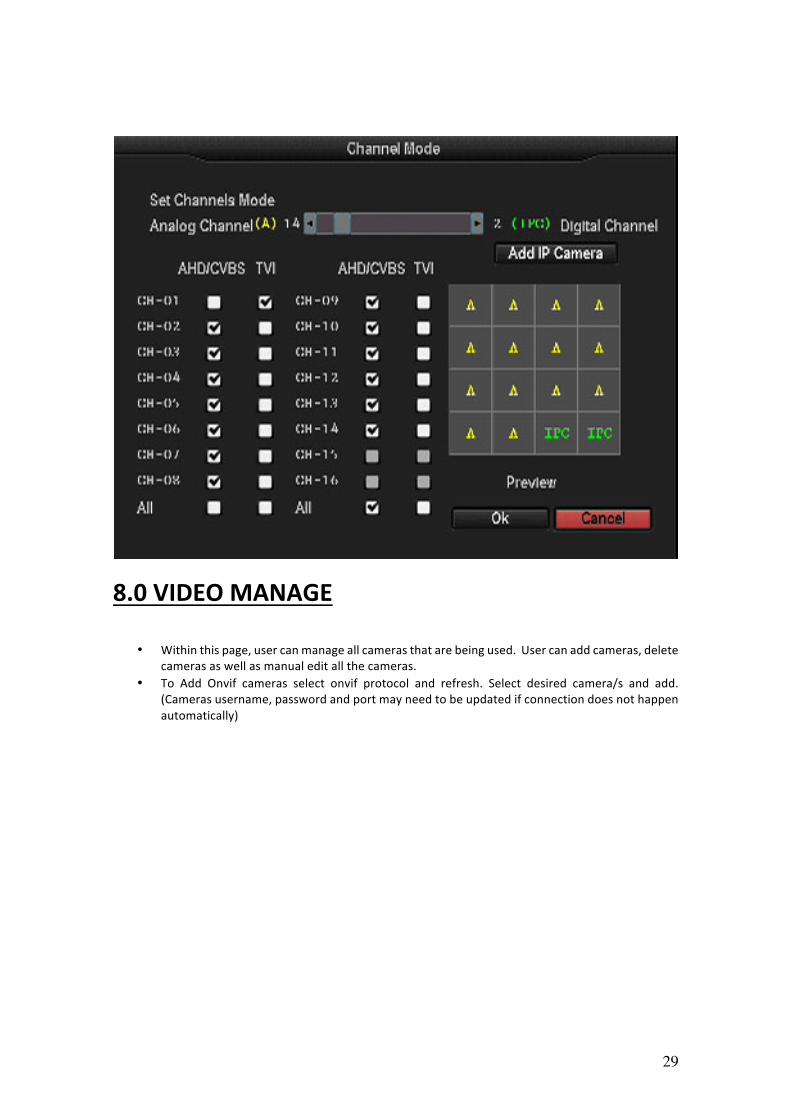
7.0CHANNELMODE
• Withinthispage,usercanchoosehowmanyanalogandIPcamerashe/sheiswantingtouseontheDVR.Onceset,theDVRwillneedtoberebootedforDVRtolookforspecifiedcameras.
• Withinthispage,usercanalsochooseifthecamerasareAHD/CVBSorTVI.Simplychecktheboxonthecamerachannel.
29
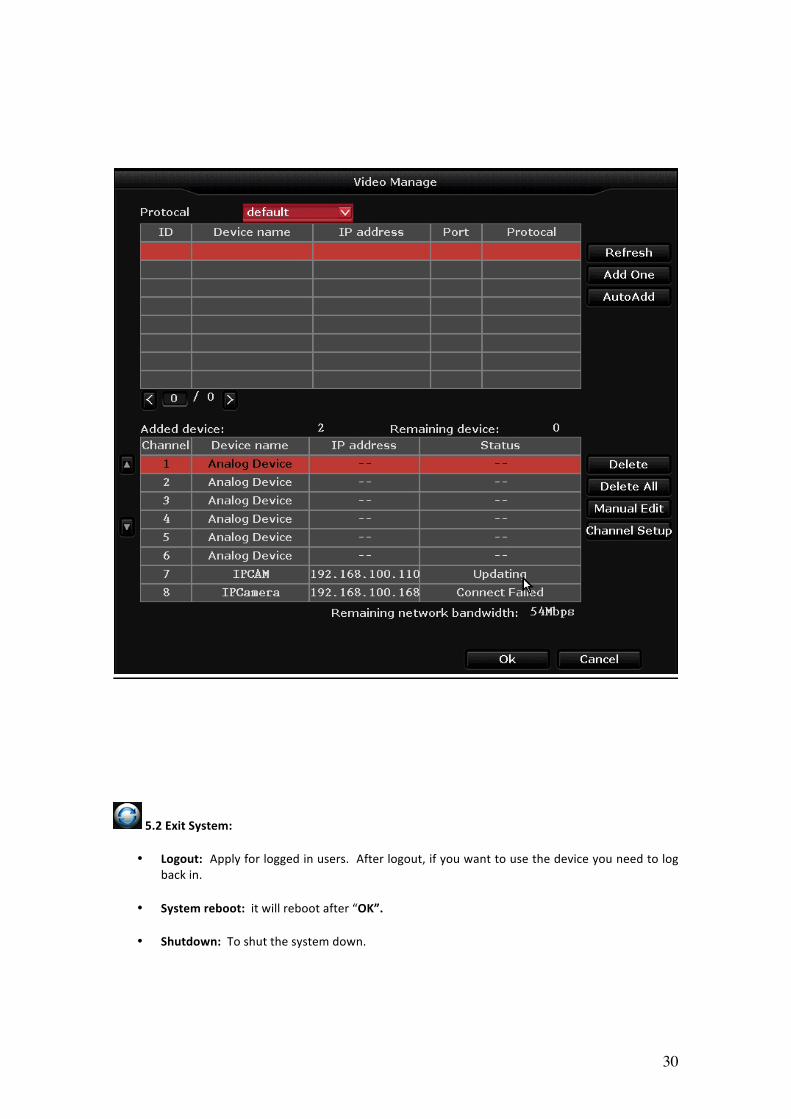
8.0VIDEOMANAGE
• Withinthispage,usercanmanageallcamerasthatarebeingused.Usercanaddcameras,deletecamerasaswellasmanualeditallthecameras.
• To Add Onvif cameras select onvif protocol and refresh. Select desired camera/s and add.(Camerasusername,passwordandportmayneedtobeupdatedifconnectiondoesnothappenautomatically)
30
5.2ExitSystem:
• Logout:Applyforloggedinusers.Afterlogout,ifyouwanttousethedeviceyouneedtologbackin.
• Systemreboot:itwillrebootafter“OK”.
• Shutdown:Toshutthesystemdown.
31
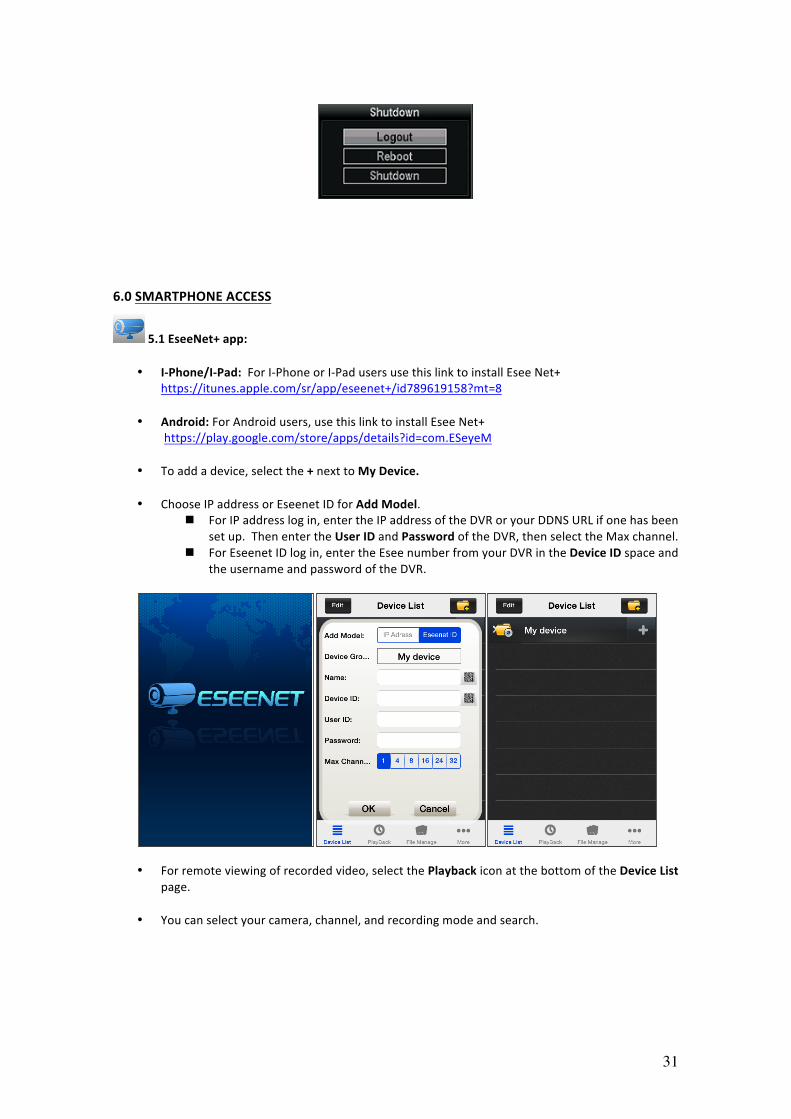
6.0SMARTPHONEACCESS
5.1EseeNet+app:
• I-Phone/I-Pad:ForI-PhoneorI-PadusersusethislinktoinstallEseeNet+https://itunes.apple.com/sr/app/eseenet+/id789619158?mt=8
• Android:ForAndroidusers,usethislinktoinstallEseeNet+https://play.google.com/store/apps/details?id=com.ESeyeM
• Toaddadevice,selectthe+nexttoMyDevice.• ChooseIPaddressorEseenetIDforAddModel.
n ForIPaddresslogin,entertheIPaddressoftheDVRoryourDDNSURLifonehasbeensetup.ThenentertheUserIDandPasswordoftheDVR,thenselecttheMaxchannel.
n ForEseenetIDlogin,entertheEseenumberfromyourDVRintheDeviceIDspaceandtheusernameandpasswordoftheDVR.
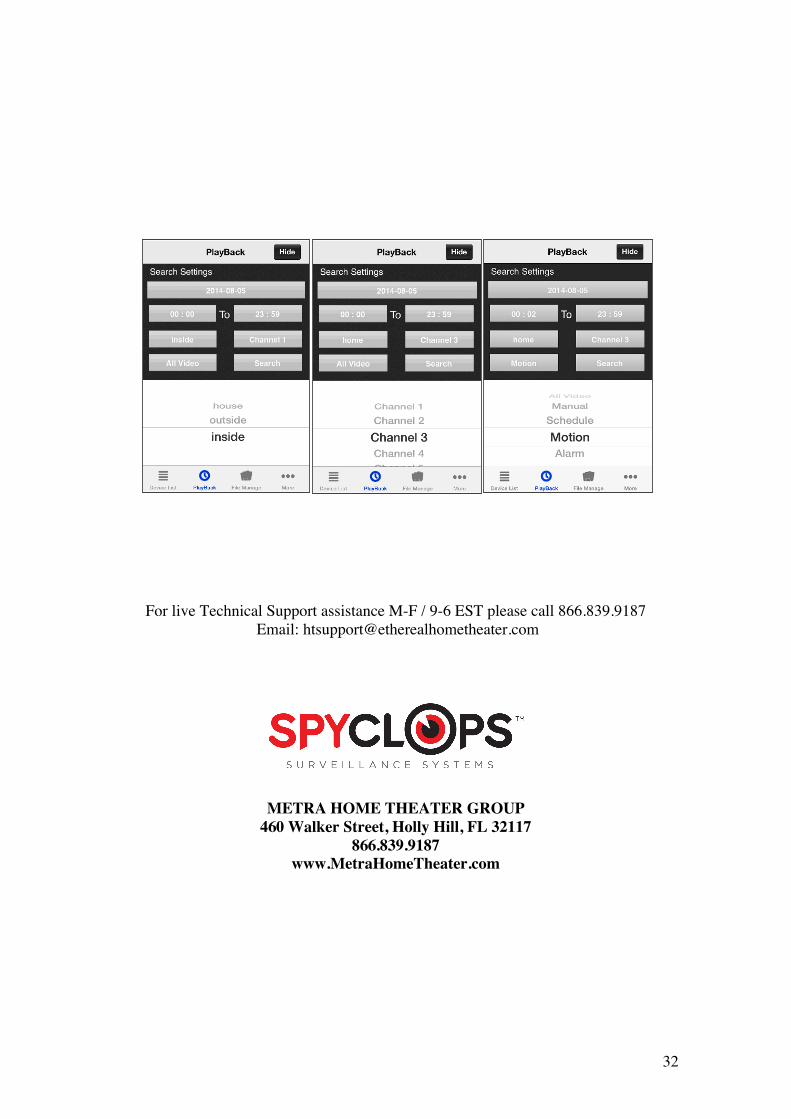
• Forremoteviewingofrecordedvideo,selectthePlaybackiconatthebottomoftheDeviceListpage.
• Youcanselectyourcamera,channel,andrecordingmodeandsearch.
32
For live Technical Support assistance M-F / 9-6 EST please call 866.839.9187 Email: [email protected]
METRA HOME THEATER GROUP 460 Walker Street, Holly Hill, FL 32117
866.839.9187 www.MetraHomeTheater.com