Embed Size (px)
Citation preview
Shapes
1
SH
AP
ES
2
Proportions of the Face and
Body in Art
Makeup Artists are masters at illusion. We manipulate the shapes and features of the face and body with our artistry. We cannot achieve this without understanding how to correctly determine proportions, shapes, and the anatomical structure of the body.
In studying anatomy drawing, you learn, for example, individual skeletal or muscular size, shapes, and functions. The functions and proportions are key in creating realism. There are fundamental drawing skills that teach you value, form, light, and shadows, as well as how these elements fall onto the surface of the face and body. For example, if you do not understand the shape and function of a muscle, your placement of highlight and shadow, a tattoo, body paint, or prosthetic will be off and therefore unsuccessful.
Painting, drawing, and understanding the body will give you the skills and ability to understand how to change facial features and alter an individual's features to look like something or someone else. Your artistry will move with the subject, making it look more authentic. This is a very important lesson used in all areas of makeup artistry. “Anatomy is an applied science which underpins fine art, the study of structure is essential for artistic representation. The skeleton, joints and muscular system of a creature determine its proportions and the movement of the body.” (Fehér 7)
Value, Shadow, and Light
by Dan Gheno
The study of values is a complicated subject. When trying to draw in a tonal manner, it helps your ability to see value changes on the model if you learn the terminology of the subject.
Values: Each object, whether simple like a sphere or complex like the human figure, is composed of millions of tonal “value” changes. These range from the brightest bright (where the object most directly faces the light) to the darkest dark (where the object is turned away from the light source).
Halftones: A generic term that refers to all of the value variations within the light side of the model. The halftones are brightest where the form turns most directly toward the light source, and are darkest just before the form falls into complete shadow.
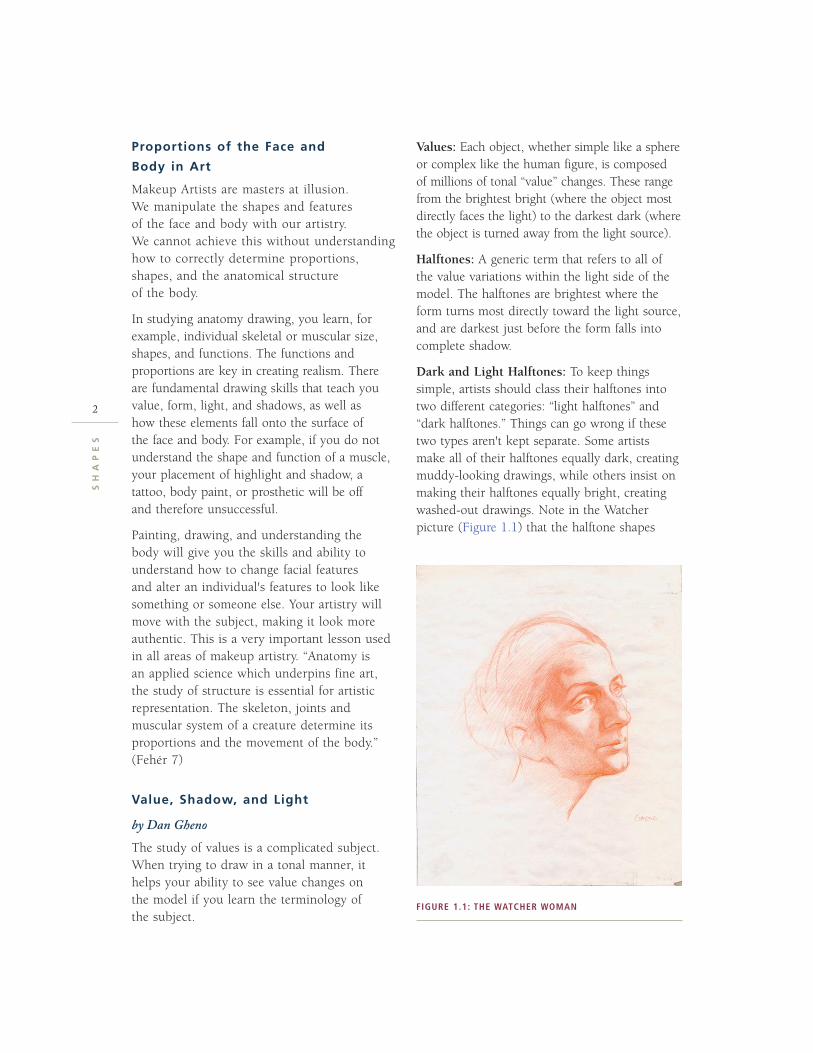
Dark and Light Halftones: To keep things simple, artists should class their halftones into two different categories: “light halftones” and “dark halftones.” Things can go wrong if these two types aren't kept separate. Some artists make all of their halftones equally dark, creating muddy-looking drawings, while others insist on making their halftones equally bright, creating washed-out drawings. Note in the Watcher picture (Figure 1.1) that the halftone shapes
FIGURE 1.1: THE WATCHER WOMAN
3
are distinctly lighter on the side of the forehead most directly facing the light source, while they are dramatically darker near the shadow shapes on the forehead. Try squinting to test the validity of the value renditions. When you squint, the light halftones should fade away and disappear into the overall light shape, while the dark halftones should visually melt into the adjacent, general shadow shapes.
Shadow: As the form of the model turns completely away from the light source, the dark halftone shapes get darker and darker, until the light completely terminates and the big shadow shape begins. Literally called the “terminator” by those who deal with light as a science, this shadow edge can look abrupt and contrast at times, or soft and fused at other times. It all depends on the amount of reflected light bouncing into the shadow side of the model.
Reflected Light: Shadows are simply the absence of light. The only reason anything can be seen within the shadow shape is because of reflected light. The light source illuminates not just the model, but also the surrounding environment. The light bounces off the walls, floor, and ceiling, ricocheting into the shadows, and lighting (or filling) the dark side of the model. Indeed, even various body parts reflect light onto the other shadowed parts of the model. One very important rule to know: no reflected light in the shadow shape can be as bright as the direct light hitting the model.
Core Shadow: When the dark side of the face turns away from any source of reflected light, the shadow gradually darkens until the darkest part of the shadow, called the “core shadow,” is reached. This term refers to an area of the form that gets no direct light and very little reflected light. Even when drawn subtly or in a barely visible manner, the core shadow creates a cornering effect that helps to magnify the plane changes of the model.
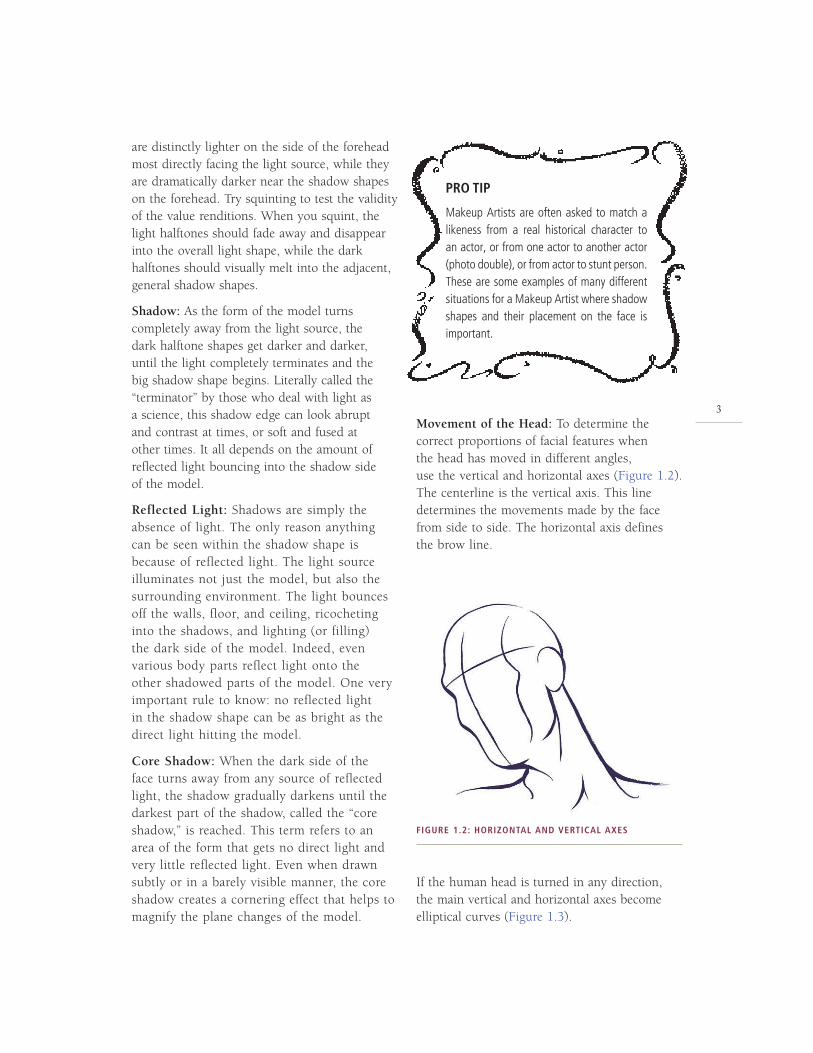
Movement of the Head: To determine the correct proportions of facial features when the head has moved in different angles, use the vertical and horizontal axes (Figure 1.2). The centerline is the vertical axis. This line determines the movements made by the face from side to side. The horizontal axis defines the brow line.
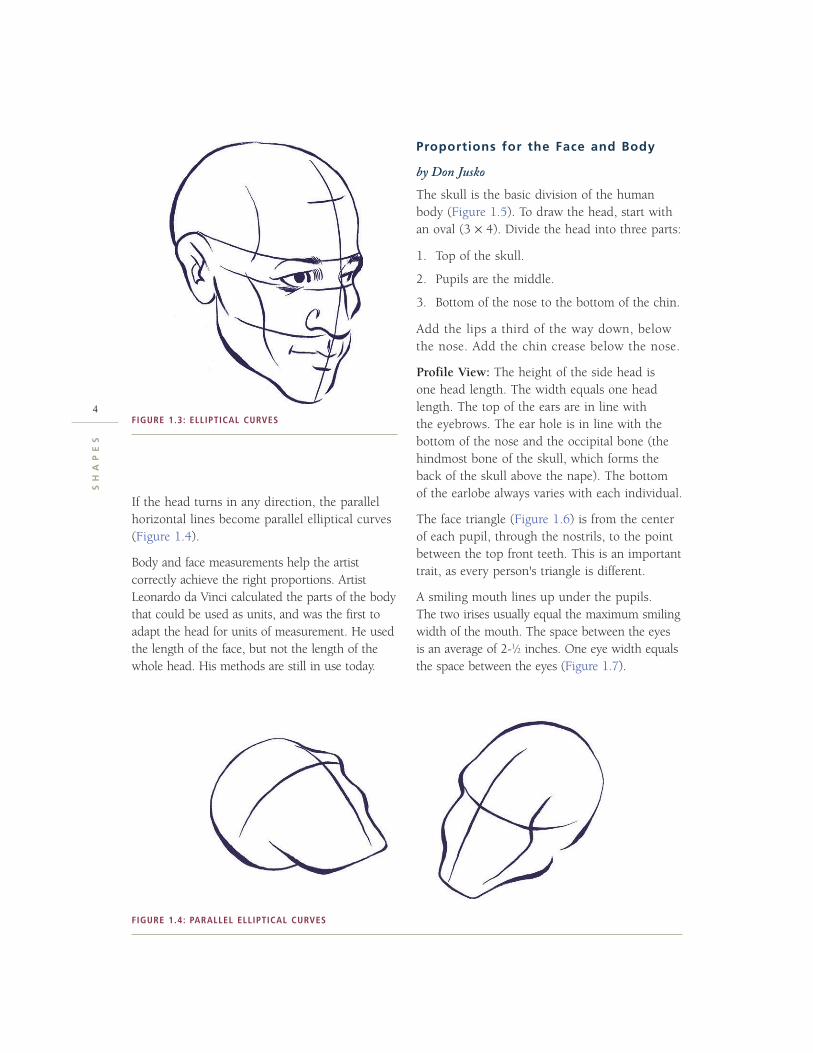
If the human head is turned in any direction, the main vertical and horizontal axes become elliptical curves (Figure 1.3).
PRO TIP
Makeup Artists are often asked to match a likeness from a real historical character to an actor, or from one actor to another actor (photo double), or from actor to stunt person. These are some examples of many different situations for a Makeup Artist where shadow shapes and their placement on the face is important.
FIGURE 1.2: HORIZONTAL AND VERTICAL AXES
SH
AP
ES
4
If the head turns in any direction, the parallel horizontal lines become parallel elliptical curves (Figure 1.4).
Body and face measurements help the artist correctly achieve the right proportions. Artist Leonardo da Vinci calculated the parts of the body that could be used as units, and was the first to adapt the head for units of measurement. He used the length of the face, but not the length of the whole head. His methods are still in use today.
Proportions for the Face and Body
by Don Jusko
The skull is the basic division of the human body (Figure 1.5). To draw the head, start with an oval (3 × 4). Divide the head into three parts:
1. Top of the skull.
2. Pupils are the middle.
3. Bottom of the nose to the bottom of the chin.
Add the lips a third of the way down, below the nose. Add the chin crease below the nose.
Profile View: The height of the side head is one head length. The width equals one head length. The top of the ears are in line with the eyebrows. The ear hole is in line with the bottom of the nose and the occipital bone (the hindmost bone of the skull, which forms the back of the skull above the nape). The bottom of the earlobe always varies with each individual.
The face triangle (Figure 1.6) is from the center of each pupil, through the nostrils, to the point between the top front teeth. This is an important trait, as every person's triangle is different.
A smiling mouth lines up under the pupils. The two irises usually equal the maximum smiling width of the mouth. The space between the eyes is an average of 2-1⁄2 inches. One eye width equals the space between the eyes (Figure 1.7).
FIGURE 1.3: ELLIPTICAL CURVES
FIGURE 1.4: PARALLEL ELLIPTICAL CURVES
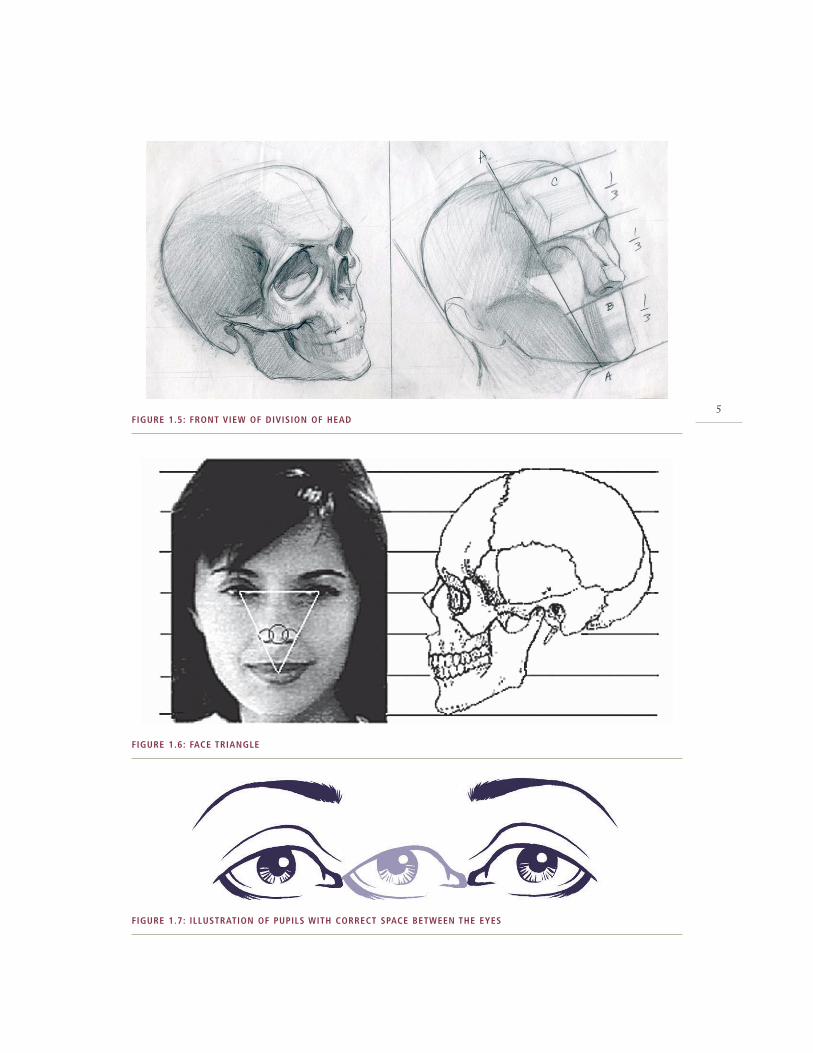
5FIGURE 1.5: FRONT VIEW OF DIVISION OF HEAD
FIGURE 1.6: FACE TRIANGLE
FIGURE 1.7: ILLUSTRATION OF PUPILS WITH CORRECT SPACE BETWEEN THE EYES
SH
AP
ES
6
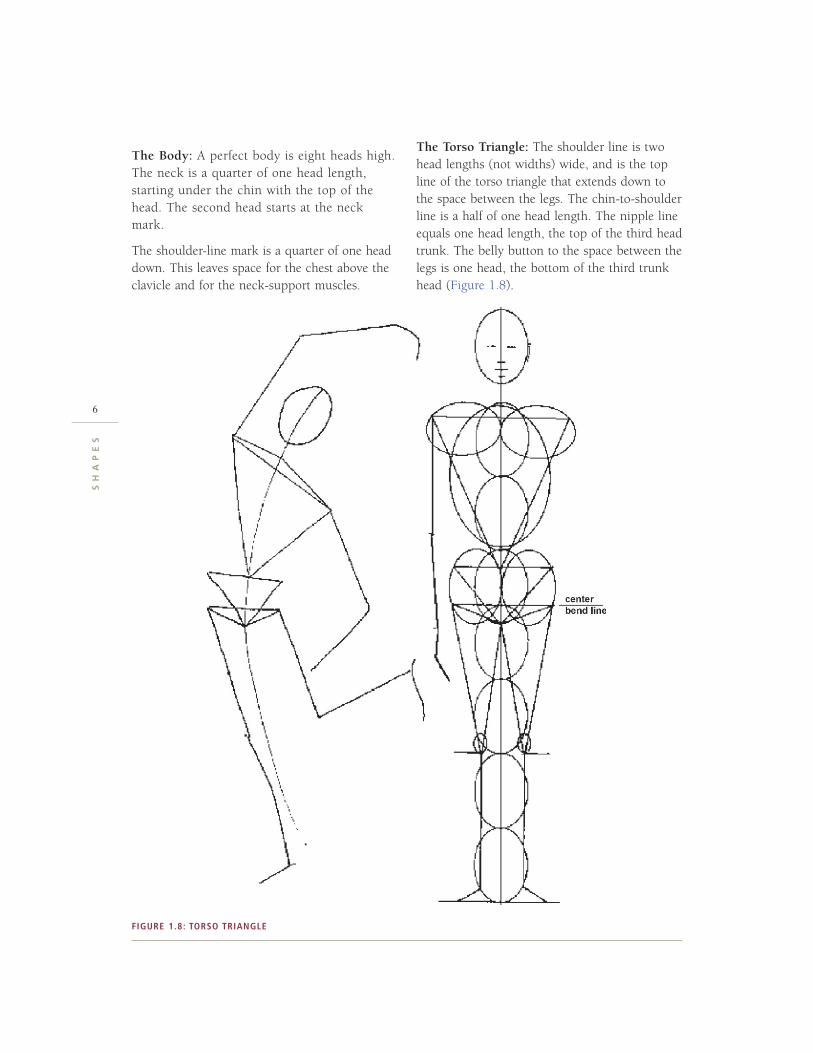
The Body: A perfect body is eight heads high. The neck is a quarter of one head length, starting under the chin with the top of the head. The second head starts at the neck mark.
The shoulder-line mark is a quarter of one head down. This leaves space for the chest above the clavicle and for the neck-support muscles.
The Torso Triangle: The shoulder line is two head lengths (not widths) wide, and is the top line of the torso triangle that extends down to the space between the legs. The chin-to-shoulder line is a half of one head length. The nipple line equals one head length, the top of the third head trunk. The belly button to the space between the legs is one head, the bottom of the third trunk head (Figure 1.8).
FIGURE 1.8: TORSO TRIANGLE
7
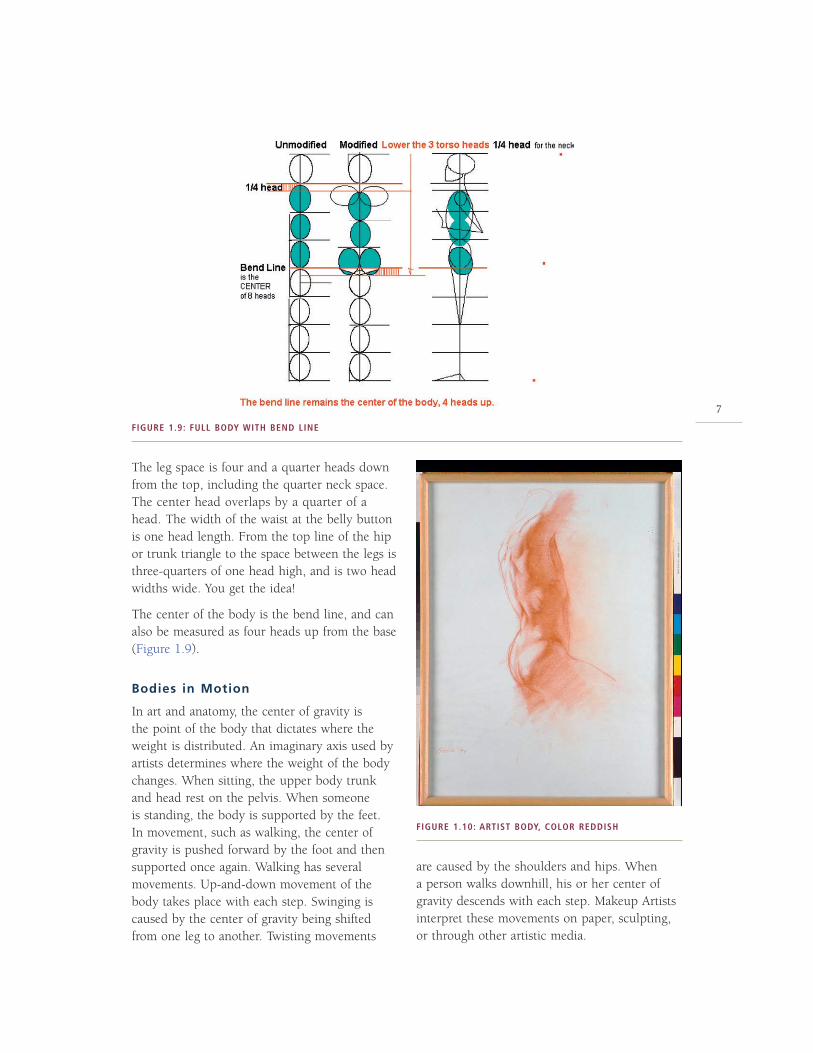
The leg space is four and a quarter heads down from the top, including the quarter neck space. The center head overlaps by a quarter of a head. The width of the waist at the belly button is one head length. From the top line of the hip or trunk triangle to the space between the legs is three-quarters of one head high, and is two head widths wide. You get the idea!
The center of the body is the bend line, and can also be measured as four heads up from the base (Figure 1.9).
Bodies in Motion
In art and anatomy, the center of gravity is the point of the body that dictates where the weight is distributed. An imaginary axis used by artists determines where the weight of the body changes. When sitting, the upper body trunk and head rest on the pelvis. When someone is standing, the body is supported by the feet. In movement, such as walking, the center of gravity is pushed forward by the foot and then supported once again. Walking has several movements. Up-and-down movement of the body takes place with each step. Swinging is caused by the center of gravity being shifted from one leg to another. Twisting movements
are caused by the shoulders and hips. When a person walks downhill, his or her center of gravity descends with each step. Makeup Artists interpret these movements on paper, sculpting, or through other artistic media.
FIGURE 1.9: FULL BODY WITH BEND LINE
FIGURE 1.10: ARTIST BODY, COLOR REDDISH
SH
AP
ES
8
Drawing the Body in Motion
by Dan Gheno
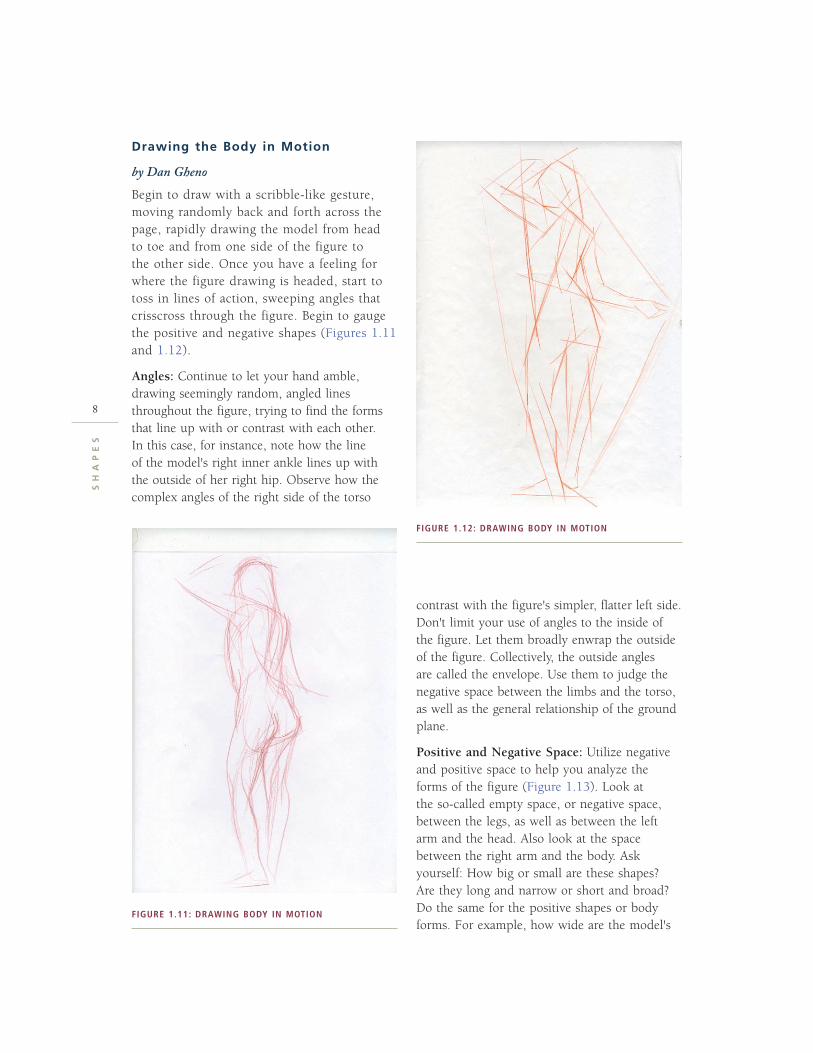
Begin to draw with a scribble-like gesture, moving randomly back and forth across the page, rapidly drawing the model from head to toe and from one side of the figure to the other side. Once you have a feeling for where the figure drawing is headed, start to toss in lines of action, sweeping angles that crisscross through the figure. Begin to gauge the positive and negative shapes (Figures 1.11 and 1.12).
Angles: Continue to let your hand amble, drawing seemingly random, angled lines throughout the figure, trying to find the forms that line up with or contrast with each other. In this case, for instance, note how the line of the model's right inner ankle lines up with the outside of her right hip. Observe how the complex angles of the right side of the torso
contrast with the figure's simpler, flatter left side. Don't limit your use of angles to the inside of the figure. Let them broadly enwrap the outside of the figure. Collectively, the outside angles are called the envelope. Use them to judge the negative space between the limbs and the torso, as well as the general relationship of the ground plane.
Positive and Negative Space: Utilize negative and positive space to help you analyze the forms of the figure (Figure 1.13). Look at the so-called empty space, or negative space, between the legs, as well as between the left arm and the head. Also look at the space between the right arm and the body. Ask yourself: How big or small are these shapes? Are they long and narrow or short and broad? Do the same for the positive shapes or body forms. For example, how wide are the model's
FIGURE 1.11: DRAWING BODY IN MOTION
FIGURE 1.12: DRAWING BODY IN MOTION
9
calves compared to her ankles? To keep the relative sizes of your positive shapes under control, gauge each body part against some other basic unit of measurement (see the section “Proportions for the Face and Body” by Don Jusko). For instance, how many head units does a leg measure?
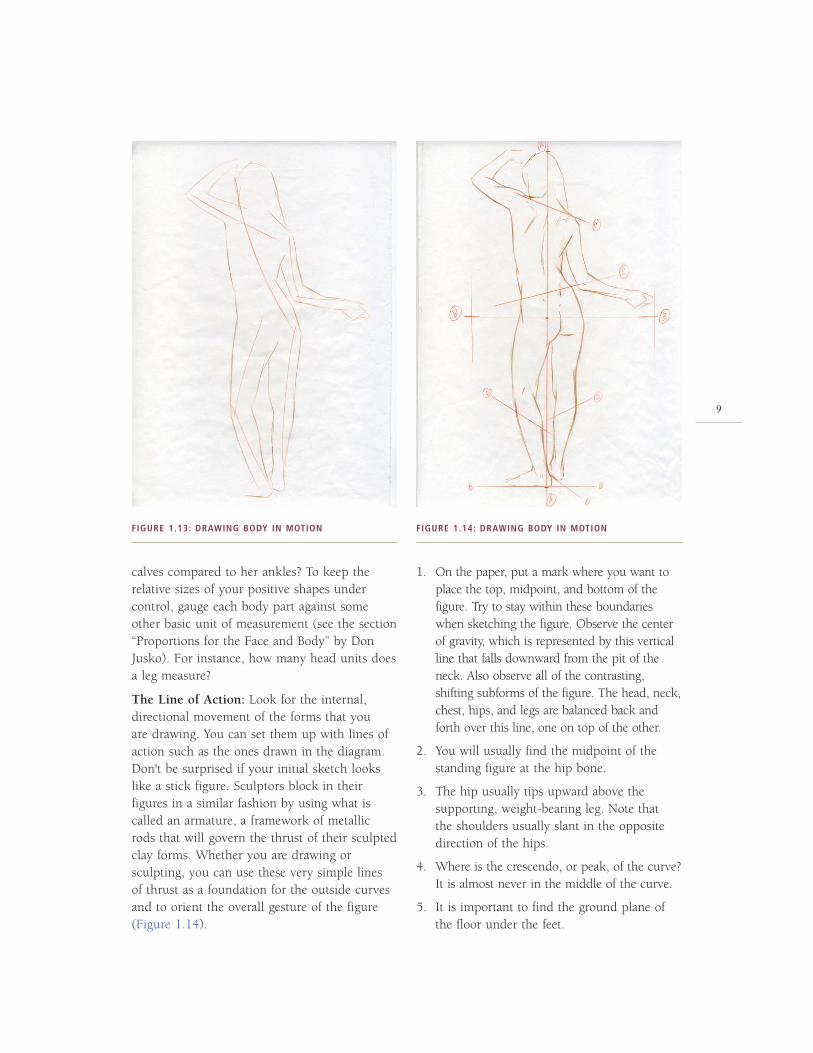
The Line of Action: Look for the internal, directional movement of the forms that you are drawing. You can set them up with lines of action such as the ones drawn in the diagram. Don't be surprised if your initial sketch looks like a stick figure. Sculptors block in their figures in a similar fashion by using what is called an armature, a framework of metallic rods that will govern the thrust of their sculpted clay forms. Whether you are drawing or sculpting, you can use these very simple lines of thrust as a foundation for the outside curves and to orient the overall gesture of the figure (Figure 1.14).
1. On the paper, put a mark where you want to place the top, midpoint, and bottom of the figure. Try to stay within these boundaries when sketching the figure. Observe the center of gravity, which is represented by this vertical line that falls downward from the pit of the neck. Also observe all of the contrasting, shifting subforms of the figure. The head, neck, chest, hips, and legs are balanced back and forth over this line, one on top of the other.
2. You will usually find the midpoint of the standing figure at the hip bone.
3. The hip usually tips upward above the supporting, weight-bearing leg. Note that the shoulders usually slant in the opposite direction of the hips.
4. Where is the crescendo, or peak, of the curve? It is almost never in the middle of the curve.
5. It is important to find the ground plane of the floor under the feet.
FIGURE 1.13: DRAWING BODY IN MOTION FIGURE 1.14: DRAWING BODY IN MOTION
SH
AP
ES
1 0
In conclusion, there are as many ways to start a drawing of the human figure from life as there are artists. The brief outline above is a personal approach to illustrations. It was prepared for students, and has been adapted from an article in American Artist magazine (Gheno).
Understanding the portions of the face and body will lead you to the art of makeup. Mastering the proportions of the face will enable you to create and design any look.
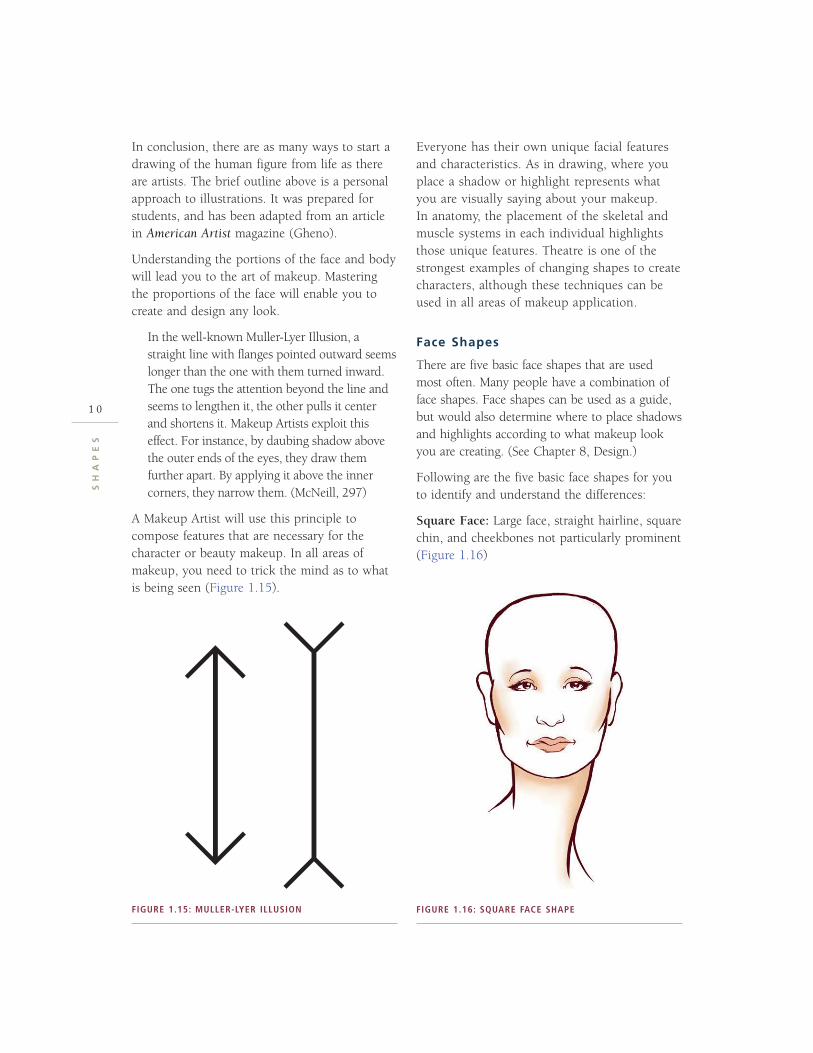
In the well-known Muller-Lyer Illusion, a straight line with flanges pointed outward seems longer than the one with them turned inward. The one tugs the attention beyond the line and seems to lengthen it, the other pulls it center and shortens it. Makeup Artists exploit this effect. For instance, by daubing shadow above the outer ends of the eyes, they draw them further apart. By applying it above the inner corners, they narrow them. (McNeill, 297)
A Makeup Artist will use this principle to compose features that are necessary for the character or beauty makeup. In all areas of makeup, you need to trick the mind as to what is being seen (Figure 1.15).
Everyone has their own unique facial features and characteristics. As in drawing, where you place a shadow or highlight represents what you are visually saying about your makeup. In anatomy, the placement of the skeletal and muscle systems in each individual highlights those unique features. Theatre is one of the strongest examples of changing shapes to create characters, although these techniques can be used in all areas of makeup application.
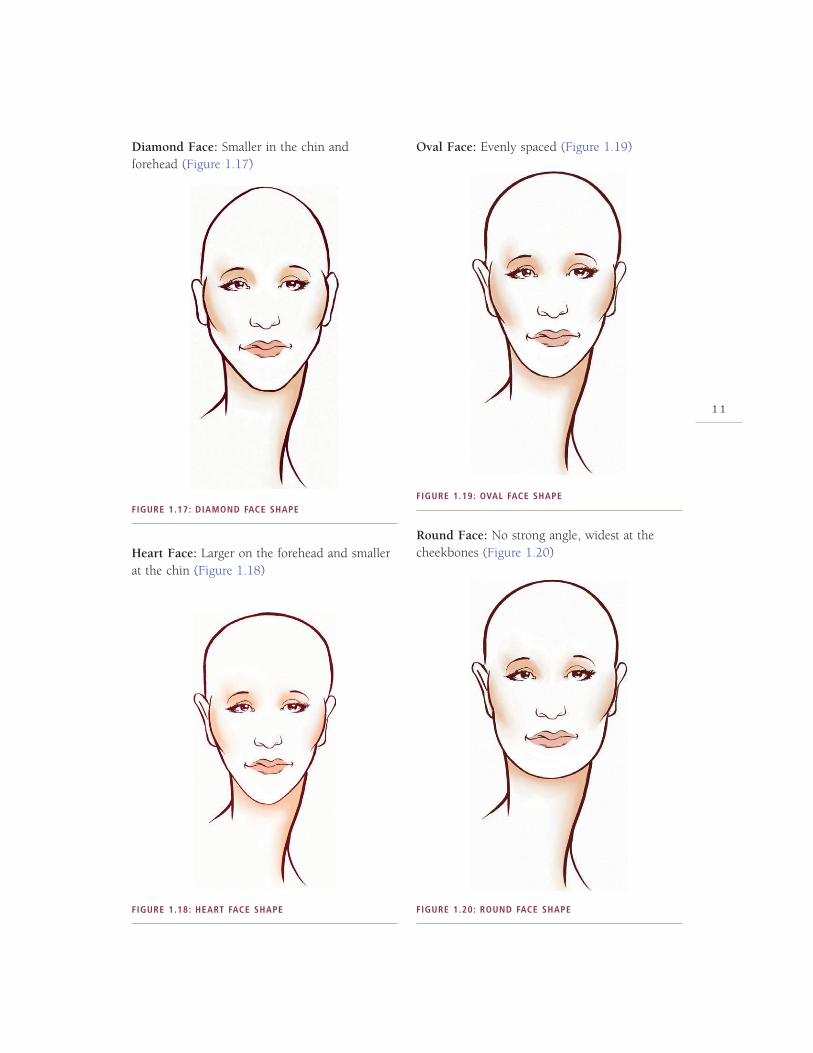
Face Shapes
There are five basic face shapes that are used most often. Many people have a combination of face shapes. Face shapes can be used as a guide, but would also determine where to place shadows and highlights according to what makeup look you are creating. (See Chapter 8, Design.)
Following are the five basic face shapes for you to identify and understand the differences:
Square Face: Large face, straight hairline, square chin, and cheekbones not particularly prominent (Figure 1.16)
FIGURE 1.15: MULLER-LYER ILLUSION FIGURE 1.16: SQUARE FACE SHAPE
1 1
Diamond Face: Smaller in the chin and forehead (Figure 1.17)
Heart Face: Larger on the forehead and smaller at the chin (Figure 1.18)
Oval Face: Evenly spaced (Figure 1.19)
Round Face: No strong angle, widest at the cheekbones (Figure 1.20)
FIGURE 1.17: DIAMOND FACE SHAPE
FIGURE 1.18: HEART FACE SHAPE
FIGURE 1.19: OVAL FACE SHAPE
FIGURE 1.20: ROUND FACE SHAPE
SH
AP
ES
1 2
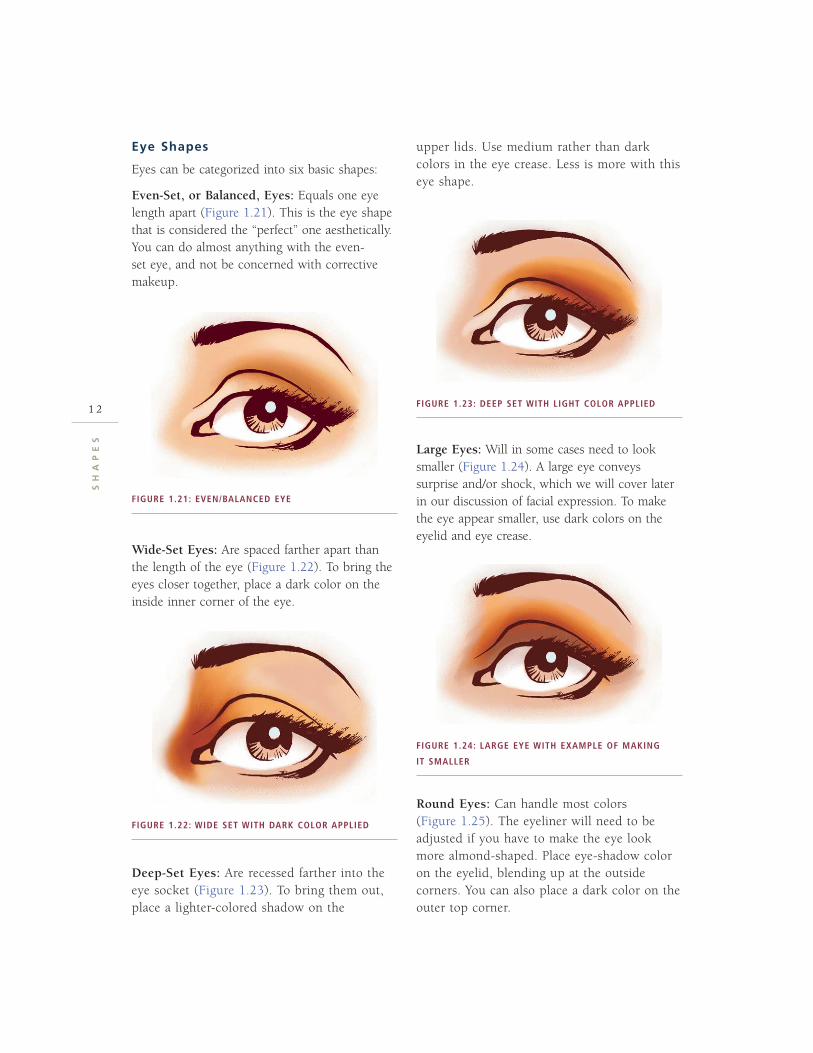
Eye Shapes
Eyes can be categorized into six basic shapes:
Even-Set, or Balanced, Eyes: Equals one eye length apart (Figure 1.21). This is the eye shape that is considered the “perfect” one aesthetically. You can do almost anything with the even-set eye, and not be concerned with corrective makeup.
Wide-Set Eyes: Are spaced farther apart than the length of the eye (Figure 1.22). To bring the eyes closer together, place a dark color on the inside inner corner of the eye.
Deep-Set Eyes: Are recessed farther into the eye socket (Figure 1.23). To bring them out, place a lighter-colored shadow on the
upper lids. Use medium rather than dark colors in the eye crease. Less is more with this eye shape.
Large Eyes: Will in some cases need to look smaller (Figure 1.24). A large eye conveys surprise and/or shock, which we will cover later in our discussion of facial expression. To make the eye appear smaller, use dark colors on the eyelid and eye crease.
Round Eyes: Can handle most colors (Figure 1.25). The eyeliner will need to be adjusted if you have to make the eye look more almond-shaped. Place eye-shadow color on the eyelid, blending up at the outside corners. You can also place a dark color on the outer top corner.
FIGURE 1.21: EVEN/BALANCED EYE
FIGURE 1.22: WIDE SET WITH DARK COLOR APPLIED
FIGURE 1.23: DEEP SET WITH LIGHT COLOR APPLIED
FIGURE 1.24: LARGE EYE WITH EXAMPLE OF MAKING
IT SMALLER
1 3
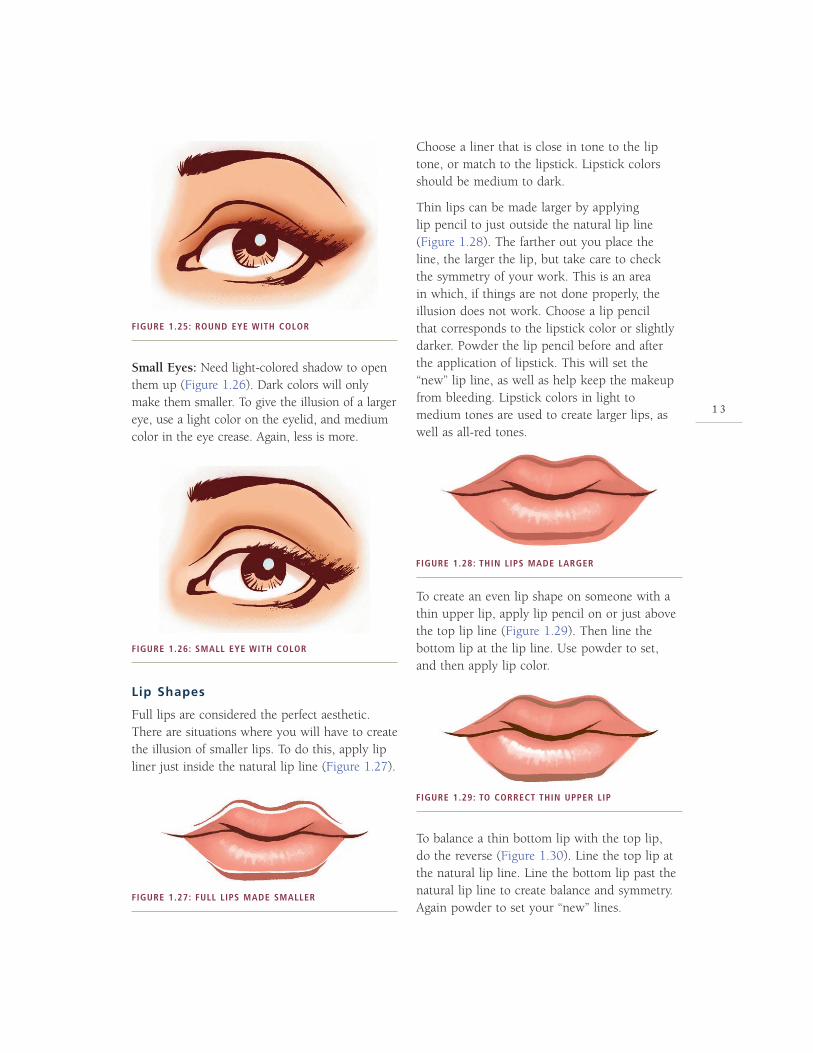
Small Eyes: Need light-colored shadow to open them up (Figure 1.26). Dark colors will only make them smaller. To give the illusion of a larger eye, use a light color on the eyelid, and medium color in the eye crease. Again, less is more.
Lip Shapes
Full lips are considered the perfect aesthetic. There are situations where you will have to create the illusion of smaller lips. To do this, apply lip liner just inside the natural lip line (Figure 1.27).
Choose a liner that is close in tone to the lip tone, or match to the lipstick. Lipstick colors should be medium to dark.
Thin lips can be made larger by applying lip pencil to just outside the natural lip line (Figure 1.28). The farther out you place the line, the larger the lip, but take care to check the symmetry of your work. This is an area in which, if things are not done properly, the illusion does not work. Choose a lip pencil that corresponds to the lipstick color or slightly darker. Powder the lip pencil before and after the application of lipstick. This will set the “new” lip line, as well as help keep the makeup from bleeding. Lipstick colors in light to medium tones are used to create larger lips, as well as all-red tones.
To create an even lip shape on someone with a thin upper lip, apply lip pencil on or just above the top lip line (Figure 1.29). Then line the bottom lip at the lip line. Use powder to set, and then apply lip color.
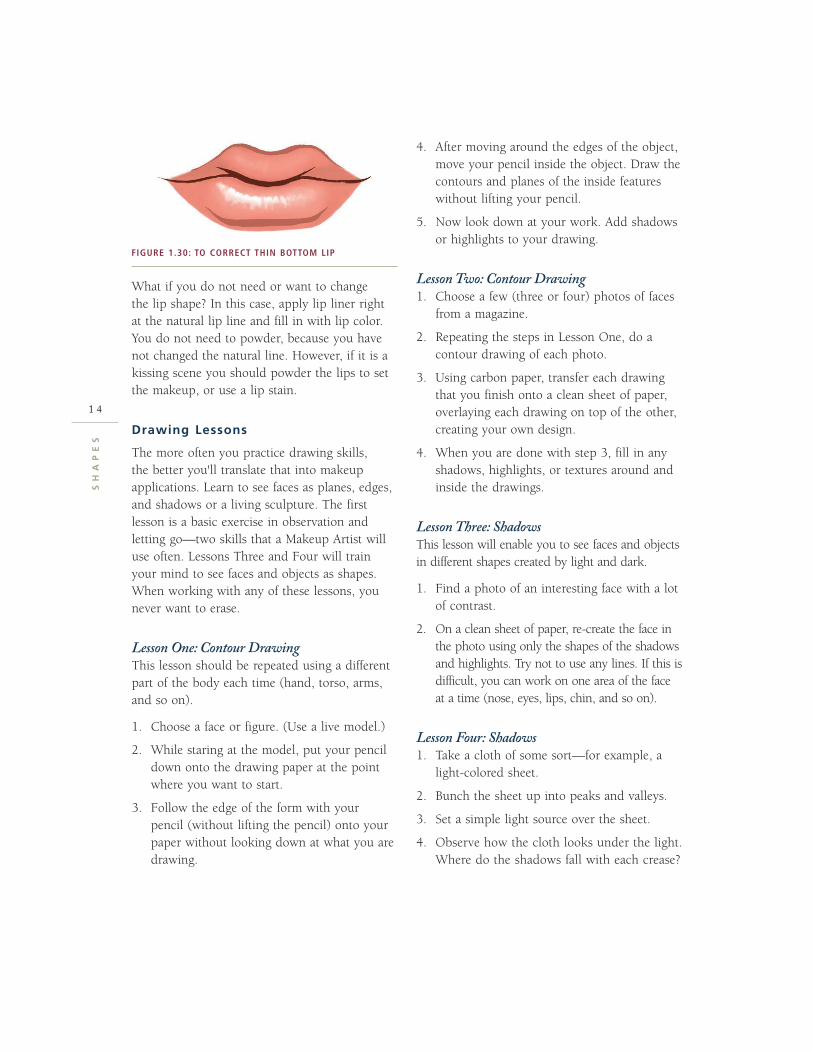
To balance a thin bottom lip with the top lip, do the reverse (Figure 1.30). Line the top lip at the natural lip line. Line the bottom lip past the natural lip line to create balance and symmetry. Again powder to set your “new” lines.
FIGURE 1.25: ROUND EYE WITH COLOR
FIGURE 1.26: SMALL EYE WITH COLOR
FIGURE 1.27: FULL LIPS MADE SMALLER
FIGURE 1.28: THIN LIPS MADE LARGER
FIGURE 1.29: TO CORRECT THIN UPPER LIP
SH
AP
ES
1 4
What if you do not need or want to change the lip shape? In this case, apply lip liner right at the natural lip line and fill in with lip color. You do not need to powder, because you have not changed the natural line. However, if it is a kissing scene you should powder the lips to set the makeup, or use a lip stain.
Drawing Lessons
The more often you practice drawing skills, the better you'll translate that into makeup applications. Learn to see faces as planes, edges, and shadows or a living sculpture. The first lesson is a basic exercise in observation and letting go—two skills that a Makeup Artist will use often. Lessons Three and Four will train your mind to see faces and objects as shapes. When working with any of these lessons, you never want to erase.
Lesson One: Contour DrawingThis lesson should be repeated using a different part of the body each time (hand, torso, arms, and so on).
1. Choose a face or figure. (Use a live model.)
2. While staring at the model, put your pencil down onto the drawing paper at the point where you want to start.
3. Follow the edge of the form with your pencil (without lifting the pencil) onto your paper without looking down at what you are drawing.
4. After moving around the edges of the object, move your pencil inside the object. Draw the contours and planes of the inside features without lifting your pencil.
5. Now look down at your work. Add shadows or highlights to your drawing.
Lesson Two: Contour Drawing1. Choose a few (three or four) photos of faces
from a magazine.
2. Repeating the steps in Lesson One, do a contour drawing of each photo.
3. Using carbon paper, transfer each drawing that you finish onto a clean sheet of paper, overlaying each drawing on top of the other, creating your own design.
4. When you are done with step 3, fill in any shadows, highlights, or textures around and inside the drawings.
Lesson Three: ShadowsThis lesson will enable you to see faces and objects in different shapes created by light and dark.
1. Find a photo of an interesting face with a lot of contrast.
2. On a clean sheet of paper, re-create the face in the photo using only the shapes of the shadows and highlights. Try not to use any lines. If this is difficult, you can work on one area of the face at a time (nose, eyes, lips, chin, and so on).
Lesson Four: Shadows1. Take a cloth of some sort—for example, a
light-colored sheet.
2. Bunch the sheet up into peaks and valleys.
3. Set a simple light source over the sheet.
4. Observe how the cloth looks under the light. Where do the shadows fall with each crease?
FIGURE 1.30: TO CORRECT THIN BOTTOM LIP

1 5
5. With a pencil, draw the sheet using simple outlines and only shadows, filling up the entire paper. Your design should go off the edges of the paper. At the end, your material may have a look of fluid movement or even
resemble a mountaintop.
References
Barcsay, J., 2006. Anatomy for the Artist. In: The Center of Gravity. Sterling, New York.
Fehér, G., 2006. Cyclopedia Anatomicae. Black Dog and Leventhal, New York.
Gheno, D., www.dangheno.net (adapted from Starting a Figure Drawing from Life. American Artist 17).
Jusko, D., Human Proportions and Painting. www.realcolorwheel.com.
McNeill, D., 1998. Constellation of Desire, The Skin Code. Little, Brown, Boston.