Embed Size (px)
Citation preview

Inside?What’s
• BERNINA® News
• Speedy Serger Quilting
• Mirror, Mirror...
• The Making of Sophie
• Black Tea Jacket
• NIFTY NOTIONS:Land That I Love Mini-Quilt
• Sprays & Such
• Ease Your Way to Fabric Manipulation
The Makeover PILLOWGive your fabric a makeover!- PAGE 4
Issue 1, March 2002 $5.95
JACKET
QUILT

PORTRAITof the
ARTISTwith her
BERNINA
©2002 Bernina of America • Visit www.berninausa.com for a dealer near you.
“Creativity is about
breaking the rules...about trying new things.”
Linda Lee – sewer, author, teacher
“I’m always combining different colors and textures and fabrics.”“I love to mix heavy textures with shiny things, or
dressy fabrics with ones that are more casual. For instance,I might try a silky top and add some organza to an edge andthen put that over linen pants. I’m not afraid to combine
things that seemingly don’t go together.”
“With my Bernina, I get perfect stitches on any fabric.”“Some people can’t sew on silk because they know their
machine won’t do it. But my Bernina performs for me, nomatter what fabric I’m working on. It’ll go from heavy wool
to chiffon to five layers of velvet without a hiccup.”

WHO WE ARE...Get to know the excellentstaff that contributes tips,project ideas and storiesto Through the Needle.
Page 2
BERNINA® NEWSThe latest and greatestproducts and servicesBERNINA® has to offer.Plus, we’ll let you knowwhat product ideas are inthe works.
Page 3
THE MAKEOVER PILLOW
This pillow is the perfectexample of what a sewingmakeover can accomplish(cover story).
Pages 4-6
SPEEDY SERGER QUILTING
Let’s step outside the boxand take a second look atwhat your serger can doin an entirely differentarea of sewing creativity.Page 7
MIRROR, MIRROR...
The perfect way to incor-porate your embroiderytalents into a room’sdécor.
Pages 8-9
THE MAKING OF SOPHIE
How the doll that asks allthe “silly” sewing ques-tions was created.
Pages 10-11
NIFTY NOTIONS: LAND THAT I LOVE MINI-QUILT
Learn how to make thispatriotic wall hangingwith the use of Teflon®
Pressing Sheets.Pages 12-13
EASE YOUR WAY TO FABRIC MANIPULATION
Helpful tips from JennieRayment on successfulfabric manipulation.
Page 14
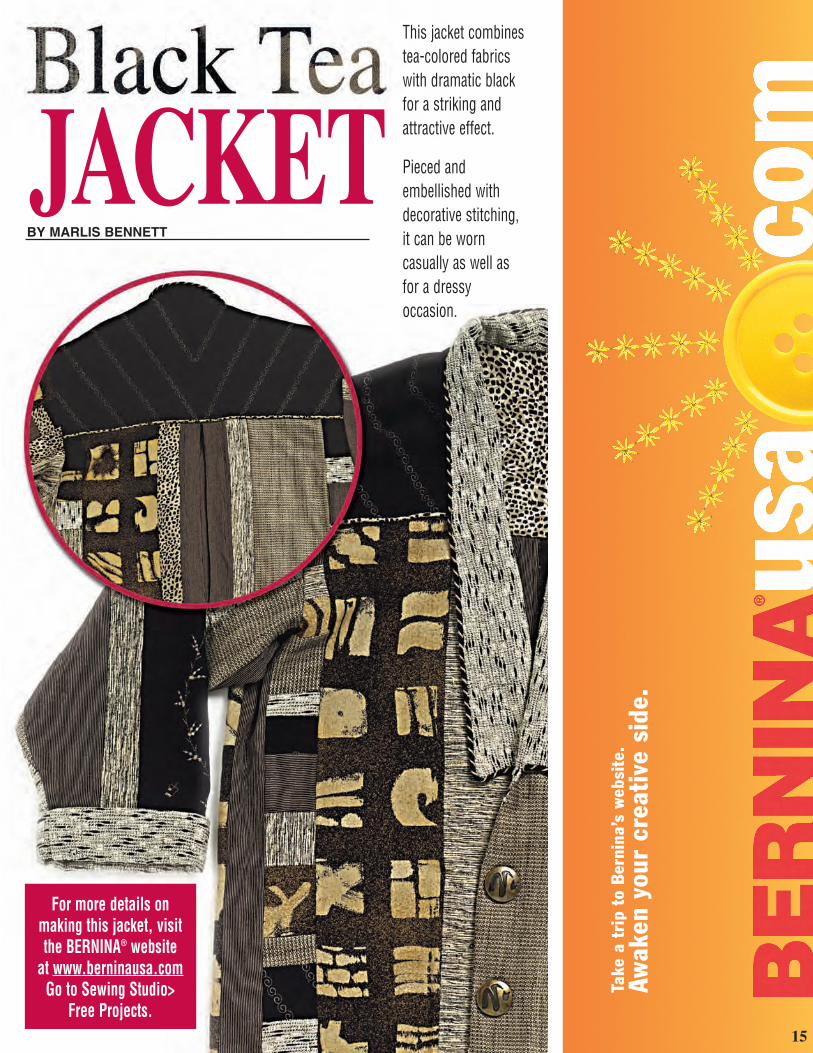
BLACK TEA JACKET
Check out this beautifullysewn jacket, then makeone for yourself bychecking out our website.
Page 15
SPRAYS & SUCHHow to make the prepara-tion phase of a projectfast and easy withfusibles, adhesives andglues.
Page 16
SOFTWARE SKILL BUILDERS
Sharpen your sewingsoftware skills with thesehelpful hints.
Page 18
PROFESSIONALPROFILE
Find out how our Editor,Jo Leichte, ended up witha job she loves.Page 20
1
A completely new approach to Celticcords, adding butterflies, birds andbeasties. Step by step photos takeCeltic designs in new directionswith new needlework techniquesthat are easy, fast and efficient.Softcover, 96 pages, color. $24.95
For the embroiderer interested indeveloping new and exciting surfacesfor stitch. Challenging and innovativesurfaces are described through clearstep-by-step guidelines & over 40different surfaces and processes tochoose from.Softcover, 144 pages, color. $22.95
Discover your creativity as you make theunique machine embroidered blocks for aLatte Quilt. The CD included has all theembroidered block patterns and isformatted for any embroidery machine.Softcover, 105 pages, color. $27.95
With Sew a Row you really are nevertoo busy to make a quilt! A magic formula
helps you make unique quilts using thelatest techniques that bring quilt making
into the 21st century. Clear diagrams andstep by step explanations show you how
to sew patchwork quickly and simply.Softcover, color. $24.95

Currently in a garment and small quilt phase,Jo is constantly on the lookout for quick, sim-ple projects to share with beginning seamsters.As Editor for BERNINA® of America, Jo isinstrumental in the production of Through theNeedle.
VICKI TRACYMirror, Mirror...& Land that ILove
JO LEICHTEContributingEditor
As an Education Consultant for BERNINA® ofAmerica, Jill is the resident master of stitchmanipulation. She loves playing with them,changing them, and using them to create tex-tured fabrics for garment and craft projects.
Finding time to sew recently, Marlene has beencreating whimsical and eclectic machine-embroidered stitchery using the artistaDesigner software. As an Education Consultantfor BERNINA® of America, Marlene focusesmuch of her time on teaching dealers how touse the artista embroidery software.
With a background in Art and HomeEconomics, Susan is interested in all types ofsewing and crafts and has written severalsewing books. She loves to be creative onpaper as well as in fabric and is the Director ofWeb and Education Communications forBERNINA® of America, Inc.
Jennie Raymont is possibly the world’s only“Nipper and Tucker.” She is a shortish, skinny-ish, wacky Brit who is the author of threebooks on fabric manipulation and surface tex-ture with a fourth one ready in May. She trav-els extensively, lecturing and teaching the art offabric manipulation.
Marlis creates unique interpretations of classicand heirloom sewn garments, incorporatingdecorative stitching techniques and embroideryin imaginative projects. As an EducationConsultant for BERNINA® of America, Marlisputs her own stamp of creativity on machinesewn projects.
Vicki’s unique sense of style and her obviouslove of sewing and machine embroidery servesher well as the owner of BERNINA® SewingStudio in Lubbock, TX. Her free-wheelingapproach to sewing is evident in her personalmotto – “Lighten Up. Be Fearless. Have Fun.”
WHOWe Are...
GAYLE HILLERTNews fromBERNINA®
SUSAN BECKDirector of Weband EducationCommunications
An avid sewer since she was a young girl,Gayle has managed to combine her vocationand her avocation. As Vice President of theEducation Department for BERNINA® ofAmerica, Inc. she is responsible for training,education and testing functions relating to all BERNINA® products.
JILL DANKLEFSENMakeover Pillow& Software SkillBuilders
NANCY BEDNARSpeedy Serger Quilting
KAY LYNCHBENNETTSprays & Such
As a Card ProductionAssistant at OESD,Inc., Kay’s job is toassist in the develop-ment of designs andembroidery cards for
elinor peace baileyThe Making of Sophie
JENNIERAYMENTEase Your Way to FabricManipulation
MARLENEBRYANTSoftware Skill Builder
MARLIS BENNETTBlack Tea Jacket
Known around the world for her whimsicaldolls, elinor shares her creative energy withBERNINA® through Sophie, a fictional stitch-er created to ask all those “stupid questions”beginning sewing students are too embarrassedto ask.
One of BERNINA®’s freelance serging experts,Nancy also creates exquisite stitched garments,quilts, and crafts. She is also co-author of TheEncyclopedia of Sewing Machine Techniques,as well as author of several other books andcontributor to many sewing publications.
BERNINA® and OESD, and to create projectsusing the embroidery designs. She has a BSdegree in Home Economics Education fromOklahoma State University. She has taughtserger classes for the past 12 years at CanadianValley Technology Center in El Reno,Oklahoma and at BERNINA® of OKC South.
2

There’s always something happening at BERNINA® but thisspring is busier than ever! Along with the premier issue ournew Through the Needle magazine, we have new machines,fun embroidery designs, and unique presser feet. And, on topof that, we have BERNINA® Bonus Days coming in April!
For those of you looking for an affordable sewing and embroi-dery machine combo, check out the newest artista sewing sys-tem! The 165E offers artista’s exclusive ability to rescaledesigns without sacrificing stitch density or design clarity, andBERNINA®’s traditional sewing and embroidery features,power, and ease of use are still part of the package!
If you’re already into embroidery, you’ll want to add our newestembroidery cards to your library. If you or your children playedwith Playmobil® toys you know how wonderful they are, andyou’ll love the designs on our exclusive Studio Bernina®
Playmobil® embroidery card.
The Quiltmaker’s Gift embroidery card has designs from thebook of the same name. A sweet story of generosity and shar-ing tells the tale of a king and a quiltmaker and the gift of quilts.Maybe you’ll accept the challenge from BERNINA®, Quilters’Resource, Benartex fabrics and Scholastic Books to make aquilt for someone and enter it in our contest to win some fab-ulous prizes for yourself. Visit the BERNINA® website fordetails.
And, don’t forget the United WeStand embroidery card fromBERNINA® and OESD. All of theproceeds from this unique col-lection of patriotic-themedembroidery designs are beingdonated to the Children’s ReliefFund of the World Trade CenterMiracles Foundation. Thedesigns have been contributedby well-known designers fea-tured on BERNINA®’s line oflicensed embroidery cards suchas Suzy’s Zoo, Debbie Mumm,
Betty Alderman, Holice Turnbow, and others. Even our favoritenew stitcher, Sophie, got in on the fun – with a little help fromher Auntie elinor!
And, more new machinesfrom BERNINA® — the1200DA and the 1300DCsergers. The 1200DA is super-easy to thread and full fea-tured with 2, 3, and 4 threadstitch capabilities. The 1300adds chain and cover stitchesfor true ready-to-wear tech-niques. With LCD screens toguide you, professionalresults are yours for everyproject made with either ofthese sergers. Take a visit toyour local dealer and have alook.
We also have a new presser foot to help make the task ofinserting an invisible zipper even easier! Invisible Zipper Foot#35 is specially designed for inserting in-seam “invisible” zip-pers. It even eliminates the tedious job of pressing the zipperfirst – the carefully engineered sole holds the zipper tape andcoils in exactly the right place for stitching. A really practicalfoot to add to your collection and just in time for creating sleekgarments for spring and summer.
And if all that weren’t enough,go to your local participatingBERNINA® dealer during Apriland receive a free gift withpurchase! BERNINA® BonusDays offers you a free gift – acollection of decorativethreads, notions, magazine,pattern – valued at $35 whenyou purchase $50.00 ofaccessories, notions, andsupplies.
So, we hope you like your first issue of Through the Needle.The people that created it think of themselves as a gatheringof friends sharing their sewing knowledge with you. Pleaseenjoy!
3
BY GAYLE HILLERT

BY JILL DANKLEFSEN
Give your fabric a makeover!Take “plain” fabrics anddress them up using pretty
threads and decorative stitches. Have fun withseveral fabrics and stitch techniques, then
piece the “new” fabrics together to form thefront of a unique decorator pillow. This is a
perfect way to pull together several colorsin a room, blending them in one or two
pillows and coordinating the room’sdécor.
Start by selecting fabrics, choos-ing firm wovens to act as a base for
your stitching. Consider experiment-ing with different fiber contents and fab-
ric textures. This form of fabric embellish-ment is one in which traditional rules can be“thrown out the window.” Don’t be afraid to
try something different or unusual, perhapseven a pieced or crinkled base. The fabrics
selected for the pillow shown hereinclude a wide wale cotton corduroy, a
woven wool plaid, a linen, and a solidwool flannel.
The next step is to select decorativethreads for stitching. There are incredible
machine embroidery and specialty threadsavailable today. Choose from rayon, cotton, andpolyester machine embroidery threads, different
types of metallic threads, and many more.There are no rules for determining the best
thread to use for a particular technique.Base your decisions on your creative
likes – perhaps the color or the textureof the thread – and stay away from the
ones that are not your favorites.
Typically, decorative threads work bestif the needle thread tension is reduced –
turned to a lower number on the tensiondial. Another way to achieve this effect is
to use a 50 wt. 3-ply cotton thread suchas Mettler Silk-Finish cotton in the
bobbin. This is a construction quali-ty thread and therefore thicker
than many threads. A heavier thread in the bobbin helps tomake the surface stitching more definite and nicer looking.Thus, by reducing the needle tension and using Mettler Silk-Finish thread in the bobbin, a rich-looking decorative stitch isachieved on the surface.
Correct needle choices are vital to success with decorativethreads and having beautifully embellished fabric(s) as an endresult. It is extremely important to have a good selection of dif-ferent types and sizes of needles available for this kind ofwork. Be sure to include the following needles in your collec-tion - Machine Embroidery, Metafil (Metallica), Topstitching,Microtex, Double and Triple needles. Each thread you use mayrequire special handling depending on the particular fabric orstitch chosen. Having a good selection of needles availableallows for proper sample work to find just the right needle andthread combination.
When executing the quantity of stitching that fabric embellish-ment requires, change the needle more frequently than usual.A dull, damaged or burred needle makes working with
SUPPLIES:• Assorted fabrics for piecing the
pillow front
• 13” square fabric for the pillow back
• Assorted embroidery threads
• HTC Armo® Weft interfacing
• 11/2 yards of purchased piping
• 12” pillow form
• Hand sewing needle and thread
• Bulky Overlock Foot #12/12C
• Open Embroidery Foot #20/20C
• Embroidery Foot #6
• Small decorative cord such as PerleCotton or Pearl Crown Rayon
4

specialty threads much more of a challengethan it needs to be! Don’t forget to clean andoil the machine regularly as well. A well-lubricated hook is a necessity for good stitchquality. Be thorough in the cleaning of thehook area – a small bit of broken thread leftbehind can cause problems far out of propor-tion to its insignificant size.
Probably the largest “road block” to decora-tive stitching on whole cloth is achievingeffective stabilization. On projects with a rel-atively small decoratively stitched area, tradi-tional “tear-away” type stabilizers work justfine. But when faced with the magnitude ofstitching all over a large piece of fabric, tradi-tional stabilizers may not present a goodworkable option. In those cases, a weft inser-
tion interfacing presents a wonderful alterna-tive. The Handler Textile Company manufac-turers one such interfacing, called Armo®
Weft. Not only does this interfacing have theability to support many different types of dec-orative stitching on a variety of fabrics, but itprovides additional body to the fabric base aswell. However, the best feature of this inter-facing is that the fabric remains soft anddrapeable when the fusing process is com-plete.
Presser feet and attachments are the final toolsnecessary to complete any decorative stitch-ing project. Keep in mind that traditional usesfor presser feet are fine, but one sometimeshas to use a presser foot or an attachment in adifferent manner in order to achieve the
desired result with decorative stitching. Agood rule of thumb is to start with the presserfoot suggested for the given technique. Thencritically examine the stitching. Does it lookas nice as it could? Have you achieved theresults you expected? If the answer to eitherone of the questions is “No”, consider experi-menting with other presser feet until you arehappy with the results. Don’t forget that theweight and type of fabric along with the stitchselection can also effect how a presser footperforms.
Now that you’ve assembled the necessarytools to begin stitching your unique decora-tively stitched fabric, it’s time to begin creat-ing your Makeover Pillow!
- Stitch Recipes Page 6
5
DIRECTIONS:Note: All seam allowances are 1/2”.
If needed, fuse the Armo® Weft interfacing to the wrong side of the fabric swatches following the manufacturer’s direc-tions.
Embellish each of the fabrics using one of the “stitch recipes” given on the following page. Or create your own embel-lishment techniques and use to decorate the fabric swatches. Remember that the examples are simply a place for youto begin creating and planning your own unique embroidered fabrics. Adjust, alter, and adapt the ideas to suit your owncreativity.
Cut the fabric pieces according to the measurements in the diagram and seam them together as shown to make a 13”square. Using Embroidery Foot #6 and a small decorative cord, couch over the seams with the decorative stitch of yourchoice.
Using Bulky Overlock Foot #12/12C, stitch the purchased piping along the raw edges of the pillow front, clipping the seam allowance at the corners for turning.
Place the pieced pillow front right sides together with the pillow back and stitch along all four sides, leaving a 6”-8”opening on one side.
Turn the pillow to the right side and press if needed. Insert the pillow form through the opening and stitch the opening closed using a hand-sewing needle and thread.
Double Diamonds
Trailing Arrows
Broken Scallops
RunningAway
Double Diamonds81/2” X 51/2” Running Away
51/2” X 61/2”
Trailing Arrows81/2” X 81/2” Broken Scallops
51/2” X 71/2”
MEASUREMENTS ARE CUT SIZES
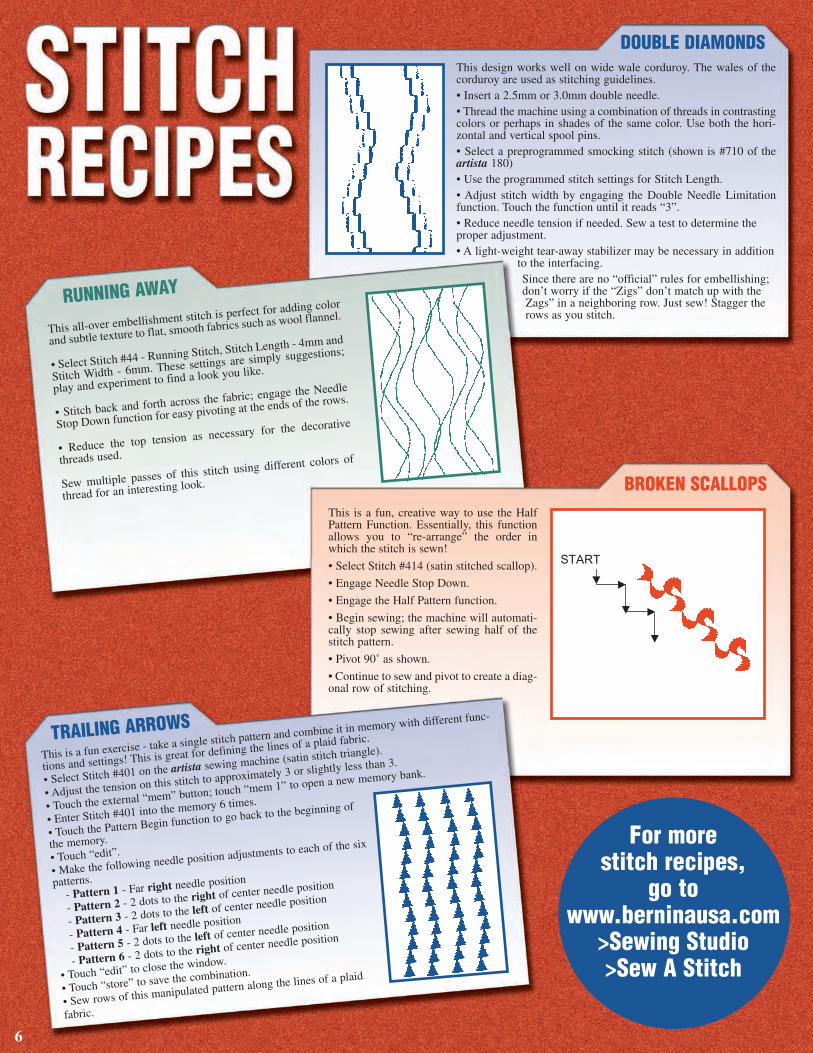
This is a fun, creative way to use the HalfPattern Function. Essentially, this functionallows you to “re-arrange” the order inwhich the stitch is sewn!
• Select Stitch #414 (satin stitched scallop).
• Engage Needle Stop Down.
• Engage the Half Pattern function.
• Begin sewing; the machine will automati-cally stop sewing after sewing half of thestitch pattern.
• Pivot 90˚ as shown.
• Continue to sew and pivot to create a diag-onal row of stitching.
This all-over embellishment stitch is perfect for adding color
and subtle texture to flat, smooth fabrics such as wool flannel.
• Select Stitch #44 - Running Stitch, Stitch Length - 4mm and
Stitch Width - 6mm. These settings are simply suggestions;
play and experiment to find a look you like.
• Stitch back and forth across the fabric; engage the Needle
Stop Down function for easy pivoting at the ends of the rows.
• Reduce the top tension as necessary for the decorative
threads used.
Sew multiple passes of this stitch using different colors of
thread for an interesting look.
6
This design works well on wide wale corduroy. The wales of thecorduroy are used as stitching guidelines.• Insert a 2.5mm or 3.0mm double needle.• Thread the machine using a combination of threads in contrastingcolors or perhaps in shades of the same color. Use both the hori-zontal and vertical spool pins.• Select a preprogrammed smocking stitch (shown is #710 of theartista 180)• Use the programmed stitch settings for Stitch Length.• Adjust stitch width by engaging the Double Needle Limitationfunction. Touch the function until it reads “3”.• Reduce needle tension if needed. Sew a test to determine theproper adjustment.• A light-weight tear-away stabilizer may be necessary in addition
to the interfacing.Since there are no “official” rules for embellishing; don’t worry if the “Zigs” don’t match up with the Zags” in a neighboring row. Just sew! Stagger the rows as you stitch.
DOUBLE DIAMONDS
TRAILING ARROWS
RUNNING AWAY
BROKEN SCALLOPS
For more stitch recipes,
go to www.berninausa.com
>Sewing Studio>Sew A Stitch
This is a fun exercise - take a single stitch pattern and combine it in memory with different func-
tions and settings! This is great for defining the lines of a plaid fabric.
• Select Stitch #401 on the artista sewing machine (satin stitch triangle).
• Adjust the tension on this stitch to approximately 3 or slightly less than 3.
• Touch the external “mem” button; touch “mem 1” to open a new memory bank.
• Enter Stitch #401 into the memory 6 times.
• Touch the Pattern Begin function to go back to the beginning of
the memory.
• Touch “edit”.
• Make the following needle position adjustments to each of the six
patterns.- Pattern 1 - Far right needle position
- Pattern 2 - 2 dots to the right of center needle position
- Pattern 3 - 2 dots to the left of center needle position
- Pattern 4 - Far left needle position
- Pattern 5 - 2 dots to the left of center needle position
- Pattern 6 - 2 dots to the right of center needle position
• Touch “edit” to close the window.
• Touch “store” to save the combination.
• Sew rows of this manipulated pattern along the lines of a plaid
fabric.

Quilt with a serger?“Why?”, you ask. Ofcourse sergers are widely
used little workhorses for won-derful rolled hems, flexible knitseams and sturdy construction withwoven fabrics. But piece and quilt ona serger? Let’s step “outside the box”and discuss a few reasons why youshould take a second look at what yourserger can do in an entirely different areaof sewing creativity.
Piecing is beautifully clean finishedBecause a serger trims and sews at the sametime, the frayed edges created when piecingquilt strips just do not happen. Home dec proj-ects, such as the Log Cabin Table Topper shownhere are so cleanly finished that they could be usedwrong side up! Lining a project to cover up raw anduneven edges is simply unnecessary.
Twice the needles equals twice the strengthA basic 4-thread overlock is the stitch of choice whenseaming woven fabrics in both garment and quilting situa-tions. Both the right and left needles are used in this stitchformation, doubling the seam strength. Consider using thisextra measure of “stitch security” when piecing your next quiltintended for a little person. A much-loved project receives lotsof wear; how comforting to have that extra row of straight stitch-ing to hold it together.
Four thread seaming controls stretchy bias edgesSimple, medium to large (4” or more) half square trianglesstretch less when seamed on a serger. The second row ofneedle stitching controls the stretch on the bias edges, andthe overlocking action of the upper and lower loopers con-tains and smooths the rippling of the seam allowances.
Piece and quilt in a flash!Remember that a serger sews approximately two times faster than a sewingmachine. Imagine how quickly you can serge through a stack of patchworkpieces! Use traditional speed piecing methods, chaining multiple units kite tailstyle. You can also use a technique that pieces and quilts at the same time. Talkabout fast! A full-sized quilt can be completed in a fraction of the time requiredby traditional methods.
Serger seam allowancesThe traditional 1/4” seam allowance used in the quilting world is easily adaptedto serger piecing. The distance between the left needle and the upper cuttingblade yields an approximate 1/4” seam allowance. Markings are also imprintedon the front of most sergers as an extra guide. For those who would like an extrameasure of accuracy, attach a BERNINA® Right Seam Guide and adjust it for aprecise 1/4” seam allowance. Position the cut edges along the seam gauge toassure that the correct amount is trimmed and serged.
Serger quilting and piecing is “relaxed quilting”. Absolutely precise, stitch-by-stitch seaming may not be totally possible given the physical make-up of theserger itself. However, the speed, strength and tidiness of the finished sergerpieced project make it a technique well worth your time to explore. So, dive intoyour stash, cut some strips, thread your serger and enjoy the creative ride....
For instructions on making the projects shown here log onto the BERNINA®
website at www.berninausa.com. Go to Sewing Studio>Free Projects. Searchfor Log Cabin Table Topper and Fleece Lap Quilt
QUILTINGSpeedy SergerSpeedy SergerBY NANCY BEDNAR
SERGER STITCHES USED FOR QUILTING & PIECINGTwo basic stitch formations are recommended for easy sergerpiecing and quilting.
FOUR-THREAD OVERLOCK STITCHUse this basic four-thread, stable stitch for both single layerpiecing and quilt-as-you-go methods using fabric and battingat the same time.
• Right and Left Needles• SL = 21/2 CW = 2• All-purpose thread in both needles and both
loopers• All tensions balanced – 4-5 on each thread
TWO-THREAD WIDE FLATLOCK STITCHUse this wide, stretchy seam for piecing and edging a polarfleece throw.
• Left Needle and Lower Looper only• Right Needle entirely removed• Upper Looper convertor installed• Upper Looper thread entirely removed• SL = 3 CW = 21/2
• Wooly Nylon in both the left needle and upper looper
• Both tensions quite low,3 or below on each depending upon the thickness of the fleece
7

Mirror, Mirror...Mirror, Mirror...
Crewel embroidery is a formof stitching with a colorfulhistory. Rather than relying
on even weave fabric, the designswere worked freeform on linen orwool challis. The thread most oftenused was wool, which created amatte finish and a slightly raisedtexture. Most traditional crewel-work employed stylized trees,vines and flowers and was inspiredsimply by looking out the windowat the garden.
When stitching crewel designs, theuse of color vs. texture is an inter-esting dilemma. Although the twoare not mutually exclusive, theyboth have an effect on the overallpicture. Because color is the firstelement observed in any project, itwill overshadow texture everytime. These designs are beautifullystitched in vibrant primary colors.However, if texture is your goal,using low contrast (almost mono-chromatic) colors will create amore sophisticated look, wheretexture takes center stage as shownin the samples on page 9.
The unique mirror project shownhere is a great way to soften thelook of accessories and the goodnews about this project is thedesigns can be changed in theframes as quickly as you changeyour mind. It offers the perfectway to incorporate your embroi-dery talents into your room’sdécor. Made as picture frame, theside panels of the mirror can befilled with embroidered cloth justas easily as photographs. Changethe embroidered sections often tofreshen the look of the room orblend with the seasons.
Both designs were stitched in onehooping using the artista largehoop. Pivot the designs 90˚, mirrorimage if desired. Hoop the battingand fabric and stitch the designsthrough both ayers.
Use the glass from the frames as atemplate to cut out the designs, butframe them without the glass.
SUPPLIES:• Studio Bernina® Crewel
Embroidery card by Iris Lee
• Monet thread by YLI
• Jeans or Topstitch needle 110
• Two 10” x 12” pieces of linen fabric
• Two 10” x 12” pieces of low-loft batting
• Mirror with frames (4”x 6” openings)
8
BY VICKI TRACY

At participating dealers
There’s a curious new arrival in Bernina’s ever-growing garden of embroidery cards — Iris Lee’s Crewel Florals. Nowhere else on Earth willyou find such colorful and curvy specimens except in this exotic collection.
9
TIPS:Use embroidery in place of
a photo in any frame. Decorator and craft stores
have frames in many forms: boxes, room dividers, bulletin boards, etc.
For some additional ideas go to www.sudberry.com/catalog
When using heavy decorative threads for embroidery, the
density of the design must be decreased; designs #31-60 on the
Studio BERNINA® Crewel Embroidery card by Iris Lee have
already been adjusted for use with Monet thread. Insert a
#110/16 Topstitching needle toaccommodate the diameter of the
thread, and use a bobbin filled with regular weight or
bobbin thread.
At participating dealers.
The king who has everything learns that the greatest gift is generosity in the award-winningchildren’s book The Quiltmaker's Gift. Now, with Bernina’s newest design card, you can
embroider a story with these colorful characters on a quilt, on a shirt, on a pillow.

One of the extraordinary things I learned about dollswhen I first began to make them is that they have a“voice” – my voice of course – but none the less sep-
arated enough from myself that it seems “other”. As a mat-ter of fact, that voice became such an integral part of my
doll making that I found it useful as a communications tool formy own sometimes overwhelming persona. The dolls seemed
to hold my anger, my strong opinions, and mollify them. Outtumbled the words, but since they belonged to the doll they
were not quite so needy or quite so intimidating. In factthe dolls managed to say many things that I could not
manage for myself.
Those of you who are a bit antique will recallthe film “Lili” with Leslie Caron; she falls in
love with puppets and the puppets love herback. Not they themselves of course buttheir puppeteer. He was cynical and bitterbut when he spoke through the puppets hebecame sentimental and charming.Stripped of them he was lost. Oh, youknow how it goes, she disarmed him,found the puppet within, stripped awayhis defensive veneer of self-deprecation,and taught him to love. It’s as old a tale
as that of a child who dresses a stick in aleaf, talking to it as if it were human.
It was this very concept that led me to createSophie. Here she was, able to ask all thedumb questions that a brand new sewerwould like to ask. She’s not self-consciousat all. Every beginner has to start at thevery beginning, but we sewers are such a
tight knit group that a new sewer feels leftout of the loop, as if she should already
know what a stitch plate is, or a selvedge.Sophie could bring off those questions for the
beginner just like a doll brings it off for me.So to develop Sophie I went back to my
imagination to the time when I was brandnew and knew nothing. I laid out all my
sewing tools and with the help of
SophieTHE
OFMaking
Creating Your Own Voice!BY elinor peace bailey
10

11
Susan Beck and Jo Leichte atBERNINA® of America figuredout what those tools were intend-ed to help the sewer accomplish.Then we told Sophie – throughMillie, her friend and teacher –and she told you. Hopefully allthis was done with enough humorand grace that you enjoyed beinginformed.
Of course Sophie simply had to leap off the page and become adoll. So I created her in the third dimension and presented her toBERNINA®. You can purchase her pattern from your local BERN-INA® dealer.
Now for those of you who are looking for a foil for your own sweetself – remember that all your crafts, quilts and garments have avoice. They can tell people who you are without your having to saya word. But I’m sure you knew that. Indeed it is wonderful whenyour work goes on before you, yelling, “Here she is!” when youenter a room. But forgive me if I claim that a doll is the most directof speakers; and, naturally, when I came to understand that, Ibecame one.
Of course Sophiesimply had to
leap off the pageand become a doll.

BERNINA® SUPPLIES:
• BERNINA® Ironing System
• artista 180E
• artista Editor Embroidery Software
• Edgestitch Foot #10/10C
• Embroidery Foot #15
• Button Sew-on Foot # 18
• Open Embroidery Foot #20/20C
• Patchwork Foot #37
Mini-QuiltGENERAL SUPPLIES:
• Pattern is Heartfelt Holidays Too from Art to Heart, design is Land that I Love
• Scraps of assorted fabrics for backing, bordersand appliqués
• Warm & Natural® batting - approximately 20” square
• 1/4 yard fusible web with paper backing
• Assorted buttons
• Assorted embroidery threads
• Blush for Uncle Sam’s cheeks
• 60 wt. cotton darning thread for quilting and stippling
12
BY VICKI TRACY

Some products are just too good to be kept a secret. One suchnotion is the Teflon® Pressing Sheet. Invented by a chef formaking the perfect folded omelet, it has found its way into the
sewing room. There, it has many functions:
1. Protects your iron and ironing board from the mess of adhesives from fusible web and iron-on interfacing
2. Use the sheet as a press cloth on any surface that should not touch the iron directly
3. For layered appliqué, position fused fabric shapes on the see-through sheet to set in place.
In addition to these sewing room uses, this sheet is great for crafts.It will protect your table from hot glue guns, stiffening fabrics,rubber stamps, and paint. The surface can simply be wiped cleanand reused.
The whimsical Uncle Sam on this Americana mini-quilt was lay-ered and fused using this product.
INSTRUCTIONS:Cut background pieces according torecommended sizes in pattern. Stitchbackground shapes together accordingto layout diagram, using PatchworkFoot #37.
Trace appliqué shapes on paper side offusible webbing. Fuse to wrong side ofappropriate appliqué fabric, using aTeflon® Pressing Sheet® to protect iron-ing surface and iron. Cut shapes out ontraced lines.
For layered appliqué, lay the Teflon®
sheet over the pattern in the book. Peelpaper backing away and fuse fabricstogether to form one piece. Peel fusedand layered design away from Teflon®
sheet and fuse to back ground fabric.
Place batting behind fused top. Using aBlanket Stitch, embroidery thread,Open Embroidery Foot #20/20C, andthe far right needle position, appliquéshapes onto background.
Select child’s play alphabet from theEditor software and type “land that Ilove” (all lower case). Send this designto the artista 180E and embroider it onlight stripe of “flag”. Sew buttons onusing Button Sew-on Foot #18 and theButton Sew-on Stitch.
Layer backing right sides together toappliquéd quilt and stitch using 1/4”seams and Patchwork Foot #37. Leaveopening for turning; turn and press,making sure the corners are square.Stitch the opening closed.
Stitch-in-the-ditch using EdgestitchFoot #10/10C to secure backing tofront. Stipple stitch the backgroundfabrics for added texture and interest,using Embroidery Foot #15 and 60 wt.cotton darning thread.
13

When Jennie Rayment was asked for afew tips on successful fabric manip-ulation, she replied...
First, learn to love your sewing machine – it isa girl’s best friend. It is not an ogre; it won’tbite and it is far less intelligent than you are soexplore all the knobs and buttons and read theinstruction book! Understanding how to oper-ate the machine to its best advantage hashelped me tremendously. For example, I usethe Blindstitch for applying any folded edges– set the length and width at 1mm and use theOpen Embroidery Foot #20. The little bite(indent) just catches the fold and the straightstitch runs outside the edge. It looks like handstitching and will confuse all your friends.
Instead of hand tacking anything in place, usethe Darning Foot to secure any textured sec-tions; use on the spot, jump to the next placeand repeat; on completion, trim threads.
Why not use an invisible thread/nylon fila-ment to disguise any
wobbles or anom-alies in the stitch-ing? Place threadon the top spool orif necessary on thebobbin and use withcotton, silk, or anyother natural fiber.
Move the needle to changethe seam width. Simply movethe needle over, away from orcloser to the inner edge of thepresser foot (all BERNINAs dothis – it is brilliant!). Use the All-Purpose Foot and move the needleto a 1/4” position. Then you can zapthe machine into zigzag mode with-out changing the presser foot and theneedle won’t break (well...not so veryoften).
Second, discover the joys of fabric play. Letyour fingers squish and squash, twiddle andfiddle. Anything that has a fold can probablybe rolled, pockets can be padded, and excessmaterial can be jiggled, twitched, andtweaked into weird and wonderful shapes.Relax about it – you can’t go wrong – it willjust be different. Many of my creations cameout of playing and experimenting. Why notlook at molded, shaped, and sculpted objectsfor inspiration? My Tucked Up Circle designcame from the underside of a mushroom.Explore other textural crafts – origami – whathappens if you do it in fabric? Maybe therewill be raw edges, but Hey! Use the serger orturn under and secure with the Blindstitch.
Third, use a fairly firm and slightly stiff mate-rial for all your texture work – a good creasemakes folding easier and more accurate. If
possible, avoid washing the material – thedressing stiffens it and adds more “body”;restore “body” to washed material with spraystarch. Natural fibers will texture; manmadematerials are mainly crease resistant.
Work with a pale colored, plain, or lightly pat-terned cloth – it displays the nipping and tuck-ing well. Use of heavily patterned and verydark colors may obscure any textured effectalthough black chintz can look marvelous.Try silk, a firm satin, and any other shiny fab-ric – the sheen enhances the textured appear-ance.
Finally, to be a real expert in the art of fabricmanipulation, chill out and smile. If it all goeswrong – stick a button on it or cover any wob-bly lines of stitching with ribbon or braid.Does it matter? It might be a great improve-ment and lots better than the sample you werecopying. Texture deals with light and shadowand a few more bumps and lumps will proba-bly add to its delight. Anyone can be an expertin my field – there’s no magic – just a case offiddly fingers.
14
BY JENNIE RAYMENT
Tucked Circle Wall-hangingand Trumpet Pillow are bothfrom Tucks, Textures andPleats by Jennie Rayment.
Other books by Jennie are Tucks& Textures Two, Tucked Up InBed, and Tinkering With Texture.
First, learn to love your sewing machine – It is a girl’s best friend.
JACKET
For more details on making this jacket, visit the BERNINA® website
at www.berninausa.comGo to Sewing Studio>
Free Projects.
This jacket combinestea-colored fabricswith dramatic blackfor a striking andattractive effect.
Pieced and embellished with decorative stitching, it can be worn casually as well as for a dressy occasion.
BY MARLIS BENNETT
Take
a t
rip
to B
erni
na’s
web
site
.Aw
aken
you
r cr
eati
ve s
ide.
15

It’s amazing how much of our “stitching” thesedays is done without a needle and thread. As newproducts have been developed, we have replaced
some of the stitching process with fusibles, adhe-sives and glues. While the strength and beauty ofthread stitched on fabric can never be replaced, thereare some products that can make the preparationphase of a project fast and easy. The latest of thesetime-saving products is a line of sprays that makebasting and pinning a thing of the past. Look forthese sprays at the store of your local BERNINA®
dealer.
505 SPRAY AND FIXTemporary Fabric Adhesive
Many of us are somewhat familiar with “temporaryfabric adhesives.” 505 holds two pieces of fabrictogether (for up to 6 months) until they are pulledapart and exposed to air. The adhesive begins to de-activate when exposed to air and will completelydissipate within 24 to 48 hours.
For machine embroidery work, 505 is used to adherestabilizer to the garment either before or after hoop-ing. Securing the stabilizer to the fabric before hoop-ing helps prevent accidental stretching and distortingof the fabrics as the garment is hooped. This is espe-cially important when embroidering knit fabrics. Toapply, spray the stabilizer with a light coating of505. Adhere the stabilizer to the wrong side of thegarment in the area to be embroidered. Gentlysmooth out any wrinkles taking care to not stretchthe garment.
In instances where hooping is impractical (smallareas of a garment such as cuffs and collars, or thickfabrics that are hard to hoop), hoop the stabilizerfirst and then spray the hooped stabilizer with 505.Place the area to be embroidered over the sprayedarea and gently smooth out any wrinkles. Take careto not stretch the fabric as you are placing it on thehooped area.
505 is also great for “basting” quilt layers togetherbefore machine or hand quilting. It does not causethe needle to gum up, and is odorless, colorless,stainless, and spotless. It contains no CFC’s and isacid free. Excess 505 cleans up with soap and water,excessive buildup of 505 can be removed withMurphy’s Oil Soap or drycleaned.
202 SPRAY AND FIXTemporary Adhesive
This temporary adhesive is a “light” version of 505.It can be used when a lighter application of tempo-rary adhesive is desired. Use it to hold tissue patterns
in place when cutting out a garment. Spray thewrong side of the pattern piece with 202 and let dryfor a few minutes. Patterns can be repositioned asneeded. The adhesive begins to dissipate whenexposed to air, but can be reapplied several times.
202 can be applied to paper patterns or templates ofany kind, and will adhere to many surfaces, includ-ing wood. It is used by wood hobbyists to hold pat-terns in place while cutting. The pattern may beremoved and used several times. Apply additional202 after several uses. The adhesive begins to dissi-pate when exposed to air, and will be completelygone within 24 to 48 hours.
It is stainless, spotless, does not gum scissors, saws,or needles, contains no CFC’s and is acid free.
404 SPRAY AND FIXPermanent Repositionable
Craft AdhesiveThink of this as “sticky note” spray. The adhesive issprayed onto the back of fabric or paper. The adhe-sive remains permanently affixed to that object. Thisfabric or paper can then be applied to another sur-face and removed or repositioned as needed; theadhesive will not transfer onto other surfaces.
404 is great for crafters and scrap bookers. Since itis acid free, it can be applied to the backs of photo-graphs. The photographs will remain in place untilthey are removed. It is acid free and contains noCFC’s.
606 SPRAY AND FIXSpray on Fusible Web
Available exclusively from Oklahoma EmbroiderySupply and Design, 606 is a permanent spray used tomake any fabric or stabilizer an “iron-on.” Appliedto the wrong side of the fabric to be fused, 606 sprayallows you to create iron-on stabilizers or appliqués.Spray several light coats onto the back of the sur-face. The more coats, the stronger the bond will bewhen fused in place. The appliqué should be satinstitched or edge stitched to securely hold it in placefor laundering. 606 is acid free and contains noCFC’s.
FABRIC SHIELDFabric Protector
Fabric Shield is used to protect fabrics from dust anddirt, spills, grease and oil; it is water repellent. Spraysurface to be treated from about 6” away. FabricShield can be laundered and drycleaned. It is acidfree, and contains no CFC’s. As with any aerosolcontainer, care should be taken to keep cans fromextremely high temperatures.
BY KAY LYNCH BENNETT
16

17

Pattern OutlinesBY MARLENE BRYANT & JILL DANKLEFSEN
18
The 175 options of preprogrammed Pattern Outlines are avail-able on any level of artista software and can be manipulatedas described below. To use one of the Pattern Outlines, draw
any shape using the appropriate tool. Next, select the Outline optionat the lower left of the screen; select the Pattern option. To changethe pattern, go to the Object Properties box under Settings. TheOutline Stitch tab has the choices divided into 10 categories.
The easiest way to manipulate a pattern outline is by alteringthe size. This is done in the Object Properties box. By chang-ing the Size and Spacing it is possible to enlarge or reduce
the pattern. If you are a more visual person, then use the resizingarrows in the Reshape Object view.
Another form of pattern outline manipulation is achieved using thediamonds above each segment of the pattern outline. Using theReshape Object tool, click and drag the patterns to respace alongthe baseline. Notice the black squares on each end of the baseline.By clicking and dragging the boxes, the line can be increased ordecreased in length, creating a better fitting pattern outline for aprescribed shape or distance.
For ultimate design freedom, create your own unique patternoutline. A pattern outline can be created with a single straightstitch or with satin stitching. The pattern below was created
using the artista Designer Software.
To begin this pattern, choose the Closed Curve tool; select SatinFill. Create a half circle 5mm long by 3.5mm high.
Click the Reshape Object tool and move the entrance point tothe lower left corner. Place the exit point on the lower rightcorner. Change the stitch angle to 90º using the angle adjust-
ment line. Press enter on the keyboard to accept the changes to thehalf circle.
Now select the half circle. Duplicate it, then mirror it horizontally.Move it to the right of the original half circle. Drag a selection boxaround both elements.
Click on Settings>Create Pattern. Name your new pattern OppositeScallops. Click OK in the dialog box. Now designate where the pat-tern should begin by left clicking on the lower left corner of thedesign. Left click on the lower right corner to designate where youwould like the pattern to repeat. A dialog box will appear indicatingthat your new pattern named Opposite Scallops is created.
One of the special features of the artista Embroidery Software is the collection of Pattern Outlines. Choose from 175 different outlinesand use them to replace existing outlines, add decorative borders and accents, create decorative stitch appliques, and add texture to back-grounds. The Designer level of artista software adds the ability to create one’s own pattern outlines.
Check this page in each issue of Through TheNeedle to sharpen your artista software skills
Selecting Pattern Outlines
Manipulating Pattern Outlines
tipWhen creating a pattern outline around an object, it is best to create the outline in segments or sides. It will fit the object more precisely, and turning cornerscleanly is easier than trying to straddle or overlap acorner.
tipChanging the grid to 5mm by 5mm makes creating patterns easier.
Creating Pattern Outlines

tipThe stitched “backdrop” of this embroidered sunflower
appears to be stitched with a sewing machine – but look atthe design closely. It was created using the pattern outline
stitches of the artista embroidery software! Follow the steps belowto create your own unique stitched fabrics.
Open the software and set up a grid appropriate for your stitches:select Settings>Options>Grid, then set horizontal and vertical spac-ing as desired.
While in the Options box, select the Hoop tab. In the Position box,turn off the Automatic Centering feature by selecting Manual.Touch OK. Zoom out to see the entire hoop on screen.
In Design mode, select Outline>Pattern. Select the Open Curvetool, then use left mouse clicks to create vertical lines of stitches asshown in the illustration. Digitize each line separately by pressingEnter after each row.
Assign a pattern outline stitch to the rows by choosing Edit>Select
All, then right clicking on the Object Properties box. The OutlineStitch tab should already be selected; from the Pattern box, clickSelect to open the pattern outline stitch menu. Select the desiredstitch, then click OK. In a few seconds the newly created stitchesappear. To view them more realistically, select the Artistic View tab.
Select Settings>Options. Reselect the Automatic Centering func-tion.
Select Edit>Select All; click on the General tab to view the finishedsize of the stitched area. Adjust if necessary, then click OK.
Select File>Save As; name the design, then click OK.
Combine your pattern outline stitch background with other designsusing the software or the on-screen editing features of the artistasewing system.
19
All of the pattern outline stitches can be viewed in theonline manual which is accessed from the Help menuof the artista software.
The flowers shown here are design #FL255from OESD and the stitch used as a back-drop is #641 from CPS software.
Pattern Outline Exercise

ProfessionalProfileProfessionalProfile Education Editor, BERNINA® of America
WHAT IS YOUR JOB?I work at BERNINA® of America in Aurora, IL, creating print publications such as Feet-ures and the Sophie Learns to Sew series, as well as writing, editing and working on articles for our website: www.berninausa.com. Even though I’m officially an editor, I also write, illustrate, proof, oversee photography, lay out pages, design projects, and even occasionally sew a bit.HOW DID YOU ARRIVE AT YOUR CURRENT POSITION?Most people assume that I have a background in Home Economics, but actually I have a Bachelor of
Science in engineering plus a Master of Fine Arts in Environmental Design (a field which encompasses
architecture and product design). That sounds like an odd mix, but engineering is a great background
for any profession as it teaches creative problem solving – breaking things down into smaller pieces,
analyzing how things work (or why they don’t), figuring out how pieces fit together to form a whole. Art
adds a foundation in good aesthetic design. My plan was to eventually become an architect or furniture
designer, but I became sidetracked when I started working part-time for a BERNINA® dealer while in
graduate school.
I’d been sewing and making clothes since I was about 10, and designing and constructing costumes and
formal wear since 1980, but working at a BERNINA® store was my first experience with really wonderful
sewing machines that would easily stitch anything I could imagine. Attending BERNINA® University in
1989 was my first exposure to the BIG world of sewing – independent pattern companies, sewing notions,
teachers that seemed to know EVERYTHING about sewing – it was great! I’ve been a BERNINA® fan ever
since. After graduation I worked with museums, including developing an exhibit on textile science for
Discovery Place in Charlotte, NC. I found that I really enjoyed researching and developing educational
exhibits, and that I not only liked writing but was pretty good at it, too (a big thank-you to Martha Morgan,
my high school English teacher!). At the same time I also started working part-time for the local BERNINA®
dealer.
Eventually I applied for a job with BERNINA® as a Training Consultant; while I didn’t get that job, I was
offered a part-time position assisting Susan Beck, who was then the Education Editor. It was a perfect fit!
Finally, three years ago I was offered a full-time position as Assistant Education Editor – if I would move
from NC to Chicago! – and last year was promoted to Education Editor. If that’s not a circuitous path, I don’t
know what is!
WHAT DO YOU LIKE BEST ABOUT YOUR JOB?That there’s always something new and different! One day I might spend writing instructions for a set of
training manuals, another laying out photos for an embroidery brochure, and the next illustrating projects for
a book on sewing techniques. Then a photo shoot, and assembling a page from Sophie’s Journal for the
website. I’m always busy, and I’m never bored. And I get to work with some of the most creative and talented
people I’ve ever met – BERNINA®’s team of Trainers and Education Consultants, and stitchers and designers
from all over the world.DO YOU SEW? IF SO, WHAT IS YOUR FAVORITE THING TO STITCH?Lately I’ve been making lots of small quilting projects – really easy patterns that go together quickly –
foundation piecing, log cabin blocks, crazy patch, sweatshirt jackets. Since my editing work is so detail-
oriented, I like to push myself in the other direction by playing with very unstructured techniques in my free
time. I also love constructing garments with my serger, especially sweater knits and fleece. I get lots of project
ideas from my sewing students – I teach a class called “Sewing Fairy Godmother” in which students work on
their projects and I provide assistance as needed – it’s like a little sewing party once a week!ANY LAST THOUGHTS?Live your dream – once you discover your heart’s desire, follow it – we don’t often get a second chance to
follow our dreams. I have a job that I love – I can’t imagine doing anything more fun or fulfilling.
JO LEICHTE
Not everyonewho works in thesewing industryis a full-timeseamstress.
From pattern designers to embroidery digitizers to notions buyers, it takes a multitude of skills to keep the industry moving.
Meet peoplewith interestingjobs and find outhow they gotthere.
20

PORTRAITof the
ARTISTwith her
BERNINA
“I create what’s in my
heart...That’s what makes me the happiest.”
Hollis Chatelain – textile artist, photographer
“This is a quilt about good friends of mine, people I really care about.”“It’s a way for me to put myself back in Africa, a place I lived for over adecade. I just love the people, and this is a way for me to be with them,to talk to them, to feel their feelings. I start with the thousands of
photographs I took out there, and then I finish by quilting the peoplein a full range of colored threads.”
“I can sew on my Bernina for 14 hours, and it doesn’t do anything wrong.”“I never get thread throw-up. You know, when you start to sew and you
get this huge glob of thread that you have to stop and cut. With myBernina, the stitching is beautiful. Plus, I can switch from a 50 weightrayon to a 30 weight cotton and never even have to adjust my thread
tension. It’s very easy to use.”
©2002 Bernina of America • Visit www.berninausa.com for a dealer near you.