Embed Size (px)
Citation preview
The HR Guide to Retirement Manager Version 1 Updated 3/5/2010
Human Resources
South Dakota Board of Regents Human Resources/Finance Information Systems
Human Resources The HR Guide to Retirement Manager
Page | 1
Table of Contents
Introduction ................................................................................................................................................................................................................... 4
Overview .................................................................................................................................................................................................................... 4
Intended Audience ..................................................................................................................................................................................................... 4
Documentation and Disclaimer ................................................................................................................................................................................. 4
Glossary .......................................................................................................................................................................................................................... 5
Rule, Validation, Maintenance Forms ............................................................................................................................................................................ 6
Business Process ............................................................................................................................................................................................................ 7
Introduction ............................................................................................................................................................................................................... 7
Logging into RM ......................................................................................................................................................................................................... 7
Inquiry – Benefits Statements .................................................................................................................................................................................... 8
Contribution Changes ................................................................................................................................................................................................ 9
Administration Data ................................................................................................................................................................................................... 9
Payroll Dates ........................................................................................................................................................................................................ 10
New Employee ..................................................................................................................................................................................................... 11
Employee Information ......................................................................................................................................................................................... 13
Add Allocations .................................................................................................................................................................................................... 13
Negative Payroll Allocations ................................................................................................................................................................................ 14
Homepage Message Setup .................................................................................................................................................................................. 15
To Review or Edit Messaging ............................................................................................................................................................................... 15
Human Resources The HR Guide to Retirement Manager
Page | 2
Calculate Contribution Limits ............................................................................................................................................................................... 17
Security Q & A, Password, or Contact Information Change .................................................................................................................................... 18
Queries and Reports .................................................................................................................................................................................................... 19
Employer Reports and Files ..................................................................................................................................................................................... 19
Plan Reports ......................................................................................................................................................................................................... 19
Contribution Change Reports .............................................................................................................................................................................. 21
Payroll Department Reports ................................................................................................................................................................................ 21
Power Search ....................................................................................................................................................................................................... 22
Common Remitter Report ................................................................................................................................................................................... 23
Common Remitter File History ............................................................................................................................................................................ 24
Carrier Report ...................................................................................................................................................................................................... 25
Retrieve Survey Results ........................................................................................................................................................................................ 26
Retrieve Website Statistics .................................................................................................................................................................................. 27
Visit History .......................................................................................................................................................................................................... 28
Retrieve Web Access History ............................................................................................................................................................................... 28
Payroll Date Report .............................................................................................................................................................................................. 29
RMLM Reports ..................................................................................................................................................................................................... 29
New Participant Report ........................................................................................................................................................................................ 29
File Uploads .................................................................................................................................................................................................................. 31
Upload New Data Files ............................................................................................................................................................................................. 31
File Upload History ............................................................................................................................................................................................... 31
Upload Demographic File ..................................................................................................................................................................................... 32
Upload New Benefit Statement File .................................................................................................................................................................... 33
Human Resources The HR Guide to Retirement Manager
Page | 3
Upload New Common Remitter File .................................................................................................................................................................... 33
Upload Past CR Files ............................................................................................................................................................................................. 33
Upload Election File ............................................................................................................................................................................................. 34
Upload Limit Amount ........................................................................................................................................................................................... 35
Upload RMLM Data Limit File .............................................................................................................................................................................. 35
Enter Online Corrections ...................................................................................................................................................................................... 35
Human Resources The HR Guide to Retirement Manager
Page | 4
Introduction Retirement Manager is an online interactive tool that can also help employees better understand their options for investing for their future. The secure website enables employees to enroll, make changes to their deduction amounts and will help project how much needs to be saved for retirement. As a human resources professional you have the ability to help employees with this process. This user guide will walk you through the navigation of Retirement Manager from a human resources end user view.
Overview The goal of this manual is to provide the HR end users guidance in navigating the Retirement Manager website. Retirement manager holds information that is helpful for both assisting employees with questions and in verifying contributions for payroll. This manual covers the navigation and functionality of the Retirement Manager website.
Intended Audience Human resources personnel who assist with retirement and benefits for employees. Only employees who have Administrator access to the Retirement Manager website will be able to access this website.
Documentation and Disclaimer This information is subject to change, not all users will have access to all of the reports and processes in this manual.
Human Resources The HR Guide to Retirement Manager
Page | 5
Glossary Allocation: The percentages of a fund's net assets designated to a particular vendor.
Common Remitter: A payment service whereby one check or wire transfer is sent by an employer company or organization to a mutual fund or insurance company and it is automatically allocated to each participant employee account.
Contribution: Money placed in a retirement account for a particular tax year. Contributions may be deductible or nondeductible, depending on the type of account.
Retirement Manager: A third party for which will provide compliance reporting to the Board of Regents in accordance with IRS regulations.
Third Party Administrator: An organization that is contracted to provide administrative services on behalf of the Plan Sponsor.
Human Resources The HR Guide to Retirement Manager
Page | 6
Rule, Validation, Maintenance Forms This is not applicable for the Retirement Manager Manual.
Human Resources The HR Guide to Retirement Manager
Page | 7
Business Process
Introduction This section will cover processes of logging in to Retirement Manager, viewing employee benefits statements, viewing contribution changes, security question and password Q&A, and administration data for the maintenance of Retirement Manager.
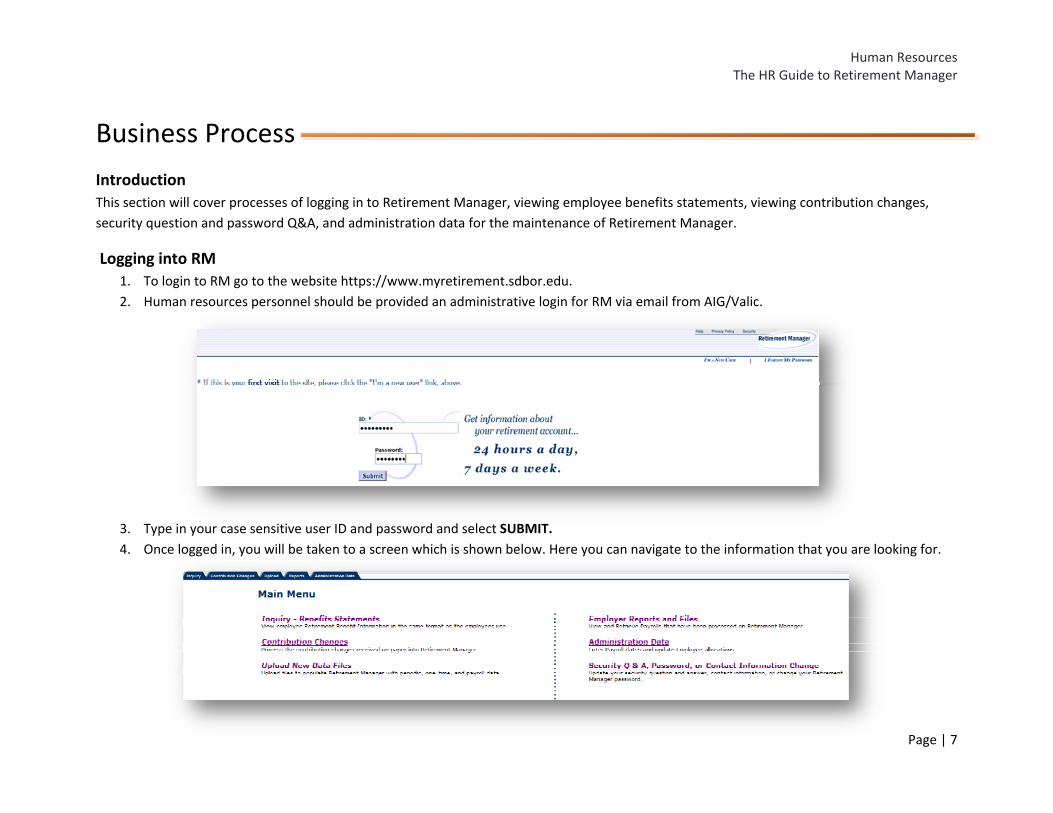
Logging into RM 1. To login to RM go to the website https://www.myretirement.sdbor.edu. 2. Human resources personnel should be provided an administrative login for RM via email from AIG/Valic.
3. Type in your case sensitive user ID and password and select SUBMIT. 4. Once logged in, you will be taken to a screen which is shown below. Here you can navigate to the information that you are looking for.
Human Resources The HR Guide to Retirement Manager
Page | 8
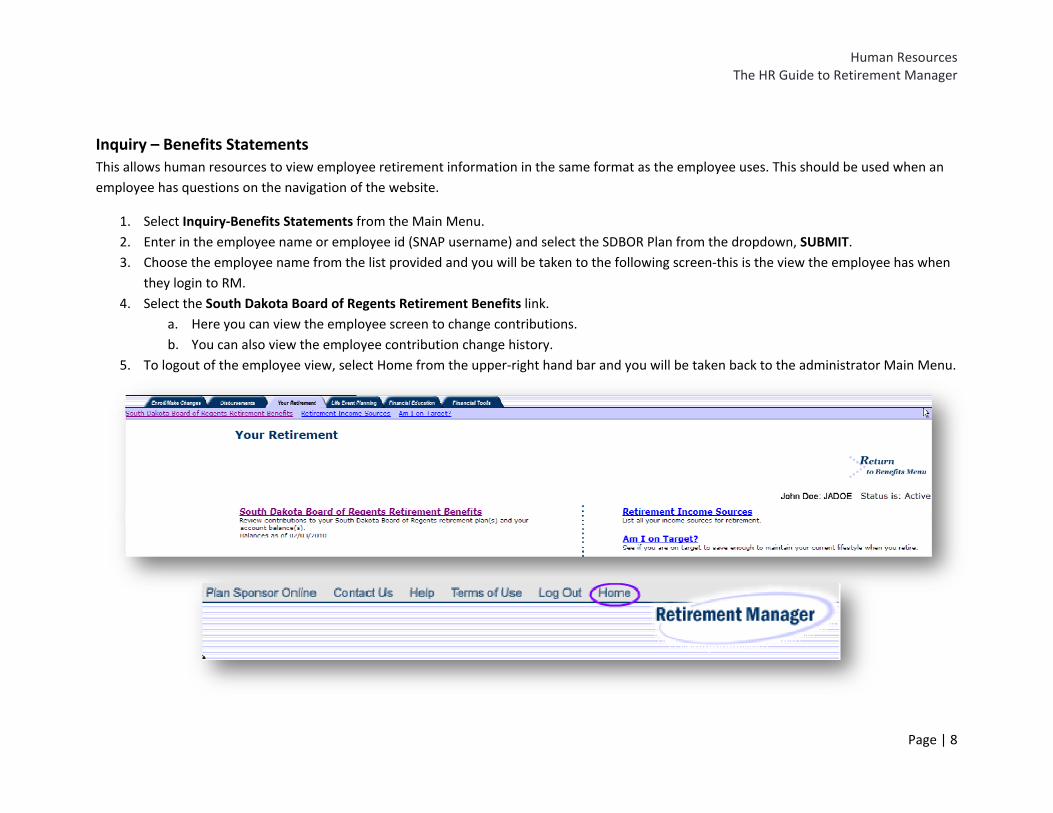
Inquiry – Benefits Statements This allows human resources to view employee retirement information in the same format as the employee uses. This should be used when an employee has questions on the navigation of the website.
1. Select Inquiry‐Benefits Statements from the Main Menu. 2. Enter in the employee name or employee id (SNAP username) and select the SDBOR Plan from the dropdown, SUBMIT. 3. Choose the employee name from the list provided and you will be taken to the following screen‐this is the view the employee has when
they login to RM. 4. Select the South Dakota Board of Regents Retirement Benefits link.
a. Here you can view the employee screen to change contributions. b. You can also view the employee contribution change history.
5. To logout of the employee view, select Home from the upper‐right hand bar and you will be taken back to the administrator Main Menu.
Human Resources The HR Guide to Retirement Manager
Page | 9
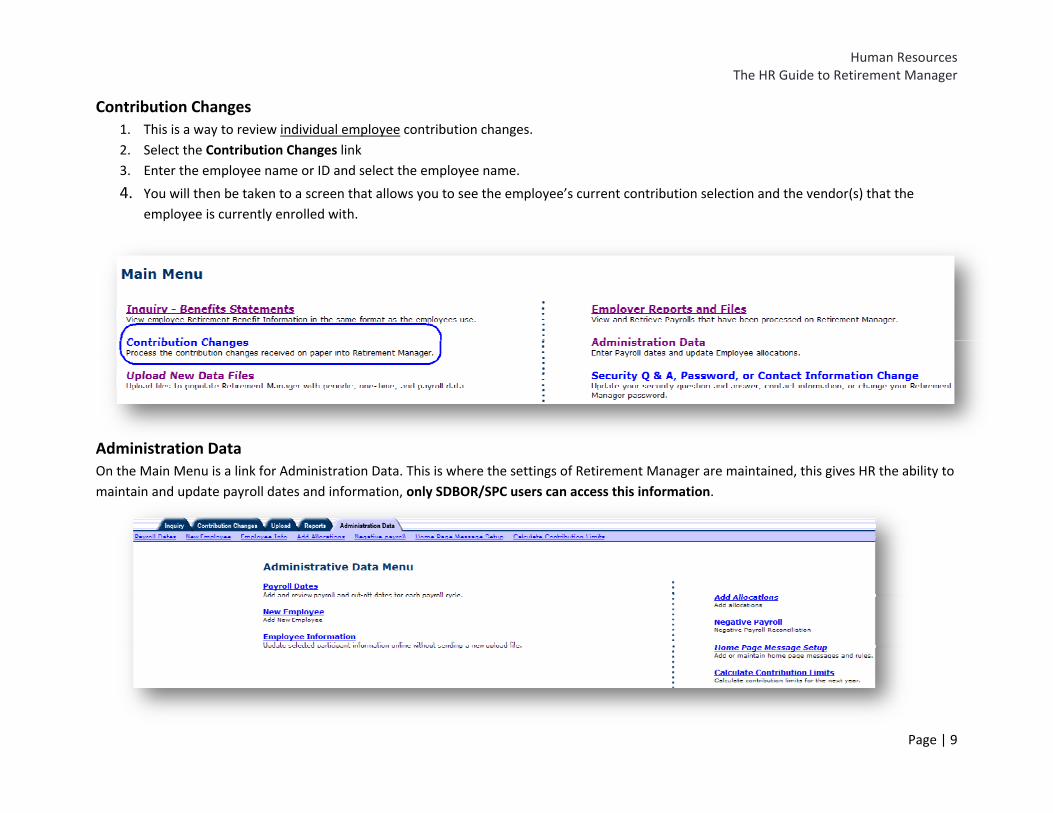
Contribution Changes 1. This is a way to review individual employee contribution changes. 2. Select the Contribution Changes link 3. Enter the employee name or ID and select the employee name.
4. You will then be taken to a screen that allows you to see the employee’s current contribution selection and the vendor(s) that the employee is currently enrolled with.
Administration Data On the Main Menu is a link for Administration Data. This is where the settings of Retirement Manager are maintained, this gives HR the ability to maintain and update payroll dates and information, only SDBOR/SPC users can access this information.
Human Resources The HR Guide to Retirement Manager
Page | 10
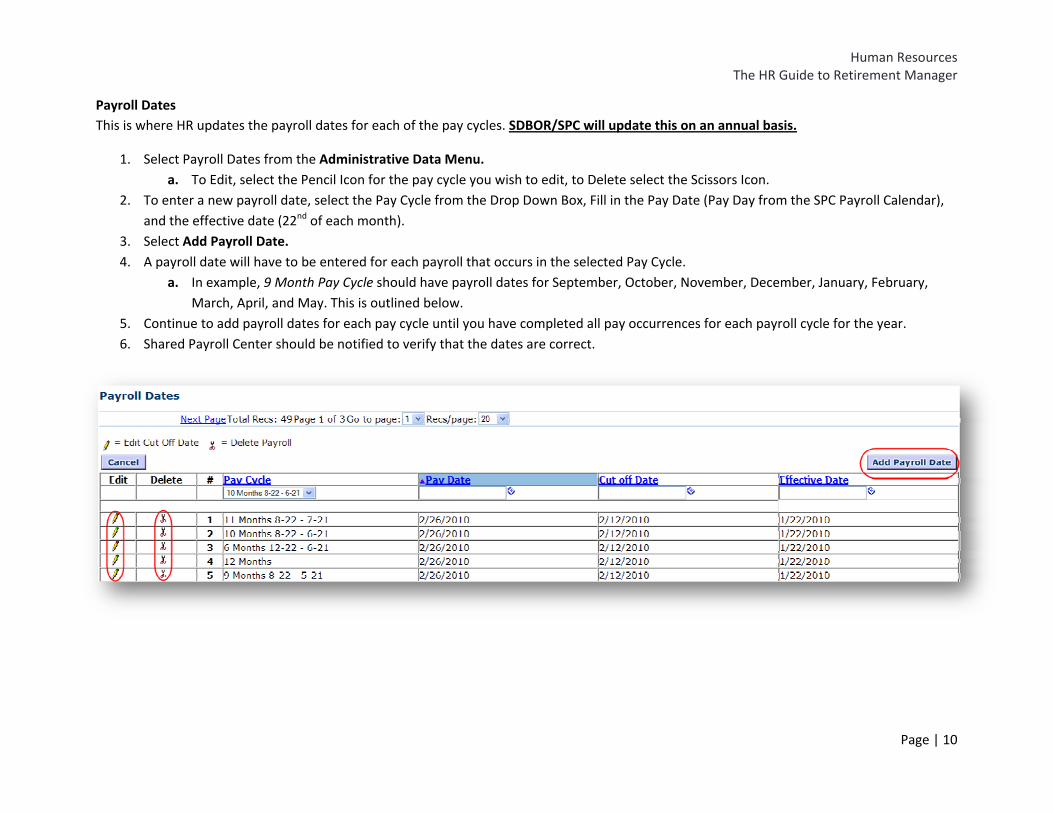
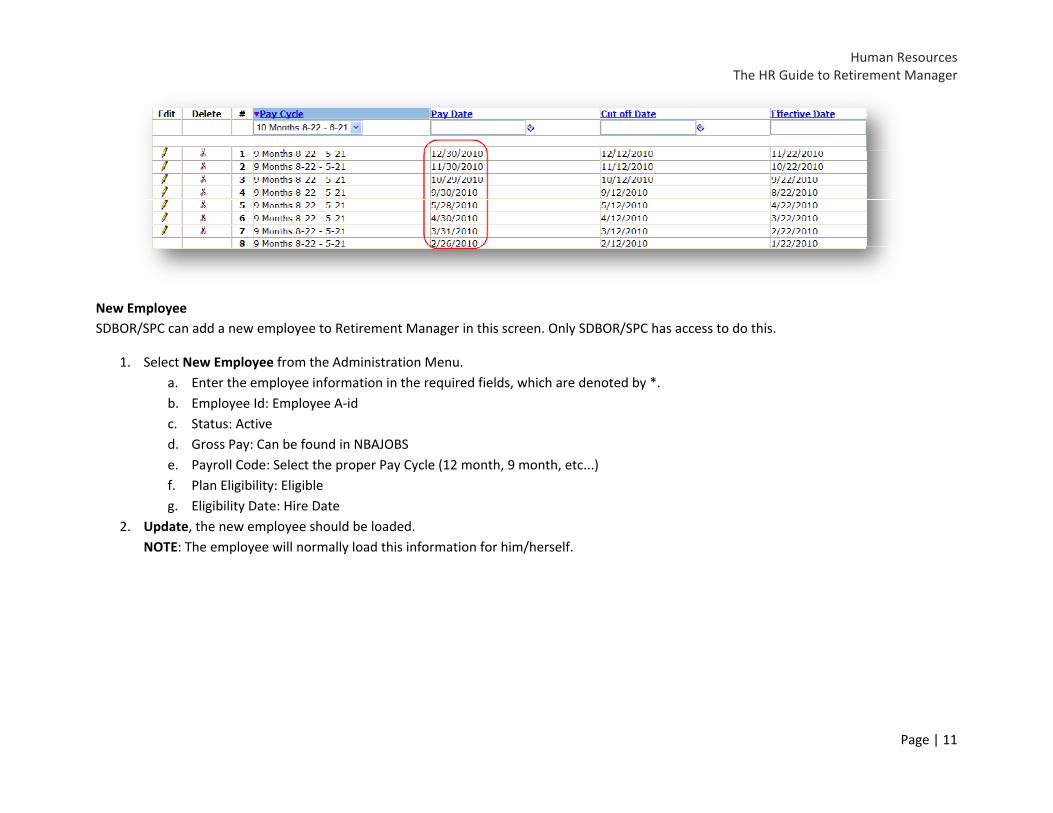
Payroll Dates This is where HR updates the payroll dates for each of the pay cycles. SDBOR/SPC will update this on an annual basis.
1. Select Payroll Dates from the Administrative Data Menu. a. To Edit, select the Pencil Icon for the pay cycle you wish to edit, to Delete select the Scissors Icon.
2. To enter a new payroll date, select the Pay Cycle from the Drop Down Box, Fill in the Pay Date (Pay Day from the SPC Payroll Calendar), and the effective date (22nd of each month).
3. Select Add Payroll Date. 4. A payroll date will have to be entered for each payroll that occurs in the selected Pay Cycle.
a. In example, 9 Month Pay Cycle should have payroll dates for September, October, November, December, January, February, March, April, and May. This is outlined below.
5. Continue to add payroll dates for each pay cycle until you have completed all pay occurrences for each payroll cycle for the year. 6. Shared Payroll Center should be notified to verify that the dates are correct.
Human Resources The HR Guide to Retirement Manager
Page | 11
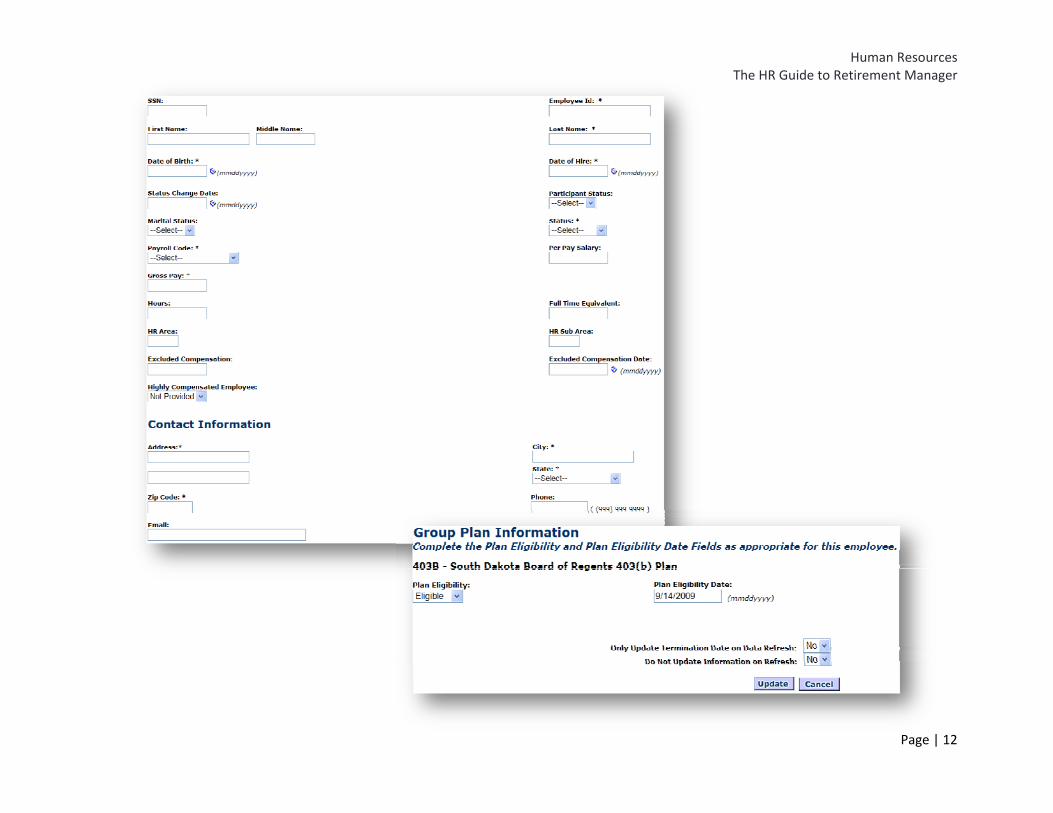
New Employee SDBOR/SPC can add a new employee to Retirement Manager in this screen. Only SDBOR/SPC has access to do this.
1. Select New Employee from the Administration Menu. a. Enter the employee information in the required fields, which are denoted by *. b. Employee Id: Employee A‐id c. Status: Active d. Gross Pay: Can be found in NBAJOBS e. Payroll Code: Select the proper Pay Cycle (12 month, 9 month, etc...) f. Plan Eligibility: Eligible g. Eligibility Date: Hire Date
2. Update, the new employee should be loaded. NOTE: The employee will normally load this information for him/herself.
Human Resources The HR Guide to Retirement Manager
Page | 12
Human Resources The HR Guide to Retirement Manager
Page | 13
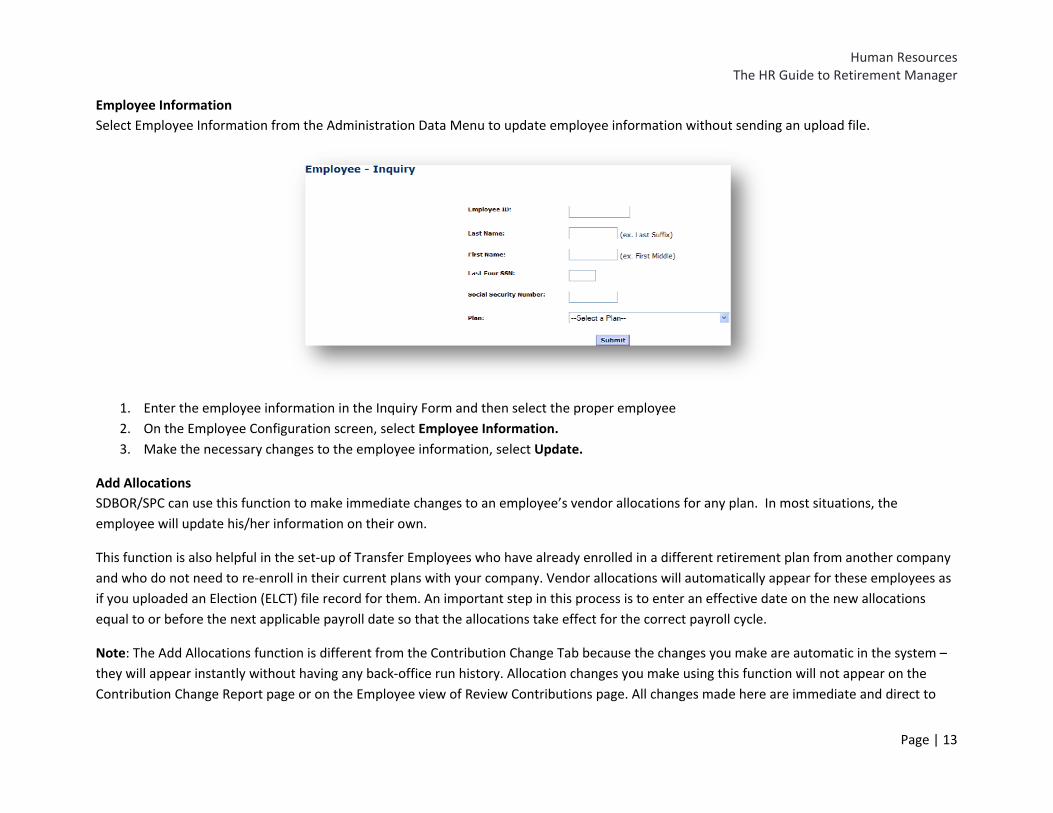
Employee Information Select Employee Information from the Administration Data Menu to update employee information without sending an upload file.
1. Enter the employee information in the Inquiry Form and then select the proper employee 2. On the Employee Configuration screen, select Employee Information. 3. Make the necessary changes to the employee information, select Update.
Add Allocations SDBOR/SPC can use this function to make immediate changes to an employee’s vendor allocations for any plan. In most situations, the employee will update his/her information on their own.
This function is also helpful in the set‐up of Transfer Employees who have already enrolled in a different retirement plan from another company and who do not need to re‐enroll in their current plans with your company. Vendor allocations will automatically appear for these employees as if you uploaded an Election (ELCT) file record for them. An important step in this process is to enter an effective date on the new allocations equal to or before the next applicable payroll date so that the allocations take effect for the correct payroll cycle.
Note: The Add Allocations function is different from the Contribution Change Tab because the changes you make are automatic in the system – they will appear instantly without having any back‐office run history. Allocation changes you make using this function will not appear on the Contribution Change Report page or on the Employee view of Review Contributions page. All changes made here are immediate and direct to
Human Resources The HR Guide to Retirement Manager
Page | 14
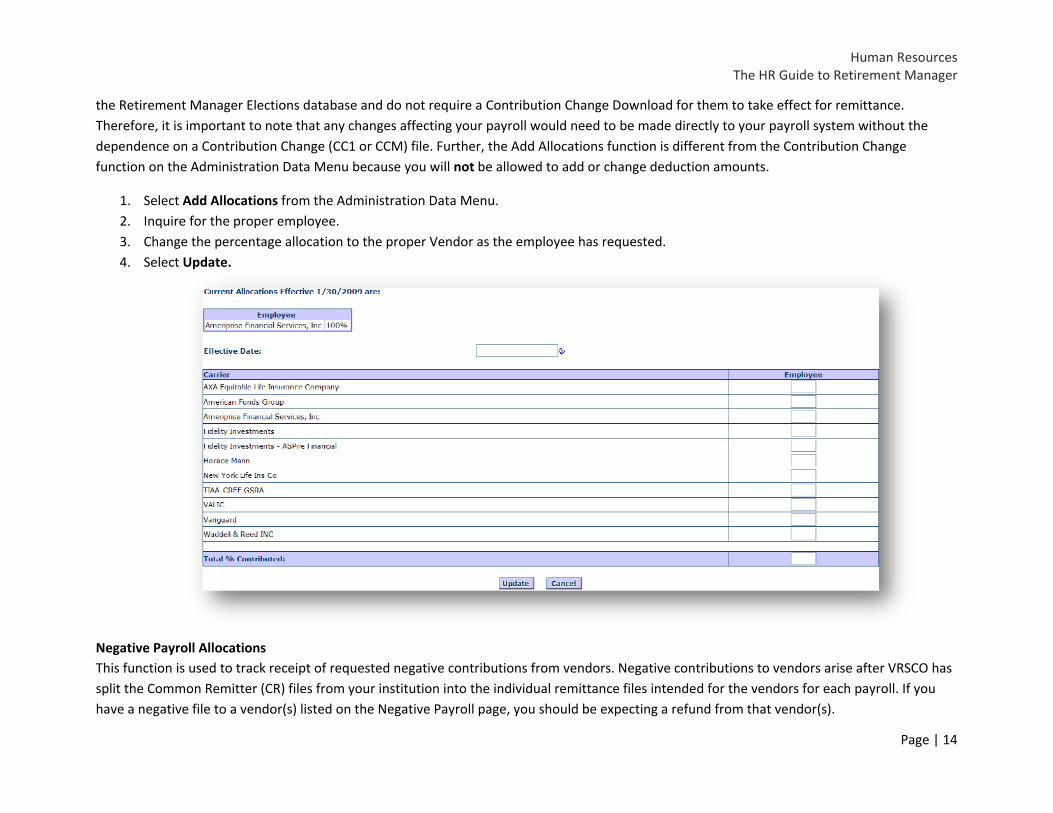
the Retirement Manager Elections database and do not require a Contribution Change Download for them to take effect for remittance. Therefore, it is important to note that any changes affecting your payroll would need to be made directly to your payroll system without the dependence on a Contribution Change (CC1 or CCM) file. Further, the Add Allocations function is different from the Contribution Change function on the Administration Data Menu because you will not be allowed to add or change deduction amounts.
1. Select Add Allocations from the Administration Data Menu. 2. Inquire for the proper employee. 3. Change the percentage allocation to the proper Vendor as the employee has requested. 4. Select Update.
Negative Payroll Allocations This function is used to track receipt of requested negative contributions from vendors. Negative contributions to vendors arise after VRSCO has split the Common Remitter (CR) files from your institution into the individual remittance files intended for the vendors for each payroll. If you have a negative file to a vendor(s) listed on the Negative Payroll page, you should be expecting a refund from that vendor(s).
Human Resources The HR Guide to Retirement Manager
Page | 15
1. Select Negative Payroll from the Administration Data Menu. 2. Enter in the proper Date Range. 3. Select the Carriers you wish to view. 4. Select Update. 5. Review the output if any is provided.
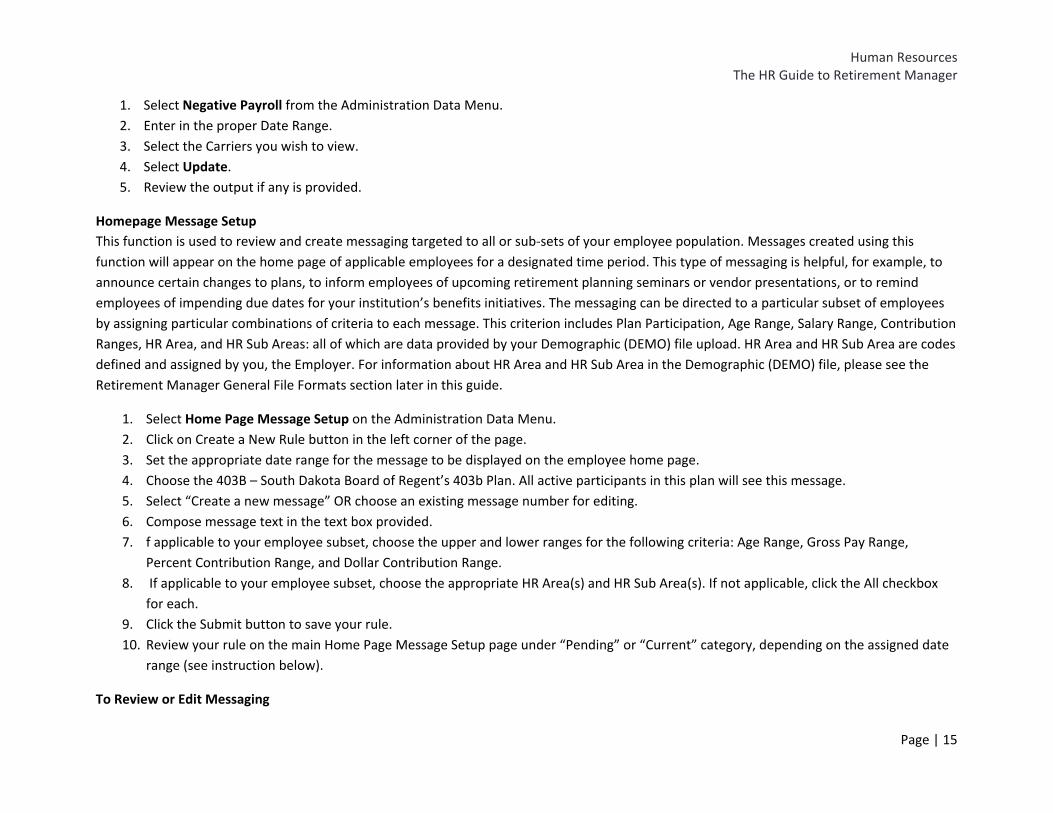
Homepage Message Setup This function is used to review and create messaging targeted to all or sub‐sets of your employee population. Messages created using this function will appear on the home page of applicable employees for a designated time period. This type of messaging is helpful, for example, to announce certain changes to plans, to inform employees of upcoming retirement planning seminars or vendor presentations, or to remind employees of impending due dates for your institution’s benefits initiatives. The messaging can be directed to a particular subset of employees by assigning particular combinations of criteria to each message. This criterion includes Plan Participation, Age Range, Salary Range, Contribution Ranges, HR Area, and HR Sub Areas: all of which are data provided by your Demographic (DEMO) file upload. HR Area and HR Sub Area are codes defined and assigned by you, the Employer. For information about HR Area and HR Sub Area in the Demographic (DEMO) file, please see the Retirement Manager General File Formats section later in this guide.
1. Select Home Page Message Setup on the Administration Data Menu. 2. Click on Create a New Rule button in the left corner of the page. 3. Set the appropriate date range for the message to be displayed on the employee home page. 4. Choose the 403B – South Dakota Board of Regent’s 403b Plan. All active participants in this plan will see this message. 5. Select “Create a new message” OR choose an existing message number for editing. 6. Compose message text in the text box provided. 7. f applicable to your employee subset, choose the upper and lower ranges for the following criteria: Age Range, Gross Pay Range,
Percent Contribution Range, and Dollar Contribution Range. 8. If applicable to your employee subset, choose the appropriate HR Area(s) and HR Sub Area(s). If not applicable, click the All checkbox
for each. 9. Click the Submit button to save your rule. 10. Review your rule on the main Home Page Message Setup page under “Pending” or “Current” category, depending on the assigned date
range (see instruction below).
To Review or Edit Messaging
Human Resources The HR Guide to Retirement Manager
Page | 16
1. Select Home Page Message Setup on the Administration Data Menu. 2. Messages to be reviewed will appear in three categories on this page: Pending, Current, and Expired.
a. Pending: All messages that have start dates in the future. b. Current: All messages currently published on the home pages of the employees who match the given criteria. c. Expired: All messages that have end dates prior to today’s date.
3. To view a larger set of Pending or Expired Messages, widen the dates at the Rule Date Range boxes and click “Go.” 4. To edit Current and Expired Messages, click the Edit link in the left column next to the appropriate message.
Human Resources The HR Guide to Retirement Manager
Page | 17
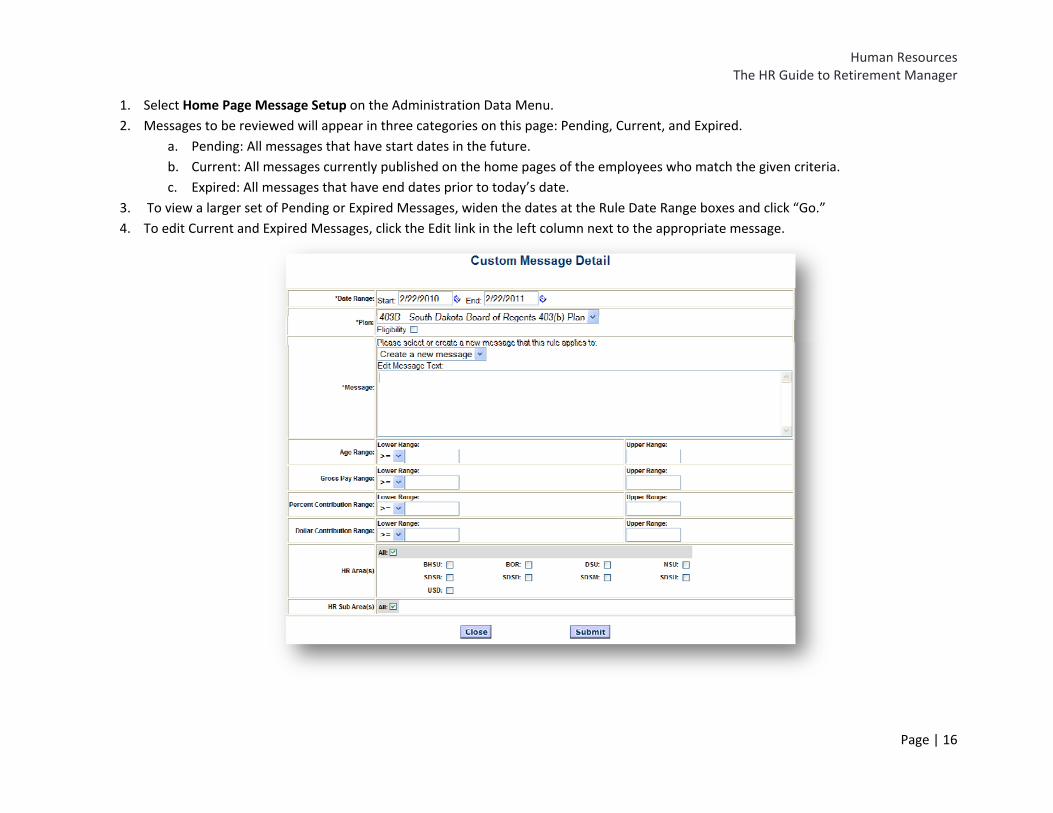
Calculate Contribution Limits SDBOR/SPC can use this function to update yearly contribution limits at the plan level. In Retirement Manager, each plan has a default contribution limit as defined by law, and, typically, those limits change at the year’s end when the laws governing the plans change. This limit update function allows you to ensure your institution’s plan base limits are changed when applicable and for the proper payroll frequencies.
1. Click on Calculate Contribution Limits on the Administration Data Menu. 2. Type in the New Contribution Limit for the year without commas or decimal points: for example, $14,000.00 should be typed “14000”. 3. Type in the Effective Date of the limit entered above using this format: MM/DD/YYYY. 4. Click the checkbox if the plan allows an age‐based catch up provision. 5. For each applicable payroll frequency, choose the first payroll date on which this new contribution limit. 6. If your institution allows the Maximum Contribution Option for a plan contribution amount, click the checkbox to generate Contribution
Changes for adjustments to employee’s monthly contribution amounts. a. The Contribution Changes generated by this change would be available for download in a Contribution Change (CC1 or CCM) file
for each payroll frequency and for each plan affected. b. If your institution does not allow the Maximum Contribution Option for a plan contribution amount, the checkbox for this
column will not be available. 7. The Update Limit for this Plan/Payroll Frequency checkbox should be used to designate which payroll frequencies to update at this time
with the new plan limits. 8. Be certain that the correct Update Limit for this Plan/Payroll Frequency checkboxes are checked and click the Update Plan Limits button. 9. The update to the selected contribution limits will occur during an hourly back office batch process and will not populate immediately on
the Employee Information Pages.
Human Resources The HR Guide to Retirement Manager
Page | 18
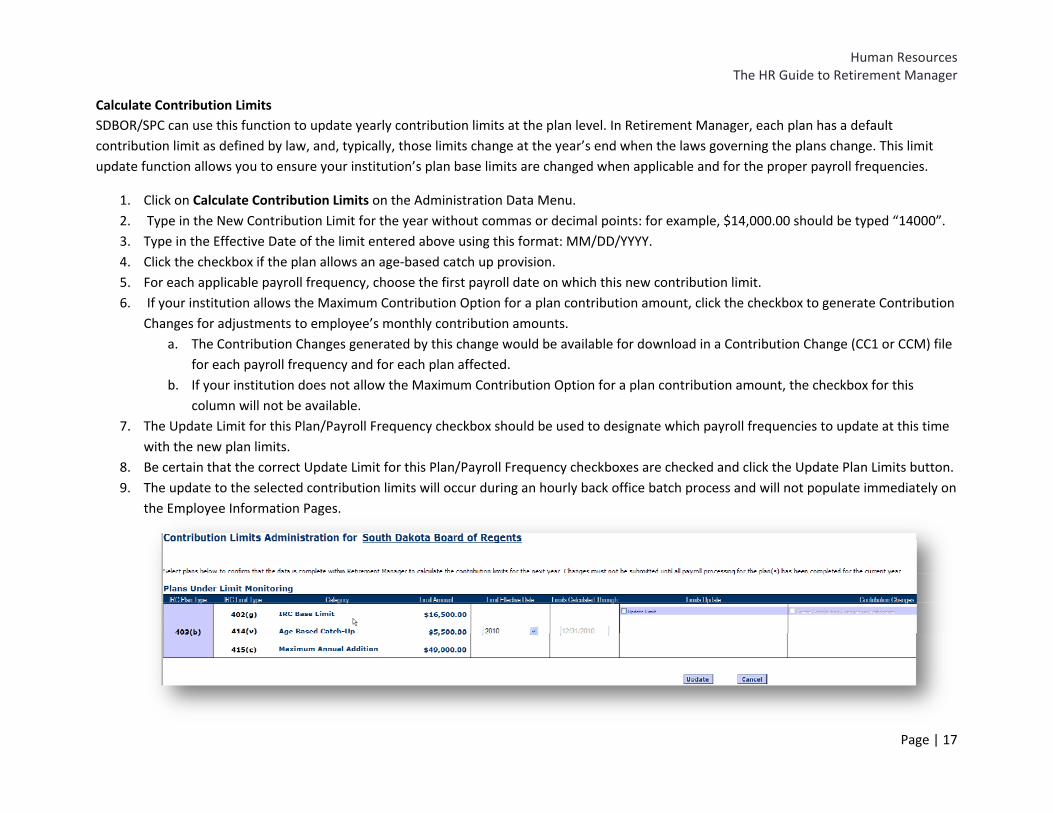
Security Q & A, Password, or Contact Information Change This function allows users to update their security question and answer, contact information, or change their Retirement Manager password.
1. On the Main Menu select Security Q & A, Password or Contact Information Change. 2. Update the appropriate information and select Submit to save your changes.
Human Resources The HR Guide to Retirement Manager
Page | 19
Queries and Reports
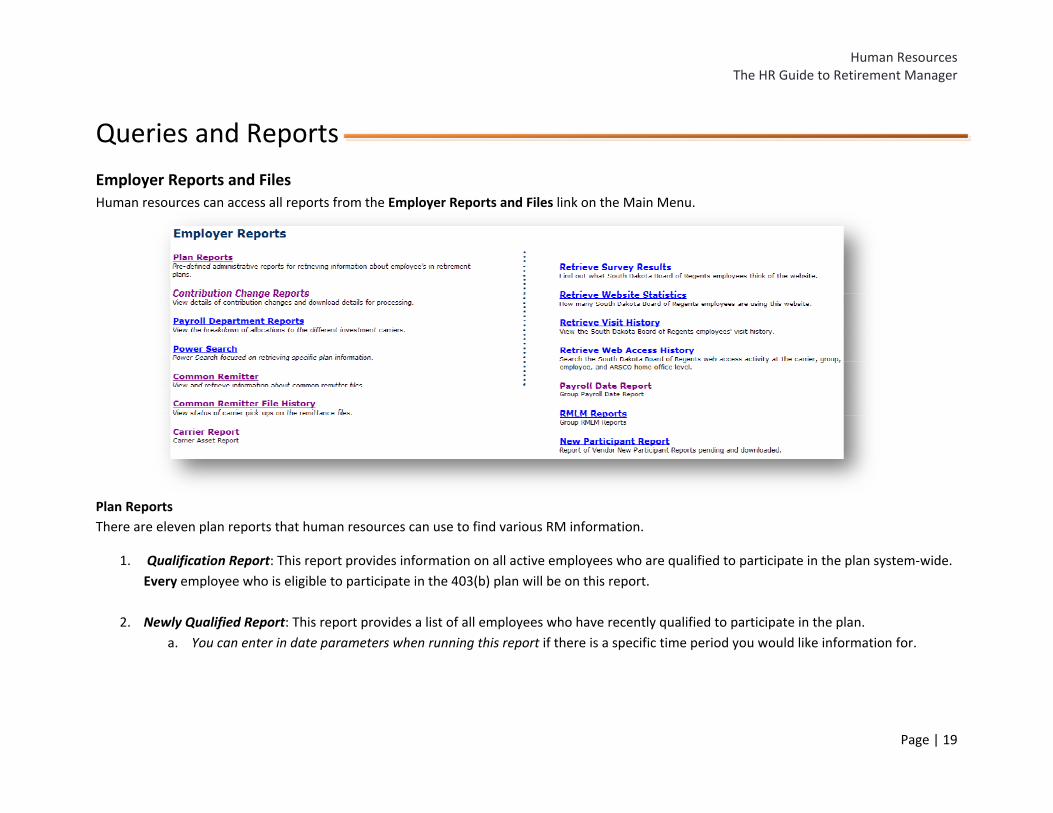
Employer Reports and Files Human resources can access all reports from the Employer Reports and Files link on the Main Menu.
Plan Reports There are eleven plan reports that human resources can use to find various RM information.
1. Qualification Report: This report provides information on all active employees who are qualified to participate in the plan system‐wide. Every employee who is eligible to participate in the 403(b) plan will be on this report.
2. Newly Qualified Report: This report provides a list of all employees who have recently qualified to participate in the plan. a. You can enter in date parameters when running this report if there is a specific time period you would like information for.
Human Resources The HR Guide to Retirement Manager
Page | 20
3. No Longer Qualified Report: This report provides a list of all active employees who are no longer qualified to participate in the plan due to a change in benefit eligibility.
4. Expected to Exceed Limits: This report shows employees whose projected contributions will exceed the limit for the calendar year. a. This report allows human resources to set a filter for parameters on an amount they enter. (IE‐Greater than $16,500).
5. Exceeded Limit Report: This report lists the employees who have exceeded their annual contribution limits.
a. This report should not need to be used because of contribution limit parameters that are set up in BANNER.
6. Participants in the Plan: This shows all current active employees who are making plan contributions.
7. Qualified but not Participating: This report lists all active employees who are eligible to participate in the 403(b) plan who have not enrolled and are not making contributions.
8. Employee Contact by Vendor: This is an Employee Contact by Vendor Report for Employees that have allocations and/or are currently remitting.
a. This report allows you to use parameters to sort by vendor, employee status, and remitting status.
9. Terminated Employees: This lists all employees who have contributed to the plan in the past but are now listed as terminated. a. You can enter in date parameters when running this report if there is a specific time period you would like information for.
10. Terminated Employees by Carrier: List of all employees who have been reported as terminated by the group broken down by the
selected carrier. a. You can set both date and carrier parameters for this report.
11. Disbursement Reports: This is simply a link to several disbursement reports; however, because SDBOR does not allow loans or hardship
distributions most of these reports are immaterial to review. a. In Service Exchange Report: This report can be used to review in‐service exchange transactions that have occurred.

Human Resources The HR Guide to Retirement Manager
Page | 21
Contribution Change Reports These reports allow human resources to view details of contribution changes and download details for processing. These reports can be viewed by payroll date and the employees are sorted by Payroll Frequency (12 month, 10 month, etc…).
1. Select View to view the report for pending or completed changes. 2. Here you can validate the employee name, the deferral option (flat rate change, stop deduction, etc…), deferral amount and vendor
allocation. 3. Select Download to view more employee details including contact information and the University the person is employed by.
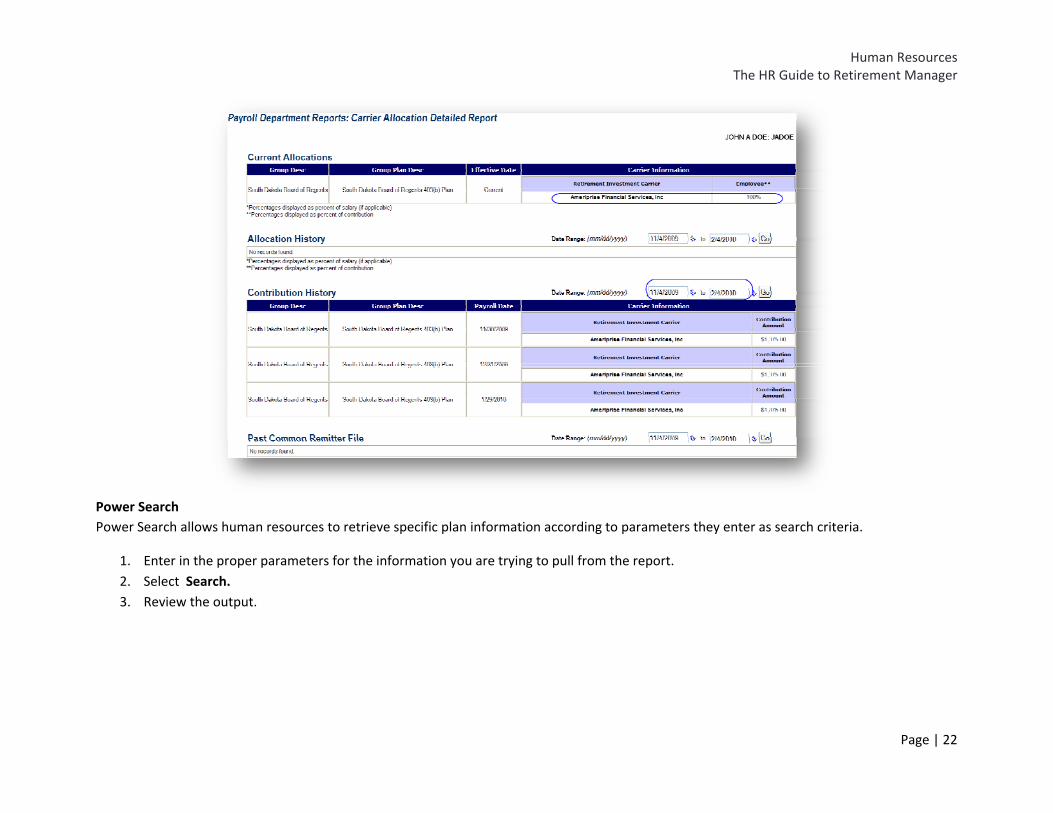
Payroll Department Reports These reports allow human resources to view the breakdown of allocations to the different investment carriers by employee in a Carrier Allocation Detailed Report, example below.
1. Enter the employee name or ID. 2. Enter the date parameters, SUBMIT. 3. View the employee’s Current Allocations, Allocation History, Contribution History, and Past Common Remitter File if applicable.
a. You can adjust the Date Range on any of the options to view more or less information as you need.
Human Resources The HR Guide to Retirement Manager
Page | 22
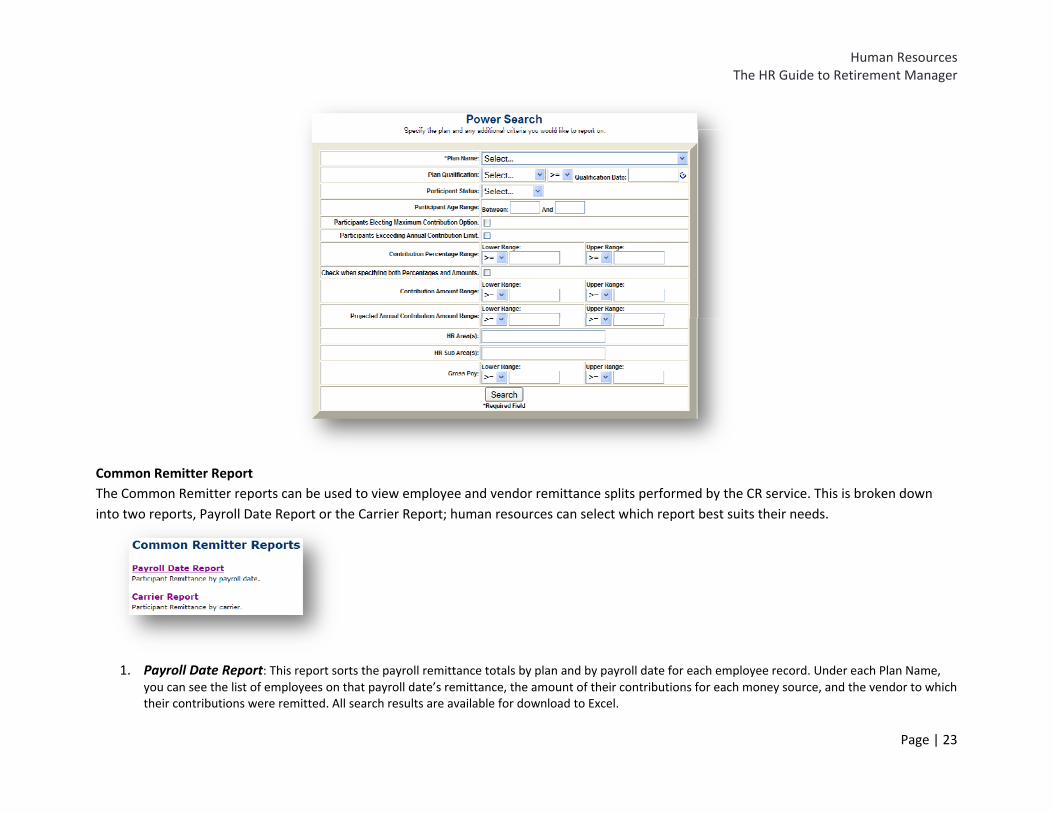
Power Search Power Search allows human resources to retrieve specific plan information according to parameters they enter as search criteria.
1. Enter in the proper parameters for the information you are trying to pull from the report. 2. Select Search. 3. Review the output.
Human Resources The HR Guide to Retirement Manager
Page | 23
Common Remitter Report The Common Remitter reports can be used to view employee and vendor remittance splits performed by the CR service. This is broken down into two reports, Payroll Date Report or the Carrier Report; human resources can select which report best suits their needs.
1. Payroll Date Report: This report sorts the payroll remittance totals by plan and by payroll date for each employee record. Under each Plan Name,
you can see the list of employees on that payroll date’s remittance, the amount of their contributions for each money source, and the vendor to which their contributions were remitted. All search results are available for download to Excel.
Human Resources The HR Guide to Retirement Manager
Page | 24
2. Carrier Report: This report sorts payroll remittances by vendor, by plan and by payroll date. Under each Plan Name and Carrier Name, you can see the list of employees on that payroll date’s remittance and the amount of their contributions for each money source. All search results are available for download to Excel.
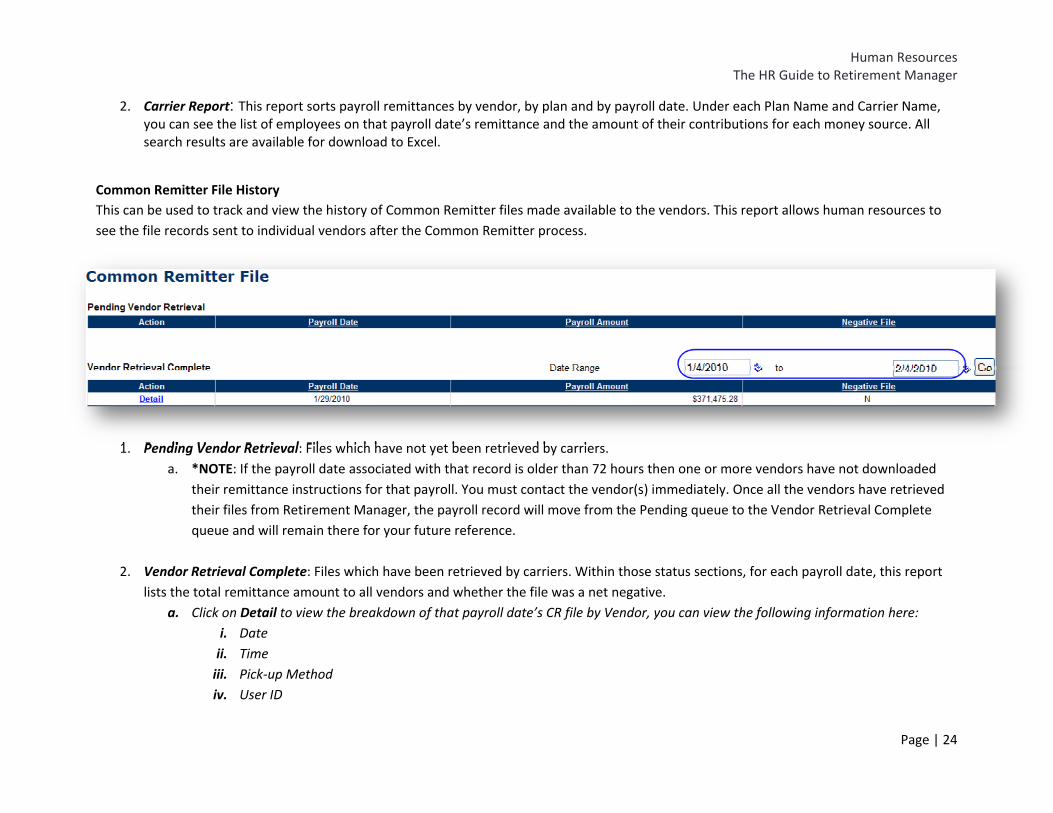
Common Remitter File History This can be used to track and view the history of Common Remitter files made available to the vendors. This report allows human resources to see the file records sent to individual vendors after the Common Remitter process.
1. Pending Vendor Retrieval: Files which have not yet been retrieved by carriers. a. *NOTE: If the payroll date associated with that record is older than 72 hours then one or more vendors have not downloaded
their remittance instructions for that payroll. You must contact the vendor(s) immediately. Once all the vendors have retrieved their files from Retirement Manager, the payroll record will move from the Pending queue to the Vendor Retrieval Complete queue and will remain there for your future reference.
2. Vendor Retrieval Complete: Files which have been retrieved by carriers. Within those status sections, for each payroll date, this report lists the total remittance amount to all vendors and whether the file was a net negative.
a. Click on Detail to view the breakdown of that payroll date’s CR file by Vendor, you can view the following information here: i. Date ii. Time iii. Pick‐up Method iv. User ID
Human Resources The HR Guide to Retirement Manager
Page | 25
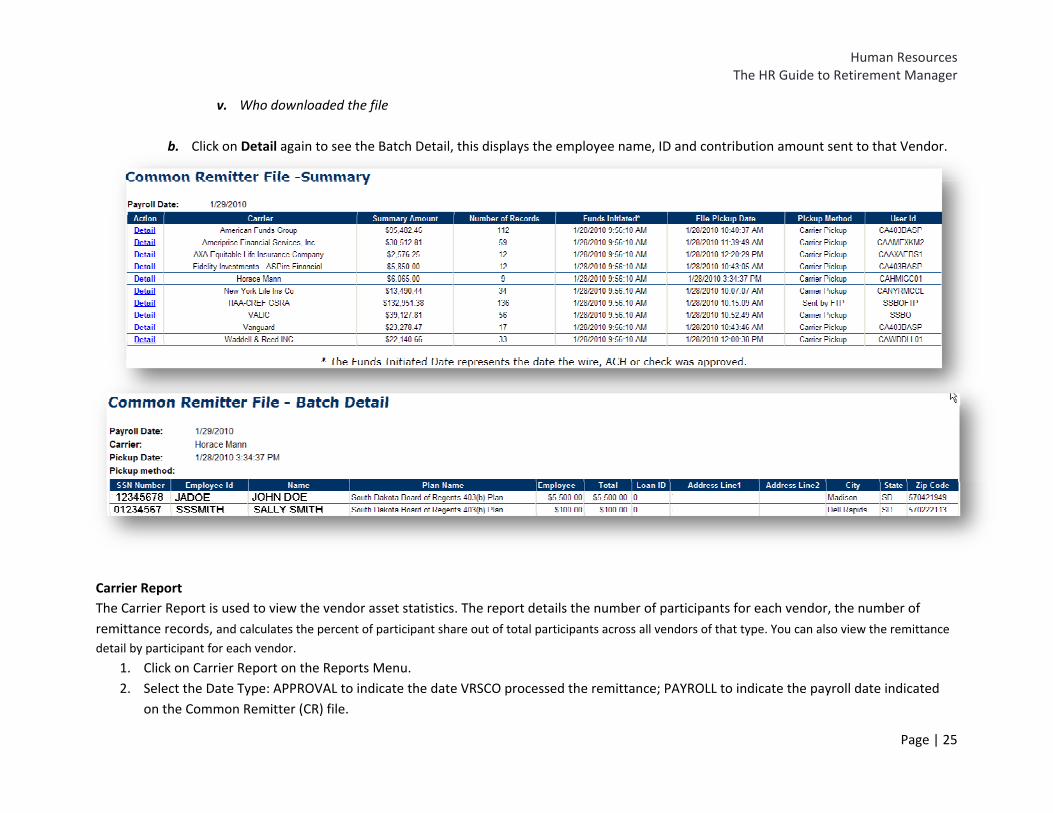
v. Who downloaded the file
b. Click on Detail again to see the Batch Detail, this displays the employee name, ID and contribution amount sent to that Vendor.
Carrier Report The Carrier Report is used to view the vendor asset statistics. The report details the number of participants for each vendor, the number of remittance records, and calculates the percent of participant share out of total participants across all vendors of that type. You can also view the remittance
detail by participant for each vendor.
1. Click on Carrier Report on the Reports Menu. 2. Select the Date Type: APPROVAL to indicate the date VRSCO processed the remittance; PAYROLL to indicate the payroll date indicated
on the Common Remitter (CR) file.
Human Resources The HR Guide to Retirement Manager
Page | 26
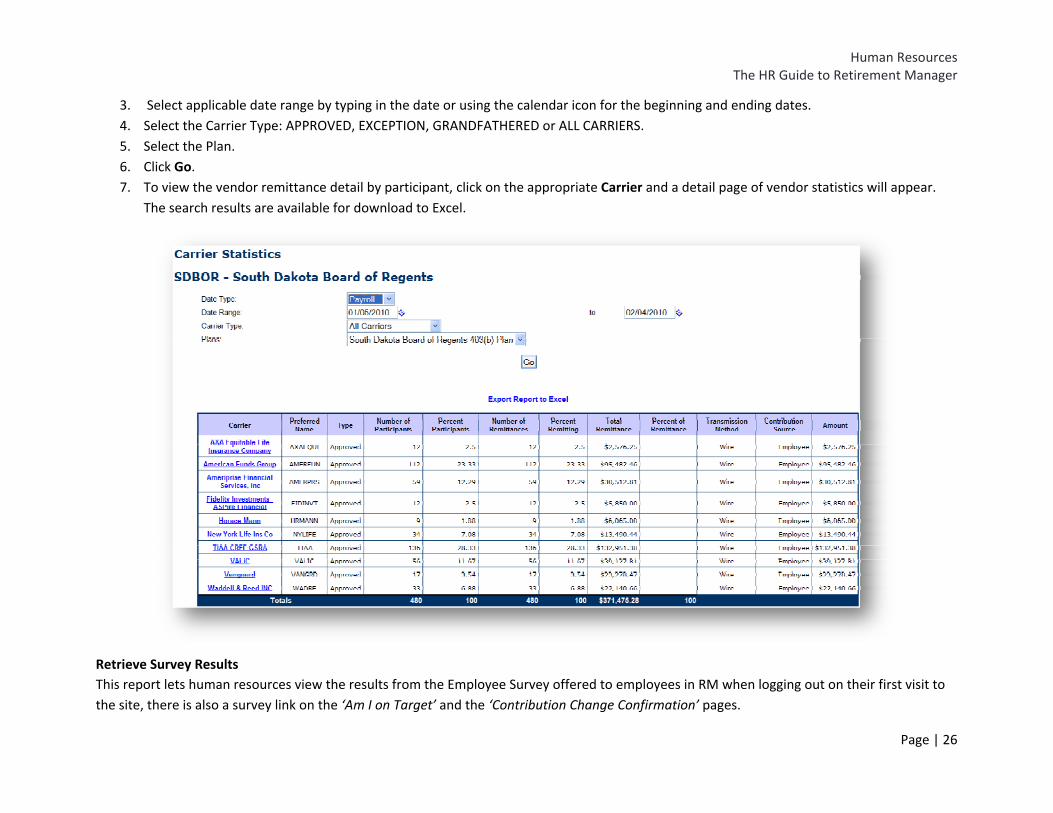
3. Select applicable date range by typing in the date or using the calendar icon for the beginning and ending dates. 4. Select the Carrier Type: APPROVED, EXCEPTION, GRANDFATHERED or ALL CARRIERS. 5. Select the Plan. 6. Click Go. 7. To view the vendor remittance detail by participant, click on the appropriate Carrier and a detail page of vendor statistics will appear.
The search results are available for download to Excel.
Retrieve Survey Results This report lets human resources view the results from the Employee Survey offered to employees in RM when logging out on their first visit to the site, there is also a survey link on the ‘Am I on Target’ and the ‘Contribution Change Confirmation’ pages.
Human Resources The HR Guide to Retirement Manager
Page | 27
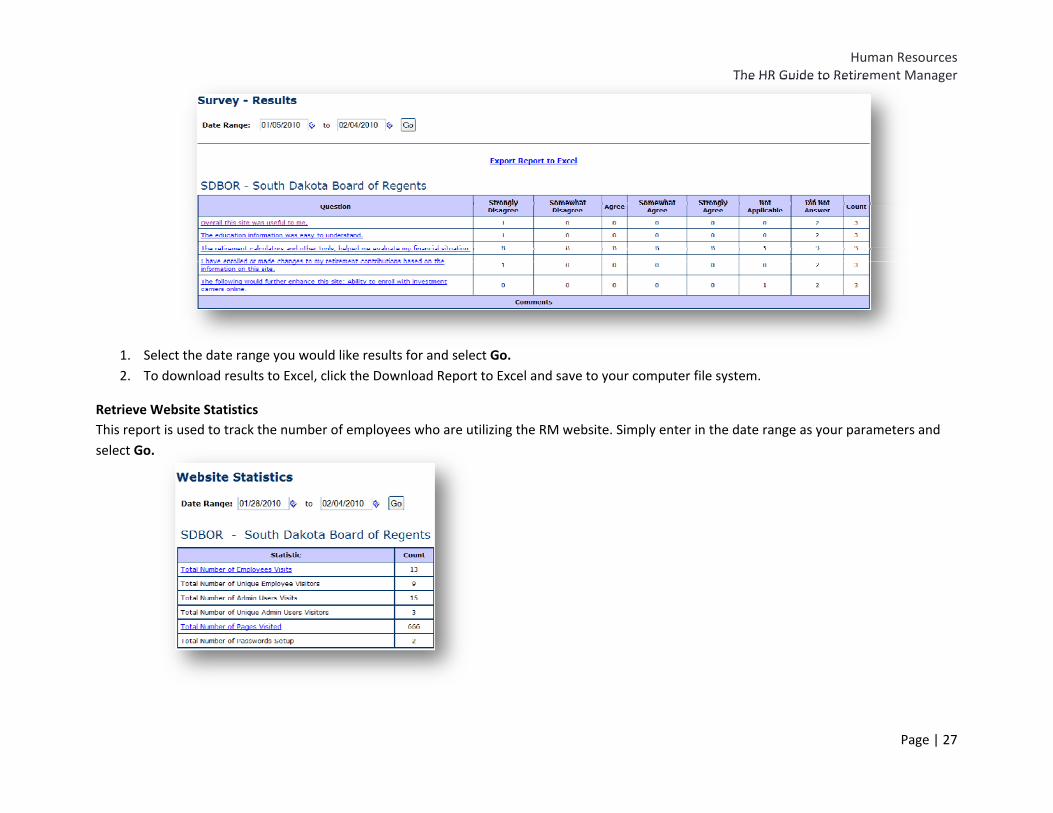
1. Select the date range you would like results for and select Go. 2. To download results to Excel, click the Download Report to Excel and save to your computer file system.
Retrieve Website Statistics This report is used to track the number of employees who are utilizing the RM website. Simply enter in the date range as your parameters and select Go.
Human Resources The HR Guide to Retirement Manager
Page | 28
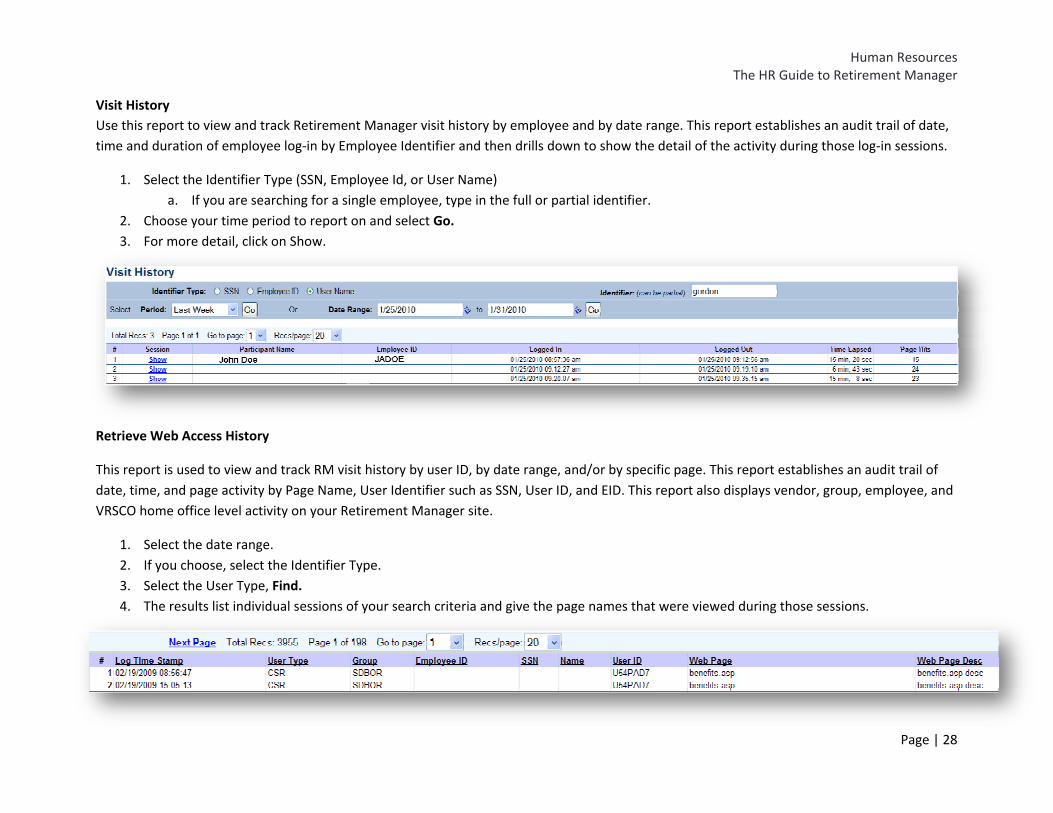
Visit History Use this report to view and track Retirement Manager visit history by employee and by date range. This report establishes an audit trail of date, time and duration of employee log‐in by Employee Identifier and then drills down to show the detail of the activity during those log‐in sessions.
1. Select the Identifier Type (SSN, Employee Id, or User Name) a. If you are searching for a single employee, type in the full or partial identifier.
2. Choose your time period to report on and select Go. 3. For more detail, click on Show.
Retrieve Web Access History
This report is used to view and track RM visit history by user ID, by date range, and/or by specific page. This report establishes an audit trail of date, time, and page activity by Page Name, User Identifier such as SSN, User ID, and EID. This report also displays vendor, group, employee, and VRSCO home office level activity on your Retirement Manager site.
1. Select the date range. 2. If you choose, select the Identifier Type. 3. Select the User Type, Find. 4. The results list individual sessions of your search criteria and give the page names that were viewed during those sessions.
Human Resources The HR Guide to Retirement Manager
Page | 29
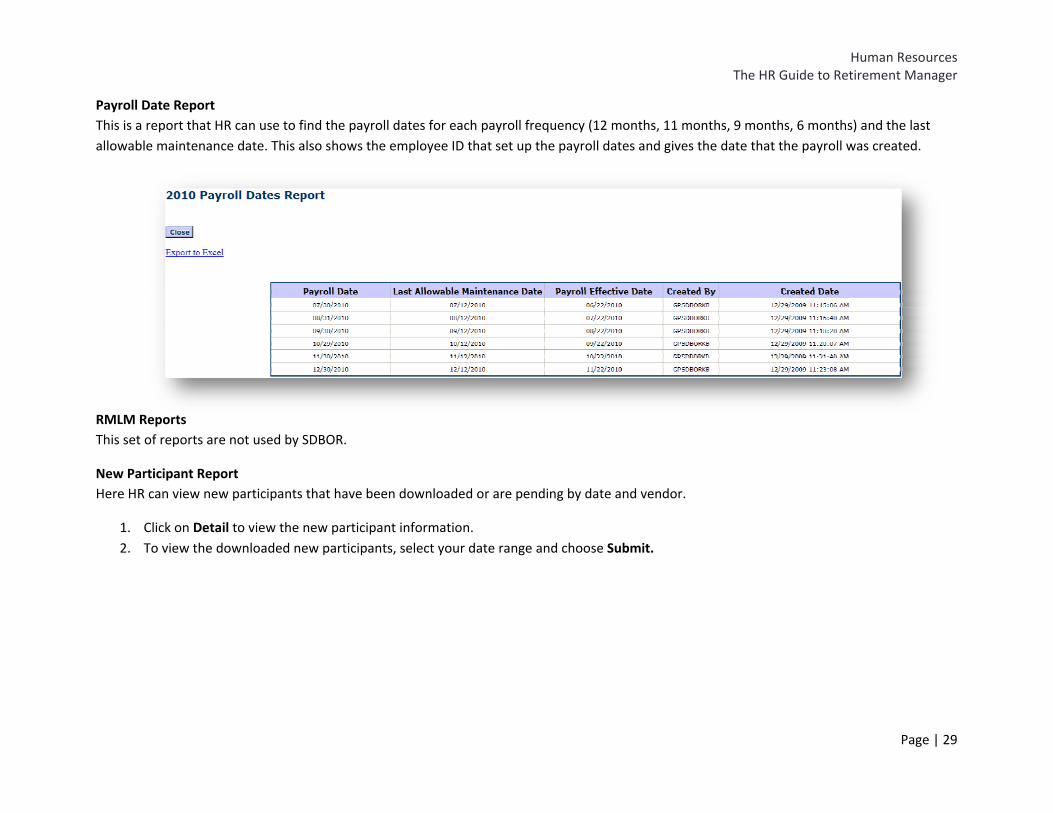
Payroll Date Report This is a report that HR can use to find the payroll dates for each payroll frequency (12 months, 11 months, 9 months, 6 months) and the last allowable maintenance date. This also shows the employee ID that set up the payroll dates and gives the date that the payroll was created.
RMLM Reports This set of reports are not used by SDBOR.
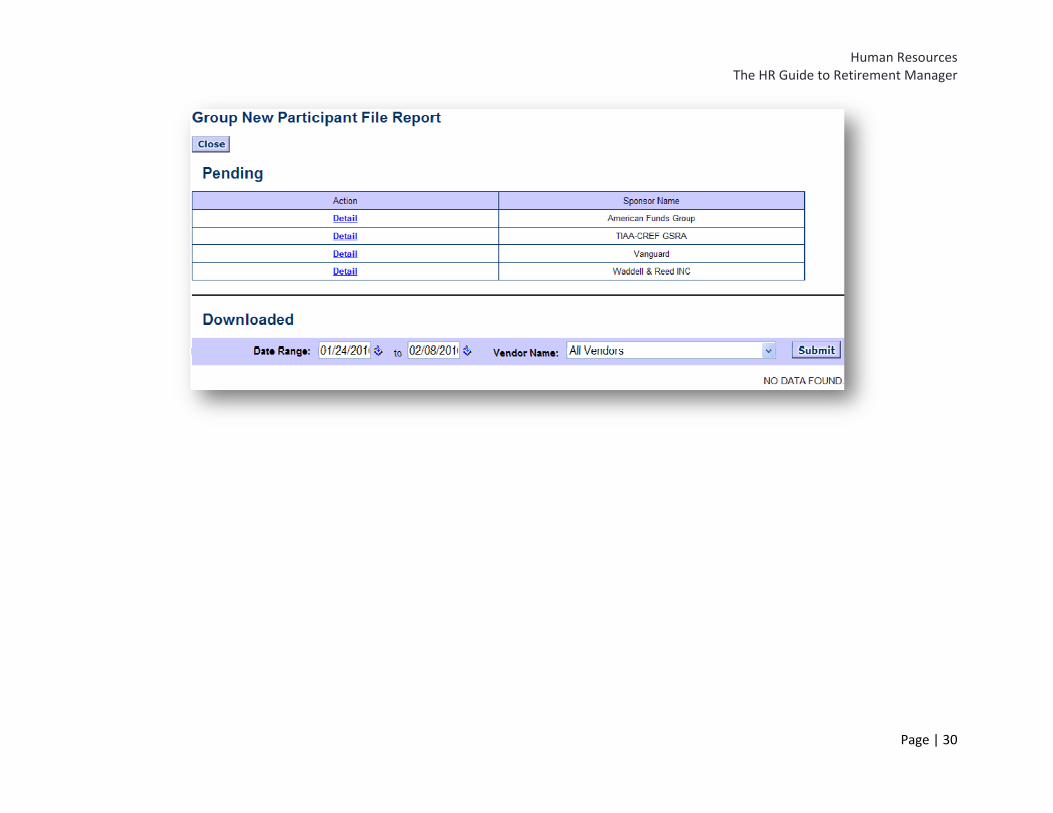
New Participant Report Here HR can view new participants that have been downloaded or are pending by date and vendor.
1. Click on Detail to view the new participant information. 2. To view the downloaded new participants, select your date range and choose Submit.
Human Resources The HR Guide to Retirement Manager
Page | 30
Human Resources The HR Guide to Retirement Manager
Page | 31
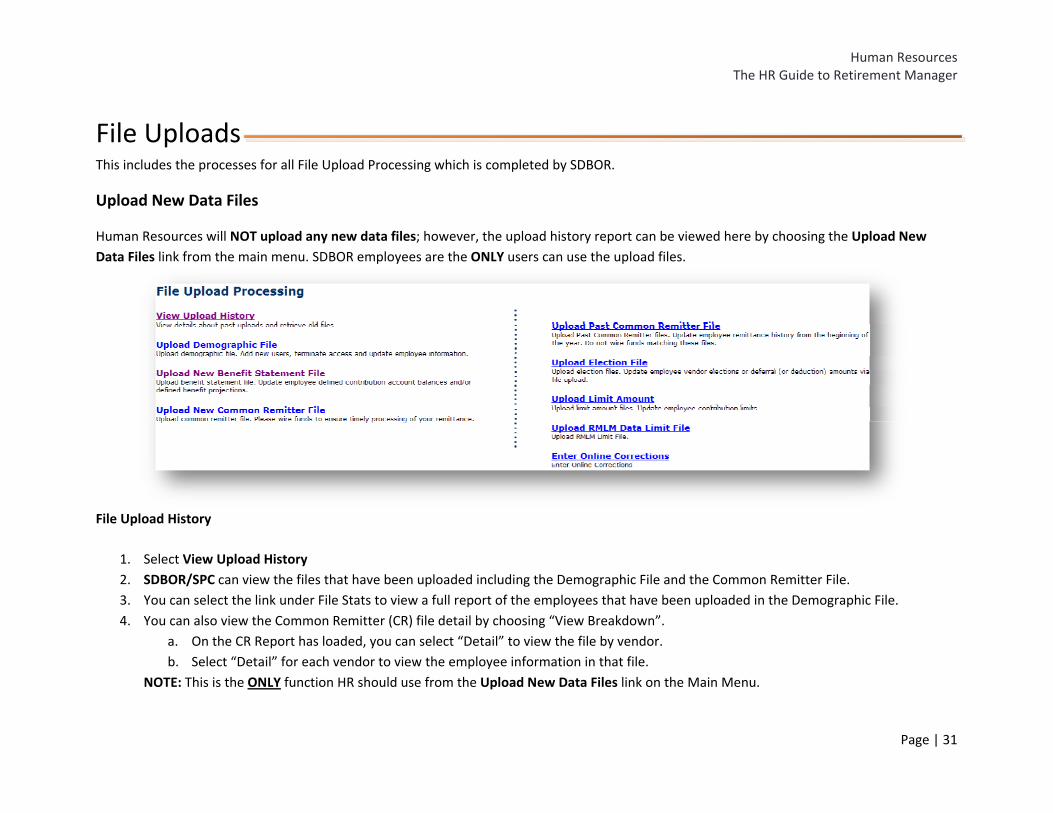
File Uploads This includes the processes for all File Upload Processing which is completed by SDBOR.
Upload New Data Files
Human Resources will NOT upload any new data files; however, the upload history report can be viewed here by choosing the Upload New Data Files link from the main menu. SDBOR employees are the ONLY users can use the upload files.
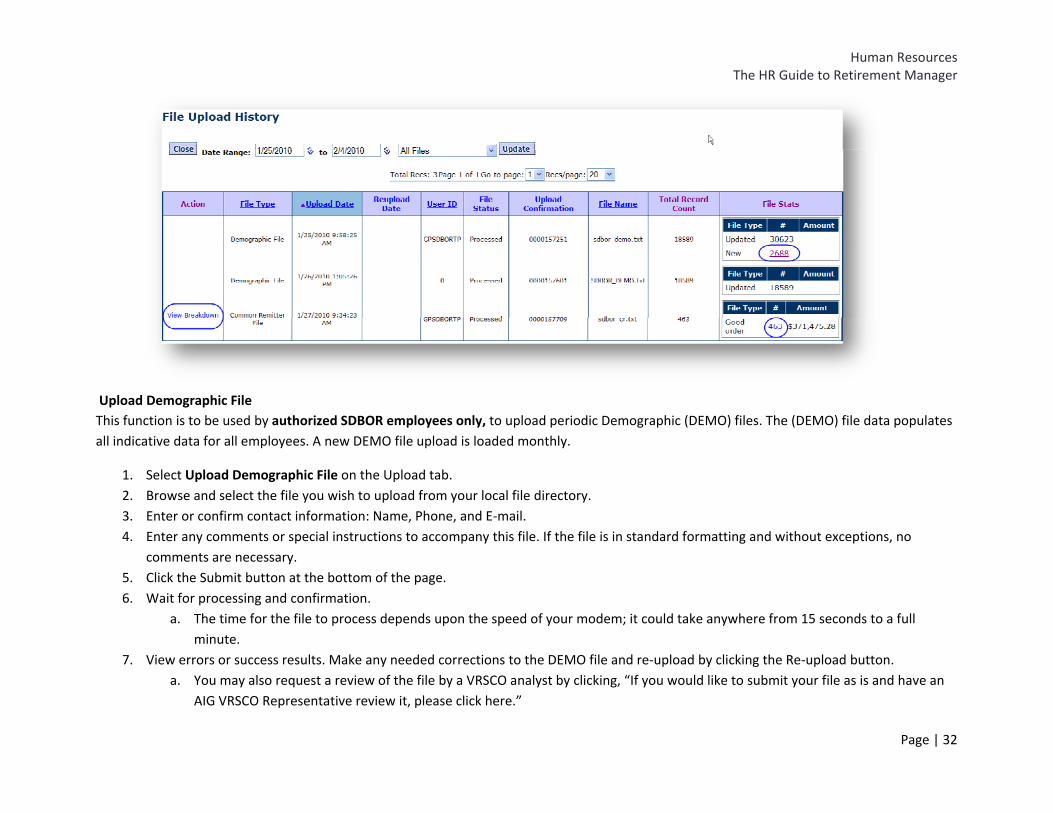
File Upload History
1. Select View Upload History 2. SDBOR/SPC can view the files that have been uploaded including the Demographic File and the Common Remitter File. 3. You can select the link under File Stats to view a full report of the employees that have been uploaded in the Demographic File. 4. You can also view the Common Remitter (CR) file detail by choosing “View Breakdown”.
a. On the CR Report has loaded, you can select “Detail” to view the file by vendor. b. Select “Detail” for each vendor to view the employee information in that file.
NOTE: This is the ONLY function HR should use from the Upload New Data Files link on the Main Menu.
Human Resources The HR Guide to Retirement Manager
Page | 32
Upload Demographic File This function is to be used by authorized SDBOR employees only, to upload periodic Demographic (DEMO) files. The (DEMO) file data populates all indicative data for all employees. A new DEMO file upload is loaded monthly.
1. Select Upload Demographic File on the Upload tab. 2. Browse and select the file you wish to upload from your local file directory. 3. Enter or confirm contact information: Name, Phone, and E‐mail. 4. Enter any comments or special instructions to accompany this file. If the file is in standard formatting and without exceptions, no
comments are necessary. 5. Click the Submit button at the bottom of the page. 6. Wait for processing and confirmation.
a. The time for the file to process depends upon the speed of your modem; it could take anywhere from 15 seconds to a full minute.
7. View errors or success results. Make any needed corrections to the DEMO file and re‐upload by clicking the Re‐upload button. a. You may also request a review of the file by a VRSCO analyst by clicking, “If you would like to submit your file as is and have an
AIG VRSCO Representative review it, please click here.”
Human Resources The HR Guide to Retirement Manager
Page | 33
8. If successful, review File Record Count and match to your file records. 9. Close to return to the Upload Menu.
Upload New Benefit Statement File This function is to be used by authorized SDBOR employees only, it is used to upload the benefit statement file. This updates employee defined contribution account balances and/or defined benefit projections.
1. Select Upload New Benefit Statement File from the menu. 2. Browse to find the correct files. 3. Submit.
Upload New Common Remitter File This function is to be used by authorized SDBOR employees only, and is used to upload Common Remitter (CR) files. A new CR file upload is required for processing payroll each month. Each CR file must accompany a wire transfer to VRSCO that matches the net amount of the payroll remittance in the file. Correction CR files may be uploaded in‐between normal payroll cycles, if necessary, and also must be accompanied by a wire transfer to VRSCO if the net remittance is positive.
1. Select Upload New Common Remitter File on the Upload New Data Files Menu. 2. Browse and select the file you wish to upload from your local file directory. 3. Confirm contact information: Name, Phone, and E‐mail. 4. Enter any comments or special instructions to accompany this file if necessary. 5. Submit. 6. Wait for processing. 7. View errors or success results by checking Contribution totals and File Record Counts. 8. Make necessary corrections, if any, to the CR file and reupload by clicking Reupload. 9. If successful, Submit. The CR will not process without completing the second submit.
Upload Past CR Files This function is to be used by authorized SDBOR employees only to upload Past Common Remitter (PCR) files. A past CR file upload is required for loading data to Retirement Manager which corresponds to prior payrolls processed since January 1st and before your institution processed its first remittance via the Common Remitter system.
Human Resources The HR Guide to Retirement Manager
Page | 34
The Past Common Remitter (PCR) file is beneficial to the accuracy of records kept on Retirement Manager for the following reasons:
(1) The remittance history by employee will be complete.
(2) The projected annual contribution by employee will be calculated based on accurate remittance data.
(3) The annual reporting will be faster and easier to access and gather at the end of the year.
Note on approach to data file: You may provide one lump sum contribution by employee, by plan for one single date, OR singular contributions by employee, by plan, by payroll date. If you choose the former option, please select only one payroll date to use in your file. Please note that this option will not allow you (the employer) to see or research past contribution amounts by payroll date via Retirement Manager. If you search for the payroll date used in the file, it will show the lump sum. The latter option will allow you to see the individual contribution amounts (but not vendor allocations) for prior payroll dates. Both options will calculate annual projected contribution amounts correctly.
1. Select Upload Past Common Remitter File on the Upload New Data Files Menu. 2. Browse and select the file you wish to upload from your local file directory. 3. Confirm contact information: Name, Phone, and E‐mail. 4. Enter any comments or special instructions to accompany this file as you see necessary. 5. Submit. 6. Wait for processing. 7. View errors or success results by checking Contribution totals and File Record Counts.
a. Make necessary corrections, if any, to the CR file and re‐upload by clicking the Reupload button. 8. Submit again. The CR will not process without completing the second submit.
Upload Election File This function is to be used by authorized SDBOR employees only to upload One‐Time Election (ELCT) and Deduction (OTDE) files for RM set‐up during implementation. An ELCT file upload supplies Retirement Manager with the vendor allocation elections of employees who are currently contributing to their plans. An OTDE file upload supplies Retirement Manager with the paycheck deduction amounts of employees who are currently contributing to their plans. These files should not be used to upload employee demographics information or updates to allocations and deductions after implementation.
1. Select Upload Election File on the Upload New Data Files Menu.
Human Resources The HR Guide to Retirement Manager
Page | 35
2. Browse and select the file you wish to upload from your local file directory. 3. Choose the applicable file type radio button: either Election File or Deferral Amount File. 4. Confirm contact information: Name, Phone, and E‐mail. 5. Submit. 6. Wait for processing. 7. View errors or success results. Make any needed corrections to the ELCT/OTDE file and re‐upload by clicking the Re‐upload button.
Upload Limit Amount This function is to be used by authorized RIS employees only to upload Contribution Limit Update (CLIM) files. A new CLIM file is recommended for updating plan contribution limits for individual employees who have limits different from the standard limits defined by law for each plan. Certain employees might have different limits due to integrated plan limits calculations or an aged‐based catch‐up provision.
1. Select Upload Limit Amount on the Upload New Data Files Menu. 2. Browse and select the file you wish to upload from your local file directory. 3. Choose the applicable file type radio button: either Election File or Deferral Amount File. 4. Confirm contact information: Name, Phone, and E‐mail. 5. Submit. 6. Wait for processing. 7. View errors or success results. Make any needed corrections to the ELCT/OTDE file and re‐upload by clicking the Re‐upload button.
Note: Yearly limits at the plan level (those defined by law for each plan) are updated using the Plan Limits functionality on the Administration Data Menu and are addressed later in this guide.
Upload RMLM Data Limit File SDBOR does not use this upload file.
Enter Online Corrections SDBOR does not use this function.


![Welcome! [mychesterfieldschools.com]mychesterfieldschools.com/wp-content/uploads/hr...Welcome! Virginia Retirement System Chesterfield County Public Schools . ... retiree • Upon](https://img.pdfslide.us/doc/110x75/5f0379f57e708231d4094e7e/welcome-m-m-welcome-virginia-retirement-system-chesterfield-county-public.jpg)