Embed Size (px)
Citation preview
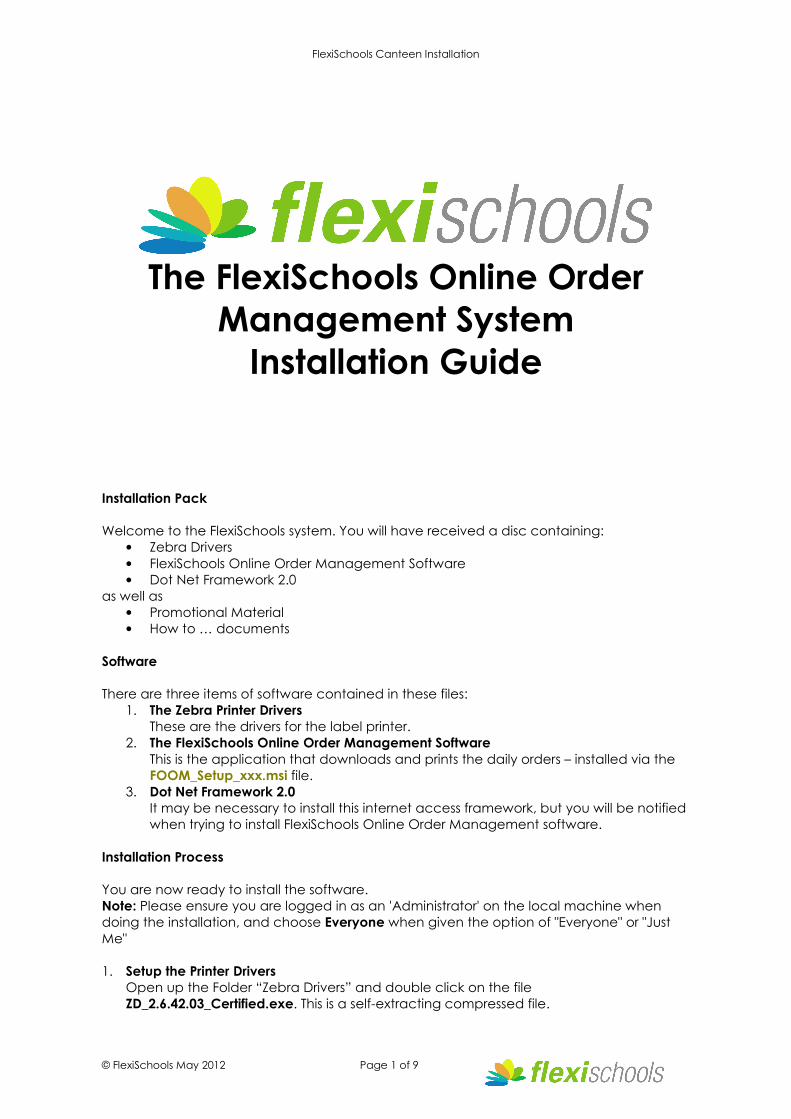
FlexiSchools Canteen Installation
© FlexiSchools May 2012 Page 1 of 9
The FlexiSchools Online Order
Management System
Installation Guide
Installation Pack
Welcome to the FlexiSchools system. You will have received a disc containing:
• Zebra Drivers
• FlexiSchools Online Order Management Software
• Dot Net Framework 2.0
as well as
• Promotional Material
• How to … documents
Software
There are three items of software contained in these files:
1. The Zebra Printer Drivers
These are the drivers for the label printer.
2. The FlexiSchools Online Order Management Software
This is the application that downloads and prints the daily orders – installed via the
FOOM_Setup_xxx.msi file.
3. Dot Net Framework 2.0
It may be necessary to install this internet access framework, but you will be notified
when trying to install FlexiSchools Online Order Management software.
Installation Process
You are now ready to install the software.
Note: Please ensure you are logged in as an 'Administrator' on the local machine when
doing the installation, and choose Everyone when given the option of "Everyone" or "Just
Me"
1. Setup the Printer Drivers
Open up the Folder “Zebra Drivers” and double click on the file
ZD_2.6.42.03_Certified.exe. This is a self-extracting compressed file.
FlexiSchools Canteen Installation
© FlexiSchools May 2012 Page 2 of 9
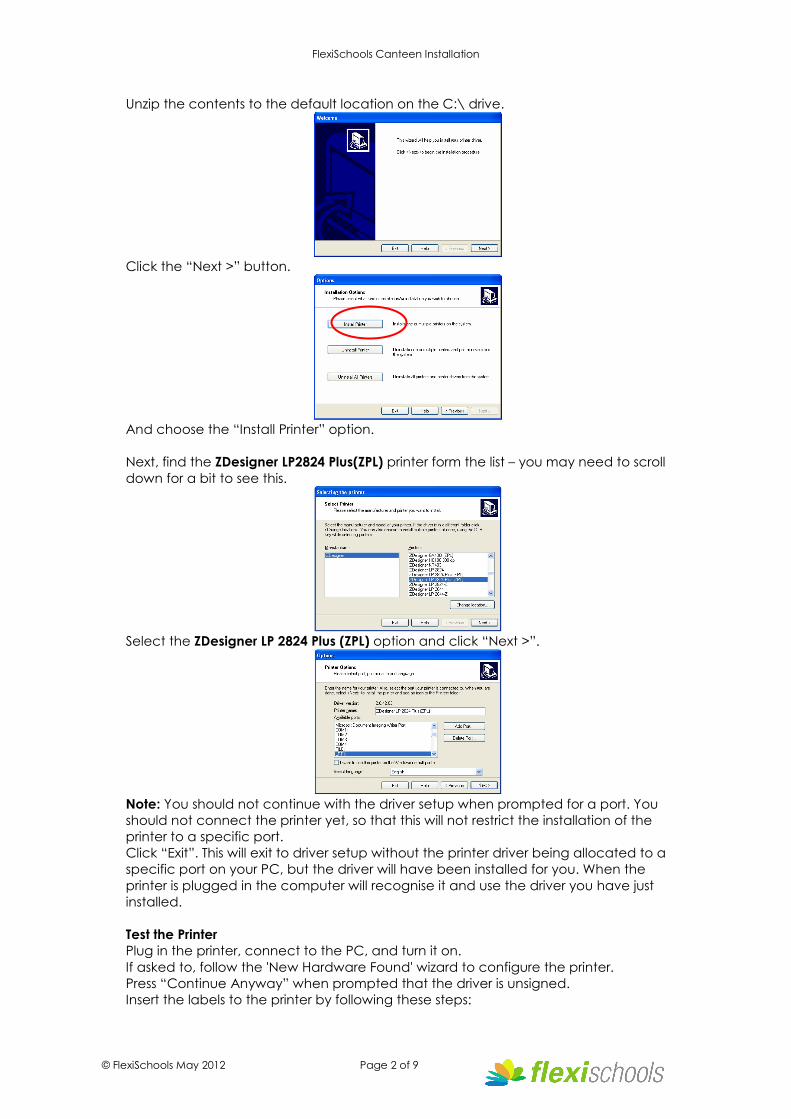
Unzip the contents to the default location on the C:\ drive.
Click the “Next >” button.
And choose the “Install Printer” option.
Next, find the ZDesigner LP2824 Plus(ZPL) printer form the list – you may need to scroll
down for a bit to see this.
Select the ZDesigner LP 2824 Plus (ZPL) option and click “Next >”.
Note: You should not continue with the driver setup when prompted for a port. You
should not connect the printer yet, so that this will not restrict the installation of the
printer to a specific port.
Click “Exit”. This will exit to driver setup without the printer driver being allocated to a
specific port on your PC, but the driver will have been installed for you. When the
printer is plugged in the computer will recognise it and use the driver you have just
installed.
Test the Printer
Plug in the printer, connect to the PC, and turn it on.
If asked to, follow the 'New Hardware Found' wizard to configure the printer.
Press “Continue Anyway” when prompted that the driver is unsigned.
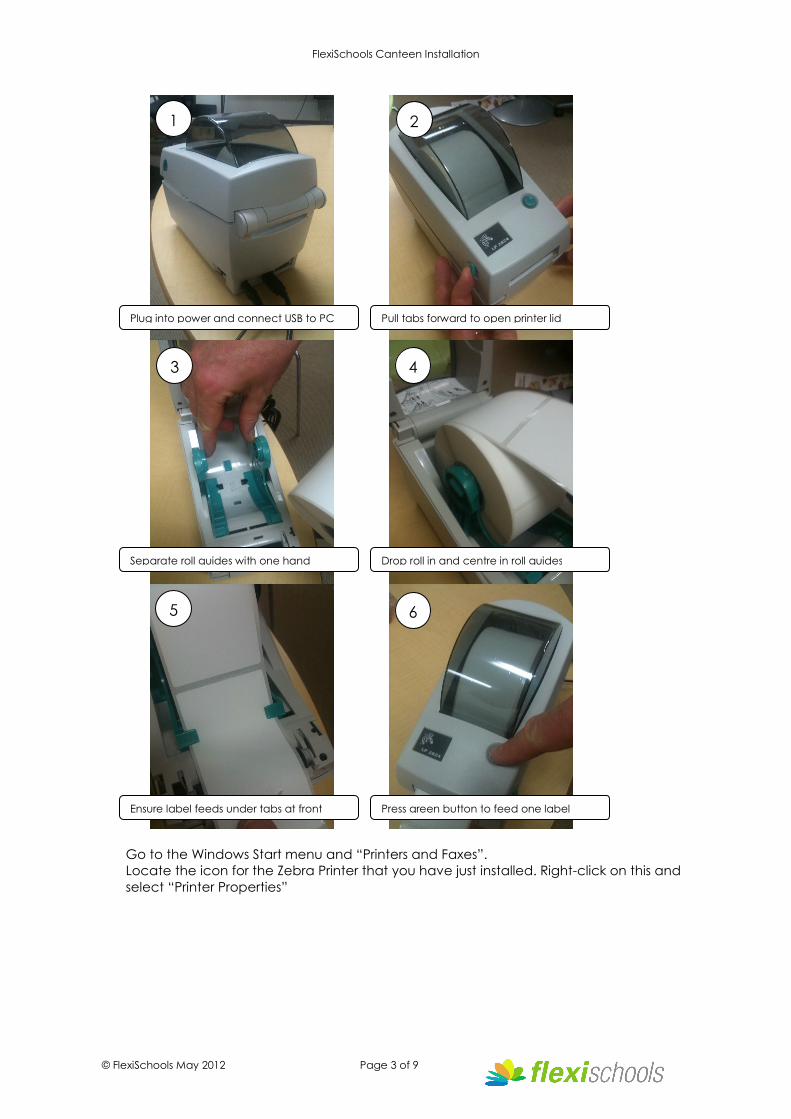
Insert the labels to the printer by following these steps:
FlexiSchools Canteen Installation
© FlexiSchools May 2012 Page 3 of 9
Go to the Windows Start menu and “Printers and Faxes”.
Locate the icon for the Zebra Printer that you have just installed. Right-click on this and
select “Printer Properties”
1
3 4
5
Plug into power and connect USB to PC
Separate roll guides with one hand Drop roll in and centre in roll guides
Ensure label feeds under tabs at front
2
Pull tabs forward to open printer lid
6
Press green button to feed one label
FlexiSchools Canteen Installation
© FlexiSchools May 2012 Page 4 of 9
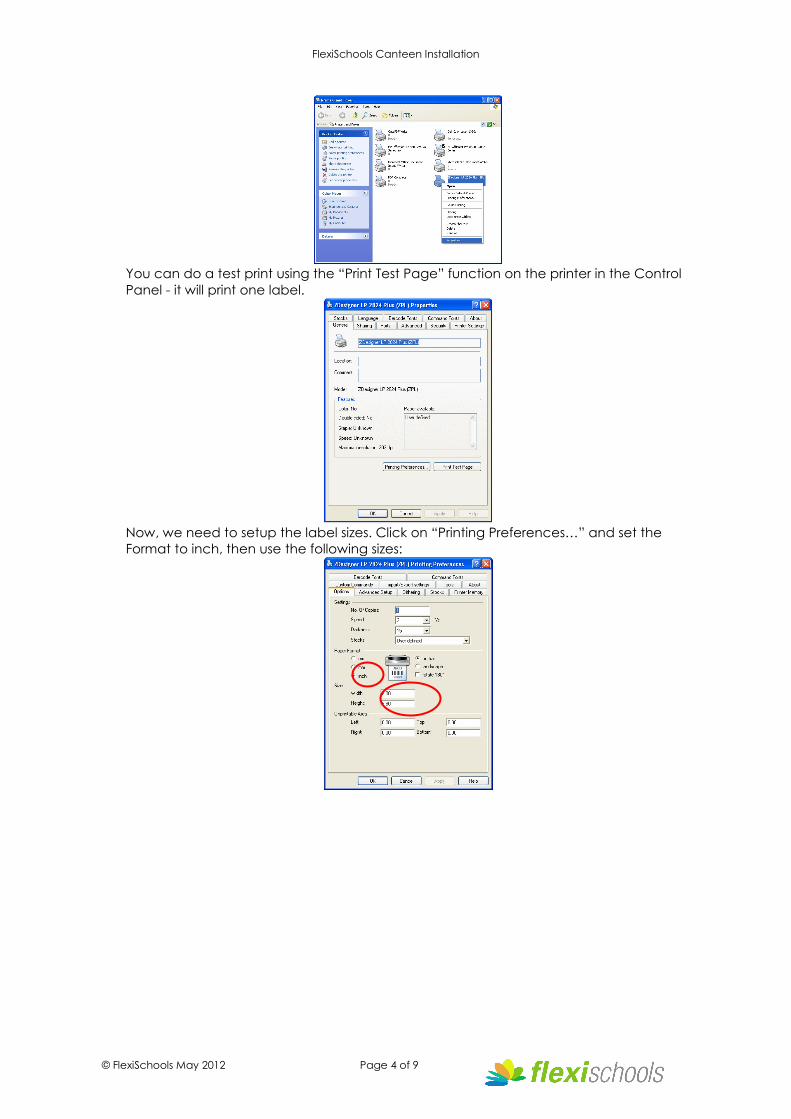
You can do a test print using the “Print Test Page” function on the printer in the Control
Panel - it will print one label.
Now, we need to setup the label sizes. Click on “Printing Preferences…” and set the
Format to inch, then use the following sizes:
FlexiSchools Canteen Installation
© FlexiSchools May 2012 Page 5 of 9
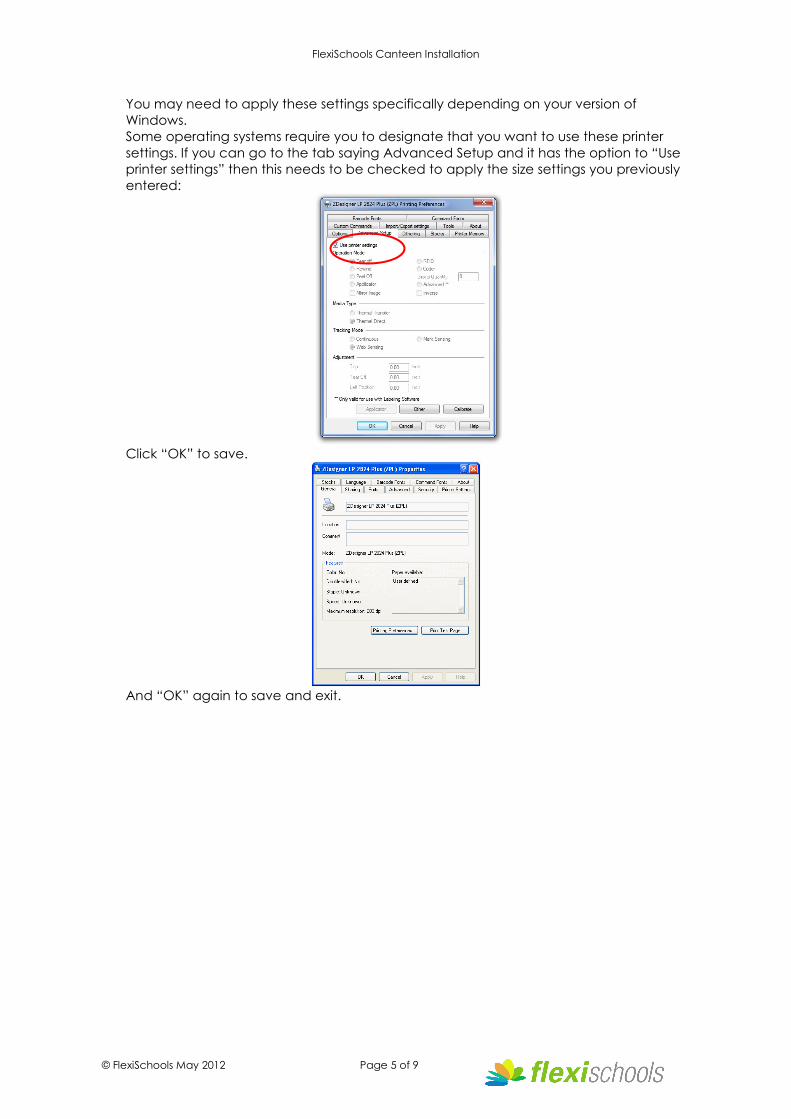
You may need to apply these settings specifically depending on your version of
Windows.
Some operating systems require you to designate that you want to use these printer
settings. If you can go to the tab saying Advanced Setup and it has the option to “Use
printer settings” then this needs to be checked to apply the size settings you previously
entered:
Click “OK” to save.
And “OK” again to save and exit.
FlexiSchools Canteen Installation
© FlexiSchools May 2012 Page 6 of 9
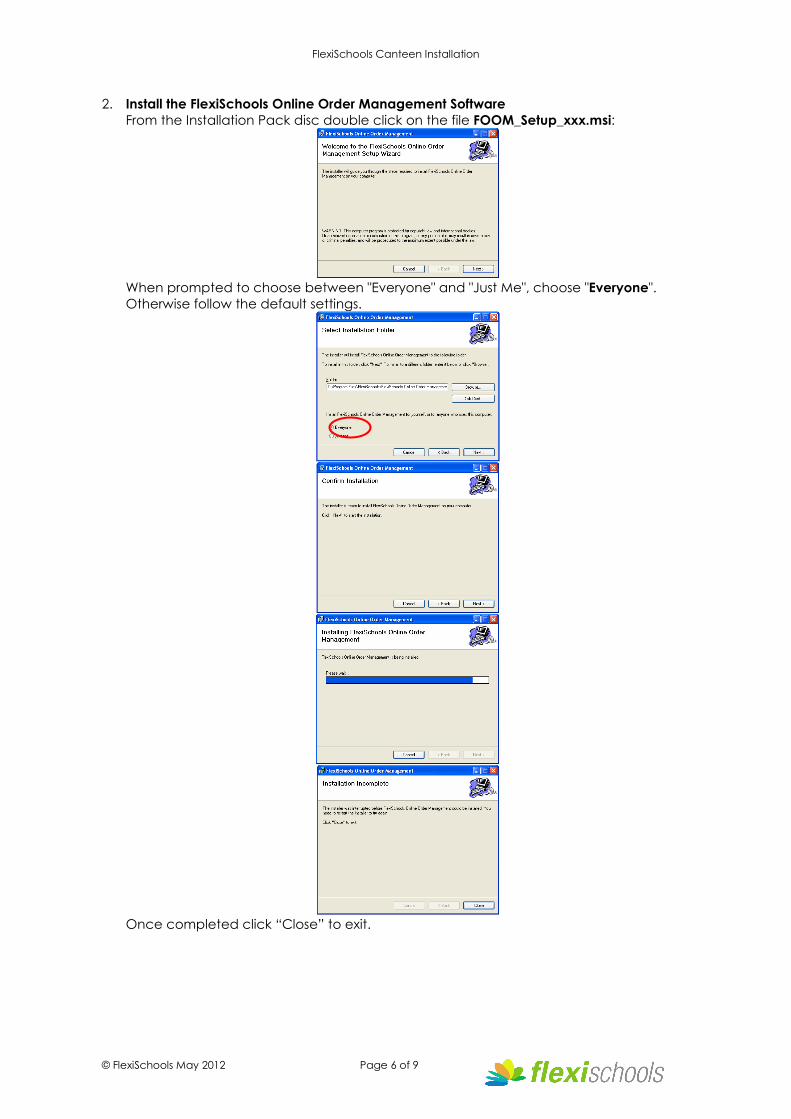
2. Install the FlexiSchools Online Order Management Software
From the Installation Pack disc double click on the file FOOM_Setup_xxx.msi:
When prompted to choose between "Everyone" and "Just Me", choose "Everyone".
Otherwise follow the default settings.
Once completed click “Close” to exit.
FlexiSchools Canteen Installation
© FlexiSchools May 2012 Page 7 of 9
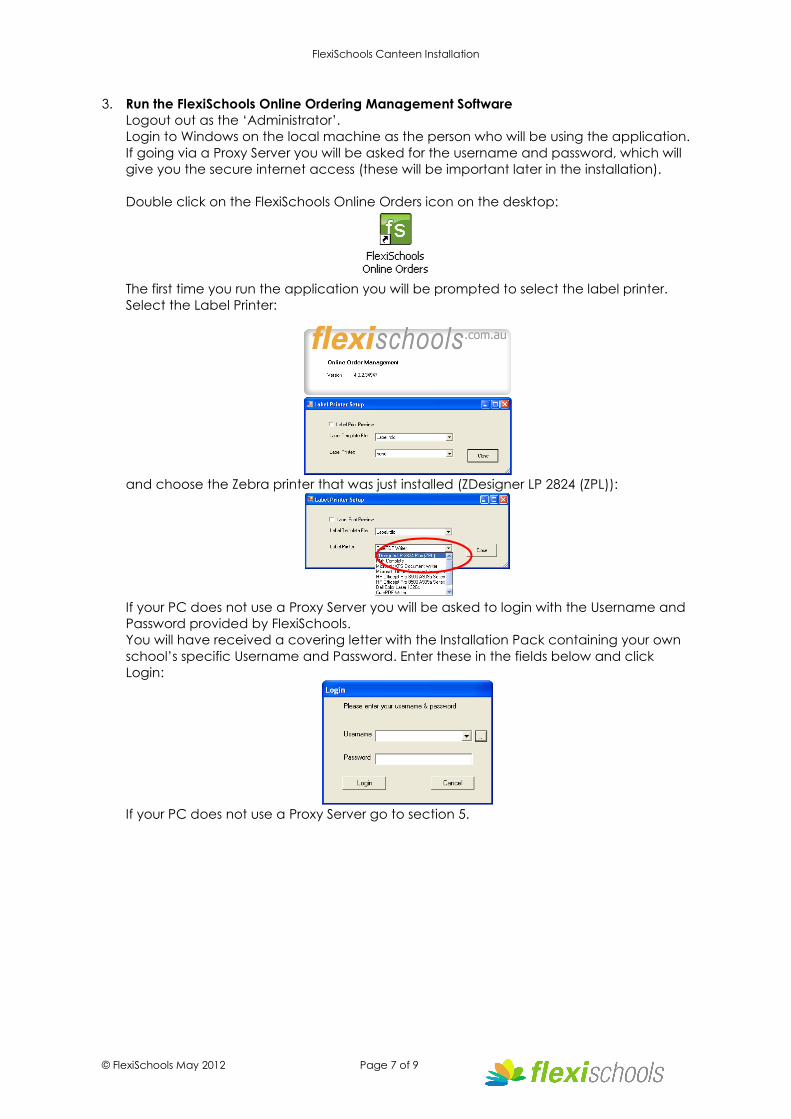
3. Run the FlexiSchools Online Ordering Management Software
Logout out as the ‘Administrator’.
Login to Windows on the local machine as the person who will be using the application.
If going via a Proxy Server you will be asked for the username and password, which will
give you the secure internet access (these will be important later in the installation).
Double click on the FlexiSchools Online Orders icon on the desktop:
The first time you run the application you will be prompted to select the label printer.
Select the Label Printer:
and choose the Zebra printer that was just installed (ZDesigner LP 2824 (ZPL)):
If your PC does not use a Proxy Server you will be asked to login with the Username and
Password provided by FlexiSchools.
You will have received a covering letter with the Installation Pack containing your own
school’s specific Username and Password. Enter these in the fields below and click
Login:
If your PC does not use a Proxy Server go to section 5.
FlexiSchools Canteen Installation
© FlexiSchools May 2012 Page 8 of 9
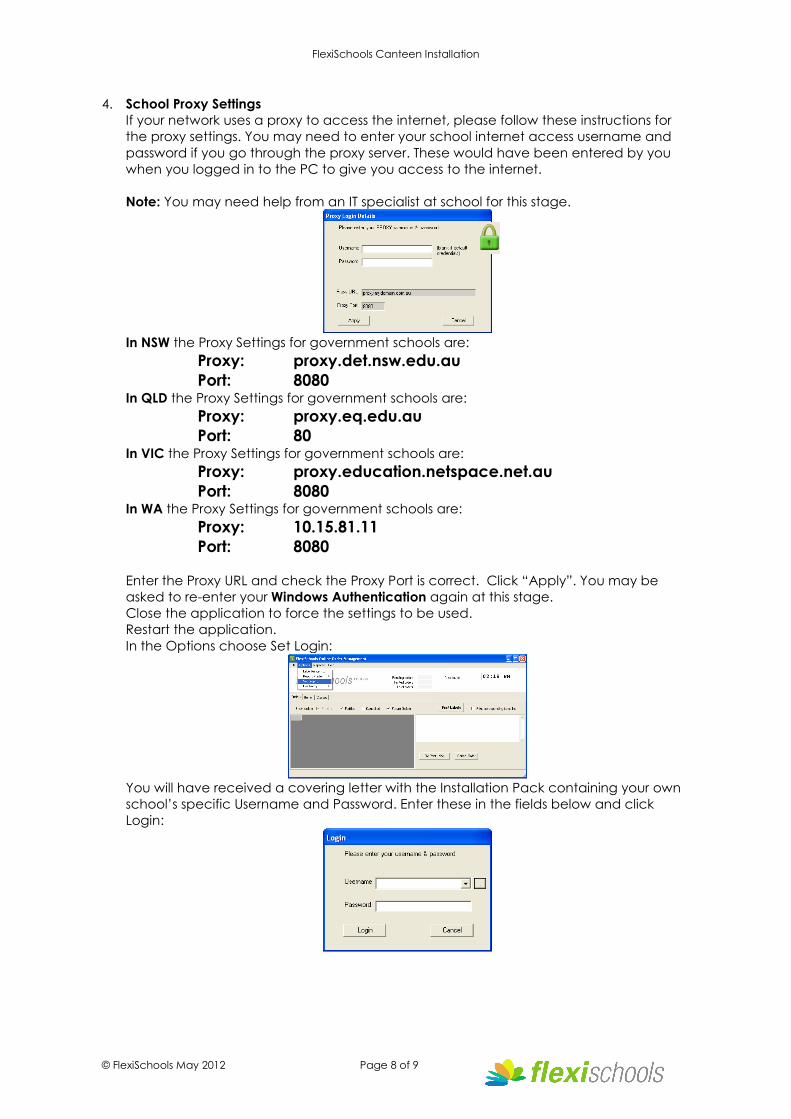
4. School Proxy Settings
If your network uses a proxy to access the internet, please follow these instructions for
the proxy settings. You may need to enter your school internet access username and
password if you go through the proxy server. These would have been entered by you
when you logged in to the PC to give you access to the internet.
Note: You may need help from an IT specialist at school for this stage.
In NSW the Proxy Settings for government schools are:
Proxy: proxy.det.nsw.edu.au
Port: 8080 In QLD the Proxy Settings for government schools are:
Proxy: proxy.eq.edu.au
Port: 80 In VIC the Proxy Settings for government schools are:
Proxy: proxy.education.netspace.net.au
Port: 8080 In WA the Proxy Settings for government schools are:
Proxy: 10.15.81.11
Port: 8080
Enter the Proxy URL and check the Proxy Port is correct. Click “Apply”. You may be
asked to re-enter your Windows Authentication again at this stage.
Close the application to force the settings to be used.
Restart the application.
In the Options choose Set Login:
You will have received a covering letter with the Installation Pack containing your own
school’s specific Username and Password. Enter these in the fields below and click
Login:
FlexiSchools Canteen Installation
© FlexiSchools May 2012 Page 9 of 9
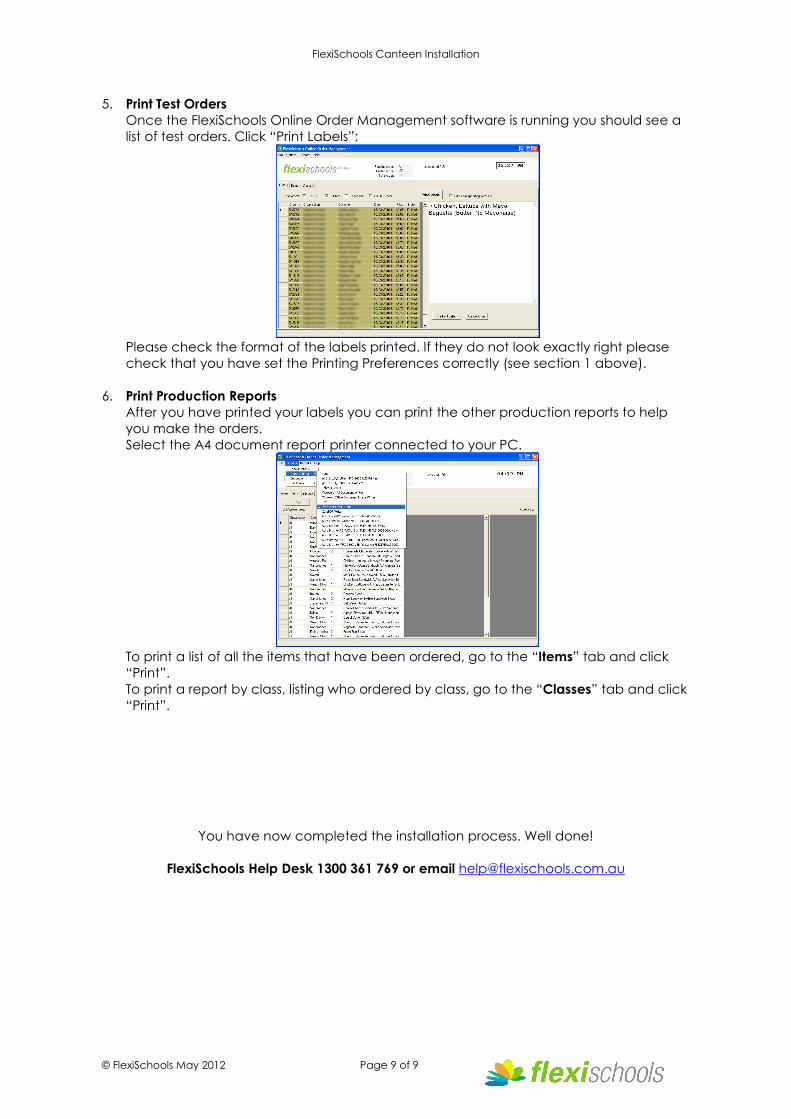
5. Print Test Orders
Once the FlexiSchools Online Order Management software is running you should see a
list of test orders. Click “Print Labels”:
Please check the format of the labels printed. If they do not look exactly right please
check that you have set the Printing Preferences correctly (see section 1 above).
6. Print Production Reports
After you have printed your labels you can print the other production reports to help
you make the orders.
Select the A4 document report printer connected to your PC.
To print a list of all the items that have been ordered, go to the “Items” tab and click
“Print”.
To print a report by class, listing who ordered by class, go to the “Classes” tab and click
“Print”.
You have now completed the installation process. Well done!
FlexiSchools Help Desk 1300 361 769 or email [email protected]