Embed Size (px)
Citation preview

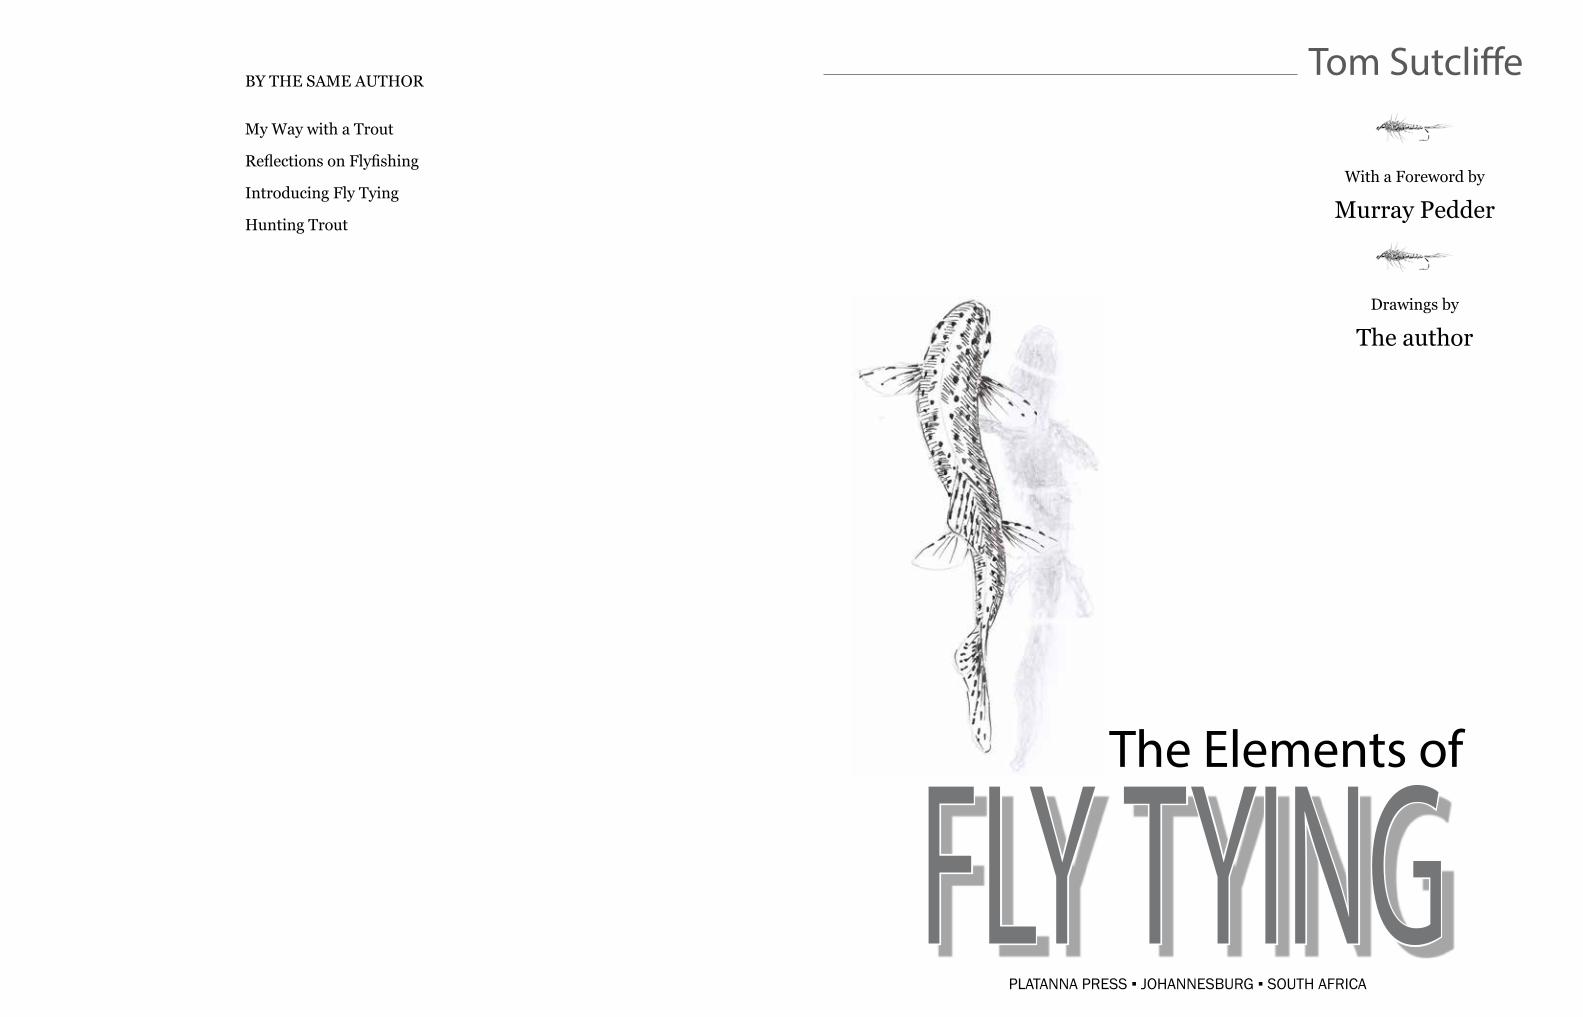
The Elements of
FLY TYING
BY THE SAME AUTHOR
My Way with a Trout
Reflections on Flyfishing
Introducing Fly Tying
Hunting Trout
Tom Sutcliffe
With a Foreword by
Murray Pedder
Drawings by
The author
The Elements of
FLY TYING

THE ELEMENTS OF FLY TYINGBy Tom Sutcliffe
Text Copyright © 2008 Tom SutcliffePublished Edition Copyright © 2008 Platanna Press
First Published in South Africa in 2008 by Platanna Press
10 9 8 7 6 5 4 3 2 1
All rights reserved. No part of this publication, except short passages for review purposes, may be reproduced, stored in a retrieval system, or transmitted in any form or by any means without the prior
written permission of the publisher, nor be otherwise circulated in any form of binding or cover other than that in which it is published and without a similar condition being imposed on the subsequent purchaser.
ISBN 978-0-9584950-5-9
Design by Paul Curtis and Irene WebbIllustrations by Tom Sutcliffe
Edited by Veronica Curtis
Printed and bound by Paarl Print, Oosterland Street, Paarl, Western Cape, South Africa(Collectors’ Edition bound by GraphiCraft, Cape Town)
Scans by Scan Shop, Cape Town
Platanna PressPO Box 1601
Randburg2125
South Africa
This book is dedicated to one of South Africa’s
greatest fly tying sons, Ed Herbst,
the best read, the most inventive
and the most academic and up to date
fly tyer I ever met.
Should a university some day decide
to offer a graduate degree
in fly tying, he’s my choice
for Professor and Head of Department.
ACKNOWLEDGEMENTS
Thanks to my friends Billy de Jong, Ed Herbst, Phil Hills, Darryl Lampert, Fred Steynberg and Mark Yelland for help and advice on text and content. A very special thanks to Dean Riphagen for the proof reading. Somehow he always takes proof reading to a cosmic level. Thanks to Murray Pedder for squeezing a foreword to this book into his busy life and to Irene Webb for handling the design. Thanks to the Natal Fly Dressers’ Society for years of inspiration and fellowship in the early days. And finally, thanks to Paul Curtis for prodding me to get this book done in the first place!
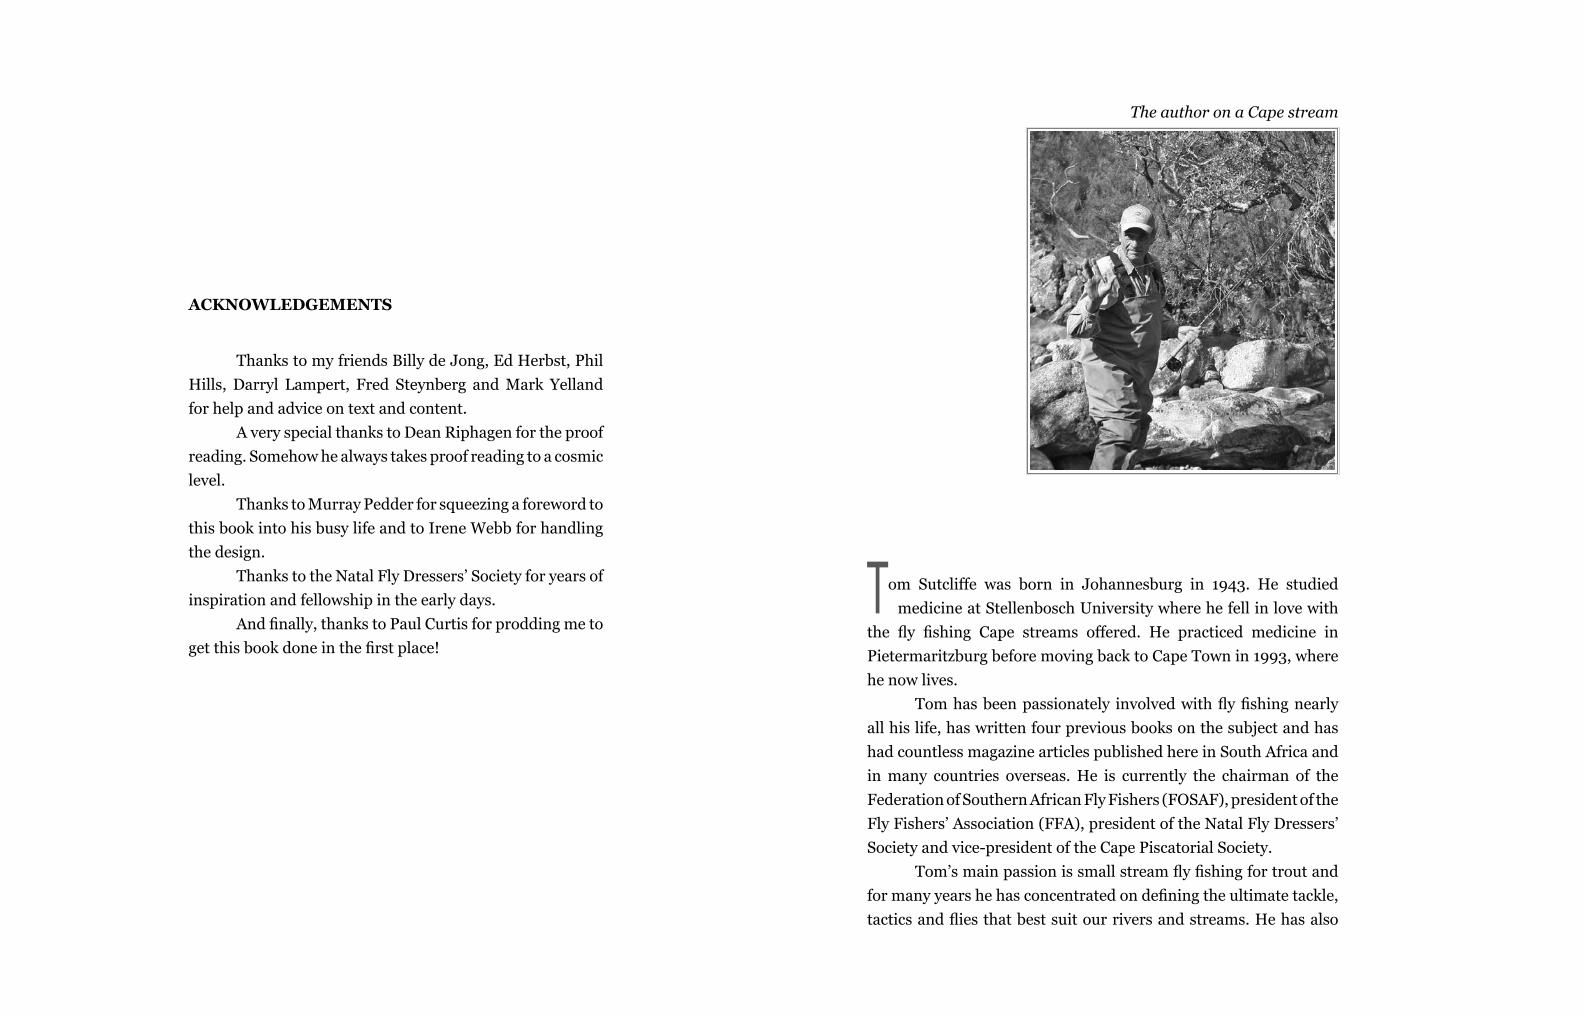
The author on a Cape stream
Tom Sutcliffe was born in Johannesburg in 1943. He studied medicine at Stellenbosch University where he fell in love with the fly fishing Cape streams offered. He practiced medicine in Pietermaritzburg before moving back to Cape Town in 1993, where he now lives. Tom has been passionately involved with fly fishing nearly all his life, has written four previous books on the subject and has had countless magazine articles published here in South Africa and in many countries overseas. He is currently the chairman of the Federation of Southern African Fly Fishers (FOSAF), president of the Fly Fishers’ Association (FFA), president of the Natal Fly Dressers’ Society and vice-president of the Cape Piscatorial Society. Tom’s main passion is small stream fly fishing for trout and for many years he has concentrated on defining the ultimate tackle, tactics and flies that best suit our rivers and streams. He has also
FOREWORD
I was about sixteen years old and had been fly fishing and tying for three years or so, when I first met Tom Sutcliffe.
Tom and master flyfisherman and fly tyer, the late Jack Blackman, were giving a talk at St Stithians College and I clearly remember being privileged to look into the fly boxes of two of South Africa’s fly fishing greats. I was completely mesmerised by the rows upon rows of perfectly tied flies and as a relative beginner, had many questions, as did the other boys, which Tom and Jack gladly answered. Today we are blessed with and almost overwhelmed by a wealth of information on fly tying. A massive information highway made up of books, the internet, DVDs, clubs and expertise in fly fishing shops that we can tap into, and learn about any subject imaginable concerning our art. This begs the question, “Is there room for another book on fly tying?”
After reading Tom’s latest book my answer is – a resounding yes!
This is a book not just for beginners but experienced tyers too. The first four chapters cover the basics thoroughly, without labouring any specific area and if you doubted yourself as a potential fly tyer these pages will surely give you all the encouragement you need. These chapters are followed by five more that cover basic and slightly more complex patterns, teaching in easy steps, the fly tying techniques necessary to stock a more than modest fly box.
But it’s when we get to the following twenty chapters, each of which covers a specific pattern, that the book really becomes something of value. Each chapter and each fly pattern is well thought out, covering virtually every tying step there is, what materials you will need to tie each pattern, what ‘triggers’ to build in, as well as some very thought provoking anecdotes and expert tips on how to fish each fly.
As you work your way through the book and learn techniques from winging to dubbing, ribbing to tying perfect parachute halos, tie flies from tiny tan ants to big baitfish imitations, you will be more
caught trout in the Test and the Bourne in England, in the Wiese River in Germany, the Tös in Switzerland, in the streams of Tasmania and in many of New Zealand’s South Island trophy rivers. He has fly fished extensively in the USA, including Vermont, Colorado and Montana and has twice taken trips to British Columbia to fish for steelhead. He has paid visits to the Okavango Delta to hunt tigerfish and bream and has a growing interest in fishing for the many yellowfish species in South Africa. Tom is now semi-retired and spends much of his free time stalking the headwaters of mountain streams in the Western Cape, or paying visits to Barkly East, Rhodes and Maclear to fish the wonderful rivers in those parts and the stillwaters around the towns of Dordrecht and Molteno. He has added photography to his love of fly fishing and fly tying with the view to producing a future book on the endless beauty and opportunity in South Africa’s rich fly fishing tapestry.

than a little impressed as your own skills and understanding of fly tying improve from chapter to chapter. Tom has drawn on decades of experience in fly fishing and fly tying and we all now have the opportunity to tap into this. Any honest tyer will tell you, that to put in words what you so easily do with your hands is no easy task if you wish to keep it uncluttered and simple to understand. Tom has managed this with pen and pencil. The combination of text and clear drawings is a winning formula that I have always enjoyed and a number of excellent books in my library adopt the same approach. Now you may still be saying to yourself that all this still does not entirely justify another book on tying, as books before have managed to cover many of the approaches Tom has covered in this new one. But what many of those books lack is Tom’s easy-to-read, almost ‘folksy’ style and his fastidious and unpretentious approach to the subject of fly tying and fly fishing in general and as a way of life. I have all of Tom’s books and I refer to them often. They get me thinking, trying new things, make me laugh. They give me the desire to pick up a rod and find the nearest water that holds a fish or two. Happily, now there’s another to add to my collection!
Murray Pedder
Chapter 1 Welcome to Fly Tying 14Chapter 2 Tools of the Trade 23Chapter 3 Guidelines for Proportion and Balance 36Chapter 4 Thread Control 40Chapter 5 Tying an All-Purpose Mayfly Nymph 47Chapter 6 Tying an All-Purpose Dry Fly 60Chapter 7 Tying a Traditional Wet Fly 71Chapter 8 Tying an All-Purpose Streamer 77Chapter 9 Tying a Bead-Head Woolly Bugger 84
Chapter 10 Tan Ant 90Chapter 11 Goddard Caddis 94Chapter 12 DDD 101Chapter 13 Elk Hair Caddis 110Chapter 14 Pheasant Tail Nymph (PTN) 114Chapter 15 Gold-Ribbed Hare’s Ear 118Chapter 16 Zak 126Chapter 17 Klinkhamer Emerger 133Chapter 18 Royal Wulff 140Chapter 19 Cream Spinner 148Chapter 20 Suspender Midge 153Chapter 21 Bloodworm 158Chapter 22 Brassie 162Chapter 23 Czech Nymph 165Chapter 24 Soft Hackle 171Chapter 25 Cream Air Head 177Chapter 26 Red-Eyed Damsel 181Chapter 27 Neutral-Density Dragonfly Nymph 188Chapter 28 Lefty’s Deceiver 194Chapter 29 Crazy Charlie 199
Chapter 30 Wrapping Up 203
Contents
WELCOME TO FLY TYING
1514
WELCOME TO FLY TYINGSome thoughts on the art of fly tying, the theory of imitation and what to expect from this book There are plenty of good reasons to start tying your own flies, but probably the most important is that it’s not a bad hobby in its own right, and the fact that it complements fly fishing so neatly is a really useful bonus. What keeps some people away from it is the Five-Thumbs-on-Each-Hand syndrome where they just see themselves as too clumsy to make anything as dainty as a perfectly winged dry fly, though they may well be able to fish that dry fly just as daintily as anyone needs to.
I have never found clumsiness, or lack of dexterity, so advanced in anyone that it ruled them out of ever tying a fly, though, of course, some people are more dexterous than others. As young doctors we could pick this up in the surgeons we worked with. Some we said had ’good hands’, meaning they were really smart at hand-eye co-ordination, and others were just not so smart at it. But in the end they all got the job done. Some were just prettier to watch than others; like comparing gliding ballerinas to hard-working handymen.
So whatever your own belief about your own lack of skill with your fingers, for the moment just park it. But every time you sit down to start tying, try this exercise to loosen up your fingers. Touch the tip of each finger with the tip of your thumb, increasing the speed each time around. Then close your eyes and do both hands together. If you can’t do it at all, see your doctor. If you can, you can tie flies!
People tend to make a big issue about how much more satisfying it is to catch fish on your own flies and yes, at first it is. But the notion is a little romantic and overcooked because after a while when you hook a fish on one of your own flies you find you haven’t even thought about that part of it. You’re excited to land the fish, sure, but not any more than the guy using a store-bought fly.
Having said that, the first few fish you catch on a fly you’ve actually designed is pretty special. There’s always a cycle to it. You happen to spot some bugs on the water, the fish are going mad for them, but you can’t quite find a match in your fly box. Back home you set your mind to matching that bug, in itself great fun. Some of your prototypes will end up fooling fish, and will endure, and some won’t, but when you do get it right it’s something you won’t forget in a hurry.
I also notice that continuing research and experimental fly tying are well established behaviour patterns in most of my fly tying friends. It’s one of the reasons we make a big thing of studying insects, but it’s also why there are more fly patterns out there now than we’ll ever be able to index. It’s just a fact that if you’re a fly tyer, it’s only a matter of time before you end up with your own versions of bloodworms, mayfly emergers, caddisflies, shrimps, crabs, baitfish, snails, you name it. Mostly your experiments will be based on some known pattern that you change enough over time to honestly call your own but, more often than not, they will end up with no particular name, other than, say, ‘My version of the bloodworm’, or whatever. Naming flies is not as fashionable as it once was.
Being able to tie your own flies also brings you closer to getting your hands on patterns you want to try but can’t find in any fly shop or, if you do find them, discover they aren’t well tied or aren’t quite to specification. I’m not saying all commercial patterns are badly made; just that many aren’t that good, and some are such ridiculous caricatures of the original pattern even the fly’s inventor wouldn’t recognise them. The best flies of all are the ones you’ve tied yourself and are dead happy with.
CHAPTER 1
WELCOME TO FLY TYING
17
THE ELEMENTS OF FLY TYING
16
The next best are custom-tied flies. Custom tying, by the way, is big business in America and increasingly so here in South Africa. The better fly shops often offer patterns tied by well-known anglers or part-time professional fly tyers. The downside, as you would expect, is that custom-tied flies cost a lot more money, though people buy them anyway because flies that are well tied are more durable and have a better chance of fooling fish. I mention this just to point out that fly tying when it’s good can open commercial opportunities for tyers, at least to the point where it can augment an income. To many folk that’s a solid enough reason to learn the art in the first place.
Not that long ago – well, say thirty years back – most anglers carried patterns that had well known names and a long lineage. Today you’ll see far fewer traditional flies, but there was a time when very little else was sold. Included in this list were flies like the Connemara Black, Invicta, Thunder and Lightning, Dunkeld, Teal and Green, Bloody Butcher and Alexandra. To a large extent they’ve been replaced with more generic patterns; general mayfly nymphs, Woolly Buggers, bloodworms, caddis larvae, that sort of thing. Some traditional patterns have stuck around, like the Adams dry fly and the Gold-Ribbed Hare’s Ear, but both are now tied in many more variations than we were once used to. (At the last count I got to five official variations of the Adams.) Or, rarely, they’ve been changed for the better. A good example of this is the way Lee Wulff took the Royal Coachman, added hair wings, used natural brown bucktail for the tail and arrived at the Royal Wulff, undoubtedly an improvement in both visibility and buoyancy.
What all this means if you are starting out fly tying is that you can expect less emphasis on mastering the precise and complicated tying procedures and formulas a lot of traditional patterns called for and more emphasis on satisfying your own imagination and sense of creativity. This is also in line with trends in what you will find in fly boxes these days: general or generic imitations of whatever lives in the water you happen to fish. As a result, I believe fly tying is more creative, more liberated if you like, maybe even easier, but
still just as rewarding. Not having to follow to the letter the formula for, say, the Jock Scott, or the original version of Houghton’s Ruby, or the wings on a Connemara Black, is a relief. Believe me. In fact that’s how we used to judge a fly tyer’s skills. We’d simply watch him wing a Connemara. Most tyers battled to get it right, even after years behind the vice. It’s also probably a fair generalization to say modern fly patterns are more effective than their earlier counterparts. There are a few reasons for this, not the least important is that contemporary pattern design has benefited from the rapid growth in our understanding and knowledge of fly fishing generally and the theory of attraction in particular, especially over the last decade or two. Tying materials have also got steadily more sophisticated and, finally, the world shrunk and we suddenly started discovering new techniques and new tying materials that not too long ago were maybe closely guarded secrets – like Czech Nymphing or Cul de Canard feathers and the giddy mix of fly patterns that each of these produced.
The advent of competitive angling helped spread the word, but mostly our acceleration in knowledge came on the back of the ever-increasing number of scholarly writings in fly fishing magazines and books, and on video tapes, DVDs and, of course, the internet. The result has been better fishing through improved tackle, better techniques and a wider range of purpose-designed fly patterns. That’s where you come in, starting out with your fly tying hobby. You’ll be able to tap right into all this once you’ve learned to tie your own patterns.
What is more important in fly tying than almost anything else – with the exception maybe of the quality of the materials you use – is to learn the basic procedures that hold good for just about any fly you want to tie such as how to maintain the right thread tension, how to weight a fly, use a Pinched-Loop and so on. These are generic steps that you must master, because they will hold good for any pattern you want to tie and I include them right at the beginning of the book
WELCOME TO FLY TYING
19
THE ELEMENTS OF FLY TYING
18
by taking you through a sort of all-purpose nymph, dry fly, wet fly, streamer and attractor fly, step-by-step. These are the ground rules, the rites of passage as it were.
Then I’ve chosen a selection of flies that we’ll go through together, again step-by-step, and it’s not an arbitrary selection either. These twenty patterns will show you just about the full box of fly tying tricks. But I’ve also selected them for their usefulness in catching trout, saltwater fish, bass (to an extent) and yellowfish. In other words, you will end up with a mayfly nymph, a baitfish imitation, a terrestrial, an emerger – I could go on. My aim is not only to teach you fly tying, but to leave you, at the end of it, with a really serviceable fly box! I’ll also broadly suggest how you fish each pattern – but I emphasize it’s going to be broad because how you fish these could be the subject of a book on its own.
Here are the patterns we will cover:TerrestrialsTan Ant DDDMayfly nymphs All-Purpose Nymph Pheasant Tailed Nymph (PTN)Gold-Ribbed Hare’s EarZak Nymph Mayfly adultsAll-Purpose Dry Fly Klinkhamer Emerger Royal WulffRusty Spent SpinnerChironomid larvae and pupaeBuzzer BloodwormBrassieSuspender MidgeCaddis adultElk Hair Caddis
Goddard CaddisSoft Hackle Caddis LarvaThe Czech Nymph Adult StoneflyCream Air HeadDamselfly NymphRed-Eye Damsel Dragonfly Nymph Neutral-Density DragonStreamers and Stillwater patternsAll-Purpose StreamerThe Bead-Head Woolly Bugger SaltwaterCrazy CharlieLefty’s Deceiver Traditional Wet FlySilver March Brown
An abbreviated theory of attractionThere has to be some logic in how you approach your fly tying and pattern design and in this book, among other things, I want to try and unlock that for you.
In the broadest terms, the theory of attraction hangs on the simple premise that fish can be persuaded to take an artificial imitation of food providing all things are equal. There is another, less important principle and that is that fish will sometimes attack what they don’t necessarily regard as food, but see as a possible threat or an intrusion into their territory. This is more the theory of aggravation than attraction.
These two facts have driven the creation of countless fly patterns over many decades. But if both notions are simple enough on the surface, they become a lot more complicated once you start digging deeper. That’s because there’s little that’s entirely predictable or consistent about fish behaviour around artificial flies.
For example, say we were both fishing a reasonable imitation
WELCOME TO FLY TYING
21
THE ELEMENTS OF FLY TYING
20
of a mayfly to rising trout and your particular fly gets all the hits and mine gets none. The questions then are: Is my technique wrong? Is there a flaw in my fly pattern? Or worse still, both! Finding the answer goes straight to the core of what fly fishing is all about; the eternal challenge to get the right fly to a fish in a way that convinces him to eat it. This book is largely about creating that right fly.
The second principle, aggravation or the territorial threat, is not well defined, other than to say that certain characteristics in a fly, in certain circumstances, provoke anger or aggravation and fish may attack the fly (and, yes, there is a fly pattern called the Aggravator).
Let’s now expand our theories on attraction. There are certain key features in the shape, outline, colour and movement of all prey that initially command a fish’s attention. Whether the fish then takes the fly or not depends on a number of things. The fish has to be hungry to start with, can’t have detected any flaws in your presentation or your pattern and must be fooled enough by the fly to believe it’s food and actually mouth it. But what started the whole process was the arrival of an artificial fly that had the right shape, outline, colour and movement to draw attention in the first place. Fly tyers call these key features, triggers.
For example, important triggers for damselfly nymphs would be their long slender bodies and their slow, undulating body movements in the water. For baitfish, it’s their linear shape, their shine, possibly some red at the gills and definitely their speed through the water. For adult caddisflies, it’s their conical shape, their long antennae and their skittish movements on the water – movement a well-respected American fly fisher once famously described as ‘the sudden inch’.
So to make effective use of triggers you have to study shape, outline, colour and movement and build these features into your artificial and, of course, the right movement into your fishing. Shape and outline are easy enough concepts to identify, understand and build into a fly. When it comes to colour, it’s obvious that if
the insect we want to copy has a golden-olive body, then that’s the colour we go for when we tie an imitation, even if that means having to specially mix a variety of dubbings, or dying them to perfection. Most fly tyers argue that matching a natural’s colour is important, but there are a few tyers who say it’s critical. I agree colour is a key feature in imitation, but I suspect getting the shade absolutely right is only a critical requirement on certain difficult waters – meaning fish can be fussier in some places than they are in others.
What I can’t explain, though, is why the colour red is so mysteriously attractive to most fish – trout certainly and, in my view, bass as well. But there’s been a fair amount of research to confirm this and a highly regarded American fly fisher, the late Gary LaFontaine, had some well-reasoned answers for it that you will find in the chapter in this book on the Royal Wulff. So should we be adding a red tag to everything we tie? Probably not and I’ll explain why. An Adams dry fly, for example, is meant to imitate an adult mayfly, and adult mayflies have no bright red appendages. They do occasionally carry bright yellow or orange eggs and these certainly become a key trigger when these mayflies return to the water to lay their eggs. On the other hand, we could add a red tag, and often do, to patterns like the Black Woolly Worm, because we don’t know exactly what we’re imitating with this fly in the first place, so a red tag won’t capsize the plot or expose our deceit. On the contrary, based on what research tells us, it will probably increase our success rate. By precisely how much, though, I couldn’t tell you.
But I did say probably not in the case of the Adams. Why probably? Well, because fly tying, and fly fishing for that matter, are not exactly precise sciences. For example, take the well-known South African dry fly, the RAB, and the ubiquitous Royal Wulff. Both imitate adult mayflies and both have red in their bodies and are pretty effective patterns, as we know. To learn more about just why the Royal Wulff is such an effective pattern despite its gaudy appearance, you must read Gary LaFontaine’s book The Dry Fly: New Angles and, specifically Chapter 10, The Theory of Attraction.
Movement is the most underrated trigger of them all and there are two elements to it. Firstly, there’s the characteristic
23
THE ELEMENTS OF FLY TYING
22
TOOLS OF THE TRADE
IntroductionI think one of the great joys of fly tying lies in the satisfaction it gives the acquisitive personality disorder most of us suffer from – meaning it opens the door to collecting things in a big way. There are maybe two important predictions I can safely make here: firstly you will never have enough fly tying materials, and secondly, they will never stop inventing new ones. So this chapter is a rough guide to what is an Aladdin’s Cave waiting for you out there, though I do list what I think you can regard as basic stuff and really ought to get. Kits, if you can find them, are a great way to start, but check the materials they offer against my list in this chapter of what you will need to complete the exercises in this book.
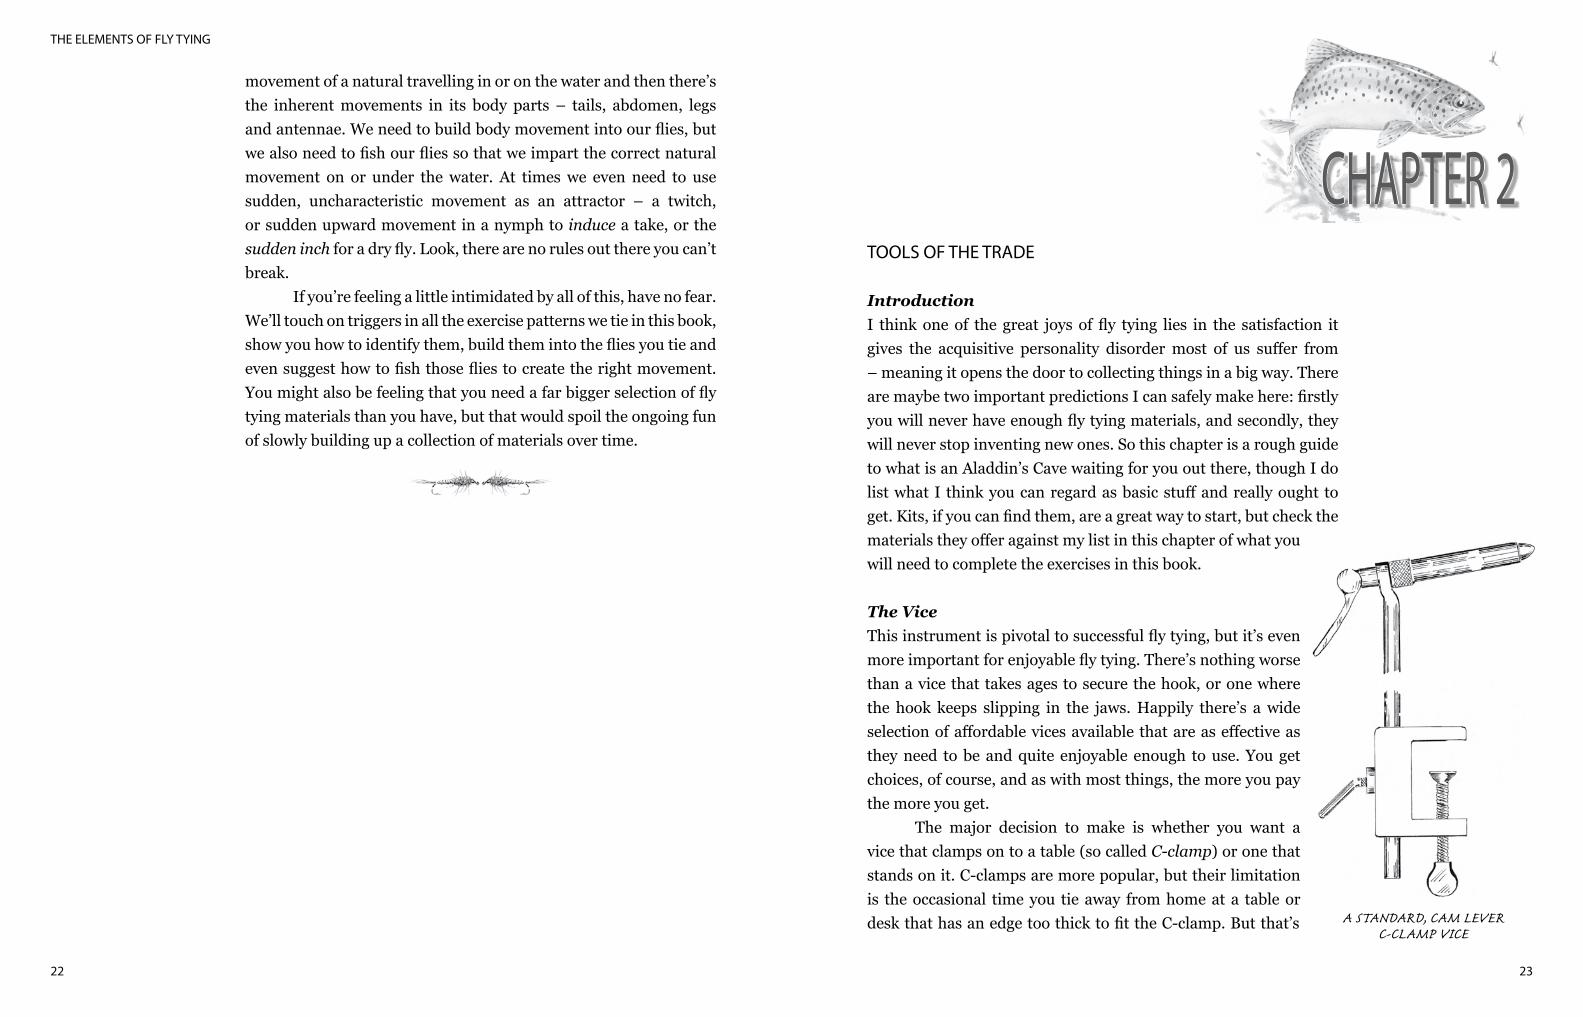
The ViceThis instrument is pivotal to successful fly tying, but it’s even more important for enjoyable fly tying. There’s nothing worse than a vice that takes ages to secure the hook, or one where the hook keeps slipping in the jaws. Happily there’s a wide selection of affordable vices available that are as effective as they need to be and quite enjoyable enough to use. You get choices, of course, and as with most things, the more you pay the more you get.
The major decision to make is whether you want a vice that clamps on to a table (so called C-clamp) or one that stands on it. C-clamps are more popular, but their limitation is the occasional time you tie away from home at a table or desk that has an edge too thick to fit the C-clamp. But that’s
movement of a natural travelling in or on the water and then there’s the inherent movements in its body parts – tails, abdomen, legs and antennae. We need to build body movement into our flies, but we also need to fish our flies so that we impart the correct natural movement on or under the water. At times we even need to use sudden, uncharacteristic movement as an attractor – a twitch, or sudden upward movement in a nymph to induce a take, or the sudden inch for a dry fly. Look, there are no rules out there you can’t break.
If you’re feeling a little intimidated by all of this, have no fear. We’ll touch on triggers in all the exercise patterns we tie in this book, show you how to identify them, build them into the flies you tie and even suggest how to fish those flies to create the right movement. You might also be feeling that you need a far bigger selection of fly tying materials than you have, but that would spoil the ongoing fun of slowly building up a collection of materials over time.
A STANDARD, CAM LEVERC-CLAMP VICE
CHAPTER 2
TOOLS OF THE TRADE
25
THE ELEMENTS OF FLY TYING
24
rare and in any case you’ll do most of your tying at home. One way to overcome the problem, though, is to take a plank of wood with you that you can lay on the table with the vice clamped to the edge of the plank. Providing there’s enough plank lying on the table the rig shouldn’t tilt.
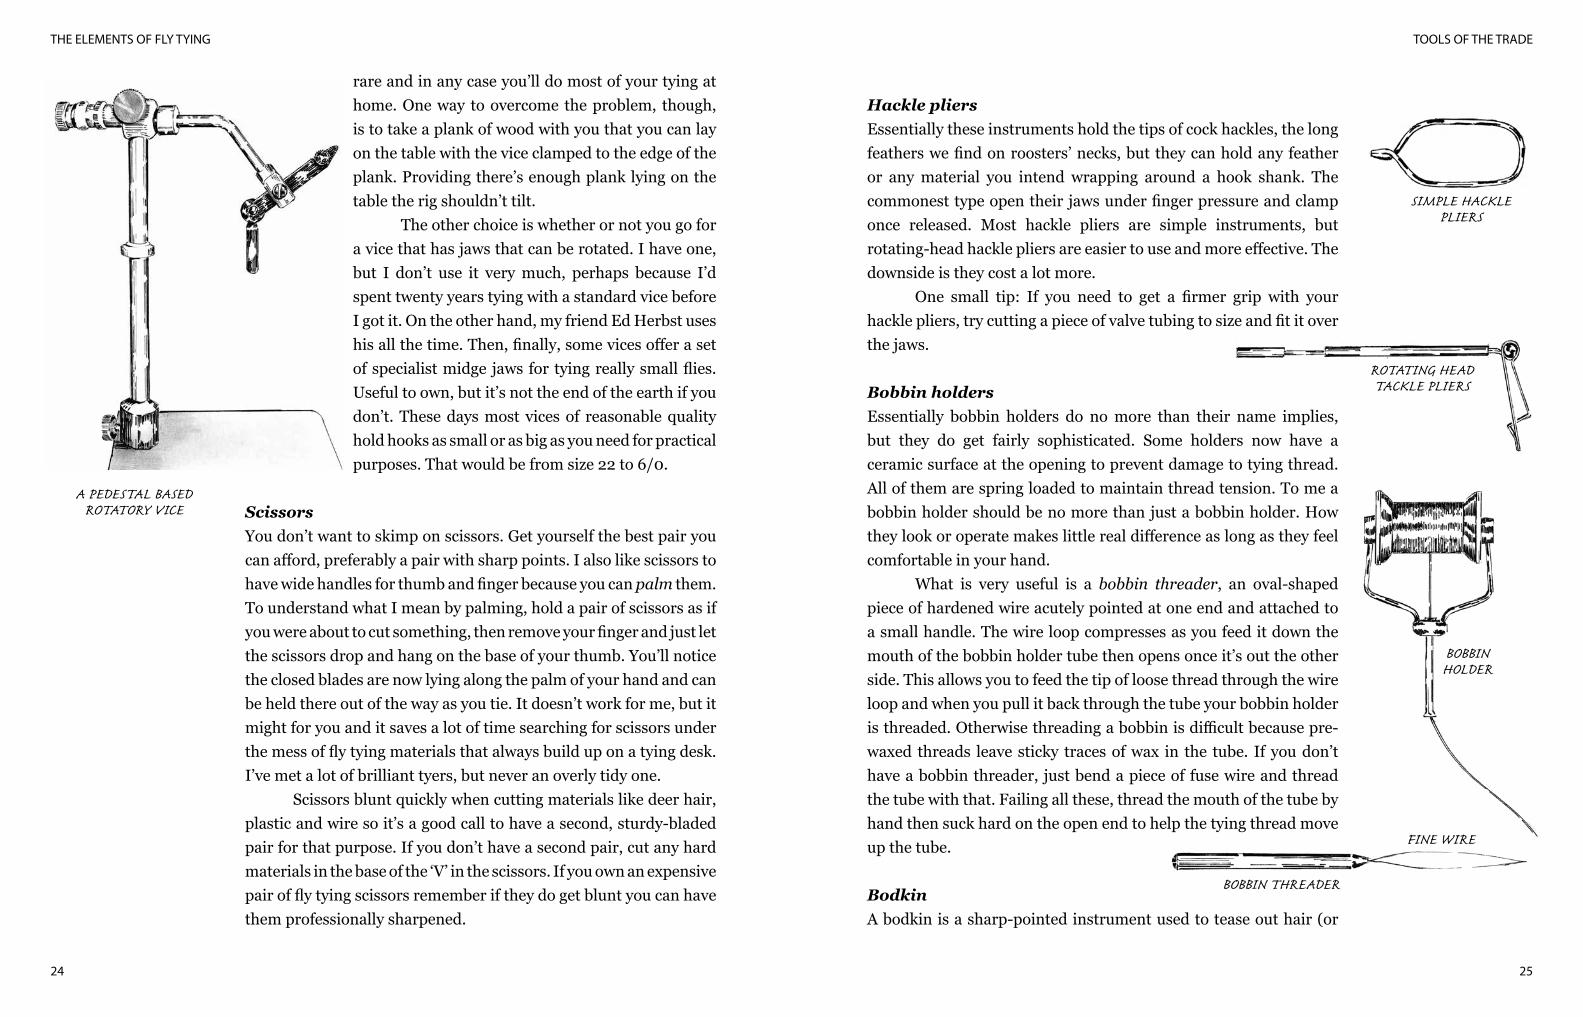
The other choice is whether or not you go for a vice that has jaws that can be rotated. I have one, but I don’t use it very much, perhaps because I’d spent twenty years tying with a standard vice before I got it. On the other hand, my friend Ed Herbst uses his all the time. Then, finally, some vices offer a set of specialist midge jaws for tying really small flies. Useful to own, but it’s not the end of the earth if you don’t. These days most vices of reasonable quality hold hooks as small or as big as you need for practical purposes. That would be from size 22 to 6/0.
ScissorsYou don’t want to skimp on scissors. Get yourself the best pair you can afford, preferably a pair with sharp points. I also like scissors to have wide handles for thumb and finger because you can palm them. To understand what I mean by palming, hold a pair of scissors as if you were about to cut something, then remove your finger and just let the scissors drop and hang on the base of your thumb. You’ll notice the closed blades are now lying along the palm of your hand and can be held there out of the way as you tie. It doesn’t work for me, but it might for you and it saves a lot of time searching for scissors under the mess of fly tying materials that always build up on a tying desk. I’ve met a lot of brilliant tyers, but never an overly tidy one.
Scissors blunt quickly when cutting materials like deer hair, plastic and wire so it’s a good call to have a second, sturdy-bladed pair for that purpose. If you don’t have a second pair, cut any hard materials in the base of the ‘V’ in the scissors. If you own an expensive pair of fly tying scissors remember if they do get blunt you can have them professionally sharpened.
Hackle pliersEssentially these instruments hold the tips of cock hackles, the long feathers we find on roosters’ necks, but they can hold any feather or any material you intend wrapping around a hook shank. The commonest type open their jaws under finger pressure and clamp once released. Most hackle pliers are simple instruments, but rotating-head hackle pliers are easier to use and more effective. The downside is they cost a lot more. One small tip: If you need to get a firmer grip with your hackle pliers, try cutting a piece of valve tubing to size and fit it over the jaws.
Bobbin holdersEssentially bobbin holders do no more than their name implies, but they do get fairly sophisticated. Some holders now have a ceramic surface at the opening to prevent damage to tying thread. All of them are spring loaded to maintain thread tension. To me a bobbin holder should be no more than just a bobbin holder. How they look or operate makes little real difference as long as they feel comfortable in your hand.
What is very useful is a bobbin threader, an oval-shaped piece of hardened wire acutely pointed at one end and attached to a small handle. The wire loop compresses as you feed it down the mouth of the bobbin holder tube then opens once it’s out the other side. This allows you to feed the tip of loose thread through the wire loop and when you pull it back through the tube your bobbin holder is threaded. Otherwise threading a bobbin is difficult because pre-waxed threads leave sticky traces of wax in the tube. If you don’t have a bobbin threader, just bend a piece of fuse wire and thread the tube with that. Failing all these, thread the mouth of the tube by hand then suck hard on the open end to help the tying thread move up the tube.
Bodkin A bodkin is a sharp-pointed instrument used to tease out hair (or
SIMPLE HACKLEPLIERS
ROTATING HEADTACKLE PLIERS
BOBBINHOLDER
A PEDESTAL BASEDROTATORY VICE
BOBBIN THREADER
FINE WIRE
TOOLS OF THE TRADE
27
THE ELEMENTS OF FLY TYING
26
DUBBING TWISTER
SPIN THE TWISTER
any other fibres), once you have completed a fly and, importantly to add drops of varnish to the heads of flies. You can buy a tailor-made fly tying bodkin, or just use a stout darning needle. Some people press the blunt end of a needle into a piece of cork so they don’t keep losing it. I got lucky, Steve Boshoff, a superb bamboo rod maker, gave me a Rolls Royce bodkin made from a section of split cane fly rod he was building. It’s not so much a bodkin as a work of art.
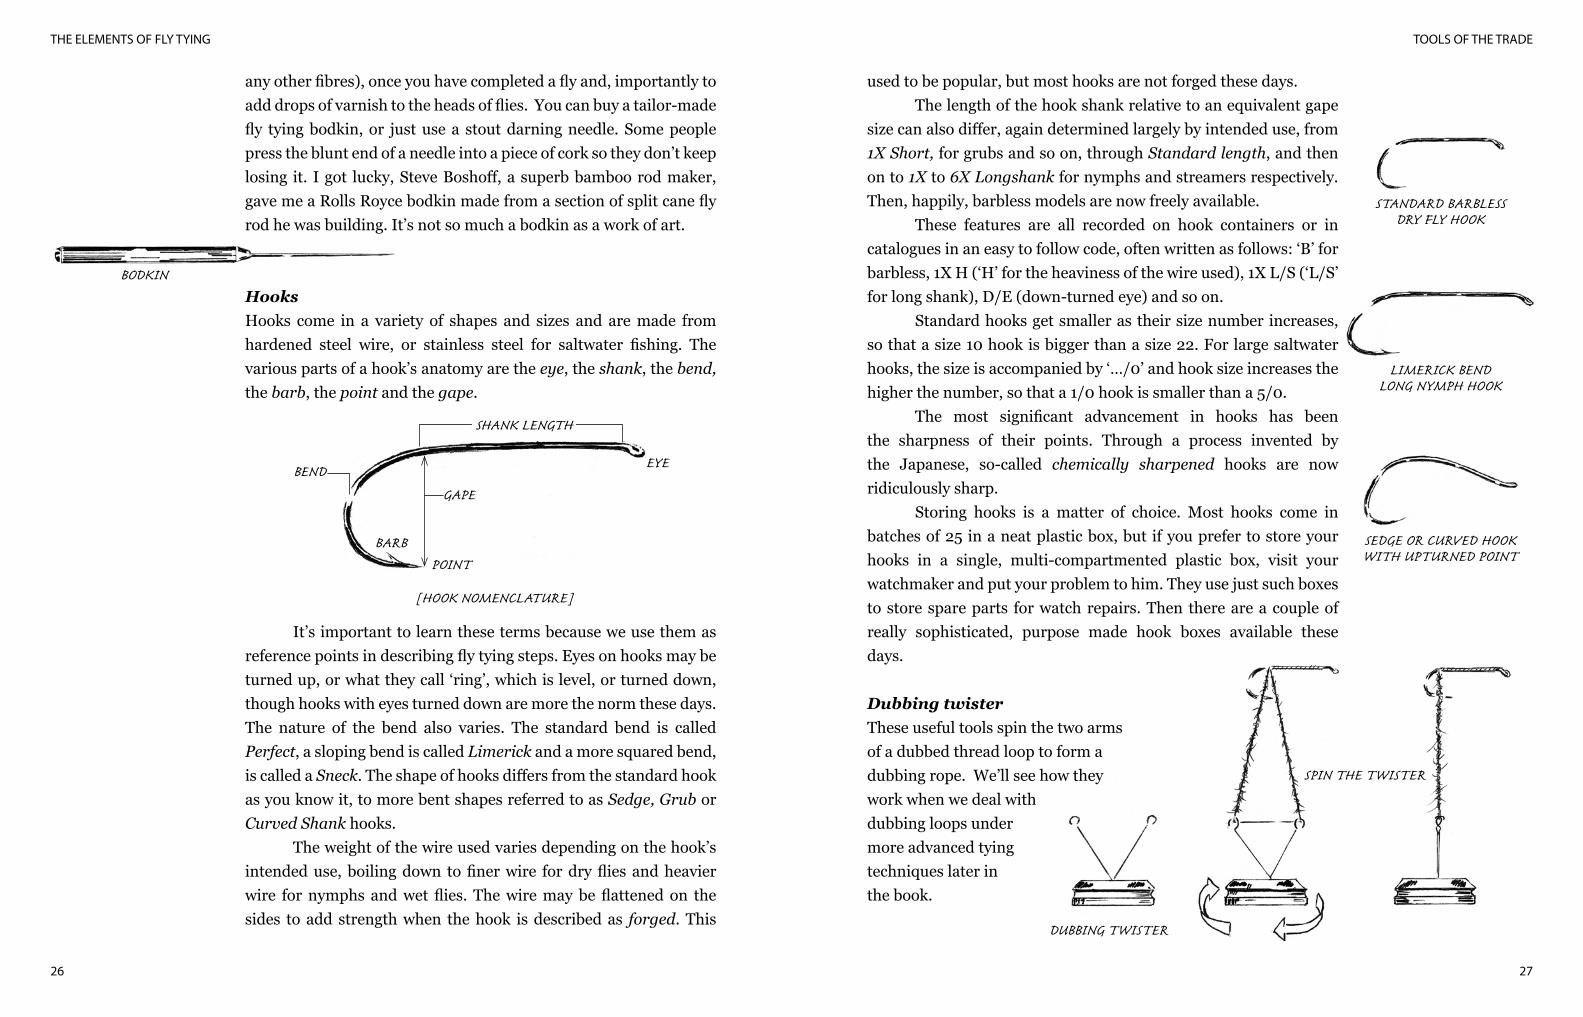
HooksHooks come in a variety of shapes and sizes and are made from hardened steel wire, or stainless steel for saltwater fishing. The various parts of a hook’s anatomy are the eye, the shank, the bend, the barb, the point and the gape.
It’s important to learn these terms because we use them as reference points in describing fly tying steps. Eyes on hooks may be turned up, or what they call ‘ring’, which is level, or turned down, though hooks with eyes turned down are more the norm these days. The nature of the bend also varies. The standard bend is called Perfect, a sloping bend is called Limerick and a more squared bend, is called a Sneck. The shape of hooks differs from the standard hook as you know it, to more bent shapes referred to as Sedge, Grub or Curved Shank hooks.
The weight of the wire used varies depending on the hook’s intended use, boiling down to finer wire for dry flies and heavier wire for nymphs and wet flies. The wire may be flattened on the sides to add strength when the hook is described as forged. This
used to be popular, but most hooks are not forged these days. The length of the hook shank relative to an equivalent gape
size can also differ, again determined largely by intended use, from 1X Short, for grubs and so on, through Standard length, and then on to 1X to 6X Longshank for nymphs and streamers respectively. Then, happily, barbless models are now freely available.
These features are all recorded on hook containers or in catalogues in an easy to follow code, often written as follows: ‘B’ for barbless, 1X H (‘H’ for the heaviness of the wire used), 1X L/S (‘L/S’ for long shank), D/E (down-turned eye) and so on.
Standard hooks get smaller as their size number increases, so that a size 10 hook is bigger than a size 22. For large saltwater hooks, the size is accompanied by ‘…/0’ and hook size increases the higher the number, so that a 1/0 hook is smaller than a 5/0. The most significant advancement in hooks has been the sharpness of their points. Through a process invented by the Japanese, so-called chemically sharpened hooks are now ridiculously sharp. Storing hooks is a matter of choice. Most hooks come in batches of 25 in a neat plastic box, but if you prefer to store your hooks in a single, multi-compartmented plastic box, visit your watchmaker and put your problem to him. They use just such boxes to store spare parts for watch repairs. Then there are a couple of really sophisticated, purpose made hook boxes available these days. Dubbing twisterThese useful tools spin the two armsof a dubbed thread loop to form adubbing rope. We’ll see how theywork when we deal withdubbing loops undermore advanced tyingtechniques later inthe book.
BODKIN
EYEBEND
GAPE
POINTBARB
[HOOK NOMENCLATURE]
SHANK LENGTH
STANDARD BARBLESSDRY FLY HOOK
LIMERICK BENDLONG NYMPH HOOK
SEDGE OR CURVED HOOKWITH UPTURNED POINT
TOOLS OF THE TRADE
29
THE ELEMENTS OF FLY TYING
28
THE HOLLOW FIBRE HAIR STACKER
INSERT HAIR ANDFIRMLY TAP STACKER
REMOVECENTRE
CYLINDER
REMOVEHAIR
TIPS STRAIGHT
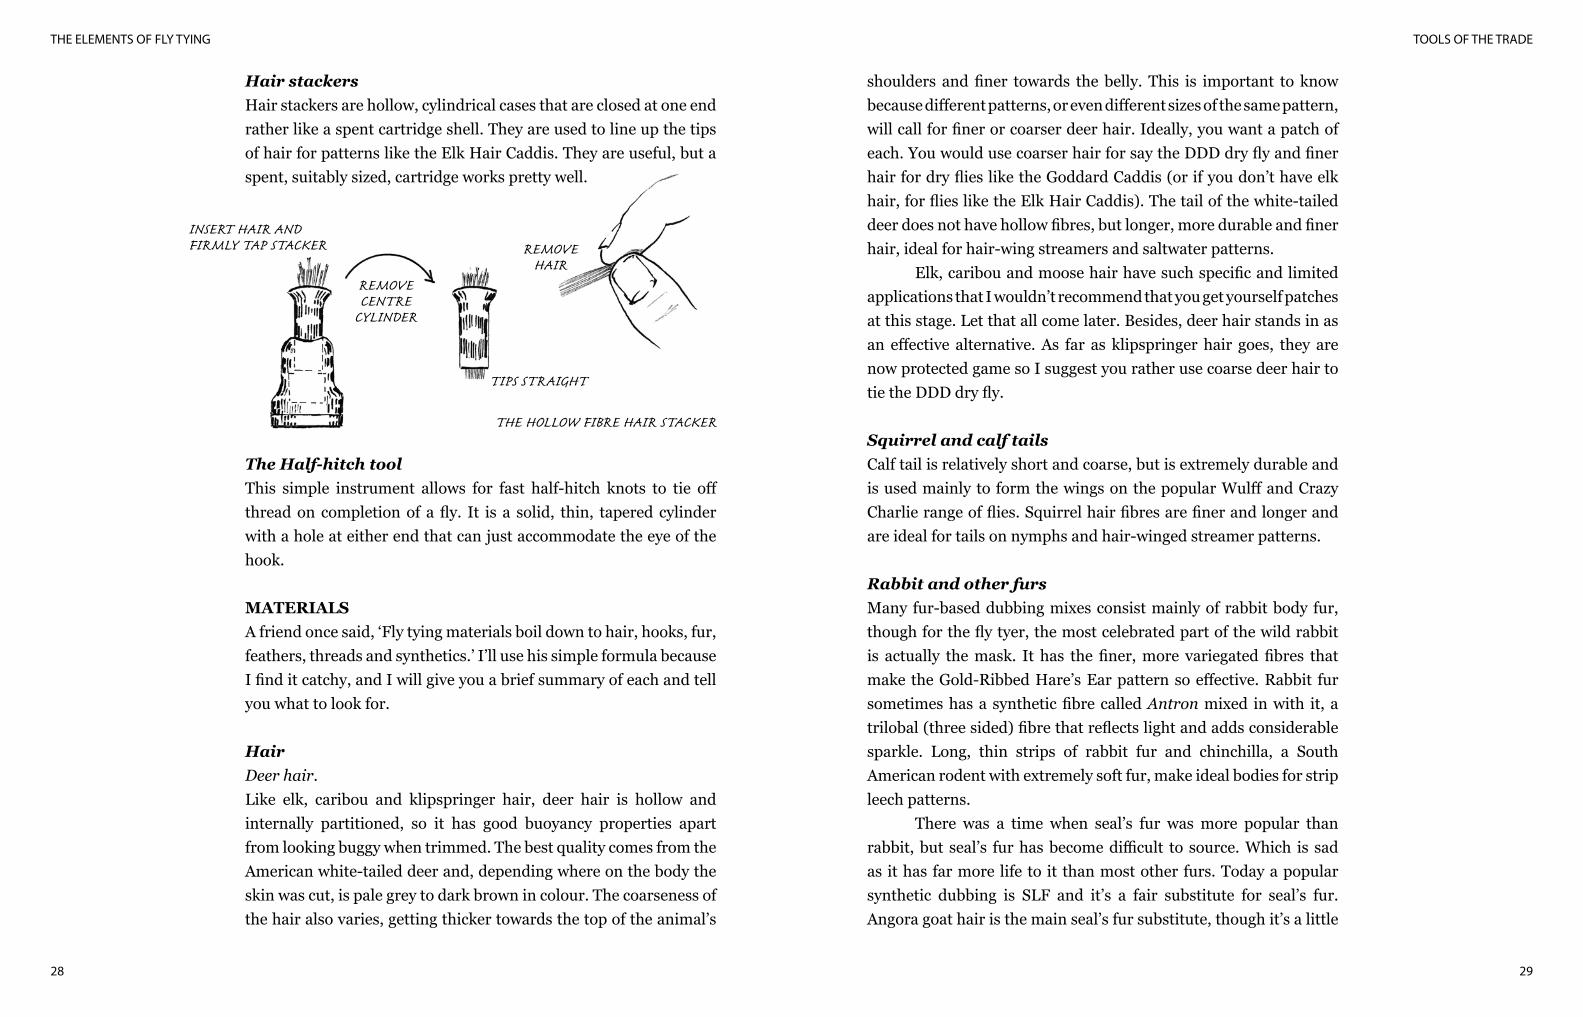
Hair stackersHair stackers are hollow, cylindrical cases that are closed at one end rather like a spent cartridge shell. They are used to line up the tips of hair for patterns like the Elk Hair Caddis. They are useful, but a spent, suitably sized, cartridge works pretty well.
The Half-hitch toolThis simple instrument allows for fast half-hitch knots to tie off thread on completion of a fly. It is a solid, thin, tapered cylinder with a hole at either end that can just accommodate the eye of the hook.
MATERIALSA friend once said, ‘Fly tying materials boil down to hair, hooks, fur, feathers, threads and synthetics.’ I’ll use his simple formula because I find it catchy, and I will give you a brief summary of each and tell you what to look for.
HairDeer hair.Like elk, caribou and klipspringer hair, deer hair is hollow and internally partitioned, so it has good buoyancy properties apart from looking buggy when trimmed. The best quality comes from the American white-tailed deer and, depending where on the body the skin was cut, is pale grey to dark brown in colour. The coarseness of the hair also varies, getting thicker towards the top of the animal’s
shoulders and finer towards the belly. This is important to know because different patterns, or even different sizes of the same pattern, will call for finer or coarser deer hair. Ideally, you want a patch of each. You would use coarser hair for say the DDD dry fly and finer hair for dry flies like the Goddard Caddis (or if you don’t have elk hair, for flies like the Elk Hair Caddis). The tail of the white-tailed deer does not have hollow fibres, but longer, more durable and finer hair, ideal for hair-wing streamers and saltwater patterns.
Elk, caribou and moose hair have such specific and limited applications that I wouldn’t recommend that you get yourself patches at this stage. Let that all come later. Besides, deer hair stands in as an effective alternative. As far as klipspringer hair goes, they are now protected game so I suggest you rather use coarse deer hair to tie the DDD dry fly.
Squirrel and calf tailsCalf tail is relatively short and coarse, but is extremely durable and is used mainly to form the wings on the popular Wulff and Crazy Charlie range of flies. Squirrel hair fibres are finer and longer and are ideal for tails on nymphs and hair-winged streamer patterns.
Rabbit and other fursMany fur-based dubbing mixes consist mainly of rabbit body fur, though for the fly tyer, the most celebrated part of the wild rabbit is actually the mask. It has the finer, more variegated fibres that make the Gold-Ribbed Hare’s Ear pattern so effective. Rabbit fur sometimes has a synthetic fibre called Antron mixed in with it, a trilobal (three sided) fibre that reflects light and adds considerable sparkle. Long, thin strips of rabbit fur and chinchilla, a South American rodent with extremely soft fur, make ideal bodies for strip leech patterns.
There was a time when seal’s fur was more popular than rabbit, but seal’s fur has become difficult to source. Which is sad as it has far more life to it than most other furs. Today a popular synthetic dubbing is SLF and it’s a fair substitute for seal’s fur. Angora goat hair is the main seal’s fur substitute, though it’s a little
TOOLS OF THE TRADE
31
THE ELEMENTS OF FLY TYING
30
lifeless for my liking.Other furs that occasionally enter the fly tyer’s radar screen,
but are rarely used these days, are muskrat, opossum, beaver, badger and even polar bear. There are many synthetic dubbings on the market that are good substitutes for fur, some even graded super-fine for dubbing dry fly bodies.
FeathersHere quality really does make a difference. The main feathers we use are hen and cock hackles, goose and partridge breast feathers (mainly for Soft Hackle patterns), marabou (an extremely long-fibred and soft feather taken from turkeys and not marabou storks), various tail feathers, mainly from turkeys and cock pheasants, duck primary wing feathers (used for winging traditional wet and dry fly patterns), peacock and the modern marvel, Cul de Canard (CDC), the soft, oily feathers located around the preen glands of ducks and geese. As we go through each pattern in the exercises that follow, I will describe their uses and qualities more fully. If you currently don’t have any materials, these are the feathers to go out and buy. But check the shopping list I give you later in this chapter.
Perhaps, though, a word on hackles and hackle capes would be in place here. A cape is the skin and feathers of a rooster or hen taken from the bird’s head to the base of its neck. In some instances roosters are genetically bred (mainly in America), for the explicit purpose of producing long, stiff-barbed, dry fly hackles. These genetic capes are excellent and an added advantage is that they come in two very useful colours that are otherwise almost unobtainable – dun, a buggy-looking, light-grey colour and grizzly, an attractively barred hackle used, amongst other things, for hackling the famous Adams dry fly. And, by the way, tiny hackles from the grizzle hen cape are used for winging it.
Fortunately, genetic capes are just nice to have and not absolutely essential unless you’re tying high quality dry flies in small sizes. You can still tie dry flies with Indian and Chinese capes and plenty of fly tyers do because of the high cost of genetic capes in comparison. But if you do want genetic capes and your budget
is tight, consider buying half capes (most dealers sell them) – otherwise, settle for less expensive ones, to start off with anyway. Whatever route you take, try to get yourself a natural black, a red or brown, a grizzly and a ginger coloured cape.
BeadsBeads come in a variety of sizes and colours and are made of brass, tungsten or glass. Most beads produced specifically for fly tying have a bevelled, counter-sunk hole through the opening on one side that is wider than on the other. Common sizes include 2.5, 3.0, 3.5, 4 to 5 mm or 5/64, 3/32, 7/64, 1/8, 5/32 to 3/16 of an inch. Colours include copper, silver, gold, nickle, orange (now very popular) and black.
Cone-shaped beads for large streamers and attractors are also available. You can get glass beads in just about any colour and size you want and they are best bought from a specialist bead shop. The downside is they often break and silver or gold-coated glass beads quickly lose their plating.
Threads, tinsels and ‘glitter’Standard tying threads vary in diameter and colour. For example, most freshwater flies are tied on 6/0 thread, but smaller flies are best tied with finer threads available down to 10/0 and even finer. There are a few specialist gossamer-fine threads available for tying micro patterns and super-strong thread, for example Kevlar, which is ideal for spinning hair, particularly for bass and saltwater flies. But they’re not always easy to source. Most saltwater flies, as well as hair body flies are tied with 3/0 Monocord but Kevlar thread can also be used for the same purpose. Essentially the colour of the thread you use needs to tone in with the overall colour of the fly you are tying, but I also use the colour of tying thread to remind me of the weight I’ve added to nymph patterns. There are any number of formulas and you can choose your own – say red for really heavy patterns, green for medium-weighted flies and black where you use no weight at all. I’ll show you how to apply the code when we tie nymphs later.
TOOLS OF THE TRADE
33
THE ELEMENTS OF FLY TYING
32
Flat tinsel is a metallic, or metallic coloured plastic material used for ribbing flies, or for the bodies of flies, and often sells under the brand name Mylar. But tinsel can be added to any pattern as loose strips to improve properties of attraction. One new synthetic that is really useful is Holographic thread, a flat, thin, very dark and refractive material. There are also ranges of synthetic glitter threads, including Krystal Flash and Flashabou, both similar in their ability to shine and reflect light and both available in a wide range of colours. Less well known is DMC thread, an embroidery thread available in a variety of bright, metallic-looking colours. DMC thread is not usually sold in fly shops, but you can get it from specialist needlework shops.
WireWire is used to add weight, and also to rib or strengthen a body.There are three types in common use: lead wire, copper wire and fuse wire. Lead and copper wire are available in different diameters, but I always prefer the thinner diameters because they’re easier to work with and are suitable for small patterns. We should be looking at the environmental impact of lead as a toxic product, I guess, and maybe we should be building weight into flies with fuse wire. But I’ll leave that one to your own conscience. An important tip is not to cut lead wire with scissors. It blunts them. Lead is soft and is easily severed by compressing it against the hook shank with your thumbnail.
Fuse and copper wire also come in different colours, useful for making solid wire bodies, ribbing certain patterns, like Sawyer’s Pheasant Tail Nymph (PTN), or generally making patterns more durable, like the optional use of fuse wire for tying the Zak. Again, don’t use your fly tying scissors on any of these wires.
Tying stationsI have seen home tying stations that have made me green with envy, but the majority of us end up tying wherever there’s a convenient place in the home. Make sure the lighting is good and buy a small portable angle poise lamp for added light. Always tie against a white
background by slipping a piece of A4 sized cartridge paper under the vice and keep a strip of polystyrene foam handy to hook completed flies on to. A thin strip of paper works well enough to hook barbed flies on, but it’s not any use for barbless patterns. Another way to store finished flies is in an empty film canister, but hang them off the rim of the canister until the head cement is dry. Tailor-made, well-crafted wooden tying stations with a wide variety of drawers and pegs to hold spools of thread, and so on, are bliss, but not everyone can afford one. What is affordable and wonderful to own is a soft, portable, partitioned fly tying carryall. I’ll say more about them towards the end of the book.
A fly tying materials shopping listHere’s a rough guide to what you want to get yourself to complete the exercises in this book:
ToolsViceScissorsHackle pliersThread bobbin holderBodkinHooks Dry fly – sizes 12, 14, 16 and 18 Nymph – sizes 12, 14 and 16 Wet fly – sizes 6, 8 and 10 Sedge – sizes 12 and 14 Streamer – sizes 4 and 6 Stainless steel saltwater – sizes 2, 4, 6 and 8FeathersPeacock herlMottled turkey wing quill or tail segmentsMarabou in black, brown and oliveHen hackle capes in grizzly, brown and blackCul de Canard in natural grey or tanCock hackle cape (Indian/Chinese) in brown,ginger and black
TOOLS OF THE TRADE
35
THE ELEMENTS OF FLY TYING
34
Genetic half-capes in dun, natural black and grizzly (genetic capes are not essential to begin with, but the longer you tie the more you will miss not owning one or two)Streamer hackle in packets (or strung), in white, dyed olive, grizzly, dyed yellow and redPartridge breast feathersCock pheasant tailHen pheasant wings, primary or secondary Dubbing Synthetic or fur based dubbing in a range of natural colours, with Antron if possibleA hare’s maskHairDeer hair, both fine and coarse patchesSquirrel tailCalf tail in yellow and whiteBucktail in natural brown, red, white and yellowChenilleBlackUltra Chenille (or Vernille) in red and whiteFlossRed, orange, yellow and greenTinselsFlat gold and silver tinselKrystal Flash in pearl, red, lime, green and goldFlashabou in pearl and blueDMC embroidery thread in blue (colour number 4012) or as near as (available only from needlework shops)Nymph rib‘Stretchy Nymph Rib’ or ‘Vinyl-Rib’ (V-Rib) in clear and redThread Kevlar in white, tan, grey and olive or Monocord in size 3/0 and in the same coloursStandard tying thread (preferably pre-waxed) in black, tan, red and olive (in size 6/0) and black and brown (in size 8/0)
Wire Lead wire, both fine and mediumFuse wire in fineCopper in fine, medium and wide (the Benecchi brand is preferred here)RibbingGold and silver ribbingBeadsBrass, sizes 2.5 mm, 3 mm and 4 mmNickel-plated lead eyesWaxStandard fly tying waxHead cementStandard fly tying head cement or Sally Hansen’s Hard as Nails available at pharmacies and some supermarkets
A word on storing natural fly tying materials Believe me – fish moths and fly tying materials don’t mix well together. Don’t wait, as I have at times over the years, to discover they’ve turned fine feathers into even finer powder inside a month! First tip is take yourself to the kitchen appliances section of your local supermarket and buy a variety of plastic containers with good airtight sealing properties. Rather spend a little more and get yourself a better quality product. Buy at least two large boxes – one for fur and one for feathers. Always add mothballs. Failing plastic containers, keep fish moths out by sealing your feathers and furs in ziplock plastic bags with a mothball or two added in. Change the mothballs every three to six months.
GUIDELINES FOR PROPORTION AND BALANCE
3736
SHANK LENGTH
BODY 1/2 TO 2/3 SHANK
TAIL 11/2 TIMESBODY LENGTH
WINGSSAMELENGTHAS HOOKSHANK
HACKLEJUSTUNDER11/2 TIMESTHE GAPE
DRY FLYPROPORTIONSGUIDELINES FOR PROPORTION AND
BALANCEOne of the quickest giveaways to a poorly tied fly is wrong proportions. There are two main pitfalls: the component parts of the fly (I’ll explain what I mean by that in a moment) are out of proportion to one another or, secondly, too much or too little material has been used in its tying. Novice tyers tend to add too much dressing material, making the tail too thick or the body too bulky, or overdo the hackling – that sort of thing. I can’t stress enough that, as a beginner, you should always work on the principle that least is best and if you are going to err, then let it be on the side of under, rather than over-dressing.
Let’s look at the proportions on the main patterns we tie – dry flies, nymphs, wet flies and streamers. Consulting the relevant sketches as you read this section will make it easier to understand. But first let me quote two rules common to just about all flies: (1) the body should end in line with the barb of the hook and (2) always leave enough space to tie in a decent head. I used the word ‘rules’, but since there are so many exceptions, and so many individual styles in fly tying, let me rather call what follows here, guidelines.
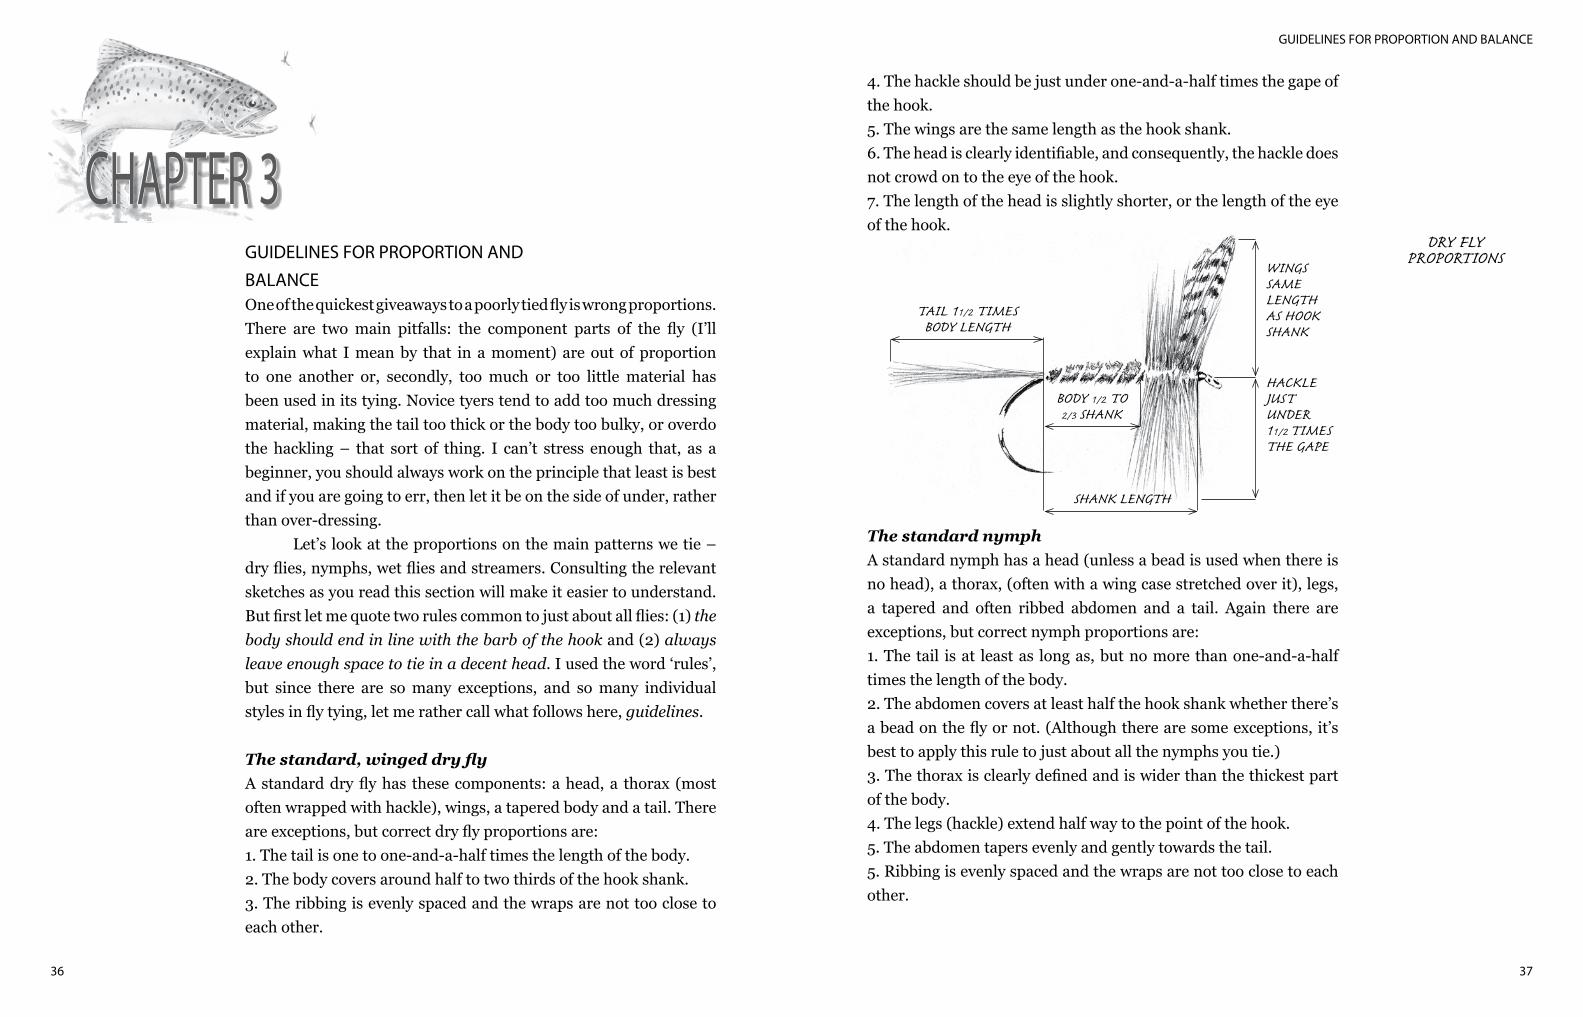
The standard, winged dry flyA standard dry fly has these components: a head, a thorax (most often wrapped with hackle), wings, a tapered body and a tail. There are exceptions, but correct dry fly proportions are: 1. The tail is one to one-and-a-half times the length of the body.2. The body covers around half to two thirds of the hook shank.3. The ribbing is evenly spaced and the wraps are not too close to each other.
4. The hackle should be just under one-and-a-half times the gape of the hook.5. The wings are the same length as the hook shank.6. The head is clearly identifiable, and consequently, the hackle does not crowd on to the eye of the hook. 7. The length of the head is slightly shorter, or the length of the eye of the hook.
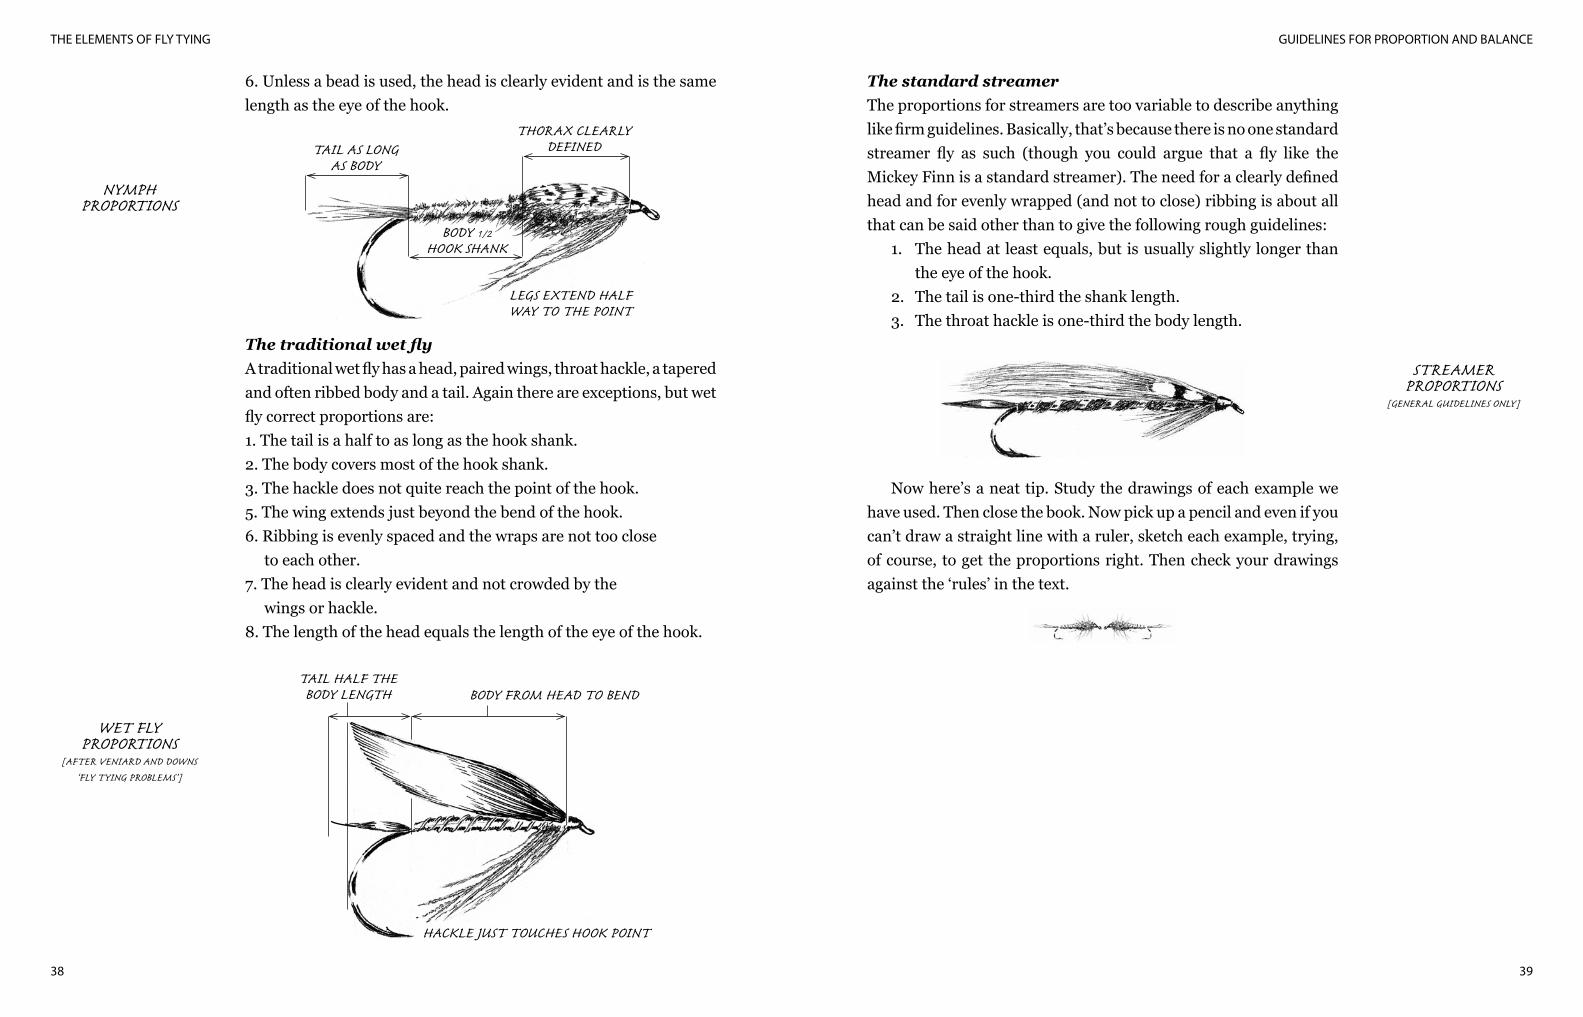
The standard nymphA standard nymph has a head (unless a bead is used when there is no head), a thorax, (often with a wing case stretched over it), legs, a tapered and often ribbed abdomen and a tail. Again there are exceptions, but correct nymph proportions are:1. The tail is at least as long as, but no more than one-and-a-half times the length of the body.2. The abdomen covers at least half the hook shank whether there’s a bead on the fly or not. (Although there are some exceptions, it’s best to apply this rule to just about all the nymphs you tie.)3. The thorax is clearly defined and is wider than the thickest part of the body.4. The legs (hackle) extend half way to the point of the hook.5. The abdomen tapers evenly and gently towards the tail.5. Ribbing is evenly spaced and the wraps are not too close to each other.
CHAPTER 3
GUIDELINES FOR PROPORTION AND BALANCE
39
THE ELEMENTS OF FLY TYING
38
NYMPHPROPORTIONS
BODY 1/2
HOOK SHANK
TAIL AS LONGAS BODY
THORAX CLEARLYDEFINED
LEGS EXTEND HALFWAY TO THE POINT
6. Unless a bead is used, the head is clearly evident and is the same length as the eye of the hook.
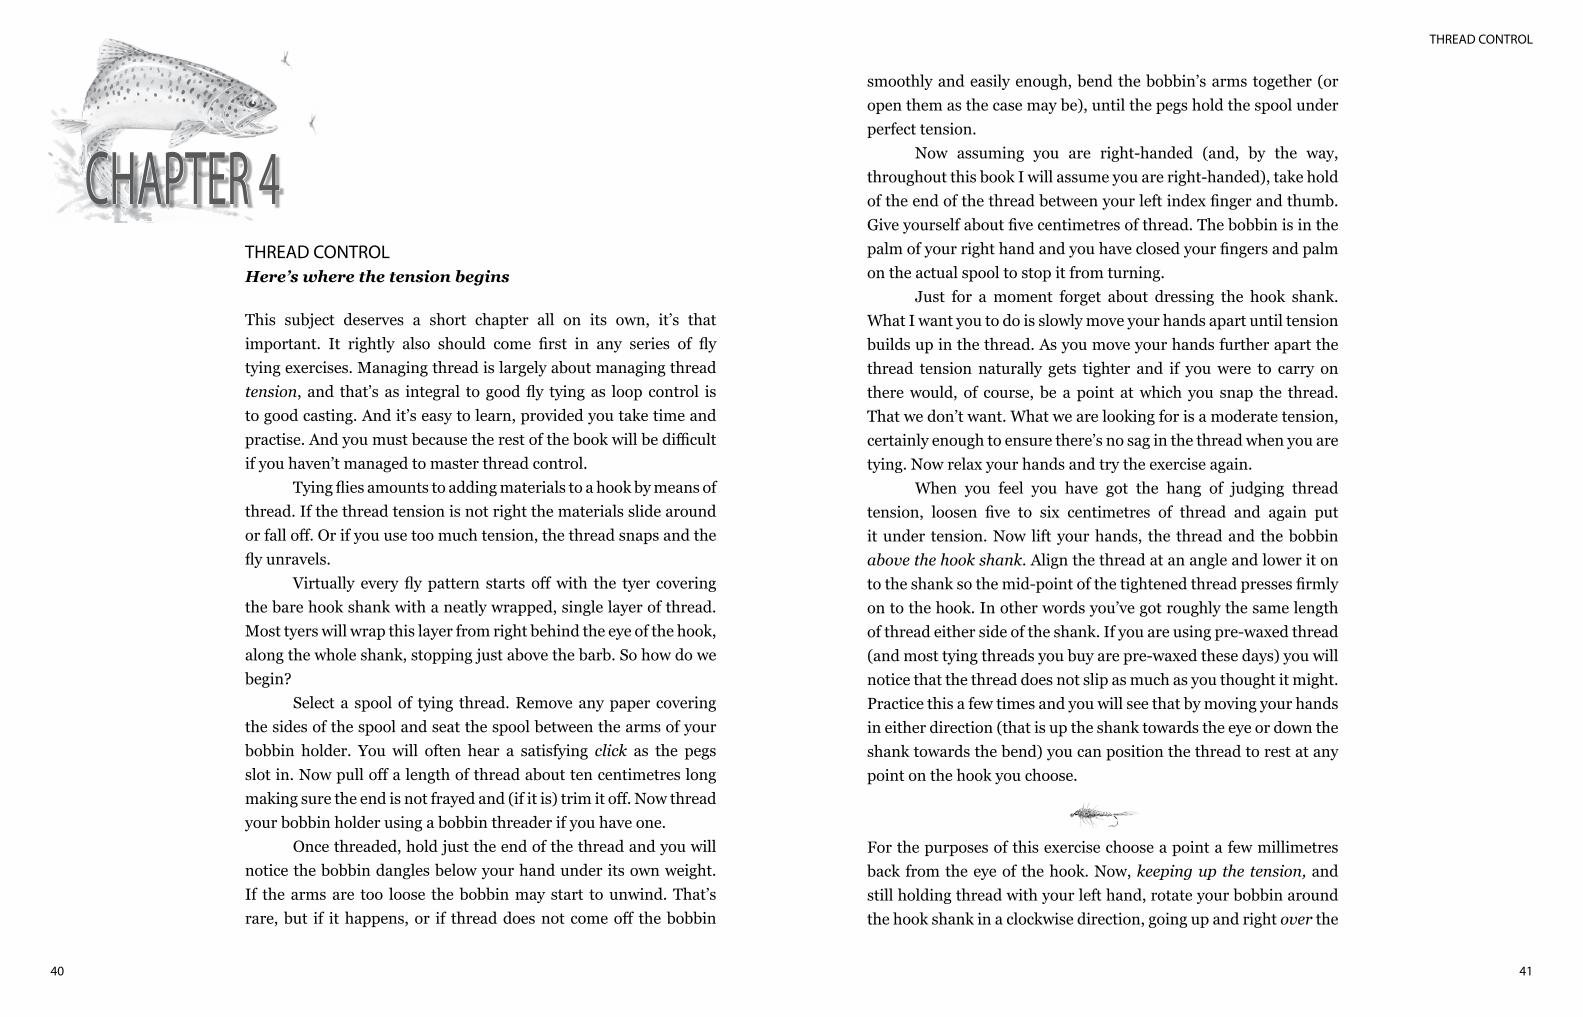
The traditional wet flyA traditional wet fly has a head, paired wings, throat hackle, a tapered and often ribbed body and a tail. Again there are exceptions, but wet fly correct proportions are:1. The tail is a half to as long as the hook shank.2. The body covers most of the hook shank.3. The hackle does not quite reach the point of the hook.5. The wing extends just beyond the bend of the hook.6. Ribbing is evenly spaced and the wraps are not too close to each other.7. The head is clearly evident and not crowded by the wings or hackle.8. The length of the head equals the length of the eye of the hook.
The standard streamerThe proportions for streamers are too variable to describe anything like firm guidelines. Basically, that’s because there is no one standard streamer fly as such (though you could argue that a fly like the Mickey Finn is a standard streamer). The need for a clearly defined head and for evenly wrapped (and not to close) ribbing is about all that can be said other than to give the following rough guidelines:
1. The head at least equals, but is usually slightly longer than the eye of the hook.
2. The tail is one-third the shank length.3. The throat hackle is one-third the body length.
Now here’s a neat tip. Study the drawings of each example we have used. Then close the book. Now pick up a pencil and even if you can’t draw a straight line with a ruler, sketch each example, trying, of course, to get the proportions right. Then check your drawings against the ‘rules’ in the text.
WET FLYPROPORTIONS
[AFTER VENIARD AND DOWNS
‘FLY TYING PROBLEMS’]
STREAMERPROPORTIONS
[GENERAL GUIDELINES ONLY]
TAIL HALF THE BODY LENGTH BODY FROM HEAD TO BEND
HACKLE JUST TOUCHES HOOK POINT
THREAD CONTROL
4140
THREAD CONTROL Here’s where the tension begins
This subject deserves a short chapter all on its own, it’s that important. It rightly also should come first in any series of fly tying exercises. Managing thread is largely about managing thread tension, and that’s as integral to good fly tying as loop control is to good casting. And it’s easy to learn, provided you take time and practise. And you must because the rest of the book will be difficult if you haven’t managed to master thread control.
Tying flies amounts to adding materials to a hook by means of thread. If the thread tension is not right the materials slide around or fall off. Or if you use too much tension, the thread snaps and the fly unravels.
Virtually every fly pattern starts off with the tyer covering the bare hook shank with a neatly wrapped, single layer of thread. Most tyers will wrap this layer from right behind the eye of the hook, along the whole shank, stopping just above the barb. So how do we begin?
Select a spool of tying thread. Remove any paper covering the sides of the spool and seat the spool between the arms of your bobbin holder. You will often hear a satisfying click as the pegs slot in. Now pull off a length of thread about ten centimetres long making sure the end is not frayed and (if it is) trim it off. Now thread your bobbin holder using a bobbin threader if you have one.
Once threaded, hold just the end of the thread and you will notice the bobbin dangles below your hand under its own weight. If the arms are too loose the bobbin may start to unwind. That’s rare, but if it happens, or if thread does not come off the bobbin
smoothly and easily enough, bend the bobbin’s arms together (or open them as the case may be), until the pegs hold the spool under perfect tension.
Now assuming you are right-handed (and, by the way, throughout this book I will assume you are right-handed), take hold of the end of the thread between your left index finger and thumb. Give yourself about five centimetres of thread. The bobbin is in the palm of your right hand and you have closed your fingers and palm on the actual spool to stop it from turning.
Just for a moment forget about dressing the hook shank. What I want you to do is slowly move your hands apart until tension builds up in the thread. As you move your hands further apart the thread tension naturally gets tighter and if you were to carry on there would, of course, be a point at which you snap the thread. That we don’t want. What we are looking for is a moderate tension, certainly enough to ensure there’s no sag in the thread when you are tying. Now relax your hands and try the exercise again.
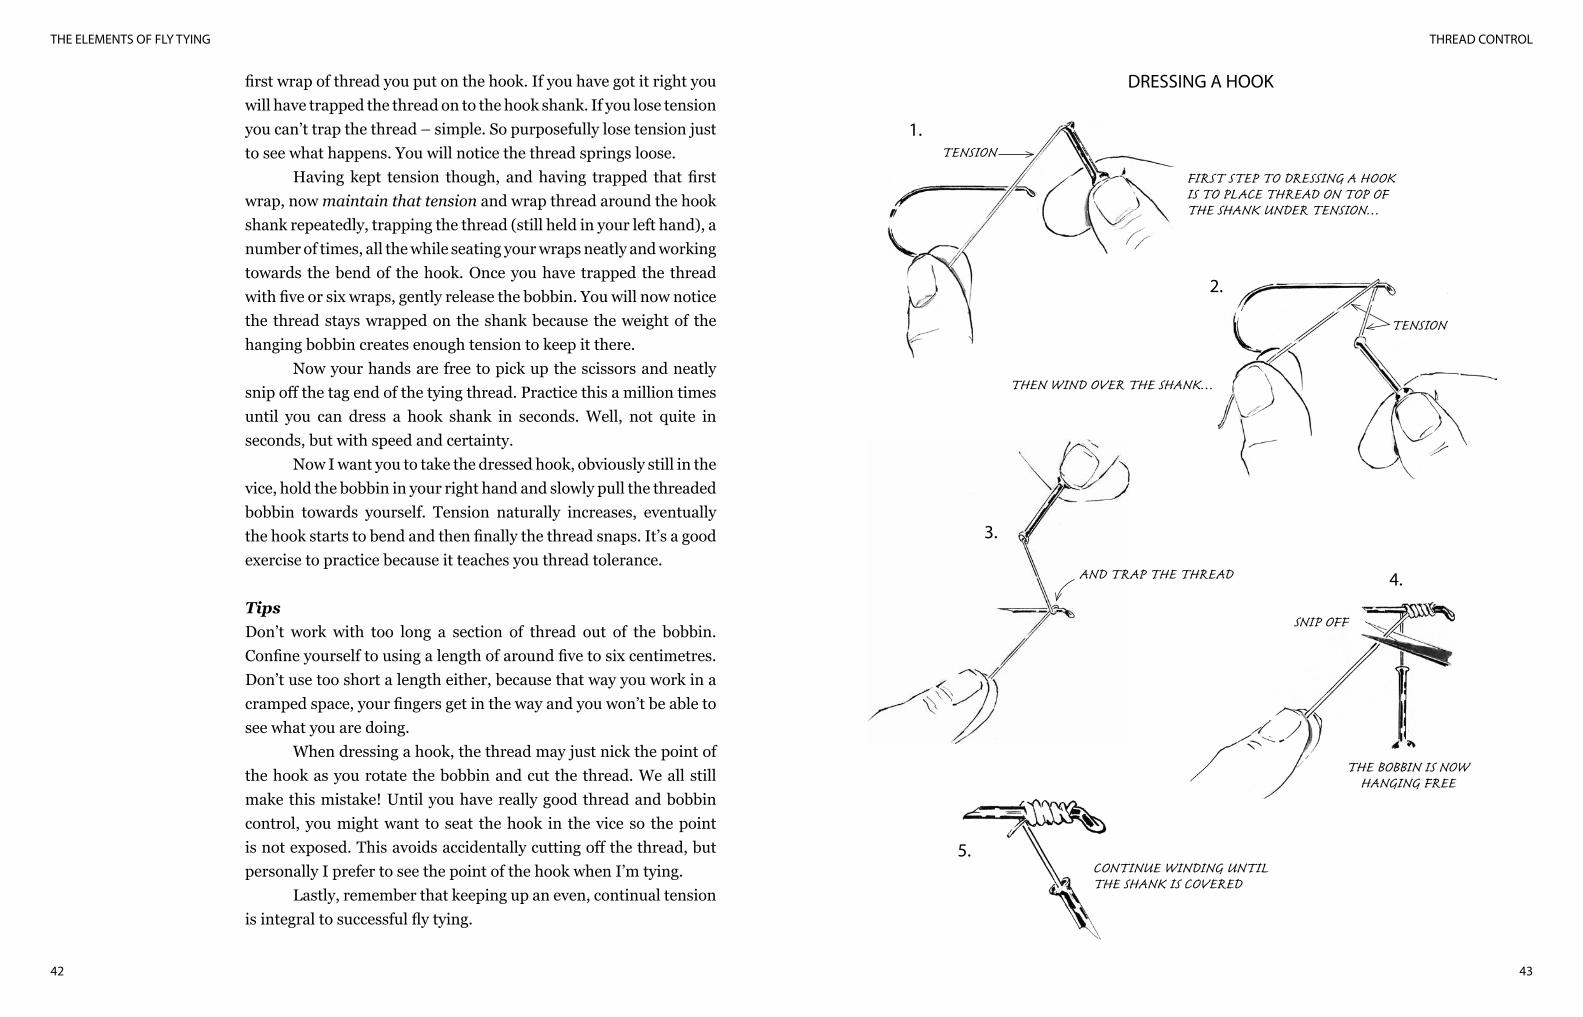
When you feel you have got the hang of judging thread tension, loosen five to six centimetres of thread and again put it under tension. Now lift your hands, the thread and the bobbin above the hook shank. Align the thread at an angle and lower it on to the shank so the mid-point of the tightened thread presses firmly on to the hook. In other words you’ve got roughly the same length of thread either side of the shank. If you are using pre-waxed thread (and most tying threads you buy are pre-waxed these days) you will notice that the thread does not slip as much as you thought it might. Practice this a few times and you will see that by moving your hands in either direction (that is up the shank towards the eye or down the shank towards the bend) you can position the thread to rest at any point on the hook you choose.
For the purposes of this exercise choose a point a few millimetres back from the eye of the hook. Now, keeping up the tension, and still holding thread with your left hand, rotate your bobbin around the hook shank in a clockwise direction, going up and right over the
CHAPTER 4
THREAD CONTROL
43
THE ELEMENTS OF FLY TYING
42
first wrap of thread you put on the hook. If you have got it right you will have trapped the thread on to the hook shank. If you lose tension you can’t trap the thread – simple. So purposefully lose tension just to see what happens. You will notice the thread springs loose.
Having kept tension though, and having trapped that first wrap, now maintain that tension and wrap thread around the hook shank repeatedly, trapping the thread (still held in your left hand), a number of times, all the while seating your wraps neatly and working towards the bend of the hook. Once you have trapped the thread with five or six wraps, gently release the bobbin. You will now notice the thread stays wrapped on the shank because the weight of the hanging bobbin creates enough tension to keep it there.
Now your hands are free to pick up the scissors and neatly snip off the tag end of the tying thread. Practice this a million times until you can dress a hook shank in seconds. Well, not quite in seconds, but with speed and certainty.
Now I want you to take the dressed hook, obviously still in the vice, hold the bobbin in your right hand and slowly pull the threaded bobbin towards yourself. Tension naturally increases, eventually the hook starts to bend and then finally the thread snaps. It’s a good exercise to practice because it teaches you thread tolerance.
Tips Don’t work with too long a section of thread out of the bobbin. Confine yourself to using a length of around five to six centimetres. Don’t use too short a length either, because that way you work in a cramped space, your fingers get in the way and you won’t be able to see what you are doing.
When dressing a hook, the thread may just nick the point of the hook as you rotate the bobbin and cut the thread. We all still make this mistake! Until you have really good thread and bobbin control, you might want to seat the hook in the vice so the point is not exposed. This avoids accidentally cutting off the thread, but personally I prefer to see the point of the hook when I’m tying.
Lastly, remember that keeping up an even, continual tension is integral to successful fly tying.
DRESSING A HOOK
TENSION
FIRST STEP TO DRESSING A HOOKIS TO PLACE THREAD ON TOP OFTHE SHANK UNDER TENSION…
THEN WIND OVER THE SHANK…
TENSION
AND TRAP THE THREAD
THE BOBBIN IS NOWHANGING FREE
SNIP OFF
CONTINUE WINDING UNTIL THE SHANK IS COVERED
1.
2.
3.
4.
5.
THREAD CONTROL
45
THE ELEMENTS OF FLY TYING
44
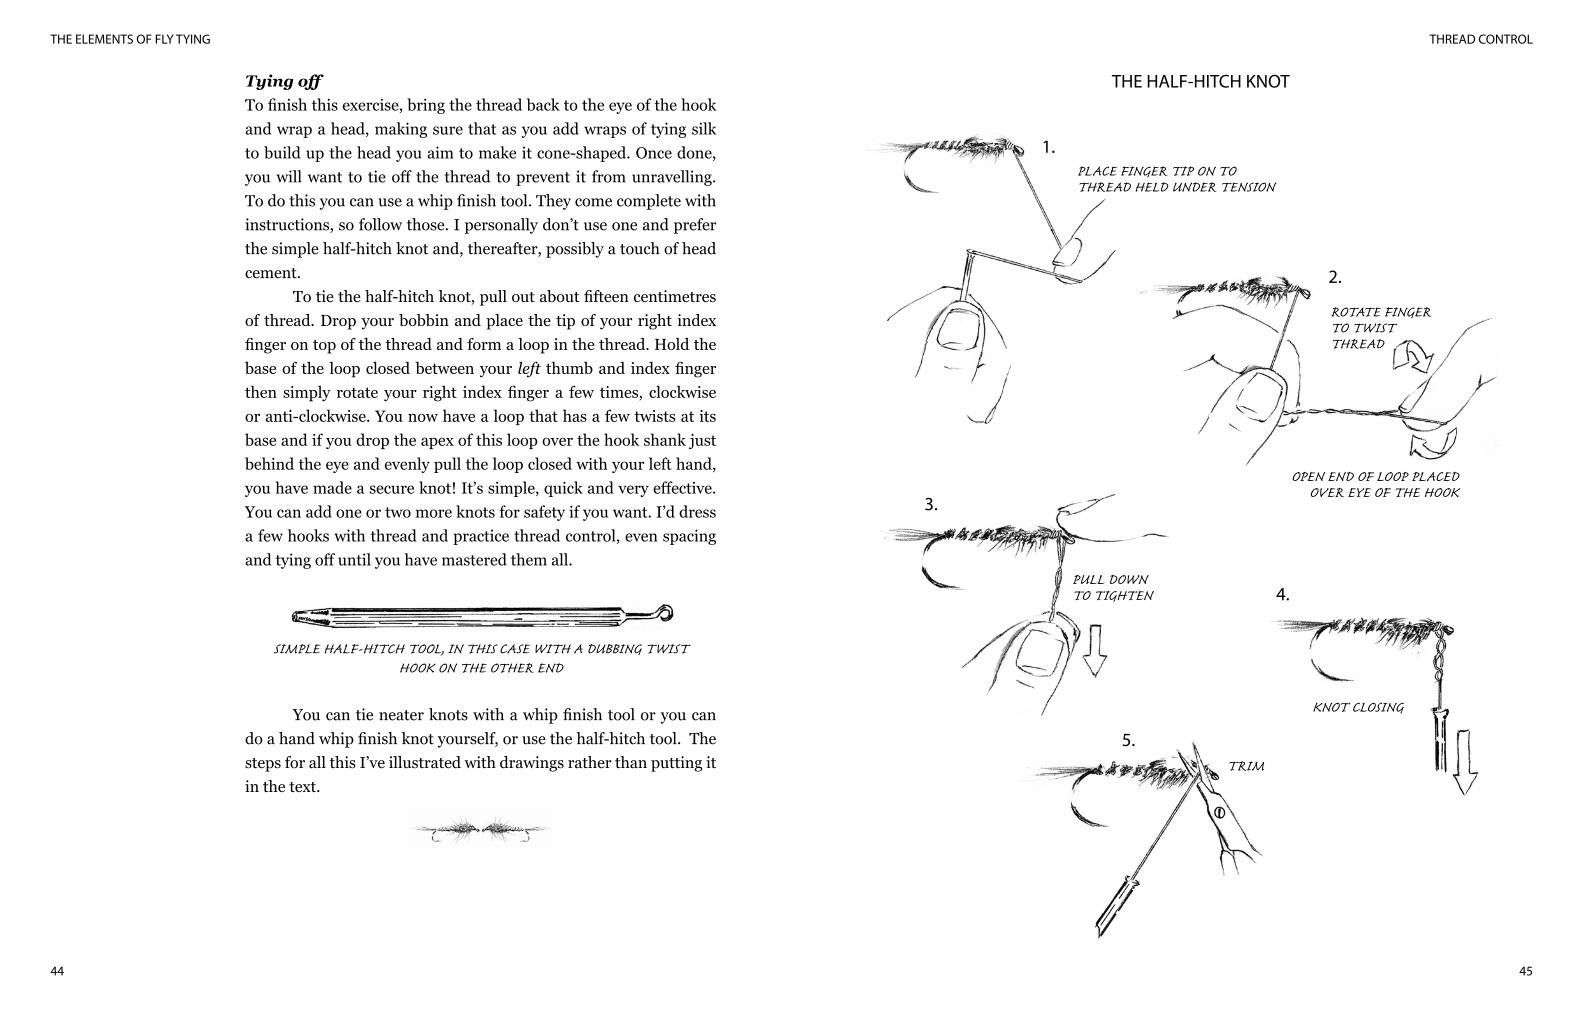
Tying off To finish this exercise, bring the thread back to the eye of the hook and wrap a head, making sure that as you add wraps of tying silk to build up the head you aim to make it cone-shaped. Once done, you will want to tie off the thread to prevent it from unravelling. To do this you can use a whip finish tool. They come complete with instructions, so follow those. I personally don’t use one and prefer the simple half-hitch knot and, thereafter, possibly a touch of head cement.
To tie the half-hitch knot, pull out about fifteen centimetres of thread. Drop your bobbin and place the tip of your right index finger on top of the thread and form a loop in the thread. Hold the base of the loop closed between your left thumb and index finger then simply rotate your right index finger a few times, clockwise or anti-clockwise. You now have a loop that has a few twists at its base and if you drop the apex of this loop over the hook shank just behind the eye and evenly pull the loop closed with your left hand, you have made a secure knot! It’s simple, quick and very effective. You can add one or two more knots for safety if you want. I’d dress a few hooks with thread and practice thread control, even spacing and tying off until you have mastered them all.
SIMPLE HALF-HITCH TOOL, IN THIS CASE WITH A DUBBING TWISTHOOK ON THE OTHER END
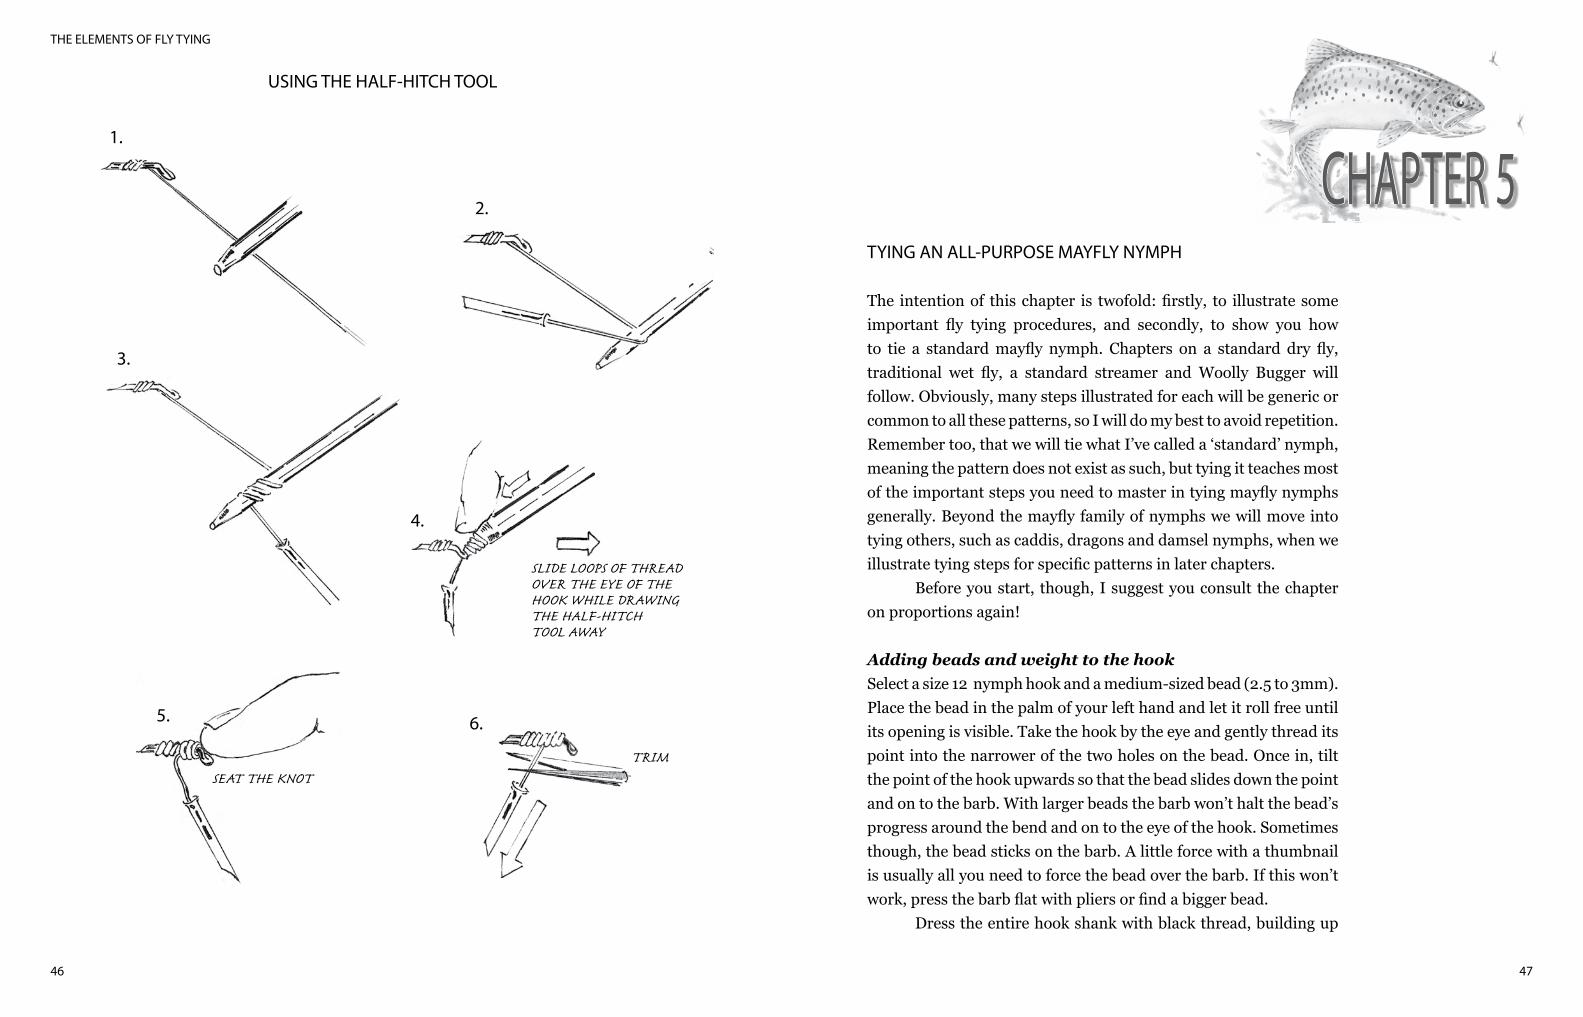
You can tie neater knots with a whip finish tool or you can do a hand whip finish knot yourself, or use the half-hitch tool. The steps for all this I’ve illustrated with drawings rather than putting it in the text.
THE HALF-HITCH KNOT
PLACE FINGER TIP ON TOTHREAD HELD UNDER TENSION
1.
ROTATE FINGERTO TWISTTHREAD
OPEN END OF LOOP PLACEDOVER EYE OF THE HOOK
2.
PULL DOWNTO TIGHTEN
3.
4.
KNOT CLOSING
5.TRIM
47
THE ELEMENTS OF FLY TYING
46
USING THE HALF-HITCH TOOL
TYING AN ALL-PURPOSE MAYFLY NYMPH
The intention of this chapter is twofold: firstly, to illustrate some important fly tying procedures, and secondly, to show you how to tie a standard mayfly nymph. Chapters on a standard dry fly, traditional wet fly, a standard streamer and Woolly Bugger will follow. Obviously, many steps illustrated for each will be generic or common to all these patterns, so I will do my best to avoid repetition. Remember too, that we will tie what I’ve called a ‘standard’ nymph, meaning the pattern does not exist as such, but tying it teaches most of the important steps you need to master in tying mayfly nymphs generally. Beyond the mayfly family of nymphs we will move into tying others, such as caddis, dragons and damsel nymphs, when we illustrate tying steps for specific patterns in later chapters.
Before you start, though, I suggest you consult the chapter on proportions again!
Adding beads and weight to the hookSelect a size 12 nymph hook and a medium-sized bead (2.5 to 3mm). Place the bead in the palm of your left hand and let it roll free until its opening is visible. Take the hook by the eye and gently thread its point into the narrower of the two holes on the bead. Once in, tilt the point of the hook upwards so that the bead slides down the point and on to the barb. With larger beads the barb won’t halt the bead’s progress around the bend and on to the eye of the hook. Sometimes though, the bead sticks on the barb. A little force with a thumbnail is usually all you need to force the bead over the barb. If this won’t work, press the barb flat with pliers or find a bigger bead.
Dress the entire hook shank with black thread, building up
SLIDE LOOPS OF THREADOVER THE EYE OF THEHOOK WHILE DRAWINGTHE HALF-HITCHTOOL AWAY
1.
2.
3.
4.
5.
SEAT THE KNOTTRIM
6.
CHAPTER 5
TYING AN ALL-PURPOSE MAYFLY NYMPH
49
THE ELEMENTS OF FLY TYING
48
a little heap behind the bead to stop it sliding away from the eye. Now put in three to six turns of lead wire just behind the bead or, if you prefer, fifteen to twenty turns of fuse wire, making sure the wraps are closely tied. This all adds weight, so it’s an optional step and depends on what intentions you have for the sink rate of the pattern.
Remember, to add lead wire, you don’t need to first attach it to the hook shank with thread. Easier and neater is to nip off a piece about ten centimetres long, hold it against the hook shank and wind it forwards around the shank towards the bead. Once you have the lead up against the bead, nip if off with your nail or, if you want more weight, wind a second layer back over the first. Cover the lead wire with a few turns of thread to secure the wraps.
What weight nymphs should you tie?In general, I carry three different weights of nymphs – no weight, medium weight and extra heavy. On an unweighted nymph you obviously use no bead and no fuse or lead wire. The absence of the bead also helps to identify the weighting of the patterns in your fly box – but the system isn’t foolproof because some heavily weighted nymphs may also have no bead. It’s a case of personal preference, but I always prefer, for example, to have a bead on all my Gold-Ribbed Hare’s Ears, but not on my PTNs (Pheasant-Tailed Nymphs).
For really heavy nymph patterns, you might well want to use red tying thread instead of black as a code to alert you to its weight. Here tungsten beads are best (they are considerably heavier than brass) but more expensive. Some people like to carry a few nymphs heavy enough to dent a floorboard if you drop them. Ultra-heavy patterns certainly have their uses, but more and more I am moving to less and less weight in my fly patterns. In fact, these days I hardly tie my stillwater flies with any weight in them at all.
How to code your nymphs for weight I’d suggest sticking more or less to the following in your fly box:
1. Nymphs with no weight at all – black thread, possibly a glass bead, no metal bead, a thorax built up with an underbody
made from a single strand of knitting wool of any colour. (I will demonstrate how to do this later).
2. Nymphs of medium weight – brass bead, olive thread, thorax built up from four to six turns of lead wire or the equivalent weight in fuse wire.
3. Heavily weighted nymphs – preferably a tungsten bead (some people even use two or three beads!), ten to twenty turns of lead wire (or fuse wire), and use red tying silk as a code. To make sure you can always see the thread colour, carry it on well around the bend when you first dress the hook so that after the fly is completed the thread is visible under the tail. That way you always know where to look and the thread will always be visible.
(Dean Riphagen has a possibly even better idea to identify weighting. He adds a tiny drop of nail varnish to the underside of the head of his nymphs before applying head cement: white for no weight, yellow for medium weight and red for real heavy. Brilliant!)
Adding a tailLet’s get back to the fly in your vice. We now have a neatly dressed hook shank, a bead in position with a few wraps of lead behind it. Now wrap the thread to the end of the hook shank, stopping just a millimetre short of where the dressing ends. This is important because we are now going to add a few tail fibres and we want to tie them in so they bed down on to a base of thread and not on to bare hook. Why? Well, if you tie fibres on to a bare hook they slip all over the place.
Pick the longest and widest cock hackle you can find on your cape and pluck it off. I’m not at all fussed about its colour as long as it is natural because right now we are teaching fly tying steps, not making designer flies. If you have a choice in capes though, go for a natural dun, or a natural black. Both those are rare in beginner’s kits I know, but Indian mixed red/brown capes are common. They make perfectly suitable tail fibres for most general all-purpose nymphs as long as there is not too much web between the fibres you select.
TYING AN ALL-PURPOSE MAYFLY NYMPH
51
THE ELEMENTS OF FLY TYING
50
Follow the hackle to where the individual fibres start to stiffen and separate. That will be about a third of the way up the stem. The fibres should be long and not too soft or too stiff. This will ensure there is some movement in the tail, a wonderful trigger. (Hackle fibres tend to get stiffer the closer you get to the tip of a hackle, and softer the closer you get to its base.)
Separate out a small bunch of these fibres by teasing them out and gently twisting them together between your left thumb and index finger. Leave them on the stem. They will stay knitted together and separated enough from the rest of the fibres on the hackle for you to be able to lay the stem against the hook shank to measure their length. Remember, the fibres must be at least as long as the shank. If they are not, choose another bunch from lower down the stem.
The next step is a really wonderful fly tying tip, so pay attention. Grasp the fibres you selected for the tail by their tips and hold them firmly between your left thumb and index finger. Grasp the hackle stalk between your right thumb and index finger at a point immediately above where your left hand has the fibres and hold the stalk very tightly. Now with sudden and sharply applied force, whip your right hand away and, hey presto, you are left with the tail hackle fibres neatly in the fingers of your left hand. It’s like magic. Please practice it a couple of times and if you don’t get it right, read this piece again. Now trim the butts straight.
How many cock hackle fibres do you actually need to make a well-balanced tail on a nymph? Well, I didn’t exactly know. So I selected a hackle, stripped a suitably sized bunch off and then actually counted them. I wasn’t sure if I would find twelve or fifty. It’s like that in fly tying, even when you’ve been at it a while. A thing just looks right or it doesn’t, but you don’t really know the detail. We end up working more by feel and general impression. As it turned out, there were twenty-one. Try counting a bunch yourself. It seems twenty to twenty-five barbs is about right.
Now take up a bunch of hackle fibres in your left hand with their butts facing to your right. There’s a little exercise I want you to do, though, before we go on because it teaches you how to work
with hackle fibres. Holding them between the tips of your thumb and index finger, swap them from your left to your right hand a few of times until you feel really confident about your ability to move the bunch between your fingertips, without it coming apart. Once you are confident, move them back to your left hand. You are about to tie in your first tail!
Hold the fibres between your left thumb and index finger and position them firmly over the back end of the hook shank a millimetre or two from where the dressing ends. The bunch should actually be touching the bed of thread. Now here’s where the fun begins because one of fly tying’s most valuable tricks is about to be revealed – the celebrated pinched loop!
We use pinched loops so often in fly tying it’s another of those steps that you really must master. Begin by letting your bobbin hang free at the very point you want the tail tied in. As we said, that’s a millimetre in from where the dressing ends. The bunch of hackle fibres is in position directly above this point. Create some tension and lift the bobbin and thread up above the hook shank and tail fibres.
Still with tension on the bobbin, slide the tying thread into the groove between your left thumb and index finger, deeply enough for you to be able to pinch the thread between your fingers, trapping the tying thread between your fingers to create a loop. Then take the bobbin smoothly around the far side of the hook and gently lower it until it hangs vertically under its own weight.
Now keeping your grip on the tail fibres and the loop, pull straight downwards on the bobbin, evenly and smoothly, until you have trapped the tail fibres firmly on top of the hook. For safety, put in a second and even a third pinched loop and then take both your hands away. There it is. The tail is firmly in place!
What can go wrong with a pinched loop? Well, if you’ve slackened your grip on the hackle fibres as you pulled the bobbin down, or if you pulled the pinched loop out of your fingers before the bobbin was hanging free, or if you didn’t pull straight down,
TYING AN ALL-PURPOSE MAYFLY NYMPH
53
THE ELEMENTS OF FLY TYING
52
the tail fibres will be loosely smeared right around the hook shank rather than sitting neatly and tightly plumb on top of it. Practice makes perfect, I promise.
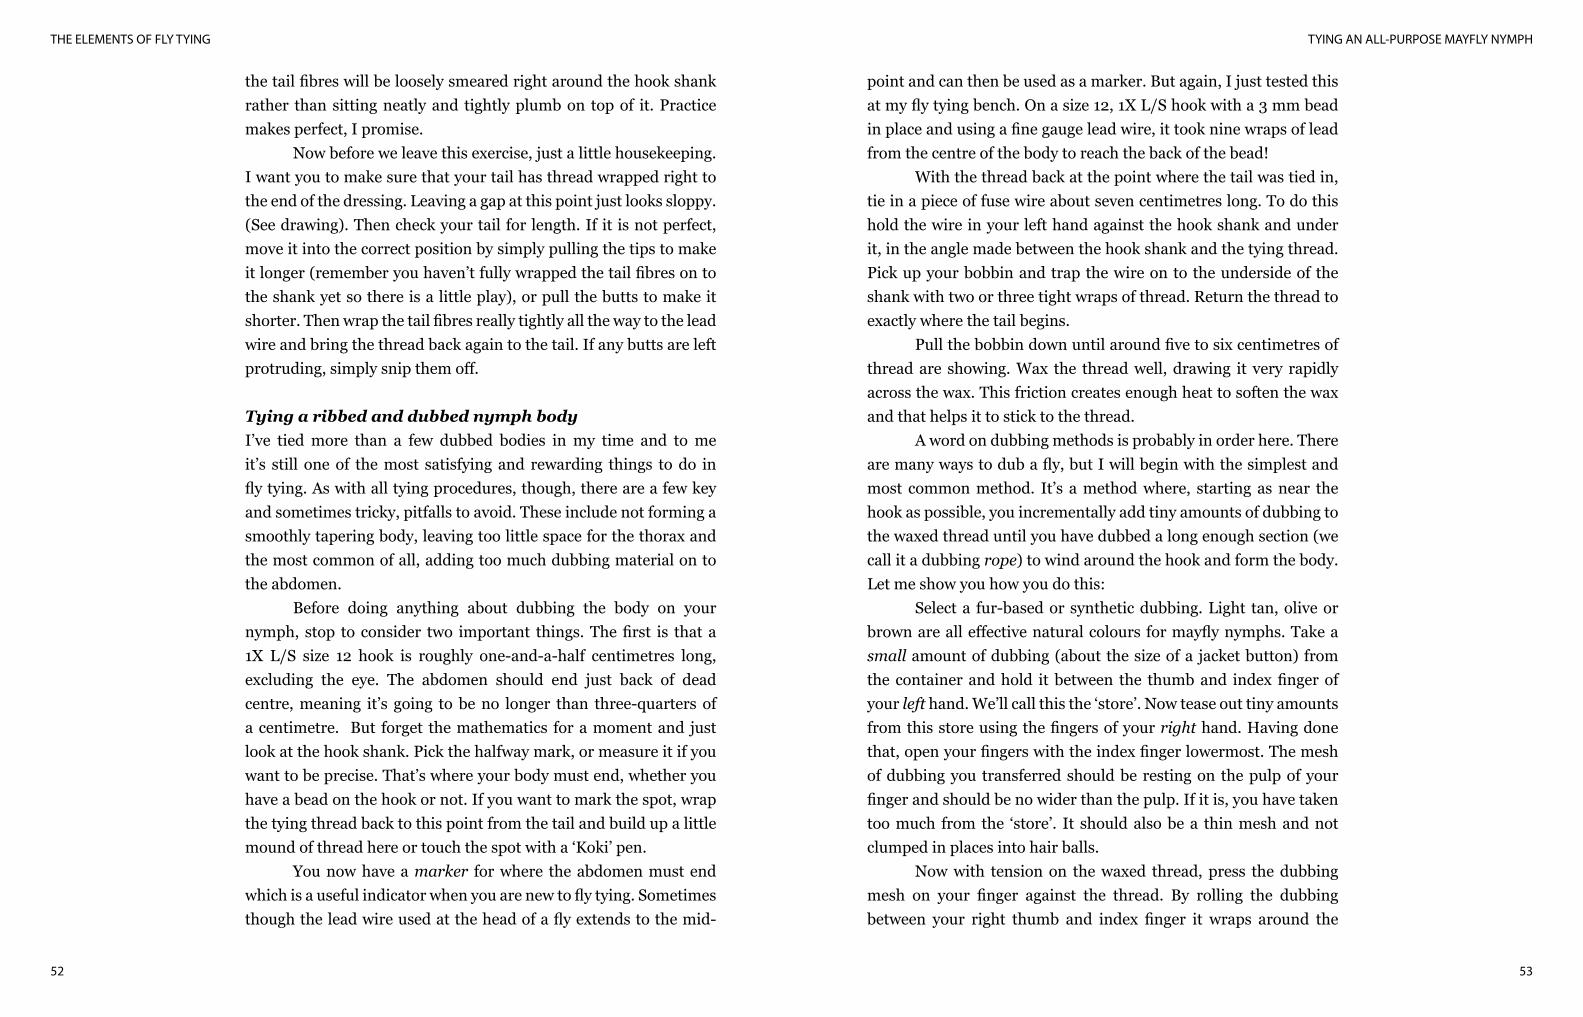
Now before we leave this exercise, just a little housekeeping. I want you to make sure that your tail has thread wrapped right to the end of the dressing. Leaving a gap at this point just looks sloppy. (See drawing). Then check your tail for length. If it is not perfect, move it into the correct position by simply pulling the tips to make it longer (remember you haven’t fully wrapped the tail fibres on to the shank yet so there is a little play), or pull the butts to make it shorter. Then wrap the tail fibres really tightly all the way to the lead wire and bring the thread back again to the tail. If any butts are left protruding, simply snip them off.
Tying a ribbed and dubbed nymph bodyI’ve tied more than a few dubbed bodies in my time and to me it’s still one of the most satisfying and rewarding things to do in fly tying. As with all tying procedures, though, there are a few key and sometimes tricky, pitfalls to avoid. These include not forming a smoothly tapering body, leaving too little space for the thorax and the most common of all, adding too much dubbing material on to the abdomen.
Before doing anything about dubbing the body on your nymph, stop to consider two important things. The first is that a 1X L/S size 12 hook is roughly one-and-a-half centimetres long, excluding the eye. The abdomen should end just back of dead centre, meaning it’s going to be no longer than three-quarters of a centimetre. But forget the mathematics for a moment and just look at the hook shank. Pick the halfway mark, or measure it if you want to be precise. That’s where your body must end, whether you have a bead on the hook or not. If you want to mark the spot, wrap the tying thread back to this point from the tail and build up a little mound of thread here or touch the spot with a ‘Koki’ pen.
You now have a marker for where the abdomen must end which is a useful indicator when you are new to fly tying. Sometimes though the lead wire used at the head of a fly extends to the mid-
point and can then be used as a marker. But again, I just tested this at my fly tying bench. On a size 12, 1X L/S hook with a 3 mm bead in place and using a fine gauge lead wire, it took nine wraps of lead from the centre of the body to reach the back of the bead!
With the thread back at the point where the tail was tied in, tie in a piece of fuse wire about seven centimetres long. To do this hold the wire in your left hand against the hook shank and under it, in the angle made between the hook shank and the tying thread. Pick up your bobbin and trap the wire on to the underside of the shank with two or three tight wraps of thread. Return the thread to exactly where the tail begins.
Pull the bobbin down until around five to six centimetres of thread are showing. Wax the thread well, drawing it very rapidly across the wax. This friction creates enough heat to soften the wax and that helps it to stick to the thread.
A word on dubbing methods is probably in order here. There are many ways to dub a fly, but I will begin with the simplest and most common method. It’s a method where, starting as near the hook as possible, you incrementally add tiny amounts of dubbing to the waxed thread until you have dubbed a long enough section (we call it a dubbing rope) to wind around the hook and form the body. Let me show you how you do this:
Select a fur-based or synthetic dubbing. Light tan, olive or brown are all effective natural colours for mayfly nymphs. Take a small amount of dubbing (about the size of a jacket button) from the container and hold it between the thumb and index finger of your left hand. We’ll call this the ‘store’. Now tease out tiny amounts from this store using the fingers of your right hand. Having done that, open your fingers with the index finger lowermost. The mesh of dubbing you transferred should be resting on the pulp of your finger and should be no wider than the pulp. If it is, you have taken too much from the ‘store’. It should also be a thin mesh and not clumped in places into hair balls.
Now with tension on the waxed thread, press the dubbing mesh on your finger against the thread. By rolling the dubbing between your right thumb and index finger it wraps around the
TYING AN ALL-PURPOSE MAYFLY NYMPH
55
THE ELEMENTS OF FLY TYING
54
thread, forming a thin rope. Always roll your fingers in one direction only. Repeat the procedure, adding to the rope as you move down the thread. You can add a fraction more dubbing to each new mesh to help ensure that the abdomen tapers from the tail, where it should be narrowest, to the thorax, where it should be broadest.
Pull your fuse wire rib out of the way and wind the dubbing rope along the hook shank, again keeping tension throughout, and make sure you leave no gaps. In other words, the wraps should fall right against each other. If the rope is thin enough you can wind turns on top of one another to increase the taper of the abdomen. Once done, put a few extra wraps of tying thread just ahead of the finished abdomen to make sure none of the dubbing rope unravels. Now wind the fuse wire forward in evenly spaced turns to form the rib.
The common mistakes here are wrapping the wire too tightly (it then disappears into the dubbing and you can’t see it), or making the space between each turn too narrow. The body then looks like a barber’s pole!
Put in a few wraps of thread to secure the wire and snip off any excess. We are now ready to tackle the thorax.
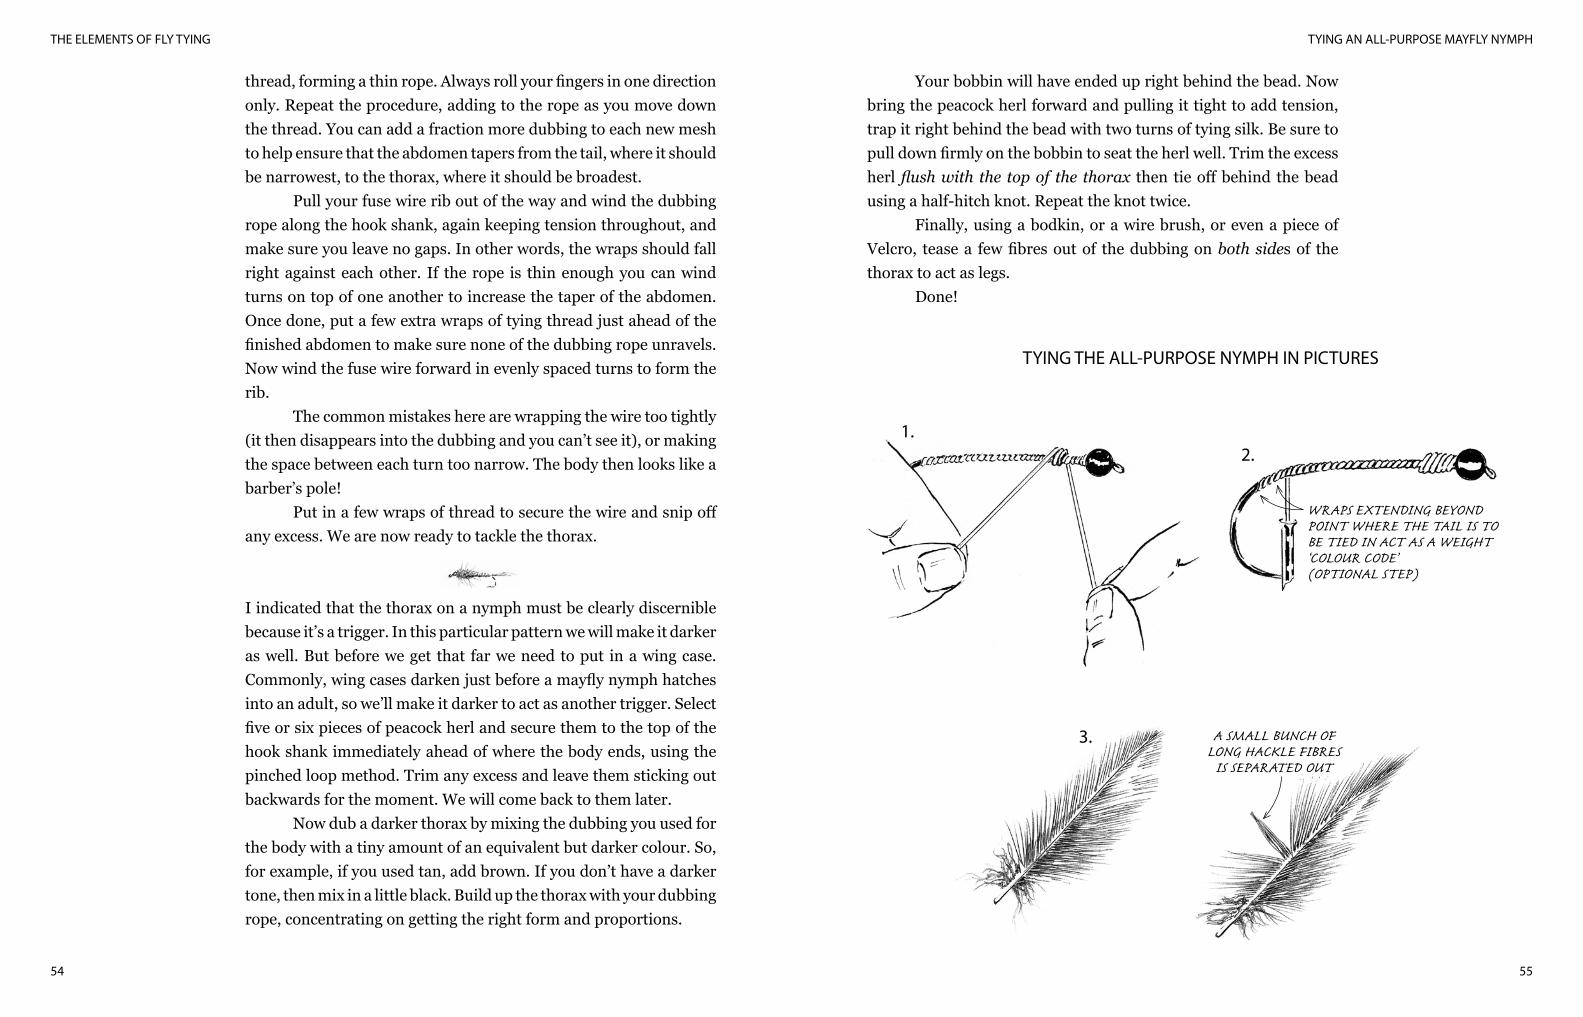
I indicated that the thorax on a nymph must be clearly discernible because it’s a trigger. In this particular pattern we will make it darker as well. But before we get that far we need to put in a wing case. Commonly, wing cases darken just before a mayfly nymph hatches into an adult, so we’ll make it darker to act as another trigger. Select five or six pieces of peacock herl and secure them to the top of the hook shank immediately ahead of where the body ends, using the pinched loop method. Trim any excess and leave them sticking out backwards for the moment. We will come back to them later.
Now dub a darker thorax by mixing the dubbing you used for the body with a tiny amount of an equivalent but darker colour. So, for example, if you used tan, add brown. If you don’t have a darker tone, then mix in a little black. Build up the thorax with your dubbing rope, concentrating on getting the right form and proportions.
Your bobbin will have ended up right behind the bead. Now bring the peacock herl forward and pulling it tight to add tension, trap it right behind the bead with two turns of tying silk. Be sure to pull down firmly on the bobbin to seat the herl well. Trim the excess herl flush with the top of the thorax then tie off behind the bead using a half-hitch knot. Repeat the knot twice.
Finally, using a bodkin, or a wire brush, or even a piece of Velcro, tease a few fibres out of the dubbing on both sides of the thorax to act as legs.
Done!
TYING THE ALL-PURPOSE NYMPH IN PICTURES
1.
WRAPS EXTENDING BEYONDPOINT WHERE THE TAIL IS TOBE TIED IN ACT AS A WEIGHT‘COLOUR CODE’(OPTIONAL STEP)
2.
A SMALL BUNCH OFLONG HACKLE FIBRES
IS SEPARATED OUT
3.
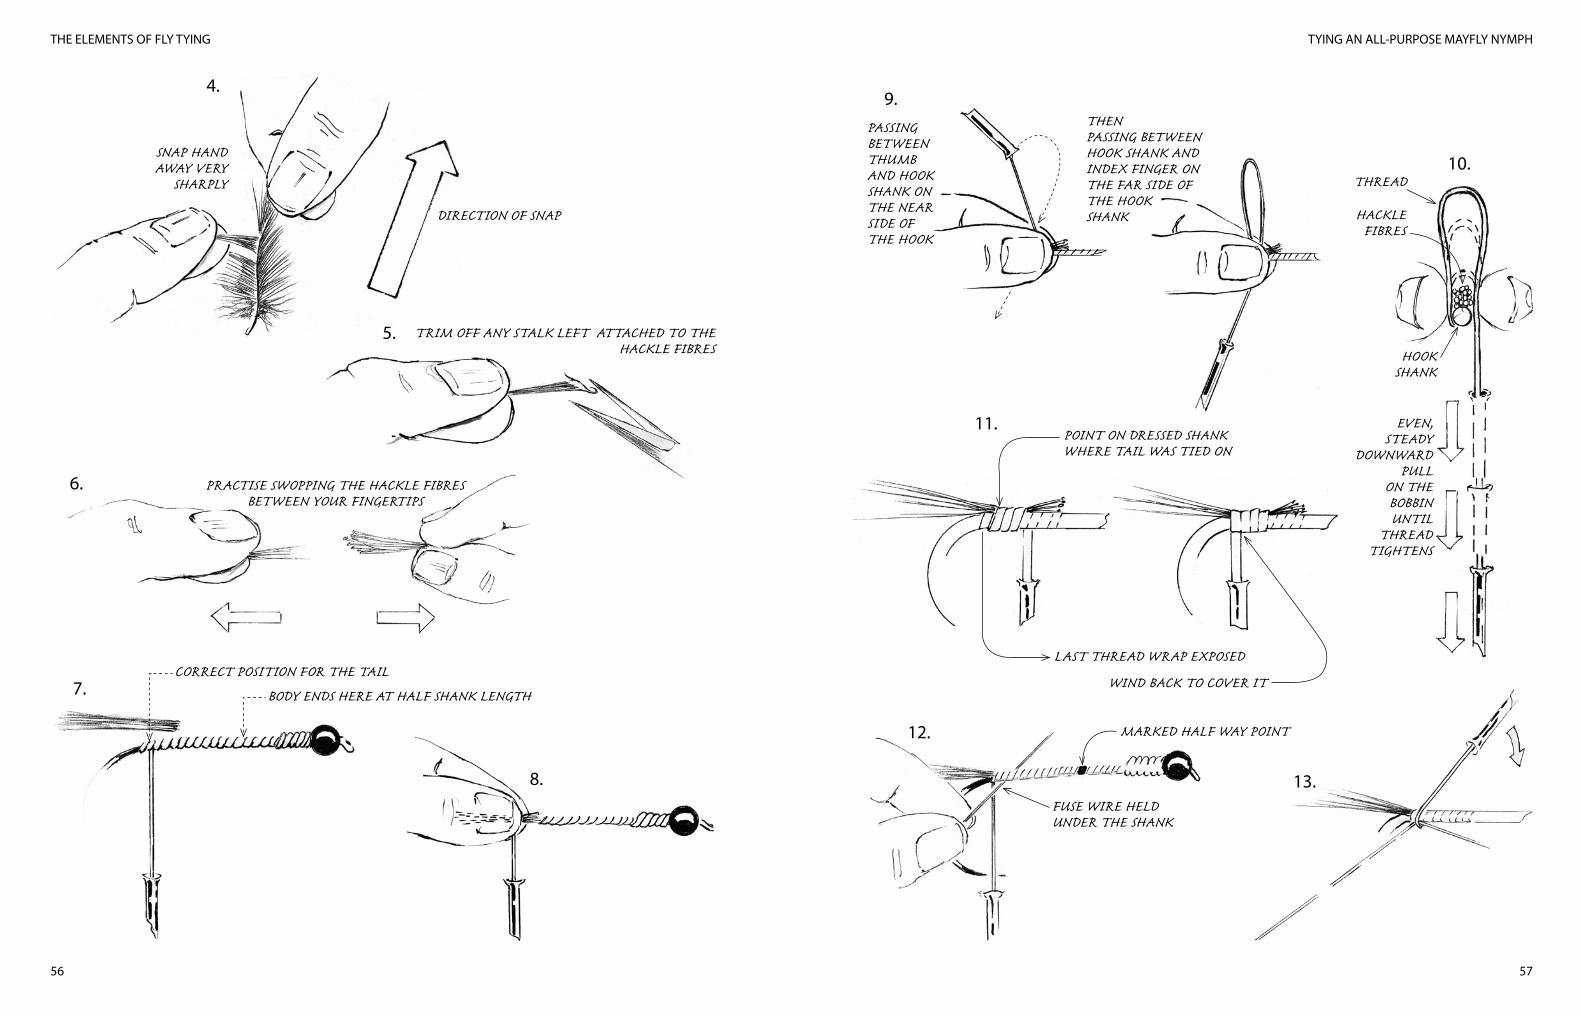
TYING AN ALL-PURPOSE MAYFLY NYMPH
57
THE ELEMENTS OF FLY TYING
56
4.
SNAP HANDAWAY VERY
SHARPLY
DIRECTION OF SNAP
5. TRIM OFF ANY STALK LEFT ATTACHED TO THEHACKLE FIBRES
6. PRACTISE SWOPPING THE HACKLE FIBRESBETWEEN YOUR FINGERTIPS
7.CORRECT POSITION FOR THE TAIL
BODY ENDS HERE AT HALF SHANK LENGTH
8.
9.PASSINGBETWEENTHUMBAND HOOKSHANK ONTHE NEARSIDE OFTHE HOOK
THENPASSING BETWEENHOOK SHANK ANDINDEX FINGER ONTHE FAR SIDE OFTHE HOOKSHANK
EVEN,STEADY
DOWNWARDPULL
ON THEBOBBINUNTIL
THREADTIGHTENS
10.THREAD
HACKLEFIBRES
HOOKSHANK
POINT ON DRESSED SHANKWHERE TAIL WAS TIED ON
LAST THREAD WRAP EXPOSED
WIND BACK TO COVER IT
11.
12. MARKED HALF WAY POINT
FUSE WIRE HELDUNDER THE SHANK
13.
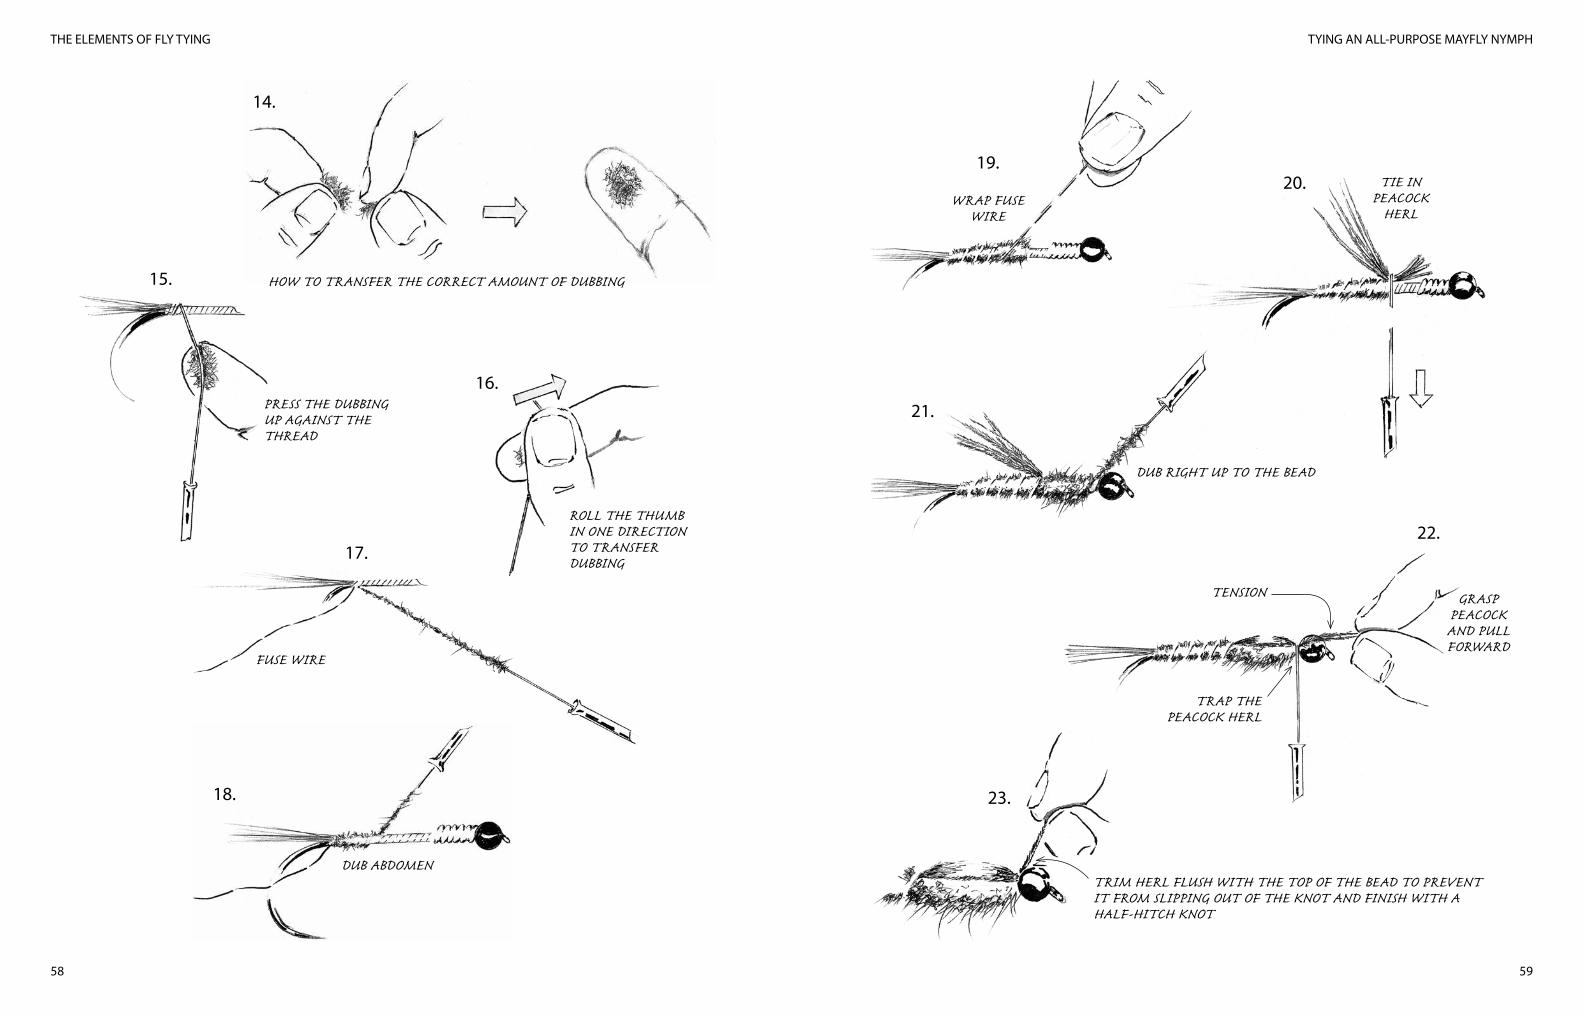
TYING AN ALL-PURPOSE MAYFLY NYMPH
59
THE ELEMENTS OF FLY TYING
58
14.
HOW TO TRANSFER THE CORRECT AMOUNT OF DUBBING15.
PRESS THE DUBBINGUP AGAINST THETHREAD
ROLL THE THUMBIN ONE DIRECTIONTO TRANSFERDUBBING
16.
FUSE WIRE
17.
18.
DUB ABDOMEN
19.
WRAP FUSEWIRE
20. TIE INPEACOCK
HERL
21.
DUB RIGHT UP TO THE BEAD
22.
GRASPPEACOCKAND PULLFORWARD
TENSION
TRAP THEPEACOCK HERL
TRIM HERL FLUSH WITH THE TOP OF THE BEAD TO PREVENTIT FROM SLIPPING OUT OF THE KNOT AND FINISH WITH AHALF-HITCH KNOT
23.
TYING AN ALL-PURPOSE DRY FLY
6160
TYING AN ALL-PURPOSE DRY FLY
Nothing in fly tying is more satisfying than tying a neat dry fly, though you will likely hear that nothing is more difficult. It’s a myth, just as you’re likely to hear that dry fly fishing is a pretty tricky business. Both are some distance off the mark. Fishing a dry fly is often one of the simplest things in all of fly fishing and the same goes for tying them. You just need to get the basics right and the rest mostly just falls into place.
What is true of tying dry flies, perhaps, is that they are a little less forgiving patterns when it comes to getting the proportions right. Also because they are smaller and less robust, they need finer and lighter materials and these are maybe marginally more difficult to work with. Other than that, tying dry flies is an absolute joy. I’m sure you will find the same.
We’ll use a standard, all-purpose imitation of an adult mayfly for this exercise. We could have chosen a caddis or a midge, but neither would teach as many principles as a mayfly, including winging and hackling. But again, before you begin, I suggest you consult the chapter on proportions.
What you will needSelect a size 14 dry fly hook. Note the shank is shorter and the wire is finer than the hook we used to demonstrate the nymph in the previous chapter. The eye is most likely turned down (up-eyed dry fly hooks are not as fashionable for dries as they once were) and the hook you have may well be barbless. Secure it in the vice and dress the shank with 8/0 tan or brown thread. This thread is finer than the 6/0 thread we used for tying the all-purpose nymph
and will obviously have less tolerance. For really tiny dry flies, say size 22 and up, thread to the equivalent of gossamer-thin 15/0 is now available. But for the moment 8/0 will do fine. Set aside two different hackle capes, your grizzly hen cape if you have one, and take out your peacock herl.
How to tie this flyThe first step is to dress the entire hook shank with tying thread. (And again, you can mark where the body will end with a turn or two more of the tying silk to serve as a reminder. Keep using this little trick until a fly pattern’s proportions come to you naturally.)
Selecting hackle to tail dry flies Select two of the longest and widest hackles from each of the capes. If possible select one that is darker, say brown, and another that is lighter, say ginger or badger. Check the hackles for web and fibre stiffness.
Let me explain. Essentially you want stiffness in the tail of a dry fly to assist with flotability and buoyancy and the rule is the wider the web, the softer the adjacent or corresponding hackle fibres will be. And the stiffer the hackles, the better the flotation. The web, by the way, is that central, denser and slightly differently toned area running either side of the hackle stalk. The web is always wider at the base of the hackle (where the fibres are softest) and narrows towards the tip of the hackle where the fibres are stiffest.
If you have difficulty seeing the web, just hold the hackle up to the light or grip the stem in your left hand and the tip in your right and open the hackle like a fan. In all the really big, long, wide hackles on a cape (both non-genetic and genetically grown) the web extends nearly to the tip of the hackle. This does not rule out their use for tails though. It works like this:
Around the base of the rooster’s head the hackles are far smaller than they are at the base of its neck (almost at the shoulder of the bird). The smaller hackles lose their web even halfway up the stalk. But their individual fibres, though nice and stiff, are not long enough to use for the tails on average-sized dry flies. I find that for
CHAPTER 6
TYING AN ALL-PURPOSE DRY FLY
63
THE ELEMENTS OF FLY TYING
62
dry fly tails you want to select the longest hackles from the centre of the base of the cape where the fibres are longer.
Now fan out your hackle and roughly one-third to halfway up the stem you will find fibres that are long enough to use even after you have subtracted the webbed section! This is what you’re after. Hackle selection is so important in tying good dry flies.
Tailing a dry fly perfectlySo you have selected two hackles now and tested both, fanned them out, measured the length of the web-free, stiffer fibres against your dressed hook shank and found they are long enough. Using the technique you learned to neatly tear off hackle fibres in the previous chapter, tear off a small bunch of fibres from each hackle. Place the first bunch on a flat, smooth surface. I find an old PC mouse pad ideal. Then lay the second bunch on top of the first, making sure that their tips are aligned. You will want about twelve fibres in each.
Now pick up the two bunches, butts first, in the thumb and index finger of your right hand, so the thick ends are concealed under the pulp of your index finger and thumb, but with the hackle tips sticking out. Now roll the fibres between your fingers by moving your index finger backwards and forwards over the pulp of your thumb – the so-called ‘pill rolling’ method. What you are doing is mixing individual fibres and, consequently also colours. You might spoil a few bunches before you get it right, but again, practice makes perfect.
We are now going to measure the right length for the tail fibres using a different method than we did for the all-purpose nymph in the previous chapter. Swap the fibres back to your left hand. The fibres are still in a bunch, but their butts will now be visible, not their tips. Now here’s the vital step, the step that separates the consistently good tyer from the average. You need to get the length of the tail just right, but how do you measure that without the bunch coming loose and when half the fibres are hidden from sight between your fingers? Easy. Well, not so easy really, but worth mastering and after reading the next paragraph, believe me you will understand exactly why we did the hand swapping exercise in the previous chapter!
Hold the bunch by the tips and lift them up against the light. You will see some unevenness. Trim the butts to the same length with your scissors, but cut off as little as possible. You just want to get the ends even. Now take hold of the butts again with your right thumb and index finger, this time by the very tips of their butts. In other words, don’t let your fingers take a big bite. Hold the bunch over the hook shank, tips pointing to the end of the hook and measure exactly how long they need to be (the same length as the shank, remember).
By holding the fibres over the shank in your right hand you can increase or decrease the length of the bunch by swapping the bunch from your right to left hand until you are gripping it at precisely the right spot in your right hand. When you have achieved this, finally swap the bunch from your right to left hand again, but this time let the fingertips of your right and left hands meet and actually touch before you transfer! That’s your measuring device; that’s how you come to the perfect length tail.
Position the fibres over the end of the dressed shank, throw a pinched loop and your tail will be exactly right. At this point don’t trim the excess butt fibres. Rather wrap thread over them and trim off only at the point where your body will end. Wrapping thread over the excess fibres helps to build bulk for the future abdomen.
There is a short cut to tailing a dry fly, but I don’t use it. You roughly guess where the tail fibres should go, put in two turns of a pinched loop, but don’t tighten. Then take your hands away to see if you have guessed right and change by moving the tail fibres with your fingers forwards or backwards on the hook before tightening up the loop. The problem is the bunch easily disintegrates or ends up untidy.
We will use a peacock herl body, exactly as on the historic North American dry fly pattern, the Quill Gordon. Select a single peacock herl and strip off the flue from the lower half. Why the lower half? Because it has more width and better definition than the tip and it’s stronger and easier to work with. This is best done by holding the
TYING AN ALL-PURPOSE DRY FLY
65
THE ELEMENTS OF FLY TYING
64
middle of the herl in your left hand, trapping the rest of the herl between the nail of your right thumb and the pulp of your right index finger and stripping your right hand downwards against the grain. Repeat the process until the flue is removed. Use a fair amount of nail pressure. If you prefer, you can stroke the herl with a rubber eraser.
Tie the tip of the stripped section of the herl to the hook shank a few millimetres ahead of the tail. To tie in the herl, hold it in your left hand and place it firmly in the angle between the tying thread and the hook shank. This stops it moving away as you try to trap it with thread – and it’s a convenient method to attach many other materials to a hook shank. Notice that you bring the herl into this angle from underneath the hook and from in front of the thread. Once anchored, wind backwards over the herl until your thread is neatly lined up with the tail. Doing this added little step ensures you leave no thread visible between where the tail starts and the herl body starts.
Now wind the thread forward on the dressed shank until you reach your marker. As you do this, build a little forward taper into the under body by simply adding more and more wraps of thread on top of one another, but don’t overdo it. Now wind the quill forward, being sure not to leave any tying thread exposed underneath and tie off beyond the abdomen. The herl should be wound forwards in turns that overlap slightly.
Adding wings and hackles Select two small hackles from the lightest coloured cape you own – and if you own a grizzly hen cape, now’s the time to bring it out! Winging dry flies is always a little easier with hen hackles, but if you don’t have a hen cape, a cock cape will do fine. Make certain the hackles are the same width and length and you want them to be around one-and-a-half to twice the length of the hook shank. Lay them flat, one on top of the other, so that any natural curve is facing outwards on each.
To understand what I mean, bring your hands together as if in prayer. Here your hands are facing concave sides inwards.
We want the reverse, in other words the concave sides outwards. Do not clean off any of the softer fibres at the base of the hackles. Now measure the hackles for length against the hook shank by gripping the base of the hackles between your left index finger and thumb. The protruding hackles should be the same length as the hook shank. Now select the spot you want to tie the wings on to the shank and position your fingers at this spot with the hackles facing forwards over the eye of the hook. This spot should be about mid-way between the end of the abdomen and the eye of the hook. Tie the hackles in together and lying flat, using a pinched loop, naturally. Wrap thread back very tightly to cover and secure their stalks, then lift and trim away any remaining hackle stalks. This is a unique way of tying in hackle wings because normally you first clean up the stalks. Here you tie over both hackles, stalks and fibres, all in one go. It’s easier to manage hackles using this method than it is to manage bare stalks.
Now we attach two dry fly hackles, one brown and one ginger (or badger), side-by-side, immediately ahead of the end of the abdomen. Select these hackles from nearer the head of the capes and check them for fibre stiffness and length. You want as little web as possible and the individual fibres must be springy and firm. If you fan the hackle out and hold it against the hook shank you can check that the fibres have the correct length (one-and-a-half times the gape of the hook). Next, strip off all the soft fibres from the base on both sides of the hackle, up to the point where the web narrows or disappears (usually a third to halfway up the stalk). This is where the hackle fibres are springy and stiff. Notice also that the stalk is narrower at this point, which will make tying in and wrapping the hackles easier. Using the same method you used to attach the peacock herl, tie each hackle to the hook shank separately, but directly alongside each other. Their concave (brighter) sides should be facing forwards. Trim off any excess.
Having secured the hackles and trimmed the stalks, bring your tying silk forward again in even wraps until you reach the base of the wings then lift them straight up and wrap a few turns of silk in front of them. Now pull the wings backwards sharply, separate
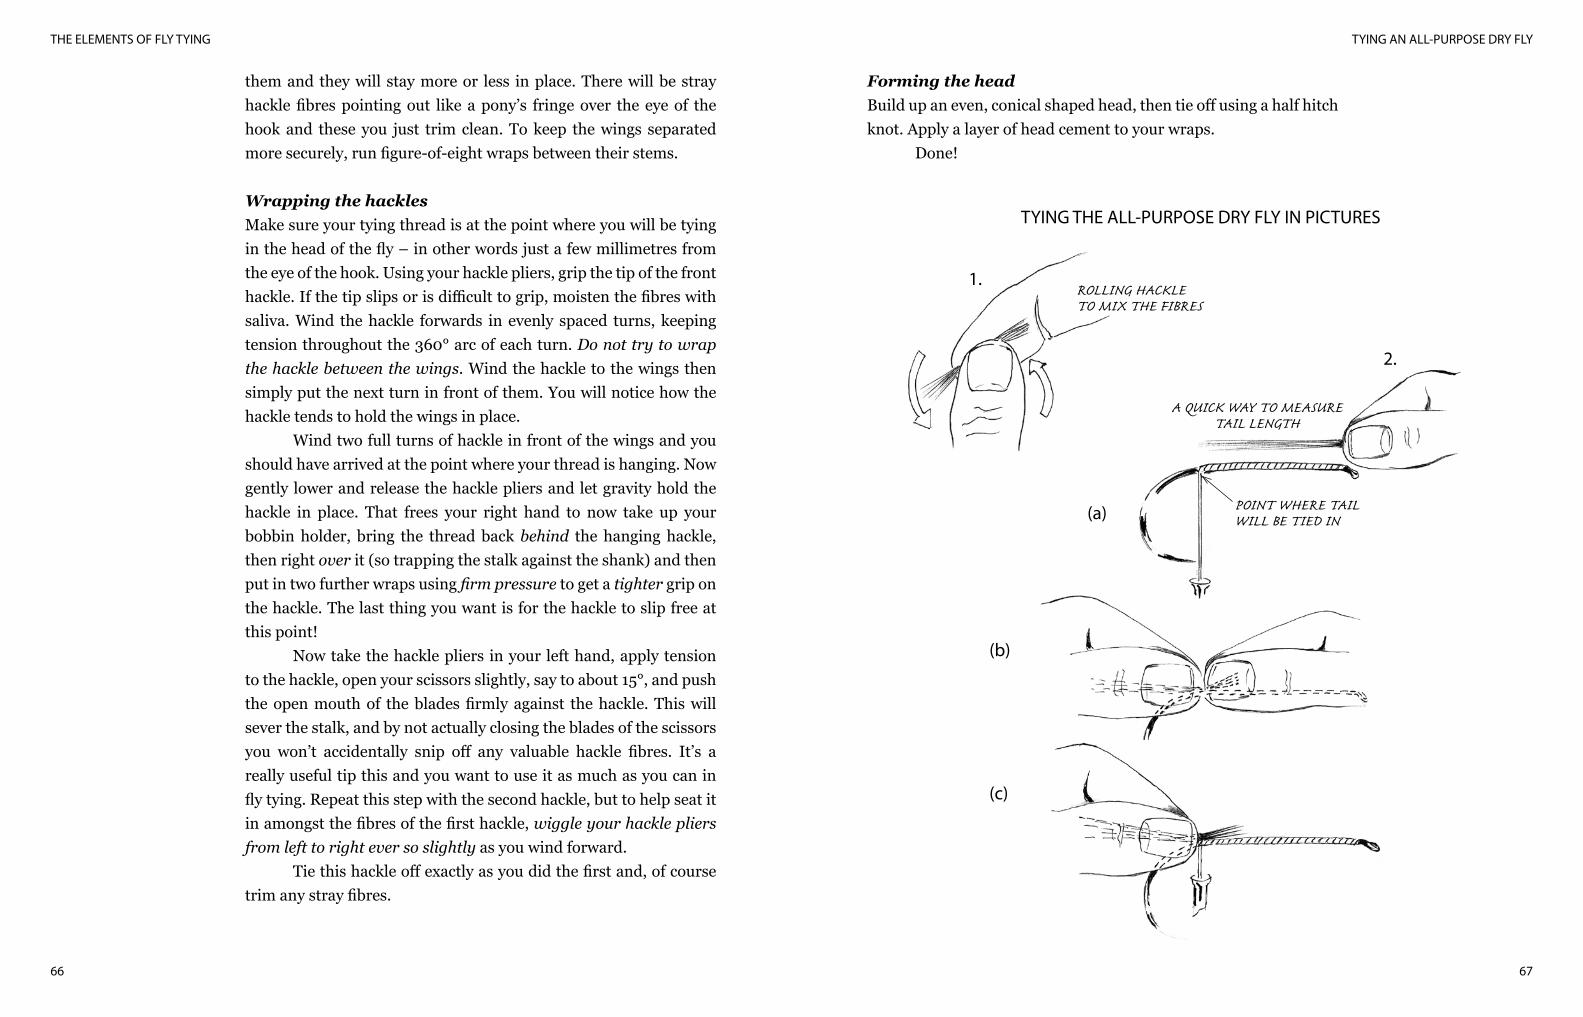
TYING AN ALL-PURPOSE DRY FLY
67
THE ELEMENTS OF FLY TYING
66
them and they will stay more or less in place. There will be stray hackle fibres pointing out like a pony’s fringe over the eye of the hook and these you just trim clean. To keep the wings separated more securely, run figure-of-eight wraps between their stems.
Wrapping the hacklesMake sure your tying thread is at the point where you will be tying in the head of the fly – in other words just a few millimetres from the eye of the hook. Using your hackle pliers, grip the tip of the front hackle. If the tip slips or is difficult to grip, moisten the fibres with saliva. Wind the hackle forwards in evenly spaced turns, keeping tension throughout the 360° arc of each turn. Do not try to wrap the hackle between the wings. Wind the hackle to the wings then simply put the next turn in front of them. You will notice how the hackle tends to hold the wings in place.
Wind two full turns of hackle in front of the wings and you should have arrived at the point where your thread is hanging. Now gently lower and release the hackle pliers and let gravity hold the hackle in place. That frees your right hand to now take up your bobbin holder, bring the thread back behind the hanging hackle, then right over it (so trapping the stalk against the shank) and then put in two further wraps using firm pressure to get a tighter grip on the hackle. The last thing you want is for the hackle to slip free at this point!
Now take the hackle pliers in your left hand, apply tension to the hackle, open your scissors slightly, say to about 15°, and push the open mouth of the blades firmly against the hackle. This will sever the stalk, and by not actually closing the blades of the scissors you won’t accidentally snip off any valuable hackle fibres. It’s a really useful tip this and you want to use it as much as you can in fly tying. Repeat this step with the second hackle, but to help seat it in amongst the fibres of the first hackle, wiggle your hackle pliers from left to right ever so slightly as you wind forward.
Tie this hackle off exactly as you did the first and, of course trim any stray fibres.
Forming the headBuild up an even, conical shaped head, then tie off using a half hitch knot. Apply a layer of head cement to your wraps.
Done!
TYING THE ALL-PURPOSE DRY FLY IN PICTURES
1.ROLLING HACKLETO MIX THE FIBRES
2.
A QUICK WAY TO MEASURE TAIL LENGTH
(a)
(b)
(c)
POINT WHERE TAILWILL BE TIED IN
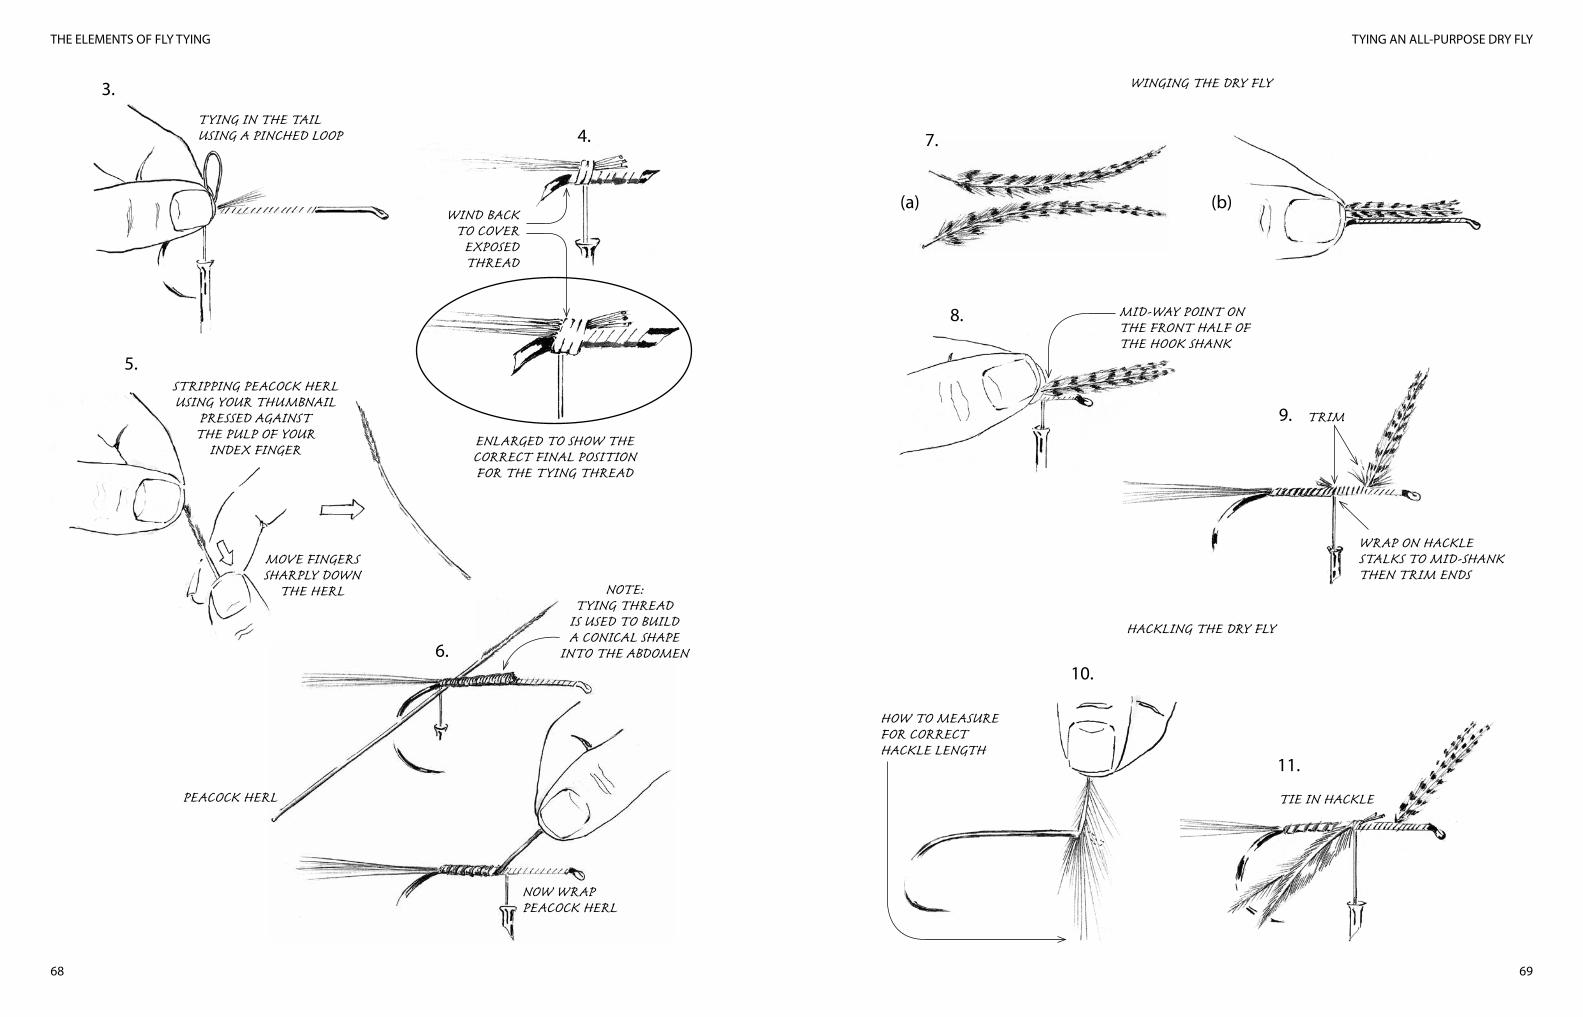
TYING AN ALL-PURPOSE DRY FLY
69
THE ELEMENTS OF FLY TYING
68
WINGING THE DRY FLY
HACKLING THE DRY FLY
3.
TYING IN THE TAILUSING A PINCHED LOOP 4.
ENLARGED TO SHOW THECORRECT FINAL POSITIONFOR THE TYING THREAD
WIND BACKTO COVER
EXPOSEDTHREAD
STRIPPING PEACOCK HERLUSING YOUR THUMBNAIL
PRESSED AGAINSTTHE PULP OF YOUR
INDEX FINGER
5.
MOVE FINGERSSHARPLY DOWN
THE HERL NOTE:TYING THREAD
IS USED TO BUILDA CONICAL SHAPE
INTO THE ABDOMEN
PEACOCK HERL
NOW WRAPPEACOCK HERL
6.
7.
(a) (b)
8. MID-WAY POINT ONTHE FRONT HALF OFTHE HOOK SHANK
9. TRIM
WRAP ON HACKLESTALKS TO MID-SHANKTHEN TRIM ENDS
10.
HOW TO MEASUREFOR CORRECTHACKLE LENGTH
TIE IN HACKLE
11.
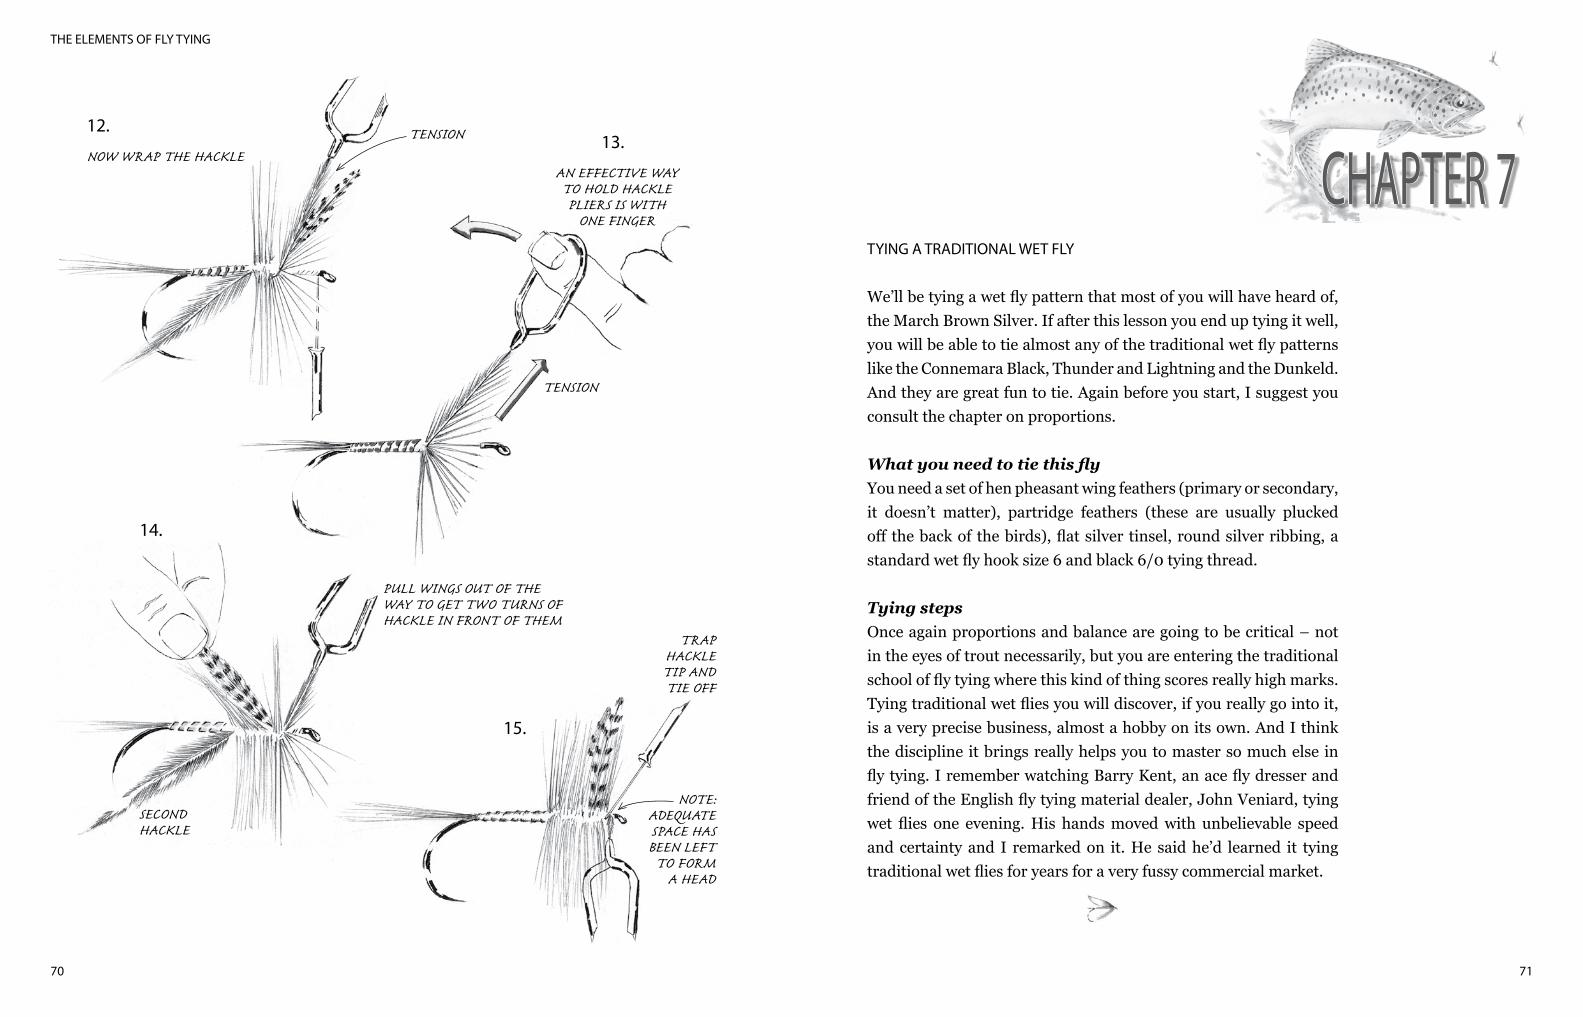
71
THE ELEMENTS OF FLY TYING
70
TYING A TRADITIONAL WET FLY
We’ll be tying a wet fly pattern that most of you will have heard of, the March Brown Silver. If after this lesson you end up tying it well, you will be able to tie almost any of the traditional wet fly patterns like the Connemara Black, Thunder and Lightning and the Dunkeld. And they are great fun to tie. Again before you start, I suggest you consult the chapter on proportions.
What you need to tie this flyYou need a set of hen pheasant wing feathers (primary or secondary, it doesn’t matter), partridge feathers (these are usually plucked off the back of the birds), flat silver tinsel, round silver ribbing, a standard wet fly hook size 6 and black 6/0 tying thread.
Tying stepsOnce again proportions and balance are going to be critical – not in the eyes of trout necessarily, but you are entering the traditional school of fly tying where this kind of thing scores really high marks. Tying traditional wet flies you will discover, if you really go into it, is a very precise business, almost a hobby on its own. And I think the discipline it brings really helps you to master so much else in fly tying. I remember watching Barry Kent, an ace fly dresser and friend of the English fly tying material dealer, John Veniard, tying wet flies one evening. His hands moved with unbelievable speed and certainty and I remarked on it. He said he’d learned it tying traditional wet flies for years for a very fussy commercial market.
12.
NOW WRAP THE HACKLE
TENSION
AN EFFECTIVE WAYTO HOLD HACKLEPLIERS IS WITH
ONE FINGER
TENSION
13.
14.
PULL WINGS OUT OF THE WAY TO GET TWO TURNS OF HACKLE IN FRONT OF THEM
SECONDHACKLE
15.
TRAPHACKLETIP ANDTIE OFF
NOTE:ADEQUATESPACE HASBEEN LEFT
TO FORMA HEAD
CHAPTER 7
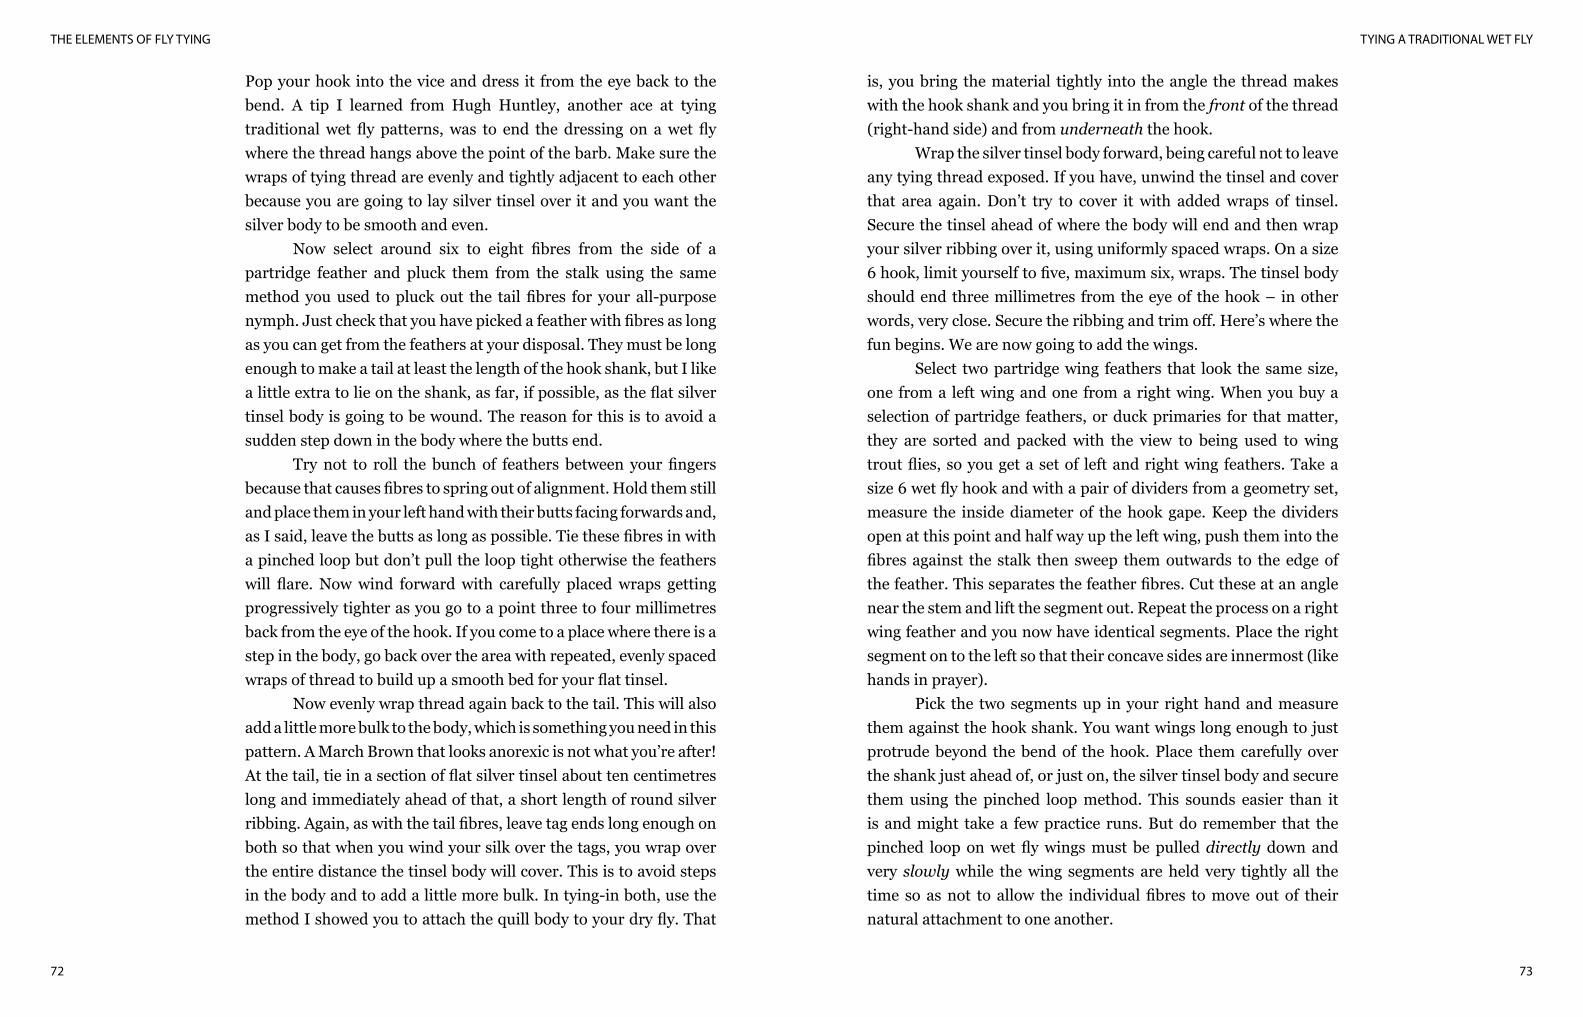
TYING A TRADITIONAL WET FLY
73
THE ELEMENTS OF FLY TYING
72
Pop your hook into the vice and dress it from the eye back to the bend. A tip I learned from Hugh Huntley, another ace at tying traditional wet fly patterns, was to end the dressing on a wet fly where the thread hangs above the point of the barb. Make sure the wraps of tying thread are evenly and tightly adjacent to each other because you are going to lay silver tinsel over it and you want the silver body to be smooth and even.
Now select around six to eight fibres from the side of a partridge feather and pluck them from the stalk using the same method you used to pluck out the tail fibres for your all-purpose nymph. Just check that you have picked a feather with fibres as long as you can get from the feathers at your disposal. They must be long enough to make a tail at least the length of the hook shank, but I like a little extra to lie on the shank, as far, if possible, as the flat silver tinsel body is going to be wound. The reason for this is to avoid a sudden step down in the body where the butts end.
Try not to roll the bunch of feathers between your fingers because that causes fibres to spring out of alignment. Hold them still and place them in your left hand with their butts facing forwards and, as I said, leave the butts as long as possible. Tie these fibres in with a pinched loop but don’t pull the loop tight otherwise the feathers will flare. Now wind forward with carefully placed wraps getting progressively tighter as you go to a point three to four millimetres back from the eye of the hook. If you come to a place where there is a step in the body, go back over the area with repeated, evenly spaced wraps of thread to build up a smooth bed for your flat tinsel.
Now evenly wrap thread again back to the tail. This will also add a little more bulk to the body, which is something you need in this pattern. A March Brown that looks anorexic is not what you’re after! At the tail, tie in a section of flat silver tinsel about ten centimetres long and immediately ahead of that, a short length of round silver ribbing. Again, as with the tail fibres, leave tag ends long enough on both so that when you wind your silk over the tags, you wrap over the entire distance the tinsel body will cover. This is to avoid steps in the body and to add a little more bulk. In tying-in both, use the method I showed you to attach the quill body to your dry fly. That
is, you bring the material tightly into the angle the thread makes with the hook shank and you bring it in from the front of the thread (right-hand side) and from underneath the hook.
Wrap the silver tinsel body forward, being careful not to leave any tying thread exposed. If you have, unwind the tinsel and cover that area again. Don’t try to cover it with added wraps of tinsel. Secure the tinsel ahead of where the body will end and then wrap your silver ribbing over it, using uniformly spaced wraps. On a size 6 hook, limit yourself to five, maximum six, wraps. The tinsel body should end three millimetres from the eye of the hook – in other words, very close. Secure the ribbing and trim off. Here’s where the fun begins. We are now going to add the wings.
Select two partridge wing feathers that look the same size, one from a left wing and one from a right wing. When you buy a selection of partridge feathers, or duck primaries for that matter, they are sorted and packed with the view to being used to wing trout flies, so you get a set of left and right wing feathers. Take a size 6 wet fly hook and with a pair of dividers from a geometry set, measure the inside diameter of the hook gape. Keep the dividers open at this point and half way up the left wing, push them into the fibres against the stalk then sweep them outwards to the edge of the feather. This separates the feather fibres. Cut these at an angle near the stem and lift the segment out. Repeat the process on a right wing feather and you now have identical segments. Place the right segment on to the left so that their concave sides are innermost (like hands in prayer).
Pick the two segments up in your right hand and measure them against the hook shank. You want wings long enough to just protrude beyond the bend of the hook. Place them carefully over the shank just ahead of, or just on, the silver tinsel body and secure them using the pinched loop method. This sounds easier than it is and might take a few practice runs. But do remember that the pinched loop on wet fly wings must be pulled directly down and very slowly while the wing segments are held very tightly all the time so as not to allow the individual fibres to move out of their natural attachment to one another.
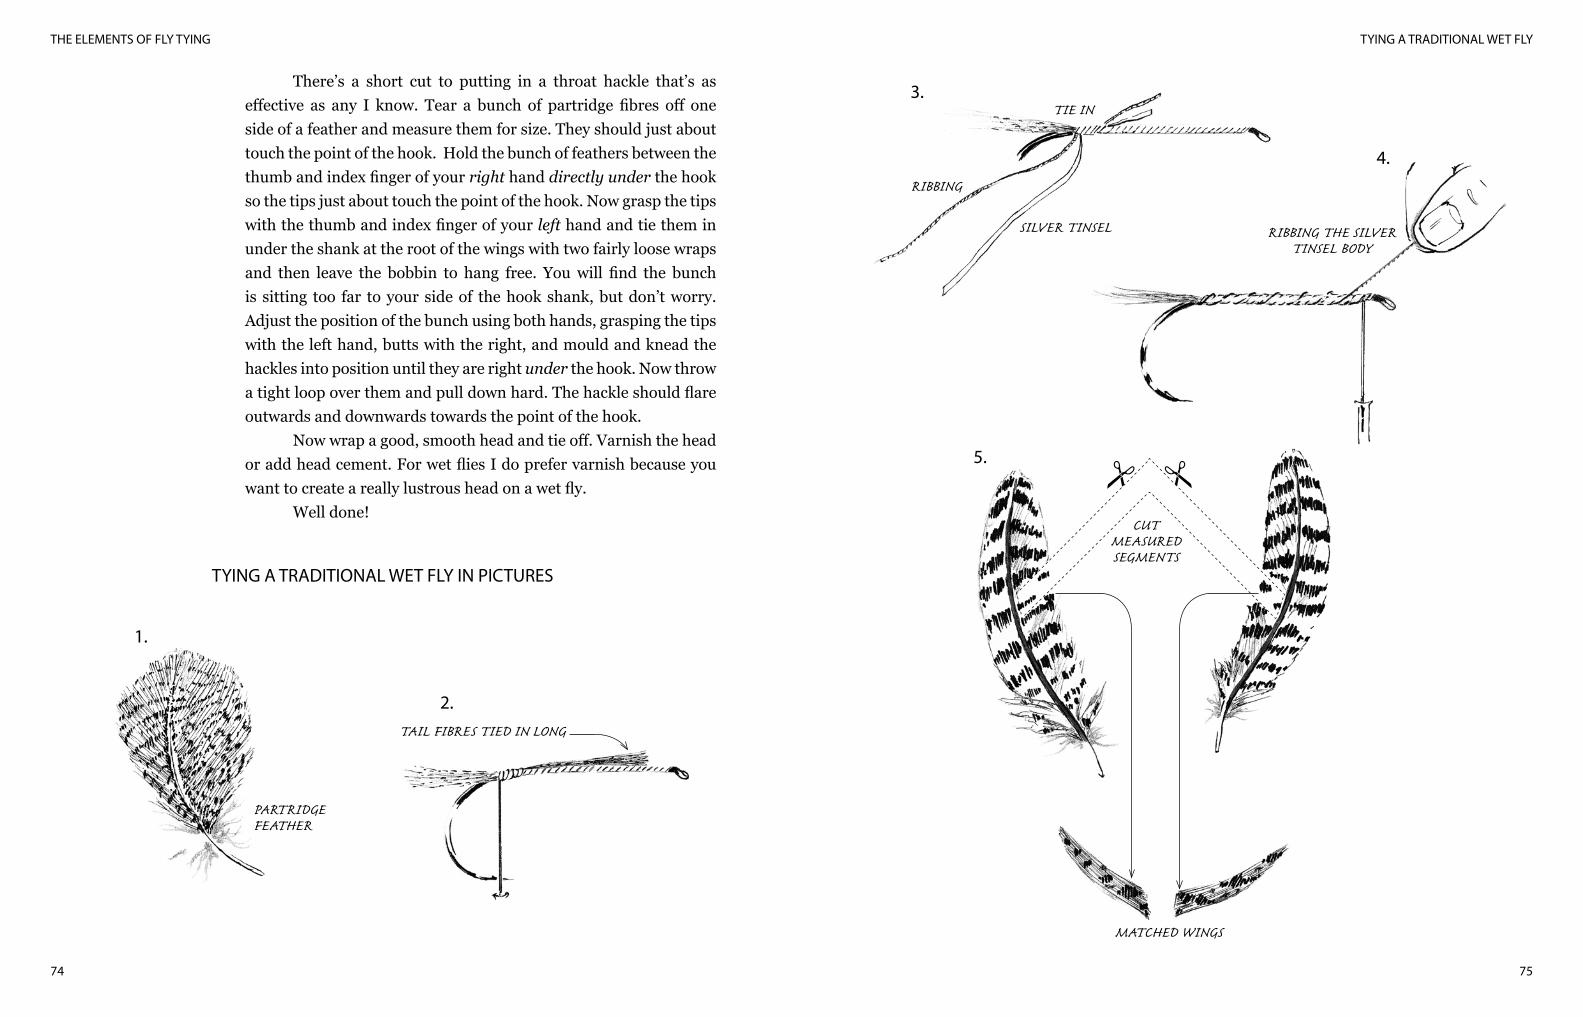
TYING A TRADITIONAL WET FLY
75
THE ELEMENTS OF FLY TYING
74
There’s a short cut to putting in a throat hackle that’s as effective as any I know. Tear a bunch of partridge fibres off one side of a feather and measure them for size. They should just about touch the point of the hook. Hold the bunch of feathers between the thumb and index finger of your right hand directly under the hook so the tips just about touch the point of the hook. Now grasp the tips with the thumb and index finger of your left hand and tie them in under the shank at the root of the wings with two fairly loose wraps and then leave the bobbin to hang free. You will find the bunch is sitting too far to your side of the hook shank, but don’t worry. Adjust the position of the bunch using both hands, grasping the tips with the left hand, butts with the right, and mould and knead the hackles into position until they are right under the hook. Now throw a tight loop over them and pull down hard. The hackle should flare outwards and downwards towards the point of the hook.
Now wrap a good, smooth head and tie off. Varnish the head or add head cement. For wet flies I do prefer varnish because you want to create a really lustrous head on a wet fly.
Well done!
1.
TYING A TRADITIONAL WET FLY IN PICTURES
PARTRIDGEFEATHER
TAIL FIBRES TIED IN LONG
2.
TIE IN3.
RIBBING
4.
SILVER TINSEL RIBBING THE SILVERTINSEL BODY
CUTMEASUREDSEGMENTS
5.
MATCHED WINGS
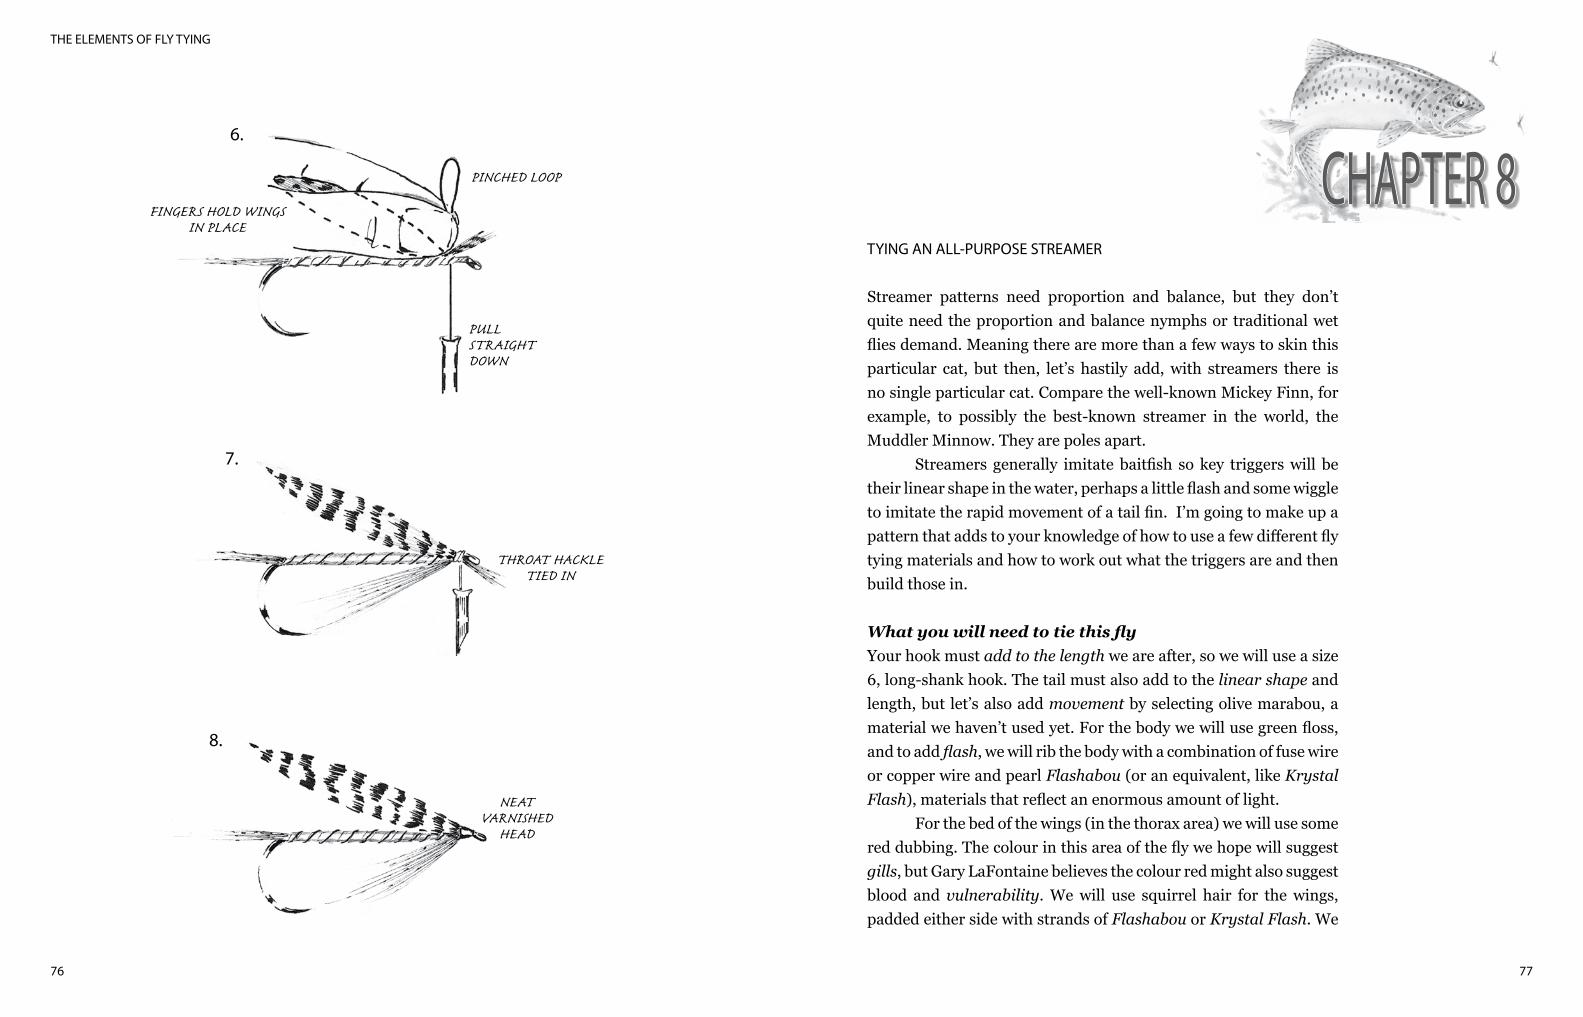
77
THE ELEMENTS OF FLY TYING
76
TYING AN ALL-PURPOSE STREAMER
Streamer patterns need proportion and balance, but they don’t quite need the proportion and balance nymphs or traditional wet flies demand. Meaning there are more than a few ways to skin this particular cat, but then, let’s hastily add, with streamers there is no single particular cat. Compare the well-known Mickey Finn, for example, to possibly the best-known streamer in the world, the Muddler Minnow. They are poles apart.
Streamers generally imitate baitfish so key triggers will be their linear shape in the water, perhaps a little flash and some wiggle to imitate the rapid movement of a tail fin. I’m going to make up a pattern that adds to your knowledge of how to use a few different fly tying materials and how to work out what the triggers are and then build those in.
What you will need to tie this flyYour hook must add to the length we are after, so we will use a size 6, long-shank hook. The tail must also add to the linear shape and length, but let’s also add movement by selecting olive marabou, a material we haven’t used yet. For the body we will use green floss, and to add flash, we will rib the body with a combination of fuse wire or copper wire and pearl Flashabou (or an equivalent, like Krystal Flash), materials that reflect an enormous amount of light.
For the bed of the wings (in the thorax area) we will use some red dubbing. The colour in this area of the fly we hope will suggest gills, but Gary LaFontaine believes the colour red might also suggest blood and vulnerability. We will use squirrel hair for the wings, padded either side with strands of Flashabou or Krystal Flash. We
CHAPTER 8FINGERS HOLD WINGS
IN PLACE
6.
PINCHED LOOP
PULLSTRAIGHTDOWN
7.
THROAT HACKLETIED IN
8.
NEATVARNISHED
HEAD
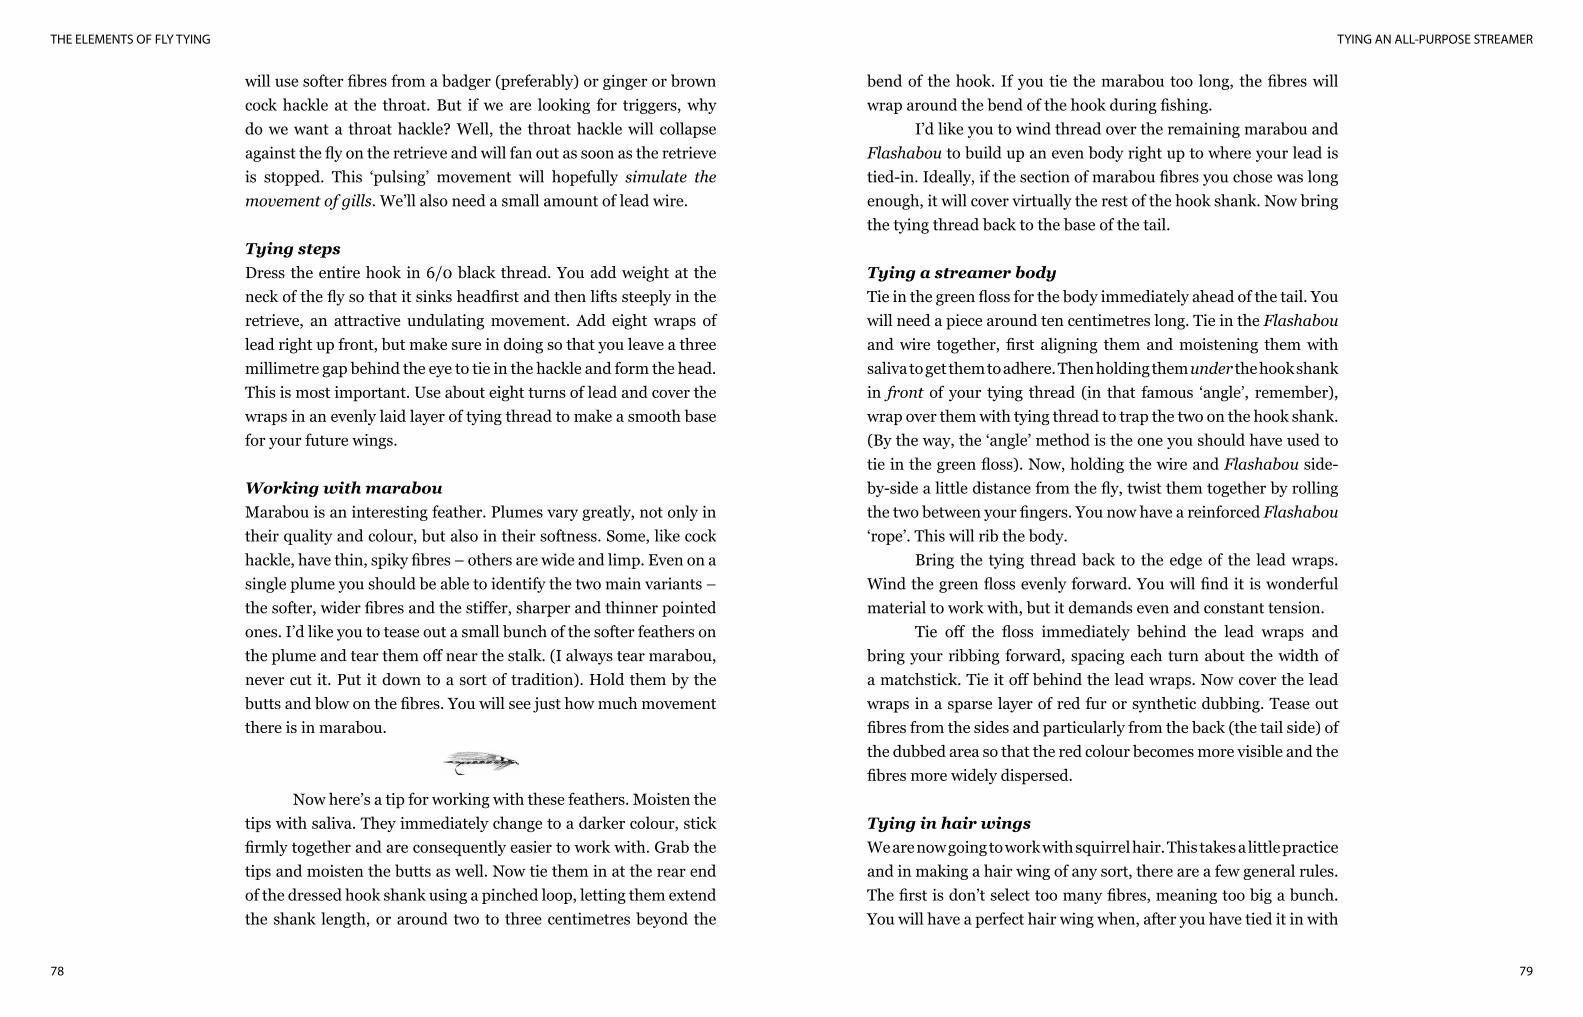
TYING AN ALL-PURPOSE STREAMER
79
THE ELEMENTS OF FLY TYING
78
will use softer fibres from a badger (preferably) or ginger or brown cock hackle at the throat. But if we are looking for triggers, why do we want a throat hackle? Well, the throat hackle will collapse against the fly on the retrieve and will fan out as soon as the retrieve is stopped. This ‘pulsing’ movement will hopefully simulate the movement of gills. We’ll also need a small amount of lead wire.
Tying stepsDress the entire hook in 6/0 black thread. You add weight at the neck of the fly so that it sinks headfirst and then lifts steeply in the retrieve, an attractive undulating movement. Add eight wraps of lead right up front, but make sure in doing so that you leave a three millimetre gap behind the eye to tie in the hackle and form the head. This is most important. Use about eight turns of lead and cover the wraps in an evenly laid layer of tying thread to make a smooth base for your future wings.
Working with marabouMarabou is an interesting feather. Plumes vary greatly, not only in their quality and colour, but also in their softness. Some, like cock hackle, have thin, spiky fibres – others are wide and limp. Even on a single plume you should be able to identify the two main variants – the softer, wider fibres and the stiffer, sharper and thinner pointed ones. I’d like you to tease out a small bunch of the softer feathers on the plume and tear them off near the stalk. (I always tear marabou, never cut it. Put it down to a sort of tradition). Hold them by the butts and blow on the fibres. You will see just how much movement there is in marabou.
Now here’s a tip for working with these feathers. Moisten the tips with saliva. They immediately change to a darker colour, stick firmly together and are consequently easier to work with. Grab the tips and moisten the butts as well. Now tie them in at the rear end of the dressed hook shank using a pinched loop, letting them extend the shank length, or around two to three centimetres beyond the
bend of the hook. If you tie the marabou too long, the fibres will wrap around the bend of the hook during fishing.
I’d like you to wind thread over the remaining marabou and Flashabou to build up an even body right up to where your lead is tied-in. Ideally, if the section of marabou fibres you chose was long enough, it will cover virtually the rest of the hook shank. Now bring the tying thread back to the base of the tail.
Tying a streamer bodyTie in the green floss for the body immediately ahead of the tail. You will need a piece around ten centimetres long. Tie in the Flashabou and wire together, first aligning them and moistening them with saliva to get them to adhere. Then holding them under the hook shank in front of your tying thread (in that famous ‘angle’, remember), wrap over them with tying thread to trap the two on the hook shank. (By the way, the ‘angle’ method is the one you should have used to tie in the green floss). Now, holding the wire and Flashabou side-by-side a little distance from the fly, twist them together by rolling the two between your fingers. You now have a reinforced Flashabou ‘rope’. This will rib the body.
Bring the tying thread back to the edge of the lead wraps. Wind the green floss evenly forward. You will find it is wonderful material to work with, but it demands even and constant tension.
Tie off the floss immediately behind the lead wraps and bring your ribbing forward, spacing each turn about the width of a matchstick. Tie it off behind the lead wraps. Now cover the lead wraps in a sparse layer of red fur or synthetic dubbing. Tease out fibres from the sides and particularly from the back (the tail side) of the dubbed area so that the red colour becomes more visible and the fibres more widely dispersed.
Tying in hair wingsWe are now going to work with squirrel hair. This takes a little practice and in making a hair wing of any sort, there are a few general rules. The first is don’t select too many fibres, meaning too big a bunch. You will have a perfect hair wing when, after you have tied it in with
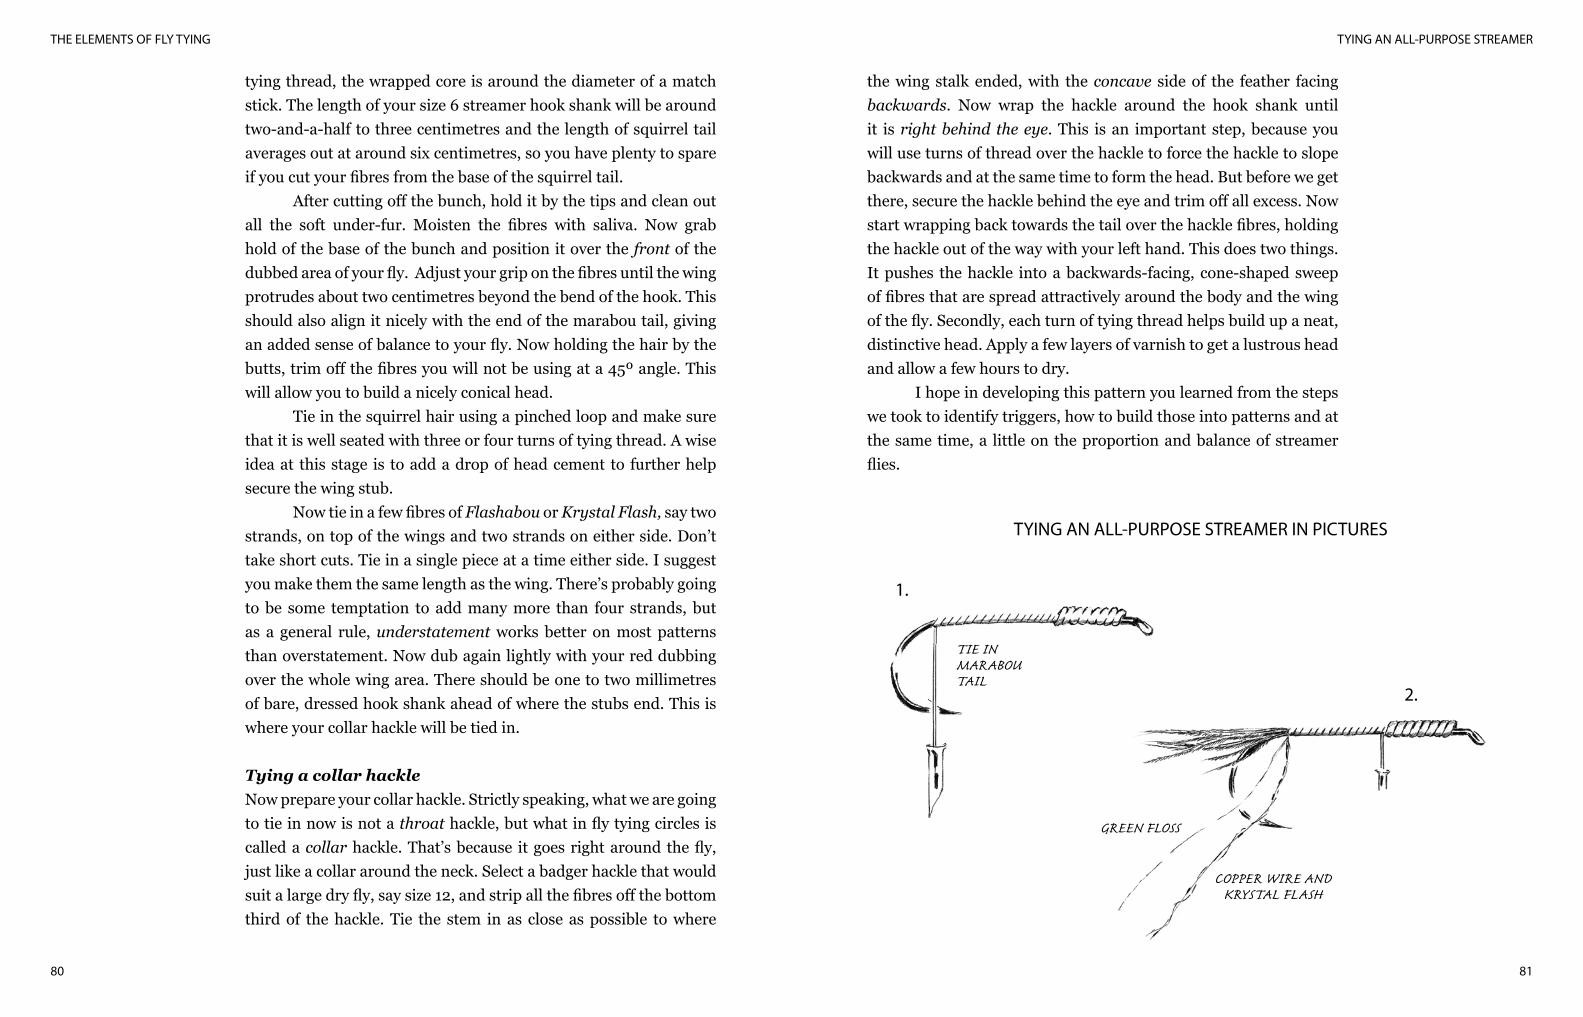
TYING AN ALL-PURPOSE STREAMER
81
THE ELEMENTS OF FLY TYING
80
tying thread, the wrapped core is around the diameter of a match stick. The length of your size 6 streamer hook shank will be around two-and-a-half to three centimetres and the length of squirrel tail averages out at around six centimetres, so you have plenty to spare if you cut your fibres from the base of the squirrel tail.
After cutting off the bunch, hold it by the tips and clean out all the soft under-fur. Moisten the fibres with saliva. Now grab hold of the base of the bunch and position it over the front of the dubbed area of your fly. Adjust your grip on the fibres until the wing protrudes about two centimetres beyond the bend of the hook. This should also align it nicely with the end of the marabou tail, giving an added sense of balance to your fly. Now holding the hair by the butts, trim off the fibres you will not be using at a 45º angle. This will allow you to build a nicely conical head.
Tie in the squirrel hair using a pinched loop and make sure that it is well seated with three or four turns of tying thread. A wise idea at this stage is to add a drop of head cement to further help secure the wing stub.
Now tie in a few fibres of Flashabou or Krystal Flash, say two strands, on top of the wings and two strands on either side. Don’t take short cuts. Tie in a single piece at a time either side. I suggest you make them the same length as the wing. There’s probably going to be some temptation to add many more than four strands, but as a general rule, understatement works better on most patterns than overstatement. Now dub again lightly with your red dubbing over the whole wing area. There should be one to two millimetres of bare, dressed hook shank ahead of where the stubs end. This is where your collar hackle will be tied in.
Tying a collar hackleNow prepare your collar hackle. Strictly speaking, what we are going to tie in now is not a throat hackle, but what in fly tying circles is called a collar hackle. That’s because it goes right around the fly, just like a collar around the neck. Select a badger hackle that would suit a large dry fly, say size 12, and strip all the fibres off the bottom third of the hackle. Tie the stem in as close as possible to where
the wing stalk ended, with the concave side of the feather facing backwards. Now wrap the hackle around the hook shank until it is right behind the eye. This is an important step, because you will use turns of thread over the hackle to force the hackle to slope backwards and at the same time to form the head. But before we get there, secure the hackle behind the eye and trim off all excess. Now start wrapping back towards the tail over the hackle fibres, holding the hackle out of the way with your left hand. This does two things. It pushes the hackle into a backwards-facing, cone-shaped sweep of fibres that are spread attractively around the body and the wing of the fly. Secondly, each turn of tying thread helps build up a neat, distinctive head. Apply a few layers of varnish to get a lustrous head and allow a few hours to dry.
I hope in developing this pattern you learned from the steps we took to identify triggers, how to build those into patterns and at the same time, a little on the proportion and balance of streamer flies.
TYING AN ALL-PURPOSE STREAMER IN PICTURES
1.
TIE INMARABOUTAIL
2.
COPPER WIRE ANDKRYSTAL FLASH
GREEN FLOSS
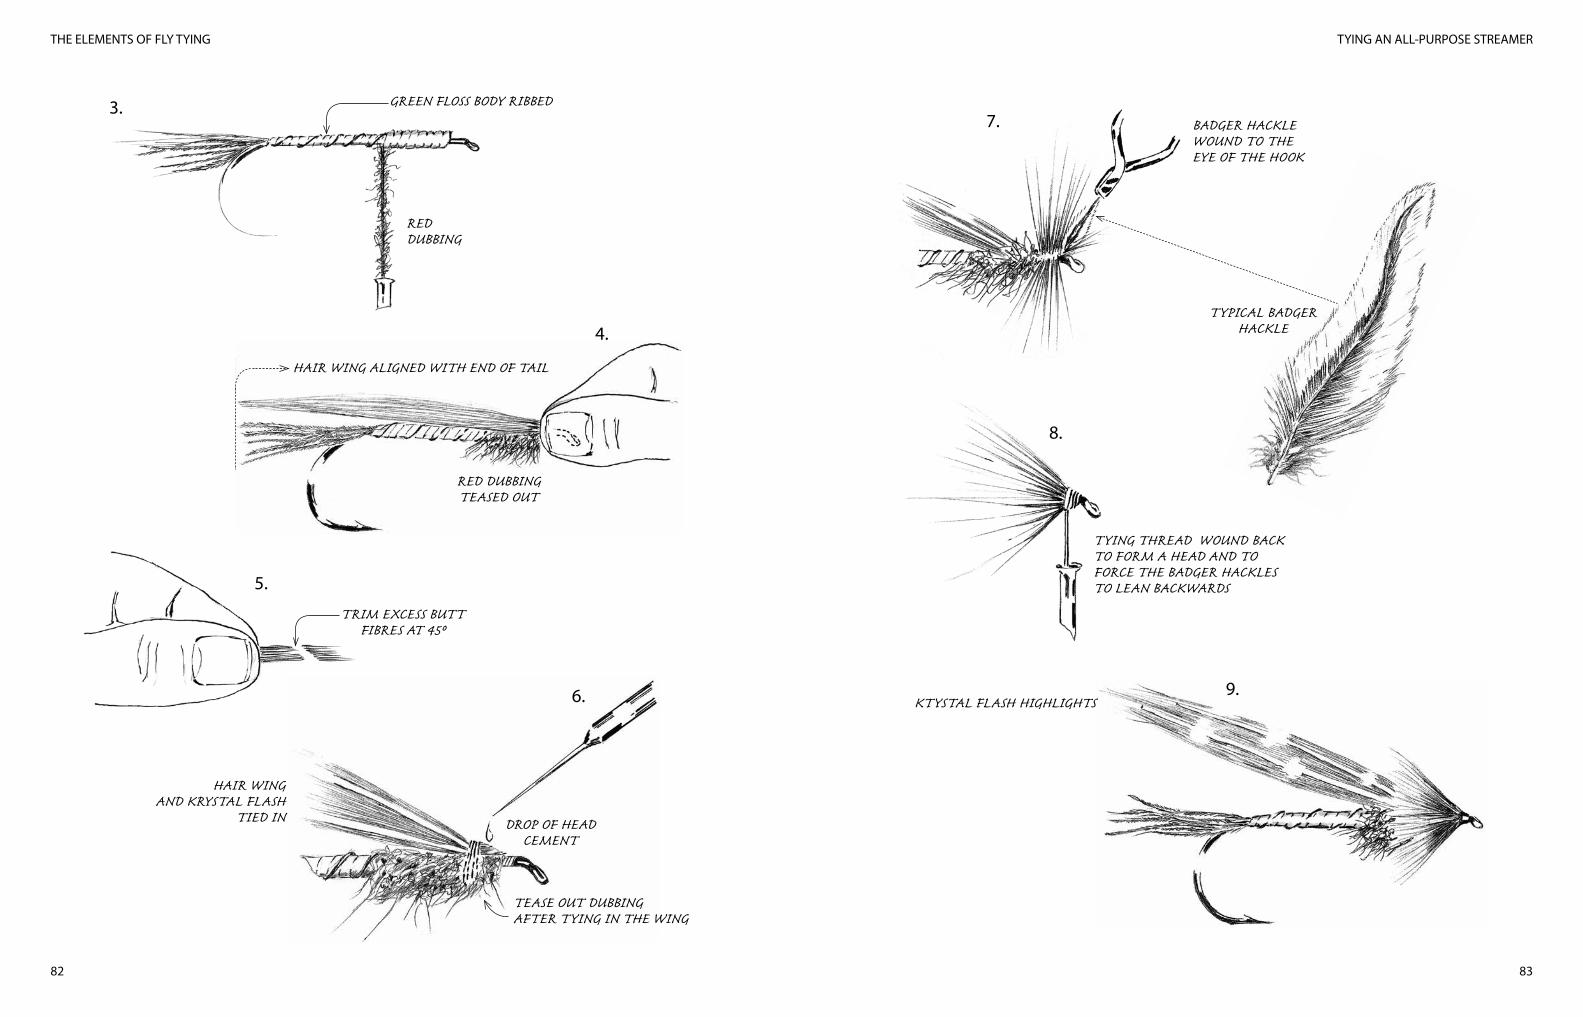
TYING AN ALL-PURPOSE STREAMER
83
THE ELEMENTS OF FLY TYING
82
3.
REDDUBBING
GREEN FLOSS BODY RIBBED
4.
HAIR WING ALIGNED WITH END OF TAIL
RED DUBBINGTEASED OUT
TRIM EXCESS BUTTFIBRES AT 45º
5.
6.
DROP OF HEADCEMENT
HAIR WINGAND KRYSTAL FLASH
TIED IN
TEASE OUT DUBBINGAFTER TYING IN THE WING
7. BADGER HACKLEWOUND TO THEEYE OF THE HOOK
TYPICAL BADGER HACKLE
8.
TYING THREAD WOUND BACK TO FORM A HEAD AND TO FORCE THE BADGER HACKLES TO LEAN BACKWARDS
9.KTYSTAL FLASH HIGHLIGHTS
TYING A BEAD-HEAD WOOLLY BUGGER
8584
TYING A BEAD-HEAD WOOLLY BUGGER
The Woolly Bugger is not an elegant fly. It makes most other patterns look exquisitely delicate and graceful, yet there’s no argument about its effectiveness. It’s just that in comparison, fishing a big, heavily-weighted, nose-diving, tail-gyrating Woolly Bugger is a lot like operating a blunt instrument – so when you do catch a fish on one it can feel a touch artless, even a little like cheating.
Nowadays there are almost as many variations on the Woolly Bugger theme as there are fly tyers, meaning there’s no single, authentic Woolly Bugger. If there once was, it’s lost now in the sands of time, although it likely originated in the eastern United States and eastern Canada as an extension of the Woolly Worm with a marabou tail. But in many ways its somewhat clouded ancestry is quite reassuring because whatever colour or material combinations you happen to use can’t be wrong in the traditional sense. And it’s a pattern that lends itself to creative change, though I suppose purists would scorn the notion of change, arguing that drab colours, like olive, brown and black, are more natural – and more artful. But the truth is you will see as many Woolly Buggers tied in vivid purple, chartreuse or orange these days as you will in natural greens or browns.
Woolly Buggers don’t imitate anything specific and, as such, might rightly be called true attractors, or, at times, aggravators, though patterns tied with bodies of variegated green and brown chenille and palmered with grizzly hackle are suggestive of large dragonfly nymphs. But I think the appeal of the modern Woolly Bugger lies more in its movement and bulk (outline) than in any real suggestion of an insect or baitfish. They do transmit the triggers
of ‘life’, though – of things living, swimming and edible. The movement in them comes from three sources. As the
fly is retrieved, its soft body hackles fold closed and spring open again as soon as the fly is still. Then in water, the marabou tail fibres clump and being so light and fine, move rhythmically and almost continually. Finally, the weight of the bead-head and lead wire up front causes the fly to climb upwards in the retrieve and to nosedive as soon as the retrieve stops. I suspect this undulating, seesaw movement is a strong trigger. It depends a lot on the weight not being overdone, of course. I’ve seen some Woolly Buggers so heavy and so large they are not so much a respected fly pattern as a dangerous weapon. And the speed of the retrieve has to be just right too – not too fast, not too slow and maybe just a little erratic. If you strip the fly too fast you lose this particular element of attraction because the fly will just plane straight back at you under the water.
These are classically stillwater and big river patterns, but I have a friend who I should name and shame – and I could, because he’s much smaller than me – who used a Woolly Bugger pattern the other day on one of the holiest and most technical brown trout streams I know of and caught fish – in front of witnesses, yet. But in a way I am glad he did, because it reminded me that in fly fishing you can only pontificate up to a point and get away with it. Soon enough, some fellow with his size 4, 6X longshank, bullet-headed Ugly Lightning will show up on your most difficult stretch and blow your theories and your technical pose straight out of the water.
What you will need to tie this flyYou will want a size 6 streamer hook, a large brass (or tungsten) bead, black 6/0 thread, medium to heavy lead wire, olive fur and Antron dubbing, round silver ribbing, Flashabou in blue or pearl, an olive marabou plume, a large soft fibred olive or grizzly cock hackle and a fine-tipped permanent marker in black. As a general rule, the variegated fibres of grizzly hackles do well on Woolly Bugger patterns, but not everybody owns a grizzly cape. So we’ll cheat and show you a neat little trick.
CHAPTER 9
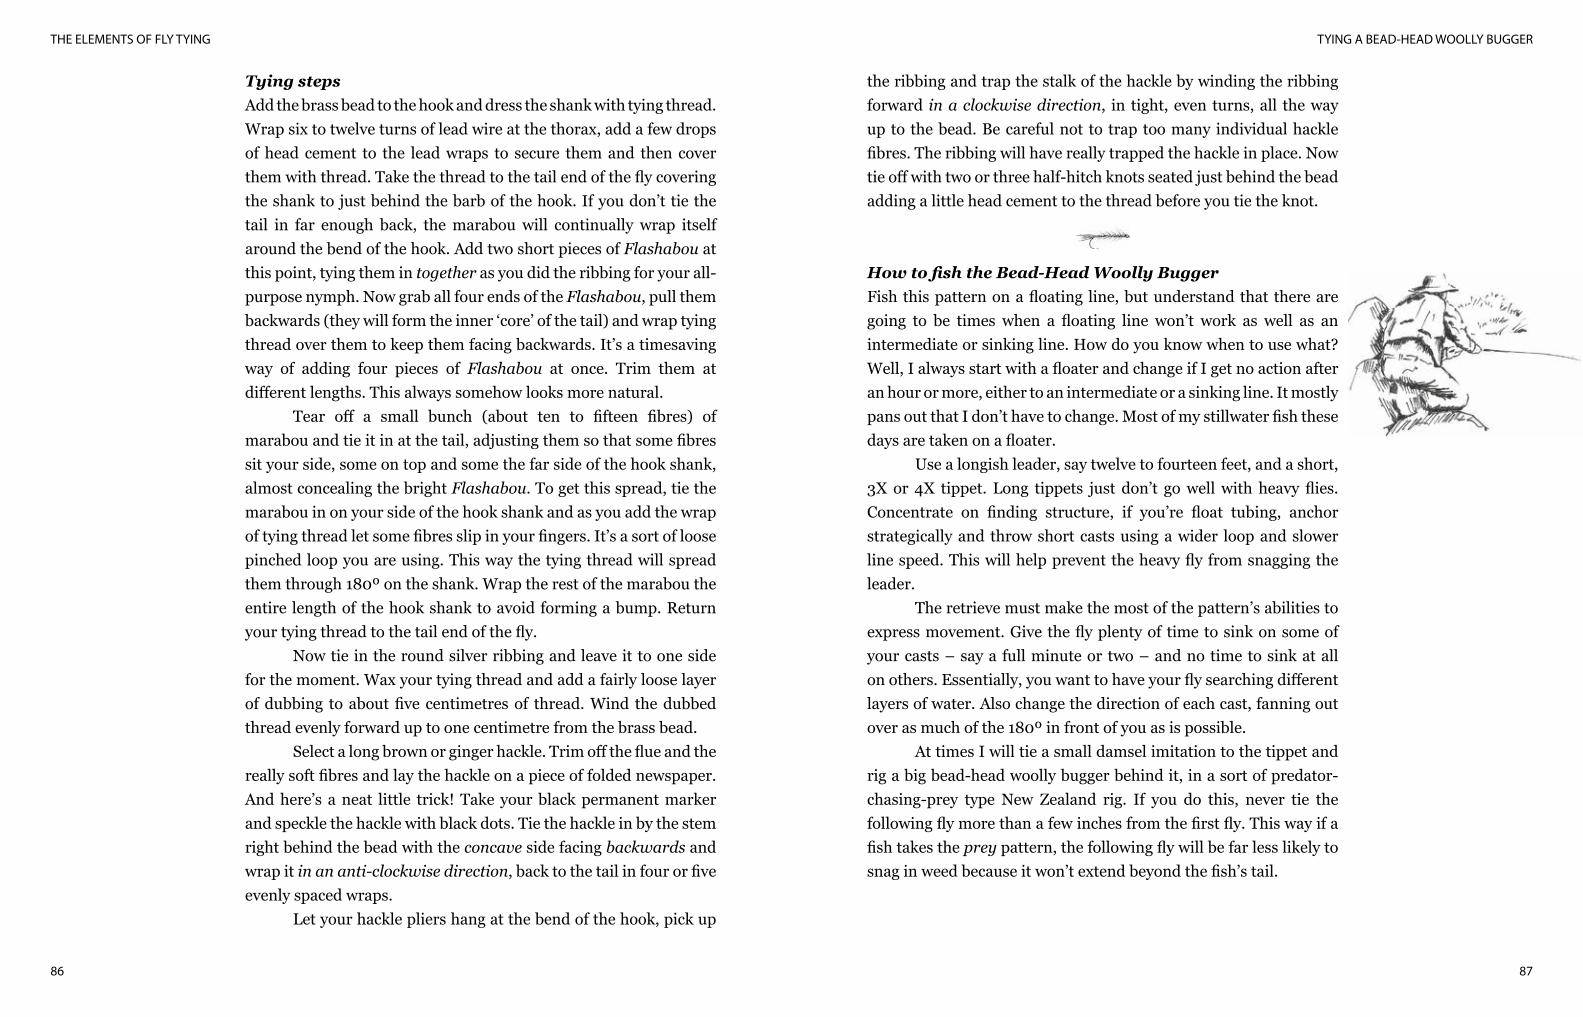
TYING A BEAD-HEAD WOOLLY BUGGER
87
THE ELEMENTS OF FLY TYING
86
Tying stepsAdd the brass bead to the hook and dress the shank with tying thread. Wrap six to twelve turns of lead wire at the thorax, add a few drops of head cement to the lead wraps to secure them and then cover them with thread. Take the thread to the tail end of the fly covering the shank to just behind the barb of the hook. If you don’t tie the tail in far enough back, the marabou will continually wrap itself around the bend of the hook. Add two short pieces of Flashabou at this point, tying them in together as you did the ribbing for your all-purpose nymph. Now grab all four ends of the Flashabou, pull them backwards (they will form the inner ‘core’ of the tail) and wrap tying thread over them to keep them facing backwards. It’s a timesaving way of adding four pieces of Flashabou at once. Trim them at different lengths. This always somehow looks more natural.
Tear off a small bunch (about ten to fifteen fibres) of marabou and tie it in at the tail, adjusting them so that some fibres sit your side, some on top and some the far side of the hook shank, almost concealing the bright Flashabou. To get this spread, tie the marabou in on your side of the hook shank and as you add the wrap of tying thread let some fibres slip in your fingers. It’s a sort of loose pinched loop you are using. This way the tying thread will spread them through 180º on the shank. Wrap the rest of the marabou the entire length of the hook shank to avoid forming a bump. Return your tying thread to the tail end of the fly.
Now tie in the round silver ribbing and leave it to one side for the moment. Wax your tying thread and add a fairly loose layer of dubbing to about five centimetres of thread. Wind the dubbed thread evenly forward up to one centimetre from the brass bead.
Select a long brown or ginger hackle. Trim off the flue and the really soft fibres and lay the hackle on a piece of folded newspaper. And here’s a neat little trick! Take your black permanent marker and speckle the hackle with black dots. Tie the hackle in by the stem right behind the bead with the concave side facing backwards and wrap it in an anti-clockwise direction, back to the tail in four or five evenly spaced wraps.
Let your hackle pliers hang at the bend of the hook, pick up
the ribbing and trap the stalk of the hackle by winding the ribbing forward in a clockwise direction, in tight, even turns, all the way up to the bead. Be careful not to trap too many individual hackle fibres. The ribbing will have really trapped the hackle in place. Now tie off with two or three half-hitch knots seated just behind the bead adding a little head cement to the thread before you tie the knot.
How to fish the Bead-Head Woolly Bugger Fish this pattern on a floating line, but understand that there are going to be times when a floating line won’t work as well as an intermediate or sinking line. How do you know when to use what? Well, I always start with a floater and change if I get no action after an hour or more, either to an intermediate or a sinking line. It mostly pans out that I don’t have to change. Most of my stillwater fish these days are taken on a floater.
Use a longish leader, say twelve to fourteen feet, and a short, 3X or 4X tippet. Long tippets just don’t go well with heavy flies. Concentrate on finding structure, if you’re float tubing, anchor strategically and throw short casts using a wider loop and slower line speed. This will help prevent the heavy fly from snagging the leader.
The retrieve must make the most of the pattern’s abilities to express movement. Give the fly plenty of time to sink on some of your casts – say a full minute or two – and no time to sink at all on others. Essentially, you want to have your fly searching different layers of water. Also change the direction of each cast, fanning out over as much of the 180º in front of you as is possible.
At times I will tie a small damsel imitation to the tippet and rig a big bead-head woolly bugger behind it, in a sort of predator-chasing-prey type New Zealand rig. If you do this, never tie the following fly more than a few inches from the first fly. This way if a fish takes the prey pattern, the following fly will be far less likely to snag in weed because it won’t extend beyond the fish’s tail.
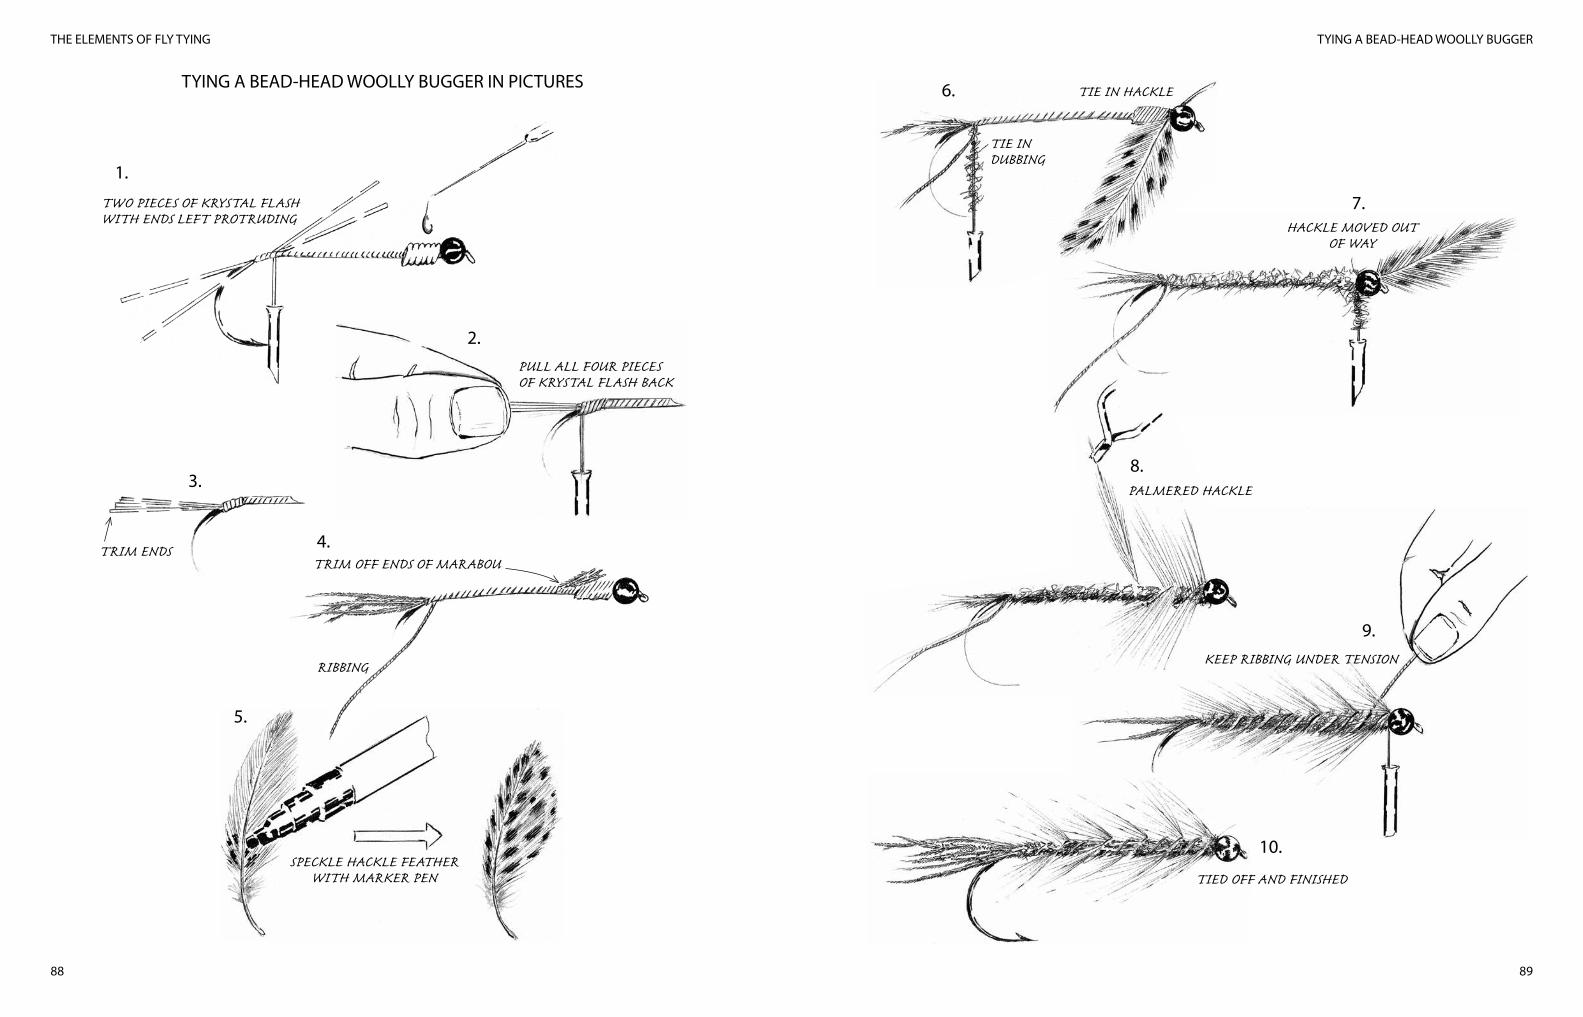
TYING A BEAD-HEAD WOOLLY BUGGER
89
THE ELEMENTS OF FLY TYING
88
TYING A BEAD-HEAD WOOLLY BUGGER IN PICTURES
1.
TWO PIECES OF KRYSTAL FLASHWITH ENDS LEFT PROTRUDING
2.PULL ALL FOUR PIECESOF KRYSTAL FLASH BACK
TRIM ENDS
3.
4.TRIM OFF ENDS OF MARABOU
RIBBING
5.
SPECKLE HACKLE FEATHERWITH MARKER PEN
6. TIE IN HACKLE
TIE INDUBBING
7.HACKLE MOVED OUT
OF WAY
8.PALMERED HACKLE
9.KEEP RIBBING UNDER TENSION
10.
TIED OFF AND FINISHED
TAN ANT
9190
TAN ANT
If you asked a gathering of fly fishers if any of them had ever been caught without an ant pattern when they really needed one, not a single hand would go up. Well, at least not an honest hand. We’ve all been without an ant pattern when that’s all that will work and it always hurts. This despite the fact that ant falls aren’t rare on rivers – or for that matter on lakes – and that they make superb prospecting or searching flies, especially when the fishing is slow. So I’ll share an easy to tie, serviceable, ant pattern with you and I suggest you add a few to your fly box. I’ll tie this one in tan, but you could safely tie red and black versions. I like to keep all three colours in my box.
This is sort of my own pattern by default, in that I can’t remember anymore where I got it from and it probably looks little like the one I originally copied from somewhere. I just find it works well enough on Cape streams and is simplicity itself to make, so it’s stayed.
What you will need to tie this fly A size 16 dry fly or sedge hook, 8/0 tan thread, tan fur mix or synthetic dubbing (or as near as you can get to tan, because colour is not the only trigger here), a partridge feather and a dark brown or black cock hackle.
Tying stepsStart by dressing the entire hook shank with tying thread.
I want you now to look at the hook in your vice and in your mind’s eye, to divide it into thirds – a back two-thirds and a front
one-third. The rear two-thirds will obviously make space for the ant’s abdomen. The point at which the rear and front thirds meet we will keep absolutely separate and distinct to represent the ant’s waist. The front third of the hook will obviously be where we tie in the ant’s head and thorax.
To make sure the waist stays visible we’ll steal a little space from the front and back segments of the hook as we tie the fly. If that sounds Irish I’ll explain in a moment, but I believe the narrow waist and the bulbous abdomen are the key triggers on ant patterns, although as you will see later, legs and pincers help. As far as colour goes, I think tan or rust-brown and a really luminous black are all effective trigger colours for ant patterns.
Dub a short section of tying thread with tan dubbing (fur or synthetic, it makes no real difference, although Antron helps to add a lustrous sparkle) and cover the abdominal area (the back two-thirds) with a single layer dubbing, returning your tying thread to the midpoint of the section you just dubbed. Remember, try not to dub right on to the waist area. Rather stop your dubbing one or two millimetres short of it. Add about two to three centimetres more dubbing to the tying thread, but don’t wrap it. Hold the bobbin in your right hand, lift it directly above the hook shank and add tension to the thread. Now using the fingers of your left hand, stroke the dubbing downwards starting at the top. You do this in one smooth movement. The dubbing will now be on the thread in the form of a clump, or a ‘ball’, perched on the body. Keep the pile of dubbing pressed down with your fingers and wrap the tying thread again around the hook, trapping the clumped dubbing on the shank as you do. You will find you end up with the oval shape of an ant’s abdomen. Now bring the thread up to the waist area.
Tie in a few fibres from a partridge feather, laying them along the top of the hook shank so that the tips extend three or four millimetres beyond the eye. Select a small, dark brown cock hackle. Strip all the soft flue off the feather. Now, unlike with dry flies, we will be using the softer fibres towards the base of the hackle (unless they happen to be white, and on some Indian capes
CHAPTER 10

TAN ANT
93
THE ELEMENTS OF FLY TYING
92
this is unfortunately the case). If the base feathers are white, select a section of the hackle where they are brown and strip off all the fibres below this point. The hot spot is where the fibres have some definition but are not yet stiff. Now strip all the barbs off one side of the hackle. Yes, all. Tie in the hackle stem with the fibres on the underside and the concave side of the feather facing forward. Take one full (360º) turn of hackle around the hook shank. The idea is to end up with a few scraggly legs, not with something that’s bushier than a toilet brush. Tie off the hackle and trim the excess. Now repeat what you did to make the abdomen, but obviously use a smaller amount of dubbing to form the thorax.
Tie off behind the eye. Separate the protruding partridge feathers so that they sit either side of the eye to represent feelers or pincers. If there are too many fibres, snip out the centre ones.
Fishing the ant The interesting thing about this pattern is it fishes better in the film, or even under it, than it does on the surface. So I never dress these ants with floatant and I fish them just as you would an emerger or a soft hackle pattern – in other words dead-drift. In fact, if you add a little weight to some of the ant patterns you tie, say by using fuse wire as an under-wrap on the body, you can fish the sunken ant, a pattern and technique the world’s leading champion of ant patterns, my fishing buddy Ed Herbst, has enormous faith in. Remember this is a river pattern, not a lake fly and it’s best fished dead-drift on a floating line and a light tippet. You will occasionally come across ants on lakes, but then they are mainly flying ants and the hatch is often prolific. It’s not a bad idea to add a pair of cellophane wings to some of your Tan Ant patterns for your stillwater fly box, but then I guess you could say the same for rivers. Adding cellophane wings is, after all, a pretty simple step.
TYING A TAN ANT IN PICTURES
1.DIMENSIONS
ABDOMEN THORAX
WAIST
2. (a)BEGIN BY DUBBING THE WHOLE BODY
(b) THEN MOVE BACK TO THE POINT MARKEDAND DUB OVER UNTIL YOUR DUBBING BOBBIN IS AT THECENTRE OFTHE BODY(SEE BELOW)
(c)SLIDE DUBBING DOWN THE THREAD TO FORM A BALL
3.TIE IN HACKLE AND
TRIM STALK ANDHACKLE PARTRIDGE
BUTTS
4.SLIDE DUBBING DOWNTO FORM THE HEAD AND THORAX
5.NOTICE THE CLEAR
SEGMENTATION OF ABDOMEN,WAIST, HEAD AND THORAX

GODDARD CADDIS
9594
GODDARD CADDIS
This has to be one of the most versatile dry flies ever, right up there with the Adams, the Royal Wulff and the Elk Hair Caddis. Constructed from spun deer hair, it floats extremely well, is highly visible and presents the perfect natural caddis silhouette to fish. Tying it with natural deer hair matches the colour of adult caddisflies fairly well, though most are probably a shade or two darker or, on stillwater, more tan coloured.
The reason I have chosen this pattern for the book is twofold: first, the pattern gives you a good introduction to spinning hollow hair, such as deer or caribou, without being too complex a pattern to tie for other reasons. Second, the Goddard Caddis is one of the simplest hair body flies there is, yet it’s an elegant and very useful pattern in its own right. So you score on both counts.
Adult caddisflies are small insects in the main, though Fred Steynberg and I found a couple on the windows of our motel in Te Anau in New Zealand’s South Island that were probably all of five centimetres long, excluding the antennae!
What you will need to tie this flyYou want a dry fly hook in size 10 through to size 16 (I’d suggest we do this exercise on a size 12 hook), grey or brown Kevlar, or 3/0 Monocord in the same colours, natural grey deer hair from a patch that has finer hair on it and a brown hackle cape.
The art of spinning deer hairBefore we start, have a look at your deer hair patch. I have a very large section that has three distinctive colour areas on it, varying
from dark brown, to light tan and even white. In the tan section, the individual fibres are around three centimetres long. If you dig the points of your scissors deep into the skin and snip off a small sheaf of hair, there is a little fluff at the base of the patch. This is called down and it’s what keeps the animal warm in winter. The rest are guard hairs and essentially they help protect the animal from injury and keep off the rain. On some patches there is more base fur than on others. Maybe it has something to do with the time of the year the animal was culled. Like we saw when we worked with the squirrel tail, you first remove the down before you start spinning.
In spinning deer hair, thread tension can become a nightmare because you need to pull down on the wraps of hair pretty firmly as you will see. Standard thread often snaps in the process, which is why using something strong like Kevlar or 3/0 Monocord really makes sense.
To begin with, let’s do a simple exercise. Dress the back half of your hook shank with standard tying thread (working on the assumption you don’t have Kevlar or Monocord), we will start spinning hair from the middle of the hook to get in a little practice. Cut a sheaf of hair that’s not too thin and not too fat. What does that boil down to? Well, I suggest each deer hair sheaf should be about as thick as a knitting needle. I just cut a sheaf myself and it measured four millimetres across.
Cut out a sheaf of deer hair, remove all the down and trim off the tips. Hold the sheaf in your left hand at an angle to the hook shank, just forward of where your tying thread dressing ends. Now take two loose wraps of tying thread around the middle of the sheaf, putting enough downward pressure on the bobbin to feel the thread only just bite gently into the hair. Keep your fingers in place and then really tighten and as you do, open the fingers on your left hand and keep wrapping. You will see the fur spin around the hook shank.
It’s a very satisfying thing to do and, not unlike casting a fly line, there’s a bit of timing involved in getting it right. It goes like this. Let go the fly line too early and the cast collapses. Let go of
CHAPTER 11
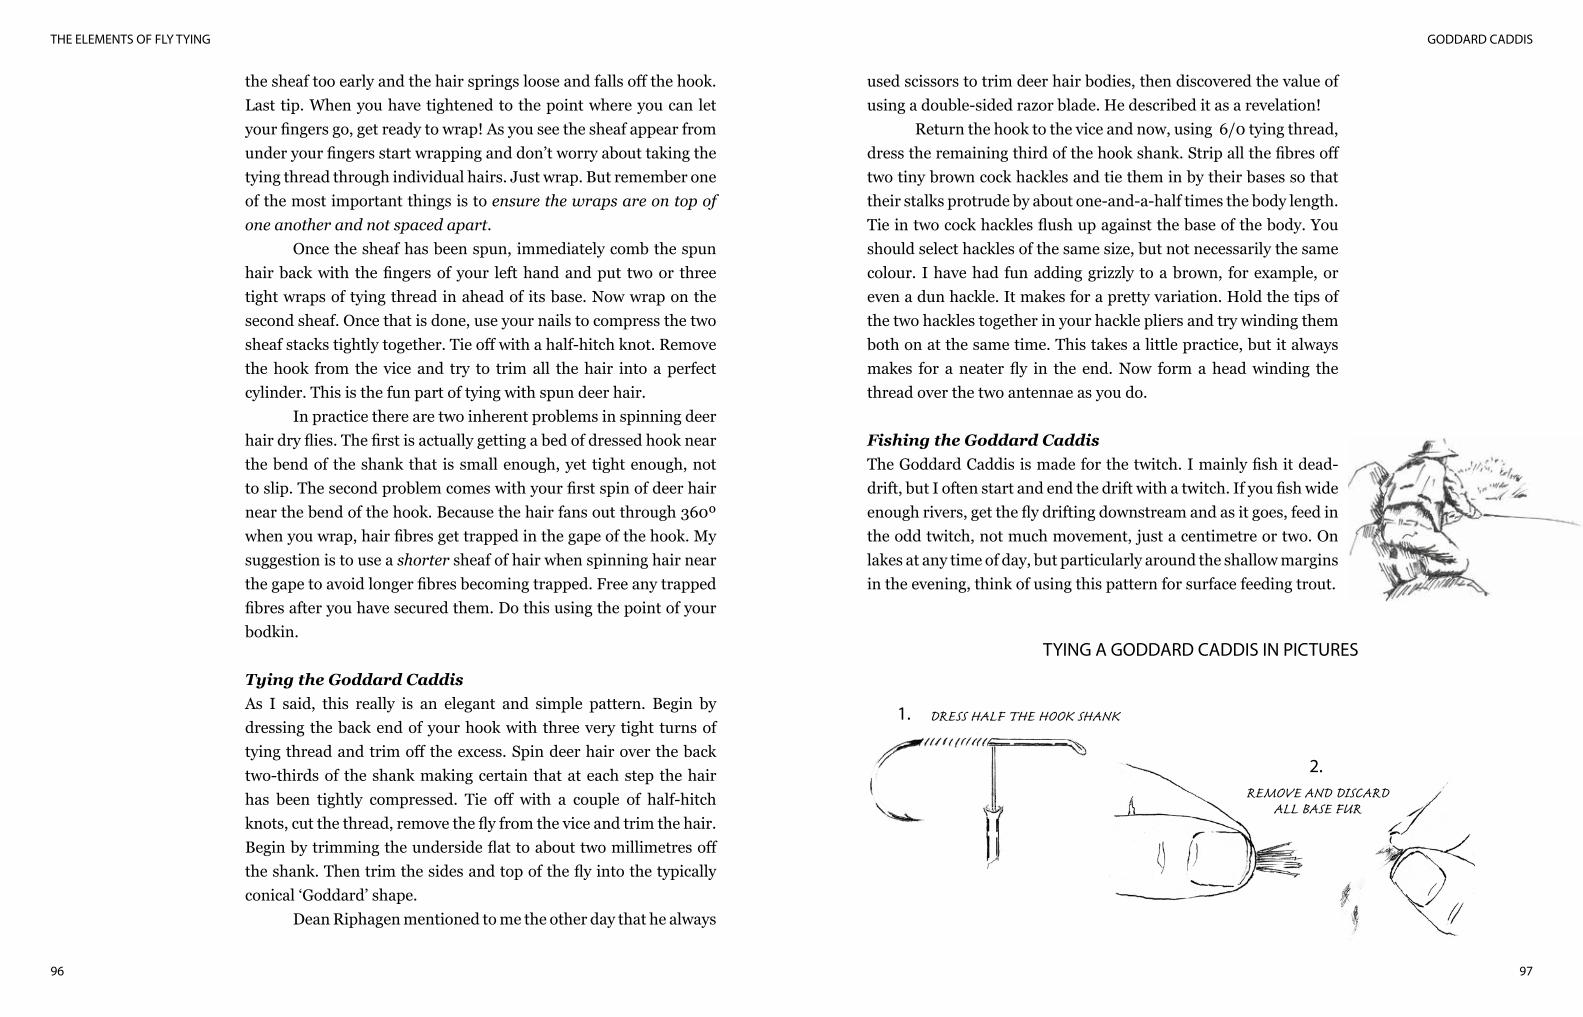
GODDARD CADDIS
97
THE ELEMENTS OF FLY TYING
96
the sheaf too early and the hair springs loose and falls off the hook. Last tip. When you have tightened to the point where you can let your fingers go, get ready to wrap! As you see the sheaf appear from under your fingers start wrapping and don’t worry about taking the tying thread through individual hairs. Just wrap. But remember one of the most important things is to ensure the wraps are on top of one another and not spaced apart.
Once the sheaf has been spun, immediately comb the spun hair back with the fingers of your left hand and put two or three tight wraps of tying thread in ahead of its base. Now wrap on the second sheaf. Once that is done, use your nails to compress the two sheaf stacks tightly together. Tie off with a half-hitch knot. Remove the hook from the vice and try to trim all the hair into a perfect cylinder. This is the fun part of tying with spun deer hair.
In practice there are two inherent problems in spinning deer hair dry flies. The first is actually getting a bed of dressed hook near the bend of the shank that is small enough, yet tight enough, not to slip. The second problem comes with your first spin of deer hair near the bend of the hook. Because the hair fans out through 360º when you wrap, hair fibres get trapped in the gape of the hook. My suggestion is to use a shorter sheaf of hair when spinning hair near the gape to avoid longer fibres becoming trapped. Free any trapped fibres after you have secured them. Do this using the point of your bodkin.
Tying the Goddard CaddisAs I said, this really is an elegant and simple pattern. Begin by dressing the back end of your hook with three very tight turns of tying thread and trim off the excess. Spin deer hair over the back two-thirds of the shank making certain that at each step the hair has been tightly compressed. Tie off with a couple of half-hitch knots, cut the thread, remove the fly from the vice and trim the hair. Begin by trimming the underside flat to about two millimetres off the shank. Then trim the sides and top of the fly into the typically conical ‘Goddard’ shape. Dean Riphagen mentioned to me the other day that he always
used scissors to trim deer hair bodies, then discovered the value of using a double-sided razor blade. He described it as a revelation! Return the hook to the vice and now, using 6/0 tying thread, dress the remaining third of the hook shank. Strip all the fibres off two tiny brown cock hackles and tie them in by their bases so that their stalks protrude by about one-and-a-half times the body length. Tie in two cock hackles flush up against the base of the body. You should select hackles of the same size, but not necessarily the same colour. I have had fun adding grizzly to a brown, for example, or even a dun hackle. It makes for a pretty variation. Hold the tips of the two hackles together in your hackle pliers and try winding them both on at the same time. This takes a little practice, but it always makes for a neater fly in the end. Now form a head winding the thread over the two antennae as you do.
Fishing the Goddard CaddisThe Goddard Caddis is made for the twitch. I mainly fish it dead-drift, but I often start and end the drift with a twitch. If you fish wide enough rivers, get the fly drifting downstream and as it goes, feed in the odd twitch, not much movement, just a centimetre or two. On lakes at any time of day, but particularly around the shallow margins in the evening, think of using this pattern for surface feeding trout.
TYING A GODDARD CADDIS IN PICTURES
1. DRESS HALF THE HOOK SHANK
2.REMOVE AND DISCARD
ALL BASE FUR
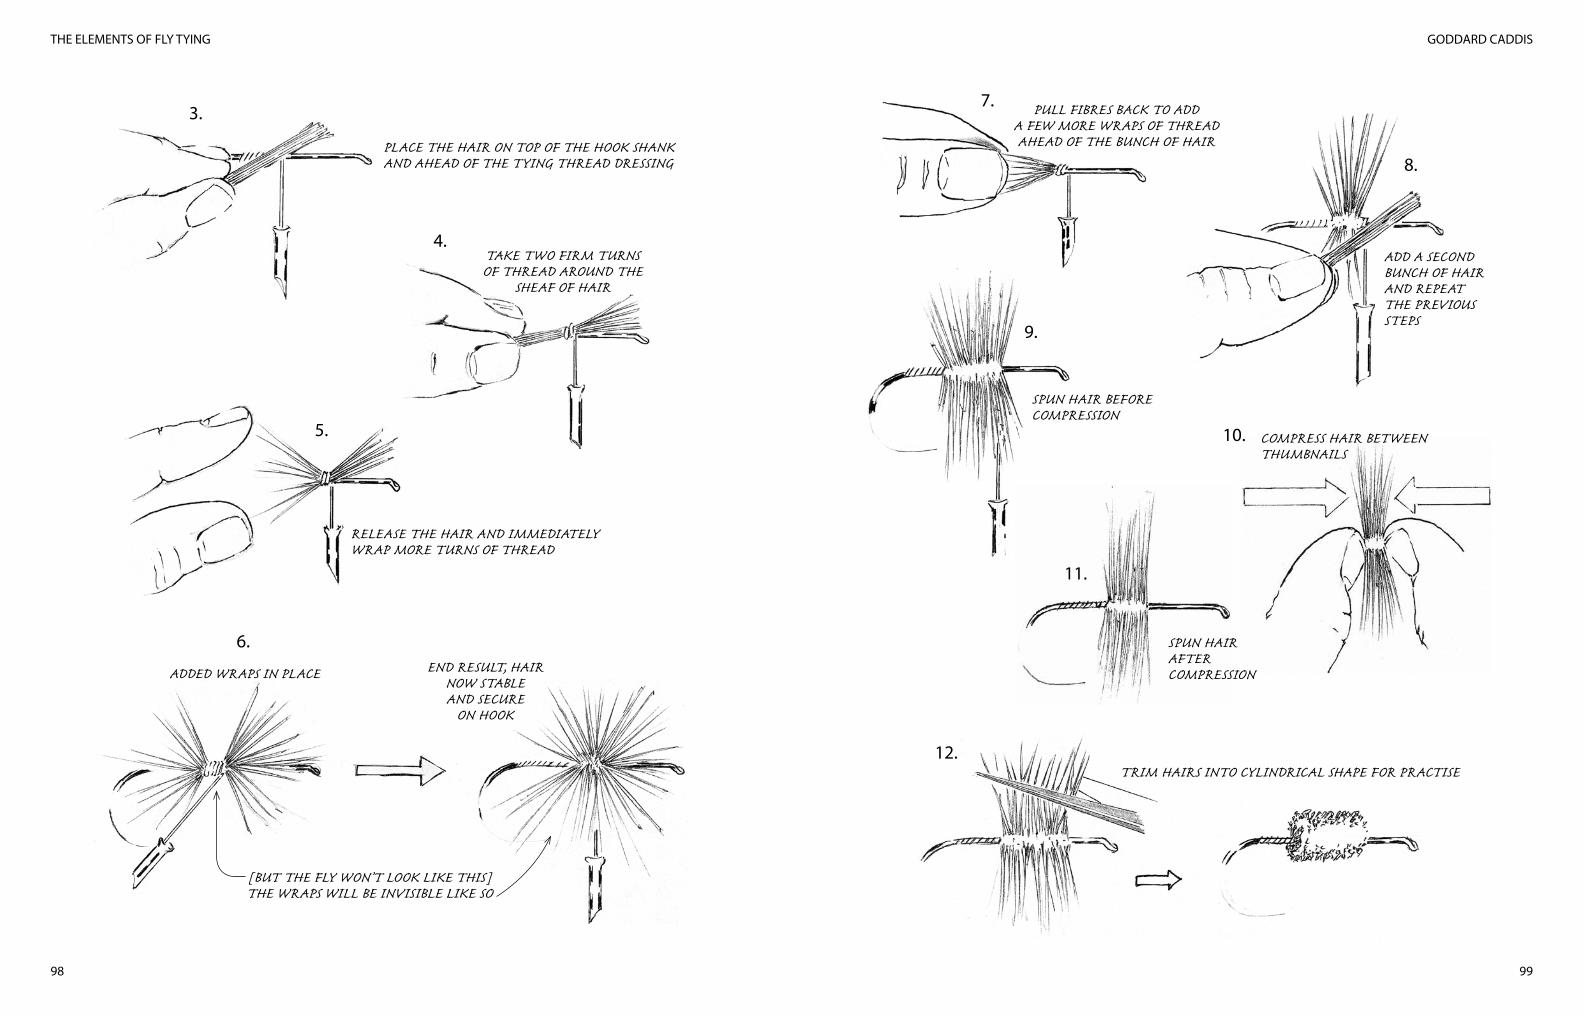
GODDARD CADDIS
99
THE ELEMENTS OF FLY TYING
98
3.
PLACE THE HAIR ON TOP OF THE HOOK SHANKAND AHEAD OF THE TYING THREAD DRESSING
4.TAKE TWO FIRM TURNSOF THREAD AROUND THE
SHEAF OF HAIR
5.
RELEASE THE HAIR AND IMMEDIATELYWRAP MORE TURNS OF THREAD
6.
ADDED WRAPS IN PLACE END RESULT, HAIRNOW STABLEAND SECURE
ON HOOK
[BUT THE FLY WON’T LOOK LIKE THIS]THE WRAPS WILL BE INVISIBLE LIKE SO
7. PULL FIBRES BACK TO ADDA FEW MORE WRAPS OF THREADAHEAD OF THE BUNCH OF HAIR
8.
ADD A SECONDBUNCH OF HAIRAND REPEATTHE PREVIOUSSTEPS
9.
SPUN HAIR BEFORECOMPRESSION
10. COMPRESS HAIR BETWEENTHUMBNAILS
11.
SPUN HAIRAFTERCOMPRESSION
12.TRIM HAIRS INTO CYLINDRICAL SHAPE FOR PRACTISE
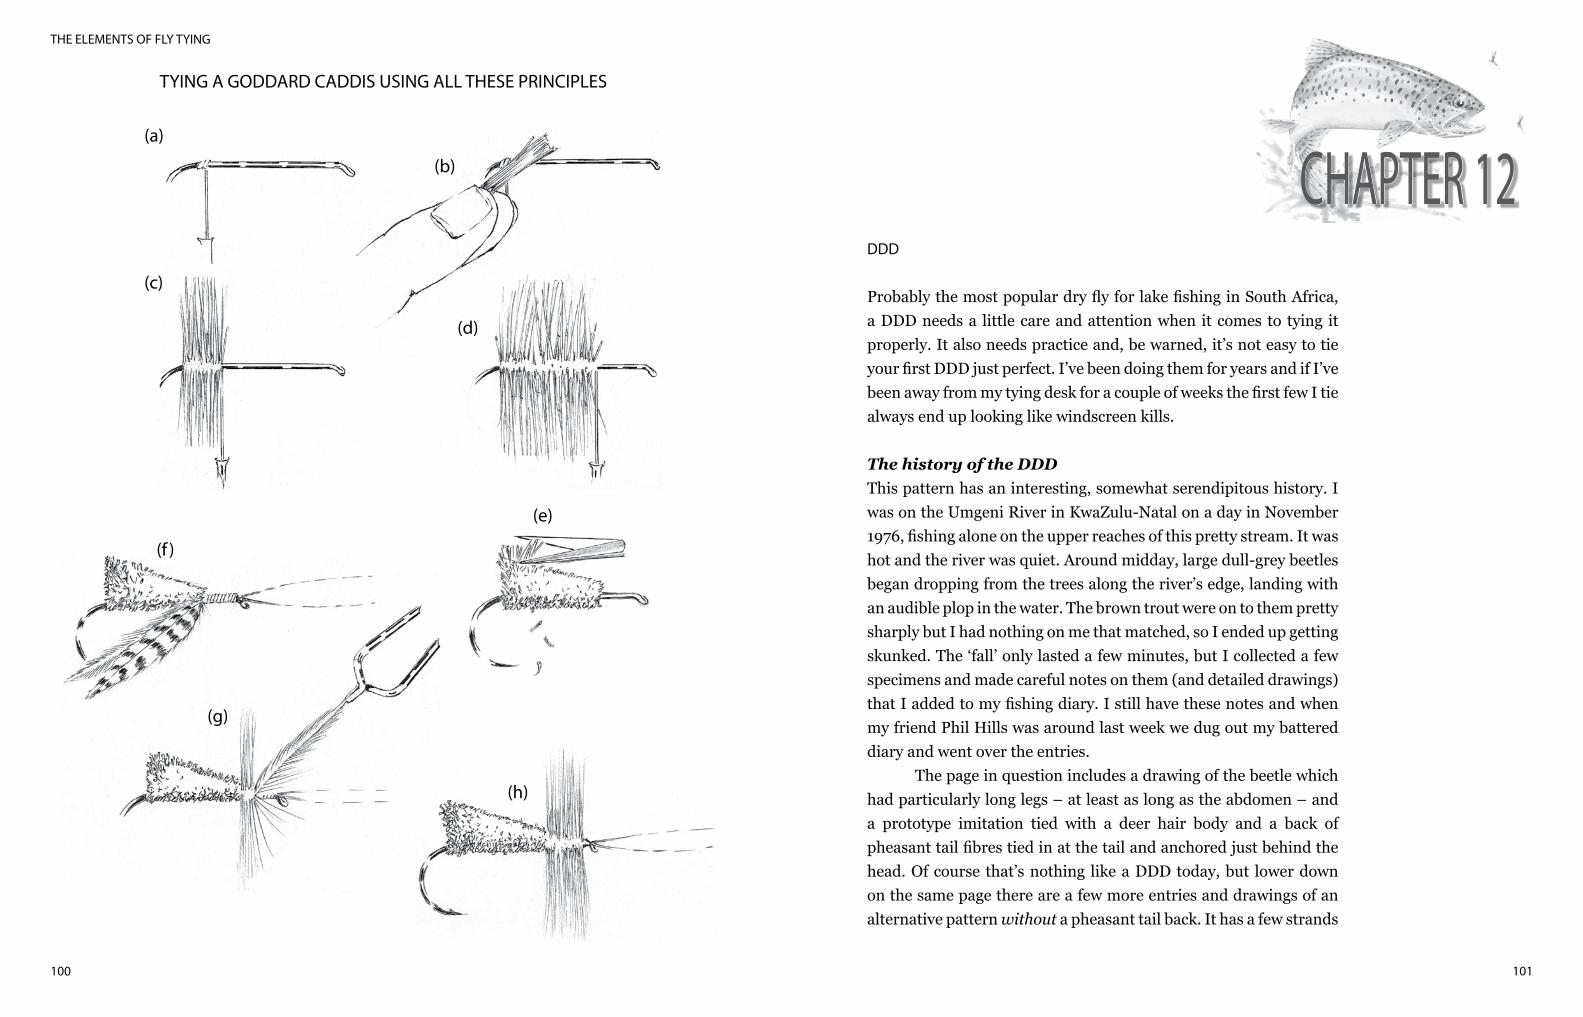
101
THE ELEMENTS OF FLY TYING
100
TYING A GODDARD CADDIS USING ALL THESE PRINCIPLES
DDD
Probably the most popular dry fly for lake fishing in South Africa, a DDD needs a little care and attention when it comes to tying it properly. It also needs practice and, be warned, it’s not easy to tie your first DDD just perfect. I’ve been doing them for years and if I’ve been away from my tying desk for a couple of weeks the first few I tie always end up looking like windscreen kills.
The history of the DDDThis pattern has an interesting, somewhat serendipitous history. I was on the Umgeni River in KwaZulu-Natal on a day in November 1976, fishing alone on the upper reaches of this pretty stream. It was hot and the river was quiet. Around midday, large dull-grey beetles began dropping from the trees along the river’s edge, landing with an audible plop in the water. The brown trout were on to them pretty sharply but I had nothing on me that matched, so I ended up getting skunked. The ‘fall’ only lasted a few minutes, but I collected a few specimens and made careful notes on them (and detailed drawings) that I added to my fishing diary. I still have these notes and when my friend Phil Hills was around last week we dug out my battered diary and went over the entries.
The page in question includes a drawing of the beetle which had particularly long legs – at least as long as the abdomen – and a prototype imitation tied with a deer hair body and a back of pheasant tail fibres tied in at the tail and anchored just behind the head. Of course that’s nothing like a DDD today, but lower down on the same page there are a few more entries and drawings of an alternative pattern without a pheasant tail back. It has a few strands
(a)
(b)
(c)
(d)
(e)
(f )
(g)
(h)
CHAPTER 12

DDD
103
THE ELEMENTS OF FLY TYING
102
of deer hair sticking out the back and sides of the fly – presumably to imitate the long trailing legs the beetle had. It seems I’d dispensed with the pheasant tail back as an unnecessary trigger, but the next little annotation alongside this drawing is really interesting. It says simply, ‘Floats better with klipspringer.’ Now that I come to think back on it, this must have been the first prototype of the DDD, though I never knew it at the time.
Some weeks later I was fishing a bunch of small lakes on a farm called Briar Mains in the foothills of the Drakensberg with my friends Hugh Huntley, Fritz Hoch and Neil Hodges. We had pulled in under the shade of a small grove of trees to eat lunch when we ran into a ‘hatch’ of a very similar beetle and again the fish went mad for them and I caught a few on the prototype beetles I had tied up with klipspringer hair as the body and legs.
At the time we were regularly fishing some mountain lakes in the Dargle district of KwaZulu-Natal and on a whim I tried the klipspringer beetle on some of the smaller ponds. It floated well and there were days when the trout took it pretty confidently. So I began to take notice of the pattern, even added a collar of cock hackle and tried a cock hackle tail, but in the end went back to the deer hair tail and left the body untidily clipped to suggest legs. It caught fish just often enough to keep up our interest. Back then, the hallmark of a good DDD was just how untidy it looked.
A few months later a fellow by the name of Bill Duckworth joined us for a weekend on the lakes. At the time we had an old caravan parked up there and although life was a little Spartan, it was also full of fish. Bill was new to fly fishing so we stuck him in the shallows of a small pond called Trophy Dam, just below the caravan, gave him a really big klipspringer beetle pattern, around size 6, and told him to leave the fly alone and just strike whenever it disappeared. It seemed an easier introduction for him to fly fishing than having to continually cast and retrieve a heavy streamer or a tiny nymph. He caught a few fish and we began to take even more notice of the fly. We found it worked well in choppy water and then best nearer the middle of the day.
Later my fishing buddy, Hugh Huntley, began tying the
pattern with a collar of klipspringer hair in place of cock hackle, which made it look even buggier, and inch-by-inch, the klipspringer beetle became the dry fly we’d always be most likely to use on lakes.
We eventually introduced the pattern to an old-timer and very good friend of mine, Taffy Walters. There’s a picture of him in the selfsame diary by the way, a few pages on from the klipspringer beetle story, holding up a deep-sided rainbow he’d taken from one our Dargle lakes. (He hadn’t taken it on the klipspringer beetle pattern though, but on what turned out to be another prototype – the Red-Eyed Damsel, and there’s a specimen of that fly stuck into the pages of the diary.) But it was Taffy, who one day up at the Dargle, asked about the floating beetle pattern and how come Bill Duckworth, who by then was tying his own, had ended up using virtually nothing else. Studying the fly he lifted it against the light and said, ‘DDD!’ We asked what that meant and he said, ‘Duckworth’s Dargle Delight!’ And the name just stuck.
What you will need to tie this flyYou want a standard wet fly hook in size 10 or 12 for lakes and down to size 16 for streams, Kevlar or Monocord in tan or olive and a patch of coarse deer hair. I sometimes also add a piece of pearl Krystal Flash tied at right angles to the shank just ahead of the body. I no longer recommend klipspringer hair for DDDs. It works a treat, but remember the animal is protected. I get a little concerned that promoting its use could end up helping klipspringers into extinction.
Tying stepsTo tie in the tail, first wrap a small base of Kevlar or 3/0 Monocord just above the barb. Cut a modest bunch of hair and measure the fibres against the hook shank so that after you secure them, they extend back roughly the body length. Trim off a significant portion of the hair at its butt. This is an important step. Tie in this tail sheaf only a few millimetres from the end of the butts. Normally we tie in deer hair roughly in the middle of the fibres, but if you do this for

DDD
105
THE ELEMENTS OF FLY TYING
104
tail fibres it becomes hard to separate the protruding butts from the hair you want to keep for the tail when you come to trim the fly. In other words, the shorter fibres near the tail will help you define the actual tail fibres when you come to do the trimming. Neither should your first tail wrap be too tight because that will cause the tail fibres to flare too much. But certainly tighten the second and third wraps, and then spin the hair. Spin further sheaves of fur along the body and between each sheaf you spin on, compress the fibres tightly with your fingernails. Cover only three-quarters of the shank with spun hair, leaving at least a quarter of the front of the shank bare to spin in the hair collar hackle.
Once you’ve covered the shank and have compressed the hair, tie off, remove the fly and trim it to a roughly conical shape. Try not to do this with anything like surgical precision otherwise the fly will look too neat and tidy.
Trim the underside of the fly, first making it flat underneath, right back to the tail. Then angle your scissors inwards from the front of the fly to the back and trim the sides of the body into a cone. In the tail area, make sure you don’t trim right up against the hook shank because then you are certain to cut off a few precious tail fibres. Now trim the top of the body, again from front to back. Slope it downwards from head to the tail.
Once trimmed, put the hook back in the vice. You can add a strip of Flashabou or Krystal Flash at this point, if you want. It’s an optional step. If you do go for it, tie in a single strand at right angles to the hook shank and trim so that each end is about two centimetres long.
The hair hackle collarCut about as much hair as you used to form the tail. Make sure that you first trim the butt ends of these fibres nice and short and spin the hair with the butts pressed against the body hair of the fly, the butts positioned so that they are aligned with, or the same height as the hair on the body. Now when you spin the hackle, the butts will merge with and add to the body hair, while the points will radiate out, giving a really buggy look to the hackle and to the fly. At first
the hackle fibres will fan out in a forward-pointing cone over the eye. Push these fibres back with your nails and build up a head with wraps of tying thread. This will help the hair hackle stay put in the right position.
Fishing the DDDThis is a useful dry fly for prospecting on lakes, but also works well enough in rivers. I like them in natural and yellow and always with a collar of deer hair rather than cock hackle. But results seem to indicate that the DDD works well enough tied with a conventional cock or hen hackle.
There’s little doubt the DDD imitates a terrestrial and you can take your pick from moths, beetles or grasshoppers, though I’m not sure it matters. Again, though, the pattern bristles with enough triggers to represent a heap of different things – there’s bulk in the water, yet with movement from the hair hackle and long tail fibres, and there’s a general buggy look to the pattern as well.
I fish the DDD with heaps of confidence, which I think helps with any pattern’s success. On lakes I drift them with the wind, or I throw them straight into the teeth of the wind and let them drift back towards me. That way you get much less by way of drag problems. Sometimes I twitch them slightly, but I never do this if I’m getting spontaneous takes anyway. Then I sometimes use a DDD as an indicator fly to drift sub-surface nymphs under, particularly bloodworm imitations. Because I often fish DDDs in lakes with seriously big trout in them, I sometimes use a large, size 6, extra-heavy wire wet fly hook to tie them on.
The final and most important point on fishing the DDD – never strike early. Let the fish take it, turn down. Only then should you strike. Look, this is not exactly a law of the Medes and Persians, but it’s a pretty useful guideline to remember.
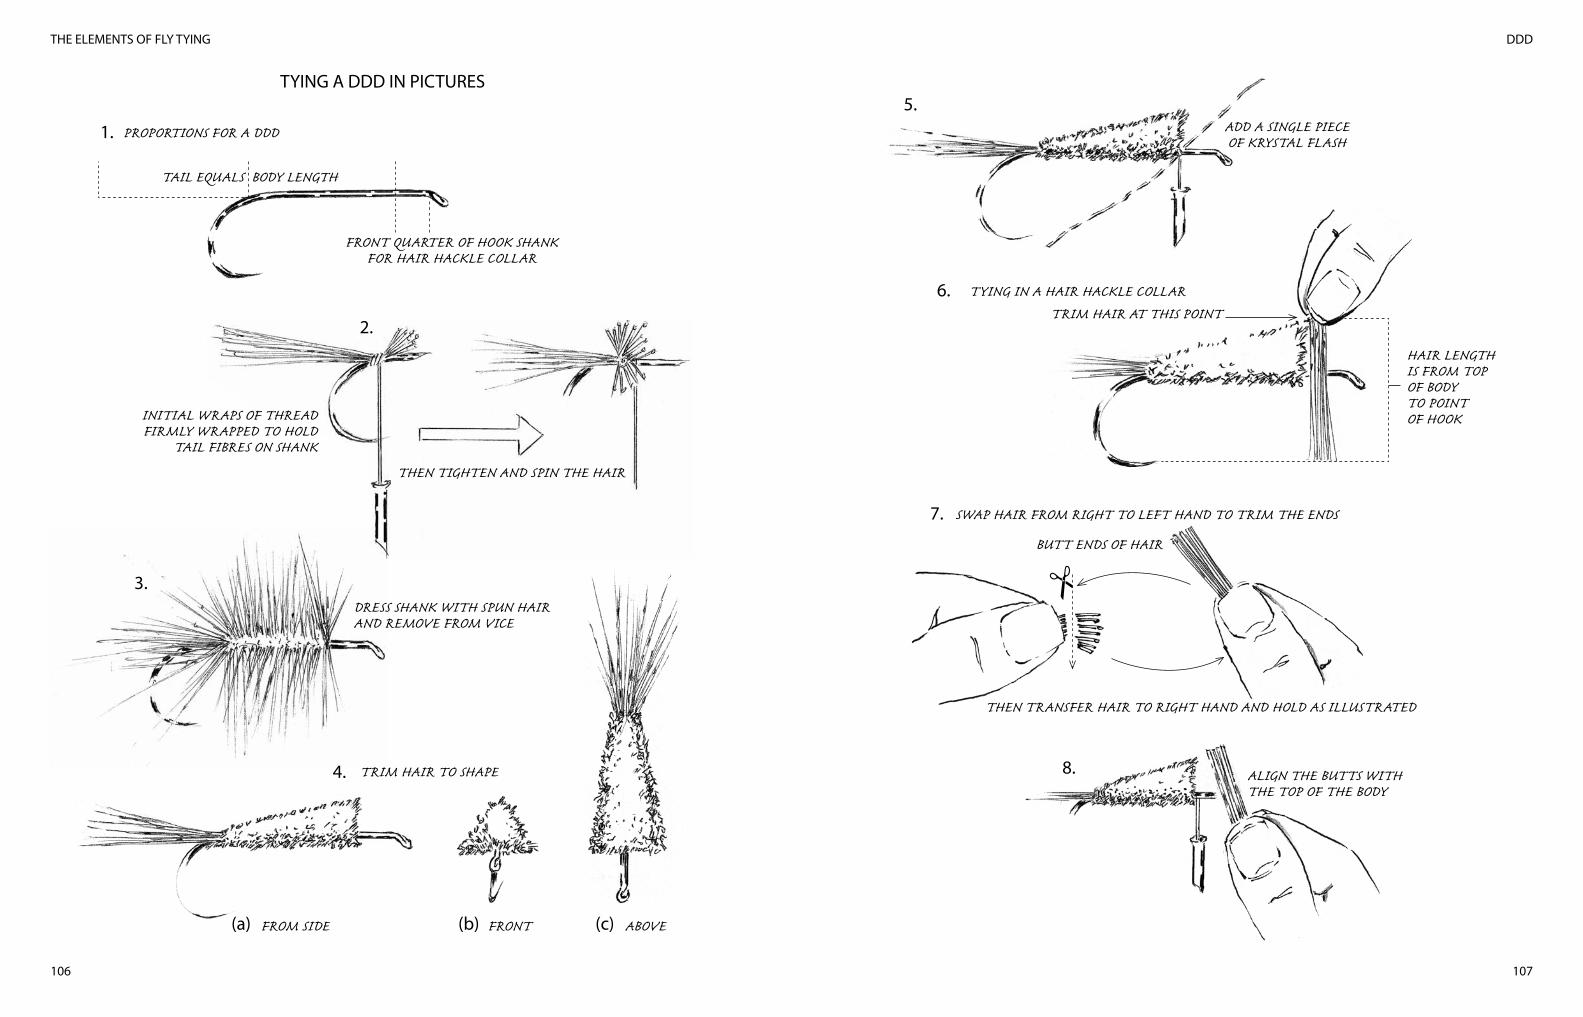
DDD
107
THE ELEMENTS OF FLY TYING
106
TYING A DDD IN PICTURES
1. PROPORTIONS FOR A DDD
TAIL EQUALS BODY LENGTH
FRONT QUARTER OF HOOK SHANKFOR HAIR HACKLE COLLAR
INITIAL WRAPS OF THREAD FIRMLY WRAPPED TO HOLD
TAIL FIBRES ON SHANK
2.
THEN TIGHTEN AND SPIN THE HAIR
3.DRESS SHANK WITH SPUN HAIRAND REMOVE FROM VICE
4. TRIM HAIR TO SHAPE
(a) FROM SIDE (b) FRONT (c) ABOVE
ADD A SINGLE PIECEOF KRYSTAL FLASH
5.
6. TYING IN A HAIR HACKLE COLLAR
TRIM HAIR AT THIS POINT
HAIR LENGTHIS FROM TOPOF BODYTO POINTOF HOOK
7. SWAP HAIR FROM RIGHT TO LEFT HAND TO TRIM THE ENDS
BUTT ENDS OF HAIR
THEN TRANSFER HAIR TO RIGHT HAND AND HOLD AS ILLUSTRATED
ALIGN THE BUTTS WITH THE TOP OF THE BODY
8.
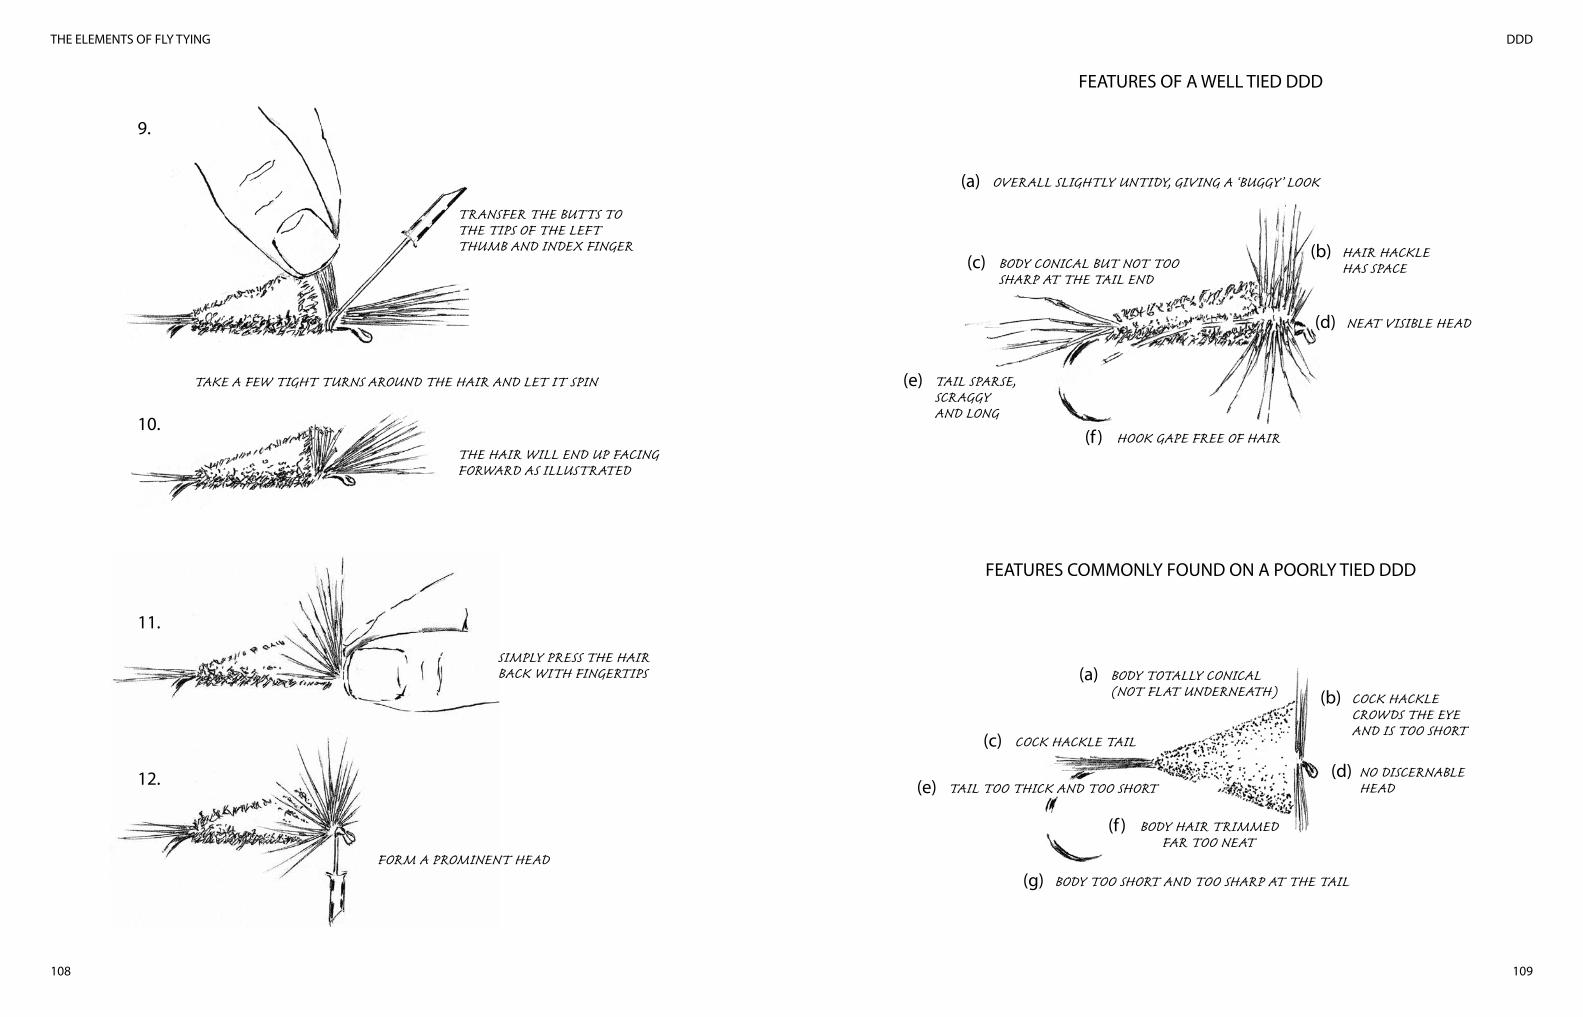
DDD
109
THE ELEMENTS OF FLY TYING
108
FEATURES OF A WELL TIED DDD
FEATURES COMMONLY FOUND ON A POORLY TIED DDD
9.
TRANSFER THE BUTTS TO THE TIPS OF THE LEFTTHUMB AND INDEX FINGER
10.
TAKE A FEW TIGHT TURNS AROUND THE HAIR AND LET IT SPIN
11.
12.
THE HAIR WILL END UP FACINGFORWARD AS ILLUSTRATED
SIMPLY PRESS THE HAIRBACK WITH FINGERTIPS
FORM A PROMINENT HEAD
(a) OVERALL SLIGHTLY UNTIDY, GIVING A ‘BUGGY’ LOOK
(c) BODY CONICAL BUT NOT TOOSHARP AT THE TAIL END
(e) TAIL SPARSE,SCRAGGYAND LONG
(b) HAIR HACKLEHAS SPACE
(d) NEAT VISIBLE HEAD
(f ) HOOK GAPE FREE OF HAIR
(a) BODY TOTALLY CONICAL(NOT FLAT UNDERNEATH)
(c) COCK HACKLE TAIL
(e) TAIL TOO THICK AND TOO SHORT
(f ) BODY HAIR TRIMMED FAR TOO NEAT
(b) COCK HACKLECROWDS THE EYEAND IS TOO SHORT
(d) NO DISCERNABLEHEAD
(g) BODY TOO SHORT AND TOO SHARP AT THE TAIL
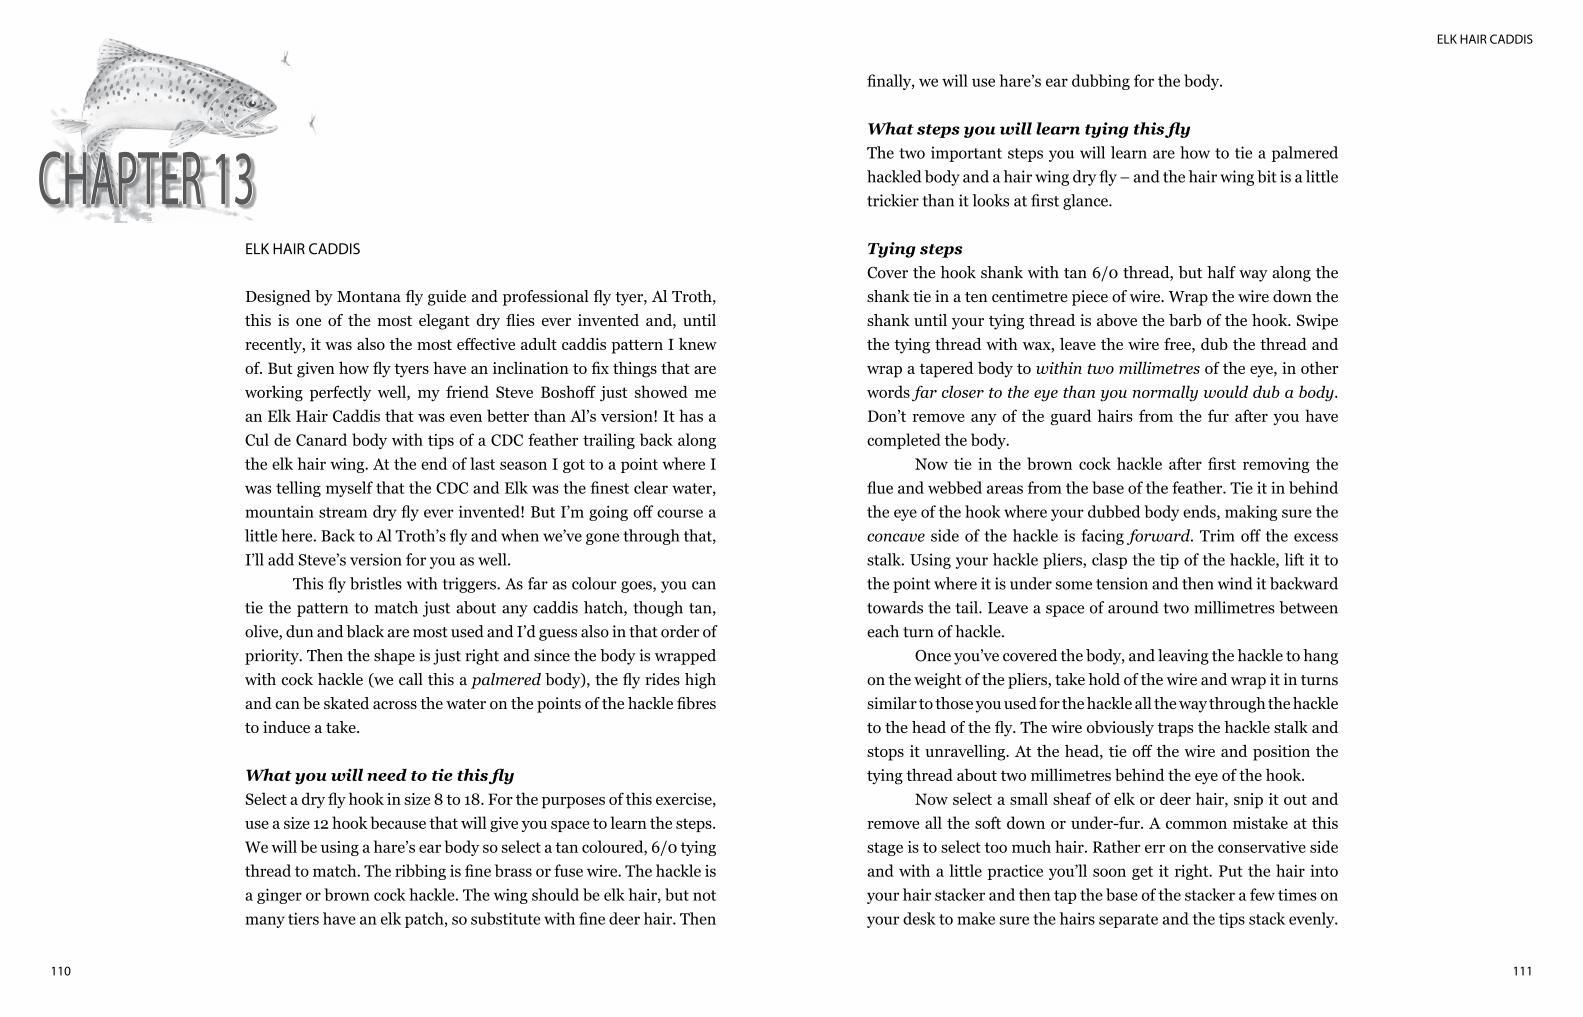
ELK HAIR CADDIS
111110
ELK HAIR CADDIS
Designed by Montana fly guide and professional fly tyer, Al Troth, this is one of the most elegant dry flies ever invented and, until recently, it was also the most effective adult caddis pattern I knew of. But given how fly tyers have an inclination to fix things that are working perfectly well, my friend Steve Boshoff just showed me an Elk Hair Caddis that was even better than Al’s version! It has a Cul de Canard body with tips of a CDC feather trailing back along the elk hair wing. At the end of last season I got to a point where I was telling myself that the CDC and Elk was the finest clear water, mountain stream dry fly ever invented! But I’m going off course a little here. Back to Al Troth’s fly and when we’ve gone through that, I’ll add Steve’s version for you as well.
This fly bristles with triggers. As far as colour goes, you can tie the pattern to match just about any caddis hatch, though tan, olive, dun and black are most used and I’d guess also in that order of priority. Then the shape is just right and since the body is wrapped with cock hackle (we call this a palmered body), the fly rides high and can be skated across the water on the points of the hackle fibres to induce a take.
What you will need to tie this flySelect a dry fly hook in size 8 to 18. For the purposes of this exercise, use a size 12 hook because that will give you space to learn the steps. We will be using a hare’s ear body so select a tan coloured, 6/0 tying thread to match. The ribbing is fine brass or fuse wire. The hackle is a ginger or brown cock hackle. The wing should be elk hair, but not many tiers have an elk patch, so substitute with fine deer hair. Then
finally, we will use hare’s ear dubbing for the body.
What steps you will learn tying this flyThe two important steps you will learn are how to tie a palmered hackled body and a hair wing dry fly – and the hair wing bit is a little trickier than it looks at first glance.
Tying stepsCover the hook shank with tan 6/0 thread, but half way along the shank tie in a ten centimetre piece of wire. Wrap the wire down the shank until your tying thread is above the barb of the hook. Swipe the tying thread with wax, leave the wire free, dub the thread and wrap a tapered body to within two millimetres of the eye, in other words far closer to the eye than you normally would dub a body. Don’t remove any of the guard hairs from the fur after you have completed the body.
Now tie in the brown cock hackle after first removing the flue and webbed areas from the base of the feather. Tie it in behind the eye of the hook where your dubbed body ends, making sure the concave side of the hackle is facing forward. Trim off the excess stalk. Using your hackle pliers, clasp the tip of the hackle, lift it to the point where it is under some tension and then wind it backward towards the tail. Leave a space of around two millimetres between each turn of hackle.
Once you’ve covered the body, and leaving the hackle to hang on the weight of the pliers, take hold of the wire and wrap it in turns similar to those you used for the hackle all the way through the hackle to the head of the fly. The wire obviously traps the hackle stalk and stops it unravelling. At the head, tie off the wire and position the tying thread about two millimetres behind the eye of the hook.
Now select a small sheaf of elk or deer hair, snip it out and remove all the soft down or under-fur. A common mistake at this stage is to select too much hair. Rather err on the conservative side and with a little practice you’ll soon get it right. Put the hair into your hair stacker and then tap the base of the stacker a few times on your desk to make sure the hairs separate and the tips stack evenly.
CHAPTER 13
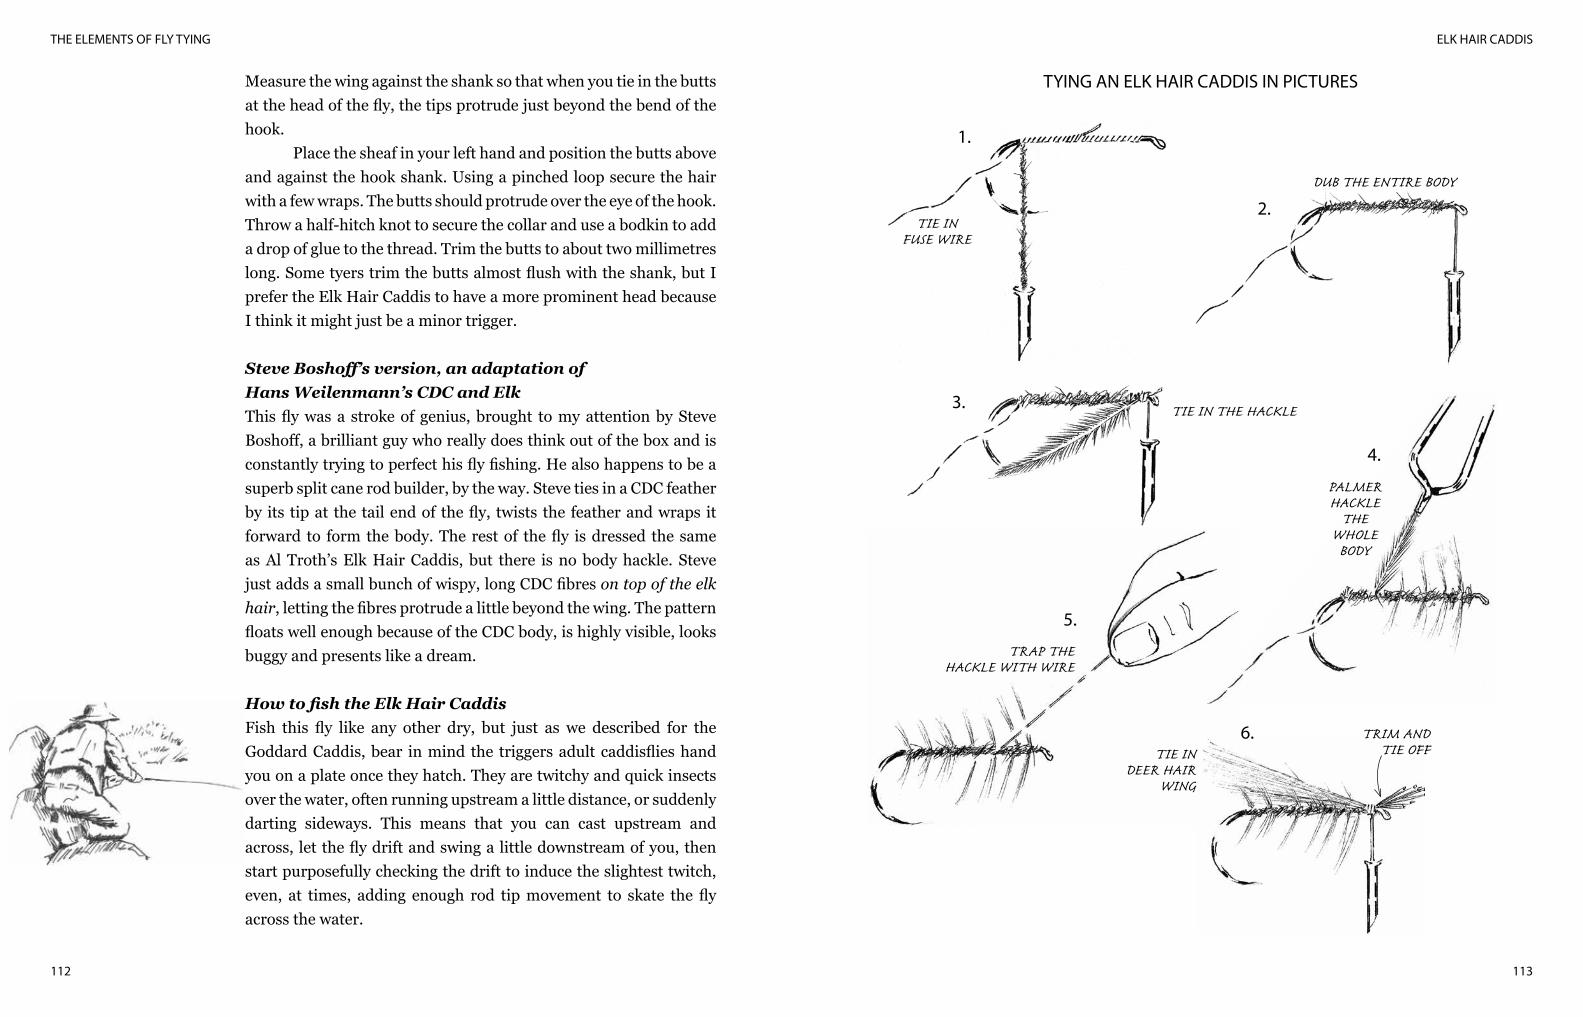
ELK HAIR CADDIS
113
THE ELEMENTS OF FLY TYING
112
Measure the wing against the shank so that when you tie in the butts at the head of the fly, the tips protrude just beyond the bend of the hook.
Place the sheaf in your left hand and position the butts above and against the hook shank. Using a pinched loop secure the hair with a few wraps. The butts should protrude over the eye of the hook. Throw a half-hitch knot to secure the collar and use a bodkin to add a drop of glue to the thread. Trim the butts to about two millimetres long. Some tyers trim the butts almost flush with the shank, but I prefer the Elk Hair Caddis to have a more prominent head because I think it might just be a minor trigger.
Steve Boshoff’s version, an adaptation of Hans Weilenmann’s CDC and ElkThis fly was a stroke of genius, brought to my attention by Steve Boshoff, a brilliant guy who really does think out of the box and is constantly trying to perfect his fly fishing. He also happens to be a superb split cane rod builder, by the way. Steve ties in a CDC feather by its tip at the tail end of the fly, twists the feather and wraps it forward to form the body. The rest of the fly is dressed the same as Al Troth’s Elk Hair Caddis, but there is no body hackle. Steve just adds a small bunch of wispy, long CDC fibres on top of the elk hair, letting the fibres protrude a little beyond the wing. The pattern floats well enough because of the CDC body, is highly visible, looks buggy and presents like a dream.
How to fish the Elk Hair CaddisFish this fly like any other dry, but just as we described for the Goddard Caddis, bear in mind the triggers adult caddisflies hand you on a plate once they hatch. They are twitchy and quick insects over the water, often running upstream a little distance, or suddenly darting sideways. This means that you can cast upstream and across, let the fly drift and swing a little downstream of you, then start purposefully checking the drift to induce the slightest twitch, even, at times, adding enough rod tip movement to skate the fly across the water.
TYING AN ELK HAIR CADDIS IN PICTURES
1.
TIE INFUSE WIRE
2.
DUB THE ENTIRE BODY
3. TIE IN THE HACKLE
4.
PALMER HACKLE
THE WHOLE BODY
5.
TRAP THEHACKLE WITH WIRE
6.TIE IN
DEER HAIRWING
TRIM ANDTIE OFF
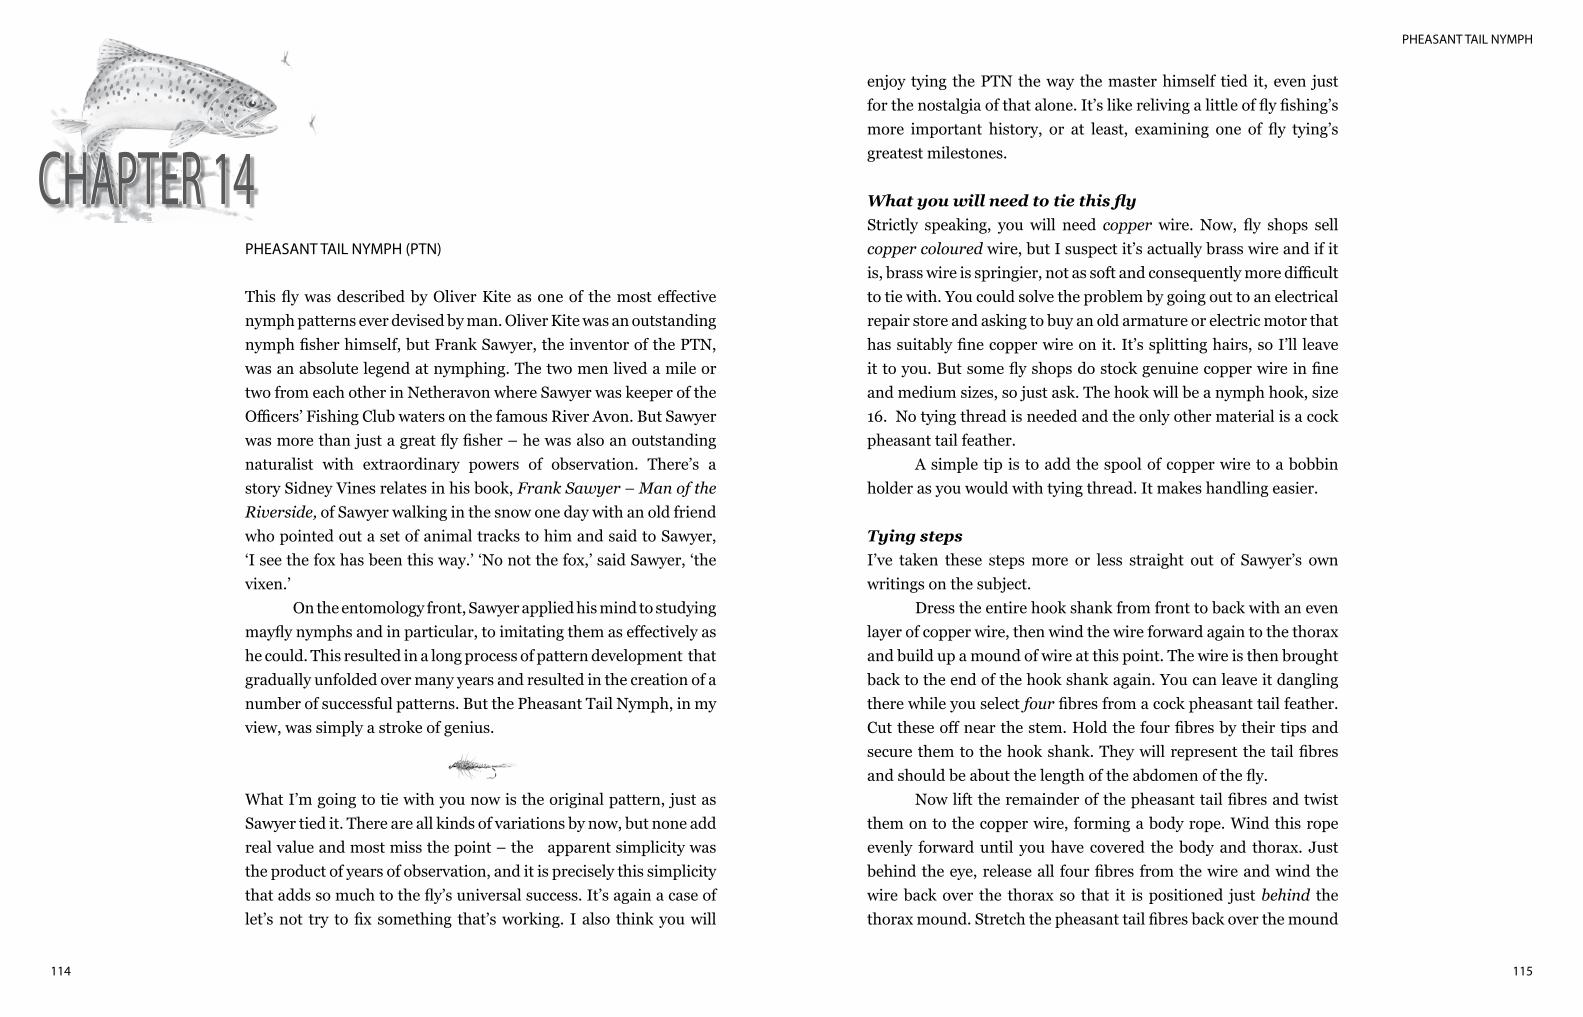
PHEASANT TAIL NYMPH
115114
PHEASANT TAIL NYMPH (PTN)
This fly was described by Oliver Kite as one of the most effective nymph patterns ever devised by man. Oliver Kite was an outstanding nymph fisher himself, but Frank Sawyer, the inventor of the PTN, was an absolute legend at nymphing. The two men lived a mile or two from each other in Netheravon where Sawyer was keeper of the Officers’ Fishing Club waters on the famous River Avon. But Sawyer was more than just a great fly fisher – he was also an outstanding naturalist with extraordinary powers of observation. There’s a story Sidney Vines relates in his book, Frank Sawyer – Man of the Riverside, of Sawyer walking in the snow one day with an old friend who pointed out a set of animal tracks to him and said to Sawyer, ‘I see the fox has been this way.’ ‘No not the fox,’ said Sawyer, ‘the vixen.’
On the entomology front, Sawyer applied his mind to studying mayfly nymphs and in particular, to imitating them as effectively as he could. This resulted in a long process of pattern development that gradually unfolded over many years and resulted in the creation of a number of successful patterns. But the Pheasant Tail Nymph, in my view, was simply a stroke of genius.
What I’m going to tie with you now is the original pattern, just as Sawyer tied it. There are all kinds of variations by now, but none add real value and most miss the point – the apparent simplicity was the product of years of observation, and it is precisely this simplicity that adds so much to the fly’s universal success. It’s again a case of let’s not try to fix something that’s working. I also think you will
enjoy tying the PTN the way the master himself tied it, even just for the nostalgia of that alone. It’s like reliving a little of fly fishing’s more important history, or at least, examining one of fly tying’s greatest milestones.
What you will need to tie this flyStrictly speaking, you will need copper wire. Now, fly shops sell copper coloured wire, but I suspect it’s actually brass wire and if it is, brass wire is springier, not as soft and consequently more difficult to tie with. You could solve the problem by going out to an electrical repair store and asking to buy an old armature or electric motor that has suitably fine copper wire on it. It’s splitting hairs, so I’ll leave it to you. But some fly shops do stock genuine copper wire in fine and medium sizes, so just ask. The hook will be a nymph hook, size 16. No tying thread is needed and the only other material is a cock pheasant tail feather.
A simple tip is to add the spool of copper wire to a bobbin holder as you would with tying thread. It makes handling easier.
Tying stepsI’ve taken these steps more or less straight out of Sawyer’s own writings on the subject.
Dress the entire hook shank from front to back with an even layer of copper wire, then wind the wire forward again to the thorax and build up a mound of wire at this point. The wire is then brought back to the end of the hook shank again. You can leave it dangling there while you select four fibres from a cock pheasant tail feather. Cut these off near the stem. Hold the four fibres by their tips and secure them to the hook shank. They will represent the tail fibres and should be about the length of the abdomen of the fly.
Now lift the remainder of the pheasant tail fibres and twist them on to the copper wire, forming a body rope. Wind this rope evenly forward until you have covered the body and thorax. Just behind the eye, release all four fibres from the wire and wind the wire back over the thorax so that it is positioned just behind the thorax mound. Stretch the pheasant tail fibres back over the mound
CHAPTER 14
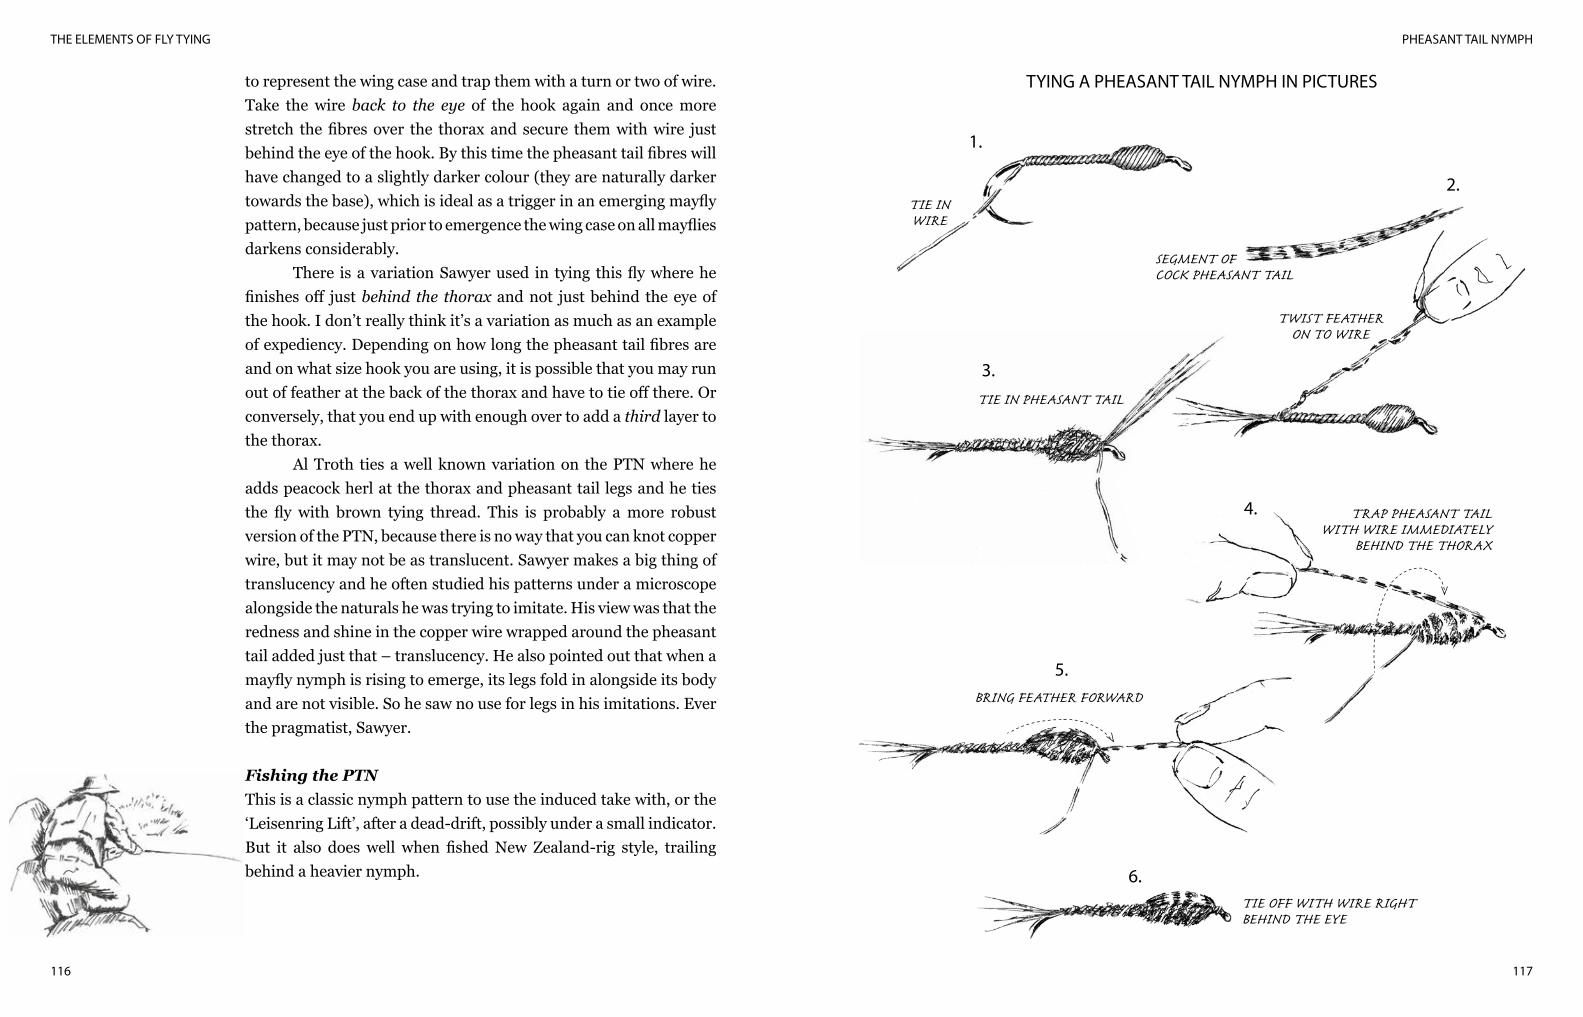
PHEASANT TAIL NYMPH
117
THE ELEMENTS OF FLY TYING
116
to represent the wing case and trap them with a turn or two of wire. Take the wire back to the eye of the hook again and once more stretch the fibres over the thorax and secure them with wire just behind the eye of the hook. By this time the pheasant tail fibres will have changed to a slightly darker colour (they are naturally darker towards the base), which is ideal as a trigger in an emerging mayfly pattern, because just prior to emergence the wing case on all mayflies darkens considerably.
There is a variation Sawyer used in tying this fly where he finishes off just behind the thorax and not just behind the eye of the hook. I don’t really think it’s a variation as much as an example of expediency. Depending on how long the pheasant tail fibres are and on what size hook you are using, it is possible that you may run out of feather at the back of the thorax and have to tie off there. Or conversely, that you end up with enough over to add a third layer to the thorax.
Al Troth ties a well known variation on the PTN where he adds peacock herl at the thorax and pheasant tail legs and he ties the fly with brown tying thread. This is probably a more robust version of the PTN, because there is no way that you can knot copper wire, but it may not be as translucent. Sawyer makes a big thing of translucency and he often studied his patterns under a microscope alongside the naturals he was trying to imitate. His view was that the redness and shine in the copper wire wrapped around the pheasant tail added just that – translucency. He also pointed out that when a mayfly nymph is rising to emerge, its legs fold in alongside its body and are not visible. So he saw no use for legs in his imitations. Ever the pragmatist, Sawyer.
Fishing the PTNThis is a classic nymph pattern to use the induced take with, or the ‘Leisenring Lift’, after a dead-drift, possibly under a small indicator. But it also does well when fished New Zealand-rig style, trailing behind a heavier nymph.
TYING A PHEASANT TAIL NYMPH IN PICTURES
1.
TIE INWIRE
2.
SEGMENT OFCOCK PHEASANT TAIL
TWIST FEATHERON TO WIRE
3.TIE IN PHEASANT TAIL
4. TRAP PHEASANT TAILWITH WIRE IMMEDIATELY
BEHIND THE THORAX
5.BRING FEATHER FORWARD
6.TIE OFF WITH WIRE RIGHTBEHIND THE EYE
GOLD-RIBBED HARE’S EAR
119118
GOLD-RIBBED HARE’S EAR
It worried me that I’d never established the origin of this great pattern, but the fact was despite it being one of the greatest fly patterns ever, I didn’t have a clue who’d invented it. I suspected it was an old English pattern and since I also knew that it is probably the most used mayfly nymph imitation on earth, the lack of any understanding of its lineage really troubled me. Not that being the most used pattern says that much, because fly fishers can be as much like sheep as the rest of society. But years of fishing Gold-Ribbed Hare’s Ears has convinced a zillion anglers that this fly’s ability to catch trout is remarkable. I’ve taken yellowfish and bass on them, even bream in the Okavango Delta. I recently quizzed three people with that old Hardy Annual hypothetical angling question that goes, ‘If you had to choose a single nymph pattern for the rest of your trout fishing life, what would it be?’ All three picked the Gold-Ribbed Hare’s Ear, but all three qualified their choice with the words, ‘That is, if it’s properly tied.’ We’ll find out what they meant by that in a moment.
To get back to the fly’s origins, Paul Curtis had done some research and wrote to me a little while back saying:
‘About the GRHE – I’ve read that it was originally a pattern by James Ogden, popularised by Halford as a dry, but rejected as it wasn’t an exact imitation of anything. I’ve also read that it goes back to (Charles) Cotton! Perhaps the most interesting description I’ve come across is in a book I have, Blacker’s Fly Making (1855). It has a picture of, and tying instructions for, a Hare’s Ear and Yellow (Number 17 in Blacker’s catalogue). Although it appears to be a winged dry (about size 20 in the new hook sizes) the instructions
are perhaps of interest to you’. They are verbatim:No 17 - Hare’s Ear and YellowThe body is made of the light part of the fur from the hare’s ear, ribbed with yellow silk; the wings are from the wing of the starling or fieldfare, and two stiff fibres of honey dun cock’s hackle, from the rump for tail, to cock up, pick out the fur at the head for legs, No. 12 hook.’
Well, if you are wondering what all the fuss is about it’s because the precise history of the pattern is an intriguing part of the hobby of fly tying. At least it is to most tyers I know and I just wanted to give you a taste of it.
So here we have the ultimate all-purpose mayfly nymph and, like so many nymph patterns, people have tried to improve on it over the years, or have come up with their own versions of how it should be tied. I researched the literature to establish the essential ingredients that make an authentic Gold-Ribbed Hare’s Ear and I’ll include them here. But I have also given a lot of thought to what makes an effective Hare’s Ear pattern as opposed to one that’s, well, just another straight up and down nymph. This is where using an actual hare’s mask to source your dubbing and then applying that dubbing on a dubbing loop, in my view, really makes the difference. Where there is some variation in interpretation is in the addition or not of a wing case and if one is added, what feather is used for it?
Dave Hughes is closest to the truth I believe, when he suggests you omit the wing case entirely on sizes under 14. Otherwise, use turkey quill, partridge breast feather or hen pheasant tail fibres for the wing case. The colour of the tying silk is also in some doubt, though not a lot. Brown seems to carry the majority vote, though black and yellow are all listed by various reliable sources. I will stick with brown for this demonstration. The addition of a bead is, of course, a more modern phenomenon and optional, but I think a bead suits the Gold-Ribbed Hare’s Ear perfectly in hook sizes 16 and larger.
So what I aim to teach you in this chapter is how to tie an
CHAPTER 15

GOLD-RIBBED HARE’S EAR
121
THE ELEMENTS OF FLY TYING
120
authentic Gold-Ribbed Hare’s Ear, but also how to use a dubbing loop. I suggest you consult the chapter on fly proportions once more before we start.
What you will need to tie this flyYou’ll need a size 12, nymph hook, brown tying thread, fine oval gold ribbing, a hare’s mask and a turkey tail (or partridge or pheasant tail if you don’t have turkey). Don’t panic if you don’t have a hare’s mask, but do try to get one. Happily, they’re readily available from most fly shops and are surprisingly inexpensive.
Tying the Gold-Ribbed Hare’s EarI’d like you to start by studying the mask. Notice that the fur on the inside of the ears is far shorter and darker than the fur on the face. Notice also that there are certain areas on the face where the guard hairs are longer and the fur more variegated in its colour. The tones vary from brown through tan, to dark and pale ginger and even white. What some people recommend is that you clip all the fur off the mask – or at least from a large part of the mask – mix it, sort and grade it and then store it in separate containers, say small zip-lock bags, for future use. Decide for yourself.
By far the best fur for tying the body of a Gold-Ribbed Hare’s Ear comes from the ears, which is understandable given the nymph’s name. But the best fur for the thorax and tail comes from those parts of the mask with the longest guard hairs and where the fur is a richer brown or ginger colour. The reason that I describe all this is to illustrate the value of getting a mask as opposed to buying ready-mixed natural fur. It’s not bad and it sort of works, but it’s no match for the real thing. In fact, you will find most of the ready mixed dubbing is mainly rabbit fur anyway and that’s far finer and has fewer guard hairs in it. It’s perfect for dubbing dries, though, and for many other kinds of nymphs.
How to tie the Gold-Ribbed Hare’s Earusing a dubbing loopIf you get this right you will have the best looking nymph on the block. Compare it to any shop-bought Hare’s Ear and you will see what I mean.
After adding a brass or tungsten bead, dress the entire hook shank with tying silk and then wrap six to twelve turns of fine lead wire at the thorax. How much weight you add depends on how you intend fishing the nymph and you will want three versions – as with all your nymphs – heavy, medium and unweighted. Over the years I have just got the impression that beaded Hare’s Ears have outclassed the unbeaded ones, but it’s nothing I’ve captured in science. It’s just an impression. Even the little size 16s somehow appear to perform better with a bead on them.
Take your tying thread to just above the barb of the hook. To tie in the tail, select a small bunch of richly coloured fur with long guard hairs and snip it off as close to the skin as you can get the points of your scissors to go. Clean the base fluff off the bunch and tie it in so that the fibres hang off the back of the hook as long as you can get them. Don’t add too fat a bunch.
Now position your tying thread again just above the barb. Take ten or so centimetres of thread off the bobbin and applying some tension to the tying thread, rest the pulp of your left index finger on it just above the bobbin. With the bobbin in your right hand and keeping tension with your left fingers, take the bobbin and thread back to the root of the tail and put a couple of wraps in at this point to trap the thread. In effect you now have a loop of thread with the tip of your left index finger in it. Release your index finger and grab hold of the end of the loop with a pair of hackle pliers. You can now let the loop hang freely. We will only use it later. Next tie in your gold ribbing and take the thread up to the thorax.
Open the loop with your fingers and coat both sides of thread with soft fly tying wax, swiping the wax swiftly to generate enough heat to soften the wax. Pick up a pinch of the hare’s ear fur you mixed. With the fur protruding between your fingers wisp it up and down both arms of the loop touching the thread lightly. Magically, a
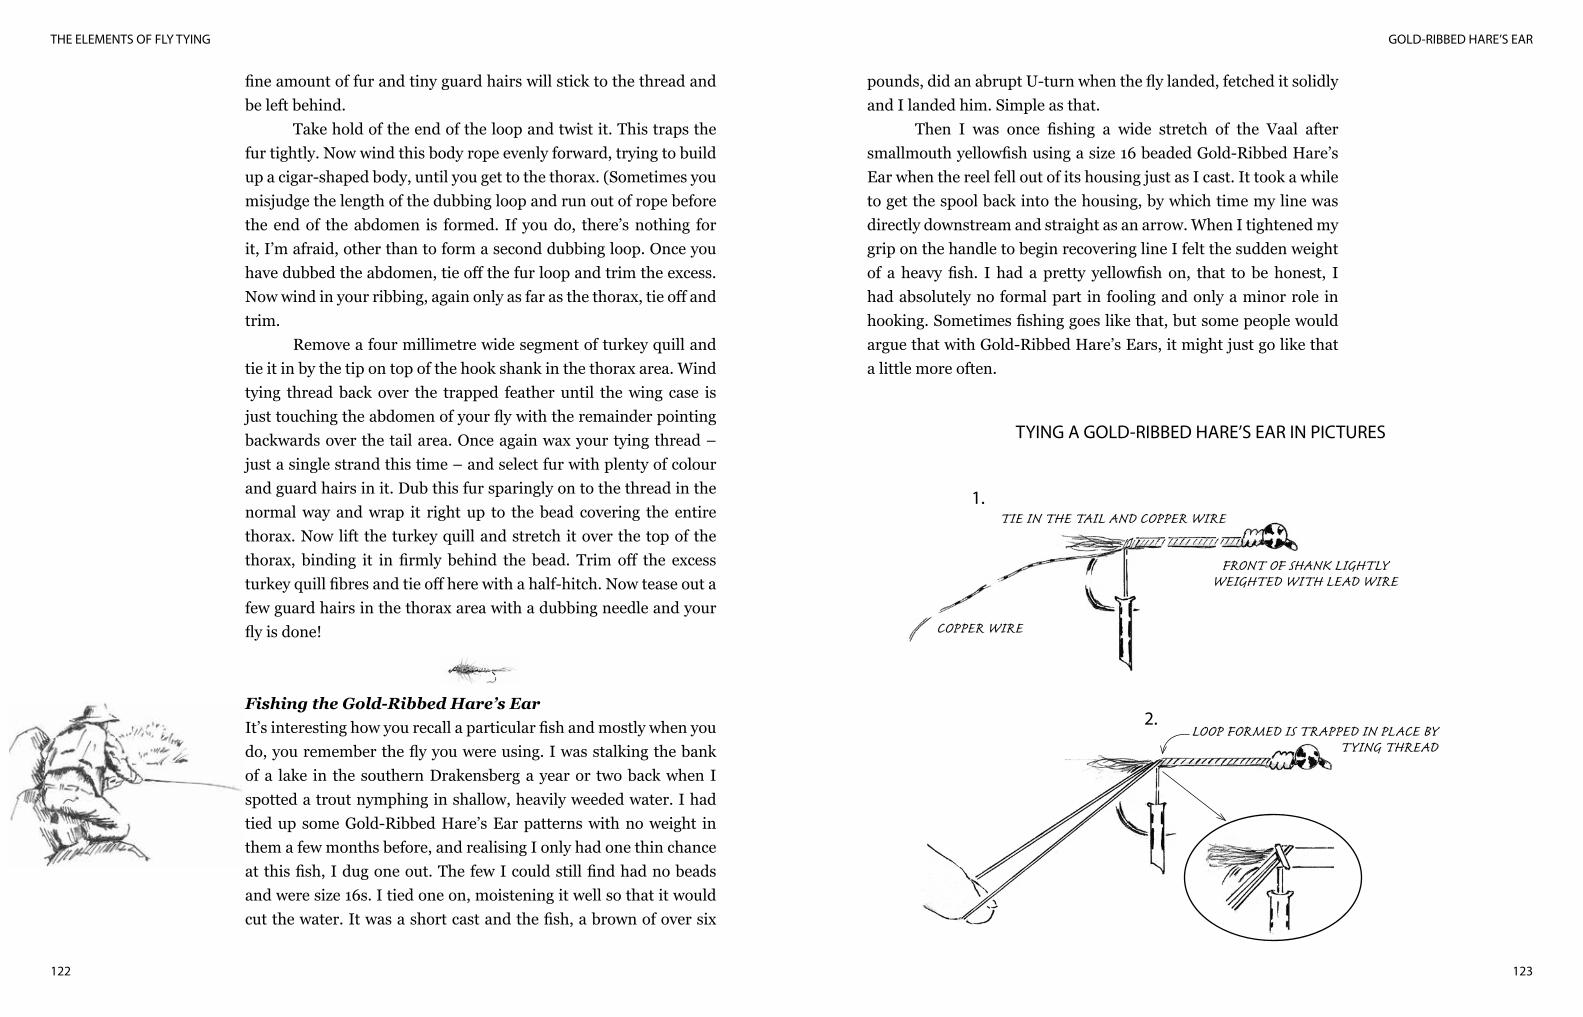
GOLD-RIBBED HARE’S EAR
123
THE ELEMENTS OF FLY TYING
122
fine amount of fur and tiny guard hairs will stick to the thread and be left behind.
Take hold of the end of the loop and twist it. This traps the fur tightly. Now wind this body rope evenly forward, trying to build up a cigar-shaped body, until you get to the thorax. (Sometimes you misjudge the length of the dubbing loop and run out of rope before the end of the abdomen is formed. If you do, there’s nothing for it, I’m afraid, other than to form a second dubbing loop. Once you have dubbed the abdomen, tie off the fur loop and trim the excess. Now wind in your ribbing, again only as far as the thorax, tie off and trim.
Remove a four millimetre wide segment of turkey quill and tie it in by the tip on top of the hook shank in the thorax area. Wind tying thread back over the trapped feather until the wing case is just touching the abdomen of your fly with the remainder pointing backwards over the tail area. Once again wax your tying thread – just a single strand this time – and select fur with plenty of colour and guard hairs in it. Dub this fur sparingly on to the thread in the normal way and wrap it right up to the bead covering the entire thorax. Now lift the turkey quill and stretch it over the top of the thorax, binding it in firmly behind the bead. Trim off the excess turkey quill fibres and tie off here with a half-hitch. Now tease out a few guard hairs in the thorax area with a dubbing needle and your fly is done!
Fishing the Gold-Ribbed Hare’s Ear It’s interesting how you recall a particular fish and mostly when you do, you remember the fly you were using. I was stalking the bank of a lake in the southern Drakensberg a year or two back when I spotted a trout nymphing in shallow, heavily weeded water. I had tied up some Gold-Ribbed Hare’s Ear patterns with no weight in them a few months before, and realising I only had one thin chance at this fish, I dug one out. The few I could still find had no beads and were size 16s. I tied one on, moistening it well so that it would cut the water. It was a short cast and the fish, a brown of over six
pounds, did an abrupt U-turn when the fly landed, fetched it solidly and I landed him. Simple as that.
Then I was once fishing a wide stretch of the Vaal after smallmouth yellowfish using a size 16 beaded Gold-Ribbed Hare’s Ear when the reel fell out of its housing just as I cast. It took a while to get the spool back into the housing, by which time my line was directly downstream and straight as an arrow. When I tightened my grip on the handle to begin recovering line I felt the sudden weight of a heavy fish. I had a pretty yellowfish on, that to be honest, I had absolutely no formal part in fooling and only a minor role in hooking. Sometimes fishing goes like that, but some people would argue that with Gold-Ribbed Hare’s Ears, it might just go like that a little more often.
TYING A GOLD-RIBBED HARE’S EAR IN PICTURES
1.TIE IN THE TAIL AND COPPER WIRE
FRONT OF SHANK LIGHTLYWEIGHTED WITH LEAD WIRE
COPPER WIRE
2.LOOP FORMED IS TRAPPED IN PLACE BY
TYING THREAD
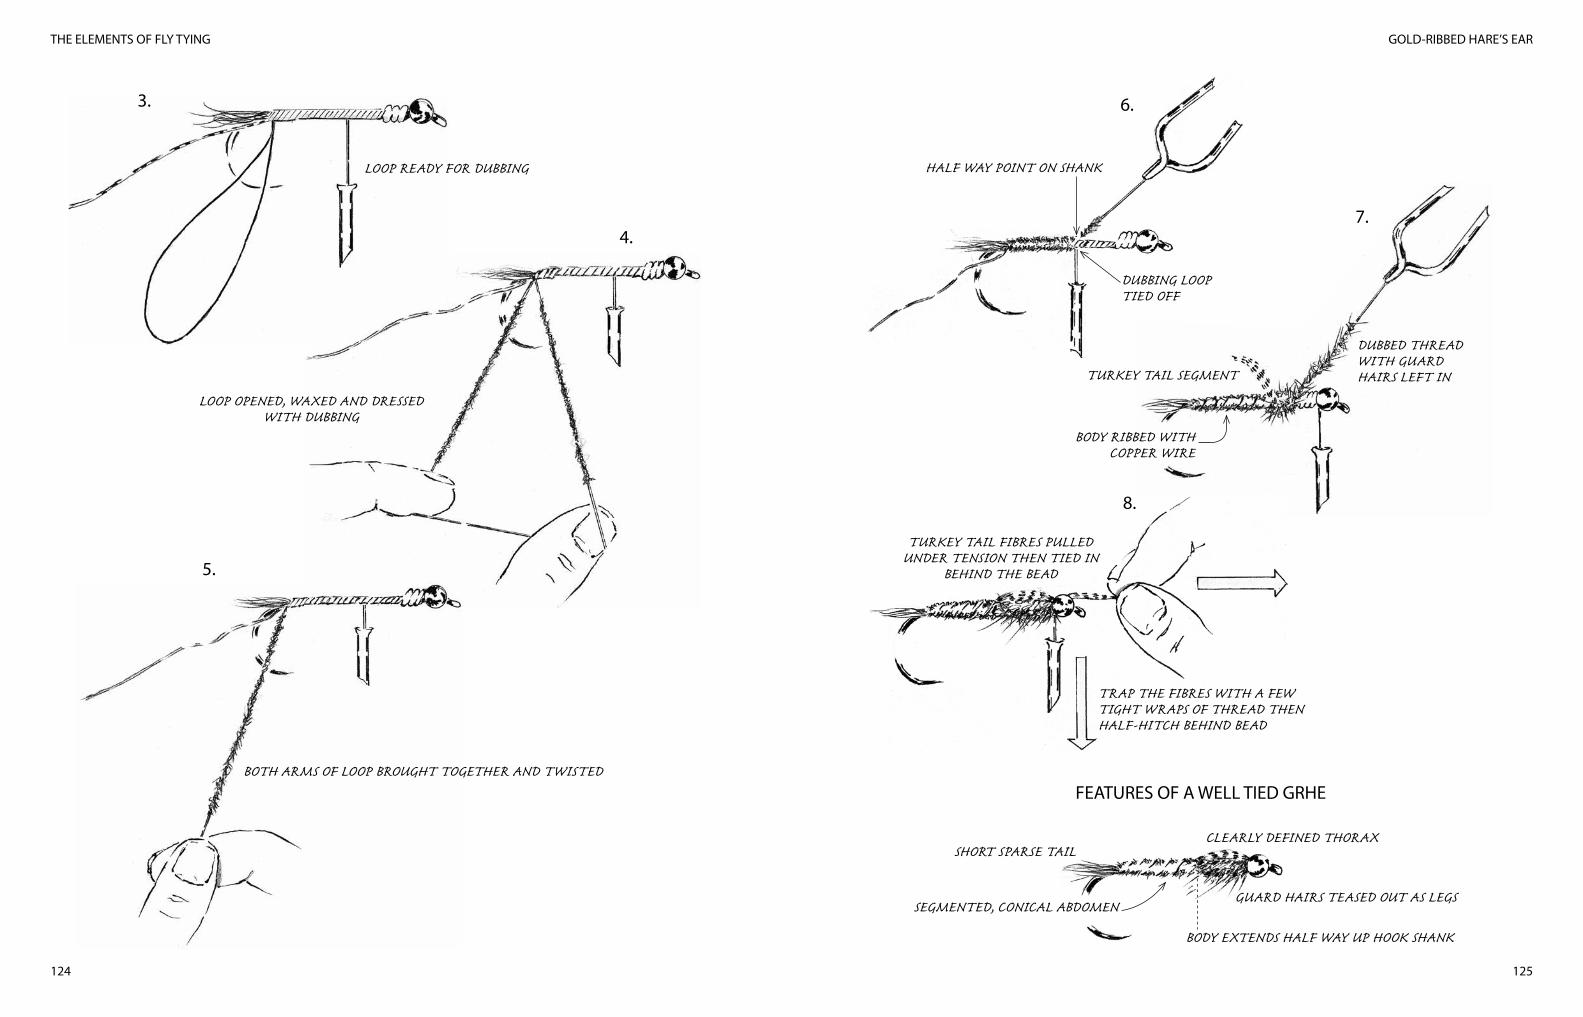
GOLD-RIBBED HARE’S EAR
125
THE ELEMENTS OF FLY TYING
124
3.
LOOP READY FOR DUBBING
4.
LOOP OPENED, WAXED AND DRESSEDWITH DUBBING
5.
BOTH ARMS OF LOOP BROUGHT TOGETHER AND TWISTED
6.
HALF WAY POINT ON SHANK
DUBBING LOOPTIED OFF
7.
DUBBED THREADWITH GUARDHAIRS LEFT INTURKEY TAIL SEGMENT
BODY RIBBED WITHCOPPER WIRE
8.
TURKEY TAIL FIBRES PULLEDUNDER TENSION THEN TIED IN
BEHIND THE BEAD
TRAP THE FIBRES WITH A FEW TIGHT WRAPS OF THREAD THEN HALF-HITCH BEHIND BEAD
FEATURES OF A WELL TIED GRHE
SHORT SPARSE TAIL
SEGMENTED, CONICAL ABDOMEN
CLEARLY DEFINED THORAX
GUARD HAIRS TEASED OUT AS LEGS
BODY EXTENDS HALF WAY UP HOOK SHANK
ZAK
127126
ZAK
You want at least one mayfly nymph that is a dark coloured all-purpose pattern, the sort of fly you can safely tie on and feel confident will come close to matching pretty well any of the mayfly nymphs. The pattern should, of course, be durable and easy to tie, because, like me, you probably put a fair number of flies into the bank-side vegetation. It should also work and the Zak does. It really is an effective pattern.
I named it after an old Zulu man we all got to know well over the twenty-odd years we fished the lakes at Hetherdon, a farm above the Dargle valley in KwaZulu-Natal. Zak was a proud, astute and deeply traditional man who nearly all his life was caretaker of the place and that included the fishing. He had more than a few cattle and lived in a modest home on the slope of a hill above a lake called The Old Dam, still one of the most beautiful and productive stillwaters I have ever fished. By the mid-1980s, the Zak had proved itself beyond any doubt, but it was still nameless. Then one night at the Hetherdon cottage when we were sitting around a log fire going over the day, a good angling buddy of mine, Willie van Niekerk, suggested I name the pattern after Zak as a token of respect and I might add, appreciation. I liked the idea and the name just stuck. Incidentally, it was in that very same room that late one memorable evening a few years earlier, Hugh Huntley put together, and named, the very first Red-Eyed Damsel ever tied!
You will need different sizes, simply because natural nymphs are available in different sizes and, of course, you will need different
weights. Pick up a few stones from the stream bed and you can quickly get an idea of the general size of the nymph population in the water. For example, on a recent trip to one of my favourite local streams, all the nymphs were very dark and small, maybe 18s, at most 16s, so I fished Zaks in those sizes.
Over the years, I’ve changed this pattern more than a little as I discovered better materials, or better tying methods, or deficiencies in the original pattern. The idea is to capture in the fly the crustaceous-looking abdominal segments of the natural, to suggest breathing gills and, of course, to add a prominent thorax and finally, to subtly suggest legs. These after all are the key triggers to look for in most mayfly nymphs. But in general, the fly must also have movement and the right colour and shape. This means long, wispy tail fibres, a cigar-shaped abdomen, a prominent thorax with a hint of hackle to suggest the legs and the colour should be dark to almost black. If these characteristics are not immediately evident in any Zak you tie, give it away – or if you didn’t tie it, don’t buy it. Particularly, discard any that are over-hackled or that have dense, stubby tails.
What you will need to tie this flyYou want a size 12 nymph hook, brass or tungsten bead (optional), water mongoose guard hairs or squirrel tail fibres, black cock hackle, tying thread to match your weight coding for nymphs, brass fuse wire (optional, but if you don’t weight the pattern you will need a single strand of plain wool to build up the under-thorax), lead wire, five peacock herls (three of them stripped clean of their flue) and finally, a blue embroidery thread called DMC Fil Metalise (colour number 4012) or blue Accent Yarn, both of which are available from needlework shops.
Tying stepsAdd a brass bead to the hook if you prefer using beads. It’s optional on this pattern and the jury is still out on what works best. I sometimes use dark green, red or blue glass beads for unweighted patterns and brass or tungsten beads for weighted ones.
CHAPTER 16
ZAK
129
THE ELEMENTS OF FLY TYING
128
Dress the hook shank with black tying thread. Tie in a sparse tail of water mongoose guard hairs, or, if you don’t have water mongoose, a few wisps of dark dun or black cock hackle or squirrel tail fibres. You want about six to ten fibres only. The tail should be about one-and-a-half to two times as long as the hook shank. Add six wraps of lead at the thorax, or if you have chosen not to add weight, build up the under-thorax with a few wraps of natural wool of any colour.
The body (abdomen) formula is four peacock herls, three of them stripped clean of their flue. (Do this by stroking the herl against the grain, using the thumbnail held against the pulp of your index finger. It’s only necessary to strip the bottom half of each herl. With a little practice it goes quickly). Then there’s a piece of shiny, purple/blue synthetic thread in the body. Krystal Flash will do, but I prefer the shiny Fil metalise or Accent Yarn. Finally, add a piece of copper or brass fuse wire, to lend strength.
I tie all these ingredients in together (but obviously one at a time!) just behind the thorax. Gather them into one bunch holding them under tension towards your chest. Then wind the thread back towards the tail, trapping the mixed materials on the side of the hook shank as you go. Doing this reduces the risk of an unsightly blob at the tail, adds strength and some lateral shape that makes the abdomen more oval than round. This, in theory anyway, will cause the fly to sink in a zigzag way, more like a falling leaf than just straight down. I did say ‘in theory’.
A vital new development is tying in the three, cleaned peacock herls by the very end of their butts, where they are lighter, almost ivory-coloured. This gives you the pale, crustaceous-looking segmentation where you want it, right in the abdomen of the fly.
Now, gently twist the peacock herl, fuse wire and the DMC thread, but don’t make too tight a rope of them. Two to three twists are all you need. Now wrap this rope fairly tightly, towards the thorax.
Stop at the thorax and secure the rope with a few wraps of thread. Now tie in a long dark dun, or black cock hackle, by the tip. Genetic hackle is perfect, because it is long and thin, but dark
Indian or Chinese necks work well enough. The size of hackle you use should be the same as you would choose if you were dressing a dry fly on an equivalent sized hook. To avoid that terrible overdressed look, strip the fibres off one side of the hackle before you tie it in. Add one extra peacock herl to give more darkness and definition to the thorax. Now twist the hackle, the added peacock herl and the body rope together and wrap it to just behind the bead (or two millimetres from the eye of the hook if you used no bead). Tie off.
In summary the tying steps are:
Step 1 A bead is added (optional), the shank dressed with tying
thread, a long, very sparse tail is tied in and the thorax is weighted with six wraps of lead (optional).Step 2
The body components are tied in immediately behind the thorax and secured against the side of the hook with tying thread wrapped back to the tail. Hold them out towards your chest under a little tension when you do this so that you wrap them on to the side of the hook.Step 3
The body components are lightly twisted together and wrapped to a point just behind the thorax on the shank where a small cock hackle is tied in by the tip and an extra peacock herl is added.Step 4
The body material and the hackle are twisted together and wrapped up to the bead, or just behind the eye, where they are tied off.Step 5
Splay out the tails fibres by pressing your thumbnail against them at the point where they leave the hook. This gives the tail a far more natural look and invites more movement into the fly.

ZAK
131
THE ELEMENTS OF FLY TYING
130
Fishing the ZakZaks fish well on a floating line with a strike indicator, just like you would use most other nymph patterns, getting takes on the drop (especially in lakes or slow moving rivers), or when dead-drifting deep through fast runs, or tumbling in riffle water, and then, often, on the swing-out, when you can add a little movement to the fly, or retrieve it. On small rivers I use 14s and 16s and on large rivers with deep pools, I may go up to a size 10. On lakes I stick with size 12 patterns. I weight the flies in distinct categories (no weight, medium and heavy), with the thread colour code I described earlier. This way I can get the fly to drift near the top or to sink like a brick, depending on conditions. The distance I tie the indicator from the fly is roughly twice the depth of the water I’m fishing and for really heavily-weighted Zaks, I often use two, or even three indicators, at various distances from the fly. By the way, I use chartreuse, orange or grey Poly Yarn for my indicators, but prefer them to be really tiny. I trim them back to match head size.
TYING A ZAK IN PICTURES
TIE INTHE TAIL
1. DMC THREADOR KRYSTAL
FLASH
2.
PEACOCKHERL
THREESTRIPPEDPEACOCK
HERLS
COPPER OR BRASS FUSE WIRE
THE BODY ‘ROPE’GATHERED
3.
4.
THE BODY ‘ROPE’ANCHORED TO THE SIDE OF
THE HOOK SHANK WITHSUCCESSIVE WRAPS OF THREAD
5.
TWIST THEBODY ROPE
6.
WRAP THE BODY ROPEUP THE HOOK SHANK
7.
PREPARING THE HACKLE
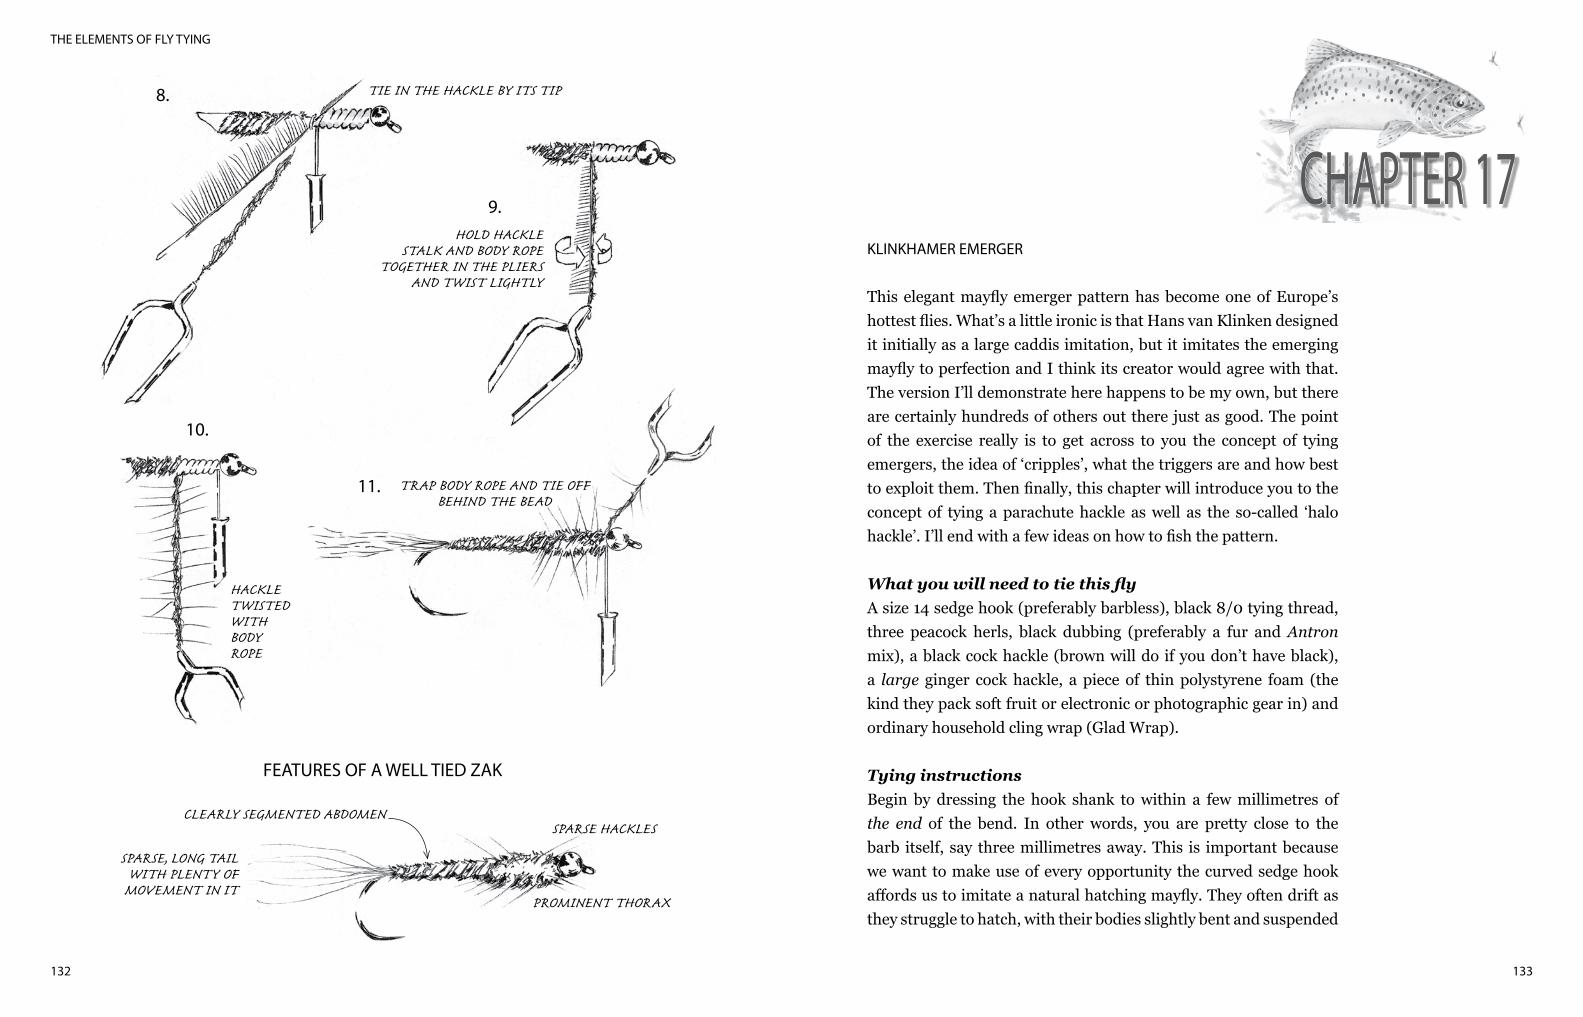
133
THE ELEMENTS OF FLY TYING
132
KLINKHAMER EMERGER
This elegant mayfly emerger pattern has become one of Europe’s hottest flies. What’s a little ironic is that Hans van Klinken designed it initially as a large caddis imitation, but it imitates the emerging mayfly to perfection and I think its creator would agree with that. The version I’ll demonstrate here happens to be my own, but there are certainly hundreds of others out there just as good. The point of the exercise really is to get across to you the concept of tying emergers, the idea of ‘cripples’, what the triggers are and how best to exploit them. Then finally, this chapter will introduce you to the concept of tying a parachute hackle as well as the so-called ‘halo hackle’. I’ll end with a few ideas on how to fish the pattern.
What you will need to tie this flyA size 14 sedge hook (preferably barbless), black 8/0 tying thread, three peacock herls, black dubbing (preferably a fur and Antron mix), a black cock hackle (brown will do if you don’t have black), a large ginger cock hackle, a piece of thin polystyrene foam (the kind they pack soft fruit or electronic or photographic gear in) and ordinary household cling wrap (Glad Wrap).
Tying instructionsBegin by dressing the hook shank to within a few millimetres of the end of the bend. In other words, you are pretty close to the barb itself, say three millimetres away. This is important because we want to make use of every opportunity the curved sedge hook affords us to imitate a natural hatching mayfly. They often drift as they struggle to hatch, with their bodies slightly bent and suspended
8. TIE IN THE HACKLE BY ITS TIP
9.HOLD HACKLE
STALK AND BODY ROPETOGETHER IN THE PLIERS
AND TWIST LIGHTLY
10.
HACKLETWISTEDWITHBODYROPE
11. TRAP BODY ROPE AND TIE OFF BEHIND THE BEAD
FEATURES OF A WELL TIED ZAK
SPARSE, LONG TAILWITH PLENTY OF
MOVEMENT IN IT
CLEARLY SEGMENTED ABDOMENSPARSE HACKLES
PROMINENT THORAX
CHAPTER 17
KLINKHAMER EMERGER
135
THE ELEMENTS OF FLY TYING
134
below the surface – the more so if the hatching process is flawed in some way, as it often is. This is where reference to ‘cripples’ comes in. So here shape is a definite trigger, but so is the half-submerged abdomen and the trailing shuck – suggesting failed emergence and vulnerability.
At the bend, tie in a tiny section of Glad Wrap. You prepare this by cutting a thin strip about two to three centimetres long and about two millimetres wide. Hold both ends and gently stretch it until it snaps. Doing this leaves a very natural, thinly pointed, curly looking end that will imitate the hatching insect’s shuck.
Now strip the flue off two peacock herls, just as you did for the Zak. Tie these in together, mid-way along their stems, but unlike the Zak, tie them in by their thin ends, but about half way along the stem where the two-toned colour of the peacock herl (pearl and black) has better definition. Then tie in one natural peacock herl, also by the thin end. Now take the tying thread back to the thorax area.
Now back to the peacock. Don’t twist the herl together. Just pick up all three and wrap them as one all the way to the thorax. You will find they perfectly imitate a segmented abdomen. The peacock herl adds a little lustre and imitates the breathing gills of the mayfly nymph located between the abdominal segments. Tie the fibres off at the thorax and trim away the excess.
Bring your tying thread to a point about three millimetres back from the eye of the hook. We are now going to put in what we call a post for the parachute hackle, a ‘post’ meaning no more or less than something you can tie the hackle around, but that conveniently floats and will also serve nicely as a spotter, something you can use to follow the fly as it drifts on the water. Take a section of polystyrene foam and cut a strip about two millimetres wide and five centimetres long. Tie the mid point of the foam in at the thorax by first passing the strip under the hook shank, then lift up both ends with your left hand. Hold them under tension and trap them above the shank by adding a few turns of thread wound horizontally around the two arms of the post. We will trim the post later. For the moment leave the two ends long.
Now prepare the hackles by removing their base flue and any heavily webbed areas. Tie in the hackles (together if you can) on to the hook shank right up against the base of the post and trim off the excess stalks.
Wax two centimetres of tying thread and cover it with a small amount of black Antron/fur mix or synthetic dubbing. Lift the two hackles upwards so they are out of the way and carefully wrap the thorax area both behind and in front of the hackle post with a few turns of dubbed thread, until you have built a discernible hump in this area. Take the dubbing nearly, but not quite, to the eye of the hook.
Now, with a pair of hackle pliers, take hold of the tip of your black (smaller) hackle and lifting and holding the foam strips under tension with your left hand, begin to wind the hackle around the post in a clockwise direction. You will find you have to change hands from time to time getting the hackle around the post. A tip here is to try to wind each successive turn of hackle under the previous one.
Once you have wound three full turns of hackle around the post, bring the hackle pliers on to the far side of the shank and let them hang there. This frees both your hands as the hackle stalk is temporarily secured to the hook shank by the weight of the hackle pliers.
Now you need to tie the hackle off. Take the bobbin and place the tying thread carefully over the top of the trapped hackle stalk, but under the parachute fibres, then right around the shank and repeat this step a couple of times. It helps to use the fingers on your left hand to gather up the parachute hackle and move its fibres out of the way. Once you have secured the hackle, trim off the excess. Now take only one full turn of the ginger hackle around the post. This is the larger hackle and its fibres will obviously be longer and will protrude well beyond those of the smaller hackle, giving what we call a halo effect. Tie off this hackle in exactly the same way as you did the first. Finish off with a few half-hitch knots.
Now lift the two foam strips of the post and, under tension, snip them off at around two millimetres long. This becomes your ‘spotter’ and it’s amazing just how well it will show up on the stream.
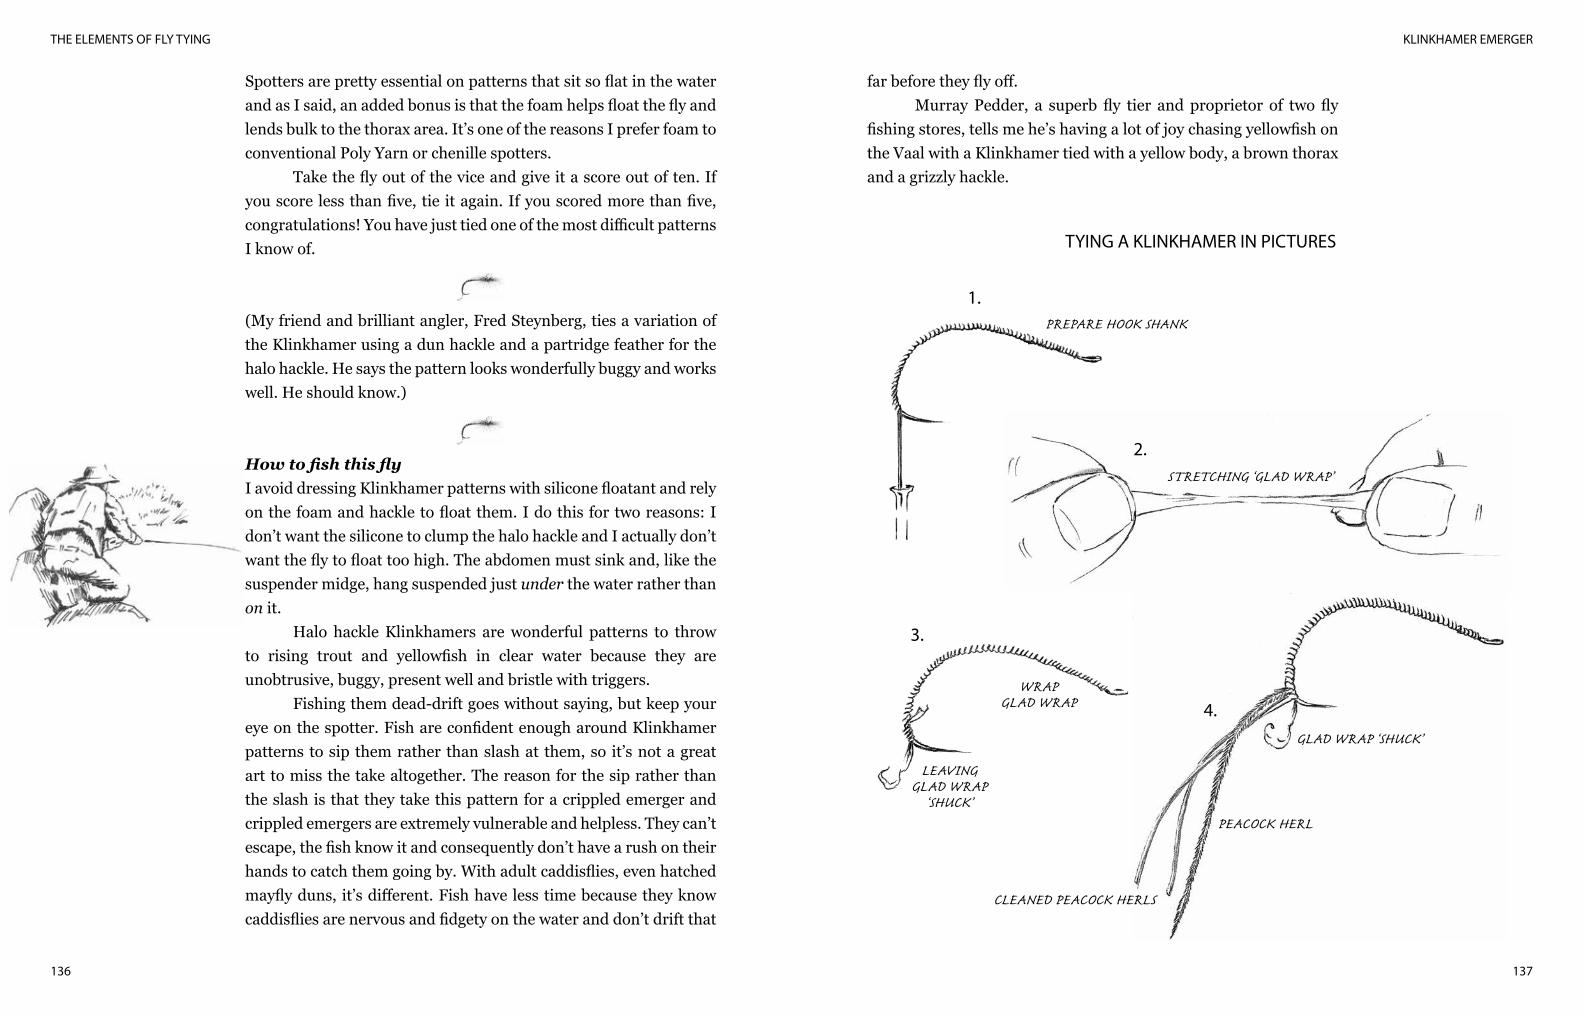
KLINKHAMER EMERGER
137
THE ELEMENTS OF FLY TYING
136
Spotters are pretty essential on patterns that sit so flat in the water and as I said, an added bonus is that the foam helps float the fly and lends bulk to the thorax area. It’s one of the reasons I prefer foam to conventional Poly Yarn or chenille spotters.
Take the fly out of the vice and give it a score out of ten. If you score less than five, tie it again. If you scored more than five, congratulations! You have just tied one of the most difficult patterns I know of.
(My friend and brilliant angler, Fred Steynberg, ties a variation of the Klinkhamer using a dun hackle and a partridge feather for the halo hackle. He says the pattern looks wonderfully buggy and works well. He should know.)
How to fish this fly I avoid dressing Klinkhamer patterns with silicone floatant and rely on the foam and hackle to float them. I do this for two reasons: I don’t want the silicone to clump the halo hackle and I actually don’t want the fly to float too high. The abdomen must sink and, like the suspender midge, hang suspended just under the water rather than on it.
Halo hackle Klinkhamers are wonderful patterns to throw to rising trout and yellowfish in clear water because they are unobtrusive, buggy, present well and bristle with triggers.
Fishing them dead-drift goes without saying, but keep your eye on the spotter. Fish are confident enough around Klinkhamer patterns to sip them rather than slash at them, so it’s not a great art to miss the take altogether. The reason for the sip rather than the slash is that they take this pattern for a crippled emerger and crippled emergers are extremely vulnerable and helpless. They can’t escape, the fish know it and consequently don’t have a rush on their hands to catch them going by. With adult caddisflies, even hatched mayfly duns, it’s different. Fish have less time because they know caddisflies are nervous and fidgety on the water and don’t drift that
far before they fly off.Murray Pedder, a superb fly tier and proprietor of two fly
fishing stores, tells me he’s having a lot of joy chasing yellowfish on the Vaal with a Klinkhamer tied with a yellow body, a brown thorax and a grizzly hackle.
TYING A KLINKHAMER IN PICTURES
PREPARE HOOK SHANK
1.
STRETCHING ‘GLAD WRAP’
2.
WRAPGLAD WRAP
3.
LEAVINGGLAD WRAP
‘SHUCK’
4.GLAD WRAP ‘SHUCK’
PEACOCK HERL
CLEANED PEACOCK HERLS
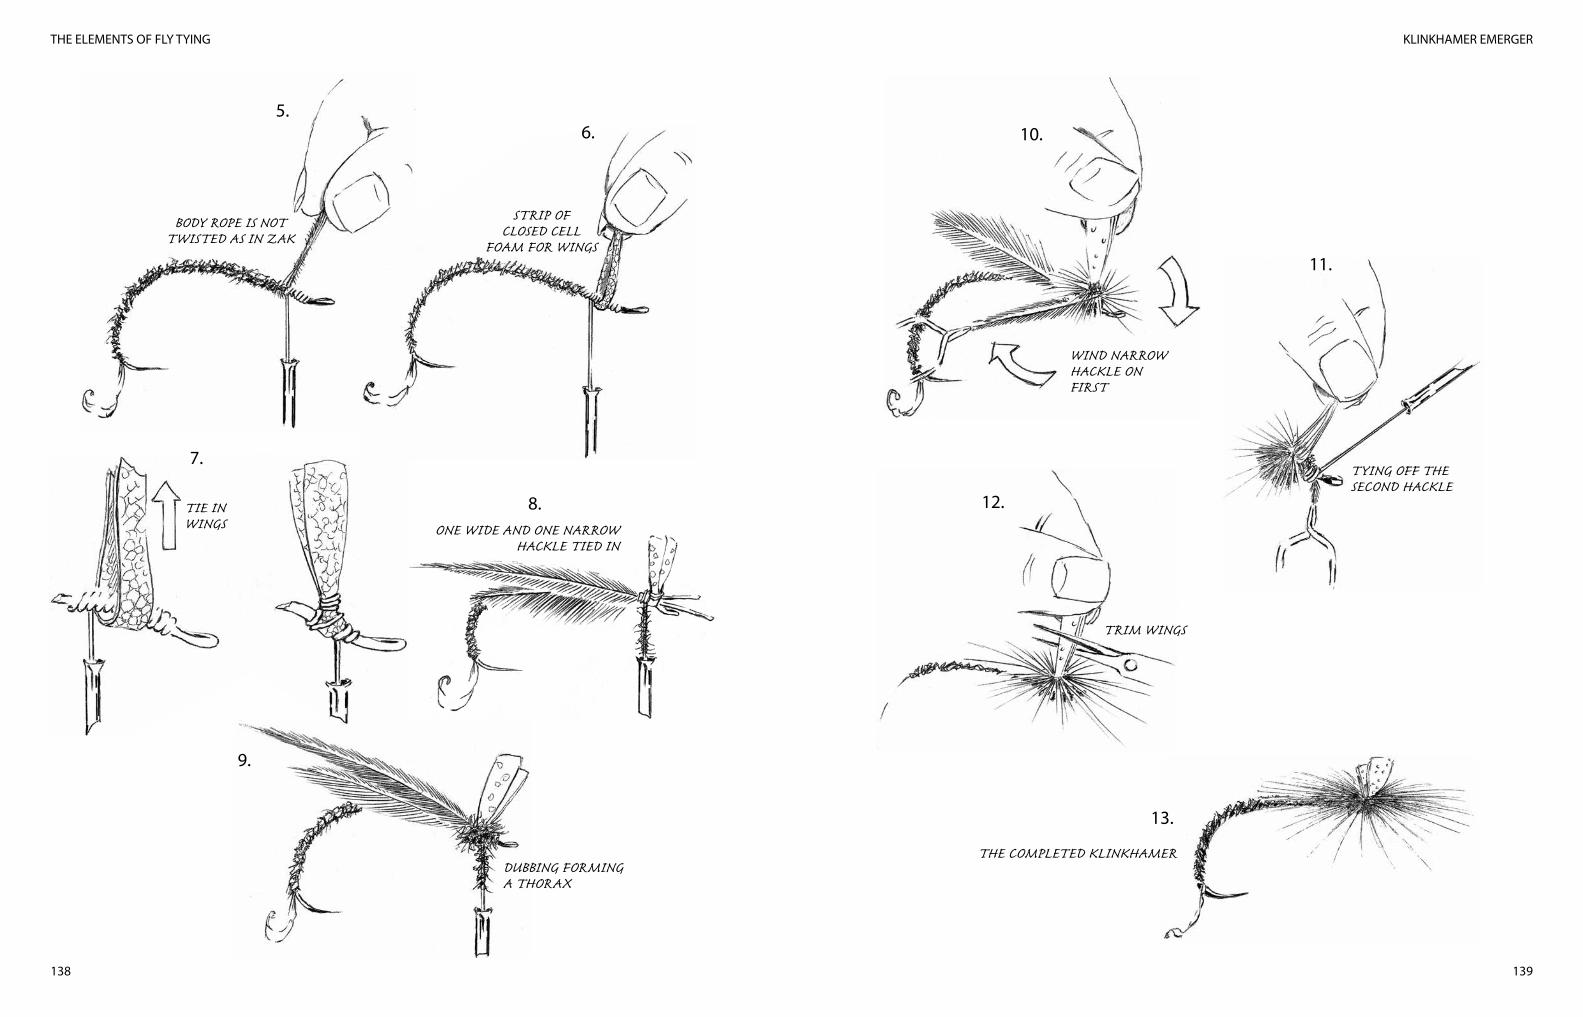
KLINKHAMER EMERGER
139
THE ELEMENTS OF FLY TYING
138
5.
BODY ROPE IS NOT TWISTED AS IN ZAK
6.
STRIP OFCLOSED CELL
FOAM FOR WINGS
7.
TIE INWINGS
8.ONE WIDE AND ONE NARROW
HACKLE TIED IN
9.
DUBBING FORMINGA THORAX
10.
WIND NARROWHACKLE ONFIRST
11.
TYING OFF THESECOND HACKLE
12.
TRIM WINGS
13.
THE COMPLETED KLINKHAMER
ROYAL WULFF
141140
ROYAL WULFF
You are about to tie one of the most successful dry flies of all time, a fly invented by one of the most successful fly fishers of all time, Lee Wulff.
It’s typically described as an attractor dry fly and it is and it isn’t. Let me explain. It has the rough shape of an adult mayfly, but its colours are anything but true mayfly – a garish mix of white, red and green that suggests a parody of Christmas decorations more than a true attempt at imitating a living insect. That is until you read Gary LaFontaine’s account of just what happens to these colours on the water in different conditions of light (see Dry Fly: New Angles, pages 211 and 212). In essence, the peacock green body is broken up by the band of bright red floss, so as Gary says, ‘…the fly is not bright – it is half-bright’. That’s because in red/orange light the green is subdued and the red is enhanced. In green light, such as you find on streams with overhanging foliage, the green is highlighted and the red is subdued. If that all sounds a little confusing, or Irish maybe, it happens to be of great practical importance, so I’ll come back to this point when we consider how best to fish a Royal Wulff.
What you will need to tie this flyA dry fly hook around size 12 (in practical fly fishing terms you’d be using 14s and 16s mostly, but for the purposes of this exercise, a size 12 hook will give you more room to work on), 6/0 black tying thread, peacock herls, a spool of red floss, white calf tail or calf body hair (which is a little straighter and finer), a brown cock hackle cape and a patch of fine deer hair. The original pattern developed by Lee Wulff calls for a tail made from natural bucktail, and if you’re a
traditionalist, please go ahead and use it. I have also used elk body hair for the tail and it’s a reasonable substitute, as is deer hair.
What new techniques will you learn?Tying in split, hair wings, using a floss over-wrap for the body and tying deer hair or bucktail to form a tail.
Tying instructionsSecure your hook in the vice and dress the shank. Bring the thread back to the thorax area to prepare for the hair wings. They are best tied in a third of the shank length back from the eye. The big mistake most tiers make is to put in the wings too close to the eye, leaving too little space to wrap hackle in front of the wings or to build a head.
Cut a bunch of white calf hair from as close to the skin as you can get and remove the soft down. Place these tips first into a hair stacker to even up the fibres. If you don’t own a stacker just miss this step. It’s not the end of the world. The thickness of the bunch of hair should be around as thick as a drinking straw. Measure the bunch for length. You want the wings to be as long as the hook shank. Hold the bunch firmly in your left hand with the tips facing forwards over the eye of the hook and bind them on with a few really tight pinched loops. Make sure the hair doesn’t slide down the side of the hook shank – you want it on top. Then wrap the remaining butt fibres tightly for two to three millimetres moving towards the tail of the fly.
Trim off the excess hair, trying to avoid cutting it at an angle so that you leave a flat bed to seat your cock hackle on. Wrap more turns of thread over the bed of hair, moving forward. When your thread is at the base of the wings, pick them up firmly and put in a number of wraps ahead of the base. This helps to elevate the wings vertically and to build up a bed for the front hackle. Bring the thread back to the base of the wings. Now using a bodkin divide the bunch of hair evenly and separate the two wing clumps. Wrap figure-of-eight turns between the two and even take a few turns of tying thread around the base of each hair wing. Return to the tail of the fly.
Cut a modest bunch of deer hair for the tail – say about
CHAPTER 18

ROYAL WULFF
143
THE ELEMENTS OF FLY TYING
142
twenty-five fibres. If you chose to use bucktail, stack the fibres in a hair stacker so that their tips are even. Measure the fibres against the shank, making sure that where you tie them in will leave a tail as long as the hook shank. I’d again use a pinched loop, but if you are using deer hair don’t tighten the first two wraps otherwise the hair will flare. After that, wrap the fibres tightly on to the hook shank as you move the thread forwards over the remaining hair butts and then trim off the excess right up at the base of the wing. Once again, we are wrapping fibres over the entire length of the hook shank to avoid leaving a bump.
Now return your thread to the tail of the fly. Your body will cover two-thirds of the hook shank and I want you to mentally divide this area into equal thirds. It will go one-third each for peacock, floss and peacock again.
To start the body, tie in four peacock herls a little way from their tips and twist them lightly into a rope. Take your tying thread forward to anywhere around the middle of the body. Wind the peacock herl over the first third of the body, anchor it with your tying thread, but don’t cut it off. Tie in a five centimetre strip of red floss and wind your peacock herl rope ahead of this point, always remembering to move your tying thread ahead of the point you are working at. Now wind the red floss over the peacock herl to cover the middle third of the body and then tie it off and trim off the excess. Wrap the remaining peacock herl to the point where you cut off the excess calf hair fibres, tie off and trim.
Select two brown cock hackles, checking that their fibres are roughly one-and-a-half times as wide as the gape of the hook. Tie them in with their concave sides facing forwards. Wrap them around the hook shank so that you get at least three turns of each behind the wing root and two ahead of it. Secure each hackle well and trim off the excess. Form a neat head and add a drop of head cement or varnish. Before the glue dries, thread the stem of a cock hackle through the eye to make sure you have not blocked the eye with cement.
Fishing the Royal WulffI said I’d come back to this and share with you some of Gary LaFontaine’s observations about light and attraction. He argues, and I’m sure he’s right, that the Royal Wulff does best in sunlight and on broken water. On cloudy days the light is made up of all colours in the spectrum and consequently the brightness of both the green peacock and red floss are dulled, robbing the fly of nearly all its attractive qualities. The Royal Wulff is not a cloudy day pattern. On sunny days the light spectrum is mostly made up of orange and red light and that enhances the red colour of the floss and dulls the green. That’s a wonderful combination. Then where the spectrum contains a lot of green light, the red is dulled and the green is enhanced, again very useful. But on sunny days that are getting on towards evening, the red and orange light rays travel at a flatter angle and so are enhanced. This makes the Royal Wulff an ideal evening light fly, more so because of the added visibility the white calf wings give it.
ROYAL WULFFPROPORTIONS
TYING A ROYAL WULFF IN PICTURES
EFFECTIVE SHANK LENGTH
TAIL EQUALS SHANK LENGTH
EFFECTIVE BODY LENGTH IN THIRDS
WING POSITION AND WING ROOT
SPACE FOR HEAD
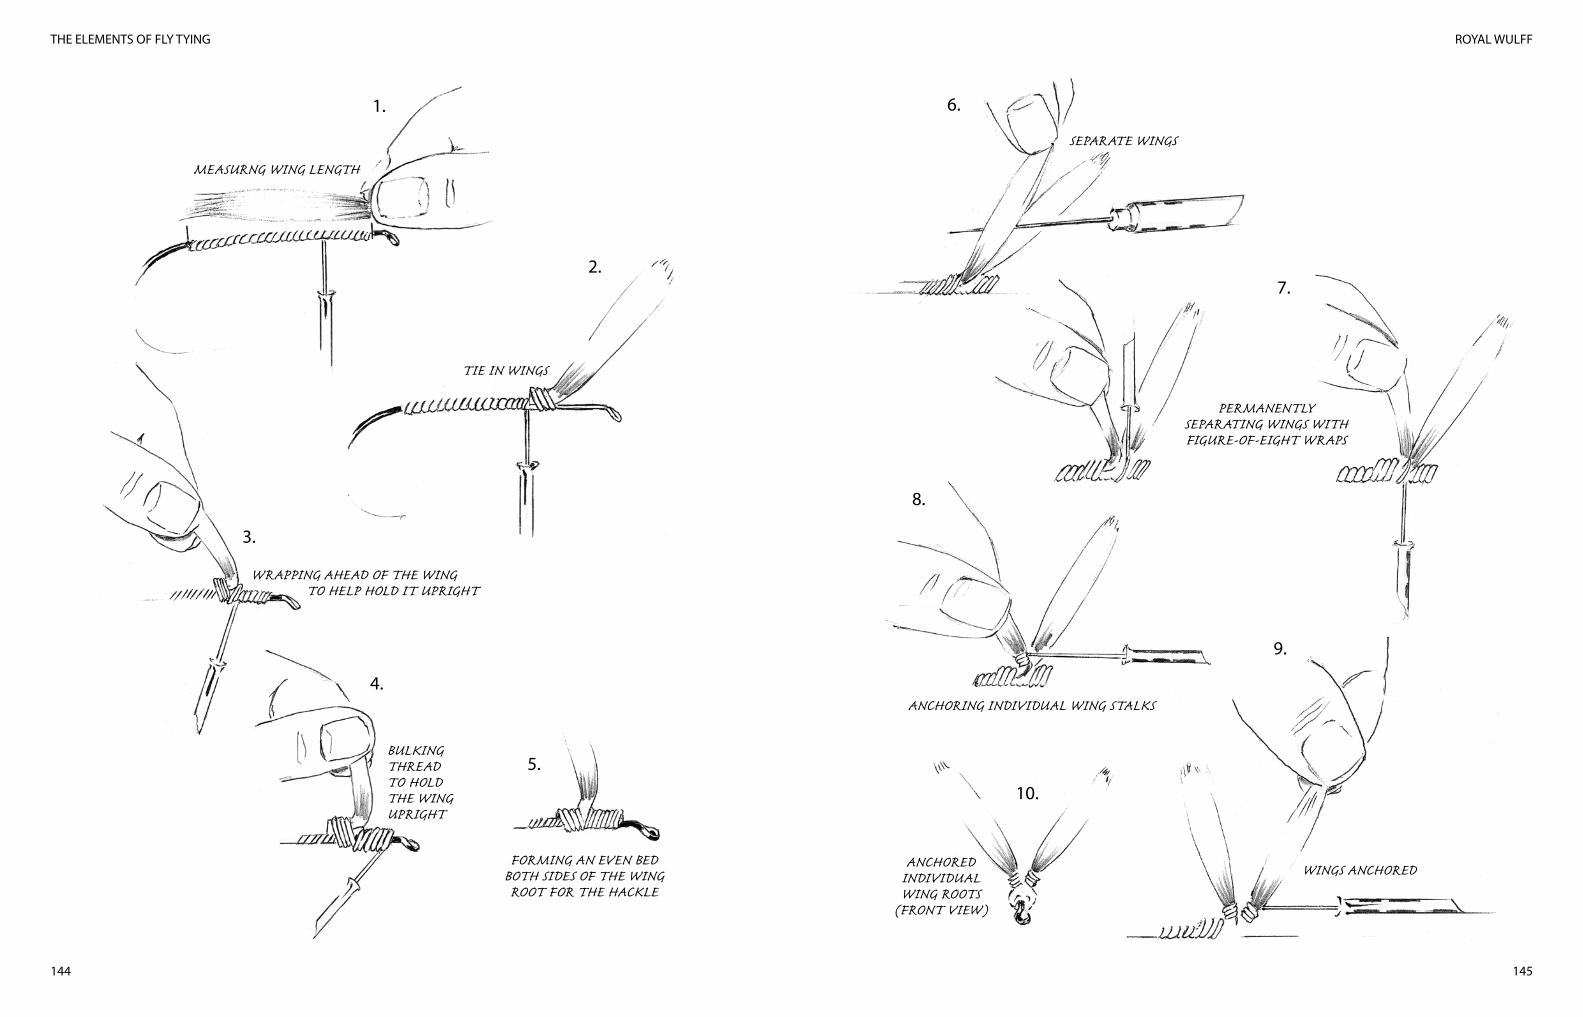
ROYAL WULFF
145
THE ELEMENTS OF FLY TYING
144
1.
MEASURNG WING LENGTH
2.
TIE IN WINGS
3.
WRAPPING AHEAD OF THE WING TO HELP HOLD IT UPRIGHT
4.
BULKINGTHREADTO HOLDTHE WINGUPRIGHT
FORMING AN EVEN BEDBOTH SIDES OF THE WINGROOT FOR THE HACKLE
5.
SEPARATE WINGS
6.
7.
PERMANENTLYSEPARATING WINGS WITHFIGURE-OF-EIGHT WRAPS
8.
ANCHORING INDIVIDUAL WING STALKS
9.
WINGS ANCHORED
10.
ANCHOREDINDIVIDUALWING ROOTS
(FRONT VIEW)

ROYAL WULFF
147
THE ELEMENTS OF FLY TYING
146
11.
MEASURING THETAIL FOR LENGH
12.
TIE IN TAIL THENPEACOCK HERL
13.
RED SILK FLOSSTIED IN (THEN COVEREDWITH PEACOCKHERL)
14.
WRAP FLOSS
TIE IN FRONTPEACOCK
HERL
15.
TIE IN HACKLES
16.
WRAP HACKLES
17.
THE COMPLETED ROYAL WULFF
CREAM SPINNER
149148
CREAM SPINNER
This is a stillwater pattern to match Caenis falls when thousands upon thousands of tiny Caenidae mayflies first dance in smoke-like columns along the water’s edge before returning to the water as spinners to lay their eggs and die. Obviously the egg laying process and ultimate death make spinners easy pickings and trout take them with effortless nonchalance, swimming through the hatch just below the surface, head tilted up, mouth open, gulping insects like there was no tomorrow! For the angler, this feeding bonanza can be anything from a great opportunity to a major problem depending on what patterns you happen to have in your fly box. In Caenis hatches, trout throw caution to the winds to maximise the feast, but they also get very selective, meaning they’ll only eat the spinners.
I saw a wonderful example of the single mindedness of this selectivity when I was fishing a tiny lake in a spinner fall early one summer evening. With fish rising all over the place, a stray grasshopper landed slap in the middle of the hatch, yet was still able to laboriously kick its way back to shore between hordes of gulping trout! So as when lake trout are into ants, or snails, or midges and nothing else will catch fish, there are equally many times on lakes when nothing but the right size and colour spinner pattern will get the job done.
For fly tyers, stillwater mayfly spinner triggers are subtle and include their delicate build, tiny size, their outspread, shiny wings and their sparse, long and slender tails. On lakes, unlike rivers, colour isn’t really a problem for the fly tyer because in most stillwater spinner falls the insects are most often a neutral pale grey to cream colour. I have taken the colour for this pattern from Dean
Riphagen’s great contribution to South African fly tying, The South African Fly Fishing Handbook, because the pattern nicely hits the middle of the road for stillwater fly fishing and won’t let you down.
What you will need to tie this flyA size 18 dry fly hook, 8/0 pre-waxed brown thread, natural or synthetic dubbing in pale cream and dark brown, a large, pale cock hackle and pearl coloured Krystal Flash.
The steps you will learn tying this flyThis pattern will teach you the delicate art of attaching individual fibres to form tails, in this case cock hackle fibres, but equally common is the use of synthetic tail fibres, such as Micro Fibetts, or even boar bristle. You will also learn how to tie-in a spent wing, in this case Krystal Flash, but the principle would hold good for any of the new brands of synthetic winging material, even for Cul de Canard or turkey ‘flats’ spent wings.
Tying stepsDress the hook shank and clip three long stiff fibres off a pale coloured cock hackle from right at the stem. These should be tied in together and you want them to protrude a little longer than the entire length of the hook. Once in place, separate the three fibres with your fingers, but don’t anchor them in place with separate turns of thread between each barb. Life is too short.
Now take the tying thread to a point three millimetres behind the eye. Select six or seven fibres of Krystal Flash. Be careful not to take too many, because a wing that is too dense will make the fly spin in the cast and twist the leader and, besides, the wing won’t look naturally transparent. Tie in a generous length so that both sides are long. Now pick up both ends in your left hand, lift them under tension so that they are vertical to the hook and snip off under your fingers. This way both wings are automatically the same length. Just make sure they are not too short. The correct guideline is to leave each wing the same length as the hook shank.
Return the tying thread to the base of the tail and dub a
CHAPTER 19
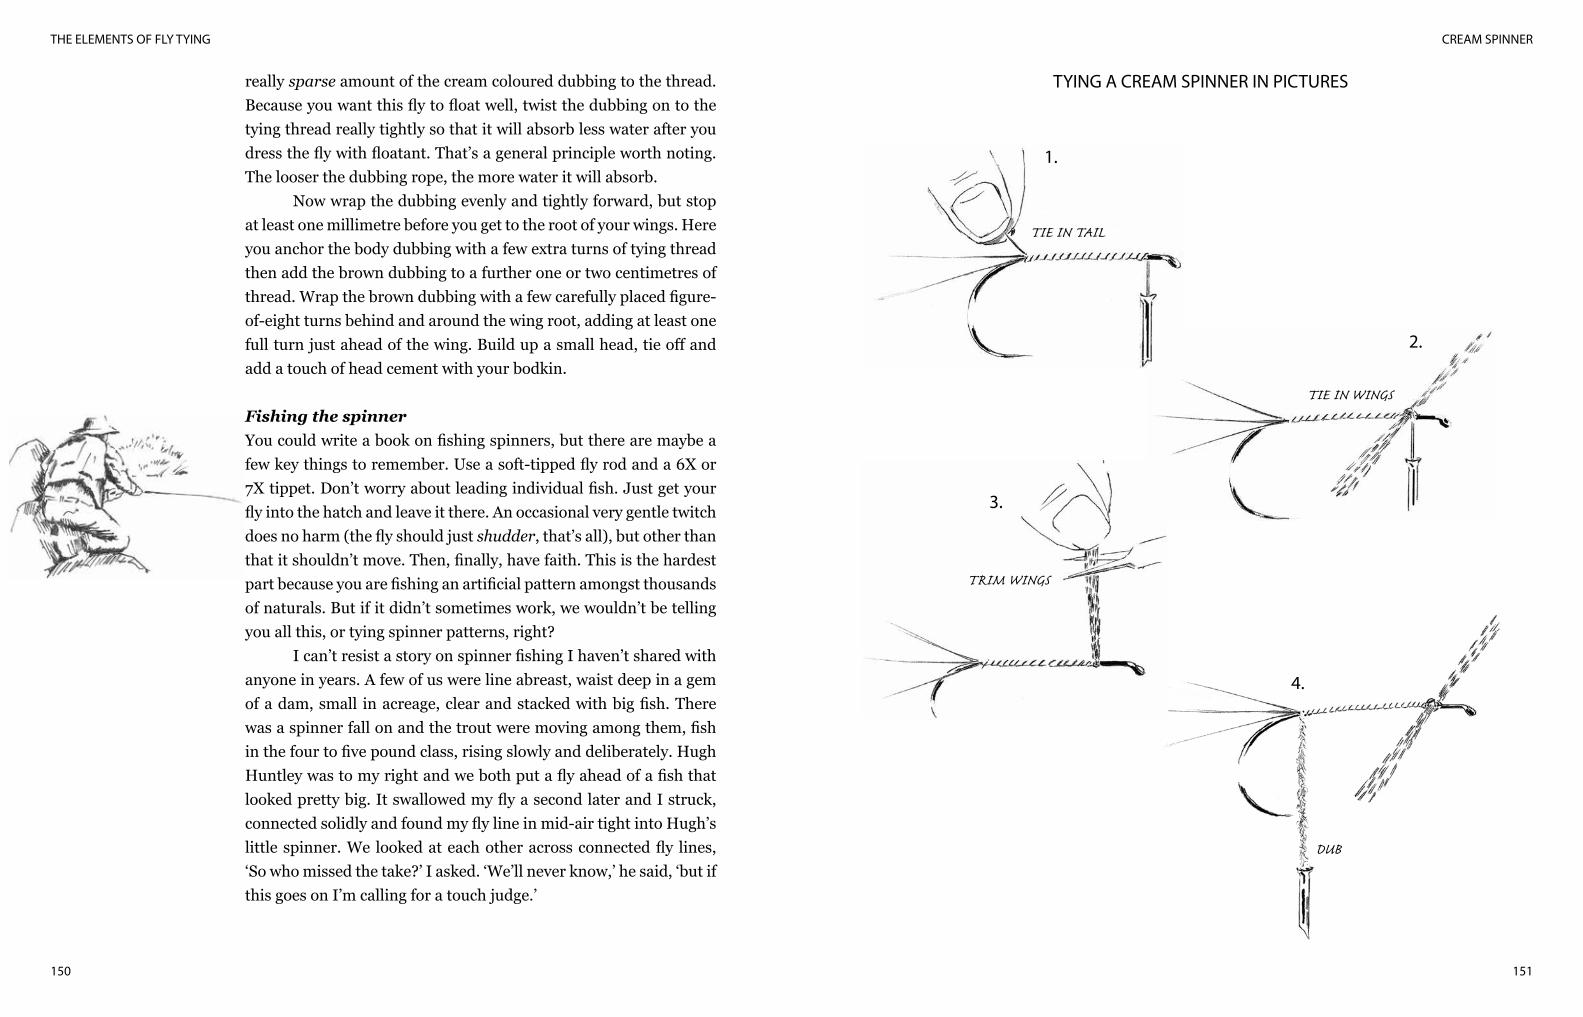
CREAM SPINNER
151
THE ELEMENTS OF FLY TYING
150
really sparse amount of the cream coloured dubbing to the thread. Because you want this fly to float well, twist the dubbing on to the tying thread really tightly so that it will absorb less water after you dress the fly with floatant. That’s a general principle worth noting. The looser the dubbing rope, the more water it will absorb.
Now wrap the dubbing evenly and tightly forward, but stop at least one millimetre before you get to the root of your wings. Here you anchor the body dubbing with a few extra turns of tying thread then add the brown dubbing to a further one or two centimetres of thread. Wrap the brown dubbing with a few carefully placed figure-of-eight turns behind and around the wing root, adding at least one full turn just ahead of the wing. Build up a small head, tie off and add a touch of head cement with your bodkin.
Fishing the spinnerYou could write a book on fishing spinners, but there are maybe a few key things to remember. Use a soft-tipped fly rod and a 6X or 7X tippet. Don’t worry about leading individual fish. Just get your fly into the hatch and leave it there. An occasional very gentle twitch does no harm (the fly should just shudder, that’s all), but other than that it shouldn’t move. Then, finally, have faith. This is the hardest part because you are fishing an artificial pattern amongst thousands of naturals. But if it didn’t sometimes work, we wouldn’t be telling you all this, or tying spinner patterns, right?
I can’t resist a story on spinner fishing I haven’t shared with anyone in years. A few of us were line abreast, waist deep in a gem of a dam, small in acreage, clear and stacked with big fish. There was a spinner fall on and the trout were moving among them, fish in the four to five pound class, rising slowly and deliberately. Hugh Huntley was to my right and we both put a fly ahead of a fish that looked pretty big. It swallowed my fly a second later and I struck, connected solidly and found my fly line in mid-air tight into Hugh’s little spinner. We looked at each other across connected fly lines, ‘So who missed the take?’ I asked. ‘We’ll never know,’ he said, ‘but if this goes on I’m calling for a touch judge.’
TYING A CREAM SPINNER IN PICTURES
1.
TIE IN TAIL
2.
TIE IN WINGS
3.
TRIM WINGS
4.
DUB
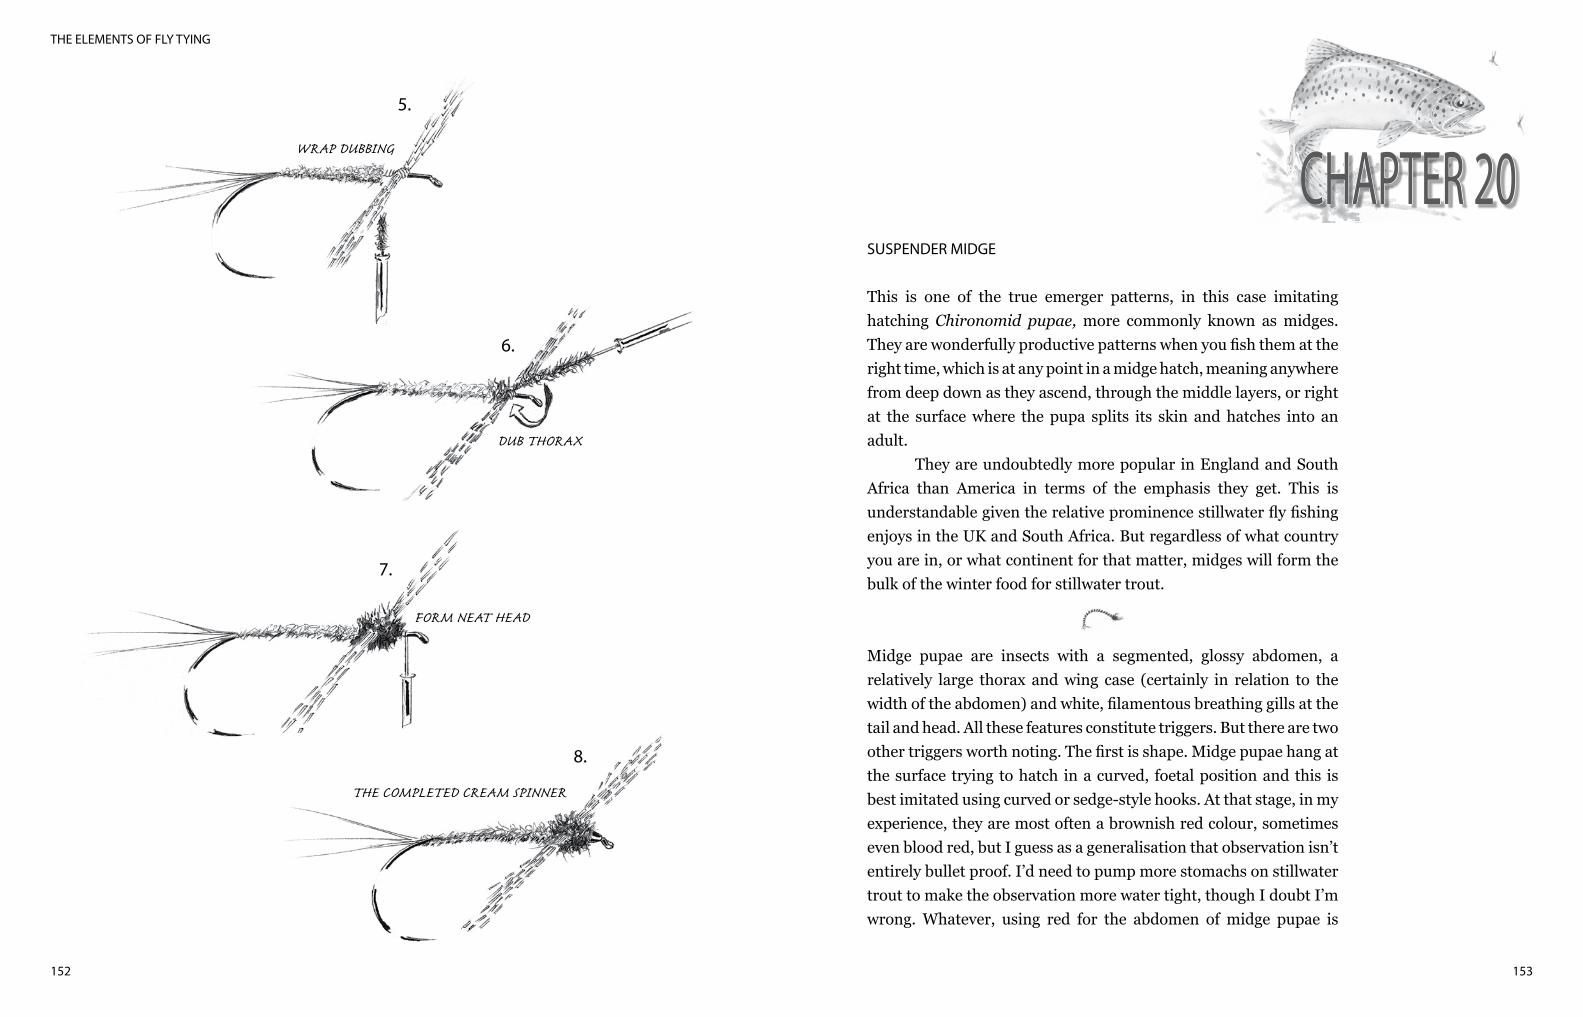
153
THE ELEMENTS OF FLY TYING
152
SUSPENDER MIDGE
This is one of the true emerger patterns, in this case imitating hatching Chironomid pupae, more commonly known as midges. They are wonderfully productive patterns when you fish them at the right time, which is at any point in a midge hatch, meaning anywhere from deep down as they ascend, through the middle layers, or right at the surface where the pupa splits its skin and hatches into an adult.
They are undoubtedly more popular in England and South Africa than America in terms of the emphasis they get. This is understandable given the relative prominence stillwater fly fishing enjoys in the UK and South Africa. But regardless of what country you are in, or what continent for that matter, midges will form the bulk of the winter food for stillwater trout.
Midge pupae are insects with a segmented, glossy abdomen, a relatively large thorax and wing case (certainly in relation to the width of the abdomen) and white, filamentous breathing gills at the tail and head. All these features constitute triggers. But there are two other triggers worth noting. The first is shape. Midge pupae hang at the surface trying to hatch in a curved, foetal position and this is best imitated using curved or sedge-style hooks. At that stage, in my experience, they are most often a brownish red colour, sometimes even blood red, but I guess as a generalisation that observation isn’t entirely bullet proof. I’d need to pump more stomachs on stillwater trout to make the observation more water tight, though I doubt I’m wrong. Whatever, using red for the abdomen of midge pupae is
5.
WRAP DUBBING
6.
DUB THORAX
7.
FORM NEAT HEAD
8.
THE COMPLETED CREAM SPINNER
CHAPTER 20
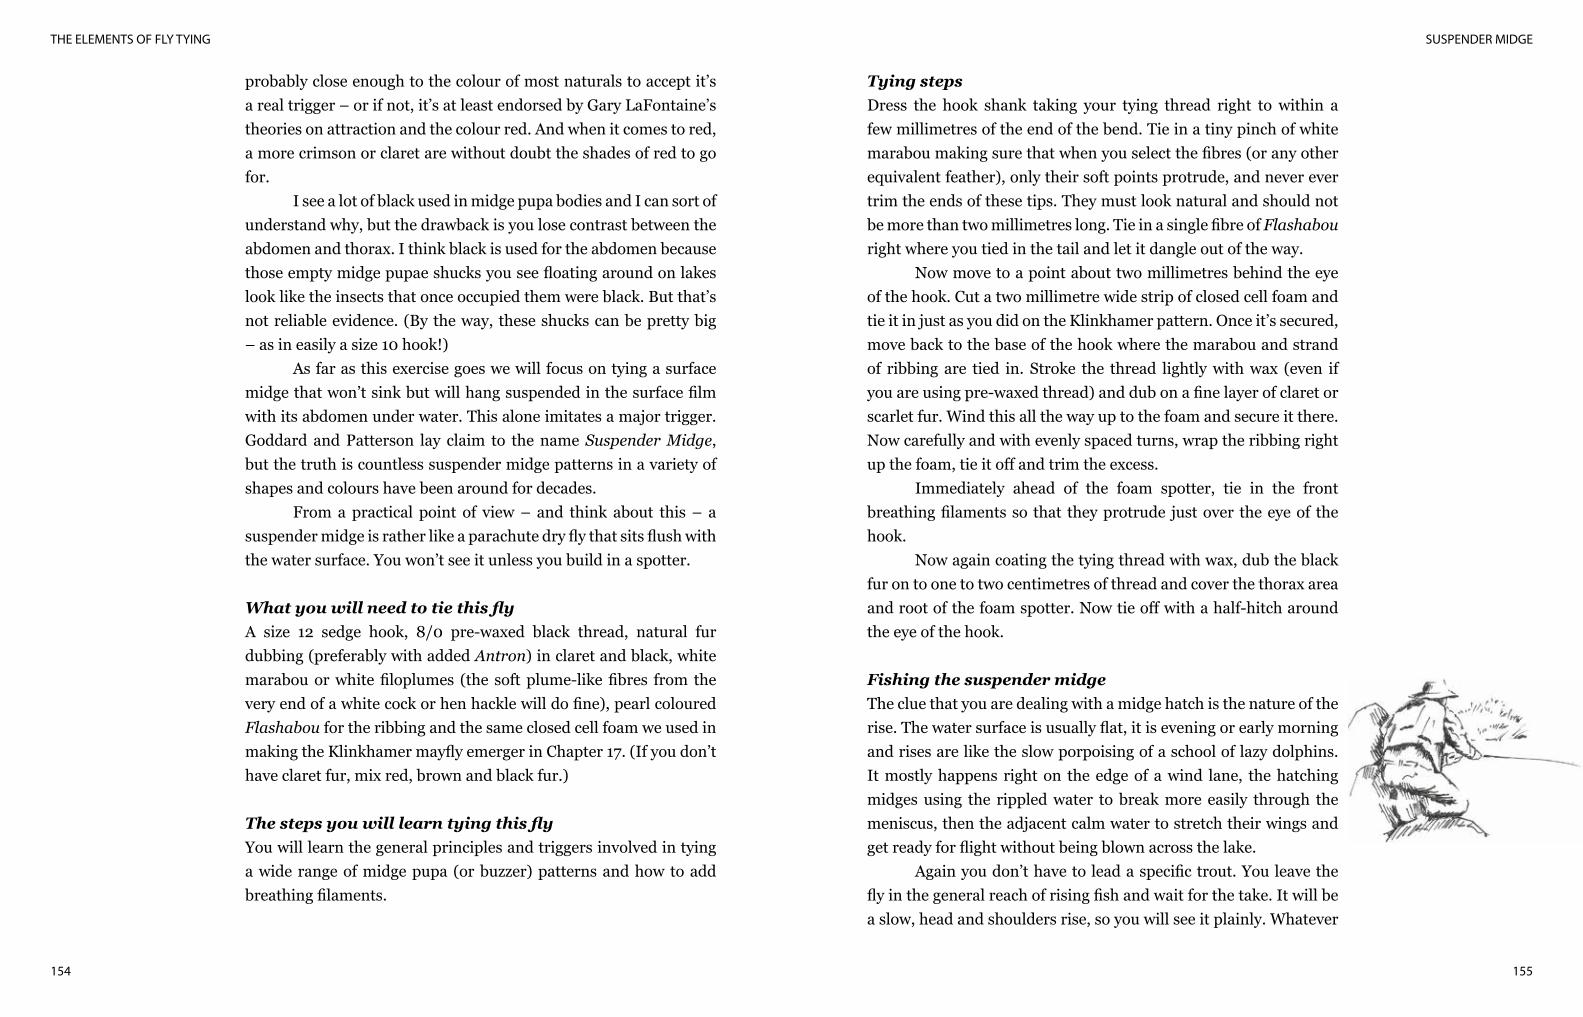
SUSPENDER MIDGE
155
THE ELEMENTS OF FLY TYING
154
probably close enough to the colour of most naturals to accept it’s a real trigger – or if not, it’s at least endorsed by Gary LaFontaine’s theories on attraction and the colour red. And when it comes to red, a more crimson or claret are without doubt the shades of red to go for.
I see a lot of black used in midge pupa bodies and I can sort of understand why, but the drawback is you lose contrast between the abdomen and thorax. I think black is used for the abdomen because those empty midge pupae shucks you see floating around on lakes look like the insects that once occupied them were black. But that’s not reliable evidence. (By the way, these shucks can be pretty big – as in easily a size 10 hook!)
As far as this exercise goes we will focus on tying a surface midge that won’t sink but will hang suspended in the surface film with its abdomen under water. This alone imitates a major trigger. Goddard and Patterson lay claim to the name Suspender Midge, but the truth is countless suspender midge patterns in a variety of shapes and colours have been around for decades.
From a practical point of view – and think about this – a suspender midge is rather like a parachute dry fly that sits flush with the water surface. You won’t see it unless you build in a spotter.
What you will need to tie this flyA size 12 sedge hook, 8/0 pre-waxed black thread, natural fur dubbing (preferably with added Antron) in claret and black, white marabou or white filoplumes (the soft plume-like fibres from the very end of a white cock or hen hackle will do fine), pearl coloured Flashabou for the ribbing and the same closed cell foam we used in making the Klinkhamer mayfly emerger in Chapter 17. (If you don’t have claret fur, mix red, brown and black fur.)
The steps you will learn tying this flyYou will learn the general principles and triggers involved in tying a wide range of midge pupa (or buzzer) patterns and how to add breathing filaments.
Tying stepsDress the hook shank taking your tying thread right to within a few millimetres of the end of the bend. Tie in a tiny pinch of white marabou making sure that when you select the fibres (or any other equivalent feather), only their soft points protrude, and never ever trim the ends of these tips. They must look natural and should not be more than two millimetres long. Tie in a single fibre of Flashabou right where you tied in the tail and let it dangle out of the way.
Now move to a point about two millimetres behind the eye of the hook. Cut a two millimetre wide strip of closed cell foam and tie it in just as you did on the Klinkhamer pattern. Once it’s secured, move back to the base of the hook where the marabou and strand of ribbing are tied in. Stroke the thread lightly with wax (even if you are using pre-waxed thread) and dub on a fine layer of claret or scarlet fur. Wind this all the way up to the foam and secure it there. Now carefully and with evenly spaced turns, wrap the ribbing right up the foam, tie it off and trim the excess.
Immediately ahead of the foam spotter, tie in the front breathing filaments so that they protrude just over the eye of the hook.
Now again coating the tying thread with wax, dub the black fur on to one to two centimetres of thread and cover the thorax area and root of the foam spotter. Now tie off with a half-hitch around the eye of the hook.
Fishing the suspender midgeThe clue that you are dealing with a midge hatch is the nature of the rise. The water surface is usually flat, it is evening or early morning and rises are like the slow porpoising of a school of lazy dolphins. It mostly happens right on the edge of a wind lane, the hatching midges using the rippled water to break more easily through the meniscus, then the adjacent calm water to stretch their wings and get ready for flight without being blown across the lake. Again you don’t have to lead a specific trout. You leave the fly in the general reach of rising fish and wait for the take. It will be a slow, head and shoulders rise, so you will see it plainly. Whatever

SUSPENDER MIDGE
157
THE ELEMENTS OF FLY TYING
156
you do, don’t strike until that head is turning down! So why the need for a spotter? Well, really to identify your fly and this is important because your best midge fishing will happen when the light is poor. The other reason for adding foam is to keep your fly in the surface film. If it hangs a few centimetres below the surface, fish will often ignore it.
TYING A SUSPENDER MIDGE IN PICTURES
1.
WHITE MARABOU ANDFLASHABOU TIED IN
CLOSED CELL FOAM
2.
WHITE MARABOU ADDED
DUB
3.
FLASHABOU RIBBING
4.DUBBING ADDED TO FORM THORAX
THE COMPLETED SUSPENDER MIDGE

BLOODWORM
159158
BLOODWORM
I am beginning to believe that a good bloodworm imitation might just be the single most useful nymph for winter stillwater fly fishing and I’m not alone in thinking this way. A group of us make a regular trip to some high altitude lakes once or twice every winter, and over the last four years the Bloodworm has started to outperform just about everything else.
Recently Fred Steynberg and I stomach-pumped a lake rainbow of around three pounds and found it jammed with bloodworms. We squeezed them from the pump into the palm of Fred’s hand to photograph them and writing this chapter I had another look at that picture just to count exactly how many we had actually managed to bag. There were twenty-four, but then we’d probably missed more than half and spilled quite a few others before I got the shot. So as far as food mass goes, this insect must be right up there with the best of them.
All bloodworm patterns are, of course, imitations of the larvae of the ubiquitous Chironomidae (midge) family, in this case the species Chironomus that live in the substrate of lakes and slow flowing rivers. Like snails, they occasionally get dislodged, or purposefully drift to new feeding grounds, but they can actively swim. They occur in our lakes in water at almost any depth and I’ve even seen them right on the surface. Their average length is one to two-and-a-half centimetres and they have segmented and deeply lustrous red abdomens. (We’ve found glassy green and pale olive species in our lakes as well, though never in the numbers we find red bloodworms
and they are nowhere near as remarkable.) The head is small, slightly thinner than the abdomen and it’s a shade or two darker, almost brown in fact, but again, just as lustrous as the abdomen.
Clearly the triggers with this insect are its glossiness, its long, thin, segmented and glowing red abdomen, the darker, lustrous head and the curved body position it most commonly adopts in the water. The bloodworms I’ve seen drifting lie absolutely motionless for long periods at a time, curled into a characteristic ‘U’ shape, or even into a tight coil, simply relying on the currents to transport them. But when challenged they make writhing movements that I guess you could say amount to active swimming. My own patterns, though, are all static, because I feel that their dead stillness in the drift is as much a trigger as any writhing movement would be and it’s a lot easier to imitate! (Attempts to create movement have seen patterns tied with red chenille, marabou, and even red elastic bands). As a further trigger, I match the curled body shape using sedge hooks.
There are a few well-known bloodworm patterns, including the Atomic Worm and the San Juan Worm, but the more I use the one I have developed and describe here, the more convinced I become of its worth, particularly for hooking big, fly-shy trout. I’d love a chance to fish this pattern for yellows on the Vaal.
What you will need to tie this flyA sedge or curved hook in size 10, Stretchy Nymph Rib or Vinyl Rib (V-Rib) in red or claret, a ten centimetre piece of pearl Flashabou, a single peacock herl and 6/0 black tying thread. The range of hook sizes you can safely use for this, or any similar bloodworm imitations, is size 8 to 16.
What steps you will learn tying this flyYou will learn how to use soft, vinyl ribbing to form neat and effective bodies for midge patterns. There are similar materials (such as Swannundaze) that have much the same tying characteristics.
Tying stepsDress the front third of the hook shank and attach a piece of Nymph
CHAPTER 21
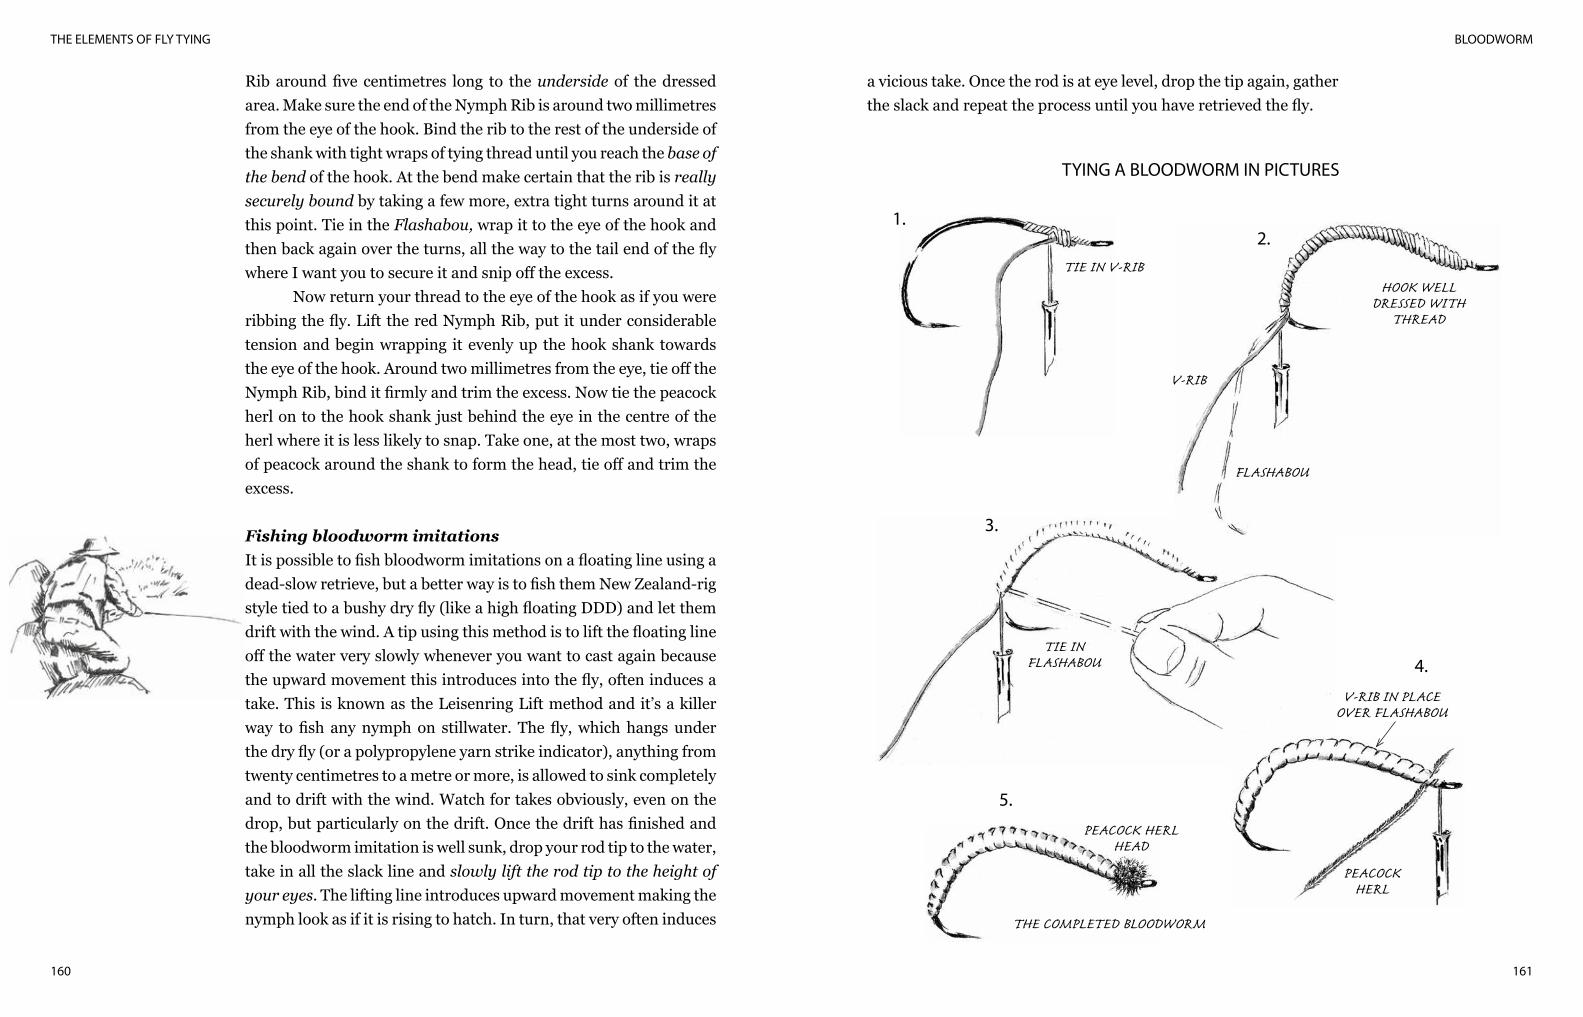
BLOODWORM
161
THE ELEMENTS OF FLY TYING
160
Rib around five centimetres long to the underside of the dressed area. Make sure the end of the Nymph Rib is around two millimetres from the eye of the hook. Bind the rib to the rest of the underside of the shank with tight wraps of tying thread until you reach the base of the bend of the hook. At the bend make certain that the rib is really securely bound by taking a few more, extra tight turns around it at this point. Tie in the Flashabou, wrap it to the eye of the hook and then back again over the turns, all the way to the tail end of the fly where I want you to secure it and snip off the excess.
Now return your thread to the eye of the hook as if you were ribbing the fly. Lift the red Nymph Rib, put it under considerable tension and begin wrapping it evenly up the hook shank towards the eye of the hook. Around two millimetres from the eye, tie off the Nymph Rib, bind it firmly and trim the excess. Now tie the peacock herl on to the hook shank just behind the eye in the centre of the herl where it is less likely to snap. Take one, at the most two, wraps of peacock around the shank to form the head, tie off and trim the excess.
Fishing bloodworm imitationsIt is possible to fish bloodworm imitations on a floating line using a dead-slow retrieve, but a better way is to fish them New Zealand-rig style tied to a bushy dry fly (like a high floating DDD) and let them drift with the wind. A tip using this method is to lift the floating line off the water very slowly whenever you want to cast again because the upward movement this introduces into the fly, often induces a take. This is known as the Leisenring Lift method and it’s a killer way to fish any nymph on stillwater. The fly, which hangs under the dry fly (or a polypropylene yarn strike indicator), anything from twenty centimetres to a metre or more, is allowed to sink completely and to drift with the wind. Watch for takes obviously, even on the drop, but particularly on the drift. Once the drift has finished and the bloodworm imitation is well sunk, drop your rod tip to the water, take in all the slack line and slowly lift the rod tip to the height of your eyes. The lifting line introduces upward movement making the nymph look as if it is rising to hatch. In turn, that very often induces
a vicious take. Once the rod is at eye level, drop the tip again, gather the slack and repeat the process until you have retrieved the fly.
TYING A BLOODWORM IN PICTURES
1.
TIE IN V-RIB
2.
HOOK WELL DRESSED WITH
THREAD
V-RIB
FLASHABOU
3.
TIE INFLASHABOU 4.
V-RIB IN PLACEOVER FLASHABOU
5.
PEACOCKHERL
PEACOCK HERL HEAD
THE COMPLETED BLOODWORM
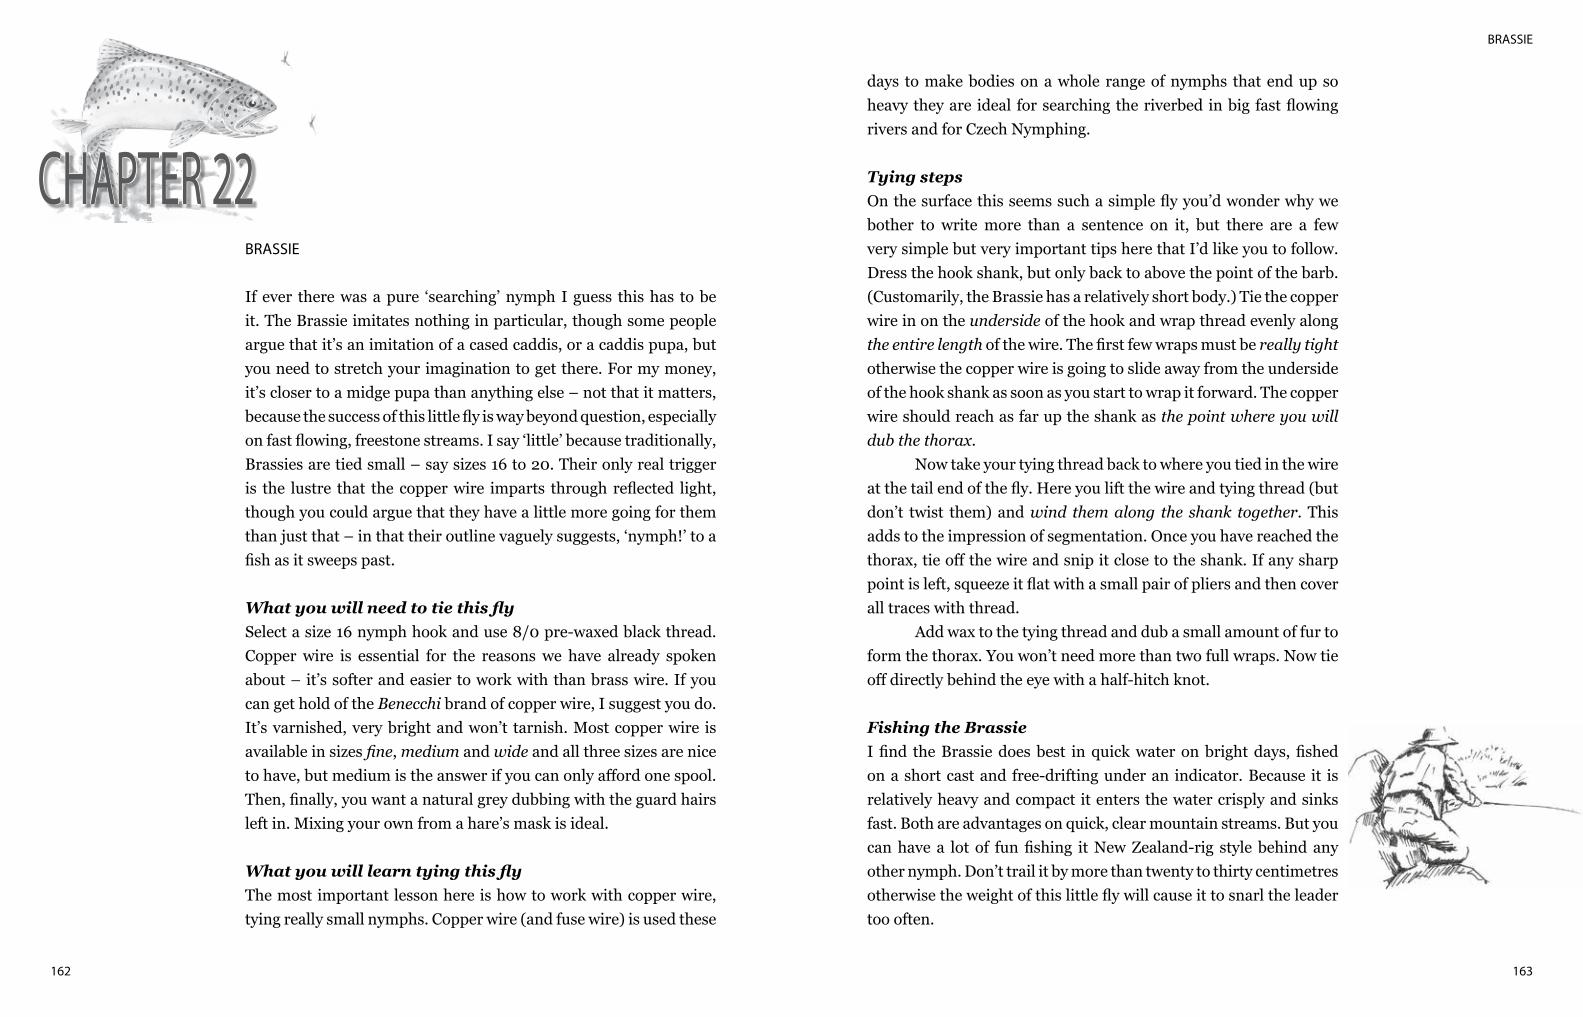
BRASSIE
163162
BRASSIE
If ever there was a pure ‘searching’ nymph I guess this has to be it. The Brassie imitates nothing in particular, though some people argue that it’s an imitation of a cased caddis, or a caddis pupa, but you need to stretch your imagination to get there. For my money, it’s closer to a midge pupa than anything else – not that it matters, because the success of this little fly is way beyond question, especially on fast flowing, freestone streams. I say ‘little’ because traditionally, Brassies are tied small – say sizes 16 to 20. Their only real trigger is the lustre that the copper wire imparts through reflected light, though you could argue that they have a little more going for them than just that – in that their outline vaguely suggests, ‘nymph!’ to a fish as it sweeps past.
What you will need to tie this flySelect a size 16 nymph hook and use 8/0 pre-waxed black thread. Copper wire is essential for the reasons we have already spoken about – it’s softer and easier to work with than brass wire. If you can get hold of the Benecchi brand of copper wire, I suggest you do. It’s varnished, very bright and won’t tarnish. Most copper wire is available in sizes fine, medium and wide and all three sizes are nice to have, but medium is the answer if you can only afford one spool. Then, finally, you want a natural grey dubbing with the guard hairs left in. Mixing your own from a hare’s mask is ideal.
What you will learn tying this flyThe most important lesson here is how to work with copper wire, tying really small nymphs. Copper wire (and fuse wire) is used these
days to make bodies on a whole range of nymphs that end up so heavy they are ideal for searching the riverbed in big fast flowing rivers and for Czech Nymphing.
Tying stepsOn the surface this seems such a simple fly you’d wonder why we bother to write more than a sentence on it, but there are a few very simple but very important tips here that I’d like you to follow. Dress the hook shank, but only back to above the point of the barb. (Customarily, the Brassie has a relatively short body.) Tie the copper wire in on the underside of the hook and wrap thread evenly along the entire length of the wire. The first few wraps must be really tight otherwise the copper wire is going to slide away from the underside of the hook shank as soon as you start to wrap it forward. The copper wire should reach as far up the shank as the point where you will dub the thorax.
Now take your tying thread back to where you tied in the wire at the tail end of the fly. Here you lift the wire and tying thread (but don’t twist them) and wind them along the shank together. This adds to the impression of segmentation. Once you have reached the thorax, tie off the wire and snip it close to the shank. If any sharp point is left, squeeze it flat with a small pair of pliers and then cover all traces with thread.
Add wax to the tying thread and dub a small amount of fur to form the thorax. You won’t need more than two full wraps. Now tie off directly behind the eye with a half-hitch knot.
Fishing the BrassieI find the Brassie does best in quick water on bright days, fished on a short cast and free-drifting under an indicator. Because it is relatively heavy and compact it enters the water crisply and sinks fast. Both are advantages on quick, clear mountain streams. But you can have a lot of fun fishing it New Zealand-rig style behind any other nymph. Don’t trail it by more than twenty to thirty centimetres otherwise the weight of this little fly will cause it to snarl the leader too often.
CHAPTER 22
165
THE ELEMENTS OF FLY TYING
164
The best way to present any weighted New Zealand-rig is to open your casting loop a little, smooth the forward and back casts and slow the line speed down. It’s also wise to limit any false casting, but that’s a rule that applies to most stream fly fishing I do.
CZECH NYMPH
Czech Nymphing has had a relatively brief history that’s more like a sea change in angling than just the introduction of a new technique. There’s little doubt that competition angling (which I know isn’t everyone’s idea of fun, but I’m comfortable with it) unearthed it and accelerated its popularity throughout the fly fishing world. It began who knows when exactly, but probably around the early seventies and definitely in Poland. Czech anglers first ran into it fishing against the Poles in 1984. Why the Czechs came to have their name attached to the technique and not the Poles is simple: they used the technique with huge success in 1986 at the World Fly Fishing Championships held in Belgium and their nation’s name just stuck. Of course it’s not just one technique either and there’s not just one Czech Nymph, so let’s unpack what is perhaps one of the most important revelations in our angling lifetimes.
To appreciate the impact Czech Nymphing has had on fly fishing, you need to read Oliver Edward’s account of the World Championships held in Wales in 1990 and then in Czechoslovakia in 1996. You should also study Karel Krivanec’s account of this history in his book, Czech Nymph and Other Related Fly Fishing Methods, which my friend Ed Herbst is currently translating from ‘Czech English’ into the Queen’s English.
The first intriguing thing is that the Czechs won the World Championship in Wales by an embarrassing margin using a short line nymphing technique, new to the world. The second astounding fact is that the England team back then thought it was the fly pattern and not the angling method that brought them success. In fact, the England team only got around to Czech Nymphing six years later in
CHAPTER 23TYING A BRASSIE IN PICTURES
1.
TIE IN BRASS WIRE
2.
DUB THORAX
3.
THE COMPLETED BRASSIE

CZECH NYMPH
167
THE ELEMENTS OF FLY TYING
166
1996 at the Czechoslovakian World Championships when a certain Vit Misar, a local fly fishing guide, showed the England team he could catch ten fish in their practice session in as many minutes after they had been skunked nearly all day on the selfsame water! But it was a classic case of too little, too late. They did their best, came nowhere, but learned a lot.
So what are we dealing with here? A miracle way of catching fish and if so, then why did the Western world take so long to tumble to it?
I think the answers are simple: (a) We are dealing with a very effective way of catching fish (more about that later). (b) It is a recent development even in eastern European countries. (c) It doesn’t appeal to a lot of people (hence the non-conversion of many otherwise hard core fly fishers) and (d), the Poles discovered it by pure chance and everyone, including the Czechs, remained pretty secretive about it until the late ‘90s.
There’s an interesting hint in the literature that Czech Nymphing began when a few Poles, who couldn’t afford fly lines, were forced to use heavy, level monofilament as a substitute. Monofilament is tough to cast (as a student I initially couldn’t afford a fly line and spent a few months casting level monofilament nylon myself, so I know). Because they were using monofilament, let’s theorize that they were also forced to fish close. The results must have astounded them, just as they astounded my pal Ed Herbst a year ago, when in front of his eyes, a well-known South African fly fisher, Johan Ferreira, winkled one trout after another out of the Holsloot with no more than a metre of leader hanging out of his rod tip! And that on a ‘bad’ day!
Now let’s consider the Czech fly patterns. They were initially thin, mainly woven and heavily-weighted imitations of caddis larvae (the patterns have since evolved dramatically) and these flies did well because they cut the water, sank fast, drifted right on the riverbed and, of course, we all know how prolific caddis larvae are in rivers. Czech Nymphs were first tied on straight hooks, but caddis triggers obviously work better on curved hooks and curved hooks later took over.
This all sounds pretty simple, but really, there is no other way I can explain the phenomenon of Czech Nymphing. Its arrival on our shores, and its subsequent successful application in our rivers, were largely fortuitous by-products of South Africa’s entry into the competitive fly fishing world sometime around 2001.
To select a really archetypal Czech Nymph for you, I went to Karel’s Krivanec’s book. I chose a fly from what he regards as typical of the genre, the Bobesh group of Czech Nymph patterns, though Krivanec is careful to explain that there is no formal classification yet of Czech Nymphs. Their history is too short and their proliferation has been too great. But the pattern is typical and I think you will enjoy tying it.
What you will need to tie this flyYou want a curved hook in size 12, 6/0 tan or yellow tying thread as well as 6/0 black, fine lead wire, tan, yellow, or cream coloured dubbing, plus a pinch of bright red dubbing and some black or dark hare’s ear dubbing. These can all be either natural furs, with or without Antron, or synthetic dubbings. Then you will want medium copper wire, a sheet of thin, clear plastic (the kind zip lock bags are made of) and, finally, 4X clear monofilament leader material.
What steps you will learn tying this flyYou will learn how to make a serviceable Czech nymph pattern, how to tie in a shell back and how to double rib.
Tying stepsDress the hook with lead wire, bringing the wire from the eye to the base of the bend. This is a novel thing to do, because we normally first dress the hook with silk. On a DVD, I watched Jiri Klima, a well-known Czech Nymphing specialist, tie a few flies, and he did exactly the same thing. I suppose you’d have to argue it cuts down on bulk and allows for slimmer patterns. Karel Krivanec also suggests you first varnish the hook shank, but give that a miss. Now attach your tying thread at the eye and lend support to the lead wraps with a few turns of tying thread.
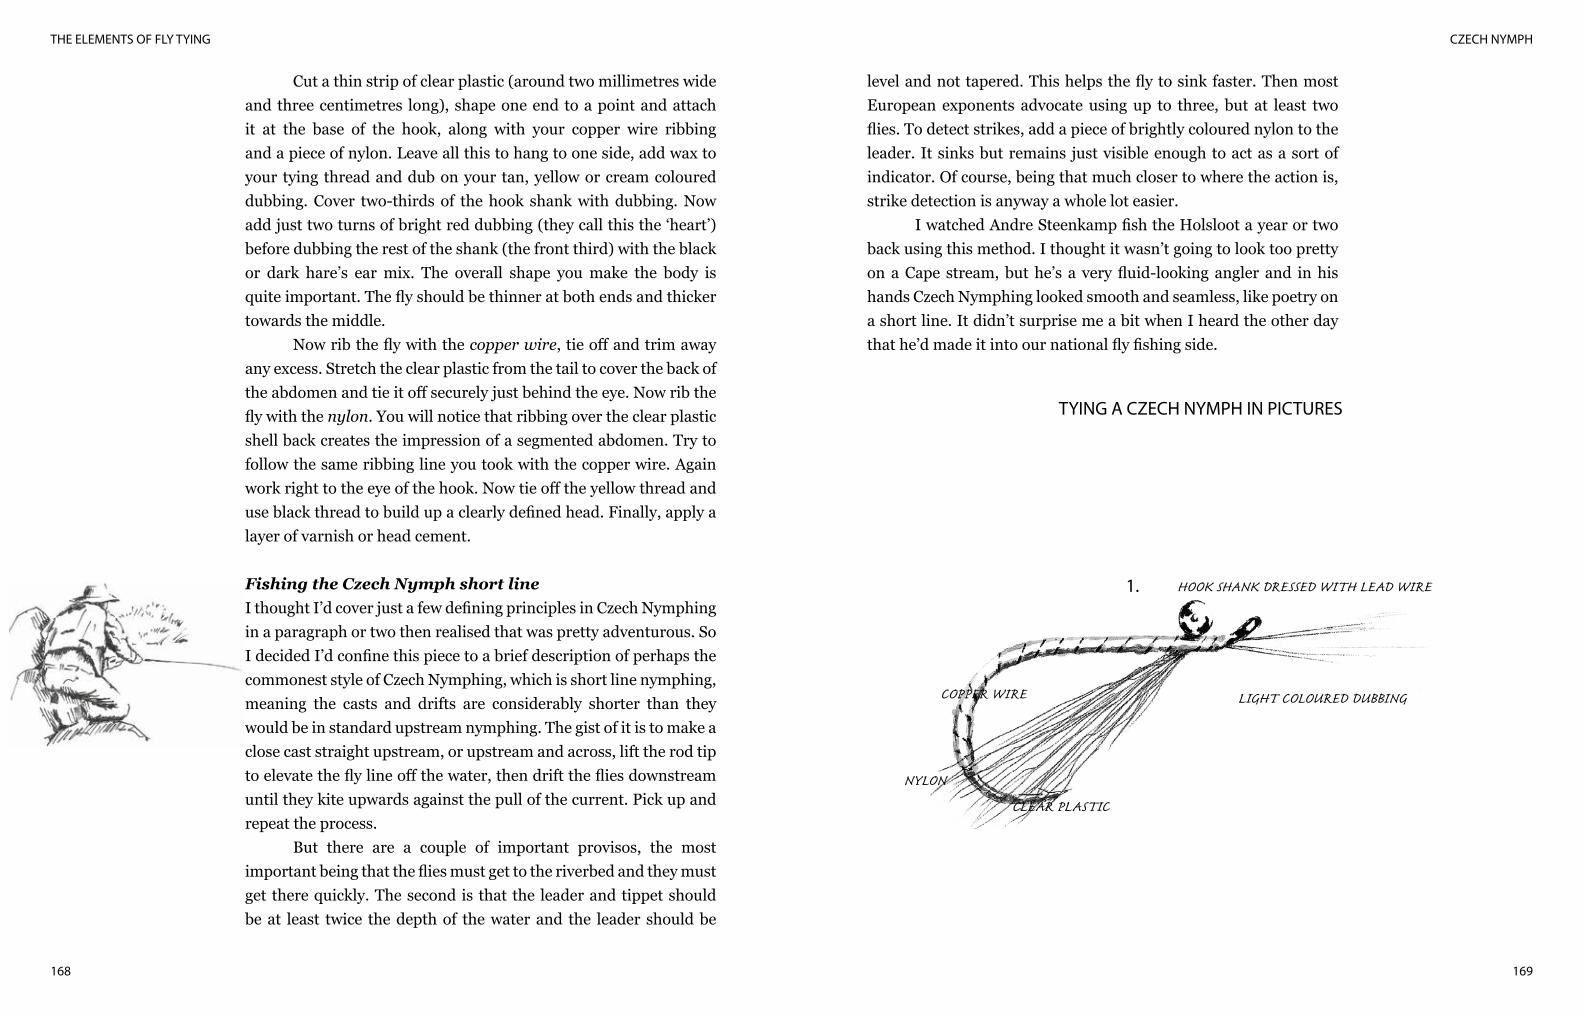
CZECH NYMPH
169
THE ELEMENTS OF FLY TYING
168
Cut a thin strip of clear plastic (around two millimetres wide and three centimetres long), shape one end to a point and attach it at the base of the hook, along with your copper wire ribbing and a piece of nylon. Leave all this to hang to one side, add wax to your tying thread and dub on your tan, yellow or cream coloured dubbing. Cover two-thirds of the hook shank with dubbing. Now add just two turns of bright red dubbing (they call this the ‘heart’) before dubbing the rest of the shank (the front third) with the black or dark hare’s ear mix. The overall shape you make the body is quite important. The fly should be thinner at both ends and thicker towards the middle.
Now rib the fly with the copper wire, tie off and trim away any excess. Stretch the clear plastic from the tail to cover the back of the abdomen and tie it off securely just behind the eye. Now rib the fly with the nylon. You will notice that ribbing over the clear plastic shell back creates the impression of a segmented abdomen. Try to follow the same ribbing line you took with the copper wire. Again work right to the eye of the hook. Now tie off the yellow thread and use black thread to build up a clearly defined head. Finally, apply a layer of varnish or head cement.
Fishing the Czech Nymph short lineI thought I’d cover just a few defining principles in Czech Nymphing in a paragraph or two then realised that was pretty adventurous. So I decided I’d confine this piece to a brief description of perhaps the commonest style of Czech Nymphing, which is short line nymphing, meaning the casts and drifts are considerably shorter than they would be in standard upstream nymphing. The gist of it is to make a close cast straight upstream, or upstream and across, lift the rod tip to elevate the fly line off the water, then drift the flies downstream until they kite upwards against the pull of the current. Pick up and repeat the process.
But there are a couple of important provisos, the most important being that the flies must get to the riverbed and they must get there quickly. The second is that the leader and tippet should be at least twice the depth of the water and the leader should be
level and not tapered. This helps the fly to sink faster. Then most European exponents advocate using up to three, but at least two flies. To detect strikes, add a piece of brightly coloured nylon to the leader. It sinks but remains just visible enough to act as a sort of indicator. Of course, being that much closer to where the action is, strike detection is anyway a whole lot easier.
I watched Andre Steenkamp fish the Holsloot a year or two back using this method. I thought it wasn’t going to look too pretty on a Cape stream, but he’s a very fluid-looking angler and in his hands Czech Nymphing looked smooth and seamless, like poetry on a short line. It didn’t surprise me a bit when I heard the other day that he’d made it into our national fly fishing side.
TYING A CZECH NYMPH IN PICTURES
1.
COPPER WIRE
NYLON
CLEAR PLASTIC
HOOK SHANK DRESSED WITH LEAD WIRE
LIGHT COLOURED DUBBING
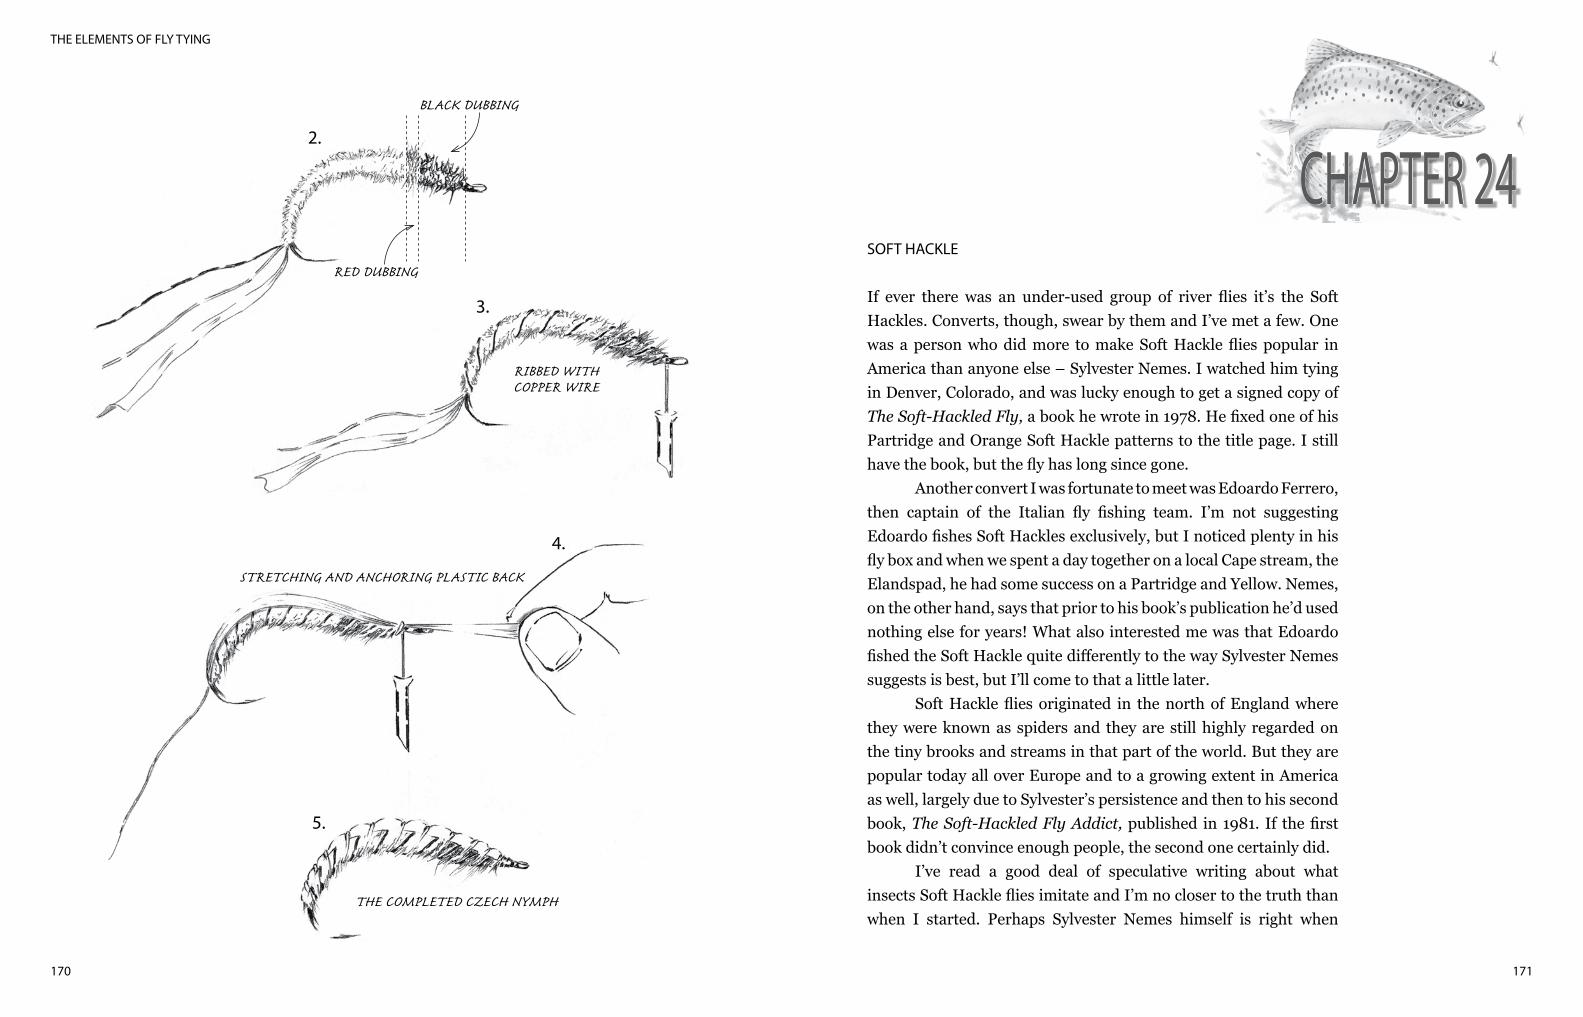
171
THE ELEMENTS OF FLY TYING
170
SOFT HACKLE
If ever there was an under-used group of river flies it’s the Soft Hackles. Converts, though, swear by them and I’ve met a few. One was a person who did more to make Soft Hackle flies popular in America than anyone else – Sylvester Nemes. I watched him tying in Denver, Colorado, and was lucky enough to get a signed copy of The Soft-Hackled Fly, a book he wrote in 1978. He fixed one of his Partridge and Orange Soft Hackle patterns to the title page. I still have the book, but the fly has long since gone.
Another convert I was fortunate to meet was Edoardo Ferrero, then captain of the Italian fly fishing team. I’m not suggesting Edoardo fishes Soft Hackles exclusively, but I noticed plenty in his fly box and when we spent a day together on a local Cape stream, the Elandspad, he had some success on a Partridge and Yellow. Nemes, on the other hand, says that prior to his book’s publication he’d used nothing else for years! What also interested me was that Edoardo fished the Soft Hackle quite differently to the way Sylvester Nemes suggests is best, but I’ll come to that a little later.
Soft Hackle flies originated in the north of England where they were known as spiders and they are still highly regarded on the tiny brooks and streams in that part of the world. But they are popular today all over Europe and to a growing extent in America as well, largely due to Sylvester’s persistence and then to his second book, The Soft-Hackled Fly Addict, published in 1981. If the first book didn’t convince enough people, the second one certainly did.
I’ve read a good deal of speculative writing about what insects Soft Hackle flies imitate and I’m no closer to the truth than when I started. Perhaps Sylvester Nemes himself is right when
CHAPTER 24BLACK DUBBING
RED DUBBING
2.
3.
RIBBED WITH COPPER WIRE
4.
STRETCHING AND ANCHORING PLASTIC BACK
5.
THE COMPLETED CZECH NYMPH
SOFT HACKLE
173
THE ELEMENTS OF FLY TYING
172
he argues that they could well imitate caddis pupae. He doesn’t close on this, though, and leaves his final interpretation open and hovering somewhere between mayfly nymphs and caddis pupae, though leaning more heavily towards the caddis family. But what he does say is that Soft Hackles pulse with life, the hackles opening and folding as the fly drifts in the current. To me that’s the key. That one word – life!
There is a range of Soft Hackle patterns and a range of feathers used to tie them. Essentially the only real difference between any two Soft Hackle flies is their body colour and the type of collar hackle they call for, so for example, the Partridge and Orange would differ in obvious ways from the Partridge and Yellow and again in other obvious ways from the Snipe and Purple. A few Soft Hackle patterns call for a ribbed body, a few have a dubbed thorax, but only one I can think of has a tail – the Tup’s Indispensable.
Proportions are important on these patterns if only because they break with convention. The traditional Soft Hackle patterns have the body ending directly above the hook point, giving the fly a shorter abdomen than we are used to and there’s no real taper to the body either. It’s straight and relatively thin, which aids entry into the water I suppose. The hackle should extend just beyond the point or just beyond the bend of the hook and generally should be tied sparse, again aiding entry.
Of all the Soft Hackle patterns, Sylvester Nemes seems to rate the Partridge and Orange the highest. It’s also the pattern that came with the book he gave me, enough of a portent I think to select it for this exercise. What you will need to tie this flyYou will need a dry fly hook in size 14, a ten centimetre piece of orange floss, tan coloured tying thread and a partridge hackle. Important to note is that partridge hackles vary in size, just as cock hackles do. So you must select a hackle that matches the hook size you use. To do this, hold the hackle by either end with both hands and lift it up perpendicularly against the underside of the hook shank under some tension. This will cause individual fibres to flare
open allowing you to judge the hackle for size. Tying stepsDress the hook with thread, remembering to stop directly above the hook point, but before completing the dressing, tie in the orange floss and bind over it as you finish. I suggest you tie the floss in underneath the hook shank. Once the dressing is complete, take the thread back to within two millimetres of the eye of the hook. Now wind the floss up the body, but don’t build in any natural taper. The body should be flat and smooth. Use two hands to wind on the floss, changing from left to right as you move from one side of the hook to the other. Tie off the floss about two millimetres behind the eye of the hook.
There are two ways to tie in the hackle, by the tip or by the stalk. I prefer tying in the stalk, but then I have a neat trick that goes with it. Dean Riphagen in his book, The South African Fly Fishing Handbook, ties the Soft Hackle in by the tip and so do a few other tyers I know. Sylvester Nemes uses the stalk and since watching him tie I have done the same and haven’t looked back. But there are two really valuable tips here I want to come to in a moment.
Select a partridge hackle and check it for size. Strip the flue off the base of the feather as well as all the softer, less well-defined fibres on the lower part of the hackle. Select the section you will use for hackling (it will need to be about one-and-a-half centimetres wide) and with your fingers separate these fibres – on both sides of the stalk – from the fibres above them on the rest of the feather. You do this by stroking the fibres downwards, leaving them at a near-right angle to the stalk. That leaves the tip fibres of the feather to grasp in your hackle pliers. Now tie in the stalk just before the first row of fibres and place it just on to the outer edge of the floss but about two millimetres back from the eye. Remember, the concave side should be facing to the back. Make sure the stalk is firmly secured and trim off the excess.
Now here are the vital tips. After tying in the stalk, compress its base by squeezing it firmly between your thumbnail and the hook shank. This softens the stalk, making wrapping far easier. Now
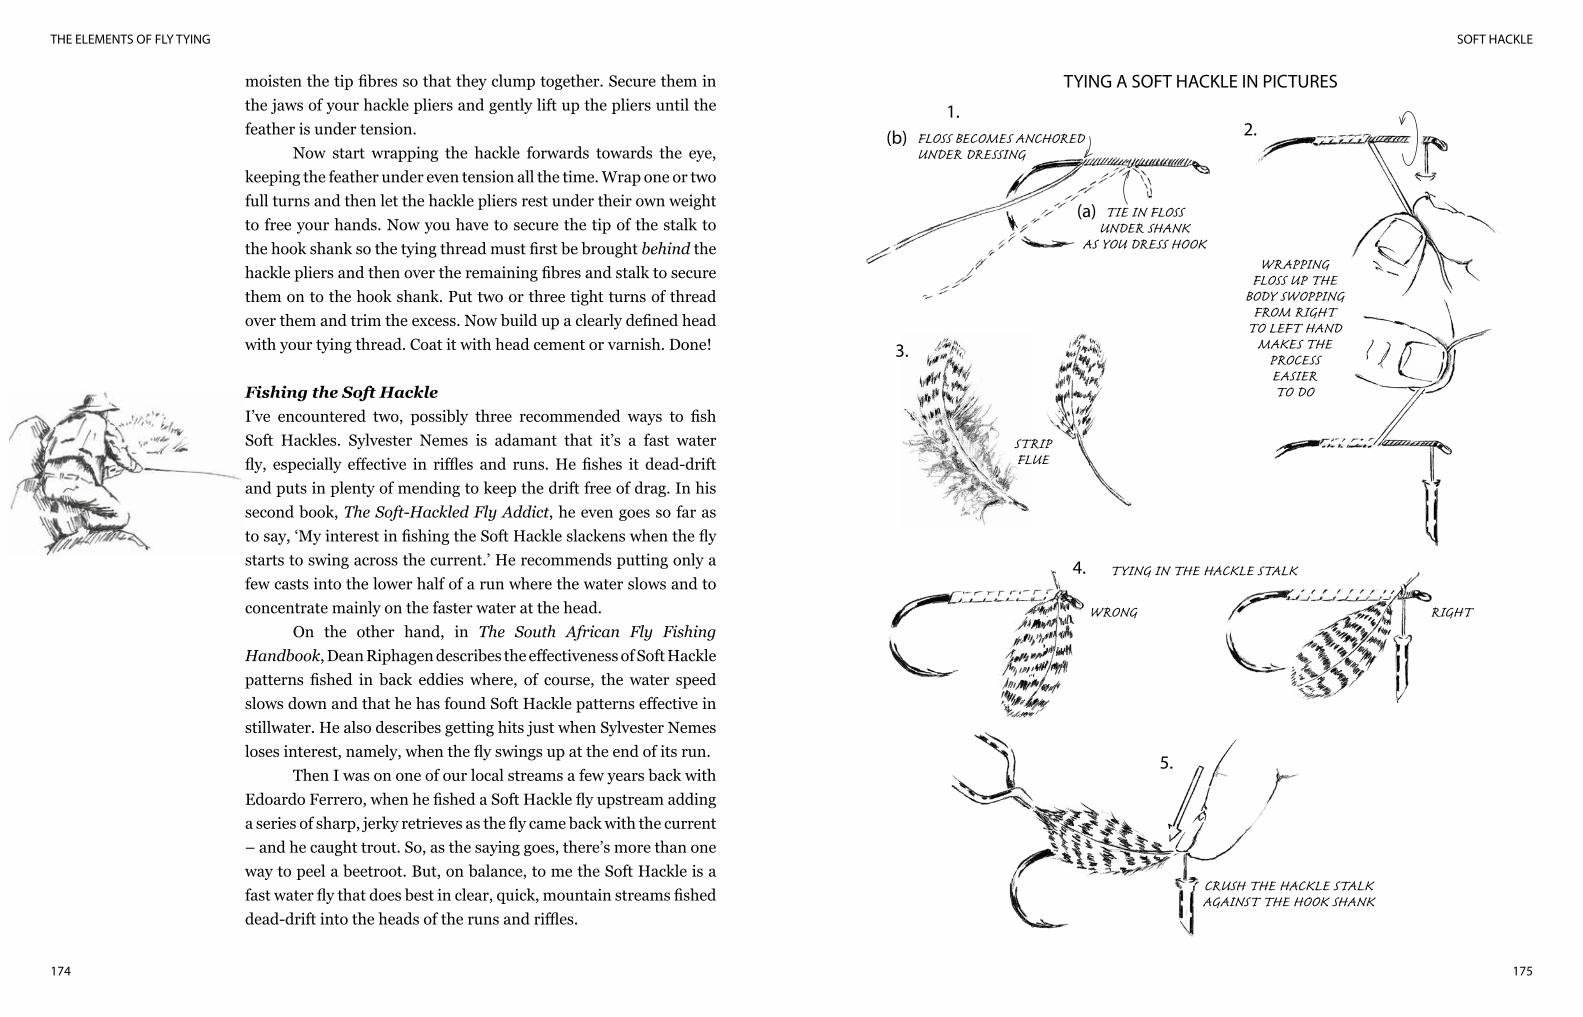
SOFT HACKLE
175
THE ELEMENTS OF FLY TYING
174
moisten the tip fibres so that they clump together. Secure them in the jaws of your hackle pliers and gently lift up the pliers until the feather is under tension.
Now start wrapping the hackle forwards towards the eye, keeping the feather under even tension all the time. Wrap one or two full turns and then let the hackle pliers rest under their own weight to free your hands. Now you have to secure the tip of the stalk to the hook shank so the tying thread must first be brought behind the hackle pliers and then over the remaining fibres and stalk to secure them on to the hook shank. Put two or three tight turns of thread over them and trim the excess. Now build up a clearly defined head with your tying thread. Coat it with head cement or varnish. Done!
Fishing the Soft Hackle I’ve encountered two, possibly three recommended ways to fish Soft Hackles. Sylvester Nemes is adamant that it’s a fast water fly, especially effective in riffles and runs. He fishes it dead-drift and puts in plenty of mending to keep the drift free of drag. In his second book, The Soft-Hackled Fly Addict, he even goes so far as to say, ‘My interest in fishing the Soft Hackle slackens when the fly starts to swing across the current.’ He recommends putting only a few casts into the lower half of a run where the water slows and to concentrate mainly on the faster water at the head.
On the other hand, in The South African Fly Fishing Handbook, Dean Riphagen describes the effectiveness of Soft Hackle patterns fished in back eddies where, of course, the water speed slows down and that he has found Soft Hackle patterns effective in stillwater. He also describes getting hits just when Sylvester Nemes loses interest, namely, when the fly swings up at the end of its run.
Then I was on one of our local streams a few years back with Edoardo Ferrero, when he fished a Soft Hackle fly upstream adding a series of sharp, jerky retrieves as the fly came back with the current – and he caught trout. So, as the saying goes, there’s more than one way to peel a beetroot. But, on balance, to me the Soft Hackle is a fast water fly that does best in clear, quick, mountain streams fished dead-drift into the heads of the runs and riffles.
TYING A SOFT HACKLE IN PICTURES
1.
TIE IN FLOSSUNDER SHANK
AS YOU DRESS HOOK
FLOSS BECOMES ANCHOREDUNDER DRESSING
(a)
(b)
WRAPPINGFLOSS UP THE
BODY SWOPPINGFROM RIGHT
TO LEFT HAND MAKES THE
PROCESSEASIERTO DO
2.
3.
STRIPFLUE
TYING IN THE HACKLE STALK
WRONG RIGHT
4.
CRUSH THE HACKLE STALKAGAINST THE HOOK SHANK
5.
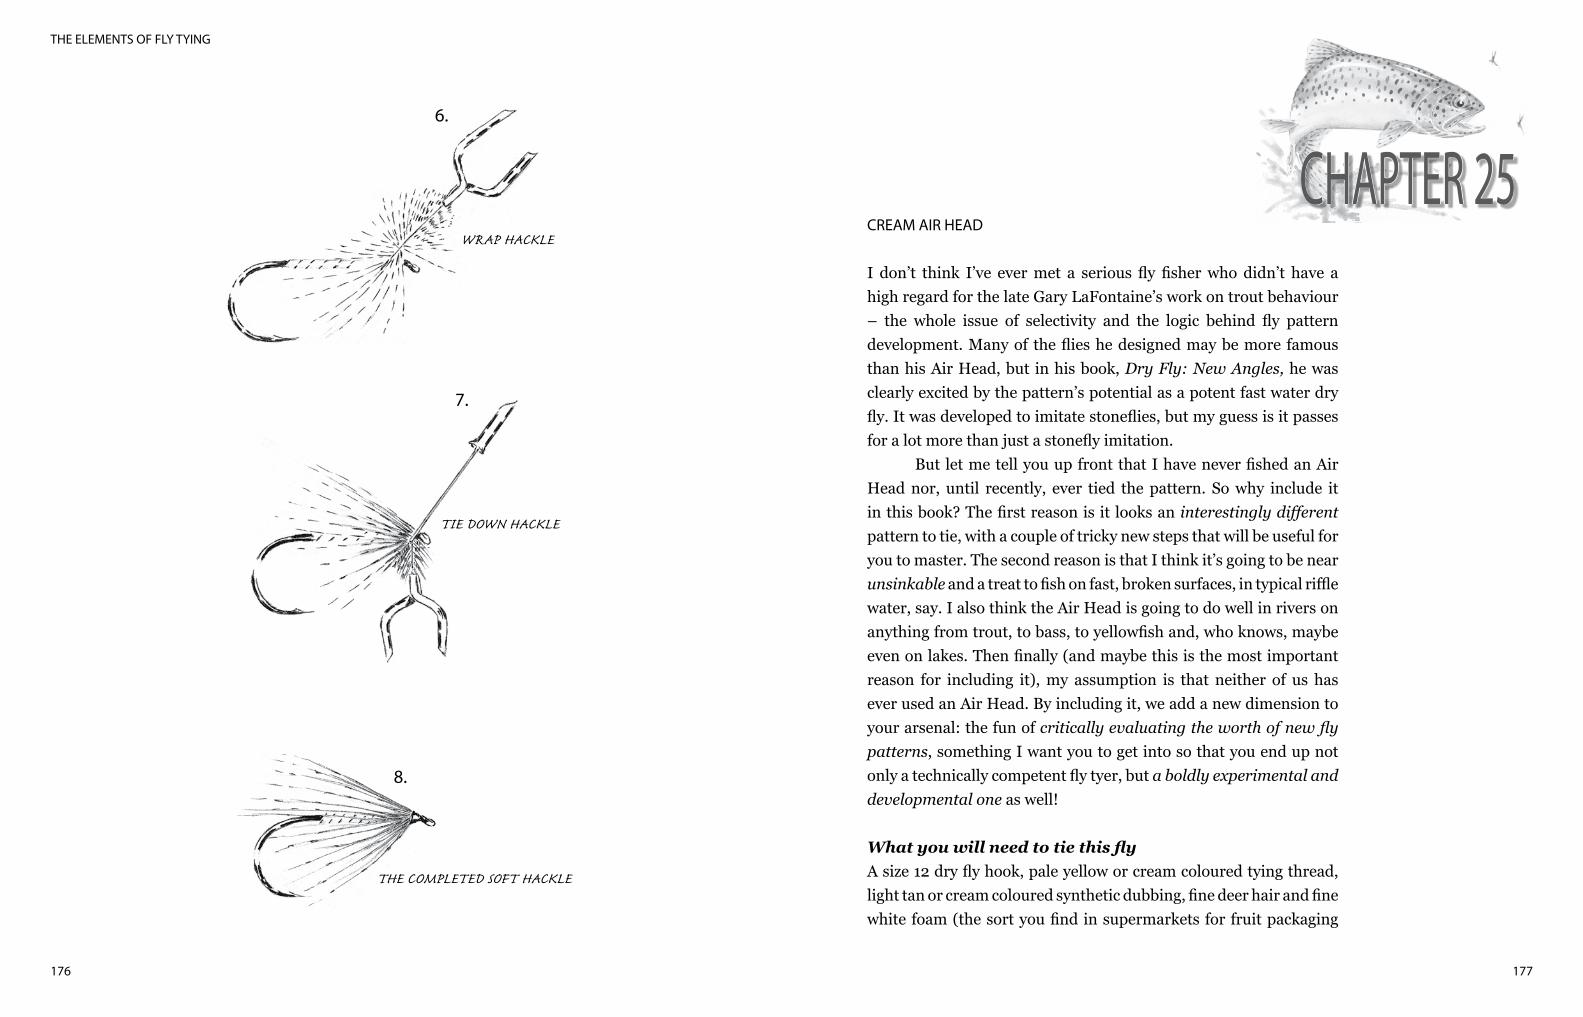
177
THE ELEMENTS OF FLY TYING
176
CREAM AIR HEAD
I don’t think I’ve ever met a serious fly fisher who didn’t have a high regard for the late Gary LaFontaine’s work on trout behaviour – the whole issue of selectivity and the logic behind fly pattern development. Many of the flies he designed may be more famous than his Air Head, but in his book, Dry Fly: New Angles, he was clearly excited by the pattern’s potential as a potent fast water dry fly. It was developed to imitate stoneflies, but my guess is it passes for a lot more than just a stonefly imitation.
But let me tell you up front that I have never fished an Air Head nor, until recently, ever tied the pattern. So why include it in this book? The first reason is it looks an interestingly different pattern to tie, with a couple of tricky new steps that will be useful for you to master. The second reason is that I think it’s going to be near unsinkable and a treat to fish on fast, broken surfaces, in typical riffle water, say. I also think the Air Head is going to do well in rivers on anything from trout, to bass, to yellowfish and, who knows, maybe even on lakes. Then finally (and maybe this is the most important reason for including it), my assumption is that neither of us has ever used an Air Head. By including it, we add a new dimension to your arsenal: the fun of critically evaluating the worth of new fly patterns, something I want you to get into so that you end up not only a technically competent fly tyer, but a boldly experimental and developmental one as well!
What you will need to tie this flyA size 12 dry fly hook, pale yellow or cream coloured tying thread, light tan or cream coloured synthetic dubbing, fine deer hair and fine white foam (the sort you find in supermarkets for fruit packaging
CHAPTER 25WRAP HACKLE
6.
TIE DOWN HACKLE
7.
THE COMPLETED SOFT HACKLE
8.
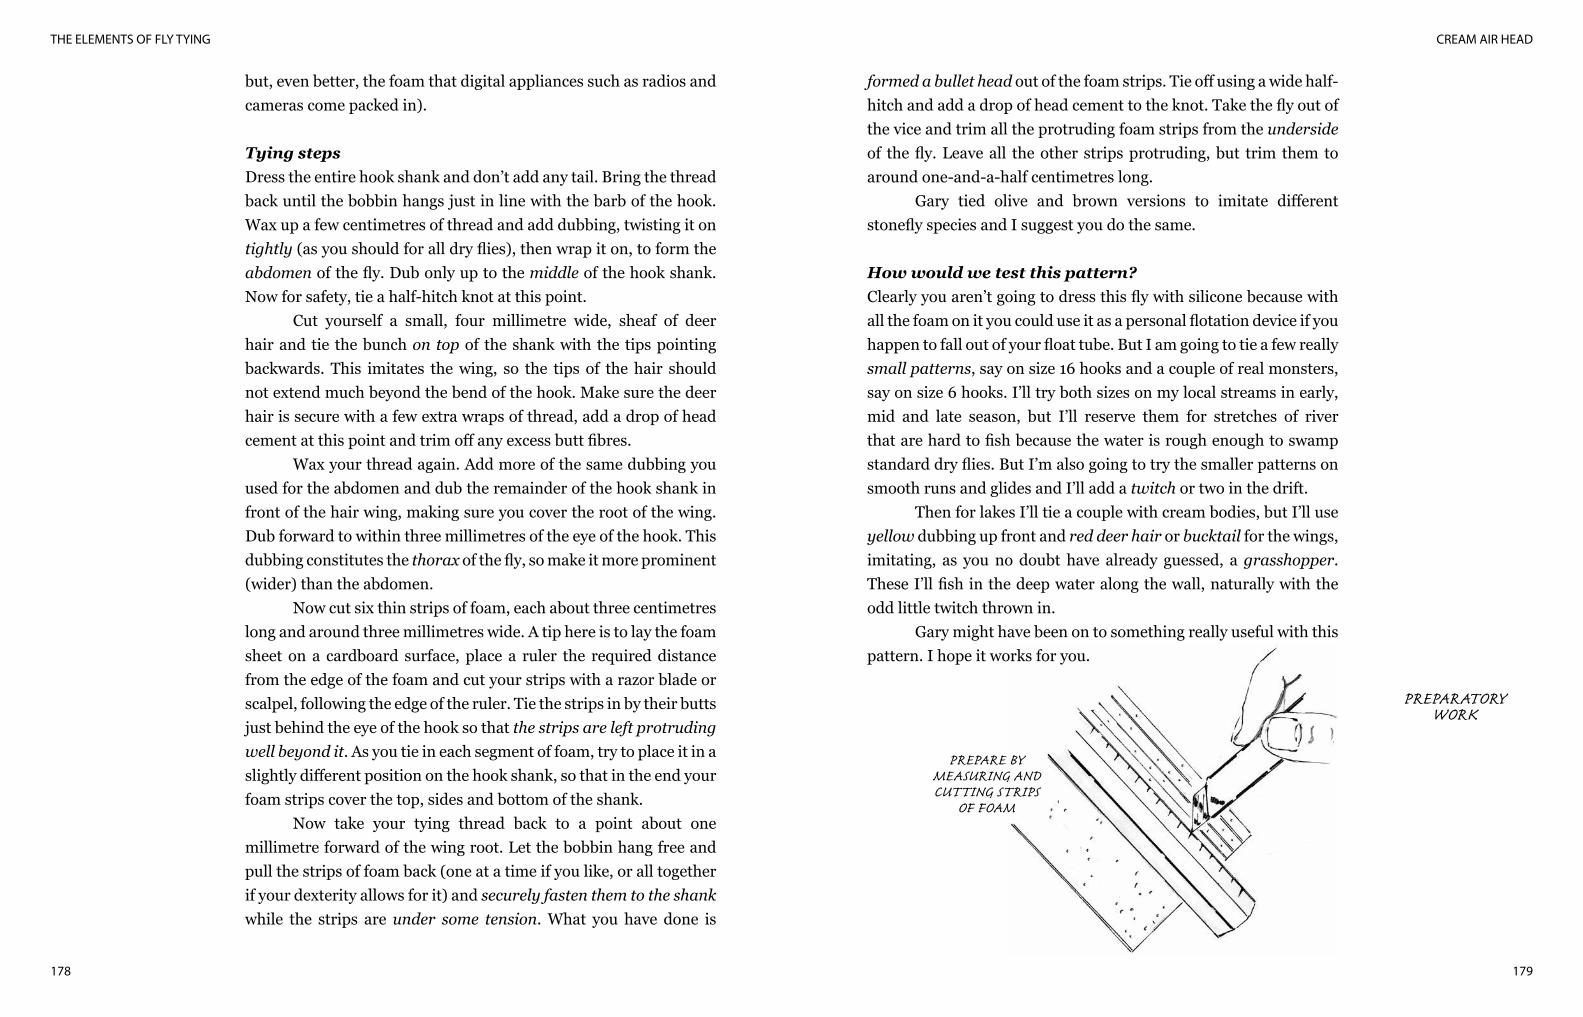
CREAM AIR HEAD
179
THE ELEMENTS OF FLY TYING
178
but, even better, the foam that digital appliances such as radios and cameras come packed in).
Tying stepsDress the entire hook shank and don’t add any tail. Bring the thread back until the bobbin hangs just in line with the barb of the hook. Wax up a few centimetres of thread and add dubbing, twisting it on tightly (as you should for all dry flies), then wrap it on, to form the abdomen of the fly. Dub only up to the middle of the hook shank. Now for safety, tie a half-hitch knot at this point.
Cut yourself a small, four millimetre wide, sheaf of deer hair and tie the bunch on top of the shank with the tips pointing backwards. This imitates the wing, so the tips of the hair should not extend much beyond the bend of the hook. Make sure the deer hair is secure with a few extra wraps of thread, add a drop of head cement at this point and trim off any excess butt fibres.
Wax your thread again. Add more of the same dubbing you used for the abdomen and dub the remainder of the hook shank in front of the hair wing, making sure you cover the root of the wing. Dub forward to within three millimetres of the eye of the hook. This dubbing constitutes the thorax of the fly, so make it more prominent (wider) than the abdomen.
Now cut six thin strips of foam, each about three centimetres long and around three millimetres wide. A tip here is to lay the foam sheet on a cardboard surface, place a ruler the required distance from the edge of the foam and cut your strips with a razor blade or scalpel, following the edge of the ruler. Tie the strips in by their butts just behind the eye of the hook so that the strips are left protruding well beyond it. As you tie in each segment of foam, try to place it in a slightly different position on the hook shank, so that in the end your foam strips cover the top, sides and bottom of the shank.
Now take your tying thread back to a point about one millimetre forward of the wing root. Let the bobbin hang free and pull the strips of foam back (one at a time if you like, or all together if your dexterity allows for it) and securely fasten them to the shank while the strips are under some tension. What you have done is
formed a bullet head out of the foam strips. Tie off using a wide half-hitch and add a drop of head cement to the knot. Take the fly out of the vice and trim all the protruding foam strips from the underside of the fly. Leave all the other strips protruding, but trim them to around one-and-a-half centimetres long.
Gary tied olive and brown versions to imitate different stonefly species and I suggest you do the same.
How would we test this pattern?Clearly you aren’t going to dress this fly with silicone because with all the foam on it you could use it as a personal flotation device if you happen to fall out of your float tube. But I am going to tie a few really small patterns, say on size 16 hooks and a couple of real monsters, say on size 6 hooks. I’ll try both sizes on my local streams in early, mid and late season, but I’ll reserve them for stretches of river that are hard to fish because the water is rough enough to swamp standard dry flies. But I’m also going to try the smaller patterns on smooth runs and glides and I’ll add a twitch or two in the drift.
Then for lakes I’ll tie a couple with cream bodies, but I’ll use yellow dubbing up front and red deer hair or bucktail for the wings, imitating, as you no doubt have already guessed, a grasshopper. These I’ll fish in the deep water along the wall, naturally with the odd little twitch thrown in.
Gary might have been on to something really useful with this pattern. I hope it works for you.
PREPARE BYMEASURING ANDCUTTING STRIPS
OF FOAM
PREPARATORYWORK
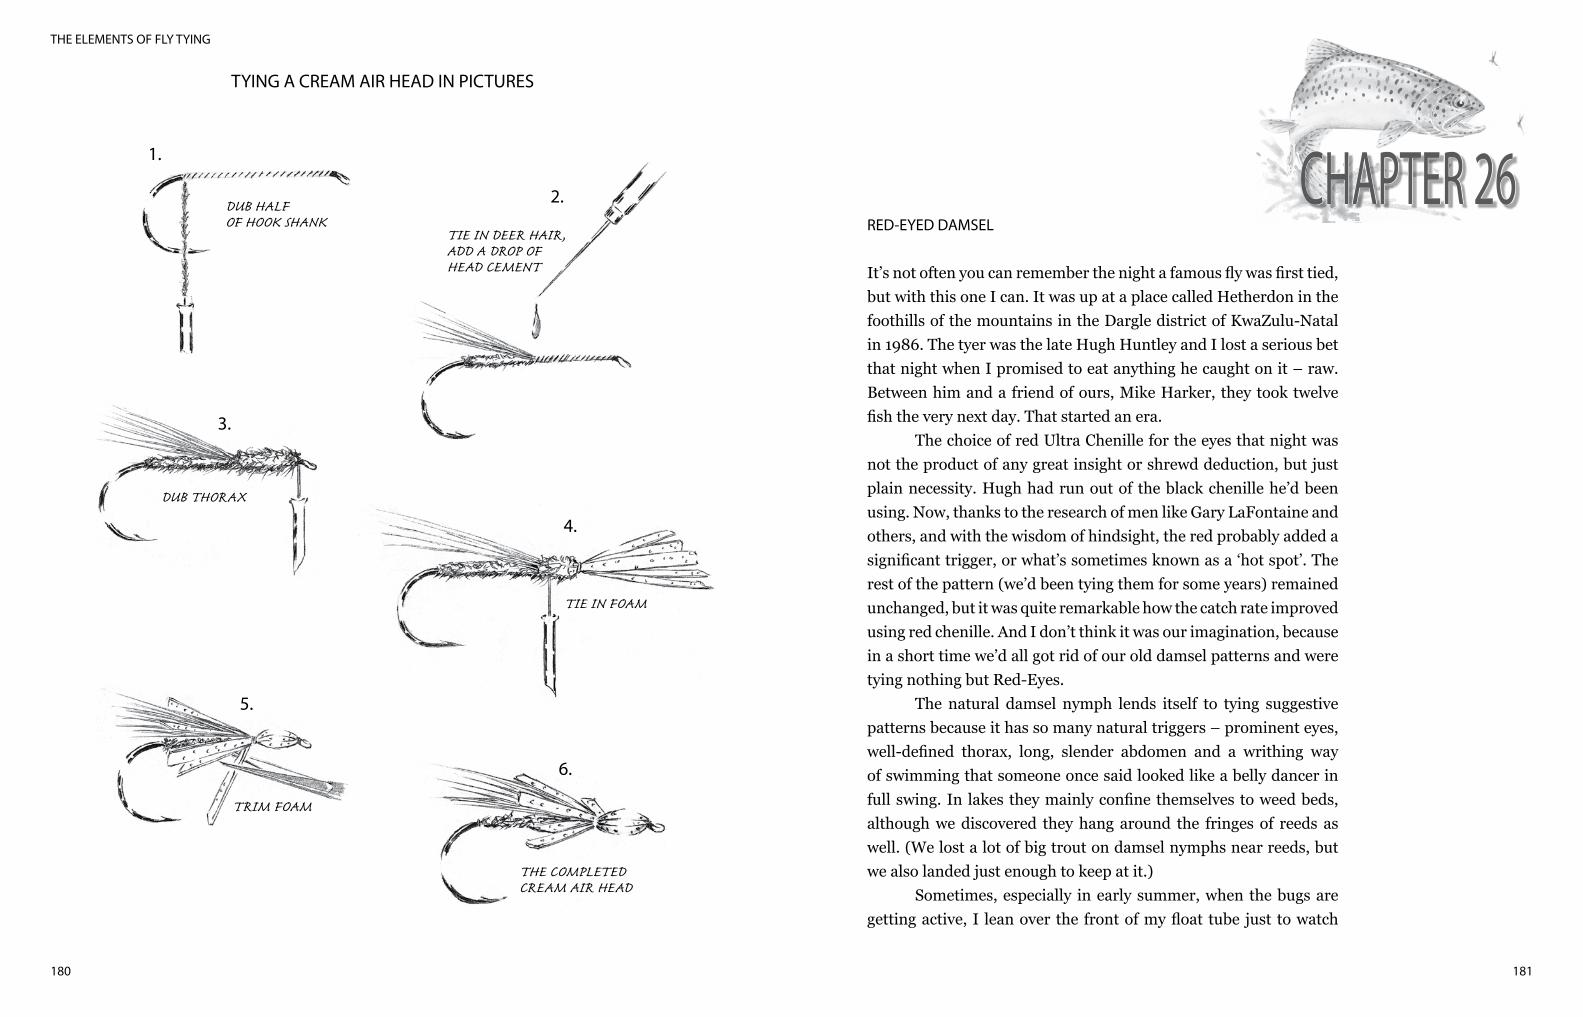
181
THE ELEMENTS OF FLY TYING
180
RED-EYED DAMSEL
It’s not often you can remember the night a famous fly was first tied, but with this one I can. It was up at a place called Hetherdon in the foothills of the mountains in the Dargle district of KwaZulu-Natal in 1986. The tyer was the late Hugh Huntley and I lost a serious bet that night when I promised to eat anything he caught on it – raw. Between him and a friend of ours, Mike Harker, they took twelve fish the very next day. That started an era.
The choice of red Ultra Chenille for the eyes that night was not the product of any great insight or shrewd deduction, but just plain necessity. Hugh had run out of the black chenille he’d been using. Now, thanks to the research of men like Gary LaFontaine and others, and with the wisdom of hindsight, the red probably added a significant trigger, or what’s sometimes known as a ‘hot spot’. The rest of the pattern (we’d been tying them for some years) remained unchanged, but it was quite remarkable how the catch rate improved using red chenille. And I don’t think it was our imagination, because in a short time we’d all got rid of our old damsel patterns and were tying nothing but Red-Eyes.
The natural damsel nymph lends itself to tying suggestive patterns because it has so many natural triggers – prominent eyes, well-defined thorax, long, slender abdomen and a writhing way of swimming that someone once said looked like a belly dancer in full swing. In lakes they mainly confine themselves to weed beds, although we discovered they hang around the fringes of reeds as well. (We lost a lot of big trout on damsel nymphs near reeds, but we also landed just enough to keep at it.)
Sometimes, especially in early summer, when the bugs are getting active, I lean over the front of my float tube just to watch
CHAPTER 26
TYING A CREAM AIR HEAD IN PICTURES
1.
DUB HALFOF HOOK SHANK
2.
TIE IN DEER HAIR,ADD A DROP OFHEAD CEMENT
3.
DUB THORAX
4.
TIE IN FOAM
5.
TRIM FOAM
6.
THE COMPLETEDCREAM AIR HEAD
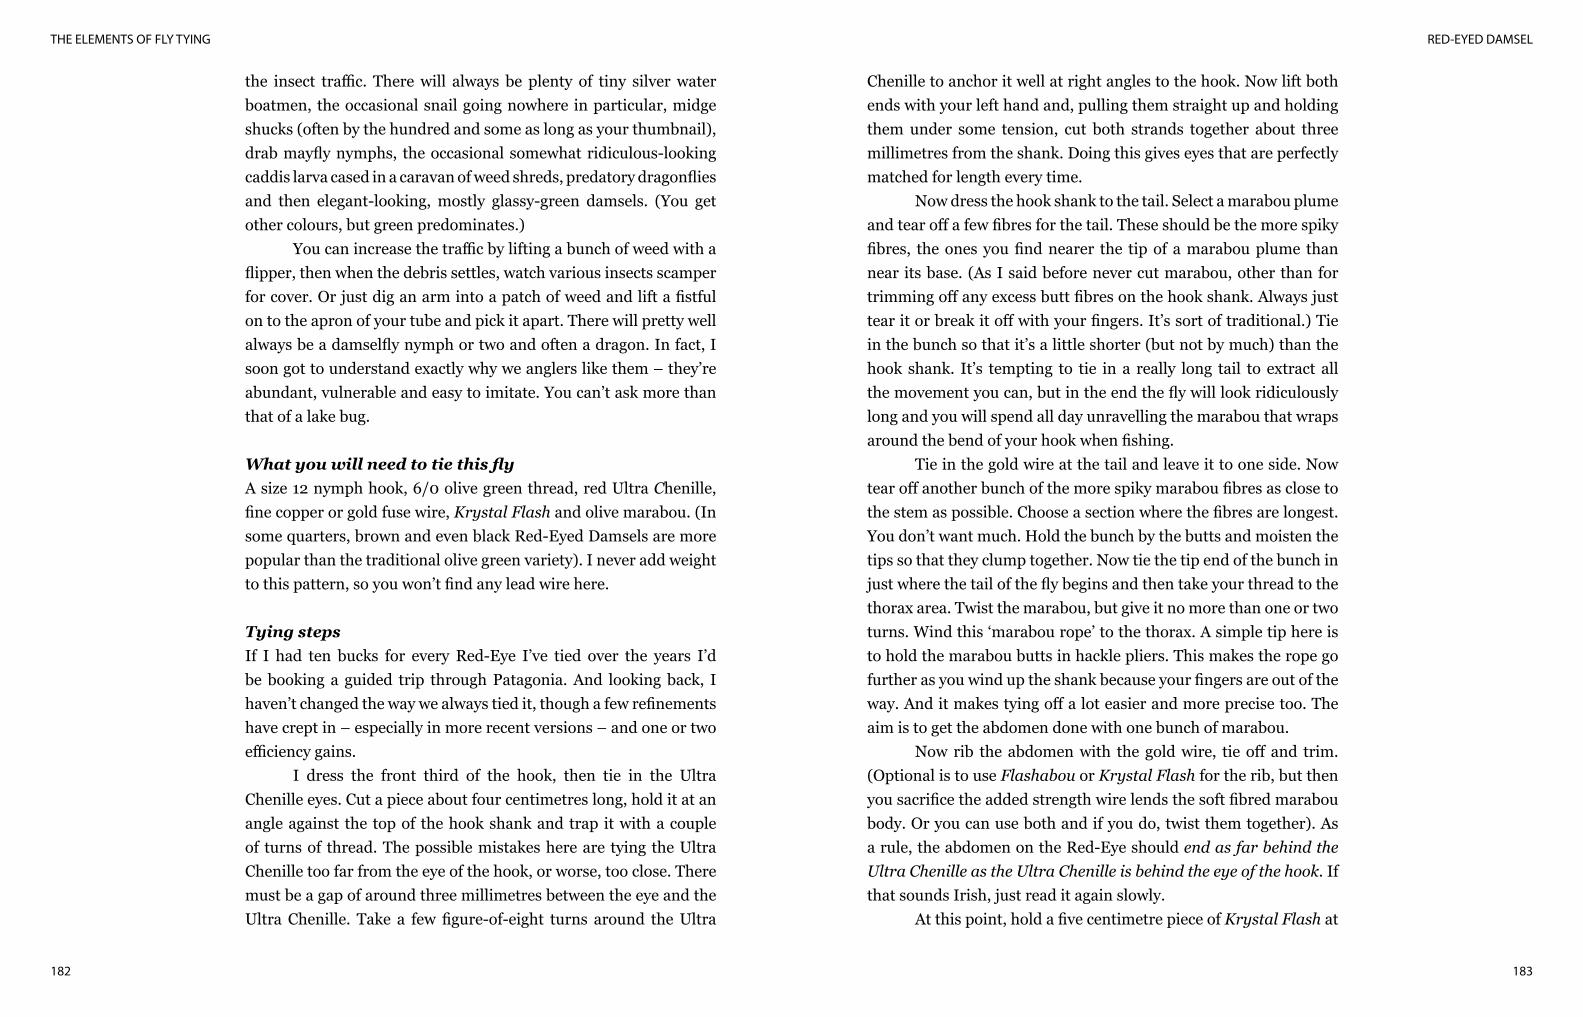
RED-EYED DAMSEL
183
THE ELEMENTS OF FLY TYING
182
the insect traffic. There will always be plenty of tiny silver water boatmen, the occasional snail going nowhere in particular, midge shucks (often by the hundred and some as long as your thumbnail), drab mayfly nymphs, the occasional somewhat ridiculous-looking caddis larva cased in a caravan of weed shreds, predatory dragonflies and then elegant-looking, mostly glassy-green damsels. (You get other colours, but green predominates.)
You can increase the traffic by lifting a bunch of weed with a flipper, then when the debris settles, watch various insects scamper for cover. Or just dig an arm into a patch of weed and lift a fistful on to the apron of your tube and pick it apart. There will pretty well always be a damselfly nymph or two and often a dragon. In fact, I soon got to understand exactly why we anglers like them – they’re abundant, vulnerable and easy to imitate. You can’t ask more than that of a lake bug. What you will need to tie this flyA size 12 nymph hook, 6/0 olive green thread, red Ultra Chenille, fine copper or gold fuse wire, Krystal Flash and olive marabou. (In some quarters, brown and even black Red-Eyed Damsels are more popular than the traditional olive green variety). I never add weight to this pattern, so you won’t find any lead wire here.
Tying stepsIf I had ten bucks for every Red-Eye I’ve tied over the years I’d be booking a guided trip through Patagonia. And looking back, I haven’t changed the way we always tied it, though a few refinements have crept in – especially in more recent versions – and one or two efficiency gains.
I dress the front third of the hook, then tie in the Ultra Chenille eyes. Cut a piece about four centimetres long, hold it at an angle against the top of the hook shank and trap it with a couple of turns of thread. The possible mistakes here are tying the Ultra Chenille too far from the eye of the hook, or worse, too close. There must be a gap of around three millimetres between the eye and the Ultra Chenille. Take a few figure-of-eight turns around the Ultra
Chenille to anchor it well at right angles to the hook. Now lift both ends with your left hand and, pulling them straight up and holding them under some tension, cut both strands together about three millimetres from the shank. Doing this gives eyes that are perfectly matched for length every time.
Now dress the hook shank to the tail. Select a marabou plume and tear off a few fibres for the tail. These should be the more spiky fibres, the ones you find nearer the tip of a marabou plume than near its base. (As I said before never cut marabou, other than for trimming off any excess butt fibres on the hook shank. Always just tear it or break it off with your fingers. It’s sort of traditional.) Tie in the bunch so that it’s a little shorter (but not by much) than the hook shank. It’s tempting to tie in a really long tail to extract all the movement you can, but in the end the fly will look ridiculously long and you will spend all day unravelling the marabou that wraps around the bend of your hook when fishing.
Tie in the gold wire at the tail and leave it to one side. Now tear off another bunch of the more spiky marabou fibres as close to the stem as possible. Choose a section where the fibres are longest. You don’t want much. Hold the bunch by the butts and moisten the tips so that they clump together. Now tie the tip end of the bunch in just where the tail of the fly begins and then take your thread to the thorax area. Twist the marabou, but give it no more than one or two turns. Wind this ‘marabou rope’ to the thorax. A simple tip here is to hold the marabou butts in hackle pliers. This makes the rope go further as you wind up the shank because your fingers are out of the way. And it makes tying off a lot easier and more precise too. The aim is to get the abdomen done with one bunch of marabou.
Now rib the abdomen with the gold wire, tie off and trim. (Optional is to use Flashabou or Krystal Flash for the rib, but then you sacrifice the added strength wire lends the soft fibred marabou body. Or you can use both and if you do, twist them together). As a rule, the abdomen on the Red-Eye should end as far behind the Ultra Chenille as the Ultra Chenille is behind the eye of the hook. If that sounds Irish, just read it again slowly.
At this point, hold a five centimetre piece of Krystal Flash at
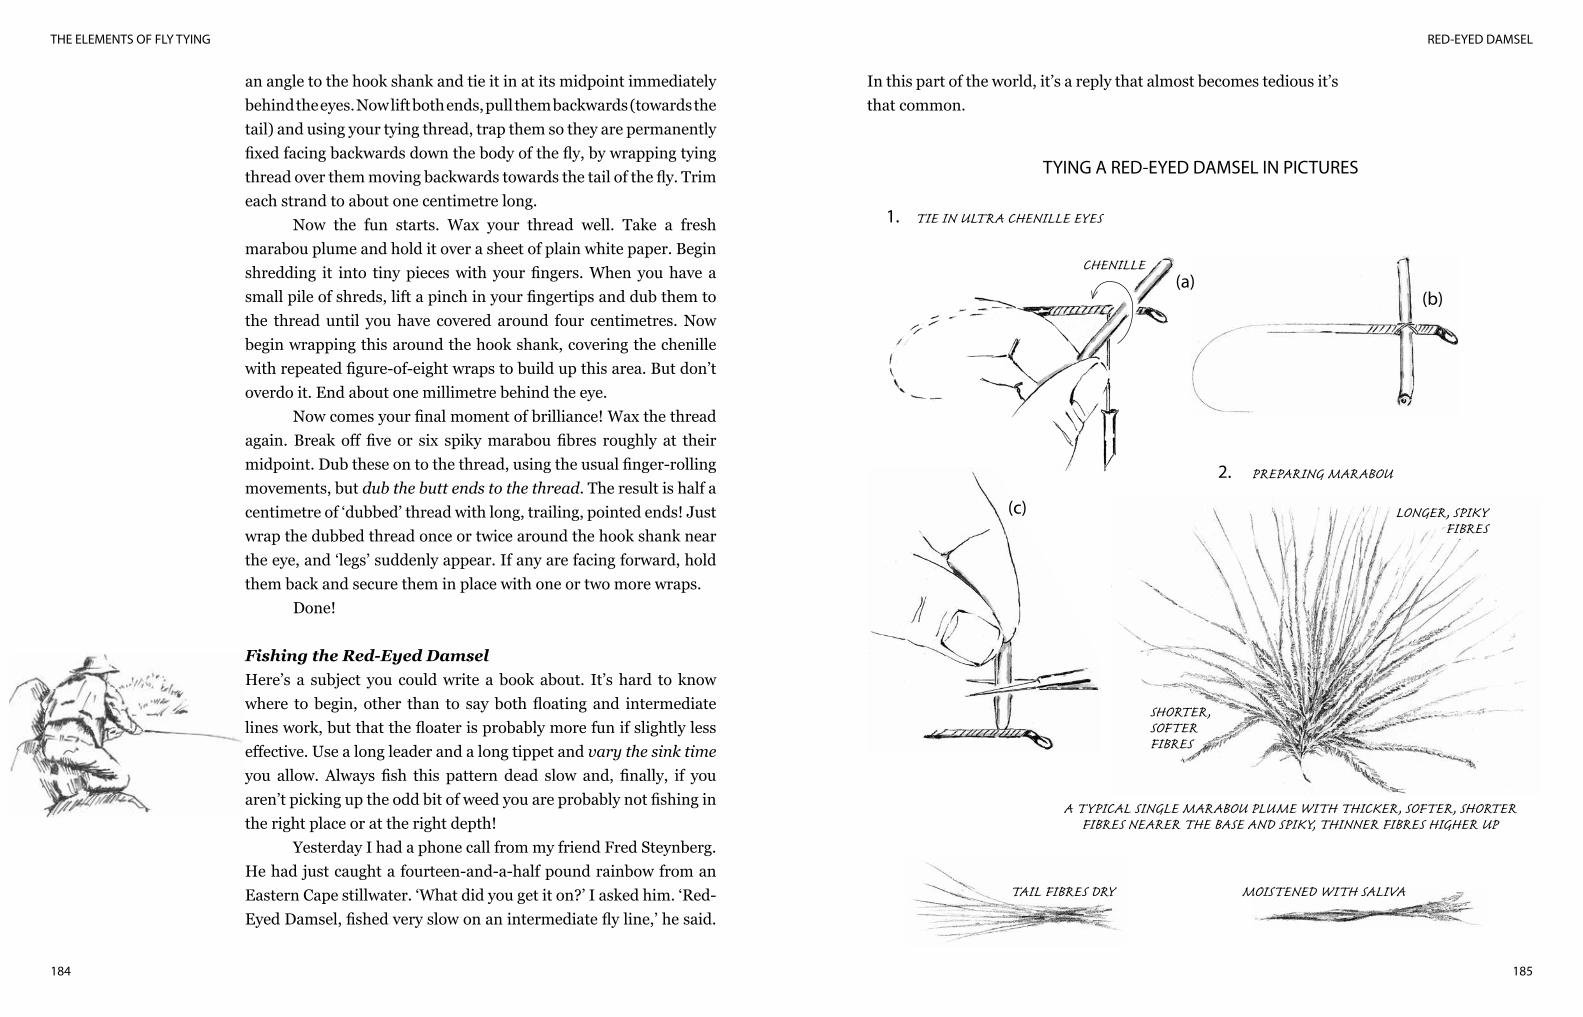
RED-EYED DAMSEL
185
THE ELEMENTS OF FLY TYING
184
an angle to the hook shank and tie it in at its midpoint immediately behind the eyes. Now lift both ends, pull them backwards (towards the tail) and using your tying thread, trap them so they are permanently fixed facing backwards down the body of the fly, by wrapping tying thread over them moving backwards towards the tail of the fly. Trim each strand to about one centimetre long.
Now the fun starts. Wax your thread well. Take a fresh marabou plume and hold it over a sheet of plain white paper. Begin shredding it into tiny pieces with your fingers. When you have a small pile of shreds, lift a pinch in your fingertips and dub them to the thread until you have covered around four centimetres. Now begin wrapping this around the hook shank, covering the chenille with repeated figure-of-eight wraps to build up this area. But don’t overdo it. End about one millimetre behind the eye.
Now comes your final moment of brilliance! Wax the thread again. Break off five or six spiky marabou fibres roughly at their midpoint. Dub these on to the thread, using the usual finger-rolling movements, but dub the butt ends to the thread. The result is half a centimetre of ‘dubbed’ thread with long, trailing, pointed ends! Just wrap the dubbed thread once or twice around the hook shank near the eye, and ‘legs’ suddenly appear. If any are facing forward, hold them back and secure them in place with one or two more wraps.
Done!
Fishing the Red-Eyed Damsel Here’s a subject you could write a book about. It’s hard to know where to begin, other than to say both floating and intermediate lines work, but that the floater is probably more fun if slightly less effective. Use a long leader and a long tippet and vary the sink time you allow. Always fish this pattern dead slow and, finally, if you aren’t picking up the odd bit of weed you are probably not fishing in the right place or at the right depth!
Yesterday I had a phone call from my friend Fred Steynberg. He had just caught a fourteen-and-a-half pound rainbow from an Eastern Cape stillwater. ‘What did you get it on?’ I asked him. ‘Red-Eyed Damsel, fished very slow on an intermediate fly line,’ he said.
In this part of the world, it’s a reply that almost becomes tedious it’s that common.
TYING A RED-EYED DAMSEL IN PICTURES
TIE IN ULTRA CHENILLE EYES
(a)(b)
CHENILLE
1.
(c)
A TYPICAL SINGLE MARABOU PLUME WITH THICKER, SOFTER, SHORTER FIBRES NEARER THE BASE AND SPIKY, THINNER FIBRES HIGHER UP
LONGER, SPIKYFIBRES
SHORTER,SOFTERFIBRES
TAIL FIBRES DRY MOISTENED WITH SALIVA
PREPARING MARABOU2.
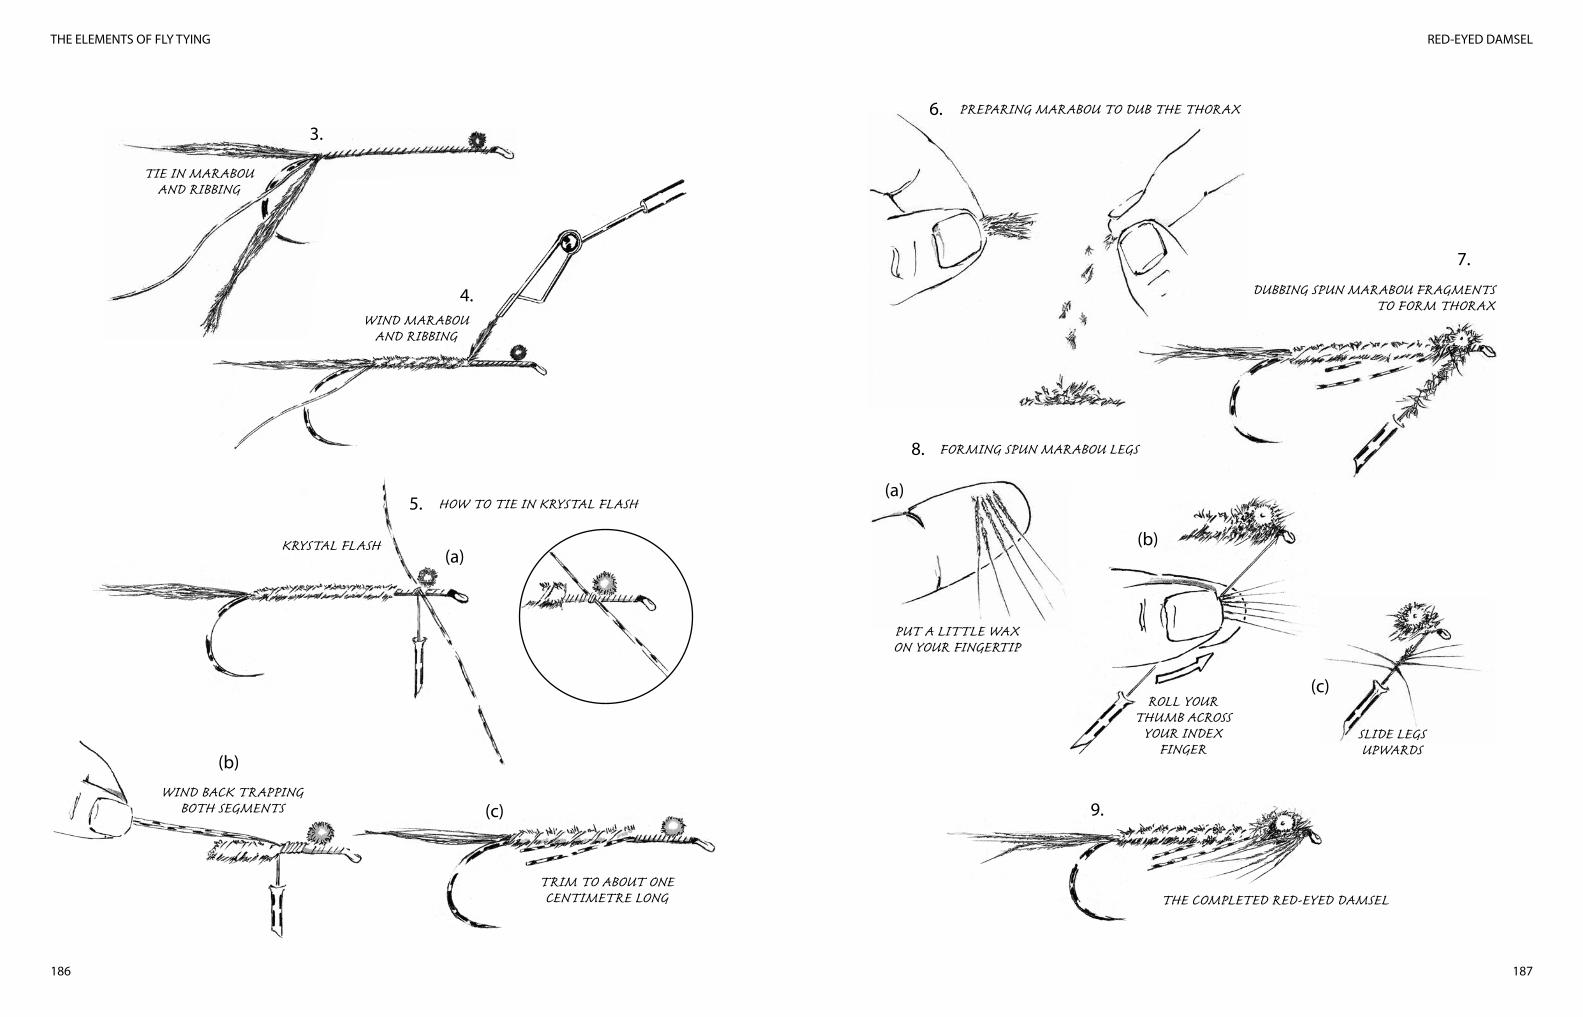
RED-EYED DAMSEL
187
THE ELEMENTS OF FLY TYING
186
TIE IN MARABOUAND RIBBING
3.
4.WIND MARABOU
AND RIBBING
HOW TO TIE IN KRYSTAL FLASH5.
(a)
(b)
(c)
KRYSTAL FLASH
WIND BACK TRAPPINGBOTH SEGMENTS
TRIM TO ABOUT ONE CENTIMETRE LONG
PREPARING MARABOU TO DUB THE THORAX6.
DUBBING SPUN MARABOU FRAGMENTSTO FORM THORAX
7.
FORMING SPUN MARABOU LEGS8.
(a)
(b)
(c)
PUT A LITTLE WAXON YOUR FINGERTIP
ROLL YOURTHUMB ACROSS
YOUR INDEXFINGER
SLIDE LEGSUPWARDS
9.
THE COMPLETED RED-EYED DAMSEL
ND DRAGONFLY NYMPH
189188
NEUTRAL-DENSITY DRAGONFLY NYMPH
I’ve seen heaps of elaborate and really pretty dragonfly nymph imitations, but most are way more elaborate than they need to be and turn upside down in the water. Which defeats one of the primary objectives of tying a fly in the first place – achieving a life-like imitation of the real thing. The neutral density concept helps correct the capsizing bit, but it also offers a few other advantages I will discuss later.
Let’s start by putting dragonflies and stillwaters into some sort of fly fishing perspective. Other than minnows, nothing in a lake offers a trout a better meal than a dragonfly nymph. And like damsels, dragons have easily imitated triggers – massive eyes, coffin-shaped bodies and a miraculous way of swimming. Tiny caudal jets blow water from the insect’s rear end and propel it forward in short, darting bursts. Of course, just like damsels, they also hang around structure, particularly reed beds. But having said that, I’ve taken trout on a ND Dragon in mid-water nowhere near structure too often for it to just be luck. It leads me to believe that dragonfly nymphs are nomadic hunters, roaming lakes pretty freely, on a sort of aquatic invertebrate safari, searching for anything edible. In that respect, they’re like any of the other typically carnivorous hunter/stalkers. I once filled a jar of water with all kinds of lake bugs that I had intended to study and photograph, but by the time I got home the only insects left were two or three very replete looking dragon fly nymphs that were already eyeing each other.
Dragonfly nymphs are nowhere near as vulnerable nor as accessible to fish as damsels, but that doesn’t make them less sought after. I’ve seen trout turning to intercept dragonfly imitations that
were metres from them. In fact, one of the most memorable moments I ever had fishing a lake, was seeing a trout of well over ten pounds turn to intercept my dragon imitation in glass-clear, shallow water. The fly was only a rod’s length from my tube when I saw the bow wave. That fish covered two metres in a split second and when I struck it felt like I’d hooked into a falling wall!
The purpose of the ND Dragon is to get a pattern that’s not too elaborate, that swims the right way up and that you can fish anywhere, even in shallow water over weed beds. The triggers are the large eyes and conical-shaped body, but one of the best triggers of all is unlocked with a jerky, erratic retrieve. I also like a fly that’s fairly simple to make and while the ND Dragon is not exactly that, it’s not a solid day’s work either.
What you will need to tie this flyYou will want a streamer hook, size 6 and olive or brown 6/0 tying thread. At one time SLF dubbing was freely available and a superb substitute for seal’s fur, but it’s not cheap. But both SLF and seal’s fur are ideal for this pattern, though if you can’t get hold of either, use a hare’s fur and Antron blend. Olive and brown are the colours you want, but I sometimes add a little black and red to both olive and brown hair to get a muddier, therefore more natural and buggy-looking mix. Then finally you need a piece of knitting wool around fifteen centimetres long. Colour doesn’t matter because you are going to hide it. Unravel the wool so that you end up with a single strand.
Tying stepsDress the entire hook with thread and put in a ten to twelve centimetre dubbing loop of tying thread right at the tail end of the dressed shank and leave it dangling there. You will return to it later. Now bring the tying thread to the front third of the hook shank. Here tie in your single strand of wool and start wrapping back towards the tail of the fly. Don’t wrap too tightly. Keep adding
CHAPTER 27
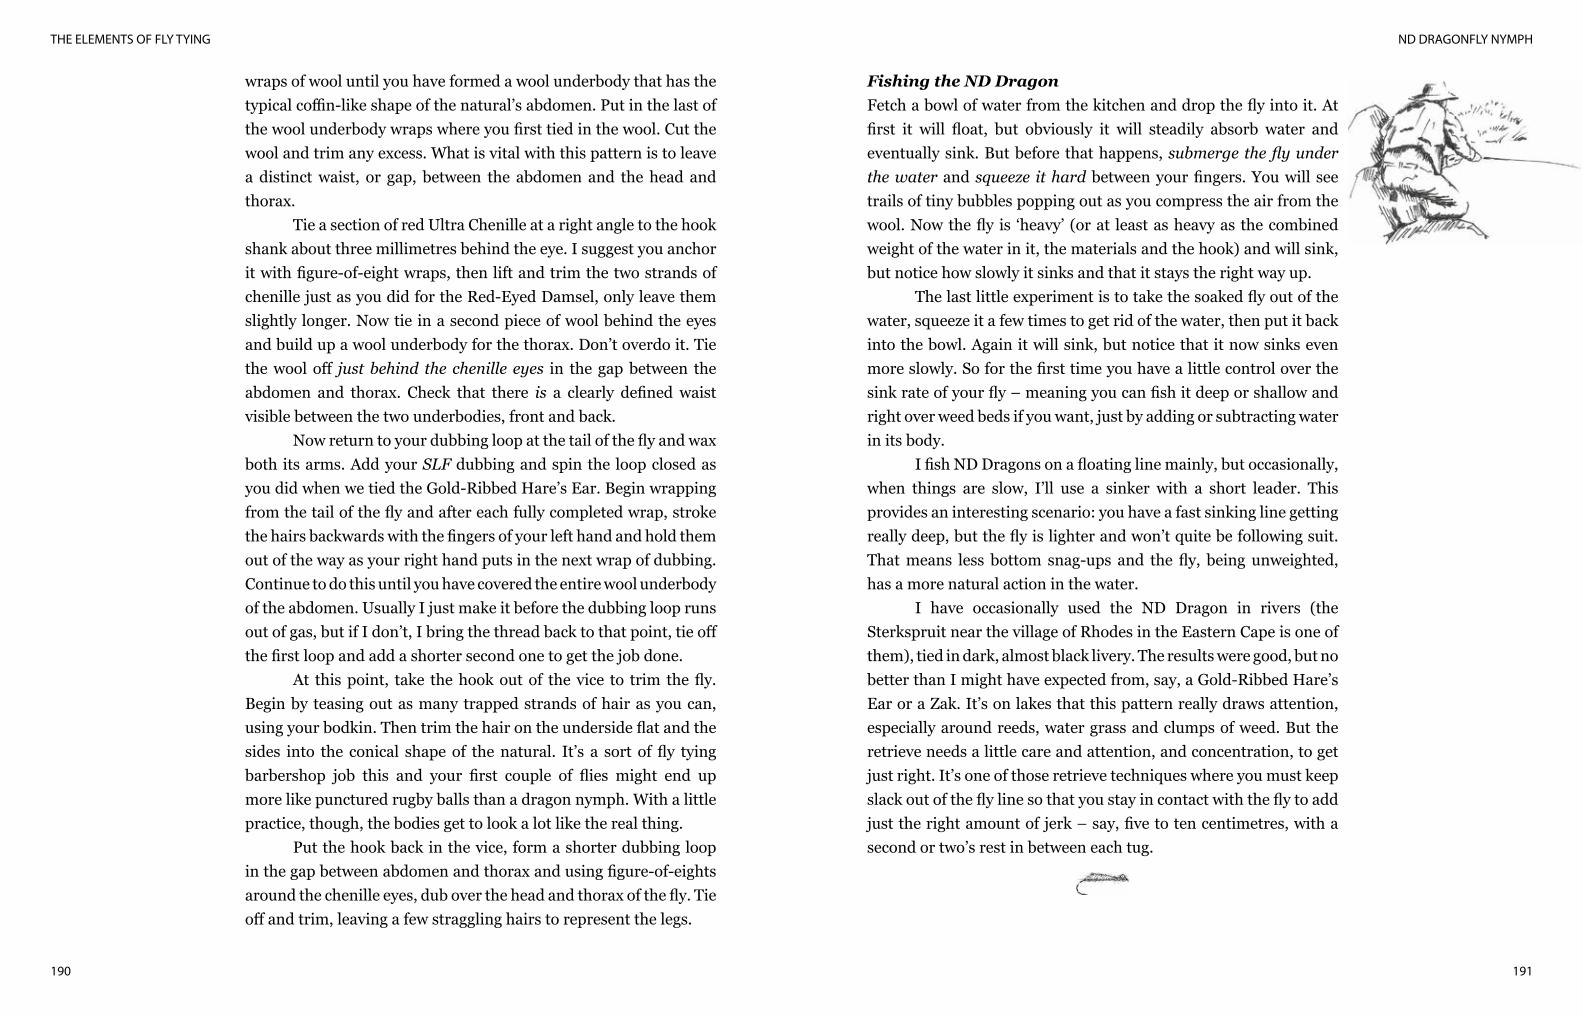
ND DRAGONFLY NYMPH
191
THE ELEMENTS OF FLY TYING
190
wraps of wool until you have formed a wool underbody that has the typical coffin-like shape of the natural’s abdomen. Put in the last of the wool underbody wraps where you first tied in the wool. Cut the wool and trim any excess. What is vital with this pattern is to leave a distinct waist, or gap, between the abdomen and the head and thorax.
Tie a section of red Ultra Chenille at a right angle to the hook shank about three millimetres behind the eye. I suggest you anchor it with figure-of-eight wraps, then lift and trim the two strands of chenille just as you did for the Red-Eyed Damsel, only leave them slightly longer. Now tie in a second piece of wool behind the eyes and build up a wool underbody for the thorax. Don’t overdo it. Tie the wool off just behind the chenille eyes in the gap between the abdomen and thorax. Check that there is a clearly defined waist visible between the two underbodies, front and back.
Now return to your dubbing loop at the tail of the fly and wax both its arms. Add your SLF dubbing and spin the loop closed as you did when we tied the Gold-Ribbed Hare’s Ear. Begin wrapping from the tail of the fly and after each fully completed wrap, stroke the hairs backwards with the fingers of your left hand and hold them out of the way as your right hand puts in the next wrap of dubbing. Continue to do this until you have covered the entire wool underbody of the abdomen. Usually I just make it before the dubbing loop runs out of gas, but if I don’t, I bring the thread back to that point, tie off the first loop and add a shorter second one to get the job done.
At this point, take the hook out of the vice to trim the fly. Begin by teasing out as many trapped strands of hair as you can, using your bodkin. Then trim the hair on the underside flat and the sides into the conical shape of the natural. It’s a sort of fly tying barbershop job this and your first couple of flies might end up more like punctured rugby balls than a dragon nymph. With a little practice, though, the bodies get to look a lot like the real thing.
Put the hook back in the vice, form a shorter dubbing loop in the gap between abdomen and thorax and using figure-of-eights around the chenille eyes, dub over the head and thorax of the fly. Tie off and trim, leaving a few straggling hairs to represent the legs.
Fishing the ND Dragon Fetch a bowl of water from the kitchen and drop the fly into it. At first it will float, but obviously it will steadily absorb water and eventually sink. But before that happens, submerge the fly under the water and squeeze it hard between your fingers. You will see trails of tiny bubbles popping out as you compress the air from the wool. Now the fly is ‘heavy’ (or at least as heavy as the combined weight of the water in it, the materials and the hook) and will sink, but notice how slowly it sinks and that it stays the right way up.
The last little experiment is to take the soaked fly out of the water, squeeze it a few times to get rid of the water, then put it back into the bowl. Again it will sink, but notice that it now sinks even more slowly. So for the first time you have a little control over the sink rate of your fly – meaning you can fish it deep or shallow and right over weed beds if you want, just by adding or subtracting water in its body.
I fish ND Dragons on a floating line mainly, but occasionally, when things are slow, I’ll use a sinker with a short leader. This provides an interesting scenario: you have a fast sinking line getting really deep, but the fly is lighter and won’t quite be following suit. That means less bottom snag-ups and the fly, being unweighted, has a more natural action in the water.
I have occasionally used the ND Dragon in rivers (the Sterkspruit near the village of Rhodes in the Eastern Cape is one of them), tied in dark, almost black livery. The results were good, but no better than I might have expected from, say, a Gold-Ribbed Hare’s Ear or a Zak. It’s on lakes that this pattern really draws attention, especially around reeds, water grass and clumps of weed. But the retrieve needs a little care and attention, and concentration, to get just right. It’s one of those retrieve techniques where you must keep slack out of the fly line so that you stay in contact with the fly to add just the right amount of jerk – say, five to ten centimetres, with a second or two’s rest in between each tug.
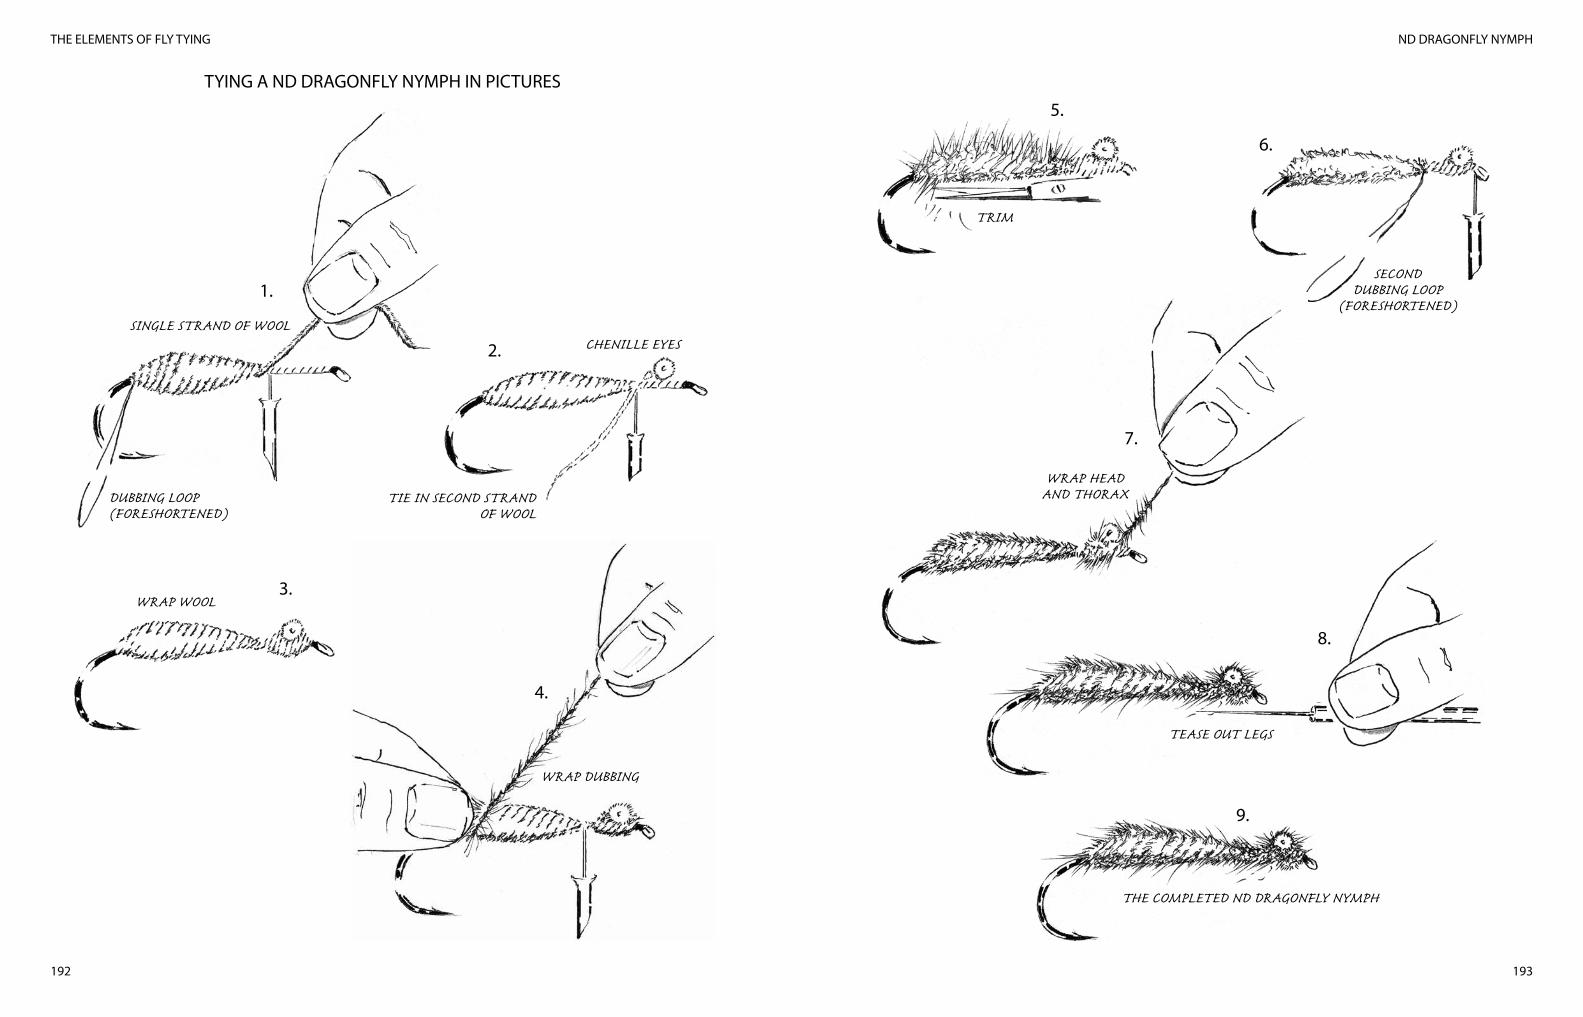
ND DRAGONFLY NYMPH
193
THE ELEMENTS OF FLY TYING
192
TYING A ND DRAGONFLY NYMPH IN PICTURES
1.
SINGLE STRAND OF WOOL
DUBBING LOOP(FORESHORTENED)
CHENILLE EYES2.
TIE IN SECOND STRANDOF WOOL
WRAP WOOL3.
WRAP DUBBING
4.
TRIM
5.
SECONDDUBBING LOOP
(FORESHORTENED)
6.
WRAP HEADAND THORAX
7.
TEASE OUT LEGS
8.
THE COMPLETED ND DRAGONFLY NYMPH
9.
LEFTY’S DECEIVER
195
THE ELEMENTS OF FLY TYING
194
LEFTY’S DECEIVER
The wonderful thing about tying this pattern is that it’s like having an empty canvas to paint on and a whole range of colours at your disposal. There are just a couple of rules of proportion, as there are with any pattern, but then it’s over to you and your imagination and your knowledge of the baitfish in your area. In a way, the next fly, the Crazy Charlie, is similar. You get a nice sense of freedom for creativity, just as you do with that other huge family of salt water flies, Joe Brooks’ Blondes.
As far as I know this is the only fly to make it on to an American stamp and it might just be the best-known saltwater pattern ever invented. It imitates a baitfish through its outline, action and colour, being neatly linear, oval, and darker on top and lighter underneath. Its inventor, Lefty Kreh, is a modern day Lee Wulff or Al McClane, a man with immense experience in just about every aspect of fly fishing for countless species. Trey Combes, another great all-rounder, makes the interesting observation that Lefty’s Deceiver is the fly most people have used as the starting point for their own saltwater patterns.
Triggers here are the long saddle hackles tied at the bend of the hook that waggle in the retrieve and create great movement, obviously the linear shape and colour we mentioned and, finally, the flash transmitted off the synthetics used, in this case, Krystal Flash or Flashabou. In the end, by rearranging the colour combinations, you can imitate an enormous number of inshore and offshore baitfish.
What you will need to tie this patternA salt water hook in the size of your choice, six white saddle hackles, Krystal Flash (pearl and red), silver Mylar, white bucktail, green or chartreuse bucktail (or ten to fifteen strands of peacock herl) and 3/0 white Monocord.
Tying stepsDress the shank with thread, building up a small bump of thread right at the end of the dressed body. This is designed to get the feathers for the tail to flare outwards. Now tie in two white saddle hackles on each side of the end of the hook (just at the bump you formed), with their concave surfaces facing outwards, making the feathers flare. Tie in a few strands of Krystal Flash on each side of the tail feathers and a small bunch on top of the tail. Make sure that their ends are not matched for length and that some fibres extend just beyond the tips of the saddle feathers.
Wrap the body with silver tinsel or Mylar, covering about three-quarters of the hook shank. Select a sheaf of white bucktail and divide it into two equal parts. Clean the base fluff away with your fingertips and holding the bunch in your left hand, trim the butts at a slight angle and add a drop of head cement at the point where you cut them. This angle will assist you later to form a smooth, cone-shaped head.
Tie in the first bunch on your side of the hook shank, about three to four millimetres behind the eye. First use two loose, pinched loop turns before adding a few tighter wraps. The fibres may role just a little so that a few splay-out slightly below and some slightly above the hook shank, but that only adds attraction to the fly and helps to create additional movement. The hair should extend about half the hook shank’s length beyond the bend. Repeat this step on the far side of the hook.
Now remove the hook from your vice, turn it upside down and select a small bunch of red Krystal Flash. Tie this in at the throat to suggest gills, cutting the fibres so that they extend no more than half way between the eye of the hook and the point, and make sure they are not cut at a clean angle, but at slightly irregular lengths.
CHAPTER 28
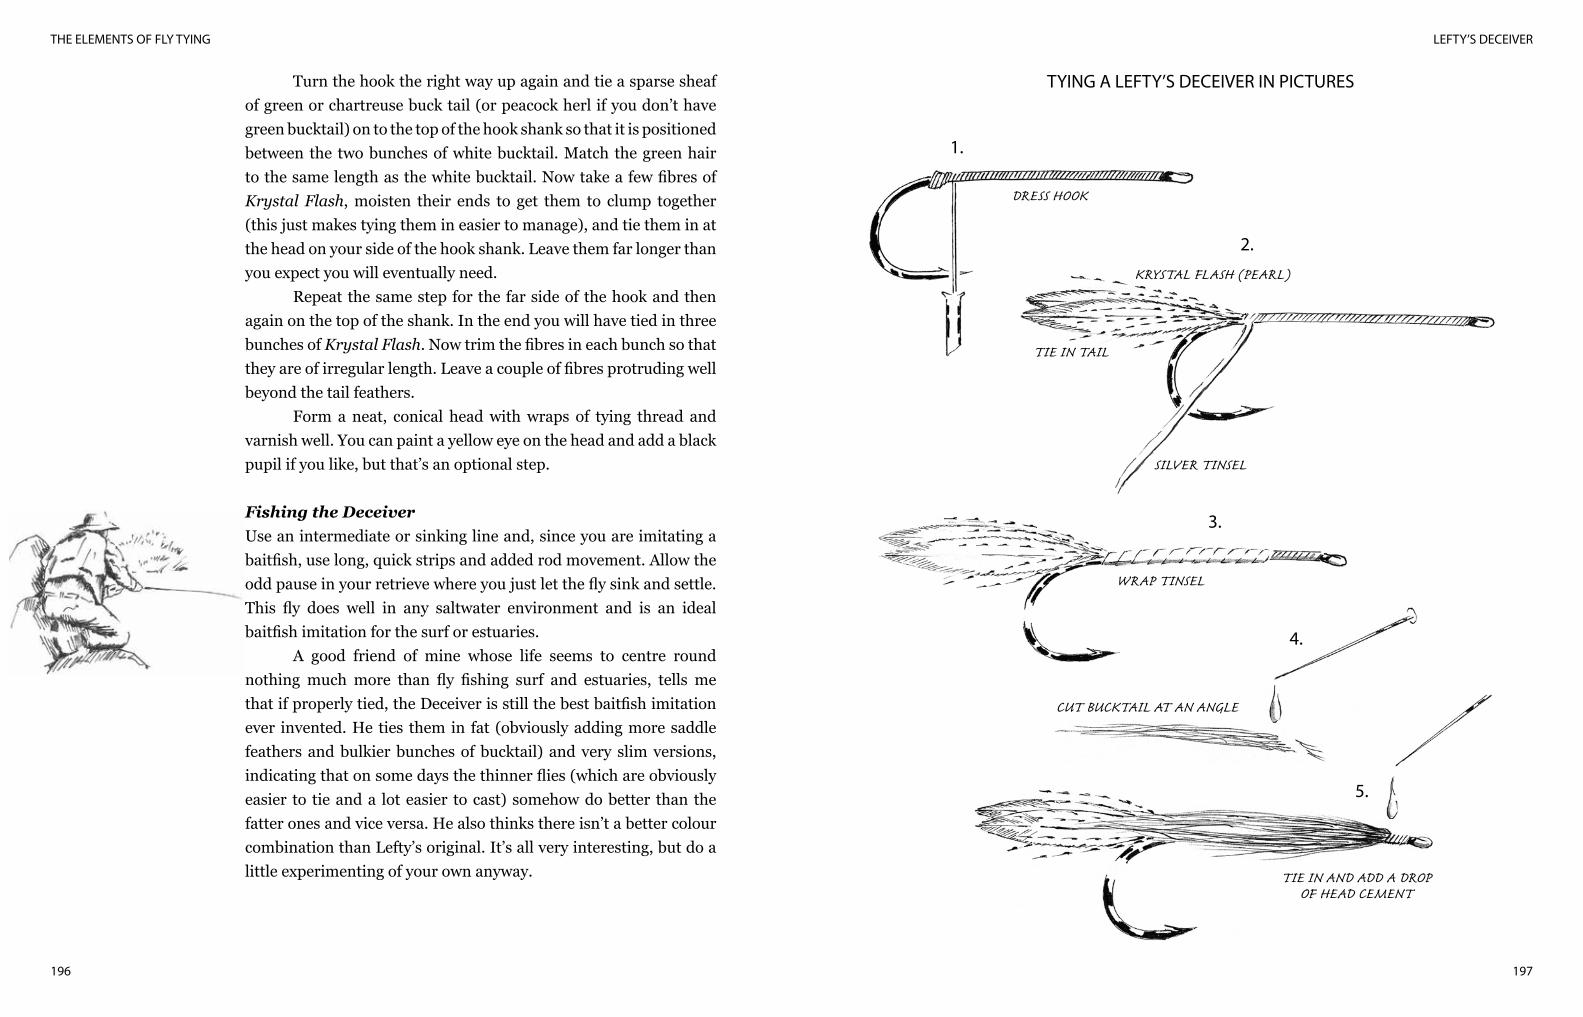
LEFTY’S DECEIVER
197
THE ELEMENTS OF FLY TYING
196
Turn the hook the right way up again and tie a sparse sheaf of green or chartreuse buck tail (or peacock herl if you don’t have green bucktail) on to the top of the hook shank so that it is positioned between the two bunches of white bucktail. Match the green hair to the same length as the white bucktail. Now take a few fibres of Krystal Flash, moisten their ends to get them to clump together (this just makes tying them in easier to manage), and tie them in at the head on your side of the hook shank. Leave them far longer than you expect you will eventually need.
Repeat the same step for the far side of the hook and then again on the top of the shank. In the end you will have tied in three bunches of Krystal Flash. Now trim the fibres in each bunch so that they are of irregular length. Leave a couple of fibres protruding well beyond the tail feathers.
Form a neat, conical head with wraps of tying thread and varnish well. You can paint a yellow eye on the head and add a black pupil if you like, but that’s an optional step.
Fishing the DeceiverUse an intermediate or sinking line and, since you are imitating a baitfish, use long, quick strips and added rod movement. Allow the odd pause in your retrieve where you just let the fly sink and settle. This fly does well in any saltwater environment and is an ideal baitfish imitation for the surf or estuaries.
A good friend of mine whose life seems to centre round nothing much more than fly fishing surf and estuaries, tells me that if properly tied, the Deceiver is still the best baitfish imitation ever invented. He ties them in fat (obviously adding more saddle feathers and bulkier bunches of bucktail) and very slim versions, indicating that on some days the thinner flies (which are obviously easier to tie and a lot easier to cast) somehow do better than the fatter ones and vice versa. He also thinks there isn’t a better colour combination than Lefty’s original. It’s all very interesting, but do a little experimenting of your own anyway.
TYING A LEFTY’S DECEIVER IN PICTURES
DRESS HOOK
1.
KRYSTAL FLASH (PEARL)
2.
TIE IN TAIL
SILVER TINSEL
WRAP TINSEL
3.
4.
CUT BUCKTAIL AT AN ANGLE
TIE IN AND ADD A DROPOF HEAD CEMENT
5.
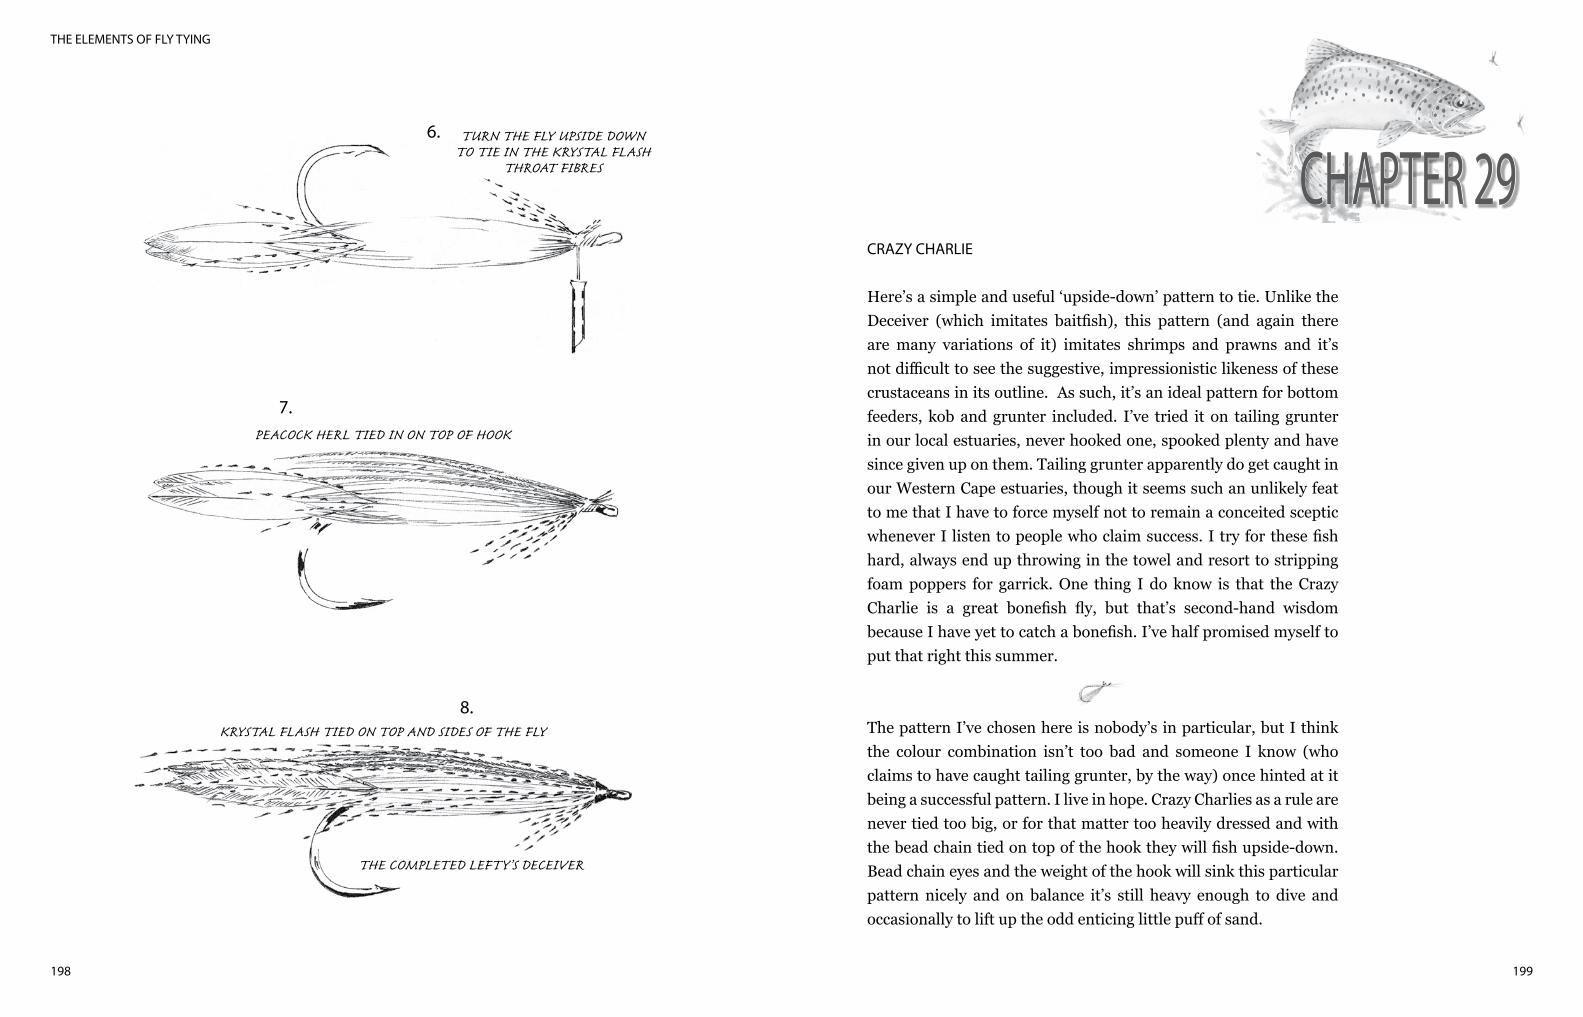
199
THE ELEMENTS OF FLY TYING
198
CRAZY CHARLIE
Here’s a simple and useful ‘upside-down’ pattern to tie. Unlike the Deceiver (which imitates baitfish), this pattern (and again there are many variations of it) imitates shrimps and prawns and it’s not difficult to see the suggestive, impressionistic likeness of these crustaceans in its outline. As such, it’s an ideal pattern for bottom feeders, kob and grunter included. I’ve tried it on tailing grunter in our local estuaries, never hooked one, spooked plenty and have since given up on them. Tailing grunter apparently do get caught in our Western Cape estuaries, though it seems such an unlikely feat to me that I have to force myself not to remain a conceited sceptic whenever I listen to people who claim success. I try for these fish hard, always end up throwing in the towel and resort to stripping foam poppers for garrick. One thing I do know is that the Crazy Charlie is a great bonefish fly, but that’s second-hand wisdom because I have yet to catch a bonefish. I’ve half promised myself to put that right this summer.
The pattern I’ve chosen here is nobody’s in particular, but I think the colour combination isn’t too bad and someone I know (who claims to have caught tailing grunter, by the way) once hinted at it being a successful pattern. I live in hope. Crazy Charlies as a rule are never tied too big, or for that matter too heavily dressed and with the bead chain tied on top of the hook they will fish upside-down. Bead chain eyes and the weight of the hook will sink this particular pattern nicely and on balance it’s still heavy enough to dive and occasionally to lift up the odd enticing little puff of sand.
CHAPTER 296. TURN THE FLY UPSIDE DOWN
TO TIE IN THE KRYSTAL FLASHTHROAT FIBRES
7.PEACOCK HERL TIED IN ON TOP OF HOOK
8.KRYSTAL FLASH TIED ON TOP AND SIDES OF THE FLY
THE COMPLETED LEFTY’S DECEIVER
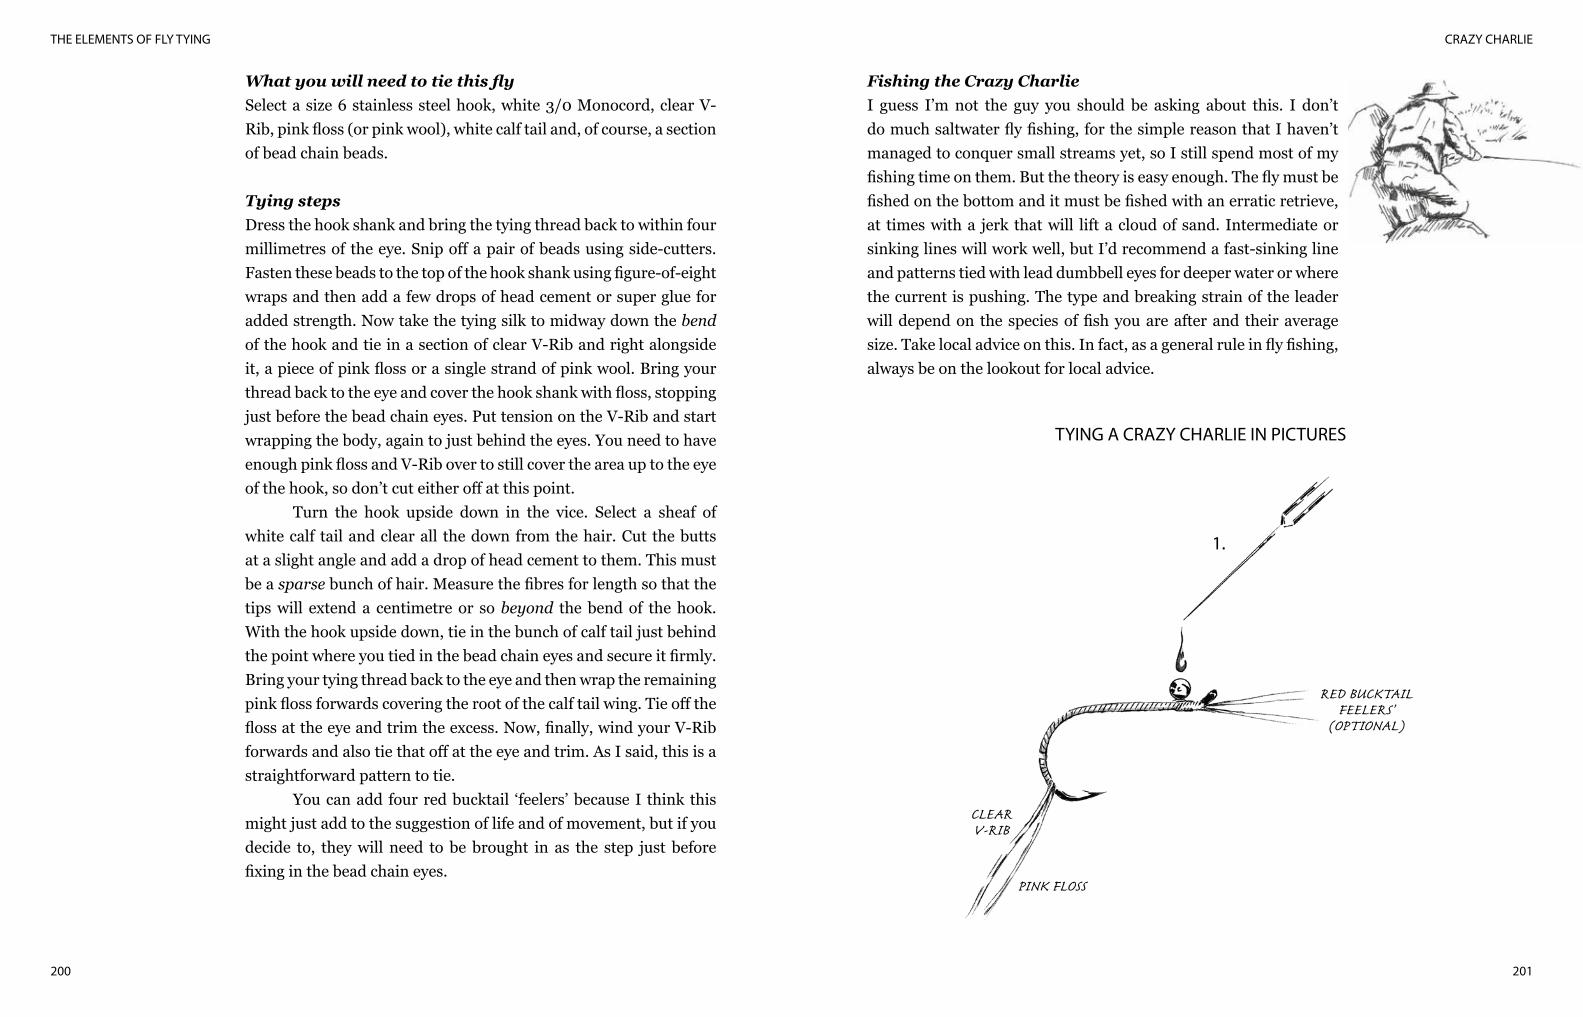
CRAZY CHARLIE
201
THE ELEMENTS OF FLY TYING
200
What you will need to tie this flySelect a size 6 stainless steel hook, white 3/0 Monocord, clear V-Rib, pink floss (or pink wool), white calf tail and, of course, a section of bead chain beads.
Tying stepsDress the hook shank and bring the tying thread back to within four millimetres of the eye. Snip off a pair of beads using side-cutters. Fasten these beads to the top of the hook shank using figure-of-eight wraps and then add a few drops of head cement or super glue for added strength. Now take the tying silk to midway down the bend of the hook and tie in a section of clear V-Rib and right alongside it, a piece of pink floss or a single strand of pink wool. Bring your thread back to the eye and cover the hook shank with floss, stopping just before the bead chain eyes. Put tension on the V-Rib and start wrapping the body, again to just behind the eyes. You need to have enough pink floss and V-Rib over to still cover the area up to the eye of the hook, so don’t cut either off at this point.
Turn the hook upside down in the vice. Select a sheaf of white calf tail and clear all the down from the hair. Cut the butts at a slight angle and add a drop of head cement to them. This must be a sparse bunch of hair. Measure the fibres for length so that the tips will extend a centimetre or so beyond the bend of the hook. With the hook upside down, tie in the bunch of calf tail just behind the point where you tied in the bead chain eyes and secure it firmly. Bring your tying thread back to the eye and then wrap the remaining pink floss forwards covering the root of the calf tail wing. Tie off the floss at the eye and trim the excess. Now, finally, wind your V-Rib forwards and also tie that off at the eye and trim. As I said, this is a straightforward pattern to tie.
You can add four red bucktail ‘feelers’ because I think this might just add to the suggestion of life and of movement, but if you decide to, they will need to be brought in as the step just before fixing in the bead chain eyes.
Fishing the Crazy CharlieI guess I’m not the guy you should be asking about this. I don’t do much saltwater fly fishing, for the simple reason that I haven’t managed to conquer small streams yet, so I still spend most of my fishing time on them. But the theory is easy enough. The fly must be fished on the bottom and it must be fished with an erratic retrieve, at times with a jerk that will lift a cloud of sand. Intermediate or sinking lines will work well, but I’d recommend a fast-sinking line and patterns tied with lead dumbbell eyes for deeper water or where the current is pushing. The type and breaking strain of the leader will depend on the species of fish you are after and their average size. Take local advice on this. In fact, as a general rule in fly fishing, always be on the lookout for local advice.
TYING A CRAZY CHARLIE IN PICTURES
RED BUCKTAIL FEELERS’
(OPTIONAL)
1.
CLEARV-RIB
PINK FLOSS
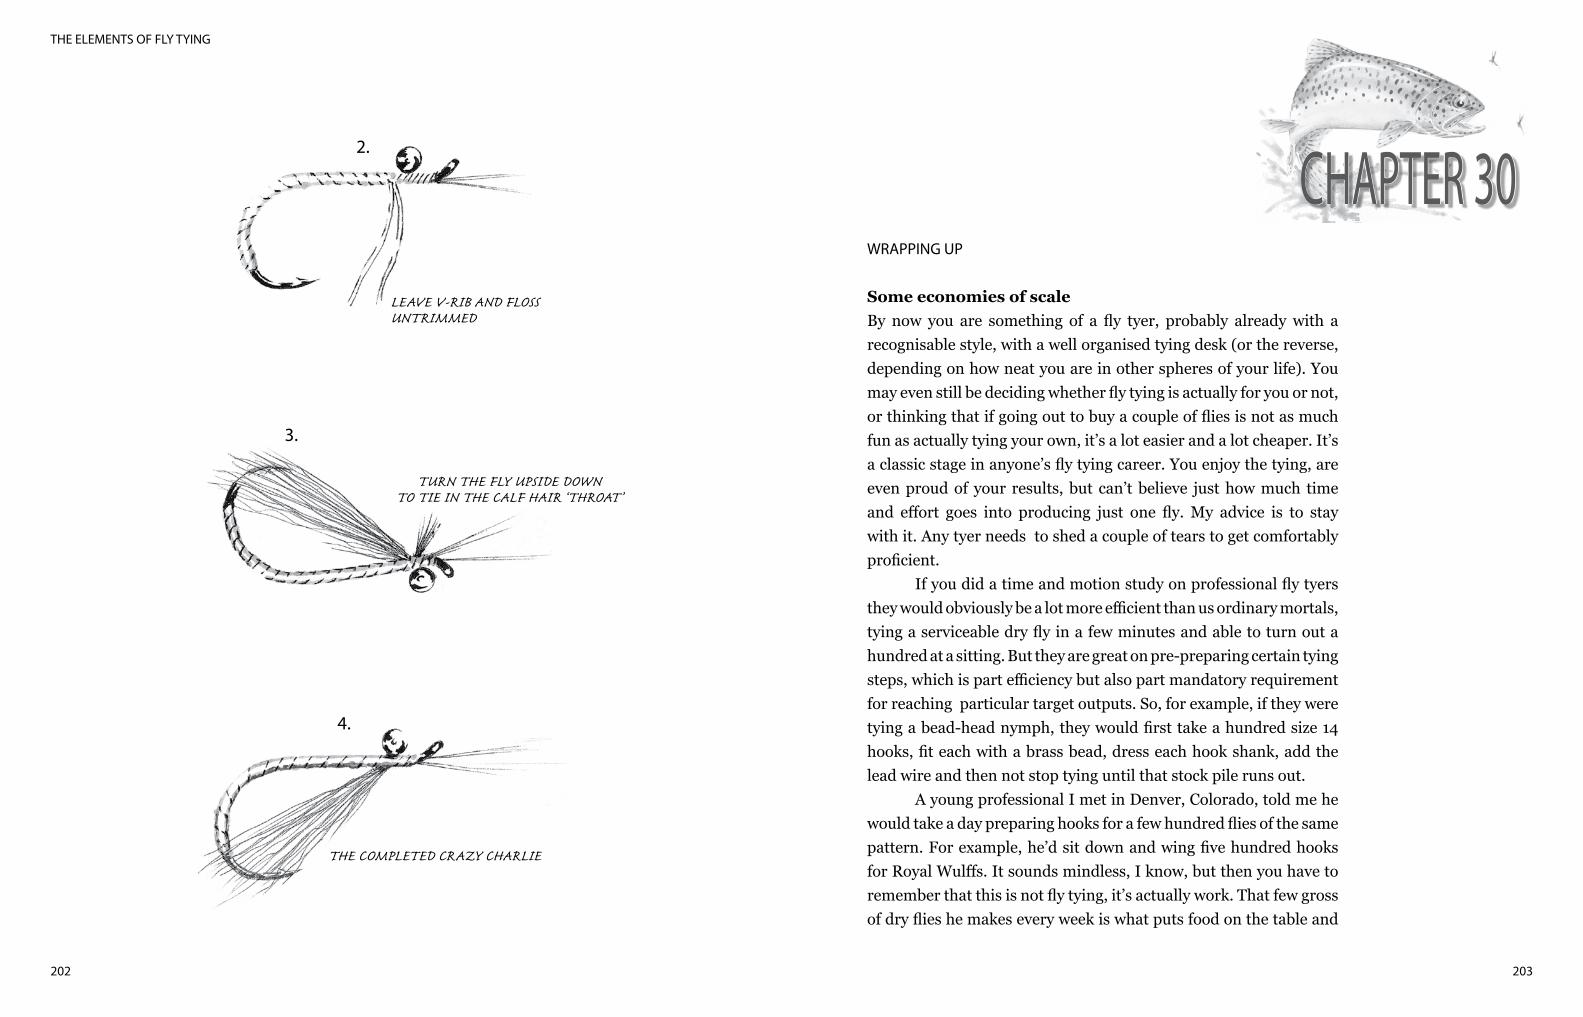
203
THE ELEMENTS OF FLY TYING
202
WRAPPING UP
Some economies of scaleBy now you are something of a fly tyer, probably already with a recognisable style, with a well organised tying desk (or the reverse, depending on how neat you are in other spheres of your life). You may even still be deciding whether fly tying is actually for you or not, or thinking that if going out to buy a couple of flies is not as much fun as actually tying your own, it’s a lot easier and a lot cheaper. It’s a classic stage in anyone’s fly tying career. You enjoy the tying, are even proud of your results, but can’t believe just how much time and effort goes into producing just one fly. My advice is to stay with it. Any tyer needs to shed a couple of tears to get comfortably proficient.
If you did a time and motion study on professional fly tyers they would obviously be a lot more efficient than us ordinary mortals, tying a serviceable dry fly in a few minutes and able to turn out a hundred at a sitting. But they are great on pre-preparing certain tying steps, which is part efficiency but also part mandatory requirement for reaching particular target outputs. So, for example, if they were tying a bead-head nymph, they would first take a hundred size 14 hooks, fit each with a brass bead, dress each hook shank, add the lead wire and then not stop tying until that stock pile runs out.
A young professional I met in Denver, Colorado, told me he would take a day preparing hooks for a few hundred flies of the same pattern. For example, he’d sit down and wing five hundred hooks for Royal Wulffs. It sounds mindless, I know, but then you have to remember that this is not fly tying, it’s actually work. That few gross of dry flies he makes every week is what puts food on the table and
CHAPTER 30LEAVE V-RIB AND FLOSSUNTRIMMED
2.
TURN THE FLY UPSIDE DOWNTO TIE IN THE CALF HAIR ‘THROAT’
3.
THE COMPLETED CRAZY CHARLIE
4.
WRAPPING UP
205
THE ELEMENTS OF FLY TYING
204
pays the electricity bill. The principle is worth remembering, though. Whenever you
sit down to tie, always ask yourself what particular patterns you actually need most, what size range you want and what preparatory steps are useful to do first. Then get those out of the way. It’s also fun to time yourself on a pattern. The time you take tying the first fly of a dozen should just about halve by the time you have tied the last. There’s a lesson in all this. When you sit down to tie, it’s better to focus on one or two patterns and tie at least a dozen of each, than to tie one or two flies in a sprinkling of different patterns.
I tend to keep the main materials I use for patterns that I tie a lot in separate plastic containers. So if I decide to tie Zaks, say, I open the box that has my pre-prepared peacock herl, small dun cock hackles, beads, wire and DMC thread. I mark the outside of the box with a black permanent marker. That way I don’t spend hours rummaging through my fly tying material collection (which is now substantial) every time I want to tie a Zak. Life’s too short.
Fly tying on fishing tripsFly tying on trips is useful for two reasons. It gives you access to patterns you discover are essential but don’t have on you (or run out of), and it gives you something more to do in the evenings than just sitting around making small talk. I have an old medical bag with useful trays and drawers in it that I pack differently depending on the trip – so if I’m mainly going to be fishing small streams, it will look a little different than it would if I was fishing lakes. The only problem is the case is a little hard and angular and doesn’t pack too easily. It’s also a lot bigger than it needs to be. However there are a few neat, portable, soft fly tying cases available. I’m not in a position to recommend any particular product, but I can endorse the principle.
The biggest problem when you’re away is finding enough light to tie under. It’s not a bad idea to invest in a small, portable lamp. If you do, don’t skimp. Get something of high quality. The owners of one fishing cottage I use, Donie and Juan-Marie Naude, who offer superb fly fishing on their farm Vrederus, thoughtfully
built a fly tying cabinet into a corner of the sitting room, along with a good light and using it you somehow don’t feel guilty about creating a bit of a mess. A lot of fishing cabin and lodge owners don’t like finding bits of feather and fur trimmings all over the carpet in the morning so it’s wise to ask permission first. Fly tying can be a little like smoking indoors. A lot of people don’t handle it well.
Further reading and how to progressThe number of fly tying books available is, as you guessed, huge and a touch confusing. In fact, so much so, that to make a list of suggested reading would be like asking someone to recommend a few good novels. You wouldn’t easily know where to begin and end. But there are a few books that stand out as really special.
The first book I want to recommend has nothing to do with fly tying from a technical, step by step point of view, but has everything to do with making sense of fly pattern design. It’s Gary LaFontaine’s masterpiece, The Dry Fly: New Angles. Next is Dean Riphagen’s brilliant work, The South African Fly Fishing Handbook, a world-class product that’s in a league of its own when it comes to pattern selection and the sumptuous quality of the photographs illustrating the various tying sequences. Then if you enjoy saltwater fly fishing, Trey Combes describes Lefty Kreh’s Salt Water Fly Patterns as the only book he takes everywhere he travels. My final choices would be Gary Borger’s Designing Trout Flies and Darrel Martin’s classics, Micropatterns and Fly-Tying Methods.
I also suggest you join a fly tying club if there is one in your area, or if not, collect a few like-minded friends together and form a group. Regular tying, especially with other people, will help you progress and keep up your interest.
It’s likely you arrived at this point in the book over a few weeks – maybe even months. And along the way there were probably occasions when you were happy with the flies you tied, and times when you cursed, slammed a few doors, maybe even kicked the cat. But despite not being fond of writing purely didactic stuff on
THE ELEMENTS OF FLY TYING
206
fly fishing, I must say I enjoyed writing this book. I suppose that’s partly because while putting it together I was picturing how it might help a few fly fishers to become serious fly tyers. If the book manages to convert even a handful it will be reward enough, and that’s a lot of what this kind of writing is all about for me.
But I have also enjoyed trying to show you that there isn’t much in fly tying that’s truly classifiable as painfully exacting, and if it does get a little scientific at times, and it does, at least it’s a down to earth, woodsy kind of science. I also hope I’ve convinced you that there’s plenty of room for you to do a little experimentation of your own, something that’s always fun, and once in while, even productive.
Finally, if you were new to fly tying when you first picked up this book and still don’t feel like a remarkably accomplished fly tyer, believe me, that’s what I would have expected. It’s where fly tying and fly fishing are alike, in the sense that both require a lot more patience and application than most people imagine when they first start out. And since we all live in the quick-fix, fast food, instant gratification age and expect most things to fall in place pretty sharply, let me tell you it took me a few years before I was tying the sort of flies I could honestly say I was pleased with. But it was worth the trip, the effort and the persistence. Not only because it grew into such an absorbing and pleasant pastime, but because tying my own flies has definitely helped me catch more fish – and, thinking back on it, probably most of the better ones as well.
I know it’s a clichéd notion, but in fly fishing and fly tying you’ll often hear people say you never stop learning, and this, to a large extent, explains the draw of these two complimentary pursuits and the hold they eventually get on us. So you may well have come to the end of the book and learned a little fly tying, but I’d guess it’s more likely you have only just begun, have just taken the first tentative steps on what is likely to become a never-ending, happy, sometimes frustrating, but always rewarding journey. Have fun.