Embed Size (px)
Citation preview

The electronic newsletter of the the Chichester and District model aero club!
"#$%&!'()$!!!!!!!!!!!!!!!!!!!!!!!!!!!!!!!! !!!!!
!!
October 2012
Chichester and District Model Aero ClubLife President: Admiral Sir John ‘Sandy’ Woodward GBE KCB
Committee 2012Chairman: Tony Chant: 01243 262816, mobile 07766 078977, [email protected] & Social Secretary: Toni Reynaud 01243 370422, [email protected] & Membership Secretary: Malcolm Farrington, 4 Little Babbsham, Aldwick Fields. Bognor Regis. West Sussex. PO21 3SZ , 01243 821789, [email protected] Officer: Don Biles 01243 774196Competition Sec.: Ray Beadle 01243 670163Thorney Rep.: Derek Honeysett 01243 371093Porthole Farm: Rep.: Ron Spiers 01243 261096Indoor Rep: Derek Ascott 01243 849088Slope Rep: John Riall 01243 782922Webmaster: [email protected] Rep. & Junior Members Protection Co-ordinator Sandra Dawson 02392 612549Committee appointed positions: John Riall 01243-782922, Senior Training OfficerBMFA Rep & CD editor: Ken Knox, 34 Galaxie Road, Cowplain, Waterlooville, PO8 9AR, 02392-593104, mobile 07885 819911 ,[email protected]
One fine Monday morning in September, by pure coincidence, four enthusiasts turned up with scale models. The Focker D7 belonging to Mick, the Sopwith Pup to Tony, the SE5A to Harry and the “the silver one!” to Ray. All four models continued to fly most of the day.
Photographs and words by Mick Blundell

Electronic newsletter of the Chichester and District Model Aero Club
Three ManoeuvresSeptember 2012
Seven competitors came for the loops rolls and spins comp. the weather was sunny with a light wind from the N. West Aircraft included fun flies, and sports. The rules were, start the clock on release of plane, take off do three rolls, three loops and three spins, in any order, then land in the designated box, the clock stopping when the first (any!) part of the model touched the ground, 10% removed if the model did land in the box, The winner would be the shortest time of the day.
First was Toni Reynaud who flew an electric model in a sedate 107.31 and managed to land in the box. Next was
Bruce Smith with his I/C powered Yak who did 62.11 sec and also made the box. while Stuart Whittle flying his electric Kantana managed 48.55.sec. and the box. The first three making the box! This looks good! Peter Doe who was flying a I/C Limbo, managed a time of 28.31 sec. but no box Oh well! John Riall and his I/C Wot 4 got a time of 45.46 sec. but no box, he was followed by Derek Honeysett flying his I/C Bullet in a time of 89.95 sec but no box and finally Ray Beadle, flying an electric Limbo, he got through the flight in 43.3 sec. but landed at the end of the runway! In the second round Peter tried harder but did 28.44 sec. and no box, he removed the fin by landing upside down!! John improved with 41.44 sec. and the box but Stewart only got to 52.42sec.and the box. . For the third round we lost Tony, ran out of battery power and Peter no fin, Ray improved with 38.39 sec. while Stewart also improved with 35.22sec.but no box. John managed 42.78sec.but no box and Bruce got to 62.59 sec with no box So the final result was a win for Peter Doe, a second for Stewart Whittle and a third for John Riall. Three electrics this year, did well hope to see more next year.Thanks to all who came! Cheers Ray
Loops Rolls Spins
FirstRound
SecondRound
ThirdRound
Best Time Position
P Doe 28.31 28.44 ------------ 28.31 1S Whittle 48.55 52.42 35.22 35.22 2
J Riall 45.46 41.44 42.78 37.29 3R Beadle 43.30 48.41 38.39 38.39 4B Smith 62.11 78.10 62.59 55.89 5
D Honeysett 89.95 99.84 103.41 89.95 6
T Reynaud 107.31 110.84 ------------ 107.31 7

BALD EAGLE(My Second Brian Taylor P51-D Mustang Build)
From Bruce Smith
It’s six years now, since I completed ‘Twilight Tear’ (Fig. 1) and entered her in the BMFA Scale National Championships, and ever since she was retired to ‘static display duty only,’ in 2008, I’ve had ‘an itch’ to get my teeth into some more serious scale building.The choice for the new model was never in doubt; it had to be another Mustang. I just love the way they look, I love the way they fly – and having shelled out on the original BT Plan nine years ago, I could also save a few quid!This model though, would be far quicker and easier to build since Traplets have now taken over the production and sales of Brian’s art forms, so I could save a heck of a lot of work by purchasing their CNC cut wood-pack. (See what’s emerging? – tight fisted cheapskate.)
I don’t intend to write, here, much about the general build though. Building a BT model is such a different experience from other builds – you get a plan and no instruction – if it’s taken you a year to build it you’ve spent at least six months studying the plan, and don’t expect any handy little hints such as ‘where to install the gear.’ No, this article is more about how this build, and this model differ from my first, particularly with respect to the fitting out and the finishing.
The general build was pretty much as I’d expected – part numbers didn’t always match between my old plan and the CNC parts – some CNC parts were smaller than required for my plan and the comb jointed ‘built up’ sections of the fuselage side recreated a perfect ‘banana’ line when they were pushed tightly together. (Fairly simple then.) I hadn’t been long into the build when I realised that I should have bought the new Traplets Plan with the wood-pack, but if I’m more stupid than tight fisted (debatable) then I’m certainly more stubborn than either and so I pressed on. In truth I wasn’t too worried about the plan differences anyway as I’d already determined that I’d be deviating from Brian’s plan a great deal. What I wanted to create was a good quality ‘Stand-off’ scale model, not a scale masterpiece. The main differences, I’d decided, from my first model would be:(1) There’d be conventional (not hidden) control horns and linkages;(2) Air retracts would replace Brian’s mechanical design;(3) Independent gear doors would be sacrificed for the sake of lightness; and(4) I’d included a sliding canopy mechanism.
From the early stages it was obvious that weight management was going to feature very much in my fitting out process and so it had to be thought out at an early stage.My trusty Laser 150 was going to power the model and this was almost double the power of Brian’s original specification. Then there was that beautiful, but very heavy ‘YT’ retract gear with machined ali oleos, bolted, metal wheels and solid 4” rubber tyres – all forward of the CG. On the other hand the canopy drive mechanism would be quite rearward along with the steerable, retractable tail-wheel mechanism and I knew I could rely on sighting any batteries in the rear of the under-wing glycol cooler moulding.
Being a ‘wings first’ builder, I initially set about re-drawing a ‘half wing plan’ since most of the CNC cut ribs were not going to be of any use. Where Brian had used ‘through wing’ linkages and pivots from one central servo, I chose to use a pair of wing mounted standard servos for the flaps and a pair of wing mounted M/G mini servos for the ailerons. I also had to fundamentally change the undercarriage geometry as well. Mechanical retracts can be situated well back in the wing as they culminate in a forward facing drive shaft. Air retracts on the other hand operate from a bulky block which doesn’t sit well with its take-off point just behind the wing’s leading edge. Believe me, there were many nights spent on the drawing board, wrestling with the old three dimensional geometry creating the bearer supporting rib profiles which would give something near the correct u/c rake and pitch, yet fit within that unusual laminar flow wing section. Unfortunately, the YT oleo legs also worked out too long for the scale installation so I had to turn about an inch off their upper section where they neatly slot into the retract unit. The rib modifications needed to enable wing mounted servos was pretty straight forward and I utilised the ever popular SLEC servo mounts which give a clean line and help protect the servos. (Fig. 2) Drawing on past experience I also chose to encapsulate the area around the retract unit installation with a removable panel made from a fairly stiff plasticard – just in case future maintenance was necessary!
I’d solved the problem of a cheap, effective canopy rail some years earlier with Twilight Tear, (cutting a slot in the top of a length of plastic box section strip and running a length of plastic ‘I’ section strip through it) but I decided I needed to solve all the problems of an actuator mechanism before I could seriously begin building the fuselage. It was only when I’d sketched out a diagram of how the basic unit might work (Fig. 3) that I realised I’d also be able to harness the actuator’s movement to open and close a scale ‘glycol cooler outlet’ below the belly. (Real boys’ stuff!)
Electronic newsletter of the Chichester and District Model Aero Club

Electronic newsletter of the Chichester and District Model Aero Club
Industry can provide a huge range of linear activators – all very heavy and very costly. My simple idea was to use a small electric motor to spin a length of M3 studding to act as a worm drive. Weeks of experimentation and research followed. I’d calculated the speed the geared motor needed to turn at with the 0.5mm pitch and over the travel distance, but then I couldn’t find a motor with a gear ration to provide it. In the end I built my own from a readily available, over-the-counter kit. Having put the basic mechanism of the actuator together I needed to draw on the electronic expertise of fellow members Andrew Gibbs and Toni Reynaud to design the two-way circuit and the suppression system – thanks guys. Only a simple thing, I know, but you’ve no idea just how elated I was when I threw the switch --- and it just worked! Designing the way it would all slip in and out of the model (again for maintenance) took a lot of think time, but eventually I evolved a very simple solution with two mounting screws concealed in the rear cockpit, then, at the far end, it’s secured with a built in captive nut which is picked up by some M3 studding down the centre of the scale aerial. (Fig. 4)
With these problems solved I was able to crack on with the rest of the build - fuz and tail feathers, and my only other deviation from Brian’s plan was to design built-up elevators rather than use solid sheeting.
With the build pretty much completed, the wings and fuselage were skinned in light-weight glass-cloth and the tail control surfaces were covered in neutral Solartex. Robart scale hinges were dry fitted as were the control horns but nothing was to be secured in place until the paintwork had been completed. Now the next huge task was ready to be undertaken – fitting the model out. As I laid all the components and electrics out on my work-bench next to the fuselage, I couldn’t help wondering just how I was going to shoe-horn it all in, let alone keep it safe from interference and vibration and make it tidy and easily accessible.
In the end it all happened by a process of elimination. Firstly any main control servos were positioned as far out of the middle of the available space as possible to allow room for other electronic components and a central run of cables. Andrew, bless his heart, had persuaded me:
(a) – that I needed a more reliable system than the five cell NimH I’d planned to use (I upgraded to a 2200 mAH 2s lipo and UBEC to bring the voltage down to 6v); and(b) to use a separate 1s 3.7v lipo for the actuator drive which would need to incorporate a 3amp slow blow-fuse.
Finishing and PaintingWhen I started out building this second BT Mustang I was fairly certain that I was going to create another Twilight Tear, but this time with invasion stripes. These bold black and white markings not only look good on a warbird, to my mind, but they also stand out well in the sky, particularly on a North Wind base landing leg on Thorney. Obviously I’d safely stored all the original templates and masks for the decals and lettering so this should save me several weeks of work. You can then imagine my disappointment when, having just done a little research, to check, I discovered that 68 Fighter Group, Duxford didn’t take delivery of their first Mustangs until December 1944. (Six months later) I’d read several 68FG pilots’ accounts of D Day Top Cover but had never realised that they were still flying P47 ‘Thunderbolts.’ (D*mn and Bl*st!) There was only one thing for it, I’d have to source another artwork scheme. Now of all the WWII aircraft, there’s probably more information on Mustangs’ colour schemes than any other – I’ve got books just on this alone, but finding a series of colour drawings or photos which cover all angles is less easy and it had got to be a scheme that appealed to me. In the end I chose to model my P51-D on a real aircraft that still competes in the Reno Races in Oshkosh (USA) and which is now owned by Jim Beasley of Philadelphia. Bald Eagle originally saw life as a P51-B (Razor back) Mustang, but like so many combat aircraft got replaced with an upgraded version over time or following combat damage. This was the case with Bald Eagle and I’ve even got photographs of her with four subtle variations in the whole coachwork scheme since she’s been in Jim’s possession.It was obvious that there was going to be a lot of ‘masking’ to spray and paint this particular scheme, especially the rear fuselage side areas, so I took an early decision to use acrylic paints since they spray so well and dry so quickly. What I didn’t realise at the time was that although you can over-spray very successfully with them, trying to over-paint with them is a non-starter. Even paintwork which has stood hardening for a fortnight will begin to lift with the second brush-stroke of a newly introduced over-colour and it’s harrowing, when just touching up areas where spray has crept under the masking tape, in case you disturb the whole surface. Simple block colour schemes are OK, but I’ll never use acrylics again for a complex paint job. I won’t regale you with all the gory details, but suffice it to say that I had to mask up the whole of the Mustang fuselage eleven separate times to achieve the final result and got through over two packs (10 rolls) of paper masking tape as well as two rolls of the fine vinyl masking tape. Never again!
My final mistake was to invest in the expensive Humbol Metalcote ‘polished aluminium’ acrylic, spray.I’d used their Metalcote enamel before, and found it very effective – it dries with a sooty surface which polishes off with a soft rag to reveal an impressive metal-like finish below. Well, I sprayed vast areas of bald eagle with the new acrylic product, spent hours polishing it to a metal finish (it’s not as good as the original enamel version) and then once I’d applied all the special waterslide decals I eventually over-sprayed the whole aircraft with Flair fuel proofer. - And all the polished aluminium finish turned GREY! (D&B again!) Still, it was only intended to be a good scale ‘hack,’ anyway and overall I’m pleased with the general finished result (Fig 7) and that despite all the modifications it still came out 4oz lighter than Brian’s original weight at 10lb 8oz which included 4oz of balance weight in the tail (BS09/12)

Electronic newsletter of the Chichester and District Model Aero Club

Electronic newsletter of the Chichester and District Model Aero Club
Old Dog, New Tricks Syndrome
With a headline like that, you may be expected to read a tale about the difficulties some new members experience in leaning to fly Radio Control for the first time, especially if – how do I put this? – they will not be seeing 21 again.
Over the years I’ve seen a number of new members with time on their hands, go on to pass the A and B certificates, but is an inescapable fact that learning to fly R/C comes so much easier to a 12 – 14 year old than ……. later in life. It would seem there is an article waiting to be written on the subject; but this is not it.
Right, now that I’ve got your attention lets do a bit of lateral thinking and move the subject sideways. Starting in December 2010 Clear Dope caught up with the 21st century by using the web/email as the primary method of distribution with considerable cost savings. However, not wishing to deprive those members without such faculties, a hard copy is still available. Other groups are not so fortunate.
Most of my flying in recent years has been with SAM 1066, (hence ‘Old Dog’) and back in 2008, for reasons, which need not concern us hear, became entirely internet based. This provoked quite a backlash of discontent at the time, but events have proved this to have been the only way the organisation could survive. Having no good need for a computer (or associated skills) at Work, Rest or Play, I for one was left with no means of checking for events or cancelations, and no access to the magazine.
Having putt off the evil moment, (akin to taking out a mortgage) not withstanding the ‘blackmail’ element of the situation, I decided to bite the preverbal bullet and acquired something called a laptop, (though I have never used it on my lap) in one of those complete packages available at the time; Computer, Router, Broadband, Security Suite and an E-mail address all set up ready to GO!...GO!......Go!.........(sorry Murray).
Has there ever been such a complicated device sold to the general public without instructions of how to use it. You buy a lawnmower, motor car or a model aircraft engine, you get a the very least some basic instructions or handbook to get the best from your new toy. BUY a computer; you get nothing. Yes, I know nearly every page has a ‘help’ button, but it’s just not cricket.
Having climbed off my soap box, fast forward to the present and I still find myself staring at the screen in frustration; how do I do that?, why didn’t that work? To make things worse the usual answer is……..easy, ‘Just Like That’. I don’t feel like signing on for a full course at the college (might prove the title of this article is short of a few extra words), but an item on the Fishbourne Club notice caught my eye.
Computer Help Club, Thursday mornings 10.00 to 1200 no booking required. Starts 25th October. They meet in a room adjacent to the main lounge, door on the North side of the building. Bring a laptop if you have one, but not essential. Thought I would go along and see what is on offer. Anyone else interested, or was it only me that was left behind in the last millennium. Don’t say you didn’t know
Name of the Old Dog? …………… Dave Etherton

Electronic newsletter of the Chichester and District Model Aero Club
E V E N T S C A L E N D A R 2 0 1 2
Date Club Night/Event Whatʼs On
2nd October Committee meeting
11th October Club Night Talk on Unmanned Aerial Surveillance
6th November Committee meeting
8th November Club Night AGM
4th December Committee meeting
13th December Club Night Subscription Collection
If you are interested in obtaining an ‘A’ or ‘B’ Certificate please contact Tony Chant, contact details above. Also please remember that you should not fly without supervision until you have attained an ‘A‘ cert.
When Driving
Around Thorney be aware of young children on bikes
Please Try to leave Porthole as tidy as
possible making sure no fuel is left
on site
Urgent Note to all Users ofPorthole Farm
It is imperative that the last person leaving the field CLOSE and LOCK the gate irrespective of other people/vehicles still being there (i.e. Dog trainers) as the land owner has INSISTED that this be carried and is a
fundamental clause in the use of the field.The chain must go through the second bar and the numbers on the lock must be scrambled. There should
be no exceptions to this mandatory action. KK
NO-GO GO
Electronic newsletter of the Chichester and District Model Aero Club
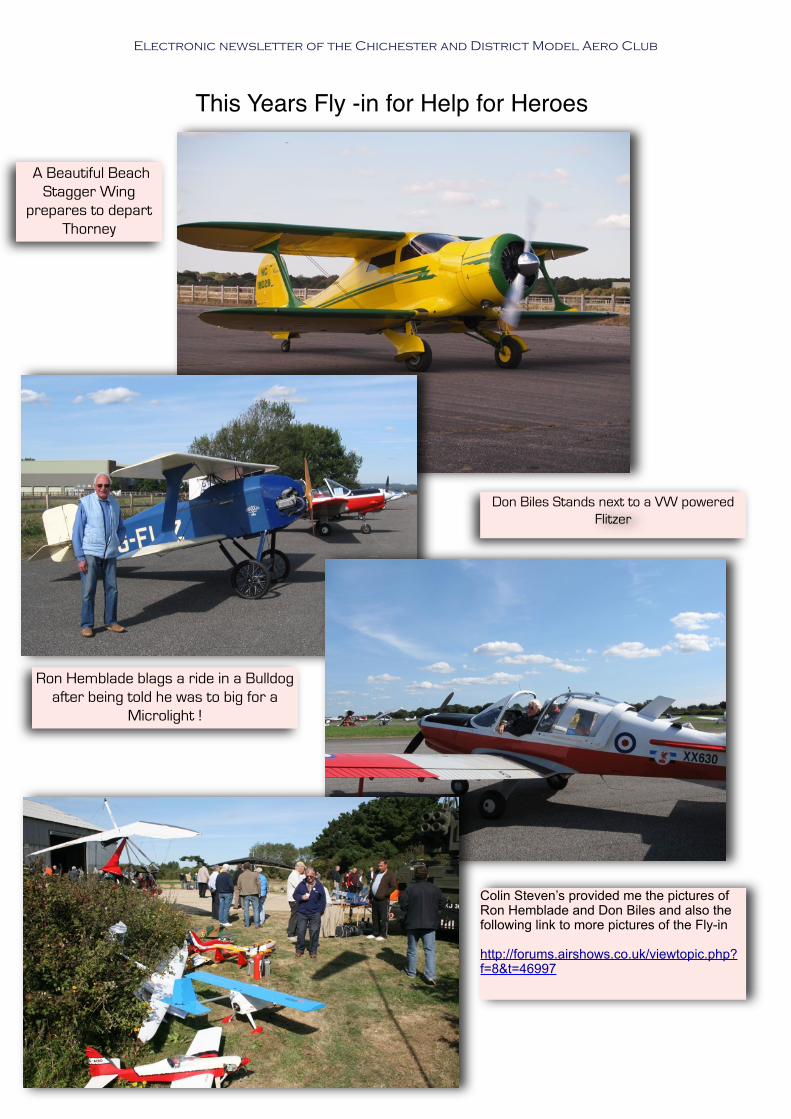
This Years Fly -in for Help for Heroes
A Beautiful Beach Stagger Wing
prepares to depart Thorney
Colin Steven’s provided me the pictures of Ron Hemblade and Don Biles and also the following link to more pictures of the Fly-in
http://forums.airshows.co.uk/viewtopic.php?f=8&t=46997
Don Biles Stands next to a VW powered Flitzer
Ron Hemblade blags a ride in a Bulldog after being told he was to big for a
Microlight !

Electronic newsletter of the Chichester and District Model Aero Club
Competition Calendar & Other Events 2012
Date and Day Time Event Venue
Saturday 29th September 12.00 Loops, Rolls and Spins Thorney Island
Saturday 13th October 12.00 Scale Thorney Island
Saturday 29th October 10.00 Fleet Air Museum RNAS Yeovilton BA22 8HT
Sunday 11th November 12.00 Open Glider fun day Thorney Island

Electronic newsletter of the Chichester and District Model Aero Club
Thorney island access – the following has been received from Defence Estates and should be noted and please do ring before hand to book an appointment
Dear Tony The Chain of Command has decided that, in future, all personnel, civilian or military, will have an annual expiry date on their vehicle pass that coincides with the expiry of their vehicle road tax. I would appreciate it if you could circulate this direction to all of your club members and arrange for them to contact me in the New Year to arrange an appointment for a new pass to be issued. In this connection, and, subject to other commitments, I will be available for pass renewal during the hours 0915-1215 & 1400-1600, Monday to Thursday. Providing the applicant has already undergone the initial Basic Check procedure, I will require one form of photo ID, CADMAC membership card and the tax disc to complete my documentation.
Kind regards
Stephanie
Stephanie Evans | Assistant Station Staff Officer | Building 134 | Baker Bks | Thorney Island | Emsworth | Hants | PO10 8DH Mil: 94295 8547 | Civ: 01243 38 8547 | DII (F): 47RA-Station Staff-SSO
A REMINDER OF FLYING TIMES AT THORNEYSaturdays and Sundays Only
10.30 Electric only (No Ducted Fans), 11.30 for Electric and IC. No flying after 18:00 hours
Thorney may be closed for access and flying from time to time as per notices posted Clear Dope and on the web site www.cadmac.co.uk
Please also note that members can bring guests to Thorney and Porthole however if
they fly they must fill in a guest flying form and they can only fly on three occasions in a year if they are not BMFA members . This is a condition of the BMFA insurance