Embed Size (px)
Citation preview
THE DIGITAL NEGATIVE
JEFF SCHEWE
Raw Image Processing in Lightroom, Camera Raw, and PhotoshopS E CO N D E D I T I O N
Peachpit Press
the Digital Negative
Jeff Schewe
Raw Image Processing in Lightroom, Camera Raw, and PhotoshopS e co N D e D i t i o N
the Digital Negative: Raw image PRoceSSiNg iN lightRoom, cameRa Raw, aND PhotoShoPSecond Edition
Jeff Schewe
Peachpit Presswww.peachpit.com
To report errors, please send a note to [email protected] Press is a division of Pearson Education.
Copyright © 2016 by Jeff ScheweAll images copyright © 2016 by Jeff Schewe
Project Editor: Valerie WitteSenior Production Editor: Lisa BraziealCopy Editor: Anne Marie WalkerProofreader: Patricia PaneComposition: Kim Scott, Bumpy DesignIndexer: Karin ArrigoniCover and Interior Designer: Mimi Heft
Notice of RightSAll rights reserved. No part of this book may be reproduced or transmitted in any form by any means, electronic, mechanical, photocopying, recording, or otherwise, without the prior written permission of the publisher. For information on getting permission for reprints and excerpts, contact [email protected].
Notice of liabilityThe information in this book is distributed on an “As Is” basis, without warranty. While every precau-tion has been taken in the preparation of the book, neither the author nor Peachpit shall have any liability to any person or entity with respect to any loss, damage, or injury caused or alleged to be caused directly or indirectly by the instructions contained in this book or by the computer software and hardware products described in it.
tRaDemaRkSAdobe, Adobe Bridge, Adobe Camera Raw, Lightroom, and Photoshop are registered trademarks of Adobe Systems Incorporated in the United States and/or other countries. All other trademarks are the property of their respective owners.
Many of the designations used by manufacturers and sellers to distinguish their products are claimed as trademarks. Where those designations appear in this book, and Peachpit was aware of a trademark claim, the designations appear as requested by the owner of the trademark. All other product names and services identified throughout this book are used in editorial fashion only and for the benefit of such companies with no intention of infringement of the trademark. No such use, or the use of any trade name, is intended to convey endorsement or other affiliation with this book.
ISBN-13: 9780134033174ISBN-10: 0134033175
9 8 7 6 5 4 3 2 1Printed and bound in the United States of America

Dedicated to the lasting memory and substantial contributions of Bruce Fraser. Thanks, Bruce, from all of us.
table of coNteNtS
Introduction xi
JJ ChaPteR 1 What Is a DIgItal NegatIve? 3Dissecting a Digital Negative 4Camera Sensor Types 5Attributes of a Digital Negative 7
Linear capture 7Digital exposure 11ETTR 14Sensor noise and ISO speed 17Colorimetric interpretation 21Metadata 24Bit depth 25
Raw Versus JPEG 27Photographic Aspects
of a Digital Negative 29Shutter speed 30Lens aperture 31Lens aberrations 32Sensor resolution 35
JJ ChaPteR 2 aDobe RaW Image PRocessINg: aN oveRvIeW 39The Genesis of Camera Raw 40The Genesis of Lightroom 41The Bridge, Camera Raw,
and Photoshop System 45Bridge 45Camera Raw 46Photoshop 48
The Lightroom Way 50
The Relationship of Camera Raw and Lightroom Versions 54
Color Management Between Lightroom, Camera Raw, and Photoshop 55
DNG File Format and DNG Converter 58To DNG or not to DNG? 58Adobe DNG Converter 59
JJ ChaPteR 3 FuNDameNtals oF lIghtRoom aND cameRa RaW 65Lightroom and
Camera Raw Defaults 66Lightroom and Camera Raw
Functionality 69The Histogram 70Lightroom and Camera Raw
Adjustment Panels 71Basic panel 72Tone Curve panel 80HSL/Color/B&W panel 83Split Toning panel 86Detail panel 87Lens Corrections panel 95Effects panel 105Camera Calibration panel 112
Lightroom and Camera Raw Tools 115Lightroom and Camera Raw Crop tools 117Lightroom and Camera Raw Spot
Removal tools 120Local adjustments in Lightroom and
Camera Raw 126Merge to High Dynamic Range (HDR)
and Merge to Panorama in Lightroom and Camera Raw 142
vi · the Digital Negative
JJ ChaPteR 4 aDvaNceD RaW PRocessINg usINg lIghtRoom oR cameRa RaW 153Tone Mapping 154
Flat lighting 154High-contrast lighting 156Blown skies 160Inclement weather 163Underexposure 166Backlit subjects 170
Color Correction 174White balance (global) 174White balance (local) 177Color curves 179Color split toning 181Color gradients 184HSL color correction 187Lens colorcast correction 188
Color to Black-and-White Conversion 192Adjusting the panchromatic response 193Warm toning 196Split toning 198Cold toning and spot of color 201Optimized black-and-white tone mapping 202Color toning using color curves 204
Maximizing Image Detail 207High-frequency edge sharpening 207Low-frequency edge sharpening 213Mixed-frequency edge sharpening 217
table of coNteNtS · vii
JJ ChaPteR 5 DePloyINg PhotoshoP to PeRFect youR DIgItal NegatIves 223Getting Images Into Photoshop 224A Typical Edit in Photoshop 226
Color Range selection tool 227Creative progressive sharpening 228Midtone contrast 230Sculpting 233Saturation and Color layer modifications 234Blue edge fix 238
Retouching 240Healing Brush and Clone Stamp tools 242Copy-and-paste patching 244Retouching using painting 245Using paths to make selections 247
Compositing Multiple Images 250Creating the composite mask 251Compositing the sky 252Luminance-based masks 253
Color to Black and White in Photoshop 255Camera Raw as a Photoshop Filter 260Removing People Via Image Stacking 262Focus Stacking 266
JJ ChaPteR 6 cReatINg aN eFFIcIeNt WoRkFloW 271Workflow Principles 272
Do things once 272Do things automatically 272Be methodical 273
The Five Workflow Stages 273Stage 1: Image ingestion 273Stage 2: Image verification 275Stage 3: Preproduction 277Stage 4: Production 281Stage 5: Postproduction 282
My Personal Workflows 284Field workflow 284Studio workflow 293
How I Organize My Images 297My Digital Imaging Area 298Performance Tuning Your System 299
Photoshop performance 299Lightroom performance 302
Index 304

This page intentionally left blank
iNtRoDuctioNThe Digital Negative, 2nd Edition is about raw image processing of digital camera captures. It details what makes for a really good digital negative and how to harness the massive power of Lightroom and Camera Raw to extract the best-possible raw rendering of that digital negative. It’s also about when and how to deploy Photoshop to take your rendered digital negatives further using the power of Photoshop to perfect the images that need and deserve the attention.
I drill down on the Lightroom Develop module and the Camera Raw plug-in extensively—that’s the meat of this book. While parametric image editing (editing the parameters instead of the image pixels in Lightroom and Camera Raw) has advanced considerably since Camera Raw was first introduced, there is still a use for that venerable old lady, Photoshop.
I wrote this book because there didn’t seem to be an optimal source of information that suitably covered the main topic without being relegated to covering everything about a single application. The world doesn’t need yet another Lightroom or Photo-shop book. What I thought was needed, though, was a book about the essence of raw image processing, regardless of the imaging application. I set out to write a book about cross-application integration that addressed the needs of photographers who want to optimize their images for the best-possible image quality.
I called the book The Digital Negative for a reason. In my formative years as a young photographer, I read a series of books by Ansel Adams that formed the genesis of my infatuation with and addiction to photography. Ansel’s books—The Camera, The Negative, and The Print—had a huge impact and greatly helped advance my knowledge of photography. Time will tell if I can have even a minute fraction of the impact on others that his books had on me.
Who am I and why should I write this book? Well, I’m a graduate of Rochester Institute of Technology (RIT), with two degrees in photography. I was a commercial
xi
advertising photographer in Chicago for over 30 years (yeah, I won a few awards). I was an early adopter of digital imaging—my first photo assignment that was manipulated on a computer was in 1984 (the year the first Macintosh computer shipped). No, I didn’t do the digital imaging—a pioneering company called Digital Transparencies, Inc., in Houston, Texas, did.
In 1992, I started doing my own Photoshop digital imaging using Photoshop 2.0. I was one of the first off-site Photoshop alpha testers (alpha meaning way before any sort of final coding is done and before it’s really usable). I got to know and work with many of the Photoshop engineers because of this testing. When I mention names like Thomas Knoll (the co-author of Photoshop) or Mark Hamburg (the No. 2 Photoshop engineer and founding engineer of Lightroom), it is not to drop names, but because these guys are friends of mine. I’ve worked with them a lot over the years. I want people to know their names and give them the respect they deserve.
I was significantly involved in the early development of both Camera Raw and Lightroom—not because Adobe was paying me tons of money (alpha testers work for free), but for the selfish motive of advancing and improving the tools I personally wanted to use.
I’ve also had the good fortune to meet a lot of the leading experts in the field: I want to express my sincere appreciation of one dearly departed friend, Bruce Fraser, noted author and educator, for taking me under his wing. I had the singular honor of joining Bruce and some other friends in forming a company named Pixel Genius, which developed Photoshop plug-ins. I also fulfilled Bruce’s wish that I take over and act as co-author of two of the books he authored, Real World Camera Raw with Adobe Photoshop and Real World Image Sharpening with Adobe Photoshop, Camera Raw, and Lightroom. I’ve also co-authored a book with another good friend and colleague, Martin Evening, titled Adobe Photoshop for Photographers: The Ultimate Workshop. So, now, with this book, I’m a full-fledged solo author!
By way of disclosure, let me just say that I am not and never have been an employee of Adobe (even though, over the years, I’ve worked with Adobe on software develop-ment). I don’t have any contracts or testimonials with any camera companies. In the book, I frequently mention specific cameras and lenses I used for image captures. I do so to provide a provenance of how and with what gear an image was captured, not to promote any specific camera. I used those cameras because, well, those are the cameras I bought and paid for (although I’ve been known to get some really good deals). My opinions are my own, and anybody who knows me knows that no company could influence me. So, when I write something, you can be assured my motives are pure (even if my tone can be a bit, uh, verbally aggressive).
I owe a large debt of gratitude to many people, and since it’s my book, I’ll take the time to mention them. First, we all owe a huge debt of gratitude to two guys, John
xii · the Digital Negative
Knoll, and his brother, Thomas, who really started this whole digital image revolu-tion by co-authoring Photoshop. I also send sincere thanks to Mark Hamburg for his willingness to put up with my quirky ways and sometimes actually listen to me when I told him what he should do. There are a ton of people at Adobe to thank: Russell Preston Brown for being a co-conspirator, Chris Cox for a lot of sneaky things he put into Photoshop, Russell Williams for striving for Photoshop excellence, and John Nack (and most recently Bryan Hughes) for being Photoshop product managers who really care about the end user. On the Camera Raw team, special thanks go to Eric Chan, who will always listen and do the right thing (even if it’s a pain), and the gone but not forgotten Zalman Stern (he didn’t die—he just went to work for Facebook).
I also thank my good friends and partners at Pixel Genius—Martin Evening, Mac Holbert, Mike Keppel, Seth Resnick, and Andrew Rodney—and our gone but not forgotten members, Mike Skurski and Bruce Fraser. We all miss them and so does the industry. I’ll also give a shout-out to the Pixel Mafia—you know who you are….
Thanks to the Peachpit “Dream Team” (that’s what Bruce used to call them, and I wholeheartedly agree): Valerie Witte, who was the newly annointed acquisitions and project editor (which means she had to put up with my foolishness and tardy submissions); my production editor, Lisa Brazieal, who conspired with me to allow me to do what I thought was best; and my development and copy editor, Anne Marie Walker, who had the unenviable job of reading and rereading all my terrible writing and correcting me to make me sound like I have half a clue. Thanks also to the book compositor, Kim Scott of Bumpy Design, who did an excellent job of laying out the book and making my figures work. Thanks to my proofreader, Patricia Pane, for catch-ing all the small stuff, and indexer, Emily Glossbrenner, for making stuff easy to find. Big thanks also go to Mimi Heft, for the cover and interior design excellence (and for putting up with my histrionics)—seriously, I never would’ve picked that image for the cover, but it really works! And a special debt of gratitude to Rebecca Gulick who was my first acquisitions and project editor who helped me get my two titles to print.
I also owe a huge debt of gratitude and massive appreciation to my long-suffering wife, Rebecca (Becky), who is always the first person to read the drivel I write (and tell me how to make it sound intelligible, which always makes me look good to my copy editor). She stoically puts up with all my inattention and bad habits when I’m writing and seems to genuinely love me in spite of myself. Thanks also to my loving daughter, Erica, who suffers the loss of her dad while I’m under deadline. She gets back at me by being one my harshest critics, which, I think, makes us even.
My thanks also go to you, the reader, for taking the time to at least get this far. I hope you’ll find this book beneficial in advancing your image-processing excel-lence. You can find additional information on the book’s companion website at www.thedigitalnegativebook.com.
—Jeff Schewe, July 2015
iNtRoDuctioN · xiii
the cReative clouD SagaWhen adobe announced the cessation of the Creative Suite and the release of the Creative Cloud, some users were less than completely satisfied (read they were pretty upset). I understand their dissatisfaction even if I don’t agree.
Back when adobe released Creative Suite 5.5 (mean-ing Photoshop 5.5), the company started down the path of offering subscription licenses to its software as well as perpetual licenses (perpetual meaning for the perpetuity of the software or until hardware and operating system ceased to support the software).
With the launch of Creative Cloud (such as Photoshop CC and all the other apps), adobe changed the game plan. It stopped producing the Creative Suite–which killed perpetual licenses and forced users into a subscription-only license. This was done for sound technical reasons, even though a lot of people claimed it was for purely business reasons: this is incorrect.
The main reason is that there are a lot of applications included in the Creative Suite/Creative Cloud—by last count over 25 applications. to provide both a per-petual license and a subscription license was virtually impossible. Running dual code bases for 25 apps was technically unfeasible. adobe made the difficult (and unpopular) decision to kill off perpetual licenses.
There was a good reason for this even if many users failed to grasp it. The way adobe accounts for its development costs of applications precludes it from adding new features to applications with perpetual licenses after the end of the quarter that applica-tion was shipped. adobe is limited to bug fixes and maintenance releases only. This is not a problem for subscription licenses. an application licensed under a subscription license can be updated at any time a new feature is ready.
So, this is where the disconnect becomes evi-dent. adobe can update and add new features to subscription-based licenses but cannot do so for perpetual licensed products.
for all of the Creative Cloud applications, once you subscribe, you get free updated versions with new features for as long as you keep the subscription active–and this is where users get a bit cranky. Users need to keep paying for continual access to their applications.
Personally, I don’t have a problem with this. I use a lot of adobe’s applications: Photoshop, InDesign, Illustra-tor, and Lightroom (I don’t use any video apps). So paying for a subscription to Creative Cloud is a no-brainer. for me, it’s a deal.
as a direct result of the negative reaction, adobe came out with a special Photographer’s Package that bundled both Photoshop and Lightroom as a package for $9.99/month (USD–price may vary by region). I know exactly who helped push this package: he had a little bit to do with starting this whole digital image processing industry.
Do I love the Creative Cloud? Not really, but although it’s a bit of a pain, I’ve come to appreciate it. I like get-ting more frequent feature updates. Do I understand why adobe did it? Yes, and I tend to agree–in general. Do I hate the Creative Cloud application? absolutely. When I recently had an issue with the Photoshop CC 2015.1 update, I couldn’t run Batch processing. My only recourse was to uninstall Photoshop CC 2015 and re-install Photoshop CC 2015.1. It sucked. Of course, with my new faster Internet it sucked less.
When Lightroom CC 2015.1 was released, a lot of the perpetual Lightroom 6.1 users were upset because Dehaze wasn’t included with Lightroom 6.1. It should not have surprised users since Dehaze didn’t make the cut for the end-Of-Quarter cutoff. But, to be hon-est, regular users shouldn’t be expected to know this stuff and adobe didn’t really explain the issue well.
Camera Raw 9.1 will continue to work in Photoshop CS6 for now (which is still available as a perpetual license), but with no new features added to the CC versions. however, there are no certainties how
xiv · the Digital Negative
long that will be true with future versions of Camera Raw. If future versions of Camera Raw will not work, users will need to either use the free DNG Converter or upgrade to Photoshop CC for new camera sup-port. Lightroom 6 will be available for the foreseeable future. adobe has gone on record stating it has no plans to kill the perpetual license, but Lightroom 6 will not get new features, only new camera support and bug fixes. how long adobe will continue to release new perpetual versions of Lightroom is unknown.
adobe is still selling Photoshop CS6, although all it will receive are bug fixes and maintenance releases; no new features will be added. Camera Raw 9.1 will work in Photoshop CS6, but you won’t have access to the new features. Ironically, Camera Raw 9.1, when hosted inside of Photoshop CS6, will actually process the image adjustments that may have been made using Camera Raw 9.x in Lightroom CC or Camera Raw when hosted by Photoshop CC. So, if somebody sends you a file from Photoshop CC or Lightroom CC, you can still process the image in Photoshop CS6.
adobe has changed one aspect of Lightroom CC (and subscription users of Lightroom 5.x) that addresses users’ access to their images and adjustments. Light-room CC (and 5.5 or later) will continue to launch even after the subscription expires. You won’t have access to the Develop or the Maps modules, and Lightroom Mobile will cease to work. The desktop application will continue to launch and provide access to the photo-graphs managed within Lightroom Library as well as the Slideshow, Web, Book, or Print modules, and you can use the export function as well.
for Photoshop CC, when your subscription ends, the application will no longer launch.
I’ve mentioned Lightroom Mobile, and you might won-der if I’ve included a section about it in this book. Nope. from my point of view, Lightroom Mobile doesn’t really address my raw processing workflow. at this
point, Lightroom Mobile needs to grow a lot before I incorporate it into my workflow.
I do encourage continued development of Lightroom Mobile. Some of the things I would like to see are further features for selection editing and key word-ing. I would also like to be able to sync the desktop and mobile device using a local area network and not have to rely on the cloud syncing. I go to some pretty remote places where getting a cell signal or Internet access is impossible, which renders mobile syncing useless.
all in all, the last couple of years have seen a lot of changes to the way people work and how software developers are adapting their business models. Many people like the subscription model with the ability to get new features more quickly. another advantage is that the subscription model allows cross-platform application use. I know many people have a Windows desktop and an apple MacBook Pro for the field. Will adobe lose some users because of subscription? Sure, I suspect adobe knows that. Will this give some other enterprising developer incentive to develop new applications? Yep, it already has. Competition breeds excellence, and it’s good for the industry–I like that!
Rather than deal with this issue in the chapters, I chose to write about it in the Introduction of the book and not clutter the working chapters. So now, on to the book!
iNtRoDuctioN · xv
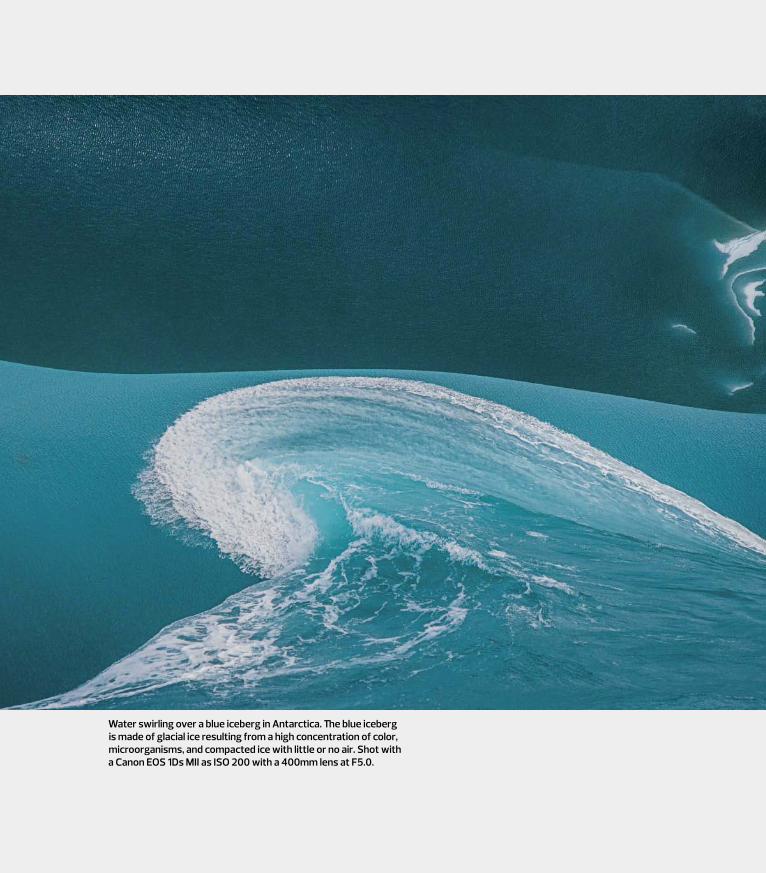
Water swirling over a blue iceberg in Antarctica. The blue iceberg is made of glacial ice resulting from a high concentration of color, microorganisms, and compacted ice with little or no air. Shot with a Canon EOS 1Ds MII as ISO 200 with a 400mm lens at F5.0.
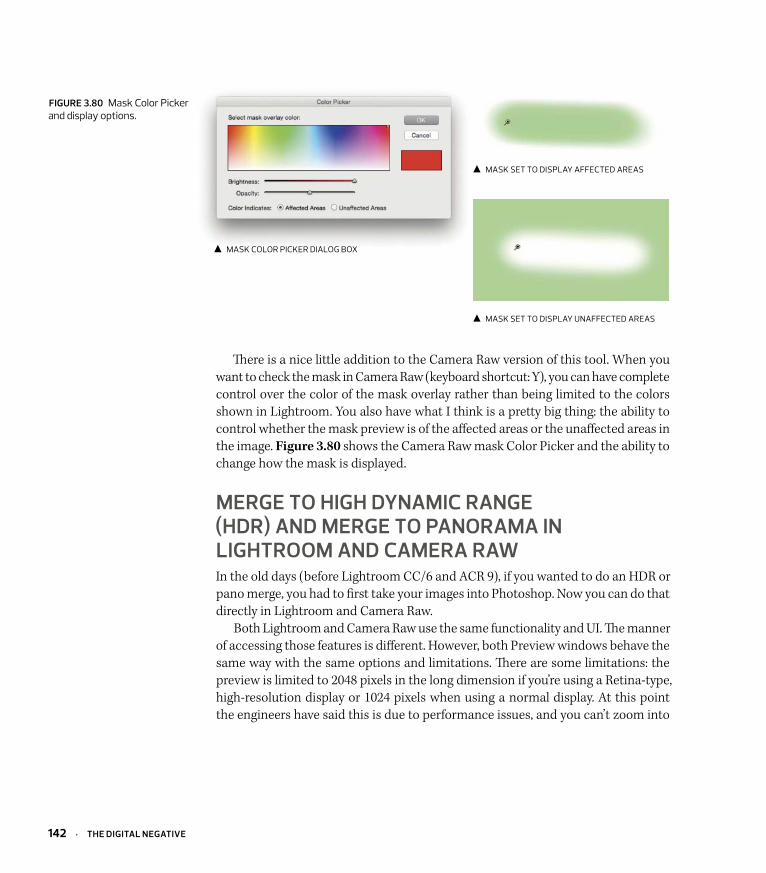
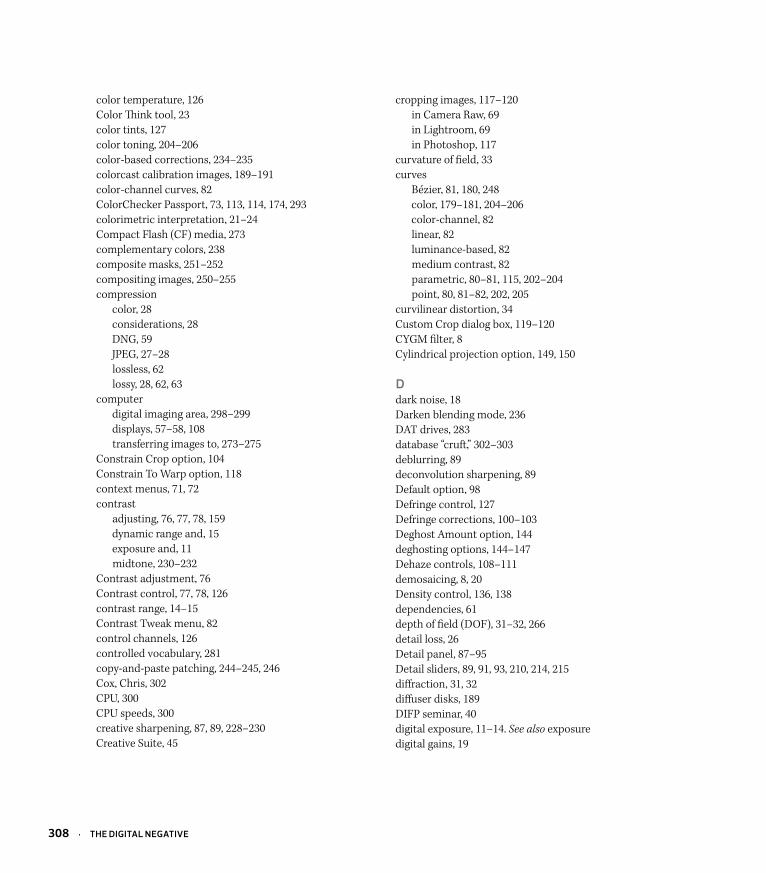
There is a nice little addition to the Camera Raw version of this tool. When you want to check the mask in Camera Raw (keyboard shortcut: Y), you can have complete control over the color of the mask overlay rather than being limited to the colors shown in Lightroom. You also have what I think is a pretty big thing: the ability to control whether the mask preview is of the affected areas or the unaffected areas in the image. Figure 3.80 shows the Camera Raw mask Color Picker and the ability to change how the mask is displayed.
MERgE tO hIgh DYNaMIC RaNgE (hDR) aND MERgE tO paNORaMa IN lIghtROOM aND CaMERa RaWIn the old days (before Lightroom CC/6 and ACR 9), if you wanted to do an HDR or pano merge, you had to first take your images into Photoshop. Now you can do that directly in Lightroom and Camera Raw.
Both Lightroom and Camera Raw use the same functionality and UI. The manner of accessing those features is different. However, both Preview windows behave the same way with the same options and limitations. There are some limitations: the preview is limited to 2048 pixels in the long dimension if you’re using a Retina-type, high-resolution display or 1024 pixels when using a normal display. At this point the engineers have said this is due to performance issues, and you can’t zoom into
FIguRE 3.80 mask color picker and display options.
maSk Set tO DISpLay affecteD areaS
maSk Set tO DISpLay UnaffecteD areaS
maSk cOLOr pIcker DIaLOg BOx
142 · thE DIgItal NEgatIvE
the preview. Hopefully, that will change in the future. It should also be noted that the UI functionality offers very little control compared to third-party applications dedicated to HDR and pano merging. However, the results are actually very good.
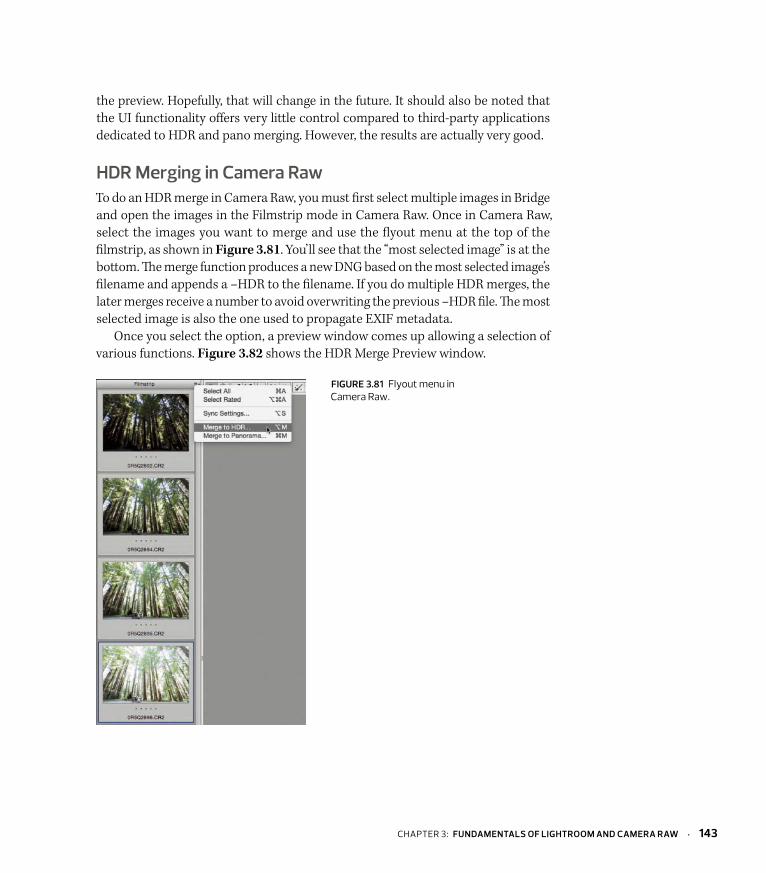
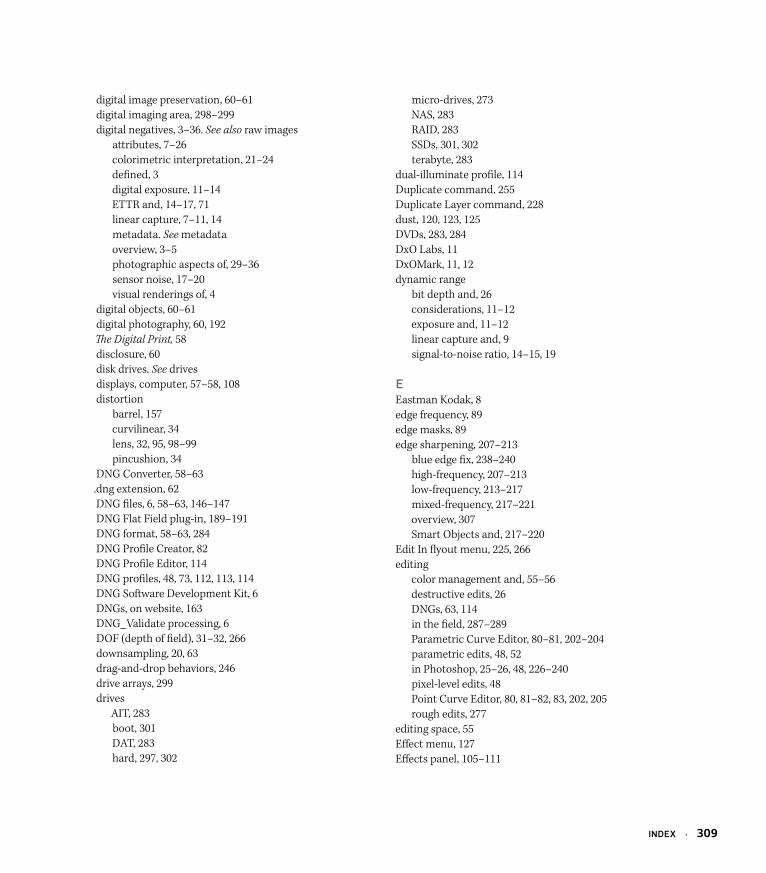
hDR Merging in Camera RawTo do an HDR merge in Camera Raw, you must first select multiple images in Bridge and open the images in the Filmstrip mode in Camera Raw. Once in Camera Raw, select the images you want to merge and use the flyout menu at the top of the filmstrip, as shown in Figure 3.81. You’ll see that the “most selected image” is at the bottom. The merge function produces a new DNG based on the most selected image’s filename and appends a –HDR to the filename. If you do multiple HDR merges, the later merges receive a number to avoid overwriting the previous –HDR file. The most selected image is also the one used to propagate EXIF metadata.
Once you select the option, a preview window comes up allowing a selection of various functions. Figure 3.82 shows the HDR Merge Preview window.
FIguRE 3.81 flyout menu in camera raw.
chapter 3: FuNDaMENtalS OF lIghtROOM aND CaMERa RaW · 143
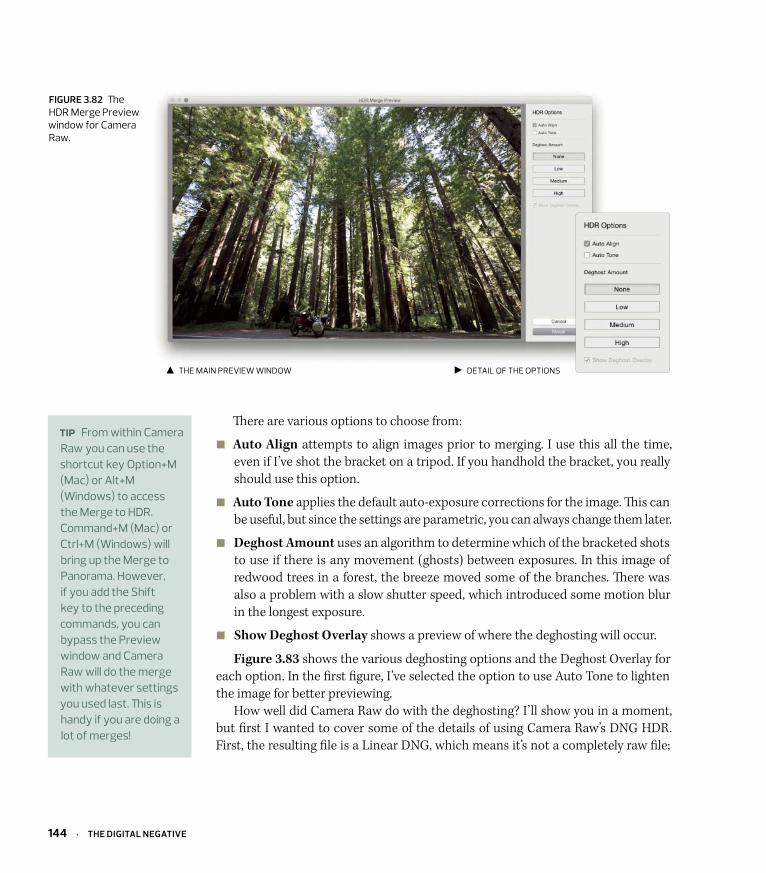
There are various options to choose from:
JJ Auto Align attempts to align images prior to merging. I use this all the time, even if I’ve shot the bracket on a tripod. If you handhold the bracket, you really should use this option.
JJ Auto Tone applies the default auto-exposure corrections for the image. This can be useful, but since the settings are parametric, you can always change them later.
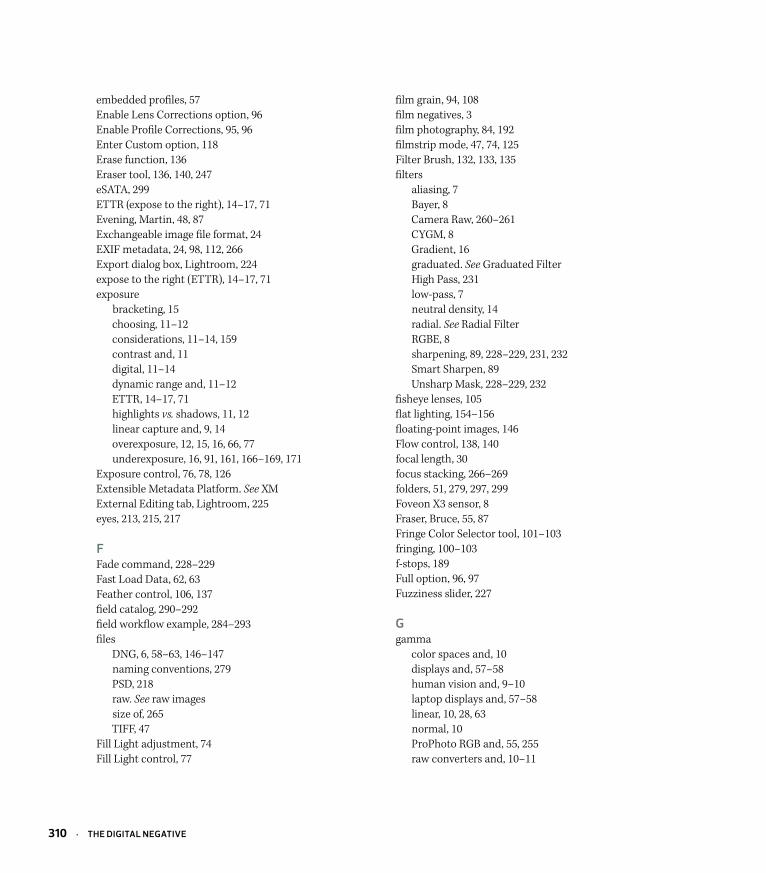
JJ Deghost Amount uses an algorithm to determine which of the bracketed shots to use if there is any movement (ghosts) between exposures. In this image of redwood trees in a forest, the breeze moved some of the branches. There was also a problem with a slow shutter speed, which introduced some motion blur in the longest exposure.
JJ Show Deghost Overlay shows a preview of where the deghosting will occur.
Figure 3.83 shows the various deghosting options and the Deghost Overlay for each option. In the first figure, I’ve selected the option to use Auto Tone to lighten the image for better previewing.
How well did Camera Raw do with the deghosting? I’ll show you in a moment, but first I wanted to cover some of the details of using Camera Raw’s DNG HDR. First, the resulting file is a Linear DNG, which means it’s not a completely raw file;
FIguRE 3.82 The hDr merge preview window for camera raw.
the maIn prevIew wInDOw DetaIL Of the OptIOnS
TIP from within camera raw you can use the shortcut key Option+m (mac) or alt+m (windows) to access the merge to hDr. command+m (mac) or ctrl+m (windows) will bring up the merge to panorama. however, if you add the Shift key to the preceding commands, you can bypass the preview window and camera raw will do the merge with whatever settings you used last. This is handy if you are doing a lot of merges!
144 · thE DIgItal NEgatIvE
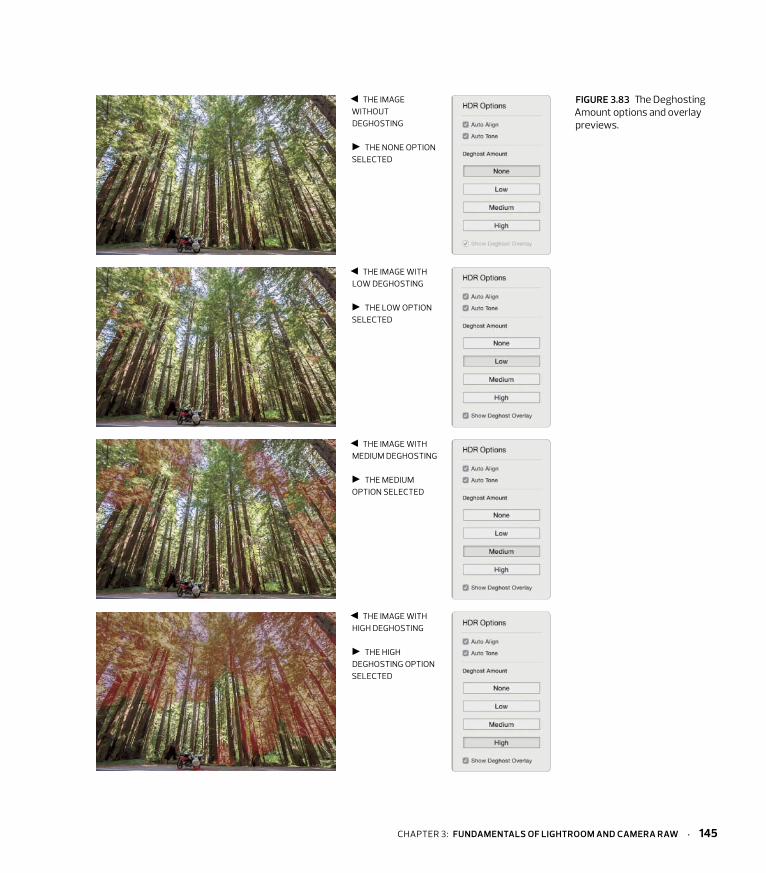
FIguRE 3.83 The Deghosting amount options and overlay previews.
the Image wIthOUt DeghOStIng
the nOne OptIOn SeLecteD
the Image wIth LOw DeghOStIng
the LOw OptIOn SeLecteD
the Image wIth meDIUm DeghOStIng
the meDIUm OptIOn SeLecteD
the Image wIth hIgh DeghOStIng
the hIgh DeghOStIng OptIOn SeLecteD
chapter 3: FuNDaMENtalS OF lIghtROOM aND CaMERa RaW · 145
it’s what I call a half-baked raw file. The image has been demosaiced, but it’s still a linear gamma (1.0). Next, the resulting DNG file is stored as a 16-bit floating-point image, but the processing applied is done in 32-bit floating-point. Don’t confuse 16-bit floating-point to 16-bit integer images; it’s still a floating-point image. You can use all the processing tools in Camera Raw to adjust the image. However, one thing to note is instead of the normal Exposure range of +– 4 stops, the HDR range is expanded to +– 10 stops. The other adjustments remain the same.
Also, when doing an HDR merge, Camera Raw ignores all the tone adjustments you may have already made, as well as any local adjustments, including spot healing. So, you may as well save your time by working on the HDR image after merging and not bother working on your original raw files. The adjustments you can (and should) make are lens corrections, image sharpening, and noise reduction. Applying these before the merge will aid in the production of an optimal merge result.
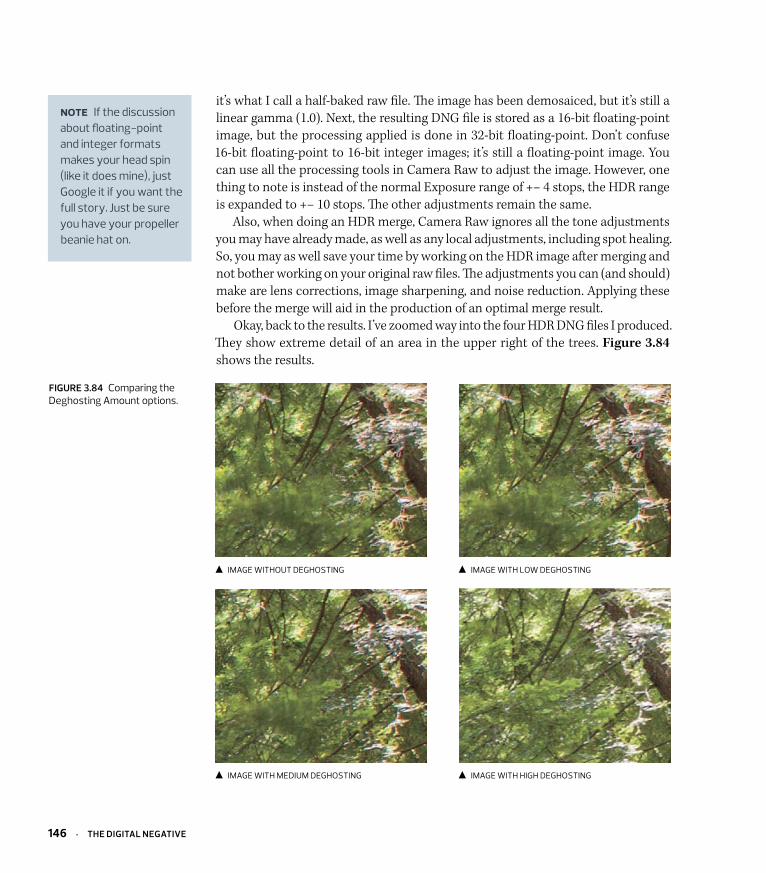
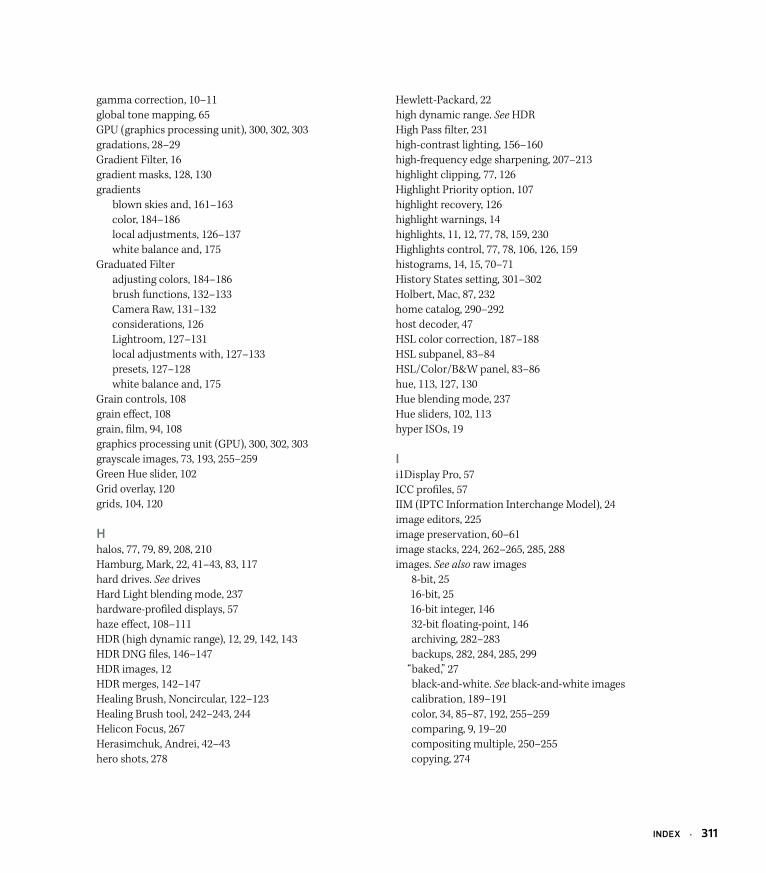
Okay, back to the results. I’ve zoomed way into the four HDR DNG files I produced. They show extreme detail of an area in the upper right of the trees. Figure 3.84 shows the results.
NOTE If the discussion about floating-point and integer formats makes your head spin (like it does mine), just google it if you want the full story. just be sure you have your propeller beanie hat on.
FIguRE 3.84 comparing the Deghosting amount options.
Image wIthOUt DeghOStIng Image wIth LOw DeghOStIng
Image wIth meDIUm DeghOStIng Image wIth hIgh DeghOStIng
146 · thE DIgItal NEgatIvE
As you can see, merging images that contain movement can lead to anomalies in the merged result. In this case, the only option that did a decent, but not 100 percent perfect job, was the High option. There is still a tiny hint of the anomalies, but depending on the size you need to use the image, they would likely be invisible. Remember, we’re pixel-peeping here. If Camera Raw’s deghosting isn’t up to your standards, you’ll need to resort to a special purpose application, such as Photomatix Pro (www.hdrsoft.com), which includes a Lightroom plug-in for improved workflow. You still need to render and export the images in the plug-in and return them to Lightroom as 32-bit TIFF files, but working on them in Lightroom works well.
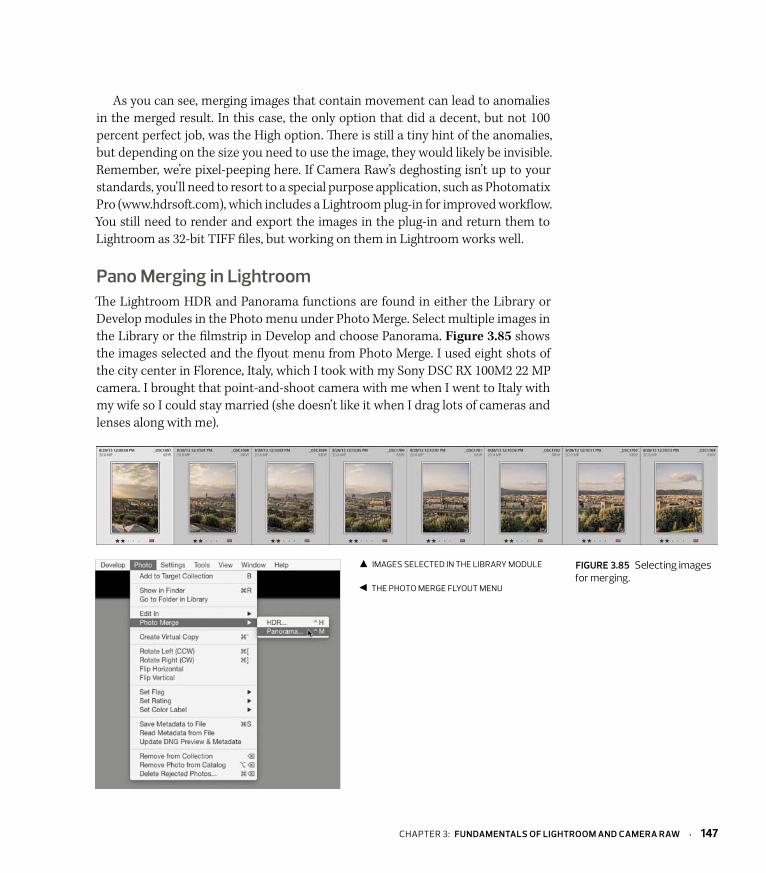
pano Merging in lightroomThe Lightroom HDR and Panorama functions are found in either the Library or Develop modules in the Photo menu under Photo Merge. Select multiple images in the Library or the filmstrip in Develop and choose Panorama. Figure 3.85 shows the images selected and the flyout menu from Photo Merge. I used eight shots of the city center in Florence, Italy, which I took with my Sony DSC RX 100M2 22 MP camera. I brought that point-and-shoot camera with me when I went to Italy with my wife so I could stay married (she doesn’t like it when I drag lots of cameras and lenses along with me).
FIguRE 3.85 Selecting images for merging.
ImageS SeLecteD In the LIBrary mODULe
the phOtO merge fLyOUt menU
chapter 3: FuNDaMENtalS OF lIghtROOM aND CaMERa RaW · 147
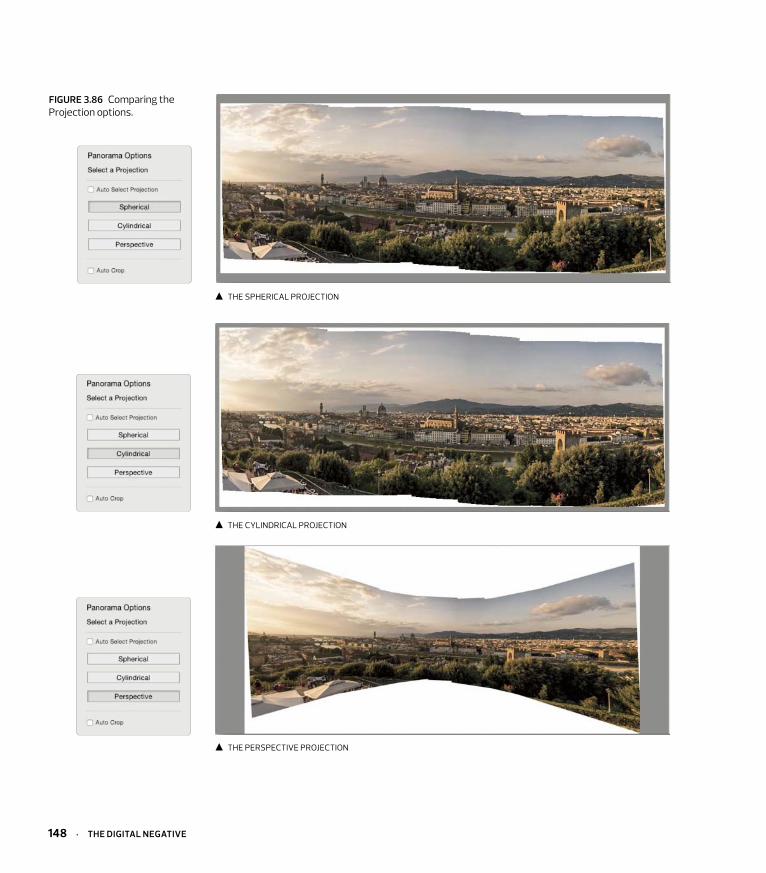
FIguRE 3.86 comparing the projection options.
the SpherIcaL prOjectIOn
the cyLInDrIcaL prOjectIOn
the perSpectIve prOjectIOn
148 · thE DIgItal NEgatIvE
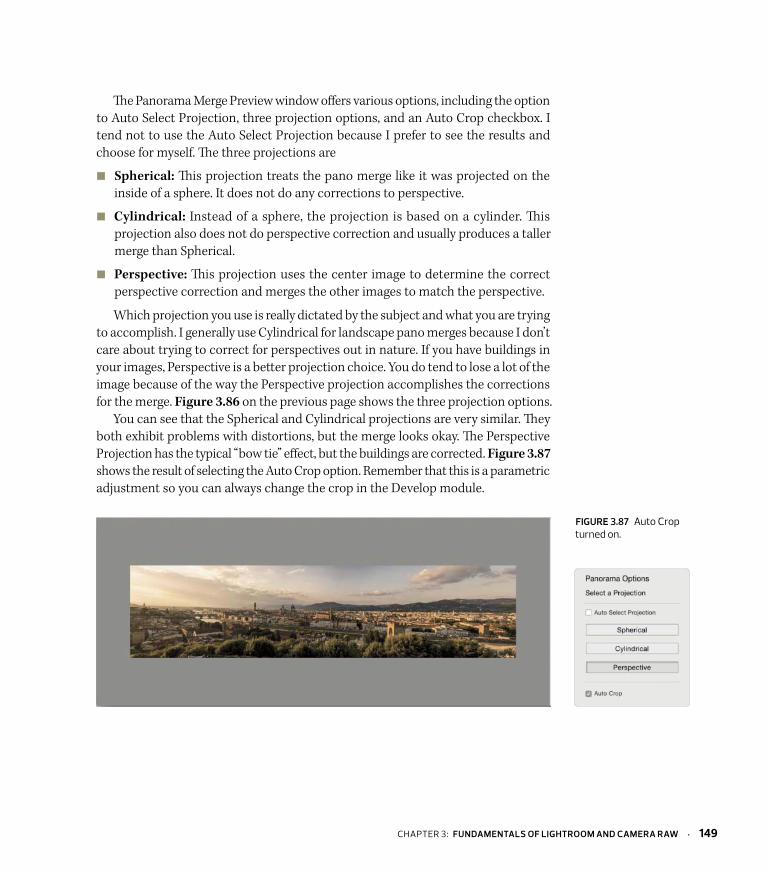
The Panorama Merge Preview window offers various options, including the option to Auto Select Projection, three projection options, and an Auto Crop checkbox. I tend not to use the Auto Select Projection because I prefer to see the results and choose for myself. The three projections are
JJ Spherical: This projection treats the pano merge like it was projected on the inside of a sphere. It does not do any corrections to perspective.
JJ Cylindrical: Instead of a sphere, the projection is based on a cylinder. This projection also does not do perspective correction and usually produces a taller merge than Spherical.
JJ Perspective: This projection uses the center image to determine the correct perspective correction and merges the other images to match the perspective.
Which projection you use is really dictated by the subject and what you are trying to accomplish. I generally use Cylindrical for landscape pano merges because I don’t care about trying to correct for perspectives out in nature. If you have buildings in your images, Perspective is a better projection choice. You do tend to lose a lot of the image because of the way the Perspective projection accomplishes the corrections for the merge. Figure 3.86 on the previous page shows the three projection options.
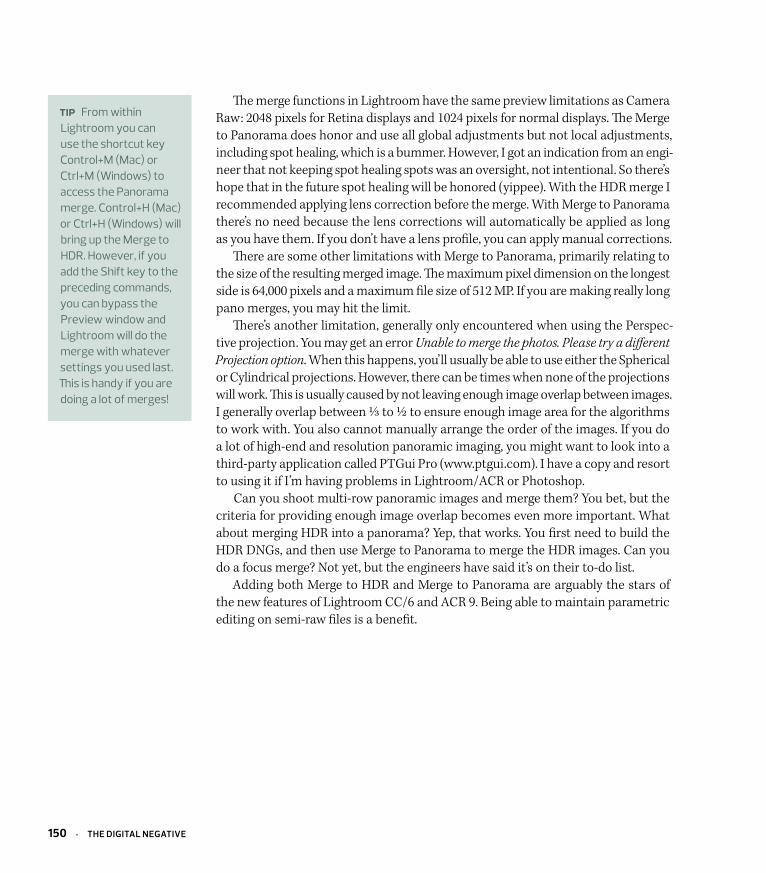
You can see that the Spherical and Cylindrical projections are very similar. They both exhibit problems with distortions, but the merge looks okay. The Perspective Projection has the typical “bow tie” effect, but the buildings are corrected. Figure 3.87 shows the result of selecting the Auto Crop option. Remember that this is a parametric adjustment so you can always change the crop in the Develop module.
FIguRE 3.87 auto crop turned on.
chapter 3: FuNDaMENtalS OF lIghtROOM aND CaMERa RaW · 149
The merge functions in Lightroom have the same preview limitations as Camera Raw: 2048 pixels for Retina displays and 1024 pixels for normal displays. The Merge to Panorama does honor and use all global adjustments but not local adjustments, including spot healing, which is a bummer. However, I got an indication from an engi-neer that not keeping spot healing spots was an oversight, not intentional. So there’s hope that in the future spot healing will be honored (yippee). With the HDR merge I recommended applying lens correction before the merge. With Merge to Panorama there’s no need because the lens corrections will automatically be applied as long as you have them. If you don’t have a lens profile, you can apply manual corrections.
There are some other limitations with Merge to Panorama, primarily relating to the size of the resulting merged image. The maximum pixel dimension on the longest side is 64,000 pixels and a maximum file size of 512 MP. If you are making really long pano merges, you may hit the limit.
There’s another limitation, generally only encountered when using the Perspec-tive projection. You may get an error Unable to merge the photos. Please try a different Projection option. When this happens, you’ll usually be able to use either the Spherical or Cylindrical projections. However, there can be times when none of the projections will work. This is usually caused by not leaving enough image overlap between images. I generally overlap between ⅓ to ½ to ensure enough image area for the algorithms to work with. You also cannot manually arrange the order of the images. If you do a lot of high-end and resolution panoramic imaging, you might want to look into a third-party application called PTGui Pro (www.ptgui.com). I have a copy and resort to using it if I’m having problems in Lightroom/ACR or Photoshop.
Can you shoot multi-row panoramic images and merge them? You bet, but the criteria for providing enough image overlap becomes even more important. What about merging HDR into a panorama? Yep, that works. You first need to build the HDR DNGs, and then use Merge to Panorama to merge the HDR images. Can you do a focus merge? Not yet, but the engineers have said it’s on their to-do list.
Adding both Merge to HDR and Merge to Panorama are arguably the stars of the new features of Lightroom CC/6 and ACR 9. Being able to maintain parametric editing on semi-raw files is a benefit.
TIP from within Lightroom you can use the shortcut key control+m (mac) or ctrl+m (windows) to access the panorama merge. control+h (mac) or ctrl+h (windows) will bring up the merge to hDr. however, if you add the Shift key to the preceding commands, you can bypass the preview window and Lightroom will do the merge with whatever settings you used last. This is handy if you are doing a lot of merges!
150 · thE DIgItal NEgatIvE

This page intentionally left blank
MaxiMizing iMage deTailGetting the most detail from your images is a complicated subject—heck, somebody could write a whole book on it. Wait, somebody already has! I co-authored the revi-sion of Bruce Fraser’s image-sharpening book: Real World Image Sharpening with Adobe Photoshop, Camera Raw, and Lightroom (Peachpit Press, 2009). I can’t stuff the 360 or so pages of that book in this section, but I’ll try to give you the most salient points when adjusting the Sharpening and Noise Reduction settings in Lightroom or Camera Raw.
You want to apply sharpening that enhances image detail but doesn’t do harm. Oversharpening is a bigger problem than undersharpening. You can always add additional sharpening down the road, but it’s very difficult to undo the undesirable effects of overly crunchy sharpening. Add the complications of sharpening to noise reduction, and you’re attempting a balancing act between getting the most image detail while reducing visible noise. Trying to arrive at optimal settings for both is difficult and requires experience and knowledge of the tools.
The reason for image sharpening in Lightroom and Camera Raw is to recover and improve the image detail lost when converting the continuous tone light of a scene into pixels captured by the sensor. The act of demosaicing introduces softness due to interpolation. The sensor itself can cause softness because of the use of aliasing filters. Lenses may have defects and can suffer from diffraction at small apertures. As a result, you’ll need to apply sharpening to improve the apparent sharpness or acutance (edge contrast). That edge part is important to understand. You want to sharpen the edges, not the non-edge surfaces in the image. Edge frequency is the determining factor of what Sharpening Radius you want to apply to your image—and is arguably one of the more difficult things to determine. I’ll break down sharpening for three com-mon edge type images: high-frequency, low-frequency, and mixed-frequency edges.
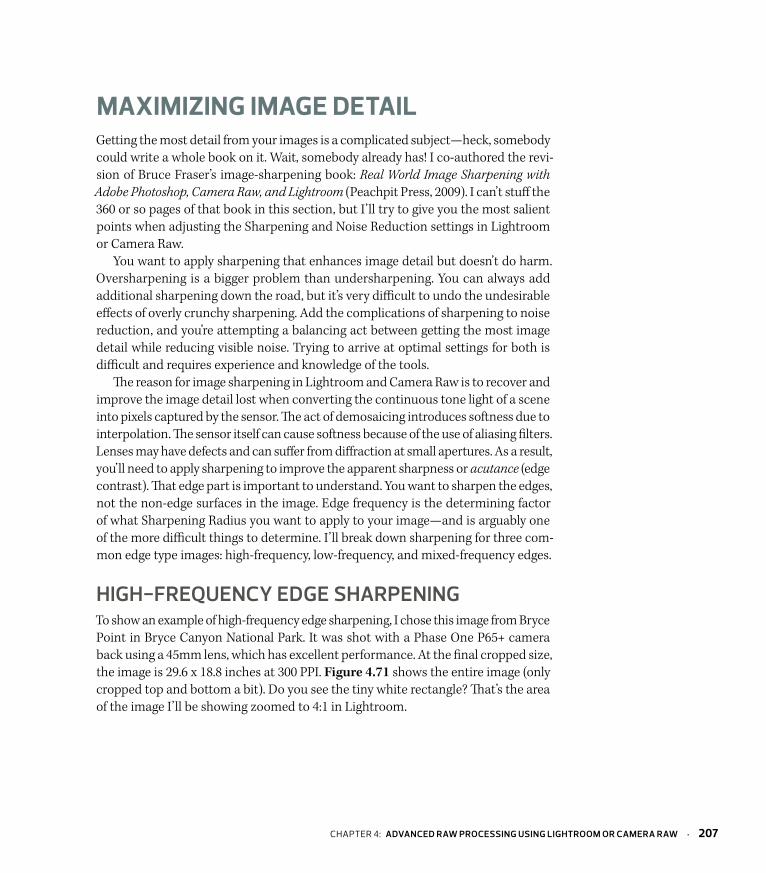
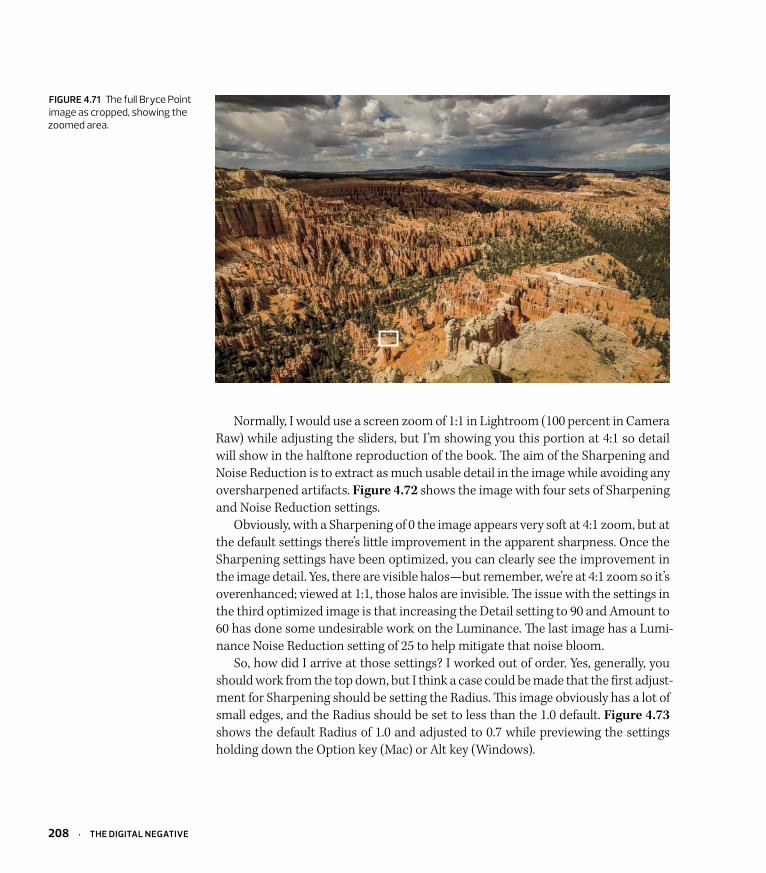
hIgh-FReqUenCy edge ShARPenIngTo show an example of high-frequency edge sharpening, I chose this image from Bryce Point in Bryce Canyon National Park. It was shot with a Phase One P65+ camera back using a 45mm lens, which has excellent performance. At the final cropped size, the image is 29.6 x 18.8 inches at 300 PPI. Figure 4.71 shows the entire image (only cropped top and bottom a bit). Do you see the tiny white rectangle? That’s the area of the image I’ll be showing zoomed to 4:1 in Lightroom.
chapter 4: AdvAnCed RAw PROCeSSIng USIng LIghTROOm OR CAmeRA RAw · 207
Normally, I would use a screen zoom of 1:1 in Lightroom (100 percent in Camera Raw) while adjusting the sliders, but I’m showing you this portion at 4:1 so detail will show in the halftone reproduction of the book. The aim of the Sharpening and Noise Reduction is to extract as much usable detail in the image while avoiding any oversharpened artifacts. Figure 4.72 shows the image with four sets of Sharpening and Noise Reduction settings.
Obviously, with a Sharpening of 0 the image appears very soft at 4:1 zoom, but at the default settings there’s little improvement in the apparent sharpness. Once the Sharpening settings have been optimized, you can clearly see the improvement in the image detail. Yes, there are visible halos—but remember, we’re at 4:1 zoom so it’s overenhanced; viewed at 1:1, those halos are invisible. The issue with the settings in the third optimized image is that increasing the Detail setting to 90 and Amount to 60 has done some undesirable work on the Luminance. The last image has a Lumi-nance Noise Reduction setting of 25 to help mitigate that noise bloom.
So, how did I arrive at those settings? I worked out of order. Yes, generally, you should work from the top down, but I think a case could be made that the first adjust-ment for Sharpening should be setting the Radius. This image obviously has a lot of small edges, and the Radius should be set to less than the 1.0 default. Figure 4.73 shows the default Radius of 1.0 and adjusted to 0.7 while previewing the settings holding down the Option key (Mac) or Alt key (Windows).
FIgURe 4.71 The full bryce point image as cropped, showing the zoomed area.
208 · The dIgITAL negATIve
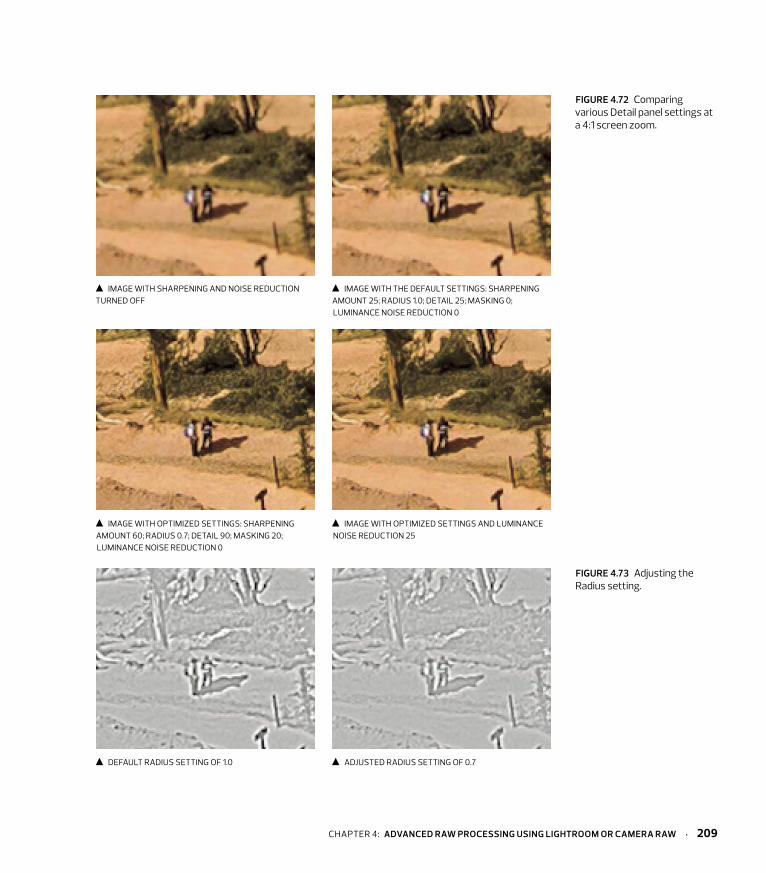
FIgURe 4.72 comparing various Detail panel settings at a 4:1 screen zoom.
Image WIth sharpenIng anD noIse reDuctIon turneD off
Image WIth the Default settIngs: sharpenIng amount 25; raDIus 1.0; DetaIl 25; masKIng 0; lumInance noIse reDuctIon 0
Image WIth optImIzeD settIngs: sharpenIng amount 60; raDIus 0.7; DetaIl 90; masKIng 20; lumInance noIse reDuctIon 0
Image WIth optImIzeD settIngs anD lumInance noIse reDuctIon 25
FIgURe 4.73 adjusting the radius setting.
Default raDIus settIng of 1.0 aDjusteD raDIus settIng of 0.7
chapter 4: AdvAnCed RAw PROCeSSIng USIng LIghTROOm OR CAmeRA RAw · 209
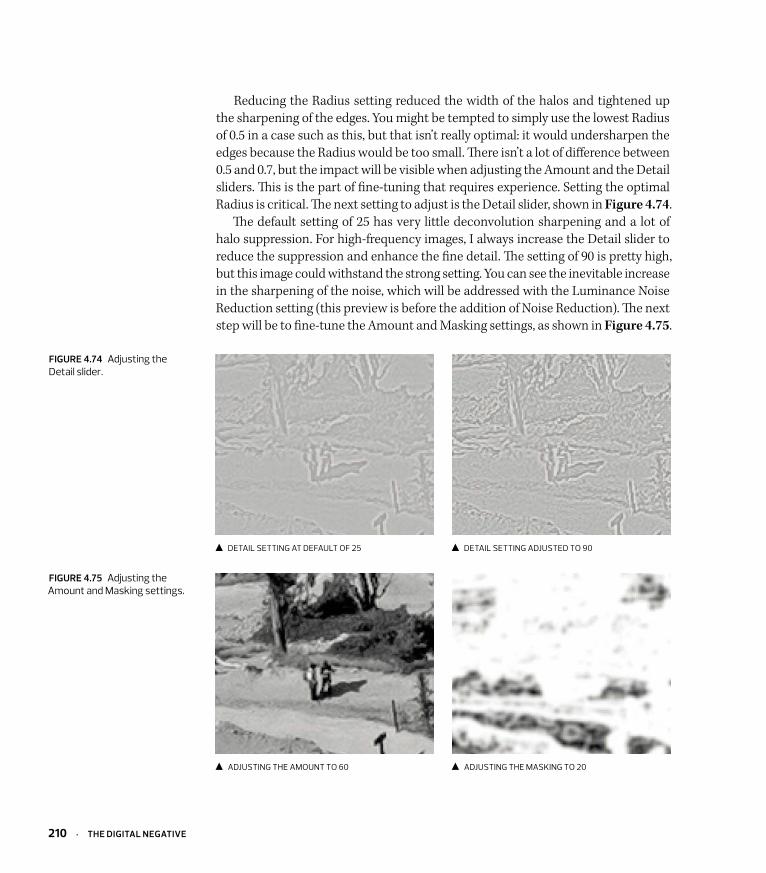
Reducing the Radius setting reduced the width of the halos and tightened up the sharpening of the edges. You might be tempted to simply use the lowest Radius of 0.5 in a case such as this, but that isn’t really optimal: it would undersharpen the edges because the Radius would be too small. There isn’t a lot of difference between 0.5 and 0.7, but the impact will be visible when adjusting the Amount and the Detail sliders. This is the part of fine-tuning that requires experience. Setting the optimal Radius is critical. The next setting to adjust is the Detail slider, shown in Figure 4.74.
The default setting of 25 has very little deconvolution sharpening and a lot of halo suppression. For high-frequency images, I always increase the Detail slider to reduce the suppression and enhance the fine detail. The setting of 90 is pretty high, but this image could withstand the strong setting. You can see the inevitable increase in the sharpening of the noise, which will be addressed with the Luminance Noise Reduction setting (this preview is before the addition of Noise Reduction). The next step will be to fine-tune the Amount and Masking settings, as shown in Figure 4.75.
FIgURe 4.74 adjusting the Detail slider.
DetaIl settIng at Default of 25 DetaIl settIng aDjusteD to 90
FIgURe 4.75 adjusting the amount and masking settings.
aDjustIng the amount to 60 aDjustIng the masKIng to 20
210 · The dIgITAL negATIve
After setting the Radius and Detail sliders, I went back to the top to adjust the Amount. The Amount is a simple “volume” control, and it’s pretty easy to see how far you can go up to the point you’re doing harm by oversharpening. Also, remem-ber that if the overall Amount setting is good for the majority of the image but produces some suboptimal areas of oversharpening, you can use the local minus Sharpening settings in the Graduated Filter or Adjustment Brush to locally reduce the global settings made in the Detail panel. This ability to mitigate oversharpen-ing is an important consideration, because it can change your global sharpening strategy. The Masking was adjusted so that surface areas (non-edge) didn’t receive the full sharpening. Where the mask is white, the full sharpening is applied; where it’s black, the sharpening is substantially reduced. If you use a very high mask set-ting, the sharpening in the black areas is almost eliminated. Be careful not to use a really high Masking setting when applying strong sharpening to an image with a lot of noise. You can get an unfortunate rippling effect, where no sharpening is applied to the surfaces and high sharpening is applied to the edges.
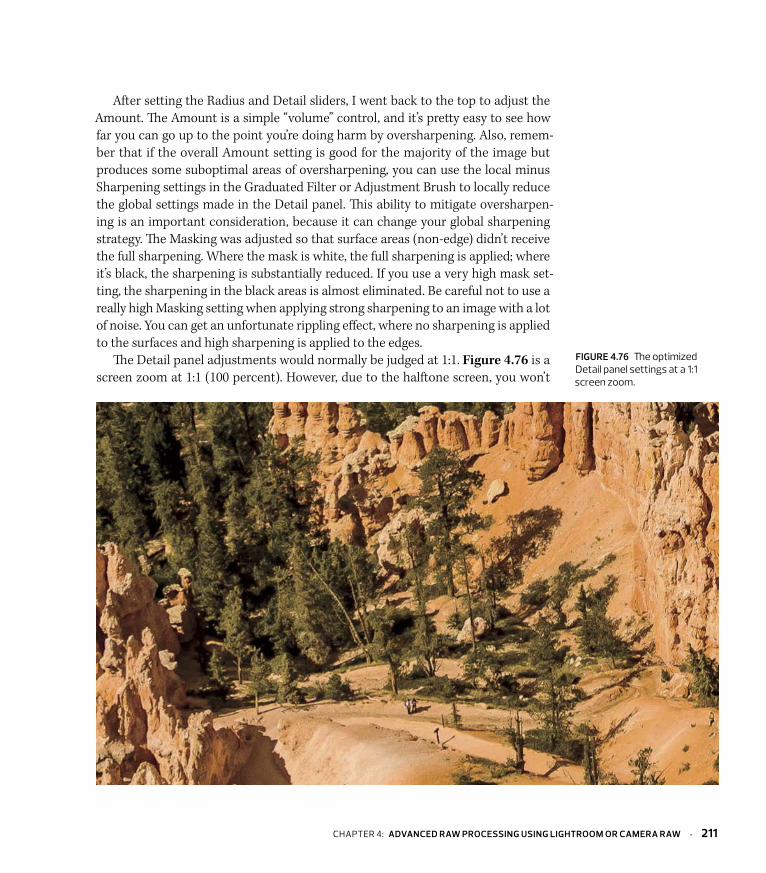
The Detail panel adjustments would normally be judged at 1:1. Figure 4.76 is a screen zoom at 1:1 (100 percent). However, due to the halftone screen, you won’t
FIgURe 4.76 The optimized Detail panel settings at a 1:1 screen zoom.
chapter 4: AdvAnCed RAw PROCeSSIng USIng LIghTROOm OR CAmeRA RAw · 211
see what I saw in Lightroom when I made the adjustments. But it should give you an idea of what things should look like when optimally adjusted.
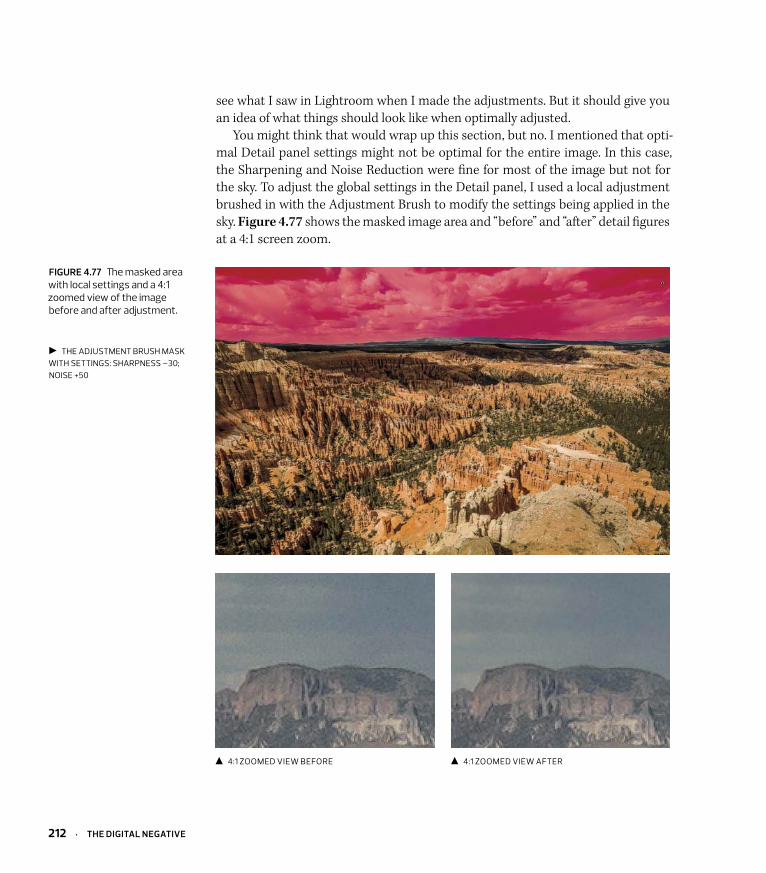
You might think that would wrap up this section, but no. I mentioned that opti-mal Detail panel settings might not be optimal for the entire image. In this case, the Sharpening and Noise Reduction were fine for most of the image but not for the sky. To adjust the global settings in the Detail panel, I used a local adjustment brushed in with the Adjustment Brush to modify the settings being applied in the sky. Figure 4.77 shows the masked image area and “before” and “after” detail figures at a 4:1 screen zoom.
FIgURe 4.77 The masked area with local settings and a 4:1 zoomed view of the image before and after adjustment.
the aDjustment brush masK WIth settIngs: sharpness –30; noIse +50
4:1 zoomeD VIeW before 4:1 zoomeD VIeW after
212 · The dIgITAL negATIve
The differences are subtle but relevant if the maximum image detail and image quality are the goal (which they always are for me). This sort of local modification doesn’t need extreme precision when creating the mask. Unlike making tone and color adjustments, locally fine-tuning the Sharpening and Noise Reduction settings only requires moderate accuracy of the mask. Because the full-size image is way too large to be reproduced in the book without substantial downsampling (which would make the image detail adjustments invisible), go back and take a look at Figure 4.71 to see the entire image and Figure 4.76 to see the results of the Sharpening and Noise Reduction at 1:1.
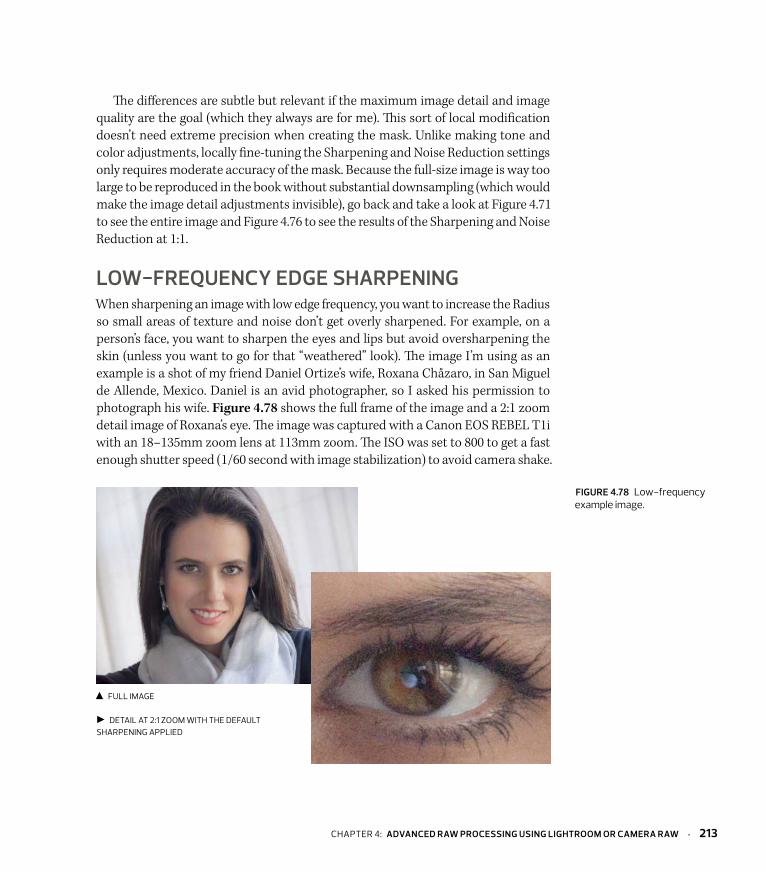
LOw-FReqUenCy edge ShARPenIngWhen sharpening an image with low edge frequency, you want to increase the Radius so small areas of texture and noise don’t get overly sharpened. For example, on a person’s face, you want to sharpen the eyes and lips but avoid oversharpening the skin (unless you want to go for that “weathered” look). The image I’m using as an example is a shot of my friend Daniel Ortize’s wife, Roxana Chåzaro, in San Miguel de Allende, Mexico. Daniel is an avid photographer, so I asked his permission to photograph his wife. Figure 4.78 shows the full frame of the image and a 2:1 zoom detail image of Roxana’s eye. The image was captured with a Canon EOS REBEL T1i with an 18–135mm zoom lens at 113mm zoom. The ISO was set to 800 to get a fast enough shutter speed (1/60 second with image stabilization) to avoid camera shake.
FIgURe 4.78 low-frequency example image.
full Image
DetaIl at 2:1 zoom WIth the Default sharpenIng applIeD
chapter 4: AdvAnCed RAw PROCeSSIng USIng LIghTROOm OR CAmeRA RAw · 213
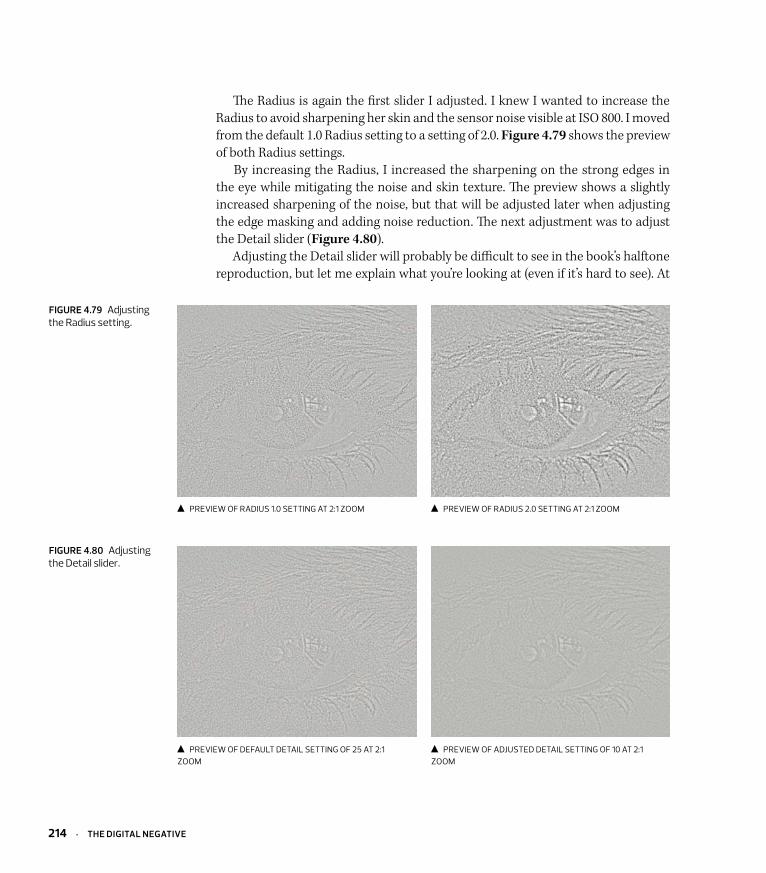
The Radius is again the first slider I adjusted. I knew I wanted to increase the Radius to avoid sharpening her skin and the sensor noise visible at ISO 800. I moved from the default 1.0 Radius setting to a setting of 2.0. Figure 4.79 shows the preview of both Radius settings.
By increasing the Radius, I increased the sharpening on the strong edges in the eye while mitigating the noise and skin texture. The preview shows a slightly increased sharpening of the noise, but that will be adjusted later when adjusting the edge masking and adding noise reduction. The next adjustment was to adjust the Detail slider (Figure 4.80).
Adjusting the Detail slider will probably be difficult to see in the book’s halftone reproduction, but let me explain what you’re looking at (even if it’s hard to see). At
FIgURe 4.79 adjusting the radius setting.
preVIeW of raDIus 1.0 settIng at 2:1 zoom preVIeW of raDIus 2.0 settIng at 2:1 zoom
FIgURe 4.80 adjusting the Detail slider.
preVIeW of Default DetaIl settIng of 25 at 2:1 zoom
preVIeW of aDjusteD DetaIl settIng of 10 at 2:1 zoom
214 · The dIgITAL negATIve
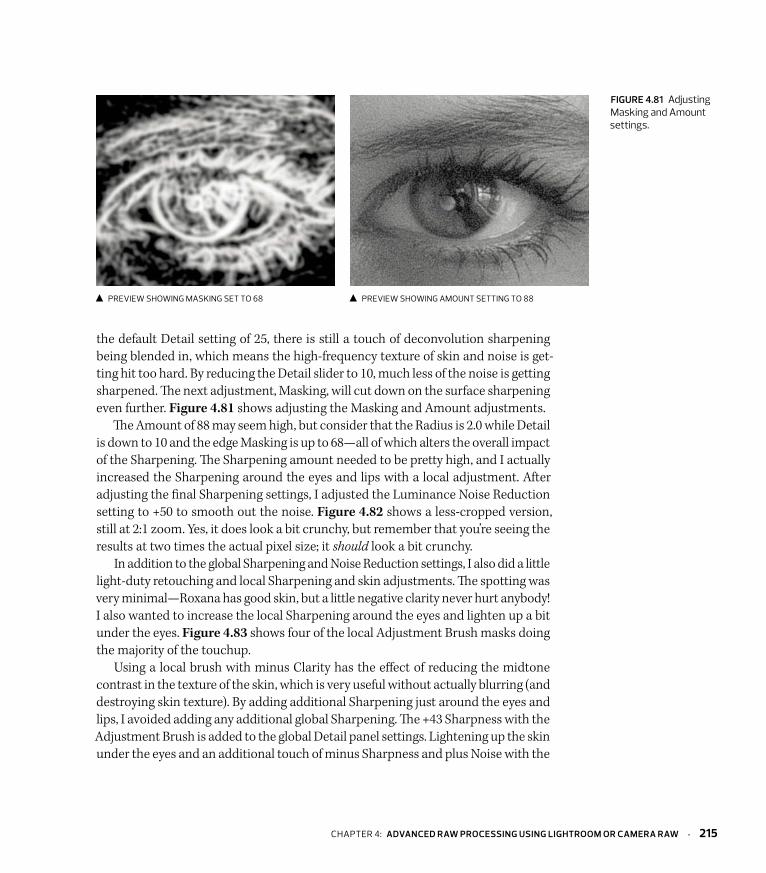
the default Detail setting of 25, there is still a touch of deconvolution sharpening being blended in, which means the high-frequency texture of skin and noise is get-ting hit too hard. By reducing the Detail slider to 10, much less of the noise is getting sharpened. The next adjustment, Masking, will cut down on the surface sharpening even further. Figure 4.81 shows adjusting the Masking and Amount adjustments.
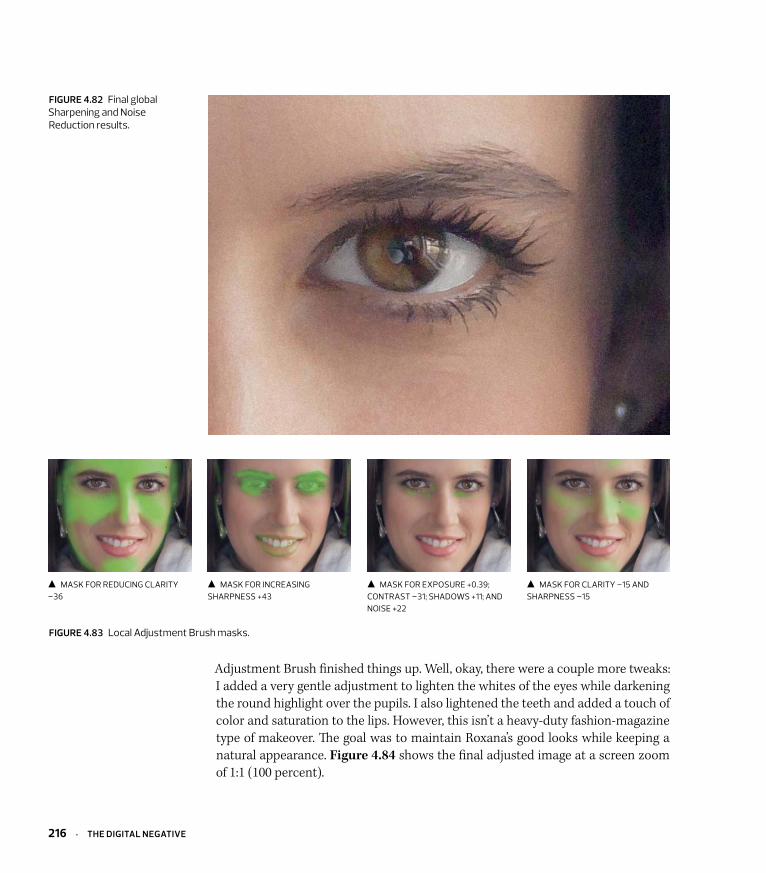
The Amount of 88 may seem high, but consider that the Radius is 2.0 while Detail is down to 10 and the edge Masking is up to 68—all of which alters the overall impact of the Sharpening. The Sharpening amount needed to be pretty high, and I actually increased the Sharpening around the eyes and lips with a local adjustment. After adjusting the final Sharpening settings, I adjusted the Luminance Noise Reduction setting to +50 to smooth out the noise. Figure 4.82 shows a less-cropped version, still at 2:1 zoom. Yes, it does look a bit crunchy, but remember that you’re seeing the results at two times the actual pixel size; it should look a bit crunchy.
In addition to the global Sharpening and Noise Reduction settings, I also did a little light-duty retouching and local Sharpening and skin adjustments. The spotting was very minimal—Roxana has good skin, but a little negative clarity never hurt anybody! I also wanted to increase the local Sharpening around the eyes and lighten up a bit under the eyes. Figure 4.83 shows four of the local Adjustment Brush masks doing the majority of the touchup.
Using a local brush with minus Clarity has the effect of reducing the midtone contrast in the texture of the skin, which is very useful without actually blurring (and destroying skin texture). By adding additional Sharpening just around the eyes and lips, I avoided adding any additional global Sharpening. The +43 Sharpness with the Adjustment Brush is added to the global Detail panel settings. Lightening up the skin under the eyes and an additional touch of minus Sharpness and plus Noise with the
FIgURe 4.81 adjusting masking and amount settings.
preVIeW shoWIng masKIng set to 68 preVIeW shoWIng amount settIng to 88
chapter 4: AdvAnCed RAw PROCeSSIng USIng LIghTROOm OR CAmeRA RAw · 215
masK for reDucIng clarIty –36
masK for IncreasIng sharpness +43
masK for exposure +0.39; contrast –31; shaDoWs +11; anD noIse +22
masK for clarIty –15 anD sharpness –15
FIgURe 4.83 local adjustment brush masks.
FIgURe 4.82 final global sharpening and noise reduction results.
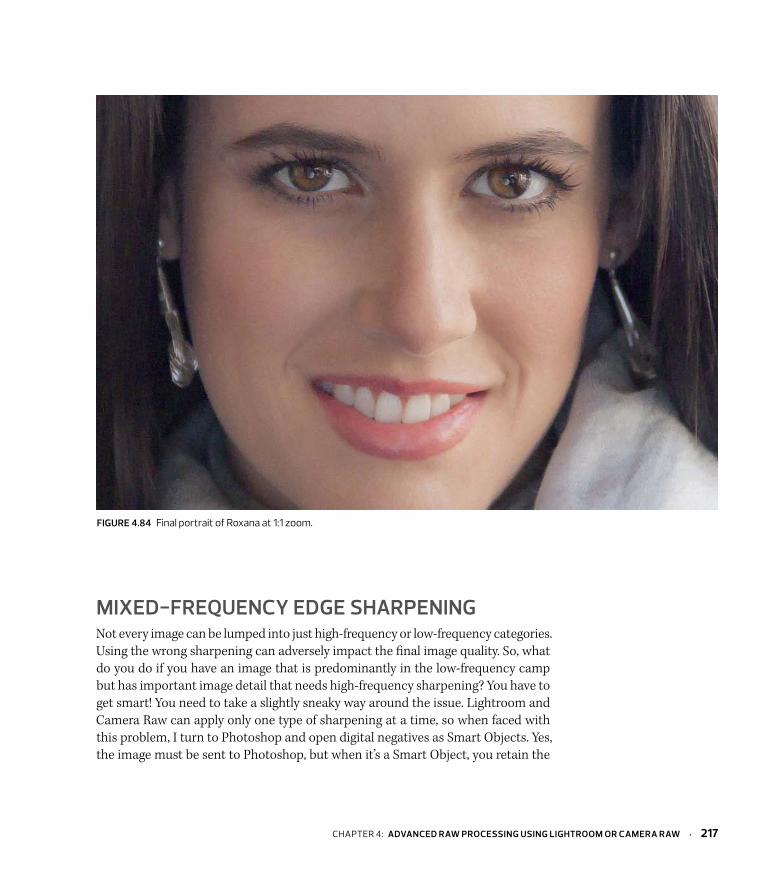
Adjustment Brush finished things up. Well, okay, there were a couple more tweaks: I added a very gentle adjustment to lighten the whites of the eyes while darkening the round highlight over the pupils. I also lightened the teeth and added a touch of color and saturation to the lips. However, this isn’t a heavy-duty fashion-magazine type of makeover. The goal was to maintain Roxana’s good looks while keeping a natural appearance. Figure 4.84 shows the final adjusted image at a screen zoom of 1:1 (100 percent).
216 · The dIgITAL negATIve
mIXed-FReqUenCy edge ShARPenIngNot every image can be lumped into just high-frequency or low-frequency categories. Using the wrong sharpening can adversely impact the final image quality. So, what do you do if you have an image that is predominantly in the low-frequency camp but has important image detail that needs high-frequency sharpening? You have to get smart! You need to take a slightly sneaky way around the issue. Lightroom and Camera Raw can apply only one type of sharpening at a time, so when faced with this problem, I turn to Photoshop and open digital negatives as Smart Objects. Yes, the image must be sent to Photoshop, but when it’s a Smart Object, you retain the
FIgURe 4.84 final portrait of roxana at 1:1 zoom.
chapter 4: AdvAnCed RAw PROCeSSIng USIng LIghTROOm OR CAmeRA RAw · 217
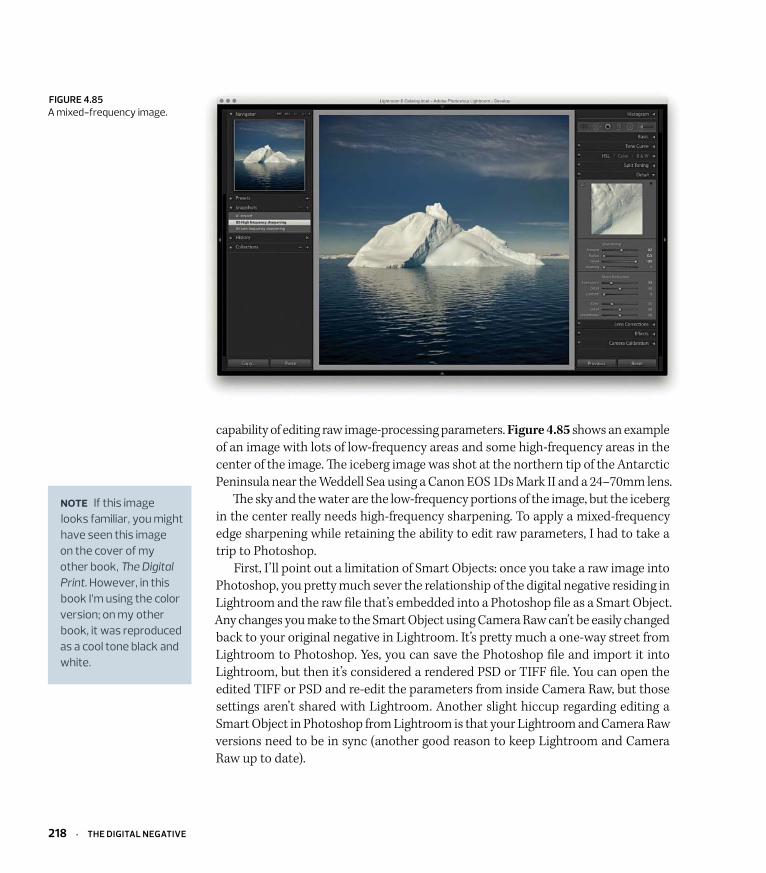
capability of editing raw image-processing parameters. Figure 4.85 shows an example of an image with lots of low-frequency areas and some high-frequency areas in the center of the image. The iceberg image was shot at the northern tip of the Antarctic Peninsula near the Weddell Sea using a Canon EOS 1Ds Mark II and a 24–70mm lens.
The sky and the water are the low-frequency portions of the image, but the iceberg in the center really needs high-frequency sharpening. To apply a mixed-frequency edge sharpening while retaining the ability to edit raw parameters, I had to take a trip to Photoshop.
First, I’ll point out a limitation of Smart Objects: once you take a raw image into Photoshop, you pretty much sever the relationship of the digital negative residing in Lightroom and the raw file that’s embedded into a Photoshop file as a Smart Object. Any changes you make to the Smart Object using Camera Raw can’t be easily changed back to your original negative in Lightroom. It’s pretty much a one-way street from Lightroom to Photoshop. Yes, you can save the Photoshop file and import it into Lightroom, but then it’s considered a rendered PSD or TIFF file. You can open the edited TIFF or PSD and re-edit the parameters from inside Camera Raw, but those settings aren’t shared with Lightroom. Another slight hiccup regarding editing a Smart Object in Photoshop from Lightroom is that your Lightroom and Camera Raw versions need to be in sync (another good reason to keep Lightroom and Camera Raw up to date).
Note If this image looks familiar, you might have seen this image on the cover of my other book, The Digital Print. however, in this book I’m using the color version; on my other book, it was reproduced as a cool tone black and white.
FIgURe 4.85 a mixed-frequency image.
218 · The dIgITAL negATIve
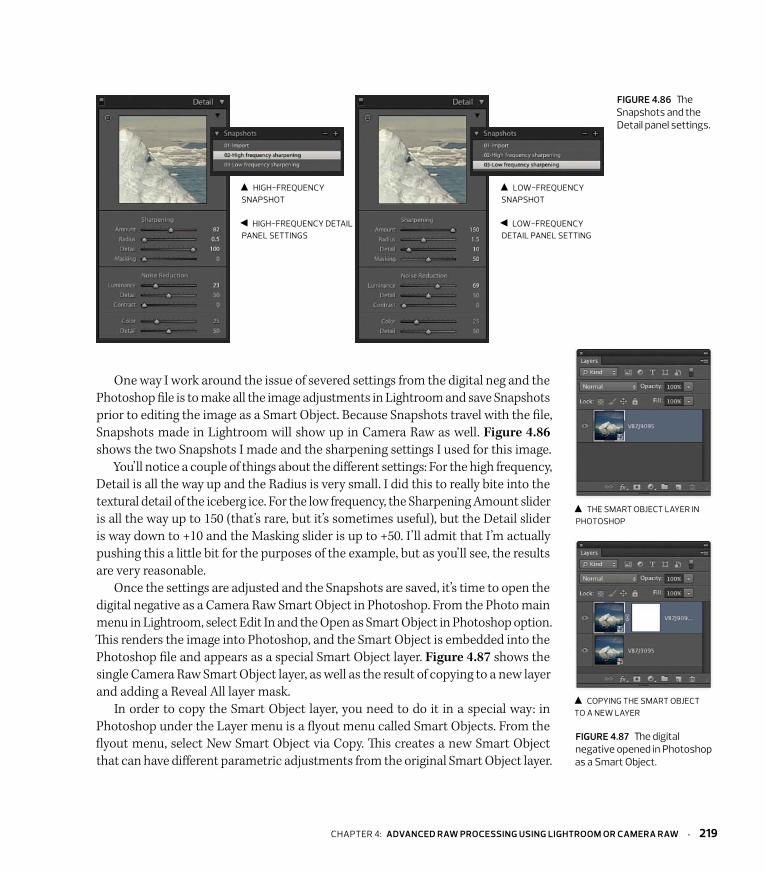
One way I work around the issue of severed settings from the digital neg and the Photoshop file is to make all the image adjustments in Lightroom and save Snapshots prior to editing the image as a Smart Object. Because Snapshots travel with the file, Snapshots made in Lightroom will show up in Camera Raw as well. Figure 4.86 shows the two Snapshots I made and the sharpening settings I used for this image.
You’ll notice a couple of things about the different settings: For the high frequency, Detail is all the way up and the Radius is very small. I did this to really bite into the textural detail of the iceberg ice. For the low frequency, the Sharpening Amount slider is all the way up to 150 (that’s rare, but it’s sometimes useful), but the Detail slider is way down to +10 and the Masking slider is up to +50. I’ll admit that I’m actually pushing this a little bit for the purposes of the example, but as you’ll see, the results are very reasonable.
Once the settings are adjusted and the Snapshots are saved, it’s time to open the digital negative as a Camera Raw Smart Object in Photoshop. From the Photo main menu in Lightroom, select Edit In and the Open as Smart Object in Photoshop option. This renders the image into Photoshop, and the Smart Object is embedded into the Photoshop file and appears as a special Smart Object layer. Figure 4.87 shows the single Camera Raw Smart Object layer, as well as the result of copying to a new layer and adding a Reveal All layer mask.
In order to copy the Smart Object layer, you need to do it in a special way: in Photoshop under the Layer menu is a flyout menu called Smart Objects. From the flyout menu, select New Smart Object via Copy. This creates a new Smart Object that can have different parametric adjustments from the original Smart Object layer.
hIgh-frequency snapshot
hIgh-frequency DetaIl panel settIngs
loW-frequency snapshot
loW-frequency DetaIl panel settIng
FIgURe 4.86 The snapshots and the Detail panel settings.
FIgURe 4.87 The digital negative opened in photoshop as a smart object.
the smart object layer In photoshop
copyIng the smart object to a neW layer
chapter 4: AdvAnCed RAw PROCeSSIng USIng LIghTROOm OR CAmeRA RAw · 219
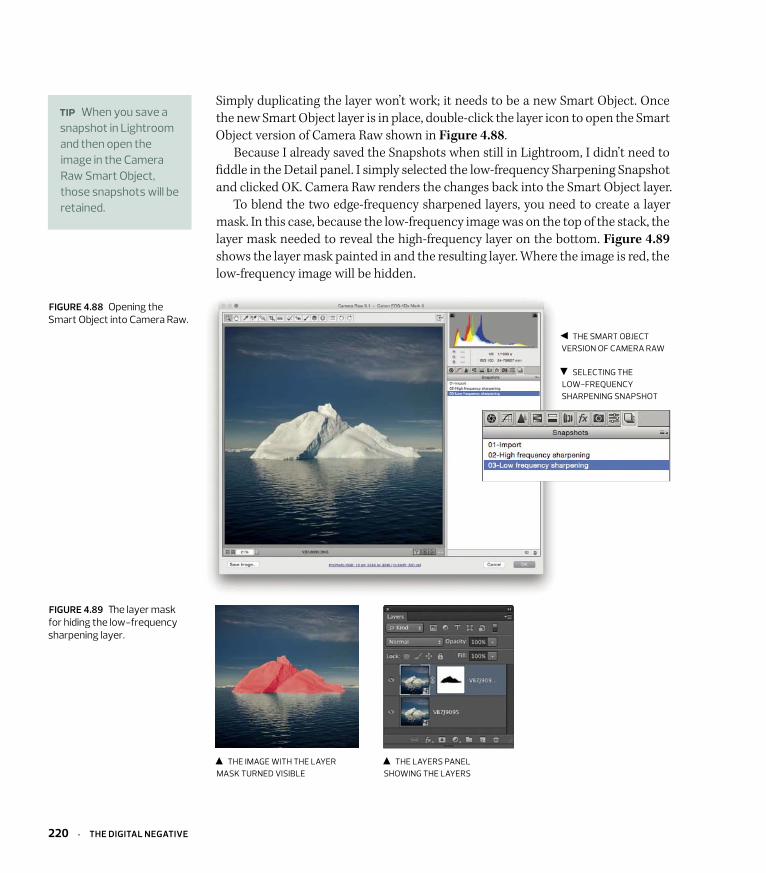
Simply duplicating the layer won’t work; it needs to be a new Smart Object. Once the new Smart Object layer is in place, double-click the layer icon to open the Smart Object version of Camera Raw shown in Figure 4.88.
Because I already saved the Snapshots when still in Lightroom, I didn’t need to fiddle in the Detail panel. I simply selected the low-frequency Sharpening Snapshot and clicked OK. Camera Raw renders the changes back into the Smart Object layer.
To blend the two edge-frequency sharpened layers, you need to create a layer mask. In this case, because the low-frequency image was on the top of the stack, the layer mask needed to reveal the high-frequency layer on the bottom. Figure 4.89 shows the layer mask painted in and the resulting layer. Where the image is red, the low-frequency image will be hidden.
FIgURe 4.88 opening the smart object into camera raw.
the smart object VersIon of camera raW
selectIng the loW-frequency sharpenIng snapshot
tip When you save a snapshot in lightroom and then open the image in the camera raw smart object, those snapshots will be retained.
FIgURe 4.89 The layer mask for hiding the low-frequency sharpening layer.
the Image WIth the layer masK turneD VIsIble
the layers panel shoWIng the layers
220 · The dIgITAL negATIve

The payoff for this mixed-edge frequency sharpening is that it allows you to mix and match the optimal Sharpening and Noise Reduction settings while still retaining the raw editing capabilities of Camera Raw. It’s a true blending of the strengths of combining Lightroom, Camera Raw, and Photoshop to optimize your image detail. Figure 4.90 shows the high-frequency layer and the blended layers.
FIgURe 4.90 comparing the high-frequency sharpening to the mixed-frequency sharpening.
the hIgh-frequency sharpeneD Image
the mIxeD-frequency sharpeneD Image
chapter 4: AdvAnCed RAw PROCeSSIng USIng LIghTROOm OR CAmeRA RAw · 221
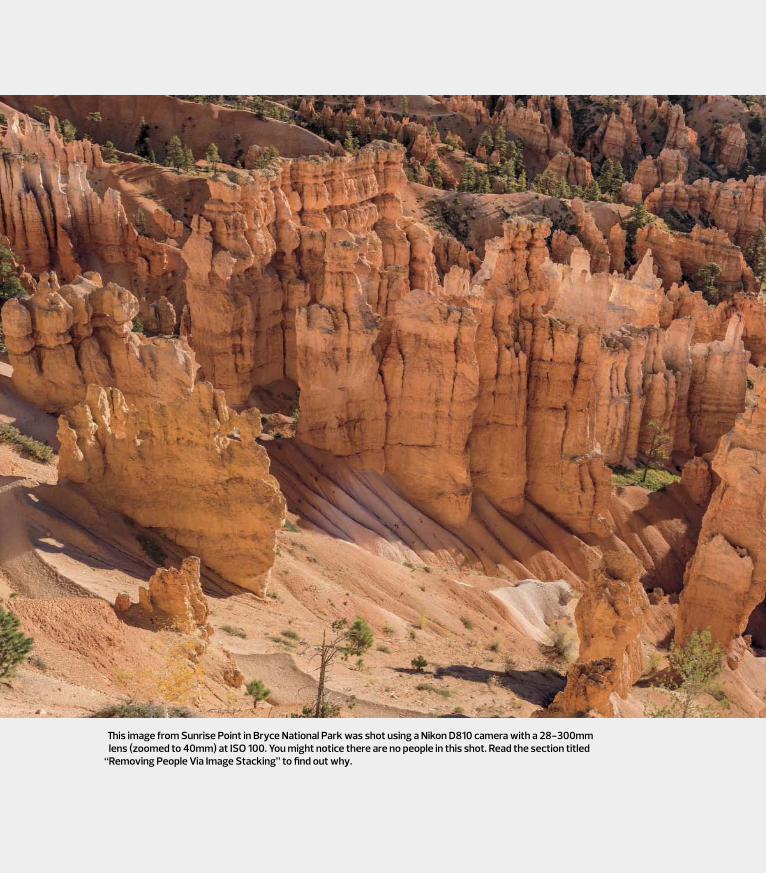
This image from Sunrise Point in Bryce National Park was shot using a Nikon D810 camera with a 28-300mm lens (zoomed to 40mm) at ISO 100. You might notice there are no people in this shot. Read the section titled
“Removing People Via Image Stacking” to find out why.

Index
8-bit channels, 578-bit images, 2516-bit floating-point images, 14616-bit images, 25, 5716-bit integer images, 14632-bit floating-point images, 14632-bit images, 5780-20 rule, 53
Aaberrations, lens, 32–36, 95, 96, 100ACR (Adobe Camera Raw) format, 46acutance, 207Adams, Ansel, 192Add to Stack command, 224Add to This Catalog command, 224Adjustment Brush
Camera Raw, 115, 126, 136, 141–142considerations, 115, 116, 126, 130, 136high-contrast lighting and, 158–159Lightroom, 115, 126, 136–140
adjustment layers, 227adjustment panels, 71–115
Basic, 72–80Camera Calibration, 112–115Detail, 87–95Effects, 105–111HSL/Color/B&W, 83–86Lens Corrections, 95–105, 303order of, 83overview, 71–72Split Toning, 86–87, 183, 185–186, 197Tone Curve, 80–83
Adobe Camera Raw (ACR) format, 46Adobe Creative Suite, 45Adobe Photoshop Lightroom CC / Lightroom 6 Book, 53Adobe Photoshop CS5 for Photographers, 48Adobe RGB color space, 10, 21–24adoption, 60
aerial haze, 108–111AFP (Apple File Protocol), 283AIT drives, 283aliasing errors, 7aliasing filters, 7Alves, Sandy, 43Amount control, 88, 90, 106, 108Amount slider, 102analog-to-digital converter, 5, 27aperture
aberrations, 32–36lens, 76overview, 31–32
Aperture program, 44aperture values, 76, 100, 266Apple Bootcamp, 298Apple File Protocol (AFP), 283archiving images, 282–283artifacts, 7, 260As Shot settings, 76, 161, 182As Shot WB setting, 174, 177Aspect Ratio menu, 118astigmatism, 33Auto Align option, 144Auto button, 85Auto Mask option
erasing with, 139–140, 141high-contrast lighting and, 159overview, 139–141painting and, 168, 182
Auto option, 96, 98, 99–100Auto Tone option, 144auto white balance (AWB), 76, 174Auto-Align Layers dialog box, 266–267, 268Auto-Blend Layers tool, 266, 268automation, 272AWB (auto white balance), 76, 174AWB setting, 76
304 · The dIgITAl negATIve
BBackground Eraser, 140background layers, 228, 231backlit subjects, 170–173backups, 282, 284, 285, 299Balance slider, 86barrel distortion, 34, 157base colors, 236Basic panel, 72–80
considerations, 126Presence controls, 79–80purpose of, 72Tone controls, 76–79vs. Tone Curve panel, 83Treatment section, 73White Balance tool, 73–76
Basic subpanel, 95, 96–97Bayer arrays, 6Bayer, Bryce E., 8Bayer filter, 8Bayer Pattern array, 8Bézier curves, 81, 180, 248binary digits, 25binary sorts, 277bit depth, 25–26, 55, 224bits, 25black clipping, 77, 78–79, 127black clipping points, 78black-and-white images
adjustments to, 84–86cold toning, 201–202color toning, 86converting to/from color, 85–86, 192–206, 255–259overview, 192panchromatic response, 193–196shooting, 85split toning, 201spot of color, 201–202tone mapping, 202–204warm toning, 196–198
Blacks control, 77, 78–79, 127blend colors, 236Blend If adjustments, 229–230, 232blend tone, 236
blending modes, 229–230, 234, 236–237blinkies, 14blown skies, 160–163blue edge fix, 238–240blurring, 30, 127boot drives, 301Bootcamp, 298bracketing, 15Bridge
as file browser, 46getting images into Photoshop from, 224introduction of, 45vs. Lightroom, 46, 50–51opening files as layers in Photoshop, 263overview, 45–46renaming images, 279sorting images, 279standard configuration, 45ways of using, 46workflow stages, 274
brightness, 75, 76, 107, 159, 237Brightness control, 77Brown Toner, 196brush settings
Adjustment Brush, 136density, 138flow, 138, 140Graduated Filter, 132–133hardness/softness, 137opacity, 138Radial Filter, 132–133, 136size, 136–137
brush strokes, 138brushes
additive, 141Adjustment Brush. See Adjustment BrushFilter Brush, 132, 133, 135Healing Brush, 242–243, 244Noncircular Healing Brush, 122–123Paint Brush, 245–247Spot Healing Brush, 115, 116, 120subtractive, 141
B&W subpanel, 84–86
Index · 305
selecting tools in, 115–116sharpening controls, 88–91sharpening images in, 207–213Spot Removal tool, 125and TIFF files, 47Tone Curve panel, 80–83toolbar, 116workflow. See workflow
Camera Raw as a Photoshop filter, 260–261Camera Raw Filter, 260–261camera sensors
CCD, 5, 7, 8CMOS, 5–7dynamic range of, 15, 19Foveon X3, 8linear capture and, 9noise, 17–20resolution, 35–36types of, 5–7
camera shake, 88, 213cameras
calibrating, 112–115creating custom profiles for, 112–113LCD screen, 4, 14legacy, 115transferring images to computer, 273–275using as card reader, 273
captions, 280–281Capture One, 39, 293–294capture resolution, 35capture sharpening, 87, 88, 89Carbon Copy Cloner (CCC), 299card readers, 273, 276cards. See memory cardscatalogs
importing, 290–292importing images from, 285Lightroom, 302virtual copies and, 289–290
CCC (Carbon Copy Cloner), 299CCD (charge-coupled device) sensors, 5, 7, 8CDs, 283, 284CF cards, 276CF (Compact Flash) media, 273
CCA (chromatic aberration), 34–35, 95, 96, 100cache settings, 300–301calibration images, 189–191calibration sliders, 113Camera Calibration panel, 112–115Camera & Imaging Product Association (CIPA), 24camera makers, 61Camera Raw
Adjustment Brush, 115, 126, 136, 141–142adjustment panels. See adjustment panelsBasic panel, 72–80Camera Calibration panel, 112–115Color Picker, 132Color Sampler tool, 69color space settings, 55–58color to black-and-white conversions in, 255compatibility of Lightroom and, 54cropping in, 69, 119–120default image settings, 47–48default renderings, 66–69Detail panel, 87–95DNG Converter and, 58–63Effects panel, 105–111genesis of, 40–41getting images into Photoshop from, 224Graduated Filter, 131–132histograms, 70–71HSL/Color/B&W panel, 83–86and JPEG, 47Lens Corrections panel, 95–105vs. Lightroom, 53, 69–70, 131Lightroom versions and, 225local adjustments in, 126–142maximizing image detail in, 207–213Merge To HDR feature, 142–147overview, 46–48parametric editing in, 48as Photoshop filter, 260–261Point Curve Editor, 80, 81–82presets, 69previewing images in, 89–90Radial Filter, 131retouching images in, 120
306 · The dIgITAl negATIve
color calibration images, 189–191color casts, 82color compression, 28Color control, 93, 127color correction, 174–191
color curves, 179–181, 204–206color gradients, 184–186color split toning, 181–183HSL, 187–188lens colorcast correction, 188–191in Photoshop, 234–235white balance, global, 174–176white balance, local, 177–178
color co-site sampling, 8color curves, 179–181, 204–206Color Detail control, 93Color Dodge blending mode, 236color fringes, 100–103color gradients, 184–186color images, 34, 85–87, 192, 255–259. See also imagescolor interpolation, 8Color layer modifications, 234–237color management, 55–58color noise, 19, 20, 93–95Color Picker, 130, 132, 142Color Priority option, 107Color Range selection tool, 227, 251–252, 257color rendering, 112, 113, 114Color Sampler tool, 57, 69, 87, 115color spaces
accidental, 22Adobe RGB, 10, 21–24choosing, 21–24, 55gamma and, 10Lab, 23ProPhoto RGB, 10, 21–24, 55–57RGB, 55, 69settings, 55–58SMPTE-240M, 22sRGB, 21–24, 57
color speckles, 93color split toning, 181–183Color subpanel, 84, 95, 100–103color swatches, 130, 132
CFA, 8Chan, Eric, 75, 87, 92, 190Channels panel, 254, 256–259charge-coupled device (CCD) sensors, 5, 7, 8chemical darkroom, 199
“chimping,” 12chromatic aberration (CA), 34–35, 95, 96, 100chrominance-sensitive elements, 8Chromix, 23CIPA (Camera & Imaging Product Association), 24clarity, 79Clarity control, 79, 127, 159, 161, 215clipping
black, 77, 78–79, 127brightness, 77highlights, 77, 126histogram, 70–71shadows, 77, 127white, 76, 77, 78–79, 126
clipping areas, 78clipping points, 78Clone Stamp tool, 238, 242–243cloud storage, 282CMOS sensors, 5–7CMYK channels, 259CMYK profiles, 21cold toning, 201–202Collections, Lightroom, 290color
adjusting, 130, 184–186, 205base, 236blend, 236complementary, 238labels, 278masks, 142presets, 130, 132result, 236, 237RGB, 55, 193–194saturation. See saturationspot of, 201–202tuning, 194warm vs. cool, 126
Color blending mode, 237Color Burn blending mode, 236
Index · 307
cropping images, 117–120in Camera Raw, 69in Lightroom, 69in Photoshop, 117
curvature of field, 33curves
Bézier, 81, 180, 248color, 179–181, 204–206color-channel, 82linear, 82luminance-based, 82medium contrast, 82parametric, 80–81, 115, 202–204point, 80, 81–82, 202, 205
curvilinear distortion, 34Custom Crop dialog box, 119–120CYGM filter, 8Cylindrical projection option, 149, 150
ddark noise, 18Darken blending mode, 236DAT drives, 283database “cruft,” 302–303deblurring, 89deconvolution sharpening, 89Default option, 98Defringe control, 127Defringe corrections, 100–103Deghost Amount option, 144deghosting options, 144–147Dehaze controls, 108–111demosaicing, 8, 20Density control, 136, 138dependencies, 61depth of field (DOF), 31–32, 266detail loss, 26Detail panel, 87–95Detail sliders, 89, 91, 93, 210, 214, 215diffraction, 31, 32diffuser disks, 189DIFP seminar, 40digital exposure, 11–14. See also exposuredigital gains, 19
color temperature, 126Color Think tool, 23color tints, 127color toning, 204–206color-based corrections, 234–235colorcast calibration images, 189–191color-channel curves, 82ColorChecker Passport, 73, 113, 114, 174, 293colorimetric interpretation, 21–24Compact Flash (CF) media, 273complementary colors, 238composite masks, 251–252compositing images, 250–255compression
color, 28considerations, 28DNG, 59JPEG, 27–28lossless, 62lossy, 28, 62, 63
computerdigital imaging area, 298–299displays, 57–58, 108transferring images to, 273–275
Constrain Crop option, 104Constrain To Warp option, 118context menus, 71, 72contrast
adjusting, 76, 77, 78, 159dynamic range and, 15exposure and, 11midtone, 230–232
Contrast adjustment, 76Contrast control, 77, 78, 126contrast range, 14–15Contrast Tweak menu, 82control channels, 126controlled vocabulary, 281copy-and-paste patching, 244–245, 246Cox, Chris, 302CPU, 300CPU speeds, 300creative sharpening, 87, 89, 228–230Creative Suite, 45
308 · The dIgITAl negATIve
micro-drives, 273NAS, 283RAID, 283SSDs, 301, 302terabyte, 283
dual-illuminate profile, 114Duplicate command, 255Duplicate Layer command, 228dust, 120, 123, 125DVDs, 283, 284DxO Labs, 11DxOMark, 11, 12dynamic range
bit depth and, 26considerations, 11–12exposure and, 11–12linear capture and, 9signal-to-noise ratio, 14–15, 19
eEastman Kodak, 8edge frequency, 89edge masks, 89edge sharpening, 207–213
blue edge fix, 238–240high-frequency, 207–213low-frequency, 213–217mixed-frequency, 217–221overview, 307Smart Objects and, 217–220
Edit In flyout menu, 225, 266editing
color management and, 55–56destructive edits, 26DNGs, 63, 114in the field, 287–289Parametric Curve Editor, 80–81, 202–204parametric edits, 48, 52in Photoshop, 25–26, 48, 226–240pixel-level edits, 48Point Curve Editor, 80, 81–82, 83, 202, 205rough edits, 277
editing space, 55Effect menu, 127Effects panel, 105–111
digital image preservation, 60–61digital imaging area, 298–299digital negatives, 3–36. See also raw images
attributes, 7–26colorimetric interpretation, 21–24defined, 3digital exposure, 11–14ETTR and, 14–17, 71linear capture, 7–11, 14metadata. See metadataoverview, 3–5photographic aspects of, 29–36sensor noise, 17–20visual renderings of, 4
digital objects, 60–61digital photography, 60, 192The Digital Print, 58disclosure, 60disk drives. See drivesdisplays, computer, 57–58, 108distortion
barrel, 157curvilinear, 34lens, 32, 95, 98–99pincushion, 34
DNG Converter, 58–63.dng extension, 62DNG files, 6, 58–63, 146–147DNG Flat Field plug-in, 189–191DNG format, 58–63, 284DNG Profile Creator, 82DNG Profile Editor, 114DNG profiles, 48, 73, 112, 113, 114DNG Software Development Kit, 6DNGs, on website, 163DNG_Validate processing, 6DOF (depth of field), 31–32, 266downsampling, 20, 63drag-and-drop behaviors, 246drive arrays, 299drives
AIT, 283boot, 301DAT, 283hard, 297, 302
Index · 309
film grain, 94, 108film negatives, 3film photography, 84, 192filmstrip mode, 47, 74, 125Filter Brush, 132, 133, 135filters
aliasing, 7Bayer, 8Camera Raw, 260–261CYGM, 8Gradient, 16graduated. See Graduated FilterHigh Pass, 231low-pass, 7neutral density, 14radial. See Radial FilterRGBE, 8sharpening, 89, 228–229, 231, 232Smart Sharpen, 89Unsharp Mask, 228–229, 232
fisheye lenses, 105flat lighting, 154–156floating-point images, 146Flow control, 138, 140focal length, 30focus stacking, 266–269folders, 51, 279, 297, 299Foveon X3 sensor, 8Fraser, Bruce, 55, 87Fringe Color Selector tool, 101–103fringing, 100–103f-stops, 189Full option, 96, 97Fuzziness slider, 227
ggamma
color spaces and, 10displays and, 57–58human vision and, 9–10laptop displays and, 57–58linear, 10, 28, 63normal, 10ProPhoto RGB and, 55, 255raw converters and, 10–11
embedded profiles, 57Enable Lens Corrections option, 96Enable Profile Corrections, 95, 96Enter Custom option, 118Erase function, 136Eraser tool, 136, 140, 247eSATA, 299ETTR (expose to the right), 14–17, 71Evening, Martin, 48, 87Exchangeable image file format, 24EXIF metadata, 24, 98, 112, 266Export dialog box, Lightroom, 224expose to the right (ETTR), 14–17, 71exposure
bracketing, 15choosing, 11–12considerations, 11–14, 159contrast and, 11digital, 11–14dynamic range and, 11–12ETTR, 14–17, 71highlights vs. shadows, 11, 12linear capture and, 9, 14overexposure, 12, 15, 16, 66, 77underexposure, 16, 91, 161, 166–169, 171
Exposure control, 76, 78, 126Extensible Metadata Platform. See XMExternal Editing tab, Lightroom, 225eyes, 213, 215, 217
FFade command, 228–229Fast Load Data, 62, 63Feather control, 106, 137field catalog, 290–292field workflow example, 284–293files
DNG, 6, 58–63, 146–147naming conventions, 279PSD, 218raw. See raw imagessize of, 265TIFF, 47
Fill Light adjustment, 74Fill Light control, 77
310 · The dIgITAl negATIve
Hewlett-Packard, 22high dynamic range. See HDRHigh Pass filter, 231high-contrast lighting, 156–160high-frequency edge sharpening, 207–213highlight clipping, 77, 126Highlight Priority option, 107highlight recovery, 126highlight warnings, 14highlights, 11, 12, 77, 78, 159, 230Highlights control, 77, 78, 106, 126, 159histograms, 14, 15, 70–71History States setting, 301–302Holbert, Mac, 87, 232home catalog, 290–292host decoder, 47HSL color correction, 187–188HSL subpanel, 83–84HSL/Color/B&W panel, 83–86hue, 113, 127, 130Hue blending mode, 237Hue sliders, 102, 113hyper ISOs, 19
Ii1Display Pro, 57ICC profiles, 57IIM (IPTC Information Interchange Model), 24image editors, 225image preservation, 60–61image stacks, 224, 262–265, 285, 288images. See also raw images
8-bit, 2516-bit, 2516-bit integer, 14632-bit floating-point, 146archiving, 282–283backups, 282, 284, 285, 299
“baked,” 27black-and-white. See black-and-white imagescalibration, 189–191color, 34, 85–87, 192, 255–259comparing, 9, 19–20compositing multiple, 250–255copying, 274
gamma correction, 10–11global tone mapping, 65GPU (graphics processing unit), 300, 302, 303gradations, 28–29Gradient Filter, 16gradient masks, 128, 130gradients
blown skies and, 161–163color, 184–186local adjustments, 126–137white balance and, 175
Graduated Filteradjusting colors, 184–186brush functions, 132–133Camera Raw, 131–132considerations, 126Lightroom, 127–131local adjustments with, 127–133presets, 127–128white balance and, 175
Grain controls, 108grain effect, 108grain, film, 94, 108graphics processing unit (GPU), 300, 302, 303grayscale images, 73, 193, 255–259Green Hue slider, 102Grid overlay, 120grids, 104, 120
hhalos, 77, 79, 89, 208, 210Hamburg, Mark, 22, 41–43, 83, 117hard drives. See drivesHard Light blending mode, 237hardware-profiled displays, 57haze effect, 108–111HDR (high dynamic range), 12, 29, 142, 143HDR DNG files, 146–147HDR images, 12HDR merges, 142–147Healing Brush, Noncircular, 122–123Healing Brush tool, 242–243, 244Helicon Focus, 267Herasimchuk, Andrei, 42–43hero shots, 278
Index · 311
ingestion, image, 273–275, 276, 279International Organization for Standardization. See ISOInternational Press Telecommunications Council.
See IPTCinterpolation, 8Invert Mask option, 135iPhone, 35–36IPTC (International Press Telecommunications
Council), 24IPTC Information Interchange Model (IIM), 24IPTC metadata, 279–281ISO (International Organization for Standardization), 58ISO factor, 30ISO settings, 19ISO speed
CMOS sensors and, 7considerations, 30–31luminance noise reduction and, 90noise and, 91, 94sensor noise and, 17–20
ISO-specific defaults, 69
JJEIDA (Japan Electronic Industries Development
Association), 24Joint Photographic Experts Group. See JPEGJPEG (Joint Photographic Experts Group), 28JPEG images
adjustments to, 28–29and Camera Raw, 47color spaces and, 21considerations, 28vs. raw images, 27–29
Kkeywording, 280keywords, 279–281Knoll, Thomas
Camera Raw rendering engine design, 66color channels and, 83creation of Camera Raw and, 40creation of Lightroom and, 43digital negatives and, 3DNG format and, 58
corrupted, 276cropping, 69, 117–120deblurring, 89delivering, 283–284displaying histograms of, 70–71duplicating, 255editing in Photoshop, 226–240flagging, 277floating-point, 146folders, 279, 297grayscale, 73, 193, 255–259HDR. See HDR imageshero shots, 278importing. See importing imageingestion, 273–275, 276, 279iPhone, 35–36JPEG. See JPEG imageslabeling, 277–278monochromatic, 86, 192opening as layers in Photoshop, 263opening from media, 54opening in Photoshop, 54organizing, 297panoramic, 142–143, 147–150preproduction, 277–281previewing, 89–90problems reading, 276quality, 35–36rating, 277–278removing people from, 262–265renaming, 279retouching. See retouching imagesselecting, 277, 278sharpening, 87–91sorting, 279split toning, 86stacks of, 285, 288transferring from camera to computer, 273–275verification of, 275–276virtual copies, 289–290
importing imagesauto importing into Lightroom, 294–297from catalogs, 285to Lightroom, 285–287
312 · The dIgITAl negATIve
Lens Blur setting, 89lens colorcast correction, 188–191Lens Corrections options, 97Lens Corrections panel, 95–105, 303lens diffraction, 31, 32lens distortion, 95, 98–99Lens Profile Creator, 98Lens Profile Downloader, 98lens profiles, 98–100lenses
aberration, 32–36aperture. See apertureastigmatism, 33curvature of field, 33curvilinear distortion, 34displaying profiles for, 98distortion, 32, 95, 98–99fisheye, 105prime, 33quality, 33telephoto, 32testing, 32tilt-shift, 100wide-angle, 32, 100, 252zoom, 32, 33, 98, 100, 213
Level option, 96, 97levels, 26Lighten blending mode, 236lighting
backlighting, 170–173blending modes and, 237fill light, 77flat lighting, 154–156high-contrast, 156–160sunsets, 76, 170, 179, 181, 183, 184
LightroomAdjustment Brush, 115, 126, 136–140adjustment panels. See adjustment panelsadjustment sliders, 73auto importing into, 294–297backups, 299Basic panel, 52, 72–80basics, 50–53vs. Bridge, 46, 50–51Camera Calibration panel, 112–115
ETTR and, 14–15multipass sharpening and, 87views on image contrast, 78
Kodak, 8, 55, 196Kodak Gap, 179
lLab color space, 23labeling images, 277–278laptops
color adjustments and, 57, 285field workflow and, 71, 284–287shooting tethered to, 293–294, 296toolbar tips, 116
Lasso selection tool, 227lateral chromatic aberration, 34layer groups, 226layer masks
applying to layers, 228color to black-and-white conversions and, 255, 257–
259copy-and-paste patching and, 244–245edge sharpening, 219–220focus stacking and, 268unlinking layer from, 252
layersadjustment, 227aligning, 266applying layer mask to, 228background, 228, 231blending modes, 229–230, 234, 236–237Color layer modifications, 234–237creating, 228duplicating, 228opacity, 230opening files as layers in Photoshop, 263pixel, 227sculpting, 233–234styles, 229unlinking from layer masks, 252using in Photoshop, 226–227
Layers panel, 228–229, 236, 254, 263LCD screen, 4, 14lens aberrations, 32–36, 95, 96, 100lens aperture, 76, 100
Index · 313
retouching images in, 120–125, 240–241selecting tools in, 115–116sharpening controls, 88–91Smart Collection, 154Solo Mode, 71sorting images, 279Split Toning panel, 86–87storage in, 50–51tethered shooting and, 293–294Tone Curve panel, 52, 80–83toolbar, 116versions, 54workflow. See workflow
Lightroom Collection, 290Lightroom Mobile, 63linear capture, 7–11, 9, 14linear curves, 82linear gamma, 10, 28, 63Linear Light blending mode, 237live view, 7Load Selection dialog box, 253local adjustments, 126–142
brush functions, 132–133, 136–142controls for, 126–127with Graduated Filter, 127–133overview, 126with Radial Filter, 134–135
local correction presets, 131local tone mapping, 65longitudinal chromatic aberration, 34lossless compression, 62lossy compression, 28, 62, 63low-frequency edge sharpening, 213–217low-pass filters, 7Luminance Amount setting, 127Luminance Contrast control, 93Luminance control, 92luminance data, 28Luminance Detail control, 92–93Luminance Noise Reduction, 90, 127luminance-based curves, 82luminance-based masks, 253–255luminance-sensitive elements, 8Luminosity blending mode, 237The Luminous Landscape website, 14
vs. Camera Raw, 53, 69–70, 131changes to images, 46Color Picker, 130color space settings, 55–58color to black-and-white conversions in, 255compatibility of Camera Raw and, 54context menus, 71, 72cropping in, 69, 117–119default image settings, 48default renderings, 66–69Detail panel, 87–95Develop module, 52DNG Converter and, 58–63Effects panel, 105–111Export dialog box, 224External Editing tab, 56folder structure, 51genesis of, 41–45getting images into Photoshop from, 224–225Graduated Filter, 127–131hard drive speed and, 302histograms, 70–71HSL/Color/B&W panel, 83–86importing catalogs, 290–292importing images to, 285–287integration with Photoshop, 225Lens Corrections panel, 95–105local adjustments in, 126–142main Library module, 50maximizing image detail, 207–213Merge To HDR feature, 142–147opening files as layers in Photoshop, 263opening images from Photoshop, 54optimizing catalog, 302–303organizing images in, 297Pareto principle and, 53performance tuning, 302–303vs. Photoshop, 44, 49, 50, 53Point Curve Editor, 80, 81–82presets, 69, 277previewing images in, 89–90Radial Filter, 131, 134–135RAM and, 302renaming images, 279restoring defaults, 68
314 · The dIgITAl negATIve
Merge To HDR feature, 142–147metadata
applying, 272camera calibration and, 112digital image preservation and, 60displaying in Bridge, 46EXIF, 24, 98, 112, 266focus distance and, 266image cropping and, 117IPTC, 24, 279–281overview, 24–25ratings/labels, 277–278templates, 272types of, 24–25white balance and, 174XMP, 24–25, 277, 285, 299
metalogging, 280metal-oxide-semiconductor field-effect transistors
(MOSFETs), 5Micro Four Thirds cameras, 98micro-drives, 273microscanning, 8Microsoft, 22Midpoint control, 106midtone contrast, 230–232midtones, 77, 159, 232, 233–234mixed-frequency edge sharpening, 217–221Moiré control, 127moiré patterns, 7, 127monochromatic images, 86, 192monochromatic lens aberrations, 33–34MOSFETs (metal-oxide-semiconductor field-effect
transistors), 5motion blur effect, 30Multiply blending mode, 236
nNack, John, 40NAS (Network Attached Storage), 283NAS drives, 283National Digital Information Infrastructure and
Preservation Program (NDIIPP), 60ND (neutral density) filter, 14NDIIPP (National Digital Information Infrastructure and
Preservation Program), 60
MMac OS systems
compatibility testing and, 298considerations, 298digital imaging area, 298–299DNG file data dumps, 6DNG Software Development Kit, 6keyboard shortcuts, 72, 115–116Lightroom performance and, 302storage considerations, 51, 283Terminal window, 6users folders, 6, 299
MacGurus, 299major gigage, 179, 180Manual subpanel, 95, 104–105marginal rays, 33Marquee tool, 227, 244, 245mask overlays, 142Masking control, 89masks
auto. See Auto Mask optioncolor, 142composite, 251–252considerations, 136edge, 89erasing, 139–140, 141gradient, 128, 130layer, 219–220luminance-based, 253–255painting, 139pins, 139Unsharp Mask filter, 228–229, 232
media. See also memory cardsCompact Flash, 273micro-drives, 273opening images, 274SD cards, 273
Median Stack Mode, 263–264Medium Contrast curve, 82memory, 299, 300–301memory cards. See also media
formatting/reformatting, 274, 276opening images from, 274SD, 273unreadable, 276
Index · 315
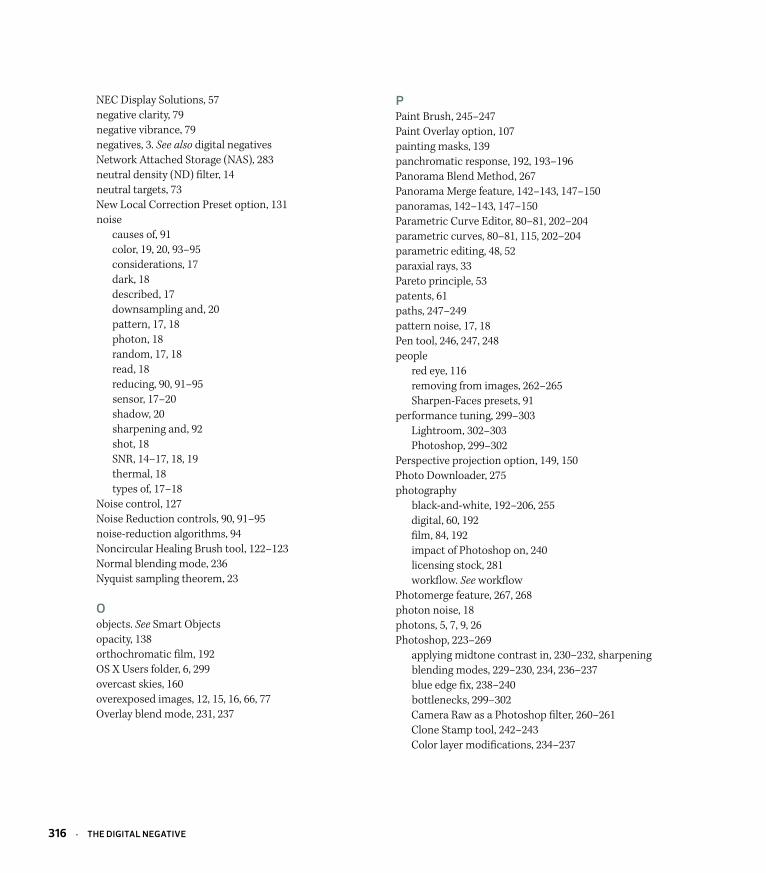
PPaint Brush, 245–247Paint Overlay option, 107painting masks, 139panchromatic response, 192, 193–196Panorama Blend Method, 267Panorama Merge feature, 142–143, 147–150panoramas, 142–143, 147–150Parametric Curve Editor, 80–81, 202–204parametric curves, 80–81, 115, 202–204parametric editing, 48, 52paraxial rays, 33Pareto principle, 53patents, 61paths, 247–249pattern noise, 17, 18Pen tool, 246, 247, 248people
red eye, 116removing from images, 262–265Sharpen-Faces presets, 91
performance tuning, 299–303Lightroom, 302–303Photoshop, 299–302
Perspective projection option, 149, 150Photo Downloader, 275photography
black-and-white, 192–206, 255digital, 60, 192film, 84, 192impact of Photoshop on, 240licensing stock, 281workflow. See workflow
Photomerge feature, 267, 268photon noise, 18photons, 5, 7, 9, 26Photoshop, 223–269
applying midtone contrast in, 230–232, sharpeningblending modes, 229–230, 234, 236–237blue edge fix, 238–240bottlenecks, 299–302Camera Raw as a Photoshop filter, 260–261Clone Stamp tool, 242–243Color layer modifications, 234–237
NEC Display Solutions, 57negative clarity, 79negative vibrance, 79negatives, 3. See also digital negativesNetwork Attached Storage (NAS), 283neutral density (ND) filter, 14neutral targets, 73New Local Correction Preset option, 131noise
causes of, 91color, 19, 20, 93–95considerations, 17dark, 18described, 17downsampling and, 20pattern, 17, 18photon, 18random, 17, 18read, 18reducing, 90, 91–95sensor, 17–20shadow, 20sharpening and, 92shot, 18SNR, 14–17, 18, 19thermal, 18types of, 17–18
Noise control, 127Noise Reduction controls, 90, 91–95noise-reduction algorithms, 94Noncircular Healing Brush tool, 122–123Normal blending mode, 236Nyquist sampling theorem, 23
Oobjects. See Smart Objectsopacity, 138orthochromatic film, 192OS X Users folder, 6, 299overcast skies, 160overexposed images, 12, 15, 16, 66, 77Overlay blend mode, 231, 237
316 · The dIgITAl negATIve
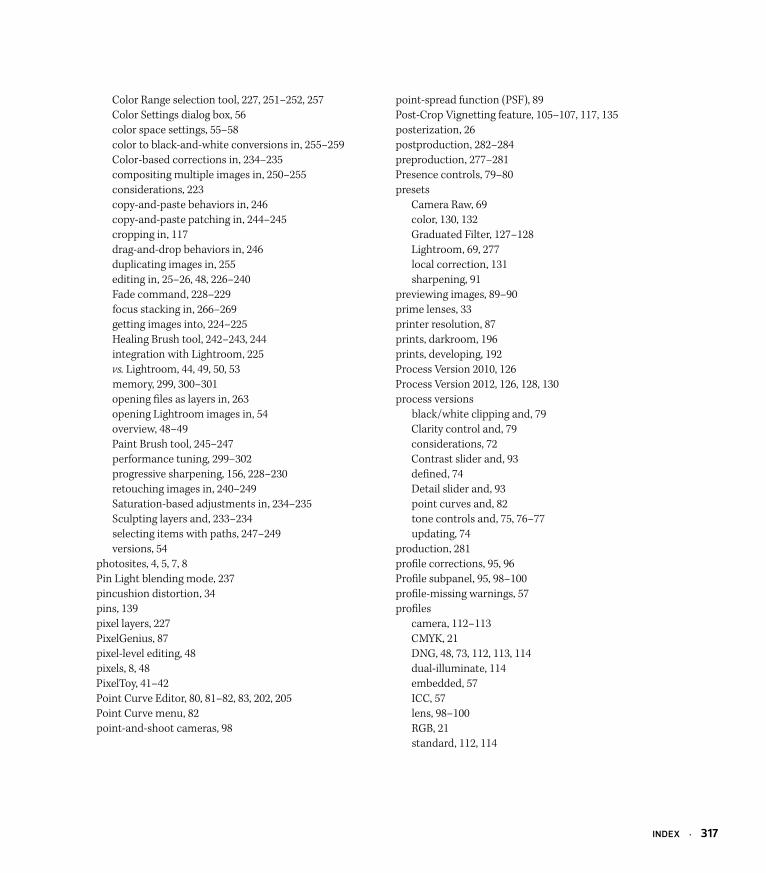
point-spread function (PSF), 89Post-Crop Vignetting feature, 105–107, 117, 135posterization, 26postproduction, 282–284preproduction, 277–281Presence controls, 79–80presets
Camera Raw, 69color, 130, 132Graduated Filter, 127–128Lightroom, 69, 277local correction, 131sharpening, 91
previewing images, 89–90prime lenses, 33printer resolution, 87prints, darkroom, 196prints, developing, 192Process Version 2010, 126Process Version 2012, 126, 128, 130process versions
black/white clipping and, 79Clarity control and, 79considerations, 72Contrast slider and, 93defined, 74Detail slider and, 93point curves and, 82tone controls and, 75, 76–77updating, 74
production, 281profile corrections, 95, 96Profile subpanel, 95, 98–100profile-missing warnings, 57profiles
camera, 112–113CMYK, 21DNG, 48, 73, 112, 113, 114dual-illuminate, 114embedded, 57ICC, 57lens, 98–100RGB, 21standard, 112, 114
Color Range selection tool, 227, 251–252, 257Color Settings dialog box, 56color space settings, 55–58color to black-and-white conversions in, 255–259Color-based corrections in, 234–235compositing multiple images in, 250–255considerations, 223copy-and-paste behaviors in, 246copy-and-paste patching in, 244–245cropping in, 117drag-and-drop behaviors in, 246duplicating images in, 255editing in, 25–26, 48, 226–240Fade command, 228–229focus stacking in, 266–269getting images into, 224–225Healing Brush tool, 242–243, 244integration with Lightroom, 225vs. Lightroom, 44, 49, 50, 53memory, 299, 300–301opening files as layers in, 263opening Lightroom images in, 54overview, 48–49Paint Brush tool, 245–247performance tuning, 299–302progressive sharpening, 156, 228–230retouching images in, 240–249Saturation-based adjustments in, 234–235Sculpting layers and, 233–234selecting items with paths, 247–249versions, 54
photosites, 4, 5, 7, 8Pin Light blending mode, 237pincushion distortion, 34pins, 139pixel layers, 227PixelGenius, 87pixel-level editing, 48pixels, 8, 48PixelToy, 41–42Point Curve Editor, 80, 81–82, 83, 202, 205Point Curve menu, 82point-and-shoot cameras, 98
Index · 317
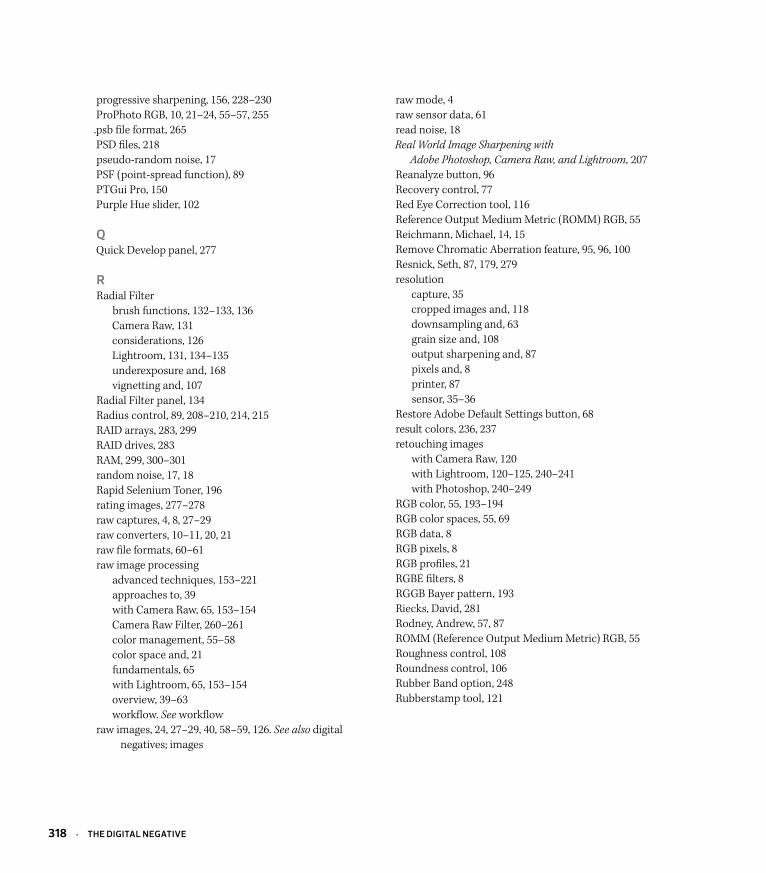
progressive sharpening, 156, 228–230ProPhoto RGB, 10, 21–24, 55–57, 255.psb file format, 265PSD files, 218pseudo-random noise, 17PSF (point-spread function), 89PTGui Pro, 150Purple Hue slider, 102
QQuick Develop panel, 277
RRadial Filter
brush functions, 132–133, 136Camera Raw, 131considerations, 126Lightroom, 131, 134–135underexposure and, 168vignetting and, 107
Radial Filter panel, 134Radius control, 89, 208–210, 214, 215RAID arrays, 283, 299RAID drives, 283RAM, 299, 300–301random noise, 17, 18Rapid Selenium Toner, 196rating images, 277–278raw captures, 4, 8, 27–29raw converters, 10–11, 20, 21raw file formats, 60–61raw image processing
advanced techniques, 153–221approaches to, 39with Camera Raw, 65, 153–154Camera Raw Filter, 260–261color management, 55–58color space and, 21fundamentals, 65with Lightroom, 65, 153–154overview, 39–63workflow. See workflow
raw images, 24, 27–29, 40, 58–59, 126. See also digital negatives; images
raw mode, 4raw sensor data, 61read noise, 18Real World Image Sharpening with
Adobe Photoshop, Camera Raw, and Lightroom, 207Reanalyze button, 96Recovery control, 77Red Eye Correction tool, 116Reference Output Medium Metric (ROMM) RGB, 55Reichmann, Michael, 14, 15Remove Chromatic Aberration feature, 95, 96, 100Resnick, Seth, 87, 179, 279resolution
capture, 35cropped images and, 118downsampling and, 63grain size and, 108output sharpening and, 87pixels and, 8printer, 87sensor, 35–36
Restore Adobe Default Settings button, 68result colors, 236, 237retouching images
with Camera Raw, 120with Lightroom, 120–125, 240–241with Photoshop, 240–249
RGB color, 55, 193–194RGB color spaces, 55, 69RGB data, 8RGB pixels, 8RGB profiles, 21RGBE filters, 8RGGB Bayer pattern, 193Riecks, David, 281Rodney, Andrew, 57, 87ROMM (Reference Output Medium Metric) RGB, 55Roughness control, 108Roundness control, 106Rubber Band option, 248Rubberstamp tool, 121
318 · The dIgITAl negATIve
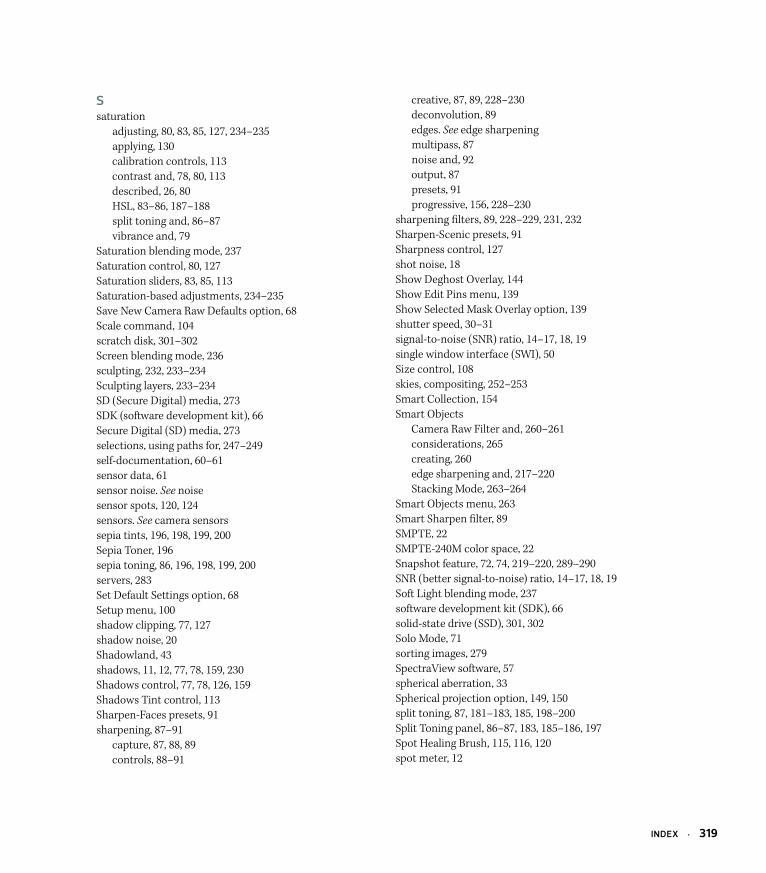
Ssaturation
adjusting, 80, 83, 85, 127, 234–235applying, 130calibration controls, 113contrast and, 78, 80, 113described, 26, 80HSL, 83–86, 187–188split toning and, 86–87vibrance and, 79
Saturation blending mode, 237Saturation control, 80, 127Saturation sliders, 83, 85, 113Saturation-based adjustments, 234–235Save New Camera Raw Defaults option, 68Scale command, 104scratch disk, 301–302Screen blending mode, 236sculpting, 232, 233–234Sculpting layers, 233–234SD (Secure Digital) media, 273SDK (software development kit), 66Secure Digital (SD) media, 273selections, using paths for, 247–249self-documentation, 60–61sensor data, 61sensor noise. See noisesensor spots, 120, 124sensors. See camera sensorssepia tints, 196, 198, 199, 200Sepia Toner, 196sepia toning, 86, 196, 198, 199, 200servers, 283Set Default Settings option, 68Setup menu, 100shadow clipping, 77, 127shadow noise, 20Shadowland, 43shadows, 11, 12, 77, 78, 159, 230Shadows control, 77, 78, 126, 159Shadows Tint control, 113Sharpen-Faces presets, 91sharpening, 87–91
capture, 87, 88, 89controls, 88–91
creative, 87, 89, 228–230deconvolution, 89edges. See edge sharpeningmultipass, 87noise and, 92output, 87presets, 91progressive, 156, 228–230
sharpening filters, 89, 228–229, 231, 232Sharpen-Scenic presets, 91Sharpness control, 127shot noise, 18Show Deghost Overlay, 144Show Edit Pins menu, 139Show Selected Mask Overlay option, 139shutter speed, 30–31signal-to-noise (SNR) ratio, 14–17, 18, 19single window interface (SWI), 50Size control, 108skies, compositing, 252–253Smart Collection, 154Smart Objects
Camera Raw Filter and, 260–261considerations, 265creating, 260edge sharpening and, 217–220Stacking Mode, 263–264
Smart Objects menu, 263Smart Sharpen filter, 89SMPTE, 22SMPTE-240M color space, 22Snapshot feature, 72, 74, 219–220, 289–290SNR (better signal-to-noise) ratio, 14–17, 18, 19Soft Light blending mode, 237software development kit (SDK), 66solid-state drive (SSD), 301, 302Solo Mode, 71sorting images, 279SpectraView software, 57spherical aberration, 33Spherical projection option, 149, 150split toning, 87, 181–183, 185, 198–200Split Toning panel, 86–87, 183, 185–186, 197Spot Healing Brush, 115, 116, 120spot meter, 12
Index · 319
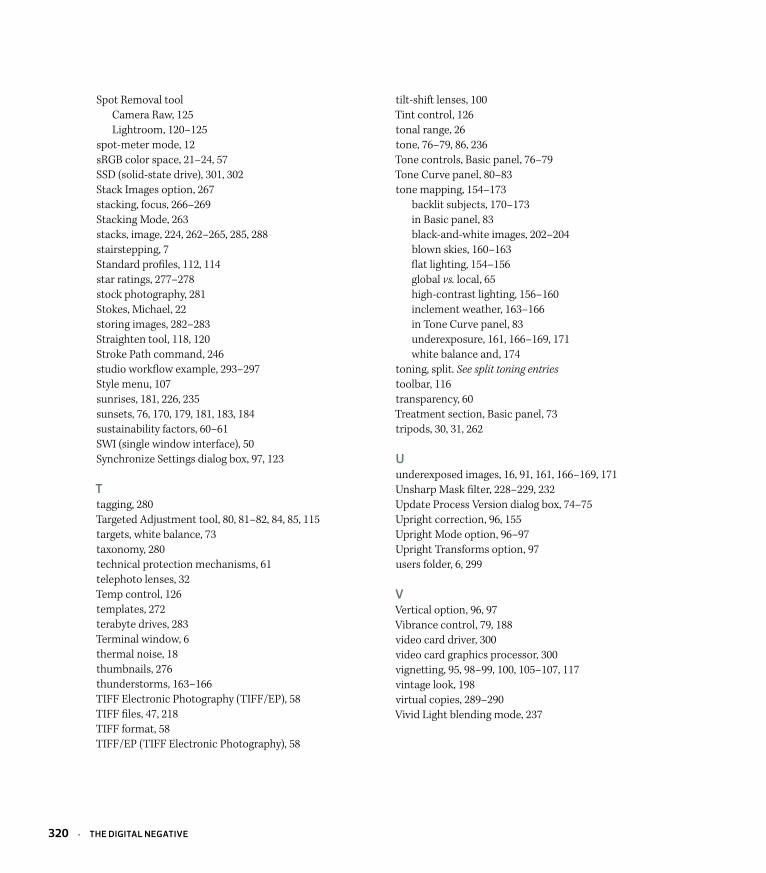
tilt-shift lenses, 100Tint control, 126tonal range, 26tone, 76–79, 86, 236Tone controls, Basic panel, 76–79Tone Curve panel, 80–83tone mapping, 154–173
backlit subjects, 170–173in Basic panel, 83black-and-white images, 202–204blown skies, 160–163flat lighting, 154–156global vs. local, 65high-contrast lighting, 156–160inclement weather, 163–166in Tone Curve panel, 83underexposure, 161, 166–169, 171white balance and, 174
toning, split. See split toning entriestoolbar, 116transparency, 60Treatment section, Basic panel, 73tripods, 30, 31, 262
Uunderexposed images, 16, 91, 161, 166–169, 171Unsharp Mask filter, 228–229, 232Update Process Version dialog box, 74–75Upright correction, 96, 155Upright Mode option, 96–97Upright Transforms option, 97users folder, 6, 299
vVertical option, 96, 97Vibrance control, 79, 188video card driver, 300video card graphics processor, 300vignetting, 95, 98–99, 100, 105–107, 117vintage look, 198virtual copies, 289–290Vivid Light blending mode, 237
Spot Removal toolCamera Raw, 125Lightroom, 120–125
spot-meter mode, 12sRGB color space, 21–24, 57SSD (solid-state drive), 301, 302Stack Images option, 267stacking, focus, 266–269Stacking Mode, 263stacks, image, 224, 262–265, 285, 288stairstepping, 7Standard profiles, 112, 114star ratings, 277–278stock photography, 281Stokes, Michael, 22storing images, 282–283Straighten tool, 118, 120Stroke Path command, 246studio workflow example, 293–297Style menu, 107sunrises, 181, 226, 235sunsets, 76, 170, 179, 181, 183, 184sustainability factors, 60–61SWI (single window interface), 50Synchronize Settings dialog box, 97, 123
Ttagging, 280Targeted Adjustment tool, 80, 81–82, 84, 85, 115targets, white balance, 73taxonomy, 280technical protection mechanisms, 61telephoto lenses, 32Temp control, 126templates, 272terabyte drives, 283Terminal window, 6thermal noise, 18thumbnails, 276thunderstorms, 163–166TIFF Electronic Photography (TIFF/EP), 58TIFF files, 47, 218TIFF format, 58TIFF/EP (TIFF Electronic Photography), 58
320 · The dIgITAl negATIve
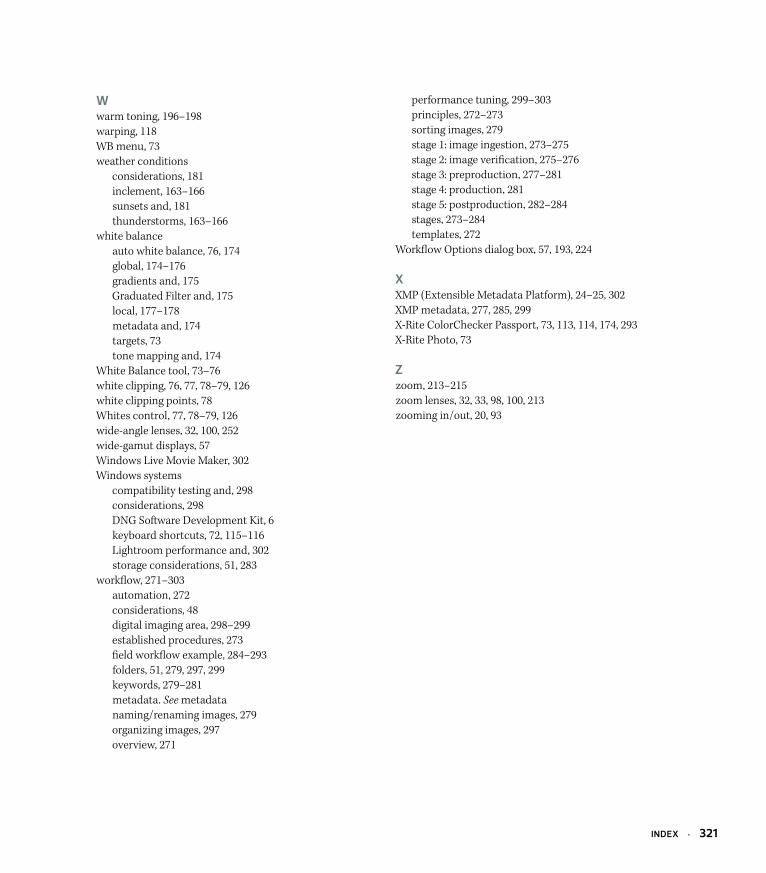
performance tuning, 299–303principles, 272–273sorting images, 279stage 1: image ingestion, 273–275stage 2: image verification, 275–276stage 3: preproduction, 277–281stage 4: production, 281stage 5: postproduction, 282–284stages, 273–284templates, 272
Workflow Options dialog box, 57, 193, 224
xXMP (Extensible Metadata Platform), 24–25, 302XMP metadata, 277, 285, 299X-Rite ColorChecker Passport, 73, 113, 114, 174, 293X-Rite Photo, 73
Zzoom, 213–215zoom lenses, 32, 33, 98, 100, 213zooming in/out, 20, 93
Wwarm toning, 196–198warping, 118WB menu, 73weather conditions
considerations, 181inclement, 163–166sunsets and, 181thunderstorms, 163–166
white balanceauto white balance, 76, 174global, 174–176gradients and, 175Graduated Filter and, 175local, 177–178metadata and, 174targets, 73tone mapping and, 174
White Balance tool, 73–76white clipping, 76, 77, 78–79, 126white clipping points, 78Whites control, 77, 78–79, 126wide-angle lenses, 32, 100, 252wide-gamut displays, 57Windows Live Movie Maker, 302Windows systems
compatibility testing and, 298considerations, 298DNG Software Development Kit, 6keyboard shortcuts, 72, 115–116Lightroom performance and, 302storage considerations, 51, 283
workflow, 271–303automation, 272considerations, 48digital imaging area, 298–299established procedures, 273field workflow example, 284–293folders, 51, 279, 297, 299keywords, 279–281metadata. See metadatanaming/renaming images, 279organizing images, 297overview, 271
Index · 321